

GE JDP39WK5WW, JDP39WK4WW, JDP39CK5CC, JDP39CK4CC, JDP39BK5BB Owner’s Manual
...
ge.com
0
(D
Safety Instruotions ... 9-4
Operating Inslru_ions
Clock and Timer . ...... 10
Conuols ............. 6, 7
Oven ................ 8, 9
Power Outage .......... 7
Sabbafll Feature ..... 13, 14
Self-Cleaning ....... 15, 16
Special Features ........ 19
SurPace Units ........... 5
Thermostat ........... ] 4
Timed Baking and
Roasting Features ...... 11
Care and Cleaning
Control _obs ......... 17
Drip Pans ............. 91
Headng Elements ...... 17
I,ift-Off Oven Door ..... 19
Lift-Up Cooktop ....... 21
LiOlt ................. 20
Shelves ............... 18
Surt_ace Units .......... 21
Vent ................. 18
Troubleshooting
Tips .............. 22-24
Accessories ........... 30
Consumer Support
Consumer
Support ...... Back Co_er
Product
Registration ........ 95, 96
Wananw ............. 31
JDP 9
Write the model and serial
numbers here:
Model #
Serial #
You can find them on a label
behind the storage drawer on
the flx)nt of the range fl'ame.
49-80485 07-07 JR
iMPORTANTSAFETYiNFORMATiON.
READALLiNSTRUCTiONSBEFOREUSING.
Foryour safety, the information inthis manual must be followed to minim)e the risk of fire, olocNc shock, or to
preventpropertydamage,personalinjury,or lossof life.
WARNINGANTI-TIPDEVICE
All rangescantipandinjurycouldresult
Topreventaccidental tippingof therange, securetheattachedAnti-Tipbracket,undertherear countertop.
If theAnti--tipdevice suppliedwith therangedoes notfit this application,usethe universalAnti-fip device
WB2X7909,
Tocheck ifthe deviceisinstalledand engagedproperly,lower theoven doorand gentlyapplymediumforce at
thehandleenduntil movementofthe rangeisdetected,Continuepressinguntil theanti-tip bracketis engaged
andmovementstops,A smaflamountof movementisacceptable atthe backof the rangetopbut it shouldbe
stableandnottip oncethe anti-tip bracketis engaged,
If you pull the range out fiom the wall fbr any reason, make suie the defice is properly engaged when
you pusl_ the range back against the wall. ff it is not, there is a possible risk of the range tipping over
and causing i_u U if you or a child stand, sit or lean on an open door.
Please _efbr to the And-Tip defice infbm_ation shipped with the device and in this manual. Failure to
rake this precaution could result in tipping of the range and i_u_>
IMPORTANTSAFETYNOtiCE
TheCaliforniaSafeDrinking Waterand ToxicEnforcementAct requiresthe Governorof Californiatopublisha
list ofsubstancesknowntothe stateto cause cancer,birth defectsor otherreproductiveharm,andrequires
businessesto warn customersofpotential exposuretosuch substances,
Thefiberglassinsulationin self-cleanovensgives off a verysmallamountof carbonmonoxideduringthe
cleaningcycle. Exposurecanbe minimizedbyventingwith an openwindow or usinga ventilationfan or hood,
SAFETYPRECAUtiONS
Whenusing electricalappliances,basicsafetyprecautionsshouldbe followed,includingthefollowing:
!?:Use this appliance only %r its intended propose
asdescribed in this (_xner's Manual.
!?:Be sure your appliance is i)roperl} installed and
grounded b} a qualified installer in accordance
with the provided installation instructions.
iJ_::iHave the installer show xou the location
of the circuit breaker or fiBe. Mark it fbr easx
ief_'ience.
Do not attempt to repair or replace any
part of }our range unless it is specificall}
recommended in this manual. All other
servicing should be refbrred to a qualified
technician.
Befbre peffbmdng any serfice, disconnect
the range power supply at the household
distribution panel by removing the flBe or
switching off the ci_vuit breaker
2
_: Do not leave children alone---children should
not be left alone or unattended in an area
where an appliance is in use. They should never
be allowed to sit or stand on any part of the
appliance.
iJi::iDo not allow anyone to climb, stand or hang
on the door or cooktop. They could damage
the range and even tip it ove_, causing severe
personal i_ur>
_: [a_ge scratches or impacts to glass doo_s can
lead to broken or shattered glass.
_: Do not store flammable materials in an oven or
near the cooktop.
CAUTION: el,,sof ch,d,e.
should not be stored in cabinets above a range
or on the bacLsplash of a range---children
climbing on the range to reach items could be
seriously injured.
A WARNING!
SAFETYPRECAUTIONS
ge.com
f_:Never wear loose4itting or hanging gam)ents
while using the appliance. Be carefid when
reaching fbr items stored over the range.
Hammable mate,ial could be ignited if brought
in contact with hot surfi/ce atnits or heating
elements and may cause severe bums.
iJii:iUse only dU pot holde*._--moist or damp pot
holders on hot surfi/ces may result in burns
flom steam. Do not let pot holdet._ touch hot
surf,ace atnits or heating elements. Do not use
a towel or other batik)' cloth in place of pot
holde,s.
iJi;:iFor your safety, never use your appliance %r
wanning or heating the room.
iJi;:iTeach chil&en not to play with tile controls or
any other part of the range.
iJi;:i?dwavs keel) dish towels, dish cloths, pot holde,s
and other linens a sate distance fiom your
t_ange.
_: Alwa> keeI)wooden and plastic attensils and
canned fbod a safe distance flom
yOHI"I_]nge.
iJii:i_Mwavskeq) combustible wall cove,ings,
cm*ains or drapes a safe distance fiom your
t_ange.
_: Do not let cooking grease or other flammable
mate,ials accumulate in or near the range.
_: Keep the hood and grease filte,s cleat) to
maintain good venting and to avoid grease fires.
iJii:iDo not use water on grease fires. Never pick up
a flaming pan. Turn the controls ofli Smother a
flaming pat) on a surfiace atnit by coveting the
pat) completely with a well-fitting lid, cookie
sheet or flat tmv Use a multi-puq)ose dU
chemical or libam-t)pe fire extinguishe,:
Flaming grease outside a pan cat) be put out by
covering it with baking soda o,, if available, by
using a multi-propose dU chemical or fbam-
type fire extinguisher
Flame in the oven cat) be smothered completely
bv closing the oven door and turning the oven
off or by using a multi-propose dU chemical or
fbam-type fire extinguisher.
_: Do not touch the surlii/ce atnits, the heating
elements or the interior surlii/ce of the oven.
These surfilces may be hot enough to burn
even though they are dark in color During and
after use, do not touch, or let clothing or other
flammable materials contact tile sur[i/ce ttnits,
areas nearby the sur[ilce units or at))' interior
area of tile oven; allow sufficient time fbr
cooling fi,st.
Potentialh' hot sur[ilces include the cooktop,
areas filcing the cooktop, oven vent opening,
surlii/ces near the opening, crevices around the
oven dooI"
REMEMBER:The inside sur[ilce of the oven may
be hot when the door is opened.
iJii:iDo not store or use combustible materials,
gasoline or other flammable vapo,s and liquids
it) the vicinity of this or at))' other appliance.
COOKMEATANDPOULTRYTHOROUGHLY...
Cookmeatandpoultrythoroughly--meattoat/eastanINTERNALtemperatureof 160°Fandpoultrytoat/eastan
INTERNALtemperatureof 180°ECookingtothesetemperaturesusua//yprotectsagainstfoodbornei//ness.
SURFACECOOKINGUNITS
Useproperpansize--select cookwarehavingflatbottomslargeenoughtocover thesurfaceunitheating
element.Theuseof undersizedcookwarewill exposea portionof the surface unitto direct contact andmay
resultin ignitionof clothing.Properrelationshipof cookwareto surfaceunit will also improveefficiency.
iJii:iNever leave tile sur[ilce ttnits ttnattended
at high heat settings. Boilove,s cause smoking
and greasy spillove*s that may catch on fire.
_: Do not use aluminum fbil to line the drip pans
or anywhere it) the oven, except as described it)
this manual. Misuse could result it) a shock, fire
haand or damage to the range.
iJii:iBe sure the drip pans and the vent duct are not
covered and are it) place. Their absence during
cooking could damage range parts and wiring.
;_:Only ce,min t}pes of glass, glass/ceramic,
earthenware or other glazed containe,._ are
suitable [br cooktop service; othe,._ ma)break 3
because of the sudden change it) temI)evatme.
IMPORTANTSAFETYINFORMATION.
READALLINSTRUCTIONSBEFOREUSING.
SURFACECOOKINGUNITS(cont.)
To minHnizedm possibilir}of bums, ig]_irionof
flammable materialsa_d spillage, the hmldle of a
cont_{nershould be mined towmd the cenmr of the
i_lge _dfl)outextending over neab} suffice units.
}'_Mua}s turn the surfiaceunit.soffbefom mmo_ N
cookware.
!'_Do not immeise or mak d)e remomble surface units.
Do not put them in a dishwashei:Do not seltklemathe
surfilce unitsin the oxen.
!'_}\])en pmpmfiN flambN foods under d)e hood, turn
the tim on.
!_:To avokt d)e possibilityof a bum or elecu'icd)o('k,
al_u)s be cemtin that the conuols for ,allsurface units
are at fl)e 0FFposition and all coilsare cool before
attempting to liftor remove a unit.
!'_Gean d_e cooktop _dd) caudon. Ira wet sponge is
umd to _pe spills on a hot cooktop, be carefifl to
avoid steam bums.
!_:Keet)m_e)e on foods being flied at high or medium
high heat re)tings.
!_:Foods for fi)_ngshould be as&y aspossible. Froston
fiozen foods or moisture on flesh foods can cruisehot
fatm bubNe up m_dover the skiesof the pan.
!_:11_ little fatfor eflbctiveshallowor deep fat ifring:
Fillingd)e pan too fifllof fatcan cau_ spilloverswhen
food is added.
!_;:Ifa combh_ationof oilsor tiltsufllbe used h) fi)ing;
sth toged)er before headng: or asfats melt dowl):
i2!LMun)sheat fatslowl),and watchas itheats.
[lse a deep tilt fl)ennometer whene\er possibleto
pmxent oxeflmathN fi_be)ond the smoking pohat.
WARNING!
OVEN
Standawayfromtherangewhenopeningtheovendoor.Hotairorsteamwhichescapescancausebumstohands,face
and/oreyes,
;'_Donot heat unopened food contah)ers.Pressure
could build up a_d fl)e contahwr could buist, causing
anHW'>
!cg:Keep d)eoven ventUllolystrtlcted.
@Keet) the oven fiee fiom grease buildup.
@Place the oven shelfin the desired posidon while the
oven iscool. [f'shehes must be handled when hot, do
not let pot holder contact the heath)g dements.
NPullhN out the shelf to the stop-lockisa convenience
in lifdnghem)' foods. It is Nso a precaution ag,%)st
bums fiom touching hot suffices of the door or
ovenwalls.
;.i'_"_\q)enusing cookhN or roasdng bags in d)e o_en,
follou the mmat_cturer's dhecdons.
!_:Do not um dm oven to oh)'newspapers.
If overheated, d)e) can catch on fne.
!_:Do not um the oven for a sto_,'agemea.Imms stored in
an oven can ignite.
!_:Do not leavepaper product.s, cooking utensilsor food
h_d)eoven when not in use.
Do not u_ alumhmm foilto lhm oxen bottoms.
Improper h_stalladonof aluminum foilma)result
in a riskof electricshock or fne.
SELF-CLEANINGOVEN
Donotuseovencleaners.Nocommercialovencleaneroroven/inerprotecfivecoatingofanykindshouldbeusedinor
aroundanypartoftheoven.Residuefromovencleanerswilldamagetheinsideoftheovenwhentheself-cleancycleisused.
!_:Do not clea_ d_edoor gasket. The door gasketis
e,,_ntial for a good _al. Q_md_oukt be taken not to
rub, damage or move the gasket.
!:_Before self-cleaning the oxen, remoxe shiny,siher-
colored oven shehes (on some models) and all
other cookware.
}_:Besure to u_peup excess spillagebefore stmfi_gd)e
mltklemaingoperation.
!'_Ifthe seltklemaingmode malfimcfions,mm the o_en
offa_d disconnect the power supply.Have it serficed
b}a qualified technician.
Gean onl} pm_slistedin this Owner's Manual.
READANDFOLLOWTHISSAFETYINFORMATIONCAREFULLY.
SAVETHESEINSTRUCTIONS
4
Usingthe surface units, ge.com
Throughout this manual, features and appearance may vary from your model.
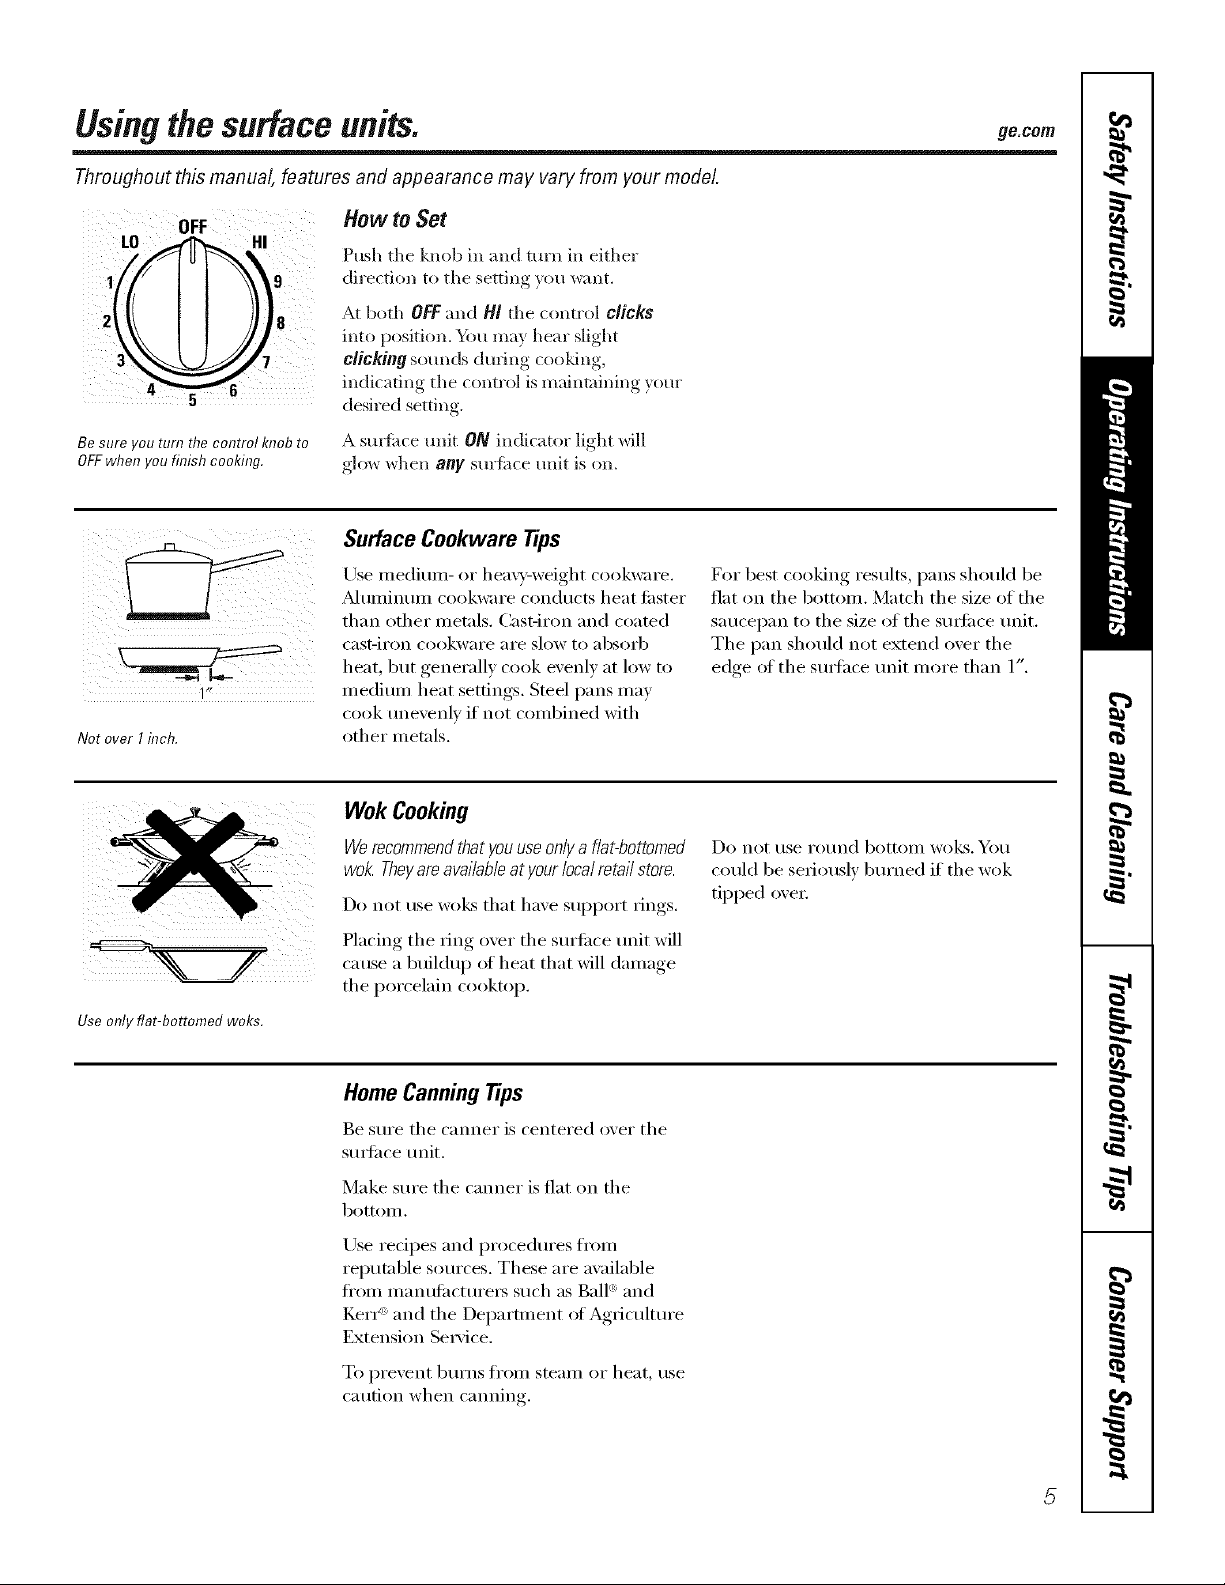
How to Set
Push the knob in and turn in either
direction to the setting you want.
At both OFF and H! the control clicks
into position. _tl may hear slight
clicking som_ds during cooking,
3
indicating the control is maintaining yore"
desired setting.
Be sure you turn the control knob to
OFFwhen you finish cooking.
1"*
Notover Iinch.
I
Use only flat-bottomed woks.
A sm_time refit ON indicator light will
glow when any surtime unit is on,
Surface Cookware tips
Use medimn- or hea\_v-weight cookware.
_kdtlIllintlIll cookware condtlcts heat fi_ster
than other metals. Cast-iron and coated
cast-iI'on cookwai'e aI'e slow to _lbsoi'b
heat, but generally cook evenly at low to
medium heat settings. Steel pans may
cook tmevenlv if not combined with
other metals.
Wok Cooking
Werecommendthat youuseonlya flat-bottomed
wok. Theyareavailableatyour local retail store.
Do not rise WO]CSthat have support rings.
Placing the ring over the surtilce unit will
cause a buildu I) of heat that will damage
the porcelain cooktop.
For best cooking results, pans shouM be
fiat on the bottom. Match the size of the
saucei)an to the size of the sm_i_ce trait.
The pan should not extend over the
edge ot the sm_hce trait more than 1".
Do not t/se I'ot/nd bottolll Wo]cs. Yell
could be seriously bm'ned if the wok
tipped oxer.
Home CanningTips
Be sm'e the canner is centered o_er the
sm_i_ce trait.
Make sure the canner is fiat on the
bottom.
Use redpes and procedm'es fl'om
reputable sources. These are awfilable
fl'om manufi_cture_ such as Ball '_and
IZerI_'_and the Department ot Agricultm'e
Extension Service.
To pi'e'_ent btli'ns fi'Olll steaill or heat, rise
caution when camfing.
Usingthe ovencontrols.
Throughout this manual, features and appearance may vary from your model.
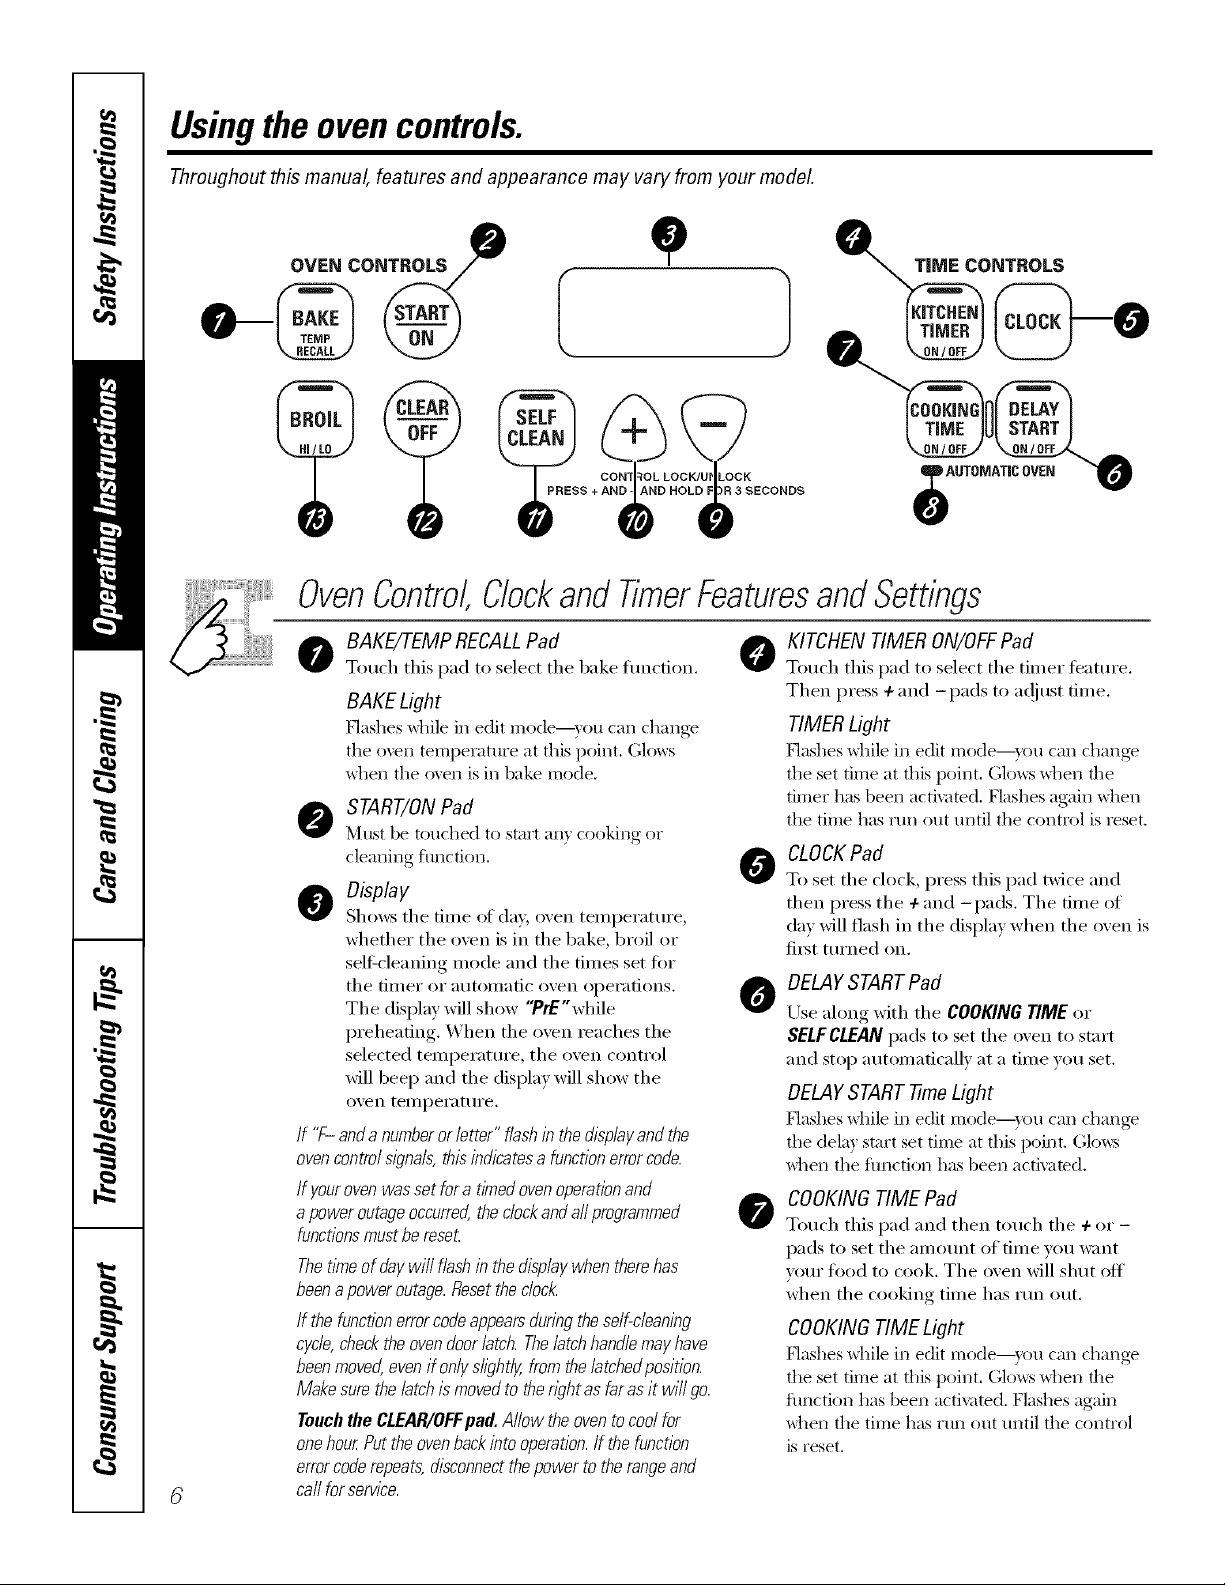
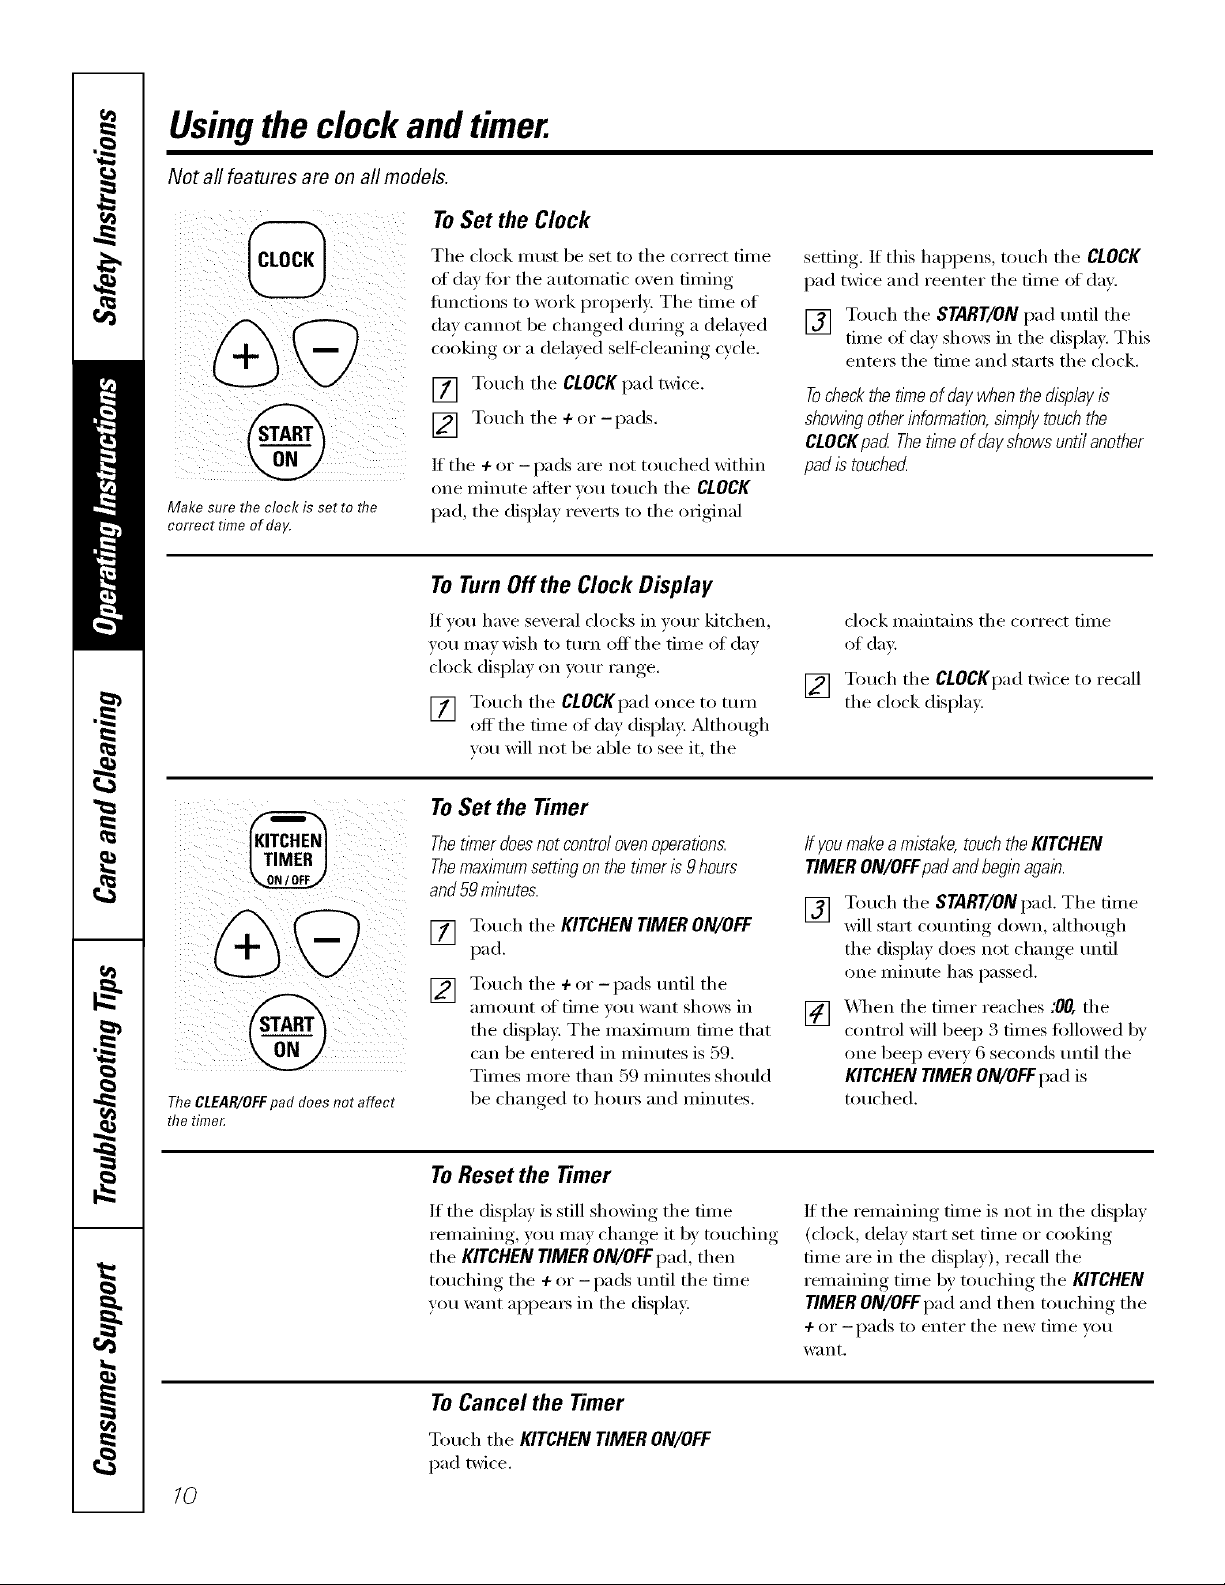
OVEN CONTROLS e _ T|ME CONTROLS
S + ECONDS
,)
OvenControl,ClockandTimerFeaturesandSettings
o@@,,
o BAKE/TEMPRECALLPad @
Touch tiffs pad to select the bake function.
BAKE Light
Hashes _hile in edit I/'lode--}rOIl (-'_111 (-h_lll_e
the oven temperatm'e at this point. Glows
_hen the o\en is in bake mode.
START/ONPad
_'ltlSt be touched to start all} cooking or
cleaning function.
O Dbplay
Shows tile time of da)', oven temperature,
whether tile oven is in tile bake, broil or
selfZcleaning mode and tile times set fi:,r
tile [iII/eI" oI" atltOIIlatic oven opei'ations.
Tile display will show "PrE'while
preheating. When tile oven reaches tile
selected temperature, tile oven control
will beep and tile display will show tile
oven temperature.
If "F- and anumberor letter" flashin thedisplay andthe
ovencontrol sl_?nals,thisindicates a functionerror code.
If yourovenwasset fora timed ovenoperation and
apower outageoccurred,the clockandaftprogrammed
functionsmustbe reseL
Thetithe of day will flash in the displaywhen therehas
beena power outage.Resetthe clod<
If the function errorcodeappearsduring the self-cleaning
cycle,checktheoven doorlatch. Thelatchhandle mayhave
beenmoved,evenifonlys/i)htly, from the latchedposition.
Makesure the latch ismoved to then_?htas faras it will go.
Touch the CLEAR/OFFpad.Allow theoven tocool for
onehourPut the ovenbackinto operation.If the function
errorcoderepeats, disconnectthepower to the rangeand
ca//for service.
0
0
0
KITCHEN TIMER ON/OFFPad
Totlcb this pad to select tile tilller teatllI'e.
Then press + and -pads to a(!iust time.
TIMERLight
Hashes while in edit Illode--}r{)tl (-'_111change
the set time at this point. Glo_:s _hen the
timer has been activated. Flashes again _hen
the time has run out until tile control is reset.
CLOCK Pad
To set tile clock, press tiffs pad twice and
then press tile + and -pads. Tile time of
day will flash in tile display when tile oven is
fit_t tin'ned on.
DELAYSTARTPad
Lrse along with tile COOKING TIME or
SELFCLEAN pads to set tile oven to start
and stop automatically at a time you set.
DELAYSTART -timeLight
Hashes while in edit I/'lode--}r{)tl (-'_111change
the dela) start set time at this point. Glows
_dmn the fimction has been activamd.
COOKINGTIME Pad
Touch this pad and then touch tile + or-
pads to set tile amotmt of time you _;mt
w)m" food to cook. Tile oven will slmt off'
when tile cooking time has run out.
COOKINGTIME Light
Hashes while in edit Illode--}r{)tl (-'_111change
the set time at this point. Glo_:s _hen the
fimction has been activated. Flashes again
_hen tile time has run out until tile control
is reset.
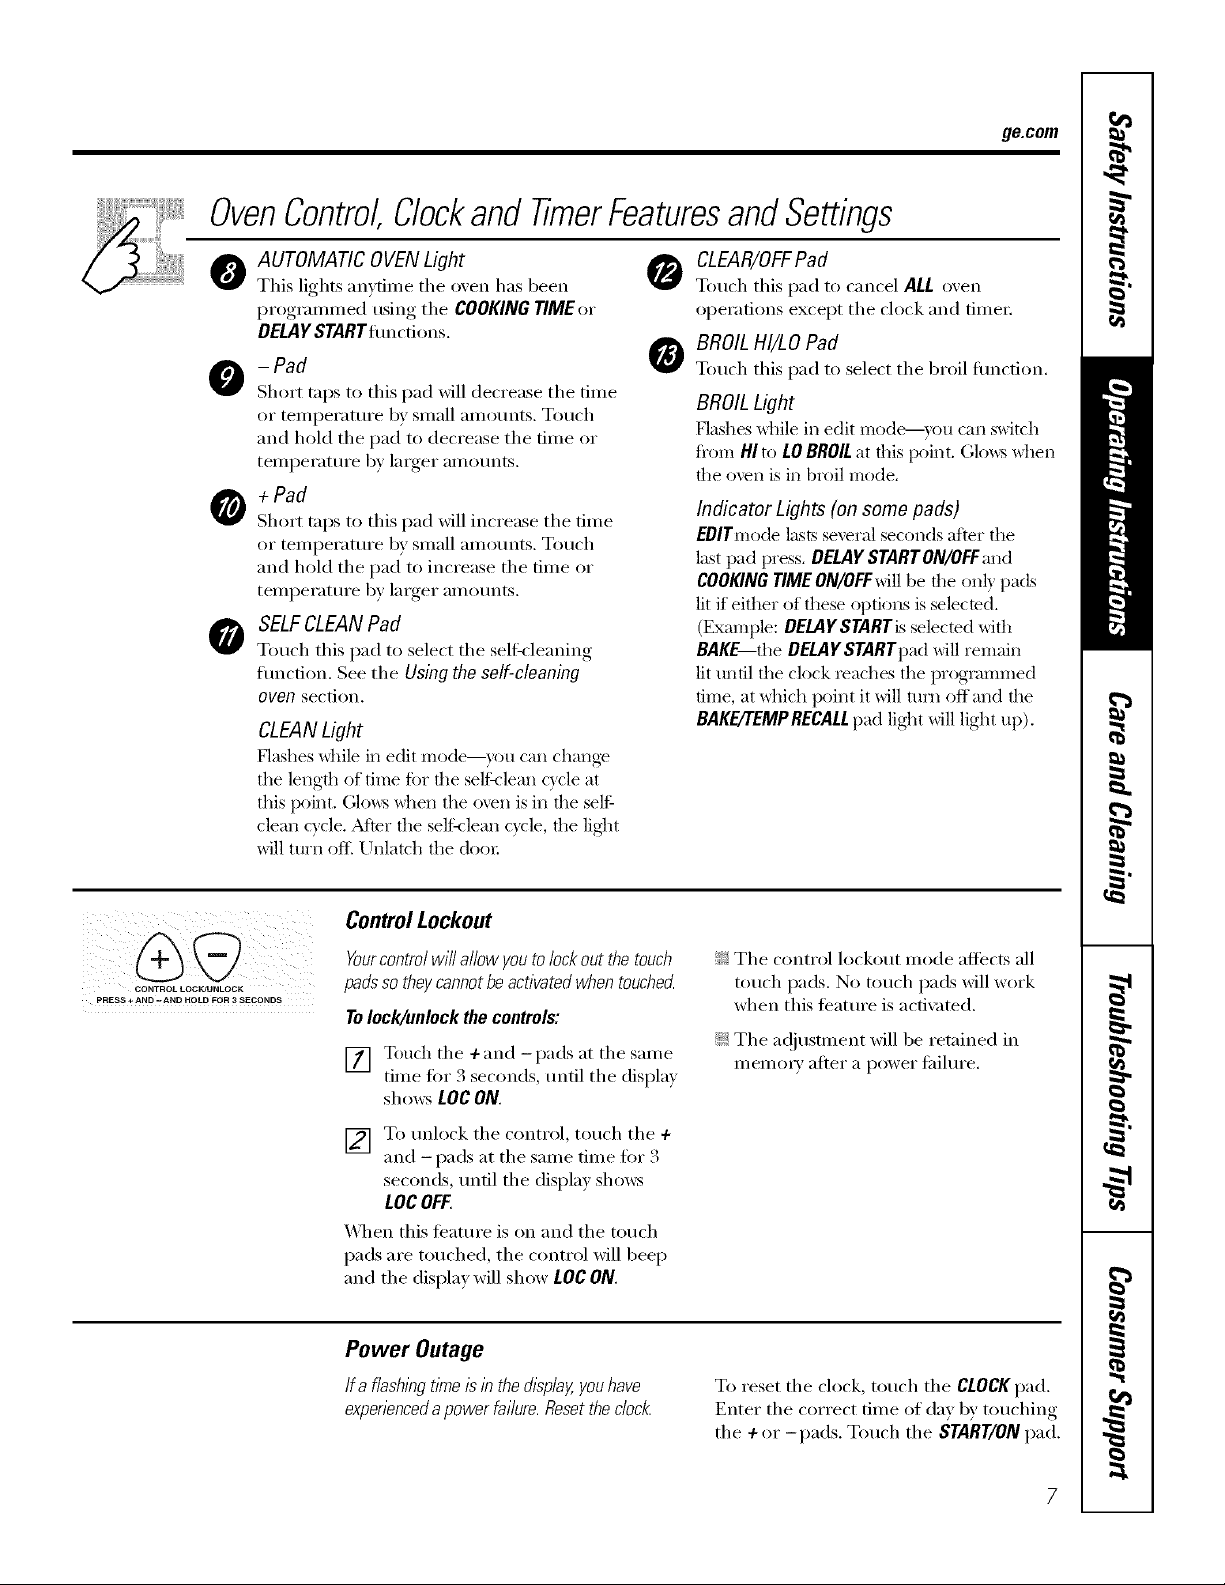
OvenControl,ClockandTimerFeaturesandSettings
ge.com
AUTOMATIC OVENLight
0
This lights anytime the oven has been
i)r()grammed using the COOKING TIME or
DELAYSTARTfimcdons.
- Pad
Short raps to this pad xdll decrease the time
or temperature by small amotmts. Touch
and hold the pad to decrease the time or
teml)erature by larger ainounts.
+ Pad
Short taps to this pad will increase the time
or temperature 1U small amo/mts. Touch
and hold the pad to increase the time or
temperatm'e by linger amo/mts.
O SELFCLEANPad
Touch this pad to select tile selfk-leaning
traction. See the Using the self-cleaning
oven section.
CLEANLight
Flashes _dfile in edit mode--}ou can change
tile length of time fbr the self-(lean c}cle at
this ix)int. (;lows when the oven is in the self=
dean c)cle. After the selfq lean cycle, the lig]lt
will ttlrIl of I[ Unlatch the docn:
CLEAR/OFF Pad
Touch this pad to cancel ALL oven
operations except tile clock and time_:
BROILHI/LO Pad
Touch this pad to select the broil traction.
BROILLight
Flashes while in edit mode---you can switch
fl'om HI to tO BROILat this point. Glows when
file ()veil is iIl broil mode.
Indicator Lights (on some pads)
EBITmode lastsseveral seconds after the
last pad press, BELAY START ON/OFFand
COOKINGTIME ON/OFFwill be the only pads
lit if either of these options is selected.
(Example: OELAYSTARTis selected with
BAKE tile DELAYSTARTpad will remain
lit until the clock reaches the programmed
time, at which point it will mm off and the
BAKE/TEMPRECALLpad lig_lt will light up),
CONTROL LOCKJUNLOCK
pRESS + AND -AND HOLD FOR 3 SECONDS
ControlLockout
Yourcontrol will allow youto lock out the touch
padsso theycannot beactivated when touched
Tolock/unlock the controls:
[] Touch tile +and -pads at tile same
time tot 3 seconds, tmtil the (lispla,_
sh(>ws LOC ON.
] To tmh)ck the control, touch the +
and -pads at the same time fin" 3
seconds,/mfil tile display sho_s
LOCOFF.
_]/en this ti_atm'e is on and tile touch
pads are touched, tile control will beep
and the display will show LOC ON.
Power Outage
Ifa flashing t/?neis in thedL_plagyouhave
expenencedapower failure. Resetthe cloct_
!i?:Tile control h)ckout mode affects all
touch pads. No touch pads will work
when this teatm'e is a(tix Ked,
!;_:Tile ac!jt/stment will be retained in
mem(ny after a power fililm'e.
To reset tile ch)ck, touch tile CLOCKpad.
Enter tile correct time of (la} by touching
tile + or-pads. Touch tile START/ONpad.
Usingthe oven.
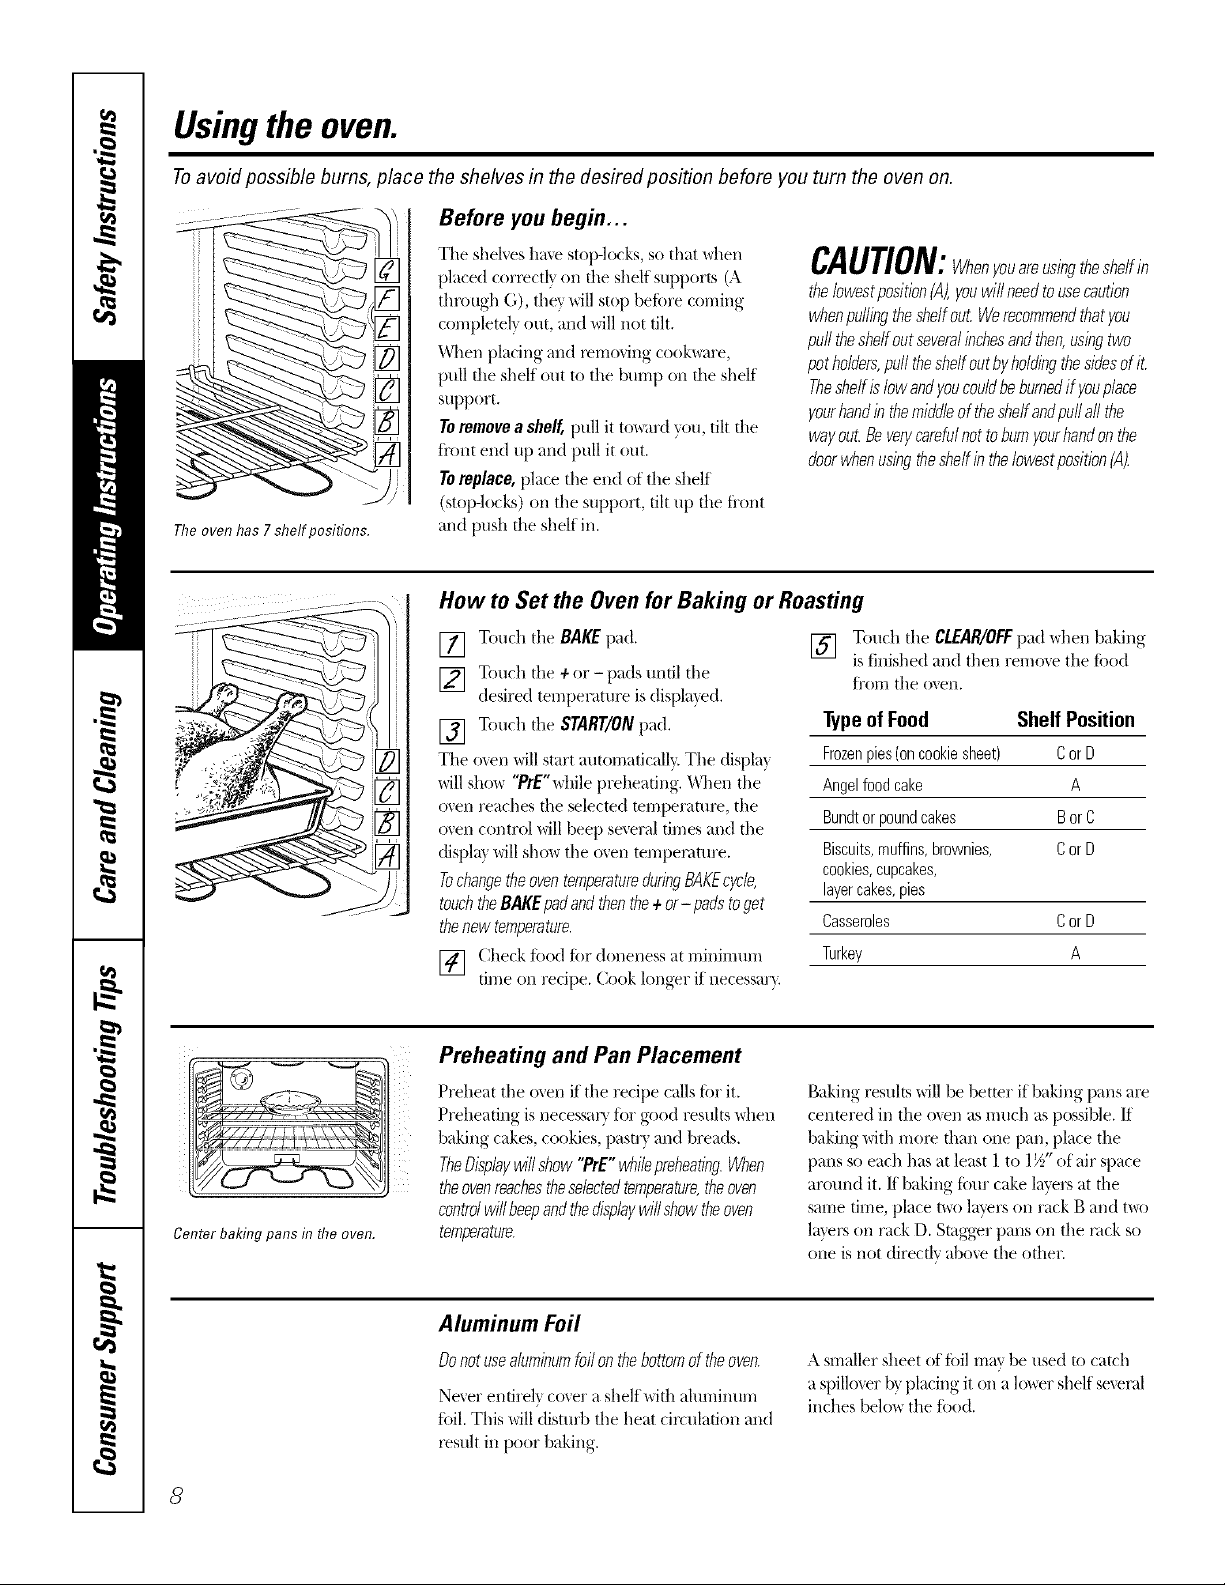
Toavoid possible bums, place the shelves in the desired posifion before you turn the oven on.
Before you begin...
The oven has 7 shelf positions.
Tile shelves ha\'e stop-locks, so that \dlen
pla.ced corx_ctl) on file shelf supports (A
throug}/G), they will stop beiiwe coming
completely out, and will not tilt.
When placing and lelrlo_ing cook\_are,
pull file shelf out to the Nmlp on file shelf
support.
Toremovea shelf,pull it tox_mdyou, tilt file
fi'ont end up and pull it out.
Toreplace,place the end ot tile shelf
(stop-lo(ks) (m the support, tilt up die fi'ont
and push the shelf in.
CAUTION:Whenyouareus/ngtheshelfin
thelowestposition(A),youwill needtousecaution
whenpullingtheshelfout.Werecommendthatyou
pulltheshelfoutseveralinchesandthen,usingtwo
potholders,pull theshelfoutbyholdingthesidesofit.
Theshelfislowandyoucouldbeburnedif youplace
yourhandin themiddleof theshelfandpullall the
wayout.Beverycarefulnotto burnyourhandonthe
doorwhenusingtheshelfinthe/owestposition(A).
How to Set the Oven for Baking or Roasting
[] Touch the BAKEpad.
] Touch the + or- pads until the
desired temperature is displayed.
[] Touch the START/ONpad.
The o_en will start automat}ca}Iv. The displa}
will show '?rE"while preheating. "_\]/en the
oven reaches the selected mmperatm_, the
oven control will bee}) several times and the
(fispla} will sho_ the ()veil temper,_ture.
TochangetheoventemperatureduringBAKEcycle,
touchtheBAKEpadandthenthe+ or- padstoget
thenew temperature.
[] Check. f_>odf_)r (}oneness at minimum
rune on recipe. Cook longer if necessar}.
[] Touch the CLEAR/OFFpad when baking
TypeofFood Shelf Position
Frozenpies(oncookiesheet) CorD
Angelfoodcake A
Bundtorpoundcakes BorC
Biscuits,muffins,brownies, CorD
cookies,cupcakes,
layercakes,pies
Casseroles CorD
Turkey A
is finished and then remo_e the fi)od
t/'orri the oven.
Center bakingpans in flTeoven.
8
Preheating and Pan Placement
Preheat the oven if the recipe calls ti)r it.
Preheating is necessaQ t()r good resuhs \allen
baking cakes, cookies, pastr} and breads.
TheDisplaywillshow"?rE" whilepreheating.When
theovenreachestheselectedtemperature,theoven
controlwillbeepandthedisplaywillshowtheoven
temperature.
Aluminum Foil
Donotusealuminumfoilonthebottomof theoven.
Never entirely cover a shelf with ahli/lii/ili//
fi)il. This will disturb the }mat circulation and
l_sult in poor baking.
Baking resuhs will be better if baking pans are
cenmred in the o_en as much as possible. If
baking with more than one pan, place the
pans so each has at least 1 to 1½" of air space
around it./1 baking timr cake layers at the
sarrie tirrie, })lace t\_o layers on rack B and t\_o
lax_rs on rack D. Stagger pans oil the n<k so
one is not directly abo\e the other
A smaller sheet of tiff] may be used to catch
a spilloxer b} placing it on alower shelf sexeral
inches below the ti)od.
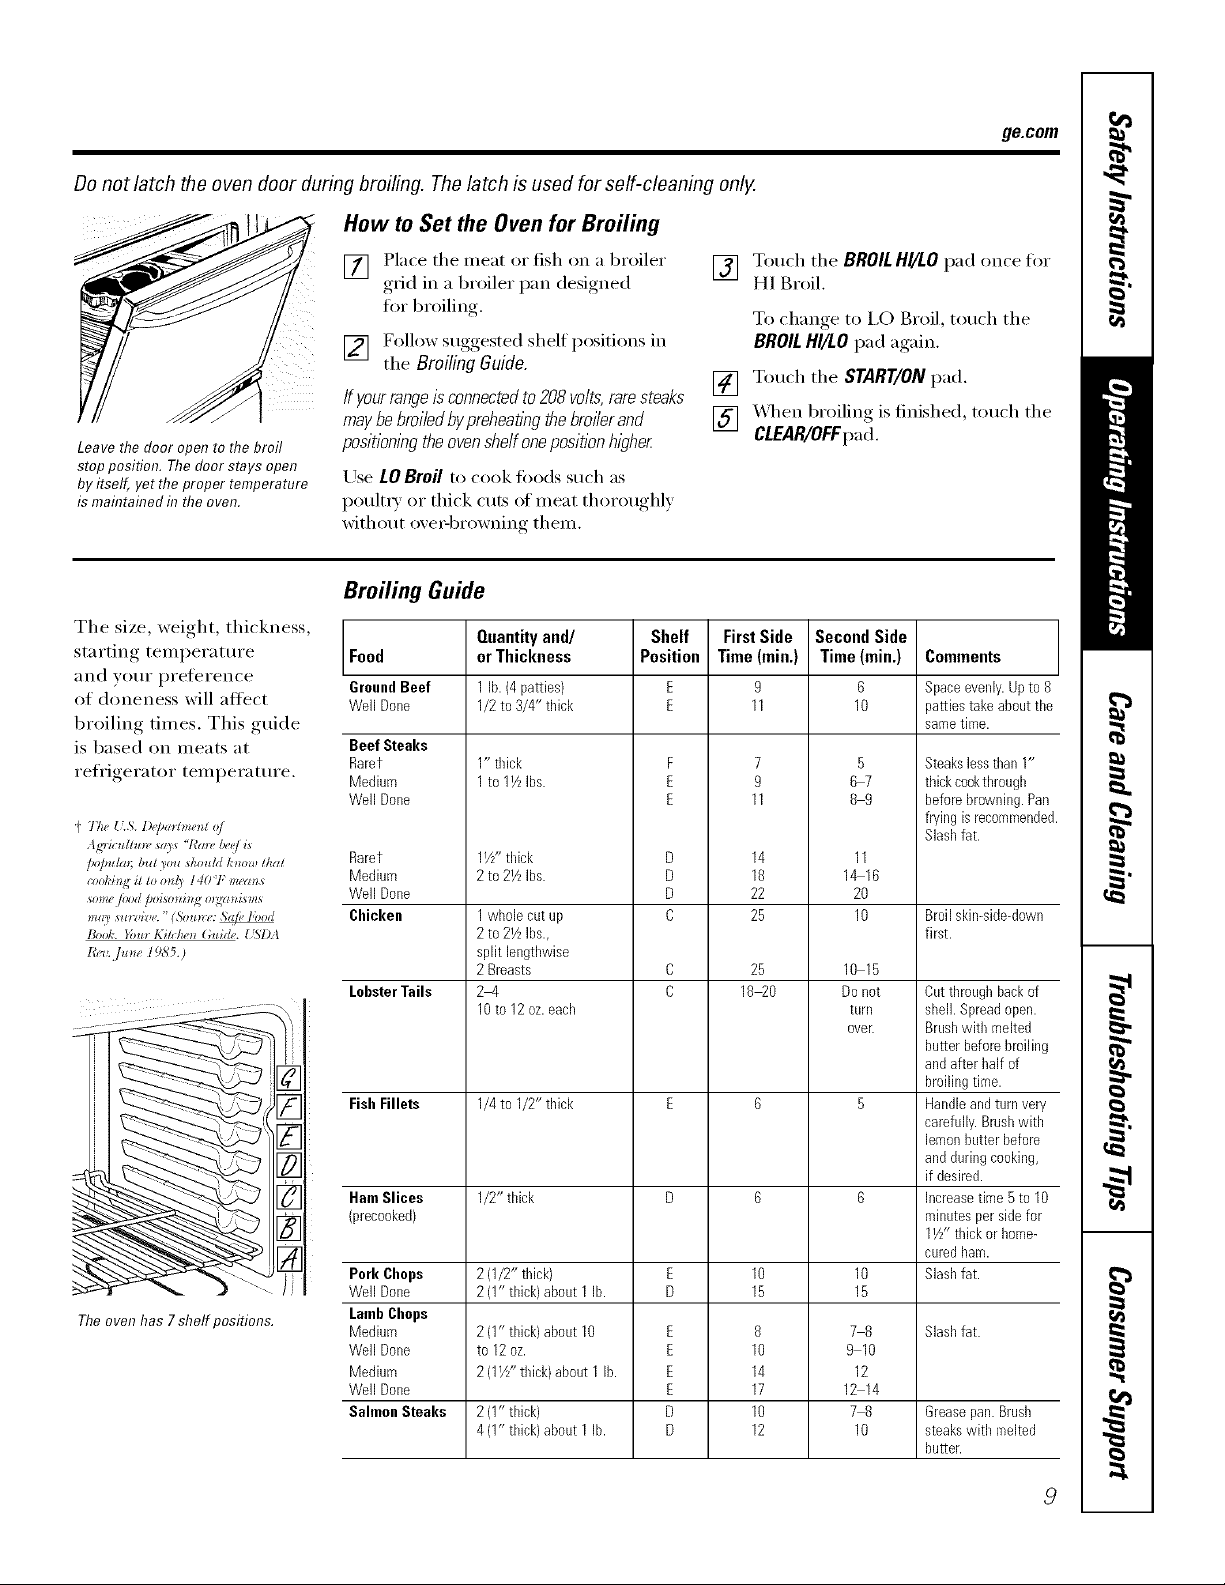
Donot latch the oven door during broiling. The latch is used for self-cleaning only.
How to Set the Oven for Broiling
ge.com
Leave the door open to the broil
stop position. The door stays open
by itself, yet the proper temperature
is maintained in the even.
Tile size, weight, thickness,
starting temperature
}lIld VO/lI" prelerence
of doneness will att'ect
broiling times. This guide
is based on meats at
refrigerator temperature.
p TD(, {kS. I)(J_a*m_e_zl o/
Agriculhm, s© s "/'a_, &e/ i*
/_l)/mlm; b*zt_o*zsko*tld /,'_*o,l!tkat
zool,'i_l,8it to o_/_ I407;" m_'(m _
_omepJod [oLsm i_N o_2t4zn*isms
_ll_U stl_'zize. "(%m*r_,: _e libod
l_ook. }Du_ Kilclw_ G,u<h,. {iSY)A
l?,_l,.]une 198'5.)
Theoven has 7 shelf positions.
[] Place tile meat or fish on a broiler
,grid in a broiler I)an designed,
for broiling.
[] Follow suogested shelf )ositions in
tile BroilingGuide.
If your range is connected to 208 voits, rare steaks
may be broiied bypreheatk_gthe broiier and
positionk_gthe oven shelf one positionhigher
Use LOBroil to cook foods such as
poult_ 7 or thick cuts of meat thoroughly
without ove_q)rowning them.
Broiling Guide
Shelf
Position
Food
GroundBeef
Well Done
Beef Steaks
Rarer
Medium
Well Done
Rarer
Medium
Well Done
Chicken
LobsterTails
Fish Fillets
Ham Slices
(precooked)
Pork Chops
Well Done
LambChops
Medium
Well Done
Medium
Well Done
Salmon Steaks
Quantityand/
orThickness
1 lb.(4 patties)
1/2to 3/4" thick
1" tbick
1to 11kIbs.
11/Z'tldck
2to 21/LIbs.
1whole cut up
2to 21/zIbs.,
split lengthwise
2Breasts
2q
10to 12 oz.each
1/4to 1/2" thick
1/2" thick
2(1/2" thick)
2(1" thick)about1 lb.
2(1" thick)about10
to 12oz.
1
2(1_" tbick) about1lb.
2(1" thick)
4(1" thick)about1 lb.
[] Touch tile BROIL HI/LO pad once fi);_"
HI Broil.
To change, to I,O Broil, touch tile
BROILHI/tO pad again.
[] Touch tile START/ON pad.
[] XAq/en broiling is finished, touch tile
CLEAR/OFFpad.
F
E
E
D
D
D
C
E
E
E
E
D
D
FirstSide
Time(min,)
9
11
7
9
11
14
18
22
25
25
18 20
8
10
14
17
10
12
Second Side
Time (rain.)
6
10
5
67
89
11
1_16
20
10
10 15
Donot
turn
over.
78
9 10
12
12 14
78
10
Comments
Spaceevenly.Upto 8
pattiestakeaboutthe
sametime.
Steakslesstban 1"
thickcooktbrougb
beforebrowning.Pan
fryingis recommendec
Slashfat.
Broilskin-side-down
first.
Cutthroughbackof
shell.Spreadopen.
Brushwitb melted
butterbeforebroiling
andafter half of
broilingtime.
Handleandturnvery
carefully.Brushwitb
lemonbutterbefore
andduring cooking,
if desired.
Increasetime 5to 10
minutesperside for
11//'thick or home-
curedham.
Slashfat.
Slashfat.
Grease pan. Brush
steaks with melted
butter.
Usingthe clock and timer.
Not all features are on all models.
To Set the Clock
Make sure the clock is set to flTe
correct time of day.
The clock must be set to the correct time
of day fin" the atmnnatic oxen tinting
flmcfions to work properly: The time of
da} cmmot be changed dm_ing a dela}ed
cooking or a delmed seltXcleaning cycle.
[] Touch the CLOCKpad twice,
[] T°uch the + °r -IXMS"
If the 4- or - pads are not touched within
one minute after xou touch the CLOCK
pad, the displa) rexerts to the original
ToTurnOff the Clock Display
If w_u have several clocks in yore" kitchen,
you may wish to mrn off the time of day
clock display on yore" range.
[] Touch the CLOCKpad once to turn
off the time of day displa); Mthough
you will not be able to see it, the
To Set the Timer
setting, If this hal)pens, touch the CLOCK
pad twice and reenter the time of din.
[] Touch the START/ON pad until the
time of day shm_s in the display. This
ente_ the time and starts the clock.
Tocheckthetimeof daywhenthedisplayis
showl)_gotherinformation,simplytouchthe
CLOCKpad Thet/meofdayshowsuntilanother
padistouched
clock maintains the correct time
of day.
Touch the CLOCKpad twice to recall
[]
the clock display.
%
TheCLEAR/OFFpad does not affect
the time£
ThetlYnerdoes not control ovenoperations.
ThemaxlYnumsemng on the timeris 9hours
and59 minutes
Touch the KITCHENTIMERON/OFF
[]
I)ad.
Touch the ÷ or-l)ads tmfil the
[]
}Ill/Olin[ oJ[ ti//le vot/W}lllt shows ill
the display. The maxim um time that
can be entered ill minutes is 59.
Times more than 59 minutes should
be changed to hom5 and minutes.
To Reset the Timer
If the display is still showing the time
remaining, you may change it by touching
the KITCHEN TIMER ON/OFFpad, then
touching the ÷ or -pads tmtil the time
wm _mlt appea_ in the display.
ToCancel the Timer
ffyoumakeamistake,touchtheKITCHEN
TIMERON/OFFpadandbeginagain.
[] Touch the START/ONpad. The time
will st;Irt counting down, althouoh
the display does not change tmfil
one minute has passed.
[] X4qmn the timer reaches :00, the
control will beep 3 times followed by
one beep every 6 seconds tmtil the
KITCHEN TIMERON/OFFpad is
touched.
If the remaining time is not in the display
(clock, delay start set time or cooking
time are in the display), recall the
remaining time by touching the KITCHEN
TIMERON/OFFpad and then touching the
÷ or -pads to enter the new tim e um
%;lilt.
Touch the KITCHENTIMERON/OFF
pad twice.
/0
 Loading...