

GE JSP57WF2WW, JSP57CF2CC, JSP57BF2BB, JS968TF2WW, JS968TF1WW Owner’s Manual
...
wwvv.GEAppliances.com
Safety Instructions ......... 2-5
©
bO
°_
Operating Instructions
Baking or Roasting .......... 11
Broiling Guide .............. 12
Canning .................... 9
Clock and Timer ............ 13
Control Lockout ............ 13
Convection .............. 16-20
Cookware ................. 8, 9
Oven .................. 10-28
Probe ..................... 15
Proofing .................. 21
Sabbath Feature ............. 28
Self-Cleaning ............ 23, 24
Special Features .......... 25-27
Surface Units ............. 6, 7
Thermostat ................ 22
Timed Baking & Roasting ..... 14
Warming .................. 21
Care and Cleaning
Broiler Pan and Grid ........ 32
Control Panel .............. 29
Door ..................... 30
Floor ..................... 31
Glass Cookmp ........... 34, 35
Knobs .................... 29
Light Bulb .............. 31, 32
Packaging Tape ............. 29
Racks ..................... 31
Storage Drawer ............. 32
Surfaces ................... 33
Vent ..................... 29
JSP 5 7
JS968
JD968
Troubleshooting Tips .... 36-39
Consumer Support
Consumer Support... Back Cover
Product Registration ...... 41, 42
Warranty .................. 43
Write the model and serial
numbers here:
Model #
Serial #
You can find them on a label
behind the open oven door
on the lower left corner of
the range frame.
164D4290P094 49-80136 07-02JR
IMPORTANTSAFETYINFORMATION.
READALLINSTRUCTIONSBEFOREUSING.
WARNING!
For your safe_ the information in this manual must be followed to minimize the risk of fire, electric
shock, or to prevent property damage, personal inju_ or loss of life.
WARNINGANTI-TIPDEVICE
All ranges can tipand injury could result.
Slide-In
Ranges:
Drop-In
Ranges:
Toprevent accidental tipping of the range, attach it to the wall and floor by installing the
Anti-tip device supplied.
Tocheck if the device is installed and engaged properly, remove the storage drawer
and inspect the rear leveling leg. Make sure it fits securely into the slot.
Toprevent accidental tipping of the range, secure the attached Anti- tip bracket, under
the rear countertop.
Tocheck if the device is installed and engaged properly, lower the oven door and gently
apply medium force at the handle end until movement of the range is detected. Continue
pressing until the anti-tip bracket is engaged and movement stops. A small amount of
movement is acceptable at the back of the range top but it should be stable and not tip
once the anti-tip bracket is engaged.
If you pull the range out from the wall lbr any reason, make sure tile device is properly
engaged when you push the range back against the wall. If"it is not, there is a possible risk of
tile range tipping over and causing injur T if you or a child stand, sit or lean on an open d_r.
Please refer m the And-Tip device information in this manual. Failure m take this precaution
could result in tipping of the range and inju* T.
IMPORTANTSAFETYNOTICE
The Califomia Safe Drinking Water and ToxicEnforcement Act requires the Govemor of Califomia to
publish a list of substances known to the state to cause cancer, birth defects or other reproductive
harm, and requires businesses to warn customers ofpotential exposure to such substances.
Thefiberglass insulation in self-clean ovens gives off a very small amount of carbon monoxide during
the cleaning cycle. Exposure can be minimized by venting with an open window or using a ventilation
fan or hood.
SAFETYPRECAUTIONS
When using electrical appliances, basic safety precautions should be followed, including the following:
N Use this appliance only lbr its intended
praise _s described in this Owner's
Manual.
@ Be sure your appliance is proper1y
installed and grounded by a qualified
installer in accordance with the provided
installation instructions.
@ Have the installer show you the location of
the circuit breaker or lilse. Mark it lbr easT
reference.
@ Do not attempt m repair or replace any
part of your range unless it is specifically
2
recommended in this manual. All other
se*vicing should be referred m a qualified
technician.
@ Befbre perlbrming aW service, disconnect
the range power supply at the household
distribution panel by removing the fuse or
switching off the circuit breaker.
@ Do not leave children alone--children
should not be left alone or unattended in
an area where an appliance is in use. They
should never be allowed m sit or stand on
any part of the appliance.
@ Do not allow anyone m climb, stand or
hang on the door; storage drawer or
cooktop. They could damage the range
and even tip it over, causing severe
pe_:sonal injm T.
www.GEAppliances.com
A WARNING!
SAFETYPRECAUTIONS
Do not operate the oven or cooktop controls if the glass is broken. Food splatter or cleaning solution
may penetrate a broken control panel or cooktop and create a risk of electrical shock. Contact a
qualified technician immediately should your glass control panel or cooktop become broken.
_ Do not store flammable materials in an
oven or near the cooktop.
_ CAUTION:Items of interest tO
children should not be stored in cabinets
above a range or on tile back of a range--
children climbing on the range to reach
items could be seriously injured.
_;_Never wear l_se-fitting or hanging
garments while using tile appliance.
Be carefi_l when reaching for items stored
over the range. Flammable material could
be ignited if"brought in contact with hot
surface units or heating elements and may
cause severe burns,
N Use only dr'i pot holders--moist or damp
pot holdei:s on hot surfaces may result in
bums from steam. Do not let pot holders
touch hot su_ace units or heating
elements. Do not use a towel or other
bulky cloth in place of _t holders.
_;aDo not use water on grease fires. Never
pick up a flaming pan. Turn tile controls
otI: Smother a flaming pan on a surface
unit by covering the pan completely with
a well4itting lid, cookie sheet or flat tray.
Use a multi-purpose dlT chemical or
foam-type fire extinguisher.
Flaming grease outside a pan can be put
out by covering it with baking soda or;
if a_lable, by using a multi-purpose dry
chemical or foam-type fire extinguisher.
Flame in the oven can be smothered
completely by closing tile oven door
and toming the oven off or by using
a multi-pur_se dry chemical or
foam-type fire extinguisher.
N For your _ety, never use your appliance
for warming or heating the room.
N Do not let cooking grease or other
flarnmable materials accumulate in or
near tile range.
Do not touch the surface units, tile
heating elements or tile interior surface
of tile oven. These surfaces may be hot
enough to burn even though they are
dark in color: During and after use, do not
touch, or let clothing or other flammable
materials contact the surface units, areas
nearby tile surface units or any interior
area of the oven; allow sufficient time for
cooling first.
Potentially hot surt:aces include tile
cooktop, areas lacing tile c_ktop, oven
vent opening, surfaces near" tile opening,
crevices around the oven door.
REMEMBER: The inside surface of tile oven
may be hot when the door is opened.
@ Do not store or use combustible materials,
gasoline or other flammable vapors and
liquids in the vicinity of"this or any other
appliance.
N Keep the hood and grease filte*:s clean
to maintain good venting and to avoid
grease fires.
N Teach children not to play with tile
controls or any other part of the range.
N Always keep dish towels, dish cloths, pot
holde*:s and other linens a safe distance
from your range.
N Always keep wooden and plastic utensils
and canned f_d a sale distance from
your range.
N Always keep combustible wall covering,
curtains or drapes a s_e distance from
your range.
COOKMEATANDPOULTRYTHOROUGHLY...
Cookmeat andpoultry thoroughly_meat to at leastan INTERNALtemperatureof 160°Fandpoultry
toat least an INTERNALtemperatureof 180°ECookingto thesetemperaturesusuallyprotects against
foodborneillness.
3
IMPORTANTSAFETYINFORMATION.
READALLINSTRUCTIONSBEFOREUSING.
RADIANTSURFACEUNITS
Use proper pan size--select cookware having flat bottoms large enough to cover the surface unit
heating element The use of undersized cookware will expose a portion of the surface unit to direct
contact and may result in ignition of clothing. Proper relationship of cookware to surface unit will
also improve efficiency.
@ Never leave tile surface units unattended
at high heat settings. Boilovers came
smoking and greasy spillovers that may
catch on fire.
N Only certain types of glass, glass/ceramic,
earthenware or other glazed containers are
suitable for cookmp service; othe*:s may
break because of the sudden change in
temperature.
N To minimize tile possibility of burns,
ignition of flammable materials and
spillage, the handle of a container
should be turned toward the center of
tile range without extending over nearby
su_ace units.
N Always turn the surl:ace units off before
removing cookware.
N When preparing flaming foods under
the h_d, turn tile fan on.
@ Use care when touching tile c_ktop. The
glass surface of the cookmp will retain heat
_ter the controls have been turned o[I:
N Keep an eye on foods being flied at high
or medium high heat setting.
N Foods lor hTing should be as dPi as
possible. Frost on frozen foods or moisture
on fresh foods can cause hot fat m bubble
up and over tile sides of the pan.
@ Use little fat for effective shallow or deep
fat flying. Filling the pan mo full of fat can
cause spillovers when lbod is added.
N If a combination of oils or lhts will be used
in flTing, stir together before heating,
or as lats melt slowly.
% Always heat lat slowly, and watch as it heats.
@ Use a deep fat thermometer whenever
possible m prevent overlneating lat beyond
the smoking point.
N Avoid scratching the glass cookmp. The
cooktop can be scratched with items such
4
as shaI_ instruments, rin_ or other
jeweh 7, and rivets on clothing.
N Large scratches or impacts m glass
door:s or cookmps can lead m broken
or shattered glass.
@ Do not operate the radiant surface units if
the glass is broken. Spillovers or cleaning
solution may penetrate a broken cooktop
and create a risk of electrical shock.
Contact a qualified technician immediately
should your glass c_ktop become broken.
N Never use the glass cooktop surface as a
cutting board.
_;_Do not place or store items that can melt
or catch fire on the glass cookmp, even
when it is not being used.
N Be care£ul when placing spoons or other
stirring utensils on glass cookmp surt:ace
when it is in use. They may become hot
and could cause burns.
@ (;lean the cookmp with caution. Ifa wet
sponge or cloth is used m wipe spills on a
hot surt:ace unit, be careful to avoid steam
burns. Some cleaners can produce
noxious fumes if applied m a hot surface.
NOTE: We recommend that you avoid
wiping a W surl:ace unit areas until they
have cooled and the indicator light has
gone off. Sugar spills are the exception to
this. Please see the Cleaning the glass
cooktop section.
N When the cooktop is cool, use only the
CERAMA BRYI'E ®Ceramic Cookmp
(;leaner and the CERAMA BRYTE
Ceramic Cookmp (;leaning Pad m clean
the cookmp.
N To avoid possible damage m the cooking
surt:ace, do not apply cleaning cream m
the glass surt:ace when it is hot.
N After cleaning, use a dry cloth or paper
towel m remove all cleaning cream residue.
N Read and lbllow all instructions and
warnings on the cleaning cream labels.

www.GEAppliances.com
WARNING!
OVEN
Stand away from the range when opening the oven door. Hot air orsteam which escapes can cause
burns to hands, face and/or eyes.
@ Do not heat unopened food containers.
Pressure could build up and tile container
could burst, causing an injm T.
N Keep the oven vent unobstructed.
N Keep tile oven free from gwease buildup.
@ Place the oven rack in the desired _sidon
while the oven is cool. If racks must be
handled when hot, do not let pot holder
contact the heating elements.
@ When using cooking or r_asting ba_ in
the oven, follow the manufacturer's
directions.
@ Pulling out the rack m tile stop-lock is a
convenience in lifting heavy foods. It is also
a precaution against burns from touching
hot surfaces of tile door or oven walls.
@ Do not use tile oven m dry newspapers.
If overheated, they can catch on fire.
_;_Do not use tile oven lbr a sto_e area.
Items stored in an oven can ignite.
@ Do not leave paper products, cooking
utensils or food in tile oven when not
in use.
@ Do not use aluminum foil m line oven
bottoms, except as suggested in this
manual. Improper installation of
aluminum lbil may result in a risk
of electric shock or fire.
SELF-CLEANINGOVEN
Do not use oven cleaners. No commercial oven cleaner or oven liner protective coating of any kind
should be used in or around any part of the oven. Residue from oven cleaners will damage the inside
of the oven when the self-clean cycle is used.
@ Do not clean tile door gasket. The door
gasket is essential for a good seal. (;are
should be taken not m rub, damage or
move the gasket.
@ Beibre se@cleaning tile oven, remove
tile racks, broiler pan, grid and other
cookware.
@ Be sure m wipe up excess spillage beibre
Stalling tile self:cleaning operation.
@ If the sell:-cleaning mode ma@mctions,
turn tile oven offand disconnect tile
power supply. Have it serviced by a
qualified technician.
@ (;lean only parts listed in this Owner's
Manual.
READANDFOLLOWTHISSAFETYINFORMATIONCAREFULLY.
SAVETHESEINSTRUCTIONS
5

Usingthesurface units.
NOTE: Throughout this manual, features and appearance may vary from your model
_ glow untiltheunitiscooledtoapproximately
i!!! !iiiilili!iii!i! iiiiiiiiiii!ii iii iiiii i, !i!!i!i ii !iiiili; iii!!ii!i!iiii iiiii directiooPUsh ekoobioandtumineithertotheset.ngyouwant.
i i; At both OFFand HI the control clicks
indicatingintoclickingposition,soundsthe Youcontrolduringmay ishearcooking,keepingslight the
power level you set.
A HOTSURFACE indicator light, on the
Be sure youturn the control knob to cooktop, will glow when any radiant
OFFwhenyoufinishcooking, element is turned on. It will remain
WARMING ZONE GUIDE
SETTING FOOD
1(Low) 8read/Pastries
2(Medium) Chocolate/%tter
2(Medium) Sauces,Stews,
CreamSoups
2(Medium) Vegetables
3(High) Soups(liquid)
3(High) TeaorCoffee
TheWarmingZoneGuideisfor
referenceonly andthe SETi-ING
thatyou needwill dependonthe
amountand type offood,the
starting temperatureofthe food
andthelengthof the holdingtime.
on until the suriace is cooled to
approximately 150°E
Hot surface indicator light will:
N comeon when the unit is hot to the touch.
_ stayonevenaftertheunitisturnedoff
Using the Warming Zone (onsomemodels)
The WARMING ZONE, located in the
center of the glass cooktop surface,
will keep hot, cooked food at serving
temperature. Always start with hot food.
Do not use to heat cold _bod. Placing
uncooked or cold food on the WARMING
ZONEcould result in food-borne illness.
[] Touch the WARMINGZONE
SET'OFFpad.
[] Touch the number pads 1, 2 or 3
to select low (1), medium (2) or
high (3) warming setting.
[] Touch the STARTpad.
To turn the WARMING ZONEoff, touch the
WARMING ZONE SET'OFF pad until
WARMER disappears from the display.
For best results, all foods on the
WARMING ZONE should be covered with a
lid or almninum fbil. When warming
pastries or breads, the cover should be
vented to allow moisture to escape.
!50°£
The WARM setting on the right REAR
surface unit keeps ah'eady heated food
warm until ready to serve. Do not use to
heat cold food.
Always use pot holders or oven mitts
when removing fbod from the WARMING
ZONE,since cookware and plates will be
hot.
It_ _IIIL#IW'IIUT_ON; Do not warm food on the
WARMING ZONE for more than two hours.
NOTE:Thewarmingzone will notglow red like
the cookingelements.
ROTwill be displayed when the glass
surface is hot and will remain on until
the surfhce is cool enough to touch.
NOTE:Lowersettingsmaynotheattheglass
surfaceenoughto causetheHOTindicatorlight
tocomeon.
A warming zone ONlight will glow when
the unit is on.
_ Donotuseplasticwraptocoverfood.Plastic
maymeltontothesurfaceandbeverydifficult
toclean.
_ Useonlycookwarerecommendedfor
top-of-rangecooking
Using the Bridge Surface Unit
To use the bridge surt:ace unit. turn the
left front control knob to the BRIDGE
settings.
For full bridge sure'ace unit operation,
also turn on the left rear surface unit.
To use only the front sur_[hce unit, turn
the control knob to the FFlONTsetting_.
Never cook directly on the glas&
Always use cookware.
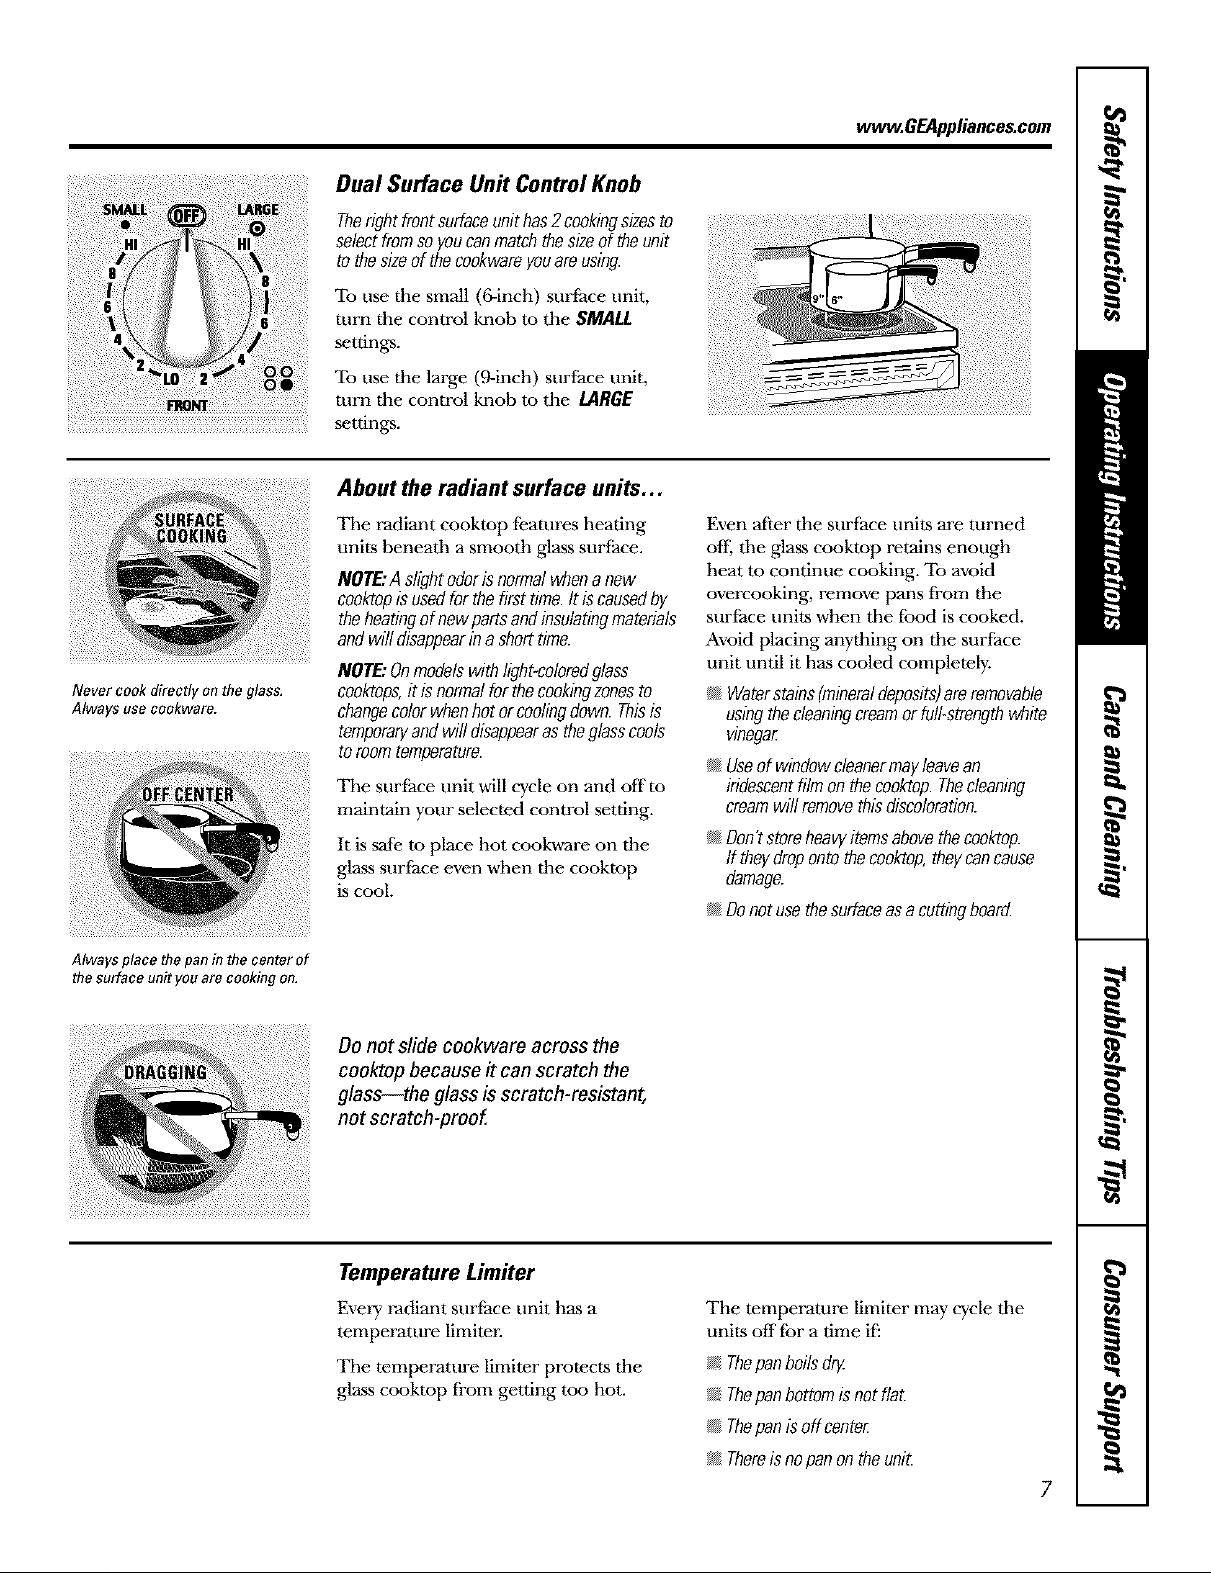
Dual Surface Unit Control Knob
Therightfrontsurfaceunithas2cookingsizesto
selectfromsoyoucanmatchthesizeof theunit
tothesizeofthecookwareyouareusing.
To use the small (6-inch) surface unit,
turn the control knob to the SMALL
settings.
To use the large (9-inch) surface unit,
turn the control knob to the lARGE
settings.
About the radiant surface units...
The radiant cooktop teatures heating
units beneath a smooth glass surface.
NOTE:A slightodorisnormalwhena new
cooktopisusedforthefirsttime.Itiscausedby
theheatingofnewpartsandinsulatingmaterials
andwilldisappearina shorttime.
NOTE:Onmodelswithlight-coloredglass
cooktops,it isnormalforthecookingzonesto
changecolorwhenhotorcoolingdown.Thisis
temporaryandwill disappearastheglasscools
toroomtemperature.
The surface unit will cycle on and off to
maintain your selected control setting.
It is safe to place hot cookware on the
glass surface even when the cooktop
is cool.
ww_.GEAppliances.com
Even 'after the surface units are turned
off, the glass cooktop retains enough
heat to continue cooking. To avoid
overcooking, remove pans from the
surface units when the tbod is cooked.
Avoid placing anything on the surface
unit until it has cooled completely.
_ Waterstains(mineraldeposits)areremovable
usingthecleaningcreamor full-strengthwhite
vinegar
_ Useofwindowcleanermayleavean
iridescentfilmonthecooktop.Thecleaning
creamwillremovethisdiscoloration.
_ Don'tstoreheavyitemsabovethecooktop.
ff theydropontothecooktop,theycancause
damage.
_ Donotusethesurfaceasa cuttingboard
Always place the panin the center of
thesurface unit you are cooking on.
Do not slide cookware across the
cooktop because it can scratch the
glass--the glass is scratch-resistant,
not scratch-proof.
Temperature Limiter
Every radiant surface unit has a
temperature limiten
The temperature limiter protects the
glass cooktop from getting too hot.
The temperature limiter may cycle the
units offtbr a time ifi
g_Thepanboilsdr_
g_Thepanbottomisnot flat.
Thepanis offcente_
_ Thereisnopanonthe unit.
7
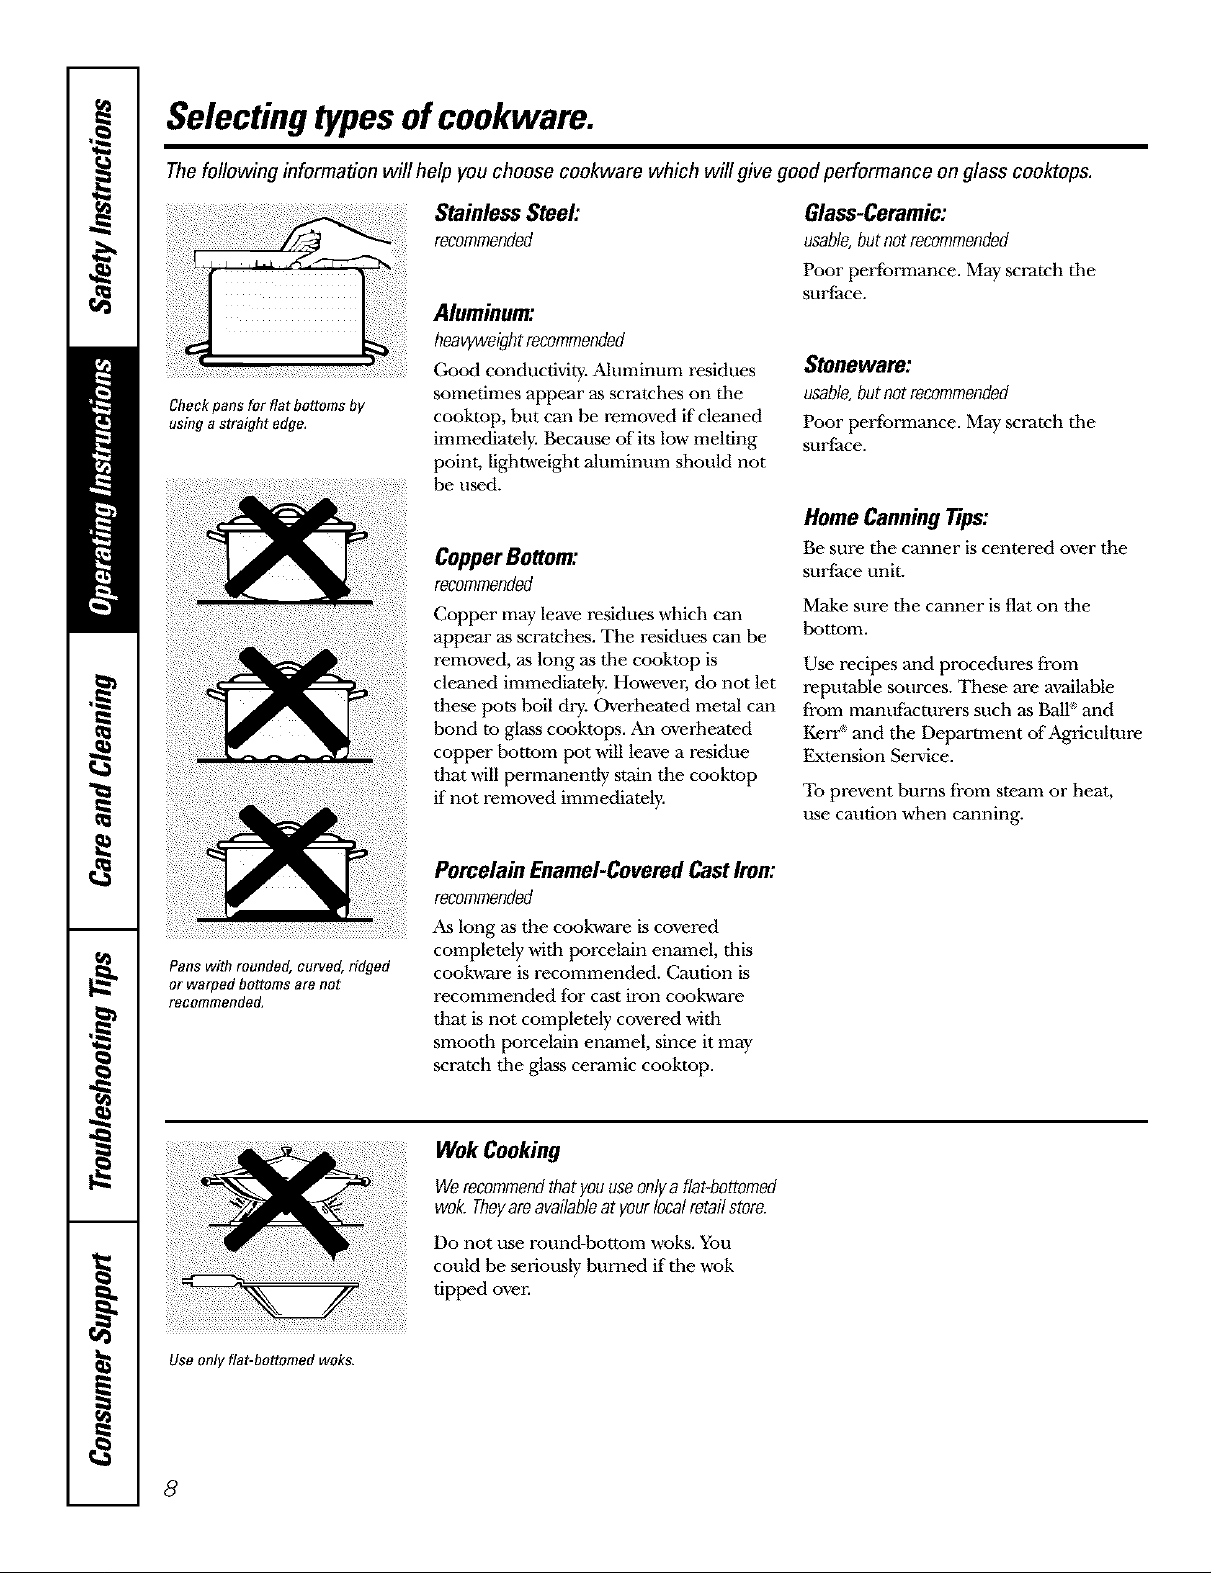
Selectingtypesof cookware.
Thefollowing information will help you choose cookware which will give good performance on glass cooktops.
Checkpans for fiat bottoms by
using a straight edge,
Stainless Steel:
recommended
Aluminum:
heavyweigbtrecommended
Good conductivity. Aluminum residues
sometimes appear as scratches on tile
cookmp, but can be removed if cleaned
immediately. Because of"its low melting
point, lightweight aluminum should not
be used.
Copper Bottom:
recommended
Copper may leave residues which can
appeal" as scratches. The residues can be
removed, as long as tile cooktop is
cleaned immediately. Howevm; do not let
these pots boil dry. Overheated metal can
bond to glass cooktops. _-Mloverheated
copper tyattom pot will leave a residue
that will permanently stain the cooktop
if not removed immediately.
Glass-Ceramic:
usable,butnotrecommended
Poor performance. May scratch tile
surface.
Stoneware:
usable,butnotrecommended
Poor performance. May scratch tile
surface.
Home Canningtips:
Be sure the canner is centered over the
surt:ace unit.
Make sure tile canner is flat on the
bottom.
Use recipes and procedures from
reputable sources. These are available
from manui;acturers such as BalF)and
KerF)and tile Department of Agriculture
Extension SmMce.
To prevent burns from steam or heat,
use caution when cmming.
Pans with rounded, curved, ridged
or warped bottoms are not
recommended.
Use only flat-bottomed wok&
PorcelainEnamel-CoveredCastIron:
recommended
As long as the cookware is covered
completely with porcelain enamel, this
cookw_re is recommended. Caution is
recommended for cast iron cookware
that is not completely covered with
smooth porcelain enamel, since it may
scratch the glass ceramic cooktop.
Wok Cooking
Werecommendthatyouuseonlyafiat-bottomed
wok.Theyareavailableatyourlocalretailstore.
Do not use round-bottom woks. You
could be seriously burned if tile wok
tipped oven
8
Observe the Following Points in Canning
Pots that extend beyond I" of
the surface unit's circle are not
recommended for most surfhce
cooking. Howevm; when canning
with ,a-ater-bath or pressure cannm;
larger<liameter pots may be used.
This is because boiling water
temperatures (even under pressure)
are not harmflal to the cooktop
surfaces surrounding the surfhce units.
Note:Flat-bottomedcannersare
required forglass cooktops. HOWEVER, DO NOT USE LARGE-
DIAMETER C_MNNERS OR OTHER
LARGE-DIAMETER POTS FOR
FRYING OR BOILING FOODS
OTHER THAN WATER. Most syrup
or sauce mixtures---and all types of
frying--cook at temperatures much
higher than boiling warm: Such
temperatures could eventually harm
the glass cooktop surfaces.
Be sure the canner fits over the
[]
center of tile surface unit. If your
cooktop or its location does not
allow the canner to be centered
on the surface unit, use smaller-
diameter pots for good canning
results.
Flat-bottomed canners must be
[]
used. Do not use canners with
flanged or rippled bottoms (often
found in enamelv_-are) because
they don't make enough contact
with the surthce units and rake
a long time to boil w-atel:
When canning, use recipes and
[]
procedures from reputable
sources. Reliable recipes and
procedures are available from the
manufacturer of your canner;
manufacturers of glass jars for
canning, such as BalF_and Kerr _'
brand; and the United States
Department of Agriculture
Extension Service.
ww_.GEAppliances.com
[] Remember that canning is a
process that generates large
amounts of steam. To avoid burns
from steam or heat, be careful
when canning.
NOTE:If your house haslow voltage,
canning may take longer than expected,
eventhough directions have been
carefully followed. Theprocess time will
be shortened by:
(1) using apressure canner,and
(2) starting with HOTtap water for fastest
heating of large quantities of water.
CAUTION:
I_;_Safe canning requires that harmful
microorganisms are destroyed and that
thejars are sealed completely. When
canning foods in a water-bath canner,
a gentle but steady boil must be
maintained for the required time. When
canning foods in a pressure canner,the
pressure must be maintained for the
required time.
I_;_After youhave adjusted the controls,
it is very important to make sure the
prescribed boil or pressure levels are
maintained for the required time.
I_;_Since you must makesure toprocess
the canningjars for the prescribed
time, with no interruption in processing
time, do not can on any cooktop
surface unff if your canner is not flat.
9
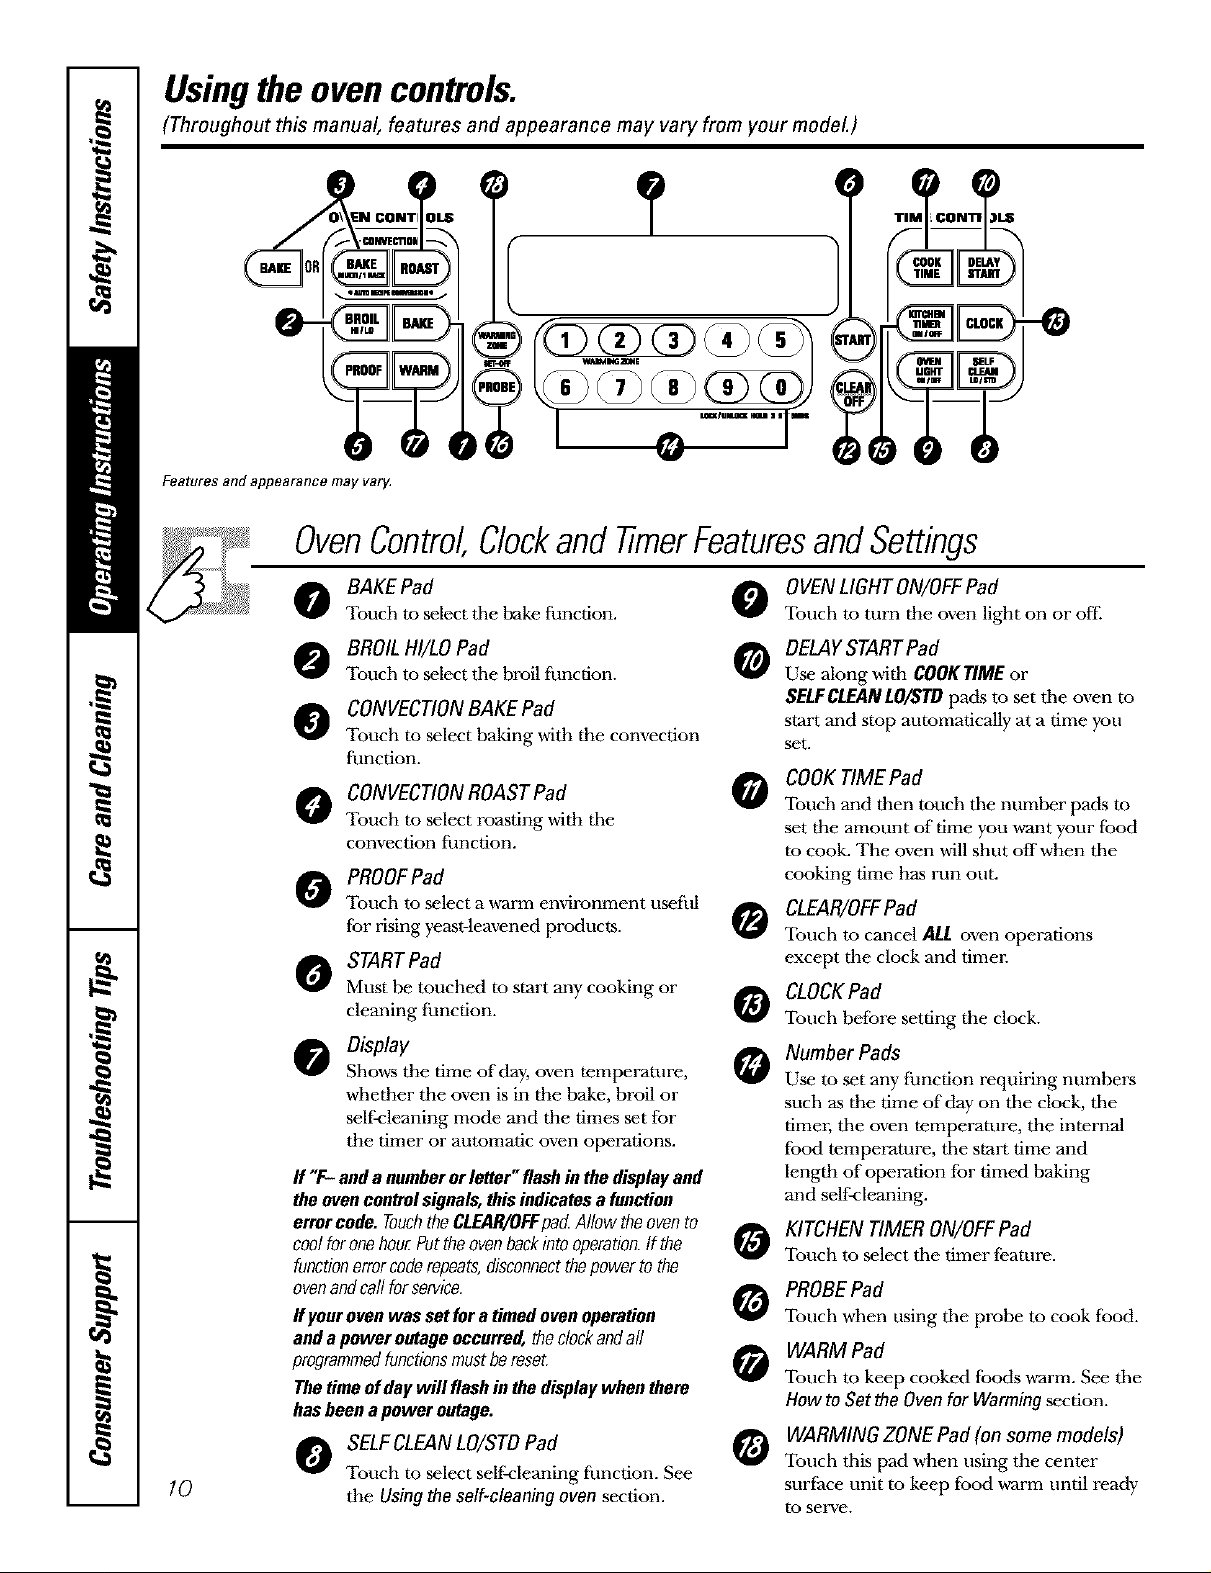
Usingtheoven controls.
(Throughout this manual, features and appearance may vary from your model.)
?
O-
Features and appearance may varg
OvenControl,Clockand timerFeaturesandSettings
BAKEPad
Touch to select tile bake function.
BROIL HI/LOPad
Touch to select tile broil ffmcdon.
CONVECTIONBAKEPad
Touch to select baking with the convection
function.
CONVECTIONROASTPad
Touch to select roasting with tile
convection function.
PROOFPad
Touch to select a warm emdronment useftil
for rising yeast-leavened products.
STARTPad
Must be touched to start any cooking or
cleaning function.
Display
Silo,an the time of day, oven temperature,
whether the oven is in the bake, broil or
self:cleaning mode and the times set for
the timer or automatic oven operations.
If "F- anda numberorletter"flashinthe displayand
theovencontrolsignals,thisindicatesa function
errarcode.TouchtheCLEAR/OFFpa_ Allowtheovento
coolforonehour.Puttheovenbackintooperation.If the
functionerrorcoderepeats,disconnectthepowertothe
ovenandcarlforservice.
IfFourovenwassetforatimedovenoperation
andapower outageoccurred,thedockandall
programmedfunctionsmustbereset.
Thetimeofdaywill flashinthedisplaywhen there
hasbeena power outage.
O OVENLIGHTON/OFFPad
Touch to turn the oven light on or off
DELAYSTARTPad
Use along with COOKTIME or
SELFCLEANLO/STDpads to set the oven to
start and stop automatically at a time you
set.
COOKTIMEPad
Touch and then touch the number pads to
set the amount of time you ,a_antyour food
to cook. The oven will shut offwhen the
cooking time has run out.
CLEAR/OFFPad
Touch to cancel ALL oven operations
except the clock and timer.
CLOCKPad
Touch before setting the clock.
Number Pads
Use to set any function requiring numbers
such as the time of day on the clock, the
timm, the oven temperature, the internal
fbod temperature, the start time and
length of operation for timed baking
and self-cleaning.
KITCHEN TIMER ON/OFFPad
Touch to select the timer feature.
PROBEPad
Touch when using the probe to cook food.
WARM Pad
Touch to keep cooked foods warm. See the
How toSet theOvenfor Warmingsection.
10
O SELFCLEANLO/STDPad
Touch to select self:cleaning ftinction. See
the Usingthe self-cleaningovensection.
_ WARMINGZONEPad(onsomemodels)
Touch this pad when using the center
surt;ace unit to keep food warm until ready
to serve.
Usingtheoven. ww_.GEAppliances.com
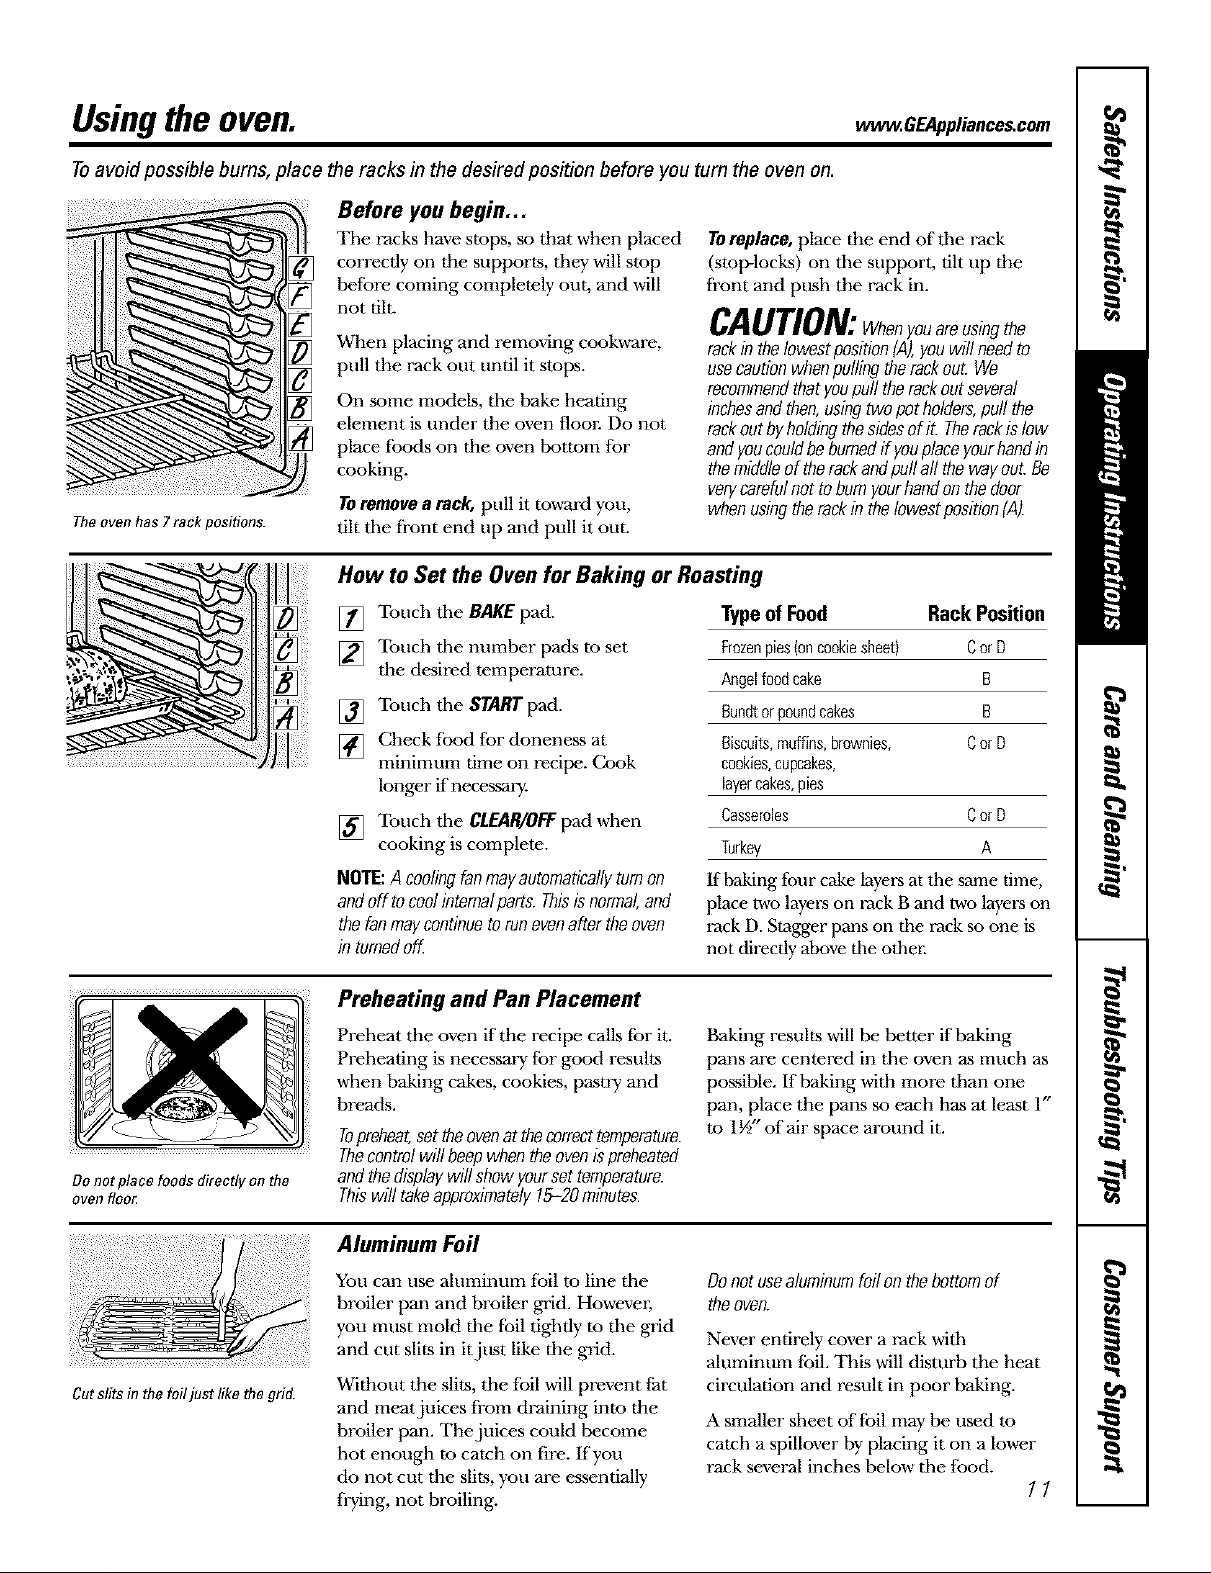
Toavoid possible burns, place the racks in the desired position before you tum the oven on.
Before you begin,..
Tbe racks have stops, so that when placed
correctly on the supports, tbey will stop
before coming completely out, and will
not tilt.
TOreplace,place the end of tile rack
(stop-locks) on tile support, tilt tip the
front and push the rack in.
CAUTION:Whenyouareusingthe
The oven has 7 rack positions.
When placing and remoxdng cook,a-are,
pull the rack out until it stops.
On some models, tile bake heating
element is under the oven floor. Do not
place foods on the oven bottom for
cooking.
TOremovea tack, pull it to,a_rd you,
tilt tile front end tip and pull it out.
How to Set the Oven for Baking or Roasting
rackinthelowestposition[,4),youwillneedto
usecautionwhenpullingtherackout.We
recommendthatyoupulltherackoutseveral
inchesandthen,usingtwopotholders,pull the
rackoutbyholdingthesidesofit. Therackislow
andyoucouldbeburnedif youplaceyourhand#7
themiddleoftherackandpullall thewayout.Be
verycarefulnotto bumyourhandon thedoor
whenusingtherackinthelowestposition(A).
Donot place foods directly on the
oven floo_
[] Touch tim BAKEpad.
[] Touch tim number pads to set
the desired temperature.
[] Touch tim STARTpad.
[] Check food for doneness at
minimum time on recipe. Cook
longer if necessary.
[] Touch tim CL_R, IOFFpad when
cooking is complete.
NOTE:A coolingfanmayautomaticallyturnon
andoff tocoolinternalparts.Thisisnormal,and
thefanmaycontinuetorunevenaftertheoven
in turnedoff.
Preheating and Pan Placement
Preheat the oven if the recipe calls J[br it.
Preheating is necessary for good results
when baking cakes, cookies, pastry and
breads.
Topreheat,settheovenatthecorrecttemperature.
Thecontrolwillbeepwhentheovenispreheated
andthedisplaywillshowyoursettemperature.
Thiswill takeapproximately15-20minutes.
Typeof Food Rack Position
Frozenpies{oncookiesheet) Cor D
Angelfoodcake B
Bundtorpoundcakes B
Biscuits,muffins,brownies, CorD
cookies,cupcakes,
layercakes,pies
Casseroles Cor D
Turkey A
If baldng four cake layers at the same time,
place two layers on rack B and two layers on
rack D. Stagger pans on tbe rack so one is
not direcdy above tbe odmn
Baking results will be better if baking
pans are centered in tbe oven as much as
possible. If baking with more tban one
pan, place the pans so each has at least 1"
to 1½" of air space around it.
Cutslits in the foil just like the grid.
Aluminum Foil
You can use aluminum foil to line tim
broiler pan and broiler grid. Howevm;
you must mold the foil tigbtly to tim grid
and cut slits in itjust like the grid.
Without the slits, the J[bilwill prevent fat
and meat juices from draining into the
broiler pan. The juices could become
hot enough to catch on fire. lfyou
do not cut the slite, you are essentially
frying, not broiling.
Donotusealuminumfoilonthebottomof
theoven.
Never entirely cover a rack witb
ahlminum foil. This will disturb the heat
circulation and result in poor baking.
A smaller sheet of foil may be used to
catch a spillover by placing it on a lower
rack several inches below tim food.
11
Usingtheoven.
ff yourrangeisconnectedto
208volts,raresteaksmaybe
broiledbypreheatingthebroiler
andpositioningtheovenrackone
positionhigher
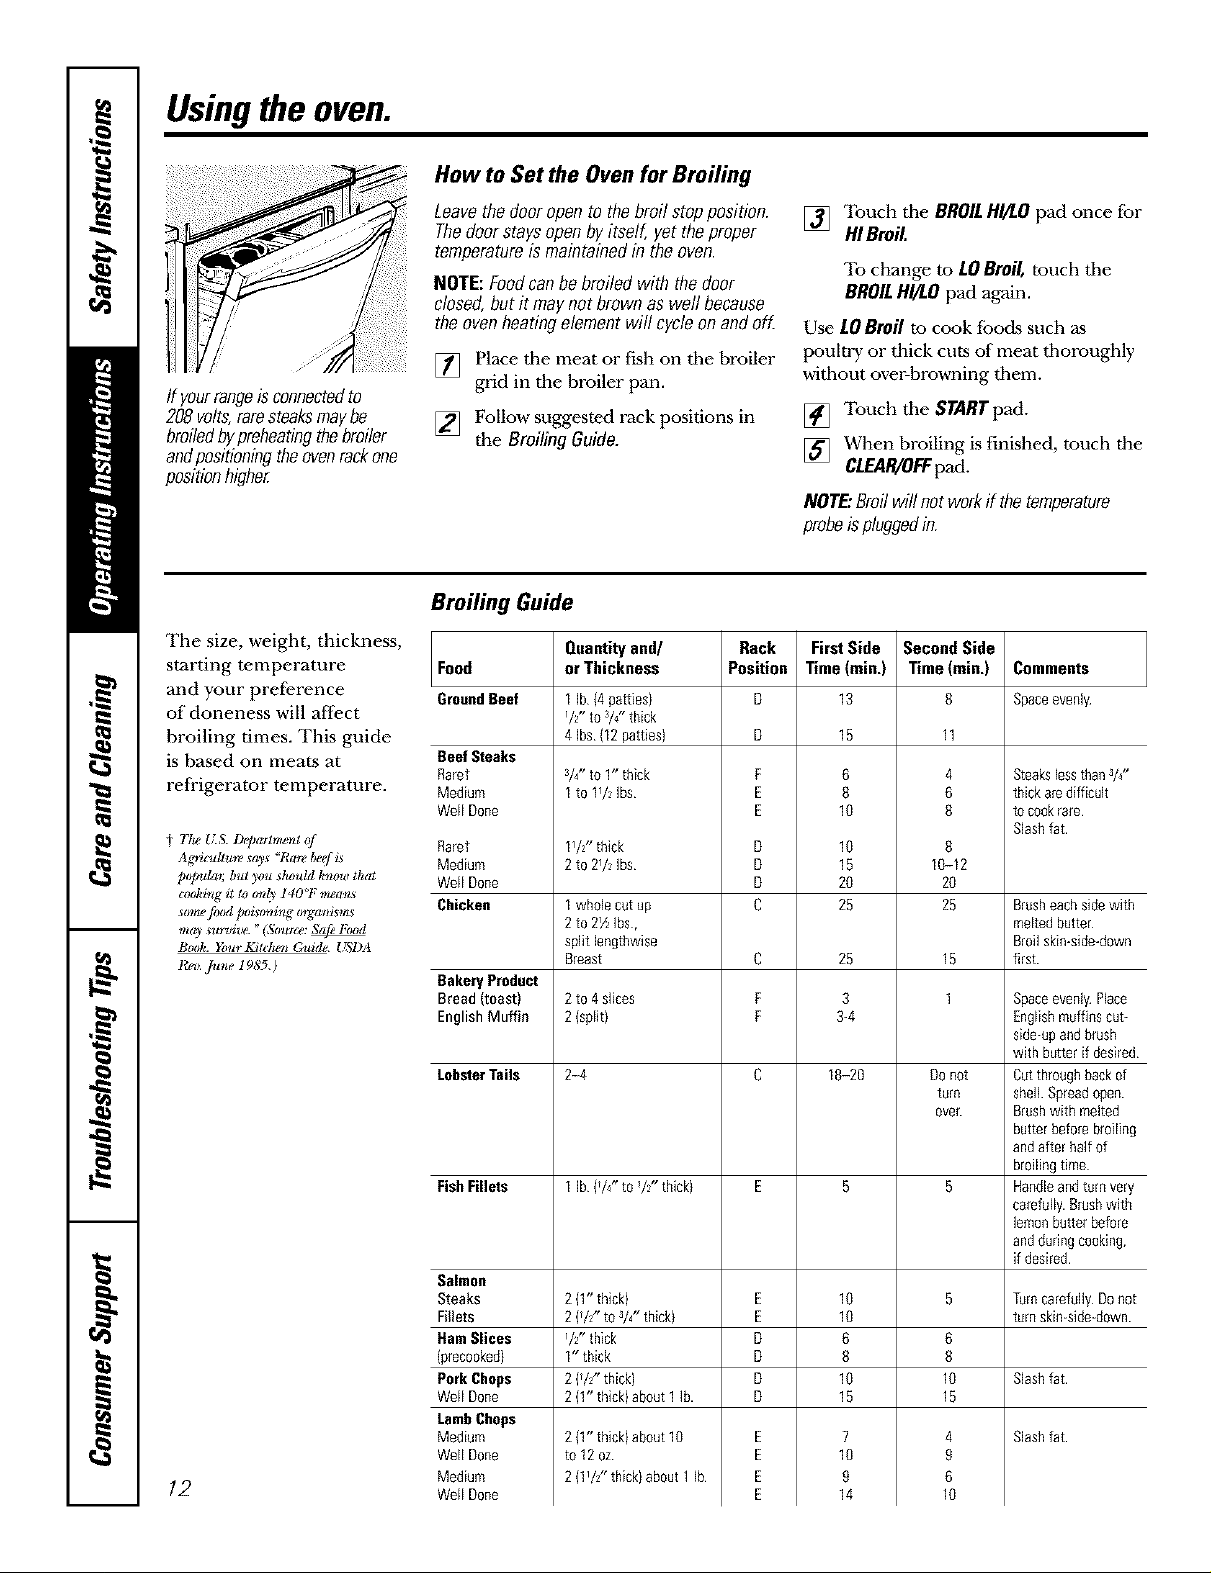
How to Set the Oven for Broiling
Leavethe dooropento thebroilstopposition.
Thedoorstaysopenbyitself, yet theproper
temperatureis maintainedin theoven.
NOTE:Foodcanbebroiledwith the door
closed,butit maynotbrownaswell because
theovenheatingelementwill cycleon andoff.
[] Place tbe meat or fish on tbe broiler
grid in the broiler pan.
[] Follow suggested rack positions in
the BroilingGuide.
Broiling Guide
[] Touch tbe BROILHI/LOpad once for
HIBroil.
To change to LOBroil, touch tile
BROILHI/LOpad again.
Use LOBrofl to cook fbocts such as
pouhry or thick cuts of meat tborougbly
witbout over-browning tbem.
[] Touch tbe STARTpad.
[] When broiling is finished, touch the
CLEAR/OFFpad.
NOTE:Broilwillnotworkif thetemperature
probeispluggedin.
The size, weight, thickness,
starting temperature
and your prefizrence
of aloneness will affect
broiling times. This guide
is based on meats at
refrigerator temperature.
T/ig _Z& 1)q)aI_mgnt of
Ag'_gc_dture _ays "Rale beef L_
pl_ula_, but you _houltl know that
L_ir_g it _ _dy 140_F meam
Book. Your KitLt_en Guide. US1)A
Rta,. June 1985.)
12
Food
GroundBeef
Beef Steaks
Raret
Medium
Well Done
Rarer
Medium
Well Done
Chicken
Bakery Product
Bread (toast)
English Muffin
LobsterTails
Fish Fillets
Salmon
Steaks
Figets
Ham Slices
(precooked}
Pork Chops
Well Done
LambChops
Medium
Well Done
Medium
Well Done
Quantityand/
orThickness
1 Ib (4 patties)
_/2"tO3/Z'thick
4 Ibs (12 patties}
3/4"to 1" thick
1to 1/_ Ibs
1yz" thick
2to 2/_ Ibs
1whole cut up
2to 2YzIbs,
split lengthwise
Breast
2to 4 slices
2(split)
2-4
1 ]b (/4" to/_" thick)
2(1" thick)
2{h" to 3/4"thick}
Ih" thick
1" thick
2{/Z' thick)
2{1" thick)about 1lb.
2{1" thick)about 10
to 12oz
2(1YZ' thick)about 1 Ib
Rack
Position
D
D
P
E
E
D
D
D
C
C
P
P
E
E
D
D
D
D
FirstSide
Time(min.)
13
15
6
8
10
10
15
20
25
25
B
B-4
18-20
10
10
6
8
10
15
7
10
9
14
SecondSide
Time (min.)
11
4
6
8
8
10-12
20
25
15
1
Do not
turn
ovec
6
8
10
15
4
9
6
10
Comments
Spaceevenly
Steakslessthan3/4-
thick arediff[cuB
tocookrare
Slashfat.
Brusheachsidewith
meltedbutter
Broilskin-sNe-down
first.
Spaceevenly Place
Englishmuffinscut-
side-upandbrush
with butter if desired
Cutthroughbackof
shell Spreadopen.
Brushwith melted
butterbefore broiling
andafter half of
broilingtime
Handleandturnvery
carefully.Brushwith
lemonbutterbefore
andduringcooking,
if desired
Turncarefully Donot
turnskin-side-down
Slash fat.
Slash fat.
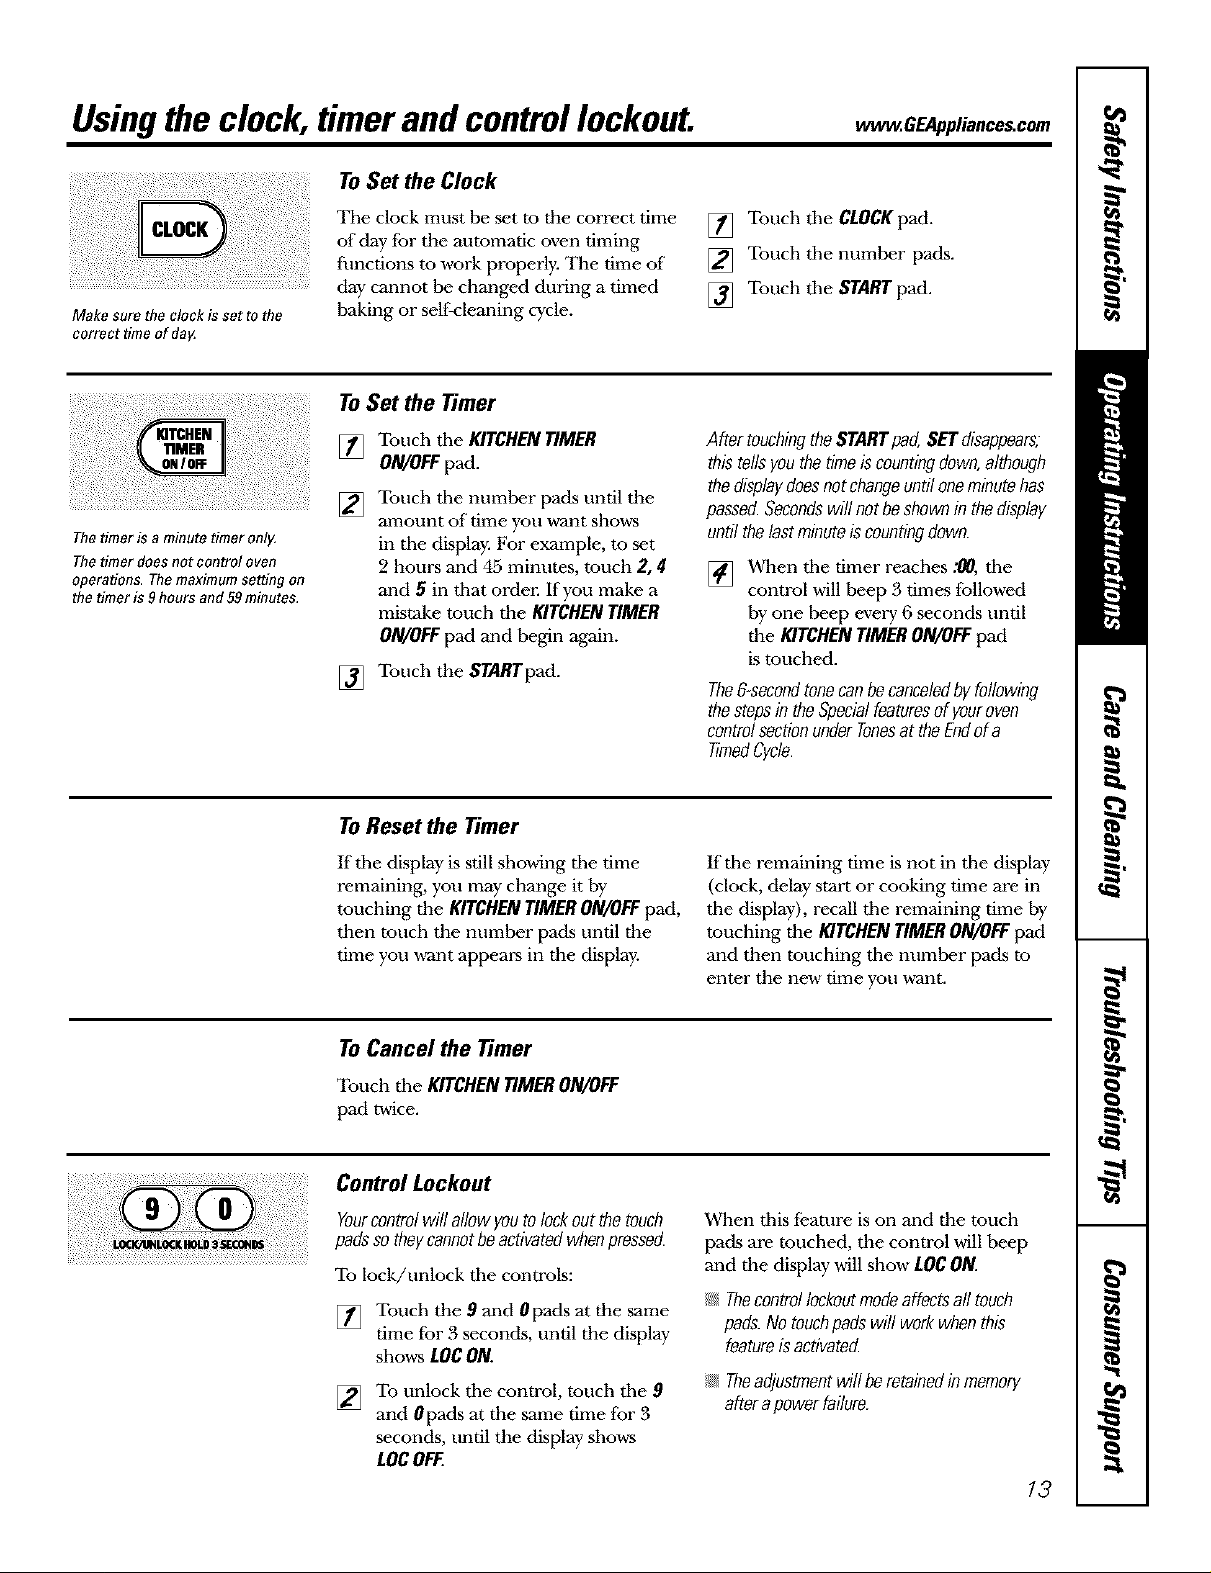
Usingtheclock, timerand controllockout. ,, .G pli,,co,.com
ToSet the Clock
Make sore the clock is set to the
correct time of dag
The timer is a minute timer only.
The timer does not control oven
operations, The maximum setting on
the timer is 9 hours and 59minutes,
The clock must be set to the correct time
of day tor the automatic oven timing
flmctions to work properly. The time of
day cannot be changed during a timed
baking or self-cleaning cycle.
To Set the timer
Touch tile KITCHENTIMER
[]
ON/OFFpad.
Touch tile number pads until the
[]
amount of time you want shows
in tile display. For example, to set
2 hours and 45 minutes, touch 2, 4
and 5 in that order. If you make a
mistake touch the KITCHENTIMER
ON/OFFpad and begin again.
[] Touch the STARTpad.
[] Touch tile CLOCKpad.
[] Touch tile number pads.
[] Touch tile STARTpad.
After touchingtheSTARTpad,SETdisappears,
thistellsyouthetimeis countingdown,although
thedisplaydoesnotchangeuntiloneminutehas
passed.Secondswillnotbeshowninthedisplay
untilthelastminuteiscountingdown.
[] When the timer reaches :00, the
control will beep 3 times followed
by one beep evmT 6 seconds until
the KITCHENTIMERON/OFFpad
is touched.
The&secondtonecanbecanceledbyfollowing
thestepsin theSpecialfeaturesof youroven
controlsectionunderTonesat theEndof a
timedCycle.
To Reset the timer
lfthe display is still showing tim time
remaining, you may change it by
touching tim KITCHEN TIMER ON/OFF pad,
then toucb the number pads until the
time you ,a-ant appears in the display.
To Cancel the timer
Touch tbe KITCHENTIMERON/OFF
pad twice.
Control Lockout
Yourcontrolwillallowyouto lockoutthetouch
padssotheycannotbeactivatedwhenpressed.
To lock/unlock the controls:
[] Touch the 9 and 0pads at the same
rime fbr 3 seconds, until the display
shows LOCON.
[] To unlock tbe control, touch tbe 9
and 0pads at the same time for 3
seconds, until the display shows
LOCOFF.
lftbe remaining time is not in the display
(clock, delay start or cooking time are in
tim display), recall the remaining time by
touching the KITCHENTIMERON/OFFpad
and then touching the number pads to
enter the new time you want.
When this fi?ature is on and the touch
pads are touched, the control will beep
and tim display will show LOCON.
N Thecontrollockoutmodeaffectsall touch
pads.Notouchpadswill workwhenthis
featureisactivate_
N Theadjustmentwill beretainedinmemory
afterapowerfailure.
13
Usingthetimedbaking andmasting features.
NOTE: Foods that spoil easily--such as milk, eggs, fish, stuffings, poultry and pork--should not be allowed to sit for
more than I hour before or after cooking. Room temperature promotes the growth of harmful bacteria. Be sure that
the oven light is off because heat from the bulb will speed harmful bacteria growth.
How to Set an Immediate Start and Automatic Stop
Theovenwill turnonimmediatelyandcookfor
aselectedlengthoftime.At theendof the
cookingtimetheovenwillturnoffautomaticall}4
[] Touch the BAKEpad.
[] Using tile number pads, enter rile
desired temperature.
[] Touch the COOKTIMEpad.
NOTE:If yourreciperequirespreheating,you
mayneedtoaddadditionaltimetothelengthof
thecookingtime.
[] Using tile numher pads, enter tile
desired baking time. The oven
temperature and the cooking time
that you entered will be displayed.
[] Touch the STARTpad.
The display will show tile changing
temperature (starting at 100°F) and the
cooking rime. The display starts changing
once the temperature reaches 100°F.
The oven will continue to cook for tile
programmed amount of time, then shut
off automatically, unless rile WARM or
rile Cook and Hold feature was set.
Depending on your model, see tile HOWtO
SettheOvenforWarmingsection or tile
Specialfeaturesofyourovencontrolsection.
Touch tile CLEAR/OFFpad to clear rile
display.
How to Set a Delayed Start and Automatic Stop
Youcan set the ovencontrol to delay-start the
oven,cookfor a specificlewtb of time and then
turnoff automatically
Make sure the clock shows the correct
time of day.
[] Touch the BAKEpad.
[] Using tile number pads, enter rile
desired temperature.
[] Touch the COOKTIMEpad.
NOTE:If yourreciperequirespreheating,you
mayneedtoaddadditionaltimetothelengthof
thecookingtime.
[] Using tile number pads, enter tile
desired baking time.
[] Touch the OEIAYsTART pad.
[] Using tile number pads, enter tile
time of day you want the oven to
turn on and start cooking.
[] Touch tile STARTpad.
If you would like to check tile times you
have set, touch the DELAYSTARTpad to
check the start time you have set or touch
rileCOOKTIMEpad to check rile length
of cooking time you have set.
When tile oven turns on at tile time of
day you have set, tile display will show the
changing temperature (starting at 100°F)
and tile cooking itme. The display starts
changing once tile temperature reaches
100°F.
The oven will continue to cook for tile
programmed amount of time, then shut
off automatically, unless tile WARM or
tile Cook and Hold feature was set.
Depending on your model, see tile HOWtO
SettheOvenforWarmingsection or tile
Specialfeaturesofyourovencontrolsection.
Touch tile CLEAR/OFFpad to clear tile
display.
14
NOTE:Anattentiontonewillsoundifyouare
usingtimedbakinganddonottouchtheSTART
padafterenteringthebakingtemperature.
 Loading...