

Page 1
GE is a trademark of the General Electric Company. Manufactured under trademark license.
Page 2
Whether you grew up with GE Appliances, or this is your first, we’re happy to have you in the family.
We take pride in the craftsmanship, innovation and design that goes into every GE Appliances
product, and we think you will too. Among other things, registration of your appliance ensures that we
can deliver important product information and warranty details when you need them.
Register your GE appliance now online. Helpful websites and phone numbers are available in the
Consumer Support section of this Owner’s Manual. You may also mail in the pre-printed registration
card included in the packing material.
2
Page 3
Read all safety instructions before using the product. Failure to follow these instructions may result
in fire, electrical shock, serious injury or death.
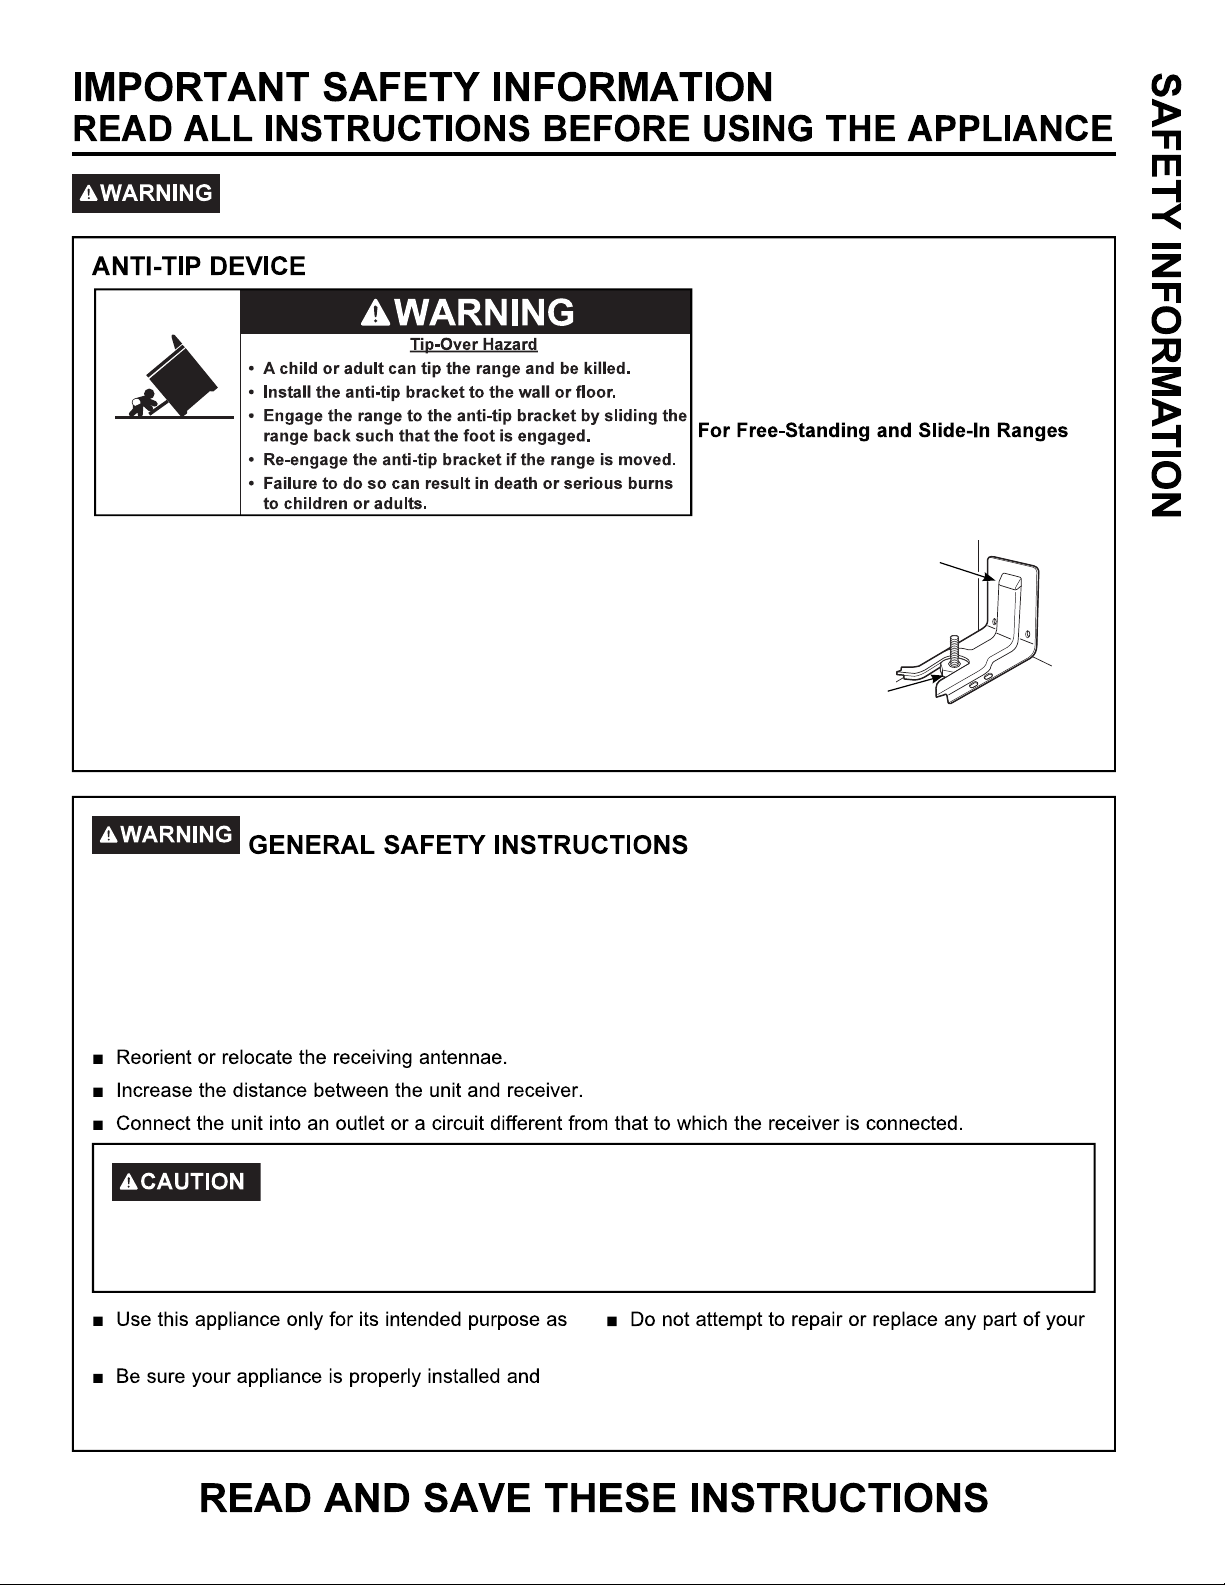
To reduce the risk of tipping the range,
the range must be secured by a properly
installed anti-tip bracket. See installation
instructions shipped with the bracket for
complete details before attempting to install.
To check if the bracket is installed and
engaged properly, look underneath the
range to see that the rear leveling leg is
engaged in the bracket. On some models, the storage drawer or kick panel
can be removed for easy inspection. If visual inspection is not possible,
slide the range forward, confirm the anti-tip bracket is securely attached to
the floor or wall, and slide the range back so the rear leveling leg is under
the anti-tip bracket.
If the range is pulled from the wall for any reason, always repeat this
procedure to verify the range is properly secured by the anti-tip bracket.
Never completely remove the leveling legs or the range will not be secured
to the anti-tip device properly.
Anti-Tip
Bracket
Leveling Leg
Free-Standing and Slide-In Ranges
This unit has been tested and found to comply with the limits for a class B digital device, pursuant to Part 18
of the FCC rules. These limits are designed to provide reasonable protection against harmful interference in a
residential installation. This unit generates, uses and can radiate radio frequency energy and, if not installed and
used in accordance with the instructions, may cause harmful interference to radio communications. However,
there is no guarantee that interference will not occur in a particular installation. If this unit does cause harmful
interference to radio or television reception, which can be determined by turning the unit off and on, the user is
encouraged to try to correct the interference by one or more of the following measures:
Persons with a pacemaker or similar medical device should exercise caution when
using or standing near an induction unit while it is in operation. The electromagnetic field may affect the
working of the pacemaker or similar medical device. It is advisable to consult your doctor or the pacemaker
manufacturer about your particular situation.
described in this Owner’s Manual.
range unless it is specifically recommended in this
manual. All other servicing should be transferred to
grounded by a qualified installer in accordance with
a qualified technician.
the provided installation instructions.
3
Page 4
or disconnect the power supply at the household
distribution panel by removing the fuse or switching
off the circuit breaker.
be left alone or unattended in an area where an
appliance is in use. They should never be allowed
to climb, sit or stand on any part of the appliance.
children above a range or on the backguard of a
items could be seriously injured.
holders on hot surfaces may result in burns from
other bulky cloth in place of pot holders.
the room.
or the interior surface of the oven. These surfaces
may be hot enough to burn even though they are
or let clothing or other flammable materials contact
the surface units, areas nearby the surface units or
any interior area of the oven; allow sufficient time
for cooling first. Other surfaces of the appliance
may become hot enough to cause burns. Potentially
hot surfaces include the cooktop, areas facing the
cooktop, oven vent opening, surfaces near the
opening and crevices around the oven door.
could build up and the container could burst,
causing an injury.
oven bottom or anywhere in the oven, except as
described in this manual. Oven liners can trap heat
or melt, resulting in damage to the product and risk
of shock, smoke or fire.
glass. Shock, fire or cuts may occur.
an internal temperature of 160°F and poultry to at
least an internal temperature of 180°F. Cooking
to these temperatures usually protects against
foodborne illness.
they contact hot surfaces causing severe burns.
or near the cooktop, including paper, plastic, pot
holders, linens, wall coverings, curtains, drapes and
gasoline or other flammable vapors and liquids.
using the appliance. These garments may ignite if
a flaming pan. Turn the controls off. Smother a
flaming pan on a surface unit by covering the pan
completely with a well-fitting lid, cookie sheet or flat
fire extinguisher.
the fire by closing the oven door and turning the
materials accumulate in or near the range. Grease
in the oven or on the cooktop may ignite.
not be allowed to accumulate on the hood or filter.
oven off or by using a multi-purpose dry chemical or
foam-type fire extinguisher.
the oven off and wait for the fire to go out.
force the door open. Introduction of fresh air at self-
clean temperatures may lead to a burst of flame
from the oven. Failure to follow this instruction may
result in severe burns.
4
Page 5
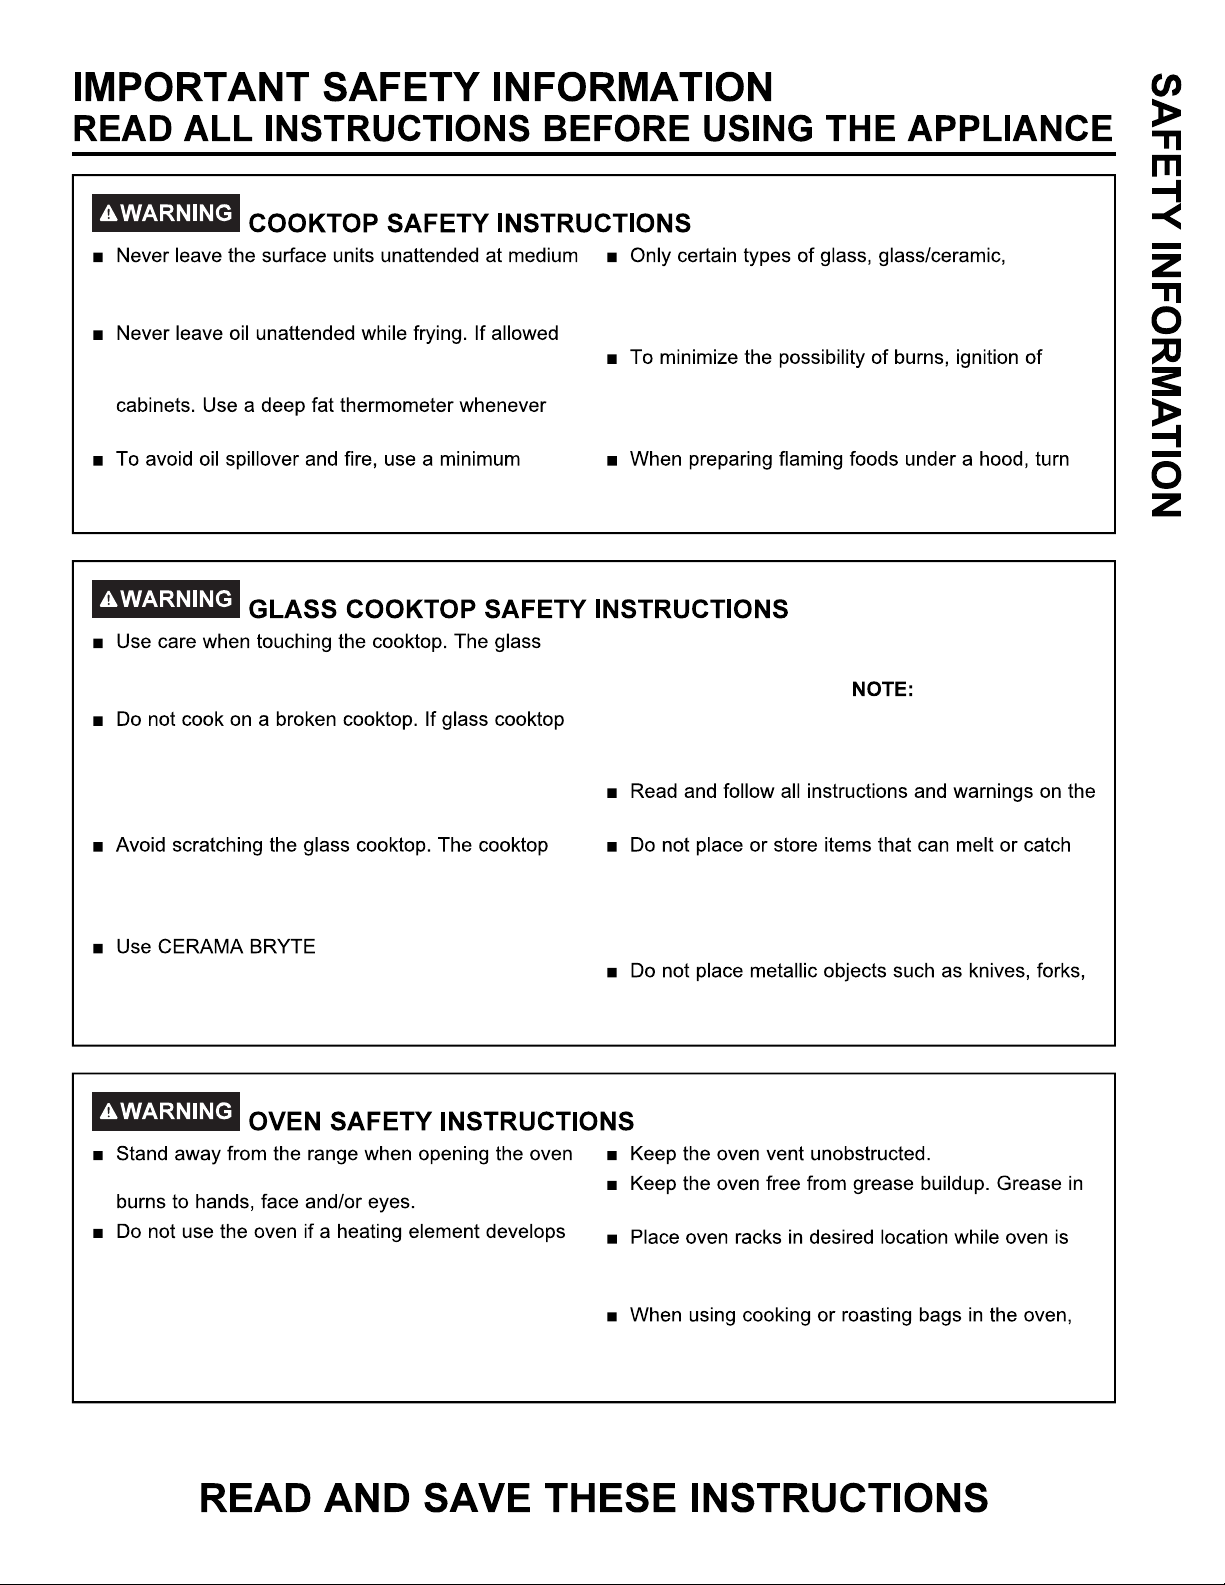
or high heat settings. Boilovers cause smoking and
greasy spillovers that may catch on fire.
to heat beyond its smoking point, oil may ignite
resulting in fire that may spread to surrounding
possible to monitor oil temperature.
earthenware or other glazed containers are suitable
for cooktop service; others may break because of
the sudden change in temperature.
flammable materials and spillage, the handle of a
container should be turned toward the center of the
range without extending over nearby surface units.
amount of oil when shallow pan-frying and avoid
cooking frozen foods with excessive amounts of ice.
surface of the cooktop will retain heat after the
controls have been turned off.
should break, cleaning solutions and spillovers
may penetrate the broken cooktop and create a
risk of electric shock. Contact a qualified technician
immediately.
can be scratched with items such as knives, sharp
instruments, rings or other jewelry, and rivets on
clothing.
®
ceramic Cooktop Cleaner
and CERAMA BRYTE® Cleaning Pad to clean
the cooktop. Wait until the cooktop cools and the
indicator light goes out before cleaning. A wet
the fan on.
sponge or cloth on a hot surface can cause steam
burns. Some cleaners can produce noxious fumes if
applied to a hot surface. Sugar spills are an
exception. They should be scraped off while still hot
using an oven mitt and a scraper. See the Cleaning
the glass cooktop section for detailed instructions.
cleaning cream label.
fire on the glass cooktop, even when it is not being
used. If the cooktop is inadvertently turned on, they
may ignite. Heat from the cooktop or oven vent after
it is turned off may cause them to ignite also.
spoons and lids on the cooktop surface since they
can get hot.
door. Hot air or steam which escapes can cause
a glowing spot during use or shows other signs
of damage. A glowing spot indicates the heating
element may fail and present a potential burn, fire,
or shock hazard. Turn the oven off immediately and
have the heating element replaced by a qualified
service technician.
the oven may ignite.
cool. If rack must be moved while oven is hot, do not
let pot holder contact hot heating element in oven.
follow the manufacturer’s directions.
5
Page 6
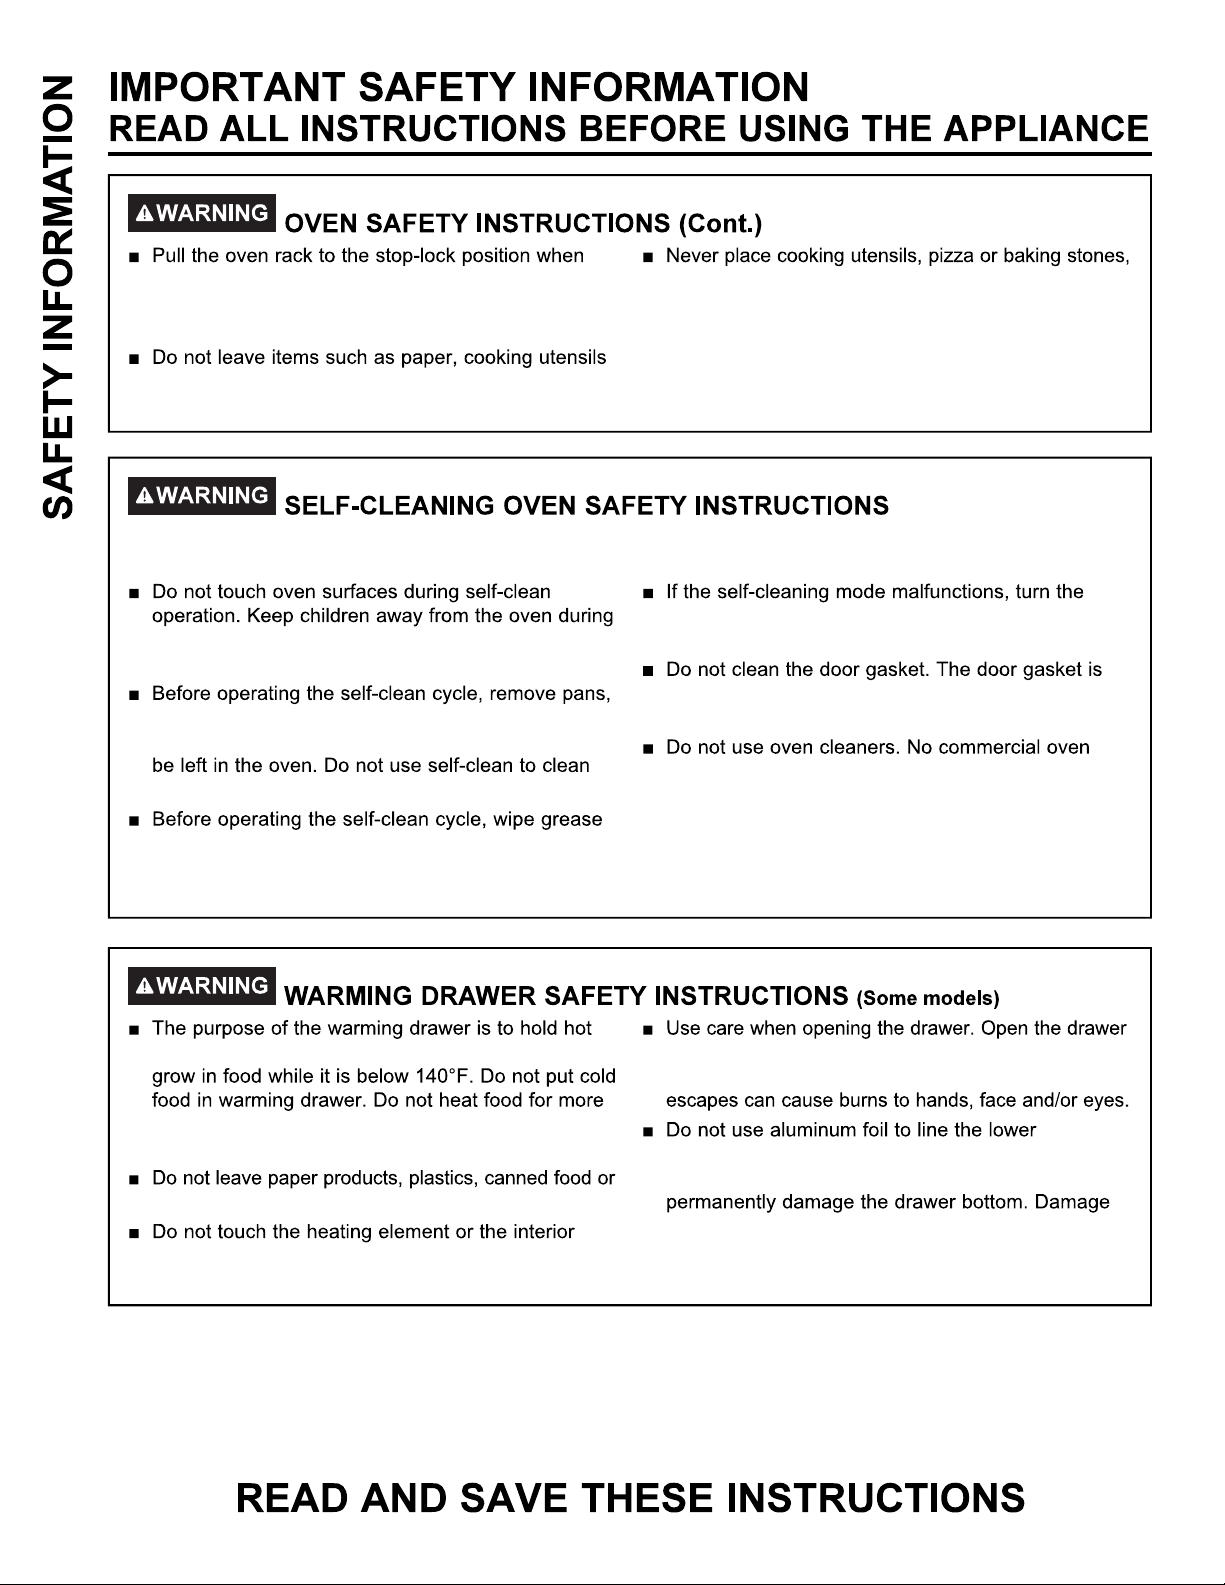
loading and unloading food from the oven. This
helps prevent burns from touching hot surfaces of
the door and oven walls.
or food in the oven when not in use. Items stored in
an oven can ignite.
The self-cleaning feature operates the oven at temperatures high enough to burn away food soils in the oven.
Follow these instructions for safe operation.
self-cleaning. Failure to follow these instructions
may cause burns.
shiny metal oven racks and other utensils from the
oven. Only gray porcelain-coated oven racks may
other parts, such as drip pans or bowls.
and food soils from the oven. Excessive amount
of grease may ignite leading to smoke damage to
your home.
or any type of foil or liner on the oven floor. These
items can trap heat or melt, resulting in damage to
the product and risk of shock, smoke or fire.
oven off and disconnect the power supply. Have it
serviced by a qualified technician.
essential for a good seal. Care should be taken not
to rub, damage or move the gasket.
cleaner or oven liner protective coating of any kind
should be used in or around any part of the oven.
cooked foods at serving temperature. Bacteria will
than 2 hours. Failure to follow these instructions
may result in foodborne illness.
combustible materials in the drawer. They may ignite.
surface of the drawer. These surfaces may be hot
enough to cause burns.
a crack and let hot air or steam escape before
removing or replacing food. Hot air or steam that
drawer. The foil will trap heat below, and upset
the performance of the oven. Foil can melt and
from improper use of aluminum foil is not covered
by the product warranty.
6
Page 7
Carefully grasp a corner of the protective shipping film
with your fingers and slowly peel it from the appliance
Remove all of the film before using the appliance for the
first time.w
To assure no damage is done to the finish of the
product, the safest way to remove the adhesive from
packaging tape on new appliances is an application of
a household liquid dishwashing detergent. Apply with a
soft cloth and allow to soak.
The adhesive must be removed from all parts. It
cannot be removed if it is baked on.
7
Page 8
Never leave the range unattended with the cooktop on medium or high serrings.
Keep flammable items away from the cooktop. Turn off all controls when done cooking. Failure to
follow these instructions can result in fire, serious injury or death.
Throughout this manual, features and apperance may vary from your model.
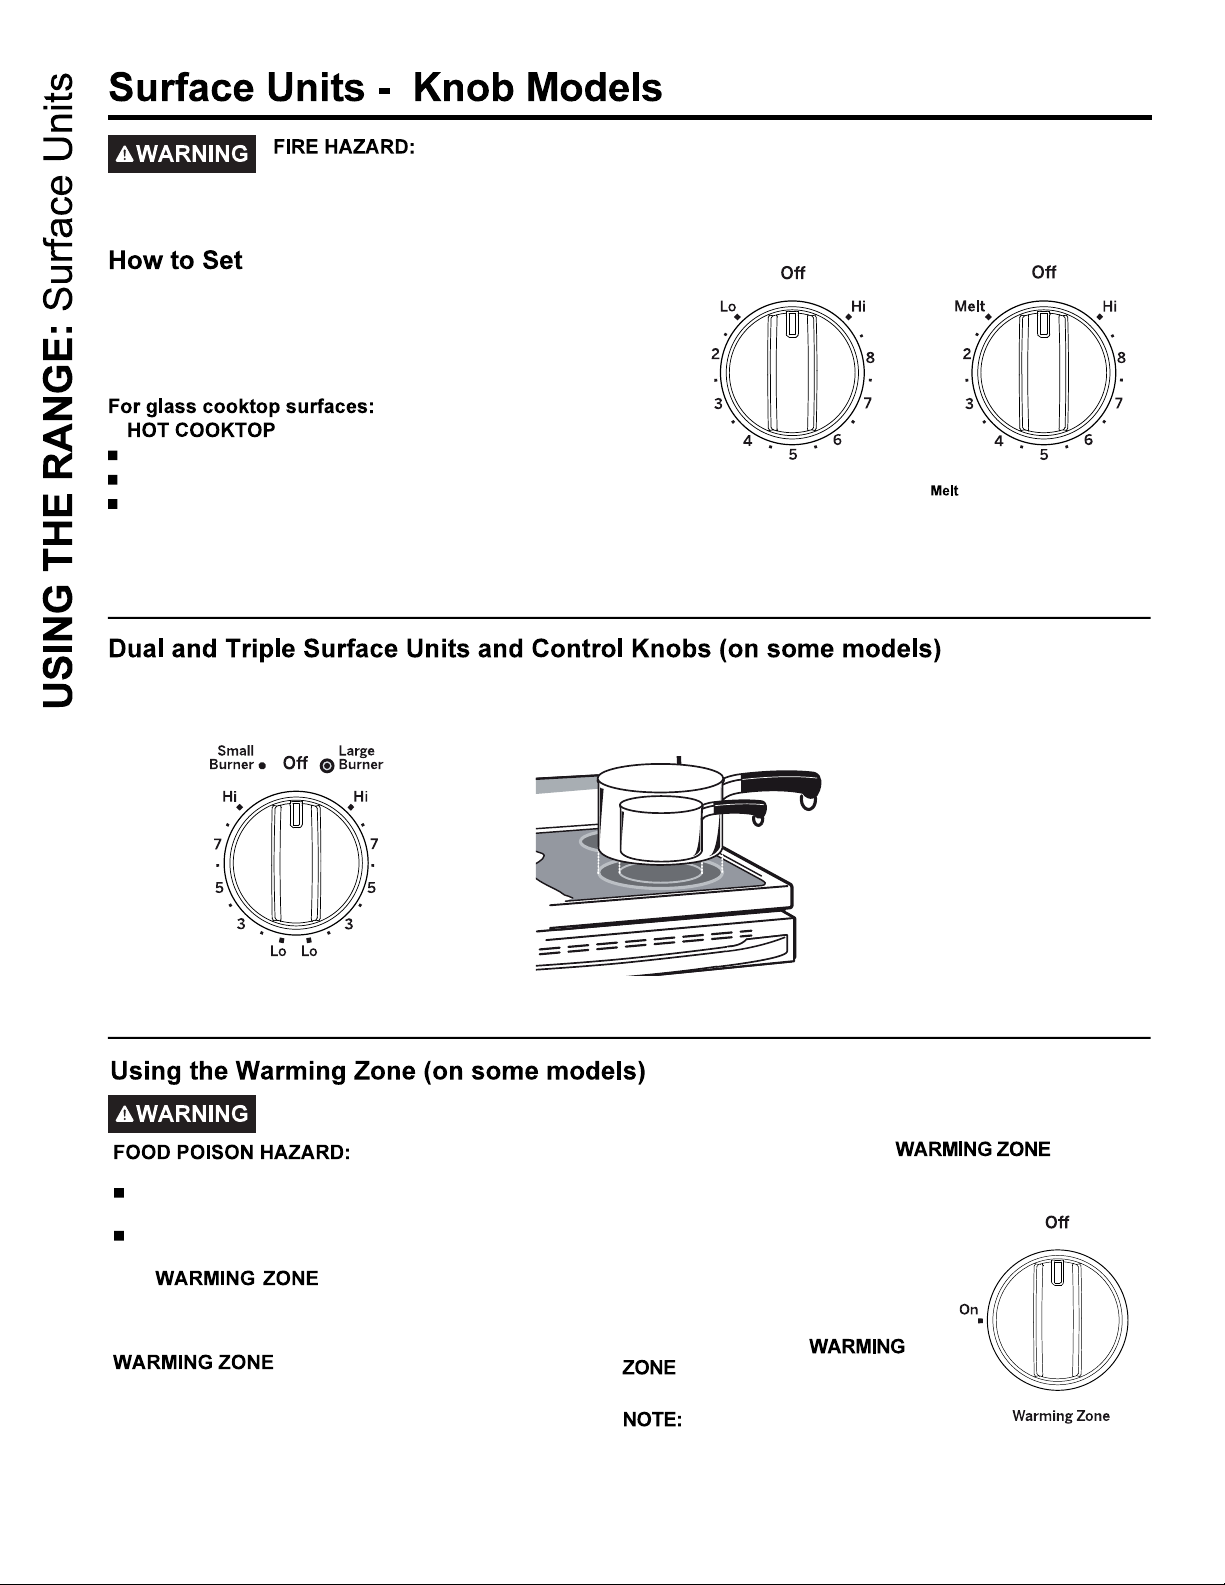
Push the knob in and turn in either direction to the setting
you want.
A surface ON indicator light will glow when any surface
unit is on.
A indicator light will:
come on when the unit is hot to the touch.
stay on even after the unit is turned off.
stay on until the unit is cooled to approximetaley 150°F.
At both OFF and HI the control clicks
into position. You may hear slight
clicking sounds during cooking,
indicating the control is maintaining
your desired setting.
Be sure you turn the control knob to
OFF when you finish cooking.
setting (on some models) will
melt chocolate or butter.
The surface unit has 2 or 3 cooking sizes to select from so you can match the size of the unit to the size of the cookware
you are using.
Models with a Dual-Ring surface
element only.
Bacteria may grow in food
at temperatures below 140°F.
Always start with hot food. Do not use warm setting
to heat cold food.
Do not use warm setting for more than 2 hours.
The , located in the back center of
the glass surface, will keep hot, cooked food at serving
temperature. Always start with hot food. Do not use to
heat cold food. Placing uncooked or cold food on the
could result in foodborne illness.
Turn the control knob to the ON position.
For models using the touch pads for warming zone
control, see section on “Using the Oven” for additional
details.
8
For best results, all foods on the should
be covered with a lid or aluminum foil. When warming
pastries or breads, the cover should be vented to allow
moisture to escape.
The initial temperature, type and
amount of food, type of pan, and
the time held will affect the quality
of the food. Always use pot
holders or oven mitts when removing food from the
, since cookware and plates
will be hot.
The surface warmer will
not glow red like the cooking
elements.
Page 9
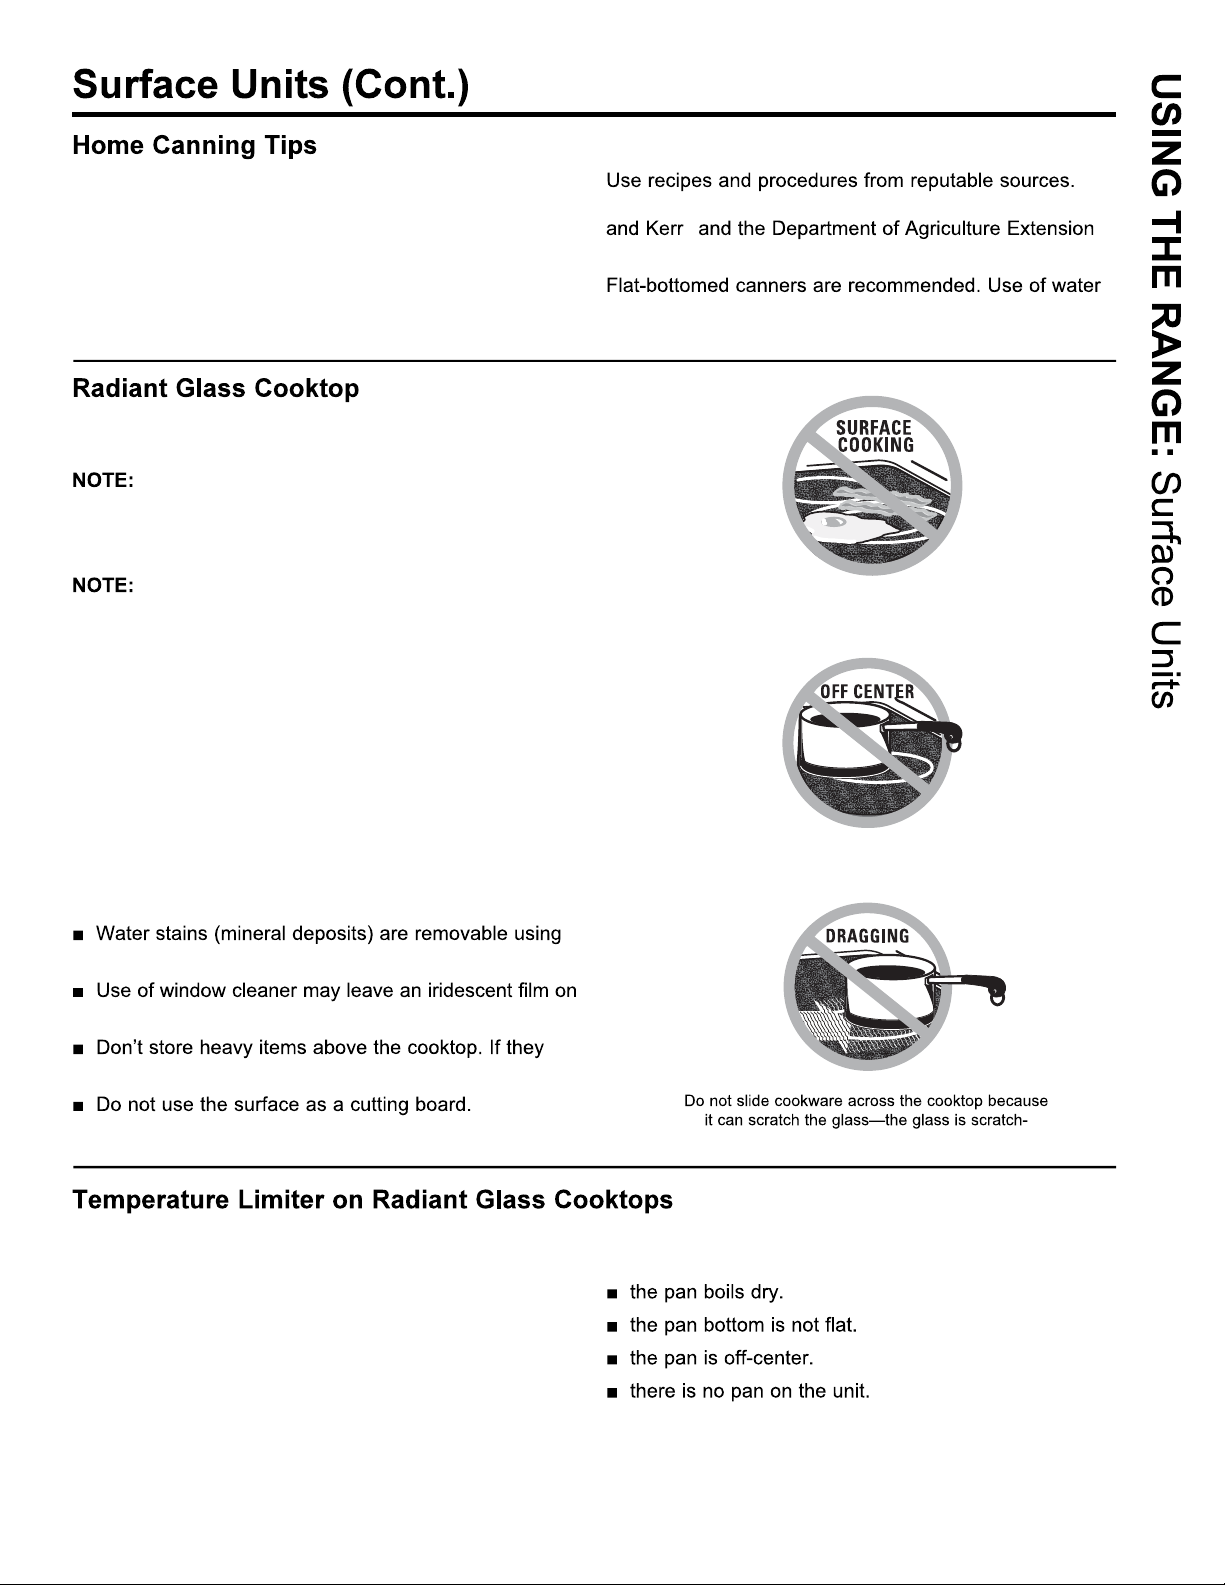
Be sure the canner is centered over the surface unit.
Make sure the canner is flat on the bottom.
To prevent burns from steam or heat, use caution when
canning.
The radiant cooktop features heating units beneath a
smooth glass surface.
A slight odor is normal when a new cooktop is
used for the first time. It is caused by the heating of new
parts and insulating materials and will disappear in a
short time.
On models with light-colored glass cooktops, it is
normal for the cooking zones to change color when hot
or cooling down. This is temporary and will disappear as
the glass cools to room temperature.
The surface unit will cycle on and off to maintain your
selected control setting.
It is safe to place hot cookware on the glass surface
even when the cooktop is cool.
Even after the surface units are turned off, the glass
cooktop retains enough heat to continue cooking. To
avoid overcooking, remove pans from the surface units
when the food is cooked. Avoid placing anything on the
surface unit until it has cooled completely.
These are available from manufacturers such as Ball®
®
Service.
bath canners with rippled bottoms may extend the time
required to bring the water to a boil.
Never cook directly on the glass. Always
use cookware.
Always place the pan in the center of the
surface unit you are cooking on.
the cleaning cream or full-strength white vinegar.
the cooktop. The cleaning cream will remove this film.
drop onto the cooktop, they can cause damage.
Every radiant surface unit has a temperature limiter.
The temperature limiter protects the glass cooktop from
getting too hot.
resistant, not scratch proof.
The temperature limiter may cycle the surface units off
for a time if:
9
Page 10
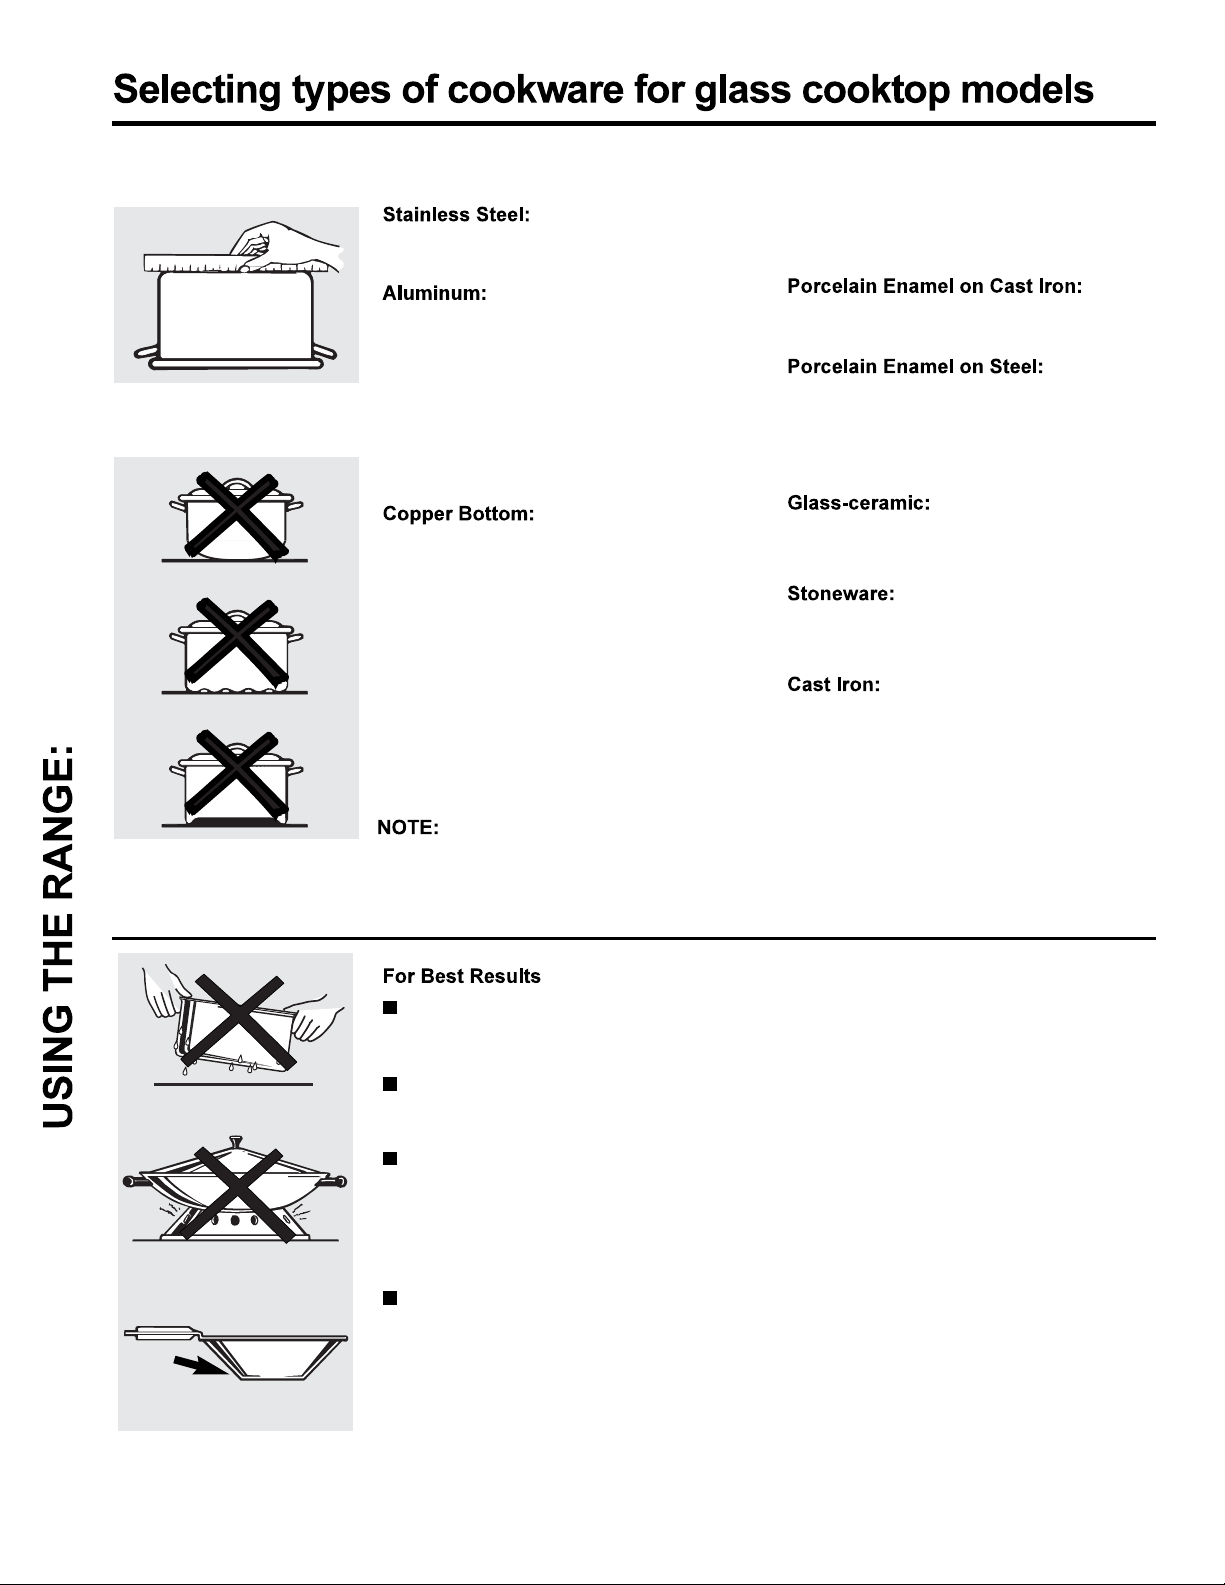
The following information will help you choose cookware which will give good performance on glass cooktops.
See insert for cookware to use with induction cooktops.
Recomended
Check pans for flat bottoms by using
a straight edge..
Cookware for Radiant Glass Cooktop
Pans with rounded, curved,
ridged or warped bottoms are
not recommended.
Heavy weight recommended.
Good conductivity. Aluminum residues
sometimes appear as scratches if cleaned
cooktop bt can be removed if cleaned
immediately. Because of its low melting
point, thin weight aluminum should not
be used.
Recommended
Copper may leave residues which can
appear as scratches. The residues can be
removed, as long as the cooktops is
cleaned inmmediately. However, do not
let these pots boil dry. Overheated metal
can bond to glass cooktops. An overheated
copper bottom pot will leave a residue that
will permanently stain the cooktop if not
removed immediately.
Follow all cookware manufacturer’s recommendations when using any type of
cookware on the ceramic cooktops.
Recommended if bottom pan is coated.
Not recommended.
Heating empty pans can cause permanent
damage to cooktops glass. The enamel can
melt and bond to the ceramic cooktop.
Not recommended.
Poor performance. Will scratch the surface.
Not recommended.
Poor performance. May scratch the surface.
Not recommended - unless designed
specifically for glass cooktops.
Poor conductivity and slow to absorb heat.
Will scratch the cooktop surface.
10
Do not place wet pans
on the glass cooktop.
Do not use woks with support
rings on the glass cooktop.
Use flat-bottomed woks
on the glass cooktop.
Place only dry pans on the surface
elements. Do not place lids on the
surface elements, particularly wet lids.
Do not use woks that have support
rings, This type of wok will not heat on
glass surface elements.
We recommend that you use only a
flat-bottomed wok. They are available
at your local retail store. The bottom
of the wok should have the same
diameter as the surface element to
ensure proper contact.
Some special cooking procedures
require specific cookware such as
pressure cookers, deep-fat fryers,
etc. All cookware must have flat
bottoms and be the correct size.
Page 11
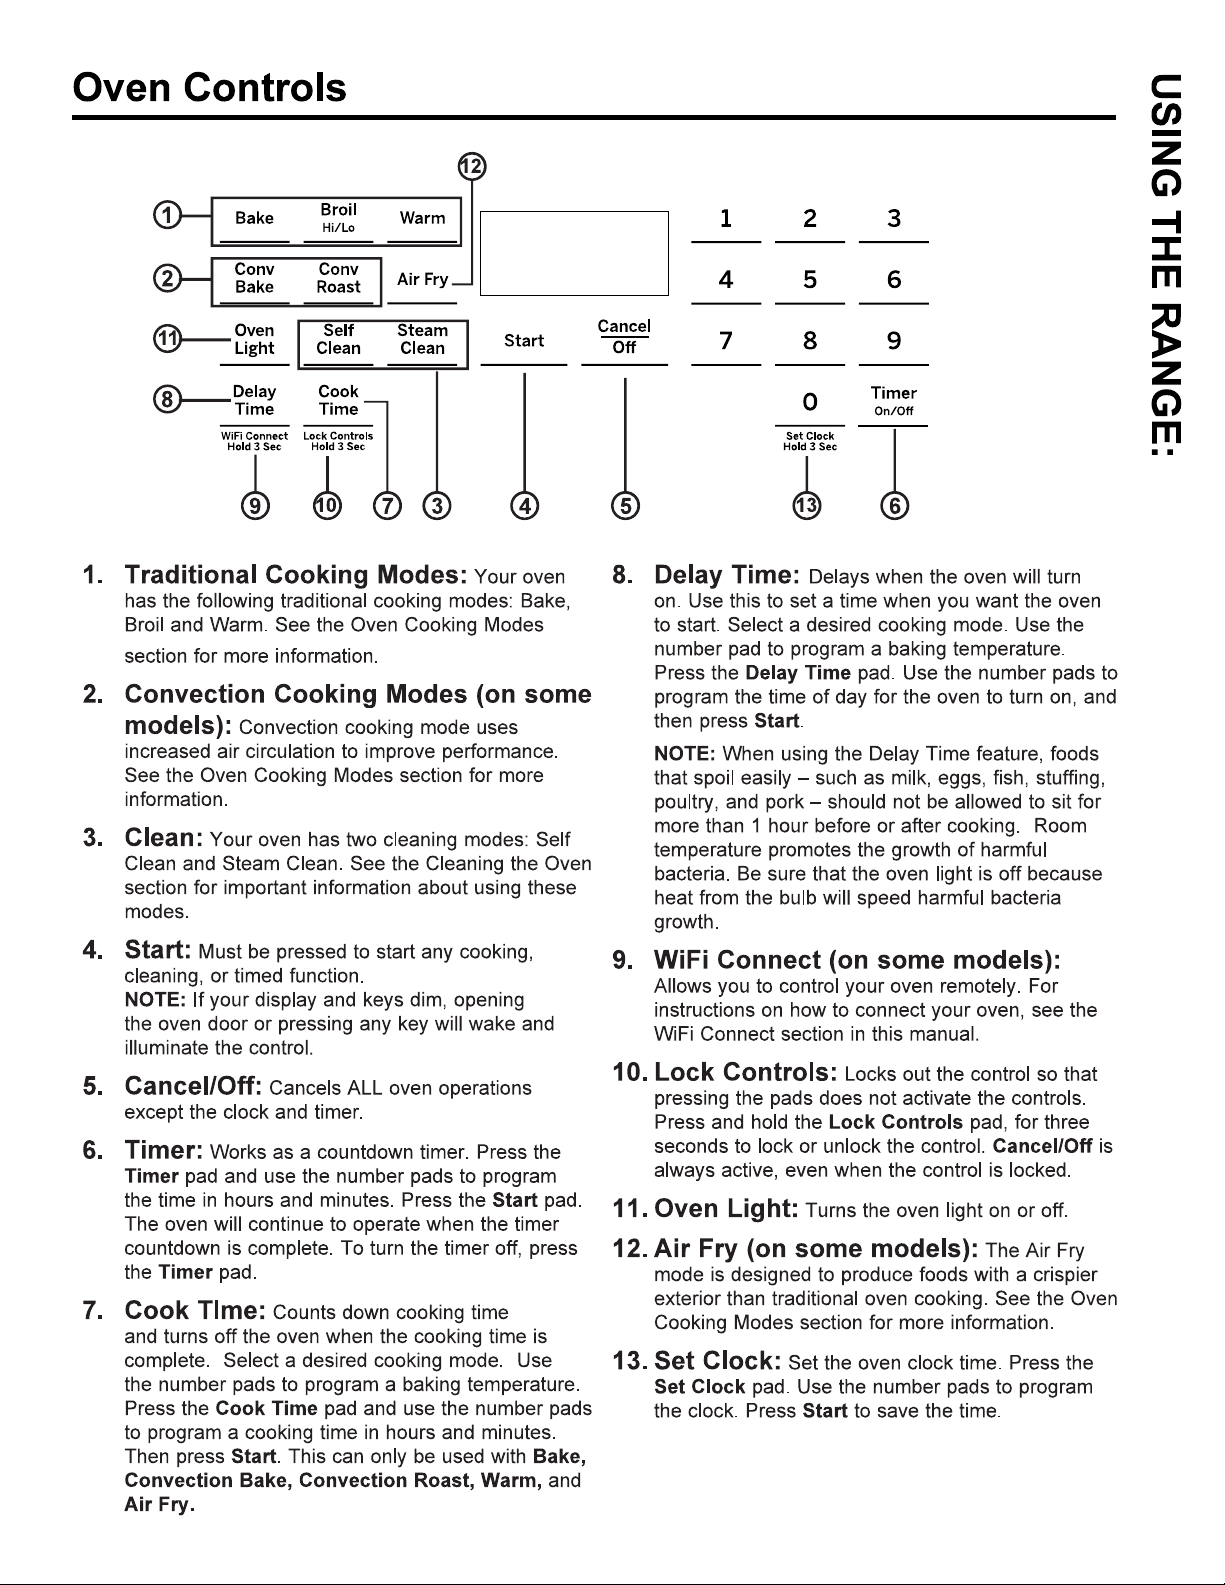
Oven Controls
11
Page 12
12
Page 13
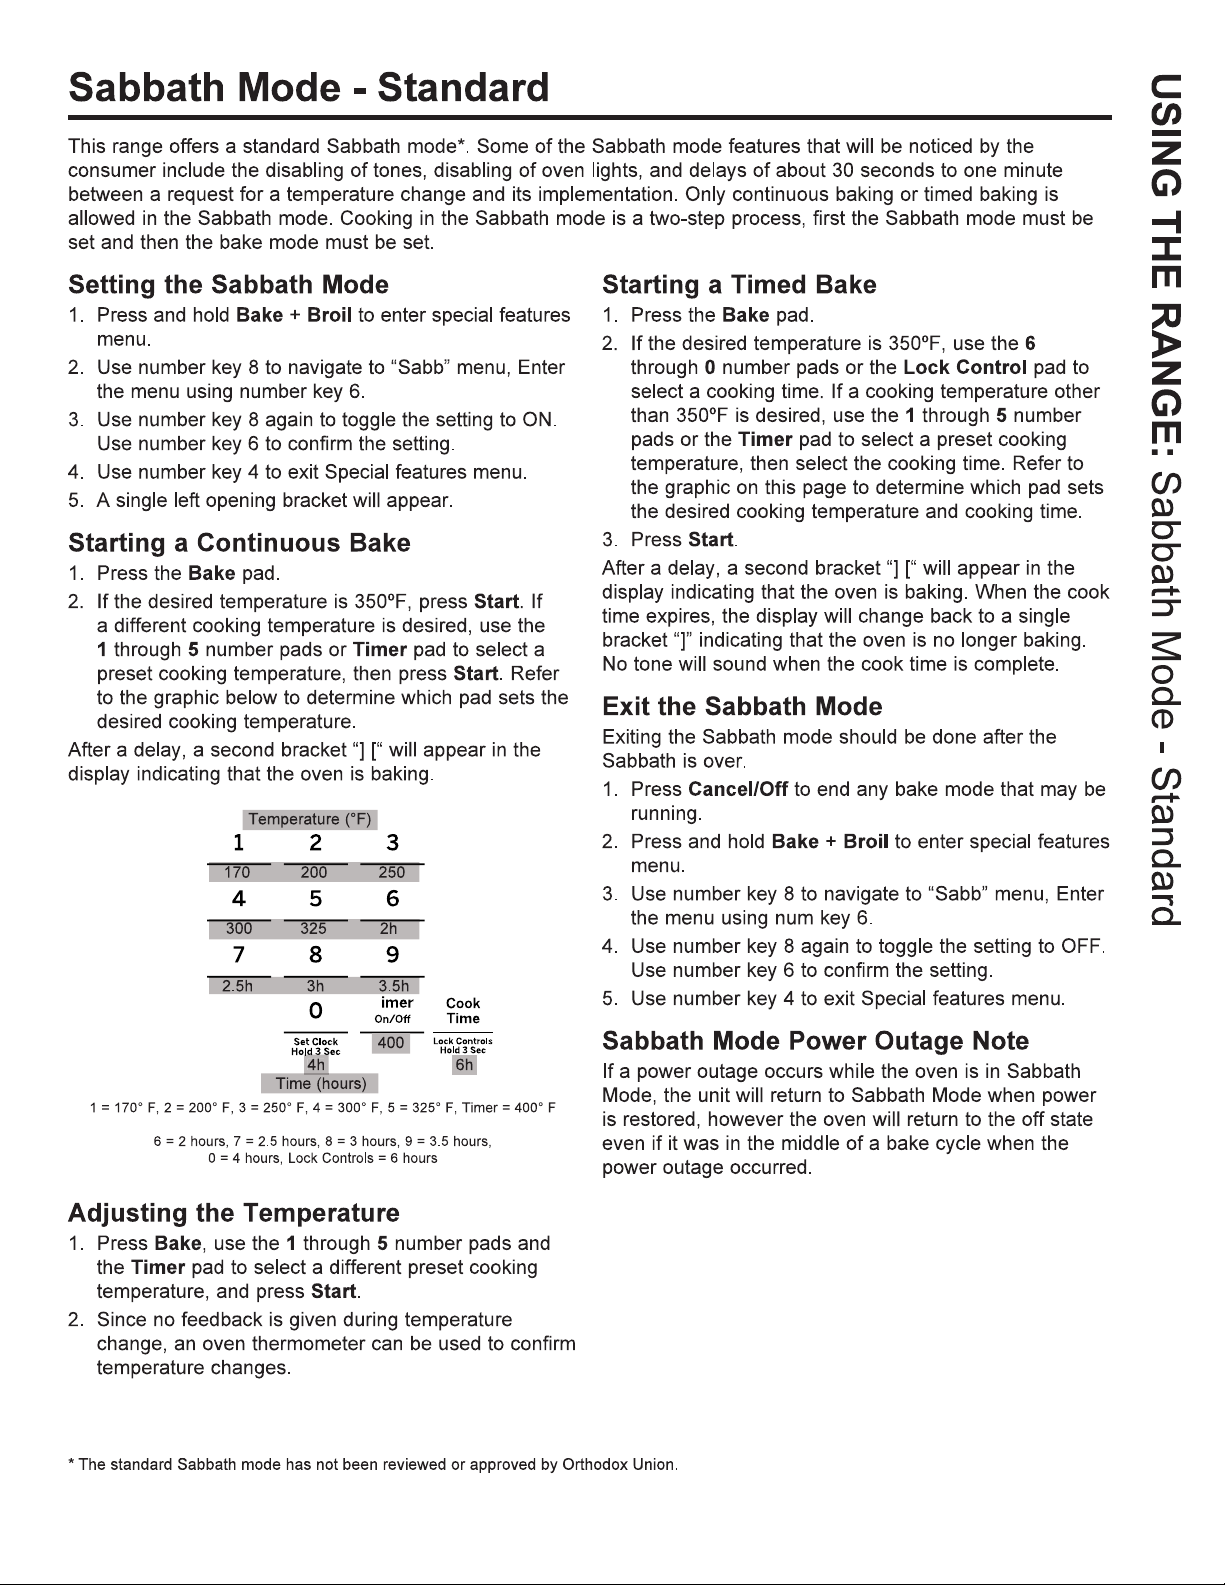
13
Page 14
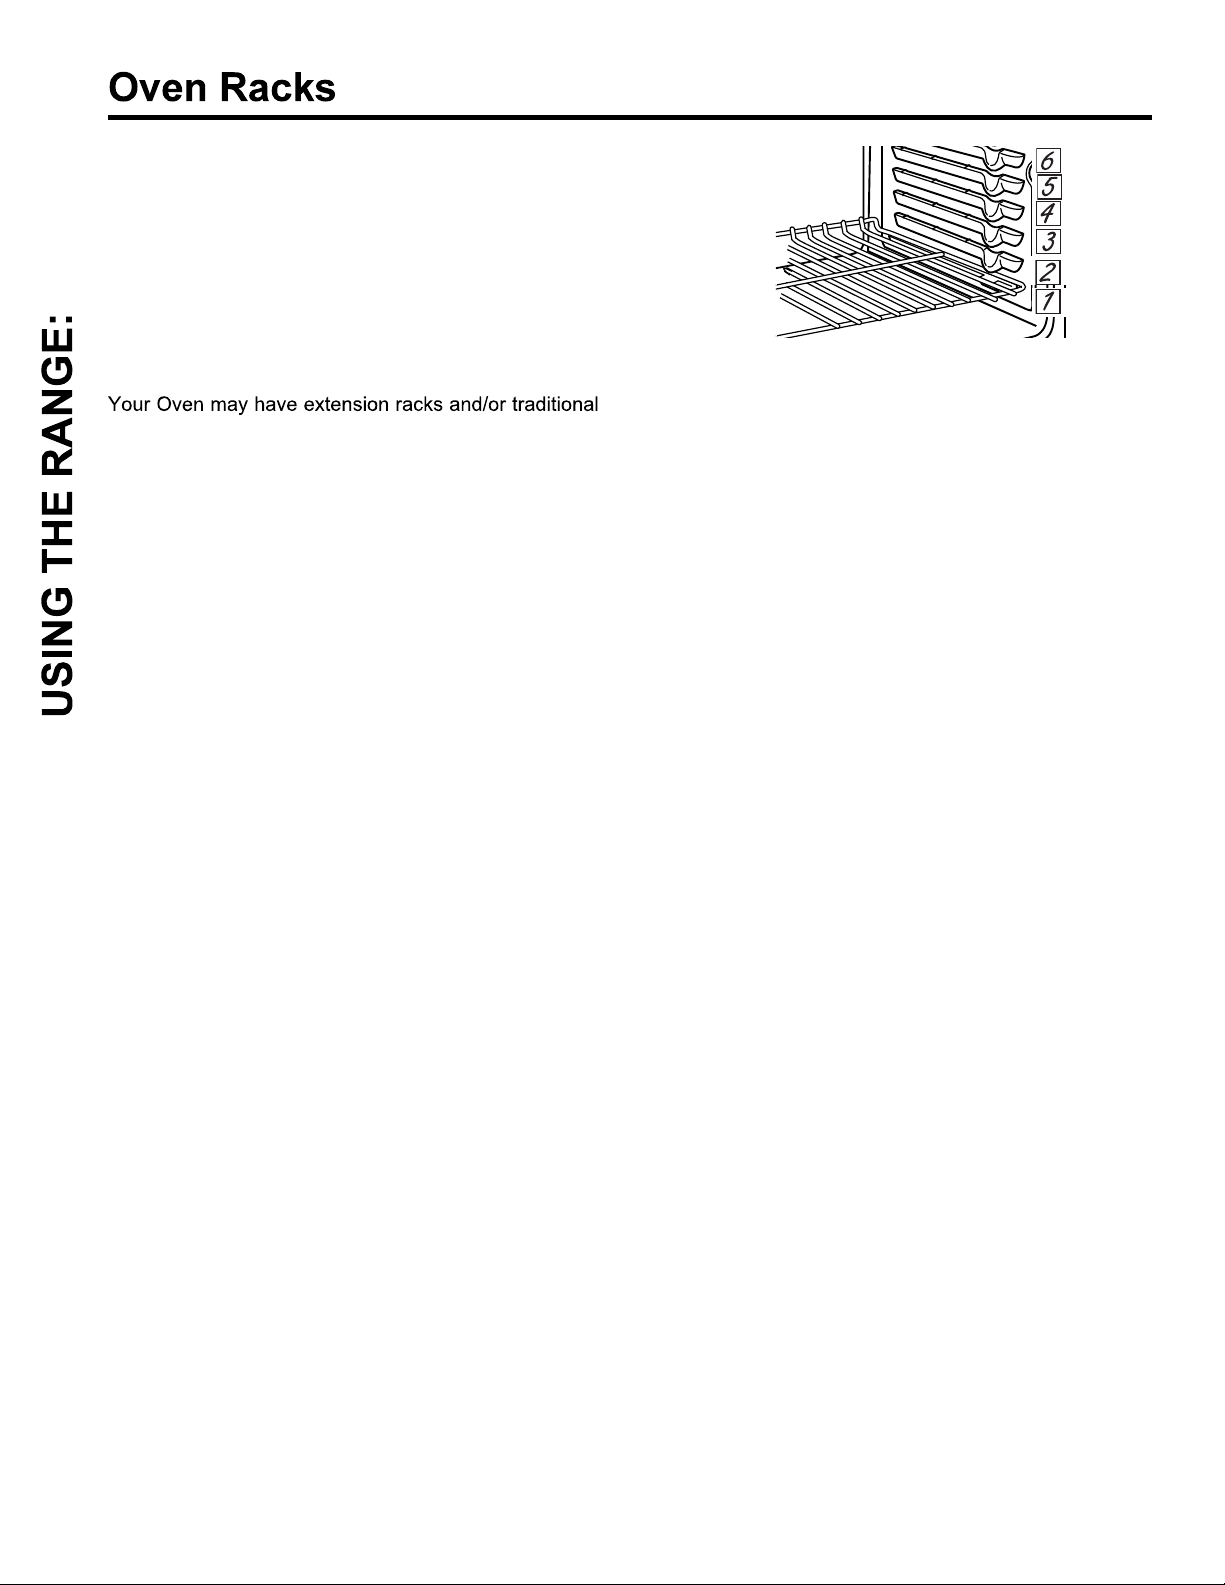
Recommended rack positions for various types of
foods are provided in the Cooking Guide. Adjusting
rack position is one way to impact cooking results. For
example, if you would prefer darker tops on cakes,
muffins, or cookies, try moving food one rack position
higher. If you find foods are too brown on top try moving
them down next time.
Oven Racks
When baking with multiple pans and on multiple racks,
ensure there is at least 1½" between pans to allow
sufficient space for air to flow.
flat racks.
To avoid possible burns, place the racks in the desired
position before you turn the oven on.
The number of rack positions may vary by model.
14
Page 15
Foil may be used to catch spills by placing a sheet on a lower rack, several inches below the food. Do not use more
foil than necessary and never antirely cover an oven rack with aluminum foil. Keep foil at least 1-1/2” from oven walls
to prevent poor heat circulation.
The material, finish, and size of cookware affect baking
performance.
than light, shiny pans. Pans that absorb heat more
readily can result in a browner, crisper, and thicker crust.
If using dark and coated cookware check food earlier
than minimum cook time. If undesirable results are
obtained with this type of cookware consider reducing
oven temperature by 25°F next time.
Shiny pans can produce more evenly cooked baked
goods such as cakes and cookies.
Glass and ceramic pans heat slowly but retain heat well.
These types of pans work well for dishes such as pies
and custards.
Air insulated pans heat slowly and can reduce bottom
browning.
15
Page 16
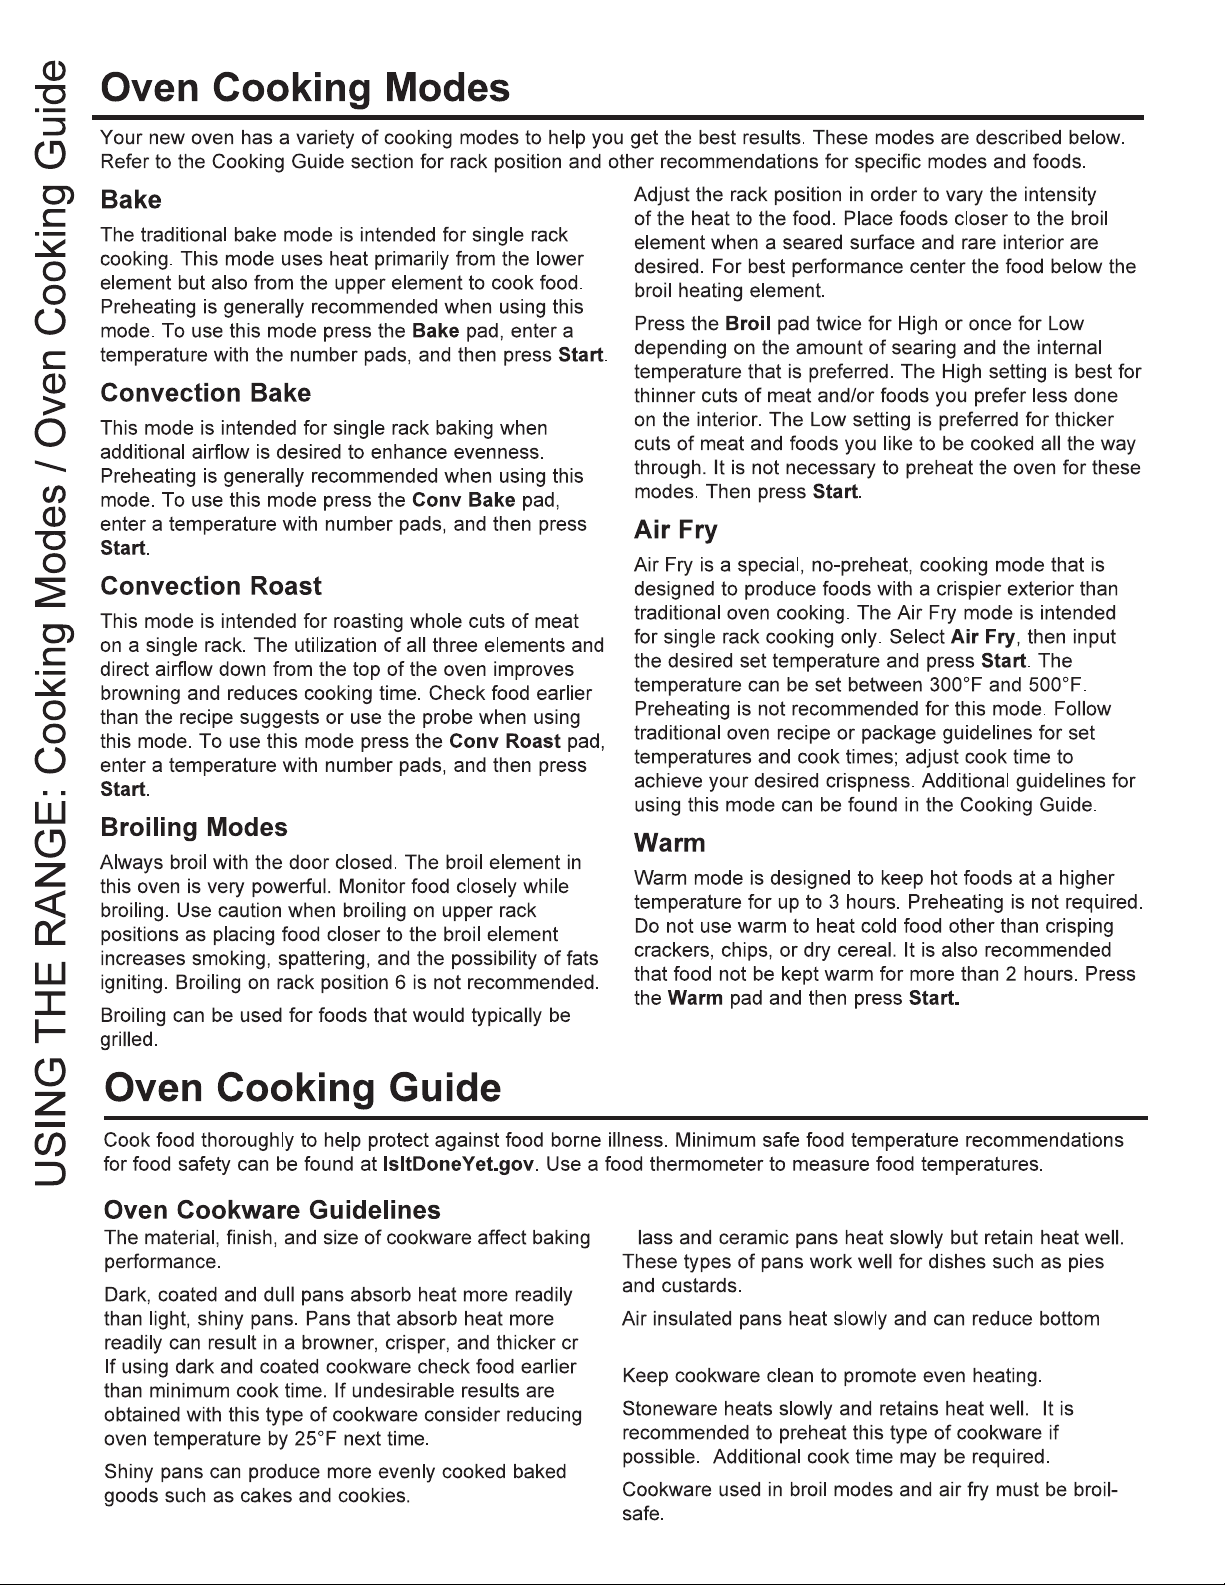
16
Page 17
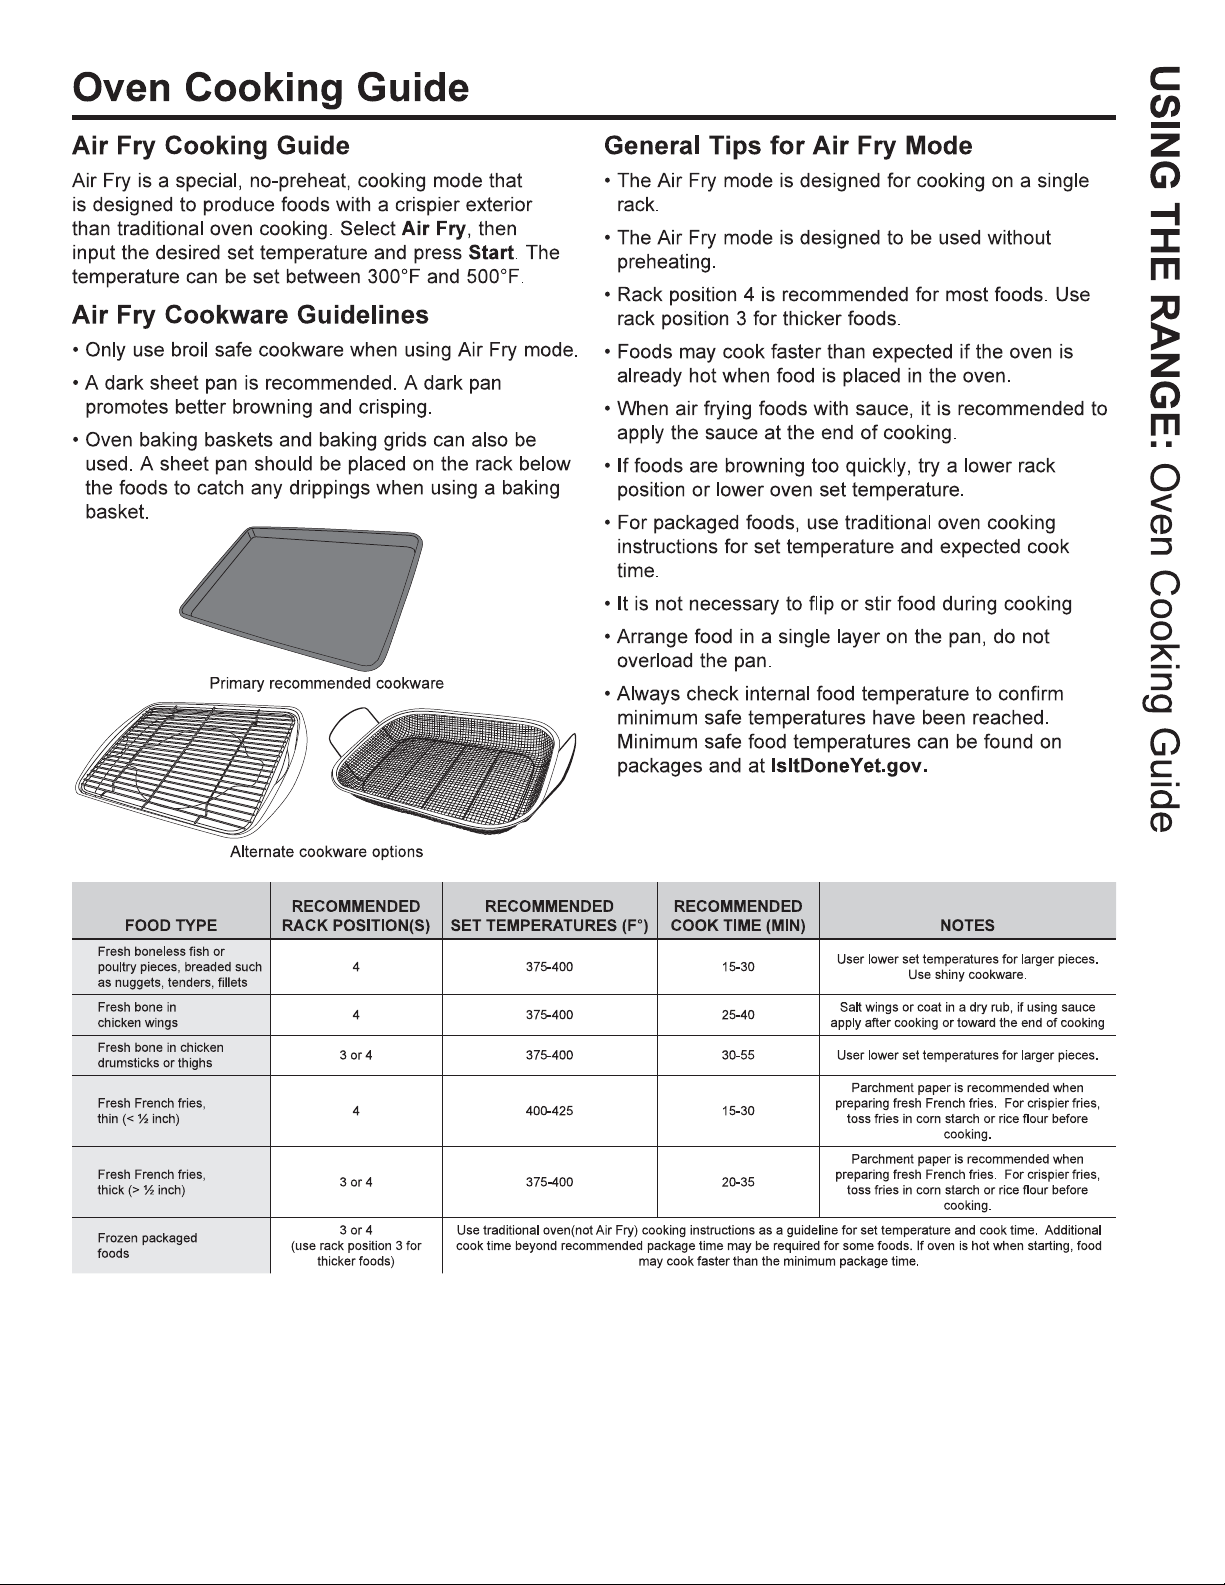
17
Page 18
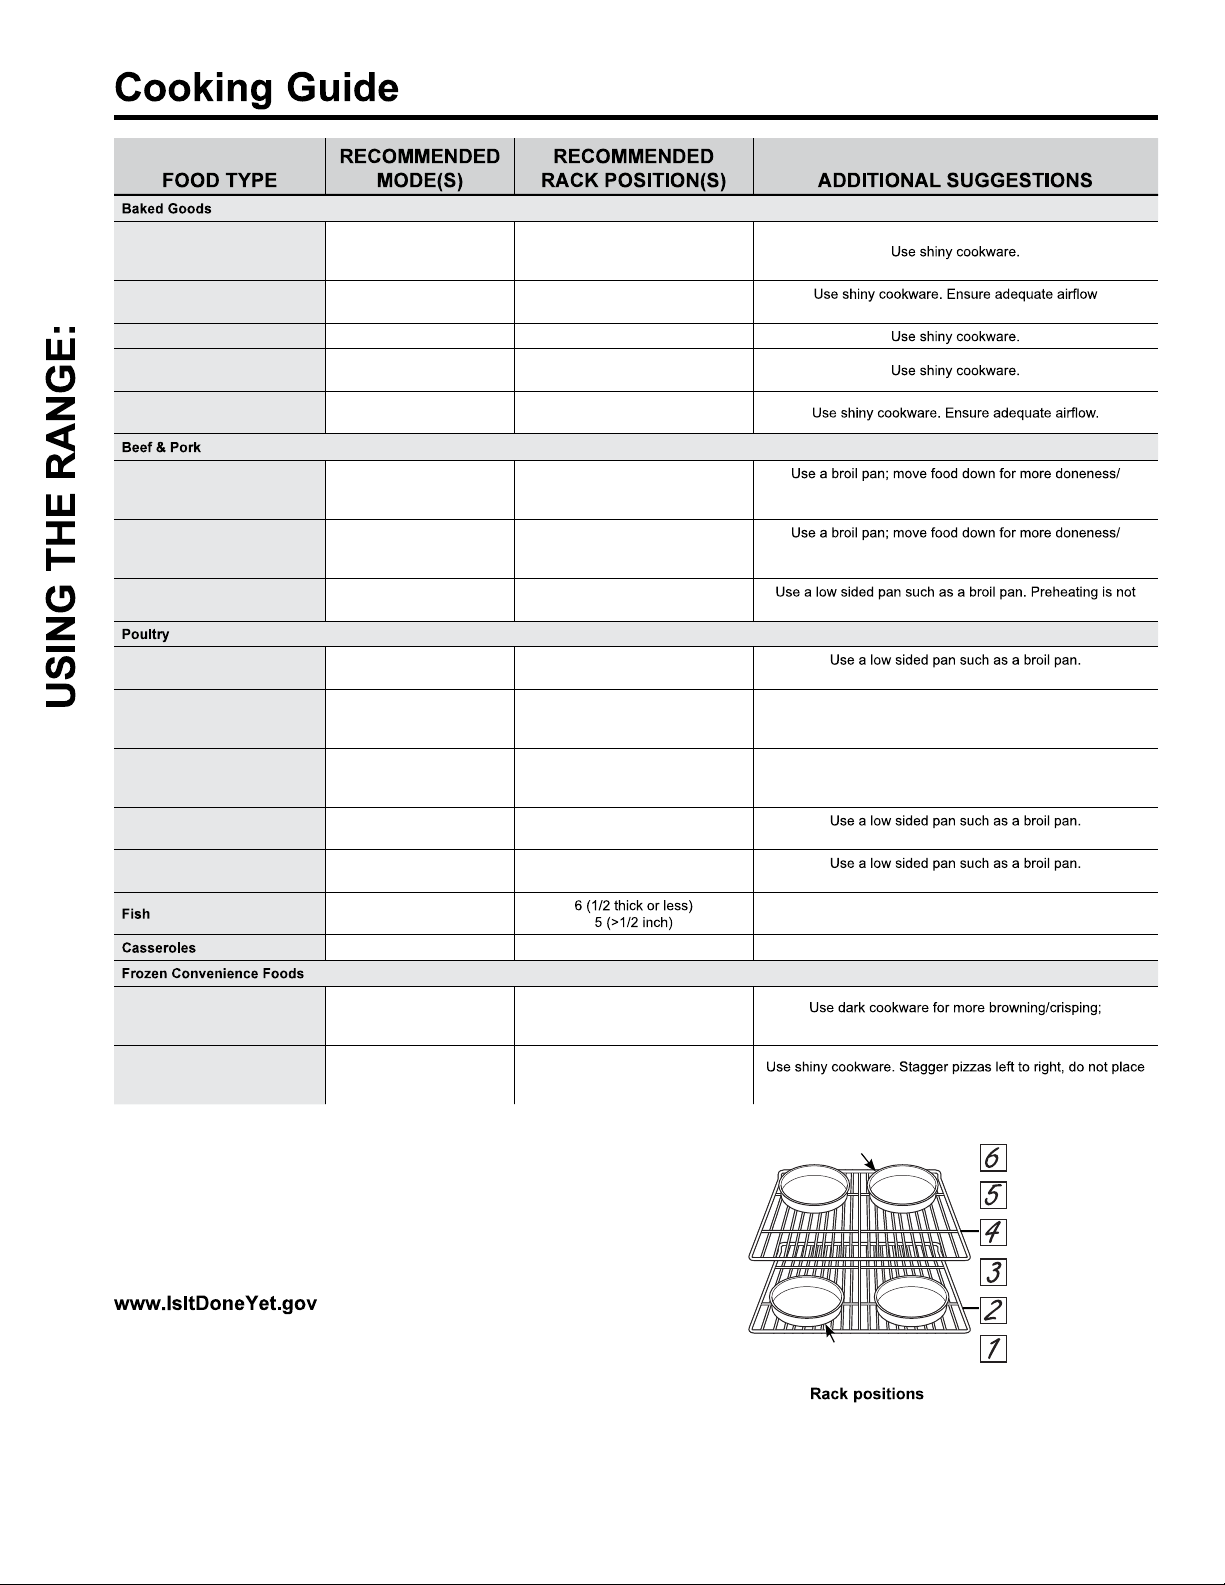
Cooking Guide
Layer Cakes, sheet cakes,
bundt cakes, muffins, quick
breads on a Single Rack
Layer cakes* on Multiple
Racks
Cookies, biscuits, scones on
a Single Rack
Cookies, biscuits, scones on
Multiple Racks
3Bake
Bake
Convection Bake
Convection Bake 2 and 4
2 and 4
1BakeChiffon cakes (angel food)
3Bake
(see illustration below).
Roasts
Whole chicken
Bone-in chicken breasts,
legs, thighs
Boneless chicken breasts
Whole turkey
Turkey Breast
Pizza, potato products,
chicken nuggets, appetizers
on a Single Rack
Pizza, potato products,
chicken nuggets, appetizers
on Multiple Racks
6Broil HiHamburgers less searing. Watch food closely when broiling. For best
5 or 6Broil HiSteaks & Chops less searing. Watch food closely when broiling. For best
Bake
Convection Roast
Bake
Convection Roast
Broil Lo
Bake
Broil Lo
Bake
Bake
Convection Roast
Bake
Convection Roast
Broil Lo
Convection Bake 2 and 4
2 or 3
2 or 3
3
3
1
3
3 or 4Bake
3Bake
performance center food below the broil heater.
performance center food below the broil heater.
necessary.
Preheating is not necessary.
If breaded or coated in sauce avoid Broil Hi modes. Broil skin
side down first. Watch food closely when broiling. For best
performance when broiling, center food below the broil heater.
If breaded or coated in sauce avoid Broil Hi modes. Broil skin
side down first. Watch food closely when broiling. For best
performance when broiling, center food below the broil heater.
Preheating is not necessary.
Preheating is not necessary.
Watch food closely when broiling. For best performance center
food below the broil heater.
use shiny cookware for less browning.
directly over each other.
*When baking four cake layers at a time, use racks 2
and 4. Place the pans as shown so that one pan is not
directly above another.
Cook food thoroughly to help protect against food
borne illness. Minimum safe food temperature
recommendations for food safety can be found at
. Make sure to use a food
thermometer to take food temperatures.
18
Rear Placement
Front Placement
Page 19
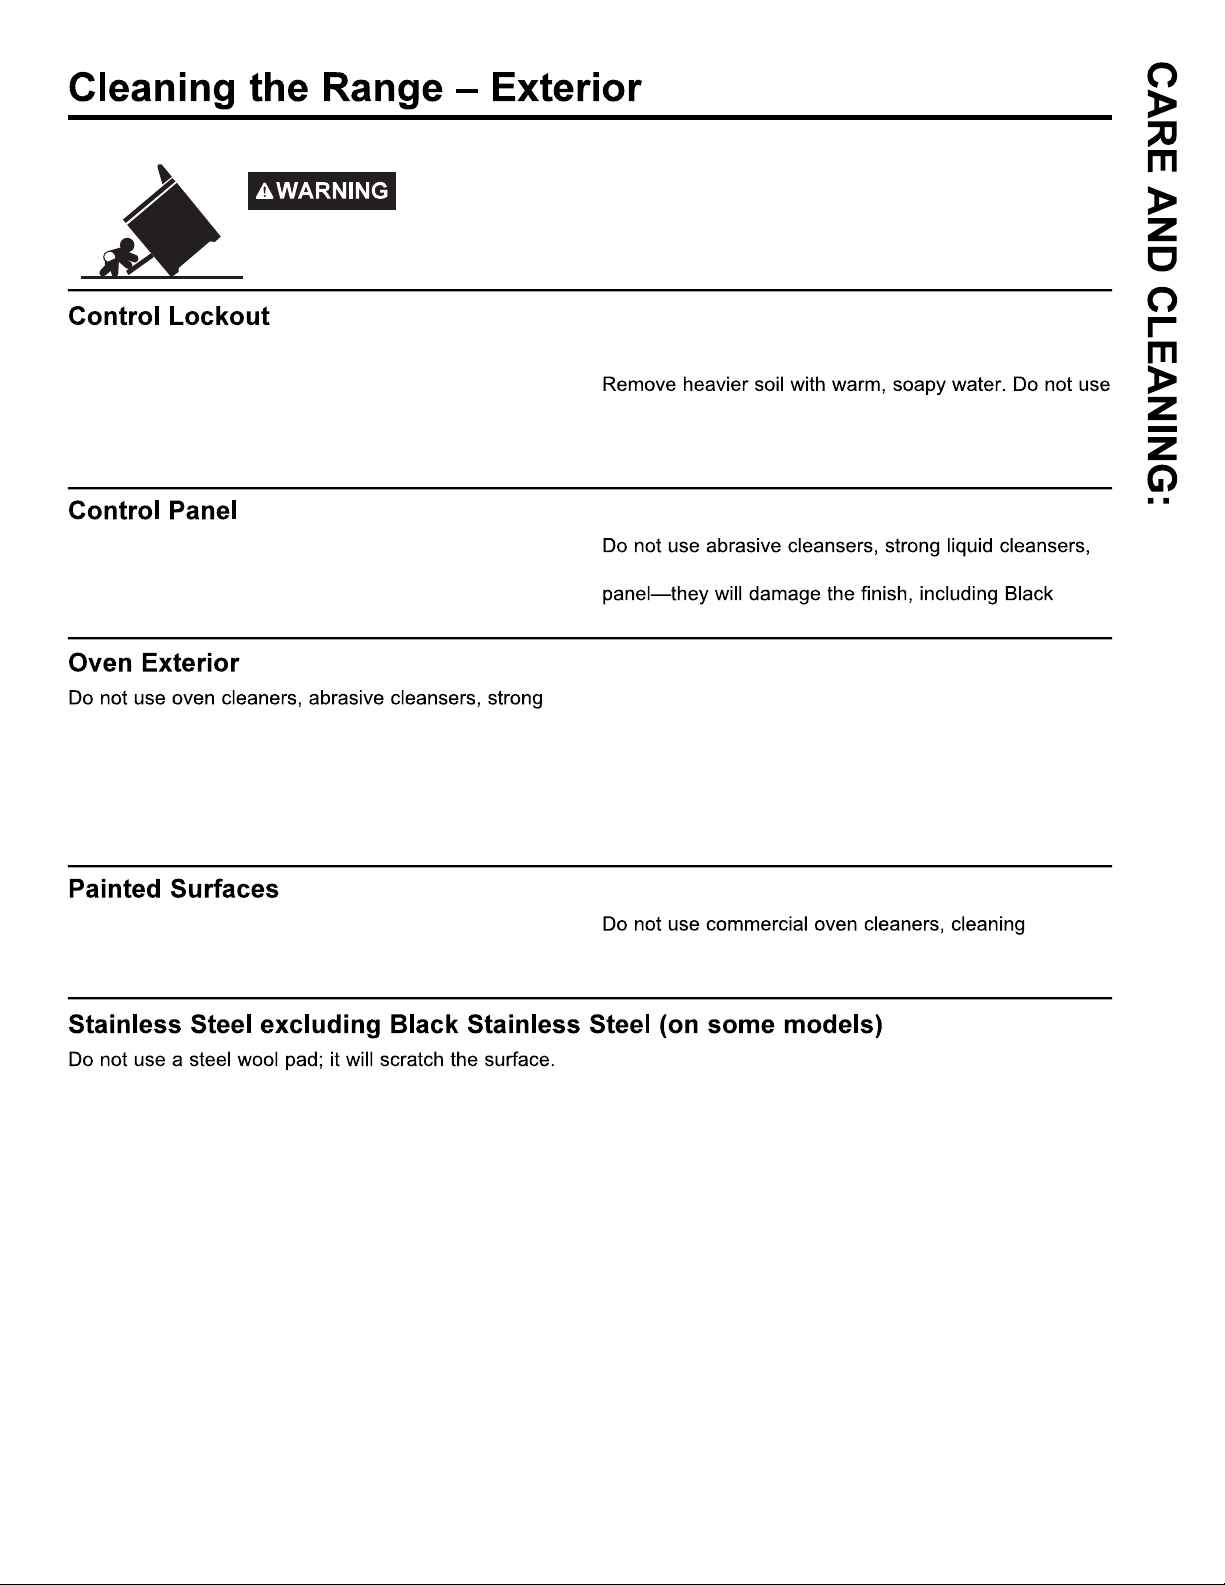
Be sure all controls are off and all surfaces are cool before cleaning any part of the range.
If your range is removed for cleaning, servicing or any reason, be sure the
anti-tip device is reengaged properly when the range is replaced. Failure to
take this precaution could result in tipping of the range and can result in death
or serious burns to children or adults.
If desired, the touch pads may be deactivated before
cleaning.
See Lock Controls in the Oven Controls section in this
manual.
Clean up splatters with a damp cloth.
It’s a good idea to wipe the control panel after each use.
Clean with mild soap and water or vinegar and water,
rinse with clean water and polish dry with a soft cloth.
liquid cleansers, steel wool, plastic scouring pads, or
cleaning powders on the interior or exterior of the oven.
Clean with a mild soap and water or vinegar and water
solution. Rinse with clean water and dry with a soft cloth.
When cleaning surfaces, make sure that they are at
room temperature and not in direct sunlight.
Painted surfaces include the sides of the range and the
door, top of control panel and the drawer front. Clean
these with soap and water or a vinegar and water solution.
You may also use a glass cleaner.
abrasives of any kind.
Reactivate the touch pads after cleaning.
Cleaning the Range – Exterior
plastic scouring pads or oven cleaners on the control
Stainless Steel.
If stain on the door vent trim is persistent, use a mild
abrasive cleaner and a sponge-scrubber for best results.
Spillage of marinades, fruit juices, tomato sauces and
basting liquids containing acids may cause discoloration
and should be wiped up immediately. Let hot surfaces
powders, steel wool or harsh abrasives on any painted
surface, including Black Stainless Steel.
To clean the stainless steel surface, use warm sudsy
water or a stainless steel cleaner or polish. Always wipe
the surface in the direction of the grain. Follow the cleaner
instructions for cleaning the stainless steel surface.
To inquire about purchasing cleaning products
including stainless steel appliance cleaner or polish,
see the Accessories and Consumer Support sections
at the end of this manual.
19
Page 20
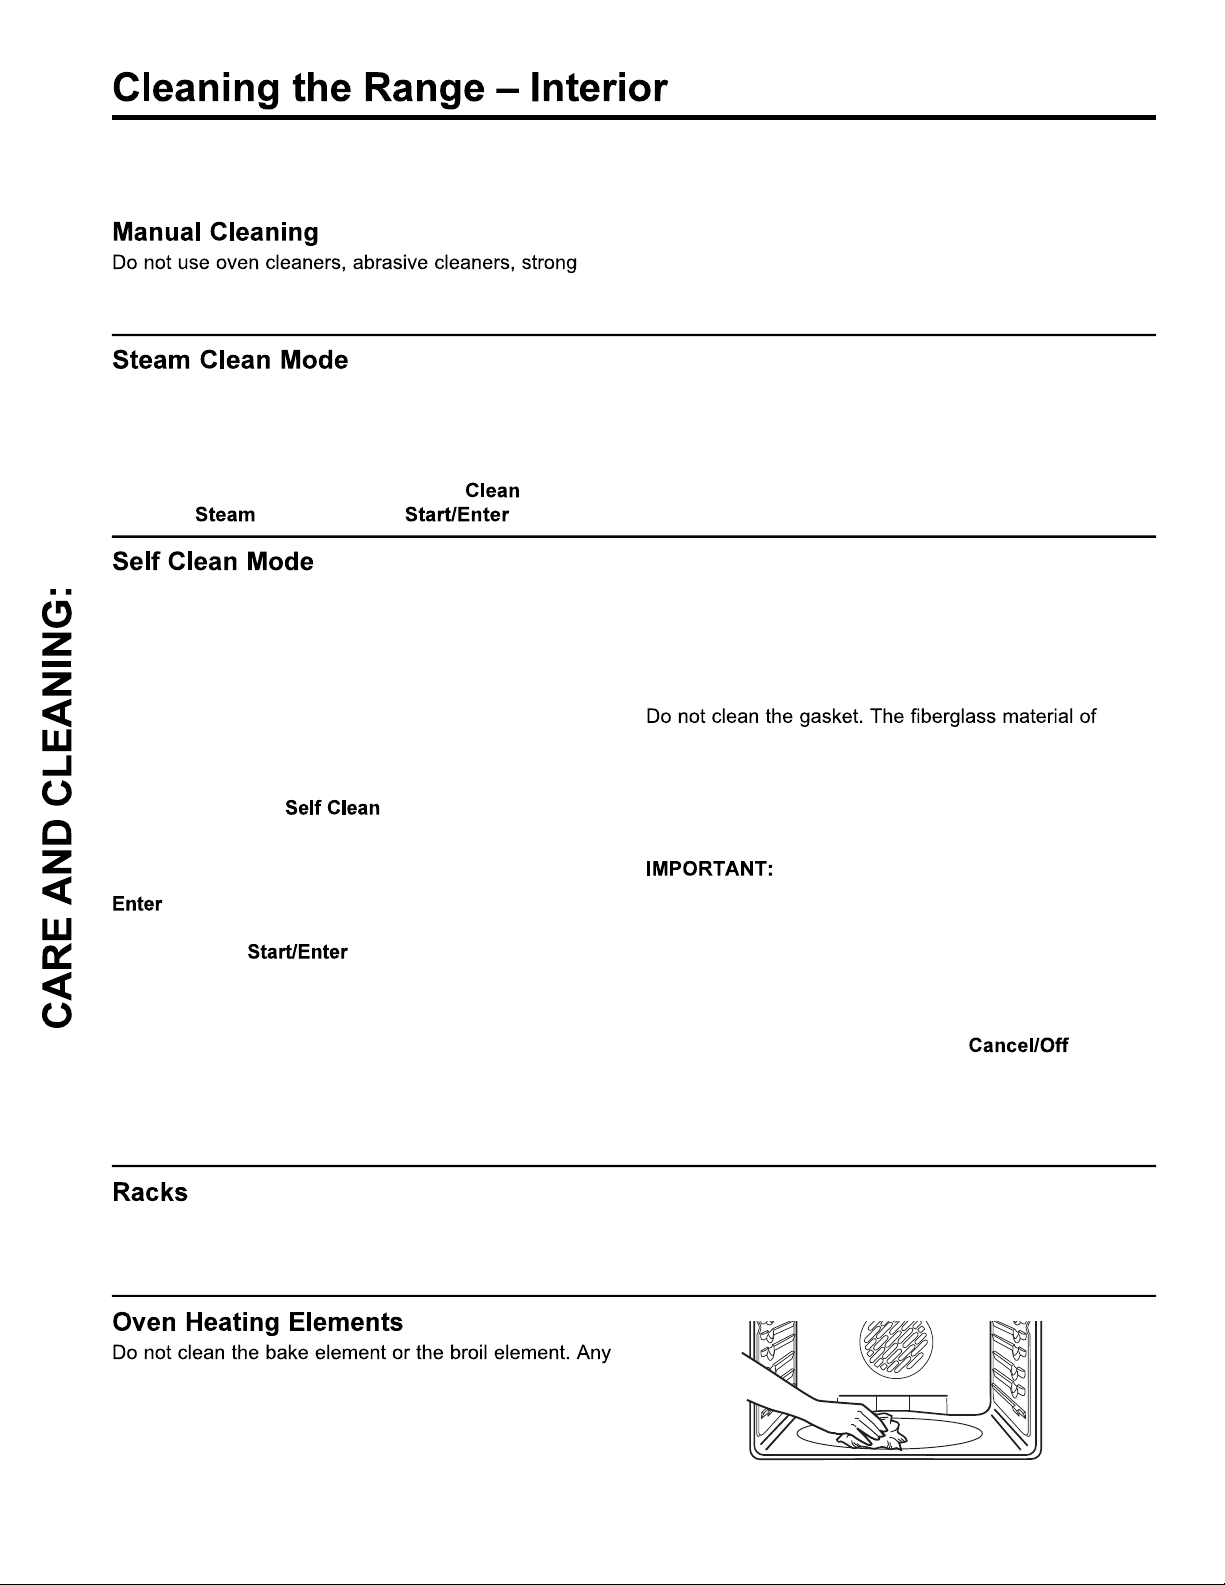
The interior of your new oven can be cleaned manually or by using Steam Clean or Self Clean modes.
Spillage of marinades, fruit juices, tomato sauces and basting liquids containing acids may cause discoloration and
should be wiped up immediately. Let hot surfaces cool, then clean and rinse.
soap and water or vinegar and water solution. Rinse with
liquid cleansers, steel wool, scouring pads, or cleaning
powders on the interior of the oven. Clean with a mild
clean water and dry with a soft cloth. When cleaning
surfaces, make sure that they are at room temperature.
Steam clean is intended to clean small spills using water
and a lower cleaning temperature than Self-Clean.
To use the Steam Clean feature, wipe grease and soils
from the oven. Pour one cup of water into the bottom
of the oven. Close the door. Press the pad twice
to select and then press . The oven
Cleaning the Range – Interior
Read Self-Cleaning Oven Safety Instructions at the
beginning of this manual before using Self Clean Mode.
Self clean uses very high temperatures to clean the oven
interior. The oven door will lock when using this feature.
Before operating the self-clean cycle, wipe up grease and
soils from the oven. Remove all items from the oven other
than enameled (dark color) racks. Shiny or silver racks
and any cookware or other items should all be removed
from the oven before initiating a self-clean cycle. Close
the door. Press the pad and a default selfclean time is displayed. The clean time can be changed
to any time between 3:00 and 5:00 hours by using the
number pads to enter a different time and pressing
. For heavily soiled ovens, the maximum 5 hour
clean time is recommended. If you wish to use the default
time, press the pad. The oven will turn off
automatically when the self-clean cycle is complete. The
door will stay locked until the oven has cooled down. After
the oven has cooled down wipe any ash out of the oven.
We recommend venting your kitchen with an open
window or using a ventilation fan or hood during the first
self-clean cycle.
door will lock. You can not open the door during the
30 minute steam clean as this will decrease the steam
clean performance. At the end of the steam clean cycle
the door will unlock. Wipe out any excess water and
any remaining soil.
Soil on the front frame of the range and outside the
gasket on the door will need to be cleaned by hand.
Clean these areas with hot water, soap-filled steel-wool
pads or cleansers such as Soft Scrub®. Rinse well with
clean water and dry.
the oven door gasket cannot withstand abrasion. It is
essential for the gasket to remain intact. If you notice it
becoming worn or frayed, replace it.
Make sure the oven light bulb cover is in place and the
oven light is off.
The health of some birds is extremely
sensitive to the fumes given off during the self-cleaning
cycle of any range. Move birds to another wellventilated room.
The surface units are automatically disabled during the
self-clean cycle. Wait until the self-clean cycle is finished
to set and use the surface units.
To stop a self clean cycle press the pad.
The door will unlatch once the oven has cooled below
the locking temperature. You will not be able to open the
door right away unless the oven has cooled below the
locking temperature.
All racks can be washed with warm, soapy water.
Enameled (not shiny) racks can be left in the cavity
during self clean.
soil will burn off when the elements are heated.
The bake element is not exposed and is under the oven
floor. Clean the oven floor with warm, soapy water.
20
Racks may be more difficult to slide, especially after
a self-clean. Put some vegetable oil on a soft cloth or
paper towel and rub onto the left and right edges.
Wipe up heavy soil on the oven bottom.
Page 21
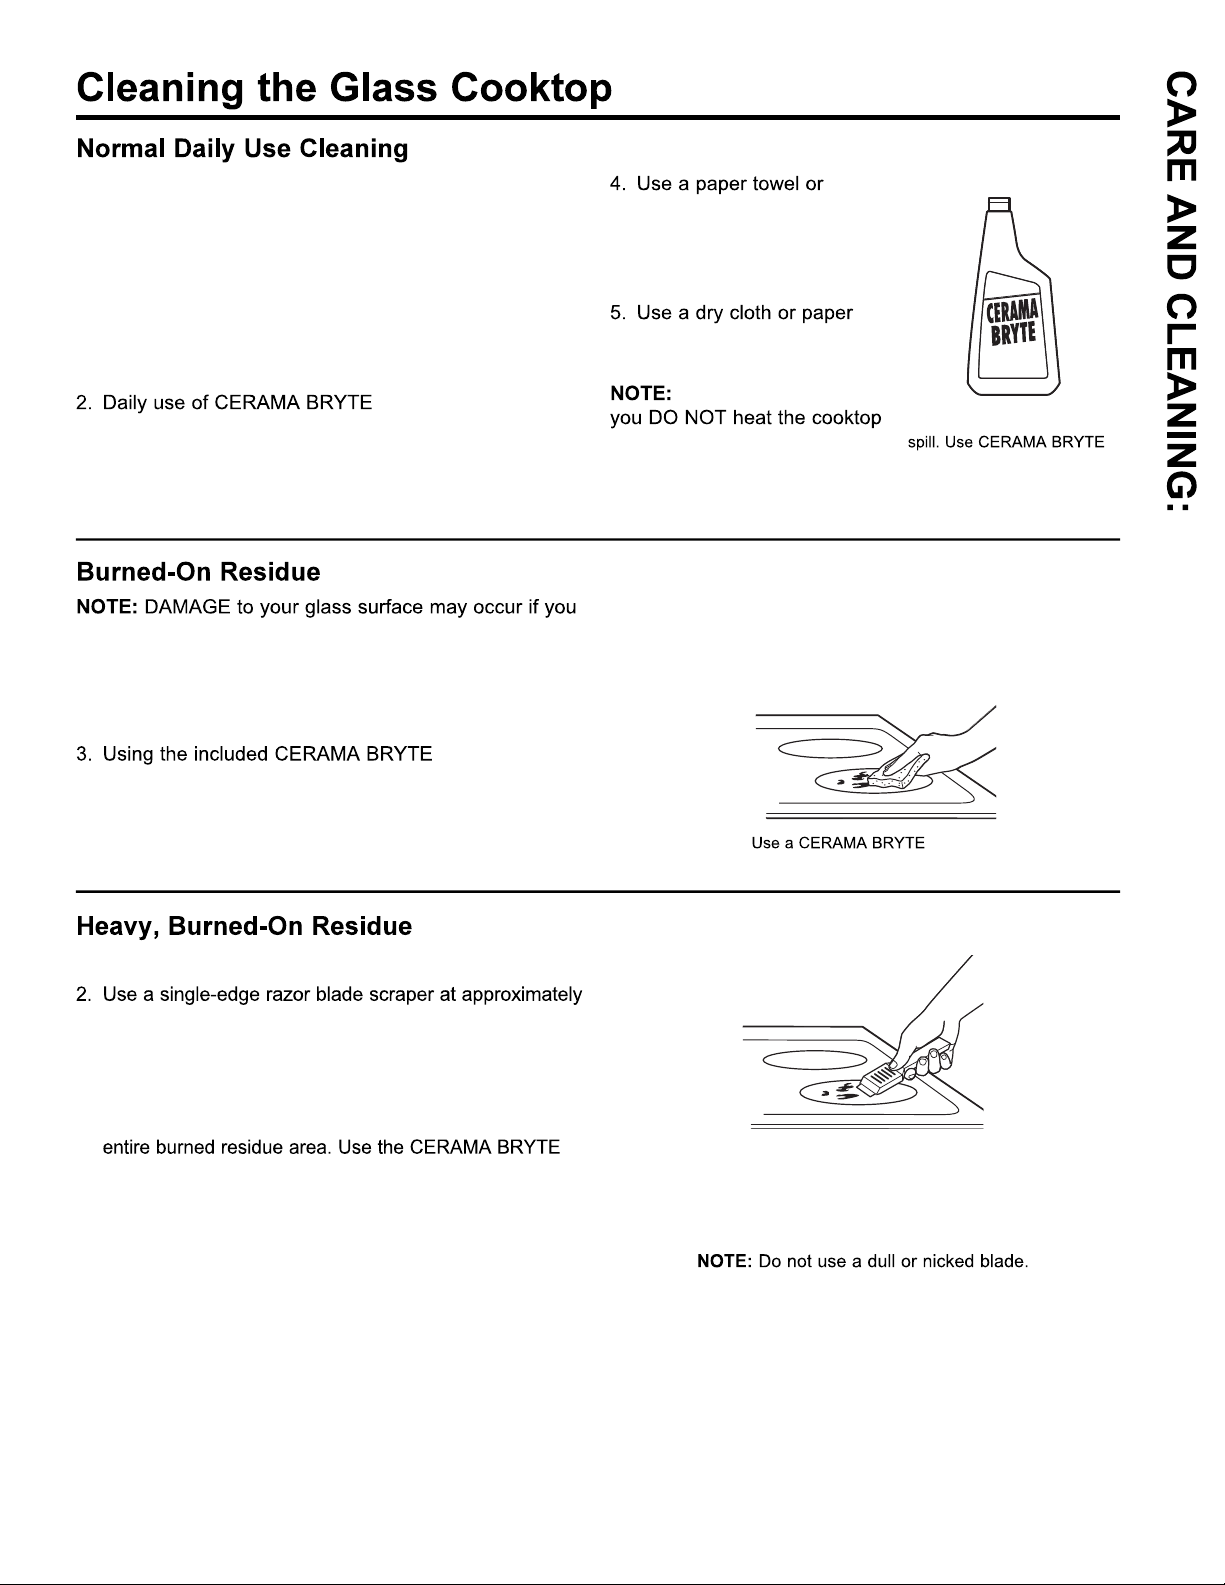
ONLY use CERAMA BRYTE® Ceramic Cooktop
Cleaner on the glass cooktop. Other creams may not
be as effective.
To maintain and protect the surface of your glass cooktop,
follow these steps:
1. Before using the cooktop for the first time, clean it
with CERAMA BRYTE® Ceramic Cooktop Cleaner.
This helps protect the top and makes cleanup easier.
®
Ceramic Cooktop
Cleaner will help keep the cooktop looking new.
3. Shake the cleaning cream well. Apply a few drops of
CERAMA BRYTE® Ceramic Cooktop Cleaner directly
to the cooktop.
use scrub pads other than those recommended.
1. Allow the cooktop to cool.
2. Spread a few drops of CERAMA BRYTE® Ceramic
Cooktop Cleaner on the entire burned residue area.
®
Cleaning Pad
for Ceramic Cooktops, rub the residue area, applying
pressure as needed.
4. If any residue remains, repeat the steps listed above
as needed.
CERAMA BRYTE® Cleaning
Pad for Ceramic Cooktops
to clean the entire cooktop
surface.
towel to remove all cleaning
residue. No need to rinse.
It is very important that
until it has been cleaned
Clean your cooktop after each
thoroughly.
Ceramic Cooktop Cleaner.
5. For additional protection, after all residue has been
removed, polish the entire surface with CERAMA
®
BRYTE
CeramCeramiicc Cooktop Cleaner and a paper towel.
®
Pad for Ceramic Cooktops.
Cleaning
®
Cleaning the Glass Cooktop
1. Allow the cooktop to cool.
a 45° angle against the glass surface and scrape the
soil. It will be necessary to apply pressure to the razor
scraper in order to remove the residue.
3. After scraping with the razor scraper, spread a few drops
of CERAMA BRYTE® Ceramic Cooktop Cleaner on the
®
Cleaning Pad to remove any remaining residue.
4. For additional protection, after all residue has been
removed, polish the entire surface with CERAMA
BRYTE® Ceramic Cooktop Cleaner and a paper towel.
The CERAMA BRYTE® Ceramic Cooktop Scraper and all
recommended supplies are available through our Parts Center.
See the Accessories and Consumer Support sections at the
end of this manual.
21
Page 22
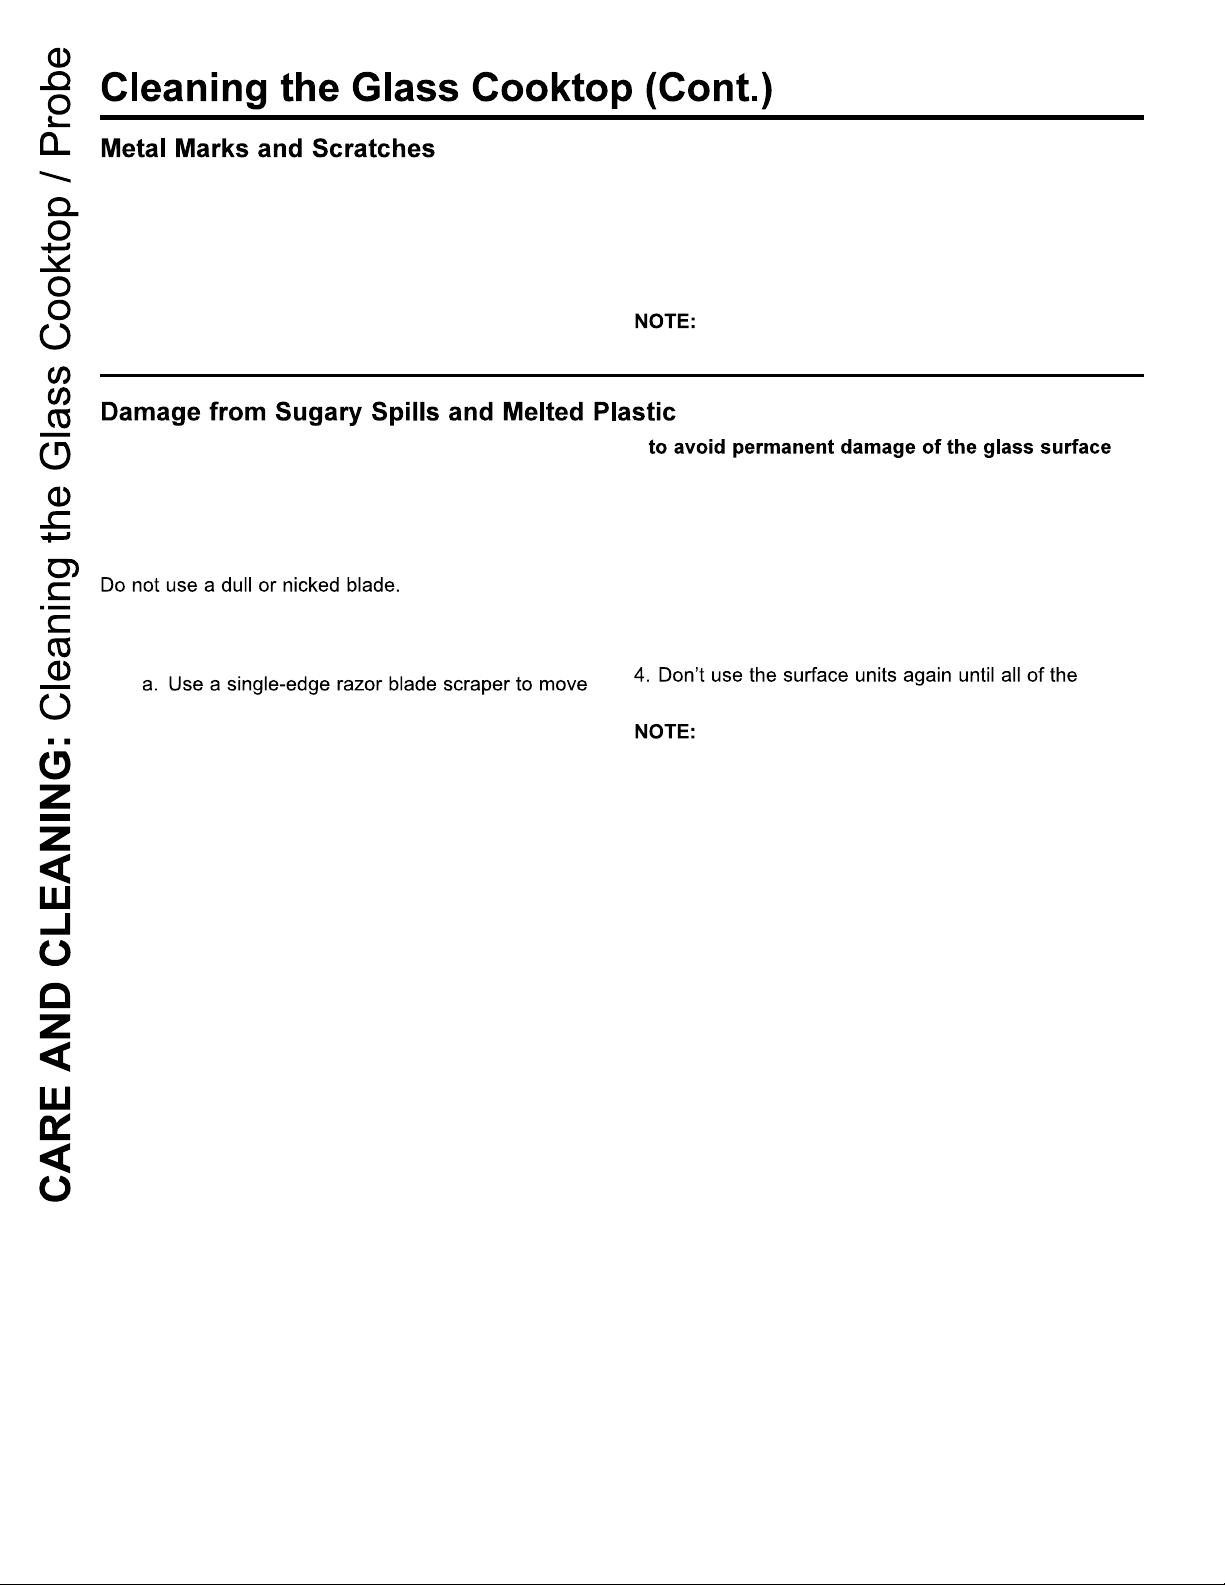
1. Be careful not to slide pots and pans across your
cooktop. It will leave metal markings on the cooktop
surface.
These marks are removable using the CERAMA
BRYTE® Ceramic Cooktop Cleaner with the CERAMA
BRYTE® Cleaning Pad for Ceramic Cooktops.
Special care should be taken when removing hot substances .
Sugary spillovers (such as jellies, fudge, candy, syrups) or melted plastics can cause pitting of the surface of your
cooktop (not covered by the warranty) unless the spill is removed while still hot. Special care should be taken when
removing hot substances.
Be sure to use a new, sharp razor scraper.
2. If pots with a thin overlay of aluminum or copper
are allowed to boil dry, the overlay may leave black
discoloration on the cooktop.
This should be removed immediately before heating
again or the discoloration may be permanent.
Carefully check the bottom of pans for roughness
that would scratch the cooktop.
1. Turn off all surface units. Remove hot pans.
2. Wearing an oven mitt:
the spill to a cool area on the cooktop.
b. Remove the spill with paper towels.
3. Any remaining spillover should be left until the surface
of the cooktop has cooled.
residue has been completely removed.
If pitting or indentation in the glass surface has
already occurred, the cooktop glass will have to be
replaced. In this case, service will be necessary.
22
Page 23
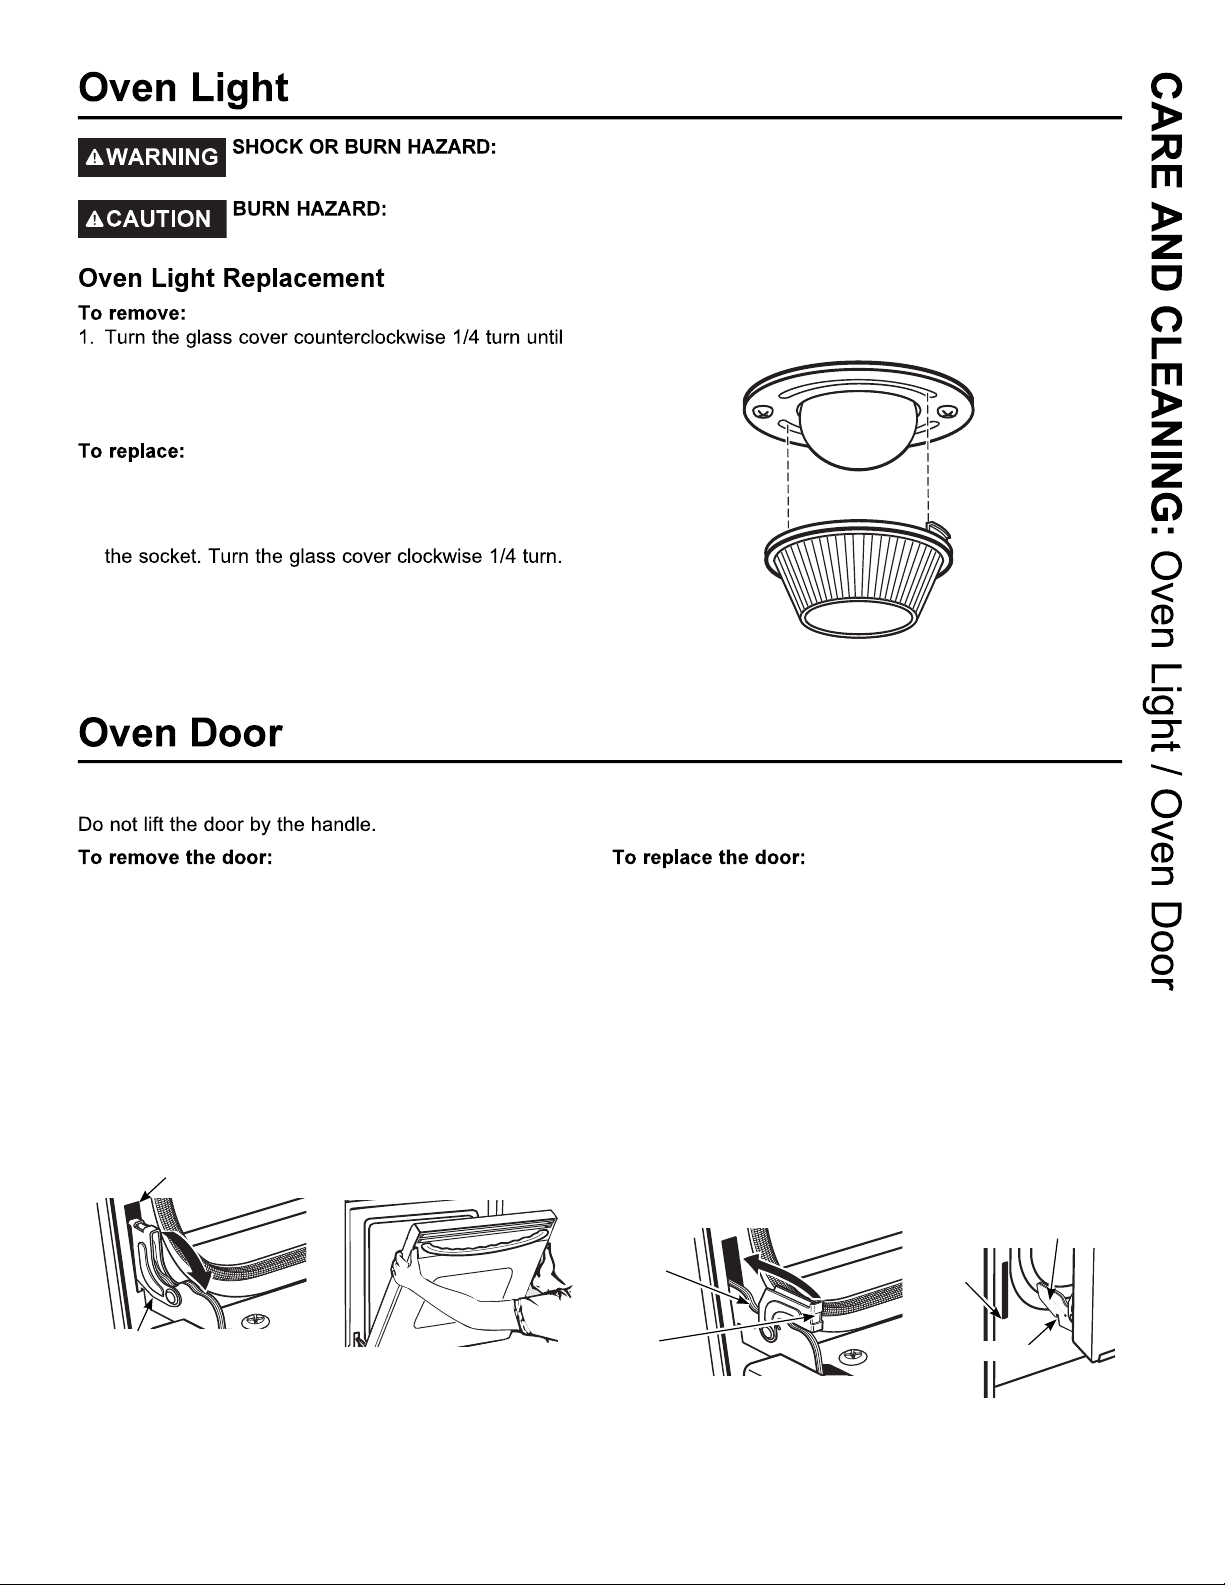
Before replacing oven light bulb, disconnect the electrical power to the
range at the main fuse or circuit breaker panel. Failure to do so may result in electric shock or burn.
The glass cover and bulb should be removed when cool. Touching hot glass with
bare hands or a damp cloth can cause burns.
the tabs of the glass cover clear the grooves of the
socket. Wearing latex gloves may offer a better grip.
2. Remove the bulb by turning it counter-clockwise.
1. Replace bulb with a new 40-watt appliance bulb.
Insert the bulb and turn it clockwise until it is tight.
2. Place the tabs of the glass cover into the grooves of
For improved lighting inside the oven, clean the glass
cover frequently using a wet cloth. This should be
done when the oven is completely cool.
3. Reconnect electrical power to the oven.
The door is very heavy. Be careful when removing and lifting the door.
1. Fully open the door.
2. Pull the hinge locks down toward the door frame, to
the unlocked position. A tool, such as a small flatblade screwdriver, may be required.
3. Firmly grasp both sides of the door at the top.
4. Close door to the door removal position. The door
should be open approximately 3" with no obstruction
above the door.
5. Lift door up and out until both hinge arms are clear of
the slots.
Slot
Hinge lock
Pull hinge locks down to unlock
Removal position
1. Firmly grasp both sides of the door at the top.
2. Starting on the left side, with the door at the same
angle as the removal position, seat the indentation of
the hinge arm into the bottom edge of the hinge slot.
The notch in the hinge arm must be fully seated into
the bottom of the slot. Repeat for right side.
3. Fully open the door. If the door will not fully open, the
indentation is not seated correctly in the bottom edge
of the slot.
4. Push the hinge locks up against the front frame of the
oven cavity, to the locked position.
5. Close the oven door.
Hinge
arm
Hinge
lock
Push hinge locks up to lock
Bottom
edge of
slot
Hinge arm
Indentation
23
Page 24
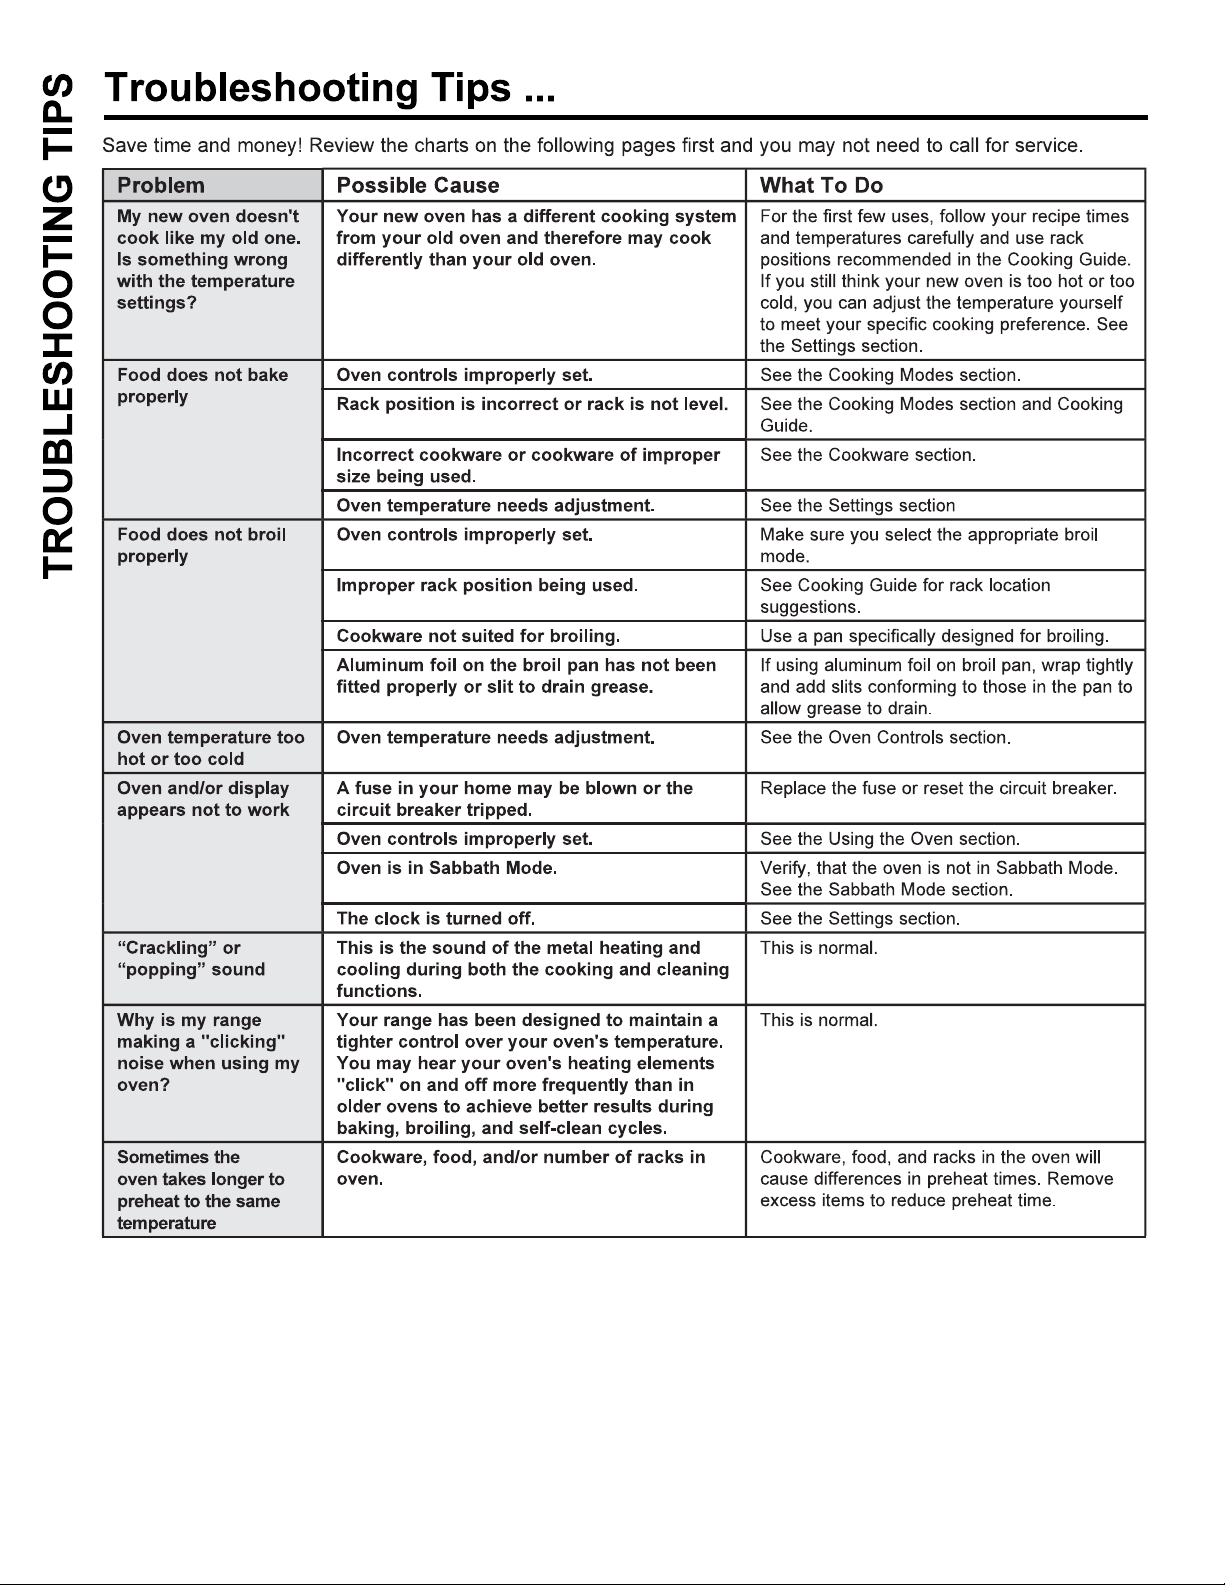
Before you call for service
.
24
Page 25
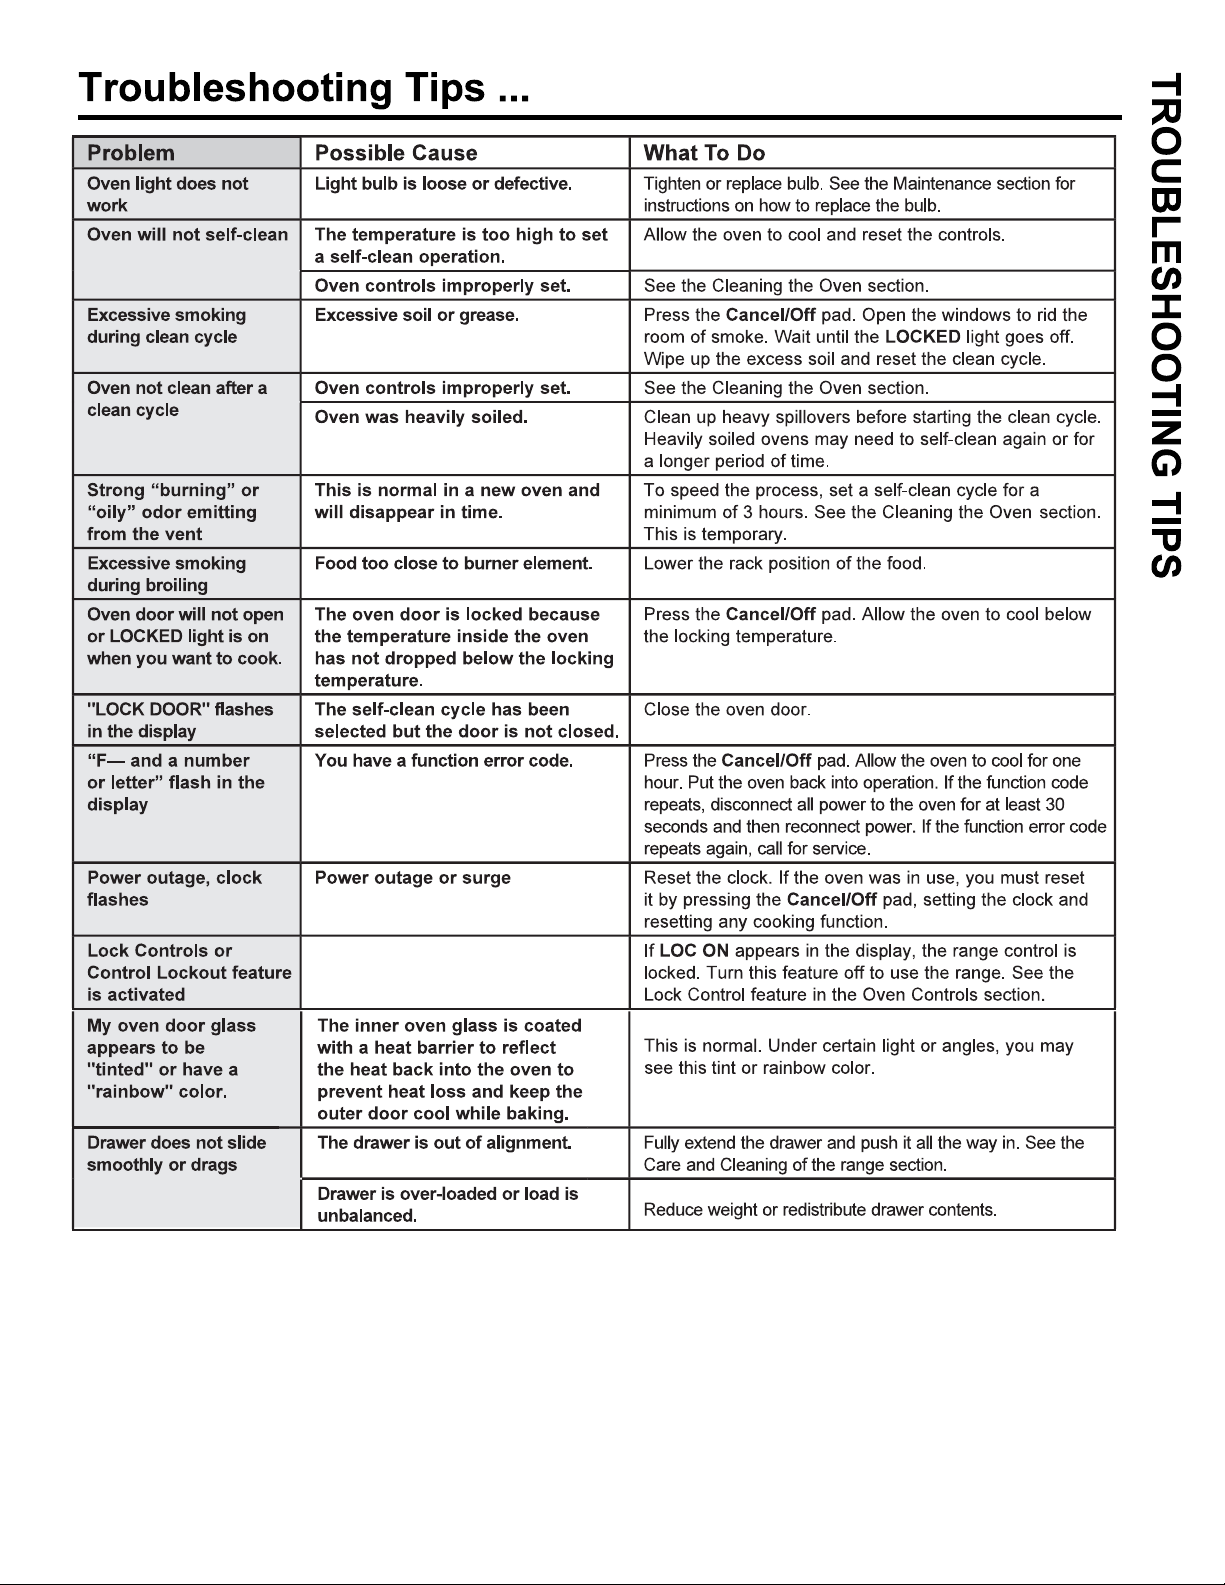
Before you call for service
25
Page 26
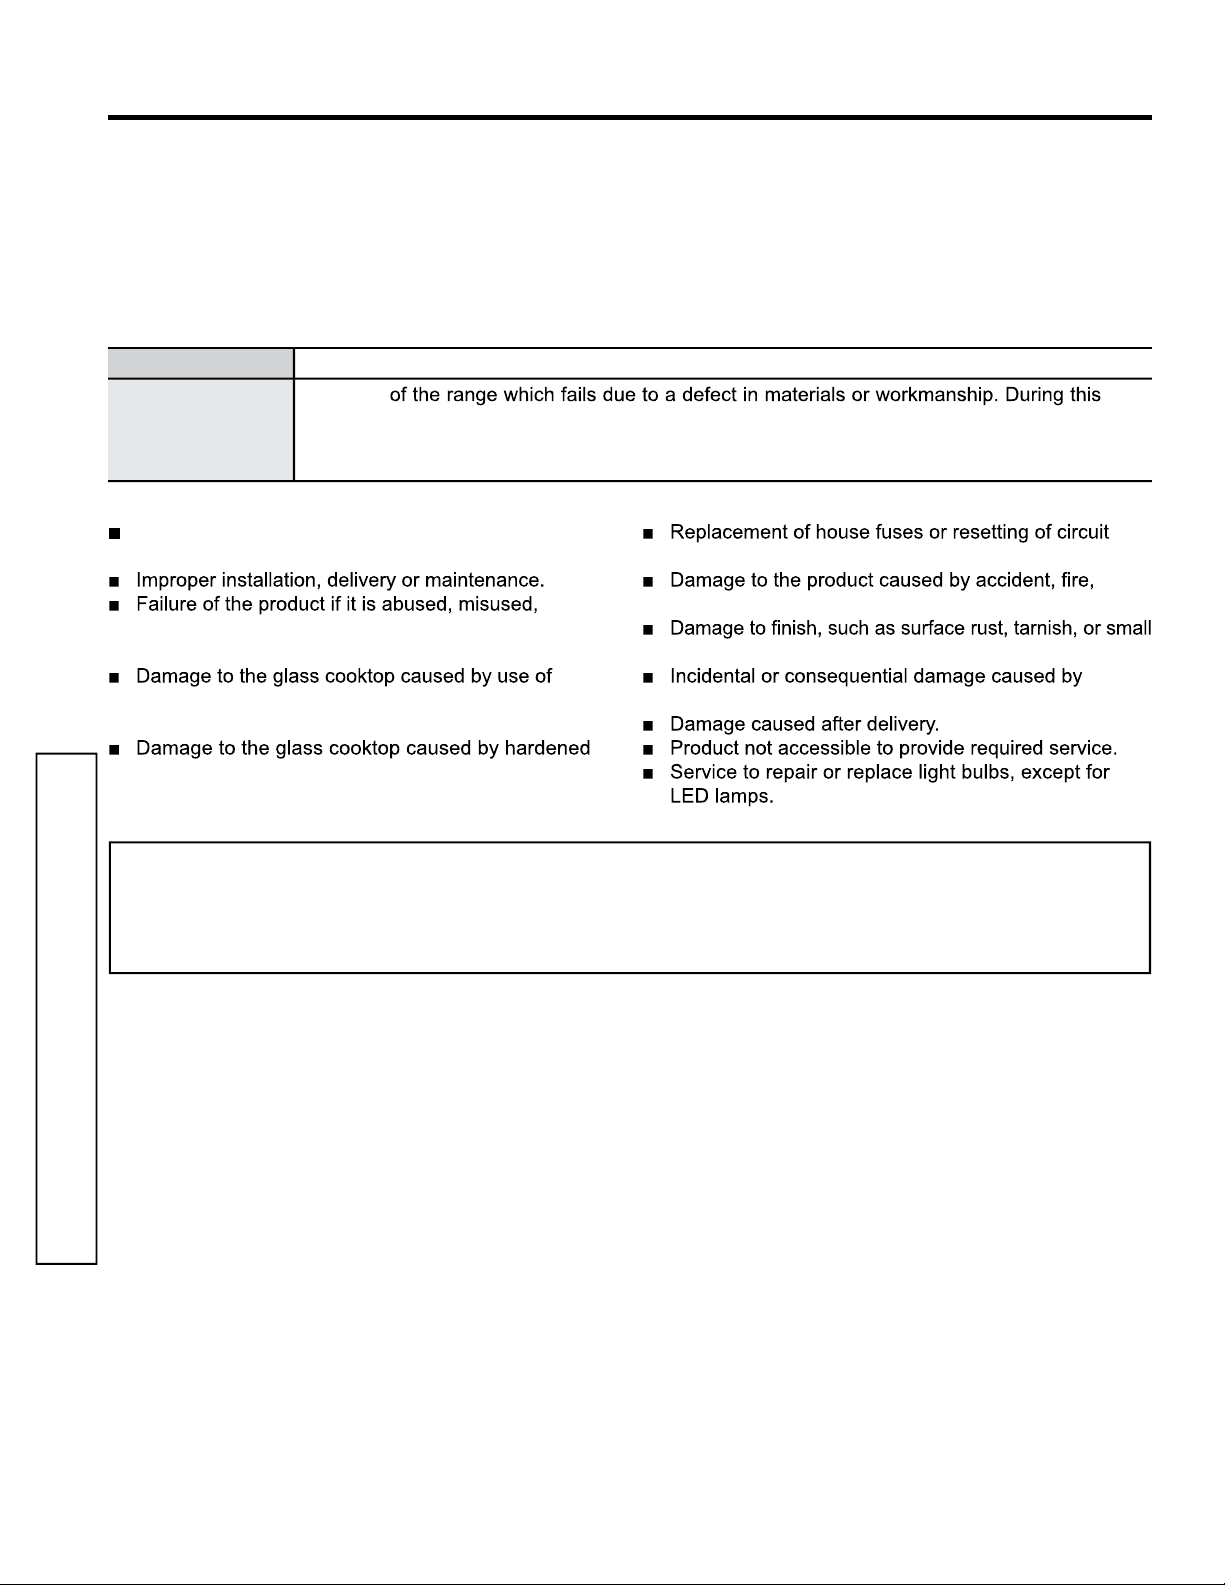
GE Appliances Electric Range Warranty
GEAppliances.ca
All warranty service is provided by our Factory Service Centers, or an authorized Customer Care® technician. To schedule
service online, visit us at
model number available when calling for service.
Servicing your appliance may require the use of the onboard data port for diagnostics. This gives a GE Appliances factory
service technician the ability to quickly diagnose any issues with your appliance and helps GE Appliances improve its
products by providing GE Appliances with information on your appliance. If you do not want your appliance data to be
WARRANTY
sent to GE Appliances, please advise your technician not to submit the data to GE Appliances at the time of service.
For the period of MC Comercial Will Provide:
One year
From the date
of the original
purchase
What MC Comercial will not cover:
Service trips to your home to teach you how to use
the product.
modified or used for other than the intended purpose
or used commercially.
www.GEAppliances.ca,
Any part
limited one-year warranty, MC Comercial will provide, free of charge, all labor and in-home
service to replace the defective part.
or call 1.800.561.3344. Please have your serial number and your
breakers.
floods or acts of God.
blemishes not reported within 48 hours of delivery.
cleaners other than the recommended cleaning
creams and pads.
spills of sugary materials or melted plastic that
are not cleaned according to the directions in the
Owner's Manual.
possible defects with this appliance.
EXCLUSION OF IMPLIED WARRANTIES
Your sole and exclusive remedy is product repair as provided in this Limited Warranty. Any implied warranties,
including the implied warranties of merchantability or fitness for a particular purpose, are limited to one year or
the shortest period allowed by law.
This warranty is extended to the original purchaser and any succeeding owner for products purchased in Canada
for home use within Canada. If the product is located in an area where service by a GE Authorized Servicer is not
available, you may be responsible for a trip charge or you may be required to bring the product to an Authorized
GE Service location.
Some provinces do not allow the exclusion or limitation of incidental or consequential damages. This warranty gives
you specific legal rights, and you may also have other rights which vary from province to province. To know what your
legal rights are, consult your local or provincial consumer affairs office.
Staple your receipt here. Proof of the original purchase
date is needed to obtain service under the warranty.
Warrantor: MC Commercial, Burlington, ON, L7R 5B6
26
Page 27
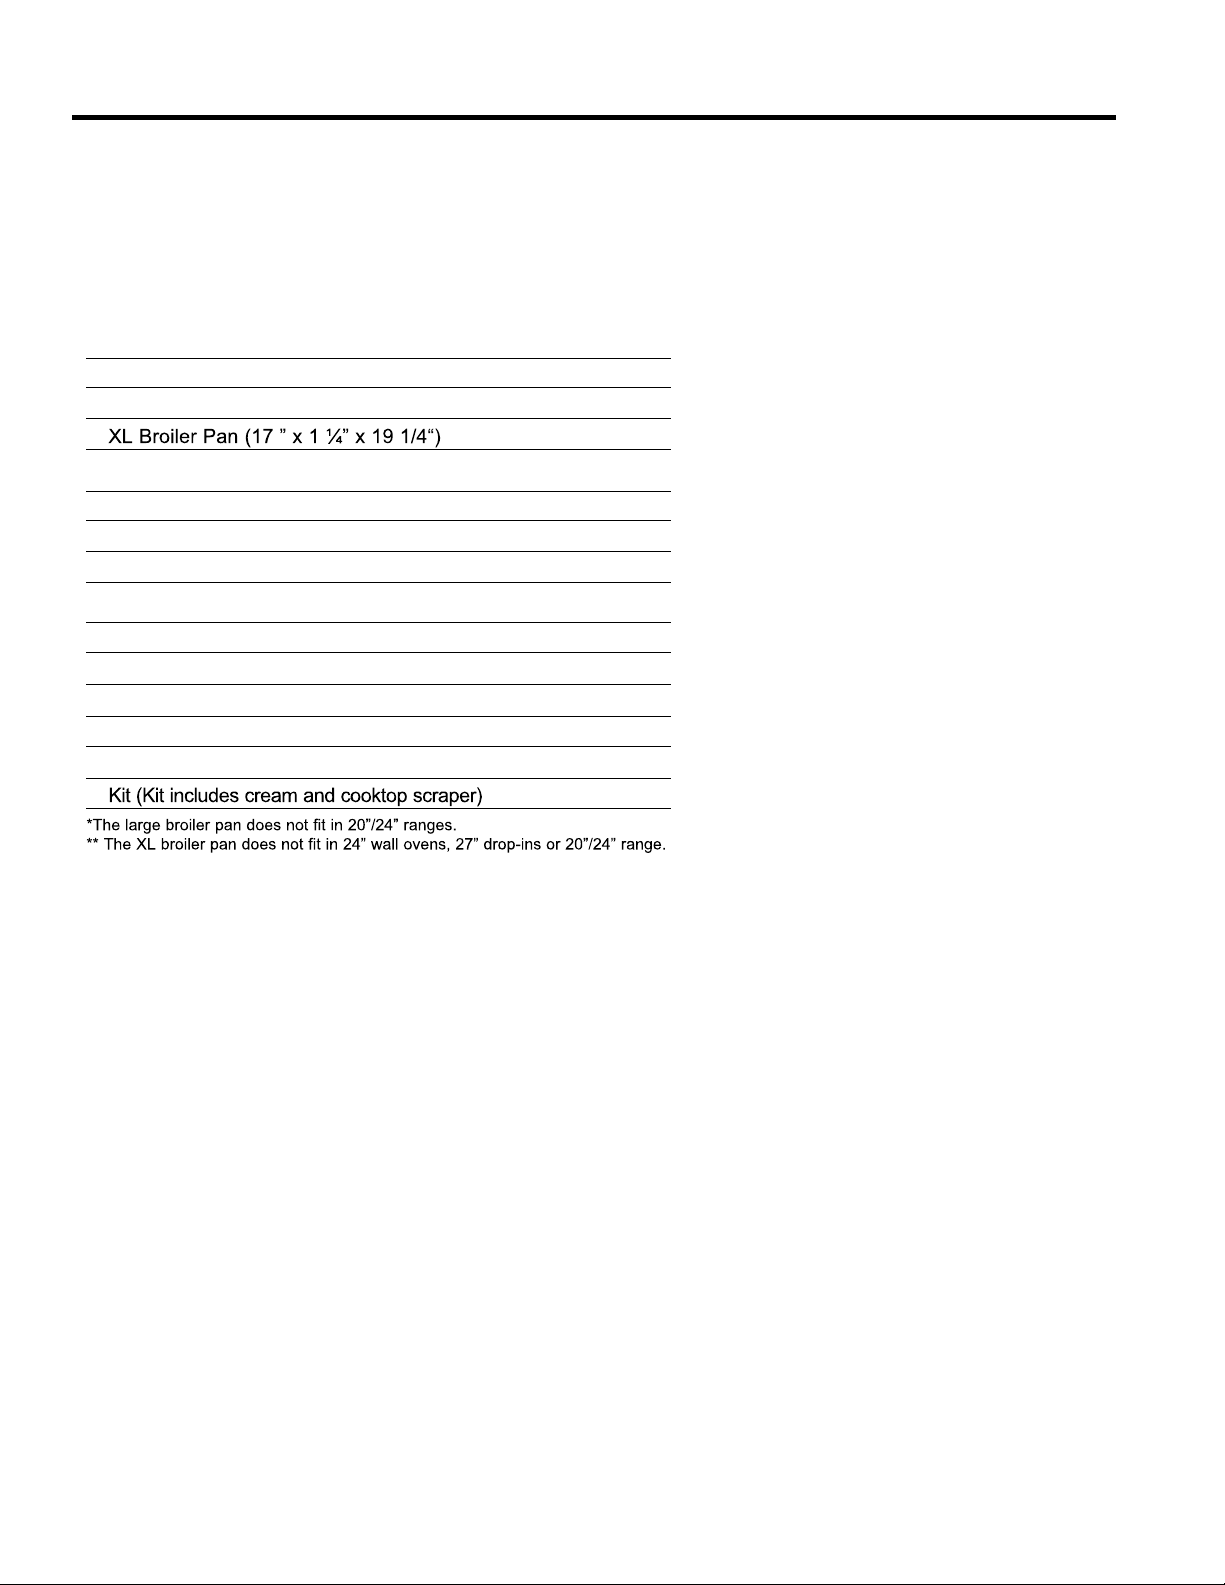
Accessories
Looking For Something More?
GE Appliances offers a variety of accessories to
improve your cooking and maintenance experiences!
Refer to the Consumer Support page for phone numbers
and website information.
The following products and more are available:
Accessories
Small Broiler Pan (8 ¾ ” x 1 ¼” x 13 ½ “)
Large Broiler Pan (12 ¾ ” x 1 ¼” x 16 ½ “)
Parts
Oven racks
Oven elements
Light bulbs
Cleaning Supplies
CitruShine™ Stainless Steel Wipes
CERAMA BRYTE®Stainless Steel Appliance Cleaner
CERAMA BRYTE® Cleaning Pads for Ceramic Cooktops
CERAMA BRYTE®Ceramic Cooktop Cleaner
CERAMA BRYTE® Ceramic Cooktop Scraper
ACCESSORIES
27
Page 28
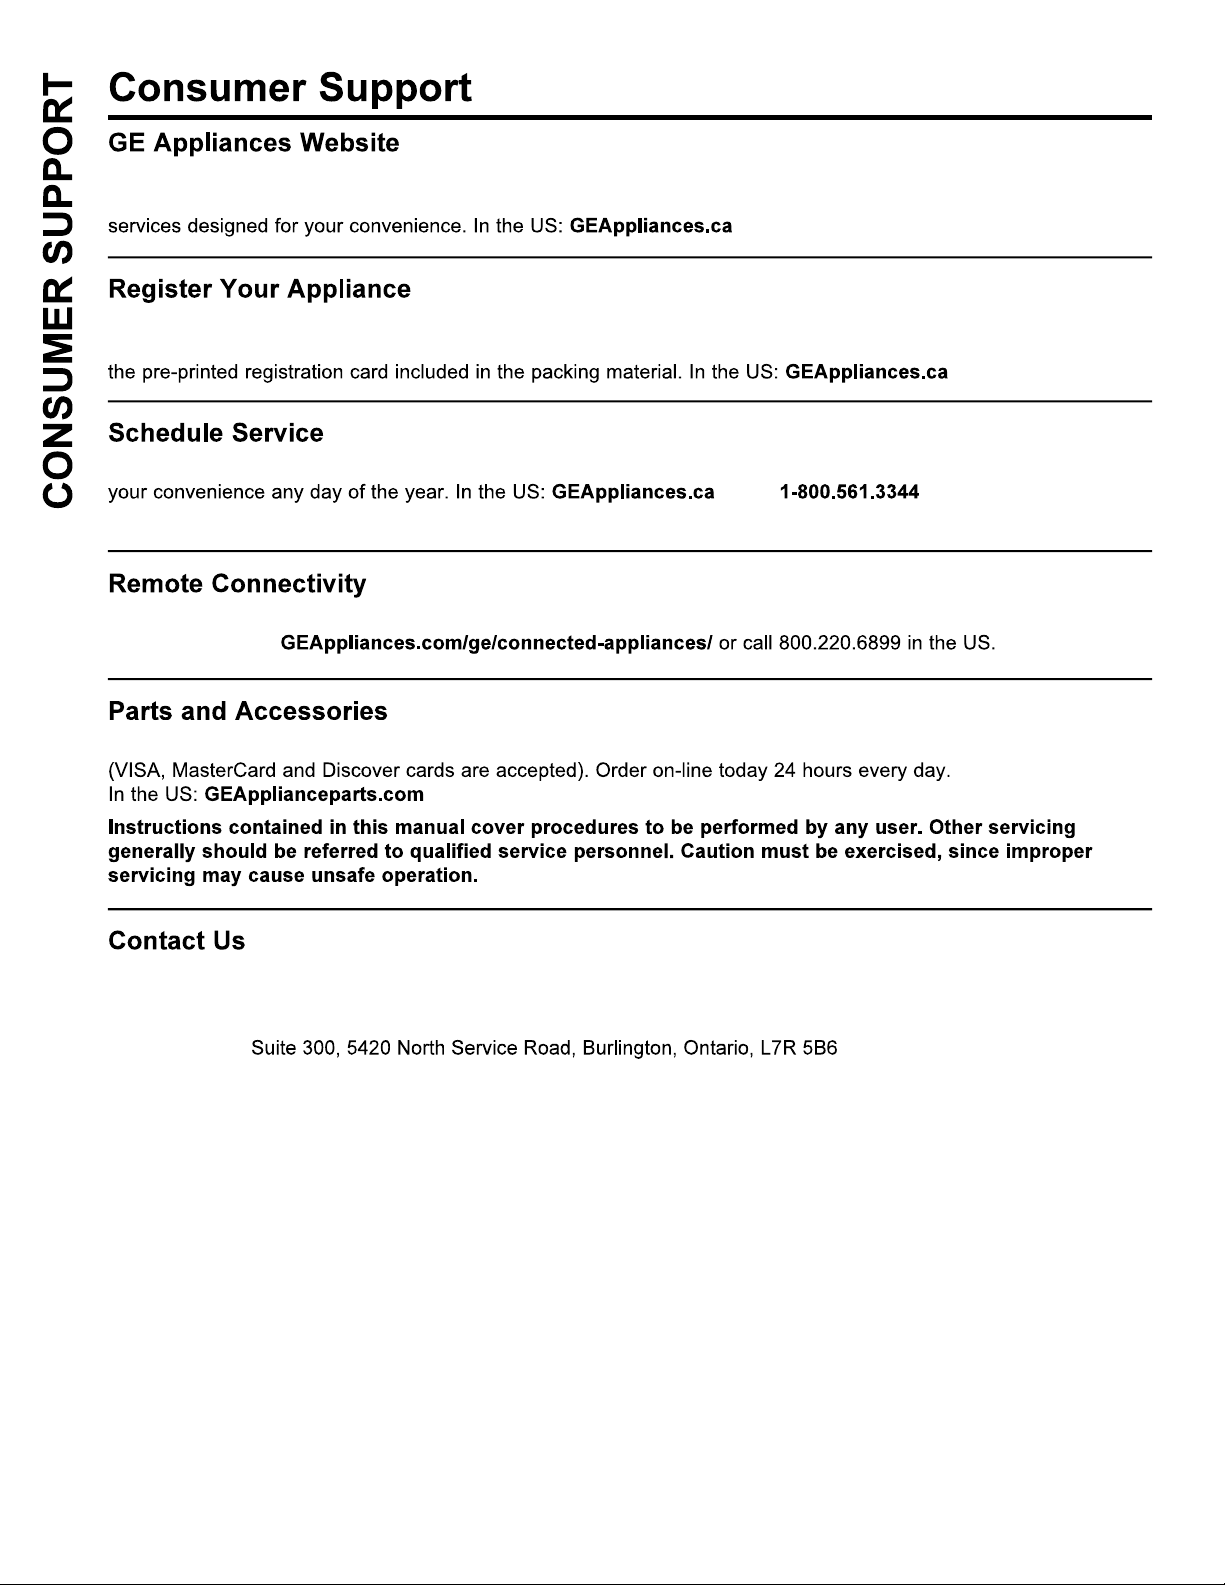
Have a question or need assistance with your appliance? Try the GE Appliances Website 24 hours a day, any day
of the year! You can also shop for more great GE Appliances products and take advantage of all our on-line support
Register your new appliance on-line at your convenience! Timely product registration will allow for enhanced
communication and prompt service under the terms of your warranty, should the need arise. You may also mail in
Expert GE Appliances repair service is only one step away from your door. Get on-line and schedule your service at
or call during normal business
hours.
For assistance with wireless network connectivity (for models with remote enable),
visit our website at
Individuals qualified to service their own appliances can have parts or accessories sent directly to their homes
or by phone at 877.959.8688 during normal business hours.
If you are not satisfied with the service you receive from GE Appliances, contact us on our Website with all the
details including your phone number, or write to:
MC Comercial |
28
Printed in Mexico
 Loading...