

Page 1

Safety Instructions . . . . . . . .2–5
Operating Instructions
Clock and Timer . . . . . . . . . . .14
Control Lockout . . . . . . . . . . .14
Controls . . . . . . . . . . . . . . . . . . .6
Oven . . . . . . . . . . . . . . . . .12, 13
Sabbath Feature . . . . . . . . .10, 11
Self-Cleaning Oven . . . . . .17, 18
Special Features . . . . . . . . . . .7–9
Thermostat . . . . . . . . . . . . . . .16
Timed Baking
and Roasting
. . . . . . . . . . . . . .15
Care and Cleaning
Broiler Pan and Grid . . . . . . . .20
Control Panel . . . . . . . . . . . . .20
Glass Surfaces . . . . . . . . . . . . .20
Heating Elements . . . . . . . . . .18
Lift-Off Oven Door . . . . . . . . .19
Light Bulb . . . . . . . . . . . . . . . .21
Painted Surfaces . . . . . . . . . . .20
Shelves . . . . . . . . . . . . . . . . . . .20
Stainless Steel Surfaces . . . . . .21
Troubleshooting Tips . . . .22–24
Consumer Support
Consumer Support . . . . . . . . .28
Product Registration . . . . .25, 26
Warranty . . . . . . . . . . . . . . . . .27
29-5510 12-05 JR
JCKP20
www.geappliances.ca
Wall Oven
Built-In Electric
Write the model and serial
numbers here:
Model # ________________
Serial # ________________
You can find them on a label
on the front of the lower oven
behind the oven door.
Owner’s Manual
Page 2
Safety Instructions
Operating Instructions
Care and CleaningTroubleshooting TipsConsumer Support
2
IMPORTANT SAFETY INFORMATION.
READ ALL INSTRUCTIONS BEFORE USING.
WARNING!
For your safety, the information in this manual must be followed to minimize the risk of fire or
explosion, electric shock, or to prevent property damage, personal injury, or loss of life.
IMPORTANT SAFETY NOTICE
The California Safe Drinking Water and Toxic Enforcement Act requires the Governor of California to
publish a list of substances known to the state to cause cancer, birth defects or other reproductive
harm, and requires businesses to warn customers of potential exposure to such substances.
The fiberglass insulation in self-clean ovens gives off a very small amount of carbon monoxide during
the cleaning cycle. Exposure can be minimized by venting with an open window or using a ventilation
fan or hood.
Page 3
3
Safety Instructions
Operating Instructions Care and Cleaning
Troubleshooting Tips Consumer Support
When using electrical appliances, basic safety precautions should be followed, including the following:
■ Use this appliance only for its intended
purpose as described in this Owner’s
Manual.
■ Be sure your appliance is properly installed
and grounded by a qualified technician in
accordance with the provided installation
instructions.
■ Do not attempt to repair or replace any
part of your oven unless it is specifically
recommended in this manual. All other
servicing should be referred to a qualified
technician.
■ Have the installer show you the location of
the circuit breaker or fuse. Mark it for easy
reference.
■ Before performing any service, disconnect
the oven power supply at the household
distribution panel by removing the fuse or
switching off the circuit breaker.
■ Do not leave children alone—children
should not be left alone or unattended in
an area where an appliance is in use. They
should never be allowed to sit or stand on
any part of the appliance.
■ Do not allow anyone to climb, stand or
hang on the door. They could damage the
oven or cause severe personal injury.
■ Be sure the oven is securely installed in a
cabinet that is firmly attached to the house
structure. Never allow anyone to climb, sit,
stand or hang on the oven door.
■ Never leave the oven door open when you
are not watching the oven.
■ Always keep combustible wall covering,
curtains or drapes a safe distance from
your oven.
■ Always keep dish towels, dishcloths, pot
holders and other linens a safe distance
from your oven.
■ Always keep wooden and plastic utensils
and canned food a safe distance away from
your oven.
■ Teach children not to play with the
controls or any other part of the oven.
■ Large scratches or impacts to glass doors
can lead to broken or shattered glass.
SAFETY PRECAUTIONS
www.geappliances.ca
Page 4
4
Safety Instructions
Operating Instructions
Care and CleaningTroubleshooting TipsConsumer Support
IMPORTANT SAFETY INFORMATION.
READ ALL INSTRUCTIONS BEFORE USING.
■ Do not store flammable materials in
an oven.
■
CAUTION: Items of interest to
children should not be stored in cabinets
above an oven; children climbing on the
oven to reach items could be seriously
injured.
■ Never wear loose-fitting or hanging
garments while using the appliance. Be
careful when reaching for items stored
in cabinets over the oven. Flammable
material could be ignited if brought in
contact with hot surfaces or heating
elements and may cause severe burns.
■ Use only dry pot holders—moist or damp
pot holders on hot surfaces may result in
burns from steam. Do not let pot holders
touch hot heating elements. Do not use a
towel or other bulky cloth.
■ For your safety, never use your appliance
for warming or heating the room.
■ Do not let cooking grease or other
flammable materials accumulate in
or near the oven.
■ Do not use water on grease fires.
Never pick up a flaming pan. Turn the
controls off.
■ Flame in the oven can be smothered
completely by closing the oven door and
turning the oven off or by using a multipurpose dry chemical or foam-type fire
extinguisher.
■ Never leave jars or cans of fat drippings in
or near your oven.
■ Do not store or use combustible materials,
gasoline or other flammable vapors and
liquids in the vicinity of this or any other
appliance.
■ Stand away from the oven when opening
the oven door. Hot air or steam which
escapes can cause burns to hands, face
and/or eyes.
■ Do not heat unopened food containers.
Pressure could build up and the container
could burst, causing an injury.
■ Keep the oven vent unobstructed.
■ Keep the oven free from grease buildup.
■ Place the oven shelf in the desired position
while the oven is cool. If shelves must be
handled when hot, do not let pot holder
contact the heating elements.
■ When using cooking or roasting bags
in the oven, follow the manufacturer’s
directions.
■ Do not touch the heating elements or the
interior surface of the oven. These surfaces
may be hot enough to burn even though
they are dark in color. During and after
use, do not touch, or let clothing or other
flammable materials contact any interior
area of the oven; allow sufficient time for
cooling first.
■ Potentially hot surfaces include oven vent
openings, surfaces near the openings,
crevices around the oven door, the edges
of the window and metal trim parts above
the door.
■ REMEMBER : The inside surface of the oven
may be hot when the door is opened.
WARNING!
SAFETY PRECAUTIONS
Page 5
5
Safety Instructions
Operating Instructions Care and Cleaning
Troubleshooting Tips Consumer Support
www.geappliances.ca
■ Pulling out the shelf to the stop-lock is a
convenience in lifting heavy foods. It is
also a precaution against burns from
touching hot surfaces of the door or
oven walls.
■ Do not use the oven to dry newspapers.
If overheated, they can catch on fire.
■ Do not use the oven for a storage area.
Items stored in an oven can ignite.
■ Do not leave paper products, cooking
utensils or food in the oven when not
in use.
■ After broiling, always take the broiler pan
out of the oven and clean it. Leftover
grease in the broiler pan can catch fire
next time you use the pan.
■ Clean only parts listed in this Owner’s
Manual.
■ Do not use aluminum foil to line oven
bottoms, except as suggested in this
manual. Improper installation of
aluminum foil may result in a risk
of electric shock or fire.
Cook meat and poultry thoroughly—meat to at least an INTERNAL temperature of 160°F and poultry
to at least an INTERNAL temperature of 180°F. Cooking to these temperatures usually protects against
foodborne illness.
COOK MEAT AND POULTRY THOROUGHLY…
■ Do not clean the door gasket. The door
gasket is essential for a good seal. Care
should be taken not to rub, damage or
move the gasket.
■ Do not use oven cleaners. No commercial
oven cleaner or oven liner protective
coating of any kind should be used in or
around any part of the oven. Residue from
oven cleaners will damage the inside of the
oven when the self-clean cycle is used.
■ Before self-cleaning the oven, remove the
broiler pan, grid and other cookware.
■ Be sure to wipe up excess spillage before
starting the self-cleaning operation.
■ If the self-cleaning mode malfunctions,
turn the oven off and disconnect the
power supply. Have it serviced by a
qualified technician.
SELF-CLEANING OVEN
READ AND FOLLOW THIS SAFETY INFORMATION CAREFULLY.
SAVE THESE INSTRUCTIONS
Page 6
6
Safety Instructions
Operating Instructions
Care and CleaningTroubleshooting TipsConsumer Support
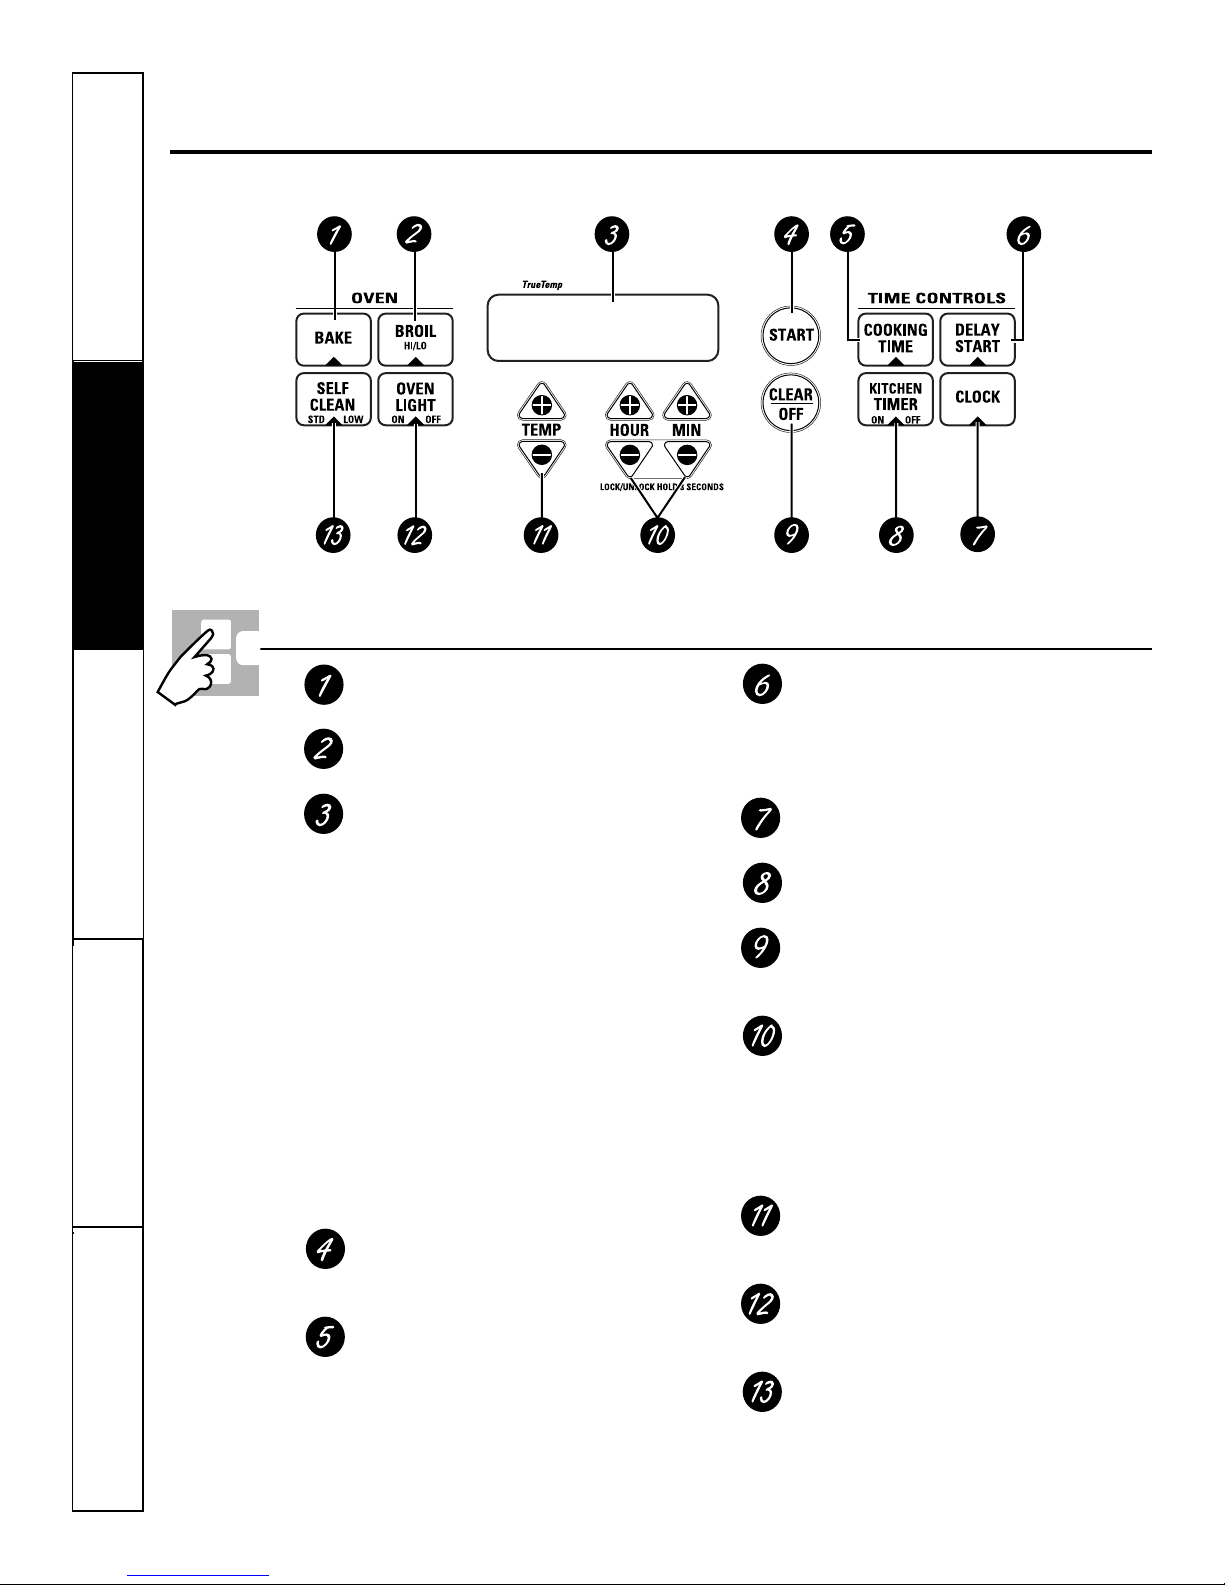
Using the oven controls.
Throughout this manual, features and appearance may vary from your model.
Oven Control, Clock and Timer Features and Settings
BAKE Pad
Press this pad to select the bake function.
BROIL HI/LO Pad
Press this pad to select the broil function.
Display
Shows the time of day, oven temperature,
whether the oven is in the bake, broil or
self-cleaning mode, and the times set for
the timer or automatic oven operations.
If “F— and a number or letter” flash in the display
and the oven control signals, this indicates a
function error code. Press the CLEAR/OFF pad. Allow
the oven to cool for one hour. Put the oven back into
operation. If the function error code repeats, disconnect
the power to the oven and call for service.
If your oven was set for a timed oven operation and a
power outage occurred, the clock and all programmed
functions must be reset.
The time of day will flash in the display when there
has been a power outage.
START Pad
Must be pressed to start any cooking or
cleaning function.
COOKING TIME Pad
Press this pad and then press the HOUR and
MIN + or – pads to set the amount of time
you want your food to cook. The oven will
shut off when the cooking time has run
out, unless the Cook and Hold feature
was set.
DELAY START Pad
Use along with COOKING TIME or SELF
CLEAN STD/LOW pads to set the oven to
start and stop automatically at a time
you set.
CLOCK Pad
Press this pad before setting the clock.
KITCHEN TIMER ON/OFF Pad
Press this pad to select the timer feature.
CLEAR/OFF Pad
Press this pad to cancel ALL oven
operations except the clock and timer.
HOUR and MIN + and – Pads
Press these pads to set times up to 9 hours
and 59 minutes—for example, the time of
day on the clock, the timer, the starting
and length of cooking time for timed bake
and the starting and length of cleaning
time for self-clean.
TEMP + and – Pads
Press these pads to set the cooking
temperature you want to use.
OVEN LIGHT ON/OFF Pad
Press this pad to turn the oven light
on or off.
SELF CLEAN STD/LOW Pad
Press this pad to select the self-cleaning
function. See the Using the self-cleaning
oven section.
Page 7
7
Safety Instructions
Operating Instructions Care and Cleaning
Troubleshooting Tips Consumer Support
Special features of your oven control. www.geappliances.ca
Your new touch pad control has additional features that you may choose to use. The following are the
features and how you may activate them.
The special feature modes can only be activated while the display is showing the time of day.
They remain in the control’s memory until the steps are repeated.
When the display shows your choice, press the START pad. The special features will remain in memory
after a power failure, except for the Sabbath feature, which will have to be reset.
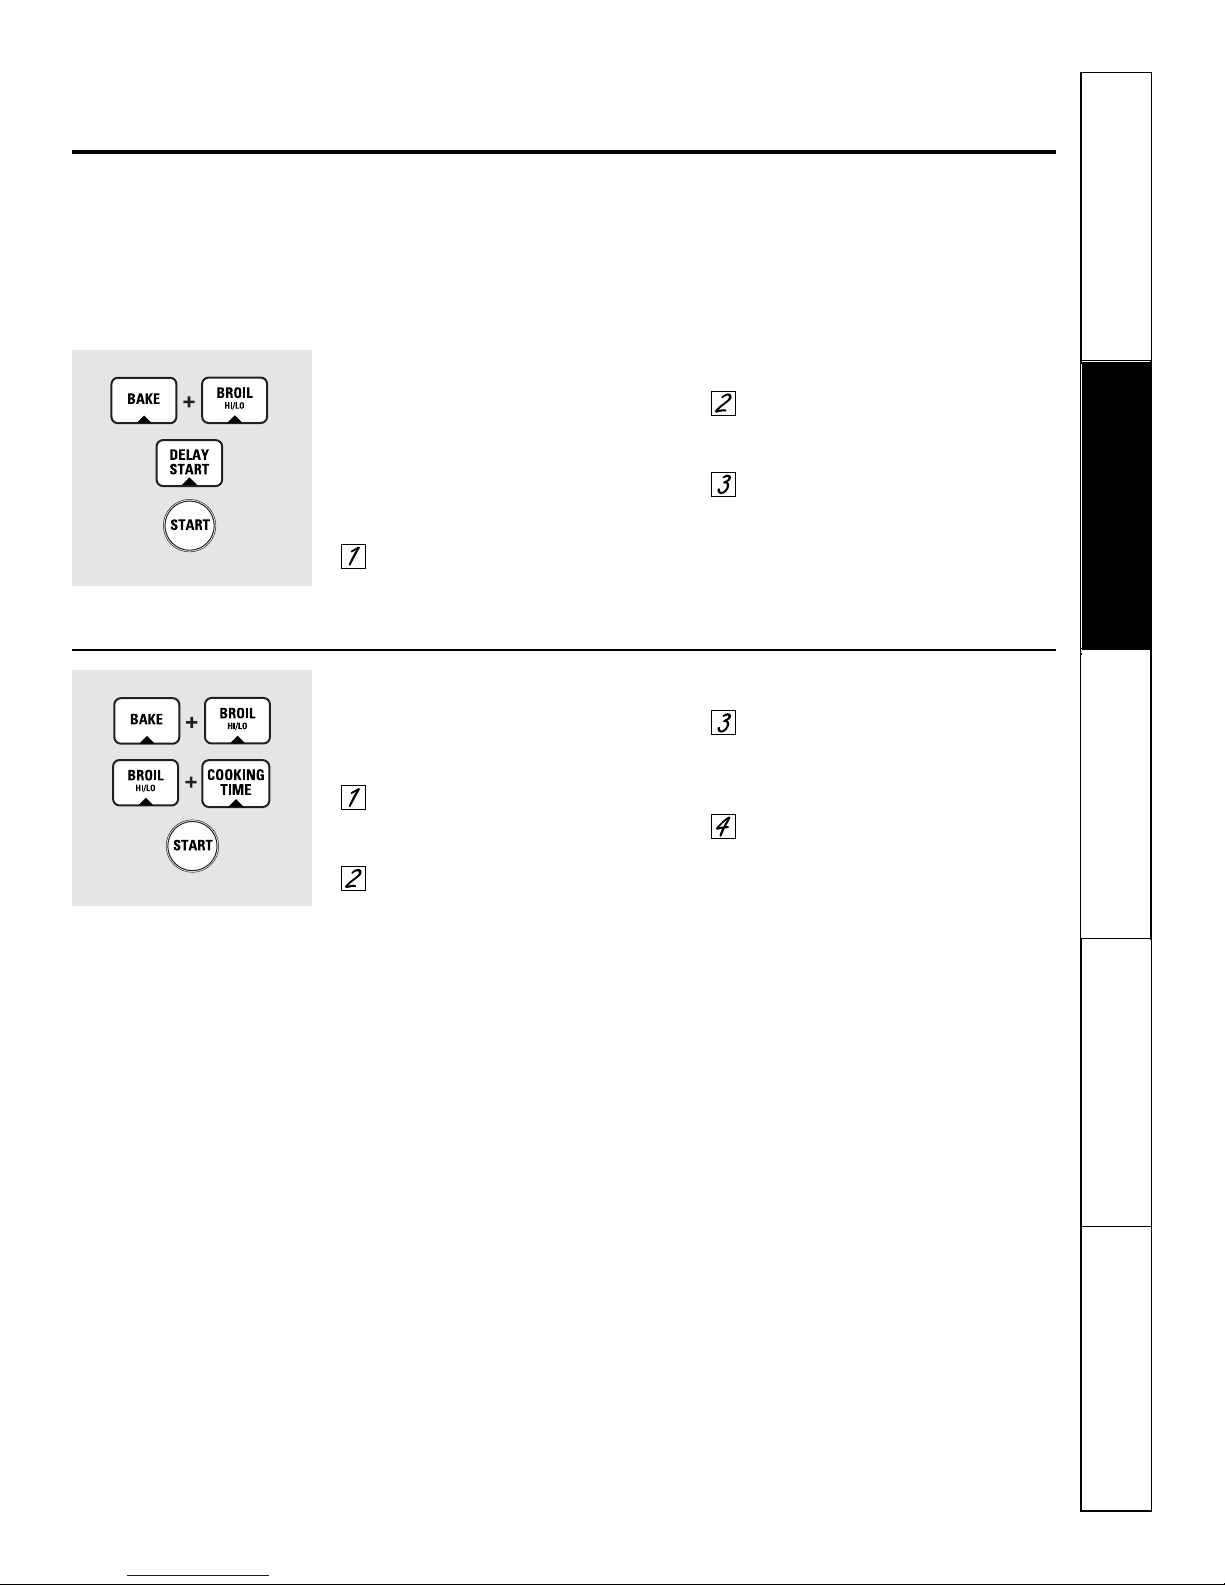
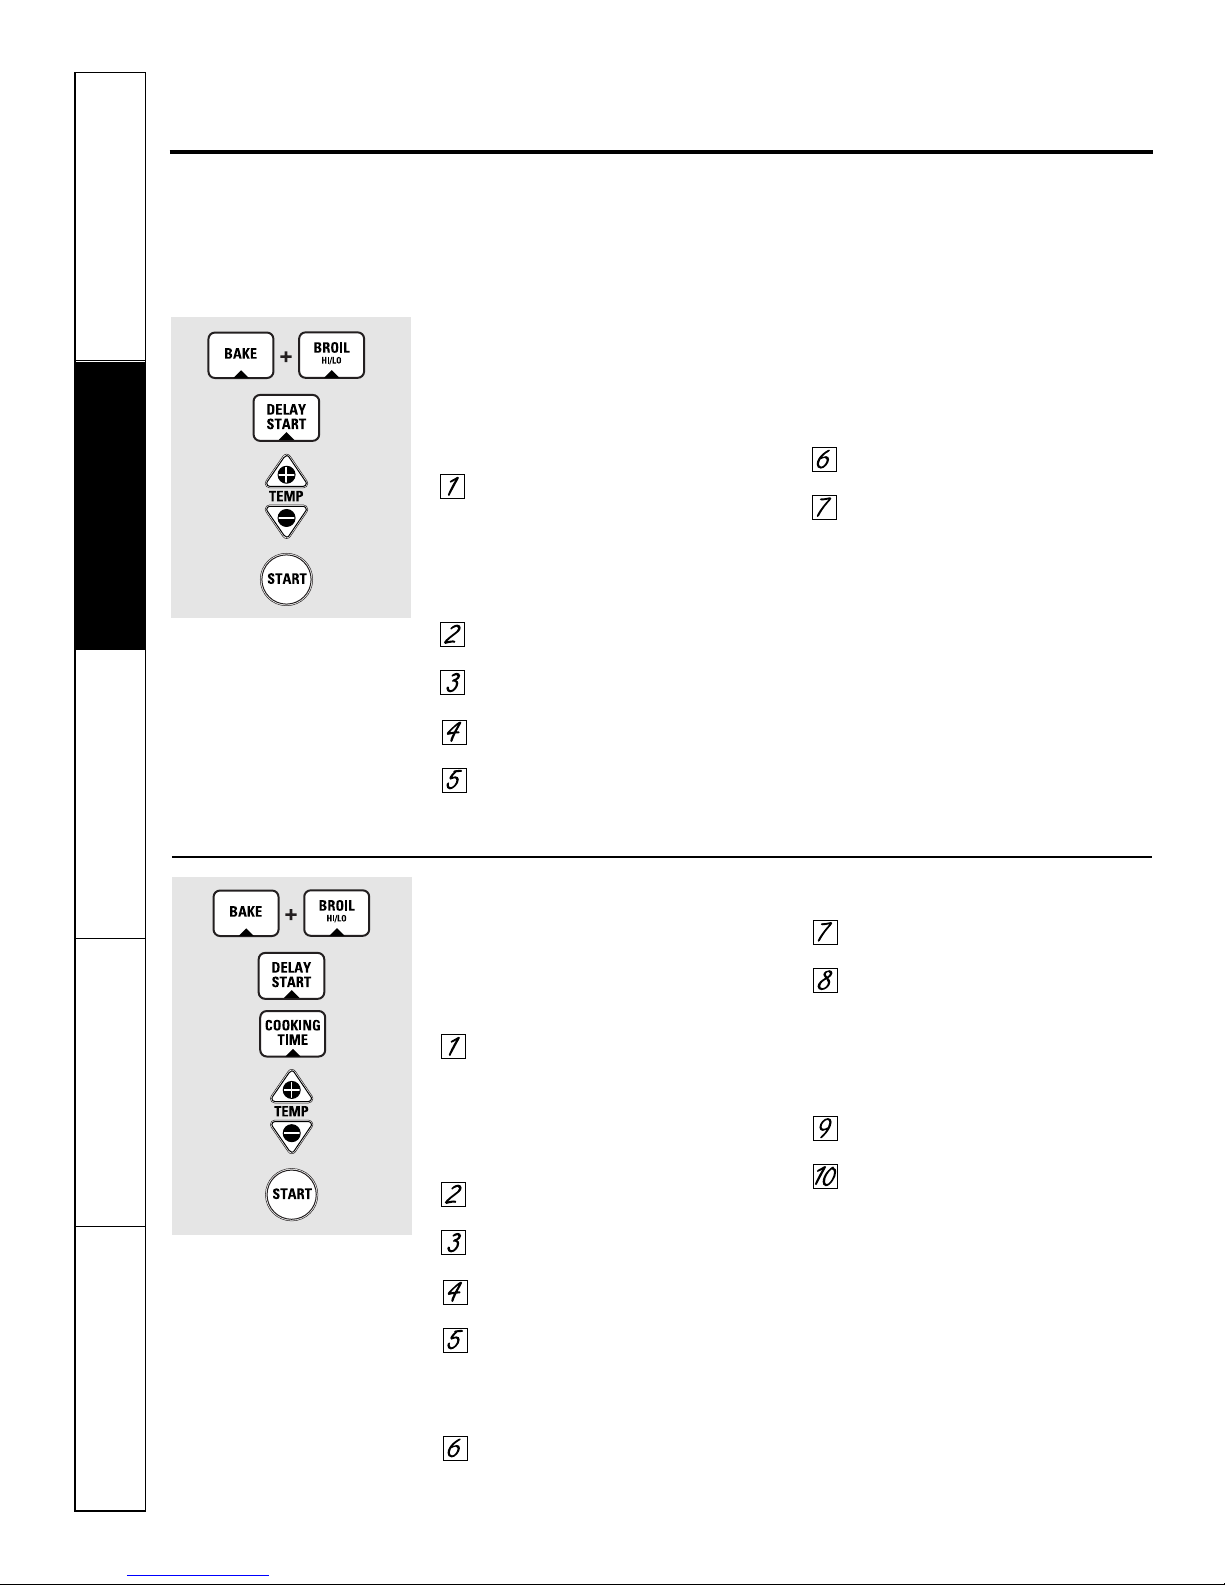
12-Hour Shutoff
With this feature, should you forget and leave the
oven on, the control will automatically turn off the
oven after 12 hours during baking functions or
after 3 hours during a broil function.
If you wish to turn off this feature, follow
the steps below.
Press the BAKE and BROIL HI/LO
pads at the same time for 3 seconds
until the display shows SF.
Press the DELAY START pad until
no shdn (no shutoff) appears in
the display.
Press the START pad to activate the
no shutoff and leave the control
set in this special features mode.
Fahrenheit or Celsius Temperature Selection
Your oven control is set to use the Fahrenheit
temperature selections but you may change this
to use the Celsius selections.
Press the BAKE and BROIL HI/LO
pads at the same time for 3 seconds
until the display shows SF.
Press the BROIL HI/LO and COOKING
TIME pads at the same time. The
display will show F (Fahrenheit).
Press the BROIL HI/LO and
COOKING TIME pads again at the
same time. The display will show
C (Centigrade).
Press the START pad.
Page 8
8
Safety Instructions
Operating Instructions
Care and CleaningTroubleshooting TipsConsumer Support
Special features of your oven control.
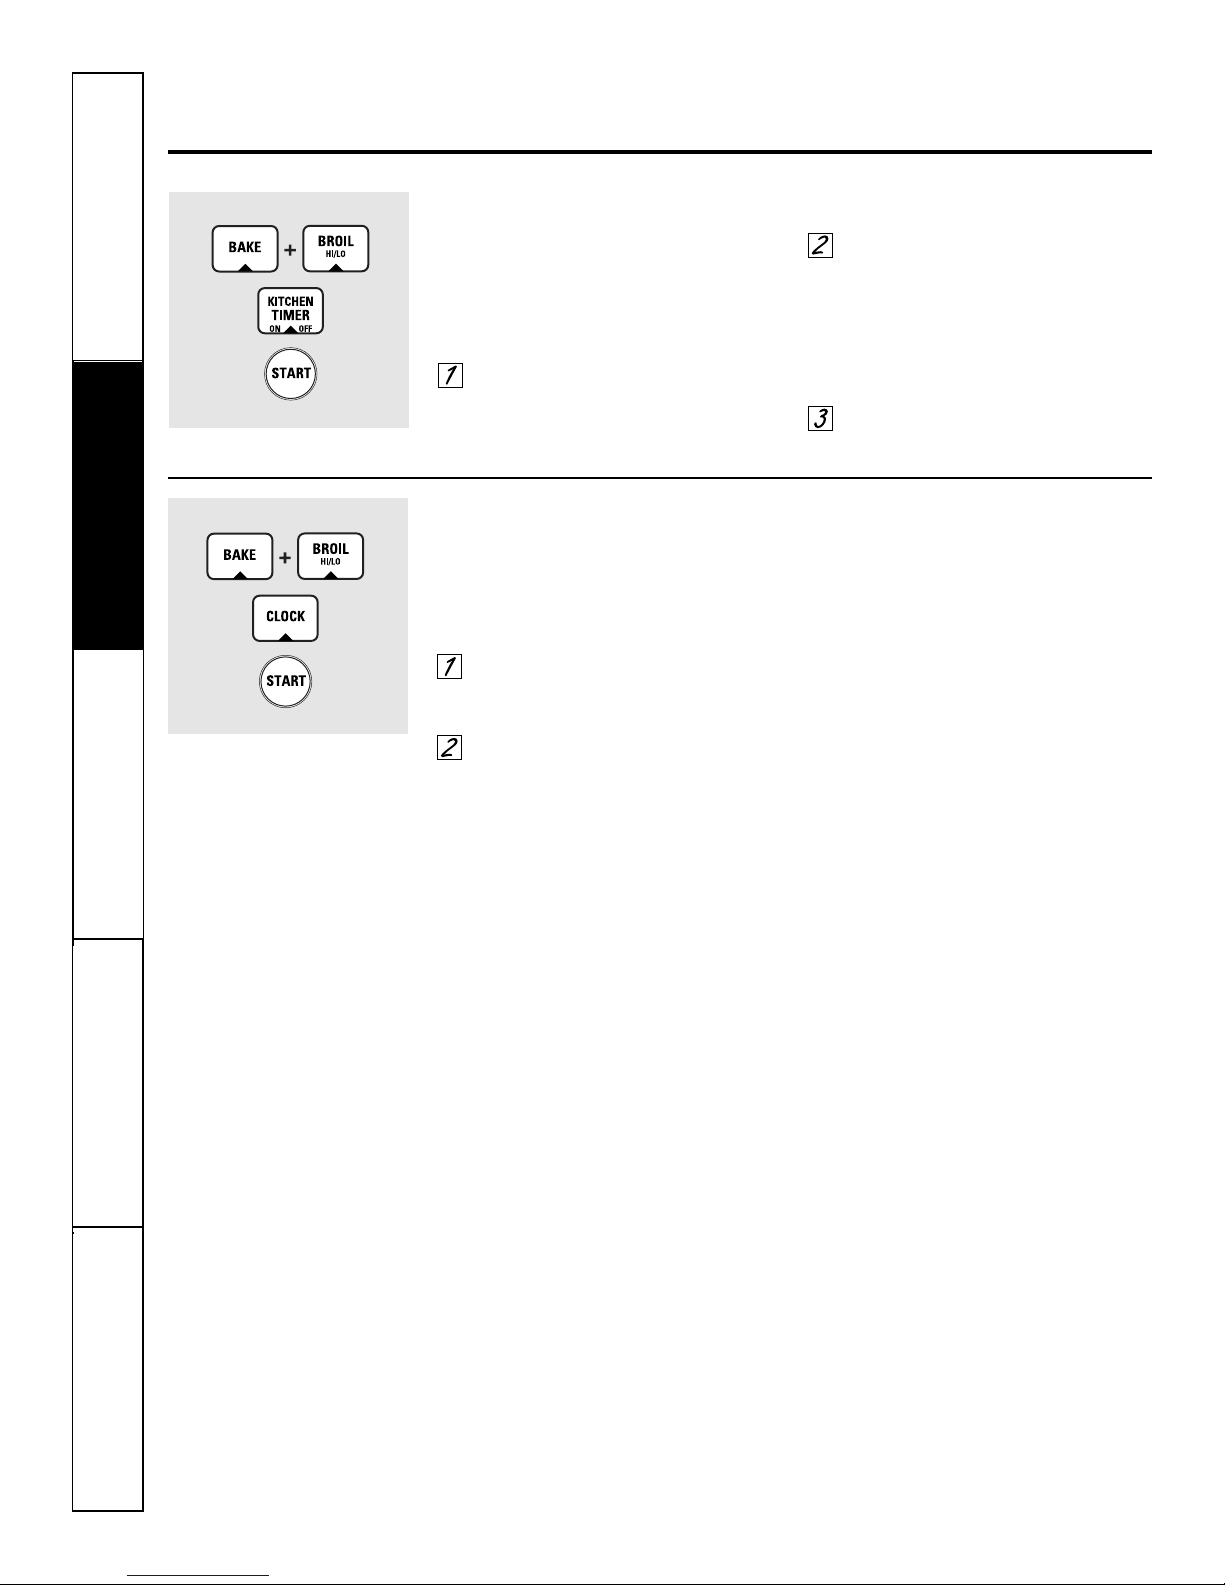
Tones at the End of a Timed Cycle
At the end of a timed cycle, 3 short beeps will
sound followed by one beep every 6 seconds until
the CLEAR/OFF pad is pressed. This continuous
6-second beep may be canceled.
To cancel the 6-second beep:
Press the BAKE and BROIL HI/LO
pads at the same time for 3 seconds
until the display shows SF.
Press the KITCHEN TIMER ON/OFF
pad. The display shows CON BEEP
(continuous beep). Press the
KITCHEN TIMER ON/OFF pad
again. The display shows BEEP.
(This cancels the one beep every
6 seconds.)
Press the START pad.
12-Hour, 24-Hour or Clock Blackout
Your control is set to use a 12-hour clock.
If you would prefer to have a 24-hour
military time clock or black out the clock
display, follow the steps below.
Press the BAKE and BROIL HI/LO
pads at the same time for 3 seconds
until the display shows SF.
Press the CLOCK pad once.
The display will show 12 hr. If this
is the choice you want, press the
START pad.
Press the CLOCK pad again to
change to the 24-hour military time
clock. The display will show 24 hr. If
this is the choice you want, press the
START pad.
Press the CLOCK pad again to
black out the clock display. The
display will show OFF. If this is
the choice you want, press the
START pad.
NOTE: If the clock is in the black-out mode, you
will not be able to use the Delay Start function.
Page 9
9
Safety Instructions
Operating Instructions Care and Cleaning
Troubleshooting Tips Consumer Support
www.geappliances.ca
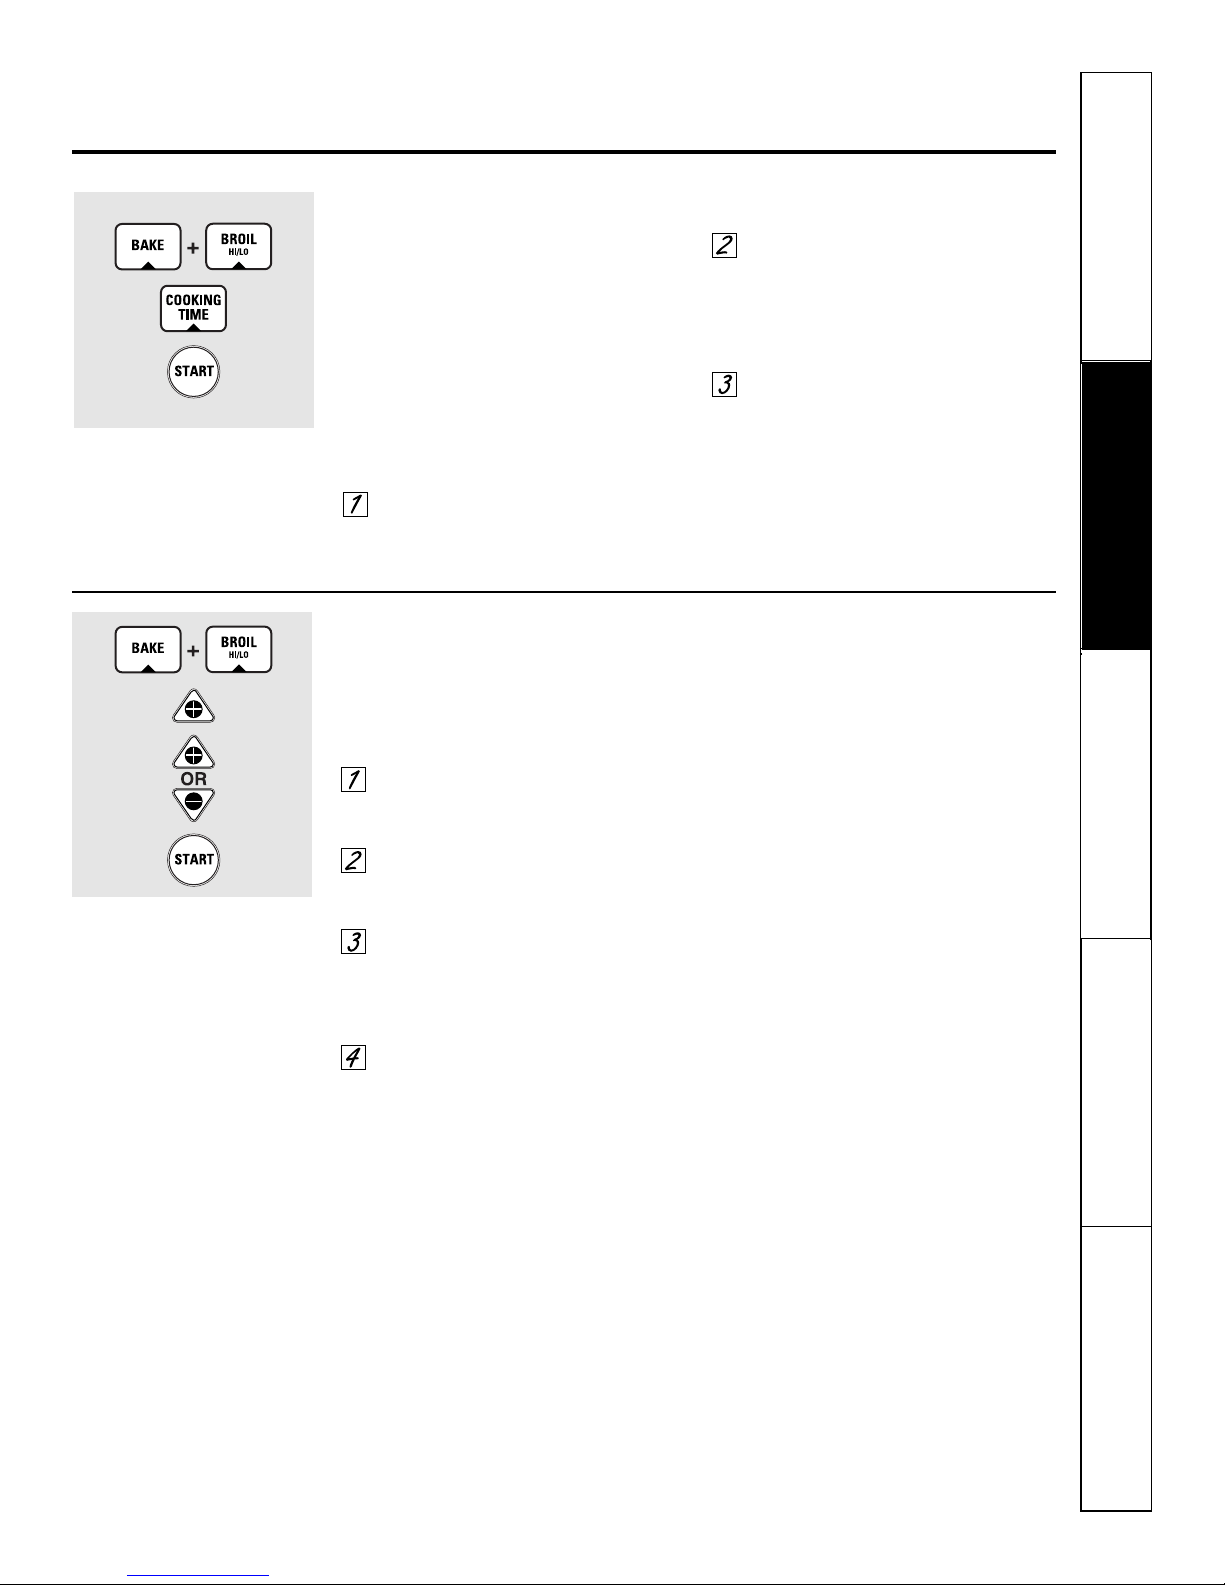
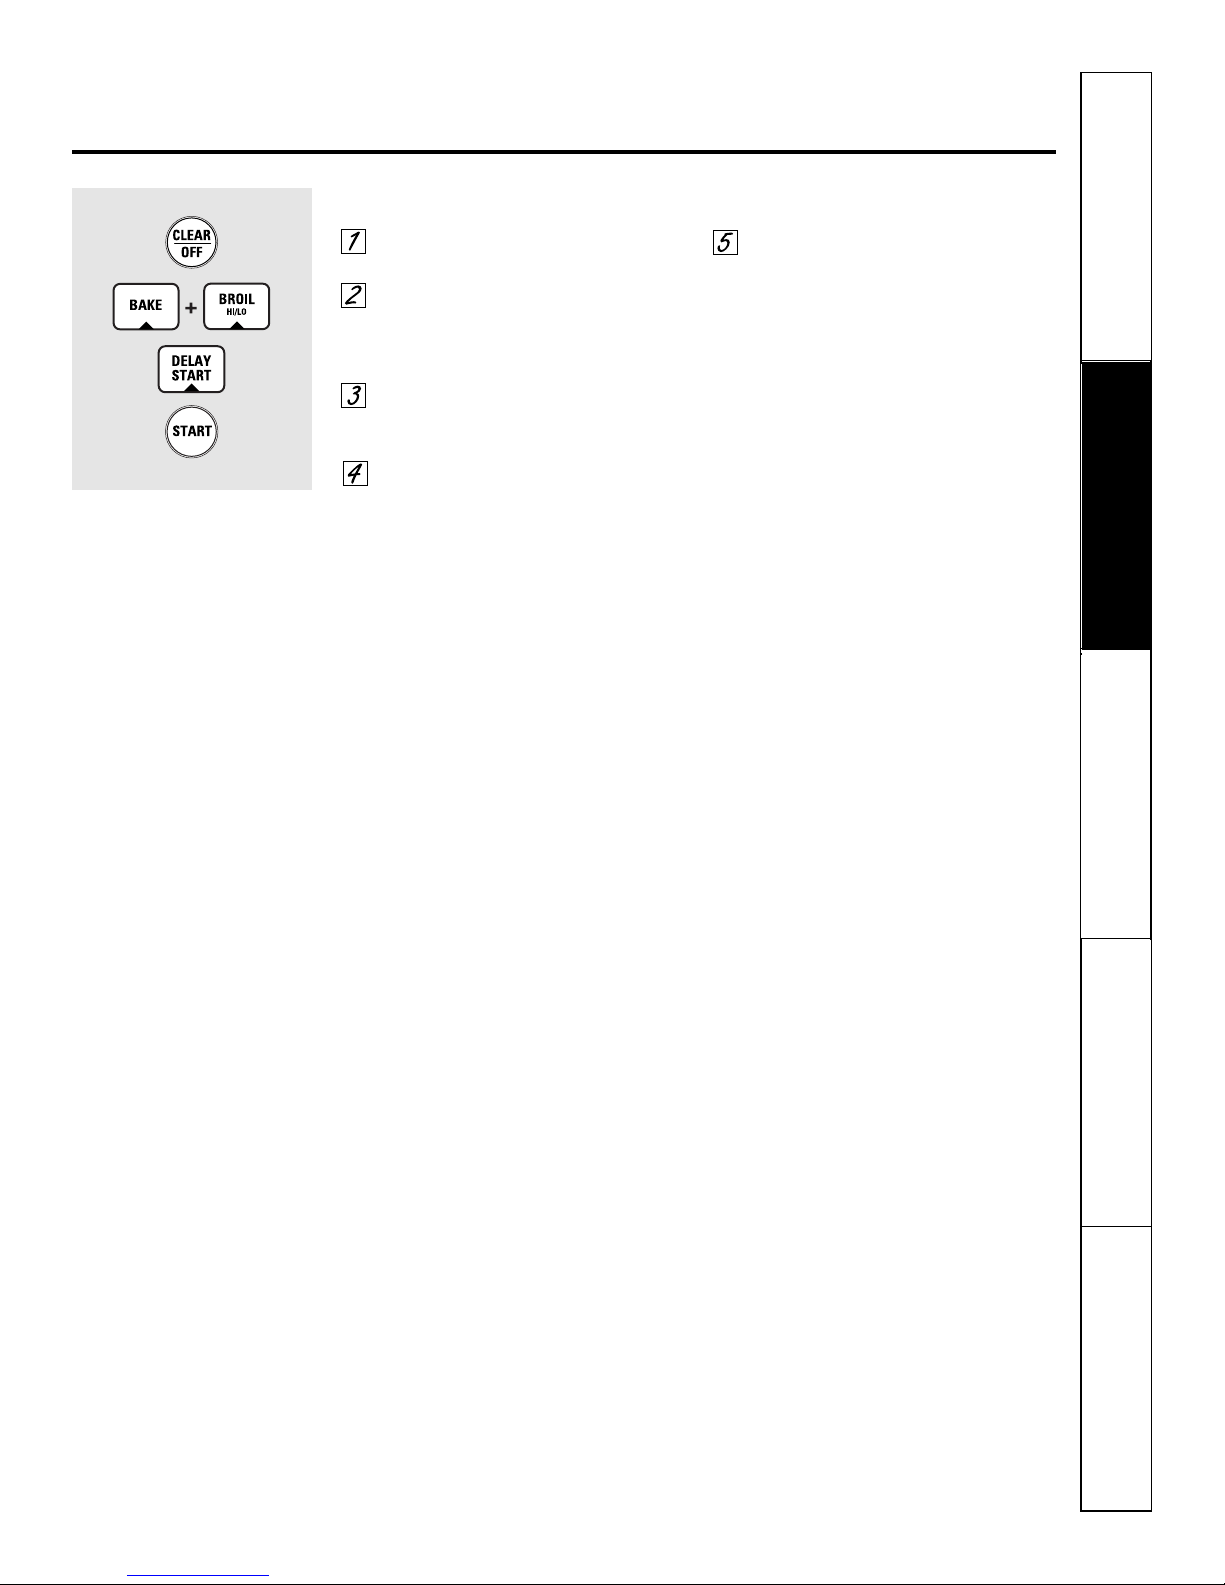
Cook and Hold
Your new control has a cook and hold feature that
keeps cooked foods warm for up to 3 hours after
the cooking function is finished.
NOTE: This feature can only be programmed to
work with Timed Baking or Roasting. (See the
Using the timed baking and roasting features
section.) After Timed Baking or Roasting has
automatically stopped, the programmed Cook
and Hold will automatically start.
To activate this feature, follow the steps
below.
Press the BAKE and BROIL HI/LO
pads at the same time for 3 seconds
until the display shows SF.
Press the COOKING TIME pad. The
display will show Hld OFF.
Press the COOKING TIME pad again
to activate the feature. The display
will show Hld ON.
Press the START pad to activate
the cook and hold feature and
leave the control set in this special
features mode.
Changing the Speed of the + or – Pads
As you use the + or – pads when setting a
time or temperature, you may notice the display
changes slowly. This special feature allows you
to change the speed. To set the speed you prefer,
follow the steps below.
Press the BAKE and BROIL HI/LO
pads at the same time for 3 seconds
until the display shows SF.
Press any + pad. The display will
show you a set speed between 1
and 5.
Press any + pad to increase the
speed up to the number 5.
Press any – pad to decrease the
speed down to the number 1.
Press START to activate the setting
and leave the control set in this
special features mode.
Page 10
10
Safety Instructions
Operating Instructions
Care and CleaningTroubleshooting Tips
Consumer Support
How to Set for Timed Baking/Roasting – Immediate Start and Automatic Stop
NOTE: To understand how the oven control works,
practice using regular (non-Sabbath) Immediate Start
and Automatic Stop before entering the Sabbath mode.
Make sure the clock shows the correct time
of day and the oven is off.
Press and hold both the BAKE and BROIL
HI/LO pads, at the same time, until the
display shows SF.
NOTE: If bake or broil appears in the
display, the BAKE and BROIL HI/LO pads
were not pressed at the same time. Press
the CLEAR/OFF pad and begin again.
Tap the DELAY START pad until SAb bAtH
appears in the display.
Press the START pad and ⊃ will appear
in the display.
Press the COOKING TIME pad.
Press the + or – pads to set the
desired length of cooking time between
1 minute and 9 hours and 59 minutes.
The cooking time that you entered will
be displayed.
Press the START pad.
Press the BAKE pad. No signal will
be given.
The preset starting temperature will
automatically be set to 350°F. Tap the
+ or – pads to increase or decrease the
temperature in 5°F increments. The
temperature can be set between 170°F
and 550°F. No signal or temperature
will be given.
Press the START pad.
After a random delay period of
approximately 30 seconds to 1 minute,
⊃ will appear in the display indicating
that the oven is baking/roasting. If ⊃
does not appear in the display, start
again at step 7.
To adjust the oven temperature, press the
BAKE pad and tap the + or – pads to increase
or decrease the temperature in 5° increments.
Press the START pad.
When cooking is finished, the display will
change from ⊃ to ⊃ and 0:00 will appear,
indicating that the oven has turned OFF but is
still set in Sabbath. Remove the cooked food.
⊃
⊃
⊃
Using the Sabbath Feature. (Designed for use on the Jewish Sabbath and Holidays.)
The Sabbath feature can be used for baking/roasting only. It cannot be used for broiling, self-cleaning,
or Delay Start cooking.
NOTE: The oven light comes on automatically (on some models) when the door is opened and goes off when the
door is closed. The bulb may be removed. See the Oven Light Bulb section. On models with a light switch on the
control panel, the oven light may be turned on and left on.
How to Set for Regular Baking/Roasting
NOTE: To understand how the oven control works,
practice using regular baking (non-Sabbath) before
entering Sabbath mode.
Make sure the clock shows the correct time
of day and the oven is off.
Press and hold both the BAKE and BROIL
HI/LO pads, at the same time, until the
display shows SF.
NOTE: If bake or broil appears in the
display, the BAKE and BROIL HI/LO pads
were not pressed at the same time. Press
the CLEAR/OFF pad and begin again.
Tap the DELAY START pad until
SAb bAtH appears in the display.
Press the START pad and ⊃ will appear
in the display.
Press the BAKE pad. No signal will
be given.
The preset starting temperature will
automatically be set to 350°F. Tap
the + or – pads to increase or decrease
the temperature in 5°F increments.
The temperature can be set between
170°F and 550°F. No signal or
temperature will be given.
Press the START pad.
After a random delay period of
approximately 30 seconds to 1 minute,
⊃ will appear in the display indicating
that the oven is baking/roasting. If ⊃
does not appear in the display, start
again at step 4.
To adjust the oven temperature, press
the BAKE pad and tap the + or – pads to
increase or decrease the temperature in 5°F
increments. Press the START pad.
NOTE: The CLEAR/OFF and COOKING TIME pads
are active during the Sabbath feature.
⊃
⊃
When the display shows ⊃ the
oven is set in Sabbath. When the
display shows ⊃ the oven is
baking/roasting.
⊃
When the display shows ⊃ the
oven is set in Sabbath. When the
display shows ⊃ the oven is
baking/roasting.
⊃
Page 11
11
Safety Instructions
Operating Instructions Care and Cleaning
Troubleshooting Tips Consumer Support
www.geappliances.ca
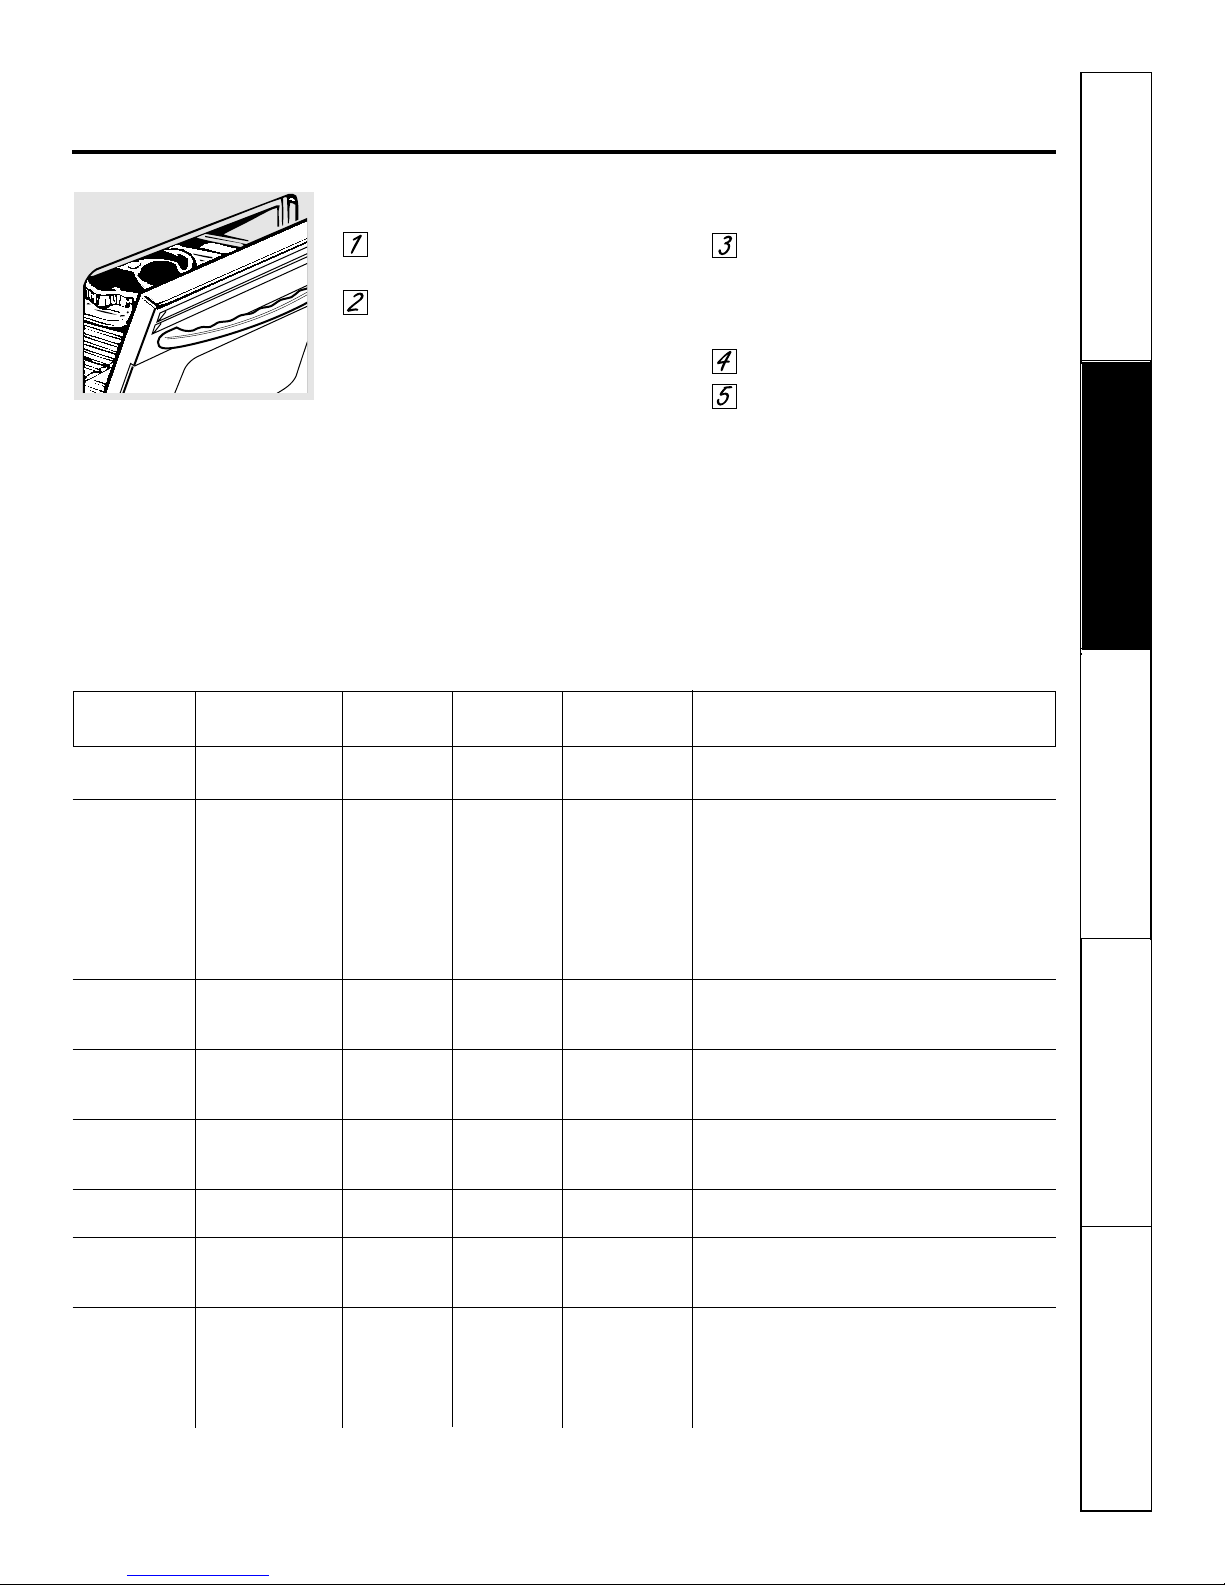
How to Exit the Sabbath Feature
Press the CLEAR/OFF pad.
If the oven is cooking, wait
for a random delay period of
approximately 30 seconds to 1
minute, until only ⊃ is in the display.
Press and hold both the BAKE and
BROIL HI/LO pads, at the same time,
until the display shows SF.
Tap the DELAY START pad until
12 shdn or no shdn appears in the
display. 12 shdn indicates that the
oven will automatically turn off after
12 hours. no shdn indicates that the
oven will not automatically turn off.
Press the START pad.
NOTE: If a power outage occurred while
the oven was in Sabbath mode, the oven
will automatically turn off and the oven
control must be reset.
Page 12

12
Safety Instructions
Operating Instructions
Care and CleaningTroubleshooting TipsConsumer Support
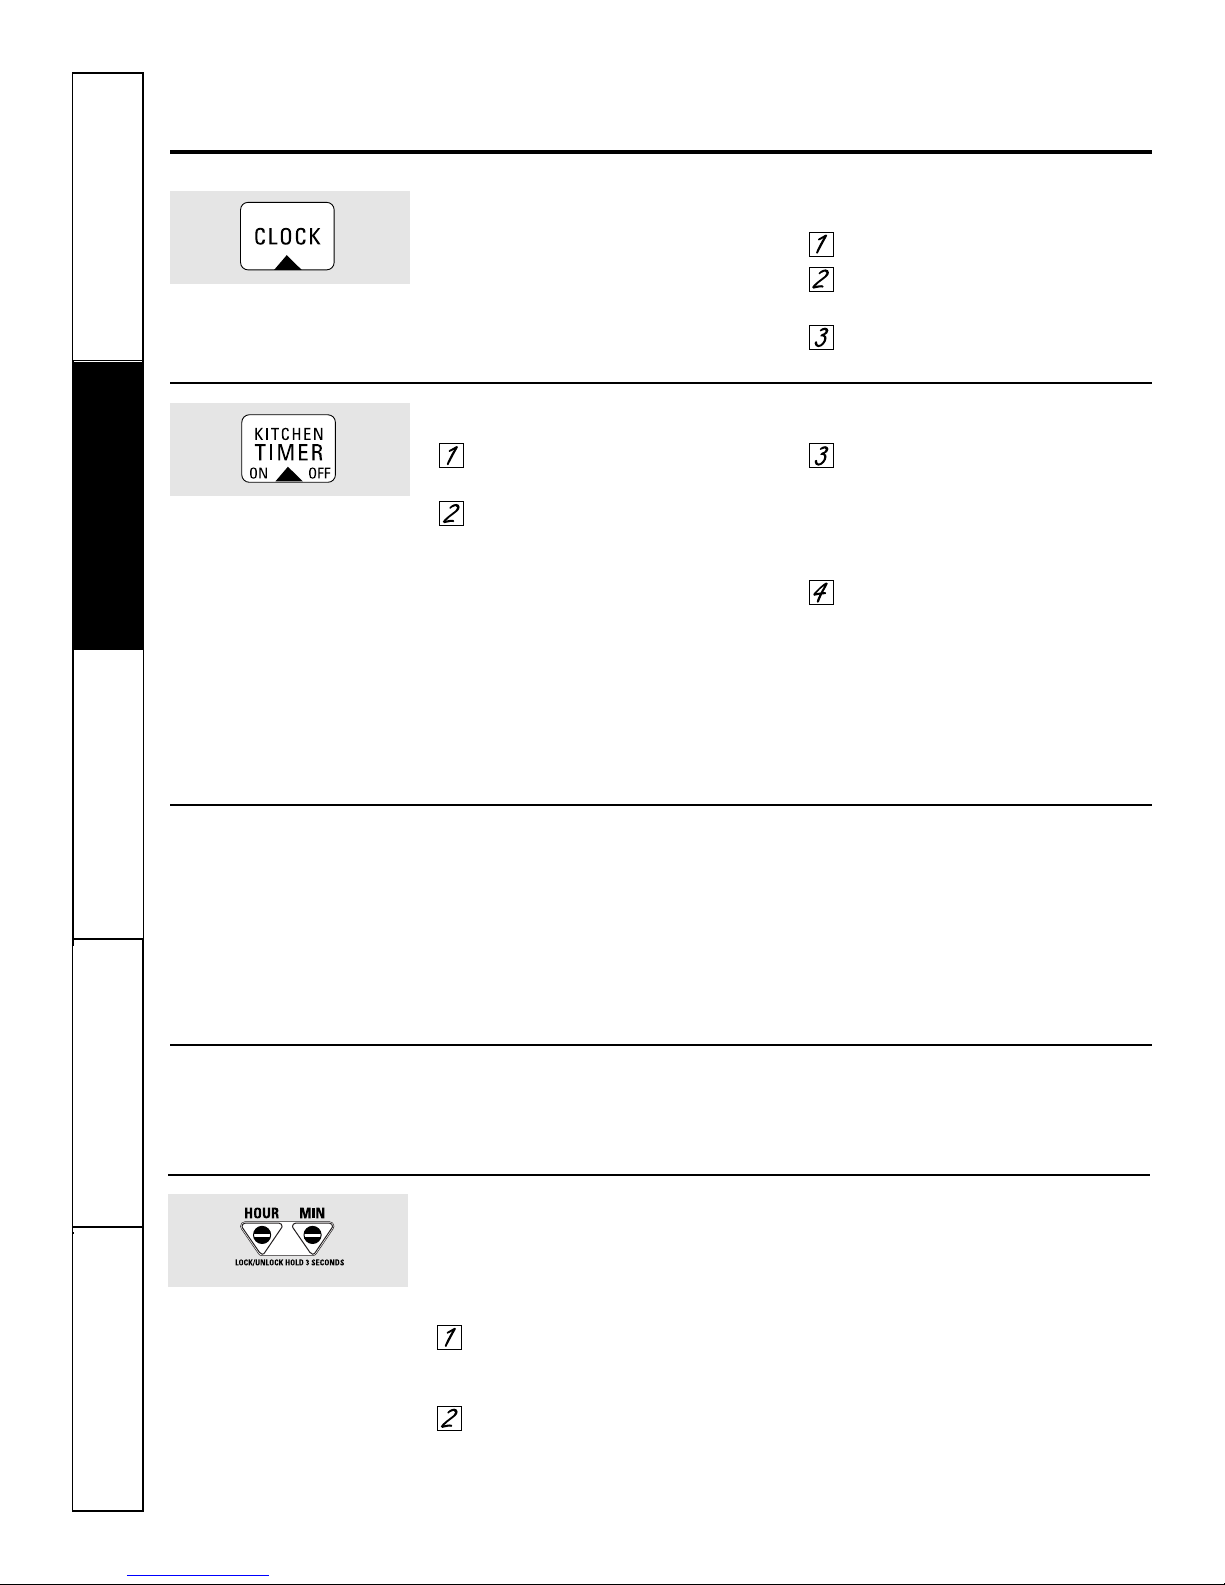
Using the oven.
To avoid possible burns, place the shelves in the desired position before you turn the oven on.
Before you begin…
The shelves have stop-locks, so that when
placed correctly on the supports, they will
stop before coming completely out, and
will not tilt.
When placing and removing cookware,
pull the shelf out to the bump on the
shelf support.
To remove a shelf, pull it toward you, tilt
the front end up and pull it out.
To replace, place the end of the shelf
(stop-locks) on the support, tilt up the
front and push the shelf in.
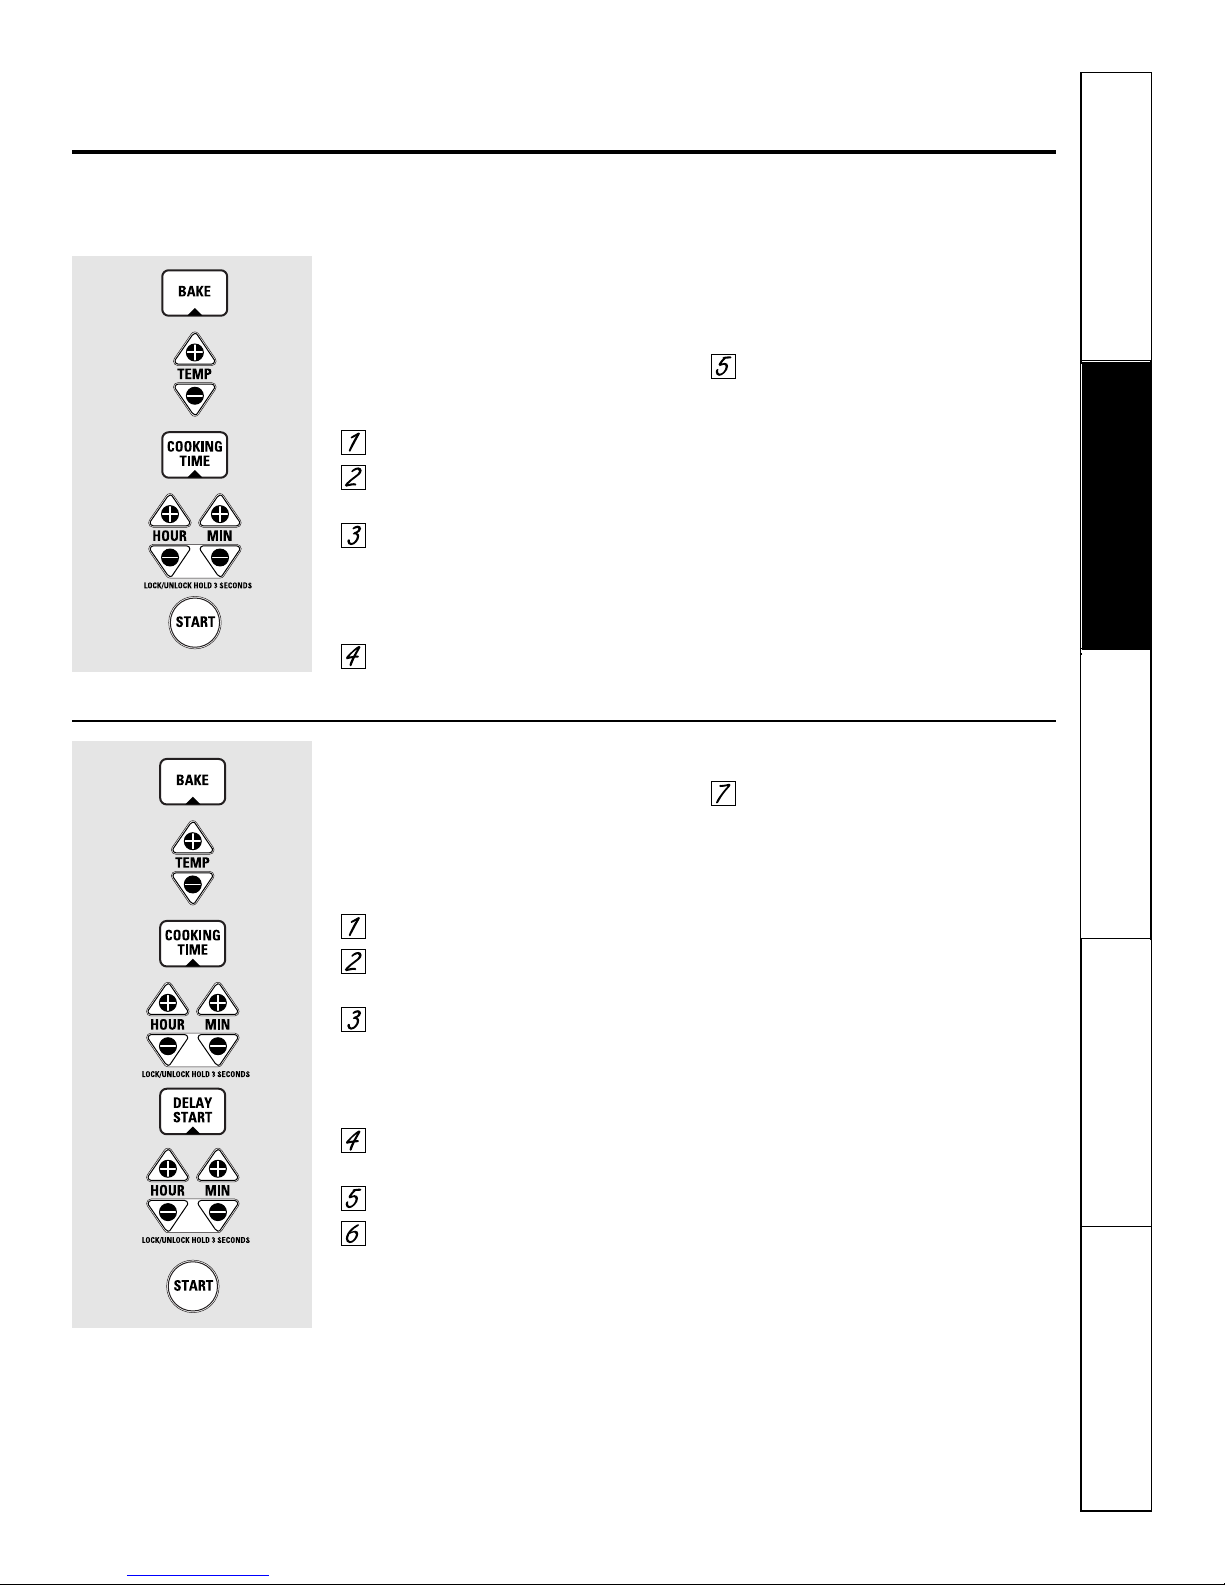
How to Set the Oven for Baking or Roasting
Press the BAKE pad.
Press the TEMP + or – pads to set
the desired temperature.
Press the START pad.
Check food for doneness at
minimum time on recipe. Cook
longer if necessary.
Press the CLEAR/OFF pad when
cooking is complete.
NOTE: A cooling fan may automatically turn on
and off to cool internal parts. This is normal, and
the fan may continue to run even after the oven is
turned off.
Type of Food Oven Shelf Positions
Frozen pies B or C
(on cookie sheet)
Angel food cake A
Bundt or pound cakes B
Biscuits, muffins, B or C
brownies, cookies,
cupcakes, layer
cakes, pies
Casseroles B or C
Preheating and Pan Placement
Preheat the oven if the recipe calls for it.
To preheat, set the oven at the correct
temperature. Preheating is necessary for
good results when baking cakes, cookies,
pastry and breads.
For ovens without a preheat indicator light or
tone, preheat 10 minutes.
Baking results will be better if baking
pans are centered in the oven as much
as possible. Pans should not touch each
other or the walls of the oven. If you
need to use two shelves, stagger the
pans so one is not directly above the
other, and leave approximately 11⁄2″
between pans, from the front, back
and sides of the wall.
Aluminum Foil
You can use aluminum foil to line the
broiler pan and broiler grid. However,
you must mold the foil tightly to the grid
and cut slits in it just like the grid.
Aluminum foil may also be used to catch a
spillover.
Never entirely cover a shelf with
aluminum foil. This will disturb the heat
circulation and result in poor baking.
A smaller sheet of foil may be used to
catch a spillover by placing it on a lower
shelf several inches below the food.
Cut slits in the foil just like the grid.
The oven has 4 shelf positions.
Page 13
Quantity and/ Ovens Shelf First Side Second Side
Food or Thickness Position Time (min.) Time (min.) Comments
Ground Beef 1 lb. (4 patties) C 10 7 Space evenly. Up to 8 patties take about the
Well Done 1/2″ to 3/4″ thick same time.
Beef Steaks
Rare 1″ thick C 6 5 Steaks less than 1″ thick cook through before
Medium 1 to 11⁄2 lbs. C 8 6 browning. Pan frying is recommended.
Well Done C 12 11 Slash fat.
Rare 11⁄2″ thick C 10 7–8
Medium 2 to 21⁄2
lbs. C 15 14–16
Well Done C 25 20–25
Chicken 1 whole A 35 10–15 Reduce time about 5 to 10 minutes per side for
2 to 21⁄2
lbs., cut-up chicken. Brush each side with melted
split lengthwise butter. Broil skin-side-down first.
Lobster Tails 2–4 B 13–16 Do not Cut through back of shell. Spread open.
6 to 8 oz. each turn over. Brush with melted butter before broiling and
after half of broiling time.
Fish Fillets 1/4″ to 1/2″ thick C 5 5 Handle and turn very carefully. Brush with
lemon butter before and during cooking, if
desired. Preheat broiler to increase browning.
Ham Slices 1″ thick B 8 8 Increase time 5 to 10 minutes per side for
(precooked) 11⁄2″ thick or home-cured ham.
Pork Chops 2 (1/2″ thick) C 10 10 Slash fat.
Well Done 2 (1″ thick) about B 13 13
1 lb.
Lamb Chops
Medium 2 (1″ thick) about C 10 9 Slash fat.
Well Done 10 to 12 oz. C 12 10
Medium 2 (11⁄2″ thick) about C 14 12
Well Done 1 lb. B 17 12–14
† The U.S. Department of Agriculture says “Rare beef is popular, but you should know that cooking it to only 140°F means some food poisoning organisms
may survive.” (Source: Safe Food Book. Your Kitchen Guide. USDA Rev. June 1985.)
Safety Instructions
Operating Instructions Care and Cleaning
Troubleshooting Tips Consumer Support
www.geappliances.ca
How to Set the Oven for Broiling
Place the meat or fish on the broiler
grid in the broiler pan.
Follow suggested shelf positions in
the Broiling Guide.
If your oven is connected to 208 volts, rare steaks
may be broiled by preheating the broiler and
positioning the oven shelf one position higher.
Press the BROIL HI/LO pad once for
HI Broil.
To change to LO Broil, press the
BROIL HI/LO pad again.
Press the START pad.
When broiling is finished, press the
CLEAR/OFF pad.
Leave the door open to the broil
stop position. The door stays open
by itself, yet the proper temperature
is maintained in the oven.
NOTE: Food can be broiled with the
door closed but it may not brown as
well because the oven heating
element will cycle on and off.
Broiling Guide
13
The size, weight, thickness, starting temperature and your preference of doneness will affect broiling times. This guide is based on meats at
refrigerator temperature.
Page 14
14
Safety Instructions
Operating Instructions
Care and CleaningTroubleshooting TipsConsumer Support
Using the clock, timer and control lockout.
To Set the Clock
The clock must be set to the correct time
of day for the automatic oven timing
functions to work properly. The time of
day cannot be changed during a timed
baking or self-cleaning cycle.
Press the CLOCK pad.
Press the HOUR and MIN + or –
pads to set the time of day.
Press the START pad.
Make sure the clock is set to the
correct time of day.
To Set the Timer
Press the KITCHEN TIMER
ON/OFF pad.
Press the HOUR and MIN + or –
pads until the amount of time
you want shows in the display.
If you make a mistake, press
KITCHEN TIMER ON/OFF and begin
again.
Press the START pad.
After pressing the START pad, SET disappears;
this tells you the time is counting down, although
the display does not change until one minute
has passed.
When the timer reaches :00, the
control will beep 3 times followed
by one beep every 6 seconds until
the KITCHEN TIMER ON/OFF pad
is pressed.
The 6-second tone can be canceled by following
the steps in the Special Features of your Oven
Control section under Tones at the End of a
Timed Cycle.
The timer is a minute timer only.
The timer does not control oven
operations. The maximum setting on
the timer is 9 hours and 59 minutes.
To Reset the Timer
If the display is still showing the time
remaining, you may change it by pressing
the KITCHEN TIMER ON/OFF pad, then
press the HOUR and MIN + or – pads
until the time you want appears in the
display.
If the remaining time is not in the display
(clock, delay start or cooking time are in
the display), recall the remaining time by
pressing the KITCHEN TIMER ON/OFF pad
and then pressing the HOUR and MIN +
or – pads to enter the new time you
want.
To Cancel the Timer
Press the KITCHEN TIMER ON/OFF
pad twice.
Control Lockout
Your control will allow you to lock out the touch
pads so they cannot be activated when pressed.
To lock/unlock the controls:
Press the HOUR and MIN – pads at
the same time for 3 seconds until
the display shows LOC ON.
To unlock the control, press the
HOUR and MIN – pads at the same
time for 3 seconds until the display
shows LOC OFF.
When this feature is on and the touch
pads are pressed, the control will beep
and the display will show LOC ON.
■ The control lockout mode affects all touch
pads. No touch pads will work when this
feature is activated.
■ The adjustment will be retained in memory
after a power failure.
Page 15
15
Safety Instructions
Operating Instructions Care and Cleaning
Troubleshooting Tips Consumer Support
Using the timed baking and roasting features. www.geappliances.ca
NOTE: Foods that spoil easily—such as milk, eggs, fish, stuffings, poultry and pork—should not be allowed to sit for
more than 1 hour before or after cooking. Room temperature promotes the growth of harmful bacteria. Be sure that
the oven light is off because heat from the bulb will speed harmful bacteria growth.
How to Set an Immediate Start and Automatic Stop
The oven will turn on immediately and cook for a
selected length of time. At the end of the cooking
time, the oven will turn off automatically.
Make sure the clock shows the correct
time of day.
Press the BAKE pad.
Using the TEMP + or – pads, enter
the desired temperature.
Press the COOKING TIME pad.
NOTE: If your recipe requires preheating, you
may need to add additional time to the length of
the cooking time.
Using the HOUR and MIN + or –
pads, enter the desired baking time.
The oven temperature and the cooking
time that you entered will be displayed.
Press the START pad.
The display shows the oven temperature
that you set and the cooking time
countdown. The display starts changing
once the temperature reaches 100°F.
The oven will continue to cook for the
programmed amount of time, then
shut off automatically, unless the Cook
and Hold feature was set. See the Special
features of your oven control section.
Press the CLEAR/OFF pad to clear the
display.
How to Set a Delayed Start and Automatic Stop
You can set the oven control to delay-start the
oven, cook for a specific length of time and then
turn off automatically.
Make sure the clock shows the correct
time of day.
Press the BAKE pad.
Using the TEMP + or – pads, enter
the desired temperature.
Press the COOKING TIME pad.
NOTE: If your recipe requires preheating, you
may need to add additional time to the length of
the cooking time.
Using the HOUR and MIN + or –
pads, enter the desired baking time.
Press the DELAY START pad.
Using the HOUR and MIN + or –
pads, enter the time of day you
want the oven to turn on and
start cooking.
Press the START pad.
NOTE: An attention tone will sound if you are
using timed baking and do not press the START
pad after entering the baking temperature.
If you would like to check the times you
have set press the DELAY START pad to
check the start time you have set or press
the COOKING TIME pad to check the
length of cooking time you have set.
When the oven turns on at the time
of day you have set, the display will show
the changing temperature (starting at
100°F) and the cooking time countdown.
The oven will continue to cook for the
programmed amount of time, then
shut off automatically, unless the Cook
and Hold feature was set. See the Special
features of your oven control section.
At the end of timed baking, the oven
will turn off. The end-of-cycle tone will
sound.
Press the CLEAR/OFF pad to clear the
display.
Page 16
16
Safety Instructions
Operating Instructions
Care and CleaningTroubleshooting TipsConsumer Support
Adjust the oven thermostat—Do it yourself!
You may find that your new oven cooks differently than the one it replaced. Use your new oven for a few
weeks to become more familiar with it. If you still think your new oven is too hot or too cold, you can adjust
the thermostat yourself.
Do not use thermometers, such as those found in grocery stores, to check the temperature setting of your oven.
These thermometers may vary 20–40 degrees.
NOTE: This adjustment will not affect the broiling or the self-cleaning temperatures. The adjustment will be
retained in memory after a power failure.
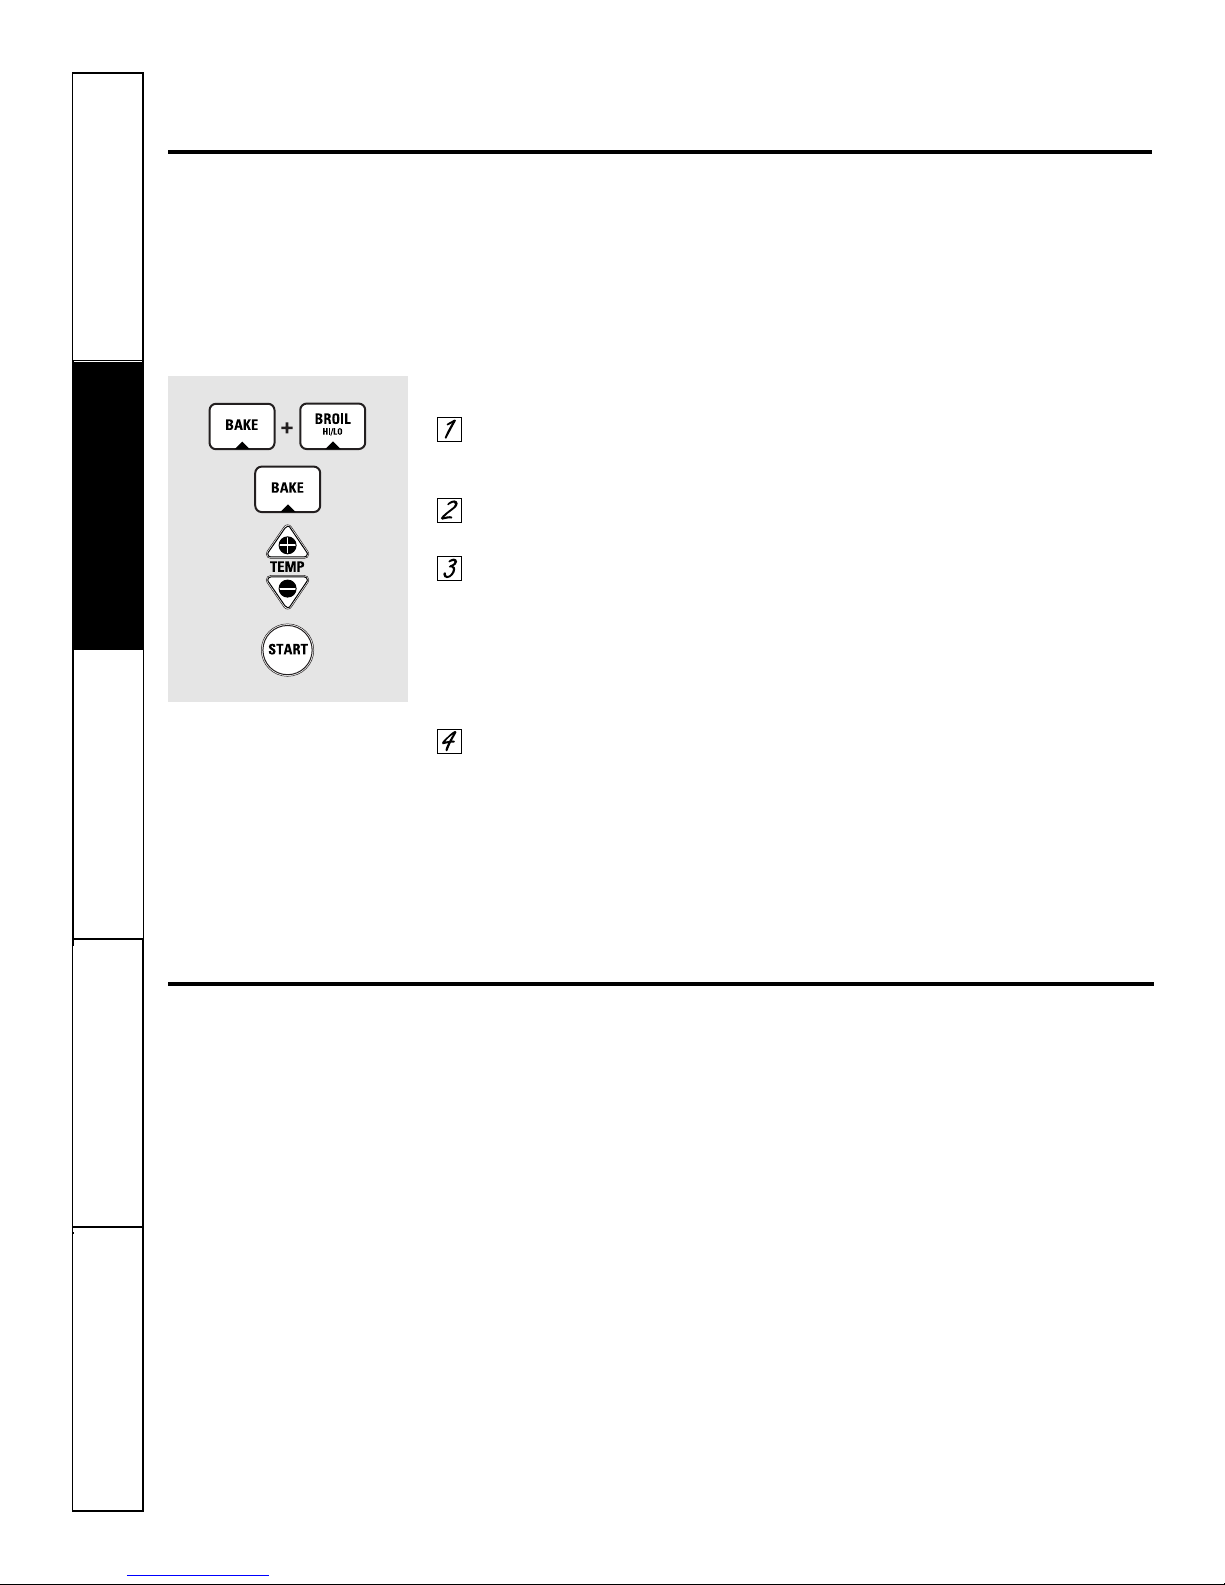
To Adjust the Thermostat
Press the BAKE and BROIL HI/LO
pads at the same time for 3 seconds
until the display shows SF.
Press the BAKE pad. A two-digit
number shows in the display.
The oven temperature can be
adjusted up to (+) 35°F hotter
or (-) 35°F cooler. Tap the TEMP +
pad to increase the temperature in
1-degree increments. Tap the TEMP
– pad to decrease the temperature
in 1-degree increments.
When you have made the
adjustment, press the START
pad to go back to the time of day
display. Use your oven as you
would normally.
The type of margarine will affect baking performance!
Most recipes for baking have been developed using high-fat products such as butter or margarine (80% fat). If you
decrease the fat, the recipe may not give the same results as with a higher-fat product.
Recipe failure can result if cakes, pies, pastries, cookies or candies are made with low-fat spreads. The lower the fat
content of a spread product, the more noticeable these differences become.
Federal standards require products labeled “margarine” to contain at least 80% fat by weight. Low-fat spreads, on the
other hand, contain less fat and more water. The high moisture content of these spreads affect the texture and flavor
of baked goods. For best results with your old favorite recipes, use margarine, butter or stick spreads containing at least
70% vegetable oil.
Page 17
17
Safety Instructions
Operating Instructions Care and Cleaning
Troubleshooting Tips Consumer Support
Using the self-cleaning oven. www.geappliances.ca
The oven door must be closed and all controls must be set correctly for the cycle to work properly.
Before a Clean Cycle
The oven must be cool in order to set the
self-clean cycle.
We recommend venting your kitchen
with an open window or using a
ventilation fan or hood during the first
self-clean cycle.
Remove the broiler pan, broiler grid, all
cookware and any aluminum foil from
the oven.
The oven shelves can be self-cleaned, but
they will darken, lose their luster and
become hard to slide.
Do not use abrasives or oven cleaners.
Clean the top, sides and outside of the
oven door with soap and water.
Make sure the oven light bulb cover
(on some models) is in place and the
oven light is off.
IMPORTANT: The health of some
birds is extremely sensitive to the fumes
given off during the self-cleaning cycle
of any oven. Move birds to another
well-ventilated room.
Wipe up heavy soil on the oven
bottom (appearance may vary).
How to Set the Oven for Cleaning
Press the SELF CLEAN STD/LOW pad
once for a 4-hour clean time or
twice for a 3-hour clean time.
A 3-hour self-clean time is
recommended for use when
cleaning small, contained spills. A
self-clean time of 4 hours or longer
is recommended for a dirtier oven.
If a time other than 4 hours or
3 hours is needed, use the HOUR
and MIN + or – pads and enter
the desired clean time.
You can change the clean time to any
time between 3 hours and 5 hours,
depending on how dirty your oven is.
Press the START pad.
The door locks automatically. The display
will show the clean time remaining. It will
not be possible to open the oven door
until the temperature drops below the
lock temperature and the LOCKED light
goes off.
When this LOCKED light is off, open
the door.
■ The word LOCKED will flash and the
oven control will signal if you set the
clean cycle and forget to close the
oven door.
■ To stop a clean cycle, press the
CLEAR/OFF pad. When the LOCKED
light goes off indicating the oven has
cooled below the locking temperature,
open the door.
Page 18

18
Safety Instructions
Operating Instructions
Care and CleaningTroubleshooting TipsConsumer Support
Using the self-cleaning oven.
The oven door must be closed and all controls must be set correctly for the cycle to work properly.
How to Delay the Start of Cleaning
Press the SELF CLEAN STD/LOW pad
once for a 4-hour clean time or
twice for a 3-hour clean time.
A 3-hour self-clean time is
recommended for use when
cleaning small, contained spills. A
self-clean time of 4 hours or longer
is recommended for a dirtier oven.
If a time other than 4 hours or
3 hours is needed, use the HOUR
and MIN + or – pads and enter
the desired clean time.
You can change the clean time to any
time between 3 hours and 5 hours,
depending on how dirty your oven is.
Press the DELAY START pad.
Using the HOUR and MIN + or –
pads, enter the time of day you want
the clean cycle to start.
Press the START pad.
The door locks automatically. The display
will show the start time. It will not be
possible to open the oven door until
the temperature drops below the lock
temperature and the LOCKED light
goes off.
When the LOCKED light is off, open
the door.
After a Clean Cycle
You may notice some white ash in the
oven. Wipe it up with a damp cloth after
the oven cools.
If white spots remain, remove them with a
soap-filled steel wool pad and rinse thoroughly
with a vinegar and water mixture.
These deposits are usually a salt residue
that cannot be removed by the clean
cycle.
If the oven is not clean after one clean
cycle, repeat the cycle.
■ You cannot set the oven for cooking
until the oven is cool enough for
the door to unlock.
■ If the shelves become hard to
slide, wipe the shelf supports with
cooking oil.
Oven Heating Elements
Do not clean the bake element or the broil
element. Any soil will burn off when the elements
are heated.
To clean the oven floor, gently lift
the bake element. Clean with warm
soapy water.
Care and cleaning of the oven.
Be sure electrical power is off and all surfaces are cool before cleaning any part of the oven.
How to Remove Packaging Tape
Carefully grasp a corner of the protective
shipping film with your fingers and slowly
peel it from the appliance surface. Do
not use any sharp items to remove the
film. Remove all of the film before using
the appliance for the first time.
To assure no damage is done to the
finish of the product, the safest way to
remove the adhesive from packaging
tape on new appliances is an application
of a household liquid dishwashing
detergent. Apply with a soft cloth and
allow to soak.
NOTE: The adhesive must be removed from all
parts. It cannot be removed if it is baked on.
Page 19

19
Safety Instructions Operating Instructions Care and Cleaning Troubleshooting Tips
Consumer Support
www.geappliances.ca
Do not rub or clean the door gasket—
it has an extremely low resistance to
abrasion.
If you notice the gasket becoming worn,
frayed or damaged in any way or if it has
become displaced on the door, you should
have it replaced.
To clean the inside of the door:
■ Because the area inside the gasket is
cleaned during the self-clean cycle, you
do not need to clean this by hand.
■ The area outside the gasket and
the door liner can be cleaned with a
soap-filled or plastic scouring pad,
hot water and detergent. Rinse well
with a vinegar and water solution.
To clean the outside of the door:
■ Use soap and water to thoroughly
clean the top, sides and front of the
oven door. Rinse well. You may also
use a glass cleaner to clean the glass
on the outside of the door. Do not let
water drip into the vent openings.
■ If any stain on the door vent trim is
persistent, use a soft abrasive cleaner
and a sponge-scrubber for best results.
■ Spillage of marinades, fruit juices,
tomato sauces and basting materials
containing acids may cause
discoloration and should be wiped
up immediately. When surface is cool,
clean and rinse.
■ Do not use oven cleaners, cleaning
powders or harsh abrasives on the
outside of the door.
Cleaning the Oven Door
The door is very heavy. Be careful when
removing and lifting the door.
Do not lift the door by the handle.
To remove the door:
Fully open the door.
Pull the hinge locks down toward
the door frame, to the unlocked
position. A tool, such as a small
flat-blade screwdriver, may be
required.
Firmly grasp both sides of the door
at the top.
Close door to the door removal
position, which is halfway between
the broil stop position and fully
closed.
Lift door up and out until the hinge
arm is clear of the slot.
To replace the door:
Firmly grasp both sides of the door
at the top.
With the
door at the
same angle as
the removal
position, seat the
indentation of
the hinge arm
into the bottom
edge of the hinge slot. The notch in
the hinge arm must be fully seated
into the bottom of the slot.
Fully open the door. If the door will
not fully open, the indentation is
not seated correctly in the bottom
edge of the slot.
Push the hinge locks up against the
front frame of the oven cavity, to the
locked position.
Close the oven door.
Hinge lock
Lift-Off Oven Door
Removal position
Indentation
Bottom
edge
of slot
Hinge lock
Slot
Push hinge locks up to lock.
Pull hinge locks down to unlock.
Hinge arm
Hinge
arm
Page 20

20
Safety Instructions
Operating Instructions
Care and CleaningTroubleshooting TipsConsumer Support
Glass Surfaces
To clean the outside glass finish, use
a glass cleaner. Rinse and polish with a
dry cloth.
Do not allow the water or cleaner
to run down inside the oven door
while cleaning.
Care and cleaning of the oven.
Control Panel
It’s a good idea to wipe the control panel
after each use. Clean with mild soap and
water or vinegar and water, rinse with
clean water and polish dry with a
soft cloth.
Do not use abrasive cleansers, strong
liquid cleansers, plastic scouring pads or
oven cleansers on the control panel—
they will damage the finish. A 50/50
solution of vinegar and hot water
works well.
Broiler Pan & Grid
Do not clean the broiler pan or grid in a selfcleaning oven.
After broiling, remove the broiler pan
from the oven. Remove the grid from the
pan. Carefully pour out the grease from
the pan into a proper container.
Wash and rinse the broiler pan and grid
in hot water with a soap-filled or plastic
scouring pad.
If food has burned on, sprinkle the grid
with detergent while hot and cover with
wet paper towels or a dishcloth. Soaking
the pan will remove burned-on foods.
Both the broiler pan and grid may be
cleaned with a commercial oven cleaner.
Both the broiler pan and grid can also be
cleaned in a dishwasher.
Do not store a soiled broiler pan and grid
anywhere in the oven.
After broiling, remove the broiler
pan from the oven.
Painted Surfaces
Clean with soap and water or a vinegar
and water solution.
Do not use commercial oven cleaners, cleansing
powders, steel wool or harsh abrasives on any
painted surface.
Oven Shelves
Clean the oven shelves with an abrasive
cleanser or steel wool. After cleaning,
rinse the shelves with clean water and dry
with a clean cloth.
NOTE: The oven shelves may be cleaned in the
self-cleaning oven. However, the shelves will
darken in color, lose their luster and become hard
to slide if cleaned during the self-cleaning cycle.
You can wipe the shelf supports with cooking
oil after self-cleaning to make the shelves slide
more easily.
Page 21

21
Safety Instructions Operating Instructions Care and Cleaning Troubleshooting Tips
Consumer Support
www.geappliances.ca
Do not use a steel wool pad; it will scratch
the surface.
To clean the stainless steel surface,
use warm sudsy water or a stainless steel
cleaner or polish. Always wipe the surface
in the direction of the grain. Follow the
cleaner instructions for cleaning the
stainless steel surface.
To inquire about purchasing stainless
steel appliance cleaner or polish, or to
find the location of a dealer or Camco
Parts Store nearest you, please call our
toll-free number:
National Parts Centre 1.800.661.1616
www.GEAppliances.ca
Stainless Steel Surfaces
(on some models)
Oven Light Bulb
NOTE: The glass cover (on some
models) should be removed only when
cold. Wearing latex gloves may offer a
better grip.
CAUTION: Before replacing your
oven light bulb, disconnect the electrical
power to the oven at the main fuse or
circuit breaker panel.
Be sure to let the light cover and bulb
cool completely.
For your safety, do not touch a hot bulb
with bare hands or a damp cloth.
To remove:
Turn the glass cover
counterclockwise 1/4 turn until the
tabs of the glass cover clear the
grooves of the socket.
Using gloves or a dry cloth, remove
the bulb by pulling it straight out.
To replace:
Use a new 130-volt halogen bulb,
not to exceed 50 watts.
Using gloves or a dry cloth, remove
the bulb from its packaging. Do not
touch the bulb with bare fingers.
Push the bulb straight into the
receptacle all the way.
Place the tabs of the glass cover into
the grooves of the socket. Turn the
glass cover clockwise 1/4 turn.
For improved lighting inside the
oven, clean the glass cover
frequently using a wet cloth. This
should be done when the oven is
completely cool.
Reconnect electrical power to
the oven.
Bulb
Socket
Tab
Glass cover
Receptacle
Use gloves
or cloth
Receptacle
Page 22

22
Safety Instructions
Operating Instructions
Care and CleaningTroubleshooting TipsConsumer Support
Before You Call For Service…
Troubleshooting Tips
Save time and money! Review the charts on the following
pages first and you may not need to call for service.
Problem Possible Causes What To Do
Control signals after You forgot to enter a • Press the BAKE pad and desired temperature or the
entering cooking time bake temperature or SELF CLEAN STD/LOW pad and desired clean time.
or delay start cleaning time.
Food does not bake Oven controls improperly set. • See the Using the oven section.
or roast properly
Shelf position is incorrect • See the Using the oven section.
or the shelf is not level.
Incorrect cookware or • See the Using the oven section.
cookware of improper
size being used.
Oven thermostat • See the Adjust the oven thermostat – Do it yourself!
needs adjustment. section.
Food does not Oven controls improperly set. • Make sure you press the BROIL HI/LO pad.
broil properly
Improper shelf • See the Broiling Guide.
position being used.
Food being cooked • Use the broiling pan and grid that came with your oven.
in a hot pan. Make sure it is cool.
Cookware not suited • Use the broiling pan and grid that came with your oven.
for broiling.
Aluminum foil used on the • See the Using the oven section.
the broiling pan and grid has
not been fitted properly and
slit as recommended.
In some areas the power • Preheat the broil element for 10 minutes.
(voltage) may be low.
• Broil for the longest period of time recommended in
the Broiling Guide.
Clock and timer A fuse in your home • Replace the fuse or reset the circuit breaker.
do not work may be blown or the
circuit breaker tripped.
Oven controls improperly set. • See the Using the clock, timer and control lockout
section.
Oven light does Light bulb is loose or defective. • Tighten or replace the bulb.
not work
Pad operating light is broken. • Call for service.
Page 23

23
Safety Instructions
Operating Instructions Care and Cleaning
Troubleshooting Tips Consumer Support
www.geappliances.ca
Problem Possible Causes What To Do
Oven temperature too Oven thermostat • See the Adjust the oven thermostat – Do it yourself!
hot or too cold needs adjustment. section.
Oven will not work A fuse in your home may • Replace the fuse or reset the circuit breaker.
be blown or the circuit
breaker tripped.
Oven controls improperly set. • See the Using the oven section.
Oven will not self-clean The oven temperature • Allow the oven to cool to room temperature and reset
is too high to set a the controls.
self-clean operation.
Oven controls improperly set. • See the Using the self-cleaning oven section.
“Crackling” or This is the sound of the • This is normal.
“popping” sound metal heating and cooling
during both the cooking
and cleaning functions.
Excessive smoking Excessive soil. • Press the CLEAR/OFF pad. Open the windows to rid
during clean cycle the room of smoke. Wait until the LOCKED light goes
off. Wipe up the excess soil and reset the clean cycle.
Oven door will not Oven too hot. • Allow the oven to cool below locking temperature.
open after a
clean cycle
Oven not clean after a Oven controls improperly set. • See the Using the self-cleaning oven section.
clean cycle
Oven was heavily soiled. • Clean up heavy spillovers before starting the clean
cycle. Heavily soiled ovens may need to self-clean
again or for a longer period of time.
“LOCKED” flashes in The self-clean cycle • Close the oven door.
the display has been selected but
the door is not closed.
LOCKED light is on The oven door is locked • Press the CLEAR/OFF pad. Allow the oven to cool.
when you want to cook because the temperature
inside the oven has not
dropped below the
locking temperature.
Page 24

24
Safety Instructions
Operating Instructions
Care and CleaningTroubleshooting TipsConsumer Support
Before You Call For Service…
Troubleshooting Tips
Problem Possible Causes What To Do
“F— and a number You have a function • Press the CLEAR/OFF pad. Allow the oven to cool for
or letter” flash error code. one hour. Put the oven back into operation.
in the display
If the function • Disconnect all power to the oven for at least 30
code repeats. seconds and then reconnect power. If the function
error code repeats, call for service.
Display goes blank A fuse in your home may • Replace the fuse or reset the circuit breaker.
be blown or the circuit
breaker tripped.
The clock is in the • See the Special features of your oven control section.
black-out mode.
Display flashes Power failure. • Reset the clock.
Unable to get the Oven control pads were • The BAKE and BROIL HI/LO pads must be pressed
display to show “SF” not pressed properly. at the same time and held for 3 seconds.
Power outage, Power outage or surge. • Reset the clock. If the oven was in use, you must reset
clock flashes it by pressing the CLEAR/OFF pad, setting the clock
and resetting any cooking function.
“Burning” or “oily” This is normal in a • To speed the process, set a self-clean cycle for a
odor emitting from new oven and will minimum of 3 hours. See the Using the self-cleaning
the vent disappear in time. oven section.
Strong odor An odor from the insulation • This is temporary.
around the inside of the
oven is normal for the first
few times the oven is used.
Fan noise A cooling fan may • This is normal. The cooling fan will turn on
automatically turn on. to cool internal parts. It may run for up to 2 hours
after the oven is turned off.
Page 25

25
Please place in envelope and mail to:
Veuillez mettre dans une enveloppe et envoyez à :
OWNERSHIP REGISTRATION
P.O. BOX 1780
MISSISSAUGA, ONTARIO
L4Y 4G1
(FOR CANADIAN CONSUMERS ONLY)
Page 26

26
Page 27

27
Safety Instructions
Operating Instructions Care and Cleaning
Troubleshooting Tips Consumer Support
27
Built-In Electric Oven Warranty.
For The Period Of: Camco Will Replace:
One Year Any part of the oven which fails due to a defect in materials or workmanship.
From the date of the During this limited one-year warranty, we will also provide, free of charge, all labor
original purchase and related service to replace the defective part.
■ Service trips to your home to teach you how to
use the product.
■ Improper installation, delivery or maintenance.
■ Failure of the product if it is abused, misused,
or used for other than the intended purpose or
used commercially.
■ Damage to the glass cooktop (if included) caused by
use of cleaners other than the recommended cleaning
creams.
■ Damage to the glass cooktop (if included) caused by
hardened spills of sugary materials or melted plastic
that are not cleaned according to the directions in the
Owner’s Manual.
■ Replacement of house fuses or resetting of circuit
breakers.
■ Damage to the product caused by accident, fire, floods
or acts of God.
■ Incidental or consequential damage caused by possible
defects with this appliance.
■ Damage caused after delivery.
■ Product not accessible to provide required service.
What Camco Will Not Cover:
This warranty is extended to the original purchaser and any succeeding owner for products purchased for
ordinary home use in Canada. In-home warranty service will be provided in areas where it is available and deemed
reasonable by Camco to provide.
Some provinces do not allow the exclusion or limitation of incidental or consequential damages, so the above
exclusion may not apply to you. This warranty gives you specific legal rights, and you may also have other rights
which vary from province to province. To know what your legal rights are in your province, consult your local or
provincial consumer affairs office.
Warrantor: Camco Inc.,
Burlington, Ontario
All warranty service provided by our Factory Service
Centers, or an authorized Customer Care
®
technician.
To schedule service, on-line, 24 hours a day, visit us
at www.geappliances.ca, or call 1.800.361.3400. Please
have serial number and model number available when
calling for service.
Staple your receipt here.
Proof of the original purchase
date is needed to obtain service
under the warranty.
EXCLUSION OF IMPLIED WARRANTIES—Your sole and exclusive remedy is product repair as provided
in this Limited Warranty. Any implied warranties, including the implied warranties of merchantability
or fitness for a particular purpose, are limited to one year or the shortest period allowed by law.
Page 28

Printed in the United States
28
GE Appliances Website www.GEAppliances.ca
Have a question or need assistance with your appliance? Try the GE Appliances Website 24 hours a day,
any day of the year! For greater convenience and faster service, you can now download Owner’s Manuals
on-line. You can also “Ask Our Team of Experts™” your questions, and so much more...
Schedule Service www.GEAppliances.ca
Expert GE repair service is only one step away from your door. Call 1.800.361.3400, 24 hours a day,
7 days a week.
Parts and Accessories www.GEAppliances.ca
To inquire about purchasing a part or an accessory for your appliance, call our National Parts Center
at 1.800.661.1616.
Contact Us www.GEAppliances.ca
If you are not satisfied with the service you receive from GE, contact us on our Website with all the details
including your phone number, or write to: Camco, Inc.
1 Factory Lane
Moncton, New Brunswick
E1C 9M3
Register Your Appliance www.GEAppliances.ca
Register your new appliance on-line—at your convenience! Timely product registration will allow for
enhanced communication and prompt service under the terms of your warranty, should the need arise.
You may also mail in the preprinted registration card included in the packing material.
Consumer Support.
Page 29

Imprimé aux États-Unis
28
Site Internet GE www.electromenagersge.ca
Pour toute question ou pour un besoin d’assistance au sujet de votre appareil ménager, consultez le site
Internet ci-dessus, accessible 24 heures sur 24 par jour, chaque jour de l’année! À partir du site, vous
pouvez télécharger les manuels d’utilisation. Il y a aussi la rubrique « Ask Our Team of Experts
MC
»
(Demandez à nos experts) et bien d’autres choses encore…
Prise de rendez-vous www.electromenagersge.ca
Il est très facile de demander l’intervention d’un technicien expert en réparation GE. Appelez le
1.800.361.3400, 24 heures par jour, 7 jours par semaine.
Pièces et accessoires www.electromenagersge.ca
Pour vous renseigner sur l’achat d’une pièce ou d’un accessoire pour votre appareil, appelez notre
Centre national de pièces au 1.800.661.1616.
Pour nous contacter www.electromenagersge.ca
Si vous n’êtes pas satisfaits des services fournis par GE, contactez-nous sur notre site Internet et donnez-nous
tous les détails voulus, y compris votre numéro de téléphone, ou écrivez à : Camco, Inc.
1 Factory Lane
Moncton, Nouveau-Brunswick
E1C 9M3
Enregistrement des appareils www.electromenagersge.ca
Vous pouvez enregistrer vos appareils en ligne—n’importe quand! L’enregistrement de vos appareils
permettra de meilleures communications et l’obtention plus rapide des services sous garantie nécessaires.
Vous pouvez également nous envoyer par la poste la carte d’enregistrement pré-imprimée fournie avec
l’appareil, ou détacher le formulaire qu’on trouve dans le Manuel de l’utilisateur.
Soutien au consommateur.
Page 30

Mesures de sécurité Fonctionnement
Soutien au
consommateur
Conseils de dépannageEntretien et nettoyage
Garantie du four électrique encastré.
Toutes les réparations sous garantie sont effectuées
par nos Centres de réparation ou par nos réparateurs CAMCO
autorisés. Pour obtenir du service en ligne 24 heures par jour,
veuillez nous visiter au site www.electromenagersge.ca ou
appelez le no 1.800.361.3400. Veuillez fournir le numéro de série et
le numéro de modèle lorsque vous appelez pour obtenir le service.
Pendant une période de : Camco remplacera :
Un an Toute pièce du four qui se révèle défectueuse en raison d’un vice de matières
à compter de la date ou de fabrication. Au cours de cette garantie limitée d’un an, nous fournirons
d’achat d'origine également sans frais la main-d’oeuvre et le service de réparation connexe
pour remplacer la pièce défectueuse.
■ Toute visite à votre domicile pour vous expliquer le
fonctionnement de l’appareil.
■ Installation, livraison ou entretien inadéquats.
■ Toute défectuosité du produit lorsqu’il a été utilisé
d’une façon abusive ou inadéquate, ou employé à des
fins commerciales ou à toute autre fin que celle pour
laquelle il a été conçu.
■ Détérioration de la surface de cuisson en verre (si
compris) provoquée par l’usage de nettoyants autres
que les crèmes et tampons de nettoyage recommandés.
■ Détérioration de la surface de cuisson en verre (si
compris) causée par des éclaboussures de produits
sucrés durcis, ou du plastique fondu qui n’a pas été
nettoyé selon les instructions données dans le manuel
d’utilisation.
■ Le remplacement des fusibles ou le réenclenchement
des disjoncteurs du panneau de distribution de votre
résidence.
■ Tout dommage au produit attribuable à un accident, un
incendie, une inondation ou un cas de force majeure.
■ Tout dommage direct ou indirect causé par une
défectuosité possible de cet appareil.
■ Dommages survenus après la livraison.
■ Le service s’il est impossible d’avoir accès au produit
pour ce faire.
Ce que Camco ne couvre pas :
Cette garantie est valable pour le premier propriétaire et tout autre propriétaire du produit s’il acheté pour utilisation
domestique au Canada. Le service à domicile sous garantie sera fourni là où il est disponible et dans les régions que
Camco considère que l’offre de service est raisonnable.
Dans certaines provinces, il est interdit d’exclure ou de limiter les dommages directs ou indirects. Il est alors possible
que les limitations ou exclusions ci-dessus ne s’appliquent pas dans votre cas. La présente garantie vous confère
des droits juridiques spécifiques. Vous pouvez bénéficier d’autres droits, qui varient d’une province à l’autre. Pour
connaître les droits dont vous bénéficiez dans votre province, communiquez avec le bureau des relations avec les
consommateurs de votre région.
Garant : Camco Inc.,
Burlington, Ontario
Agraphez votre reçu ici.
Vous devez fournir la preuve de
l’achat original pour obtenir des
services en vertu de la garantie.
27
EXCLUSION DE GARANTIES IMPLICITES – Votre seul et unique recours est la réparation du produit selon
les dispositions de cette Garantie limitée. Toutes les garanties implicites, incluant les garanties de
commercialité et d’adéquation à un usage spécifique, sont limitées à une année ou à la période la plus
courte autorisée par la législation.
Page 31

26
Notes.
Mesures de sécurité
Fonctionnement
Entretien et nettoyageConseils de dépannage
Soutien au
consommateur
Page 32

25
Notes. www.electromenagersge.ca
Mesures de sécurité Fonctionnement
Soutien au
consommateur
Conseils de dépannageEntretien et nettoyage
Page 33

Mesures de sécurité
Fonctionnement
Entretien et nettoyageConseils de dépannage
Soutien au
consommateur
24
Problème Causes probables Correctifs
“F—” et un chiffre ou Il s’agit d’un code d’erreur. • Appuyez sur CLEAR/OFF (annulation/arrêt). Laissez le four
une lettre clignotent refroidir pendant une heure. Remettez le four en marche.
à l’écran
Si le code d’erreur est de • Coupez l’alimentation électrique du four pendant au
nouveau affiché. moins 30 secondes, puis rétablissez l’alimentation
électrique. Si le code d’erreur est de nouveau affiché,
appelez un réparateur.
L’écran d’affichage Un fusible peut être grillé • Remplacez le fusible ou réenclenchez le disjoncteur.
n’est pas allumé ou un disjoncteur peut être
déclenché dans le panneau
de votre résidence.
L’horloge est réglée au • Voir la section Caractéristiques spéciales des
mode d’extinction. commandes du four.
L’écran d’affichage Panne de courant. • Réglez à nouveau l’horloge.
clignote
Impossibilité d’afficher Vous n’avez pas appuyé • Il faut appuyer simultanément sur les touches
le message “SF” correctement sur BAKE (cuisson) et BROIL HI/LO (grillage max./min.)
pendant 3 secondes.
Panne de courant, Panne de courant ou • Réglez à nouveau l’horloge. Si le four était en marche,
l’horloge clignote surtension. vous devez le réinitialiser en appuyant sur CLEAR/OFF
(annulation/arrêt), en réglant l’horloge et en
programmant à nouveau la fonction de cuisson qui
était en cours.
Odeur de «brûlé» ou Ce phénomène est normal • Pour accélérer le processus, réglez un programme
«d’huile» provenant lorsque le four est neuf et d’autonettoyage d’au moins 3 heures. Voir la section
de l’évent disparaîtra avec le temps. Utilisation du four autonettoyant.
Fortes odeurs Les premières fois que vous • Ce phénomène est temporaire.
utilisez le four, il est normal
de sentir une odeur provenant
de l’isolant qui se trouve à
l’intérieur du four.
Bruit de ventilateur Un ventilateur de • C’est normal. Le ventilateur de refroidissement
refroidissement peut se mettra en marche pour refroidir les pièces
se mettre en marche internes. Il peut fonctionner jusqu’à 2 heures
automatiquement. de temps une fois le four éteint.
Avant d’appeler un réparateur…
Conseils de dépannage
Page 34

23
www.electromenagersge.ca
Mesures de sécurité Fonctionnement
Soutien au
consommateur
Conseils de dépannageEntretien et nettoyage
Problème Causes probables Correctifs
Température trop La commande de • Voir la section Réglage des commandes du four – Faites-
élevée ou trop basse température du four le vous-même!
dans le four doit être réglée.
Le four ne fonctionne pas Un fusible peut être grillé ou • Remplacez le fusible ou réenclenchez le disjoncteur.
un disjoncteur peut être
déclenché dans le panneau
de votre résidence.
Commandes du four mal • Voir la section Utilisation du four.
réglées.
Le programme La température du four est • Laissez le four refroidir jusqu’à la température de la
d’autonettoyage ne trop élevée pour pouvoir pièce, puis réglez à nouveau les commandes.
fonctionne pas régler un autonettoyage.
Commandes du four mal • Voir la section Utilisation du four autonettoyant.
réglées.
Des craquements Ces bruits sont produits • Ce phénomène est normal.
se font entendre par le métal sous l’effet de
la chaleur et du
refroidissement pendant
les fonctions de cuisson
et d’autonettoyage.
Fumée excessive Quantité excessive • Appuyez sur CLEAR/OFF (annulation/arrêt). Ouvrez
pendant l’autonettoyage de saleté. les fenêtres pour dissiper la fumée. Attendez que le
message LOCKED soit éteint. Essuyez l’excès de
saleté, et programmez à nouveau l’autonettoyage.
La porte ne s’ouvre pas Le four est trop chaud. • Laissez la température du four descendre sous la
après l’autonettoyage température de verrouillage.
Le four n’est pas propre Commandes du four mal • Voir la section Utilisation du four autonettoyant.
après l’autonettoyage réglées.
Le four était très sale. • Essuyez le surplus de saleté avant de programmer
l’autonettoyage. Lorsque le four est très sale, il peut
être nécessaire de programmer un autre autonettoyage
ou de régler une durée de nettoyage plus longue.
Le message “LOCKED” Vous avez programmé • Fermez la porte du four.
clignote à l’écran l’autonettoyage mais n’avez
pas fermé la porte.
Le message “LOCKED” La porte du four est • Appuyez sur CLEAR/OFF (annulation/arrêt). Laissez
s’allume lorsque vous verrouillée parce que la le four refroidir.
désirez effectuer une température dans le four
cuisson n’est pas descendue sous la
température de verrouillage.
Page 35

Conseils de dépannage
Économisez du temps et de l’argent! Consultez d’abord
les tableaux des pages qui suivent. Vous pourriez vous
éviter d’appeler un réparateur.
Problème Causes probables Correctifs
Un signal sonore se fait Vous avez oublié d’entrer • Appuyez sur BAKE (cuisson) et entrez la température
entendre après avoir entré une température de désirée, ou appuyez sur SELF CLEAN STD/LOW
une durée de cuisson ou cuisson ou une durée (autonettoyage normal/bas) et entrez la durée de
une heure de mise en de nettoyage. nettoyage désirée.
marche différée
Cuisson ou rôtissage Les commandes du four • Voir la section Utilisation du four.
inadéquats des sont mal réglées.
aliments dans le four
La grille n’est pas à la bonne • Voir la section Utilisation du four.
position ou elle n’est pas de
niveau.
La batterie de cuisine ou • Voir la section Utilisation du four.
ses dimensions ne sont pas
appropriées.
La commande de température • Voir la section Réglage de la commande de
du four doit être réglée. température—Faites-le vous-même!
Grillage inadéquat des Les commandes du four • Assurez-vous d’avoir appuyé sur BROIL HI/LO (grillage
aliments dans le four sont mal réglées. max./min.).
Grille placée à une hauteur • Voir le Guide de grillage.
inadéquate.
Aliments cuits dans une • Utilisez la lèchefrite et la grille fournies avec votre four.
casserole de cuisson chaude. Assurez-vous qu’elles sont froides.
Casserole de cuisson qui ne • Utilisez la lèchefrite et la grille fournies avec votre four.
convient pas au grillage.
La lèchefrite et la grille n’ont • Voir la section Utilisation du four.
pas été recouvertes correctement
de papier d’aluminium et des
ouvertures n’ont pas été
pratiquées, comme recommandé.
Dans certaines régions, la • Faites réchauffer l’élément chauffant pendant
tension de l’alimentation 10 minutes.
peut être basse.
• Faites griller pendant une période plus longue que
celle recommandée dans le Guide de grillage.
L’horloge et la minuterie Un fusible peut être grillé • Remplacez le fusible ou réenclenchez le disjoncteur.
ne fonctionnent pas ou un disjoncteur peut être
déclenché dans le panneau
de votre résidence.
Commandes du four mal • Voir la section Utilisation de l’horloge, de la minuterie
réglées. et du verrouillage des commandes.
La lampe du four ne L’ampoule est dévissée ou grillée. •Revissez-la ou remplacez-la.
s’allume pas
La touche qui actionne la • Appelez un réparateur.
lampe du four est défectueuse.
Avant d’appeler un réparateur…
Mesures de sécurité
Fonctionnement
Entretien et nettoyageConseils de dépannage
Soutien au
consommateur
22
Page 36

21
Mesures de sécurité Fonctionnement
Soutien au
consommateur
Conseils de dépannageEntretien et nettoyage
www.electromenagersge.ca
N’utilisez pas de tampons de laine d’acier;
ils pourraient rayer la surface.
Pour nettoyer la surface en acier
inoxydable, utilisez de l’eau chaude
savonneux ou un produit nettoyant ou cire
à acier inoxydable. Essuyez toujours la
surface dans le sens du grain. Suivez les
instructions du produit nettoyant pour
nettoyer la surface en acier inoxydable.
Pour savoir comment acheter le produit
nettoyant ou le cire pour appareils
électroménagers en acier inoxydable, ou
pour trouver un détaillant ou un magasin
de pièces Camco près de chez vous, veuillez
appeler notre numéro sans frais :
Centre national de pièces
1.800.661.1616
www.electromenagersge.ca
Surfaces en acier inoxydable
(sur certains modèles)
Ampoules du four
REMARQUE : Vous ne devez enlever
le couvercle de verre que lorsque votre
four est froid. Vous aurez une meilleure
prise si vous portez des gants de latex.
ATTENTION : Avant de remplacer
votre ampoule électrique du four, débranchez
le courant électrique au niveau du fusible
principal ou du disjoncteur du panneau
électrique.
Assurez-vous que le couvercle à lumière
et l’ampoule électrique soient
complètement froids.
Pour votre sécurité, ne touchez jamais
une ampoule chaude à mains nues ou
avec un linge humide.
Enlèvement :
Tournez le couvercle en verre dans
le sens opposé à celui des aiguilles
d’une montre d’1/4 de tour jusqu’à
ce que les taquets du couvercle de
verre correspondent aux encoches
de la douille.
Avec des gants ou à l’aide d’un linge
sec, enlevez l’ampoule en la tirant
tout droit.
Remplacement :
Utilisez une ampoule halogène
neuve de 130 volts, d’une puissance
inférieure à 50 watts.
Avec des gants ou à l’aide d’un linge
sec, enlevez l’ampoule de son
emballage. Ne touchez jamais
l’ampoule à mains nues.
Poussez l’ampoule tout droit dans le
réceptacle, jusqu’au fond.
Placez les taquets du couvercle
en verre dans les encoches de la
douille. Tournez le couvercle en
verre dans le sens des aiguilles
d’une montre 1/4 de tour.
Pour voir plus clair à l’intérieur
du four, nettoyez fréquemment le
couvercle en verre à l’aide d’un
linge humide. Ne le nettoyez que
quand le four est complètement
froid.
Rebranchez le courant électrique
au four.
Ampoul
e
Douille
Languette
Couvercle de protection en verre
Réceptable
Utilisez des
gants ou un
linge
Réceptable
Page 37

20
Entretien et nettoyage du four.
Mesures de sécurité
Fonctionnement
Entretien et nettoyageConseils de dépannage
Soutien au
consommateur
Grilles du four
Nettoyez les grilles avec un produit
nettoyant abrasif ou un tampon à récurer
en acier. Après le nettoyage, rincez les
grilles à l’eau claire et séchez-les avec un
linge propre.
REMARQUE : Vous pouvez également nettoyer
les grilles du four dans le four autonettoyant.
Toutefois, elles terniront, perdront de leur lustre
et glisseront moins facilement si elles sont
nettoyées dans le four autonettoyant. Pour faire
glisser les grilles plus facilement, appliquez un
peu d’huile végétale ou de cuisson sur un essuie-
tout, puis essuyez les bords des grilles du four
avec l’essuie-tout.
Tableau de commande
Il est conseillé d’essuyer le tableau de
commande après chaque utilisation.
Nettoyez-le avec un savon doux et de
l’eau, ou une solution d’eau et de
vinaigre. Rincez à l’eau claire et essuyez
avec un linge doux.
N’utilisez pas de produits nettoyants
abrasifs, de produits nettoyants liquides
puissants, de tampons à récurer en
plastique ou de produits nettoyants
commerciaux pour le four sur le tableau
de commande—ces produits
endommageront le fini. Vous pouvez
aussi utiliser une solution contenant
autant d’eau chaude que de vinaigre.
Grille et lèchefrite
Ne nettoyez pas la grille et la lèchefrite dans le
four autonettoyant.
Après le grillage, sortez la grille et la
lèchefrite du four. Enlevez la grille de la
lèchefrite. Versez délicatement la graisse
de la lèchefrite dans un contenant.
Lavez et rincez la lèchefrite, de même
que la grille, dans de l’eau savonneuse
très chaude avec un tampon à récurer en
plastique ou savonneux.
Si des aliments sont brûlés à leur surface,
saupoudrez du détergent sur la grille
pendant qu’elle est chaude et couvrez
d’un linge à vaisselle ou d’essuie-tout
humides. Ce trempage fera décoller les
aliments brûlés.
Vous pouvez aussi nettoyer la lèchefrite à
l’aide d’un produit nettoyant commercial
pour le four.
Vous pouvez toutefois laver la grille et la
lèchefrite au lave-vaisselle.
Ne laissez pas la lèchefrite et la grille sales dans
le four.
Après le grillage, sortez la grille et
la lèchefrite du four.
Surfaces peintes
Nettoyez-les avec de l’eau et du savon ou
une solution d’eau et de vinaigre.
N’utilisez pas de produits nettoyants
commerciaux pour le four, de poudres à récurer,
de tampons à récurer en acier ou de produits
nettoyants abrasifs sur les surfaces peintes.
Surfaces de verre
Pour nettoyer les surfaces de verre,
utilisez un produit nettoyant pour
les vitres. Rincez et polissez avec
un linge sec.
Faites attention de ne pas faire couler
d’eau ou de produit nettoyant à
l’intérieur de la porte pendant le
nettoyage.
Page 38

19
Mesures de sécurité Fonctionnement
Soutien au
consommateur
Conseils de dépannageEntretien et nettoyage
www.electromenagersge.ca
Pour nettoyer l’intérieur de la porte :
■ Puisque la section à l’intérieur du joint se
nettoie durant le cycle d’autonettoyage,
aucun besoin de le nettoyer à la main.
■ La section à l’extérieur du joint et la
doublure de porte se nettoient avec un
tampon à récurer de plastique ou rempli
de savon, de l’eau chaude et du détergent.
Rincez bien avec une solution de vinaigre
et d’eau.
Pour nettoyer l’extérieur de la porte :
■ Utilisez du savon et de l’eau pour bien
laver le dessus, les côtés et l’avant de la
porte du four. Rincez bien. Vous pouvez
aussi utiliser un nettoyant pour le verre
pour nettoyer le verre à l’extérieur de la
porte. Ne laissez pas l’eau couler dans les
ouvertures des évents.
■ Si des taches sur la garniture d’évent de la
porte restent, utilisez un nettoyant doux
abrasif et un racloir éponge pour de
meilleurs résultats.
■ Les marinades, les jus de fruits, les sauces
tomates et les produits pour arroser
contenant des acides peuvent provoquer
une décoloration et doivent être essuyés
immédiatement. Lorsque la surface est
froide, nettoyez et rincez.
■ N’utilisez pas de nettoyant de four, de
poudres de nettoyage ou d’abrasifs forts sur
l’extérieur de la porte.
Ne frottez pas et ne nettoyez pas
le joint de porte car il a une résistance
extrêmement faible à l’abrasion.
Si vous remarquez qu’il devient usé,
s’effiloche, est endommagé de quelque
façon ou a été déplacé sur la porte, vous
devriez le remplacer.
La porte est très lourde. Faites attention quand
vous l’enlevez ou vous la soulevez.
Ne soulevez jamais la porte par sa poignée.
Enlèvement de la porte :
Ouvrez complètement la porte.
Tirez les verrous de charnières vers
l’armature de la porte, en position
déverrouillée. Un outil, comme un
tournevis à lame plate, peut être
nécessaire.
Tenez fermement les deux côtés du
haut de la porte.
Fermez la porte en position
d’enlèvement de la porte, qui est à mi-
chemin entre la position d’arrêt de grill
et la position fermée.
Soulevez la porte et faites-la sortir
jusqu’à ce que le bras de charnière sorte
complètement de sa fente.
Remise en place de la porte :
Tenez fermement les deux côtés du
haut de la porte.
Avec la porte
au même
angle que
pour l’enlever, mettez
le renfoncement du
bras de charnière
dans l’arête du bas de
la fente de charnière.
Le renfoncement du
bras de charnière doit être bien installé
dans le bas de la fente.
Ouvrez complètement la porte.
Si la porte n’est pas complètement
ouverte, l’indentation ne repose pas
bien à l’extrémité inférieure de la fente.
Poussez les verrous de charnière contre
l’armature de devant du trou du four,
en position verrouillée.
Fermez la porte du four
.
Verrous de
charnière
Enlèvement de la porte du four en la soulevant
Position d’enlèvement
Renforcement
Extrémité
de la
fente
Verrous de charnière
Fente
Poussez vers le haut les verrous des charnières pour verrouiller.
Tirez
en bas
les verrous des
charnières pour déverrouiller.
Bras de
charnière
Bras de
charnière
Nettoyage de la porte du four
Page 39

Entretien et nettoyage du four.
Avant de nettoyer une pièce quelconque du four, assurez-vous que l’alimentation électrique a été coupée et
que toutes les surfaces de l’appareil ont refroidi.
Pour enlever le ruban gommé d’emballage
Agrippez avec soin un coin de la pellicule
d’expédition de protection avec vos doigts
et retirez-la lentement de la surface de
l’appareil. N’utilisez pas d’objet tranchant
pour l’enlever. Retirez toute la pellicule avant
d’utiliser l’appareil pour la première fois.
Pour s’assurer qu’il n’y ait pas de dommages
au fini du produit, le meilleur moyen de
retirer l’adhésif du ruban d’emballage du
nouvel appareil est d’appliquer du détergent
liquide pour laver la vaisselle. Appliquez avec
un chiffon souple et laissez tremper.
REMARQUE : l’adhésif doit être retiré de toutes
les pièces. Il ne peut l’être s’il est cuit en place.
18
Utilisation du four autonettoyant.
Pour que le programme fonctionne adéquatement, il faut que la porte du four soit fermée et que toutes les
commandes soient réglées correctement.
Pour différer le début de l’autonettoyage
Appuyez sur la touche SELF CLEAN STD/
LOW (autonettoyage normal/bas ) une
fois pour nettoyer pendant 4 heures ou
deux fois pour nettoyer pendant 3
heures.
Nous vous recommandons
l’autonettoyage de 3 heures pour
nettoyer des petites saletés limitées et
l’autonettoyage de 4 heures pour les
fours plus sales.
Si vous avez besoin d’un temps autre
que 3 heures ou 4 heures, utilisez les
touches HOUR (heure) et MIN (minute)
+ ou – et inscrivez le temps de nettoyage
désiré.
Vous pouvez changer le temps de nettoyage à
n’importe quel temps entre 3 et 5 heures,
selon le degré de saleté du four.
Appuyez sur DELAY START (mise en
marche différée).
Appuyez sur HOUR et MIN + ou – pour
entrer l’heure à laquelle vous désirez
que le programme d’autonettoyage
commence.
Appuyez sur START (marche).
La porte se verrouille automatiquement.
L’écran affiche l’heure de début du
nettoyage. Il ne sera alors plus possible
d’ouvrir la porte tant que la température ne
sera pas descendue sous la température de
verrouillage et que le message LOCKED sera
affiché à l’écran.
Lorsque le message LOCKED n’est plus affiché
à l’écran, ouvrez la porte.
Après l’autonettoyage
Vous remarquerez un peu de cendre blanche
dans le four. Essuyez-la avec un linge humide
lorsque le four a refroidi.
S’il reste des taches blanches, faites-les disparaître à
l’aide d’un tampon à récurer savonneux. Rincez à fond
avec une solution d’eau et de vinaigre.
Il s’agit généralement de résidus de sel qui ne
disparaissent pas lors de l’autonettoyage.
Si le four n’est pas propre après un premier
nettoyage, programmez à nouveau un
autonettoyage.
■ Vous ne pouvez programmer aucune
fonction de cuisson tant que le four n’a pas
suffisamment refroidi pour que vous
puissiez déverrouiller la porte.
■ Si les grilles du four glissent difficilement,
appliquez un peu d’huile végétale ou de
cuisson sur un essuie-tout, puis essuyez les
bords des grilles du four avec l’essuie-tout.
Mesures de sécurité
Fonctionnement
Entretien et nettoyageConseils de dépannage
Soutien au
consommateur
Éléments chauffants du four
Ne nettoyez pas l’élément de cuisson ou de grillage.
La saleté brûlera lorsque les éléments chaufferont.
Pour nettoyer la sole du four, soulevez
gentiment l’élément de cuisson. Nettoyez avec
de l’eau chaude savonneuse.
Page 40

Utilisation du four autonettoyant. www.electromenagersge.ca
Pour que le programme fonctionne adéquatement, il faut que la porte du four soit fermée et que toutes les
commandes soient réglées correctement.
Avant l’autonettoyage
Attendez que le four se soit refroidi avant de
régler le cycle d'autonettoyage.
Nous vous recommandons d’assurer
une ventilation adéquate en ouvrant une
fenêtre ou en utilisant un ventilateur ou
une hotte de cuisine au cours du premier
autonettoyage.
Retirez du four la lèchefrite, la grille de la
lèchefrite, tous les ustensiles de cuisson et
le papier d’aluminium.
Les grilles du four peuvent être nettoyées
dans le four autonettoyant. Toutefois,
elles terniront, perdront de leur lustre et
glisseront moins facilement.
N’utilisez pas de matières abrasives ou de
nettoyants à four. Nettoyez le dessus, les
côtés et l’extérieur de la porte du four
avec du savon et de l’eau.
Assurez-vous que le capot de la lampe du
four est bien en place et que la lampe est
éteinte.
IMPORTANT : Certains oiseaux sont
extrêmement sensibles à la fumée
produite pendant le programme
d’autonettoyage de n’importe quel
four. Placez les oiseaux dans une
autre pièce bien aérée.
Essuyez le surplus de saleté sur la
sole du four (l’apparence peut
varier).
Comment régler l’autonettoyage
Appuyez sur la touche SELF CLEAN
STD/LOW (autonettoyage
normal/bas) une fois pour nettoyer
pendant 4 heures ou deux fois pour
nettoyer pendant 3 heures.
Nous vous recommandons
l’autonettoyage de 3 heures pour
nettoyer des petites saletés limitées
et l’autonettoyage de 4 heures pour
les fours plus sales.
Si vous avez besoins d’un temps
autre que 3 heures ou 4 heures,
utilisez les touches HOUR (heure) et
MIN (minute) + ou – et inscrivez le
temps de nettoyage désiré.
Vous pouvez changer le temps de
nettoyage à n’importe quel temps entre
3 et 5 heures, selon le degré de saleté
du four.
Appuyez sur START (marche).
La porte se verrouille automatiquement.
L’écran affiche la durée de nettoyage
résiduelle. Il ne sera alors plus possible
d’ouvrir la porte tant que la température
ne sera pas descendue sous la
température de verrouillage et que le
message LOCKED sera affiché.
Lorsque le message LOCKED n’est plus
affiché, ouvrez la porte.
■ Le message LOCKED clignote et un
signal sonore se fait entendre si vous
réglez un programme d’autonettoyage
et oubliez de fermer la porte du four.
■ Pour interrompre un programme
d’autonettoyage, appuyez sur
CLEAR/OFF (autonettoyage). Lorsque le
message LOCKED s’éteint pour indiquer
que la température du four est
descendue sous la température de
verrouillage, ouvrez la porte.
17
Mesures de sécurité Fonctionnement
Soutien au
consommateur
Conseils de dépannageEntretien et nettoyage
Page 41

16
Réglage de la commande de température—faites-le vous-même!
Il est possible que vous trouviez que dans votre nouveau four la cuisson est différente que dans votre ancien four.
Utilisez votre nouveau four pendant quelques semaines afin de vous familiariser avec son fonctionnement. Si vous
trouvez que la température dans votre nouveau four est trop élevée ou trop basse, vous pouvez régler la commande
de température vous-même.
Nous vous recommandons de ne pas utiliser un thermomètre bon marché, comme ceux vendus dans les épiceries,
pour vérifier le réglage de température de votre nouveau four. Ces thermomètres peuvent présenter des écarts de
20 à 40 degrés.
REMARQUE : Ce réglage n’affectera nullement les températures de grillage et d’autonettoyage. De plus, il sera
conservé en mémoire si jamais une panne de courant survient.
Pour régler la commande de température
Appuyez simultanément sur les
touches BAKE (cuisson) et BROIL
HI/LO (grillage max./min.)pendant
3 secondes, jusqu’à ce que l’écran
affiche SF.
Appuyez sur la touche BAKE
(cuisson). Un nombre de deux
chiffres s’affiche à l’écran.
La température du four peut être
augmentée (+) ou réduite (-) de
35 °F. Appuyez une fois sur la
touche TEMP + pour augmenter la
température de 1 degré. Appuyez
une fois sur la touche TEMP – pour
diminuer la température de 1 degré.
Lorsque la modification
désirée est effectuée, appuyez sur
START (marche) pour afficher de
nouveau l’heure. Vous pouvez
maintenant utiliser votre four
comme d’habitude.
Mesures de sécurité
Fonctionnement
Entretien et nettoyageConseils de dépannage
Soutien au
consommateur
Le type de margarine utilisée affecte la cuisson!
La plupart des recettes nécessitant une cuisson exige l’utilisation de produits à forte teneur en matières grasses,
comme du beurre ou de la margarine (80 % de matières grasses). Si vous diminuez la quantité de gras, vous pourriez
ne pas obtenir les mêmes résultats qu’avec un produit à plus forte teneur en matières grasses.
Vous pouvez rater votre recette de gâteau, de tarte, de pâtisseries, de biscuits ou de friandises lorsque vous utilisez
de la graisse tartinable à faible teneur en matières grasses. Plus la teneur en matières grasses d’une graisse
tartinable est faible, plus la différence est appréciable.
En vertu des normes fédérales, les produits étiquetés comme étant de la «margarine» doivent contenir au moins 80 %
de matières grasses. Par contre, les graisses tartinables à faible teneur en matières grasses contiennent moins de gras et
plus d’eau. La forte teneur en eau de ces graisses tartinables affecte la texture et la saveur des produits de boulangerie.
Pour obtenir de bons résultats avec vos anciennes recettes préférées, utilisez de la margarine, du beurre ou de la graisse
à tartiner contenant au moins 70 % d’huile végétale.
Page 42

Utilisation de la cuisson et du rôtissage minutés. www.electromenagersge.ca
REMARQUE : Ne laissez jamais des aliments comme des produits laitiers, du poisson, de la farce, de la volaille et du
porc reposer pendant plus d’une heure avant ou après la cuisson. Lorsque ces aliments sont laissés à la température
de la pièce, cela favorise la prolifération de bactéries nocives. Assurez-vous que la lampe du four est éteinte car la
chaleur produite par l’ampoule pourrait favoriser la prolifération de bactéries.
Comment régler une mise en marche immédiate et un arrêt automatique
Le four se met en marche immédiatement et
fonctionne pendant la durée réglée. À la fin de la
durée de cuisson, le four s’éteint automatiquement.
Appuyez sur BAKE (cuisson).
Appuyez sur les touches TEMP +
ou – pour entrer la température
désirée.
Appuyez sur COOKING TIME (durée
de cuisson).
REMARQUE : Si votre recette exige que vous
fassiez réchauffer le four, vous pouvez allonger la
durée de cuisson.
Appuyez sur les touches HOUR et
MIN + ou – pour entrer la durée de
cuisson désirée. La température du
four et la durée de cuisson que vous
avez entrée sont affichées à l’écran.
Appuyez sur START (marche).
L’écran affiche la température du four
que vous avez réglée, ainsi que le compte
à rebours de la durée de cuisson.
Lorsque la température atteint 100 °F,
l’écran affiche la température progressive
du four.
Le four poursuit la cuisson pendant
la durée programmée, puis s’éteint
automatiquement, à moins que la
caractéristique Cuisson et Attente
soit en marche. Consultez la section
Caractéristiques spéciales des commandes
du four.
Pour effacer l’écran d’affichage, appuyez
sur CLEAR/OFF (annulation/arrêt).
Comment régler une mise en marche différée et un arrêt automatique
Vous pouvez programmer la minuterie du four
pour que le four se mette en marche à une heure
précise, fonctionne pendant une durée pré-
déterminée, puis s’éteigne automatiquement.
Assurez-vous que l’horloge affiche la
bonne heure.
Appuyez sur BAKE (cuisson).
Appuyez sur les touches TEMP +
ou – pour entrer la température
désirée.
Appuyez sur COOKING TIME (durée
de cuisson).
REMARQUE : Si votre recette exige que vous
fassiez réchauffer le four, vous pouvez allonger la
durée de cuisson.
Appuyez sur les touches HOUR et
MIN + ou – pour entrer la durée de
cuisson désirée.
Appuyez sur DELAY START (mise en
marche différée).
Appuyez sur les touches HOUR et
MIN + ou – pour entrer l’heure
à laquelle vous désirez que le four
se mette en marche et que la
cuisson débute.
Appuyez sur START (marche).
REMARQUE : Une tonalité d’attention se fait
entendre lorsque vous réglez une cuisson minutée
et n’appuyez pas sur START (marche) après avoir
entré la température de cuisson.
Si vous désirez vérifier les durées de
cuisson que vous avez réglées, appuyez
sur DELAY START (mise en marche
différée) pour vérifier l’heure de début
réglée, ou appuyez sur COOKING TIME
(durée de cuisson) pour vérifier la durée
de cuisson que vous avez réglée.
Lorsque le four se met en marche à
l’heure que vous avez réglée, l’écran
affiche la température réelle du four
(à partir de 100 °F), ainsi que le compte
à rebours de la durée de cuisson.
Le four poursuit la cuisson pendant
la durée programmée, puis s’éteint
automatiquement, à moins que la
caractéristique Cuisson et Attente
soit en marche. Consultez la section
Caractéristiques spéciales des commandes
du four.
Lorsque la durée de cuisson est écoulée,
le four s’éteint et la tonalité de fin de
cuisson se fait entendre.
Pour effacer l’écran d’affichage, appuyez
sur CLEAR/OFF (annulation/arrêt).
Mesures de sécurité Fonctionnement
Soutien au
consommateur
Conseils de dépannageEntretien et nettoyage
15
Page 43

14
Utilisation de l’horloge, de la minuterie et
du verrouillage des commandes.
Pour régler l’horloge
Pour que les dispositifs de chronométrage
automatiques du four fonctionnent
correctement, vous devez régler l’horloge
à la bonne heure. Il n’est pas possible de
modifier l’heure au cours d’une cuisson
minutée .
Appuyez sur CLOCK (horloge).
Appuyez sur les touches HOUR et
MIN + ou – pour régler l’heure à
l’horloge.
Appuyez sur START (marche).
Assurez-vous que l’horloge est
réglée à la bonne heure.
Pour régler la minuterie
Appuyez sur KITCHEN TIMER ON/OFF
(marche/arrêt de la minuterie).
Appuyez sur les touches HOUR et
MIN + ou – jusqu’à ce que la durée
désirée soit affichée à l’écran.
Si vous faites une erreur, appuyez
sur KITCHEN TIMER ON/OFF
(marche/arrêt de la minuterie),
puis recommencez.
Appuyez sur START (marche).
Après avoir appuyé sur la touche START
(marche), le message «SET» (réglé) s’efface pour
vous indiquer que le compte à rebours est
commencé, même si l’écran demeure inchangé
pendant une minute.
Lorsque la minuterie atteint :00,
un signal sonore se fait entendre
trois fois, suivi d’un signal toutes
les 6 secondes jusqu’à ce que vous
appuyiez sur KITCHEN TIMER ON/OFF
(marche/arrêt de la minuterie).
Vous pouvez annuler le signal sonore toutes
les 6 secondes en suivant les étapes données
à la section «Caractéristiques spéciales de la
commande du four» sous «Tonalités à la fin
d’une fonction minutée».
La minuterie n’est en fait qu’un
compte-minutes.
Elle ne commande pas les différentes
fonctions du four. Elle peut
chronométrer une durée pouvant
atteindre 9 heures et 59 minutes.
Pour modifier le réglage de la minuterie
Pendant que la durée résiduelle est
affichée à l’écran, vous pouvez la
modifier en appuyant sur KITCHEN TIMER
ON/OFF (marche/arrêt de la minuterie),
et ensuite sur les touches HOUR et MIN +
ou – pour afficher la durée que vous
désirez à l’écran.
Si la durée résiduelle n’est pas affichée
à l’écran (lorsque l’heure, le début
de la mise en marche différée ou la
durée de cuisson sont affichés à l’écran),
rappelez la durée résiduelle à l’écran
en appuyant sur KITCHEN TIMER
ON/OFF (marche/arrêt de la minuterie),
et appuyez ensuite sur les touches
HOUR et MIN + ou – pour entrer la
nouvelle durée.
Pour annuler la minuterie
Appuyez deux fois sur KITCHEN TIMER
ON/OFF (marche/arrêt de la minuterie).
Mesures de sécurité
Fonctionnement
Entretien et nettoyageConseils de dépannage
Soutien au
consommateur
Verrouillage des commandes
Cette commande vous permet de verrouiller les touches
de manière à ce qu’elles ne puissent pas être activées
quand vous les pressez.
Pour verrouiller/déverrouiller les commandes :
Appuyez sur les touches HOUR (heure)
et MIN (minute) en même temps
pendant 3 secondes, jusqu’à ce que LOC
ON. (verrouillage) apparaisse sur l’écran.
Pour déverrouiller la commande,
appuyez sur les touches HOUR (heure) et
MIN (minute) – en même temps jusqu’à
ce que LOC OFF (déverrouillage)
apparaisse sur l’écran.
Quand cette caractéristique est branchée et
les touches sont appuyées, la commande fait
un signal sonore et LOC ON (verrouillage)
apparaît sur l’écran.
■ Le mode de verrouillage du réglage influence toutes
les touches. Aucune touche ne fonctionne quand
cette commande est en marche.
■ L’ajustement reste en mémoire après huit pannes de
courant.
Page 44

Comment régler un grillage dans votre four
Déposez la viande ou le poisson sur
la grille de la lèchefrite.
Placez la grille du four à la hauteur
recommandée dans le Guide de
grillage.
Si votre four est alimenté par un courant de
208 volts, vous pouvez faire griller les biftecks
saignants en faisant réchauffer le four et en
plaçant la grille du four un cran plus haut.
Appuyez une fois sur BROIL HI/LO
(grillage max./min.) pour un
grillage MAXIMUM.
Pour passer au grillage MINIMUM,
appuyez encore une fois sur BROIL
HI/LO (grillage max./min.).
Appuyez sur START (marche).
Lorsque le grillage est terminé,
appuyez sur CLEAR/OFF
(annulation/arrêt).
Laissez la porte entrouverte à la
position de grillage. La porte
demeure ouverte et, pourtant, le
four maintient la température
appropriée.
REMARQUE : Les aliments peuvent
être grillés la porte fermée mais ils
ne brunissent pas bien parce que
l’élément de chauffage du four se
met en marche et s’arrête.
Guide de grillage
Quantité Hauteur Premier Deuxième
et (ou) de la côté côté Remarques
Aliment épaisseur grille (minutes) (minutes)
Boeuf haché 1 lb (4 croquettes) C 10 7 Espacer également. La durée
Bien cuit 1/2 à 3/4 po de cuisson est la même pour
d’épaisseur faire cuire jusqu’à 8 croquettes.
Biftecks
Saignant 1 po d’épaisseur C 6 5 Les biftecks de moins de 1 po
À point 1 à 1
1
⁄2 lb C 8 6 d’épaisseur cuisent avant de
Bien cuit C 12 11 brunir. Il est recommandé de
les faire cuire à la poêle.
Entailler le gras.
Saignant 11⁄
2 po d’épaisseur C 10 7–8
À point 2 à 2
1
⁄
2 lb C 15 14–16
Bien cuit C 25 20–25
Poulet 1 entier A 35 10–15 Réduire la durée de cuisson
2 à 2
1
⁄2 lb, de 5 à 10 minutes par côté
sur la longueur pour le poulet en morceaux.
Badigeonner chaque côté de
beurre fondu. Faire d’abord
griller le poulet la peau
en-dessous.
Queues de 2 à 4 B 13–16 Ne pas Entailler le dos de la carapace.
homard 6 à 8 oz. ch. retourner. Ouvrir. Badigeonner de beurre
fondu avant le grillage et à la
mi-cuisson.
Filets de poisson 1/4 à 1/2 po d’épaisseur C 5 5 Manipuler et retourner avec
soin. Badigeonner de beurre
citronné avant et pendant la
cuisson, si désiré. Faire réchauffer
le four pour brunir davantage.
Tranches de 1 po d’épaisseur B 8 8 Augmenter la durée de 5 à
jambon 10 minutes par côté si la
(tout cuit) tranche a 1
1
⁄2 po d’épaisseur
ou si le jambon est fumé.
Côtelettes de porc 2 (1/2 po d’épaisseur) C 10 10 Entailler le gras.
Bien cuit 2 (1 po d’épaisseur) B 13 13
environ 1 lb
Côtelettes
d’agneau
À point 2 (1 po d’épaisseur) C 10 9 Entailler le gras.
Bien cuit environ 10 à 12 oz C 12 10
À point 2 (1
1
⁄2 po d’épaisseur) C 14 12
Bien cuit environ 1 lb B 17 12–14
Mesures de sécurité Fonctionnement
Soutien au
consommateur
Conseils de dépannageEntretien et nettoyage
13
www.electromenagersge.ca
† Le ministère de l’Agriculture des États-Unis
fait la mise en garde suivante : «Même si
la consommation du boeuf saignant est très
répandue, il faut savoir que lorsque la
température interne de la viande atteint
seulement 140 °F, certains micro-
organismes nuisibles pour la santé ne sont
pas détruits.» (Source : Safe Food Book,
Your Kitchen Guide, USDA, rév. juin
1985.)
La taille, le poids, l’épaisseur, la température de départ et vos préférences de cuisson influencent
la durée de grillage. Ce guide est basé sur des viandes à température de réfrigération.
Page 45

12
Utilisation de votre four.
Pour éviter tout risque de brûlures, installez les grilles à la hauteur appropriée avant de mettre le four en marche.
Avant d'utiliser votre four...
Les grilles sont dotées de butées. Lorsque
les grilles sont placées correctement sur
leurs supports, ces butées les empêchent
de sortir complètement et de basculer.
Lorsque vous placez ou prenez un
récipient dans le four, tirez la grille
complètement jusqu’à ce qu’elle bloque.
Pour enlever une grille, tirez-la vers vous,
soulevez l’avant de la grille, puis sortez-la
complètement.
Pour la remettre en place, placez les
extrémités de la grille (butées) sur les
supports, soulevez l’avant de la grille,
puis poussez-la complètement jusqu’au
fond du four.
Le four présente 4 hauteurs de grille.
Comment régler une cuisson ou un rôtissage
Appuyez sur BAKE (cuisson).
Appuyez sur les touches TEMP +
ou – pour régler la température
désirée.
Appuyez sur START (marche).
Vérifiez la cuisson des aliments
après la durée minimum indiquée
dans votre recette. Faites cuire plus
longtemps au besoin.
Lorsque la cuisson est terminée,
appuyez sur CLEAR/OFF
(annulation/arrêt).
Aliment Hauteur de la grille
Tartes surgelées B ou C
(sur une plaque à biscuits)
Gâteau des anges A
Gâteaux bundt ou B
quatre-quarts
Petits pains, muffins, B ou C
carrés au chocolat, biscuits,
petits gâteaux, gâteaux à
étages, tartes
Casseroles B ou C
REMARQUE : Un ventilateur peut se
mettre automatiquement en marche
pour refroidir les pièces internes.
Cette situation est tout à fait
normale. Le ventilateur peut
continuer de fonctionner même
lorsque le four est éteint.
Réchauffage et positionnement des casseroles
Ne faites réchauffer le four que si la
recette l’exige. Il est nécessaire de faire
réchauffer le four pour la cuisson des
gâteaux, des biscuits, des pâtisseries et du
pain.
Pour les fours qui ne sont pas dotés d’une tonalité
ou d’une lampe témoin de préchauffage, préchauffer
pendant 10 minutes.
Pour une cuisson uniforme, il faut placer
les casseroles le plus possible au centre
du four. Les casseroles ne doivent pas
entrer en contact les uns avec les autres
ou avec les parois du four. Si vous utilisez
deux grilles, disposez les casseroles de
sorte qu’ils ne soient pas placés
directement les uns au-dessous des
autres et laissez environ 1
1
⁄2 po entre les
casseroles et l’avant, l’arrière et les côtés
du four.
Papier d’aluminium
Vous pouvez recouvrir la grille et la
lèchefrite de papier d’aluminium. Toutefois,
vous devez ajuster le papier parfaitement
sur la grille et pratiquer des ouvertures
correspondant à celles de la grille.
On peut aussi utiliser un papier d’aluminium pour
récupérer les débordements.
Ne déposez jamais une feuille de papier
d’aluminium sur toute la surface d’une
grille, car cela affectera la circulation de
l’air chaud et donnera une cuisson
inadéquate.
Vous pouvez placer une petite feuille
de papier d’aluminium sur une grille
placée à quelques pouces au-dessous de
l’aliment que vous faites cuire afin de
recueillir les débordements.
Pratiquez des ouvertures
correspondant à celles de la grille.
Mesures de sécurité
Fonctionnement
Entretien et nettoyageConseils de dépannage
Soutien au
consommateur
Page 46

11
Mesures de sécurité Fonctionnement
Soutien au
consommateur
Conseils de dépannageEntretien et nettoyage
Sortie du mode Sabbath
Appuyez sur la touche CLEAR/OFF
(annulation/arrêt).
Si le four est en train de cuire,
attendez pendant une durée
variable d’environ 30 secondes à
une minute, que ⊃ apparaisse sur
l’écran.
Pressez sur les touches BAKE
(cuisson) et BROIL HI/LO (grillage
max./min.), en même temps, et
maintenez-les appuyées jusqu’à ce
que SF apparaisse sur l’écran.
Tapez sur la touche DELAY START
(mise en marche différée) jusqu’à
ce que 12 shdn ou no shdn apparaisse
sur l’écran. 12 shdn signifie que le
four s’arrête automatiquement au
bout de 12 heures et no shdn signifie
que le four ne s’arrête pas
automatiquement.
Appuyez sur la touche START (mise
en marche).
REMARQUE : En cas de panne d’électricité
pendant que le four est en mode
Sabbath, le four s’arrête
automatiquement et vous
devez régler à nouveau le four.
www.electromenagersge.ca
Page 47

10
Utilisation du mode Sabbath.
(conçu pour les fêtes juives et le Sabbath)
Mesures de sécurité
Fonctionnement
Entretien et nettoyageConseils de dépannage
Soutien au
consommateur
Réglage de la mise en marche immédiate et de l’arrêt automatique de la cuisson et du rôtissage
NOTE : Pour bien comprendre comment fonctionne le mode
Sabbath, commencez par utiliser votre four en mode de mise
en marche immédiate et d’arrêt automatique avant de
l’utiliser en mode Sabbath.
Assurez-vous que l’horloge indique la bonne heure
du jour.
Pressez sur les touches BAKE (cuisson)
et BROIL HI/LO (grillage max./min.), en même
temps, et maintenez-les appuyées jusqu’à ce
que SF apparaisse sur l’écran.
NOTE: Si le mot Bake (cuisson) ou Broil
(grillage) apparaît sur l’affichage, cela
signifie que les touches
BAKE
et
BROIL HI/LO
n’ont pas été pressées
simultanément. Appuyez sur la touche
CLEAR/OFF
et recommencez.
Tapez sur la touche DELAY START (mise en
marche différée) jusqu’à ce que SAb bAtH
(sabbath) apparaisse sur l’écran.
Appuyez sur la touche START (mise en
marche). ⊃ apparaît sur l’écran.
Appuyez sur la touche COOKING TIME (temps
de cuisson).
Appuyez sur la touche + ou – pour régler la
durée désirée de cuisson (entre 1 minute et 9
heures et 59 minutes). La durée de cuisson
inscrite apparaît sur l’écran.
Appuyez sur la touche START (mise en
marche).
Appuyez sur la touche BAKE (cuisson).
Aucun signal n’apparaît sur l’écran.
Votre four est automatiquement pré-réglé à
une température de 350°. Tapez sur la
touche + ou – pour augmenter ou diminuer
la température par tranches de 5°. Vous
pouvez choisir une température de 170° à
550°. Aucun signal ni aucune température
n’apparaît.
Appuyez sur la touche START (mise en
marche).
Après un délai d’une durée variable
d’environ 30 secondes à une minute,
⊃ apparaît à nouveau sur l’écran,
indiquant que le four est en train de cuire ou
de rôtir. Si ⊃ n’apparaît pas sur l’écran,
recommencez à l’étape 7.
Pour régler la température du four, appuyez sur la
touche BAKE (cuisson), tapez sur la touche + ou –
pour augmenter ou diminuer la température par
tranche de 5°. Appuyez sur la touche START (mise
en marche).
Quand la cuisson est terminée, ⊃ se transforme
en ⊃ sur l’écran et 0:00 apparaît sur l’écran,
indiquant que le four s’est arrêté, mais qu’il est
toujours en mode Sabbath. Enlevez les aliments
cuits.
⊃
⊃
⊃
Vous ne pouvez utiliser le mode Sabbath que pour cuire ou pour rôtir. Vous ne pouvez pas l’utiliser pour griller, autonettoyer ou
mettre en marche en mode différé.
NOTE : Vous allumez automatiquement la lumière du four (sur certains modèles) en ouvrant la porte, et vous l’éteignez
automatiquement en fermant la porte. Vous pouvez enlever l’ampoule. Consultez la section «Remplacement de l’ampoule du four».
Si votre modèle a un commutateur de lumière sur le panneau de contrôle, vous pouvez allumer la lumière et la laisser allumée.
Réglage normal de la cuisson et du rôtissage
NOTE : Pour bien comprendre comment fonctionne le mode
Sabbath, commencez par utiliser votre four en mode normal
avant de l’utiliser en mode Sabbath.
Assurez-vous que
l’horloge
indique la bonne heure
du jour.
Pressez sur les touches BAKE (cuisson) et
BROIL HI/LO (grillage max./min.), en même
temps, et maintenez-les appuyées jusqu’à ce
que SF apparaisse sur l’écran.
NOTE: Si le mot Bake (cuisson) ou Broil
(grillage) apparaît sur l’affichage, cela
signifie que les touches
BAKE
et
BROIL HI/LO
n’ont pas été pressées
simultanément. Appuyez sur la touche
CLEAR/OFF
et recommencez.
Tapez sur la touche DELAY START (mise en
marche différée) jusqu’à ce que SAb bAtH
(sabbath) apparaisse sur l’écran.
Appuyez sur la touche START (mise en
marche). ⊃ apparaît sur l’écran.
Appuyez sur la touche BAKE (cuisson).
Aucun signal n’apparaît.
Votre four est automatiquement pré-réglé à
une température de 350°. Tapez sur la
touche + ou – pour augmenter ou diminuer
la température par tranches de 5°. Vous
pouvez choisir une température de 170° à
550°. Aucun signal ni aucune température
n’apparaît.
Appuyez sur la touche START (mise en
marche).
Après un délai d’une durée variable
d’environ 30 secondes à une minute,
⊃ apparaît à nouveau sur l’écran,
indiquant que le four est en train de cuire ou
de rôtir. Si ⊃ n’apparaît pas sur l’écran,
recommencez à l’étape 4.
Pour régler la température du four, appuyez sur la
touche BAKE (cuisson), puis tapez sur la touche +
ou – pour augmenter ou diminuer la température
par tranches de 5°. Appuyez sur la touche START
(mise en marche).
REMARQUE : Les touches CLEAR/OFF
(annulation/arrêt) et COOKING TIME (durée de
cuisson) restent actives en mode Sabbath.
⊃
⊃
Quand ⊃ apparaît sur l’écran, vous
avez réglé le four pour le Sabbath.
Quand ⊃ apparaît sur l’écran,
le four est en train de cuire ou de
rôtir.
⊃
Quand ⊃ apparaît sur l’écran, vous
avez réglé le four pour le Sabbath.
Quand ⊃ apparaît sur l’écran,
le four est en train de cuire ou de
rôtir.
⊃
Page 48

9
Cuisson et attente
Votre nouvelle commande possède une
caractéristique de «cuisson et attente» qui
permet de garder au chaud les aliments cuits
pendant un maximum de 3 heures après la fin de
la cuisson.
REMARQUE : Cette caractéristique peut être
seulement programmée pour fonctionner avec la
cuisson ou la rôtisserie avec minuterie (Consultez
la section Utilisation des caractéristiques de
cuisson et de rôtisserie avec minuterie). Après
l’arrêt automatique de la cuisson ou de la
rôtisserie avec minuterie, la cuisson et attente
programmées commencent automatiquement.
Pour actionner cette fonction, suivez les
étapes ci-dessous.
Appuyez simultanément sur les
touches BAKE (cuisson) et BROIL
HI/LO (grillage max./min.) pendant
3 secondes, jusqu’à ce que l’écran
affiche SF.
Appuyez sur COOKING TIME (durée
de cuisson). L’écran affiche Hld OFF
(attente hors fonction).
Appuyez de nouveau sur COOKING
TIME (durée de cuisson) pour
actionner la caractéristique. L’écran
affiche Hld ON (attente en fonction).
Appuyez sur START (marche) pour
que la caractéristique «cuisson et
attente» soit en fonction et régler la
commande à ce mode spécial.
Modification de la vitesse des touches + et –
Lorsque vous utilisez les touches + et – pour
régler une durée ou une température, vous
remarquerez que l’affichage change lentement.
Cette caractéristique spéciale vous permet de
modifier la vitesse de défilement. Pour régler la
vitesse que vous désirez, suivez les étapes ci-
dessous.
Appuyez simultanément sur BAKE
(cuisson) et BROIL HI/LO (grillage
max./min.) pendant 2 secondes
jusqu’à ce que l’écran affiche «SF».
Appuyez sur une touche +. L’écran
affiche une vitesse entre 1 et 5.
Appuyez sur une touche + pour
augmenter la vitesse jusqu’au
chiffre 5.
Appuyez sur la touche – pour
réduire la vitesse jusqu’au chiffre 1.
Appuyez sur START (marche)
pour mettre ce réglage en fonction
et régler la commande à ce mode
spécial.
Mesures de sécurité Fonctionnement
Soutien au
consommateur
Conseils de dépannageEntretien et nettoyage
www.electromenagersge.ca
Page 49

8
Caractéristiques spéciales des commandes du four.
Tonalités à la fin d’une fonction minutée
À la fin d’une fonction minutée, trois signaux
sonores courts se font entendre, suivis d’un
signal sonore toutes les 6 secondes, jusqu’à ce
que vous appuyiez sur CLEAR/OFF
(annulation/arrêt). Cette tonalité toutes
les 6 secondes peut être annulée.
Pour annuler la tonalité toutes les
6 secondes :
Appuyez simultanément sur les
touches BAKE (cuisson) et BROIL
HI/LO (grillage max./min.) pendant
3 secondes, jusqu’à ce que l’écran
affiche SF.
Appuyez sur KITCHEN TIMER ON/OFF
(marche/arrêt de la minuterie).
L’écran affiche CON BEEP (tonalité
continue). Appuyez de nouveau
sur KITCHEN TIMER ON/OFF
(marche/arrêt de la minuterie).
L’écran affiche BEEP. (La tonalité
toutes les 6 secondes est ainsi
annulée.)
Appuyez sur START (marche).
12 heures, 24 heures ou extinction de l’heure
Votre commande est réglée pour fonctionner avec
le système horaire de 12 heures.
Si vous désirez utiliser le système horaire
de 24 heures ou préférez ne pas afficher
l’heure, suivez les étapes ci-dessous.
Appuyez simultanément sur les
touches BAKE (cuisson) et BROIL
HI/LO (grillage max./min.) pendant
3 secondes, jusqu’à ce que l’écran
affiche SF.
Appuyez une fois sur CLOCK
(horloge). L’écran affiche 12 hr.
Si c’est le mode que vous désirez,
appuyez sur la touche START
(marche).
Appuyez de nouveau sur CLOCK
(horloge) pour régler le système
horaire de 24 heures. L’écran
affiche 24 hr. Si c’est le mode que
vous désirez, appuyez sur la touche
START (marche).
Appuyez de nouveau sur CLOCK
(horloge) pour éteindre l’horloge.
L’écran affiche OFF (éteint). Si c’est
le mode que vous désirez, appuyez
sur la touche START (marche).
REMARQUE : Lorsque l’horloge est réglée au
mode «extinction», vous ne pouvez utiliser la
fonction de mise en marche différée.
Mesures de sécurité
Fonctionnement
Entretien et nettoyageConseils de dépannage
Soutien au
consommateur
Page 50

7
Caractéristiques spéciales des commandes du four.
www.electromenagersge.ca
Votre nouvelle commande à touches électroniques possède des caractéristiques supplémentaires que vous pouvez
utiliser. Voici ces caractéristiques et de quelle façon vous pouvez les régler.
Les caractéristiques spéciales ne peuvent être mises en fonction que lorsque l’heure est affichée à l’écran. Elles
sont conservées dans la mémoire de la commande jusqu’à ce que vous suiviez à nouveau les étapes indiquées.
Lorsque l’écran affiche votre choix, appuyez sur START (marche). Ces caractéristiques spéciales sont conservées en
mémoire, même après une panne de courant.
Extinction après 12 heures
Grâce à cette caractéristique, si vous oubliez le
four et le laissez allumé, la commande l’éteindra
automatiquement après 12 heures pendant les
fonctions de cuisson, ou après 3 heures pendant
une fonction de grillage.
Si vous désirez annuler cette fonction,
suivez les étapes ci-dessous.
Appuyez simultanément sur les
touches BAKE (cuisson) et BROIL
HI/LO (grillage max./min.) pendant
3 secondes, jusqu’à ce que l’écran
affiche SF.
Appuyez de nouveau sur DELAY
START (mise en marche différée).
L’écran affiche no shdn (aucune
extinction).
Appuyez sur START (marche) pour
que l’extinction soit en fonction et
régler la commande à ce mode
spécial.
Température en degrés Fahrenheit ou Celsius
Votre commande est réglée pour afficher la
température en degrés Fahrenheit, mais vous
pouvez modifier cette sélection afin de l’afficher
en degrés Celsius.
Appuyez simultanément sur les
touches BAKE (cuisson) et BROIL
HI/LO (grillage max./min.) pendant
3 secondes, jusqu’à ce que l’écran
affiche SF.
Appuyez simultanément sur les
touches BROIL HI/LO (grillage
max./min.) et COOKING TIME (durée
de cuisson). L’écran affiche F
(degrés Fahrenheit).
Appuyez simultanément de nouveau
sur les touches BROIL HI/LO (grillage
max./min.) et COOKING TIME (durée
de cuisson). L’écran affiche C
(degrés Celsius).
Appuyez sur START (marche).
Mesures de sécurité Fonctionnement
Soutien au
consommateur
Conseils de dépannageEntretien et nettoyage
Page 51

6
Utilisation des commandes du four.
Dans le présent manuel, les caractéristiques et l’apparence peuvent être différentes de celles de votre modèle.
Réglage et caractéristiques des commandes du four,
de l’horloge et de la minuterie
Touche BAKE (Cuisson)
Appuyez sur cette touche pour choisir la
fonction de cuisson.
Touche BROIL HI/LO (Grillage max./min.)
Appuyez sur cette touche pour choisir la
fonction de grillage.
Écran d'affichage
Indique l’heure, la température du four,
que le four soit au mode de cuisson ou
grillage, et la durée réglée pour les fonctions
automatiques du four ou pour la minuterie.
«F–et un nombre» clignotent à l’écran et des bips se
font entendre pour indiquer un code d’erreur. Appuyez
sur CLEAR/OFF (annulation/arrêt). Laissez le four refroidir
pendant une heure. Remettez le four en marche. Si le code
d’erreur est de nouveau affiché, coupez l’alimentation
électrique et appelez un réparateur.
Si vous aviez réglé une fonction minutée sur votre
four au moment où la panne de courant s'est
produite, il faut régler à nouveau toutes les fonctions
programmées, ainsi que l’horloge.
L’heure clignote à l’écran après une panne de
courant.
Touche START (Mise en marche)
Il faut appuyer sur cette touche pour mettre
en marche n’importe quelle fonction de
cuisson.
Touche COOKING TIME (Durée de
cuisson)
Appuyez sur cette touche, et ensuite
sur les touches HOUR et MIN + ou –
correspondant à la durée de cuisson que
vous désirez régler pour vos aliments. Le
four s’éteint automatiquement lorsque la
durée de cuisson est écoulée, à moins que la
caractéristique Cuisson et Attente soit en
marche.
Touche DELAY START (Mise en marche
différée)
S’utilise avec la touche COOKING TIME
(durée de cuisson) ou SELF CLEAN STD/LOW
(autonettoyage normal/bas) pour
programmer le four afin qu’il se mette en
marche ou s’arrête automatiquement à
l’heure désirée.
Touche CLOCK (Horloge)
Appuyez sur cette touche avant de régler
l’horloge.
Touche KITCHEN TIMER ON/OFF
(Marche/arrêt de la minuterie)
Appuyez sur cette touche pour choisir la
fonction de minuterie.
Touche CLEAR/OFF (Annulation/arrêt)
Appuyez sur cette touche pour annuler
TOUS les réglages du four, à l’exception
de l’horloge et de la minuterie.
Touches HOUR et MIN + et –
Appuyez sur ces touches pour régler une
durée pouvant atteindre 9 heures et 59
minutes—par exemple l’heure à l’horloge,
la minuterie, l’heure de début et la durée
d'une cuisson minutée, ainsi que l’heure
de début et la durée d’un autonettoyage.
Touches TEMP + et –
Appuyez sur ces touches pour régler la
température de cuisson désirée.
Touche OVEN LIGHT (Lampe du four)
Appuyez sur cette touche pour allumer ou
éteindre la lampe du four.
Touche SELF CLEAN STD/LOW
(Autonettoyage normal/bas)
Appuyez sur cette touche pour choisir la
fonction d’autonettoyage. Reportez-vous à la
section Utilisation du four autonettoyant.
Mesures de sécurité
Fonctionnement
Entretien et nettoyageConseils de dépannage
Soutien au
consommateur
Page 52

5
Mesures de sécurité Fonctionnement
Soutien au
consommateur
Conseils de dépannageEntretien et nettoyage
Faites cuire la viande et la volaille à fond—la température INTERNE de la viande doit être d'au moins
160 °F, et celle de la volaille d'au moins 180 °F. La cuisson à ces températures internes assure
généralement une bonne protection contre les intoxications alimentaires.
FAITES CUIRE LA VIANDE ET LA VOLAILLE À FOND…
■ Ne nettoyez pas le joint de la porte. Ce
joint est essentiel à une bonne étanchéité.
Il faut éviter de le récurer, de
l’endommager ou de le déplacer.
■ N’utilisez pas de produits nettoyants
commerciaux pour le four. Il ne faut
jamais utiliser des produits nettoyants
commerciaux ou des enduits protecteurs
dans le four ou près des pièces du four.
Les résidus de ces produits nettoyants
endommageront l’intérieur du four
lorsque vous effectuerez un autonettoyage.
■ Avant de commencer l’autonettoyage,
enlevez la lèchefrite, la grille et autres
ustensiles de cuisine.
■ Avant de commencer l’autonettoyage,
essuyez les aliments renversés.
■ Si le programme d’autonettoyage
fonctionne mal, éteignez le four et coupez
l’alimentation électrique. Faites réparer
l’appareil par un technicien qualifié.
FOUR AUTONETTOYANT
VEUILLEZ LIRE ET SUIVRE À LA LETTRE CES MESURES DE SÉCURITÉ.
CONSERVEZ CES DIRECTIVES
www.electromenagersge.ca
Page 53

4
MESURES DE SÉCURITÉ IMPORTANTES.
VEUILLEZ D’ABORD LIRE LES MESURES DE SÉCURITÉ.
■ Ne tentez pas d’éteindre des feux de
graisse avec de l’eau. Ne prenez jamais une
casserole enflammée dans vos mains.
Ramenez les commandes à OFF.
■ Vous pouvez éteindre complètement les
flammes en fermant la porte du four et en
éteignant l’appareil, ou en utilisant un
extincteur chimique à poudre ou à
mousse.
■ Ne laissez jamais de pots à graisse ou de
boîtes de conserve contenant des matières
grasses à proximité de votre four.
■ Ne rangez jamais ou n’utilisez jamais de
matières combustibles, d’essence ou autres
liquides inflammables à proximité de cet
appareil ou de tout autre électroménager.
■ Ne vous tenez pas trop près du four
lorsque vous ouvrez la porte. L’air chaud
et la vapeur qui s’en échappent peuvent
vous brûler les mains, le visage et les yeux.
■ Ne faites pas chauffer de récipient fermé.
L’accumulation de pression dans le
récipient peut le faire éclater, causant
ainsi des blessures.
■ Assurez-vous que l’évent du four n’est
jamais obstrué.
■ Ne laissez pas s’accumuler de dépôts
graisseux dans le four.
■ Placez les grilles à la hauteur désirée
lorsque le four est froid. Si vous devez
les manipuler lorsque le four est chaud,
évitez que vos mitaines de four entrent
en contact avec les éléments du four.
■ Lorsque vous utilisez des sachets pour la
cuisson ou le rôtissage, suivez les directives
du fabricant.
■ Tirez la grille jusqu’à la butée si vous devez
soulever des casseroles lourdes. Vous
éviterez ainsi de vous brûler en touchant
aux parois de la porte ou du four.
■ Ne faites pas sécher de journaux dans le
four. S’ils surchauffent, ils risquent de
prendre feu.
■ N’entreposez pas d’articles dans votre four.
Ils pourraient prendre feu.
■ Ne touchez pas aux éléments chauffants,
ni aux parois du four. Ces surfaces peuvent
être suffisamment chaudes pour causer des
brûlures, même si elles ne sont pas rouges.
Pendant et après l’utilisation, faites en
sorte que vos vêtements et autres
matériaux inflammables ne viennent pas
en contact avec les parois du four. Laissez-
les d’abord refroidir.
■ Les surfaces susceptibles de devenir
chaudes comprennent notamment l’évent
du four et les surfaces qui l’entourent, les
aspérités autour de la porte du four, la
surface périphérique du hublot et les
moulures métalliques au-dessus de la
porte.
■ N’OUBLIEZ PAS : Les parois du four
peuvent être chaudes lorsque vous ouvrez
la porte.
■ Ne laissez pas de produits en papier,
d’ustensiles de cuisson ou d’aliments dans
le four lorsqu’il n’est pas utilisé.
■ Après le grillage, sortez toujours la
lèchefrite du four et nettoyez-la. La graisse
qui s’est accumulée dans la lèchefrite
pourrait prendre feu la prochaine fois que
vous utiliserez le four.
■ Ne nettoyez que les pièces indiquées dans
le présent manuel d’utilisation.
■ N’utilisez pas de papier d’aluminium pour
couvrir la sole du four, sauf de la façon
indiquée dans le présent guide. Une
utilisation inadéquate du papier
d’aluminium peut présenter des risques de
chocs électriques ou d’incendie.
■ De grandes égratignures ou des impacts
sur la surface vitrée des portes peuvent
entraîner le bris du verre.
MISE EN GARDE!
MESURES DE SÉCURITÉ
Mesures de sécurité
Fonctionnement
Entretien et nettoyageConseils de dépannage
Soutien au
consommateur
Page 54

Mesures de sécurité Fonctionnement
Soutien au
consommateur
Conseils de dépannageEntretien et nettoyage
3
■ Gardez toujours les linges à vaisselle, les
mitaines de four et autres articles en tissu à
une distance sécuritaire de votre four.
■ Gardez toujours les ustensiles en plastique
et en bois, de même que les aliments en
conserve, à une distance sécuritaire de
votre four.
■ Apprenez aux enfants à ne pas jouer avec
les commandes ou toute autre pièce du
four.
■ Ne rangez pas de matériaux inflammables
dans le four.
■
ATTENTION: Ne rangez pas des
articles qui présentent un intérêt pour les
enfants, dans les armoires se trouvant au-
dessus du four car ceux-ci pourraient
grimper sur l’appareil pour les atteindre
et risqueraient de se blesser.
■ Ne portez jamais de vêtements amples
lorsque vous utilisez cet appareil. Faites
attention lorsque vous prenez des articles
rangés dans les armoires au-dessus du four.
Les tissus inflammables peuvent prendre
feu au contact des surfaces chaudes et
causer de graves brûlures.
■ N’utilisez que des poignées ou des
mitaines de four sèches—les poignées ou
mitaines de four humides ou mouillées
peuvent causer des brûlures de vapeur. Ne
laissez pas les poignées venir en contact
avec les éléments chauffants. N’utilisez pas
de serviette ou autre objet encombrant en
tissu au lieu de mitaines de four.
■ Pour votre sécurité, n’utilisez pas cet
appareil pour réchauffer la pièce.
■ Ne laissez pas de graisse ou autres matières
inflammables s’accumuler dans le four ou
à proximité de ce dernier.
www.electromenagersge.ca
Page 55

MESURES DE SÉCURITÉ IMPORTANTES.
VEUILLEZ D’ABORD LIRE LES MESURES DE SÉCURITÉ.
MISE EN GARDE!
Pour votre sécurité, veuillez suivre les directives données dans le présent manuel afin de réduire au
minimum les risques d’incendie et de chocs électriques, et prévenir tous dommages et blessures
graves ou mortelles.
Lorsque vous utilisez un électroménager, observez toujours les mesures de sécurité de base,
notamment les suivantes :
■ N’utilisez cet appareil que pour l’usage
auquel il est destiné, comme expliqué dans
le présent manuel.
■ Assurez-vous que votre appareil est bien
installé et mis à la terre par un installateur
qualifié, conformément aux directives
d’installation fournies.
■ Demandez à l’installateur de vous montrer
l’emplacement du disjoncteur ou du
fusible. Identifiez-le pour pouvoir le
trouver facilement.
■ Ne tentez pas de réparer ni de remplacer
aucune pièce du four, à moins que cela ne
soit recommandé dans le présent guide.
Tout autre service d’entretien doit être
assuré par un réparateur qualifié.
■ Avant d’effectuer une réparation, coupez
toujours l’alimentation du four au
panneau de distribution en enlevant le
fusible ou en déclenchant le disjoncteur.
■ Ne laissez pas les enfants sans
surveillance—Il ne faut jamais laisser les
enfants seuls ou sans surveillance près de
l’appareil, lorsque celui-ci fonctionne. On
doit également leur interdire de grimper
ou de s’asseoir sur l’appareil.
■ L’isolant en fibre de verre des fours
autonettoyants produit une très petite
quantité de monoxyde de carbone
pendant l’autonettoyage. Pour réduire
l’exposition à ce gaz, assurez une
ventilation en ouvrant une fenêtre ou en
faisant fonctionner un ventilateur ou la
hotte de cuisine.
■ Ne laissez personne grimper ou monter
sur la porte du four, ou s’y agripper. Cela
pourrait endommager l’appareil ou causer
de graves blessures.
■ Assurez-vous que le four est bien installé
dans une armoire solidement fixée à la
charpente de la résidence. Ne laissez
personne grimper, s’asseoir ou monter
sur la porte du four, ou s’y agripper.
■ Ne laissez jamais la porte du four ouverte
lorsque vous ne surveillez pas l’appareil.
■ Gardez toujours les revêtements muraux
combustibles, les rideaux et les tentures à
une distance sécuritaire de votre four.
MESURES DE SÉCURITÉ
2
Mesures de sécurité
Fonctionnement
Entretien et nettoyageConseils de dépannage
Soutien au
consommateur
Page 56

www.electromenagersge.ca
JCKP20
Manuel d’utilisation
encastré
Four électrique
29-5510 12-05 JR
Mesures de sécurité . . . . . . 2–5
Directives de fonctionnement
Caractéristiques spéciales . . .7–9
Commande
de température . . . . . . . . . . . .16
Commandes du four . . . . . . . . .6
Cuisson et rôtissage
minutés . . . . . . . . . . . . . . . . . .15
Four . . . . . . . . . . . . . . . . . .12, 13
Four autonettoyant . . . . . .17, 18
Horloge et minuterie . . . . . . .14
Sabbath . . . . . . . . . . . . . . . 10, 11
Verrouillage des commandes .14
Entretien et nettoyage
Ampoules du four . . . . . . . . . .21
Éléments chauffants
du four . . . . . . . . . . . . . . . . . . 18
Grille et lèchefrite . . . . . . . . . 20
Grilles du four . . . . . . . . . . . . .20
Enlèvement de la porte
du four
. . . . . . . . . . . . . . . . . . 19
Surfaces de verre . . . . . . . . . . .20
Surfaces en acier inoxydable . .21
Surfaces peintes . . . . . . . . . . . .20
Tableau de commande . . . . . .20
Conseils de dépannage
. . . 22–24
Soutien au consommateur
Garantie . . . . . . . . . . . . . . . . . 27
Soutien au consommateur . . . 28
Transcrivez ici les numéros de
modèle et de série :
Modèle N° ________________
Série N° __________________
Vous les trouverez sur une étiquette
apposée sur le cadre avant du four,
derrière la porte.
 Loading...