

Page 1
GEAppliances.com
Self-Cleaning Gas
Safety Instructions 2–5
Operating Instructions
Clock.and.Timer. 14,.15
8-32
. Baking.and.Roasting.
. Broiling,.Broiling.Guide. 12,.13
. Oven. 8,.9
. Power. .10,.15
.
. Sabbath.Feature. 18,.19
. 23,.24
. Shelves.
. Special.Features.
. Steam.Clean.
. Thermostat. .20
. Timed.Baking..
. and.
Surface. 6–8
Warming. 21,.22
Care and Cleaning
Aluminum.Foil.
Burner. 25,.26
Burner.
Control.Panel.and. 28,.29
Installation
Instructions
Air.
Anti-Tip.Device.
Assemble.Surface. 41,.42
Checking.Burner..
Connecting.the.Range..
..to.Gas. 39,.40
Dimensions.and..
.. 36,.37
Electrical.Connections.
Leveling.the.Range.
Troubleshooting
Tips
45-48
Accessories
Consumer Support
Consumer. .Cover
Warranty.for.Customers..
in.
Warranty.for.Customers..
in.the.U S A
Owner’s Manual
& Installation
Instructions
JCGBS23
In Canada contact us at:
www.GEAppliances.ca
Door.Removal.
Oven.Bottom.
Oven.Light.
Oven.
23,.24
Stainless.Steel.
Ranges
Write the model and serial
numbers here:
Model # ____________________
Serial # _____________________
You.can.find.them.on.a.label.on.
the.front.of.the.range.behind.the.
warming.drawer.or.lower.oven.
drawer
183D5580P274 29-5741 08-11 GE
Page 2
IMPORTANT SAFETY INFORMATION.
READ ALL INSTRUCTIONS BEFORE USING.
WARNING
result, causing property damage, personal injury or death.
-.Do.not.store.or.use.gasoline.or.other.flammable.vapors.and.liquids.in.the.vicinity.of.this.or.any.other.appliance
- WHAT TO DO IF YOU SMELL GAS
■ Do.not.try.to.light.any.appliance
■ Do.not.touch.any.electrical.switch;.do.not.use.any.phone.in.your.building
■ Immediately.call.your.gas.supplier.from.a.neighbor’s.phone.Follow.the.gas.supplier’s.instructions
■ If.you.cannot.reach.your.gas.supplier,.call.the.fire.department
-.Installation.and.service.must.be.performed.by.a.qualified.installer,.service.agency.or.the.gas.supplier
If the information in this manual is not followed exactly, a fire or explosion may
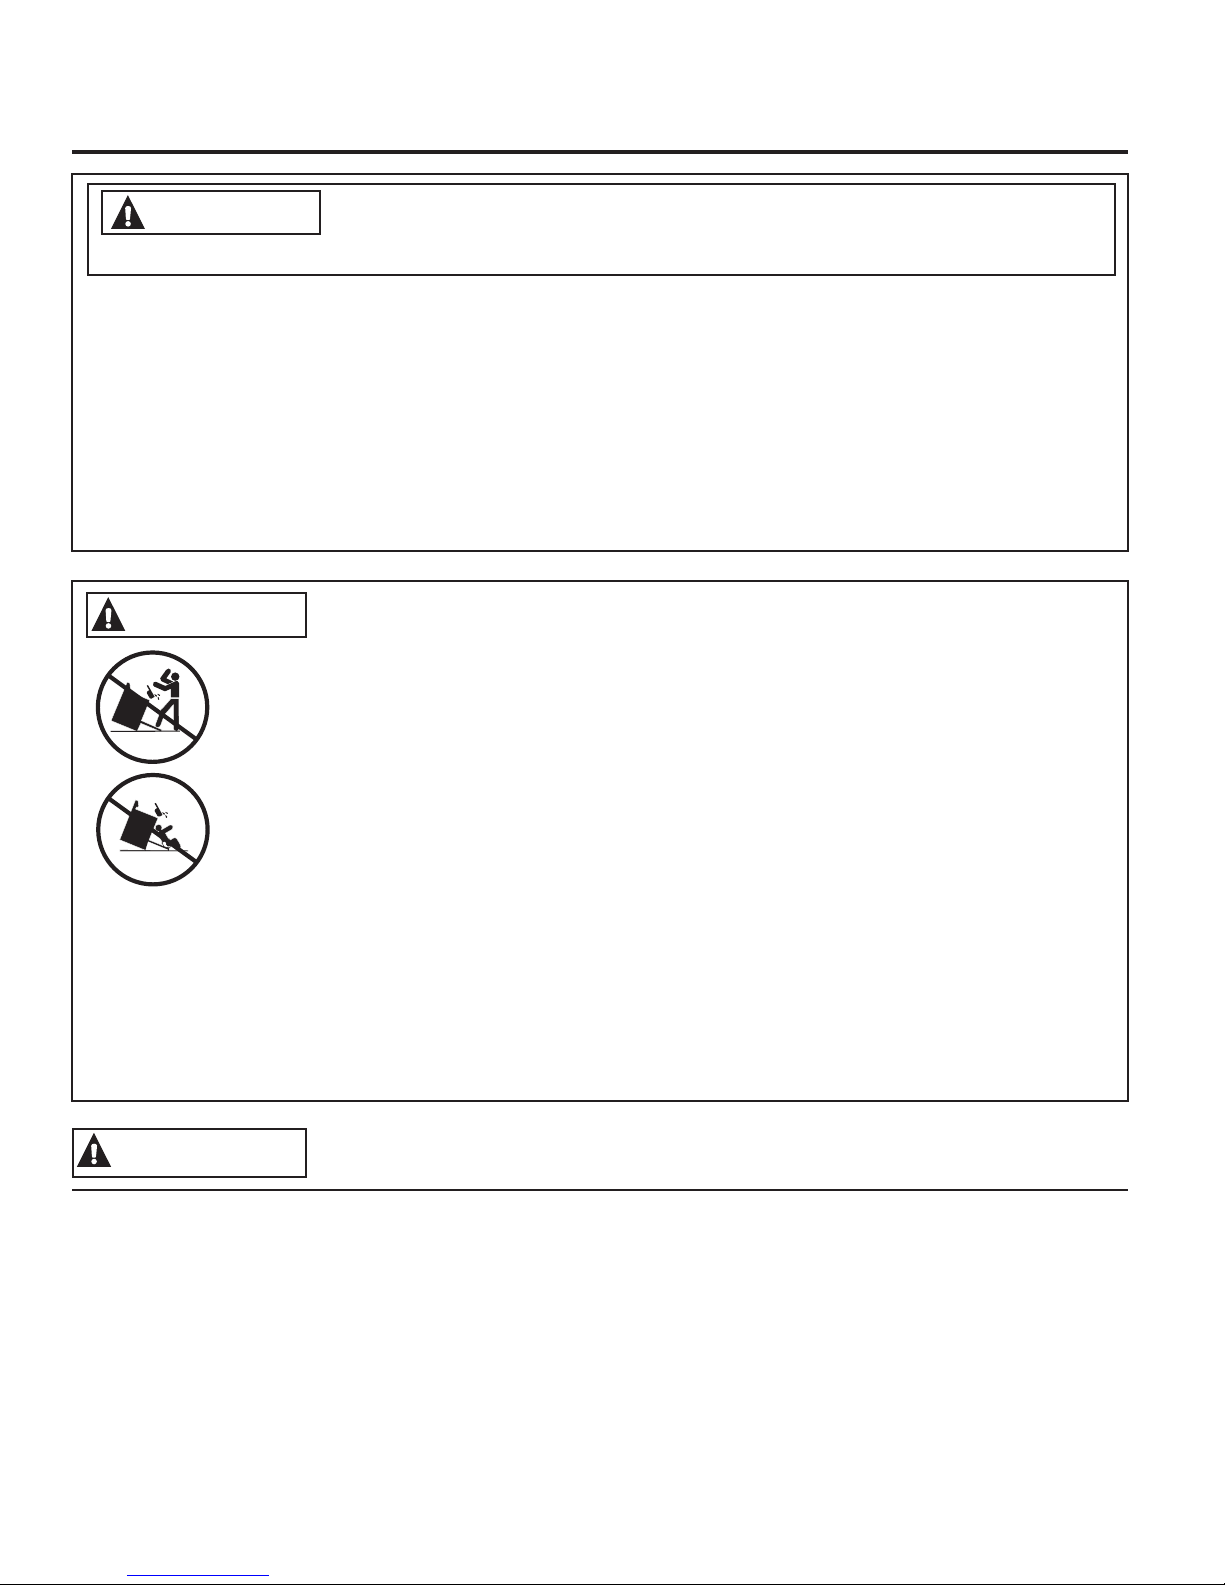
WARNING
■..All.ranges.can.tip
■
BURNS.or.other.SERIOUS.INJURIES.can.result
■ INSTALL.and.CHECK.the.anti-tip.bracket.following.the.instructions.supplied.with.the.bracket
To.reduce.the.risk.of.tipping.the.range,.the.range.must.be.secured.by.a.properly.installed.anti-tip.
bracket.See.installation.instructions.shipped.with.the.bracket.for.complete.details.before.attempting.
to.install
To.check.if.the.bracket.is.installed.and.engaged.properly,.look.underneath.the.range.to.see.that.the.
rear.leveling.leg.is.engaged.in.the.bracket.On.some.models,.the.storage.drawer.or.kick.panel.can.be.
removed.for.easy.inspection.If.visual.inspection.is.not.possible,.slide.the.range.forward,.confirm.the.
anti-tip.bracket.is.securely.attached.to.the.floor.or.wall,.and.slide.the.range.back.so.the.rear.leveling.leg.is.under.the.
anti-tip.bracket
If.the.range.is.pulled.from.the.wall.for.any.reason,.always.repeat.this.procedure.to.verify.the.range.is.properly.secured.
by.the.anti-tip.bracket.
Never.completely.remove.the.leveling.legs.or.the.range.will.not.be.secured.to.the.anti-tip.device.properly.
If.you.did.not.receive.an.anti-tip.bracket.with.your.purchase,.call.18006268774.to.receive.one.at.no.cost.(in
call.18005613344).For.installation.instructions.of.the.bracket,.visit.GEAppliancescom.(in.Canada,.GEAppliancesca)
.Canada,.
WARNING
The.California.Safe.Drinking.Water.and.Toxic.Enforcement.Act.requires.the.Governor.of.California.to.publish.a.list.of.
substances.known.to.the.state.to.cause.cancer,.birth.defects.or.other.reproductive.harm,.and.requires.businesses.to.
warn.customers.of.potential.exposure.to.such.substances
The.fiberglass.insulation.in.self-clean.ovens.gives.off.a.very.small.amount.of.carbon.monoxide.during.the.cleaning.cycle.
Exposure.can.be.minimized.by.venting.with.an.open.window.or.using.a.ventilation.fan.or.hood
.IMPORTANT.SAFETY.NOTICE
SAVE.THESE.INSTRUCTIONS
2
Page 3
GEAppliances.com
WARNING
.GENERAL.SAFETY.INSTRUCTIONS
WARNING
NEVER use this appliance as a space heater to heat
or warm the room. Doing so may result in carbon
monoxide poisoning and overheating of the oven.
■..Use.this.appliance.for.its.intended.purpose.as.described.
in.this.owner’s.manual
■..Have.your.range.installed.and.properly.grounded.by.
a.qualified.installer.in.accordance.with.the.provided.
installation.instructions.Any.adjustment.and.service.
should.be.performed.only.by.a.qualified.gas.range.
installers.or.service.technicians.Do.not.attempt.to.repair.
or.replace.any.part.of.your.range.unless.it.is.specifically.
recommended.in.this.manual
■..Your.range.is.shipped.from.the.factory.set.for.use.with.
natural.gas.It.can.be.converted.for.use.with.LP.gas.
If.required,.these.adjustments.must.be.made.by.a.
qualified.technician.in.accordance.with.the.installation.
instructions.and.local.codes.The.agency.performing.this.
work.assumes.responsibility.for.the.conversion
■..Have.the.installer.show.you.the.location.of.the.range.
gas.shut-off.valve.and.how.to.turn.it.off.if.necessary
■..Plug.your.range.into.a.120-volt.grounded.outlet.only.Do.
not.remove.the.round.grounding.prong.from.the.plug.
If.in.doubt.about.the.grounding.of.the.home.electrical.
system,.it.is.your.responsibility.and.obligation.to.have.an.
ungrounded.outlet.replaced.with.a.properly.grounded,.
three.prong.outlet.in.accordance.with.the.National.
Electrical.Code.Do.not
appliance
■..Before.performing.any.service,.unplug.the.range.
or.disconnect.the.power.supply.at.the.household.
distribution.panel.by.removing.the.fuse.or.switching.off.
the.circuit.breaker
■..Be.sure.all.packing.materials.are.removed.from.the.
range.before.operating.to.prevent.ignition.of.these.
materials
.use.on.extension.cord.with.this.
■ Do.not.leave.children.alone.or.unattended.in.an.
area.where.an.appliance.is.in.use.They.should.never.
be.allowed.to.climb,.sit.or.stand.on.any.part.of.the.
appliance
■ Do.not.store.items.of.interest.to.children.above.a.range.
or.on.the.backguard.of.a.range—children.climbing.on.
the.range.to.reach.items.could.be.seriously.injured
■..Do.not.allow.anyone.to.climb,.stand.or.hang.on.the.
oven.door,.drawer.or.cooktop.They.could.damage.the.
range.or.tip.it.over.causing.severe.injury.or.death
■..Never.block.the.vents.(air.openings).of.the.range.They.
provide.the.air.inlets.and.outlets
the.range.to.operate.properly.with.correct.combustion.
Air.openings.are.located.at.the.rear.of.the.cooktop,.at.
the.top.and.bottom.of.the.oven.door,.and.at.the.bottom.
of.the.range.under.the.warming.drawer,.lower.oven.
drawer.or.kick.panel
■ Use.only.dry.pot.holders—moist.or.damp.pot.holders.on.
hot.surfaces.may.result.in.burns.from.steam.Do.not.let.
pot.holders.touch.surface.burners,.burner.grate,.or.oven.
heating.element.Do.not.use.a.towel.or.other.bulky.cloth.
in.place.of.pot.holders
■..Be.careful.not.to.touch.hot.surfaces.of.the.range.
Potentially.hot.surfaces.include.burners,.grates,.cooktop,.
backguard,.oven.and.door.interior.and.crevices.around.
the.oven.door
■..Do.not.heat.unopened.food.containers.Pressure.could.
build.up.and.the.container.could.burst,.causing.an.
injury
■..Cook.meat.and.poultry.thoroughly—meat.to.at.least.an.
internal.temperature.of.160°F.and.poultry.to.at.least.
an.internal.temperature.of.180°F.Cooking.to.these.
temperatures.usually.protects.against.foodborne.illness
.that.are.necessary.for.
■ Avoid.scratching.or.impacting.glass.doors,.cooktops.or.
control.panels.Doing.so.may.lead.to.glass.breakage.Do.
not.cook.on.a.product.with.broken.glass.Shock,.fire.or.
cuts.may.occur
SAVE.THESE.INSTRUCTIONS
3
Page 4
IMPORTANT SAFETY INFORMATION.
READ ALL INSTRUCTIONS BEFORE USING.
WARNING
■..Do.not.store.or.use.flammable.materials.in.an.oven.or.
near.the.cooktop,.including.paper,.plastic,.pot.holders,.
linens,.wall.coverings,.curtains,.drapes.and.gasoline.or.
other.flammable.vapors.and.liquids
■..
Never.wear.loose-fitting.or.hanging.garments.while.
using.the.appliance.Avoid.storing.commonly.used.
items.in.cabinets.above.the.range.and.be.careful.when.
reaching.over.the.range.Clothing.in.close.proximity.to.
burners.or.hot.surfaces.may.ignite.causing.severe.burns
WARNING
.
KEEP.FLAMMABLE.MATERIALS.AWAY.FROM.THE.RANGE
IN.THE.EVENT.OF.A.FIRE,.TAKE.THE.FOLLOWING.STEPS.
TO.PREVENT.INJURY.AND.FIRE.SPREADING:
■..Do.not.use.water.on.grease.fires.Never.pick.up.
a.flaming.pan.Turn.the.controls.off.Smother.a.
flaming.pan.on.a.surface.burner.by.covering.the.pan.
completely.with.a.well-fitting.lid,.cookie.sheet.or.flat.
tray.If.necessary,.use.a.multi-purpose.dry.chemical.or.
foam-type.fire.extinguisher
■..If.there.is.a.fire.in.the.oven.during.baking,.turn.the.oven.
off.and.keep.the.door.closed.until.the.fire.goes.out.If.
■ Do.not.let.cooking.grease.or.other.flammable.materials.
accumulate.in.or.near.the.range.Grease.in.the.oven.or.
on.the.cooktop.may.ignite.
■ Clean.ventilating.hoods.frequently.Grease.should.not.
be.allowed.to.accumulate.on.the.hood.or.filter
necessary,.use.a.multi-purpose.dry.chemical.or.foam.
type.fire.extinguisher
■ If.there.is.a.fire.in.the.oven.during.self-clean,.turn.the.
oven.off.and.wait.for.the.fire.to.go.out.Do.not.force.
the.door.open.Introduction.of.fresh.air.at.self-clean.
temperatures.may.lead.to.a.burst.of.flame.from.the.
oven.Failure.to.follow.this.instruction.may.result.in.
severe.burns.
WARNING
■..Never.leave.the.surface.burners.unattended.at.medium.
or.high.heat.settings.Foods,.especially.oily.foods,.may.
ignite.resulting.in.fire.that.could.spread.to.surrounding.
cabinets
■..Never.leave.oil.unattended.while.frying..If.allowed.to.
heat.beyond.its.smoking.point,.oil.may.ignite.resulting.
in.fire.that.may.spread.to.surrounding.cabinets..Use.a.
deep.fat.thermometer.whenever.possible.to.monitor.oil.
temperature.
■ To.avoid.oil.spillover.and.fire,.use.a.minimum.amount.of.
oil.when.shallow.pan-frying.and.avoid.cooking.frozen.
foods.with.excessive.amounts.of.ice.
■ Use.proper.pan.size.and.avoid.pans.that.are.unstable.
or.easily.tipped.Select.cookware.that.is.matched.to.the.
size.of.the.burner.Burner.flames.should.be.adjusted.so.
that.they.do.not.extend.beyond.the.bottom.of.the.pan.
Excessive.flame.may.be.hazardous
■..Always.use.the.LITE.position.when.igniting.the.top.
burners.and.make.sure.the.burners.have.ignited
■ When.using.glass/ceramic.cookware,.make.sure.it.is.
suitable.for.cooktop.service;.others.may.break.because.
of.sudden.change.in.temperature
COOKTOP.SAFETY.INSTRUCTIONS
■..To.minimize.the.possibility.of.burns,.ignition.of.
flammable.materials.and.spillage,.the.handle.of.a.
container.should.be.turned.toward.the.center.of.the.
range.without.extending.over.nearby.burners
■ When.preparing.flaming.foods.under.a.hood,.turn.the.
fan.on
■ Do.not.use.a.wok.with.a.round.metal.support.ring.the.
ring.may.trap.heat.and.block.air.to.the.burner.resulting.
in.a.carbon.monoxide.hazard
■ Do.not.attempt.to.lift.the.cooktop.Doing.so.may.
damage.the.gas.tubing.to.the.surface.burners.resulting.
in.a.gas.leak.and.risk.of.fire
■ Do.not.use.aluminum.foil.to.cover.the.grates.or.line.
any.part.of.the.cooktop.Doing.so.may.result.in.carbon.
monoxide.poisoning,.overheating.of.the.cooktop.
surfaces,.or.a.potential.fire.hazard
4
SAVE.THESE.INSTRUCTIONS
Page 5
GEAppliances.com
WARNING
WARNING
passages.in.the.oven.bottom.or.cover.an.entire.rack.with.
materials.such.as.aluminum.foil.Doing.so.blocks.air.flow.
through.the.oven.and.may.cause.carbon.monoxide.
poisoning.Aluminum.foil.linings.may.also.trap.heat,.causing.
a.fire.hazard
■..Stand.away.from.the.range.when.opening.the.oven.
door.Hot.air.or.steam.which.escapes.can.cause.burns.
to.hands,.face.and/or.eyes
■ Keep.the.oven.free.from.grease.buildup.Grease.in.the.
oven.may.ignite.
■ Place.oven.racks.in.desired.location.while.oven.is.cool.
If.rack.must.be.moved.while.oven.is.hot,.be.careful.to.
avoid.touching.hot.surfaces
WARNING
The self-cleaning feature operates the oven at temperatures high enough to burn away food soils in the oven.
Follow these instructions for safe operation.
OVEN.SAFETY.INSTRUCTIONS
.
NEVER.cover.any.slots,.holes,.or.
■..Pull.the.oven.rack.to.the.stop-lock.position.when.
loading.and.unloading.food.from.the.oven.This.helps.
prevent.burns.from.touching.hot.surfaces.of.the.door.
and.oven.walls
■ Do.not.leave.items.such.as.paper,.cooking.utensils.or.
food.in.the.oven.when.not.in.use.Items.stored.in.an.
oven.can.ignite
■..Do.not.leave.items.on.the.cooktop.near.the.oven.vent.
which.is.in.the.center.of.the.backguard.Items.may.
overheat.resulting.in.a.risk.of.fire.or.burns
■..When.using.cooking.or.roasting.bags.in.the.oven,.follow.
the.manufacturer’s.directions
■..Never.broil.with.door.open.Open-door.broiling.is.not.
permitted.due.to.overheating.of.control.knobs
SELF-CLEANING.OVEN.SAFETY.INSTRUCTIONS
■..Before.operating.the.self-clean.cycle,.remove.pans,.
shiny.metal.oven.racks.and.other.utensils.from.the.
oven.Only.porcelain-coated.oven.racks.may.be.left.in.
the.oven.Do.not.use.self-clean.to.clean.other.parts,.
such.as.grates
■..Before.operating.the.self-clean.cycle,.wipe.grease.and.
food.soils.from.the.oven.Excessive.amount.of.grease.
may.ignite.leading.to.smoke.damage.to.your.home
WARNING
■..The.purpose.of.the.warming.drawer.is.to.hold.hot.
cooked.foods.at.serving.temperature.Bacteria.will.grow.
in.food.while.it.is.below.140°F.Do.not.put.cold.food.in.
warming.drawer.Do.not.heat.food.for.more.than..
2.hours.Failure.to.follow.these.instructions.may.result.in.
foodborne.illness
■..Do.not.leave.paper.products,.plastics,.canned.food.or.
combustible.materials.in.the.drawer.They.may.ignite
■ Do.not.touch.the.heating.element.or.the.interior.surface.
of.the.drawer.These.surfaces.may.be.hot.enough.to.
cause.burns.
.WARMING.DRAWER/LOWER.OVEN.DRAWER.SAFETY.
.INSTRUCTIONS
(Some models)
■ If.the.self-cleaning.mode.malfunctions,.turn.the.oven.off.
and.disconnect.the.power.supply.Have.it.serviced.by.a.
qualified.technician.
■ Do.not.clean.the.door.gasket.The.door.gasket.is.
essential.for.a.good.seal.Care.should.be.taken.not.to.
rub,.damage.or.move.the.gasket
■ Do.not.use.oven.cleaners.No.commercial.oven.cleaner.
or.oven.liner.protective.coating.of.any.kind.should.be.
used.in.or.around.any.part.of.the.oven
■ Use.care.when.opening.the.drawer.Open.the.drawer.a.
crack.and.let.hot.air.or.steam.escape.before.removing.
or.replacing.food.Hot.air.or.steam.that.escapes.can.
cause.burns.to.hands,.face.and/or.eyes
■ Do.not.use.aluminum.foil.to.line.the.warming.drawer.
Foil.is.an.excellent.heat.insulator.and.will.trap.heat.
beneath.it.This.will.upset.the.performance.of.the.
drawer.and.potentially.cause.a.fire.hazard
SAVE.THESE.INSTRUCTIONS
5
Page 6
Using the gas surface burners.
Throughout this manual, features and appearance may vary from your model.
Push the control knob in and turn
it to the LITE position.
Before Lighting a Gas Burner
..Make.sure.all.burners.are.in.place
..Make.sure.all.grates.on.the.range.are.
properly.placed.before.using.any.burner
How to Light a Gas Surface Burner
WARNING
.
are not covered by cookware may present a risk
of fire or clothing ignition. The griddle burner
should only be used with the griddle in place.
Failure to do so may result in serious injury.
Make.sure.all.the.surface.burners.are.placed.in.
their.respective.positions
Push.the.control.knob.in.and.turn.it.to.the.LITE.
position
Burner flames that
After Lighting a Gas Burner
..Do.not.operate.the.burner.for.an.extended.
period.of.time.without.cookware.on.the.
grate.The.finish.on.the.grate.may.chip.
without.cookware.to.absorb.the.heat
..Be.sure.the.burners.and.grates.are.cool.
before.you.place.your.hand,.a.pot.holder,.
cleaning.cloths.or.other.materials.on.them
You.will.hear.a.little.clicking.noise—the.sound.
of.the.electric.spark.igniting.the.burner
Turn.the.knob.to.adjust.the.flame.size.If.the.
knob.stays.at.LITE,.it.will.continue.to.click
When.one.burner.is.turned.to.LITE,.all.the.
burners.spark.Do.not.attempt.to.disassemble.
or.clean.around.any.burner.while.another.
burner.is.on.An.electric.shock.may.result,.which.
could.cause.you.to.knock.over.hot.cookware
Medium
Large
Extra
Large
on
some
models
Center (oval)
(on some
models)
Small
Extra Large
Sealed Gas Burners
Your.gas.range.cooktop.has.sealed.gas.
burners.They.offer.convenience,.cleanability.
and.flexibility.to.be.used.in.a.wide.range.of.
cooking.applications
The.smallest.burner.in.the.right.rear.position.
is.the.simmer.burner.On.some.models,.the.
right.front.position.triple.flame.burner.will.be.
the.simmer.burner.This.burner.can.be.turned.
down.to.SIM.for.a.very.low.simmer.setting.
It.provides.precise.cooking.performance.for.
delicate.foods.such.as.sauces.or.foods.that.
require.low.heat.for.a.long.cooking.time
The.medium.(left.rear).and.the.large.(left.
front).burners.are.the.primary.burners.
for.most.cooking.These.general-purpose.
burners.can.be.turned.down.from.HI.to.LO.to.
suit.a.wide.range.of.cooking.needs
The.extra.large.burner.(right.front,.triple.flame.
burner,.or.left.front.burner.on.some.models).are.
the.maximum.output.burners.Like.the.other.
four.burners,.it.can.be.turned.down.from.HI.to.
SIM.for.a.wide.range.of.cooking.applications.
6
Page 7
How to Select Flame Size
GEAppliances.com
. WARNING
not covered by cookware may present a risk
of burns or clothing ignition. Never let flames
extend beyond the sides of the cookware.
.. Flames that are
Top-of-Range Cookware
Aluminum: Medium-weight.cookware.is.
recommended.because.it.heats.quickly.
and.evenly.Most.foods.brown.evenly.in.an.
aluminum.skillet.Use.saucepans.with.tightfitting.lids.when.cooking.with.minimum.
amounts.of.water
Cast-Iron:.If.heated.slowly,.most.skillets.will.
give.satisfactory.results
Enamelware:.Under.some.conditions,.the.
enamel.of.some.cookware.may.melt.Follow.
cookware.manufacturer’s.recommendations.
for.cooking.methods
Glass:.There.are.two.types.of.glass.
cookware—those.for.oven.use.only.and.
Watch.the.flame,.not.the.knob,.as.you.adjust.
heat.When.fast.heating.is.desired,.the.flame.
size.on.a.gas.burner.should.match.the.
cookware.you.are.using
Flames.larger.than.the.bottom.of.the.cookware.
will.not.result.in.faster.heating.and.may.be.
hazardous
those.for.top-of-range.cooking.(saucepans,.
coffee.and.teapots).Glass.conducts.heat.
very.slowly
Heatproof Glass Ceramic:.Can.be.used.for.
either.surface.or.oven.cooking.It.conducts.
heat.very.slowly.and.cools.very.slowly.Check.
cookware.manufacturer’s.directions.to.be.
sure.it.can.be.used.on.gas.ranges
Stainless Steel:.This.metal.alone.has.poor.
heating.properties.and.is.usually.combined.
with.copper,.aluminum.or.other.metals.for.
improved.heat.distribution.Combination.
metal.skillets.usually.work.satisfactorily.
if.they.are.used.with.medium.heat.as.the.
manufacturer.recommends
Use.a.flat-bottomed.wok
Stove Top Grills
Do.not.use.stove.top.grills.on.your.sealed.gas.
burners.If.you.use.the.stove.top.grill.on.the.
sealed.gas.burner,.it.will.cause.incomplete.
combustion.and.can.result.in.exposure.to.
carbon.monoxide.levels.above.allowable.
current.standards.
Wok This Way
We.recommend.that.you.use.a.14-inch.or.
smaller.flat-bottomed.wok.Make.sure.the.wok.
bottom.sits.flat.on.the.grate.They.are.available.
at.your.local.retail.store
Only.a.flat-bottomed.wok.should.be.used
In Case of Power Failure
In.case.of.a.power.failure,.you.can.light.the.
gas.surface.burners.on.your.range.with.a.
match.Hold.a.lit.match.to.the.burner,.then.
push.in.and.turn.the.control.knob.to.the.LITE.
position.Use.extreme.caution.when.lighting.
burners.this.way.
This.can.be.hazardous.to.your.health
Do.not.use.a.wok.support.ring.Placing.the.
ring.over.the.burner.or.grate.may.cause.the.
burner.to.work.improperly,.resulting.in.carbon.
monoxide.levels.above.allowable.standards.
This.could.be.dangerous.to.your.health.
Surface.burners.in.use.when.an.electrical.
power.failure.occurs.will.continue.to.operate.
normally
7
Page 8

Using the oven controls.
Throughout this manual, features and appearance may vary from your model.
Oven Control, Clock and Timer Features and Settings (on some models)
Bake/Temp Recall Pad
.Touch.this.pad.to.select.the.bake.function
Bake Light
.Flashes.while.in.edit.mode—you.can.change.the.
oven.temperature.at.this.point.Glows.when.the.
oven.is.in.bake.mode
Start/On Pad
.Must.be.touched.to.start.any.cooking.or.cleaning.
function
Display
.Shows.the.time.of.day,.oven.temperature,.
whether.the.oven.is.in.the.bake,.broil.or.selfcleaning.mode.and.the.times.set.for.the.timer.or.
automatic.oven.operations.The.display.will.show.
PRE.while.preheating.When.the.oven.reaches.the.
selected.temperature,.the.oven.control.will.beep.
and.the.display.will.show.the.oven.temperature
If “F–” and a number or letter flash in the display and the
oven control signals, this indicates a function error code.
If your oven was set for a timed oven operation and a
power outage occurred, the clock and all programmed
functions must be reset.
The time of day will flash in the display when there has
been a power outage. Reset the clock.
If the function error code appears during the self-cleaning
cycle, check the oven door latch. The latch handle may
have been moved, even if only slightly, from the latched
position. Make sure the latch is moved to the right as far
as it will go.
Touch the Clear/Off pad. Allow the oven to cool for one
hour. Put the oven back into operation. If the function
8
error code repeats, disconnect the power to the range
and call for service.
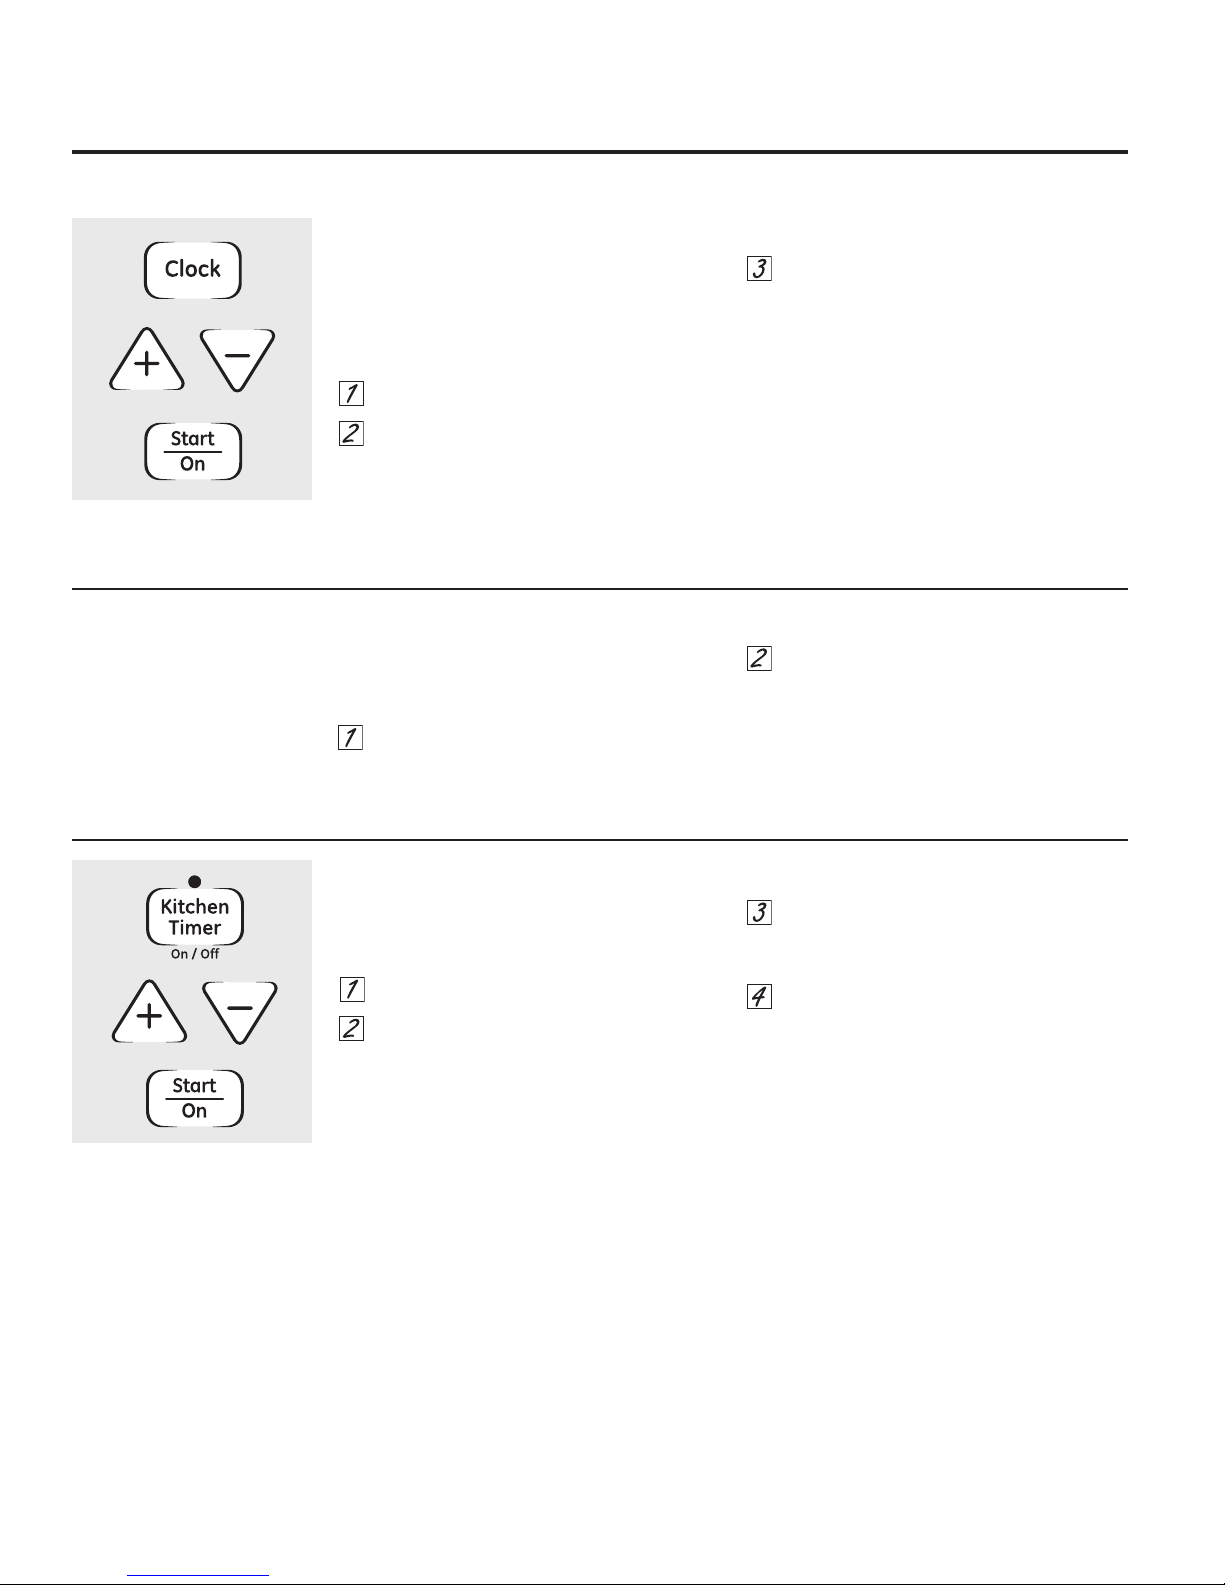
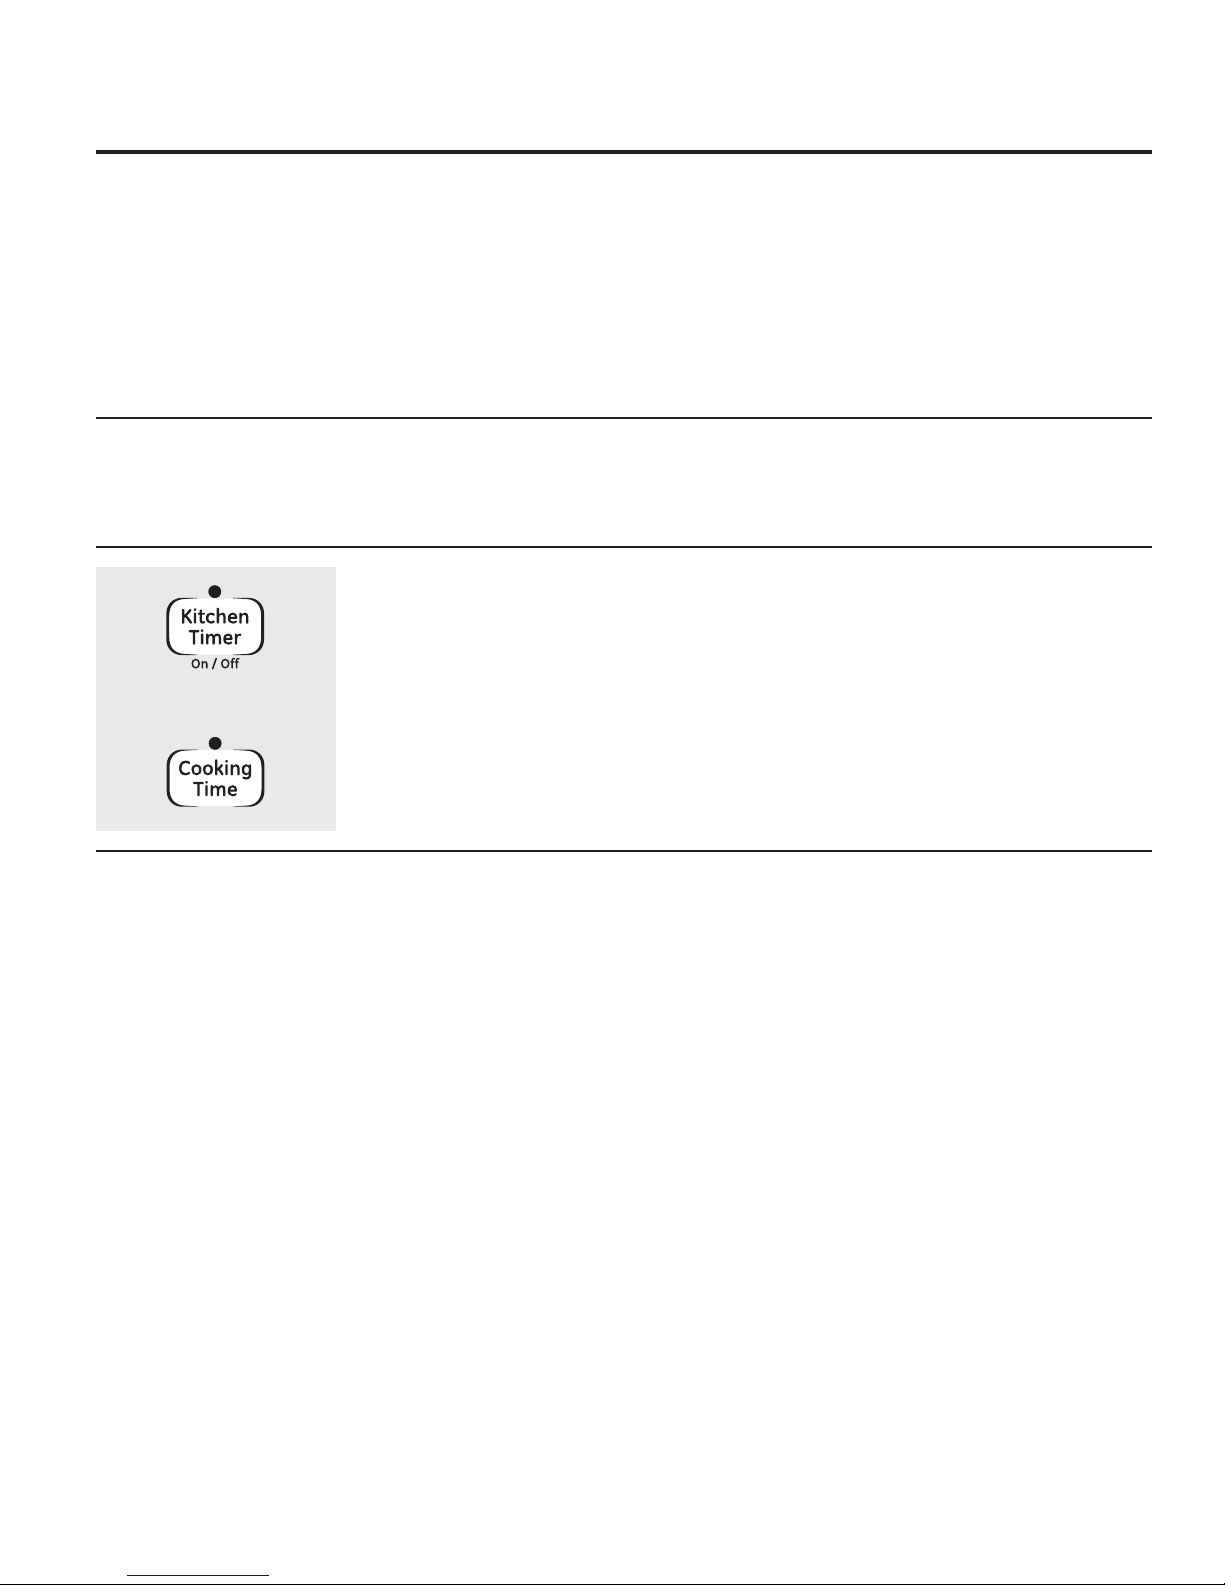
Kitchen Timer On/Off Pad
.Touch.this.pad.to.select.the.timer.feature..
Then.press.the.+.and.–.pads.to.adjust.the.timer
Timer Light
.Flashes.while.in.edit.mode—you.can.change..
the.set.time.at.this.point.Glows.when.the.timer.has.
been.activated.Flashes.again.when.the.time.has.
run.out.until.the.control.is.reset
Clock Pad
.To.set.the.clock,.press.this.pad.twice.and.then.
press.the.+.and.–.pads.The.time.of.day.will.flash.
in.the.display.when.the.oven.is.first..
turned.on
Start Time Pad (on some models)
.Use.along.with.the.Cooking Time. or.Self
Clean.pads.to.set.the.oven.to.start.and.stop.
automatically.at.a.time.you.set
Start Time Light
.Flashes.while.in.edit.mode—you.can.change..
the.start.time.at.this.point.Glows.when.the.function.
has.been.activated
Cooking Time Pad (on some models)
.Touch.this.pad.and.then.touch.the.+.or.–.pads.
to.set.the.amount.of.time.you.want.your.food.
to.cook.The.oven.will.shut.off.when.the.cooking.
time.has.run.out
Cooking Time Light
.Flashes.while.in.edit.mode—you.can.change..
the.set.time.at.this.point.Glows.when.the.function.
has.been.activated.Flashes.again.when.the.time.
has.run.out.until.the.control.is.reset
Page 9
. GEAppliances.com
Oven Control, Clock and Timer Features and Settings (on some models)
Automatic Oven Light (on some models)
.This.lights.anytime.the.oven.has.been.
programmed.using.the.Cooking Time.or.Start
Time.functions
Oven Light On/Off Pad
.Touch.this.pad.to.turn.the.oven.light.on.or.off
– Pad
.Short.taps.to.this.pad.will.decrease.the.time.or.
temperature.by.small.amounts.Touch.and.hold.
the.pad.to.decrease.the.time.or.temperature.by.
larger.amounts
+ Pad
.Short.taps.to.this.pad.will.increase.the.time.or.
temperature.by.small.amounts.Touch.and.hold.
the.pad.to.increase.the.time.or.temperature.by.
larger.amounts
Self Clean Pad (on some models)
.Touch.this.pad.to.select.the.self-cleaning.
function.See.the.Using the self-cleaning oven.
section
Clean Light
.Flashes.while.in.edit.mode—you.can.change.the.
length.of.time.for.the.self-clean.cycle.at.this.point.
Glows.when.the.oven.is.in.the.self-clean.cycle.After.
the.self-clean.cycle,.the.light.will.turn.off.Unlatch.
the.door
Clear/Off Pad
.Touch.this.pad.to.cancel.ALL.oven.operations.
except.the.clock.and.timer
Broil Hi/Lo Pad
.Touch.this.pad.to.select.the.broil.function
Broil Light
.Flashes.while.in.edit.mode—you.can.switch.from.Hi.
to.Lo Broil at.this.point.Glows.when.the.oven.is.in.
broil.mode
Indicator Lights (on some pads)
EDIT.mode.lasts.several.seconds.after.the.last.pad.
press.Start Time and.Cooking Time.will.be.the.
only.pads.lit.if.either.of.these.options.is.selected.
(Example:.Start Time.is.selected.with.Bake—the.
Start Time.pad.will.remain.lit.until.the.clock.reaches.
the.programmed.time,.at.which.point.it.will.turn.off.
and.the.Bake/Temp Recall.pad.light.will.light.up)
Steam Clean Pad (on some models)
.Touch.this.pad.for.easier.cleaning,.light.soiling.of.
the.oven.cavity.or.door
Oven Temperature Knob (on some models)
OVEN TEMP
N
A
E
L
C
Appearance.may.vary
F
F
O
2
0
L
I
O
R
0
4
5
0
5
0
0
B
Turn.the.OVEN TEMP knob.to.the.setting.you.want
.The.oven.cycling.light.comes.on.during.cooking
0
0
2
5
0
3
0
0
3
5
0
4
9
Page 10
Using the oven.
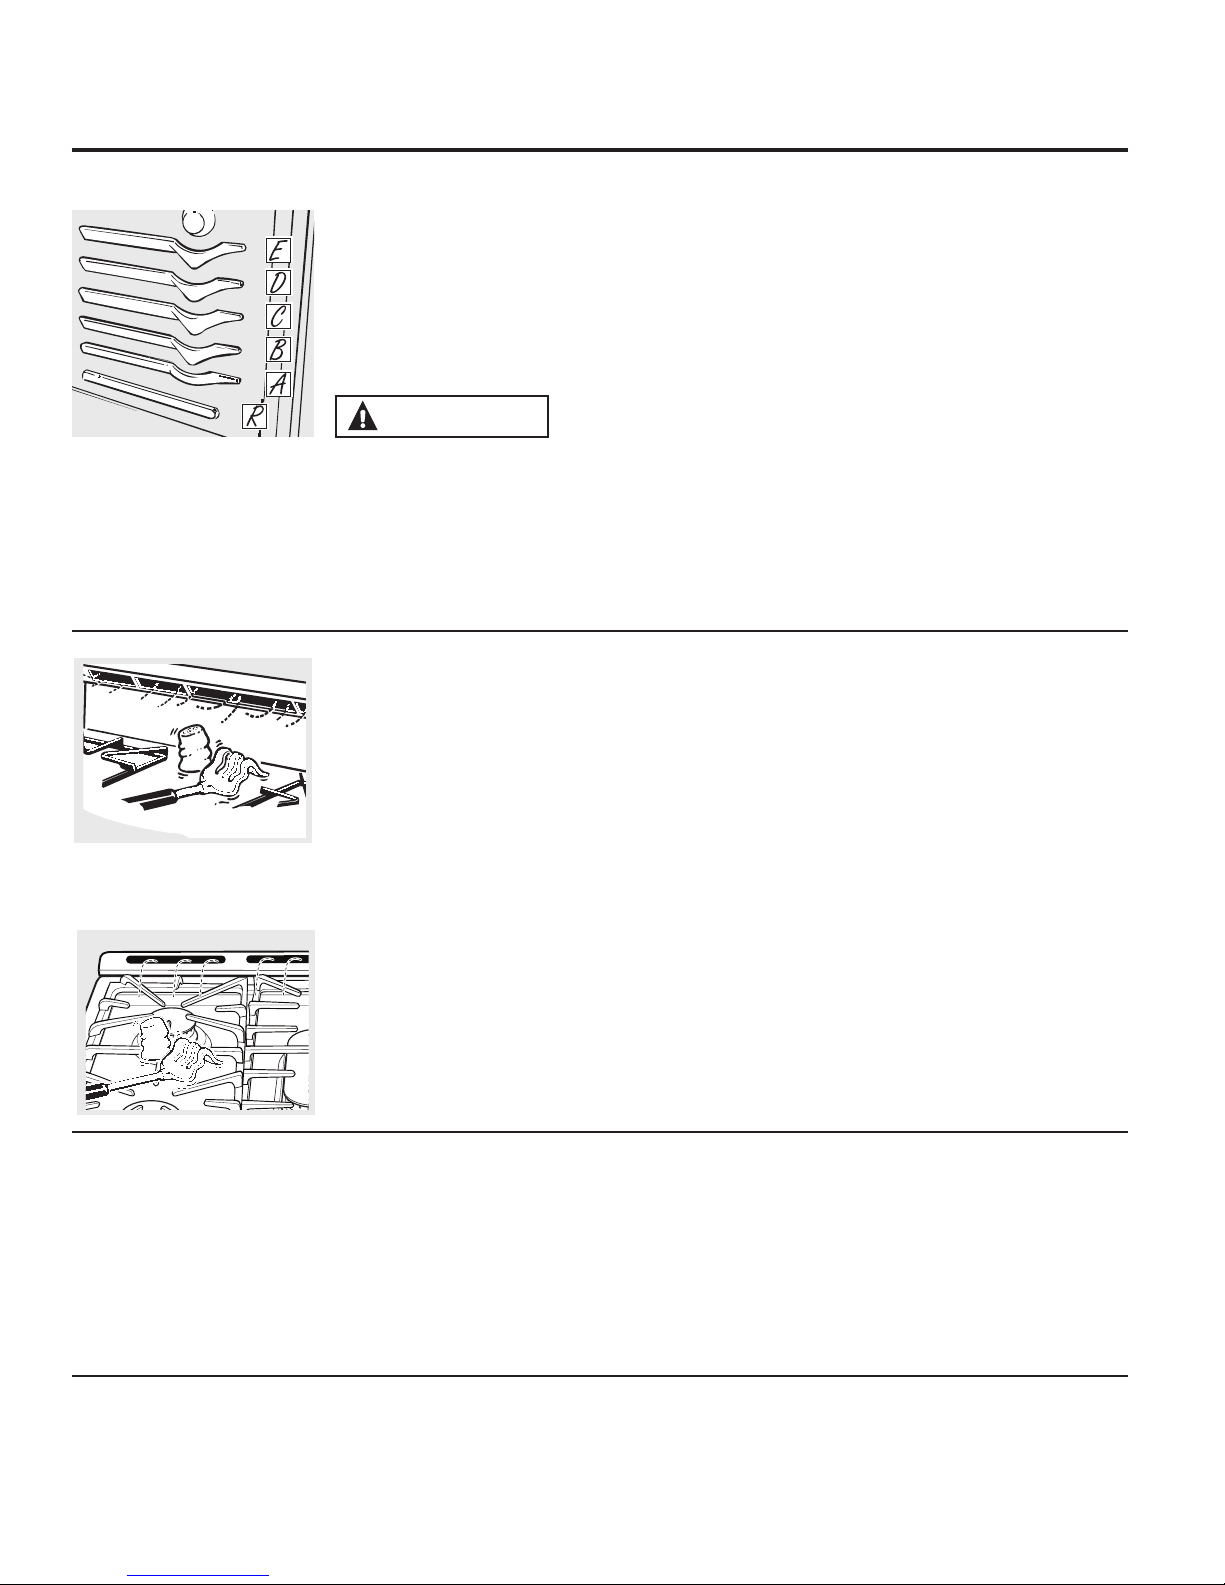
To avoid possible burns, place the shelves in the desired position before you turn the oven on.
Before you begin…
The oven has 5 shelf positions.
It also has a special low shelf
position (R) for extra large items,
such as a large turkey.
Plastic items on the cooktop may
melt if left too close to the vent.
Vent appearance and location vary.
The.shelves.have.stop-locks,.so.that.when.
placed.correctly.on.the.shelf.supports.(A.
through.E),.they.will.stop.before.coming.
completely.out,.and.will.not.tilt
When.placing.and.removing.cookware,.pull.the.
shelf.out.to.the.bump.on.the.shelf.support
CAUTION When you are
.
using a rack in the lowest position (R), you
will need to use caution when pulling the
rack out. We recommend that you pull the
rack out several inches and then, using two
pot holders, pull the rack out by holding the
sides of it. The rack is low and you can be
burned if you put your hand in the middle of
the rack and pull all the way out.
Upper Oven Vent
Your.oven.is.vented.through.ducts.at.the.rear.
of.the.range.Do.not.block.these.ducts.when.
cooking.in.the.oven—it.is.important.that.the.
flow.of.hot.air.from.the.oven.and.fresh.air.
to.the.oven.burner.be.uninterrupted.Avoid.
touching.the.vent.openings.or.nearby.surfaces.
during.oven.or.broiler.operation—they.may.
become.hot
To remove a shelf,.pull.it.toward.you,.tilt.the.
front.end.up.and.pull.it.out
To replace,.place.the.end.of.the.shelf.(stoplocks).on.the.support,.tilt.up.the.front.and.push.
the.shelf.in
NOTE: The shelf is not designed to slide out at
the special low shelf (R) position.
..Handles.of.pots.and.pans.on.the.cooktop.
may.become.hot.if.left.too.close.to.the.vent
..Do.not.leave.plastic.or.flammable.items.on.
the.cooktop—they.may.melt.or.ignite.if.left.
too.close.to.the.vent
..Do.not.leave.closed.containers.on.the.
cooktop.The.pressure.in.closed.containers.
may.increase,.which.may.cause.them..
to.burst
..Metal.items.will.become.very.hot.if.they.are.
left.on.the.cooktop,.and.could.cause.burns
Power Outage
The.oven.or.broiler.cannot.be.lit.during.a.power.
failure.Gas.will.not.flow.unless.the.glow.bar.is.
hot
If.the.oven.is.in.use.when.a.power.failure.
occurs,.the.oven.burner.shuts.off.and.cannot.
be.re-lit.until.power.is.restored.This.is.because.
Upper Oven Light
Touch.the.Oven.Light.pad.on.the.upper.control.
panel.to.turn.the.light.on.or.off
10
the.flow.of.gas.is.automatically.stopped.
and.will.not.resume.when.power.is.restored.
until.the.glow.bar.has.reached.operating.
temperature
Page 11
Using the upper oven. GEAppliances.com
If your model has a door latch, do not lock the oven door with the latch during baking or roasting.
The latch is used for self-cleaning only.
How to Set the Upper Oven for Baking or Roasting
The oven has a special low shelf
(R) position just above the oven
bottom. Use it when extra cooking
space is needed, for example,
when cooking a large turkey. The
shelf is not designed to slide out
at this position.
Your.oven.is.not.designed.for.open-door.
cooking
..Touch.the.Bake.pad
...Touch.the.number.pads.to.set.the.desired.
temperature
...Touch.the.Start. pad
The.word.ON.and.100°.will.be.displayed.
As.the.oven.heats.up,.the.display.will.show.the.
changing.temperature.When.the.oven.reaches.
the.temperature.you.set,.a.tone.will.sound
Preheating and Pan Placement
To.change.the.oven.temperature.during.BAKE.
cycle,.press.the.Bake.pad.and.then.the.number.
pads.to.get.the.new.temperature
...Check.food.for.doneness.at.minimum.time.
on.recipe.Cook.longer.if.necessary
...Touch.the.Clear/Off. pad.when.cooking.is.
complete
NOTE: A.cooling.fan.may.automatically.turn.
on.and.off.to.cool.internal.parts.This.is.normal,.
and.the.fan.may.continue.to.run.even.after.the.
oven.is.turned.off
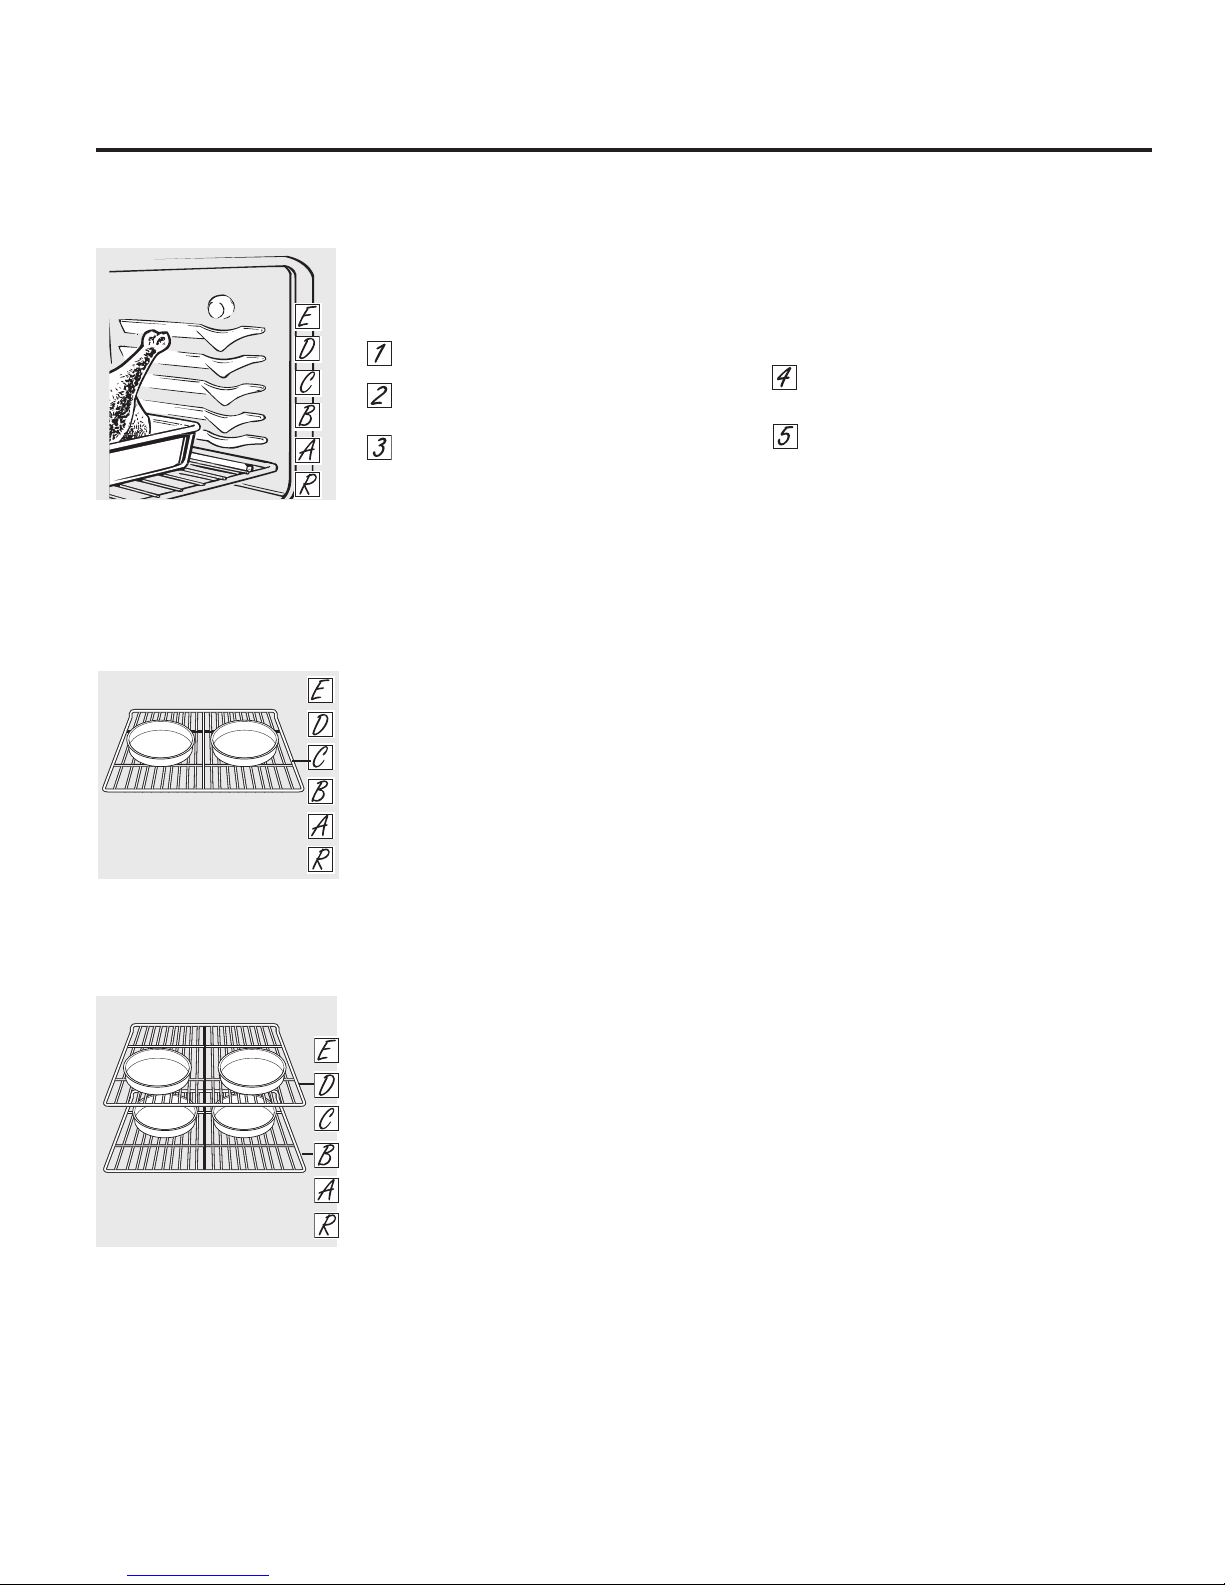
When baking on a single rack, use
the rack position from the chart for
your type of food. Baking results
will be better if baking pans are
centered in the oven as much as
possible.
When baking four cake layers at a time,
use racks B and D. Place the lower
pans at the back of the rack and the
upper pans to the front of the rack
shown so that one pan is not directly
above another.
To avoid possible burns, place the racks in the
desired position before you turn on the oven.
Preheat.the.oven.if.the.recipe.calls.for.it.
To.preheat,.set.the.oven.at.the.correct.
temperature.Preheating.is.necessary.for.good.
results.when.baking.cakes,.cookies,.pastry.and.
breads.
For.ovens.without.a.preheat.indicator.light.or.
tone,.preheat.10.minutes
Baking.results.will.be.better.if.baking.pans..
are.centered.in.the.oven.as.much.as.possible.
Pans.should.not.touch.each.other.or.the.walls.of.
the.oven.If.you.need.to.use.two.shelves,.stagger.
the.pans.so.one.is.not.directly.above.the.other,.
and.leave.approximately.11⁄2”.between.pans,.
from.the.front,.back.and.sides.of.the.wall
11
Page 12
Using the upper oven.
Aluminum Foil
Do.not.use.aluminum.foil.to.line.oven.bottoms.
The.foil.will.trap.heat.below.and.upset.the.
performance.of.the.oven.Foil.can.melt.and.
permanently.damage.the.oven.bottom.
Damage.from.improper.use.of.aluminum.foil.is.
not.covered.by.the.product.warranty.
Foil.may.be.used.to.catch.spills.by.placing.a.
sheet.on.a.lower.rack,.several.inches.below.
the.food.Do.not.use.more.foil.than.necessary.
and.never.entirely.cover.an.oven.rack.with.
aluminum.foil..Keep.foil.at.least.1-1/2”.from.
oven.walls.to.prevent.poor.heat.circulation
Oven Moisture
As.your.oven.heats.up,.the.temperature.change.
of.the.air.in.the.oven.may.cause.water.droplets.
to.form.on.the.door.glass.These.droplets.
are.harmless.and.will.evaporate.as.the.oven.
continues.to.heat.up
If your model has a door latch, do not lock the oven door with the latch during broiling.
The latch is used for self-cleaning only.
How to Set the Upper Oven for Broiling
Close the door. Always broil with
the door closed.
...Place.the.meat.or.fish.on.a.broiler.grid.in..
a.broiler.pan
...Follow.suggested.shelf.positions.in.the.
Broiling Guide
...The.oven.door.must. be.closed.during.
broiling
...Touch.the.Broil Hi/Lo. pad.once.for.
Hi Broil
...To.change to.Lo Broil,.touch.the.Broil Hi/
Lo.pad.again
...Touch.the.Start.pad
...When.broiling.is.finished,.touch.the.Clear/
Off.pad
Serve.the.food.immediately,.and.leave.the.pan.
outside.the.oven.to.cool.during.the.meal.for.
easiest.cleaning
Use.Lo.Broil.to.cook.foods.such.as.poultry..
or.thick.cuts.of.meat.thoroughly.without.overbrowning.them
12
Page 13
Broiling Guide
GEAppliances.com
The size, weight, thickness,
starting temperature and
your preference of doneness
will affect broiling times. This
guide is based on meats at
refrigerator temperature.
†The U.S. Department of
Agriculture says “Rare beef is
popular, but you should know that
cooking it to only 140°F. means
some food poisoning organisms
may survive.” (Source: Safe Food
Book, Your Kitchen Guide, USDA
Rev. June 1985.)
The oven has 5 shelf positions.
Food Doneness
Beef Rare.-.Medium.
Rare
(140°F-150°F)
Medium.(160°F) Steaks-
Well.Done.
(170°F)
Medium.(160°F) Ground.Beef..
Type or
Thickness
Steaks1”.thick
3/4”.to.1”.thick
Steaks-
3/4”.to.1”.thick
Patties.-
Broil
Setting
Rack
Position*
Comments
Hi E Steaks.less.than.
1”.thick.are.difficult.to.cook.rare.
Hi D-E
They.may.cook.
through.before.
browning
Hi D
To.avoid.curling,.
Hi D-E
slash.fat.at.1”.
intervals
1/2”.to.3/4”.thick
Well.Done.
(170°F)
Ground.Beef..
Patties.-
Hi D
1/2”.to.3/4”.thick
Chicken Breast,.boneless Hi C Broil.skin.side.
Breast,.bone-in Hi C
down.first
Fish.fillets 1/2”.to.1”.thick Hi D Handle.and.turn.
very.carefully
slash.fat.at.1”.
Pork.
Chops
Well.Done
(170°F)
Lo D
3/4”.thick Hi D To.avoid.curling,.
intervals
*Due to the variety of meats and cuts available, you may select alternate rack positions based on personal preference
of doneness and external searing. See illustration for description of rack positions.
13
Page 14
Using the clock and timer. (on some models)
Not all features are on all models.
To Set the Clock
Make.sure.the.clock.is.set.to.the.
correct.time.of.day
The.clock.must.be.set.to.the.correct.time.of.day.
for.the.automatic.oven..timing.functions.to.work.
properly.The.time.of.day.cannot.be.changed.
during.a.delayed.cooking.or.a.delayed.selfcleaning.cycle
...Touch.the.Clock. pad.twice
...Touch.the.+.or.–.pads
If.the.+.or.–.pads.are.not.touched.within.one.
minute.after.you.touch.the.Clock.pad,.the.
display.reverts.to.the.original.setting.If.this.
happens,.touch.the.Clock.pad.twice.and.
reenter.the.time.of.day
To Turn Off the Clock Display
If.you have.several.clocks.in.your.kitchen,.you.
may.wish.to.turn.off.the.time.of.day.clock.
display.on.your.range
...Touch.the.Clock.pad.once.to.turn.off.the.
time.of.day.display.Although.you.will.not.
be.able.to.see.it,.the.clock.maintains.the.
correct.time.of.day
...Touch.the.Start/On. pad.until.the.time.of.
day.shows.in.the.display.This.enters.the.
time.and.starts.the.clock
To.check.the.time.of.day.when.the.display.is.
showing.other.information,.simply.touch.the.
Clock.pad.The.time.of.day.shows.until.another.
pad.is.touched
...Touch.the.Clock.pad.twice.to.recall.the.
clock.display
The.timer.is.a.minute.timer.only.
The.Clear/Off.pad.does.not.affect.
the.timer
To Set the Timer
The timer does not control oven operations.
The maximum setting on the timer is 9 hours
and 59 minutes.
...Touch.the.Kitchen Timer On/Off.pad
...Touch.the.+.or.–.pads.until.the.amount.of.
time.you.want.shows.in.the.display.The.
maximum.time.that.can.be.entered.in.
minutes.is.59.Times.more.than.59.minutes.
should.be.changed.to.hours.and.minutes
If you make a mistake, touch the Kitchen Timer
On/Off pad and begin again.
...Touch.the.Start/On.pad.The.time.will.start.
counting.down,.although.the.display.does.
not.change.until.one.minute.has.passed
...When.the.timer.reaches.:00,.the.control.
will.beep.3.times.followed.by.one.beep.
every.6.seconds.until.the.Kitchen Timer
On/Off.pad.is.touched
14
Page 15
GEAppliances.com
Not all features are on all models.
To Reset the Timer
or
If.the.display.is.still.showing.the.time.remaining,.
you.may.change.it.by.touching.the.Kitchen
Timer On/Off.pad.and.then.touching.the.+.or.
–.pads.until.the.time.you.want.appears.in.the.
display
To Cancel the Timer
Touch.the.Kitchen Timer On/Off.pad.twice
End of Cycle Tones (on some models)
Clear.the.tones.by.pressing.the.pad.of.the.
function.you.are.using
If.the.remaining.time.is.not.in.the.display.(clock,.
start.time.or.cooking.time.are.in.the.display),.
recall.the.remaining.time.by.touching.the.
Kitchen Timer On/Off.pad.and.then.touching.
the.+.or.–.pads.to.enter.the.new.time.you.want
Power Outage
If a flashing time is in the display, you have
experienced a power failure. Reset the clock.
To.reset.the.clock,.touch.the.Clock.pad.Enter.
the.correct.time.of.day.by.touching.the.+.or.–.
pads.Touch.the.Start/On pad
15
Page 16
Using the timed baking and roasting features. (on some models)
Do not lock the oven door with the latch during timed cooking. The latch is used for self-cleaning only.
NOTE: Foods that spoil easily—such as milk, eggs, fish, stuffings, poultry and pork—should not be allowed to sit for more
than 1 hour before or after cooking. Room temperature promotes the growth of harmful bacteria. Be sure that the oven
light is off because heat from the bulb will speed harmful bacteria growth.
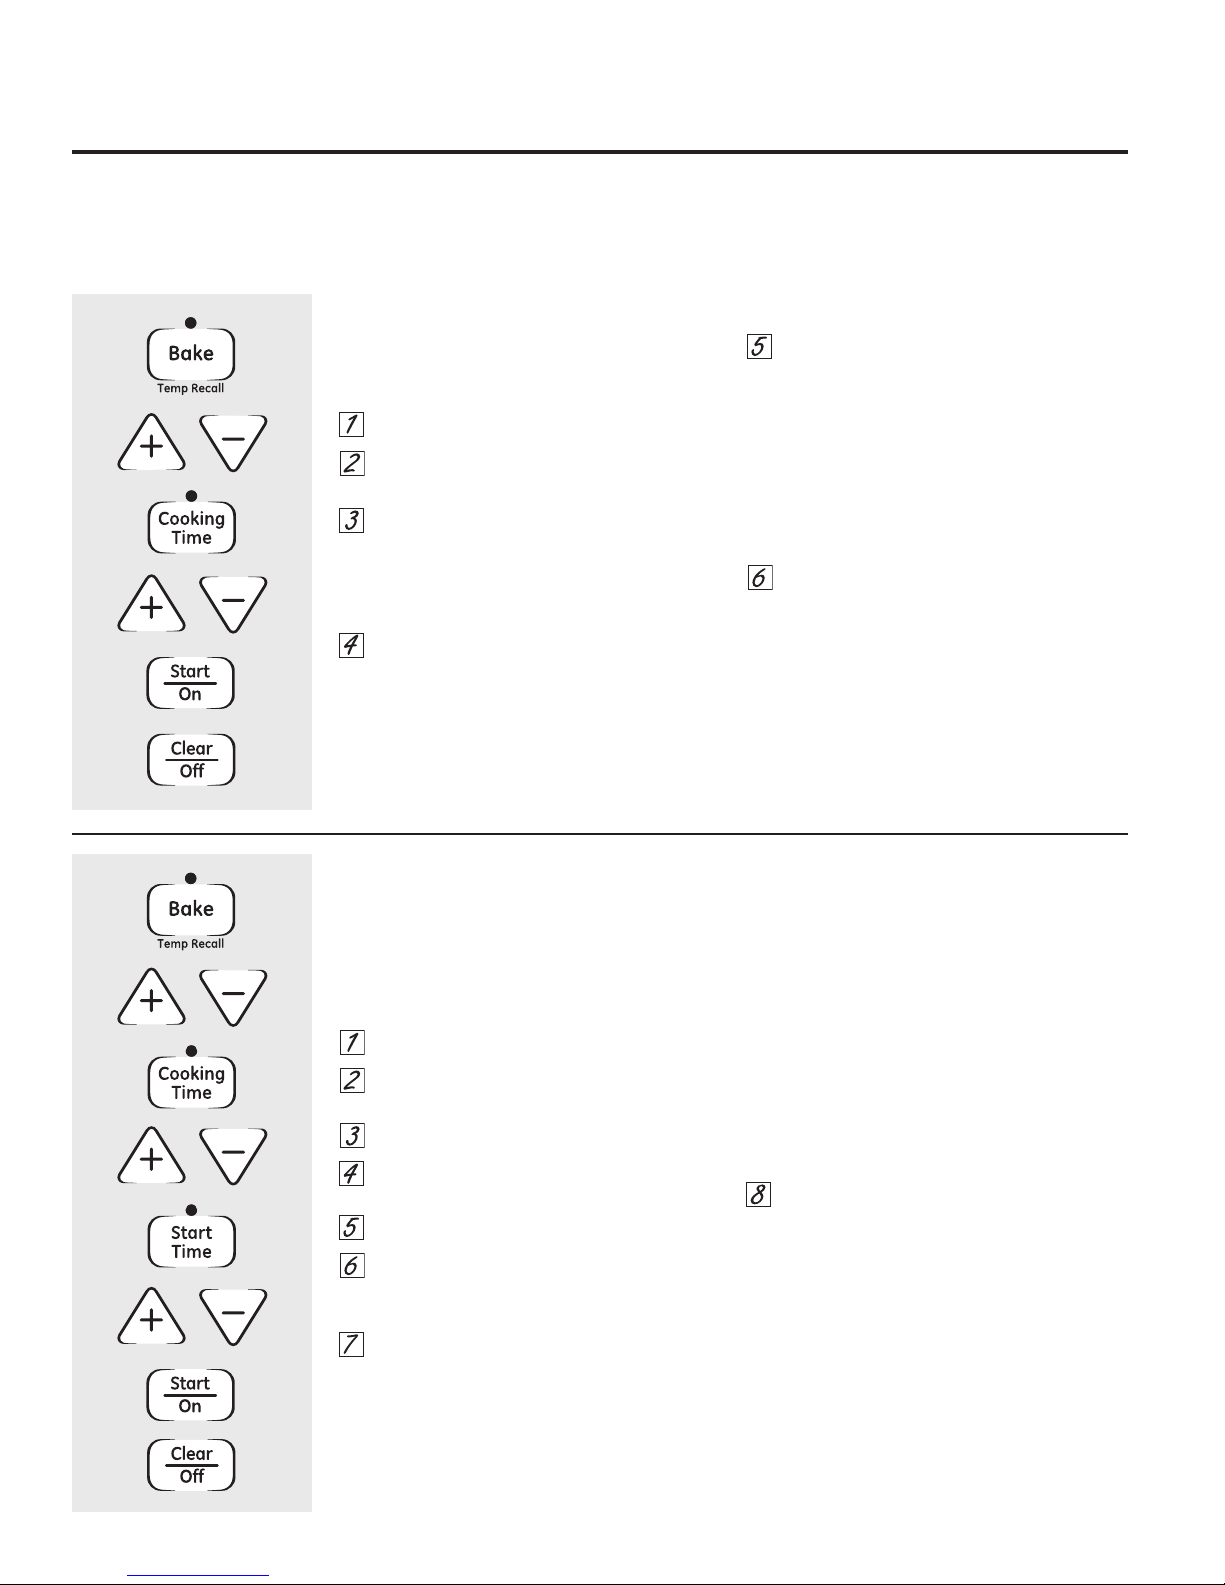
How to Set an Immediate Start and Automatic Stop
The oven will turn on immediately and cook for a
selected length of time. At the end of the cooking
time, the oven will turn off automatically.
...Touch.the.Bake.pad
...Touch.the.+.or.–.pads.to.set.the.oven.
temperature
...Touch.the.Cooking Time. pad
NOTE: If your recipe requires preheating, you
may need to add additional time to the length of
the cooking time.
...Touch.the.+.or.–.pads.to.set.the.baking.
time
The.cooking.time.that.you.entered.will.be.
displayed.(If.you.select.Cooking Time.first.and.
then.adjust.the.Bake Temperature,.the.oven.
temperature.will.be.displayed.instead)
..Touch.the.Start/On.pad
The.display.shows.either.the.oven.temperature.
that.you.set.or.the.cooking.time.countdown.
(The.display.starts.with.PRE.if.showing.the.oven.
temperature)
The.oven.will.continue.to.cook.for.the.
programmed.amount.of.time,.then.turn.off.
automatically
...Touch.the.Clear/Off.pad.to.clear.the.
display.if.necessary
Remove the food from the oven. Remember,
even though the oven shuts off automatically,
foods continue cooking after controls are off.
How to Set a Delayed Start and Automatic Stop
The oven will turn on at the time of day you set,
cook for a specific length of time and then turn
off automatically.
Make.sure.the.clock.shows.the.correct.time.of.
day.
...Touch.the.Bake.pad
...Touch.the.+.or.–.pads.to.set.the.oven.
temperature
...Touch.the.Cooking Time. pad
...Touch.the.+.or.–.pads.to.set.the.desired.
length.of.cooking.time
...Touch.the.Start Time.pad
...Touch.the.+.or.–.pads.to.set.the.time.of.
day.you.want.the.oven.to.turn.on.and.
start.cooking
NOTE: If.you.would.like.to.check.the.times.you.
have.set,.touch.the.Start Time.pad.to.check.the.
start.time.you.have.set.or.touch.the.Cooking
Time.pad.to.check.the.length.of.cooking.time.
you.have.set
When.the.oven.turns.on.at.the.time.of.day.
you.have.set,.the.display.will.show.PRE.until.it.
reaches.the.selected.temperature,.and.then.it.
will.display.the.oven.temperature
At.the.end.of.cooking.time,.the.oven.will.turn.off.
and.the.end.of.cycle.tone.will.sound
...Touch.the.Clear/Off.pad.to.clear.the.
display.if.necessary
Remove the food from the oven. Remember,
even though the oven shuts off automatically,
foods continue cooking after controls are off.
...Touch.the.Start/On.pad
NOTE: An attention tone will sound if you are
using timed baking and do not touch the
Start/On pad.
16
Page 17

Special features of your oven control. (on some models)
GEAppliances.com
Your new touch pad control has additional features that you may choose to use. The following are the features and how
you may activate them.
The special feature modes can only be activated while the display is showing the time of day. They remain in the control’s
memory until the steps are repeated.
When the display shows your choice, touch the
Start/On pad. The special features will remain in memory after a power
failure.
NOTE: The Sabbath feature and the Thermostat Adjustment feature are also Special Features, but they are addressed
separately in the following sections.
12 Hour Shut-Off
With this feature, should you forget and leave
the oven on, the control will automatically
turn off the oven after 12 hours during baking
functions or after 3 hours during a broil function.
If.you.wish.to.turn.OFF.this.feature,.follow.the.
steps.below
...Touch.the.Bake. and.Broil Hi/Lo.pads.at.
the.same.time.for.3.seconds.until.the.
display.shows.SF
...Touch.the.Clock. pad.The.display.will.show.
ON.(12.hour.shut-off).Touch.the.Clock.pad.
repeatedly.until.the.display.shows.OFF.(no.
shut-off)
...Touch.the.Start/On. pad.to.activate.the.no.
shut-off.and.leave.the.control.set.in.this.
special.features.mode
17
Page 18

Using the Sabbath feature. (on some models)
(Designed for use on the Jewish Sabbath and Holidays)
The Sabbath feature can be used for baking/roasting only. It cannot be used for broiling, self-cleaning or delay start
cooking.
NOTE: The oven light comes on automatically (on some models) when the door is opened and goes
off when the door is closed. The bulb may be removed. See the Oven Light Replacement section. On
models with a light switch on the control panel, the oven light may be turned on and left on.
How to Set for Regular Baking/Roasting
When.the.display.shows.⊃ the.
oven.is.set.in.Sabbath.When.the.
display.shows.
baking/roasting
⊃⊂.the.oven.is.
NOTE: To understand how the oven control works,
practice using regular baking (non-Sabbath) before
entering Sabbath mode.
Make sure the clock shows the correct time of day
and the oven is off.
...Touch.and.hold.both.the.Bake.and.Broil Hi/Lo.
pads,.at.the.same.time,.until.the.display.shows.
SF
...Tap.the.Clock.pad.until.SAb.appears.in.the.
display
...Touch.the Start/On.pad.and.⊃ will.appear.in.
the.display
...Touch.the.Bake.pad.No.signal.will.be.given
...The.preset.starting.temperature.will.
automatically.be.set.to.350°.Tap.the.+.or.–.
pads.to.increase.or.decrease.the.temperature.
in.25°.increments.The.temperature.can.be.set.
between.170°.and.550°.No.signal.or.
temperature.will.be.given
...Touch.the.Start/On.pad
...After.a.random.delay.period.of.approximately.
30.seconds.to.1.minute,.⊃⊂ will.appear.in.the.
display.indicating.that.the.oven.is.
If.⊃⊂ doesn’t.appear.in.the.display,.
roasting.
start.again.at.Step.4
To.adjust.the.oven.temperature,.touch.the.Bake.pad.
and.tap.the.+.or.–.pads.to.increase.or.decrease.the.
temperature.in.25°.increments.Touch.the.Start/On.
pad
NOTE: The.Clear/Off.and Cooking Time.pads.are.
active.during.the.Sabbath.feature
Certified
Sabbath
Mode
baking/
K
When.the.display.shows.⊃ the.
oven.is.set.in.Sabbath.When.the.
display.shows.
baking/roasting
⊃⊂.the.oven.is.
18
How to Set for Timed Baking/Roasting—Immediate Start and Automatic Stop
NOTE: To understand how the oven control works,
practice using regular (non-Sabbath) Immediate Start
and Automatic Stop before entering the Sabbath
mode.
Make sure the clock shows the correct time of day
and the oven is off.
...Touch.and.hold.both.the.Bake.and.Broil Hi/Lo.
pads,.at.the.same.time,.until.the.display.shows.
SF
...Tap.the.Clock.pad.until.SAb.appears.in.the.
display
...Touch.the.Start/On.pad.and.⊃ will.appear.in.
the.display.
...Touch.the.Cooking Time.pad.
...Touch.the.+.or.–.pads.to.set.the.desired.length.
of.cooking.time.between.1.minute.and.9.hours.
and.59.minutes.The.cooking.time.that.you.
entered.will.be.displayed
...Touch.the.Start/On.pad
...Touch.the.Bake.pad.No.signal.will.be.given
...The.preset.starting.temperature.will.
automatically.be.set.to.350°.Tap.the.+.or.–.
pads.to.increase.or.decrease.the.temperature.
in.25°.increments.The.temperature.can.be.set.
between.170°.and.550°.No.signal.or.
temperature.will.be.given
...Touch.the Start/On.pad
...After.a.random.delay.period.of.approximately.
30.seconds.to.1.minute,.⊃⊂ will.appear.in.the.
display.indicating.that.the.oven.is.
If.⊃⊂ doesn’t.appear.in.the.display,.
roasting.
start.again.at.Step.7
To.adjust.the.oven.temperature,.touch.the.Bake.pad.
and.tap.the.+.or.–.pads to.increase.or.decrease.the.
temperature.in.25°.increments.Touch.the.Start/On.
pad
When.cooking.is.finished,.the.display.will.change.
from.⊃⊂ to.⊃,.indicating.that.the.oven.has.turned.
OFF.but.is.still.set.in.Sabbath.Remove.the.cooked.
food
baking/
Page 19

How to Exit the Sabbath Feature
GEAppliances.com
...Touch.the.Clear/Off.pad
...If.the.oven.is.cooking,.wait.for.a.random.delay.
period.of.approximately.30.seconds.to.1.
minute,.until.only.⊃ is.in.the.display
...Touch.and.hold.both.the.Bake.and.Broil Hi/
Lo.pads,.at.the.same.time,.until.the.display.
shows.SF
...Tap.the.Clock.pad.until.ON.or.OFF.appears.in.
the.display.ON.indicates.that.the.oven.will.
automatically.turn.off.after.12.hours.OFF.
indicates.that.the.oven.will.not.automatically.
turn.off.See.the.Special.features.section.for.an.
explanation.of.the.12 Hour Shut-Off.feature
...Touch.the.Start/On.pad
NOTE: If a power outage occurred while the oven
was in Sabbath, the oven will automatically turn off
and stay off even when the power returns. The oven
control must be reset.
19
Page 20

Adjust the oven thermostat—Do it yourself! GEAppliances.com
You may find that your new oven cooks differently than the one it replaced. Use your new oven for a few weeks to
become more familiar with it. If you still think your new oven is too hot or too cold, you can adjust the thermostat yourself.
Do not use thermometers, such as those found in grocery stores, to check the temperature setting of your oven.
These thermometers may vary 20–40 degrees.
NOTE: This adjustment will not affect the broiling or the self-cleaning temperatures. The adjustment will be retained
in memory after a power failure.
To Adjust the Thermostat (on some models)
OVEN TEMP
F
F
O
2
0
0
2
5
0
3
0
N
A
E
L
C
L
I
O
R
0
3
5
0
4
0
0
4
5
0
5
0
0
B
Front.of.OVEN.TEMP.knob..
(knob.appearance.may.vary)
L
O
O
S
E
N
S
C
R
E
W
S
T
O
R
O
T
A
T
E
R
E
T
T
E
O
K
H
A
M
C
O
O
M
L
A
E
K
R
E
Back.of.OVEN.TEMP.knob..
(knob.appearance.may.vary)
...Touch.the.Bake. and.Broil Hi/Lo.pads.
at.the.same.time.for.3.seconds.until..
the.display.shows.SF
...Touch.the.Bake. pad.A.two-digit.number.
shows.in.the.display
...The.oven.temperature.can.be.adjusted.up.
to.(+).35°F.hotter.or.(–).35°F.cooler.Touch.
...When.you.have.made.the.adjustment,.
touch.the.Start/On.pad.to.go.back.to.the.
time-of-day.display.Use.your.oven.as.you.
would.normally
NOTE: This adjustment will not affect the broiling
or self-cleaning temperatures. It will be retained
in memory after a power failure.
the.+.pad.to.increase.the.temperature.in.
1-degree.increments
...Touch.the.–.pad.to.decrease.the.
temperature.in.1-degree.increments
To Adjust the Thermostat (on models with an OVEN TEMP Knob)
...Pull.the.OVEN TEMP.knob.off.the.range.
and.look.at.the.back.side.To.make.an.
adjustment,.loosen.(approximately.one.
turn),.but.do.not.completely.remove,.the.
two.screws.on.the.back.of.the.knob.
...With.the.back.of.the.knob.facing.you,.hold.
the.outer.edge.of.the.knob.with.one.hand.
and.turn.the.front.of.the.knob.with.the.
other.hand
To.increase.the.oven.temperature,.move.
the.top.screw.toward.the.right.You’ll.hear.
a.click.for.each.notch.you.move.the.knob.
To.decrease.the.oven.temperature,.move.
the.top.screw.toward.the.left.
Each.click.will.change.the.oven.
temperature.approximately.10°F.(Range.
is.plus.or.minus.60°F.from.the.arrow).We.
suggest.that.you.make.the.adjustment.
one.click.from.the.original.setting.and.
check.oven.performance.before.making.
any.additional.adjustments
...After.the.adjustment.is.made,.retighten.
screws.so.they.are.snug,.but.be.careful.
not.to.overtighten.
...Replace.the.knob,.matching.the.flat.area.
of.the.knob.to.the.shaft,.and.check.
performance
The type of margarine will affect baking performance!
Most recipes for baking have been developed using high-fat products such as butter or margarine (80% fat). If you
decrease the fat, the recipe may not give the same results as with a higher-fat product.
Recipe failure can result if cakes, pies, pastries, cookies or candies are made with low-fat spreads. The lower the fat
content of a spread product, the more noticeable these differences become.
Federal.standards.require.products.labeled.“margarine”.to.contain.at.least.80%.fat.by.weight.Low-fat.spreads,.on.the.other.hand,.
contain.less.fat.and.more.water.The.high.moisture.content.of.these.spreads.affects.the.texture.and.flavor.of.baked.goods.For.best.
results.with.your.old.favorite.recipes,.use.margarine,.butter.or.stick.spreads.containing.at.least.70%.vegetable.oil
20
Page 21

Using the electric warming drawer. (on some models) GEAppliances.com
WARNING FOOD POISON HAZARD: Bacteria may grow in food temperatures below 140F.
• Always start with hot food. Do not use WARM settings to heat cold food.
• Do not warm food for more than 2 hours.
The warming drawer will keep hot, cooked foods at serving temperature. Always start with hot food. Do not use to
heat cold food other than crisping crackers, chips or dry cereal. Failure to follow these instructions may result in
foodborne illness.
Control Knob (on models equipped with a knob)
Push.and.turn.the.control.knob.to.any.desired.
setting
NOTES:
..The.warming.drawer.cannot.be.used.during.a.
self-clean.cycle
..The.warming.drawer.has.three.settings:.1,.2.and.
3.These.settings.maintain.different.temperature.
levels.in.the.warming.drawer
..On.some.models,.if.using.the.oven.at.the.same.
time.as.the.warming.drawer,.only.the.oven.
settings.will.be.displayed
When Using the Warming Drawer
The.warming.drawer.will.keep.hot,.cooked.
foods.at.serving.temperature.Always.start.with.
hot.food.Do.not.use.to.heat.cold.food.other.
than.crisping.crackers,.chips.or.dry.cereal
Allow approximately 25 minutes for the
warming drawer to preheat.
. ..Do.not.put.liquid.or.water.in.the.warming.
drawer
. ..All.foods.placed.in.the.warming.drawer.
should.be.covered.with.a.lid.or.aluminum.
foil.When.warming.pastries.or.breads,.the.
cover.should.be.vented.to.allow.moisture.
to.escape
Number Pad Setting
1 Lo.(pies)
2 Med.(casseroles)
3 Hi.(meats)
. ..Food.should.be.kept.hot.in.its.cooking.
container.or.transferred.to.a.heat-safe.
serving.dish
NOTE: Plastic containers or plastic wrap will
melt if in direct contact with the drawer, pan
or a hot utensil. Melted plastic may not be
removable and is not covered under your
warranty.
. ..Remove.serving.spoons,.etc,.before.placing.
containers.in.warming.drawer
Temperature Selection Chart
To.keep.several.different.foods.hot,.set.the.
control.to.the.food.needing.the.highest.setting
. ..The.temperature,.type.and.amount.of.food,.
and.the.time.held.will.affect.the.quality.of.the.
food
. ..Repeated.opening.of.the.drawer.allows.the.
hot.air.to.escape.and.the.food.to.cool
. ..With.large.loads,.it.may.be.necessary.to.use.
a.higher.warming.drawer.setting.and.cover.
some.of.the.cooked.food.items
.Do.not.use.plastic.containers.or.plastic.wrap
FOOD TYPE CONTROL
SETTING
Casserole MED/2
Chili HI/3
Pizza MED/2
Potatoes,.baked HI/3
Tortilla.Chips LO/1
Waffles. LO/1
21
Page 22

Using the electric warming drawer. (on some models)
To Crisp Stale Items
. ..Place.food.in.low-sided.dishes.or.pans
. ..Preheat.on LO/1 setting
. ..Check.crispness.after.45.minutes.Add.time.
as.needed
To Warm Serving Bowls and Plates
To.warm.serving.bowls.and.plates,.set.the.
control.on.LO/1
CAUTION
Dishes will be hot. Use pot holders or mitts
when removing hot dishes.
. ..Use.only.heat-safe.dishes
. ..If.you.want.to.heat.fine.china,.please.check.
with.the.manufacturer.of.the.dishes.for.their.
maximum.heat.tolerance
. ..You.may.warm.empty.serving.dishes.while.
preheating.the.drawer
22
Page 23

Using the self-cleaning upper oven. GEAppliances.com
If your model has a door latch, never force the latch handle. Forcing the handle will damage the door lock mechanism.
The oven door must be closed and all controls set correctly for the cycle to work properly.
Before a Clean Cycle
Wipe up heavy soil on the oven
bottom
DO NOT hand
clean gasket. (On
some models,
the gasket is on
the inner door.
DO hand clean
inside door frame
and glass.
DO hand clean oven frame.
OVEN TEMP
F
F
O
2
0
0
2
5
0
3
0
N
A
E
L
C
L
I
O
B
R
0
3
5
0
4
0
0
4
5
0
5
0
0
For.the.first.self-clean.cycle,.we.recommend.
venting.your.kitchen.with.an.open.window.or.
using.a.ventilation.fan.or.hood
Remove.any.broiler.pan,.broiler.grid,.all.
cookware,.probe.and.any.aluminum.foil.from.
the.oven—they.cannot.withstand.the.high.
cleaning.temperatures
NOTE:
..If.your.oven.is.equipped.with.nickel.oven.
Do.not.clean.the.gasket.The.fiberglass.
material.of.the.front.frame.gasket.cannot.
withstand.abrasion.It.is.essential.for.the.
gasket.to.remain.intact.If.you.notice.it.
becoming.worn.or.frayed,.replace.it
Wipe up any heavy spillovers on the oven
bottom.
Make.sure.the.oven.light.bulb.cover.is.in.place.
and.the.oven.light.is.off
shelves,.remove.them.before.you.begin.the.
self-clean.cycle
..If.your.oven.is.equipped.with.gray.
porcelain-coated.oven.shelves,.they.may.be.
left.in.the.oven.during.the.self-clean.cycle
Soil on the front frame of the range and
outside the gasket on the front frame will
need to be cleaned by hand. Clean these
IMPORTANT:. The.health.of.some.birds.is.
extremely.sensitive.to.the.fumes.given.off.
during.the.self-cleaning.cycle.of.any.range.
Move.birds.to.another.well.ventilated.room
NOTE: Use caution when opening the upper
oven after the self-clean cycle has ended. The
oven may still be hot.
areas with hot water, soap-filled scouring
pads or cleansers such as Soft Scrub®. Rinse
well with clean water and dry. Wipe off the
flat inner door and glass with soapy water
and sponge.
How to Set the Oven for Cleaning (on models with an OVEN TEMP Knob)
Follow.the.directions.in.the.Before.a.Clean
Cycle.section
...Latch.the.door
...Turn.the.OVEN TEMP. knob.to.CLEAN
The Clean Time is 4 hours and 20 minutes. The
self-clean light will come on and stay on until the
self-clean cycle is complete.
The oven shuts off automatically when the clean
cycle is complete.
...After.a.clean.cycle,.turn.the.OVEN TEMP
knob.to.OFF.and.slide.the.latch.handle.to.
the.left.as.far.as.it.will.go
To.cancel.self-clean.cycle,.turn.OVEN TEMP
knob.to.off.and.slide.latch.to.left.as.far.as.it.will.
go.Wait.until.self-clean.light.stops.blinking.Use.
oven.as.desired
NOTE:.Never.force.the.latch.If.the.oven.is.too.
hot,.you.will.not.be.able.to.slide.the.latch.Allow.
the.oven.to.cool
How to Set the Oven for Cleaning
Follow.the.directions.in.the.Before a Clean
Cycle.section
...Latch.the.door
NOTE: Never.force.the.latch.If.the.oven.is.
too.hot,.you.will.not.be.able.to.slide.the.latch.
Allow.the.oven.to.cool
...Touch.the.Self Clean. pad
The.Clean Time.is.normally.4.hours.and.20.
minutes.You.can.change.the.Clean Time.to.
any.time.between.3.and.5.hours,.depending.on.
the.amount.of.soil.in.your.oven
...Touch.the.+.or.–.pads.until.the.desired.
Clean Time.is.displayed
...Touch.the.Start/On. pad
The.self-clean.cycle.will.automatically.
begin.after.CLEAN. is.displayed.and.the.time.
countdown.appears.in.the.display
While.the.oven.is.self-cleaning,.you.can.touch.
the.Clock.pad.to.display.the.time.of.day.To.
return.to.the.clean.countdown,.touch.the.Self
Clean.pad
The.oven.shuts.off.automatically.when.the.
clean.cycle.is.complete,.and.0:00.will.flash.in.
the.display
...Slide.the.latch.handle.to.the.left.as.far.as.it.
will.go.and.open.the.door
23
Page 24

Care and cleaning of the range.
The oven door must be closed and all controls set correctly for the cycle to work properly.
How to Delay the Start of Cleaning (on some models)
You can set the oven control to delay-start the
oven, clean for a specific length of time and then
turn off automatically.
Make.sure.the.clock.shows.the.correct.time.of.
day
Follow.the.directions.in.the.Before a Clean Cycle
section
...Latch.the.door
NOTE: Never.force.the.latch.If.the.oven.is.too.
hot,.you.will.not.be.able.to.slide.the.latch.Allow.
the.oven.to.cool
...Touch.the.Self Clean. pad
...Touch.the.+. or.–. pads.to.set.the.Clean
Time
The.Clean.Time.is.preset.for.4.hours.and.20.
minutes.You.can.change.the.Clean.Time.to.any.
time.between.3.and.5.hours,.depending.on.the.
amount.of.soil.in.your.oven.If.a.different.Clean.
Time.is.desired,.touch.the.+.or.–.pads.until.the.
desired.Clean.Time.is.displayed
...Touch.the.Start Time.pad
Change.the.Start.Time.by.touching.the.+.or.–.
pads.The.start.time.will.appear.in.the.display
...Touch.the.Start/On. pad
The.self-clean.cycle.will.automatically.begin.at.
the.time.set
While.the.oven.is.self-cleaning,.you.can.touch.
the.Clock.pad.to.display.the.time.of.day.To.
return.to.the.clean.countdown,.touch.the.Self
Clean pad
The.oven.shuts.off.automatically.when.the.
clean.cycle.is.complete,.and.0:00.will.flash.in.
the.display
...Slide.the.latch.handle.to.the.left.as.far.as.it.
will.go.and.open.the.door
To Stop a Clean Cycle (on some models)
Touch.the Clear/Off pad
Wait.until.the.oven.has.cooled.below.the.
locking.temperature.to.unlatch.the.door.You.
will.not.be.able.to.open.the.door.right.away.
unless.the.oven.has.cooled.below.the.locking.
temperature
After a Clean Cycle
You.may.notice.some.white.ash.in.the.oven.
Wipe.it.up.with.a.damp.cloth.after.the.oven.
cools.
If white spots remain, remove them with a
soap-filled scouring pad and rinse thoroughly
with a vinegar and water mixture.
These.deposits.are.usually.a.salt.residue.that.
cannot.be.removed.by.the.clean.cycle
If.the.oven.is.not.clean.after.one.clean.cycle,.
repeat.the.cycle.
..You.cannot.set.the.oven.for.cooking.until.the.
oven.is.cool.enough.for.the.door.to.unlock
While.the.oven.is.self-cleaning,.you.can.
touch.the.Clock.pad.to.display.the.time.
of.day.To.return.to.the.clean.countdown,.
touch.the.Cooking Time.pad
..If.the.shelves.become.hard.to.slide,.apply.a.
small.amount.of.vegetable.oil.or.cooking.oil.to.
a.paper.towel.and.wipe.the.edges.of.the.oven.
shelves.with.the.paper.towel
24
Page 25

Be sure electrical power is off and all surfaces are cool before cleaning any part of the range.
WARNING If your range is removed for cleaning, servicing or any reason, be
.
sure the anti-tip device is reengaged properly when the range is replaced. Failure to take
this precaution could result in tipping of the ra
To check if the bracket is installed and engaged properly, carefully tip the range forward. The
bracket should stop the range within 4 inches. If it does not, the bracket must be reinstalled.
If the range is pulled from the wall for any reason, always repeat this procedure to verify the
range is properly secured by the anti-tip bracket.
If your range has no anti-tip bracket, call 1.800.626.8774 to receive one at no cost.
nge and cause injury.
Sealed Burner Assemblies.(on some models)
GEAppliances.com
Inner.burner.
cap
Burner..
base
Electrode
Cooktop
Tri-Ring.Burner..
(on.some.models)
Side.grate
Outer.
burner.
cap
Center.
griddle
Burner.head.
and.cap.
assembly
Electrode
Turn.all.controls.OFF. before.removing.the.
burner.parts
The.round.side.burner.caps.and.burner.
heads.can.be.lifted.off,.making.them.easy.to.
clean.The.electrodes.are.not.removable
The.oval.center.burner.head.and.cap.
assembly.can.be.lifted.off,.making.it.easy..
to.clean.The.burner.electrode.is.not.
removable
The.tri-ring.burner.inner.cap.can.be.lifted.
off.for.cleaning.the.outer.cap.and.base.
assembly.can.be.lifted.off.the.cooktop.as.one.
piece.for.cleaning.purposes
. CAUTION
cooktop without all burner parts and grates
in place.
Electrode
Electrode
The.electrode.of.the.spark.igniter.is.
exposed.when.the.burner.head.is.
removed.When.one.burner.is.turned.
to.LITE,.all.the.burners.spark.Do.
not.attempt.to.disassemble.or.clean.
around.any.burner.while.another.
burner.is.on.An.electric.shock.may.
result,.which.could.cause.you.to.knock.
over.hot.cookware
Do not operate the
or
Tri-ring.base..
(on.some.models)
Chef’s
griddle
Burner.head.
cap.and.
electrode
. CAUTION
tri-ring or bridge burner cap from head.
The.tri-ring.or.bridge.burner.head.and.cap.
assembly.can.be.lifted.off,.making.it.easy.to.
clean.The.electrode.is.not.removable
Do not remove
25
Page 26

Care and cleaning of the range..
Standard Twin Burner Assemblies (on some models)
Grate
Drip.pan.(if.so.equipped)
Surface.burner
CAUTION:
Do.not.operate.the.cooktop.without.all.
burner.parts,.drip.pans.(if.so.equipped).
and.grates.in.place
For cleaning information on sealed burners,
see section below. Sealed burner cooktops
do not lift up.
On.models.with.standard.twin.burners,.the.
cooktop.lifts.up.for.easy.access
Turn.all.controls.OFF.before.removing.burner.
parts.and.drip.pans.(if.so.equipped)
The.burner.grates.and.drip.pans.(if.so.equipped).
can.be.lifted.off,.making.them.easy.to.clean
The.holes.in.the.surface.burners.of.your.range.
must.be.kept.clean.at.all.times.for.proper.
ignition.and.an.even,.unhampered.flame
You.should.clean.the.surface.burners.routinely,.
especially.after.bad.spillovers,.which.could.clog.
these.holes.
Wipe.off.surface.burners.If.heavy.spillover.
occurs,.remove.the.surface.burners.from.the.
range.Burners.lift.out.for.cleaning.Lift.up.the.
cooktop.and.then.lift.out.the.surface.burners
To.remove.burned-on.food,.soak.the.surface.
burner.in.a.solution.of.mild.liquid.detergent.and.
hot.water.Soak.the.surface.burner.for.20.to.30.
minutes.
For.more.stubborn.stains,.use.a.cleanser.like.
Soft.Scrub®.brand.or.Bon.Ami®.brand.Rinse.well.
to.remove.any.traces.of.the.cleanser.that.might.
clog.the.surface.burner.openings.
Do.not.use.steel.wool.because.it.will.clog.the.
surface.burner.openings.and.scratch.the.
surface.burners.If.the.holes.become.clogged,.
clean.them.with.a.sewing.needle.or.twist-tie
Before.putting.the.surface.burner.back,.shake.
out.excess.water.and.then.dry.it.thoroughly.by.
setting.it.in.a.warm.oven.for.30.minutes.Then.
place.it.back.in.the.range,.making.sure.it.is.
properly.seated.and.level
Check.the.flame.pattern.of.each.burner.If.the.
flames.are.“jumpy”.(not.steady),.clean.the.holes.
again.with.a.sewing.needle.or.twist-tie
Clean.these.holes.thoroughly.on.each.
burner
Drip Pans (if so equipped)
Remove.the.grates.and.lift.out.the.drip.pans.
Drip.pans.can.be.cleaned.in.a.dishwasher.or.
by.hand
When.replacing.the.drip.pans,.make.sure.they.
are.in.the.correct.position
Place.them.in.a.covered.container.Add..
1/4.cup.ammonia.and.let.soak.several.hours.or.
overnight.Wash,.rinse.well.and.dry
CAUTION: Do not clean the drip
pans in a self-cleaning oven.
26
Page 27

Burner.cap.is.
properly.seated
Burner.heads.(on.some.models)
The.burner.heads.(on.some.models).
are.removable.Simply.lift.them.off.
the.range.for.cleaning
Tri-ring.head.(on.some.models)
Burner.head
Burner.base
Make.sure.the.ring.in.the.burner.head.
is.positioned.over.the.electrode.and.
that.the.burner.head.is.fully.inserted.
inside.the.burner.base.A.small.gap.
between.the.base.and.head.is.normal
Front-right.head.(on.some.models),.
front-left.head,.back-right.head.and.
back-left.head
Burner.head
Stability.chamber
Burner..
base
Make.sure.the.slot.in.the.burner.head..
is.positioned.over.the.electrode
The.oval.burner.head/cap.assembly.is.
removable.Simply.lift.it.off.the.range.for.
cleaning.Use.a.sewing.needle.or.twist-tie.
to.unclog.the.small.hole.in.the.burner.
heads
Electrode
Burner.cap.is.
NOT.properly.
seated
Electrode
Use.a.sewing.
needle.or.twist-tie.
to.unclog.the.
small.hole.in.the.
burner.head
Hole.in.
burner.
head
Burner Caps, Bases and Heads
Before.removing.the.burner.caps.and.heads.
(on.some.models),.remember.their.size.and.
location.Replace.them.in.the.same.location.
after.cleaning
NOTE: Do not use steel wool or scouring
powders to clean the burner parts.
Burner caps
Lift.off.when.cool.Wash.burner.caps.in.hot,.
soapy.water.and.rinse.with.clean.water.You.
may.scour.with.a.plastic.scouring.pad.to.
remove.burned-on.food.particles
Tri-ring burner (on some models)
The outer cap on the tri-ring burner is not
removable. Only the center round cap may be
removed for cleaning.
To.clean.the.burner.bases,.use.soapy.water.and.a.
plastic.scouring.pad.Wipe.clean.with.a.damp.cloth
Make.sure.that.no.water.gets.into.the.burner.
bases.Allow.them.to.dry.fully.before.using
Burner Heads (on some models) and Oval
(Center) Burner Head/Cap Assembly
The burner heads and the oval burner head/cap
assembly are removable. Simply lift them off the
range for cleaning.
For.proper.ignition,.make.sure.the.small.hole.in.
the.section.that.fits.over.the.electrode.is.kept.
open.A.sewing.needle.or.wire.twist-tie.works.
well.to.unclog.it
The slits in the burner heads must be kept clean
at all times for an even, unhampered flame.
Clogged.or.dirty.burner.ports.or.electrodes.will.
not.allow.the.burner.to.operate.properly
Any.spill.on.or.around.an.electrode.must.
be.carefully.cleaned.Take.care.to.not.hit.an.
electrode.with.anything.hard.or.it.could.be.
damaged
Clean.the.burner.heads.routinely,.especially.
after.bad.spillovers,.which.could.clog.the.
openings.Lift.off.when.cool
To.remove.burned-on.food,.soak.the.burner.
heads.in.a.solution.of.mild.liquid.detergent.
and.hot.water.for.20–30.minutes.For.more.
stubborn.stains,.use.a.toothbrush
After cleaning
Before.putting.the.burner.caps,.heads.(on.some.
models).and.oval.head/cap.assembly.back,.
shake.out.excess.water.and.then.dry.them.
thoroughly.by.setting.in.a.warm.oven.for.30.
minutes
GEAppliances.com
Replacement Burner Heads.(on some models)
Replace.burner.heads.over.the.electrodes.on.
the.cooktop,.in.the.correct.locations.according.
to.their.size.There.is.one.small,.one.medium,.
one.large.and.one.extra-large.burner.head
.
(on.some.models)
Front.of.range
(on.some.models)
Tri-ring.head
Make.sure.the.slot.or.hole.(depending.on.model).in.
the.burner.head.is.positioned.over.the.electrode
Hole
Electrode
or
Slot
Electrode
Oval (Center) Burner Head/Cap Assembly
Replace.the.oval.(center).head/cap.assembly.over.
the.electrode.on.the.cooktop
Oval.head.and.cap.
assembly
Front.of.range
Make.sure.the.slot.in.the.
burner.head.is.positioned.
over.the.electrode
Slot
Electrode
Caps
Replace.the.matching.size.caps.onto.the.burner.
bases.or.heads
Make.sure.that.the.heads.(on.some.models).and.
caps.are.replaced.in.the.correct.locations
(on.some.models)
Front.of.range
Tri-ring.cap
(on.some.models)
27
Page 28

Care and cleaning of the range..
Burner Grates
Your.range.has.two.or.three.professional-style.
double.grates.These.grates.are.positionspecific.For.maximum.stability,.these.grates.
should.only.be.used.in.their.proper.position;.
they.cannot.be.interchanged.left.to.right.or.
front.to.back.For.convenience,.the.undersides.
Appearance.may.vary
The.grates.may.be.cleaned.in.a.
dishwasher
Left.Front
Center
Right.Front
of.the.left.and.right.grates.are.marked.“LEFT.
FRONT”.and.“RIGHT.FRONT”.Make.sure.the.
front.portion.of.both.grates.is.in.front.The.
middle.grate.has.a.bow.in.front.Make.sure.the.
bowed.portion.is.toward.the.front.of.the.range.
In.addition,.the.middle.grate.is.supported.by.the.
left.and.right.grates.and.must.be.installed.LAST.
for.stability
Cleaning
Lift.out.when.cool.Grates.should.be.washed.
regularly.and,.of.course,.after.spillovers.Wash.
them.in.hot,.soapy.water.and.rinse.with.clean.
water.When.replacing.the.grates,.be.sure.
they.are.positioned.securely.over.the.burners.
Replace.the.grates.so.that.continuous.arcs.are.
formed.with.the.center.ribs.of.all.three.grates
Do.not.operate.a.burner.for.an.extended.period.
of.time.without.cookware.on.the.grate.The.
finish.on.the.grate.may.chip.without.cookware.
to.absorb.the.heat
To.get.rid.of.burned-on.food,.place.the.grates.in.
a.covered.container.Add.1/4.cup.ammonia.and.
let.them.soak.several.hours.or.overnight.Wash,.
rinse.well.and.dry.
Although.they.are.durable,.the.grates.will.
gradually.lose.their.shine,.regardless.of.the.
best.care.you.can.give.them.This.is.due.to.their.
continual.exposure.to.high.temperatures.You.
will.notice.this.sooner.with.lighter.color.grates
NOTE: Do not clean the grates in a self-cleaning
oven.
Gas/Control
Cooktop Surface
To.avoid.damaging.the.porcelain-enamel.
surface.of.the.cooktop.and.to.prevent.it..
from.becoming.dull,.clean.up.spills.right.away.
Foods.with.a.lot.of.acid.(tomatoes,.sauerkraut,.
fruit.juices,.etc).or.foods.with..
high.sugar.content.could.cause.a.dull.spot..
if.allowed.to.set
Oven Air Vents
Never.block.the.vents.(air.openings).of.the.
range.They.provide.the.air.inlet.and.outlet.that.
are.necessary.for.the.range.to.operate.properly.
with.correct.combustion
Air.openings.are.located.at.the.rear.of.the.
cooktop,.at.the.top.and.bottom.of.the.oven.
door,.and.at.the.bottom.of.the.range
Upper Control Panel
On models so equipped, lock out the touch pads
before cleaning.
Clean.up.splatters.with.a.damp.cloth
When.the.surface.has.cooled,.wash.and.rinse.
For.other.spills.such.as.fat.spatterings,.wash.
with.soap.and.water.once.the.surface.has.
cooled.Then.rinse.and.polish.with.a.dry.cloth
NOTE: For stainless steel cooktops, refer
to the Stainless steel surfaces section.
Vent.appearance.and.location.vary
Do.not.use.abrasives.of.any.kind
Unlock the touch pads after cleaning.
You.may.also.use.a.glass.cleaner
Remove.heavier.soil.with.warm.soapy.water.
28
Page 29

Lower Control Panel (Front Manifold Panel) and Knobs
GEAppliances.com
Surface.burner.knob
Red.line
Lower.oven.knob.(on.some models)
Some.models.have.dual.support.
rods.that.will.hold.the.cooktop.up.
while.you.clean.underneath.it
It’s.a.good.idea.to.wipe.the.control.panel.after.
each.use.of.the.oven.Use.a.damp.cloth.to.
clean.or.rinse.For.cleaning,.use.mild.soap.and.
water.or.a.50/50.solution.of.vinegar.and.water.
For.rinsing,.use.clean.water.Polish.dry.with.a.
soft.cloth
Do.not.use.abrasive.cleansers,.strong.liquid.
cleaners,.plastic.scouring.pads.or.oven.cleaners.
on.the.control.panel—they.will.damage.the.
finish
Do.not.try.to.bend.knobs.by.pulling.them.up.
or.down.or.by.hanging.a.towel.or.other.such.
loads.This.can.damage.the.gas.valve.shaft
The.knobs.can.be.cleaned.in.a.dishwasher.or.
they.may.also.be.washed.with.soap.and.water.
Make.sure.the.insides.of.the.knobs.are.dry.
before.replacing
Replace.the.knobs.in.the.OFF.position.to.ensure.
proper.placement
Metal.parts.can.be.cleaned.with.soap.and.
water.Do.not.use.steel.wool,.abrasives,.
ammonia,.acids.or.commercial.oven.cleaners.
Dry.with.a.soft.cloth
NOTE: Knobs are not interchangeable. Be sure to
reinstall the knobs to the original location.
The.control.knobs.may.be.removed.for.easier.
cleaning
Make.sure.the.knobs.are.in.the.OFF.positions.
and.pull.them.straight.off.the.stems.for.
cleaning
Lift-Up Cooktop (on models with standard twin burners)
Clean.the.area.under.the.cooktop.often.
Built-up.soil,.especially.grease,.may.catch.on.
fire.
To.make.cleaning.easier,.the.cooktop.may.be.
lifted.up
NOTE: Do not lift the cooktop on sealed burner
models. Lifting the cooktop can lead to damage
and improper operation of the range.
Clean.under.the.cooktop.with.hot,.soapy.water.
and.a.clean.cloth.If.you.removed.your.surface.
burners.while.cleaning,.make.sure.they.are.
properly.seated.when.replacing.them
After.cleaning,.lower.the.cooktop.(be.careful.
not.to.pinch.your.fingers).
To raise the cooktop:
..Be.sure.the.burners.are.turned.off
...Remove.the.grates
...Grasp.the.two.front.burner.wells.and.lift.
up
29
Page 30

Care and cleaning of the range..
Oven Bottom
The.oven.bottom.has.a.porcelain-enamel.
finish.To.make.cleaning.easier,.protect.the.
oven.bottom.from.excessive.spillovers.by.
placing.a.cookie.sheet.on.the.rack.below.the.
rack.you.are.cooking.on.This.is.particularly.
important.when.baking.a.fruit.pie.or.other.
foods.with.a.high.acid.content.Hot.fruit.
fillings.or.other.foods.that.are.highly.acidic.
(such.as.tomatoes,.sauerkraut.and.sauces.
with.vinegar.or.lemon.juice).may.cause.pitting.
and.damage.to.the.porcelain-enamel.surface.
and.should.be.wiped.up.immediately.
To.clean.up.spillovers,.use.soap.and.water,.an.
abrasive.cleaner.or.soap-filled.scouring.pad.
Rinse.well.to.remove.any.soap.before.selfcleaning
Slot
Hinge..
lock
Pull.hinge.locks.down.to.unlock
Removal.position
Bottom.
edge.of.
slot
Hinge.arm
Indentation
Lift-Off Oven Door (on some models)
The door is very heavy. Be careful when
removing and lifting the door.
Do.not.lift.the.door.by.the.handle.
To remove the door:
..Fully.open.the.door
...Pull.the.hinge.locks.down.toward.the.door.
frame,.to.the.unlocked.position.A.tool,.
such.as.a.small.flat-blade.screwdriver,.
may.be.required
...Firmly.grasp.both.sides.of.the.door.at.the.
top
...Close.door.to.the.door.removal.position,.
which.is.halfway.between.the.broil.stop.
position.and.fully.closed
...Lift.door.up.and.out.until.the.hinge.arm.
is.clear.of.the.slot
To replace the door:.
...Firmly.grasp.both.sides.of.the.door.at.the.
top
...With.the.door.at.the.same.angle.
as.the.removal.position,.seat.the.
indentation.of.the.hinge.arm.into.the.
bottom.edge.of.the.hinge.slot.The.notch.
in.the.hinge.arm.must.be.fully.seated.into.
the.bottom.of.the.slot
...Fully.open.the.door.If.the.door.will.not.
fully.open,.the.indentation.is.not.seated.
correctly.in.the.bottom.edge.of.the.slot
...Push.the.hinge.locks.up.against.the.front.
frame.of.the.oven.cavity.to.the.locked.
position
...Close.the.oven.door
Hinge.
lock
Hinge.
arm
Lift-Off Oven Door (on some models)
The oven door is removable, but it is heavy.
You may need help removing and replacing
the door.
To remove the door:
...Open.it.a.few.inches.to.the.special.stop.
position.that.will.hold.the.door.open.
...Grasp.firmly.on.each.side.and.lift.the.
door.straight.up.and.off.the.hinges
NOTE: Be.careful.not.to.place.hands.between.the.hinge.and.the.oven.door.frame.
since.the.hinge.could.snap.back.and.pinch.
Lift.the.door.straight.up.and.
off.the.hinges
30
Push.hinge.locks.up.to.lock
fingers
To replace the door:
...Make.sure.the.hinges.are.in.the.special.
stop.position.Position.the.slots.in.the.
bottom.of.the.door.squarely.over.the.
hinges.
...Lower.the.door.slowly.and.evenly.over.
both.hinges.at.the.same.time.If.the.
hinges.snap.back.against.the.oven.
frame,.pull.them.back.out
Page 31

. GEAppliances.com
Oven Racks
The.gasket.is.designed.with.a.gap.
at.the.bottom.to.allow.for.proper.
air.circulation
Do.not.rub.or.clean.the.door.
gasket—it.has.an.extremely.low.
resistance.to.abrasion.
If.you.notice.the.gasket.becoming.
worn,.frayed.or.damaged.in.any.
way.or.if.it.has.become.displaced.
on.the.door,.you.should.have.it.
replaced
All.oven.racks.may.be.cleaned.by.hand.with.an.
abrasive.cleaner.or.steel.wool.After.cleaning,.
rinse.the.racks.with.clean.water.and.dry.with.a.
clean.cloth.Gray.porcelain-coated.oven.racks.
may.remain.in.the.oven.during.the.self-cleaning.
cycle.without.being.damaged.The.nickel-plated.
oven.racks.may.remain.in.the.oven.during.the..
self-cleaning.cycle,.but.they.will.lose.their.luster.
Cleaning the Door
To clean the inside of the door:
■..Do.not.allow.excess.water.to run.into.any.
holes.or.slots.in.the.door.
■..Wipe.dishwashing.detergent.over.any.
baked-on.spatters.on.the.glass.Use.a.single.
sided.safety.razor.blade.to.clean.it.off.Then.
wipe.over.the.glass.with.a.soapy.cloth.to.
remove.any.residue.and.dry.off
■..The.area.outside.the.gasket.can.be.cleaned.
with.a.soap-filled.plastic.scouring.pad
and.become.hard.to.slide.It.will.be.necessary.
to.grease.all.oven.rack.side.edges.with.a.light.
coating.of.vegetable.oil.after.cleaning.them.by.
hand.or.in.the.oven.This.will.help.maintain.the.
ease.of.sliding.the.racks.in.and.out.of.the.oven
To clean the outside of the door:
■..Use.soap.and.water.to.thoroughly.clean.the.
top,.sides.and.front.of.the.oven.door.Rinse.
well.You.may.also.use.a.glass.cleaner.to.
clean.the.glass.on.the.outside..
of.the.door
■..Spillage.of.marinades,.fruit.juices,.tomato.
sauces.and.basting.materials.containing.
acids.may.cause.discoloration.and.should.be.
wiped.up.immediately.When.the.surface.is.
cool,.clean.and.rinse
■..Do.not.use.oven.cleaners,.cleansing.powders.
or.harsh.abrasives.on.the..
outside.of.the.door
Stainless Steel Surfaces
(on some models)
Do not use a steel wool pad; it will scratch the
surface.
IMPORTANT: APPLY A PROTECTIVE COAT
OF CERAMA BRYTE
®
PART # WB02T10111
STAINLESS STEEL BRIGHTENER BEFORE
USING..
This.will.help.you.to.maintain.the.brightness.
and.appearance.of.your.stainless.steel.range
■..In.order.to.avoid.any.discolorations.and/or.
grease.stains,.we.recommend.cleaning.and.
removing.any.spills,.spots.and.grease.from.
the.range.after.use
■..It.is.important.to.use.a.soft.cloth.or.paper.
towel.every.time.the.range.is.cleaned.to.
avoid.any.scratches
Read.carefully.the.instructions.on.the.back.of.
the.Brightener.for.better.results
Cleaning Instructions:
1...Remove.grates
2...Wash.using.warm,.soapy.water:
..Wet.soft.cloth.or.paper.towel.(avoid.using.
excessive.water)
..Wipe.the.surface.in.the.direction.of.the.grain.
(following.the.steel.lines)
..Rinse.and.wring.out.a.soft.cloth.or.paper.
towel.and.dry.the.range
3....Apply.a.degreaser.that.does.not.contain.
sodium.hydroxide.or.stainless.steel.cleaner.
(follow.instructions)
4...Apply.Cerama.Bryte®.Stainless.Steel.
Brightener.(follow.instructions)
5....Repeat.steps.2–4.as.many.times.as.needed
6....Put.grates.back.in.place
Follow.these.instructions.for.any.stainless.steel.
surface.on.your.range
DO NOT USE for cooktop or stainless steel
parts cleaning:
•..Caustic.lye.(sodium.hydroxide).or.cleaners.
containing.this.chemical
•..Hard.or.steel.wool.pads
•..Abrasive.materials.or.chemicals
To.inquire.about.purchasing.stainless.steel.
appliance.cleaner.or.polish,.or.to.find.the.
location.of.a.dealer.nearest.you,.please.call.our.
toll-free.number:
National Parts Center 800.626.2002 (U.S.)
800.661.1616 (Canada)
GEAppliances.com (U.S.)
www.GEAppliances.ca (Canada)
31
Page 32

Care and cleaning of the range..
WARNING
Shock or Burn Hazard: Before replacing oven light bulb, disconnect the electrical power to the
range at the main fuse or circuit breaker panel. Failure to do so may result in electric shock or burn.
Oven Light Replacement (on some models)
Be.sure.to.let.the light.cover.and.bulb.cool.
completely
To remove the cover:
...Twist.lens.counterclockwise.about.a.
quarter.turn.to.remove.
Do not remove any screws to remove the cover.
...Replace.bulb.with.a.40-watt.appliance.
bulb.or.two-prong.halogen.bulb,.as.
appropriate
To replace the cover:
...Line.up.tabs.of.lens.in.front.of.tabs.on.
housing.and.rotate.clockwise.to.engage
Oven Light Replacement (on some models)
...Do not remove any screws to remove
the cover.
...Do.not.touch.hot.bulb.with.a.wet.cloth.
Replace.bulb.with.a.40-watt.household.
appliance.bulb
To replace cover:
...Place.it.into.the.groove.of.the.light.
receptacle.Pull.the.wire.forward.to.the.
center.of.the.cover.until.it.snaps.into.
place.When.in.place,.the.wire.holds.the.
cover.firmly.Be.certain.the.wire.is.in.the.
depression.in.the.center.of.the.cover
...Connect.electrical.power.to.the.range
Wide.cover.holder
. CAUTION
your oven light bulb, disconnect the electrical
power to the range at the main fuse or circuit
breaker panel. Be sure to let the light cover
and bulb cool completely.
The.oven.light.bulb.is.covered.with.a.removable.glass.cover.that.is.held.in.place.with.a.
bail-shaped.wire.Remove.the.oven.door,.if.
desired,.to.reach.cover.easily
To remove:
...Hold.a.hand.under.the.cover.so.it.
doesn’t.fall.when.released.With.fingers.
of.the.same.hand,.firmly.push.back.the.
wire.cover.holder.Lift.off.the.cover.
Before replacing
The.storage.drawer.may.be.
removed.for.cleaning.under.the.
range.
32
Removable Kick Panel (on some models)
The.kick.panel.may.be.removed.for.cleaning.
under.the.range
To remove:
Lift.up.the.bottom.of.the.panel.slightly.to.
disengage.the.panel.from.the.tabs.at.the.base.
of.the.range.Pull.the.bottom.of.the.panel.
forward.until.the.spring.clips.are.released.at.
the.top.of.the.panel
To replace:
Insert.the.two.slots.at.the.bottom.of.the.panel.
onto.the.two.tabs.at.the.base.of.the.range,.and.
push.the.top.of.the.panel.forward.to.engage.
the.spring.clips
Removable Storage Drawer (on some models)
The storage drawer is a good place to store
cookware and bakeware. Do not store plastics
and flammable material in the drawer.
The.storage.drawer.may.be.removed.for.
cleaning.under.the.range.Clean.the.storage.
drawer.with.a.damp.cloth.or.sponge.Never.use.
harsh.abrasives.or.scouring.pads
To remove storage drawer:
To replace storage drawer:
..Pull.drawer.straight.out.until.it.stops
...Tilt.the.front.of.the.drawer.up.and.free.of.
the.range.
...Set.the.stops.on.the.back.of.the.drawer.
over.the.stops.in.the.range
..Slide.drawer.evenly.and.straight.back,.so.
that.the.rails.in.the.range.are.engaged
Page 33

Using Steam Clean. (on some models). GEAppliances.com
CAUTION
During the steam clean cycle,
the oven bottom becomes hot enough to cause burns.
Wait until the cycle is over (30 minutes) before wiping
the inside surfaces of the oven. Failure to do so may
result in burns.
The.Steam.Clean.cycle.makes.it.easier.to.clean.light.soiling.
from.the.porcelain.oven.interior.and.door.glass
To Begin Steam Clean Cycle:
..Remove.racks.and.accessories.from.the.
oven.cavity.Do.not.place.cookware.or.
other.items.in.the.oven.during.the.Steam.
Clean.cycle.
Recessed.
Area
Burner.
Slots
Pour.1.cup.of.water.onto.the.oven.
floor
..Pour.1.cup.(8.oz).room-temperature.
water.onto.the.recessed.area.of.the.oven.
bottom.Do.not.add.cleaning.solutions.or.
chemicals.of.any.kind.to.the.water.Do.not.
pour.water.down.the.burner.slots.on.oven.
bottom
..Close.the.door
..Press.the.Steam Clean.pad;.then.press.
Start/On
..A.30-minute.cycle.will.begin.to.count.
down.on.the.display.
..When.the.Steam.Clean.cycle.is.complete,.
the.oven.control.will.beep.and.the.Steam
Clean.light.will.blink.Press.the.Clear/Off.
pad.and.open the door.
..The.oven.bottom.and.remaining.water.
will.still.be.very.warm.at.the.end.of.the.
cycle.This.is.normal
..Remove.soils.using.a.scrub.brush.or.nylon.
scouring.pad.A.soap-filled.steel.wool.pad.
may.be.used.only.on.the.porcelain.oven.
interior.The use of abrasive pads will
scratch the door glass..Do.not.wipe.soil.
or.water.onto.the.door.gasket
..Remove any remaining water with a dry
cloth or sponge.
..Leave.the.door.open.to.air.dry
The range should be at room temperature before beginning the Steam Clean cycle..If.the.oven.is.too.hot,.“Hot”.will.
appear.on.the.display.and.the.cycle.will.not.activate.until.the.
oven.cools.down.
The.Steam.Clean.cycle.performs.best.on.new.spills.or.soils.
Burned-on.food.is.more.difficult.to.remove
IMPORTANT NOTES:
•. If.a.steam.clean.cycle.is.initiated.without.
water,.press.the.Clear/Off pad.to.end.the.
cycle.Wait.for.the.range.to.cool.to.room.
temperature.before.pouring.water.into.
the.recessed.area.and.initiating.another.
steam.cycle
•. Do.not.open.the.door.during.the.Steam.
Clean.cycle.An.error.beep.will.sound.upon.
opening.the.door
•. Press Clear/Off.pad.at.any.time.to.end.the.
cycle
•. If.mineral.deposits.remain.in.the.oven.bottom.after.cleaning,.use.a.cloth.or.sponge.
soaked.in.vinegar.to.remove.them
•. Some.water.may.drip.from.the.bottom.of.
the.oven.door.If.this.happens,.wipe.it.up.at.
the.end.of.the.cycle
•. The.door.gasket.may.be.wet.when.the.
Steam.Clean.cycle.finishes.This.is.normal.
Do.not.clean.the.gasket
•. If.soil.still.remains.after.cleaning.the.oven,.
see.the.Care and Cleaning of the Range.
section.of.the.Owner’s.Manual.for.additional.options
33
Page 34

Installation
Range
Instructions
If you have questions, call 1.800.GE.CARES or visit our Website at: GEAppliances.com
In the Commonwealth of Massachusetts
..This.product.must.be.installed.by.a.licensed.plumber.or.
•
gas.fitter
..When.using.ball.type.gas.shut-off.valves,.they.shall.be.
•
the.T-handle.type
.
.A.flexible.gas.connector,.when.used,.must.not.exceed.3.feet
•
BEFORE YOU BEGIN
Read these instructions completely and carefully.
Installation of this range must conform with local
codes, or in the absence of local codes, with the
National Fuel Gas Code, ANSI Z223.1/NFPA.54, latest
edition. In Canada, installation must conform with
the current Natural Gas Installation Code, CAN/
CGA-B149.1 or the current Propane Installation
Code, CAN/CGA-B149.2, and with local codes where
applicable. This range has been design-certified by
CSA International according to ANSI Z21.1, latest
edition and Canadian Gas Association according to
CAN/CGA-1.1 latest edition.
As.with.any.appliance.using.gas.and.generating.heat,.
there.are.certain.safety.precautions.you.should.follow.
You.will.find.these.precautions.in.the.Important Safety
Information.section.in.the.front.of.this.manual.Read.
them.carefully
•
. IMPORTANT –.Save.these.instructions.for.
local.electrical.inspector’s.use
•
. IMPORTANT –.Observe.all.governing.
codes.and.ordinances
•. Note to Installer –.Leave.these.instructions.with.
the.appliance.after.installation.is.completed
•. Note to Consumer –.Keep.this.Owner’s.Manual.
and.Installation.Instructions.for.future.reference
•. Note –.This.appliance.must.be.properly.grounded
•. Servicer –.The.electrical.diagram.is.in.an.envelope.
attached.to.the.back.of.the.range.
•. Proper.installation.is.the.responsibility.of.the.installer.
•. Product.failure.due.to.improper.installation.is.not.
covered.under.the.Warranty
Mobile Home - Additional Installation Requirements
The.installation.of.this.range.must.conform.to.the.
Manufactured.Home.Construction.and.Safety.Standard,.
Title.24.CFR,.Part.3280.(formerly.the.Federal.Standard.
for.Mobile.Home.Construction,.use.the.Standard.for.
Manufactured.Home.Installations,.ANSI.A225,.1/NFPA.
501A.or.with.local.codes
Mobile home installations require:
•
..When.this.range.is.installed.in.a.mobile.home,.it.must.
be.secured.to.the.floor.during.transit.Any.method.of.
securing.the.range.is.adequate.as.long.as.it.conforms.to.
the.standards.listed.above
FOR YOUR SAFETY
Do not store or use combustible materials, gasoline
or other flammable vapors and liquids in the vicinity
of this or any other appliance.
If you smell gas:
Open.windows
Don’t.touch.electrical.switches
Extinguish.any.open.flame
Immediately.call.your.gas.supplier
TOOLS YOU WILL NEED
Phillips.screwdriver
Flat-blade.screwdriver
Pencil.and.ruler
Pipe.wrenches.(2)
(one.for.backup)
Open-end.or..
adjustable.wrench
Level
Drill,.awl.or.nail
MATERIALS YOU MAY NEED
•..Gas.line.shut-off.valve
•..Pipe.joint.sealant.or.UL-approved.pipe.thread.tape.with.
Teflon*.that.resists.action.of.natural.and.LP.gases
•..Flexible.metal.appliance.connector.(1/2”.ID).
A.5-foot.length.is.recommended.for.ease.of.installation.
but.other.lengths.are.acceptable.Never.use.an.old.
connector.when.installing.a.new.range
•..Flare.union.adapter.for.connection.to.gas.supply.line.
(3/4”.or.1/2”.NPT.x.1/2”.ID)
•..Flare.union.adapter.for.connection.to.pressure.regulator.
on.range.(1/2”.NPT.x.1/2”.ID)
•..Liquid.leak.detector.or.soapy.water
•..Lag.bolt.or.1/2”.OD.sleeve.anchor.(for.concrete.
floors.only)
*Teflon:.Registered.trademark.of.DuPont
.34
Page 35

Installation Instructions
WARNING
INSTALLATION SAFETY
INSTRUCTIONS
Read these instructions completely and carefully.
Failure to follow these instructions can result in
electrical shock, fire, serious injury, or death.
..Improper.installation,.adjustment,.alteration,.service.
or.maintenance.can.cause.injury.or.property.
damage.Refer.to.this.manual.For.assistance.or.
additional.information,.consult.a.qualified.installer,.
service.agency,.manufacturer.(dealer).or.the.gas.
supplier
..Never.reuse.old.flexible.connectors.The.use.of.old.
flexible.connectors.can.cause.gas.leaks.and.personal.
injury.Always.use.NEW.flexible.connectors.when.
installing.a.gas.appliance
..Leak.testing.of.the.appliance.shall.be.conducted.
according.to.the.manufacturer.instructions
..Remove.all.packing.material.and.literature.from.oven.
before.connecting.gas.and.electrical.supply.to.range
..Do.not.attempt.to.operate.the.oven.of.this.range.
during.a.power.failure.(Electric.Ignition.models.only)
..Have.your.range.installed.by.a.qualified.installer
..Your.range.must.be.electrically.grounded.in.
accordance.with.local.codes.or,.in.the.absence.of.
local.codes,.in.accordance.with.the.National.Electrical.
Code.(ANSI/NFPA.70,.latest.edition).In.Canada,.
electrical.grounding.must.be.in.accordance.with.the.
current.CSA.C221.Canadian.Electrical.Code.Part.1.
and/or.local.codes.See.Electrical Connections.in.this.
section
..Before.installing.your.range.on.linoleum.or.any.other.
synthetic.floor.covering,.make.sure.the.floor.covering.
can.withstand.180°F.without.shrinking,.warping.or.
discoloring.Do.not.install.the.range.over.carpeting.
unless.a.sheet.of.1/4”.thick.plywood.or.similar.
insulator.is.placed.between.the.range.and.carpeting
..Make.sure.the.wall.coverings.around.the.range.can.
withstand.heat.generated.by.the.range.up.to.200°F
..Avoid.placing.cabinets.above.the.range.To.reduce.
the.hazard.caused.by.reaching.over.the.open.flames.
of.operating.burners,.install.a.ventilation.hood.over.
the.range.that.projects.forward.at.least.5”.beyond.
the.front.of.the.cabinets
..The.ventilating.hood.must.be.constructed.
of.sheet.metal.not.less.than.00122”.thick.
Install.above.the.cooktop.with.a.clearance.of.not.
less.than.1/4”.between.the.hood.and.the.underside.
of.the.combustible.material.or.metal.cabinet.The.
hood.must.be.at.least.as.wide.as.the.appliance.and.
centered.over.the.appliance.Clearance.between.the.
cooking.surface.and.the.ventilation.hood.surface.
MUST NEVER BE LESS THAN 24”
EXCEPTION: Installation.of.a.listed.microwave.oven.or.
cooking.appliance.over.the.cooktop.shall.conform.to.
the.installation.instructions.packed.with.that.appliance
..If.cabinets.are.placed.above.the.range,.
allow.a.minimum.clearance.of.30”.between.the.
cooking.surface.and.the.bottom.of.unprotected.
cabinets
..If.a.30”.clearance.between.cooking.surface.and.
overhead.combustible.material.or.metal.cabinets.
cannot.be.maintained,.protect.the.underside.of.the.
cabinets.above.the.cooktop.with.not.less.than.1/4”.
insulating.millboard.covered.with.sheet.metal.not.less.
than.00122”.thick.Clearance.between.the.cooking.
surface.and.protected.cabinets.MUST NEVER BE LESS
THAN 24”.
..The.vertical.distance.from.the.plane.of.the.cooking.
surface.to.the.bottom.of.adjacent.overhead.cabinets.
extending.closer.than.1”.to.the.plane.of.the.range.
sides.must.not.be.less.than.18”.(See.the.Dimensions.
and.Clearances. illustration.in.this.section)
CAUTION - Only the GE Café branded series
of Advantium® or microwave over-the-range ovens are
designed to be installed above the GE Café range..Surfaces.
above a gas range can become hot.Installation of any other
over-the-range.oven.above.a.GE.Café.range.may.result.in.
surface temperatures that can cause burns
.35
Page 36

Installation Instructions
DIMENSIONS AND CLEARANCES
Provide adequate clearances between the range and adjacent combustible surfaces. These dimensions must be
met for safe use of your range. The location of the electrical outlet and pipe opening (see Gas Pipe and Electric
Outlet Locations) may be adjusted to meet specific requirements.
The range may be placed with 0” clearance (flush) at the back wall.
18”
Minimum.to.
cabinets.on.
either.side..
of.the.range
Minimum.
clearance..
to.left.wall*
To.cabinets.
below.
cooktop.and.
at.the.range.
back
6”
30”
30”
Minimum
0”
30.3/4”
6”
Minimum.
clearance.to.
right.wall
36”
Maximum.
depth.for.
cabinets.above.
countertops
13”
Front.edge.of.
the.range.side.
panel.forward.
from.cabinet
1/4”
Depth.with.door.closed.(includes.door.handle)
297/8”
0”
To.cabinets.below.
cooktop.and.at.
the.range.back
Height
48”
Depth.with.door.open:
45.7/8”
30”
361/4”.±1/4”
36
Page 37

Installation Instructions
DIMENSIONS AND CLEARANCES (Models CCGS985
30”
*411⁄2”
*Height.to.backguard.based.on.
Café.style.backguard.kit.installed
Depth.with.door.open:
461⁄4”
only)
Depth with door closed
(includes door handle)
29.1⁄8”
361/4”.±1/4”
.37
Page 38

Installation Instructions
LOCATION
Do not locate the range where it may be subject to
strong drafts. Any openings in the floor or wall behind
the range should be sealed. Make sure the openings
around the base of the range that supply fresh air
for combustion and ventilation are not obstructed
by carpeting or woodwork.
Your.range,.like.many.other.household.items,.is..
heavy.and.can.settle.into.soft.floor.coverings.such.as.
cushioned.vinyl.or.carpeting.Use.care.when.moving..
the.range.on.this.type.of.flooring.It.is.recommended.
that.the.following.simple.and.inexpensive.instructions.
be.followed.to.protect.your.floor
The.range.should.be.installed.on.a.sheet.of.plywood..
(or.similar.material).When.the.floor.covering.ends.at.
the.front.of.the.range,.the.area.that.the.range.will.rest.
on.should.be.built.up.with.plywood.to.the.same.level.or.
higher.than.the.floor.covering.
This.will.allow.the.range.to.be.moved.for.cleaning..
or.servicing.Also,.make.sure.your.floor.covering.will.
withstand.180°F.(See.the.Installation.Safety.Instructions.
section)
Make.sure.the.wall.coverings.around.your.range.can.
withstand.the.heat.generated.(up.to.200°F).by.the.
range.(See.the..Installation Safety Instructions.section)
IMPORTANT!
1
PROVIDE ADEQUATE GAS SUPPLY
Your range is designed to operate at a pressure of 5”
of water.column.on.natural.gas.or,.if.designed.for.LP.gas.
(propane.or.butane),.10”.of.water.column
Make.sure.you.are.supplying.your.range.with.the.type..
of.gas.for.which.it.is.designed.
This.range.is.convertible.for.use.on.natural.or..
propane.gas.If.you.decide.to.use.this.range.on.LP.gas,.
conversion.must.be.made.by.a.qualified.LP.installer.
before.attempting.to.operate.the.range.on.that.gas
For.proper.operation,.the.pressure.of.natural.gas.supplied.
to.the.regulator.must.be.between.5”.and.13”.of.water.
column.
For.LP.gas,.the.pressure.supplied.must.be.between.10”.
and.13”.of.water.column.
When.checking.for.proper.operation.of.the.regulator,..
the.inlet.pressure.must.be.at.least.1".greater.than.the.
operating.(manifold).pressure.as.given.above.
The.pressure.regulator.located.at.the.inlet.of.the.range.
manifold.must.remain.in.the.supply.line.regardless.of.
whether.natural.or.LP.gas.is.being.used.
A.flexible.metal.appliance.connector.used.to.connect.the.
range.to.the.gas.supply.line.should.have.an.ID.of.1/2”.
and.be.5.feet.in.length.for.ease.of.installation.In.Canada,.
flexible.connectors.must.be.single.wall.metal.connectors.
no.longer.than.6.feet.in.length
Remove.all.tape.and.packaging.Make.sure.the.burners.
are.properly.seated.and.level
Take.the.accessory.pack.out.of.the.oven.and/or.drawer
Check.to.be.sure.that.no.range.parts.have.come.loose.
during.shipping
CONVERTING TO LP GAS
(or converting
back to natural gas from LP)
This range leaves the factory set for use with natural
gas. If you want to convert to LP gas, the conversion
must be performed by a qualified LP gas installer.
The.conversion.instructions.and.LP.orifices.can.be.found.
attached.to.the.range.next.to.the.pressure.regulator
Keep.these.instructions.and.the.orifices.in.case.you.want.
to.convert.back.to.natural.gas
38
Page 39

Installation Instructions
2
.CONNECT THE RANGE TO GAS
Shut off the main gas supply valve before disconnecting
the old range and leave it off until the new hook-up has
been completed. Don’t forget to relight the pilot on other
gas appliances when you turn the gas back on.
Because.hard.piping.restricts.movement.of.the.range,.the.
use.of.a.CSA.International-certified.flexible.metal.appliance.
connector.is.recommended.unless.local.codes.require.a.
hard-piped.connection.
Never.use.an.old.connector.when.installing.a.new.range.
If.the.hard.piping.method.is.used,.you.must.carefully.align.
the.pipe;.the.range.cannot.be.moved.after.the.connection.
is.made
To.prevent.gas.leaks,.put.pipe.joint.compound.on,.or.wrap.
pipe.thread.tape.with.Teflon*.around,.all.male.(external).
pipe.threads
A...Install.a.manual.gas.line.shut-off.valve.in.the.gas.line.in.
an.easily.accessed.location.outside.of.the.range.Make.
sure.everyone.operating.the.range.knows.where.and.
how.to.shut.off.the.gas.supply.to.the.range
B...Install.male.1/2”.flare.union.adapter.to.the.1/2”.NPT.
internal.thread.at.inlet.of.regulator.Use.a.backup.
wrench.on.the.regulator.fitting.to.avoid.damage
..When.installing.the.range.from.the.front,.remove.the.90°.
elbow.for.easier.installation
C..Install.male.1/2”.or.3/4”.flare.union.adapter.to.the.NPT.
internal.thread.of.the.manual.shut-off.valve,.taking.care.
to.back-up.the.shut-off.valve.to.keep.it.from.turning
D..Connect.flexible.metal.appliance.connector.to.the.
adapter.on.the.range.Position.range.to.permit.
connection.at.the.shut-off.valve
E..When.all.connections.have.been.made,.make.sure.all.
range.controls.are.in.the.off.position.and.turn.on.the.
main.gas.supply.valve.Use.a.liquid.leak.detector.at.all.
joints.and.connections.to.check.for.leaks.in.the.system
WARNING Fire hazard: Do not use a
flame to check for gas leaks.
When.using.test.pressures.greater.than.1/2.psig.to.
pressure.test.the.gas.supply.system.of.the.residence,.
disconnect.the.range.and.individual.shut-off.valve.from.the.
gas.supply.piping.When.using.test.pressures.of..
1/2.psig.or.less.to.test.the.gas.supply.system,.simply.
isolate.the.range.from.the.gas.supply.system.by.closing.the.
individual.shut-off.valve
*Teflon:.Registered.trademark.of.DuPont
GAS PIPE AND ELECTRICAL OUTLET LOCATIONS
Recommended.area.for.120V.
outlet.on.rear.wall.and.area.for.
through-the-wall.connection.of.
pipe.stub.and.shut-off.valve
Recommended.area.
for.through-the-floor.
connection.of.pipe.stub.
and.shut-off.valve
CAUTION To prevent
drafts from affecting burner
operation, seal all openings in floor
and wall.
.39
Page 40

Installation Instructions
FLEXIBLE CONNECTOR HOOKUP
Pressure.
regulator
G
as.Flow.into.Range
RIGID PIPE HOOKUP OPTIONS
Gas.Flow.into.Range
45°.Elbow
Nipple
Union
Pressure..
regulator
Installer: Inform
the consumer of
the location of the
gas shut-off valve.
Installer: Inform
the consumer of
the location of the
gas shut-off valve.
90°.Elbow
Black..
iron.pipe
Union
Nipple
Gas..
shut-off..
valve
1/2”.or.3/4”
Gas.pipe
Adapter
1/2”.or.3/4”.
Gas.pipe
90°.Elbow
shut-off..
valve
1/2”.or.3/4”.
Alternate.Hookup
Nipple
Gas..
90°.Elbow
Gas.pipe
Installer: Inform the
consumer of the
location of the gas
shut-off valve.
Flex.
connector.
(6.ft.max)
Adapter
Gas..
shut-off..
valve
Adapter
Adapter
90°.Elbow
Nipple
Quick.connect..
or.union
Nipple
Gas.Flow.into.Range
90°.
Elbow
Pressure..
regulator
40
Page 41

Installation Instructions
ELECTRICAL CONNECTIONS
3
Electrical Requirements
120-volt,.60.Hertz,.properly.grounded.dedicated.circuit.
protected.by.a.15-amp.or.20-amp.circuit.breaker.or.time.
delay.fuse
Note:.Use.of.automatic,.wireless,.or.wired.external.
switches.that.shut.off.power.to.the.appliance.are.not.
recommended.for.this.product
Grounding
WARNING Shock Hazard: This
appliance must be properly grounded. Failure
to do so can result in electric shock.
SEAL THE OPENINGS
4
Seal.any.openings.in.the.wall.behind.the.range.and.in.the.
floor.under.the.range.when.hookups.are.completed
.ASSEMBLE SURFACE BURNERS
5
Burner Heads (on some models)
A
Place.burner.
heads.over.
the.electrodes.
on.the.
cooktop,.in.
the.correct.
locations.
according.to.
their.size.
Make sure the slot in the
burner head is positioned
over the electrode
Front.of.range
(on.some.models)
(on.some.models)
Triple.flame.head
Hole
Ensure.proper.ground.
exists.before.use
The.power.cord.of.this.appliance.is.equipped.with.a.
three-prong.(grounding).plug.which.mates.with.a.standard.
three-prong.grounding.wall.receptacle.to.minimize.the.
possibility.of.electric.shock.hazard.from.this.appliance
The.customer.should.have.the.wall.receptacle.and.circuit.
checked.by.a.qualified.electrician.to.make.sure.the.
receptacle.is.properly.grounded
Where.a.standard.two-prong.wall.receptacle.is.
encountered,.it.is.the.personal.responsibility.and.
obligation.of.the.customer.to.have.it.replaced.with.a.
properly.grounded.three-prong.wall.receptacle
DO NOT, UNDER ANY CIRCUMSTANCES, CUT OR REMOVE
THE THIRD (GROUND) PRONG FROM THE POWER CORD.
DO NOT USE AN ADAPTER. DO NOT USE AN EXTENSION
CORD.
A word about GFCI’s – GFCI’s are not required or
recommended for gas range receptacles.
Ground.Fault.Circuit.Interrupters.(GFCI’s).are.devices.that.
sense.leakage.of.current.in.a.circuit.and.automatically.
switch.off.power.when.a.threshold.leakage.level.is.
detected.These.devices.must.be.manually.reset.by.the.
consumer.The.National.Electrical.Code.requires.the.use.of.
GFCI’s.in.kitchen.receptacles.installed.to.serve.countertop.
surfaces.Performance.of.the.range.will.not.be.affected.
if.operated.on.a.GFCI-protected.circuit.but.occasional.
nuisance.tripping.of.the.GFCI.breaker.is.possible
or
Electrode
B
Oval (Center) Burner Head/Cap Assembly
Slot
Front.right.burner..
(on.some.models)
Electrode
Place.the.oval.(center).head/cap.assembly.over.the.
electrode.on.the.cooktop
Oval.head.and.cap.
assembly
Front.of.range
. Caps
C
Make.sure.the.slot.in.the.
burner.head.is.positioned.
over.the.electrode
Electrode
Place.the.matching.size.caps.onto.the.burner.bases..
or.heads
Make.sure.that.the.heads.(on.some.models).and.caps.
are.replaced.in.the.correct.locations
Front.of.range
(on.some.models)
Tri-ring.cap
(on.some.models)
Slot
41
Page 42

Installation Instructions
ASSEMBLE SURFACE BURNERS.
5
..
. Grates
D
Place.the.left,.right.and.center.grates.on.the.cooktop.
These.grates.are.position.specific.The.undersides.of.
the.left.and.right.grates.are.marked.“LEFT.FRONT”.and.
“RIGHT.FRONT”.On.some.models.the.underside.of.the.
grates.are.marked.“Outside”.Place.the.middle.grate.
with.its.bowed.front.toward.the.front.of.the.range
CAUTION
Do not operate the burner
without all burner parts in place.
Left.Front
6
.
CHECK IGNITION OF SURFACE
Center
Right.Front
BURNERS
Operation.of.all.cooktop.and.oven.burners.should.be.
checked.after.the.range.and.gas.supply.lines.have.been.
carefully.checked.for.leaks
(CONT)
7
CHECK IGNITION OF OVEN BURNER
The.oven.is.designed.to.operate.quietly.and.
automatically.To.operate.the.oven,.press.the.Bake.pad.
and.then.press.the.number.pads.until.350°. appears.in.
the.display.Touch.the.Start. pad.After.30–90.seconds,.
the.oven.burner.will.ignite.and.burn.until.the.set.
temperature.is.reached.The.oven.burner.will.continue.
to.cycle.on.and.off.as.necessary.to.maintain.the.oven.at.
the.temperature.indicated.by.the.display
To.check.ignition.of.the.broil.burner,.touch.the.Broil Hi/
Lo.pad.and.then.the.Start.pad.After.30–90.seconds,.the.
broil.burner.will.ignite
Electric ignition models.require.electrical.power.to.
operate.In.case.of.a.power.outage,.the.oven.burners.on.
these.models.cannot.be.lit.manually.with.a.match.Gas.
will.not.flow.unless.the.glow.bar.is.hot
If.the.oven.is.in.use.when.a.power.outage.occurs,.the.
burner.will.shut.off.and.cannot.be.re-lit.until.power.is.
restored
Electric Ignition Models
Select.a.top.burner.knob.and.simultaneously.push..
in.and.turn.to.LITE.position.You.will.hear.a.clicking.sound.
indicating.proper.operation.of.the.spark.module.Once.the.
air.has.been.purged.from.the.supply.lines,.burners.should.
light.within.4.seconds.After.burner.lights,.rotate.knob.out.
of.the.LITE. position.Try.each.burner.in.succession.until.all.
burners.have.been.checked
Quality of Flames
The.combustion.quality.of.burner.flames.needs.to.be.
determined.visually
(A) Yellow flames—
Call.for.service
(B) Yellow tips
on outer cones—
Normal.for.LP.gas
(C) Soft blue
flames—Normal.
for.natural.gas
If burner flames look like (A), call for service. Normal
burner flames should look like (B) or (C), depending on
the type of gas you use.
With.LP.gas,.some.yellow.tipping.on.outer.cones..
is.normal
42
Page 43

Installation Instructions
8
.ADJUST BROIL AND OVEN BURNER
AIR ADJUSTMENT SHUTTER
IF NECESSARY
Air adjustment shutters for the top and bottom burners
regulate the flow of air to the flames.
Air..
adjustment.shutter
Loosen
The.air.adjustment.shutter.for.the.top.(broil).burner.is.in.
the.center.of.the.rear.wall.of.the.oven
Loosen
Air.adjustment.
shutter
The.shutter.for.the.bottom.(oven).burner.is.near.the.back.
wall.behind.the.warming.drawer.Remove.the.drawer.See.
the.Care and cleaning of the range. section
To adjust the flow of air to either burner, loosen the
Phillips head screw and rotate the shutter toward open
or closed position as needed.
8
.ADJUST BROIL AND OVEN BURNER
AIR ADJUSTMENT SHUTTER IF
NECESSARY
Oven.bottom
To remove the oven bottom:
A..Remove.the.screws.holding.down.rear.of.the.oven.
bottom
B..Grasp.the.oven.bottom.at.finger.slots.on.each.side
C..Lift.the.rear.of.the.oven.bottom.enough.to.clear.the.
lip.of.the.range.frame,.push.it.back,.and.then.pull.it.up.
and.out
9
LEVELING THE RANGE
A...Install.the.oven.shelves.in.the.oven.and.position.the.
range.where.it.will.be.installed.with.front.access.to.
front.leveling.legs.and.rear.access.to.rear.leveling.legs.
All.legs.must.be.leveled.BEFORE.the.product.is.installed
Leg.
leveler
Raise.
range
(CONT)
Lower.
range
Raise.
range
Lower.
range
The.flames.for.the.top.(broil).burner.should.be.steady.with.
approximately.1”.blue.cones.and.should.not.extend.out.
over.the.edges.of.the.burner.baffle
To.determine.if.the.bottom.burner.flames.are.burning.
properly,.remove.the.oven.bottom.Flames.should.have.
approximately.1”.blue.cones.and,.if.range.is.supplied.
with.natural.gas,.should.burn.with.no.yellow.tipping..
(With.most.LP.gas,.small.yellow.tips.at.the.end.of.outer.
cones.are.normal).Flames.should.not.lift.off.burner.ports.
If.lifting.is.observed,.gradually.reduce.air.shutter.opening.
until.flames.are.stabilized
(on.some.models)
B...Check.for.levelness.by.placing.a.spirit.level.or.a.cup,.
partially.filled.with.water,.on.one.of.the.oven.shelves..
If.using.a.spirit.level,.take.two.readings—with.the.level.
placed.diagonally.first.in.one.direction.and.then.the.other
C...Remove.the.drawer.(on.some.models).See.the.Care and
cleaning of the range.section.The.front.leveling.legs.can.
be.adjusted.from.the.bottom.and.the.rear.legs.can.be.
adjusted.from.the.top.(on.some.models).or.the.bottom
D...Use.an.open-end.or.adjustable.wrench.to.adjust.the.
leveling.legs.until.the.range.is.level
(on.some.models)
. WARNING..Never.completely.remove.
the.leveling.leg.as.the.range.will.not.be.secured.to.the.
anti-tip.device.properly
E...After.leveling.the.unit,.slide.it.into.final.position.and.
verify.levelness
F...After.the.range.is.level,.slide.the.range.away.from.the.
wall.so.that.the.Anti-Tip.device.can.be.installed
43
Page 44

Installation Instructions
10
INSTALLING THE ANTI-TIP DEVICE
WHEN ALL HOOKUPS ARE COMPLETED
WARNING
ANTI-TIP DEVICE
• All ranges can tip.
• BURNS or other SERIOUS INJURIES
can result.
• INSTALL and CHECK the
anti-tip bracket following the
instructions supplied with the bracket.
To.reduce.the.risk.of.tipping.the.range,.the.range.must.
be.secured.by.a.properly.installed.anti-tip.bracket.Follow.
the.instructions.packaged.with.the.bracket
To.check.if.the.bracket.is.installed.and.engaged.
properly,.look.underneath.the.range.to.see.that.the.
rear.leveling.leg.is.engaged.in.the.bracket.On.some.
models,.the.storage.drawer.or.kick.panel.can.be.
removed.for.easy.inspection.If.visual.inspection.is.not.
possible,.slide.the.range.forward,.confirm.the.anti-tip.
bracket.is.securely.attached.to.the.floor.or.wall,.and.
slide.the.range.back.so.the.rear.leveling.leg.is.under.
the.anti-tip.bracket
If.the.range.is.pulled.from.the.wall.for.any.reason,.always.
repeat.this.procedure.to.verify.the.range.is.properly.
secured.by.the.anti-tip.bracket
.
Make sure all controls are left in the off position.
Make sure the flow of combustion and ventilation air
to the range is unobstructed.
If.your.range.has.no.anti-tip.bracket,.call.18006268774.
to.receive.one.at.no.cost
44
Page 45

Before you call for service… GEAppliances.com
Troubleshooting Tips
Save time and money! Review the charts on the following
pages first and you may not need to call for service.
Problem Possible Causes What To Do
. Plug on range is not completely. •. Make.sure.electrical.plug.is.plugged.into.a.live,.properly
Top burners do not light
. inserted in the electrical outlet...grounded.outlet
or do not burn evenly.
.
(The front right burner is
. Burner slits on the side of the. •. Remove.the.burners.and.clean.them.Check.the.
designed to have slightly
. burner may be clogged...electrode.area.for.burned-on.food.or.grease.See.
smaller flames between
. . . the.Care and cleaning of the range.section
the 6 and 9 o’clock
. Improper burner assembly.. •. Make.sure.the.burner.parts.are.installed.correctly
positions. This is normal.)
. . . See.the.Care and cleaning of the range section
Burner flames very. Improper air to gas ratio.. •. If.range.is.connected.to.LP.gas,.contact.the.person.
large or yellow.. . who.installed.your.range.or.made.the.conversion
Surface burners light. The oven gas shut-off valve . •. To.check.the.oven.gas.shut-off.valve,.remove.the
but oven does not. may have accidentally been..drawer.(see.the.Care and cleaning of the range.
. moved during cleaning or..section).For.lower.oven.drawer.models,.remove.the.
. moving.. . rear.access.panel.by.unscrewing.the.thumb.screws.
. . . in.the.upper.left.and.right.corners.Look.for.the.gas..
. . . shut-off.lever.at.the.back.of.the.range.
Lever.is..
shown.closed.
PULL.TO.OPEN
Sealed.burner.models
Lower.oven.drawer.models
Thumb.screws
Control signals after. You forgot to enter a bake . •. Touch.the.Bake.pad.and.desired.temperature.
entering cooking time. temperature or cleaning time...or.the.Self Clean.pad.and.desired.clean.time
or start time
Food does not bake or . Oven controls improperly set.. •. See.the.Using the upper oven.section
roast properly in the
upper oven
. Incorrect cookware or cookware . •.See.the.Using the upper oven.section
. of improper size being used.
. Oven thermostat needs . •. See.the.Adjust the upper oven thermostat—Do it
. adjustment.. . yourself!.section
. Clock not set correctly.. •. See.the.Using the clock and timer.section
. Aluminum foil used improperly. •. See.the.Care and cleaning of the range.section
. in the oven.
. Oven bottom not securely. •. See.the Installation of the range. section
. seated in position.
Burners do not light. Plug on range is not . •. Make.sure.electrical.plug.is.plugged.into.a.live,.properly
. completely inserted in the..grounded.outlet
. electrical outlet.
. Gas supply not connected . •. See.the.Installation.Instructions.that.came.with.your.
. or turned on.. . range
. Bridge burner won’t light. •. See How to Light Bridge Burner for Model PCGB980 section.
. Shelf position is incorrect.. •. See.the.Using the upper oven.section
45
Page 46

Before you call for service…
Troubleshooting Tips
Problem Possible Causes What To Do
Burners do not light. A fuse in your home may be. •. Replace.the.fuse.or.reset.the.circuit.breaker
(cont.). blown or the circuit breaker.
. tripped.
. Burner parts not replaced . •. See.the.Care and cleaning of the range.section
. correctly..
Food does not broil. Oven controls improperly set.. •. Make.sure.you.touch.the.Broil Hi/Lo.pad.
properly in the upper oven
. Improper shelf position. •.See.the.Broiling Guide
. being used.
. Food being cooked . •.For.best.results,.use.a.pan.designed.for.broiling.
. in a hot pan.. . Make.sure.it.is.cool
. Cookware not suited . •.For.best.results,.use.a.pan.designed.for.broiling
. for broiling.
. Oven bottom not securely. •. See.the.Installation.of.the.range.section
. seated in position.
. Oven door not closed.. •. See.the.Using the upper oven.section
Upper oven temperature Oven thermostat . •.See.the Adjust the upper oven thermostat—Do it
too hot or too cold. needs adjustment.. . yourself!.section
Clock and timer . Plug on range is not completely.. •.Make.sure.electrical.plug.is.plugged.into.a.live,.properly.
do not work. inserted in the electrical outlet...grounded.outlet
. A fuse in your home may be . •. Replace.the.fuse.or.reset.the.circuit.breaker
. blown or the circuit breaker..
. tripped.
. Oven controls improperly set.. •. See.the.Using the clock and timer.section
Upper oven light does . Light bulb is loose or defective.. •. Tighten.or.replace.the.bulb
not work
. inserted in the electrical outlet...grounded.outlet
Upper oven will not.. The oven temperature is too . •. Allow.the.range.to.cool.to.room.temperature.and.
self-clean. high to set a self-clean operation...reset.the.controls
. Oven controls improperly set.. •. See.the.Using the self-cleaning upper oven.section
. On models with a door latch,. •.Make.sure.you.move.the.door.latch.handle.all.the.way
. the oven door is not in the..to.the.right
. locked position.
“Crackling” or. This is the sound of the . •.This.is.normal.
“popping” sound. metal heating and cooling
. during both the cooking and.
. cleaning functions.
. Plug on range is not completely . •. Make.sure.electrical.plug.is.plugged.into.a.live,.properly.
46
Page 47

GEAppliances.com
Problem Possible Causes What To Do
Excessive smoking. Excessive soil.. •. Touch.the.Clear/Off. pad.Open.the.windows.to
. . . rid.the.room.of.smoke.Wait.until.the.LOCKED DOOR.
. . . light.goes.off.Wipe.up.the.excess.soil.and.reset.the...
. . . clean.cycle
Oven door will not open Oven too hot.. •. Allow.the.oven.to.cool.below.locking.temperature
after a clean cycle.. . Do.not.lock.the.door.with.the.door.latch.except.when
. . . using.the.self-clean.feature
Oven not clean after a Oven controls not properly set.. •. See.the Using the self-cleaning upper oven.section
clean cycle
. . . cycle.Heavily.soiled.ovens.may.need.to.self-clean..
. . . again.or.for.a.longer.period.of.time
“Door” appears in the. Latch handle was moved to the. •. Move.the.latch.handle.to.the.right.only.when.setting
display (on models . right but a program other than..the.self-cleaning.cycle
with a door latch). self-clean was selected.
“LOCK DOOR” flashes. The self-clean cycle has been . •. Close.the.oven.door.and.on.models.with.a.latch,.move
in the display. selected but the door is not ..the.latch.all.the.way.to.the.right
. closed and on models with a latch,
. the latch was not moved all the
. way to the right.
LOCKED DOOR light.. The oven door is locked. •.Touch.the.Clear/Off. pad.Allow.the.oven.to.cool
is on when you want. because the temperature..and.then,.on.models.with.a.door.latch,.unlock.the.door
to cook. inside the oven has not ..
. dropped below the
. locking temperature.
Oven was heavily soiled.. •. Clean.up.heavy.spillovers.before.starting.the.clean.
“F—and a number or. On models with a door latch, . •. The.latch.may.have.been.moved,.even.if.only.slightly,
letter” flash in the display if a function error code appears..from.the.locked.position.Make.sure.the.latch.is.moved
. during the self-cleaning cycle,..to.the.right.as.far.as.it.will.go
. check the oven door latch.
. You have a function error code. . •. Touch.the.Clear/Off.pad.Allow.the.oven.to.cool.for.
. . . one.hour.Put.the.oven.back.into.operation
. If the function code repeats.. •. Disconnect.all.power.to.the.range.for.5.minutes
. . . and.then.reconnect.power.If.the.function.error.
. . . code.repeats,.call.for.service
Oven shelves are . The nickel shelves (if so equipped) . •. Apply.a.small.amount.of.vegetable.oil.to.a.paper.
difficult to slide. were cleaned in a self-clean cycle... towel.and.wipe.the.edges.of.the.oven.shelves.with.
. The gray porcelain-coated shelves.. the.paper.towel.Do.not.spray.with.Pam®.or.other.
. (if so equipped) were improperly..lubricant.sprays
. cleaned.
“Probe” appears in . This is reminding you to enter a. •. Enter.a.probe.temperature
the display (some models). probe temperature after plugging..
. in the probe.
Water remaining on . This is normal. •. Remove.any.remaining.water.with.a.dry.cloth.or.sponge
oven floor after steam
clean cycle
47
Page 48

Before you call for service…
Troubleshooting Tips
Problem Possible Causes What To Do
Display goes blank. A fuse in your home may be . •. Replace.the.fuse.or.reset.the.circuit.breaker
.
.
Display flashes. Power failure. . •. Reset.the.clock
Unable to get the . Oven control pads were . •. The.Bake.and.Broil Hi/Lo.pads.must.be.touched.at
display to show “SF”. not pressed properly.. . the.same.time.and.held.for.3.seconds
Power outage,. Power outage or surge.. •. Reset.the.clock.If.the.oven.was.in.use,.you.must.reset.
clock flashes. . . it.by.touching.the.Clear/Off.pad,.setting.the.clock.
. . . and.resetting.any.cooking.function
“Burning” or “oily”. This is normal in a new oven . •. To.speed.the.process,.set.a.self-clean.cycle.for.a
odor emitting from. and will disappear in time. ..minimum.of.3.hours.See.the.Using the self-cleaning
the vent. . . oven. section
Strong odor. An odor from the insulation . •. This.is.temporary
. around the inside of the oven
. is normal for the first few times
. the oven is used.
blown or the circuit breaker tripped.
The clock is in the black-out mode.
.
. •. See.the.Special.features.of.your.oven.control.section
Fan noise (some models).
. . . parts.It.may.run.for.up.to.1.1/2.hrs.after.the.oven.is.turned
. off.
Drawer does not slide The drawer is out of alignment.. •. Fully.extend.the.drawer.and.push.it.all.the.way.in..
smoothly or drags.. . See.the.Care.and.cleaning.of.the.range.section
. Drawer is over-loaded or load. •. Reduce.weight.Redistribute.drawer.contents
. is unbalanced.
Lower oven drawer or . A fuse in your home may be . •. Replace.the.fuse.or.reset.the.circuit.breaker
warming drawer will . blown or the circuit breaker
not work . tripped.
. The oven is self-cleaning. . •. Wait.for.the.self-clean.cycle.to.finish.and.the.oven.to.cool
. Controls improperly set.. •. See.the.Electric warming drawer.or.Lower oven
drawer.section
Excessive condensation . Liquid in drawer. . •. Remove.liquid
in the drawer
. Temperature setting too high.. •. Reduce.temperature.setting
Food dries out in the . Moisture escaping.. •. Cover.food.with.lid.or.aluminum.foil
lower oven drawer or
warming drawer
. Uncovered foods.. •. Cover.food.with.lid.or.aluminum.foil
.
A cooling fan
. Drawer not fully closed.. •. Push.drawer.in.until.latch.engages
may turn on.. •. This.is.normal.The.cooling.fan.will.turn.on.to.cool.internal.
48
Page 49

Accessories. GEAppliances.com
Looking For Something More? (Not all accessories are available for all models.)
You.can.find.these.accessories.and.many.more.at.GEAppliances.com.(US).
or.www.GEAppliances.ca.(Canada),.or.call.800.626.2002.(US).or.800.661.1616.(Canada).
(during.normal.business.hours).Have.your.model.number.ready
Grates Surface.Burner.Heads.and.Caps
Griddle
Oven.Racks
Surface.Elements.and.Drip.
Pans
Oven.Elements Light.Bulbs
Knobs
or
Experience these other great products to keep your kitchen looking great!
Ceramic.Cooktop.
Cleaning.Kit:.
Includes.cleaner,.
scraper.and.pad
WX10X117GCS
Ceramic.Cooktop.
Cleaning.Wipes
WX10X305
Stainless.Steel.
Appliance.Polish.
Wipes
WX10X10001
Stainless.Steel.
Appliance.
Cleaner
PM10X311
Get the most out of your Broiler Pan! (Not for use with Broiler Drawer models.)
Use.your.pan.and.grid.cover.to.broil.hamburgers,.seafood,.steaks,.vegetables,.bacon,.chops.and.so.much.
more!.The.pan.below.catches.the.excess.fats.and.oils
. •.Genuine.GE.Part
. •.Easy.To.Clean
. •.One-Year.Warranty
Limited Time Offer! Free Shipping!
When.you.order.your.broiler.pan.within 30 days.of.purchasing.your.GE.cooking.product
Small Large* XL**
U.S. Part # WB48X10055 WB48X10056 WB48X10057
Canada Part # 222D2097G001 222D2097G002 N/A
Dimensions 8-3/4” W x 1-1/4” H x 13-1/2” D 12-3/4” W x 1-1/4” H x 16-1/2” D 17” W x 1-1/4” H x 19-1/4” D
* The large (standard) broil pan does not fit in 20”/24” ranges.
** The XL pan does not fit in 24” wall ovens, 27” drop-ins or 20”/24” ranges.
To place your order, call 800.626.2002 (U.S.), 800.661.1616 (Canada) or mail this form to:
In the U.S.: GE Parts, P.O. Box 221027, Memphis, TN 38122-1027. In Canada: GE Parts, 1 Factory Lane, Moncton, N.B. E1C 9M3
._._._._._._._._._._._._._._._._._._._._._._._._._._._._._._._._._._._._._._._._._._._._._._._._._
Quantity ____________________ Part Number __________________________________________________
____________________ ______________________________________________________________
____________________ ______________________________________________________________
Model Number ______________ Serial Number __________________ Brand _______________ Date of Purchase __________
First Name ____________________________________________ Last Name ______________________________________________
Address__________________________________________________________________________________________________________
City __________________________________________________ State ___________ Zip Code _____________________________
Phone ________________________________________________ E-Mail __________________________________________________
Check ______ Money Order ______
Call 800.626.2002 in the U.S. or 800.661.6161 in Canada for current pricing. All credit card orders must be called in.
Broiler Pan Order Form
49
Page 50

GE Gas Range Warranty..(For customers in the United States)
All warranty service provided by our Factory Service Centers,
®
or an authorized Customer Care
technician. To schedule
service, on-line, 24 hours a day, visit us at GEAppliances.com, or
call 800.GE.CARES (800.432.2737). Please have serial number and
model number availa ble when calling for service.
Staple your receipt here.
Proof of the original purchase
date is needed to obtain service
under the warranty.
For The Period Of: GE Will Replace:
One Year. Any part.of.the.range.which.fails.due.to.a.defect.in.materials.or.workmanship.During.this
From the date of the. limited one-year warranty,.GE.will.also.provide, free of charge,.all.labor.and.in-home.service.
original purchase. to.replace.the.defective.part
.What.GE.Will.Not.Cover:
■ Service trips to your home to teach you how to use
the product.
■ Improper installation, delivery or maintenance.
■ Product damage or failure of the product if it is abused,
misused, modified, used for other than the intended
purpose, or used commercially.
■ Replacement of house fuses or resetting of circuit breakers.
■ Damage to the product caused by accident, fire, floods
or acts of God.
■ Incidental or consequential damage caused by possible
defects with this appliance.
■ Damage caused after delivery.
■ Product not accessible to provide required service.
EXCLUSION OF IMPLIED WARRANTIES—Your sole and exclusive remedy is product repair as provided
in this Limited Warranty. Any implied warranties, including the implied warranties of merchantability or
fitness for a particular purpose, are limited to one year or the shortest period allowed by law.
This warranty is extended to the original purchaser and any succeeding owner for products purchased for home
use within the USA. If the product is located in an area where service by a GE Authorized Servicer is
not available, you may be responsible for a trip charge or you may be required to bring the product to an
Authorized GE Service Location for service. In Alaska, the warranty excludes the cost of shipping or service calls to
your home.
Some states do not allow the exclusion or limitation of incidental or consequential damages. This warranty gives
you specific legal rights, and you may also have other rights which vary from state to state. To know what your
legal rights are, consult your local or state consumer affairs office or your state’s Attorney General.
Warrantor: General Electric Company. Louisville, KY 40225
50
Page 51

GE Gas Range Warranty..(For customers in Canada)
All warranty service provided by our Factory Service Centers
®
or an authorized Customer Care
technician. For service,
call 1.800.561.3344. Please have serial number and model
number available when calling for service.
Staple your receipt here.
Proof of the original purchase
date is needed to obtain
service under the warranty.
For The Period Of: Mabe Will Replace:
One Year. Any part.of.the.range.which.fails.due.to.a.defect.in.materials.or.workmanship.During.this
From the date of the. limited one-year warranty,.Mabe.will.also.provide, free of charge,.all.labor.and.in-home.service.
original purchase. to.replace.the.defective.part
.
What Mabe Will Not Cover:
■ Service trips to your home to teach you how to use
the product.
■ Improper installation, delivery or maintenance.
■ Product damage or failure of the product if it is abused,
misused, modified, used for other than the intended
purpose, or used commercially.
■ Replacement of house fuses or resetting of circuit breakers.
■ Damage to the product caused by accident, fire, floods
or acts of God.
■ Incidental or consequential damage caused by possible
defects with this appliance.
■ Damage caused after delivery.
■ Product not accessible to provide required service.
EXCLUSION OF IMPLIED WARRANTIES—Your sole and exclusive remedy is product repair as provided
in this Limited Warranty. Any implied warranties, including the implied warranties of merchantability or
fitness for a particular purpose, are limited to one year or the shortest period allowed by law.
WARRANTOR IS NOT RESPONSIBLE FOR CONSE QUEN TIAL DAMAGES.
Warrantor: MABE CANADA INC.
51
Page 52

Consumer Support.
GE Appliances Website In the U.S.: GEAppliances.com
Have.a.question.or.need.assistance.with.your.appliance?.Try.the.GE.Appliances.Website.24.hours.a.day,..
any.day.of.the.year!.For.greater.convenience.and.faster.service,.you.can.now.download.Owner’s.Manuals,..
order.parts.or.even.schedule.service.on-line.In Canada: www.GEAppliances.ca
Schedule Service In the U.S.: GEAppliances.com
Expert.GE.repair.service.is.only.one.step.away.from.your.door.Get.on-line.and.schedule.your.service.at.your.
convenience.24.hours.any.day.of.the.year!.Or.call.800GECARES.(8004322737).during.normal.business.hours
In Canada, call 1.800.561.3344
Real Life Design Studio In the U.S.: GEAppliances.com
GE.supports.the.Universal.Design.concept—products,.services.and.environments.that.can.be.used.by.people.of.
all.ages,.sizes.and.capabilities.We.recognize.the.need.to.design.for.a.wide.range.of.physical.and.mental.abilities.
and.impairments.For.details.of.GE’s.Universal.Design.applications,.including.kitchen.design.ideas.for.people.with.
disabilities,.check.out.our.Website.today.For.the.hearing.impaired,.please.call.800TDDGEAC.(8008334322)
In Canada,.contact:..Manager,.Consumer.Relations,.Mabe.Canada.Inc.
Suite.310,.1.Factory.Lane.
Moncton,.NB.E1C.9M3
Extended Warranties In the U.S.: GEAppliances.com
Purchase.a.GE.extended.warranty.and.learn.about.special.discounts.that.are.available.while.your.warranty.is.still..
in.effect.You.can.purchase.it.on-line.anytime,.or.call.8006262224.during.normal.business.hours.GE.Consumer.Home.
Services.will.still.be.there.after.your.warranty.expires.In Canada, call 1.888.261.2133
Parts and Accessories In the U.S.: GEAppliances.com
Individuals.qualified.to.service.their.own.appliances.can.have.parts.or.accessories.sent.directly.to.their.homes.(VISA,.
MasterCard.and.Discover.cards.are.accepted).Order.on-line.today,.24.hours.every.day.or.by.phone.at..
8006262002.during.normal.business.hours
Instructions contained in this manual cover procedures to be performed by any user. Other servicing generally
should be referred to qualified service personnel. Caution must be exercised, since improper servicing may cause
unsafe operation.
Customers.in Canada.should.consult.the.yellow.pages.for.the.nearest.Mabe.service.center,.or.call.18882613055
Contact Us In the U.S.: GEAppliances.com
If.you.are.not.satisfied.with.the.service.you.receive.from.GE,.contact.us.on.our.Website.with.all.the.details.including.
your.phone.number,.or.write.to:.. .General.Manager,.Customer.Relations.
GE.Appliances,.Appliance.Park.
Louisville,.KY.40225
In Canada: www.GEAppliances.ca, or.write.to:..Director,.Consumer.Relations,.Mabe.Canada.Inc
Suite.310,.1.Factory.Lane.
Moncton,.NB.E1C.9M3
Register Your Appliance In the U.S.: GEAppliances.com
Register your new appliance on-line—at your convenience!.Timely.product.registration.will.allow.for.enhanced.
communication.and.prompt.service.under.the.terms.of.your.warranty,.should.the.need.arise.You.may.also.mail..
in.the.pre-printed.registration.card.included.in.the.packing.material.In Canada: www.GEAppliances.ca
Printed in Mexico
This book is printed on recycled paper.
 Loading...