

Page 1

Ranges
Radiant Self-Cleaning
29-5516 12-05 JR
Safety Instructions . . . . . . .2–5
Operating Instructions
Clock and Timer . . . . . . . . . . .14
Convenience Outlet . . . . . . . . .9
Cookware . . . . . . . . . . . . . . . . . .7
Oven . . . . . . . . . . . . . . . . .10–23
Controls . . . . . . . . . . . . . . . . .10
Broiling Guide . . . . . . . . . . . .12
Sabbath Feature . . . . . . . .22, 23
Self-Cleaning . . . . . . . . . .18, 19
Special Features . . . . . . . .20, 21
Temperature Conversion . . . .10
Thermostat . . . . . . . . . . . . . .15
Timed Baking and Roasting . .13
Warming Drawer . . . . . . .16, 17
Surface Units . . . . . . . . . . . . 6–9
Care and Cleaning . . . . . 24–29
Installation Instructions . 30–33
Troubleshooting Tips . . . 34–37
Accessories . . . . . . . . . . . . .42
Consumer Support
Consumer Support . . . . . . . . . 44
Product Registration . . . . .39, 40
Warranty . . . . . . . . . . . . . . . . . 43
www.GEAppliances.ca
Write the model and serial
numbers here:
Model # ________________
Serial # ________________
You can find them on a label
behind the storage drawer on
the front of the range frame.
JCB800
JCB900
Owner’s Manual and
Installation Instructions
Page 2
2
IMPORTANT SAFETY INFORMATION.
READ ALL INSTRUCTIONS BEFORE USING.
WARNING!
For your safety, the information in this manual must be followed to minimize the risk of fire, electric
shock, or to prevent property damage, personal injury, or loss of life.
All ranges can tip and injury could result.
To prevent accidental tipping of the range, attach it to the wall and floor by installing the Anti-Tip
device supplied.
If the Anti-Tip device supplied with the range does not fit this application, use the universal Anti-Tip
device WB2X7909.
To check if the device is installed and engaged properly, remove the storage drawer and inspect
the rear leveling leg. Make sure it fits securely into the slot.
If you pull the range out from the wall for any reason, make sure the device is properly engaged when
you push the range back against the wall. If it is not, there is a possible risk of the range tipping over
and causing injury if you or a child stand, sit or lean on an open door.
Please refer to the Anti-Tip device information in this manual. Failure to take this precaution could
result in tipping of the range and injury.
WARNING ANTI-TIP DEVICE
When using electrical appliances, basic safety precautions should be followed, including the following:
■ Use this appliance only for its intended
purpose as described in this Owner’s Manual.
■ Be sure your appliance is properly installed and
grounded by a qualified installer in accordance
with the provided installation instructions.
■ Have the installer show you the location of
the circuit breaker or fuse. Mark it for easy
reference.
■ Do not attempt to repair or replace any
part of your range unless it is specifically
recommended in this manual. All other
servicing should be referred to a qualified
technician.
■ Before performing any service, disconnect
the range power supply at the household
distribution panel by removing the fuse or
switching off the circuit breaker.
■ Do not leave children alone—children should
not be left alone or unattended in an area
where an appliance is in use. They should
never be allowed to sit or stand on any part
of the appliance.
■ Do not allow anyone to climb, stand or hang
on the door, storage drawer or cooktop. They
could damage the range and even tip it over,
causing severe personal injury.
SAFETY PRECAUTIONS
Consumer Support Troubleshooting Tips Care and Cleaning Operating Instructions Safety Instructions
Page 3
3
www.GEAppliances.ca
Cook meat and poultry thoroughly—meat to at least an INTERNAL temperature of 70°C (160°F) and poultry to at
least an INTERNAL temperature of 80°C (180°F). Cooking to these temperatures usually protects against
foodborne illness.
COOK MEAT AND POULTRY THOROUGHLY…
Safety Instructions
Operating Instructions
Safety Instructions
Operating Instructions Care and Cleaning
Troubleshooting Tips
Consumer Support
Do not operate the oven or cooktop controls if the glass is broken. Food splatter or cleaning solution
may penetrate a broken control panel or cooktop and create a risk of electrical shock. Contact a
qualified technician immediately should your glass control panel or cooktop become broken.
■ Do not store flammable materials in an oven
or near the cooktop.
■ CAUTION: Items of interest to children
should not be stored in cabinets above a range or on
the back of a range—children climbing on the range
to reach items could be seriously injured.
■ Never wear loose-fitting or hanging garments
while using the appliance. Be careful when
reaching for items stored over the range.
Flammable material could be ignited if
brought in contact with hot surface units or
heating elements and may cause severe burns.
■ Use only dry pot holders—moist or damp
pot holders on hot surfaces may result in
burns from steam. Do not let pot holders
touch hot surface units or heating elements.
Do not use a towel or other bulky cloth in
place of pot holders.
■ Do not use water on grease fires. Never pick
up a flaming pan. Turn the controls off.
Smother a flaming pan on a surface unit
by covering the pan completely with
a well-fitting lid, cookie sheet or flat tray.
Use a multi-purpose dry chemical or
foam-type fire extinguisher.
Flaming grease outside a pan can be put
out by covering it with baking soda or, if
available, by using a multi-purpose dry
chemical or foam-type fire extinguisher.
Flame in the oven can be smothered
completely by closing the oven door and
turning the oven off or by using a multipurpose dry chemical or foam-type fire
extinguisher.
■ For your safety, never use your appliance
for warming or heating the room.
■ Do not let cooking grease or other flammable
materials accumulate in or near the range.
■ Do not touch the surface units, the heating
elements or the interior surface of the oven.
These surfaces may be hot enough to burn
even though they are dark in color. During and
after use, do not touch, or let clothing or other
flammable materials contact the surface units,
areas nearby the surface units or any interior
area of the oven; allow sufficient time for
cooling first.
Potentially hot surfaces include the cooktop,
areas facing the cooktop, oven vent opening,
surfaces near the opening, crevices around the
oven door.
REMEMBER: The inside surface of the oven may be
hot when the door is opened.
■ Do not store or use combustible materials,
gasoline or other flammable vapors and liquids
in the vicinity of this or any other appliance.
■ Keep the hood and grease filters clean
to maintain good venting and to avoid
grease fires.
■ Teach children not to play with the controls
or any other part of the range.
■ Always keep dish towels, dish cloths, pot
holders and other linens a safe distance
from your range.
■ Always keep wooden and plastic utensils and
canned food a safe distance from your range.
■ Always keep combustible wall coverings,
curtains or drapes a safe distance from
your range.
SAFETY PRECAUTIONS
Page 4
4
IMPORTANT SAFETY INFORMATION.
READ ALL INSTRUCTIONS BEFORE USING.
Use proper pan size—select cookware having flat bottoms large enough to cover the surface unit
heating element. The use of undersized cookware will expose a portion of the surface unit to direct
contact and may result in ignition of clothing. Proper relationship of cookware to surface unit will
also improve efficiency.
■ Never leave the surface units unattended at
high heat settings. Boilovers cause smoking
and greasy spillovers that may catch on fire.
■ Only certain types of glass, glass ⁄ceramic,
earthenware or other glazed containers are
suitable for cooktop service; others may break
because of the sudden change in temperature.
■ To minimize the possibility of burns, ignition
of flammable materials and spillage, the handle
of a container should be turned toward the
center of the range without extending over
nearby surface units.
■ Always turn the surface units off before
removing cookware.
■ Do not flame foods on the cooktop. If you do
flame foods under the hood, turn the fan on.
■ Use care when touching the cooktop.
The glass surface of the cooktop will retain
heat after the controls have been turned off.
■ Keep an eye on foods being fried at high or
medium high heat settings.
■ Foods for frying should be as dry as possible.
Frost on frozen foods or moisture on fresh
foods can cause hot fat to bubble up and
over the sides of the pan.
■ Use little fat for effective shallow or deep
fat frying. Filling the pan too full of fat can
cause spillovers when food is added.
■ If a combination of oils or fats will be used
in frying, stir together before heating, or
as fats melt slowly.
■ Always heat fat slowly, and watch as it heats.
■ Use a deep fat thermometer whenever
possible to prevent overheating fat beyond
the smoking point.
■ Avoid scratching the glass cooktop. The
cooktop can be scratched with items such
as sharp instruments, rings or other jewelry,
and rivets on clothing.
■ Large scratches or impacts to glass doors or
cooktops can lead to broken or shattered glass.
■ Do not operate the radiant surface units if the
glass is broken. Spillovers or cleaning solution
may penetrate a broken cooktop and create a
risk of electrical shock. Contact a qualified
technician immediately should your glass
cooktop become broken.
■ Never use the glass cooktop surface as a
cutting board.
■ The surface units are automatically disabled
during the self-clean cycle. Make sure that all
surface unit controls are turned off at all times
during the self-clean cycle. Any surface unit
that is set to an on position, while the self-clean
cycle is operating, will automatically come on
after the self-clean cycle is finished, and could
result in an on, unattended surface unit. Wait
until the self-clean cycle is finished to set and
use the surface units.
■ Do not place or store items that can melt or
catch fire on the glass cooktop, even when it
is not being used, or during the self-clean cycle.
■ Be careful when placing spoons or other
stirring utensils on glass cooktop surface when
it is in use. They may become hot and could
cause burns.
■ Clean the cooktop with caution. If a wet
sponge or cloth is used to wipe spills on a hot
surface unit, be careful to avoid steam burns.
Some cleaners can produce noxious fumes if
applied to a hot surface.
NOTE: We recommend that you avoid wiping any
surface unit areas until they have cooled and the
indicator light has gone off. Sugar spills are the
exception to this. Please see the Cleaning the glass
cooktop section.
■ When the cooktop is cool, use only the
Ceramic Cooktop Cleaner and the Ceramic
Cooktop Cleaning Pad to clean the cooktop.
■ To avoid possible damage to the cooking
surface, do not apply cleaning cream to
the glass surface when it is hot.
■ After cleaning, use a dry cloth or paper towel
to remove all cleaning cream residue.
■ Read and follow all instructions and warnings
on the cleaning cream labels.
■ Do not use plastic wrap to cover food. Plastic
may melt onto the surface and be very difficult
to remove.
RADIANT SURFACE UNITS
Consumer Support
Troubleshooting Tips Care and Cleaning
Operating Instructions Safety Instructions
WARNING!
Page 5

SAVE THESE INSTRUCTIONS
READ AND FOLLOW THIS SAFETY INFORMATION CAREFULLY.
5
Safety Instructions
Operating Instructions
Safety Instructions
Operating Instructions Care and Cleaning
Troubleshooting Tips
Consumer Support
www.GEAppliances.ca
Do not use oven cleaners. No commercial oven cleaner or oven liner protective coating of any kind
should be used in or around any part of the oven. Residue from oven cleaners will damage the inside
of the oven when the self-clean cycle is used.
■ CAUTION : DO NOT LEAVE FOOD OR COOKING
UTENSILS, ETC. IN THE OVEN OR ON THE COOKTOP DURING
SELF-CLEANING MODE OF OPERATION.
■ Do not clean the door gasket. The door gasket is
essential for a good seal. Care should be taken not to
rub, damage or move the gasket.
■ Before self-cleaning the oven, remove the broiler
pan, grid and other cookware.
■ Be sure to wipe up excess spillage before starting the
self-cleaning operation.
■ If the self-cleaning mode malfunctions, turn the
oven off and disconnect the power supply. Have it
serviced by a qualified technician.
■ Clean only parts listed in this Owner’s Manual.
■ The surface units are automatically disabled during
the self-clean cycle. Make sure that all surface unit
controls are turned off at all times during the selfclean cycle. Any surface unit that is set to an on
position, while the self-clean cycle is operating, will
automatically come on after the self-clean cycle is
finished, and could result in an on, unattended
surface unit. Wait until the self-clean cycle is finished
to set and use the surface units.
■ Gray porcelain-coated oven racks may be cleaned in
the oven during the self-clean cycle.
SELF-CLEANING OVEN
Stand away from the range when opening the oven door. Hot air or steam which escapes can cause
burns to hands, face and/or eyes.
■ Do not heat unopened food containers. Pressure
could build up and the container could burst,
causing an injury.
■ Keep the oven vent unobstructed.
■ Keep the oven free from grease buildup.
■ Place the oven rack in the desired position while the
oven is cool. If racks must be handled when hot, do
not let pot holder contact the heating elements.
■ When using cooking or roasting bags in the oven,
follow the manufacturer’s directions.
■ Pulling out the rack to the stop-lock is a convenience
in lifting heavy foods. It is also a precaution against
burns from touching hot surfaces of the door or
oven walls.
■ Do not use the oven to dry newspapers.
If overheated, they can catch on fire.
■ Do not use the oven for a storage area. Items stored
in an oven can ignite.
■ Do not leave paper products, cooking utensils or
food in the oven when not in use.
■ Do not use aluminum foil to line oven bottoms,
except as suggested in this manual. Improper
installation of aluminum foil may result in a risk
of electric shock or fire.
OVEN
■ The purpose of the warming drawer is to hold hot
cooked foods at serving temperature. Always start
with hot food; cold food cannot be heated or cooked
in the warming drawer.
■ Do not use the drawer to dry newspapers.
If overheated, they can catch on fire.
■ Do not leave paper products, plastics, canned food
or combustible materials in the drawer.
■ Never leave jars or cans of fat drippings in or near
your drawer.
■ Do not warm food in the drawer for more than two
hours.
■ Never place, use or self-clean the oven drawer pan in
the oven.
■ Do not touch the heating element or the interior surface
of the drawer. These surfaces may be hot enough
to burn.
REMEMBER: The inside surface of the drawer may be
hot when the drawer is opened.
■ Use care when opening the drawer. Open the
drawer a crack and let hot air or steam escape before
removing or replacing food. Hot air or steam which
escapes can cause burns to hands, face and/or eyes.
■ Do not use aluminum foil to line the lower oven
drawer. Foil is an excellent heat insulator and will
trap heat beneath it. This will upset the performance
of the drawer and it could damage the interior
finish.
WARMING DRAWER (on some models)
Page 6
6
Temperature Limiter
Every radiant surface unit has a
temperature limiter.
The temperature limiter protects the
glass cooktop from getting too hot.
The temperature limiter may cycle the
units off for a time if:
■ The pan boils dry.
■ The pan bottom is not flat.
■ The pan is off center.
■ There is no pan on the unit.
Consumer Support Troubleshooting Tips Care and Cleaning Operating Instructions Safety Instructions
About the radiant surface units.
NOTE: Throughout this manual, features and appearance may vary from your model.
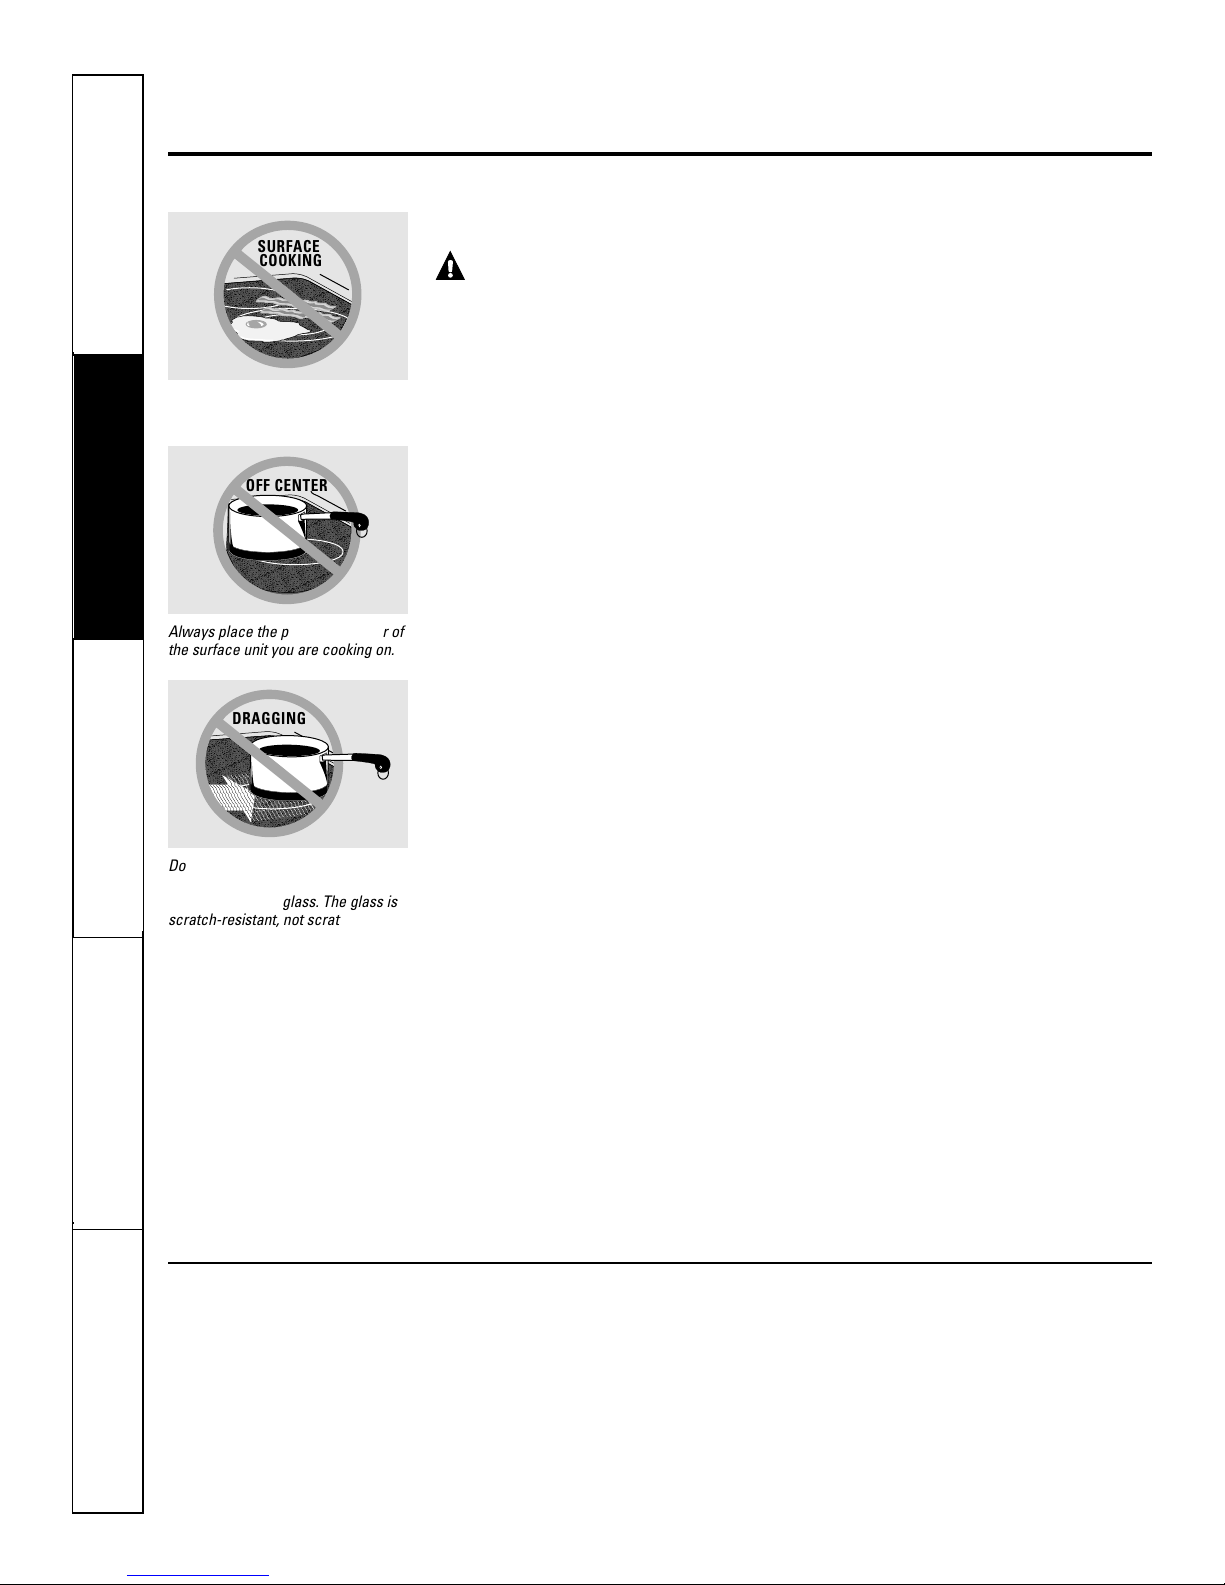
Never cook directly on the glass.
Always use cookware.
About the Radiant Surface Units
WARNING: The surface
units are automatically disabled during
the self-clean cycle. Make sure that all
surface unit controls are turned off at all
times during the self-clean cycle. Any
surface unit that is set to an on position,
while the self-clean cycle is operating, will
automatically come on after the self-clean
cycle is finished, and could result in an
on, unattended surface unit. Wait until
the self-clean cycle is finished to set and
use the surface units.
The radiant cooktop features heating
units beneath a smooth glass surface.
Cooktop temperatures increase with
the number of surface units that are on.
With 3 or 4 units turned on, surface
temperatures are high. Always use
caution when touching the cooktop.
An indicator light will come on when
the surface unit is turned on.
The appropriate HOT surface indicator
light will glow when its corresponding
radiant element is turned on and will
remain on until the surface has cooled
below 65.5°C (150°F).
NOTE:
Hot surface indicator light will:
■ Come on when the surface unit is
turned on.
■ Stay on even after the unit is turned off.
■ Glow brightly until the unit has cooled
below 65.5°C (150°F).
NOTE: A slight odor is normal when a new
cooktop is used for the first time. It is caused by
the heating of new parts and insulating materials
and will disappear in a short time.
NOTE: On models with light-colored glass
cooktops, it is normal for the cooking zones to
change color when hot or cooling down. This is
temporary and will disappear as the glass cools
to room temperature.
It is safe to place hot cookware from the
oven or surface on the glass cooktop
when the surface is cool.
Even after the surface units are turned
off, the glass cooktop retains enough
heat to continue cooking. To avoid
overcooking, remove pans from the
surface units when the food is cooked.
Avoid placing anything on the surface
unit until it has cooled completely.
■ Water stains (mineral deposits) are removable
using the cleaning cream or full strength white
vinegar.
■ Use of window cleaner may leave an iridescent
film on the cooktop. The cleaning cream will
remove this discoloration.
■ Don’t store heavy items above the cooktop.
If they drop onto the cooktop, they can cause
damage.
■ Do not use the surface as a cutting board.
;;
;
;;;;
;;
;
;
;
;
;
;
;
;;
;;
;;
;;
;;
;;;
;
;
;;;
;;;;
;
;;;
Always place the pan in the center of
the surface unit you are cooking on.
;
;;;
;
;
;
;;;
;
;;;
;;
;;
;
;
;;
Do not slide cookware across the
control or cooktop surface because
it can scratch the glass. The glass is
scratch-resistant, not scratchproof.
SURFACE
COOKING
OFF CENTER
DRAGGING
Page 7
7
Safety Instructions
Operating Instructions
Safety Instructions
Operating Instructions Care and Cleaning
Troubleshooting Tips
Consumer Support
Stainless Steel:
recommended
Aluminum:
heavy weight recommended
Good conductivity. Aluminum residues
sometimes appear as scratches on the
cooktop, but can be removed if cleaned
immediately. Because of its low melting
point, thin weight aluminum should not
be used.
Copper Bottom:
recommended
Copper may leave residues which can
appear as scratches. The residues can
be removed, as long as the cooktop is
cleaned immediately. However, do not let
these pots boil dry. Overheated metal can
bond to glass cooktops. An overheated
copper bottom pot will leave a residue
that will permanently stain the cooktop
if not removed immediately.
Porcelain Enamel Covered Cast Iron:
recommended
As long as the cookware is covered
completely with porcelain enamel, this
cookware is recommended. Caution is
recommended for cast iron cookware
that is not completely covered with
smooth porcelain enamel, as it may
scratch the glass ceramic cooktop.
Glass-ceramic:
usable, but not recommended
Poor performance. May scratch the
surface.
Stoneware:
usable, but not recommended
Poor performance. May scratch the
surface.
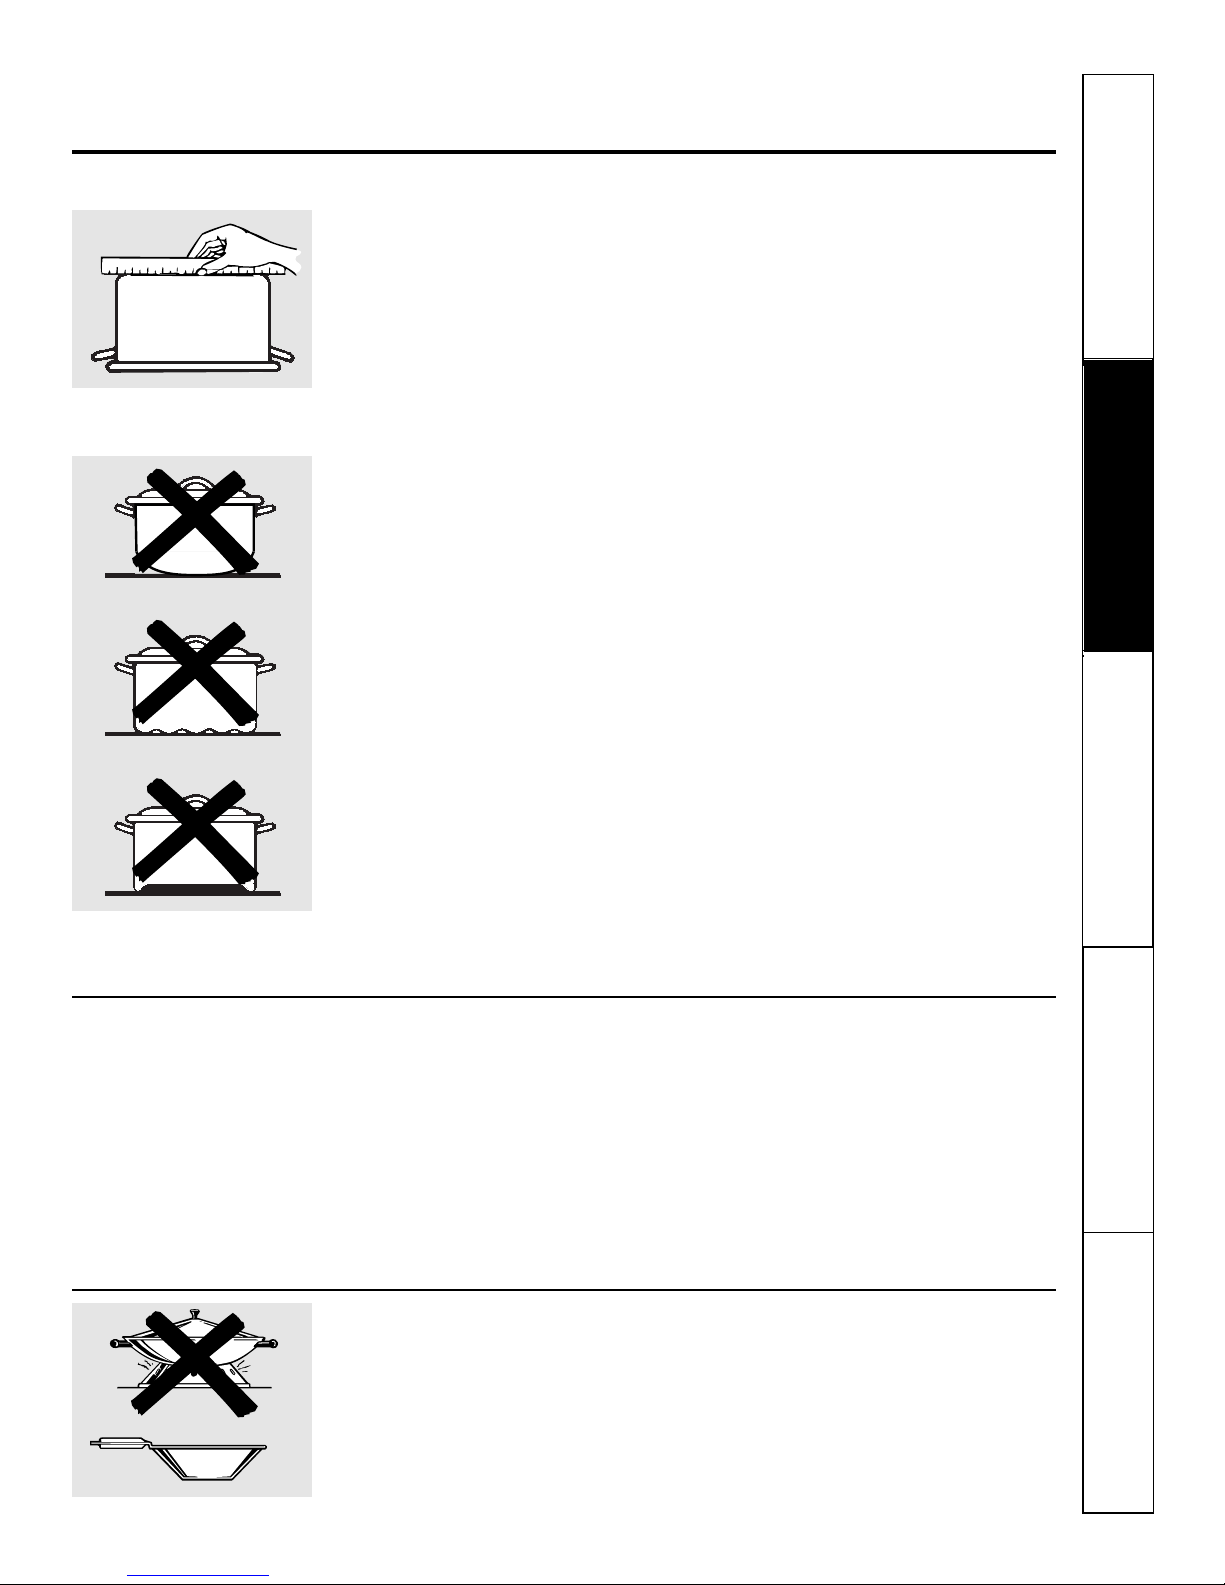
Check pans for flat bottoms by using
a straight edge.
Pans with rounded, curved, ridged
or warped bottoms are not
recommended.
www.GEAppliances.ca
The following information will help you choose cookware which will give good performance on glass cooktops.
Use only flat-bottomed woks.
Home Canning Tips
Be sure the canner is centered over the
surface unit.
Make sure the canner is flat on the
bottom.
To prevent burns from steam or heat,
use caution when canning.
Use recipes and procedures from
reputable sources. These are available
from manufacturers such as Ball®and
Kerr®and the Department of Agriculture
Extension Service.
Flat-bottomed canners are recommended.
Use of water bath canners with rippled
bottoms may extend the time required to
bring the water to a boil.
Wok Cooking
We recommend that you use only a flat-bottomed
wok. They are available at your local retail store.
Do not use woks that have support rings.
Do not use round-bottom woks. You
could be seriously burned if the wok
tipped over.
Page 8

8
Consumer Support Troubleshooting Tips Care and Cleaning Operating Instructions Safety Instructions
Be sure you turn the control knob to
OFF when you finish cooking.
Using the surface units.
Dual Surface Unit Control Knob (on some models)
The right front surface unit has 2 cooking sizes
(22.9 cm and 30.5 cm [9″ and 12″]) to select from
so you can match the size of the unit to the size of
the cookware you are using. On some models, the
left front surface unit also has 2 cooking sizes
(15.2 cm and 22.9 cm [6″ and 9″]).
To use the small surface unit, turn the
control knob counterclockwise to the
SMALL BURNER settings.
To use the large surface unit, turn the
control knob clockwise to the LARGE
BURNER settings.
How to Set
Push the knob in and turn in either
direction to the setting you want.
At both OFF and MAX the control clicks
into position. You may hear slight clicking
sounds during cooking, indicating the
control is keeping the power level you set.
A HOT surface indicator light, on
the cooktop, will glow when any radiant
element is turned on. It will remain
on until the surface is cooled to
approximately 65.5°C (150°F).
Hot surface indicator light will:
■ come on when the unit is hot to the touch.
■ stay on even after the unit is turned off.
■ glow until the unit is cooled to approximately
65.5°C (150°F).
WARNING: The surface
units are automatically disabled during
the self-clean cycle. Make sure that all
surface unit controls are turned off at all
times during the self-clean cycle. Any
surface unit that is set to an on position,
while the self-clean cycle is operating, will
automatically come on after the self-clean
cycle is finished, and could result in an
on, unattended surface unit. Wait until
the self-clean cycle is finished to set and
use the surface units.
22.9 cm (9")
15.2 cm (6")
30.5 cm (12")
22.9 cm (9")
Page 9

9
Safety Instructions
Operating Instructions
Care and Cleaning Troubleshooting Tips Consumer Support
www.GEAppliances.ca
Using the Warming Zone (on some models)
The WARMING ZONE is located in the
back center of the glass surface. Always
start with hot food. Do not use to heat
cold food. Placing uncooked or cold food
on the WARMING ZONE could result in
foodborne illness.
Push and turn the control knob to any
desired setting.
For best results, all foods on the
WARMING ZONE should be covered with
a lid or aluminum foil.
Always use pot holders or oven mitts
when removing food from the
WARMING ZONE, as cookware will be hot.
A HOT surface indicator light will glow
when the glass surface is hot and will
remain on until the surface is cool
enough to touch. Lower settings may
not heat the glass surface enough to
cause the HOT surface indicator light
to come on.
A WARMING ZONE indicator light will
glow when the unit is on.
NOTE: The WARMING ZONE will not glow red
like the cooking elements.
Food Type Control Setting
Sauces MIN
Soups (cream) Medium
Stews Medium
Vegetables Medium
Hot Beverages MAX
Soups (other than cream) MAX
Breads/Pastries MIN
The chart above shows initial suggested settings only.
The temperature, type and amount of food, type of pan
and the time held will affect the quality of the food.
CAUTION: Do not leave food on the
WARMING ZONE for more than 2 hours.
■ Do not use plastic wrap to cover food. Plastic
may melt onto the surface and be very difficult
to clean.
■ Use only cookware recommended for
top-of-range cooking.
Convenience Outlet (on some models)
The 120V convenience outlet located on
the top of the backguard may be used to
plug in small electrical appliances.
When using the outlet, be sure that the
electrical cord does not rest on or near a
surface unit. If the surface unit is turned
on, the cord will be damaged.
To reset the circuit breaker, press the
switch located near the outlet on top of
the backguard.
Page 10
10
Consumer Support Troubleshooting Tips Care and Cleaning Operating Instructions Safety Instructions
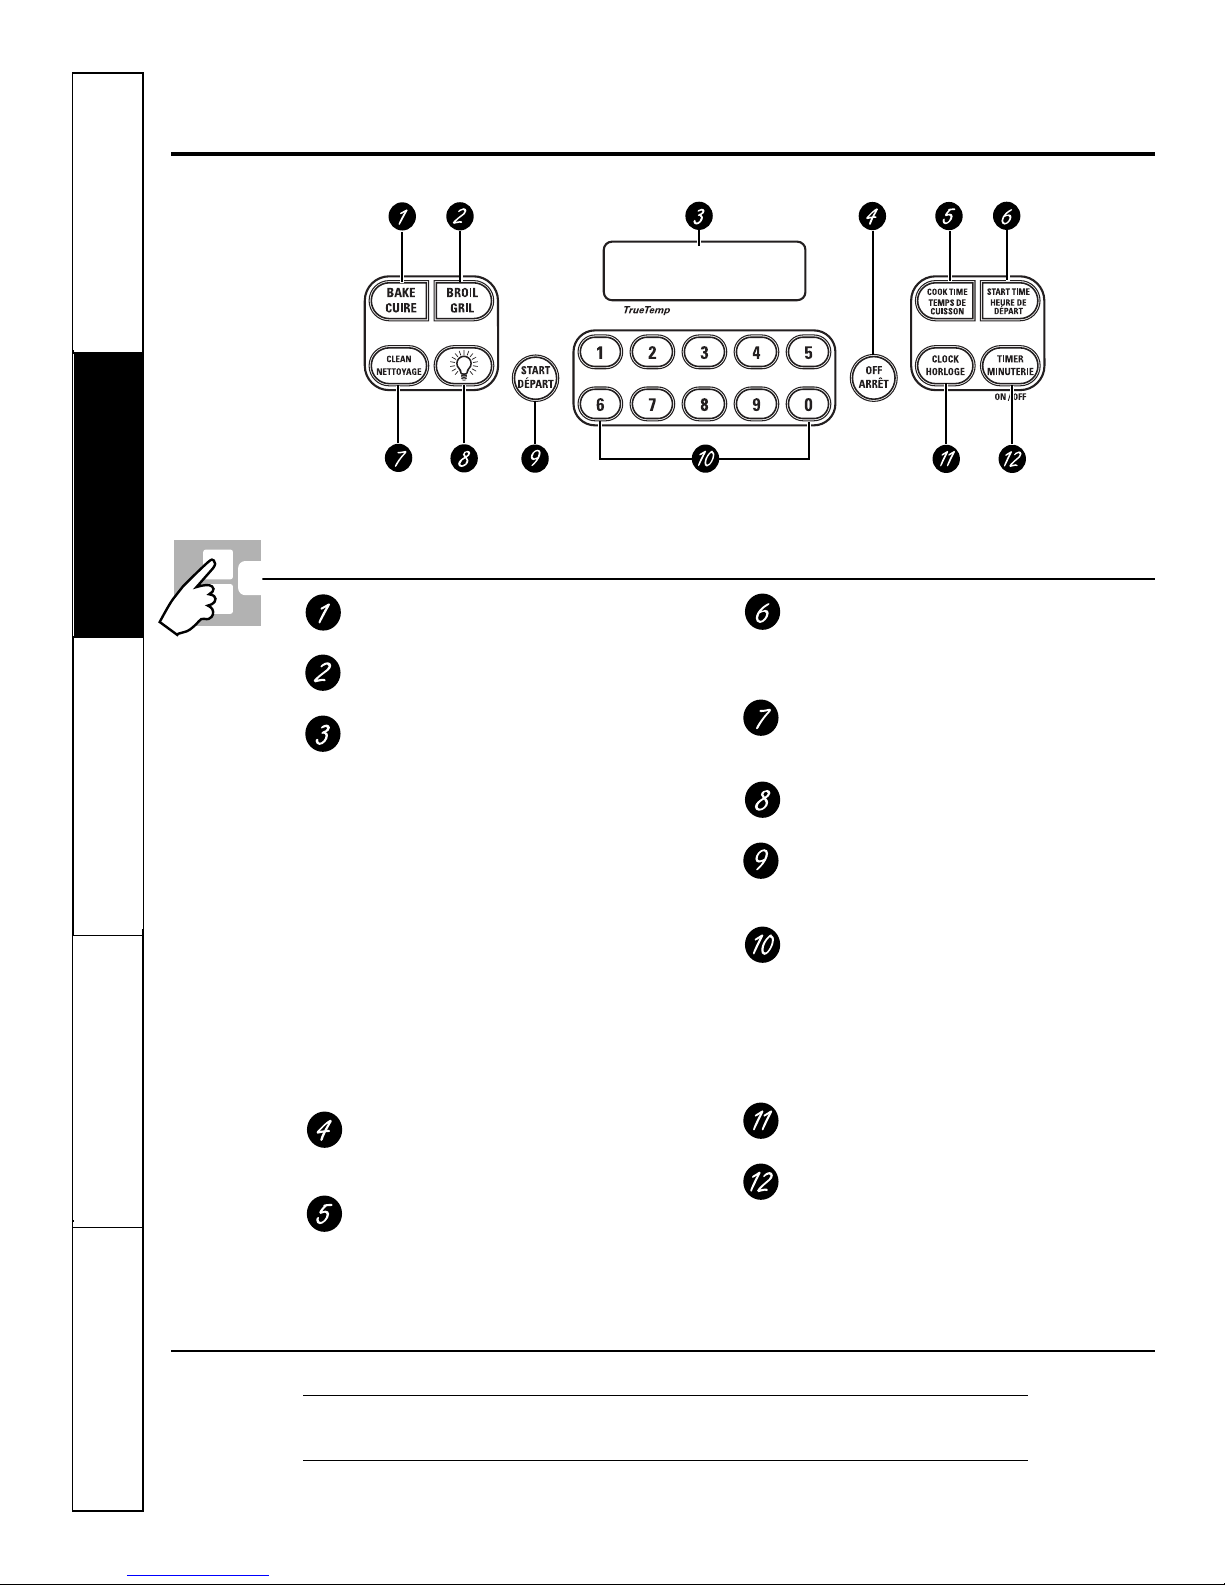
BAKE Pad
Touch to select the bake function.
BROIL Pad
Touch to select the broil function.
Display
Shows the time of day, oven temperature,
whether the oven is in the bake, broil or
self-cleaning mode and the times set for
the timer or automatic oven operations.
If “F– and a number or letter” flash in the display and
the oven control signals, this indicates a function
error code. Touch the OFF pad. Allow the oven to cool for
one hour. Put the oven back into operation. If the function
error code repeats, disconnect the power to the oven and
call for service.
If your oven was set for a timed oven operation
and a power outage occurred, the clock and all
programmed functions must be reset.
The time of day will flash in the display when there
has been a power outage.
OFF Pad
Touch to cancel ALL oven operations
except the clock and timer.
COOK TIME Pad
Touch and then touch the number pads to
set the amount of time you want your food
to cook. The oven will shut off when the
cooking time has run out.
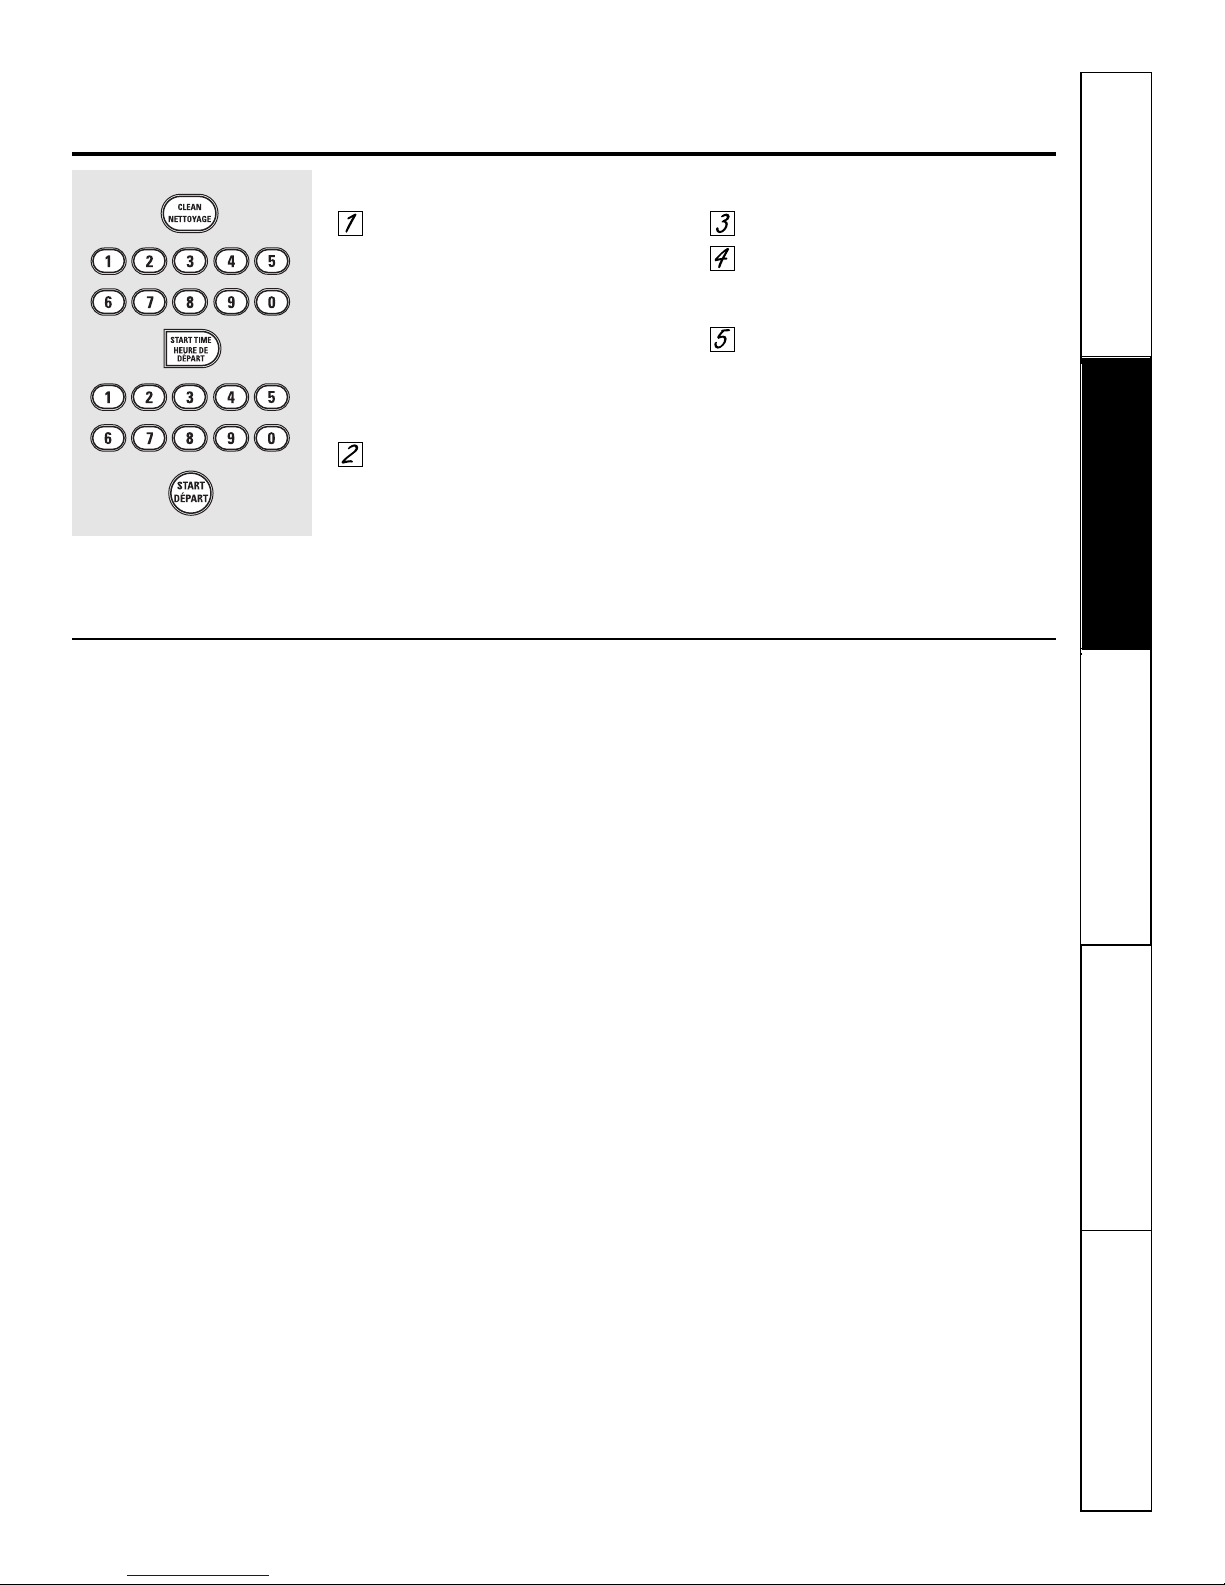
START TIME Pad
Use along with COOK TIME or CLEAN pads
to set the oven to start and stop
automatically at a time you set.
CLEAN Pad
Touch to select self-cleaning function.
See the Using the self-cleaning oven section.
OVEN LIGHT Pad
Touch to turn the oven light on or off.
START Pad
Must be touched to start any cooking or
cleaning function.
Number Pads
Use to set any function requiring numbers
such as the time of day on the clock, the
timer, the oven temperature, the internal
food temperature, the start time and
length of operation for timed baking
and self-cleaning.
CLOCK Pad
Touch before setting the clock.
TIMER Pad
Touch to select the timer feature.
Oven Control, Clock and Timer Features and Settings
Features and appearance
may vary.
On some models
Using the oven controls.
Fahrenheit° 140 150 170 200 250 275 300 325 350 375 400 425 450 475 500 525 550
Celsius° 60 65 75 95 120 135 150 160 175 190 205 220 230 245 260 275 290
Temperature Conversions
Page 11
11
Using the oven.
www.GEAppliances.ca
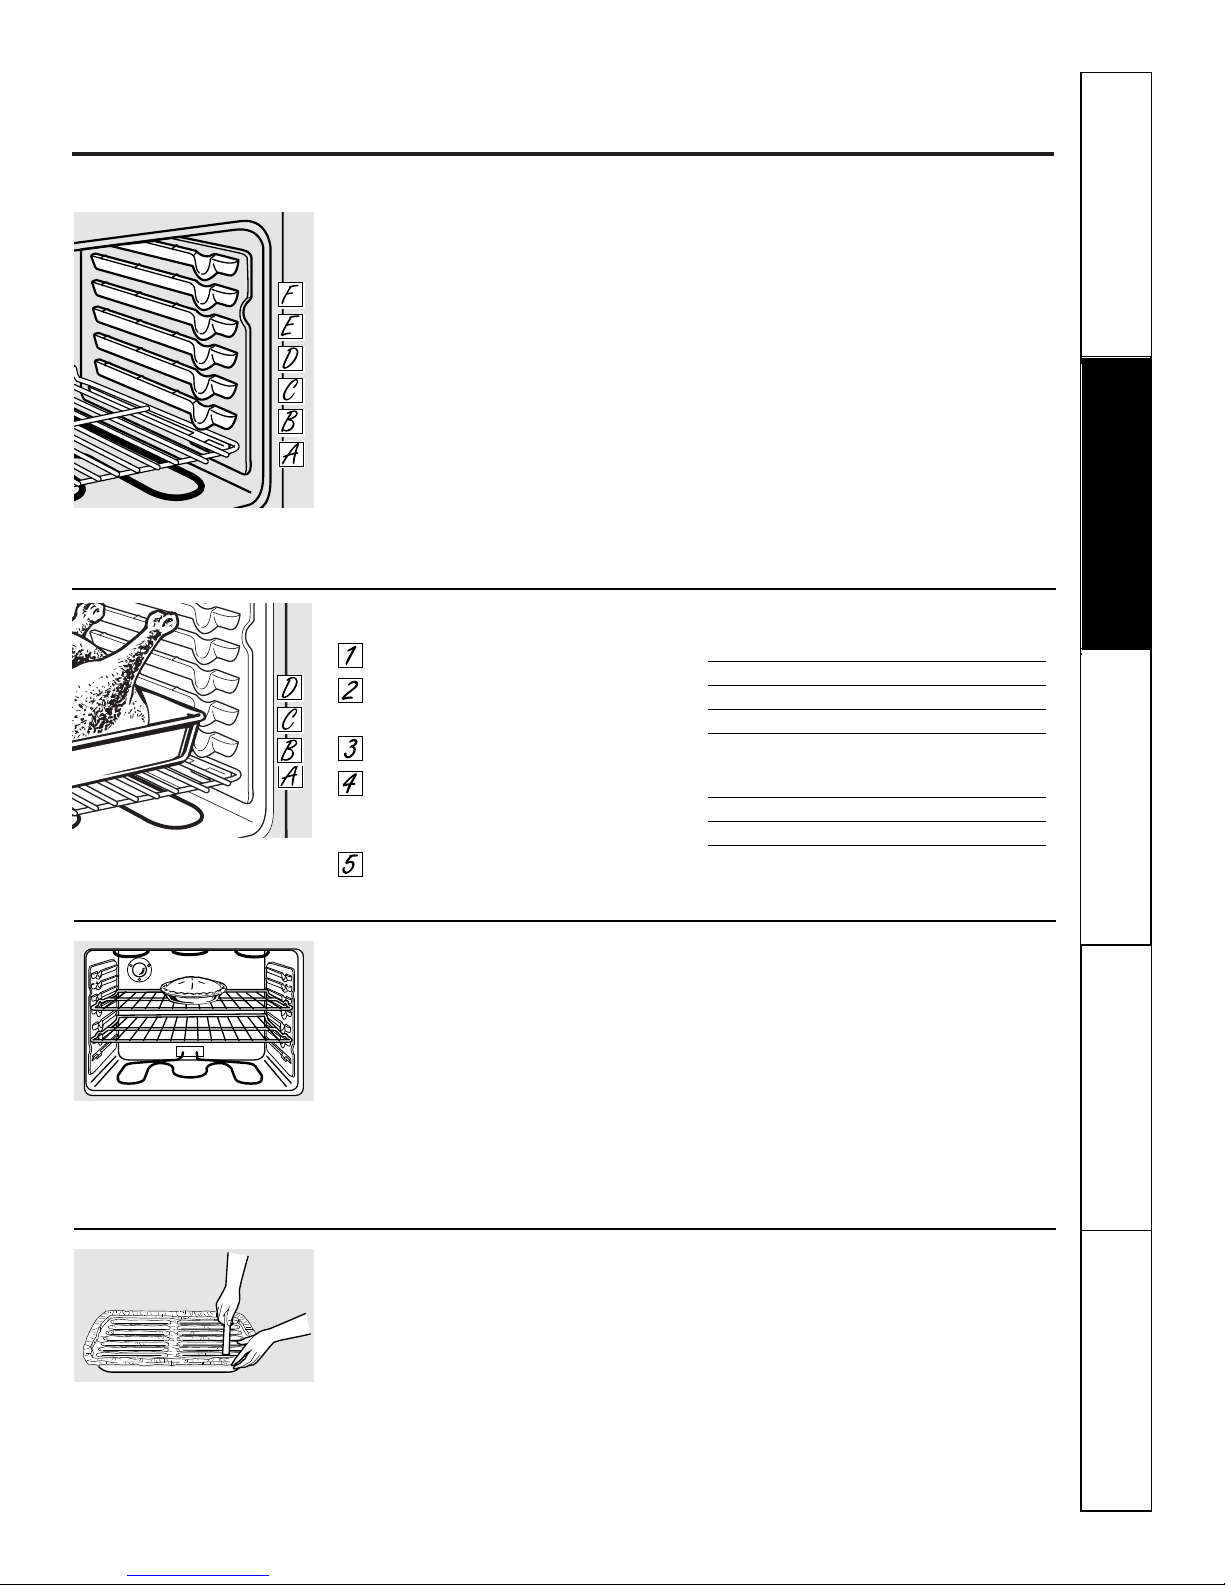
To avoid possible burns, place the racks in the desired position before you turn the oven on.
Before you begin…
The racks have stop-locks, so that when
placed correctly on the rack supports
(A through F), they will stop before
coming completely out, and will not tilt.
When placing and removing cookware,
pull the rack out to the bump on the
rack support.
To remove a rack, pull it toward you,
tilt the front end up and pull it out.
To replace, place the end of the rack
(stop-locks) on the support, tilt up the
front and push the rack in.
CAUTION: When you are using the
rack in the lowest position (A), you will need
to use caution when pulling the rack out. We
recommend that you pull the rack out several
inches and then, using two pot holders, pull the
rack out by holding the sides of it. The rack is low
and you could be burned if you place your hand
in the middle of the rack and pull all the way out.
Be very careful not to burn your hand on the door
when using the rack in the lowest position (A).
The oven has 6 rack positions.
Preheating and Pan Placement
Preheat the oven if the recipe calls for it.
Preheating is necessary for good results
when baking cakes, cookies, pastry and
breads.
To preheat, set the oven at the correct temperature.
The control will beep when the oven is preheated
and the display will show your set temperature.
This will take approximately 6–10 minutes.
Baking results will be better if baking
pans are centered in the oven as much as
possible. If baking with more than one
pan, place the pans so each has at least
2.5 cm to 3.8 cm (1 to 11⁄2″) of air space
around it. If baking four cake layers at
the same time, place two layers on rack B
and two layers on rack D. Stagger pans
on the rack so one is not directly above
the other.
Aluminum Foil
Never cover the oven bottom with aluminum foil.
You can use aluminum foil to line the
broiler pan and broiler grid. However,
you must mold the foil tightly to the grid
and cut slits in it just like the grid.
Aluminum foil may also be used to catch
a spillover. To do so, place a small sheet
of foil on a lower rack several inches
below the food.
Never entirely cover a rack with
aluminum foil. This will disturb the heat
circulation and result in poor baking.
Cut slits in the foil just like the grid.
Center baking pans in the oven.
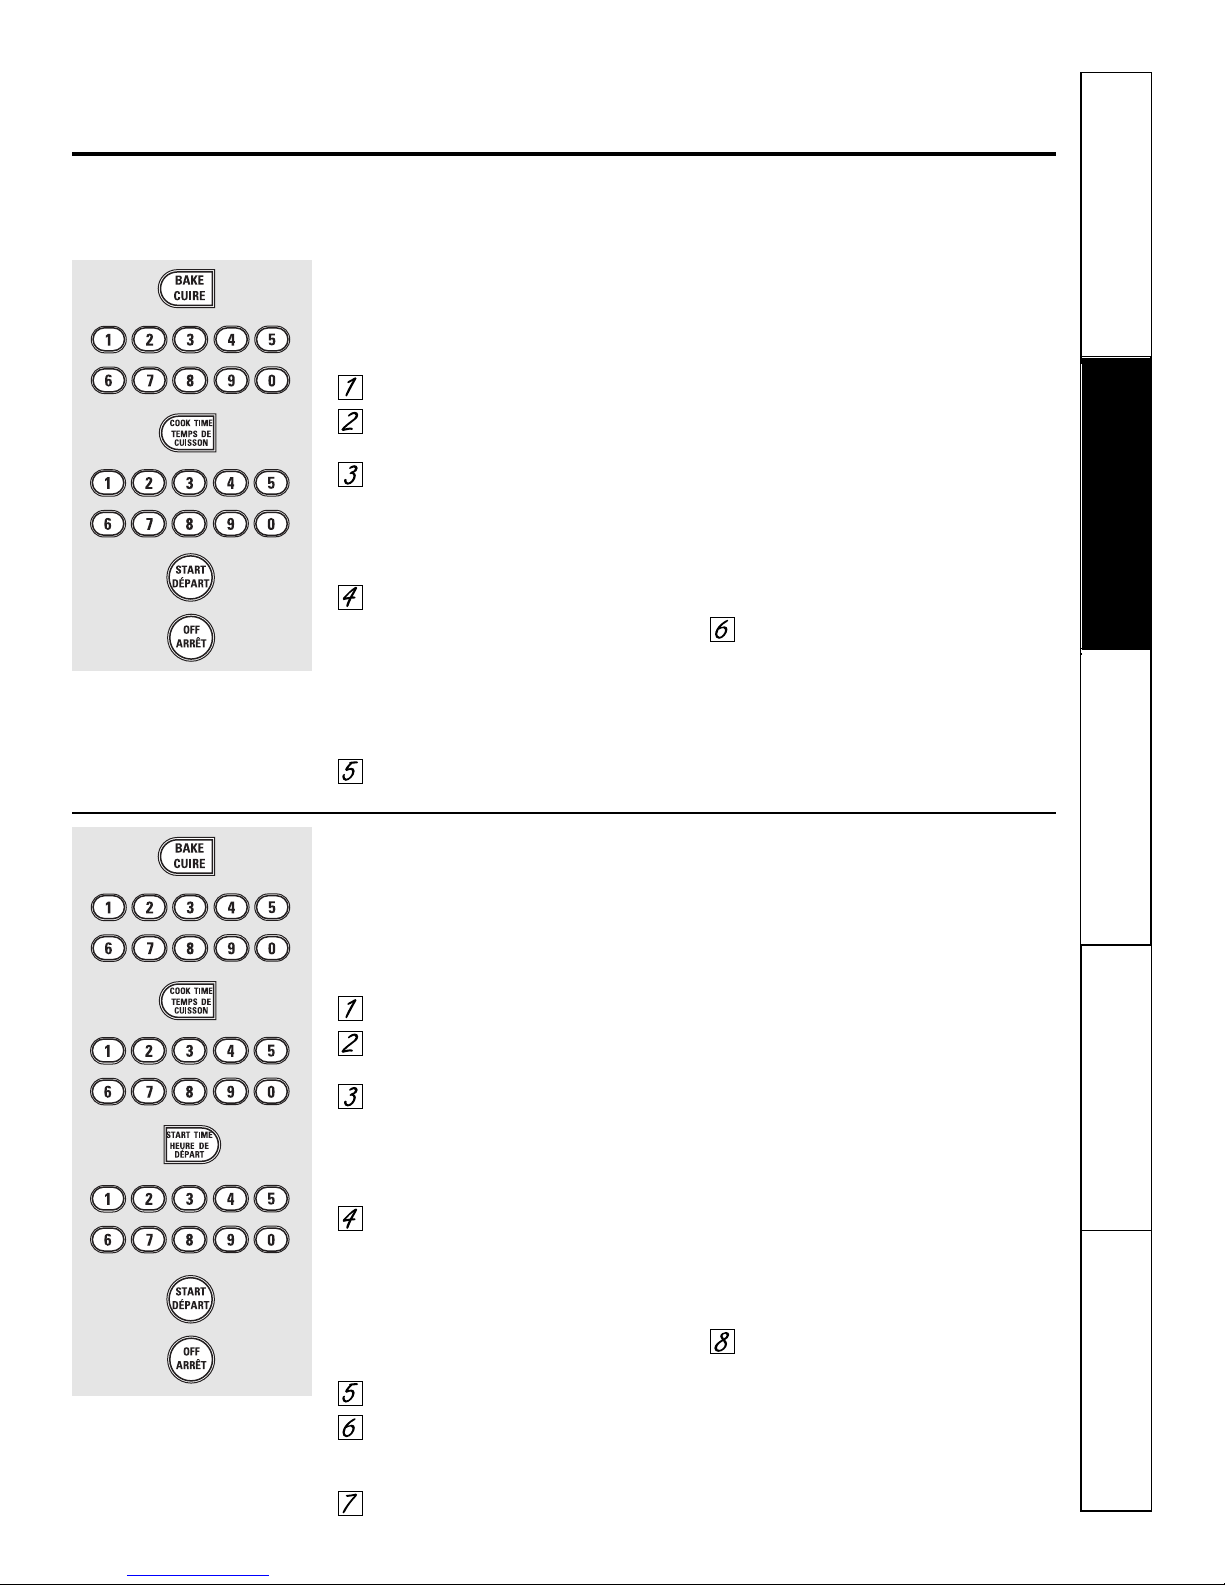
How to Set the Oven for Baking or Roasting
Touch the BAKE pad.
Touch the number pads to set
the desired temperature.
Touch the START pad.
Check food for doneness at
minimum time on recipe. Cook
longer if necessary.
Touch the OFF pad when cooking
is complete.
Type of Food Rack Position
Frozen pies (on cookie sheet) D
Angel food cake A
Bundt or pound cakes B or C
Biscuits, muffins, brownies, C or D
cookies, cupcakes,
layer cakes, pies
Casseroles C or D
Turkey A
Safety Instructions
Operating Instructions Care and Cleaning
Troubleshooting Tips
Consumer Support
Page 12
12
Consumer Support Troubleshooting Tips Care and Cleaning Operating Instructions Safety Instructions
Using the oven.
The size, weight, thickness,
starting temperature
and your preference
of doneness will affect
broiling times. This guide
is based on meats at
refrigerator temperature.
† The U.S. Department of
Agriculture says “Rare beef is
popular, but you should know that
cooking it to only 60°C (140°F).
means some food poisoning
organisms may survive.” (Source:
Safe Food Book. Your Kitchen
Guide. USDA Rev. June 1985.)
The oven has 6 rack positions.
Quantity and/ Rack* First Side Second Side
Food or Thickness Position Time (min.) Time (min.) Comments
Ground Beef 454 g (1 lb.) (4 patties) C 10 7–10 Space evenly.
1.25 to 1.9 cm (1⁄2 to 3⁄4″) thick
1.8 kg (4 lbs.) (16 patties) C 15 11
Beef Steaks
Rare† 1.9 to 2.5 cm (3⁄4 to 1″) thick E 6 4 Steaks less than 1.9 cm
Medium 454 to 680 g (1 to 1 1⁄2 lbs.) D 8 6 (3⁄4″) thick are difficult
Well Done D 10 7–10 to cook rare.
Slash fat.
Rare† 3.8 cm (1 1⁄2″) thick C 10 8
Medium
900 g to 1.14 kg (2 to 2 1⁄2 lbs.)
C 15 10–12
Well Done D 20 20
Chicken 1 whole cut up B 25 25 Brush each side with
900 g to 1.14 kg (2 to 2 1⁄2 lbs.),
melted butter.
split lengthwise Broil skin-side-down
Breast B 25 15 first.
Bakery Product
Bread (toast) 2 to 4 slices D 3 1 Space evenly. Place
English Muffin 2 (split) E 3-4 English muffins cut-
side-up and brush
with butter if desired.
Lobster Tails 2–4 B 18–20 Do not Cut through back of
turn shell. Spread open.
over. Brush with melted
butter before broiling
and after half of
broiling time.
Fish Fillets 454 g (1 lb.) (0.6 to 1.25 cm D 5 5 Handle and turn very
[1⁄4 to 1⁄2″] thick) carefully. Brush with
lemon butter before
and during cooking,
if desired.
Salmon
Steaks 2 (2.5 cm [1″] thick) D 10 5 Turn carefully. Do not
Fillets
2 (0.6 to 1.25 cm [1⁄2 to 3⁄4″] thick)
D 10 turn skin side down.
Ham Slices 1.25 cm (1⁄2″) thick C 6 6
(precooked) 2.5 cm (1″) thick C 8 8
Pork Chops 2 (1.25 cm [1⁄2″] thick) C 10 10 Slash fat.
Well Done
2 (2.5 cm [1″] thick) about 450 g (1 lb.)
C15 15
Lamb Chops
Medium 2 (2.5 cm [1″] thick) about D 7 4 Slash fat.
Well Done 312 to 375 g (10 to 12 oz.) D 10 9
Medium
2 (3.8 cm [11⁄2″] thick) about 450 g (1 lb.)
D9 6
Well Done D 14 10
Broiling Guide
*See illustration for description of rack positions.
If your range is connected to 208 volts,
rare steaks may be broiled by preheating
the broiler and positioning the oven rack
one position higher.
How to Set the Oven for Broiling
Leave the door open to the broil stop position.
The door stays open by itself, yet the proper
temperature is maintained in the oven.
Place the meat or fish on the broiler
grid in the broiler pan.
Follow suggested rack positions in
the Broiling Guide.
Touch the BROIL pad once for
HI Broil.
To change to LO Broil, touch the
BROIL pad again.
Use LO Broil to cook foods such as
poultry or thick cuts of meat thoroughly
without over-browning them.
Touch the START pad.
When broiling is finished, touch the
OFF pad.
Page 13
13
Safety Instructions
Operating Instructions
Safety Instructions
Operating Instructions Care and Cleaning
Troubleshooting Tips
Consumer Support
Using the timed baking and roasting features.
www.GEAppliances.ca
NOTE: Foods that spoil easily—such as milk, eggs, fish, stuffings, poultry and pork—should not be allowed to sit for
more than 1 hour before or after cooking. Room temperature promotes the growth of harmful bacteria. Be sure that
the oven light is off because heat from the bulb will speed harmful bacteria growth.
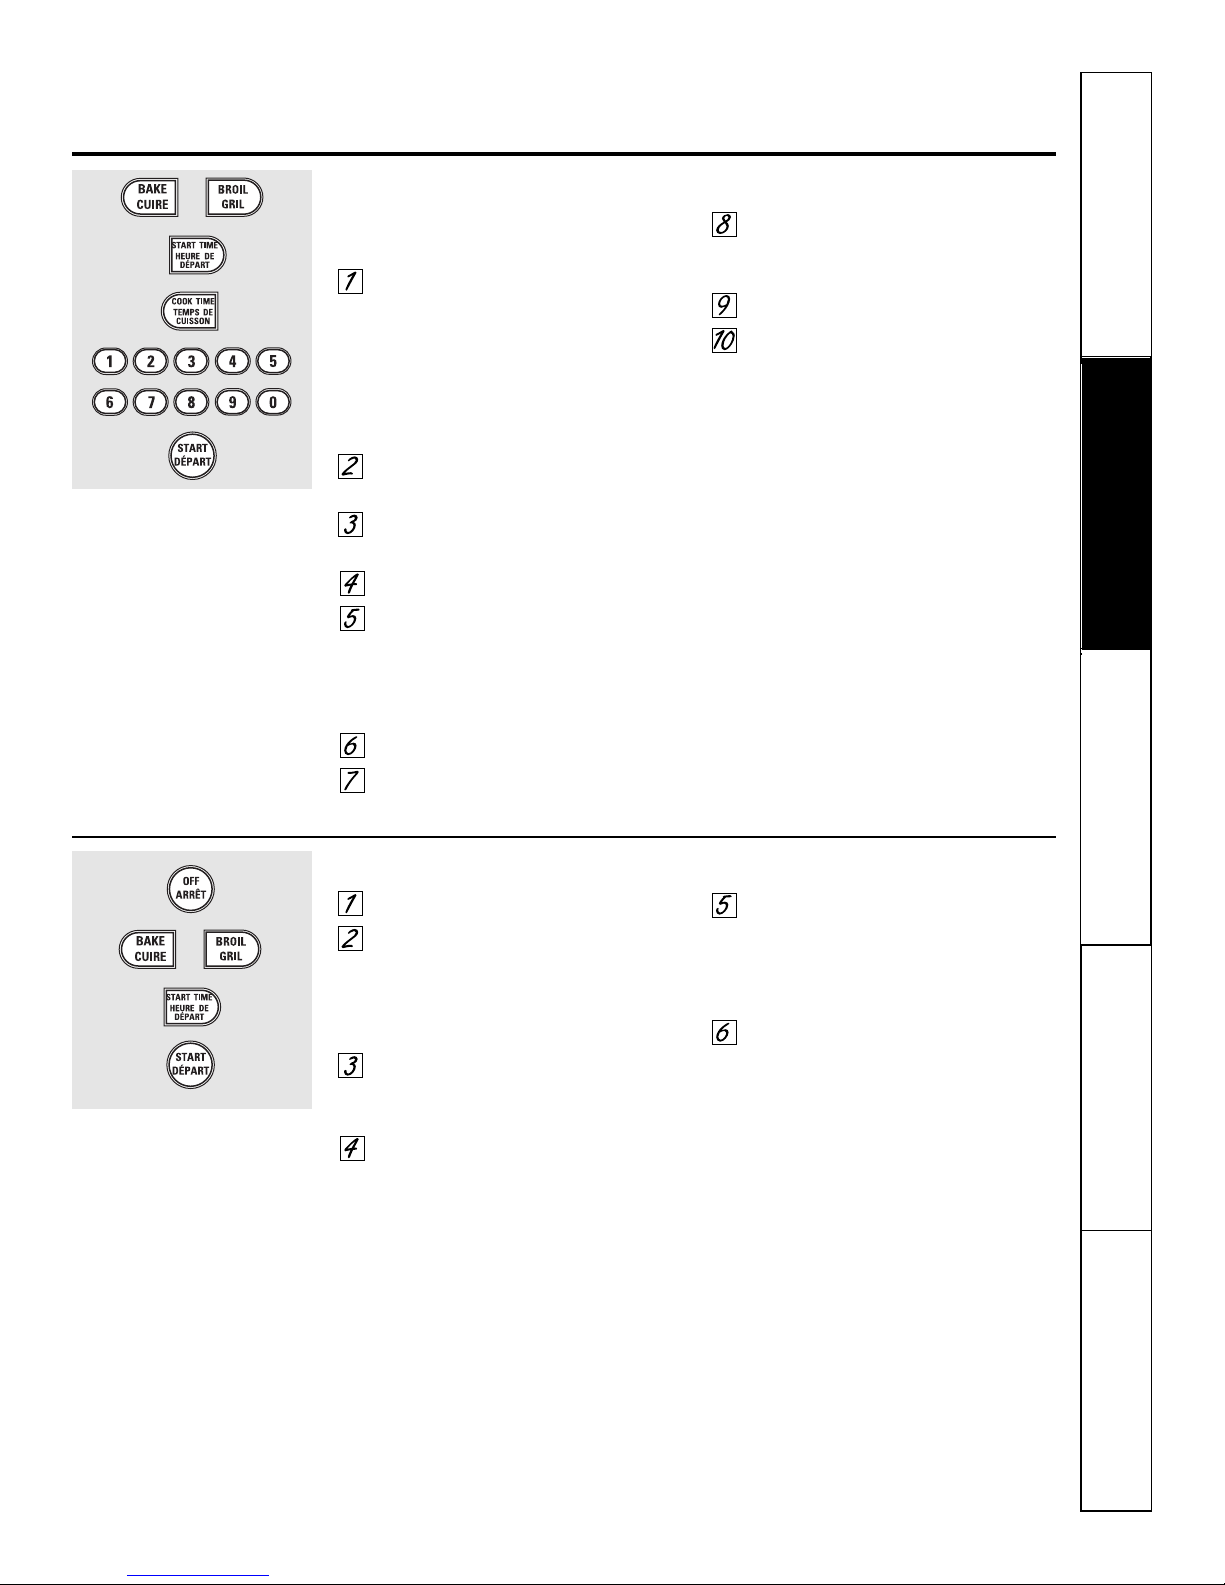
How to Set an Immediate Start and Automatic Stop
The oven will turn on immediately and cook for
a selected length of time. At the end of the
cooking time the oven will turn off automatically.
Touch the BAKE pad.
Touch the number pads to set the
desired oven temperature.
Touch the COOK TIME pad.
NOTE: If your recipe requires preheating, you may
need to add additional time to the length of the
cooking time.
Touch the number pads to set the
desired length of cooking time. The
minimum cooking time you can set
is 1 minute.
The oven temperature that you set
and the cooking time that you
entered will be in the display.
Touch the START pad.
NOTE: An attention tone will sound if you are using
timed baking and do not touch the START pad.
The oven will turn ON, and the display will
show the cooking time countdown and the
changing temperature starting at 38°C
(100°F). (The temperature display will
start to change once the oven temperature
reaches 38°C [100°F].) When the oven
reaches the temperature you set, 3 beeps
will sound.
The oven will continue to cook for
the set amount of time, then turn off
automatically.
Touch the OFF pad to clear the
display if necessary. Remove the
food from the oven. Remember,
even though the oven turns off
automatically, food left in the oven
will continue cooking after the
oven turns off.
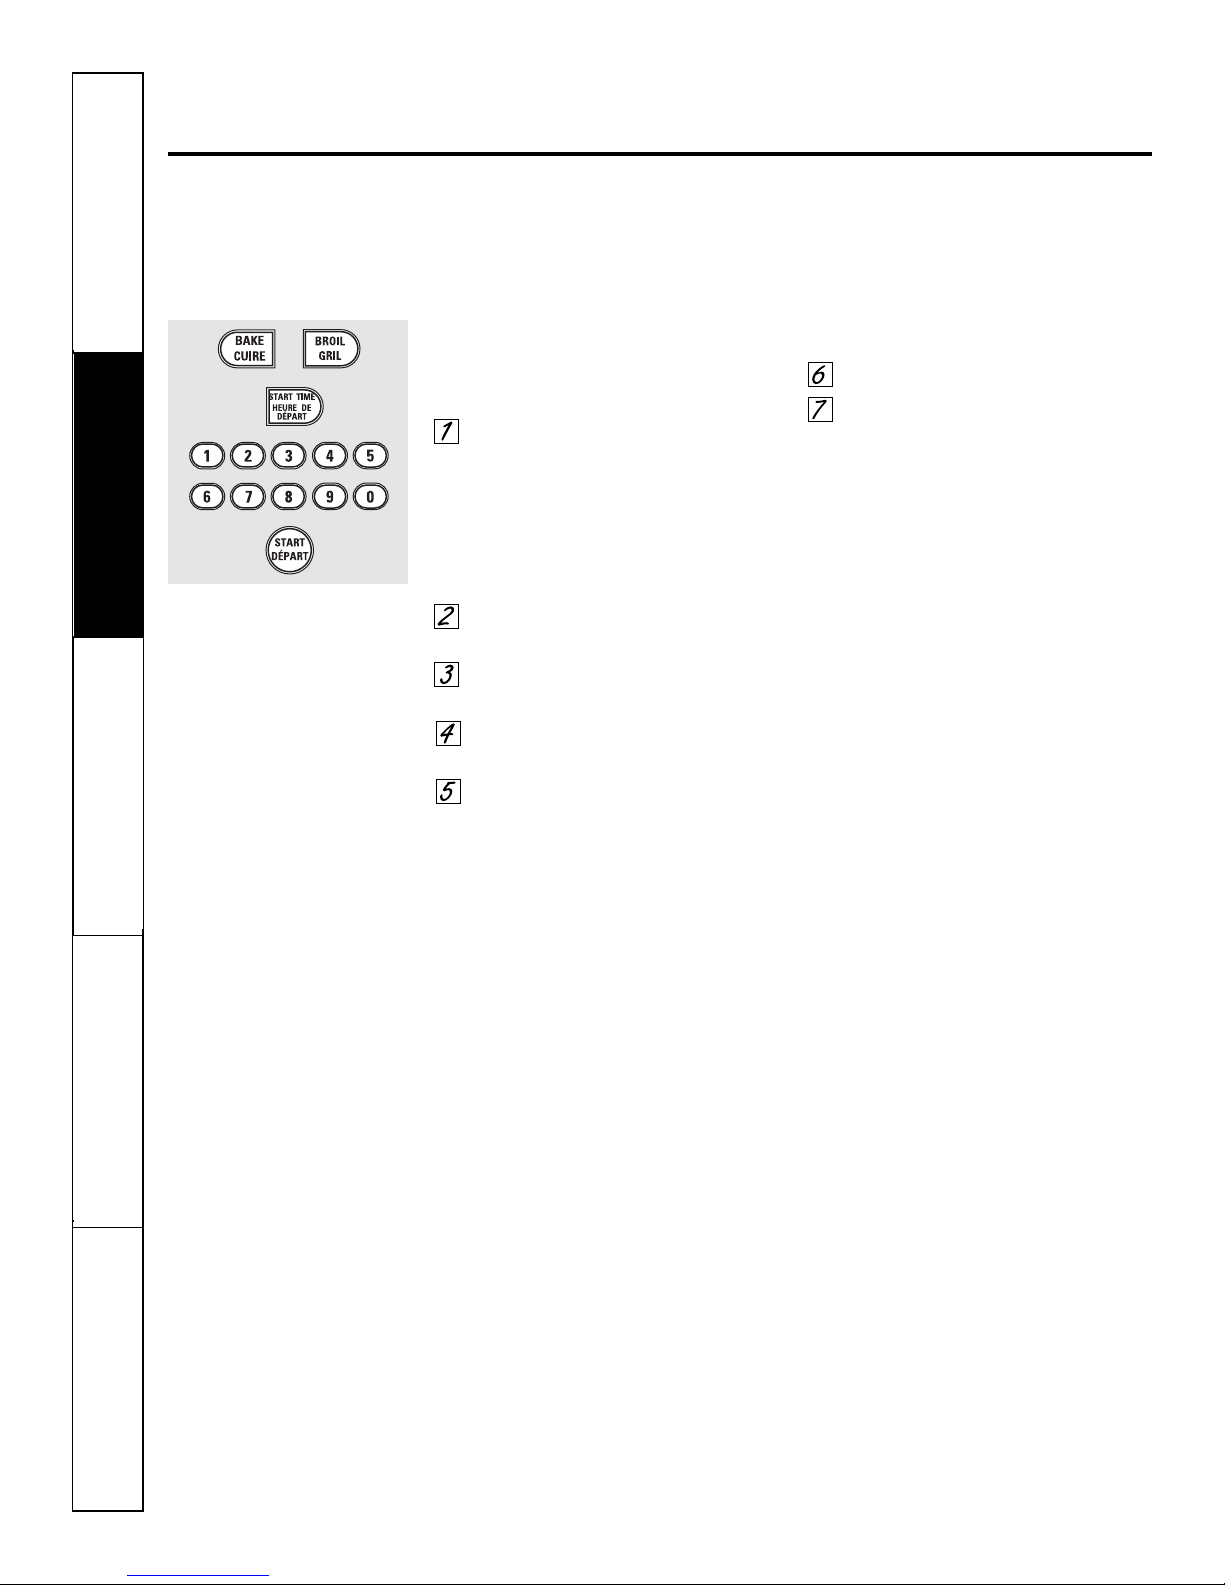
How to Set a Delayed Start and Automatic Stop
The oven will turn on at the time of day you set,
cook for a specific length of time and then turn off
automatically.
Make sure the clock shows the correct
time of day.
Touch the BAKE pad.
Touch the number pads to set the
desired oven temperature.
Touch the COOK TIME pad.
NOTE: If your recipe requires preheating, you may
need to add additional time to the length of the
cooking time.
Touch the number pads to set the
desired length of cooking time. The
minimum cooking time you can set
is 1 minute.
The oven temperature that you set
and the cooking time that you
entered will be in the display.
Touch the START TIME pad.
Touch the number pads to set the
time of day you want the oven to
turn on and start cooking.
Touch the START pad.
NOTE: An attention tone will sound if you are using
timed baking and do not touch the START pad.
NOTE: If you would like to check the times
you have set, touch the START TIME pad to
check the start time you have set or touch the
COOK TIME pad to check the length of cooking
time you have set.
When the oven turns ON at the time
of day you set, the display will show the
cooking time countdown and the
changing temperature starting at 38°C
(100°F). (The temperature display will
start to change once the oven
temperature reaches 38°C [100°F].)
When the oven reaches the temperature
you set, beeps will sound.
The oven will continue to cook for
the set amount of time, then turn off
automatically.
Touch the OFF pad to clear the
display if necessary. Remove the
food from the oven. Remember,
even though the oven turns off
automatically, food left in the oven
will continue cooking after the
oven turns off.
Page 14
Consumer Support Troubleshooting Tips Care and Cleaning Operating Instructions Safety Instructions
14
Make sure the clock is set to the
correct time of day.
The Timer is a minute timer only.
The Timer does not control oven
operations. The maximum setting on
the Timer is 9 hours and 59 minutes.
Using the clock, kitchen timer and convenience outlet.
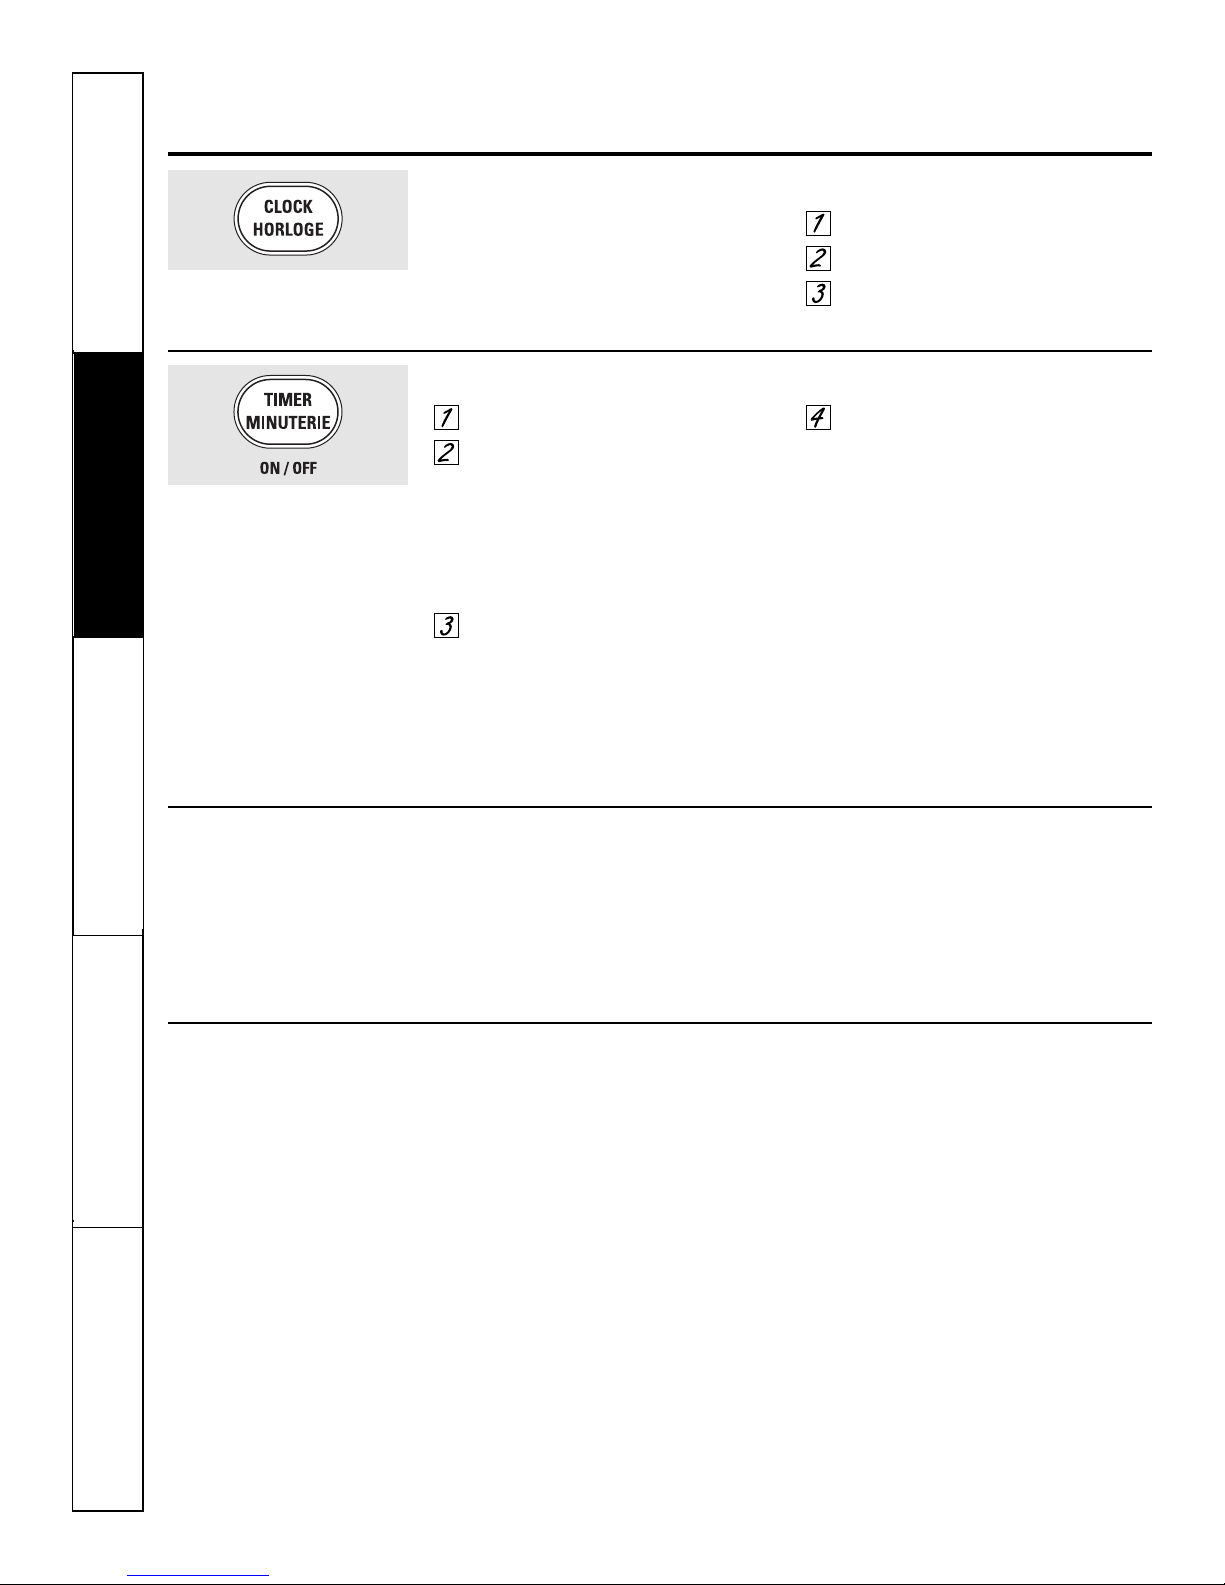
To Set the Clock
The clock must be set to the correct time
of day for the automatic oven timing
functions to work properly. The time of
day cannot be changed during a timed
baking or self-cleaning cycle.
Touch the CLOCK pad.
Touch the number pads.
Touch the START pad.
To Set the Timer
Touch the TIMER pad.
Touch the number pads until the
amount of time you want shows
in the display. For example, to set
2 hours and 45 minutes, touch 2, 4
and 5 in that order. If you make a
mistake touch the TIMER pad and
begin again.
Touch the START pad.
After touching the START pad, SET disappears;
this tells you the time is counting down, although
the display does not change until one minute has
passed. Seconds will not be shown in the display
until the last minute is counting down.
When the Timer reaches :00, the
control will beep 3 times followed
by one beep every 6 seconds until
the TIMER pad is touched.
The 6-second tone can be canceled by following
the steps in the Special features of your oven
control section under Tones at the End of a
Timed Cycle.
To Reset the Timer
If the display is still showing the
time remaining, you may change it by
touching the TIMER pad, then touch the
number pads until the time you want
appears in the display.
If the remaining time is not in the display
(clock, delay start or cooking time are in
the display), recall the remaining time by
touching the TIMER pad and then
touching the number pads to enter the
new time you want.
To Cancel the Timer
Touch the TIMER pad twice.
Page 15

Safety Instructions
Operating Instructions
Safety Instructions
Operating Instructions Care and Cleaning
Troubleshooting Tips
Consumer Support
15
Adjust the oven thermostat—Do it yourself!
www.GEAppliances.ca
You may find that your new oven cooks differently than the one it replaced. Use your new oven for a few weeks to
become more familiar with it. If you still think your new oven is too hot or too cold, you can adjust the thermostat
yourself.
Do not use thermometers such as those found in grocery stores to check the temperature setting of your oven.
These thermometers may vary 6–11 degrees C (20–40 degrees F).
NOTE: This adjustment will only affect baking and roasting temperatures; it will not affect broiling or self-cleaning
temperatures. The adjustment will be retained in memory after a power failure.
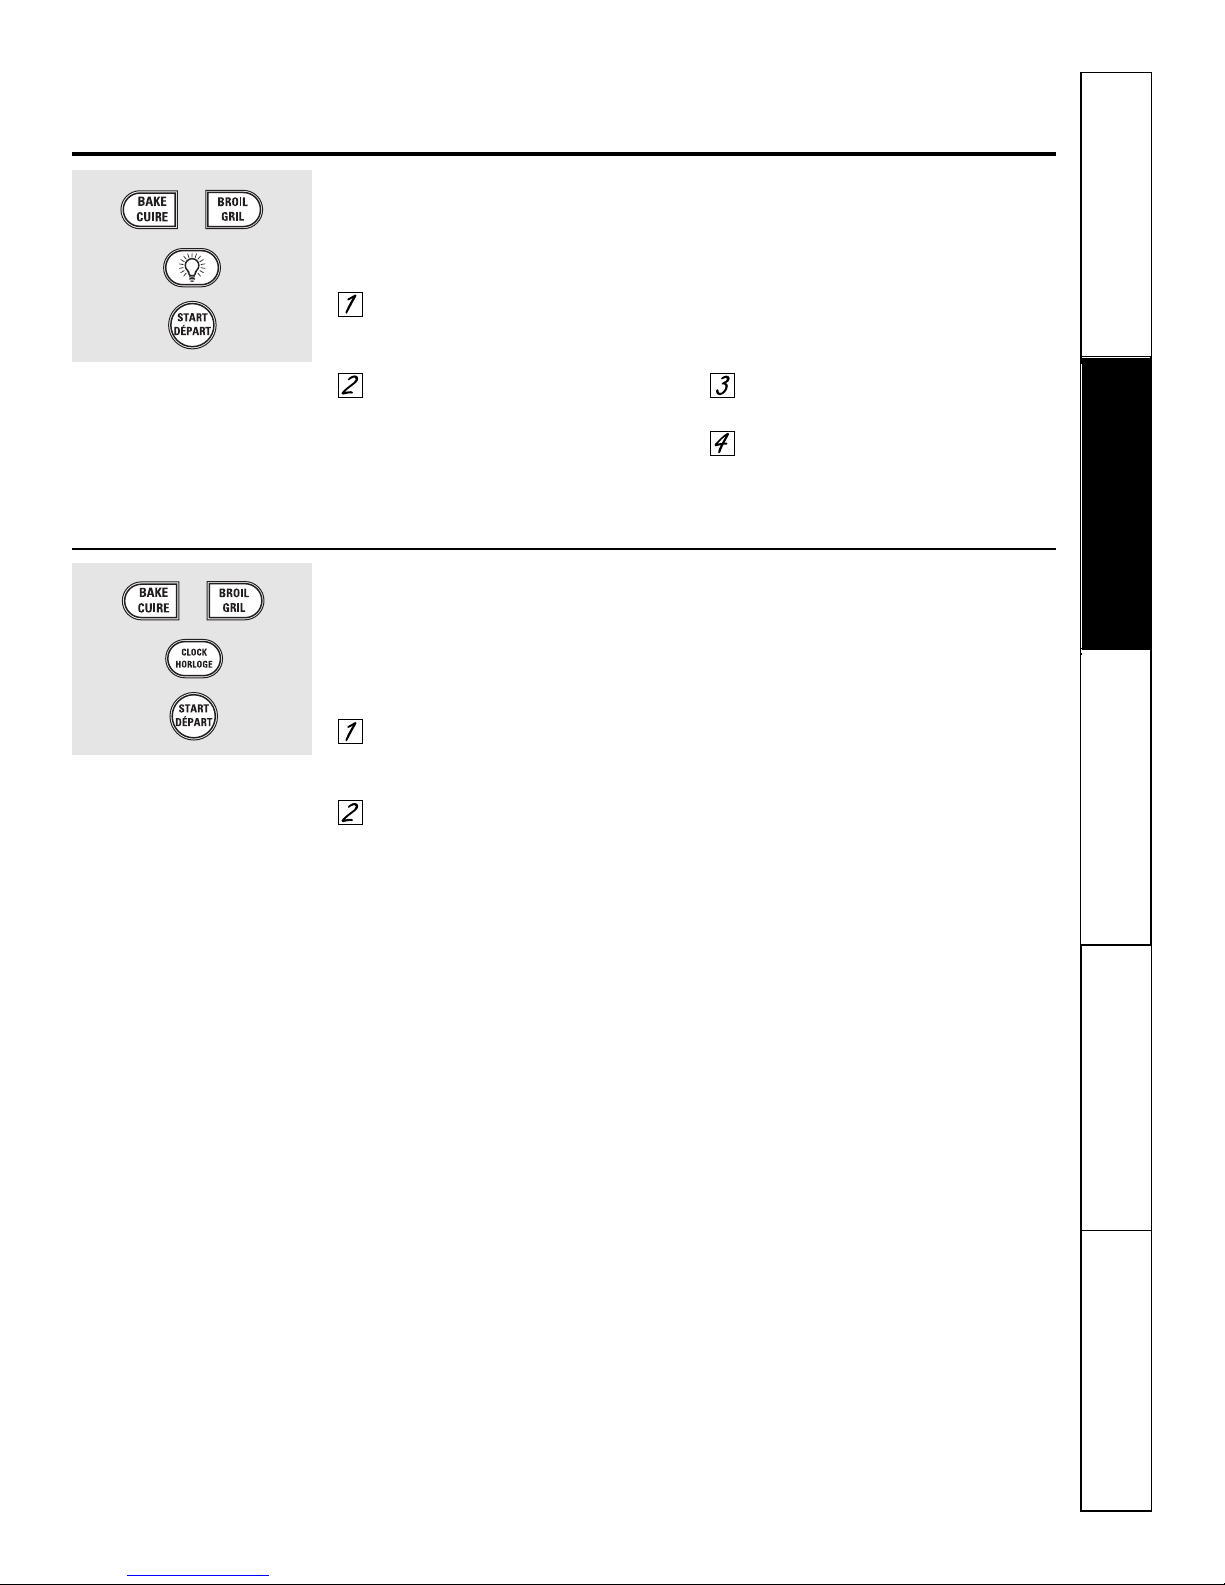
To Adjust the Thermostat
Touch the BAKE and BROIL pads at
the same time for 3 seconds until
the display shows SF.
Touch the BAKE pad. A two digit
number shows in the display.
Touch BAKE again to alternate
between increasing and decreasing
the oven temperature.
The oven temperature can be
adjusted up to (+) 19°C (35ºF)
hotter or (-) 19°C (35ºF) cooler.
Touch the number pads the same
way you read them. For example, to
change the oven temperature 12°C
(15ºF), touch 1 and 5.
When you have made the
adjustment, touch the START pad to
go back to the time of day display.
Use your oven as you would normally.
The type of margarine will affect baking performance!
Most recipes for baking have been developed using high fat products such as butter or margarine (80% fat).
If you decrease the fat, the recipe may not give the same results as with a higher fat product.
Recipe failure can result if cakes, pies, pastries, cookies or candies are made with low fat spreads. The lower the
fat content of a spread product, the more noticeable these differences become.
Federal standards require products labeled “margarine” to contain at least 80% fat by weight. Low fat spreads, on the
other hand, contain less fat and more water. The high moisture content of these spreads affects the texture and flavor
of baked goods. For best results with your old favorite recipes, use margarine, butter or stick spreads containing at least
70% vegetable oil.
+
Page 16
16
Consumer Support Troubleshooting Tips Care and Cleaning Operating Instructions Safety Instructions
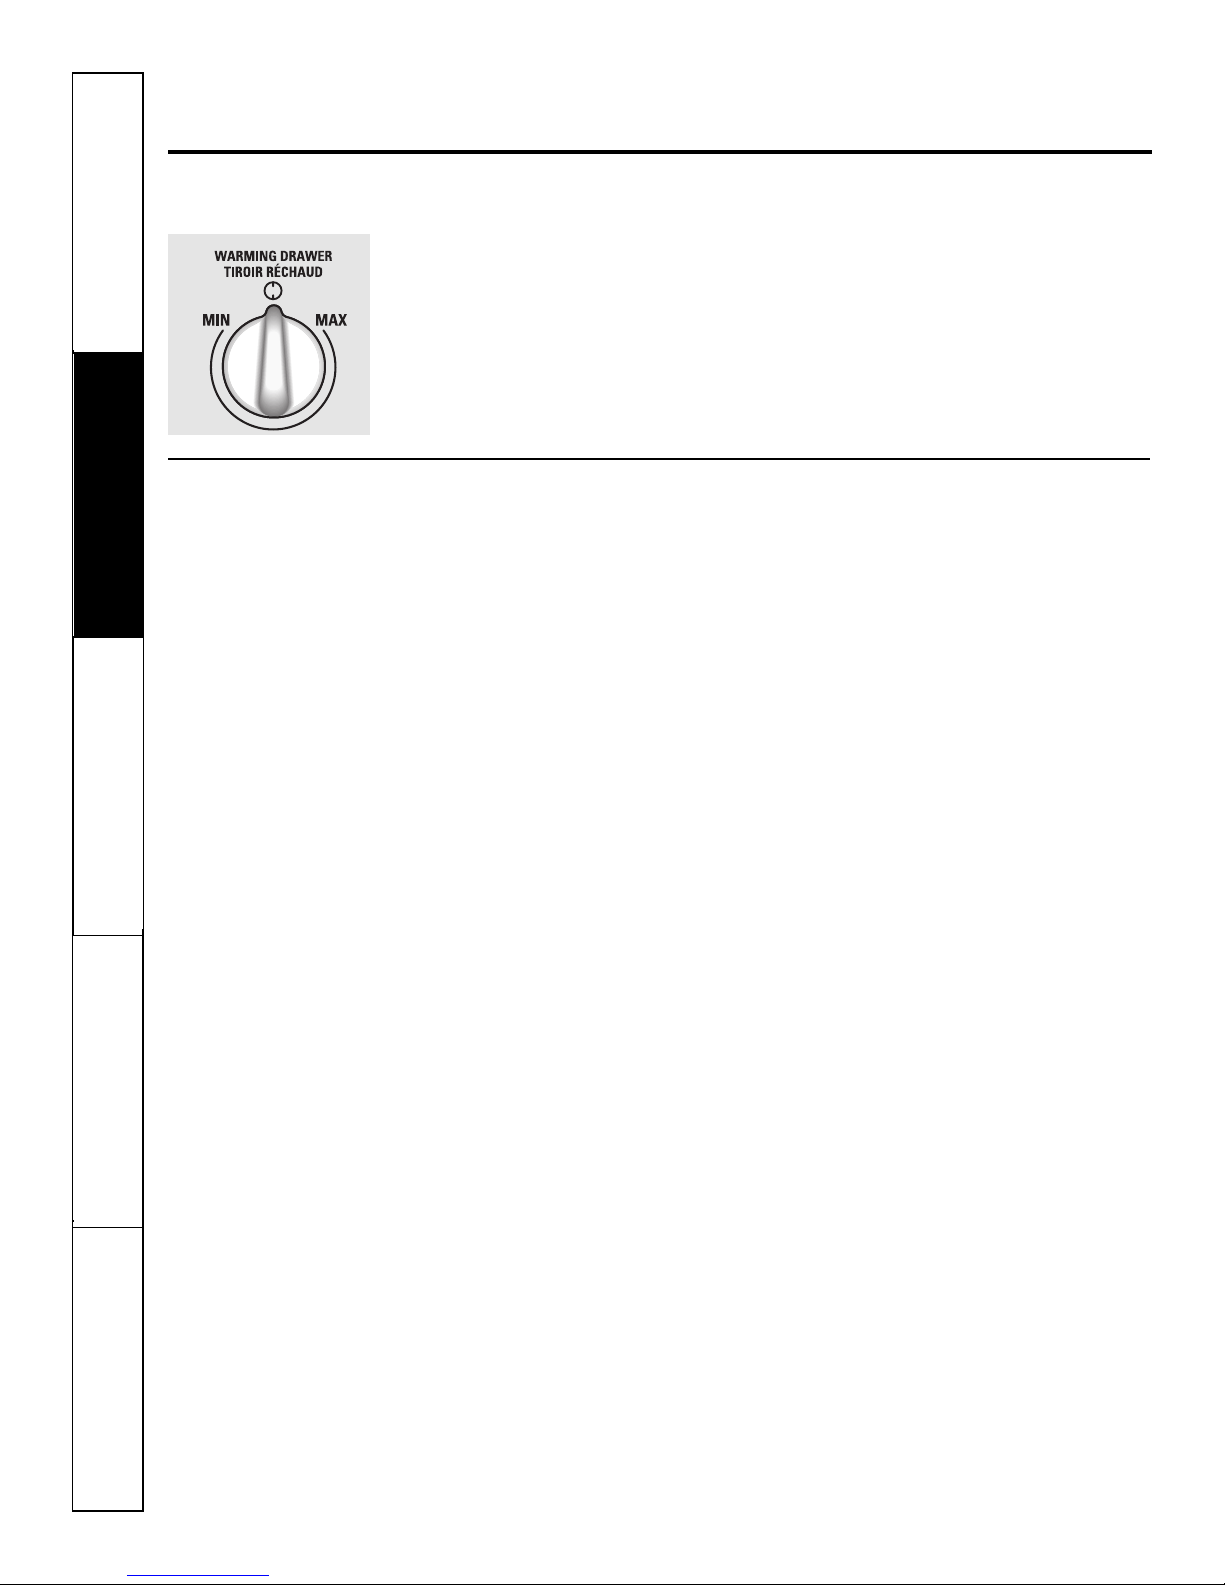
The warming drawer will keep hot, cooked foods at serving temperature. Always start with hot food. Do not
use to heat cold food other than crisping crackers, chips or dry cereal.
Using the warming drawer. (on some models)
To Use the Warming Drawer
Push and turn the control knob to any
desired setting.
When Using the Warming Drawer
The warming drawer will keep hot,
cooked foods warm. Always start with hot
food. Do not use to heat cold food other
than crisping crackers, chips or dry cereal.
Do not line the warming drawer or pan
with aluminum foil. Foil is an excellent heat
insulator and will trap heat beneath it. This
will upset the performance of the drawer
and could damage the interior finish.
Allow approximately 25 minutes for the
warming drawer to preheat.
■ Do not put liquid or water in the
warming drawer.
■ All foods placed in the warming drawer
should be covered with a lid or
aluminum foil. When warming pastries
or breads, the cover should be vented
to allow moisture to escape.
■ Food should be kept hot in its cooking
container or transferred to a heat-safe
serving dish.
CAUTION: Plastic containers or plastic wrap will
melt if in direct contact with the drawer, pan or a hot
utensil. Melted plastic may not be removable and is
not covered under your warranty.
■ Remove serving spoons, etc., before
placing containers in warming drawer.
Page 17

17
Safety Instructions
Operating Instructions
Safety Instructions
Operating Instructions Care and Cleaning
Troubleshooting Tips
Consumer Support
Temperature Selection Chart
To keep several different foods hot,
set the control to the food needing the
highest setting.
■ The temperature, type and amount
of food, and the time held will affect
the quality of the food.
■ Repeated opening of the drawer allows
the hot air to escape and the food
to cool.
■ With large loads it may be necessary to
use a higher warming drawer setting
and cover some of the cooked food
items.
■ Do not use plastic containers or
plastic wrap.
CAUTION: Do not keep food in the warming
drawer for more than two hours.
Food Type Control Setting
Bacon MAX
Breads MIN
Casserole Medium
Chicken, fried MAX
Ham MAX
Muffins MIN
Pies MIN
Pizza MAX
Potatoes, baked MAX
Tortilla Chips MIN
To Crisp Stale Items
■ Place food in low-sided dishes or pans.
■ Preheat on MIN setting.
■ Check crispness after 45 minutes. Add
time as needed.
To Warm Serving Bowls and Plates
To warm serving bowls and plates, set the
control on MIN.
■ Use only heat-safe dishes.
■ If you want to heat fine china, please
check with the manufacturer of the
dishes for their maximum heat
tolerance.
■ You may warm empty serving dishes
while preheating the drawer.
CAUTION: Dishes will be hot. Use pot holders or
mitts when removing hot dishes.
www.GEAppliances.ca
Page 18
Consumer Support Troubleshooting Tips Care and Cleaning Operating Instructions Safety Instructions
18
Wipe up heavy soil on the oven
bottom.
Using the self-cleaning oven.
The oven door must be closed and all controls set correctly for the cycle to work properly.
Before a Clean Cycle
We recommend venting your kitchen
with an open window or using a
ventilation fan or hood during the
first self-clean cycle.
Remove the racks, broiler pan, broiler
grid, all cookware and any aluminum foil
from the oven.
NOTE: If your oven is equipped with gray
porcelain-coated oven racks, they may be
left in the oven during the self-clean
cycle.
Soil on the front frame of the range and
outside the gasket on the door will need
to be cleaned by hand. Clean these areas
with hot water, soap-filled steel-wool pads
or cleansers such as Soft Scrub®. Rinse
well with clean water and dry.
Do not clean the gasket. The fiberglass
material of the oven door gasket cannot
withstand abrasion. It is essential for the
gasket to remain intact. If you notice it
becoming worn or frayed, replace it.
Wipe up any heavy spillovers on the
oven bottom.
Make sure the oven light bulb cover is
in place and the oven light is off.
IMPORTANT: The health of some birds is
extremely sensitive to the fumes given off during
the self-cleaning cycle of any range. Move birds
to another well-ventilated room.
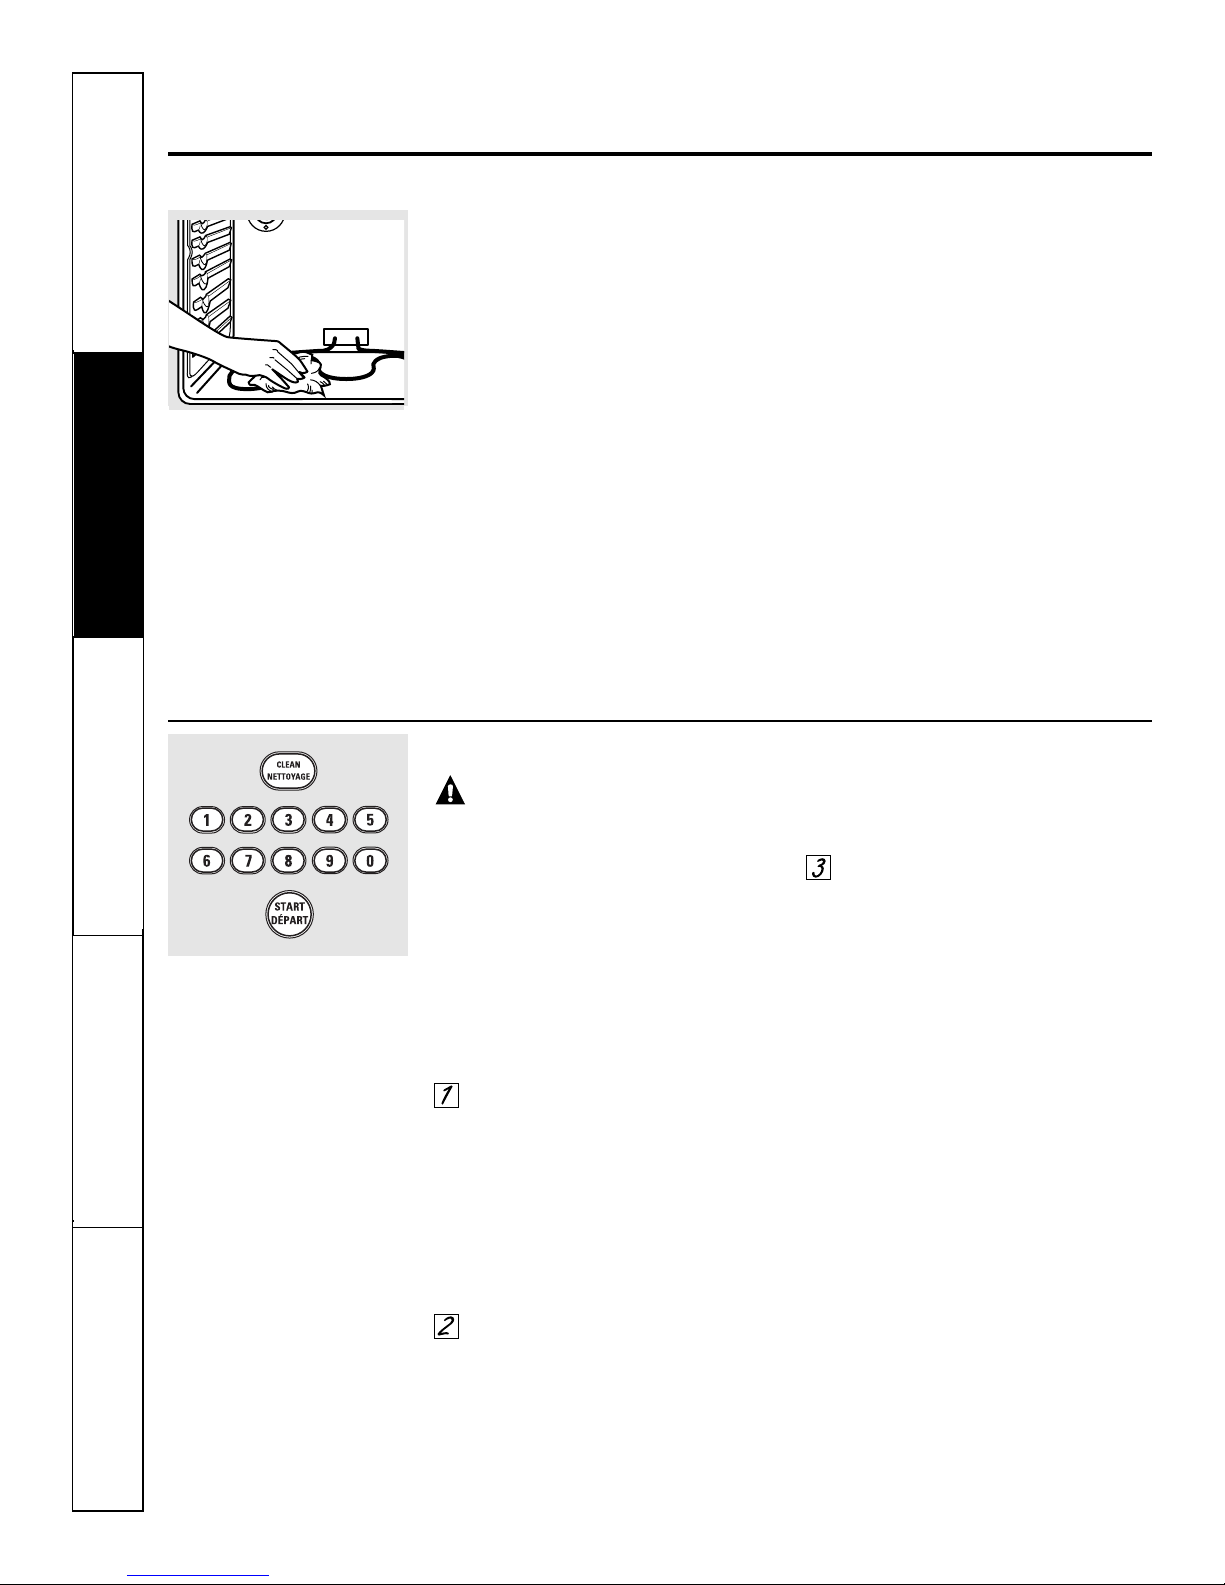
How to Set the Oven for Cleaning
WARNING: The surface
units are automatically disabled during
the self-clean cycle. Make sure that all
surface unit controls are turned off at all
times during the self-clean cycle. Any
surface unit that is set to an on position,
while the self-clean cycle is operating, will
automatically come on after the self-clean
cycle is finished, and could result in an
on, unattended surface unit. Wait until
the self-clean cycle is finished to set and
use the surface units.
Touch the CLEAN pad once for a
4-hour clean time or twice for a
3-hour clean time.
A 3-hour self-clean time is
recommended for use when
cleaning small, contained spills.
A self-clean time of 4 hours or
longer is recommended for
a dirtier oven.
If a time other than 4 hours or
3 hours is needed, use the number
pads and enter the desired
clean time.
You can change the clean time to any
time between 2
1
⁄2
hours and 5 hours,
depending on how dirty your oven is.
Touch the START pad.
The door locks automatically. The display
will show the clean time remaining. It will
not be possible to open the oven door
until the temperature drops below the
lock temperature and the LOCKED light
goes off.
When the LOCKED light goes off, you will
be able to open the door.
■ The word LOCKED will flash and the
word door will display if you set the
clean cycle and forget to close the
oven door.
■ To stop a clean cycle, touch the OFF
pad. When the LOCKED light goes off
indicating the oven has cooled below
the locking temperature, you
will be able to open the door.
Page 19
Safety Instructions
Operating Instructions
Safety Instructions
Operating Instructions Care and Cleaning
Troubleshooting Tips
Consumer Support
19
www.GEAppliances.ca
How to Delay the Start of Cleaning
Touch the CLEAN pad once for a
4-hour clean time or twice for a
3-hour clean time.
A 3-hour self-clean time is
recommended for use when
cleaning small, contained spills.
A self-clean time of 4 hours or
longer is recommended for
a dirtier oven.
If a time other than 4 hours or
3 hours is needed, use the number
pads and enter the desired
clean time.
You can change the clean time to any
time between 21⁄2
hours and 5 hours,
depending on how dirty your oven is.
Touch the START TIME pad.
Using the number pads, enter the
time of day you want the clean cycle
to start.
Touch the START pad.
The door locks automatically. The display
will show the start time. It will not be
possible to open the oven door until
the temperature drops below the lock
temperature and the LOCKED light
goes off.
When the LOCKED light goes off, you
will be able to open the door.
After a Clean Cycle
You may notice some white ash in the
oven. Wipe it up with a damp cloth after
the oven cools.
If white spots remain, remove them with
a soap-filled steel wool pad and rinse
thoroughly with a vinegar and water
mixture.
These deposits are usually a salt residue
that cannot be removed by the clean
cycle.
If the oven is not clean after one clean
cycle, repeat the cycle.
■ You cannot set the oven for cooking or another
self-clean cycle until the oven is cool enough
for the door to unlock.
■ While the oven is self-cleaning, you can touch
the CLOCK pad to display the time of day.
To return to the clean countdown, touch the
CLEAN pad.
■ If the racks become hard to slide, apply a small
amount of cooking oil to a paper towel and
wipe the edges of the oven racks with the
paper towel.
Page 20

20
Consumer Support Troubleshooting Tips Care and Cleaning Operating Instructions Safety Instructions
Special features of your oven control.
Your new touch pad control has additional features that you may choose to use. The following are the features and
how you may activate them.
The special feature modes can only be activated while the display is showing the time of day. They remain in the
control’s memory until the steps are repeated.
When the display shows your choice, touch the START pad. The special features will remain in memory after
a power failure, except for the Sabbath feature, which will have to be reset.
12-Hour Shutdown
With this feature, should you forget and leave the
oven on, the control will automatically turn off
the oven after 12 hours during baking functions
or after 3 hours during a broil function.
If you wish to turn OFF this feature, follow
the steps below.
Touch the BAKE and BROIL pads at
the same time for 3 seconds until
the display shows SF.
Touch the START TIME pad until
no shdn (no shut-off) appears in the
display.
Touch the START pad to activate the
no shut-off and leave the control
set in this special features mode.
Fahrenheit or Celsius Temperature Selection
Your oven control is set to use the Fahrenheit
temperature selections but you may change this
to use the Celsius selections.
Touch the BAKE and BROIL pads at
the same time for 3 seconds until
the display shows SF.
Touch the COOK TIME and BROIL
pads at the same time. The display
will show F (Fahrenheit).
Touch the COOK TIME and BROIL
pads again at the same time. The
display will show C (Celsius).
Touch the START pad.
Tones at the End of a Timed Cycle
At the end of a timed cycle, 3 short beeps will
sound followed by one beep every 6 seconds
until the OFF pad is touched. This continual
6-second beep may be canceled.
To cancel the 6-second beep:
Touch the BAKE and BROIL pads at
the same time for 3 seconds until
the display shows SF.
Touch the TIMER pad. The display
shows CON BEEP (continuous beep).
Touch the TIMER pad again. The
display shows BEEP. (This cancels the
one beep every 6 seconds.)
Touch the START pad.
+
+
+
+
Page 21
21
Safety Instructions
Operating Instructions Care and Cleaning
Troubleshooting Tips
Consumer Support
www.GEAppliances.ca
Tone Volume
This feature allows you to adjust the tone volumes
to a more acceptable volume. There are three
possible volume levels.
Touch the BAKE and BROIL pads at
the same time for 3 seconds, until
the display shows SF.
Touch the LIGHT pad. The display
will show 2 BEEP. This is the middle
volume level.
Touch the LIGHT pad again. The
display will show 3 BEEP. This is the
loudest volume level.
Touch the LIGHT pad again. The
display will show 1 BEEP. This is the
quietest volume level.
For each time the level is changed,
a tone will sound to provide an
indication of the volume level.
Choose the desired sound level
(1 BEEP, 2 BEEP, 3 BEEP).
Touch the START pad to activate
the level shown.
12-Hour, 24-Hour or Clock Blackout
Your control is set to use a 12-hour clock.
If you would prefer to have a 24-hour
military time clock or black out the clock
display, follow the steps below.
Touch the BAKE and BROIL
pads at the same time for 3 seconds
until the display shows SF.
Touch the CLOCK pad once. The
display will show 12 hr. If this is
the choice you want, touch the
START pad.
Touch the CLOCK pad again to
change to the 24 hour military time
clock. The display will show 24 hr.
If this is the choice you want, touch
the START pad.
Touch the CLOCK pad again to black
out the clock display. The display will
show OFF. If this is the choice you
want, touch the START pad.
NOTE: If the clock is in the black-out mode you
will not be able to use the Delay Start function.
+
+
Page 22
22
Consumer Support Troubleshooting Tips Care and Cleaning Operating Instructions Safety Instructions
When the display shows ⊃ the
oven is set in Sabbath. When the
display shows ⊃ the oven is
baking/roasting.
⊃
Using the Sabbath feature.
(on some models)
(Designed for use on the Jewish Sabbath and Holidays)
The Sabbath feature can be used for baking/roasting only. It cannot be used for broiling, self-cleaning
or Delay Start cooking.
NOTE: The oven light comes on automatically (on some models) when the door is opened and goes off when the
door is closed. The bulb may be removed. See the Oven Light Replacement section. On models with a light switch
on the control panel, the oven light may be turned on and left on.
How to Set for Regular Baking/Roasting
Make sure the clock shows the correct time of
day and the oven is off.
Touch and hold both the BAKE and
BROIL pads, at the same time, until
the display shows SF.
NOTE: If bake or broil appears in the
display, the BAKE and BROIL pads were
not touched at the same time. Touch the
OFF pad and begin again.
Tap the START TIME pad until
SAb bAtH appears in the display.
Touch the START pad and ⊃ will
appear in the display.
Touch the BAKE pad. No signal
will be given.
Using the number pads, enter the
desired temperature between 77°C
(170°F) and 288°C (550°F). No
signal or temperature will be given.
Touch the START pad.
After a random delay period of
approximately 30 seconds to
1 minute, ⊃ will appear in the
display indicating that the oven is
baking/ roasting. If ⊃ doesn’t
appear in the display, start again
at Step 4.
To adjust the oven temperature, touch
the BAKE pad, enter the new temperature
using the number pads and touch the
START pad.
NOTE: The OFF and COOK TIME pads are active
during the Sabbath feature.
⊃
⊃
+
Page 23
23
Safety Instructions
Operating Instructions Care and Cleaning
Troubleshooting Tips
Consumer Support
When the display shows ⊃ the
oven is set in Sabbath. When the
display shows ⊃ the oven is
baking/roasting.
⊃
www.GEAppliances.ca
How to Set for Timed Baking/Roasting—Immediate Start and Automatic Stop
Make sure the clock shows the correct time of
day and the oven is off.
Touch and hold both the BAKE and
BROIL pads, at the same time, until
the display shows SF.
NOTE: If bake or broil appears in the
display, the BAKE and BROIL pads were
not touched at the same time. Touch the
OFF pad and begin again.
Tap the START TIME pad until
SAb bAtH appears in the display.
Touch the START pad and ⊃ will
appear in the display.
Touch the COOK TIME pad.
Touch the number pads to set the
desired length of cooking time
between 1 minute and 9 hours and
99 minutes. The cooking time that
you entered will be displayed.
Touch the START pad.
Touch the BAKE pad. No signal will
be given.
Using the number pads, enter the
desired temperature. No signal or
temperature will be given.
Touch the START pad.
After a random delay period of
approximately 30 seconds to 1
minute, ⊃ will appear in the
display indicating that the oven is
baking/roasting. If ⊃ doesn’t
appear in the display, start again at
Step 7.
To adjust the oven temperature, touch
the BAKE pad, enter the new temperature
using the number pads and touch the
START pad.
When cooking is finished, the display
will change from ⊃ to ⊃ and 0:00
will appear, indicating that the oven
has turned OFF but is still set in Sabbath.
Remove the cooked food.
⊃
⊃
⊃
How to Exit the Sabbath Feature
Touch the OFF pad.
If the oven is cooking, wait for
a random delay period of
approximately 30 seconds to
1 minute, until only ⊃ is in the
display.
Touch and hold both the BAKE and
BROIL pads, at the same time, until
the display shows SF.
Tap the START TIME pad until
12 shdn or no shdn appears in the
display.
Choose 12 shdn, indicating that the
oven will automatically turn off after
12 hours or no shdn, indicating that
the oven will not automatically turn
off after 12 hours.
Press START when the option that
you want is in the display (12 shdn or
no shdn).
NOTE: If a power outage occurred while the oven
was in Sabbath, the oven will automatically turn
off and stay off even when the power returns.
The oven control must be reset.
+
+
Page 24
Care and cleaning of the range.
Be sure all controls are off and all surfaces are cool before cleaning any part of the range.
If your range is removed for cleaning, servicing or any reason, be sure the anti-tip
device is re-engaged properly when the range is replaced. Failure to take this
precaution could result in tipping of the range and cause injury.
How to Remove Protective Shipping Film and Packaging Tape
Carefully grasp a corner of the protective
shipping film with your fingers and slowly
peel it from the appliance surface. Do not
use any sharp items to remove the film.
Remove all of the film before using the
appliance for the first time.
To assure no damage is done to the finish
of the product, the safest way to remove
the adhesive from packaging tape on new
appliances is an application of a household
liquid dishwashing detergent. Apply with
a soft cloth and allow to soak.
NOTE: The adhesive must be removed from all
parts. It cannot be removed if it is baked on.
Control Knobs
The control knobs may be removed for easier
cleaning.
Make sure the knobs are in the OFF
positions and pull them straight off the
stems for cleaning.
The knobs can be cleaned in a
dishwasher or they may also be washed
with soap and water. Make sure the insides
of the knobs are dry before replacing.
Replace the knobs in the OFF position
to ensure proper placement.
Oven Vent
The oven vent is located above the right rear
surface unit.
This area could become hot during
oven use.
It is normal for steam to come out of
the vent.
The vent is important for proper air circulation.
Never block this vent.
Control Panel
It’s a good idea to wipe the control panel
after each use of the oven. Use a damp
cloth to clean or rinse. For cleaning, use
mild soap and water or a 50/50 solution
of vinegar and water. For rinsing, use
clean water. Polish dry with a soft cloth.
Do not use abrasive cleansers, strong
liquid cleaners, plastic scouring pads or
oven cleaners on the control panel—
they will damage the finish.
24
Consumer Support Troubleshooting Tips Care and Cleaning Operating Instructions Safety Instructions
Page 25
25
Safety Instructions
Operating Instructions Care and Cleaning
Troubleshooting Tips
Consumer Support
www.GEAppliances.ca
The gasket is designed with a gap at the
bottom to allow for proper air circulation.
Do not rub or clean the door gasket—
it has an extremely low resistance to
abrasion.
If you notice the gasket becoming worn,
frayed or damaged in any way or if it
has become displaced on the door,
you should have it replaced.
Cleaning the Oven Door
To clean the inside of the door:
■ Because the area inside the gasket is cleaned
during the self-clean cycle, you do not need to
clean this by hand.
■ The area outside the gasket and the door liner
can be cleaned with a soap-filled steel wool or
plastic pad, hot water and detergent. Rinse
well with a vinegar and water solution.
To clean the outside of the door:
■ Use soap and water to thoroughly clean the
top, sides and front of the oven door. Rinse
well. You may also use a glass cleaner to clean
the glass on the outside of the door. Do not let
water drip into the vent openings.
■ If any stain on the door vent trim is persistent,
use a soft abrasive cleaner and a spongescrubber for best results.
■ Spillage of marinades, fruit juices, tomato
sauces and basting materials containing acids
may cause discoloration and should be wiped
up immediately. When surface is cool, clean
and rinse.
■ Do not use oven cleaners, cleaning powders or
harsh abrasives on the outside of the door.
The door is very heavy. Be careful when
removing and lifting the door.
Do not lift the door by the handle.
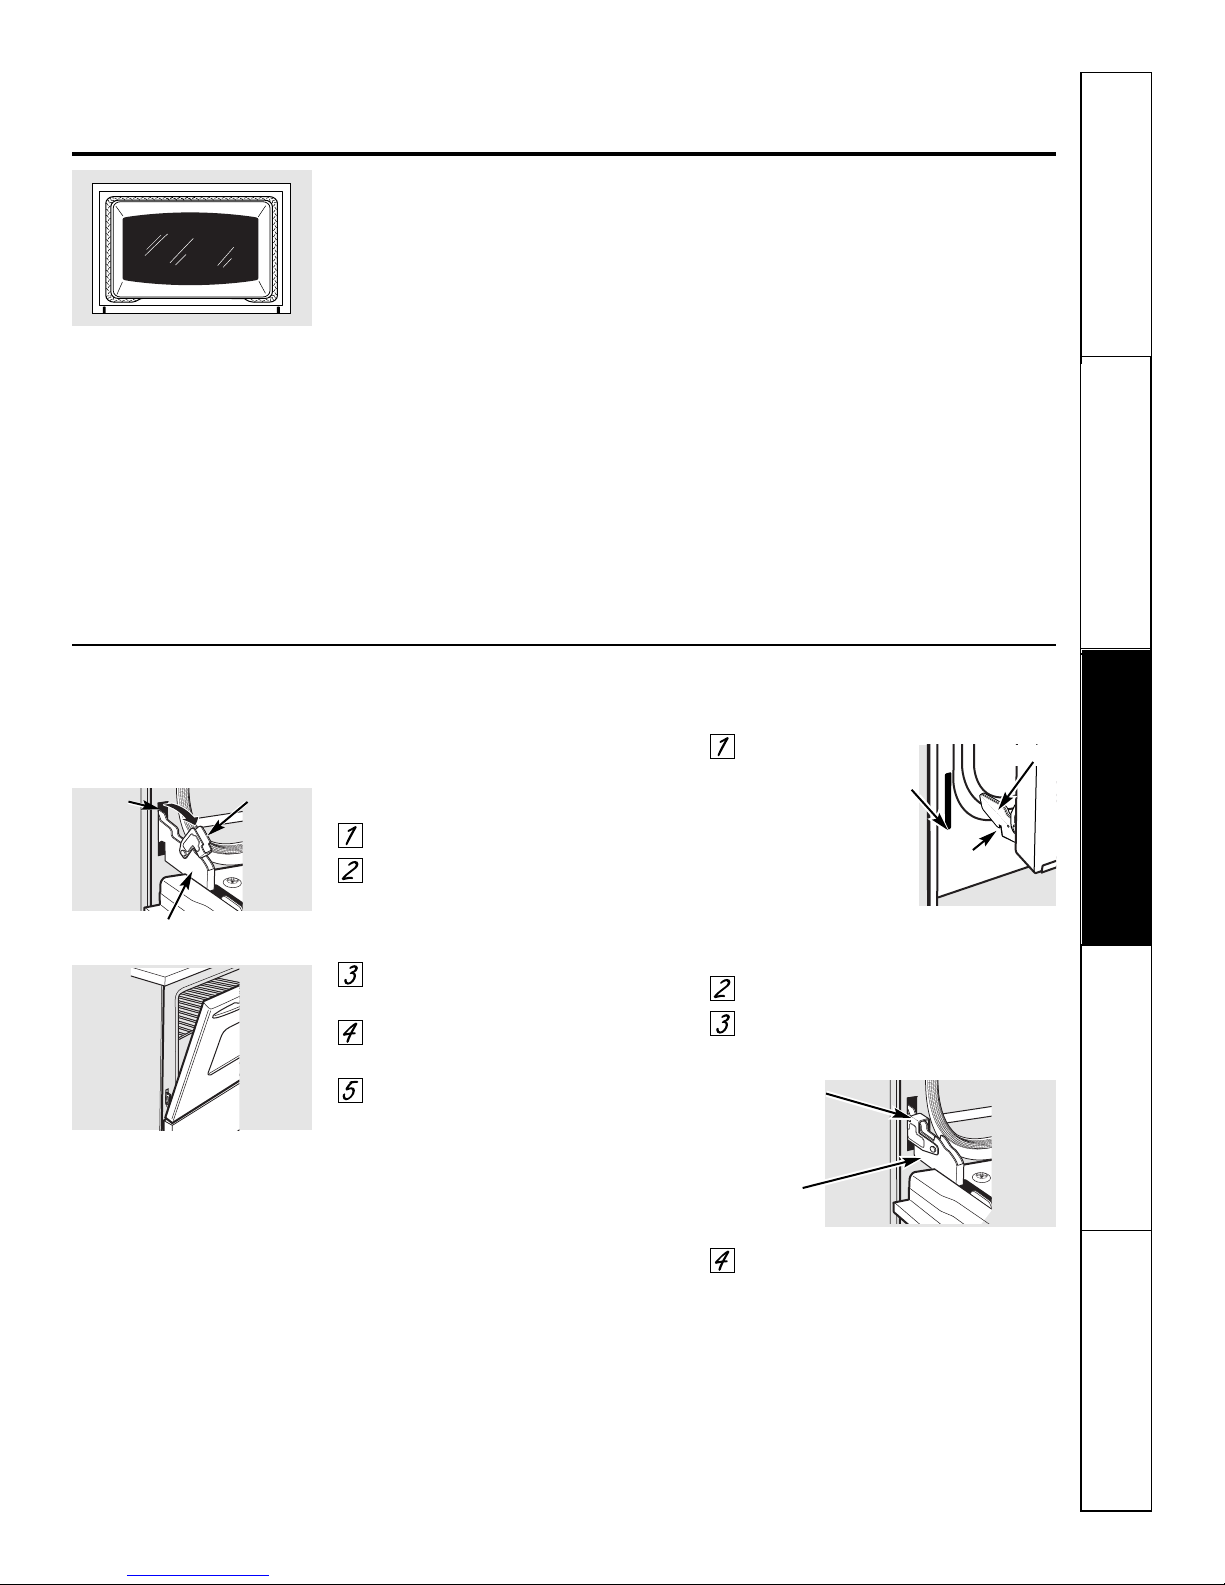
To remove the door:
Fully open the door.
Push the hinge locks down toward
the door frame, to the unlocked
position. This may require a
flat-blade screwdriver.
Close door to the door removal
position.
Firmly grasp both sides of the door
at the top.
Lift door up until the hinge arm is
clear of the slot.
To replace the door:
Firmly grasp
both sides of
the door at
the top, with
the door at the
same angle as the
removal position.
Seat the indentation
on the bottom of the hinge arm into
the bottom edge of the hinge slot.
Fully open the door.
Push the hinge locks up against the
front frame of the oven cavity to the
locked position.
Close the oven door.
Seated
Hinge Arm
Indentation
Bottom
edge
of slot
Hinge arm
Locked
Position
Removal position
Lift-Off Oven Door
Hinge lock
(unlocked
position)
Hinge arm
Slot
Page 26
Care and cleaning of the range.
Do not store a soiled broiler pan and
grid anywhere in the range.
Stop guide
Rail
Wire cover holder.
Do not clean the broiler pan or grid in a selfcleaning oven.
After broiling, remove the broiler pan
from the oven. Remove the grid from
the pan. Carefully pour out the grease
from the pan into a proper container.
Wash and rinse the broiler pan and grid in hot
water with a soap-filled or plastic scouring pad.
If food has burned on, sprinkle the grid
with detergent while hot and cover with
wet paper towels or a dishcloth. Soaking
the pan will remove burned-on foods.
Both the broiler pan and grid may be cleaned with
a commercial oven cleaner.
Both the broiler pan and grid can also be
cleaned in a dishwasher.
Oven Light Replacement
CAUTION: Before replacing your oven
light bulb, disconnect the electrical power to the
range at the main fuse or circuit breaker panel.
Be sure to let the light cover and bulb
cool completely.
To remove the cover:
Hold a hand under the cover so it
doesn’t fall when released. With
fingers of the same hand, firmly
push back the wire cover holder.
Lift off the cover.
Do not remove any screws to remove
the cover.
Replace bulb with a 40-watt
appliance bulb.
To replace the cover:
Place it into groove of the light
receptacle. Pull wire forward to the
center of the cover until it snaps
into place.
Connect electrical power to the
range.
Broiler Pan and Grid
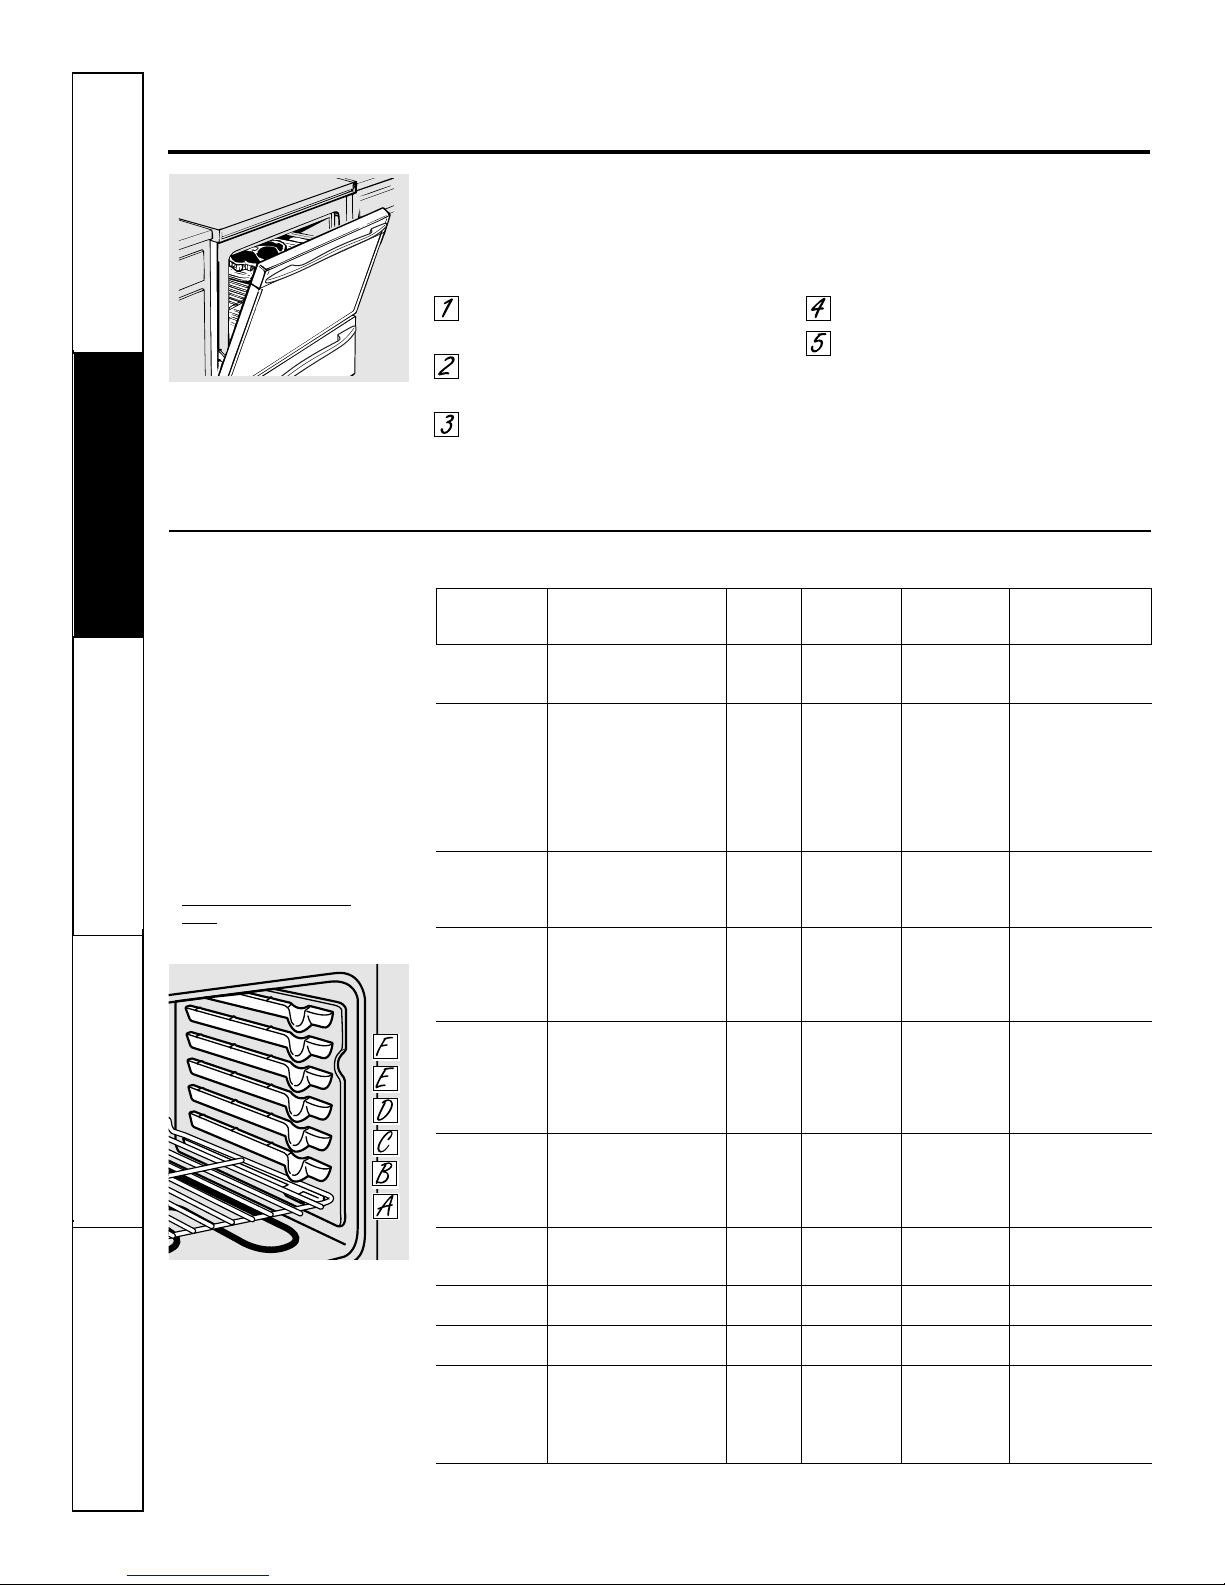
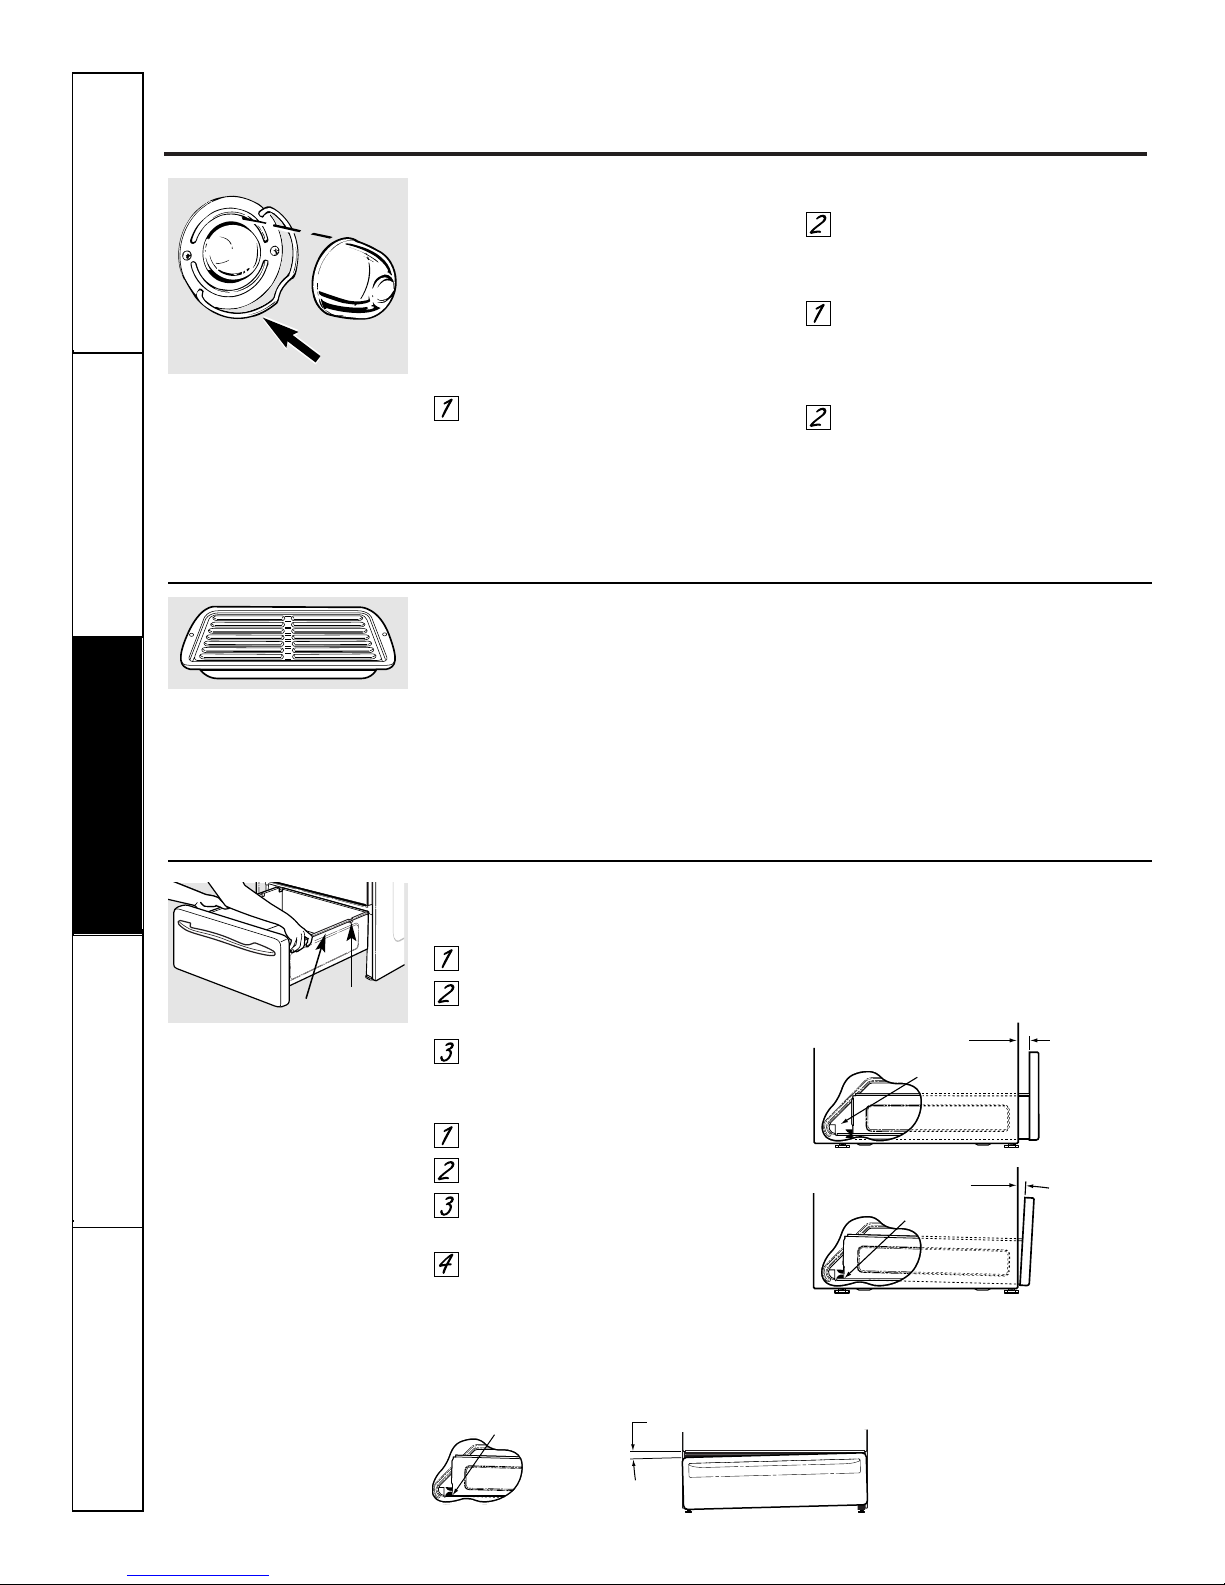
To remove the drawer:
Pull the drawer out until it stops.
Lift the front of the drawer until
the stops clear the guides.
Remove the drawer.
To replace the drawer:
Place the drawer rails on the guides.
Push the drawer back until it stops.
Lift the front of the drawer and push
back until the stops clear the guides.
Lower the front of the drawer and
push back until it closes.
If drawer is crooked:
Remove and replace, making sure the rail
is in the guide.
If drawer won’t close:
Remove and replace, making sure the
power cord is no longer obstructing the
drawer and/or the rail is in the guide.
Storage Drawer Removal (on some models)
Rear drawer support
is on top of guide rail
on the high side
Drawer does not
close completely
Power cord may be
obstructing drawer
in this area
Drawer front
panel tipped
away from
body side
Rear drawer support
is resting on top of
guide rail
Drawer front panel
tipped to one side
26
Consumer Support Troubleshooting Tips Care and Cleaning Operating Instructions Safety Instructions
Page 27
Safety Instructions
Operating Instructions
Safety Instructions
Operating Instructions Care and Cleaning
Troubleshooting Tips
Consumer Support
27
www.GEAppliances.ca
Clean with an abrasive cleanser or steel
wool. After cleaning, rinse the racks with
clean water and dry with a clean cloth.
NOTE: If your oven is equipped with gray
porcelain coated oven racks, they may be left in
the oven during the self-clean cycle.
To make the racks slide more easily,
apply a small amount of vegetable oil
to a paper towel and wipe the edges
of the oven racks with the paper towel.
Do not spray with Pam®or other
lubricant sprays.
Oven Racks
Painted surfaces include the sides,
top of the control panel and the drawer
front. Clean these with soap and water
or a vinegar and water solution.
Do not use commercial oven cleaners,
cleaning powders, steel wool or harsh
abrasives on any painted surface.
Painted Surfaces
Do not use a steel wool pad; it will scratch
the surface.
To clean the stainless steel surface, use
warm sudsy water or a stainless steel
cleaner or polish. Always wipe the surface
in the direction of the grain. Follow the
cleaner instructions for cleaning the
stainless steel surface.
To inquire about purchasing stainless
steel appliance cleaner or polish, or to
find the location of a dealer or Camco
Parts Store nearest you, please call our
toll-free number:
National Parts Center 1.800.661.1616
www.GEAppliances.ca
Stainless Steel Surfaces (on some models)
Oven Heating Elements
Do not clean the bake element or the broil
element. Any soil will burn off when the
elements are heated.
To clean the oven floor, gently lift
the bake element. Clean with warm
soapy water.
Oven rack
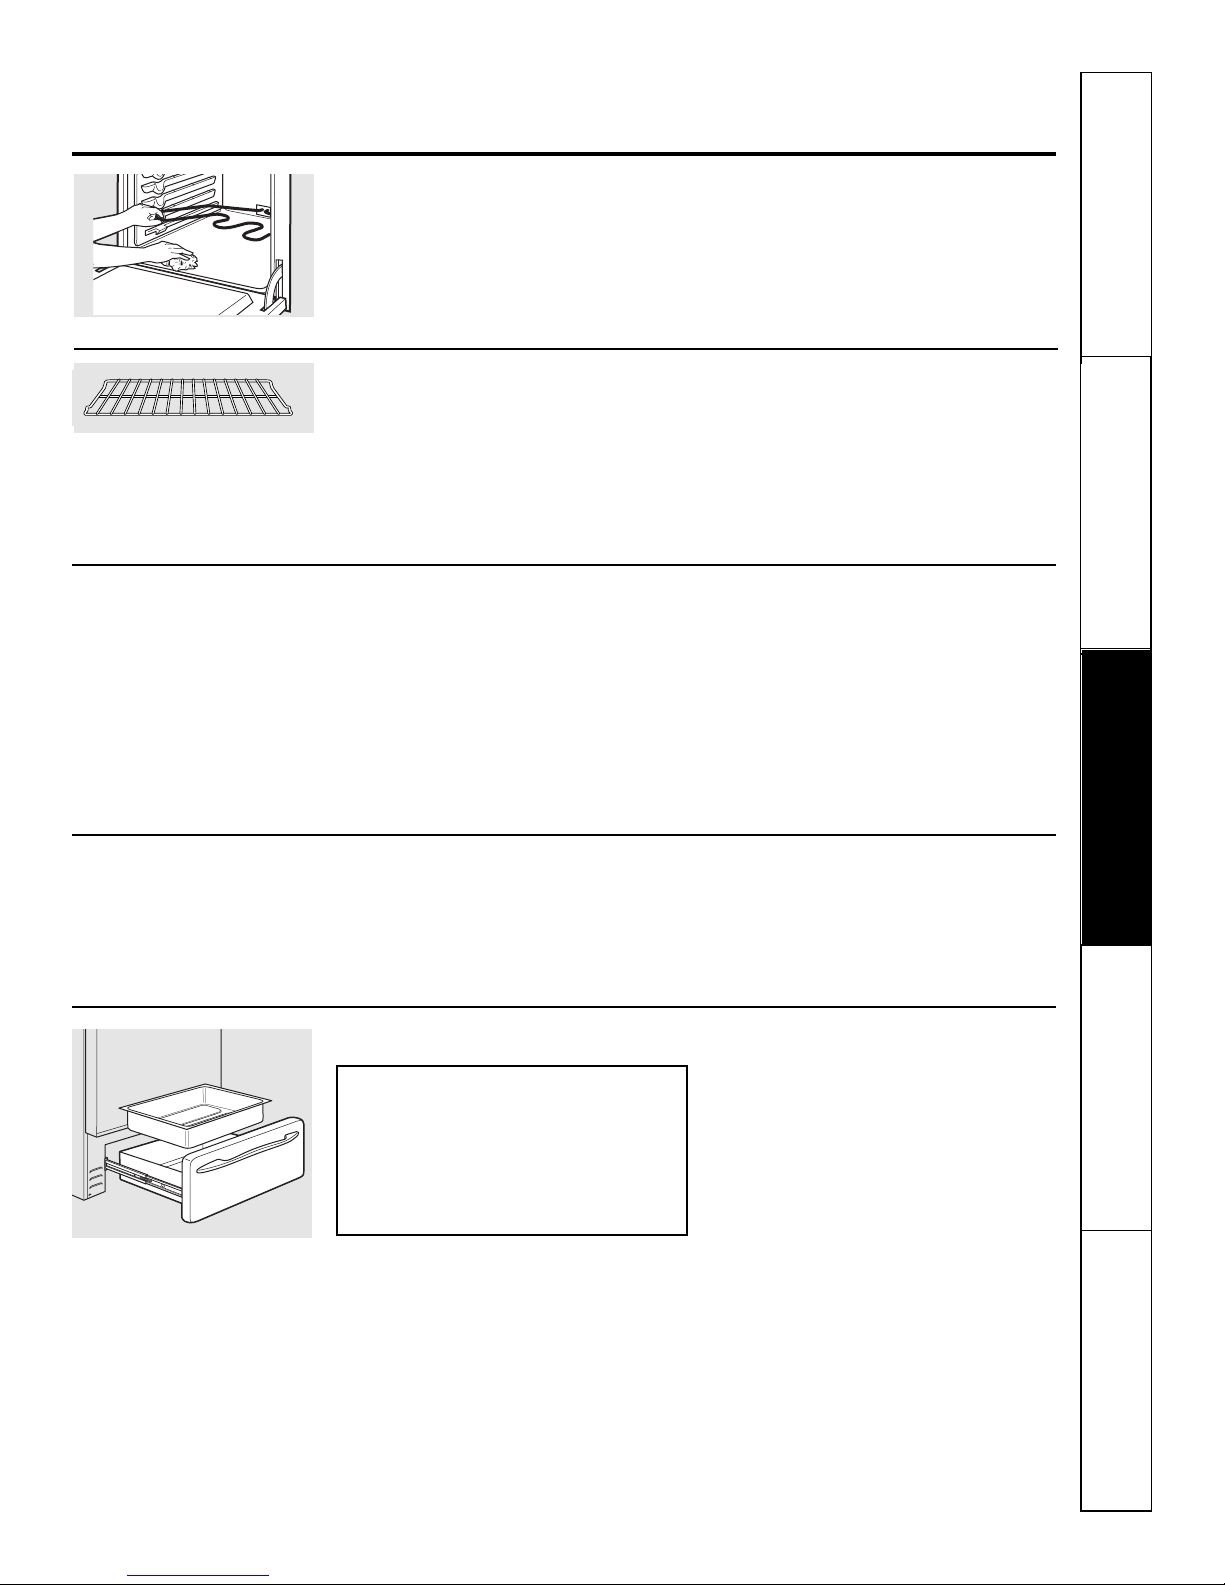
Removable Oven Drawer Pan
NOTE: Allow oven drawer to cool before
removing pan.
NOTE: Wipe spills promptly after each use.
■ Never place, use or self-clean the oven
drawer pan in the oven.
■ Oven drawer has a removable pan for
easy cleaning. Clean with hot soapy
water and a sponge or dish towel. Dry
with a clean cloth. Replace the pan in
the oven drawer.
NOTE: For models with an electric warming
drawer or oven drawer, before performing any
adjustments, cleaning or service, disconnect the
range electrical power supply at the household
distribution panel by removing the fuse or
switching off the circuit breaker. Make sure
the drawer heating element is cool.
Page 28

Cleaning the glass cooktop.
The Ceramic Cooktop Scraper and
all recommended supplies are
available through our dealers or
through a Camco Parts Store.
NOTE: Do not use a dull or nicked
blade.
Use a Cleaning Pad for Ceramic
Cooktops.
Clean your cooktop after
each spill. Use Ceramic
Cooktop Cleaner.
WARNING: DAMAGE to your glass
surface may occur if you use scrub pads other
than those recommended.
Allow the cooktop to cool.
Spread a few drops of Ceramic
Cooktop Cleaner on the entire
burned residue area.
Using the included Cleaning Pad for
Ceramic Cooktops, rub the residue
area, applying pressure as needed.
If any residue remains, repeat the
steps listed above as needed.
For additional protection, after all
residue has been removed, polish
the entire surface with Ceramic
Cooktop Cleaner and a paper towel.
Normal Daily Use Cleaning
ONLY use Ceramic Cooktop Cleaner on
the glass cooktop. Other types of cleaners
may not be as effective.
To maintain and protect the surface of
your glass cooktop, follow these steps:
Before using the cooktop for the
first time, clean it with Ceramic
Cooktop Cleaner. This helps protect
the top and makes cleanup easier.
Daily use of Ceramic Cooktop
Cleaner will help keep the cooktop
looking new.
Shake the cleaning cream well.
Apply a few drops of Ceramic
Cooktop Cleaner directly to the
cooktop.
Use a paper towel for Ceramic
Cooktops to clean the entire
cooktop surface.
Use a dry cloth or paper towel
to remove all cleaning residue.
No need to rinse.
NOTE: It is very important that you DO NOT heat
the cooktop until it has been cleaned thoroughly.
Burned-On Residue
Allow the cooktop to cool.
Use a single-edge razor blade scraper
at approximately a 45° angle against
the glass surface and scrape the soil.
It will be necessary to apply pressure
to the razor scraper in order to
remove the residue.
After scraping with the razor scraper,
spread a few drops of Ceramic
Cooktop Cleaner on the entire
burned residue area. Use the
Cleaning Pad to remove any
remaining residue.
For additional protection, after all
residue has been removed, polish
the entire surface with Ceramic
Cooktop Cleaner and a paper towel.
Heavy, Burned-On Residue
28
Consumer Support Troubleshooting Tips Care and Cleaning Operating Instructions Safety Instructions
Page 29

Safety Instructions
Operating Instructions
Safety Instructions
Operating Instructions Care and Cleaning
Troubleshooting Tips
Consumer Support
29
www.GEAppliances.ca
Sugary spillovers (such as
jellies, fudge, candy, syrups)
or melted plastics can cause
pitting of the surface of your
cooktop (not covered by the
warranty) unless the spill
is removed while still hot.
Special care should be
taken when removing hot
substances.
Be sure to use a new, sharp
razor scraper.
Do not use a dull or nicked
blade.
Be careful not to slide pots and pans
across your cooktop. It will leave
metal markings on the cooktop
surface.
These marks are removable using
the Ceramic Cooktop Cleaner with
the Cleaning Pad for Ceramic
Cooktops.
If pots with a thin overlay of
aluminum or copper are allowed
to boil dry, the overlay may leave
black discoloration on the cooktop.
This should be removed
immediately before heating again
or the discoloration may be
permanent.
WARNING: Carefully check the
bottom of pans for roughness that would scratch
the cooktop.
Metal Marks and Scratches
To clean the cooktop seal around the
edges of the glass, lay a wet cloth on it
for a few minutes, then wipe clean with
nonabrasive cleaners.
Cooktop Seal
Glass surface—potential for permanent damage.
Damage from Sugary Spills and Melted Plastic
Turn off all surface units. Remove
hot pans.
Wearing an oven mitt:
a. Use a single-edge razor blade
scraper to move the spill to
a cool area on the cooktop.
b. Remove the spill with paper
towels.
Any remaining spillover should be
left until the surface of the cooktop
has cooled.
Don’t use the surface units again
until all of the residue has been
completely removed.
NOTE: If pitting or indentation in the glass
surface has already occurred, the cooktop glass
will have to be replaced. In this case, service will
be necessary.
To inquire about purchasing a part or
an accessory for your appliance, please
call our toll-free number:
National Parts Center 1.800.661.1616
www.GEAppliances.ca
Ceramic Cooktop Cleaner . . .# WX10X300
Ceramic Cooktop Scraper . . .# WX10X302
Kit . . . . . . . . . . . . . . . . . . . . . . . .# WB64X5027
(Kit includes cream and cooktop scraper)
Cleaning Pads for
Ceramic Cooktops . . . . . . . . .# WX10X350
To Order Parts
Page 30

30
Installation Free-Standing
Instructions Electric Ranges
BEFORE YOU BEGIN
Read these instructions completely and
carefully.
•
IMPORTANT — Observe all
governing codes and ordinances.
• Note to Installer – Be sure to leave these
instructions with the Consumer.
• Note to Consumer – Keep these instructions
for future reference.
• Skill level – Installation of this appliance
requires basic mechanical skills.
• Product failure due to improper installation
is not covered under the Warranty.
WARNING — This appliance must
be properly connected by means of the
supplied cord and plug. If your kitchen does
not have a receptacle, you must have one
installed by a licensed electrician.
FOR YOUR SAFETY:
WARNING
— Before beginning the
installation, switch power off at service panel
and lock the service disconnecting means
to prevent power from being switched on
accidentally. When the service disconnecting
means cannot be locked, securely fasten a
prominent warning device, such as a tag,
to the service panel.
All rough-in and spacing dimensions must be
met for safe use of your range. Electricity to
the range can be disconnected at the outlet
without moving the range if the outlet is in
the preferred location (remove lower drawer).
ANTI-TIP DEVICE
WARNING — To reduce the risk
of tipping, the appliance must be secured by
properly installed Anti-Tip bracket packed
with this appliance.
If the Anti-Tip device supplied with the range
does not fit this application, use the universal
Anti-Tip device WB2X7909.
WARNING
—
• All ranges can tip
• Injury to persons could result
• Install Anti-Tip bracket packed
with range
• See Installation Instructions
If you pull the range out and away from the
wall for any reason, make sure the Anti-Tip
bracket is engaged when the range is pushed
back against the wall.
Questions? Call 1.800.361.3400 or Visit our Website at: www.GEAppliances.ca
FOR YOUR SAFETY:
To reduce the risk of burns or fire when reaching
over hot surface elements, cabinet storage space
above the cooktop should be avoided. If cabinet
storage space is to be provided above the
cooktop, the risk can be reduced by installing a
range hood that sticks out at least 12.5 cm (5”)
beyond the front of the cabinets. Cabinets
installed above a cooktop must be no deeper
than 32.5 cm (13”).
Make sure the cabinets and wall coverings around
the range can withstand the temperatures (up to
93.3°C [200°F]) generated by the range.
REMOVE SHIPPING MATERIALS
Remove packaging materials. Failure to
remove packaging materials could result in
damage to the appliance.
NOTE: Cut the orange shipping ties from the
power cord, being careful not to damage the
cord.
Page 31

31
PREPARE THE OPENING
See illustrations for all rough-in and spacing
dimensions.
The range must be placed with
12 mm (1/2”)
minimum clearance at the back wall and side
walls of the cabinet.
MINIMUM DIMENSIONS BETWEEN COOKTOP,
WALLS AND ABOVE THE COOKTOP:
*** Make sure the wall covering, countertop and
cabinets around the range can withstand the
heat (up to 93.3°C [200°F]) generated by the
range.
*** Allow 76.2 cm (30”) minimum clearance
between surface units and bottom of
unprotected wood or metal cabinet, and
38 cm (15”) minimum between countertop
and adjacent cabinet bottom.
*** Recommended spacing to heat-sensitive
surfaces.
1
TOOLS YOU WILL NEED
Installation Instructions
PREPARE TO INSTALL THE RANGE
MATERIALS YOU MAY NEED
Anchor Sleeves
Lag Bolts
(For Anti-Tip Bracket Mounted
on Concrete Floors Only)
Adjustable Wrench
Level
Phillips Screwdriver
Drill with 1/8” Bit
Pencil
Safety Glasses
Tape Measure
Flat-blade
Screwdriver
PARTS INCLUDED
Anti-Tip Bracket Kit
Acceptable electrical
outlet area.
Orient the electrical
receptacle so the length
is parallel to the floor.
7.6 cm
(3″)
7.6 cm
(3″)
19 cm
(7
1
⁄2″)
63 cm
(25″)
76.2 cm
(30″)
91.4 cm
(36″)
*12 mm
(
1
⁄2”) min.
**38 cm
(15
”) min.
**76 cm
(30
”
) min.
***14.25 cm
(6
”) min.
*12 mm
(1⁄2”) min.
Page 32

REMOVE STORAGE DRAWER
ON MODELS WITHOUT BAKING
OR WARMING DRAWERS
Pull the drawer out until it stops.
Lift the front of the drawer until the
stops clear the guide.
Remove the drawer.
C
B
A
4
ANTI-TIP DEVICE INSTALLATION
An Anti-Tip bracket is supplied with instructions
for installation in a variety of locations. The
instructions include all necessary information
to complete the installation. Read the Safety
Instructions and the instructions that fit your
situation before beginning installation.
WARNING —
• Range must be secured by Anti-Tip bracket
supplied.
• If the Anti-Tip device supplied with the
range does not fit this application, use the
universal Anti-Tip device WB2X7909.
• See instructions to install (supplied with
bracket).
• Unless properly installed, the range could
be tipped by stepping or sitting on the door.
Injury may result from spilled hot liquids
or from the range itself.
2
Installation Instructions
INSTALL THE RANGE
Stop
Typical installation of anti-tip bracket attachment to wall
Bracket
Screw must
enter wood
or metal
Wall plate
LEVEL THE RANGE
Install the oven racks in the oven
and position the range where it will
be installed.
Check for levelness by
placing a spirit level or
a cup, partially filled
with water, on one of
the oven racks. If using
a spirit level, take two
readings—with the level
placed diagonally first in
one direction and then the other.
The front leveling legs can be adjusted
from the bottom and the rear legs can be
adjusted from the top or the bottom.
Use an open-end or adjustable wrench
to adjust the leveling legs until the range
is level.
D
C
B
A
5
Leg
leveler
Lower
range
Raise
range
Spirit level
32
PREPARE TO LEVEL MODELS WITH
WARMING DRAWERS
Measure the height of your countertop
at the rear of the opening (X).
Adjust two rear leveling legs so that the
rear of the cooktop is at the same height
as the counter (Y).
Slide unit into place.
C
B
A
3
X
Y
Page 33

REPLACE THE STORAGE
DRAWER
Place the drawer rail on the guides.
Push the drawer in until it stops.
Lift the front of the drawer and push in
until the stops clear the guides.
Lower the front of the drawer and push in
until it closes.
D
C
B
A
6
Stop
FINAL INSTALLATION
CHECKLIST
• Check to make sure the circuit breaker is
closed (RESET) or the circuit fuses are
replaced.
• Be sure power is in service to the building.
• Check to be sure that all packing materials
and tape have been removed. This will
include tape on metal panel under control
knobs (if applicable), adhesive tape, wire
ties, cardboard and protective plastic.
Failure to remove these materials could
result in damage to the appliance once the
appliance has been turned on and surfaces
have heated.
• Check to make sure that the door and
drawer are parallel to each other and that
both operate smoothly. If they do not, see
the Owner’s Manual for proper replacement.
• Check to make sure that the rear leveling leg
is fully inserted into the Anti-Tip bracket and
that the bracket is securely installed.
7
OPERATION CHECKLIST
• Turn on one of the surface units to observe
that the element glows within 60 seconds.
Turn the unit off when glow is detected.
If the glow is not detected within the time
limit, recheck the range wiring connections.
If change is required, retest again. If no
change is required, have building wiring
checked for proper connections and voltage.
• Check to make sure the Clock (on models
so equipped) display is energized. If a series
of horizontal red lines appear in the display,
disconnect power immediately. Recheck the
range wiring connections. If change is made
to connections, retest again. If no change is
required, have building wiring checked for
proper connections and voltage. It is
recommended that the clock be changed
if the red lines appear.
• Be sure all range controls are in the OFF
position before leaving the range.
8
Installation Instructions
33
MODEL AND SERIAL NUMBER
LOCATION
The rating plate is located above the drawer
on the oven frame or on the side of the drawer
frame.
Location of
model rating
plate
Page 34

Before you call for service…
Troubleshooting Tips
Save time and money! Review the charts on the following
pages first and you may not need to call for service.
Problem Possible Causes What To Do
Surface units will not Improper cookware • Use pans which are flat and match the diameter of
maintain a rolling boil being used. the surface unit selected.
or cooking is not
In some areas, the power • Cover pan with a lid until desired heat is obtained.
fast enough
(voltage) may be low.
Surface units do not The self-clean cycle has • During a self-clean cycle, the surface units will not
work or they do not been set. work. Press the OFF pad to stop the self-clean
work properly cycle or wait until the self-clean cycle is finished to set
and use the surface units. See the About the radiant
surface units section.
A fuse in your home may be • Replace the fuse or reset the circuit breaker.
blown or the circuit breaker
tripped.
Cooktop controls • Check to see the correct control is set for the surface
improperly set. unit you are using.
Surface indicator lights The self-clean cycle has During a self-clean cycle, the surface units will not
turn on, but surface units been set. work. Press the OFF pad to stop the self-clean cycle
do not work or wait until the self-clean cycle is finished to set
and use the surface units. See the About the radiant
surface units section.
Surface unit stops This is normal. The unit
glowing when turned is still on and hot.
to a lower setting
Scratches (may appear Incorrect cleaning • Scratches are not removable. Tiny scratches will become
as cracks) on cooktop methods being used. less visible in time as a result of cleaning.
glass surface
Cookware with rough bottoms • To avoid scratches, use the recommended cleaning
being used or coarse particles procedures. Make sure bottoms of cookware are clean
(salt or sand) were between before use, and use cookware with smooth bottoms.
the cookware and the surface
of the cooktop.
Cookware has been slid
across the cooktop surface.
Areas of discoloration Food spillovers not cleaned • See the Cleaning the glass cooktop section.
on the cooktop before next use.
Hot surface on a model • This is normal. The surface may appear discolored
with a light-colored cooktop. when it is hot. This is temporary and will disappear
as the glass cools.
Plastic melted to Hot cooktop came into • See the Glass surface—potential for permanent damage
the surface contact with plastic placed section in the Cleaning the glass cooktop section.
on the hot cooktop.
34
Consumer Support Troubleshooting Tips Care and Cleaning Operating Instructions Safety Instructions
Page 35

Safety Instructions
Operating Instructions
Safety Instructions
Operating Instructions Care and Cleaning
Troubleshooting Tips
Consumer Support
35
www.GEAppliances.ca
Problem Possible Causes What To Do
Pitting (or indentation) Hot sugar mixture spilled • Call a qualified technician for replacement.
of the cooktop on the cooktop.
Frequent cycling Improper cookware • Use only flat cookware to minimize cycling.
off and on of being used.
surface units
Control signals after You forgot to enter a • Press the BAKE pad and desired temperature or the
entering cooking time bake temperature or CLEAN pad and desired clean time.
or delay start cleaning time.
Food does not bake Oven controls improperly set. • See the Using the oven section.
or roast properly
Rack position is incorrect • See the Using the oven section.
or the rack is not level.
Incorrect cookware or • See the Using the oven section.
cookware of improper
size being used.
Oven thermostat needs • See the Adjust the oven thermostat—Do it yourself!
adjustment. section.
Clock and timer do Plug on range is not completely • Make sure electrical plug is plugged into a live, properly
not work inserted in the electrical outlet. grounded outlet.
A fuse in your home may • Replace the fuse or reset the circuit breaker.
be blown or the circuit
breaker tripped.
Oven controls improperly set. • See the Using the clock and timer section.
Oven light does Light bulb is loose or defective. • Tighten or replace the bulb.
not work
Switch operating light • Call for service.
is broken.
Food does not Door not open to the broil stop • See the Using the oven section.
broil properly position as recommended.
Oven controls improperly set. • Make sure you press the BROIL pad.
Improper rack position • See the Broiling Guide.
being used.
Cookware not suited • Use the broiling pan and grid that came with your range.
for broiling.
Aluminum foil used on the • See the Using the oven section.
the broiling pan and grid has
not been fitted properly and
slit as recommended.
In some areas the power • Preheat the broil element for 10 minutes.
(voltage) may be low.
• Broil for the longest period of time recommended in
the Broiling Guide.
Page 36

Before you call for service…
Problem Possible Causes What To Do
Oven temperature too Oven thermostat • See the Adjust the oven thermostat—Do it yourself!
hot or too cold needs adjustment. section.
Oven will not work Plug on range is not • Make sure electrical plug is plugged into a live,
completely inserted in properly grounded outlet.
the electrical outlet.
A fuse in your home may • Replace the fuse or reset the circuit breaker.
be blown or the circuit
breaker tripped.
Oven controls improperly set. • See the Using the oven section.
Storage drawer Rear drawer support is • Reposition the drawer. See the Storage Drawer
is crooked on top of the guide rail. Removal instructions in the Care and cleaning of your
range section.
Storage drawer Power cord may be • Reposition the drawer and power cord. See the
won’t close obstructing drawer Storage Drawer Removal instructions in the Care and
in the lower back cleaning of your range section.
of the range.
Rear drawer support is • Reposition the drawer. See the Storage Drawer
on top of the guide rail. Removal instructions in the Care and cleaning of your
range section.
Oven will not self-clean The oven temperature is • Allow the oven to cool to room temperature and
too high to set a self-clean reset the controls.
operation.
Oven controls improperly set. • See the Using the self-cleaning oven section.
“Crackling” or This is the sound of the • This is normal.
“popping” sound metal heating and cooling
during both the cooking and
cleaning functions.
Excessive smoking Excessive soil. • Press the OFF pad. Open the windows to rid the room
during a clean cycle of smoke. Wait until the LOCKED door light goes off.
Wipe up the excess soil and reset the clean cycle.
Oven door will not Oven too hot. • Allow the oven to cool below locking temperature.
unlock
Oven not clean after Oven controls not properly set. • See the Using the self-cleaning oven section.
a clean cycle
Oven was heavily soiled. • Clean up heavy spillovers before starting the clean
cycle. Heavily soiled ovens may need to self-clean
again or for a longer period of time.
“LOCK DOOR” flashes The self-clean cycle has been • Close the oven door.
in the display selected but the door is not
closed.
“LOCKED” door light is The oven door is locked • Touch the OFF pad. Allow the oven to cool.
on when you want because the temperature
to cook inside the oven has not
dropped below the
locking temperature.
36
Consumer Support Troubleshooting Tips Care and Cleaning Operating Instructions Safety Instructions
Page 37

Safety Instructions
Operating Instructions
Safety Instructions
Operating Instructions
Care and Cleaning
Troubleshooting Tips Consumer Support
www.GEAppliances.ca
37
Problem Possible Causes What To Do
“F – and a number You have a function • Press the OFF pad. Put the oven back into
or letter” flash error code. operation.
in the display
If the function code repeats. • Disconnect all power to the range for at least 30
seconds and then reconnect power. If the function
error code repeats, call for service.
Display goes blank A fuse in your home may be • Replace the fuse or reset the circuit breaker.
blown or the circuit
breaker tripped.
The clock is turned off from • See the Special features of your oven control section.
showing in the display.
Display flashes Power failure. • Reset the clock.
Unable to get the Oven control pads were • The BAKE and BROIL pads must be pressed
display to show “SF” not pressed properly. at the same time and held for 3 seconds.
Power outage, Power outage or surge. • Reset the clock. If the oven was in use, you must reset
clock flashes it by pressing the OFF pad, setting the clock and
resetting any cooking function.
“Burning” or “oily” This is normal in a new • To speed the process, set a self-clean cycle for a
odor emitting from oven and will disappear minimum of 3 hours. See the Using the self-cleaning
the vent in time. oven section.
Strong odor An odor from the insulation • This is temporary.
around the inside of the
oven is normal for the first
few times the oven is used.
No power supply from Small appliance plug is not • Make sure the small appliance plug is properly
convenience outlet completely inserted in the inserted.
on top of backguard convenience outlet.
(on some models)
The backguard is too hot • Allow the range to cool, then reset the circuit
and the convenience outlet breaker by pressing the switch located near the
breaker has tripped. convenience outlet.
Oven drawer or A fuse in your home may be • Replace the fuse or reset the circuit breaker.
warming drawer blown or the circuit breaker
will not work tripped.
Controls improperly set. • See the Electric warming drawer or Oven drawer section.
Excessive condensation Liquid in drawer. • Remove liquid.
in the drawer
Uncovered foods. • Cover food with lid or aluminum foil.
Temperature setting too high. • Reduce temperature setting.
Food dries out in Moisture escaping. • Cover food with lid or aluminum foil.
the oven drawer or
Drawer not fully closed. • Push drawer in until latch engages.
warming drawer
Page 38

38
Consumer Support Troubleshooting Tips Care and Cleaning Operating Instructions Safety Instructions
Notes.
Page 39

39
Please place in envelope and mail to:
Veuillez mettre dans une enveloppe et envoyez à :
OWNERSHIP REGISTRATION
P.O. BOX 1780
MISSISSAUGA, ONTARIO
L4Y 4G1
(FOR CANADIAN CONSUMERS ONLY)
Page 40

40
Page 41

Safety Instructions
Operating Instructions Care and Cleaning
Troubleshooting Tips
Consumer Support
Notes.
41
Page 42

42
Consumer Support Troubleshooting Tips Care and Cleaning Operating Instructions Safety Instructions
Looking For Something More?
To inquire about purchasing a part or an accessory for your appliance,
call our National Parts Center at 1.800.661.1616.
Oven Racks Broiler Pan
Oven Elements Light Bulbs Knobs
Cleaner Cleaning Pads Scraper
Accessories.
Page 43

Safety Instructions
Operating Instructions
Safety Instructions
Operating Instructions Care and Cleaning
Troubleshooting Tips
Consumer Support
GE Electric Range Warranty.
For The Period Of: Camco Will Provide:
One Year Any part of the range which fails due to a defect in materials or workmanship. During this
From the date of the limited one-year warranty, Camco will also provide, free of charge, all labor and related
original purchase service to replace the defective part.
Five Years A replacement glass cooktop if it should crack due to thermal shock, discolor, crack at the
From the date of the rubber seal between the glass cooktop and the porcelain edge, or if the pattern wears off.
original purchase
Replacement radiant surface or oven elements if they should burn out.
During this limited additional four-year warranty, you will be responsible for any labor or
related service.
Ten Years Porcelain oven cavity and door liner if it should rust through. During this limited additional
From the date of the nine-year warranty, you will be responsible for any labor or related service.
original purchase
■ Service trips to your home to teach you how to
use the product.
■ Improper installation, delivery or maintenance.
■ Failure of the product if it is abused, misused,
or used for other than the intended purpose or
used commercially.
■ Damage to the glass cooktop (if included) caused by
use of cleaners other than the recommended cleaning
creams.
■ Damage to the glass cooktop (if included) caused by
hardened spills of sugary materials or melted plastic
that are not cleaned according to the directions in the
Owner’s Manual.
■ Replacement of house fuses or resetting of circuit
breakers.
■ Damage to the product caused by accident, fire, floods
or acts of God.
■ Incidental or consequential damage caused by possible
defects with this appliance.
■ Damage caused after delivery.
■ Product not accessible to provide required service.
What Camco Will Not Cover:
This warranty is extended to the original purchaser and any succeeding owner for products purchased for
ordinary home use in Canada. In-home warranty service will be provided in areas where it is available and deemed
reasonable by Camco to provide.
Some provinces do not allow the exclusion or limitation of incidental or consequential damages, so the above
exclusion may not apply to you. This warranty gives you specific legal rights, and you may also have other rights
which vary from province to province. To know what your legal rights are in your province, consult your local or
provincial consumer affairs office.
Warrantor: Camco Inc.,
Burlington, Ontario
EXCLUSION OF IMPLIED WARRANTIES—Your sole and exclusive remedy is product repair as provided
in this Limited Warranty. Any implied warranties, including the implied warranties of merchantability
or fitness for a particular purpose, are limited to one year or the shortest period allowed by law.
All warranty service provided by our Factory Service Centers, or
an authorized Customer Care
®
technician. To schedule service,
on-line, 24 hours a day, visit us at www.geappliances.ca, or call
1.800.361.3400. Please have serial number and model number
available when calling for service.
Staple your receipt here.
Proof of the original purchase
date is needed to obtain service
under the warranty.
43
Page 44

Printed in the United States
GE Appliances Website www.GEAppliances.ca
Have a question or need assistance with your appliance? Try the GE Appliances Website 24 hours a day,
any day of the year! For greater convenience and faster service, you can now download Owner’s Manuals
on-line. You can also “Ask Our Team of Experts™” your questions, and so much more...
Schedule Service www.GEAppliances.ca
Expert GE repair service is only one step away from your door. Call 1.800.361.3400, 24 hours a day,
7 days a week.
Parts and Accessories www.GEAppliances.ca
To inquire about purchasing a part or an accessory for your appliance, call our National Parts Center
at 1.800.661.1616.
Contact Us www.GEAppliances.ca
If you are not satisfied with the service you receive from GE, contact us on our Website with all the details
including your phone number, or write to: Camco, Inc.
1 Factory Lane
Moncton, New Brunswick
E1C 9M3
Register Your Appliance www.GEAppliances.ca
Register your new appliance on-line—at your convenience! Timely product registration will allow for
enhanced communication and prompt service under the terms of your warranty, should the need arise.
You may also mail in the preprinted registration card included in the packing material.
Consumer Support.
44
Page 45

Imprimé aux États-Unis
Site Internet GE www.electromenagersge.ca
Pour toute question ou pour un besoin d’assistance au sujet de votre appareil ménager, consultez le site
Internet ci-dessus, accessible 24 heures sur 24 par jour, chaque jour de l’année! À partir du site, vous
pouvez télécharger les manuels d’utilisation. Il y a aussi la rubrique « Ask Our Team of Experts
MC
»
(Demandez à nos experts) et bien d’autres choses encore…
Prise de rendez-vous www.electromenagersge.ca
Il est très facile de demander l’intervention d’un technicien expert en réparation GE. Appelez le
1.800.361.3400, 24 heures par jour, 7 jours par semaine.
Pièces et accessoires www.electromenagersge.ca
Pour vous renseigner sur l’achat d’une pièce ou d’un accessoire pour votre appareil, appelez notre
Centre national de pièces au 1.800.661.1616.
Pour nous contacter www.electromenagersge.ca
Si vous n’êtes pas satisfaits des services fournis par GE, contactez-nous sur notre site Internet et donnez-nous
tous les détails voulus, y compris votre numéro de téléphone, ou écrivez à : Camco, Inc.
1 Factory Lane
Moncton, Nouveau-Brunswick
E1C 9M3
Enregistrement des appareils www.electromenagersge.ca
Vous pouvez enregistrer vos appareils en ligne—n’importe quand! L’enregistrement de vos appareils
permettra de meilleures communications et l’obtention plus rapide des services sous garantie nécessaires.
Vous pouvez également nous envoyer par la poste la carte d’enregistrement pré-imprimée fournie avec
l’appareil, ou détacher le formulaire qu’on trouve dans le Manuel de l’utilisateur.
Service à la clientèle.
44
Page 46

Instructions
de sécurité
Mode d’emploi Entretien et nettoyage
Dépannage
Service à la clientèle
Cuisinière électrique—Garantie.
Pendant une période de : Camco remplacera ce qui suit :
Une année Toute pièce de la cuisinière manifestant un vice de matériau ou de fabrication. Au cours
À compter de la date de cette garantie limitée d’un an, nous fournirons également sans frais la main-d’oeuvre
d’achat initial et le service de réparation connexe pour remplacer la pièce défectueuse.
Cinq ans La surface de cuisson si elle se brise à la suite de choc thermique, se décolore ou
À compter de la date se fend au joint d’étanchéité entre la surface de cuisson en verre et les bords en
d’achat initial céramique, ou si le motif s’use et disparaît.
Les éléments rayonnants de surface ou les éléments du four, s’ils brûlent.
Pendant cette période de garantie limitée supplémentaire de quatre ans, vous serez
responsable des frais de main-d’oeuvre ou le service de réparation.
Dix ans La cavité du four de porcelaine et la garniture de porte, si elles rouillent.
À compter de la date Pendant cette garantie limitée supplémentaire de neuf ans, vous serez responsable des
d’achat initial frais de main-d’œuvre ou le service de réparation.
Toutes les réparations sous garantie sont effectuées par nos
Centres de réparation ou par nos réparateurs CAMCO autorisés.
Pour obtenir du service en ligne 24 heures par jour, veuillez nous
visiter au site www.electromenagersge.ca ou appelez le no
1.800.361.3400. Veuillez fournir le numéro de série et le numéro de
modèle lorsque vous appelez pour obtenir le service.
Agraphez votre reçu ici.
Vous devez fournir la preuve de
l’achat original pour obtenir des
services en vertu de la garantie.
■ Toute visite à votre domicile pour vous expliquer le
fonctionnement de l’appareil.
■ Installation, livraison ou entretien inadéquats.
■ Toute défectuosité du produit lorsqu’il a été utilisé
d’une façon abusive ou inadéquate, ou employé à des
fins commerciales ou à toute autre fin que celle pour
laquelle il a été conçu.
■ Détérioration de la surface de cuisson en verre (si
compris) provoquée par l’usage de nettoyants autres
que les crèmes et tampons de nettoyage recommandés.
■ Détérioration de la surface de cuisson en verre (si
compris) causée par des éclaboussures de produits
sucrés durcis, ou du plastique fondu qui n’a pas été
nettoyé selon les instructions données dans le manuel
d’utilisation.
■ Le remplacement des fusibles ou le réenclenchement
des disjoncteurs du panneau de distribution de votre
résidence.
■ Tout dommage au produit attribuable à un accident, un
incendie, une inondation ou un cas de force majeure.
■ Tout dommage direct ou indirect causé par une
défectuosité possible de cet appareil.
■ Dommages sur venus après la livraison.
■ Le ser vice s’il est impossible d’avoir accès au produit
pour ce faire.
Ce que Camco ne couvre pas :
Cette garantie est valable pour le premier propriétaire et tout autre propriétaire du produit s’il acheté pour utilisation
domestique au Canada. Le service à domicile sous garantie sera fourni là où il est disponible et dans les régions que
Camco considère que l’offre de service est raisonnable.
Dans certaines provinces, il est interdit d’exclure ou de limiter les dommages directs ou indirects. Il est alors possible
que les limitations ou exclusions ci-dessus ne s’appliquent pas dans votre cas. La présente garantie vous confère
des droits juridiques spécifiques. Vous pouvez bénéficier d’autres droits, qui varient d’une province à l’autre. Pour
connaître les droits dont vous bénéficiez dans votre province, communiquez avec le bureau des relations avec les
consommateurs de votre région.
Garant : Camco Inc.,
Burlington, Ontario
EXCLUSION DE GARANTIES IMPLICITES – Votre seul et unique recours est la réparation du produit selon
les dispositions de cette Garantie limitée. Toutes les garanties implicites, incluant les garanties de
commercialité et d’adéquation à un usage spécifique, sont limitées à une année ou à la période la plus
courte autorisée par la législation.
43
Page 47

42
Notes.
Service à la clientèle Dépannage Entretien et nettoyage Mode d’emploi
Instructions
de sécurité
Page 48

41
Notes.
Instructions
de sécurité
Mode d’emploi
Entretien et nettoyage Dépannage Service à la clientèle
Page 49

40
Vous cherchez autre chose?
Pour vous renseigner sur l’achat d’une pièce ou d’un accessoire pour votre
appareil, appelez notre centre national de pièces au 1.800.661.1616.
Grilles du four Lèchefrite
Éléments du four Ampoules électriques Boutons
Nettoyant Tampons de nettoyage Grattoir
Accessoires.
Service à la clientèle Dépannage Entretien et nettoyage Mode d’emploi
Instructions
de sécurité
Page 50

39
www.electromenagersge.ca
Instructions
de sécurité
Mode d’emploi
Entretien et nettoyage Dépannage Service à la clientèle
Problème Causes possibles Solution
Forte odeur Une odeur venant de l’isolant • Cette odeur est temporaire.
autour et à l’intérieur du four est
normale pendant les premières
utilisations du four.
Il n’y a pas de courant La fiche du petit appareil • Assurez-vous de bien faire entrer la fiche du petit appareil
dans les prises de courant électroménager n’entre pas bien électoménager dans la prise de courant.
qui se trouvent en haut du dans la prise de courant.
dosseret de protection
Le dosseret est trop chaud et • Laissez refroidir le dosseret de protection, puis remettez le
(sur certains modèles)
le commutateur de la prise de courant en appuyant sur le commutateur placé près de la
courant a basculé. prise de courant.
Le tiroir-four ou Un fusible a peut-être • Remplacez le fusible ou réenclenchez le disjoncteur.
le tiroir garde-chaud sauté ou le disjoncteur s’est
ne fonctionne pas déclenché.
Commandes incorrectement • Voyez la section Tiroir garde-chaud électrique ou Tiroir-four.
réglées.
Condensation excessive Liquide dans le tiroir. • Enlevez le liquide.
dans le tiroir
Aliments non couverts. • Recouvrez l’aliment d’un couvercle ou de papier
aluminium.
Réglage de température trop • Réduisez le réglage de température.
élevé.
La nourriture dessèche De l’humidité s’échappe. • Recouvrez l’aliment d’un couvercle ou de papier
dans le tiroir-four ou aluminium.
le tiroir garde-chaud
Tiroir non complètement fermé. • Poussez le tiroir jusqu’à ce qu’il s’enclenche.
Page 51

Problème Causes possibles Solution
Le voyant LOCKED est La porte du four est verrouillée • Appuyez sur la touche OFF (ARRÊT). Laissez le four refroidir.
allumé quand vous voulez parce que la température
faire cuire quelque chose intérieure du four n’est pas
retombée en dessous de la
température de verrouillage.
« F » — et un chiffre ou Vous avez un code d’erreur • Appuyez sur la touche OFF (ARRÊT). Essayez de réactiver
une lettre clignotent à de fonction. les commandes.
l’afficheur
Si le code de fonction se répète. • Débranchez complètement la cuisinière pendant
30 secondes puis rebranchez-la. Si le code d’erreur de
fonction se répète, appelez le service après-vente.
L’afficheur est effacé Il se peut qu’un des fusibles de • Remplacez le fusible ou réamorcez le coupe-circuit.
votre domicile soit hors de
service ou que le coupe-circuit
ait disjoncté.
L’horloge n’indique pas l’heure • Consultez la section Caractéristiques spéciales des
sur l’afficheur. commandes de votre four.
L’afficheur clignote Panne de courant. • Reprogrammez l’horloge.
L’afficheur n’indique Vous n’avez pas appuyé • Vous devez appuyer simultanément sur les touches
pas SF correctement sur les touches BAKE (CUIRE) et BROIL (GRIL) et les maintenir enfoncées
de commande du four. pendant 3 secondes.
Panne de courant, Panne de courant ou • Reprogrammez l’horloge. Si le four était en cours
l’horloge clignote augmentation soudaine d’utilisation, vous devez le reprogrammer en appuyant
de la tension. sur la touche OFF (ARRÊT), en réglant l’horloge et en
reprogrammant les fonctions de cuisson qui étaient
en cours d’utilisation.
Odeur de « brûlé » ou Ces odeurs sont normales dans • Pour accélérer le processus, réglez un cycle d’autonettoyage
d’« huile » venant de un four neuf et disparaîtront d’au moins 3 heures. Voyez la section Utilisation du four
l’évent à l’usage. autonettoyant.
38
Avant d’appeler le réparateur…
Service à la clientèle Dépannage Entretien et nettoyage Mode d’emploi
Instructions
de sécurité
Conseils de dépannage
Page 52

www.electromenagersge.ca
37
Instructions
de sécurité
Mode d’emploi Entretien et nettoyage
Dépannage
Service à la clientèle
Problème Causes possibles Solution
Température du four trop Le thermostat du four a besoin • Voyez la section Réglage du thermostat du four—Faites-le
chaude ou trop froide d’être réglé. vous-même!
Le four ne marche pas La prise de la cuisinière n’est • Veillez à ce que la prise soit insérée dans une prise murale
pas complètement insérée dans sous tension, correctement mise à la terre.
la prise d’alimention.
Il se peut qu’un des fusibles de • Remplacez le fusible ou réamorcez le coupe-circuit.
votre domicile soit hors de
service ou que le coupe-circuit
ait disjoncté.
Commandes du four mal réglées. • Voyez la section Utilisation du four.
La porte est restée en position • Si nécessaire laissez le four refroidir; déverrouillez ensuite
verrouillée. la porte.
Le tiroir de rangement Le support arrière du tiroir est • Repositionnez le tiroir. Voyez les instructions Dépose du
est de travers au-dessus du rail de guidage. tiroir de rangement à la section Entretien et nettoyage de votre
cuisinière.
Le tiroir de rangement Le cordon électrique bloque • Repositionnez le tiroir et le cordon électrique. Voyez les
ne ferme pas peut-être le tiroir en bas et instructions Dépose du tiroir de rangement à la section
à l’arrière de la cuisinière. Entretien et nettoyage de votre cuisinière.
Le support arrière du tiroir est • Repositionnez le tiroir. Voyez les instructions Dépose du
au-dessus du rail de guidage. tiroir de rangement à la section Entretien et nettoyage de votre
cuisinière.
L’autonettoyage du four La température du four est trop • Laissez la cuisinère refroidir et reprogrammez les
ne marche pas haute pour régler une opération commandes.
d’autonettoyage.
Commandes du four mal réglées. • Voyez la section Utilisation du four autonettoyant.
La porte du four n’est pas en • Assurez-vous d’amener la poignée du verrou de la porte
position verrouillée. complètement à droite.
Crépitement ou C’est le bruit du métal qui • Ceci est normal.
craquement chauffe et refroidit pendant
les fonctions de cuisson et
de nettoyage.
Fumée excessive pendant Saleté excessive. • Appuyez sur la touche OFF (ARRÊT). Ouvrez les fenêtres pour
l’autonettoyage évacuer la fumée. Attendez jusqu’à ce que le voyant sur la
touche CLEAN (NETTOYAGE) s’éteigne. Essuyez les salissures
excessives et reprogrammez l’autonettoyage.
La porte du four ne Four trop chaud. • Laissez le four refroidir jusqu’à une température en dessous
se verrouille pas de la température de verrouillage.
Four pas propre après Commandes du four mal réglées. • Voyez la section Utilisation du four autonettoyant.
l’autonettoyage
Le four était très sale. • Enlevez les renversements importants avant de démarrer
l’autonettoyage. Il peut être nécessaire de recommencer
l’autonettoyage des fours très sales, ou d’augmenter
sa durée.
Les mots « LOCK DOOR » L’autonettoyage a été sélectionné • Fermez la porte du four.
clignotent à l’afficheur mais la porte n’est pas fermée.
Page 53

Problème Causes possibles Solution
Petits trous Mélange sucré chaud renversé • Appelez un technicien qualifié pour la remplacer.
(ou indentations) sur sur la surface de cuisson.
la surface de cuisson
Arrêts et remises en Mauvais ustensiles utilisés. • Utilisez seulement des ustensiles à fond plat pour
marche fréquents des minimiser ce problème.
éléments de surface
La console émet un signal Vous avez oublié d’entrer une • Appuyez sur la touche BAKE (CUIRE) et la température
sonore après avoir entré température de cuisson ou souhaitée ou la touche CLEAN (NETTOYAGE) et la durée
une durée de cuisson une durée de nettoyage. de nettoyage souhaitée.
ou mise en march différée
Les aliments ne sont Commandes du four mal réglées. • Voyez la section Utilisation du four.
pas cuits ou rôtis
Position de grille incorrecte ou • Voyez la section Utilisation du four.
correctement
grille pas horizontale.
Mauvais ustensile, ou ustensile • Voyez la section Utilisation du four.
de la mauvaise taille utilisé.
Le thermostat du four a besoin • Voyez la section Réglage du thermostat du four—Faites-le
d’être réglé. vous-même!
L’horloge et la minuterie La prise de la cuisinière n’est • Vérifiez que la prise est insérée dans une prise murale sous
ne marchent pas pas complètement insérée dans tension, correctement mise à la terre.
la prise d’alimentation.
Il se peut qu’un fusible de votre • Remplacez le fusible ou réamorcez le coupe-circuit.
domicile soit hors de service ou
que le coupe-circuit ait disjoncté.
Commandes du four mal réglées. • Voyez la section Utilisation de l’horloge et de la minuterie.
L’ampoule du four ne L’ampoule est desserrée ou • Resserrez l’ampoule ou remplacez-la.
marche pas défectueuse.
Le commutateur qui • Appelez le service.
commande la lumière est cassé.
Les aliments ne grillent La porte n’est pas ouverte en • Voyez la section Utilisation du four.
pas correctement position d’arrêt de grillade
comme c’est recommandé.
Commandes du four mal réglées. • Veillez à appuyer sur la touche BROIL (GRIL).
Position de grille incorrecte. • Voyez le Guide de cuisson au gril.
Ustensile ne convenant pas • Utilisez la lèchefrite et sa grille, livrées avec votre cuisinière.
à la cuisson au gril.
Le papier d’aluminium utilisé • Voyez la section Utilisation du four.
sur la lèchefrite et sa grille n’a pas
été ajusté correctement et perforé
selon les recommandations.
Dans certaines régions, • Préchauffez l’élément de gril pendant 10 minutes.
le courant peut être bas.
• Faites griller pendant la plus longue période recommandée
dans le Guide de cuisson au gril.
36
Service à la clientèle Dépannage Entretien et nettoyage Mode d’emploi
Instructions
de sécurité
Avant d’appeler le réparateur…
Conseils de dépannage
Page 54

Avant d’appeler le réparateur… www.electromenagersge.ca
Conseils de dépannage
Économisez du temps et de l’argent! Vérifiez le tableau ci-dessous pour éviter tout appel de service
qui ne serait pas nécessaire.
Problème Causes possibles Solution
Les éléments de surface Mauvais ustensiles utilisés. • Utilisez des récipients à fond plat dont le diamètre
ne gardent pas la correspond à celui de l’élément de surface utilisé.
température d’ébullition;
Dans certaines régions, • Mettez un couvercle sur le récipient jusquà ce que vous
la cuisson n’est pas
la tension peut être basse. obteniez la température souhaitée.
assez rapide
Les éléments de surface Le cycle d’autonettoyage • Pendant l’autonettoyage, les éléments de surface ne
ne fonctionnent pas ou fonctionne. fonctionnent pas. Appuyez sur la touche OFF (ARRÊT)
ne fonctionnent pas (effacement/arrêt) pour arrêter le cycle d’autonettoyage ou
correctement attendez que ce cycle se termine pour mettre en marche
les éléments de surface. Consultez la section À propos
des éléments de surface.
Il se peut qu’un des fusibles • Remplacez le fusible ou réamorcez le coupe-circuit.
de votre domicile soit hors
de service ou que le coupe-circuit
ait disjoncté.
Les commandes de la surface • Vérifiez que la commande appropriée est réglée pour
de cuisson sont mal réglées. l’élément de surface que vous utilisez.
Les lumières d’indicateur Le cycle d’autonettoyage Pendant l’autonettoyage, les éléments de surface ne
de surface s’allument, fonctionne. fonctionnent pas. Appuyez sur la touche OFF (ARRÊT)
mais les éléments de (effacement/arrêt) pour arrêter le cycle d’autonettoyage ou
surface ne fonctionnent attendez que ce cycle se termine pour mettre en marche
pas les éléments de surface. Consultez la section À propos
des éléments de surface.
L’élément de surface Ceci est normal. L’élément est
arrête de briller quand encore en marche et chaud.
la température est à un
réglage plus bas
Rayures (pouvant avoir Mauvaises méthodes de • Les rayures ne peuvent pas être enlevées. Les rayures
l’aspect de fentes) sur nettoyage. minuscules deviendront moins visibles avec le temps et
la surface de cuisson les nettoyages.
en verre
Ustensiles à fond rugueux
• Pour éviter les rayures, utilisez les méthodes de nettoyage
utilisés ou grosses particules
recommandées. Vérifiez que le fond des ustensiles est
(sel ou sable) entre l’ustensile
propre avant de les utiliser et utilisez des ustensiles à
et la surface de cuisson.
fond lisse.
Un ustensile a été poussé sur
la surface de cuisson.
Zones de décoloration Renversements non nettoyés • Reportez-vous à la section Nettoyage de la surface de cuisson
sur la surface de cuisson avant l’usage suivant. en verre.
Surface chaude sur un modèle • Ceci est normal. La surface peut paraître décolorée quand
dont la surface de cuisson est elle est chaude. Ce changement est temporaire et disparaît
de couleur claire. à mesure que le verre refroidit.
Plastique fondu sur La surface de cuisson chaude • Voyez Surface en verre—possibilités de dommages permanents
la surface est entrée en contact avec le à la section Nettoyage de la surface de cuisson en verre.
plastique placé sur la surface
de cuisson chaude.
35
Instructions
de sécurité
Mode d’emploi Entretien et nettoyage
Dépannage
Service à la clientèle
Page 55

34
LISTE DE VÉRIFICATION FINALE
DE L’INSTALLATION
• Vérifiez que le coupe-circuit est fermé (RESET/
RÉAMORCÉ) ou que les fusibles du circuit ont
été remis en place.
• Vérifiez que l’électricité marche dans le bâtiment.
• Vérifiez que tout le matériel d’emballage et tous
les rubans adhésifs ont été enlevés. Ceux-ci
comprennent le ruban adhésif sur le panneau
en métal en dessous des boutons de commande
(le cas échéant), tous les rubans adhésifs, les
attaches en métal, les cartons et les protections
en plastique. Si vous n’enlevez pas ce matériel,
la cuisinière pourrait être endommagée quand
elle est allumée et que ses surfaces sont
chauffées.
• Vérifiez que la porte et le tiroir sont parallèles
l’une à l’autre et qu’ils fonctionnent tous les
deux correctement. Dans le cas contraire,
reportez-vous au Manuel de l’utilisateur pour
savoir comment les remplacer.
• Vérifiez que le pied de nivellement arrière
est complètement inséré dans le dispositif
antibasculement, et que ce dispositif est installé
de façon sûre.
7
LISTE DE VÉRIFICATION DU
FONCTIONNEMENT
• Allumez un des éléments de surface pour
vérifier que l’élément se met à briller dans les
60 secondes qui suivent. Éteignez l’élément
après avoir fait cette observation. S’il ne brille
pas dans les 60 secondes, vérifiez de nouveau
les raccords électriques de la cuisinière. S’ils
doivent être modifiés, testez de nouveau.
Si aucun changement n’est nécessaire, faites
vérifier les raccords et le voltage de l’installation
électrique du bâtiment.
• Vérifiez que l’afficheur de l’horloge (pour les
modèles qui en ont une) est activé. Si une série
de lignes horizontales apparaît à l’afficheur,
coupez l’électricité immédiatement. Revérifiez
les raccords électriques de la cuisinière. Si des
modifications sont apportées aux raccords,
testez de nouveau. Si aucun changement n’est
nécessaire, faites vérifier les raccords et le
voltage de l’installation électrique du bâtiment.
Si des lignes rouges apparaissent dans l’horloge,
nous vous recommandons de la changer.
• Assurez-vous que toutes les commandes de la
cuisinière sont à la position OFF (ARRÊT) avant
de vous en éloigner.
8
Instructions d’installation
EMPLACEMENT DES NUMÉROS DE
MODÈLE ET DE SÉRIE
La plaque signalétique est située au-dessus
du tiroir, sur le bâti du four ou sur le côté du bâti
du tiroir.
Emplacement
de la plaque
signalétique
REMISE EN PLACE DU TIROIR
DE RANGEMENT
Placez les rails du tiroir sur les guides.
Poussez le tiroir jusqu’à ce qu’il s’arrête.
Levez l’avant du tiroir et poussez jusqu’à ce
que les butées dépassent les guides.
Baissez l’avant du tiroir et poussez jusqu’à ce
qu’il soit fermé.
D
C
B
A
6
Butée
INSTALLATION DE LA CUISINIÈRE
Page 56

33
DÉPOSE DU TIROIR DE
RANGEMENT SUR LES
MODÈLES SANS TIROIRS
GARDE-CHAUD OU DE CUISSON
Tirez sur le tiroir jusqu’à ce qu’il s’arrête.
Levez l’avant du tiroir jusqu’à ce que les
butées soient dégagées des guides.
Retirez le tiroir.
C
B
A
4
INSTALLATION DU DISPOSITIF
ANTIBASCULEMENT
Un dispositif antibasculement est fourni avec
des instructions pour l’installation dans divers
emplacements. Ces instructions comprennent tous
les renseignements nécessaires pour mener à bien
l’installation. Lisez les instructions de sécurité et
les instructions se rapportant à votre situation
avant de commencer l’installation.
AVERTISSEMENT —
• La cuisinière doit être fixée avec le dispositif
antibasculement fourni.
• Si le dispositif antibasculement fourni avec la
cuisinière ne convient pas à votre appareil,
utilisez le dispositif antibasculement universel
WB2X7909.
• Reportez-vous aux instructions d’installation
(fournies avec le dispositif).
• Si elle n’est pas installée correctement, la
cuisinière pourrait basculer si quelqu’un monte
ou s’asseoit sur la porte. Des liquides chauds
renversés, voire la cuisinière elle-même
pourraient causer des blessures.
2
Instructions d’installation
INSTALLATION DE LA CUISINIÈRE
Butée
Installation typique du dispositif antibasculement au mur
Dispositif
antibasculement
Plaque
murale
MISE À NIVEAU DE LA
CUISINIÈRE
Installez les grilles dans le four et positionnez
la cuisinière à son emplacement définitif.
Vérifiez que la cuisinière
est de niveau en mettant
un niveau à bulle ou
une tasse partiellement
remplie d’eau sur l’une
des grilles du four. Si
vous utilisez un niveau à
bulle, vérifiez deux fois :
la première fois avec le niveau en diagonale
dans une direction et la deuxième fois dans
l’autre.
Les pieds de nivellement avant peuvent être
ajustés par le bas, et ceux de derrière par le
haut ou par le bas.
Utilisez une clé plate ou une clé à molette pour
ajuster les pieds, jusqu’à ce que la cuisinière
soit de niveau.
D
C
B
A
5
Pied de
nivellement
Baisser la
cuisinière
Élever la
cuisinière
Niveau
à bulle
La vis doit
pénétrer dans le
bois ou le métal
MISE À NIVEAU DES MODÈLES
AVEC TIROIR GARDE-CHAUD
Mesurez la hauteur de votre plan de travail à
l’arrière de l’ouverture (X).
Ajustez les deux pieds de nivellement
arrière, de sorte que l’arrière de la surface
de cuisson soit à la même hauteur que le
plan de travail (Y).
Glissez l’appareil en place.
C
B
A
3
X
Y
Page 57

32
PRÉPARATION DE L’OUVERTURE
Voyez les illustrations pour toutes les dimensions
brutes et les dégagements.
La cuisinière doit être positionnée au moins 12 mm
(1/2 po) d’espace par rapport au mur arrière et aux
parois latérales des placards.
DIMENSIONS MINIMUMS ENTRE LA SURFACE
DE CUISSON, LES MURS ET AU-DESSUS DE LA
SURFACE DE CUISSON :
*** Assurez-vous que le revêtement des murs, les
plans de travail et les placards qui se trouvent à
proximité de la cuisinière peuvent résister aux
températures générées par la cuisinière (jusqu’à
93,3 °C/200 °F).
*** Laissez au moins 76,2 cm (30 po) d’espace entre
les éléments de surface et le bas des placards
en métal ou en bois non protégé, et au moins
38 cm (15 po) d’espace entre le plan de travail
et le bas du placard adjacent.
*** Dégagement recommandé pour les surfaces
sensibles à la chaleur.
1
OUTILS NÉCESSAIRES
Instructions d’installation
PRÉPARATIFS D’INSTALLATION DE LA CUISINIÈRE
MATÉRIEL SUPPLÉMENTAIRE
Gaines d’ancrage
Boulons à
tête d’écrou
(Uniquement pour les dispositifs antibasculement
montés sur un sol en béton)
Clé à molette
Niveau à bulle
Tournevis à tête Phillips
Perceuse avec foret de
3,2 mm (1/8 po)
Crayon
Lunettes protectrices
Ruban à mesurer
Tournevis à lame plate
PIÈCES COMPRISES
Nécessaire de dispositif
antibasculement
7,6 cm
(3 po)
7,6 cm
(3 po)
19 cm
(7
1
⁄2 po)
63 cm
(25 po)
Zone de prise de
courant acceptable.
Orientez la prise murale
parallèlement au sol.
*12 mm
(
1
⁄2 po)
min.
**38 cm
(15 po) min.
**76 cm
(30 po) min.
***14,25 cm
(6 po) min.
76,2 cm
(30 po)
91,4 cm
(36 po)
*12 mm
(1⁄2 po)
min.
Page 58

31
Instructions Cuisinières
d’installation électriques autonomes
AVANT DE COMMENCER
Lisez attentivement ces instructions.
•
IMPORTANT — Observez tous les
codes et règlements en vigueur.
• Remarque pour l’installateur — Veillez à laisser
ces instructions avec le consommateur.
• Remarque pour le consommateur —
Conservez ces instructions pour un usage
ultérieur.
• Niveau d’aptitude — L’installation de cet appareil
nécessite des compétences de base en
mécanique.
• Une panne du produit suite à une mauvaise
installation n’est pas couverte par la garantie.
AVERTISSEMENT
—
Cet appareil
doit être connecté correctement avec le câble et la
prise électrique fournis. Si votre cuisine n’a pas de
réceptacle pour la connexion, vous devez en faire
installer un par un électricien agréé.
POUR VOTRE SÉCURITÉ :
AVERTISSEMENT — Avant de
commencer l’installation, coupez l’électricité au
tableau de distribution et verrouillez le dispositif
de déconnexion de l’alimentation pour empêcher
que le courant soit rétabli accidentellement. S’il
est impossible de verrouiller la déconnexion au
tableau de distribution, attachez fermement un
avertissement, par exemple une étiquette, au
tableau de distribution.
Toutes les instructions de dimensions brutes et
d’espacement doivent être satisfaites pour que
vous puissiez utiliser votre cuisinière en toute
sécurité. L’alimentation en électricité de la
cuisinière peut être coupée à la prise, sans
déplacer la cuisinière, si la prise se trouve à
l’emplacement définitif (retirez le tiroir inférieur).
DISPOSITIF ANTIBASCULEMENT
AVERTISSEMENT
—
Pour
réduire les risques de basculement, le dispositif
antibasculement livré avec l’appareil doit être
installé correctement pour en assurer la stabilité.
Si le dispositif antibasculement fourni avec la
cuisinière ne convient pas à votre appareil, utilisez
le dispositif antibasculement universel WB2X7909.
AVERTISSEMENT
—
•
Toutes les cuisinières peuvent
basculer
• Il peut en résulter des blessures
• Installez le dispositif
antibasculement fourni avec la
cuisinière
• Reportez-vous aux instructions
d’installation
Si vous devez éloigner la cuisinière du mur pour
une raison ou pour une autre, assurez-vous que
le dispositif antibasculement est correctement
engagé lorsque vous la replacez contre le mur.
Des questions? Appelez le 1.800.361.3400 ou consultez notre site Web à : www.electromenagersge.ca
POUR VOTRE SÉCURITÉ :
Pour réduire les risques de brûlure ou d’incendie
lorsque vous vous penchez au-dessus d’éléments
de surface chauds, évitez de mettre des placards
de rangement au-dessus de la surface de cuisson.
S’il y a des placards de rangement au-dessus de la
surface de cuisson, vous pouvez réduire les risques
en installant une hotte s’étendant d’au moins
12,5 cm (5 po) en avant des placards. Les placards
installés au-dessus d’une surface de cuisson ne
doivent pas avoir plus de 32,5 cm (13 po) de
profondeur.
Assurez-vous que les placards et le revêtement des
murs qui se trouvent à proximité de la cuisinière
peuvent résister aux températures générées par la
cuisinière (jusqu’à 93,3 °C/200 °F).
RETIREZ L’EMBALLAGE D’EXPÉDITION
Retirez tout l’emballage. Si vous ne l’enlevez pas,
l’appareil pourrait être endommagé.
NOTE : Coupez les attaches oranges d’expédition
du cordon d’alimentation, en prenant bien soin de
ne pas endommager le cordon.
Page 59

Pour vous renseigner sur l’achat d’une
pièce ou d’un accessoire pour votre
appareil électroménager, veuillez appeler
notre numéro sans frais :
Centre national des pièces 1.800.661.1616
www.electromenagersge.ca
Nettoyant pour surfaces de cuisson
en vitrocéramique . . . . . . . . . . . . .nº WX10X300
Grattoir pour surfaces de cuisson
en vitrocéramique . . . . . . . . . . . . .nº WX10X302
Nécessaire . . . . . . . . . . . . . . . . . . .nº WB64X5027
(Nécessaire comprenant la crème nettoyante et
le grattoir)
Tampons de nettoyage pour surfaces de
cuisson en vitrocéramique . . . . .nº WX10X350
Pour commander des pièces
Les renversements contenant
du sucre (comme les gelées, le
caramel, les confiseries et les
sirops) ou le plastique fondu
peuvent causer des petits trous
dans votre surface de cuisson
(qui ne sont pas couverts par la
garantie) à moins d’être enlevés
immédiatement pendant qu’ils
sont encore chauds. Faites
particulièrement attention
lorsque vous enlevez des
substances chaudes.
Pour plus de sécurité, utilisez
un grattoir muni d’une lame de
rasoir neuve bien aiguisée.
N’utilisez pas de lame
émoussée ou ébréchée.
Veillez à ne pas faire glisser vos ustensiles
et récipients sur votre surface de
cuisson. Ils y laisseraient des marques
métalliques.
Ces marques peuvent être enlevées en
utilisant le nettoyant et le tampon de
nettoyage pour surfaces de cuisson en
vitrocéramique.
Si vous laissez bouillir des récipients
recouverts d’une mince couche
d’aluminium ou de cuivre jusqu’à ce
que tout le liquide s’évapore, cette
couche d’aluminium ou de cuivre peut
laisser une décoloration noire sur la
surface de cuisson.
Enlevez-la immédiatement, avant de
faire chauffer de nouveau, sinon la
décloration pourrait devenir
permanente.
AVERTISSEMENT : Vérifiez
soigneusement que la surface de vos récipients n’est
pas rugueuse; ceux-ci pourraient rayer votre surface
de cuisson.
Marques métalliques et rayures
Pour nettoyer le joint d’étanchéité de la
surface de cuisson entourant les bords du
verre, placez sur le joint un chiffon mouillé
pendant quelques minutes, puis essuyez-le
avec des nettoyants non abrasifs.
Joint d’étanchéité de la surface de cuisson
Surface en verre—possibilités de dommages permanents.
Dommages causés par des renversements contenant du sucre ou par du
plastique fondu
Éteignez tous les éléments de surface.
Retirez les récipients chauds.
Portez un gant isolant et :
a. Utilisez un grattoir à une lame de
rasoir pour déplacer le renversement
vers une zone froide de la surface de
cuisson.
b. Enlevez le renversement avec du
papier essuie-tout.
Tout renversement restant doit être
laissé jusqu’à ce que la surface de
cuisson ait refroidi.
Attendez, pour utiliser à nouveau les
éléments de surface, que tous les
résidus aient été enlevés complètement.
REMARQUE : Si des trous ou des indentations ont
déjà apparu dans la surface en verre, celle-ci doit
être remplacée. Dans ce cas, vous devrez faire appel
au service après-vente.
Nettoyage de la surface de cuisson en verre.
30
Service à la clientèle Dépannage Entretien et nettoyage Mode d’emploi
Instructions
de sécurité
Page 60

29
Instructions
de sécurité
Mode d’emploi Entretien et nettoyage
Dépannage
Service à la clientèle
Nettoyage de la surface de cuisson en verre. www.electromenagersge.ca
Le grattoir pour surfaces de cuisson
en vitrocéramique et toutes les
fournitures recommandées sont
disponibles chez nos détaillants et
dans les magasins de pièces Camco.
REMARQUE : N’utilisez pas de lame
émoussée ou ébréchée.
Utilisez un tampon de nettoyage
pour surfaces de cuisson en
vitrocéramique.
Nettoyez votre surface de
cuisson après chaque
débordement. Utilisez un
nettoyant pour surfaces de
cuisson en vitrocéramique.
AVERTISSEMENT : Vous
pouvez ENDOMMAGER votre surface en verre si
vous utilisez des tampons à récurer autres que ceux
qui sont recommandés.
Laissez la surface de cuisson refroidir.
Répartissez quelques gouttes du
nettoyant pour surfaces de cuisson en
vitrocéramique sur toute la surface de
résidus brûlés.
À l’aide du tampon de nettoyage pour
surfaces de cuisson en vitrocéramique
livré avec votre appareil, frottez les
résidus, en appuyant si nécessaire.
S’il reste des résidus, répétez les étapes
ci-dessus autant que nécessaire.
Pour une plus grande protection, une
fois tous les résidus enlevés, polissez
toute la surface avec le nettoyant pour
surfaces de cuisson en vitrocéramique
et un papier essuie-tout.
Nettoyage après un usage quotidien normal
Utilisez SEULEMENT un nettoyant pour
surfaces de cuisson en vitrocéramique sur
votre surface de cuisson en verre. Les autres
types de nettoyants peuvent ne pas être
aussi efficaces.
Pour entretenir et protéger la surface de
votre surface de cuisson en verre, suivez les
étapes ci-dessous :
Avant d’utiliser votre surface de cuisson
pour la première fois, nettoyez-la avec
un nettoyant pour surfaces de cuisson
en vitrocéramique. Ce premier
nettoyage aidera à protéger la surface
et rendra les nettoyages suivants plus
faciles.
L’utilisation quotidienne d’un
nettoyant pour surfaces de cuisson
en vitrocéramique permettra à votre
surface de cuisson de garder son
aspect neuf.
Secouez bien la crème de nettoyage.
Appliquez quelques gouttes du
nettoyant directement sur la surface
de cuisson.
Utilisez un papier essuie-tout sur les
surfaces de cuisson en vitrocéramique
pour nettoyer la totalité de la surface
de cuisson.
Avec un chiffon ou un papier essuie-
tout sec, enlevez tous les résidus de
nettoyage. Il n’est pas nécessaire de
rincer.
REMARQUE : Il est très important de NE PAS faire
chauffer la surface de cuisson jusqu’à ce qu’elle ait
été nettoyée complètement.
Résidus brûlés
Laissez la surface de cuisson refroidir.
Servez-vous d’un grattoir à une lame de
rasoir, que vous utiliserez à un angle
d’environ 45° contre la surface en
verre, pour gratter les résidus. Vous
devrez appuyer sur le grattoir pour
enlever les résidus.
Après avoir enlevé les résidus avec le
grattoir, répartissez quelques gouttes du
nettoyant pour surfaces de cuisson en
vitrocéramique sur toute la surface de
résidus brûlés. Utilisez le tampon de
nettoyage pour enlever tout résidu
restant.
Pour une plus grande protection, une
fois tous les résidus enlevés, polissez
toute la surface avec le nettoyant pour
surfaces de cuisson en vitrocéramique
et un papier essuie-tout.
Résidus brûlés importants
Page 61

Entretien et nettoyage de la cuisinière.
Grille du four
Nettoyez-les avec un produit nettoyant
abrasif ou à la laine d’acier. Après le
nettoyage, rincez les grilles à l’eau claire et
essuyez-les avec un chiffon sec et propre.
REMARQUE : Si votre four est équipé de grilles
porcelanisées de couleur grise, vous pouvez les
laisser dans le four pendant le cycle
d’autonettoyage.
Si les grilles deviennent difficiles à faire
glisser, appliquez une petite quantité
d’huile végétale sur un papier essuie-tout et
passez-le sur les bords des grilles. N’utilisez
pas Pam
®
ni aucun autre aérosol lubrifiant.
Grilles du four
Les surfaces peintes comprennent les côtés,
le haut du tableau de commande et la
façade du tiroir. Nettoyez-les à l’eau et
au savon ou avec une solution d’eau et
de vinaigre.
N’utilisez pas de produits commerciaux de
nettoyage de fours ou de poudres à récurer,
tampons en laine d’acier ou produits
abrasifs agressifs sur les surfaces peintes.
Surfaces peintes
N’utilisez jamais de tampon en laine d’acier,
il rayera votre surface.
Pour nettoyer la surface en acier
inoxydable, utilisez de l’eau chaude
savonneux ou un produit nettoyant ou cire
à acier inoxydable. Essuyez toujours la
surface dans le sens du grain. Suivez les
instructions du produit nettoyant pour
nettoyer la surface en acier inoxydable.
Pour savoir comment acheter le produit
nettoyant ou le cire pour appareils
électroménagers en acier inoxydable, ou
pour trouver un détaillant ou un magasin
de pièces Camco près de chez vous, veuillez
appeler notre numéro sans frais :
Centre national de pièces 1.800.661.1616
www.electromenagersge.ca
Surfaces en acier inoxydable (sur certains modèles)
Éléments de chauffage du four
Ne nettoyez jamais l’élément de cuisson ou
l’élément de grillade. Toute leur saleté disparaîtra
en brûlant quand vous les chaufferez.
Pour nettoyer le bas du four, soulevez
doucement l’élément de cuisson. Nettoyez
avec de l’eau savonneuse chaude.
28
Service à la clientèle Dépannage Entretien et nettoyage Mode d’emploi
Instructions
de sécurité
Bac de tiroir amovible
REMARQUE : Laissez le tiroir-four refroidir avant
d’enlever le bac.
REMARQUE : Enlevez rapidement les produits
renversés après chaque emploi.
■ Ne placez jamais, ni utilisez ou passez
à l’autonettoyage dans le four le bac du
tiroir.
■ Le tiroir-four comporte un bac amovible,
facilitant le nettoyage. Nettoyez-le avec
de l’eau savonneuse très chaude et une
éponge ou un torchon. Séchez-le avec
un linge propre. Remettez le bac dans
le tiroir.
REMARQUE : Pour les modèles avec un tiroir-four
électrique, débranchez la cuisinière au niveau du
tableau de distribution en enlevant le fusible ou
en déclenchant le disjoncteur, avant de faire tout
réglage, nettoyage ou entretien. Assurez-vous
que l’élément chauffant du tiroir est froid.
Page 62

27
Instructions
de sécurité
Mode d’emploi Entretien et nettoyage
Dépannage
Service à la clientèle
www.electromenagersge.ca
Ne rangez une lèchefrite et une
grille sales dans aucune partie de
la cuisinière.
Butée du
guide
Rail
Bride de la protection.
Ne nettoyez pas la lèchefrite ou sa grille dans un
four autonettoyant.
Après avoir utilisé le gril, retirez la lèchefrite
du four. Retirez la grille de la lèchefrite.
Versez avec précaution la graisse de la
lèchefrite dans un récipient approprié.
Lavez et rincez la lèchefrite et la grille à l’eau
chaude, avec un tampon à récurer savonneux ou
en plastique.
S’il y a des restes de nourriture brûlés,
arrosez la grille avec un détergent pendant
qu’elle est chaude et couvrez-la avec du
papier essuie-tout ou un torchon humides.
Faites tremper la lèchefrite pour enlever les
aliments brûlés.
La lèchefrite et la grille peuvent être nettoyées avec
un produit de nettoyage commercial pour fours.
Elles peuvent aussi être mises au lave-vaisselle.
Remplacement de l’ampoule du four
ATTENTION : Avant de remplacer
l’ampoule du four, coupez l’alimentation électrique
de la cuisinière en enlevant le fusible ou en
déclenchant le disjoncteur au tableau de distribution
principal.
Laissez refroidir la protection de l’ampoule
et l’ampoule avant de les enlever.
Pour enlever la protection :
Mettez une main sur la protection pour
qu’elle ne tombe pas quand elle sera
détachée. Avec les doigts de la même
main, repoussez fermement la bride de
la protection. Soulevez la protection.
N’enlevez aucune vis pour retirer la protection.
Remplacez l’ampoule par une
ampoule de 40 watts pour appareils
électroménagers.
Pour remettre la protection :
Mettez-la dans la rainure du boîtier de
l’ampoule. Tirez la bride vers l’avant,
jusqu’au centre de la protection,
jusqu’à ce qu’elle se mette en place
d’un coup sec.
Rétablissez le courant électrique à la
cuisinière.
Grille et lèchefrite
Pour retirer le tiroir :
Tirez sur le tiroir jusqu’à ce qu’il
s’arrête.
Levez l’avant du tiroir jusqu’à ce que
les butées soient dégagées des guides.
Retirez le tiroir.
Pour remettre le tiroir :
Placez les rails du tiroir sur les guides.
Poussez le tiroir jusqu’à ce qu’il
s’arrête.
Levez l’avant du tiroir et poussez
jusqu’à ce que les butées dépassent les
guides.
Baissez l’avant du tiroir et poussez
jusqu’à ce qu’il soit fermé.
Si le tiroir est de travers :
Retirez-le et remettez-le en vous assurant
que le rail est dans le guide.
Si le tiroir ne ferme pas :
Retirez-le et remettez-le en vous assurant
que le câble électrique ne gêne plus le
tiroir, et/ou que le rail est engagé dans le
guide.
Tiroir de rangement amovible (sur certains modèles)
Le support arrière du
tiroir est sur la partie
supérieure du rail
Le tiroir ne
ferme pas
complètement
Le câble électrique
gêne peut-être le tiroir
à cet endroit
La façade du
tiroir penche en
avant par rapport
à la cuisinière
Le support arrière du
tiroir est au-dessus
du rail
La façade du tiroir
penche d’un côté
Page 63

Entretien et nettoyage de la cuisinière.
Le joint est discontinu en bas pour
permettre une circulation adéquate
de l’air.
Ne frottez pas le joint de la porte et
ne le nettoyez pas—il a une très faible
résistance aux abrasifs.
Si vous remarquez que le joint est usé,
effiloché ou endommagé, ou s’il n’assure
pas une bonne étanchéité, faites-le
remplacer.
Nettoyage de la porte du four
Pour nettoyer l’intérieur de la porte :
■ La zone se trouvant à l’intérieur du joint est
nettoyée pendant le cycle d’autonettoyage;
vous n’avez donc pas à le faire vous-même.
■ La zone située à l’extérieur du joint et du
revêtement de la porte peut être nettoyée avec
un tampon de laine d’acier savonneux ou un
tampon en plastique, de l’eau chaude et un
détergent. Rincez abondamment avec une
solution de vinaigre et d’eau.
Pour nettoyer l’extérieur de la porte :
■ Utilisez de l’eau et du savon pour nettoyer
complètement le haut, les côtés et le devant de la
porte. Rincez abondamment. Vous pouvez aussi
utiliser un produit nettoyant pour vitres pour
nettoyer le verre de l’extérieur de la porte. Ne
laissez pas l’eau couler à l’intérieur de l’évent.
■ Si une tâche sur la garniture de l’évent de la porte
est difficile à enlever, utilisez un produit abrasif
doux et une éponge à récurer pour obtenir les
meilleurs résultats.
■ Les éclaboussures de marinades, de jus de fruit,
de sauce tomate et de jus d’arrosage des viandes
contiennent des acides qui peuvent être à
l’origine de décolorations, et doivent être
essuyées immédiatement. Lorsque la surface
est froide, nettoyez et rincez.
■ N’utilisez pas de produits de nettoyage pour
fours, de poudres à récurer ou de produits très
abrasifs sur l’extérieur de la porte.
La porte est très lourde. Soyez prudent quand
vous retirez et soulevez la porte.
Ne soulevez pas la porte par la poignée.
Pour enlever la porte :
Ouvrez la porte en grand.
Poussez les verrous de charnière vers
le bas du cadre de la porte, jusqu’à la
position déverrouillée. Vous aurez peut-
être besoin d’un tournevis à lame plate.
Fermez la porte jusqu’à ce qu’elle
atteigne la position de retrait.
Saisissez fermement les deux côtés de
la porte par le haut.
Soulevez la porte vers le haut, jusqu’à
ce que le bras de la charnière soit
complètement sorti de la fente.
Pour remettre la porte en place :
Saisissez
fermement
les deux côtés
de la porte
par le haut. La porte
étant au même angle
que lorsque vous
l’avez retirée, glissez
l’encoche du bord inférieur du bras de
la charnière dans le bord inférieur de
la fente de charnière.
Ouvrez la porte en grand.
Poussez les verrous de charnière contre
l’armature antérieure de la cavité du
four jusqu’à la position de verrouillage.
Fermez la porte du four.
Bras de
charnière
en place
Indentation
Bord
inférieur
de la
fente
Bras de charnière
Fente
Bras de
charnière
Position de
verrouillage
Position de retrait
Porte de four amovible
Verrou de charnière
(position déverrouillée)
26
Service à la clientèle Dépannage Entretien et nettoyage Mode d’emploi
Instructions
de sécurité
Page 64

25
Entretien et nettoyage de la cuisinière. www.electromenagersge.ca
Assurez-vous que toutes les commandes sont désactivées et que toutes les surfaces sont froides avant de nettoyer
toute partie de la cuisinière.
Si vous déplacez votre cuisinière pour la nettoyer, la réparer ou pour toute autre
raison, assurez-vous que le dispositif antibasculement est engagé correctement
quand la cuisinière est remise en place. Si vous ne prenez pas cette précaution,
la cuisinière pourrait basculer et causer des blessures.
Évent du four
L’évent du four est situé au-dessus de l’élément
de surface arrière droit.
Cette zone pourrait devenir chaude
pendant l’utilisation du four.
Il est normal que de la vapeur s’échappe de
l’évent.
L’évent est important pour que l’air puisse circuler
correctement. Ne le bloquez jamais.
Tableau de commande
Vous devriez essuyer le panneau de contrôle
après chaque utilisation du four. Utilisez un
linge humide pour nettoyer ou rincer. Pour
nettoyer, utiliser une solution d’eau
savonneuse légère ou une solution 50/50
d’eau et de vinaigre. Pour rincer, utilisez de
l’eau pure. Polissez à sec avec un linge
doux.
N’utilisez jamais de nettoyant abrasif,
de nettoyant liquide fort, de tampon
de récurage en matière plastique ou
de nettoyant à four sur le panneau de
contrôle—ils endommageront la surface.
Comment retirer la pellicule d’expédition protectrice et le ruban d’emballage
Agrippez délicatement un coin de la
pellicule d’expédition protectrice avec les
doigts et retirez délicatement de la surface
de l’appareil. N’utilisez pas d’articles
tranchants pour retirer la pellicule. Retirez
toute la pellicule avant d’utiliser l’appareil
pour la première fois.
Pour s’assurer qu’il n’y ait aucun dommage
au fini du produit, le moyen le plus sûr de
retirer l’adhésif du ruban d’emballage sur
les nouveaux appareils est une application
d’un détergent liquide de lave-vaisselle.
Appliquez-le avec un chiffon doux et laissez
tremper.
REMARQUE : l’adhésif doit être retiré de toutes les
pièces. Il ne peut pas être retiré s’il est cuit sur la
surface.
Boutons de commande
Les boutons de commande se retirent pour faciliter
leur nettoyage.
Assurez-vous que les boutons soient en
position OFF (ARRÊT) et retirez-les des tiges
pour les nettoyer.
Les boutons se nettoient au lave-vaisselle ou
vous pouvez les laver avec de l’eau et du
savon. Assurez-vous que l’intérieur des
boutons soit sec avant de les replacer.
Replacez les boutons en position OFF
(ARRÊT) pour vous assurer qu’ils soient bien
placés.
Instructions
de sécurité
Mode d’emploi Entretien et nettoyage
Dépannage
Service à la clientèle
Page 65

24
Service à la clientèle Dépannage Entretien et nettoyage Mode d’emploi
Instructions
de sécurité
Lorsque l’afficheur indique ⊃, le
four est réglé sur le mode sabbat.
Lorsque l’afficheur indique ⊃ ,
le four est en mode de cuisson/
rôtissage.
⊃
Utilisation de la caractéristique sabbat.
(sur certains modèles)
(Conçue pour être utilisée pendant le sabbat et les fêtes juives)
Comment régler la mise en marche immédiate et l’arrêt automatique pour
la cuisson/le rôtissage minutés
Assurez-vous que l’horloge est réglée à l’heure
correcte et que le four est éteint.
Appuyez simultanément sur les deux
touches BAKE (CUIRE) et BROIL (GRIL) et
maintenez-les enfoncées jusqu’à ce que
l’afficheur indique SF.
REMARQUE : Si bake (cuire) ou broil (grill)
apparaît à l’afficheur, vous n’avez pas appuyé
simultanément sur les touches BAKE (CUIRE)
et BROIL (GRIL). Appuyez sur la touche OFF
(ARRÊT) et recommencez.
Appuyez sur la touche START TIME
(HEURE DE DÉPART) jusqu’à ce que
SAbbAtH (Sabbat) apparaisse à
l’afficheur.
Appuyez sur la touche START (DÉPART)
et ⊃ s’affiche.
Appuyez sur la touche COOK TIME
(TEMPS DE CUISSON).
Appuyez sur les touches numériques
pour régler la durée de cuisson
souhaitée, entre 1 minute et 9 heures
et 99 minutes. La durée de cuisson que
vous avez réglée sera affichée.
Appuyez sur la touche START (DÉPART).
Appuyez sur la touche BAKE (CUIRE).
Aucun signal sonore n’est émis.
Appuyez sur les touches numériques
pour entrer la température souhaitée.
Aucun signal sonore ne sera émis ni
aucune température affichée.
Appuyez sur la touche START (DÉPART).
Après une période d’attente allant
d’environ 30 secondes à 1 minute, ⊃
apparaîtra à l’afficheur, indiquant que
le four est en cours de cuisson ou de
rôtissage. Si ⊃ n’apparaît pas à
l’afficheur, recommmencez à l’étape 7.
Pour régler la température du four, appuyez
sur la touche BAKE (CUIRE), entrez la
nouvelle température en utilisant les
touches numériques et appuyez sur la
touche START (DÉPART).
Lorsque la cuisson est terminée, l’afficheur
passe de ⊃ à ⊃ et 0:00 apparaît,
indiquant que le four est OFF (ARRÊT), mais
est toujours en mode sabbat. Retirez les
aliments cuits.
⊃
⊃
⊃
Comment sortir de la caractéristique sabbat
Appuyez sur la touche OFF (ARRÊT).
Si le four est toujours en marche,
attendez environ 30 secondes à
1 minute, jusqu’à ce que seulement
⊃ s’affiche.
Appuyez simultanément sur les deux
touches BAKE (CUIRE) et BROIL (GRIL) et
maintenez-les enfoncées jusqu’à ce que
l’afficheur indique SF.
Appuyez sur la touche START TIME
(HEURE DE DÉPART) jusqu’à ce que 12
shdn (arrêt 12 h) ou no shdn (pas d’arrêt)
apparaisse à l’afficheur.
Sélectionnez 12 shdn, pour indiquer
que le four s’arrêtera automatiquement
après 12 heures, ou no shdn, indiquant
que le four ne s’arrêtera pas
automatiquement après 12 heures.
Appuyez sur START (DÉPART) quand
l’option souhaitée est affichée (12 shdn
ou no shdn).
REMARQUE : S’il se produit une panne de courant
pendant que le four est en mode sabbat, le four
s’arrête automatiquement et reste arrêté même si le
courant est rétabli. La commande du four doit être
reprogrammée.
+
+
Page 66

23
Instructions
de sécurité
Mode d’emploi Entretien et nettoyage
Dépannage
Service à la clientèle
Lorsque l’afficheur indique ⊃, le
four est réglé sur le mode sabbat.
Lorsque l’afficheur indique ⊃ ,
le four est en mode de cuisson/
rôtissage.
⊃
Utilisation de la caractéristique sabbat.
(sur certains modèles)
(Conçue pour être utilisée pendant le sabbat et les fêtes juives)
www.electromenagersge.ca
La caractéristique sabbat peut seulement être utilisée pour la cuisson courante et le rôtissage. Elle ne peut pas être
utilisée pour la cuisson à convection, la cuisson au gril, la cuisson différée ou l’autonettoyage.
REMARQUE : La lampe du four s’allume automatiquement (sur certains modèles) quand la porte est ouverte, et elle
s’éteint quand la porte est fermée. L’ampoule peut être retirée. Voyez la section sur le remplacement de l’ampoule du
four. Sur les modèles munis d’un interrupteur sur le tableau de commande, la lampe du four peut-être allumée et
laissée allumée.
Comment régler la cuisson/le rôtissage courants
Assurez-vous que l’horloge est réglée à l’heure
correcte et que le four est éteint.
Appuyez simultanément sur les deux
touches BAKE (CUIRE) et BROIL (GRIL)
et maintenez-les enfoncées jusqu’à ce
que l’afficheur indique SF.
REMARQUE : Si bake (cuire) ou broil
(grill) apparaît à l’afficheur, vous n’avez
pas appuyé simultanément sur les touches
BAKE (CUIRE) et BROIL (GRIL). Appuyez
sur la touche OFF (ARRÊT) et recommencez.
Appuyez sur la touche START TIME
(HEURE DE DÉPART) jusqu’à ce que
SAbbAtH (Sabbat) apparaisse à
l’afficheur.
Appuyez sur la touche START (DÉPART)
et ⊃ s’affiche.
Appuyez sur la touche BAKE (CUIRE).
Aucun signal sonore n’est émis.
À l’aide des touches numériques,
entrez la température souhaitée entre
77 °C (170 °F) et 288 °C (550 °F).
Aucun signal sonore ne sera émis ni
aucune température affichée.
Appuyez sur la touche START (DÉPART).
Après une période d’attente allant
d’environ 30 secondes à 1 minute, ⊃
apparaîtra à l’afficheur, indiquant que
le four est en cours de cuisson ou de
rôtissage. Si ⊃ n’apparaît pas à
l’afficheur, recommmencez à l’étape 4.
Pour régler la température du four,
appuyez sur la touche BAKE (CUIRE), entrez
la nouvelle température en utilisant les
touches numériques et appuyez sur la
touche START (DÉPART).
REMARQUE : Les touches OFF (ARRÊT) et COOK
TIME (TEMPS DE CUISSON) sont actives lorsque
la caractéristique sabbat est en marche.
⊃
⊃
+
Page 67

22
Service à la clientèle Dépannage Entretien et nettoyage Mode d’emploi
Instructions
de sécurité
Caractéristiques spéciales des commandes
de votre four.
Volume du signal sonore
Cette caractéristique permet de régler le volume du
signal sonore à un niveau qui vous convient. Il y a
trois niveaux de volume possibles.
Appuyez simultanément sur les
touches BAKE (CUIRE) et BROIL (GRIL)
pendant 3 secondes jusqu’à ce que
l’afficheur indique SF.
Appuyez sur la touche LAMPE.
L’afficheur indique 2 BEEP (2 bips).
Ce volume est le volume moyen.
Appuyez de nouveau sur la touche
LAMPE. L’afficheur indique
3 BEEP (3 BIPS). Ce volume est
le volume le plus fort.
Appuyez de nouveau sur la touche
LAMPE.
L’afficheur indique
1 BEEP
(1 BIP). Ce volume est le volume le
plus bas.
Chaque fois que le volume est changé,
un signal sonore donne une indication
du niveau de volume.
Sélectionnez le volume souhaité
(1 BEEP, 2 BEEP, 3 BEEP).
Appuyez sur la touche START (DÉPART)
pour activer le volume souhaité.
12 heures, 24 heures ou effacement de l’heure
Votre tableau de commande est réglé pour utiliser
une horloge de 12 heures.
Si vous le préférez, vous pouvez utiliser une
horloge de 24 heures ou effacer l’affichage
de l’horloge. Suivez les étapes ci-dessous.
Appuyez simultanément sur les
touches BAKE (CUIRE) et BROIL (GRIL)
pendant 3 secondes jusqu’à ce que
l’afficheur indique SF.
Appuyez une fois sur la touche CLOCK
(HORLOGE). L’afficheur indique 12 hr.
Si c’est ce que vous souhaitez, appuyez
sur la touche START (DÉPART).
Appuyez de nouveau sur la touche
CLOCK (HORLOGE) pour changer à une
horloge de 24 heures. L’afficheur
indique 24 hr. Si c’est ce que vous
souhaitez, appuyez sur la touche
START (DÉPART).
Appuyez de nouveau sur la touche
CLOCK (HORLOGE) pour effacer
l’affichage de l’horloge. L’afficheur
indique OFF (DÉSACTIVÉ). Si c’est ce
que vous souhaitez, appuyez sur la
touche START (DÉPART).
REMARQUE : Si l’heure est effacée, vous ne
pourrez pas utiliser la mise en marche différée.
+
+
Page 68

21
Instructions
de sécurité
Mode d’emploi Entretien et nettoyage
Dépannage
Service à la clientèle
Caractéristiques spéciales des commandes
de votre four.
www.electromenagersge.ca
Votre nouveau tableau de commande à touches est doté de caractéristiques spéciales que vous souhaiterez
peut-être utiliser. La section ci-dessous décrit ces caractéristiques et comment vous pouvez les activer.
Les modes des caractéristiques spéciales peuvent seulement être activés quand l’afficheur indique l’heure du jour.
Ils restent dans la mémoire du tableau de commande jusqu’à ce que les différentes étapes soient répétées.
Quand l’afficheur indique votre sélection, appuyez sur la touche START (MISE EN MARCHE). Les caractéristiques
spéciales resteront en mémoire après une panne de courant, à l’exception de la fonction sabbat, qui devra être
reprogrammée.
Arrêt automatique après 12 heures
Avec cette caractéristique, si vous oubliez et laissez
le four allumé, la commande éteindra le four
automatiquement après 12 heures de cuisson
ou 3 heures de fonctionnement du gril.
Si vous voulez ARRÊTER cette caractéristique,
suivez les étapes ci-dessous.
Appuyez simultanément sur les
touches BAKE (CUIRE) et BROIL (GRIL)
pendant 3 secondes jusqu’à ce que
l’afficheur indique SF.
Appuyez sur la touche START TIME
(HEURE DE DÉPART) jusqu’à ce que le
message « no shdn » (pas d’arrêt)
apparaisse à l’afficheur.
Appuyez sur la touche START (DÉPART)
pour désactiver l’arrêt automatique et
laissez cette commande
réglée dans ce
mode de caractéristiques spéciales.
Températures en degrés Fahrenheit ou Celsius
Le tableau de commande de votre four est réglé pour
utiliser les températures en degrés Fahrenheit, mais
vous pouvez changer ce réglage si vous voulez
utiliser les degrés Celsius.
Appuyez simultanément sur les
touches BAKE (CUIRE) et BROIL (GRIL)
pendant 3 secondes jusqu’à ce que
l’afficheur indique SF.
Appuyez simultanément sur les
touches COOK TIME (TEMPS DE
CUISSON) et BROIL (GRIL). L’afficheur
indique F (Fahrenheit).
Appuyez de nouveau simultanément
sur les touches COOK TIME (TEMPS DE
CUISSON) et BROIL (GRIL). L’afficheur
indique C (Celsius).
Appuyez sur la touche START (DÉPART).
Signaux sonores à la fin d’un cycle minuté
À la fin d’un cycle minuté, 3 bips courts sont émis,
suivis d’un bip toutes les 6 secondes jusqu’à ce
que vous appuyiez sur la touche OFF (ARRÊT). Vous
pouvez annuler ce signal sonore qui se répète toutes
les 6 secondes.
Pour annuler le signal sonore qui se répète
toutes les 6 secondes :
Appuyez simultanément sur les
touches BAKE (CUIRE) et BROIL (GRIL)
pendant 3 secondes jusqu’à ce que
l’afficheur indique SF.
Appuyez sur la touche TIMER
(MINUTERIE). Cet afficheur indique
CON BEEP (BIP CONTINU). Appuyez
de nouveau sur la touche TIMER
(MINUTERIE). L’afficheur indique BEEP.
(Cette opération annule le signal sonore
qui se répète toutes les 6 secondes.)
Appuyez sur la touche START (DÉPART).
+
+
+
+
Page 69

20
Service à la clientèle Dépannage Entretien et nettoyage Mode d’emploi
Instructions
de sécurité
Utilisation du four autonettoyant.
Comment différer le début de l’autonettoyage
Appuyez une fois sur la touche
CLEAN (NETTOYAGE) pour une durée de
nettoyage de 4 heures, ou deux fois
pour une durée de nettoyage de
3 heures.
La durée de 3 heures est recommandée
pour nettoyer les petites salissures ne
s’étendant pas sur une grande surface.
Pour les fours plus sales, il est
recommandé d’utiliser un nettoyage
de 4 heures ou plus.
Si vous voulez une durée de nettoyage
différente de 4 ou 3 heures, utilisez les
touches numériques pour entrer la
durée de nettoyage souhaitée.
Vous pouvez choisir une durée de nettoyage
allant de 2 heures et demie à 5 heures, en
fonction du degré de salissure de votre four.
Appuyez sur la touche START TIME
(HEURE DE DÉPART).
Utilisez les touches numériques pour
entrer l’heure à laquelle vous souhaitez
que le nettoyage commence.
Appuyez sur la touche START (DÉPART).
La porte se verrouille automatiquement.
L’afficheur indique l’heure de la mise en
marche du nettoyage. Vous ne pourrez pas
ouvrir la porte du four jusqu’à ce que la
température retombe en dessous de la
température de verrouillage, et que le
voyant LOCKED (VERROUILLÉ) s’éteigne.
Une fois le voyant LOCKED éteint, vous
pourrez ouvrir la porte.
Après l’autonettoyage
Vous remarquerez peut-être un peu de
cendre blanche dans le four. Essuyez-la avec
un chiffon humide après que le four a
refroidi.
S’il reste des tâches blanches, enlevez-les
à l’aide d’un tampon de laine d’acier
savonneux et rincez abondamment avec
une solution d’eau et de vinaigre.
Ces dépôts sont en général des résidus de
sel qui ne peuvent pas être enlevés pendant
l’autonettoyage.
Si le four n’est pas propre après un cycle,
recommencez.
■ Il n’est pas possible de régler le four pour la
cuisson ou pour un autre cycle d’autonettoyage
avant que le four soit assez froid et que la porte
soit déverrouillée.
■ Pendant l’autonettoyage du four, vous pouvez
appuyer sur la touche CLOCK (HORLOGE) pour
afficher l’heure. Pour revenir au décompte du
temps, appuyez sur la touche CLEAN
(NETTOYAGE).
■ Si les grilles deviennent difficiles à faire glisser,
appliquez une petite quantité d’huile végétale sur
un papier essuie-tout et passez-le sur les bords
des grilles.
Page 70

19
Instructions
de sécurité
Mode d’emploi Entretien et nettoyage
Dépannage
Service à la clientèle
Essuyez toute la saleté importante
sur la sole du four.
Utilisation du four autonettoyant. www.electromenagersge.ca
La porte du four doit être fermée et toutes les commandes correctement réglées pour que le cycle fonctionne correctement.
Avant l’autonettoyage
Nous vous recommandons d’aérer votre
cuisine en ouvrant une fenêtre, ou d’utiliser
une hotte de ventilation pendant le premier
cycle d’autonettoyage.
Retirez les grilles, la lèchefrite et sa
grille, tous les ustensiles et tout papier
d’aluminium du four.
REMARQUE : Si votre four est équipé de
grilles porcelanisées de couleur grise, vous
pouvez les laisser dans le four pendant le
cycle d’autonettoyage.
La saleté se trouvant sur l’armature frontale
de la cuisinière et autour de la partie
extérieure du joint de la porte devra être
nettoyée à la main. Nettoyez ces zones à
l’eau chaude et avec des tampons de laine
d’acier savonneux ou des produits
nettoyants tels que Soft Scrub
®
. Rincez-les
soigneusement à l’eau claire et séchez-les.
Ne nettoyez pas le joint. Il est fait en fibre
de verre qui ne résiste pas aux produits
abrasifs. Il est essentiel que le joint reste
intact. Si vous remarquez qu’il s’use ou
qu’il s’effiloche, remplacez-le.
Essuyez tous les renversements importants
sur la sole du four.
Assurez-vous que la protection de l’ampoule
électrique du four est bien en place et que
la lampe du four est éteinte.
IMPORTANT : Certains oiseaux sont extrêmement
sensibles aux vapeurs venant du four de toutes les
cuisinières lors du cycle d’autonettoyage; elles
peuvent affecter leur santé. Déplacez les oiseaux
et mettez-les dans une autre pièce bien aérée.
Comment régler le four pour l’autonettoyage
AVERTISSEMENT :
Les éléments de surface sont automatiquement
débranchés pendant le cycle d’autonettoyage.
Assurez-vous que tous les réglages d’éléments
de surface sont éteints pendant tout le
temps du cycle d’autonettoyage. Tout
élément de surface qui est réglé en position
de marche pendant le cycle d’autonettoyage
se mettra automatiquement en marche à
la fin du cycle d’autonettoyage et peut se
mettre à chauffer sans surveillance. Attendez
que le cycle d’autonettoyage soit terminé
pour régler et utiliser les éléments de surface.
Appuyez une fois sur la touche
CLEAN (NETTOYAGE) pour une durée
de nettoyage de 4 heures, ou deux
fois pour une durée de nettoyage
de 3 heures.
La durée de 3 heures est recommandée
pour nettoyer les petites salissures ne
s’étendant pas sur une grande surface.
Pour les fours plus sales, il est
recommandé d’utiliser un nettoyage
de 4 heures ou plus.
Si vous voulez une durée de nettoyage
différente de 4 ou 3 heures, utilisez les
touches numériques pour entrer la
durée de nettoyage souhaitée.
Vous pouvez choisir une durée de nettoyage
allant de 2 heures et demie à 5 heures, en
fonction du degré de salissure de votre four.
Appuyez sur la touche START (DÉPART).
La porte se verrouille automatiquement.
L’afficheur indique la durée de nettoyage
restante. Vous ne pourrez pas ouvrir la
porte du four jusqu’à ce que la température
retombe en dessous de la température
de verrouillage, et que le voyant LOCKED
(VERROUILLÉ) s’éteigne.
Une fois le voyant LOCKED éteint, vous
pourrez ouvrir la porte.
■ Le mot « LOCKED » clignote et le mot
« door » (porte) s’affiche si vous réglez
le cycle d’autonettoyage et oubliez de
fermer la porte du four.
■ Pour interrompre un cycle
d’autonettoyage, appuyez sur la
touche OFF (ARRÊT). Quand le voyant
LOCKED s’éteint, indiquant que le four
a refroidi jusqu’à une température
en dessous de la température de
verrouillage, vous pouvez de
nouveau ouvrir la porte.
Page 71

18
Service à la clientèle Dépannage Entretien et nettoyage Mode d’emploi
Instructions
de sécurité
Tableau de sélection des températures
Pour garder au chaud différents aliments,
réglez la commande en fonction de la
nourriture nécessitant le réglage le plus
élevé.
■ La température, le type et la quantité
d’aliment, ainsi que la durée, ont un effet
sur la qualité de l’aliment.
■ L’ouverture répétée du tiroir permet à
l’air chaud de s’échapper et à l’aliment
de refroidir.
■ Avec de grandes quantités, il pourra
être nécessaire de choisir un réglage plus
élevé et de recouvrir certains aliments.
■ N’utilisez pas de contenants en plastique
ni d’emballage en plastique.
ATTENTION : Ne laissez pas dans le tiroir des
aliments pendant plus de deux heures.
Type d’aliment Réglage
Bacon MAX.
Croustilles de maïs MIN.
Jambon MAX.
Muffins MIN.
Pains MIN.
Pizza MAX.
Plats en sauce Moyen
Pommes de terre au four MAX.
Poulet, frit MAX.
Tartes MIN.
Pour rendre croustillants des aliments
■ Placez l’aliment dans des plats ou
ustensiles peu profonds.
■ Préchauffez au réglage MIN.
■ Vérifiez si l’aliment est croustillant après
45 minutes. Continuez au besoin.
Pour réchauffer assiettes et bols
Réglez au niveau MIN.
■ N’utilisez que des plats ne craignant pas
la chaleur.
■ Si vous désirez réchauffer de la
porcelaine fine, vérifiez avec le fabricant,
pour connaître la tolérance thermique
maximale de sa porcelaine.
■ Vous pouvez réchauffer des plats de
service vides pendant le préchauffage
du tiroir.
ATTENTION : Les plats vont être très chauds.
Utilisez des maniques ou mitaines pour enlever
ces plats.
Utilisation du tiroir réchaud. (sur certains modèles)
Page 72

17
Instructions
de sécurité
Mode d’emploi Entretien et nettoyage
Dépannage
Service à la clientèle
Le tiroir réchaud garde au chaud les aliments cuits et chauds. Commencez toujours avec des aliments chauds.
N’utilisez pas ce tiroir pour chauffer des aliments froids, sauf pour rendre croustillants des craquelins, des
croustilles ou des céréales sèches.
Utilisation du tiroir réchaud. (sur certains modèles) www.electromenagersge.ca
Pour utiliser le tiroir réchaud
Poussez le bouton de commande et tournez-le
sur le réglage souhaité.
Lors de l’utilisation du tiroir réchaud
Le tiroir réchaud gardera au chaud les
aliments cuits, chauds. Commencez toujours
par des aliments chauds. N’utilisez pas ce
tiroir pour réchauffer des aliments froids,
sauf pour rendre croustillants des craquelins,
croustilles ou céréales sèches.
N’utilisez pas de papier aluminium pour tapisser
ce tiroir. Le papier aluminium est un excellent
isolant qui emprisonne la chaleur en dessous.
Ceci modifierait la performance du tiroir et
pourrait endommager son fini intérieur.
Attendez environ 25 minutes que le tiroir
réchaud préchauffe.
■ Ne versez pas de liquide ou d’eau dans
ce tiroir.
■ Couvrez tous les aliments placés dans ce
tiroir avec un couvercle ou avec du papier
aluminium. Pour les pâtisseries ou les pains,
prévoyez une aération dans le couvercle
pour laisser l’humidité s’échapper.
■ Gardez l’aliment dans son plat de cuisson
ou transférez-le dans un plat de service ne
craignant pas la chaleur.
ATTENTION : Les contenants ou emballages en
plastique fondent s’ils sont en contact direct avec le
tiroir, le bac ou un ustensile chaud. Le plastique fondu
peut ne pas s’enlever et ceci n’est pas couvert par la
garantie.
■ Enlevez les cuillères de service, etc., avant
de mettre les contenants dans le tiroir
réchaud.
Page 73

16
Service à la clientèle Dépannage Entretien et nettoyage Mode d’emploi
Instructions
de sécurité
Réglage du thermostat du four—
Faites-le vous-même!
Vous découvrirez peut-être que votre nouveau four cuit différemment de celui qu’il a remplacé. Utilisez votre
nouveau four pendant quelques semaines pour vous familiariser avec lui. Si vous trouvez qu’il est trop chaud ou trop
froid, vous pouvez régler le thermostat vous-même.
N’utilisez pas de thermomètres tels que ceux que l’on trouve dans les supermarchés pour vérifier le réglage de
température de votre four. Ces thermomètres peuvent accuser une différence allant de 6 à 11 degrés Celsius
(20 à 40 degrés Fahrenheit).
REMARQUE : Ce réglage affectera seulement les températures de cuisson courante et de rôtissage; il n’affectera pas
les températures du gril ou de l’autonettoyage. La mémoire conserve ce réglage après une panne de courant.
Pour régler le thermostat
Appuyez simultanément sur les
touches BAKE (CUIRE) et BROIL (GRIL)
pendant 3 secondes jusqu’à ce que
l’afficheur indique SF.
Appuyez sur la touche BAKE (CUIRE).
Un nombre à deux chiffres s’affiche.
Appuyez de nouveau sur BAKE (CUIRE)
pour alterner entre une augmentation
et une diminution de la température
du four.
La température du four peut être
réglée pour être de 19 ºC (35 ºF) de
plus ou de moins. Appuyez sur les
touches numériques dans l’ordre où
vous les lisez. Par exemple, pour
changer la température du four de
12 ºC (15 ºF), appuyez sur 1 puis 5.
Une fois le réglage terminé, appuyez
sur la touche START (DÉPART) pour
revenir à l’affichage de l’heure. Utilisez
votre four de la façon habituelle.
Le type de margarine que vous utilisez
influencera la performance de la cuisson!
La plupart des recettes de pâtisserie ont été créées en utilisant des produits de haute teneur en matière grasse, tels
que le beurre ou la margarine (80% de matière grasse). Si vous diminuez la quantité de matière grasse, la recette ne
donnera pas les mêmes résultats qu’avec un produit de haute teneur en matière grasse.
La recette peut échouer si les gâteaux, tartes, pâtisseries, biscuits ou confiseries sont faits avec des produits à
tartiner à faible teneur en matière grasse. Moins il y a de matière grasse dans un de ces produits, plus ces
différences peuvent être sensibles.
Les normes fédérales exigent que les produits portant l’étiquette « margarine » contiennent au moins 80% de leur poids en
matières grasses. D’un autre côté, les produits à tartiner à faible teneur en matière grasse contiennent moins de graisse et
davantage d’eau. Cette haute teneur en eau affecte la texture et le goût des aliments cuits au four. Pour obtenir les meilleurs
résultats avec vos recettes favorites, servez-vous de margarine, de beurre ou de produits gras en bâtonnets contenant au
moins 70% d’huile végétale.
+
Page 74

15
Instructions
de sécurité
Mode d’emploi Entretien et nettoyage
Dépannage
Service à la clientèle
Assurez-vous que l’horloge est
réglée à l’heure correcte.
La minuterie ne sert qu’à compter les
minutes.
La minuterie ne contrôle pas le
fonctionnement du four. Le réglage
maximum de la minuterie est de 9
heures et 59 minutes.
Utilisation de l’horloge, de la minuterie
et prise confort.
www.electromenagersge.ca
Pour régler l’horloge
L’horloge doit être réglée à l’heure correcte
pour que les fonctions automatiques de
minutage du four fonctionnent
correctement. L’heure ne peut pas être
changée pendant les programmes de
cuisson minutée ou d’autonettoyage.
Appuyez sur la touche CLOCK
(HORLOGE).
Appuyez sur les touches numériques.
Appuyez sur la touche START (DÉPART).
Pour régler la minuterie
Appuyez sur la touche TIMER
(MINUTERIE).
Appuyez sur les touches numériques
jusqu’à ce que la durée souhaitée
s’affiche. Par exemple, pour régler
2 heures et 45 minutes, appuyez sur 2,
4 et 5 dans cet ordre. Si vous faites
une erreur, appuyez sur la touche
TIMER (MINUTERIE) et recommencez.
Appuyez sur la touche START (DÉPART).
Après avoir appuyé sur la touche START (DÉPART),
SET (VALIDER) disparaît; cela veut dire que le cycle
a commencé le compte à rebours bien que
l’affichage ne change qu’après qu’une minute s’est
écoulée. Les secondes ne commenceront à s’afficher
que lorsqu’il ne restera qu’une minute de marche.
Quand la minuterie atteint :00,la
commande émet un signal sonore trois
fois, suivi d’un autre signal toutes les
6 secondes, jusqu’à ce que vous
appuyiez sur la touche TIMER
(MINUTERIE).
Le signal à 6 secondes peut être annulé en
suivant les instructions données dans la section
Caractéristiques spéciales des commandes de votre
four, sous Signaux sonores à la fin d’un cycle minuté.
Pour régler la minuterie de nouveau
Si l’afficheur indique encore la durée
restante, vous pouvez la changer en
appuyant une fois sur la touche
TIMER (MINUTERIE), puis en appuyant sur
les touches numériques que vous voulez
voir apparaître à l’afficheur.
Si la durée restante n’apparaît pas à
l’afficheur (l’horloge, l’heure de la mise
en marche différée ou la durée de cuisson
sont à l’afficheur), revenez à la durée
restante en appuyant sur la touche TIMER
(MINUTERIE), puis en appuyant sur les
touches numériques pour entrer la
nouvelle durée souhaitée.
Pour annuler la minuterie
Appuyez deux fois sur la touche TIMER
(MINUTERIE).
Page 75

14
Service à la clientèle Dépannage Entretien et nettoyage Mode d’emploi
Instructions
de sécurité
Utilisation des caractéristiques de cuisson et de rôtissage minutés.
REMARQUE : Les aliments qui se gâtent facilement—tels que le lait, les oeufs, le poisson, la farce, les volailles et
le porc—ne devraient pas rester dans le four plus d’une heure avant ou après la cuisson. La température ambiante
contribue à multiplier les bactéries dangereuses. Assurez-vous que la lampe du four est éteinte car la chaleur
provenant de l’ampoule accélérerait la multiplication des bactéries dangereuses.
Comment régler une mise en marche immédiate et un arrêt automatique
Le four s’allumera immédiatement et restera en marche
pendant la durée sélectionnée. À la fin de la durée de
cuisson, le four s’éteindra automatiquement.
Appuyez sur la touche BAKE (CUIRE).
Appuyez sur les touches numériques pour
régler la température du four souhaitée.
Appuyez sur la touche COOK TIME (TEMPS
DE CUISSON).
REMARQUE : Si votre recette demande un préchauffage,
vous devrez peut-être ajouter du temps supplémentaire à
la durée de cuisson.
Appuyez sur les touches numériques
pour régler la durée de cuisson souhaitée.
La durée de cuisson minimum que vous
pouvez sélectionner est une minute.
La température du four que vous réglez
et la durée de cuisson que vous entrez
apparaîtront sur l’afficheur.
Appuyez sur la touche START (DÉPART).
REMARQUE : Un signal sonore sera émis si vous utilisez
la cuisson minutée, et n’appuyez pas sur la touche START
(DÉPART).
Le four se mettra en MARCHE et l’afficheur
indiquera le nombre de minutes de cuisson
restantes et les changements de température
à partir de 37,8 °C (100 °F). (L’affichage de
la température commencera à changer une
fois que la température du four atteindra
37,8 °C/ 100 °F.) Quand le four aura atteint la
température préréglée, un signal sonore sera
émis 3 fois.
Le four restera en marche pour la durée
préréglée, puis s’éteindra automatiquement.
Appuyez sur la touche OFF (ARRÊT) pour
effacer l’affichage, si nécessaire. Retirez les
aliments du four. Souvenez-vous que même
si le four s’éteint automatiquement, les
aliments laissés dans le four continueront à
cuire après l’arrêt du four.
Comment régler une mise en marche différée et un arrêt automatique.
Le four se mettra en marche à l’heure que vous réglez,
restera allumé pour la durée spécifiée, puis s’éteindra
automatiquement.
Assurez-vous que l’horloge est réglée à l’heure
correcte.
Appuyez sur la touche BAKE (CUIRE).
Appuyez sur les touches numériques pour
régler la température du four souhaitée.
Appuyez sur la touche COOK TIME (TEMPS
DE CUISSON).
REMARQUE : Si votre recette demande un préchauffage,
vous devrez peut-être ajouter du temps supplémentaire à
la durée de cuisson.
Appuyez sur les touches numériques
pour régler la durée de cuisson souhaitée.
La durée de cuisson minimum que vous
pouvez sélectionner est une minute.
La température du four que vous réglez
et la durée de cuisson que vous entrez
apparaîtront sur l’afficheur.
Appuyez sur la touche START TIME (HEURE
DE DÉPART).
Appuyez sur les touches numériques pour
régler l’heure à laquelle vous voulez que le
four se mette en marche et commence la
cuisson.
Appuyez sur la touche START (DÉPART).
REMARQUE : Un signal sonore sera émis si vous utilisez
la cuisson minutée, et n’appuyez pas sur la touche START
(DÉPART).
REMARQUE : Si vous voulez vérifier les heures que vous
avez réglées, appuyez sur la touche START TIME
(HEURE DE DÉPART) pour vérifier l’heure de début de
cuisson que vous avez réglée, ou sur la touche COOK
TIME (TEMPS DE CUISSON) pour vérifier la durée de
cuisson réglée.
Quand le four se mettra en MARCHE à l’heure
préréglée, l’afficheur indiquera la durée de
cuisson restante et le changement de
température à partir de 37,8 °C (100 °F).
(L’affichage de la température commence à
changer une fois que la température du four
atteint 37,8 °C/100 °F). Quand le four aura
atteint la température préréglée, un signal
sonore sera émis.
Le four restera en marche pour la durée
préréglée, puis s’éteindra automatiquement.
Appuyez sur la touche OFF (ARRÊT) pour
effacer l’affichage, si nécessaire. Retirez les
aliments du four. Souvenez-vous que même
si le four s’éteint automatiquement, les
aliments laissés dans le four continueront
à cuire après l’arrêt du four.
Page 76

13
www.electromenagersge.ca
Instructions
de sécurité
Mode d’emploi Entretien et nettoyage
Dépannage
Service à la clientèle
La taille, le poids, l’épaisseur,
la température initiale et vos
préférences de degré de
cuisson affectent les durées
de cuisson au gril. Ce guide est
basé sur des viandes dont la
température initiale est celle
du réfrigérateur.
† D’après le ministère de l’Agriculture
des États-Unis, « Le boeuf saignant
est populaire, mais vous devez savoir
que le cuire à seulement 60 °C
(140 °F) signifie que des organismes
provoquant des intoxications
alimentaires survivront peut-être ».
(Source : Safe Food Book. Your
Kitchen Guide. USDA Rév. juin
1985.)
Le four a 6 positions de grille.
Quantité et/ou Position* Premier côté
Deuxième côté
Aliment épaisseur de grille durée (mn) durée (mn) Commentaires
Boeuf hâché 454 g (1 lb) (4 portions) C 10 7–10 Espacer régulièrement.
1,25 à 1,9 cm (1/2 à 3/4 po)
d’épaisseur
1,8 kg (4 lbs) (16 portions) C 15 11
Biftecks
Saignant † 1, 9 à 2,5 cm (3/4 à 1 po) E 6 4 Les biftecks de moins de
À point d’épaisseur D 8 6 1,9 cm d’épaisseur sont
Bien cuit 454 à 680 g (1 à 1
1
⁄2 lb) D 10 7–10 difficile à cuire saignants
Faire des fentes dans
Saignant † 3,8 cm (1
1
⁄2 po) d’épaisseur C 10 8 le gras.
À point 900 g à 1,14 kg (2 à 2
1
⁄2 lb) C 15 10–12
Bien cuit D 20 20
Poulet 1 poulet entier découpé B 25 25 Brossez chaque côté
900 g à 1,14 kg (2 à 2
1
⁄2 lb), avec du beurre fondu.
fendre dans le sens de
la longueur Faire griller la peau en
Poitrine B 25 15 dessous d’abord.
Produit de
boulangerie
Pain (rôties) 2 à 4 tranches D 3 1 Espacez également.
Muffin 2 (partagés) E 3-4 Placez les muffins la
partie coupée vers le
haut et brossez avec du
beurre si vous le
désirez.
Queues de homards 2–4 B 18–20 Ne pas Fendre le dos de la
retourner.
carapace. Ouvrir.
Badigeonner
avec du
beurre fondu avant de
passer au gril, et à
mi-cuisson.
Filets de poisson 454 g (1 lb) 0,6 à 1,25 cm D 5 5 Manipuler et tourner avec
(1/4 à 1/2 po) d’épaisseur beaucoup de soin.
Badigeonner avec du beurre
citronné avant et durant la
cuisson, selon le goût.
Saumon
Steaks 2 (2,5 cm / 1 po d’épaisseur) D 10 5 Tourner avec beaucoup
Filets 2 (0,6 à 1,25 cm / D 10 de soin. Ne tournez pas la
1
⁄2
à
3
⁄4
po d’épaisseur) côté de la peau vers
le bas.
Tranches de 1,25 cm (1/2 po) d’épaisseur C 6 6
jambon 2,5 cm (1 po) d’épaisseur C 8 8
(précuit)
Côtes de porc 2 (1,25 cm /
1
⁄2 po d’épaisseur) C 10 10 Faire des fentes dans
Bien cuit 2 (2,5 cm / 1 po d’épaisseur), C 15 15 le gras.
environ 450 g (1 lb)
Côtes d’agneau
À point 2 (2,5 cm / 1 po d’épaisseur), D 7 4 Faire des fentes dans
Bien cuit environ 312 à 375 g (10 à 12 oz) D 10 9 le gras.
À point 2 (3,8 cm / 1
1
⁄
2 po d’épaisseur) D 9 6
Bien cuit environ 450 g (1 lb) D 14 10
Guide de cuisson au gril
*Voir l’illustration pour trouver la position des grilles.
Page 77

12
Utilisation du four.
Service à la clientèle Dépannage Entretien et nettoyage Mode d’emploi
Instructions
de sécurité
Ne mettez pas de papier d’aluminium sur la sole
du four.
Vous pouvez utiliser du papier d’aluminium
pour tapisser le fond de la lèchefrite et la
grille du gril. Cependant, vous devez bien
tendre le papier sur la grille et y faire des
fentes semblables à celles de la grille.
Vous pouvez mettre une feuille de papier
d’aluminium sur une grille située plusieurs
centimètres sous les aliments pour attraper
les renversements.
Ne recouvrez jamais entièrement une grille
de papier d’aluminium. Cela empêcherait
la circulation de la chaleur et les résultats
de la cuisson seraient médiocres.
Papier d’aluminium
Faites des fentes dans le papier
d’aluminium semblables à celles
de la grille.
Si votre cuisinière est connectée sous
208 volts, vous pouvez obtenir des
biftecks saignants en préchauffant le
gril et en mettant la grille du four un
niveau plus haut.
Comment régler le four pour utiliser le gril
Laissez la porte du four ouverte à la butée pour le
gril. La porte reste ouverte d’elle-même mais la
température correcte est maintenue dans le four.
Mettez la viande ou le poisson sur la
grille de la lèchefrite.
Suivez les suggestions de positions de
grille qui se trouvent dans le Guide de
cuisson au gril.
Appuyez une fois sur la touche BROIL
(GRIL) pour une température de gril
ÉLEVÉE.
Pour passer à une température de gril
plus BASSE, appuyez sur la touche
BROIL (GRIL) une deuxième fois.
Utilisez le réglage LO Broil (gril MIN.) pour
faire cuire complètement des aliments tels
que des volailles ou des tranches de viande
épaisses sans trop les faire brunir.
Appuyez sur la touche START (DÉPART).
Lorsque la cuisson au gril est terminée,
appuyez sur la touche OFF (ARRÊT).
Page 78

11
Avant de commencer…
Les grilles présentent des butées qui, si elles
sont placées correctement sur les supports,
empêchent les grilles de sortir
complètement et de basculer.
Pour placer des ustensiles sur les grilles ou
pour en enlever, tirez sur la grille jusqu’à ce
qu’elle s’arrête.
Pour retirer une grille, tirez-la vers vous,
soulevez l’avant et sortez-la.
Pour remettre une grille, placez les
extrémités (butées) sur le support, soulevez
l’avant et poussez la grille en place.
ATTENTION : Quand vous utilisez
une grille dans la position la plus basse (A), soyez
prudent quand vous la retirez du four. Nous vous
recommandons de retirer la grille d’une dizaine de
centimètres au moins (plusieurs pouces) puis, à
l’aide de deux poignées ou mitaines, de la retirer
complètement en la tenant par les côtés. La grille
est basse et vous pourriez vous brûler si vous mettez
la main en son milieu et tirez la grille vers vous pour
la sortir. Faites aussi très attention à ne pas vous
brûler la main sur la porte du four lorsque la grille
est dans la position la plus basse (A).
Le four a 6 positions de grille.
Préchauffage et placement du récipient
Préchauffez le four si la recette l’indique.
Il est nécessaire de préchauffer le four pour
la cuisson des gâteaux, des biscuits, de la
pâtisserie et du pain.
Pour la préchauffage, mettez le four à la bonne
température. Quand le four atteint la température
choisie, le réglage du four fait entendre plusieurs
fois un Bip et l’afficheur indique la température du
four. La période de préchauffage dure
approximativement 6-10 minutes.
Vous obtiendrez de meilleurs résultats si les
plaques à pâtisserie sont placées le plus
possible au milieu du four. Si vous mettez
plus d’un récipient dans le four, placez-les
de telle sorte que chaque récipient a au
moins 2,5 cm (1 po) à 3,8 cm (1
1
⁄2po)
d’espace libre autour de lui. Si vous faites
cuire quatre couches de gâteau en même
temps, mettez-en deux sur la grille B et deux
sur la grille D. Répartissez les récipients sur
la grille pour faire en sorte qu’aucun ne se
trouve directement au-dessus d’un autre.
Centrez les récipients dans le four.
Utilisation du four. www.electromenagersge.ca
Pour éviter les brûlures, placez les grilles à la position voulue avant de mettre le four en marche.
Instructions
de sécurité
Mode d’emploi Entretien et nettoyage
Dépannage
Service à la clientèle
Comment régler le four pour la cuisson ou le gril
Appuyez sur la touche BAKE (CUIRE).
Appuyez sur les touches numériques
pour régler la température souhaitée.
Appuyez sur la touche START (DÉPART).
Vérifiez si les aliments sont cuits
après le temps minimum indiqué sur la
recette. Laissez cuire plus longtemps si
nécessaire.
Appuyez sur la touche OFF (ARRÊT)
lorsque la cuisson est terminée.
Position
Aliment de la grille
Tartes surgelées (sur une plaque à gâteau) D
Gâteau des anges A
Gâteau de Bundt ou quatre-quarts B ou C
Gâteaux secs, muffins, brownies, C ou D
biscuits, petits gâteaux, génoises, tartes
Plats mijotés C ou D
Dinde A
Page 79

10
Service à la clientèle Dépannage Entretien et nettoyage Mode d’emploi
Instructions
de sécurité
Touche BAKE (CUIRE)—Appuyez sur cette touche
pour choisir la fonction de cuisson.
Touche BROIL (GRIL)—Appuyez sur cette touche
pour choisir la fonction de gril.
Afficheur—Indique l’heure, la température du
four, si le four est en mode de cuisson, gril ou
autonettoyage, et la durée réglée pour la minuterie
ou le fonctionnement automatique du four.
Si « F », un nombre ou une lettre clignotent à l’afficheur, et
si un signal sonore est émis, ceci indique un code d’erreur.
Appuyez sur la touche OFF (ARRÊT). Laissez le four refroidir une
heure. Remettez le four en marche. Si le code d’erreur de fonction
se répète, débranchez le four et appelez le service après-vente.
Si votre four a été réglé pour une opération minutée et
qu’une panne de courant ait eu lieu, il faudra reprogrammer
l’horloge et toutes les fonctions.
L’heure clignotera à l’afficheur en cas de panne de courant.
Touche OFF (ARRÊT)—Appuyez sur cette touche
pour annuler TOUS les réglages du four à
l’exception de l’horloge et de la minuterie.
Touche COOK TIME (TEMPS DE CUISSON)—
Appuyez sur cette touche et sur les touches
numériques appropriées pour programmer la
durée pendant laquelle vous désirez que la cuisson
ait lieu. Le four s’arrêtera lorsque la durée de
cuisson se sera écoulée.
Touche START TIME (HEURE DE DÉPART)—
Utilisez cette touche avec les touches COOK TIME
(TEMPS DE CUISSON) ou CLEAN (NETTOYAGE) pour
la mise en marche et l’arrêt automatiques aux
heures que vous sélectionnez.
Touche CLEAN (NETTOYAGE)—Appuyez sur cette
touche pour choisir la fonction d’autonettoyage.
Voyez la section Utilisation du four autonettoyant.
Touche LAMPE—Appuyez sur cette touche pour
allumer ou éteindre la lampe
du four.
Touche START (DÉPART)—Appuyez sur cette
touche pour mettre en marche toute fonction de
cuisson ou de nettoyage.
Touches numériques—Utilisez ces touches pour
programmer toute fonction nécessitant des
chiffres, par exemple l’heure, la minuterie,
la température du four, la température interne
de la nourriture, l’heure de mise en marche et
la durée de cuisson minutée et d’autonettoyage.
Touche CLOCK (HORLOGE)—Appuyez sur cette
touche pour régler l’horloge.
Touche TIMER (MINUTERIE)—Appuyez sur
cette touche pour sélectionner la fonction de
minuterie.
Commandes du four, horloge, minuterie et réglages
Les caractéristiques et
l’aspect peuvent varier.
Sur certains modèles
Utilisation des commandes du four.
Page 80

9
www.electromenagersge.ca
Utilisation de la zone de réchauffage (sur certains modèles)
La ZONE DE RÉCHAUFFAGE (WARMING ZONE)
est située au milieu et à l’arrière de la
surface en verre. Commencez toujours en y
mettant des aliments chauds. Ne l’utilisez
pas pour réchauffer des aliments froids. Si
vous mettez des aliments non cuits ou froids
sur la ZONE DE RÉCHAUFFAGE, vous vous
exposez à des maladies d’origine
alimentaire.
Appuyez sur le bouton de commande et
tournez-le jusqu’au réglage souhaité.
Pour obtenir les meilleurs résultats,
tous les aliments placés sur la ZONE DE
RÉCHAUFFAGE devraient être recouverts
d’un couvercle ou de papier d’aluminium.
Servez-vous toujours de poignées ou de
gants isolants lorsque vous retirez les
aliments de la ZONE DE RÉCHAUFFAGE
parce que les ustensiles seront chauds.
Un voyant de surface CHAUDE s’allume
lorsque la surface en verre est chaude,
et il reste allumé jusqu’à ce qu’elle soit
suffisamment froide pour pouvoir être
touchée. Des réglages plus bas sont
susceptibles de ne pas chauffer
suffisamment la surface en verre pour
que le voyant lumineux de surface
CHAUDE s’allume.
Un voyant pour la ZONE DE RÉCHAUFFAGE
s’allume lorsque l’élément est en marche.
REMARQUE : La ZONE DE RÉCHAUFFAGE
ne devient pas rouge, au contraire des éléments
de cuisson.
Aliment Réglage
Sauces MIN
Soupes (crèmes) Medium (Moyen)
Ragoûts Medium (Moyen)
Légumes Medium (Moyen)
Boissons chaudes MAX
Soupes (autres que les crèmes) MAX
Pains / pâtisseries MIN
Le tableau ci-dessus montre seulement les réglages
suggérés pour commencer. La température, le type et
la quantité d’aliments, le type de récipient et le temps
de réchauffage affectent tous la qualité des aliments.
ATTENTION : Ne laissez pas
d’aliments sur la ZONE DE RÉCHAUFFAGE
pendant plus de 2 heures.
■ N’utilisez pas de films plastiques pour couvrir
les aliments. Le plastique pourrait fondre sur
la surface et être très difficile à nettoyer.
■ Utilisez seulement des ustensiles recommandés
pour la cuisson sur la partie supérieure d’une
cuisinière.
Instructions
de sécurité
Mode d’emploi Entretien et nettoyage
Dépannage Service à la clientèle
Prise confort (sur certains modèles)
Vous pouvez utiliser la prise confort de 120V
située en haut du dosseret de protection
pour brancher de petits appareils
électroménagers.
Quand vous utilisez cette prise, assurez-vous
que le cordon d’alimentation ne se trouve
pas à proximité ou sur une unité de surface.
Vous endommagerez le cordon
d’alimentation en allumant l’unité de
surface.
Pour remettre en marche le disjoncteur,
appuyez sur le commutateur situé près de la
prise en haut du dosseret de protection.
Page 81

8
Veillez à mettre la commande à la
position OFF (ARRÊT) quand vous
avez fini de cuisiner.
Utilisation des éléments de surface.
Réglage
Appuyez sur le bouton et tournez-le dans
une direction ou l’autre jusqu’au réglage
souhaité.
Aux positions ARRÊT et MAX, la commande
se met en place avec un déclic. Vous
entendrez peut-être de légers déclics
pendant la cuisson, ils indiquent que la
commande garde le réglage établi.
Un voyant de surface CHAUDE, situé sur
la surface de cuisson, brille quand un des
éléments radiants est allumé. Ce voyant
continuera à briller jusqu’à ce que la surface
soit refroidie et atteigne la température
approximative de 65,5 °C (150 °F).
Le voyant de surface chaude :
■ s’allume quand l’élément est chaud au toucher.
■ reste allumé même après l’arrêt de l’élément.
■ brille jusqu’à ce que l’élément ait refroidi à une
température approximative de 65,5 °C (150 °F).
AVERTISSEMENT :
Les éléments de surface sont automatiquement
débranchés pendant le cycle d’autonettoyage.
Assurez-vous que tous les réglages d’éléments
de surface sont éteints pendant tout le
temps du cycle d’autonettoyage. Tout
élément de surface qui est réglé en position
de marche pendant le cycle d’autonettoyage
se mettra automatiquement en marche à
la fin du cycle d’autonettoyage et peut se
mettre à chauffer sans surveillance. Attendez
que le cycle d’autonettoyage soit terminé
pour régler et utiliser les éléments de surface.
Service à la clientèle Dépannage Entretien et nettoyage Mode d’emploi
Instructions
de sécurité
L’élément de surface de cuisson qui se trouve devant
et à droite a 2 tailles de cuisson (22,9 cm [9 po] et
30,5 cm [12 po]), ce qui vous permet de choisir la
taille de cuisson correspondant à la taille de
l’ustensile que vous utilisez. Sur certains modèles,
l’élément de surface avant gauche aussi comporte
deux dimensions (15,2 et 22,9 cm/6 et 9 po).
Pour utiliser le petit élément de surface,
mettez en sens inverse des aiguilles d’une
montre le bouton de commande à la
position SMALL BURNER (PETIT BRÛLEUR).
Pour utiliser le grand élément, mettez dans
le sens des aiguilles d’une montre le bouton
de commande à la position LARGE BURNER
(GRAND BRÛLEUR).
22,9 cm (9 po)
Bouton de commande d’élément de surface double (sur certains modèles)
30,5 cm (12 po)
15,2 cm (6 po)
22,9 cm (9 po)
Page 82

Instructions
de sécurité
Mode d’emploi Entretien et nettoyage
Dépannage
Service à la clientèle
Acier inoxydable :
recommandé
Aluminium :
aluminium lourd recommandé
Bonne conductivité. Les résidus d’aluminium
prennent quelquefois l’apparence de rayures
sur la surface de cuisson mais peuvent être
enlevés s’ils sont nettoyés immédiatement.
À cause de son point de fusion bas,
l’aluminium léger n’est pas recommandé.
Fond en cuivre :
recommandé
Le cuivre peut laisser des résidus qui
peuvent avoir l’apparence de rayures.
Ces résidus peuvent être enlevés pourvu
que la surface de cuisson soit nettoyée
immédiatement. Cependant, ne laissez
pas le liquide dans ces récipients bouillir
jusqu’à ce qu’il s’évapore. Le métal
surchauffé peut fusionner avec les surfaces
de cuisson en verre. Un récipient à fond en
cuivre surchauffé laissera un résidu qui fera
une tâche permanente sur la surface de
cuisson s’il n’est pas enlevé immédiatement.
Fonte recouverte d’émail vitrifié :
recommandée
Ce type de récipient est recommandé
pourvu qu’il soit recouvert complètement
d’émail vitrifié. Il est recommandé de faire
très attention si le récipient en fonte n’est
pas complètement recouvert d’émail vitrifié,
parce qu’il est susceptible de rayer la
surface de cuisson en vitrocéramique.
Vitrocéramique :
utilisable, mais non recommandée
Performance médiocre. Est susceptible de
rayer la surface.
Poterie en grès :
utilisable, mais non recommandée
Performance médiocre. Est susceptible de
rayer la surface.
Verifiez, à l’aide d’une règle, que les
fonds des récipients sont plats.
Les récipients dont les fonds sont
bombés, courbés, striés ou voilés
ne sont pas recommandés.
www.electromenagersge.ca
Les renseignements suivants vous aideront à choisir des ustensiles qui auront une bonne performance lors de leur
utilisation avec des surfaces de cuisson en verre.
Utilisez seulement des woks
à fond plat.
7
Conseils pour les mises en conserve
Assurez-vous que le bain-marie est placé au
centre de l’élément de surface.
Assurez-vous que son fond est plat.
Pour éviter les brûlures dues à la vapeur ou
à la chaleur, faites attention lorsque vous
faites des conserves.
Suivez des recettes et des procédures
provenant de sources fiables. Vous pouvez
vous les procurer auprès de fabricants tels
que Ball
®
et Kerr
®
, ainsi que des services
d’extension du ministère de l’Agriculture
(aux États-Unis).
Les bains-marie à fond plat sont
recommandés. L’utilisation de bains-marie à
fond strié peut allonger la durée requise pour
atteindre la température d’ébullition de l’eau.
Utilisation d’un wok
Nous vous recommandons d'utiliser seulement des
woks à fond plat. Vous pouvez vous les procurer
dans la plupart des magasins de détail.
N’utilisez pas les woks munis d’anneaux de
soutien.
N’utilisez pas les woks à fond bombé. Vous
pourriez subir des brûlures graves si le wok
se renversait.
Page 83

Limiteur de température
Chaque élément radiant de surface est
muni d’un limiteur de température.
Le limiteur de température empêche la
surface de cuisson en verre de surchauffer.
Il peut éteindre les unités pour un certain
temps si :
■ le liquide du récipient bout et s’évapore
complètement.
■ le fond du récipient n’est pas plat.
■ le récipient n’est pas posé sur le centre de
l’élément.
■ il n’y pas de récipient sur l’élément.
6
À propos des éléments radiants de surface.
REMARQUE : Les caractéristiques et leur aspect, présentés dans ce manuel, peuvent varier du modèle qui est le vôtre.
Ne faites jamais rien cuire
directement sur le verre.
Utilisez toujours un ustensile.
À propos des éléments radiants de surface
AVERTISSEMENT :
Les éléments de surface sont automatiquement
débranchés pendant le cycle d’autonettoyage.
Assurez-vous que tous les réglages d’éléments
de surface sont éteints pendant tout le
temps du cycle d’autonettoyage. Tout
élément de surface qui est réglé en position
de marche pendant le cycle d’autonettoyage
se mettra automatiquement en marche à
la fin du cycle d’autonettoyage et peut se
mettre à chauffer sans surveillance. Attendez
que le cycle d’autonettoyage soit terminé
pour régler et utiliser les éléments de surface.
La surface de cuisson à éléments radiants
est composée d’éléments de surface
recouverts d’une surface en verre lisse.
La température de la surface de cuisson
augmente avec le nombre d’éléments de
surface en marche. Si 3 ou 4 éléments sont
en marche, la température de la surface est
élevée. Soyez toujours prudent quand vous
touchez la surface de cuisson.
Un voyant s’allume quand l’élément de
surface est mis en marche.
Le voyant de surface CHAUDE approprié
est allumé quand son élément radiant
correspondant est mis en marche, et il reste
allumé jusqu’à ce que la surface ait refroidi
à moins de 65,5 °C (150 °F).
REMARQUE :
Le voyant de surface chaude :
■ s’allume quand l’élément de surface est
en marche.
■ reste allumé même après l’arrêt de l’élément.
■ brille jusqu’à ce que l’élément ait refroidi à une
température inférieure à 65,5 °C (150 °F).
REMARQUE : Une légère odeur est normale
lorsqu’une surface de cuisson neuve est utilisée
pour la première fois. Elle est provoquée par
l’échauffement des nouvelles pièces et des
matériaux isolants, et disparaît rapidement.
REMARQUE : Sur les modèles dont le verre de
la surface de cuisson est de couleur claire, il est
normal que les zones de cuisson changent de
couleur lorsqu’elles sont chaudes ou qu’elles
refroidissent. Ce changement est temporaire et
disparaît à mesure que le verre refroidit pour
revenir à la température ambiante.
Vous pouvez en toute sécurité placer des
ustensiles chauds venant du four ou de la
surface sur la surface de cuisson en verre
quand celle-ci est froide.
Même après l’arrêt des éléments de surface,
la surface de cuisson en verre garde
suffisamment de chaleur pour que la
cuisson continue. Pour éviter que les
aliments soient trop cuits, retirez les
récipients des éléments de surface quand
les aliments sont cuits. Évitez de placer quoi
que ce soit sur l’élément de surface jusqu’à
ce qu’il soit complètement froid.
■ Les tâches d’eau (dépôts minéraux) peuvent être
enlevées à l’aide de la crème nettoyante ou de
vinaigre blanc non dilué.
■ L’utilisation d’un produit nettoyant pour fenêtres
peut laisser un film iridescent sur la surface de
cuisson. La crème nettoyante fait disparaître cette
décoloration.
■
Ne rangez pas d’objets lourds au-dessus de la
surface de cuisson. S’ils tombent sur la surface de
cuisson, ils sont susceptibles de l’endommager.
■ N’utilisez jamais la surface comme planche à
découper.
;;;
;
;;;
;;
;
;;
;;;;
;;
;;
;;;
;
;
;
;
;;;;;
;
;
;
;
;;;;
;
;;
;;
;
;;
;;
;
;;;
;;
;;
;;;;;
;
;;
;;
;;
;
;;;
;;;
;;;;;
;;
;;
;;
;;;;
;;
;
;
Mettez toujours l’ustensile au centre
de l’élément de surface dont vous
vous servez.
Ne faites jamais glisser les ustensiles
sur les commandes ou sur la surface
de cuisson car vous pourriez rayer le
verre. Le verre résiste aux rayures,
mais jusqu’à un certain point.
Service à la clientèle Dépannage Entretien et nettoyage Mode d’emploi
Instructions
de sécurité
Glisser
Mal centré
la surface
Cuisson sur
Page 84

CONSERVEZ CES INSTRUCTIONS
LISEZ ET SUIVEZ ATTENTIVEMENT CES CONSEILS DE SÉCURITÉ.
5
www.electromenagersge.ca
N’utilisez pas de produits de nettoyage pour fours. N'utilisez aucun produit commercial de nettoyage pour fours ou aucun
produit de protection de revêtements de fours de quelque type qu'ils soient, dans ou alentour de toute partie du four. Le
résidu des produits nettoyants pour fours endommagera l’intérieur du four pendant le cycle d’autonettoyage.
■
ATTENTION : NE LAISSER AUCUN ALIMENT,
USTENSILE DE CUISINE, ETC. DANS LE FOUR OU SUR LA SURFACE
DE CUISSON DURANT LE CYCLE D’AUTONETTOYAGE.
■ Ne nettoyez pas le joint de porte. Celui-ci est essentiel
pour assurer une bonne étanchéité. Ne frottez pas, ne
l’endommagez pas et ne le déplacez pas.
■ Avant l’autonettoyage, retirez la lèchefrite, sa grille et tous
les ustensiles.
■ Assurez-vous d’enlever les produits renversés avant
l’autonettoyage.
■ Si le mode d’autonettoyage ne fonctionne pas
correctement, éteignez le four et débranchez-le. Faites-le
réparer par un technicien qualifié.
■ Ne nettoyez que les pièces indiquées dans ce manuel de
l’utilisateur.
■ Les éléments de surface sont automatiquement
débranchés pendant le cycle d’autonettoyage. Assurez-vous
que tous les réglages d’éléments de surface sont éteints
pendant tout le temps du cycle d’autonettoyage. Tout
élément de surface qui est réglé en position de marche
pendant le cycle d’autonettoyage se mettra
automatiquement en marche à la fin du cycle
d’autonettoyage et peut se mettre à chauffer sans
surveillance. Attendez que le cycle d’autonettoyage soit
terminé pour régler et utiliser les éléments de surface.
■ Les grilles porcelanisées grises peuvent rester dans le four
pour être nettoyées pendant l’autonettoyage.
AUTONETTOYAGE DU FOUR
Tenez-vous à l’écart de la cuisinière en ouvrant la porte du four. L’air chaud ou la vapeur qui s’en échappent pourraient
brûler les mains, le visage et/ou les yeux.
■ Ne chauffez pas de contenants d’aliments non ouverts.
La pression pourrait s’accumuler et le contenant pourrait
éclater, causant des blessures.
■ Veillez à ne pas obstruer la ventilation du four.
■ Assurez-vous que le four ne présente pas d’accumulation
de graisse.
■ Placez la grille du four à la position désirée lorsque le four
est froid. Si vous devez manipuler les grilles lorsqu’elles
sont chaudes, veillez à ne pas laisser vos poignées ou
mitaines entrer en contact avec les éléments chauffants.
■ Si vous utilisez des sachets de cuisson ou de rôtissage dans
le four, suivez les instructions du fabricant.
■ Il est pratique de tirer la grille jusqu’à la butée pour
soulever des aliments lourds. C’est aussi une précaution
contre les brûlures pour éviter de toucher les surfaces
chaudes de la porte ou des parois du four.
■ N’utilisez pas votre four pour sécher des journaux. En cas
de surchauffe, ils pourraient prendre feu.
■ N’utilisez pas le four comme espace de rangement. Les
articles rangés dans le four pourraient prendre feu.
■ Ne laissez pas de produits en papier, ustensiles de cuisine
ou aliments dans le four quand il n’est pas en cours
d’utilisation.
■ N’utilisez pas de papier d’aluminium pour recouvrir le bas
du four, sauf comme il est décrit dans le présent manuel.
Une mauvaise installation du papier d’aluminium peut
créer un risque de décharge électrique ou d’incendie.
FOUR
Instructions
de sécurité
Mode d’emploi
Entretien et nettoyage
Dépannage
Service à la clientèle
■ Ce tiroir garde-chaud a pour fonction de garder les
aliments cuits et chauds à la température où ils seront
servis. Commencez toujours avec des aliments chauds; les
aliments froids ne peuvent être chauffés ou cuits dans ce
tiroir.
■ N’utilisez pas ce tiroir pour sécher des journaux. S’ils
étaient surchauffés, ils pourraient prendre feu.
■ Ne laissez pas d’articles en papier, des plastiques, des boîtes
de conserve ou des matériaux combustibles dans ce tiroir.
■ Ne laissez jamais de bocaux ou de boîtes de graisse dans
votre tiroir ou près de celui-ci.
■ Ne réchauffez pas d’aliments dans ce four pendant plus de
deux heures.
■ Ne placez jamais, ni utilisez ou passez à l’autonettoyage le
bac du tiroir garde-chaud dans le four.
■ Ne touchez jamais l’élément chauffant ou la surface intérieure
du tiroir. Ces surfaces peuvent être très chaudes et brûler.
N’OUBLIEZ PAS : La surface intérieure du tiroir peut être
très chaude, à l’ouverture du tiroir.
■ Soyez prudent en ouvrant le tiroir. Ouvrez un peu le
tiroir pour laisser l’air chaud et la vapeur s’échapper, avant
d’enlever ou de remettre des aliments. L’air chaud ou la
vapeur qui s’échappe peut brûler les mains, le visage ou les
yeux.
■ N’utilisez pas de papier aluminium pour tapisser ce
tiroir. Le papier aluminium est un excellent isolant qui
emprisonne la chaleur en dessous. Ceci modifierait la
performance du tiroir et pourrait endommager son fini
intérieur.
TIROIR GARDE-CHAUD (sur certains modèles)
Page 85

4
INSTRUCTIONS DE SÉCURITÉ IMPORTANTES. LISEZ LES
INSTRUCTIONS QUI SUIVENT AVANT D’UTILISER VOTRE APPAREIL.
Utilisez des ustensiles de la dimension appropriée—sélectionnez des ustensiles à fond plat, suffisamment
grands pour couvrir l’élément chauffant de l’élément de surface. L’utilisation d’ustensiles trop petits
exposera une partie de l’élément de surface à des contacts directs, et pourrait mettre le feu aux
vêtements. Une relation correcte entre l’ustensile et l’élément de surface améliore aussi l’efficacité.
■ Ne laissez jamais les éléments de surface sans
surveillance lorsqu’ils sont réglés sur une haute
température. Les aliments renversés peuvent fumer
et la graisse peut s’enflammer.
■ Seuls certains types de verre, vitrocéramique,
potterie et autres récipients en terre cuite
conviennent au service des aliments cuits sur la
surface de cuisson; les autres peuvent se briser à
cause du changement soudain de température.
■ Pour réduire les risques de brûlures et d’incendie,
de même que les renversements, la poignée des
ustensiles devrait être orientée vers le centre de la
cuisinière, en évitant de la placer au-dessus des
éléments de surface adjacents.
■ Arrêtez toujours les éléments de surface avant de
retirer les ustensiles.
■ Ne flambez pas les aliments sur la surface de
cuisson. Si vous le faites sous la hotte, mettez le
ventilateur en marche.
■ Soyez prudent lorsque vous touchez la surface de
cuisson. La surface en verre garde la chaleur après
l’arrêt des commandes.
■ Surveillez attentivement les aliments lorsque vous
les faites frire à un réglage élevé ou moyen.
■ Lorsque vous désirez frire des aliments, assurez-vous
qu’ils sont aussi secs que possible. Le givre sur les
aliments surgelés ou l’humidité des aliments frais
peuvent faire bouillonner le gras et le faire déborder
sur les côtés du récipient.
■ Utilisez peu de graisse pour une friture efficace à la
poêle ou en friteuse. Si le récipient contient trop de
graisse, il peut en résulter des débordements lors de
l’ajout des aliments.
■ Si vous utilisez plus d’un type d’huile ou de graisse
pour la friture, remuez-les bien ensemble avant de
les faire chauffer ou pendant qu’ils fondent lentement.
■ Faites toujours chauffer les matières grasses à feu
doux, et surveillez-les constamment.
■ Utilisez un thermomètre de cuisson pour la grande
friture lorsque cela est possible, afin d’empêcher
que l’huile ne fume.
■ Évitez de rayer la surface de cuisson en verre. La
surface de cuisson en verre peut être rayée par des
objets tels que les instruments aiguisés, les bagues
et autres bijoux et les rivets des vêtements.
■ Les rayures importantes ou les coups portés aux portes
ou surfaces de cuisson en verre peuvent entraîner la
brisure du verre ou son éclat en mille morceaux.
■ N’utilisez pas les éléments radiants de surface si le verre
est brisé. Des débordements ou du liquide de nettoyage
peuvent pénétrer dans une surface de cuisson brisée et
créer un risque de décharge électrique. Communiquez
immédiatement avec un technicien qualifié si le verre
de la surface de cuisson est brisé.
■ N’utilisez jamais la surface de cuisson en verre
comme planche à découper.
■ Les éléments de surface sont automatiquement
débranchés pendant le cycle d’autonettoyage.
Assurez-vous que tous les réglages d’éléments de
surface sont éteints pendant tout le temps du cycle
d’autonettoyage. Tout élément de surface qui est
réglé en position de marche pendant le cycle
d’autonettoyage se mettra automatiquement en
marche à la fin du cycle d’autonettoyage et peut
se mettre à chauffer sans surveillance. Attendez que
le cycle d’autonettoyage soit terminé pour régler
et utiliser les éléments de surface.
■ Ne posez ni ne rangez des objets susceptibles de
fondre ou de prendre feu sur la surface de cuisson
en verre, même quand elle n’est pas en cours
d’utilisation, ou pendant le cycle d’autonettoyage.
■ Soyez prudent lorsque vous posez des cuillères
ou d’autres ustensiles servant à mélanger sur la
surface de cuisson en verre lorsqu’elle est en cours
d’utilisation. Ces ustensiles pourraient devenir
chauds et causer des brûlures.
■ Soyez prudent lorsque vous nettoyez la surface
de cuisson. Si vous utilisez une éponge ou un tissu
mouillé pour enlever les éclaboussures sur un
élément de surface chaud, faites attention à éviter
les brûlures provoquées par la vapeur. Certains
produits nettoyants peuvent créer des vapeurs
nocives lorsqu’ils sont appliqués sur une surface
chaude.
REMARQUE : Nous vous recommandons d’éviter d’essuyer
toutes les zones des éléments de surface, jusqu’à ce qu’ils
aient refroidi et que le voyant se soit éteint. Cette
recommandation ne s’applique pas aux éclaboussures
de sucre. Veuillez vous reporter à la section Nettoyage de la
surface de cuisson en verre.
■ Lorsque la surface de cuisson est froide,
servez-vous uniquement de nettoyant et de
tampons de nettoyage pour surfaces de cuisson en
vitrocéramique pour nettoyer la surface de cuisson.
■ Pour éviter d’endommager la surface de cuisson,
n’appliquez pas de crème de nettoyage à la surface
en verre quand elle est chaude.
■ Après le nettoyage, utilisez un chiffon sec ou un
papier essuie-tout pour enlever tous les résidus de
crème nettoyante.
■ Lisez et suivez toutes les instructions et tous les
avertissements qui se trouvent sur les étiquettes de
crème nettoyante.
■ N’utilisez pas de films plastiques pour couvrir les
aliments. Le plastique pourrait fondre sur la surface
et être très difficile à enlever.
ÉLÉMENTS RADIANTS DE SURFACE
AVERTISSEMENT!
Service à la clientèle
Dépannage Entretien et nettoyage
Mode d’emploi
Instructions
de sécurité
Page 86

3
www.electromenagersge.ca
Cuisez bien la viande et la volaille—la viande jusqu’à une température INTERNE d’au moins 70 °C (160 °F) et
la volaille jusqu’à une température INTERNE d’au moins 80 °C (180 °F). La cuisson à ces températures protège
habituellement contre les maladies d’origine alimentaire.
CUISEZ BIEN LA VIANDE ET LA VOLAILLE…
Safety Instructions
Operating Instructions
Instructions
de sécurité
Mode d’emploi Entretien et nettoyage
Dépannage
Service à la clientèle
N’utilisez pas les commandes du four ou de la surface de cuisson si le verre est brisé. Des éclaboussures de
nourriture ou du liquide de nettoyage pourraient pénétrer dans un tableau de commande ou une surface de
cuisson brisés et créer un risque de décharge électrique. Communiquez immédiatement avec un technicien
qualifié si le verre du tableau de commande ou de la surface de cuisson est brisé.
■ Ne rangez pas de matériaux inflammables dans
un four ou près de la surface de cuisson.
■ ATTENTION : Ne rangez pas dans les
armoires se trouvant au-dessus de la cuisinière ou sur le
dosseret de l’appareil des articles qui présentent un intérêt
pour les enfants—ceux-ci pourraient grimper sur l’appareil
pour les atteindre et risqueraient de se blesser gravement.
■ Ne portez jamais de vêtements amples ou
pendants lorsque vous utilisez cet appareil. Faites
attention lorsque vous prenez des articles rangés
dans les armoires au-dessus de la cuisinière. Les
tissus inflammables peuvent prendre feu s’ils
entrent en contact avec les éléments de surface
ou les éléments chauffants chauds et peuvent
causer de graves brûlures.
■ N’utilisez que des poignées ou des mitaines
sèches—les poignées ou mitaines humides ou
mouillées entrant en contact avec des surfaces
chaudes peuvent causer des brûlures de vapeur.
Ne laissez pas les poignées entrer en contact avec
les éléments de surface ou les éléments chauffants
chauds. N’utilisez pas de serviette ou de morceau
d’étoffe volumineux à la place de poignées.
■ Ne tentez pas d’éteindre des feux de graisse
avec de l’eau. Ne prenez jamais une casserole
enflammée dans vos mains. Éteignez les
commandes. Étouffez les flammes d’un ustensile
reposant sur un élément de surface en le
couvrant complètement avec un couvercle ajusté,
une plaque à biscuits ou un plateau plat. Utilisez
un extincteur chimique tout usage à poudre
sèche ou à mousse.
Éteignez les feux de graisse à l’extérieur du
poêlon avec du bicarbonate de soude ou, si
possible, un extincteur tout usage à poudre
chimique ou à mousse.
Pour éteindre les flammes dans le four, fermez
complètement la porte du four et éteignez le four
ou utilisez un extincteur tout usage à poudre
chimique ou à mousse.
■ Pour votre sécurité, n’utilisez jamais votre
appareil pour chauffer ou réchauffer la pièce.
■ Ne laissez pas de produit gras de cuisine ou autres
matériaux inflammables s’accumuler dans ou
près de la cuisinière.
■ Ne touchez pas les éléments de surface, les
éléments chauffants ou la surface intérieure du
four. Ces surfaces peuvent être suffisamment
chaudes pour entraîner des brûlures même si
elles sont de couleur foncée. Pendant et après
l’utilisation, ne touchez pas ou ne laissez pas les
vêtements ou tout autre matériau inflammable
entrer en contact avec les éléments de surface,
leur périphérie, ou toute partie de l’intérieur du
four; attendez suffisamment de temps que la
cuisinière refroidisse.
Les surfaces pouvant devenir chaudes comprennent
la surface de cuisson, les zones en face de la surface
de cuisson, l’évent du four, les surfaces situées près
de l’évent et les fentes situées autour de la porte du
four.
N’OUBLIEZ PAS : La surface intérieure du four peut être
assez chaude lorsque vous ouvrez la porte.
■ N’utilisez et ne rangez jamais de matériaux
combustibles, d’essence ou autres liquides ou
vapeurs inflammables à proximité de cet appareil
ou de tout autre électroménager.
■ Veillez à ce que la hotte et les filtres à graisse
restent propres pour maintenir une bonne
ventilation et pour empêcher les feux de graisse.
■ Apprenez aux enfants à ne pas jouer avec les
commandes ou toute autre partie de la cuisinière.
■ Gardez toujours vos serviettes, torchons, poignées
ou mitaines et autres tissus à bonne distance de
votre cuisinière.
■ Gardez toujours les ustensiles en bois et en
plastique, ainsi que les boîtes de conserve,
à bonne distance de votre cuisinière.
■ Gardez toujours les revêtements de murs en tissu,
rideaux ou tentures combustibles à bonne
distance de votre cuisinière.
MESURES DE SÉCURITÉ
Page 87

2
INSTRUCTIONS DE SÉCURITÉ IMPORTANTES. LISEZ LES
INSTRUCTIONS QUI SUIVENT AVANT D’UTILISER VOTRE APPAREIL.
AVERTISSEMENT!
Pour votre sécurité et pour minimiser les risques d’incendie, de décharge électrique, de dommages
matériels ou corporels, ou même d’accidents mortels, les utilisateurs doivent se conformer aux
instructions présentées dans ce manuel.
Toutes les cuisinières peuvent basculer et causer ainsi des blessures.
Pour éviter que votre cuisinière ne bascule accidentellement, fixez-la au mur et au sol à l’aide du
dispositif antibasculement fourni.
Si le dispositif antibasculement fourni avec la cuisinière ne convient pas à cette application, utilisez
le dispositif antibasculement universel WB2X7909.
Pour vérifier si ce dispositif est bien installé, retirez le tiroir de rangement et inspectez le pied de
nivellement arrière. Assurez-vous qu’il est engagé fermement dans la fente.
Si vous devez éloigner la cuisinière du mur pour une raison ou pour une autre, assurez-vous que le dispositif
est de nouveau engagé lorsque vous remettez la cuisinière en place contre le mur. Autrement, la cuisinière
risque de basculer et de causer des blessures si vous ou un enfant montez, si vous vous assoyez ou si vous
appuyez sur la porte ouverte du four.
Reportez-vous aux renseignements sur le dispositif antibasculement donnés dans le présent manuel. Si vous
ne prenez pas cette précaution, la cuisinière pourrait basculer et causer des blessures.
AVERTISSEMENT DISPOSITIF ANTIBASCULEMENT
Lors de l’utilisation d’appareils électriques, des précautions de sécurité de base doivent être observées,
y compris les suivantes :
■ N’utilisez cet appareil que pour l’usage pour
lequel il a été prévu, comme il est décrit dans
ce manuel de l’utilisateur.
■ Assurez-vous que votre appareil a été
correctement mis à la terre et installé par
un installateur qualifié, conformément aux
instructions d’installation fournies.
■ Demandez à votre installateur de vous montrer
l’emplacement du coupe-circuit ou du fusible.
Marquez-le pour pouvoir le retrouver facilement.
■ Ne tentez pas de réparer ou de remplacer
toute pièce de votre cuisinière, à moins que cela
ne soit spécifiquement recommandé dans le
présent manuel. Confiez toutes les autres
réparations à un technicien qualifié.
■ Avant toute réparation, coupez l’alimentation
électrique de la cuisinière au panneau
d’alimentation en électricité de l’habitation,
en retirant le fusible ou déconnectant le coupe-
circuit.
■ Ne laissez pas les enfants sans surveillance—les
enfants ne devraient pas être laissés seuls ou sans
surveillance dans un endroit où un appareil
électroménager est en cours d’utilisation. Ils ne
devraient pas non plus être autorisés à s’asseoir
ou se tenir debout sur toute partie de l’appareil.
■ Ne laissez personne monter sur la porte, le tiroir
de rangement ou la surface de cuisson, s’y tenir
ou s’y accrocher. Cela pourrait endommager
l’appareil ou le faire basculer, causant ainsi de
graves blessures.
MESURES DE SÉCURITÉ
Service à la clientèle Dépannage Entretien et nettoyage Mode d’emploi
Instructions
de sécurité
Page 88

JCB800
JCB900
29-5517 12-05 JR
Instructions de sécurité . . . . . . . . .2–5
Mode d’emploi
Éléments de surface . . . . . . . . . . . . 6–9
Four . . . . . . . . . . . . . . . . . . . . . . .10–24
Autonettoyage . . . . . . . . . . . . . .19, 20
Caractéristiques cuisson et
rôtissage minutés . . . . . . . . . . . . . . .14
Caractéristique sabbat . . . . . . . .23, 24
Caractéristiques spéciales . . . . .21, 22
Commandes du four . . . . . . . . . . . .10
Guide de cuisson au gril . . . . . . . . .13
Réglage du thermostat—
Faites-le vous-même . . . . . . . . . . . .16
Horloge et minuterie . . . . . . . . . . . .15
Prise confort . . . . . . . . . . . . . . . . . . . .9
Tiroir réchaud . . . . . . . . . . . . . .17–18
Ustensiles . . . . . . . . . . . . . . . . . . . . . . .7
Entretien et nettoyage . . . . . . . 25–30
Instructions d’installation . . . . 31–34
Dépannage . . . . . . . . . . . . . . . . 35–39
Accessoires . . . . . . . . . . . . . . . . . . . . 40
Service à la clientèle
Garantie . . . . . . . . . . . . . . . . . . . . . . 43
Service à la clientèle . . . . . . . . . . . . . 44
www.electromenagersge.ca
Inscrivez ci-dessous les numéros
de modèle et de série :
N° de modèle________________
N° de série
________________
Ils se trouvent sur une étiquette
derrière le tiroir de rangement,
sur le cadre de la cuisinière.
Cuisinières
autonettoyantes, à éléments radiants
Manuel d’utilisation et
instructions d’installation
 Loading...