

Page 1
3-&”vq&2G
:t?2v4aG’t+
,,
,,~
‘;~owtoget
“::tM@’bestfrom
.
,,,
‘,. ,. ,:
,,
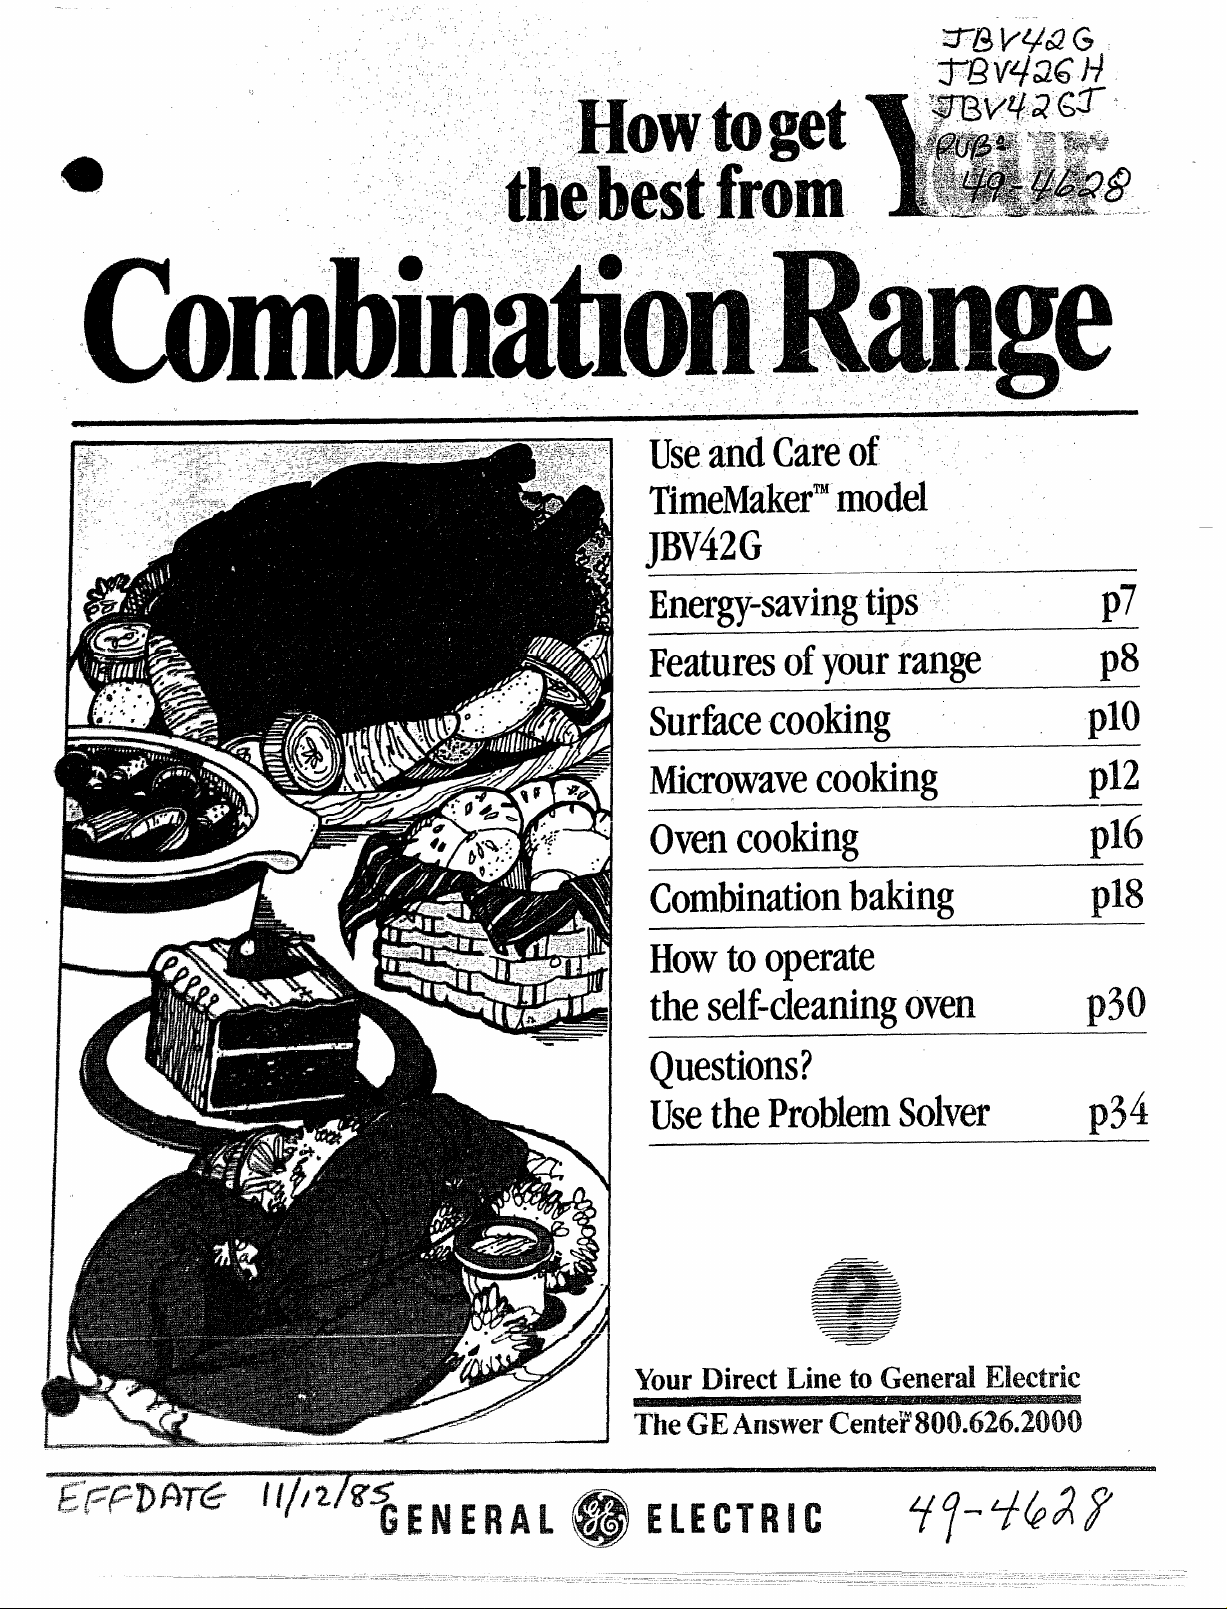
UseandCareof
TimeMaker”model
TBv42G
Energy-savingtips
Featuresofyourrange
—-
p7
p8
Surfacecooking
Microwavecooking
Ovencooking
Combinationbaking
Howtooperate
theself-cleaningoven
Questions?
UsetheProblemSolver
plo
p12
plti
pl$
p30
p34i
YourDirectLineto GeneralElectric
TheGEAnswerCenteF86h.626.2000
Page 2
Read thisbook carefully.
His intended to help youoperate
and maintain your new Range
proper6y.
Keepit handy for answersto your
questions.
Hyou don’t understand something
or need more help, w;ite: (inciude
your phone number)
Consumer Affairs
Generai Electric Company
Appliance Park
Louisville, KY 40225
Keep proof of originai purchase
date (such as your salesslip or
cancelied check) with this book
to establish the warranty period.
writeCkwmthemodeland
serialm.mbwsll
You’llfind them on a label on the
front of the range behind the oven
door.
These numbers are also on the
Consumer Product Ownership
Registration Card that came with
your Range. E3eforesending in this
card, pleasewrite these numbers
here:
ModelNo.
Seria!No.
Usethese numbers in any
correspondence or servicecalls
concerning your Range.
E%sure ycmrRangeis
registered.
it is important that we, the manu-
facturer, know the location of your
Rangeshould a needoccur for
adjustments.
Yoursupplier is responsible for
registering you asthe owner.
Pleasecheck with your supplier to
be sure he has done so; also send
in your Consumer Product Ownership Registration Card. If you move,
or if you are not the original purchaser pleasewrite to us, stating
model and serial numbers. This
appliance mustbeI’egistered.
Pleasebetxwtairithatit is.
Write to:
General Electric Company
FlangeProduct Service
Appliance Park
Louisville, KY 40225
H YOM
range. s*
immediately contact the dealer (or
builder) that sold you the Range.
save time and
EkfweYOUrequest
the ProblemSolveron page 34. It
lists minor causesof operating
problems that you can correct
yourself.
I
received a damaged
money.
service,check
‘fhe electric output of this
microwave oven is625 watts. I
(a) DONot Atiempt to operate this
oven with the door open since open
door operation can result in harmfu4
exposure to microwave energy. Ris
important not to defeat or tamper
wi+h +hn.en$c+~~.i-+nd=-h~
WWJI?? 61TV9UIULY11
(b) Do !NotPlaceany object between
the oven front face and the door or
ailow soil or cleaner residue to
accumulate on sealing surfaces.
(C)IIIM P&XOperatethe oven if it is
damaged. Risparticularly important
that the oven door close properly
and that there is no damage to the
(1) door (bent),
(2) hinges and latches (broken or –
loosened)
(3) door seals and sealing surfaces.
IL=l 1UU180.
(d)TheOVenShouldNot be
adjusted or repaired by anyone
except properly qualified service
personnel.
?$
I
-.
-.
Page 3
Before Using Your Range . ... . . . 2
.,
-~~%%afetyInstructions . ... . . . . ... ,3-5
y+~;=~+,.<*
..b*&%!
\
“%ergy Saving Tips. .. . . . . ... . . . 7
Get to Know Your
Combination Range . . . . . .. . . . 6
Featuresof Your
Combination Range .... . . . .. . 8
Setting Digital Clock and
Minute Timer . . . ..... . . . .....9
Surface Cooking . . . . .. . . . . . .. . 10
Howto Microwave . . . ... . . . ...l2
l-low to lvlicrowa~eDefrost . . ... 14
How to Conventional Bake .... . 16
How to Combination Bake . . . . . 18
How to Conventional Roast . . . . 20
How to Combination Roast. .,. . 22
How to Conventional Ewoii.. . . . 24
How tc Combination Broil . . . .. 26
How to Care for Your
Combination Range . . ..... . . 28
How to Self-Clean Your Oven... 30
Cleaning Chart . . . . . . . . . . .. ...32
The Problem Solver ... . . . . . ... 34
if YouNeed Service . . . . . ... ...35
Warranty . . ...... . . . . . Back Cover
.-
a
When using electrical appliances
basic safety precautions should
befollowed, including the
following:
WARNING—TOreducethe risk
of burns, electric shock, fire,
injury to persons or exposure to
excessivemicrowave ertergy:
@ Usethis appliance only for its
intended use as described in this
manual.
@ Be sure your appliance is
properly installed and grounded
by a qualified technician in
acm-m-lanmawi~ln*~@pro!dd~d
.—--------- --- ...... .s.-
installation instructions.
e This appliance must be con-
nected to a grounded, metallic,
permanent wiring system, or an
equipment grounding conductor
should be run with the circuit
conductors and connected to
the equipment grounding terminal or lead on the appliance.
@ This appliance should be serviced only by qualified service
personnel. Contact nearest
authorized service facility for
examination, repair or
adjustment.
@ Before performing any
service, DISCONNECT THE
RANGE POWERSUPPLYAT
THE HOUSEHOLD 131STRlf3UTI(XN PANEL BY 13EMOVING
THE FUSEOR SWITCHING
OFF THE CIRCUIT BREAKER.
G3Do not cover or block any
openings on the appliance.
@ Do not useoutdoors.
s Do not operate this appliance
if it is not working properly, or if
it hasbeendamaged or dropped.
@ As with any appliance. close
supervision is necessarywhen
used by children.
@ Do not Ik?aweChildren a&@==—
children should not be left alone
or unattended in area where
appliance is in use.They should
never be allowed to sit or stand
on any part of the appliance.
@ IDon’tallow anyone to climb,
stand Orhang on the &3Qr,
drawer or range top. They could
damage the range and eventip
it @3Mercaus~ngseverepersonal
injury.
@ CAUTION: Do NOTSTORE
ITEMS OF INTEREST TO
CH!LDREN RNCAB!NETS
ABOVE A RANGE (X%(XV!THE
BACKSPLASH OF A RANGE–
CHILDREN CLIMBING ON THE
RANGE TO REACH ITEMS
COULD BE SERIOUSLY
INJURED=
@ Wear proper clothing. Loose
fitting or hanging garments
should never be worn while
using the appliance. Flammable
material could be ignited if
brought in contact with hot heating elements and may cause
severe burns.
I@ use only dry pothoMers——
moist or damp potholders on
hot surfaces may result in burns
from steam. Do not let pot-
holders touch hot heating elements, Do not use a towel or
other bulky cloth.
@ !h&?veruse your appliance for
warming m!’heating the ?xXxm.
@ Storags in U3rcmApplianee—
Flammable materials should not
be stored in an oven or near sur-
face units.
@ Keep hood and
to maintain good ventirtg
dean
and to avoid grease fires.
@ Do not let Cooking gK%3seor
other flammable
grease filters
materialsacxu-
twuiateinthel!’ange‘43$’nearii.
(conhfwednextpege)
3
Page 4
(continued)
.:<:;:~=w
Q DOE@use ‘wateran gw?fulw
i%%?%
Newerpick up a flaming
pm. Smother flaming pan on
Stl[faae unit by covering pan
Gonlplete!y with we!! fitting lid,
cookie sheet or fiat tray. Flaming
grease outside a pan cart be put
out by covering vviih
baking
SCxk3w, if awaikmk?, a mm”
purpose dry chemical or foam.
@ r$mE-araftm M+%Ihsding ~~g+
-- ..-. ------ ... . ....
men!s far
own.
interior swkw d
These surfaces may be
hot ermugn to burn eventhough
they are dark in color. During
and after use,do not touch, or
let clothing or other flammable
materials contact surface units,
amac nm=irhy~~-f~~e ~~~~~g~
-,--v ,,W-.W
any interior area of the oven;
allow sufficient time for cooling,
first.
Potentially hot surfaces include
the cooktop and areas facing
the cooktop, oven vent opening
and surfaces near the openings,
and crevices around the oven
door.
FhsmembenThe inside surface
of the oven may be hot when the
door is opened.
e when cxlKMwJpork follow
our directions exactly and
always cook the meat to at least
170°. This assures that, in the
remote possibility that trichina
may be present in the meat, it
will be killed and meat will be
safeto eat.
fMicvowave oven cooking:
@ Read and follow the specific
“PRECAUTIONS TO AVOID
POSSIBLE EXPOSURETO
EXCESSIVEMICROWAVE
ENERGY” found on page 2.
= To reduce the risk of fire in
the oven cavity:
—De not overcook food. Care-
fully attend appliance if paper,
p]a~ti~,or other c~nlbu~tib!e
materials are placed inside the
ovm to facilitate cooking.
-..mf?emove
paper or plastic bags
wire twist-ties from
before
placing bag in oven.
—Paper RNveband r!apkins,‘wax
paper. Recycled paper products
can contain metal flecks which
may causearcing or ignite.
Paper products containing nylon
or nylon filaments should be
avoided, asthey also ignite.
—-Donot use your microwave
oven to dry newspapers.
—-Donot pop pq3corn in your
w@m3vwweWtienUriless in a
special microwave popcorn
accessory or unlessyou use
popcorn labeled for use in
microwave ovens.
—Do not OperateMe awlxnwhile
empty to avoid damage ‘tothe
oven and the danger cdfire. If by
accident the oven should run
empty a minute or two, no harm
is done. However,try to avoid
operating the oven empty at all
times—it savesenergy and prolongs life of the oven.
=-If materials inside the oven
should ignite, keepoven door
closed, turn oven off, and disconnect the power cord, or shut
off power at the fuse or circuit
breaker panel.
@ Some products such as
whole eggs and sealedcontainers—for example, closed
glass jars—may explode and
should not be heated in this
oven.
@Seedoor surface cleaning
instructions on page29.
@ Don’i defrost frozen beverages in narrow necked bottles;
especially carbonated ones.
Even if the container is opened,
pressure can build up. This can
causethe container to burst,
resulting in injury.
@ ‘Usemetal Jf3niyas directed in
Cool{bookoMetal strips as used
on meat, roasts are helpful when
used as shown in Cookbook.
TV dinners may be cooked in
metal trays. However, when
wing metal
i17microwave oven,
keep WRtd at ilwx$t“l-inch away
!h?sx33skks of CwE?n”
83 cooking !..m?mk may
become hat becauseof heat
transferred from the heated
food. This is especially true if
plastic wrap has been covering
the top and handles of the
utensil. Potholders may be
neededto handie the utensil.
@sometimes, the awenfloor
can become’
BQ ~~ref~ft~~~~ingthefiQor
%0(3!ht toW.ndi.
during and after cooking.
@ !!20not use any thermomet~r
in food you are microwaving
unlessthat thermometer is
design~d or recommended for
usein the microwave oven.
a Boiling eggs (in and out of
sheli) is not recommended for
microwave cooking. Pressure
can build up inside egg yolk and
may cause it to burst, resulting
in injury.
@ lf%xds
withunbroken fc$!’m%’
“skin” such as potatoes, hot
dogs or sausages,tomatoes,
apples,chicken livers and other
giblets, and eggs (seeabove)
should be
pierced to allow
steamto escape during cooking,
63Avoid heating baby food in
glassjars, even without their
lids; especially meat and egg
mixtures.
@ Plastic Utensib-—Plastic
utensils designed for microwave
cooking are very useful, but
should be used carefully. Even
microwave plastic may not be as
tolerant of overcooking conditions as
are glass or ceramic
materials and may soften or
char if subjected to short periods
of overcooking. In longer exposures to overcooking, the food
and utensils could ignite. For
these reasons: 1) Use micro-
wave piastics only “and use
them” in strict compliance with
the utensil manufacturer’s
recommendations. 2) Do not
subject empty utensils to micro-
waving. 3) Do not permit children
to use plastic utensils without F3=5:,1
complete supervision.
$.-...*
e
Page 5
...
._:
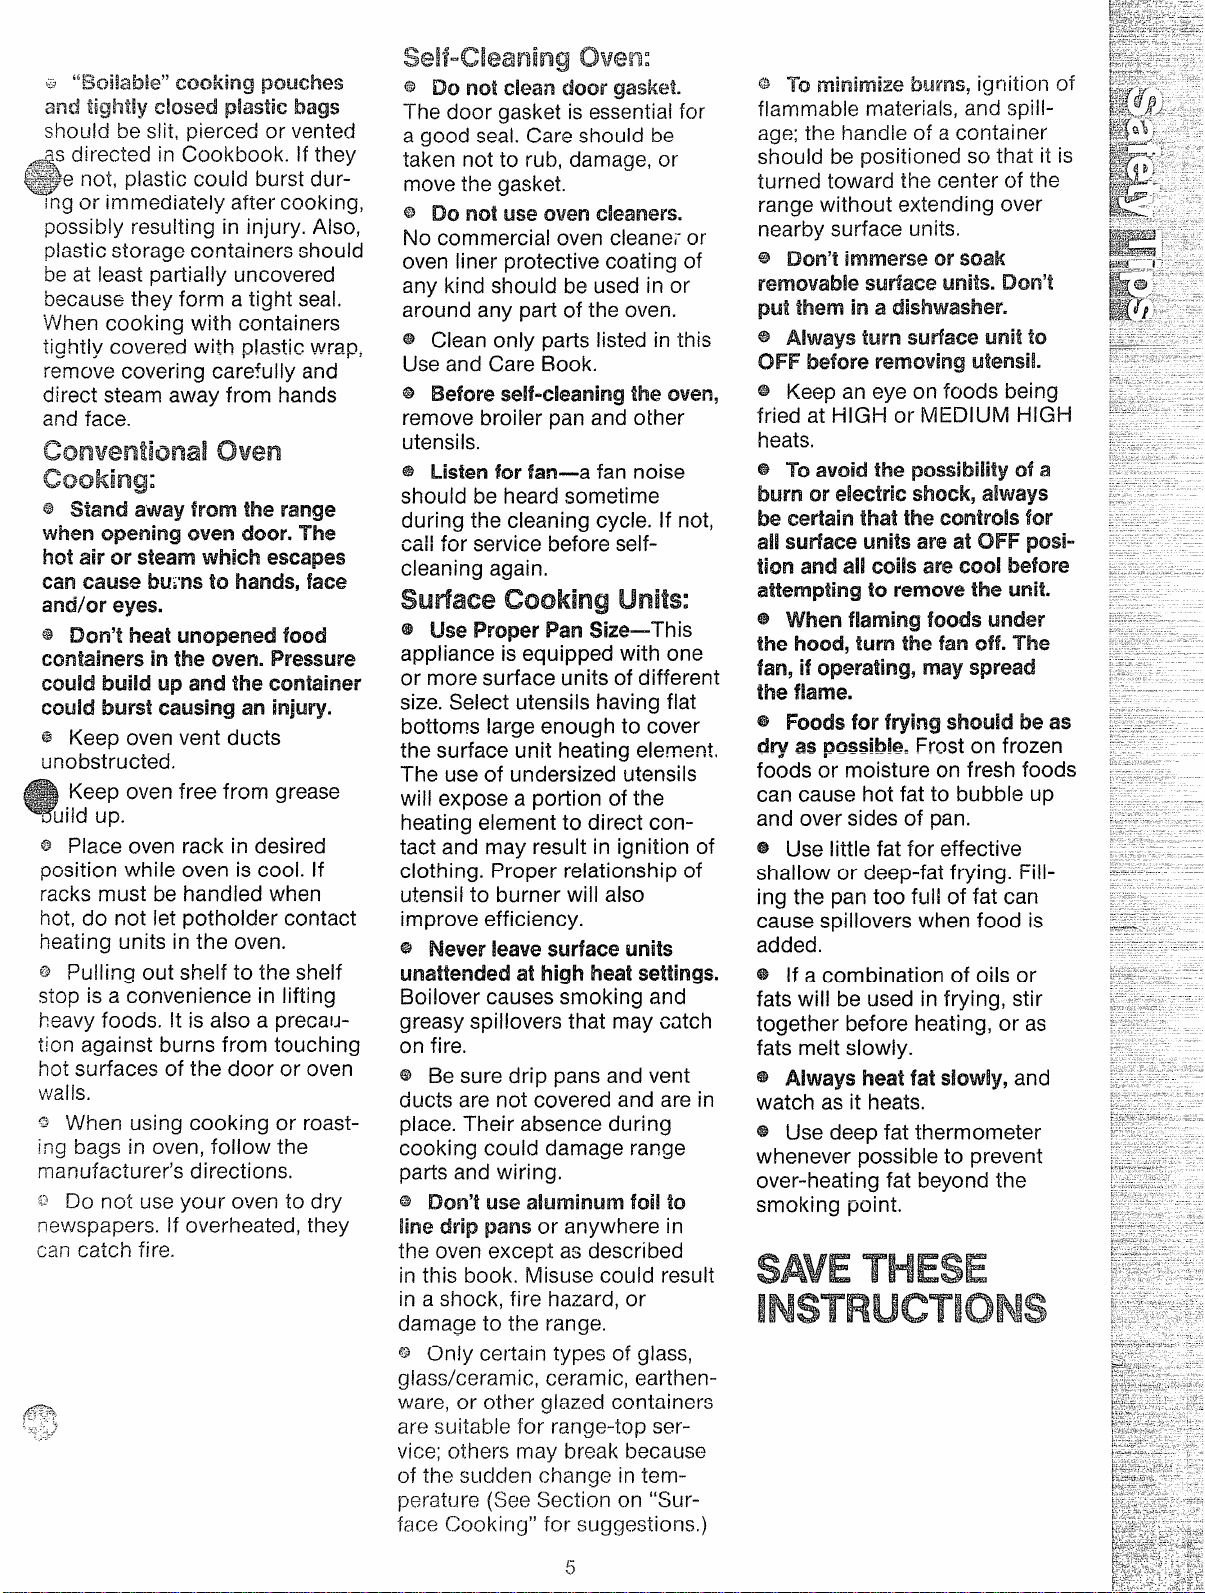
‘ “BcikMe” Cao!<ing ptx.d-ws
and tightly C%wxi plastic
should be slit, pierced or vented
~p~sdirected in
%@enot, plastic could burst dur-
:..~\.7
L
Ingor
possibly resulting in injury. Also,
plastic storage containers should
beat least partially uncovered
becausethey form a tight seal,
‘Whencooking with containers
tightly covered with p!astic wrap,
remove covering carefully and
direct steam away from hands
and face.
~ Stand mwy fromthe range
when openingcwen door. The
hot
can muse
amWcweyes.
@ Ekm’t MM
Ccmtahw% inthe oven. !%’essure
CX3LWI!mJik!up and the Cxmtainer
Cmddburst Cm.WBgan injury
@ Keep oven vent ducts
unobstructed.
:. Keep oven free from grease
=uild up.
$!!)
@ Place oven rack in desired
position while oven is cool. If
racks must be handled when
hot, do not let potholder contact
heating units in the oven.
~ Pulling out shelf to the shelf
stop is a.convenience in lifting
heavyfoods. Mis also a precaution against burns from touching
hot surfaces of the door or oven
walis.
~ When using cooking or roasting bags in oven, follow the
manufacturer’s directions.
o Do not useyour oven to dry
newspapers. If overheated, they
can catch fire.
immediately after cooking,
airor steam which escapes
Cookbook. If they
Iiwi’ns to hands, fax?
unopened food
bags
self-cleaning Owen:
Do notdean ‘&3(x gasket.
@
The door gasket is essentialfor
a good seal.Care should be
taken not to rub, damage, or
movethe gasket.
@ Do not use cwwl ck?aner%
No commercial oven cleaner or
oven liner protective coating of
any kind should be used in or
around any part of the oven.
@ Clean only parts listed in this
Use and Care Book.
@ Before self-cleaning the oven,
remove broiler pan and other
utensils.
@ Listen for fan—-afan noise
should be heard sometime
during the cleaning cycle. If not,
call for service before selfcleaning again.
Sutiaee cooking units:
@ Use Proper Pan Sbx+—--This
appliance is equipped with one
or more surface units of different
size.Select utensils having fiat
bottoms large enough to cover
the surface unit heating element.
The use of undersized utensils
will expose a portion of the
heating element to direct con-
tact and may result in ignition of
clothing. Proper relationship of
utensii to burner wiil also
improve efficiency.
@ Never k?avesurface units
unattended at high heat settings.
Boilover causes smoking and
greasy spillovers that may catch
on fire.
@ Be sure drip pans and vent
ducts are not covered and are in
place. Their absence during
cooking could damage range
parts and wiring.
@ Don’t use aluminum foil %3
line drip pans or anywhere in
the oven except as described
in this book. Misuse could result
in a shock, fire hazard, or
damage to the range.
Q Only certain types of glass,
glass/ceramic, ceramic, earthenware, or other glazed containers
are suitable for range-top service; others may break because
of the sudden change in temperature (SW Section on “Surface Choking” for suggestions.)
@ To minimize burns, igqition of
flammable materials, and spillage;the handle of a container
should be positicmedso that it is
turned toward the center of the
range without extending over
nearby surface units.
@ Don’t immerse Orsoak
removab!e surface units. Don?
put them in a dishwasher.
@ Always turnSWfaceW’mto
OFF before removingL4w’ww
@ Keep an eye on foods being ::,-- .--:
fried at HIGH or MEDIUM HIGH ~-’-
heats.
@ To avoid the passabilityof a
burn or electric shock, ahfl?ays :;-- :
be certain that the controls for ---_--M SUtiaw?units are at OFF posi- ‘ --
ticmland ail coils are cool before :: ‘.. .-
attempting to remove the unit.
@ when flaming kinds Lmder
m! hood, turn‘Mefanoff.‘The
.-
.-
.-
-.-
fan,ifoperating,may ‘spwad
the WNrie.
@ mock
dry as pQssMe, Frost on frozen
foods or moisture on fresh foods
can cause hot fat to bubble up
and over sides of pan.
@ Use little fat for effective
shallow or deep-fat frying. Fill-
ing the pan too full of fat can
cause spillovers when food is
added.
@ Use deep fat thermometer
whenever possible to prevent
over-heating fat beyond the
smoking point.
forfryingSI’KN.kibe as
SAVETHESE
INSTRUCTIONS
5
Page 6
Now ycm txwacook many d your
favoriterecipesfasterand easier
with the new Combination Range
from Genera! Electric. By joining
thefamiliarityof mmwentiord fxmkingwiththespeedand convenience
of microwave cxmking,your C2m913inationRange gives you the versati!ify of mrnbimtion cooking. in
addition, it dfers easycleaning of
f~e g~~ag~aKTgeand an automatic
se! f-dearaingoven.
Knowing how to use and care for
your appiiance properly will save
you
time and energy, increase
your efficiency, and give you more
flexibility in your cooking style. We
have kept features from your
former range and added new ones
to make cooking a more creative
experience.
Your Combination Range has many
features you may not have used
before, The best way to become
familiar with them is to read this
Use and Care Book thoroughly.
You will iearn how to care for your
Combination Range as weil as
how to cook conventionality, cook
with microwave energy, or combine both for a unique cooking
function.
This Use and Care Book wiii show
with detaiied step-by-step information and illustrations how to
use the cooking and cieaning featu$es. To help you better understand your new range,
recipes are illustrated throughout
the book.
There are severai ways to create a
variety of dishes and meals with
your Combination Range.
“i-low To”
cooking
With your Combination Range,
you -may stiii use your favorite
recipes. lJsuaily the oniy adjustments are in setting your oven. A
Cooking and Adapting Chart, show-
ing adjustments in oven temperatures, times, and power ieveis, is in
the front of each food chapter of
the Cookbook. General guidelines
for adapting are in a specific section in the front of the Cookbook.
TakingCareof!Your ‘
CombinationRange
To keep your Combination Range
performing efficiently, it is impor-
tant for you to ciean and care for it
reguiarly, and this book wiil show
you how. Continued use of your
self-cleaning feature, as weli as
frequent washing of your other
range parts, wiii help your Combi-
nation Range to continue giving
you the best performance possible.
Page 7
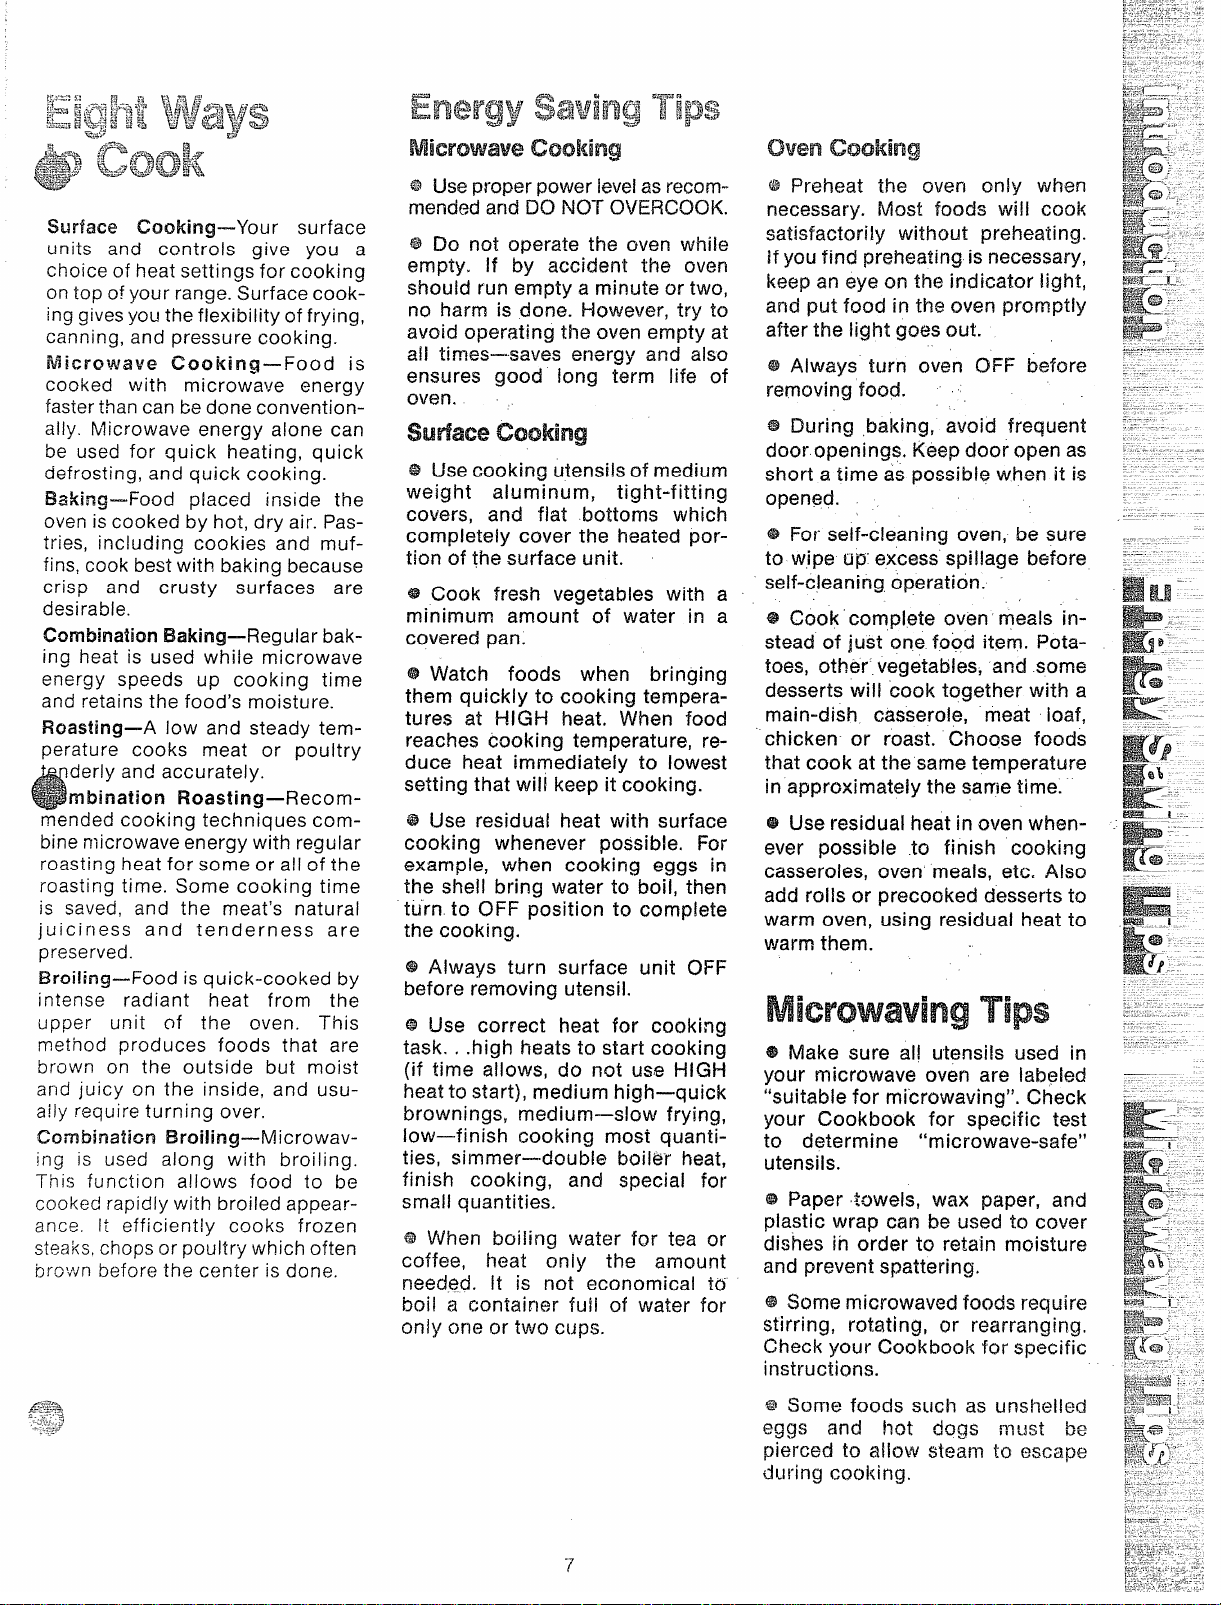
Surface Cooking—Your surface
units and controls give you a
choice of heat settings for cooking
on top of your range. Surface cook-
gives you the flexibility of frying,
ing
canning, and pressure cooking.
Microwave Cooking—Food is
cooked with microwave energy
fasterthan can be done conventionally. Microwave energy alone can
be used for quick heating, quick
defrosting, and quick cooking.
Baking—Food placed inside the
oven is cooked by hot, dry air. Pastries, including cookies and muffins, cook best with baking because
crisp and crusty surfaces are
desirable.
CombinationE?aking-Regular baking heat is used while microwave
energy speeds up cooking time
and retains the food’s moisture.
Roasting—A low and steady temperature cooks meat or poultry
derly and accurately.
rnbination Roasting—Recommended cooking techniques combine microwave energy with regular
roasting heat for some or all of the
roasting time. Some cooking time
is saved, and the meat’s natural
juiciness and tenderness are
preserved.
i3roiiing-Food is quick-cooked by
intense radiant heat from the
upper unit of the oven. This
method produces foods that are
brown on the outside but moist
arid juicy on the inside, and usuaily require turning over.
Combinatim iBroiling-Microwaving is used along with broiling.
This function a!lows food to be
cooked rapidly with broiled appearance. [t efficiently cooks frozen
steaks,chops or poultry which often
brown before the center is done.
* Useproper power levelasrecommended and DO P-K)?OVER(XX3K.
* DO
r-totoperate the oven while
empty, {f by accident the oven
should run empty a minute or two,
no harm is done. However, try to
avoid operating the oven empty at
ail times—-saves energy and also
ensures good long term life of
oven.
s Usecooking utensils of medium
weight aluminum, tight-fitting
covers, and fiat bottoms which
completely cover the heated portion of the surface unit.
@Cook fresh vegetables with a
minimum amount of water in a
covered pan.
@Watch foods when bringing
them quickly to cooking temperatures at HIGH heat. When food
reaches cooking temperature, re-
duce heat immediately to lowest
setting that will keep it cooking.
@IJse residual heat with surface
cocking whenever possible, For
example, when cooking eggs in
the sheli bring water to boil, then
turn to OFF position to complete
the cooking.
* Always turn surface unit
before removing utensil.
@lJse correct heat for co~king
task. . high heats to start cooking
time ailows, do not use HIGH
(if
heat to start), medium high—quick
brownings, medium—slow frying,
low—finish cooking most quantities, simmer—--double boiler heat,
finish cooking,
small quantities.
@When boiling water for tea or
coffee, heat only the amount
need@. R is not economical to
boil a contain~r fujl of water for
only one or two cups,
and special for
OFF
* preheat the oven only when
necessary. Most foods will cook
satisfactorily without preheating.
If you find preheating is necessary,
keep an eye on the indicator light,
and put food in the oven promptly
after the light goes out.
@Always turn oven OFF before
removing food.
@During ,bakirig, avoid frequent
door openings. Keep door open as
short a time as possible when it i-s
opened.
@For self-cleaning oven, be sure
to w,ipe up”excess spil~age before
self-cleaning operation.
4$Cook complete oven meals in-
stead of just one food item. Potatoes, other vegetables, and some
desserts will cook together with a
main-dish casserole, meat ioaf,
chicken or roast. Choose foods
that cook at the same temperature
in approximately the sam~etime.
@Use residual heat in oven when-
ever possible to finish cooking
casseroles, oven meals, etc. Also
add rolls or precooked desserts to
warm oven, using residual heat to
warm them.
@Make sure al! utensils used in
your microwave oven are iabeled
“suitable for microwaving”. Check
your Cookbook for specific test
to determine
utensils.
@Paper +owels, wax paper, and
plastic wrap can be used to cover
dishes in order to retain moisture
and prevent spattering.
@Some microwaved foods require
stirring, rotating, or rearranging.
Check your Cookbook for specific
instructions.
“microwave-safe”
Page 8
A
fill
b
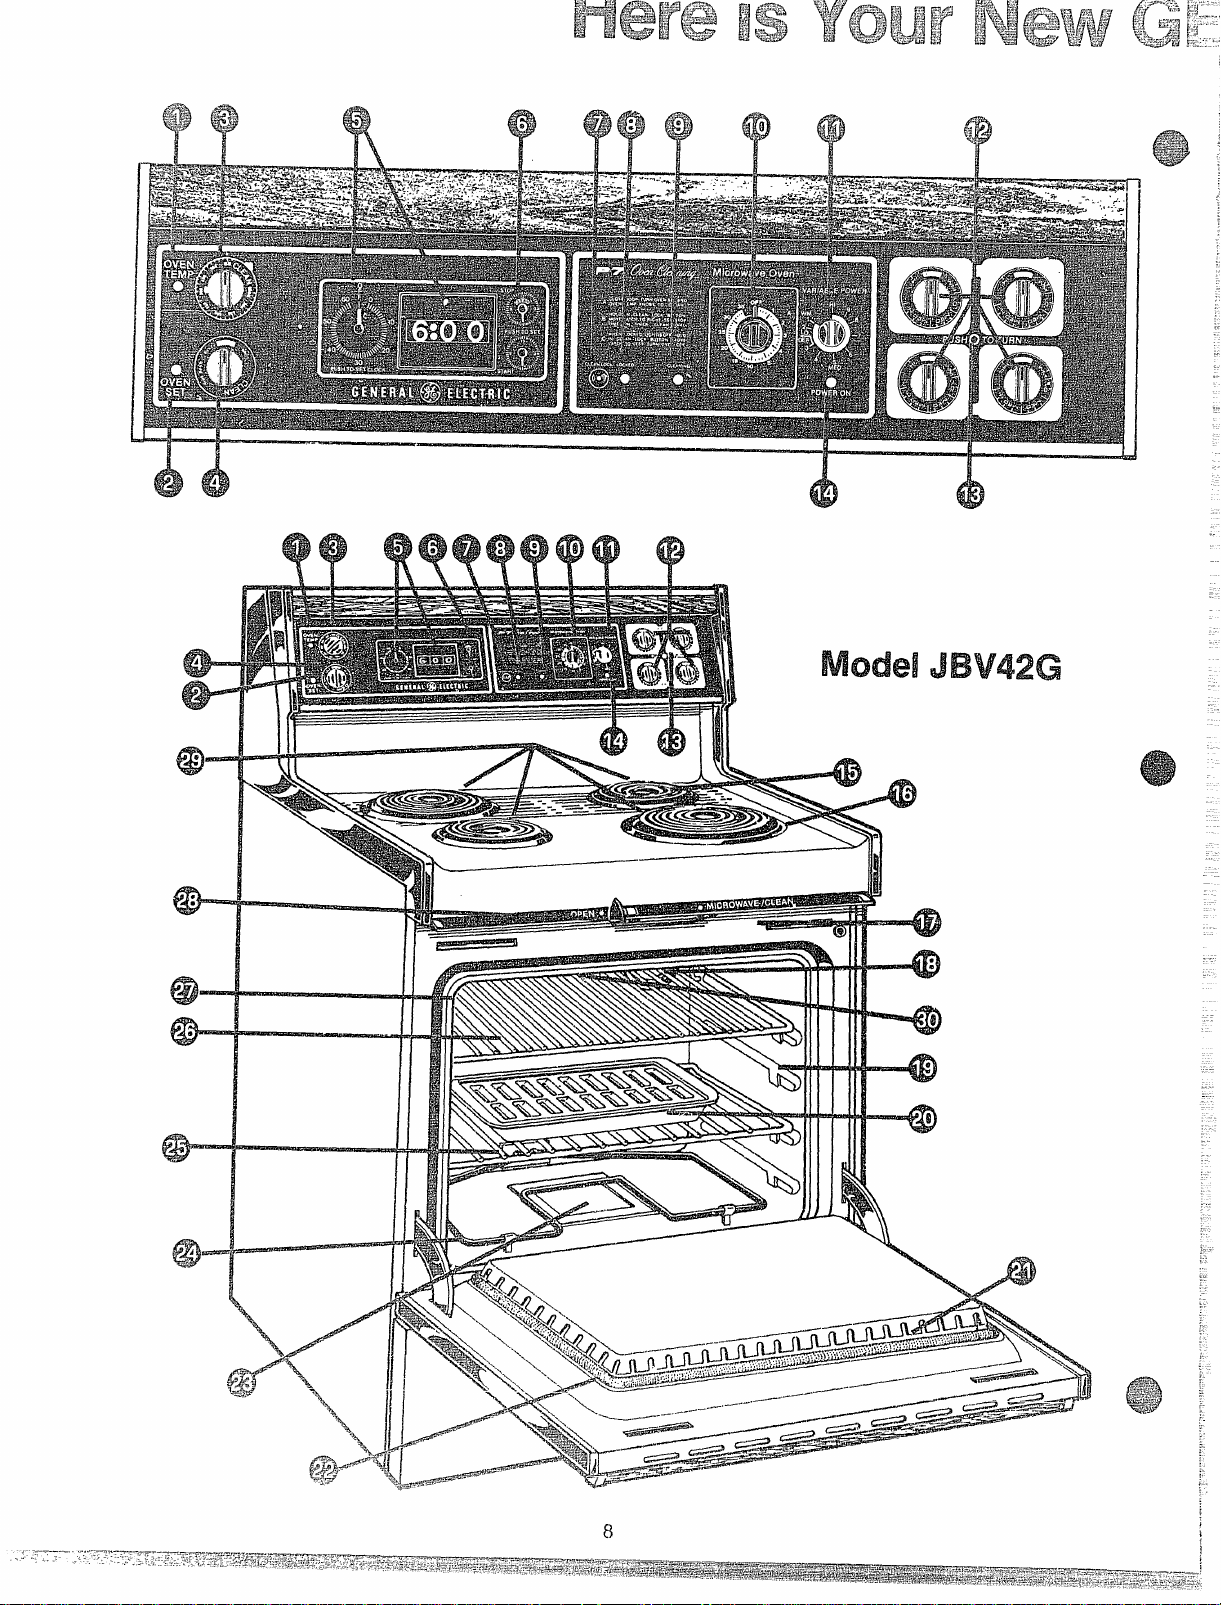
ModeiJBV42G
.9?s?+
.-
Am
@
8
[
Page 9

OVEN CYCLING LIGHT’. Light glows until selected
oven temperature is reached. H serves as a “preheat” indicator.
OVEN “ON” LIGHT. Glows when oven is turned on
for any type of conventional oven cooking of selfc!eaning, and remains on as long as oven is in use.
OVEN TEMP (CLEAN) KNOB. This control sets the
temperature of your oven when conventional cooking and must be set for self-cleaning.
To Set Temperature for Conventional Cooking–The
dial is marked from VWvlto BROIL.with increments of
twenty-five degrees between settings.
ToSet Self-Cleaning–Dial to area marked CLEAN.
OVEN SET (CLEAN) KNOB. This control sets the
specified type of conventional cooking or sets selfcieaning of your range. To Set Oven Function—Dial
to the area marked BAKE, TIME BAKE,or BROIL.
To Set Self-Cleaning–Diai must be turned to area
marked CLEAN.
43..ClCK/MihlUTETIMER. Digitai Clock indicates the
time of day. To set the Clock, push in the center knob
of the Minute Timer and turn in either direction to the
numerals for the correct time of day. Let knob out after setting Clock.
To set Minute Timer (marked from 1 to 60 minutes),
turn the knob to desired minutes. Knob must be out
to set the Minute Timer. Minute Timer will buzz after
time haselapsed, and must be turned oft manually.
AUTOMATIC OVEN THMER.Has Start and Stop dials
which you set to controi oven cooking [TIME BAKE)
or Self-C!eaning. Timing starts and stops automatically. Dials are timed bythe range’s Clock.
CLEAN LOCK. When setting your oven for selfcleaning, you must push this button a,fter latching
door to begin self-cleaning function. Also, button
must be pushed and held to unlock door after selfclean.
LXXX IJGHT. Glows when your oven has reached
cleaning temperature and oven will be locked. Light
stays on during cleaning and only goes off after heat
has decreased enough to unlock door.
OVEN CLEANING L!GHT. Giows when all steps for
cleaning have been set. It rcrnains on during clean-
ing and until Oven Set Knob is turned to OFF.
k~iCROWAVETIMER. This feature is used only with
microwave cooking. It controls the length of time you
microwave in your oven and must be set before
microwaving will begin. When it signals, microwaving
has stopped, and can only be started again by resetting Microwave Timer.
MICROWAVE VARIABLE POWER CONTROL. This
control can be set from levels 1 to HI. By setting the
control, you can vary the amount of microwave
power in the oven. Your Cookbook will indicate
which power level to usefor each recipe.
SURFACE L$N!T CXINTROLS. Push in to set. Dial
from LO to HIGHfor range top
MASTER INDICATOR L!GHT FOR SURFACE UNITS.
When any of the surface units are on, this light will
come on ‘and stay on until the Calrod” unit is turned Q
off,
This feature also allows you to check to make
sure no surface unit has been left on after you’ve
c.qron!c,imdr.nnkinrl nr) th~ rzlnge~op,
“.
~.1-!.=.-...”..J...,~- ..,,...,._.
Mii2FK)WAW W3WEFi “0?4”LJGHT.The light ~omes
~n and stays on as long as microwave energy is
bsing used in the oven.
cooking.
OVENVENTDLJCT.Foundunderyour’oven’sright rear
@
Calrodunit, thisfeatureventstheairfrorn youroven.
Note:With some microwaving and combination cook-
ingit isnormalforsteam toriserapidly from thevent.
DRIP PAh.%AND RihlGS. Some units will have
chrome-plated drip pans and rings. Others will have
separate chrome-plated rings with porcelain drip
pans.
MODEL AND SERIAL NLIMBEFI PLATE. Found on
@
the right side of the oven frame. These numbers
identify your specific model when calling for service.
.
NYiV3?10F3OVEN LIGHT’. Automatically turns on
*
@
when the oven door is opened,
e
EMBOSSED SHELF SIJPPCNTTS.To indicate differ-
@
ent cooking positions in the oven, these supports are
labeled A, B,C, and D. See your Cookbook for explanation of the proper shelf positions for individual
recipes to be used.
EN%OILEFIPANANDRACK. Usedfor conventional and
combination broiling and roasting.
Broiler Pan–Used to catch food drippings,
Rack–Supports food above the drippings and shields
themfrom broiler heat which lessens spatters.
OVEN DOOR. Has a solid inner panel with slots
@
which keeps microwaves in the oven while you are
cooking.
WOVENDOORGASKET. Seals oven door securely.
@
CERAMIC GLASS PLATE. Microwaves enter the
@
oven from this area. The plate protects the microwave system from food spillage while allowing
energy to easily passthrough.
A
BAKE UNIT’.When turned on, it heats the air inside
@
the oven. Do not lift or remove.
12-BAR OVEN SHELF. The widely-spaced shelf is
@
used mainly for one shelf microwaving or combination cooking. The spacing of the shelf bars allows the microwave energy to surround and cook the
food evenly. For heating small containers, you may
prefer using 19-BarShelf to prevent spillage.
19-BAROVEN SHELF. The shelf, with narrow sPac-
a
@
ing, should be located above 12JBarShelf for two
shelf microwaving or combination cooking. When microwaving or combination cooking on one shelf, it is
most efficient to place it in “D” (Top) shelf position or
remove it from oven.
OVEN LINER. Made of grey porcelain enamel and
@
helps retain heat and enefgy when cooking conventionally, microwaving, or combination cooking.
DOORLATCH. Usedonly for microwave cooking and
:
@
self-cleaning.
Open–Latch is placed to the left.
Microwave–Latch is moved without pushing Clean
Lock Button to MICROWAVE/CLEAN.
Clean–Without pushing Clean Lock Button move
Latch to MICROWAVE/CLEAN, then press Clean
Lock Button to start. To unlatch door, hold in Clean
Lock Button while moving Latch to OPEN.
CALFN2D@PLUG-IN SURFACE LJNITS. Units are
coiled to h~at pan surface evenly. They carI be re-
moved for quick cleaning of the drip pans.
EW@iLui%iT.Wnen turned on it raciiates neat to food
@
surface. DCInot remove.
9
Page 10
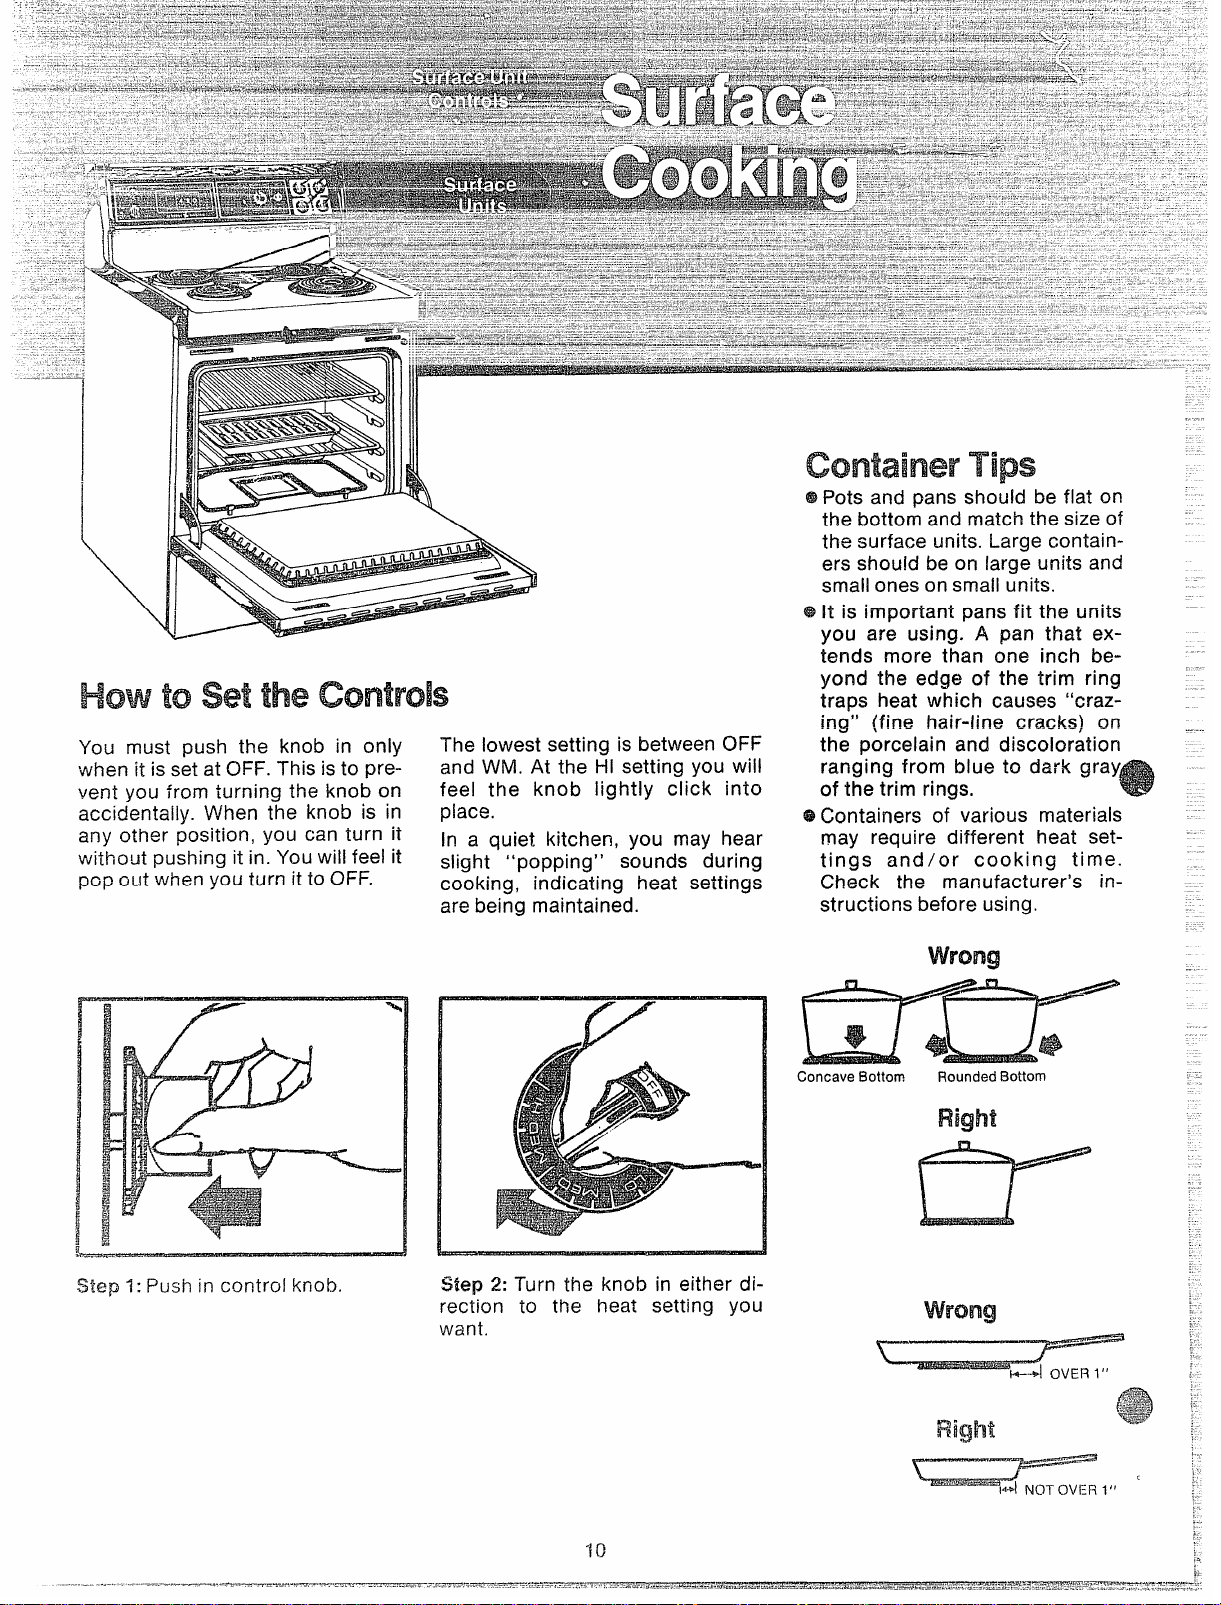
You must push the knob in only
when it is set at OFF. This is to pre-
you from turning the knob on
vent
accidentally. When the knob is in
any other position, you can turn it
without pushing it in. You will feel it
pop out when you turn it to OFF.
The lowest setting is between OFF
and WM. At the HI setting you will
feel the knob lightly click into
place.
In a quiet kitchen, you may hear
slight “popping” sounds during
cooking, indicating heat settings
are being maintained.
ContainerTips
@Pots and pans should be flat on
the bottom and match the size of
the surface units. Large contain-
ers should be on large units and
small ones on small units.
@It is important pans fit the units
you are using. A pan that extends more than one inch beyond the edge of the trim ring
traps heat which causes “crazing” (fine hair-line cracks) on
the porcelain and discoloration
ranging from blue to dark gray
of the trim rings.
@Containers of various materials
may require different heat settings and/or cooking time.
Check the manufacturer’s instructions before using.
wrong
$$fe~I: Push in control knob. Step 2: Turn the knob in either di
rection to the heat setting you
want,
mm
ConcaveBottom RoundedBottom
Right
Page 11
The corMai17er materials listed below are best suited for top-of-the-range cooking.
Giveseven ~eatingwhileresponding quickly to temperature changes. Good for
.
quick frying, saut6ing, or braising.
Cast Iron
Enamelware Because porcelain enamei is used over other metal, the cooking procedures de-
Glass-ceramic Responds slowly to temperature changes. Good for long, low-heat cooking of
Stainless Stee!
Responds slowly to temperature changes. Good for lengthy, low-heat frying and
pan broiling.
pend on the type of metal covered. Enamelware is good for cooking large
amounts of liquid.
liquids. New glass-ceramic range-top pans are coated on the underside bottom
surface with metal and are designed for even heating.
For better heating, stainless steei is combined with another metal. Good for
cooking eggs, sauces, soups, and vegetables.
~OW toHard=CookEggs ~ __._..
—.
Questions
and
Q. May 1 can foods and preserves
on my surface units?
A. Yes.,but only use containers designed for canning purposes.
Check the manufacturer’s instruc.
tions and recipes for preserving
foods. Be sure canner is flat-bottomed and fits over the center of
your Cair~dR
generates large amounts of steam,
he carefui to prevent burns from
steam or heat, Canning should
only be done on surface units.
Q. ‘JVhyam I not getting the heat /
r-;f+9d
:.,_
,l~j:j~~
*~liing?
.3.....
~~=::~;j~!i,f~i:r .U, , ,.l 13
-..<,W
c;heck to make sure that your plug!:! u;~its are wxL4r81yfastened into
~i-:fizurfac5 connection.
Answers
unit, Since canning
ff’om my units even though I
the knobs on the right
r,~j”ef~<.~
rninfx
~
.2> -4,,W” L.
unit
Off$
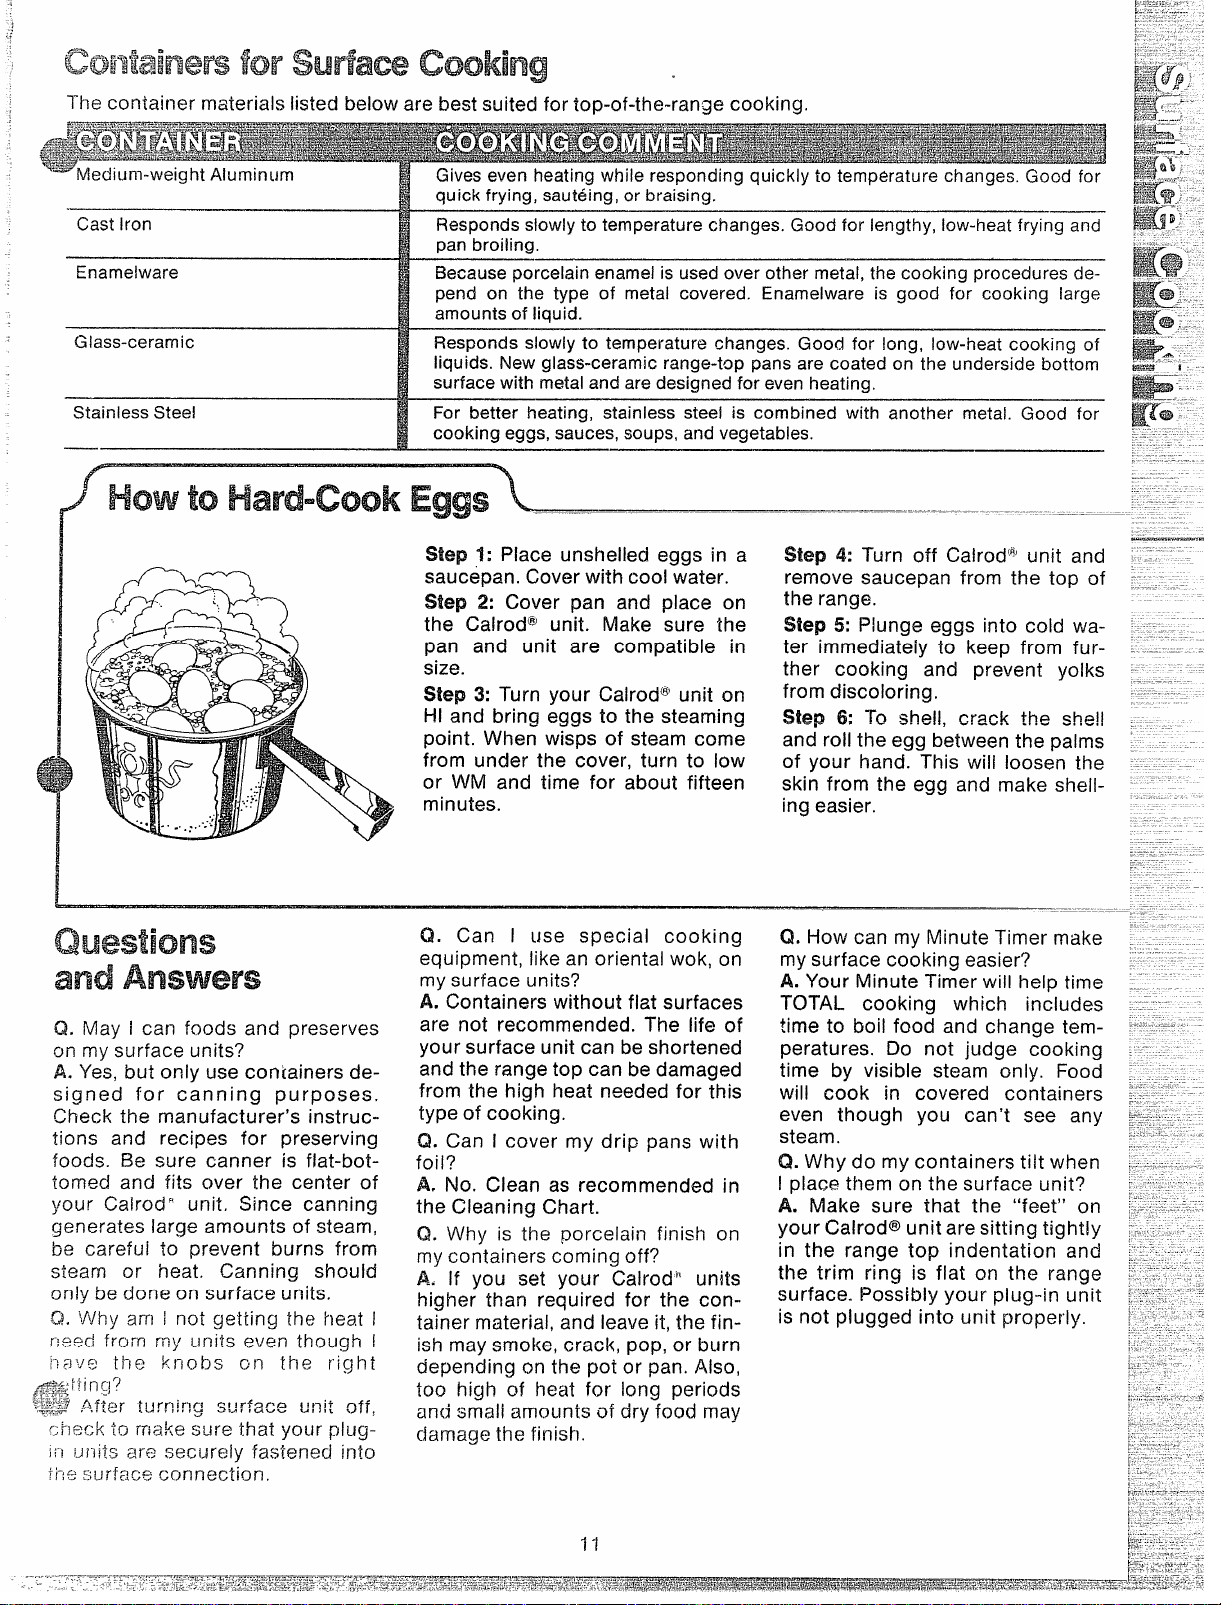
Step 1: Place unshelled eggs in a
saucepan. Cover with cool water.
Step 2: Cover pan and place on
the Ca!rod@ unit. Make sure the
pan and unit are compatible in
size.
Step 3: Turn your Calrod@unit on
HI and bring eggs to the steaming
point. When wisps of steam come
from under the cover, turn to low
or WM and time for about fifteen
minutes.
Q. Can I use special cooking
equipment, like an oriental wok, on
my surface units?
A. Containers without flat surfaces
are not recommended. The life of
your surface unit can be shortened
and the range top can be damaged
from the high heat needed for this
type of cooking.
Q. Can I cover my drip pans with
foil?
A. No. Clean as recommended in
the Cleaning Chart.
Q. Why is the porcelaiil finish on
my containers coming off?
A. If you set your Calrodn un!ts
higher than required for the container material, and leave it, the finish may smoke, crack, pop, or burn
depending on the pot or pan. Also,
too high of heat for long periods
and small amounts of dry food may
damage the finish.
Step 4: Turn off Calrod(Q’unit and
remove saucepan from the top of
the range.
Step 5: Plunge eggs into cold wa-
ter immediately to keep from further cooking and prevent yolks
from discoloring.
Step 6: To shell, crack the she!!
and roll the egg between the palms
of your hand. This will loosen the
skin from the egg and make shelling easier.
-—
Q. How can my Minute Timer make - .= .
my surface cooking easier?
A. Your Minute Timer will help time -_
TOTAL cooking which includes ---
time
tO boil food and change tern- “--:”~...
peratures. Do not judge cooking , -..
time by visible steam only. Food , __
will cook in covered containers :j-~:- -even though you can’t see
steam.
Q. Why do my containers tilt when ~ -----‘.1place them on the surface unit? :_:-~
A. Make sure that the “feet” on -.=--.-=your Calrod@unit are sitting tightly ,-:-.. -_
in the range top indentation and , ----the trim ring is flat on the range “’ 7-------:
surface. Possibly
your plug-in unit ;-::: .-’ =
-.—
any <~.=l=___
—
.—
Page 12

Ill
CONTROLSToLXSEINMICROWAVING
The Variabie Power Control is
marked with 10 settings from 1
(VVARM) to l-ii (H!GH). However.
between each of the numbers
there are markings which allow
you to further adjust the power
level to fit the type, amount, and
!-II(High)
6-7 (Medium High)
kind of food you are cooking. YGU
have complete control and flexibility over the amount of microwave power needed for best cooking results. Use your Cookbook as
a guide as well as the chart below.
‘do-wtosettivi!$Cx3twdsl
Sh?p 1: Turn the Variable Powe
Level Control to desired level o
power.
Step 2: To set the Microwave
Timer, grasp the knob and turn to
the desired time setting for food
you wish to prepare.
Step 3: Close the door and push
Latch to the right to MlCRC)WAVE/
CLEAN and oven begins to cook
automatically. Microwave Power
“on’” Light comes on.
YOU wish to check food, push
If
Latch to OPEN and open the door.
After closing the door and pushing
Latch to MICROWAVE/CLEAN,
oven resumes without resetting Microwave Timer,
At completion of the time ycm’v~>
set, Microwave Timer signals an~:;j,~
microwaving automatically stops.
Microwave Power “On” Light goes
out.
[.. \
12
..
—. ..,.—____.—.—__——.—.—
.—-
Page 13

(See pages 19, 20 and 27 for Combination Cooking conta~ners.)
The containers listed below are best suited for microwaving
Makesure each container is approved for microwaving by manufacturer. Ideal
for quick and even heating. See “Safety Instructions” on page 4 before using
plastic containers.
Glass and
Glass-ceramic
Pottery, Porcelain,
andChina
J Paper and Plastic Wrap
Aluminum Foil
Metal
[not recommended)
Most oven-to-tableware is labeled “suitable for microwave”. Use for casseroles,
custards, egg dishes, vegetables, and quick heating of liquids.
“Microwave Safe” should appear on label before using or check with the manu-
facturer. The Cookbook describes tests to determine if different containers are
microwave safe.
l-hese are acceptable for microwaving only, but must not be used when com-
bination cooking. Bacon cooks quickly since paper plates and towels absorb the
grease. Paper towels used over foods will help absorb moisture and prevent
spatters. Microwave approved plastic wraps are used to hold in moisture and aid
in faster cooking results.
TV dinners and similar items can be microwaved successfully. Keep containers
at least 1“ from oven walls and door. See Cookbook for other suggested usages
of foil on chicke;l, meats and fish.
Metal containers are riot recommended. For microwaving only, metal containers
are very inefficient and better results are obtained by using one of the other
mentioned materials. Metal containers can arc to oven shelf leaving slight burn
marks or pits on container and oven shelf.
Usefor special dishes to be served directly from the oven.
Howi!oMicrowave
/
Step 1: Arrange 1 bunch (1 to 1lA
lb.) of fresh broccoli in a 13x9x2-in.
dish. Position thinner pieces to-
ward the center and stalks to the
outside.
Step 2: Add 1Acup water, 1Atea-
spoon salt, and cover dish with
plastic wrap with one corner
turned back to vent the steam.
Step 3: Place 12-Bar Oven Shelf on
position “B”. Place the 19-Bar
Oven Shelf on position “D” or re-
move it from oven.
Step 4: Place dish on 12-Bar Shelf
in the oven, close door, and slide
Latch to MICROWAVE/CLEAN.
in your Combination Flange.
Step 5: Set Variable Power Level
Control to HI (HIGH) and turn the
Microwave Timer to 6 minutes.
Step 6: After Microwave Timer signals, slide Latch to OPEN, open
door, and rotate dish in the oven.
Step 7: Close door, slide Latch to
MICROWAVE/CLEAN and set Microwave Timer to 6 minutes.
Step 8: After Microwave Timer signals, slide Latch to OPEN, open
door and remove dish from oven. If
you remove dish before time on
Microwave Timer has elapsed, remember to turn Timer to “0”.
Q~@~~~Q~~
andAnswers
Q. can / microwave in plastic con-
tainers after using the oven for anGtherflunctiori?
A. Be sure oven shelf is cooled because the plastic could melt when
touching a hot sheif.
=Q.Will wax paper melt during rni~;r~y~avecGoking7
A, No. Wax paper holds heat for
faster cooking, but does not melt
~~=;s~ickto the food.
:-;.-.-17,
.-
_=>
-------Should I expect to hav6’sleam
1-};;-]~
~=o’~enafter microwaving?
3,,y~~. Be SUre to stand away from
::ange when
‘:jzfaty instructions’) on page 4.)
opening door. (.See
Q. Can I open the door to check
the food during microwaving?
A. Yes. Slide the Latch to OPEN
and check food, then close the
door arid slide the Latch back to
MICROWAVE/CLEAN. After the
Latch is secured, the Microwave
Timer automatically resumes the
time you originally set.
Q.
Are there certain foods that
should not be microwaved?
A. Yes. Eggs in the shell can burst.
Other foods such as hot dogs,
baked potatoes, apples, poultry
giblets or eggs out of the shell
need to be pierced to prevent bursting. See Cookbook for other foocls
that need attention. (See “Safety
Iristrwctions” on page 4,)
Q. Is it necessary to cover all foods
durii~g microwaving?
A. No, but covering foods is recommended in order to retain moisture in foods such as casseroles.
Covering foods, like bacon, with
paper towels will prevent spatter
and absorb the moisti~re.
Q. Cai~ I change Power Levels
while cooking?
A. Yes. If your recipe calls for different Power Levels, set the first
Power Level in the recipe and sei
the Microwave Timer for the time
specified for the first Power Level.
When the Timer signals, simply reset the
reset the Microwave
second Power Level and
Timer.
Page 14

Ill CONTROLSTOUSE!?4DEFROSTING
How
S.ep I: Set Variabie Power Level
Control to “3” (LO/DEF) setting.
Step 2: To set the Microwave
Timer, grasp the knob and turn to
the desired time as shown in the
Cookbook defrosting chart.
toSet Controls toDefrost
-ripsforsuccessful
Defrosting
@Stir foods such as casseroles,
vegetables, or saucy foods dur-
ng defrosting,
/2;
@Turn over or rotate food such as
meats, layered casseroles,
boxed fish, or cakes.
@ Separate pieces of chicken or
fish as soon as possible.
Ground beef can be split apart
for quicker defrosting.
Page 15

The to!lowing chart shows different materials best suited for freezing and microwave defrosting home-frozen
foods and purchased frozen foods,
Excellent for freezing vegetables or single portion leftovers. Ek?sure containers
are microwave-safe to prevent melting, See “Safety instructions” on page 4
.—
Paper, cardboard cartons
or boxes
G!a~s
,41urninurmFoil
Metal
(not recommended)
before using plastic containers.
Many new TV dinners are packaged in paper trays which ailow for even micro-
waving. Cartons used for deli foods, sour cream, and other similar foods are
ideal for freezing for short periods. Boxes containing frozen fish, meats, or other
purchased frozen items, microwave well but usually need turning as specified in
Cookbook.
Glass products promote even defrosting but are not well suited for freezing.
Foods should be transferred to glass containers just before defrosting. Make
sure glass is “microwave-safe”.
Shallow foil trays can be used for homemade dinners, but food that microwaves
well should be selected. Food in foil trays over 34” high should be removed from
the trays for more even results. Keep at least 1“ from oven walls and door. Some
TV dinners contain foods such as fries or breads that do not microwave well.
Those foods should be removed before defrosting. If aiuminum foil is used for
freezing, remove before defrosting for best results.
Metai containers can arc to oven shelf leaving slight burn marks or pits on container and oven sheif.
) HORWtoMicrowave Defrost Park Chops (iz__
.-
Step 1: Place 12-13arOven Shelf on
position “B” in oven cavity and 19Bar Oven Shelf on position “D”.
Step 2: Put wrapped package of
frozen pork
Bar Oven Shelf and push Latch to
MiCROWAVE/CLEAN,
Step 3: Turn Variable
chops in center of 12-
Power Level
Control to 3(LO/DEF).
Step 4: Turn Microwave Timer to 8
minutes and defrosting will beain.
Step 5: When Microwave Timer
signals and oven stops, slide Latch
to OPEN, open the door and turn
over the package of pork chops.
Q. Can i automatically set the oven
to defrost, then microwave?
A. No. You must reset the Variable
Power Level Control and the Mi-
crowave Timer to the specified
power level and cooking time
required to microwave after defrosting.
Q. When I defrosted hamburger
patties, the edges were already
cooked, Why is this?
A. The density and size of the food
makes a difference when defrosting; try using minimum recommended defrosting time first, Most
meat patties must be rotated dur-
ing tofa! defrosting time. Recheck
your (hokbook for specific times
and power levels.
Step & Close door. Slide Latch to
MIGROWAVE/CLEAN.
Step ?’:Turn MicrowaveTimer to 8
minutes and oven will begin de-
frosting again.Thereis
change the Variable Power Level
Control.
Step & When Microwave Timer
signals, slide Latch to OPEN, open
door, and remove defrosted pork
chops. Carefully separate chops
with a table knife, <some chops
may still be icy) and return any
other frozen chops to oven for
more microwaving.
Q. If the specific food that i wish to
defrost is not in the Cookbook,
what do Ido?
A. Find a food that is similar in size
and density and use the time suggested for that food. You may wish
to check the food before the time
has elapsed on the Microwave
Timer.
IQ. Do all foods defrost best on
Power Level 3?
A. Ail foods can be defrosted on
Power Level 3, but small
portion foods such as doughnuts,
can be defrosted best on Power
Level “7 or HI. By using highmPower l...evels,you defrost quicket-.
Be sure to check Cookbook for
special times.
no need to
or sing~~
15
Page 16

HowtoSetYourRangeforBaking
DIGITALICMXX,AUTOMATICOVENTIMER
ANDMINUTETIMER
Step t: Place either Oven Shelf on
the embossed shelf support labeled
“B’’orasindicatedi nCookbook.
Step 2. After making sure that the
oven door is closed, turn the Oven
Set Knob to BAKE. Oven “On”
Light comes on and remains on as
long as Oven Set Knob ison BAKE.
S%p 3: Turn Oven Temp Knob to
the temperature called for in rec-
ipe. Oven Cycling Light comes on
and remains on until preset oven
temperature is reached. It reappears each time oven temperature
drops below preset temperature.
S$ep
4: You may set your Minute
Time?-tothedesireci cooking time as
ir)ciicafsx,l iri your recipe. If your
cooking time is longer than sixty
mjnutes: Minute Timer ml.~st be
<*fl..S-,+
!....-7,k-L.
Most foods cook satisfactorily
without preheating. If preheating is
required, put your dish promptly in
the range after Oven Cycling Light
goes out.
Step 5: Place food inside the oven.
Make sure at least 1“ of space is
left between the cooking container
and the oven wall for proper heat
circulation. Close the oven door.
NOTE: Avoid opening your oven
door frequently. This could cause
undesirable results in your baking.
Only,check foods at the minimum
time of the recipe. Then cook
longer if necessary.
Step 6:When the BAKE cycle is
complete, turn off heat. When
cooking food for the first time in
your oven, usethetirne on your recipe as a guide. Be sure foods are
done before removing from oven.
If+k3wtoSk3tY’(MM’Range
fm”Time I13ak?
Your Automatic oven Timer controls your TIME BAKE feature.
When you TIME BAKE, your range
can be preset to start and stop
automatically if you are not home.
Step 1: Be sure the range Clock
shows correct time of day since
Clock controls the Oven Timers.
Start dial pointer must indicate
same time of day as on Clock. If
you want the oven to turn on at a
later time, set that time by pushing
in knob on Start dial and turn
pointer to time that you want oven
to start. (There’s no need to set
Start dial when starting time is the
present time of day.)
Step 2: To determine Stop time,
add the food’s cooking time to
time set on Start dial. Push in knob
on Stop dial and turn pointer to
time oven is to turn off.
Step 3:Turn Oven Set Knob to Tlh/lE
BAKE. Oven “On” Light comes on
immediately even if the Start time is
later.
Step 4: Turn Oven Temp Knob to
temperature setting. Oven Cycling
Light comes on even though heat
is not on in the oven if a later start
time is used. Your oven automat-g~
ically turns on and off at the times%@
you set.
a~ep 5: Remove food and turn
Oven Set Knob to OFF.
Q
I 5
Page 17

The corit~irlers listed below are best suited for baking in your combination oven.
. .—-. ..-——. . —— .—..
—— .——
Ovenproof glass/ pottery
Teflon, dull or
darkened cookware 25° when
)HowtoBake Brownies~=-------------- ---
Because this cookware absorbs heat quickly and holds it well, your oven temperature needs to be !owered 25°,
casseroles.
[
Absorbs heat quicker than shiny or brighter containers. Lower your oven setting
crusty surface is desirable.
1
using this cookware or use recommended temperature when dark,
Food has deep crust on the top. Best for
— .——
Step 1: Prepare your brownie bat-
ter according to your recipe or di-
rections on packaged mix. You
may use either a metal or glass 8“
pan. If glass is used, place the 19Bar Oven Shelf on position “B”
and the 12-Bar Shelf on position
“D” or remove from the oven. If
metal pan is used, position 19-Bar
Oven Shelf on “A” and 12-Bar
Shelf on “C” or “D”.
Step 2: Close the oven door and
turn the Oven Set Knob to BAKE
and the Oven Temp Knob to 400°
to preheat your oven. Both Oven
Indicator Lights come on.
Step 3: Pour the brownie batter
into 8“ greased pan.
Step 4: When your Oven Cycling
Light goes out, place the pan inside your oven taking care not to
let it touch the sides of your oven
cavity.
Step 5: Set your Minute Timer for
eight minutes.
Step & When your Minute Timer
buzzes, check to make sure your
brownies are completely done. Remove the pan—allow to coo! and
then cut into squares.
Step 7: Turn Oven Set Knob to
OFF.Oven “On” Light goes off.
.--.
Questions
and
Q. Why aren’t ,my foods done even
though they have cooked the full
time?
A. You may have opened the oven
door too often during the cooking
cycle and al!owed the heat to escape. Be sure to remove all con-
tainers other than those in use for
baking, and be sure there is one
irrch space between containers
used and oven walls.
IQ.Do the oven indicator lights
p:;t~
@=~=;j}<~?
-::”>::~:j
--~-~----:“ “Yes, even if you have set the
OVentg start at a later time, but
~}j=r~he~{~d09s not begin.
Answers
wh~n 1 set Imy ov~n to
ap-
Tlh/lE
Q. How do I bake at high altittides?
A. Baking at high altitudes involves
changing the temperature and
time of cooking as well as altering
your measurements. For the best
results and further information,
check your Cookbook or state agricultural station.
Q. What if the pointer on the Start
dial doesn’t show the same time as
on the Clock?
A. Turn pointer dial to the correct
time and it will pop out and cannot
be turned.
Q. How do I use my Automatic
Oven Timer if I want to begin cook-
ing immediately but want the oven
shut off while I’m gone’?
A. Set the STOP time only, then
turn the Oven Set Knob to TIME
BAKE and the Oven Ternp Knob to
the proper temperature setting,
heat too fast. Use a shiny aiuminum baking sheet and check oven
shelf position.
Q. Are there certain foods that
cook well in TIME BAKE?
A, Most meats, fruits and vegetables generally take well to automatic cooking. However, foods
of a highly perishable nature such
as milk, eggs, fish, stuffings,
poultry and pork, shou[d not be
cooked automatically unle~ the
standing time in the oven is md
more than 2 hour$ before or af%w
cooking. Foods shouki always be
chilled in refrigerator befor~ cook-’
ing when using a delayed START
time.
Page 18

CONTROLS‘l-c)tJsE !NCOMB!NAT!ONBAKE
HowtoSetYourRangetoCombination Bake
After selecting a recipe from the
Cookbook or revising your own according to Cookbook instructions,
you must set all of the knobs for
both conventional baking and mi-
crowaving as described below.
SHep1: often the container material will determine the shelf posi-
tion to be used. lMost
combination
bakingusesthe 12-BarOvenShelf
oneither “A” or “B” position.
Step 2: Place food in the oven after
positioning the shelf.
Step 3: Turn the Oven Temp Knob
to the desired temperature.
Step 4: Turn the Oven Set Knob to
BAKE, Both Oven Indicator Lights
come on. Oven Cycling Light remains on until internal oven temperature is reached.
Step 5: Close the
push Latch to
CLEAN.
Step 6: Turn the
Level Control to
level.
Step 7: Turn Microwave Timer to
the amount of time for microwaving as specified in the recipe.
Microwave “On” Light comes on
and oven is now microwaving as
well as baking.
Step 8: When Microwave Timer
signals, the oven is continuing with
conventional baking only. Microwave “On” Light goes out. Check
recipe and remove food if neces-
sary.
Step 9: When food is finished and
removed from oven, you must turn
Oven Set Knob to OFF because
the Oven Controls and Microwave
Controls function independently of
each other.
oven door and
MICROWAVE/
Variable Power
desired power
.-
Page 19

These container materia!s are best for co~mbinationbaking:
.
Oven-proof Paper Board
Oven-proof Plastics
Aluminum Foil
Metal
> HowtoCombinationBakeFish~ ...
Can be used in ovens set no higher than 375°. Check package directions before
use. Do not use other paper containers. See “Safety instructions” on page 5.
There are certain plastics that can withstand oven temperatures to 400°. Check
manufacturer’s specifications before using. Because these containers allow
microwave energy to penetrate a[’ifood surfaces, foods which are combination
baked in them are often higher in volume then when metal pan is used. Do not
use other plastics or plastic wraps. See “Safety Instructions:’ on page 5.
TV dinners and similar items may be prepared quickly. Use aluminum foil
rected in Cookbookfor meatsand
oven walls and door.
Medium weight aluminum conducts heat more evenly than stainless steel and
faster than glass. Check in your Cookbook for results when baking in different
containers. Metal containers may arc to oven sheif leaving slight burn marks or
pits on container or oven shelf. Place containers at least 1“ from oven walls and
door
E!
chicken. Place containers at least 1“ from
........-------
Step 1: In a 13x9x2-in. glass dish,
prepare fish (about 2 Ibs.) for
cooking according to your Cook-
book or other recipe. Place 12-E3ar
Oven Shelf on shelf position “B”
and other Oven Shelt on position
“D” or remove from oven. (If metal
pan is used, use shelf position “A”
for 12Bar Oven Shelf.)
S%ep2: Place dish in oven and
close the oven door. Push the
Latch to MICROWAVE/CLEAN.
as di-
—.
Step 3: Set the Oven Temp Knob to
500° and the Oven Set Knob to
BAKE. Both Oven Indicator Lights
will appear. When 500° is reached,
Oven Cycling Light goes out.
Step 4: Turn Variable Power Level
Control to 7 (MED. HIGH).
Step 5: Turn Microwave Titner to 9
minutes. Microwave Power ‘“On”
Light comes on and remains on
until the Timer signals or the Latch
is pushed to OPEN.
SteD & After Microwave Timer sig-
nal;, slide Latch to OPEN, op~n ..= . . ..
door, and remove the dish.
Step 7’: Turn Oven Set Knob to --
OFF.
Q~~stio~~
andAnswers
~, Aifter setting bot}~ Oven Control
Knobs and Microwave Controls,
vvhy
didn’t microwaving begin?
A. You must move the Latch on the
oven door to MICROWAVE before
the oven will begin microwaving. If
oven still doesn’t begin, recheck
ali the knobs to make sure all are
prop2r\y set.
i:~. f;an I use
~<<z%:~r.o[0~
,::=’.~l
-.
_-SzY
.. ~---~.-,-
:y)<>jfj~ ‘-’
i, frozen fish or seafood’?
“’.{S~.
but more cooking [irne is
;~s!x;sc~.(;heck your Cookbook for
*.
~J~f_/~/i[jrji>:~~in~,
combination baking
!Irr!es
needed for CCJ~.-
Q. Can I set my oven to automat-
ically start and stop at a later time
when my recipe requires both
microwaving and conventional
baking?
A. No, because after setting the
Microwave Timer and latching the
door, microwaving begins immediafeiy. You may TIME BAKE, but the
starting time must always be the
present time of day and it only con-
trols conventional heat.
Q. Can more than one item be
cooked at the same time’?
A. Yes, if microwave and baking
times and ternperatuww are the
same. Check the recipes in the
cookbook for similar foods.
-19
Q. Should I expect to have steam
in the oven after Combination
Baking?
A. Yes. Be sure to stand away from
range when opening door.
Q. Is it necessaryto set the oven
Control Knobs before setting Microwave Controls?
A. No. The Oven Contro!s and Microwave Controls function
pendently of each other.
Q.
Can i open the oven door dur-
ing combination baking?
A. ‘{es, the oven continues baking
and microwave cooking stops. It
will continue after closing and
latching the door.
inde-
Page 20

Ill
CONTROLSTOUSEINROASTING
How
step -i:
meat and place, fat side
rack in the broiier pan that came
with your
meat to baste itself.
S&p 2: Use shelf position “A’ or
“B”,
Cookbook. Place C)ven Shelf on
the correct embossed shelf sup-
port. For very tall roasts, remove
second oven shelf.
Step 3: Turn the OverI Temp Knob
to 325°.
poultry which is roasted at 3750.)
:;@>
tur~ the LOven.Set Knob to BAKE.
tosetYour
Check the weight
range. This helps the
or the one indicated in your
(The exception is small
4: Close the oven door and
Range
of the
on the
UP,
‘for
Roasting
Oven
stays
“On” Light comes on and
on until Oven Set
Knob is
turned to OFF. Oven Cycling Light
comes on and remains on until
temperature is reached.
Step 5: Place your meat inside the
oven, making sure the pan is not
touching the oven walls or door.
step Q:
roasting cycle is complete.
Turrl off the heat when the
❑
w
Be sure meat is cooked to your
satisfaction. Most meats continue to cook slightly while
standing after being removed
from the oven. This should be
taken into consideration when
determining your cooking time.
Always use a roasting pan that
fits the size of your meat. A
roast placed in a pan too small
for its size will drip over the
edge.
You may cook frozen meat
roasts without thawing. However, you must allow more
cooking time for large roasts,
add 10-25 minutes per pound.
For roasts under 5 pounds, add
10minutes per pound.
To slow down surface browning
on turkeys, you can use a foil
“tent”.
should be laid loosely over the
poultry so the heat can circulate
under the fQi!.
Most frozen poultry should be
thawed before cooking to elTsure it is done evenly. Some, S.&%
however, can be cooked WC-‘“%
cessfully without thawing.
Check the packer’s label for
specific directions.
The tent-shaped foil
C3
‘$=
Page 21

The containers below are suggested to use when you are roasting in your Combination Range,
WA.
—.
.—.—.—.———
Broiler Pan and Rack
Oven
A!uminurn Pan and Rack
This pan is designed for roasting and broiling. ~hrome rack keeps the drippings
cool by reflecting heat away from porcelain pan, Slots allow drippings to fall into
pan.
II
Conductsheatquicklyandevenly.
B
)HowtoPrepare aStanding RibRoast~
Step ?: Place the meat, fat side
up, on the rack of the broiler pan
which comes with your range. Do
not cover. Add no liquid. Insert
meat thermometer.
Step 2: Position either oven shelf
at “B”. (Use “A” if roast is tall.) Re-
move the other Oven Shelf if necessary or position on “D”. Place
roast in oven.
Step 3: Set Oven Temp Knob to
325°. Set the Oven Set Knob on
BAKE. Oven “On” Light comes on
and stays on until Oven Set Knob
is turned OFF. Oven Cycling Light
comes on until preset temperature
is reached.
Step 4: For Standing Rib Roasts
see the chart following Step 6, and
set Minute Timer as a reminder if
you wish.
Step 5: At the end of cooking time,
check your meat thermometer. If
meat is done, remove from oven.
Step 6: Turn the Oven Set Knob
to OFF.
.-
~Questions
aridAnswers
Q. ‘When buying a roast are there
any special tips that would help me
cook it more evenly?
A. Yes. Buy a roast as even in
thickness as possible, or buy roiled
roasts.
Q, Can 1seal the sides of my foil
“tent” when roasting a turkey?
A. S@aling the foil will steam the
/“;-!eat,
,fi~;,-j~;. ‘‘ -)
‘=-~~~i-leat.
Leaving it unsealed allows
~It LOcirculate and brown the
Doneness ApproximateTime in
—— ——
Rare
Medium
Well Done 35-45min. 28-33min.
Q. Do I need to preheat my oven
each time I cook a roast or poultry?
A. It is rarely necessary to preheat
your oven, only for very small
roasts, which cook a short length
of time.
Q. Why does the temperature on
my meat thermometer seems unusually high for the amount of time
I’ve cooked the meat?
A. The thermometer may have
slipped frolm its original position as
meat cooks. Reposition, making
sure it is in the center of the rr~eat
and not tou?hing bone, fat, or
gristle.
Minutes PerPound
3-5 Ibs. 6-8 Ibs. –
24-30 min. 18-22
30-35min. 22-26min.
min.
to check for doneness?
A. A meat thermometer isthe most
accurate test for checking if your
meat is done. The thermometer
should be inserted in the center of
a roast or breast of the poultry
without touching fat, bone, or
gristle.
Q. Why is my roast crumbling
when I try carving it into slices?
A. Roasts are easier to slice if allowed to cool 10 to 20 minutes after removing from the oven. Be
sure to cut across the grain.
Finished Meat
Thermometer
Temperature
130-140
150-160
170-185
21
Page 22

HowtosetYourRangeIIKlcombination Roast
—
Because roasting is a baking procedure for meats, oven controls
are set on BAKE.
Step 1: Specific shelf locations for
individual foods
the Cookbook, Most combination
roasting uses the 12-Bar Oven
Shelf on-”B” position.
are suggested in
Step 2: Turn Oven Temp Knob to
desired temperature. (This is usually 3250.)
Step 3: Turn Oven Set Knob to
BAKE. Oven “On” Light comes on
and stays on until the Oven Set
Knob is turned to OFF. Oven Cyciing Light comes on until preset
tenlperature is reached.
Step 4: Set Variable Power Control
by turning dial to the specified Microwave Power Level (usually LO
(3) or WARM (1)).
Step 5: Determine total roasting
time. [f Cookbook states time in
minutes per pound, this must be
figured for your roast. Set Microwave Timer.
reset after partial cooking, depending on roasting time.
Wrier may need to be
Step & Ciose oven door and slide
Latch to MICROWAVE/CLEAN.
Both roasting and microwaving are
occurring at the same time. Microwave Power “On” Light comes on
and remains on during microwaving.
Step 7’: When Microwave Timer
signals, the oven continues con-
ventional roasting. You must turn
Oven Set Knob to OFF because
Oven Ccntro!s and MicrQwavw$*
Controls function independently OIE%*ST
@achother.
“#&@
9
Z!
Page 23

~:ontsiii-~ersforCombinationRoasting
,.-
The following are container materials best suited for combination roasting:
Glass–Ceramic (pyroceram)
1“ ‘ - -
Pottery
Metal
Paper and Plastic (not recommended) ‘
Cooking Bags Cooking bags approved for conventional oven use may be used in Combination
Must be oven-proof and microwave-proof. See test for microwave-proof in Cookbook. Some pyroceram roasting dishes have ridges on the bottom of them, so
trivet is not needed. Otherwise, use glass trivet.
Mu$t be oven-proof and microwave-proof. See test for microwave-proof in
Cookbook.
Metal containers may arc to oven shelf leaving slight burn marks or pits on con-
tainer and oven shelf. Broiler pan and rack that come with this range may be
used but should be placed at least 1“ from oven walls and door.
See “Safety Instructions” on page 5.
Roasting of such foods as turkey or chicken to help hold moisture and spatters.
Step1: Prepare2Yzlb. chicken for
roasting according to the Cookbook. Make sure pan size is larger
than the chicken. Place chicken in
glass dish with glass trivet.
Step 2: Place 12-Elar Oven Shelf
on “B” position in oven. Remove
1$1-iilar Shelf or leave at “D”
position.
StepI 3:>Put the chicken in the
oven on middle of shelf to allow
heat to adequately surround dish.
Step 4: Close door and slide Latch
to MICROWAVE/CLEAN.
Step 5: Turn Oven Temp Knob to
400° and Oven Set Knob to BAKE.
Both Oven Indicator lights come
on. Only Oven Cycling Light goes
off when preset oven temperature
is reached.
Step 6: Set Variable Power Control
to 5 (MEDIUM).
Step 7’: Turn Microwave Timer to
20 minutes. Microwave “On” Light
comes on and stays on. When
Timer signals, check chicken and
continue cooking, if necessary.
Step 8: Turn off Oven Set Knob
and slide Latch to OPEN. Using
hot pads, remove chicken. Make
sure Microwave Timer is on “0”.
Questions
AndAnswers
C!. What shelf position is recom-
mended when using a metal container instead of glass?
A. Shelf position “A” is recommended whenever any metal container or roasting pan is used for
Combination Roasting. Refer to
your Cookbook for added tips and
times for cooking.
0. DOGSthe oven automatically
!urn off when the Microvvave Timer
e:.
F...,-.i-r}
;-r.->-?I ‘U:Ir!I-3r
~-$-..,.:-.—,”,+
‘“++%.No, only the Microwave energy
~-!ops. CGr]ventiona! heat cor\tin~~r:.:;
untl! y.~u turn the Oven Set
!<~\Q~)f(j ~~~.
Q. After checking on my chicken
during” cooking time, i closed the
door but microwaving didn’t begin.
Why?
A. Make sure the Latch is in the
MICROWAVE/CLEAN position after closing the door. Check the Microwave Timer to be sure there is
time remaining. If it is on “O”, reset
t~ desired time.
Q. Do most meats require a stand-
ing time after combination
roasting?
A. Yes, for easier carving and
serving, you may want to let meats
stand. Most meat roasts continue
cooking a few minutes while stand-
ing. Check specific recipes in the
Cookbook.
2:3
Q. Why do I set the Oven Set Knob
on BAKE for roasting?
A. Roast and bake use the same
oven setting and heat units in the
oven. Roast refers to the cooking
of meats and poultry. Bake refers
to the cooking of pies, pastries,
and casseroles.
Q. Should I expect to have steam
in the oven aRer Combination
Roasting?
A. Yes. Be sure to stand away from
range when opening door.
Page 24

Ill
.
CONTROLSTO LEEINBROILING
HCMA!
step 1:
broikf
ways use the rack so fat drips into
the broiler pan.
Step 2: Position Oven Shelf as indicated in your Cookbook.
Place the meat on the
rack in the broiler pan. Ai-
I
!
(
...-...,-.,.....+.—-...-
Step 3: Turn the Oven Set Knob
and Oven Temp Knob to BROIL.
Both Oven Indicator Lights come
on,
Step 4:
a few inches (except chicken, see
below). The door will stay open itself
yet the proper temperature WN be
maintained in the oven. During cooking, turn the food only once.
Step 5: Turn Oven !?@Knob to OFF
andserve food immediately.Leavethe
pan outside the oven to cool during
the meal for easycleaning.
Leave oven door ajar
s Foil may be used to line the
broiler pan and rack. However,
be sure to cut openings in the
foil to correspond with the slits
in the broiler rack so fat drips
into the pan below.
s For all weights of chicken, broil
with door closed.
* Placing food closer to the top
of the oven increases smoking,
spattering,
on the meat and the possibility
of food fat catching on fire. Always keep rack 3-5 inches
from the broiling unit.
exterior browning
2’4
Page 25

Usethe containers below when broiling in your Combination Flange.
– ----- _-
— —
~g%S&
ES.--.,.- -
W&L. ‘.
K%iE5:“-.
w- .%. _
..- * .
w.-.” --
!s4iz-
——
Questions
ai’xilAnswers
Q. Are there any other ways to
maintain juiciness of meat?
A. Follow directions in Cookbook
for shelf positioning and time the
meat carefully. Other tips such as
the use of tongs to turn meat over
aregivenin your Cookbook.
0. Do I need to grease my broiler
rack to prevent meat from
sticking?
A. No. The broiler rack is designed
to reflect broiler heat thus keeping
the surface cool enough to prevent sticking of the meat to the
surface.
Step 1: Cut off the extra fat from
ham slice and cut vertical slashes
about two inches apart in the re-
maining fat. This will keep the meat
from curling.
Step 2: Center the ham slice on
the broiler rack in the broiler pan.
Step 3: Position Oven Shelf on
“c”.
Step 4: Turn both the Oven Set
and Oven Temp Knobs to BROIL.
Both Oven indicator Lights come
on. Place the pan with the ham
slice inside the oven. Leave the
oven door open about 3 inches.
Q. My range is being operated on
low power (voltage). Why are my
meats not turning out as brown as
they should?
A. Preheat the broil unit for ten
minutes with the food and broiler
pan outside the oven. While broiling the food, turn only once but
cook for the longest period of time
indicated in your Cookbook.
hQ. Can I broil bakery goo s and
pastries in my Combination
Range?
A. Yes. Position the Oven Shelf on
“D”. For toast or toaster pastries,
cook one side for lM to 2 minutes
and the other side for about 30
seconds. For English muffins, split
the muffin and cook for 3 to 4 min-
utes on one side only.
Step 5: Broil the top side of the
ham until it is lightly browned (for
1/2” slice about 8 minutes, 11/2”
slice about 12 minutes). Then turn
and broil the second side (for Vz”
slice 4-5 minutes, for 1
Y2° slice
9-11 minutes). For a M-I” slice of
ham, yQu need only to turn it once.
For larger pieces of meat, check
your Cookbook for instructions.
Step & When the ham slice is
done, turn off the oven and serve
immediately.
Q. Should I salt the meat before
broiling?
A. No. Salt draws out the juices
which would be evaporated in
broiling. Always salt after broiling.
Always turn with tongs because
piercing meat with a fork allows
the juices to escape, As poultry
and fish broil, brush each sidq of-
ten with butter.
Q. When broiling, is it necessary
to always use a rack in the pan?
A. Yes. Using the rack suspends
the meat over the pan. As the meat
cooks, the juices fall into the pan
thus keeping meat dryer. Juices
which are protected by the rack
stay cooler, thus preventing excessive spatter.
25
Page 26

CONTROLS‘TOUSEINcombination BROIL
Broiling uses only the top heating
unit inside the oven cavity to give
intense browning to your dish
while microwaving speeds up the
cooking.
fuliy in your Cookbook for foods
being prepared using Combination
Broil,
Step f: Refer to the Cookbook for
specific sheif position and then
place 12-Bar Oven Shelf on that
position
Follow directions care-
Step 2: Close door and slide Latch
to MICROWAVE/CLEAN.
Step 3: Set oven controls by turn-
ing both the Oven Set and Oven
Temp Knobs to BROIL. Both Oven
Indicator Lights come on.
Step 4: Turn Variable Power Level
control to power level given in the
recipe usually LO (3) but check
Cookbook,
Step 5: Set Microwave Timer for
first side cooking time. When Mi-
crowave Timer signals, micro-
waving has stopped but broiling is
continuing. Turn over meat and reset Microwave Timer for second
side cooking.
Step & Turn Oven Set Knob to
OFF since Oven Controls and Microwave Controls function inciependently and Oven Controls must
be turned off manually.
Page 27

The following chart shovvscontainer materials best suited for combination broiling.
Broiler Pan & Rack
Other Metals
Paper and Plastic (not recommended)
This pan and rack comes with your range and is designed for spatter-free broil-
ing. Chrome rack keeps the drippings cool by reflecting heat away from porce-
lain pan. Slots allow drippings to fall into pan. Place containers at least 1“ from
oven walls and door. Aluminum foil is not recommended in covering broi!er rack
when microwave energy is used, Non-stick spray’coatings are suggested.
Metal containers may arc to oven shelf [caving slight burn marks or pits on container and oven shelf.
See “Safety instructions” on page 5.
S*6W 1: Select !4” to 1“ thick
steaks and place frozen on top the
rack in broiler pan.
Step 2:’ Put 12-J3arOven Shelf on
position “C” in the oven. Place 19Bar Oven Shelf on “A” or remove
from oven.
Step 3: Place pan with steak on
the middle of the oven shelf in the
oven.
Step 4: Close door and push
Latch to MICROWAVE~CLEAN.
Step 5: Turn both the Oven Set
and Oven Temp Knobs to BROIL.
Oven “On” Light and Oven Cycling Light come on. Oven Cycling
Light goes off when broiling temperature is reached,
——
——
Step & Set Variable Power Level
on LO (3) and turn Microwave
Timer to 4 minutes. Microwave
“On” Light appears and remains
on while microwaving.
Step 7: When Microwave Timer
signals, slide the Latch to OPEN.
Open the door and turn steak over.
Step & Close the door. Slide the
Latch to MICROWAVE/CLEAN and
set Microwave Timer to 4 minutes,
When Microwave Timer signals, re-
move steak from oven and turn
Oven Set Knob to OFF. Remember
that oven shelves and door will be
hot; so use dry potholders to remove pan.
Questions
andAnswers
(3.
Can I set my oven controls to
automatically turn the broiler off
after microwaving stops?
A. No. CNen controls used in conventional broiling must be man-
ualiy turned off.
Q, f’dust all foods be turned over
d~]ringcombination broiling?
A. Foods such as broiled vegefablss ,are r-rotturned over, Foods
!.~!at
requir~ browning on both
@~das such as steaks and other
,.-----,
..
,L+;fij~\:; f~~q
ruzip~s in your Cookbook wifl
:;;-j~’,j’jy~lJ
,.
r,(->[;;!(!n$j,
t bc t:.!rrlGd o’,~sr, “!-he
the best method of
Q. Are all steaks best cooked by
Combination Broil?
A. No. Meats less than %“ in depth
should be pan broiled on the sur-
face. Thicker cuts should be Com-
bination 13roiled because micro-
waving cooks meat faster than the
broiling unit browns, Conventional
Broil is best for steaks under M“.
Q. DO I need to use a rack when
Combination Broiling?
A, Yes. Just as in conventional
broiiing, a rack is needed to keep
the drippings COOIand away from
the meat being cooked The best
rack to use is packed with your
range. !; yo~idesire to use another
kind of rack, chrome or a glass
rack conditioned for high-intensity
heat is recommended.
27’
Q. Since glass containers are rec-
ommended for Combination
Roasting and many other foods,
should I consider glass containers
for Combination Broiling?
A. No, glass manufacturers do not
recommend these containers for
broiling. However, glass-ceramic
(Pyroceram) may be used with
metal trivet if desired.
Q. Must I always use the metal
rack and pan that came with my
range?
A. Although there are some materials such as (pyroceram) that can
take intense heat, it is suggested
fOr best
chrome rack and porcelain broiler
par! that was packed in your range.
rf%.UltS to id~~ ti?e special
a
Page 28

i.
~~
---
.-
IA!!!(
\
OvenThermostat
The temperature on your new
Combination Range has been accurately set at the factory. How-
ever,
browns too much or too little, you
may make a simple adjustment on
your Oven Temp Knob. To readjust
your thermostat:
@
p
-?
q-.
-..
+--
if your food consistently
Pull the Oven Temp Knob off of
the shaft. Look at the back of
the knob and note the current
setting before making any
a.djusfment.
Loosen both screws on the
back of the knob.
Lift the point~!r and mov~ it one
notch in the desired direclion.
To increase overl ternperaiure,
NOTE: Oven temperatures can be
raisedby20° or loweredby 30°.
Tighten screws.
Return the knob to the range by
matching the flat area of the
knob to the shaft.
Recheck oven ~erformance be-
fore making “an additional
adjustment.
Your Combination Range is vented
through a duct located under the
right rear Calrod(R)unit, Clean the
duct often.
To remove:
@Remove right rear Calrod@ unit.
@ Remove drip pan/ring.
6$Lift out oven vent duct.
To replace:
@ Place the part with opening of
the duct under the round open-
ing in the drip pan. It is imporiaj-ti ttm duci is in fhe correct
position so moisture and vapors
from the oven can be released
during oven use.
NOTE: Never cover the hole in the
oven vent duct
with aluminum foil
or any other material. This pre-
vents the oven vent from working
properly during any cooking cycle.
Clean the area under the reflector
pans often.
cially grease, may catch fire. To
make cleaning easier, the plug-in
surface units are removable.
TERMINALS
I
REC
RING
To clean:
@Wipe around the edges of the ‘-.
surface unit opening in th$$$j~
range top. Clean the area 13elothe unit. Rinse all washed areas L
with a damp cloth or sponge.
Built-up soil, espe-
/
CHROME.PLATED
ORIPPAN/RING
I
SPIDER
I
,,
28
Page 29

Caution: Be sure all controls are
turrled OFF before attempting tO
clean under the cooktop or re-
~@#o~ing the Calrod@units.
“s+@j$$-oremove:
L
Raise the unit coil opposite the
receptacle, Lift about one inch
above the trim ring and pull
away from the receptacle. Caution: Be sure the coils are cool
before removing a Cairod@unit.
After removing the plug-in surface unit, lift ~he drip pan/ring
to clean under the unit.
To replace:
@
Place the drip pan/ring in the
surface unit cavity found on top
of the range. Line up the drip
pan so the unit receptacle can
be seen.
@
inset-t the terminals of the plug-in
unit through the opening in the
pan/ring and into the receptacle.
a
Guide the surface unit into Place
so it fits evenly and fits snugly
into drip pan or trim ring.
Note: If your range has separate
trim rings, the drip pan must be
under the trim ring.
Do noi attempt to clean plug-in
surface units in an automatic
dishwasher.
Do not immerse plug-in surface
units in liquids of any kind.
Do not bend the plug-in surface
unit plug terminals.
Do not attempt to clean, adjust
or in any way’repair the plug-in
receptacle.
Door Surface. When cleaning surfaces of door and oven that come
together on closing the door, use
only mild, non-abrasive soaps or
detergents applied with a sponge
or soft cloth.
ocm-uEl--’-
CXIJTiON: Before replacing your
oven bulb. disconnect the elec-
trical power for your range at the
main fuse or the circuit breaker
panel. Be sure to let the lamp
cover and bulb COOIcompletely
before removing or replacing.
To remove:
@ Unscrew the one bottom screw
on the lamp cover.
@ Lift up lamp cover and remove
bulb.
To replace:
@ Put in a40 watt appliance bulb.
@ Close the lamp cover and re-
screw back into place making
sure cover fits flush with oven
wall.
@ Connect electrical power to the
range.
.Q~~~tions
andAnswers
Q. Can the porcelain enamel finish
bcorne stained?
A. Yes. In order to avoid staining
your range finish, if acid foods are
spilled they should be wiped up
immediately.
fl~ Can I line my broiler pan and
>.,,
l--!$~kwith ~Cjil?
~.~~~
~;
Tes,
?.<--.-.;.
-th Corivenfional Broil and not
I:J~[hCombination i3raii.
but Shol.lld he L!sw.! Qr-!!y
Q. Should I remale the ceramic
glass plate in the bottom of my
oven during the cleaning cycle?
A. Never remove the ceramic
glass plate. it covers the micro-
wave generating device which
controls the amount of microwave
energy released during cooking.
Q. Can ! clean my reflector pans/
rings in the oven?
A. No. They are chrome-plated
and will discolor. You must remove
+hnn) ;~~~~
clean with a mild soap and water
solution.
thg SiJi’f~CE? CZiVitji
2!3
Zti_idi.ttbtl$
Q.
Can I use foil in place of my
broiler pan and rack?
A. No. This may improperly cook
food, damage the oven finish, or
increase the heat on the outside of
the range surface.
Q. Can i line my Oven Vent Duct
with foil or other material to keep
its surface clean?
A. No. This keeps the vent from
properly releasing moisture collecting in your range.
Page 30

STEP ‘$!:Remove all Ce$okware
—
and food as we!! as heavy soii de-
posits from the oven. Clean spat-
ters or spills around the oven door,
rectangular flanges, and gasket.
Then close the door. (Oven shelves
may be left in oven. Note: Shelves
may become gray after several
clean ings.)
STEP 2:“rum oven set K’@
and Oven T’empKmb clockwise to
CLEAN.The control will snap into
final position
sition is reached.
when the CLEAN po-
r
Ii
~~~~ ~: Slide Latch to MICROWAVE/CLEAN then press Clean
Lock Button.
STEP 45set The Automatic
(Men Timer:
Push in knob on Stop (Clean)
Dial and turn to the time you
wish oven to stop cleaning. Add
the number of hours needed for
cleaning to the present time of
day.
Cleaning Indicator Lights come
on when all steps are set
properly.
If you wish to clean at a later
ti~e set Start Dial to that time.
NOTE: A slight odor may be detected especially during the first
few cleanings. Do not be alarmed.
This is normal cluring the self-
cleaning cycie.
When cleaning temperature is
reached, Lock Light cxmes on and
door cannot be unlatched until
--+-=-m
\
‘\
30
Page 31

~“f~,p ~:
oH, push and hoid the Clean Lock
Button while sliding Latch to
Whei? Lock Light goes
&’
STEP6:Turn C$ven%X Knob to
(XT.
Q. Why did the Lock Light come
on when 1 first set the oven for
CLEAN?
A. Lock Light glowing indicates
that oven is too hot. Turn Oven Set
Knob to OFF and open Oven Door
to cool the internal cavity. After a
short period of time, reset controls
for cleaning.
Q. What should ! do if excessive
smoking occurs during cleaning?
A. This is caused by excessive
grease and you should switch the
Oven Set Knob to OFF. Open windows and doors to rid room of
smoke. Allow the oven to cool for
at /east one hour before opening
the door. Wipe up the excess
grease and reset the clean cycle.
Q. is the “crackling” sound I hear
during cleaning normal?
A. Yes. This is the metal heating
and cooling during both the cooking and cleaning functions.
Q. My oven shelves have become
gray after several cleanings. ISthis
normal?
A. Yes. After many cleanings, the
shelves may lose some luster and
discolor to a deep gray color.
Q. My oven shelves do not slide
easily. What isthe matter?
A. After many cleanings, oven
shelves may become so clean they
do not slide easily. If you wish
shelves to slide more easily,
dampen fingertips with a small
amount of cooking oil and rub
lightly over the side of the shelf
where they touch shelf supports.
Q. Why do i have ash left in my
oven after cleaning?
A. Some types of soil will leave a
deposit which is ash. it can be removed with adamp sponge or cloth.
Q. W\7y is there still some black
soil left after cleai7ing?
A. You did not time the oven to
clean long enough. This deposit
will be removed in later cleanings.
Q. If my oven clock is not working
can I still self-clean my oven?
A. No. Your Automa!ic Oven Timer
uses the {ange clock to help start
and stop your self-cleaning cycle.
Q. VVhatcauses the hair-like lines
orI the enameled surface of my
oven?
A. This is a common condition resulting from heating and cooling
during cleaning. They do not affect
how your oven performs.
Q. Can plug-in units be cleaned in
the oven?
A. No. They will be damaged.
Clean on top of the range by heating the coils as shown in the “How
To Care For Your Combination
Range.”
Q. Why won’t my oven clean imm-
ediately even though I have set
ail the time and clean knobs
correctly?
A. Check to be sure your range
clock is set to the correct time of
day. Also check to be sure the
oven Latch is closed securely.
Q. If the inside of my oven door is
soiled will it be cleaned during the
cleaning cycle?
A. Yes. The raised section of the
oven door inside the gasket will be
cleaned. The area outside the
oven gasket must be cleaned by
hand as described in the “Cleaning Chart”.
Q. Can I open the oven door when
the Lock Light is on?
A. No. You must turn all the controls to OFF and allow the oven to
cool. When the Lock Light goes
out, you may open the oven door.
Q. Why would I want to set my Au-
tomatic Oven Timer to start cleaning at a later time of day?
A. Some utility companies offer
cheaper electric rates at times
when electrical consumption is
lowest, Since these rates often occur late at night when you may be
sleeping, you can set your oven
before going to bed so cleaning
times coincide with these lower
rates.
Page 32

Your Combination Range is cleaned two ways: man-
ually and by using the automatic self-cleaning function. This chart describes parts of your range, clean-
ing materials to use on each part, and general
directions for cleaning. Be sure to follow these direc-
tions carefully to assure maximum
NOTE: Let range parts cooi before cleaning
manually.
Bake
Unitand
use of your range.
BroilUnit
>.
.”e Soap and Water
@ Scmp-FiUed “.
Scouring Pad
@ Piastic,S.courirlg
-.
Do not clean the bake unit or broil unit. Any soil will
burn off when the unit is heated.
not hinged and cannot be lifted to clean the oven floor.
If spillover, residue, or ash accumulates around the
bake unit, gently wipe around the unit with warm water.
NOTE:The bake unit is
,.
-- Drain fat, cool pan arid rack siightlj. (Do not ‘let soiled
‘pan ahd rack stand.in oven @ COOI).Sprinkle cm deter-
‘ gent Fill the pan witti
papertowelove’rthe rack;
few minutes. Wash; scour if necessary. Rinse and dry.
OPTION: The broiler .~an and rack ,mayalso be clean=d
in a dishwasher. -
w~~mwater and spreadC1OMor
Le$pan arid rack’stand for a .
Control
Top and Oven
Knobs: Range
OutsideGiassFinish
Metal, including
Chrome Side Trims
and Trim Strips
iris.ide oven Door”:
Mild Soap and Water
- Soap and Water
Soap and Water
@ Paper Towei
@ Dry Cloth
* Soap and Water
Soap and Water’
Pull off knobs. Wash gently but do not soak. Dry and re-
turn controls to range making sure to match flat area on
the knob and shaft.
Wash all glass with cloth dampened in soapy water.
Rinse and polish with a dry cloth. If knobs on the controi panel are removed, cfo”not allow water to run down
inside the surface of glass while cleaning. ~
Wash, rinse, and then polish with a dry cloth. DO NOT
USE steel wool, abrasives, ammonia, acids, or commercial oven cleaners which may damage the finish.
Avbid cleaning
powders or harsh abrasiveswhich may
scratchtheenamel.
Ifacids
pa~er
should spill on the range while it is hot, use a dry
towel or cloth to wipe up right away. When the
surfacehas cooled,washand rinse.
For other spills, such as fat smatterings, etc., wash with
soap and water when coold and then rinse. Polish wdh
a dry cloth.
On this oven, clean ONLY the door liner outside the gasket, The door is automatically cleaned if the oven is in
the self-cleaning cycle. If spiliover or spattering should
occur in cooking function, wipe the door with soap and
water.
DO NOT rub or damage gasket. Avoid gettir~~
soap and water on the gasket or in the rectangular
flanges on the door.
32
Page 33

..,.—,.
;
k,- .)’
[~.
‘s-~
.
Chrome-F7ated
or Chrome Trim
Rings and Pans
)
Rings ~
~
Soap andWater
@
@ Stiff-Bristled Brush
;*
[
~
@ Soap-Filled
.:
Scouring Pad
~
:“
(NorI Metallic)
[’,
j
i
Cool before cleaning. Frequent wiping with mild soap
and water will prolong the time between major cleanings. Be sure to rinse thoroughly. For heavy soiling, use
your self-cleaning cycle often.
Remove the Oven Vent Duct found under the right rear
surface unit.
WaSPIin hot, scmpy water and dry and re-
place, See positioning directions in ‘[How to Care for
Your Combination Range.”
Clean as described below or in the dishwasher. DO
NOT CLEAN ON THE SELF-CLEANING FUNCTION as
pans and rings will discolor.
bVipeail rings after each cooking so unnoticed spatter
will not “burn on” next time you cook. To remove
“burned-on” spatters use any or all cleaning materials
mentioned. Rub lightly with scouring pad to prevent
scratching of the surface.
-...-——— .. -—- .———. . . .. . ..—— .. . . . . . . . . . . . . . .. . . .
I
Cool pan siightly. Sprinkle on detergent and wash or
scour pan with warm water. Rinse and dry. in addition,
pan may also be cleaned in the dishwasher or in the
self-cleaning oven,
Your shelves can be cleaned with the self-cleaning
function in the oven. For heavy soil, clean by hand using
any and all mentioned materia!s. Rinse thoroughly to remove all materials after cleaning.
Spatters and spills burn away when the coils are heated.
At NW end cd a mea!, remove a!i utensiis from the
CZdrodr{unit and heat the soiled units at
burn off
about a minute W@ switch the ~;~nitsto OFF.
Avoid getting cleaning materials cm the coils, Wipe off
any cleaning rnateria!s with a damp paper towel beb-e
heating the Ca!racl” unit.
DCJNO? handle ~heunit before completely cocded,
DO NOT self-clean plug-in units.
DO NOT immerse plug-in units in auy kind of liquid.
Wipe off the ceramic glass plate with a damp rag. Dry
thoroughly. DcJnot use abrasives or commercial over}
cleaners on the plate. NOTE: Never relnove the ceramic.
glass plate from the oven floor.
. ..
i-f{. Let the soil
1..< .-
0
,
,-
.-J n
d ,.1
Page 34

obtain service,see yourwarranty
the back pageofthis book.
We’reproud of our service and
want youto be pleased. If for some
reasonyou are not happy with the
serviceyou receive,here arethree
stepsto follow for further help.
FIRST,contact the peoplewho
serviced your appliance. Explain
whyyouare notpleased. In most
cases,this will solve the
NEXT
if you are still not pleased,
problem.
write a!]the details—including your
phone number-to:
Manager,Consumer Relations
General Electric
Appliance Park
Louisville, Kentucky4(?225
FINALLY,if your problem is stili not
resoived,write:
MajorAppiiance
Consumer Action Panei
20 North Wacker Drive
Chicago, iiiinois 60606
Ewa--
IiwLQ?.
Page 35

, $~f~~~ ~~ ~~~~~~~
r
FULL.ONE=YEARWARRANTY This warrantyis extendedto the
Foroneyearfromdate of original
purchase,wewill provide,freeof
charge,parts andservicelaborin
yourhometo repairor replace
part d the mkmvave cwew’range
that fails becauseof a marwfacturing defect.
LIMITEDADDITIONAL
FOUR=YEARWARRANW
Forthe secondthroughfifth year
fromdateof original purchase,
we will provide,freeof charge,a
replacement
magnetrontubefails becauseof a
manufacturingdefect.Youpayfor
theservicetrip to yourhomeand
serviceiaborcharges.
magnetron tube if the
any
original purchaser andanysucceed- i~:,, ..
ing-ownerfor productspurchased
for ordinaryhomeusein the48
mainlandstates,Hawaiiand
Washington,D.C.InAlaskathe
warrantyis the sameexceptthat it
is LIMITEDbecauseyoutiust pay
to ship the productto theservice
shopor for the service technician’s
travelCONSto yourhome.
AHwarrantyservicewill beprovided
byour FactoryServiceCentersor
byourauthorizedCustomerCare@
servicersduring normalworking
hours.
LookintheWhite or YellowPages
of yourtelephonedirectoryfor
GENERALELECTRICCOMPANY,
GENERALELECTRICFACTORY
SERVICE,GENERALELECTFllC-
I-K3TPOINTFACTORYSERVICEor
GENERALELECTRICCUSTOMER
CARE@SERVICE.
$MiSi%Ez’
$j&+&&==7
*V—~
I
I:<.
i
g--:-
~~.~~ !~ ~~~ ~~~~~~~ ~Servicetrips to yourhometo
teachyouhowto usethe product.
Readycmr (J562and Care
youthenhaveanyquestions
if
aboutoperatingthe product,
pleasecontactyourdealerorour
ConsumerAffairs office at the
addressbelow,or call, toll free:
TheGEAnswerCenter”
800.626.2000
consumerinformationservice
~Improperinstallation.
Ifyou havean installationproblem,
contactyourdealeror installer.
Youareresponsiblefor providing
adequateelectrical,exhausting
andotherconnectingfacilities.
Some states do not allow the exclusionor limitation of incidentalor consequentialdamages,so theabovelimitationor exclusion
may not apply to you. This warranty gives you specific legal rights, and you may also have other rights which vary from state to state.
To know what your legal rights are in your state, consult your local or state consumer affairs office or your state’s Attorney General.
Whm3mtw: General Hectric (kmnparty
H further help is needed txmxming this warranty, ccmtact:
Manager–COnsumer Affairs, G&nerd Ek9ctrk (Xmpany, Appliance F%Mk,Lwisville, KY’M1225
materiaL
~Replacementof housefuses
or resettingof circuit breakers.
eFailureof the productif it is
usedfor otherthanits intended
purposeor usedcommercially.
~Damageto productcaused
by accident,fire,floods or acts
of God.
WARRANTOR1S
SIBLEFORCONSEQUENTIAL
DAMAGES.
NOT RESPON-
.Jx–a
i?=
,-s-
,:=
12=9-
ig. --
!&m
,==-_
j?
Ir–
l>=.
~L~
1:=
~+=:
.—.
,t_—_
ja>E
B&
~&i
Irx
!gz
Ir—--
~>+-;
—-.. :: ___
————.
;’“i-’;;’-ikx/362/4725PI35
‘;;;’ XX;;. 4$4528
..... ....= —.-— -
—.
11-95
GENEBAL@ELEcTRic
-.
.
..
 Loading...