

GE JBS55SM3SS Owner’s Manual
ge.com
Safety Instructions ......... 2-6
ep=m
Operating Instrudions
Clock and Timer .............. 14
Oven ..................... 10-17
Power Outage ............... 11
Sabbath Feature ............. 16
Special Features ............. 15
Thermostat ................. 17
Surface Units ............... 7-9
Care and Cleaning
Control Fmobs ............... 18
(;lass Cooktop ............ 22, 23
i,ift-Off Oven Door ........... 20
Light ........................ 21
Oven Interior ................ 19
Shelves ...................... 21
Storage Drawer Removal ...... 21
Troubleshooting Tips ..... 24-26
Accessories .................. 27
Consumer Support
Consumer Support ..... Back Cov_r
Product Registration ......... 29, 30
Warranty .................... 31
/gs55
Write the model and serial
numbers here:
Model #
Serial #
You can find them on a label
behind the storage drawer on
the flont of the range flame.
49-80541 04-08 JR
IMPORTANTSAFETYINFORMATION.
READALLINSTRUCTIONSBEFOREUSING.
WARNING!
For your safety, the information in this manual must be followed to minimize the risk of fire,
electric shock, or to prevent property damage, personal injury, or loss of life.
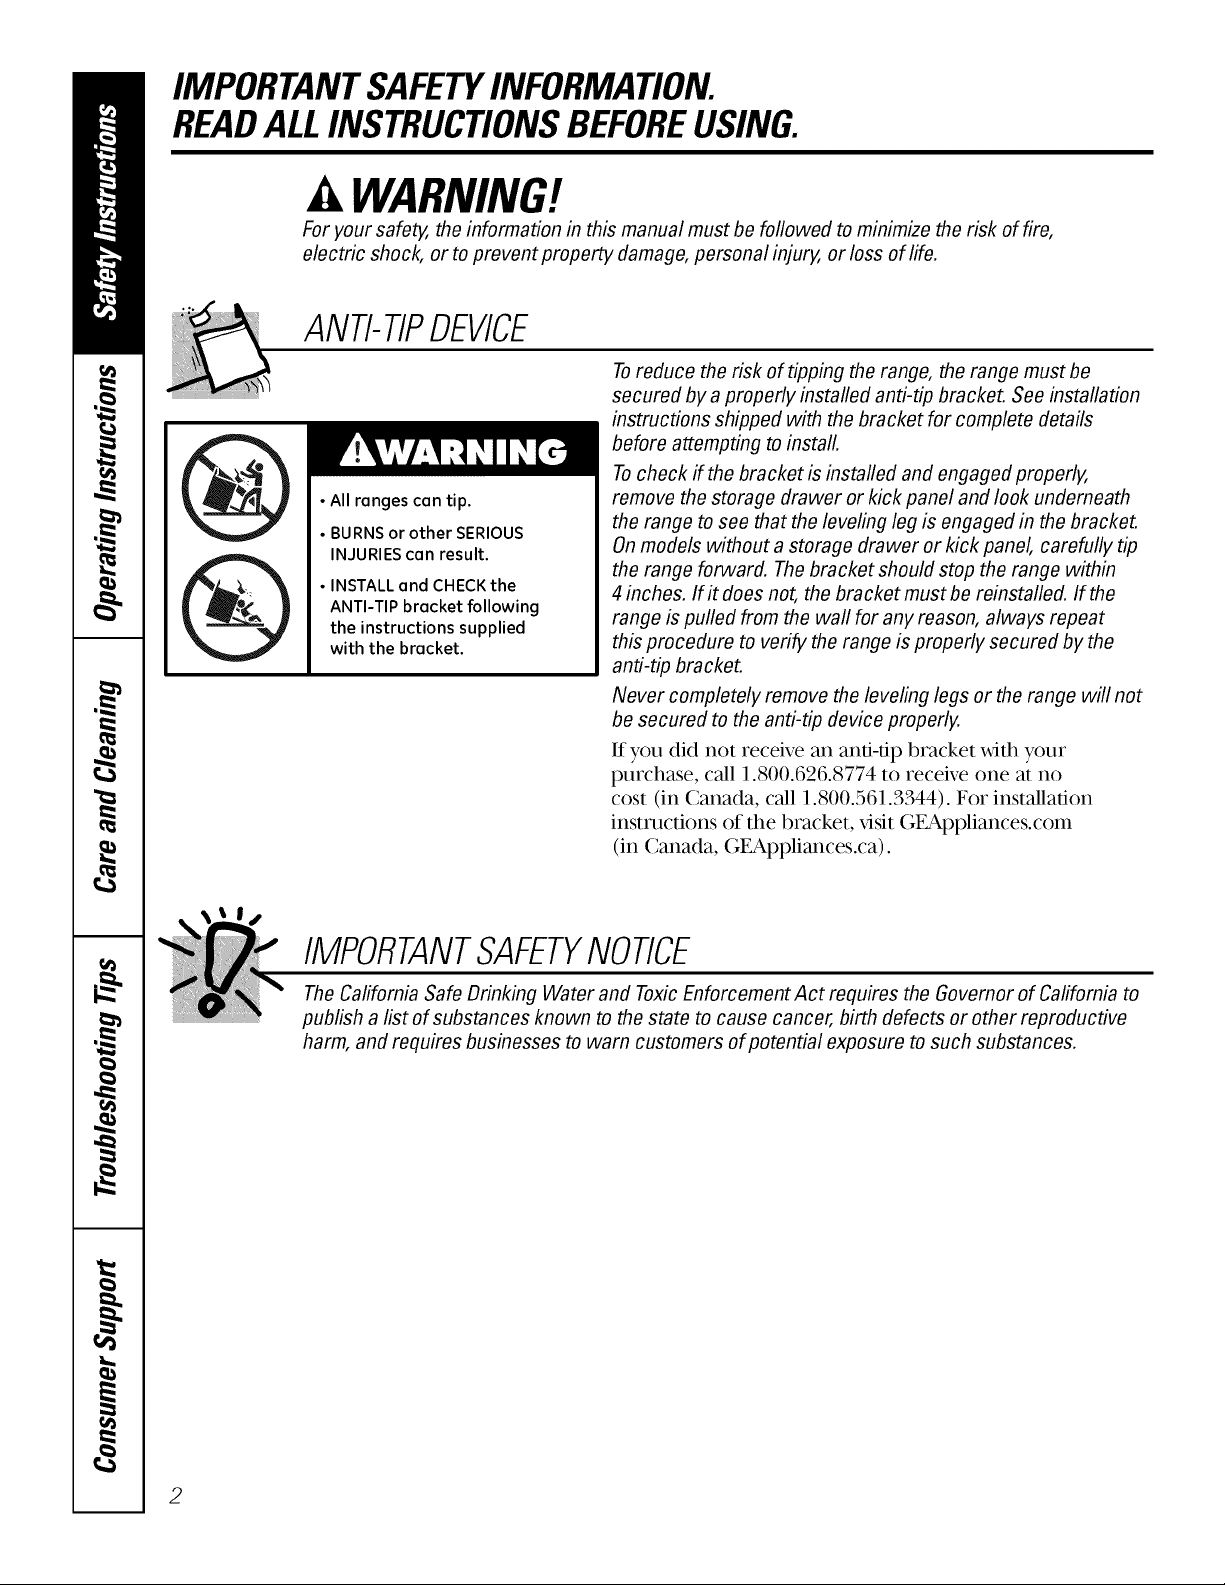
ANti-TIPDEVICE
Toreduce the risk of tipping the range, the range must be
secured by a properly installed anti-tip bracket. See installation
instructions shipped with the bracket for complete details
before attempting to install.
Tocheck if the bracket is installed and engaged properly,
• All ranges can tip.
• BURNS or other SERIOUS
INJURIES can result.
• INSTALL and CHECK the
ANTI-TIP bracket following
the instructions supplied
with the bracket.
remove the storage drawer or kick panel and look underneath
the range to see that the leveling leg is engaged in the bracket.
Onmodels without a storage drawer or kick panel, carefully tip
the range forward. The bracket should stop the range within
4 inches. Ifitdoes not, the bracketmustbe reinstalled. If the
range is pulled from the wall for any reason, always repeat
this procedure to verify the range is properly secured by the
anti-tip bracket.
Never completely remove the leveling legs or the range will not
be secured to the anti-tip device properly.
It you did not receive an anti-tip bracket with your
purchase, call 1.800.626.8774 to receive one at no
cost (in Canada, call 1.800.561.3344). For installation
insunctions of the bracket, x,isit (;EAppliances.com
(in Canada, GEAppliances.ca).
IMPORTANTSAFETYNOtiCE
TheCalifornia Safe Drinking Water and ToxicEnforcement Act requires the Governor of California to
publish a list of substances known to the state to cause cancer, birth defects or other reproductive
harm, and requires businesses to warn customers of potential exposure to such substances.
2
ge.com
SAFETYPRECAUTIONS
When using electrical appliances, basic safety precautions should be followed, including the following:
Use this appliance only for its intended
propose as descnbed in flus Owner's
Manual.
Be sure your appliance is properly
installed and _ounded by a qualified
installer in accordance xdth the prox,ided
installation instructions.
Have the installer show you the location
of the circuit breaker or fuse. Mark it fk)r
easy reference.
Do not attempt to repair or replace any
part of your range unless it is specifically
recommended in this manual. All other
serx,icing should be referred to a qualified
technician.
Before perfk)rming any ser\,ice, disconnect
the range power supply at the household
distribution panel by remox,ing the fuse or
switching off the circuit breaker-
Do not leave children alone---children
should not be left alone or unattended in
an area where an appliance is in use. They
should never be 'allowed to sit or stand on
any part of the appliance.
Do not allow anyone to climb, stand or
hang on the door, storage drawer or
cookmp. They could damage the range
and even tip it over, causing severe
persorral in,ju U.
it WARNING'!
SAFETYPRECAUTIONS
Do not operate the oven or cooktop controls if the glass is broken. Food splatter or cleaning solution
may penetrate a broken control panel and create a risk of electrical shock. Contact a qualified
technician immediately should your glass control panel become broken.
Do not store flammable materials in Do not use water on grease fires. Never
an oven or near the cooktop.
CAUTION: temsofi.terestto
children should not be stored in cabinets
above a range or on the backsplash of a
range--children climbing on the range
to reach items could be seriously injured.
Never wear loose-fitting or han_ng
garments while using the appliance.
Be careful when reaching fk_r items stored
over the range. Flammable material could
be ignited if brought in contact with hot
surface units or heating elements and may
cause severe burns.
Use only d U pot holders--moist or damp
pot holders on hot surfaces may result in
burns fiom steam. Do not let pot holders
touch hot surface units or heating
elements. Do not use a towel or other
bulky cloth in place of pot holders.
pick up a flaming pan. Turn the controls
ore Smother a flaming pro1 on a surface
unit by covering the pro1 complewly with
a welMitting lid, cookie sheet or fiat tray.
Use a multi-purpose d U chemical or
fkmm-type fire extinguisher.
Flaming _ease outside a pan can be put
out by coveting it with baking soda or;
if available, by using a multi-purpose dU
chemical or foam-type fire extinguisher.
Flame in the oven can be smothered
completely by closing the oven door and
turning the oven off or by using a multi-
propose dU chemical or fk)am-type fire
extinguisher
3
IMPORTANTSAFETYINFORMATION.
READALLINSTRUCTIONSBEFOREUSING.
WARNING!
SAFETYPRECAUTIONS
For your safety, never use your appliance
for wamnng or heating the room.
Do not let cooking grease or other
flammable materials accumulate in or
near the range.
Do not touch the surface units, the
headng elements or the interior surface
of the oven. These surfaces may be hot
enough m bum even though they are
dark in color. During and after use, do not
touch, or let clothing or other flammable
materials contact the surface units, areas
nearby the surface units or any interior
area of the oven; allow sufficient time fk)r
cooling first.
Potentially hot surfaces include the
cooktop, areas facing the cooktop, oven
vent opening, surfaces near the opening,
crex,ices around the oven door:
REMEMBER:The inside surface of the oven
may be hot when the door is opened.
Do not store or use combustible materials,
gasoline or other flammable vapors and
liquids in the x,icinity of this or any other
appliance.
Keep the hood and grease filters clean
to maintain good venting and to avoid
_ease fires.
Teach children not to play xdth the
controls or any other part of the range.
Always keep dish towels, dishcloths, pot
holders and other linens a s'ate distance
flom your range.
Always keep wooden and plastic utensils
and canned food a safe distance flom
your range.
Always keep combustible wall coverings,
curtains or drapes a s_e distance from
your range.
COOKMEATANDPOULTRYTHOROUGHLY...
Cookmeat andpoultry thoroughly--meat toat least an INTERNALtemperatureof 160°Fandpoultry to at least
an INTERNALtemperatureof 180°ECookingto thesetemperaturesusuallypmtects against foodbomeillness.
RADIANTSURFACEUNITS
Use proper pan size--select cookware having flat bottoms large enough to cover the surface unit
heating element. The use of undersized cookware will expose a portion of the surface unit to direct
contact and may result in ignition of clothing. Proper relationship of cookware to surface unit will
also improve efficiency.
Never leave the surface units unattended
at high heat settings. Boilovers cause
smoking and greasy spillovers that may
catch on fire.
Only certain types of glass, glass/ceramic,
earthenware or other glazed containers
are suitable fk)rcooktop serx,ice; others
may break because of the sudden change
in temperature.
iiiiiiiiiiiii!
To minimize the possibility of burns,
i_dfion of flammable mamfials and
spillage, the handle of a container
should be turned reward the center of
the range without exmnding over nearby
surface units.
ii!!_i!Alwaysturn the surface units offbefore
removing cookware.
ii!!_i!Whenprepafingflaming fk)ods under
the hood, turn the fan on.
4
RADIANTSURFACEUNITS
ge.com
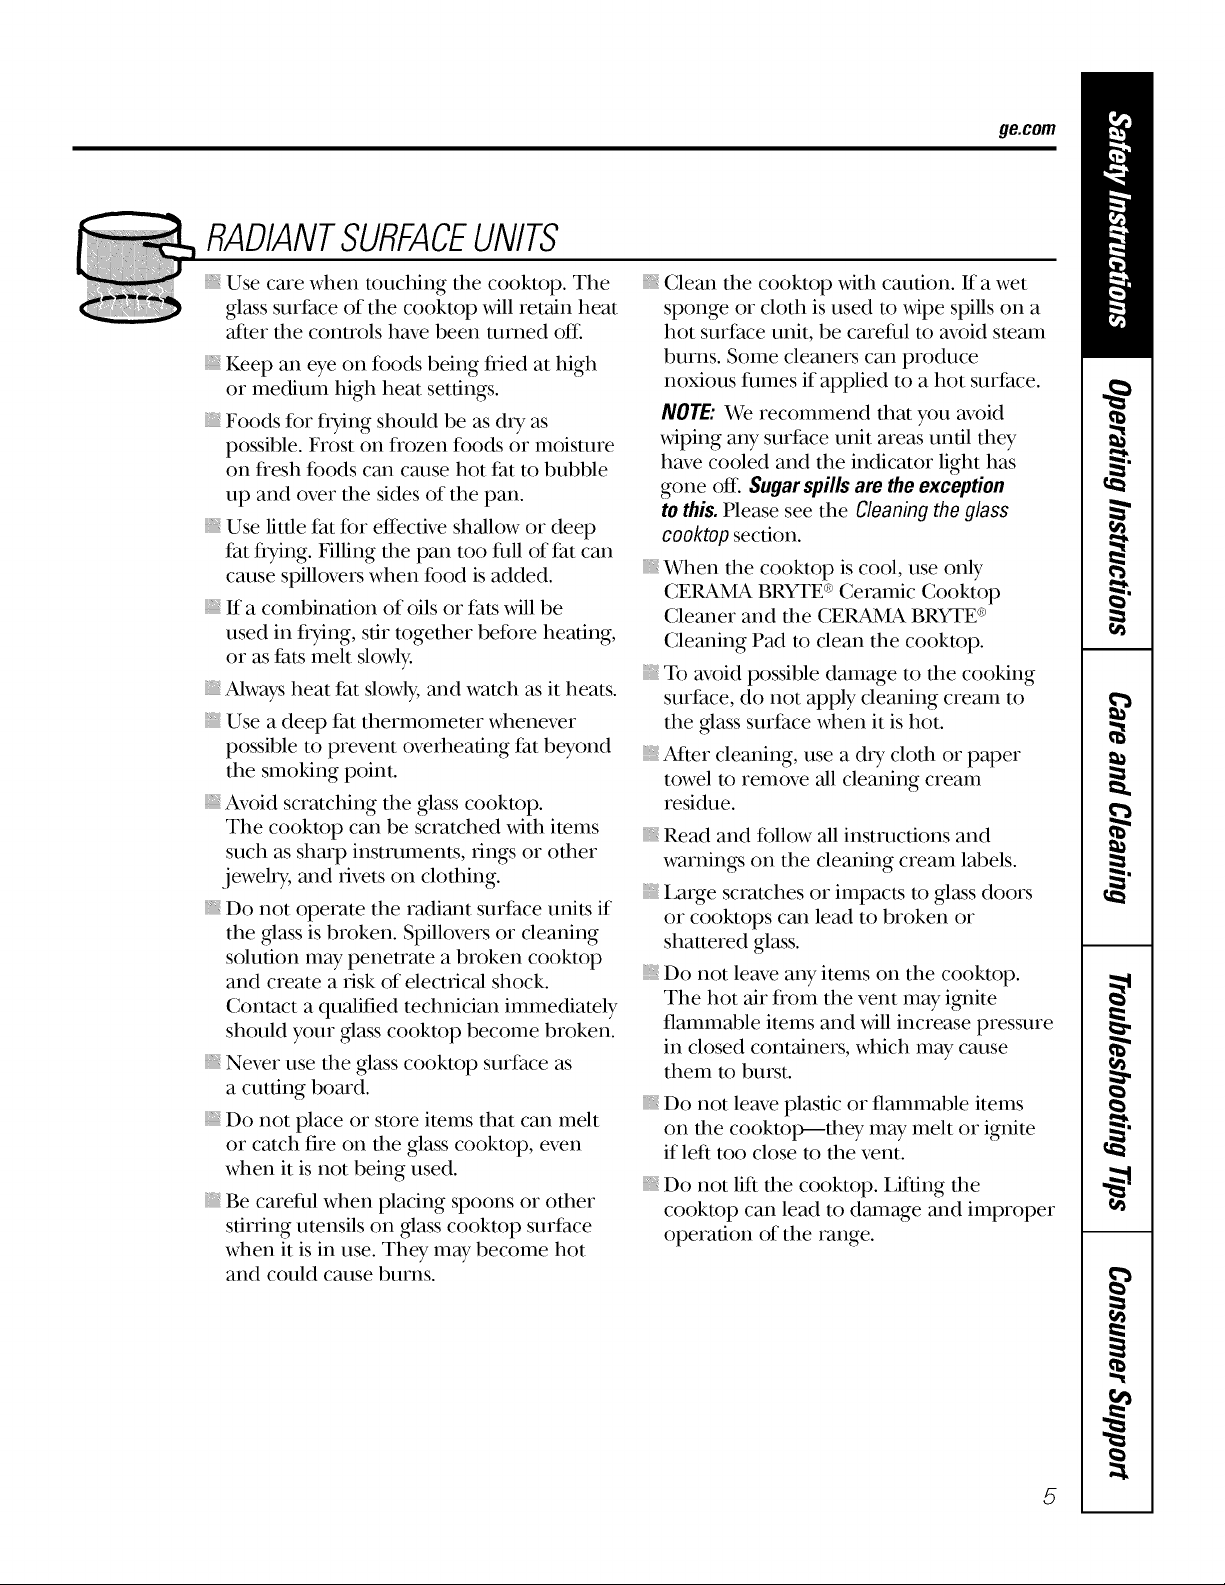
Use care when touching the cooktop. The
glass surface of the cooktop will retain heat
•after the controls have been turned oft
Keep an eye on foods being flied at high
or medium high heat settings.
Foods for flTing should be as dU as
possible. Frost on frozen foods or moisture
on flesh foods can cause hot fat to bubble
up and over the sides of the pan.
Use little fat for effective shallow or deep
fat flTing. Filling the pan too full of fat can
cause spillovers when food is added.
If a combination of oils or fats will be
used in flTing, stir together before heating,
or as fats melt slowly.
Always heat fat slowly, and watch as it heats.
Use a deep fat thermometer whenever
possible to prevent overheating fat beyond
the smoking point.
Avoid scratching the glass cooktop.
The cooktop can be scratched with items
such as sharp instruments, rings or other
jeweh T, and rivets on clothing.
Do not operate the radiant surface units if
the glass is broken. Spillovers or cleaning
solution may penetrate a broken cooktop
and create a risk of electrical shock.
Contact a qualified technician immediately
should your glass cooktop become broken.
Never use the glass cooktop surface as
a cutting board.
Do not place or store items that can melt
or catch fire on the glass cooktop, even
when it is not being used.
Be careful when placing spoons or other
stirring utensils on glass cooktop surface
when it is in use. They may become hot
and could cause burns.
Clean the cooktop with caution. If a wet
sponge or cloth is used to wipe spills on a
hot surface unit, be careful to avoid smam
burns. Some cleaners can produce
noxious fumes if applied to a hot surface.
NOTE: We recommend that you avoid
wiping any surface unit areas until they
have cooled and the indicator light has
gone ott. Sugarspills are the exception
to this. Please see the Cleaning the glass
cooktop section.
When the cooktop is cool, use only
CERAMA BRYTE ®Ceramic Cooktop
Cleaner and the CERAMA BRYTE _>
Cleaning Pad m clean the cookmp.
To avoid possible damage to the cooking
surface, do not apply cleaning cream to
the glass surface when it is hot.
After cleaning, use a d U cloth or paper
towel m remove 'all cleaning cream
residue.
Read and follow all instructions and
warnings on the cleaning cream labels.
i,arge scratches or impacts m glass doors
or cooktops can lead to broken or
shattered glass.
Do not leave any items on the cooktop.
The hot air flom the vent may i_fite
flammable imms and will increase pressure
in closed containers, which may cause
them to burst.
Do not leave plastic or flammable items
on the cooktoD---they may melt or ignim
if left too close to the vent.
Do not lift the cooktop. Lifting the
cooktop can lead to damage and improper
operation of the range.
5
IMPORTANTSAFETYINFORMATION.
READALLINSTRUCTIONSBEFOREUSING.
WARNING!
OVEN
Stand away from the range when opening the oven door. Hot air or steam which escapes can cause
bums to hands, face and/or eyes.
Do not heat unopened food containers.
Pressure could build up and the container
could burst, causing an in,ju U.
Keep the oven vent unobstructed.
Keep the oven flee from _ease buildup.
Place the oven shelf in the desired position
while the oven is cool. If shelves must be
handled when hot, do not let pot holder
contact the heating elements.
When using cooking or roasting bags in
the oven, fk)llow the manuf`acmrer's
directions.
Pulling out the shelf to the stop-lock is a
convenience in lifting heax T f_)ods. It is also
a precaution against burns from touching
hot surfaces of the door or oven walls.
Do not use the oven to d_T newspapers.
If overheated, they can catch on fire.
Do not use the oven for a storage area.
Items stored in an oven can ignite.
Do not leave paper products, cooking
utensils or fk)od in the oven when not
ill use.
Do not use aluminum foil to line
oven bottoms. Improper installation
of aluminum foil may result in a risk
of electric shock or fire.
READANDFOLLOWTHISSAFETYINFORMATIONCAREFULLY.
SAVETHESEINSTRUCTIONS
6
Usingthe surface units, gecom
Throughout this manual, features and appearance may vary from your model
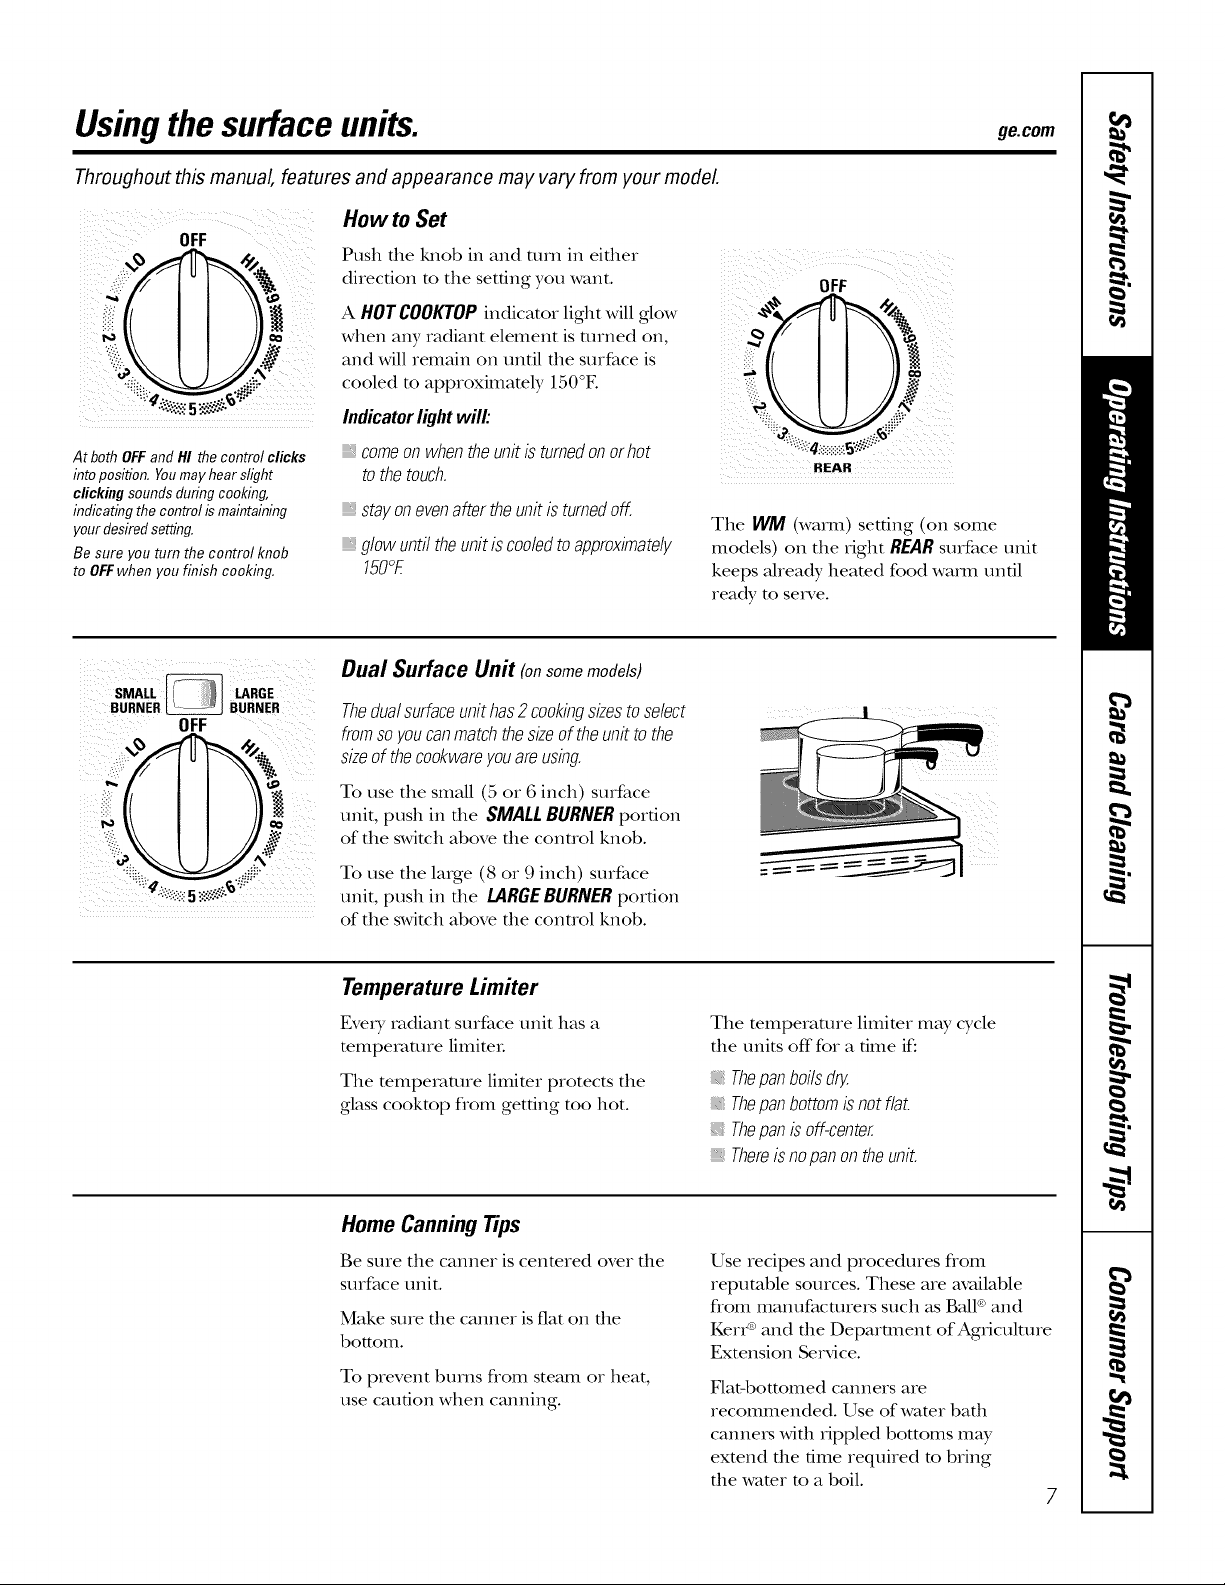
How to Set
Push tile lmob in and turn in either
direction to tile setting you want. OFF
A HOTCOOIffOPindicator light will glow 4
and will remain on until tile surface is _ gg
cooled to approximately 150°E _:_:
Indicatorlightwill: '_
At both OFFandHI the control clicks
into position. Youmay hear slight
clicking soundsduring cooking
indicating the control ismaintaining
yourdesiredsetting.
Be sure you turn the control knob
to OFFwhen you finish cooking.
SMALL LARGE
BURNER_ BURNER
OFF
comeonwhentheunitis turnedonorhot
tothetouch. BEAR
_,stayonevenaftertheunitis turnedoff
glowuntil theunitiscooledtoapproximately
150°E
Tile WM (waml) setting (on some
models) on tile right REAR surface unit
keeps Mready heated food waml until
ready to seI_'e.
Dual Surface Unit (onsomemodels)
Thedualsurfaceunithas2cookingsizestoselect
fromsoyoucanmatchthesizeoftheunittothe
sizeof theco&wareyouareusing.
To use tile small (5 or 6 illch) surface
unit, push in tile SMALLBURNERportion
of tile switch above tile control knob.
To use tile laIge (8 or 9 inch) surface
unit, push in tile LARGEBURNERportion
of tile switch above tile control knob.
Temperature Limiter
EveD, radiant surface unit has a
mmpemture limiteL
Tile mmpemture limimr protects tile
glass cookmp fiom getting mo hot.
Tile mmperamre limimr may cycle
file units off for a time if."
Thepanboilsd_
Thepanbottomisnotflat.
Thepanisoff-center.
Thereis nopanontheunit.
Home Canning Tips
Be sure tile canner is centered over tile
surface unit.
Make sure tile canner is fiat on tile
bottom.
To prevent burns flom steam or heat,
use caution when canning.
Use recipes and procedures flom
reputable sources. These are available
flom manufacturers such as Bald and
Ken ¢ and tile Deparmlent of Agriculture
Extension Se_Mce.
Flat-bottomed canners are
recommended. Use of water badl
cannei_ with rippled bottoms m W
extend the time required m bring
the wamr m a boil.

Usingthe surface units.
Throughout this manual, features and appearance may vary from your model
Wok Cooking
Werecommendthatyouuseonlyaflat-bottomed
wok.Theyareavailableat yourlocalretailstore.
Do not use woks dlat have support rings.
Use only flat-bottomed woks.
The following information will help you choose cookware which will give good performance on glass cooktops.
About the radiant surface units...
The radiant cooktop feam,es heating
co&topNOTE.",,,,itsbeneathAisslightusedodorfora smood,theisnormalfirsttime.glasswhenItsu,face,isacausednew by
Never cook directly on the glass,
Always use cookware,
NOTE:Onmodelswithlight-coloredglass
co&tops,it isnormalforthecookingzonesto
changecolorwhenhotorcodingdown.Thisis
temporaryandwill disappearas theglasscools
toroomtemperature.
The surface unit will cycle on and off"to
maintain your selecmd conuol setting.
Always place the pan in the center of
the surface unit you are cooking on.
It is safe m place hot cookwme on the
glass surface even when the cooktop
is cool.
Even after the surface units are tinned
off, the glass cooktop retains enough
heat m continue cooking. To avoid
overcooking, remove pans flom the
surface units when the food is cooked.
Avoid placing anything on the surface
unit until it has cooled completely.
Do not use found bottom woks.
You could be seriously burned if the
wok dpped oveL
Do not slide cookware across the
cooktop because it can scratch the
glass--the glass is scratch-resistant,
not scratchproof.
Waterstains(mineraldeposits)areremovable
usingthecleaningcreamorfull-strengthwhite
vinegar
Useof windowcleanermayleavean
iridescentfilmontheco&top.Thecleaning
creamwillremovethisdiscoloration.
Don'tstoreheavyitemsabovetheco&top.
If theydropontotheco&top,theycancause
damage.
Donotusethesurfaceas acuttingboard.
8
Selectingtypesofcookware, ge.oom
Checkpans for flat bottoms by
using a straight edge,
Pans with rounded, curved, ridged
or warped bottoms are not
recommended.
Stainless Steel'.
recommended
Aluminum:
heavyweightrecommended
Good conduc6vit T. Aluminum residues
sometimes appear as sc_v_tcheson tile
cooktop, but can be iemoved if cleaned
immediamly. Because of its low melting
point, thin weight aluminum should not
be used.
CopperBottom:
recommended
Goppei may leave Iesidues which can
appea_ as sc_atches. Tile _esidues can be
removed, as long as tile cookmp is
cleaned immediately. HoweveL do not let
these pots boil dD,. Ove_beamd metal can
bond m _ass cookmps. An ove_beated
copper bottom pot will leave a residue
that will pemlanently stain the cooktop
if not iemoved immediamly.
PorcelainEnamel-CoveredCastIron:
recommended
As long as file cookwme is covered
completely wifll poicelain enamel, dds
cookwaIe is iecommended. Gaufion is
_ecommended fo_ cast iron cookwme
that is not complemly coveied with
smooth porcelain enamel, since it mW
sc_v_tchthe glass ce_amic cooktop.
Glass-Ceramic:
usable,butnotrecommended
Poor peifoimance. May scIatch file
suIface.
Stoneware:
usable,butnotrecommended
Poor pexfoimance. May scxatch file
suIface.
9
Usingthe ovencontrols.
Throughout this manual, features and appearance may vary from your model.
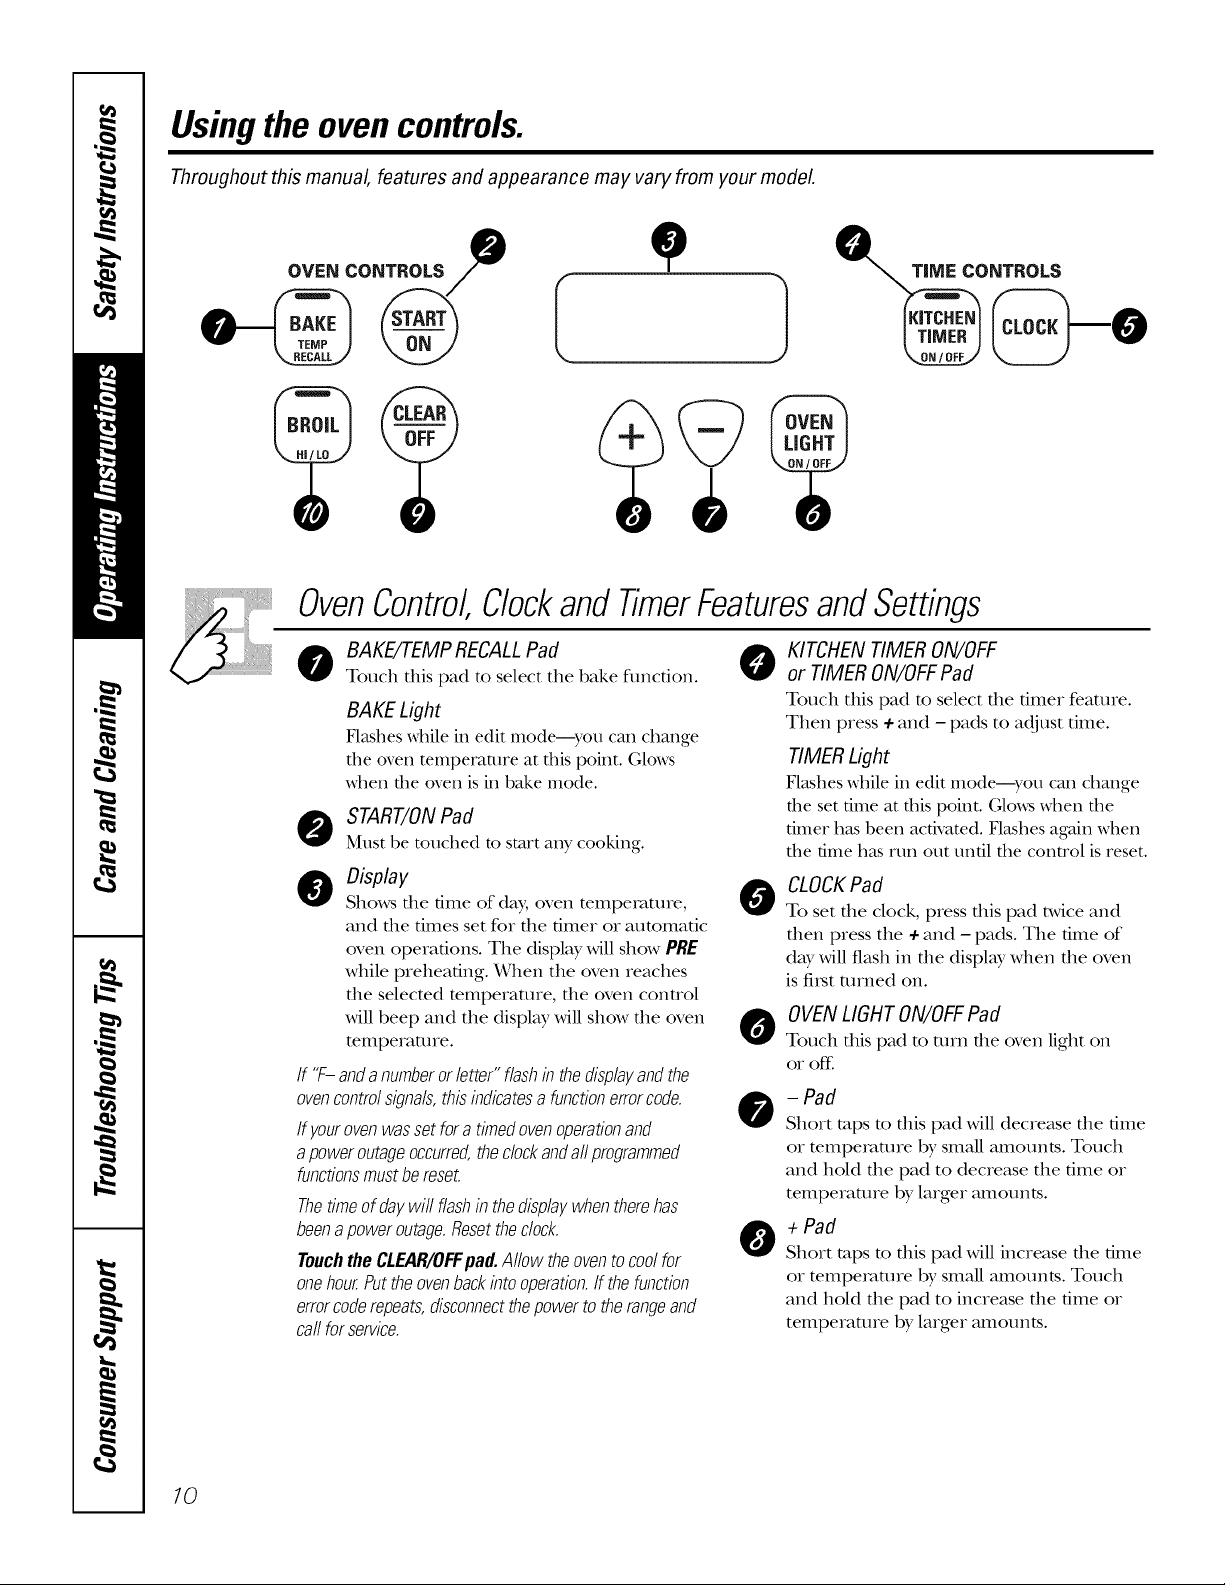
OVEN CONTROLS
0
OvenControl ClockandTimerFeaturesandSettings
o AKE/TEMP RECALLPad O
Touch this pad to select the bake fimcfion.
BAKE Light
Flashes while in edit mode---you caI1 change
the oven temperature at this point. Glows
when the oven is in bake mode.
O START/ON Pad
Must be touched to st,artany cooking.
0 Display
Shows file time of day, oven temperature,
and the times set for the timer or automatic
oven operations. The displ W will show PRE
while preheating. _4qlen the oven reaches
file selected temperature, file oven control
Mll beep and the display Mll show file oven
temperature.
If "F-andanumberorletter"flashinthedisplayandthe
ovencontrolsignals,thisindicatesa functionerrorcode.
If yourovenwassetfora timedovenoperationand
apoweroutageoccurred,theclockandaftprogrammed
functionsmustbereset.
Thetimeofdaywit flashin thedisplaywhentherehas
beenapoweroutage.Resettheclock.
TouchtheCLEAR/OFFpad.Allowtheoventocoolfor
onehour.Puttheovenbackintooperation.Ifthefunction
errorcoderepeats,disconnectthepowertotherangeand
ca//forservice.
KITCHEN TIMER ON/OFF
or TIMER ON/OFFPad
Touch this pad to select the timer feature.
Then press + and - pads to adjust time.
TIMER Light
Flashes _dfile in edit IIlo(lei-},'O/l can change
tile set time at this point. (;lo,_s when the
timer has been activated. Flashes again xd_en
the time has rtm out until the control is reset.
CLOCKPad
0
To set die clock, press dds pad twice and
fllen press the 4-and - pads. The time of
day will flash in die display when file oven
is first turned on.
O OVENLIGHT ON/OFFPad
Touch this pad to mrn the oven light on
Of off.
- Pod
Short raps to this pad will decrease the time
or mmpemmre by smaU amounts. Touch
and hold the pad to decrease the time or
temperature by larger amounts.
O +POd
Short taps to this pad will increase the time
or mmpemmre by smaU amounts. Touch
and hold the pad to increase the time or
temperature by larger amounts.
10
 Loading...