

Page 1
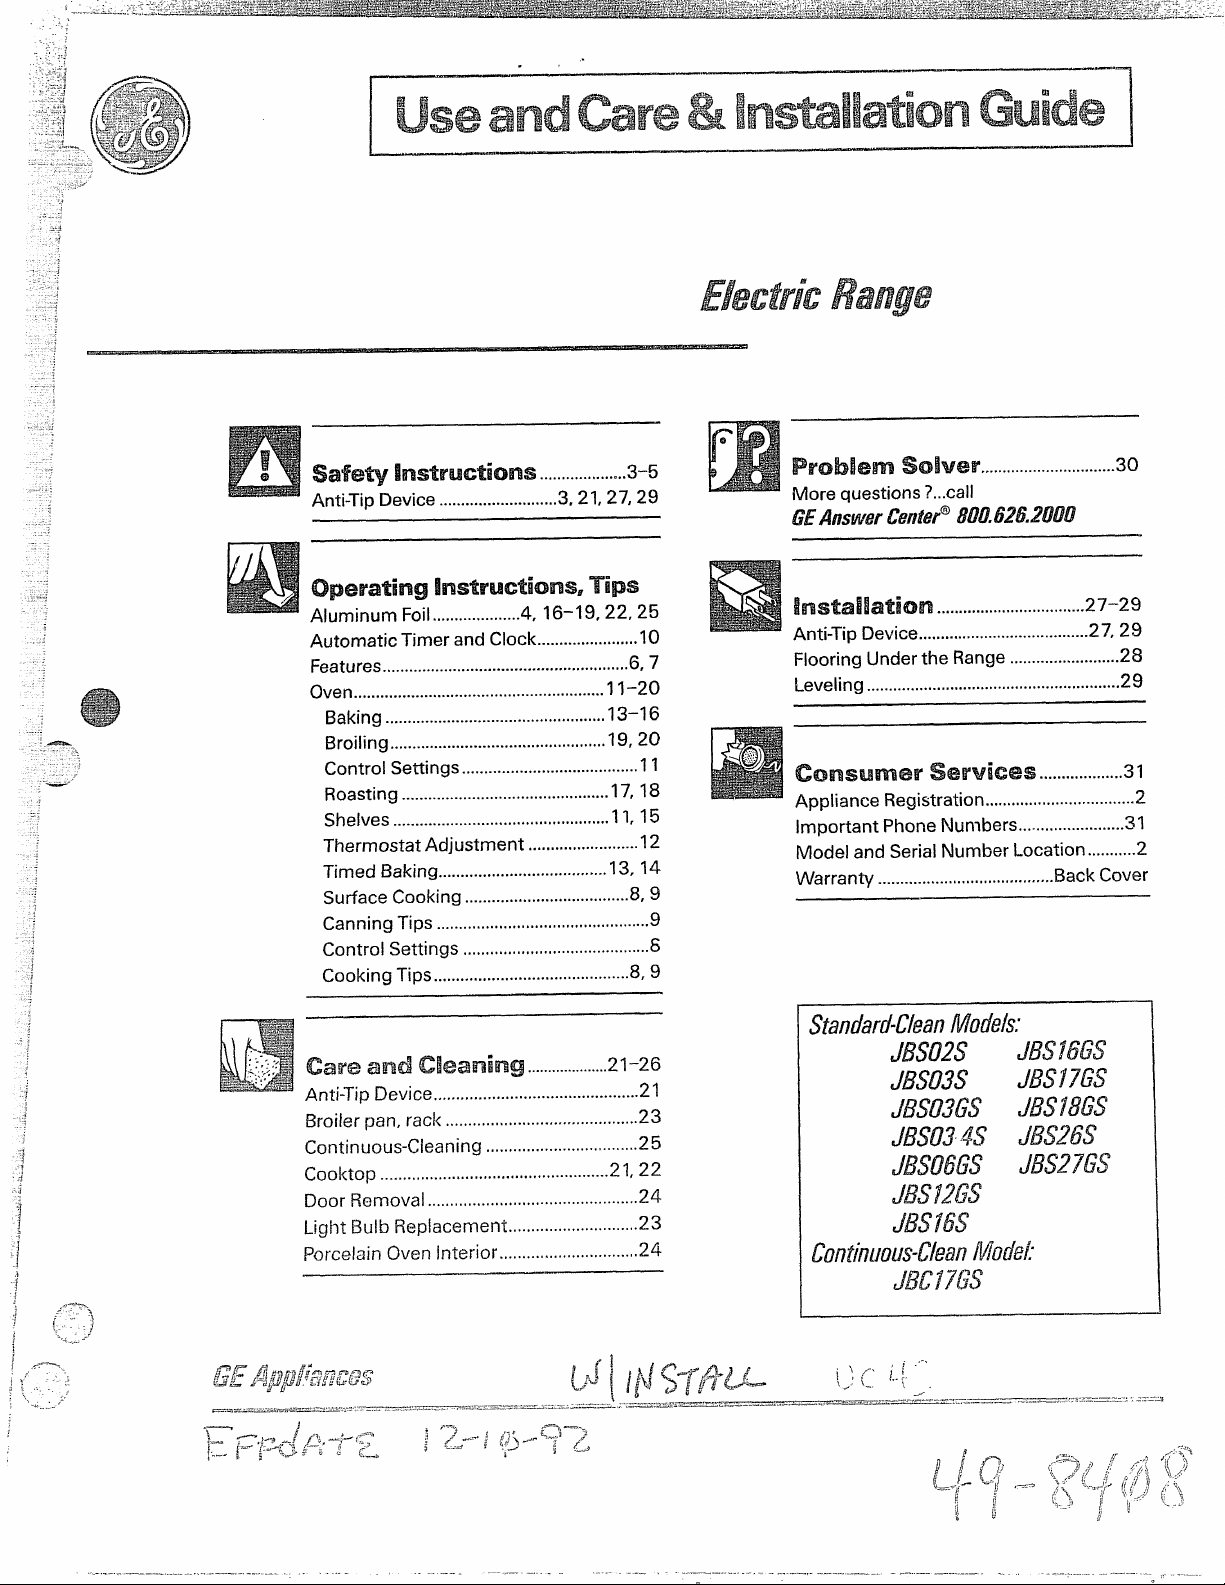
safe~ Instruetioms ... .... .... ..... ....3-5
—..
—-—
~), - ---
Anti-Tip Device
... ................. ..... ..
3,21,27,29
problem sQBver ... .... .... .... .... ..... .... ...3o
More questions?...call
GEAnswercenter@800.626.2000
op~~~ti~~!~st~uctio~s, mp~
Aluminum Foil
Automatic Timer and Clock... .... .... ..... .... ...l O
Features
... ..... ..... ..... .... .... ...... ..... .... ...... ..........
Oven
Baking
Broiling
ControlSettings
Roasting
Shelves
Thermostat Adjustment ... ...... .... ..... .......12
Timed Baking.......... ...... ...... ..... ..... ......l3t 14
SurfaceCooking..... ..... ...... ..... ..... ..... ......87~
CanningTips
Control Settings
Cooking Tips.............. ...... ...... ........... ....-..8r9
~~~e ~n~ ~~~~m~~~ ....................21-26
Anti-TipDevice....... ....... ....... ...... ..... ..... .......".2l
Broiierpan, rack...... ....... ...... ....... ...... ...... ....”23
Continuous-Cleaning .,...,............... ...... .......25
Cooktop..... ....o.... ..... ....... ...... ....... ...... ......2~~22
Door Removal
LightBulbReplacement.,,...,... .... ....... ........23
PorcelainOveninterior....... ....... ....024... .......24
., ..... .... ..... ....4. 16-19,22,25
... ..... .... ..... ..... .... ..... ...... ..... .... ..... .....
11-20
... ..... .................................... ..... .
.... ..... ..... .... ..... ...... .... ...... .... ..... .
... ...... ..... ...... .... ..... .... .......11
.... ..... .... ..... ...... ..... ..... ...... .... ...
... ..... ..... .... ...... ..... ...... ..... .... ..... .
.... .... ....... ..... ...... ..... ..... ..... .... ...
.... ...... ...... ..... ..... ...... ..........
.... ...... ....... ...... ....... ...... ..... ..... .
13-16
19,20
17, 18
11,15
6,7
24
Instaiiatien ..................................27-29
Anti-TipDe)'ice........... .................... ..... ...27.2$
FlooringUnderthe Range............... ..... .....28
Leveling
consumer services .. ..... ...... .... ..3l
ApplianceRegistration................ ...... .... ..... ...2
Important PhoneNun~bers...... .... ...... ..... ...3l
Model andSerial Number Location..... ......2
warranty ... ..... ..... ..... .... ..... .... ..... ....BackCOVer
9
6
... ..... ..... ..... .... .... .... .... .... ..... ..... ..... .... .
29
Page 2

a damagedrange. @e
‘---—’
:
b
i
Itisintendedtoheip you
operateand maintainyour new
rangeproperly.
Keep ithandy for answers to
your questions.
If youdon’t understandsomething
or need more help, write(include
your phone number):
ConsumerAffairs
GE
Appliance Park
Louisville,KY 40225
You’llfindthem on a label
behindtherange door or behind
thestoragedrawer.
These numbers are alsoon the
ConsumerProductOwnership
RegistrationCard that camewith
yourrange. Before sending in
thiscard, pleasewrite these
numbershere:
ModelNumber
SerialNumber
Use thesenumbers in any
correspondenceor servicecalls
concerning your range.
mYou NEED SERVICE
To obtainservice, see the Consumer Services page in
tileback of this book.
We’reproud of’our service and want you to be
pleased. If for some reason you are not happy with the
service you receive, here are 3 steps to follow for
further help.
FIRST, contact thepeople who serviced your
appliance. Explain why you are notpleased. In most
cases, this will solve the problem.
Immediatelycontactthe dealer (or
builder)thatsoldyouthe ra~~ge.
~~v~
timeand money.
Beforeyou request
service.ee
Check the ProblemSolver in the
back of thisbook, It listscauses of
minoroperatingproblems that you
can correct yourself.
-—=
NEXT’,if you are stillnot pleased,write all the
details-–including your phone number—to:
Manager, Consumer Relations
GE
Appliance Park
Louisville, KY 40225
FINALLY,if your problem is still not resolved, write: ;
MajorAppliance Consumer Action Panel
20 North Wacker Drive
Chicago, IL 60606
Page 3

can tip and injurycould result.
Toprevent
the range from
ifieluding excessloading of the
oven dOO~7attach it to thewall and
floor
by installing the Anti-Tip
devicesupplied,To insure the
deviceis properlyinstaIIedand
engaged,removethe ~~ckpaneI or
accidentaltipping of
abnormalusage,
@~~ fi~~~~g~f~~~y~~~ ta climb9stand or hang
on the doorydrawer or cooktope~h~ycould
damagetherangeand.eventipit over,causing
severe personal hljury.
QCAUTION: ITEMS OF INTEWST To
CHILDREN SHOULD NOT BE STORED IN
CABINETS ABOVEA MNGE OR ON THE
BACKSPLASH OF A
m~~%cm~m~
cLmBINGONTHErdNGEToREACH
ITEMSCOULDBESERIOUSLYmmRED*
@Neverwear
whileusing the appliance. Flammablematerial
couldbe ignitedif broughtin contactwithhot
heatingelementsandmay causesevereburns.
notletpot holderstouchhotheatingelemefits.Do
not use atowelor otherbulky cloth.
eKor your safety9never use your appiiance for
warmingorheatingthe room.
@Do NOTSTOW OR USEcomusTBLR
MTERMLS, GAsoLmE OROTHER
FLAmABLE VAPOW ANDLIQUIDSIN
THEvIcmITY OFTms OR ANYOTHER
APPLIANCE.
~Keephoodandgreasefilters clean to maintain
good venting and to avoid grease tires.
~Da not Eetcooking grease or other flammable
materials accumulate in or near the FaIRgeo
eDo not touch the heating elemenk or inte~ior
sutiaee of the oveBI.Thesesurfacesmaybe hot
enough to burn even tho~lghthey arcda~.kin color.
During and after use, do nottouch,or letclothi~~g
or otherflammabIernateiialscontactthe surface
units, the areas nearby the surfaceunits or ally
interior area of the oven;allow sufficienttimefor
cooiing, first.
Eoose-fittingQrhanging garm@~@
~Use ody d~~potholders-moist
or damp pot holde~son hotsurfaces
may resultin burnsfromsteam.Do
Potentiallyhot surfacesiilclude the cooktop,Mess
facing theCooktop,ovenvent opening,Swl”iaces
near the opening, crevices aroundthe ov~~ldoor,
the edges of the door window and metaltiilmparfs
abOV~ the door.
f.?=e~naiaber:TfIeinside s~]rfaceof tileovel]fins))
l~ehot when the door is opzrledo
—..
Page 4

oDonot usewater on greasefires,
Never pick up a flamingpan.
Smotherflamingpan on surfaceunit
by coveringpan completelywithwell-fittinglid,
cookiesheetor flattray,orif available,usea dry
chemicalor foam-typeextinguisher.
~WIIencookingpork9followthe directions
exactlya~dalwayscookthemeatto aninternal
temperatureofat least170”F.Thisassures that,in
theremotepossibilitythattrichinamay be present
in the meat,it willbe killedandthe meatwill be
safeto eat.
*
Useproper pan size—This
~% applianceis equippedwithdifferent
-
l-~
having flat bottoms large enough to cover the
surface unit heating element. The use of
undersized cookware will expose a portion of the
heating element to direct contact and may result in
ignition of clothing. Proper relationship of
cookware to burner will also improve efficiency.
~Never leave SUflace Uniti Unattended at high
heat se~~ings,Boilover causes smoking and
greasy spillovers that may catch on fire.
sizesurfaceunits.Selectcookware
~Stind awayfromthe rangewhenopening
the ovendoor.Hot airor steamwhichescapes
can causeburnsto hands,faceand/oreyes.
@Do not heat unopened food containers.
Pressurecouldbuild up and thecontainercould
burst, causingan injury.
eKeep the oven vent unobstructed.
@Place the oven shelf inthe desired position
whilethe oven is cool.If theshelvesmostbe
handIedwhenhot,do notletpotholdercontact
the heatingunitsin theoven.
el~ulling
outthe shelf to the Silelfstop-lock
isa convenience in lifting!Ieavyfoods.
It is also aprecautionagainstburnsfrom touching
hot surfaces of thedooror oven walls.
gYvllenusing Cool{ingor roasting bags in oven9
follow the manufacturer’sdirections.
eBe sure the drip pans and vent are not
Covered
and are in place. Their absenceduring cooking
coulddamagerangepartsandwiring.
~Do not use aluminum foilto linedrippansor
anywherein theovenexceptas describedin
this book. Misusecouldresfiltin a shock,fire
hazardor damageto therange.
@Only certiin typesof glass>glass/ceramie9
earthenware or other glazedcontainers are
suitible for eooktopservice;othersmaybreak
becauseof thesuddenchangein temperature.
~Tominimizethepossibtiityofburns9ignition
of flammablematerials,and spillage,the handle
of a containershouldbe turned towardthecenter
of the range withoutextendingover nea~by
surfaceunits.
~Always turn surface unit to OFBbefore
removingcookware.
QToavoidthe possibility of a burn or electric
ShOCIK9alwaysbe certainthatthe controls for
all surface units are at OFF position.and all
coilsare cool before attempting to lift or remove
the unit.
ewhen naming foods are under the hoodyturn
eDo not immkerseor Soalirenlova:nles~~rfae$
_—..—.___
the fan off. The fan, if operating,may spread
the flame.
Il]liheDo no~put them in a disi3waslIcr.
.-
—-—-—. ...———.—- ....—.
I
Page 5
a ~Q~~~ f~~ f~yi~g $~~~]~be as dry as possible.
FrostOnfrozenfoodsormoistureon fresh foods
can causehotfat to bubbleupandoversides
of pan.
~A]waysheat fat slowly,andwatchas it heats.
QUsedeep fat thermometer whenever possible to
preventoverheatingfatbeyondthe smokingpoint.
SAW TmsE
@sTRucTIoNs
-~,,
(“
[z- .;
-...,----
. . . . . . .—.
j
—
.
:.
,-__.
”_-.---.- . . . --------- --—----
—.—
____ , -...=.
-. .-—
—-—
—— —.. —..
.J
_-—._.___
Page 6
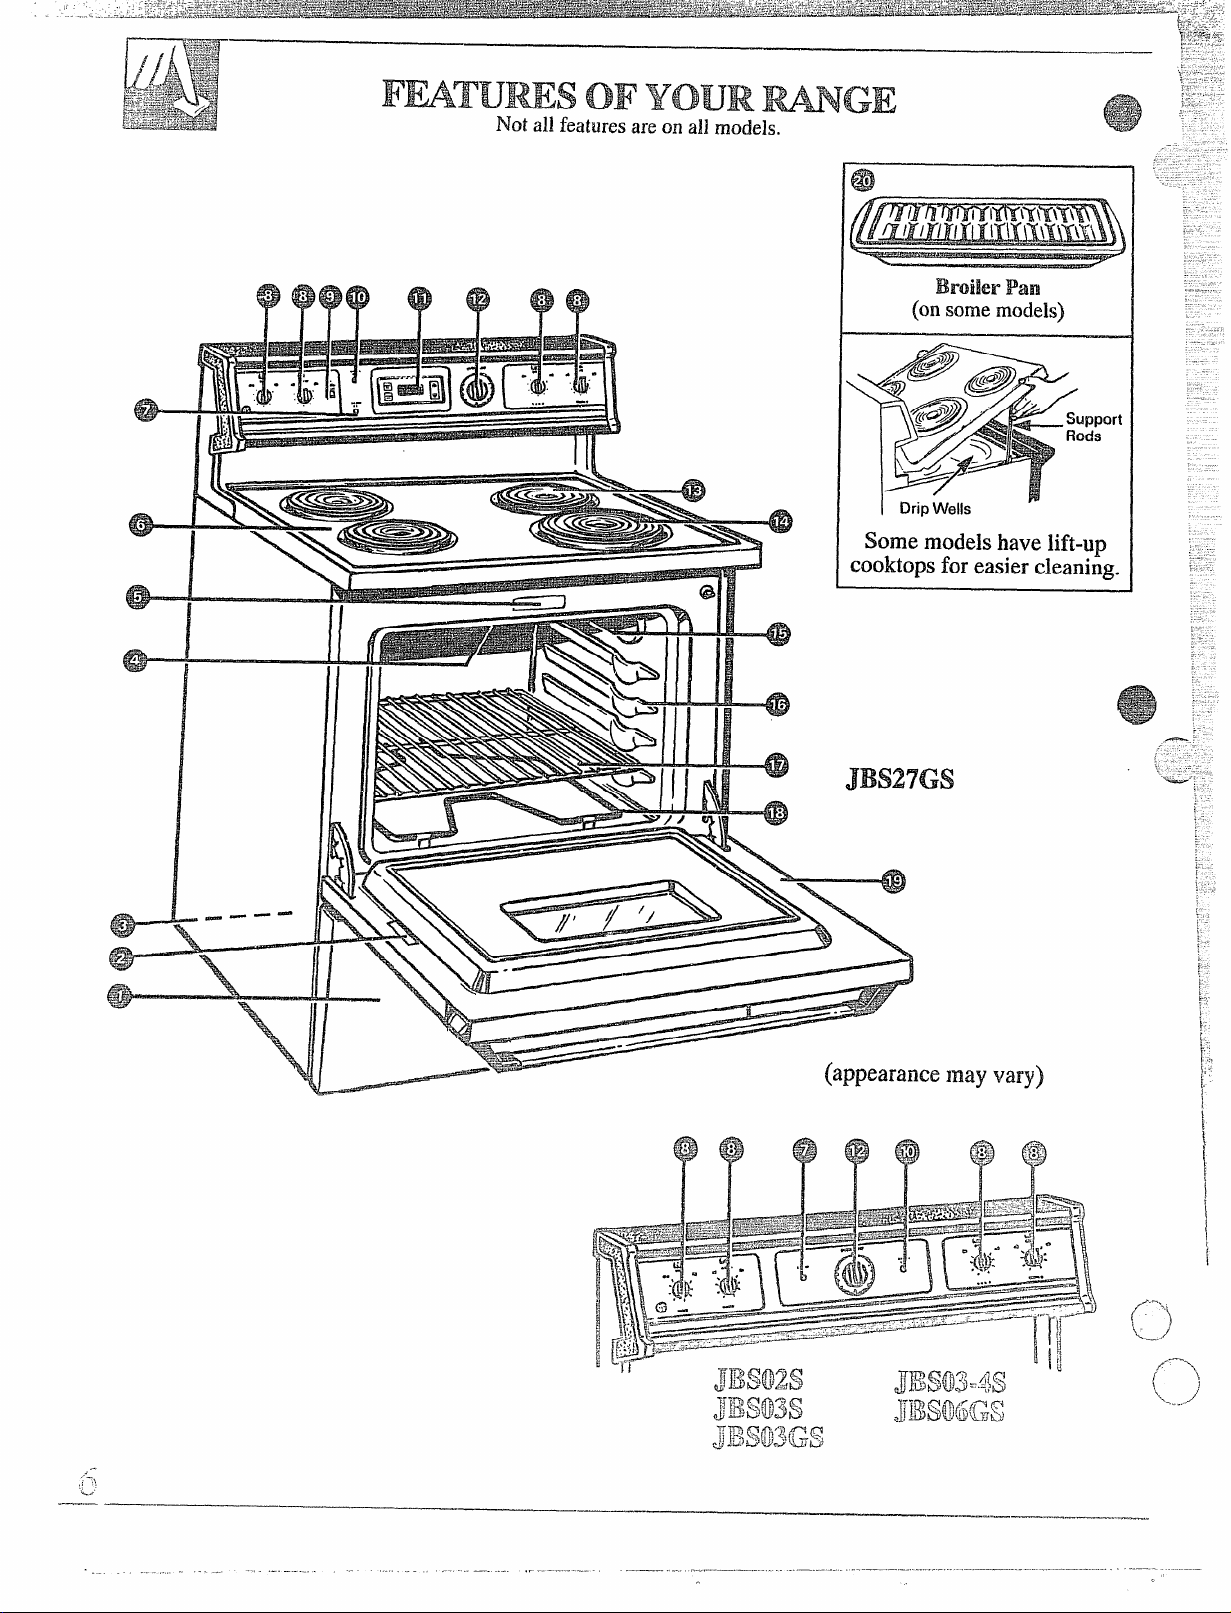
Q
I@
Broiler Pam
(on some models)
Somemodels have iift-up
cooktops
foreasier cleaning.
pport
ds
JBS27GS
(appearance Inay vary)
..--
-,
,>
k.-
. ..-.—
.—— —
,.— ,.—.—,
Page 7
-—
----
.-
-—-
13
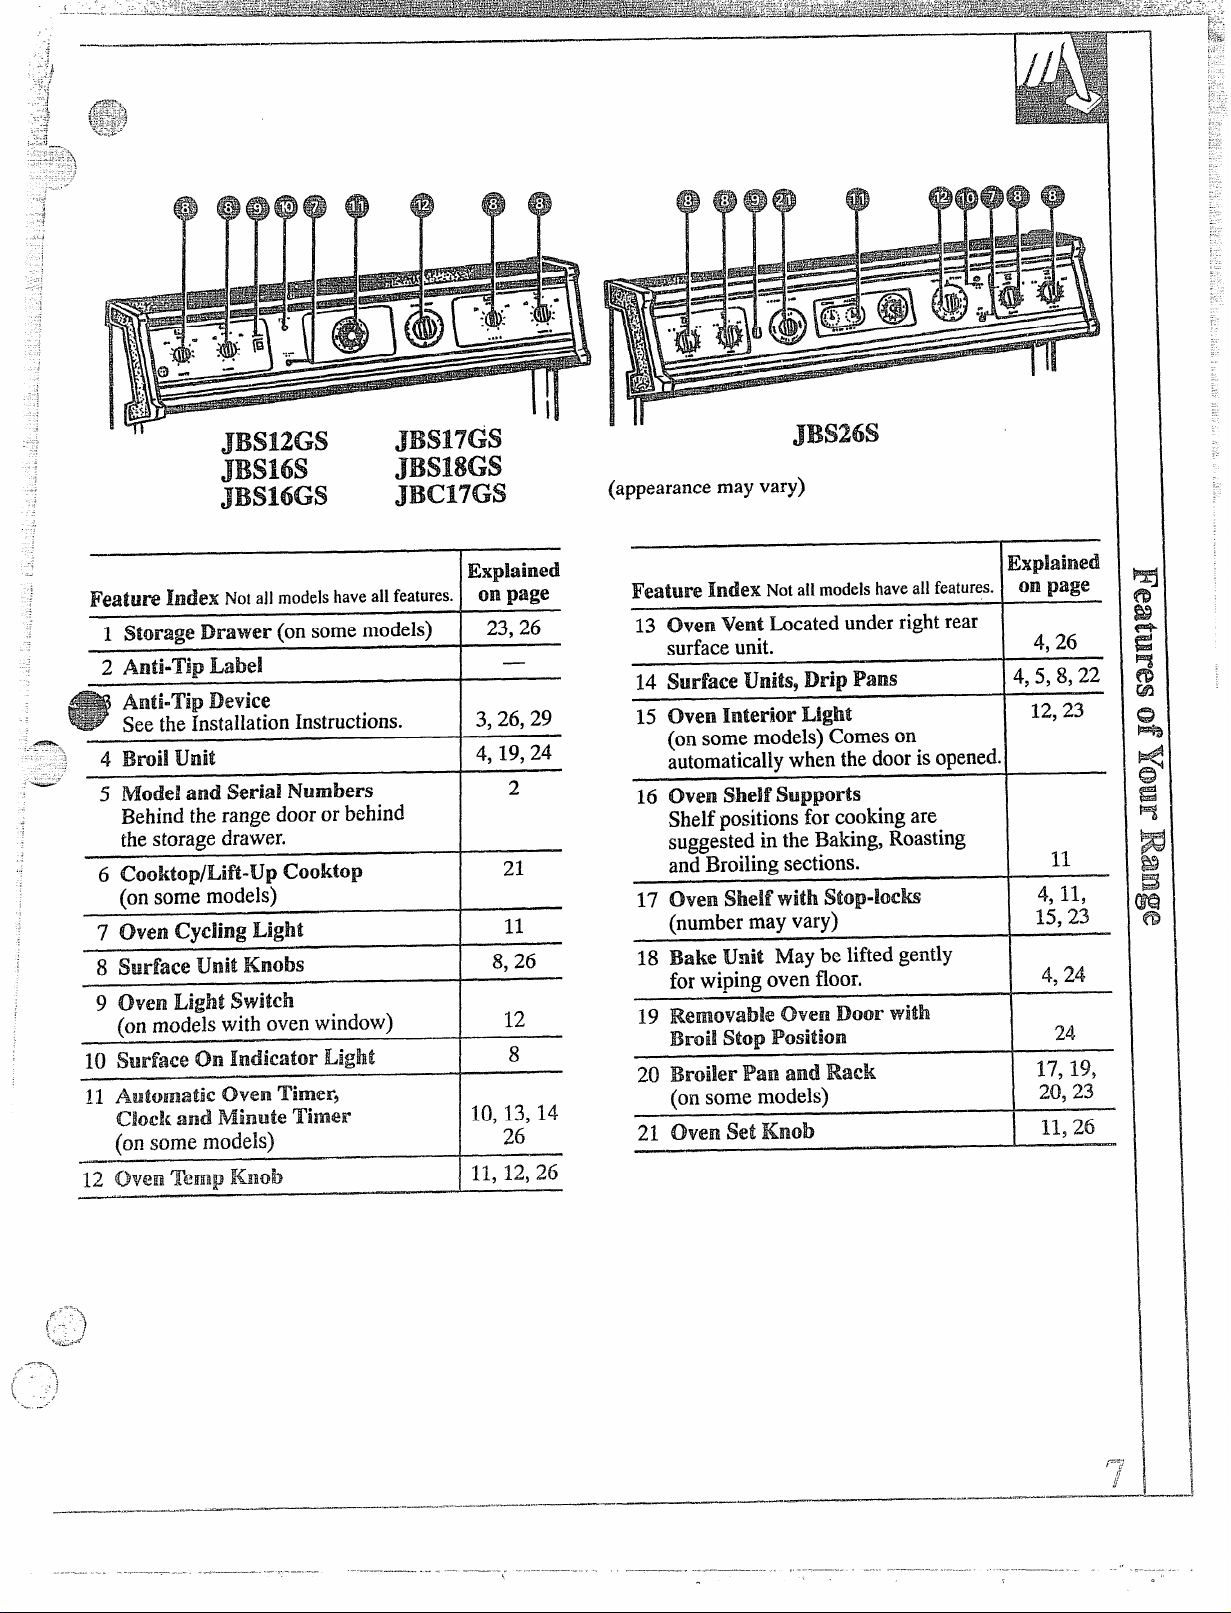
JBS12GS
JBS16S
JBS16GS
JBS17GS
JBS18GS
JBC17GS
~e~~u~ ~n~ex Notallmodelshaveallfeatures.
1 Storage Drawer (on some models)
2 Anti”Tip Label
Anti-Tip Dev;ce
See the installation Instructions.
4 Broil unit
5 .Modeland serial Numbers
Behind the range door or behind
the storage drawer.
6 C@oktop/~ift-~p
~OOktO~
(on some models)
7 oven cycling Light
8 Surface ~nit
9
ovenLight switch
~nObS
(on models with oven window)
Explained
on page
I 23,26
—
3,26,29
I 4,19,24
1
12
21
11
8,26
12
1 !1
JBS26S
(appearancemay vary)
~@~~uR’~~n~~xNotallmodelshave
13 oven Vent heated under right rear
surface unit.
15 oven Interior Light
(on some models) Comes on
automaticallywhen the dooris opened.
16
~Ve~ Shelf Supports
Shelf positionsfor cooking are
suggested in the Baking, Roasting
and Broiling sections.
17 oven shelf
(number may vary)
18 Bake Unit Maybe lifted gentiy
for wiping oven floor.
withstop-lock
all features. m
4,26
4,5,8,22
12,23
4,11,
15,23
4,24
24
20 Broiler Pan and Rack
(on some models)
21 oven set Knob
—
—..—-.——--
17, 19,
20,23
p-
—
/
j
Page 8
.. .
,,
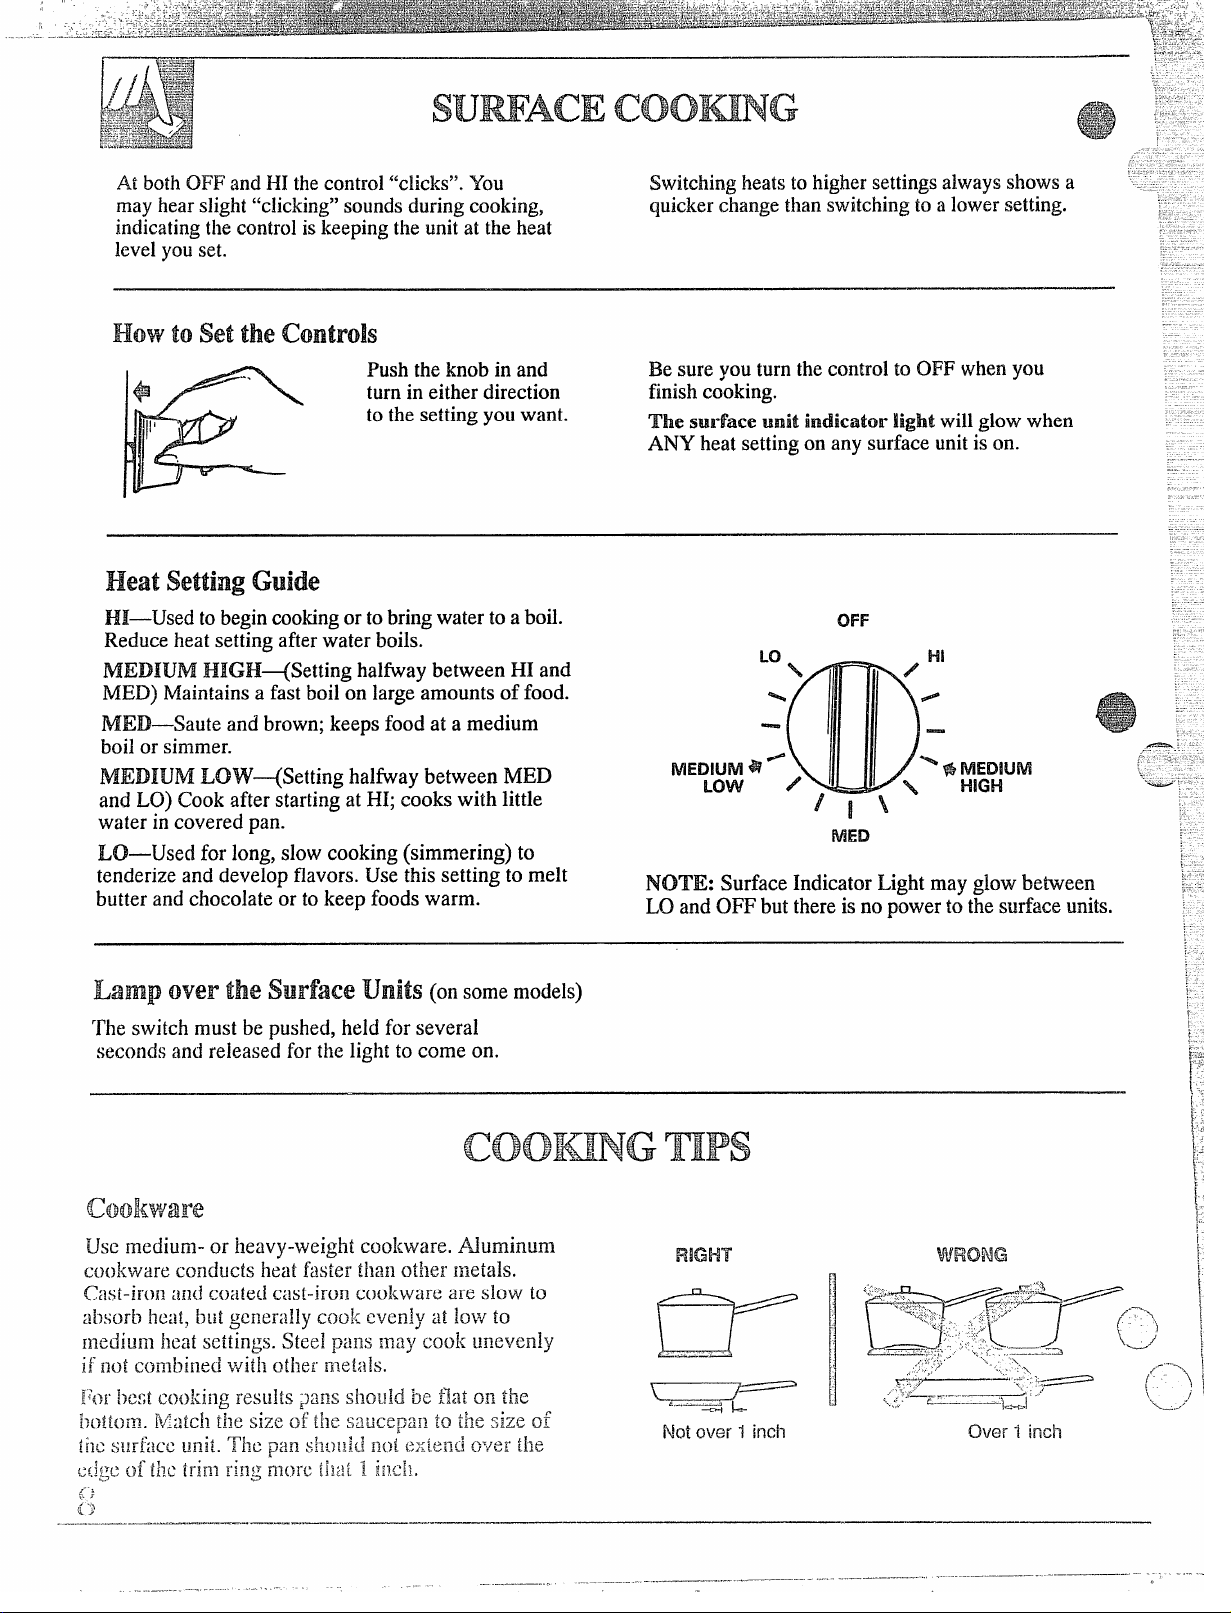
At bothOFF and141thecontrol“clicks”, You
may hearslight“clicking”soundsduring cooking, quickerchange thanswitching to alower setting.
indicatingthecontrolis keeping the unitat the heat
levelyou set.
Push the knob in and Be sureyou turn the control to OFF when you
turn in either direction finish cooking.
to the setting you want.
Hi—Used to begin cookingorto bringwater to a boil.
Reduce heat settingafter water boils.
MEDIUM HIGH<Setting halfway between HI and
MED) Maintainsa fast boil on large amounts of food.
MED—Saute and brown; keepsfood at a medium
boil or simmer.
MEDIUM LOW+Setting halfway between MED
and LO) Cook after starting at HI; cooks with little
water in covered pan.
LO—Used for long, slow cooking (simmering) to
tenderize and develop flavors. Use this setting to melt
butter and chocolate or tokeep foods warm.
Switchingheatsto highersettingsalwaysshows a ‘-< ‘“
The .swrfaceunit indicator light will glow when
ANY heat settingon any surface unitis on.
OFF
Lo
%
\ /
I
MEDIUM* -
NOTE: Surface Indicator Light may glowbe~een ~LO and OFF but there is nopower to thesurfiaceunits.
Low
-@-
/
!IIN
u-
MED
HI
/
% * ~,:fluM
-—
-.
-.
m
-.
-..
.-
-
‘~heswitch must be pushed,held for several
seconds and released for the light to come on.
Page 9
Do not overfill cookware with fat thatmay spilloverwhen addingfood,
FYostfoods bubble vigorously.Watchfood frying at hightemperatures.
Keepthe range and hood clean fromgrease.
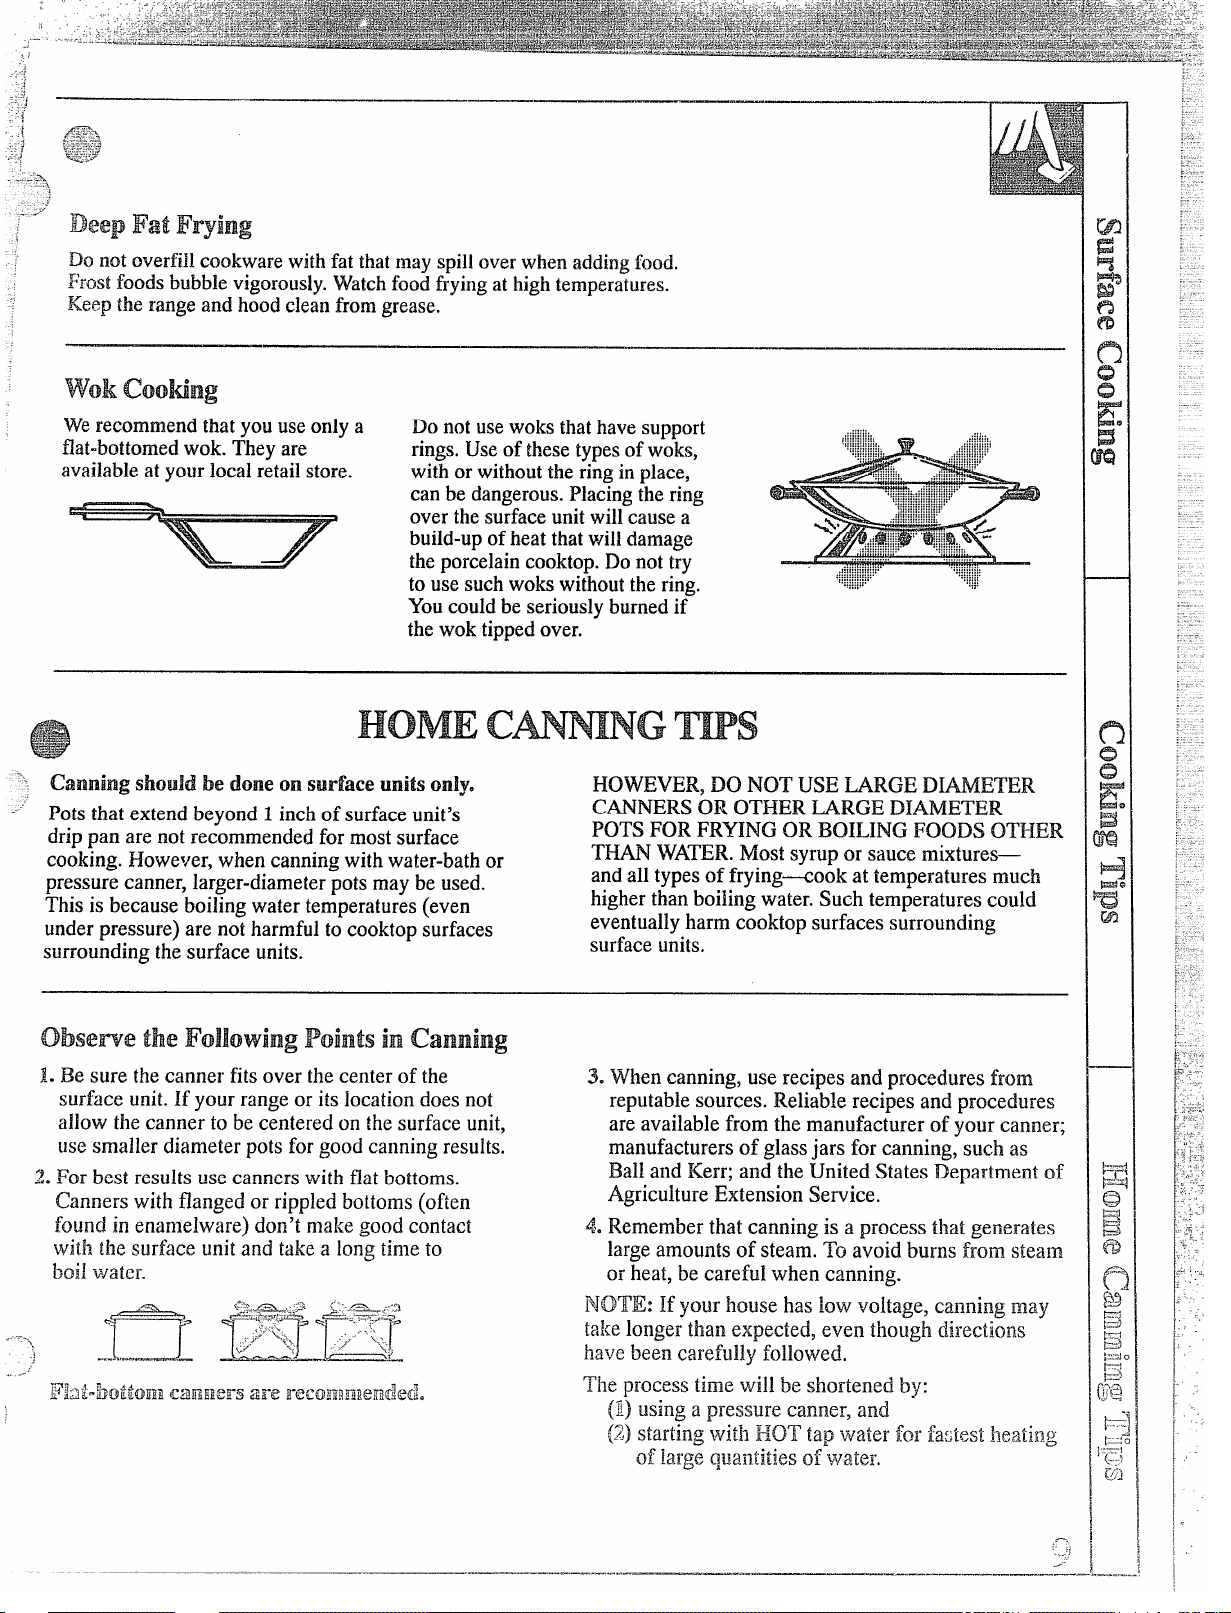
Ivek CooMng
Werecommend thatyou useonly a
flat-bottomedwok. They are
availableat your localretail store.
Do notusewoks thathave support
rings. Use of thesetypesof woks,
with orwithout the ring inplace,
can be dangerous.Placingthe ring
over the surfaceunit will cause a
build-upof heat thatwill damage
the porcelain cooktop.Do not try
to use suchwoks withoutthe ring.
Youcould beseriouslyburned if
the wok tippedover.
HOMECmNG mS
canning shouldbedone on surface units Onlye HOWEVER, Do NOTUSEMRGE DWETER
Pots that extend beyond 1inch of surface unit’s
drip pan are not recommended for most surface
cooking. However, when canning with water-bath or
pressure canner, larger-diameter pots may be used.
This is because boiling water temperatures (even
. .
under pressure) are no~harmful tocooktop surfaces
surrounding the surface units.
CNNERS OR OTHER MRGE DIAMETER
POTSFOR FRYING OR BOILING FOODS OTHER
TW }VATER.Nfostsyrup or sauce mixtures—
and all typesof frying-cook at temperatures much
higher than boiiing water. Such temperatures could
eventuallyharm cooktop surfaces surrounding
..-
surface units.
1. Be sure the canner fits over the center of the
surface unit.If your range or its location does not
allow the canner to be centered on the surface unit,
use smaller diameter pots for good canning resuits.
J1.For best results use canners with flat bottoms.
Canners with flanged or rippled bottoms (often
found in enan~elware)don’t make good contact
with tilesurface unit and take a long time to
boil water.
3. When canning, use recipes and procedures from
reputable sources. Reliable recipes and procedures
are available from the manufacturer of your canner;
manufacturers of glass jars for canning, such as
Ball and Kerr; and the United States Department of
Agriculture Extension Service.
4. Rernernberthat canning is a process that generates
large amounts of steam. To avoid burns from stea~n
or heat, be careful when canning.
NDTE: If your house has low voltage,
takelonger
have been carefully followed.
——.—.— .. . ...—
canningmay
tha~~expected, even though directions
—.——.—.—.—__..__ . ...=._.
-.
r !1
.;.
Page 10
The automatictimer and clock seine several purposes.Followthe directions
-.,\F
--
~
.+
.
L
1,
\’*
~:.
[’<
!
for the Clockand Timer that apply to your model.
—
—
—.
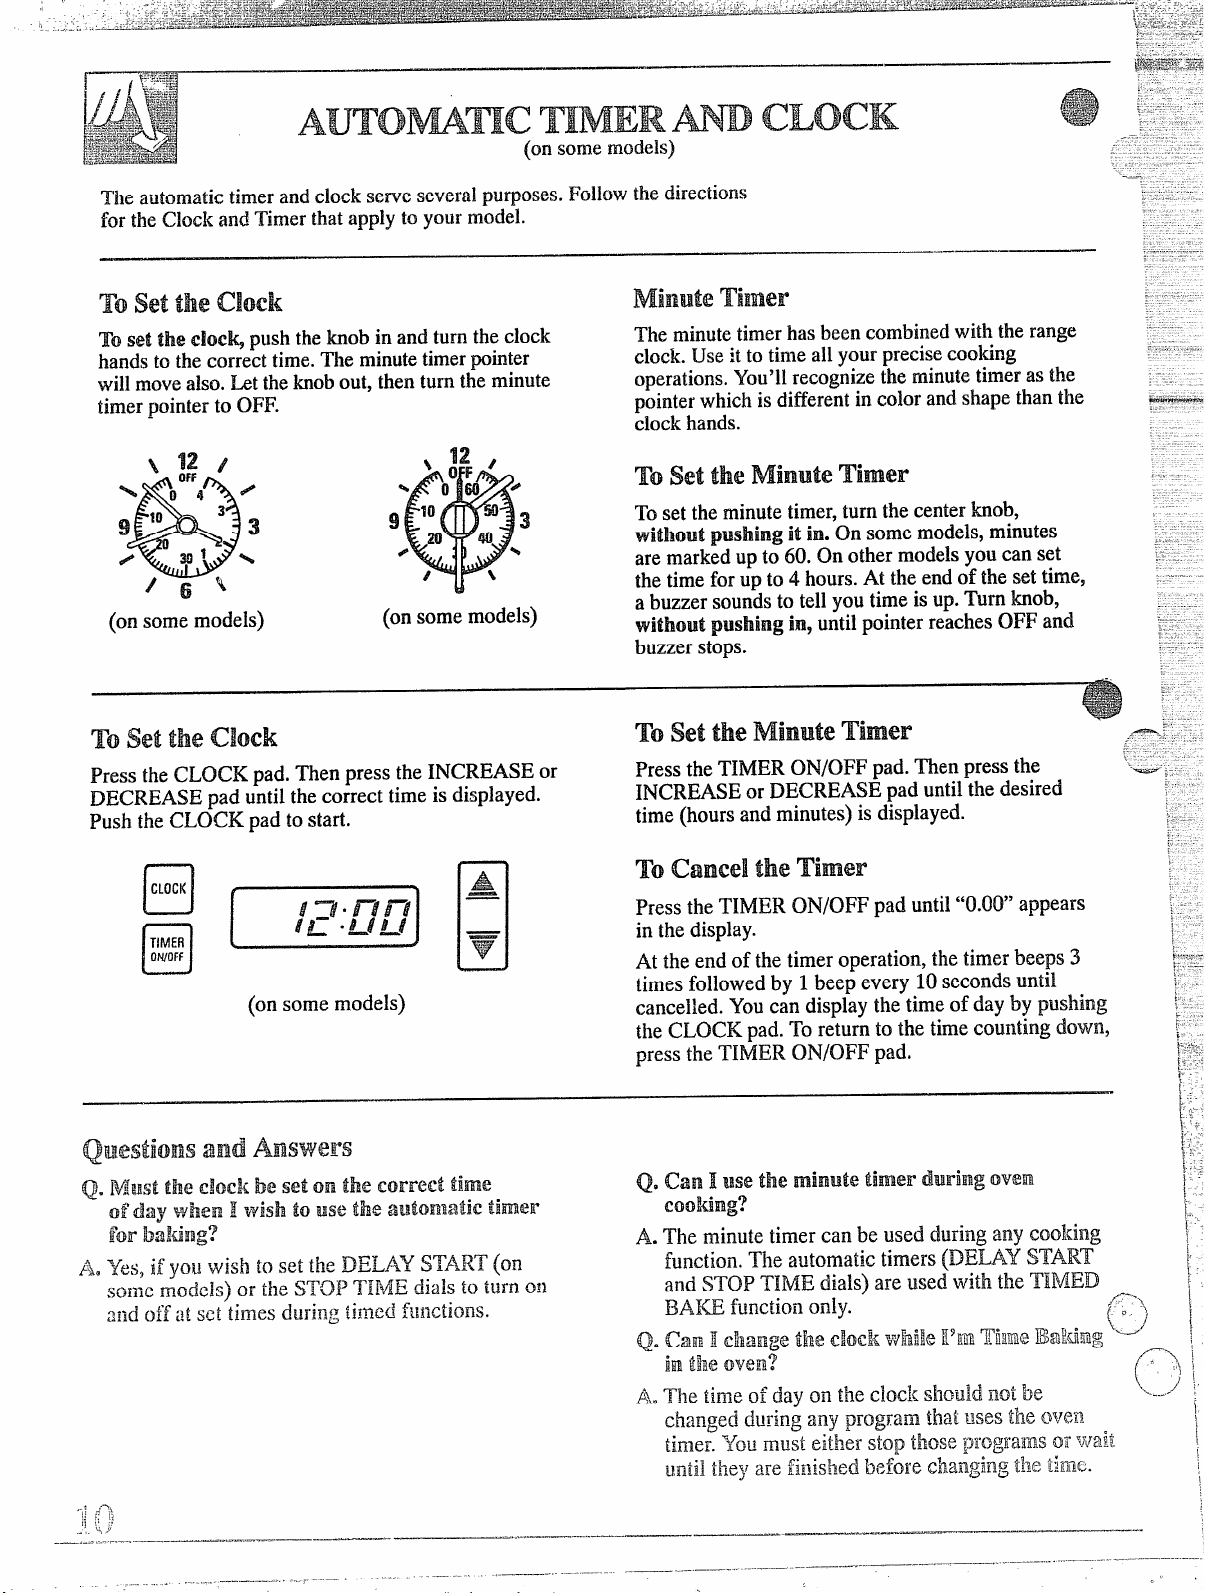
To set the Cloelc
To set the cloc& push theknob in and turnthe clock
hands to thecorrect time. The minutetimerpointer
willmovealso. ht theknobout, thenturn the minute
timerpointer to OFF.
(on somemodels)
To set the Ciock
Press the CLOCK pad. Then press theINCREASE or
DECREASE pad until thecorrect time is dispIayed.
Push the CLOCK pad to start.
[q[-]
TIMER
OWOFf
0
(on some models)
Questions a~ld Answers
(on some models)
●
——
A
7
u
Minwte TiBner
The minutetimerhas been combinedwith the range
clock Useitto time all yourprecisecooking
operations.You’llrecognize the minutetimeras the
pointerwhich isdifferent in colorand.shapethan the
clock hands.
.—
-.
~~
TosettheMinuteTimer
To set theminute timer, turn thecenterknob,
without pushing it in. On some models, minutes
are marked upto 60. On other modelsyou.can set
the time forup to 4 hours.At the end of the set time,
a buzzer soundsto tellyou timeis up.Turn knob,
without pushing in? until pointer reachesOFF and
buzzer stops.
To set the Minute Timer
Press theTIMER ON/OFF pad. Then press the ‘=---
INCREASE or DECREASE pad until the desired
time (hoursand minutes) is displayed.
.-
—
.
—
-
.
Tocancel the Timer
Press theTIMER ON/OFF pad until“0.00” appears ~
in thedisplay.
At the end of the timer operation, the timerbeeps 3
times followed by 1 beep every 10seconds until
canceiled. Youcan display the time of day by
the CLOCKpad. To return to the time COUnt~~g~OWII, ~.
press theTIMER ON/OFF pad.
push~ng \-
w.
.-
~:.
~~
~...
]=
~
i1
.
..—=-.
-1:?“??
‘i Q . .
.—. .-. ——...—--.-.,..———
_ ~.— --- . — .-,...——-— —.
.--”----
——- . ———-..——..=--
.—.——-—— ---
Page 11

1. Look atthecontrols.Be sure you understandhow
. ———.——. _ _____ ____
_———. _—— _
—
to set themproperly. Read over the directionsfor
theAutomatic Oven Timerso you
understandits
use with thecontrols.
2. Checkthe oven interior.Look at the shelves.
Takea practicerun at removing andreplacing
themproperly,to givesure, sturdy support.
ovencontrols
3. Read overthe informationand tipsthatfollow.
4. ICeepthisbook handy so youcan refer to it,
especiallyduringthe
firstweeks ofi~singyour
new range.
Some models have 1oven controlknob-the
OVEN TEMP.Other modelshave 2 control
knobs— the OVEN SET and the OVEN TEMP.
The OVEN SET bob has settingsfor BAKE,
TIMED BA~, BROIL, and OFF.
The OVEN TEMP bob maintains the temperature
you set, from WARM(lSO”F.)to BROIL (550°F.).
The oven eyeiing light glows until the oven reaches
~ our selected temperature, then goes off and on with
‘ e oven unit(s) during cooking.
B
Oven Shelves
To remove the shelves from the
oven pull the shelf toward you, tilt
the front end upward and pull the
shelf out.
To replace, place theshelf on the
shelf supportwith thestop-locks
(the curved extension of shel~
When placing cookware on a shelf,
pull the shelf out to the stop
position. Place the cookware on
the shelf, then slide the shelf back
into the oven. This will eliminate
reaching into the hot oven.
facing up and toward the rear of
the oven. Tilt up front and push
shelf toward the back of the oven
until itgoes past “stop” on the oven
wall. Then lower the front of the
shelf and push it all the way back.
OWNSm
OVEN,=MP
A
i
$
*
71Qti0
@
(Knobappearanc~mayvary.)
o
1%
m
.—--.
,,.,........-
.—--—z.,--,
————.—— . . . ...——.-..—-= .. . ..—
——— . . ...———-—..-. -.!”. -.—--.-...—— ——-——
——..
J
Page 12

@Y.*’$$
USING YOUROVEN
(continued)
On modelswith oven window,useswitchto tum lighton and off when door
is closed.
Adjusting theoven Thermostat
If youI don’t think the oven is heating at the right
temperature when you are bating or roasting,you
can resetthe thermostat yourself.
When cooking food for thefirst time in yournew
oven, use timegiven on recipesas a guide. Oven
thermostats,over a period of years, may “drift” from
the fiactorysetting and the differencesin timing
between anold arida new ovenof 5 to 10 minutesare
not unusual. Youroven has been set correctly at the
factory and is more likely to be accuratethan the oven
which itreplaced.
We do not reeonl~llend the use of inexpensive
thermometers, such as those found in the grocery
store,
tocheck the temperature setting of your new
oven. These thermometers can vary by 2U0 degrees.
‘Fodecide l~owmuch to change the temperatum,
set theoven temperature 25°F.higher or lower
than
thetemperaturein yourrecipe,thenbake.Theresults
this “test”should give you an ideaof how much the
of
temperature shouId be changed.
Poi
Back of
OVEN TEMP
To adjustthe thermostat bob:
1.Pull the OVEN TEMP knob off theshaft, look at
the back of theknob and note the current setting
beforemakinganyadjustments.
2.~osen bothscrewsonthebackof theknob.
3. To increase the oven temperature, move the
pointer 1notch toward the-words“MAKE
EiO~ER.”
Todecrease the oven temperature, turnthe pointer
1notch toward thewords “MAKE COOLER.”
Each notch changes the temperatureby 10degrees
I;ahrenheit.
Tighteilthe screws.
Ileplacc [heknob, matching the flat area of the
kn~b to the shaft.
Frontof
Knob
OVENTEMPKnob
(knob appearance may vary)
.-
..—.——.,..-—.——..—.— —
———...
Page 13

IZouroven temperatureiscontrolledvery accurately using an oven control
. .
system.lye recommend that you operate therange for anumberof weeks
usingthe time given on recipesas aguide to become familiarwith your new
oven’sperformance. Ifyouthink an adjustmentis necessary,see the
Adjustingthe OvenThermostatsection.
HOV4toset YourRangefor
To avoid possible burns, place the
shelvesin thecorrect position
beforeyou turn the oven on.
(knob appearance may vary)
mED BmNG
(on some models)
OVENTEMP
1
%OwtoTimeBake
1.Turn theQVEN SET knob (on
some models)to BAKE and the
OVEN TEMP knob to the
temperatureyoudesire.
2. Checkfood for donenessat
minimumtime on recipe. Cook
longer if necessary.Switch off
the heat and remove foods.
Youroven can beset to turnon or off automatically.
NOTE: Before beginning,make sure theoven clock shows the correct time of day.
To set the clock push the knob in and turn the clock hands to the correct time.
How to set Immediate start and Automatic stop
Toavoid
possii)iebtIrns,place the shelves in
the correct position before you turn the oven on.
‘l’heoven will turn on immediately,cook for
a sciected length of timel then turn off automatically.
..
2. Turn the OVEN SET knob to TIMED BAKE.
Turn the OVEN TEMP knob to thedesired oven
temperature, for example 250”F,The oven will start
immediately,continue to cook for the programmed
amount of time, then shut off automatically.
3. Remove the food from the oven. Remember, foods
that are left inthe oven continue cooking after the
controls are off.
NOTE: Foods that are highly perishable, such as
milk, eggs, fish, stuffings, poultry and pork should
not be allowed to sitfor more than 1 hour before or
after cooking. Room temperature promotes the growtl~
..
‘~’
of harmful bacteria. Be sure that the oven light is off
because heat from the bulb will speed harmful
bacteria growth.
<1 f- ;, ]., :.;.
I
. -—... -. ,..— ---- ,. -—
.—.— --------
,-.” ~- - --- —.——-- .--+ ,--
—
.— . .
,., . . . ,-----,
Page 14

the correcipositionbefore-youturn the oven on.
Yoilcanset the ovencontrol to turn the oven on
automatically,cook fora specificlength of time
and turnoff automatically.
NOTE: Youmust use the TIMED BA~ setting.
1. To setthe Start Time,push in the knob on
the DELAY STARTdial and turn the pointer
to thetime you want the oven to turn on, for
example 3:30.
STOPTIME DELAYSTART
,$111,,,
[$3 ‘8:
PUSHTOWW
2. To set the Stop Time, push in theknob on the
STOP TIME dial and turn the pointer to the time
you want the oven to turn off, for example 6:~.
This means your recipecalled for 2%hoursof
baking time.
The time on the STOP TIME dial must be later
than the time Shokvnon the range ‘clockand the
DEMY
START dial.
3. Turnthe OVEN SET knob to TIMED BAW. Turn
the OVENTEMP bob to thedesired temperature.
4. When cooking is completed,turn the OVEN
SET knob to OFF and remove food from the
oven. Remember,foods that are left in the
oven continue cookingafter the controls are off.
NOTE:
@Foods that are highly perishable,such as milk, eggs,
fish, stuffings,poultry and pork should notbe
allowed tosit for more than 1hour before or after
cooking, Room temperature promotes the growth of
harmful bacteria. Be surethat’the oven light is off
because heat from the bulb will speed harmful
bacteria growth.
~The oven indicator light(s) at the TIMED B= ---
setting may work differently than they do at the
‘-~
B- setting.
Page 15

1701best bakingresults,followthese suggestions:
—.—_. . .—,-..._.—_________ -..._
oven shelves
Arrangetheoven
shelfor shelvesin
the desiredlocations
whilethe oven is
COOI.The correct
shelfposition
dependson the kind
of food and the
browningdesired.
As agen;rai rule, ‘
placemost foodsin the middle of theoven, on either
~hesecond or third shelf from the bottom. See the
chartfor suggested shelf positions.
D
@
:
o
r
Angel food cake
Biscuitsor muffins
Cookiesor cupcakes
Brownies
Layer cakes
Bundtor pound cakes
Pies or pieshells
Frozenpies
[A
I Boi’c
I Bore
I Bore
I Bor C
I AorB
I BorC
A (on cookie sheet)
I
I
I
I
I
I
I
Preheat theoven if the recipe calls for it. Preheat
means bringing the oven up to the specified
temperaturebefore putting in the food. Topreheat, set
theoven at thecorrect temperature—selecting a
higher temperature does not shorten preheat time.
Uscthe proper
pandeterminesthe amountof browning that wiIl occur.
sDark, rough or dull pans absorb
browner, crisper crust. Use !his ~ypefor pies.
bakingpan. The type of finish on the
heatresulting in a
Casseroles
Roasting
Preheating is necessary for good resultswhen baking
cakes, cookies,pastry and bieads. For most casseroles
and roasts,preheating is not necessary.For ovens
without a preheat indicator light or tone, preheat 10
minutes. After the oven is preheated place the food
in theoven as quickly as possible to prevent heat
from escaping.
Bor C
Aor B
Pan Placement
For even cooking and proper browning, there must be
enough room for air circulation in the oven. Baking
results will be better ifbaking pans are centered as
much as possible rather than being placed to the front
or to the back of the oven.
Pans should not touch each other or thewalls of the
oven. Allow 1 to 1Xinch space between pans as well
as from the back of the oven, the door and the sides.. If
you use 2 shelves, stagger the pans so 1 isnot directl~~
abovethe other.
....
. ...........
——.. . -------..-,.--.—-
_-.——.—---—....---, -——
!“..-.-----...” 0------
..-—.>.—
‘,!~.:
-.=.=
,,
>.” ?.$
.-”. . J
Page 16

When baking cookies,flat cookie sheets (without
sides)produce better-lookingcookies. Cookies baked
in ajelly roll pan (shortsides allaround) may have
darkeredges andpale or light browning may occur.
Do not use a cookie sheet solargethat it touches the
walls orthe doorof theoven.
For best results, useonly 1 cookie sheet in the oven
at a time.
Pies cakes
For bestresults, bake pies in dark, rough or dullpans
to producea browner,crisper crust. Frozen piesin foil
pans should be pIacedon an aluminumcookie sheet
for baking since theshiny foilpan reflects heat away
from thepie crust; thecookie sheet helps retain it.
Never entireiy cover a shelf with a Iargecookie
sheel or aluminum foil,This will distu-rbthe heat
circulation and result in poor baking. A smaller sheet
of foil may be used tocatch a spi!lover by placing it
[}na Iowcr shelf several ir]chesbeiow the food.
When bakingcakes, warped or bent panswill cause
unevenbaking resultsand poorlyshaped products.
A cake baked in a pan larger than the recipe
recommendswill usuallybe crisper,thinner and drier .
than it shouldbe. If baked in apan smaller than
recommended, it may be undercookedand batter may
overflow.Check the recipeto makesure thepan size
used is the onerecommended.
.-
--”w
.--—.—---—-.------ ----
Page 17

Roastingis cooking by dryheat.Tender meat or
poultrycan be roasted uncoveredin youroven.
~oasi~ngtemperatures,which should be low and
steady,keep spatteringto a minimum.
1.
Place !he shelf in A or B position.No preheating
is necessary.
2. Checktheweight
~
e
of the meat. Place it fatside-up (or poultry
breast side-up), on a
roasting rack in a
shallowpan. The
a
*Z:-)”/’:d,:
@#,&...{./
a
~
II* II
../..
melting fat will baste s
the meat. Select a pan as close to the size o~themeat as possible. (The
broiler pan with rack isa good pan for this.) Line
the.broilerpan with aluminumfoil when usingpan
for marinating,cookingwith fruits, cooking heavily
cured meats, or for bastingfood during cooking.
Avoid spilling these materiaIs inside the oven or
inside theoven door.
ov~ s=
OVENTEMP
7/)
Roastingis reallya bakingproced~~reused forrnsats.
Therefore,oven controlsare set to BA~ or TIMED
BA.~. (Youmay heara slightclickingsound,
indicatingiheoven isworking properly.)Roastingis
easy;just followthese directions:
4. After roastingis complete,turn theOVEN SET
knob (on somemodels)or the OVEN TEMP knob
,
n
to OFF.
Mostmeatscontinueto cook slightlywhile standing,
after being removedfrom the oven. Standing time
recommended for roastsis 10 to 20 minutes.This
allows roasts to firm up and makes themeasier to
carve. Internaltemperaturewill riseabout 5°to 10°F.;
to compensatefor temperaturerise, ifdesired, remove
roas[from oven sooner (at 5° to 10”F.less than
temperature in the guide).
NOTE:
~You may wish to use Timed Baking, as describedin
the Bakingsection of thisbook, to turn oven on and
off automatically.
“Remember that food will continueto cook in the hot
oven and therefore shouldbe removed when the
desired internaltemperature has been reached.
<.
a
;
{
(knob appear:
ce may vary)
3. Turn the OVEN SET knob (on some models)
to BAKE and the OVEN T~MP knob to the
temperature you desire.
FrozenRoasts
Frozen roasts of beef, pork, lamb, etc., can be started
without thawing, but ailow 10 to 25 minutes per
pound additional time (1Ominutes per pound for
rotistsunder 5 pounds, more time for larger roasts).
most frozen poultry before ioasting to ensure
T’haw
even doneness. Some commercial frozen poultry can
be cooked successfully without thawing. Follow
directions given on package label.
Page 18

—
A.
Checkingthe finishedinternaltemperatureat
the completionof cookingtimeis recommended.
Temperaturesare shown in the RoastingGuide.
For roastsover 8 lbs., check with thermometer
at half-hour intervalsafter halfthecooking time
haspassed.
is my roast Crumbling when I t~ to
why
Q*
carve it?
Roastsare easierto sliceif allowed tocool 10 to
A.
20 minutesafter removingfrom oven.Be sure to
cut across thegrain of the meat.
~o~smG GUIDE
“
A..It israrely necessary to preheat youroven.Preheat
only for verysmall roasts,which cooka short
length of time.
A. Yes.Buy a roast aseven in thicknessas possible,
or buy rolledroasts.
Q. Can I seal the sidesof my foil “tent”when
roastinga turkey?
A. Sealing the foilwill steam the meat.having it
unsealedailows the air to circulateand brown
the meat.
.-.-,
.. --
>:~
—
.—
oven
Qpe
Meat
Tendercuts;rib,highquality
sirlointip,rumpor topround*
hmb legorbone-inshoufder* 325” Rare:
Vealshoulder,legor loin*
I)oi-kloin,riborshoulder* 325°
f+:tm,precooked
l~f$ultg
(~hickenorDuck
[Uhickef}pieces
“1’tlrkcy
Temperature
Doneness
325° Rare:
Medium:
Well Done: 40-45 30-35
Medium: 25-30 24-28
WellDone: 30-35
325° WellDone: 35-45
WellDone:
325°
325”
To~~r.m:
WellDone: 35-40 30-35
350° WellDone:
325° WellDone:
Approximate RoastingWme
in MinutesperPound
3 tO ~ lbs, 6 tO 8 ~bS.
24-33 18-22
35-39
21-25
22-29
20-23
28-33
30--40
35-45
3W0
17-20minutesperpound(anyweight)
3 to s lbs.
over s lbs.
35--40
10to 15lbs.
18_~5
over 15lbs.
15-20
‘[~(}rbL}IIL:ltissroIlcdrt}:~stsover6 inchesthick,add5 to 10minutesperpoundtotimesgivenabove.
140c–1500~
150°–1600
170°-1850
170°-1800
170°–1800
115°-1200
~.-.:
Page 19

..=,
Oven.~os~fish a~–~t~ndeicutsOfmeatcan be broiled.FO11OW these
directionsto keep spatteri~gand smokingto a minimum.
1. If the meat has fat or gristle near edge, cut vertical
slashesthroughbothabout2 inchesapart.If desired,
the fat may b; trimmed, leaving the layer about
1/8 inch thick.
2. Placethe meaton the broiler rack inthe broilerpan.
Always usethe rackso the fatdripsinto the broiler
pan; otherwise thejuices maybecome hot enough to
catch onfire.
3. Position the shelf on the recommendedshelf
position as suggestedin Broiling Guide.
4. have the
door open to the broil
stop position. The doorstays open
by itself, yet thepropertemperature
is maintainedin theoven.
5. Turn the OVEN SET (on some models) andthe
OVENTEMP bobs to BROIL. Preheatingunitsis
notnecessary.
6. Turn foodonly once duringbroiling.Time foods
for firstsideaccording to the Broiling Guide.
Turn food, then use timesgiven for second
sideas aguideto preferred doneness.(Where
2 thicknessesand times are given together,
usefirst timesgiven for thinnestfood.)
7. Whenfinishedbroiling, turn the OVEN SET knob
(on some models)and the OVEN TEMP knob
to OFF (dependingon yourmodel). Servefood
immediately,leavingthe broiler pan andrack
outsideovento cool duringmeal for easiestcleaning.
Youcan use aluminum foil to line your broiler pan and the broiler rack.
However, you must mold ~hefoiltighily to therack and cut slits in itjust
like the rack.
Without the sli!s,the foil will prevent thefat and meat juices from draining
to the broiler Pan.“fheiuices couldbecome hotenough to catch on fire. If
you do not cu~the slits:you are frying, notbroiling. -
-f
.,
—...— .
..—-”” .-.—.- .—-. ..-”. -,-,.— —-—-.. _—
Q.why are my meatsnotturning outas browm as
they should?
A. In someareas, the power (voltage) to the oven
may be low.In these cases, preheat the broil unit
for 10 minutes before placing broiler pan with
food in oven. Check to see if
recommended shelf position. Broil for longest
period of time indicated in the Broiling Guide.
Turn food only once during broiling.
.——-..
.. .. . ... . ........— ——
YOUare US~~gthe
.,,,,fi.,
“-~]
ji
—.-
.—..
Page 20

.
.
yy%;q
~e_=s ..
-u~.”:q,;
,=.>_+J:~
~. p~
*@y-
.
,[’k~
F“
[+g~:-~~
a..:~~
Bakery Products
Bread(Toast)or
ToasterPastries
EnglishMuffins
hbster Tails
‘~~-$$
i
“’?.23+::%5~i%.:
Always use a broi!erpan andrack They are
*
designedto minimizesmokingand spatteringby
trappingjuices in the shieldedlower part of thepan.
e The oven door Show!dbe open to tlaebroiI stop
position.
* If desired,marinate meats or chicken before
broiling,or brush with barbecuesaucelast5
to 10minutesonly.
Quantityand/or
Food
Bacon 1/2lb. (about8
GmMndBeef
WellDone
Beefsteaks
Rare
Medium
WellDone
Rare
Medium
WellDone
Thickness
thinslices)
1lb.(4patties)
l/2t03,4inchthickl C I 10 I ‘7
1inchthick
(1to 1Xlbs.)
1X
inchthick
1whole A
(2to2ti lbs.),
;plitlengthwise
~toQ slices
[pkg.(2)
?(split) c
~~
6 to8 oz.each)
-Ib. filJcts1/4to
/2
inch thick
inchthick
~~o~~.m~GUIDE
Posltlon TimeqMtnutes Time.M~nutes
I ‘Ae!f
lc14fi 14%
c
c
c
c
, ,
I I I
c
B
c 5 5
B
I
~ When arrangingfoodorIpan, do not letfatty edges, ‘. __
which could soil oven with fatdripping,hangover
the sides.
L3
Frozen steakscan be broiledby positioning
the oven shelfat next lowest shelf positionand
increasingcookingtime given inthis guide
1%times per side.
I ‘imtydeI‘econdpde
6 5
8
12
10 7-8
35 10-15 Reducetimeabout5 to 10minutes
Y*2 1/2
1
3-4 ifdesired.
13-16 Do not
I
8
10
13
I
:
turnover.
8 increasetime5to 10minutesperside
10
13
comments
Arrangeinsinglelayer.
Spaceevenly.
Upto8 pattiestakeaboutsametime.
Steaksless than1 inchthickcook
throughbeforebrowning.Panfrying
isrecommended.
Slashfat.
persideforcut-upchicken.Brush
eachsidewithmeltedbutter.Broil
Spaceevenly.PlaceEnglishmuffins
cut-side-upandbrushwithbutter,
Cut throughbackof shell.Spread
open.Brushwithmeltedbutterbefore
broilingandafter halfofbroilingtime. -
Handleandturnverycarefully.Brush
withlemonbutterbeforeandduring
cooking,ifdesired.Preheatbroilerto
increasebrowninp.
for1Xinchthickor homecuredham.
Slashfat.
—“
—
—
‘~-
~..-.,/-,
.,/; ;
,:,
-: ...#-
10 9
12
14
17 12-14
6
——— .--———.--........-..--...-..—...--.——.—.-....—.
1(.)
12
1-2
Slashfat.
if desired,splitsausagesin half
lengthwise;cutinto5-to6-incl~pieces.
.F--.,
(
i,
...-
_——_. __—______ .._.——__.._.
-)
,-
‘->,
i,
~t,. 1
‘.—/
Page 21

Propercare and cleaning are importantso yourrangewill give youefficient
andsatisfactoryservice. Followthesedirectionscarefullyin caringfor it to
helpassure safe andpropermaintenance.
BE SURE
OFTHE MNGE.
ELECTRIC POWER IS OFF BEFORE CLENING ANY PART
If your range is removedforcleaning,servicingor any reason,
A
be sure anti-tip deviceisre-engagedproperlywhenthe range
isreplaced.Failure totakethisprecautionCouidresult in tipping of
the range and causeiqury.
Somemodels have a cooktopthat can be lifted up
foreasier cleaning.To make cleaning easier, the
entire cooktop may be lifted up and supported in the
up position.
Be sure a!l
raising the cooktop. There are 2 side supportsthat
lock into position when the cooktop islifted up. The
fi~ceunits do
~
er cleaning under the cooktop with hot, mild soapy
water and a clean cloth, lowerthe cooktop. Be careful
swrfaeeunits areturnedofi before
riotneed tobe removedbefore lifting.
I
Page 22

Toclean thesurfaceunits, turnthecontroltothe highest
.__.
:=<:-
..__-.
~
—
—
.-
setting for a minute. The coilswill burnoff any soil.
CAUTION
*Donotimmersethesurfaceunits in liquidsof anykind.
*Do not clean thesurface units in a dishwasher.
~Do notbend thesurface unit phig terminals.
*Do not attempt to clean, adjustor in any way repair
the plug-in receptacle.
To remove the drip pans for cleaning,the surface units
must be removed first.Make surethe surface units are
completely coolbefore touchingthem.
SurfaceUni(
Recepta
DripPan
Lift the surface unit about 1 inch above the drip pan
and pull it out.
Do
notlift the surface unit mom than 1 inch.
If you do2it may notlie flat on the drip pan when
you p;ug it back in.
Repeated lifting of the surface unit mom
than 1 inch above the drip pan can permanently
dasnage tha receptacle.
.
To replace a surface unit:
Replacethe drippan intothe recess in the
*
cooktop.Make sure openingin thepan linesup
.-.
-—
—
..-
:.-..-.=..—..4.._. .
-.
with the receptacle.
oInsertthe terminalsof the surfaceunitthrough
theopening in the drip pan and into the receptacle.
0Guids the surface unit into place soit restsevenly. ‘=--x:::=
,:
~=~
..
.-
—
Drip Pans
Removethe surfaceunits.Then liftout the drippans.
The drippanscan be cleanedby hand.Place themin a
covered container(or a plasticbag) with 1/4 cup
ammoniato loosen the soil.Then scrubwith a soap
filledscouringpad if necessary.Rinsewith clean
.
water andpolishwith a clean soft cloth.
The drippans may also be cleanedin thedishwasher.
clean the area under the drip pans often.
Built-upsoiI,especially grease, may catch fire.
.-
—
Do not cover drip pans with foil. Using foil so clo
to the receptaclecould cause shock, fire or damage t
the range.
CAUT1ON: Be sure all controls are turnedto
.~. .
:& --
OFFand surface unitsare coolbefore attempting
to removethem.
.
_.,
--
-.
--
.
,
Page 23

clean the shelveswith a mild abrasivecleanser.
.—
Wter cleaning,rinsetheshelveswithcleanwater and
drywith aclean cloth.
To remove heavy, burned-on soil, soapy metalpads
maybe used.After scrubbing,wash with soapywater,
rinseand dry.
~~~~~~ ~fi~ ~~~ ~~~~ (on somemodels)
After bmi~ing, remove the broiler pan from the oven.
Removethe rack from the pan. Carefully pour out the
grease in the pan into a proper container.Wash and
rinse the pan and rack in hot soapy water.
If food has burned on, sprin~e the rack while hot
.-
.,=:
with detergentand cover with wet paper towelsor a
dishcloth.Burned-on foods will soak loosewhile the
meal isbeing served.
CAUTION:Before replaeingyouroven lampbulb,
disconnecttheelectricpowerfor yourrangeat
themainfuseorcircuitbreakerpane!or pullthe
plug.Be
completely before removing or replacing them. When
in use, light bulbs can become warm enough to break
if touched with a moist cloth or towel. When cleaning,
avoid touching warm lamps with cleaning cloths if the
sure to let the lamp cover and bulb cool
The broilerpan and rack may also be cleaned in
the dishwasher. Do not store a soiled broiler pan
and rack anywherein therange.
remove:
To
~Hold your hand unde~the cover so it doesn’t fall
when released. With fingers of the same hand,
firmly push back the wire until it clearsthe cover.
Lift off the cover.
Do NOT mMovE MY Screws.
~Replace bulb with 40-watt home appliance bulb.
lamp cover isremoved.
The
oven lamp (bulb)
is Coveredwith a glass
@~
~h
w“
‘u
removable cover which
is held in place with a wire.
Rem(~vethe oven door,
.,
. .
if desired, to reach the
cover easily.
‘{
‘ ~y
~)
1-.4
I
~Place it into the groove of the lamp receptacle. Pull
the wire forward to the center of cover until it snaps
in place. When in place, the wire holds the cover
firmly. Be certain the wire is in thedepression in the
center of the cover.
QConnect electric power to the range.
.—a
,’
“3
1..-. ,--
.. ...-,—...........-..-———-——-.——
—-.— ..
___ —..-...+.. .....-—--—-—-.-.--,
-—.-..
—
------ L ---- .
,.X—..
—.—
Page 24

The oven door isremovable,
but it isheavy.Youmay need
help removing and replacing
the door.
To ~mmovethe door~openit a
few inchesto the specialstop
positionthat wiI1hold thedoor
open.Grasp firmly orIeach side
and ~iftthe door straightup and
off the hinges.
NOTE: Be careful notto place handsbetween the
hingeand the oven door frameas the hinge could
snap back and pinch fingers.
To mplaee the door,make sure thehinges are in the
specialstop position. Position the slots inthe bottom
of thedoorsquarely over thehinges at thesame time.
If hingessnap back against the ovenframe, pull them
back out.
TO CLEANTHE DOOR:
Inside
“ soap and waterwill normally do thejob.
of door:
Heavy spattering or spillovers may require
cleaning with a mild abrasivecleaner. Soapy, wet
metalpads may also be used. Do not allow food
spills with a high sugar or acid content (such as
milk, tomatoes, sauerkraut, fruitjuices or pie filling)
to remain on the surface. They maycause a dull
spot even after cleaning.
eIf necessaIry~ youmay usean ovencieaxBer*
Followpackage directions.
~Clean the insideof theoven window with a mild
non-scratchingcleanerand a damp cloth.
~Use soapandwater to thoroughlyclean the top$
sidesand front ofthe oven, DO NOT let water run
down through openingsin the topof the door.Rinse
well. Youmay also usea glass cleanerto clean the
glasson theoutsideof the door.
6Spillageof marinades,fruitjuices, tomato sauces
and basting materials containing acids may cause
discolorationand shouldbe wiped up immediately.
When surfaceis cool, clean and rinse.
eDonotuseovencleaners9cBeansingpowdemor
harsh abrasiveson the outside
NOTE: Do notclean the bake unitor the broil unit.
Any soilwill bum offwhen the units are heated.
The bake unit can be liftedgently toclean theoven
fIoor.If spillover,residue, or ash accumulatearound
the bake unit,gently wipe aroundthe unit with
warm water.
of the door.
—.
-.
.~
With proper care, the porceltiin
eni]mclfinish on the inside of
thti{)vcn-ttlp, bottom, sides,
back and inside of thedoorwill stay new-looking for years.
,--‘ -. .4
.=,,<:
-,
.-’
If necessary9you may use an ovenCleaner.
Follow package directions.
QDo not spray on the electrical controls and switches
because it could cause ashort circuit and result in
sparking
o Do not allow a fib-nfrom the cleaner to build upon
the temperature sensor—it could cause the oven to
heat improperly, (The sensor islocated at tl]etop of
the oven.) Carefully wipe the sensor ciean after eacl~
oven cleaning, being careful not to move the senso~
as a change in itsposition could afiect how tile
OV~~bakes.
Oi fire.
(?,
Page 25

specialcam of comtiIluous-cIe8ningoven Interior:
notattempttoCleantheoven untilyou have
Do
read this Se$!tion.
Continuous-c!eaningoven cleansitself while
The
coolting.The oven interiorisfinishedwith aspecial
coaii}igthatcannot be cleanedin theusual manner
with soap, detergents,steelwool pads, commercial
ovencleaners,coarse abrasivepadsor coarsebrushes.
Useof such cleansers and/orthe use of ovensprays
will cause permanent damage.
The special coating is a porousceramic material,
which isdark in color and feelsslightly rough to the
touch.If magnified,the surface would appearas
peaks, valleys and sub-surface“tunnels.” Thisrough
finish tends to preventgreasespattersfrom forming
littlebeadsor dropletsthat rundown the sidewalls of
a hard-surface oven liner, leaving unsightlystreaks
thatrequire hand cleaning. Instead,when spatterhits
the porous finish,it is dispersedand partially
absorbed.This spreading action increasesthe
exposureof oven soiIto heatedairand makesit
,,.omewhat~essnoticeable.
—
—-
;“
[.; .:
oiln~aynot disappear completelyand atsome time
after extended usage, stainsmay appearthat cannot
-’ be removed.
The
specialcoatingwork beston small amounts
of spatter.
especially sugars, egg or dairy mixtures. For this
reason, theoven is equipped with a removable,
replaceable aluminum foil oven bottom liner which
protects theporous finish on theb(]ttomof the oven
from spill[~vers.
‘~biss~]eci:~lcoating is RiotIlsedon oven shelves or
OKEtile inside of tl~eoven do{]r.Remove theseto
clean with ;tcommcruitil{Jvencleaner [0 prevent
dal]l;~gingthe <;[llltirlllotis-{~lcaningOven coating.
’11)Cle:lgl the coEltinRlous-cle:313iF3gove~l:
i. 1 .ctrange p[]rlsC(JC)Ibcf(lrehan~ling. We
rcct~nlrllendruhbcr glLJvcsbc w{]rnwhen cleaning.
2. Rcmc>vcshe~vtisand ci)(lkw;~re,inc[uding the
{>r{~il~:rpat]:tndI-;]ck.
.3,l?erll~}veexcess spills and [~oiiovcrsfrt~zlthe
:lluminum foil
tllc liner’fronl tllcoven.
liL~iIiLisI’r(};l}spil!iIlg~>nto the p[}rt}t~sfinish. Then
---
rcil~t]v~:~klnn~inun~
‘\
:1d:inlp (;!:)fh. (Before Clc:itli!lg ~~i ~
..
:iillillinu Iil [(~i!lint:r>Iif’t IT:l!ct:[Init out Llfthe lf’:ly.)
Itdoesnotwork well with largerspills,
C)VCII botfofil }illcf t3eforeremoving
‘~hisis t{}prevent excess
foiI bt)tt:}~llliil(:r t\r]L\clet\Il wilh
‘ ~“cnl{)viIl~~(Ilc
4. Soilvisibility maybe reducedby operatingthe
ovenat 400”F,Closethe doorand settemperature
controlto 400”F’.‘.ime for at least 4 hours.
Repeatedcyclesmay be necessarybefore
improvementinappearanceis apparent.
Remember:Duringthe operation oftheoven, the
door$ windowandotherrangesurfaceswillgethot
enoughto
COOBbefore replacingovenshe~vesandaluminum
foiloven bottom.
5. Ifa spilloveror heavy soilingoccurs on theporous
surface,as soon as the oven has cooled, remove as
much of thesoil as possibleusing a smallamount
of water and a stiff-bristlenylonbrush. Use water
sparinglyand change it frequently,keeping itas
clean aspossible, andbe sure to blot it up with
paper towels, cloths or sponges. Do notrub or
scrub with paper towels, cloths or sponges,since
they will leave unsightly lint on the ovenfinish.
If water leaves a white ring on thefinish as itdries,
applywater again andblot itwith a cleansponge,
starting at theedge of the ring and workingtoward
the center.
The insideof the oven door has a porcelainenamel
finish.The oven door lifts off for cleaning away from
the Continuous-CleaningOven. For instructionson
how to clean the inside of the oven door refer to the
Lift-Off Oven Door section.
Usecare in removing and replacing aluminumfoil
oven bottom liner and shelves and in placing and
removing dishes and food to avoid scratching,
rubbingor otherwise damaging the porousfinish on
the oven walls.
Do not use soap, detergent?steel woolpads9
Conlmercial oven eleaner9siliconeoven sprays?
ct]arse pads or coarse brushes on tineporous
surface. These
the porous
cau.nseburns. Do nottouch. ht the range
products will spot, clog and damage
surfdceandreduceitsabilityto work.
_.._.. .....—.—.
——.
‘.. --—.. —.—---- ------- -“-,-
I
~--<,[~
,/:,c.Jb
1
-.-—-
.—.—. -
.—. —. - .-.-.—————
—..
Page 26

Theal”ea Umderthe range ean bereached easily for
cleaning by
models). To remove, pullthe drawerout all the way,
tilt up the front and removeit. Toreplace, insertglides
at theback of the drawer beyond thestop on range
glides. Lift the drawer if necessaryto insert easily.Ut
the front of the drawer down, thenpush i~]to close.
Ciean up any spillsor spatterswith a damp cloth.
Remove heavier soilwith warm, soapywater.
Clean controlpanel with mild liquiddish detergent
and a soft cloth. Rub control panel lightly.
CAUTION: Do not use abrasives of any kind on the
control panel. The letteringon models with touch
pads is sensitive toabrasives and pressure.
The controlknobs may be removed for easier
cleaning. Toremove knob, puil it straightoff the stem.
Wash kobs in soap and water but do not soak.
removingthe bottom drawer (Omsome
Toclean under Emodeiswitha
front tick pane17remove the
panelby pullingitstraightout
at the bottom. To replacethe
panel,firsthookthe top tabson
and then thebottomtabs.
.
-.
ovenvent
The oven is vented through an opening under theright rear surface unit.
Never cover the opening with aluminum foil or any other material.This
would prevent the oven vent from working properly.
Painted surfaces includethe outsideoven door,sides,
control panel and drawer front. Clean these with soap
and water or a vinegar and water solution.
Do motuse Commemial oven cleaners, eleansimg
powdem9steel woolor harsh abrasives on any
painted surface,
“+”. .
—
.-
.
t
i
;I
/“ + .x.-.
*,!;~$
.— .——___. ._-. .. .
—..=.-
,=.,.._’ _
——.——.——
“.—m=.
—.., -._.. =_____=_-= . . . .. . . . ... . . ..4-. . . . ,_
Page 27

L—
-.
FOOLSYouW!LLHEEO
~Large blade screwdriver
Channellockpliers or smallratchet wrench
- ith 3/16” socket (forlevehg range)
“L
-...
~ 1/4’ hex head nutdriver
PREPARETHEOPEHIM$
1%”spacing is recommended from the range to
adjacent vertical walls above cooktop surface,
Allow
30”minimumclearancebetweensurface
unitsand bottomofunprotectedwoodor metal
top cabinet,and 15”minimumbe~~een
countertop and adjacentcabinetbottom.
To eliminate the risk ofburns orfireby reaching
overheated surface units,cabinetstorage space
abovethe surfaceunits shouldbe avoided.If
cabinetstorage isto be provided,the risk canbe
reduced byinstallingarange hood thatprojects
horizon~llya min.of5“beyondthe bottomof
the cabinets.
NOTLESSTHAN
WIDTHOFRANGE
1/
I
1,
mMow HOUSEWSE OR OPEN
CIRCUITB~R BEFom BEGINNING
INmwmoN.
Illis appliancemustbe supplied with the proper
voltage and frequency,
incliviclual,properlywounded branch circuit,
protectedbya circuit breaker ortime delayfuse,as
notedon the rating~]late.
Wiltingmust conformtoNationalElectricCodes.
Utie electric serviceprovideddoesnotmeet the
above specifications,itis recom~ended thata
licensedelectricianinstaHan approvedoutlet.
andconnectedtoan
//
)
/
I
WALL
IH
)/
INSTALL
OUTLETBOX
ON EITHER
SIDEOF
m. .,,.,.--...—-,
,.r-.--.”,—----.,-”,.
[
J
i
I
&
,-.!-..-,.
-- L-
‘d “
,L
‘v
OFRANGE
(co;tti~ttiedftextpage)
.-:-AS-L——-’”c,-
‘ ,~&_
1%“
MIN.
W~\L
(installineitilerrearcorner)
LOCATE
OUTLETBOX
/WITHIN EITHER
<_,HADED AREA
I
Page 28

PREMREFM%OPEN!MG(~omt’d)
----
..
.
Flootingunder tiefinge
Your range, likemany Otierhousehold
items9 isheavy md cm Setie into SOR
floor Covefigs such as cushioned tinyl or
ca~eting.
When movingthe range on this type
offlooring,use care, and followthese simpleand
inexpensiveinstructions.
The range should be installedon a 1/4 inchthick
sheet ofplywood(or similarmaterial)as follows:
Whenthe floor coveting ends at the @ont ofthe
range, the area that the range willrest onshould
be builtup withplywoodto the same levelor
higher than the floorcovering.This willallow
the range to be movedfor cleaning or servicing.
STEP2
FREMREFOREiEcTRHuLCOMMECTION
Use onlya 3-conductor,or ifrequired a 4conductor range cord set as noted below.These
cord sets are providedwith ring type terminals.
The electrical rating ofthe cord must be 125/250
voltsminimum, 40 amperes.
NO~: Only a 4-conductorcord is to be used
when the applianceis installedin a mobilehome
or where localcodes do not permit grounding
through the neutral.
STEP3
1. Imcateconnector blocl<at the bottom rear of
range :~n(lremove rear \viringcover.
2. Directlybelowthe co~]nectorblock is ahole
Jvitlla l{nocl<ol!tring for acco~nmo(latingconduit
fittings+Bracl<ctsprovide(lare used to suppol-t
the flexiblecor(l str:~inrelief, ~vhicllmust be
:+(-~c~lrclyatt;~chedto the ~’ordsc~t.
8W!RESYSTEM
Power CordInstillation-Insert screws
through powercord terminalsso that the screws
passthroughconnectorblockterminalsand
engage nuts. Tighten screws securely.
Cable Dhect InsMa&on—Clmp bare wires
betweenthe connector blockterminalsand
movablenutswith screws tightened securely.
1. copper Wi$-ing
Connectthe neutral or grounded wire ofthe
supplycircuit to the neutral terminal ofthe
connector block,located inthe center.The
power leads must be connected to the outside
(brass colored) terminals.
NEUTRAL
TERMINAL
/.
.-d -, -> .,
,<:,,
[J ~~
GROUNDINGSTRAP
(GROUNDINGTO RANGE)
-’Y,,
%..
...
)
Page 29

~. Muminum Wiring
connect length ofcopperbuildingwireto
A.
range terminal block.
B. Splicecopperwires to aluminumwiringusing
specialconnectorsdesigned and U.L.approved
forjoiningcopperto aluminum,and followthe
connectormanufacturer’srecommended
procedure closely.
NOIE: Wire used, locationandenclosure of
splices,etc., must conformto good wiring
practice and localcodes.
WMING:
Frame grounded to neutral ofappliance
through a link.Hused in a MOBILEHOMEor
ifLOCALCODESdo not permitgrounding
.-;~l~-o-ugh~the neutral:
1) disconnect the linkfrom neutral,
2) use grounding terminal or lead to ground
unit in accordance with localcodes, and
3) connect neutral terminal orlead to branch
circuit in usual manner.
(Ifthe applianceis to be connected by
means of a cord set, use 4-conductorcord
for this purpose.) , ,,
4
;ONNECTOR
iLocK
~lTi-1GROUNDIP
/
\
GROUND
LUG
waRMlN6
1. Mnge must be securedby ~TI-TIP bracket
supptied.
~. Seeinstructionsto install (suppliedwith
bracket).
3. Unlessproperlyinstalled,range couldbe
tippedby steppingor sittingon door.Injury
mightresult from spilledhot liquidsor from
range itself.
TypicalinstallationofAnti”Tipbracket
Attachmentto Wa!l
STEP7
LEVELINGVHEWHGE
The range must be level.Levelingfeet are located
at each corner ofthe base ofthe range. Remove
the storage drawer or kick panel (dependingon
your model)and using channellocks, rotate the
levefingfeet in and out as required to levelthe
range. (Forinstructions on howto remove and
replace the storage drawer or the kick panel, see
the CleaningUnder the Rangesection inCare
and Cleaning.)On some models,there are plastic
coverswhich may be removed for easy
adjustment oust squeeze and pull).
One ofthe rear levelingfeet willengage the
mT1-?’IP bracket (allowfor some sideto side
adjustment). Nlow a minimum clearance of1/8”
between the range and the levelingfootthat isto
be installed into the ANTI-TIPbracket.
Check the range for proper installationinto the
~TI-T113 bracket (after the range has been
properly installed) by grasping the edges ofthe
REARburner holes and carefully attempting to
tiltthe range forwarcl.
Page 30

—
1
PROBLEM
POSSIBLE CAUSE
OVEN \vILL
WORK
NOT
OVEN’LIGFIT
DOES NOT’WORK
FOOD DOESNOT
BROIL PROPERLY
FOODDOES NOT
ROAST OR BAKE
PROPERLY
~Theplug on range is not completelyinsertedin tileelectricaloutlet.
*The circuitbreakerin your househas been tripped, or a fuse has b~enblOwn.
~Oven controlsnotproperlyset.
oThe lightbulb is looseor defective. Tightenor replace.
~The switchoperating oven lightis broken. Cdl for service.
~TheOVEN SET knobnot setat BRO~.
“The OVEN TEMP knob not setat BROIL.
0The door not left ajar asrecommended.
~Improper shelf position being used. See the Broiling Guide.
~Food isbeing cooked onhot pan.
eCookware is not suited for broiling.
~Aluminumfoil used on thebroil panrack has not been fitted properly and
slitas recommended.
eThe OVEN SE?’knobnot set at BAKE.
0The OVEN TEMP knob not set atproper temperature.
eShelf positionis incorrect. See the Roasting or the Baking sections.
~Incorrectcookware orcookware of improper size is being used.
eA foil tent was notused when needed to slowdown browning duling roasting.
0The OVEN TEMP knob needs adjustment. See Adjustingthe Oven
Thermostat section.
~=:
_’;
:
SIJRFACE UNITS
NOT FUNCT1ONING
PROPERLY
~
Thesurfaceunits are notpluggedinsolidly.
*Thedrippansarenotsetsecurelyinthecooktop.
QThe surfaceunitcontrolsarenotproperlyset.
(7--‘)
,’
\
L.
,-~’
,.
.
‘-1)..
.....
‘]
/
Page 31

‘j
-- --3
WI&
.>.. —
tie purchaseofyour new GEappliance,receive tie assurancetiat tiyoueverIIeed
I 1
i~tiomation or assishnce from GE,wdllbe here, Allyoul~a~e tO ~0 is C~ll—~O1l-~ree!’
i%GE consumer service professional willprovide expert repair service,
scheduled at a time that’s convenient for you. Many GE Consumer Service
company-operated locations offer you service today or tomorrow, or at your
convenience (7:00 a.m. to 7:00 p.m. weekdays, 9:00 a.m. to 2:00 p.m. Saturdays).
Our factory-trained technician; know your appliance inside and-out–so most
repairs can be handled injust 1visit.
~~atever yourquestion about anyGEmajorappliance, GEAnswerCenter@
information serviceisavailabletohelp.
answered promptly and courteously. And you can call any time. GE Answer
Center@ service isopen 24 hours a day,
Your call—and your question—will be
7days a week.
UporI request, GEwill provide
Braiile controis for a variety of GE
appliances, and abrochure to
Consumers with impaired hearing or speech who have
access to a
TDDor a conventional teletypewritermay
call800-TDD-GEAC(800-8334322) to request
:~ssistin planning a barrier-free information or service.
kitchen forpcrsf~nswithlimited
n~<)llility.“~oobtain these ileIns,
fre(!Ofchai”ge,call
800.626$2000.
~. .....
,.
—.
.’
Page 32

,
I
YOURGERANGE
.
WARRANW
WHATISCOVERED
WHATisNOTCOVERED
Thiswarrantyisextendedto
Foroneyear from dateof original
purchase,wewill provide, free of
charge, parts and sewice labor in
yourhometo repairor rep!aceany
pad of the ran~e thatfailsbecause
of a manufacturingdefect.
theoriginalpurchaserand any
succeedingownerfor
purchased
the48 mainlandstates,Hawaiiand
Washington,D.C.InAlaskathe
warrantyisthesameexceptthat it is
LIMITEDbecauseyoumustpayto
shipthe productto theservice shop
orforthe servicetechnician’stravel
coststoyourhome.
for ordinaryhomeusein
products
Allwarranty service will be
provided by our Factory ~ervice
Centers
CustomerCare”servicersduring
normalworkinghours.
Shouldyourapplianceneed
service,duringwarrantyperiod
or beyond,call800-GE-CARES
(800-432-2737).
oService trips to your home to o Replacement of house fuses or
teach you howto usethe product. resetting of circuit breakers.
Read your Use and Care material.
If you then have any questions
about operatingthe product,
please contact your dealer or our
Consumer Affairs office atthe
address below,or call,toll free:
GE Answer Center@
800.626.2000
consumer information service
oimproper installation,
If you have an installation
problem, contact your dealer or
installer. You are responsiblefor
providing adequateelectrical, gas,
exhaustingand other connecting
facilities as described in the
Installation instructions provided
with the product.
eFailureof the product if it is used -
oDamageto productcaused by
WARRANTORIS NQT
RESPC)NSIBLEFOR
CONSEQUENTIALDAMAGES.
or byourauthorized
for other than its intended
purpose or usedcommercially. ;
accident, fire, floods or acts
of God.
Somestatesdonotallowtheexciusior~or Iimita!ionofinciden~alorconsequentialdamages,sotheabovelimitationorexclusion
maynotapplytoyou.Thiswarrantygivesyou specificlegalrights,andyoumayalsohaveother
knowwhatyourlegalrightsareinyourstate,consultyourlocalorstateconsumeratiairsofice or yourstate’sAttorneyGeneral.
To
.-
rights which vary from state to state.
 Loading...