

Page 1
GE Appliances
Range
Electric
Part No. 183D6379P007 Pub. No. 49-88000-A 01-01 JR
JBS08PIC
Owner’s Manual
Printed in Mexico
This book is printed on recycled paper.
Page 2
Congratulations!
You Are Now Part of the GE Family
Welcome to the GE family. We’re proud of our
quality products. You’ll see it in this easy-to-use
Owner’s Manual.
Best of all, you’ll experience these values each
time you use your range. That’s important,
because your new range will be part of your family
for many years. And we hope you will be part of
ours for a long time to come.
We thank you for buying GE. We appreciate your
purchase, and hope you will continue to rely
on us whenever you need quality appliances for
your home.
Safety Information
Safety Precautions . . . . . . . 3–5
Oven . . . . . . . . . . . . . . . . . . . . 4
Surface Cooking Units . . . . . . 5
Operating Instructions
Using the Surface Units . . . . . 6
Using the Oven . . . . . . . . . 7–10
Oven Thermostat . . . . . . . . . 10
Care and Cleaning
Control Panel and Knobs . . . .11
Oven/Cooktop . . . . . . . . . . . .12
Lift-Off Oven Door . . . . . . . . . 13
Oven Light Replacement . . . . 14
Broiler Pan and Grid . . . . . . . 14
Surface Units . . . . . . . . . . . . 15
Installation Instructions
Before You Begin . . . . . . . . . 16
Prepare the Opening . . . . . . . 17
Electrical Connection . . . 18, 19
Anti-Tip Device . . . . . . . . . . . 20
Leveling the Range . . . . . . . . 20
Troubleshooting Tips
Problem Solver . . . . . . . . 21–22
Inside you will find many helpful hints on how to use and maintain your
range properly. Just a little preventive care on your part can save you a
great deal of time and money over the life of your range.
You’ll find many answers to common problems in the
Problem Solver
section. Review our chart of Troubleshooting Tips first; it lists causes of
minor operating problems that you can correct yourself.
Read this Manual
GE & You, A Partnership.
For Your Records
Staple sales slip or cancelled check here.
Write the model and serial numbers here:
#
#
You can find them on a label behind the range door or behind the
storage drawer or kick panel.
2
Safety InstructionsCare and CleaningInstallation InstructionsTroubleshooting Tips
Operating Instructions
Page 3
Troubleshooting Tips
Operating Instructions
Safety Instructions
IMPORTANT SAFETY INFORMATION.
READ ALL INSTRUCTIONS BEFORE USING.
Care and Cleaning Installation Instructions
WARNING!
For your safety, the information in this manual must be followed to minimize the risk of fire or explosion,
electric shock, or to prevent property damage, personal injury, or loss of life.
All ranges can tip and injury could result.
To prevent accidental tipping of the range, attach it to the wall and floor by installing the Anti-Tip device
supplied.
To check if the device is installed and engaged properly, carefully tip the range forward. The Anti-Tip
device should engage and prevent the range from tipping over.
If you pull the range out from the wall for any reason, make sure the device is properly engaged
when you push the range back against the wall. If it is not, there is a possible risk of the range
tipping over and causing injury if you or a child stand, sit or lean on an open door.
Please refer to the Anti-Tip device information in this manual. Failure to take this precaution
could result in tipping of the range and injury.
WARNING
ANTI-TIP DEVICE
When using electrical appliances, basic safety precautions should be followed, including the following:
■Use this appliance only for its intended
purpose as described in this Owner’s
Manual.
■Be sure your appliance is properly installed
and grounded by a qualified technician in
accordance with the provided installation
instructions.
■ Do not attempt to repair or replace any part
of your range unless it is specifically
recommended in this manual. All other
servicing should be referred to a qualified
technician.
■ Before performing any service, disconnect
the range power supply at the household
distribution panel by removing the fuse or
switching off the circuit breaker.
■ Do not leave children alone—children
should not be left alone or unattended in an
area where an appliance is in use. They
should never be allowed to sit or stand on
any part of the appliance.
■ Do not allow anyone to climb, stand or hang
on the door, storage drawer or cooktop.
They could damage the range and even tip it
over, causing severe personal injury.
■ Do not store flammable materials in an oven
or near the cooktop.
■
CAUTION:
Items of interest to children
should not be stored in cabinets above a
range or on the backsplash of a range—
children climbing on the range to reach
items could be seriously injured.
SAFETY PRECAUTIONS
3
Page 4
IMPORTANT SAFETY INFORMATION.
READ ALL INSTRUCTIONS BEFORE USING.
Operating Instructions
4
Safety InstructionsCare and CleaningInstallation InstructionsTroubleshooting Tips
■ Never wear loose-fitting or hanging garments
while using the appliance. Be careful when
reaching for items stored over the range.
Flammable material could be ignited if
brought in contact with hot surface units or
heating elements and may cause severe
burns.
■ Use only dry pot holders—moist or damp pot
holders on hot surfaces may result in burns
from steam. Do not let pot holders touch hot
surface units or heating elements. Do not use
a towel or other bulky cloth.
■ For your safety, never use your appliance
for warming or heating the room.
■ Do not let cooking grease or other
flammable materials accumulate in
or near the range.
■ Do not use water on grease fires. Never pick
up a flaming pan. Turn the controls off.
Smother a flaming pan on a surface unit by
covering the pan completely with a wellfitting lid, cookie sheet or flat tray. Use a
multi-purpose dry chemical or foam-type
fire extinguisher.
■Flaming grease outside a pan can be put
out by covering it with baking soda or, if
available, by using a multi-purpose dry
chemical or foam-type fire extinguisher.
■Flame in the oven can be smothered
completely by closing the oven door and
turning the oven off or by using a multipurpose dry chemical or foam-type fire
extinguisher.
■ Do not touch the surface units, the heating
elements or the interior surface of the oven.
These surfaces may be hot enough to burn
even though they are dark in color. During
and after use, do not touch, or let clothing
or other flammable materials contact, the
surface units, areas nearby the surface units
or any interior area of the oven; allow
sufficient time for cooling first.
■Potentially hot surfaces include the cooktop,
areas facing the cooktop, oven vent opening,
surfaces near the opening, crevices around
the oven door and metal trim parts above
the door.
■
REMEMBER:
The inside surface of the oven
may be hot when the door is opened.
■ Do not store or use combustible materials,
gasoline or other flammable vapors and
liquids in the vicinity of this or any other
appliance.
■ Keep the hood and grease filters clean
to maintain good venting and to avoid
grease fires.
WARNING!
SAFETY PRECAUTIONS
COOK MEAT AND POULTRY THOROUGHLY…
Cook meat and poultry thoroughly—meat to at least an INTERNAL temperature of 160°F. and poultry to at least an
INTERNAL temperature of 180°F. Cooking to these temperatures usually protects against foodborne illness.
■ Stand away from the range when opening the
oven door. Hot air or steam which escapes
can cause burns to hands, face and/or eyes.
■ Do not heat unopened food containers.
Pressure could build up and the container
could burst, causing an injury.
■ Keep the oven vent unobstructed.
■ Keep the oven free from grease buildup.
■ Place the oven shelf in the desired position
while the oven is cool. If shelves must be
handled when hot, do not let pot holder
contact the heating elements.
■ Pulling out the shelf to the stop-lock is a
convenience in lifting heavy foods. It is also a
precaution against burns from touching hot
surfaces of the door or oven walls.
■ When using cooking or roasting bags in the
oven, follow the manufacturer’s directions.
■ Do not use the oven to dry newspapers. If
overheated, they can catch on fire.
■ Do not use the oven for a storage area. Items
stored in an oven can ignite.
■ Do not leave paper products, cooking
utensils or food in the oven when not in use.
OVEN
Page 5
Troubleshooting Tips
Operating Instructions
Safety Instructions Care and Cleaning Installation Instructions
5
Use proper pan size—select cookware having flat bottoms large enough to cover the surface unit
heating element. The use of undersized cookware will expose a portion of the surface unit to direct
contact and may result in ignition of clothing. Proper relationship of cookware to surface unit will also
improve efficiency.
■Never leave the surface units unattended at
high heat settings. Boilovers cause smoking
and greasy spillovers that may catch on fire.
■Do not use aluminum foil to line the drip
pans or anywhere in the oven except as
described in this manual. Misuse could
result in a shock, fire hazard or damage
to the range.
■Be sure the drip pans and the vent duct are
not covered and are in place. Their absence
during cooking could damage range parts
and wiring.
■Only certain types of glass, glass ⁄ceramic,
earthenware or other glazed containers are
suitable for cooktop service; others may
break because of the sudden change in
temperature.
■To minimize the possibility of burns, ignition
of flammable materials and spillage, the
handle of a container should be turned
toward the center of the range without
extending over nearby surface units.
■Always turn the surface units off before
removing cookware.
■Do not immerse or soak the removable
surface units. Do not put them in a
dishwasher. Do not self-clean the surface
units in the oven.
■When preparing flaming foods under the
hood, turn the fan on.
■To avoid the possibility of a burn or electric
shock, always be certain that the controls for
all surface units are at the
OFF
position and
all coils are cool before attempting to lift or
remove a unit.
■Clean the cooktop with caution. If a wet
sponge is used to wipe spills on a hot
cooktop, be careful to avoid steam burns.
■Keep an eye on foods being fried at high or
medium high heat settings.
■Foods for frying should be as dry as possible.
Frost on frozen foods or moisture on fresh
foods can cause hot fat to bubble up and over
the sides of the pan.
■Use little fat for effective shallow or deep fat
frying. Filling the pan too full of fat can cause
spillovers when food is added.
■If a combination of oils or fats will be used in
frying, stir together before heating, or as fats
melt slowly.
■Always heat fat slowly, and watch as it heats.
■Use a deep fat thermometer whenever
possible to prevent overheating fat beyond
the smoking point.
SURFACE COOKING UNITS
READ AND FOLLOW THIS SAFETY INFORMATION CAREFULLY.
SAVE THESE INSTRUCTIONS
Page 6
Operating Instructions
Safety InstructionsCare and CleaningInstallation InstructionsTroubleshooting Tips
6
Using the surface units.
Throughout this manual, features and appearance may vary from your model.
How to Set
Push the knob in and turn in either
direction to the setting you want.
At both
OFF
and HIthe control
clicks
into
position. You may hear slight
clicking
sounds during cooking, indicating the
control is keeping the power level you set.
Be sure you turn the control knob
to OFF when you finish cooking.
Surface Cookware Tips
(on some models)
Use medium- or heavy-weight cookware.
Aluminum cookware conducts heat faster
than other metals. Cast-iron and coated
cast-iron cookware are slow to absorb heat,
but generally cook evenly at low to medium
heat settings. Steel pans may cook unevenly
if not combined with other metals.
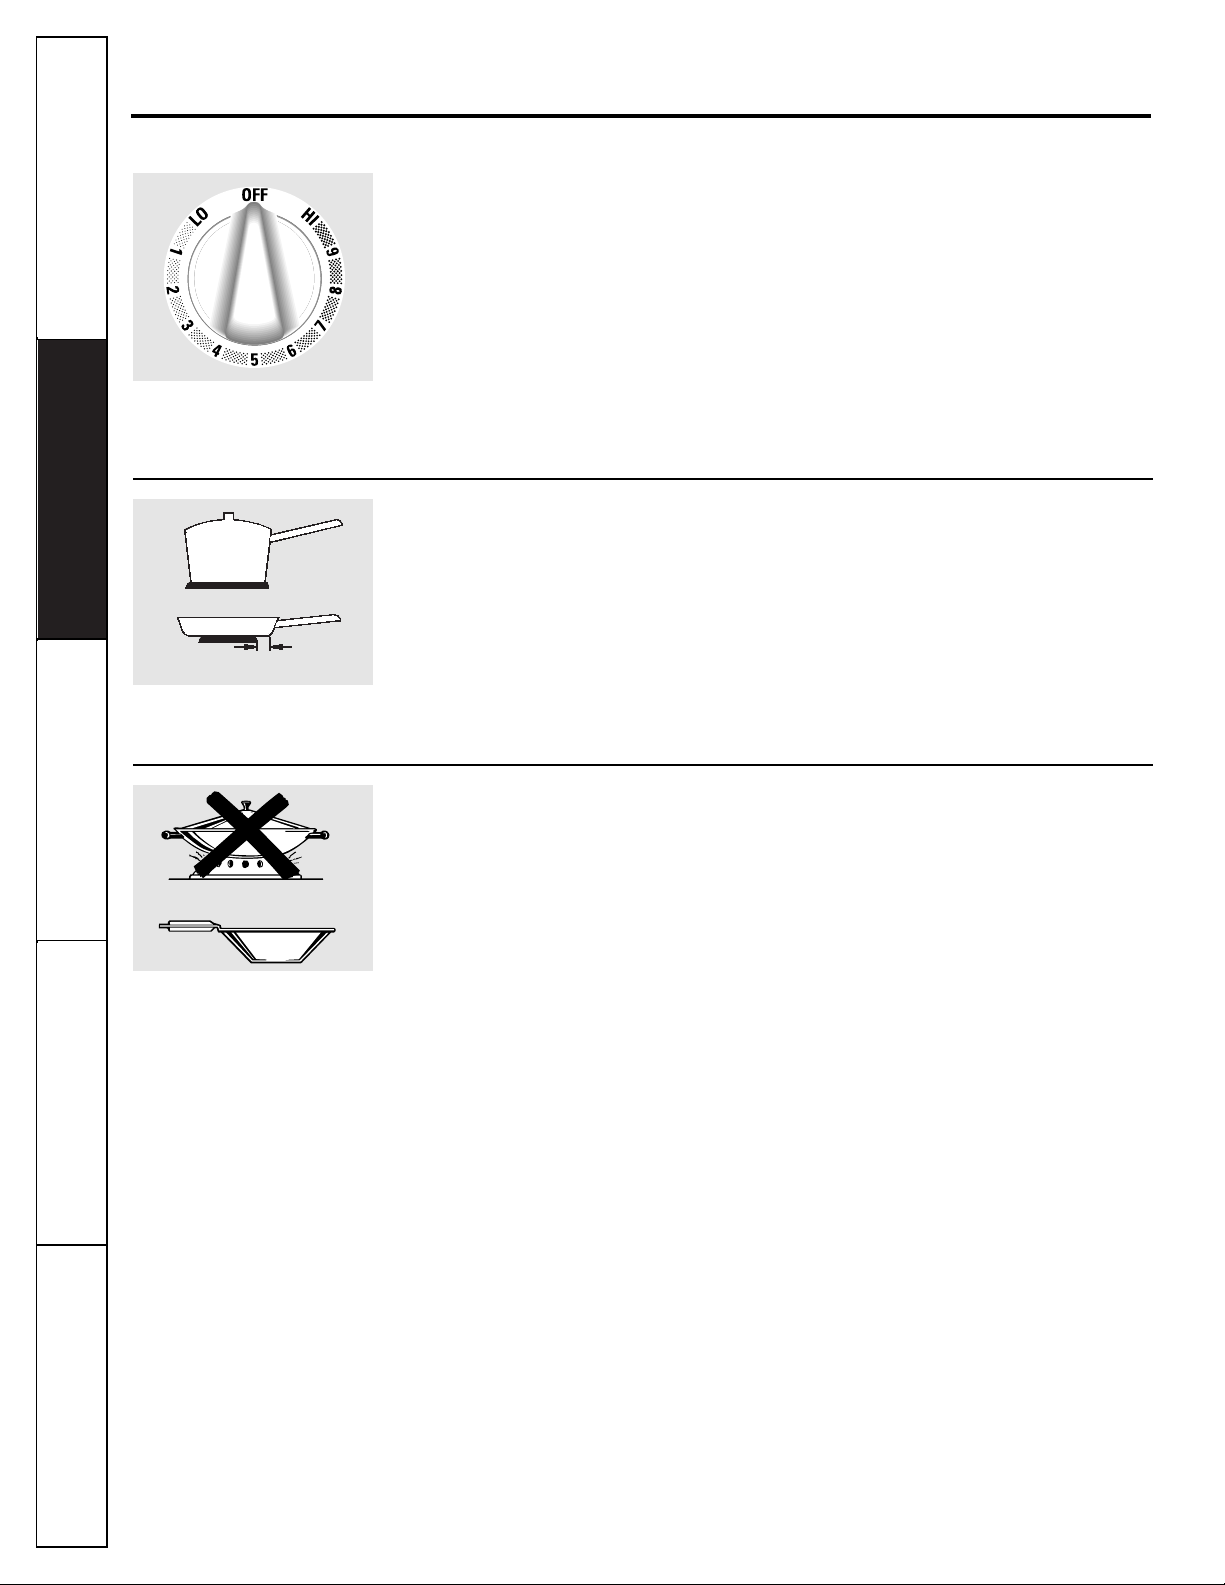
For best cooking results, pans should be flat
on the bottom. Match the size of the
saucepan to the size of the surface unit. The
pan should not extend over the edge of the
surface unit more than 1 inch.
Not over 1 inch
1″
Wok Cooking
(on some models)
We recommend that you use only a flat-bottomed
wok. They are available at your local retail store.
Do not use woks that have support rings.
Use of these types of woks, with or without
the ring in place, can be dangerous.
Placing the ring over the surface unit will
cause a build-up of heat that will damage
the porcelain cooktop. Do not try to use
such woks without the ring. You could be
seriously burned if the wok tipped over.
Use only flat-bottomed woks.
Page 7
7
Troubleshooting TipsCare and Cleaning Installation Instructions
Operating InstructionsSafety Instructions
Using the oven.
To avoid possible burns, place the shelves in the desired position before you turn the oven on.
Before you begin…
The shelves have stop-locks, so that when
placed correctly on the supports, they will
stop before coming completely out, and will
not tilt.
When placing and removing cookware,
pull the shelf out to the bump on the shelf
support.
To remove a shelf,
pull it toward you, tilt the
front end up and pull it out.
To replace,
place the end of the shelf (stoplocks) on the support, tilt up the front and
push the shelf in.
The oven has 6 shelf positions.
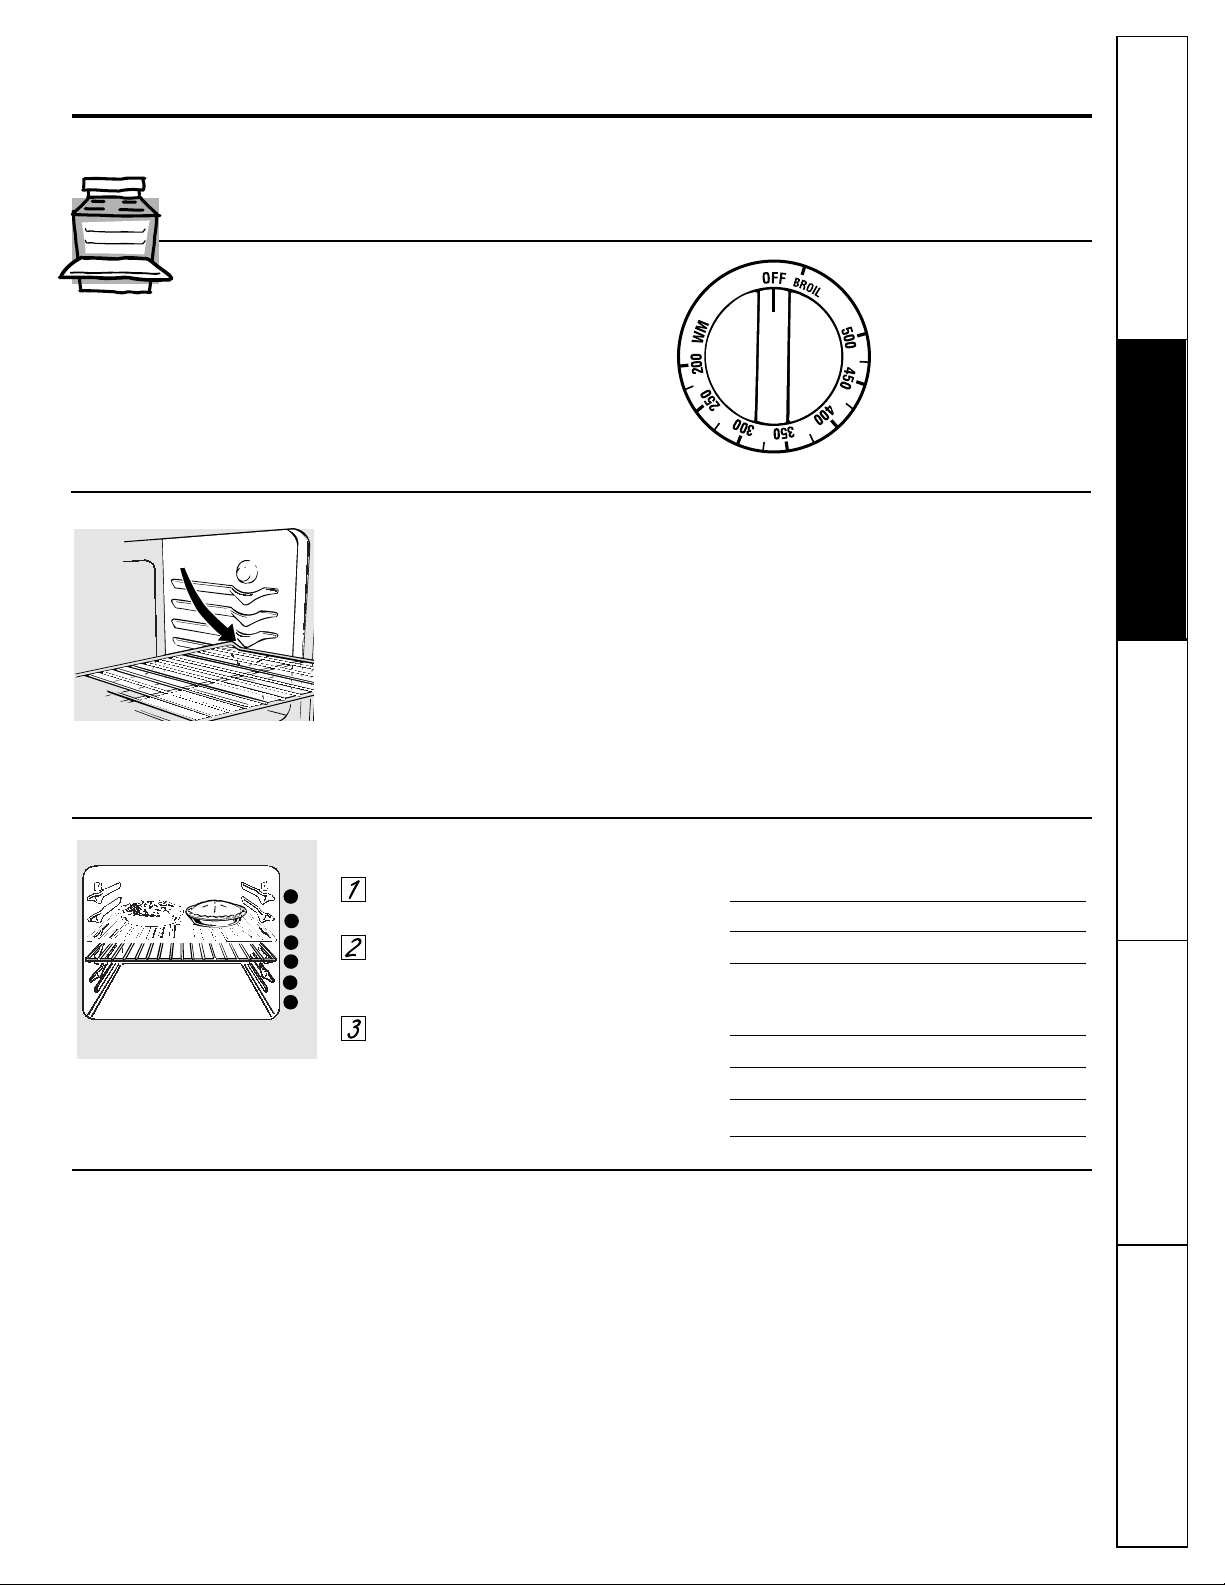
How to Set the Oven for Baking or Roasting
Turn the Oven Temperature knob to
the temperature you desire.
Check food for doneness at minimum
time on recipe. Cook longer if
necessary.
Turn the Oven Temperature knob to
OFF
when cooking is complete.
Type of Food Shelf Position
Frozen pies (on cookie sheet) C
Angel food, bundt or pound cakes B or C
Biscuits, muffins, brownies, B or C
cookies, cupcakes,
layer cakes, pies
Casseroles B or C
Turkey R or A
Roasting R, A or B
E
D
B
C
A
R
Oven Control Settings
(on standard clean models only)
Oven Temperature Knob
Turn this knob to the setting you want.
■
The oven cycling light glows until the oven reaches your
selected temperature, then goes off and on with the oven
element(s) during cooking.
Preheating and Pan Placement
Preheat the oven if the recipe calls for it.
To preheat, set the oven at the correct
temperature. Preheating is necessary for
good results when baking cakes, cookies,
pastry and breads.
For ovens without a preheat indicator light or tone,
preheat 10 minutes.
Baking results will be better if baking pans
are centered in the oven as much as
possible. Pans should not touch each other
or the walls of the oven. If you need to use
two shelves, stagger the pans so one is not
directly above the other, and leave
approximately 3.81 cm (1
1
⁄2″) from the
front of the pan to the front of the shelf.
Page 8
Using the oven.
Operating Instructions
Safety InstructionsCare and CleaningInstallation InstructionsTroubleshooting Tips
8
Aluminum Foil
Never entirely cover a shelf with aluminum
foil. This will disturb the heat circulation
and result in poor baking.
You can use aluminum foil to line the
broiler pan and broiler grid. However, you
must mold the foil tightly to the grid and cut
slits in it just like the grid.
How to Set the Oven for Broiling
Place the meat or fish on the broiler
grid in the broiler pan.
Follow suggested shelf positions in the
Broiling guide.
Turn the Oven Temperature knob to
BROIL.
Leave the door open to the broil
stop position. The door stays open
by itself, yet the proper temperature
is maintained in the oven.
Page 9

9
Troubleshooting TipsCare and Cleaning Installation Instructions
Operating InstructionsSafety Instructions
Quantity and/ Shelf First Side Second Side
Food or Thickness Position Time (min.) Time (min.) Comments
Ground Beef 1 lb. (4 patties) C 13 8 Space evenly.
1
/2 to
3
/4″ thick
4 lbs. (12 patties) C 15 11
Beef Steaks
Rare†
3
/4 to 1″ thick E 6 4 Steaks less than 3/4″
Medium 1 to 1 1/2 lbs. D 8 6 thick are difficult
Well Done D 10 8 to cook rare.
Slash fat.
Rare† 1
1
/2″ thick C 10 8
Medium 2 to 2 1/2 lbs. C 15 10–12
Well Done D 20 20
Chicken 1 whole cut up B 25 25 Brush each side with
2 to 2 1⁄2 lbs., melted butter.
split lengthwise Broil skin-side-down
Breast B 25 15 first.
Bakery Product
Bread (toast) 2 to 4 slices D 3 1 Space evenly. Place
English Muffin 2 (split) E 3-4 English muffins cut-
side-up and brush
with butter if desired.
Lobster Tails 2–4 B 18–20 Do not Cut through back of
turn shell. Spread open.
over. Brush with melted
butter before broiling
and after half of
broiling time.
Fish Fillets 1 lb. (1/4 to
1
/2″ thick) D 5 5 Handle and turn very
carefully. Brush with
lemon butter before
and during cooking,
if desired.
Salmon
Steaks 2 (1″ thick) D 10 5 Turn carefully. Do not
Fillets 2 (1/2 to
3
/4″ thick) D 10 turn skin side down.
Ham Slices
1
/2″ thick C 6 6
(precooked) 1″ thick C 8 8
Pork Chops 2 (
1
/2″ thick) C 10 10 Slash fat.
Well Done 2 (1″ thick) about 1 lb. C 15 15
Lamb Chops
Medium 2 (1″ thick) about 10 D 7 4 Slash fat.
Well Done to 12 oz. D 10 9
Medium 2 (1
1
/2″ thick) about 1 lb. D 9 6
Well Done D 14 10
Broiling Guide
The size, weight, thickness,
starting temperature,
and your preference
of doneness will affect
broiling times. This guide
is based on meats at
refrigerator temperature.
Page 10
Adjust the oven thermostat—Do it yourself!
Operating Instructions
Safety InstructionsCare and CleaningInstallation InstructionsTroubleshooting Tips
You may find that your new oven cooks differently than the one it replaced. Use your new oven for a few weeks to
become more familiar with it. If you still think your new oven is too hot or too cold, you can adjust the thermostat yourself.
Do not use thermometers, such as those found in grocery stores, to check the temperature setting of your oven. These thermometers may vary
11–22°C. (20–40°F).
The type of margarine will affect baking performance!
Most recipes for baking have been developed using high fat products such as butter or margarine (80% fat). If you
decrease the fat, the recipe may not give the same results as with a higher fat product.
Recipe failure can result if cakes, pies, pastries, cookies or candies are made with low fat spreads. The lower the fat content of a spread product,
the more noticeable these differences become.
Federal standards require products labeled “margarine” to contain at least 80% fat by weight. Low fat spreads, on the other
hand, contain less fat and more water. The high moisture content of these spreads affects the texture and flavor of baked
goods. For best results with your old favorite recipes, use margarine, butter or stick spreads containing at least 70%
vegetable oil.
10
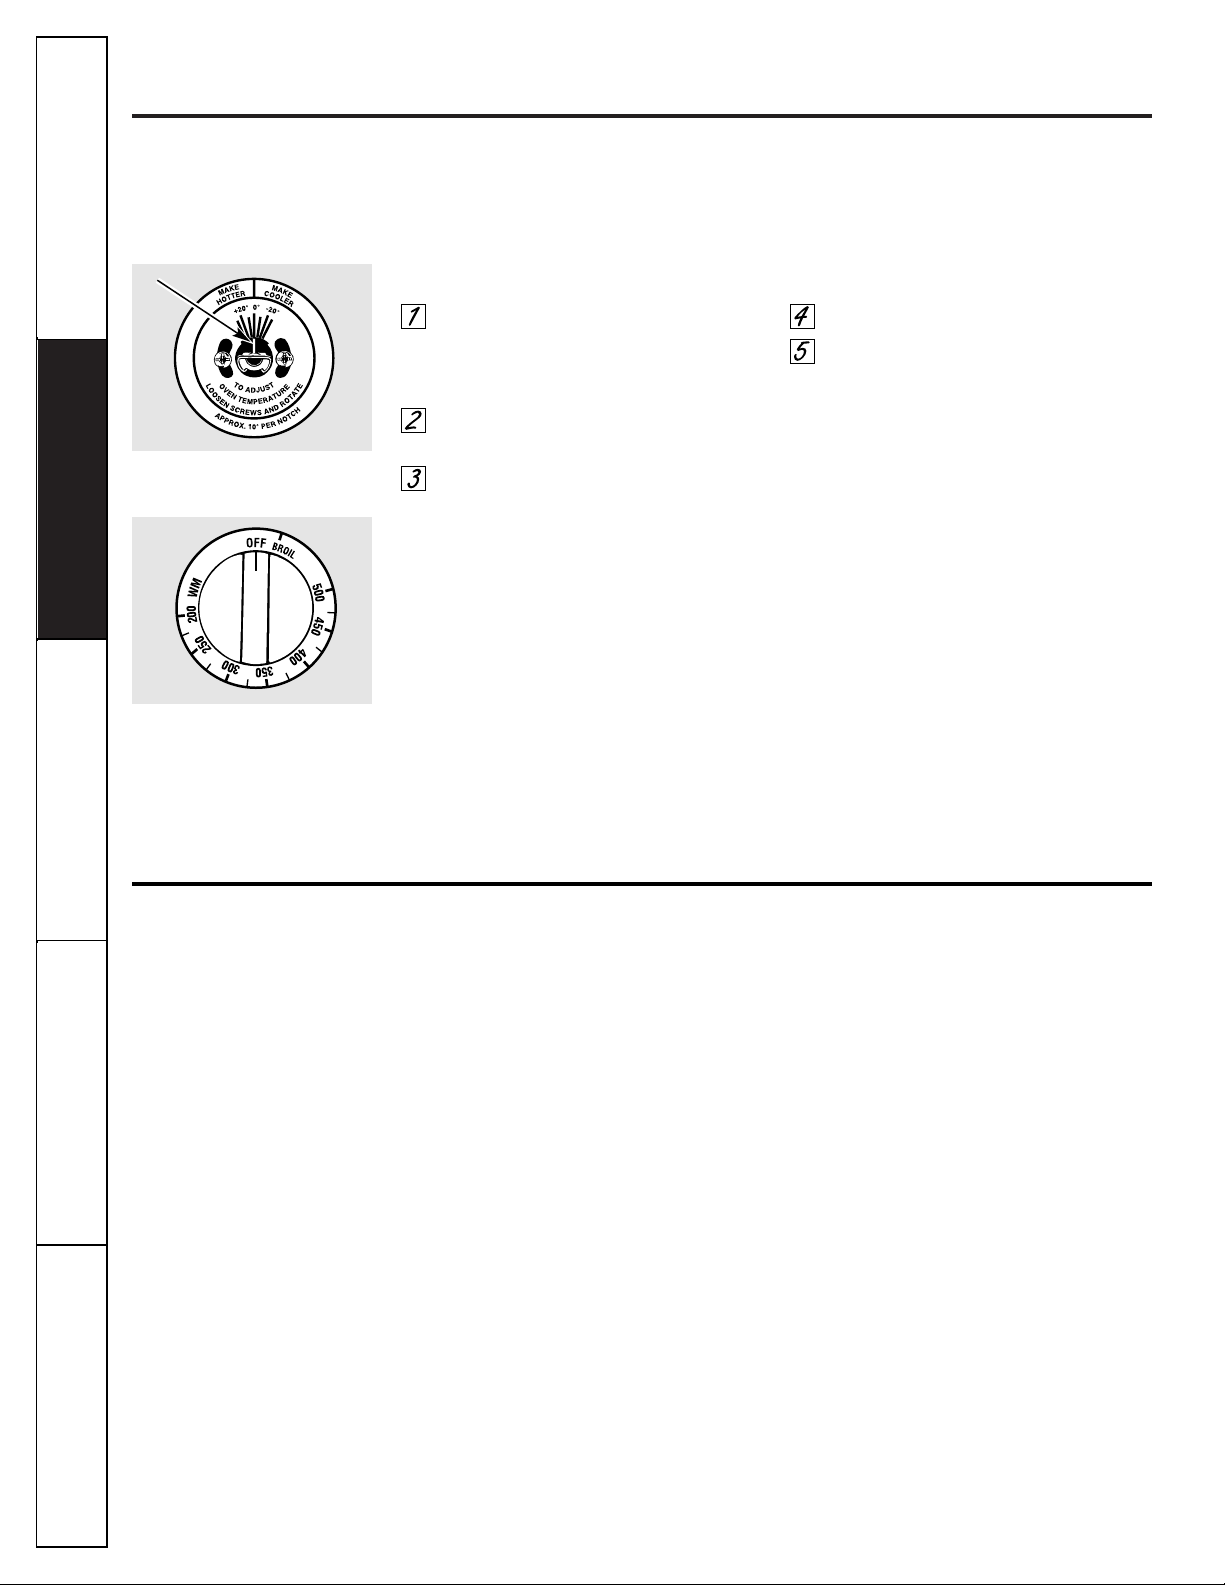
For Models with Only an Oven Temperature Knob
Pull the Oven Temp knob off the shaft,
look at the back of the knob and note
the current setting
before
making any
adjustments.
Loosen both screws on the back of the
knob.
To
increase
the oven temperature,
move the pointer toward the words
“MAKE HOTTER.”
To
decrease
the oven temperature,
turn the pointer toward the words
“MAKE COOLER.”
Each notch changes the temperature by 10
degrees Fahrenheit.
Tighten the screws.
Replace the knob, matching the flat
area of the knob to the shaft.
Front of OVEN TEMP knob (knob
appearance may vary)
Back of OVEN TEMP knob
Pointer
Page 11

11
Troubleshooting TipsCare and Cleaning Installation Instructions
Operating InstructionsSafety Instructions
Care and cleaning of the range.
Control Panel and Knobs
Clean up spatters with a damp cloth.
Remove heavier soil with warm, soapy water.
Do not use abrasives of any kind on the control panel.
The control knobs may be removed for
easier cleaning. To remove a knob, pull it
straight off the stem. Wash the knobs in
soap and water but do not soak.
Pull the knob straight off the stem.
Oven Vent
(on some models)
The oven is vented through an opening
under the right rear surface unit.
Never cover the opening with aluminum foil
or any other material.
Coil models oven vent location.
If your range is removed for cleaning, servicing or any reason, be sure the anti-tip
device is re-engaged properly when the range is replaced. Failure to take this
precaution could result in tipping of the range and cause injury.
Painted Surfaces
Painted surfaces include the sides of the
range and sides of the door trim.
Clean these with soap and water or a vinegar
and water solution.
Do not use commercial oven cleaners,
cleaning powders, steel wool or harsh
abrasives on any painted surface.
Page 12

Porcelain Oven Interior
(for standard clean models only)
With proper care, the porcelain enamel
finish on the inside of the oven—top,
bottom, sides, back and inside of the door—
will stay new-looking for years.
Let the range cool before cleaning. We
recommend that you wear rubber gloves
when cleaning the range.
Soap and water will normally do the job.
Heavy spattering or spillovers may require
cleaning with a mild abrasive cleaner.
Soapy, wet metal pads may also be used.
Do not allow food spills with a high sugar or acid
content (such as milk, tomatoes, sauerkraut, fruit
juices or pie filling) to remain on the surface. They
may cause a dull spot even after cleaning.
Household ammonia may make the
cleaning job easier. Place
1/2 cup in a shallow glass or pottery
container in a cold oven overnight. The
ammonia fumes will help loosen the
burned-on grease and food.
If necessary, you may use an oven cleaner.
Follow the package directions.
Do not spray oven cleaner on the electrical
controls and switches because it could
cause a short circuit and result in sparking
or fire.
Do not allow a film from the cleaner to
build up on the temperature sensor—it
could cause the oven to heat improperly.
(The sensor is located at the top of the
oven.) Carefully wipe the sensor clean
after each oven cleaning, being careful not
to move the sensor as a change in its
position could affect how the oven bakes.
Do not spray any oven cleaner on the oven
door, handles or any exterior surface of the
oven, cabinets or painted surfaces. The
cleaner can damage these surfaces.
Porcelain Enamel Cooktop
The porcelain enamel finish is sturdy but
breakable if misused. This finish is acidresistant. However, any acidic foods spilled
(such as fruit juices, tomato or vinegar)
should not be permitted to remain on
the finish.
If acids spill on the cooktop while it is hot,
use a dry paper towel or cloth to wipe it up
right away. When the surface has cooled,
wash with soap and water. Rinse well.
For other spills such as fat spatterings, wash
with soap and water or cleansing powders
after the surface has cooled. Rinse well.
Polish with a dry cloth.
Oven Shelves
Clean the shelves with an abrasive cleanser
or steel wool.
Care and cleaning of the range.
Operating Instructions
Safety InstructionsCare and CleaningInstallation InstructionsTroubleshooting Tips
12
Page 13
13
Troubleshooting TipsCare and Cleaning Installation Instructions
Operating InstructionsSafety Instructions
Care and cleaning of the range.
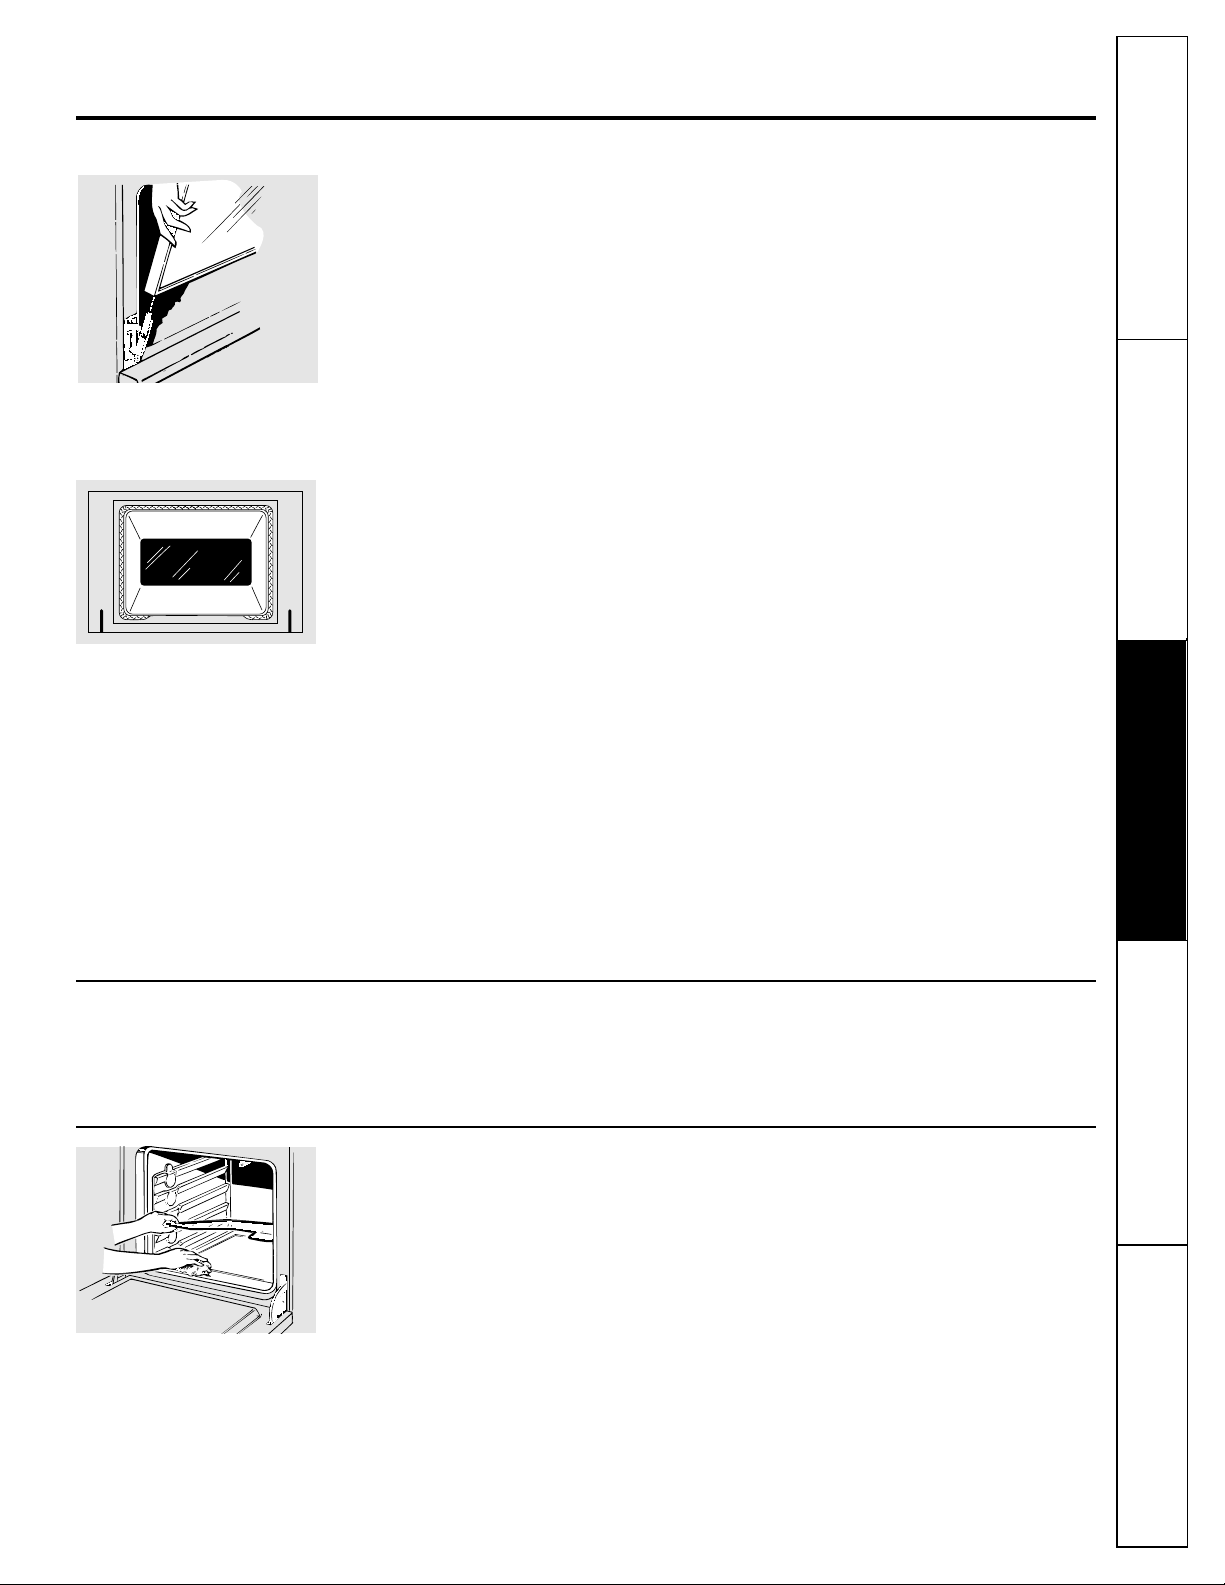
Lift-Off Oven Door
The oven door is removable for cleaning.
Do not lift the door by the handle.
To remove the door,
open it to the special
stop position. Grasp firmly on each side and
lift the door straight up and off the hinges.
Do not place hands between the hinge and the oven
door frame.
To replace the door,
make sure the hinges
are in the special stop position. Position
the slots in the bottom of the door squarely
over the hinges and slowly lower it over
both hinges.
To clean the inside of the door:
(on standard clean models)
■ Soap and water will normally do the
job. Heavy spattering or spillovers may
require cleaning with a mild abrasive
cleaner. Soapy, wet metal pads may also
be used.
Do not allow food spills with a high sugar or acid
content (such as milk, tomatoes, sauerkraut, fruit
juices or pie filling) to remain on the surface. They
may cause a dull spot even after cleaning.
■ If necessary, you may use an oven cleaner.
Follow the package directions.
■ Clean the inside of the oven window with
a mild non-scratching cleaner and a
damp cloth.
To clean the outside of the door:
■ Use soap and water to thoroughly clean
the top, sides and front of the oven door.
Rinse well. You may also use a glass
cleaner to clean the glass on the outside
of the door. Do not let water drip into the
vent openings.
■ Spillage of marinades, fruit juices, tomato
sauces and basting materials containing
acids may cause discoloration and should
be wiped up immediately. When surface
is cool, clean and rinse.
■ Do not use oven cleaners, cleaning
powders or harsh abrasives on the
outside of the door.
Lift the door straight up and off the
hinges.
The gasket is designed with a gap
at the bottom to allow for proper air
circulation.
Do not rub or clean the door
gasket—it has an extremely low
resistance to abrasion.
If you notice the gasket becoming
worn, frayed or damaged in any
way or if it has become displaced
on the door, you should have it
replaced.
Glass Window
(on some models)
To clean the outside glass finish, use a glass
cleaner. Rinse and polish with a dry cloth.
Oven Heating Elements
Do not clean the bake element or the broil element.
Any soil will burn off when the elements are heated.
To clean the oven floor, gently lift the bake
element. Clean with warm soapy water.
Page 14
Oven Light Replacement
(on some models)
CAUTION: Before replacing your oven light
bulb, disconnect the electrical power to
the range at the main fuse or circuit
breaker panel.
Be sure to let the light cover and bulb cool
completely.
To remove the cover:
Hold a hand under the cover so it
doesn’t fall when released. With fingers
of the same hand, firmly push back the
wire cover holder. Lift off the cover.
Do not remove any screws to remove the cover.
Replace bulb with a 40-watt household
appliance bulb.
To replace the cover:
Place it into groove of the light
receptacle. Pull wire forward to the
center of the cover until it snaps into
place.
Connect electrical power to the range.
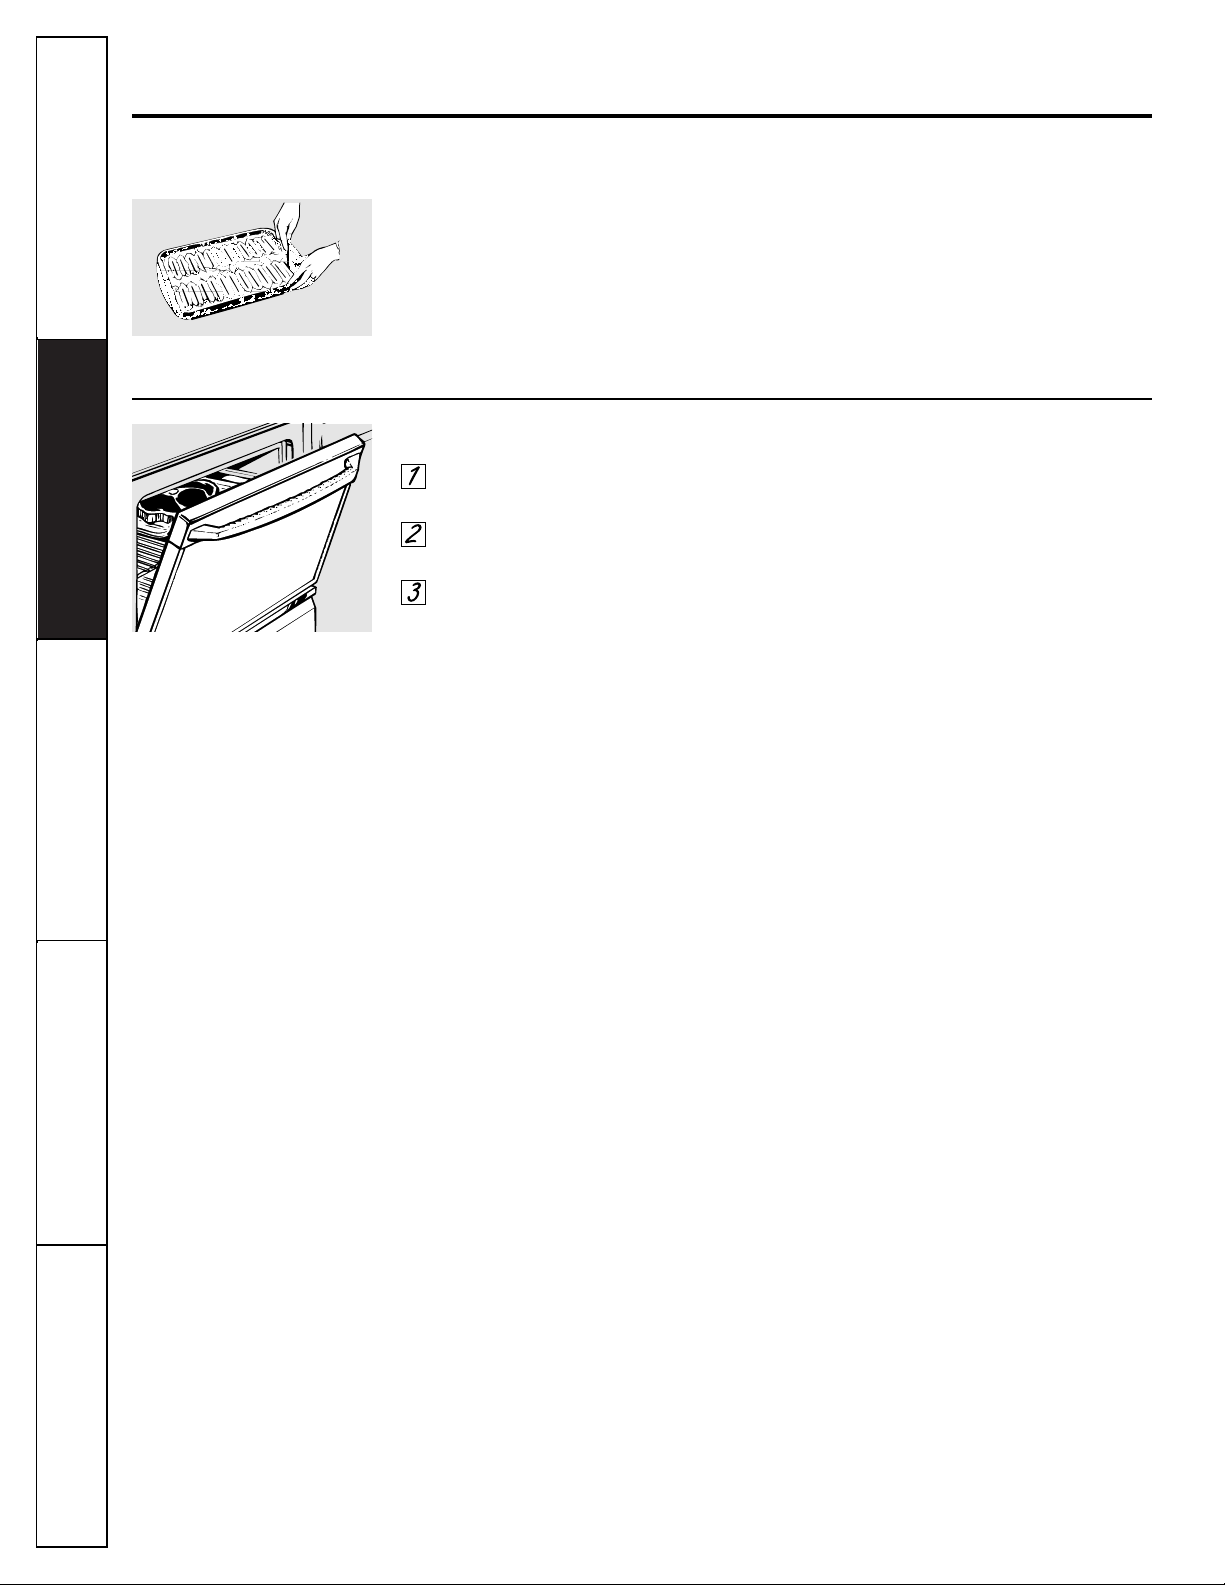
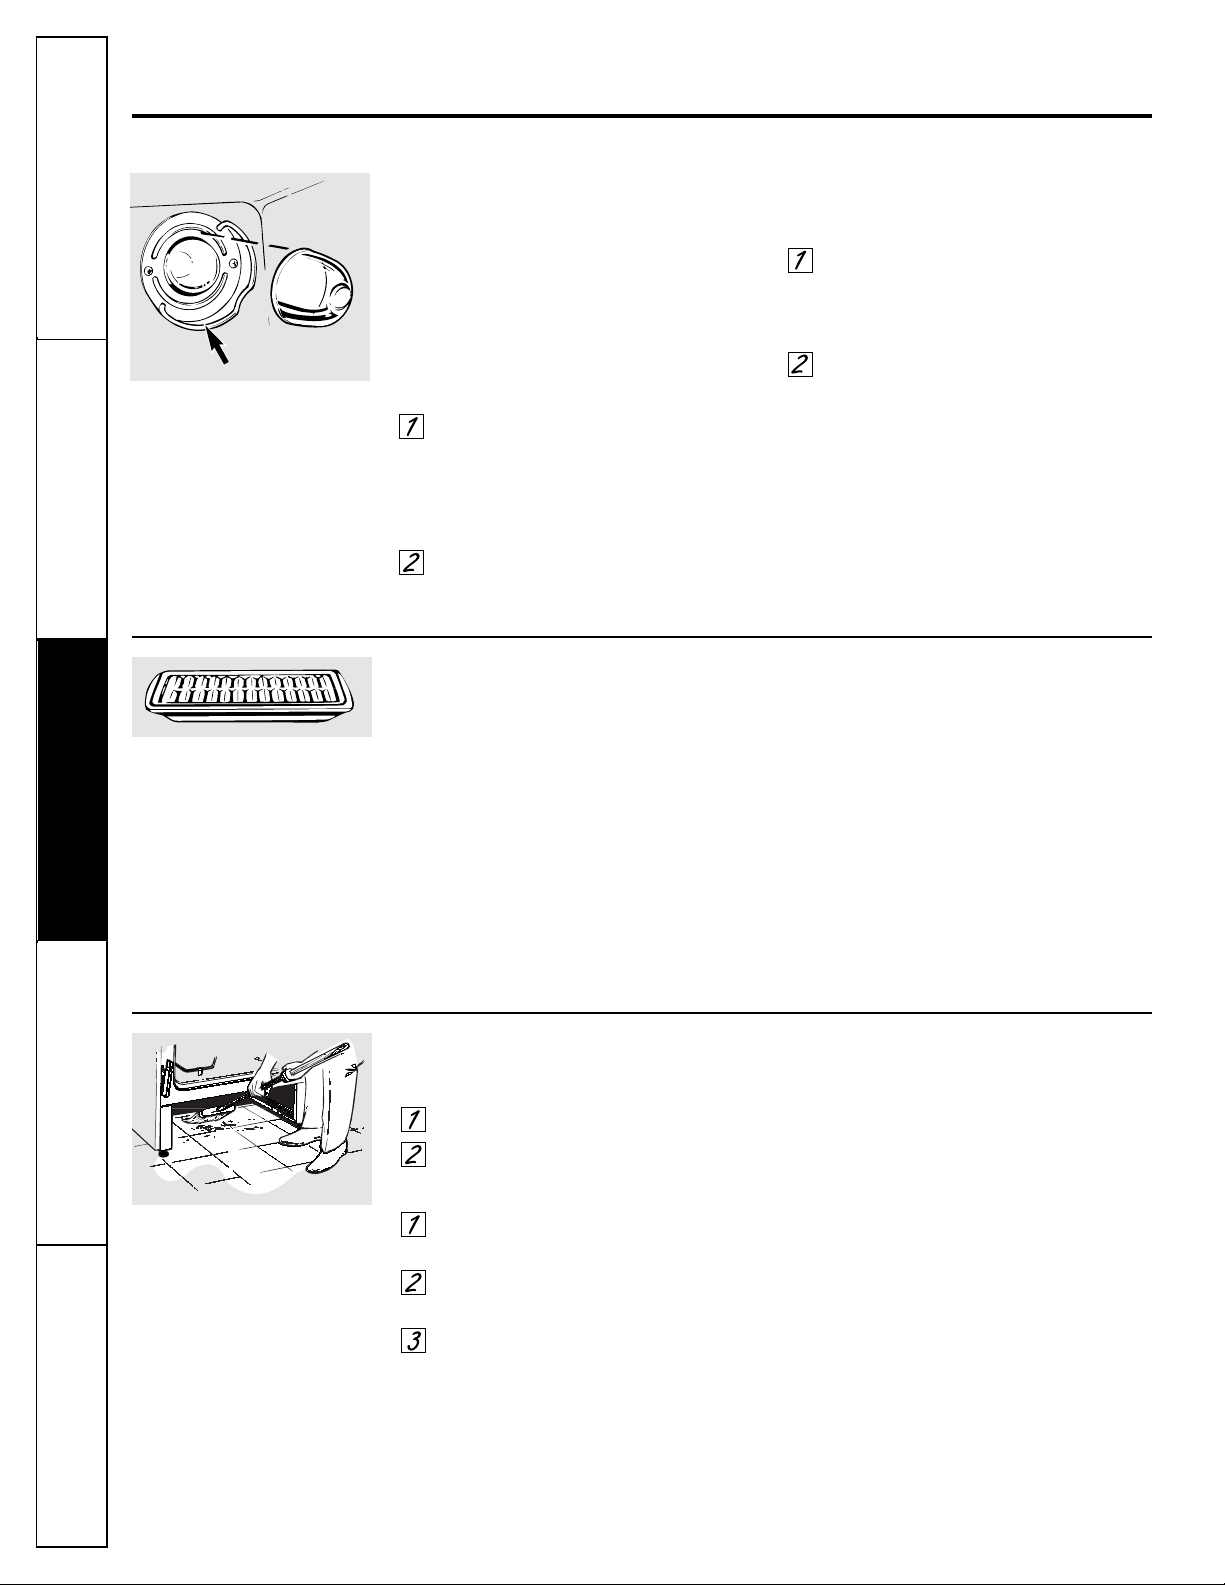
Broiler Pan & Grid
After broiling, remove the broiler pan from
the oven. Remove the grid from the pan.
Carefully pour out the grease from the pan
into a proper container.
Wash and rinse the broiler pan and grid in
hot water with a soap-filled or plastic
scouring pad.
If food has burned on, sprinkle the grid
with detergent while hot and cover with wet
paper towels or a dishcloth. Soaking the pan
will remove burned-on foods.
The broiler pan may be cleaned with a
commercial oven cleaner. If the grid is grey
enamel, it can also be cleaned with an oven
cleaner. If the grid is chrome, do not use an
oven cleaner to clean it.
Both the broiler pan and grid can also be
cleaned in the dishwasher.
Do not store a soiled broiler pan and grid anywhere
in the range.
After broiling, remove the broiler
pan from the oven.
How to Remove the Storage Drawer or Kick Panel to Clean Under the Range
To remove the storage drawer:
Pull the drawer out all the way.
Tilt up the front and remove it.
To replace the storage drawer:
Insert glides at the back of the drawer
beyond the stop on range glides.
Lift the drawer if necessary to insert
easily.
Let the front of the drawer down, then
push in to close.
To remove the kick panel,
pull it straight out
at the top.
To replace the panel,
first hook the bottom
tabs on and then the top tabs.
Clean under the range.
Wire cover holder
Operating Instructions
Safety InstructionsCare and CleaningInstallation InstructionsTroubleshooting Tips
14
Care and cleaning of the range.
Page 15

15
Troubleshooting TipsCare and Cleaning Installation Instructions
Operating InstructionsSafety Instructions
Be sure the controls are turned to OFF and the surface units are cool before attempting to remove them.
Surface Units
(on some models)
To clean the surface units, turn the control
to the highest setting for a minute. The coils
will burn off any soil.
To remove a surface unit:
To remove the drip pans for cleaning, the
surface units must be removed first.
Lift the surface unit about 2.5 cm (1 inch)
above the drip pan and pull it out.
Do not lift the surface unit more than 2.5 cm (1 inch).
If you do, it may not lie flat on the drip pan when
you plug it back in.
Repeated lifting of the surface unit more
than 2.5 cm (1 inch) above the drip pan can
permanently damage the receptacle.
To replace a surface unit:
Replace the drip pan into the recess in the
cooktop. Make sure the opening in the pan
lines up with the receptacle.
Insert the terminals of the surface unit
through the opening in the drip pan and
into the receptacle.
Guide the surface unit into place so it rests
evenly.
Do not immerse the surface units in liquids
of any kind.
Do not clean the surface units in a
dishwasher.
Do not bend the surface unit plug
terminals.
Do not attempt to clean, adjust or in any
way repair the plug-in receptacle.
Drip Pans
(on some models)
Remove the surface units. Then lift out the
drip pans.
For best results, clean the drip pans by
hand. Place them in a covered container (or
a plastic bag) with 60 ml (1/4) cup ammonia
to loosen the soil. Then scrub with a soapfilled scouring pad if necessary. Rinse with
clean water and polish with a clean soft cloth.
The drip pans may also be cleaned in the
dishwasher.
Clean the area under the drip pans often.
Built-up soil, especially grease, may catch
fire.
Do not cover the drip pans with foil. Using foil so
close to the receptacle could cause shock, fire or
damage to the range.
Lift-Up Cooktop
(on some models)
Some models have a cooktop that can be
lifted up for easier cleaning. The entire
cooktop may be lifted up and supported in
the up position.
The surface units do not need to be
removed; however, you may remove one to
make raising the cooktop easier. There are
two side supports that lock into position
when the cooktop is lifted up.
After cleaning under the cooktop with hot,
mild soapy water and a clean cloth, lower
the cooktop. Be careful not to pinch your
fingers.
To lower the cooktop, push the rods back
and gently lower the cooktop until it rests in
place.
Be sure all surface units are turned
off before raising the cooktop.
Surface unit
Drip pan
Receptacle
Page 16

Operating Instructions
Safety InstructionsCare and CleaningInstallation InstructionsTroubleshooting Tips
16
International Installation Instructions.
(220–240, 50/60Hz, 2-wire)
Read these instructions completely and carefully.
Before You Begin
IMPORTANT: Save these instructions for the local
electrical inspector’s use.
IMPORTANT: OBSERVE ALL GOVERNING CODES
AND ORDINANCES.
NOTE TO INSTALLER: Leave these instructions
with the appliance after installation is completed.
NOTE TO CONSUMER: Keep this Owner’s Manual
and Installation Instructions for future use.
NOTE: This appliance must be properly grounded.
Tools You Will Need
■Large blade screwdriver
■6 mm (1/4″)hex head nutdriver
■Channel lock pliers
■3/16″open-end or socket wrench
■1 3⁄8″open-end or adjustable wrench
■Tape measure
Electrical Requirements
CAUTION, FOR PERSONAL SAFETY: DO NOT USE
AN EXTENSION CORD WITH THIS APPLIANCE.
REMOVE HOUSE FUSE OR OPEN CIRCUIT
BREAKER BEFORE BEGINNING INSTALLATION.
This appliance must be supplied with the proper
voltage and frequency, and connected to an
individual, properly grounded branch circuit,
protected by a circuit breaker or time delay fuse,
as noted on the rating plate.
Wiring must conform to National Electric Codes.
If the electric service provided does not meet the
above specifications, have a licensed electrician
install an approved outlet.
Because range terminals are not accessible after
range is in position, flexible service conduit or cord
must be used.
Page 17

Read these instructions completely and carefully.
Troubleshooting Tips
Operating InstructionsSafety Instructions
Care and Cleaning Installation Instructions
Preparing the Opening
Allow 3.81 cm (1
1
⁄2″) spacing from the range to
adjacent vertical walls above cooktop surface.
Allow 76.2 cm (30″) minimum clearance between
surface units and bottom of unprotected wood or
metal top cabinet, and 38.1 cm (15″) minimum
between countertop and adjacent cabinet bottom.
EXCEPTION: Installation of a listed microwave oven or
cooking appliance over the cooktop shall conform to the
installation instructions packed with that appliance.
If cabinet storage is installed, reduce risk by
installing a range hood that projects horizontally a
min. of 12.7 cm (5″) beyond the bottom of the
cabinets. Make sure the wall covering, countertops
and cabinets around the range can withstand heat
generated by the range, oven or cooktop up to
93°C. (200°F.).
Outlet box
Cord
Floor
17.78 cm
(7″)
C of range
L
Wall
Hood
Wall
Not less than the width
of the range
12.7 cm (5″) Min.
76.2 cm
(30″)
Min.
38.1 cm
(15″)
Min.
3.81 cm
(1
1
⁄2″)
Min.
Locate the outlet box within either shaded area.
8.89 cm
(3
1
⁄2″)
Install the outlet
box on either
side of the C
12.7 cm (5″)
L
5.72 cm
(2
1
⁄4″)
17
19.05 cm
(7
1
⁄2″)
19.05 cm
(7
1
⁄2″)
Page 18

Operating Instructions
Safety InstructionsCare and CleaningInstallation InstructionsTroubleshooting Tips
18
International Installation Instructions.
(220–240, 50/60Hz, 2-wire)
Read these instructions completely and carefully.
Flooring Under the Range
Your range, like many other household items, is heavy and can
settle into soft floor coverings such as cushioned vinyl or
carpeting.
When moving the range on this type of flooring, it
should be installed on a 6 mm (1/4″) thick sheet of
plywood (or similar material) as follows:
When the floor covering ends at the front of the
range, the area that the range will rest on should be
built up with plywood to the same level or higher
than the floor covering. This will allow the range to
be moved for cleaning or servicing.
Prepare for Electrical Connection
Use a certified range power cord. Such a cord will be
marked with a symbol of certification. If you are
unsure about the certification of your range power
cord, please consult with your local electrical parts
distributor and obtain one or have a licensed
electrician install your range. Finally, you may have
to purchase a separate strain relief if your cord is not
accompanied by one.
A range cord rated for 40A usage is recommended.
The cord must also have a minimum 250V rating. A
50A cord is not recommended but, if used, it should
be marked for use with nominal 3.49 cm (1
3
⁄8″)
diameter connection openings. Care should be
taken to center cable and strain relief (discussed in
Step 3) within knockout hole to keep cable from
rubbing the edge.
Power Cord Strain Relief Installation
Remove the lower rear range wiring cover to
expose the connector block and bracket.
Remove the knockout ring 3.49 cm (1
3
⁄8″)
located on bracket directly below the
connector. To remove the knockout, use a pair
of pliers to bend the knockout ring away from
the bracket and twist until ring is removed.
Assemble the strain relief in the hole. Insert the
power cord through the strain relief and
tighten. Allow enough slack to easily attach the
cord terminals to the connector block. If tabs
are present at the end of the winged strain
relief, they can be removed for better fit.
NOTE: Do not install the power cord without a strain
relief. The strain relief bracket should be installed before
reinstalling the rear range wiring cover.
Use ring terminals which have screw hole openings
of sufficient size for the terminal screws and ground
screw to be used in Step 4. The above illustration
depicts a power cord with “ring” terminals on the
ends of the power cord leads.
This is a close-up view of a “ring”
terminal. The ring terminal
shown in this close-up illustration
is the “closed barrel” type. We
recommend use of the “closed
barrel” type with a large enough
“barrel” to accommodate the
cord leads. Proper crimping force
should be applied to connect
stranded wires to the ring
terminals.
NOTE: If your range power
cord is “stranded” and is not
terminated with ring terminals,
you MUST attach the above
terminals to the cord leads. A
“stranded” power cable is one
with many thin wires twisted
together as shown in this
illustration.
“closed barrel”
terminal
“stranded wires”
Strain relief bracket
(Provided with range cord.
Not part of range.)
Connector block
Wiring cover
(shown removed)
Strain relief
Power cord
Green
ground
screw and
plate
Ring terminals
Bracket
Knockout ring removed.Knockout ring in bracket.
Page 19

Troubleshooting Tips
Operating Instructions
Read these instructions completely and carefully.
Safety Instructions
Care and Cleaning Installation Instructions
2-Wire Power Cord Installation
WARNING:
THE POWER LEADS
MUST BE CONNECTED TO THE OUTSIDE (BRASS
COLORED) TERMINALS. THE GROUND (EARTH)
LEAD MUST BE CONNECTED TO THE FRAME OF
THE RANGE WITH THE GREEN GROUNDING
SCREW.
RANGE FRAME MUST BE GROUNDED PROPERLY
TO AVOID POTENTIAL ELECTRICAL SHOCK.
Remove the 2 screws from the connector block.
Remove the grounding screw and strap from
the connector block middle location and the
screw connecting it to the frame of the range.
Insert screws through each power cord
terminal ring and into connector block until
screw engages nut. Tighten screws securely.
Attach ground (earth) wire to the frame of the
range. This is the green, or green with yellow
stripe, wire.
After
Before
Green screw grounds
range to earth (ground)
Green grounding screw and
plate (grounding to range)
Red “L” (Line)
Black “N” (Neutral)
2-Wire Conduit Installation
WARNING:
CONNECTOR BLOCK IS
APPROVED FOR COPPER WIRE CONNECTION
ONLY. IF ALUMINUM WIRE IS USED, SEE NOTE
BELOW.
Remove the 2 screws from the connector block.
Remove the grounding strap from the connector
block middle location and the screw connecting it to
the frame of the range. Insert bare wires between
the connector block terminals and movable nuts.
Tighten screws securely. Attach ground (earth) wire
to the frame of the range.
NOTE: ALUMINUM WIRING
Do not connect aluminum wire to connector
block. Use copper building wire rated for the
correct amperage and voltage to make 3
(three) 7.62 cm (3-inch) copper jumper wires.
Connect wire as described above.
Splice copper wires to aluminum wiring using
special connector terminals designed for
joining copper to aluminum and follow the
connector manufacturer’s recommended
procedure closely.
Wire used, location and enclosure of splices, etc., must
conform to good wiring practices and local codes.
19
Screw
Flexible
cable
Bare wire
tips
Conduit
Bracket
Connector block
terminal
Movable nut
Bare wire
Connector
block
Page 20

Operating Instructions
Safety InstructionsCare and CleaningInstallation InstructionsTroubleshooting Tips
20
International Installation Instructions.
(220–240, 50/60Hz, 2-wire)
Final Check
Be sure all range controls are in the OFF position
before leaving the range.
Anti-Tip Device Installation
Read these instructions completely and carefully.
Leveling the Range
A. Remove the storage
drawer, broiler drawer or
kick panel.
B. Use a 3/16″open-end or
socket wrench to back out
both rear leveling legs
approximately two turns.
C. Use a 1
3
⁄8″open-end or
adjustable wrench to back out the front leveling
legs two turns.
D. Install the oven shelves in the oven and position
the range where it will be installed.
E. Check for levelness by placing a spirit level or a
cup, partially filled with water, on one of the
oven shelves. If using a spirit level, take two
readings—with the level placed diagonally first
in one direction and then the other.
F. Adjust the leveling legs until the range is level.
WARNING
■Range MUST be secured by the
Anti-Tip device
supplied.
■Unless properly installed, the range could be
tipped by stepping or sitting on the door. Injury
might result from spilled hot liquids or from the
range itself.
■After installing the
Anti-Tip device
verify that it is
in place by carefully attempting to tilt the range
forward.
■This range has been designed to meet all
recognized industry tip standards for all normal
conditions.
■ The use of this device does not preclude tipping
of the range when not properly installed.
■ If the
Anti-Tip device
supplied with the range
does not fit this application, use the universal
Anti-Tip device
WB02X7909.
An
Anti-Tip bracket
is supplied with instructions
for installation in a variety of locations. The
instructions include all necessary information
to complete the installation. Read the
Safety
Instructions
and the instructions that fit your
situation before beginning installation.
Typical installation of anti-tip bracket attachment to wall.
Bracket
Screw must
enter wood
or metal
Wall plate
Page 21

21
Troubleshooting Tips
Operating InstructionsSafety Instructions
Care and Cleaning Installation Instructions
Problem Solver…
Troubleshooting Tips
Save time and money! Review the charts on the following
pages first and you may not need to call for service.
Problem Possible Causes What To Do
Surface units not
The surface units are • With the controls off, check to make sure the surface
functioning properly
not plugged in solidly. unit is plugged completely into the receptacle.
The surface unit controls • Check to see the correct control is set for the surface
improperly set. unit you are using.
The drip pans are not set •With the controls off, check to make sure the drip pan
securely in the cooktop. is in the recess in the cooktop and that the opening in
the pan lines up with the receptacle.
Oven light does not work
Light bulb is loose or defective. •Tighten or replace the bulb.
Switch operating light is broken. •Call for service.
Oven will not work
Plug on range is not completely •Make sure electrical plug is plugged into a live, properly
inserted in the electrical outlet. grounded outlet.
A fuse in your home may be • Replace fuse or reset circuit breaker.
blown or the circuit
breaker tripped.
Oven controls improperly set. •See the
Using the oven
section.
Food does not bake
Oven controls improperly set. •See the
Using the oven
section.
or roast properly
Shelf position is incorrect or the • See the
Using the oven
section.
shelf is not level.
Incorrect cookware or cookware • See the
Using the oven
section.
of improper size being used.
Oven thermostat needs • See the
Adjust the oven thermostat—Do it yourself!
adjustment. section.
Food does not
Oven is not set at
BROIL.
• Make sure you turn the knob all the way to the
broil properly BROIL
position.
Door not open to the broil stop • See the
Using the oven
section.
position as recommended.
Improper shelf position •See the
Broiling guide.
being used.
Food being cooked in a hot pan. • Use the broiling pan and grid that came with your
range. Make sure it is cool.
Cookware not suited for broiling. • Use the broiling pan and grid that came with your
range.
Aluminum foil used on the • See the
Using the oven
section.
the broiling pan and grid has
not been fitted properly and
slit as recommended.
In some areas the power • Preheat the broil element for 10 minutes.
(voltage) may be low.
•Broil for the longest period of time recommended in
the Broiling guide.
Page 22

Operating Instructions
Safety InstructionsCare and CleaningInstallation InstructionsTroubleshooting Tips
22
Problem Solver…
Troubleshooting Tips
Save time and money! Review the charts on the following
pages first and you may not need to call for service.
Problem Possible Causes What To Do
Oven temperature too
Oven thermostat •See the
Adjust the oven thermostat—Do it yourself!
hot or too cold
needs adjustment. section.
Oven door is crooked
The door is out of position. •Because the oven door is removable, it sometimes gets
out of position during installation. To straighten the
door, push down on the high corner.
Oven makes
This is the sound of the •This is normal.
clicking noise
heating element turning
off and on during
cooking functions.
Page 23

Part No. 183D6379P007 Pub. No. 49-88000-A 01-01 JR
JBS08PIC
Ï°Oq Ç°LU°p
ǤNeÉ ¤MdÇä Ç°J·d´p
Ç°Lu®ààààb
Ç°JNd¡Uzw
©ï¶l -w Ç°LJ¼Op
©ï¶l ³cÇ Ç°J·OñV «Kv èüâ ±FUÏÉ Ç°·Jd´d
Page 24

2
¢FKOLUÜ Ç°·AGOq
ǧ·»bÇå Ç°u¥bÇÜ Ç°¼DºOW.............6
ǧ·FLUä Ç°Hdæ.......................7-01
£d±u§·UÜ Ç°Hdæ........................01
±FKu±UÜ °K¼š±W
Ç¥·OU©UÜ Ç°¼š±W....................3-5
Ç°Hdæ......................................4
è¥bÇÜ Ç°DNw Ç°¼DºOW.................5
Ç°FMU´W èÇ°·MEOn
ЕТьЗь З°·ºJr.............................11
Ç°Hdæ è§D` Ç°DNw Ç°FKuê.............21
-p ¡UÈ Ç°Hdæ...........................31
ǧ·¶bÇä °L¶W Ç°Hdæ.....................41
è«UÁ 訶JW Ç°Auê......................41
Ç°u¥bÇÜ Ç°¼DºOW......................51
²BUz` ǯ·AUá ±uÇ{l
Ç°»Kq èÇ•š¥t
¥šä Ç°LAU¯q......................12-22
¢FKOLUÜ Ç°·d¯OV
®¶q Çæ ¢¶bÃ..............................61
¢ºCOd Ç°H·ºW..........................71
Ç°·u•OšÜ Ç°JNd¡UzOW...............81,91
Ç°¼MUÏ Ç°Iu§w Ç°LU²l °š²IšÈ.........02
¢¼u´W Ç°Lu®b............................02
±¶dèã!
Ç•¶º·r ÇŸæ ¤eÁÇ ±s ǧdÉ ¤MdÇä Ç°J·d´p
±d¥¶U ¡Jr -w ǧdÉ ¤MdÇä Ç°J·d´p. ²ºs ²H·»d ¡LM·¹U¢MU ÐÇÜ
Ç°Mu«OW Ç°¹ObÉ. è§uá ¢Kºk аp -w ³cÇ Ç°b°Oq Ç°¼Nq
Ç™§·FLUä.
èÇ™-Cq ±s ¯q аp, §uá ¢LUüÓ ³cç Ç°IOr -w ¯q ±dÉ
¢¼·FLq -ONU ±u®bã. è³cÇ Ç±d ³Uå. _æ ±u®bã Ç°¹b´b
§OB¶` ¤eÁÇ ±s ǧd¢p °¼MuÇÜ «b´bÉ. ,²ºs ²Q±q Ãæ ¢B¶`
¤eÁÇ ±s ǧd¢MU °LbÉ ©u´KW.
è²AJdã «Kv ¨dÇÁ ±M·Z ¤MdÇä Ç°J·d´p. è²Ibü ¨dÇÄã, è²Q±q
Ãæ ¢uÇ•q Ç™«·LUÏ «KOMU ¯KLU Ç¥·¹X Ç°v ±FbÇÜ ÐÇÜ Ç°¹uÏÉ
Ç°FU°OW °LMe°p.
±s äq §¹š¢p
®r ¡·b¡Of ®¼OLW Ç°¶Ol Ãè •uüÉ Ç°AOp ³MU.
ï·V ü®r Ç°LuÏ´q èÇ°d®r Ç°L¼K¼q ³MU:
#
#
§·¹b³U «Kv ¡DU®W ”Kn ¡UÈ Ç°Lu®b Çè ”Kn ÏüÌ Ç°·»e´s Çè Ç°KuÍ Ç™ü¢bÇÏê.
Å®dà ³cÇ Ç°J·OV
§·¹b -Ot ²BUz` ±HObÉ «b´bÉ ¥uä ¯OHOW ǧ·FLUä è•OU²W ±u®bã. ±¹dÏ ¨OµU ±s Ç°FMU´W
Ç°u®UzOW ±s ¤U²¶p §uá ¢u-d «KOp Ç°J¸Od ±s Ç°u®X èÇ°LUä «Kv DZ·bÇÏ ¥OUÉ ±u®bã.
§·¹b Ç°J¸Od ±s Ç™¤U¡UÜ «s Ç°LAU¯q Ç°LQ°u-W -w ®¼r
¥šä Ç°LAU¯q
. üǤl ¤bèä
²BUz` Ç°JAn «s ±uÇ{l Ç°»Kq èÇ•š¥NU Çè™. -Ib ÇÏü¤X -Ot ǧ¶UÈ ±AU¯q ¢AGOq
£U²u´W ´LJMp Ç•š¥NU ¡MH¼p.
òX è¤MdÇä Ç°J·d´p, ¨dǯW .
¢FKOLUÜ °·u”w Ç°¼š±W
¢FKOLUÜ Ç°·AGOqÇ°FMU´W èÇ°·MEOn
¢FKOLUÜ Ç°·d¯OV
²BUz` ǯ·AUá ±uÇ{l
Ç°»Kq èÇ•š¥t
Page 25

3
±FKu±UÜ ³U±W °·u”w Ç°¼š±W.
Å®dà ¯U-W Ç°·FKOLUÜ ®¶q Ç™§·»bÇå .
¢ºc´d!
±s äq §š±·p ´¹V Ç¢¶UÙ Ç°¶OU²UÜ Ç°uÇüÏÉ -w ³àcÇ Ç°J·OV °·IKOq ”Dd ²AuÈ Ç°ºd´o Çè Ç™²H¹Uü Çè Ç°BFIW Ç°JNd¡UzOW Çè
°LMl ¥bèË Ç{dÇü -w Ç°LL·KJUÜ Çè ¥bèË Ç•U¡W ¨»BOW Çè Ç°u-UÉ.
¢ºc´d
è§OKW ±IUè±W °š²IšÈ
Çæ ¤LOl Ç°LuÇ®b ´LJs Çæ ¢MIKV è¢RÏê Ç°v ¥bèË ÃÐé.
°LMl Ç™²IšÈ Ç°Fd{w °KLu®b Çü¡Dt ¡U°ºUzj èÇ_ü{OW èаp ¡·d¯OV è§OKW ±IUè±W Ç™²IšÈ Ç°LuüÏÉ ±l Ç°Lu®b.
°K·ºIo ±s Ãæ ¢Kp Ç°u§OKW ±d¯¶W è±FAIW -w ±JU²NU ¡AJq §KOr, -p Ç°KuÍ Ç•ü¢bÇÏê Ãè ÏüÌ Ç°·»e´s £r «U´s ü¤q Ç™§·uÇÁ
Ç°»KHOW, è¢Q¯b ±s DzNU ÏÇ”KW è¡S¥JUå -w Ç°Ao Ç°»UÕ ¡NU.
è«Mb±U ¢¼ºV Ç°Lu®b Ç°v Ç°»UüÌ ¡FObÇ «s Ç°ºUzj _ê §¶V, ¢Q¯b ±s Ãæ Ç°u§OKW ±FAIW ¡AJq §KOr «Mb±U ¢b-l Ç°Lu®b £U²OW -w Ç¢¹Uç
Ç°ºUzj. èÅÐÇ °r ´ºbË Ç°·FAOo, -OJuæ ³MUã Ç¥·LUä ¥bèË ”Dd ±s DzIšÈ Ç°Lu®b è±¼¶¶U ÃÐé ÃÐÇ ®LX òX Ãè ©Hq ¡U°u®uá Ãè Ç°¹KuÓ Ãè
Ç™§·MUÏ «Kv ¡UÈ ±H·uÍ.
´d¤v Ç°d¤uÙ Å°v Ç°LFKu±UÜ Ç°L·FKIW ¡u§OKW ±IUè±W Ç™²IšÈ Ç°uÇüÏÉ -w ³cÇ Ç°b°Oq. Åæ «bå Ç_”c ¡Ncç Ç™¥·OU©UÜ ®b ´M·Z «Mt ŲIšÈ Ç°Lu®b
è¥bèË ÃÐé.
Å¥·OU©UÜ Ç°¼š±W
ǧ·FLUä ³cÇ Ç°¹NUÒ -w Ç°GdÖ Ç°L»Bh °t 襼¶LU ³u ±ºbÏ
-w ³cÇ Ç°b°Oq.
¢Q¯b ±s Ãæ ¤NUÒã ±d¯V ¡AJq §KOr èòt ±RüÖ ¡uǧDW -Mw
±R³q 詶IU °·FKOLUÜ Ç°·d¯OV Ç°LFMOW Ç°L·u-dÉ.
´¹V Ù ¢Iuå ¡U•š¥t Ãè ç·¶bÇä Ãê ¤eÁ ±s ±u®bã ±U °r ¢dÏ
¢u•OW -w ³cÇ Ç°b°Oq ¡Q²t ´LJMp Ç°IOUå ¡NU ¡MH¼p. ñU ¡U°M¼¶W
°JU-W ëLUä Ç°BOU²W Ç_”dé -O¹V Ç°d¤uÙ Å°v -Mw ±R³q °c°p
¥·v ´Iuå ¡NU.
®¶q ŤdÇÁ ôW ëLUä •OU²W, Ã-Cq ±Bbü ¢Gc´W Ç°Lu®b ¡U°·OUü
Ç°JNd¡Uzw ±s «Mb °u¥W Ç°·uÒ´l °KLMeä èаp ¡Hp Ç°LBNd
(Ç°HOuÒ) Çè ¡H·` ÏÇzdÉ ®U©l Ç°bÇzdÉ Ç_è¢u±U¢OJw.
™ ¢·dã éHUä ¡LHdϳr - ´¹V «bå ¢dã éHUä ¡LHdϳr Ãè Ïèæ
±dÇ®¶W -w ±MDIW -ONU ¨GUä. è´¹V Ù ´¼L` °Nr ±DKIU ¡U°¹KuÓ
Ãè Ç°u®uá «Kv Ãê ¤eÁ ±s Ç°¹NUÒ.
™¢¼L` _ê ¨»h ¡U°·¼Ko Ãè Ç°u®uá Ãè Ç°·FKo «Kv ¡UÈ Ç°Lu®b
Ãè «Kv Ç°KuÍ Ç•ü¢bÇÏê Ãè «Kv ÏüÌ Ç°·»e´s Ãè «Kv üÃÓ Ç°DNw,
¥OY Çæ аp ®b ´RÏê Ç°v DzIš¡t ±LU ®b ´¼¶V ÃÐé ¨b´b
°œ¨»UÕ.
™¢Ir ¡·»e´s ±uÇÏ ®U¡KW °š¥·dÇâ ÏÇ”q -dæ Ãè ¡U°IdÈ ±s üÃÓ
Ç°DNw.
¢M¶Ot:
´¹V «bå ¢»e´s Ç_¨OUÁ Ç°·w ¢¼·LOq Ç_©HUä -w
”eDzUÜ -uâ ±u®b Ãè «Kv ±U¯s ´ºbË «Mb³U ¢d¨UÔ Çü¢bÇÏê
°KLu®b- ²EdÇ _æ Ç_©HUä Ç°c´s ´·¼KIuæ «Kv Ç°Lu®b °Ku•uä Ç°v
¢Kp Ç_¨OUÁ ´LJs Çæ ´BU¡uÇ ¡QÐé ”DOd.
«Mb ǧ·FLUä Ç_¤NeÉ Ç°JNd¡UzOW, ´¹V Å¢¶U٠ǥ·OU©UÜ Ç°¼š±W Ç_§U§OW, ¨U±KW ±U ´Kw:
<
<
<
<
<
<
<
<
¢FKOLUÜ °·u”w Ç°¼š±W
¢FKOLUÜ Ç°·AGOq Ç°FMU´W èÇ°·MEOn
¢FKOLUÜ Ç°·d¯OV
²BUz` ǯ·AUá ±uÇ{l
Ç°»Kq èÇ•š¥t
Page 26

4
±FKu±UÜ ³U±W °·u”w Ç°¼š±W.
Å®dà ¯U-W Ç°·FKOLUÜ ®¶q Ç™§·»bÇå .
™ ¢K¶f ±DKIU ±š¡f §Uz¶W (±d¢»OW) Çè £OUÈ ±·b°OW ¡OMLU
¢¼·FLq Ç°Lu®b. ¢u”v Ç°FMU´W «Mb±U ¢uÏ Ç°u•uä Ç°v ǨOUÁ
±»e²W -uâ Ç°Lu®b. Ãæ Ç°LuÇÏ Ç°IU¡KW °ž¥·dÇâ ´LJs Ãæ ¢A·Fq
ÅÐÇ ±U «d{X Ç°v ¢š±f ±l Ç°u¥bÇÜ Ç°¼DºOW Ç°¼U”MW è®b
¢¼¶V ¥dèâ ¡U°GW.
ǧ·FLq -Ij ±U§JUÜ ¤U-W °ºLq Ç°Ibèü ¥OY Ãæ Ç°LU§JUÜ
Ç°d©¶W Ãè Ç°L¶KKW Ç°LFbÉ °ºLq Ç°Ibèü -uâ Ç_§D` Ç°¼U”MW
´LJs Ãæ ¢¼¶V -w ¥dèâ ±s Ç°¶»Uü. ™ ¢bÙ ±U§JUÜ Ç°Ibèü
¢KLf Ç°u¥bÇÜ Ç°¼DºOW Ç°¼U”MW Çè «MU•d Ç°·¼»Os. ™
¢¼·FLq -u©W Çè ôW Ç®LAW Ç”dé ¯¶OdÉ Ç°º¹r.
±s Ǥq §š±·p, ™ ¢¼·FLq ±u®bã ±DKIU -w ¢b-µW Çè ¢¼»Os
Ç°Gd-W.
™ ¢bÙ ¨ºuå Ç°DNw Çè ôW ±uÇÏ Ç”dé ®U¡KW °š¨·FUä ¢·dǯr -w
Ç°Lu®b Çè ¡U°IdÈ ±Mt.
™ ¢¼·FLq Ç°LUÁ -w ¥dÇzo Ç°Aºuå. ™ ¢K·Ij Çè ¢L¼p ±IšÉ
±K·N¶W. ÃÏü ±HU¢O` Ç°·ºJr Ç°v è{l (Ç°HBq FFO). Ç”Lb ôW
±IšÉ ±K·N¶W «Kv è¥bÉ §DºOW ¡·GDOW Ç°LIšÉ ¯KOW ¡GDUÁ
´GDONU ¤ObÇ Çè ¡KuÍ Ç°JFp Ç°LºKv Çè ¡BOMOW ±¼DºW. ǧ·FLq
©HU´W ¥d´o ±s Ç°MuÙ Ç°JOLUèê Ç°¹Uá ±·FbÏ Ç_¬dÇÖ Çè ±s
Ç°MuÙ Ç°d¬uê.
Åæ Ç°Aºuå Ç°LK·N¶W ”UüÌ ±IšÉ ´LJs Å©HUzNU ¡·GDO·NU ¡BuÏÇ
З°»¶Oe Зи ¡U§·FLUд ©HU´W ¥d´o ±s З°MuЩ З°JOLUик З°¹Uб ±·FbП
З_¬dЗЦ Зи ©HU´W ¥d´o ±s З°MuЩ З°d¬uк Зж и¤bЬ. ´LJs Е©HUБ
З°MOdЗж ¯KOW -w З°Hdж ¡GKo ¡UИ З°Hdж иЕПЗьЙ ±H·UН З°Hdж «Kv и{l
(Ç°HBq FFO) Çè ¡U§·»bÇå ©HU´W ¥d´o ±s Ç°MuÙ Ç°JOLUèê
Ç°¹Uá ±·FbÏ Ç_¬dÇÖ Çè ©HU´W ¥d´o ±s Ç°MuÙ Ç°d¬uê.
™ ¢KLf Ç°u¥bÇÜ Ç°¼DºOW Çè «MU•d Ç°·¼»Os Çè Ç°¼D` Ç°bÇ”Kw
°KHdæ, ¥OY ´LJs Ãæ ¢Juæ Ç_§D` §U”MW ¡U°bü¤W Ç°·w ¢RÏê Ç°v
Ç°ºdâ ¥·v è°u ¯U²X ®U¢LW Ç°Kuæ. ãMU× è¡Fb Ç™§·FLUä, ™ ¢KLf
Ç°u¥bÇÜ Ç°¼DºOW Çè ™ ¢bÙ ±š¡f Çè ôW ±uÇÏ ®U¡KW °š¨·FUä
¢š±f ³cç Ç°u¥bÇÜ è™ ¢KLf Ç°LMU©o Ç°Id´¶W ±s Ç°u¥bÇÜ
Ç°¼DºOW Çè ôW ±MU©o ÏÇ”KOW °KHdæ, èǧL` Ãè™ ¡u®X ¯Uá
°K·¶d´b.
Åæ Ç_§D` Ç°·w ¢JLs -ONU Ç°ºdÇüÉ ¢A·Lq «Kv üÃÓ Ç°DNw
èÇ°LMU©o Ç°L¹UèüÉ Ç°LuǤNW °dÃÓ Ç°DNw è-·ºW ¢Nu´W Ç°Hdæ
èÇ_§D` Ç°L¹UèüÉ °·Kp Ç°H·ºW èÇ°H¹uÇÜ Ç°LºODW ¡¶UÈ Ç°Hdæ
èäeÇÁ Ç•©Uü Ç°LFb²w (Ç°e”d-W) Ç°·w -uâ Ç°¶UÈ.
¢c¯d:
´LJs Ãæ ´Juæ Ç°¼D` Ç°bÇ”Kw °KHdæ §U”MU «Mb±U ´·r
-·` Ç°¶UÈ.
™ ¢ï»eæ Çè ¢¼·FLq ±uÇÏ ®U¡KW °š¥·dÇâ Çè ¤UÒè°Os Çè Ç¡»dÉ Çè
§uÇzq ®U¡KW °ž¨·FUä ¡U°IdÈ ±s ³cÇ Ç°Lu®b Çè Ãê ¤NUÒ Â”d.
¥U-k «Kv Çæ ´Eq ¬DUÁ Ç°AHj °KLu®b è¯c°p -š¢d Ç°Aºuå
²EOHW °š¡IUÁ «Kv ¢Nu´W ¤ObÉ è°LMl ¥dÇzo Ç°Aºuå.
<
<
<
<
<
<
<
¢ºc´d!
Å¥·OU©UÜ °·u”w Ç°¼š±W
<
éNw Ç°Kºuå èÇ°bèǤs ¤ObÇ
éNw Ç°Kºuå èÇ°bèǤs ¤ObÇ- ¢DNv Ç°Kºuå ¡bü¤W ¥dÇüÉ ÏÇ”KOW ¢¶Km 061ò á «Kv Ç_®q èÇ°bèǤs ¡bü¤W ¥dÇüÉ ÏÇ”KOW
¢¶Km 081ò á «Kv Ç_®q.
®n ¡FObÇ «s Ç°Lu®b «Mb -·` ¡UÈ Ç°Hdæ. ÃÐ Çæ Ç°NuÇÁ Ç°¼U”s Çè
Ç°¶»Uü Ç°cê ´NdÈ ´LJs Çæ ´¼¶V ¥dèâ °KOb´s èÇ°u¤t è/ Çè
Ç°FOMOs.
™ ¢Ir ¡·¼»Os «¶uÇÜ Ã©FLW è³w ±GKIW. -Ib ´MAQ {Gj
ÏÇ”KNU ±LU ®b ´RÏê Ç°v DzH¹Uü Ç°F¶uÉ, ±¼¶¶U ÃÐé.
¥U-k «Kv ¡IUÁ -·ºW Ç°·Nu´W ¬Od ±FU®W (¬Od ±¼bèÏÉ).
¥U-k «Kv ¡IUÁ Ç°Hdæ ”U°OU ±s ¢¹Ll Ç°Aºuå.
{l üá Ç°Hdæ -w Ç°LJUæ Ç°Ld¬uÈ -Ot ¡OMLU ´Juæ Ç°Hdæ ¡UüÏÇ.
èÇÐÇ ¯Uæ ±s Ç°Cdèüê ǧ·FLUä Ç_ü-n è³w §U”MW, -š ¢bÙ
±U§p Ç°Ibèü ´KLf «MU•d Ç°·¼»Os.
Åæ §ºV Ç°dá °K»UüÌ ¥·v ±Bb Ç°dá ´Juæ ±šzLU è§Nš °d-l
Ç_©FLW Ç°¸IOKW. èDzt Ç´CU Å¥·OU× {b Ç°ºdèâ ²·O¹W °Lf
Ç_§D` Ç°¼U”MW °¶UÈ Ç°Hdæ Çè ¤büDzt.
«Mb ǧ·FLUä ïOUÓ ©Nw Çè ¢ºLOd (¢ºLOh) -w Ç°Hdæ, Ç¢¶l
¢u¤ONUÜ Ç°BU²l.
™ ¢¼·FLq -d²p -w ¢¹HOn Ç°Bºn. -SÐÇ Ç•¶ºX ¥dÇü¢NU
±Hd©W -U²NU ´LJs Çæ ¢º·dâ.
™ ¢¼·FLq Ç°Hdæ ¯ºOe °K·»e´s ÅÐ Çæ Ç_¨OUÁ Ç°L»e²W -w -dæ
´LJs Çæ ¢A·Fq.
™ ¢·dã ±M·¹UÜ èü®OW Çè ÃèDzw ©Nw Çè Ç©FLW -w Ç°Hdæ «Mb±U ™
´Juæ ±¼·FLš.
<
<
<
<
<
Ç°Hdæ
<
<
<
<
<
¢FKOLUÜ °·u”w Ç°¼š±W
¢FKOLUÜ Ç°·AGOqÇ°FMU´W èÇ°·MEOn
¢FKOLUÜ Ç°·d¯OV
²BUz` ǯ·AUá ±uÇ{l
Ç°»Kq èÇ•š¥t
Page 27

5
™ ¢·dã Ç°u¥bÇÜ Ç°¼DºOW ¨GU°W ¡bèæ ±dÇ®¶W è³w «Mb ±uÇ{l
Ç°C¶j °KºdÇüÉ Ç°FU°OW. ÅÐ Ãæ Ç°GKOUæ Ç°LHd× °œ¨OUÁ ´·¼¶V «Mt
Ï”Uæ è§JV è¢MU£d ±Hd× °Kb³uæ ±LU ®b ´RÏê Ç°v Ç°·IU×
Ç°MOdÇæ.
™ ¢¼·»bå ü®Uzo Ç_°LOMOuå -w ¢¶DOs Ãè«OW Ç°·MIOj Çè ¢¶DOs
Ãê ±JUæ ”d -w Ç°Hdæ §ué ±U ³u ±AUü Ç°Ot -w ³cÇ Ç°b°Oq. Åæ
§uÁ Ç™§·FLUä ®b ´M·Z •b±W ¯Nd¡UzOW Çè ”Dd ¥d´o Çè ¢Kn
°KLu®b.
¢Q¯b ±s Ãæ Ãè«OW Ç°·MIOj (Ç°·¹LOl) è-·ºW ±¹dé Ç°·Nu´W ¬Od
±GDOOs è-w ±JU²NLU. ÅÐ Ãæ «bå è¤uϳLU Ç£MUÁ Ç°DNw ´LJs Ãæ
´·Kn ǤeÇÁ Ç°Lu®b è¢Lb´bÇÜ Ç§š¯t.
{l -Ij «Kv üÃÓ Ç°DNw Ãè«OW ±s ²u«OUÜ ±FOMW ±s Ç°e¤UÌ Çè
Ç°e¤UÌ Ç°¼OdDZOp Çè Ç°H»Uü´UÜ Çè Ãè«OW ±e¤¹W Ç”dé, ²EdÇ
_æ Ç_è«OW ”šá Ç°Lc¯uüÉ ®b ¢MJ¼d ¡¼¶V Ç°·GOd Ç°LHU¤T -w
Ïü¤W Ç°ºdÇüÉ.
°·IKOq З¥·LU°OW ¥bиЛ ¥dив иЗ¨·FUд З°LuЗП З°IU¡KW °š¨·FUд
иЗ™²¼JUИ иЗ°·MU£d, -U²t ´¹V ЗПЗьЙ ±I¶i З°u«UБ ²U¥OW ±M·Bn
З°Lu®b Пиж Зж ¢L·b З°v ±U -uв З°u¥bЗЬ З°¼DºOW З°Id´¶W.
´¹V ¡U§·LdÇü -Bq Ç°JNd¡UÁ «s Ç°u¥bÇÜ Ç°¼DºOW ®¶q ¥Lq
(²Iq) ÃèDzw Ç°DNw.
™ ¢GLd Çè ¢MIl Ç°u¥bÇÜ Ç°¼DºOW Ç°IU¡KW °KHp. è™ ¢CFNU -w
¬¼U°W Ç_©¶Uâ. è™ ¢MEn Ç°u¥bÇÜ Ç°¼DºOW ÐÇ¢OU -w Ç°Hdæ.
°·¹MV Å¥·LUä ¥bèË ¥dèâ Ãè •b±W ¯Nd¡UzOW, ¢Q¯b ÏÇzLUë ±s Ãæ
è§Uzq Ç°·ºJr -w ¤LOl Ç°u¥bÇÜ Ç°¼DºOW «Mb Ç°u{l -Bq
FFO
èÃæ ¤LOl Ç°LKHUÜ ¡UüÏÉ ®¶q ±ºUè°W ü-l Ãè -p ôW è¥bÉ
§DºOW .
«Màb±àU ¢Jàuæ éàFLàW ±K·àNà¶W çààHq ¬DààUÁ Ç°AààHU× °KLàu®àb
(DOOH),-O¹V ¢AGOq ±dè¥W Ç°GDUÁ.
²En §D` Ç°DNw ¡ºcü è«MU´W. è«Mb ǧ·»bÇå ®DFW ǧHMZ Çè
®LUÔ ±¶KKW -w ±¼` Ç°dÐÇÐ Ç°cê «Kv è¥bÉ §DºOW §U”MW,
-O¹V Ç°ºdÕ «Kv ¢¹MV Ç°ºdèâ ±s Ç°¶»Uü.
üÇ®V ¡FOMOp Ç_©FLW Ç°·w ´¹dê ®KONU «Mb Çè{UÙ ±·u§DW Çè
«U°OW °bü¤W Ç°ºdÇüÉ.
´¹V Ãæ ¢Juæ Ç_©FLW Ç°LFbÉ °KIKw ¤U-W ¡Ibü Ç™±JUæ ²EdÇ _æ
è¤uÏ Ç°¸KZ «Kv Ç_©FLW Ç°L¹LbÉ Çè Ç°d©u¡W «Kv Ç_©FLW Ç°DUÒ¤W
´LJs Çæ ´¼¶V ¢MU£d -IU«UÜ ±s Ç°b³uæ Ç°¼U”MW _«Kv è-uâ
¤uDzV Ç°LIšÉ.
ǧ·FLq §Ls ®KOq ±s äq ®Kw {µOq -FUä Çè ®Kw ϳMw «LOo. ÃÐ
Ãæ ±KT Ç°LIšÉ ¡U°JU±q ¡U°¼Ls ´LJs Çæ ´¼¶V ¢MU£d èDz¼JUÈ
±Hd× «Mb Å{U-W Ç°DFUå Ç°v Ç°LIšÉ.
ÅÐÇ Ç§·FLq ”KOj ±s Ç°e´uÜ èÇ°b³uæ -w Ç°IKw, -O¹V ¢IKO¶NLU
¡¶FCNLU ®¶q Ç°·¼»Os Çè ¡OMLU ´MBNd (´¼O`) Ç°b³s ¡¶DT.
Å«Lq ¡U§·LdÇü «Kv ¢¼»Os Ç°¼Ls ¡¶DT, èüÇ®¶t è³u ´¼»s.
ǧ·FLq £d±u±·d °Kb³s Ç°FLOo «Mb±U ´Juæ аp ±LJMU °Kºb ±s
Ç°·¼»Os Ç°LHd× °Kb³s Ç°v ±U èüÇÁ ²IDW Ç°·b”Os.
<
<
<
<
<
<
<
è¥bÇÜ Ç°DNw Ç°¼DºOW
<
´d¤v ±dǤFW èÇ¢¶UÙ ±FKu±UÜ Ç°¼š±W ³cç ¡FMU´W.
¥U-k «Kv ³cç Ç°·FKOLUÜ
<
<
<
<
<
З§·»bе и«UБ ¡LIUУ ±šzr - З”·d ГПиЗЬ ©Nw РЗЬ ®UЩ ±¼D` и±¼·uк и¯¶Od ¡U°Ibь З°cк ´JHw °·GDOW «MBd ¢¼»Os
З°u¥bЙ З°¼DºOW. ЕР Гж З§·»bЗе ГиЗ²w ©Nw РЗЬ ±IUУ •GOd ¡U°M¼¶W °Ku¥bЙ §uб ´FdЦ ¤eБЗ ±s З°u¥bЙ З°¼DºOW
°KLf З°L¶U¨d ±LU ®b ´M·Z «Mt З¨·FUд °KLš¡f. иГж З°Fš®W З°LšzLW _иЗ²w З°DNw ¡U°u¥bЙ З°¼DºOW §uб ¢º¼s ¯HUБЙ
З°Lu®b З´CU.
¢FKOLUÜ °·u”w Ç°¼š±W
¢FKOLUÜ Ç°·AGOq Ç°FMU´W èÇ°·MEOn
¢FKOLUÜ Ç°·d¯OV
²BUz` ǯ·AUá ±uÇ{l
Ç°»Kq èÇ•š¥t
<
<
<
Page 28

6
ǧ·FLUä Ç°u¥bÇÜ Ç°¼DºOW
-w ¯U-W •HºUÜ ³cÇ Ç°b°Oq ®b ¢»·Kn Ç°¼LUÜ èÇ°LEU³d «s Ç°DdÇÒ Ç°cê ¢LKJt
±s äq Ç°ºBuä «Kv ²·UzZ ©Nw Ã-Cq ´¹V Ãæ ¢Juæ
Ç_èDzw ÐÇÜ ®UÙ ±¼D` è±¼·uê. èÇ-o ±U ¡Os ±IUÓ
Ç•²UÁ Ðè Ç°LI¶i è±IUÓ Ç°u¥bÉ Ç°¼DºOW. è´¹V Ù
´L·b Ç•²UÁ -uâ ¥U-W Ç°u¥bÉ Ç°¼DºOW ¡Q¯¸d ±s 5,2
§r.
¯OHOW {¶j ±HU¢O` Ç°·ºJr
Å{Gj «Kv Ç°LH·UÍ Å°v Ç°bÇ”q £r ÇÏüç -w Ãê Ç¢¹Uç
¢d´bç.
´ºbË ±H·UÍ Ç°·ºJr •uÜ ©IDIW «Mb±U ´¸¶X -w
±JU²t -w Ç°u{FOs (
-Bq
FFO) è (
«U°OW
IH).
è´LJMp §LU٠ÕuÇÜ
©IDIW
”HOHW Ç£MUÁ Ç°DNw,
è´bä аp «Kv Çæ ¤NUÒ Ç°·ºJr ´FLq «Kv ¡IUÁ Ç°u¥bÉ
«Mb ±¼·ué Ç°ºdÇüÉ Çè ±¼·ué Ç°IbüÉ Ç°·w ®LX ¡U°C¶j
«KOt.
²BUz` ŲUÁ Ç°DNw
(°¶Fi Ç°DdÇÒÇÜ)
ǧ·»bå ŲUÁ ©Nw ±·u§j Çè £IOq Ç°uÒæ. ´u•q ŲUÁ
Ç°DNw Ç_°LOMOuå Ç°ºdÇüÉ Ã§dÙ ±s Ç°LFUÏæ Ç_”dé, Åæ
ŲUÁ Ç°DNw ±s Ç°ºb´b Ç°e³d è¥b´b Ç°e³d Ç°LGKn ´Juæ
¡DT -w DZ·BUÕ Ç°ºdÇüÉ, °JMt ¡BHW «U±W ´DNw
¡U°·¼Uèê «Mb ±u{l Ç°ºdÇüÉ (±M»HCW Ç°v ±·u§DW)
ÅÐÇ °r ´Js ±b±¹U ±l ±Fbæ ”d.
¢Q¯b ±s òp ÃÏüÜ ±H·UÍ Ç°·ºJr Ç°v Ç°u{l
(-BqFFO) «Mb±U ¢M·Nw ±s «LKOW Ç°DNw.
™ ´·¹UèÒ 2.5§r
Çæ è{l Ç°ºKIW -uâ Ç°u¥bÉ Ç°¼DºOW §ORÏê Ç°v ¢¹Ll
Ç°ºdÇüÉ Ç°cê ±s ¨Q²t Ç°ºUâ Ç°Cdü ¡¼D` Ç°DNw
Ç°»e-w. ™ ¢¼·FLq ±¸q ³cç Ç°DU§UÜ ¡bèæ Ç°ºKIW. ÅÐ
Dzp §·º·dâ Ç¥·dÇ®U ¨b´bÇ ÇÐÇ Ç²IK¶X Ç°DU§W.
©U§UÜ Ç°DNw
(°¶Fi Ç°DdÇÒÇÜ)
²u•Op ¡Qæ ¢¼·»bå -Ij ©U§W ÐÇÜ ®UÙ ±¼·uê. DzNU ±·u-dÉ -w
±»UÒæ Ç°·Lu´MUÜ Ç°LºKOW.
™¢¼·»bå ©U§UÜ ±eèÏÉ ¡ºKIUÜ ¥U±KW. _æ ǧ·FLUä
±¸q ³cç Ç°DU§UÜ ±l Ç°ºKIW Çè ¡bè²NU §OJuæ ”DdÇ.
ǧ·FLq ©U§UÜ ±¼·u´W Ç°IFd
¢FKOLUÜ °·u”w Ç°¼š±W
¢FKOLUÜ Ç°·AGOqÇ°FMU´W èÇ°·MEOn
¢FKOLUÜ Ç°·d¯OV
²BUz` ǯ·AUá ±uÇ{l
Ç°»Kq èÇ•š¥t
Page 29

7
¯OHOW ǧ·»bÇå Ç°Hdæ
°·¹MV ±s З¥·LU°OW З°ºd´o, {l З°d-uб -w З°LuЗ{l З°Ld¬u¡W ®¶q ЗПЗьЙ З°Hdж З°v и{l
Ç°·AGOq
(NO).
Çæ °L¶W ÏèüÉ Ç°Hdæ ¢·u³Z ¥·v ´Bq Ç°Hdæ Ïü¤W Ç°ºdÇüÉ Ç°·w Ç”·d¢NU, £r ¢MDHT
£U²OW ±l Ǩ·GUä èDzDHUÁ Ç°Hdæ «MU•d Ç°Hdæ Ç£MUÁ Ç°D¶a.
<
{¶j è§Uzq Ç°·ºJr -w Ç°Hdæ
(«Kv Ç°DdÇÒÇÜ ÐÇÜ Ç°·MEOn Ç°IOU§w)
Òü Ïü¤W ¥dÇüÉ Ç°Hdæ
ÃÏü ³cÇ Ç°eü Ç°v Ç°C¶j Ç°cê ¢d¬V -Ot.
2
1
3
°Hp üá ±s Ç°Hdæ,
ǧº¶t ²U¥O·p, ñq Ç°MNU´W
Ç_±U±OW °Kdá _«Kv £r ǧº¶t Ç°v Ç°»UüÌ.
è•«UÏ¢t Ç°v ±JU²t,
{l ±R”dÉ Ç°dá (±Bb
Ç•´IUá) «Kv ¥U±q Ç°dá, ñq ±Ib±W Ç°dá _«Kv
èÃÏ-l Ç°dá °O¼·Id -w ±JU²t.
®¶q ǧ·»bÇå Ç°Hdæ
°Ib ¢r ¢BLOr Ç_ü-n ¡LBbÇÜ Ç´IUá ¡ºOY DzNU
«Mb±U ¢u{l ¡AJq •ºO` «Kv ¥uDZq Ç_ü-n, -¼uá
¢In ®¶q Çæ ¢»dÌ ¡U°JU±q ±s Ç°Hdæ, è§uá ™ ¢LOq.
«Mb è{l DzUÁ ©Nw «Kv üá, ǧºV Ç°dá Ç°v Ç°»UüÌ
¥·v Ç°M·uÁ Ç°cê «Kv ¥U±q Ç°dá.
¯OHOW {¶j Ç°Hdæ °K»¶Oe Ãè Ç°·ºLOd
²uÙ Ç°DFUå ±u{l Ç°dá
-DUzd ±¹LbÉ («Kv -DUzd ü®OIW)
¡MbÜ Ãè ¯FJW ü©KOW
¡¼Ju´X, ±U-s, ¡dÇè²Oe, ¯FJUÜ ±ºšÜ,
¯FJW ±Ju¡W, ¯FJW ±D¶IW, -DUzd
¯¼dè°W
Ï´p üè±w
¢ºLOd
ÇÏü ±H·UÍ Ïü¤W ¥dÇüÉ Ç°Hdæ Ç°v Ç°ºdÇüÉ Ç°·w
¢d¬V -ONU.
°Hºh З°DFUе -OLU ´·FKo ¡U²¹UТ ©NOt -w ГП²v
±bЙ иЗьПЙ -w З°u•HW. З©Nw °LbЙ З©uд «Mb
З°CdиьЙ.
ÇÏü ±H·UÍ Ïü¤W Ç°ºdÇüÉ Ç°v è{l (
-Bq
FFO)
«Mb±U ´JLq Ç°DNw.
°KHdæ 4 ±uÇ{l °Kd-uá
B Ãè C
B Ãè C
C
Ç°·¼»Os Ç°L¼¶o èè{l Ç•²UÁ
§»s Ç°Hdæ ±¼¶IU ÇÐÇ ²BX Ç°u•HW «Kv аp. è±s
Ǥq Ç°·¼»Os Ç°L¼¶o Ç{¶j ÏüÉ ¥dÇüÉ Ç°Hdæ «Mb
Ïü¤W Ç°ºdÇüÉ Ç°BºOºW. è´Juæ Ç°·¼»Os {dèü´U
°KºBuä «Kv ²·UzZ ¤ObÉ «Mb ”¶Oe Ç°JFp èÇ°JFp
Ç°LºKv èÇ°LF¹MUÜ èÇ°»¶e.
è¡U°M¼¶W °œ-dÇæ ¡bèæ °L¶W Ãè ²GLW •uÜ °K·¼»Os Ç°L¼¶o, §»s
±¼¶IU °LbÉ \1 Ï®Uzo.
§·Juæ ²·UzZ Ç°»¶Oe îq ÇÐÇ ¯U²X Ãè«OW Ç°»¶Oe
±·uǧDW -w Ç°Hdæ ¡Ibü Ç•±JUæ. è´¹V Ç™ ¢·š±f
Ç_è«OW ±l ¡FCNU Çè ±l ¤büÇæ Ç°Hdæ. èÇÐÇ ¯MX ¢º·UÌ
Ç°v ǧ·»bÇå ü-Os, -O¹V è{` Ç_è«OW ¡U°·FU®V
(±Mºd-W «s ¡FCNU) ¡ºOY ™ ¢Juæ èÇ¥bÉ -uâ
Ç™”dé ±¶U¨dÉ, ±l ¢dã ±¼U-W ¥uÇ°w 18\3 §r
(2/1 1") ±s ¥U-W Ç™²UÁ ¥·v ¡bÇ´W Ç°dá.
¢FKOLUÜ °·u”w Ç°¼š±W
¢FKOLUÜ Ç°·AGOq Ç°FMU´W èÇ°·MEOn
¢FKOLUÜ Ç°·d¯OV
²BUz` ǯ·AUá ±uÇ{l
Ç°»Kq èÇ•š¥t
E
D
C
B
A
R
B Ãè C
R Ãè A
R, A Ãè B
Page 30

8
ǧ·»bÇå Ç°Hdæ
è´LJs ǧ·FLUä •HOºW ü®Uzo Ç_°LMOuå •GOdÉ ™°·IUÁ
¢MIOj Ç°FBUüÉ ¡u{FNU «Kv üá Çè ¢ºX Ç°DFUå ¡L¼U-W
¡Cl ¡u•UÜ.
ü®Uzo Ç_°LMOuå
™ ¢GDw З°dб ¯Kt ¡d®Uzo З_°LMOuе. -Qж ³cЗ ´Fuв
З°·uТ´l З°ºdЗьк и´RПк З°v ьПЗБЙ З°»¶Oe.
âdã ¡UÈ Ç°Hdæ ±H·u¥U Ç°v ±u{l ¢u®Ht Ç°»UÕ
¡U°Auê. Çæ Ç°¶UÈ ´¶Iv ±H·u¥U ¡cÇ¢t, è±l аp ´·r
Ç°LºU-EW «Kv Ïü¤W Ç°ºdÇüÉ Ç°LMU§¶W -w Ç°Hdæ.
¯On ¢C¶j Ç°Hdæ °KAuê
{l Ç°Kºr Çè Ç°¼Lp «Kv ¨¶JW Ç°Auê -w ŲUÁ
Ç°Auê.
Ç¢¶l Çè{UÙ Ç°dá Ç°LI·d¥W -w
Ï°Oq Ç°Auê
.
ÃÏü Òü Ïü¤W ¥dÇüÉ Ç°Hdæ Ç°v
Ç°Auê
LIORB.
1
3
2
¢FKOLUÜ °·u”w Ç°¼š±W
¢FKOLUÜ Ç°·AGOqÇ°FMU´W èÇ°·MEOn
¢FKOLUÜ Ç°·d¯OV
²BUz` ǯ·AUá ±uÇ{l
Ç°»Kq èÇ•š¥t
Page 31

9
Ç°DFUå
°ºr ±¸dèå
¨dÇz` °ºr Ç°¶Id
¬Od ±MC¹W Ç°Auê
±·u§DW
±Au´W ¤ObÇë
¬Od ±MC¹W Ç°Auê
±·u§DW
±Au´W ¤ObÇë
ϤUÌ
±F¹MUÜ
”¶e (¢u§X)
±Hs
Ç™§·U¯uÒÇ
¨dÇz` §Lp
©d´W
§KLuæ
¨dÇz` §KLuæ
¨dÇz` ©d´W
®Dl °ºr Ç°ºLq
±·u§DW
±Au´W ¤ObÇë
±·u§DW
±Au´W ¤ObÇë
Ç°JLOW è/Ãè
Ç°¼ïLp
(4 -DUzd) 005¤r
52,1-2 §r
21 -DOdÉ, 0002¤r
2 - 5,2 §r
005 - 057¬r
8,3§r
1 - 52\1 ¯OKu
ϤU¤W ¯U±KW 152,1 ¯¹r ±IDu«W
©u°OU.
•bü
2 - 4 ®Dl
2 (±I¼u±W ²BHOs)
2-4
005¬r, è§LJNU
5,0 - 52,1§r
2 (§Lp 5\2§r)
2 ( 52,1 2§r)
2 ®DFW ¥Lq
§LJNU 5,2§r
2 ®DFW ¥Lq
§LJNU 8,3§r
±d¨àààb Ç°ààAààààuê
±u{l
Ç°dá
C
C
E
D
D
C
C
D
B
B
D
E
B
D
D
D
D
D
D
D
Ç°¹U²V Ç_èä
Ç°u®X (Ï®Uzo)
31
51
6
8
01
01
51
02
52
52
3
3-4
81-02
5
01
01
7
01
9
41
Ç°¹U²V Ç°¸U²w
Ç°u®X (Ï®Uzo)
8
11
4
6
8
8
01-21
02
52
51
1
™ ¢IK¶NU °œ«Kv
5
5
4
9
6
01
±š¥EUÜ
¢¶Fb «s ¡FCNU ¡L¼U-UÜ
±·¼Uè´W.
¨dÇz` §LJNU îq ±s
2§r ´BFV ©¶»NU (¬Od
±MC¹W Ç°Auê). ®Dl
Ç°b³s.
Ãϳs ¯q ¤U²V ¡e¡bÉ
±MBNdÉ. Ǩuê Ç°¹U²V
Ç°cê ¡t Ç°¹Kb Çè™.
¢¶Fb «s ¡FCNU ¡L¼U-UÜ
±·¼Uè´W. Ç®Dl Ç°¹eÁ
Ç_«Kv °KLHs £r Ãϳs
¡e¡bÉ ÇÐÇ ÇüÏÜ.
Å®Dl Ç°ENd ¢LU±U,
Å-dϳU ±H·u¥W. ÇϳMNU
¡e¡bÉ ±MBNdÉ ®¶q Ç°Auê
è¡Fb DzICUÁ ²Bn Ò±s
Ç°Auê.
DZ¼JNU èÇ®K¶NU ¡FMU´W
¨b´bÉ, ÃϳMNU ¡e¡bÉ
°OLuæ ®¶q èÇ£MUÁ Ç°DNw,
«Mb Ç°d¬¶W.
îK¶NU ¡FMU´W, ™¢IKV ¤NW
Ç°¹Kb °œ§Hq.
®Dl Ç°b³s
¢FKOLUÜ °·u”w Ç°¼š±W
¢FKOLUÜ Ç°·AGOq Ç°FMU´W èÇ°·MEOn
¢FKOLUÜ Ç°·d¯OV
²BUz` ǯ·AUá ±uÇ{l
Ç°»Kq èÇ•š¥t
З°º¹r, З°uТж, З°¼пLp, Пь¤W
З°ºаааdЗьЙ З°L¶·bzааW, и¢HCааOq
²аu«OаааW З°DаNw З°LаDKu¡W ¯KNU
«ааuЗ±аааааq ±аR£аааdЙ «аKааv ±аааbП
З°Aааuк. ³ааcЗ З°b°Oаq ±FаLаuд
«Kv Г§аUУ Еж З°Kºаuе ¡bь¤аW
¥dЗьЙ З°¸š¤W.
Page 32

01
{¶j £d±u§·UÜ Ç°Hdæ
ß
Ç{¶Dt ¡MH¼p!
´LJMp ±š¥EW Çæ -d²p Ç°¹b´b ´DNw ¡AJq ´»·Kn «s Ç°Hdæ Ç°Ib´r Ç°cê ǧ·¶b°·t, è²u•Op ¡U§·»bÇå -d²p Ç°¹b´b °FbÉ Ç§U¡Ol °·B¶`
ï¸d Å°LU±U ¡t.
™ ¢¼·»bå £d±u±·dÇÜ, ¯U°·w ¢¶UÙ -w ±»UÒæ Ç°·Lu´MUÜ, °Hºh ±uÇ{l {¶j Ïü¤W Ç°ºdÇüÉ °Hd²p. -Ncç Ç°¸d±u±·dÇÜ ®b ¢»·Kn «s Ç°bü¤W Ç°ºIOIOW ¡LIbÇü 11òå ¥·v 22ò å.
°KDdÇÒÇÜ ÐÇÜ Òü èÇ¥b -Ij °bü¤W ¥dÇüÉ Ç°Hdæ
ǧºV Òü Ïü¤W ¥dÇüÉ Ç°Hdæ «s Ç°IB¶W
£r DzEd -w Ç°¹U²V Ç°»KHw °Keü 虥k
Ç°C¶j Ç°ºU°w
®¶q
ǤdÇÁ Ãê ¢Fb´q.
ÇüÎ ¯š Ç°¶d¬OOs -w Ç°¹U²V Ç°»KHw °Keü.
°e´UÏÉ
Пь¤аааааW ¥dЗьЙ З°Hааааааdж, ¥аааdг З°LR¨аааааааааааd
Пь¤W иЗ¥аааааbЙ ²ºu ¯KLаааW
(Т´ааUПЙ З°ºаааааdЗьЙ
RETTOH EKAM
)
è°»Hi Ïü¤W ¥dÇüÉ
Ç°Hdæ ¥dã Ç°LR¨d Ïü¤W èÇ¥bÉ ²ºu ¯KLW
(Ò´UÏÉ
Ç°¶dèÏÉ
RELOOC EKAM
)
.
¯q Ïü¤W ±s Ç°LR¨d ¢GOd Ïü¤W Ç°ºdÇüÉ È 01 Ïü¤UÜ -Nd²NU´X.
1
3
2
±R¨d
Ç°¹U²V Ç°»KHw °eü Ïü¤W ¥dÇüÉ Ç°Hdæ
±Ib±W Òü Ïü¤W ¥dÇüÉ Ç°Hdæ
(±ENd Ç°eü ®b ´»·Kn)
¨b Ç°¶dǬw.
ëb Ç°eü Ç°v ±JU²t ±l ±DU¡IW Ç°LMDIW Ç°L¼·u´W
±s Ç°eü ±l Ç°IB¶W.
4
5
²uÙ Ç°LUü¤d´s ´R£d «Kv ÃÏÇÁ Ç°»¶Oe!
¢r ¢Du´d ±FEr è•HUÜ Ç°»¶Oe ¡U§·FLUä ±M·¹UÜ ¬MOW ¡U°¼Ls ±¸q Ç°e¡bÉ Çè Ç°LUü¤d´s (08% §Ls). -SÐÇ ¢r ¢IKOq ¯LOW Ç°¼Ls -Uæ Ç°u•HW ™
¢FDw ²Hf Ç°M·UzZ Ç°·w ´LJs Ç°ºBuä «KONU ¡U§·FLUä ±M·¹UÜ ¢º·uê «Kv ¯LOW ï¶d ±s Ç°¼Ls.
è´LJs Çæ ¢HAq Ç°u•HW ÅÐÇ •MFX Ç°JFJUÜ Çè Ç°HDUzd Çè Ç°LF¹MUÜ Çè Ç°JFJUÜ Ç°BGOdÉ Çè Ç°ºKu´UÜ ¡U§·FLUä ±¼ºUÜ ®KOKW Ç°¼Ls. -JKLU ®q ±º·ué Ç°¼Ls -w Ç°L¼ºW ¯LU Ç¢CºX ³cç Ç°Hdèâ.
¢Mh Ç°L¼·u´UÜ Ç°HObüÇ°OW «Kv Çæ Ç°LM·¹UÜ Ç°·w ¢ºLq «š±W (±d¤d´s) ´M¶Gw Çæ ¢º·uê «Kv Ç°¼Ls ¡M¼¶W 08% èÒ²U «Kv Ç_®q. ñU Ç°L¼ºUÜ ®KOKW Ç°¼Ls, ±s Ç°¹NW
Ç™”dé, -·º·uê «Kv §Ls îq è±UÁ ï¸d. è´R£d Ç°Lº·ué Ç°FU°w ±s Ç°d©u¡W -w ³cç Ç°L¼ºUÜ «Kv ¡MOW è²JNW Ç°¼Kl Ç°L»¶uÒÉ. °KºBuä «Kv Ç-Cq Ç°M·UzZ ±s è•H·p
Ç°Ib´LW ǧ·FLq Ç°Ld¤d´s Çè Ç°e¡bÉ Çè ÕU¡l Ç°L¼ºUÜ Ç°·w ¢º·uê «Kv 07% «Kv Ç_®q ±s Ç°e´X Ç°M¶U¢w.
¢FKOLUÜ °·u”w Ç°¼š±W
¢FKOLUÜ Ç°·AGOqÇ°FMU´W èÇ°·MEOn
¢FKOLUÜ Ç°·d¯OV
²BUz` ǯ·AUá ±uÇ{l
Ç°»Kq èÇ•š¥t
Page 33

11
Ç°FMU´W ¡U°Lu®b è¢MEOHt
ÅÐÇ ¢r ²Iq Ç°Lu®b Ç°»UÕ ¡p ±s ±JU²t °·MEOHt Çè •OU²·t Çè _ê §¶V ”d, ¢Q¯b ±s Çæ è§OKW ±IUè±W Ç™²IšÈ ¢FAo
£U²OW ¡AJq §KOr «Mb±U ´FUÏ Ç°Lu®b Ç°v ±JU²t, ²EdÇ _æ Ç°HAq -w Ç¢»UÐ ³cÇ Ç™¥·OU× ´LJs Çæ ´M·Z «Mt ŲIšÈ Ç°Lu®b
è´¼¶V ÃÐé.
´LJs -p ±HU¢O` Ç°·ºJr ±s äq Ç°·MEOn ¡¼Nu°W. °Hp
±H·UÍ ±U ŧº¶t ¡U§·IU±W ±s ®B¶·t (§U®t). Ŭ¼q
Ç°LHU¢O` -w ±UÁ è•U¡uæ °Js ™ ¢MIFNU.
²En Ãê §J¶UÜ Çè ¢d¨UÔ ¡uǧDW ®LUÔ ±¶Kq.
ÃÒä Ç™¢¼UÎ Ç°Ab´b ¡uǧDW Ç°LUÁ Ç°bÇ-T èÇ°BU¡uæ.
™¢¼·»bå ±uÇÏ ¥U¯W ±s Ãê ²uÙ «Kv °u¥W Ç°·ºJr.
°u¥W Ç°·ºJr èÇ°LHU¢O`
ǧºV Ç°eü ¡U§·IU±W ±s ®B¶·t
-·ºW Ç°·Nu´W
(«Kv ¡Fi Ç°DdÇÒÇÜ)
¢·r ¢Nu´W Ç°Hdæ ±s ”šä -·ºW ¢ºX Ç°u¥bÉ Ç°¼DºOW
Ç°»KHOW Ç°OLMv.
™ ¢GDw Ç°H·ºW ±DKIU ¡uǧDW ü®Uzo Ç_°LMOuå
Çè ôW ±UÏÉ Ç”dé.
™ ¢¼·FLq ±MEHUÜ -dæ ¢¹Uü´W Çè ±¼U¥Oo ¢MEOn Çè
•uá •K¶w Çè ±uÇÏ ¥U¯W ”AMW «Kv Ãê §D` ±DKw.
¢A·Lq Ç_§D` Ç°LDKOW «Kv Ç°¹uDzV èÇ°büÌ Ç_±U±w.
²En ³cç Ç_§D` ¡uǧDW Ç°LUÁ èÇ°BU¡uæ Çè ¡uǧDW
±ºKuä ”q è±UÁ.
Ç_§D` Ç°LDKOW
±u®l -·ºW ¢Nu´W -dæ ©dÇÒ Ç°LKn Ç°JNd¡Uzw
¢FKOLUÜ °·u”w Ç°¼š±W
¢FKOLUÜ Ç°·AGOq Ç°FMU´W èÇ°·MEOn
¢FKOLUÜ Ç°·d¯OV
²BUz` ǯ·AUá ±uÇ{l
Ç°»Kq èÇ•š¥t
Page 34

21
Ç°FMU´W ¡U°Lu®b è¢MEOHt
§D` Ç°DNw Ç°FKuê Ç°LDKw ¡U•²U±q
ÅÐÇ ¢MU£dÜ Ã¥LUÖ «Kv §D` Ç°DNw è³u §U”s,
ǧ·»bå -u©W èü®OW ¤U-W Çè ®DFW ®LUÔ ¤U-W °L¼ºt
-uüÇ. è«Mb±U ´¶dÏ Ç°¼D` Ǭ¼Kt ¡uǧDW •U¡uæ è±UÁ,
£r ǨDHt ¤ObÇ.
¡U°M¼¶W °K¼J¶UÜ (Ç°·MU£dÇÜ) Ç_”dé ±¸q Ç°·d¨U¨UÜ
Ç°b³MOW, Ǭ¼q ¡uǧDW •U¡uæ è±UÁ Çè ¡L¼U¥Oo
¢MEOn ¡Fb Çæ ´¶dÏ Ç°¼D`. ǨDn ¤ObÇ. °Ll ¡uǧDW
®DFW ®LUÔ ¤U-W.
™ ¢dÔ ±MEn Ç°Hdæ «Kv ǤNeÉ è±HU¢O` Ç°·ºJr Ç°JNd¡UzOW
™²NU ¢¼¶V -w ®Bd Ç°bÇzdÉ Ç°JNd¡UzOW è¥Buä ¨dÇüÉ Çè
¥d´o.
™ ¢¼L` °D¶IW ü®OIW ±s Ç°LMEn ¡U°·¹Ll «Kv ǤNeÉ
Ç¥¼UÓ Ïü¤W Ç°ºdÇüÉ _²NU ®b ¢¼¶V -w ¢¼»Os Ç°Hdæ
¡BuüÉ ±GKu©W (Ãæ ǤNeÉ Ç•¥¼UÓ ¢Il -w ëKv Ç°Hdæ).
DZ¼` ¤NUÒ Ç•¥¼UÓ ¡FMU´W °·MEOHt ¯KLU ¢r ¢MEOn Ç°Hdæ,
±l Ç°ºdÕ «Kv «bå ¢ºd´p ¤NUÒ Ç•¥¼UÓ, ¥OY Çæ
Ç¥bÇË ¢GOOd -w ±u®FNU ®b ´R£d «Kv ¯OHOW ®OUå Ç°Hdæ
¡U°DNw.
™ ¢dÔ Ãê ±MEn -dæ «Kv ¡UÈ Ç°Hdæ, Ç°LIU¡i Çè ôW
ǧD` ”Uü¤OW °KHdæ Çè Ç°JU¡OMUÜ Çè Ç_§D` Ç°LDKOW. Çæ
Ç°LMEn ´LJs Çæ ´·Kn ³cç Ç_§D`.
Çæ •Iq Ç°BOMw Ç°LDKw ¡U•²U±q «Kv Ç°I¼r Ç°bÇ”Kw
°¼D` Ç°Hdæ- ®LW è®Fd è”Kn èÏÇ”q Ç°¶UÈ §Oº·Hk
¡LENdç Ç°¹b´b °¼MuÇÜ «b´bÉ ÇÐÇ ¢KIv Ç°FMU´W Ç°LšzLW.
Ç¢dã Ç°Lu®b ¥·v ´¶dÏ °·MEOHt. ²u•Op ¡Sü¢bÇÁ ¯Huá
±DU©OW «Mb ¢MEOn Ç°Lu®b.
Çæ Ç°BU¡uæ èÇ°LUÁ ´JHw «UÏÉ °·MEOn Ç°Lu®b. Çæ
Ç°¼J¶UÜ Ç°¸IOKW èÇ°·d¨U¨UÜ Ç°b³MOW ®b ¢·DKV
Ç°·MEOn ¡LMEn ¥Uã ±F·bä. ¯LU ®b ´Keå ǧ·FLUä
è§UÏÇÜ ±s Ç°Buá Ç°LFb²w Ç°L¶KKW ¡U°BU¡uæ.
™ ¢·dã Ç°DFUå Ç°LM¼JV Ç°cê ´º·uê «Kv ¯LOW «U°OW ±s Ç°¼Jd Çè
Ç°ºU±i (±¸q Ç°LK` èÇ°DLU©r è§Uèü¯dÇèÜ è«BOd Ç°Huǯt Çè
¥AuÇÜ Ç°HDUzd) Çæ ´¶Iv «Kv Ç°¼D`. ¥OY DzNU §··ºuä Ç°v ¡IFW
±F·LW ¥·v ¡Fb Ç°·MEOn.
Åæ Ç_±u²OU Ç°LMe°OW ´LJs Çæ ¢¼Nq «LKOW Ç°·MEOn. {l
²Bn ¯uÈ -w ¯uÈ {ºq Çè ¥Uè´W -»Uü´W -w -dæ ¡UüÏ
Ç£MUÁ Ç°KOq. -Uæ á»dÉ Ç_±u²OU §uá ¢¼U«b «Kv Çü”UÁ
Ç°Aºr èÇ°DFUå Ç°Lº·dâ.
ÃÐÇ °eå Ç_±d ´LJMp ǧ·FLUä ±MEn Ç°Hdæ ±·¶FU
Ç°·FKOLUÜ Ç°uÇüÏÉ ±l Ç°FK¶W.
Ç°I¼r Ç°bÇ”Kw °KHdæ ±s Ç°BOMw (Ç°¶uü§KOs)
(°DdÇÒÇÜ Ç°·MEOOn Ç°IOU§w)
Çæ •Iq Ç•²U±q Ç°BOMw (Ç°¶uü§KOs) ´F·¶d ®uê è±·Os
è°JMt ®U¡q °KJ¼d ÅÐÇ ±U §UÁ ǧ·»bDZt. èÇæ ³cÇ Ç°BIq
±IUèå °œ¥LUÖ. è«Kv ôW ¥Uä, ´¹V Ù ´¼L` ¡¶IUÁ
ôW §J¶UÜ Ã©FLW ¥U±COW (±¸q «BOdÇÜ Ç°Huǯt Çè
Ç°DLU©r Çè Ç°»q) «Kv Ç°BIq.
Ãü-n Ç°Hdæ
²En Ç_ü-n ¡LMEn ¥Uã Ãè ¡Buá •K¶w.
¢FKOLUÜ °·u”w Ç°¼š±W
¢FKOLUÜ Ç°·AGOqÇ°FMU´W èÇ°·MEOn
¢FKOLUÜ Ç°·d¯OV
²BUz` ǯ·AUá ±uÇ{l
Ç°»Kq èÇ•š¥t
Page 35

31
Ç°FMU´W ¡U°Lu®b è¢MEOHt
Çü-l Ç°¶UÈ ¡BuüÉ ±¼·IOLW Ç°v Ç_«Kv è-Jt ±s
Ç°LHBK·Os.
™ ¢ºp Çè ¢MEn ¥AOW Ç°¶UÈ ¥OY DzNU ¢L·Kp
±IUè±W ±M»HCW ¤bÇ °Kºp.
ÅÐÇ ™¥EX Çæ Ç°ºAOW Ç•¶ºX ¡U°OW Ãè ±·P¯KW Çè
±·M¼KW Çè ¢U°HW ¡Q´W ©d´IW Çè ÅÐÇ Ç•¶ºX ±eÇ¥W
«Kv Ç°¶UÈ -O¹V ǧ·¶bÇ°NU.
Çæ Ç°ºAOW ±BLLW ¡H¹uÉ -w Ç_§Hq °K¼LUÍ
¡bèüÇæ Ç°NuÇÁ ¡BuüÉ ±šzLW.
²EdÇ _æ Ç°LMDIW Ç°·w ÏÇ”q Ç°ºAOW ´·r ¢MEOHNU
ãMUÁ ÏèüÉ Ç°·MEOn Ç°cÇ¢w, -U²p ™ ¢º·UÌ Ç°v ¢MEOHNU
¡U°Ob.
Çæ §J¶UÜ Ç°··¶Oq è«BOdÇÜ Ç°HU¯NW è•KBW
Ç°DLU©r è±uÇÏ Ç°KºUÁ Ç°Lº·u´W «Kv Ã¥LUÖ ´LJs
Çæ ¢¼¶V ¢GOOd Ç°Kuæ è´¹V ±¼ºNU -uüÇ «Mb±U ´¶dÏ
Ç°¼D` è±s £r ¢MEn è¢ADn.
<
<
<
<
<
-p ¡UÈ Ç°Hdæ
Çæ ¡UÈ Ç°Hdæ ®U¡q °KHp °HdÖ ¢MEOHt.
™ ¢d-l Ç°¶UÈ ¡U°LI¶i.
°Hp Ç°¶UÈ,
Ç-·ºt ¥·v ±u{l Ç°·u®n Ç°»UÕ. DZ¼p
Ç°¶UÈ ¤ObÇ ±s ¯q ±s ¤U²¶Ot èÇü-l Ç°¶UÈ ±¼·IOLU
_«Kv è-Jt ±s Ç°LHBK·Os.
üÇ«w «bå è{l Ç°Ob´s ¡Os Ç°LHBKW èÅ©Uü ¡UÈ Ç°Hdæ.
•«UÏÉ Ç°¶UÈ Ç°v ±JU²t,
¢Q¯b ±s Çæ Ç°LHBK·Os -w
±u{l Ç°·u®n Ç°»UÕ. {l Ç°AIuâ Ç°·w -w ®UÙ Ç°¶UÈ
±¼·IOLU -uâ Ç°LHBK·Os. £r Ç”Hi Ç°¶UÈ ¡¶DT
¡U°·¼Uèê -uâ ¯š Ç°LHBK·Os -w ²Hf Ç°u®X.
°·MEOn ÏÇ”q Ç°¶UÈ
( «Kv ©dÇÒÇÜ Ç°·MEOn Ç°cÇ¢w)
™ ¢·dã Ç°DFUå Ç°LM¼JV Ç°cê ´º·uê «Kv ¯LOW «U°OW ±s Ç°¼Jd Çè
Ç°ºU±i (±¸q Ç°ºKOV èÇ°DLU©r è§Uèü¯dÇèÜ è«BOd Ç°Huǯt Çè
¥AuÇÜ Ç°HDUzd) Çæ ¢¶Iv «Kv Ç°¼D`. ¥OY DzNU §··ºuä Ç°v ¡IFW
±F·LW ¥·v ¡Fb Ç°·MEOn.
«Mb Ç°Keèå ´LJMp ǧ·FLUä ±MEn -dæ. Ç¢¶l
Ç°·FKOLUÜ Ç°uÇüÏÉ ±l Ç°FK¶W.
²En ÏÇ”q ²U-cÉ Ç°Hdæ ¡U§·FLUä ±MEn ±F·bä ¬Od
¥Uã ±l ®DFW ®LUÔ ±¶KKW.
<
ǧ·FLq Ç°LUÁ èÇ°BU¡uæ -w Ç°·MEOn Ç°·Uå °ILW
è¤U²¶w èèǤNW Ç°Hdæ. ǨDn ¤ObÇ. ´LJMp Ç´CU
ǧ·FLUä ±MEn Ò¤U¤w °·MEOn Ç°e¤UÌ ”UüÌ Ç°Hdæ.
™ ¢·dã Ç°LUÁ ´·IDd ÏÇ”q -·ºW Ç°·Nu´W.
°·MEOn ”UüÌ Ç°¶UÈ
™ ¢¼·FLq ±MEHUÜ °KHdæ Çè ±¼U¥Oo ¢MEOn Çè ±uÇÏ
¥U¯W ”AMW «Kv Ç°¶UÈ ±s Ç°»UüÌ.
Ç°MuÇ-c Ç°e¤U¤OW
(«Kv ¡Fi Ç°DdÇÒÇÜ)
°·MEOn ©KOW Ç°e¤UÌ Ç°»Uü¤w, ǧ·FLq ±MEn Ò¤UÌ.
ǨDHNU è°LFNU ¡IDFW ®LUÔ ¤U-W.
«MU•d ¢b-µW Ç°Hdæ
™ ¢MEn «MBd Ç°»¶Oe Çè «MBd Ç°Auê. -Qê Ç¢¼UÎ ´LJs Çæ ´º·dâ
è´eèä «Mb±U ´¼»s Ç°FMBd.
°·MEOn Ãü{OW Ç°Hdæ, Çü-l «MBd Ç°»¶Oe ¡d-o è²En
Ç_ü{OW ¡LUÁ -Ot •U¡uæ.
¢FKOLUÜ °·u”w Ç°¼š±W
¢FKOLUÜ Ç°·AGOq Ç°FMU´W èÇ°·MEOn
¢FKOLUÜ Ç°·d¯OV
²BUz` ǯ·AUá ±uÇ{l
Ç°»Kq èÇ•š¥t
Page 36

41
Ç°FMU´W ¡U°Lu®b è¢MEOHt
ǧ·¶bÇä °L¶W Ç°Hdæ
(-w ¡Fi Ç°DdÇÒÇÜ)
¢M¶Ot:
®¶q ǧ·¶bÇä °L¶W Ç°Hdæ, Ç-Bq ±Bbü
Ç©U®W Ç°JNd¡UzOW «s Ç°Lu®b ±s «Mb °u¥W
Ç°LBNd Çè ®U©l Ç°·OUü Ç°dzO¼w.
¢Q¯b ±s ¢dã ¬DUÁ è¡BOKW Ç°KL¶W °·¶dÏ ¢LU±U.
°Hp Ç°GDUÁ
{l Ç¥bé ´b´p ¢ºX Ç°GDUÁ ¡ºOY ™ ´¼Ij
«Mb±U ´·r Ç«U®·t. è¡uǧDW Ç•U¡l ²Hf Ç°Ob, ÇÏ-l
Ç°¼Kp Ç°LU§p °KGDUÁ ¡¸¶UÜ Ç°v Ç°»Kn. èÇü-l
Ç°GDUÁ.
™ ¢Hp ôW ¡dǬw (±¼U±Od ±Ku°¶W) «Mb -p Ç°GDUÁ.
1
2
ǧ·¶bä Ç°KL¶W ¡KL¶W ±Me°OW ®uÉ 04 èÇ×.
{Ft -w Ç°ºe Ç°cê -w ÏèÇÉ Ç°KL¶W. ǧºV Ç°¼Kp
°œ±Uå ¥·v ±M·Bn Ç°GDUÁ 襷v ´DIDo -w
±JU²t.
1
2
®r ¡·u•Oq ±Bbü Ç°DU®W Ç°JNd¡UzOW Ç°v Ç°Lu®b.
•«UÏÉ è{l Ç°GDUÁ
¡Fb Ç°Auê, ÔdÌ è«UÁ Ç°Auê ±s Ç°Hdæ.
²En çHq Ç°Lu®b
±U§p ¬DUÁ Ç°¼Kp
è«UÁ 訶JW Ç°AuÇ´W
¡Fb Ç°Auê, Ç”dÌ è«UÁ Ç°Auê ±s Ç°Hdæ, èÇ”dÌ Ç°A¶JW
±s Ç°u«UÁ. •V Ç°b³uæ ¡FMU´W ±s è«UÁ Ç°Auê -w ŲUÁ
±MU§V.
Ǭ¼q èǨDn è«UÁ 訶JW Ç°AuÇ´W -w ±UÁ §U”s
¡uǧDW ¥AOW ¡š§·OJOW ±LKuÁÉ ¡BU¡uæ •ÒÇ°W Ç_è§UÎ.
ÅÐÇ Ç¥·dâ Ç°DFUå, üÔ Ç°A¶JW ¡uǧDW ±MEn è³w
§U”MW, è¬Dw Ç°A¶JW ¡uǧDW -u©W èü®OW Çè ±MAHW
Ç©¶Uâ. Åæ ²Il Ç°u«UÁ §uá ´e´q ¥dèâ Ç°DFUå Ç°FU°IW ¡t.
´LJs ¢MEOn è«UÁ Ç°AuÇ´W ¡uǧDW ±MEn -dæ ¢¹Uüê.
ÅÐÇ ¯U²X Ç°A¶JW ÐÇÜ ±OMU ü±UÏ´W, -OLJs ¢MEOHNU Ç´CU
¡uǧDW ±MEn -dæ. èÇÐÇ ¯U²X Ç°A¶JW ÐÇÜ ¯dèå -š
¢¼·FLq -w ¢MEOHNU ±MEn -dæ.
´LJs Ç´CU ¢MEOn è«UÁ 訶JW Ç°AuÇ´W -w ¬¼U°W
Ç©¶Uâ.
™ ¢»eæ è«UÁ 訶JW Ç°AuÇ´W è³LU ±·¼»Uæ -w Ãê ±JUæ ¡U°Lu®b.
¯OHOW -p ÏüÌ Ç°·»e´s Çè Ç°KuÍ Ç•ü¢bÇÏê °·MEOn çHq Ç°Lu®b
•ÒÇ°W ¤dÏ Ç°·»e´s:
™«UÏÉ è{l ÏüÌ Ç°·»e´s -w ±JU²t:
ǧºV Ç°büÌ ¡Jq ±bÇç Ç°v Ç°»UüÌ.
1
2
ñq ±Ib±W Ç°büÌ _«Kv è-Jt.
ÃÏ”q ±Me°IUÜ Ç°büÌ Ç°·w «Mb ±R”d¢t èüÇÁ Ç°LBb
Ç°cê «Kv ±Me°IUÜ Ç°Lu®b.
1
2
Çü-l Ç°büÌ «Mb Ç°CdèüÉ •Ï”U°t ¡¼Nu°W.
3
ÏÙ ±Ib±W Ç°büÌ _§Hq, £r ÇÏ-Ft Ç°v Ç°bÇ”q °OGKo.
-p Ç°KuÍ Ç•ü¢bÇÏê,
ǧº¶t ±¼·IOLU °K»UüÌ ±s
Ç°FKu´W.
°u{l Ç°KuÍ -w ±JU²t,
Çè™ «Ko Ç°FdÇèê Ç°¼HKOW £r
Ç°FdÇèê Ç°FKu´W.
¢FKOLUÜ °·u”w Ç°¼š±W
¢FKOLUÜ Ç°·AGOqÇ°FMU´W èÇ°·MEOn
¢FKOLUÜ Ç°·d¯OV
²BUz` ǯ·AUá ±uÇ{l
Ç°»Kq èÇ•š¥t
Page 37

51
¢Q¯b ±s Çæ ±HU¢O` Ç°·ºJr -w è{l (-Bq
FFO
) èÇæ Ç°u¥bÉ Ç°¼DºOW ¡UüÏÉ ®¶q ±ºUè°W -JNU.
Ç°u¥bÇÜ Ç°¼DºOW
(«Kv ¡Fi Ç°DdÇÒÇÜ)
°·MEOn Ç°u¥bÇÜ Ç°¼DºOW, ÃÏü ±HU¢O` Ç°·ºJr Ç°v ëKv
è{l °LbÉ Ï®OIW èÇ¥bÉ. è§uá ¢FLq Ç°LKHUÜ «Kv ¥dâ
ôW Çè§UÎ.
°Hp è¥bÉ §DºOW:
-p Ãè«OW Ç°·MIOj °·MEOHNU, ´¹V -p Ç°u¥bÇÜ
Ç°¼DºOW Çè™.
Çü-l Ç°u¥bÉ Ç°¼DºOW ¥uÇ°w 5\2 §r -uâ è«UÁ Ç°·MIOj
èǧº¶NU °K»UüÌ.
™ ¢b-l Ç°u¥bÉ Ç°¼DºOW ¡Q¯¸d ±s 5\2§r, èÇÐÇ ü-F·NU ¡Q¯¸d ±s
5\2§r, -Ib ™ ¢Il ±¼DºW «Kv è«UÁ Ç°·MIOj «Mb±U ¢FOb ¢u•OKNU
¡U°IU¡f £U²OW.
èÇæ ¢JdÇü ü-l Ç°u¥bÉ Ç°¼DºOW ¡Q¯¸d ±s 2.5§r -uâ
è«UÁ Ç°·MIOj ´LJs Çæ ´·Kn Ç°LI¶f ¡AJq ÏÇzr.
™ ¢GLd Ç°u¥bÇÜ Ç°¼DºOW -w ôW §uÇzq ±NLU ¯Uæ ²u«NU.
™¢MEn Ç°u¥bÇÜ Ç°¼DºOW -w ¬¼U°W Ç©¶Uâ.
™ ¢¸Mw édÇá ®U¡f (-Og Яd) Ç°u¥bÉ Ç°¼DºOW.
™ ¢ºUèä ¢MEOn Çè {¶j Çè Ç•šÍ - ¡Q´W ©d´IW- Ç°LI¶f
(Ç°HOg Ç_²¸v) Ç°cê ´b”q -w Ç°IU¡f.
•«UÏÉ è{l è¥bÉ §DºOW:
ëb è{l è«UÁ Ç°·MIOj -w Ç°H¹uÉ Ç°·w -w §D` Ç°DNw,
¢Q¯b ±s Çæ Ç°H·ºW Ç°·w -w Ç°u«UÁ ±IU¡KW °KLI¶f.
ÃÏ”q édÇá Ç°u¥bÉ Ç°¼DºOW ”šä Ç°H·ºW Ç°·w -w
è«UÁ Ç°·MIOj è-w Ç°LI¶f.
è¤t Ç°u¥bÉ Ç°¼DºOW ¡ºOY ¢d¢Je ¤ObÇ -w ±JU²NU.
Ç°LI¶f
Ç°u¥bÉ Ç°¼DºOW
è«UÁ Ç°·MIOj
Ãè«OW Ç°·MIOj
(«Kv ¡Fi Ç°DdÇÒÇÜ)
-p Ç°u¥bÇÜ Ç°¼DºOW. £r Çü-l Ãè«OW Ç°·MIOj °K»UüÌ.
è°KºBuä «Kv ²·UzZ Ã-Cq, ²En Ãè«OW Ç°·MIOj ¡U°Ob {FNU -w è«UÁ ±GDv (Çè -w ¯Of ¡š§·Op) ±l 06
±KKOK·d (ü¡l ¯uÈ) ñu²OU °ºq Ç_è§UÎ. £r ²En ™ÒÇ°W
Ç_è§UÎ ¡ºAOW ±LKuÁÉ ¡BU¡uæ, «Mb Ç°CdèüÉ, èDn
¡LUÁ ²EOn è°Ll ¡IDFW ®LUÔ ²EOHW è²U«LW.
è´LJs Ç´CU ¢MEOn Çè«OW Ç°·MIOj -w ¬¼U°W Ç_©¶Uâ.
²En Ç°LMDIW Ç°·w çHq Ãè«OW Ç°·MIOj ¡U§·LdÇü. Çæ
Ç_è§UÎ Ç°L·dǯLW -”U•W Ç°b³MOW ±MNU- ´LJs Çæ ¢K·Ij
Ç°MOdÇæ.
™ ¢GDw Ãè«OW Ç°·MIOj ¡d®Uzo Ç™°LOMOuå. ¥OY Ãæ ǧ·»bÇå ü®Uzo
Ç_°LOMOuå °GKo Ç°LI¶f ´LJs Çæ ´¼¶V •b±W ¯Nd¡UzOW Çè ¥d´o Çè ¢Kn
°KLu®b.
ü-l §D` Ç°DNw Ç°FKuê
(«Kv ¡Fi Ç°DdÇÒÇÜ)
¡Fi Ç°DdÇÒÇÜ ¢º·uê «Kv üÃÓ ©Nw ´LJs ü-Ft _«Kv
°·¼NOq «LKOW Ç°·MEOn. è´LJs ü-l §D` Ç°DNw ¡U°JU±q
è¥LKt è³u ±d-uÙ _«Kv.
è™ ´º·UÌ ³cÇ Ç_±d -p Ç°u¥bÇÜ Ç°¼DºOW. è«Kv ôW
¥Uä, ´LJs -p èÇ¥bÉ ±MNU °¹Fq ü-l üÃÓ Ç°DNw çNq.
³MUã ¥U±KOs ¤U²¶OOs ´MIHšæ -w ±u{FNLU «Mb±U ´·r
ü-l §D` Ç°DNw _«Kv.
¡Fb ¢MEOn Ç°LMDIW Ç°·w çHq üÃÓ Ç°DNw ¡uǧDW ±UÁ
§U”s è•U¡uæ ±F·bä è®DFW ®LUÔ ²EOHW, òeä üÃÓ
Ç°DNw _§Hq. Ç¥dÕ «Kv «bå {Gj Ç•U¡Fp ¢ºX
üÃÓ Ç°DNw.
蕲eÇä üÃÓ Ç°DNw _§Hq, Ç{Gj «Kv Ç°ºU±KOs Ç°v
Ç°»Kn èòeä üÃÓ Ç°DNw ¡»HW _§Hq ¥·v ´d¢Je -w
±JU²t.
¢Q¯b ±s Çæ ¤LOl Ç°u¥bÇÜ Ç°¼DºOW -w è{l
(-Bq
FFO
) ®¶q ü-l §D` Ç°DNw
¢FKOLUÜ °·u”w Ç°¼š±W
¢FKOLUÜ Ç°·AGOq Ç°FMU´W èÇ°·MEOn
¢FKOLUÜ Ç°·d¯OV
²BUz` ǯ·AUá ±uÇ{l
Ç°»Kq èÇ•š¥t
Page 38

61
¢FKOLUÜ Ç°·d¯OX Ç°bè°OW.
(022-042 -u°X, 05/06 ³d¢e, §KJOs)
Å®dà ³cç Ç°·FKOLUÜ ¯U±KW è¡FMU´W.
®¶q Ãæ ¢AGq Ç°Lu®b
³Uå:
¥U-k «Kv ³cç Ç°·FKOLUÜ ™§·FLUä Ç°LH·g Ç°LºKw.
³ààUå: üÇ«ààw ¤LOààl Ç°KuÇzàà` èÇ™¯ààuÇÏ Ç°LºKOààW
Ç°LFMOW ¡U°·d¯O¶UÜ.
±š¥EW °KIUzr ¡·d¯OV Ç°Lu®b:
Ç¢dã ³cç Ç°·FKOLUÜ
±l Ç°Lu®b ¡Fb Ç™²·NUÁ ±s Ç°·d¯OV.
±š¥EW °BU¥V Ç°Lu®b:
Ç¥·Hk ¡b°Oq Ç°LU°p ³cÇ
Ç°»UÕ ¡·FKOLUÜ Ç°·d¯OV ™§·»bDZt -w Ç°L¼·I¶q.
±š¥EW:
³cÇ Ç°¹NUÒ ´¹V Ãæ ´RüÖ ¢Qü´CU ±MU§¶U.
±Hp ¡dǬw ¡MBq ¯¶Od.
±Hp •uDZOq ¡dÃÓ §bǧw 6 ±r (1/4 ¡u•W).
ÒüÏ´W ¢¸¶OX ±»bÏÉ.
Ç_ÏèÇÜ Ç°·w ¢º·U¤NU
<
<
<
Ç°L·DK¶UÜ Ç°JNd¡UzOW
¢M¶Ot, °K¼š±W Ç°A»BOW:
™ ¢¼·»bå ¯U¡q ¢Lb´b ±l
³cÇ Ç°Lu®b.
-p ±BNd Ç°LMeä Ãè Å-·` ®U©l Ç°·OUü ®¶q ¡bÁ «LKOW Ç°·d¯OV.
´¹V ¢Gc´W ³cÇ Ç°Lu®b ¡U°¹Nb èÇ°·dÏÏ Ç°LšzLOs, è´u•q Ç°v
ÏÇzdÉ -d«OW ±¼·IKW ±Rü{W ¡AJq §KOr, ¢·r è®U´·NU ¡IU©l ¢OUü Çè
¡LBNd Ðè ¢Q”Od Ò±Mw, ¯LU ³u ±AUü Ç°Ot «Kv °u¥W Ç°LIMMUÜ
°KLu®b.
´¹V Çæ ´Juæ ¢Lb´b Ç_§šã ±DU¡o °KuÇz` Ç°LFMOW.
ÅÐÇ ¯U²X Ç°»b±W Ç°JNd¡UzOW Ç°L·u-dÉ ¡U°LMeä ™ ¢¼·u-w
Ç°LuÇ•HUÜ Ç°HMOW Ç°Lc¯uüÉ Ã«šç, -Ou•v ¡Qæ ´Iuå ¯Nd¡Uzw
±d”h ¡·d¯OV ±I¶f (±»dÌ) ±F·Lb.
²EdÇ _²t ™ ´Juæ ±s Ç°¼Nq Ç°u•uä Ç°v ²NU´UÜ Ç°·u•Oq
Ç°JNd¡UzOW °KLu®b ¡Fb è{Ft -w ±JU²t, °cÇ ´¹V ǧ·»bÇå ±U§uüÉ
±d²W °K»b±W Çè ¯U¡q ±dæ.
¢FKOLUÜ °·u”w Ç°¼š±W
¢FKOLUÜ Ç°·AGOqÇ°FMU´W èÇ°·MEOn
¢FKOLUÜ Ç°·d¯OV
²BUz` ǯ·AUá ±uÇ{l
Ç°»Kq èÇ•š¥t
±H·UÍ ü¡j •Mbè®w Ãè ±H·uÍ Ç°Hp ±IUÓ 3/61 ¡u•W
±H·UÍ ü¡j ±H·uÍ Ç°Hp Ãè DzC¶U©w ±IUÓ 3/8 1 ¡u•W
¨d´j ®OUÓ
<
<
<
Page 39

71
Å®dà ³cç Ç°·FKOLUÜ ¯U±KW è¡FMU´W.
Ç«bÇÏ Ç°H·ºW
Ç¢dã ±¼U-W 18\3 §r ¡Os Ç°Lu®b èÇ°¹büÇæ Ç°dzO¼OW Ç°L¹UèüÉ -uâ
§D` Ç°DNw.
Ç¢dã 2\67§r ¯Qϲv ”KuÕ ¡Os Ç°u¥bÇÜ Ç°¼DºOW è®UÙ Ç°bè™È
Ç°»A¶w Çè Ç°LFb´s ¬Od Ç°LeèÏ ¡ºLU´W ±šzLW, èÇ¢dã 1\83§r ¯ºb
Çϲv ¡Os üÃÓ Ç°DUè°W è®UÙ Ç°bè™È Ç°L¹Uèü.
ŧ·¸MUÁ:
Çæ ¢d¯OV -dæ ±u¤UÜ Ï®OIW Çè ¤NUÒ ©Nw ±F·Lb, -uâ üÃÓ Ç°DNw ´¹V Çæ
´DU¡o ¢FKOLUÜ Ç°·d¯OV Ç°LF¶QÉ ±l аp Ç°¹NUÒ.
ÅÐÇ ü¯V Ïè™È ¢»e´s, ´LJs ¢IKOq ”Dd Ç°ºd´o «s ©d´o ¢d¯OV ¬DUÁ
(¯LW) °KLu®b ¥OY ´¶dÒ Ç-IOU 7\21§r èüÇÁ ®UÙ Ç°bèÇ°OV. ¢Q¯b ±s Çæ
¬UÁ (èüâ) Ç°ºUzj 讼r Ç°DUè™ èÇ°bèÇ°OV Ç°·w ¥uä Ç°Lu®b ´LJs Çæ
¢·ºLq Ç°ºdÇüÉ Ç°L·u°bÉ «s Ç°Lu®b Çè Ç°Hdæ Çè §D` Ç°DNw ¥·v 39òå.
™´Iq «s «dÖ Ç°Lu®b
¬DUÁ
7\21§r Ç®q ¥b
Ç«¸d «Kv •Mbèâ Ç°·Gc´W
ÏÇ”q Ãê ±s Ç°LMDI·Os Ç°L¹KK·Os
¥Uzj
2\67§r
Ãϲv ¥b
1\83§r
Ãϲv ¥b
2\67§r
¥Uzj
5\91§r
87\71§r
50\91§r
98\8§r
7\21§r
Ç™ü{OW
27\5§r
¯U¡q ±dæ
ü¯V •Mbèâ
Ç°·Gc´W «Kv
Ãê ±s ¤U²¶w
•Mbèâ Ç°·Gc´W
1
¢FKOLUÜ °·u”w Ç°¼š±W
¢FKOLUÜ Ç°·AGOq Ç°FMU´W èÇ°·MEOn
¢FKOLUÜ Ç°·d¯OV
²BUz` ǯ·AUá ±uÇ{l
Ç°»Kq èÇ•š¥t
Page 40

81
¢FKOLUÜ Ç°·d¯OX Ç°bè°OW.
(022-042 -u°X, 05/06 ³d¢e, §KJOs)
Å®dà ³cç Ç°·FKOLUÜ ¯U±KW è¡FMU´W.
Ç_ü{OW Ç°·w ǧHq Ç°Lu®b
Çæ ±u®bã, ±¸q Ç°J¸Od ±s Ç_¨OUÁ Ç°LMe°OW, £IOq è´LJs Çæ ´¼·Id «Kv Ç_¬DOW Ç°MU«LW
°œüÖ ±¸q Ç°HOMOq Ç°L¶Ds èÇ°¼¹UÏ.
è«Mb ¢ºd´p Ç°Lu®b «Kv ³cÇ Ç°MuÙ ±s Ç_ü{OUÜ, ´¹V è{Ft «Kv °uÍ
±s ”AV Ç_¡KJUÌ §LJt 6±r (Çè ±U¨U¡Nt) ¯LU ´Kw:
«Mb±U ´M·Nw ¬DUÁ Ç_ü{OW «Mb ±Ib±W Ç°Lu®b, -O¹V Çæ ¢d¯V
Ç°LMDIW Ç°·w §uá ´¼·Id «KONU Ç°Lu®b ¡»AV Ç¡KJUÌ ¡MHf ±¼·ué
Çü¢HUÙ ¬DUÁ Ç_ü{OW Çè ëKv ±Mt. è§uá ´·O` аp ¢ºd´p Ç°Lu®b
°·MEOHt Çè •OU²·t.
ǧ·»bå ¯U¡q ±dæ ±F·Lb °·Gc´W Ç°Lu®b. è§OJuæ «Kv ±¸q ³cÇ Ç°JU¡q
¡OUæ Ç´CU¥w °d±e Ç™«·LUÏ. èÇÐÇ ¯MX ¬Od ±·Q¯b ±s Ç«·LUÏ Ç°JU¡q
Ç°Ldæ Ç°»UÕ ¡·Gc´W ±u®bã, -Cš ǧ·Ad Ç°LuÒÙ Ç°cê Ç«·bÜ «Kv
¨dÇÁ Ç_ÏèÇÜ Ç°JNd¡UzOW ±Mt èǨ·d ±Mt Ç°JU¡q Çè Ç¥Cd ¯Nd¡Uzw ±R³q
°KIOUå ¡·d¯OV ±u®bã. è-w Ç°MNU´W, ®b ´·u¤V «KOp ¨dÇÁ è§OKW
±¼·IKW °·»HOn Ç™²HFUä (Ç°·u¢d) ÇÐÇ ¯Uæ Ç°JU¡q Ç°Ldæ ™ ´º·uê «Kv
¢Kp Ç°u§OKW.
´u•v ¡JU¡q ±dж °KLu®b ±MU§V °š§·»bЗе °·OUь 04 Г±¶Od. и´¹V З´CU
Зж ´Juж ±MU§¶U °K¹Nb 052 -u°X ¯ºb ГП²v. Зж З°JU¡q З°LMU§V д05
Г±¶Od ¬Od ±u•v ¡t, З™ З²t, ЗРЗ З§·»bе, ´¹V Зж ´u{l «KOt ¡OUж
З´CU¥w ´HOb ¡U§·»bЗ±t ±l -·ºUЬ ¢u•Oq ®Dd³U 94\3§r. ´¹V
З¢»UР З°FMU´W °u{l З°J¶q ии§OKW ¢»HOn З™²HFUд )З°·w §·¶ºY -w
З°»DааааuЙ ь®ааr 3 ) -аааw З°Lаd¯аааe ПЗ”аааq З°¼аааbЗПЙ З°LаR®·ааааW °KH·ºаааааааааW
(eloH tuokconK) °ºHk Ç°JU¡q ±s Ç°ºp ±l Ç°ºU-W.
Ç•«bÇÏ °K·u•Oq Ç°JNd¡Uzw
2
3
-p ¬DUÁ ¢Lb´b ǧšã Ç°Lu®b ¡U°LR”dÉ Ç°¼HKOW °JAn ±¹Lu«W
Ç°·u•Oq èÇ°¼MUÏ Ç°Iu§w.
-p ¥KIW Ç°¼bÇÏÉ Ç°LR®·W (94\3§r) Ç°Lu¤uÏÉ «Kv Ç°¼MUÏ Ç°Iu§w
±¶U¨dÉ Ã§Hq Ç°Lu•q. è°Hp Ç°¼bÇÏÉ Ç°LR®·W, ǧ·»bå ÒèÌ ±s
Ç°eüÏ´UÜ °¸Mw ¥KIW Ç°¼bÇÏÉ Ç°LR®·W ¡FObÇ «s Ç°¼MUÏ Ç°Iu§w è¢Kué
¥·v ¢MHp Ç°ºKIW.
ǧ·»bå ²NU´UÜ ¢u•Oq ¥KIOW ÐÇÜ -·ºUÜ °KuÇ°V ¡LIUÓ ¯Uá °¶dǬw
²NU´UÜ Ç°·u•Oq è¡d¬w Ç_ü{w Ç°L¼·»b±W -w Ç°»DuÉ (4). ´u•n
Ç°AJq ëšç Ç°JU¡q Ç°Ldæ °K·Gc´W ¡Q©dÇá ¢u•Oq ¥KIOW «Kv édÇá
¯U¡q Ç°·Gc´W Ç°Ldæ.
¯U¡q Ç°·Gc´W èè§OKW ¢»HOn Ç•²HFUä
È
Ã
Ì
¥KIW Ç°¼bÇÏÉ Ç°LR®·W -w Ç°¼MUÏ Ç°Iu§w
¥KIW Ç°¼bÇÏÉ Ç°LR®·W ±eÇ°W ±s ±JU²NU
ü¯V è§OKW ¢»HOn Ç™²HFUä -w Ç°H·ºW. ÃÏ”q ¯U¡q Ç°·Gc´W Ç°Ldæ
”šä è§OKW ¢»HOn Ç™²HFUä èÇü¡Dt ¤ObÇ. Ç¢dã Çü¢»UÁ ¯U-w °d¡j
²NU´UÜ ¢u•Oq Ç°JU¡q ¡¼Nu°W ¡L¹Lu«W Ç°·u•Oq. ÇÐÇ è¤bÜ «dÇèê
«Mb è§OKW ¢»HOn Ç™²HFUä Ç°L¹MºW, -OLJs ÇÒÇ°·NU ±s äq ¢uÇ-o
Ã-Cq.
±š¥EW:
™ ¢d¯V ¯U¡q Ç™¢Gc´W Ç°Ldæ ¡bèæ è§OKW ¢»HOn Ç•²HFUä. ´M¶Gw
¢d¯OV Ç°¼MUÏ Ç°Iu§w °·»HOn Ç™²HFUä ®¶q Å«UÏÉ ¢d¯OV Ç°GDUÁ Ç°»KHw °JuÇ¡q
Ç°Lu®b.
³cç °IDW «s ®dÈ °MNU´W ¢u•Oq ¥KIOW. Çæ
²NU´W Ç°·u•Oq Ç°ºKIOW Ç°Lu{ºW -w Ç°AJq
Ç°Id´V ³w ±s ²uÙ (Ç°¶d±Oq Ç°LGKo). ²u•w
¡U§·»bÇå ²NU´W ¢u•Oq ²uÙ (Ç°¶d±Oq Ç°LGKo).
¡¶d±Oq ¯¶Od ¡bü¤W ¢JHw ™§·OFUÈ Ç©dÇá
Ç°JU¡q Ç°Ldæ. è´¹V ¢¼KOj ®uÉ ±šzLW °K·COOo
°·u•Oq Ç_§šã Ç°L¹bè°W ¡MNU´UÜ ¢u•Oq
¥KIOW.
±š¥EW:
ÅÐÇ ¯Uæ Ç°JU¡q Ç°Ldæ °·Gc´W
±u®bã (±¹bèä) è™ ´M·Nw ¡MNU´UÜ ¢u•Oq
¥KIOW,
-O¹V
Çæ ¢d¡j ²NU´UÜ Ç°·u•Oq
ëšç ¡Q©dÇá Ç°JU¡q. Çæ ¯U¡q ¢Gc´W
(±¹bèä) ³u Ç°Lº·uê «Kv çšã ü®OIW
¯¸OdÉ ±H·u°W ±l ¡FCNU ¯U°Lu{` -w Ç°AJq.
²NU´W ¢u•Oq ²uÙ (Ç°¶d±Oq Ç°LGKo)
çšã ®OU§OW
¬DUÁ Ç°JuÇ¡q
(±eÇä ±s ±JU²t)
±¹Lu«W Ç°·u•Oq
²NU´UÜ ¢u•Oq ¥KIOW
§Kp Çü{w
Ç”Cd è¡d¬w
è°u¥W
§MUÏ ®u§w
¯U¡q ±dæ °KDU®W
Ç°¼MUÏ Ç°Iu§w °·»HOn Ç™²HFUä
(±eèÏ ¡JU¡q Ç°Lu®b Ç°Ldæ. °Of
¤eÁÇë ±s Ç°Lu®b)
è§OKW ¢»HOn Ç™²HFUä
¢FKOLUÜ °·u”w Ç°¼š±W
¢FKOLUÜ Ç°·AGOqÇ°FMU´W èÇ°·MEOn
¢FKOLUÜ Ç°·d¯OV
²BUz` ǯ·AUá ±uÇ{l
Ç°»Kq èÇ•š¥t
Page 41

91
¢FKOLUÜ °·u”w Ç°¼š±W
¢FKOLUÜ Ç°·AGOq Ç°FMU´W èÇ°·MEOn
¢FKOLUÜ Ç°·d¯OV
²BUz` ǯ·AUá ±uÇ{l
Ç°»Kq èÇ•š¥t
Å®dà ³cç Ç°·FKOLUÜ ¯U±KW è¡FMU´W
¢d¯OV ¯U¡q Ç°·Gc´W Ç°Ldæ Ðè Ç°¼KJOs
4
¢ºc´d:
´¹V ¢u•Oq édÇá Ç°·Gc´W ¡MNU´UÜ
Ç°·u•Oq Ç°»Uü¤OW (°u²NU ¯U°MºUÓ Ç_•Hd). è´¹V ¢u•Oq
©dá Ç°·Qü´i ¡NOJq Ç°Lu®b ¡uǧDW ¡d¬w Ç°·Qü´i
Ç_”Cd.
´¹V ¢Qü´i ³OJq Ç°Lu®b ¡Dd´IW ±šzLW è¤ObÉ °·¹MV
Ç°Bb±W Ç°JNd¡UzOW.
-p Ç°¶d¬OOs ±s ±¹Lu«W Ç°·u•Oq.
-p ¡d¬w Ç_ü{w èÇ°Duâ (Ç°MDUâ) ±s Ç°Lu®l Ç_è§j °L¹Lu«W
Ç°·u•Oq è-p Ç°L¼LUü Ç°cê ´d¡j ³cç Ç°L¹Lu«W ¡NOJq Ç°Lu®b.
È
Ã
Ì
®¶q
¡d¬w ÔCd è°u¥W Ç°·Qü´i
(Ç°·Qü´i Ç°v Ç°Lu®b)
¡Fb
ÇÏ”q Ç°¶dǬw ”šä ¯q ¥KIW ²NU´W ¢u•Oq ¯U¡q Ç°·Gc´W Ç°Ld²W è-w
±¹Lu«W Ç°·u•Oq ¥·v ´FAo Ç°¶d¬w -w Ç°BU±u°W. Ãü¡j Ç°¶dǬw ¤ObÇ.
Çü¡j §Kp Ç°·Qü´i ¡NOJq Ç°Lu®b. è³cÇ ³u Ç°¼Kp Ç_”Cd Çè Ç_”Cd
±l ¨d´j Ç•Hd.
Ï
Ã¥Ld ˜L Œ (”j)
ǧuÏ ˜N Œ (¥OUÏê)
Ç°¶d¬w Ç_”Cd ´RüÖ
Ç°Lu®b ¡U_üÖ (¢Qü´i)
¢d¯OV Ç°¼KJOs -w ±U§uüÉ
5
¢ºc´d:
Çæ ±¹Lu«W Ç°·u•OšÜ ±F·LbÉ -Ij
°·u•ààOq Ç_§àààšã Ç°MºU§àààOW. ÇÐÇ Ç§ààà·»b±X ǧààààšã
Ç_°LOMOuå, DzEd Ç°Lš¥EW ÇϲUç.
-p Ç°¶d¬OOs ±s ±¹Lu«W Ç°·u•Oq. -p ©uâ Ç_ü{w ±s Ç°Lu®l Ç_è§j
°L¹Lu«W Ç°·u•Oq è-p Ç°L¼LUü Ç°cê ´d¡j ³cç Ç°L¹Lu«W ¡NOJq Ç°Lu®b.
ÇÏ”q Ç_§šã Ç°FUü´W ¡Os ²NU´UÜ ±¹Lu«W Ç°·u•Oq èÇ°BuDZOq Ç°L·ºd¯W.
Çü¡j Ç°¶dǬw ¡S¥JUå. Çü¡j §Kp Ç°·Qü´i ¡NOJq Ç°Lu®b.
™ ¢u•q ǧšã Ç_°u±OMOuå ¡L¹Lu«W Ç°·u•OšÜ. ǧ·»bå §Kp ±BMuÙ
±s Ç°MºUÓ ±MU§V °œ±¶Od èÇ°¹Nb Ç°BºOºOs °FLq £š£W ǧšã «¶uü
(5\7§r). Ãè•q Ç°¼Kp ¯U°LAdèÍ Ç«šç.
Çè•q Ç_§šã Ç°MºU§OW ¡U°¹bä ¡U§šã Ç_°LOMOuå ±¼·»b±U ²NU´UÜ
±u•q ”U•W ±BLLLW °·u•Oq Ç°MºUÓ ¡U_°LOMOuå èÇ¢¶l ¡b®W Ç°Dd´IW
Ç°·w ´u•w ¡NU •U²l Ç°Lu•q. ´¹V Çæ ´Juæ Ç°¼Kp Ç°L¼·»bå è±u{l.
È
Ã
±š¥EW: ¢Lb´b Ç_§šã Ç_°LOMOuå
¢ºu´DUÜ Ç°u•šÜ Ç°L¹bè°W Ç°a, ±DU¡IW °KLUü§UÜ Ç°HMOW °K·Lb´b
Ç°¹Ob èÇ°KuÇz` Ç°LºKOW.
§Kp «Uü
•Lu°W ±·MIKW
¡d¬w
²NU´W ±¹Lu«W Ç°·u•Oq
¯U¡q ±dæ
±¹Lu«W Ç°·u•Oq
§MUÏ ®u§w
²NU´UÜ Ç°¼Kp Ç°FUüê
±U§uüÉ
Page 42

02
¢FKOLUÜ °·u”w Ç°¼š±W
¢FKOLUÜ Ç°·AGOqÇ°FMU´W èÇ°·MEOn
¢FKOLUÜ Ç°·d¯OV
²BUz` ǯ·AUá ±uÇ{l
Ç°»Kq èÇ•š¥t
¢FKOLUÜ Ç°·d¯OV Ç°bè°OW.
(022-042 -u°X, 05/06 ³d¢e, §KJOs)
Å®dà ³cç Ç°·FKOLUÜ ¯U±KW è¡FMU´W.
¢ºc´d
6
¢d¯OV Ç°¹NUÒ Ç°LU²l °ž²IšÈ
<
<
<
´¹V ¢¸¶OX Ç°Lu®b
¡U°¹NUÒ Ç°LU²l °ž²IšÈ
Ç°LeèÏ ±l Ç°¹NUÒ.
´LJs °KLu®b Ãæ ´MIKV ÅÐÇ °r ´Js ±¸¶X ¤ObÇë è¥bË Ãæ ¨»h •Fb
«Kv Ç°¶UÈ Ãè ¤Kf «KOt. ®b ´BUÈ Ç°A»h ²·O¹W •²¼JUÈ
Ç°¼uÇzq Ç°¼U”MW Ãè ±s Ç°Lu®b ÐÇ¢t.
¡Fb ¢d¯OV
Ç°¹NUÒ Ç°LU²l °ž²IšÈ
, ¢Q¯b Dzt -w ±JU²t Ç°BºO`
«s ©d´o Ãæ ¢ºUèä ¡ºcü ¢LOOq Ç°Lu®b Å°v Ç_±Uå.
<
<
<
¢r ¢BLOr ³cÇ Ç°Lu®b ¡ºOY ´·uÇ-o ±l ¤LOl Ç°LIU´Of Ç°FU°LOW
Ç°LFdè-W -w Ç°BMU«W °ž²IšÈ ¢ºX Ç°Edèá Ç°D¶OFOW.
³cÇ Ç°¹NUÒ °s ´ºuä Ïèæ DzIšÈ Ç°Lu®b ÅÐÇ °r ´ïd¯V ¤ObÇë.
ÅÐÇ ¯Uæ
Ç°¹NUÒ Ç°LU²l °ž²IšÈ
Ç°LeèÏ ±l Ç°Lu®b ™ ´·DU¡o ±Ft,
´LJMp Ãæ ¢¼·FLq
¤NUÒ
«Lu±w
±U²l °ž²IšÈ
ü®r
9097X20BW.
Ç°¹NUÒ Ç°LU²l Ç™²IšÈ ±eèÏ ±l ¢FKOLUÜ Ç°·d¯OV -w ñU¯s ±»·KHW.
袷CLs Ç°·FKOLUÜ ¯U-W Ç°LFKu±UÜ Ç°š±W •¢LUå «LKOW Ç°·d¯OV. Å®dÃ
¢FKOLUÜ Ç°¼š±W
èÇ°·FKOLUÜ Ç°·w ¢šzr è{Fp ®¶q Ç°¶bÁ ¡U°·d¯OV.
Ç°IuÓ
°uÍ Ç°¹bÇü
´¹V Ãæ ´b”q
Ç°¶d¬w -w
Ç°»AV Ãè
Ç°LFbæ
Ç°d¡j -w Ç°¹bÇü.
7
Å¢eÇæ Ç°Lu®b
8
¢Q¯b ±s Çæ ¤LOl Ç°LHU¢O` «Kv Ç°Lu{l (
-Bq
FFO) ®¶q ¢dã Ç°Lu®b.
Ç°·ºIo Ç°MNUzw
DzeÙ ÏüÌ Ç°·»e´s, Ãè ÏüÌ Ç°Auê Ãè
Ç°Ku¥W Ç°¼HKOW.
ǧ·FLq ±H·UÍ ü¡j •Mbè®w Ãè
±H·uÍ Ç°Hp ±IUÓ 3/61 ¡u•W °Hp
Çü¤q Ç•¢eÇæ Ç°»KHOW «s ©d´o
ÅÏÇü¢NU ±d¢Os ¢Id´¶Uë.
ǧ·FLq ±H·UÍ ü¡j ±H·uÍ Ç°Hp Ãè DzC¶U©w ±IUÓ 3/8 1 ¡u•W °Hp
Ãü¤q Ç•¢eÇæ Ç_±U±OW «s ©d´o ÅÏÇü¢NU ±d¢Os ¢Id´¶Uë.
¡à-
Ì-
Ã-
ü¯ñV Çü-n Ç°Hdæ è{l Ç°Lu®b -w Ç°LJUæ Ç°cê ¢d´b ¢d¯O¶t -Ot.
Å-ºh Ç•¢eÇæ «s ©d´o è{l ±OeÇæ ¢¼u´W ¯ºu°w Ãè ¯uÈ ¡t ¡Fi
Ç°LUÁ «Kv üá Ç°Hdæ. ÅÐÇ ¯MX ¢¼·FLq Ç°LOeÇæ, Å®dà ǰLIOUÓ
±d¢Os, ±dÉ èÇ°LOeÇæ ±u{uÙ ¡Dd´IW ®Dd´W -w Ç¢¹Uç èÇ¥b £r -w
Ç•¢¹Uç Ç_”d.
Ç{¶j Çü¤q Ç•¢eÇæ ¥·v ´¼·uê Ç°Lu®b ¢LU±Uë.
Ï-
è-
³à-
Page 43

12
±U³u Ç°ºqÇ_§¶UÈ Ç°Lº·LKWÇ°LAJKW
°L¶W Ç°Hdæ ™ ¢CUÁ
¢Q¯b ±s ¢u•Oq Ç°IU¡f Ç°JNd¡Uzw ¡LI¶f ±RüÖ ¢Qü´CU ±MU§¶U
è´¼dê -Ot Ç°·OUü Ç°JNd¡Uzw.
ǧ·¶bä Ç°LBNd Çè Ç«b {¶j ®U©l Ç°·OUü.
üǤl ®¼r
ǧ·FLUä Ç°Hdæ
¡BOKW Ç°KL¶W ±d¢»OW Çè ¢U°HW
Ç°Hdæ ™ ´FLq
±H·UÍ ¢AGOq Ç°CuÁ ±J¼uü
®U¡f Ç°Lu®b °Of ±b”š ¡U°JU±q -w
±I¶f Ç°JNd¡UÁ.
Çæ ±BNdÇ ®b Ç¥·dâ Çè Çæ ®U©l Ç°·OUü ®b
-Bq -w ±Me°p.
ГТьЗь З°·ºJr -w З°Hdж °Of ±C¶u©W ¡AJq
•ºO`.
¨b Ç°KL¶W ¤ObÇ Çè ǧ·¶b°NU
¥šä Ç°LAU¯q
(²BUz` Ç°JAn «s ±uÇ{l Ç°»Kq èÇ•š¥NU)
Ç®·Bb -w Ç°u®X èÇ°LUä! üǤl Ç°¹bÇèä -w Ç°BHºUÜ
Ç°·U°OW Çè™ °Fq аp ´GMOp «s Ç°ºU¤W Ç°v ©KV Ç°»b±W.
Ç°u¥bÇÜ Ç°¼DºOW
™¢RÏê èªOH·NU ¡AJq
§KOr
>
>
>
>
ǧ·bÙ -Mw Ç°BOU²W
üǤl ®¼r
ǧ·FLUä Ç°Hdæ
üǤl ®¼r
ǧ·FLUä Ç°Hdæ
üǤl ®¼r
ǧ·FLUä Ç°Hdæ
üǤl ®¼r
¢C¶Oj £Od±u§·UÜ Ç°Hdæ - Ç«LKNU ¡MH¼p
Ç°DFUå °r ´·r ”¶Oeç Çè
¢ºLOdç ¡AJq ±šzr
ГТьЗь З°·ºJr -w З°Hdж °O¼X ±C¶u©W
¡AJq •ºO`
±u{l Ç°dá ¬Od •ºO` Çè Ç°dá °Of
±¼·u´U
è«UÁ ©Nw ¬Od •ºO` Çè Çæ è«UÁ Ç°DNw
Ç°L¼·»bå Ðè ®OUÓ ¬Od ±šzr
£d±u§·UÜ Ç°Hdæ ´º·UÌ Ç°v {¶j
>
>
>
>
>
¢Q¯b ±s Dzp ®b ÃÏüÜ Ç°eü ¥·v ¯U±q ±AuÇüç ¥·v Ç°Lu{l (
Ç°Auê
LIORB)
üǤl ®¼r
ǧ·FLUä Ç°Hdæ
üǤl
Ï°Oq Ç°Auê
ǧ·FLq è«UÁ 訶JW Ç°Auê Ç°c´s èüÏÇ ±l ±u®bã. ¢Q¯b ±s DzNU ¡UüÏÉ
ǧ·FLq 訶JW Ç°Auê Ç°c´s èüÏÇ ±s ±u®bã
üǤl ®¼r
ǧ·FLUä Ç°Hdæ
§»s «MBd Ç°Auê ±¼¶IU °LbÉ 01 Ï®Uzo
Ǩuê _©uä ±bÉ ±I·d¥W -w Ï°Oq Ç°Auê
Ç°DFUå °r ´·r ¨u´t
¡AJq ±šzr
Ç°Hàdæ °àr ´Cà¶j «Kàv è{àl (
Ç°Aàuê
LIORB)
«àbå ¢àdã Ç°¶àUÈ ±H·àu¥U ¥·àv ±u{àl
Ç°·u®n Ç°»UÕ ¡U°Auê ¯U°Lu•v ¡t
±u{l Ç°dá Ç°L¼·FLq ¬Od •ºO`
©Nw Ç°DFUå -w è«UÁ §U”s.
DzUÁ Ç°DNw ¬Od ±MU§V °KAuê.
ü®Uzo Ç_°LOMOuå Ç°L¼·FLKW «Kv ¨¶JW
è«UÁ Ç°Auê °r ¢u{l ¡AJq ±šzr è™
¢º·uê «Kv ¨Iuâ ¯U°Lu•v ¡t
-w ¡Fi Ç°LMU©o ¢Juæ Ç°IbüÉ (Ç°Hu°·OW)
±M»HCW
>
>
>
>
>
>
>
>
¢FKOLUÜ °·u”w Ç°¼š±W
¢FKOLUÜ Ç°·AGOq Ç°FMU´W èÇ°·MEOn
¢FKOLUÜ Ç°·d¯OV
²BUz` ǯ·AUá ±uÇ{l
Ç°»Kq èÇ•š¥t
±l è{l ±HU¢O` Ç°·ºJr -w ±u{l
Ç°HBq
FFO, Ç-ºh Ç°u¥bÉ
Ç°¼DºOW °K·Q¯b ±s òNU ±u•KW ¡U¥JUå -w Ç°LI¶f.
Ç°u¥bÇÜ Ç°¼DºOW °O¼X ±u•KW (±b”KW)
¡¸¶UÜ -w Ç°LI¶f.
>
>
¢ºIo ±s òp ®b {¶DX ±H·UÍ Ç°·ºJr Ç°BºO` Ç°»UÕ ¡U°u¥bÉ
Ç°¼DºOW Ç°·w ¢¼·»b±NU.
±HU¢O` Ç°·ºJr -w Ç°u¥bÉ Ç°¼DºOW
±C¶u©W «Kv ±u{l ¬Od ±šzr .
±l è{l ±HU¢O` Ç°·ºJr -w ±u{l
Ç°HBq
FFO, Ç-ºh •OMOW
Ç°·MIOj °K·Q¯b ±s òNU ±u{u«W -w Ç°·¹u´n Ç°»UÕ ¡NU -w è¥bÉ
Ç°DNw Ç°FKu´W èÇæ Ç°H·ºW Ç°·w -w Ç°BOMOW ±·uÇ-IW ±l Ç°LI¶f.
•uDzw Ç°·MIOj °O¼X ±u{u«W ¡U¥JUå -w
è¥bÉ Ç°DNw Ç°FKu´W .
>
Page 44

22
±U³u Ç°ºqÇ_§¶UÈ Ç°Lº·LKWÇ°LAJKW
¥šä Ç°LAU¯q
(²BUz` Ç°JAn «s ±uÇ{l Ç°»Kq èÇ•š¥NU)
Ç®·Bb -w Ç°u®X èÇ°LUä! üǤl Ç°¹bÇèä -w Ç°BHºUÜ
Ç°·U°OW Çè™ °Fq аp ´GMOp «s Ç°ºU¤W Ç°v ©KV Ç°»b±W.
üǤl ®¼r ¢C¶Oj £d±u§·UÜ Ç°Hdæ- Ç«LKNU ¡MH¼p
_æ Ç°¶UÈ ²IUä, -U²t Ç¥OU²U ´eÇÍ ±s ±u{Ft Ç£MUÁ Ç°·d¯OV °·Iu´r Ç°¶UÈ,
Ç{Gj Ç°v Ç™§Hq «Kv Ç°eÇè´W Ç°FKOU.
³cÇ Ã±d ©¶OFw
Ïü¤W ¥dÇüÉ Ç°Hdæ
§U”MW ¤bÇ Çè ¡UüÏÉ
¤bÇ
¡UÈ Ç°Hdæ ±K·uê (¬Od
±¼·IOr)
´Bbü «s Ç°Hdæ •uÜ
®d®FW
£d±u§·UÜ Ç°Hdæ ´º·UÌ Ç°v ¢C¶Oj
Çæ Ç°¶UÈ ±eÇÍ ±s ±u{Ft
³cÇ ³u •uÜ «MBd Ç°·¼»Os è³u
|A·Gq è´·u®n Ç£MUÁ èªOHW Ç°DNw
>
>
>
¢FKOLUÜ °·u”w Ç°¼š±W
¢FKOLUÜ Ç°·AGOqÇ°FMU´W èÇ°·MEOn
¢FKOLUÜ Ç°·d¯OV
²BUz` ǯ·AUá ±uÇ{l
Ç°»Kq èÇ•š¥t
 Loading...