

Page 1
UsandCare&[nsti[iation Guide[
safe~ lmstruetions .... .... .... ..... ...3-5
operatinglnstruetions, mps
Aluminum Foil.. .... ..... .... ..... ..... .... ....-.5. 15, 18
AutomaticTimer and Clock. ..... ..... ..... .... ...lO
Features
Oven........... ..... ..... .... ..... ..... ..... .... ..... ..... ...~l.2O
Thermostat Adjustment ... ...... ..... ...... .... .12
SurfaceCooking.............. ..... ..... ....... .... ......8. 9
ControiSettings ..... .... ...... ..... ..... ...... ..... ... ...8
CookingTips... ...... ..... ..... ...... ..... ...... ..... ...8.9
Home CanningTips.. .... ...... ..... ...... ..... .... ....9
~~fa ~m~ ~~~~~~~~...,.,..,., .. .. .....2!-26
Broilerpan,rack .... ...... ...... ..... ....... ...... ..... ....25
Continuous-Cleaning
i
Cooktop..-.. ...... ..... ...... ....... ..... ...... ...... .....
DoorRemoval .. ...... ....... .... ....... ...... ...... ...... ...
I
I
Light BulbReplacement..... ...... ....... ....... ....23
2ven Vent.... ...... ....... ...... ..... ....... ....... ...... ..4r22
“)orceiainOven interior..... ....... ...... ....... ......25
;torageDrawer.... ........................e..... ...... ....24
... ..... .... ..... ..... ..... .... ..... ..... .... ..... ......6.7
Baking,Timed Baking. ..... ...... .... ......12-15
Broiling,BroilingGuide...... .... ..... .....18-20
ControlSettings...... ..... .... ...... .... ..... ..... .... .I I
Light...... ..... .... ..... ..... ..... ..... ..... ..... ...... ..... ....-11
Roasting,RoastingGuide.... ...... .... ..l6. 17
SheIves...... .... ..... ...... ..... ..... ..... ..... ........l 1,12
... ...... ...... ...... ....... .... ..
26
21,22
24
P~Ob#@m ~o~w~~
More questions?...call
............. .......0..........
30
GEARswerceDt@r@800.626.2000
!nstai~atien ..................................27-29
Anti-TipDevice
FlooringUnderthe Range................. ..... ...28
Leveling
consumer seFvices ... ..... ..... ......3l
Appliance Registration.............. ...... ..... ..... ....2
Model and Serial Number Location.... .... ...2
Warranty ...... ...... .... .... ..... ..... .... ......BackCover
... .... .... .... ..... .... .... .... ...... ..... ...
.... ..... ..... .... ............. .... .... ..... ..... ..... ....
29
29
Page 2
Piisintendedtohelpyou
-.
=-
;@
operatemd
maintain your new
rangeproperly.
Keep it handy for answersto
your questions.
If youdon’tunderstandsomething
orneedmorehelp,write(include
yourphonenumber):
ConsumerAffairs
GE.Appliances
AppliancePark
Louisville,KY40225
behindtherangedoororbehind
thestoragedrawer.
~ese numbersarealsoonthe
ConsumerProductOwnership
RegistrationCardthatcamewith
yourrange.Beforesendingin
thiscard,pleasewritethese
numbershere:
ModelNumber
SerialNumber
thesenumbersinany
Use
correspondenceor servicecalls
concerningyourrange.
Immediatelycontactthedealer(or
builder)thatsoldyoutherange.
save time and money.
Before you request
Serticee oa
ChecktheProblemSolverinthe
backofthisguide.Itlistscausesof
minoroperatingproblemsthat you
cancorrectyourself.
.-
.—
wYou WED SERWCE.e e
Toobtainservice,seethe
ConsumerServicespagein the
backofthisguide.
We’reproudof ourserviceand
wantyouto be pleased.If for some
reasonyouarenothappy withthe
serviceyoureceive,herearethree
stepsto followfor furtherhelp.
FIRST,contactthe peoplewho
servicedyourappliance.Expltin
whyyouarenotpleased.k most
cases,thiswillsolvetheproblem.
~XT, ifyouarestillnotpleased,
writeallthedetails—including
yourphonenumber—to:
Manager,ConsumerRelations
GEAppliances
AppliancePark
Louisville,KY40225
~ALLY, ifyourproblemis still
notresolved,write:
MajorApplianceConsumer
ActionPanel
20NotihWackerDrive
Chicago,E 60606
I>s=
o
I
(
f
i
i
u
]
[
i
/-->
/:
. .~
—.-.
.-”. .-
—. — . . ..-”.—.. . . .
. . . ..—.-——
—...—.——------ ..,--
i
.—.. . . . . .. . . . . ..-——--- ----- .— -- . . ---—---
Page 3
... —=- ,,, ..—
I
-.. ___ ,_...._—— -...-.. -. —-—--- -—..
”- ———---—--— —--
——.....—-——
—..— —...
‘1
~.
-
:)
~’
Page 4

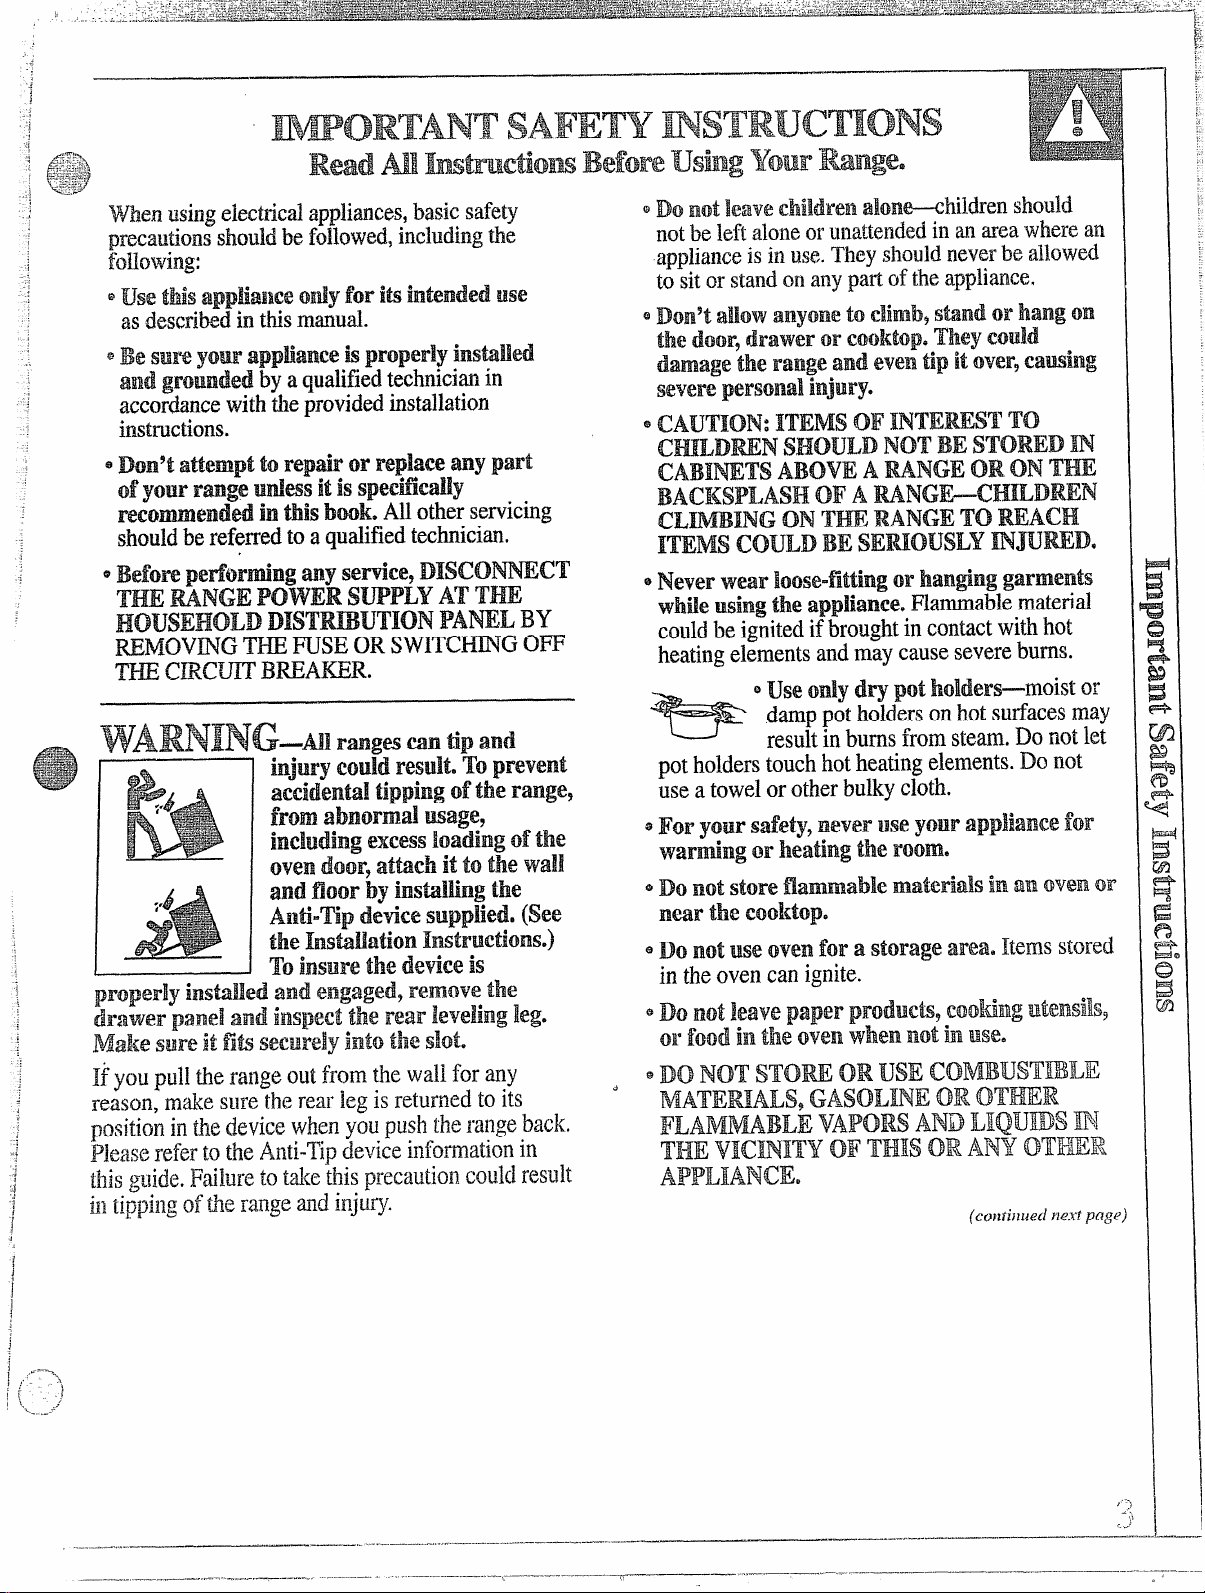
QNever ~eavetile ovendoor openwhen you are
“,. .——---- —., . . ..— .—-—. . . - . . . ..—---- . . . . . .. . ..-
notwatching the range.
@~~ ~~t let
materials accumulate
Do nottouch heating elemenb or interior
~
sufiace of oven. Thesesurfacesmay behot
enoughto bul~.1eventhoughtheyare darkin
color.During and after use, do not touch,or let
c~othingor otherflammablematerialscontact
surfaceunits,areas nearbysurfaceunitsor any
interiorareaof the oven;allowsufficienttime
for cooling,first.
Potentia~lyhotsurfacesincludethecooktop, areas
facingthecooktop, oven vent opening,surfaces
near the opening,crevicesaroundthe ovendoor,
the edgesof the door windowandmetal trim parts
abovethe door.Remember:Theinside surfaceof
the ovenmay be hot whenthe dooris opened.
by coveringpan completely with weII-fittinglid,
cookiesheetor flat tray,or if available,use dry
chemica~or foam-typeextinguisher.
cookinggrease or other flammable
inor near the range.
QDo notuse wateron greasefires.
Never pick up a naming pan.
Smotherflamingpan on surfaceunit
eKeep ovenventunobstructed.
Place ovenshelf indesired positionwhile
e
oven is cool.If shelvesmustbehandledwhen
hot, do notletpot holdercontactheating units
in the oven.
* Pulling outShelftothe shelf stop isa
convenienceinlifting heavy foods.It is also a
precautionagainst burns fromtouching hot
surfaces ofthe door or ovenwalls.
QWhenusingcookingorroastingbagsinoven9
followthemanufacturer’sdirections.
eDonotuse your oventodry newspapers.If
overheated,they can catchfire.
Flaminggrease outsidea pan can be put outby
covering with bakingsodaor, if available,a nlultipurposedry cllemica]or foam-typefire
extingl]isher.
Flame in the oven can be slnotheredcompletely
by closing the oven
doorandiurningtheOVCn
controlto OFF ot.usea dry chemica]or foam-type
fire extinguisher.
,/’”.
-————.—”-..—- -
—..
..—..—.—
——
Page 5
Q
j.-
~x=.. applianceisequippedwith different
-~~
~_<-
~?
USeproper pan size—This
sizesurfaceunits,Selectcookware
havingflatbottoms largeenoughto
coverthe surfaceunitheatingelement.Theuse of
undersizedcookwarewillexposeaportionof the
heatingelementtodirectcontactandmay resultin
j~llition of clothing.properrelationshipof
cookwareto burnerwill also improveefficiency.
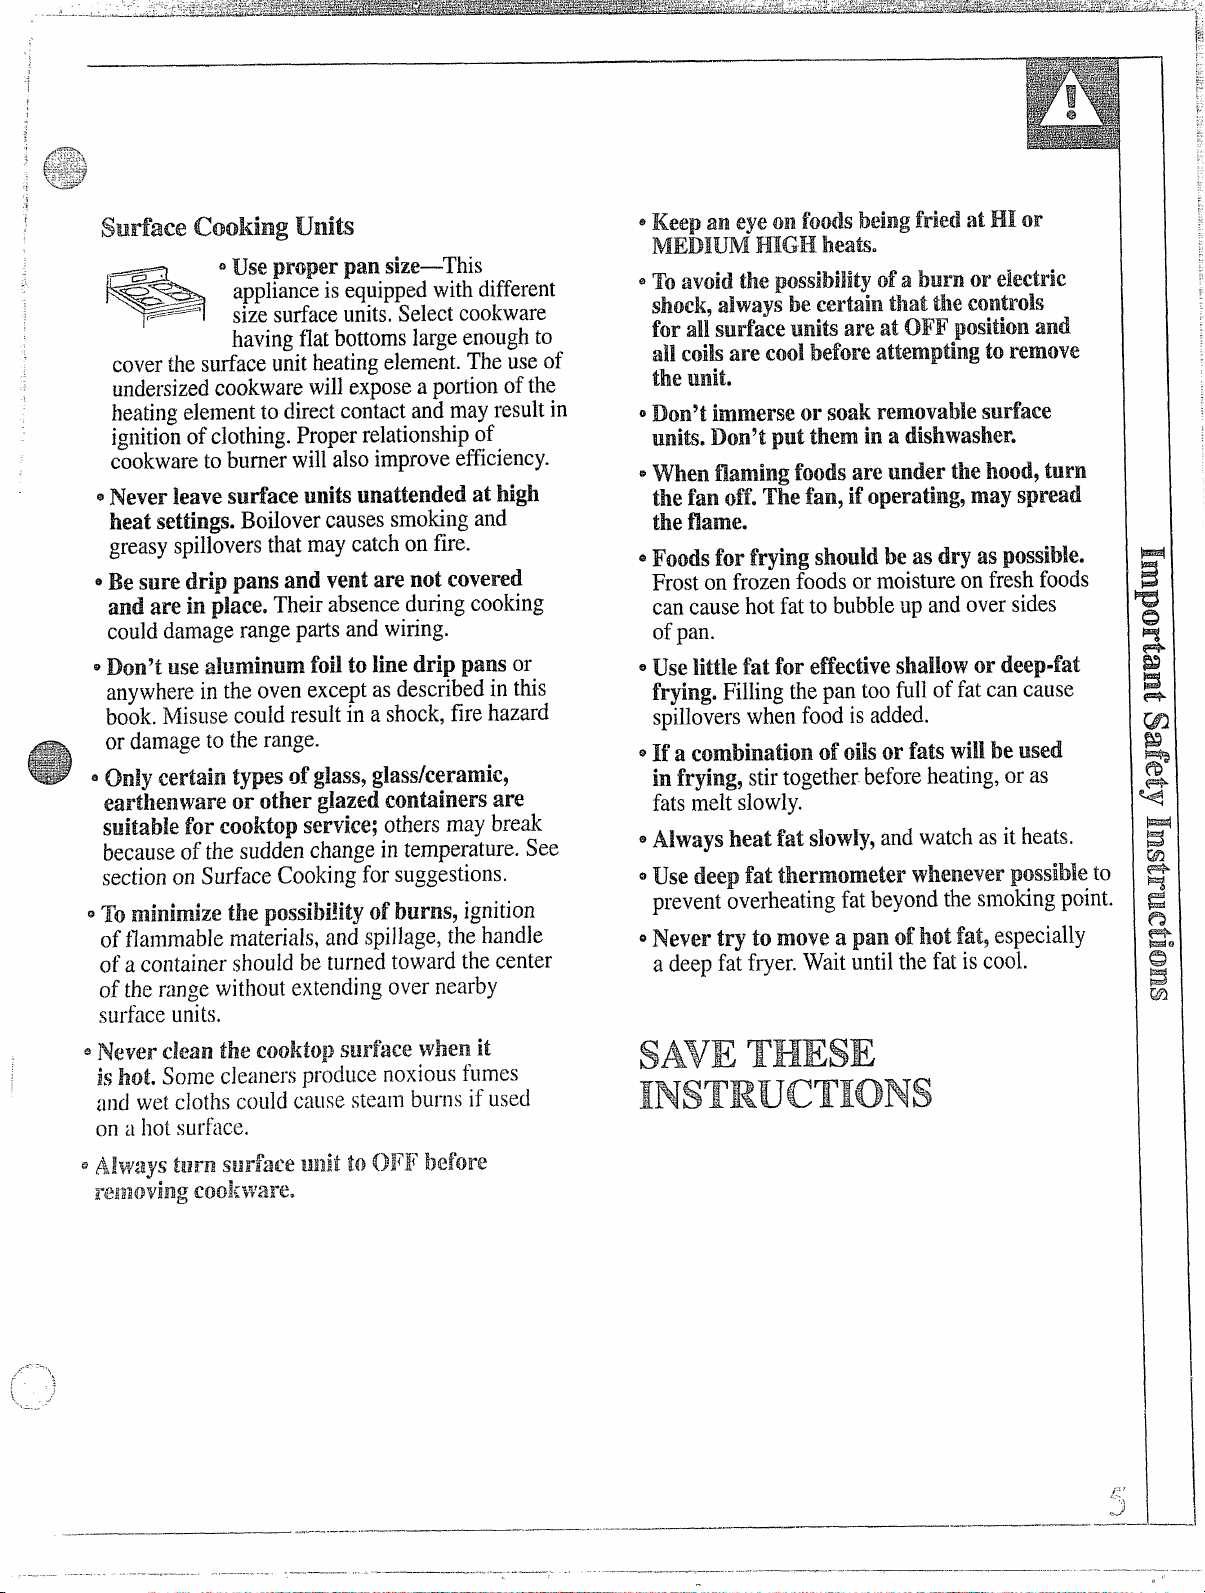
@Never leave SwtiaeeUxlitiunattended at high
heat settings. Boilovercausessmokingand
greasyspilloversthatmay catchon fire.
e~~ ~~~~~~~p~~~~~~~vent are not covered
and are in place. Theirabsenceduringcooking
coulddamagerangeparts and wiring.
~~~~~~use a~~~i~~~ foflto line drip pans or
anywhereinthe ovenexceptasdescribedin this
book.Misusecouldresultin a shock,fire hazard
or damageto the range.
eonly certain types of glass9glass/ceramie9
eartl~enwareor other glaztd containers are
suitable for cooktopservice;
othersmay break
becauseof the suddenchangein temperature.See
sectionon Surface Cookingfor suggestions.
~To minimize the possibility of burnsy ignition
of flammable materials,and spillage,the handle
of a containershould be turnedtoward the center
of the rungewithoutextendingover nearby
surface units.
Keep
an eye011foods b$imgfried atHI or
MEDIUM KIIG13heako
Toavoid the
shock9
possibility ofa!burn or electric
always be certainthat the controls
forall surface Mnititire atOFF positionand
all Coils
the unit.
Dom9timlmer$eor soak removable surface
Units.DQn9tputthem inadishwasher.
when naming foods areunder the hood9turn
the fan Off. The fan, if operating, may spread
the flame.
Foods for frying should beas dry
Frostonfrozenfoods or moisture on fresh foods
cancausehot fat to bubbleup and oversides
ofpan.
Uselittle fat for eflective shallow or deep-fat
frying. FilIingthepan toofull of fat can c~use
spilloverswhen food is added.
eIf ~ ~~~~~~~~~~~of ~~~~~~fat$ wil~be used
in frying9stirtogetherbeforeheating,or as
fats melt slowly.
~Always heat fat slowly,and watchas it heats.
Q Usedeepfattl~ermometer whenever possible to
preventoverheatingfat beyondthe smokingpoint.
~Neve~try iOmove a pan of hot fat9
a deep fat fryer.Waituntilthe fat is cool.
are Coolbefore attemptingto!remove
aspossible.
especially
s Never clean the Cooktoj}surface when it
is hot. Sornccleaners produce noxiousfumes
and wet clothscould cause stean~burns if used
on ithot surface.
G?%iways tlaFnSarface tlilit to OFl~before
re~nlovingCQo];ware.
——
.4”.—...—
— --------—--
.... .
____ ........—...-.-—-------
-...——
,;:’
.—.—...=.—
d
Page 6
II
.——--”-------
. . ... -.——
—.——- . .—-. ”.—...—...—. . . . . . . . .._.
—
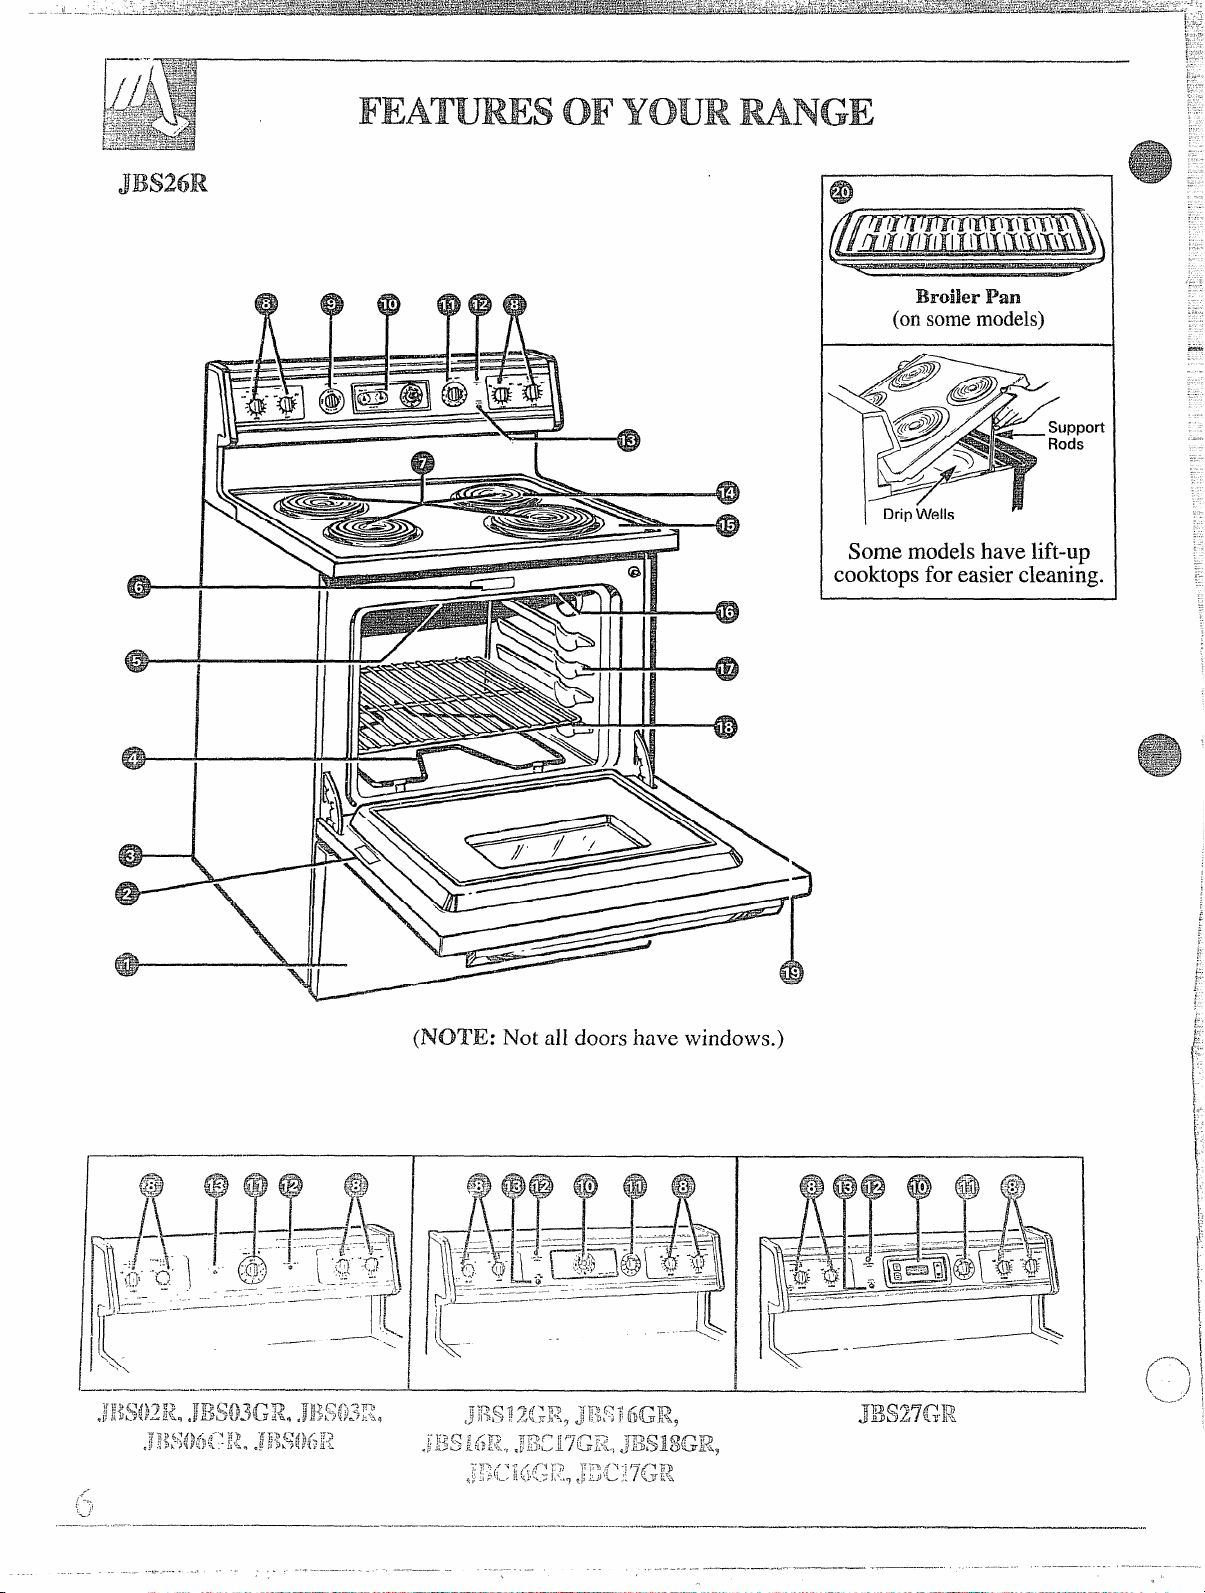
Broiler Pan
(onsomemodels)
ppon
ds
Some models have lift-up
cooktops for easier cleaning.
.----
1?
‘> .
r
(NOTE: Not all doors have
windows.)
”________._ -,_.
—
.—— ,.
Page 7
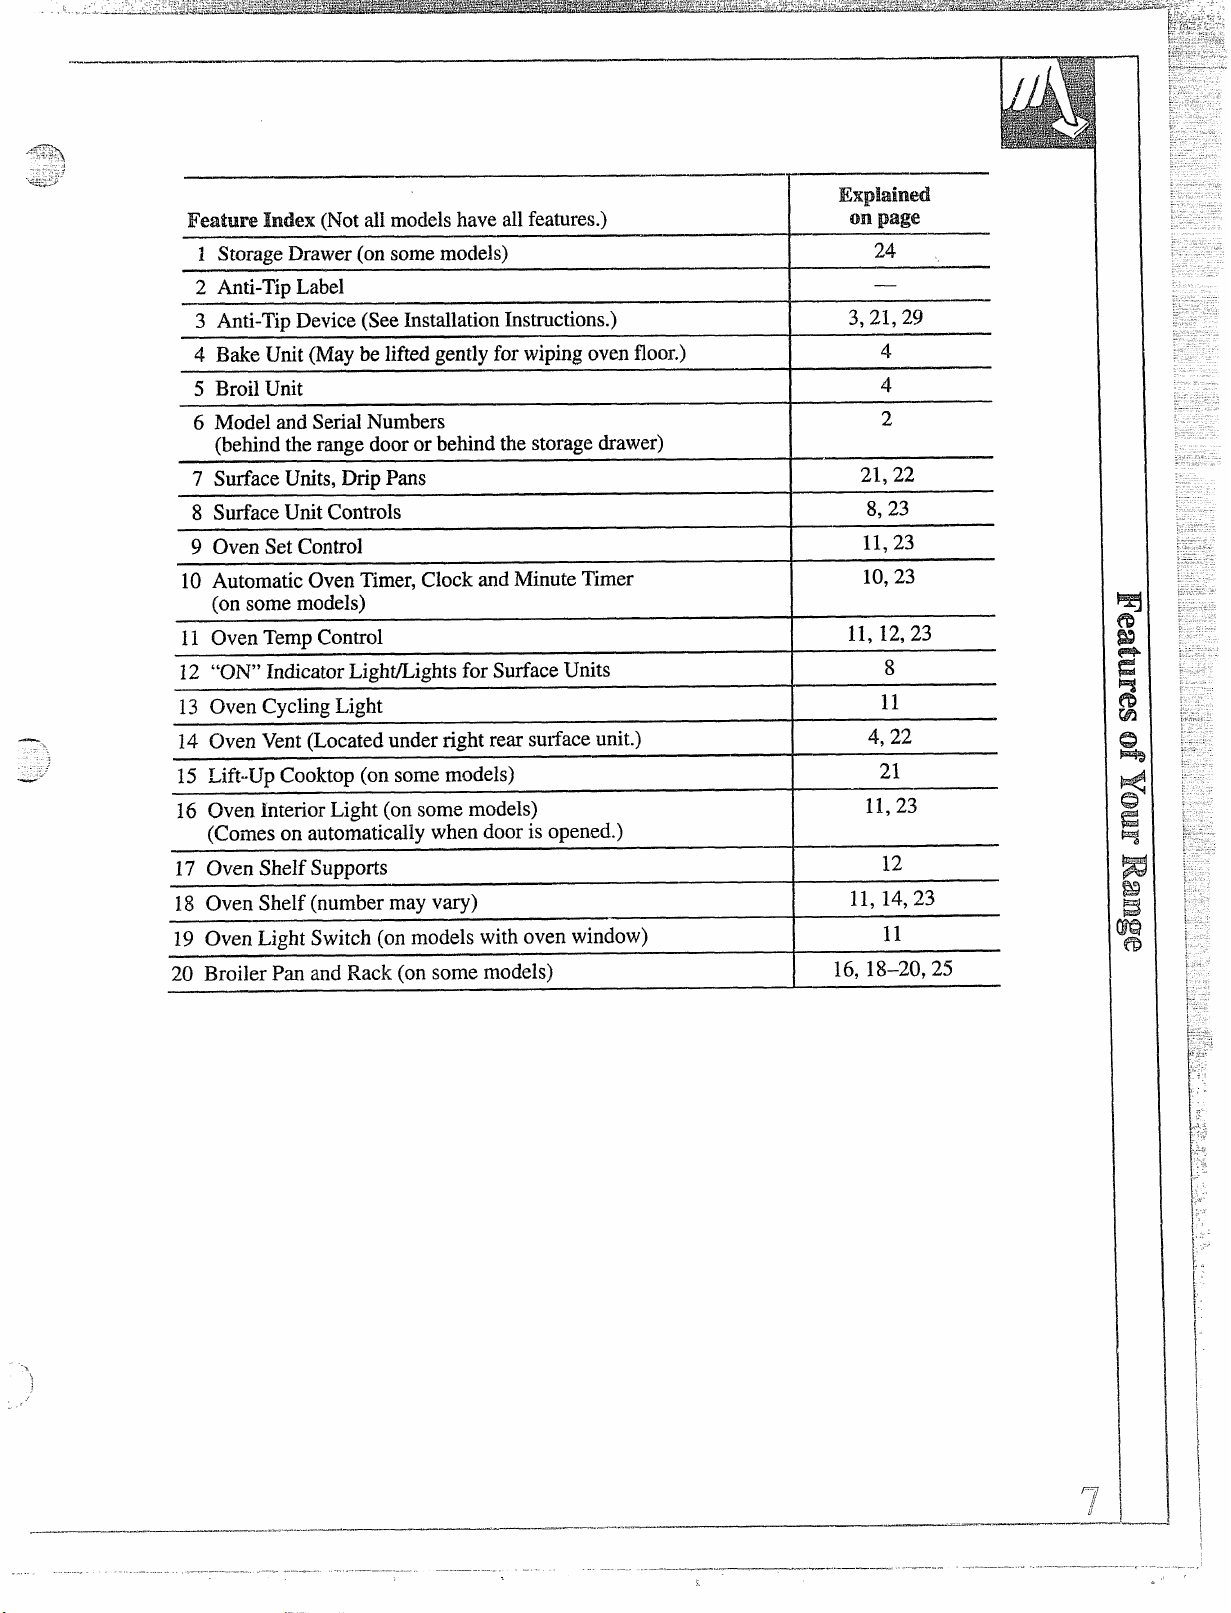
Feature Index(Notallmodelshaveall features.)
1 StorageDrawer(onsomernoclels)
2 Anti-TipLabel
3 Anti-TipDevice(SeeInstallationIns~ctions.)
4 BakeUnit (Maybelifted gentlyforwipingovenfloor.)
5 BroilUnit
6 ModelandSerialNumbers
(behindthe rangedoororbehindthestoragedrawer)
7 SurfaceUnits,MD Pans
8 SurfaceUnitControls
9 OvenSetControl
10 AutomaticOvenTimer,Clock andMinuteTimer
(onsomemodels)
11 OvenTempControl
12 “ON”IndicatorLight/LightsforSurfaceUnits
13 OvenCyclingLight
14 OvenVent(Locatedunderrightrearsurfaceunit.)
15 Lift-UpCooktop(onsomemodels)
16 Ovenhterior Light(onsomemodels)
(Comesonautomaticallywhendoorisopened.)
17 OvenShelfSupports
18 OvenShelf(numbermay
vary)
o; page
I
24
—
3,21,29
4
4
2
21,22
8,23
11,23
10,23
11,12,23
8
I
11
4,22
21
11,23
12
11,14,23
19 OvenLightSwitch(onmodelswithovenwindow)
20 BroilerPanandRack(onsomemodels)
I
11
I 16,18-20,25
.-,,e_ —+.-. ...--’..
—.—.———---—---—--------”----,----- ---—
—
—~——,——. . ..—=——— —
Page 8
—’&$~&;:
/4(,1,,‘@$
~w$- =.=.-=:;!:
f~=&&ti~= .
1,$[
&&&$:
.---.:...._==..-.*.-
‘;~:
..
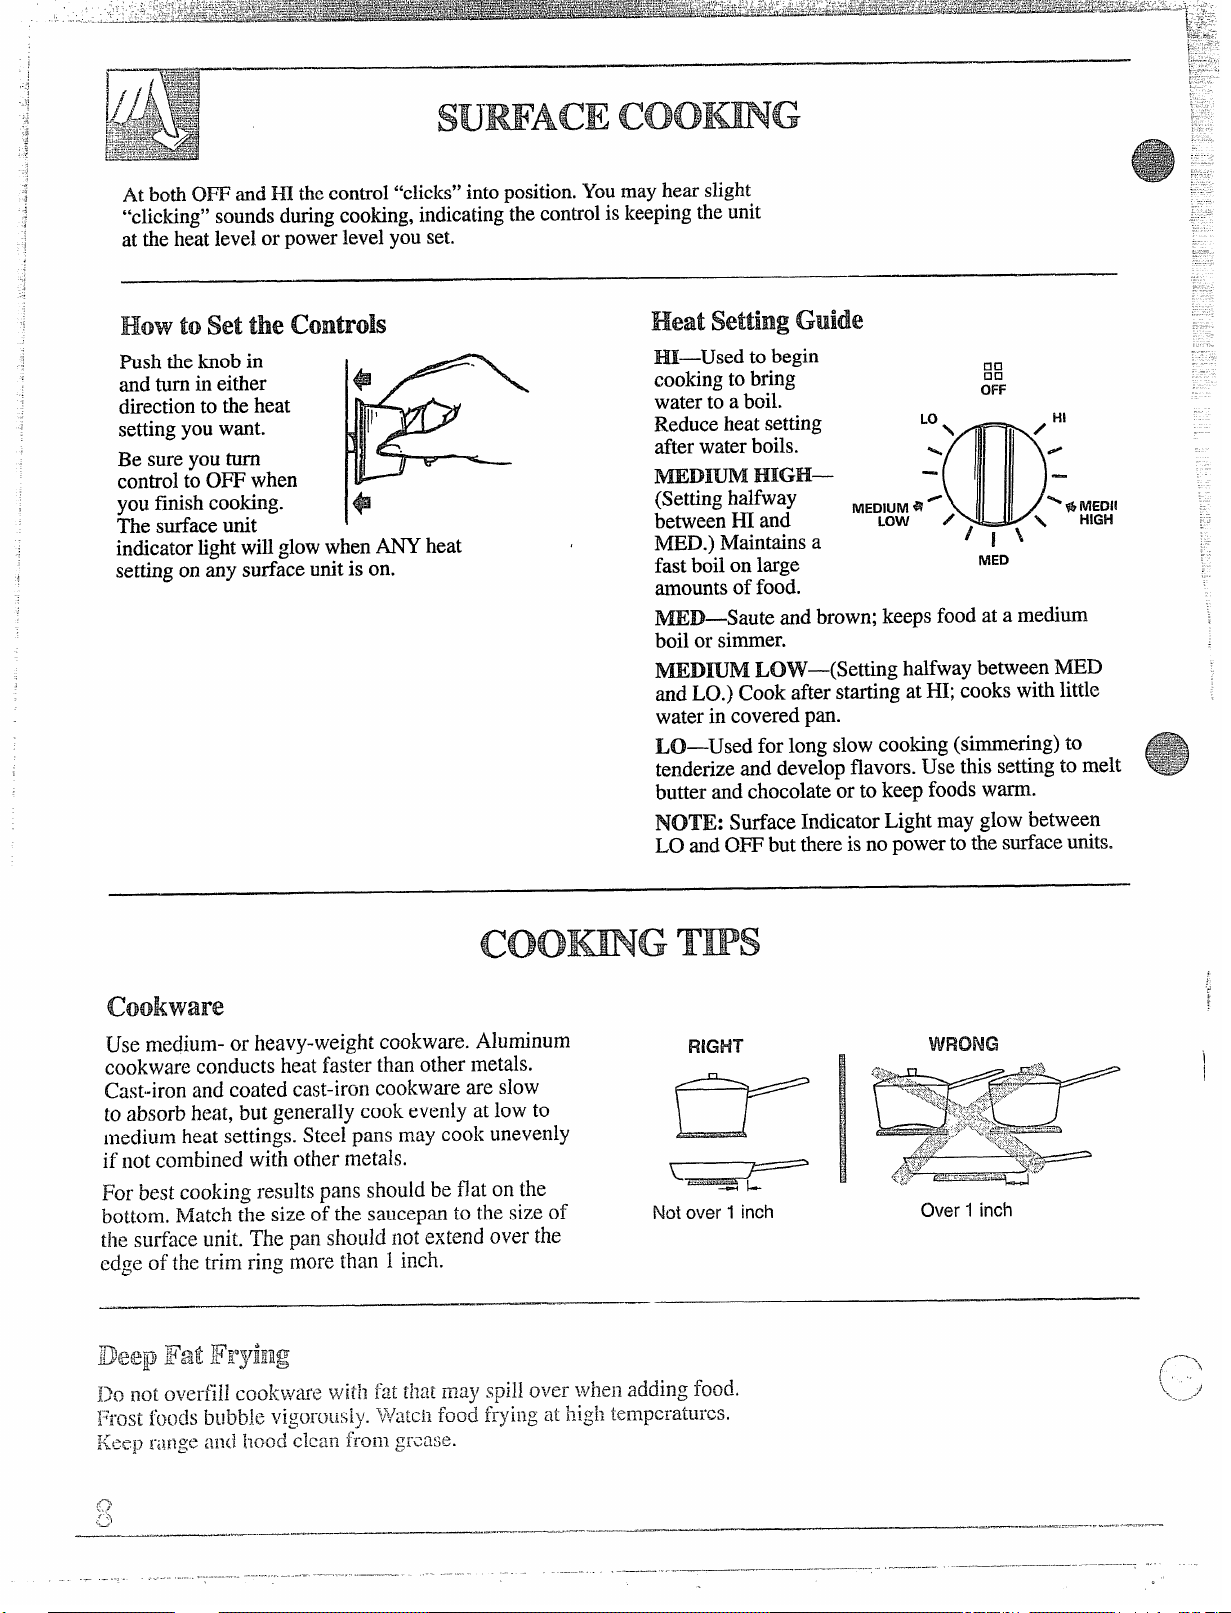
Atboth0~ and~ thecontrol“clicks”intoposition.Youmayhearslight
“clicking”soundsduringcooking,indicatingthe controliskeepingthe unit
attheheat levelorpowerlevelyouset.
—.
sumAcE coomG
Howtosetthe controls
Msh the knobin
andturnineither
directionto theheat
settingyouwant.
Besureyouturn
controlto0~ when
youfinishcooking.
Thesurfaceunit
indicatorlightwillgloww]
setig on tiy sutiaceunitis on.
Heat settingGuide
Hi—Usedtobegin
cookingto bring
waterto a boil.
Reduceheat setting
afterwaterboils.
m~m HIGH—
(Settinghalfway
between~ and
MED.)Maintainsa
fastboilonlarge
amountsof food.
mD—Saute andbrown;keepsfoodata medium
boilorsimmer.
~D~M LOW—(SettinghalfwaybetweenMED
andLO.)CookafterstartingatHI;cookswithlittle
waterin coveredpan.
LO—Usedforlongslowcooking(simmering)to -
tenderizeanddevelopflavors.Usethissettingtomelt
butterandchocolateor to keepfoodswarm.
NOTE: SurfaceIndicatorLightmayglowbetween
LOand0~ butthereisnopowertothesurfaceunits.
MEKI
-;B&@
-$~~
0
:::*.
coom
cookware
Usemedium-or heavy-weightcookware.Aluminum
cookwareconductsheatfi~sterthanothermetals.
Cast-ironandcoatedcast-ironcookwareareslow
toabsorbheat,butgenerallycookevenlyatlowto
mediumheatsettings.Steelpansmaycookunevenly
if notcombinedwithothermetals.
For bestcookingresultspansshouldbe flatonthe
bott<>rn.Matchthesizeof the saucep’anto thesizeof
tile surface
edge
.-,
.:l
:.
unit.Thepanshou]dnot extendoverthe
of the trimringmorethan 1inch.
GTms
RIGHT
over 1 inch
Not
Page 9
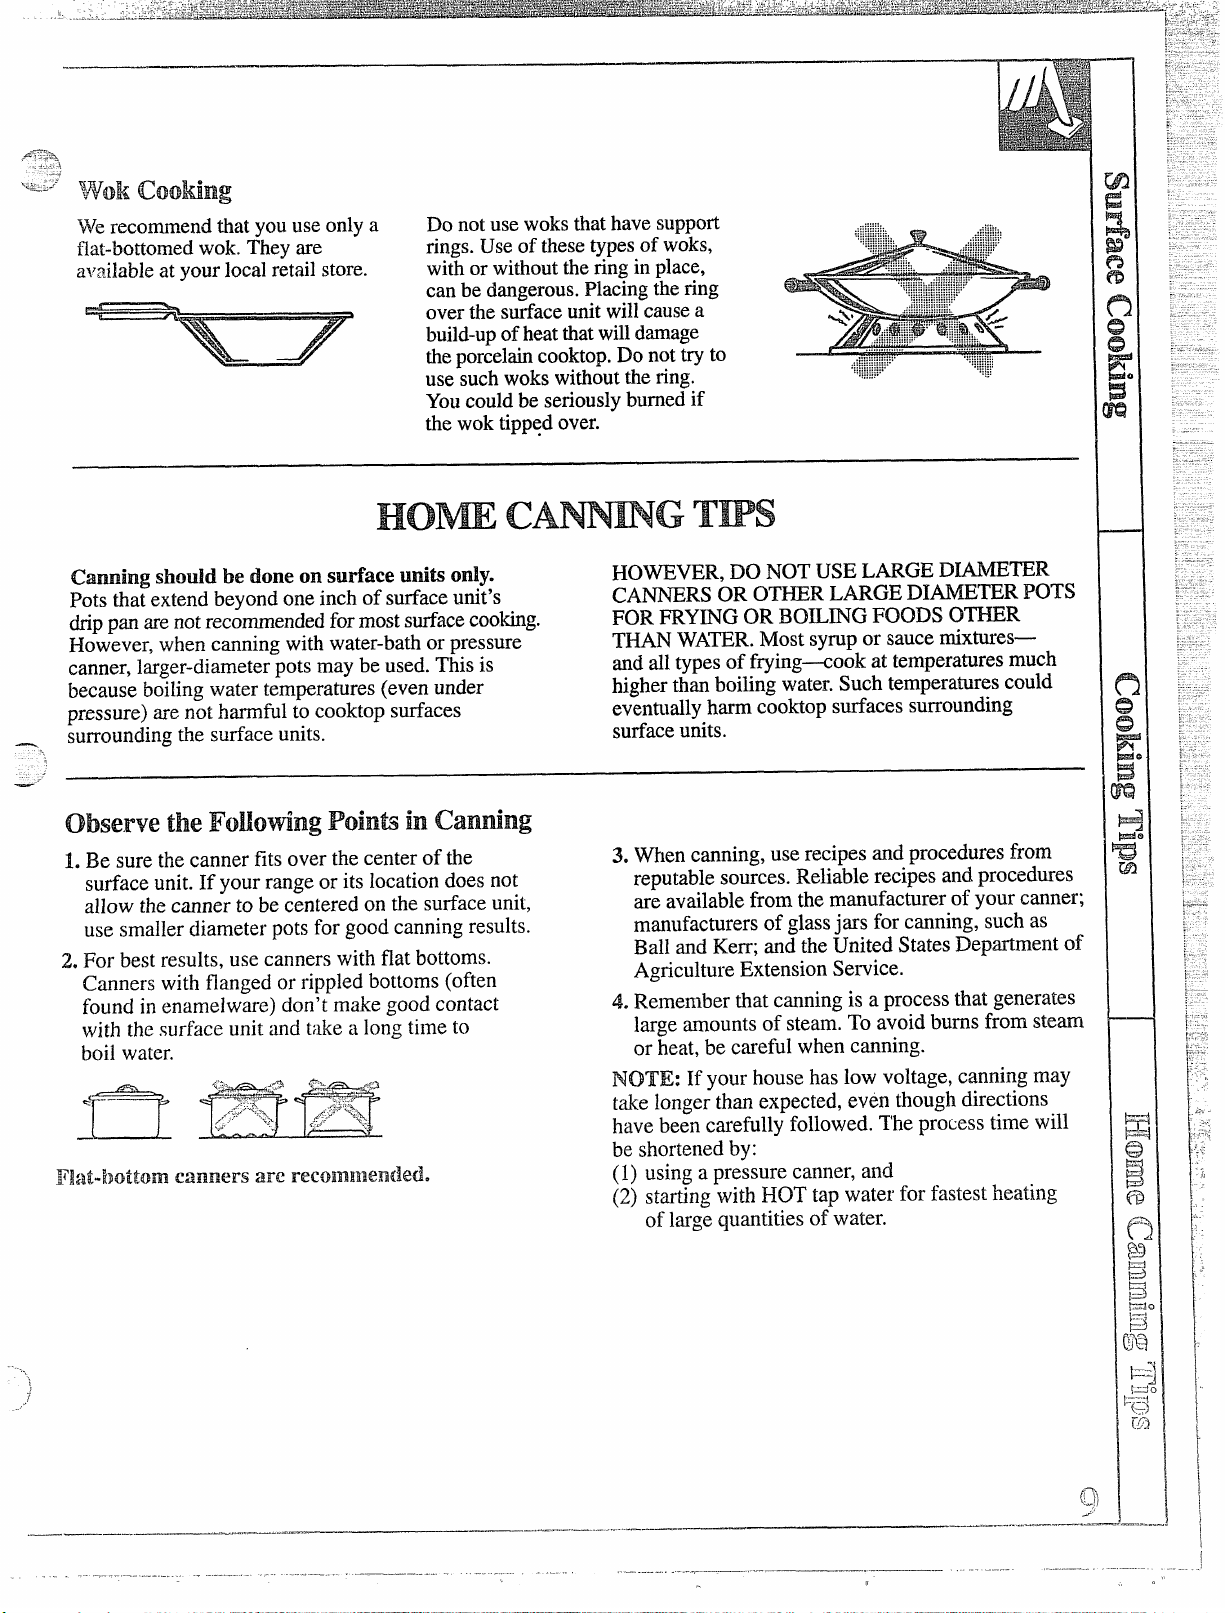
We recommendthatyouuseonlya
fiat-bottomedwok.Theyare
availableatyourlocalretailstore.
Donotuse woksthathavesupport
rings.Useofthesetypesofwoks,
withorwithouttheringinplace,
canbedangerous.Placingthering
overthesurfaceunitwillcausea
build-upofheatthatwilldamage
theporcelaincooktop.Donottryto
usesuchwokswithoutthering.
Youcouldbeseriouslyburnedif
thewoktippedover.
~om c~m
Canning should be doneon sutiace uti@only.
Potsthatextendbeyondoneinchof stiace unit’s
drippanarenotrecommendedformostsurfacecooking.
However,whencanningwithwater-bathorpressure
canner,larger-diameterpotsmaybeused.Thisis
becauseboilingwatertemperatures(evenunder
pressure)arenotharmfultocooktopsurfaces
surroundingthesurfaceunits.
1.Be surethecannerfitsoverthecenterofthe
surfaceunit.If yourrangeorits locationdoes not
allowthecanner to be centeredonthesurfaceunit,
usesmallerdiameterpotsforgoodcanningresults.
2.Forbestresults,usecannerswithflatbottoms.
Cannerswithflangedor rippledbottoms(often
foundinenamelware)don’tmakegoodcontact
withthesurfaceunitandt:~kealongtimeto
boilwater.
Yl:lt’-l}ottomcanners are
recolnR12&n(ied.
GTws
HOWEVER,DONOTUSELARGEDWTER
CANRS ORO~R LARGEDIMETER POTS
FORFRY~G ORBOm~G FOODSOMR
THANWA~R. Mostsyruporsaucernixtures—
andalltypesoffrying-cook attemperaturesmuch
higherthanboitingwater.Suchtemperaturescould
eventuallyharmcooktopsurfacessurrounding
surfaceunits.
3.Whencanning,userecipesandproceduresfrom
reputablesources.Reliablerecipesandprocedures
areavailablefromthemanufacturerof yourcanner;
manufacturersof glassjarsforcanning,suchas
BallandKerr;andtheUnitedStates Departmentof
AgricultureExtensionService.
4. Rememberthatcanningisa processthatgenerates
largeamountsofsteam.Toavoidbumsfromsteam
orheat,becarefulwhencanning.
NOTE: If yourhousehaslowvoltage,canningmay
takelongerthanexpected,ev~nthoughdirections
have beencarefullyfollowed.Theprocesstimewill
beshortenedby:
(1) usingapr[ssurecanner,and
(2) startingwithHOTtapwaterfor fastestheating
oflargequantitiesofwater.
— ———.. ---., —.
. ... . ... . . . ..— ----- .-.--.. -.————
~—.—.-... -.
“.-.—. - .——
?
Q-J)
>’
Page 10
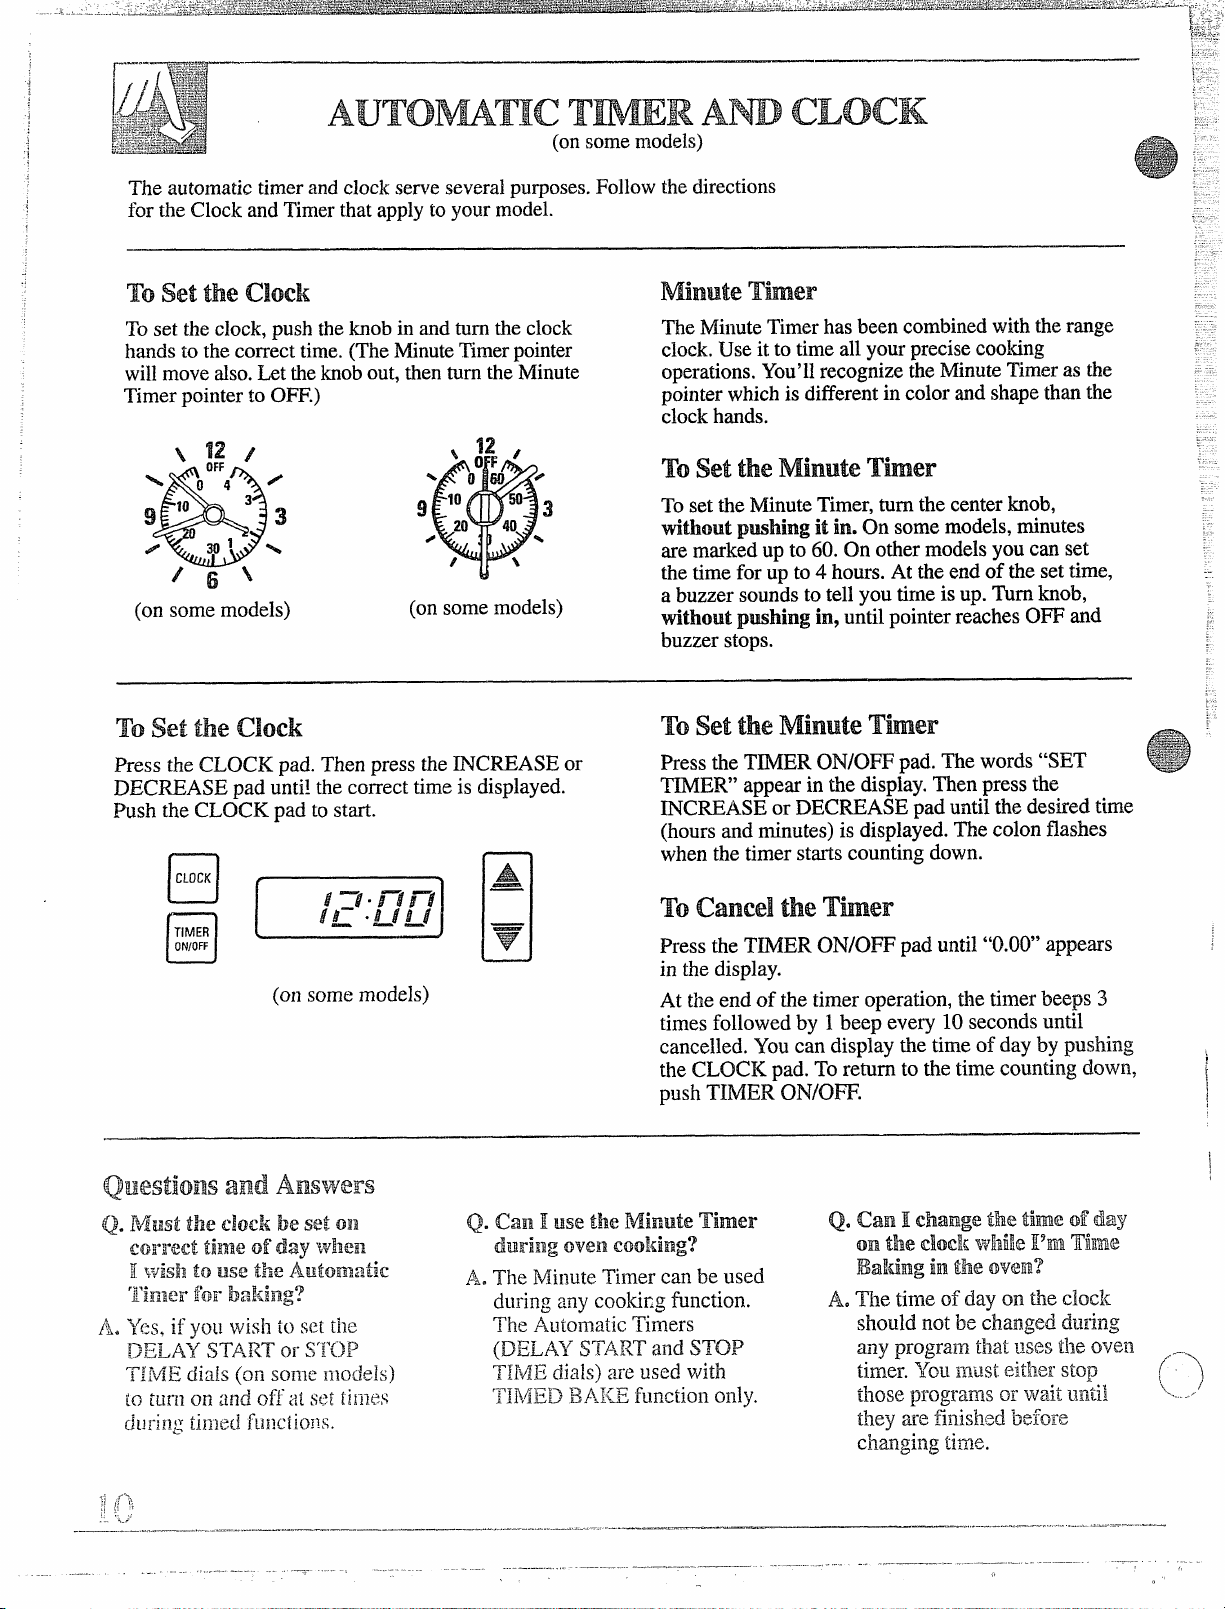
Tosettheclock,pushtheknobin andturntheclock
handstothecorrecttime.(TheMinuteTimerpointer
willmovealso.Lettheknobout,then turntheMinute
TimerpointertoOW.)
(onsomemodels)
(onsomemodels)
MinuteTher
The MinuteTimerhasbeencombinedwiththerange
clock.Useitto time allyourprecisecooking
operations.You’llrecognizetheMinuteTimerasthe
pointerwhichisdifferentincolorandshapethanthe
clockhands.
TosettheMinuteTimer,turnthecenterknob,
tithout pwhing ;t in. On somemodels,minutes
aremarkedupto60.Onothermodelsyoucanset
thetime forupto 4 hours.Attheendofthesettime,
abuzzersoundstotellyoutimeisup.Turnknob,
tithout pmhing in, untilpointerreaches0~ and
buzzerstops.
.-
PresstheCLOCKpad.ThenpresstheINCREASEor
DECREASEpad untilthecorrecttimeisdisplayed.
PushtheCLOCKpadto start.
CLOCK
A
n
TIMER
ON/OFF
o
(on some models)
v
H
TosettheMinute Ther
PresstheTIMERON/OFF pad.Thewords“SET
TIMER”appearinthedisplay.Thenpressthe
~CREASE orDECREASEpaduntilthedesiredtime
(hoursandminutes)isdisplayed.Thecolonflashes
whenthetimerstm~scountingdown.
PresstheT~ER ON/OFFpaduntil“0.00”appears
in thedisplay.
Attheendof thetimeroperation,thetimerbeeps3
timesfollowedby 1beepevery 10secondsuntil
cancelled.Youcandisplay thetimeofdayby pushing
theCLOCKpad.Toreturnto thetimecountingdown,
pushTIMERON/0~.
&*g
“*-
o
,
(
(--)
\
+.....,
/
Page 11

Bef’re usingYouroven
1.Lookatthecontrols.Besureyouunderstand
howtosetthemproperly.Readoverthedirections
fortheOvenControlssoyouunderstandhowto
usethem.
2.Checkoveninterior.Lookat theshelves.Take
apracticerunatremovingandreplacingthem
properly,togive sure,sturdysupport.
ovencontrols
3.Readoverinformationmd tipsthat.follow.
4,Keepthisbookhandysoyoucan~eferto it,
especiallydttingthefirstweeksof~~singyour
newrange.
,--—=.l
Somemodelshaveoneovencontrolknob-OVEN
TEMP.Othermodelshavetwoovencontrol
knobs-OVEN ~MP andOVENSET.TheOVEN
SETknobhassettingsforBAKE,mD BAKE,
BROE andOFT.
OVENTEMPmaintainsthetemperatureyou set,
fromWA~ (150°F.)to BROK (550°F.).On some
models,theOVENTEMPknobdso turnstheovenoff.
The Oven CyclingLight glowsuntiltheoven
reachesyourselectedtemperature,thengoes
offandon withtheovenunit(s) duringcooking.
~v~~ ~~~~~(onsomemodels)
Thelight comesonautomaticallywhenthedooris opened.
Onmodelswithovenwindow,usetheswitchto turnthelight on andoff
whenthe dooris closed.Theswitchislocatedon thefrontofthedooron
somemodels.OnothermodeIs,you’llfindit on thecontrolpanel.
oven Interior shelves
Theshelvesaredesignedwithstop-locks,so that
whenplacedcorrectlyonthe shelfsupports,theywill
stopbeforecomingcompletelyoutfromtheoven,and
willr~ottiltwhenremovingfoodfromor placingfood
011thcm.
‘Foremovethe shelvesfromthe oven, pull the
shelftowardyou,tiltfrontend upwardandpullthe
shelfOu[.
~’~fiop]$geey
lo[;ks(curved extension of
placethe
shelf on silelf Suppoll withStOp-
shelf)facingupand
t{vwa~+(ltile rear of Illeoven.“~i]tup frontandpush
si~clftowardthe backof theove~~untilitgoespast
“~t~p”on tileover2wa~l.~hs~?lowert~le
j
t;helf and pllsh it a!~ tile \4ay bat]:.
fr013t Of the
OVENSR
I
OVEN-TEMP
(knobappearancemayvary)
Page 12

Theovenhasfourshelfsupportsidentifiedinthis
}
illustrationasA (bottom),B,CandD(top).Shelf
positionsfortooting foodaresuggestedonbaking,
roastingandbroilingpages.
Adjusting ovenThemostit
Usethetimegiveninyourrecipewhenusingthe
ovenforthefiisttime.Oventhermostats,in time,may
“drift”fromthefactorysettinganddifferencesin
timingbetweenanoldanda newovenof 5 to 10
minutesarenotunusual.Yourovenhasbeenset
correctlyatthefactoryandis morelikelytobe
accuratethan the ovenwhichitreplaced.However,if
youfindthatyourfoodsconsistentlybrowntoolittle
ortoomuch,youmaymake a simpleadjustmentin
thethermostat(OvenTernp)knob.
Poi
1
Toadjust the thermosht bob:
1.Pullthe knobofftheshaft,lookatthebackofthe
knobandnotethecurrentsettingbeforernting
anyadjustments.
2.Loosenbothscrewsonthebackoftheknob.
3.If theoventemperatureseemstoohot,movethe
pointertowardthewordsMAW COOLER.If the
temperatureseemstoocool,movepointertoward
thewordsMA~ HOTTER.Eachnotchchanges
thetemperatureby about10degreesFahrenheit.
4. Tightenthescrews.
5.Replacetheknob,matchingthe flat areaof the
knobtothe shaft.
1.To :avoid~]ossil)leE]urns,place
theshelvesin thecorrect
p[}sitionbeforeyouturnthe
ovenon.
2. Closetheovendoor.Turnthe
OVENSETknob(onsome
models)to
BAI<Eandthe
OVENTE”MPknobtothe
temperatureyoudesire.
3.Checkfoodfordonenessat
minimumtimeonrecipe.Cook
Iongerif necessary.Switch.off
heatandremovefoods.
,f-“,
I
\
..-
----
)
,/
Page 13

Tm DBAmG
\;Nfi
(on some models)
The automaticoven timercontrolsa-edesignedtoturntheovenonoroff
automaticallyatspecifictimesthat youset.(UseT~ED BAKEonthe
OVENSETknob.)
NOTE:Beforebeginning,make
surethehandsoftherangeclock
showthecorrecttimeofday.
Tostartcookingimmediately,and
turnoffautomatically,youmust
turntheOVENSET-~ob to
T~D BAKE.Remember,foods
continuecookingaftercontrolsare
offbecausetheovenretainsheat,
fora long time,iftheovendooris
notopened.
PUSHTOTURN
1.TosettheStopTime,pushin
theknobontheSTOPTIME
dialandturnthepointertothe
timeyouwanttheoventoturn
o~. forexample6:00.The
DELAYSTAARTdial shouldbe
atthesamepositionasthetime
of dayonclock.
-u-
TurntheOVENSETknobto
2.
TIMEDBAKE.TurntheOVEN
TEMPknobtotheoven
temperature,forexample250°F.
Theovenwillstartimmediately
andwillstopat thetimeyou
have set.
OVENSH I
OVENWMP
I
How tosetDelayStati andAutomaticstop
DelayStartandAutomaticStopis
settingtheoventimertoturnthe
ovenonandoffautomaticallyata
latertimethanthepresenttime of
day.YoumustusetheTIMED
BA= setting.
Si’opTIRE DELAYSTART
$2:? ($!
‘.
~ ;\” “//,,,,,,,
‘Ilt,l,tt
PUSI{TOTURN
Clock
6 \’”
1.Toset starttime,pushinthe
knobon theDELAYSTART
dialand turntl~epointerto the
timeyouwanttheovento turn
on,for example3:30.
STOPTIME DEMYSTA~
.,.T‘;$“/(,,
.\
=
;9T34 29
“/
~,
‘//,,,,\
\\\\\‘;$‘v,,,
/.
=\
&
,: .,
‘/
\\”
‘/1(,1,1{
PUSHTOTURN
6 \\”
2.Tosetthe StopTlrne,pushin the
knobonthe STOPTIMEdial
andturnthe pointertothetime
youwanttheoventoturnoff,
forexample6:00,Thismeans
yourrecipecalledfortwoand
one-halfhoursof bakingtime.
NOTE:
~Be surethatovenlight is off
becauseheatfromthebulbwill
speedharmfulbacteriagrowth.
~TimeonSTOPTIMEdialmust
be laterthantimeshownon range
clockandDELAYSTARTdial.
/.
,:
:
=
Clock
*Foodsthatarehighlyperishable, R
suchasmilk,eggs,fish, stuff~ngs,
poultryandporkshouldnotbe
allowedto sitoutfor morethan
onehour beforeoraftertooting.
Room temperaturepromotesthe
growthof harmfulbacteria.
3.TurntheOVENSETlmobto
TIMEDBAI=. TurntheOVEN
TEMPknobto 250°F.or
recommendedtemperature.
H
Placefoodin oven, closethe
doorandthe ovenwill
automaticallybeturnedon and
offat thetimesyouhaveset.
Whencookingiscompleted,
turntheOVENSETto OFFand
removefood fromthe oven.
OvenIndicatorLight(s)at
BA~
settingmay work
TIMED
differentlythanti~eydo at BAI@.
setting.Carefullyrecheckthesteps
givenabove.If all operationsare
doneas explained,ovenwill
opezateas it shotlld.
~’
@
p!
‘
:30
p>
Q:Q
I
....... ..,,---.-————
——,—.—
———...
.—.—
.._._=—=._—_..- —.....-.-.-..-=
~“,........
Page 14

Forbestbakingresults,followthesesuggestions:
ovenshelves
Arrange theoven
shelforshelves
inthedesired
locationswhile
theoveniscool.
Thecorrectshelf
positiondepends
onthekindof
foodandthe
browningdesired.
Asa generalrule,
place mostfoodsin themiddleoftheoven,oneither
thesecondo: thirdshelffromthebottom.Seethe
chartforsuggestedshelfpositions.
&gel foodc&e A
Biscuitsormuffins
Cookiesorcupcakes Bor C
Brownies Bor C
Layercakes Bor C
Bundtorpoundcakes
Piesorpieshells Bor C
Frozenpies I A (oncookiesheet) I
asseroles I BorC
Ic
Bor C
Aor B
I
IRoasting I AorB
Preheating
Preheattheovenif therecipecallsforit.Preheat Preheatingis necessaryforgoodresultswhenbting
meansbringingtheovenupto thespecified
temperaturebeforeputtinginthefood.Topreheat,set androasts,preheatingis notnecessary.Forovens
theovenatthecorrecttemperature-selectinga
higher temperaturedoesnotshortenpreheattime. minutes.Aftertheoveriispreheatedplacethe food
cakes,cookies,pastryand breads.Formostcasseroles
withoutapreheatindicatorlight or tone,preheat10
in theovenasquicklyaspossibletopreventheat
fromescaping.
BakingPans
LJsethe properbakingpan.Thetype of finishon the
pandeterminesthe amountofbrowningthatwiIloccur.
oDark,roughordullpansabsorbheatresultingina
l~rowner,crispercrust.Usethistypeforpies.
Forevencookingandproperbrowning,theremustbe
enoughroomforaircirculati~nin theoven.Baking
resultswillbe better if bakingpansMecenteredas
muchaspossibleratherthanbeingplacedto thetiont
orto thebackof the oven.
Pansshouldnot toucheachotheror thewallsof tie
oven. Allow 1t? 1%inchspacebetweenpansaswell
asfrom thebackof theoven,thedoormd the sides,
If youusetwoshelves,staggertheparrssooneis not
dir~ctlyabovetheotl~er.
I
i=
,-
[“
Page 15

BaMngGuides
,,
Whenusingpreparedbakingmixes,followpackagerecipeorinstructions
forbest results.
cookies
Whenbakingcookies,flatcookiesheets(without
sides)producebetter-lookingcookies.Cookiesbaked
ina jelly rollpan(shortsidesallaround)mayhave
darkeredgesandpaleorlightbrowningmayoccur.
Donotuseacookiesheetso largethatittouchesthe
wallsorthedoorof theoven.
Forbestresults,useonlyonecookiesheetin theoven
ata time.
/
I
s
\J
Res
Forbestresults,bake piesin dark,roughor dullpans
toproducea browner,crispercrust.Frozenpiesin foil
pansshouldbeplacedonandurninumcookiesheet
forbaking since the shinyfoilpanreflectsheataway
fromthepiecrust;thecookiesheethelpsretainit.
Neverentirely
cover a shelfwitha largecookiesheet
oraluminumfoil.This }villdisturbtheheat
circulationandresultsinpoorbaking.A smallersheet
offoil maybeused to catcha spilloverbyplacingit
ona lowershelfseveral inchesbelowthefood.
cakes
Whenbakingcakes,warpedorbentpanswillcause
unevenbakingresultsandpoorlyshapedproducts.
Acakebakedinapanlargerthantherecipe
recommendswillusuallybecrisper,thinneranddrier
thanitshouldbe.If bakedin a pansmallerthan
recommended,itmaybe undercookedandbattermay
overflow.Checktherecipeto makesurethe pansize
usedisthe onerecommended.
..AQ
!:\;:$-k~+.’<%b
..-.
—... .—-— .. --..—
. . ... ......... .. ,--.—, ,..... -...-—..— .—----- —...-.-....—..—
~,[.
J!k
,-
,.21!
0
Page 16

RoAsTmG
Roastingiscookingbydryheat.Tendermeator
poultrycanberoasteduncoveredinyouroven.
Roastingtemperatures,whichshouldbelowand
steady,keepspatteringtoaminimum.
Roastingisreallya bakingprocedureusedformeats.
Therefore,ovencontrolsaresettoBAKEorTIMED
BA~. (You mayhearaslightclickingsound,
indicatingthe ovenisworkingproperly.)Roastingis
easy;just followthesesteps:
1.Placetheshelf
inAorB
position.No
preheatingis
necessary.
2. Checkthe
weightofthe
meat.Placethe
meatfat-side-up
orpoultrybreastshallowPan.The
Select a pan as close to he sizeofthemeatas
sid-up,onroastingrackin a
meltingfatwillbastethemeat.
possible.(Broilerpanwithrackis a goodpanfor
this.)Linebroilerpanwithaluminumfoilwhen
usingpanfor marinating,cookingwithfruits,
cookingheavilycuredmeats,or bastingfood
duringtooting. Avoidspillingthesematerials
insidetheovenorinsidetheovendoor.
OWNSFI-
I
OWM,WMP
1
BME
0
?
1
) \
%\\:
@
$
$
+
7/ouO
3.TurntheOVENSET(onsomemodels)toBA~
andtheOVENTEMPto325°F.Smallpoultrymay
becookedat375°F.for bestbrowning.
4.Most meatscontinuetocookslightlywhile
standing,afterbeingremovedfromtheoven.
Standingtimerecommendedforroastsis 10to20
minutes.Thisallowsroaststo firmupandmakes
themeasierto carve.Internaltemperaturewillrise
about5°to 10°F.;tocompensatefortemperature
rise,ifdesired,removeroastfromovensooner(at
5°to 10”F.lessthantemperatureintheguide).
NOTE:YoumaywishtouseWD BAKE,as
describedin theBakingsectionofthisbook,toturn
ovenonandoffautomatically.
Rememberthatfoodwillcontinueto cookinthehot
ovenandthereforeshouldberemovedwhenthe
desiredinternaltemperaturehasbeenreached.
FrozenRoa$@
Frozenroastsofbeef,pork,lamb,etc.,canbe started Thawmostfrozenpoultrybeforeroastingtoensure
withoutthawing,butallow10to 25minutesper
pound additionaltime(10minutesperpoundfor
roastsunder5 pounds,moretilne for largerroasts).
evendoneness.Some commercialfrozenpouItrycan
becookedsuccessfullywithoutthawing.Follow
directionsgiven on packagelabel.
.,~—.,
,..
:
‘L“.3.’
)
. . ....
I -;
:. ,., :
Page 17

j
,~%j
: J==::.:’:--
E$-=~33
-.:’
1.
Positionovenshelf atBfor small-sizeroasts(3to
7 Ibs.)andat A forlargerroasts.
2.Placemeatfat-sideup,orpoultrybreast-sideup,
onbroilerpanorothershallowpanwithtrivet.
Donotcover.Donots~ff poultryuntiljustbefore
roasting.Usemeatthermometerformoreaccurate
doneness.(Donotplacethermometerinstuffing.)
3.Removefatanddrippingsasnecessary.Baste
asdesired.
.—
~o~s~m~GUDE
4. Standingtimerecommendedforroastsis 10to
20minutes.Thisallowsroaststofirmupand
makesthemeasiertocarve.Internaltemperature
willriseabout5°to 10°F.;tocompensatefor
temperatureincrease,ifdesired,removetheroast
fromovensooner(at5°to 10”F.less than
temperaturein thisguide).
5.Frozenroastscanberoastedbyadding10to
25minutesperpoundmoretimethangivenin
guideforre~rig;ratedroasts.(10minu~esper
poundforroastsunder5 pounds.)Defrostpoultry
beforeroasting.
P
1
oven
Temperature
Meat
Tendercuts;rib,highquality
325°
sirlointip,rumportopround*
Lamblegor bone-inshoulder*
Vealshoulder,legorIoiri*
Porkloin,ribor shouIder*
Ham,~recooked
Poultry
ChickenorDuck
Chickenpieces
Turkev
‘KFor bonelessroIIedroastsover6 inchesthick,add 5 to 10minutesperpoundtotimesgivenabove.
f TheU.S.Departmentof Agriculturesays,
poisoningorganismsmaysurvive.”(Source:SafeFoodBook.—
325°
325°
325°
325°
325°
350°
325°
“Rarebeefispopular,butyoushouldknowthatcookingitto only 140”F.meanssomefood
DonenM
Rare:
Medium:
WelIDone:
Rare:
Medium:
WellDone:
WellDone:
WellDone:
ToWarm:
WellDone:
WellDone:
WellDone:
YourKitchenGuide.USDARev.June1985.)
ApproximateRoasting Time
in Mnutes per Pound
3to 5lbs.
24-33
35–39
40-45
21-25
25-30
30-35
3545
35-45
17–20minutesperpound(anyweight)
Ibs. Over 5 lbs.
3 tO5
35-40
3540
tO 15Ibs.
10
18–25 15-20
6to 8 lbs.
18–22
22–29
30-35
20-23
24-28
28–33
3W0
3W0
30-35
Over 15 lbs.
Internal
Temperature“F.
140°–1500T
150°–1600
170°–1850
140°–1500*
150°–1600
170°–1850
170°–1800
170°–1800
1250–130°
185°–1900
185°–1900
In thigh:
185°–1900
.....
-...
——. ——
___ ... . . . -..-.—- ....-. -—---- .. . ... ...- . . ...———-
:! i :Ll
,1
J;
.-
—...._-~
——...
.
Page 18

Broilingiscookingfoodby intenseradiantheatfrom
the upperunitintheoven.Mostfishandtendercuts
ofmeatcanbebroiled.Followthesestepstokeep
spatteringandsmokingtoaminimum.
1,If meathasfatorgristlenearedge,cutvertical
slashesthroughbothabout2inchesapart.If
desfied,thefatmaybetrimmed,leavinglayer
about1/8inchthick.
2.Placethemeatonthe broilerrackinthebroilerpan.
Alwaysusetheracksothefatdripsintothebroiler
pan; otherwisejuicesmaybecomehotenoughto
catchfire.
3.Positiontheshelfontherecommendedshelf
positionassuggestedin theBroilingGuide.Most
broilingisdoneonCposition,butifyourrangeis
connectedto
208 volts,
youmaywish
tousea higher
position.
4.Leavethedoor
ajara few
inches.The
doorstays
openbyitself,
yettheproper
temperatureis
w
maintainedin
theoven.
OVENSm
5.TurntheOVENSET(onsomemodels)andthe
OWN ~MP bobs toBRO~. Preheatingis
notnecessary.
6.Turnfoodonlyonceduringbroiling.Timefoods
forfirstside perBroilingGuide.
Turnfood,thenusethetimesgivenforsecondside
asaguidetopreferreddoneness.(Wheretwo
thicknessesandtimesaregiventogether,usefirst
timesgivenforthinnestfood.)
OVEN,TEMP
7. Whenfinishedbroiling,turntheOVENSETorthe
OWN TEMPknobto 0~ (dependingonyour
model).Servefoodimmediately,leavingthebroiler
panandrackoutsidetheoventocoolduringmeal
foreasiestcleaning.
Youcan usealuminumfoiltoline
yourbroilerpan andbroilerrack.
However,youmustmoldthefoil
tightlyto therackandcutslitsin it
just liketherack.
Withouttheslits,thefoilwill
preventfatandmeatjuicesfrom
drainingtothebroilerpan.The
juicescouldbecomehotenoughto
catchonfire. If youdonotcutthe
slits,youarefrying,notbroiling.
,.-.
‘..
[
k.
1
... ,.
----
Page 19

4..Yes.Usingtheracksuspendsthemeatover the
pan.Asthemeatcooks,thejuicesfallintothepan,
thus keepingmeatdrier.Juicesareprotectedbythe
rackandstaycooler,thuspreventingexcessive
spatterandsmoking.
Q. Should1sdt the meat before
No. Salt draws outthejuicesandallowsthemto
A.
broiling?
evaporate.Alwayssaltaftercooking.Turnmeat”
withtongs;piercingmeatwithaforkallowsjuices
to escape.Whenbroilingpoultryorfish,brush
eachside oftenwithbutter.
A, In someareas,thepower(voltage)totie oven
maybelow.In thesecases,preheatthebroilunit
for 10minutesbeforeplacingbroilerpanwith
foodinoven.Checktoseeifyouareusing the
recommendedshelfposition.Broilforlongest
periodoftimeindicatedintheBroilingGuide.
~rn foodonlyonce duringbroiling.
A.No.Thebroilerrackisdesignedtoreflectbroiler
heat,thuskeepingthesurfacecoolenoughto
preventmeatfromstickingto thesurface.
However,sprayingthebroilerracklightlywith
avegetablecookingspraybeforecookingwill
makecleanupeasier.
(continuednext page)
..
\
-j
,,——....-... ... ......——-----,===-....-.. - ....—. +=.—-. =- ——.—..-. ---
u .. . . . ..—-----------
1~(f,
.-
..—,
-—””
3 >.
.——-.
Page 20

1.Alwaysusebroilerpanandrackthatcomeswith
youroven.It isdesignedtominimizesmokingand
spatteringbytrappingjuicesin theshieldedlower
partofthepan.
2. oven door shouldbe ajar for all foods.There
isa specialpositionon door whichholdsdoor
opencorrectly.
3.Forsteaksandchops,slashfatevenlyaround
outsideedgesofmeat.Toslash,cutcrosswise
throughouterfatsurfacejust to theedgeofthe
meat. Usetongstoturnmeatovertoprevent
piercingmeatandlosingjuices.
4. If desired,marinatemeatsorchickenbefore
broiling,or brushwithbarbecuesaucelast5 to
10minfitesonly.
5.Whenarrangingfoodonpan,donotletfattyedges ‘hangoversides,whichcould soilovenwith
fatdripping.
6.Broilerdoesnotneedto bepreheated.However,
forve~ythinfoods,ortoincreasebrowning,
preheatifdesired.
7.Frozensteakscanbebroiledbypositioningthe
ovenshelfatnextlowestsl~elfpositionand
increasingcookingtimegiveninthisguide1YZ
timesperside.
8.If yourrange is connectedto 208Volts,raresteaks
maybebroiledbypreheatingthebroilerand
positioningtheovenshelfonepositionhigher.
.._
.-
..
Food
Bacon
GroundBeef
WellDone
BeefSteaks
Rare
~Medium
WellDone
Rare
Medium
WellDone
Chicken
Bakery Products
Bread
(Toast)or
ToasterPastries
l~nglishMuffins
Lol)ster ‘~:lils
Quantityand/or
Thickness
1/2lb.(about8
thinslices)
1 lb. (4patties)
1/2to3/4inchthick
1 inchthick
(1to 1%lbs.)
IZ irlchthick
(2to2XIbs.)
1 whole
(2to2filbs.),
splitlengthwise
2 to4slices
1pkg.(2)
2(spjit)
2-4
((}108 oz. each)
inchthick
comments
Arrangein singlelayer.
Spaceevenly.
c
c
c
c
c
~
c
c
A
c
c
B Cutthroughbackof shell.Spreadopen.
c
B
c
B
7
7
9
13
10
15
25
35
1%-2
5 5
8 8
10
13 13
4--5
7
9
13
7-8
14-16
20-25
10-15
1/2
10
U~to8t)attiestakeaboutsametime.
Steakslessthan 1inchthickcookthrough
beforebrowning.Panfryingisrecommended. x%!=
Slashfat.
Reducetimeabout5 to 10minutes
persideforcut-upchicken.Bmsh
eachsidewithmeltedbutter,Broil
skin-side-downfirst.
Spaceevenly.PlaceEnglishmuffinscut-sideupandbrushwithbutter,ifdesired.
Brushwithmeltedbutterbeforeand
afterhalfofbroilingtime.
HandleandturnverycarefuIly.Brushwith
lemonbutterbeforeandduringcooltingif
desired.Preheatbroilerto increasebrowning.
Increasetime5 to 10minutesperside
for 1Xinchthickorhome-cured.
Slashfat.
-z&*g&.
.,..=-—
o
c
c
c
B
c
8
10 10
10
17 12-14
4-7
4-6
I
Slashfat.
-—.
Ifdesired,splitsausagesi~~half
lengthwise;cutin;o5-to6-inchpieces. .=.~’
(-’)
Page 21

.2:”::->
:!
;.~:~:.,.~
>
~~~~~+P~-opercareandcleaningmeimpofiantsoyourrangewillgiveyouefficient
-andsatisfactoryservice.Followthesedirectionscarefullyincaringfoiyour
rangetoassuresafeandpropermaintenance.
If’your range is removedfor cleaning,servicing or any reason9
A
L be sure anti-tip device
is replaced. Railureto @kethis precautioncould resu~tintippingof
the rangeand
causeinjury.
is re-engagedproperly when the range
Toavoiddarnagingthe
porcelainenamelsurfaceofthe
cooktopandtopreventitfrom
becomingdull,cleanupspills
right away.Foodswithalotof
Donotstore
near the cooktop.
=
II
materials,gasolineorotherflammablevaporsand
liquidsinthevicini~ofthisoranyotherappliance.
flammablematerials in an oven or
Donotstoreor usecombustible
acid(tomatoes,sauerkraut,fruitjuices,etc.)orfoods
withahigh sugarcontentcouldcausea dullspotif
allowedtoset.Whenthesurfacehas cooled,washand
rinse.Forotherspills,suchasfatsmatterings,etc.,
washwithsoapandwateroncethesurfacehas
cooled.Thenrinseandpolishwithadrycloth.
modelshave a cookto~ that can be liftedupfor
Some
easiercleaning.Tomakecleaningeasier,theentire
cooktopmaybeliftedup andsupportedintheup
position.
sure all surface uraifiare turned off before
Be
raising tl~ecoolttop.
lockinto~ositionwhenthecookto~islifted
Thereare two sidesupportsthat
UP.T’he
Aftercleaningunder
thecooktopwithhot,
mildsoapywater
anda cleancloth,
lowerthecooktop.
Becarefulnottopinch
your fingers.
Calrocl”u;its do notneedtoberem~vedbefore-lifting. Tolowerthecooktop,pushtherodsbackandgently
lowerthecooktopuntilit restsin place.
surfaceUlli&
Spattersand spil)sburnawaywhenthecoilsare
heated.At theend of;] meal,removeallpansfromthe
surfaceunitaIIdhei~tthesoiledunitatHI.Letthe soil
burnoffa[~oLItoncminuteandswitchtheunitto OFF.
~vojdg(:ttillgclcanin: matcria[son[hecoils.Wipe
of:fanjlc[eanin: materialswitha damppapertowel ~Do not bendthe surfaceunitplLIgterminals.
l;{:fi)~-(~i)c;l[in~:thesL]I’f:lceunit.
-,
~~cep[2c/e
SurfaceUnii
,,,.‘ ,,-.::~:-c->-::::;~-.-~~,
~_(\L,~L~---r-------
.-—---- --
\
-. .----’ ~’:
.,~_. ; ;.::~’”
.:
“.,‘i-;.=,l.
,.=;
------
\
~;j
-_d~,.T._e-,-:r--.-%,..:-~%—-~:.+-,.i=“..—-”~—:-F---;.,::,_\
.,-
~’,~...-:--=---—.-
(:L,.,$.
‘---j-i{ “-
<, , ._&:---,” ~
/’:::-)~
.J--...._->.>-
‘-Y “
,~- ---
,>
\./--
/’+..___
‘-\7rip Pan
cAurrIoN
0Do notimmersethesurfaceunits in liquidsof
anykind.
oDo notcleanthe surfaceunitsin a dishwasher.
*Doilotattempt to clean,adjustor in any wayrepair
thepl~lg-inrece~3tacle.
.
Page 22

~Toremove thedrippansforcleaning,thesurface
unitsmustberemovedfirst.
~Makesurethesurfaceunitsarecompletelycool
beforetouchingthem.Pulloutthesurfaceunitsby
1.Putthesurfaceunitprongsthroughtheside
openingofthedrippan.Fitthesurfaceunitsupport
intothedrippannotch.
side opening
slippingyourfingersunderitandpullingstraight
out.Trynottoliftitupanyhigherthannecessary.
If youlifttoohigh,itmaydamagethe outletand
causfithesurfaceunitstositatanangleinsteadof
restingflaton thedrippan.
Toclean: 2.Holdthesurfaceunitand
The drippanscanbecleanedbyhand.Placethemin a
coveredcontainer(orplasticbag)witha 1/4cup
ammoniato loosenthesoil.Thenscrubwitha soap
filledscouringpadtoloosenthesoil.Rinse withclean
wateranddrywitha cleansoftcloth.
The drippansmayalsobe cleanedinthedishwasher.
drippantogether.Restyour
fingersonthecooktopas
youslidetheprongsinto
theoutlet.Pushtheminfirmly,
thenletthedrippanrestonthecooktop.
3.Thesurfaceunitis replacedproperlywhenthe
prongsfitsnuglyintheoutletandthesurfaceunit
notch
restsflatonthe drippan.Makesurethesurfaceunit
supportisintie drippannotch.
surfaceunit
Makesure the support fits
notch.
Thecooktoplightiseasily
replacedwitha fluorescenttubeof
thesi~mewattage.Befor~changing
thelamp,pulltheplugtotherange
or disconnectthepoweratthe
mainfuseorcircuit breakerp:~nel.
r ;--L?
...
/’
,~.
.—.—.,
..—— -
_——.
”-— ,—-—-.-”,~ -———
ovenvent
Theovenis vented
throughan openingunder
therightrearsurfaceunit.
Nevercovertheopening
withaluminumfoilor any
othermaterial.Thiswould
preventtheovenvent from
‘“”’”-\
‘)
(
,.
.-J.,..’
.—.-
.—.
._——
—..-..-.-——-- —————,—
Page 23

,
It’sagoodideatowipethecontrolpanelaftereach
LISeof the oven.Clemwithmildsoapandwateror
~~ine~mandwater,rinsewith
clean water andpolish
d~ywitha softcloth.
Donot
L~seabrasivecleansers,strongliquidcleaners,
plasticscouringpadsor ovencleanersonthecontrol
panel-they willdamagethefinish.A50/50solution
ofvinegarandhotwaterworkswell.
Thecontrolknobsmayberemovedforeasier
cleaning.Toremovebob, pullit straightoffthestem.
Ifknob is difficulttoremove,place a towelor
dishclothbetweentheknobandcontrolpanelandpull
gently.Washtheknobsinsoapandwaterora vinegar
Tocleanoutsideglassfinish,useaglasscleaner.Do
notallowthewateror cleanertorundowninside
openingsintheglasswhilecleaning.
Metalpartscanbe cleanedwithsoapandwater.Do
notusesteelwool,abrasives,ammonia,acidsor
commercialovencleaners.Drywithasoftcloth.
andhotwatersolutionbut donotSOA.
CAUTION: ~ef’re re~~aCi~~yOU~ OVe~ iam~ bulb,
disconnectthe electficpower foryour range atthe
mtin fuseor eiretitbreaker
Be
suretoletthelampcoverandbulb coolcompletely
panel or pu~lthe plug.
beforeremovingorreplacingthem.Wheninuse,light
bulbscanbecomewarmenoughtobreakif touched
witha moistclothortowel.Whencleaning,avoid
touchingwarmIarnpswithcleaningclothsif thelamp
coverisremoved.
The ovenlamp(bulb)iscoveredwithaglassremovable
coverwhichisheldinplacewithawire.Removetie
ovendoor,ifdesired,toreachthecovereasily.
Toremove:
QHoldyourhand underthecoverso it doesn’tfall
whenreleased,Withfingersof thesamehand,
firmlypushbackthewireuntil it clearsthecover.
Liftoff thecover.
Do NOTmMow m Screws.
~Replacebulbwith40-watthomeappliancebulb.
Toreplacecover:
~Placeitintothegrooveof thelampreceptacle.~11
thewireforwardto thecenter of coveruntilitsnaps
in place.Wheninplace, the wireholdsthecover
firmly.Becertainthewireis in thedepressioninthe
centerofthecover.
~Connectelectricpowerto therange.
.“_.—...,----.---.—--——---,~-.-—------
—... -..-..——
—..—.
—
___, . . ...._ —=.-.—--———.-----.-=-=
~.:t7cJ’
...
Page 24

..
{.,,.,
~+$+~+$:
~;-:.
..
“~r cAmA%~i~~EAmG @~
k$-3$5.%j~$-
:~:.::.::.::?<:-+-:-+
~
..fl. ~ . .. -
~,Ja=&_-*E?3 .
How toRemovethestorageDraweror mek PaneItocleanu~ldertheRange
Theareaundertherangecanbereachedeasilyfor
cleaningby removingthebottomdrawer(onsome
models).Toremove,pullthedraweroutalltheway,tilt
upthefrontandremoveit.Toreplace,insertglidesat
thebackof thedrawerbeyondthestoponrangeglides.
Liftthedrawerifnecessarytoinserteasily.Letthe
frontof thedrawerdown,thenpushinto close.
Tocleanundermodelswitha frontkickpanel,remove
thepanelbypullingitstraightoutatthebottom.To
replacethepanel,firsthookthetoptabsonandthen
thebottomtabs.
\
.
7,
Theovendooris removable,
butit is heavy.Youmayneed
helpremovingandrepIacing
thedoor.
Toremovethe door,open it a
fewinchesto thespecialstop
positionthat willholdthedoor
open. Graspfirmlyoneachside
andliftthedoorstraightupand
offthehinges.
NOTE: Becarefulnotto placehandsbetweenthe
hingeandtheovendoor frameas thehingecould
snapbackandpinchfingers.
Toreplace the door,makesurethehingesarein the
specialstopposition.Positiontheslotsinthebottom
ofthedoorsquarelyoverthehingesat the sametime.
If hinges snapbackagainsttheovenframe,pullthem
backout.
TOCLEAN Tm DOOR:
hside ‘ofdoor:
~Soap and water a normally do thejob. Heavy
spatteringorspflloversmayrequirecleaningwitha
mildabrasivecleaner.Soapy,wetmetalpadsmay
alsobeused.Do notallowfoodspills
withahighsugaror acidcontent(suchasmik,
tomatoes,sauerkraut,fruitjuicesorpiefilling)to
remainonthesurface.Theymaycausea dullspot
evenaftercleaning.
E neeessary9youmay m~ean ovenc~eanerr.Follow
e
packagedirections.
~Cleantheinsideoftheovenwindowwitha mild
non-scratchingcleanseranda dampcloth.
~Usesoapandwaterto thoroughlycleanthetop,
sidesmd frontofthe oven.DONOTletwaterrun
downthroughopeningsinthetopofthe door.Rinse ~
well.Youmayalsousea glassclemerto c~e~ the
glassontheoutsideof thedoor.
eSpillageofmarinades,fruitjuices,tomatosauces
andbastingmaterialscontainingacidsmaycause
discolorationandshouldbewipes up immediately.
Whensurfaceiscool,cleanandrinse.
...
-.
L.~.
:..
~
/
i
~
[
[.
)
I
Page 25

Afterbroiling,remove
thebroilerpanand
rackfromtheoven.
Removetherackfrom
thepan.Carefullypour
outthegreaseinthepan
intoa propercontainer.
If foodhasburnedon,sprifie therackwithdetergent
whilehotandcoverwithwetpapertowelsor a
dishcloth.Thatway,burned-onfoodswillsoakloose
whilethemealisbeingserved.
Wash;scourifnecessary.Rinseanddry.Thebroiler
panandrackmayalsobe cleanedina dishwasher,
Donotstorea soiledbroilerpanandrackanywhere
intherange.
Tocleantheoutsideglassfinish,
useaglasscleaner.Rinseand
polishwithadrycloth.Donot
allowthe waterorcleanertorun
downinsideopeningsin theglass
whilecleaning.
~o~c~~~~~~Y~~ ~~~~~~~~(onsomemodels)
Withpropercare,theporcelainenamelfinishonthe
insideoftheoven—top,bottom,sides,backand
inside of thedoor—-wfilstaynew-lookingforyears.
Let range COOIbefore
cleaning. Werecommendthat
youwearrubbergloveswhencleaningtherange.
Soap andwaterwill normally do the job. Heavy
spatteringorspilloversmayrequirecleaningwitha
mildabrasivecleaner.Soapy,wetmetaIpadsmayalso
beused.Donot allowfoodspillswitha highsugaror
acidcontent(suchas milk,tomatoes,sauerkraut,fruit
juices or piefilling) to remainonthesurface.They
maycausea dull spotevenaftercleaning.
Householdammoniamay makethe cleaningjob
easier. Place1/2cupina shallowglassor pottery
containerin a coldovenovernight.Theammonia
fumeswillhelploosentheburned-ongreaseandfood.
Donot usesteelwool,
abrasives,ammoniaor
commercialovencleaners.
Tosafelycleansurfaces;
wash,rinseandthendry
witha softcloth.
If necessary,youmay usean oven
cleanere
Followpackagedirections.
cautions
about usingspray-on ovencleaners:
~Donot sprayontheelectricalcontrolsandswitches
becauseitcouldcausea shortcircuitandresultin
sparkingorfiie.
~Donot allowaflhnfromthecleanertobuildupon
thetemperaturesensor—itcouldcausetheovento
heatimproperly.(Thesensoris locatedat thetopof
theoven.)Carefullywipethesensorcleanaftereach
ovencleaning,beingcarefulnottomovethesensor
as a changein itspositioncouldaffecthow the
ovenbakes.
*Do not sprayanyovencleanerontheovendoor,
handlesor anyexteriorsurfaceoftheoven,wood
or paintedsurfaces.Thecleanercandamagethese
surfaces.
(co~2tir2z4ednexl page)
I
o
Page 26

cAm
(“”—
,{
“-.—.—”.
——.
_—-. —... -. ..-—
,——-. --.= =..—.——-—
Do notattempttoclean the oventlntilyoknhave
Am
read this section.
The Continglous-cleaning ovenCleansifielfwhile
cooking.Theovenwalls arefinishedwitha special
coating
that cannotbecleanedin theusualmanner
withsoap,detergents,steelwoolpads,commercial
ovencleaners,coarseabrasivepads or coarsebrushes.
Useofsuchcleansersand/ortheuseofovensprays
willcausepermanentdamage.
The special coating is a porousceramic material,
whichisdarkincolorandfeelsslightlyroughto the
touch.Ifmagnified,the surfacewouldappearas
peaks,valleysandsub-surface“tunnels.”Thisrough
finishtendstopreventgrease spattersfromforming
littlebeadsor dropletsthatrundown the sidewallsof
a hard-surfaceovenliner,leavingunsightlystreaks
that requirehandcleaning.Instead,whenspatterhits
the porousfinish,it isdispersedandpartially
absorbed.Thisspreadingactionincreasesthe
exposureofovensoiltoheatedairandmakesit
somewhatlessnoticeable.
Soilmaynotdhappwr completelyandat sometime
afterextendedusage,stainsmayappearthatcannot
beremoved.
The specialcoatingworks best on small arnounk
of spatter.
Itdoesnotworkwellwithlargerspills,
especiallysugars,eggordairymixtures.Forthis
reason,theovenis equippedwitharemovable,
replaceablealuminumfoilovenbottomlinerwhich
protectstheporousfinishonthebottomof theoven
fromspillovers.
Thisspecia~coatingisIlot used onovenShelvesor
~}~~tl~ei~~sideofthe ovendoor. Removetheseto
cleanwitha commercialovencleanerto prevent
damagingtheCorltinllot]s-Cle:~nirlgOvencoating.
cLEmG
(continued)
Tocleantile continuous-cleaningoven:
1.~t rangepartscoolbeforehandling.We
2.Removeshelvesandcookware,includingthe
3.Removeexcessspillsandboiloversfromthe
4.Soilvisibilitymaybe reducedbyoperatingthe
Remember:During the
door,window and other range sutiaces will get hot
enough to mwe burns. Do not touch. Let the range
cool before replacingoven shelvesand aluminum
foil oven bottom.
5.
The insideofthe ovendoor has a porcelain enamel
finish.Theovendoorliftsoffforcleaningawayfrom
theContinuous-CleaningOven.Forinstructionson
howto cleantheinsideof theovendoorreferto the
Lift-OffOvenDoorsection.
Usecarein removingandreplacingaluminumfoil
ovenbottomlinerandshelvesandin placing and
removingdishesandfoodto avoidscratching,
rubbingor otherwisedamagingtheporousfinishon
theovenwalls.
recommendrubberglovesbewornwhencleani~g.
broilerpanandrack.
aluminumfoilov~nbottomlinerbeforeremoving
the linerfromtheoven.Thisistopreventexcess
liquidsfromspillingonto theporousfinish.Then
removealuminumfoilbottomlinerandcleanwith
adampcloth.(Beforecleaningorremovingthe
aluminumfoilliner,liftbakeunitoutoftheway.)
ovenat400°F.Closethedoorandsettemperature
controlto400°F.Timefor atleastfourhours.
Repeatedcyclesmaybenecessarybefore
improvementin appearanceis apparent.
operationof the oven, the
.,%---
If a spilloverorheavysoilingoccursontheporous #&p
surface,assoon as theovenhascooled,removeas
“-:s=:
o
muchofthesoilaspossibleusinga smallamount
ofwateranda stiff-bristlenylonbrush.Usewater
sparinglyandchangeitfrequently,keepingit as
cleanaspossible,andbe suretoblotit up with
papertowels,clothsorsponges.DOnotrubOr
scrubwithpapertowels,clothsor sponges,since
theywillleaveunsightlylinton theovenfinish.
If waterleavesa whiteringon thefinishasitdries,
applywateragainandblotitwitha cleansponge,
startingattheedgeoftheringandworkingtoward
thecenter.
..
----
.
.’J,. 1
< .=
_________.__.. ... .. ..—.-....-.-.-—-----------—
Do not use SoanydetergeE3t9SteRl$~?oo}~i3aclsp
coE%3nleTcialoven eleaneF9silicolB$.
Coarsey:ldsor CoarsebrREskB@sOY5tIT!ejporo~!s
~~jrfeic~. 1 ,
~y~~;j,:::c+
~ ~]~e$ep~~.ductswill
poroLIssurface and]-educeits abi]ityto work.
the
DonotSi.1L:~:GL,.*,y0..Jb.
a-fi,-ai-t?nr-fi;:P7~sa~~i‘76.-*
.’-..I,2-_
A
“oi)’ye~ls~3?.”8’s7
SpOt7 CiOg 3Rd d~~~~e,
,.sL?., \
f-lF(’e(~,~-L;;;Tfi:~fi~~\~jd!li.i.”
~j,,.:::-Jor
til$;yCollld{lernl;ll?elltl}~darn2gctil(;f~.llisil.
I
..
..—.”
Page 27

STEPa
PRRMREFME0PEM!M6
1%inch spacingis recomme~]dedfromthe range
to adjacent verticalwallsabovecooktopsurface.
Allow30inches minimumclearancebetween
surface units and bottom ofunprotectedwood
or metaltop cabinet,and 15inches minimum
between countertop and adjacent cabinetbottom.
To efiminatethe risk ofburns or fireby reaching
overheated surface units, cabinetstorage space
abovethe surface units shouldbe avoided.If
cabinet storage is to be provided,the risk can be
reduced by installinga range hood that projects
horizontallya min. of 5 inches beyondthe
bottom ofthe cabinets.
NOT LESSTHAN
WIDTH OF RAN~E
1<
1,
~ brgeblade screwdriver
[ ~~annel ~oc~pliers or ~~allratchet wrench
with 3/16 inch socket (forlevelingrange)
ELEcrsgm~~~us~~M~~m
c~mo~, FoR PENONM s~.
DONm USEm mNSION comm
m~s WPLWCE.
W.MOWHOUSE
WSE OR OPEN
c~~cm B~R BEFom BEGINNING
IN.wAwmoN.
~is appliancemustbe suppliedwiththe proper
vol~ge andfrequency,andconnected
.....
.. -..
in~ivi~u~,
protectedbya circuitbreaker or timedelayfuse,as
notedonthe ratingpIate.
Wiringmust confijrmto NationalEIectricCodes.
Iftile elecbicserviceprovideddoes not meet the
abovespecifi~~tions,itisrecommendedthat a
ticensedelectricianinstauan approvedou.tiet.
Becauserange termkds are Ilotaccessibleafter
I-aIl(geisinposition,flexibleservice~ond~it~~cord
~~~~~s~~~[j&<d.
-r.:Q.T.-.-,.>-r----------
properlygroundedbranch ci.rcui~
...........
-.. -——------- - -=--J’==--,”.-—-—
—-
-..:-.-!J<~.-.-A.--L——-...----~-’
~0an
. ........,....,
1
.<”H JH
//
/
NSTALL
)UTLET BOX
3N EITHER
SIDEOF ~
OUTLET
BOX d
0 0
MIN.
//
Inl
-
I
I
I
LOCATE
WITHIN
EITHER
SHADEDAREA
I
-. ----
Page 28

PREMREWME@PE#lH6(G@@#’d]
mootigunder tieWge
range,Ime mmy Otier household
Your
items9
floor covefigs suchas cushio~~edtinyl or
Y
of ooring,use care, and followthese simpleand
inexpensiveinstructions.
The range should be installedon a 1/4 inchthick
sheet ofplywood(orsimilarmaterial)as follows:
Whezstheflmr
range9
be builtup with plywoodto the same levelor
higher than the floorcovering.This wiflallow
the range to be movedfor cleaningor servicing.
Use onlya 3-conductor,or ifrequired a 4conductor range cord set as noted below.These
cord sets are providedwith ring type terminals.
The electricalrating ofthe cord must be 125/250
voltsminimum,40 amperes.
~~T~: only a 4-conductorcord is to be used
when the applianceis installed in a mobile home
or where localcodes do not permit grounding
through the neutral.
STEP3
1. hcate connector bIock at the bottom rear of
range and remove rear wiring cover.
2e Directlybelow the connector block is a hole
with a knockout riilgfor accommodating conduit
fittings. 13racketsprovidedare used to support
the flexiblecord strain relief, which must be
securely attached to the cord set.
ishea~ ad m setieinb sofi
etig. When movingthe range on this type
couetingends at the front ofthe
the area that the range willrest on should
Power Cord Instigation-Insert screws
through powercord terminals so that the screws
passthroughconnectorblockterminalsand
engagenuts. Tighten screws securely.
&ble Dtied hsMation41mp bare wires
betweenthe connectorblockterrninds and
movablenutswith screws tightenedsecurely.
1a copper Wtig
Connectthe neutral or grounded wire ofthe
SUDDlVcircuitto the neutral terminal ofthe
co~n~ctorblock, located in the center. me
power leads must be connected to the outside
(brass colored) terminals.
NGE)
\L )
-...,
Page 29

2. Muminam Wting
A. Connectlengthofcopperbuildingwire to
range terminalblock.
B. Splicecopperwties to aluminumwiringusing
specialconnectorsdesigned and U.L.approved
forjoiningcopperto akuninum,and followthe
connectormanufacturer’srecommended
procedure closely.
NOTE:Wire used, locationand enclosure of
splices,etc., must conformto goodwiring
practiceand localcodes.
wmNG:
Frame grounded to neutral ofapphance
through a fink.If used in a MOBILEHOMEor
ifLOCN CODESdonot permit grounding
through the neutral:
1) disconnect the linkhorn neutial,
Z)use grounding terminal or lead to ~ound
unit in accordance with localcodes, and
3)connect neutral terminal or lead to branch
circuit in usual manner.
(Ifthe applianceis to be connected by
means ofa cord set, use 4-conductorcord
for this pu
ONNECTOR
LOCK
~JM~~~~
1. Wge must be secured by NTI-TIP bracket
suppfied.
2. Seeinstructionsto install(suppfiedwith
bracket).
3. Unlessproperlyinstalled,range couldbe
tippedby steppingor sitting on door.Injury
might result horn spilledhot fiqtiidsorfrom
range itse~.
Typical installationofAnti-Tipbracket
Attachment toWa!!
Bracket
\
S?EP7
LEVELBHCTMSm%E
The range must be level.Levelingfeet are
located at each corner ofthe base ofthe range.
Removethe storage drawer or kick panel
(depending on your model) and using channel
locks, rotate the levelingfeet in and out as
required to levelthe range. For instructions on
how to remove and replace the storage drawer or
the kick panel, see the CleaningUnder the Wnge
section in Care and Cleaning.) On some models,
there are plasticcovers which may be removed
for easy adjustment Qustsqueeze and pull).
One of the rear levelingfeet willengage the
~TI-T’IP bracket (allowfor some side to side
adjustment). Allowa minimum clearance of 1/81’
between the range and the levelingfoot that is to
be installed into the ~TI-TIP bracket.
Check the range for proper installationinto the
NTI-TIP bracket (after the range has been
properly installed) by grasping the edges ofti~e
~~ burner holes and carefully attempting to
tilt the range forward.
~—+...-”-------------- , —
—.,.=. --.-...-.-——
;
..-
Page 30

POSSIBLE CAUSE
OVENWLL
NOTwow
OWN LIG~
DOESNOT
FOODDOESNOT
BROmPROPEWY
FOODDOESNOT
ROAST OR BAKE
PROPEUY
WORK
~Plugonrangeisnotcompletelyinsertedintheelectricalout~et.
eThecircuitbreakerin yourhol~sehasbeentripped~or a fusehasbeen blown.
@Ovencontrolsnotproperlyset.
eLightbulbis loose.
~Bulbisdefective.Replace.
eSwitchoperatingovenlightisbroken.Callforservice.
OVENSETknobnotsetatBROIL.
OVENTEMPknobnotsetatBROW.
Doornot leftajarasrecommended.
Impropershelfpositionbeingused.ChecktheBroifingGuide.
Foodis beingcookedonhotpan.
Cookwareis notsuitedforbroiling.
Aluminumfoilusedon thebroilpanrackhasnotbeenfittedproperlyand
slitasrecommended.
~OVENSETknobnotsetatBAKE.
@OVENTE~ knobnotsetatBAKE.
~Shelfpositionisincorrect.ChecktheRoastingorB*ng Sections.
s Ovenshelfisnotlevel.
~Incomectcookwareorcookwareof impropersize is beingused.
~A foiltentwasriot usedwhenneededto slowdownbrowningduringroasting,
CALROD@SURFACE
~ITS NOTFUNCTIONING
PROPERLY
OVENTEMPERATURE
Too HOT OR Too COIJDI
~Surfaceunitsarenotpluggedin solidly.
~Drippansarenotsetsecurelyinthecooktop.
~Surfaceunitcontrolsarenotproperlyset.
9OVEN ~EM~ knob needs adjustment. See the Adjusting Oven
~llerlllostat section.
Page 31

scheduIed at a time that’s convenient
for you. IManyGE Consumer Service
c~~pally.op~rated locations offer you
service today or tomorrow, or at your
convenience (7:00a.m. to 700 p.m.
weekdays,9:00 a.m. to 2:00 p.m. Satur-
days).Our filctoiy-trained technicians
know your appliance inside anci (}III.—
so most repairs can be handled ill <just
(}llevisit.
You can have the secure feeiing that
GE Consumer Service will still be
there after your warranty expires. Purchase a GE contract while your warranty is still in effect and you’ilreceive
a substantial discount. With a mul6ple-
yearcontract,you’reassuredoffiture
serviceat today’sprices.
Whatever your question about any GE
major appliance, GEAnswer Cente@
information service is avatiableto
help. Your call-and your question—
will be answered promptly and
courteously.And you can call any
time. GE hswer Cente# service is
open 24 hours a day 7 daysa week.
Telecommunication Device for the Ded
..-
__r. + , -,-
--
.=—_–d
,1;
I
Page 32

1,
---- . . .
.,.-.”.~~—.
~–
i
..,--—
Save proof of original purchasedate such as your saiesslip or cancelied check to establish warranty period.
WHATISCOVERED
YOURGEELECTR[GRANGE
WARRANTY
FULL ONE-YEARWARRANTY
For one year from date of original
purchase, we
charge, parts and
your hometo repairor replace
any pafl of fhe range that fails
becauseof a manufacturing
defect.
will provide,free of
servicelabor in
—~
This warrantyisextendedto
the originalpurchaser and any
succeeding owner for products
purchased for ordinay home use
the 48 mainland states, Hawaii
in
andWashington,D.C.InAlaskathe
warrantyis the same exceptthat it
is LIMITED becauseyou must pay
ship the producttothe sewice
to
shop or
travel coststo
All warranty servicewill be
provided by our Factoy Service
Centers or by our authorized
Customer Care@servicersduring
normalworking hours.
Should your applianceneed
service, during warranty period
or beyond, call 800-GE-CARES
(800-432-2737),
for the servicetechnician’s
your home.
-.
q
4
WHAT1SNOTCOVERED
~Servicetrips to your home to
teach you how to usethe product.
ReadyourUse and Carematerial.
If you then have any questions
about operating the product,
please contact your dealer or our
Consumer Affairs office at the
address below, or call, toll free:
GE Answer CenteF
800.626.2000
consumer information service
~Improper installation.
If you have an installation
problem, contact your dealer or
installer.Youare responsible for
providing adequate electrical,gas,
exhaustingand other connecting
facilities as described in the
Installation Instructions provided
with the product.
..—
Some states do not allow the exclusion or limitation of incidental or consequential damages, so the above limitation or exclusion
may not apply to you. This warranty gives you specific legal rights, and you may also have other rights which val~ from state to state.
“ToI(now what your legal rights are in your state, consult your local or state consumer affairs office or your state’s Attorney General.
~~?~~~~~~~~: ~~~~~~~ ~j~ctric company
* Replacement of house fuses or
resetting of circuit breakers.
~Failure of the product if it is used
for other than its intended
purpose or used commercially.
~Darnageto product caused
by accident, fire, floods or acts
of God.
WARRANTOR IS IV(?T
RESPONSIBLE FOR
CONSEQUENTIAL DAMAGES.
i
If furtiaer haip is Eneedad eonGeriniR3g this
~q~~~g~y—=
rQ~~~~g~fi~:’jj”~f~i~q,GE glppliances, Lotlisviile, }(Y 40225
warFanty7write:
 Loading...