

Page 1
vvvvvv.GEAppliances.com
Safety Instructions
Anti-Tip Device .............. 2
Oven ....................... 6
Radiant Surface Units ........ 5
Safety Precautions ......... 3, 4
Operating Instructions
(3ock and Timer ............ 13
Oven ................... l 0-18
Sabbath Feature ........... 15
SelfLCleaning ........... 17, 18
Thermostat ................ 16
Timed Baking & Roasting ...14
Surface Units .............. 7-9
Care and Cleaning
Broiler Pan & (;rid .......... 22
Control Knobs ............. 19
Glass Cooktop ........... 23, 24
I,ift-Off Oven Door .......... 20
I.ight ...................... 22
Shelves .................... 21
EER2000
EI:'R 3000
.]1_P64
.]1_P65
.]1_P66
.]BP6 7
JBP70
./BP78
Troubleshootb_g Tips . _ 5
.. 2,-28
Consumer Support
(]onsumer Support .. Back (]over
Product Registration ..... 29, 30
Warranty .................. 31
Write the model and serial
numbers here:
Model #
Serial #
You can lind them on a label
behind the storage drawer on
the flont of the range flame.
164D4290P049 4920091 03-07 dR
Page 2
IMPORTANTSAFETYINFORMATION.
READALLINSTRUCTIONSBEFOREUSING.
For your safe_ the information in this manual must be followed to minimize the risk of fire,
electric shock, or to prevent property damage, personal injury, or loss of life.
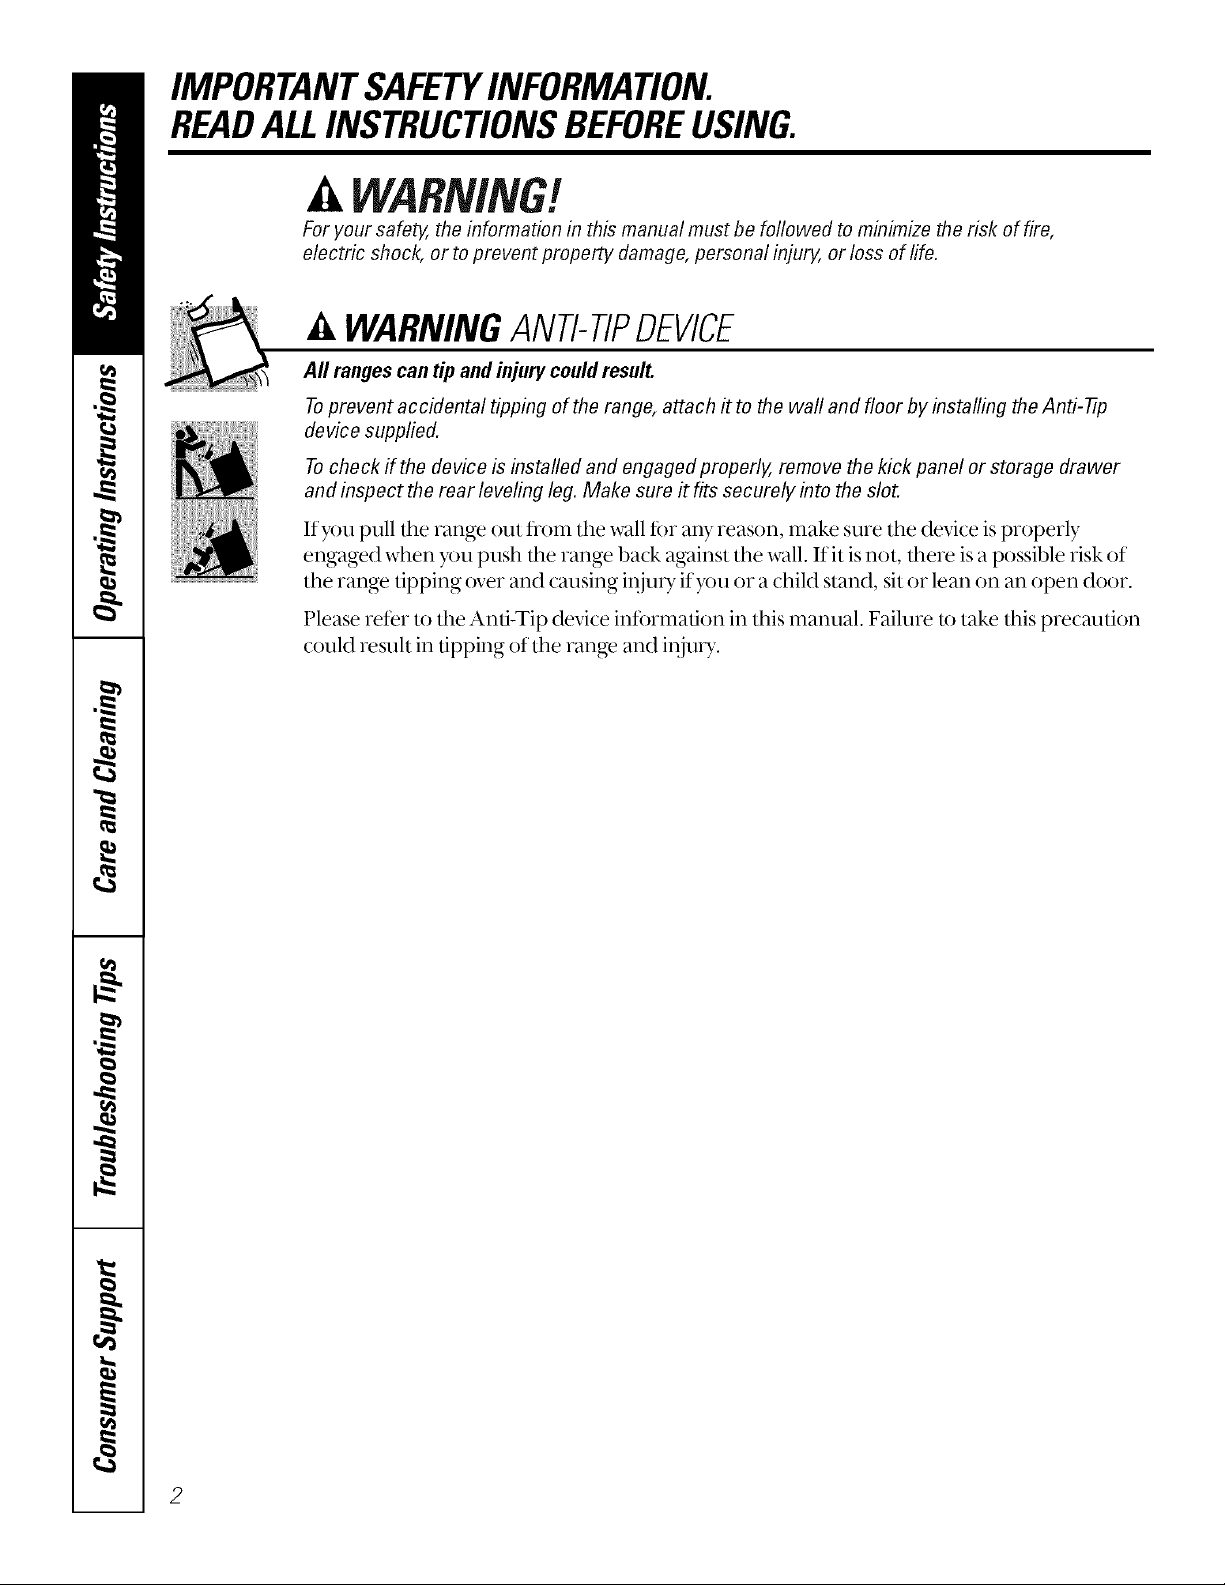
_, WARNINGANTI-TIPDEVICE
All ranges can tip andinjury could result.
Toprevent accidental tipping of the range, attach it to the wall and floor by installing the Anti--tip
device supplied.
Tocheck if the device is installed and engaged properly, remove the kick panel or storage drawer
and inspect the rear leveling leg. Make sure #fits securely into the slot.
If you pull file range out from tile wall for aW reason, make sure the device is properly
engaged when you push the range back aKainst the wall. Ifit is not, flmre is a possible risk of
the range tipping over and causing inju U if you or a child stand, sit or lean on an open door.
Please ,efer m the Anti-Tip device information in this manual. Failme to take this p,ecaution
could result in tipping of the range and inju U.
2
Page 3
www.GEAppliances.com
IMPORTANTSAFETYNOtiCE
The California Safe Drinking Water and ToxicEnforcement Act requires the Governor of Califomb to
publish a list of substances known to the state to cause cancer, birth defects or other reproductive
harm, and requires businesses to warn customers of potential exposure to such substances.
The fiberglass insulation in self-clean ovens gives off a very small amount of carbon monoxide during
the cleaning cycle. Exposure can be minimized by venting with an open window or using a ventilation
fan or hood.
Fluorescent lightbulbs contain mercury. If your model has asurface light, you must recycle the
fluorescent lightbulb according to local, state and federal codes.
SAFETYPRECAUtiONS
When using electrical appliances, basic safety precautions should be followed, including the following:
Y_;Use this appliance only for its inmnded
puq)om asdescribed in this O_mer's Mmmal.
Y_;Be sure your appliance is properly installed
and g¢_mnded by a qualified installer in
acco_,lance with the provided installation
instnlctions.
_2_Have the installer show you tile location of
tile circuit breaker or fuse. Marie itfk)reasy
iJ_Z:;Do not attempt to repair or replace any
part of your range unless it is specifically
recommended in this manual. All other
servicing should be refer,ed m a qualified
technician.
@
l',efore pe_t6r_ming any service, disconnect
the range power supply at the household
disuibution panel by removing the fllse or
switching off tile circuit breaker.
@
Do not leave chil(hen alone-chil(hen
should not be left alone or unattended in
an area where an appliance is in use. They
should never be allowed to sitor stand on
any part of the appliance.
@
Do not allow anyone to dimb, stand or
hang on the door, storage drawer or
cooktop. They could damage the range
and even tip it over, causing severe
personal injury.
3
Page 4
IMPORTANTSAFETYINFORMATION.
READALLINSTRUCTIONSBEFOREUSING.
WARNING!
SAFETYPRECAUTIONS
Do not operate the oven or cooktop controls ff the glass is broken. Food splatter or cleaning solution
may penetrate a broken control panel and create a risk of electrical shock. Contact a qualified
technician immediately should your glass control panel become broken.
_ Do not store flammable materials in all
oven or near the cooktop.
CAUTION:.emsofinterestto
children shouM not be stored in cabinets
above a range or on the backsplash of a
range-clrildren climbing on tire range to
reach items couM be seriously injured.
iJhZ:_Never wear loose4itting or hanging
garments while using dre appliance. 1_
carefld when reaching fbr items stored over
the range. Flammable material could be
ignited ifbrought in conlact with hot
smiace units or beating elemenl_s and m W
cause severe burns.
_ Use only dL-vpot holders-moist or damp
pot holders on hot surfaces mW result in
bums fi-om steam. Do not let pot holders
touch hot sudace units or lmating elemenl_s.
Do not use a u)wel or other bulky doth in
place of pot holders.
iJ_Z::Do not use water on gTease fires. Never
pick up a flaming pan. Turn tire controls
off. Smother a flaming pan on a snrface
unit by covering tire pan completely with a
well4itting lid, cookie sheet or flat u W. Use
a nmlti-purpose (hT chemical or fimm-type
fire exting_fisher.
Flaming g_ease outside a pan can be put
out by covering it wiflr baking soda or, if
available, by using a multi-purpose (hT
chemical or foam-type fire exfing_dsher.
Flame in tire oven can be srnodmred
completely by dosing dre oven door and
mining tire oven off or by using a muhi-
purpose (h7 chemical or fimm-type fire
extinglfisher.
iJhZ:_For _x)ur safety, never use your appfiance
fbr warming or heating die morn.
_ Do not let cooldng g_ease or other
flammable materials accumulate in or
near the range.
iJ_Z:;Do not touch tire snrface units, the lmafing
elements or the interior snrface of tire
oven. These surfaces may be hot enougtr to
burn even though they are daft< in color.
During and after use, do not touch, or let
clothing or other flammable materials
contact tire surface units, areas nearby the
smiace unil_s or any interior area of tire
oven; allow sufficient time for cooling first.
Potentially hot smiaces include dm
cooktop, areas facing dre cooku)p, oven
vent opening, smtaces near the opening,
crevices around tire oven door.
REMEMBER:Tire inside smiace of tire oven
may be hot when the door is opened.
iJSi:;Do not store or use combustible materials,
gasoline or ()flier flammable vapors and
liquids in tire vicinity of this or aW other
appliance.
_; Keep dre hood and grease filters clean
to maintain good venting and to avoid
g_ease fires.
iJhZ:;Teach clriMren not u) playwith dre
controls or any other part of tire range.
N Always keep dish towels, dish cloths, pot
hoMers and other linens a safe distance
from _mr range.
_ Ahvays keep wooden and plastic utensils
and canned food a safe distance flom
your range.
iJ_Z:;Ahvays keep combustible wall coverings,
curtains or (kapes a safe distance flom
your range.
COOKMEATANDPOULTRYTHOROUGHLY...
Cookmeat andpoultry thoroughly--meat to at leastan INTERNALtemperatureof 160°Eandpoultry
toat least an INTERNALtemperatureof 180°ECookingto thesetemperaturesusuallypretectsagainst
4
foodbomeillness.
Page 5
www.GEAppliances.com
RADIANTSURFACEUNITS
Use proper pan size--select cookware having flat bottoms large enough to cover the surface unit
heating element. The use of undersized cookware will expose aportion of the surface unit to direct
contact and may result in ignition of clothing. Proper relationship of cookware to surface unit will also
improve efficiency.
_; Never leave file smthce units unattended at
high heat settings, l_ilovers cause smoking
and gTeasy spillovers that may catch on fire.
_ Only certain types of glass, glass/ceramic,
eartlmnware or other glazed containers are
suitable for cooktop sersice; others m W
break because of tile sudden change in
temperature.
iJ_i:;To minimize tire possibility of burns,
ignition offlammable mamrials and
spillage, tile hmldle of a container shouM
be turned towar, l the center of tile range
without extending over neafl)y sm_ace uniLs.
_ Always mm fire stnlace units offbefore
removing cookware.
iSi:;When preparing flaming foods under dm
hood, turn tire fan on.
_ Use care when touching dre cooktop. Tire
glass surface of tile cooktop will retain heat
after tile controls have been turned off.
iJhi:_Keep an eye on foods being flied at high or
medium high heat settings.
_ Foods far flying should be as d_T as
possible. Fr_)st on fiozen foods or moisture
on flesh foods can cause hot fat to bubble
up and over tile sides of tile pan.
iJ_i:_Use little fat far effective shallow or deep
fat flTing. Filling tire pan too full offat can
cause spillovers when food is added.
iJ_i:;Ira combination of oils or fats will be used
in flying, stir together 1)efbre heating, or as
fats melt slowly.
iJ_i:_Always heat fat slowly, and watch as it beats.
iJ_i:;Use a deep fat flmrmometer whenever
possible to prevent overheating fat beyond
tire smoking point.
_ Do not operate fire radiant smtace units if
tire glass is broken. Spillovers or cleaning
solution may penetrate a broken cooktop
and create a risk of elecuical shock.
Contact a qualified technician immediately
shouM }_ur glass cooktop become broken.
iJ_i:;Never use dm glass cooktop smface as a
cutting board.
iJ}i:;Do not place or store items lhat can melt or
catch fire on the glass cooku)p, even when
it is not being used.
iJhi:;Be carefld when placing spoons or other
sti_Ting utensils on ,glass cooktop smtace
when it is in use. They may become hot and
could cause bums.
iS::;Clean dm cooku)p wid_ caution. Ifa wet
sponge or cloth is used to wipe spills on a
hot sm_ace unit, be car_ful to avoid steam
bums. Some cleaners can produce noxious
fumes if applied m a hot smtace.
NOTE,"We recommend fllat you avoid
wiping any smtace unit areas until they
have cooled and the indicau)r light has
gone ore Sugar spills are tire exception to
this. Please see tile Cleaning the glass
cooktop section.
i_i:;When tire cooktop is cool, use only tire
recommended cleaning cream to dean
tire cooktop.
i_hi:;To avoid possible damage to dre cooldng
surface, (k) not apply cleaning cream to tile
glass surlace when it is hot.
i_i:;After cleaning, use a dU cloth or paper
towel to remove all cleaning (:ream residue.
i_i:;Read and ff)llow all insm_ctions and
warnings on the cleaning cream labels.
iJhi:;Avoid scratching tire glass cooktop. Tile
cooktop can be scratched with items such
as sharp insmmlents, rings or other
,jewelry, and rivets on clothing.
Page 6
IMPORTANTSAFETYINFORMATION.
READALLINSTRUCTIONSBEFOREUSING.
WARNING!
OVEN
Stand away from the range when opening the oven door. Hot air or steam which escapes can cause
bums to hands, face and/or eyes.
iJhi:;Do not heat unopened food containers.
Pressure could build up and tile container
could burst, causing an in juU.
ijh::;Keep tile oven vent unobstn_cted.
ij_::;Keep tile oven flee fmni gTease buildup.
ijh::;Place tile oven shelf in the desired position
while the oven is cool. If shelves must be
handled when hot, do not let pot holder
contact tile heating elements.
_; V_qmnusing cooking or roasting bags in
tile oven, R)llow the manuf_tctu,er's
di,ecfions.
Pulling out file shelf to tile stop-lock is a
convenience in lifting heaxT f{_ods.It is also
a precaution against burns fi_ml touching
hot stn-l_tcesof tile door or oven walls.
ijh::;Do not use dm oven to (h3,newspapers.
ltoverheated, dmy can catch oil fire.
_ Do not use the oven f{)r a storage area.
Items stored in an oven can ignite.
ijh::;Do not leave paper products, cooking
utensils or f{_odin the oven when not
in use.
Do not use aluminum f0il to line ()veil
bottoms, except as suggested in this
manual. Improper installation of
aluminunl f()il may result in a risk of
electric shock or fire.
SELF-CLEANINGOVEN
Do not use oven cleaners. No commercial oven cleaner or oven liner protective coating of any kind
should be used in or around any part of the oven. Residue from oven cleaners will damage the inside
of the oven when the self-clean cycle is used.
_; Do not clean dm door gasket. Tile door
gasket is essential f{)r a good seal. Care
should be taken not to rub, damage or
move the gasket.
iJ_i:;Bef_re self:cleaning the oxen, remove the
broiler pail, gTid and other cookware.
9_;Be sure to wipe up excess spillage bef_re
starting tile sell:cleaning operation.
_;Ifdie self:deaning mode nialtuncdons,
mrn the oven off and disconnect file
power supply. Have it serx'iced bya
qualified teclmician.
ijh::;(]lean only parl_slisted in this Owner's
Manual.
READANDFOLLOWTHISSAFETYINFORMATIONCAREFULLY.
SAVETHESEINSTRUCTIONS
Page 7

USing the surface units. . .oeAppliancos.com
Throughout this manual, features and appearance may vary from your model.
OFF
thek.obi. a.dturni. eid e,
direction to dm setting you x_wnk
A HOTCOOKTOPindicator light will glow
How to Set
when any radiant element is turned on,
: and MI1 rem_fin on unUl tl,e sm{a(:e is
(ooled to approximately 15()°F. :_::
Indicatorlightwill:
At both OFFand HI the control clicks
flTtoposition.Youmay hearslight
clickingsounds duringcooking
hTdicatingthe controlis maflTtahTflTg
yourdesired setting
Be sure you turn the control knob to
OFFwhen you finish cooldng.
i:Ycomeonwhentheunit Ishottothetouch. :_>........ _:_f_:
: stayonevenaftertheunitisturnedoff REAR
i2 glowuntiltheunitiscooledtoapproximately
150°E
Dual Surface Unit Control Knob (onsomemodels)
s,,,,[,. , .GE
BURNEI__ BURNER
OFF
Thenghtfrontsurfaceunithas2cookings/2esto
selectfromso youcanmatchthesizeof theunit
tothes/_eof thecookwareyouareusing.
To use the slnall (6 in(h) surfa(e unit,
push in the SMALLBURNERportion of
the switch al)ove the (ontrol knol).
OFF
co
:1111171
The WM (winm) setting (on some
models) on the right REARsurlace unit
keeps aheady heated loud wmm until
ready to serve.
FRONT
SETrlNG FOOD
(Low) Bread/Pastries
(Medium) Chocolate/Butter
(Medium) Sauces,Stews,
CreamSoups
(Medium) Vegetables
(High) Soups(liquid)
(High) TeaorCoffee
TheWarmer Guideisfor reference
onlyand the SETTINGthatyou
needwill dependonthe amount
andtype offood,the starting
temperatureofthe food, andthe
lengthofthe holdingtime.
To use the large (9 inch) striP,meunit,
push in the LARGEBURNERportion of
the switch above the control knob.
Using the Warming Zone (onsomemodels)
The WARMINGZONE,located in the back
center of the glass surface, will keep hot,
cooked toed at serving temperature.
Ahvays start xdth hot fi)o(l. Do not use
to heat cold ti)od. Pla(ing uncooked or
cold ti)od on the WARMINGZONE could
result in too(bborne illness.
Pt]sh and tt]I'I] the (ontrol knol) to any
desired setting.
For best resuhs, all ti)o(ls on the WARMING
ZONEsh{)uld be o)vered with a lid or
ahmfinum ti)il. When wamfing pasuies
or breads, the o)ver should be vented
to alh)w moisture to escape.
Always use potholders or oven mitts when
removing food tiom the WARMINGZONE,
as cookware and plates will be hot.
CAUTION: Do not warm food on the
WARMINGZONEfor more than two hours.
NOTE:Thesurfacewarmerwillnot glow redlike
the cooking elements.
A HOTsurl_lce in(li(ator light will glow
when the glass surlitce is hot and will
remain on until the surtime is cool
enough m touch. I.ower settings may not
heat the glass sudime enough to cm_se the
HOTsurlime in(licator light to come on.
A WARMINGZONEindicator light will
glow when the unit is on.
i:YDonotuseplasticwraptocoverfoodPlastic
maymeltontothesurfaceandbeverydifficult
toclean.
>_Useonlycookwarerecommendedfor
top-of-rangecooking.
Page 8
Usingthesurface units.
Throughout this manual, features and appearance may vary from your model.
About the radiant surface units...
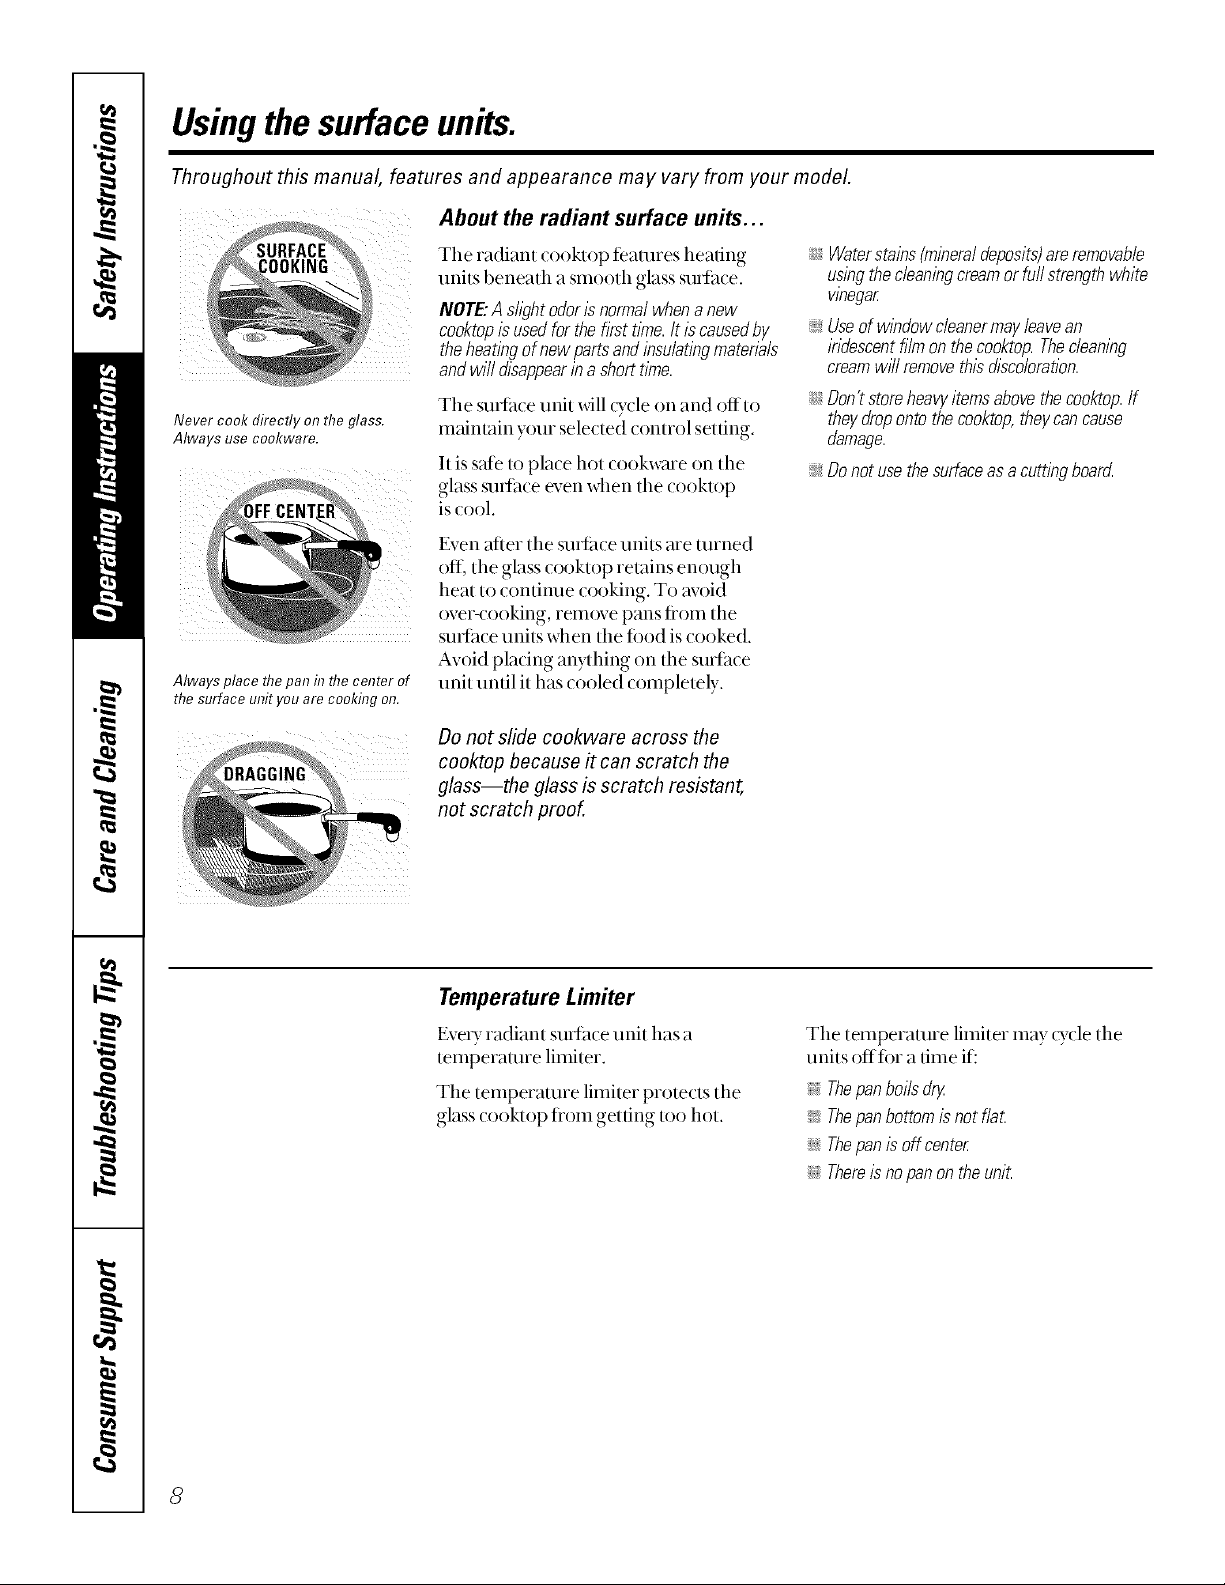
Never cook directly on the glass.
Always use cookware.
Always place tlTepan in tlTecenter of
the surface unit you are cooking on.
The radiant cooktop tbamres heating
uni/s beneath a smooth glass surlace.
NOTE."A sflghtodor12normalwhena new
cooktopis usedforthefirsttime.Itis causedby
theheatingofnewpartsandinsulatingmateriab
andwilldisappearinashorttime.
The sm_:ace unit _fillQ,cle on and offto
maintain your selected control setting.
Itis safe to place hot cookwme on the
glass suffa_ em, en when the _ooktop
is _ool.
Even after the suditce uni/s are turned
oil the glass cooktop relains enough
heat to contimm cooking. To avoid
over-_ooking, rem{_ve pans fiom the
sudime uni/s when the fi)od is cooked.
Avoid placing anything on the sudime
unit until it has cooled completely.
Do not slide cookwara across the
cooktop because # can scratch the
glass--the glass is scratch resistant,
not scratch proof.
i::__Waterstains(mineraldeposits)areremovable
usingthecleaningcreamorfurlstrengthwhite
wnegar
:i_Useofwindowcleanermayleave,an
iridescentfilmonthecooktop.Thecleaning
creamwillremovethisdiscoloration.
i_:_:Don'tstoreheavyitemsabovethecooktop.If
theydropontothecooktop,theycancause
damage.
>_Donotusethesurfaceasacuttingboard.
Temperature Limiter
EveD"radiant stutace unit has a
temperature limiter.
The temperature limiter protecls the
glass cooklop fiom getting too hot.
The temperature limiter may _ycle the
units ottti)r a dine if:
>_Thepan boils dn/
_,_Thepan bottom isnot fla£
ijj; Thepan is off center
i::__Thereis nopan on the uniL
8
Page 9
Selectingtypesofcookware, w .CEApp,ia,ces.com
The following information will help you choose cookware which will give good performance on glass cooktops.
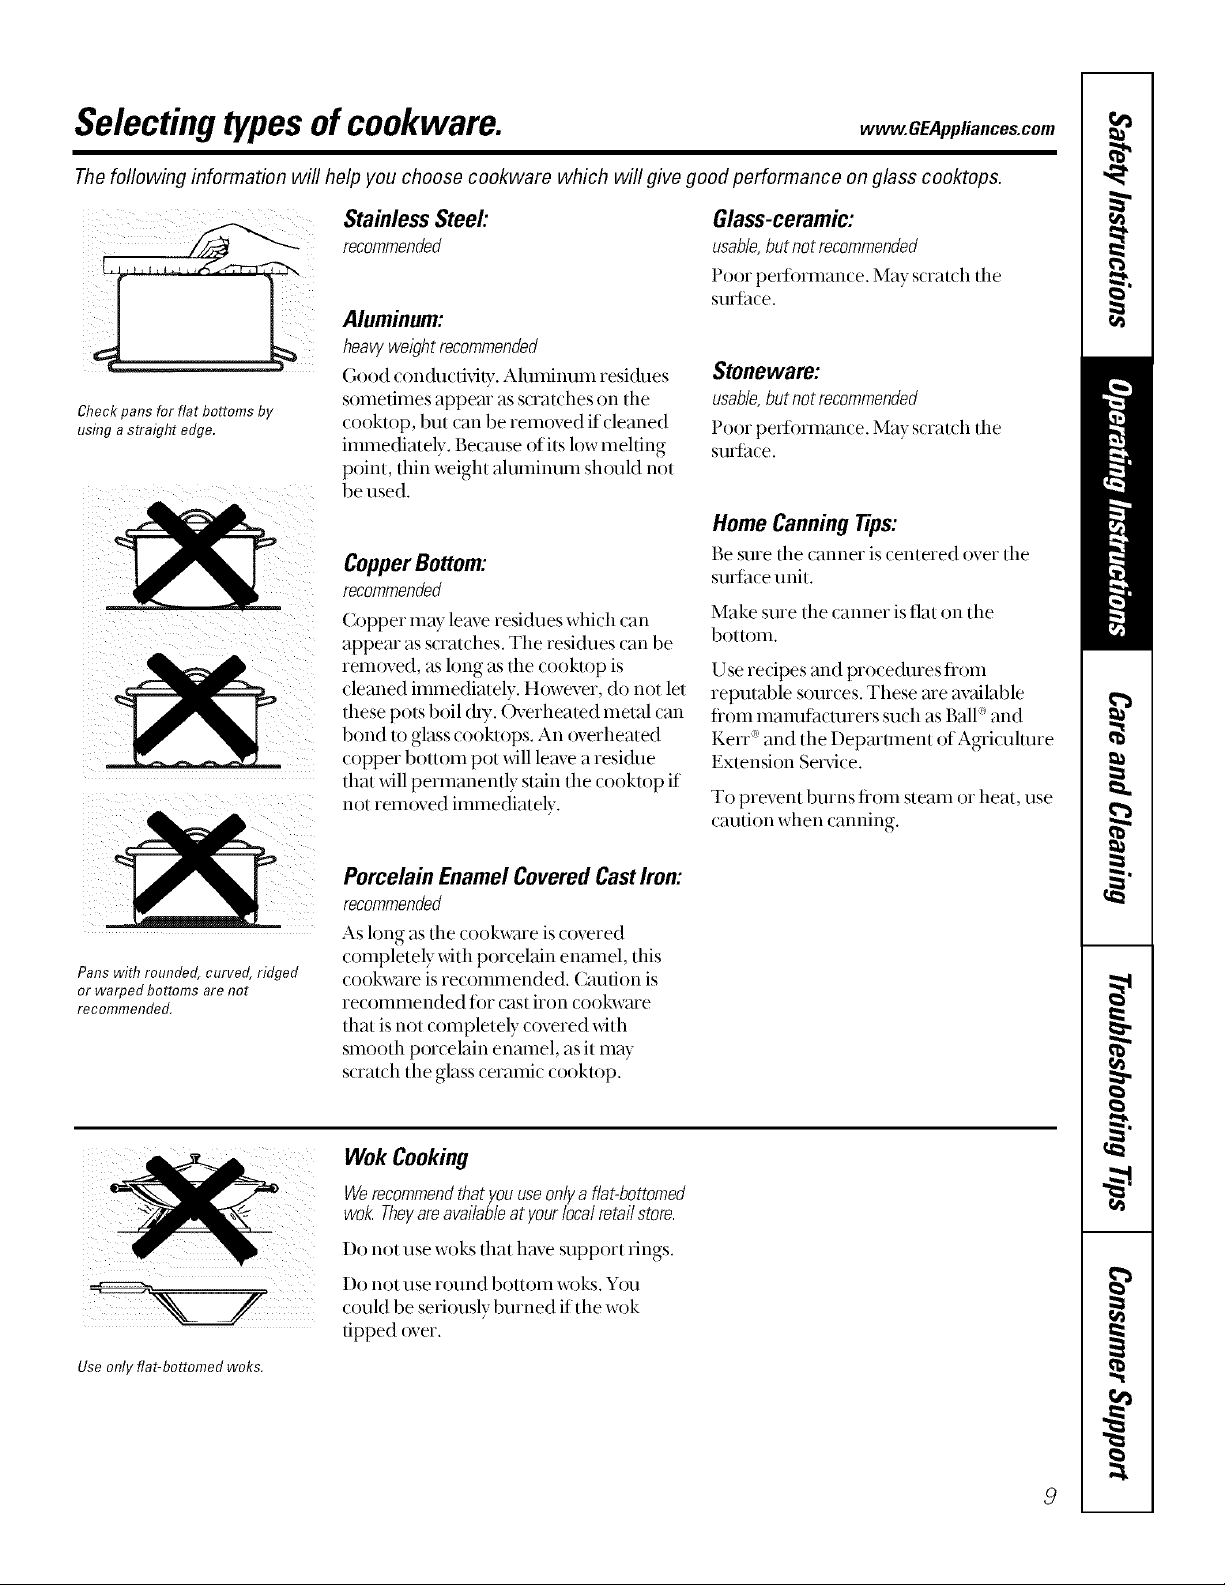
Check pans for flat bottoms by
using astraigltt edge.
Stainless Steel'.
recommended
Aluminum:
heavyweightrecommended
Good conductidty. Aluminum residues
sometimes appear as scrau hes on the
cooktop, but can be removed if cleaned
immediately. Because ofi/s low melting
point, thin weight aluminum should not
be used.
CopperBottom:
recommended
Copper may leaveresidues which can
appear as scratches. The residues can be
removed, as long as the cooklop is
cleaned immediately. Ht_wever, do not let
these pots boil (hy. Overheated metal can
bond to glass cooktops. An overheated
copper bottom pot will leave a resi&_e
that will permanently stain the cooktop if
not rem{_ved immediately.
Glass-ceramic:
usable,butnotrecommended
Poor pedi)rmance. May scratch the
stwlhce.
Stoneware:
usable,butnotrecommended
Poor pedormance. May scratch the
stwlhce.
Home Canning Tips:
Be sure the canner is centered over the
SUlTace unit.
Make sure the canner is fiat on the
bottoln.
Use recipes and procechnes flom
reputable sources. These me available
flom mam_thcmrers such as BalF and
Kerr' and the Depmnnent of Agricuhure
Extension Service.
To prevent burns fi'OlIl stealn or heat, use
(aution when (anning.
Pans with rounded, curved, ridged
or warped bottoms are not
recommended.
Use only flat-bottomed wok&
Porcelain EnamelCoveredCastIron:
recommended
As long as the cookwme is covered
completely with porcelain enmnel, this
cookware is recommended. Cmnion is
recommended tot cast iron cookwme
that is not completely o)vered with
smooth porcelain enmnel, as it may
scratch the glass ceramic cookmp.
Wok Cooking
Werecommendthatyouuseonlyaflat-bottomed
wok Theyareavailableatyourlocalretailstore.
Do not use woks that have support rings.
Do not use round bouoin woks. You
(ouM be seriously burned if the wok
tipped over.
Page 10
Usingthe ovencontrols.
Throughout this manual, features and appearance may vary from your model.
AUTOMATIC OVEN _
HOUR MIN,
TEMP REHEA
RECALL
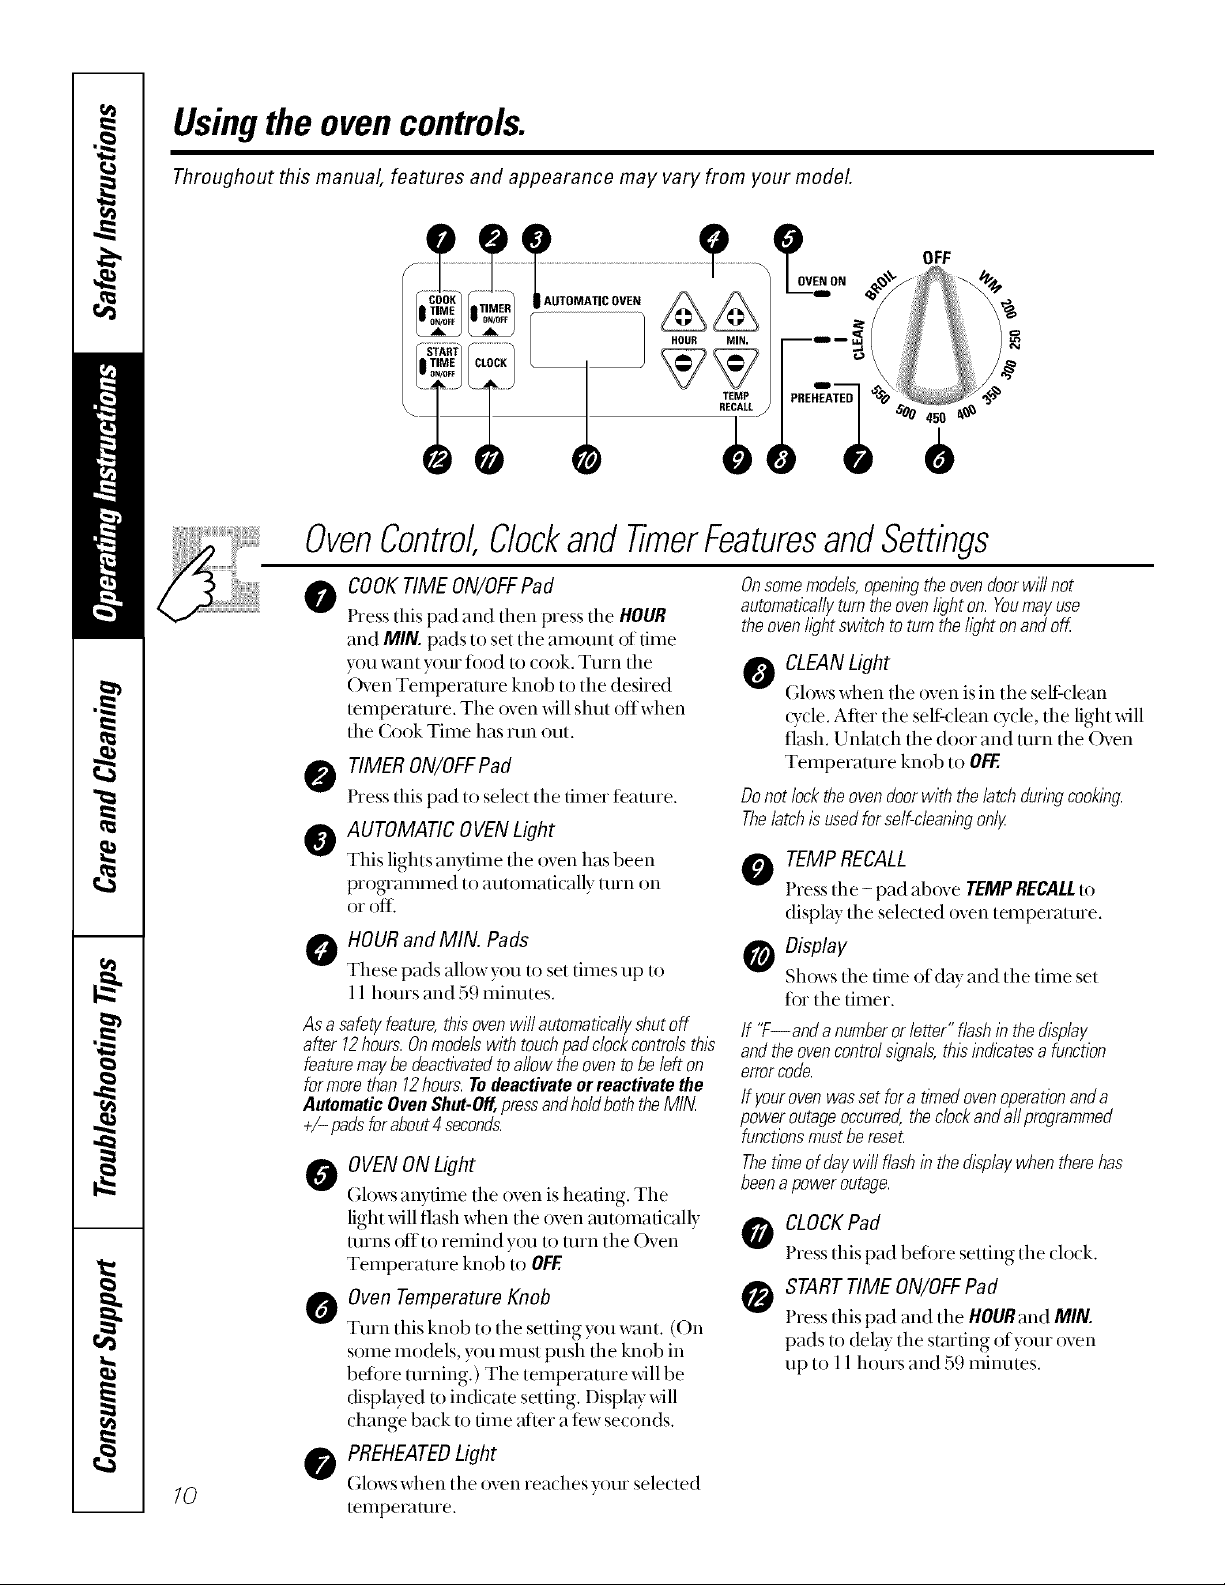
OvenControlClockandTimerFeaturesandSettings
OFF
COOKTIME ON/OFFPad
0
Press this pad and fllen press tile HOUR
and MIN. pads to set tile ainount of dine
y(tll W;tIlt yotn" tit(t0 m cook. %11"n tile
Oven Teinperamre knob to the desired
teinpeivmne. Tile oven xdll shut offwhen
the took Tiine has mn out.
TIMER ON/OFFPad
Press this pad to sele(t tile diner ti_attne.
O AUTOMATIC OVEN Light
This lights anyfiine tile oven has been
prograinined tit atllomalically turn on
t)i t)tt_
HOURand MIN. Pads
These pads allow yt)u tit set dines up tit
l 1hours and 59 ininutes.
Asa safetyfeature,thisovenwillautomaticallyshutoff
after 12hours.Onmodelswithtouchpadclockcontrolsthis
featuremaybedeactivatedtoallowtheoventobeleft on
formorethan12hours.Todeactivateorreactivatethe
AutomaticOvenShut-Off,pressandholdboththeMIN
+/- padsforabout4 seconds.
OVENON Light
0
(;lows anytime tile oven is heating. Tile
light _dll flash when tile oven mm)inafically
turns off tit relnind you to turn tile Oven
Teinperamre knob to OFF.
Oven Temperature Knob
0
Turn tllis knob to tile setting ytm want. (Oil
seine ino(Ms, you illtlSt push tile knob in
betitie turning.) The teinperamre will be
displayed u) indicate setting. Display xfill
change back to dine after a tew seconds.
Onsome mode& openlbg the oven doorwi# not
automaticallyturn the oven hght on. Youmay use
the oven hghtswitch to turn the hght onand off.
0 CLEANLight
(;lows when tile oven is in tile selt:( lean
_ycle. Aliei tile self clean Q,cle, tile light _dll
flash. Unlatch tile door and turn tile Oven
Teinperamre knob to OFF.
Donotlocktheovendoorwith thelatchdunngcooktng.
ThelatchIsusedforself-c/eaningonly
0 TEMPRECALL
Press tile - pad above TEMPRECALLto
display tile selected oven teinperamre.
Display
Shows tile dine t)f day and tile tiine set
ti)i tile tiiner.
If "F--and a numberorletter"flashin thedisplay
andtheovencontrolm}_na/s,thisindicatesafunction
errorcode.
If yourovenwasset fora timedovenoperationanda
poweroutageoccurred,thedockandaftprogrammed
functionsmustberese_
Thetimeof daywi//flashin thedisplaywhentherehas
beenapoweroutage.
0 CLOCKPad
Press this pad befoie setting tile (lt)(k.
STARTTIME ON/OFFPad
Press this pad and tile HOURandMIN.
pads to delay tile starting of your oven
up to 11hours and 59 ininutes.
10
@ PREHEATEDLight
(;lows when tile oven rea(hes yt)ur sele(ted
[elilpei'altne.
Page 11

Usingthe oven. vvvvw.GEAppliances.com
Toavoid possible bums, place the shelves in the desired posifion before you turn the oven on.
Before you begin...
CAUTION:Whenyouareusingtheshelfin the
lowestposition(A),youwill needtousecaution
whenpu/Dbgtheshelfout Werecommendthat
youpufftheshelfoutseveralinchesandthen,
usingtwopotholders,pufftheshelfoutby
ho/dlbgthesidesofit Theshelfislowandyou
couldbeburnedif youplaceyourhandinthe
middleoftheshe/fandpu//aftthewayout Be
verycarefulnotto burnyourhandonthedoor
whenusingtheshelfinthelowestposition(A).
Theoven has 6 shelf positions.
The shelves have stops, so that when
placed correctly on the supports, they_dll
stop before coming completely out, and
xfill not tilt.
When placing and remr)x4ng cookware,
pull the shelfr)ut until it stops.
Toremove a sheff, pull it toward you, tilt
the fiont end up and pull it out.
Toreplace,place the end of the shelf
(stop-locks) (m tile support, tilt tip the
firmt and push the shelf in.
How to Set the Oven for Baking or Roasting
ill i i f i i \ \ \xt-*_._'_
Center baking pans in the oven
[] Turn t he (-)ven Temperature knob
to the temperature you desire.
Oil some models, you must push tim
knob in bell)re turning.
[] Check food for doneness at
minimum time on recipe. Cook
hmger if necessat T.
[] Turn the Oven Temperature knob
to OFFwhen cooking is complete.
Preheating and Pan Placement
Preheat the oven if tile recipe (railsfi)r it.
Preheating is necessaty fi)r good resuhs
when baking cakes, cookies, past U and
breads.
Topreheat,set theovenat thecorrecttemperature.
Thecontrol will beepwhen the ovenis preheated
andthe display will show yourset temperature.
Thiswill take approximately8-10 mlbutes.
TypeofFood ShelfPosition
Frozenpies(oncookiesheet) D
Angelfoodcake A
Bundtorpoundcakes CorD
Biscuits,muffins,brownies, CorD
cookies,cupcakes,
layercakes,pies
Casseroles CorD
Turkey A
Baking resuhs will be better if baking pails
are centered in the oven as iiluch as
possible. If baking with more than one
pail, place the pails so each has at least 1
to {1/._,,,of air space motmd it. Ifbaking
tour cake 1wers at tile same time, place
two 1wers oil rack B and two 1wers oil
rack D. Stagger the pails oil the rack so
one is not directly ab{)ve the other.
Cut slits in the foil just like the grid.
Aluminum Foil
You (rail use ahnninum fi)il to line tile
broiler pail and broiler grid. However,
you must mold the foil tightly to the grid
and cut slits in itjust like the grid.
Without tile slits, tile toil will prevent tat
and meat juices flom draining in/o the
broiler pail. The juices could become
hot enough to catch on fire. If you
do not cut the slits, you are essen/ially
flying, not broiling.
Donot usealuminum foil on thebottom of
the oven.
Never entirely cover a shelf with
aluminum foil. This xfill (fismrb tlle heat
(ir(ulatirm and resuh in poor baking.
A smaller sheet of foil may be used tr)
(arch a spillover by pla(ing it on a h)wer
slielf several in(lies beh)w the fi)od.
11
Page 12

Usingthe oven.
Toavoid possible bums, place the shelves in the desired position before you turn the oven on.
How to Set the Ovenfor Broiling
Leave the door open to the broil
stop position. Thedoor stays open
by itself, yet the proper temperature
is maintaflTedf17the oven.
The size, weight, thickness,
starting temperature,
and your pretFren(e
of doneness will affect
broiling times. This guide
is based on meats at
refrigerator temperature.
_ Ttu,{'.S. l)e[mrtme,t o/
Agrig_dtmesays "l¢az_,bee]Ls
/m/_[a_; but)'ot_slto_ddlozou,that
(_,_)l_h_g{lto on{V t4(Pt< m_a_L_
s*_Jiu('."(_ourg_':£_e Food Bo_k.
Your Kit( lu_*t;ui&. I 'SI)A R¢(L
12
[] Place the meat or tish on the broiler
grid in the broiler pan,
[] Follow suggested shelf positions in
tl_e Broiling Guide.
Ifyourrangeisconnectedto208voits,rare
steaksmaybebroiiedbypreheatingthebroiler
andpositioningtheovenshe/foneposition
hi#her
lJse LOBroil U)cook foods such as pouh U
or thick cuts of meat thoroughly _dthout
over-browning them.
Broiling Guide
Shelf
Position
D
D
C
B
D
D
D
D
Food
GroundBeef
Beef Steaks
Rarer
Medium
Well Done
Rarer
Medium
Well Done
Chicken
Bakery Product
Bread (toast)
EnglishMuffin
LobsterTails
Fish Fillets
Salmon
Steaks
Fillets
Ham Slices
(precooked)
Pork Chops
Well Done
LambChops
Medium
Well Done
Medium
Well Done
Quantityand/
orThickness
1 lb.(4 patties)
I/2 to 3/4ff thick
4 Ins.(12patties)
3/4to I" thick
1to 1 I/2 Ins.
1 I/2'* thick
2to 2 I/2 Ibs.
1whole cat up
2to 2 I/zIbs.,
split lengthwise
Breast
2to 4 slices
2(split)
2_
1 In.(1/4 to I/2ts thick)
2(1" thick)
2 (I/2 to 3/4"thick}
I/2" thick
1" thick
2(I/2" thick)
2(1" thick)about 1 lb.
2{1"thick) about 10
to 12 oz.
2(11/_,,thick)about1 lb.
[] Turn the Oven Temperature knob
to BROIL.
On some models, you must push the
knob in beti)re turning.
[] When broiling is finished, mrn the
Oven Temperature knob to 0FE
F
E
E
E
E
F
E
E
E
E
E
E
First Side
Time (min,)
13
15
6
8
10
10
15
2O
25
25
3
3-4
18_0
10
10
6
8
10
15
7
10
9
14
Second Side
Time (rain.)
8
4
6
8
8
10 12
20
25
15
1
Do not
turll
oveE
6
8
10
15
4
9
6
10
Comments
Spaceevenly.
Steakslessthan s/4"
thick aredifficult
tocookrare.
Slashfat.
Brasheachsidewith
meltedbutter.
Broilskin-side-down
first.
Spaceevenly.Place
Englishmuffinscut-
side-upandbrash
with butterif desired.
Catthroughbackof
sheikSpreadopen.
Brashwith melted
butterbeforebroiling
andafter half of
broilingtime.
Handleandturnvery
carefully.Brushwith
lemonbutterbefore
andduring cooking,
if desired.
Turncarefully.Do not
tamskin sidedown.
Slashfat.
Slashfat.
Page 13

Usingthe clock andtimer, www.GEAppliances.com
Not all features are on all models.
To Set the Clock
Make sure the clock is set to the
correct time of da_
! i iii!i( !
Thetimer is a minute timer onl_
Thetimer does not control oven
operations.
Themaximum setting onthe timer is
11hours and 59mflTutes.
Tile clock nmst be set to tile correct dine
of day titi tile autoinatic oven dining
fimcfions to work properly. Tile tiine of
day cannot be changed during a tiined
baking or self cleaning {ycle.
[] Press tile CLOCKpad.
[] Press the HOURand MIN.pads until
tile time of day shows in tile display.
ToBlack-Out the Clock
Ifyou have several clocks in your kitchen,
you inay wish m black-_tut the dine ofd W
displW ofy{tur range. If so, press the
CLOCKpad.
PresstheCLOgKpadtwicetoretainthetimeof
dayafterab/ack-ou£
Ahhough you cannot see it, the clock
maintains tile conect tiine of day. It xdll
reappear for the (hnation ofa W flmction
that displays a Start Tiine or Cook Tiine.
Press the CLOCKpadagain ut bring back
the display.
ToSet the Timer
[] Press tile TIMERON/OFFpad. [] Press tile HOURand MIN. padsundl
tile atnount of time yt)u want shows
in the (fisplay. The timer willstart
auttnnatically xdthin a few sect mds
ofreleasing the pad.
To Reset the Timer
If tile display is still showing the dine
reinaining, you inay change it by pressing
the HOURand MIN. pads until the tiine
ytiu want appears in the (fisplay.
ToCancel the Timer
Presstile TIMERON/OFFpad twi_e.
End of Cycle Tones
Clear tile tones by pressing tile pad of tile
fimctitm yt)u are using.
If tile reinaining tiine is not in the display,
recall the reinaining dine by pressing the
TIMERON/OFFpad and then pressing the
HOURand MIN. pads until the new tiine
y(iu w;tilt sh(iws in tile (fisplay.
13
Page 14

Usingthetimedbakingand mastingfeatures.
Do not latch the oven door during timed cooking. Thelatch is used for self-cleaning only.
NOTE."Foods that spoil easily-such as milk, eggs, fish, stuffings, poultry and pork-should not be allowed to sit for
more than 1hour before or after cooking. Room temperature promotes the growth of harmful bacteria. Be sure that
the oven light is off because heat from the bulb will speed harmful bacteria growth.
How to Set an Immediate Start and Automatic Stop
Theoven will turnon lYnrnedlatelyand cookfor a
selectedlengthof tlYne.At the end of the cooking
time the oven will turnoff autornatically
Tile display will show tile cooking time
remaining. When tile oven reaches tile
set temperature, a tone sounds.
HOUR MIN.
START
TIME
ON/OFF
HOUR MIN.
[] Press tile COOKTIMEON/OFFpad.
[] Using file HOURand MIN. pads,
enter the lengfll of (ooking time.
Turn tile Oven Temperature knob to
[]
tile desired temperature.
On some models, you must push tile
knob in before turning.
When tile oven mltomafically unns
off tile AUTOMATICOVENlight will flash
and the oven will signal. Turn the oven
conuol to OFFto stop the flashes and
signal.
How to Set a Delayed Start and Automatic Stop
Youcansettheovencontroltodelay-startthe
oven,cookfora specihclengthoftimeandthen
turnoffautomatically
Make sure tile clock shows tile conect
time of day.
[] Press tile STARTTIMEON/OFFpad.
[] Using tile HOURand MIN. pads,
enter tile filne you want (ooking
10 S[}ll't,
When tile oven mnomafically unns off
tile AUTOMATICOVENlight will flash
and the oven will signal. Turn the oven
conuol to OFFto stop the flashes and
signal.
[] Press tile COOKTIMEON/OFFpad.
[] Using tile HOURand MIN. pads,
COOK
TIME
ON/OFF
/4
enter tile length of(ooking time.
[] Turn tile Oven Temperature knob
to tile desired temperature.
On some models, you must push tile
knob in before [uI'ning.
Page 15

Usingthe SabbathFeature.
(Designed for use on the Jewish Sabbath and Holidays) (Onsomemodels) vvvvw.GEAppliances.com
The Sabbath feature can be used for baking/roasting only. It cannot be used for broiling, self-cleaning,
or Delay Start cooking.
NOTE: The oven light comes on automatically (on some models) when the door is opened and goes off when the door
is closed. The bulb maybe removed. See the Oven Light Replacement section. On models with a light switch on the
control panel, the oven light may be turned on and left on.
How to Set for Regular Baking/Roasting
Makesuretheclockshowsthecorrecttimeofday
andtheovenisoff
Pressand heM boththe MIN. +AND -
[]
pads, at thesame time,llnti] tile d splay
chanoes
Press and hold eitherthe MIN. + OR - pad
[]
[mtil tl_e display changes, then release
the pad. It SAb appears in the display,
go to the next step. If SAb is not in tile
display, continue to press, hold and
release tile pad until SAb appears.
] Tunl dm Oven Temperaulre knob
to tlle desired temperature between
warm (WM) and 550 °. Tile display Mll
show D.
After a random delay period ot
approximately 30 seconds to 1 mimue,
D C will appear in tile displa} indicating
that the oven is baking or roasting.
If D C does not appear in tile display,
reset tile temperature.
To a(!just the oven ternperamre, turn the
(ken Temperature knob to the desired
temperature.
NOTE:The COOKTIMEON/OFKpad is active
during the Sabbath teature.
( COOK )
]|TIME ]
ON/OFF
i )i ii[ lil)ii ii
How to Set for TimedBaking/Roasting- ImmediateStart andAutomaticStop
Makesuretheclockshowsthecorrecttimeofday
andtheovenisoK
[] Press arld hoM both dle MIN. +ANI) -
pads, at thesametime,until tile displa}
changes.
[] Press and hold eitherthe MIN.+ OR - pad
until tl-,e display changes, then release
the pad. It SAb appears in the displa}, go
to the next step. I1SAb is not in tile
display, continue to press, hoM and
release the pad until SAb appears.
Press tile COOKTIMEON/OFFpad.
[]
] lrnmediatelyenter dmlengd-,(t c( okng
time, using the HOURand MIN. pads.
Tile cooking time that you entered will
be displa} ed.
[_ Turn tile ()yen Temperature knob to
the desired temperature. The displa} will
show D.
After a random delay period of
approximately 30 seconds to 1 minute,
D C will appear in the displa} indicating
that the oven is baking or roasting.
If D C does not appear in tile display,
reset tile temperature.
To a(!just the oven ternperamre, turn the
()yen Temperature knob to the desired
ternperamre.
When cooking is finished, tile display will
change fl'om D C to D, indicating that tile
oven has turned OFFbut is still set in Sabbath.
Remove the cooked t0od.
How to Exit the SabbathFeature
[]Turn the ()yen Temperature knob
to OFF
ff tile oven is cookino- wait for a randonl
time dela} of approximately b0 seconds
to l minute until onl} D is in file displa}.
Press and hoM both tile MIN.+ AND -
[]
pads, at the same time, until the d splay
chano-es
Press and hoM eitherthe MIN.+ OR -pad
[]
until tl-,e display changes, then release
the pad. Continue to press, hoM and
release the pad until ONor OFFappears
tot your preference of 12 hour automatic
oven shut-otE ONindicates that dm
12 hour autornatic oven slmt-ofl is turned
on and OEEindicates that tlle 12 hour
automatic oven shut-oil is turned off.
] Press tile CLOCKpad to rettwn to tile time
of day.
NOTE:If a power outage occurred when die
oven was in Sabbadl rnode, tile oven will
atltomatically tllrl-i ()t] and tile oven control
must be reset.
15
Page 16

Adjust the oven thermostat--Do it yourself!
Youmay find that your new oven cooks differently than the one # replaced. Useyour new oven for a few
weeks to become more familiar with it. If you still think your new oven is too hot or too cold, you can adjust
the thermostat yourself.
Do not use thermometers, such as those found in grocery stores, to check the temperature setting of your oven.
These thermometers may vary 20_40°F.
ToAdjust the Thermostat
If the oven a(!justment is set cooler
than the thcto U setting a mimls sign (-)
and the ac!justed temperature will appem
in the display.
[] Wait several se(onds fi)r tile (onuol
to automati( ally set and return to its
previous setting.
NOTE:Thlsadjustmentwillnotaffectthe
broilingor theself-cleaningtemperatures.The
adjustmentwi//beretainedafterapowerfa/Ture.
HOUR
[] Put the Oven Temperature knob in
the OFFposition.
[] lhess and hold tile HOUR+/-padsfor
5 se(onds until the display (hanges.
[] Before display changes 1)a(k, press
the HOUR+/-pads to in(tease or
decrease the temperature in 5
degree increments.
The oven temperature can be a({justed
up as much as 35 °F. or (h)wn as nmch
as 35°F.
Thetypeofmargarine will affect bakingperformanc!!
Most recipes for baking have been developed using high fat products such asbutter or margarine (80%fat). If you
decrease the fat, the recipe may not give the same results as with a higher fat product.
Recipe failure can result if cakes, pies, pastries, cookies or candies are made with low fat spreads. The lower the fat
content of a spread product, the more noticeable these differences become.
Federal standmds require products labeled "mmgarine" to contain at least 80% tilt by weight. I_owtat spreads, on the
other hand, contain less tat and more water. The high moisture content of these spreads attects the texture and flavor of
baked goods. For best resuhs with y{)ur old titvorim recipes, use margarine, butter or stick spreads containing at least
70% vegelable oil.
16
Page 17

Usingthe self-cleaning oven. . OEAppliancescom
Never force the latch handle. Forcing the handle wifl damage the door lock mechanism.
Before a Clean Cycle
Wipe up heavy soil on flTeoven
bottom.
"vWrecommend venting your kitchen
_fith an open window or using a
ventilation tim or hood during the first
sell:dean cycle.
Remove the shelves, broiler pan, broiler
grid, all cookware and any ahmfinum foil
fiom the oven.
The oven shelves can be sel&:leaned,
but flmy will darken, lose flmir luster
and become hard to slide.
Soil on the front fimne of the range and
outside the gasket on the door will need
to be cleaned by hand. Clean these meas
with hot water, soap-filled steel-wool pads
or cleansers such as Soft ScrubS7 Rinse
well with clean water and (by.
How to Set the Oven for Cleaning
[] Latch the door.
[] Turn the Oven Temperature knob
to CLEAN.
On seine inodels, you inust push the
knob in befi)re turning.
Clean (y{le time is normally 4 hours
and 20 mimnes. On models with COOK
TIMEand STARTTIMEpads, )_)ucan
change the dean time to between 3 hours
and 5 hours, 59 minutes byusing the
HOURand MIN. pads. The display will
show the clean time counting (h twn.
Do not clean the gasket. The fiberglass
material of the {)yen door gasket cannot
withstand abrasion. It is essential titr the
gasket to remain intact. Ifyou notice it
becoming worn or flayed, replace it.
Wipe up any heaW spillovers on the oven
bottom.
Make sure tile oven lightbulb cover is in
place and the oven light is off.
IMPORTANT'.The heahh of some birds is
extremely sensitive to tile fhmes given off
during the selfqleaning o<le of any
range. Move birds to anoflmr well
ventilated room.
Tostopa cleancycle,turn the Oven
Temperature knob to OFF.Wait until the
oven has tooled and unlat(h the door.
>:While the oven is sell:cleaning, you
can press the CLOCKpad to display
the time of day. To return/o the clean
countdown, press the COOKTIME
ON/OFFpad.
When the CLEANlight flashes, slide the
latch handle to the left, and turn the
Oven Temperature knob to OFF.
17
Page 18

Usingtheself-cleaning oven.
How to Delay the Start of Cleaning
Make sure the clock shows tile correct
time of (It)'.
[] I,atch the door,
llll_
OFF
I START/
[11TIME [
|w ON/OFF
HOUR MIN.
[] Turn the ()yen Tempet'aUlre knob
to CLEAN.
On some models, y_nlnmst push the
knob in befi)re ulrning.
[] Press the STARTriME ON/OFFpad.
[] Press the HOURand MIIV.pads to set
tile time cleaning xfill start.
When the gLEAN light flashes, slide
the latch handle to the left as tiu as it
will go and turn the Oven Temperature
knob to OFF.
13
After a Clean Cycle
You tllay notice some white ash in tile
oven. Wipe it up xdth a (htnp doth after
tile ovell cools.
If white spotsremalh,remove them with a soap-
filledsteel wool pad and rinse thoroughly with a
wnegarand water ml)cture.
These deposits are usually a salt residue
that (annot be relnoved by tile clean 0_(le.
If the oven is not clean af/er one clean
()_(le, repeat tile ()_(le.
>;You cannot set tile oven fi)r cooking
until the oven is (ool enough for the
door to be unlat(hed.
>: If tile shelves become h_ud to slide,
apply a small am_nmt ofvegelable oil or
cooking oil to a paper towel and wipe
the edges of the oven shelves with the
paper towel.
Page 19

Careand cleaningof therange. CE4pplia,cescem
Be sure all controls are off and all surfaces are cool before cleaning any part of the range.
If your range is removed for cleaning, servicing or any reason, be sure the anti-tip
device is re-engaged properly when the range is replaced. Failure to take this
precaution could result in tipping of the range and cause injury.
How to Remove Packaging Tape
Molded rib Clear groove in
Springclip
To assure no dmnage is done to the finish
of the product, the safest w_ly to rem_ we
the adhesive left fiom paclc_ng tape on
new appliances is an application of a
househoM liquid dishwashing detergent,
mineral oil or cooking oil.
Control Knobs
ToRemove:
[] Be sure the knob isin tile OFFposidon.
[] Pullsuaightoffthestem. Usinga
piece of suing can make rem_)ving tile
knob easier. Slip the string under and
ar_)und the knob, pull straight out.
Washtheknobthoroughlywithwarmsoapy
waterDrycompletelywithasofi cloth.DONOT
lettheknobsoak.
Control Panel
Clean up splatters _ith a damp (loth.
i_):You may also use a glass (leaner.
Apply with a soft cloth _md allow to soak.
Wipe (hy and then apply an appliance
polish to thoroughly clean and protect
tile surface.
NOTE:Theplastictape(onsomemodels)must
beremovedfromall chrometrim.Itcannotbe
removedif itisbakedon.
ToReplace:
[] Check tile back of the knob.
[] The molded rib of the knob is
designed to fit perfectly onto the
knob stem.
[] Align the rooMed rib to the clear
groove in the knob stem. Push the
knob back as far as it will go.
>; Remove heavier soil xdth warm
soapy w;ltei.
>; Do not use abrasives of any kind.
I StOP guide
Storage Drawer Removal
Toremove the drawer:
[] Pull the drawer out until it stops.
[] I,ifl the fiont of the drawer until the
stops clear the guides.
] Remove the (hawer.
Toreplacethedrawer:
[] Place the (hawer rails on tile guides.
[] Push tim drawer ba(k until it stops.
[] IJfi the flont of the drawer and push
back until tile stops clear the guides.
[] I,ower tile fiont of the drawer and
push back until it closes.
19
Page 20

Careand cleaningof therange.
Lift-Off Oven Door
Pull flTehinge locks down to flTe
unlocked position.
The gasket is designed with a gap
at the bottom to allow for proper air
circulation.
Do not rub or clean the door
gasket--it has an extremely low
resistance to abrasion.
If you notice the gasket becoming
worn, frayed ordamaged f17any
way or if it has become displaced
on the door, you should have it
replaced.
The oven door is rem_)vable fi)r easier
access to the lightbulb.
Do not lift the doorby thehandie.
Toremove the door:
[] Fully open the door.
[] Llcll hinge has a hinge hxk. Using a
tool, pull tile hinge hl(ks down
against tile door flame.
[] Firmly grasp the door at the top sides.
[] Close the door to the stop position.
[] I_ifl the door up and pull straight
out,
Toreplacethedoor:
[] Firmly grasp tile door at thetopsides.
Thisiscritical.
[] Approa(h tile range with tile door
angled in a vertical position.
Toclean the inside of the door:
i_:Because the area inside the gasket is
(leaned during the sell:<lean o,cle, you
do not need to clean this by hand.
>:The area outside the gasket and
the door liner can be cleaned with a
soap-filled steel wool or plastic pad, hot
water and detergent. Rinse well _dth a
dnegm and water solution.
Toclean the outside of the door.
i_:_:Use soap and water to thoroughly
clean the top, sides and flont of tile
oven door. Rinse well. You may also
use a glass cleaner to clean the glass on
the outside of the door. Do not let
water &ip into the vent openings.
>;If any stain on tile door vent triln is
persistent, use a soft abrasive cleaner
and a sponge-scrubl)er tot best resuhs.
!i::Spillage ofmminades, fi_uitjuices,
tomato stances and basting materials
containing acids may cause
discoloration and should be wiped up
immediately. When sudime is cool,
clean and rinse.
Do not use oven cleaners, cleaning
powders or h_ush abrasives on the
outside of the door.
2O
[] (bride the hinges into the slols.
[] h_sh door in firmly while opening.
[] Once in position, open the door
completely, l'ush the hinge locks
back in mwzu(ls tile flont flame.
Page 21

Painted Surfaces
www.GEAppliances.com
Paimed sm_lilcesinclude the sides, top of
backgumd and the drawer fiont.
Clean these xdth soap and water or a
xinegm and water solution.
Oven Vent
Theovenventislocatedbeh/ndthenghtrear
surfaceunit.
This area could become hot during
oven use.
Oven Shelves
Clean the oven shelves with an abrasive
cleanser or steel wool. After cleaning,
rinse the shelves with clean water and &T
with a clean cloth.
NOTE."Theovenshelvesmay becleaned in the
self-cleaningoven.However,the shelveswill
darkenib color, lose thek /usterand become hard
to slide if cleanedduring the self-c/eanlbgcycle.
Do not use COmlilercial oven cleaners,
cleaning powders, steel wool or hmsh
abrasives on any painted sm_hce.
It is nomlal fi)r steam to come out
of the vent and moisture mW collect
underneath it when the oven is in use.
TheventislYnportantforproperaircirculation.
Neverblockthisvent.
To make the shelves slide more easily
apply a small mnount ofvegelable oil
or cooking oil to a paper towel and wipe
the edges of the oven shelves with the
paper t()wel.
21
Page 22

Careand cleaningof therange.
Oven Light Replacement
!iii
Wire cover holde_
Afterbroiling,removethebroiler
panfromflyeoven.
CAUTION:Before replacing your oven
lightbulb, disconnect the electrical
power to the range at the main fuse or
circu# breaker panel
Be sure to let the light cover and bulb
cool completely.
Toremove the cover:
V_ HoM a hand under tile cover so it
doesn't fall when released. Wifll
fingers of tim same hand, firefly
push back the wire (over holder.
Lift off the (over.
DO not remove any screws to remove
thecove_
[] Replace bull) with a 40-wau
appliance bull).
Broiler Pan & Grid
Donot clean thebroiler pan oror/d in a
self-c/ean/n0 oven.
After broiling, rem()ve tile broiler pan
flom tile oven. Rem()ve tile grid flom tile
pan. Cmefiflly pour out the grease fiom
tile pan into a proper container.
Wash and rinse tile broiler pan and grid
in hot water with a soap-filled or plastk
s(oming pad.
Toreplace the cover:
[] Place it into groove of tim light
receptacle. Pull _dre tb_ward to
tile center of the cover until it
snaps into place.
[] ( onnect electrical power to
tile range.
If food has burned on, sprinkle tile grid
with detergent while hot and o)ver with
wet paper towels or a dishcloth. Soaking
the pan will rem()ve burned-on foods.
Bofll tile broiler pan and grid may be
(leaned wilh a (oIIllIleI'( ial oven (leanei,
Bofll tile broiler pan and grid can also be
(leaned in a dishwasher.
Donot store a soiled broiler pan andgnd
anywherein the range.
22
Oven Heating Elements
Donot clean thebake element or the broil
element Anysoil will bum off when the
elementsareheatecL
To clean tile oven floor, gemly lift
tile bake element. (lean _4tll warm
soapy water.
Page 23

Cleaningthe glass cooktop. .GEAppliances.com
Normal Daily Use Cleaning
Cleanyourcooktepafter
eachspill.
Scotch-Brite¢_ Multi-Purpose
No Scratch blue scrub sponge
ONLY use the recommended cleaning
(ream, Cerama BD_te'P, on tile glass
cooktop. Other creams may not be as
effective.
To maintain and protect the surf:ace of
your glass cooktop, fi)llow these steps:
[] Befine using tile (ooktop for tile
first time, clean it _4tll tlle cooktop
cleaning cream. This helps protect
tlle top and makes clean-up easier.
[] Dailyuse of tim cooktop cleaning
cream _411help keep the (ooktop
looking new.
Burned-On Residue
WARNING:DAMAGEtoyourglasssurface
mayoccurif youusescrubpadsotherthan
BLUEScotch-Brite®Multi-PurposeNoScratch
scrubspongesby3M.
[] Allow the (ooktop to (ool.
[] Spread a few drops of Cerama
Bute <':'to the entire burned residue
alea.
[] Shake tlle cleaning cream well.
Apply a tew (hops of tile cream
dire(fly to tlle (ooktop.
[] Use a paper towel or sponge to clean
the entire cooktop smface.
NOTE:It la veryimportantthat youDONOT
heatthe cooktopuntilit hasbeencleaned
thoroughly
[] If any residue remains, repeat tile
steps listed above as needed.
[] For additional protection, after
all residue has been removed,
polish the entire surface xdth
( erama IhTte<''and a paper towel.
[] Using tlle scrub sponge, rub the
residue area, applying pressure as
needed.
Heavy, Burned-On Residue
' _/ [] Allow d_e cooku)p u) cool.
Brvtd' u_ fl_eentire burned residue
o.-_ [] Spread a few drops of Cerama
[] Hokl the razor scraper at
TheRAZORSCRAPERis available
through our Parts Center. See
instructions under "To Order Parts"
section on next page.
approximately a 45 ° angle against
tl,e glass surti_ce and scrape d_e
soil. II will be necessary U) apply
pressure It) the razor scraper in
order u) remove il}e residue.
Keep a small amount of cream on
[]
fl_e residue as you s(rape.
After scraping with the razor
[]
scraper, use [lie s(illb sponge 1o
remove any remaining residue.
[] For additional protection, after all
residue has been removed, polish
tlle entire smtit(e wid_ Celalll;4
Bryte < and a paper towel
NOTE:Razorbladeispackedinvertedfor
safetyreasons.Priortouse,theblademustbe
rotatedandreinsertedintoslot.Donot usea
dull or nickedblade.
23
Page 24

Cleaningthe glass cooktop.
Metal Marks and Scratches
Be careflfl not to slide pots and
[]
pans across your cooktop. It will
leave metal markings oil tile
cooktop smlhce.
These marks are removable using
the cleaning cream _dth a scrub
sponge and/or razor scraper.
If pots with a thin overlay of
[]
ahnninuln or (opper are allowed
to boil &T, tile overlay may leave
CooktopSeal
To clean tile cooktop seal around tile
edges of the glass, lay a wet cloth on it
for a tew minutes, then wipe clean xdth
nonabrasive cleaners.
Glasssurface - potential forpermanent damage.
black discoloration on tile
cooktop.
This should be removed
immediately before heating again
or the discoloration may be
permanent.
WARNIN& Carefullycheckthebottomof
pansfor roughnessthat wouldscratch
thecooktop.
Our testing shows that if
you are cooking high sugar
mixtures such as jelly or
fudge and have a spillover,
it can cause permanent
damage to the glass surface
unless the spillover is
immediately removed.
Damage from Sugary Spills and Melted Plastic
[] Turn offall surface units. Remove
hot pans.
] "v\Teaiing }Ill oven mitt:
a. Use [lie iazoi scraper 1o illove
tile spill to a (eel area on tile
cooktop.
b. Remove tile spillwith
paper towels.
To Order Parts
To order ( eralna BITIe 'P (realn and
tile razor scraper, please call our
toll-free number:
NationalParts Center 800-626-2002.
CeremaBryte®Cream ....... # WXIOX300
RazorScraper ............. # WX5X1614
Kit ...................... # WB64X5027
(Kitincludescreamandrazorscraper)
[] Any remaining spillover should be
left until tile surta(e of tile (ooktop
has cooled.
[] Don't use tile surface units again
until all of the residue has been
completely removed.
NOTE:If pitting or indentationin theglass
surfacehasalreadyoccurred,thecooktop
glasswi//haveto berep/acec_in this case,
servicewill benecessan/
24
Page 25

Before YouCallForService...
Troubleshooting -tips
Save time and money! Review the charts on the following
pages first and you may not need to call for service.
www.GEAppliances.com
Possible Causes
Surfaceunitswill not Improper cookware
maintaina roiling boil being used.
What To Do
• Use pans which are fiat and mat(h tile diameter
of the sui_a(e unit sele(ted.
or cooking is not
Sugaceunitsde A fuse in your home may be • Replace tile fuse or reset tile drcuit breaker.
notworkproperly blown or the circuit breaker
tripped.
Cooktop controls • Che(k to see tile corre(t (ontrol is set for the suifa( e
improperly set. unit you are using.
Scratches(mayappear
ascracks)oncooktop
/Tiili i ii)i/iliiii)iI i
Areas of discoloration Food spillovers not cleaned • See the Cleaning the glass cooktop section.
on the cooktop before next use.
Incorrect cleaning
methods being used.
Cookware with rough bottoms
being used or coarse particles
(salt or sand) were between
the cookware and the surface
of the cooktop.
Cookware has been slid
across the cooktop surface.
• Scratches me not rem()vable. Tiny scratches will become
less visible in dine as a result of cleaning.
• To avoid scratches, use the recommended cleaning
proce&nes. Make sure bottoms of cookware me clean
bell)re use, and use cookware with smooth bottoms.
Hot surface on a model • This is normal. The surf:ace may appear discolored
with a white glass cooktop, when it is hot. This is temporm y and will disappear
as the glass cools.
Plastic melted Hot cooktop came into • See the Glass surface--potential for permanent damage
to the surface contact with plastic placed section in the Cleaning the glass cooktop section.
on the hot cooktop.
Pitting (or indentation) Hot sugar mixture spilled • Call a qualified technician for replacement.
of the cooktop on the cooktop.
Frequent cycling Improper cookware • Use only fiat cookware to minimize cycling.
off and on of being used.
surface units
The display goes Power surge. • Disconnect power at tile fuse box or circuit breaker
blank or indicator lot at least l 0 seconds. Turn power on and power
lights come on when up your range. If tlae indicator lights are still on,
range is not in use (all fin service.
Clock and timer do Plug on range is not completely • Make sure electrical plug is plugged into a live, properly
not work inserted in the electrical outlet, gr()unded outlet.
A fuse in your home may • Replace the fllse or reset the cir_uit breaker.
be blown or the circuit
breaker tripped.
Oven controls improperly set. • See the Using the clock and timer section.
25
Page 26

Before YouCallForService...
Troubleshooting tips
Possible Causes What ToDo
Oven light does Lighthtdb is loose or defective. • Tighten or replace file bulb.
not work
Oven will not work Plug on range is not • Make sure elecu ical plug is plugged into a live, properly
Food does not hake Oven controls improperly set. • See tile Using the oven section.
orroast properly Sheffposition is incorrect or • See the Using the oven section.
Switch operating • Call fi)r sevvice.
light is broken.
completely inserted in grounded outlet.
the electrical outlet.
A fuse in your home may " Replace tile filse or reset tile cir_uit breaker.
be blown or the circuit
breaker tripped.
Oven controls improperly set. * See the Using the oven section.
Door left in the • If necessmy, allow tile oven to cool then unlock
locked position, tile door.
the shelf is not level.
Incorrect cookware or " See the Using the oven se( finn.
cookware of improper
size being used.
Oven thermostat needs * See the Adjust the oven thermostat--Do it yourself!
adjustment, section.
Food does not Oven controls improperly set. • Make sure you mm the knob all tim way to tim
broil properly BROIL position.
Door not open to the • See the Using the oven section.
broil stop position as
recommended.
Improper shelf position • See tile Broiling Guide.
being used.
Cookware not suited • Use tile broiling pan and grid that came with your range.
for broiling.
Aluminum foil used on the * See tile Using the oven section.
broiling pan and grid has
not been fitted properly and
slit as recommended.
In some areas the power * Preheat tile broil element fin 10 minutes.
(voltage) maybe low.
• Broil for the longest period of time recommended in
the Broiling Guido.
Oven temperature Oven thermostat
too hot or too cold needs adjustment.
26
• See the Adjust the oven thermostat--Do it yourself!
se(tiou.
Page 27

Possible Causes What ToDo
www.GEAppliances.com
Power outage,
clock flashes
Storage drawer Rear drawer support is • Reposition tile drmver. See the Storage Drawer
is crooked on top of the guide rail. Removalinsmlctions in tile Care and cleaning of your
Storage drawer Power cord may be • Reposition the drmver and power cord. See the
won't close obstructing drawer Storage Drawer Removalinsuawdons in tile Cam and
Oven will not self-clean The oven temperature • Alh)w the range to cool to room temperature and reset
Power outage or surge. • Some models will automatically resume their setting
once the power is restored. On models xdth a clock,
you must reset the clock. If tile oven was in use, you
must reset it by turning the Oven Temperature knob
back to OFF,setting the clock and resetting any
cooking flmction.
range section.
in the lower back cleaningof your rangesection.
of the range.
Rear drawer support is • Reposition tile drawer. See the StorageDrawer Removal
on top of the ,grade rail. instructions in tile Careand cleaning of your range
set tion.
is too high to set a the (onuols.
self-clean operation.
Oven controls improperly set. • Make sure y()u turn tile control knob all the w:ty to tile
CLEANposition.
Oven door is not in • Make sure you move the door latch handle all the
the locked position, way to the right.
Oven starts a self-clean Oven door locked during • Turn the Oven Temperature knob to OFF.Alh)w the
cyclewhen youwanted cooking, oven to cool. Never ti)rce the door latch handle.
tobake, roastor broil
"Crackling" or This is the sound of the • This is normal.
"popping" sound metal heating and cooling
during both the cooking
and cleaning functions.
Excessive smoking Excessive soil. • Turn the Oven Temperature knob to OFF.Open
duringa clean cycle the windows to rid the room of sml)ke. Wait until
tile CLEANlight goes off. Wipe up tile excess soil
and reset the clean (Tcle.
Oven door will Oven too hot. • Allow tile oven to cool below locking temperature.
notunlock
CLEANlight flashes Oven controls not • Move tile door latch handle to tile right before
properly set. setting tile Oven Temperature knob to CLEAN.
27
Page 28

Before YouCallForService...
Troubleshooting tips
Possible Causes What To Do
Oven not clean after Oven controls not " See the Using the self-cleaning oven section.
a clean cycle properlyset.
Oven was heavily soiled. • Clean up heavv spillovers 1)efore starting tile (lean
(y(le. Heavily soiled ovens may need to self-(lean
again or for a hmger period of time.
Ovenmakes This is the sound of the * This is normal.
clicking noise heating element turning
off and on during
cooking functions.
CLEAN light is on The oven door was • Turn the Oven Telnl_eramre knob to OFF. Allow tile
when you want to cook accidentally locked, oven to cool. Then move tile latch to tile far left,
"F--andanumber You have a function * Turn the Oven Telnperamre knob to OFE Put the oven
or letter" flash in error code. ba(k into operation.
Never force the door latch handle.
If the function code repeats. " Dis(onne(t all powe, to the ,ange fo, at least
The display goes blank Power surge. * Disconne(t power at the filse box or dr(uit breaker
or indicator lights come for at least l 0 seconds. Turn power on and power
on when rang e is not up your range. If the indi(ator lights are still on,
The clock is in the * See the Using the clock and timer se(tion.
black-out mode.
Oven door will Oven too hot. " Turn the Oven Temperamre knob to CLEAN.
not lock Tile glowing oven (leaning light after the knob is
! !ilii!/i!71!i!i!i!i!i!i!i!i!I
"Burning" or..oily,. This is normal in a new
odor emitting from oven and will disappear
the vent in time.
Strongodor
An odor from the insulation
around the inside of the
oven is normal for the first
few times the oven is used.
30 se( ends and then i e( onne( t powei. If tile
function error code repeats, call for service.
(all fi)r sev_i( e.
turned indi(ates the oven is too hot fl'oln previous
use. To (ool tile oven, open the door wide, and alh)w
the oven to cool. After tile oven has (ogled, (h)se
the door and slide the lat(h handle all the way to
the right.
• To speed tile process, set a self clean cycle
for a minimum of 3 hours. See the Using the
self-cleaning oven se(tion.
• This is tempora U.
28
Page 29

GE Service Protection Plus TM
GE, a name recognized worldwide %r quality and dependability, oKers you
SeiMce Protection Plus"-cornprehensive protection on all your appliances-
No Matter What Brand!
Benefits Include:
• Backed by GE
• All brands covered
• Unlimited service calls
• All parts and labor costs included
• No out-of-pocket expenses
• No hidden deductibles
• One 800 number to call
You will be completely satisfied with our service prote(fion or you may request your money ba(k
on d_e remaining value of your (omra( t. No questions asked. It's dmt simple.
Prote(t your refligerator, dishwasher, washer and dryer, range, TV, VCR and mu(h more-anybrand!
Plus tl_ere's no extra charge for emergency service and low monthly financing is available. Even icemaker
coverage and ti_od spoilage protection is offered. You can rest easy, knowing tl_at all your valuable
household products are protected against expensive repairs.
We TI Cover Any Appliance.
Anywhere. Anytime.
Pla,eyo.r.,niiden(e in (;Eand(allusin d,eU.S.toll-iieeat 800-626-2224
for more informalion.
%-\11br3rlds ( i)w.?l_ed, tip 11) _0 } e3ls old, ill Ill(? (Ol]lil'lel]I I] [ J.S.
._ Gut here
Please place in envelope and mail to:
General Electric Company
Warranty Registration Department
P.O. Box 32150
Louisville, KY 40232-2150
29
Page 30

Consumer Product Ownership Registration
[)ear (_ustomer:
Thank you fbr purchasing our product and thank you fl)r placing your c(mfidence in us.
We are proud to have you as a customer!
Follow these three steps to protect your new appliance investment:
Complete and mail
your Consumer
Product Ownership
Registration today.
Have Ihe pea(c (d"
mind ol knowing we
(all con(acl }()u ill tilt
unlikely exenl of a
saRqy modifica/ion.
Afier mailing Ihe
regislralion below,
store Ibis document
in a saR' place. 11
contains inlbnnalion
you will need should
you require sec,ice.
Our service number is
800 GE (ARES
(800-432-2737).
Model Number Serial Number
I I I I I
Important: If you did not get a registration card with your
product, detach and return the form below to
ensure that your product is registered, or register
online at www.GEAppliances.com.
Consumer Product Ownership Registration
Read your Owner's
Manual carelully.
It will help you
operate yOUFnew
appliance properly.
, I
._ (_ttt herr
I I I
Mr. Ms. Mrs. Miss
Firsl I ] Last]
Name I I I I I I I I I Nana( I I I I I I I I I I I I
S'ee'I I
Addr(ss I I I I I I I I I I I I I I I I I I I I I I I I
Model Number Serial Number
Apl.# I , I I I I I , I e-mai_Add,'ess'
Zi )
I)al(:Placed
Monlh I)av
* PIt ase provide your e-mail address to receixe, xia t -mail, discounts, special ol]_'rs and olhtr imporlanl
communications Iiona (,E Applianct s ((;ILk).
Cl-leck herr if you (/() not want 1() receixe cotnmunicafions Ii-om (;l:A's carel_tll} st lecled l)_lYlnt YS.
0
GEAppliances
General E/ectric Company
Lot/isville, Kentocky
w_GEAppliances,com
30
Page 31

GEElectricRange Warranty.
Aft warranty service provided by our Factory Service
Centers, or an authorized Customer Care®technician.
Toschedule service, on-line, 24 hours a day, contact us
at www.GEAppliances.com, or carl 800-GE-CARES.
Staple your receipt here.
Proof of the original purchase
date is needed to obtain service
under the warranty<
GE Will Provide:
one Year Anypartof the range whi(:h filils due to a (lef_'ct in inatefials or workinanship.
From the date of the I)uring this full one-year warranty, (;E will also proxdde, free of charge, all lal)or
erigina!purchase and in-home servi(e to repla(e the defe(tive part.
Five Years
From the date of the
original Purchase
i;_:Service trips to your home to teach you how to use
the product.
i_:Improper installation.
i_:Failure of the product if it is abused, misused,
or used for other than the intended purpose or
used commercially.
A replacement glass cooktop ifit should crack due to thermal shock, discoh)r, crack at the
rubber seal between the glass cooktop and the porcelain edge, or if the pattern wears ore
A replacementradiantsurfaceunitif it should burn out.
I)uring this limited additionalfour-yearwarranty,you will be responsible fi)r any lal)or
or in-holne sei_4(e.
i;_:Replacement of house fuses or resetting of circuit
breakers.
>_Damage to the product caused by accident, fire, floods
or acts of God.
i_:Incidental or consequential damage caused bypossible
defects with this appliance.
;i::Damage to the ,glass cooktop caused by use of cleaners
other than the recommended cleaning creams.
i_:Damage to the glass cooktop caused by hardened
spills of sugarynmterials or melted plastic that
are not cleaned according to the directions in
the Owner's Manual.
This warranty is extended to the original purchaser and any succeeding owner for products purchased for
home use within the USA. In Alaska, the warranty excludes the cost of shipping or service calls to your home.
Some states do not allow the exclusion or limitation of incidental or consequential damages. This warranty
gives you specific legal rights, and you may also have other rights which vary from state to state. Toknow
what your legal rights are, consult your local or state consumer affairs office or your state's Attorney General.
Warrantor: General Electric Company.Louisville, lot"40225
3/
Page 32

ConsumerSupport.
GEAppliancesWebsite www.GEAppliances.com
Have a question or need assistance _dth your appliance? TU the GE Appliances Website 24 hours a day,
any day of the year} For greater convenience and taster service, you can now download (-)wner's Manuals,
order pmts, catalogs, or even sche(hfle sevvice on-line. You can also "Ask Our Temn of Experts ......
your questions, and so much more...
ScheduleService
Expert C,Erepair se_x,iceis only one step away fiom your door. Get on-line and schedule your se_x,iceat
your (onvenience 24 hou_ s any day of tlle yea_: Ot (all 800-(,E-CARES 800-432-2737) during normal
business hours.
RealLifeDesignStudio
GE supports the Universal Design concept-products, secvices and environments that can be used by
people of all ages, sizes and capabilities. We recognize the need to design iota wide range of phFsical and
mental abilities and impairments. For delails of GE's Universal Design applications, including kitchen
design ideas tot people with disabilities, check out our Website ted W. For the heming impaired, please call
800-TDD-GEAC (800-833-4322).
ExtendedWarranties
Purchase a (;E extended warranty and learn about special discounts that are ax ailable while your warranty
is still in effect. You can purchase it on-line anytime, or call 800-626-2224 during normal business hours.
(;E Consunmr Home Sec_d(es will still be flmre after your warranty expires.
PartsandAccessories
www.GEAppliances.com
www.GEAppliances.com
www.GEAppliances.com
www.GEAppliances.com
lncfividuals qualified to service their ox_ll appliances can have parts or accessories sent directly to their homes
(VISA, MasterCard and Discover cards are accepted). Order on-line today, 24 lloms m_eD_day or by phone at
800-626-2002 during normal business hours.
Instructions contained in this manual cover procedures tobe performed by any user. Other servicing generally
should be referred to qualified service personnel Cautionmust be exercised, since improper servicing may cause
unsafe operation.
ContactUs
lf)_u me not satisfied with tile secvice y{)ureceive flom GE, contact us on our Website with all the delails
includingyour phone number, or _xite to: General Manager, Customer Relations
GE Appliances, Appliance Park
I,ouisville, KY 40225
www.GEAppliances.com
RegisterYourAppliance www.GEApp/iances.com
Register your new appliance on-line--at your convenience! Timely pro(blot regism_ti(m will allow for
q
enhanced communication and prompt se_-_iceunder [l,e [erms of your warranly, should tl_eneed arise.
You may also mail in [l,e pre-primed regism_tion card inchlded ill die pacing malerial, or detacll and
use tl,e form in Iris Owner's Manual.
Printed in flTeUnited States
 Loading...