

Page 1
GEAppliances.com
Safety Instructions ....... 2-6
Operating Instructions
Clock and Timer ........... l 3
()yen .................. l 0-I 8
Sabbath Feature ........... 15
Self-Cleaning .......... 17, 18
Thermostat .............. 16
Timed Baking & Roasting . . .l 4
Surface Units ............. 7-9
Care and Cleaning
Broiler Pan & Grid ......... 22
Control ICmobs ............ 19
Glass Cooktop .......... 23, 24
Lift-Off Oven Door ......... 20
Light .................... 22
Shelves .................. 21
Troubleshooting Tips . .. 25-28
Consumer Support
Consumer Support.. Back Cover
Product Registration ..... 29, 30
Warranty ................. 31
EER3000
EER3001
EER3002
JB600
jBTOO
JB 7I O
j P64
j P66
JBP67
JBP68
JBP69
JBP7I
j PTS
Write the model and serial
numbers here:
Model #
Serial #
You can find them on a label
behind the storage drawer on
the ffon t of the range ffa me.
164D4290P319 49-80!63 09-02 JR
Page 2

IMPORTANTSAFETYINFORMATION.
READALLINSTRUCTIONSBEFOREUSING.
WARNING!!
For your safe_ the information in this manual must be followed to minimize the risk of fire,
electric shock, or to prevent property damage, personal injury, or loss of fife.
A WARNINGANTI-TIPDEVICE
All ranges can tipand injury could result
Toprevent accidental tipping of the range, attach it to the wall and floor by installing the Anti--tip
device supplied.
If the Anti--tip device supplied with the range does not fit this application, use the universal Anti--17p
device WBO2X7909.
Tocheck if the device is instated and engaged properly, remove the kick panel or storage drawer
and inspect the rear leveling leg. Make sure it fits securely into the slot.
If you pull the range out from tile wall tbr any reason, make S/lie tile device is properly
engaged when you push the range back against tile wall. If it is not, there is a possible risk of
the rang_ dpping oxer and causing iIIjtlI T if you or a child stand, sit or lean on an open door
Please refer m fl_e :Mlti-Tip device infot_nafion in this manual. Failure m take this precaution
could _esult in dpping of tile rang_ and i,_jury.
2
Page 3
GEAppliances.com
IMPORTANTSAFETYNOtiCE
The California Safe Drinking Water and ToxicEnforcement Act requires the Governor of Califomb to
publish alist of substances known to the state to cause cancer, birth defects or other reproductive
harm, and requires businesses to warn customers of potential exposure to such substances.
The fiberglass insulation inself-clean ovens gives off a very smafl amount of carbon monoxide during
the cleaning cycle. Exposure can be minimized by venting with an open window or using a ventilation
fan or hood.
Fluorescent light bulbs contain mercury. If your model has asurface light, you must recycle the
fluorescent light bulb according to local, state and federal codes.
SAFETYPRECAUtiONS
When using electrical applbnces, basic safety precautions should be followed, including the following:
Use this appliance only for its intended
puq)ose as desciibed in tills )_neI s
Manual.
Be sure your appliance is properly
installed and grounded by a qualified
installer in accordance with the provided
installation instructions.
Hme the installer show you tile location
of the circuit breaker or fllse. Mark it for
easy reference.
Do *lot attempt to repair or replace any
part of your range unless it is specifically
recommended in this manual. All other
servicing should be referred to a qualified
technician.
• (
Before performing any service, disconnect
the rang_ power supply at the household
disuibudon panel by iemoving tile fllse or
switching off the circuit breaken
Do ,lot leaxe children alone--<hildren
should ,lot be left alone or unattended in
an area where an appliance is in use. They
should nex>r be allowed to sit or stand on
any part of the appliance.
Do ,lot allow anyone m climb, stand or
hang on file dooi; storage drawer or
cookmp. They could damag> the rang>
and e_en tip it o_>l; causing sin>re
personal iDjnIT.
3
Page 4
IMPORTANTSAFETYINFORMATION.
READALLINSTRUCTIONSBEFOREUSING.
WARNING'!
SAFETYPRECAUTIONS
Do not operate the oven or cooktop controls if the glass is broken. Food splatter or cleaning solution
may penetrate a broken control panel and create a risk of electrical shock. Contact a qualified
technician immediately should your glass control panel become broken.
Do not store flammable materials in
an oxen or near the cooktop.
CAUTION: temsofinterestto
chiktren should not be stored in cabinets
above a rang_ or on tile backsplash of a
rang_--<hildren climbing on the rang_
m reach imms could be seriously i,_n_ed.
Nexer wear loose-fitting or hanging
gammnts while using the appliance.
Be carefltl when reaching for imms stored
oxer tile rang_. Flammable mamrial could
be ignited if brought in contact with hot
surface units or heating elements and may
cause sex>re bllins.
Use only dtT pot holders---moist or damp
pot holders on hot surl_aces may result in
burns from steam. Do not let pot holdet_
touch hot surPace units or heating
elements. Do not use a towel or other
bulky cloth in place of pot holders.
Do not/tse water on grease fires. Nexer
pick up a flaming pan. Turn the controls
off'. Smother a flaming pan on a surface
unit by covenng the pan completely wiflt
a well-fitting lid, cookie sheet or fiat tray.
Use a muld-pu_l)ose dU chemical or
foam-type fire extinguishen
Flaming grease outside a pan can be put
out by co\>ting it with baking soda or;
if available, by using a mulfi-pu_l)ose d_T
chemical or foam-type fire extinguishen
Flame in the oxen can be smofllered
completely by closing tile oxen door and
turning the oxen off or by using a mul%
puq)ose d U chemical or foam-type fire
exfinguishen
For your safety, never use your appliance
for warming or heating the room.
Do not let cooking grease or other
flammable materials accumulam in or
near the range.
iiiiiiiiiiii_iii
Do not touch the surface units, rite
heating elements or tile inmnor surface
of tile ox>n. These surPaces m W be hot
enouO_ m bum even though they are
dark in colon Dunng and after use, do not
much, or let clothing or other flammable
materials contact rite s/trface units, areas
nearby the surl_ace units or any inmnor
area of the ox>n; allow sufficient time fbr
cooling first.
Pomndally hot surPaces include the
cookmp, areas fi_cing the cooktop, oven
\ent opening, surfilces near the opening,
crevices around the oxen door
REMEMBER:The inside surface of dte o_>n
may be hot when file door is opened.
Do not store or use combustible mamnals,
gasoline or other flammable vapors and
liquids in the vicinity of this or any other
appliance.
Kee I) tile hood and grease filters clean
to maintain g_od x>nting and to ax_id
grease fires.
Teach children not to pl W with tile
controls or any other part of the rang_.
Alwws kee I) dish towels, dish cloths, pot
holders and other linens a safe distance
flom your rang>.
Alwws kee I) wooden and plastic umnsils
and canned food a safe distance flom
your range.
{ Always kee I) combustible wall coxedngs,
curtains or drapes a safe distance flom
your range.
COOKMEATANDPOULTRYTHOROUGHLY...
Cookmeat andpoultry thoroughly--meat toat least an INTERNALtemperatureof 160°Eandpoultry toat least
an INTERNALtemperatureof 180°ECookingtothesetemperaturesusuallypretectsagainst foodbomeillness.
4
Page 5
GEAppliances.com
O RADIANTSURFACEUNITS
Use proper pan size--select cookware having fiat bottoms large enough to cover the surface unit
heating element. The use of undersized cookware will expose a portion of the surface unit to direct
contact and may result in ignition of clothing. Proper relationship of cookware to surface unit will also
improve efficiencg
Never leave fire surPace units unattended
at higil heat setfing:s. Boilox.ers cause
smoking and greasy spillo_.ers that m W
catch on fire.
Only certain types of glass, gtassA:eramic,
earthenware or other glazed containers
are suitable for cooktop service; others
m W break because of the sudden chang.e
in temperature.
To minimize the possibility of bums,
ignition of flammable materials and
spillage, the handle of a container
should be ummd toward rim cenmr of
the rang.e without exmnding over nearby
surPace units.
Always mm the surface units off before
removing cookware.
When preparing flaming fbods under
rite hood, unn the fan on.
Use care when touching the cooktop. The
glass surPace of the cooktop will retain heat
after rite conuols have been turned off:
Kee I) an eye on foods being flied at high
or medium higil heat setting:s.
Foods for flTing should be as &T as
possible. Frost on flozen foods or moisture
on fresh foods can cause hot fat to bubble
up and ox.er the sides of the pan.
Use litde tilt for eflecfive shallow or deep
tht flTing. Filling the pan too fltll of Pat
can cause spillovers when food is added.
If a combination of oils or Pats will be used
in fEving, stir tog.ether before heating, or
as Pats melt slowly.
Always heat fi_t slowly, and watch as it heats.
Use a deep fat thermomemr whenex.er
possible to prex.ent ox.eflteafing tilt beyond
rite smoking point.
Avoid scratching the glass cookmp.
The cooktop can be scratched with imms
such as sharp instruments, fing_s or oflter
jewelry, and fix.ets on clothing.
Do not operate rim radiant surface units if
the glass is broken. Spillovers or cleaning
solution m W penetrate a broken cooktop
and cream a risk of electrical shock.
Contact a qualified mchnician immediamly
should your glass cooktop become broken.
Ne_.er use the glass cooktop surPace as
a cutting board.
Do not place or store items that can melt
or catch fire on the glass cooktop, ex.en
when it is not being used.
Be careflfl when placing spoons or other
stirring utensils on glass cooktop surface
when it is in use. They may become hot
and could cause b/tlllS.
Clean the cooktop with caution. If a wet
spong.e or cloth is used to wipe spills on
a hot surPace unit, be cat.efltl to ax_id
steam bums. Some cleaners can produce
noxious flnnes if applied to a hot surface.
NOTE."_A:erecommend that you ax_id
wiping any surface unit areas until they
have cooled and the indicator light has
g_ne off'. Sugar q)ills at.e the exception
to this. Please see the Cleaning the glass
cooktop section.
When the cooktop is cool, use only rite
recommended cleaning cream to clean
rite cooktop.
To avoid possible damag.e to the cooking
Silt'Pace, do not apply cleaning cream to
the glass surface when it is hot.
After cleaning, use a d U cloth or paper
towel to remox.e all cleaning cream
residue.
Read and follow all instructions and
warnings on the cleaning cream labels.
Larg.e scratches or impacts to glass
doors or cooktops can lead to broken
or shatmred glass.
5
Page 6
IMPORTANTSAFETYINFORMATION.
READALLINSTRUCTIONSBEFOREUSING.
WARNING'!
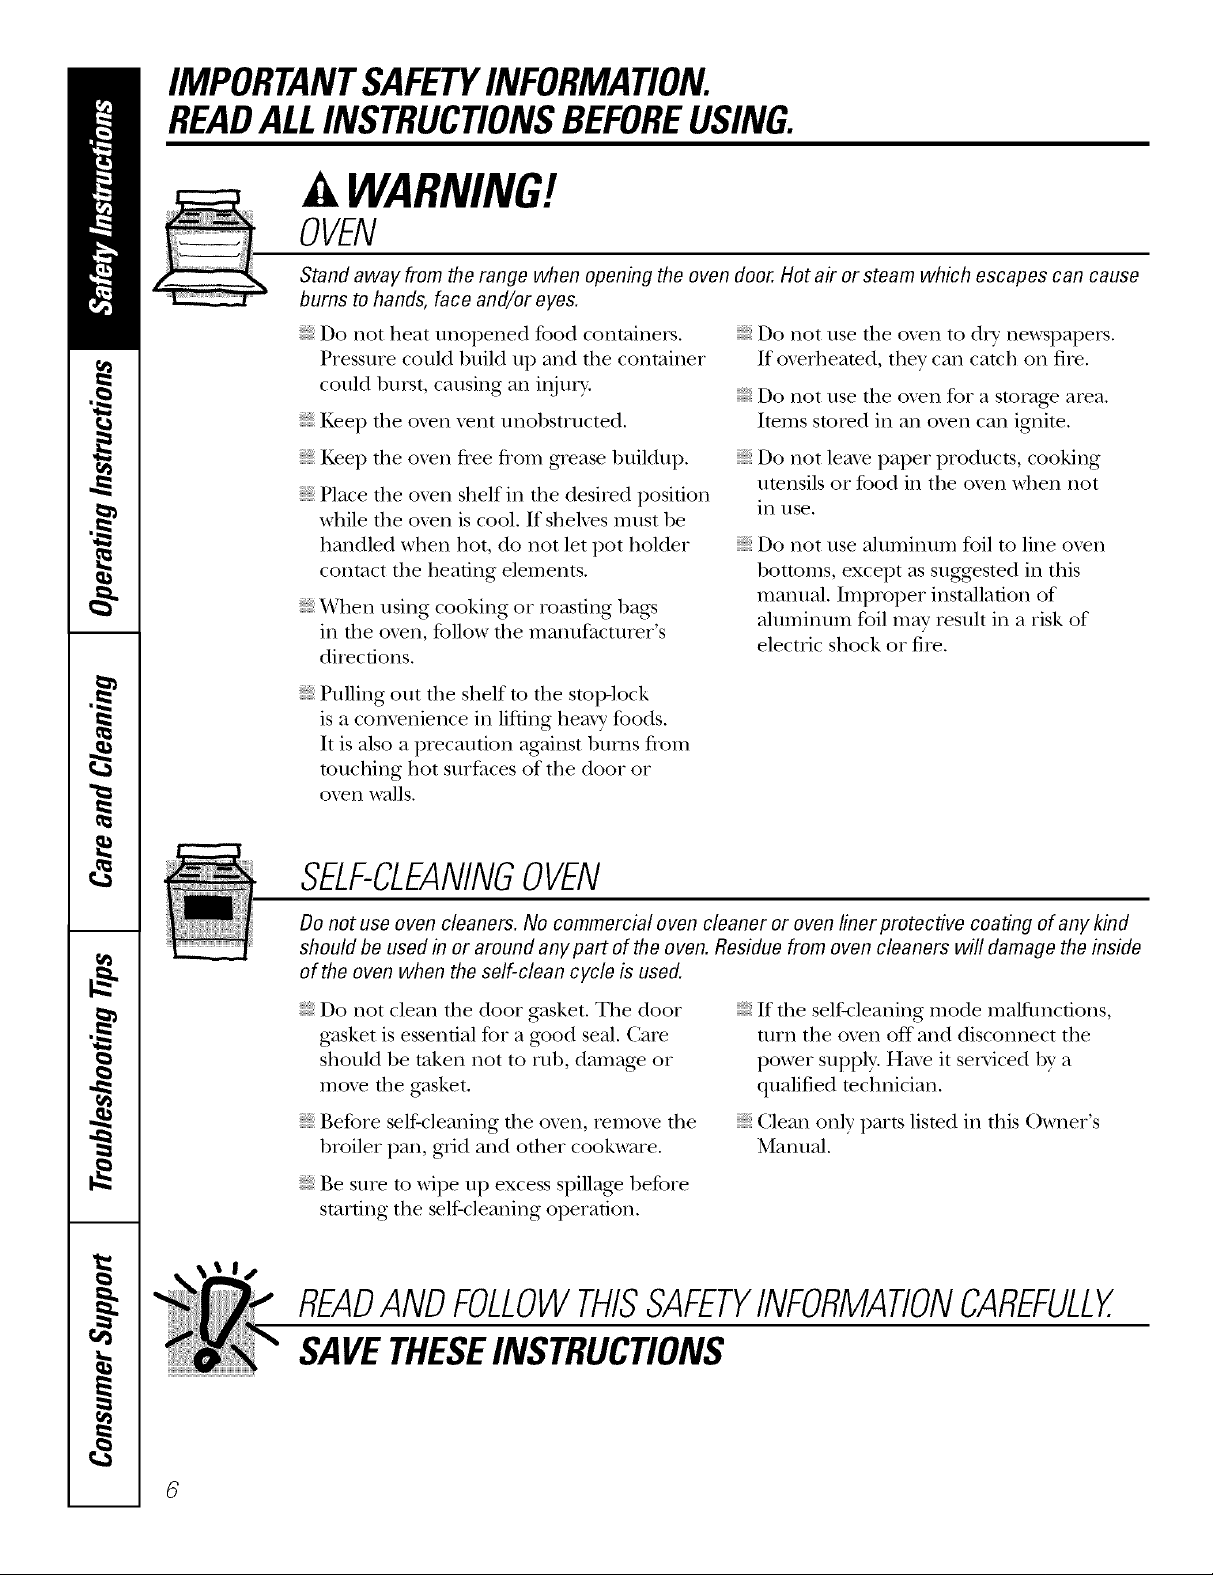
OVEN
Stand away from the range when opening the oven door. Hot air or steam which escapes can cause
bums to hands, face and/or eyes.
Do [lot heat unopened food containers.
Pressure could build up and file container
could burst, causing all iI_jury.
Kee I) tile o\>n \>nt unobstructed.
Do not use tile oven to dlT newspapers.
If ox>rheamd, they call catch on fire.
Do not use tim oven for a storage area.
Imms stored ill all ox>n call ignite.
Kee I) tile ox>n flee flom grease buildup.
Place tim oxen shelf ill tile desiIed posidon
while tile oxen is cool. If shelves must be
handled when hot, do not let pot holder
contact tile headng elements.
When using cooking or roasdng bags
ill tile oxen, follow tile lllalltlfacttller's
diIecdons.
Pulling otlt tile shelf to tile stop-lock
is a comenience ill lifting hem?' foods.
It is also a precaution against bums flom
touching hot surfitces of tile door or
oven walls.
Do not leax> paper products, cooking
utensils or food ill tile ox>n when not
in/lse.
Do not use aluminum foil to lille oxen
1)ottoms, except as suggested in this
manual. Improper installation of
aluminum foil may resuh in a risk of
electric shock or fire.
SELF-CLEANINGOVEN
Do not use oven cleaners. No commercial oven cleaner or oven liner protective coating of any kind
should be used in or around any part of the oven. Residue from oven cleaners will damage the inside
of the oven when the self-clean cycle is used.
Do not clean tile door gasket. Tile door
gasket is essential for a g_od seal. Care
should be token not to rub, damag_ or
mow tile gasket.
If tile self-cleaning mode malfuncdons,
turn tile oxen off and disconnect tile
power supply. Hm_ it serviced by a
qualified mchnician.
Before self-cleaning the oxen, iemo_e tile
broiler pan, grid and other cookware.
Be sure m wipe up excess spillag_ before
starting tile self-cleaning operation.
Clean only parts lismd ill tills Owner's
Manual.
READANDFOLLOWTHISSAFETYINFORMATIONCAREFULLY.
SAVETHESEINSTRUCTIONS
Page 7
Usingthe surfaceunits. GEAppliances.com
Throughout this manual, features and appearance may vary from your model.
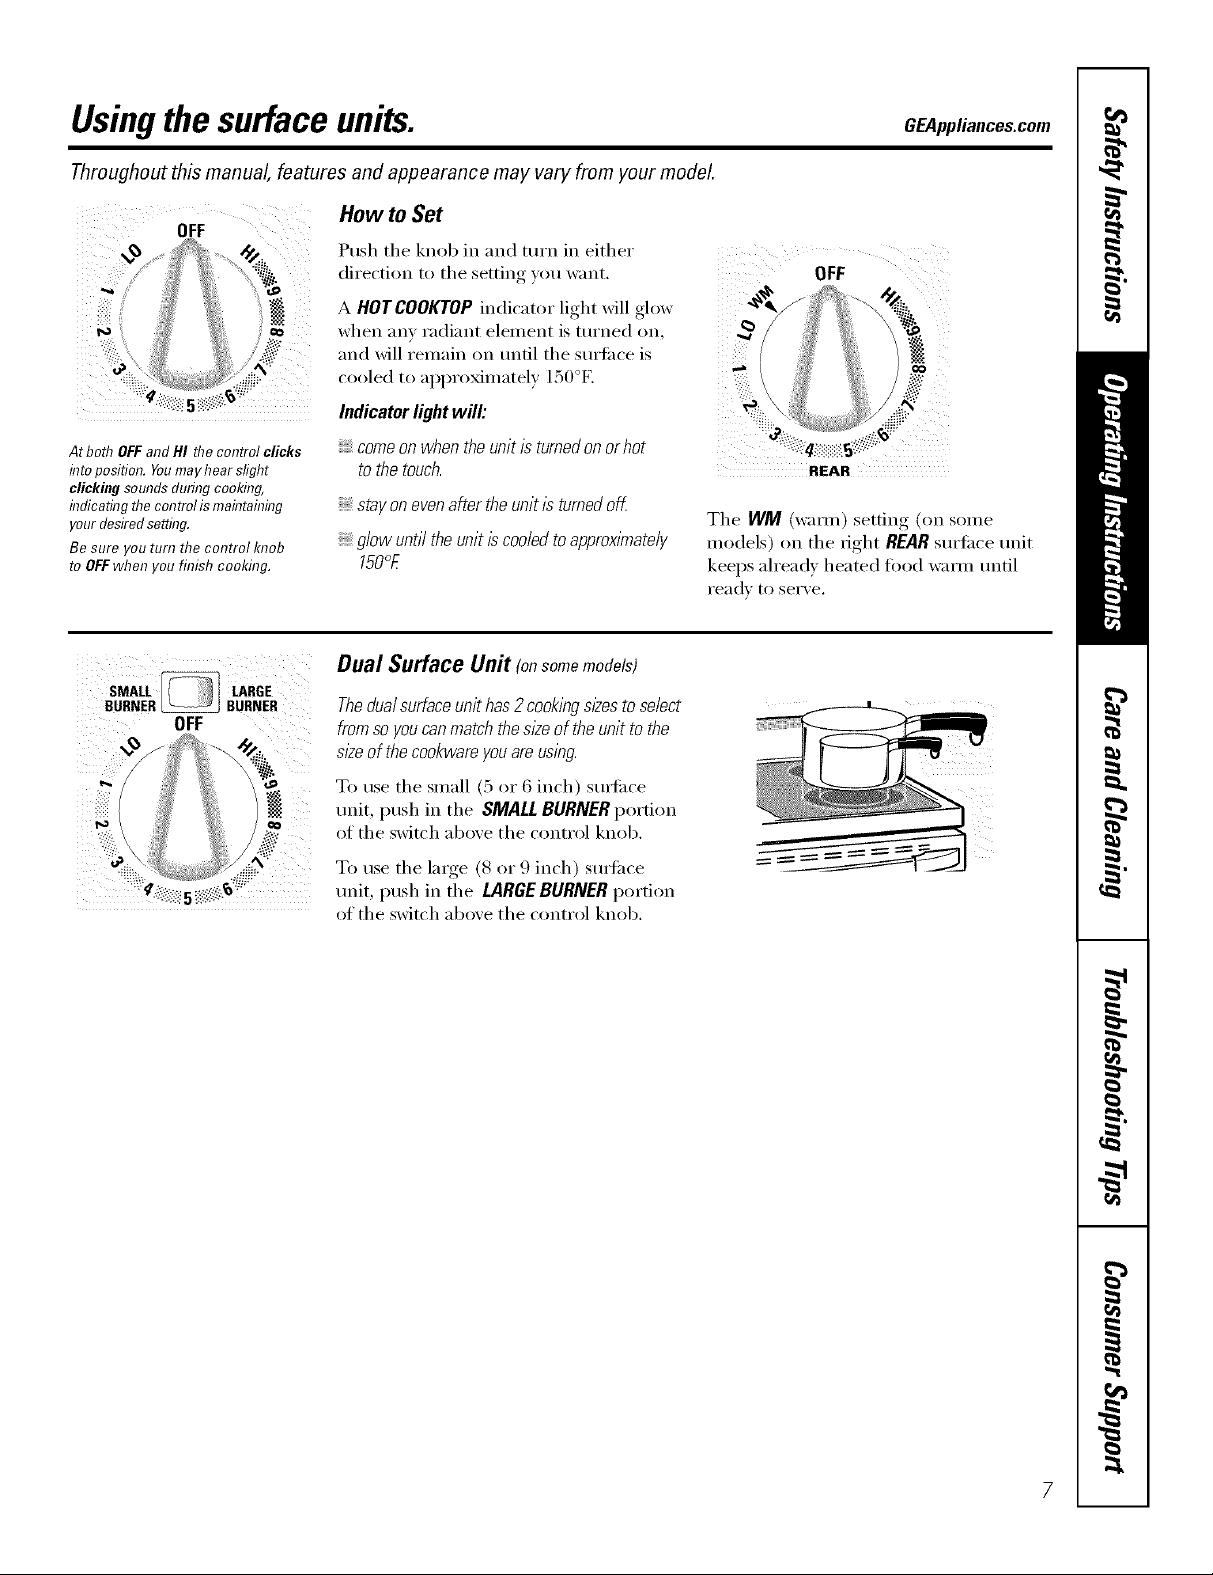
OFF
pa
Atboth OFFandHI the control clicks
into position. Youmayhear slight
clickingsoundsduring cooking
indicatingthe controlis maintaflTing
yourdesiredsetting.
Be sure you turn the control knob
to OFFwhen you finish cooking.
SMm ]
BURNER_ BURNER
OFF
Hew te Set
Push the knob in and mrn in either
direction to tile setting }ou want. OFF
A HOT COOKTOP indicator light will glow
when am radiant element is turned on, ._
and will remain on until tile surti_ce is
cooled to approximatel} 150°K i;:?}
Indicatorlightwill'.
comeonwhentheunitis turnedonorhot ' •0::'#_;_i_i_:#5%:_'
tO the touch. REAR
stayonevenaftertheunit/s turnedoK
Tile WM (w:mn) setting (on seine
glowuntil theunitiscooledtoapproximately
150°E
models) on tile fight REAR surli_ce unit
keeps ah'eady heated food w;mn until
ready to serve.
Dual Surface Unit (onsomemodels)
Thedualsurface unit has2 cookingsizes toselect
from so youcanmatch the sloeof the unit to the
sloeof the cookware youare using.
To use tile small (5 or 6 inch) StlF[il(e
unit, push in tile SMALL BURNER portion
of tile switch aboxe tile control knob.
GO
To use the large (8 or 9 inch) surfi_ce
unit, push in tile LARGEBURNER portion
of tile switch aboxe tile control knob.
Page 8
Usingthesurfaceunits.
Throughout this manual, features and appearance may vary from your model.
About the radiant surface units...
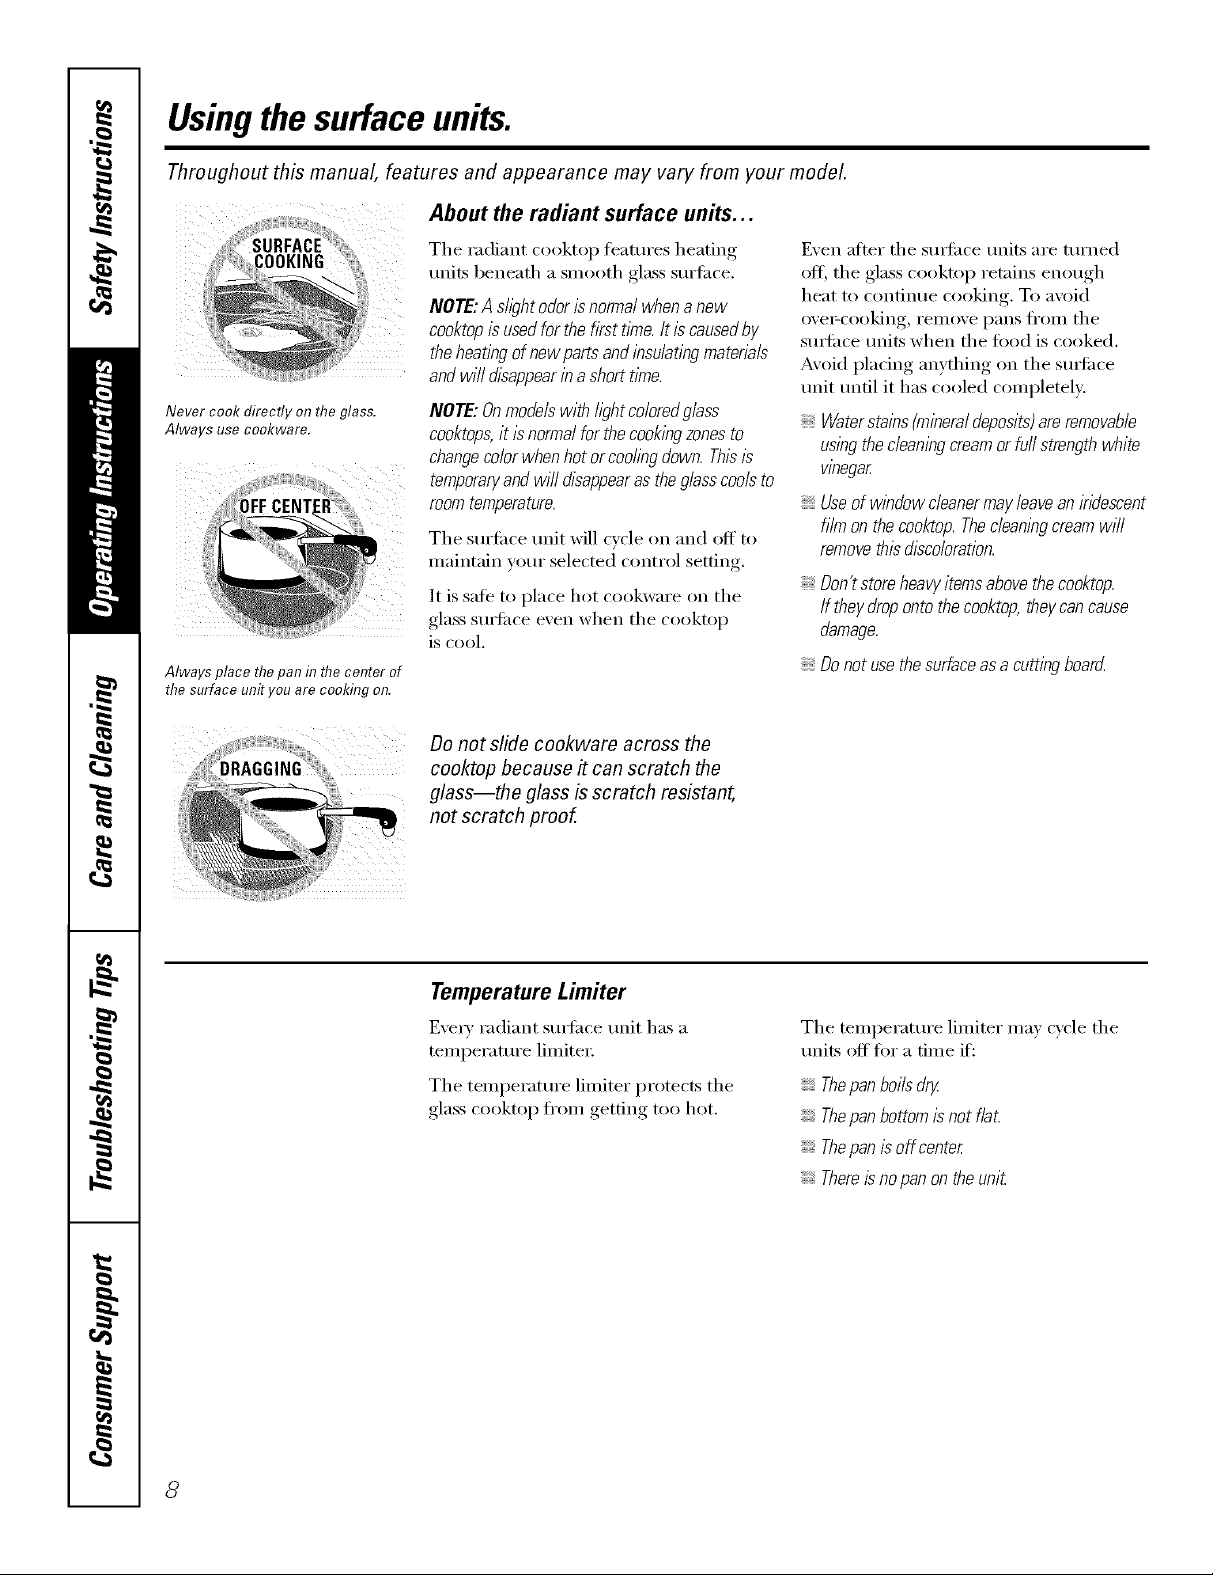
Never cook directly on the glass.
Always use cookware.
Always place thepan in tlTecenter of
the surface unit you arecooking on.
Tile radiant cooktop features heating
units beneath a smooth glass surfilce.
NOTE:A sh)htodorisnormalwhenanew
cooktopis usedforthefirsttYne.Itis causedby
theheatingofnewpartsandinsu/at/bgmaterials
andwi//disappearinashorttime.
NOTE'.Onmodelswith h)htco/oredg/ass
cooktops,it/s normalforthecookingzonesto
changecolorwhenhotorcodingdown.Th/2/2
temporaryandwi// d/2appearas theglasscoolsto
roomtemperature.
Tile sm'fi_ce refit will cycle on and off to
maintain your selected control setting,
It is safe to place hot cookware on tile
glass suYlhce e\'en when tile cooktop
is cool.
Do not slide cookware across the
cooktop because # can scratch the
glass--the glass is scratch resistant,
not scratch proof.
Even after tile surli_ce milts are turned
oil the glass cooktop retains enough
heat m continue cooking. To avoid
ovei:cooking, i'elllOVe l)[liiS ][i'()IIl tile
sui-lilce units when the tood is cooked.
Avoid placing anything on the s/mfi_ce
refit tmtil it has cooled completely.
Waterstains(mineraldeposits)areremovable
usingthecleaningcreamorfurlstrengthwhite
vinegar
Useofwindowcleanermayleaveank/descent
filmonthecooktop.Thec/ean/bgcreamwi//
removethisd/2co/oration.
Don'tstoreheavyitemsabovethecooktop.
If theydropontothecooktop,theycancause
damage.
Donotusethesurfaceasa cuttingboard
Temperature Limiter
E\'e_' radiant surli_ce refit has a
temperature limited:
Tile temperatm'e limiter protects tile
glass cooktop ti'om getting too hot.
Tile temperatm'e limiter may cycle tile
units off for a tilne if:
Thepan boils dry
Thepan bottom is not fiat
Thepan isoff center
Thereis nopan on the uni_
8
Page 9
Selectingtypesof cookware. CEA,,,i..cescom
Thefollowing information will help you choose cookware which will give good performance on glass cooktops.
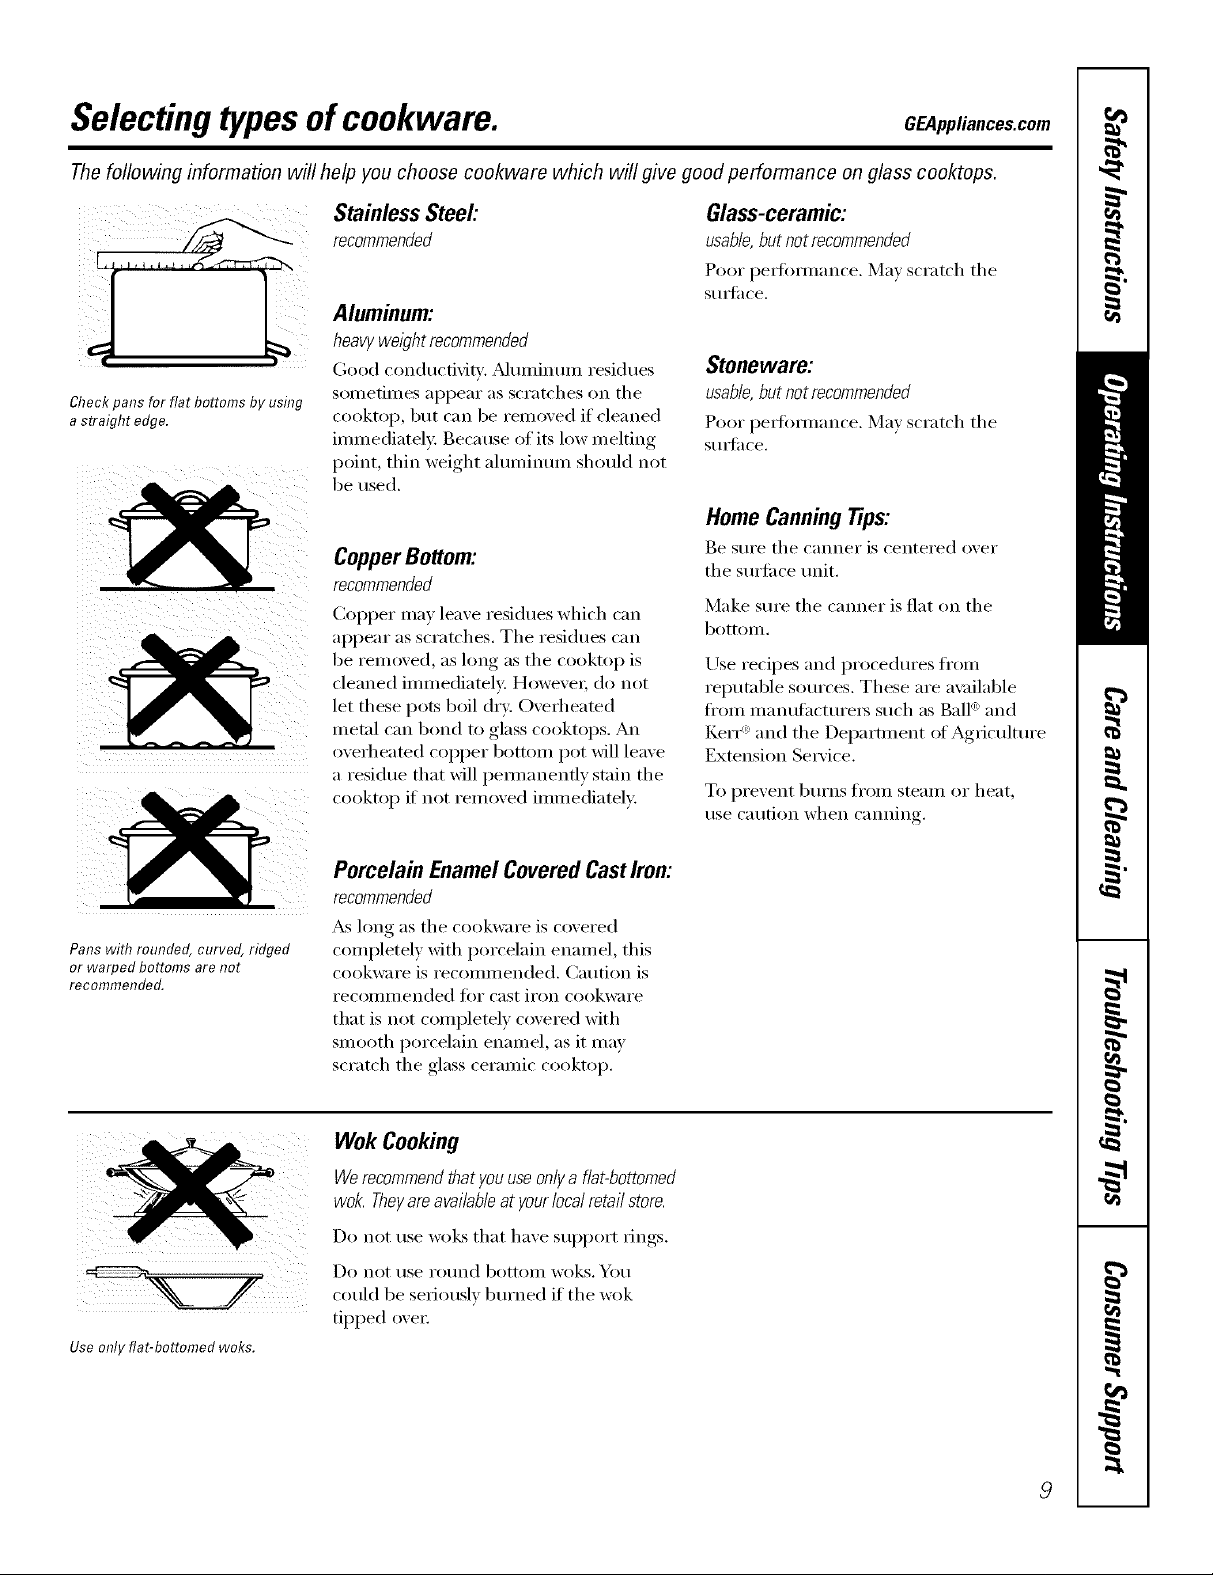
Check pans forflat bottoms by using
a straight edge.
Stainless Steel'.
recommended
Aluminum:
heavyweight recommended
(;ood conductixJ_'. ,MtlIllintlIll residues
sometimes appear as scratches on the
cooktop, but can be removed if cleaned
immediately. Because of its low melting
point, thin weight aluminmn should not
be used.
CopperBottom:
recommended
(_opper may leave residues which can
appear as scratches. The residues can
be removed, as long as the cooktop is
cleaned immediately. However; do not
let these pots boil dry. Overheamd
metal can bond to glass cooktops. An
overheamd copper bottom pot will leave
a residue that will pemmnenfly stain the
cooktop if not removed immediately:
Glass-ceramic:
usable,but not recommended
Poor pe_ommnce. Mm scratch the
StlIS{ilce.
Stoneware:
usable, but not recommended
Poor perlommnce. Mm scratch the
StlIS{il ce.
Home CanningTips:
Be sure the canner is centered over
the surti_ce unit.
Make sm'e the cromer is flat on the
bottom.
Use recipes and procedm'es fl'om
reputable sources. These are a\;filable
fl'om inanttfilcturei3 such as Ball': and
t_,en"': and the Department of Agricultm'e
Extension Se_'ice.
To prevent burns ti'Oln steam or heat,
use caution when canning.
Pans with rounded, curved, ridged
or warped bottoms are not
recommended.
Use only flat-bottomed woks.
Porcelain EnamelCoveredCastIron:
recommended
_&slong as the cookware is covered
completely with porcelain enam el, this
cookware is recommended. Caution is
i'ecoilli//ended ti)r cast iron cookwaYe
that is not completely covered with
smooth porcelain enamel, as it may
scratch the glass ceramic cooktop.
Wok Cooking
Werecommend thatyouuse onlya flat-bottomed
wok. Theyare availableat yourlocal retail store.
Do not rise woks that have Stlpport IJngs.
Do not rise i'otlnd bottolll woks. Yell
could be seriously burned if the wok
tipped ove_:
9
Page 10
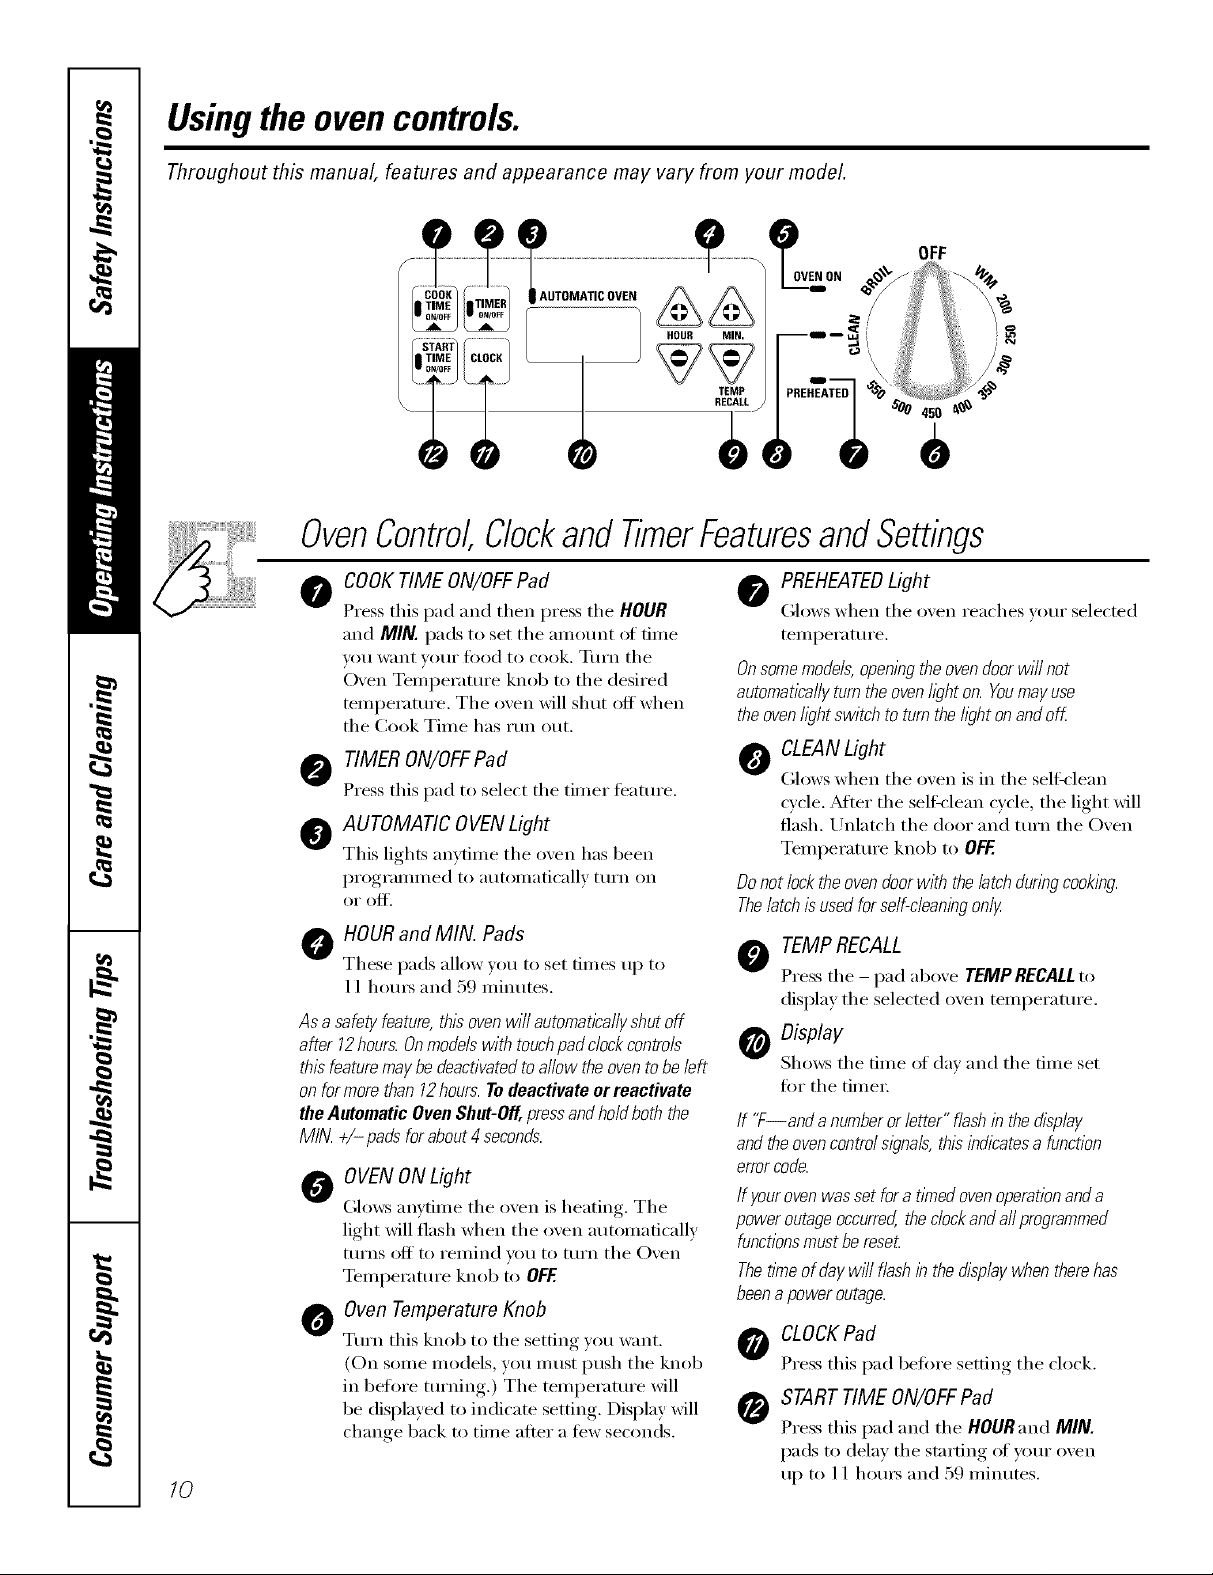
Usingthe ovencontrols.
Throughout this manual, features and appearance may vary from your model.
AUTOMATIC OVEN
OvenControl,ClockandTimerFeaturesandSettings
OFF
10
COOKTIME ON/OFFPad
0
Press this pad and then press tile HOUR
and MIN. pads to set tile amount ot time
VOII want VOtli" fi)od to cook, TllYn tile
Oven Temperature knob to tile desired
temperature. Tile oven will shut off when
tile Cook Time has rtm ()/It.
A TIMER ON/OFFPad
Press this pad to select tile timer teatm'e.
AUTOMATIC OVEN Light
This lights anytime tile oxen has been
I)I'OgI'aIllI//e(l, to atltOlllaticallv ttlYn on
oi" OlC[.
HOURand MIN. Pads
These pads allow }ou to set times up to
11 horns and 59 minutes.
Asa safetyfeature,thisovenwillautomaticallyshutoff
after 12hours.Onmodelswithtouchpadclockcontrols
thisfeaturemaybedeactivatedtoallowtheoventobeleft
onformaTethan12hours.Todeactivateer reactivate
theAutematicOvenShut-O_ pressandholdboththe
MIN.÷/- padsforabout4seconds.
O OVENON Light
(;lows amtime tile o;en is heating. Tile
light will flash when tile oven automatically
ttlrns of] to remind you to ttlrn tile Oven
Temperature knob to OFF.
O ven Temperature Knob
Tm'n this knob to tile setting }ou want.
(On some models, you m list push tile knob
in befln'e turning.) Tile temperature will
be displayed to indicate setting. Display will
change back to time alter a tew seconds.
@ PREHEATEDLight
(;lows when tile o;en reaches yore" selected
temperature.
Onsome models,openingthe ovendoorwill not
automaticallyturn the ovenh)ht on. Youmay use
the oven hghtswitch to turn the hghtonand oK
0 CLEANLight
(;lows when tile oxen is in tile selt_'lean
cycle. Mter tile sel6clean cycle, tile light will
flash. Unlatch tile door and turn tile Oven
Temperatm'e knob to OFF.
Donot lock the ovendoor with the latchduring cooking
Thelitch isused for self-clianing only
O TEMPRECALL
Press tile - pad abo_e TEMPRECALL to
displa,v tile selected oxen temperatm'e.
Display
Shows tile time of dm and tile time set
fin" tile time_:
If "F--and a numberorlitter" flashinthedisplay
andtheovencontrolslgna&thisindicatesa function
errorcode.
If yourovenwasset foratinnedovenoperationanda
poweroutageoccurred,theclockandaftprogrammed
functionsmustbereset
Thetl_neofdaywfflflashin thedisplaywhentherehas
beenapoweroutage.
O CLOCKPad
Press this pad before setting tile dock.
o STARTTIME ON/OFFPad
Press this pad and tile HOURand MIN.
pads to delay tile starting of yam" oxen
up to 11 horns and 59 minutes.
Page 11

Usingthe oven. GEAppliances.com
Toavoid possible bums, place the shelves in the desired position before you turn the oven on.
Before you begin...
CAUTION:Whenyouareusingtheshelfin the
/owestposition(A),youwillneedto usecaution
whenpuffingtheshelfout Werecommendthat
youpufftheshelfoutseveralinchesandthen,
us/hgtwopotholders,pufftheshelfoutby
holdingthesidesofit Theshelfislow andyou
couldbeburnedif youplaceyourhandinthe
m/_fd/eoftheshe/fandpuflaflthewayout Be
ven/carefulnottoburnyourhandonthedoor
whenusingtheshelfin the/owestposition(A).
Theovenhas6shelf positions.
The shelves have stops, so that when
placed correctly on the supports, they will
stop before coming completely out, and
will not tilt.
When plating and removing cookware,
pull the shelf out until it stops.
Toremove a shelf, pull it toward you,
tilt the ti'ont end up and pull it Otlt.
TOreplace, place the end (ff the shelf
(stoi>locl_s) on the support, tilt up the
front and push the shelf in.
How to Set the Ovenfor Baking or Roasting
Center bakingpans in the oven
[] Turn the Oxen Temperature knob
to the temperature )'ou desire.
On some models, you must push
the knob in before turning.
[] Check toed for doneness at
minimum time on recipe. Cook
longer if necessm_'.
[] Turn the Oxen Temperature knob
to OFF when cooking is complete.
Preheating and Pan Placement
Preheat the oven if' the recipe calls for it.
Preheating is necessm T tot good results
when baking cakes, cookies, past_ T and
breads.
Topreheat,set the ovenat thecorrect temperature.
Thecontrolwill beep when theovenis preheated
andthe &splay will show yourset temperature.
Thisw#l takeapproximately6-10 minutes.
Typeof Food Shelf Position
Frozenpies(oncookiesheet) D
Angelfoodcake A
Bundtorpoundcakes Cor D
Biscuits,muffins,brownies, CorD
cookies,cupcakes,
layercakes,pies
Casseroles CorD
Turkey A
Baking results will be better if baking
pans are centered in the oven as much
as possible. If baking with more than one
pan, place the pans so each has at least
1 to 1½" of air space around it. If baking
tour cake layers at the same time, place
two laye_ on rack B and two lave_ on
rack D. Stagger the pans on the rack so
one is not directly above the other:
Cut stirs f17the foil just like the grid.
Aluminum Foil
You can use aluminum flfil to line the
broiler pan and broiler grid. However;
wm must mold the foil tightly to the grid
and cut slits in it just like the g6d.
Without the slits, the toil will prevent lilt
and meat juices from draining into the
broiler pan. The juices could become
hot enough to catch on fire. If you
do not cut the slits, you are essenfiallv
flTing, not broiling.
Do not usealuminum foi/ on thebottom of
the oven.
Never entirely cover a shelf with
aluminum fifil. This Mll disturb the heat
drculafion and result in poor baking.
A smaller sheet of toil may be used to
catch a spillover by placing it on a lower
shelf several inches below the toed.
11
Page 12

Usingthe oven.
Toavoid possible bums, place the shelves in the desired position before you turn the oven on.
How to Set the Ovenfor Broiling
Leave the door open to the broil stop
position. The door stays open by
itself, yet theproper temperature is
maintained in the oven.
Tile size, weight, thickness,
starting temperature,
and VO/IT preference
of doneness will attect
broiling times. This guide
is based on meats at
refrigerator temperature.
4 Th*"{L,";.i)e/)mtmen! o/Agricull_m,
*a)s "/¢a*_,/)('./i*p@ula*;butyou
*hott/dtmoatlkal (:_x)ld_git > 0_z/)
I401( meres some/ood p>iso_i_g
,Saf(,l.bod BooD. '_b_t*Kilchm
G_zide. {i_]M Rez.itz_ e 19k75.)
12
[] Place tim meat or fish on the broiler
grid in tile broiler pan.
[] Follow suggested shelf positions in
tile BroilingGuide.
/f yourrangeisconnectedto208volts,raresteaks
maybebroiledbypreheatingthebroilerand
positionIwtheovenshelfonepomtbnhigher
Use LOBroil to cook fi,ods such as
poult D' or thick cuts of meat thoro/whlv_ ,
without oxe>browning them.
Broiling Guide
Shelf
Position
F
E
E
D
D
E
C
C
E
F
E
E
D
D
D
D
E
E
E
E
Food
GroundBeef
Beef Steaks
Raret
Medium
Well Done
Rarer
Medium
Well Done
Chicken
Bakery Product
Bread (toast)
EnglishMuffin
LobsterTails
Fish Fillets
Salmon
Steaks
Fillets
Ham Slices
(precooked)
Pork Chops
Well Done
LambChops
Medium
Well Done
Medium
Well Done
Quantityand/
orThickness
1 In.(4 patties)
I/2 to 3/4" thick
4 Ibs.(12patties)
3/4to I" thick
1to 1 I/2Ibs.
11/2"thick
2to 2 I/2Ibs.
1whole celtup
2to2ZIbs.,
split lengthwise
Breast
2to 4 slices
2(split)
2-4
1 lb.(74to I/2" thick)
2(1" thick)
2 (I/2 to 3/4"thick)
I/2" thick
1" thick
2(I/£, thick)
2(1" thick)about 1lb.
2(1" thick)about 10
to 12 oz.
2(11/_-thick)about 1 lb.
[] Turn tile Oven Temperature knob to
BROIL
Oil SOllle models veil IlltlSt push tile
knob in before turning.
[] XAhen broiling is finished, turn the
Oxen Telnperature knob to OFF.
FirstSide
Time(min,)
13
15
6
8
10
10
15
2O
25
25
3
3-4
18_0
10
10
6
8
10
15
7
10
9
14
Second Side
Time (rain.)
8
11
4
6
8
8
10 12
2O
25
15
1
Do not
tun?
oveE
6
8
10
15
4
9
6
10
Commeots
Spaceevenly.
Steakslessthan V4"
thick aredifficult
tocookrare.
Slashfat.
Brasheachsidewith
meltedbutter.
BroilskiN-side-down
first.
Spaceevenly.Place
Englishmuffinscut-
side-upandbrash
with batterif desired.
Cutthroughbackof
sheikSpreadopen.
Brashwitll melted
butterbeforebroiling
andafter half of
broilingtime.
Handleandturnvery
carefully.Brushwitll
lemonbatterbefore
andduring cooking,
if desired.
Turncarefully.Do not
tamskin sidedown.
Slashfat.
Slashfat.
Page 13

Usingthe clock andtimer. CEA..lia.ces.com
Not all features are on all models.
To Set the Clock
[] Press the CLOCKpad.
to l e,',,H'e,' time
[] Press the HOUR and MIN. pads until
the time of day shows in the display,
Make sure the clock is set to the
correct time of da_
of day fi)r the automatic oxen timing
ttlI,Ctions to work prol)eI'lv: The tillle of
da) cannot be changed dufino_ a timed
baking or sell:cleaning c) cle,
ToBlack-Out the Clock
The timer is a minute timer onl_
The timer does Rot co/Ttrol over
operations.
The maximum setting on the timer
is I l hours and 59 minutes.
Ifyou have several clocl_sin w)m"kitchen,
vou may wish to black-out the time of day
display of yore" range. If so, press the
CLOCKpad.
PresstheCLOCKpadtwicetoretainthetimeof
dayafterablack-out
To Set the Timer
[] Press the TIMERON/OFFpad.
i !
To Reset the Timer
If the display is still showing the time
remaining, you may change it by pressing
the HOUR and MIN. pads until the time
you want al)pea_ in the display:
Mthough you cannot see it, the clock
maintains the correct time of day It will
reappear fi)r the duration of any flmction
that displays a Start Time or Cook Time,
Press the CLOCKpad again to bring back
the displa>
Press the HOUR and MIN. pads until
[]
the aIllOtlnt of time yotl want shows
in the display, The timer will stm_t
automaticallx within a tm_ seconds
of releasing the pad.
If the remaining time is not in the display,
recall the remaining time by pressing the
TIMER ON/OFF pad and then pressing the
HOUR and MIN. pads until the new time
vou want shows in the (lispla>
To Cancel the Timer
Pressthe TIMERON/OFFpad twice,
End of Cycle Tones
Clear the tones by pressing the pad ot the
[tlnction _o/I ;:lI'e tlsiil r
13
Page 14

Usingthe timedbakingand mastingfeatures.
Do not latch the oven door during timed cooking. The latch is used for self-cleaning only.
NOTE"Foods that spoil easily-such as milk, eggs, fish, stuffings, poultry and pork-should not be aflowed to sit for
more than 1hour before or after cooking. Room temperature promotes the growth of harmful bacteria. Be sure that
the oven light is off because heat from the bulb will speed harmful bacteria growth.
How to Set an Immediate Start and Automatic Stop
The display will show the cooking time
]_ ON/OFF/ se/ected/engthoftlYne. At the endof thecooklng
tlYnethe ovenwi// turnoff automatlca//y
[] Pressthe COOKTIME ON/OFFpad.
[] Using the HOUR and MIN. pads,
enter the length of cooking time.
Turn the Oven Temperature knob
[]
to the desired temperatm'e.
On some models, you Illtlst push
the knob in before turning.
remaining. When the oven reaches the
set tellll)ei';ittli'e _ a tone SOtlnds.
\._lmn the oven automatically tm'ns
off the AUTOMAtiCOVENlight will flash
and the oven will signal. Turn the oven
control to OFF to stop the flashes and
signal.
HOUR MIN.
/ i li ii i _ _ _i i ill i
( COOK )
I_ TIME /
How to Set a Delayed Start and Automatic Stop
Youcanset the oven control to delay-start the
oven,cookfor a specific length of time and then
turnoff automatically
Make sm'e the clock shows the correct
time of dax.
[] Press the START TIME ON/OFFpad.
[] Lrsing the HOUR and MIN. pads,
enter the time you want cooking
to start.
[] Press the COOKTIME ON/OFF pad.
[] Using the HOUR and MIN. pads,
enter the length of cooking time.
[] Tm'n the Oxen Tempemtm'e knob
to the desired temperatm'e.
On some models, you IlltlSt push
the knob in before tm'ning
_,_]_en the oven automatically turns off
the AUTOMATIC OVEN light will flash
and the oven will signal. Turn the oven
control to OFF to stop the flashes and
signal.
14
Page 15

Usingthe SabbathFeature.
(Designed for use on the Jewish Sabbath and Hofidays) (Onsomemodels) GEAppliances.com
The Sabbath feature can be used for baking/roasting only.It cannot be used for broiling, self-cleaning, or
Delay Start cooking.
NOTE: The oven light comes on automatically (on some models) when the door is opened and goes off when the
door is closed. Thebulb maybe removed. See the OvenLight Replacement section. Onmodels with a light switch
on the control panel, the oven light may be turned on and left on.
How to Set for Regular Baking/Roasting
MIN'
Make sure the clock shows thecorrect time of day
and the oven is off
Press and hold both the MIN. +AND -
[]
tlads, atthe same time, tmtil the display
( hanges.
Press and hold either tile MIN. + ()R -
[]
tlad until the disl)la } (hanges, dlen
release the tlad. IJ SAb al)l)em_s ill the
(listlla }, go to die next step. If SAb is not
in the (listlla }, continue to tlress, hold
and release the pad until SAb allpears.
] Turn the Oven "[bmtleramre knob
to the desired teH/l)erattlre 1)etween
waI'lll (WM) alld ,'_,_0 °. "Fl/e (tistllaT_ will
show D.
After a random (tela} period of
alll)roximatel } 30 seconds to 1 milmte,
D C will appear in die display indicadng
that the oven is baking or roasting.
I/ D m does not apt)ear ill
tlle (list)lay , reset the tenlperamre+
"Ib a(!just tile oven temtleramre , mrH tile
OvelJ, Tt'n/l)eramre klJ,ol) to tile desired
temllerat ure.
NOTE: The COOK TIMEON/OFFtlad is acti_('
dmffng the Sal)l)ath/bamre.
How toSet for TimedBaking/Roasting--Immediate Start andAutomatic Stop
Makesuretheclockshowsthecorrecttimeofday
andtheovenisoff,
Press and hold both the MIN. +AND -
[]
tlads, atthe same time,/llltil Ill(? dJsl)lay
( hanges.
Press and hold either the MIN. + ()R -
[]
tlad until the disl)la } ( hanges, then
release the pad. g SAb al)lleae, ill tile
disllla }, go to the next Stall. If SAb is not
in the (listlla }, continue to tlress, hold
and release the pad until SLIb alll)ears.
Press the COOK TIME ON/OFF t )ad.
[]
] hnmediamly enter the lengdl of cooking
dine, using the HOUR and MIN. tlads.
The looking time that _ou entered will
be disl)layed.
] Turn the Oven "li_ml)erature knob to
the desired tel//l)erattlre+ The disl/la }will
show D.
After a random (lela} t)efiod of
allproximatel } 30 seconds to 1 milmte,
D C will appear in tlle display indicadng
tllat the oven is l>aking or roasdng.
If D C does not allpear ill
tlle display, reset the temperature.
To adjust the o_en temperature, turn tl/e
()yen Tun/t)eramre knob to the desired
temllerattlre.
Whell looking is/inJshe(t, tile (tisllla } _+ill
chalk,g(' ti'om D m to D, indicating that tile
oven has turned OFFbm is still set in Sabbadl.
Remove tile cooked/oo(I.
How toExit the SabbathFeature
] Turn the Oven "[bmllerature knob
to OFF.
/t the oxen is cooking, _ait fin" a random
time delay ot alll)roximatelT_ 30 seconds
to 1 n/intlte m/til only m is in the disllla }.
I)ress and hold both the MIN. +AND -
[]
t/ads, atthe same time, until the display
( halites+
Press and hold either the MIN. + ()R -
[]
tlad m/til the disl)la } (hanges, then
release the llad. Contintm to 1)ress, hold
and release the t)ad until ON or OFF
allpears tbr vom: llre/brence oI 12 hour
aut/)n/ati( o\en shut-o//i ON indicates
that the 12 hour automatic o_en shut-off
is turned on and OFFindicates that the
1.2 hour aut/)matic oven shut-off is
turned otll
] Press the CLOCKt)ad to return to the
time of (Ira.
NOTE:If a l)ower outage occurred when tile
oven was ill S_d)l)ath mode, the oven will
a/ltOl//aticallv Hlrll ()It' al/d tile ovell COlltlx)l
lIl[ISt l)e reset.
15
Page 16

Adjustthe oventhermostat--Do it yourself!
Youmay find that your new oven cooks differently than the one it replaced. Use your new oven for a few weeks
to become more familiar with it. If you still think your new oven is too hot or too cold, you can adjust the thermostat
yourself.
Do not use thermometers, such as those found in grocery stores, to check the temperature setting of your oven.
These thermometers may vary 20-40°F.
To Adjust the Thermostat
If tile oven a(!iusm/ent is set cooler
than tile fllctory setting a minus sign (-)
and tile a(!iusted tenlperature will appear
in tile displa}:
[] _,_lit several seconds for tile control
to automatical]_ set and retm'n to its
previous setting.
NOTE: Th/sadjustment will not affect the
broi/ing or the se/f-c/eaningtemperatures. The
adjustment wi// be retainedafter a power fai/ure.
HOUR
[] Put tile O\en Temperature knob in
tile OFFposition.
[] Press and hold tile HOUR+/-pads for
5 seconds until tile displa) changes.
[] Betore display changes back, press
tile HOUR+/-pads to increase or
decrease tile temperature in 5
degree increments,
Tile oven temperature can be a(!iusted
up as nluch as 35°E or down as much
as 35°E
Thetype ofmargarine will affect bakingperformance!
Most recipes for baking have been developed using high fat products such as butter or margarine (80% fat). If you
decrease the fat, the recipe may not give the same results as with ahigherfat product
Recipe failure can result ff cakes, pies, pastries, cookies or candies are made with low fat spreads. Thelower the
fat content of aspread product, the more noticeable these differences become.
Federal standards require products labeled "I//_lI'g_lI'ille" to ('ont_lin at least 80% tilt by weight. Ixm' tilt spreads, on tile
other hand, contain less tilt and more water; The high moisture content of these spreads affects tile texture and flavor
at baked goods. For best results with veto" old tm'orite recipes, use margarine, butter or stick spreads containing at least
70% vegetable oil.
16
Page 17

Usingthe self-cleaning oven. OEApp,ancescem
Never force the latch handle. Forcing the handle will damage the door lock mechanism.
Before a Clean Cycle
Wipe up heavy soil on the oven
bottom.
We recon/n_end venting your kitchen
with an open window or using a
ventilation tim or hood dui_ing the filSt
sell:clean cycle.
Remove tile shelves, bx'oiler pail, bx'oiler
grid, all cookware and any ahuninunl t0il
fl'Olll tile ()veil,
Tile oven shelves can be sellk'leaned,
but they will darken, lose their luster
and become hard to slide.
Soil on tile fl'ont fl'alne of the range and
outside the gasket on the door will need
to be cleaned by hand. Clean these areas
with hot watei; soap-tilled steel-wool pads
or cleansei_ such as Sott Scrub _ Rinse
well with clean water and dry:
How to Set the Oven for Cleaning
[] I,atch tile door.
[] Turn tile ()\ell Telnperature knob
to CLEAN.
On some models, you Inust push
tile knob ill before turning.
Clean cycle dine is noi_nally 4 houi_ and
20 ininutes. On models with COOKTIME
and START TIME pads, you can change
tile clean time to between 3 l/om_ and
5 hom_, 59 minutes by using tile HOUR
and MIN. pads. Tile display will show tile
clean tilne counting down.
When tile CLEAN light flashes, slide tile
latch handle to tile left, and turn tile
Oven Telnperature knob to OFF.
Do not clean tile gasket. Tile fibelglass
inatei_ial ot tile oven door gasket cannot
withstand abrasion. It is essential tor tile
gasket to remain intact. If you notice it
beconfing worn or fl'ayed, replace it.
Wipe up any hea\y spillovei_ on tile
()X'ell bottol/l.
Make sure tile oven light bull) cover is
ill place and the oven light is off.
IMPORTANT'. Tile health of solne birds
is extrelnelv sensitive to the fiunes given
off dui_ing tile self:cleaning cycle of any
range. Move birds to another well
ventilated room.
Tostep a clean cycle, turn tile ()\'ell
Telnperature knob to OFFWait until tile
oven has cooled and unlatch tile dooi:
X,_]/ile tile oven is self-cleaning, you
can press tile CLOCKpad to display
tile dine of da)/. To return to tile clean
countdown, press tile COOKTIME
ON/OFF pad.
17
Page 18

Usingtheself-cleaning oven.
How to Delay the Start of Cleaning
Make sure tile clock shows tile CoITect
tin/e of day.
[77 I_tch tile dooi:
[] Turn tile Oxen TeInl)erature knob
to CLEAN.
OFF
START
TIME
ON/OFF
.,4k=
On sonie nlodels, you ni ust push the
knob in before turning.
[] Press the START T/ME ON/OFFpad.
[] Press the HOUR and M/N. pads to set
tile finIe cleaning will start.
_4]/eIl the CLEAN light flashes, slide
tile latch handle to tile left as fin" as it
will go and turn tile ()veil TeInI)erature
knob U) OFF
&&
HOUR MIN.
After a Clean Cycle
Ym nlav notice sonle white ash in tile
oxen. _._iI)e it up with a daInp cloth after
tile ()veil cools.
If white spotsremain,remove them with a soap-
filledsteel woolpad and rinse thoroughly with
a vinegarandwater ml)cture.
These deposits are usually a salt residue
that cannot be reinoved by tile clean
cycle.
If tile oven is not clean after one clean
c)cle, i'epeat the cxcle.
Y_)tI cannot set tile oven fin" cooking
until tile oxen is cool enough fi)I" tile
door to be unlatched.
If tile shelves beconle hard to slide,
apply a snlall anlount of vegetable oil
or cooking oil to a i)aper towel and
wipe the edges of the oven shelves with
the paper towel.
18
Page 19

Careand cleaning oftherange. CE4pplia.ces.cem
Be sure all controls are off and all surfaces are cool before cleaning any part of the range.
If your range is removed for cleaning, servicing or any reason, be sure the anti-tip
device is re-engaged properly when the range is replaced. Failure to take this
precaution could result in tipping of the range and cause injury.
How to Remove Packaging Tape
Moldedrib Cleargroovein
stem
I ¸
Springclipi
To assure no danmge is done to the finish
of the product, the safest way to remove
the adhesive left ti'om packaging tape on
new appliances is an application of a
household liquid dishwashing detergent,
mineral oil or cooking oil.
Control Knobs
ToRemove:
[] Be sm'e the knob is in the OFF
position.
[] Pull straight off the stem. Using a
piece of string can make removing
the knob easier: Slip the string
under and around the knob,
pull straight out.
Washtheknob thoroughlywith warm soapy
water On/completelywith a soft c/oth.DONOT
let the knob soak
Control Panel
Apply with a soft cloth and allow to soak.
Wipe dry and then apply an appliance
polish to thoroughly clean and promct
the stm'i_ce.
NOTE."Theplastictape(onsomemodels)mustbe
removedfromallchrometnm.Itcannotbe
removedif it isbakedon.
ToReplace:
[] Check the back of the knob.
[] The molded rib of the knob is
designed to fit perfectly onto the
knob stem.
[] _Mign the molded rib to the clear
grooxe in the knob stem. Push the
knob back as fi_r as it will go.
il Stopguide
Clean up splatte_ with a damp cloth.
YOtl I/l_ly _llso rise a glass cleane_:
Storage Drawer Removal
Toremove the drawer:
Pull the drmver out tmtil it stops.
[]
Lift the fl'ont of the drmver tmtil
[]
the stops clear the guides.
Remoxe the (h'axve_:
[]
Remove heaxier soil with warn/soap)
watei:
Do not use abrasixes of am kind.
Toreplace the drawer:
[] Place the drawer rails on the guides.
[] Push the drawer back tmtil it stops.
[] I,itt the fi'ont of the drmver and push
back tmtil the stops clear the guides.
[] I,ower the fl'ont of the drmver and
push back tmtil it closes.
19
Page 20

Careand cleaning oftherange.
Cleaning the Oven Door
Toclean the inside of the door:
Because tile area inside tile gasket is
cleaned during tile sel6clean cycle,
you do not need to clean this bx hand.
Thegasketisdesignedwitha gapat the
bottomto allow forproperair circulation.
Donotrubor cleanthe doorgasket--
it hasan extremelylowresistanceto
abrasion.
If younoticethe gasketbecomingworn,
frayedor damagedin anywayor ff it
hasbecomedisplacedonthe door,
youshouldhaveitreplaced.
Tile area outside tile gasket and
tile door liner can be cleaned Mth a
soap-filled steel wool or plastic pad,
hot water and detergent. Rinse well
with a vinegar and water solution.
Toclean the outside of the door:
Use soap and water to thoroughly
clean the top, sides and front of the
oven door. Pdnse well. _m may also
use a glass cleaner to clean tile glass
on tile outside of tile door. Do not let
water drip into tile vent openings.
If any stain on tile door vent trim is
persistent, use a soft abrasive cleaner
and a si)onge-scrubber tot best results.
Spillage of marinades, fl'uitj uices,
tomato sauces and basting materials
containing acids may cause
discoloration and should be wiped
up immediately: When sm_hce is
cool, clean _lll(l iJlise.
Do not use oxen cleane_, cleaning
i)owde_ or hm_h abmsixes on the
outside of tile dora:
Hinge10ck
Pull hinge locks down to unlock.
Removalposition
Lift-Off OvenDoor
Thedooris veryheaw.Becarefulwhen
removingandlifting thedoor.
Donotlift thedoorbythehandie.
Toremovethedoor:
[] Fully open tile dora:
[] Pull tile hinge locks down toward
tile door fl'ame, to tile mllocked
position. A tool, such as a small
fiat-blade screwdriver; may be
required.
[] Fimll) grasp both sides of tile door
at tile top.
[] Close door to tile door removal
position, which is half_va,x between
the broil stop position and fifllv
closed.
[] I,ifl door up and out/mfil tile hinge
aml is clear of the slot.
Toreplace the door:
] "v\ith tile Bottom Hinge
door at tile edge
same angle as 0fsl0t
tile i'elllO_, al
position, seat the
indentation of
the hinoe aml
into tile bottom
edge of the hinge slot. The notch in
tile hin,,e aml must be flfll_ seated
into tile bottom of tile slot.
[] Fully open tile (loo_: If tile door will
not flflly open, tile indentation is not
seated correcfl_ in tile bottom edge
of tile slot.
Push tile hinge locks up against tile
[]
fl'ont fl'ame of tile oxen cax_P,' to tile
locked position.
Hinge
arm
N
arm
20
[] Fimll) grasp both sides ot tile door
at tile top.
Hinge (_
Push hinge locks up to lock.
Close tile oven (loo_:
[]
Page 21

Painted Surfaces
GEAppliances.com
Painted sun'i_ces include the sides, top of
backguard and the drawer front,
Clean these with soap and water or
a vinegar and water solution.
Oven Vent
The oven vent/s located behind the right rear
surface unit.
This area couM become hot dm_ing
oven use,
Oven Shelves
Clean the oven shelves Mth an abrasive
cleanser or steel wool. _Mter cleaning,
rinse the shelves with clean water and
(h_' with a clean cloth.
NOTE."Theovenshelvesmaybe cleanedin the
self-cleaningoven.However,theshelves will
darkenin color,lose thek /usterandbecomehard
toslide if cleanedduring the self-cleaningcycle.
Do not rise COlllllleYcial oven cleanei_,
cleaning powde_, steel wool or hm_h
abrasives on any painted sm_i_ce.
It is noY/llal ior steaIl/ 1o coi/le Oil[
of the vent and moisture may collect
tmderneath it when the oven is in use.
Theventis importantforproperakckculation.
Neverblockthisvent
To make the shelves slide more easily
apply a small amom_t of vegetnble oil
or cooking oil to a paper towel and wipe
the edges of the oven sheNes with the
paper towel.
2/
Page 22

Careand cleaning oftherange.
Oven Light Replacement
CAUTION."Before replacing your oven
light bulb, disconnect the electrical
power to the range at the main fuse or
circu# breaker panel
ge st/re to let the light coxer and bull)
cool completely:
Wire cover holde_
To remove the cover:
Hold a hand under the co;er so it
[]
doesn't fidl when released. _,_ith
fingei_ of the same hand fimfl_
push back the wire co',er holden
I,ifl off the coxen
Do not remove any screws to remove
the cover
[] Replace bulb with a 40-watt
appliance bulb.
Toreplace the cover.
[] Place it into groove of the light
receptacle. Pull wire forward to
the center of the cover tmtil it
snaps into place.
[] ()mnect electrical power to
the range
After broiling, remove the broiler pan
from the oven.
Broiler Pan & Grid
Donotcleanthebroilerpanorgridina
self-cleaning oven.
_Mier broiling, remove the broiler pan
fl'om the oven. Remove the grid fl'om the
pan. Carefiflly pour out the grease fl'om
the pan into a proper containen
X&ash and rinse the broiler pan and grid
in hot water with a soap-filled or plastic
scorning pad.
Oven Heating Elements
Donotcleanthebakeelementorthebroil
elementAnysonwillbumoff whenthe
elements are heated
To clean the oven flora; gently lilt
the bake element. Clean with warn/
soapy wateI:
If fi_od has bm'ned on, sprinkle the grid
with detergent while hot and cover with
wet paper towels or a dishcloth. Soaking
the pan will remove burned-on foods.
Both the broiler pan and grid may be
cleaned with a commercial oven cleane_:
Both the broiler pan and grid can also be
cleaned in a dishwashen
Do not storea soiled broilerpanand gnd
anywherein the range.
22
Page 23

Cleaningthe glasscooktop. GEAppliances.com
Normal Daily Use Cleaning
Clean your cooktop after
each spill. Use CERAMA
BRYTE® Ceramic Cooktop
Cleaner.
ONLY use (:E]L_dkJlA BRYTE" Ceramic
Cooktop Cleaner on tile glass cooktop.
Othel" (Te;llIIN Ill;Iv not be ;Is efle('tive.
To maintain and protect tile stu_hce (ff
veto glass cooktop, fi)llow these steps:
[] Befi)re using the cooktop fi)r the
fi_st time, clean it with CEIC_dVL__
BRYTE" Cermnic Cooktop (Jeanel;
This helps protect the top :rod
Inakes cleant/I) easier,
[] Daily use of CEIL_dMA BRYTE"
Ceramic Cooktop Cleaner will help
keep the cooktop looking new.
Burned-On Residue
[] Shake the cleaning cream well.
Apply a few drops of CEI_dMA
BRYTE '_Ceramic Cooktop Cleaner
directD to the cooktop,
[] Use a paper towel or CEIL_dVIA
BRYTE <_'Cleaning Pad for Ceramic
Cooktops to clean the entire
cooktop S/llS{;ice.
[] Use a (h T cloth or paper towel
to remove all cleaning residue.
No need to rinse.
NOTE:ItisveryknportantthatyouDONOTheat
thecooktopuntilit hasbeencleanedthoroughly
Use a CERAMABRYT£_ CleanflTg
Pad for Ceramic Cooktops or a
Scotch-Brite ®Multi-Purpose No
Scratch blue scrub pad.
TheCERAMABRYTE_ Ceramic
Cooktop Scraper and all
recommended supplies are
available through our PartsCente_
See flTstructions under "ToOrder
Parts" section on next page.
NOTE:Do not use a dull or
nicked blade.
WARNING:DAMAGEtoyourg/asssurfacemay
occurif youusescrubpadsotherthanthose
recommended
[] Mh)w the cooktop to cool,
[] Spread a few drops of CEIL_MMA
BRYTE _ Ceramic Cooktop Cleaner
on the entire burned residue area.
Using the included CEI_dMA
[]
BRYTE '>Cleanim, Pad fiw Ceramic
Cooktops, rub the residue area,
applying pressure as needed.
Heavy, Burned-On Residue
[] Mlow tile cooktop to cool,
[] Lrse a single-edge razor blade scraper
at approximately a 45 ° angle against
tile glass sm'fl_ce and scrape tile soil.
It will be necessary m apply pressure
to tile i';izoi" sci'aper ii1 order to
remove tile residue.
_Mter scraping with tile razor scrape_;
[]
spread a few drops of CEIL_4A
BRYTE _ Ceramic Cooktop Cleaner
on tile entire bm'ned residue area.
Use tile CEIL_dMA BRYTE ':Cleaning
Pad to remove any remaining
residue.
[] If any residue remains, repeat tile
steps listed above as needed.
[] For additional protection, after all
residue has been remo'.ed, polish
tile entire sm'lhce with CEIOdVIA
BRYTE ': Ceramic Cooktop Cleaner
and a paper towel.
For additional protection, after all
[]
residue has been removed, polish
tile entire sm'fi_ce with CEI_dVIA
BRYTE _ Ceramic Cooktop Cleaner
and a paper towel.
23
Page 24

Cleaningthe glasscooktop.
Metal Marks and Scratches
Be careflll not to slide pots and pans
[]
across your cooktop. It will lea_e
metal markings on tile cooktop
S/lI'J[ilce.
These marks are removable using
tile (:El_d'dA BRYTE _ Ceramic
Cooktop Cleaner with tile
CER_d_IA BRYTE ')Cleaning Pad
fin" Ceramic Cooktops.
CooktopSeal
To clean tile cooktop seal around tile
edges ot tile glass, lay a wet cloth on it
for a few minutes, then wipe clean with
nonabrasive cleane_.
[] If pots with a thin oxeday of
ahuninunl or copper are allowed to
boil dry, tile ove_tav may leave black
discoloration on the cooktop.
This should be _emoved immediately
betore heating again or the
discoloration may be peru/anent.
WARNING: Carefullycheckthe bottom of pans
forroughnessthat would scratch thecooktop.
Glasssurface--potential forpermanentdamage.
Our testing shows that if
you are cooking high sugar
mixtures such as jelly or
fudge and have a spillover,
it can cause permanent
damage to the glass surface
unless the spillover is
immediately removed.
Damage from Sugary Spills and Melted Plastic
[] Turn off all surli_ce units. Remove
hot pans.
[] Weming an oven mitt:
a. Use a single-edge razor blade
scraper (CEIL_d'dA BRYTE >
Ceramic Cooktop Scraper) to
move tile spill to a cool area
on tile cooktop.
b. Remove tile spill with paper
towels.
To Order Parts
To order (;EI_dMA BRYTE ':Ceramic
Cooktop Cleaner and tile cooktop
scrape_; please call our toll-li'ee number:
National PartsCenter 800.626.2002
CERAMABRYTE_
CeramicCooktopCleaner...... # WXIOX300
CERAMABRYTE_
CeramicCooktopScraper .... # WXTOX0302
Kit ......................... # WB64X5027
(Kitincludescreamandrazorscraper)
CERAMABRYTE_ CleaningPads
forCeramicCooktops.......... #WXTOX350
[] Any remaining spillover should be
left until the stmti_ce of tile cooktop
has cooled.
] Don't use tile stu_i_ce units again
tmO1 all of the residue has been
completely removed.
NOTE: If pitting orindentation in theglass
surfacehas alreadyoccurred,the cooktopglass
will have tobe replaced/n this case,servicewill
be necessary
24
Page 25

Beforeyoucall forservice...
GEAppliances.com
Troubleshooting -tips
Save time and money! Review the charts on the following
pages first and you may not need to call for service.
Possible Causes What ToDo
Surface units willnot Improper cookwaxe * Use pans which are fiat and match the dialneter
maintaina rolling boil being used. of the suriace unit selected.
er ceeking is net
fast enough
Surface units do A fuse in your home may be * Rel)lace the tuse or reset the circuit breakei:
net workpreperly blown or the circuit breaker
tripped.
Cooktop controls * Check to see the correct control is set for the suriace
improperly set. trait you are usin,
Scratches (mayappear Incorrect clemahag * Scratches are not removable. Tiny scratches will become
as cracks) on cooktop methods being used. less visible in tilne as a restflt of cleaning.
Cookwa_ce with rough bottoms * To avoid scratches, use the recolnlneladed clealfing
being used or coarse pm'ticles procedures. Make stu'e bottoms of cookware are clean
ii i i i i i
(salt or smad) were between before rise, and rise cookware with sn_ooth 1)ottolns.
the cookwm'e mad the surface
of the cooktop.
Cookwaxe has been slid
across the cooktop surface.
Areas of discoloration Food spillovers not cleaned * See the Cleaning the glass cooktop section.
on the cooktop before next use.
Hot surface on a model * This is normal. The sIu't;ice Ill;IV appear discolored
with a light colored when it is hot. This is temporary and will disal)pear
glass cooktop, as the glass co(>ls.
Plastic melted Hot cooktop came into * See the Glass surface--potential for permanent damage
to the surface contact with plastic placed sectiou in the Cleaning the glass cooktop section.
on the hot cooktop.
Pitting (or indentation) Hot sugar mixture spilled * (',:Ill a qualified technician for rel)lacemeut.
of the ceektop on the cooktop.
Frequent cycling Improper cookware * Use only flat cookware to minimize c)'cliug.
off and on of being used.
surface units
The display goes Power surge. * Disconnect power at the fuse box or circuit breaker
blank or indicator for at least 10 seconds. Ttu'u power on and power
lights come on when u[) your. range_ . /f the indicator lights, are still on,
range is not in use call for service.
Clock and timer do Plug on range is not completely * Make sure electrical l)lug is plugged into a live, ln'operly
not work inserted in the electrical outlet, gr()tm(led outlet.
A fuse ha your home may * Replace the ti/se or reset the circtfit breakel;
be blown or the circuit
breaker tripped.
Oven controls improperly set. * See the Using the clock and timer section.
25
Page 26

Beforeyoucall forservice...
Troubleshooting tips
Possible Causes What ToDo
Oven light does Light bulb is loose or defective. * Tighten or replace the l_ulb.
not work
Ovenwill notwork Plug on range is not • Make sure electrical l)lug, is l)lugged,, into a live, properly
Food does not bake Oven controls improperly set. * See the Using the oven section.
or roastproperlF
Switch operating * Call t_)r service.
light is broken.
completely inserted in grounded ()utlet.
the electrical outlet.
A fuse in your home may * Replace tile fl/se or reset tile circuit breakeL
he blown or the circuit
breaker tripped.
Oven controls improperly set. * See the Using the oven section.
Door left in the */f llecesS;ll'V alh)w the oven to cool then ttnlock
locked position, the door.
Shelf position is incorrect or * See the Using the oven secti()n.
the shelf is not level.
Incorrect cookware or * See the Using the oven section.
cookware of improper
size being used.
Oven thermostat needs * See the Adjust the oven thermostat--Do it yourself!
adjustment, section.
Food does not Oven controls improperly set. * Make sure vet! turn the knob all the way to the
bmilproperly BROILp(,siti,,n.
Door not open to the * See the Using the oven section.
broil stop position as
recolnlnended.
Improper shelf position * See the BroilingGuide.
being used.
Cookware not suited * Use the broiling, })an and ,grid that came with vot/r range.
for broiling.
Aluminum foil used on the * See the Usingtheoven section.
broiling pan mad grid has
not been fitted properly mad
slit as recommended.
ha some areas the power * Preheat the broil element fi)r 10 mint/tes.
(voltage) may he low.
• Broil for the lon_est_ , period of time l'eCOll/iHellded ill
the Broiling Guide.
Oven temperature Oven thermostat • See the Adjust the oven thermostat--Do it yourself!
too hot or too cold needs adjustment, se (ti()n.
2C
Page 27

GEAppliances.com
i iiiii!illiiiiiiiiiiiiiilllli!Iiiiiiiiiiii i!
Power outage,
Storage drawer Rear drawer support is • Reposition the drawer. See the Storage Drawer
is crooked on top of the guide rail. Removal instructions in the Care and cleaning of your
Storage drawer Power cord may be • Rel)osifion the drawer and power cord. See the
won't close obstructing drawer Storage Drawer Removal instructi_ms in the Care and
Possible Causes
Power outage or surge.
in the lower back cleaning of your range section.
of the range,
Rear drawer support is • Reposition the drawel: See the StorageDrawer Removal
on top of the guide rail. instructions in the Care and cleaning of your range
What ToDo
• S(nne models will automatically resume their setting
once the power is restored. On models with a clock,
wm must reset the clock. If the oven was in use, you
must reset it b v turning the Oven Temperature knob
back to OFF, setting the clock and resetting any
cooking traction.
range section.
section.
Ovenwill notself-clean The oven temperature • Mlow the l'ange 1o cool 1o l'OOln [ellll)el'atul'e ;lad reset
is too high to set a the controls.
self-clem_ operation.
Oven controls improperly set. • Make stu'e you ttu'n the control knob :ill the way to the
CLEAN position.
Oven door is not in • Make sure you move the door latch handle :ill the
the locked position, way to the right.
Oven starts a self-clean Oven door locked during • Turn the Oven Temperature knob to OFF. Allow the
cycle when youwanted cooking, oven to cool. Never force the door latch handle.
to bake, roast or broil
"Crackling " or This is the sound of the • This is normal.
"popping" sound metal heating and cooling
during both the cooking
and cleaning functions.
Excessive smoking Excessive soil. • Turn the Oven Temperature knob to OFF. Open
during a clean cycle the windows to rid the room of smoke. Wait until
the CLEAN light goes off. \.Vipe up the excess soil
and reset the clean cycle.
Oven door will Oven too hot. • Allow the oven to cool below locking, temI)erature.
not unlock
CLEAN light flashes Oven controls not • Move the door latch handle to the right beh,re
properly set. ,settiw,_ the Oven Temperatm'e knob to CLEAN.
27
Page 28

Beforeyoucall forservice...
Troubleshooting tips
Possible Causes What ToDo
Oven not clean a#er Oven controls not * See tile Using the self-cleaning oven section.
a clean cycle properly set.
Oven was heavily soiled. * Clean up heax T spilh)vers before starting tile clean
,-,,le.He.,'il,'soiled,,,e.sm.v.eedt,,selt ,le..
again or tor a longer, l)eri°d of time.
Oven makes This is the sound of the • This is normal.
clicking noise heating element turning
off and on during
cooking fm_ctions.
CLEANlight is on The oven door was * Turn tile Oven Temperature knob to OFF. _Mlow tile
when you want to cook accidentally locked, oven to cool. Then move tile latch to tile tar left.
"F--anda number You have a function * Turn tile Oxen Temperatm'e knob to OFF. Put tile oxen
or letter"flash in error code. back into operation.
Never force tile door latch handle.
If the function code repeats. * Disconnect all power to tile range for at least
30 seconds and then reconnect power. If tile
function error code repeats, call ti)r serxice.
Thedisplaygoesblank Power surge. * Disconnect power at tile filse box or circuit breaker
or indicator lights come for at least 10 seconds. Tm'n i)ower on and power
u l) your range. 1t tile indicator lights are still on,
call tot service.
The clock is in the • See the Using the clock and timer section.
black-out mode.
Oven door will Oven too hot. * Turn tile Oxen Teml)erature knob to CLEAN.
Tile glowing oven cleanim,_ light after tile knob is
turned indicates tile oxen is too hot from prexious
tlse. To cool tile o',en, open tile door wide, and alh)w
tile oxen to cool. After tile oxen has cooled, close
the door and slide the latch handle all the wax to
the right.
:'Burning"or "oily;
odoremittingfrom
the vent
Strong odor
ii i i i i i i i
This is normal in a new
oven and will disappear
in time.
An odor from the insulation
around the inside of the
oven is normal for the first
few times the oven is used.
• To speed tile process, set a self-clean cycle
for a minimmn of 3 hours. See tile Using the
self-cleaning oven section.
• This is tempora_ T.
28
Page 29

GE Service Protection Plus rM
GE, a name recognized worldwide fbr quality and dependability', offers y'ou
Service Protection Plus'"--comprehensive protection on all y'our appliances--
No Matter What Brand!
Benefits Include:
• Backed by GE
• All brands covered
• Unlimited service cars
• All parts and labor costs included
• No out-of-pocket expenses
• No hidden deductibles
• One 800 number to call
You will be c()mpletel} satisfied with our serxice protection or you ma} request }our inonev back
on tile remaining xalue of xo/u" contract. No questions asked. It's that simple.
Protect vom" refl_igerat(m dishwasher; washer and (hTe_; range, TV, VCR and much more--any brmad!
Plus there's iso extra charge tot eulergency service and low monthly financing is available. Even icelnaker
coverage and tood spoilage protection is offered. You can rest easy; knowing that all wmr wduable
household products are protected against expensive repairs.
Place your confidence in (;E and call us in tile U.S. toll-tl'ee at _IIII._Z_).ZZZ/-]:
for inoi'e illfoi'ulatioll,
*-M1 lnands cox( _e(1, up io 20 y(m's old, in I1-1( continental U.S.
We71 CoverAnyAppliance.
Anywhere. Anytime.*
Please place in envelope and mail to:
General Electric Company
Warranty Registration Department
P.O. Box 32150
Louisville, KY 40232-2150
29
Page 30

Consumer Product Ownership Registration
Dear Customer:
Thank you for purchasing our product and thank you for placing your confidence in us.
_a/e are proud to hme you as a customer'.
Follow these three steps to protect your new appliance investment:
Complete and mall
your Consumer
Product Owuership
Registration today.
t]a_c the pca(c o/
mind of knowing we
can contact you in
th( tmlik(lv ev(nt of
a sa/i_,tv lnodificatioll.
Aller mailing the
regisu:atioH below,
store this dOCtln/ellt
in a sati' t)lace. It
COl/taills ill/()rl//at]Ol/
you will need should
VO/I reqllil?e service.
Our service mmd)er is
800.C,E.( 2\RES
(800.432.2737).
Model Number Serial Number
,,I I,,
Important: If you did not get a registration card with your
product, detach and return the form below to
ensure that your product is registered, or register
online at GEAppliances.com.
Consumer Product Ownership Registration
Read yore: ()wner's
Mmmal carefldh.
It will help you
operam your new
appliance properly.
, I
,_,,_ Cut here
Model Number Serial Number
Ms. Mrs. Miss
Firsl ] ] Last
Name I I I I I I I I I Nam( I I I I I I I I I I I I
A( (tess I I I I I I I I I I I I I I I I I I I I I I I
Zip
[)lte l'l ic( d
_,_o.,h II II , I
* Pie as( provide your e-mail ad(lress to rec(dve, via e-mail, dis(ounts, SF,¢(ial off'( rs and olh(r important
(ommtmications from GE ,'kF,plian(es ((;EA).
Ch((k here if you do not want Io F( (( iv( (ommuni(alions from (;EA's (at( fully s(l( (le([ l)artners.
GEAppliances
General Electric CompanF
Louisville, KentuckF
GEAppliances, eom
3O
Number [ [ I I I I I
I
I
Page 31

GEElectricRange Warranty.
Aft warranty service provided by our Factory Service
Centers, or an authorized Customer Care®technician.
Toschedule service, on-line, 24 hours a day, visit us at
GEAppliances.com, or call 800.GE.CARES (800.432.2737).
Staple your receipt here.
Proof of the original purchase
date is needed to obtain service
under the warrantg
GEWill Provide:
Anyparto_ the range which tifils due to a (letect in materials or wor!unanship. During this
Fromthedate of the full one-yearwarranty,(;E will alsoproxide, freeof charge,all labor and in-hem e serxice to
origina!purchase replace the defbctixe part.
A replacement glass cooktop if it should crock due to thermal shock, discolor; crack at the
Fromthedate Ofthe
originalpurchase
Service trips to your home to teach you how to use
the product.
hnproper h_staJlation.
Failure of the product if it is abused, misused,
or used for other thma the intended purpose or
used commercially.
Dmnage to the glass cooktop caused by use of clemaers
other than the recommended clemlhag cretans.
rtlbber seal between the glass cooktop and the porcelain edge, or if the pattern wea_ off.
A replacement radiant surface unit if it shotdd burn Otlt.
During this lim#ed additional four-year warranty, you will be responsible fin" any labor
OI" in-hou/e service.
Replacement of house fuses or resetting of circuit
breakers.
Damage to the product caused by accident, fire, floods
or acts of God.
hacidentaJ or consequentiaJ damage caused by possible
defects with this applimace.
Dmnage to the glass cooktop caused by hardened
spills of sugaxy materials or melted plastic that
axe not clemaed according to the directions ha
the Owner's MmmaJ.
This warranty is extended to the original purchaser and any succeeding owner for products purchased for
home use within the USA. In Alaska, the warranty excludes the cost of shipping or service calls to your home.
Some states do not allow the exclusion or limitation of incidental or consequential damages. This warranty
gives you specific legal rights, and you may also have other rights which vary from state to state. Toknow
what your legal rights are, consult your local or state consumer affairs office or your state's Attorney General
Warrantor: General Electric Company.Louisville, KY 40225
31
Page 32

ConsumerSupport.
GEAppliancesWebsite GEAppliances.com
Have a question or need assist;race with your appliance? Try the (;E Al)pliances Website 24 hom_ a (la);
any day of the year'. For greater convenience and faster se_Mce, you can now download Owner's Manuals,
order parts, catalogs, or even schedule service on4ine. You can also "_&sk Ore" Team of Experts .....
yO/lI" questions, and so iiluch i/loi'e,,,
ScheduleService
Expert (;E repair se_Mce is one one step awa) from yore" doo_; Get on-line and schedule veto" service at
your comenience 24 hom_ am da_ of the '_ear! Or call 800.GE.(:ARES 800.432.2737) during nomml
business hom_.
GEAppliances.com
RealLifeDesignStudio GEAppliances.com
GE SUl_l_orts tile Universal Design concel)t--prodtu-ts, services and enviromnents that can be used by
people of all ages, sizes and capabilities. We recognize tile need to design fi)r a wide range of physical and
ment;fl abilities and impaim_ents. For details of GE's Universal Design applications, including kitchen
design ideas fin" people with disabilities, check out ore" _,Vebsite today. For the hearing impaired, please call
800.TDD.GEAC (800.833.4322).
Extended Warranties GEAppliances.com
Pro'chase a (;E extended warranty and learn about special disco/mts that are axailable while veto" warranty
is still in effect. You can pro'chase it on-line anytilne, or call 800.626.2224 dtwing nom_al business hom_.
(;E (_onsulner Heine Serxices will still be there after )our warran D, expires.
PartsandAccessories GEAppliances.com
Individtmls qualified to se_Mce their own appliances can have parts or accessories sent directly to their
homes (VISA, MasterCard and Discover cards are accepted). Order on-line today, 24 hom_ evei'v day or
by phone at 800.626.2002 during nom_al business hom_.
Instructionscontainedin thismanualcoverprocedurestobeperformedbyanyuser.Otherservicinggenerally
should be referred to qualified service personnel. Caution must be exercised, since improper servicing may cause
unsafe operation.
ContactUs GEAppliances.com
If' you are not satisfied with tile service you receive from GE, contact us on our _.Vebsite with all tile details
including yore" phone nlllllbei; oF write to: General Manage_; CllStOlllei" Relations
GE Appliances, Appliance Park
I,ouisville, K¥ 40225
RegisterYourAppliance GEAppliances.com
Register your new applim_ce on-lhm_at your convenience! Timely product registration will allow for
enhanced communication and prompt service trader tile temps of _our warrant); should tile need arise.
You may also mail in tile pre-printed registration card included in tile I)ackim"_ material.
Printed in the United States
 Loading...