

GE JBP62SN1SS, JBP23SN1SS, JB720SN1SS, JB700SN1SS, JB700DN1BB Owner’s Manual
...
GEAppliances.com
Safety instructions ........ 2-6
-0
C5
C
0
"0
U3
C
C
C_
4-a
Or)
0
(1)
LL.
I
I
Operating Instructions
Clock end Timer ............. 17
Oven ...................... 1!-22
Adjust the Oven Thermostat .... 19
Broiling, Broiling Guide ....... 14
Controls ................... 1i
Lower Oven Drawer ........... 16
Power Outage ......... 12
Sabbath Feature ......... 20
Self-Cleaning .......... 21, 22
Special Features .............. 19
Timed Baking and Roasting 18
Warming Drawer ...... 15
Surface Units .............. 7-10
Quickset tli and
Quickset IV Models
Care and Cleaning
CoilSurface Units ............ 29
Control Knobs ............ 23
Drip Pans ............. 29
Gloss Cooktop ............. 27, 28
Lift-Off Oven Door ...... 25
Lift-Up Cooktop ........... 29
Light ...................... 26
I
Oven Heating Elements ...... 26
Racks ............ 26
Removable Lower Oven
Drawer Pan ......... 24
Removable Warming
Drawer Pan ................. 24
Standard-Clean Oven Interior 2/4
Storage Drawer ..... 26
Vent ....... 2/4
In Canada contact us at:
www.GEAppfiances ca
Troubleshooting Tips 30-33
Accessories .............. 34
Consumer Support
Consumer Support ,, BackCover
Warrantg ....... 35
Write the model and serial
numbers here:
Model #
Seria! #
You can find them on a label
behind the drawer or behind the
lower oven door on the front of
the rangeframe
Printed on
Recgcled Paper
49-80567 03-09 JR

IMPORTANT SAFETYINFORMATION.
READ ALL INSTRUCTIONS BEFOREUSING.
WARNING I
Readaft safety instructions before using the product, Failure to follow these instructions mag result in fire,electric
shock, serious injury or death
ANTI-TIP DEVICE
Toreduce the nsk of tipping the range, the range must
be secured bg apropertg installed anti-tip bracket See
installation instructions shipped with the bracket for complete
details before attempting to install
For Freestanding Ranges:
Tocheck if the bracket is installed and engaged properly,
remove the storage drawer or kick panel and took underneath
the range to see that the leveling leg isengaged in the
bracket, On models without a storage drawer or kickpanel,
carefully tip the range forward Thebracket should stop the
range within 4 inches, tf it does not, the bracket must be
reinstalled If the range is pulled from the watt for"ang reason,
atwags repeat this procedure to verifg the range is properf#
secured bg the anti-tip bracket
Never completely remove the leveling legs or the range wilt
not be secured to the antFtip device propertg
For Slide-In Ranges:
To check if the bracket is installed and engaged properlg,
remove the storage drawer or kick panel and look
underneath the range to seethat the leveling leg is engaged
in the bracket
0
•All ranges can tip.
•BURNS or other SERIOUS
INJURIES can result,
• INSTALL and CHECK the
ANTI-TI P bracket following
the instructions supplied
with the bracket.
For Drop-ln Ranges:
Tocheck if the bracket is installed and engaged propertg,
lower the oven door and gentlg applg medium force at
the handle end until movement of the range is detected
Continue pressing until the anti-tip bracket is engaged
and movement stops,,A small amount of movement is
acceptable at the back of the range top, but it should be
stable and not tip once the anti-tip bracket is engaged,
if it does not, the bracket must be reinstalled
If gou did not receive an anti-tip bracket with gout purchase,
coil 1800 626877/4 to receive one at no cost {in Canada, call
1..800,5613344) For installation instructions of the bracket,
visit GEAppliances,,com (inCanada, GEAppliances,ca),
WARNING I IMPORTANTSAFETYNOTICE
TheCafifomJaSafe Drinking Water and ToxicEnforcement Act requires the Governor of Cafifomia to publish a list
of substances known to the state to cause cancer; birth defects or other reproductive harm, and requires
businesses to warn customers of potentiaf exposure to such substances
Thefiberglass insulation in self-dean ovens gives off a verg smafl amount of carbon monoxide during the cleaning
cgde Exposure can be minimized by venting with an open window or using a ventilation fan or hood
ltt, WARNING IGENERALSAFETYINSTRUCTIONS
GEAppliancesocom
Use this appliance for its intended purpose as
described in this Owner's l'4anua[
Be sure gour appliance isproperlg installed and
grounded bg a qualified installer in accordance with
the provided installation instructions
Do not attempt to repair or replace ang part of gour
range unless it is speciflcallg recommended inthis
manual All other servicing should be transferred to
a qualified technician
Before performing ang service, unplug the range
or disconnect the power supplg at the household
distribution panel bg removing the fuse or switching
off the circuit breaker
: Do not leave children alone-children should not
be left alone or unattended inan area where an
appliance isin use Theg should never be allowed
to climb, sit or stand on ang part of the appliance
:::::::CAUTION :Do notstoreitemsofinterestto
children above a range or on the backguard of a
range-children climbing on the range to reach
items could be seriouslg injured
: Use onfg drg pot holders-moist or damp pot
holders on hot surfaces mag result in burns from
steam. Do not let pot holders touch hot surface
units or heating elements Do not use a towel or
other bulkg cloth in place of pot holders
,: Never use gour appliance for warming or heating
the roam
:i: Do not touch the surface units, the heating
elements or the interior surface of the oven
These surfaces mag be hot enough to burn even
though theg are dark in color_During and after use,
do not touch, or let clothing or other flammable
materials contact the surface units, areas nearbg
the surface units or ang interior area of the oven;
allow sufficient time for cooling first, Other surfaces
of the appliance may become hot enough to cause
burns Potentiallg hot,surfaces include the cooktop,
areas facing the cooktop, oven vent opening,
surfaces near the opening and crevices around the
oven door.
Do not heat unopened food containers Pressure
could build up and the container could burst,
causing an injury
Do not use aluminum foil to line the drip pans or
anywhere in the oven, except as described inthis
manual Hisuse could result in damage to the range
and shock or fire hazard
:' Avoid scratching or impacting glass doors, coot<
tops or control panels Doing so mag lead to glass
breakage. Do not cook on a product with broken
glass Shock,fire or cuts mag occur.
:::Cook meat and poultrg thoroughlg-meat to at
least an internal temperature of 160°F and poultrg
to at least an internal temperature of 180°F.Cooking
to these temperatures usuallg protects against
foodborne illness
WARNING I KEEPFLAMMABLE MATERIALSAWAY FROM
THERANGE.
Do not store or use flammable materials in on oven
or near the cooktop, including paper, plastic, pot
holders, linens, wall coverings, curtains, drapes and
gasoline or other flammable vapors and liquids
Never wear toose4itting or hanging garments while
using the appliance These garments mag ignite if
theg contact hot surfaces causing severe burns
:::::Do not let cooking grease or other flammable
materials accumulate inor near the range Grease
in the oven or on the coot,top mag ignite,
Clean ventilating hoods frequently Grease should
not be allowed to accumufate on the hood or filter,
IMPORTANT SAFETYINFORMATION.
READ ALL INSTRUCTIONS BEFOREUSING.
i_, WARNING !IN THE EVENTOFA FIRE,TAKETHE FOLLOWING
STEPSTOPREVENTTHEFIREFROMSPREADING:
Do not use water on grease fires Never pick up
a flaming pan, Turn the controls off Smother a
flaming pan on a surface unit bg covering the
pan completelg with a weIFfitting lid, cookie sheet
or fiat t_ag Use a multi-purpose drg chemical or
foam-tgpe fire extinguisher
iz::If there is a fire in the oven during baking, smother
the fire bg closing the oven door and turning the
oven off or by using a multi-purpose drg chemical
or foam-type fire extinguisher
L: If there isa fire in the oven during selFclean,
turn the oven off and wait for the fire to go out
Do not force the door op_B Introduction of fresh
air at self-clean temperatures may lead to a burst
of flame from the oven Failure to follow this
instruction mag result in severe burns
l_i,WARNING JCOOKTOP,SAFETYINSTRUCTIONS
Never leave the surface units unattended at
medium or high heat settings Boilovers cause
smoking and greasy spillovers that mag catch
on fire
Never leave oil unattended while frying If allowed
to heat begond its smoking point, oil mag ignite
resulting in fire that may spread to surrounding
cabinets Use a deep fat thermometer whenever
possible to monitor oil temperature
if!::
To avoid oil spitlover and fire, use o minimum
amount of oil when shallow pan-frying and avoid
cooking frozen foods with excessive amounts of ice
i;::Onlg certain types of glass, glass/ceramic,
earthenware or other glazed containers are suitable
for cooktop service; others mag break because of
the sudden change in temperature,
To minimize the possibility of burns, ignition of
flammable materials and spillage, the handle of a
container should be turned toward the center of the
range without extending over nearby surface units,
: When preparing flaming foods under a hood, turn
the fan on
Use proper pan size-select cookware having flat
bottoms large enough to cover the surface heating
element, The use of undersized cookware will
expose a portion of the surface unit to direct
contact and mag result in ignition of clothing.
Proper relationship of cookware to surface unit
will also improve efficiency
4
GEAppliances.com
[AkWARNHNG ] RADIANTCOOKTOPSAFETYINSTRUCTIONS
(Somemodels)
Use care when touching the cooktop The glass
surface of the cook*topwill retain heat after the
controls have been turned off,
Do not cook on a broken cooktop If glass cooktop
should break, cleaning solutions and spi!lovers mag
penetrate the broken cooktop and create a risk of
electric shock Contact a qualified technician
immediatelg
Avoid scratching the glass cooktop The cooktop
can be scratched with items such as knives, sharp
instruments, rings or otherjewelrg, and rivets on
clothing
::: Do not place or store items that can melt or catch
fire on the glass cooktop, even when it isnot being
used, If the cooktop is inadvertentlg turned on, theg
mag ignite. Heat from the cooktop or oven vent
after it is turned off mag cause them to ignite also
Use CERAMABRYTE®ceramic Cooktop Cleaner and
CERAMABRYTE®Cleaning Pad to clean the cooktop
Wait until the cooktop cools and the indicator light
goes out before cleaning A wet sponge or cloth
on a hot surface can cause steam burns Some
cleaners can produce noxious fumes if applied to
o hot surface, Note: Sugar spills ore on exception
Theg should be scraped off while still hot using an
oven mitt and a scraper. Seethe Cleaning the glass
coaktop section for detailed instructions,
Readand follow all instructions and warnings on
the cleaning cream label
WARNnNG1COIL COOKTOPSAFETYINSTRUCTIONS
(Some models;
Do not immerse or soak the removable surface
units Do not put them in a dishwasher Do not self-
clean the surface units in an oven, Doing so mag
cause them to fail presenting a burn or fire hazard
:::::Toavoid the possibilitg of a burn or electric shack,
atwags be certain that the controls for atl surface
units are at the OFFposition and a!l coils are coo!
before attempting to lift or remove a coil surface unit
L Besure the drip pans are not covered and are in
place. Their absence during cooking could damage
range parts and wiring
l,& WARNHNG I OVENSAFETYINSTRUCTIONS
Stand owag from the range when opening the oven
door, Hot air or steam which escapes can cause
burns to hands, face and/or ages
( Keep the oven vent unobstructed
::: Keep the oven free from grease buildup Grease
in the oven mag ignite
::: Place oven racks in desired location while oven
iscool. If rack must be moved while oven is hot,
do not let pot holder contact hot heating element
in oven.
When using cooking or roasting bags in the oven,
follow the manufacturer s directions
Pullthe oven rack to the stopqock position when
loading and unloading food from the oven. This
helps prevent burns from touching hot surfaces
of the door and oven walls
Do not leave items such as paper, cooking utensils
or food in the oven when not in use Items stored in
an oven can ignite
Do not use aluminum foil to line the oven bottom
Foilmag trap or reflect heat leading to a shock or
fire hazard.
5
IMPORTANT SAFETYINFORMATION.
READALL INSTRUCTIONS BEFOREUSING.
....................................................................... ,,,,,,,,,,,,,,,,,,,,, ,
I_ WARNING SELF-CLEANINGOVENSAFETYINSTRUCTIONS
{Some models)
The seff-cleaning feature operates the oven at temperatures high enough to burn awag food soils in the
oven Follow these instructions for safe operation.
Before operating the self-clean cgcte, remove pans,
shing metal oven racks and other utensils from the
oven. Onlg grag porcelaimcoated oven racks mag
be left in the oven Do not use self-clean to clean
other parts, such as drip pans or bowls
Before operating the self-clean cgcle, wipe grease
and food soils from the oven. Excessiveamount of
grease mog ignite leading to smoke damage to
gour home
If the selFcleoning mode malfunctions, turn the
oven off and disconnect the power supplg Have it
serviced bg a qualified technician
Do not clean the door gasket. The door gasket is
essential for o good seal. Care should be taken not
to rub, damage or move the gasket
!i:!:.
Do not use oven cleaners No commercial oven
cleaner or oven liner'protective coating of ang kind
should be used in or around ang part of the oven
!-&WARNING t WARMING DRAWER/LOWEROVEN DRAWER
SAFETYINSTRUCTIONSCsomemodefsJ
i!i!i!
The purpose of the warming drawer isto hold hot
cooked foods at serving temperature. Bacteria will
grow in food while it isbelow ].40°F Do not put cold
food in warming drawer. Do not heat food for more
than 2 hours Failure to follow these instructions
mag result in foodborne iIIness.
Do not leave paper products, plastics, conned food
or combustible materials in the drawer Theg mag
ignite
Do not touch the heating element or the interior
surface of the drawer These surfaces mag be hot
enough to cause burns,
L Use core when opening the drawer, Open the
drawer o crack and let hot air or steam escape
before removing or replacing food Hot air or
steam that escapes can cause burns to hands,
face and/or eges
Do not use aluminum foil to line the warming
drawer Foil isan excellent heat insulator and
wilt trap heat beneath it. This will upset the
performance of the drawer and potentia!lg
cause o fire hazard,
Using the surface units, tonsomemode )
,,i,,u,ml,i ,,,,,,,,,,,, ii ilu i,im ii, ullll i
GEAppliances,,com
WARNI or high settings Keep flammable items owag from the cooktop Turn off all
NG_ FIREHAZARD, Never leave the range unattended with the cooktop on medium
...... controls when done cooking Failure to follow these instructions con result in
fire, serious injurg or death
Throughout this manual, features and appearance mug vary from your model
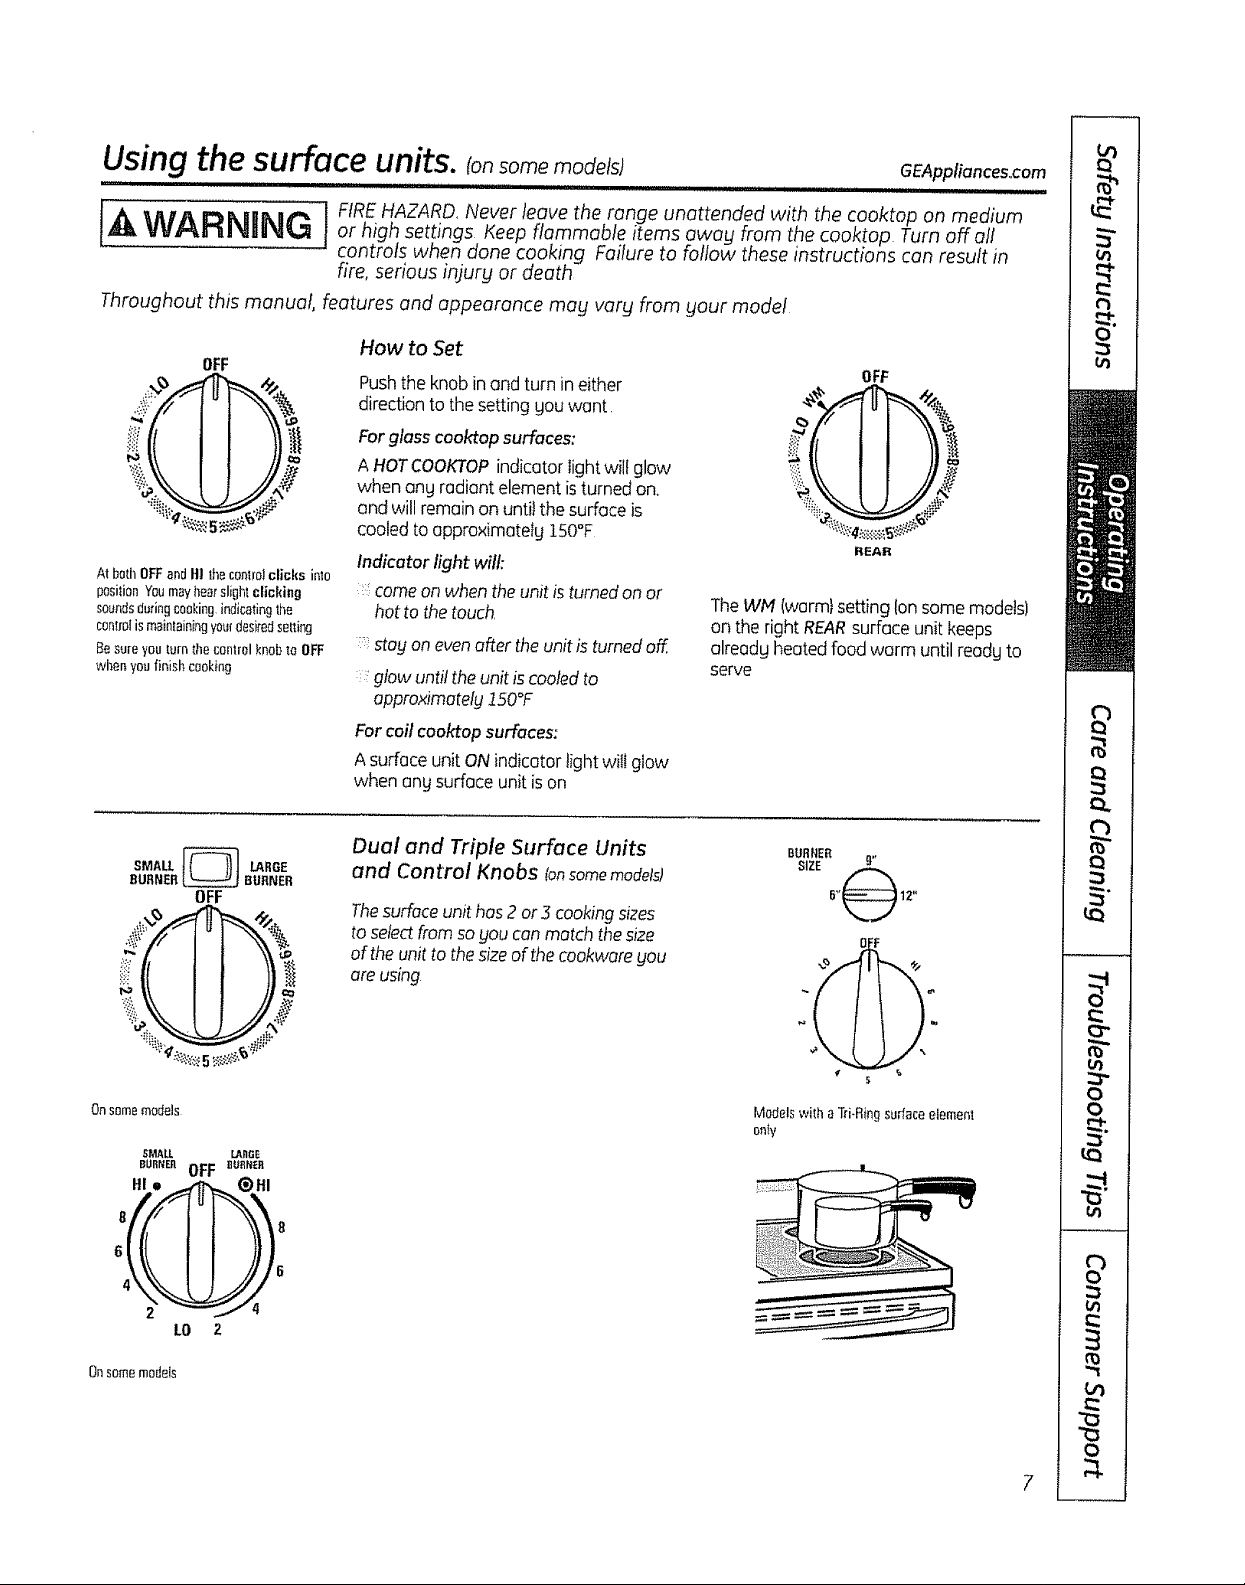
How to Set
OFF
Pushthe knob inand turn ineither
OFF
directionto thesetting gouwant.
Forglass cooktop surfaces:
A HOTCOOKTOPindicator lightwillglow
when ong radiant element isturned on.
_.\* I I //,,_
I I /l
and will remain on untilthe surfaceis
AtbotllOFFandItl thecontrolclicks inlo
positio_¥_Jm_¥l_ sii_h_cli_ki_g
soundsduringcookingindicatingthe
controtis maintainingyo_rdeskodstating
Besureyou _.urnthecontrolknobto OFF
whenyoufinishcooking
cooled toappro×imatetg150°F
Indicator light will:
:_.comeonwhentheunit isturnedon or
hotto thetouch,
::;stagonevenafter the unit is turnedoff,
::'glow until the unit is cooledto
TheWM (warmtsettingIon some models)
ontheright REARsurfaceunit keeps
olreodgheatedfoodworm until reodgto
serve
RI_AR
approximately!150°F
For coil cooktop surfaces:
A surface unit ONindicator light wilt glow
when ong surface unit is on
SMALL _ LARGE
BURNER_ 8UF_NEFI
OFF
On some models
_MAtL LMiGE
BOn.EnOFF_n_e.
6
LO Z
Onsome models
Dual and Triple Surface Units
and Control Knobs tonsomemodels)
BURNER
SIZE 9"
Thesuffoce unit has 2 or 5 cooking sizes
to select from so _loucan motd_ tt]esize
0
of the unit to the size of the cookwore gou
ore using
Modelswilha Td.Rfngsurfaceelement
ontV
B
Usingthe surface units.
Throughout this manual, features and appearance may vary from your model,
Temperature Limiter on Radiant Glass Cooktops
Evergradiant surface unit has a
temperaturetimiter.
Thetemperature lirniter protects thegloss
coaktopfrom getting toohot
Thetemperature limiter mag cgclethe
unitsoff for atime if,'
::_.thepan bails drg
• thepan bottom Jsnotfiat
,::thepan is off-center
:::thereis no pan onthe unit
Modelswith a bridgebume_"only
I%
FnONT BRIDGE
BURNER _ BURNER
F'-."k"
\t,l !)i
FRONT
WarmingZone
MED
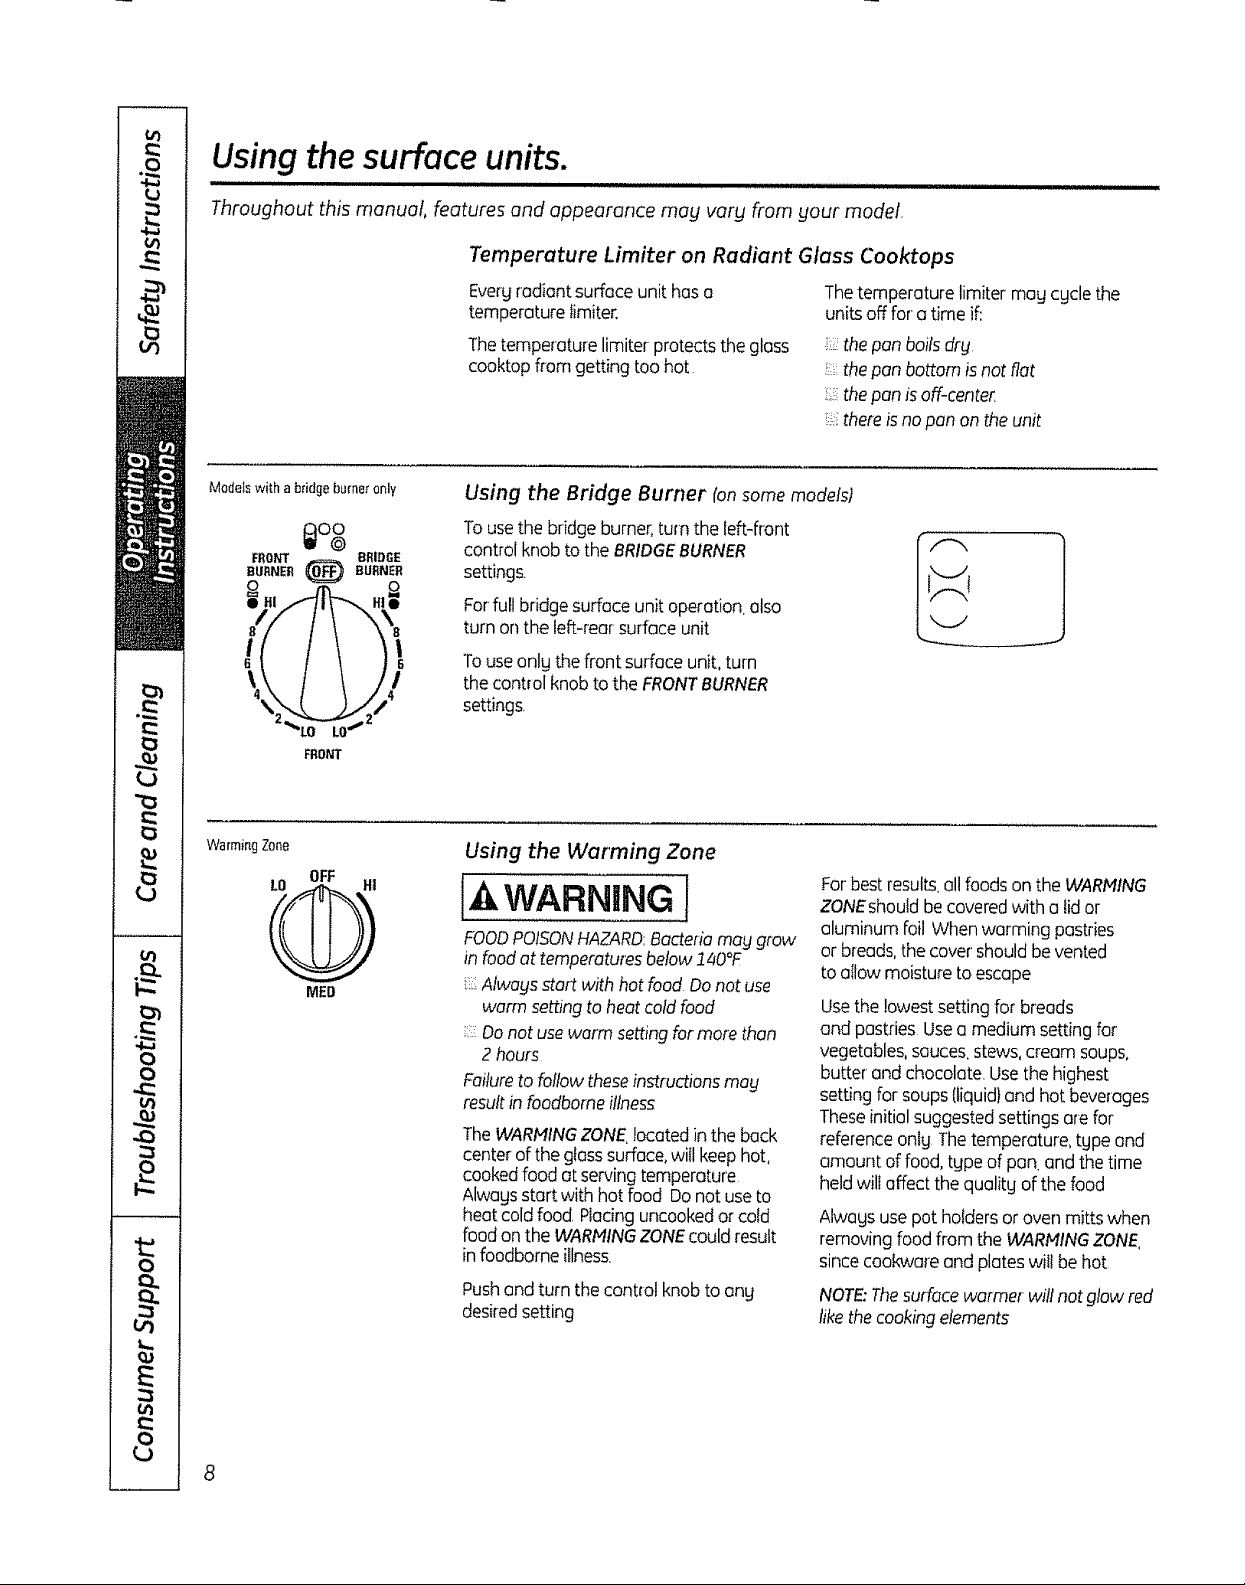
Using the Bridge Burner (onsome models)
Tousethe bridge burner,turn the left-front
controlknob tothe BRIDGEBURNER
settings
Forfull bridge surfaceunit operation,also
turn on the left-rear surfaceunit
Touse onlg the front surface unit, turn
the control knob to the FRONT BURNER
settings.
Using the Warming Zone
For best results, all foods on the WARNING
WARNaNGI
FOODPOISONHAZARD:Bacteriamay grow
in foodat temperaturesbelow140°F
Alwagsstart with hot food.Donot use
warm setting to heat cold food
Donot usewarm settingfor more than
2 hours
Failureto follow theseinstructionsmag
resultin foodbomeillness
TheWARNINGZONElocatedin the back
centerof theglasssurface,willkeephot,
cookedfood at servingtemperature
Alwagsstart with hot food Donot useto
heatcoldfood. Placinguncookedor cold
foodon the WARNINGZONEcouldresult
in foodbomeillness.
Pushandturn thecontrol knob to ong
desiredsetting
ZONEshould be covered with a lid or
aluminum foil When warming pastries
or breeds, the cover' should be vented
to oIIow moisture to escape
Use the lowest setting for breads
and pastries Use a medium setting for
vegetables, sauces, stews, cream soups,
butter and chocolate. Use the highest
setting for soups {liquid} and hot beverages
These initial suggested settings are for
reference onlg The temperature, tgpe and
amount of food, tgpe of pan. and the time
held will affect the qualitg of the food
Alwagsusepot holdersor oven mitts when
removing food from the WARNINGZONE
sincecookwareand plateswil!be hot
NOTE:Thesurfacewarmer willnotglow red
likethecookingelements
GEAppliances.com
Thefollowing information wifl help gou choose cookware which wit! give good performance on glass cooktops,
Home Canning Tips
Besurethecanneriscenteredover
the surfaceunit
Makesurethecannerisfiat onthe bottom
Topreventburns from steam or heat,
usecautionwhen canning
Userecipesand proceduresfrom
reputablesources Theseareavailable
from manufacturers suchas Bali®and
Kerr¢ and the Department of Agriculture
ExtensionService
Flat-bottomedcannersare recommended
Useof water bath cannerswith rippled
bottoms mag extendthe time required
to bring the water to a boil
============================
::i;:_SURFACE :
i:::_,:, COOK NG
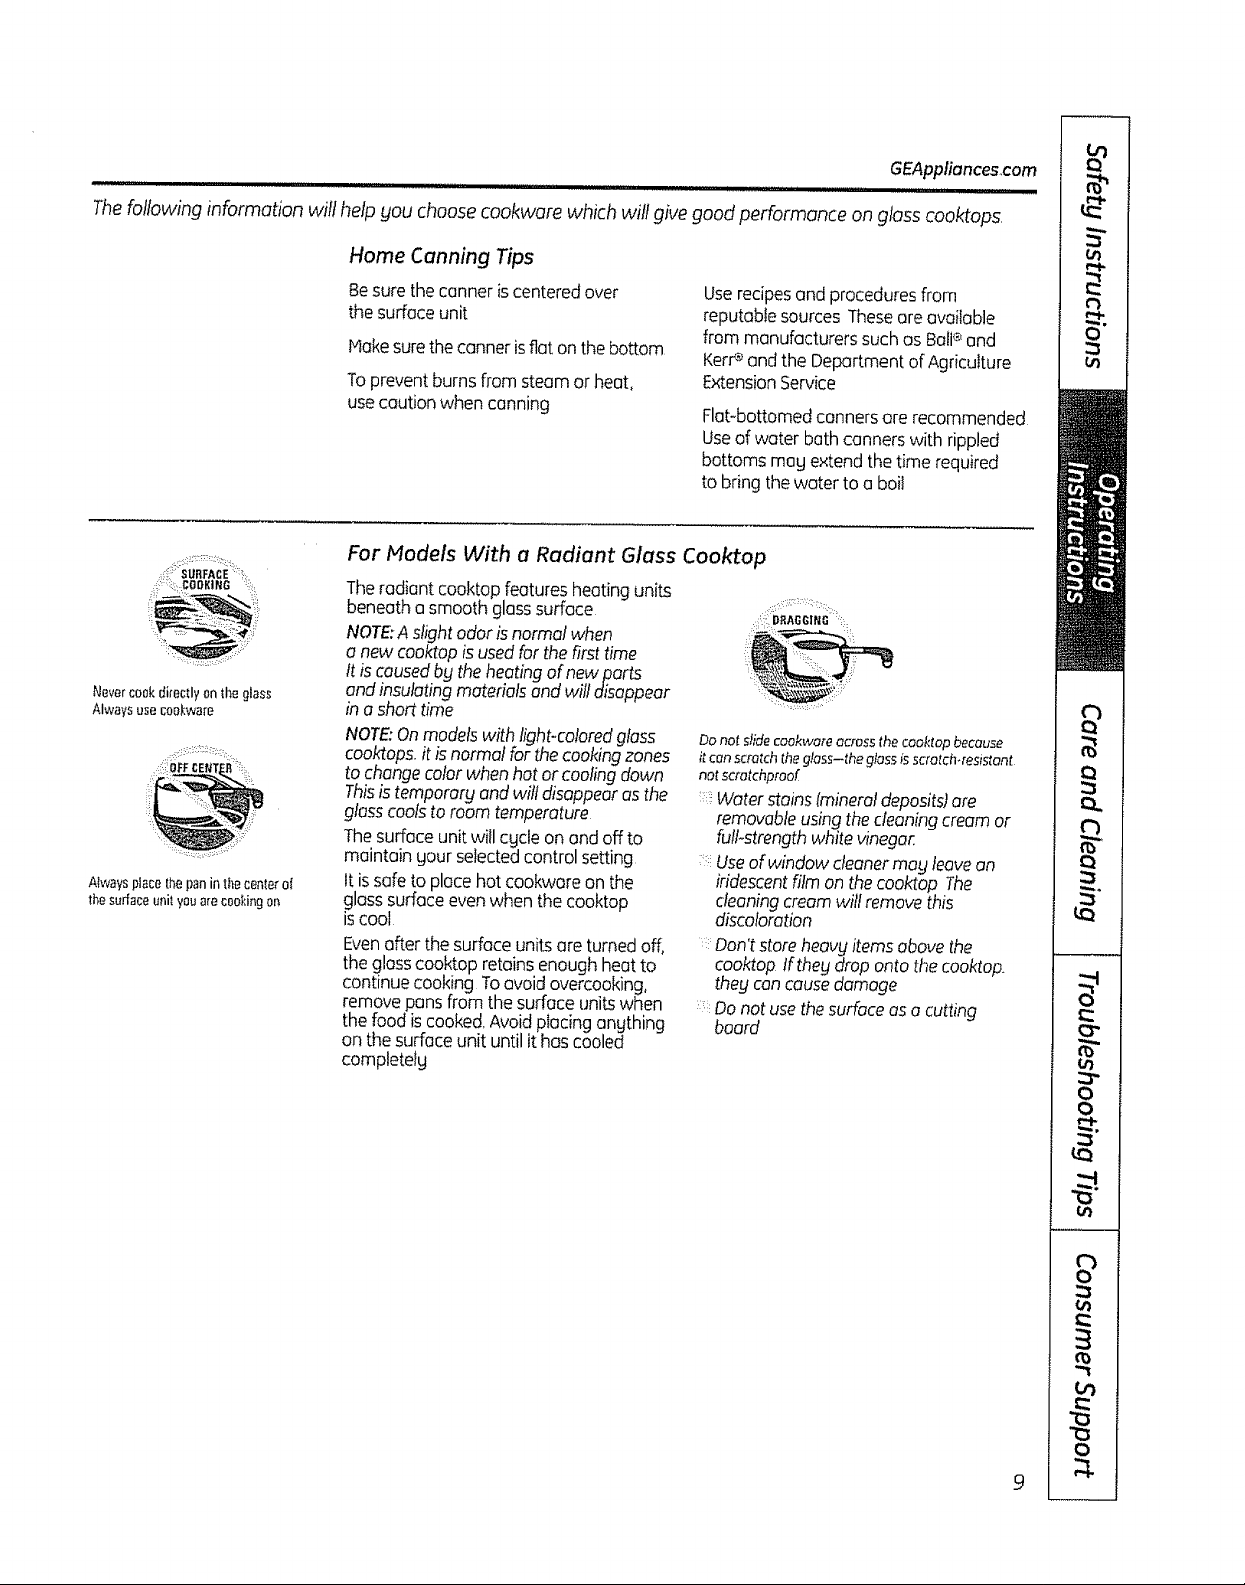
Nevercookdirectly{_ntheglass
Alwaysusecookware
Ak,_aysplacethepaninthecenterof
thesurfaceunityouarecookingon
For Models With a Radiant Glass Coo_op
Theradiantcooktopfeatures heating units
beneatha smooth glasssurface
NOTE:A slightodorisnormal when
a new cooktop is usedforthefirst time
tt is causedb9 theheatingof newports
and insulatingmaterialsand will disappear
in a shorttime
NOTE:Onmodelswith light-coloredglass
cooktops,it isnormal forthecookingzones
to changecolorwhen hot or coolingdown
Thisistemperer9 and will disappearusthe
glasscoolstoroom temperature
Thesurfaceunit will cgcle on and off to
maintain gour seiectedcontrolsetting
issafe to
It surfaplacecehot cookwareon the
glass evenwhen the cooktop
iscool
Evenafterthe surfaceunitsare turned off,
theglasscooktopretainsenough heatto
continue cooking Toavoidovercooking,
removepansfrom the surfaceunitswhen
thefood iscooked,Avoidplacing anything
DO not slide caakware across the cooktop because
itcan scratch the glass-the glass isscratch.resistant
not scratchprao[
Waterstainslmineral deposits) are
removable using the cleaning cream or
fulFstrength white vinegar
:::!Useof windowcleanermagleavean
iridescentfilm on the cooktop The
cleaningcreamwillremovethis
discoloration
: Don't storeheavyitemsabovethe
cool<toplf thegdrop onto thecool<top.
they cancausedamage
Do not use the surface as a cutting
board
on the surface unit until it has cooled
completelg
::::::::::: :i: :::: : :
D_AO6IIIO
Selecting types of cookware for radiant glass cooktop models.
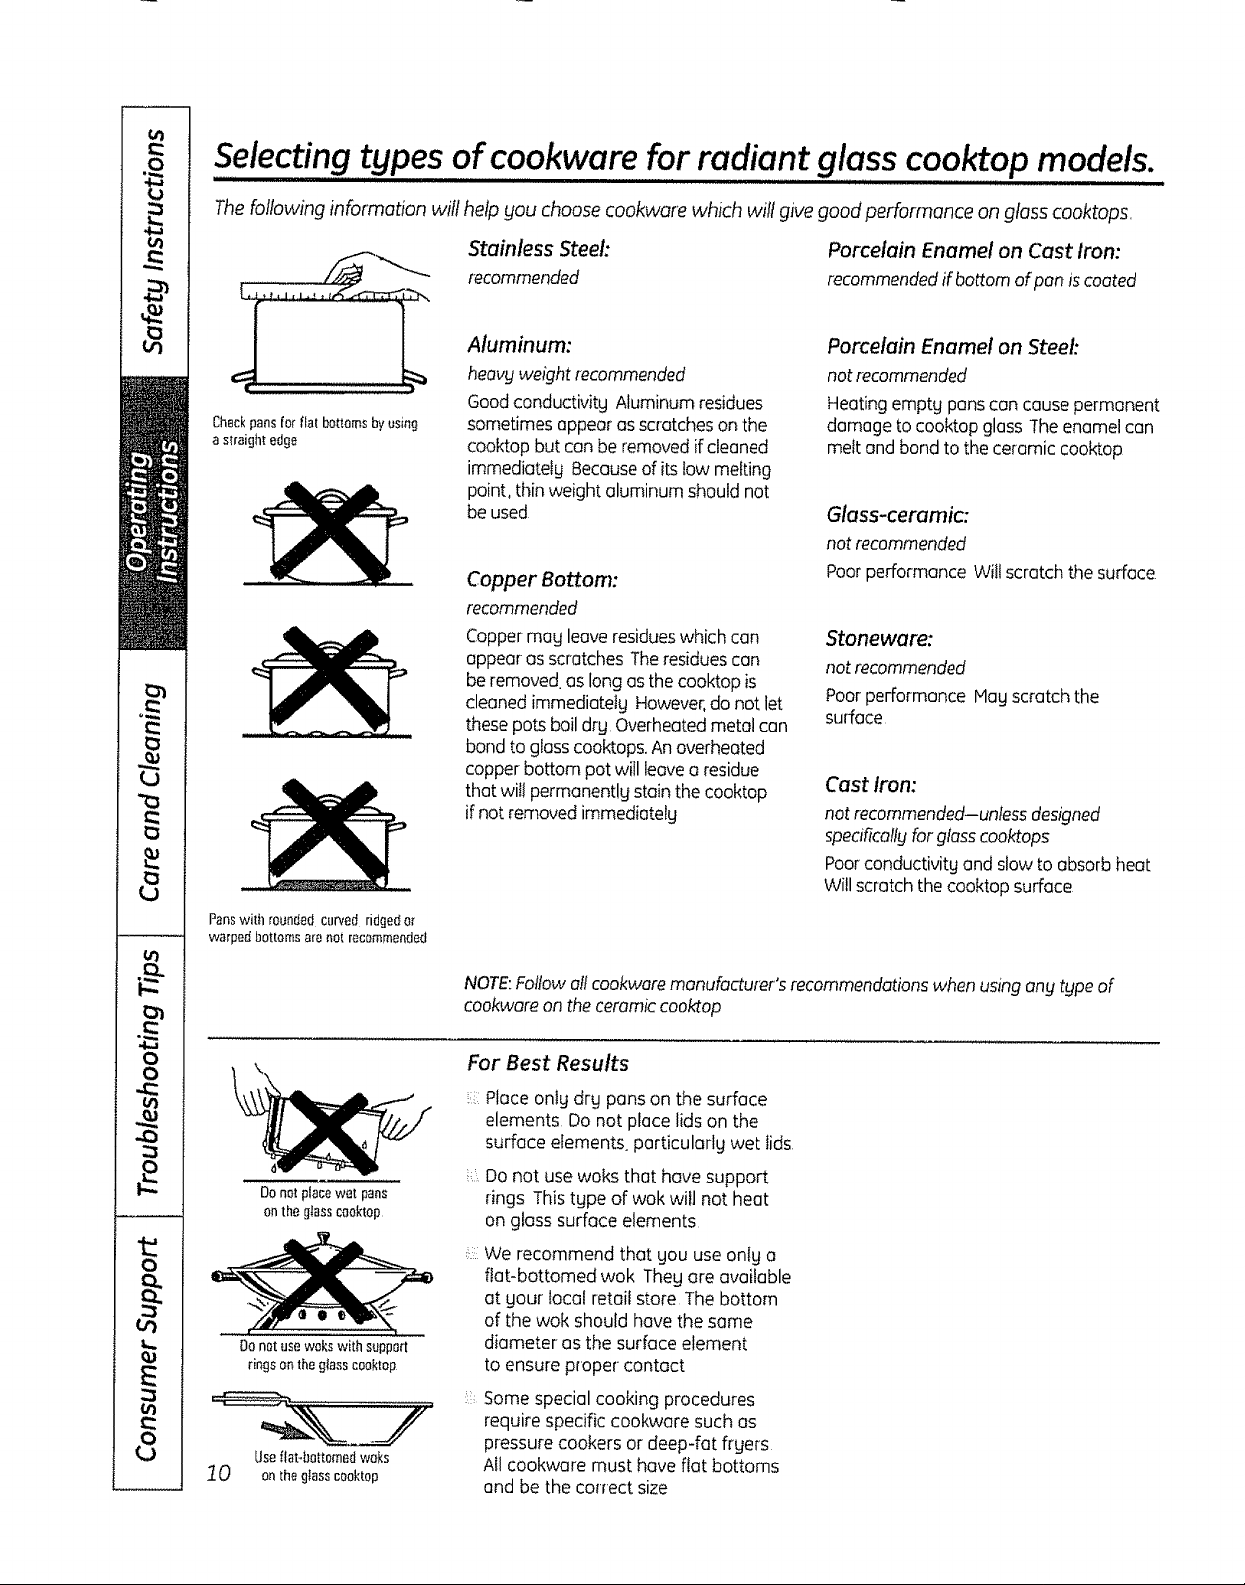
The following information willhelp you choose cookware which wilt give good performance on g/ass cooktops,
Stainless Steel:
recommended
Porcelain Enamel on Cast Iron:
recommended if bottom of pan is coated
ChBckpansfor flatbottomsbyusing
as{raightedge
Panswith roundedcurvedridgedor
warpedbottomsarenot recommended
Aluminum:
heavgweight recommended
Goodconductivitg Aluminum residues
sometimesappear as scratcheson the
coaktop but canbe removedif cleaned
immediatelg Becauseof its low melting
point,thin weight aluminum should not
be used
Copper Bottom:
recommended
Coppermag leave residueswhich can
appear as scratches The residuescan
be removed,as long as the cooktop is
cleanedimmediatetg However,do not let
these pots baildrg,Overheatedmetal carl
bond to gloss cooktops. Anoverheated
copper bottom pot willleave o residue
that wil!permanentlg stain the cooktop
ifnot removed immediatelg
Porcelain Enamel on Steel:
not recommended
Heating emptg pans can cause permanent
damage to cooktop gloss The enamel can
mett and bond to the ceramic cook-top
Glass-ceramic:
not recommended
Poor performance Willscratch the surface
Stoneware:
not recommended
Poor performance lag scratch the
surface
Cast Iron:
not recommended-unless designed
specificallyfor glass cooktops
Poor conductivitg and slow to absorb heat
Willscratch the cooktop surface
Donetplacewet pans
onthe g_asscooktop
Donat usewakswith support
ringsonthe g_assceoktep
Useflat4}ottemedwoks
]. 0 on the gtasscooktop
NOTE:Follow al!cookware manufacturer's recommendations when using ang &Ipeof
cookware on the ceramiccooktop
For Best Results
Place onlg drg pans on the surface
elements Do not place lids on the
surface elements, particularlg wet lids
Do not usewoks that have support
rings Thistgpe of wok will not heat
on gloss surface elements
We recommend that gou use onlg a
fiat-bottomed wok Theg are available
at gour local retail store The bottonq
of the wok should have the same
diameter as the surface element
to ensure proper contact
Some special cooking procedures
require specific cookware such as
pressurecookers or deep-fat frgers
All cookwore must have flat bottoms
and be the correct size
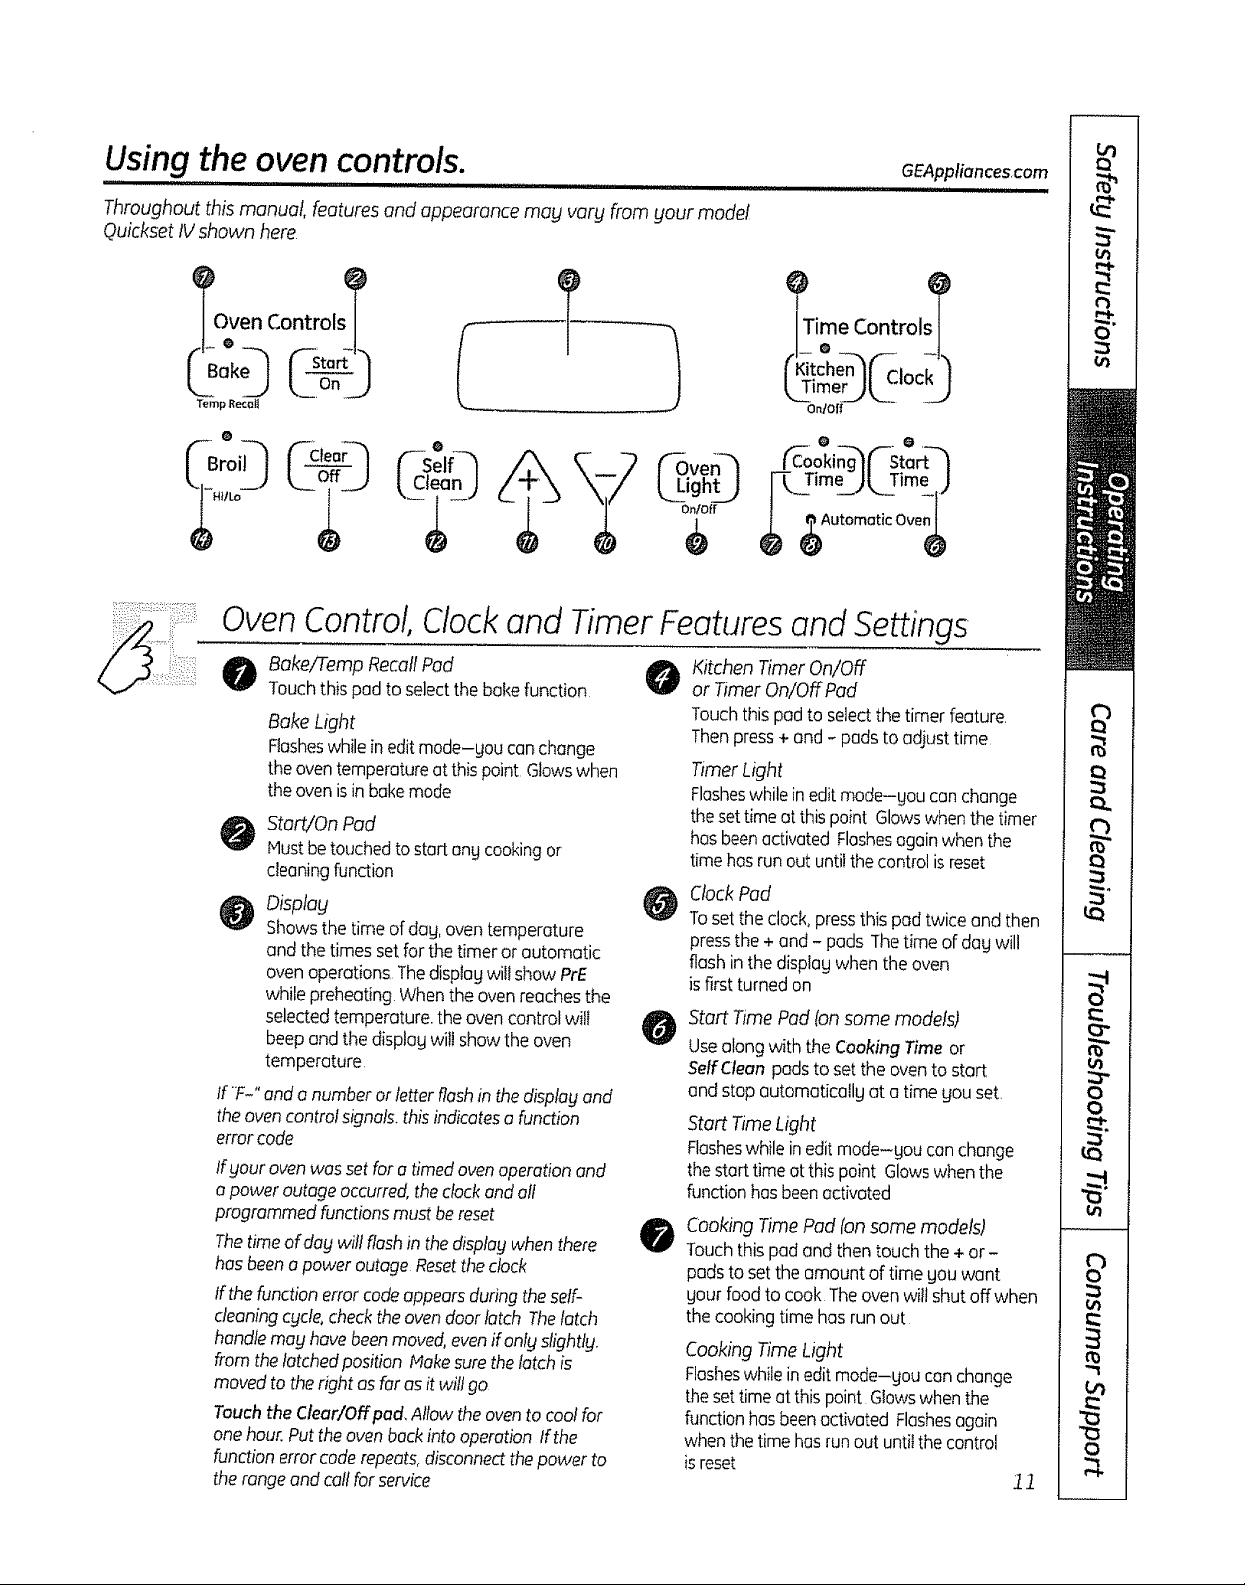
Using the oven controls.
Throughout this manual features and appearance may vary from your model
Quickset IV shown here
_%ven Controls_ ) t_ _r)Time Controls_
CBake_'l F start'l ,Ki' =n,! _ , ,/1-Kitchene--" "- -!..
T_'mp R_'il _' _ On/Off
GEAppliences.com
o
f"--Self-_
tcieanJ
LOive
@D
On/Off
0 .0,
¢ okin ¢-S art--'l
r-Czim JL-rime)
Oven Control, Clock and Timer Features and Settings
BakeiTemp RecallPad
0
Touchthispad to selectthe bakefunction
Bake Light
Flasheswhile inedit mode-gou canchange
theoventemperatureatthispoint Glowswhen
theovenisin bakemode
Start/On Pad
Hust betouchedtostart angcookingor
cleaningfunction
Dispbg
Showsthe time of dag,oventemperature
and the times setfor thetimer or automatic
ovenoperations,Thedisplagwiil show PrE
while preheatingWhenthe ovenreachesthe
selectedtemperature,theoven control wilI
beepand the displagwillshow theoven
temperature
If F-" anda numberor letter flashin the display and
theovencontrolsignals,thisindicatesa function
errorcode
lfgour oven wasset for a timedovenoperationand
apower outageoccurred,theclockandaft
programmed functions must be reset
Thetime of dug wiflflush in the displag when there
hasbeenapower outage Resettheclock
If the function errorcodeappearsduring the self-
cleaningcgcle,checkthe ovendoorlatch Thelatch
handlemaghavebeenmoved,evenif onlgslightlg.
from the latchedposition Nake surethelatch is
moved to the right as far us it will go
Touch the Cleur/Off pad.Allow the oven to cool for
one hour.Puttheovenbackintooperation Ifthe
function errorcode repeats, disconnect the power to
therangeand call for service
Kitchen Timer On/Off
or Timer On/Off Pad
Touch this pad to select the timer feature,
Then press + and - pads to adjust time
Timer Light
Flasheswhile inedit mode-gou canchange
thesettime at thispoint Glowswhenthe timer
has beenactivated Flashesagainwhen the
time hasrun outuntilthecontrolisreset
Cbck Pad
Toset the clock, press this pad twice and then
press the + and - pads The time of dog will
flash inthe displag when the oven
is first turned on
Start Time Pad (onsome models)
Usealong with the Cooking Time or
SelfCleanpadsto set the oven to start
and stop automaticallg at a time gou set.
Start TimeLight
Flasheswhile inedit mode-gou canchange
thestarttimeatthis point Glowswhenthe
functionhasbeenactivated
Cooking Time Pad fansome models)
0
Touchthis padand then touch the + or -
padsto set the amount of time gou want
gout foodto cook Theovenwill shutoffwhen
the cookingtime hasrun out
Cooking Time Light
Flasheswhile inedit mode-gou can change
thesettimeatthis point Glowswhenthe
functionhasbeenactivated Flashesagain
whenthe time hasrunout untilthe control
isreset
tt
 Loading...