

Page 1
Self-CleaningRadiantRange
Safe~ Instrutiions ...................3-5
Anti-TipDevice ....... ......................... 3,30, 38
OperatingInstructions,~ps
Aluminum Foil..... .......................... 19,23-25
ClockandTimer ......... ................................. 16
ControlPanel.... ............................................ 15
Features.~.. .................................................. 6, 7
Oven .... ................................................... 17-28
Auto Oven Shut Off... .............................. 17
Baking...... ........................................... 18, 19
Broiling..... ........................................... 25,26
Roasting. ............................................ 23,24
Self< leaning Instructions.. ...........27-29
Timed Baking...... .............................. 20,21
Power Outage.... .......................................... 16
SurfaceCooking .... .............................. 1&l 4
CanningTps ............................................. 13
CooktopComparison ...........................8,9
ControlSettings....................................... 10
Cookware Tips.................................. 11, 12
SurfaceCleaning..................................... 14
Careand Cleaning...................3&34
Anti-TipDevice ... .........................................30
Door Removal..............................................32
Oven tight .... ................................................. 30
GlassCooktop.............................................. 14
Self-CleaningInstructions.................27-29
Problem Solver......................39-41
Thermostat Adjustment–
DoIt Yourself........ ....................................22
More questions?...call
GEAnswerCenter”800.626.2000
Installation ...............................34-38
Anti-Tip Device... ..................................34, 38
FlooringUnderthe Range......................... 35
Leveling..... ..... ... ......... ........... .......... ........ 36
Consumer Services...........42,43
Appliance Registration...... ...........................2
Important Phone Numbers....................... 43
Model and Serial Location................ ...... .. 2
WarranW .. ........... ... ........ ........... BackCover
Models: JBP60
JBP65 JBP77
JBP75 JBP78
JBP76
GEAppiances
6-95 CG
Page 2
Congratulations! You havejust purchased one of
the most innovativeand exciting products on the
market today. A great deal of research and technology
has gone into the development of this appliance, and
we believethat by choosing GE, you have made a
wise investment that will provide years of enjoyment.
With this range you not only get the assurance of
GE quality,but many other exceptional features.
Quick Cooking Response
● With radiant heating surface units you get fast,
uniform cooking. The heat cycles on and off to
maintain the temperature level.
QuickClean’MDesign
● Hard to clean cracks and crevices are eliminated.
The full-width glass cooktop is sealed to the
porcelain enamel spill-proof frame. The raised
edges and recessed top contain spills.
~LP US~LP YOU...
Glass Cooktop
● This durable “glass ceramic” material is impact,
stain and scratch resistant.
QuickSet Self-Clean Oven Controls
● QuickSet controls make setting the self-clean
cycle easy. The controls also feature Auto Oven
Shut-Off, electronic clock and timer, automatic
oven timer, a singlecontrol knob, a preheat light
and signal and more.
Safety Features
● The four hot surface indicator lights let you
know which surface unit is turned on or still
too hot to touch.
“Big View” Window (on some models)
● An exclusive feature from GE, the big window
makes it easy to check baking progress without
opening the door.
Beforeusingyour range,readthis
guidecarefully.
It is intended to help you operate and maintain your
new range properly.
Keep it handy for answers to your questions.
If you don’t understand something or need more
help, call:
GE Answer Center”
800.626.2000
24 hours a day, 7 days a week
Writedownthemodelandserialnumbers.
You’llfind them on a label behind the range door or
behind the storage drawer or kick panel.
These numbers are also on the Consumer Product
Ownership Registration Card thatcame with your
range. Before sending in this card, please write these
numbers here:
ModelNumber
SerialNumber
Use these numbers in any correspondence or service
calls concerning your range.
Ifyou receiveda damagedrange...
Immediately contact the dealer (or builder) that sold
you the range.
Savetimeand money.
Beforeyou requestservice...
Check the Problem Solver in the back of this guide. It
lists causes of minor operating problems that you can
correct yourself.
2
Page 3
IMPORTANTSAFETYN~CE
● TheCaliforniaSafeDrinkingWaterand Toxic
EnforcementAct
requiresthe Governorof
Californiato publisha list of substancesknown to
thestateto causebirthdefectsor otherreproductive
harm,and requiresbusinessesto warn customers
ofpotentialexposureto such substances.
● Thefiberglassinsulationin self-clan ovens
givesoff
monoxideduring the cleaningcycle.
averysmallamountofcarbon
Exposure
can be minimizedby ventingwith an open
windowor using a ventilationfan or hood.
● Fluorescentlightbulbscontainmercury.
If yourmodelhas a surfacelight,you must
recyclethe fluorescentlightbulb accordingto
local,state and federal codes.
When usingelectricalappliances,basic safety
precautionsshouldbe followed,includingthe
following:
● Usethis applianceonlyfor itsintendeduse
as describedin thisguide.
● Besure yourapplianceisproperlyinstalled
and grounded
by aqualifiedtechnicianin
accordancewith the providedinstallation
instructions.
● Donot attempt to repair or replaceany
part ofyour range utiess it is specifically
recommendedin thisguide.
shouldbe referred to a qualifiedtechnician.
All other servicing
AWARNING
Alirang= cantipand injury could
resulkTopreventaccidentaltipping
ofthe range,
floor by installingthe Anti-Tipdevice
supplied.
Tocheckif the deviceis installedand
engagedproperly,removethe kick
panelor ;to&gedrawer and inspect the rear Ieveling
leg.Make sure it fits securelyinto the slot.
If youpull the range out from the wall for any
reason, makesure the deviceis properly engaged
when you push the range back againstthe wall.
If it is not, there is apossiblerisk ofthe range
tippingoverand causing injuryif you or achild
stand,sit or lean on an opendoor.
Pleaserefer to the Anti-Tipdeviceinformation
in this guide.Failure to take this precautioncould
resultin tippingof the range and injury,
● CAUTION:ITEMSOFINTERESTTO
CHILDRENSHOULDNOTBESTOREDIN
CAB~ETS ABOVEARANGEORONTHE
BACKSPLASHOFA RANGE-CHILDREN
CLIMBWGONTHERANGETOREACH
ITEMSCOULDBESEMOUSLY~mRED,
● Neverwearloose-fittingorhanginggarmenk
whileusingthe appkance.
reachingfor items stored overthe range.
Nammable materialcould be ignited if brought
in contactwith hot surfaceunitsor heating
elementsand may cause severeburns.
attach it to the wall and
Be carefulwhen
● Beforeperforminganyservice,DISCONNECT
THERANGEPOWERSUPPLYATTHE
HOUSEHOLDDIST~UTION PANEL
REMOVINGTHE FUSE OR SWITCH~G OFF
THE CIRCUITBREAKER.
● Donot leavechildrenalon~hildren should
notbe leftaloneor unattendedin an area where an
applianceis in use. They shouldnever be allowed
to sit or standon anypart of the appliance.
● Donotallowanyonetoclimb,stand or hang
BY
onthe door,kickpanelor storagedrawer or
cooktop.They
tip it over,causingseverepersonalinjury.
● Donotstoreflammablematerialsinan oven
coulddamagethe range and even
or near thecooktop.
● Useonlydry potholders—moistor
damppotholdersonhotsurfacesmay
resultinbumsfromsteam.Donotlet
potholderstouchhotsurfaceunitsorheating
elements.
● For your safety,neveruseyourappliancefor
Do notuse a towelor otherbulkycloth.
warmingor heatingthe room.
● DONOTSTOREOR USECOMBUSTIBLE
MATERMLS,GASOLINEOR OTHER
FLAMMABLEVAPORSANDLIQUIDSIN
THEVIC~lTY OF THISOR ANYOTHER
APPLIANCE,
(continued next page)
3
Page 4
!
U
~ORTANT SA~~ ~STRUCTIONS
(continued)
● Keepthehoodand greasefilterscleanto
maintaingoodventingandtoavoidgreasefires.
● Donot letcookinggreaseor otherflammable
materialsaccumulatein or near the range.
–~
e
on a surfaceunitby coveringthe pan completely
with a well-fittinglid, cookie sheetor flattray.
Use a multi-purposedry chemicalor foam-type
fire extinguisher.
Flaminggreaseoutsidea pan can be put out by
coveringit withbaking sodaor, if available,by
using a multi-purposedry chemicalor foamtype
fireextinguisher.
Flame in the ovencan be smotheredcompletely
by closing the ovendoor and turningthe oven off
or by usinga multi-purposedry chemicalor foamtype fireextinguisher.
● Donotusewateron greasefries.
3’
Neverpickup a flamingpan.
the controlsoff. Smothera flamingpan
Turn
QDonottouchthesurfaceunits,the heating
elementsor theinteriorsurfaceofthe oven.
Thesesurfacesmay behot enoughto burneven
thoughthey aredark in color,Duringand after
use,do not touch,or let clothingor other
flammablematerialscontactthe surfaceunits,
areasnearbythe surfaceunitsor anyinteriorarea
of the oven;allowsufficienttimefor cooling,first.
Potentiallyhot surfacesincludethecooktop,areas
facingthe cooktop,ovenvent opening,surfaces
nearthe opening, crevicesaroundthe ovendoor
and metaltrim parts abovethe door.
Remember:The insidesurfaceof the ovenmay
be hot when the door is opened.
● Whencookingpork,followthe directions
exactlyand alwayscook the meat to an internal
temperatureof at least 170°F.Thisassures that,
in theremotepossibilitythattrichina may be
presentin the meat, it will be killed and the meat
will be safe to eat.
Oven
● Keepthe ovenventunobstructed.
● Keepthe ovenfreefrom grease
buildup.
● Placetheovenshelfin the desiredposition
whiletheoveniscool.
If shelvesmust be
handledwhen hot, do not let pot holder contact
the heatingelements.
● Pullingout the shelfto the shelfstopis a
conveniencein liftingheavyfoods.Itisalso
aprecautionagainstburnsfromtouchinghot
surfacesofthedoororovenwalls.
QWhenusingcookingor roastingbagsin the
oven,followthemanufacturer’sdirections.
● Donot useyourovento dry newspapers.
If overheated,they can catch on fire.
● Donot useovenfora storagearea. Itemsstored
inanovencanignite.
● Donot leavepaper products,cookingutensils
or foodin theovenwhennotin use.
Self-Cleating Oven
● Donot cleanthe door gasket.Thedoorgasket
isessentialforagoodseal.Careshouldbetaken
nottorub,damageormovethegasket.
● Donotuseovencleaners.Nocommercialoven
cleanerorovenlinerprotectivecoatingofanykind
shouldbeusedinoraroundanypartoftheoven.
Residuefromovencleanerswilldamagetheinside
oftheovenwhentheself-cleancycleisusd,
● Cleanonlyparts listedinthisUseand
CareGuide.
● Beforeself-cleaningthe oven,removethebroiler
pan,gridandothercookware.
● Besure to wipeup excessspillagebefore
startingtheself-cleaningoperation.
● If the self-cleaningmodemalfunctions,
turn the ovenoff anddisconnectthe power supply.
Haveit servicedby a qualifiedtechnician.
● Standawayfromthe rangewhenopeningthe
ovendoor.
causebums
● Donot heat unopenedfoodcontainers.
Hot airor steamwhichescapescan
to hands, face andor eyes.
Pressurecould buildup andthe containercould
burst,causingan injury.
Page 5
Cooktopand RadiantSufiace Unifi
● Useproperpansiz*Select cookwarehaving
flat bottomslargeenoughto coverthe selected
surfaceunit.Theuse of undersizd cookwarewill
exposea portionof the surfaceunit to direct
contactand may resultin ignitionof clothing.
Properrelationshipof thecookwareto the surface
unitswill also improveefficiency.
s Never leavethe surface
heatsettings.Boiloverscause smokingand
high
unitsunattendedat
greasy spilloversthat may catch on fire.
● Donotoperatethe radiant surfaceunits if
theglassisbroken.Spilloversorcleaning
solutionmaypenetrateabrokencooktopand
createa riskofelectricalshock.Contacta
qualifiedtechnicianimmediatelyshouldyour
glasscooktopbecomebroken.
● Avoidscratchingtheglasscooktop.The
cooktopcanbescratchedwithitems
instruments,rings or otherjewelry and rivetson
clothing.
● Neverusetheglasscooktopsurfaceasa
suchas sharp
cuttingboard,
● Donotplaceorstoreitemsthat can meltor
catchfireontheglasscooktop,evenwhenitis
notbeingused.
● Becarefulwhen placingspoons or other
stirringutensilson glasscooktopsurface
when it is in use. They may becomehot and
couldcause burns.
● Tominimizethe possibilityof burns,ignition
of flammablematerialsand spillage,the handle
of a containershouldbe turned towardthe center
of the range withoutextendingover the nearby
surfaceunits.
● Alwaysturnthe surfaceunits off before
removingcookware.
● Foodsforfryingshouldbe asdry as possible.
Froston frozen foodsor moistureon fresh foods
can cause hot fat to bubbleup and overthe sides
of the pan.
. Uselittle fat foreffectiveshallowor deep-fat
frying.Filling the pan too full of fatcan cause
spilloverswhenfood is added.
● If a combinationof oilsor fats willbe used
frying,stir togetherbeforeheating,or as fats
in
melt slowly.
● Alwaysheatfat slowly,andwatchasitheats.
● Usea deepfat thermometerwhenever
possibleto prevent overheatingfat beyond
the smokingpoint.
● Cleanthe cooktopwithcaution.If a wet
spongeor clothis used to wipe spills on a hot
surfaceunit,be carefulto avoidsteam burns.
Somecleanerscan producenoxiousfumes if
appliedto a hot surface.
NOTE: Werecommendthat you avoidwiping
any surfaceunit areas untilthey havecooledand
the indicatorlight has goneoff. Sugarspillsare
theexceptionto this.Please see the Glass
CooktopCleaning section.
When the cooktopis cool,use only the
recommendedcleaningcreamto cleanthe cooktop.
● Usecare when touching the cooktop.
The glass surfaceof thecooktopwill retain
heatafter the controlshavebeen turned off.
● Toavoidpossibledamageto the cooking
surface,do notapply cIeaningcream to the
glass surfacewhen it is hot.
● Aftercleaning,use a dry clothor papertowelto
removeall cleaningcream residue.
● Readand followall instructionsand warnings
on the cleaningcreamlabels.
● Keepan eyeonfoodsbeingfriedat highor
medium
● Whenflamingfoodsareunderthe hood,turn
highheat settings.
the fan off. The fan, if operating,may spread
theflame.
SAVETHESE
INSTRUCTIONS
5
Page 6
M
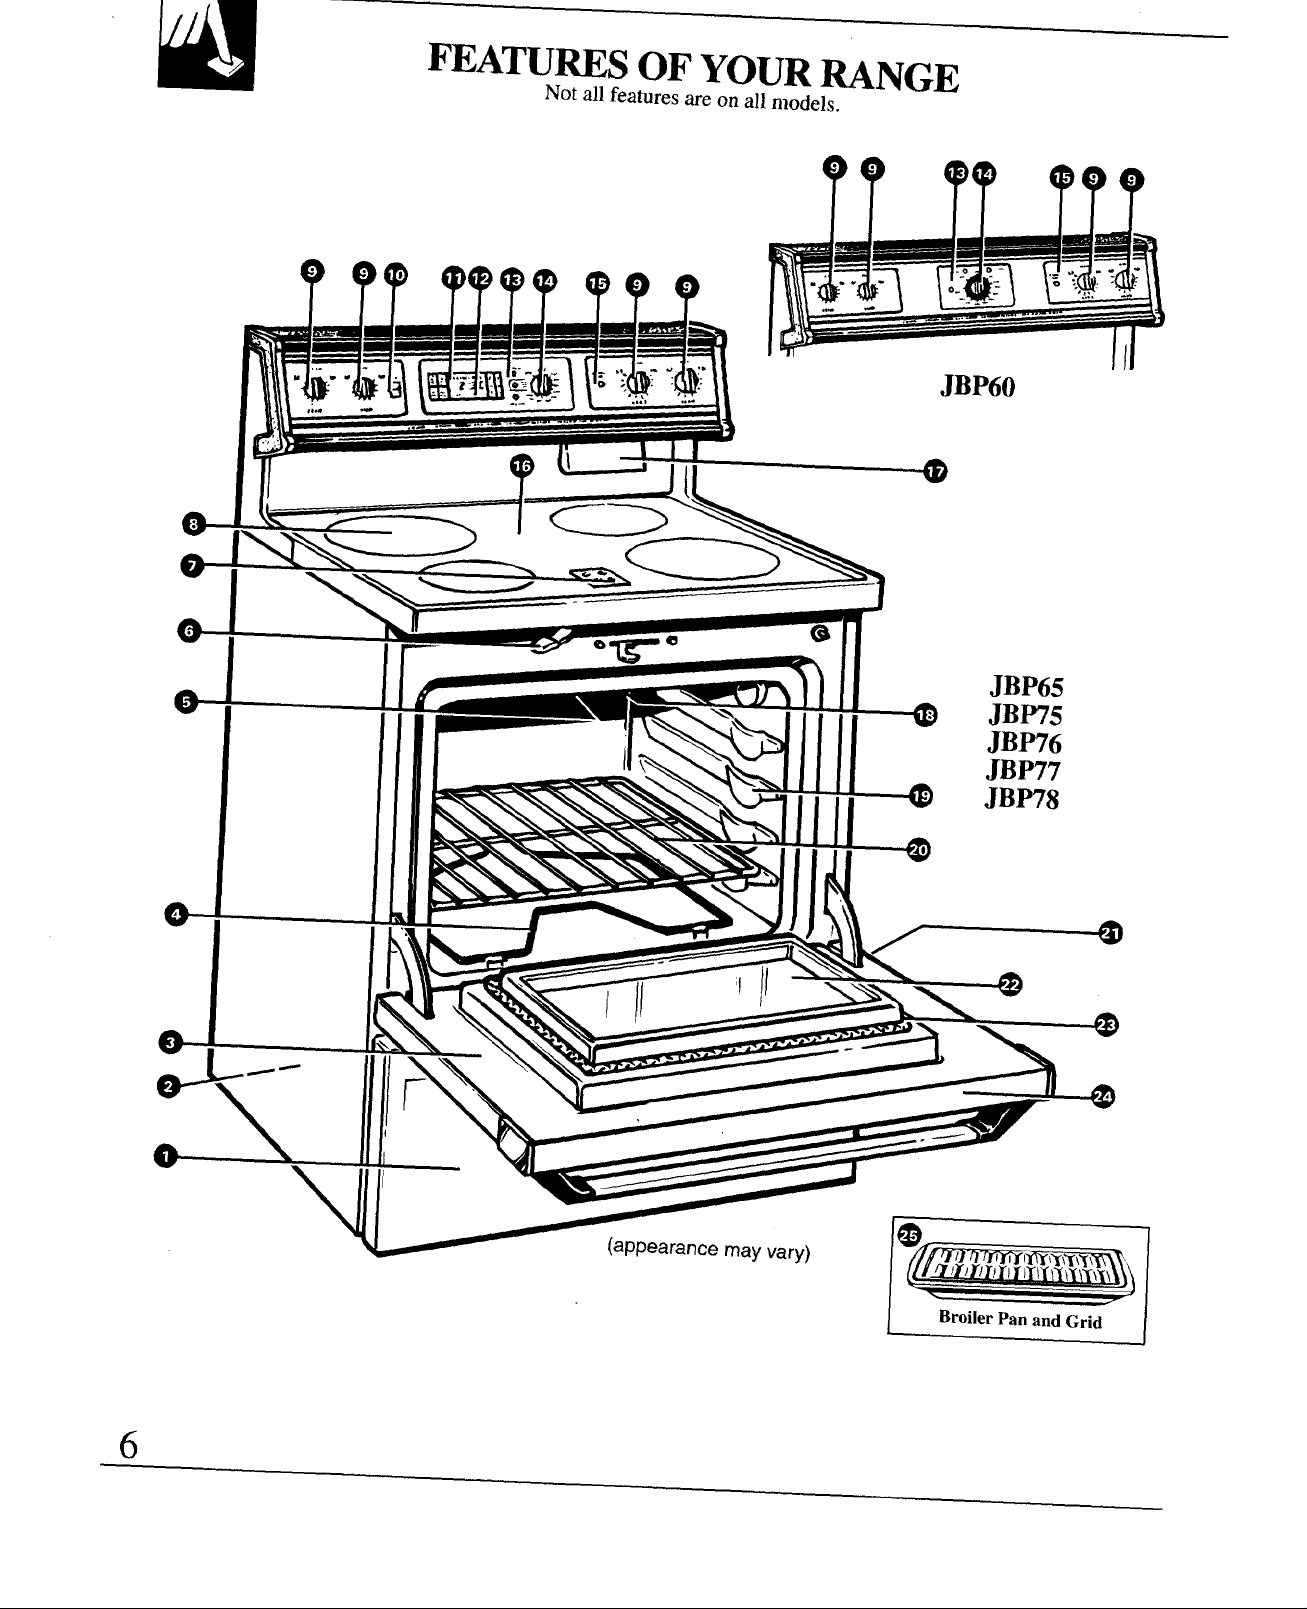
FEATUMS OF YOURRANGE
Not all features are on all nlodels.
JBP60
6
■
9
BroilerPan and Grid
[
I
Page 7
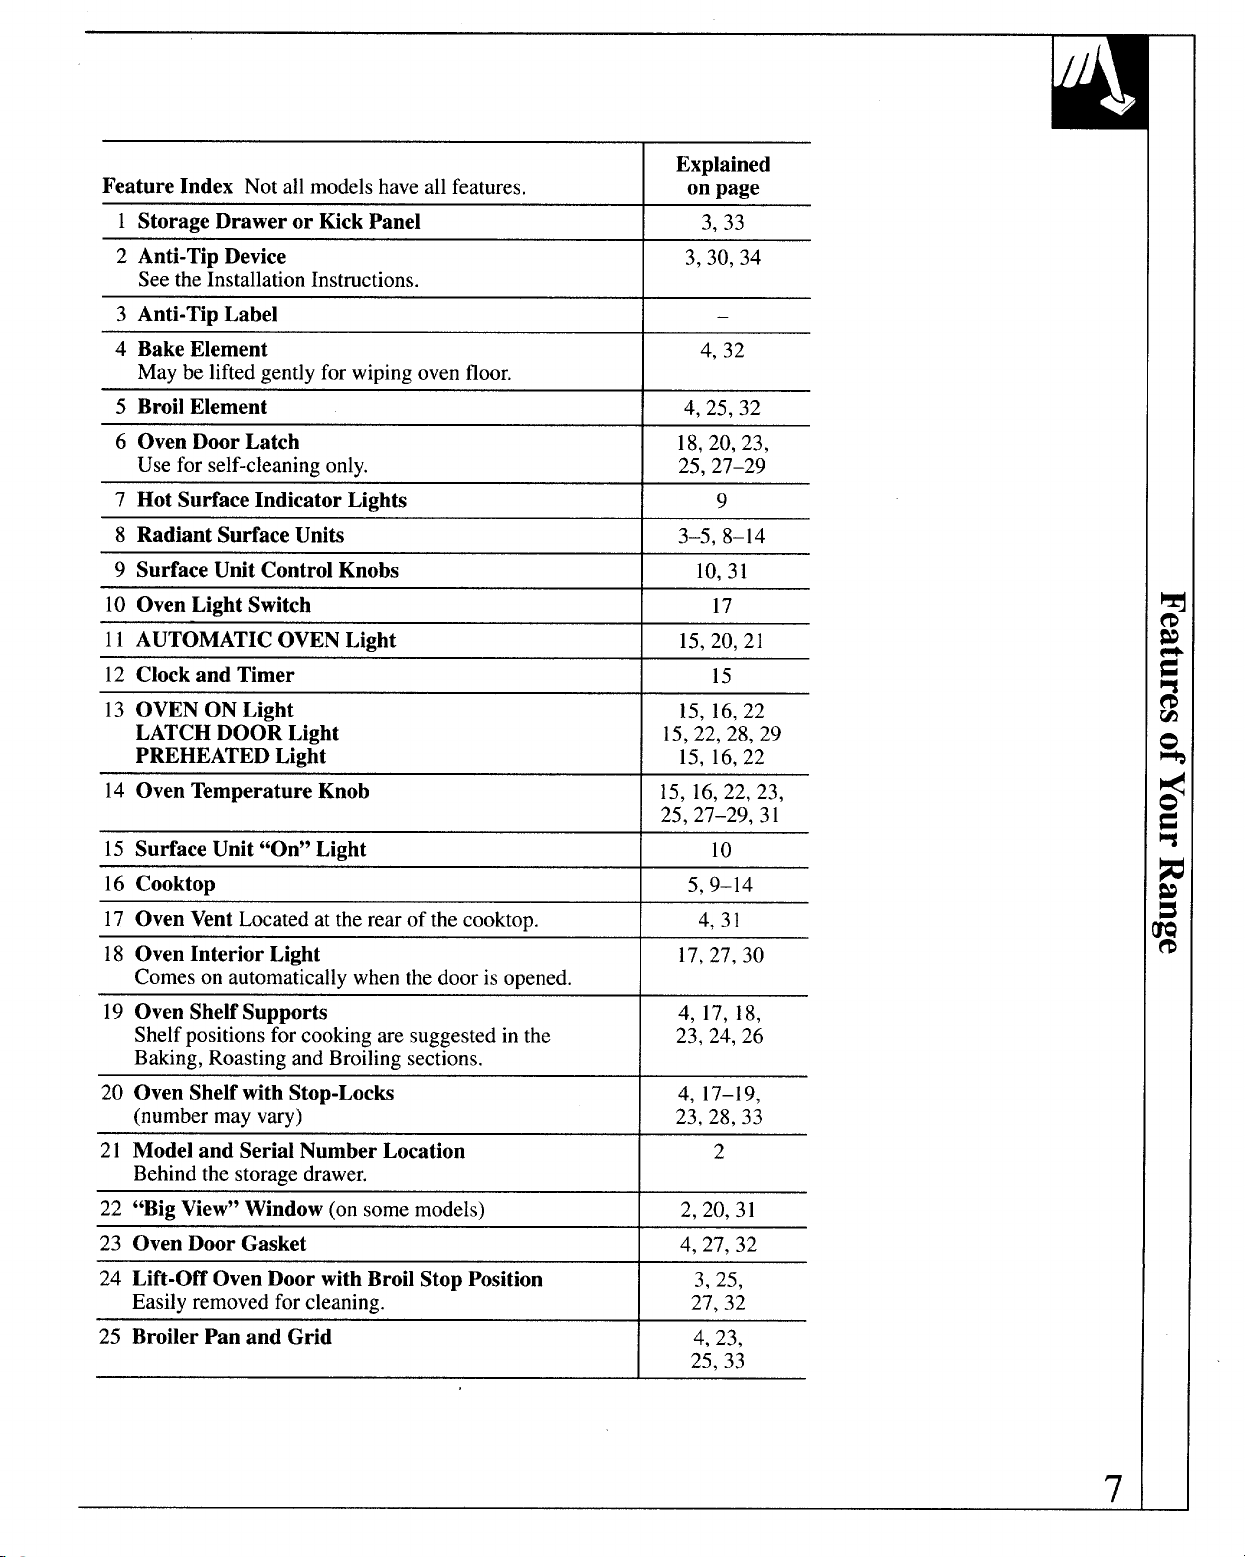
Feature Index Not all models have all features,
Explained
onpage
1 Storage Drawer or Kick Panel
2 Anti-Tip Device
See the Installation Instructions.
3 Anti-Tip Label
4 Bake Element
May be lifted gently for wiping oven floor.
5 Broil Element
6 Oven Door Latch
Use for self-cleaning only.
7 Hot Surface Indicator Lights
8 Radiant Surface Unifi
9 Surface Unit Control Knobs
10
OvenLight Switch
11 AUTOMATIC OVEN Light
12 Clock and Timer
13 OVEN ON Light
LATCH DOOR Light
PREHEATED Light
14 Oven Temperature Knob
3,33
I
3,30,34
1-
4,32
I
4,25,32
18,20,23,
25,27-29
9
3-5,8-14
10,31
I
I 15,20,21
I
17
15
15, 16,22
15,22,28,29
15, 16,22
15, 16,22,23,
25,27-29,31
15 Surface Unit “On” Light
16 Cooktop
17 Oven Vent Located at the rear of the cooktop.
18 Oven Interior Light
Comeson automaticallywhen thedooris opened.
19 Oven Shelf Supports
Shelfpositionsforcookingaresuggestedin the
Baking, Roasting and Broiling sections.
20 Oven Shelf with Stop-Locks
(numbermayvary)
21 Model and Serial Number Location
Behind the storage drawer.
22 “Big View” Window (on some models)
23 Oven Door Gasket
24 Lift-Off Oven Door with Broil Stop Position
Easily removedforcleaning.
25 Broiler Pan and Grid
10
5,9-14
4,31
17,27,30
4, 17, 18,
23,24,26
4, 17-19,
23,28,33
2
I
I 2,20,31
I 4,27,32
3,25,
27,32
4,23,
25,33
b
s
m
m
Page 8
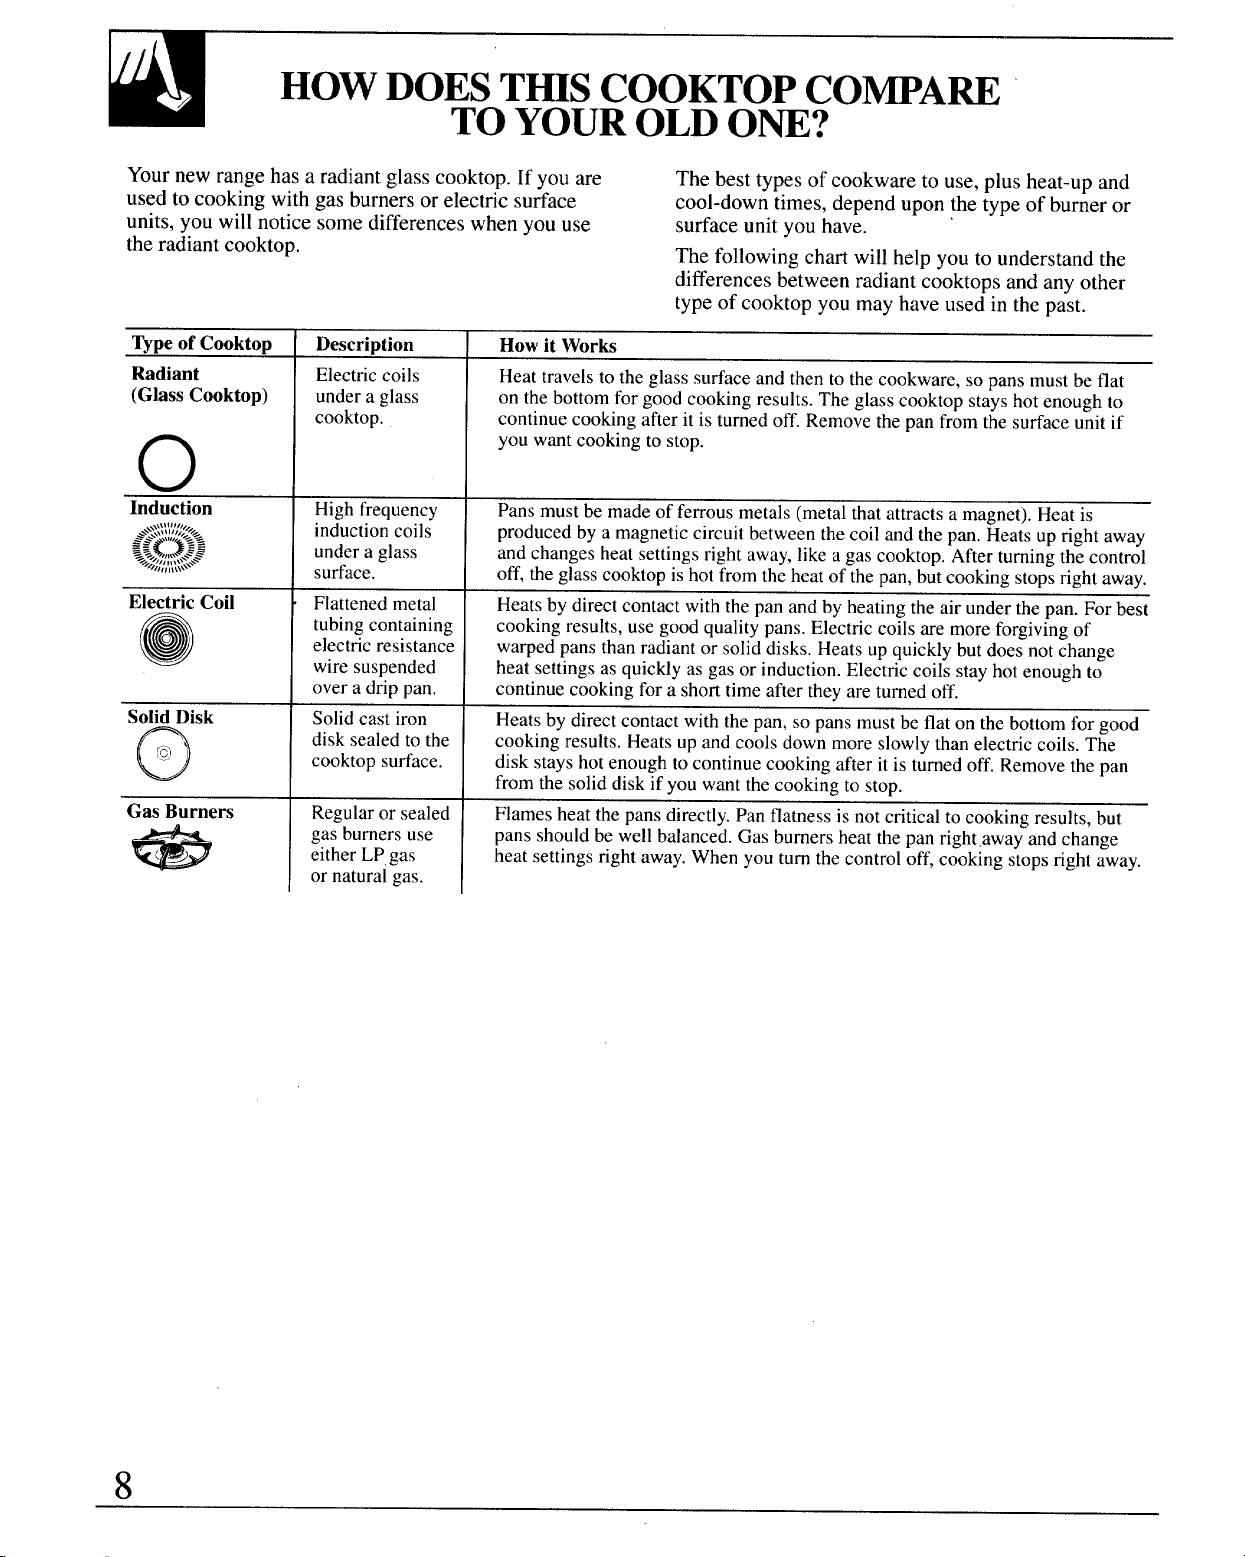
HOWDOEST~S COOKTOP CO~ARE
TOYOUROLDO~?
Yournew range has a radiant glass cooktop. If you are The best types of cookware to use, plus heat-up and
used to cooking with gas burners or electric surface
units, you will notice some differences when you use
the radiant cooktop.
cool-down times, depend upon the type of burner or
surface unit you have.
The following chart will help you to understand the
differences between radiant cooktops and any other
type of cooktop you may have used in the past.
~pe of Cooktop
Radiant
(GlassCooktop)
o
Induction
\\\l!II,,,,,
@g@>
“J.,,,,,,,\\\
ElectricCoil
)
@
Solid
Disk
(~) ‘,
o
Gas Burners
.—
[J
*
Description
Electriccoils
undera glass
cooktop.
Highfrequency
inductioncoils
underaglass
surface.
Flattened metal
tubing containing
electric resistance
wiresuspended
overadrippan.
Solid cast iron
disk sealed to the
cooktop surface.
Regular or sealed
gas burners use
either LP,gas
or natural gas.
How it Works
Heat travels to the glass surface and then to the cookware, so pans must be flat
on the bottom for good cooking results. The glass cooktop stays hot enough to
continue cooking after it is turned off. Remove the pan from the surface unit if
you want cooking to stop.
Pans must be made of ferrous metals (metal that attracts a magnet). Heat is
produced by a magnetic circuit between the coil and the pan. Heats up right away
and changes heat settings right away,like a gas cooktop. After turning the control
off, the glass cooktop is hot from the heat of the pan, but cooking stopsright away.
Heats by direct contact with the pan and by heating the air under the pan. For best
cooking results, use good quality pans. Electric coils are more forgiving of
warped pans than radiant or solid disks. Heats up quickly but does not change
heat settings as quickly as gas or induction. Electric coils stay hot enough to
continue cooking for a short time after they are turned off.
Heats by direct contact with the pan, so pans must be flat on the bottom for good
cooking results. Heats up and cools down more slowly than electric coils. The
disk stays hot enough to continue cooking after it is turned off. Remove the pan
from the solid disk if you want the cooking to stop.
Flames heat the pans directly. Pan flatness is not critical to cooking results, but
pans should be well balanced. Gas burners heat the pan right.away and change
heat settings right away.When you turn the control off, cooking stops right away.
8
Page 9

GeneralInformationAboutRadiantSurfaceUnib
The radiant cooktop features heating units beneath a
smooth glass surface. The surface units are shown by
outlines on the glass.
Before you use the cooktop for the first time, clean
it with cleaning cream. This helps protect the top
and makes clean-up easier.
NOTE: A slight odoris normalwhena new cooktop
is used for the first time, It is caused by the heating of
new parts and insulating materials and will disappear
in a short time.
When a surface unit is turned on, coils beneath the
surface unit radiate heat through the glass to the
cookware. The red glow of the coils will be visible
through the glass, It will take the surface unit a few
moments to heat up. The coil cycles on and off to
maintain your selected control setting. With poor
cookware, you will see frequent cycling of the unit
off and on. Good, flat cookware will minimize
the cycling.
Use only flat-bottomed cookware. Do not let pots boil
dry. Overheated metal can bond to glass cooktop. An
overheated copper pot will leave a residue that will
permanently stain the glass.
Sliding aluminum cookware across the glass may
leave metal marks. These metal marks will appear as
small scratches. They can be removed with cleaning
cream and a razor scraper.
It is safe to placehot cookwarefrom the ovenor surface
on the glass sutiace when the surfaceis cool.
Avoidsliding pans on the glass cooktop. Pan edges
that are even slightly rough or grit on the cooktop can
cause scratches on the glass.
Evenafterthe surfaceunitsare turnedoff,theglass
cooktopretainsenoughheatto continuecooking.To
avoidovercooking,removepansfromthe surfaceunits
whenthefoodiscooked.Avoidplacinganythingonthe
surfaceunituntilit hascooledcompletely.
The Hot Surface Lights will stay lit untilthe cooktop
is safe to touch. It is not unusual for the lights to stay
lit for 30 minutes.
HotSurfaceIndicatorLight
A “HOT SURFACE’ light will glow brightly when
any radiant element is turned on, and will remain lit
after the unit is turned off until the surface is cool
enough to touch. Each element has its own “HOT
SURFACE’ indicator light.
● It comes on instantly when the unit is turned on.
● It stays on even after the unit is turned off.
● It glows brightly until the unit is safe to touch.
A “HOT SURFACE”light will glow brightly when any
element is turned on.
91
Page 10
SUmACE CONTROLS
At both OFF and HI the control “clicks” into position. Youmay hear slight
“clicking”sounds during cooking, indicating the control is keeping the unit
at the heat levelor power levelyou set.
Switching heats to higher settings always shows a quicker change than
switching to lower settings.
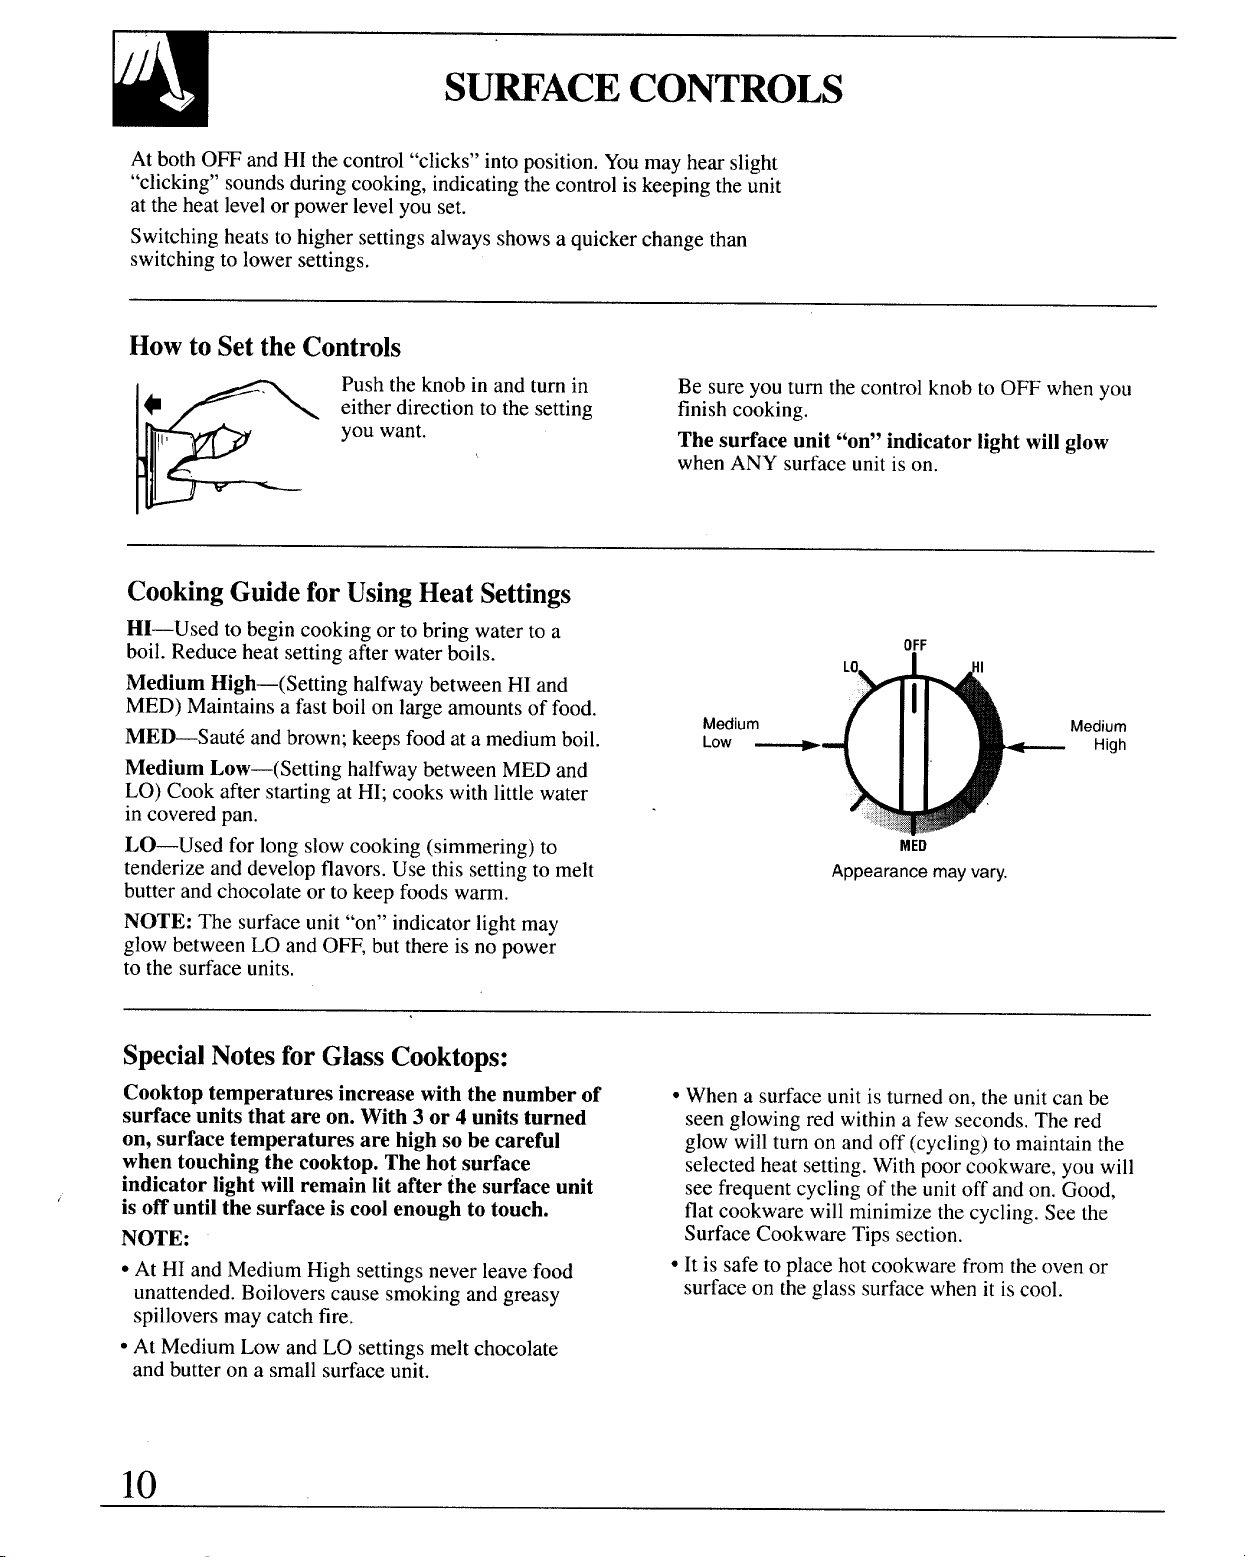
Howto Setthe Controls
Push the knob in and turn in
+ ‘
11’
either direction to the setting finish cooking.
you want.
K
CookingGuidefor UsingHeat Settings
HI—Used to begin cooking or to bring water to a
boil. Reduce heat setting after water boils.
Medium High—(Setting halfway between HI and
MED) Maintains a fast boil on large amounts of food.
MED—Sautd and brown; keeps food at a mediumboil.
Medium Low—(Setting halfwaybetween MED and
LO) Cook after starting at HI; cooks with little water
in covered pan.
LO—Used for long slowcooking (simmering) to
tenderize and developflavors. Use this setting to melt
butter and chocolate or to keep foods warm.
NOTE: Thesurfaceunit“on”indicatorlightmay
glow betweenLO and OFF, but there is no power
to the surface units,
Be sure you turn the control knob to OFF when you
The surface unit “on” indicator light will glow
when ANY surface unit is on.
OFF
Medium
Low ~ High
MEO
Appearance may vary.
Medium
SpecialNotesforGlassCooktops:
Cooktop temperatures increase with the number of
surface units that are on. With 3 or 4 units turned
on, surface temperatures are high so be careful
when touching the cooktop. The hot surface
indicator light will remain lit after the surface unit
is off until the surface is cool enough to touch.
NOTE:
● At HI and Medium High settingsnever leave food
unattended. Boiloverscause smoking and greasy
spillovers may catch fire.
● At Medium Low and LO settings melt chocolate
and butter on a small surface unit.
10
● When a surface unit is turned on, the unit can be
seen glowing red within a few seconds.The red
glow will turn on and off (cycling) to maintain the
selected heat setting. With poor cookware, you will
see frequent cycling of the unit off and on. Good,
flat cookware will minimize the cycling. See the
Surface Cookware Tips section.
● It is safe to place hot cookware from the oven or
surface on the glass surface when it iscool.
Page 11
~pes ofCookware
SU~ACE COOKWAm TWS
The following information will help you choose
cookware which will give good performance.
Stainless Steel: highly recommended
Especially good with a sandwich clad bottom. The
sandwich bottomcombines the benefits of stainless
steel (appearance, durability and stability) with the
advantages of aluminum or copper (heat conduction,
even heat distribution).
Aluminum: heavy weight recommended
Good conductivity.Aluminum residues sometimes.
appearas scratcheson the cooktop,but can be removed
ifcleaned immediately.Because of its low melting
point,thin weightaluminumshould not be used.
Cast Iron: usable, but not recommended
Poor performance. May scratch the surface.
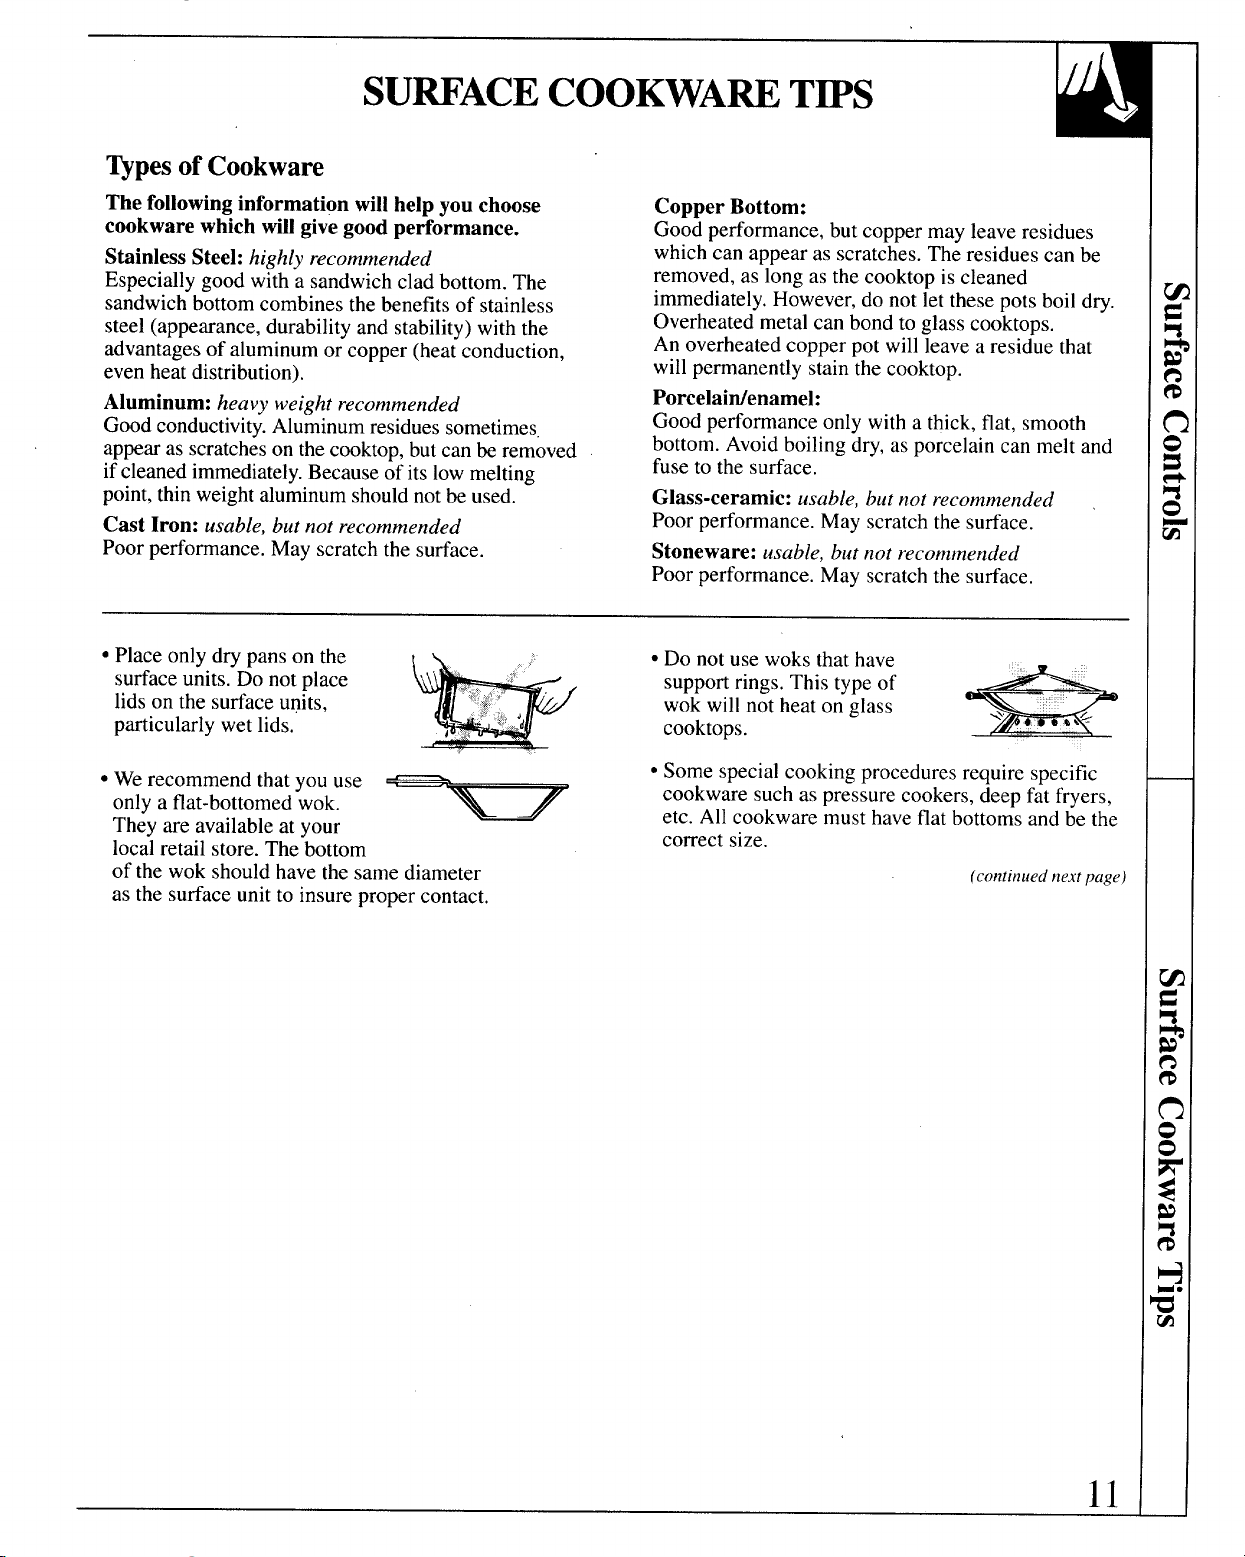
● Place only dry pans on the
surface units. Do not place
lids on the surface units,
particularly wet lids.
● We recommend that you use
only a flat-bottomed wok.
They are available at your
local retail store. The bottom
of the wok should have the same diameter
as the surface unit to insure proper contact,
Copper Bottom:
Good performance, but copper may leave residues
which can appear as scratches. The residues can be
removed, as long as the cooktop is cleaned
immediately. However, do not let these pots boil dry.
Overheated metal can bond to glass cooktops.
An overheated copper pot will leave a residue that
will permanently stain the cooktop.
Porcelaitienamel:
Good performance only with a thick, flat, smooth
bottom. Avoidboiling dry,as porcelain can melt and
fuse to the surface.
Glass-ceramic: usable, but not recommended
Poor performance. May scratch the surface.
Stoneware: usable, but not recommended
Poor performance. May scratch the surface.
● Do not use woks that have
support rings. This type of
wok will not heat on glass
cooktops.
● Some special cooking procedures require specific
*
cookware such as pressure cookers, deep fat fryers,
etc. All cookware must have flat bottoms and be the
correct size.
(c(lntinL{ednext page)
11I
Page 12
SUWACE COOKWA~ TWS
Howto CheckPanPetiomance
Use of correct cookware can affect the cooking
performance and cleaning of your cooktop.
The correct cookware reduces the temperature of
the cooktop surface and minimizes the chance of
spilloversburning onto the cooktop.
You must use pans with perfectly flat bottoms.
Some pans may have curved or rounded bottoms or
may be warped. If you are unsure of the flatness of
your pans you may do this quick test.
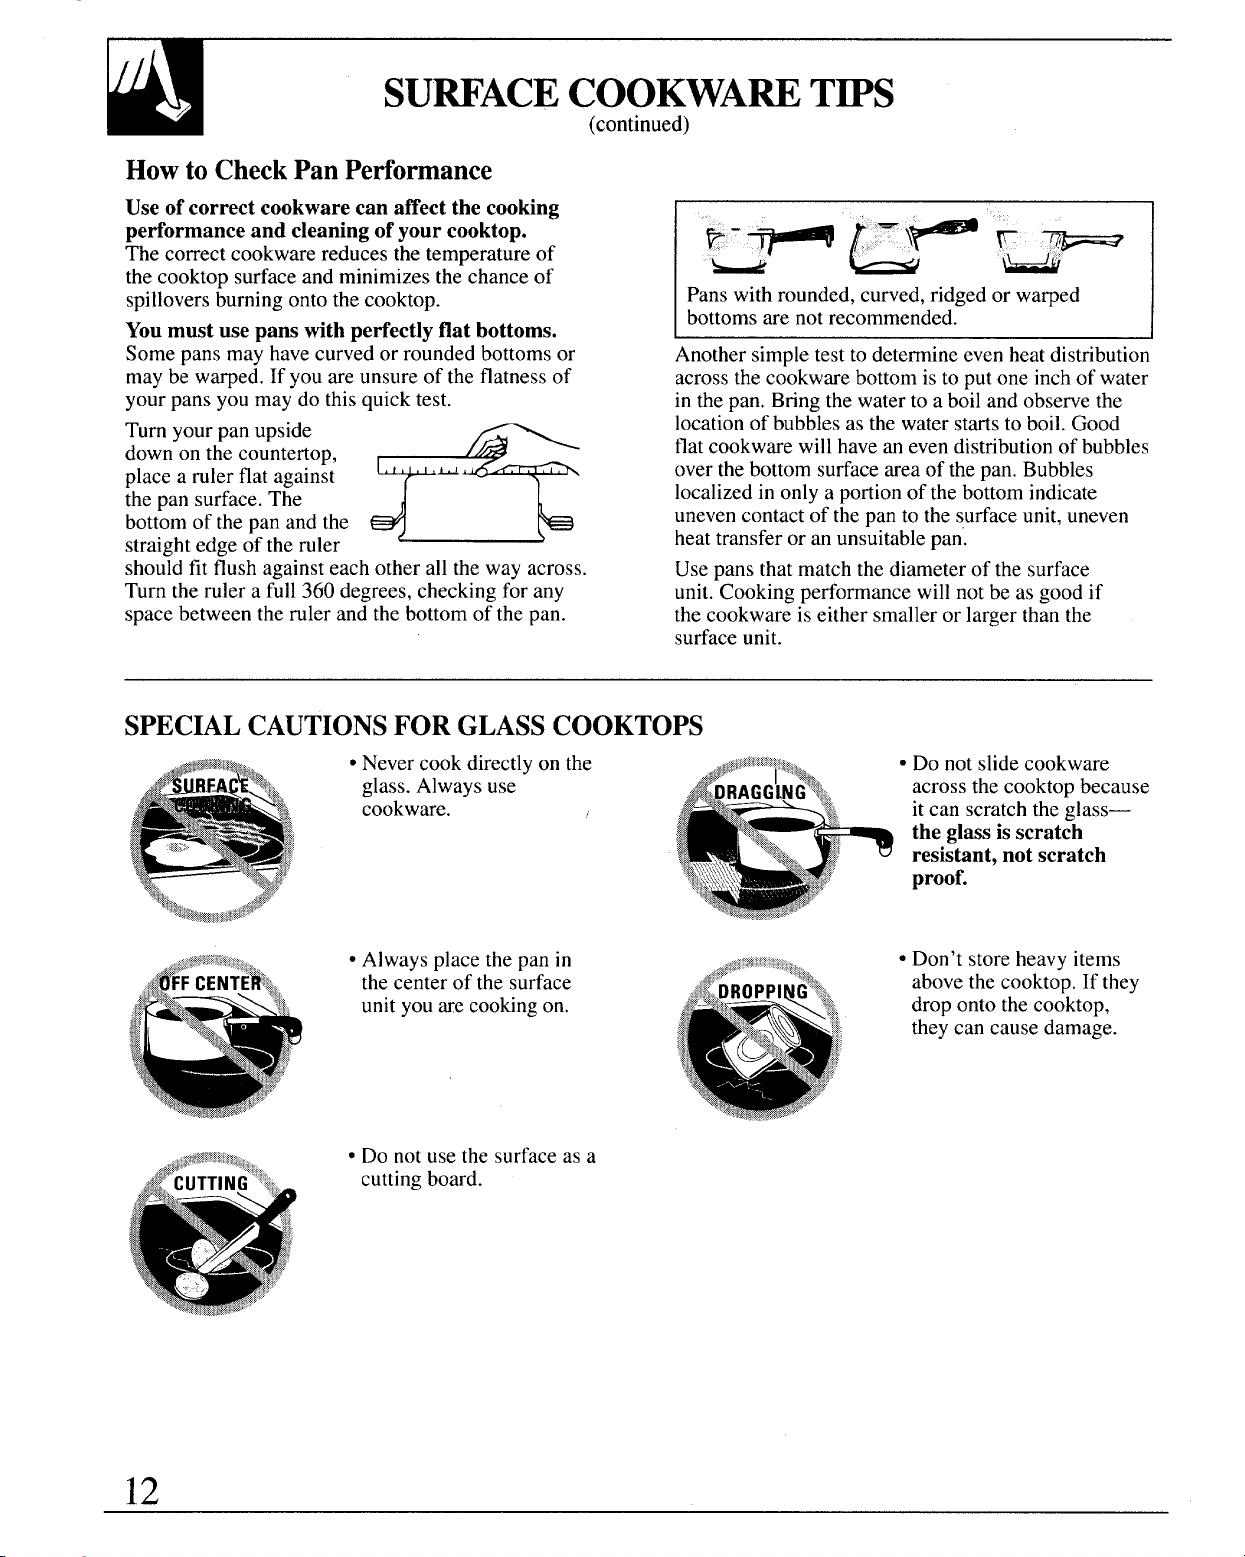
Turn your pan upside
down on the countertop,
place a ruler flat against
the pan surface. The
bottom of the pan and the
straight edge of the ruler
should fit flush against each other all the way across.
Turn the ruler a full 360 degrees, checking for any
space between the ruler and the bottom of the pan.
(continued)
Another simple test to determine even heat distribution
across the cookware bottom isto put one inch of water
in the pan, Bring the water to a boil and observe the
location of bubbles as the water startsto boil. Good
flat cookware will have an even distributionof bubbles
over the bottom surface area of the pan. Bubbles
localized in only a portionof the bottom indicate
uneven contact of the pan to the surfaceunit, uneven
heat transfer or an unsuitablepan:
Use pans that match the diameter of the surface
unit. Cooking performance will not be as good if
the cookware is either smaller or larger than the
surface unit.
v-~ .“\? TwTm
&
Pans with rounded, curved, ridged or warped
bottoms are not recommended.
L
SPECIALCAUTIONSFORGLASSCOOKTOPS
● Always place the pan in
the center of the surface
unit you are cookingon.
● Do not use the surface as a
cutting board.
across the cooktop because
it can scratch the glass—
the glassis scratch
resistant, not scratch
proof.
● Don’t store heavy items
above the cooktop. If they
drop onto the cooktop,
they can cause damage.
12
Page 13
Canning should be done on the cooktop only.
Pots that extend beyond 1inch of the surface unit
circle are not recommended for most surface cooking.
However, when canning with water-bath or pressure
canner, larger-diameter pots may be used. This is
because boiling water temperatures (even under
pressure) are not harmful to the cooktop surfaces
surrounding the surface units.
Observethe FollowingPoink in Canning
HOWEVER, DO NOT USE LARGE DIAMETER
CANNERS OR OTHER LARGE DIAMETER POTS
FOR FRYING OR BOILING FOODS OTHER
THAN WATER.Most syrup or sauce mixtures—
and all types of frying+ook at temperatures much
higher than boiling water. Such temperaturescould
eventuallyharm the glass cooktop surfaces.
1. Be sure the canner fits over the center of the surface
unit. If your cooktop or its location does not allow
the canner to be centered on the surface unit, use
smaller diameter pots for good canning results.
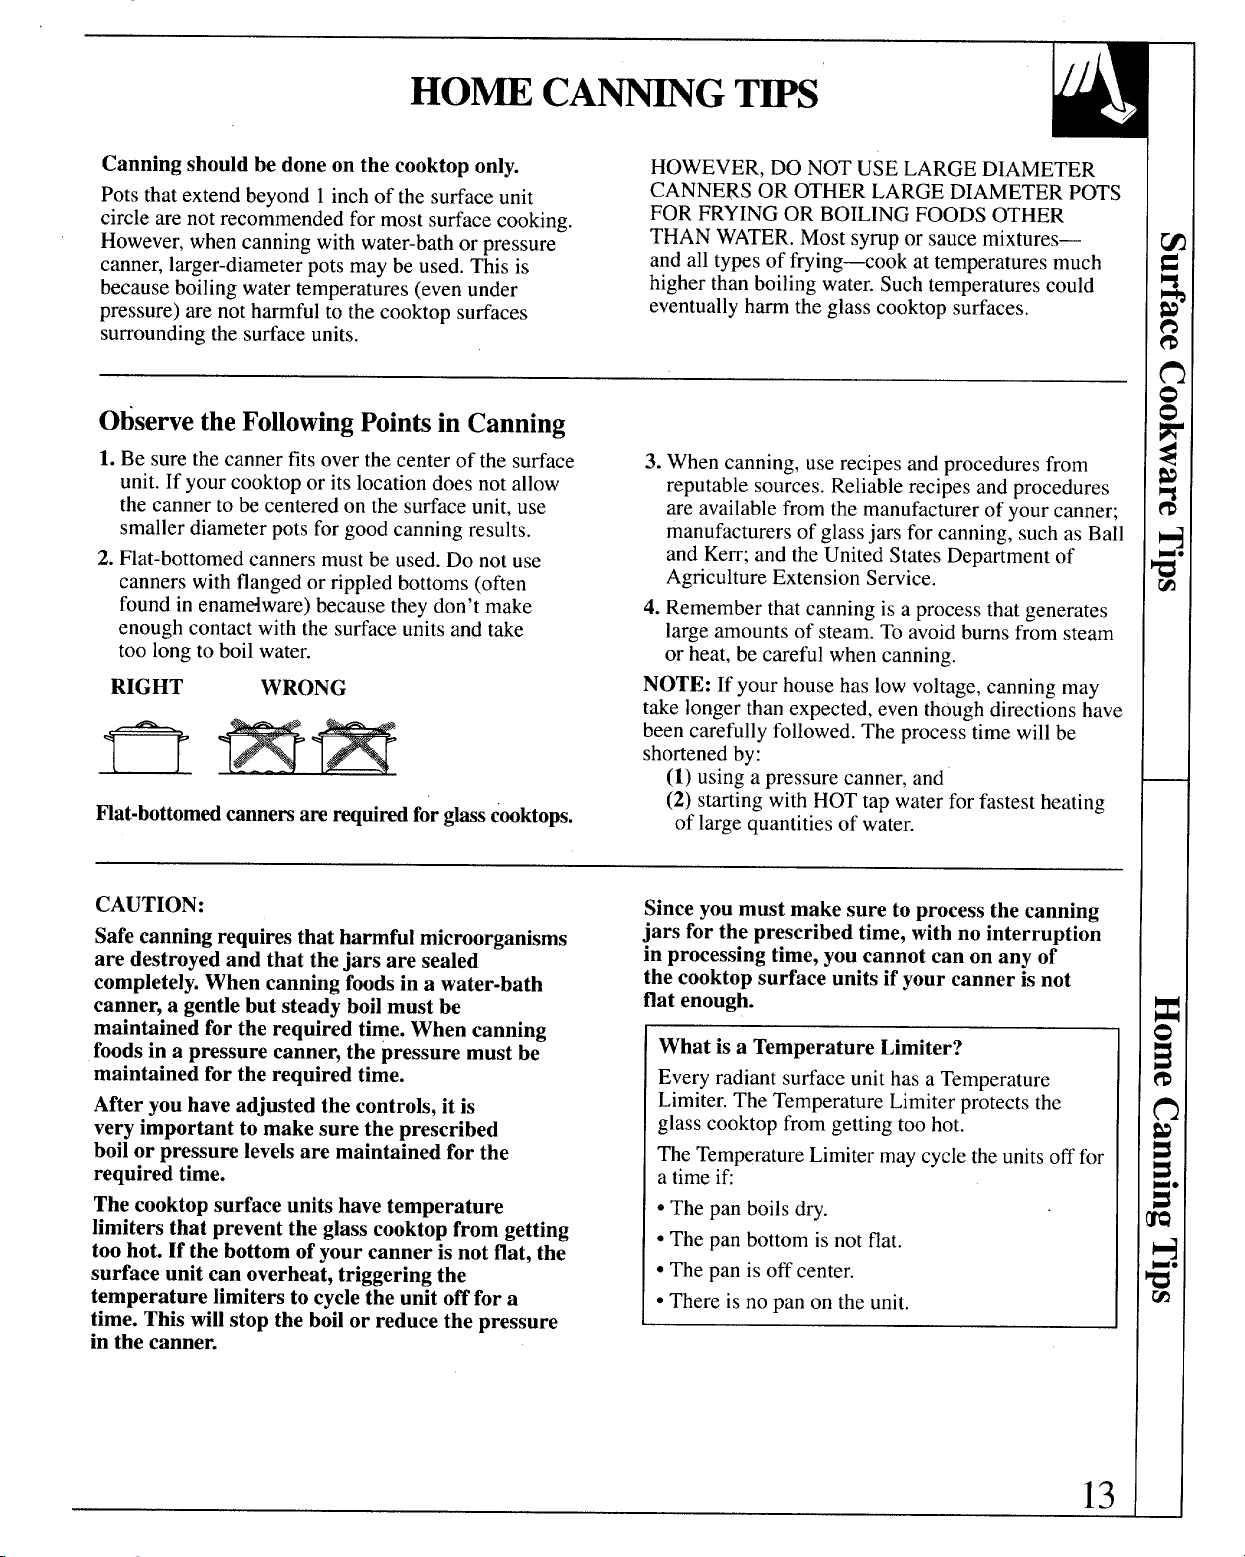
2. Flat-bottomed canners must be used. Do not use
canners with flanged or rippled bottoms (often
found in enamdware) because they don’t make
enough contact with the surface units and take
too long to boil water.
RIGHT
WRONG
Flat-bottomedcannersarerequiredfor~ass cooktops.
CAUTION:
Safe canning requiresthat harmful microorganisms
are destroyed and that the jars are sealed
completely. When canning foods in a water-bath
canner, a gentle but steadv boil must be
maintained for the requir~d time. When canning
foods in a pressure canner, the pressure must be
maintained for the required time.
After you have adjusted the controls, it is
very important to make sure the prescribed
boil or pressure levels are maintained for the
required time.
The cooktop surface units have temperature
limiters that prevent the glass cooktop from getting
too hot. If the bottom of your canner is not flat, the
surface unit can overheat, triggering the
temperature limiters to cycle the unit off for a
time. This will stop the boil or reduce the pressure
in the canner.
3. When canning, use recipes and procedures from
reputable sources. Reliable recipes and procedures
are availablefrom the manufacturer of your canner;
manufacturers of glassjars for canning, such as Ball
and Kerr; and the United States Department of
Agriculture Extension Service.
4. Remember that canning is a process that generates
large amounts of steam. To avoidburns from steam
or heat, be careful when canning.
NOTE: If your house has low voltage,canning may
take longer than expected, even though directions have
been carefully followed. The process time will be
shortened by:
(1) using a pressure canner, and
(2) starting with HOT tap water for fastest heating
of large quantities of water.
Since you must make sure to process the canning
jars for the prescribed time, with no interruption
in processing time, you cannot can on any of
the cooktop surface units if your canner is not
flat enough.
What is a Temperature Limiter?
Everyradiantsurfaceunithasa Temperature
Limiter.The Temperature Limiter protects the
glass cooktop from getting too hot.
The TemperatureLimiter may cyclethe units off for
a time if
● The pan boils dry.
● The pan bottom is not flat.
● The pan is off center,
● There is no pan on the unit.
13
Page 14
GLASSCOOKTOP CLEANING
GlassCooktopCleaning
Cleaning of glasscooktops is different from cleaning a
standard porcelain finish. To maintain and protect the
surfaceofyournewglasscooktopfollowthesebasic steps.
Before you use the cooktop for the first time, clean
it with cleaning cream. This helps protect the top
and makes clean-up easier.
DAILY CLEANING: Use only a recommended
cleaning cream, such as Cerama Brite or the
Cooktop Cleaning Creme, on the glass cooktop.
For normal, light soil:
1. Rub a few drops (less is better) of the cleaning
cream onto soiled area using a damp paper towel.
Buff with a dry paper towel until all soil and cream
are removed. Frequent cleaning leaves a protective
coating which isessential in preventing scratches
and abrasions.
2. Cleanthe surfacewith the cleaningcream after
each use.
For heavy, burned on soil:
1. Applya few dropsof thecleaningcreamto the
(cool) soiledarea.
2. Using a damppapertowel, rubthecreaminto the
burnedonarea.As with anyburnedon spill,this
mayrequiresomeeffort.
3. Carefullyscrapesoil withrazorscraper.Hold
scraperata 30° angleagainsttheglasscooktop.
4. If anysoil remains,repeatthe stepslistedabove. For
additionalprotection,after all soilhas been removed,
polish the entire surface with the cleaning cream.
5. Buff with a dry paper towel.
NOTE:
● Using a razor scraper will not damage the surface
if the 30° angle is maintained.
● Be sure to use a new,sharp razor scraper. Do not use
a dull or nicked blade.
● Store the razor scraper out of reach of children.
SPECIAL CARE: Sugary spillovers (suchasjellies,
fudge,candysyrups)ormelted plastics cancause
pittingof the surfaceof yourcooktop(notcoveredby
thewarranty)unless the spill is temoved while still
hot. Special care should be tiken when removing
hot substances. Follow these instructions carefully
and remove soil while spill is still hot.
1. Turn off all surface units affected by the spillover.
Remove hot pans.
2. Wearing an oven mitt, hold the
razor scraper at a 30° angle to the
+ ,J.’!J :-
_i%~<’!
,.,,\
cooktop and scrape hot spill to a - ‘ , ,
cool area outside the surface unit.
I ,./’ ‘
F
3. Whh the spillin a coolarea, use a dry paper towelto
removeanyexcess.Any spilloverremainingshould
be left untilthe surfaceof the cooktop has cooled.
Do not continueto usethe soiled sutiace unituntil all
of the spilloverhas been removed.Followthe steps
underHeavy Soil to continuethe cleaningprocess.
COOKTOP SEAL: Toclean thecooktopseal,let a
wetclothrest on it fora fewminutes, then wipeclean.
Use a milddetergentif needed,Do notusea knifeor any
sharpobjecton the sealbecauseit will cut or damageit.
GENEML INFORMATION: As the cleaning
cream cleans, it leaves a protectivecoating on the
cooktop surface. This coatinghelps to preventbuild-up
of mineral deposits (water spots) and will make future
cleaning easier. Dishwashing detergents remove this
protectivecoating and therefore make the cooktop
more susceptibleto staining.
To conveniently order more cream antior scrapers
for cleaning your glasscooktop, please call our toll
free number:
National Parts Center
Cleaner 10oz.
Scraper
Cream and scraper kit
800-626-2002
#Wx10X300
#WX5X1614
# WB64X5027
PRECAUTIONS
● If pots with a thin overlay of aluminum, copper or
enamel are allowed to boildry, the overlay may bond
with the glasscooktopand leavea black discoloration.
This should be removed immediately before heating
again or the discoloration may be permanent.
● Water stains (mineral deposits) are temovable using
the cleaning cream or full strength white vinegar.
● Use of window cleaner may leave an iridescent film
on the cooktop. The cleaning cream will remove this
discoloration.
14
● If you slide aluminum or copper cookware across
the surface of your cooktop, they may leave metal
markings which appear as scratches. If this should
happen, use the razor scraper and cleaning cream to
remove these markings, Failureto remove these
residues immediately may leave permanent marks.
● Most cleanerscontain ammonia,chemicals and
abrasiveswhich can damage the surface of your
cooktop.Use only the recommendedcleaning
creamfor proper cleaningand protectionof
yourglass cooktop.
Read and follow all instructions and warnings
on the cleaning cream labels.
Page 15
FEATURESOFYOUROWN CONTROL
Not all features are on all models. Appearance may vary.
9QQ
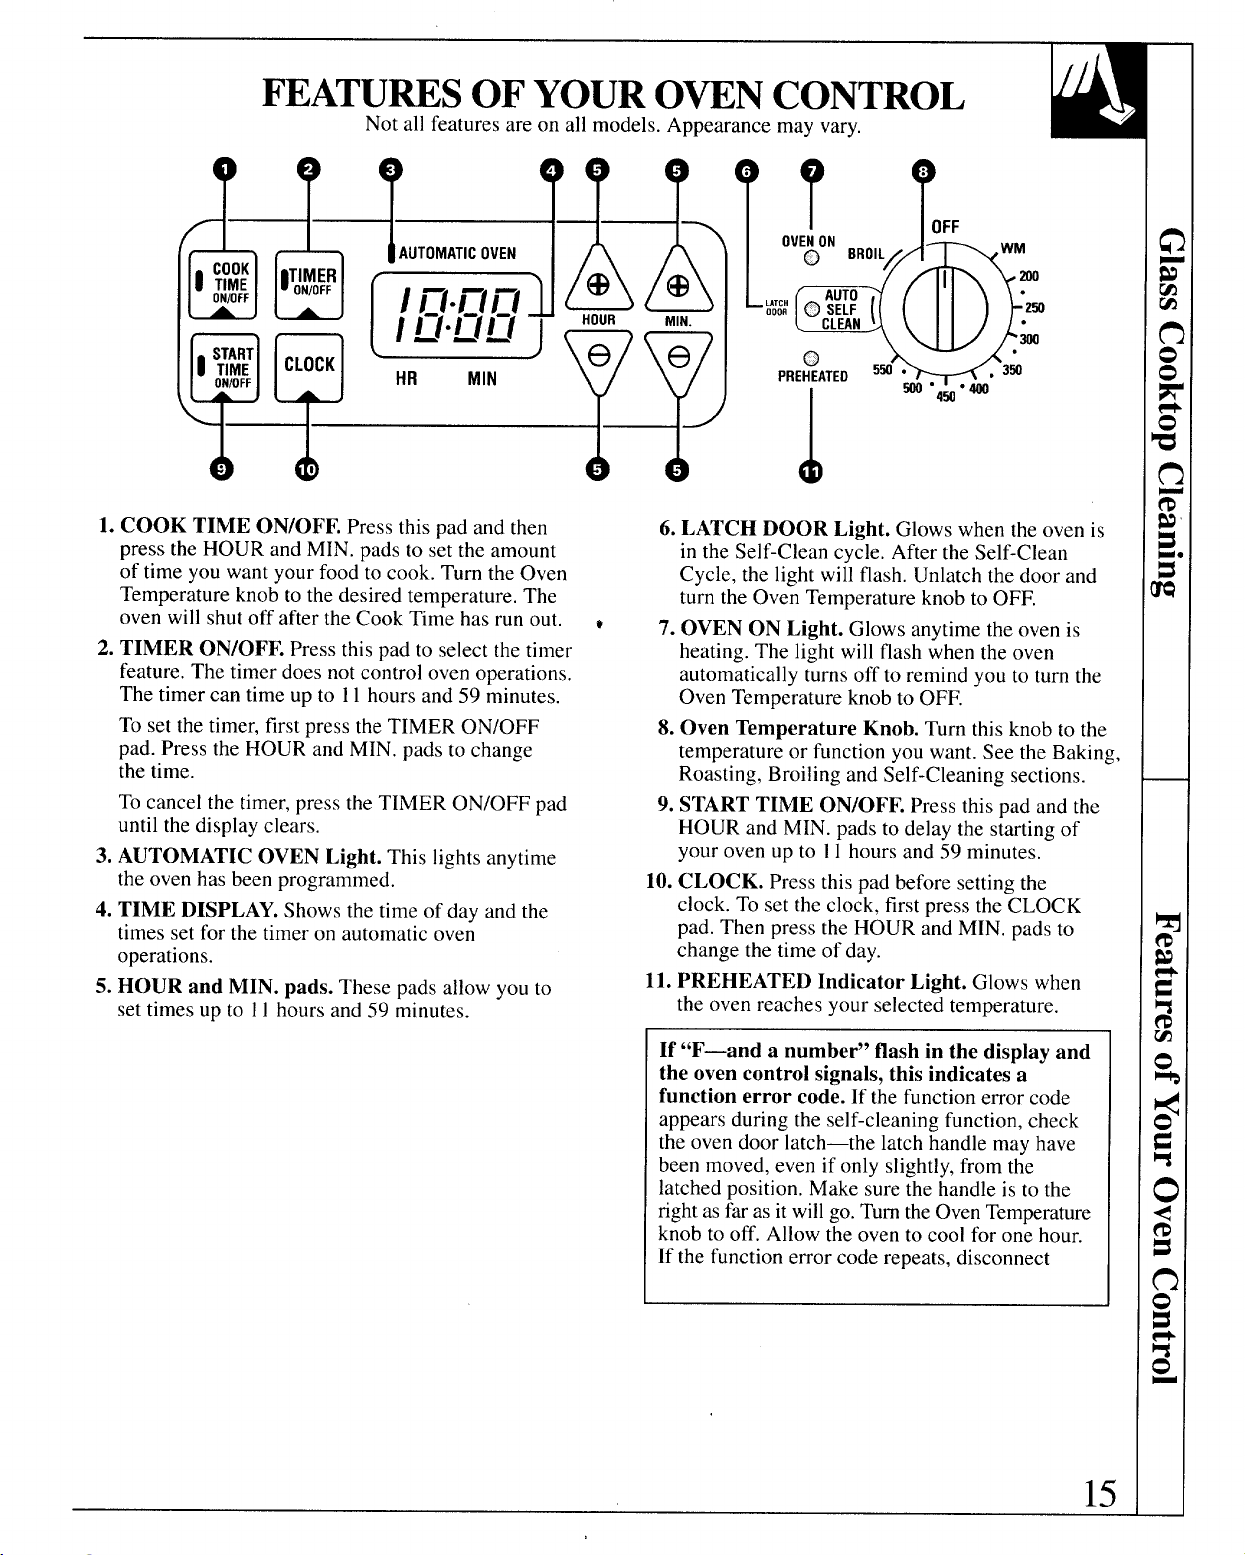
1. COOK TIME ON/OFF. Pressthispadandthen
press the HOUR and MIN. pads to sktthe amount
of time you want your food to cook. Turn the Oven
Temperature knob to the desired temperature. The
oven will shut off after the Cook Time has run out. o
2. TIMER ON/OFF. Press this pad to select the timer
feature. The timer does not control oven operations.
The timer can time up to 11 hours and 59 minutes.
To set the timer, first press the TIMER ON/OFF
pad. Press the HOUR and MIN. pads to change
the time.
To cancel the timer, press the TIMER ON/OFF pad
until the display clears.
3. AUTOMATICOVEN Light. Thislightsanytime
theovenhasbeen programmed.
4. TIME DISPLAY.Showsthe timeof day andthe
timesset forthetimeron automaticoven
operations.
5. HOUR and MIN. pads. Thesepadsallowyou to
settimes upto 11hoursand59 minutes.
6. LATCH DOOR Light. Glows whentheoven is
in theSelf-Cleancycle. Afterthe Self-Clean
Cycle, the lightwill flash.Unlatchthedoorand
turntheOvenTemperatureknobto OFF.
7. OVEN ON Light. Glows anytimetheoven is
heating.The light will flash when the oven
automatically turns off to remind you to turn the
Oven Temperature knob to OFF.
8. Oven Temperature Knob. Turnthisknobto the
temperatureorfunctionvou want.See the Bakinp.
Roa;ting, Broiling and ~elf-Cleaning sections. u‘
9. STARTTIME ON/OFF. Pressthispadandthe
HOURandMIN.padsto delaythe startingof
youroven up to 11 hours and 59 minutes.
10. CLOCK. Pressthispadbeforesettingthe
clock. To set the clock, firstpress the CLOCK
pad. Then press the HOUR and MIN. pads to
change the time of day.
11. PREHEATED Indicator Light. Glows when
the oven reaches your selecte~ temperature,
If “F-and a number” flash in the display and
the oven control signals, this indicates a
function error code. Ifthe functionerrorcode
appearsduringtheself-cleaningfunction,check
the oven door latch—the latch handle may have
been moved, even if only slightly,from the
latched position. Make sure the handle is to the
rightasfar as it willgo. TurntheOven Temperature
knob to off. Allow the oven to cool for one hour.
If the function error code repeats, disconnect
15
Page 16

OWN CONTROL,CLOCKAm TMR
AutomaticClock
The clock must be set for the automatic oven timing
functions to work properly.The time of day cannot be
changedduring a TimedBaking or Self-Cleaningcycle.
Timer
The timer is a minute timer only.
The timer does not control oven
operations. The maximum setting
on the timer is 11 hours and 59
minutes.
ToSet the Timer
1. Press the TIMER
#TJ$$~
u
2. Press the HOUR and MIN. pads
until the amount of time you
want shows in the display.The
timer will start automatically
within a few seconds of
releasing the pad.
ToCanceltheTimer
Tocancel the
the display. To recall the time remaining, press the
TIMER ON/OFF pad once, To cancel the timer press
the TIMER ON/OFF pad again.
timer, the remaining time must be in
ToSet the Clock
clOCK 2. press the HOUR and MIN. pads to set the
n
ON/OFF pad.
Endof CycleTones
The end of cycle tone can be cleared by pressing the
TIMER ON/OFF pad or,on some models, by pressing
the COOK TIME ON/OFF pad depending on which
function you are using.
1. Press the CLOCK pad.
time of day.
ToResetthe Timer
If the display is still showing the
time remaining, you may change it
by pressing the HOUR and MIN.
pads until the time you want
appears in the display.
If the remaining time is not in the
display,recall the remaining time
by pressing the TIMER ON/OFF
pad and then pressing the HOUR
and MIN. pads until the new time
you want shows on the display.
(on some models)
PowerOutage
On some models, after a power outage the oven will
automatically resume its setting once the power is
restored.
For models with a CLOCK pad, when the power is
restored the display will flash the time of day until a
pad is pressed or the knob is turned. Reset the clock to
the correct time of day.
If the oven was in operation when the power outage
occurred, the Oven Temperature knob must be turned
back to OFF. Then reset the knob to the way it was
before the power outage.
If your model has a COOK TIME ON/OFF pad
and your oven was set for timed baking or roasting
when the power outage occurred, the clock and all
programmed functions must be reset. To reset them,
first turn the Oven Temperature knob back to OFF,
reset the clock, functions and knob back to the way
they were before the power outage.
OvenTemperatureKnob
The oven temperature
knob maintains the
temperature you set
from WARM(170°F.)
to BROIL (550°F.). It
also has an OFF and
an AUTO SELF
CLEAN setting.
Appearance may vary.
The PREHEATED light glows whentheoven
reachesyour selected temperature.
The OVEN ON light will glow anytime the Oven
Temperatureknobis not intheOFFpositionandis
seton atemperatureor a function.
16
Page 17
BeforeUsingYourOven
USmG YOUROWN
1. Look at the controls. Be sure you understand how to
setthem properly.
2. Check the oven interior.Look at the shelves. Take
a practice run at removing and replacing them
properly to give sure, sturdy support.
OvenShelves
The shelves are designed with stop-locks so that
when placed correctly on the shelf supports, they
will stop before coming completely out from the
oven, and will not tilt when removing food from or
placing food on them.
When placing cookware on a shelf, pull the shelf out
to the bump on the shelf support. Place the cookware
on the shelf, then slide the shelf back into the oven.
This will eliminate reaching into the hot oven.
To remove a shelf from the oven,pull it towards you,
tilt the front end upward and pull it out.
3. Read over the information and tips that follow.
4. Keep this guide handy so you can refer to it,
especially during the first weeks of using your
new range.
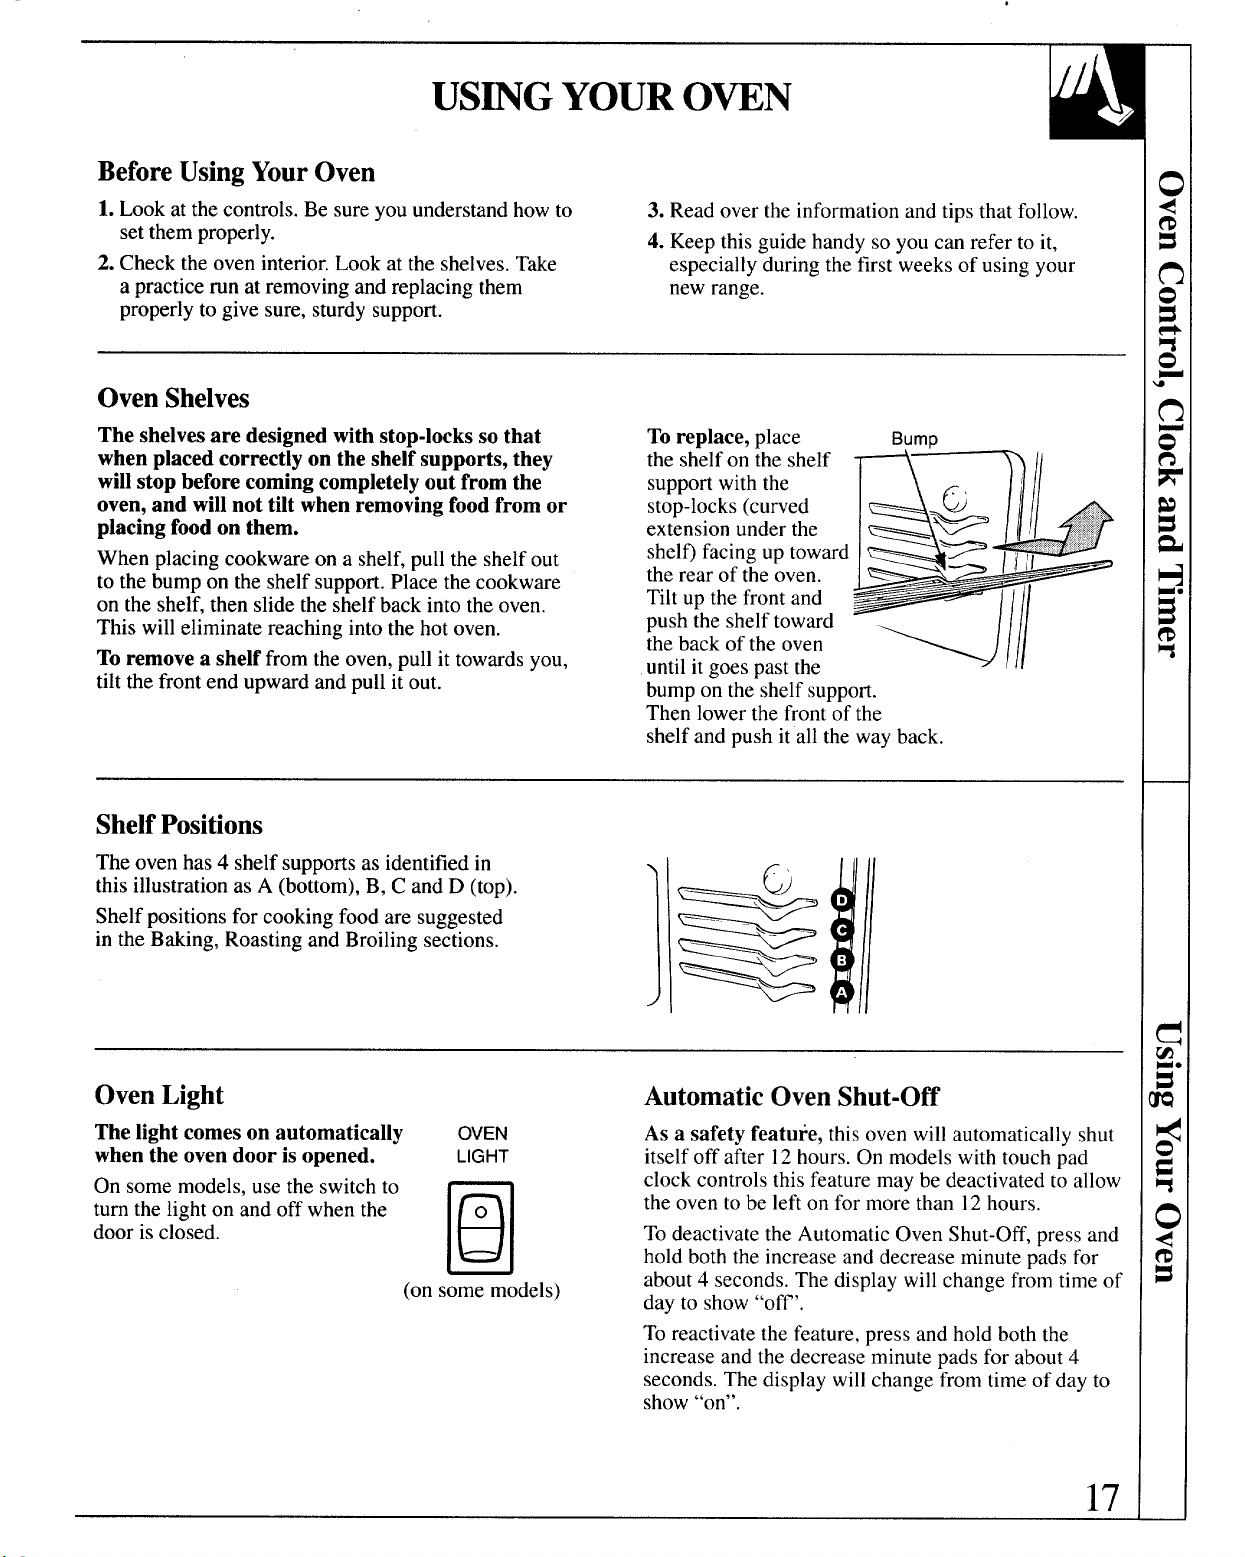
To replace, place
the shelf on the shelf
support with the
stop-locks (curved
extension under the
shelfl facing up toward
the rear of the oven.
Tilt up the front and
push the shelf toward
~heback of the oven
until it goes past the
bump on the shelf support.
Then lower the front of the
shelf and push it all the way back.
-//1
ShelfPositions
The oven has 4 shelf
this illustration as A (b;~om), B, C and D (top).
Shelf positions for cooking food are suggested
in the Baking, Roasting and Broiling sections.
supportsas identified in
OvenLight
The light comes on automatically
when the oven door is opened.
On some models, use the switch to
turn the light on and off when the
door isclosed.
OVEN
LIGHT
o
D
{ J
(on some models)
. .
b
L-’
—-
[/
,<
—-
~
~\-
AutomaticOvenShut-Off
As a safety feature, thisoven will automaticallyshut
itselfoff after12hours.Onmodels withtouchpad
clock controlsthisfeaturemaybe deactivatedto allow
theoven to be lefton for morethan 12hours.
TodeactivatetheAutomaticOven Shut-Off,pressand
holdboththeincreaseanddecreaseminutepadsfor
about4 seconds. Thedisplaywill changefromtimeof
dayto show“off’.
To reactivate the feature, press and hold both the
increase and the decrease minute pads for about 4
seconds. The display will change from time of day to
show “on”.
17
Page 18
BAmG
Do not lock the oven door with the latch during
baking. The latch is used for self-cleaning only.
Youroven temperature is controlled verv accurately
using an oven ~ontrolsystem. We recommend that’
you operate the range for a number of weeks using the
time given on recipes as a guide to become familiar
with your new oven’s performance.
Howto SetYourRangefor Baking
Toavoid possible burns, place the shelves in the
correct position before you turn the oven on.
1. Turn the Oven Temperature knob to the
temperature you desire.
OvenShelves .
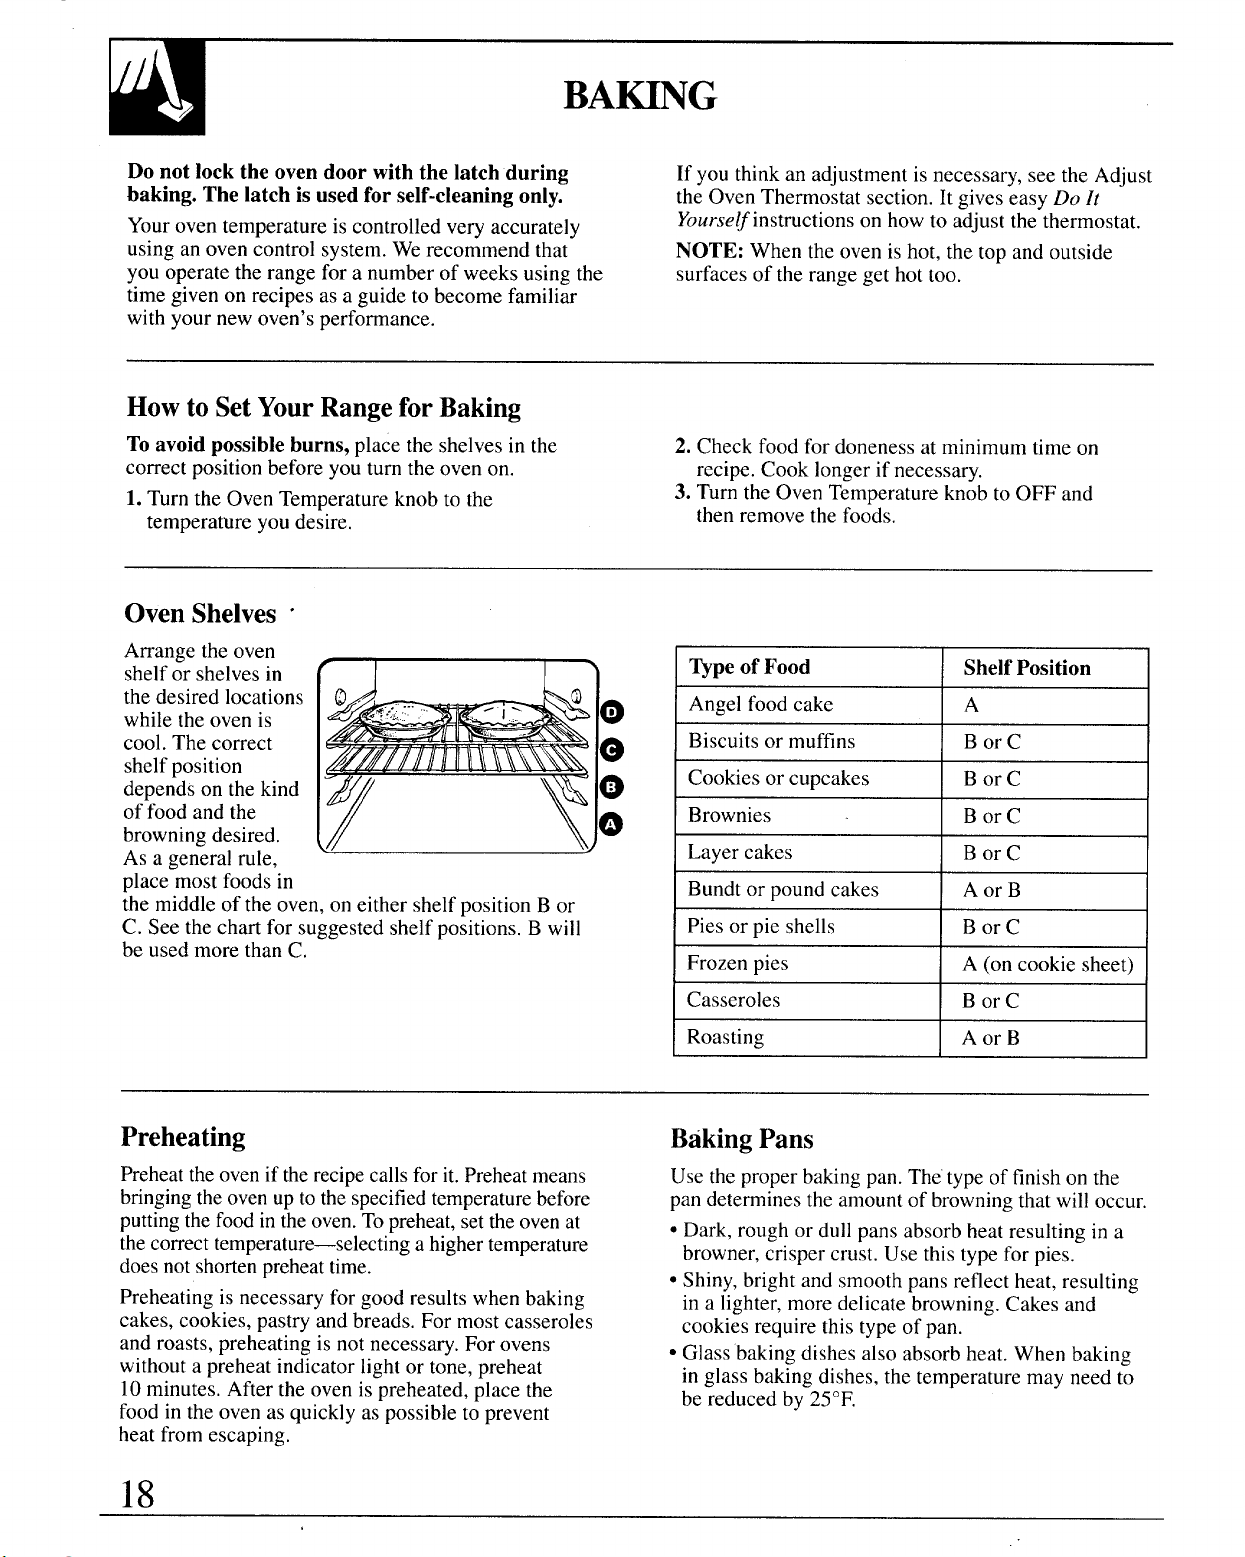
Arrange the oven
shelf or shelves in
the desired locations
while the oven is
cool. The correct
shelf position
depends on the kind
of food and the
browning desired.
As a general rule,
place most foods in
the middle of the oven, on either shelf position B or
C. See the chart for suggested shelf positions. B will
be used more than C,
If you think an adjustment is necessary, see the Adjust
the Oven Thermostat section. It gives easy Do
Yourse/~instructionson how to adjust the thermostat.
NOTE: When the oven is hot, the top and outside
surfaces of the range get hot too.
2. Check food for doneness at minimum time on
recipe. Cook longer if necessary.
3. Turn the Oven Temperature knob to OFF and
then remove the foods.
Typeof Food
I Angel food cake
I
Biscuitsormuffins
Cookies or cupcakes
I Brownies I BorC
I Layer cakes
I Bundt or pound cakes
I Pies or Dieshells
Frozen pies A (on cookie sheet)
Shelf Position
1A
I Bor C
1
Bor C
I Bor C
] Aor B
I Bor C
lt
I
I
I
I
I
I
Preheating
Preheattheoven if therecipecallsfor it. Preheatmeans
bringing the oven up to the specified temperaturebefore
puttingthe food in the oven.To preheat,set the oven at
thecorrect temperature—selectinga higher temperature
doesnot shortenpreheattime.
Preheating is necessary for good results when baking
cakes, cookies, pastry and breads. For most casseroles
and roasts, preheating is not necessary. For ovens
without a preheat indicator light or tone, preheat
10minutes. After the oven is preheated, place the
food in the oven as quickly as possible to prevent
heat from escaping.
18
1Casseroles
Roasting Aor B
I BorC
BakingPans
Use the properbaking pan. The type of finish on the
pan determines the amountof browningthat will occur.
● Dark, rough or dull pans absorb heat resulting in a
browner, crisper crust. Use this type for pies.
● Shiny,bright and smooth pans reflect heat, resulting
in a lighter, more delicate browning. Cakes and
cookies require this type of pan.
● Glass baking dishes also absorb heat. When baking
in glass baking dishes, the temperature may need to
be reduced by 25°F.
I
Page 19

PanPlacement
For even cooking and proper browning, there must be
enough room for air circulation in the oven. Baking
results will be better if baking pans are centered as
much as possible rather than being placed to the front
or to the back of the oven.
Pans should not touch each other or the walls of
the oven. Allow 1-to 1H-inch space between pans
as well as from the back of the oven, the door and
the sides. If you need to use two shelves, stagger the
pans so one is not directly above the other.
BakingGuides
When using prepared baking mixes, follow package recipe or instructions
for the best baking results.
Cookies
When baking
cookies,flatcookie
sheets (without
sides) produce
better-looking
cookies. Cookies
baked in ajelly roll
pan (shortsidesall
around) may have foil may be used
darker edges and
pale or lightbrowning may occur. by placing it on a
Do not use a cookie sheet so lar~e that it touches the
walls or the door of the oven. Never entirely cover
a shelf with a large cookie sheet.
For best results, use only one cookie sheet in the oven
at a time.
AluminumFoil
Neverentirelycover
a shelf with
aluminum foil.
This will disturb
the heat circulation
and result in
poor baking.
A smallersheet of
to catch a spillover
lower shelf several
inches below the food.
Pies
For best results, bake pies in dark, rough or dull pans
to produce a browner, crisper crust. Frozen pies in foil uneven baking results and poorly shaped products.
pans should be placed on an aluminum cookie sheet A cake baked in a pan larger than the recipe
for baking since the shiny foil pan reflects heat away recommends will usually be crisper, thinner and
from the pie crust; the cookie sheet helps retain it.
Cakes
When baking cakes, warped or bent pans will cause
drier than it should be. If baked in a pan smaller than
recommended, it may be undercooked and batter may
oveflow. Check the recipe to make sure the pan size
used is the one recommended.
Don’tPeek
Set the timer for the estimated cooking time and do
not open the door to look at your food. Most recipes time. Take advantage of the “Big View” window (on
provide minimum and maximum baking times such as
“bake 30-40 minutes.” the oven door frequently during cooking allows heat
DO NOT open the door to check untilthe minimum
some models) to monitor cooking progress. Opening
to escape and makes baking times longer. Yourbaking
results may also be affected.
19
Page 20
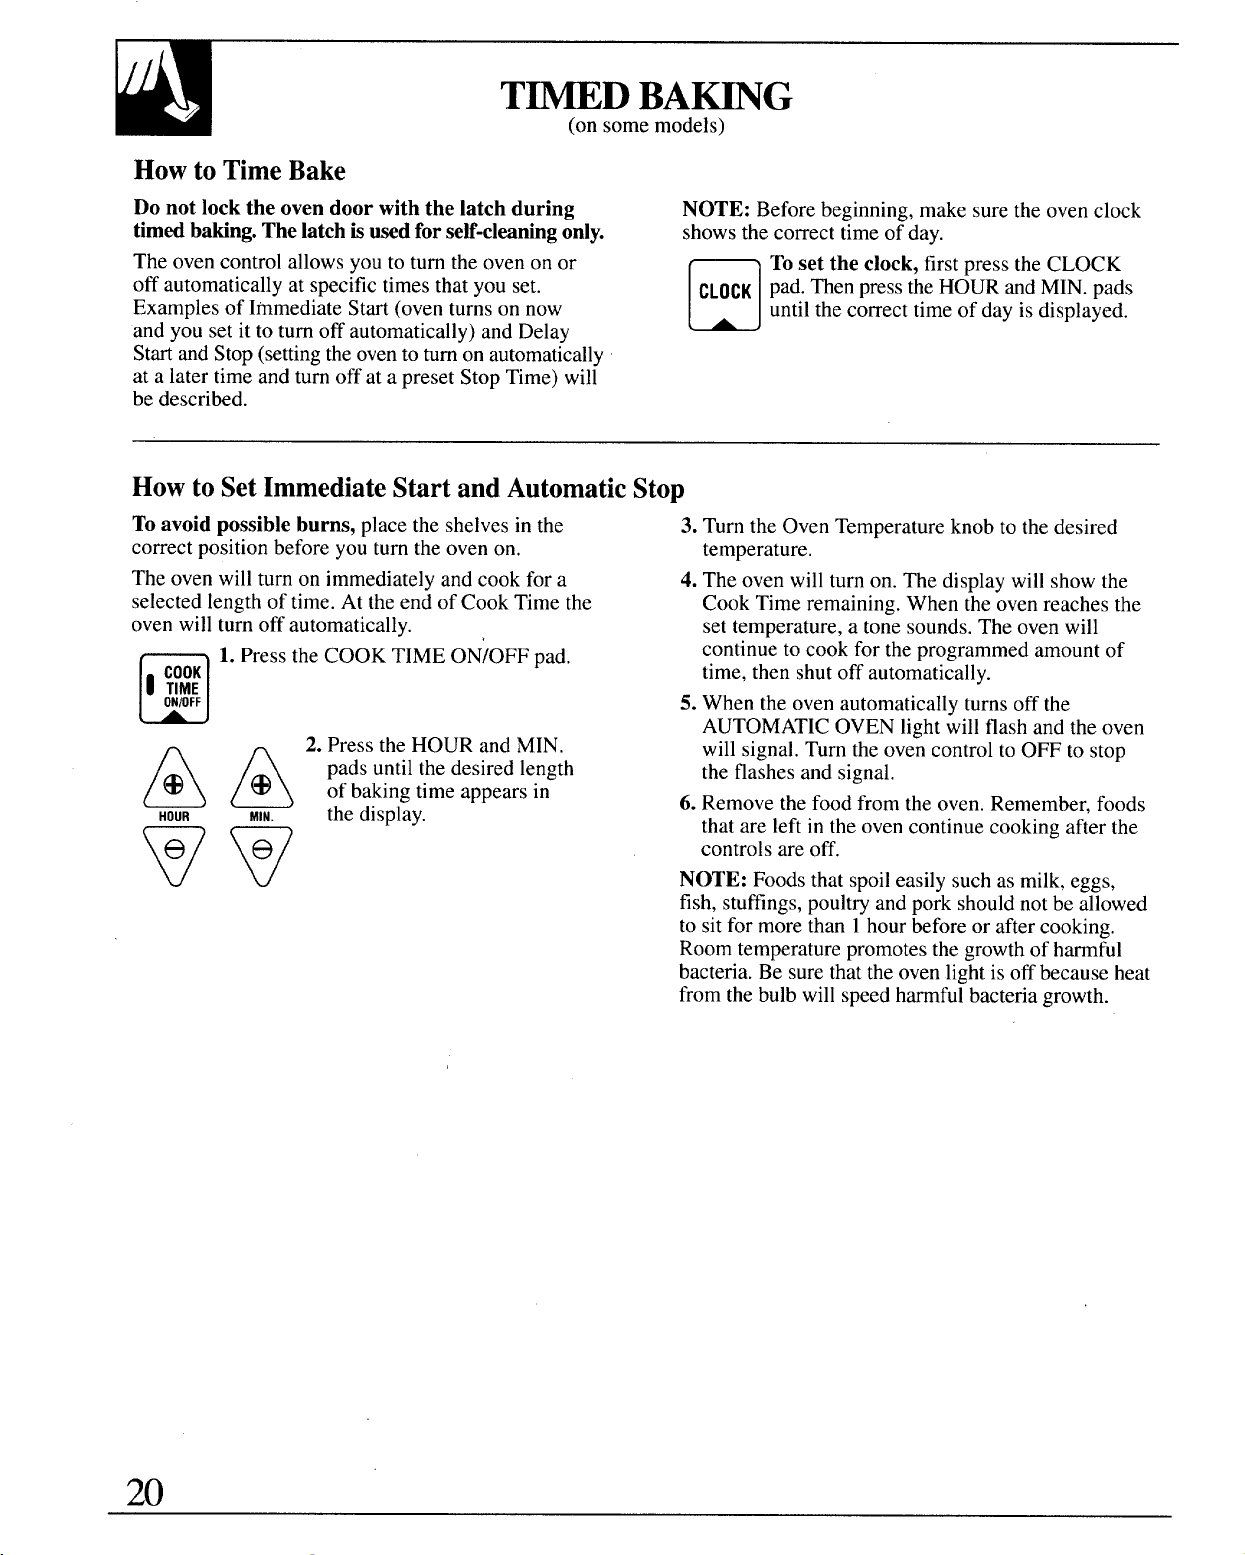
Howto TimeBake
T~D BA~G
(onsome models)
Do not lock the oven door with the latch during
timed baking. The latchis usedforseti-cleaningonly.
The oven control allows you to turn the oven on or
off automatically at specific times that you set.
Examples of Immediate Start (oven turns on now
and you set it to turn off automatically) and Delay
Startand Stop (settingthe ovento turnon automatically
at a later time and turn off at a preset Stop Time) will
be described.
Howto SetImmediateStart and AutomaticStop
Toavoid possible burns, place the shelves in the
correct positionbefore you turn the oven on.
The oven will turn on immediately and cook for a
selected length of time. At the end of Cook Time the
oven will turn off automatically.
1. Press the COOK TIME ON/OFF pad.
o j;;;
u
2. Press the HOUR and MIN.
pads until the desired length
A A thedi;p,ay
HOUR
——
MIN.
of baking t]me appears in
. .
NOTE: Before beginning, make sure the oven clock
shows the correct time of day.
To set the clock, first press the CLOCK
CLOCK Pad men PreSSthe HOUR ~d MIN. pads
❑
3. Turn the Oven Temperature knob to the desired
temperature.
4. The oven will turn on. The display will show the
Cook Time remaining. When the ovenreaches the
set temperature, a tone sounds.The oven will
continue to cook for the programmed amount of
time, then shut off automatically.
5. When the oven automatically turns off the
AUTOMATIC OVEN light will flash and the oven
will signal. Turn the oven control to OFF to stop
the flashes and signal.
6. Remove the food from the oven. Remember, foods
that are left in the oven continue cooking after the
controls are off.
NOTE: Foods that spoileasily such as milk, eggs,
fish, stuffings,poultry and pork should not be allowed
to sitfor more than 1hour before or after cooking.
Room temperature promotes the growthof harmful
bacteria. Be sure that the oven lightis off because heat
from the bulb will speed harmfulbacteria growth.
until the correct time of day is displayed.
20
Page 21

Howto Set DelayStartandAutomaticStop
Quick Reminder:
1. Press the COOK TIME ON/OFF pad.
2. Press the HOUR and MIN. pads to set the
desired length of cooking time.
3. Press the STARTTIME ON/OFF pad.
4. Press the HOUR and MIN. pads to set
the time of day you want cooking to start.
5. Turn the Oven Temperature knob to the
desired temperature.
Toavoid possible burns, place the shelves in the
correct position before you program the oven.
Youcan set the oven control to delay-start the oven,
cook for a specific lengthof time and then turn off
automatically.
For example: Let’s say it’s 2:00 and dinner time
is shortly after 7:00. The recipe suggests3 hours
cooking time at 325°F.
1. Press the COOK TIME ON/OFF pad.
I ;:;:
n
L~J
2. For 3 hours of cooking time, press
n
@
U
HOUR
the HOUR pad until “3:00” appears
in the display.
4. Press the HOUR pad until “4:00” appears in the
display.The timer is now set to start baking in
2 hours, at 4:00.
5. Turn the Oven Temperature knob to the desired
temperature (in this example 325°F.).
The oven is now setto start at 4:00 and cook
for 3 hours at a temperature of 325°F. At the
end of the 3 hour cooking time (7:00), the oven
will automatically turn off. When the oven
automatically turns off the AUTOMATIC OVEN
light will flash and the oven will signal. Turn the
oven control to OFF to stop the flashes and signal.
6. Remove the food from the oven. Remember,
even though the oven shuts off automatically,
foods continue cooking after controls are off.
NOTE:
● The low temperature zone of thisrange (between
WARM and 200°F.) is available to keep hot cooked
foods warm. Food kept in the oven longer than
two hours at these low temperatures may spoil.
● Foods that spoileasily such as milk,eggs, fish,
stuffings,poultry and pork shouldnot be allowed
to sitfor more than one hourbefore or after cooking.
Room temperaturepromotesthe growth of harmful
bacteria.Be sure thatthe oven lightis off because heat
from the bulb will speed harmfulbacteria growth.
e
v
3. Press the STARTTIME ON/OFF pad.
I y~;
u
QuestionsandAnswers
Q. CanI use the minute timer during oven Q. Can I change the time of day on the clock while
cooking? I’m Time Baking in the oven?
A. The minute timer can be used during any A. The time of day on the clock should not be
cooking function. changed during any program that usesthe oven
timer. You must either stopthose programs or wait
until they are finished before changing the time.
21
Page 22

ADmST T~ OWN T~~OSTAT—
DOIT YOURSELF!
Youmay find that your new oven cooks differently
than the one it replaced. Werecommend that you
use your new oven for a few weeks to become more
familiar’with it, following the times given in your
recipes as a guide.
If you think your new oven is too hot or too cold,
you can adjust the thermostat yourself. If you think
it is too hot, adjust the thermostat to make it cooler.
If you think it is too cool, adjust the thermostat to
make it hotter.
We do not recommend the use of inexpensive
thermometers, such as those found in grocery stores,
to check the temperature setting of your new oven.
These thermometers may vary 2M0 degrees.
ToAdjust the Thermostat:
1. Put the Oven Temperature knob in the
OFF position.
2. Press and hold the HOUR INCREASE
and the HOUR DECREASE pads for 5
@
A
HOuR 3. Immediately,before display changes
e
v
The oven temperature can be increased up to 35°F.
hotter or decreased 35°F. cooler.
If the oven adjustment is set cooler than the factory
setting a minus sign “-” and the offset temperature
will appear in the display.
4. Wait several seconds for the control to
automatically set and return to its previous setting.
NOTE: This adjustment will not affect the broiling or
the self-cleaning temperatures. The adjustment will be
retained in memory after a power failure.
seconds until the display changes.
back, press the HOUR INCREASE or
DECREASE pads to increase or decrease
the temperature in 5 degree increments.
ToAdjustthe Temperatureon ModelswithOnly an OvenTemperatureKnob
1. Put the knob in the OFF position.
2. Pull the knob off by pulling straight out.
3. Press and hold the HOTTER or COOLER button
for 5 seconds to make the ovqn 20°F.hotter or 20°F.
cooler.
When you are adjusting the thermostat, the
following lights will flash indicating where the
thermostat will be set when vou release the
adjustment button:
OVEN ON indicates the thermostat will be set at the
factory setting,
PREHEATED indicates the thermostat will be set
20°F. hotter.
LATCH DOOR indicates the thermostat will be set
20°F.cooler.
4. After you have made the adjustment, replace
the knob.
OVENON ~ OFF ~ PREHEATED
BROIL
/ , ‘:M
fi:l Q#jN [
@
5W .
5W
●4w”4m
(appearancemayvary)
.
. 3W
.
.
m
2W
22
Page 23

ROAST~G
Do not lock the oven door with the latch during
roasting. The latch is used for self-cleaning only.
Roasting is cooking by dry heat. Tender meat or
poultry can be roasted uncovered in your oven.
Roasting temperatures, which should be low and
steady,keep spattering to a minimum.
Roasting is really a baking procedure used for meats.
Therefore, the oven controls are set for Baking or
Timed Baking. (You may hear a light clicking sound,
indicating the oven is working properly.)Timed
Baking will turn the oven on and off automatically.
1. Place the shelf in A or B position. No preheating
is necessary.
2. Check the weight of the
meat. Place it,~at sideup,
or for poultry,breast-sideup, on the roasting grid in ,’ ,
a shallow pan. The
melting fat will baste the meat. Select a pan
as close to the size of the meat as possible.
(The broiler pan with grid is a good pan for this.)
h
&i
*,..,,..t
.,,,..,.,,.>.,.‘
~
.<.,
Most meats continue to cook slightly while standing,
after being removed from the oven. Standing time
recommended for roasts is 10to 20 minutes. This
allows roasts to firm up and makes them easier to
carve. Internal temperature will rise about 5° to 10°F.;
to compensate for temperature increase, if desired,
remove the roast from the oven sooner (at 5° to 10°F.
less than the temperature in the Roasting Guide).
Remember that food will continue to cook in the hot
oven and therefore should be removed when the
desired internal temperature has been reached,
,,
—
Useof AluminumFoil
Youcan use aluminum foil to line the broiler pan.
This makes clean-up easier when using the pan for
marinating, cooking with fruits, cooking heavily cured
meats or basting food during cooking. Press the foil
tightly around the insideof the pan.
I
I
(c[~ntin[iedne.rfp(ige)
Page 24

Questionsand Answers
ROAST~G
(continued)
Q. Is it necessary to check for doneness with a
meat thermometer?
A. Checking the finished internal temperature at
the completion of cooking time is recommended.
Temperatures are shown in the Roasting Guide.
For roasts over 8 lbs., check with thermometer
at half-hour intervals after half the cooking time
has passed.
Q. Why is my roast crumbling when I try to
carve it?
A. Roasts are easier to slice if allowed to cool 10to
20 minutes after removing them from the oven.
Be sure to cut across the grain of the meat.
ROAST~G GU~E
FrozenRoask
Frozen roasts of beef, pork, lamb, etc., can be started
without thawing, but allow 10 to 25 minutes per
pound additional time (10 minutes per pound for
roasts under 5 pounds, more time for larger roasts).
Q. Do I need to preheat my oven each time I cook
a roast or poultry?
A. It is not necessary to preheat your oven.
Q. When buying a roast, are there any special tips
that would
help me cook it more evenly?
A. Yes. Buy a roast as even in thickness as possible,
or buy rolled roasts.
Q. Can I seal the sides of my foil “tent” when
roasting a turkey?
A. Sealing the foil will steam the meat. Leaving it
unsealed allows the air to circulate and brown
the meat.
Make sure poultry is thawed before roasting.
Unthawed poultry often does not cook evenly.
Some
commercial frozen poultry can be cooked successfully
without thawing. Follow the directions given on the
package label.
Oven
Qpe
Meat
Tendercuts; rib, high quality
sirloin tip, rump or top round*
Lamb leg or bone-in shoulder*
Vealshoulder,legor loin*
Porkloin,ribor shoulder*
Ham,precooked
Poultry
Chicken or Duck
Chicken pieces
Turkev
*Forboneless rolled roasts over6 inches thick, add 5 to 10minutes per pound to times given above.
~The U. S. Department of Agriculture says “Rarebeefis popular,but youshouldknowthat cookingit to only 140°F.meanssome
foodpoisoningorganismsmay survive?’(Source:Safe FoodBook.YourKitchenGuide,USDARev.June 1985,)
Temperature
325°
325”
325”
325°
325”
325°
350°
325°
Doneness
Rare:
Medium:
Well Done:
Rare:
Medium:
Well Done:
Well Done:
Well Done:
To Warm:
Well Done:
Well Done:
Well Done:
Approximate Roasting Time
in Minutes per Pound
3 to 5 lbs.
24-33
35-39 22-29
4045
21-25
25-30
3@35 28-33
3545 3040
3545
17–20minutesperpound (anyweight)
3 to 5 Ibs.
3540
35-40
10to 15lbs.
18-25
6 to 8 lbs.
18-22
30-35
20-23
24-28
3040
Over 5 lbs.
30-35
Over 15Ibs.
15-20
Internal
Temperature ‘F.
140°–1500t
150°–1600
170°–1850
1400–150°T
150°–1600
170°–1850
1700–180°
1700–180°
115°–1200
185°–1900
185°–190°
In thigh:
185°–1900
24
Page 25

Do not lock the oven door with the latch while
broiling. The latch is used for self-cleaning only.
Broilingis cookingfood by intenseradiantheat from the
upperbroilelementin the oven.Mostfish and tender
cutsof meatcan be broiled.Followthesedirectionsto
keep spatteringand smokingto a minimum.
Turn the food only once during broiling.Time the
foods for the first side according to the Broiling Guide.
Turn the food, then use the times given for the second
side as a guide to the preferred doneness.
1. If the meat has fat or gristle around the edge, cut
vertical slashes throughboth about 2 inches apart.
If desired, the fat may be trimmed, leaving layer
about 1/8 inch thick.
2. Place the meat on the broiler grid in the broiler pan.
Always use the grid so the fat drips into the broiler
pan; otherwise thejuices may become hot enough
to catch on fire.
3. Position a shelf on the recommended shelf position
as suggested in the Broiling Guide.
Useof AluminumFoil
Youcan use aluminum foil to line your broiler pan
and broiler grid. However,you must mold the foil
tightly to the grid and cut slitsin itjust like the grid
Without the slits,the foil will prevent fat and meat
juices from draining to the broiler pan. The juices
could become hot enough to catch on fire. If you do
not cut the slits,you are frying, not broiling.
4. Leave the door open to the broil
stop position. The door staysopen
by itself,yet the proper temperature _- .
is maintained in the oven.
5. Turn the Oven Temperature knob to BROIL.
Make sure you turn the knob all the way to the
BROIL position.
6. Turn the food only once during broiling. Time the
foodsfor the firstsideaccordingto theBroilingGuide.
7. When broilingis finished,turn the OvenTemperature
knobto OFF.Serve the food immediately,andleave
thepan outsidetheoven tocool duringthemeal for
easiestcleaning.
H
1,
QuestionsandAnswers
Q. When broiling, is it necessary to always
use a grid in the pan?
A. Yes.Using the grid suspends the meat over the
pan. As the meat cooks, thejuices fall into the pan,
thus keeping meat drier. Juices are protected by the
grid and stay cooler, thus preventing excessive
spatter and smoking.
Q. Should I salt the meat before broiling?
A. No. Salt draws out thejuices and allows them to
evaporate. Always salt after cooking. Turn the
meat with tongs; piercing the meat with a fork also
allows the juices to escape. When broiling poultry
or fish. brush each side often with butter.
I
Q. Why are my meats not turning out as brown
as they should?
A. In some areas, the power (voltage) to the range
may be low, In these cases, preheat the broil
element for 10minutes before placing broiler pan
with food in oven. Check to see if you are using
the recommended shelf position. Broil for the
longest period of time indicated in the Broiling
Guide. Turn the food only once during broiling.
Q. Do I need to grease my broiler grid to prevent
meat from sticking?
A. No. The broiler grid is designed to reflect broiler
heat, thus keeping the surface cool enough to
prevent the meat from sticking to the surface.
However, spraying the broiler grid lightly with
a vegetable cooking spray before cooking will
make clean-up easier.
?~
Page 26

● Always use a broiler pan and grid. They are
● If desired, marinate meats or chicken before broiling,
designed to minimize smoking and spattering by or brush withbarbecue saucelast 5 to 10minutesonly.
trappingjuices in the shielded lower part of the pan.
● The oven door should be open to the broil
stop
position. oven bottom.
● Make sure YOUturn the knob all the wav to the
.
BROIL pofition.
● When arranging food on the pan, do not let fatty
edges hang over the sides. These could soilthe
● Frozen steaks can be broiled bv ~ositionin~ the oven
. .
0 .-.
shelf at next lowest shelf position and increasing
cooking time given in this guide 1k times per side.
Food
Ground Beef
WellDone
Beef Steaks
Rare
Medium
WellDone
Rare
Medium
WellDone
Chicken
Bakery Products
Bread(Toast)or
ToasterPastries
En~lishMuffins
Lobster Taiis
Fish
Ham Slices
(urecooked)
Pork Chops
WellDone
Lamb Chops
Medium
WellDone
Medium
Well Done
Wieners and
similar precooked
sausages,
bratwurst
Quantityandor
Thickness
1/2 lb. (about 8
thin slices)
1lb, (4 patties)
1/2to 3/4 inch thick
1inch thick
[1to 1Xlbs.)
1%inch thick
:2to 2fi lbs.)
1whole
:2to 2fi lbs.),
}plitlengthwise
~to 4 slices
I pkg. (2)
1 (split)
~~
6 to 8 oz. each)
l-lb. fillets 1/4to
1/2inch thick
I inch thick
1(1/2 inch thick)
2(1 inch thick),
about 1lb.
2(1 inch thick),
about 10to 12oz.
2(1 Xinch thick),
about 1 lb.
1-lb. pkg. (10)
Shelf
Position
Time, Minutes
c
c
c
c
c
c
c
c
A
Cor D
Cor D
B
c
B 8
c
B 13
c
c
c
B
c
First Side
4%
10 7
6
8
12
10
15
25
35
1%-2 1/2 Space evenly, Place English muffins
34
13-16
5
10
10
12
14
17
6 1-2 If desired, split sausages in half
Second Side
Time, Minutes
4%
5
6
11
7-8
14-16
20-25
10-15
Do not
turn over.
5
8
10
13
9
10
12
12–14
Comments
Arrangein single layer,Bacon
Space evenly.
Up to 8 patties take about same time.
Steaks less than 1 inch thick cook
through before browning. Pan frying
is recommended.
Slash fat.
Reduce time about 5 to 10minutes
per side for cut-up chicken. Brush
each side with melted butter, Broil
skin-side-down first.
cut-side-up and brush with butter,
if desired.
Cut throughback of shell. Spread
open. Brush with melted butter before
broiling and after half of broiling time.
Handle and turn very carefully. Brush
with lemon butter before and during
cooking, if desired. Preheat broiler to
increase browning.
Increase time 5 to 10minutes per side
for 1X inch thick or home cured ham.
Slash fat.
Slash fat.
lengthwise; cut into 5- to 6-inch pieces.
26
Page 27

OPEM~G T~ SELF-CLEANmG OWN
TotalCleaning Cycle Time: 4 hours and 20 minutes
Quick Reminder:
1. Latch the door.
2. Turn the Oven Temperature knob to
AUTO SELF CLEAN.
Beforea CleanCycle
The range must be completely cool in order to set
the self-clean cycle. You may have to allow the oven
to cool before you can slidethe door latch.
We recommend venting with an open window or
using a ventilation fan or hood during the first selfclean cycle.
1. Remove all cookware and any aluminum foil from
the oven—they cannot withstand the high cleaning
temperatures.
NOTE: The oven shelves may be cleaned in the
self-cleaning oven. However, they will darken, lose
their luster and become hard to slide.
2. To avoid heavy smoke in the kitchen during selfcleaning, wipe up heavy soil on the oven bottom.
(If you use soap, rinse thoroughly before selfcleaning to prevent staining.)The enamel grid and
broiler pan may be cleaned in the self-cleaning
oven. However, to help preventheavy smoke
caused by self-cleaning the greasy soil in the pan,
you must first clean off the excess grease.
w
3. Clean spatters or spills on the oven front frame,
and the-ovendoor outside the gasket with a
dampened cloth. The oven front frame and the
oven door outside the gasket do not get cleaned by
the self-clean cycle. On these areas use detergent
and hot water or a soap-filled steel wool pad.
Rinse well with a vinegar and water solution.
This will help prevent a brown residue from
forming when the oven is heated. Buff these areas
with a dry cloth. Do not clean the gasket.
Do not use abrasives or oven cleaners. Clean the
top, sides and outside front of the oven door with
soap and water.
Make sure the oven light bulb cover is in place.
Do not rub or clean the door gasket—
the fiberglass material of the gaskethas an
extremely low resistance to abrasion. An intact
and well-fitting oven door gasket is essential for
energy-efficient oven operation and good baking
results. If you notice the gasket becoming worn,
frayed or damaged in any way or if it has become
displaced on the door, you should have it replaced.
. Close the door and make sure the oven light
4. ----- ----_
is off. If the oven light is not turned off, tie life
of the bulb will be shortened or it may burn out
immediately.
Do not use commercial oven cleaners or oven
protectors in or near the self-cleaning oven.
A combination of any of these products plus the high
clean cycle temperatures may damage the porcelain
finish of the oven.
/
- Ovenlight
- Oven front frame
Ovendoor gasket
.
(continlied next page)
27
Page 28
OPEMT~G T~ SELF-CLEAN~G OWN
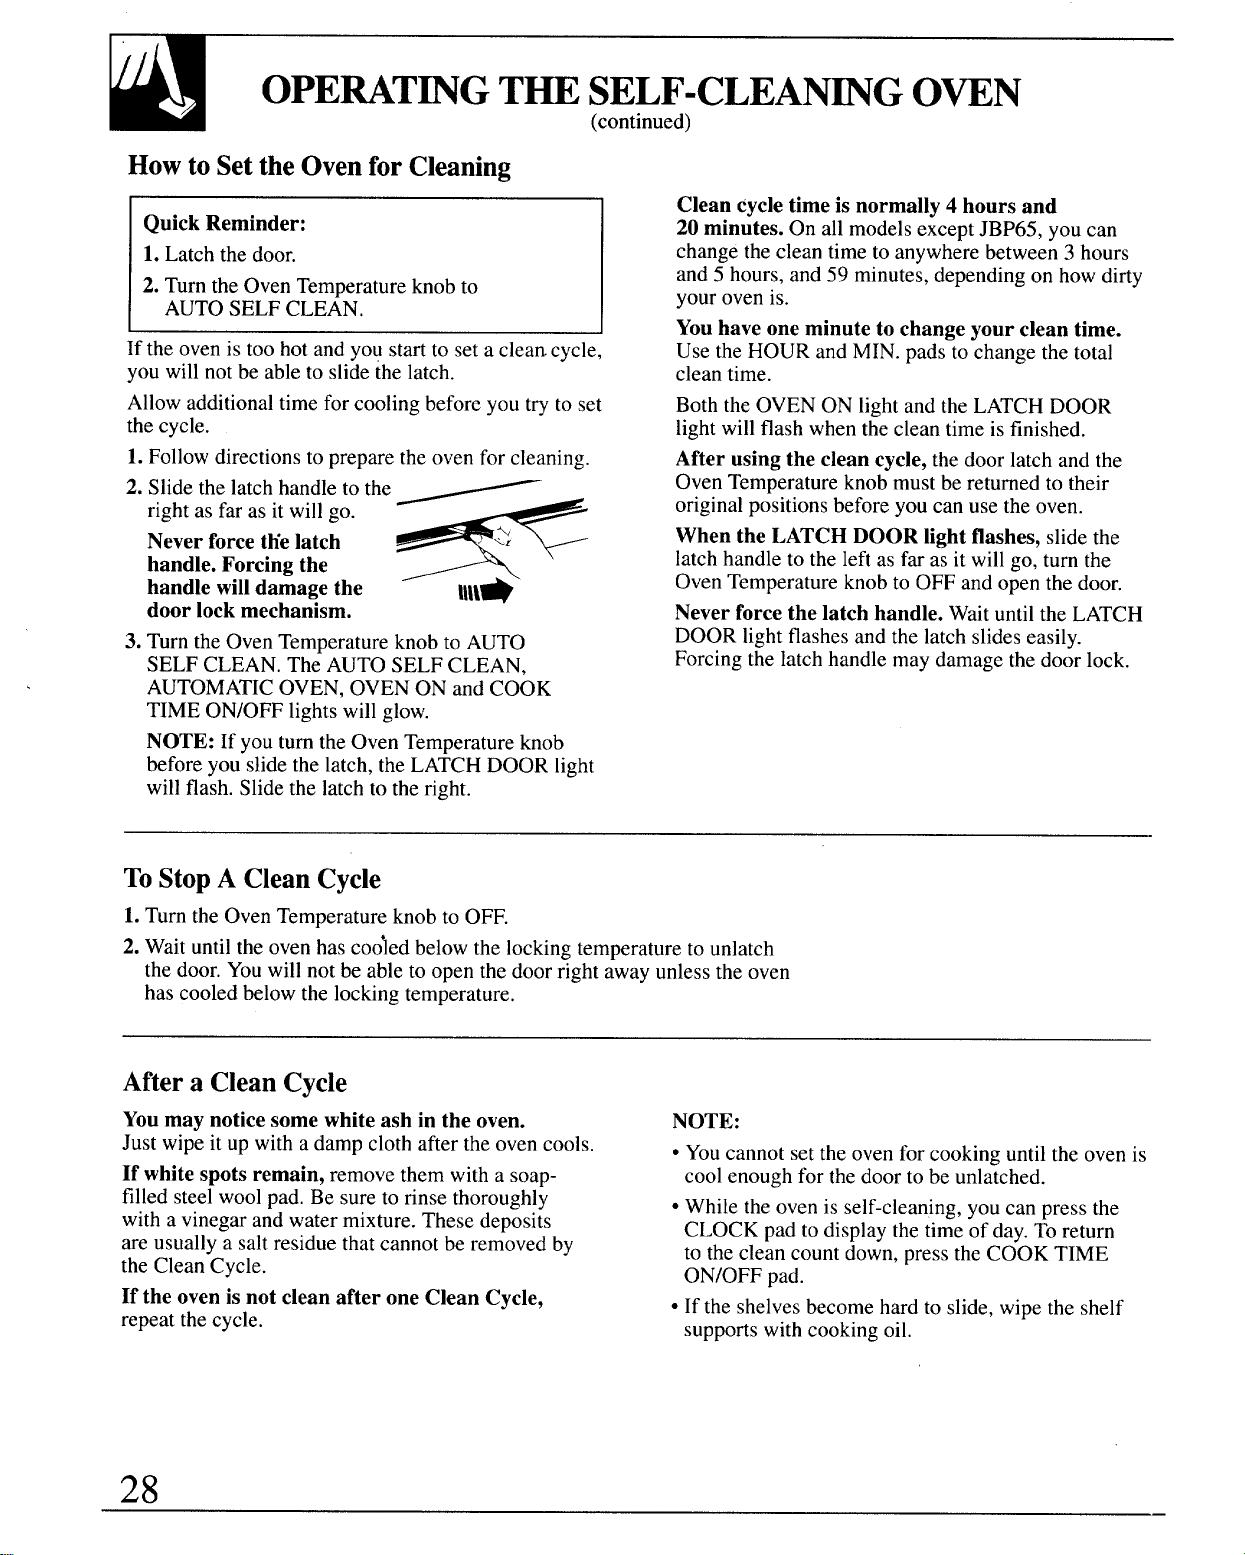
Howto Setthe OvenforCleaning
(continued)
Quick Reminder:
1. Latch the door.
2. Turn the Oven Temperatureknob to
AUTO SELF CLEAN,
If the oven is too hot and you start to set a clean cycle,
you will not be able to slidethe latch.
Allow additional time for cooling before you try to set
the cycle.
1. Follow directions to prepare the oven for cleaning.
2. Slide the latch handle to the
right as far as it will go.
Never force t~e latch
handle. Forcing the
handle will damage the
door lock mechanism.
3. Turn the Oven Temperature knob to AUTO
SELF CLEAN. The AUTO SELF CLEAN,
AUTOMATIC OVEN, OVEN ON and COOK
TIME ON/OFF lights will glow.
NOTE: If you turn the Oven Temperature knob
before you slide the latch, the LATCH DOOR light
will flash. Slide the latch to the right.
*
\
, <f
Clean cycle time is normally 4 hours and
20 minutes. On all models except JBP65, you can
change the clean time to anywhere between 3 hours
and 5 hours, and 59 minutes, depending on how dirty
your oven is.
Youhave one minute to change your clean time.
Use the HOUR and MIN. pads to change the total
clean time.
Both the OVEN ON light and the LATCH DOOR
light will flash when the clean time is finished.
After using the clean cycle, the door latch and the
Oven Temperature knob must be returned to their
original positions before you can use the oven.
When the LATCH DOOR light flashes, slide the
latch handle to the left as far as it will go, turn the
Oven Temperature knob to OFF and open the door.
Never force the latch handle. Wait until the LATCH
DOOR light flashes and the latch slides easily.
Forcing the latch handle may damage the door lock.
ToStopA CleanCycle
1. Turn the Oven Temperature knob to OFF.
2. Wait until the oven has codled below the locking temperature to unlatch
the door. You will not be able to open the door right away unless the oven
has cooled below the locking temperature.
Aftera CleanCycle
Youmay notice some white ash in the oven.
Just wipe it up with a damp cloth after the oven cools.
If white spots remain, remove them with a soap-
filled steelwool pad. Be sure to rinse thoroughly
with a vinegar and water mixture. These deposits
are usually a salt residue that cannot be removed by
the Clean Cycle.
If the oven is not clean after one Clean Cycle,
repeat the cycle.
NOTE:
● You cannot set the oven for cooking until the oven is
cool enough for the door to be unlatched.
● While the oven is self-cleaning, you can press the
CLOCK pad to display the time of day. To return
to the clean count down, press the COOK TIME
ON/OFF pad.
● If the shelves become hard to slide, wipe the shelf
supports with cooking oil.
28
—
Page 29

HOWto Set DelayStartof Cleaning (on somemodels)
QuickReminder:
1. Latch the door.
2. Turn the Oven Temperature Control knob to
AUTO SELF CLEAN.
3. Press the STARTTIME ON/OFF pad.
4. Press the HOUR and MIN. pads to set the
time of day you want cleaning to start.
The Self-Clean Cycle will automatically
begin at the time you selected.
Delay Start is setting the oven timer to start the clean
cycle automatically at a later time than the present
time of day.
For example: Let’s say it is 7:00 and you want the
oven to begin self-cleaning at 9:00 after you’re
finished in the kitchen. The oven isjust soiled a
normal amount so the normal Clean Time of 4 hours
and 20 minutes is preferred.
1. Follow steps to prepare the oven for cleaning.
2. Slide the latch handle to the
right as far as it will go.
Never force the latch
handle. Forcing the
handle will damage the
door lock mechanism.
3. Turn the Oven Temperature knob to the AUTO
SELF CLEAN position.
4. Press the START TIME ON/OFF pad.
5. Press the HOUR pad until 9:00 appears in the
display.The timer is now set to start cleaning in
2 hours, at 9:00.
The Self-Clean Cycle will be set to automatically
begin at 9:00 and finish at 1:20.
Both the Oven On light and the Latch Door light
will flash when the Clean Time is finished.
6. When the Latch Door light flashes, slide the latch
handle to the left as far as it will go, turn the Oven
Temperature knob to OFF and open the door.
Never force the latch handle. Wait until the Latch
Door light flashes and the latch slideseasily. Forcing
the latch handle may damage the door lock.
Questionsand Answers
Can I use commercial oven cleaners on any part
Q.
of my self-cleaning oven?
A. No cleaners or coatings should be used around any
part of this oven. If you do use them and do not
thoroughly rinse the oven with water, wiping it
absolutely clean afterwards, the residue can scar
the oven surface and damage metal parts the next
time the oven is automatically cleaned.
Q. What should I do if excessive smoking occurs
during cleaning?
A. Thisis caused by excessive soil.Turn the Oven
Temperature knob to OFF. Open the windows to
rid room of smoke. Waituntil the LATCH DOOR
light goes off. Wipe up the excess soil and reset the
clean cycle.
Q. Is the “crackling” or “popping” sound I hear
during cleaning normal?
A. Yes.Thisis the soundof the meti heatingand cooling
during both the cooking and cleaning functions.
Q. Should there be any odor during the cleaning?
A. Yes,there will be an odor during the first few
cleanings. Failure to wipe out excessive soil might
also’causea strong odor when cleaning.
Q. Why do I haveash left in my ovenafter cleaning?
A. Some types of soilwill leavea depositwhich is ash.
It can be removed with a damp spongeor cloth.
Q. What causes the hair-like lines on the enameled
surface of my oven?
A. This is a normal condition,resulting from heating
and cooling during cleaning. These lines do not
affect how your oven performs.
Q. My oven shelves do not slide easily. What is
the matter?
A.
The self-clean cycle causes the oven shelves to
lose their luster and become hard to slide.To make
shelves slide more easily, wipe the shelf supports
with cooking oil.
My oven shelves have become gray after the
Q.
self-clean cycle. Is this normal?
A.
Yes.After the self-clean cycle, the shelveswill lose
some luster and change to-a deep gray color.
Q. Can I cook food on the cooktop while the oven
is self-cleaning?
A. Yes.While the oven is self-cleaning, you can use
the cooktopjust as you normally do.
Q. The LATCH DOOR light flashes when I set the
clean cycle. What’s wrong?
A. The LATCH DOOR light will flash until the latch
is moved to the right.
29
Page 30

Proper care and cleaning are important so your range will giveyou efficient
and satisfactory service. Follow these directionscarefully in caring for it to
help assure safe and proper maintenance.
BE SURE ELECTRIC POWER IS OFF BEFORE CLEANING ANY PART
OF THE RANGE,
If your range is removed for cleaning, servicing or any reason,
A
be sure anti-tip device is re-engaged properly when the range
is replaced. Failure to take this precaution could result in tipping of
the range and cause injury.
OvenLightReplacement(on some models)
CAUTION: Before replacing your oven light bulb,
disconnect the electrical power to the range at the
main fuse or circuit breaker panel. Be sure to let
the light cover and bulb cool completely.
The oven light bulb iscovered with a removableglass
coverthat is held in place with a bail-shapedwire.
Removethe oven door, if desired, to reach covereasily.
To remove:
1. Hold a hand under the
cover so it doesn’t fall when
released. With fingers of the
same hand, firmly push back
the wire cover holder.Lift off the cover.
DO NOT REMOVE ANY SCREWS TO
REMOVE COVER.
2. Do not touch hot bulb with a wet cloth. Replace
bulb with a 40-watt household appliance bulb.
:~p ‘
r
<’
o@
“e
Wre cover holder
To replace cover:
1. Place it into groove of the light receptacle. Pull
wire forward to the center of the cover until it snaps
into place. When in place, the wire holds the cover
firmly.Be certain the wire is in the depression in
the center of the cover.
2. Connect electrical power to the range.
,.J
A
30
Page 31

ControlPaneland Knobs
Clean up any spills or spatters with a damp cloth.
Remove heavier soil with warm, soapy water.
Clean the control panel with mild liquid dish
detergent and a soft cloth. Rub the control panel
lightly.
CAUTION: Do not use abrasives of anv kind on the
control panel. The lettering on models ‘withtouch
pads is sensitiveto abrasives and pressure.
The control knobs may be removed for easier
cleaning. To remove a knob, pull it straight off the
stem. Wash the knobs in soap and water but do
not soak.
OvenVent
The oven is vented through an opening at the rear of
the cooktop. Never cover the opening with aluminum
foil or any other material. This would prevent the
oven vent from working properly.
-g~
r
1
II
MetalParts
Do not use steel wool, abrasives, ammonia or
commercial oven cleaners. To safely clean surfaces;
wash, rinse and then dry with a soft cloth.
PaintedSutiaces
Painted surfaces include the sides, the control panel
and the drawer or kick panel front. Clean these with
soap and water or a vinegar and water solution.
Do not use commercial oven cleaners, cleansing
powders, steel wool or harsh abrasives on any
painted surface.
GlassWindow
Toclean the outside glassfinish, use a glass cleaner.
Rinse and polish with a dry cloth.
(continued next page)
31
Page 32

CAm Am CLEAN~G
Lift-OffOvenDoor
The oven door is removable,
but it is heavy. Youmay need
help removing and replacing the
door. Do not lift the door by the
handle. This can cause the glass
to break or can cause damage to
the door.
To remove the door, open it a
few inches to the special stop
position that will hold the door
open. Grasp firmly on each side
and lift the door straightup and
off the hinges.
NOTE: Be carefulnotto ~lace handsbetweenthe
hinge and the oven door f~ameas the hinge could snap
back and pinch fingers.
To replace the door, make sure the hinges are in the
special stop position. Position the slots in the bottom
of the door squarely over the hinges. Then lower the
door slowlyand evenly over both hinges at the same
time. If hinges snap back against the oven frame, pull
them back out. If the oven door is crooked, push down
on the high corner to straighten it.
TO CLEAN THE DOOR:
Inside of the door:
● Because the area inside the gasket is cleaned during
the self clean cycle, you do not need to clean this by
hand. Any soap left on the liner causes additional
stains when the oven is heated,
● The area outside the gasket can be cleaned with a
scouring pad.
(continued)
Outside of the door:
● Use soap and water to thoroughly clean the top,
● Spillage of marinades, fruit juices, tomato sauces
● Do not use oven cleaners, cleansing powders or
cDo not rub or clean the door gasket—the fiberglass
material of the gasket has an extremely low
resistance to abrasion. An intact and well-fitting
oven door gasket is essential for energy-efficient
oven operation and good baking results. If you
notice the gasket becoming worn, frayed or damaged
in any way or if it has become displaced on the door,
you should have it replaced.
NOTE: The gasket is designed with a gap at the
bottom to allow for proper air circulation.
~“.’.’’’.’.’.”.’.”’’’’’’’”.’% I
IFall\
sides and front of the oven door. Rinse well. You
may also use a glass cleaner to clean the glass on the
outside of the door.To avoid water marks on the
inside of the door glass, do not let water drip into the
vent opening.
and basting materials containing acids may cause
discoloration and should be wiped up immediately.
When surface is cool, clean and rinse.
+
/
/
lkJI
11X 1 I
I
Inside Gasket
OvenHeatingElements
Do not clean the bake element or the broil element.
Any soilwill burn off when the elements are heated.
The bake element can be lifted gently to clean the
oven floor. If spillovers,residue or ash accumulate
around the bake element gently wipe around the
element with warm water.
32
Broil Element
Bake Element
Page 33

OvenShelves
Clean the shelveswith an abrasivecleanser or steel
wool. After cleaning, rinse the shelves with clean
water, rinse and dry.
NOTE: The oven shelvesmay also be cleaned in the
self-cleaning oven, however, the shelves will darken
in color, lose their luster and become hard to slide if
cleaned duringthe self-cleaning cycle.
BroilerPan andGrid
After broiling, remove the broiler pan from the oven.
Remove the grid from the pan. Carefully pour out the
grease from the pan into a proper container. Wash and
rinse the broiler pan and grid in hot water with a soapfilled or plastic sc?uring pad.
The enamel grid and broiler pan may be cleaned in
the self-clean oven. However,to prevent heavy smoke
caused by self-cleaning the greasy soil in the pan, you
must first clean off the excess grease.
If food has burned on, sprinkle the grid with
detergent while hot and cover with wet paper
towels or a dishcloth. Soaking the pan will remove
burned-on foods.
The broilerpan may be cleaned with a commercial
oven cleaner. If the grid is grey enamel, it can also be
cleaned with an oven cleaner.If the grid is chrome, do
not use an oven cleaner to clean it.
mlmy\x\y\I\m
Both the broiler pan and grid can also be cleaned in
the dishwasher.
Do not store a soiled broiler pan and grid anywhere in
the range.
Howto Removethe StorageDraweror KickPanelto CleanUnderthe Range
The area under the range can be reached easily
for cleaning by removing the bottom drawer (on
some models). To remove, pull the drawer out all
the way, tiltup the front and remove it. To replace,
insert glides at the back of the drawer beyond the
stop on range glides. Lift the drawer if necessary to
insert easily. Let the front of the drawer down, then
push in to close.
Toclean under models with a front kick Danel.
remove the panel by pulling it straightout it the ‘
bottom. To replace the panel, first hook the top tabs
on and then the bottom tabs,
33
Page 34

BEFOREYOUBEGIN
Read these instructions completely
and carefully.
IMPORTANT:Save these instructions for
the local electrical inspector’s use.
IMPORT~ OBSERW ~ GOWRNING
CODESAND ORDINANCES.
NOTETO INWWR kave tiese
kstructions tith the appfianceafter
insWtion is completed.
NOTETO CONSUMER Keep this Use and
CareGuide and Initiation Instructions for
future use.
N~ ~s app- must b proper~
~unded.
TOOLSYOUWILLNEED
● hrge blade screwdriver
● Channel lock pliers or smallratchet wrench
with 3/ l~inch socket (forlevelingrange)
● l/4-inch hex head nutdriver
STEP1
PREPMETHEOPENING
1%inch spacing is recommended from the range
to adjacentvertical wallsabove cooktop surface.
Alow 30 inches minimum clearance between
surface units and bottom ofunprotected wood or
metal top cabinet, and
between countertop and adjacent cabinet bottom.
EXCE~ON: Installationof a listed microwave
oven or cooking appliance over the cooktop shall
conform to the installationinstructions packed
with that appliance.
To eliminatethe risk ofburns or fire by reaching
over heated surface units, cabinetstorage space
abovethe surface units should be avoided.If
cabinet storage is to be provided, the risk can be
reduced by installinga range hood that projects
horizontallya min. of 5 inches beyond the
bottom ofthe cabinets. Make sure the wall
covering,countertops and cabinets around the
range can withstand heat generated by the
range, oven or cooktop up to 200°E
15inches minimum
NOT LESS THAN
W\DTH OF RANGE
/
/
ELECTRl~LREQUIREMENTS
CA~ON, FOR PERSON~ SAF~
DO NOTUSE AN EXTENSIONCORD_
THISAPP~CE.
REMOW HOUSE FUSE OR OPEN
CIRCU~ BREAKERBEFORE BEGINNING
INWW~ON.
Thisappfiancemustbe supphedwiththe proper
voltageandfrequency,andconnectedtoan
individual,properlygroundedbranch circuit
protectedby a circuitbreaker ortimedelayfuse,as
notedon the ratingplate.
Wiringmust conformto NationalElectricCodes.
Hthe electricsertice provideddoesnotmeet the
above spectications,itis recommendedthata
ficensedelectricianinsti an approvedoutiet.
Becauserange terminalsare notaccessibleafter
range isin position,flexibleserviceconduitor cord
mustbe used.
30” 0 –-
MIN. 15
]1-:
.
WALL
INSTALL
OUTLET
ON EITH
SIDE OF
//
./”
//“
MIN.
/“
A
,/
(install in either rear corner) —
mnm~
, ‘-
~
~
p
, HOOD
/WITHIN EITHER
5 MIN.
-—
LOCATE
OUTLET BOX
34
Page 35
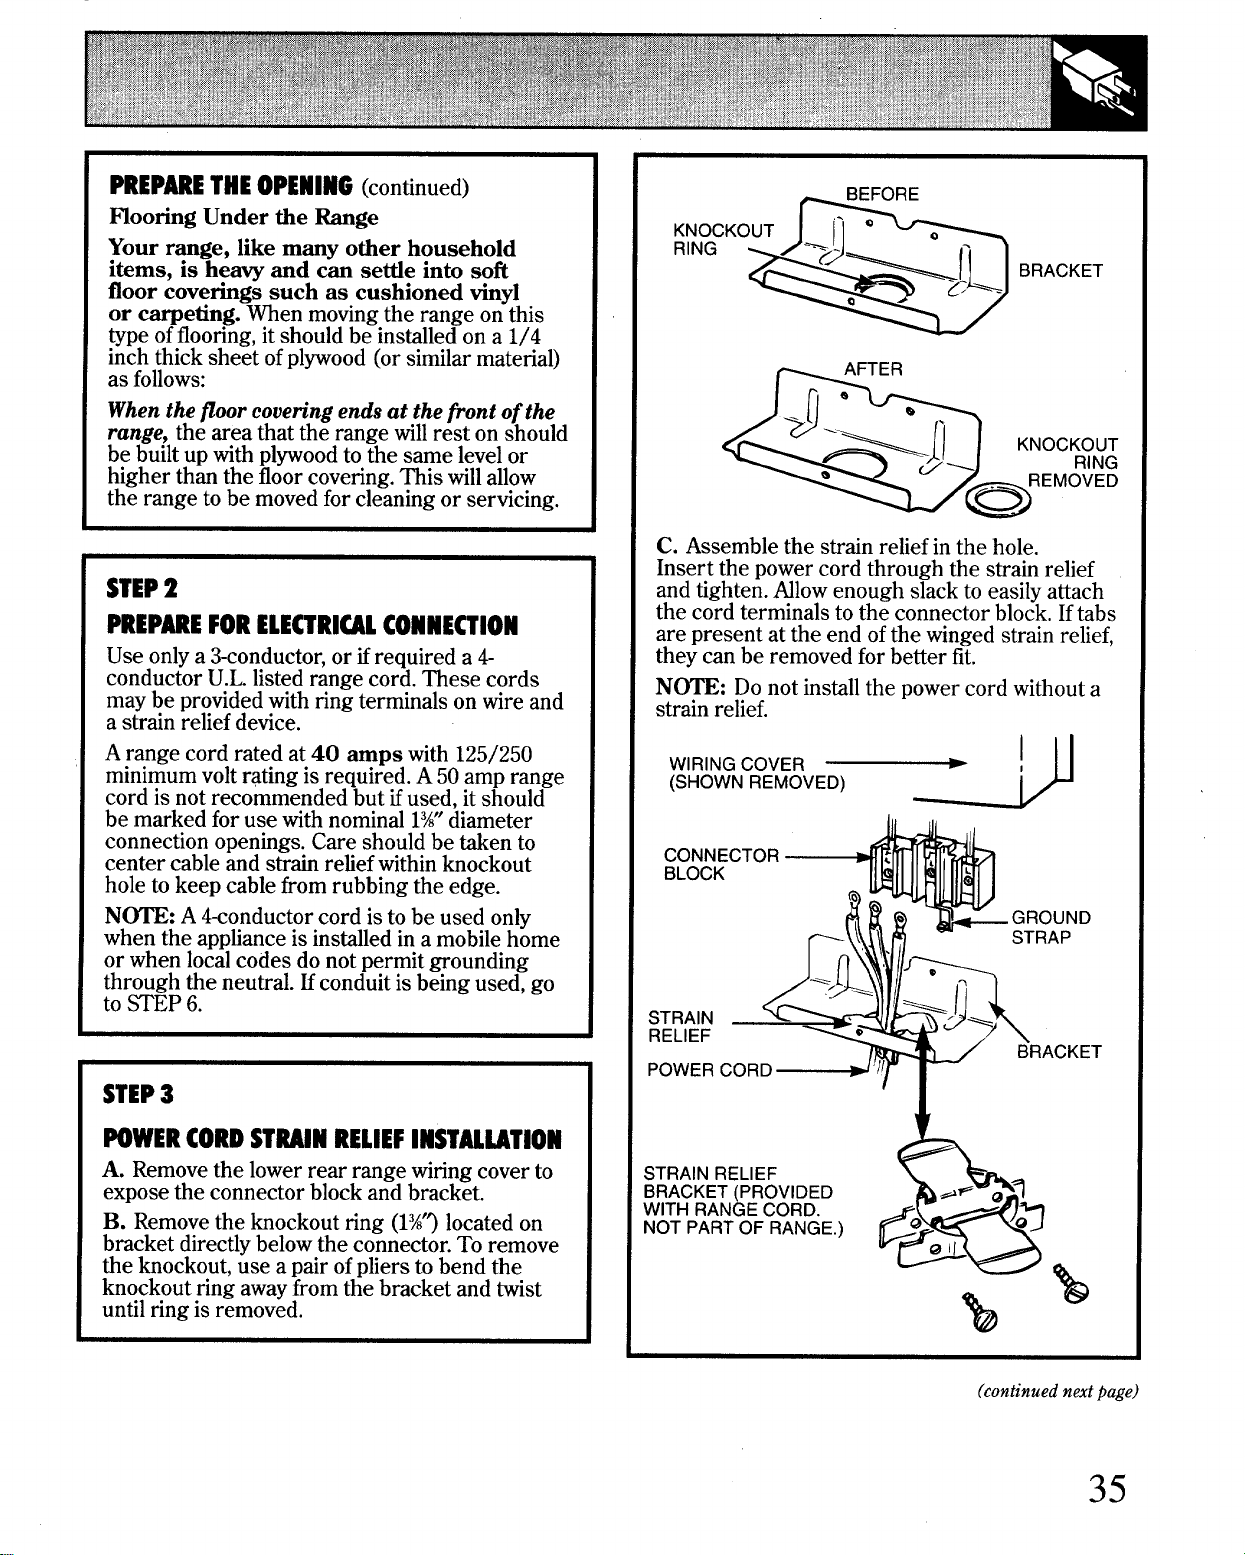
PREP~ETHEOPENING(continued)
flooring Under the bge
Your range, like many other household
items, is heavy and w setie into soft
floor coverings such as cushioned vinyl
or qeting. men movingthe range on this
type offlooring,it should be installedon a 1/4
inch thick sheet ofplywood(or similar material)
as follows:
Whenthefloorcoveting endsat thefront ofthe
range, the area that the range willrest on should
be builtup with plywoodto the same levelor
higher than the floorcovering.This willallow
the range to be movedfor cleaningor servicing.
STEP2
PREPMEFORELECTRl~LCONNECTION
Use onlya 3-conductor,or if required a 4
conductor U.L.listed range cord. These cords
may be providedwith ring terminals on wire and
a strain reliefdevice.
A range cord rated at 40 amps with 125/250
minimumvolt rating is required. A 50 amp range
cord is not recommended but ifused, it should
be marked for use with nominal lW diameter
connection openings. Care should be taken to
center cable and strain refiefwithin knockout
hole to keep cable from rubbing the edge.
N~: A 4conductor cord isto be used only
when the apptianceis installedin a mobile home
or when localcodes do not permit grounding
through the neutral. Hconduit is being used, go
to =EP 6.
BEFORE
KNOCKOUT “’ “
RING
%
J
-~ ~
“ <J:~
BRACKET
a
,
C. Assemble the strain relief in the hole.
Insert the power cord through the strain relief
and tighten. Nlow enough slackto easilyattach
the cord terminals to the connector block. Iftabs
are present at the end ofthe winged strain relief,
they can be removed for better fit.
N~: Do not installthe power cord without a
strain relief.
WIRING COVER
(SHOWN REMOVED)
—M
D
STEP3
POWER(ORDSTWIHRELIEFINSTMMTIOH
A.
Removethe lower rear range wiring coverto
expose the connector block and bracket.
B. Remove the knockout ring (l%’?located on
bracket directly belowthe connector. To remove
the knockout, use a pair ofpfiers to bend the
knockout ring awayfrom the bracket and twist
until ring is removed.
ET
(continuednextpage)
35
Page 36

STEP4
STEP5
3 WIREPOWERCORDINSTMUTION
Removethe 3wire terminal screws from
the connector block.Insert screws through
each power cord terminal ring and intothe
connector block untilthe screws engage the
nuts. Be certain that the center wire is connected
to the center screw of the connector block.
Tighten screws securely.Do NOT remove
ground strap connection.
CONNECTOR
D
Po
WARNING:~E NEUTRALOR GROUND
~ OF~E POWERCORD MUfl BE
CONNECTEDTO~E NEUTRAL
TEWAL LOCATED~ ~E CE~R OF
~ CONNECTORBLOCK ~E POWER
LEADSMUSTBE CONNECTEDTOM
O~IDE (B= CO~RED) ~RMINALS.
4 WIREPOWERCORDINSTALWTION
Removethe 3 screws tiom the connector
A.
block.
B. Removethe grounding screw and strap from
the connector block middle locationand the
screw connection to the frame of the range.
BEFORE
NEUTRAL
TERMINAL
GROUNDIN
(GROUNDING TO RANGE)
C. Insert screws through each power cord
terminal ring and into connector block until
screw engages nut. Be certiin that the center
wire is connected to the center screw ofthe
connector block.Tighten screws securely.
D. Attach ground wire to the frame ofthe range.
AFTER
36
WARNING:~E NEUTRALWRE OF
SUPPLY CIRCU~ IS CONNECTEDTO
~E NEUTRALTERMINAL~CATED
IN ~E CENTEROF ~E CONNE~OR
BLOCK ~E POWERLEADS MUW
BE CONNECTEDTO ~E OUTSIDE
(BRASS CO~RED) TEmIN~. ~E
4~ GROUNDING LEADMUSTBE
CONNE~D TO ~E FRAMEOF ~E
RANGEm ~E GROUNDING SCREW.
Page 37

STEP6
STEP7
3 WIRECONDUITlMSTnMTION
Removethe 3 screws from the connector
block. Insert bare wires between the connector
block terminals and movablenuts. Tighten
screws securely.Do not remove ground
strap connection.
BARE
BRACKET
/’\/ ,
@
A
~— Wlh”ETiPS
n.
4 WIRECONDUITINSTALWTION
Removethe 3 screws from the connector block.
Removethe grounding strap from the connector
block middle locationand the screw connecting
itto the frame ofthe range. Insert bare wires
between the connector block terminals and
movablenuts. Tighten screws securely.Attach
ground wireto the frame ofthe range.
\\ @ + SCREW
TERMINAL
% FLEXIBLE
CABLE
BARE
WIRE TIPS
CONNECTOR
BLOCK
\-/
%
.-
4
I
A
‘RACKET+n\klNIJl
WARNING:CONNE~R BLOCKIS
APPRO~D FOR COPPER ~RE
CONNE~ON ONLY.IF ALUMINUM
~RE IS USED, SEE N~ BELOW.
N~: ALUMINUMWMNG
A. Do not connectMuminum wire to connector
block. Use copper buildingwire rated for the
correct amperage and voltageto make 3 (three)
3 inch copperjumper wires. Connectwire as per
Step 6 or 7 depending on number ofwires.
B. Splicecopper wires to aluminum wiring
special connector terminals designed and UL
approved for joining copper to aluminum and
follow the connector manufacturers
recommended procedure closely.
Wire used, location and enclosure of splices,
etc., must conform to good wiring practices and
local codes.
using
ONDUIT
WARNING:CONNE~OR BLOCKIS
APPRO~D FOR COPPER ~RE
CONNE~ION ONLY.IF ALUMINUM
~RE IS USED, SEE NO~ BELOW.
N~: ALUMINUMWWNG
A. Do not
block. Use copper building wire rated for the
correct amperage and voltage to make 3 (three)
3 inch copper jumper wires. Connect wire as per
Step 6 or 7 depending on number of wires.
B. Splice copper wires to aluminum wiring using
special connector terminals designed and UL
approved for joining copper to aluminum and
follow the connector manufacturers
recommended procedure closely.
Wire used, location and enclosure of splices,
etc., must conform to good wiring practices and
local codes.
connect Numinum wire to connector
(continuednext
page)
37
Page 38

STEP8
ANTI-TIPBWCKETlNSTAL~TION
NTI-TIP bracket is suppliedwithinstructions
N
for installationina varietyoflocations.The
instructionsincludea template,a parts listand a
listoftoolsnecessary to completethe installation.
Readthe IMPORT~T S~~ INSTRUCTIONS
and the instructionsthat fityour situationbefore
beginninginstallation.
WARNING
1. Range must be secured by NTI-TIP bracket
supplied.
2. See instructions to install (supplied with
bracket).
3. Unless properly installed, range could be
tipped by stepping or sitting on door. Injury
might result from spilled hot liquids or from
range itseti.
TypicalInstallationofAnti-TipBracket
Attachmentto Wall
STEP9
LEVELINGTHERANGE
The range must be level. kveling feet are located
at each corner ofthe base of the range. Remove
the storage drawer or kick panel (depending on
your model) and using channel locks, rotite the
leveling feet in and out as required to level the
range. (For instructions on how to remove and
replace the storage drawer or the kick panel, see
the Cleaning Under the Range section in Care
and Cleaning.) On some models, there are plastic
covers which may be removed for easy
adjustment oust squeeze and pull).
One of the rear levefing feet will engage the
~TI-TIP bracket (allow for some side to side
adjustment). Alow a minimum clearance of l/&
inch between the range and the leveling foot that
is to be installed into the ~TI-TIP bracket.
Check the range for proper installation into the
~TI-TIP bracket (after the range has been
properly installed) by removing the kick panel or
storage drawer and inspecting the rear leveling
leg. Make sure it fits securely into the slot.
Bracket
ScrewMust Enter
WoodorMetal
WallPlate
STEP10
FINALCHECK
Be sure allswitches are in the OFF position
before leavingthe range.
38
Page 39

QUESTIONS?
USE THIS PROBLEM SOLVER
●
PROBLEM
SURFACE UNITS WILL
NOT M~~ A ROLL~G
BOIL OR FRYING RATE IS
NOT FAST ENOUGH
.FOODS COOK SLOWLY
SURFACE ~ITS DO NOTWORK PROPERLY
TINY SCRATCHES
(may appear as cracks) OR
ABRASIONS ON RADIANT
COOKTOP GLASS SURFACE
POSSIBLE CAUSE
● Youmust use pans which are absolutely flat. If light can be seen between
the pan bottom and a straight edge, the elements will not trmsfer heat properly.
● Pan bottoms should closely match the diameter of the surface unit selected.
“ Improper cookware being used. Pan bottoms shouldbe flat, fairly heavy-weight
and the same diameter as the surface unit selected.
● Difficulty may be in the main distribution panel of your house, caused by a
blown oven-circuit fuse, a tripped oven-circuit breaker, the main fuse or the
main circuit breaker, depending on the nature of the power supply.If a circuit
breaker is involved,reset it. If the control box uses fuses, the oven fuse
(a
cartridge-type)shouldbe changed,BUT ONLY BY SOMEO~ FAMILIAR
WITH ELECTRICAL CIRCUITS. If after performing one of these procedures,
the fuse blows or circuit breaker trips again, call for service.
NOTE: Apartment tenants or condominium owners should ask their building
management to perform thischeck before calling for service.
● Cooktop surface unit controls are not properly set, or the wrong control knob
is set for the surface unit you are using.
● Incorrect cleaning methods have been used, cookware with rough bottoms has
been used, or coarse particles (stit or sand) were between the cookware and the
surface of cooktop. Use recommended cleaning procedures, be sure cookware
bottoms and cookware are clean before use and use cookware with smooth
bottoms. Tiny scratches are not removable but will become less visible in time
as a result of cleaning.
METAL MARKINGS
(may appear as scratches)
DARK S~AKS
OR SPECKS
A~AS OF
DISCOLORAHON
ON COOKTOP
HOT SUGAR MIXTURES/
PLASTIC MELTED TO
T~ SURFACE
FREQUENT CYCLING
OFF AND ON OF
SURFACE UNITS
● Do not slide aluminum cookware across the surface. Use recommended
cleaning procedure to remove marks.
● Incorrectcleaning materialshave been used, encrusted boiloversor grease spatters
remain on the surface. Use a razor scraper and recommended cleaning procedure.
● Use a r=or scraper and recommended cleaning procedure.
● Marks from aluminum and copper pans as well as mineral deposits from water
or food can be removed with the cleaning cream.
Q See the Glass Cooktop Cleaning section.
● Incorrect cookware used. Use only flat cookware to minimize cycling.
(continuednextpage)
39
Page 40

●
PROBLEMSOLWR
(continued)
PROBLEM
“F-AND A NUMBER”
FLASH IN THE DISPLAY
THE DISPLAY GOES
BLANK OR INDICATOR
LIGHTS COME ON WHEN
THE RANGE IS NOT IN USE
OVEN LIGHT
DOES NOT WORK
OVEN WILL NOT WORK
FOOD DOES NOT
BROIL PROPERLY
POSSIBLE CAUSE
● If the time display flashes “F-and a number’:you have a function error code.
If a function error code appears during the self-cleaning cycle, check the oven
door latch. The latch may have been moved, even if only slightly,from the
latched position. Make surethe latch is moved to the right as far as it will go.
Turn the Oven Temperature knob to off. Allow the oven to cool for one hour.
Put the oven back into operation.
● Disconnect all power to the range for 5 minutes and then reconnect power.
If the failure code repeats, then call for service.
● Disconnect power to the range at the fuse box or circuit breaker for at least
10seconds. Turn power on and power up your range. If the indicator lights are
still on, call for service.
“ Light bulb is loose or defective. Tighten or replace.
● Switch operating oven light is broken. Call for service.
● Plug on range is not completely insertedin the electrical outlet.
● The circuit breaker in your house has been tripped, or a fuse has been blown.
● Oven controls not properly set.
● Door left in locked position after cleaning.
*The Oven Temperature knob not set at BROIL. Make sure you turn the knob all
the way to the BROIL position.
● Door not left open to the broil stop position as recommended.
● Improper shelf position being used. See the Broiling Guide.
● Food is being cooked on hot pan.
● Cookware is not suited for broiling.
● Aluminum foil used on the broil pan rack has not been fitted properly
and slit as recommended.
FOOD DOES NOT ROAST
OR BAKE PROPERLY
OVEN TEMPERATURE
TOO HOT OR TOO COLD
CLOCK AND TIMER DO
NOT WORK
● The Oven Temperature knob not set correctly.
c Shelf position is incorrect. See the Roasting or Baking sections.
● Oven shelf not level.
. Incorrect cookware or cookware of improper size is being used.
● A foil tent was not used when needed to slow down browning during roasting.
● Oven thermostat needs adjustment. See the Adjust the Oven Thermostat—
Do
ItYourse~section.
● Oven thermostat needs adjustment. See the Adjust the Oven Thermostat—
Do it Yourse~section.
● Make sure the electrical plug is plugged into a live,properly grounded
power outlet.
● Check for power outage.
● Review the Oven Control, Clock and Timer section of this guide.
Page 41

●
●
‘“m
PROBLEM
OVEN
SELF-CLEAN
OVEN DOOR
ACCIDENTALLY LOCKED
DURING COO~NG
OVEN DOOR ~L
NOT UNLOCK
WILL NOT
OVENNOTCLEAN
A~R CLEANCYCLE
LATCH DOOR
LIGHT FLASHES
OVEN DOOR
1S CROOKED
POSSIBLE CAUSE
●Oventemperatureistoohigh toset self-cleanoperation.Allowtherange to cool
to roomtemperatureandresetthecontrols.
● Controlknobnot setto AUTOSELFCLEAN.
● Door latch handle not moved all the way to the right.
● Turn the Oven Temperature knob to OFF. Allow the oven to cool. Never force
the door latch handle.
● Oven mustcoolbelow locking temperature,
● Oven controlsnotsetproperly.
● Heavilysoiledovensmayneedto self-cleanagainor fora longerperiod.
● Heavy spilloversshould be cleaned before starting clean cycle.
● The Oven Temperature knob is set at auto self cIean before the
door latch handle is moved to the right.
● Because the oven door is removable, it sometimes gets out of position during
installation. To straighten the door, push down on the high comer.
If you ned morehelp.. call, toll free:
GE Answer Center@
8W.626.2W
consumerinformationservice
Page 42

W YOU~ED SERWCE...
We’reproud of our service and want you to be
pleased, If for some reason you are not happy with the
service you receive, here are three steps to follow for
further help.
FIRST, contact the people who serviced your
appliance. Explain why you are not pleased. In most
cases, this will solvethe problem.
NEXT, if you are still not pleased, write all the
details—including your phone number—to:
Manager, Consumer Relations GE Appliances
Appliance Park
Louisville, KY 40225
FINALLY,if your problem is still not resolved, write:
Major Appliance Consumer Action Program
20 North WackerDrive
Chicago, IL 60606
42
Page 43

We’llBeThere
With the purchase ofyour new GE appliance, receive the assurance that ifyou ever need
information or assistance horn GE, we’llbe there. All you have to do is call—toll-free!
GEAnswerCentep
80~62&2000
Whatever your question about any GE major appliance, GE Answer Center@
information service is available to help. Your call—and your question-will be
answered promptly and courteously. And you can call any time. GE Answer
Center@ service is open 24 hours a day, 7 days a week.
I}HomeRepa;rSemite
80ME4ARES(80M32-273fl
AGE consumer service professional will provide expert repair service,
scheduled at a time that’s convenient for you. Many GE Consumer Service
company~perated locations offer you service today or tomorrow, or at your
convenience (7:00 a.m. to 7:00 p.m. weekdays, 9:00 a.m. to 2:00 p.m. Saturdays).
Our factory-traine~ technicians know your appliance inside and out–so most
repairs can be handled injust one visit.
ForCustomemWithSpecialNeeds...
80~6262000
Upon request, GEwillprovide
Braillecontrols for a varietyof
appliances, and a brochure to
assistin planning a barrier-free
kitchen for persons with limited
mobility. To obtain these items,
free of charge, call800.626.2000.
GE
Consumers withimpaired hearing or speech who have
access to a
call800-TDD-GUC (800-833-4322)to request
information or service.
TDDor a conventional teletypewritermay
SewiceContrac&
80W2&2224
You can have the secure feeling that GE Consumer Service will still be there
after your warranty expires. Purchase a GE contract while your warranty is still
in effect and you’ll receive a substantial discount. With a multiple-year contract,
you’re assured of future service at today’s prices.
Pa& andAccessories
80@62&2002
Indlviduds qufified to service their ow appliances
can have parts or accessories sent directly to their home.
The GEparts system provides access to over 47,000
parts...and all GEGenuine Renewal Partsare fully
warranted.VISA, MasterCardand Discover cards
are accepted.
User maintenance instructions contained in this guide
cover procedures intended to be performed by anyuser.
Other servicing generdy shodd be referred to qutified
service personnel. Caution must be exercised, since
improper servicing maycause unsafe operation.
Page 44
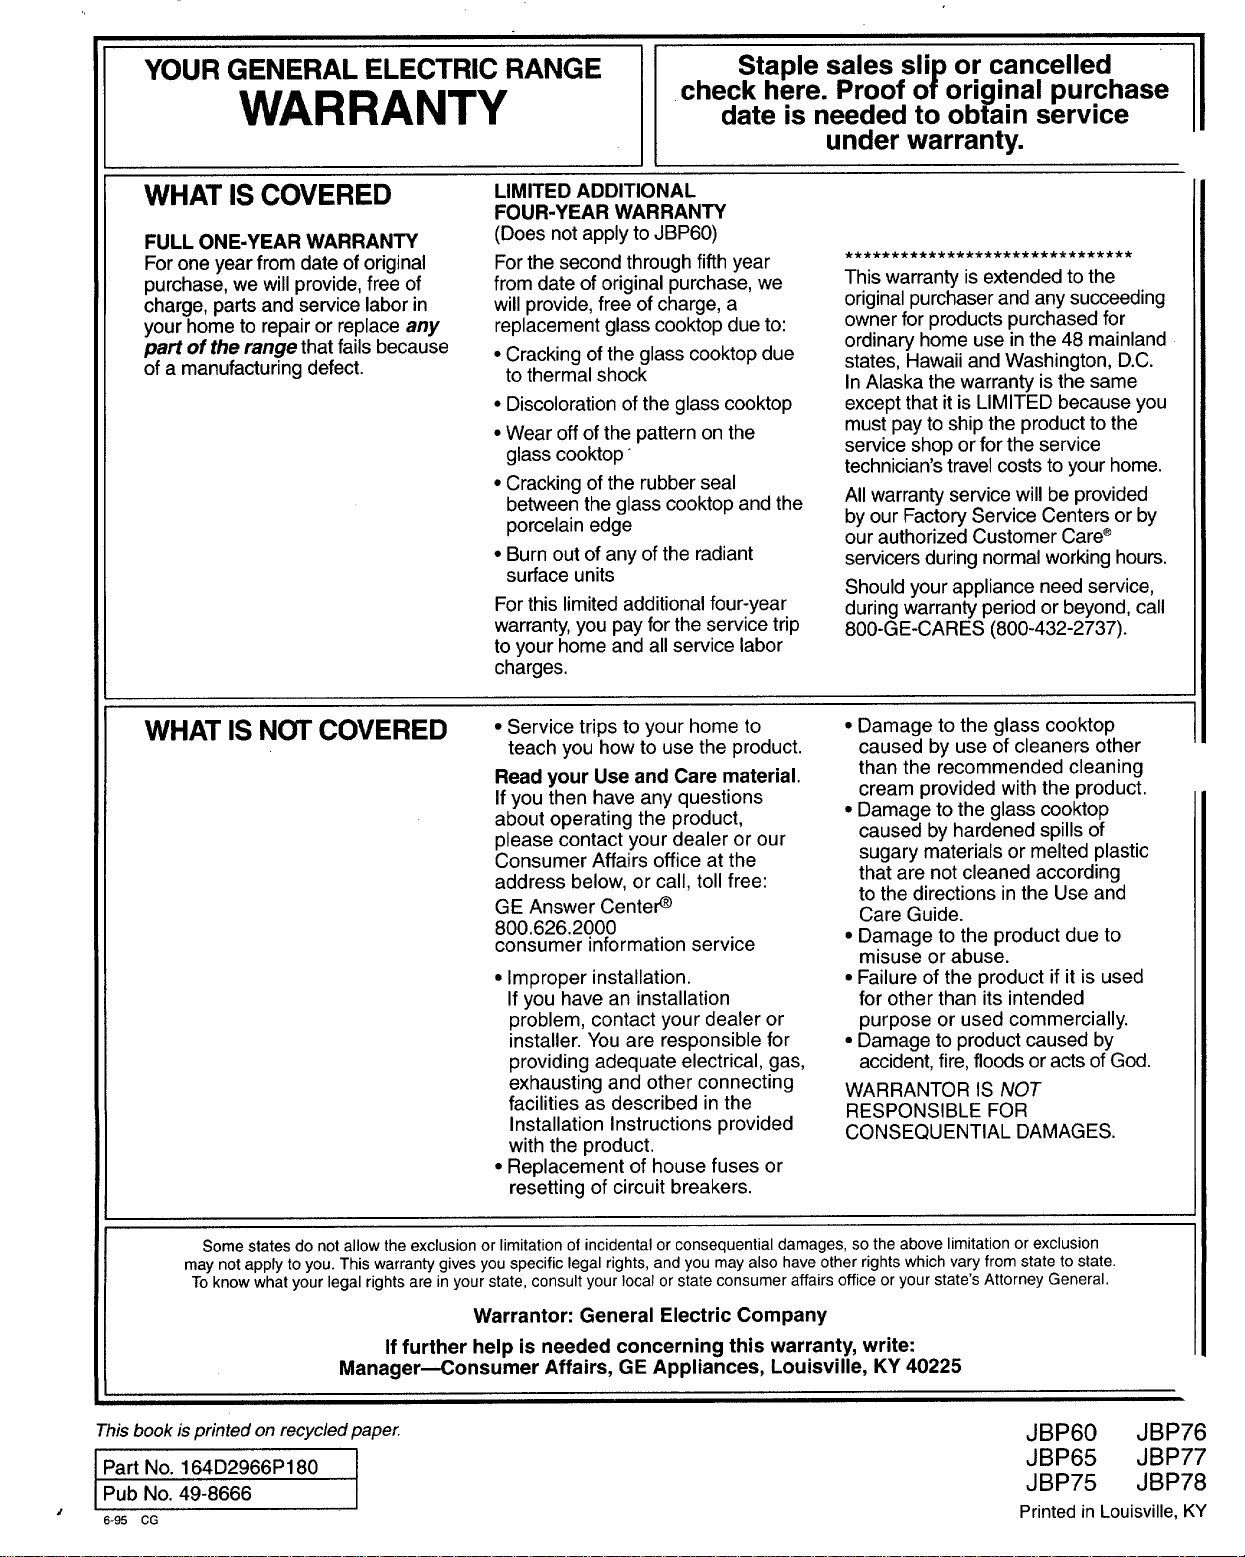
YOURGENERALELECTRICRANGE
WARRANTY
WHATIS COVERED
FULLONE-YEARWARRANTY
Forone year from date of original
purchase, we will provide,
charge,parts and servicelaborin
your hometo repairor replaceany
pafi of the range that fails because
of a manufacturingdefect.
free of
LIMITEDADDITIONAL
FOUR-YEARWARRANTY
(Doesnot applyto JBP60)
Forthe secondthroughfifth year
from date of original purchase,we
will provide,free of charge,a
replacementglasscooktopdue to:
● Crackingof the glass cooktopdue
to thermal shock
● Discolorationof the glasscooktop
● Wearoff of the patiern on the
glasscooktop’
● Crackingof the rubberseal
betweenthe glasscooktopand the
porcelainedge
● Burn out of anyof the radiant
surfaceunits
Forthis limitedadditionalfour-year
warranty,you payforthe servicetrip
to your home andall service labor
charges.
Staplesales sli or cancelled
checkhere. Proofo original purchase
r
date is neededto obtainservice
II
I
I
underwarranty.
***** **************************
Thiswarrantyis extendedto the
originalpurchaserandany succeeding
ownerfor productspurchasedfor
ordinaryhome use inthe 48 mainland
states,HawaiiandWashington,D.C.
InAlaskathe warranty isthe same
exceptthat it is LIMITED becauseyou
mustpayto shipthe productto the
serviceshopor for the service
technician’stravelcoststo yourhome.
All warrantyservicewill be provided
byour FactoryServiceCentersor by
ourauthorizedCustomerCare@
servicersduringnormalworkinghours.
Shouldyourapplianceneed service,
duringwarrantyperiod or beyond,call
800-GE-CARES(800-432-2737).
,
WHATISN~ COVERED
● Service trips to your home to
teach you howto use the product.
Readyour Use and Care material.
Ifyou then haveany questions
about operating the product,
please contact your dealer or our
Consumer Affairs office at the
address below, or call, toll free:
GE Answer Cente@
800.626.2000
consumer information service
● Improper installation.
If you have an installation
● Damage to the glass cooktop
caused by use of cleaners other
than the recommended cleaning
cream provided with the product.
● Damageto the glasscooktop
caused by hardenedspills of
sugary materials or melted plastic
that are not cleanedaccording
to the directionsin the Use and
Care Guide.
● Damageto the product due to
misuse or abuse.
● Failure of the product if it is used
for other than its intended
problem, contact your dealer or purpose or used commercially.
installer. Youare responsible for
providing adequate electrical,gas,
exhaustingand other connecting
facilities as described in the
Installation Instructions provided
with the ~roduct.
● Replacementof house fuses or
● Damageto productcaused by
accident,fire,floodsoracts ofGod.
WARRANTORIS NOT
RESPONSIBLEFOR
CONSEQUENTIALDAMAGES.
resetting of circuit breakers.
Some states do not allow the exclusion or limitation of incidental or consequential damages, so the above limitation or exclusion
may not apply to you. This warranty gives you specific legal rights, and you may also have other rights which vary from state to state.
To know what your legal rights are in your state, consult your local or state consumer affairs office or your state’s Attorney General.
Thisbook js printed on recycled papec
,~
6-95 CG
Warrantor: General Electric Company
If further help is needed concerning this warranty, write:
Manager<onsumer Affairs, GE Appliances, Louisville, KY 40225
JBP60
JBP65
JBP75
JBP76
JBP77
JBP78
PrintedinLouisville, KY
 Loading...