

GE JBP49WK3WW, JBP49WK2WW, JBP49WK1WW, JBP49CK3CC, JBP49CK2CC Owner’s Manual
...
ge.com
Safety Instructions ........ 2-6
33
©
Operating Instruc_tions
Adjust the Oven Thermostat--
Do It Yourself! ............. ] 6
Clock and Timer . .......... ] ]
Oven ................... 9, l 0
Oven Control ............... 8
Sabbath Feature ............ ] 5
Self-Cleaning ............ ]7, ]8
Special Oven Features .... ] 3, ] 4
Surface Units ............... 7
Timed Baking and
Roasting Features ........... 19
Care and Cleaning
Broiler Pan and Grid ........ 91
Control I_mobs ............. 19
Drip Pans ................. 22
Heating Elements ........... 19
Lift-Off Oven Door .......... 20
Lift-Up Cooktop ............ 23
I Jgh t ..................... 21
Painted S/llfaces ............ 21
Shelves ................... 20
Storage Drawer ............. 21
Surface Units .............. 22
Vent ..................... 23
JBP49
Troubleshooting Tips ... 24-26
Accessories ............... 30
Consumer Support
Consumer Support . . . Back Coxer
Product Registration ...... 27, 28
Warranty .................. 31
Write the model and serial
numbers here:
Model #
Serial #
You can find them on a label
behind the storage drawer on
the fl'o n t of the range fl'a me.
49-80367 ! 1-05JR

iMPORTANTSAFETYiNFORMATiON.
READALLiNSTRUCTiONSBEFOREUSING.
For your safety, the information in this manual must be followed to minimize the risk of fire,
elecNc shock, or to prevent property damage, personal injury, or loss of fife.
WARNINGANTI-TIPDEVICE
All ranges can tip and injury could result.
Toprevent accidental tipping of the range, attach it to the wall and floor by installing the Anti--tip
device supplied.
If the Anti--tip device supplied with the range does not fit this application, use the universal Anti--17p
device WB2X7909.
Tocheck if the device is installed and engaged properly, remove the kick panel or storage drawer
and inspect the rear leveling leg. Make sure it fits securely into the slot.
If you pull die Fange out flom dm wall %I any reason, make sm_e tile device is p_opeFly
engaged when you push the Fang_ back against the wall. If it is not, theFe is a possible i_iskof
tile iang_ tipping oxer and causing i,_ju_T if you oi a child stand, sit oi lean on an open dooi-
Please Iefer m the Anti-Tip device infollnation in this manual. Failuie m take this p_ecaution
could iesult in tipping of the rang_ and i,ljm>
2
ge.com
IMPORTANTSAFETYNOtiCE
TheCalifomb Safe Drinking Water and ToxicEnforcement Act requires the Governor of Califomb to
publish a list of substances known to the state to cause cancer, birth defects or other reproductive
harm, and requires businesses to warn customers of potential exposure to such substances.
Thefiberglass insulation in self-clean ovens gives off a very small amount of carbon monoxide during
the cleaning cycle. Exposure can be minimized by venting with an open window or using a ventilation
fan or hood.
Ruorescent light bulbs contain mercury. If your model has asurface light, you must recycle the
fluorescent light bulb according to local, state and federal codes.
SAFETYPRECAUtiONS
When using electrical appliances, basic safeQ/precautions should be followed, including the following:
_fi:,:Use this appliance only for its intended
puq)ose as described in this )wrier s
Manual,
_t_::Be sure your appliance is properly
installed and grounded by a qualified
installer in accordance with tile proxqded
installation instructions.
_:;Hme tlle installer show you file location
of file circuit breaker or fuse. Mark it for
east' reference.
q_{_;Do not attempt to repair or replace any
part of your range unless it is specifically
recommended in this manual. All other
servicing should be referred to a qualified
technician.
;;; Be%re per%nning aW seiMce, disconnect
tile range power supply at rim household
distribution panel by removing tile fl_se or
switching off tlle circuit b_eaken
_; Do not lem_ children alone--_hildren
should not be left alone or unattended in
an area where an appliance is in use. They
should hexer be allowed to sit or stand on
any part of tile appliance.
_i:,iDo not allow anyone to climb, stand or
hang on tile dooi; storag_ drawer or
cooktop. They could damag_ tile rang_
and e_en tip it o_er, causing severe
personal fi_ury.
_t;;;i,arg> scrawhes or impacts to glass doors
can lead m broken or shatmied glass.
3
IMPORTANTSAFETYINFORMATION.
READALLINSTRUCTIONSBEFOREUSING.
A WARNING'!
SAFETYPRECAUTIONS
Do not operate the oven or cooktop controls ff the glass is broken. Food splatter or cleaning solution
may penetrate a broken control panel and create a risk of electrical shock. Contact a qualified
technician immediately should your glass control panel become broken.
;_;Do riot store flamn/able materials in an ;_;Kee I) tile hood and grease filters clean
oxen or near the cooktop.
CAUtiON: Items of interest to
child,en should riot be stored in cabinets
aboxe a range or on the backsplash of
a range--children climbing on the range
to reach items could be seriously injured.
Never wear loose-fitting or hanging
gm_nents while using die appliance.
Be careful when reaching for imms stoied
ox>r the range. Flammable material could
be ignited if brought in contact wifll hot
surface units or heating elements and
may cause se\'ere bnrlls.
Use only d*y pot holders--moist oi damp
pot holders on hot surt_aces may result in
burns from smam. Do not let pot holdei_
touch hot surt_ace units or heating
elements. Do not use a towel or other
bulky cloth in place of pot holders.
_{:_For your safew, nexer use yonr appliance
for warming or heating the room.
_{:_Teach children riot to play with file
controls oi any other part of the range.
_7{:;Always kee I) dish towels, dish cloths, pot
holders and other linens a safb distance
from your range.
_?{:;Always kee I) wooden and plastic utensils
and canned food a safe distance flom
vonr range.
_t_;Always kee I) combustible wall coxerings,
curtains or drapes a safe distance flom
your range.
;f; Do riot let cooking grease or other
flammable materials accumulate in
or near the range.
to maintain g_od xenting and to mold
grease fires.
Do not use water on grease fires. Never
pick up a flaming pan. Turn dm conuols
off: Smother a flaming pan on a snrPace
unit hy coxering the pan completely with
a well-fitting lid, cookie sheet or fiat uav
Use a muld-puq)ose d, T chemical or
foam-wpe fire extinguisher
Flaming grease outside a pan can be put
out by covering it with baking soda oi;
if available, hy using a muldq)uq)ose d, T
chemical or foam-type fire exdnguishen
Flame in die oven can be smothered
completely hy closing dm oven door and
tui_ning the o\_n off oi by using a multi-
purpose dW chemical or foam-type fire
exdnguishen
Do not touch the surface units, the
heating elements oi the inmdor sur£tce
of the ox>n. These surt_aces m W be hot
enough to hum e\'en though they aie
dark in color Dndng and after use, do riot
much, or let clothing or oilier flammable
materials contact file surface units, areas
nearhy the surt_ace units or any inmrior
area of the ox>n; allow sufficient time tbr
cooling t5rst.
Potentially hot sniiCaces inch,de the
cooktop, areas facing the cooktop, oxen
lent opening, surthces ,lear the opening,
crevices around the oxen door
REMEMBER: The inside surface of tile o_en
may be hot when the door is opened.
Do riot store or use combnsfihle mamrials,
gasoline or other flammable vapors and
liquids in the vicinity of this or any other
appliance.
COOKMEATANDPOULTRYTHOROUGHLY...
Cookmeat andpoultry thoreughly--meat toat least an INTERNALtemperatureof 16O°Fandpoultry
toat least an INTERNALtemperatureof 180°ECookingto thesetemperaturesusuallyprotectsagainst
4
foodbomeillness.
ge.com
SURFACECOOKINGUNITS
Use proper pan size--select cookware having flat bottoms large enough to cover the surface unit
heating element. The use of undersized cookware will expose a portion of the surface unit to direct
contact and may result in ignition of clothing. Proper relationship of cookware to surface unit will also
improve efficiency.
_fi:,iNex_r leave the surfi_ce units unattended
at high heat settings. Boilo_>rs cause
smoking and greasy spillo_ers that may
catch on fire.
_{_Do not use aluminum foil to line the drip
pans or any_,here in the oven except as
described in this manual. Misuse could
result in a shock, fire hazard or damag>
to the range.
E:,:Be sure the drip pans and the vent duct
ate not coxered and are in place. Their
absence during cooking could damag>
rang> parts and wiring.
_{_Only certain types of glass, glassAeramic,
earthenware or oflter glazed containers
are suitable for cookmp set-_dce; others
may break because of rite sudden change
in ten_perature.
_?{::To minimize the possibility of bums,
ignition of flammable mamrials and
q)illage, rite handle of a container
should be turned toward the center
of the rang_ wifltout exmnding oxer
nearby surface units.
_fi:,iAlways turn rite surface units off before
rent oving cookware.
_{_:Do not immerse or soak the
removable surface units. Do not put
them in a dishwashen Do not self-clean
fire sttiP, tce units in fire ox>n.
E:,:Clean the cooktop wiflt cant.ion, ff a wet
sponge is used to wipe spills on a hot
cooktop, be careflfl to axoid smam bmxls.
E:,:Kee I) an eye on foods being fried at high
or medium high heat setting:s.
_?{:;Foods for flTing should be as dry as
possible. Frost on flozen foods or moisture
on fiesh foods can cause hot l_atto bubble
up and ox>r the sides of the pan.
_:;Use little fat tbr effective sha]low or deep
fat flTing. Filling the pan mo flfll of l_atcan
cause spillox>rs when fbod is added.
_]{_If a combination of oils or fats will be used
in fEving, stir together before heating, or as
fats melt slowly.
E:,IAlwws heat l_atslowly, and watch as it heats.
E:,:Use a deep fat thennomemr whenever
possible m prexent ox>flteating l_at beyond
the smoking point.
E:,:Do not leave any imms on fl_e cookmp.
The hot air flom the x>nt m W ignite
flammable items and will increase p_essme
in closed containers, which may cause
them to burst.
_{_;Do not leave plastic imms on rite
cooktop---fltey may melt if"left too close
to the \_nt.
_{_When preparing flaming %ods under
the hood, un-n rite l_anon.
E:,ITo ax_id d_e possibility of a bum or
elecuic shock, always be certain fltat fl_e
controls for all surl_ace units are at the
OFFposition and all coils ate cool before
atmmpting to lift or remove a unit.
5
IMPORTANTSAFETYINFORMATION.
READALLINSTRUCTIONSBEFOREUSING.
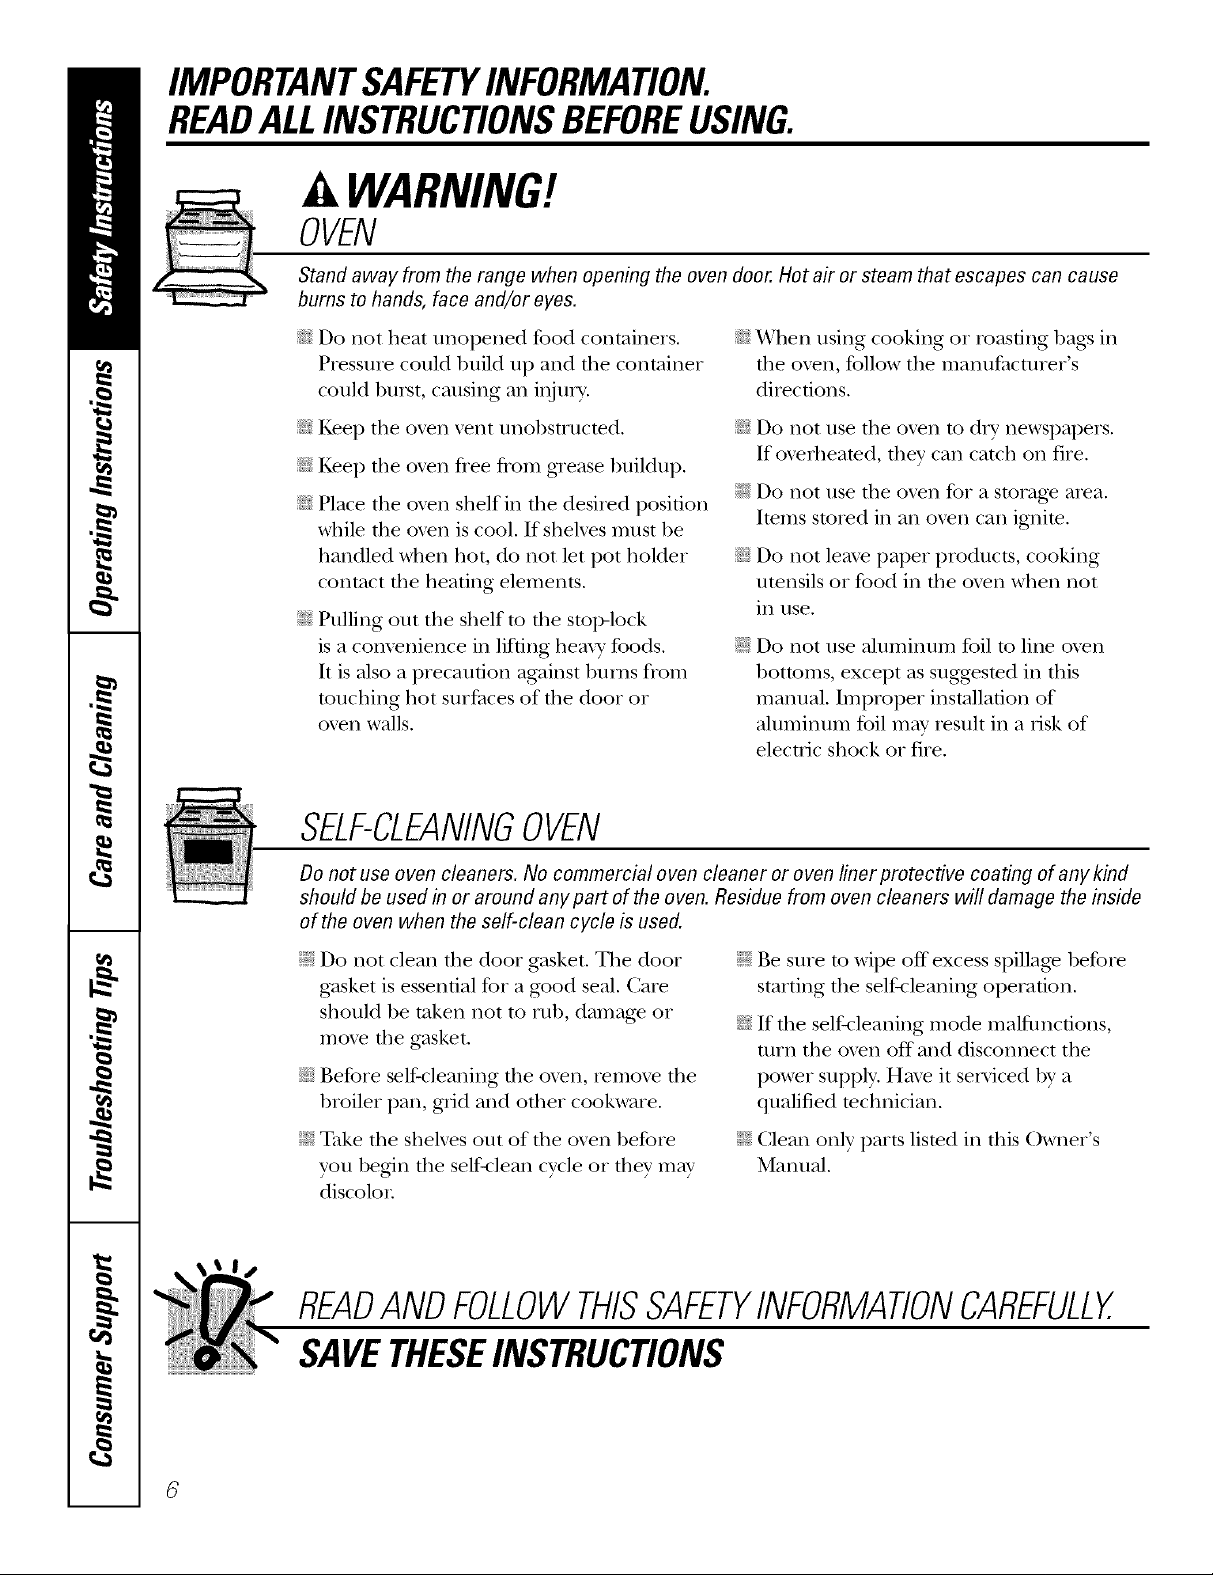
WARNING'!
OVEN
Stand away from the range when opening the oven door. Hot air or steam that escapes can cause
bums to hands, face and/or eyes.
_{;_Do not heat unopened tbod containers.
Pressure corrld build tlI) and tile container
could burst, causing an irlju]_].
_i:Kee I) tile o\en \>nt unobstructed.
_{_Kee I) the ox>n flee flom grease buildup.
_{;;Place the ox>n shelf in file desixed position
while file oven is cool. If sheh>s must be
handled when hot, do not let pot holder
corrmct file heating elements.
_i:,:Pulling out tire shelf m fire stop-lock
is a com>nience in lifting hemy' foods.
It is also a precaution against bums flom
touching hot surt_aces of file door or
ox>n walls.
_t{;_When using cooking or roasting bags in
the oxen, follow the manufi_cturer's
directions.
_;;Do riot use tire o\_n to dry newspapers.
If oxeflleated, riley can catch on fire.
_i:,:Do not use the oven fox a storag_ area.
hems stored in an o_n can ignite.
N Do not lem> paper products, cooking
utensils or food in tile oven when not
ixl /lse,
;_?:':Do not use aluminum foil to line oxen
bottoms, except as suggested in this
manual. Improper installation of
aluminum tbil may result in a risk of
electric shock or fire.
SELF-CLEANINGOVEN
Do not use oven cleaners. No commercial oven cleaner or oven liner protective coating of any kind
should be used in or around any part of the oven. Residue from oven cleaners will damage the inside
of the oven when the self-clean cycle is used.
;_i:,:Do not clean fire door gasket. Tile door
gasket is essential fox a g_od seal. Care
should be token not to nil), damag_ or
mox> tile gasket.
_;:Before self-cleaning the oven, remox> tile
broiler pan, grid arrd other cookware.
;fi:,:_ke the shelves Otlt of the oven before
you begin tile self-clean cycle or they m W
discolor
;_;Be sure to wipe off excess spillage before
starting tile self-cleaning operation.
_:;If fire self-cleaning mode malfunctions,
mrn tire oven off arrd disconnect tile
power supply. Haxe it serviced by a
qualified technician.
_?:':Clean only parts lismd in this Owner's
Manual.
READANDFOLLOWTHISSAFETYINFORMATIONCAREFULLY.
SAVETHESEINSTRUCTIONS
Usingthe surface units, ge.com
Throughout this manual, features and appearance may vary from your model.
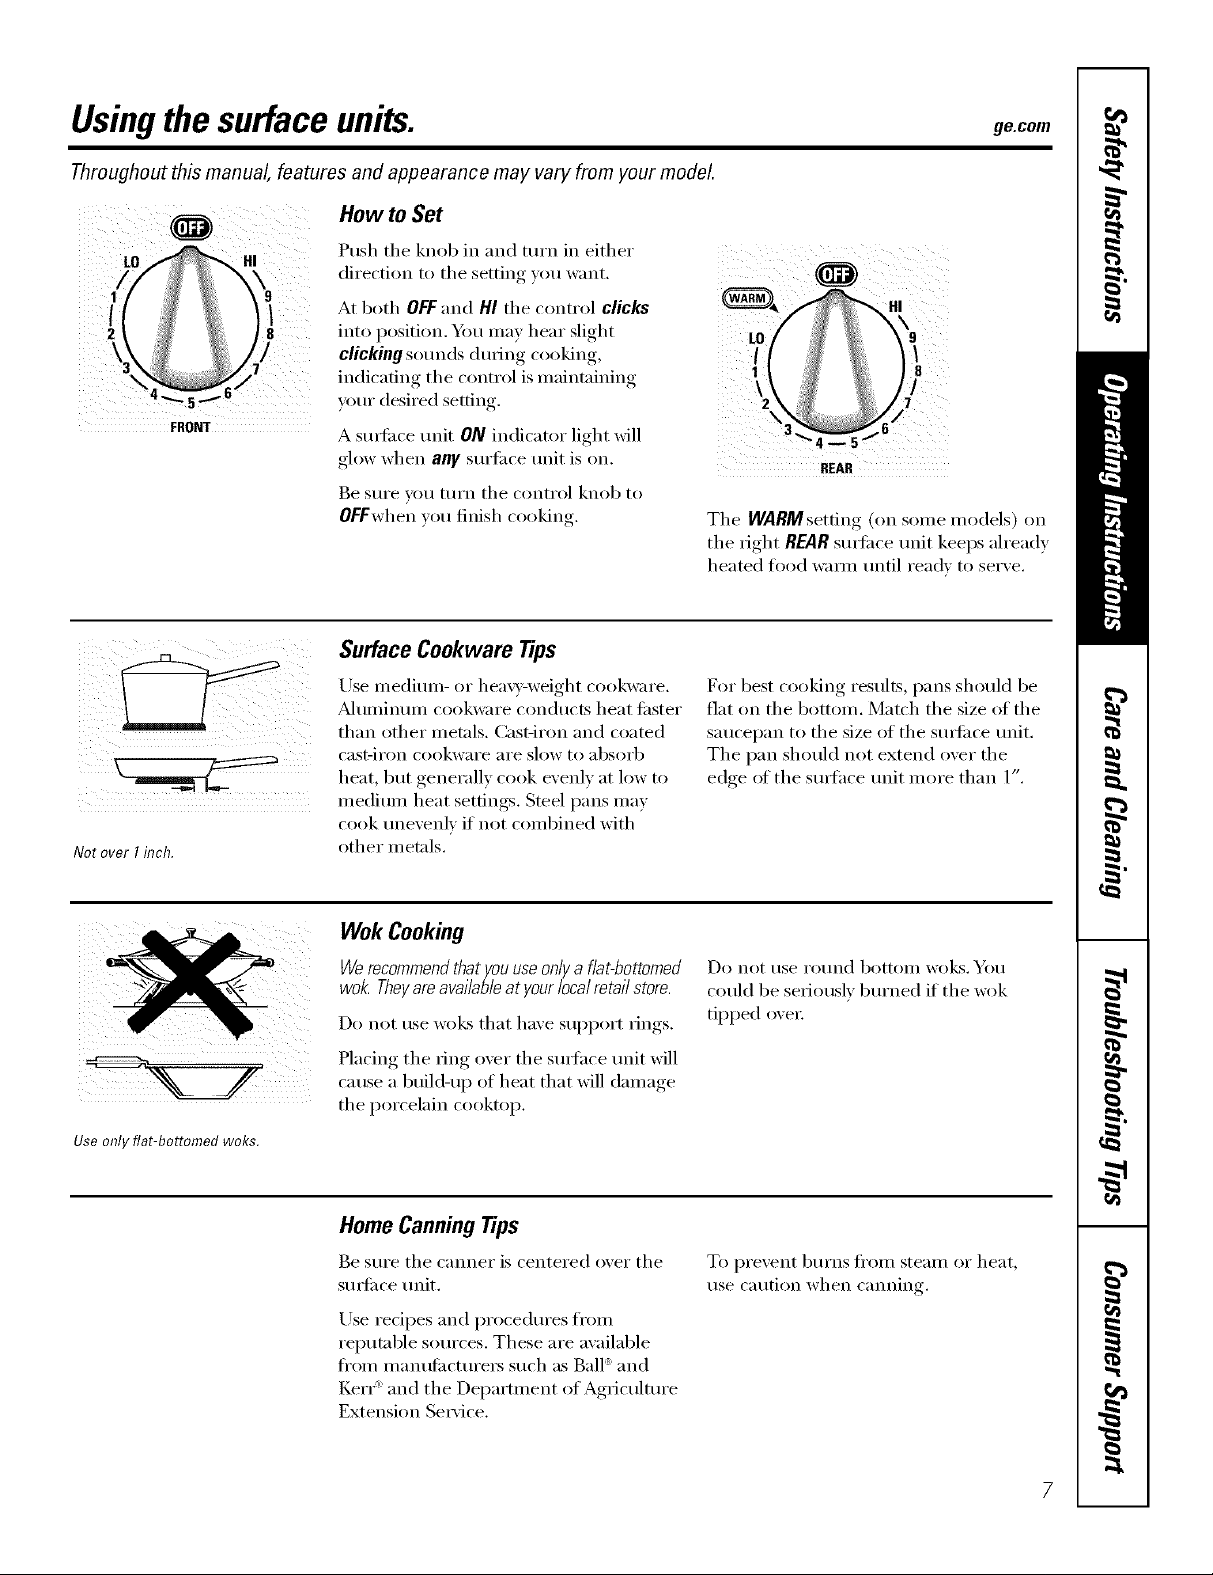
How to Set
Push the knob in and mrn in either
directiont.thesetting,.,,
At both OFFand HI the control clicks ,. HI
into I)°siti°n . "tim ram• hear slight, tO
FRONT
clickingsounds during cooking, I : _ \
indicating the control is maint;fining \ ]1
your desired setting. 2 \ g; _ i,//7:7
A stmfi_ce refit ON indicator light will o
glow when any surti_ce unit is on. REAR
Be sure you turn the control knob to
OFFwhen w_u finish cooking. The WARMsetfing (on SOlne models) on
Surface Cookware Tips
1 8
the right REARstmfi_ce unit keeps ah'eady
heated tood wam_ tmtil ready to serve.
Not over I inch.
Use only flat-bottomed woks.
Use medimn- or hea\)'-weight cookware.
_kdtllllintllll cookware conducts heat fi_ster
than other met;fls. Cast-iron and coated
cast-iron cookware are slow to absorb
heat, but generally cook evenly at low to
medium heat settings. Steel pans may
cook tmevenN if not combined with
other metals.
Wok Cooking
Werecommendthat you useonlya flat-bottomed
wok Theyareavailable at yourlocal retail store.
Do not rise Wo]_sthat have SUl)port rings.
Placing the ring over the suiqfhce unit will
cause a build-up of heat that will damage
the porcelain cooktop.
Home CanningTips
Be sm'e the canner is centered o_er the
stmfi_ce refit.
For best cooking results, pans should be
fiat on the bottom. Match the size of the
saucei)an to the size of the surfi_ce refit.
The pan should not extend over the
edge of the Stllbf_lceunit more than l".
Do not t/se i'ot/nd bottolll woks. YOtl
could be seriously burned if the wok
tipped oxen:
To pi'e_ent btli'ns ti'oi//steai// or heat,
rise Catltion when canning.
Use redpes and procedures fl_om
reputable sources. These are awfilable
fl'om manufi_ctm'e_ such as Ball =and
Kerr" and the Depamnent of Agriculture
Extension Service.
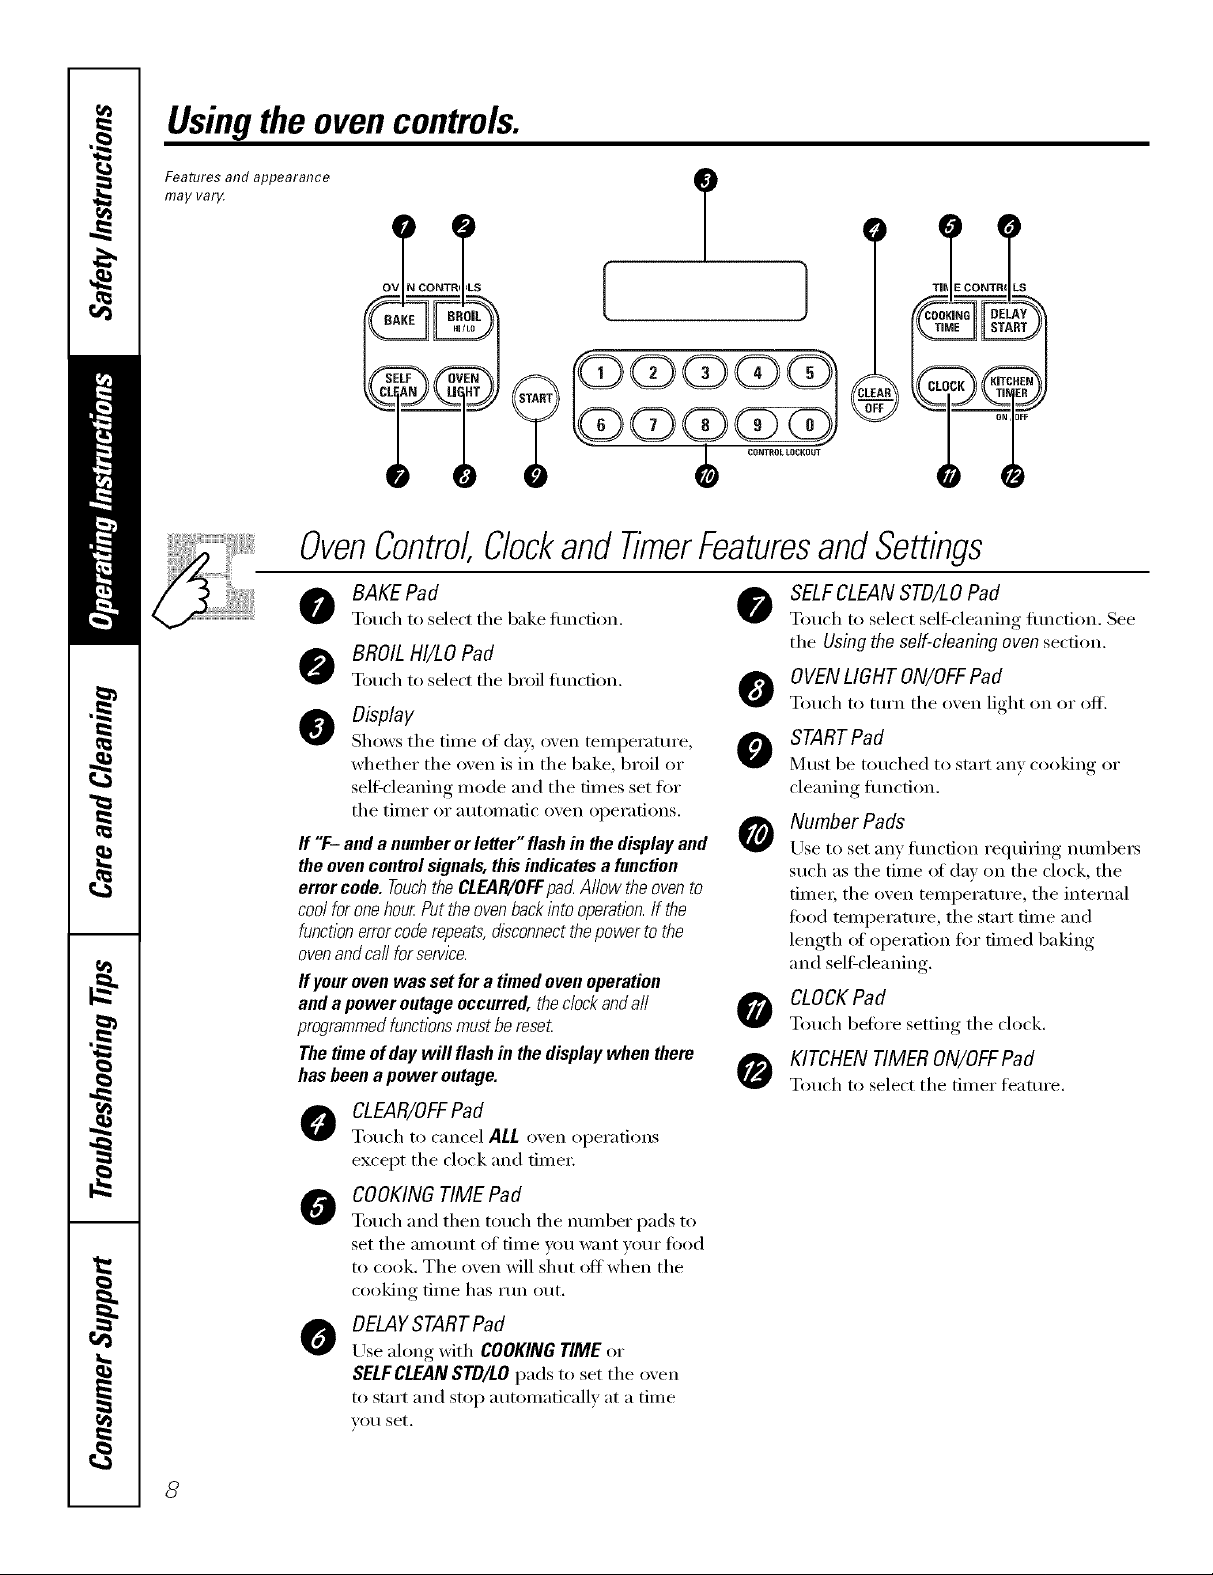
Usingthe oven controls.
Features and appearance
may var}4
OvenControl,Clockand TimerFeaturesandSettings
T
BAKE Pad
Touch to select the bake flulcfion.
BROIL HI/LOPad
Touch to select the broil flnlcfion.
Display
Shows tile tiIne of day, oven tenlperature,
whether the oven is in the bake, broil or
self=cleaning nlode and the dines set fi)i"
tile tilller or atltoI//atic ()veil opei'ations.
If "F- anda numberor letter"flashin thedisplayand
theovencontrolsignals,thisindicatesa function
errorcode. TouchtheCLEAR/OFFpadAllowtheovento
coolfor onehourPuttheovenbackintooperation.If the
functionerrorcoderepeats,disconnectthepowertothe
ovenandcallforservice.
Ifyourovenwassetfora timedovenoperation
anda poweroutageoccurred,thedockandall
programmedfunctionsmustbereset
Thetimeof daywill flashin thedisplaywhen there
hasbeenapoweroutage.
CLEAR/OFFPad
Touch to cancel ALLoxen operations
except the clock and fiinei;
COOKINGTIME Pad
Touch [lIl(1 then touch tile ntlIllbeI" p[l(1s to
set the _llllOtlnt of [iil/e VOtl w;lilt votli" fi)od
to cook. Tile ()veil will shut off when tile
cooking tiI/le has I'[In ()ILL
DELAYSTARTPad
0
Use along with COOKING TIME or
SELF CLEAN STD/LO pads to set tile oven
to stnrt and stop autonlaticallv at a tilne
VO/I set,
SELFCLEANSTD/LO Pad
@
Touch to select sel6cleaning flmcfion. See
the Using the self-cleaning oven section.
OVENLIGHT ON/OFFPad
0
Touch to turn tile oven light on or ofl_
STARTPad
0
Mtlst be touched to stnrt any cooking or
cleaning flnlction.
Number Pads
Use to set any flnlcfion requiring nunlbers
such as the tiine (ff day oil the clock, the
tiinei; the ()veil tenlperamre, the internal
ti)od tenlperature, the start tiIne and
length (ff operation ti)I" dined baking
and self:cleaning.
CLOCKPad
Touch befi)I'e setting the clock.
KITCHEN TIMER ON/OFFPad
Touch to select the tinier teatuI'e.
8
Usingtheoven. ge.com
Toavoid possible burns, place the shelves in the desired position before you turn the oven on.
Before you begin...
Theovenhas6shelfpositions.
The shelts have stop-locks, so that when
I)laced correctly on the shelf suppoi_s (A
through F), they will stop befi)Ie coining
cotnpletely out, and will not tilt.
/Allen pladng and removing cookware,
ptlll the shelf out to the bmnp on the
shelf suppo_qt.
Toremove a shell, pull it to_;trd you, tilt
the fi'ont end up and ptil] it out.
Toreplace, place tile end of the shelf
(stop-locks) on the support, tilt up the
fl'ont and push the shelf in.
CAUTION:Whenyouareue,bgthe
shelf lb the Iowestposition{,4),youwill need
to usecaution whenpu/hbg the shelf out. We
recommendthat youpuff the shelf out several
/bchesand then,us/bg two pot holders,puff the
shelf out byholflbg the sidesof it. Theshelf is
low andyou couldbe burnedif youplace your
hand /bthe middle of the shelf andpufi afl the
way out.Be verycarefulnot to burnyourhandon
the door when us/bgtheshelf/b thelowest
position (A).
How to Set the Oven for Baking orRoasting
[] Touch the BAKE pad.
[] Touch the ntunber pads to set the
()veil telllpei'attli'e.
Tochangethe oven temperaturedunbgthe
Bakecycle,touch the BAKEpadand set the
new temperature.
Touch the START pad. When the
[]
oven starts to heat, the changing
teniperattire will be ill the display.
The display starts changing once
the teniperattn'e reaches 100°F.
TypeofFood Shelf Position
Frozenpies(oncookiesheet) D
Angelfoodcake A
Bundtorpoundcakes BorC
Biscuits,muffins,brownies, CorD
cookies,cupcakes,
layercakes,pies
Casseroles CorD
Turkey A
Center bakflTgpans f17the oven.
Cut stirs f17 the foil just like the grid.
[] Touch the CLEAR/OFFpad when
bakino is finished.
Preheating and Pan Placement
Preheat tile o\ en if the re(ipe rails for it.
Preheating is necessary for good results
when baldng cakes, cooldes, pastry and
breads.
Topreheat,set theovenat thecorrecttemperature
Thecontrol will beepwhen the ovenis preheated
andthed/&/ay wffl show yourset temperature.
Th/2will take approx/knately6-10 mbutes.
Aluminum Foil
Never cover the oven bottom with
aluminum foil.
Youcanusealuminum foil to line the broiler pan
andbroilergrid However,youmust mold the foil
tightly to thegrid andcut s/its in itjust /ike thegrid
_Mtunintun foil inav also be (ised to catch
a spilhweI: To (1(5so, place a slnall sheet
(ff foil on a lower shelf several inches
below the food.
Baldng resuhs will be better if baking
pans are centered in the oven as milch
as possible. If baking with moie than one
pan, place the palls so each has at least
1 to 1½" of air space around it. If baking
ibm" cake layeI_ at the san/e time, place
two layers on shelf B and I_vo layers on
shelf D. Stagger pans on the shelf so one
is not directly o_er the othe_;
Never entirely cover a shelf with
ahuninuln fifil. This will dismlt) the heat
circulation and result ill poor baking.
9
Usingtheoven.
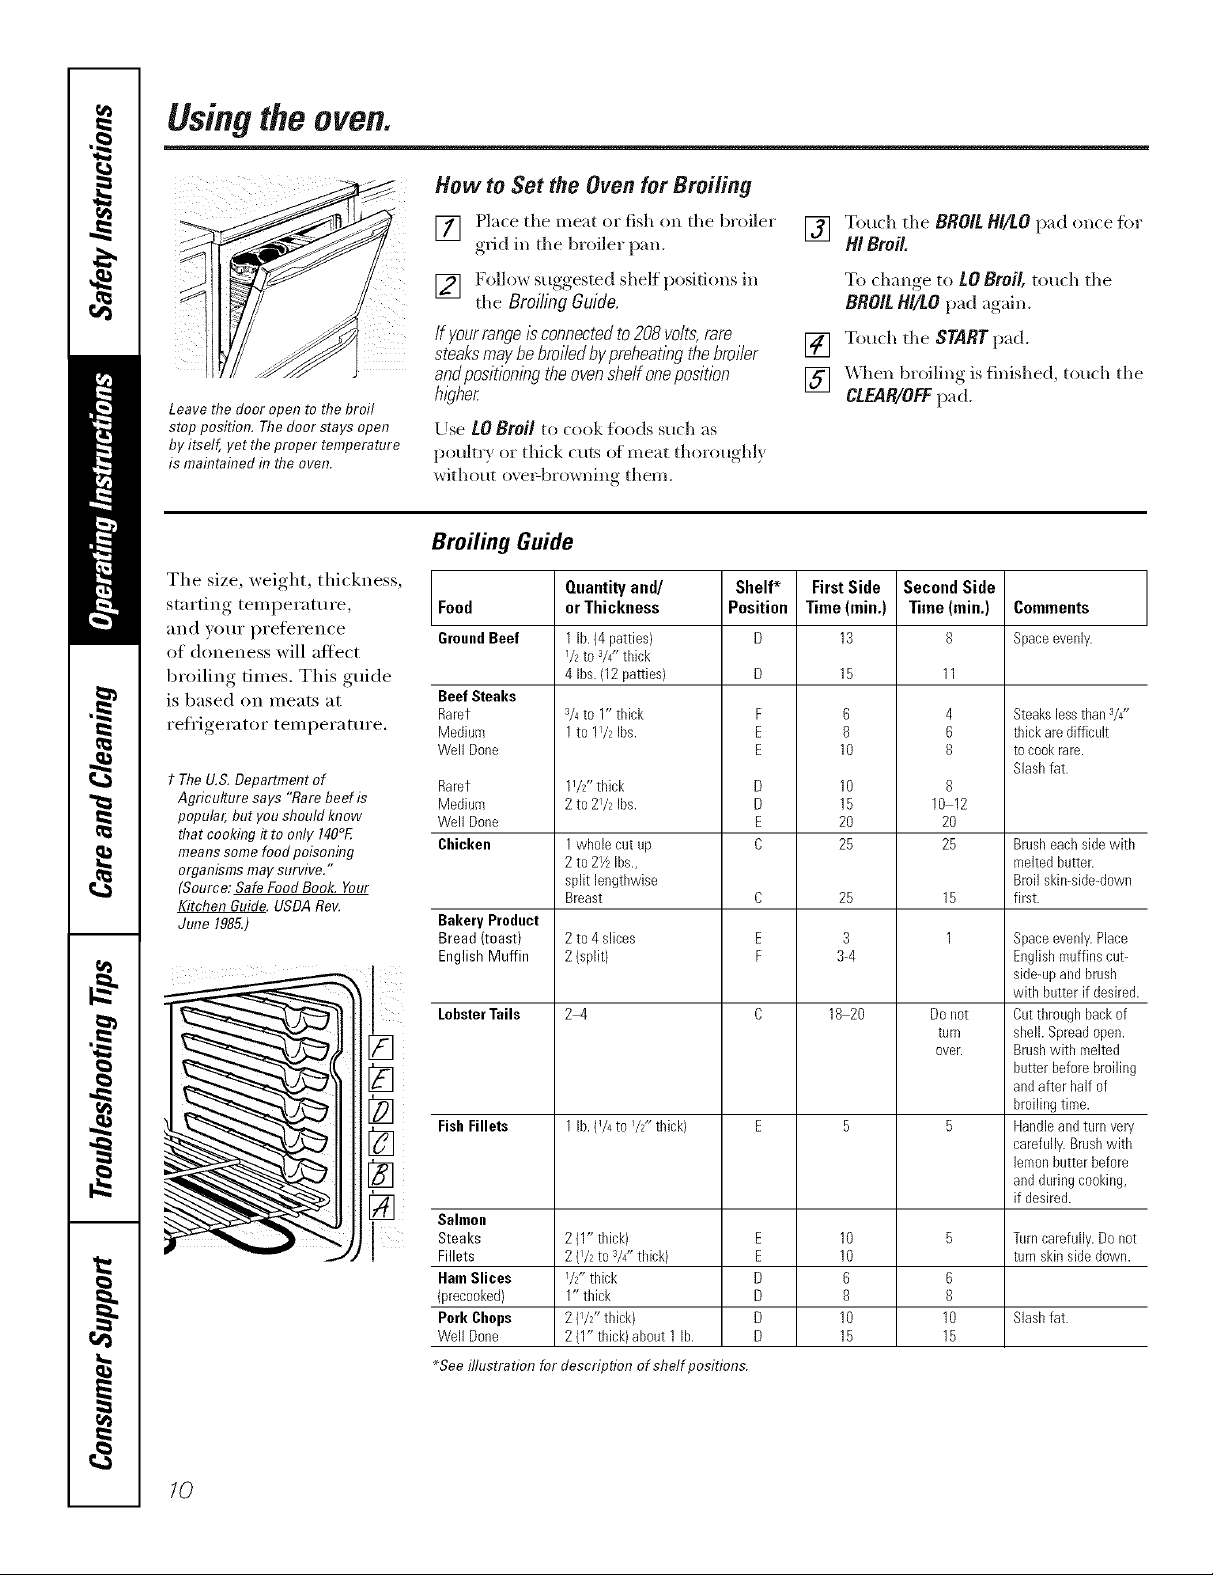
How to Set the Oven for Broiling
Leave the door open to the broil
stop position. The door stays open
by itself, yet theproper temperature
is maflTtainedf17the oven.
Tile size, weight, thickness,
starting teml)erature,
and VOilE i)i'efei'ence
of aloneness will affect
broiling times. This guide
is based on meats at
refl'igerator temperature.
t TheU.S.Department of
Agriculture says "Rare beef is
popular, but you shouldknow
that cooking it to only 140°E
means some foodpeisonflTg
organisms may survive."
(Source: Safe Food Book. Your
Kitchen Guide. USDARoy.
June 1985.)
[] Place the meat or fish on tile broiler
grid in tile broiler lXm.
[] Follow suggested shelf positions in
the Broiling Guide.
Ifyourrange/sconnectedto208volts,rare
steaksmaybebro//edbypreheatlngthebroiler
anflposit/onlngtheovenshelfoneposition
hl_zher
Use tO Broil to cook foods such as
poultry or thick cuts of meat tho,'oughl}
without o_el4_rowning them.
Broiling Guide
Food
GroundBeef
BeefSteaks
Rarer
Medium
Well Done
Raret
Medium
Well Done
Chicken
Bakery Product
Bread (toast)
EnglishMuffin
LobsterTails
FishFillets
Salmon
Steaks
Fillets
HamSlices
(precooked)
Pork Cbops
Well Done
_Seeillustration for description of shelf pesitimTs.
Quantity and/ Shelf* First Side
or Thickness Position Time(rain.)
1lb.(4 patties) D 13
1/_to 3/4"tlfick
4 Ibs.(12patties} D
V4to 1" thick F 6
1to 11/2Ibs. E 8
11/2" thick D 10
2 to21/2 Ibs. D 15
1wholecut up C 25
2 to21/zIbs.,
split lengthwise
Breast C 25
2 to4 slices E 3
2 (split) F 34
2-4 C 18 20
1 lb. (1/4to I/2" thick) E 5
2 (1"thick) E
2 (I/2 to V4"thick) E
1/_,,thick D
1" thick D
2 (I/2"thick) D
2 (1"thick)about1 lb. D
[] Touch the BROILHi/tO pad once fi)r
HI Broil.
To ch'm-e to LOBroil, touch the
BROIL HI/tO pad again.
[] Touch tile START pad.
[] _len broiliw4 is finished, touch tile
CLEAR/OFF pad.
Second Side
Comments
Spaceevenly.
Steakslessthan3/Z'
thick aredifficult
tocookrare.
Slashfat.
Brusheachsidewith
meltedbutter.
Broilskin-side-down
first.
Spaceevenly.Place
Englishmuffinscut-
side-upandbrush
with batter if desired.
Cutthroughbackof
shell. Spreadopen.
Brushwith melted
butter beforebroiling
andafter half of
broilingtime.
Handleandturnvery
carefully.Brushwith
lemonbutterbefore
anddaringcooking,
if desired.
Turncarefully.Do not
turn skinside down.
Slashfat.
E 10
E 20
Time (rain.)
8
4
6
8
8
10 12
20
25
15
1
Donot
turn
over.
10
10
6
8
10
15
6
8
10
15
10
 Loading...