

Page 1

—
—
SMhJ
l!o~
u.mu!u,yyv
f%l!UUE?~
sd!~
Jat.u!Jpue qaol~
sd!~fhJp’@@JaI,i~
sa.mlea~
uaAc)
Iaued
jOJ~UO~
10J~UO~
.-
sfki!uas
fiu~leaqa~d
f3u!qoo~aaej.m~
sf3u!~a~IOWOO
ap!ng fhpjoo~
sd~la.ieAAyoo~
W@~Tamq.m~
.... ...........................................
apyg &l!~~OJ~‘6U~l!OJ~
suo~ymilsu~!hqueala-+[as
(z ‘b
..........................................
11
... ..............................................
6
... ...........................................
9
... ......................................
L
‘9
... .....................................................
bi%-ti~‘6‘8
L1-sl
.............”.”..”.”..ap!ng ~u!ye~ ‘f?iu!qe~
!.2’02
..”.””...””..”.-””’”
8
.... ............................................
6‘8
.... ..................................
Lz %1.
‘m.s-...o-....i-.luawaoelda~qln~ :w@!T
L1.‘9
.... .........................................
61-’81
‘.....--....o-.”ap~n~fhJpseoH‘fh!lseo~
17Z-zz
---.-s
SI.-Q1
... ................................
Oi.
........................................
S1 ‘Zt
..... ...............................
‘Zi
cl
...................................
92‘olJ
......................................
6uy3Aa7
huem~
kmg~e~ue~st!!g
aopa~ d!~-!puv
a6ue~ aq~Japuntiu!.IooH
uo!le.iyqfk~ awe!ldd~
.uo~yimcqle!.ia~pue p3popy
SW3~AcM3$JMNMFMSU4C$0
1.S-6Z
.... ..............................
..... .............................
........................................
I.S‘6Z %
0s
“..”.”-””-.s”””””CO””””””
Ls
... .......................................................
Ss”””””””””””””””””””
z
..................................
z
...........................
HA02~3@~
pm am?~
doqooa
leAoLua~Joocj
wa~ uaAO
ap!ng fh~ueal~
~aMe4~f3f5e403~
82-s2..’....””.”’”””””.”.
Elz
.... .........................................
!lZ
.... ......................................................
9Z
.... ...........................................
9Z
... ...................................................
m ‘Lz
... ..................................
wwY3n@v Jelsoumql
W
.... .........................
Page 2
c.
-.
Bit
+&..&
”.m —
.—.
It is intendedto helpyou
operateandmaintainyournew
rangeproperly.
Keepit handyfor answersto
yourQuestions.
d
Myou’don’tunderstandsomething
orneedmorehelp,write(include
yourphone number):
ConsumerAffairs
GEAppliances
AppliancePark
Louisville,KY40225
m
You’llfindthemon a label
behindtherangedoororbehind
thestoragedrawer.
Thesenumbersarealsoon the
ConsumerProductOwnership
RegistrationCardthat camewith
your range.Beforesendingin
thiscard,pleasewritethese
numbershere:
ModelNumber
SerialNumber
Usethese numbers in any
correspondenceor servicecalls
concerningyourrange.
If ‘you. lreceived
a range...
Immediatelycontactthedealer(or
builder)thatsoldyoutherange.
savetimeand.money.
Beforeyou. Ireql.mw
Serticee@
ChecktheProblemSolverin the
backofthisbook.It listscausesof
minoroperatingproblemsthatyou
cancorrectyourself.
e
.
.-
Toobtainservice,seethe
ConsumerServicespageinthe
backofthis book.
We’reproudof ourserviceand
wantyouto bepleased.If for some
reasonyouarenothappywiththe
serviceyoureceive,hereare three
stepsto fol~owforfurtherhelp.
FIRST’,contactthepeoplewho
servicedyourappliance.Explain
whyyouare notpleased.In most
cases,thiswillsohe theproblem.
NEXT,if you are stillnotpleased,
writeall thedetails-including
yourphonenumber—to:
Manager,ConsumerRelations
GEAppliances
AppliancePark
Louisville,KY40225
meCdh’1’ia safe Wahixand‘m&
Act
requirestheGovernord’
California
theNate
ham, am!requires 13t3shNxu3eS1%Warn
pmmtid exposureto W3d’1.
to a M ofsubstmces knownto
tocausebirthdefects or ckbfx
FDLW.JX,if yourproblemis still
notresolved,write: ,
MajorAppliande~onsumer
ActionPanel
20NorthWackerDrive
Chicago,IL60606
,,
,7
,.
.,
.
Tk fibeigkiss insulationinsdf-ckxm Ovensgi’w%,
Offa very filial]amountd?
thedeahgcycle.13xposwecanibe by
“ venting‘withml qxm window or wing a
d
fanorI’KixL
+.+
J.e*-
:x
@
Iq
f
‘,,.=-.-/
,..—.
a.m.
—.
.—.——.
Page 3
When using ekxtrical appliances,basic safety
——..,..”——..—
——....—-————
.
precautionsshotddlx followed, includingthe
following:
e US~ this d-g for1$s useas
described.inthismanual.
@~~ $u~ your is ~~~
bya qualifiedtechnicianinaccordance
withtheprovidedinstallationinstructions.
~~$j~9~ torepairorreplaceanypartQf
yourI-’mgel.mks$itis
in thisbook,AHotherservicingshouldberefereed
toaqualifiedtechnician.
~ my service,
THERANGE ATI’m
PANELBY
ItEmv’mvmGTHEFUSECR!WWTCHINGOFF
THECIRCUITBREAKER.
~~@$@rWhf%?j?j’ or
whik usingthe Fkimable material
couldbeignitedif broughtincontactwithhot
heatingelementsandmaycausesevereburns.
eU$eOniydry pothokkm++noistordamppot
holdersonhotsurfacesmayresultinburnsfrom
steam.Donotletpotholderstouchhotheating
elements.Donotusea towelorotherbulkycloth.
@lj’oryour!%&@nt?veruseym.w’ f~~
or the Iroom.
~ DO~~T fj~ ~~~
OR
Am m
~m m ORANY
oKeep and grease dean to mtirmin
goodventingandto avoidgreasefires.
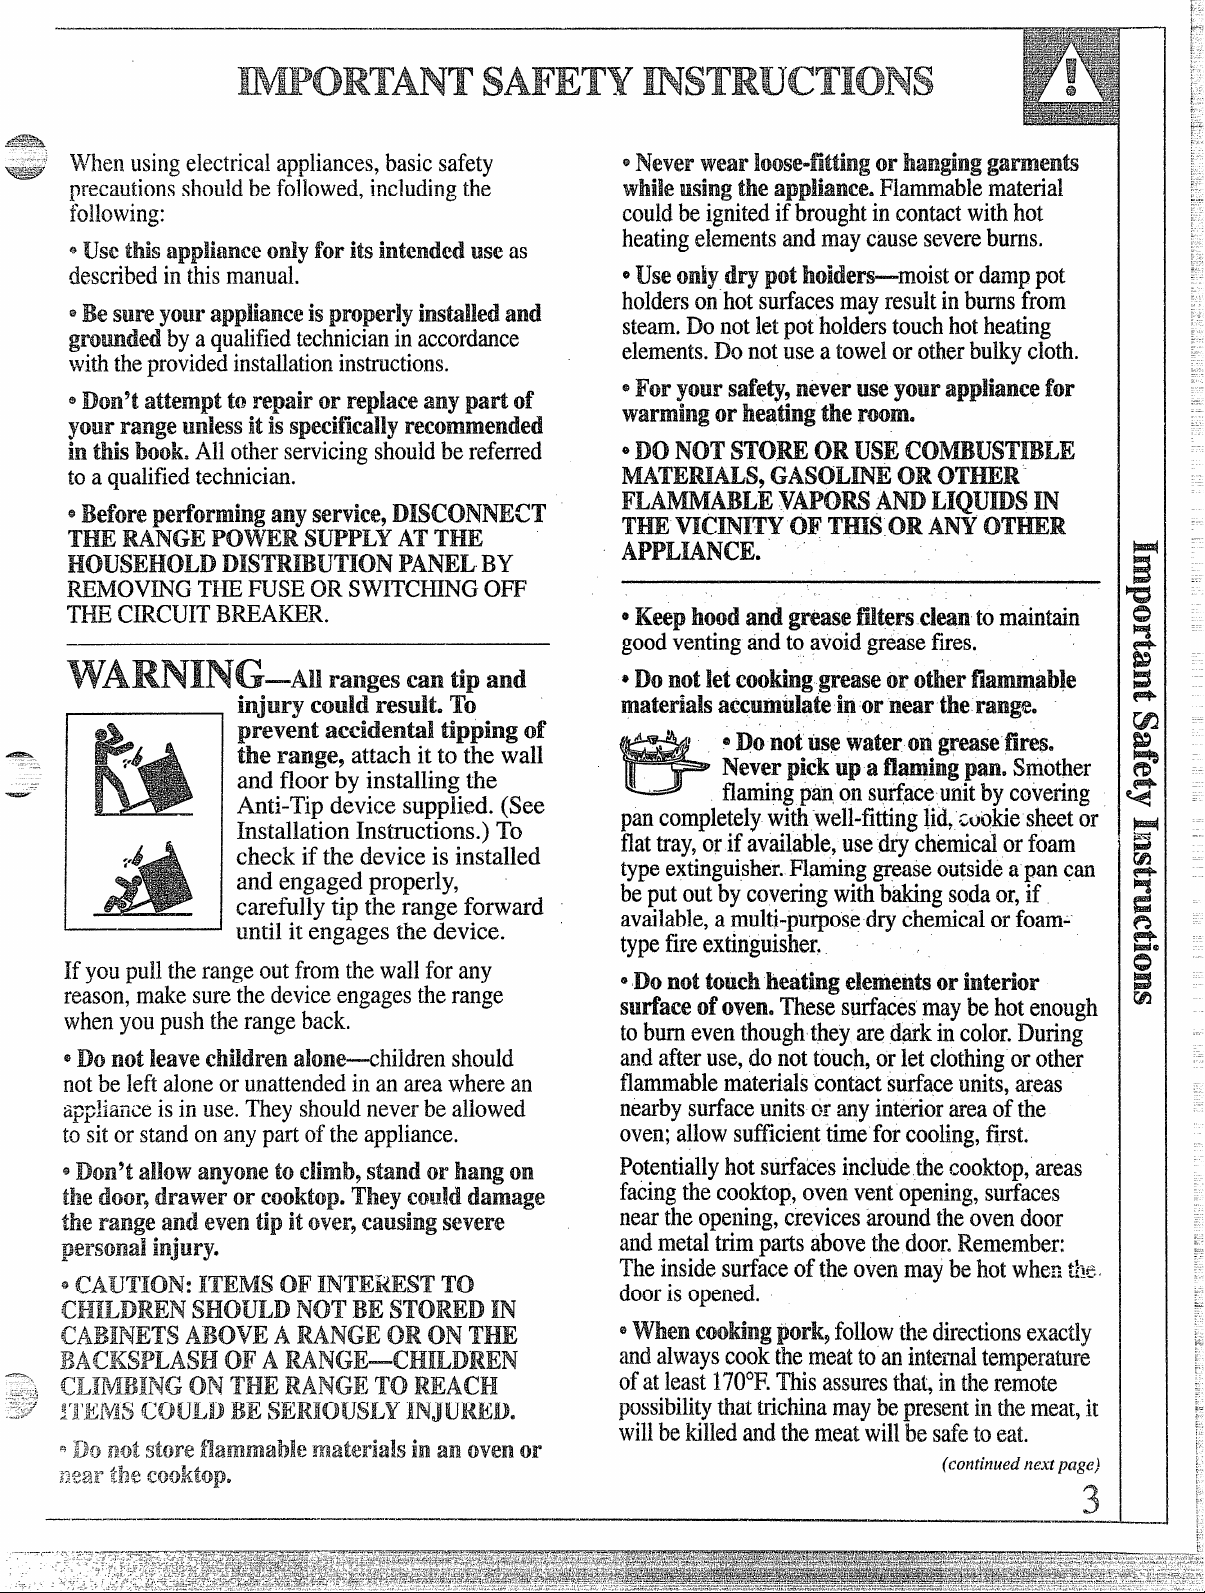
rangescantipim~
injurymumr’esdt. To
—
—
-.
—
L
Ifyoupulltherangeoutfromthewallforany
~eason,makesurethedeviceengagestherange
whenyoupushtherangeback.
s ~~ ~~~ ]gi~~~ ~~~~~—chi~dren s~~~~d
notbeleftaloneor unattendedinanareawherean
appliaxtiisinuse.Theyshouklneverbe allowed
tositorstandonanypartoftheappliance.
“(yilfyrlolw: rrEMs (II? TO
KzmABmlGONTEIERANGETo
prevent d’
the.
nmge9 attach it to the wall
andfloor by installingthe
Anti-Tipdevicesupplied.(See
InstallationInstructions.)To
check if the deviceis installed
and engagedproperly,
carefu}lytip the rangeforward
until it engagesthe device.
NOT”BE IN
$~~ not let cookinggreaseor other
in.or !m%31rtherangoe
~~~ ~Q~tisewateron’gK%MM?filx?se
I!WWIWpickup a pan.Smother
flamingpaqonsurfa;e@ bycovering
pancompletelywith“well-fitting~id,amkiesheetor
flattray,orifavailable,usedrychemicalorfoam
typeextinguisher.Flaminggreaseoutsidea pancan
beputoutbycoveringwithbakingsodaor,if
available,amulti-purposedrychemicalorfoam--
typefireextinguisher.
@!~~~~~~@~& or
surfaceof’oven.Thesesurfacesmaybehotenough
tobumeventhoughthey aredarkincolor.During
andafteruse,donottouch,orletclothingorother
flammablematerialscontactsurfaceunits,areas
nearbysurfaceunitsoranyinterkkareaofthe
oven;allowsuf!licienttimeforcooling,first.
Potentiallyhotsurfabesincludethecooktop,areas
fadingthecooktop,ovenventopening,surfaces
neartheopening,crevicesk-omittheovendoor
andmetaltrimpa~~sabovethedoor.Remember:
Theinsidesurfaceoftheovenmaybehotwhentk
doorisopemxl.
~ p0Fk9followthedirectionsexactly
(andalwayscookthemeattoani~temaltemperature
ofatlsastI’70W’.Thisassuresthat,intheremote
possibilitythattrichinamaybepresentinthemeat,it
willbekilledandthemeatwillbesafetoeat.
(continuedmzttpage)
6
3
Page 4
Owm
@p~~~gyOyem in whileoven
iscookIfshelves mustbehandledwhenhot,donot
M potholdercontactheatingunitsintheoven.
ew-henW&Rg tlr bagsh
followthemanufacturer’sdirections.
~Do nott,lsg?youroventodry If
overheated,theycancatchfire.
a DOIIOf USeWVWWBfbr a storage ma Itemsstored
inanovencanignite.
Knwmy
units
~
Use properpan@zx+This
< applianceisequippedwithdifferent
%
~ sizesurfaceunits.Selectcookware
havingflatbottomslargeenough
surfaceunitheatingelement.Theuseofundersized
cobkwarewillexposeaportionoftheheating
elementtodirectcontactandmayresultinignition
of’clothing.Properrelationshipofcookwareto
burnerwillalsoimproveefficiency.
~piJeveFkMVesurfaceunits at
heat settings.Boilovercausessmokingandgreasy
spilloversthatmaycatchonfire.
* Besuredrip pansand ventawenotCrowedand
are in.place.Theirabsenceduringcookingcould
damagerangepartsandwiring.
8D0~9tU,KW M to linedrip pansor
anywhereintheovenexceptasdescribedinthis
book.Misusecouldresultinashock,firehazardor
ciwiiagetotheIange.
~
only e(i!rtain types of gkMxJ9
earthenware mother glared are
for dxddq service;
becauseofthesuddenchangeinter.perature.See
sectiononSurfaceCookingforsuggestions.
~T’ominidze the ofbum+ ignitionof
flammablematerials,andspillage,thehandleofa
containershouklbeturnedtowardthecenterofthe
rangewithoutextendingovernearbysurfaceunits.
tocoverthe
othersmaybreak
~‘Donotdean door gasket. ThedooIgasket is
essentialfora goodseal.Careshouldbetakennot
torub,damageor movethegasket.
~~Q q~~~~e gj~~~~~~eNoco~~erci~~oven
cleanerorovenlinerprotectivecoatingofanykind
shouldbeusedinoraroundanypartoftheoven.
5C.Mw’i!only part$ Med inthisuseand
cm%!Book
,..—-....----------
~A&ays Ihll=nsUdkX!I.M%ittOOl?l?b&3N
txmkwam
~Keep an eye on foods being fried at HI or
heat settings.
UITo avoid the of a bum or electric
shodi9 be certain that the for all
surface units mat OFIY and M coils
awecod before to W or the
e~~~9t ~~s~~~ ~~~a~~
mm%putthemina Donot
the armsinw?own,
@ foodsareI.mderthehowi~turn
thefan(g. me flu%,if may
thefhmee
Qf(J(j&for lb asdryas
Frostonfrozenfoodsormoistureonfreshfoods
caflcausehotfattobubbleupandoversides
ofpan.
————
Page 5
.——
—,—
(Corltinwd)
frying.Fillingthepan too Ml offatcancause
spikwerswhenfoodisadded.
in stirtogetherbeforeheating,orasfats
meltslowly.
ovencooking
~Preheatovenonlywhennecessary.Mostfoodswill
cooksatisfactorilywithoutpreheating.If youfind
preheatingis necessary,watchtheovendisplay,and
putfoodin ovenpromptlyafterthe selected
temperatureis displayedandtheovensignals.
~Alwaysturnovenoff beforeremovingfood.
~Duringbaking,avoidfrequentdooropenings.Keep
dooropenasshorta time as possibleif it is opened.
~Cookcompleteovenmealsinsteadofjust onefood
item.Potatoes,othervegetables,andsomedesserts
willcooktogetherwithamain-dishcasserole,meat
loaf.chickenor roast.Choosefoodsthatcookat the
.
sametemperatureandin approximatelythe same
amountoftime.
@Useresidualheatin the ovenwheneverpossibleto
finishcookingcasseroles,ovenmeals,etc.Alsoadd
roHsorprecookeddessertsto a warmoven,using
residualheatto warmthem.
~$edeep fat ~~
@
preventoverheatingfatbeyondthesmokingpoint. W
mG
surface
~Usecookwareofmedium-weightaluminum?with
tight-fittingcovers,andflatbottomswhichcompletely
covertheheatedportionofthesurfaceunit.
~Cookfreshvegetableswitha minimumamountof
waterin a coveredpan.
~Watchfoodswhenbringingthemquicklyto cooking
temperaturesat highheat.Whenfoodreachescooking
temperature,reduceheatimmediatelyto lowestsetting
thatwillkeepitcooking.
~Useresidualheatwithsurfacecookingwhenever
possible.Forexample,whencookingeggsin their
shells,bringwaterandeggsto a boil,thenturnto
OFFpositi~nandcoverc~okwarewithlidtocomplete
thecooking.
,.
B
g
5
Page 6
r
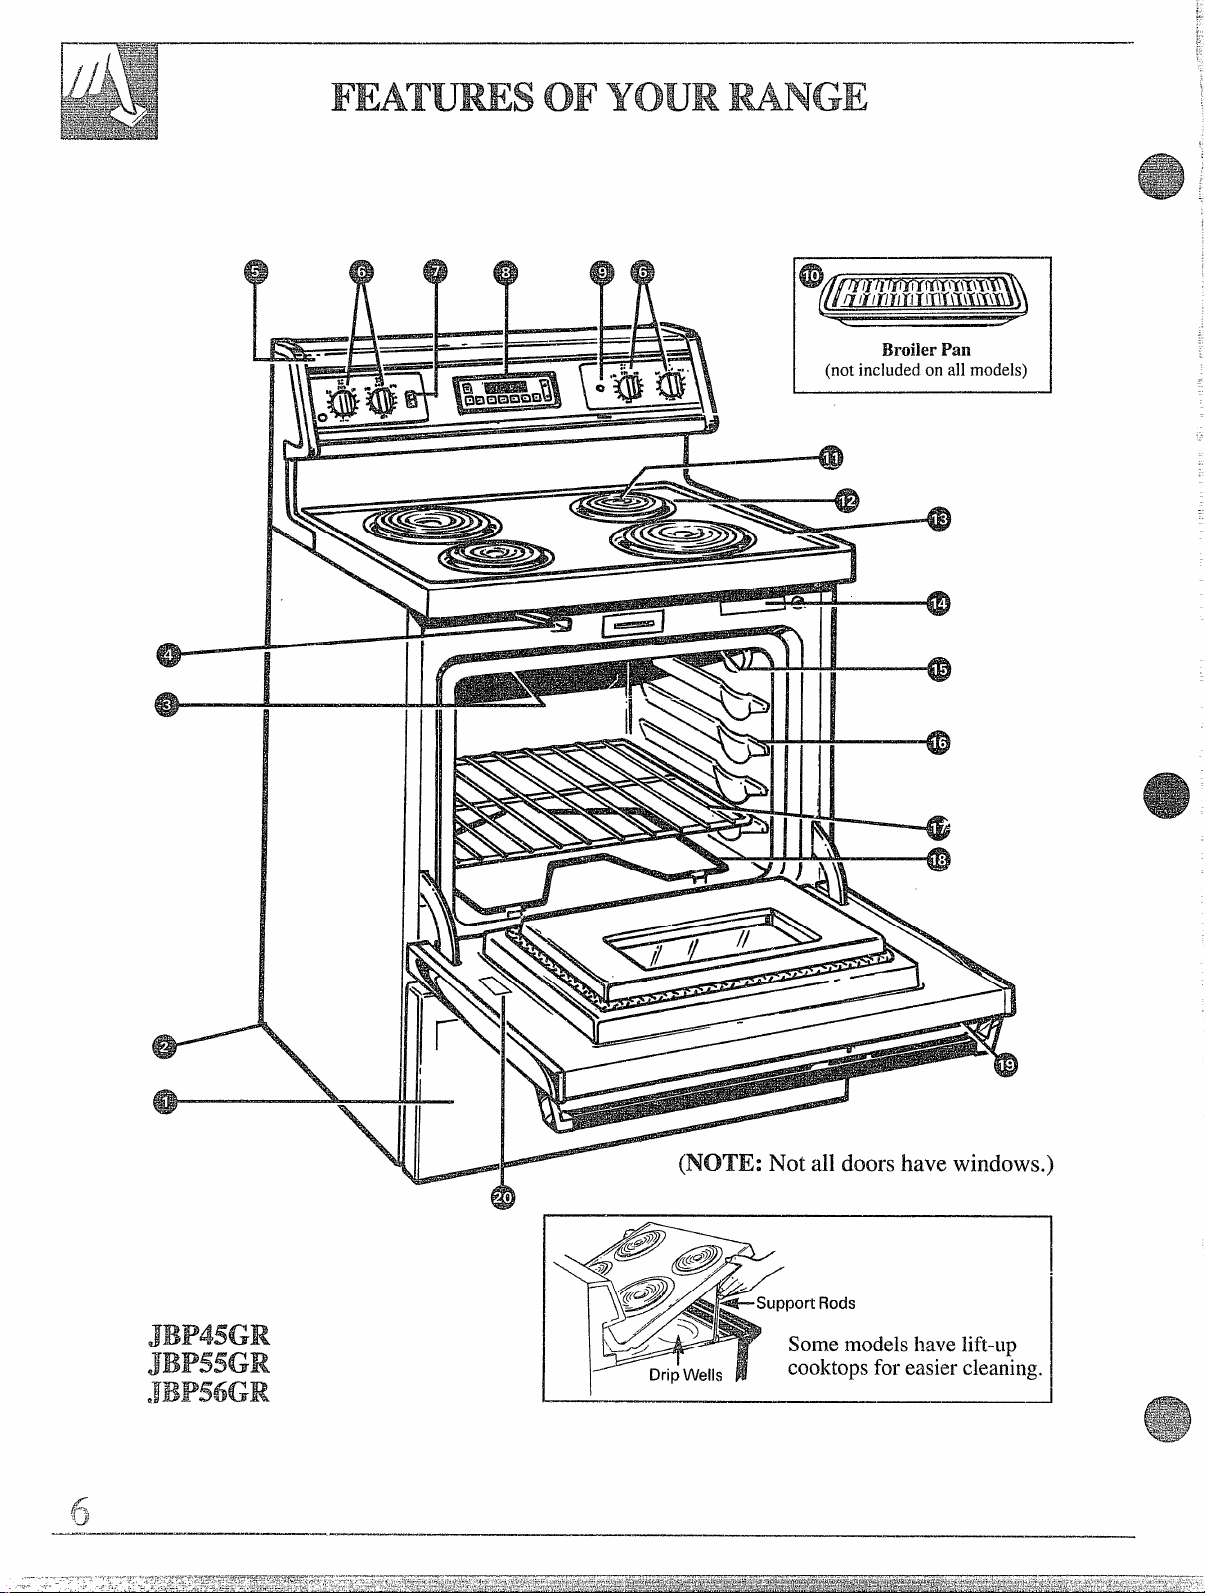
(NOTE; Notall doors have windows
portRock
Somemodelshavelift--up
cooktopsfol-easiercleaning.
Page 7
Explained
Feature Index (Notallmodelshaveall features.)
1 StorageDrawer(onsomemodels) 27,28
on page
2 Anti-TipDevice(SeeInstallationInstructions.)
3 BroilUnit
4 DoorLatch(UseforSelf-Cleanonly.)
5 SurfaceLight(onsomemodels)
6 SurfaceUnitControls
7 SurfaceLightSwitch(on somemodels)
8 OvenControl,ClockandTimer
9 SurfaceUnit“ON”IndicatorLight
10 BroilerPanandRack(onsomemodels)
(DonotcleaninSelf-Cleanoven.)
11 OvenVent(Locatedunderrightrear surfaceunit.)
12 Ca.lrod@SurfaceUnits,DripPans
(onsomemodels)
13 Lift-UpCooktop(onsomemodels)
14 ModelandSerialNumberLocation
(behindtherangedoororbehindthe storagedrawer)
15 OvenInteriorLight(on somemodels)
(Comeson automaticallywhendooris opened.)
3,29,31
28
22,23
10,26
10
8,9
18–21,28
26 ,
25,28
25
2
I
14,27
!7s
16 OvenShelfSupports 14
(Forroasting,bakingandbroilingpositionsof
shelves,seesuggestionsin cookingguides.)
17 OvenShelf(numbermayvary) 14,28
18 BakeUnit(Maybe liftedgentlyfor wipingovenfloor.)
19 OvenLight Switch(for modelswithovenwindow)
20 Anti-TipLabel
28
‘7
Page 8
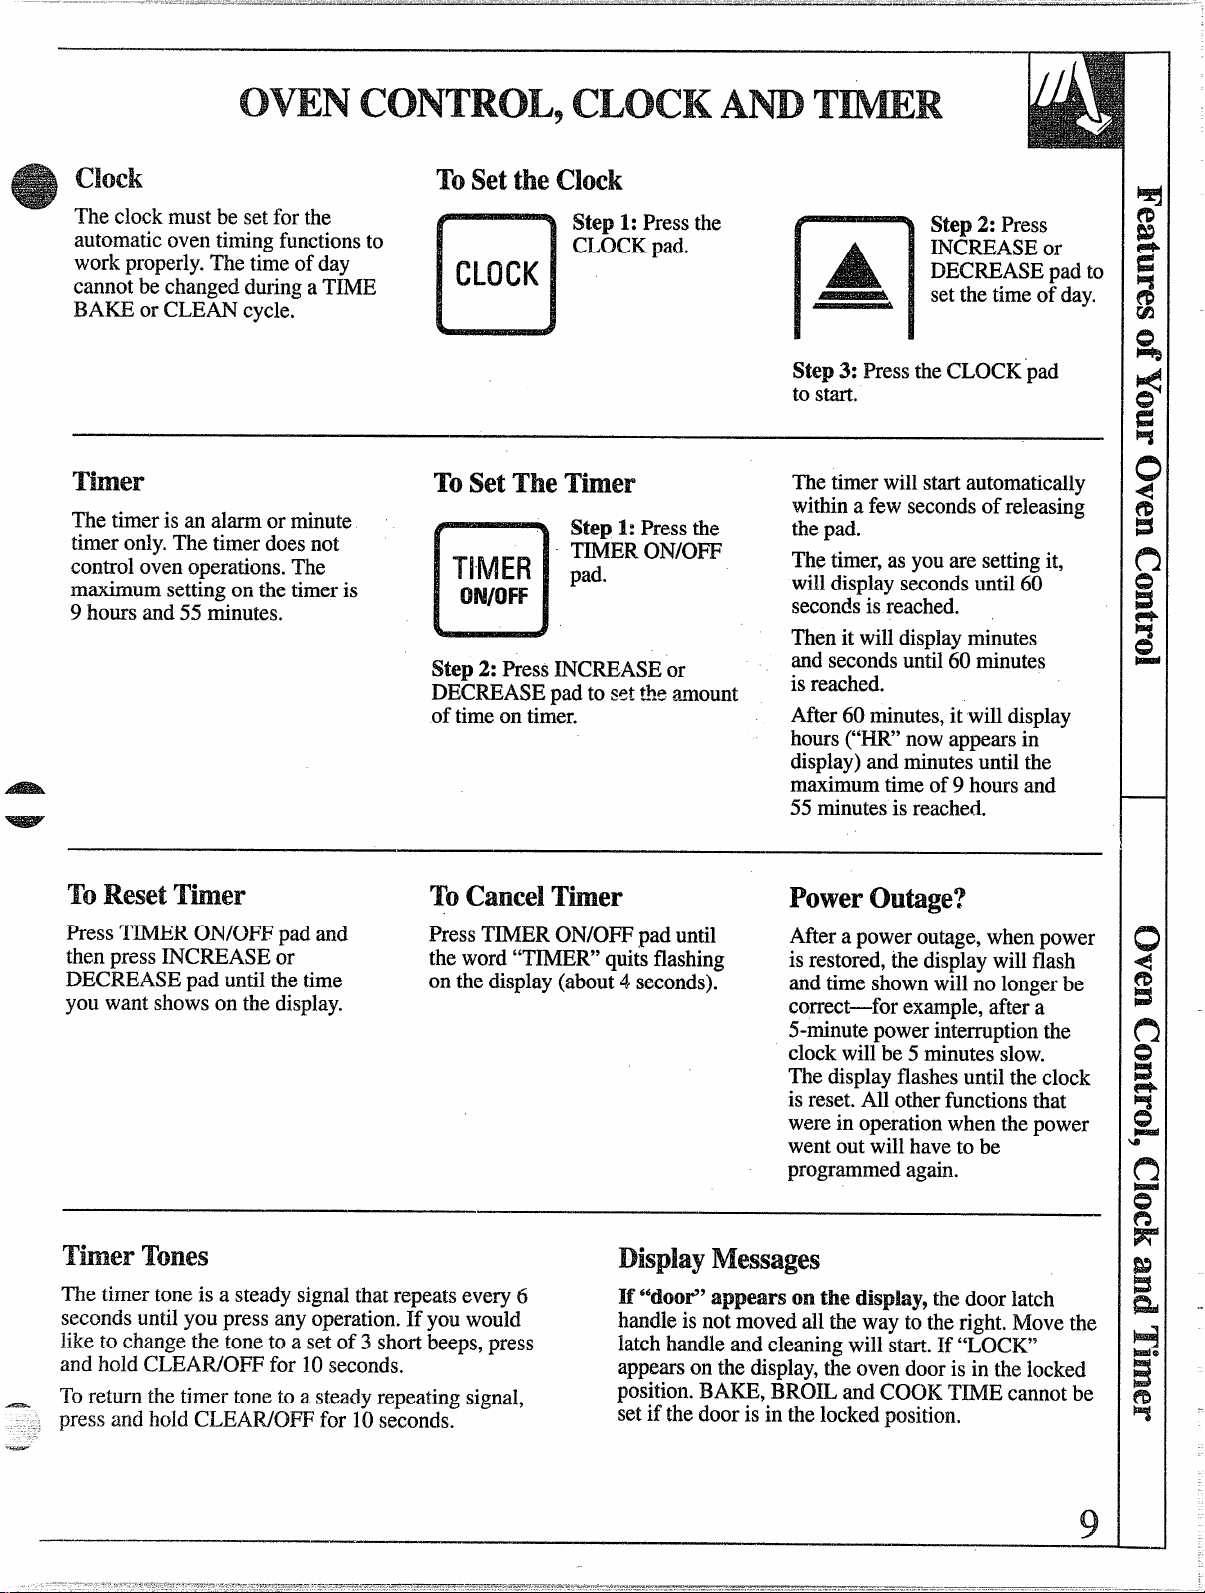
cklek
setthe!clock
To
Theclockmustbesetfor the
automaticoventimingfunctionsto
workproperly.Thetimeof day
cannot be changed.duringa TIME
BAISEor CLEANcycle.
CLOCK
Step 1:Pressthe
CLOCKpad.
mmer Toset‘me Timer
Thetimeris an alarmor minute
timeronly.Thetimerdoesnot
control ovenoperations.The
maximumsettingonthetimeris
9 hoursand55minutes.
oN/oFF
Step 2: PressINCREASEor
DECREASEpadto setthearrount
oftimeon timer.
Step 1: Pressthe
TIMEROIWOFF
pad.
~~ Step 2: Press
INCREASEor
DECREASEpadto
setthe timeofday.
Step 3: PresstheCLOCK’pad
to start.
Thetimerwillstartautomatically
withina fewsecondsofreleasing
thepad.
Thetimer,as youaresettingit,
willdisplaysecondsuntil60
secondsisreached.
Thenit willdisplayminutes
andsecondsuntil 60 minutes
is reached.
After60 minutes,it willdisplay
hours(“I-R”nowappearsin
display)andminutesuntilthe
maximumtimeof9 hoursand
55minutesisreached.
‘lb ResetTimer ml cancel‘b-w
PressTIMERONVOFFpadand
thenpressINCREASEor
DECREASEpad untilthe time
youwantshowsonthedisplay.
Timer Tones
Thetimertoneis a steadysignalthatrepeatsevery6
secondsuntilyoupressanyoperation.If you would
liketo change the toneto a setof 3 shortbeeps,press
andholdCLEAR/OFFfor 10seconds.
Toreturn thetimertonetoasteadyrepeatingsignal,
—
pressaridhold CLEAR/OFFfor 10seconds.
Power
PressTIMER01’+VOFFpaduntil
theword“TIMER”quitsflashing
on thedisplay(about4,seconds). andtimeshownwillnolongerbe
If “door” appears on the dk@ay9the doorlatch
handleis notmovedallthe wayto theright.Movethe
latchhandleand cleaningwill start.If “LOCK”
appearsonthedisplay,the ovendooris in thelocked
position.BAKE,BROILandCOOKTIIVIEcannotbe
setifthedoor is in thelockedposition.
Aftera poweroutage,whenpower
isrestored,thedisplaywillflash
correct-for example,aftera
5-minutepowerinterruptionthe
clockwillbe5 minutes slow.
Thedisplayflashesuntiltheclock
isreset.All otherfunctionsthat
werein operationwhenthepower
wentoutwillhaveto be
programmedagain.
outage?
—
9
Page 9
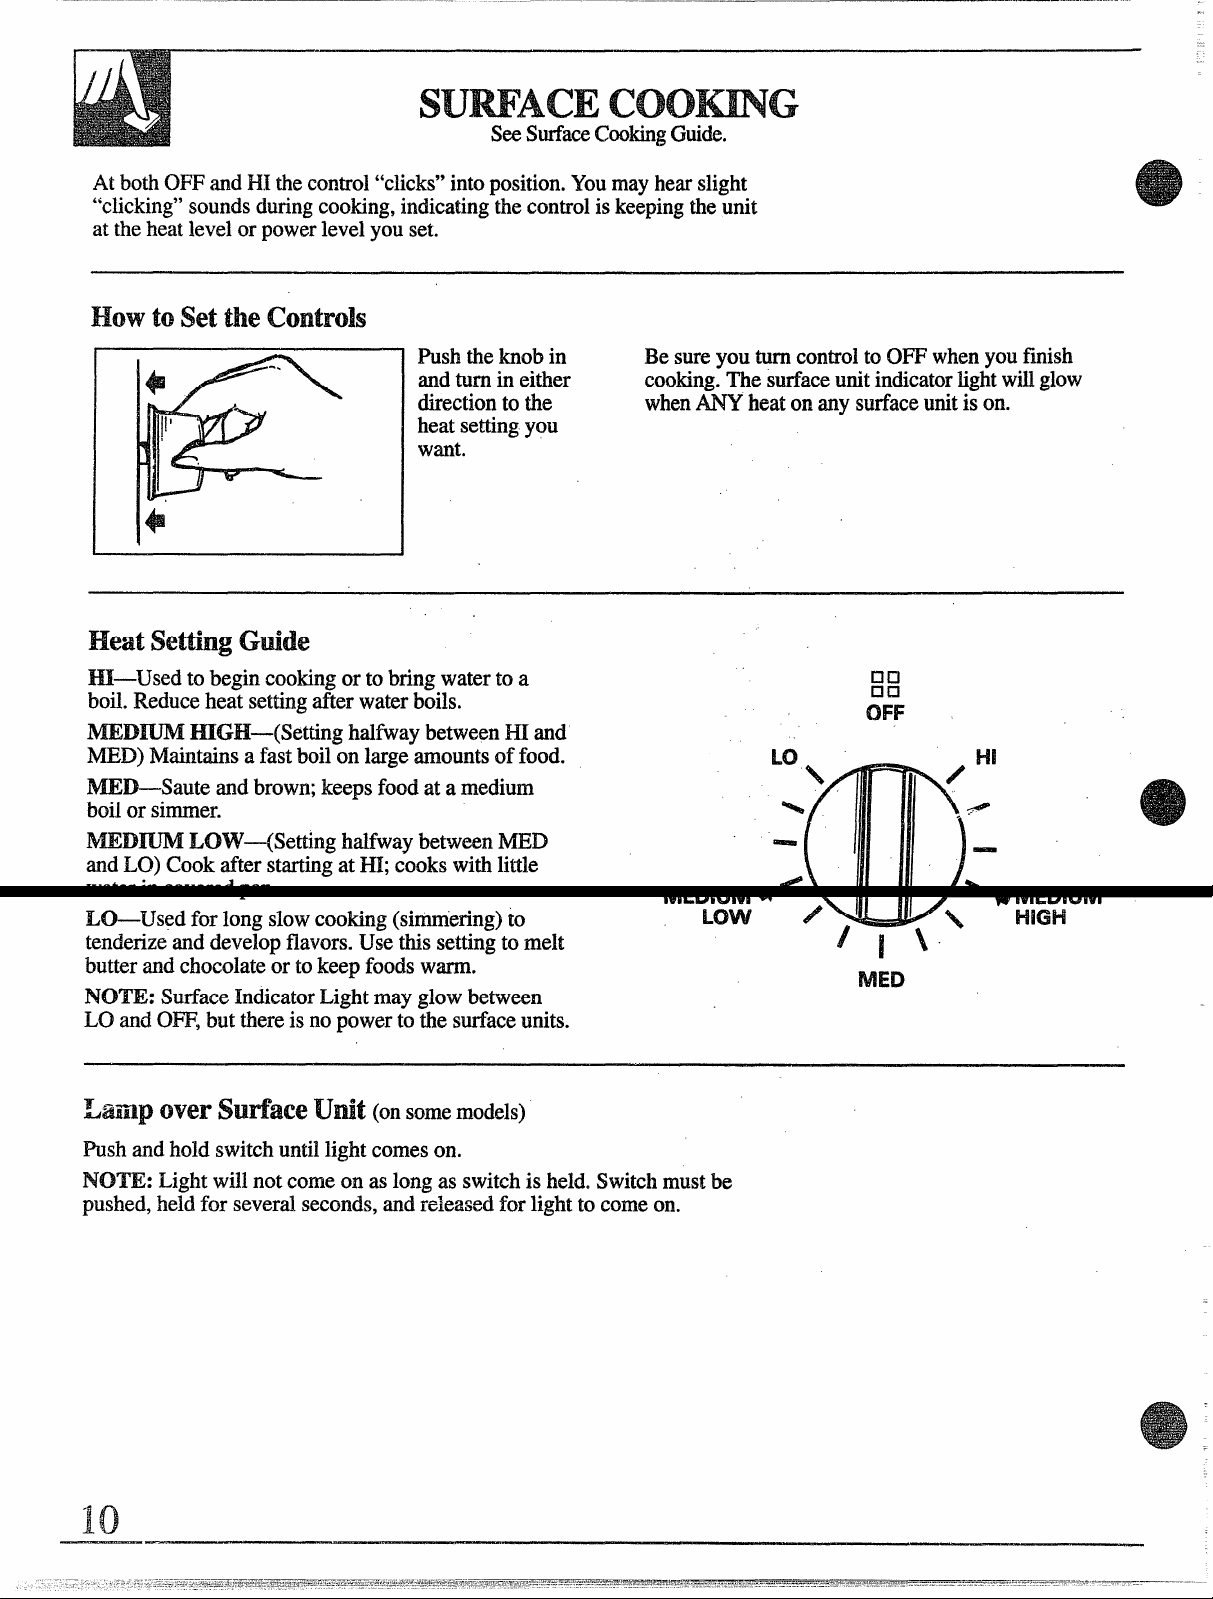
see surfacecookingGuide.
AtbothOFFandHIthecontrol“clicks”intoposition,Youmayhearslight
“clicking”soundsduringcooking,indicatingthecontrolis keepingtheunit
attheheatlevelorpowerlevelyou set.
Howtosetthecontrols
Pushtheknobin
andturnin either
directiontothe
heatsettingyou
want.
—
Heat (hide
ED-Used to begincookingortobringwaterto a
boil.Reduceheat settingafterwaterboils.
MIHXUNIHBGH-(Setting halfwaybetweenHI and
MED)Maintainsa fast boilonlargeamountsof food.
IWID-+aute andbrown;keepsfoodat a medium
boilorsimmer.
LOVV-(Setting halfwaybetweenMID
andLO)Cookafterstartingat HI; cookswithlittle
waterin coveredpan.
LO—Usedforlongslowcooking(simmering)to
tenderizeanddevelopflavors.Use thissettingto melt
butterandchocolateortokeepfoodswarm.
NOTE: SurfaceIndicatorLightmay glowbetween
LO andOFF,but thereis nopowerto the surfaceunits.
Besureyou turncontrolto OFFwhenyoufinish
cooking.Thesurfaceunitindicatorlight willglow
whenANYheatonanysurfaceunit is on.
!:
OFF
UNV HIGH
MED
Pushandholdswitchuntillightcomeson.
NOTE: Lightwillnot comeon as longas switchisheld.Switchmustbe
pushed,heldfor severalseconds,andreleasedfor light to comeon.
Page 10
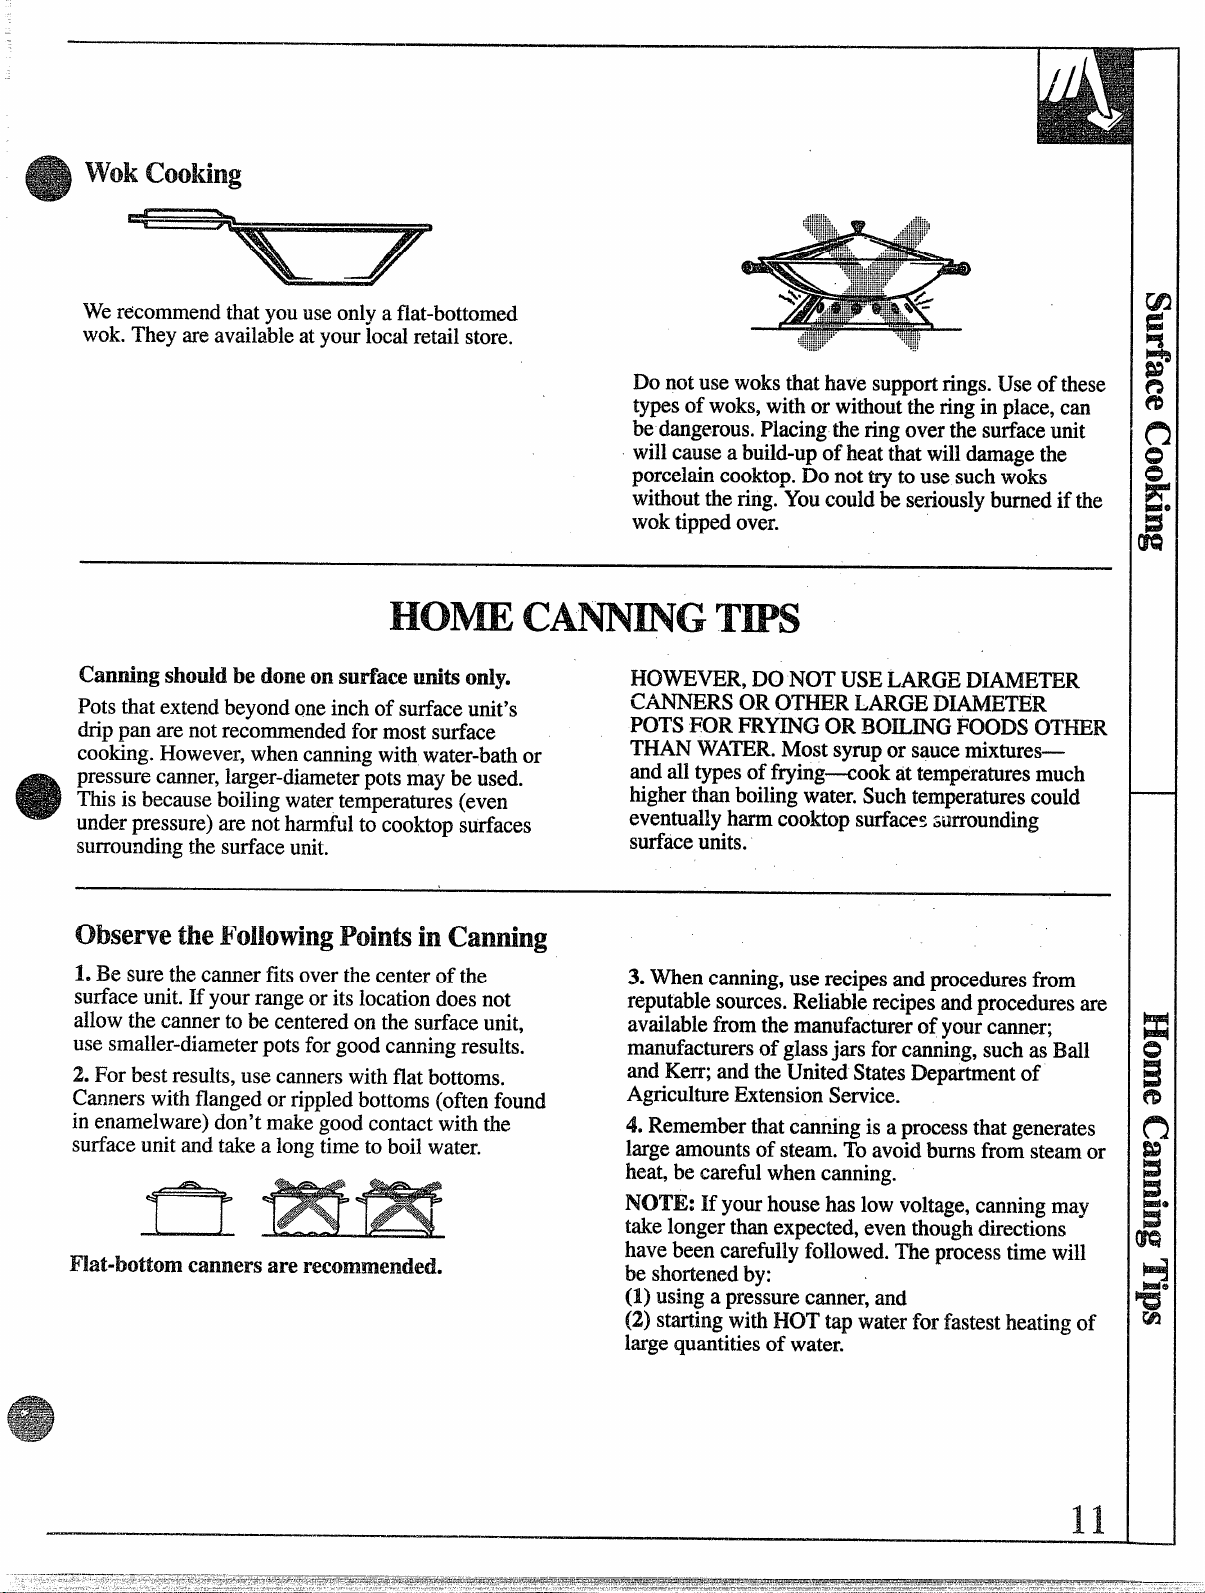
wok
Werecommendthatyouuseonlya flat-bottomed
wok.Theyareavailableatyourlocal retailstore.
Do notusewoksthathavesupportrings.Useofthese
types of woks,withor withouttheringinplace,can
be dangerous.Placingtheringoverthe surfaceunit
willcausea build-upof heatthatwilldamagethe
porcelaincooktop.Do nottrytousesuchwoks
withoutthering.Youcouldbe seriouslyburnedif the
woktippedover.
Gumirlg should h? doneonsmface Rmit$only,
Potsthat extendbeyondoneinchofsurfaceunit’s
drippan arenotrecommendedfor mostsurface
cooking.However,whencanningwithwater-bathor
pressurecanner,larger-diameterpotsmaybeused.
Thisis becauseboilingwatertemperatures(even
under pressure)arenotharmfulto cookto~surfaces
surroufidingthe surfaceunit.
.
observeh! Pointsincanning
L Be surethecannerfitsover thecenterof the
surfaceunit.If’yourrangeor its locationdoesnot
allowthecannerto be centeredonthesurfaceunit,
usesmaller-diameterpots forgoodcanningresults.
2.Forbestresults,use cannerswithflatbottoms.
Cannerswithflangedor rippledbottoms(oftenfound
in enamelware)don’t makegoodcontactwiththe
surfaceunitandtakea longtimeto boilwater.
Flat-bottom cannersaremxmmended.
HowmR,
cmRs OROTHERLARGEDI.AMEmR
POTSFOR.FRYINGORBOILINGFoom OTHER
THANWATER.Mostsyrupor saucemixtures—
andalltypesof frying-cook attemperaturesmuch
higherthanboilingwater.Suchtemperaturescould
eventuallyharmcooktopsurfacessurrounding
surfaceunits.
3.Whencanning,use recipesandproceduresfrom
reputablesources.Reliablerecipesandproceduresare
availablefromthemanufacturerof yourcanner;
manufacturersof glassjars forcanning,suchas Ball
andKerr;andtheUnitedStatesDepartmentof
AgricultureExtensionService.
4. Rememberthatcanningis aprocessthatgenerates
largeamountsof steam.Toavoidburnsfrom steamor
heat,becarefulwhencanning.
NOTE: If yourhousehaslowvoltage,canningmay
takelongerthanexpected,eventhoughdirections
havebeencarefiily followed.Theprocesstimewill
be shortenedby: .
(1)usinga pressurecanner,and
(2) startingwithHOTtapwaterfor fastestheatingof
largequantitiesof water.
DoI’wYrUSELARGEIxANwrm
Page 11
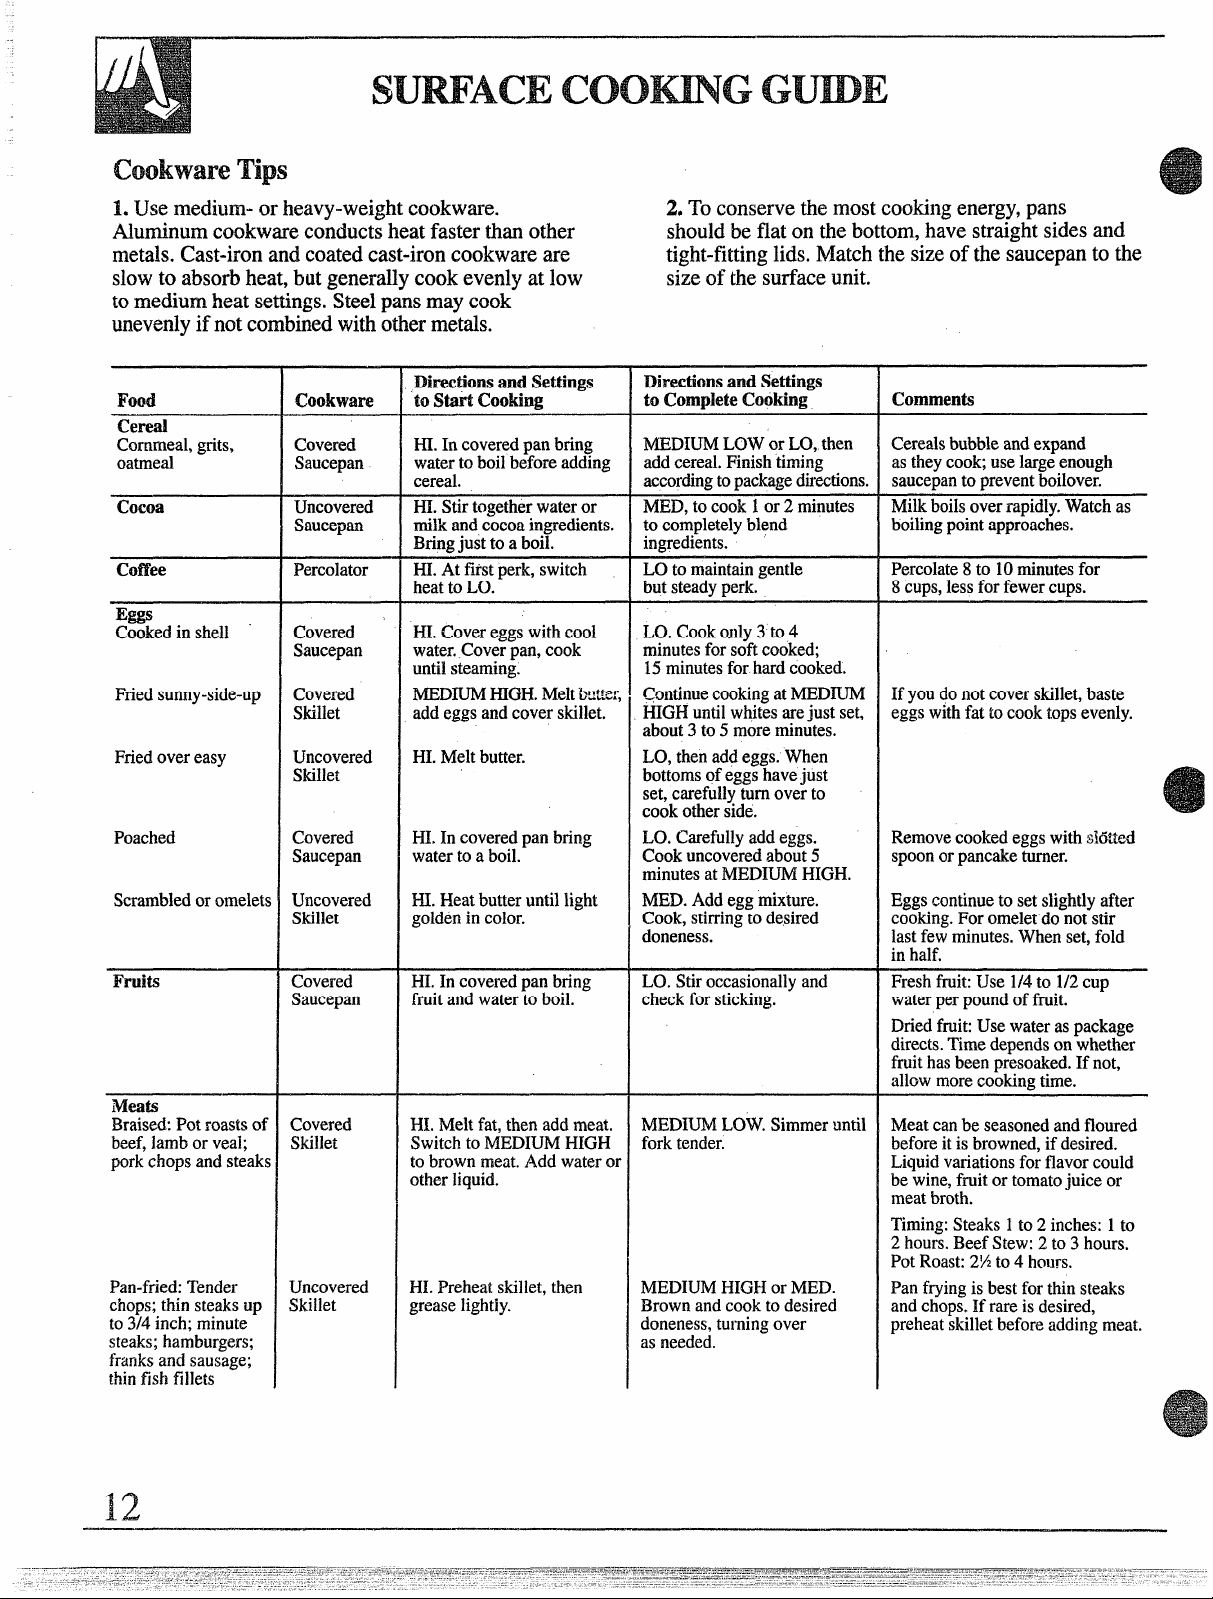
Tips
1.Usemedium-or heavy-weightcookware.
Aluminumcookwareconductsheatfasterthanother
metals.Cast-ironandcoatedcast-ironcookwareare
slowto absorbheat,butgenerallycookevenlyat low
tomediumheatsettings.Steelpansmaycook
unevenlyif notcombinedwithothermetals.
DirectionsandSettings
Food
Cookware
tostart cooking
Cereal
Cornmeal,grits,
oatmeal
Cocoa
Coffee Percolator
Covered
Saucepan
Uncovered
Saucepan
HI.In coveredpanbring
waterto boilbeforeadding
cereal.
HI.Stirtogetherwateror
milkandcocoaingredients.
just to a boil.
~~ng
HI.Atftistperk,switch
heatto LO.
Eggs
Cookedinshell
Friedsunny-side-up
Friedovereasy
Poached
Scrambledoromelets
Covered
Saucepan
Covered
Skillet
Uncovered
Skillet
Covered
Saucepan
Uncovered
Skillet
Fruits Covered
Saucepan
HI.Covereggswithcool
water.Coverpan,cook
untilsteaming.
MEDIUMHIGH.Mekbutte~
addeggsandcoverskillet.
HI.Meltbutter. LO,thenaddeggs.When
HI.In coveredpanbring
watertoaboil.
HI.Heatbutteruntillight
goldenincolor.
HI,In coveredpanbring
fruitandwatertoboil.
mats
Braised:Potroastsof
beef,lamborveal;
porkchopsandsteaks
Pan-fried:Tender
chops;thinsteaksup
to3/4inch;minute
steaks;hamburgers;
franksandsausage;
thinfishfillets
Covered
Skillet
Uncovered
Skillet
HI.Meltfat,thenadd meat,
SwitchtoMEDIUMHIGH
tobrownmeat.Addwateror
otherliquid.
HI.Preheatskillet,then
greaselightly.
2. Toconservethemostcookingenergy,pans
shouldbeflatonthebottom,havestraightsidesand
tight-fittinglids.Matchthesizeof thesaucepanto the
sizeof thesurfaceunit.
DirectionsandSettings
toCompleteCooking Comments
MEDIUMLOWorLO,then
add cereal.Finishtiming
accordingtopackagedirections.
MED,tocook1or2 minutes
to completelyblend
ingredients.
LOto maintaingentle
butsteadyperk.
LO.Cook
minutesfor softcooked;
15minutesforhardcooked.
ContinuecookingatMEDIUM
HIGHuntilwhitesarejust set,
about3 to 5moreminutes.
bottomsofeggshavejust
set,carefullyturnoverto
cookotherside.
LO.Carefullyaddeggs.
Cookuncoveredabout5
minutesatMEDKJMHIGH.
MED.Addeggmixture.
Cook,stirringtodesired
doneness.
LO.Stiroccasionallyand
checkforsticking.
MEDIUMLOW.Simmeruntil
fork tender.
MEDIUMHIGHor MED.
Brownandcook to desired
doneness,turningover
as needed.
only3to4
Cerealsbubbleandexpand
astheycook;uselargeenough
saucepantopreventboilover.
Milkboilsoverrapidly.Watchas
boilingpointapproaches.
Percolate8to 10minutesfor
CUPS,lessforfewerCUPS.
8
Ifyoudonotcoverskillet,baste
eggswithfat tocooktopsevenly.
RemovecookedeggswithW%ted
spoonorpancaketurner.
Eggscontinuetosetslightlyafter
cooking.Foromeletdonotstir
lastfewminutes.Whenset,fold
inhalf,
Freshfruit:Use 1/4to 1/2cup
waterperpoundoffruit.
Driedfruit:Usewateraspackage
directs.Timedependson whether
fruithasbeenpresoaked.Ifnot,
allowmorecookingtime.
Meatcanbe seasonedandfloured
beforeitisbrowned,if desired.
Liquidvariationsforflavorcould
bewine,fruitortomatojuice or
meatbroth.
Timing:Steaks1to 2inches:1to
2 hours.BeefStew:2 to 3hours.
PotRoast:2X to 4 hours.
Panfryingis bestforthinsteaks
andchops.Ifrareis desired,
preheatskilletbeforeaddingmeat.
12
Page 12

3. DeepFatFrying.Donotovertll cookwarewithfat
thatmayspilloverwhenaddingfood.Frostyfoods
bubblevigorously.Watchfoodsfryingathigh
temperatures.Keeprangeandhoodcleanfrom
accumulatedgrease.
Bight
NOTOVER1’
OVER1“
mod
Mews
FriedChicken
Pan-tied bacon
Sauteed:Lesstender
thinsteaks(chuck,
round,etc.);liver;
thickorwholefish.
Simmeredor stewed
meat;chicken;
cornedbeef;smoked
pork;stewingbeef;
tongue;etc.
MeltingchocoMe9
marshmaliows9
butter
Pancakesor
‘Frenchtoast
cookware
Covered
Skillet
Uncovered
Skillet
Covered
Skillet
Covered
DutchOve~
Kettleor
Large
Saucepan
Small
Uncovered
Saucepan.
Skilletor
Griddle
Pasta
Noodlesorspaghetti
PressureCooking Pressure
Puddhgs, Sauces,
C&dies,Frostings
Vegetables
Fresh Covered
Frozen
Sauteed:Onions;
greenpeppers;
mushrooms;celery;etc.,
Large
Covered
KettleorP{
Cookeror
Canner
Uncovered
Saucepan
Saucepan
Covered
Saucepan
Uncovered
Skillet
Eweam?(kits i Covered
Saucepan
1
DirectionsandSettings
tostart cooking
HI.Meltfat.Switchto
MEDiUMHIGHto
brownchicken.
HI.In coldskillet,arrange
baconslices.Cookjustuntil
startingto sizzle.
HI.Meltfat. SwitchtoNIED
tobrownslowly.
HI.Covermeatwithwater
andcoverpanor kettle.
Cookuntilsteaming.
MEDIUMLOW.
minutestomeltthrough.Stirto
smooth.
MEDIUMHIGH.Heatskillet8 Cook2 to 3minutesperside.
to10 minutes.Greaselightly,
HI.Incoveredkettle,bring
saltedwaterto a boil,uncover
and addpastaslowlysoboiling
doesnotstop.
HI.Heatuntilfirstjiggle
isheard.
HI.Bringjust toboil.
HI.Measure1/2to 1inch
waterinsaucepan.Addsalt
andpreparedvegetable.
Incoveredsaucepanbring
toboil.
HI.Measurewaterandsalt
asabove.Addfrozenblock
ofv~getable.Incovered
saucepanbringtoboil.
‘HI,Inskillet,meltfat.
HI.Bringsaltedwatertoaboil. MEDIUMLOW.Coverand
Allow 10to 15
Directions
CompleteCooking
LO.Coverskilletandcookuntil
tender.Uncoverlastfewminutes.
MEDIUMHIGH.Cook,turning
overas needed.
LO.Coverandcookuntiltender.
LO.Cookuntilfork tender.
(Watershouldboilslowly.)For
vtxy!L”geamounts,medium
heatmaybeneeded.
Usesmallsurfaceunit.
MEDIUMHIGH.Cookuncovered
untiltender.Forlargeamounts,
HImaybe neededtokeepwater
atrollingboilthroughoutentire
cockingtime.
MEDIUMHIGHforfoods
cooking10minutesorless.
MEDforfoodsover10 minutes.
LO.”TOfinishcooking.
MED.Cook1pound10to 30
ormoreminutes,depending
ontendernessofvegetable.
LO.Cook accordingto
timeonpackage.
MED.Addvegetable.
Cookuntildesired
tendernessisreached.
cookaccordingtotime.
andSWiqgsto
I
comments
For crisp,drychicken,cover
only afterswitchingtoLO
for10minutes.Uncoverand
cook,turningoccasionally
for10to20minutes.
Amoreattention-freemethod
istostartandcookat MED.
Meatmaybe breadedor
marinatedin saucebefore
frying.
Add salt orotherseasoning
beforecookingifmeathas
notbeensmokedor
otherwisecured.
Whenmeltingmarshmallows,
add milkor water.
‘~ick battezhikesslightly
longertime.Turnover
pancakeswhenbubbles
riseto surface.
Uselargeenoughkettleto
preventboilover.Pasta
doublesinsizewhencooked.
Cookershouldjiggle2to 3
timesperminute.
Stirfrequentlyto prevent
sticking.
Uncoveredpanrequiresmore
waterandlongertime.
Breakuporstiras needed
whilecooking.
Ttimoveror stirvegetableas
necessaryforevenbrowning.
Riceandgritstripleinvolume
aftercooking.Timeat
MEDIUMLOW.
riceand2cupswaterfor 25r
minutes,Grits:1cupgritsand
4cupswaterfor40minutes.
R.iCR1CUD
1.3
Page 13

Da RI(Mlockthe ovendoorwiththe door Mel-lexceptwhenSeIf-cleaning.
—
Youroven
.
..-
1.Lookat the controls.Besureyouunderstandhow
to set themproperly.Readoverthedirectionsforthe
OvenControlsso youunderstandhowtousethem.
2. Checkoveninterior.Lookat the shelves.Takea
practicerunatremovingand replacingthemproperly,
togivesure,sturdysupport.
oven
Theshelvesaredesignedwith
stop-locksso thatwhenplaced
correctly ontheshelfsupports,
theywillstopbeforecomingout
completelyfromtheoven,and
till not tiIt whenremovingfood
fromorplacingfoodonthem.
ml REMOWETHE
fromtheoven,pulltowardyou,tilt
frontendupwardandpullthernout. ‘
I nII
3. Readoverinformationandtipsthatfollow.
4. Keepthis bookhandyso you canreferto it,
especiallyduringthefirst weeksofusingyour
newrange. “
TO REPLACE, placeshelfon
shelfsupportwithstop-locks
(curvedextensionundershelf)
facingup towardtherearof the
oven.Tiltup frontandpushthe
shelftowardthebackof theoven
untilit goespast“stop”on theoven
wall.Thenlowerthefrontof the
shelfandpushitallthewayback.
smLvEs
v’
1 ‘h) II
Theovenhas four shelfsupports–
A (bottom),B, C andD (top).
Shelfpositionsforcookingfood
aresuggestedon Baking,Roasting
andBroilingpages.
—
ovenLight
Thelight comeson automatically
whenthe ovendoorisopened.
. .
Usetheswitchon frontof doorto
turnthelighton andoffwhenthe
doorisclosed.
M
Page 14

SeeBakingGuide.
Youroventemperatureis controlledveryaccuratelyusinganovencontrol
system.Werecommendthatyouoperatetherangefor a numberof weeks
usingthe timegivenon recipesas a guide to becomefamiliarwithyournew
oven’sperformance.If youthinkan adjustmentis necessary,seeAdjusting
OvenTemperaturesection.
Howtoset‘YimrRangefor
Step 1: Positionthe shelforshelvesintheoven.If
cookingon two shelvesat thesametime,place
shelveson alternate.shelfsupportsandstaggerfood
on them.
$tep 2: Closetheovendoor.
Step 3: PressBAKEpad.
Step 5: PressINCREASEorDECREASEpaduntil
desiredtemperatureisdisplayed.”
Theword“ON”andthechangingtemperaturewillbe
displayedas theovenheatsup.Whentheoven
reachesthesettemperatureatone willsound.
TochangeoventemperatureduringBAKEcycle,
pressBAKEpadandthenINCREASEor
DECREASEpadtogetnewtemperature.
CLEAR
Step4: PressINCREASEpad.The
lastovensettemperatureappearsin
thedisplay.
Howtoset startand stop
Theoventurnsonrightaway,cooksforpreset
lengthof time,andturnsoffautomaticallyat the
presetStopTime.
S%q 1: Positiontheshelfor shelvesin theoven. If
cookingon two shelvesat the sametime,place
shelveson alternateshelfsupportsand staggerfood
on.them.
Step 2: Closetheovendoor.
Step 3: PressICOOKTI.MEpad.
Step4:PressINCREASEpaduntil
desiredlengthofbakingtimeappears
in the display.
\
Step6:PressINCREASEorDECREASEpad until
desiredtemperatureis displayed.
Theword“ON”andtherisingoven temperaturewill
bedisplayedastheovenheatsup.Whenthe oven
reachesthe settemperaturea tonewillsound.The
ovenwillcontinueto cookfortheprogrammed
amountoftime,then shutoff automatically.
Step 7: Removefoodfromtheoven.Remember,even
thoughovenshutsoff automatically,foodscontinue
cookingaftercontrolsare off.
OFF
BAKE
Step 6: PressCLEAR.KN?Fwhen
bakingis finishedandthenremove
foodfromoven.
1
Step5:PressBAKEpad.Attention
tonewilloccurif step5 is notdone.
15
Page 15

G
(continued)
HowtoTim!
Theovencontrolallowsyouto turntheovenonor Tosetthe clock, fiist presstheCLOCKpad.
offautomaticallyat specifictimesthatyouset.
NOTE: l!h%ill%?be@lning make
showsthe correct time ofday.
SWi%?theOVelilC~Of2k
How tosetDelay startand stop
Quick Reminder:
LPressCOOKTINIEpad.
2. PressINCREASWDECREASEpadto set
cookingtime.
3. PressSTOPTIMEpad.
4. PressNXEASE/ DECREASEpaduntil
desiredStopTimeappearsin display.
5.PressBAKEpad.
6. PressINCREASE/DECREASEpadto select
oventemperature.
“TIME”willflash in thedisplay.PressINCREASEor
DECREASEpaduntil correcttimeof dayisdisplayed.
I “5:00”appearson
A. -
controlautomaticallysetsStopTimeby addingthe
CookTimeto thetimeof day. In thisexample,the
timeof dayis 2:00andtheCook Timeis 3 hours.
Adding3 hourstothetimeof dayequals5:00.
Step 6: ChangeStopTimefrom5:00to 7:00by
pressingINCREASEpaduntil“7:00”appearsin
thedisplay.
Step7:PressBAKEpad.
thedisplayand
DelayMartandStopis settingtheoventimerto turn
theovenonandoffautomaticallyat alatertime than
thepresenttimeof day.
Forexample:Let’ssay it’s2:00anddinnertimeis
shortlyaf& 7:00.Th~recipe suggests3 hoursbaking
timeat325”F.Here’show:
$tep 1: Positionthe shelfor shelvesin theoven.If
cookingontwoshelvesat the sametime,staggerthe
pansfoibestheat circulation.
Step 2: Close the ovendoor.
Step 3: Press COOKTIMEpad.
ICOOK
TIME
Step4:For 3 hoursofcookingtime,
pressINCREASEpaduntil“3:00”
appearsin the display.
Step5: PressSTOFTIMEpad.
STOP
BAKE
u
$tm8:PressINCREASEpad.Thelastovenset
temperatureappearsin the~isplay.PressINCREASE
or DECREASEpaduntil“325°”is displayed.
At4:O0,the ovenwillturnon automatically.The .
word“CN’ andthechangingoventemperaturewill
bedisplayedastheovenheatsup.Theovenwill
continueto cookfortheprogrammed3 hoursandshut
offautomaticallyat 7:00.
Step 9: Remove food fromtheoven.Remember,even
thoughovenshutsoff automaticaHy,foodscontinue
cookingaftercontrolsareoff.
NOTE: The lowtemperaturezoneofthisrange
(between150”F.and200°F.)is availabletokeephot
cookedfoodswm. Foodkeptin theovenlonger
thantwo hoursattheselowtemperaturesmay spoil.
Whensettingyourovenfor a delaystart,neverlet
foodssuchas dairyproducts,fish,meat,poultry,etc.
sitformore than 2 hoursbeforeactualcooking
begins.Roomtemperaturepromotesthegrowthof
harmfulbacteria.Be suretheovenlightis offbecause
heatfrom thebulbwillspeedbacteriagrowth.
16
Page 16

G
L Aluminumpansconductheat
2. Darkornon-shinyfinishesand
quickly.Formostconventional glasscookwaregenerallyabsorb
baking,light,shinyfinishesgive
heat,whichmayresultin dry,crisp
bestresultsbecausetheyhelp musts.Reduceovenheat250??.if
preventoverbrowning.Forbest lightercrustsaredesired.Rapid
results,werecommenddull browningof somefoodscan be
bottomsurfacesforcakepans
andpieplates.
Container
Bred
Biscuits(1/2-in.thick)
Coffeecake
Cornbreador mufilns
Gingerbread
Muffins
Popovers
Quickloafbread
Yeastbread(2Ioaves)
Plainrolls
Sweetrolls
cakes
(withoutshortening)
Angelfood
Jellyroll
Sponge
Cakes
Bundtcakes
Cupcakes
Fruitcakes
Layer
Layer,chocolate
Loaf
Cookies
Brownies
Drop
Refrigerator
Rolledor sliced
Fruits,other Desserts
Bakedapples
Custard
Puddings,rice
and custard
Pies
Frozen
Meringue
Onecrust
TWOcrust
i%l.$myshell
Miscellaneous
Bakedpotatoes
Scaliopcddishes
Souffles
ShinyCookieSheet
ShinyMetalPanwith
satin-finishbottom
Cast-Ironor GlassPan
ShinyMetalPanwith
satin-finishbottom
ShinyMetalMuffk Pan
DeepGlassor CastIron Cups
Metalor GlassLoafPans
Metalor GlassLoafPans
ShinyOblongorMufllnPan
ShinyOblongorMuffh Pan
AluminumTubePan
MetalJellyRollPan
Metalor CeramicPan
MetalorCeramicPan
ShinyMetalMuffMPan
MetalorGlassLoaforTubePan
ShinyMetalPanwith
satin-finishbottom
ShinyMetalPanwith
satin-finishbottom
Metalor G1assLoafPan
Metalor GlassPan
CookieSheet
CookieSheet
CookieSheet
GlassorMetalPan
GlassCustardCupsor Casserole
(setinpanofhotwatef)
GlassCustardCupsor Casserole
FoilPanonCookieSheet
Spreadto crustedges
Glassor Satin-finishMetalPan
Glassor Satin-finishMetalPan
Glassor Satin-finishMetalPan
SetonOven Shelf
2ilassor MetalPan
GlassPan
achieved-bypreheatingcast-iron
cookware.
Shelf
Position
A,B
A!B
B
B
B
;::
B, C
B, C!
A,B,C
B
B
A,B,C
A,B,C
B
(hen
Temperature Cmnmerlts
400°-4750
350°-4000
400°-4500
350°
400°-4250
375°
350°-3750
375°-4250
375°-4250
350°-3750
325°-3750
375°-4000
325°-3500
325°-3500
350°-3750
275°-3000
350°-3750
350°-3750
350°
32.5”-350°
350°-4000
400°-4250
375°-4000
350°-4000
300°-3500
325°
400°-4250
325°-3500
400°-4250
400°-4250
450°
325°-4000
325°-3750
300°-3500
3. Preheatingtheovenis not
alwaysnecessary,especial~yfor
foodswhichcooklongerthan30to
40 minutes.Forfoodswithshort
cookingtimes,preheatinggives
bestappearanceandcrispness.
—
4. C)pentheovendoortocheck
foocfaslittleaspossibleto prevent
unevenheatingandto saveenergy.
Time,
Minutes
15-20
20-30
20-40
45-55-
20-30
45-60
45-60
45-60
10-25
20-30
30-55
10-15
45-60
45-65
20-25
2-4
k.
20-35
25-30
40-60
25-35
10-20
6-12
7-12
30-60
30-60
50-90
45-70
15-25
40-60
40-60
12-15
60-90
30-60
30-75
Canned,refrigeratedbiscuitstake2to
4 minuteslesstime.
Preheatcast-ironpanfor crispcrust.
Decreaseabout5minutesformufiln
mix,orbakeat450”F.for25minutes,
thenat 350°F.for 10 to 15minutes.
Darkmetalor glassgivedeepest
browning.
Forthinrolls,ShelfB maybe used.
We-piece panis convenient.
Linepanwithwaxpaper.
Paperlinersproducemoistercrusts.
Use300”F.andShelfB forsmallor
individualcakes.
Barcookiesfrommixuse sametime.
UseShelfC and increasetemp.25”F.
to50°F.formorebrowning.
Reducetemp.to300°F.forlarge
custard.
Cookbreadorricepuddingwith
custardbase80to 90minutes.
Largepiesuse400°F.andmoretime.
Toquicklybrownmeringue,use400”F.
for8to 10minutes.
Custardfillingsrequirelower
temperature,longertime.
Increasetimeforlargeramountor
size.
1’7
Page 17

Roastingiscookingbydryheat.Tendermeator
poultrycanbe roasteduncoveredin youroven.
Roastingtemperatures,whichshouldbelowand
steady,keep spatteringtoaminimum.Whenroasting,
it is notnecessaryto sear,baste,coveror addwater
to yourmeat.
Roastingisreallya bakingprocedureusedfor meats.
Therefore,ovencontrolsare setforBAKEor TIME
BAKE.(Youmayheara slightclickingsound,
indicatingtheovenis workingproperly.)Roastingis
easy;justfollowthesesteps:
Step 1: Checkweightofmeat,andplace,fat sideup,
onroastingrackin a shallowpan.(Broilerpanwith
rackisa goodpanfor this.)Linebroilerpanwith
aluminumfoil whenusingpanformarinating,
cookingwithfruits,cookingheavilycuredmeats,or
bastingfoodduringcooking,Avoidspillingthese
materialsonovenlinerordoor.
Step 2: Placein
ovenon shelfin
A or B position.
Nopreheatingis
necessary.
Step 3: PressBAKEpad.
Step 4: PressINCREASEpad.The
ovensettemperatureappearsin
thedisplay.
Step 5: PressINCREASEor DECREASEpaduntil
desiredtemperatureis displayed.
Theword“ON”andthechangingoventemperature
willbe displayedastheovenheatsup.Whentheoven
reachesthesettemperatureatone willsound.
TochangeoventemperatureduringBAKEcycle,
pressBAKEpadandthenINCREASEor
DECREASEpad to getnewtemperature.
Step6:PresstheCLEAR/OFFpad
CLEAR
Step 7: Mostmeatscontinueto cookslightlywhile
standing,afterbeingremovedfromtheoven.
Standingtimerecommendedfor roastsis 10to 20
minutes.Thisallowsroaststofirmup andmakes
themeasierto carve.Internaltemperaturewillrise
about5°to 10°F.;to compensatefor temperature
increase,ifdesired,removetheroastfromoven
sooner(at 5°to 10°F.lessthantemperaturein the
RoastingGuide).
NOTE: YoumaywishtoTIMEBAKE,asdescribed
in theBakingsectionof thisbook, to turnovenon and
off automatically.
Rememberthatfoodwillcontinueto cookin thehot
ovenand thereforeshouldberemovedwhenthe
desiredinternaltemperaturehasbeenreached.
whenbakingis finishedandthen
removefoodfromoven.
For’FrozenRoa$ts
~Frozenroasts of beef,pork,lamb,etc.,canbe.started
withoutthawing,butallow10to 25 minutesper
poundadditionaltime(10minutesperpoundfor
roastsunder5 pounds,moretimeforlargerroasts).
~Thawmostfrozenpoultrybeforeroastingto ensure
evendoneness.Somecommercialfrozenpoultrycan
be cookedsuccessfullywithoutthawing.Follow
directionsgivenonpackagelabel.
U!il
Page 18

Q.Is it necessarytocheek for
donenesswith a meat
A. Checkingthefinishedinternal
temperatureatthecompletionof
cookingtimeisrecommended.
Temperaturesareshowninthe
RoastingGuide.Forroastsover
8lbs.,cookedat300°F.withreduced
time,checkwiththermometerat
half-hourintervalsafterhalfthe
cookingtimehaspassed.
Q. Why is my roast crumbling
vvhmI tryto carveit?
A. Roastsareeasierto sliceif
allowedto cool 10to20minutes
afterremovingfromoven.Be sure
to cutacrossthe grainof the meat.
Q.Do I need topreheat my own
eachtimeIcooka mastor
poultry?
A. It is rarelynecessaryto preheat
youroven.Preheatonlyforvery
smallroasts,whcihcooka short
lengthoftime.
Q.When hying a roast,me
thereanyspecialtipsthat would
helpmecookit moreevenly?
A. Yes.Buyaroastasevenin
thicknessas possible,orbuyrolled
roasts.
Q. Can I seal thesidesofrny foil
“tent”Whenroastinga turkey?
A. Sealingthefoilwillsteamthe
meat.Leavingitunsealedallows
theairtocirculateandbrown
themeat.
L PositionovenshelfatBfor small-sizeroasts(3 to
4. Standingtimerecommendedforroastsis 10to 20
7 lbs.)andatAforlargerroasts. minutes.Thisallowsroaststo firmupandmake them
2.Hace meatfat-side-up,orpoultrybreast-side-up,
onbroilerpan or othershallowpanwithtrivet.Do not
cover.Do notstuffpouhryuntiljust beforeroasting.
Usemeatthermometerformoreaccuratedoneness.
easierto carve.Internaltemperaturewillrise about5°
to 10°F.;tocompensatefortemperatureincrease,if
desired,removetheroastfromovensoor!er(at5°to
IO”F.lessthantemperaturein thisguide).
(I3onotplacethermometerin stuffing.) 5.Frozenroastscanbe conventionallyroastedby
3. Removefat anddrippingsas necessary.Baste
as desired.
adding10to25minutesperpoundmoretimethan
givenin guide for refrigeratedroasts.(10minutes
poundfo~roastsunder~ pounds.)Defrostpouhry”
per
beforeroasting.
Meat
Tendercuts;rib,highqualitysirlointip,
rumportopround*
Lamblegorbone-inshoulder*
Vealshoulder,legor loin*
Porklin,ribor shoulder*
Ham,precooked
Ham,raw
*Forbonelessrolledroastsover6
inchesthick,add5 to 10 minutesper
~oundtotimesgivenabove.
PouM’y
ChickenorDuck
Chickenpieces
Turkey
oven
Temperature
325°
325°
325°
325°
325°
325°
325°
350°
325°
Doneness
Rare:
Medium:
WellDone:
Rare:
Medium:
WellDone:
WellDone:
WellDone:
Towarm:
WellDone:
WellDone:
WellDone:
WellDone:
ApproximateWastingTime
inMinutesperPmmd
3 to5 lbs. 6to8NM.
24-30
18-22
30-35 22-25
35-45 28-33
21–25
25–30
30-35
35-45
20-23
24-28
28-33
30-40
3545 30-40
10minutesperpound(anyweight)
under 10U-M. 10to15lbs.
20-..3o
3 to 5 lbs.
35-40
35-40
toMNM.
10
20-25 15-20
17-20
Over 5NM.
30-35
CWer15NM
Internal
Temperature‘F.
40°
130°-
60°
150°-
85°
170°-
40°
130°-
60°
150°-
85°
170°-
80°
170°-
80°
170°-
30°
125°-
170°
185°–1900
185”–190°
In thigh:
185°-1900
Page 19

Broilingiscookingfoodbyintenseradiantheatfrom
-
theupperunitintheoven.Mostfishand tendercuts
of meatcanbe broiled.Followthesestepsto keep
spatteringand smokingto a minimum.
Step 1: If meathasfatorgristlenearedge,cut
verticalslashesthroughboth about2 inchesapart.
if desired,fat maybe trimmed,leavinglayerabout
1/8inchthick
Step2:Placemeatonbroilerrack inbroilerpan.
Alwaysuserack so fat dripsintobroilerpan;
otherwisejuices maybecomehotenoughto catchfire.
Step 3: Positionshelfonrecommendedshelfposition
as suggestedin BroilingGuide.Mostbroilingis
doneon C position,butif yourrangeis connectedto
208Volts,youmay wishtouseahigherposition.
Step4:Leavedoor ajarafewinches.Thedoorstays
openby itself,yet propertemperatureis maintainedin
theoven.
Step 5: Press13R01Lpad.
Step6:SelectLOBroil(450”F.)by tapping
INCREASEpadonce.SelectHI Broil(550°F.)by
tappingINCREASEpadtwice.
TochangefromHI BroiltoLOBroil,pressthe ‘
BROILpadthentap DECREASEpadonce.
h=.~q
., .
11(=
ll$X\>>
Turnfood,thenusetimesgivenfor secondside as a
guideto preferreddoneness.(Wheretwothicknesses
andtimesaregiventogether,usefwsttimesgivenfor
thinnestfood.)
Step8:WhenBroilingis completedpress
CL13AR/OFF.Servefoodimmediately,andleavepan
outsideovento coolduringmealfor easiestcleaning.
.. .-
/“”
it
K
Step7:Turnfoodonly
onceduringcooking.
Timefoodsfor firstside
perBroilingGuide.
use
Youcanuse ah.u-ninumfoilto lineyour broilerpan andbroilerrack.However,
youmustmoldthe foiltightlyto therackandcutslitsinitjust likethe rack.
Withouttheslits,thefoilwillpreventfatandmeatjuicesfromdrainingto the
broilerpan.Thejuices couldbecomehotenoughto catchonfire. If youdo
notcuttheslits,youarefrying,notbroiling.
i% Am$wers
Q. Whimbroiling, is itnecessary
alwaysusea rackinthepan?
to
A. Yes.Usingtherack suspends
themeatoverthepan.As the meat
cooks,thejuices fall intothepan,
thuskeepingmeatdrier.Juicesare
protectedbytherack and stay
cooler,thuspreventingexcessive
spatterandsmoking.
Q. Should 1salt the meat before
broiling?
A.. No.Saltdrawsoutthejuices
andallowsthem to evaporate.
Alwayssaltaftercooking.Turn
meatwithtongs;piercingmeat
witha forkalsoallowsjuices to
escape.Whenbroilingpoultryor
fish,brusheach side oftenwith
butter.
Foil
Q.my 2MX3mymeatsnot
turningoutasbrowmasthey
should?
A. In someareas,thepower
(voltage)totherangemaybe low.
In thesecases,preheatthe broil
unitfor 10minutesbeforeplacing
broilerpanwithfoodin oven.
Checkto seeif youareusingthe
recommendedshelfposition.Broil
for longestperiodof timeindicated
in the BroilingGuide.Turnfood
onlyonce duringbroiling.
/1
(). Do I need
rackto preventmeatfrom
sticking’?
A. No. Thebroilerrackisdesigned
to reflectbroilerheat,thus keeping
thesurfacecoolenoughto prevent
meatfrom stickingto the surface.
However,sprayingthebroilerrack
lightlywith a vegetablecooking
spraybeforecookingwillmake
cleanupeasier.
togrease my broiler
P“
20
Page 20

——
.—.—----
L Alwaysusebroilerpanandrack thatcomeswith
your oven.Itisdesignedtominimizesmokingand
spatteringbytrappingjuicesintheshieldedlowerpart
ofthepan.
2.Ovendoorshouldbeopento the broilstopposition
forallfoods.
3.For steaksandchops,slashfat evenlyaround
outsideedgesof meat.TO slash,cutcrosswisethrough
outerfat surfacejust to theedgeof the meat.Use
tongs to turnmeatovertopreventpiercingmeatand
losingjuices.
4.If desired,marinatemeatsor chickenbefore
broiling,orbrushwithbarbecuesaucelast 5 to 10
minutesonly.
QWmtit.yandk
mod
Bacon
GroundBeef
WellDone
Beefsteaks
Rare
Medium
WellDone
Rare
Medium
WellDone
Chicken 1whole
BakeryPro&Ms
Bread(Toast)or
ToasterPastries
EnglishMuff5ns
Lobster Tails
Fish
ramWices
(precooked)
Pork
(h~S
WellDone
Limb Chops
Medium
WellDone
Medium
WellDone
Wieners andsimilar
precookedsausages,
bratwurst
Thickness Position
thinslices)
1 lb. (4patties)
1/2to3/4
i inchthick
(1to 1!4lbs.)
lfi in.thick
(2to 2Xlbs.)
(2to 2!AIbs.),
splitlengthwise
2to4 slices
1pkg.(2)
2 (split)
2-4
(6to 8oz.each)
l-lb. fillets1/4to
1/2in.thick
1in,thick c
2(1 inch)
about
2(1!4inch)
about1lb.
l-lb. pkg.(10)
shelf
I
!
in.thick
10to 12oz. D
I
I
I
I
D
D
D
D
D
D
D
B
D
D
c HI
D
D
D
c
D
m or
LO Broil
HI
Hr
HI
LO
HI
HI
LO
HI
HI 8
m 6 1-2 Ifdesired,splitsausagesinhalf
5. Whenarrangingfoodonpan,do notletfattyedges
hangoversides,whichcouldsoilovenwithfatdripping.
6. Broilerdoes not needto bepreheated.However,
for verythinfoods,or to increasebrowning,preheat
if desired.
7.Frozensteakscanbeconventionallybroiledby
positioningtheovenshelfat nextlowestshelf
positionandincreasingcookingtimegivenin this
guideIXtimesper side.
8.If yourrange is connectedto208volts,rare steaks
maybe broiledby preheatingbroilheaterand
positioningtheovenshelfonepositionhigher.
8-9
9
12-13
13
10
15
25
28-30
2-3 1/2-1
3-4
13-16
*
-41-+--
12-13
—
Comments
Arrangeinsinglelayer,
Spaceevenly.
6-7
I
7
6-7
8-9
6-7
9-12
16-18
18-,20
Do not Cutthroughbackof shell,Spreadopen.
I
8-9
Upto 8pattiestakeaboutsametime.
Steakslessthan1inchthickcook
throughbeforebrowning.Panfrying
isrecommended.
Slashfat.
Reducetimeabout5to 10minutesper
sideforcut-upchicken.Brusheachside
withmeltedbutter.Broilskin-side-dovm
first,
Spaceevenly.PlaceEnglishmuftlns
cut-side-upandbrushwithbutter,
ifdesired.
Brushwithmeltedbutterbeforeand
afterhalfofbroilingtime.
Handleandturnverycarefully.Bmsh
withlemonbutterbeforeandduring
cookingif desired.Preheat broilerto
increasebrowning.
Increasetime5to 10minutesperside
for 1Xinchthickor homecuredham.
Slashfat.
I
10
10
17 12-14
4-7
10
I
4-6
Slashfat.
lengthwise;cutinto5-to 6-inchpieces.
Page 21

a) clean Cyck?
.
G
NormalCleaningTime:3 hours
Quick Remimk?r:
1.Prepareovenforcleaning.
2. Closeovendoor.
3. PressCLEANpad,
4. PressINCREASEorDECREASEpad to set
cleantime.
Therangemustbe completelycoolin orderto setthe
self-cleancycle.
Step 1: Removethebroilerpan,broilerrack,all
cookwareandanyahnninu~ foilfromtheoven—they
cannotwithstandthehighcleaningtemperatures.
@ven shelvesmaybe leftinoven.NOTE: Shelves
willdiscolorafterthe self-cleancycle.)
Step 2: Wipeup heavysoilon theovenbottom.
ovenFront Frame
A.
‘B.Oven Door Gasket
c. oven Light
Step 3: Cleanspattersorspillsonovenfrontframe(A)
andovendooroutsidegasket(B)withadampened
cloth.Polishwithadrycloth.Donotcleangasket(B).
Neveruseacommercialovencleanerinor around
self-cleaningoven.
Step4:Closethedoorandmakesuretheovenlight
(C)is off.
Ovenshelvesmaybecleanedin the self-cleaning
oven.However,theywilldarken,losetheirlusterand
becomehardtoslide.Wipethe shelfsupportswith
cookingoilafterself-cleaningto makeshelvesslide
moreeasily.
Caution: Chromedrippansshouldneverbecleaned
in the self-cleaningoven.
Do not use
protectors in or near the self-cleaning oven.
combinationof anyoftheseproductsplusthehigh
cleancycletemperaturesmaydamagetheporcelain
finishoftheoven.
Important
me ovendoormustbe closedandlatched~d dl
controlsmustbe setcorrectlyfor thecleancycleto
workproperly.
commercial oven cleaners or oven
A
—
Howtosetovenforckming
Step 1: Followstepsaboveto preparethe oven
forcleaning.
Step2:Closethe oven
$&n;:;::;;;:sfx
as it will go.
Step 3: PressCLEANpad.
Step 4: PressINCREASEor DECREASEpaduntil
desiredCleanTimeis displayed.
CleanTimeis normally3 hours.Youcan change the
CleanTimetoanywherebetween2 and4 hours,
dependingon how dirtytheovenis.
The self-cleancyclewillautomaticallybeginwithina
few secondsand the word “ON”willappearon the
display.Whenthe ovenlockstheword“LOCKy’will
bedisplayedand,a shorttimelater,thedoorlatch
handle willbe lockedin position,It willnotbe
possible to opentheovendooruntilthetemperature
dropsbelowthelocktemperature.
Step 5: WhentheLOCKlight is off,slidelatchhandle
totheleftasfar asitwillgo andopenthedoor.
Never
“LOCK” goes
handle may dfunagethedoorlock.
Aftera cleancycle,youmaynoticesomewhiteashin
theoven.Justwipeit up with a dampcloth.
If whitespots remain, removethemwitha soap-filled
steelwoolpad.Be sureto rinsethoroughlywitha
vinegarandwatermixture,Thesedepositsareusuallya
saltresiduethatcannotberemovedbythecleancycle.
Iftheovenisnotcleanafteronecleancycle,thecycle
maybei.epeated.
forcethelatchhandle.Wait.untiltheword
outinthe display.Forcingthe kwd-1
22
Page 22

After al cycle
Whenthecleancycleisfinished,theword“CLEAN”willgo out in thedisplay
andthe.ovenwillbegintocool.Whentheoventemperaturehasfallenbelow
thelockingtemperature(about20-30minutesafiertheword“CLEAN”
goesoutattheend of thecleancycle),theword“LOCK”goesoutandthe
doorcanbeopened.
Howto startof
DelayStartissettingtheoventimerto startthe clean
cycle automaticallyatalatertimethanthepresent
timeof day.I?WHZ:Beforebeginning,makesurethe
ovenclockshowsthecorrecttimeof day.
‘@lickReminder-Delaystartfor’SW-ckfm:
1.Prepareovenfor cleaning.
2. Slidethelatchhandleto therightasfar asit
willgo.
3. PressCLEANpad.
4. PressINCREASEpad.
5.PressSTOPTIMEpad.
Timethatappearsis3 hourslaterthanthetimeof
day.PressINCREASEpaduntil the StopTimeyou
desireappearsin the display.Theself-cleancycle
willautomaticallybegin3 hoursbeforetheStop
Timeyouselect.
1
Forexample:Let’s.sayit’s7:00andyouwantthe
ovento beginself-cleaningat9:00afteryou’re
finishedin thekitchen.Theovenisjust saileda
riorrnalamountso thenormalCleanTimeof 3 hours
is preferred.
Step 1: Preparetheovenforcleaning.
Step 2: Closethe ovendoor
andslidelatchhandleto the
rightas far as it willgo.
Step 3: PressCLEANpad.
‘&l
#
Step 4: PressINCREASEpad.
Step 5: CleanTimeforheavysoilcanbe setfor
4 hours.If a longeror shorterCleanTimeis desired,
pressINCREASEorDECREASEpad untildesired
CleanTimeis displayed.
Step 6: PressSTOPTIMEpad.
STOP
TIME
u
Step 7: ChangeStopTimefrom 10:00to 12:00by
pressingINCREASEpad until“12:00”appearsin
thedisplay.Thewords“DELAYCLEAN”willalso
appearin thedisplay.
Theself-cleancyclewillautomaticallybeginat9:00
andfinishat 12:00.Theword“ON”willappearon
thedisplayat 9:00.
Whentheovenlocks,theword“IXICK”willbe
displayedand,ashorttimelater,thedoorlatchhandle
willbe lockedin position.It will notbepossible to
opentheovendooruntil the temperaturedropsbelow
thelocktemperature.
Whenthecleancycleis finished,the word“CLEAN”
willgo outinthedisplayandtheovenwillbeginto
cool.Whentheoventemperaturehas fallenbelow
thelocking temperature(about20-30minutes after
theword “CLEAN”goesout at theendoftheclean
cycle),the word“H3CK”goesoutandthedoorcan
beopened.
Neverforcethelatchhandle.Wait unti~the word
‘%OCK” goesout in the display.Forcingthe latch
handle may damage the door lock.
“1000” appearson display’md
“STOPTIME”flashes.Thecontrol
automaticallysetsStopTimeby
addingtheCleanTimeto thetimeof
day.In thisexample,the timeofdayis
7:00and theCleanTimeis 3 hours.
Adding3 hoursto thetimeofday
equals10:00.
Step8:WhentheLOCK
lightis off,slide latch
handleto theleftas far m it
}$ willg. and openthe door.
-w-
(continuednextpage)
23
Page 23

(continued)
andAnswers
Q.mny ovendock is met
VwrkirlgUxm1Stiuself-dam
‘my oven?
ii. Ethe clockis notworkingthen
theentirecontrolis notworking.If
theclockis not setto thecorrect
timeof dayyouwillnotbeableto
setadelaycleanto endata
specifictime.
canI use mnmercid oven
Q.
dams on my partofmyseMck%ningown-l?
A. No cleanersor coatingsshould
beusedaroundanypartof this
oven.If youdo usethemanddo not
thoroughlyrinsetk ovenwith
water,wipingit absolutelyclean
afterwards,theresiduecan scarthe
ovensurfaceand damagemetal
partsthenexttimetheovenis
automaticallycleaned.
Q. CanIdean the Woven
Gasketaroluldtheovendoor?
A. No,thisgasketis essentialfora
goodovenseal,andcaremustbe
takennottorub,darnageor move
thisgasket.
Q. What should I do if excessive
smokingoccursduring cleaning?
A.
This is causedby excessivesoil.
PresstheCLEARKEFpad.Open
windowstoridroomof smoke.
Waituntiltheovenhascooled
(about20-30minutes)andtheword
“LOCK”is offinthedisplay.Wipe
uptheexcesssoilandresetthe
cleancycle.
Q. 1sthe %radding”soundI
hearduringcleating no~al?
A.Yes.Thisisthesoundofthemetal
heatingandcoolingduringboththe
cookingandcleaningfunctions.
Q. $houki there be any’odor
duringthecleaning?
A. Yes,theremaybe a slightodor
duringthe firstfewcleanings.
Failureto wipeoutexcessivesoil
might alsocausea strongodor
whencleaning.
Q. mat causesthe.hair-like
lineson the enanxkd surfaceof
myoven?
A.Thisisanormalcondition,
resultingfromheatingandcooling
duringcleaning.Theselinesdo not
affecthowyourovenperforms.
I@Why do I haveashM inmy
ovenaftercleaning?
A. Sometypesof soilwillleave
adepositwhichis ash.It can
beremovedwitha dampsponge
orcloth.
Q.My ovenshelves do not slide
easily.Whatisthe~at.ter?
A. Aftermanycleanings,oven
shel,vesmaybecomesocleanthey
donotslideeasily.Tomakeshelves
slide moreeasily,aftereachselfcleaningfunctiondarnpenfingers
witha smallamountof cookingoil
andrub lightlyoversidesof shelf
wheretheycontactshelfsupports.
Q.My ovenshelveshavebecome
grayafterthesdfmcieancycle.Is
thisnormal?
A.Yes.Aftertheself-cleancycle,
theshelvesmaylosesomeluster
andchange to a deepgraycolor.
Q.Theword“door”appeared
onthedisp~aywhenIsekted
theCleanCycle.What’swrong?
A. Thedoorlatchhandle mustbe
movedallthewayto theright.
Movethelatchhandleandcleaning
willstart.
oven
Whencookingfoodforthefirsttimein yournew
oven, usetimegivenonrecipesas a guide.Oven
thermostats,over a periodof years,may “drift”from
thefactorysettingand thedifferencesintiming
betweenan old and a new ovenof5 to 10minutesare
notunusual.Yourovenhasbeen setcorrectlyat the
factoryandis morelikelyto be accuratethantheoven
whichitreplaced.
If youthinkthe ovenshouldbe hotteror cooler,you
can adjustit yourself.Todecidehowmuchto change
thetemperature,settheoventemperature25°F.higher
or lowerthanthetemperaturein yourrecipe,then
bake.Theresultsof this“test”shouldgiveyouan
ideaof howmuchthetemperatureshouldbe changed.
24
ToAdjustTemperature:
1.PressBAKEpad.
20Selectan oventemperaturebetween500°F.
and550°F.
3. Immediately,beforeBAKEindicatorstops
flashing,pressandholdthe BAKEpad for about4
seconds.Thereddisplaywillchangeto theoven
adjustmentdisp~ay.
4. Theoventemperaturecanbeadjustedup to
(+)35°F.hotteror (-) 35°F.cooler.Usethe
INCREASEorDECREASEpadsto selectthedesired
changein thered display.
5. Whenyouhavemadethe adjustment,pressthe
CLEAR/OFFpadto go back to the timeofday
display.Useyourovenasyouwouldnormally.
NOTE:Thisadjustnuntwillnot affectBd or
CBm It will lbe w~em
power k BX%I’NWML
Page 24

A
m
seeCkming Chide.
Propercareandcleaningareimportantsoyourrangewill giveyouefficient
andsatisfactoryservice.Followthesedirectionscarefullyin caringfor your
rangeto assuresafeandpropermaintenance.
Theporcelainenamelcooktopis sturdybutbreakable
ifmisused.Thisfinishis acid-resistant.However,any
foodspillswithahighacidcontent(suchas hit
juices,tomatoorvinegar)shouldnotbe permittedto
remainon thefinish.
(onsomemodels)
Somemodelshavea cooktopthatcanbe Iiiledupfor
easiercleaning.TOmakecleaningeasier,theentire
cooktopmaybe lifted
up andsupportedin
theupposition.
f!!?mrfkeunitsamDrip Pans
Tocleanthesurfaceunits,turnthe controlto the
highest settingfor a minute.Thecoilswillburnoff
anysoil.
CAUTION
~Donotimmersethesurfaceunitsinliquidsofanykind.
eDo notcleanthesurfaceunits in a dishwasher.
*Do notbendthe surfaceunitplug terminals.
*Do not attemptto clean,adjust or in any wayrepair
theplug-inreceptacle.
Toremovethedrippansforcleaning,thesurfaceunits
mustberemovedfirst.
SurfaceUnit
Fk3ceptacl
DripPail
—
-.“ Lift the surfaceunitabout1inchabovethedrippan
---
ad. pullit out.
Besameail surfaceunitsare turnedoffbefore
raisingthecooktop.Therearetwosidesupportsthat
lockintopositionwhenthecooktopisliftedup. The
Calrod@unitsdonotneedtoberemovedbeforelifiing.
Aftercleaningunderthecooktopwithhot,mildsoapy
waterand a cleancloth,lowerthecooktop.Becareful
notto pinchyourfingers.
Tolowerthecooktop,pushtherodsbackandgently
lowerthecooktopuntilit restsinplace.
DonotHftthe surke
unitmore than 1 inch. If you
do,itmay not.k? M onthe drip pan whenyou
plug it back
Repeated Ming d’ the surfaceunitmorethan
in.
1inchabovethe drip pan cm permanently
dwnagetherfeceptack.
Toreplacea surfaceunit:
~Replacethedrippan intotie recessin the cooktop.
Makesureopeninginthepanlines up withthe
receptacle.
@Inserttheterminalsof the surfaceunitthrough
theopeningin.the drippanandintothereceptacle.
~Guidethesurfaceunitintoplacesoitrestsevenly.
Q. Can I coverthe drippanswithfoil?
A.No, becauseusingfoilsoclose to thereceptacle
couldcauseshock,fireor damageto therange.See
tiie CleaningGuideforcleaning suggestions.
(continuednextpage)
25
Page 25

(continued)
ownvent
Theovenis ventedthroughan openingundertheright
rearsurfaceunit.Nevercovertheopeningwith
aluminumfoiloranyothermaterial.Thiswould
preventtheovenvent fromworkingproperly.
WhmIIchanginga cooktopk_uq9donottouchthe
IX&3]attheendsof thelanq3.
Thecooktoplightis easilyreplacedwitha fluorescent
tube of thesamewattage.Beforechangingthelamp,
puHtheplugtotherangeor disconnectthepowerat
themainfhseorcircuitbreakerpanel.
Toremove:
~Liftthe
towardyouandthenup.
~Placefingersontopneareachendofthelamp.
~Rollthetopof thelampgently towardthefrontof
the rangeandgentlypullthelampfromthe socket,
makingsureitdoesnothitthe hunpcover.
Toreplace:
* placefingersonthetopneareachendofthelamP.
~Pressthelampintotheslotsuntilit smipsintoplace.
eMovelampcoverdownandsnapintoplace.
SWf%’MX!I&Illp (onsomemodels)
lampcover by pullingthebottomedge
26
Contrd PanelandKnobs
Cleanup anyspillsor spatterswitha dampcloth.
Removeheaviersoilwithwarm,soapywater.
Cleancontrolpanelwithmildliquiddishdetergent
anda softcloth.Rubcontrolpanellightly.
CAUTION: Donot use abrasivesof anykindonthe
controlpanel.The letteringonmodelswithtouchpads
issensitivetoabrasivesandpressure.
Thecontrolknobsmayberemovedfor easier
cleaning.Toremoveknob,pullit straightoff the stern.
Washknobsin soapandwaterbutdonotsoak.
ovenDoor
ToREMOVEdoor,open toBROILposition,or where
youfeelthehinge catch.Holdthedoorsides,lift it up
andawayfromthehinges.
ToREPLACE,lineup the doorwiththe hingesand
pushthedoorfirmlyintoplace.
Page 26

~F@~ ~tllll~ (onsomemodels)
CAUTION:
disconnectthe electricpowerforyourrangeatthe
mainfuseor circuitbreakerpanelorpuiitheplug.
Besureto let thelampcoverandbulb cool
completelybeforeremovingorreplacingthem.When
inuse,lightbulbscan becomewarmenoughtobreak
iftouchedwithamoistclothortowel.Whencleaning,
avoidtouchingwarmlampswithcleaningclothsif the
lampcoveris removed.
The ovenlamp(bulb)iscoveredwitha glass
removablecoverwhichisheldin placewitha wire.
Removetheovendoor,ifdesired,to reachthe
covereasily.
Toremove:
*Holdyour handunderthecoversoitdoesn’tfall
whenreleased.Withfingersofthesamehand,fiiy
pushbackthewireuntilit clearsthecover.Liftoff
thecover.
Do NOT REMOVE ANY
o
Replacebulbwith40-watthomeappliancebulb.
TOreplacecover:
aPlaceit intothegrooveofthelampreceptacle.Pull
thewireforwardtothecenterofcoveruntilit snapsin
place.Wheninplace,thewireholdsthecoverfirmly.
Becertainthewireisinthedepressioni:~thecenterdf
thecover.
IIIConnectelectricpowerto therange.
13f2forereplacing ym.wovenkunphdb,
SCxEwse
\\ /\
Ekn’vtoRemovetheStorageDrawer or
Kick Palld tomm under theRange
Theareaunderthe rangecanbereachedeasilyfor
cleaningbyremovingthebottomdrawer(onsome
models).Toremove,pullthedraweroutalltheway,
tiltupthefrontandremoveit.Toreplace,insertglides
atthebackof thedrawerbeyondthestopon range
glides.Lift the drawerif necessarytoinserteasily.Let
thefrontof the drawerdown,thenpushin to close.
TOcleanundermodelswitha frontkickpanel,
removethepanelby pullingit straightoutatthe
bottom.Toreplacethepanel,first hookthetop tabs
onandthenthe bottomtabs.
2’7’
Page 27

IR4Jin’
Bake
wit id
Broil
unit
BroilerPan
and Rack
Gird” Swfa!e
wit coils
Coa’ltrdKnobs:
RangeTopandOven
Me@ incid.ing
Chrome
and Trim
SideTrims
Strir.ls
(MsideandInside
of OvenDoor*
(MsideGiassFinish
OvenGasket*
OvenLiner
PoreeiainEnamel
andPainted
Surfaces*
I%rceiainEmunei
DripPans
$~~]y’~
(SeeSelf-Cleaning
OvenDirections)
Mm-ageDrawer
MATERIALSTO USE
GENERAL
notcleanthebakeunitorbroilunit.Anysoilwillburnoffwhentheunitisheated,
Do
DIREC-TIONS
I?KNE:Thebakeunitishingedandcanbe liftedgentlyto cleantheovenfloor.If
spiilover,residue,orashaccumulatesaroundthebakeunit,gentlywipearoundtheunit
withwarmwater.
eSoapandWater
~Soap-FilledScouringPad
eDishwasher
@MildSoapandWater Pulloffknobs.Washgentlybutdonotsoak.Dryandreturncontrolsto range,making
~SoapandWater
Drain fat, coolpanand rackslightly.(Do notlet soiledpanandrackstandinovento
cool.)Sprinkleon detergent.Fillthepanwithwarmwaterandspreaddampclothorpaper
towelovertherack.Letpanandrackstandfora fewminutes.Wash;scourifnecessary.
Rinseanddry.CWTION:The broilerpanandrack mayalsobe cleanedina dishwasher.
DO NOTCLEANINSELF-CLEANINGOVEN.
~~
~()~ USE CiiShW$’iSher
todean the surfaceunitcoils.
DO NOThandletheunit
beforecompletelycoded.
DO
NOTimmerseplug-in
unitsinanykindOfliquid.
suretomatchflatareaontheknobandshaft.
NIT USEsteelWOOi,
DO
abrasiv%ammoni~acids
Spattersand spillsburnawaywhenthecoilsareheated.
Attheendofameal,removeailpansfromthe Cairod@
unitand heatthe soiledunitsat HI. Let thesoilbumoff
abouta minuteandswitchtheunitstoOFF.Avoidgetting
cleaningmaterialson the coils.Wipeoffanycleaning
materials withadamppapertowelbefore heatingthe
Cairod@unit.
.
Tosafelycleansurfaces:wash,rinse,andthenpolish
withadrycloth.
OrcommercialOvencieaners.
@SoapandWater DO NOT IJSBoven
cleaners9cleansing
powdersorhwh
abrasives.
@SoapandWater
~SoapandWater
0PaperTowel
● Drycloth
DSoapandWater
DAmmonia Porcelaindrippanscanbe cleanedindishwasherorbyhand.Placethemina covered
~Soap-FilledScouringPad container(orplasticbag)with 1/4cupammoniato loosensoil.Thenscrubwithscouring
oSoapandWater Forheavysoil,the shelvescanbecleanedduringtheself-cleancycle.Theywillchange
~Self-CleanCycle
@SoapandWater Forcleaning,removedrawerbypullingit allthewayopen, tilt upthe frontandlift out. “
Washallglasswithclothdampenedinsoapywater.Rinseandpolishwithadrycloth.Ifknobs
areremoved,do notallowwaterto rundowninsidethe surfaceofglasswhilec!eaning.
I
AvoidgettingANYcleaningmaterialsonthegasket.
Coolbeforecleaning.‘Frequentwipingwithmildsoapandwaterwillprolongthe time”—
betweenmajorcleanings.Be sure
Forheavysoiling,useyourself-cleaningcycleoften.
Ml NM’USEoven
cieaners,cieamdng
powdersOrharsh
abrasives.
scratchthesurface.
padif necessaxy.
to adeepgray colorandwill notslideas easilyasbeforeself-cleaning.Tomakethem
slidemoreeasily,useyour fingersto applya littlebit ofcookingoilto the sidesof the
shelfwheretheycontactthe shelfsupports.
Wipewithdampclothorspongeandreplace.Neveruseharshabrasivesorscouringpads.
Thesemight
INSIDEOFDOOR:CleanONLYthedoorlineroutside
thegasket.Thedoor is automaticallycleanedif theovenis
intheself-cleaningcycle.DO,NOTrubor damagegasket.
Avoidgettingsoapandwateronthegasketorinthe
openingsonthedoor.Rinsewell.
linercausesadditionalstainswhenovenis reheated.
OUTSIDEOFDOOR:Usesoapandwaterto thoroughly
cleanthe
top,sidesand frontof theovendoor.
IN(ITE:Soaplefton
torinsethoroughlytoavoiddditiod stahbg.
Ifacidsshouldspillonthe rangewhileit is hot,useadry
papertowelorclothto wipeuprightaway.Whenthe
surfacehascooled,washandrinse.Forotherspills,such
asfatsmatterings,etc., washwithsoapandwaterwhen
cooledandthenrinse.Polishwitha dm cloth.
*Spillageofmarinades,fruitjuices,tomatosaucesandbastingmaterialscontainingacidsmaycausediscoloration.Spiiioversshouldbewipedup
immediatdv.withcarebeingtakennotto touchanyhotwxtionoftheoven.Whenthesurfaceiscool.cleanandrinse.
,, .
.
.——, —.-
Page 28

Readthese imtmctims Compk?tely
ad Carddy.
savethese instrwtionsfor
the local ekctrid inspector%mm
(MEmwEALL
mm m
Nm m mm-R: L@mi?these
in-dons witht-heapphw!e!dk?r
institionisfcompktede
~m m iifk~pti~ u~~ f3d
care Guide and Installationh3tlTlctions for
future use.
Channellockpliersorsmallratchetwrench
with 7/32” socket (forlevelingrange)
1?4”spacing is recommended fromtherangeto
adjacentverticalwallsabovecooktopsurface.
Allow30”
units and bottom of unprotected wood or metal
top cabinet, and 15”minimum between
countertop and adjacent cabinet bottom.
To eliminate the risk ofburns or fire by reaching
over heated surface units, cabinet storage space
abovethe surface units should be avoided.If
cabinet storage is to be provided,the risk can be
reduced by installing a range hood that projects
horizontallya min. of 5“beyond the bottom of
the cabinets.
1
minimum clearance between wu-face
NOTLESSTHAN
WIDTHOF
I
1<
RANGE
I
1,
clwrxm, FOR $MJ?EFY:
Do Nor WmAN 13XTENSIONCORD
m
THIS13LPPmcE.
IFUSEOROPEN
I?EMKERIm?cMtE
mmmmoNe
This appliancemustbesuppliedwiththeproper
voltage
andfkquency,andcomectedtoan
individual,properlygroundedbranchcircuit
protectedbyacircuitbreakerortimedelayfuse,as
mted ontheratingplate.
WiringmustconformtoNationalElectricCodes.
Iftie electricserviceprovideddoesnotmeetthe
abovespecifications,itisrecomend~d thata
licensedelectricianinstallanapprovedoutiet
Becauserangeterminalsarenotaccessibleallw
rangeisinposition,flexibleserviceconduitorcord
mustbeused.
BEGImING
I / MIN.
Y’
INSTALL
OUTLETBOX
ONEITHER .
SIDEOFQ
W~LL
u L -9+,,,. :-’ “’’”--
BOX--J
Anti-TipBracket
(installin
I
I
I
I
4
(h~1=
RANf2F
~w
eitherrearcorner)
I
(cmthwed next@ge)
29
Page 29

—
mSTmLAnON,mSTRUCTEONS ~
‘.~,-.,
,,,
,- ,
.
. ,>..,
!
!:. ‘
Fkmil’lgIJmk?rthe Range
Your range, like many other household
items,isheavy and can settle into soft
floor c0vf3@&3such as cushioned vinyl or
carpdin~e Whenmovingthe range on this type
offlooring,use care, and followthese simpleand
inexpensiveinstructions.
The range should be installedon a 1/4 inch thick
sheet of ply-wood(or similar material) as follows:
when the floor coveting ends at the j’lwnto~tlw
range, the area
bebuiltupwithplywoodtothe samelevelor
higherthanthefloorcovering.Thiswillallow
therangeto be movedforcleaningorservicing.
Useon~y
conductor range cord set as noted below.These
cord sets are provided with ring type terminals.
The electrical rating ofthe cord must be 125/250
volts minimum, 40 amperes.
NOTE:Onlya 4-conductorcord is to be used
when the applianceis installed in a mobile home
or where local codes do not permit grounding
through the neutral.
1. Locateconnector Mockat the bottom rear of
range and ‘Eemoverear wiring cover.
2. Directly below the connector block is a hole
with a knockout ring for accommodating conduit
fittings.Brackets provided are used to support
the flexiblecord strain relief,which must be
securely attached to the cord set.
a 3-conductor,or ifrequired a 4
3
thattherangewillrest onshould
‘.(tiqntinued) I
,’ J
.,~
Power Cord Im&dMiom4nsert screws
throughpowercordterminalssothatthe screws
passthroughconnectorblockterminalsand
engagenuts.Tightenscrewssecurely.
CONNECTOR
BLOCK
TERMINAL
CableDirect I@a.Mien-Ckunp bare wires
betweentheconnectorblockterminalsand
movablenutswithscrewstightenedsecurely
1. copper
MOVABLE
NUT~
Connect the neutral or grounded wire ofthe
supplycircuitto the neutral terminal ofthe
connector block, located in the center. The
power leads must be connected to the outside
(brass colored) terminals.
SCREW+
9
&/
+
>?
&
wiring
..
$?
~ i -CONNECTOR
b
;~;: ~ s
\
&
~ ~~~ABLE
I
+
SCREW
1
POWERCORD
RINGTERMINAL
+ m&R
BLOCK
TERMINAL
FLEXIBLE
CABLE
STRAINRELIEF
‘PFIOVIDECIWIT
iET. NOT PART
TOR
coNNEmR 13UXK 1s
im%KwED Fat ‘COPPER VVn?E
ONLY’.
Page 30

)
2. AkmBinUmr!i
A Connectlengthofcopperbuildingwireto
rangeterminalblock.
B. Splicecopperwirestoahminumwiringusing
specialconnectorsdesignedandU.L.approved
forjoiningcoppertoaluminum,andfollowthe
connectormanufacturer’srecommended
procedureclosely
NOTE:Wireused,locationandenclosureof
splices,etc.,mustconformtogoodwiring
practiceandlocalcodes.
1. Rangemustbe securedbyANTI-TIPbracket
supplied.
2. Seeinstructionsto install(suppliedwith
bracket).
3. Unlessproperlyinstalled,rangecouldbe
tippedbysteppingor sittingondoor.Injury
mightresultffornspilledhotliquidsorfrom
rangeitself.
TypicalinstallatimofAnti-Tipbracket
AttachmenttoWall
Bracket
!5
Frame groundedto neutralofappliance
throughalink.Ifused inaMOBILEHOMEor
ifLOCALCODESdo notpermitgrounding
throughthe neutral:
1)disconnectthe l.inkfromneutral,
2)usegroundingterminalor leadtoground
1unitinaccordancewith~oc~codes,~d
3)connectneutralterminalor leadtobranch
circuitinusualmanner.
(Ifthe applianceistobe connectedby
means ofa cordset,use4-conductorcord
6
ScrewMustEnter
W?/mdoriWeta/
1
\
WVaflFYate
7
TherangemustbeleveLLevelingfeetarelocated
ateachcornerofthebaseofthe range.Remove
the storagedrawerorkickpanei(dependingon
yourmodel)andusingchannellocks,rotatethe
levelimfeetinandoutasreauiredtolevelthe
range.-(or instructionsonhhwtoremoveand
replacethe storagedrawerorthekickpanel,see
theCleaningUnderthe RangesectioninCare
andCleaning.)Onsomemodels,thereareplastic
coverswhichmayberemovedforeasy
adjustment(justsqueezeandpull).
Oneofthe rearlevelingfeetwillengagethe
I
ANTI-TIPbracket(allowforsomesideto side
..
adjustment).Allow=aminimumclearanceofI/$tf
betweentherangeandthe levelingfootthatisto
beinstded intotheANTI-TIPbracket.
Checkthe rangeforproperinstdation intothe
ANTI-TIPbracket(aftertheramzehasbeen
I
properlyinstalled)bygrasping&eedgesofthe
REARburner holesandcarefullyattemptingto
tiltthe rangeforward.
ANANTI-TIPbracketis supp&xlwithinstructions
forinstallationinavarietyoflocations.The
instructionsincludea template,apartslistanda
listoftoolsnecessarytocompletethe installation.
Readthe HVHWRTANTSAFHYDHHU.J(310NS
andthe.instructionsthatfityoursituationbefore
beginninginstdkitkm.
8
Besureallswitchesareinthe “off”position
beforeleavingthe range.
Page 31

CWENWILL
Ncm WORK
OVENLIGHT
‘
DOES ‘
LK.WT - ~
~
‘“:~
(cmn’dekso equipgieq)‘
>.
.=, -,
NOT ‘
Imm.4 : ‘ -
..., .-
NOT
“
ROASTORBAKE
~L@t bulbis looseordefective.Tightenorrepla=.
*$.wit@operatingovenlightis broken.Callf& service.
~~uores~entlap is loose ordefective.Adjustor replace.
~~r~ssswitchfor 2“sec~ndscIf lampdoes.notcome
~
SwitchoperatingIigbtis broken.Callfor service: . ~
—-
Oi2, repeat.
*A~n&n~mfoil.beingusedimproperlyinoven.
~Ovenventblocked6ntopofrange.,
*~~ge
@Ip$otiectc@&re-being used.Ch&k-BakingGuidefbrcookwaretips.
~Clocksetincorrectly..
~Con~o]s& inc<~fie~tly+Revieweach
QJShelf p@tion is-~ficorrect.-Check Bt@g9 Wasting and.Broiling G~ides,
@(XM@I$M1’knob not set at ~~o~~. ~ ‘“ - .
*(X7EN~MP l&ob not set at H?CNL. - , ‘
~~ool. not left ajaras retiorn~enckxi.. ‘ -,
~
Impropershelfpositionbeingused.CheckBroilingGuide.
~Food&beingcookedon hotpan.
*Cookwareisnotsuitedfor broiling.’
~Aluminumfoilusedonthe broil‘panrackhasnotbetmfittedpro~erly
ahdslitasrecommended.
e OVEN SETkIIOb notset atBAKE.
Or oven ~~elfpotleveL
,-
..
‘.
‘COOkiIIg Secti&n. .
,.
!.
,$
.
,.
,.
..
.,
~.~~~N ~Mp knobnotsetcorrectly. ,
,,
CWEN
T’Cx3H(IT
cmTOOCOLD.
Shelfpositionis iiitiorrect.ChedkRoastingor BakingGuide.
~
*Oven shelfnotlevel.
,.
@Incorrectcookwareor cookwareofimproper sizeisbeingused.
@A foil tentwas not usedwhenneededto slowdownbrowningduringroasting.
~Clventhermostatneedsadjustment,See ThermostatAdjustmentsection.
Page 32

CAUSE
CLOCK A-ND
TIIMERDo NOT’WORK
OVEN V?mL Nor
SHJw’mMN
OVEN mm VvILL
Nor -U’!NLOCK
OWN Nor CLEAN
Z4.FTERCUL4N CYCLE
“door” APPEARS
ONDEWLAY
* hf~e SUre the ekixtricalplugispluggedintoalive, prOperly~~unded
poweroutlet.
*Checkfor power
Review C3mtrd, Clock and Timer section of this book.
*
outage.
comfx 13mx AFrm
ImmRD?w OVEN ‘1’mf.E
ORSTOPTIME
‘T-” AND
Amwm
FLASHONDISPLAY
* This isremindingyoutoentera baketemp&@lUd..< “ - . . .’. ~. ,.,
~If the timedisplayflashes“F-”
PressCLEARKX?F.Allowovento coolfor onehomlIf thefailurecoderepeats,,
di~~~~ect ~1 powerto therange.Callfor servide. ‘ ~,, - ,
Ifyou needmom! Jheqhedl,M free:
GEAnswer Cmk?l-”
cww.mer service
. ...
, -,
andanumber,y“buhavefunctionerrorcodia ~
.,
2-
,’
.,
. ~
.,
‘..
‘ , . , ! .“~,?-
,,
,,
-, ‘ ~
. .
-.
‘,1
. .!
33
Page 33

AGE Gonstmer Service professiord
will provide expert repair service,
schedt.ded at a time that’s cormmient
for you. Many GE Consumer Service
company-operated locations offer you
service today or tomorrow, or at your
corwenience (’?:00am. to %00p.m.
weekda~ 9:00
days).Our factory-trained technicians
know your appliance inside and outso most repairs can be handled injust
one visit.
a.m.to 2:00p.m. Satur-
can have the securefeelingthat
You
GE Consumer %-vice will still be
there after your
chse a GE contract while your wa=
rarity is still in effect and you’llreceive
a substantial discount. TVitb.a rnuitipleyear contract, you’re assured of fiture
service at today’sprices.
warranty ex@-es.Pt.n--
Whatever your question about any GE
major appliance, GE Answer &nte@
information service is available to
help. Your call-and your question—
will be answered promptly and
courteously And you can call ally
time. GE Answer Gente@ service is
open 24 hours a da% days a week.
TelecommunicationDevicefor the Deaf
-
7rT7°
4“
Idividu.ds qudifkd toservicetheir
owma@itmces
parts or accessories sent directly to
their home. The GE parts system pro-
vides access to over 4’7,000parts.. and
all IGEGenuine Renewal Parts are
fi..dlywarranted. VISA,
canhave needed
MasterCard
and~iscovercardsareaccepted.
Usermaintemmcekstietions
containedinthisbookletcoverproce=
dumshtended tobe
any tniwr. Other
shouldbe E%&?mdtoqw-tnified.sm””
peribmedby
vicepersomei. CkN.RtioMRmustbe
RKmisd, sinceimpmp?rservicing
maycame ImL!id’eqxmtim.
Uponreques~ GE will provide Braille
controls for a variety of GE appliances,
and a brochure to assist.in phrming a
barrier--free kitchen for persons with
limited mobility TOobtain these items,
free of charge, call 800.626.2?000,.
Consumers with impaired hearing
or speech who have access to a TD.D
or a corwentioml t.elet~evn-iter may
Cd 800-TDD-G.EFK (860-833-4322)
to request imfix-matior]or service.
Page 34

... .
..—.———
——.—”.
GE
WARRANTY
Skiveproofof originalpurchasedatesuchasyoursalessliporcancelledcheckto establishwarrantyperiod.
Thiswarrantyisextendedto
Foroneyearfromdateoforiginal
purchase,wewiliprovide,freeof
charge,park andservicelaborin
yourhometo repairor replace
anypart d therangethatfails
becauseofa manufacturing
defect.
theoriginalpurchaserandany
succeeding
purchased for
inthe48rnainkmdstates,Hawaii
andWashington,DC. InAlaskathe
warrantyisthesameexceptthatit
is !JMITHI becauseyoumustpay
to shiptheproducttotheservice
shoporfortheservicetechnician’s
travelcoststo yourhome.
AMwarrantyservicewiilbe
providedbyourFactoryService
Centersor by ourauthorized
CustomerCare@servicersduring
normalworki’nghours.
mvner for prcducts
ordinaryhomeuse
LookintheWhiteorMMowPages
ofyourtelephonedirectoryfor
GENERAL E3S2TFW
GENERAL
ELECTRICFIVXXN’
COMPANY,
SERVICE,GHflWWLELECTRICHOTPOINTFACTORY
or GENEFL4LELECTRIC
WSKNVER
cAFE@sERvlcE.
F
SERVKX
oServicetripstoyourhometo
teachyouhowto usetheproduct.
Readyour
Ifyouthenhaveanyquestions
aboutoperatingthe productplease
contactyourdealerorour
ConsumerAffairsofficeat the
addressbelow,or call,tollfree:
GEAnswerCenteP
800.626.2000
consumerinformationsewice
@Improperinstallation.
Hyouhaveaninstallationproblem,
contactyourdealeror installer.
Youare responsibleforproviding
Somestatesdo notaliowtheexclusionor limitationofincidentalorconsequentialdamages,sotheabovelimitationor exclusion
may notapplytoyou.Thiswarrantygivesyouspecificlegalrights,andyoumay alsohaveotherrightswhichva~ fromstatetostate.
Toknowwhatyour!egalrightsarein yourstate,consultyourlocalorstateconsumeraffairsofficeoryourstate’sAttorneyGeneral.
MfWWUevhelp !!s this WB4te:
Useand Care
Ek?ctrlc
AHW”S, GE
adequateelectrical,gas,exhausting
andotherconnectingfacilitiesas
describedinthe installation
Instructionsprovidedwiththe
product.
@Replacementcdhousefusesor
resettingof circuitbreakers.
~Failureoftheproductifit isused
forotherthanitsintendedpurpose
or usedcommercially. ,
* Damagetoproductcaused
byaccident,fire,floodsor acts
of(3M.
VVARRANTC)RH
f?lX31XXVslBLEFC)FI
CONSEQUENTIALDAMAGES
KY
NOT
.
 Loading...