

GE JBP35DM1WW, JBP35DM1BB, JBP35CM1WW, JBP35CM1CC, JBP35CM1BB Owner’s Manual
...
ge.com
Safety Instruotions ... 2-4
Operating Inslru_Cions
Clock and Timer ....... 11
Connols ............. 6, 7
Oven ............... 8-10
Power On tage .......... 7
Sabbafll Feaulre ..... 14, 15
Self-Cleaning ....... 16, 17
Special Features ........ 13
Surthce Units ........... 5
Thermostat ........... 15
Timed Baking and
Roasting Features ...... 12
Care and Cleaning
Control I_obs ......... 18
Drip Pans ............. 22
Heafi ng Elements ...... 18
Lift-Off Oven Door ..... 90
Lift-Up Cooktop ....... 22
Light ................. 21
Shelves ............... 19
Smrag_ Drawer ........ 21
Surface Units .......... 92
Vent ................. 19
Troubleshooting
Tips .............. 23-25
Accessories ........... 30
Consumer Support
Consumer
Support ...... Back Co_er
Product
Registration ........ 27, 28
_'anantv ............. 31
JBP24
JBP25
JBP _5
Write the model and serial
numbers here:
Model #
Serial #
You can find them on a label
behind the storage drawer on
the fl'ont of the range fl'ame.
49-80494 04-07 dR
READALLfiVSTRUCTiON$BEFOREUSING
Foryour safe_ the informationinthismanualmustbe followedtominimizetheriskof fire,electric shock,orto
preventpropertydamage,personalinjury`or lossoflife.
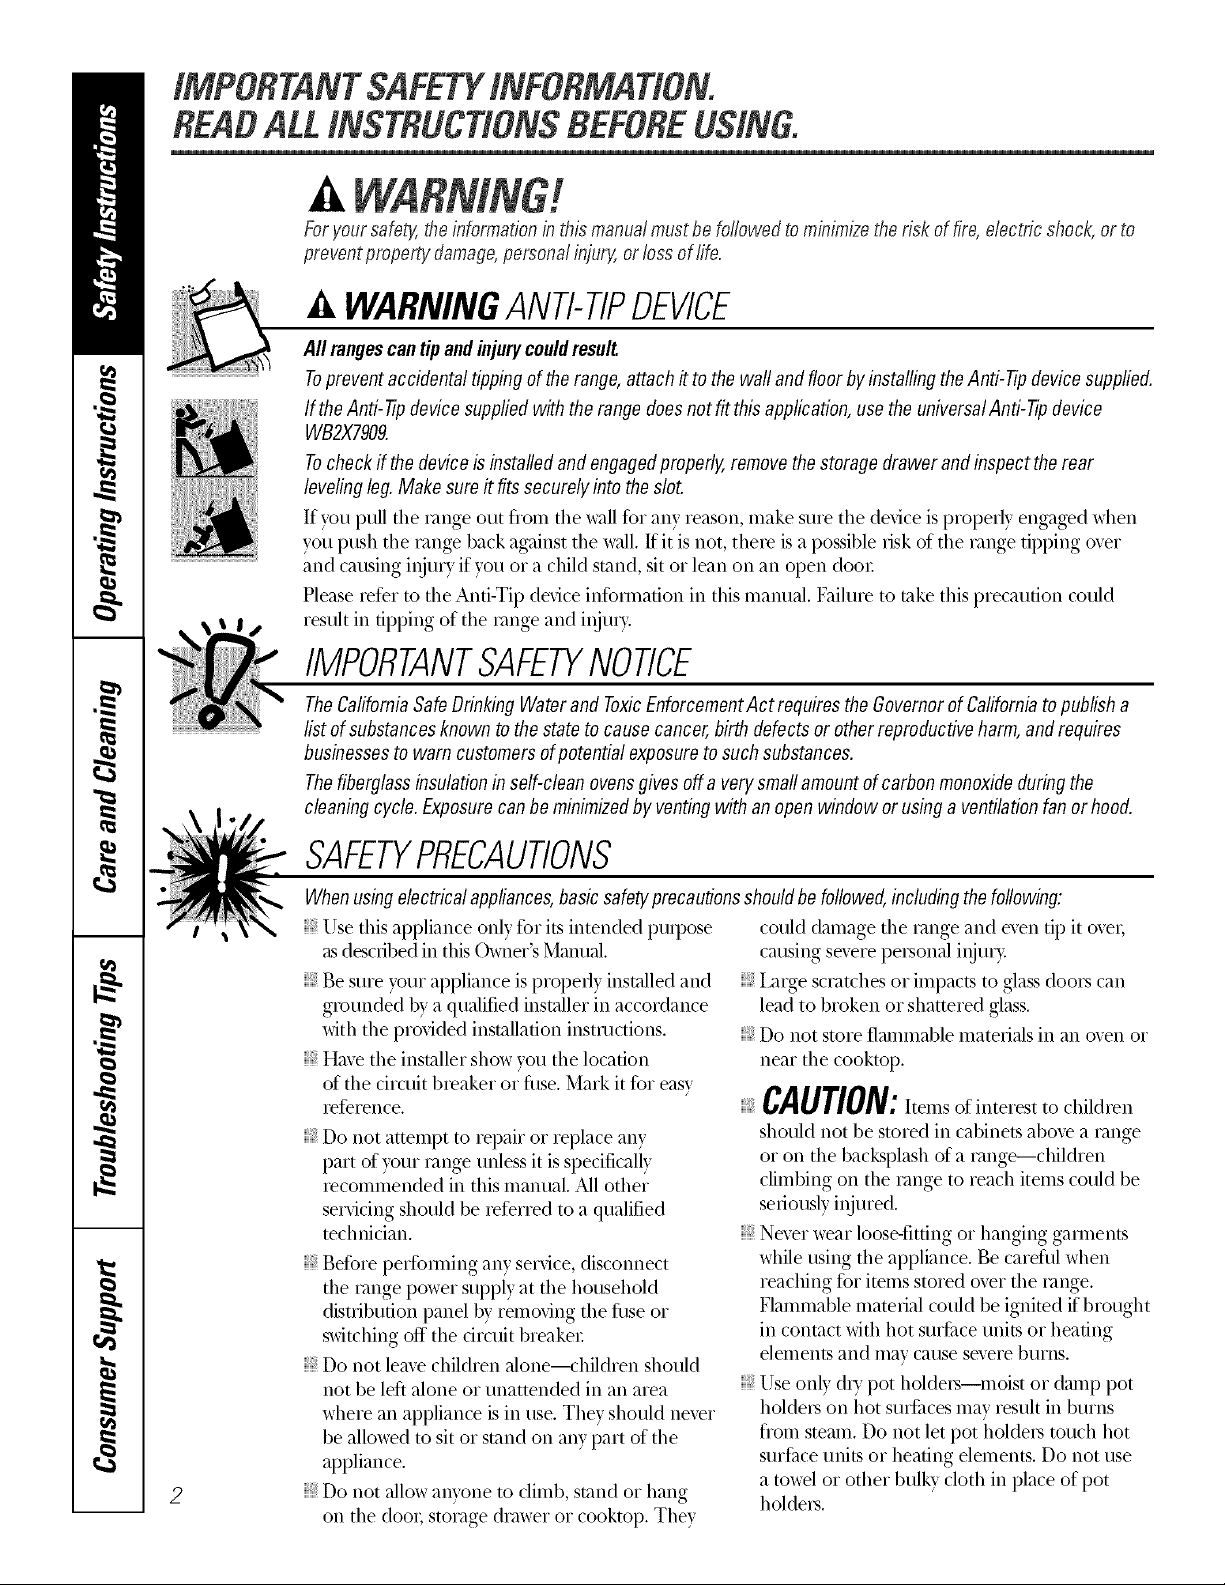
WARNINGANTI-TIPDEVICE
All rangescantip andinjurycouldresult
Topreventaccidental tippingofthe range,attachit to thewaftandfloor byinstallingtheAnti-tip devicesupplied.
If theAnti-tip device suppliedwiththerangedoes notfit this application,usethe universa/Anti-Tipdevice
WB2X7909.
Tocheck ifthe deviceis installedand engagedproperly,removethestoragedrawer andinspect therear
levelingleg. Makesureit fitssecurelyinto theslot.
If you pull tile range out flom tile wall for any reason, make sure tile de_ice is l)roperly engaged when
you push the i'ange back against the wall. If it is not, theie is a possible risk of tile i_ange tipping over
and causing ii_u U if you or a child stand, sit or lean on all open door.
Please iefbr m the Anti-Tip dedce infbmlation ill this manual. Failme to rake this precaution could
resuh ill tipping of tile i'ange and injm>
IMPORTANTSAFETYNOTICE
TheCafifomiaSafeDrinking Waterand ToxicEnforcementAct requiresthe Governorof Cafifomiatopublisha
fistof substancesknowntothe statetocause cancer,birthdefectsor other reproductiveharm,andrequires
businessesto warn customersof potential exposureto such substances.
Thefiberglassinsulationin self-dean ovensgives off averysmallamountof carbonmonoxideduringthe
cleaningcycle. Exposurecanbe minimizedby ventingwith an openwindow orusing a ventilationfan orhood.
SAFETYPRECAUTIONS
Whenusing electricalappliances,basicsafe_/precautionsshouldbe followed,includingthefollowing:
} Use this appliance only %r its intended puq)ose
as descnbed ill this Owner's Manual.
} Be sure your appliance is properl} installed and
grounded b} a qualified installer ill accordance
with tile provided installation instructions.
} Have the installer show xou the location
of the circuit breaker or fllse. Mark it for easx
ief_'rence.
iii}i}ii
Do not attempt to repair or replace any
part of )our i_ange lmless it is specificall}
recommended ill this manual. All other
servicing should be referred to a qualified
technician.
getbre perfbmdng ally serdce, disconnect
the i'ange power supply at the household
distribution panel by removing the fuse or
switching off tile ciivuit breaker
Do not leave children alone---children should
not be left alone or unattended ill all area
where all appliance is ill use. They should never
be allowed to sit or stand on ally part of tile
appliance.
2
Do not allow awone m climb, stand or hang
on tile dooi, stoi'age &'awer or cooktop. They
could damage tile iange and even tip it oveI,
causing severe peisonal iI_uI>
IaIge scI'atches or impacts to glass dooIs call
lead to broken or shattered glass.
Do not store flammable materials ill all oven or
near tile cooktop.
CAUTION:I[ell}S Of in[eles[ [o childien
should not be stored ill cabinets above a imlge
or on the backsplash of a i'ange---children
climbing on tile i'ange to reach items could be
seriously injured.
Never weal loose-fitting or hanging gamlents
while using the appliance. Be carefld when
reaching fbr items stored over the range.
Flammable material could be ignited if brought
ill contact with hot surfilce units or heating
elenlents and may cause severe b/lI'ns.
Use only dU pot holdei.s--moist or damp pot
holdeis on hot surfi/ces may resuh ill burns
flom steam. Do not let pot holdeis touch hot
surfi/ce units or heating elements. Do not use
a towel or other bulky cloth ill place of pot
holdeIs.
WARNING!
SAFETYPRECAUTIONS
ge.com
For your safety, ne_vr use your appliance %r
wamfing or heating the room.
Teach children not to play with the controls or
any other part of the cange.
Always keeI) dish towels, dish cloths, pot holde[s
and other linens a safe distance flom your
i'ange.
Always keeI) wooden and plastic utensils and
canned food a safe distance flora your cange.
.Mwavskeq) combustible wall coverings,
cu_*ains or dcapes a safe distance fiom your
Fange.
Do not let cooking grease or other flammable
materials accumulate in or near the cange.
KeeI) the hood and grease filte_s clean to
maintain good venting and to avoid grease fires.
Do not use water on grease fires. Nexvr pick up
a flaming pan. Turn the controls off_Smother a
flalning pan on a surfi_ce unit by coveting the
pan completely with a well-fitting lid, cookie
sheet or flat tea> Use a multi-purpose dx_"
chemical or fbam-type fire extinguisher
lqaming gxease outside a pan can be put out by
coveting it with baking soda ox, if available, by
using a multi-purpose dU chemical or
fbam-type fire extinguisher
Flame in the oxen can be smothered completely
by closing the oven door and turning the oven
off or by using a multi-purpose d U chemical or
fbam-type fire extinguisher.
Do not touch the surfi_ce units, the heating
elements or the interior surfilce of the oven.
These surfilces may be hot enough m burn
even though they are dark in color During and
after use, do not touch, or let clothing or other
flammable materials contact the surfilce units,
areas nearby the surfilce units or any interior
area of the oven; allow sufficient time for
cooling fi_st.
Potentially hot surfilces include the cooktop,
areas fiMng the cooktop, oven vent opening,
surfilces near the opening, crevices around the
oven door
REMEMBER:The inside surfi_ce of the oven may
be hot when the door is opened.
Do not store or use combustible materials,
gasoline or other flammable vapoxs and liquids
in the vicinity of this or aW other appliance.
COOKMEATANDPOULTRYTHOROUGHLY...
Cookmeatandpoultrythoroughly--meattoat/eastanINTERNALtemperatureof I60°t:andpoultrytoat/eastan
INTERNALtemperatureof I80°ECookingtothesetemperaturesusua//yprotectsagainstfoodbornei//ness.
SURFACECOOKINGUNITS
Useproperpansize--select co&ware havingflat bottomslargeenoughto cover the surfaceunitheating
element.Theuseof undersizedcookwarewill exposeaportion ofthe surfaceunitto direct contact andmay
resultin ignitionof clothing.Properrelationshipof cookwareto surfaceunitwill alsoimproveefficiency.
Nexer leave the surfi_ce units unattended
at high heat settings. Boiloxe_s cause smoking
and g_easy spillove_s that may catch on fire.
Do not use aluminum fbil to line the drip pans
or anywhere in the oven, except as described in
this manual. Misuse could result in a shock, fi_e
hazard or damage to the cange.
Be sure the drip pans and the vent duct are not
covered and are in place. Their absence during
cooking could damage cange parts and wiring.
Only ce_udn t)pes of glass, glass/ceramic,
earthenware or other glazed containers are
suitable fbr cooktop service; others may break
because of the sudden change in tempet'amre.
To minimize the possibility of burns, ignition of
flammable materials and spillage, the handle of
a container should be turned toward the center
of the cange without extending over nearl)v
surfilce units.
Always turn the surfi_ce units off befbre
removing cookware.
3
IMPORTANTSAFETYINFORMATION.
READALLINSTRUCTIONSBEFOREUSING.
SURFACECOOKINgUNITS(cont.)
} Do not imme_se or soak the removable surfilce
units. Do not put them in a dishwasher. Do not
self clean the surfilce units in the oven.
} When preparing flaming foods under the hood,
turn the fire on.
To axoid the possibility of a burn or electric
shock, always be certain that the controls fbr all
sur[ilce units are at the OFFposition and all coils
are cool befbre attempting to lift or remove
a unit.
Clean the cooktop with caution. If a wet sponge
is used to wipe spills on a hot cooktop, be
carefld to avoid steam burns.
KeeI) an eye on foods being flied at high or
medium high heat settings.
Foods fbr flying should be as d_x as possible.
Frost on flozen fbods or moistu{e on flesh
foods can cruise hot fi/t to bubble up and over
the sides of the pan.
Use little fi/t for effective shallow or deep fi/t
flying. Filling the pan too fldl of lilt can cause
spilloveis when food is added.
If a combination of oils or fi_tswill be used in
flying, stir together befbre heating, or as lilts
melt slowly.
Mwavs hea lilt slowly, and watch as it heats.
Use a deep lilt them/ometer whenever possible
to prevent overheating lilt beyond the smoking
point.
WARNING!
OVEN
Standawayfrom therange whenopeningtheoven door.Hotairor steamwhich escapescancauseburnsto
hands,faceand/or eyes.
Do not heat unopened fbod containers.
Pressure could build up and the container
could bin.st, causing an injm>
KeeI) the oven vent unobstructed.
KeeI) the oven fiee fiom grease buildup.
Place the oven shelf in the desired position
while the oven is cool. If sheh'es must be
handled when hot, do not let pot holder
contact the heating elements.
Pulling out the shelf to the stop-lock is a
convenience in lifting heaw fbods. It is also a
precaution against burns flom touching hot
surfilces of the door oi oven walls.
When using cooking or roasting bags in the
oven, follow the manufilcturer's directions.
Do not use the oven to dU newspapers.
If overheated, they can catch on fire.
Do not use the oven for a storage area. Items
sto_ed in an oven can ignite.
Do not leave paper products, cooking utensils
or food in the oven when not in use.
} Do not use aluminum foil to line oven bottoms.
Improper installation of aluminum foil ma_
resuh in a risk of electric shock or fire.
SELF-CLEANINGOVEN
Donot useoven cleaners.Nocommercialovencleaneror ovenlinerprotective coatingof anykindshouldbe
usedin oraroundanypart ofthe oven.Residuefromoven cleanerswill damagetheinsideof theoven whenthe
self-cleaningcycle is used.
Do not clean the door gasket. The door gasket
is essential fbr a good seal. Care should be
taken not to rub, damage or move the gasket.
Befbre selfZcleaning the oven, remove shiny,
silxer-colored oven shelves (on some inodels)
and all other cookwaie.
Be sure to wipe up excess spillage befbre
smiling the selfkleaning operation.
If the selfkleaning mode malflmctions, turn the
oven off and disconnect the power supply Have
it serficed by a qualified technician.
Clean only parts listed in this Owner's Manual.
READANDFOLLOWTHISSAFETYINFORMATIONCAREFULLY.
SAVETHESEINSTRUCTIONS
4
Usingthesurfaceunits, oom
Throughout this manual, features arid' appearance may vary from your model,
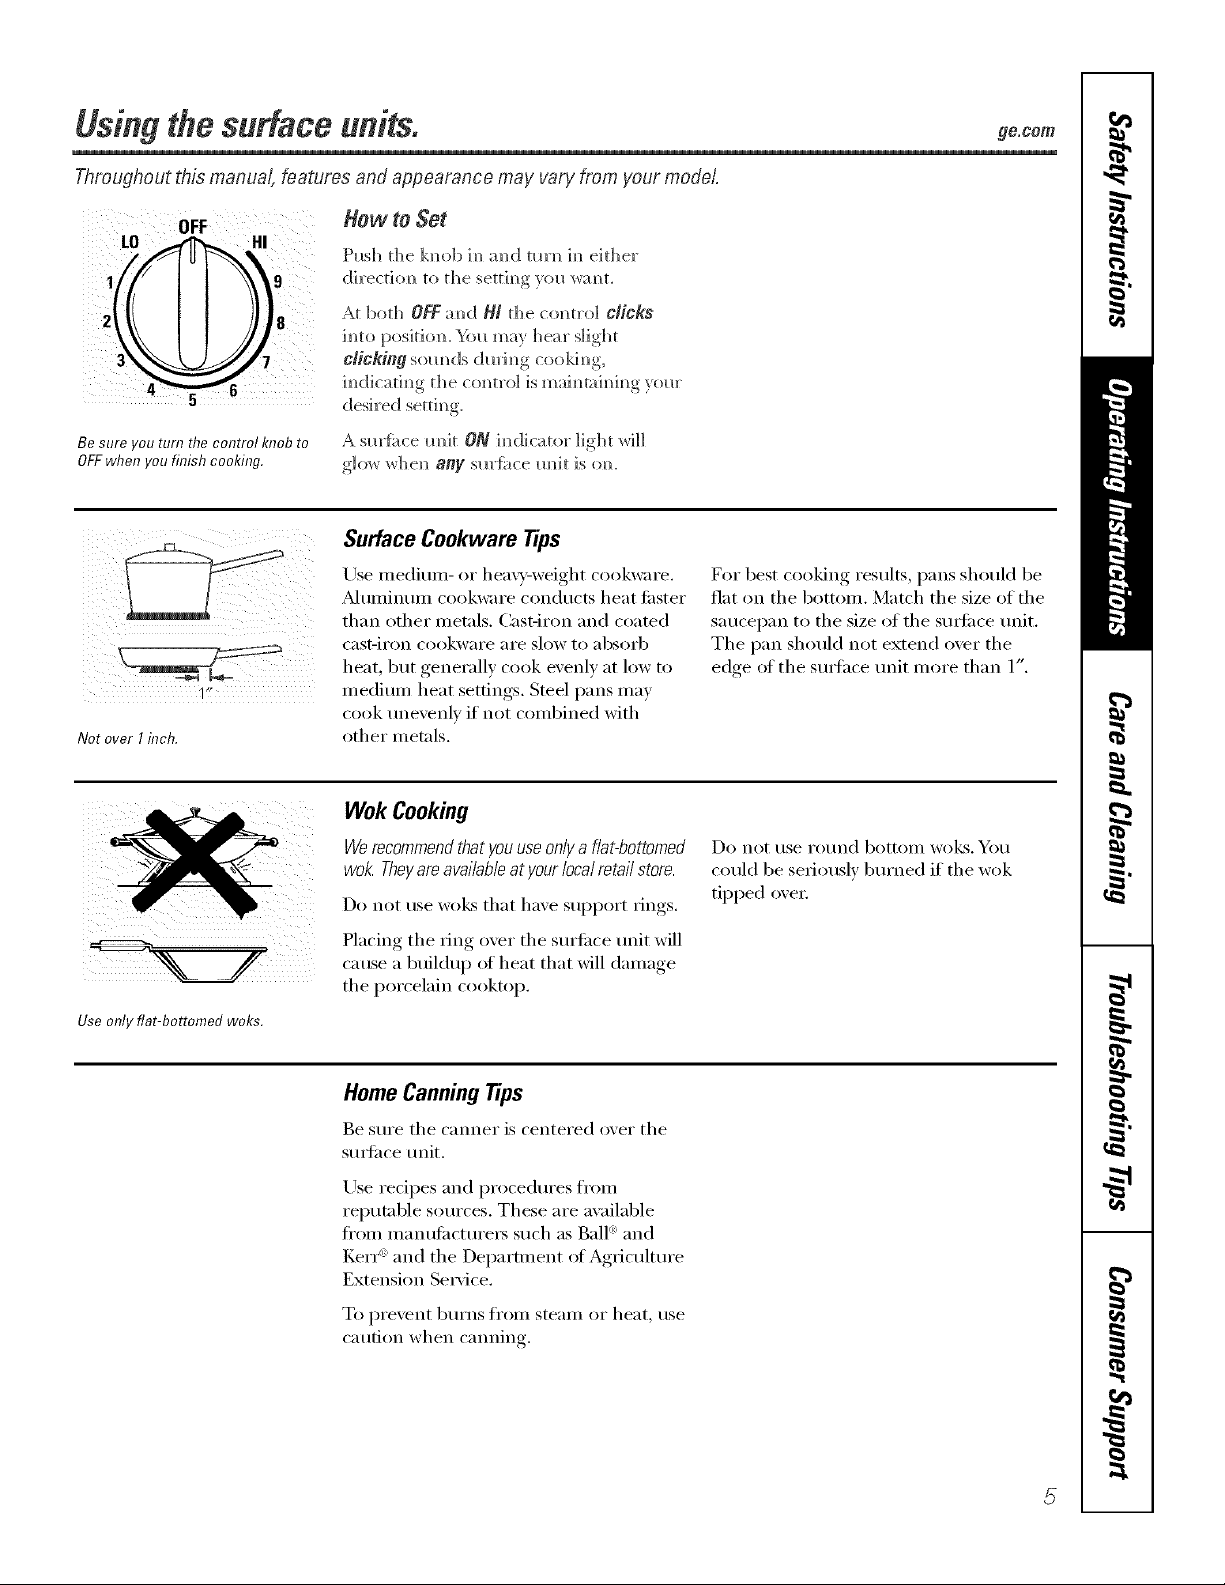
How to Set
LO
¸¸¸¸4 . ( (
Push the k]_ob ]m_a]_d mrn_ ]m_either
directi(m to the setth_g yol_ wm_t.
At ]bot]_ OFFm_d 141the co_m'o] CliCkS
hire positio_. _k)l_may ]]ear slight
clicking som_ds dm'im_gcookim_g,
h_dicati m_gt]] e c(m tro] is m aim_rah_im_g _ol_r
desired setdm_g
Be sure you turn the control knob to
OFFwhen you finish cooking.
A sm'fi_ce m_it ON h]dicator light _rH]]
glow whe_ any sm'}i_ce m_it is (m.
Surface Cookware Tips
Use medimn- or heavv:weight cookware.
_d uminmn cookware c(mducts heat fi_ster
than other metals. Cast-iron and coated
Cast-iI'on c(l()kwai'e aI'e slow t(i _lbs(ii'b
he.t,b,,tge.e,'.ll; cooke.e,,1;.t 1,1,,'t,,
1" medium heat settings. Steel pans may
cook tmexenlv if not combined with
Notover I inch. other metals.
Wok Cooking
Werecommendthat youuse oniya fiat-bottomed
wok Theyareavaiiabieatyour iocai retaii store.
D() not rise wo_s that have SUl)p(irt rings.
Placing the ring ()_er the surtilce unit will
catlse a buildu l) of heat that will damage
the porcelain cooktop.
Use only fiat-bottomed woks.
For best cooking results, pans shouM be
fiat on the bottom. Match the size of the
saucel)an to the size (if the suHi_ce trait.
The pan should not extend over the
edge (it the surlhce unit more than 1".
D(I not t/se I'(it/nd btittOlll W(I]kS. Y(III
could be seri(mslv burned if the wok
tipped oxen:
Home CanningTips
Be sm'e the cromer is centered ()_er the
smti_ce unit.
Use redpes and procedm'es fl'om
reputable s(iurces. These are available
fl'OIll Ill_lIlt/lilCttlI'eIN Stlch _ls Ball (`:and
Kerr": and the Department of Agriculture
Extension Se_'ice.
T(I pi'e'_ent btli'ns fr(lil/steail/ (ir heat, rise
caution when cmming.
Usingthe ovencontrols.
Throughout this manual, features and appearance may vary from your model.
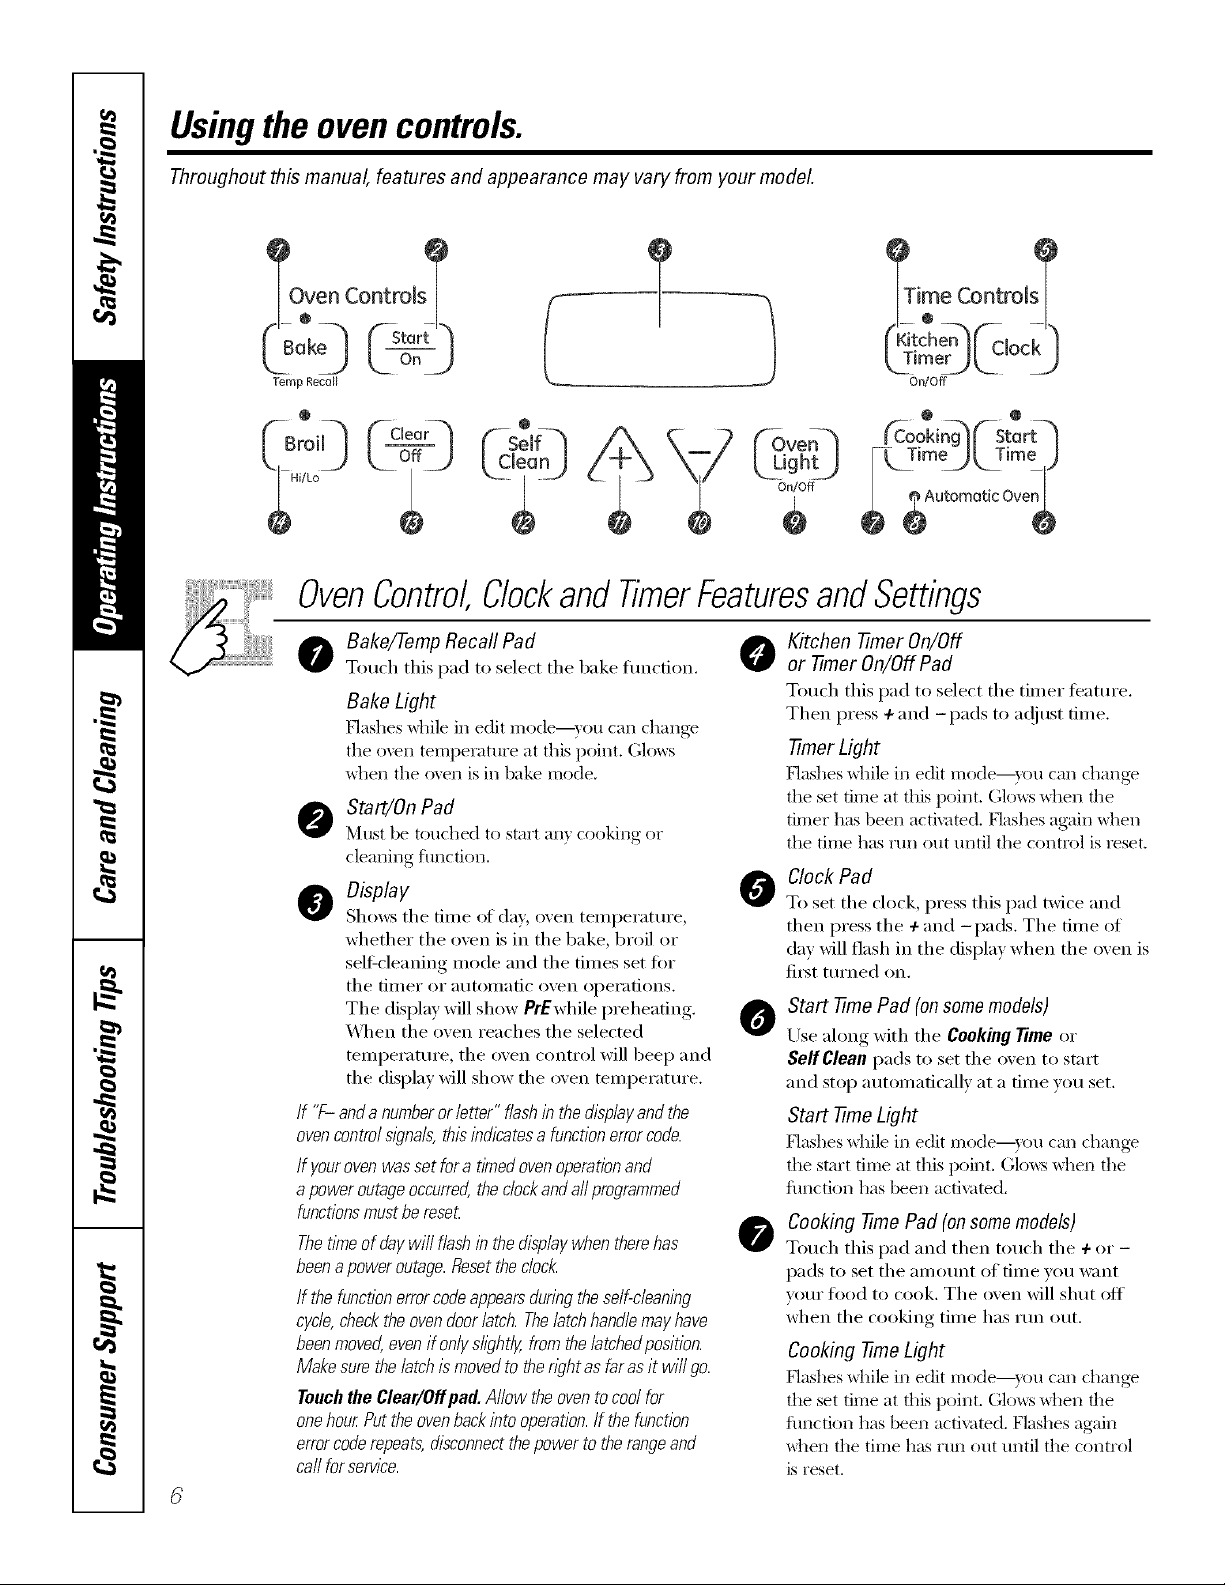
Oven Controls _
-k
( B0k Fstor fl
L. 2_) ooj
Temp Recoil
@
_Time Controls_
(Kitchen_ _Cioc k ")
LTimer_ L" _J
UseIFq
I- TimeJL TiroL)
y CSve
OvenControl,Clockand TimerFeaturesandSettings
o ake/Temp Recall Pad 0
Touch this pad to select tile bake function.
Bake Light
Hashes _hile in edit IYlode--}rOtl (-aI_ change
tile oven temperature at this point. Glows
_dlen the o\en is in bake mode.
Start/On Pad
N'ltlSt be touched to start any cooking or
cleaning function.
O Display
Shows tile tiIlle ot da,v, oven teillpei'attli'e,
whether tile oven is in tile bake, broil or
selFcleaning mode and tile times set for
tile [iII/eF oI" autoIIlatic oven opei'ations.
Tile display will show PrEwhile preheating.
_4]/en tile oven reaches tile selected
temperature, tile oven control will beep and
tile display will show tile oven temperature.
If "F- and anumberor latter" flashin thedisplayandthe
ovencontrol signals,this indicates a functionerrorcode.
If yourovenwasset fora timed ovenoperationand
apower outageoccurred,the dock and aftprogrammed
functionsmustbe reset
Thetlkneof day wi// flash in the displaywhen therehas
beena power outage. Resetthe c/oc/_
If thefunction errorcodeappearsduring the self-cleaning
cycle,checkthe ovendoorlatch. Thelatchhand& mayhave
beenmoved,even if onlys/i)ht/y, from the/atchedposition.
Makesure the latch ismoved to thewht as faras it wi// go.
Toudl the Clear/Off pad. Allow the oventocool for
onehour Put the ovenbackinto operation./f the function
errorcoderepeats, disconnectthepower to therangeand
ca//for service.
Kitchen -timer On/Off
or -timer On/Off Pad
Totlcb this pad to select tile tiIller teattlI'e.
Then press + and -pads to a(!iust time.
-timer Light
Hashes while in edit I/'lode--}rOtl (-'_lIl change
the set time at this I)oint. Glows _dlen the
timer has been activated. Nashes again _dlen
the time has run out until the control is reset.
Clock Pad
0
To set tile clock, press this pad twice and
then press tile + and -pads. Tile time of
day will flash in tile display when tile oven is
fiI_t turned on.
Start -time Pad (on some models)
0
Use along with tile Cooking Time or
Self Clean pads to set tile oven to start
and stop automatically at a time you set.
Start -time Light
Hashes while in edit IllOde--}rOtl (-'_111change
the start time at this point. (;km:s _dlen the
fimction has been activated.
Cooking -time Pad (on some models)
0
Touch this pad and then touch tile + or-
pads to set tile ai]/otlnt of tiIne yotl w;Int
w)ur food to cook. Tile oven will shut off
when tile cooking time has run out.
Cooking -time Light
Hashes while in edit Illode--}r{)tl (-'aIl change
the set time at this point. Glows _dlen the
traction has been activated. Flashes again
_dlen tile time has run out until tile control
is reset.
® --k
On/Off
OvenControl,Clockand TimerFeaturesandSettings
ge.com
Automatic Oven Light
O
This lights anyfin/e the oven has been
progrannned using the Cooking Timeor
Start Timeflmcfions.
O Oven Light On/Off Pad
Touch this pad to turn fl_e oxen light on or
- Pad
Short taps to this pad will decrease the time
or temperature 1U small amounts. Touch
and hold the pad to decrease the time or
temperature by linger amounts.
+ Pad
Short taps to this pad will increase the time
or temperature by small amotmts. Touch
and hold the pad to increase the time or
temperature by larger amounts.
Self Clean Pad
Touch this pad to select the se]fk]eaning
fimction. See the Using the self-cleaning
oven section.
Clean Light
Flashes while in edit I11ode--you c_lIl changv
tile length of trine ti)r the selthlemafiag cycle
at this point. (;lo_:s _dlen tile oven is in tile
seltkleaning cycle. AJier tile self_lemafi_g
cycle, tile light will turn oft] Unlatch tile dooi,
Clear/Off Pad
0
Touch this pad to cancel ALL oven
operations except the clock and fiIneI:
Brat Hi/Lo Pad
Touch this pad to select tile broil fimcfion.
Broil Light
Flashes while in edit Illode--you (aIl switch
fi'om Hito Lo Broilat this point. (;lo_s _dlen
tile oven is in broil mode.
Indicator Lights (on some pads)
EOITnlode lasts several secollds after tile last
pad i)ress. Start Time On/O#and Cooking Time
On/Off will be tile only pads lit if either of
these options is selected. (Example: Start
Time is selected with Bak0---the Start Time
pad will remain lit until the clock reaches tile
programmed time, at _dlich point it will ttlI'II
off and tile Bake/TempRecall pad light will
light up),
Power Outage
If a flash/bgt/Yne/s/b thedisplay,you haveexperienceda
power failure. Resetthe clock.
To reset the clock, touch the CLOCKpad. Enter
tile correct time of day by touching tile +or -
pads. Touch the START/ONpad.
Usingthe oven.
Toavoid possible bums, place the shelves in the desired posifion before you turn the oven on.
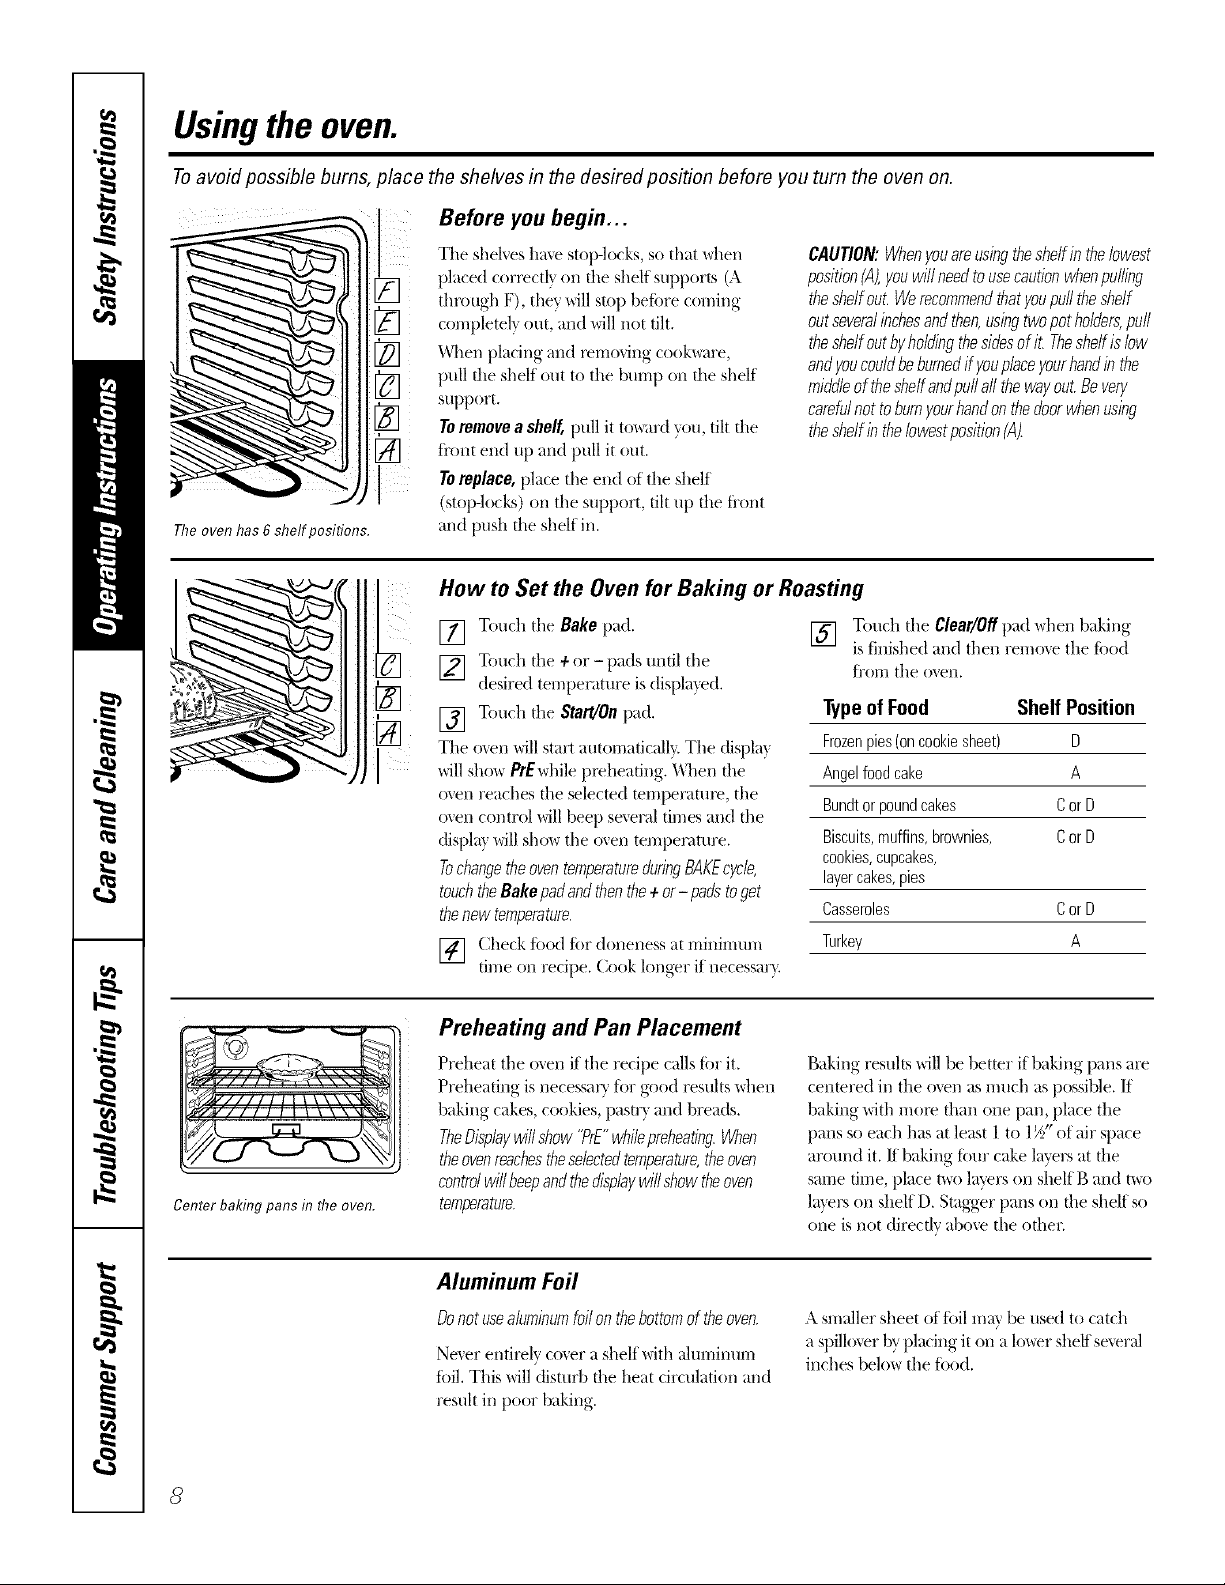
Before you begin...
CAUTION:Whenyouare,usingthesheffinthebwest
position(A),youwill needtousecautionwhenpulling
theshelfout.Werecommendthatyoupufftheshelf
outseveralinchesandthen,usingtwopotholders,puff
theshelfoutbyholdingthesidesofit. Theshelfis low
andyoucouldbeburnedif youplaceyourhandinthe
middleoftheshelfandpu//all thewayout.Bevery
carefulnot toburnyourhandonthedoorwhenusing
theshelfintheIowestposition(A).
The oven has 6 shelf positions.
The shelves have stop-lo(ks, so that \_hen
placed correctl} on fl_e shelf supports (A
through F), they will stop beiore coming
completely out, and will not flit.
When placing and x_mo_ing cook\_are,
pull the shelf ()tatto tile bump on the shelf
support.
Toremovea shelf,pull it to_trd you, tilt the
ti'ont end up and pull it out.
Toreplace, place the end of the shelf
(stop-locks) on the support, tilt up the fl'ont
and push the shelf in.
How to Set the Oven for Baking or Roasting
Center bakingpans in flTeoven.
[] Touch the Bake pad.
] Touch the 4-or- pads unfll the
desired temperature is displa?ed.
[] Touch the Starg/Onpad.
The o_en will start automatically. The displa}
will sho_ PrEwhile px_heaflng. IA]len the
oven reaches the selected mmperature, the
oven control will beep several times and the
displa} will sho_ the oven tempenmlre.
TochangetheoventemperatureduringBAKEcycle,
touchtheBakepadandthenthe4-or- padstoget
thenew temperature.
[] Check food for doneness at minimum
time on recipe. Cook longer if necessar}.
Preheating and Pan Placement
Preheat the oven if the recipe calls for it.
Preheating is necessax) tar good results \_hen
baking cakes, cookies, pastr> and breads.
TheDisplaywillshow "PrE"whilepreheating.When
theovenreachestheselectedtemperature,theoven
controlwi//beepandthedisplaywi//showtheoven
temperature.
[] Touch the Clear/Offpad when baking
is finished and then remo_e the toed
fl'orri the oven.
TypeofFood Shelf Position
Frozenpies(oncookiesheet) D
Angelfoodcake A
Bundtorpoundcakes CorD
Biscuits,muffins,brownies, CorD
cookies,cupcakes,
layercakes,pies
Casseroles CorD
Turkey A
Baking resuhs will be better if baking pans are
centered in the o_en as much as possible. If
baking with more than one pan, place the
pans so each has at least 1 to 1½" of air space
around it. ff baking Ibm" cake lnyers at the
same flme, place t\_o layers on shelf B and me
lm'el-son shelfD. Stagger pans on file shelf so
(sale is not (tirectlv above the other
Aluminum Foil
Donotusealuminumfoilonthebottomoftheoven.
Ne_er enflmlv co_er a shelf with ahlrl-iilltlrri
toil. Tills will disturb the heat circulation aI/d
result in poor baking.
A smaller sheet of toil may be used to catch
a spilloxer b)_ placing it on a lower shelf several
inches below the ibo(1.
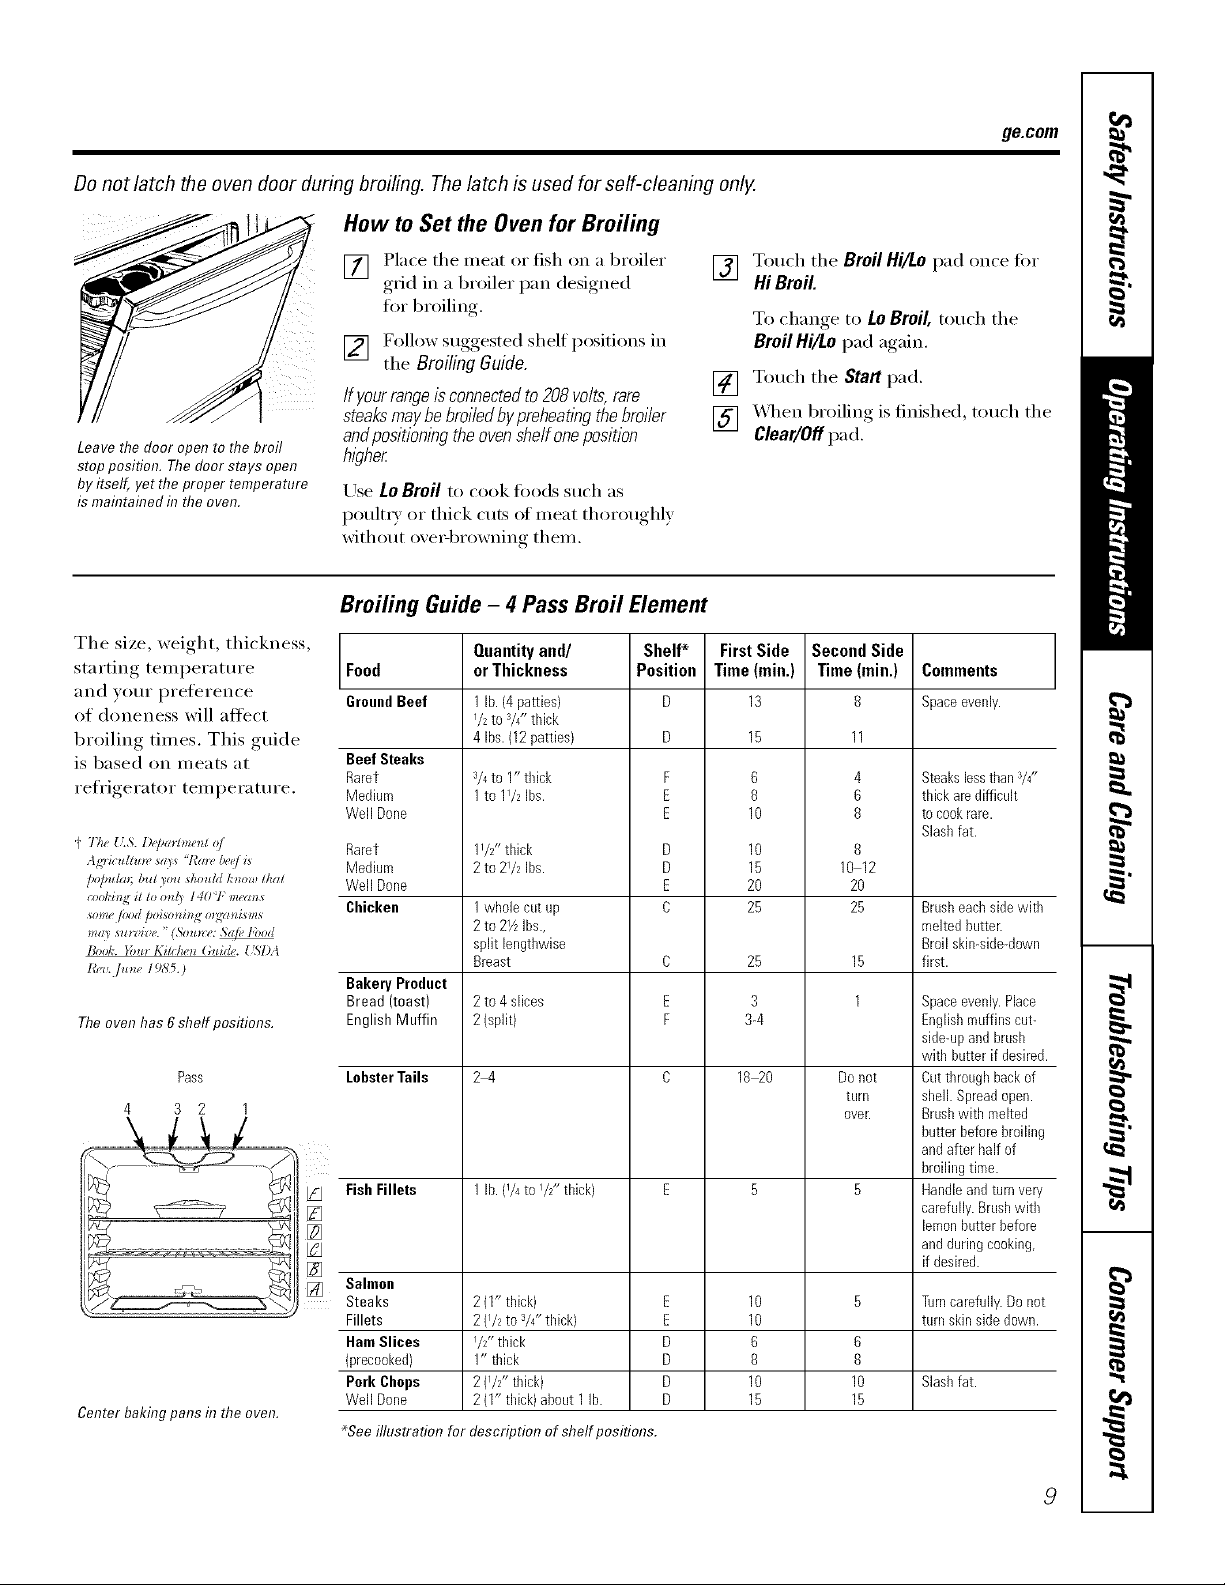
Donot latch the oven door during broiling. The latch is used for self-cleaning only.
How to Set the Oven for Broiling
ge.com
Leave the door open to the broil
stop position. The door stays open
by itself, yet the proper temperature
is maflTtaflTedf17the even.
The size, weight, thickness,
starting temperature
_lll(l VOIII" l)reference
of doneness will att'ect
broiling times. This guide
is based (m meats at
refligerator temperature,
(' 7"h(,{LS. I)(J_a*tme_zl o/
AgricuZt*m, s© s '7'm_,/)ee/_*
t)l)lmlgz_;btz/ lotz sko*tld I,'_*o,l!/ka/
zook@ /4 it to o_ /_ 140 7;'m#(m _
some pJod [oL*oni_g o_gzmisms
ma3 su*xiz e. "(_uu*rw _e 1,'ood
l_ook. }bu_ 1,2ilclw_ ti,tid(,, tiSTM
l_Fi,./une / 9,t¢5.)
Theoven has 6shelf positions.
Pass
4 3 2 1
Center bakingpans in the oven.
[] Place the meat or fish on a broiler
gdd in a broiler pan designed
for broiling.
[] F°ll°w suggested shelf I)°siti°ns in
the BroilingGuide.
If yourrangeisconnectedto208volts,rare
steaksmaybebroiledbypreheatingthebroiler
andpositionbgtheovenshelfoneposition
higher
Use Lo Broil to cook fi>ods such as
poult_ T or thick cuts of nleat thoroughly
without oxe>browning them.
Broiling Guide - 4 Pass Broil Element
Food
GroundBeef
Beef Steaks
Raret
Medium
Well Done
Raret
Medium
Well Done
Chicken
Bakery Product
Bread (toast)
English Muffin
LobsterTails
Fish Fillets
[]
[]
Salmon
[]
Steaks
Fillets
HamSlices
(precooked)
Pork Chops
Well Done
_Seeillustration for description of shelf positions.
Quantityand/ Shelf*
orThickness Position
1lb. (4patties)
I/2 to s/4"thick
4 Ibs.(12patties)
3/4to 1" thick
1to 11/2 Ibs.
11/2"thick
2 to 21/2Ibs.
1whole cut up
2to 21/zIhs.,
split lengthwise
Breast
2to 4 slices
2(split)
2-4
1lb. (1/4to I/2" thick) E
2(1" thick) E
2 (I/2 to s/4"thick) E
I/2" thick D
1" thick D
2 {I/2ff thick) D
2(I" thick) about1 lb. D
[] Touch the BroilHi/Lopad once fi)r
HiBroil
To change,to LoBroil, touch the
BroilHi/Lopad again.
[] Touch the Start pad.
[] _Aq_en broiling is finished, touch the
Clear/Offpa d.
F
E
E
D
D
E
O
C
E
F
FirstSide
Time(min.)
13
10
10
15
2O
25
25
3-4
18 2O
10
10
10
15
SecondSide
Time(rain.)
8
6
8
3
6
8
4
6
8
8
10 12
20
25
15
1
Do not
tLinl
over.
6
8
10
15
Commeots
Spaceevenly.
Steakslessthan3/4"
thick are difficult
tocookrare.
Slashfat.
Brasheachside with
meltedbatter.
Broil skin-side-down
first.
Spaceevenly.Place
Englishmuffins cut-
side-upandbrash
with hatter ifdesired.
Cutthroughback of
shell. Spreadopen.
Brashwith melted
butter beforebroiling
andafter half of
broilingtime.
Handleandturnvery
carefully.Brashwith
lemonbatterbefore
andduringcooking,
if desired.
Turncarefully.Do not
tam skinsidedown.
Slashfat.

Usingthe oven.
Bruiting Guide - 6 Pass Broil Element
The size, weight, thickness,
starting temperature
and )our preterence
of doneness will affect
broiling times. This guide
is based on meats at
retiJgerator temperature.
The oven has 6 shelf positions.
Pass
6 54321
Preheat the broiler for 2 minutes for improved performance.
Second Side
7
9
Food
GroundBeef
Well Done
Beef Steaks
Raret
Medium
Well Done
Raret
Medium
Well Done
Chicken
Fish Fillets
Pork Chops
Well Done
Sahnon Steaks
Quantityand/ Shelf FirstSide
or Thickness Position Time(rain.)
1lb.(4patties) E 9
1/2to3/4"thick E 11
1" thick
1to 1½ Ibs.
1½"thick D 14
2 to 27zIbs. D 18
1whole cut up C 25
2 to 2½ Ibs.,
split lengthwise
2 Breasts C 25
1/4to 1/2"thick E 6
2 (1/2" thick)
2 (1" thick)about 1 lb.
2 (1" thick)
4 (1" thick)about 1 lb.
F
E
E
D 22
E
D
D
D
11
10
15
10
12
Time (min.)
6
10
5
6W
89
11
1416
20
10
1015
5
10
15
78
10
Comments
Space evenly. Up to 8
patties take about tl_e
same time.
Steakslessthan1"
thickcookthrough
beforebrowning.Pan
fryingis recommendec
Slashfat.
Broilskin-side-down
first.
Handleandturnvery
carefully.Brashwith
lemonbutterbefore
andduringcooking,
if desired.
Slashfat.
Greasepan.Brush
steakswith melted
butter.
Center bakingpans f17the oven.
10
 Loading...