

GE JBP29GM4WH, JBP29GM1 Owner’s Manual
Range
Contents
Aluminum Foil 21 Problem Solver 29
Anti-Tip Bracket 3, 30 Repair Sergice 35
Appliance Registration 2 Safety Instructions 3, 4
Canning Tips 12 Surface Cooking 8-14
Care and Cleaning 23, 24 Control Settings 9
Cleaning Guide 28 Cooking Guide 13, 14
Clock/Timer 16 Cookware Tips 10
Electronic Controls 16, 17 Warranty Back Cover
Energy-Saving Tips 5
Features 6, 7
Installation Instructions 30.33
Leveling 33
Model and Serial Numbers 2 Installation 30-33
Oven 15
BakingfBaking Guide !8, 19
Broiling/Broiling Guide 21,22
Control Settings 16, 17
Door Removal 24
Light; Bulb Replacement 15, 23
Preheating 5, 19
RoastinglRoasting Guide 20
Serf-Cleaning Instructions 25-27
Shelves 15, 23, 28 GEAnswerCenter_
Thermostat Adjustment 27 800.626.2000
Models JBP29G
JB553G
j_570G
571G
GEAppliances
i,,,i,,,i , W"I"'HIIII""I'N"NIIPII'W I1'11"1 I' I

Help us
help you...
Before using your range,
read this book carefully.
It is intended to help you operate
and maintain your new range
properly_
Keep it handy for answeis to your
questions.
If you don't understand something
or need more help, write (inctude
your phone number):
Consumer Affairs
GE Appliances
Appliance Park
Louisville, KY 40225
Write down the model
and serial numbers.
You'll find them on a label on
the front of the range behind the
storage drawer:
These numbers are also on the
Consumer Product Ownership
Registration Card that came with
your range. Before sending in this
card, please write these numbers
here:
If you received
a damaged range...
Immediately contact the dealer (or
builder) that sold you the range.
Save time and money.
Before you request
service...
Check the Problem Solver on
page 29. It lists causes of minor
operating problems that you
can correct yourself.
Model Number
Serial Number
Use these numbers in any
correspondence or ser'cice calls
concerning your range.
ORTANT SAFETY qSTRUCTIONS
Read all instructia_ before us_g r_ts appua__=eo
When using electrical appliances, o Do not leave children alone--
basic safety precautions should children should not be left alone
be followed, including the or unattended in an area where
following: an apphance is in use. They
+ Use this appliance only for its
kntended use as described in this
manual.
o Be sure your appliance is
properly kissed and grounded
by a qualified technician in
accordance with the provided
installation instructions.
o Don't attempt to repair
or replace any part of your
range unless it !s specific!lly
recommended in this book. All
should never be allowed to sit or
stand on any part of the appliance.
o Don't allow anyone to climb,
stand or hang on the door,
drawer or range top. They
could damage the range and
even tip it over, c!usLng severe
personal injury.
o CAUTION: ITEMS OF
INTERF_T TO CHILDREN
SHOULD NOT BE STORED
IN CABINETS ABOVE A o Do not touch heating
RANGE OR ON THE
other servicing should be referred
to a qualified technician.
+ Before performing any
service, DISCONNF_L_ THE
RANGE POWER SUPPLY
AT TIlE HOUSEHOLD
DISIRIBUTION PANEL
BY REMOVING THE FUSE
OR SWITCHING OFF THE
CIRCUIT BREAKER.
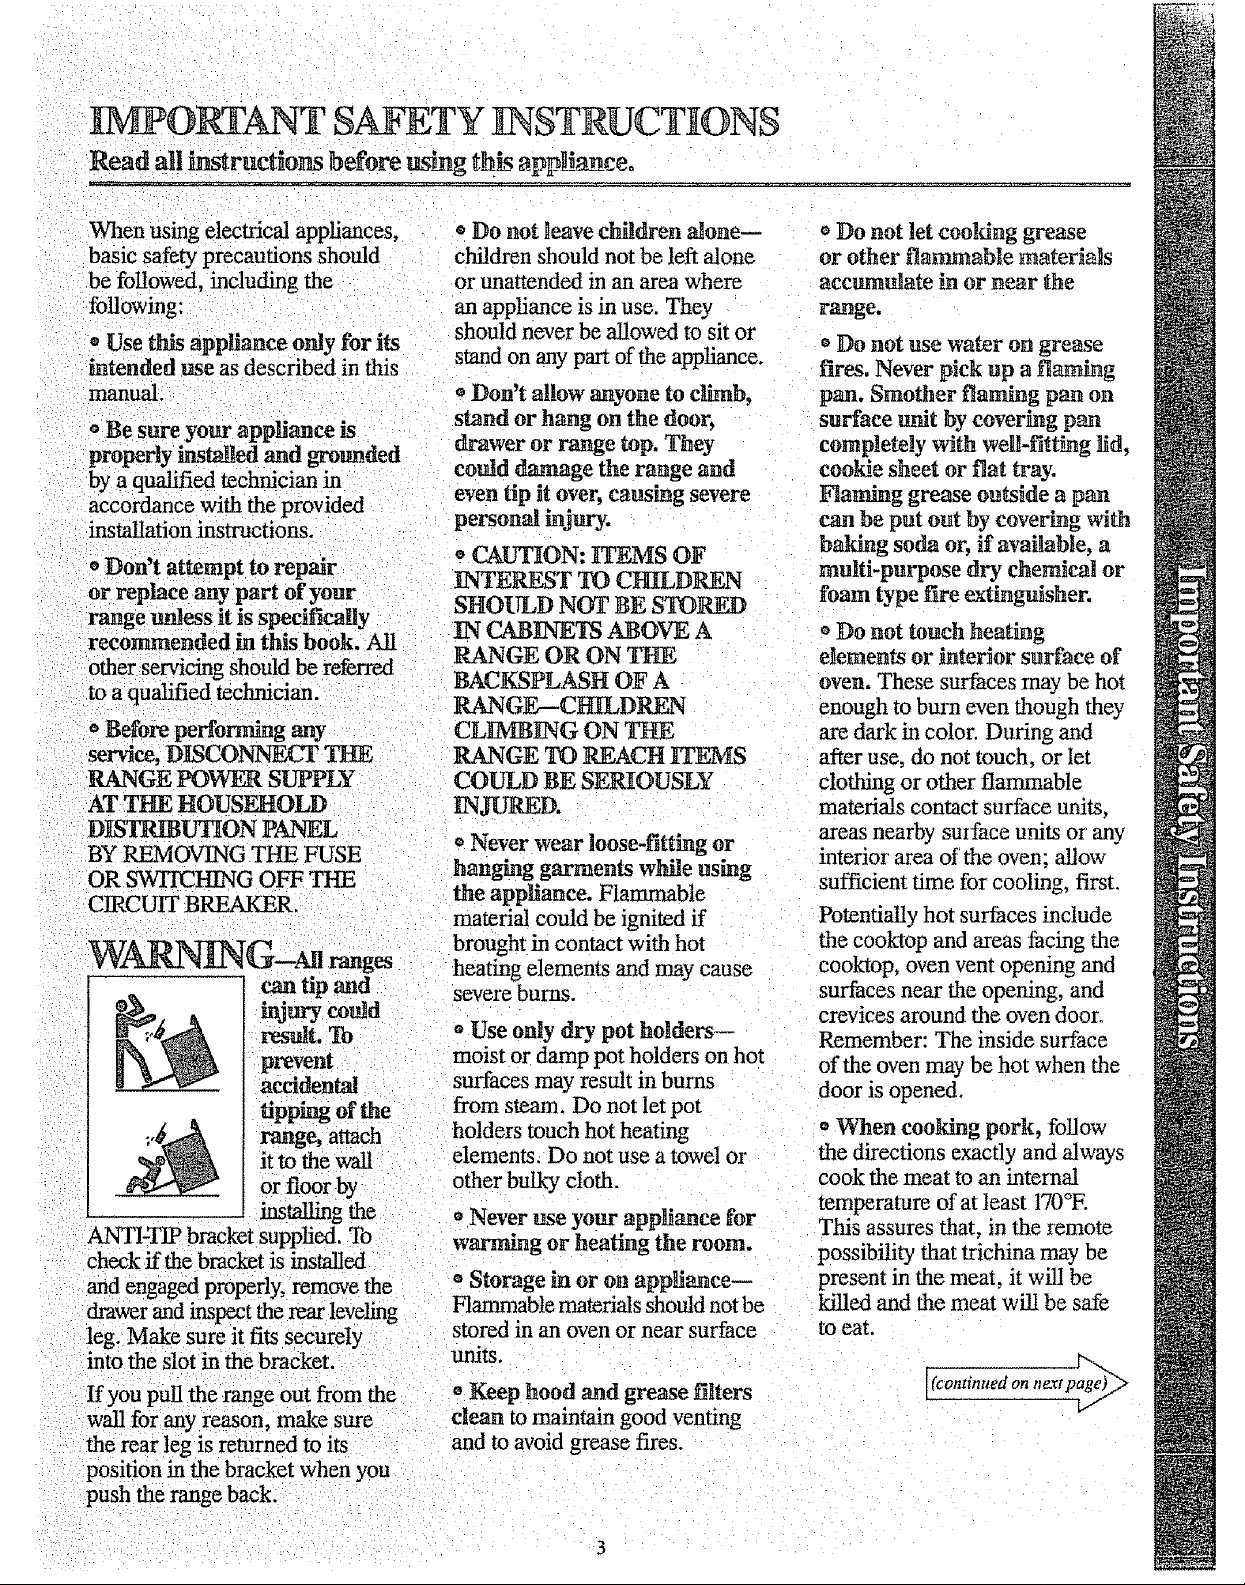
WARN G- r ges
can tip and
_ury could
result, To o Use only dry pot holders--
prevent moist or damp pot holders on hot
accidental surfaces may result in bums
tipping of the from steam. Do not let pot
range, attach holders touch hot heating o When cooking pork, follow
it to the walt elements, Do not use a towel or the directions exactly and always
or floor by other bulky cloth, cook the meat to an internal
installing the o Never use your appliance for This assures that, in the remote
ANTI-TIP bracket supplied, To warming or heating the room.
check ff the bracket is installed
and engaged properly, remove the o Storage in or on appUance--
drawer and inspect the rear leveling Flammable materials should not be
leg. Make sure it fits securely stored in an oven or near surface
into the slot in the bracket, units.
BACKSPLASH OF A
RANGE-CHILDREN
CLIMBING ON THE
RANGE TO REACH ITEMS
COULD BE SERIOUSLY
INJURED.
+ Never wear loose-fitthlg or
hanging garments while using mterior area of the oven; allow
the appliance. Flammable sufficient time for cooling, first.
material could be ignited if
brought in contact with hot
heating elements and may cause
severe bums.
o Do not let coo!ring grease
or other flammable materials
accumulate in or near the
range.
o Do not use water on grease
fh'es. Never pick up a flam_g
pan. Smother flaming pan on
surface unit by covering pan
completely with well-fitting _d,
cookie sheet or fiat tray.
.... grease outside a pan
can be put out by coverNg with
baking soda or, if available, a
multi-purpose dry chemical or
foam type f'we extinguisher.
elements or interior surface of
oven, These surfaces may be hot
enough to bum even though they
are dark in color. During and
after use, do not touch, or let
clothing or other flammable
materials contact surface units,
areas nearby surface units or any
Potentially hot surfaces include
the cooktop and areas facing the
cooktop, oven vent opening and
surfaces near the opening, and
crevices around the oven door,
Remember: The inside surface
of the oven may be hot when the
door is opened.
temperature of at least 170°E
possibility that trichina may be
present in the meat, it will be
killed and the meat wil! be safe
to eat.
If you pull the range out from the
wall for any reason, make sure
the rear leg is returned to its
position in the bracket when you
push the range back.
o Keep hood and grease filters
clean to maintain good venting
and to avoid grease fires.
[(continued on tmrt p_
ORTANT SAFETY PqSTRUCTI[ONS continued>
Oven
o Stand away from range when
opening oven door. Hot air or
steam which escapes can cause
burns to hands, face and!or eyes.
Don't heat unopened food
containers in the oven. Pressure
could build up and the container
could burst, causing an injury.
o Keep oven vent duct
unobstructed.
o Keep oven free from grease
buildup.
o Place oven shelf in desired
position while oven is cool. If
shelves must be handled when
hot, do not let pot holder contact
heating units in the oven.
Pulling out shelf to the
shelf stop is a convenience in
lifting heavy foods. It is also a
precaution against burns from
touching hot surfaces of the
door or oven wails.
o When using cooking or
roasting bags i oven, follow
the manufacturer's directions.
o Do not use your oven to dry
newspapers. If overheated, they
can catch fire,
Don't use aluminum foil
anywhere in the oven except as
described in this book. Misuse
could result in a fire hazard or
damage to the range.
"n
Self-Cleaning Oven
* Do not clean the door gasket
before reading special cleaning
instructions on page 25. The
door gasket is essential for a good
seal. Be careful not to rub, damage
or move it.
* Do not use oven cleaners. No
commercial oven cleaner or oven
liner protective coating of any
kind should be used in or around
any part of the oven.
o Clean only parts listed in this
Use and Care Book.
o Before serf-cleaning the oven,
remove broiler pan and other
utensils.
Surface Cooking Units
o Use proper pan size--This
appliance is equipped with one
or more surface units of different
size_ Select utensils having flat
bottoms large enough to cover
the surface unit heating element.
The use of undersized utensils
will expose a portion of the
heating element to direct contact
and may result in ignition of
c!othing. Proper relationship
of utensil to surface unit will
also improve efficiency.
Never leave surface units
unattended at high heat settings.
Boilover causes smoking and
greasy spillovers that may catch
on fire.
o Don't assume that you know
how to operate all parts of the
range. Some features may work
differently from those on your
previous range.
o Clean cooktop with caution.
If a wet sponge or cloth is used
to wipe spills on a hot cooking
area, be careful to avoid steam
bum. Some cleansers can produce
noxious fumes if applied to a hot
surface,
o Do not cook on a broken
.................. or cleaning
solution may penetrate a broken
cooktop and create a risk of
electrical shock° Contact a
qualified technician immediately
should your cooktop become
broken.
,, Only certain types of glass,
glass/ceramic, earthenware or
other glazed containers are
suitable for range-top service;
others may break because of the
sudden change in temperature.
(See section on "Surface
Cooldng" for suggestions.)
o To minimize the possibility of
lmrns, ignition of flammable
materials, and spillage, the
handle ofa containei should be
turned toward the center of the
range without extending over
nearby surface units.
o Always turn surface unit to
OFF before removing utensil.
o Keep an eye on foods being
fried at HIGH or MEDIUM
HIGH heats.
o Use of decorative metal
covers on surface elements is
not recommended. If a covered
element is turned on, element
burnout could result,
When flaming foods under
the hood, turn the fan off. The
fan, ff operating, may spread
the flame.
o Foods for frying should be as
dry as possible, Frost on frozen
foods or moisture on fresh foods
can cause hot fat to bubble up
and over sides of pan°
o Use little fat for effective
shallow or deep-fat frying.
Filling the pan too full of fat can
cause spillovers when food is
added.
• If a combination of oils or
fats will be used in frying, stir
together before heating, or as fats
melt slowly.
o Always heat fat slowly, and
watch as it heats.
o Use deep fat thermometer
whenever possible to prevent
overheating fat beyond the
smelting point.
SAVE THFAE
E STRUCTIONS
Energyogav T ps
Oven Cooking
Surface Cook g o
"Use :€ookware of medium weight
aluminum, with fight-fitting covers,
and flat bottoms which completely
cover the heated portion of the
surfaceunit.
Cook fresh vegetables with a
minimum amount of water in a
covered pan.
o Watch foods when bringing them
quickly to cooking temperatures at - During baldng, avoid frequent
high heat. When food reaches door openings. Keep door open as
cooking temperature, reduce heat
immediately to lowest setting that
will keep it cooIdng,
o Use residual heat with surface
Cooking whenever possible. For
example, when cooking eggs in the
shell, bring water and eggs to boil,
then turn to OFF position and Cover
with lid to complete the cooking.
_,Use correct heat for cooking task: casserole, meat loaf, chicken or
HI--for rapid boil (if time allows, roast. Choose foods that cook at the
do not use high heat to start), same temperature and in
MEDIUM HI--quick browning.
.... . _ . o Use residual heat in the oven
lvm_--sJow irymg, whenever possible to finish cooking
WARM--finish cooking most casseroles, oven meals, etc. Also
quantifies, simmer--double boiler add rolls or precooked desserts to
heat, finish cooking, and special for warm oven, using residual heat to
small quantifies, warm them.
LO--to maintain serving
temperature of most foods.
, o When boiling water for tea or
Coffee, heat only amount needed.
It is not economical to boil a
container full of water for one
or two cups.
o Preheat oven only when
necessary. Most foods will cook
satisfactorily without preheating.
If you find preheating is necessary,
listen for the beep, and put food in
oven promptly after the oven is
preheated
Always tmn oven OFF before
removing food.
short a time as possible if it is
opened.
e Be sure to wipe up excess spillage
before starting the self-cleaning
operatiom
o Cookcomplete oven meals instead
ofjust one food item. Potatoes,
other vegetables, and some desserts
will cook together with a main-dish
approximately the same time.
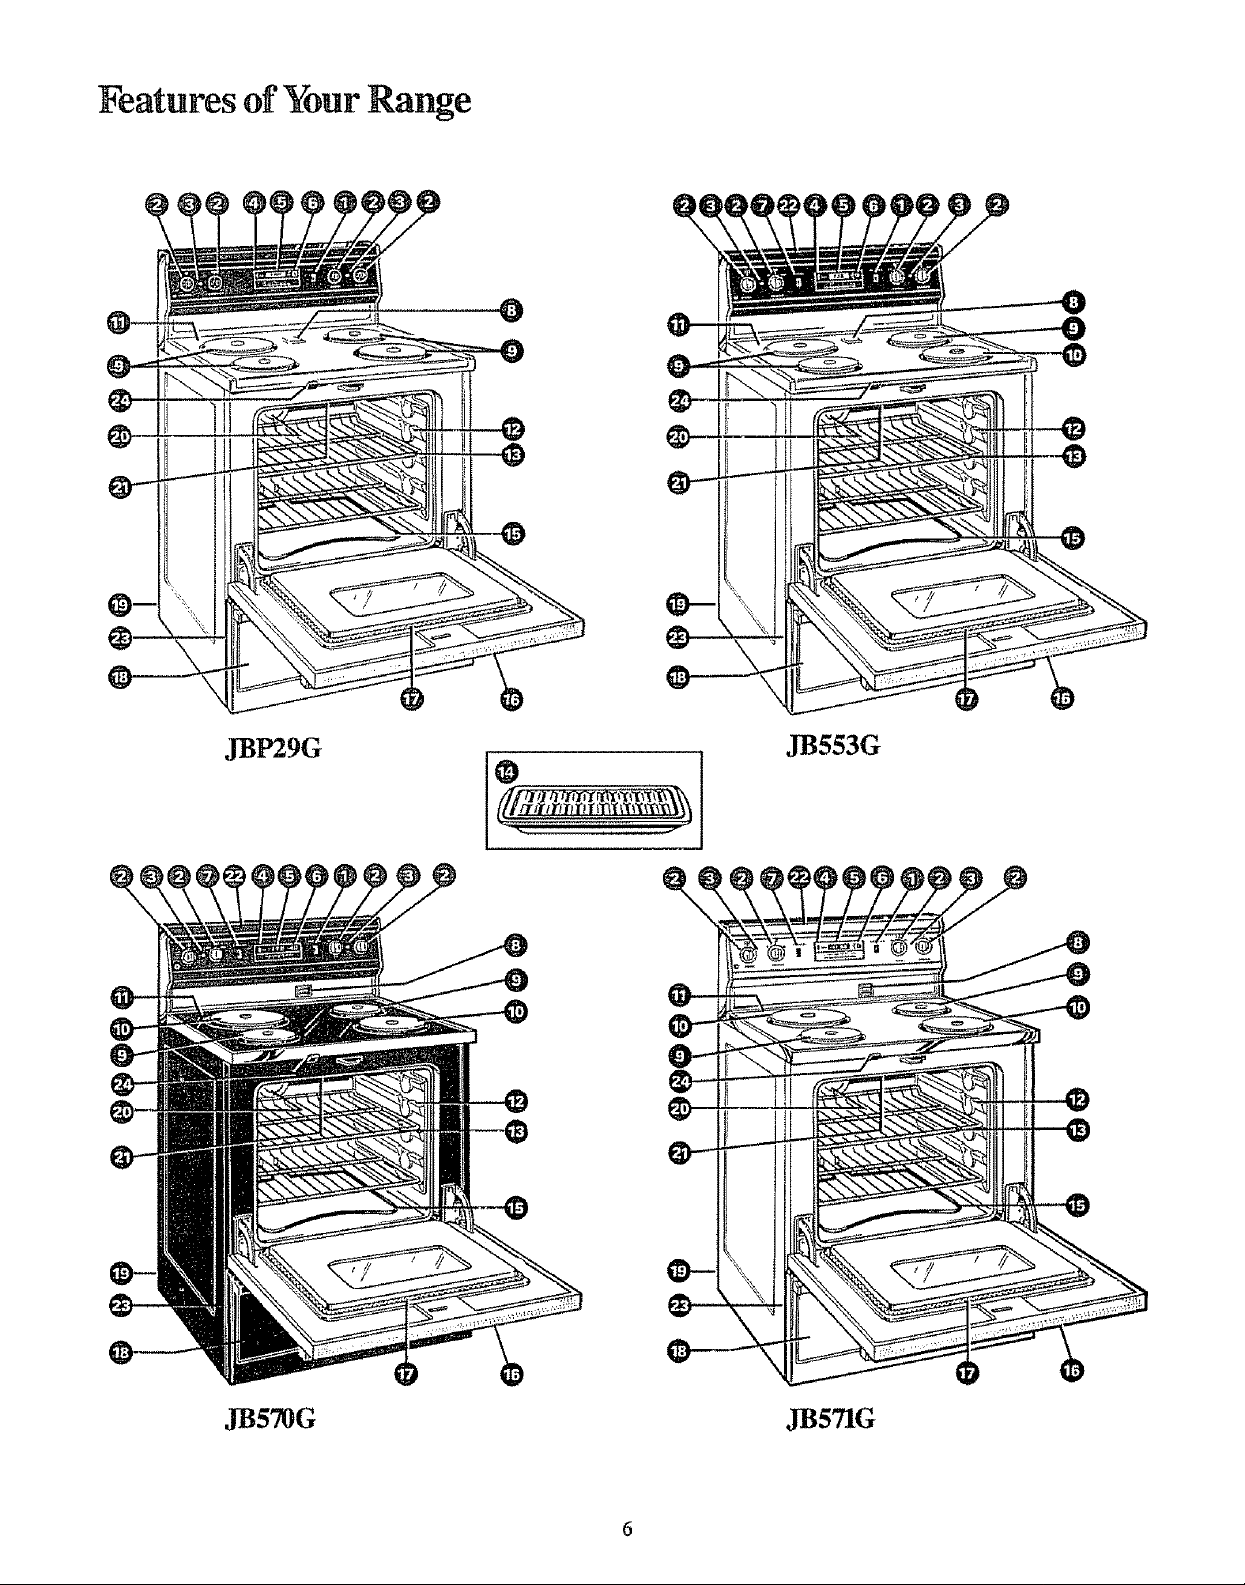
Features of Your Range
JBP29G
JB553G
JB570G
JB571G
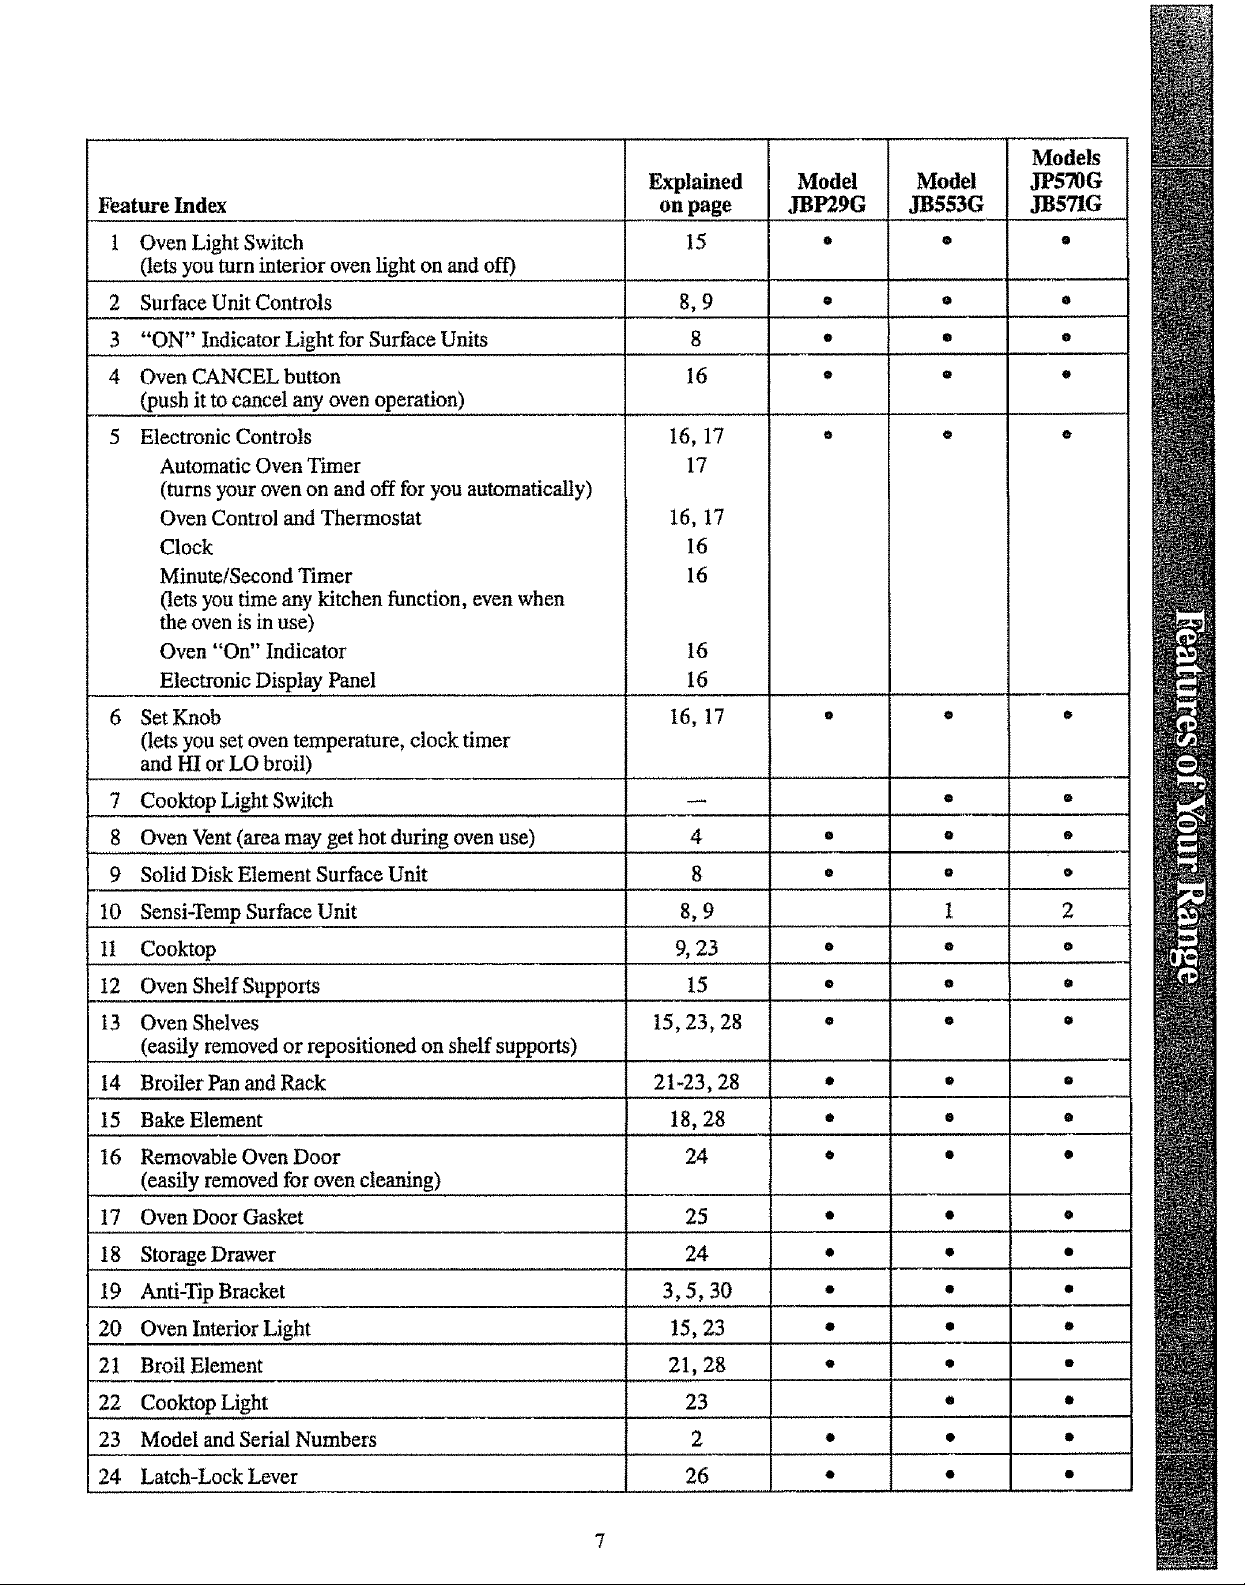
Feature Index
1 Oven Light Switch
(lets you turn interior oven light on and off)
2 Surface Unit Controls
3
"ON" Indicator Light for Surface Units : 8
4 Oven CANCEL button
(push it to cancel any oven operation)
5 Electronic Controls
Automatic Oven Timer
(turns your oven on and off for you automatically)
Oven Control and Thermostat
Clock
Minute/Second Timer
(lets you time any kitchen function, even when
the oven is in use)
Oven "On" Indicator
Electronic Display Panel
6 Set Knob
(lets you set oven temperature, clock timer
and HI or LO broil)
7 Cooktop Light Switch
8 Oven Vent (area may get hot during oven use)
9 Solid Disk Element Surface Unit
Explained
on page
15
8,9
16
16, 17
17
16, 17
16
16
16
16
16, 17
4
8
Model
JBP29G
o
o @
• •
o
o
Model
JB553G
o
• •
• •
o o
Models
JP570G
JB571G
o
10 Sensi-Temp Surface Unit
It Cooktop
12 Oven Shelf Supports
13 Oven Shelves
(easily removed or repositioned on shelf supports)
14 Broiler Pan and Rack
15 Bake Element
16 Removable Oven Door
(easily removed for oven cleaning)
....17 Oven Door Gasket
18 Storage Drawer
19 Anti-Tip Bracket
20 Oven Interior Light
2t Broil Element
22 Cooktop Light .....
23 Model and Serial Numbers
24 Latch-Lock Lever
8,9
9, 23
15
15, 23, 28
21-23, 28
18, 28
24
25
24
3,5,30
15, 23
21,28
23
2
26
o
• •
• •
II
o
o
,, ,, ,,,,,,,,,,,, ......
1 2
• •
o
o
• •
• •
• •
• •
• o
t •
• •
a
o
Surface Cooking
BeforeUshagYourCool¢ p
forthe First Time
The top working surface of solid
disk elements have a protective
coating which must be hardened
before using the elements for the
first time. To harden this coating,
the solid disk elements should be
heated without a pan for a short
period of time (regular elements
at HI setting and Sensi-Temp
element at maximum setting for
3 to 5 minutes).
There will be some smoke and
odor; this is normal° Heating of
the solid disk element will
change the stainless steel trim
rings to a gold color.
THE SOLID DISK ELEMENT
PROTECTIVE COATING MUST BE
HARDENED TO HELP PROTECI"
THE ELEMENT OVER ITS LIFE
General Information
About Solid Disk Elements
Using a solid disk element is quite
similar to using an electric coil,
with which you probably are
familiar. With both types of surface
units you will enjoy the cleanliness
of electricity and the benefits of
retained heat in the elements.
However, there are differences,
o Solid disk elements do NUF glow
red, even at HI setting..
* Solid disk elements reach
temperature a little slower, and
hold heat longer than conventional
elements. Solid disk elements have
very even heat distribution_ Since
solid disk elements hold heat
longer, you may wish to turn the
element off sooner, and take
advantage of the residual heat.
The amount of residual heat is
dependent upon the quantity and
type of food, the material and
thickness of the pan and the
setting used for' cooking,
• The ted dot in the center of the solid
disk element indicates built-in
tempeiature limiters that
automatically reduce the heat if a
pan boils dry, if the element is
turned on without a pan or if the
pan is not making enough contact
with the surface of the element,
The red dots will wear off with use
without affecting the perfotxnance
of the elements.
oThere is retained heat in the elemem
On boilovers, wait for element to
cool before cleaning element area.
* Solid disk element cooking takes
you a step closer to easier cleanup,
because the cooking surface is
sealed against spills and there are
no drip pans or burner box to clean,
* You must use proper fiat
bottomed cookware, not cookware
that is warped, convex, or concave.
Improper cookware will cause
unsatisfactory cooking results.
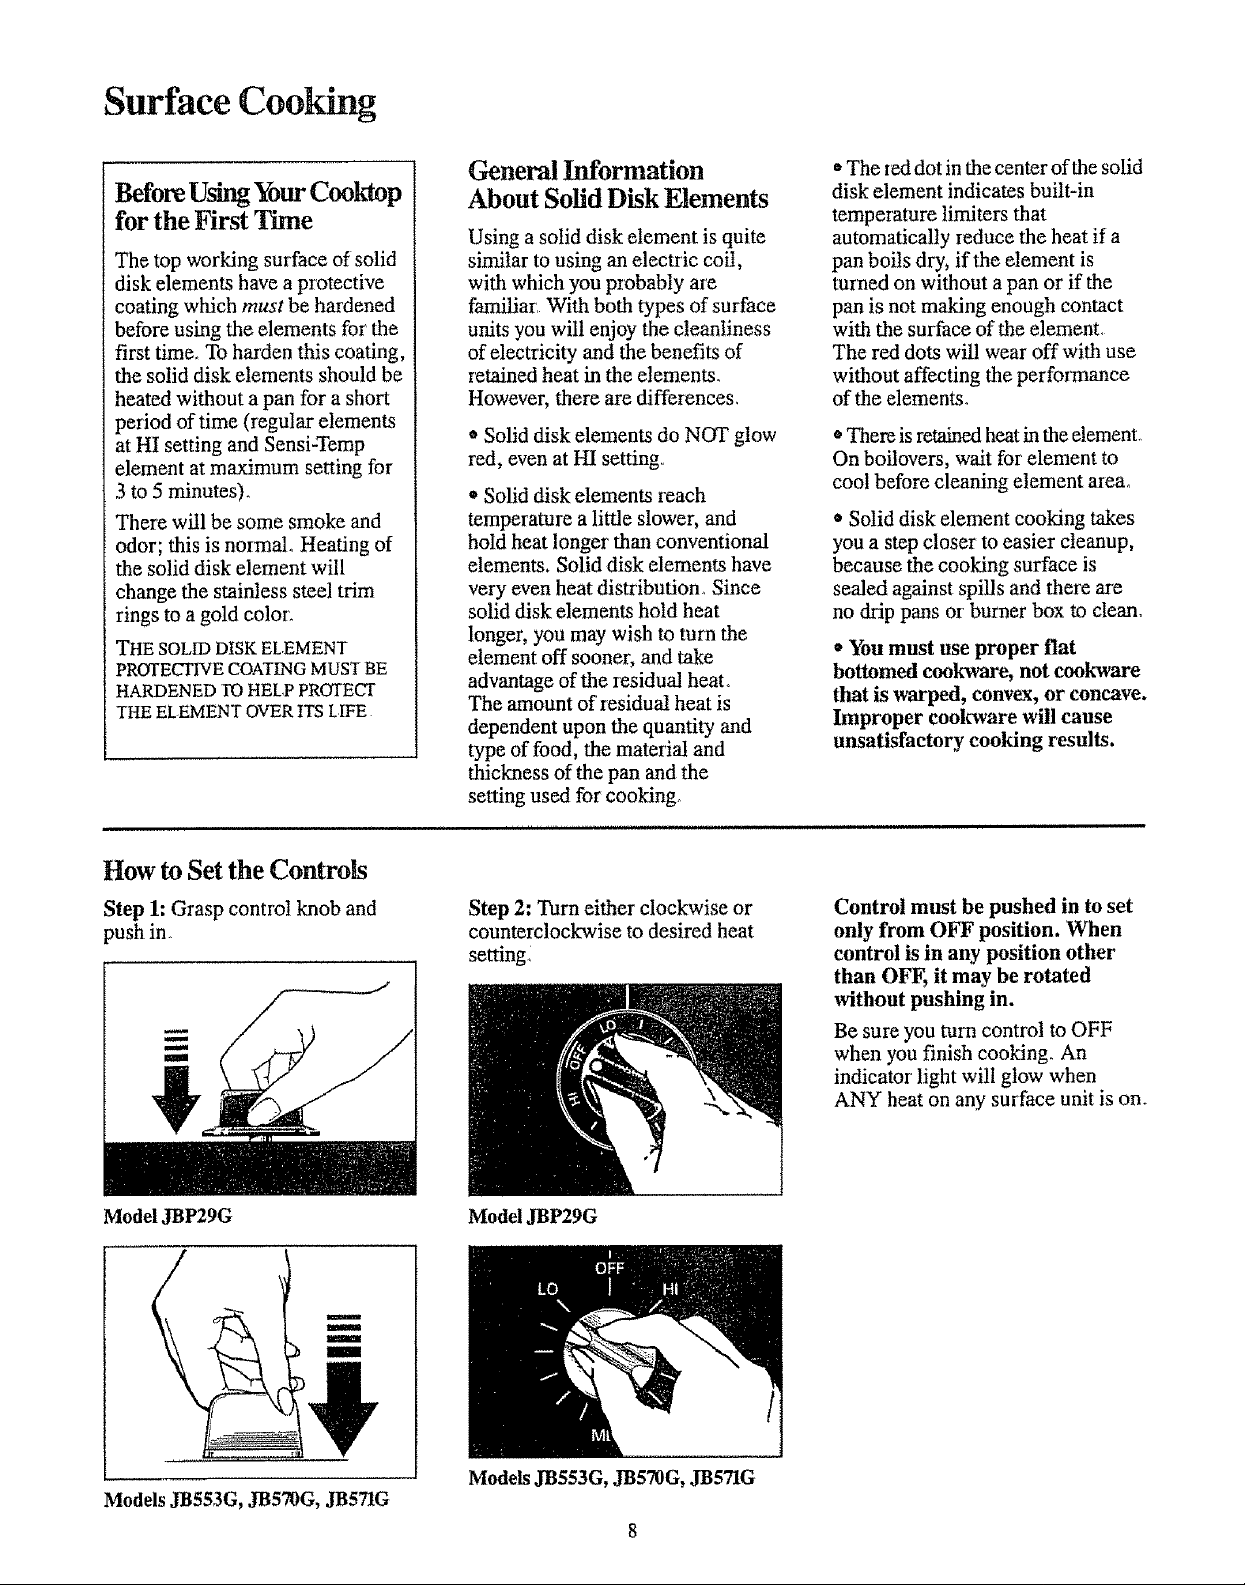
How to Set the Controls
Step 1: Grasp control knob and
push in A
Model JBP29G
m
III
Step 2: Turn either clockwise or
counterclockwise to desired heat
settingl
Model JBP29G
Control must be pushed in to set
only from OFF position. When
control is in any position other
than OFF, it may be rotated
without pushing in.
Be sure you turn control to OFF
when you finish cooking. An
indicator light will gtow when
ANY heat on any surface unit is on.
Models JB553G, JB570G, JB571G
Models JB553G, J-B570G, JB571G
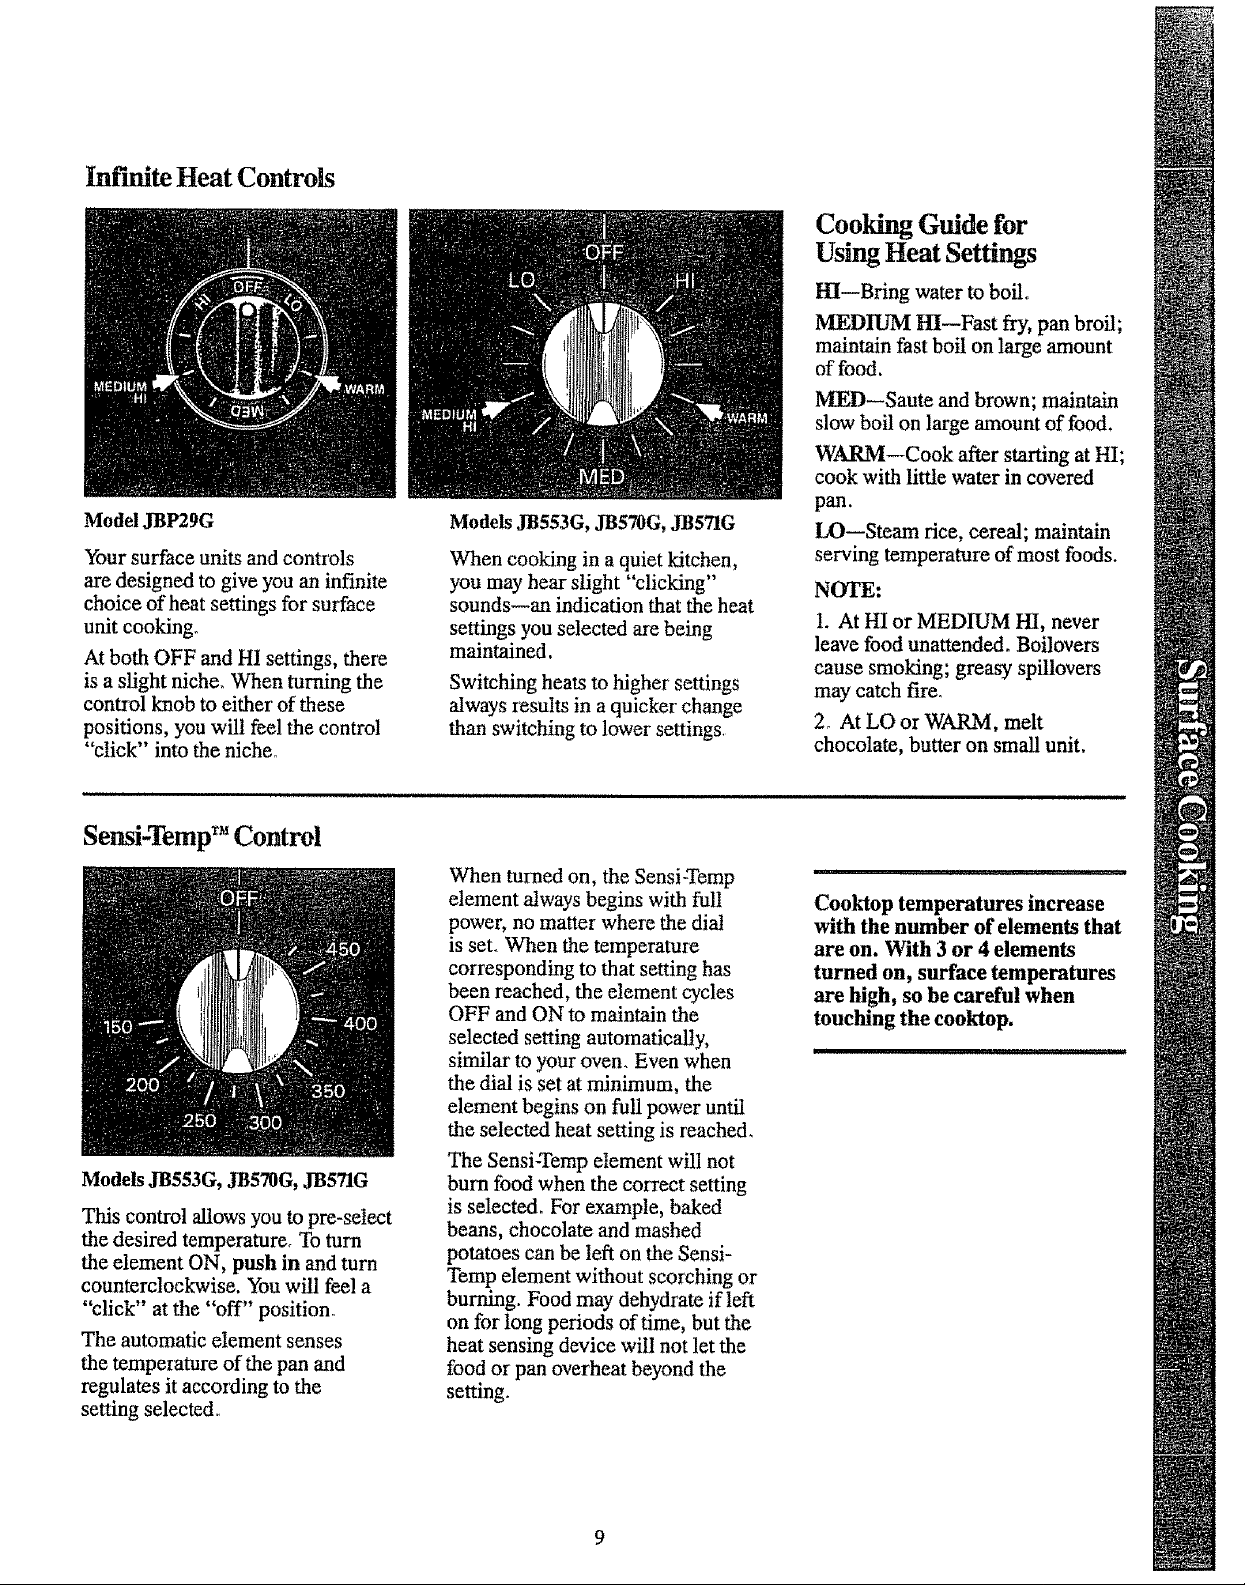
Inf'mite Heat Controls
Model JBP29G
Your surface units and controls
are designed to give you an infinite
choice of heat settings for surface
unit cooking.
At both OFF and HI settings, there
is a slight niche. When turning the
control knob to either of these
positions, you will feel the control
"click" into the niche,
Models JB553G, JB570G, JB571G
When cooking in a quiet kitchen,
you may hear slight "clicking"
sounds--an indication that the heat
settings you selected are being
maintained,
Switching heats to higher settings
always iesults in a quicker change
than switching to lower settings,
Cooldng Guide for
Using Heat Settings
HI--Bring water to boilo
MEDIUM HI--Fast fry, pan broil;
maintain fast boil on large amount
of food.
1VLED--Saute and brown; maintain
slow boil on large amount of food,
WARM--Cook after starting at HI;
cook with little water in covered
pan.
LO--Steam rice, cereal; maintain
serving temperature of most foods.
N(_rE:
1. At HI or MEDIUM HI, never
leave food unattended. Boilovers
cause smoking; greasy spitlovers
may catch fire.
2. At LO or WARM, melt
chocolate, butter on small unit,
Sensi-Temp TM Control
Models JB553G, JB570G, JB571G
This control allows you to pre-select
the desired temperature. To turn
the element ON, push in and turn
counterclockwise. You will feel a
"click" at the "off" position.
The automatic element senses
the temperature of the pan and
regulates it accolding to the
setting selected.
When turned on, the Sensi-Temp
element always begins with full
power, no matter where the dial
is set. When the temperature
corresponding to that setting has
been reached, the element cycles
OFF and ON to maintain the
selected setting automatically,
similar to your ovem Even when
the dial is set at minimum, the
element begins on full power until
the selected heat setting is reached.
The Sensi-Temp element will not
burn food when the correct setting
is selected. For example, baked
beans, chocolate and mashed
potatoes can be left on the Sensi-
Temp element without scorching or
burning. Food may dehydrate if left
on for tong periods of time, but the
heat sensing device will not let the
food or pan overheat beyond the
setting.
Cooktop temperatures increase
with the number of elements that
are on. With 3 or 4 elements
turned on, surface temperatures
are high, so be careful when
touching the cooktop.
Solid Disk Element Cookware Tips
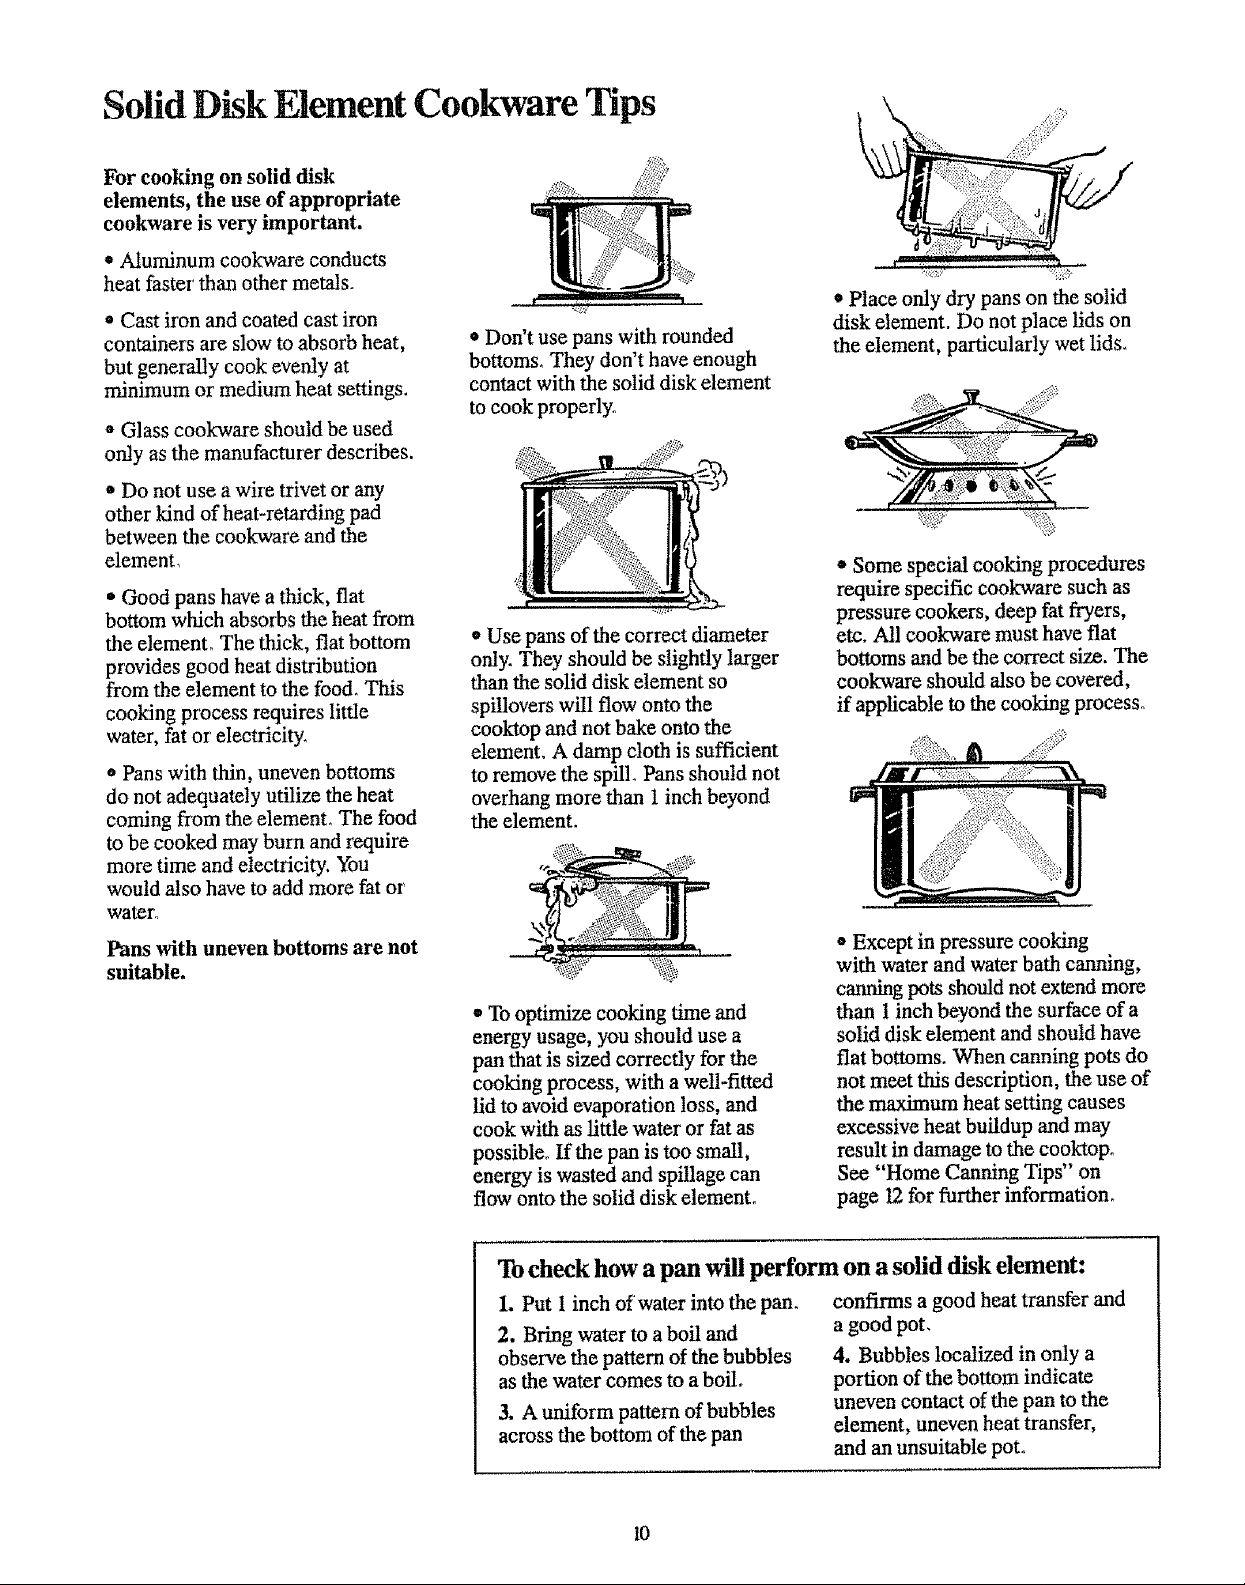
For cooking on solid disk
elements, the use of appropriate
cookware is very important.
* Aluminum cookware conducts
heat faster than other metals.
* Cast iron and coated cast iron
containers are slow to absorb heat,
but gene:ally cook evenly at
minimum or medium heat settings.
o Glass cookware should be used
only as the manufacturer describes.
• Do not use a wire trivet or any
other kind of heat-retarding pad
between the cookware and the
element,
• Good pans have a thick, flat
bottom which absorbs the heat from
the element° The thick, flat bottom
provides good heat distribution
from the element to the food. This
cooking process requires little
water, fat or electricity.
* Pans with thin, uneven bottoms
do not adequately utilize the heat
coming from the element° The food
to be cooked may burn and require
more time and electricity. You
would also have to add more fat or
wate_
Pans with uneven bottoms are not
suitable.
• Don't use pans with rounded
bottoms, They don't have enough
contact with the solid disk element
to cook properly,
• Use pans of the correct diameter
only. They should be slightly larger
than the solid disk element so
spillovers will flow onto the
cooktop and not bake onto the
element. A damp cloth is sufficient
to remove the spill. Pans should not
overhang more than 1 inch beyond
the element.
• To optimize cooking time and
energy usage, you should use a
pan that is sized correctly for the
cooking process, with a well-fitted
lid to avoid evaporation loss, and
cook with as little water or fat as
possible° If the pan is too small,
energy is wasted and spillage can
flow onto the solid disk element_
• Place only dry pans on the solid
disk element. Do not place lids on
the element, particularly wet lids.
)
o Some special cooking procedures
require specific cookware such as
pressure cookers, deep fat fryers,
etc. All cook-ware must have flat
bottoms and be the correct size. The
cookware should also be covered,
if applicable to the cooking process°
o Except in pressure cooking
with water and water bath canning,
canning pots should not extend more
than 1 inch beyond the surface of a
solid disk element and should have
fiat bottoms. When canning pots do
not meet this description, the use of
the maximum heat setting causes
excessive heat buildup and may
result in damage to the cooktop.
See "Home Canning Tips" on
page 12 for further information.
Tocheck how a pan will perform on asolid disk element:
L Put 1 inch of water into the pan.
2. Bring water to a boil and
observe the pattern of the bubbles
as the water comes to a boil.
3. A uniform pattern of bubbles
across the bottom of the pan
I0
confirms a good heat transfer and
a good pot.
4. Bubbles localized in only a
portion of the bottom indicate
uneven contact of the pan to the
element, uneven heat transfer,
and an unsuitable pot.
Surface Cooldng
Questions & Answers
Q. May I can foods and preserves
on my solid disk dements?
A. Yes, but only use containers
designed for canning purposes.
Check the manufacturer's
instructions and recipes for
pleserving foods Be sure canner
is fiat-bottomed and fits over the
center of solid disk element Since
canning generates large amounts
of steam, be careful to avoid burns
from steam or heat. Canning
should only be done on surface
units° Follow our iecommendations
in the Home Canning Tips section_
Q, Why does the solid disk
element smoke when I first
turn it on?
A. This initial smoking is both
normal and necessary A rust
preventative is applied to each
element at the factory. When the
unit is turned on for the first time,
the coating will burn off the
element areas° This takes
approximately five minutes and
should be done without any pans
on the element. Otherwise, the
coating wil! stick to the pan_
Q. Why is the cooktop hot to
the touch?
A. More heat is transferred to the
cooktop by the solid disk elements
than by conventional coils because
the elements are clamped securely
to the cook-top. This, of course,
eliminates spil!overs from getting
inside the cooktop chassis_ The
secret to keeping the cook-top
comfmtably cooler is to turn the
cooktop on only after the cookware
and its contents are placed on the
element. More heat will then be
tmnsfeired to the cookwaze and the
food rather than the cooktop. The
cooktop temperature will not cause
damage to the cabinets, countertops
or cookware,
Q. Why am I overcooking my
food with the new solid disk
elements?
A. The solid disk elements are
very energy-efficient and retain
heat much longer than the coil
elements, Food wilt boil or fly
three to five minutes after the
controls are turned off. We
recommend that you begin cooking
at lower settings than you have in
the past and gradually increase or
decrease heat as desiled. The
energy savings are significant°
Q. Can I use special cooking
equipment, like an oriental wok,
on my solid disk elements?
A. Cookware without flat surfaces
is not recommended° The life of
your solid disk elements can be
shortened and the range cooktop
can be damaged from the high heat
needed for this type of cooking_
Qo Brhy is the porcelain finish on
my containers coming off?.
A. If you select a heat setting
higher than required for the
container material, and leave it,
the finish may smoke, crack, pop,
or burn depending on the pot or
pan, Also, a too high heat for long
periods, and small amounts of dry
food, may damage the finish.
Q. Why does it take a long time
to cook my food?
A. It doesn't. The extra time it
takes compared to the conventional
coil element is measured in seconds,
not minutes. These few seconds are
due to the greater mass ofthe element°
If the food is cooking slowly, it is
because the pots and pans are warped
or have an uneven bottom surface.
If flat bottom pots and pans are
used, cooking performance of the
solid disk element closely parallels
that of the coil element with less
energy consumption.
I1
 Loading...