

GE JBP22P, JBP22GP, JBP26GP, JBP24GP, JBP26APJBP26WP Use And Care And Installation Manual
...Page 1
—
—
Aldm ~Ofi
Anti-TipDevice
ApplianceRegistration
C-g Tips
Carewd Cleaning
ClocVTher 12
ConsumerServices
Energy-SavingTips
Featies
Ins*tion hstructions
Levehg
ModelandSerialNmbers
men 13-23
Baking,BakingGtide
Brohg, Broihg Guide
ControlSettings 13
DoorRemoval
Light;BtibReplacement 13,22
Roasting,RoastingGuide 16,17
SelfCle*g
4,18
3,27,29
2
9 StietyInstructions
22-25
31
5 warranty
6,7
27-29
5
2
14,15
18,19
22
20,21
~ermostat Adjusment
VentDuct
ProblemSolver
Stice Cooking
ControlSetfi~s
CookwareTips
GEAmswerCentera
800.626.2000
23
22
26
2-4
8-11
8
10,11
BackCover
Mode.kJBP22P
JBP22GP JBP26AP
JBP24GP pP26wP
JBP25GP
JBP26GP
Page 2
Ifis intendedtohelpyou
operateandmaintainyournew
rangeproperly.
Keepit handyforanswersto
your questions.
If youdon’tunderstandsomething
orneedmorehelp,write(include
your phonenumber):
ConsumerAffairs
GEAppliances
AppliancePark
Louisville,KY40225
writedownthemodel
andserialnumbers.
You’llfindthemon a labelon
thefrontof therangebehindthe
rangedoor.
Thesenumbersarealsoonthe
ConsumerProductOwnership
Registration~~d t~a~camewith
your range.Beforesendingin
thiscard,pleasewritethese
numbershere:
ModelNumber
SerialNumber
Usethesem~mbersin any
correspondenceorservicecalls
concerningyourrange.
Ifyoureceived
a damagedrange.ee
Immediatelycontactthedealer(or
builder)thatsoldyoutherange.
save time and money.
Before you request
S~~ViC~e.0
ChecktheProblemSolverinthe
backofthisbook.It listscausesof
minoroperatingproblemsthatyou
cancorrectyourself,
If you need sertiee..e
Toobtainservice,seethe
ConsumerServicespagein
thebackof thisbook.
We’reproudofour serviceand
wantyoutobepleased.If for some
reasonyouwe nothappywiththe
serviceyoureceive,herearethree
stepstofollowforfurtherhelp.
FIRST,contactthepeoplewho
servicedyourappliance.Explain
whyyouarenotpleased.Inmost
cases,thiswillsolvetheproblem.
NEXT,if youarestillnotpleased,
writeallthedetails—including
yourphonenumber—to:
Manager,ConsumerRelations
GEAppliances
AppliancePark
Louisville,KY40225
F~ALLY, if yourproblemis still
notresolved,write:
MajorApplianceConsumer
ActionPanel
20NorthWackerDrive
Chicago,IL60606
IMPORTANT
SAFETY
INSTRUCTIONS
ReadaHhstructions
before
appliance.
IMPORTANT
SAWETYNOTICE
me CaliforniaSafeDrinking
WaterandToxicEnforcement
ActrequirestheGovernorof
Californiatopublishafistof
substancesknowntothestateto
causebirthdefectsorother
reproductiveharm,andrequires
businessestowarncustomersof
potentialexposureto such
substances.
me fiberglassinsulationin
self-cleanovensgivesoffa
verysmallamountofcarbon
monoxideduringthecleaning
cycle.Exposure;an bernini--fiized.
by
orusingi ventilatiofifanor
using ttis
u
ventingwithanopenwindow
Page 3
—. ..____. _..
—.
——
IIVIP(IRTANTSAFETYINSTRUCTIONS
.
usingthisappliance.
~& }i~henusing electricalappliances,
applianceisinuse.Theyshould
c--s’basicsafetv~recautionsshouldbe
neverbeallowedtositorstand
follo~ved.~n~ludingthefollowing:
euTsethisapplianceoIilyfor
itsintendeduseasdescribedin
thismanual.
*Besureyourapplianceis
properly
installedand
grounded
bya qualified
technicianinaccordancewiththe
providedInstallationInstructions.
eDon9tattenlpt to repair
or replaceanypart ofyour
rangeunlessit is specifically
recommendedin this book.All
etherservicingshouldbereferred
toa qualifiedtechnician.
eBeforepetiormingany
Sertice,DIscoNmcT Tm
MNGEPOWERSUPPLY
ATTHEHOUSEHOLD
DISTRIBUTIONPANEL
BYREMOV~G~E FUSE
ORS~T71TCH~G0~ ‘~~
CRCUITBMAK.ER.
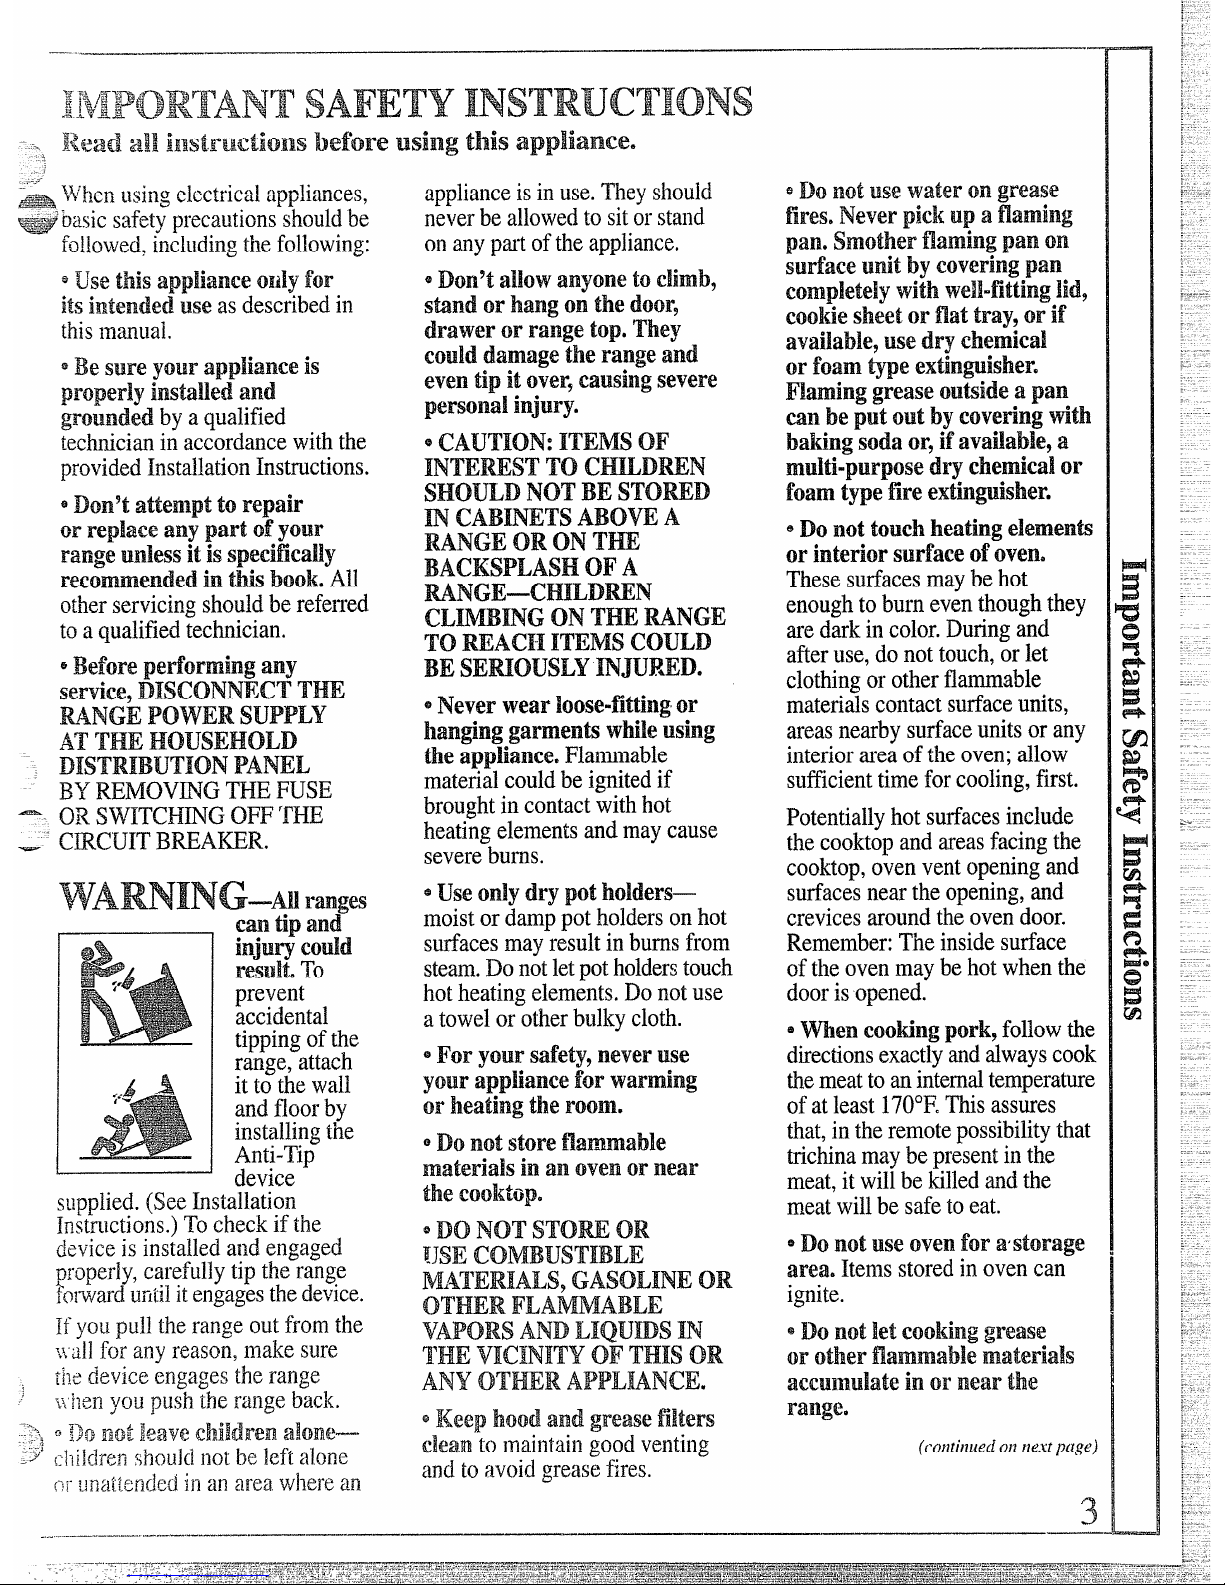
WARNING–AIranges
I
prevent
accidental
tippingofthe
range,attach
it tothewall
andfloorby
installingthe
Anti-Tip
device
onanypartoftheappliance.
e
Don9tallowanyoneto efimb~
Shnd
or hangonthedoor9
drawer or rangetop. They
coulddamagethe
rangeand
eventipit over?causingsevere
personalinjury.
e ~A~~~~~: ~~~~~ ~fi
INmWST TOcm~m~
SHOULDNOTBESTORED
m cABmTs ABOVEA
RANGEORONT~
BACKSPLASHOF
A
MNGE—CHILDWN
cLIMBmGONTHEMNGE
ToMACH ITEMSCOULD
BEsEmousLYmJuRED.
* NeverwearEoose”fittingor
hanginggarmentswhileusing
theappliance,Flammable
materialcouldbeignitedif
broughtincontactwithhot
heatingelementsandmaycause
severeburns.
e
use onlydrypot holders—
moistor~ampjot holdersonhot
surfacesmayresultinburnsfrom
steam.Donotletpotholderstouch
hotheatingelements.Donotuse
atowelorotherbulkycloth.
e
DoNOTSTOW OR
[JSE COMBUSTIBLE
MATERIALS,GASOLINEOR
OTHERFLAMMABLE
VAPORSANDLIQUDSW
THEVICINITYOFTHISOR
ANYOTHERAPPLMNCR.
eDonotuse water ongrease
fires.Neverpickup alflaming
pan.smother namingpanon
Sutiaeeunit
by Covering pan
completelywithwe~l”fittinglid9
cookiesheetor fiat
tray, or if
available9usedry Chemical
orfoamme extin~isher.
Elaminggreaseoubidea pan
canbe
put out by covetingtith
baking
sodaor,ifavailable,a
multi-purpose dry chemicalor
foam
typefireextinguisher.
@Do
not touchheatingelemenh
or interiorsurface ofoven.
Thesesurfacesmaybehot
enoughtoburneventhoughthey
aredarkincolor.Duringand
afteruse,donottouch,orlet
clothingorotherflammable
materialscontactsurfaceunits,
areasnearbysurfaceunitsorany
interiorareaoftheoven;allow
sufficienttimeforcooling,first.
Potentiallyhotsurfacesinclude
thecooktopandareasfacingthe
cooktop,ovenventopeningand
surfacesneartheopening,and
crevicesaroundtheovendoor.
Remember:Theinsidesurface
oftheovenmaybehotwhenthe
doorisopened.
ewhenCootingpork9followthe
directionsexactlyandalwayscook
themeattoaninternaltemperature
ofatleast170°F.Thisassures
that,intheremotepossibilitythat
trichinamaybepresentinthe
meat,itwillbekilledandthe
meatwillbesafetoeat.
~Donotuseovenfor a’storage
area.Itemsstoredinovencan
ignite.
*Donot let cookinggrease
orotherflammablematerials
accu~nulateinornearthe
range.
(ct)fttifliielioflf7e.xtp[ltqe)
3
.... .. ... . ........—...—.—.———-——---
—
—. —.
Page 4
:..
<...-
...
——w
L---
-.
ewhenusing Cootingor
roastingbags inOvenyfollow
themanufacturer’sdirections.
eDonot use yo~r ovento dry
newspapers.If overheated,they
cancatchfire.
eDonot Cleandoorgasket.
me doorgasketisessentialfora
goodseal.Careshouldbetaken
nottorub,damageor lnovethe
gasket.
@Do notuse ovencleaners.No
comercial ovencleaneloroven
linerprotectivecoatingofany
kindshouldbeusedin oraround
allypartoftheoven.
oBeforeself-cleaningtileoven~
removebroilerpallandother
cQoliware*
surfaceCootingunits
euseproper pan sizyTtis
applianceisequippedw~thoneor
moresurfaceunitsofdifferent
size.Selectcookwarehavingflat
bottomslargeenoughtocover
thesurfaceunitheatingelement.
me useofundersizedcookware
willexposeaportionofthe
heatingelementtodirectcontact
andmayresultinignitionof
clothing.Properrelationshipof
cookwaretoburnerwillalso
improveefficiency.
~~e~e~~ea~es~fl~~eti~
una&ndd at E* b.mtSetttilgs.
Bofiovercausessmokingand
greasyspilloversthatmaycatch
onfiie.
eBesuredrip pans and vent
ductsare not coveredand are
in place.~eir absenceduring
cookingcoulddarnagerange
partsandwiring.
e~~~~~~s~~~~~~~~~f~~]~~
Binedrip pansoranywherein
theovenexceptasdescribedin
thisbook.Misusecouldresultin
a shock,firehazardordamageto
therange.
eonly certaintypesofglass9
glas#eeramic9earthenwareor
otherg~azedcontainersare
suitib~eforrange-topsertice;
others
may breakbecauseofthe
suddenchangeintemperature.
(Seesectionon “Surface
Cooking”forsuggestions.)
@Tominimizethepossibilityof
burns, ignitionofflammable
materials,andspillage,the
handleofacontaine~*shouldbe
t~~rnedtowardthecenterofthe
rangewithoutextendingover
nearbysurfaceunits.
eKeepan eyeonfoodsbeing
fried
at highor Inediumhigh
heatsettings.
eToavoidthepossibilityofa
burnor electricshock,always
becetiain that the controlsfor
an sutiaceuni@areatOFW
positionandaUeoiisarecool
beforeattemptingtoremove
theunite
oWhenfladng foodsare
underthehoodyturnthefan
off.Thefan9if IoperatingYmay
spreadtheflame.
oFoodsfor fryingshouldbeas
dry as possible.Frc3tonfrozen
foodsormoistureonfreshfoods
cancausehotfattobubbleup
andoversidesofpan.
9 ~s~~~~~~fat for ~fi~~~~~~
sha~owor deep-fatfrying.
Fillingthepantoofulloffatcan
causespilloverswhenfoodis
added.
e If a ~o~~~~~a~~o~of~~~s~~
fab willbeusedinfrying,stir
togetherbeforeheating,orasfats
meltslowly.
* Alwaysheatfatsiowly9and
watchasitheats.
oUsedeepfatthermometer
wheneverpossibletoprevefit
overheatingfatbeyondthe
smokingpoint.
Page 5
h~t~mg
YourRange
—
—
Yourrange,likemanyother
holl$eho!d
items,isheavyand m
Settk?
intosoftfloor Covetigs such
ascmhionedvhyl or mr~fig.
J$%enmovingthe
rangeonthistype
offlooringusecare,andItis
recommendedthatthesesimpleand
inexpensiveinstructionsbefollowed.
Therangeshouldbe installedona
1/4inchthicksheetof plywood(or
sifilar material)asfollows:
When
thefloor covering ends at thefront
of tlzerange, the
meathattherange
willreston shouldbebuilt up with
plywoodtothesamelevelor
higherthanthefloorcovering.
~s willallowtherange to be
movedforcleaningor servicing.
Forcompleteinformationsee
htallation hstructionsintheback
ofthisbook.
Leveling the Range
Levelingscrewsarelocatedon
eachcomerofthebaseof the
range.Removethebottomdrawer
andyoucanleveltherangeonan
unevenfloorwiththeuseof a
nutdriver.
Toremovedrawer,pulBdrawer
outaMthe way,tiltup the front
andtakeitout.Toreplace
drawer,insertg~idesat backof
drawerbeyondstopon range
glides.Liftdrawerifnecessaryto
inserteasily.Letfrontof drawer
down,thenpushinto close.
surfacecooking
*Usecookwareofmediumweight
aluminum,withtight-fitting
covers,andflatbottomswhich
completelycoverthe heated
portionof the surfaceunit.
eCookfreshvegetableswith a
minimumamountofwaterin a
coveredpan.
~Watchfoodswhenbringingthem
quicklyto cookingtemperaturesat
highheat.Whenfoodreaches
cookingtemperature,reduceheat
immediatelytolowestsettingthat
willkeepit cooking.
eUseresidualheatwithsurface
cookingwheneverpossible.For
example,whencookingeggsin the
shell,bringwaterandeggsto boil,
thenturnto OFFpositionand
covercookwarewithlidto
completethecooking.
ovencooking
ePreheatovenonlywhen
necessary.Mostfoodswillcook
satisfactorilywithoutpreheating.
If youfindpreheatingisnecessary,
watchtheindicatorlight,andput
foodin ovenpromptlyafterthe
lightgoesout.
~AlwaysturnovenOFFbefore
removingfood.
eDuringbaking, avoidfrequent
dooropenings.Keepdooropenas
shortatimeaspossibleif it is
opened.
eBesureto wipeupexcess
spillagebeforestartingtheself-
cleaningoperation.
eCookcompleteovenmeals
insteadofjust onefooditem.
Potatoes,othervegetables,and
somedessertswillcooktogether
witha main-dishcasserole,meat
loaf,chickenor roast.Choose
foodsthatcookatthesame
temperaturemd in approximately
thesametime.
*Useresidualheatin theoven
wheneverpossibleto finish
cookingcasseroles,ovenmeals,
etc.Also addrollsor precooked
dessertsto warmoven,using
residualheatto warmthem.
5
Page 6
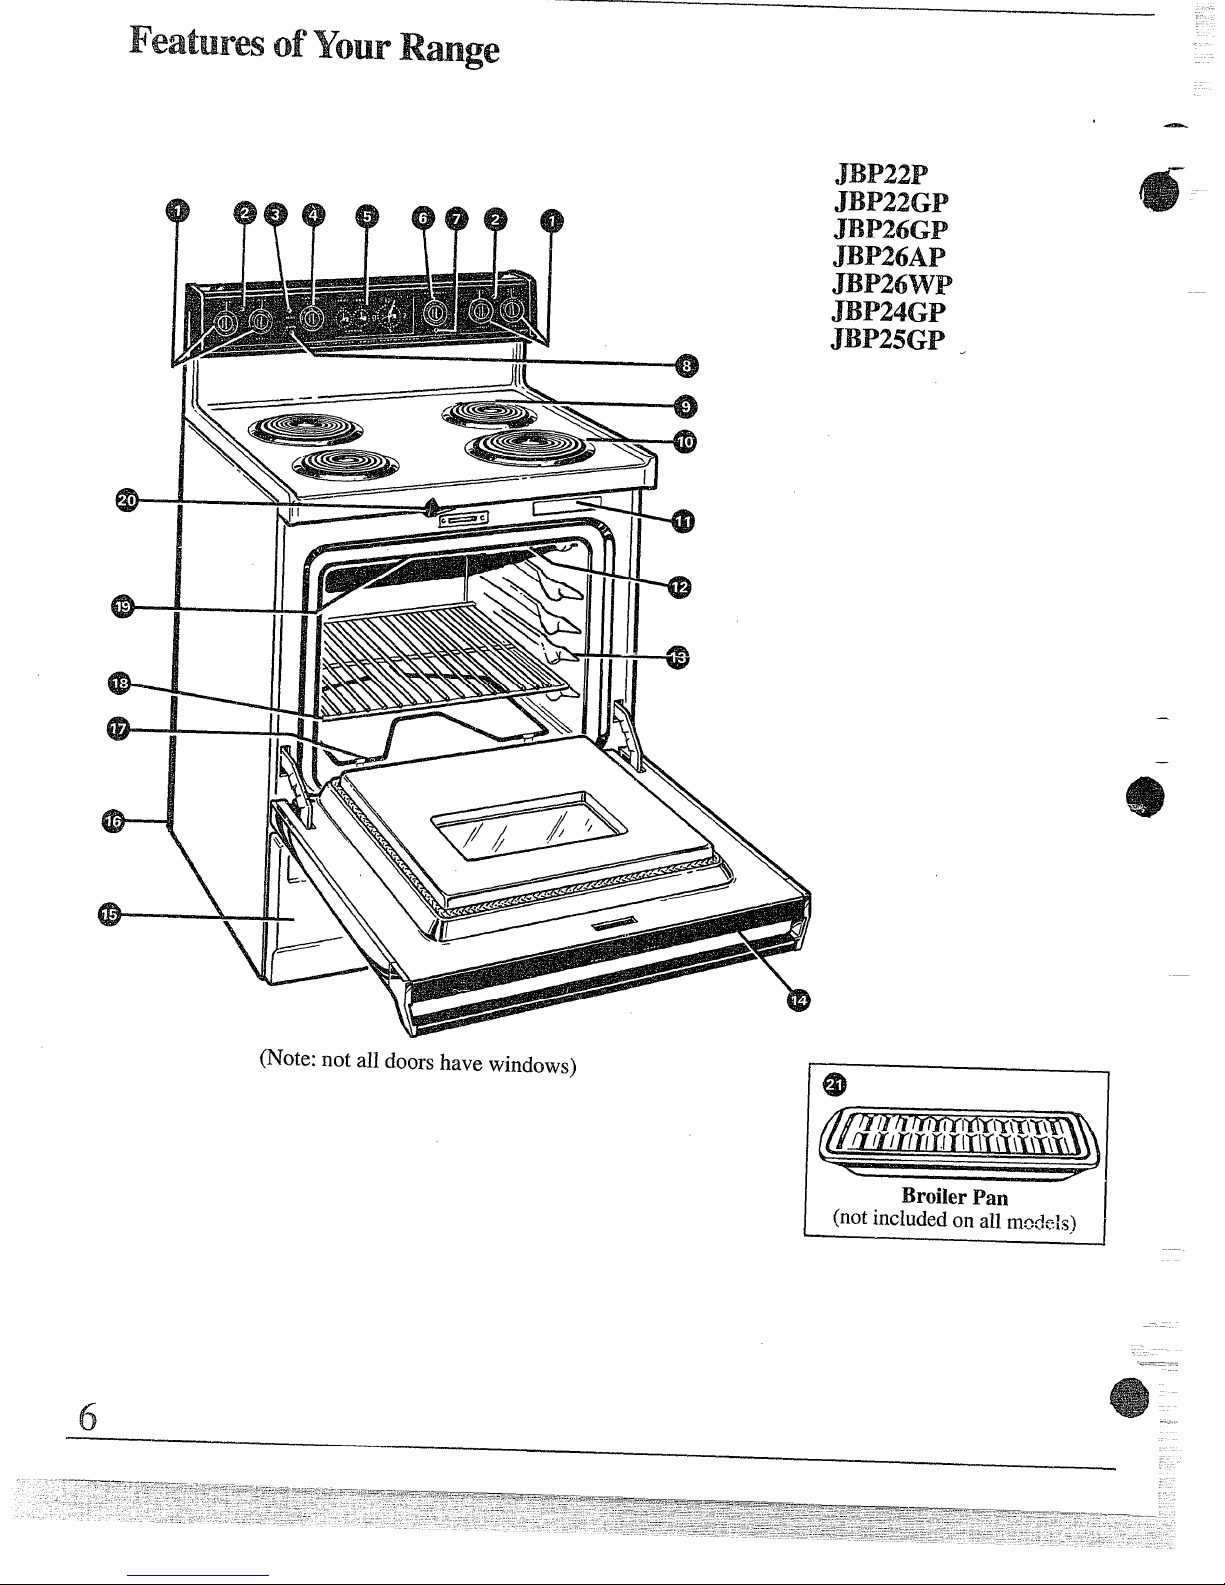
FeaturesofYourRange
*
+
d
:
(Note:
not all doorshave windows)
,?BP22P
JBP22GP
JBP26GP
JBP26AP
JBP26WP
JBP24GP
JBP25GP
.
—
—
6
Page 7
—
Explained
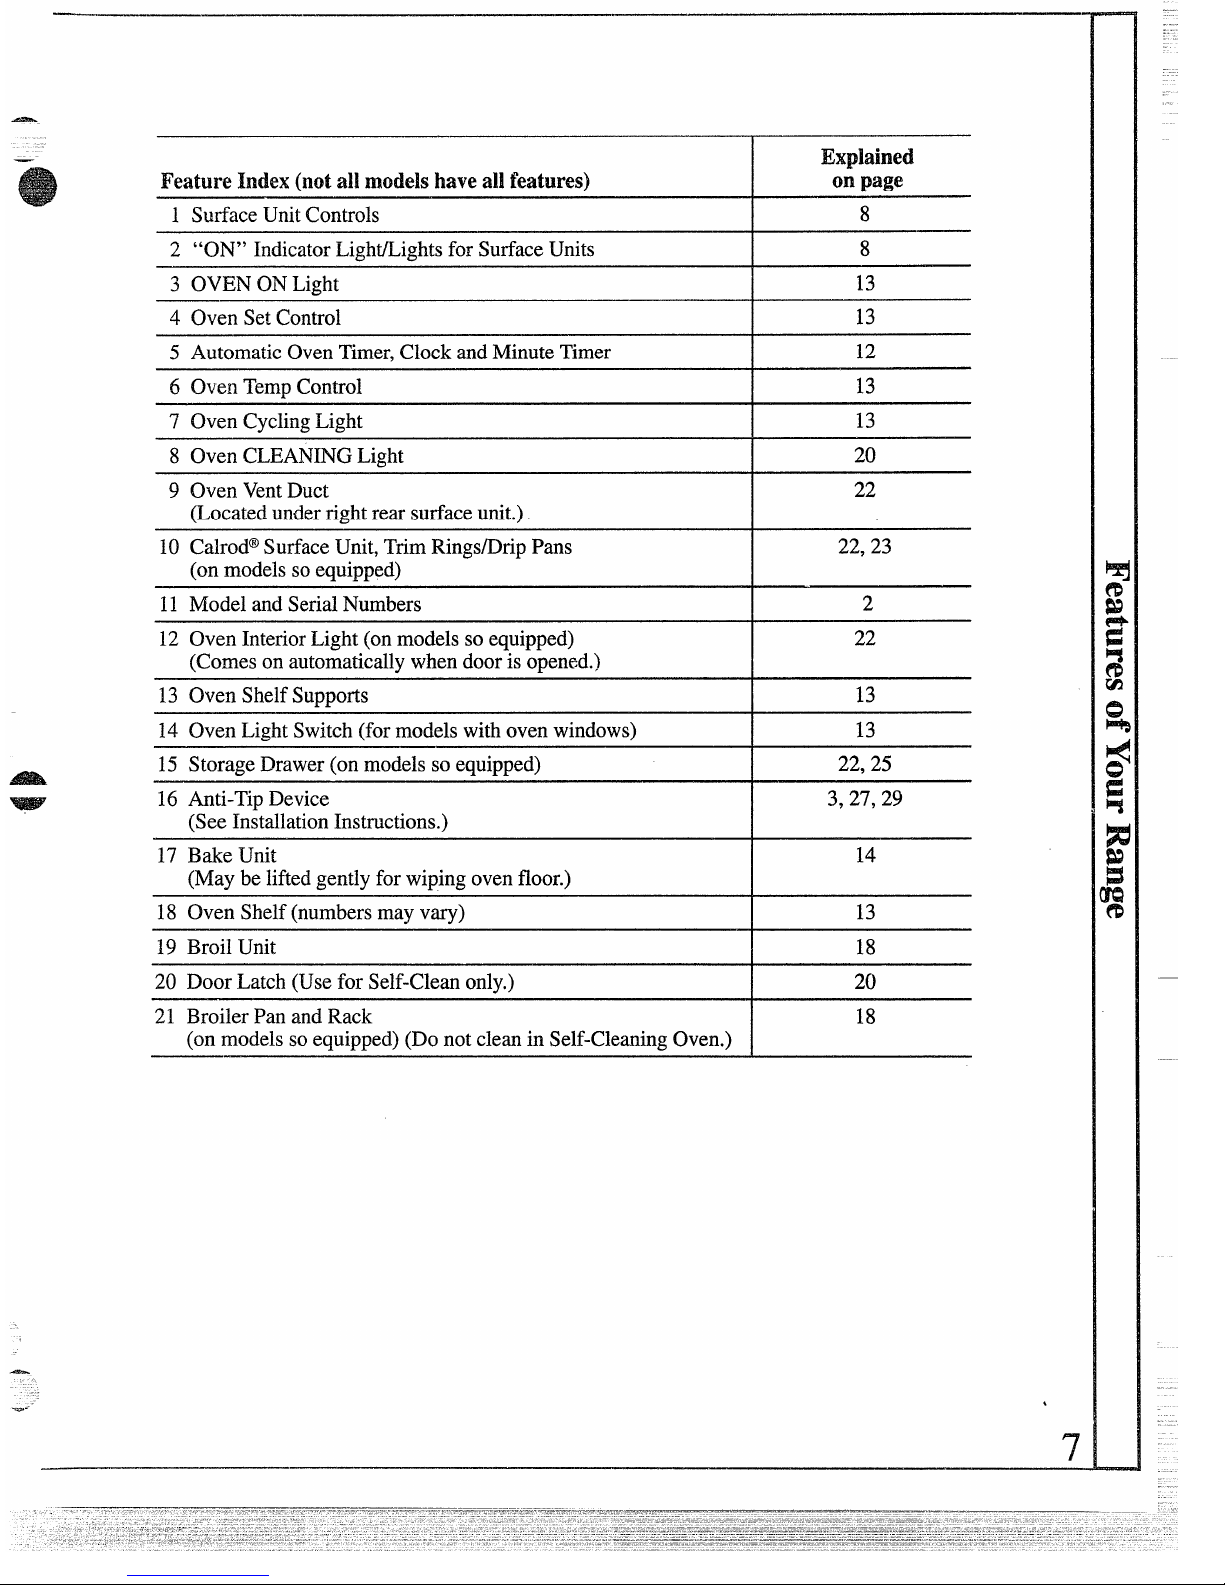
FeatureIndex(notallmodelshaveallfeatures)
onpage
1 SurfaceUnitControls
8
2 “ON” IndicatorLight/Lightsfor SurfaceUnits 8
3 OVENONLight
13
4 OvenSetControl
13
5 AutomaticOvenTimer,ClockandMinuteTimer
12
6 Ove~~TempControl
13
7 OvenCyclingLight
13
8 OvenCLEANINGLight
20
9 OvenVentDuct
22
(Locatedunderrightrear surfaceunit.)
10 Calrod@SurfaceUnit,TrimRings/DripPans
22,23
(onmodelssoequipped)
11 ModelandSerialNumbers
2
12 OvenInteriorLight(onmodelssoequipped)
22
(Comeson automaticallywhendooris opened.)
13 Oven ShelfSupports 13
14 OvenLightSwitch(formodelswithovenwindows)
13
15 StorageDrawer(onmodelsso equipped) 22,25
16 Anti-TipDevice 3,27,29
(SeeInstallationInstructions.)
17 Bake Unit
14
(Maybe liftedgentlyfor wipingovenfloor.)
18 OvenShelf(numbersmayvary) 13
19 Broil Unit 18
20 DoorLatch(Usefor Self-Cleanonly.) 20
21 BroilerPan andRack
18
(onmodels so equipped)(Donotcleanin Self-CleaningOven.)
7
Page 8
surfacecooking with
Itilnite Heat
controls
AtbothOFFandfII positions,
thereis a slightnicheso control
“clicks”atthosepositions;“click”
onHI marksthehighestsetting;
thelowestsettingisLO.In a quiet
kitchenyoumayhearslight
“clicking”soundsduringcooking,
indicatingheatsettingsselectedare
beingmaintained.
Switchingheatsto higher settings
alwaysshowsaquickerchange
thanswitchingtolowersettings.
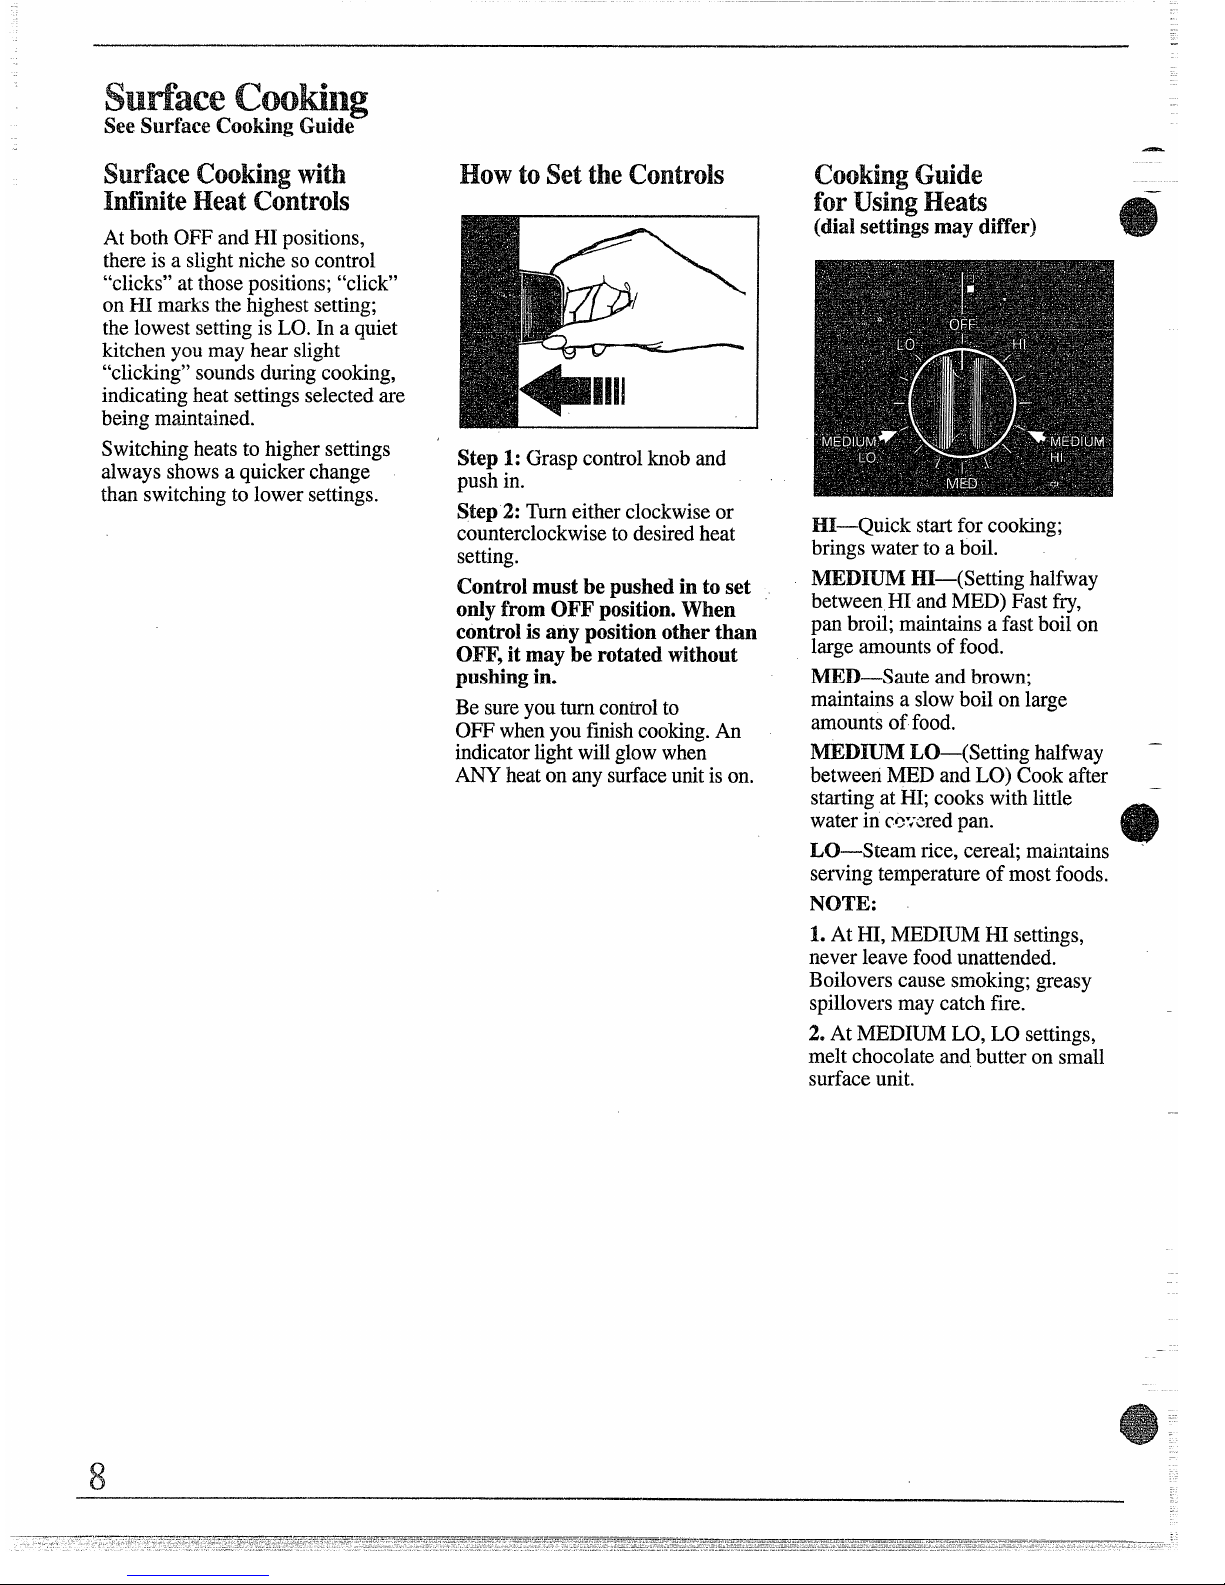
Howto setthecontrols
Step 1: Graspcontrolknoband
pushin.
Step 2: Turneitherclockwiseor
counterclockwisetodesiredheat
setting.
Control mustbe pushedin to set
onlyfrom OFFposition.When
eontro~is anypositionotherthan
OFF,itmaybe rotatedwithout
pushingin.
Besureyouturncontiolto
OFFwhenyoufinishcooking.An
indicatorlightwillglowwhen
~ heaton anysurfaceunitison.
.-
—
cooking Guide
forUsiigHeati
—
(dialsettingsmaydifler)
HI—Quickstartfor cooking;
brings waterto a boil.
MED~M H1—(Settinghalfway
between~ andMED)Fastfry,
pa broil;maintainsafastboilon
large amountsoffood.
MED—Sauteandbrown;
maintainsa slowboilon large
amountsoffood.
MEDIUMLO—(Settinghalfway –
betweenMEDandLO)Cookafter
—
startingatHI; cookswithlittle
waterinco-icredpan.
a
LO—Steamrice,cereal;maiiltains “
servingtemperatureof mostfoods.
NOTE:
1.At HI, MED~M ~ settings,
neverleavefoodunattended.
Boiloverscausesmoking;greasy
spilloversmaycatchfire.
2.AtMEDI~ LO,LO settings,
meltchocolateandbutteronsmall
surfaceunit.
—
8
Page 9
-_
—
.
-.
—.
I
Questions& Answem
Q. May I canfoodsand
preservesonmySutiaceunit?
A.Yes,butonlyusecookware
designedforcanningpurposes.
Checkthemanufacturer’s
instructionsand~ecipesfor
preservingfoods.Besurecanner
isflat-bottomedandfitsoverthe
centerofyourCalrod@unit.Since
canninggenerateslargeamountsof
steam,becarefultoavoidburns
fromsteamorheat.Canningshould
onlybedone on surfaceunits.
Q. CanI covermy drippans
withfoil?
A.No. Cleanasrecommendedin
CleaningGuide.
Q.CanI usespecialcoo!ting
equipment,likeanorienbl wok9
onanysufiaceunits?
A. Cookwarewithoutflatsurfaces
is notrecommended.Thelifeof
yoursurfaceunitcanbe shortened
andtherangetopcanbedamaged
fromthehighheatneededforthis
typeofcooking.
Q. Why amI notgettingthe heat
I needfrommyuniti even
thoughI havetheknobsonthe
rightsetting?
A. Afterturningsurfaceunitoff
andmakingsureit is cool, checkto
makesurethatyourplug-inunits
are securelyfastenedintothe
surfaceconnection.
Q. Whydm mycookware~t
whenIplaceitonthesufiaceunit?
A. Becausethesurfaceunitisnot
flat.Makesurethat the “feet” on
yourCah-od@unitsare sitting
tightlyin therangetopindentation
andthereflectorringis flaton the
rangesurface.
Q. Whyis theporcelain.finishon
mycookwarecomingon
A. If yousetyourCalrod@unit
higherthanrequiredforthe
cookwarematerial,andleaveit,
thefinishmaysmoke,crack,pop,
orburndependingonthepotor
pan.Also,a toohigh heatforlong
periods,andsmallamountsofdry
food,maydamagethefinish. -
Canningshouldbedoneon
surfaceunik ody.
Potsthatextendbeyondone inch
ofcookingelement’strimringare
notrecommendedformostsurface
cooking.However,whencanning
withwater-bathorpressure
canner,larger-diameterpotsmay
beused.Thisis becauseboiling
~vatertemperatures(evenunder
qressure)are notharmfil to
~ooktopsurfacessurroundingthe
r-f
IU aceunit.
30WEVER,DO NOT USE
.ARGEDIAMETERCANNERS
2ROTHERLARGEDIAMETER
>~TSFORFR~~NGOR
301LINGFOODSOTHER
rHANWA~R. Mostsyrupor
auce mixtures—andalltypesof
rying—
cookat temperatures
ouchhigherthanboilingwater.
~uchtemperaturescould
ventuallyharmcooktopsurfaces
Llrroundingsurfaceunits.
observeFoIIotingPoints
incanning
1.Be surethecannerfitsoverthe
centerofthe surfaceunit.If your
rangeorits locationdoesnot
allowthecannerto be centeredon
thesurfaceunit,use smallerdiameterpots for goodcanning
results.
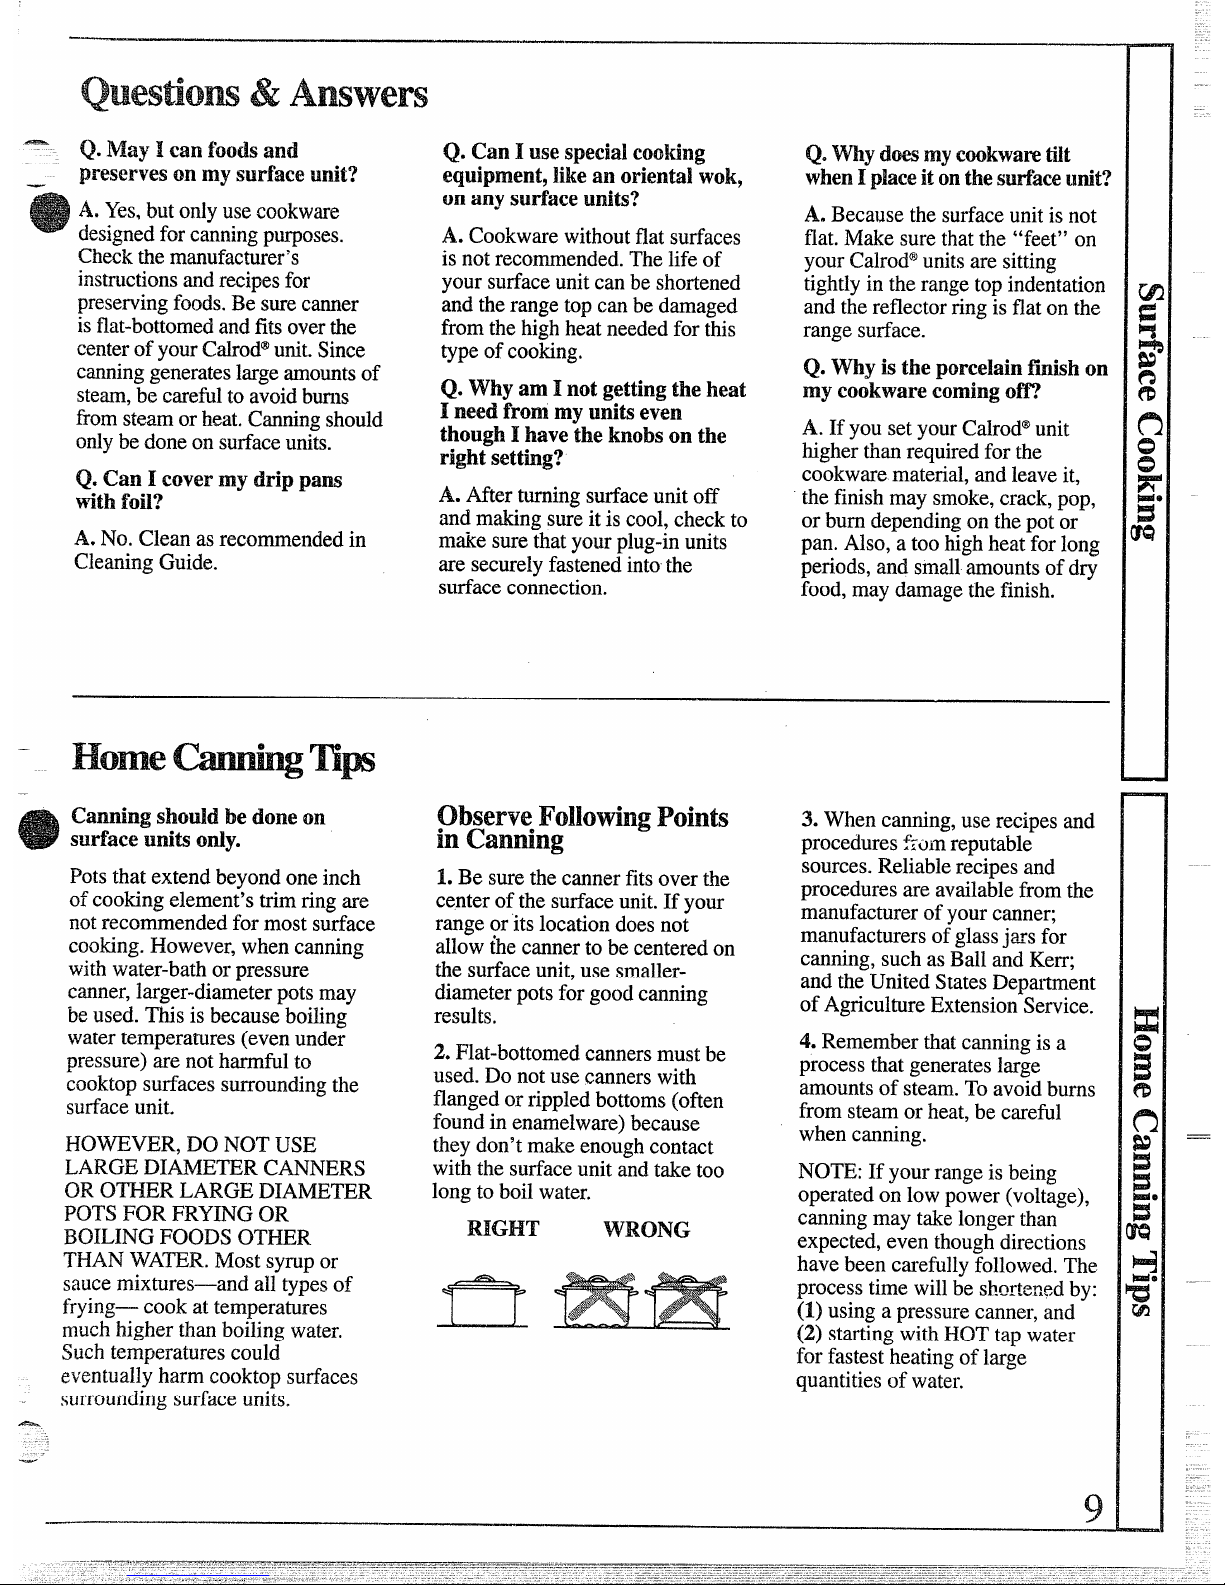
2.Flat-bottomedcannersmustbe
used.Do notusecannerswith
flangedor rippledbottoms(often
foundinenamelware)because
theydon’t makeenoughcontact
withthesurfaceunitandtaketoo
longto boilwater.
RIGHT
WRONG
3. Whencanning,userecipesand
proceduresfzu~nreputable
sources.Reliablerecipesand
proceduresareavailablefromthe
manufacturerof yourcanner;
manufacturersof glassjz~sfor
canning,suchasBallandKerr;
andtheUnitedStatesDepartment
of AgricultureExtensionService.
4. Rememberthatcanningisa
processthatgenerateslarge
amountsofsteam.Toavoidburns
fromsteamor heat,becareful
whencanning.
NOTE:Ifyourrangeisbeing
operatedon lowpower(voltage),
canningmaytakelongerthan
expected,eventhoughdirections
havebeencarefullyfollowed.The
processtime willbe shortenedby:
(1)
usingapressurecanner,and
(2)startingwithHOTtapwater
for fastestheatingoflarge
quantitiesof water.
9
Page 10
-—
SuflaceCmtingGtide
.—-
2.Toconservethemostcooking
3.DeepFatFrying.Donotoverfill —
energy,pansshouldbeflaton the
kettle withfat thatmayspillover
bottom,havestraightsidesand
whenaddingfood.Frostyfoods —
tight fittinglids.Matchthe size
bubblevigorously.Watchfoods
@
ofthesaucepanto thesizeofthe
fryingathightemperaturesand
surfaceunit.Apanthatextends
keeprangeandhoodcleanfrom
morethanan inchbeyondtheedge
accumulatedgrease.
cookwareTips
1.Usemedium-orheavy-weight
cookware.Aluminumcookware
conductsheatfasterthanother
metals.Castironandcoatedcast
ironcookwareareslowto absorb
heat,butgenerallycookevenlyat
lowor mediumsettings.Steelpans
maycookunevenlyif notcombined
ofthetrimring trapsheatcausing
discolorationonchrometrimrings
rangingfromblueto dark grey.
withothermetals.
~irectionsand
Settings
toCompleteCooking
Direetiomsand Settings
toStartCooking
Comments
FQod
Cookware
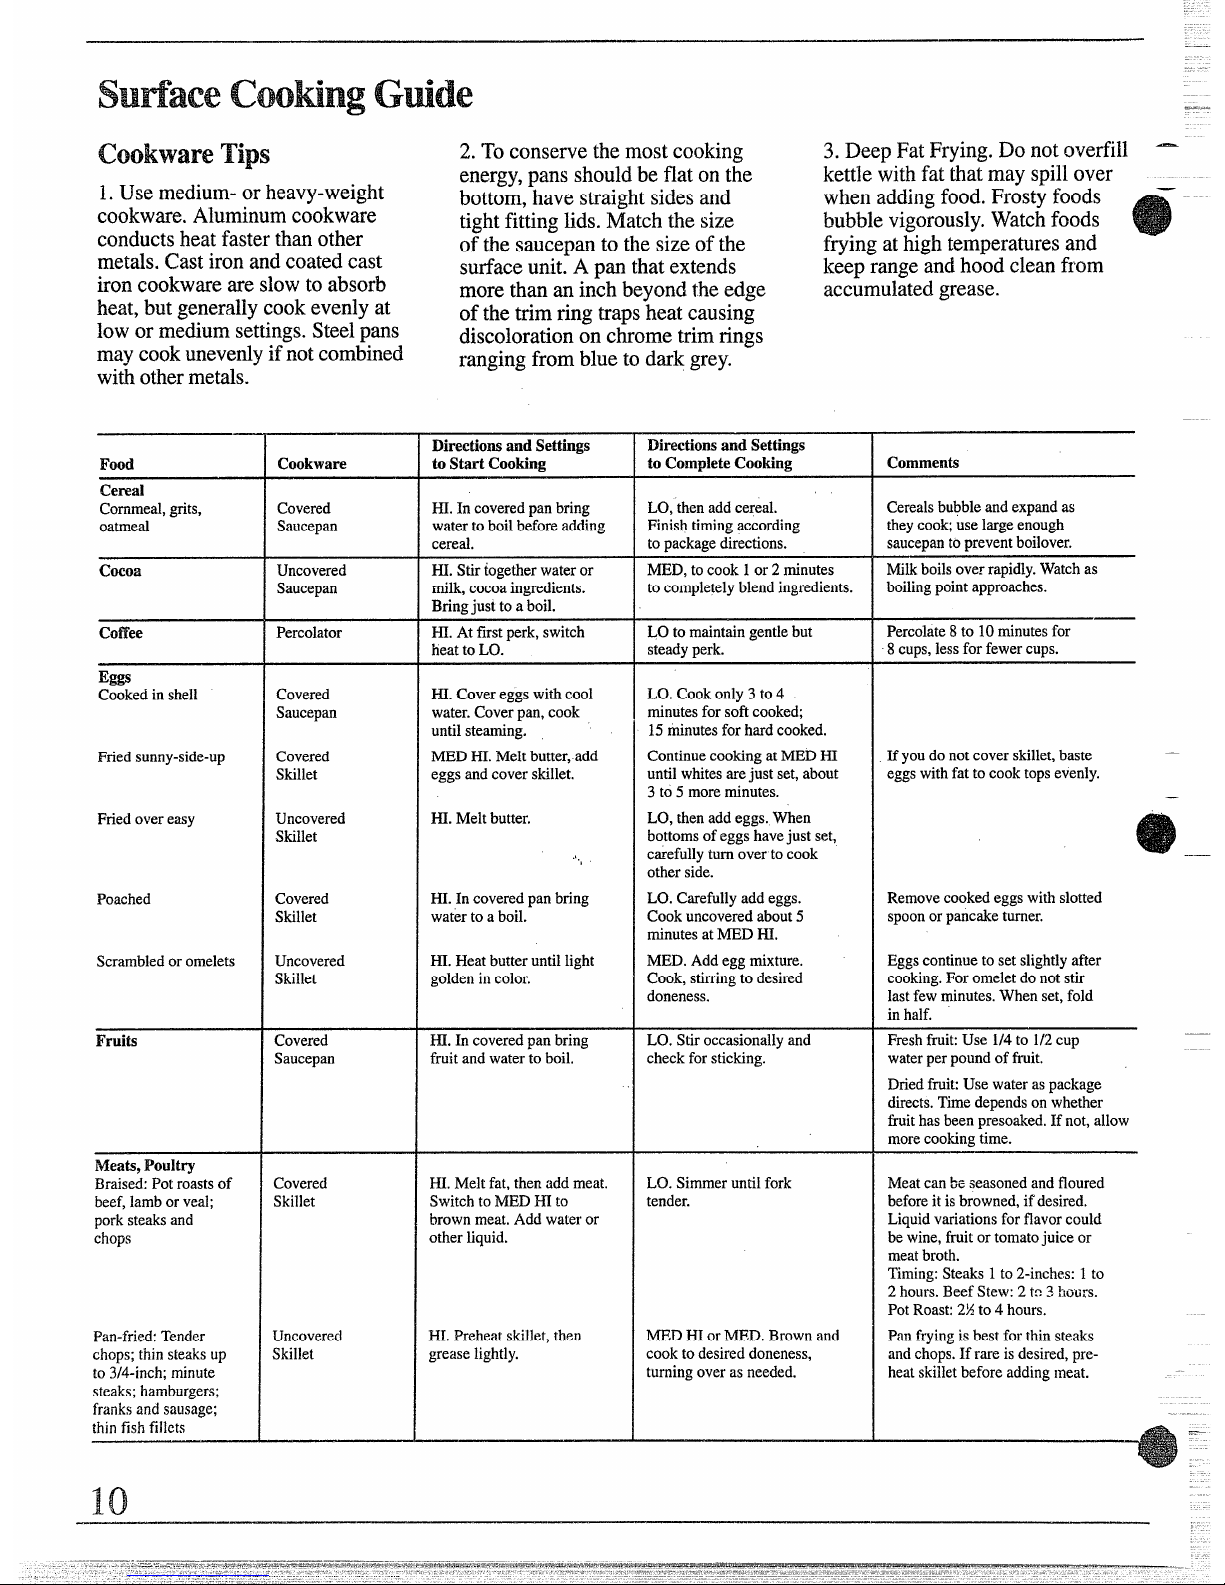
Cereal
Cornmeal,grits,
oatmeal
LO,thenaddcereal.
Covered
Saucepan
HI.Incoveredpanbring
watertoboilbeforeadding
cereal.
Cereals bubbleandexpandas
theycook;uselargeenough
saucepantopreventboilover.
Finishtimingaccording
topackagedirections.
MED,tocook1or 2 minutes
Cocoa
Uncovered
Saucepan
HI.Stirtogetherwateror
milk,cocoaingredients.
Bringjustto aboil.
Milkboilsoverrapidly.Watch as
boilingpointapproaches.
tocompletelyblendingredients.
LO to maintaingentlebut
steadyperk.
Percolate 8to 10minutesfor
8cups,lessforfewercups.
Coffee Percolator
~. Atfirstperk,switch
heattoLO.
Eggs
Cookedinshell
Friedsunny-side-up
Friedovereasy
LO.Cookonly 3 to 4
Covered
Saucepan
HI.Covereggswithcool
water.Coverpan,cook
untilsteaming.
MEDHI.Meltbutter,add
eggsandcoverskillet.
minutesforsoficooked;
15minutesforhardcooked.
Ifyoudonot coverskillet,baste
—
eggswithfat to cook topsevenly.
Covered
Skillet
ContinuecookingatMEDHI
untilwhitesarejustset,about
3to 5 moreminutes.
—
HI.Meltbutter.
LO,thenaddeggs.When
bottomsofeggshavejustset,
carefullyturnovertocook
otherside.
Uncovered
Skillet
.,,,
HI.In coveredpanbring
waterto aboil.
LO.Carefullyaddeggs.
Cookuncoveredabout5
minutesatME.D~.
MED.Addeggmixture.
Cook,stirringtodesired
doneness.
Removecookedeggswithslotted
spoonorpancaketurner.
Poached
Scrambledoromelets
Covered
Skillet
Uncovered
Skillet
HI.Heatbutteruntillight
goldenincolor.
Eggscontinuetosetslightlyafter
cooking.Foromeletdonotstir
lastfewminutes.Whenset,fold
inhalf.
Fruits Covered
Saucepan
~. In coveredpan bring
fruitandwatertoboil,
LO.Stiroccasionallyand
checkforsticking.
Freshfruit:Use 1/4to 1/2cup
waterperpoundoffruit,
Driedfiit: Usewateraspackage
directs.Timedependsonwhether
fruithasbeenpresoaked.If not,allow
morecookingtime.
Meats,Poultry
Braised:Potroastsof
beef,lamborveal;
porksteaksand
chops
Covered
Skillet
HI.Meltfat, thenaddmeat.
SwitchtoMEDHIto
brownmeat.Addwateror
otherliquid.
LO.Simmeruntilfork
tender.
Meatcanbeseasonedandfloured
beforeitisbrowned,if desired,
Liquidvariationsforflavorcould
bewine,fruitor tomatojuiceor
meatbroth.
Timing:Steaks1to2-inches:1to
2hours.BeefStew:2 to3hours.
PotRoast:22to4 hours.
Pdn-fried:Tender
chops;thinsteaksup
to3/4-inch;minute
steaks;hamburgers;
franksandsausage;
thin fish filIcts
Uncovered
Skillet
HI.Preheatskillet,then
greaselightly.
MEDHIorMED.Brownand
cooktodesireddoneness,
turningoverasneeded.
Panfryingis bestforthinsteaks
andchops.Ifrareis desired,preheatskillet beforeaddingmeat.
—-
—
—
Page 11

..
.
RIGHT
WRONG
‘; r
OVER1“
—
—
.
—
DirectionsandSettings
toCom~IeteCooking
DirectionsandSettings
toStartCooking
Food Cookware Comments
FriedChicken
Covered
Skillet
HI.Meltfat.SwitchtoMED
HItobrownchicken.
LO.Coverskilletand
cookuntiltender.Uncover
lastfewminutes,
Forcrispdrychicken,coveronly
afterswitchingtoLOfor 10minutes.
Uncoverandcook,turning
occasionally10to20minutes.
MEDHI.Cook,turning
overas needed,
Panfriedbacon
Uncovered
s~ll~t
HLIn coldskillet,arrange
baconslices.Cookjust
untilstartingtosizzle.
Amoreattention-freemethod
isto startandcook at MED.
Sauteed:Lesstender
thinsteaks(chuck,
round,etc.);liver;
thickorwholefish
Covered
Skillet
HLMeltfat,SwitchtoMED
tobrownslowly.
LO Coverandcook
untiltender.
Meatmaybebreadedor
marinatedin saucebeforefrying.
Simmeredorstewed
meat;chicken;corned
beet smokedpork;
stewingbeet tongue;etc
CoveredDutch
Oven,Kettleor
LargeSaucepan
HI.Covermeatwithwater
andcoverpanorkettle.
Cookuntilsteaming.
LO.Cookuntilfork
tender.(Watershould
slowlyboil.)Forverylarge
loads,mediumheatmay
beneeded.
Addsaltorotherseasoning
beforecookingif meathasnot
beensmokedorotherwise
cured.
Meltingchocolate,
butter,marshmallows
SmallUncovered
Saucepan.Use
smallsurfaceunit.
LO.Allow10to 15 minutes
tomelttiough. Stirtosmooth.
Whenmeltingmarshmallows,add
milkorwater.
Pancakesor
Frenchtoast
Skilletor
Griddle
MEDHLHeatskillet8to
10minutes.Greaselightly.
Cook2to3minutesperside. Thickbattertakesslightlylonger
time.Turnpancakesoverwhen
bubblesrisetosurface.
Pasta
Noodlesorspaghetti CoveredLarge
KettleorPot
HI.Incoveredkettle,bring
saltedwaterto a boil,uncover
andaddpastaslowlyso
boilingdoesnotstop.
MEDHI.Cookuncovered
untiltender.Forlarge
amounts,HImaybe
neededtokeepwaterat
rollingboilthroughout
entirecookingtime.
Uselargeenoughkettleto
preventboilover.Pastadoubles
insizewhencooked.
PressureCooking PressureCooker
orCanner
~. Heatuntilfirstjiggleis
heard.
Cookershouldjiggle2 to 3times
perminute.
MEDHIforfoodscooking
10minutesorless.MEDfor
foodsover10minutes.
Puddings,Sauces,
Candies,Frostings
Uncovered
Saucepan
HI.Bringjusttoboil. LO.Tofinishcooking.
Stirfrequentlyto prevent
sticking.
Vegetables
Fresh ~. Measure1/2to 1inchCovered
Saucepan
MED.Cook1pound10
to30 or moreminutes,
dependingon tenderness
ofvegetable.
Uncoveredpanrequiresmore
waterandlongertime.
waterin saucepan.Add
saltandpreparedvegetable.
Incoveredsaucepanbring
toboil.
Frozen Covered
Saucepan
HI.Measurewaterandsalt
as above.Addfrozenblock
ofvegetable.Incovered
saucepanbringtoboil,
LO.Cookaccordingto
timeonpackage.
Breakuporstirasneededwhile
cooking.
Sauteed:Onions;
greenpeppers;
mushrooms;celery;etc.
LJncovered
Skillet
HI,Inskilletmeltfat.
MED.Addvegetable.
Cookuntildesired
tendernessis reached.
LO.Coverandcook
accordingtotime.
Turnoveror stir vegetableas
necessary forevenbrw+nir~g.
~overed
Saucepan
HI.Bringsaltedwaterto a
boil.
RiceandGrits
Riceandgritstriplein volumeafter
cooking.TimeatWM.Rice: 1 cuprice
and2 cupswater—25minutes.Grits:
1cupgritsand4 cupswater—40
minutes.
Page 12

-.
—
Automatic
merand clock
TheAutomaticTimerandClock
onyourr~mgeare helpfuldevices
thatserveseveralpurposes.
Tosetclock
TOSETT~ CLOCK,push the
center hob in andturn theclock
handsto thecorrecttime.(The
MinuteTimerpointerwillmove
also,let knobout,turntheTimer
pointerto OFF.)
TosetMinuteTher
TheMinuteTimerhasbeen
combinedwiththeClock.Use it to
timeW yourprecisecooking
operations.You’llrecognizethe
MinuteTimerasthepointerwhich
isditierent in colorandshapethan
theclockhands.
TOSET~ M~ -R,
turnthecenterknob,without
pmtig k, untilpointerreaches
numberofminutesyouwishtotime.
minutes aremarked,upto60, in the
centerringontheclock.)Attheend
ofthe settime,a buzzersoundsto
tellyoutimeisup.Tm knob,
withoutpwhkg in,untilpointer
reachesOFFandbuzzerstops.
TimeBakeuses
AutomaticTimer
UsingAutomaticTimer,youcan
TIMEBAKEwiththeovenswing
immediatelyandturningoffat the
StopTimesetor youcansetboth
DELAYSTARTandSTOPdialstoautomaticallystartandstop
ovenatalatertimeofday.Ittakes
theworryoutofnotbeimghometo
startor stopthe oven.
SettingthedialsforT~E BAKE
is explainedin detailin theBaking
sectionofthisbook.
Seu”cleanuses
AutomaticTher
Theself-cleaningfunctiononyour
rangeusestheAutomaticTimerto
setthelengthoftimeneededto
cleanwhetheryouwishtoclean
immediatelyor delaythecleaning
untillowenergytimessuchas
duringthenight.Seethe
Self-Cleaninginstructionsin
thisbook.
QuestionsandAnswers -–
Q.Howcan I usemy Minute –
Timerto makemysutiace
cookingeasier?
A. YourMinuteTimerwillhelp
timetotal cookingwhichincludes
timetoboilfoodandchange
temperatures.Do notjudge
cookingtimebyvisiblesteam
only.Foodwillcookin covered
containerseventhoughyoucan’t
seeanysteam.
Q.Mwt
theciockbesetoncomect
tie of&y whenI ah towe the
Automatic~er forbabg?
A.Yes,ifyou wishto setthe
DELAYSTARTor STOPT~E
dialstoturnon andoffat settimes
duringtimedfinctions.
Q. CanIuse theMinuteTimer
duringovencooking?
A.TheMinuteTimercanbeused
duringanycookingfunction.The –
AutomaticTimers(DELAYSTART
andSTOPTW dids) areused —
withTM B~._= functiononly.
Q. CanI changethe clock whiie
I’mTimeCookingin theoven?
A.No.Theclockcannotbe changed
duringanyprogramthatusesthe
oventimer.Youmusteitherstop
thoseprogramsor waituntilthey
arefinishedbeforechangingtime.
Page 13

using Youroven
—
BeforeusingYouroven
—
1.Lookat thecontrols.Besure
youunderstandhowto setthem
properly.Readoverthedirections
fortheAutomaticOvenTimerso
youunderstanditsusewiththe
controls.
2.Checkoveninterior.Lookat
theshelves.Takea practicerun
atremovingandreplacingthem
properly,togivesure,sturdysupport.
3.Readoverinformationandtips
thatfollow.
4. Keepthisbook handysoyou
canrefer to it, especiallyduring
thefirstweeksofgetting
acquaintedwithyourrange.
oven controls
Thecontrolsfortheovenare
markedOWN SETandOVEN
TEMP.TheOVENSETcontrol
hassettingsforBAKE,TIME
BA~, BROIL,CLE~ andOW.
Whenyouturntheknobto the
desiredsetting,the properheating
unitsarethenactivatedforthat
operation.
OVEN~MP controlmaintainsthe
temperatureyouset,fromWAM
{150°F.)to F3ROU.(550°b.)and
dso at CLE~ (880”F.).
oven cycling Light
The OvenCyctingLightglows
untiltheovenreachesyourselected
temperature,thengoesoffandon ~
withtheovenunit(s)duringcootig.
PRE~A~G theoven,evento
hightemperaturesettings,is speedy.
Itrarelytakeslongerthan10
minutes.Reheattheovenonly
whennecessary.Mostfoodswill
cooksatisfactorilywithout
preheatig. Ifyoufindpreheating
isnecessary,keepan eyeonthe
indicatorlightandputfoodin the
ovenpromptlyafterlightgoesout.
01’enonLight
TheOvenOn light, locatedto the
leftof the OVENSETknob,will
glowanytimetheOVENSET
knobisnotin theOFFposition.
ovenLight
(on modek so eqtipped)
Thelightcomeson automatically
whenthedooris opened.(On
modelswithovenwindowuse
switchto turnlighton andoff
whendooris closed.)
Switchis locatedon frontof door.
ovenInteriorshelves
Theshelvesare designedwith
stop-lockssothatwhenplaced
correctlyonthe shelfsupports,
they(a)willstopbeforecoming
completelyfromtheoven,and
(b)willnottiltwhenremoving
foodfromorplacingfoodon them
~“
VIII
TO WMOW T~ S~LVES
fromtheoven,pullthemtoward
you,tiltfrontendupwardandpull
themout.
TO ~PLACE9 placeshelf on
shelfsupportwithstop-locks
(curvedextensionundershelf)
facingup towardtherear of the
oven.Tiltup frontandpushthe
shelftowardthebackofthe oven
untilitgoespast “stop” onthe
ovenwall.Thenlowerthefrontof
the shelfandpushitWthewayback.
shelfPositions
1.
Theovenhasfourshelfsupports—
A (bottom),B, C andD (top).
Shelfpositionsfor cookingfood
are suggestedonBaking,Roasting
andBroilingpages.
Page 14

lVhencookinga foodfor thefirst
timeinyournewoven,usetime
givenonrecipesas a guide.Oven
thermostats,overa periodofyears,
may “drift” fromthefactory
settingandadifferenceintiming
betweenan oldanda newovenof
5 to 10minutesisnotunusual.
Sinceyournewovenhasbeenset
correctlyatthefactoryit is more
likelytobe accuratethantheoven
itreplaced.
Howto set Your
Range
forBating
Step 1: Place foodin oven,being
certaintoleaveabout1inchof
spacebetweenpansandwallsof
ovenforgood circulationofheat.
Close ovendoor. Duringbaking,
avoidfrequentdooropeningsto
preventundesirableresults.
Step2: TurnOVENSETknobto
BA.~ andOVENTEMPknobto
temperatureonrecipeorin Baking
Guide.
Step 3: Checkfoodfordoneness
atminimumtimeonrecipe.Cook
longerif necessary.Switchoffheat
andremovefoods.
Howto TimeBake
(onmodels with thisfeature)
Theautomaticoventimercontrols
aredesignedtoturntheovenon or
offautomaticallyat specifictimes
thatyouset.
Howto setImetiate
StartandAutomaticStop
NOTE:Beforebegiming,make
surethehandsof therangeclock
showthecorrecttimeofday.
ImmediateStartissimplysetting
theovento startbakingnowand
turnoffata latertimeautomatically.
Remember,foodscontinuecooking
aftercontrolsareoff.
Step 1: TosetStopTime,pushin
knobon STOP- dialandturn
pointerto timeyouwantovento
tumoff,forexample6:00.The
DELAYST~T dialshouldbeat
thesamepositionasthethe of
dayon clock.
Step 2: TurnOVENSETknobto
T~E BAKE.TurnOVENTEMP
knobto oventemperature,for
example250”F.Theovenwillstart
immediatelyandwillstopatthe
timeyouhaveset.
How to
setDelay
startandstop
DelayStartandStopis settingthe
oventimerto turntheovenonand
offautomaticallyat a latertime
thanthepresenttimeofday.
Step 1: Toset starttime,pushin
knobonDELAYSTARTdialand
turnpointerto timeyouwantoven
to turnon,forexample3:30.
Step2:TosetStopTime,pushin
knobon STOPTME dialandturn
pointerto timeyouwantovento
turnoff,for example6:00.This
meansyourrecipecalledfortwo
andone-halfhoursof bakingtime.
NOTE: Thetimeon STOPT~E
dialmustbelaterthanthetime
shownon therangeclockand
DELAYSTARTdial.
Step 3: TurnOVENSETknobto
TME BAKE.TurnOVENTEMP
knobto250”F.orrecommended
temperature.
Placefoodinoven,closethedoor
andautomaticallytheovenwillbe
turnedon andoffatthetimes you
haveset.Whencookingis
completed,turn OVENSETto
GFFandremovefoodfromoven.
Ovenindicatorlight(s)atT~E
BAKEsettingmayworkdifferently
thantheydo atBAKEsetting.
Carefullyrecheckthestepsgiven
above.Ifdl operationsaredone
asexplained,ovenwilloperate
asit should.
— ––
—
—
—
Page 15

BaEngGtide
1.Aluminumpansconductheat
2. Dark or non-shinyfinishesand
3.Preheatingtheovenisnotalways
quickly.Formostconventional glasscookwaregenerallyabsorb
necess~, especiallyforfoods
baking,light,shinyfinishes heat,whichmayresultindry,crisp
whichcooklongerthan30to 40
generallygivebestresultsbecause crusts.Reduceovenheat 25°F.if
minutes.Forfoodswithshort
theyhelppreventoverbrowning. lightercrustsare desired.Rapid cookingtimes,preheatinggives
Forbestbrowningresults,we
browningof somefoodscanbe
bestappearanceandcrispness.
—
.
—
.
recommenddullbottom surfaces
achievedbypreheatingcast-iron
4. Opentheovendoor to check
forcake pansandpieplates.
cookware.
foodaslittleaspossibletoprevent
unevenheatingandto saveenergy.
shelf
Position
oven
Temperature
Time,
Minutes
Food
Container
Comments
Bread
Biscuits(Min.thick) ShinyCookieSheet
Shiny
MetalPanwith
satin-finishbottom
CastEonorGlassPan
ShinyMetalPanwith
satin-finishbottom
ShinyMetalMuff~nPans
B,C
B,A
B
B
A,B
B
ABB
A,B
B, A
400°-4750
350°-4000
400°-4500
350°
400°-4250
375°
350°-3750
375°-4250
375°-4250
350°-3750
325°-3750
375°-4000
325°-3500
15-20
20-30
20-40
45-55
20-30
45-60
45-60
45-60
10-25
20-30
30-55
10-15
45-60
45-65
20-25
2-4
hrS.
20-35
25-30
40-60
Canned,refrigeratedbiscuitstake2to
4minuteslesstime.
Coffeecake
Cornbreadormuff~ns
Gingerbread
Preheatcast-ironpanforcrispcrust.
Decreaseabout5minutesformuffin
-mix,orbakeat450”F.for25minutes,
thenat350”F.for10to15minutes.
~ufflns
Popovers
Quickloafbread
yeastbread(2loaves)
DeepGlassorCast-IronCups
MetalorGlassLoafPans
MetalorGlassLoafPans
ShinyOblongorMuffinPans
ShinyOblongorMuffinPans
Darkmetalorglassgivedeepest
browning.
Forthinrolls,ShelfBmaybeused.
Forthinrolls,ShelfBmaybeused.
Plainrolls
Sweetrolls
Cakes
(without shortening)
Angelfood
Jellyroll
Sponge
Aluminum Tube Pan
MetalJellyRollPan
MetalorCeramicPan
Two-piece pan is convenient.
Line pan with waxed paper.
Cakes
Bundt cakes
Cupcakes
Fruit cakes
325°-3500
350°-3750
275°-3000
350°-3750
350°-3750
350°
Metal or Ceramic Pan
Shiny Metal Muffin Pans
Metal or Glass Loaf or Tube Pan
Shiny Metal Pan with
satin-finish bottom
Shiny Metal Pan with
satin-finish bottom
Metal or Glass Loaf Pans
A,B
A:B
B
B
B
Paper liners produce moister crusts.
Use 300”F.and Shelf B for small or
individual cakes.
Layer
Layer, chocoIate
Loaf
Cookies
Brownies
Drop
MetalorGlassPans
Cookie Sheet
Cookie Sheet
Cookie Sheet
B, C
B, C
B, C
B, C
325°-3500
350°-4000
400°-4250
375°-4000
25-35
10-20
6-12
7-12
Barcookiesfrommixusesametime.
UseShelfCandincreasetemp.25”F.
to50”F.formorebrowning.
Refrigerator
Rolled or sliced
Fruits.
Other’Desserts
Baked apples
Custard
GlassorMetal Pans
Glass Custard Cups or Casserole
(set in pan of hot water)
Glass Custard
CupsorCasserole
A,B, C
B
B
A
B, A
A,B
B
B
350”-400°
300°-3500
325°
30-60
30-60
50-90
Reducetemp.to 300”F.forlarge
custard.
Cookbreadorricepuddingwith
custardbase80to 90minutes.
Puddings, rice
and custard
Pies
Frozen
NIeringue
FoilPanon CookieSheet
Spreadtocrustedges
GlassorSatin-finishMetalPan
GlassorSatin-finishMetalPan
GlassorSatin-finishMetalPan
400°-4250
325°-3500
400°-4250
400°-4250
450°
45-70
15-25
40-60
40-60
12-15
Largepiesuse400°F.andmoretime.
Toquicklybrownmeringue,use400”F.
for8 to 10minutes,
Custardfilli~~gsrequirelower
temperature,longertime.
Onecrust
Twocrust
Pastryshell
NlisceIlaneous
Bakedpotatoes
Scallopeddishes
souffles
SetonOvenShelf
GlassorMetalPan
Glass
A,B, C
A,B, C
B
—.—
325°-4000
325°-3750
300°-3500
60-90
30-60
30-75
Increasetimefor largeramountor
size.
.
Page 16

.—
Roasting is cooking by dryheat.
Tendel
meat orpoultrycanbe
roasteduncoveredin youroven.
Roastingtemperatures,which
shouldbelowandsteady,keep
spatteringto a minimum.When
roasting,itis notnecessarytosear,
baste,coveroraddwatertoyour
meat.
Roastingis reallya baking
procedureusedfor meats.
Therefore,ovencontrolsaresetto
BAKE.(Youmayheara slight
clickingsound,indicatingtheoven
isworkingproperly.)Roastingis
easy;just followthesesteps:
Step 1: Checkweightofmeat,and
place,fat sideup,on roastingrack
in a shallowpan.(Broilerpanwith
rackisa goodpanfor this.)Line
broilerpanwithaluminumfoil
whenusingpanfor marinating,
cookingwithfruits,cooking
heavilycuredmeats,or for basting
foodduringcooking.Avoid
spillingthesematerialson oven
linerordoor.
Step 2: Placemeatinovenon
shelfin eitherA or B position.No
preheatingis necessary.
Step 4: Mostmeatscontinueto
cookslightlywhilestanding,after
beingremovedfromtheoven.
Standingtimerecommendedfor
roastsis 10to 20 minutes.This
allowsroaststo firmup andmakes
themeasierto carve.ktemal
temperaturewillriseabout5°to
10”F.If youwishto compensate
fortemperatureincrease,remove
theroastfromtheoven(at5°to
10°F.lessthantemperaturein the
guide).
NOTE:Youmayvtishto use
TIMEBAKE,as describedinthe
Bakingsection,to turnovenon
andoffautomatically.
Rememberthatfoodwillcontinue
tocookin thehotovenand
thereforeshouldberemovedwhen
thedesiredinternaltemperature
hasbeenreached.
For Frozen Roasb
o Frozenroastsofbeef,pork,
lamb,etc.,canbe startedwithout
thawing,butallow 10to25
minutesperpoundadditionaltime
(10minutesperpoundforroasts
under5 pounds,allowmoretime
perpoundforlargerroasts).
~Thawmostfrozenpoultrybefore
roastingto ensureevendoneness.
Somecommercialfrozenpoultry
canbe cookedsuccessfullywithout
thawing.Followdirectionsgiven
onpacker’slabel.
Questionsand~~SW~~S
Q.Isitnecessarytocheck
fordonenesswithameat
thermometer?
A. Checkingthefinishedinternal
temperatureatthecompletionof
cookingtimeis recommended.
Temperaturesare shownin
RoastingGuideon oppositepage.
Forroastsover8lbs.,cooked at
300”F.withreducedtime,check
withthermometerathalf-hour
intervalsafterhalfthetimehas
passed.
Q.Whyismy roastcrumbling
whenI tryto carve it?
A. Roastsareeasierto sliceif
allowedto cool 10to20minutes
afterremovingfromoven.Be sure
to cut acrossthegrainofthemeat.
Q.Do1needto preheatmyoven
eachtimeI cookaroastor
poultry?
A. It
is rarelynecessarytopreheat
youroven,onlyforvery small
roasts,whichcookashortlength
oftime.
Q.Whenbuyinga roast,are
thereanyspecialtipsthatwould
helpme cookitmoreevenly?
A. Yes.Buy a roastasevenin
thicknessaspossible,or buyrolled
roasts.
Q. CanI seaI the sidesof my foil
“tent’>whenroastinga turkey?
—
—
—
—
A. Sealingthe foilwill steamthe
meat.Leavingit unsealedallows
theairto circulateandbrownthe
meat.
Step3: TurnOVENSETtoBAKE
andOWN TEMPto325”F.Small
poultrymaybe cookedat 375”F.
forbestbrowning.
—
-.
Page 17

RoastingGuide
~
1.PositionovenshelfatBfor
small-sizeroasts(3to 7 ]bs.)and
—
at A for larger roasts.
2.Placemeatfat-side-up,or
poultlybreast-side-up,onbroiler
panor othershallowpanwith
trivet.Do notcover.Do notstuff
poultryuntiljust beforeroasting.
Usemeatthermometerformore
accuratedoneness.(Donot place
thermometerin stuti~ng.)
Meat
Tendercuts;rib,highqualitysirloin
tip,rumportopround*
Lamblegorbone-inshoulder*
Vealshoulder,legorloin*
Porkloin,riborshoulder*
Ham,precooked
Ham,raw
*Forbonelessrolledroastsover6
inchesthick,add5 to 10minutesper
poundtotimesgivenabove.
_—_
—
Poult~
ChickenorDuck
Chickenpieces
..
Turkey
3.Removefatanddrippingsas
5.~rozenroas~ canbe
necessary,Basteasdesired.
conventionallyroastedby adding
4.Standingtimerecommendedfor
10to25minutesperpoundmore
timethangivenin guide for
roastsis 10to20minutes.This
allowsroaststo firmupandmakes
refrigeratedroasts.(10minutesper
themeasiertocarve.Internal
poundfor roastsunder5pounds.)
temperaturewillriseabout5°to
Defrostpoultrybeforeroasting.
10”-F.If youwishtocompensate
fortemperatureincrease,remove
theroastfromtheovensooner(at
5°to 10°F.lessthantemperaturein
thisguide).
.
Oven
Tempera~
325°
325°
325°
325°
325°
325°
325°
350°
325°
Doneness
Rare:
Medium:
WellDone:
Rare:
Medium:
WellDone:
WellDone:
WellDone:
ToWarm:
WellDone:
WellDone:
WellDone:
WellDone:
Approximate Ro~ting Time
in Minutes per
Pound
3
to 5 lbs.
24-30
30-35
35-45
21-25
25-30
30-35
35-45
35-45
6
to 8 lbs.
18-22
22-25
28-33
20-23
24-28
28-33
30-40 ~
30-40
10minutesperpound(anyweight)
Under10lbs.
10 to 15lbs.
20-30
17-20
3to 5]bs.
Over5 lbs.
35-40
30-35
35-40
10to 15lbs.
Over15lbs.
20-25
15-20
Internal
Temperature“F.
130°-1400
150°-160°
170°-185°
130°-1400
150°-1600
170°-185°
170°-180°
170°-180°
125°-1300
170°
185°-1900
185°-1900
In
thigh:
185°-190°
Page 18

Broiling
B~oilingis cookingfoodbyintense
radiantheatfromtheupperunitin
theoven. Mostfish.andtendercuts
ofmeatcanbe broiled.Follow
thesestepstokeepspatteringand
smokingto a minimum.
Step 1: If meathasfat orgristle
nearedge,cutverticalslashes
throughbothabout 2“ apart.If
desired,fatmaybe trimmed,
Ieavinglayerabout1/8”thick.
Step2:Placemeatonbroilerrack
inbroilerpari.Alwaysuserack so
fatdripsintobroilerpan;otherwise
juicesmaybecomehotenoughto
catchfire.
Step 6: Turnfoodonlyonce
duringbroiling.Timefoodsfor
firstsideperBroilingGuide.
Turnfood,thenusetimesgivenfor
secondsideas a guide to preferred
doneness.(Wheretwothicknesses
andtimesaregiventogether,use
firsttimesgivenforthinnestfood.)
$tep7:Whenftished broiling,tum
OVENSETknobtoOFF.Servefood
immediately,leavingthebroilerpan
andrackoutsideoventocoolduring
me~foreasiestcleaning.
Step3: Positionshelfon
recommendedshelfpositionas
suggestedinBroilingGuide.Most
broilingis doneonC position,but
if yourrangeis connectedto 208
Volts,youmay wishto usea
higherposition.
Youcanusealuminumfoiltoline
yourbroilerpanandbroilerrack.
However,youmustmoldthefoil
tightlyto therackandcutslitsin
itjust liketherack.
Step 4: Leavedoorajar a few
inches (except whenbroiling
chicken).Thedoorstaysopenby
itself,yetthepropertemperatureis
maintainedintheoven.
Step 5: TurnbothOVENSETand
OVEN~MP knob
~0 BROIL.
Preheatingunitsisnotnecessary.
(Seenotesin BroilingGuide.)
Withouttheslits,thefoilwill
preventfat andmeatjuicesfrom
drainingto thebroilerpan.The
juicescouldbecomehotenoughto
catchonfire.If youdo notcutthe
slits,youare@ing, notbroiling.
Questions& ~~SW~~S ‘-
Q. WhyshouldI leavethe door ‘—
closedwhenbroilingchicken?
A.Chickenistheonlyfood
recommendedforclosed-door
broiling.Thisis becausechickenis
relativelythickerthanotherfoods
youbroil.Closingthedoorholds
moreheatin theovenwhichallows
chickentocookevenlythroughout.
Q. men broiling,isit necessary
to alwaysusea rackinthe pan?
A.Yes.Usingtheracksuspendsthe
meatoverthepan.Asthemeatcooks,
thejuicesfallintothepan,thuskeeping
meatdrier.Juicesareprotectedbythe
rackandstaycooler,thuspreventing
excessivespatterandsmoking.
Q. $hould1saltthemeatbefore
broilkg?
A. No.Saltdrawsoutthejuices
andallowsthemtoevaporate.
Alwayssaltaftercooking.Turn
meatwithtongs;piercingmeat
witha forkallowsjuicesto escape. —
Whenbroilingpoultryorfish,
brusheachside oftenwithbutter. –
Q.my w mymwts not_
@
outas browmastheyshould?
A.In someareas,thepower(volt-
age)totheovenmaybe low.In
thesecases,preheatthebroilunit
for 10minutesbeforeplacing
broilerpanwithfoodin oven.
Checkto seeif youareusingthe
.—
recommendedshelfposition:Broil
for longestperiodof timeindicated
in theBroilingGuide.Turnfood
onlyonceduringbroiling.
Q.DoI needtogreasemybroiIer
mcktQpreventmat ~m sticking?
A.No.Thebroilerrackis designed
to reflectbroilerheat,thus keeping
thesurfacecoolenoughtoprevent
meatfromstickingtothesurface.
However,sprayingthebroilerrack
lightlywitha vegetablecooking
spraybeforecookingwillmake
cleanupeasier.
—
Page 19

BroilingGuide
foods,orto inc~easebrowning,
preheatif desired.
1.Alwaysusethebroilerpanand
rackthatcomeswithyouroven.It
isdesignedtominimizesmoking
andspatteringbytrappingjuicesin
theshieldedlowerpartofthe pan.
2.Ovendoorshouldbeajarforall
foodsexceptchicken;thereisa
specialpositionondoorwhich
holdsdooropencorrectly.
overtopreventpiercingmeatand
losingjuices.
4.If desired,marinatemeatsor
chickenbeforebroiling,orbrush
withbarbecuesaucelast5to 10
minutesof broilingonly.
7, Frozensteakscanbe
conventionallybroiledby
positioningtheovenshelfatnext
lowestshelfpositionandincreasing
cookingtimegiveninthisguide
1%timesperside.
8.If yourrangeisconnectedto
208Volts,raresteaksmaybe
5.Whenarrangingfoodon pan,
donotletfattyedgeshangover
sides.Fatthatdripscouldsoilthe
oven.3.For steaksandchops,slashfat
evenlyaroundoutside;dges ofmeat.
6.Broilerdoesnotneedtobe
broiledby preheatingbrdiland
Toslash,cutcrosswisethrough
preheated.However,forverythin
positioningtheovenshelfone
outerfat surfacejust to the edge of
positionhigher.
themeat.Usetongstoturnmeat
Quantityred/or shelf
XirstSide
Thickness
Position Tlrae,Minutes
k lb.(about8 c’ 3%
thinslices)
SecondSide
Time,Minutes
I
CommentsFood
3%
I
Arrangeinsinglelayer.
GroundBeef
WellDone 4-5
I
Spaceevenly.
Upto8 pattiestakeaboutsametime.
1 lb. (4patties)
c
7
Xto %in. thick
t
I
BeefSteaks
Rare
Medium
WellDone
Rare
Medium
WellDone
‘7
9
13
7-8
14-16
20-25
Steakslessthan1inchthickcook
throughbeforebrowning.Panfryingis
recommended.Slashfat.
1in.thick
(1to 1Xlbs.)
c
c
c
c
c
c
7
9
13
10
15
25
1%in.thick
(2to2Xlbs.)
10-15 Reducetimeabout5to 10 minutesperside
for cut-upchicken.Brusheachsidewith
meltedbutter.Broilwithskin-side-down
firstandbroilwithdoor closed.
Chicken 1whole
(2to2Xlbs.),
splitlengthwise
A
35
BakeryProducts
Bread(Toast)or
ToasterPastries
EngiishMuffins
Lobstertails
(6to 8oz.each)
% Spaceevenly.PlaceEnglishmuffinscut-
side-upand brush withbutter,ifdesired.
2to 4 slices
1 pkg.(2)
2 (split)
c
1‘/?-2
c 3-4
Donot
turnover.
Cutthroughbackofshell,spreadopen.
Brushwithmeltedbutterbeforebroiling
andafterhalfofbroilingtime.
2-4 B 13-16
Fish
1-lb.filletsMto
%in.thick
c 5 5
Handleandturn verycarefilly.Brushwith
lemonbutterbeforeandduringcooking,if
desired.Preheatbroilertoincreasebrowning.
HamStices
(precooked)
1 in. thick B 8 8
I
Increasetime5to 10minutespersidefor
1Hinchthickor home-curedham.
PorkcIIops
Well Done 2(X in.)
2(1 in. thick),
about1lb.
c 10
B
13
10
Slashfat.
13
Lamb
ChO~S
Medium
WellDone
Medium
WellDone
.
.-
WieIIersand
similarprecooked
-e
sausages,bratwurst
c 82(1 in.thick)
about10to 12oz.
2(1Xin,thick),
about1lb.
4-7
Slashfat.
10
4-6
12-14
c 10
c 10
B
17
l-z
Ifdesired,splitsausagesinhalf
lengthwise;cutinto5to6 inchpieces.
l-lb. pkg.(10)
c
6
Page 20

operatingtheSew=cleatingoven
Normal cleaningtime:3 hours
Beforesettingoven
controls,check These
Things:
step1:
*Removebroilerpan,broilerrack
andothercookwarefromtheoven.
(Ovenshelvesmaybeleftin oven.
NOTE: Shelveswilldiscolor
duringthe self-cleancycle.)
step 2;
~Wipeup heavysoilonoven
bottom.If youusesoap,rinse
thoroughlybeforeself-cleaning,
topreventstaining.
o
c
A. OvenFrontFrame
B. OvenDoorGasket
C. Openings
inDoor
D. OvenLight
step3:
~Cleanspattersorspillsonoven
frontframe(A)andovendoor
outsidegasket(B)withadampened
cloth. Polishwithadry cloth.Do
notcleangasket(B).Donotallow
watertorundownthrough
openingsin top of door(C).Never
usea commercialovencleanerinor
aroundself-cleaningoven.
Step4:
@Close ovendoorandmakesure
ovenlight(D)is off.
Ca~~tion:Chrometrimringsaround
thesurfaceunitsshouldneverbe
cleanedintheself-cleaningoven.
Neithershouldreflectorpansof
foilorshinychrome.
How to set oven for
cleaning
-.
Step 1:
~
mrn OWN SET’andOWN
TE~ bobs toCLEAN.Controls
willsnapintofinalpositionwhen
theCLEANlocationisreached.
step3:
0 Settheautomaticoventimer:
Step 2:
0
Slidethe latchhandleto theright
asfar as it willgo.
Theovenwfilsmokethefwsttime
youusethe self-cleancycle even
thoughyouhavewipedup any
excessivesoil.Thisisnormaland
shouldstopin about 10minutes.
Tohelpcontrolthesmoke,turnon
theexhaustfanovertherange
whenyouusethe self-cleancycle
thefirsttime’.
eMakesureboththeclockand
theDELAYSTARTdialshowthe
correcttimeofday.Whenthe
DELAYSTARTknobis pushedin
andturned,it will“pop”intoplace
whenthetimeshownon theclock
isreached.
~Pushin andturnSTOPTIME
knob. SetStopTimefor three
hourslaterthanpresenttimeof
day—forexample,if it is 6:00
now,set StopTimefor 9:00.
Theovencyclinglight (below
OVENTEMPknob),the
CLEANINGlightandthe OVEN
ONlightwillglow,indicatingthat
theself-cleancyclehasbegun.
Whentheovenreachesa certain
temperature,theovendoorwill
lock.Thelatchhandlecannotbe
moveduntilovencleaningis
completeandthe ovenC061Sdown.
Ovefidoorandwindow(onmodels
soequipped)get hot duringselfcleancycle.DO NOT’TOUCH.
—
—
.
—m
@
~Cleantop,sidesandoutside front
ofovendoorwithsoapandwater.
Donotuseabrasivesor oven
cleaners.
.-
—-
20
—.
Page 21

- FQI1OWThesestepsafter
self-cleaning
Aftercleaningiscomplete,the
door willsta~locked untiltheoven
coolsdown.‘Thistakesabout30
minutes.
step1:
~Whenovenhascooled,slidethe
latchhandleto theleftasfar asit
willgoandopenthedoor-.If the
door willnotopenmovethelatch
handlebacktotheright,waitan
additional15minutesandthentry
again.Donotforcethelatchhandle.
m
step 2:
~T’llrn OVENSETknobto OFF.
step 3:
*
~Uril OVF.NTEMPknobto
WAW.
NOTE: Tostartandstopcleaning
atatimelaterthanshownon
clock,pushin andturn DELAY
STARTdid totimeyouwish
cleaningtostart.ThensetSTOP
TIMEdial for threehourslater
thantheStartTime.Ovenwill
automaticallyturnon and offatthe
settimes.
——
QuestionsandAnswers
Q.my won’tmyovenclean
immediatelyeventhou@I setdl
thetimeandclm bobs comtiy?
A. Checktobe sureyourDELAY
STARTdialis setto the sametime
astherangeclock.Alsocheckto
be surelatchhandleismovedto
theright.
Q.Krny ovenclockisnotworhg,
u Is~ se~-cl- myoven?
A. No.YourAutomaticOven
Timerusestherangeclockto help
startandstopthe self-cleaning
cycle.
Q. CanI use commercialoven
cleanersonanypartofmyself-
cleaningoven?
A.Nocleanersorcoatingsshould
beusedaroundanypartofthisoven.
Hyoudousethemanddonotwipe
theovenabsolutelyclean~fterward.
Theresiduecanscartheovensurface
anddarnagemetalpartsthenexttime
the ovenisautomaticallycleaned.
Q. Can 1clean the Woven
Gasketaroundthe ovendoor?
A.No,thisgasket is essentialfora
goodovenseal,andcaremustbe
takennottorub,damageormove
thisgasket.
Q. Afterhavingjust usedthe
oven9I couldnotmovethelatch
handle.Why?
A.Afterseveralcontinuoushigh:
temperaturebakingsorbroilings,
the doorcannotbelatched.If this
happens,letthe ovencoolby
openingtheovendoor.Afterthe
ovenhascooled,youwillbeableto
latchthe ovendoorforself-cleaning.
Q. WhatshouidI do ifexcessive
smok;ngoccursduringcleaning?
A. Thisis causedbyexcessivesoil,
andyoushouldswitchtheOVEN
SETknobto0~. Openwindowsto
ridroomofsmoke.Allowtheoven
tocool foratleastonehourbefore
openingthe door.Wipeuptheexcess
soilandresetthecleancycle.
Q. Is
the‘6C~~Ck~iH~” soundI
hearduringcleaningnormal?
A;Yes.Thisisthemetal heating
andcoolingduringboththe
cookingandcleaningfunctions.
Q. Should tl~erebe anyodor
duringthecleaning?
A. Yes,theremaybe a slightodor
duringthefirstfewcleanings.
Failureto wipeoutexcessivesoil
mightalsocauseanodorwhen
cleaning.
Q. mat causesthehair-like
linesontheenameledsurfaceof
myoven?
A. Thisis anormalcondition
resultingfromheatingandcooling
duringcleaning.Theydonotaffect
howyourovenperforms.
Q. WhydoI haveashleftin my
ovenaftercleaning?
A. Sometypes of soilwillleave
a depositwhichis ash.It canbe
removedwitha dampspongeor
cloth.
Q. My ovenshelves do not slide
easily.Whatistk;smatter?
A. Afiermanycleanings,oven
shelvesmaybecomesoclean
theydo notslideeasily.Tom&e
shelvesslidemoreeasilyaftereach
self-cleaningcycle,dampenfingers
witha smallamountofcookingoil
andrub lightlyoversidesof shelf
wheretheycontactshelfsupports.
Q. My oven shelveshavebecome
grayaftertheself-cieancycle.Is
thisnormal?
A. Yes.Aftertheself-cleancycle,
the shelvesmay losesomeluster
anddiscolortoa deepgray.
Q. CanIcookfoodonthecooktop
wtile theovenisseIf-cIeating?
A. Yes.Whilethe ovenis
self-cleaning,you canuse the
cooktopjustas younormallydo.
—
Page 22

—
———
careandcleating
(SeeCleaIlingGuide)
PIoperca~eandcleaningare
importantsoyourrangewillgive
youefficientmd satisfactoryservice.
Followthesedirectionscarefullyin
caringforyourrangetoassuresafe
andpropermaintenance.
Cooktop
Theporcelainenamelcooktopis
sturdybutbreakableif misused.
Thisfinishis acid-resistant.
However,anyfoodspillswitha
highacidcontent(suchasfruitjuices,
tomatoorvinegar)shouldnotbe
permittedtoremainonthe finish.
cleaning under the Range
Theareaundertherangeofmodels
equippedwitha bottomdrawercan
bereachedeasilyforcleaningby
removingthebottom drawer.To
remove,pull draweroutallthe
way,tiltupthefrontandremove
it.Toreplace,insertglides at back
ofdrawer beyondstop on range
glides.Liftdrawerif necessaryto
insefieasily.Letfrontof drawer
down,thenpushinto close.
RemovableOvenDoor
ToREMOVEdoor,opento BROIL
position,orwhereyoufeelhinge
catchslightly.Graspdooratsides;
liftdooruparidawayfromhinges.
To
REPI.ACE,graspdooratsides.
Lineupdoorwithhingesanclpush
doorfirmlyjntoplace.
22
ovenventDuct
Yourrangeis ventedthough a
ductlocatedundertherightrear
surfaceunit.Cleanthe ductoften.
Toremove:
eMake sureunitis cool.
eLiftuprightrear surfaceunit.
o Removedrippan/trimring.
@Liftoutovenvent duct.
Toreplace:
oPlacethepartovertheovenvent
locatedbelowthecooktopwith
openingoftheductunderthe
roundopeninginthedrippan.It is
importantthatthe duct is in the
correctpositionsomoistureand
vaporsfromtheovencanbe
releasedduringovenuse.NOTE:
Nevercoverthehole in the oven
ventduct withaluminumfoilor
anyothermaterial.Thisprevents
theovenvent from working
properlyduringanycookingcycle.
LalnpReplacement
CAUTION: Beforereplacing
yourovenlampbulb,discomect
theelectricpowerforyourrange
atthemainfuseorcircuit
breakerpanel.Besuretolet the
lampcoverandbulbcool
completelybeforeremovingor
replacingthem.
Theovenlamp(bulb)iscovered
withagIassremovablecoverwhich
isheldinplacewitha bail-shaped
wire.Removeovendoor,if desired,
toreachcovereasily.
Toremove:
~Holdhandundercoversoit
doesn’tfallwhenreleased.With
fingersofsamehand,firmlypush
backwirebailuntilitclearscover.
Liftoffcover.DONOT~MOVE
ANY
SCREWS.
~
Replacebulbwith40-watthome
appliancebulb.
Toreplacecover:
oPlaceit intogrooveoflamp
receptacle.Pullwirebail forwardto
centerofcoveruntilit snapsinto
place.Whenin place,wireholds
coverfirmly.Becertainwirebailis
indepressionincenterof cover.
~Connectelectricpowertorange.
surfaceUtih
Cleantheareaunderthe drip
pan/trimringsoften.Built-upsoil,
especiallygrease,maycatchfire.
Tomakecleaningeasier,tilt-lock
unitsliftup andlockin theup
position,andplug-inunits
areremovable.
Caution:Besureallcontrolsare
turnedtoOFVandsutiace units
arecoonbeforeattemptingtoIift
orremovethem.
Afterliftingthetilt-locku*. or
removinga plug-inunit,remove
thedrippan/trimringsandclean
themaccordingtodirectionsin the
CleaningGuide.Wipearoundthe
edgesofthesurfaceunitopening.
Cleantheareabelowtheunit.
Rinseallwashedareaswith
a dampclothor sponge.
——
—-
—
—
—
e
—
—
Page 23

‘- Tilt-L@ck(Stind=up)uni@
—
(onmodelsso equipped)
Tiit-lockwi@c-et beremovti.
Youcanlifta tilt-lockunitupward
about6 inches andit willlockin
theup position.
Torepositionthettit-lockunit:
~Replacethedrippan/trimring
intotherecessin thecooktop.
~Hyouhavea separatetrimring,
putit in placeover the drippan.
Thedrippanmust beunder the
trimring.
eGuidethe surfaceunitintoplace
soit restsevenly.
Plug”Inunits
(on models so equipped)
Plug-inunitscanbe removed.
Lifta plug-in unitabout1inch
above the trimring-just enough
to graspit—andpullit out.
Do
notIKta plug-inunitmore
than1inch.Myoudo9it maynot
lieflatonthetrimringwhenyou
piugit backin.
RepeatedItitingoftheplu~in
tit more than1inchabovethe
&imringcanpemanent]y
daage thereceptacle.
Separate
Drip Pan & Trim Ring
Installation/Removal
/
R
Toreplacea plugin unit:
0Replacethedrippanintothe
recessinthecooktop.Makesure
openinginpanlinesupwith
receptacle.Ifyouhavea separate
trimring,putitin placeoverthe
drippan.Thedrippan mustbe
under the trimring.
~Inserttheterminalsoftheplug-in
unitthroughtheopeninginthe
drippan andintothereceptacle.
0Guidethesurfaceunitintoplace
soitrestsevenly.
Note:Thedrippanmustbe under
thetrimring.
CAUTEON
@Do notattempttocleanplug-in
surfaceunitsinan automatic
dishwasher.
~Do notimmerseplug-insurface
unitsin liquidsof any kind.
0Do notbendtie plug-insurface
unitplugterminals.
*Donotattemptto clean,adjustor
in any wayrepairtheplug-in
receptacle.
Adjwthgovenmermosht
Usethetimegiveninyourrecipe
whenusingtheovenforthefirst
time.Oventhermostats,in time,
may “drift” fromthefactory
settinganddifferencesintiming
betweenanoldanda newovenof
5 to 10minutesarenotunusual.
Yourovenhasbeensetcorrectlyat
thefactoryandismorelikelyto be
accuratethantheovenwhichit
replaced.However,if you findthat
yourfoodsconsistentlybrowntoo
littleor toomuch,youmaymakea
simpleadjustmentin the
thermostat(OvenTemp)knob.
Toadjwt thethermostatknob:
1.Pulltheknobofftheshaft,look
atthebackoftheknobandnote
thecurrentsettingbeforemaking
anyadjustments.
2.Loosenbothscrewson theback
oftheknob.
3. If theoventemperatureseems
toohot,movethetopscrewtoward
thewordHOTTER.Ifthe
temperatureseemstoocool,move
thescrewtowardtheword
COLDER.Eachnotchchangesthe
temperatureby about8 degrees
Fahrenheit.
4.Tightenthescrews.
5.Replacetheknob,matchingthe
flatareaof theknob to the shaft.
23
Page 24

..-
Cleating Gtide
NOTE: Let range/ovenpartscoolbeforetouchingorhandling.
—
GENERALDIRECTIONS
Do not cleanthe
bakeunitorbroilunit.Anysoilwillburnoffwhentheunitisheated.
NOTE:Thebakeunitishinged and can be lifted gentlyto clean the oventloor.If spillover,
residue,or ash accumulatesaroundthe bakeunit, gently wipe aroundthe unit withwarm water.
Drainfat, coolpanandrack slightly.(Donot let soiledpan and rack standin ovento cool.)
Sprinkleon detergent.Fill the panwithwarmwater and spreadcloth or papertowel over the
rack.Let panand rack standfora fewminutes.Wash;scourifnecessary.Rinseanddry.
OPTION:The broilerpanandrackmayalso be cletied in a dishwasher.
Pulloff knobs.Washgentlybut do not soak. Dry and return controls to range,makingsureto
matchflat area on the knobandshaft.
Washall glass withclothdampenedinsoapywater,Rinseandpolish witha drycloth. If knobs
meremoved,donotallowwatertorun downinsidethe surface of glass while cleaning.
MATERIALSTOUSE
BakeUnitand
BroilUnit
BroilerPan and Rack
oSoapandWater
eSoap-FilledScouringPad
~Plastic
ScouringPad
eDishwasher
ControlKnobs:
Range TopandOven
@Mild SoapandWater
OutsideGlass Filtish
oSoapandWater
Wash,rinse, and thenpolishwitha drycloth,
Metal,including
ChromeSideWIrns
andTrii Strips
● SoapandWater
DO NOT USE steel wool,
abrasives,amxnonia,acidsor
comercial oven cleaners.
If acids shouldspill onthe range whileit is hot, use a
drypapertowel or clothto wipe up rightaway.Whenthe
surfacehascooled, wash and rinse.
PorcelainEnameland
PaintedSurfaces*
ePaperTowel
“DryCloth
eSoapandWater
DONOTUSEovencleaners,
cl=nsing powdersorharsh
abrasives.These mightscratch
the surface.
Forotherspills, such as fat smatterings,etc.,washwith soap
andwaterwhencooledand then rinse.Polishwith a dry
cloth.
DONOTUSEovencleaners,
cleamingpowdersorharsh
abrasives.
INSIDEOF DOOR:Clean ONLYthedoorliner outside
thegasket.The dooris automaticallycleanedif the oven
isintheself-cleaningcycle. DO NOT rub or damage
gasket.Avoidgettingsoapand wateron the gasket or in the
openingson the door.Rinsewell. NOTE Soapleft on liner
causesadditionalstainswhenovenis reheated.
OUTS~E OFDOOR Use soap anflwater to thoroughly
cleanthe top, sides and front of theovendoor.
InsideandOutside
OvenDooT*
~SoapandWater
—
—
AvoidgettingANYcleaningmaterialsonthe gasket.
OvenGasket*
*SoapandWater Coolbeforecleaning.Frequentwipingwithmild soapand water will prolongthe time between
majorcleanings.Be
suretorimethoroughlytoavoidadditiondstaining.Forheavysoiling,
useyourself-cleaningcycleoften.
RemovetheOvenVentDuctfoundundertherightrearsurfaceunit.Washinhot,soapywater
anddryandreplace.(Openingshouldmatchopeningindrippan.)
OvenLiner
OvenVentDuct
DSoap and Water
BSoapandWater
Yourshelvescanbe cleanedwiththeself-cleaningfunctioninthe oven.For heavy soil, clean by
handandrinsethoroughly.
Shelves
(See
Self-Cleaning
OvenDirections)
*Spillageof marinades,fruit iuices, tomatosauces and bastingmaterialscontainingacids may cause discoloration. Spilloversshouldbe wiped up
A-
immediately,withcare being-takento not touch any hotporti;n of the oven, When-thesurface is cool, clean and rinse.
—
—
Page 25

PART
-*”
Calrod@Surface
unit coils
StorageDrawer
Chrome-Plated
TrimKings
Mminm
DripPam
PorcelainEnamel
Dtip Pans
—
MA’IERIALSTOUSE
● SoapandWater
o SoapandWater
*Stiff-BristledBrush
“PlasticScouringPad
0Soapand Water
ePlasticScouringPad
*Dishwasher
eSoapandWater
oSoap-FilledScouringPad
~PlasticScouringPad
GENEMI. DIRECTIONS
DONOTUSEadishwasher
toclean thesufiace unitcoils,
Spattersandspillsburnawaywhenthe coilsare heated.
At the end of a meal,removeall utensilsfrom the Calrorl@
unitand heat the soiledunitsat
131.Letthe soilbum off
abouta minuteandswitchthe unitsto OFF.Avoidgetting
cleaningmaterialsonthe coils. Wipeoffanycleaning
materialswith a damppapertowelbeforeheadngtie Calrod@
unit.
DONOThandletheunitbeforecompletelycooled.
DONOT attemptto cleanplug-inunitsintheself-cleaning
oven.
DONOTimmerseplug-inunitsinanykindofliquid,
Forcleaning,removedrawerbypullingit all the way open,tilt up the front andlift out. Wipe
withdampcloth or sponge and replace. Never use harsh abrasives or scouringpads.
Clean z: describedbeloworin the dishwasher.DONOTCLEANIN SELF-CLEANING
OVEN.Ringswilldiscolor.Wipeafter each cookingsounnoticedspatterwill notburnon
nexttime you cook.To removeburned-onspatters, use any or all cleaningmaterials
mentioned.Rub lightlywithscouringpadto preventscratchingof the surface.
Coolpansslightly.Soakin detergent and washor scourpanswithhot water.Rinseanddry.
Pansmay also becleanedin the dishwasher.
Porcelaindrippanscan be cleaned in dishwasher,or byhand.Afterpanscool slightly,soak in
detergentand hot water,washwith a plastic scouringpadif necessary,thenrinse anddry.
25
Page 26

—
.
——-.
. ——-—.
se+ Questions?
..——..——
,—..—.—~——
———
“~~=~ UseTMsProblemSolver
.———..————
c~”
PROBLEM
OVENWILL
NOT
WORK
OVENLIGHT
DOESNOTWORK
FOODDOESNOT
BRomPROPERLY
FOODDOESNOT
ROASTORBAKE
PROPERLY
CALROD”SUMACE
UNITSNOT
F~CTIONING
PROPERLY
OVENWILLNOT
SELF-CLEAN
OVENDOOR
WON’TLATCH
~
POSSIBLECAUSE ANDREMEDY
gPlugonrangeisnotcompletelyinsertedin theelectricaloutlet.
*The circuitbreakerin yourhousehasbeentripped,or a fusehasbeenblown.
*Ovencontrolsnotproperlyset.
~Doorleftinlockedpositionaftercleaning.
o Light bulbis loose. ,
0 Bulbis defective.Replace.
*Switchoperatingovenlightisbroken.Callforservice.
o OVENSETknob not setatBRO~. . ,
eOVEN’TEMP@obnot setatBRO~: .~
*Doornotleft ajaras recommended.
@hproper shelfpositionbeingused.CheckBroilingGuide.
eNecessarypreheating‘wasnotdo’ne. ‘ i
*Foodis beingcookedonhotp~.’ ~ ‘‘
.,
~Cookwareisnot suite’dforbroiling. ~ ~ ~‘
~Aluminum’foilusedonthebroil,panrackhas”notbeenfittedproperlyand slitas
recofiended. ‘ ‘, ~ ~ , ~ ~‘
gOVENSETknobnotseton BA~. ‘
.
~OVENTEMPknobnotsetcorrectly. ,
—
~Shelfpositionis incorrect.CheckRoastingor,13akingGuides.
o Ovenshelfis notlevel.
~Incorrebtcookwareorcookwareofimpropersizeis beingused.
eA foiltentwas notusedwhenneeded to slowdownbrowningdunlngroasting.
~Surfaceunitsarenotpluggedinsolidy. . ‘ ~
~Trimrings/drippansarenot setsecurelyin tie rangetop. ‘
eSurfaceunitcontrolsarenotproperlyset. \
~Automatictimerdialsnot setornotsetproperly.Clockmustbe setto timeof day and
theSTOPTIMEdialmustbe setandadvancedbeyondthetimenotedon ovenclock.
~TheSTOPTIMEdialwas notadvancedfor‘longenough.
o BothOVENSETandOVENTEMPknobsmustbe setatCLEANsetting.
=Duringthe self-cleaningfunction,athickpileof spilloverinthe.ovencanleavea
heavylayerofashthatcaninsulatetheareafromfurtherheat.
o Latchhandlenotmovedto theright.
~Ovenmaybe toohot fromprevioususe.Openovendoorto cooloven. Whenoven
hascooled,latchhandlecan againbemoved.
*OVENSETknobmustbe atCLEANor0~ beforelatchhandlecan be moved.
If
youneedmorehelpo..call,tolllfree:
GE Answercenter@
800.626.2000
consumerinformationservice
26
-—
Page 27

--
TOOLSYouWILLHEEO
Large blade screwdriver
Channellock pliers
BM=R
BEFO~ BEGImING
mwmmoN.
~s
appliancemustbesuppfiedwithtie proper
voltageand&equency,andconnectedtoan
individual,properlygroundedbranchcircti~
protectedbyacircuitbreakerortimedelayfuse,as
notedontheratingplate.
Wtig mustconformto NationalElectricCodes.
Ethe electricservice
provideddoesnotmeetthe
abovespecifications,itisrecommendedthata
ficensedelectricianinsManapprovedoutie~
Bemuserangeterrnindsarenotaccessibleafter
rangeisinposition,fletibleservicecondtitorcord
mustbeused.
STEP1
PREMRE
?HEOPENBMG
1Y211spacingisrecommendedfromtherangeto
adjacentverticalwallsabovecooktopsurface.
Nlow301’finirnum clearancebetweensurface
unitsandbottomofunprotectedwoodormetal
topcabinet,and
1511minimumbetween
countertopandadjacentcabinetbottom.
STEP1(cont.)
Toeliminatetheriskofburnsorfirebyreaching
overheatedsurfaceunits,cabinetstoragespace
abovethe surfaceunitsshouldbe avoided.If
cabinetstorageistobe provided,the riskcanbe
reducedbyinstallingarangehoodthatprojects
horizontallyamin.of511beyondthe bottomofthe
cabinets.
NOT LESS THAN
WIDTH OF RANGE
27
Page 28

STEP2
PREmREFORELEcTR!aLCOWHECTBON
Use onlya 3-conductor,or ifrequired a 4
conductor range cord set as noted below.
These cord sets are provided with ring
type terminals.
The electricalrating ofthe cord must be
125/250volts minimum,40amperes.
NOTE:Only a 4-conductorcord is to be used
when the applianceis instaUed
in a mobile
borne or where local codes do not permit
grounding through the neutral.
STEP3
1. bcate connector block at the bottom rear
ofrange and remove rear wiringcover.
2. Directlybelow the connector block is a
hole with a knockout ring for accommodating
conduitfittings. Brackets provided are used to
support the flexiblecord strain relief,which
must be securely a~ched to the cord set.
R
3wiRESYSTEM
Power COrd lnshflation-Insert screws
through powercord terminals so that the
{
screwspass through connectorblockterminals
and engage nuts. Tighten screws securely.
;EW+
?
POWER CORD
...
RINGTERMINAL
k
@\~
<>.!
:~:::CTOR /
e
MOVABLE
TERMINAL
NUT
i
CableDhect lnstiation-Clamp bare wires
betweenthe connectorblockterminals and
movablenutswithscrews tightened securely.
. .
9
b
+ SCREW
*
.
!
@ ::JJ:cTOR
BARE
TERMINAL
WIRE~ ‘
Q-
FLEXIBLE
CABLE
MOVABLE
NUT ~ .
1. copper Wtig
Connectthe neutral or grounded wire ofthe
supplycircuit to the neutral terminal ofthe
connector block, located in the center.The
power leads must be connected to the outside
(brass colored) terminals.
GROUNDING STRAP
(GROUNDED TO RANGE)
Page 29

~
W-ING: CONNEC~RBLOCKIS
– MPROWDFORCOPPERWm
~coNNEmoN ONLY*
2*Nwinum Wifing
b
L Connect length ofcopper buildingwire to
range terminal block.
~. splicecopperwirestoaluminumwiringusing
specialconnectorsdesignedandU.L.approvedfor
joiningcoppertoaluminum,andfollowthe
connectormanufacturer’srecommended
procedureclosely.
NOTE:Wire used, locationand enclosure of
splices, etc., must conformto good wiring practice
and local codes.
SEP5
HIRE SYSTEM
SPECW@RouNDIMGiMsFRucTloHs
w~G:
Framegroundedtoneutralofappfiancethrougha
link.Husedin
a MOBILEHOME or if LOCK
CODESdo not permit grounding through the
neutral:
1)disconnect the link from neutral,
2) use grounding terminal or lead to ground unit in
accordance with local codes, and
A
~)connect neutral terminal or lead to branch
~~Luui~in usualmanner.
(Iftheapplianceisto be connectedbymeansofa
cordset,use4-conductorcordforthispurpose.)
CONNECTOR
BLOCK
4TH GROUNDING
LEAD ~~ >
GROUND
LUG
STEP6
AHT!”T!PBMCKETiHsfhLLATfloM
~ ~~-TIP bracketis suppliedwithinstructions
forinstallationinavarietyoflocations.The
instructionsincludeatemplate,aPartslistanda
list
oftools necessary to c~mplet~the installation.
Readthe
lMPORT’~T SN~ 1NSTRUCTIONS
L andthe instructionsthatfitvoursituationbefore
z~eg-ififiiugsinstallation. “
WABNSHG
1. Rangemustbe securedbyANTI-TIPbracket
supplied.
2. See instructionstoinstall(suppliedwith
bracket).
~. Unlessproperlyinstalled,rangecouldbetipped
bysteppingorsittingondoor.Injurymightresult
fromspilledhotliquidsorfromrangeitself.
TypicalinstallationofAnti-Tipbracket
Attachmentto Wall
Bracket
ScrewMust Enter
Wallplate
WoodorMetal
h
STEP7
LEVEL[MG TME MNGE
Therangemustbeleveled.LevelingfeetzYe
locatedoneachcornerofthebaseoftherange.
~emovethe storagedrawerandrotatethe leveling
feetinoroutasrequired.Toremovedrawer,pullit
outallthe way,tiltupthe frontandremoveit.To
replace,insertglidesatbackofdrawerbeyond
stoponrangeglides.Li drawerifnecessaryto
inserteasily.
Oneoftherearlevelingfeetwillengagethe~T1-
TIP bracket(allowforsomesidetoside
adjustment).Allowa minimumclearanceof1/811
betweentherangeandthe levelingfootthat is to
beinstalledintothe~T1-TIP bracket.
Checktherangeforproperinstallationintothe
ANTI-TIPbracket (after the range has been
properly installed) by grasping the edges ofthe
~AR burner holes and carefully attempting to tilt
the range forward.
STEP8
FINALCHECK
Be sure all switches are inthe “off”position before
leavingthe range.
29
Page 30

we’llBeThere
JViti tiepurchaseof yournew GEapplimce, receivetie
assurancefiat if yOIieverneed information or assistance
~
~- fromGE,we’llbe
fiere. Ml you have to do is cdl—-toll-free!
—
AGEConsumerServiceprofessional
willprovideexpertrepairservice,
—
scheduledat a timethat’sconvenient
foryou.ManyGEConsumerService
company-operatedlocationsofferyou
servicetodayor tomorrow,oratyour
convenience(kOOa.m.to %00p.m.
weekdays,9:00a,m. to2:00p.m.Saturdap).Our factory-minedtecbicias
knowyourapplianceinsideandout—
somostrepairscanbehandledinjust
onevisit.
WhateveryourquestionaboutanyGE
majorappliance,GE AnswerCente@
informationserviceisavailableto
help.Yourcd—and yourquestion—
willbeansweredprompdyand
courteously.Andyoucancallany
time.GEAnswerCente@serviceis
open24hoursa day‘?daysa week.
Youcan have the secure feeling that
GEConsumer Service w~l SWbe
there after your
warrantyexpires.Purchase a GE con~ct while your warrantyis still in efiect and you’llreceive
a substantialdiscount.Witha mdtiple-
yearcontract,you’reassuredof fiture
service at today’sprices.
~lecommunicationDevicefortheDeaf
htitidu~ quafied towfieetick
om appfimcescanhaveneeded
p=ts or accessoriessentdirectlyto
theirhome,freeof shippingcharge!
TheGEpartssystemprovidesaccess
toover47,000parts...andallGE
GenufieRenewalPam arefilly
warranted.WSA,Mastefiardand
Discovercardsareaccepted.
user mtitenmce htmdons
Contied k ti booMetcoverpme
dms titended to
be pfiomed by
my Ru*r.Othe?Setidng genetiy
shodd be refemd tOquMed ser”
tiee pmonnel$ Cautionmustbe
Smlm AA
-— - . . . . .. . . ..
m. -.
. ..-. .*
00 w--,,.
=... ...
Uponrequest,GEwillprovideBraille
controlsfora varietyofGEappliances,
andabrochuretoassistin planninga
barrier-freekitchenforpersonswith
limitedmobili~.Toobtaintheseitem%
freeofcharge,cdl 800.626.2000.
Consumerswithimpairedhearing
or speech who haveaccess to a TDD
or a conventional teletypewritermav
C~l800-TDD-GEAC(8~0-833-43zz)‘
torequestinformationorservice.
Page 31

7
YOURGEELECTRICRANGE
WARRANTY
Saveproofoforiginalpurchasedate suchasyoursalessliporcancelledchecktoestablishwarrantyperiod.
L
—
WHATIs COVERED
FULLONE-YEAR WARRANTY
Foroneyearfromdateoforiginal
purchase,wewill provide,freeof
charge,partsandservicelaborin
yourhometo repairor replace
any Pati of the
rangethatfails
becauseofa manufacturing
defect.
Thiswarrantyis extendedto
theoriginalpurchaserandany
succeedingownerfor products
purchasedforordinaryhomeuse
inthe48 mainlandstates,
Hawaii
andWashington,D.C.InAlaskathe
warrantyisthesameexceptthatit
is LIMITEDbecauseyoumustpay
toshiptheproducttothe service
shoporfortheservicetechnician’s
travelcoststoyourhome.
Allwarrantyservicewillbe
providedbyour FactoryService
Centersorby ourauthorized
CustomerCare”servicersduring
normalworkinghours.
LookintheWhiteorYellowPages
ofyourtelephonedirectoryfor
GENERAL ELECTRICCOMPANY,
GENERAL ELECTRICFACTORY
SERVICE,GENERALELECTRIC-
HOTPOINTFACTORYSERVICE
or GENERALELECTRIC
CUSTOMERCARE@SERVICE.
WHAT!s NOTCOVERED
@Servicetripstoyourhometo
eReplacementofhousefusesor
teachyouhowto usetheproduct.
resettingofcircuitbreakers.
.
Readyour Useand Care material.
o
F~lureoftheproductif it is used
Ifyouthenhaveanyquestions forotherthan itsintendedpurpose
aboutoperatingthe Productplease or used commercially.
contactyourdealerorour ConsumerAffairsofficeatthe
@Damagetoproductcaused
byaccident,fire,floodsoracts
addressbelow,orcall,tollfree:
ofGod.
GEAnswerCenter@
800.626.2000
consumerinformationservice
WARRANTORIS
NOT
RESPONSIBLEFOR
CONSEQUENTIALDAMAGES.
~Improperinstallation.
Ifyouhaveaninstallationproblem,
contactyourdealerorinstaller.
Youareresponsibleforproviding
adequateelectrical,gas,exhausting
andotherconnectingfacilities.
Some states do not allow the exclusion or limitation of incidental or consequential damages, so the above limitation or exclusion
may not apply to you. This warranty gives you specific legal rights, and you may aiso have other rights which vary from state to state.
To knowwhat your legal rights are in your state, consult your local or state consumer affairs office or your state’s Attorney General.
Warrantor: General Electric Company
#ffutiher help is needed concerning this warranty, write:
Manager—Consumer Affairs, GE Appliances, Louisville, KY
40225
.
Thisbook is printed on recycled paper.
——
.
~
5-91 CG
JBP22P
JBP24GP JBP26
JBP22GP JBP25GP JBP26A
JBP26WP
 Loading...