

Page 1
Safety Information
Anti-Tip Device ............. 3
Oven ..................... 6
Safety Precautions ........ 3, 4
Surface Cooking Units ....... 5
Operating Instructions
Clock and Timer . .......... l ]
()yen .................. 8-10
Sabbath Feature ........... ] 3
Self-Cleaning .......... ] 5, ] 6
Thermostat .............. ] 4
Timed Baking
and Roasting Features ...... ] 9
Surface Units .............. 7
Care and Cleaning
Broiler Pan & Grid ......... 90
Control Knobs ............ 17
Lift-Off Oven Door . ........ 19
Lift-Up Cooktop ........... 21
Light .................... 90
Shelves .................. l 8
Storage Drawer Removal .... 90
Surface Units ............. 91
GEAppliances
JBP24
JBP26
JBP30
JBP_5
Troubleshooting Tips ... 22-24
Customer Service
Product Registration . . . 9, 95, 96
Service Telephone
Numbers .......... Back Covet
_'arrantv ................. 97
FCupdated www.geappliances.com 164D4290PO07 49-80038 07-00 JR
Page 2
GE& You,A Service Partnership.
IMPORTANT!
Fill out the (_onsuiner Product Registration Card.
Two Easy Ways ToRegister YourAppliance!
Through the internet at _v.geappliances.com.
Complete and mail the enclosed Product Registration Card.
FORYOURRECORDS
Write the model and serial numbers here:
#
#
You can find them on a label behind the storage drawer on the fl'ont of the range frame.
Staple sales slip or cancelled check here.
Proot of the original i)m'chase date is needed to obtain service trader the warranty:
READTHISMANUAL
Inside you _dll find man_ helpflfl hints on how to use and maintain _om" range propefly,.lust a little
prexenfixe care on your part can saxe _ou a great deal of time and money oxer the life of yore" range.
IFYOUNEEDSERVICE
Ym'll find many answei_ to cominon problems in the Before YouCallForService section. If you
review our chart of TroubleshootingTipsfirst, you may not need to call fin" service at all.
If wm do need service, you can relax knowing hel I) is only a phone call away. A list of toll-fl'ee
customer seiMce nuinbei_ is inchlded in the back section of this inanual.
OR
Visit our _.Vebsite at vvvvvv.geappliances.com
2
Page 3

IMPORTANTSAFETYINFORMATION.
READALLINSTRUCTIONSBEFOREUSING.
WARNING!
For your safe_ the information in this manual must be followed to minimize the risk of fire,
electric shock, or to prevent property damage, personal injury, or loss of fife.
WARNINGANTI-TIPDEVICE
All ranges can tip and injury could result.
Topre vent accidental tipping of the range, attach it to the wall and floor by installing the Anti--tip
device supplied.
Tocheck if the device is installed and engaged properly, remove the kick panel or storage drawer
and inspect the rear leveling leg. Make sure # fits securely into the slot.
ffyou pull die rang_ out from dm wall for aW reason, make sure die device is properly
engaged when you push the rang_ back against the wall. If it is not, there is a possible risk of
the rang_ tipping oxer and causing itljui_' if you or a child stand, sit or lean on an open door
Please refer to the Anti-Tip device information in this manual. Failure to take this precaution
could _esult in tipping of the rang_ and inju U.
IMPORTANTSAFETYNOtiCE
The California Safe Drinking Water and ToxicEnforcement Act requires the Governor of California to
publish a list of substances known to the state to cause cancer, birth defects or other reproductive
harm, and requires businesses to warn customers of potential exposure to such substances.
The fiberglass insulation in self-clean ovens gives off a very small amount of carbon monoxide during
the cleaning cycle. Exposure can be minimized by venting with an open window or using a ventilation
fan or hood.
Fluorescent light bulbs contain mercury. If your model has a surface light, you must recycle the
fluorescent light bulb according to local, state and federal codes.
SAFETYPRECAUtiONS
When using electrical appliances, basic safe_/ precautions should be followed, including the following:
Use this appliance only for its intended
puq)ose as desciibed in this )_ner s
Manual.
Be sure your appliance is properly
installed and grounded by a qualified
installer in accordance with the proxqded
installation instructions.
Have file installer show you the location
of the ci_vuit breaker or fllse. Mark it for
easy' reference.
Do not atmmpt to repair or replace any
part of your range unless it is specifically
recommended in this manual. All other
servicing shou]d be referred to a qualified
technician.
• (
Before performing any service, disconnect
d_e range power supply at the household
disuibufion panel by removing the fl_se or
switching off rite circuit breaken
Do not leave children alone----children
should not be left a]one or unattended in
an area where an appliance is in use. They
should never be allowed m sit or stand on
any part of the appliance.
Do not allow anyone m climb, stand or
hang on the door; storage drawer or
cookmp. They could damag_ the rang>
and e_en tip it ovel; causing se_re
personal inju U.
3
Page 4
IMPORTANTSAFETYINFORMATION.
READALLINSTRUCTIONSBEFOREUSING.
a, WARNING'!
SAFETYPRECAUTIONS
Do not store flammable materials in an
oxen or neat the cooktop.
CAUTION: temsofinterestto
iiiiiiiiiiii_iii
children should ,lot be stored in cabinets
aboxe a range or on tile backsplash of a
range--<'hildren climbing on tile range to
reach items cou]d be seriously injured.
iiiiiiiiiiii_iii
Never wear loose-fitting or hanging
garments while using file appliance. Be
carefld when reaching for items stored
ox>r tile range. Flammable material could
be ignited if brougtlt in contact wifll hot
surface units or heating elements and
m W cause severe hums.
iiiiiiiiiiii_iii
Use only dly pot holders--moist or damp
pot holders on hot sur/_aces may result in
burns from smam. Do not let pot holders
touch hot sur/_ace units or heating
elements. Do not use a towel or other
bulky cloth in place of pot holders.
For your safety, nexer use your appliance
for warming or heating the room.
Teach children not to play with die
controls or any other part of the range.
Always kee I) dish towels, dish cloths, pot
holders and other linens a safe distance
from your range.
Always kee I) wooden and plastic utensils
and canned food a safe distance flom
your range.
Always kee I) combustible wall coxetings,
curtains or drapes a safe distance flom
your range.
Do not let cooking grease or other
flammable materials accumulate in
or near the range.
Kee I) tile hood and grease filters clean
to maintain g_od xenting and to axoid
grease fires.
iiiiiiiiiiii_iii
Do not use water on grease fires. Never
pick up a flaming pan. Turn dm conuols
off. Smother a flaming pan on a surface
unit by coveting the pan complemly with a
well-fitting lid, cookie sheet or fiat tr W. Use
a mulfi-puq)ose &Y chemical or foam-type
fire extinguisher
Flaming grease outside a pan can be put
out by covering it with baking soda or, if
available, by using a muhi-puq)ose d U
chemical or foam-type fire extinguishen
Flame in dte oven can be smothered
completely hy closing dm oven door and
tuTning the o\en off orhy using a multi-
purpose dU chemical or tbam-type rite
extinguisher
Do not touch the surface units, the
heating elements or tile inmfior sttr/_ace
of tile oven. These sur/_aces m W be hot
enough to bum even thougit they are dark
in color Duling and after use, do not
touch, or let clothing or oilier flammable
matetia]s contact rite sttrface units, areas
nearhy the sur/_ace units or any inm_ior
area of the ox>n; allow sufficient time lbr
cooling first.
Potentially hot sur/_aces include the
cooktop, areas facing the cooktop, oxen
xent opening, surfaces near the opening,
crevices around tile oxen door
REMEMBER:Tile inside surface of tile oxen
may be hot when the door is opened.
Do not store or use combustible mamfials,
gasoline or other flammable vapors and
liquids in the vicinity of this or any other
appliance.
COOKMEATANDPOULTRYTHOROUGHLY...
Cookmeat andpoultrythoroughly--meat toat least an INTERNALtemperatureof 160°Eandpoultrytoat least
an INTERNALtemperatureof 180°ECookingto thesetemperaturesusuallypretectsagainstfoodbomeillness.
4
Page 5
SURFACECOOKINGUNITS
Use proper pan size--select cookware having flat bottoms large enough to cover the surface unit
heating element. The use of undersized cookware will expose a portion of the surface unit to direct
contact and may result in ignition of clothing. Proper relationship of cookware to surface unit will also
improve efficiency.
Ne_r leave the surfiwe units unattended
at high heat setfing:s. Boilox_rs cause
smoking and gseasy spillox_rs that may
catch on fire.
Do not use aluminum %il to line flse dii I)
pans or an>vhere in the oven except as
descs-ibed in this manual. Misuse could
result in a shock, fire hazard or damag>
to dse rang>.
Be sure the drip pans and flse x_nt duct
are not co_ered and are in place. Their
absence during cooking could damag>
rang_ parts and wiring.
Only certain types of glass, glassAeramic,
earthenware or offset glazed containers are
suitable for cookmp sesMce; others may
break because of the sudden chang> in
temperature.
To minimize the possibility of bmrls,
ignition of flammable mamrials and
spillage, fl_e handle of a container
should be turned toward the center
of the rang_ wifllont exmnding ox_r
nearby surface units.
Always turn the surface units off before
removing cookware.
Do not immerse or soak the removable
surface units. Do not put flsem in a
dishwashen Do not self-clean the surthce
units in the oxen.
When preparing flaming foods under dse
hood, tuI'n the tim on.
To a_id fl_e possibility of a bnrll 05
electric shock, always be certain that the
connols for all surthce units are at the
OFFposiuon and all coils are cool before
atmmpfing tolift 05 remox_ a unit.
Clean the cooktop with caution. It"a wet
sponge is used to wipe spills on a hot
cooktop, be careflfl to a_id smam bnrrls.
Kee I) an eye on foods being fried at high
or medium high heat settings.
Foods for flTing should be as d U as
possible. Frost on fiozen foods or moistule
on flesh fbods can cause hot fat to bubble
up and ox>r the sides of the pan.
Use litde t:at for efl_cdve shallow or deep
t:at flTing. Filling the pan too flfll of tzatcan
cause spilloxers when food is added.
If a combination of oils or fats will be used
in fi?'ing, stir mg>ther before heating, or as
tzarsmelt slowly.
Always heat fiat slowly, and watch as it heats.
Use a deep Pat them_omemr whenexer
possible to prex_nt ox_rheafing tht beyond
the smoking point.
5
Page 6

IMPORTANTSAFETYINFORMATION.
READALLINSTRUCTIONSBEFOREUSING.
WARNING'!
OVEN
Stand away from the range when opening the oven door. Hot air or steam which escapes can cause
bums to hands, face and/or eyes.
Do not heat unopened food containers.
Pressure could build up and the container
could burst, cansing all iI)ju U.
Kee I) file oxen x>nt unobstructed.
Kee I) the ox>n free flom grease buildup.
Place file oven shelf ill rite desired position
while rite oxen is cool. If shehes must be
handled when hot, do not let pot holder
contact tile heating elements.
Pulling out tile shelf m tile smi>lock is a
comenience ill lifting heaxy' foods. It is also
a precaution against burns from touching
hot surfitces of the door or oxen walls.
When using cooking or roasting bags
in the oven, follow the manufacturer's
directions.
Do not use the oxen to d_T newspapers.
If oxerheated, they call catch on fire.
Do not use tile oxen for a storage area.
hems stored ill all oxen call ignite.
Do not leme paper products, cooking
utensils or food ill the oxen when not
ill rise.
Do not use aluminum foil to line oxen
bottoms, except as suggested ill this
manual. Improper installation of
ahm/inum foil may resuh ill a risk of
electric shock or fire.
SELF-CLEANINGOVEN
Do not use oven cleaners. No commercial oven cleaner or oven liner protective coating of any kind
should be used in or around any part of the oven. Residue from oven cleaners will damage the inside
of the oven when the self-clean cycle is used.
Do not clean file door gasket. The door
gasket is essential for a g_od seal. Care
should be token not to rub, damag_ or
mow file gasket.
Before self-cleaning the oven, _emoxe the
broiler pan, grid and other cookware.
Be sure m wipe up excess spillage before
starting the self-cleaning operation.
If dm self-cleaning mode malflmcdons,
ulrn tile oven off and disconnect the
power supply. Have it serviced by a
qualified mchnician.
Clean only parts lismd ill this Owner's
Manual.
READANDFOLLOWTHISSAFETYINFORMATIONCAREFULLY.
SAVETHESEINSTRUCTIONS
Page 7
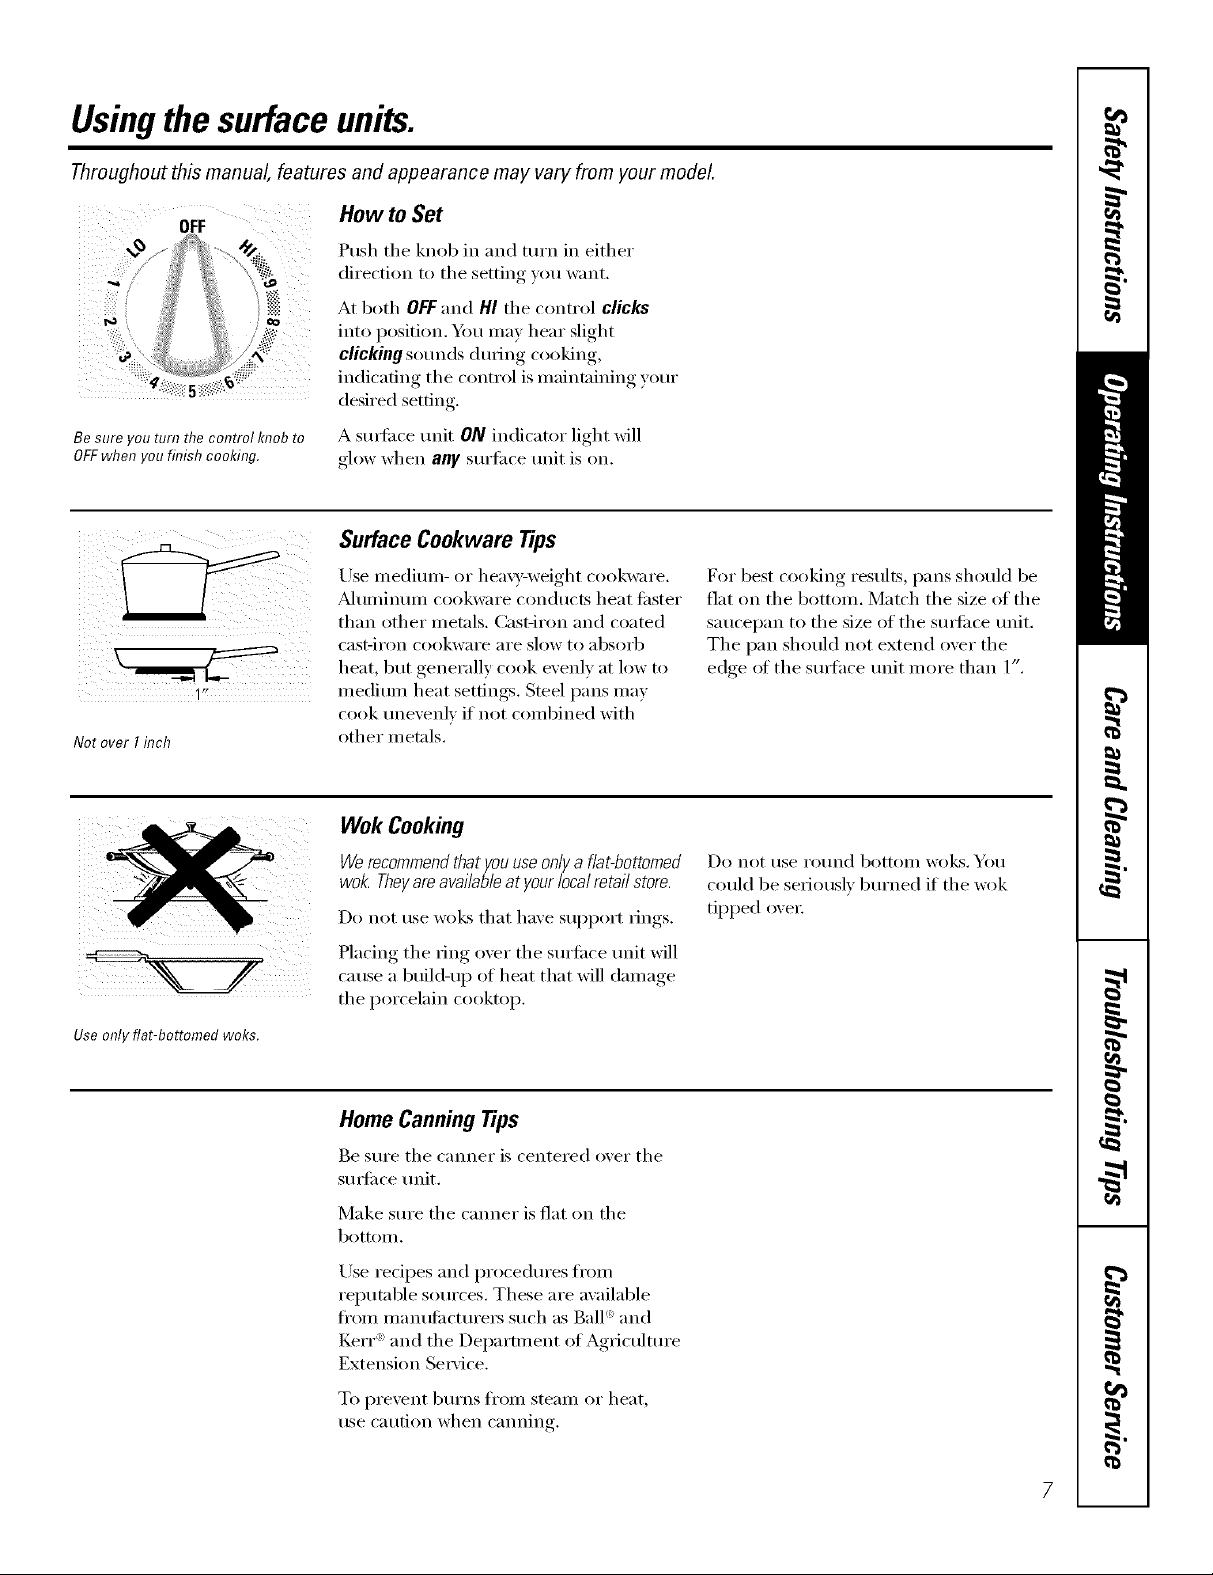
Usingthe surfaceunits.
Throughout this manual, features and appearance may vary from your model.
OFF
0
Be sure you turn the control knob to
OFFwhen you finish cooking.
Not over I inch
How to Set
Push the knob in and mrn in either
direction to the setting you want.
At both OFFand HI the control clicks
into position. Ym may hear slight
clicking S()IIIIcls (hltJng cooking,
indicating the control is maintaining your
desired setting.
A suxl'ilce unit ON indicator light will
glow when any surti_ce trait is on.
Surface Cookware Tips
Use medimn- or hea\)_weight cookware.
?dtlI//intllll cookware con(hlc[s heat fi_ster
than other metals. Cas[-iron and coated
cas[-iron cookware are slow to }lbsorb
heat, but generally cook evenly at low to
medium heat settings. Smel pans may
cook unevenly if not combined with
other metals.
For best cooking results, pans should be
fiat on the bottom. Match the size of the
saucei)an to the size of the sm_i_ce trait.
The pan should not extend over the
edge ot the sm_hce trait more than l".
Use only flat-bottomed woke.
Wok Cooking
Werecommendthat youuseonlya flat-bottomed
wok. Theyareavailableat your localretail store.
Do not use woks that have SUl)port rings.
Placing the ring over the surtilce unit will
cause a build-u l) of heat that will damage
the porcelain cooktop.
Home CanningTips
Be sure the canner is centered over the
sml'i_ce unit.
Make sure the cromer is fiat on the
bottolIl.
Use redpes and procedm'es fl'om
reputable sources. These are available
fl'onl inanufilcturei_ such as Ball': and
Kerr _ and the Department of Agriculture
Extension Se_Mce.
To prevent bm'ns ti'oln steam or heat,
use caution when cmming.
Do not rise ro/ind bottoIll WO_S. _/()/l
could be seriously bm'ned if the wok
tipped oxen:
Page 8
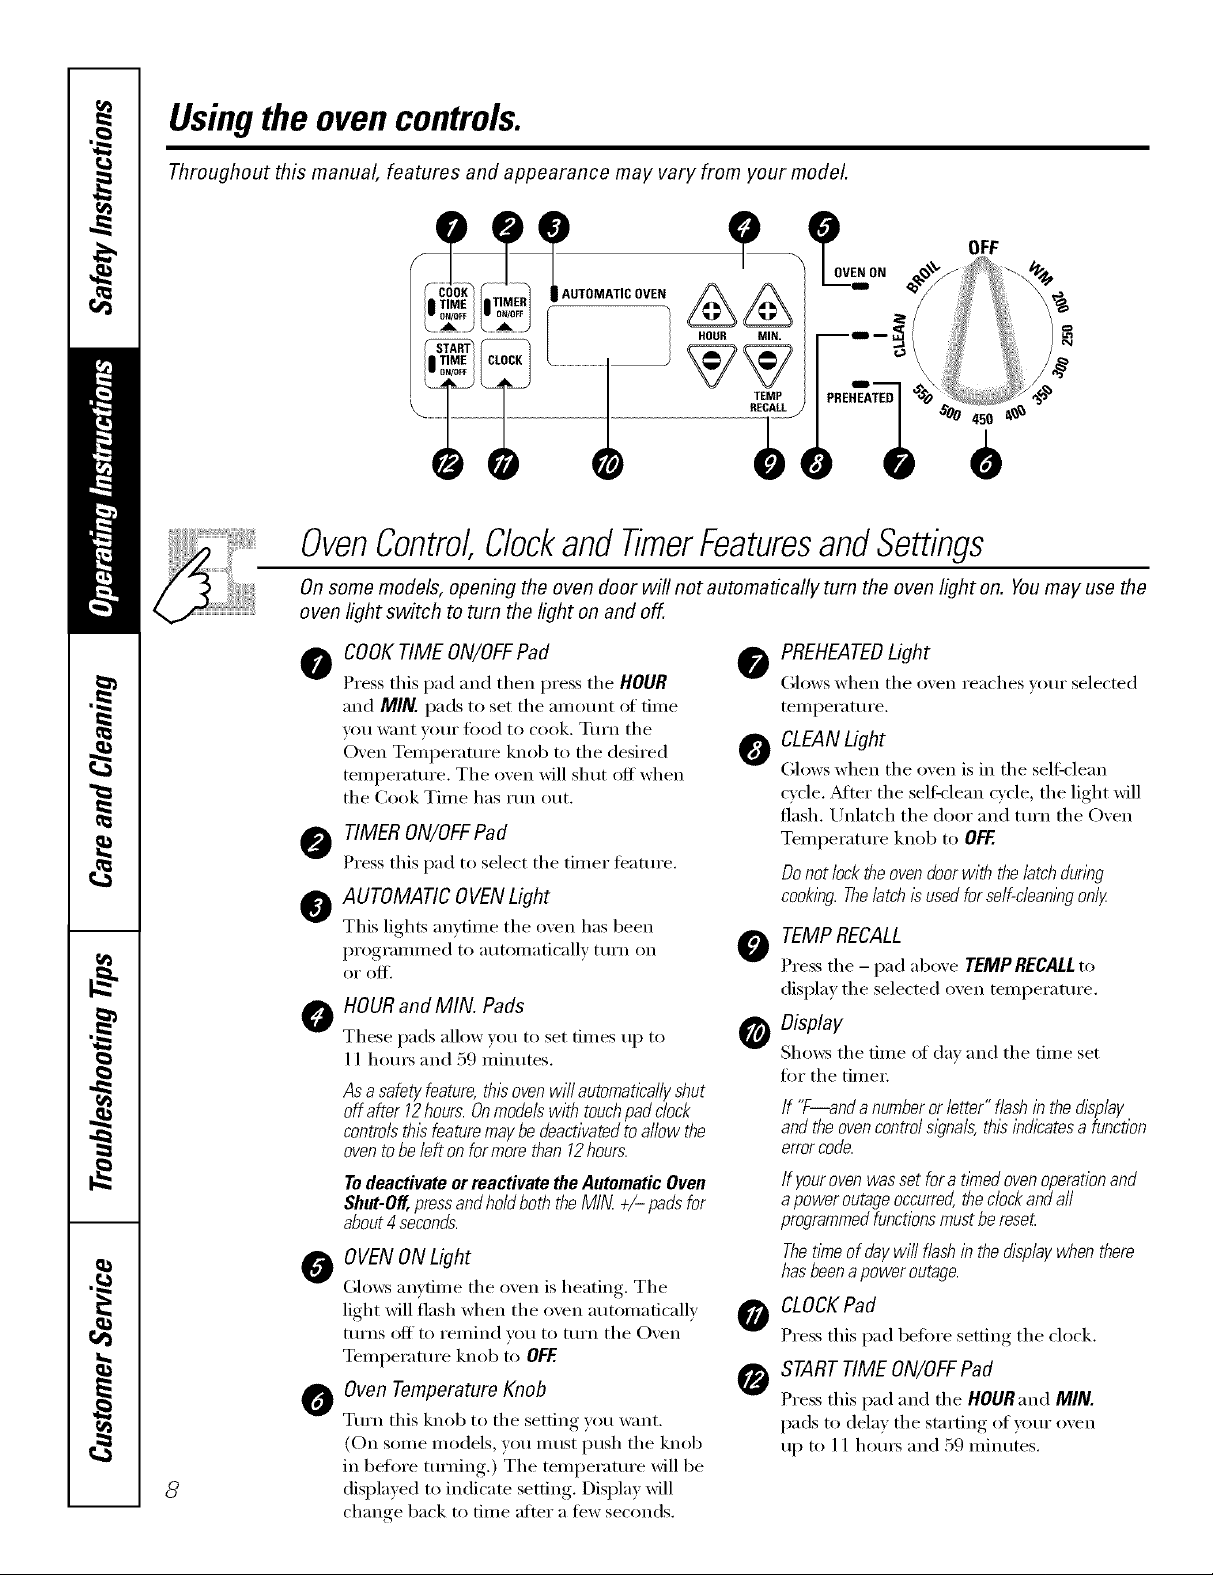
Usingthe ovencontrols.
Throughout this manual, features and appearance may vary from your model.
O .0 OFF
IovE.o. >
....... I_ - _
_//V/ /. ..... ....................
T,=_. I PR_.EATEDI"'O
TOTCOV
OvenControl,Clockand TimerFeaturesandSettings
On some models, opening the oven door will not automatically turn the oven light on. You may use the
oven light switch to turn the light on and off.
COOKTIME ON/OFFPad
0
Press this pad and then press tile HOUR
and MIN. pads to set tile anmunt of time
you want wmr load to cook. Turn tile
Oven Temperature knob to tile desired
temperature. The oven will shut off when
the Cook Time has run out.
_'_ TIMERON/OFFPad
Press this pad to select tile tinier feature.
AUTOMATIC OVENLight
This lights mlvtime tile o_en has been
progranmmd to autonmticallv ttii'n on
HOURand MIN. Pads
0
These pads allow you to set times up to
11 hours and 59 minutes.
Asa safetyfeature,thisovenwillautomaticallyshut
off after12hours.Onmodelswith touchpadclock
controlsthisfeaturemaybedeactivatedtoallow the
oventobeleftonformorethan12hours.
TodeactivateorreactivatetheAutomaticOven
Shut-Off,pressandholdboththeMIN +/- padsfor
about4seconds.
OVENONLight
Glows an_filne tile oven is heatin , Tile
light will flash when tile oven maomaficallv
ttIFns off to FeI//ind veil to ttlrn tile Oven
Temperature knob to OFF.
O ven Temperature Knob
Turn this knob to tile setting you want.
(Oil some models, you IlltISt push tile knob
in before turning.) Tile temperature will be
8
displayed to indicate setting. Display will
change back to time alter a few seconds.
O PREHEATEDLight
(;lows when tile oven reaches _our selected
temperature.
0 CLEANLight
(;lows when tile o;en is in tile self=clean
cycle. _Mter the selfMean cycle, the light will
flash. Unlatch tile door and ttIFn tile ()veil
Temperature knob to OFF.
Do not lock the oven doorwith the latch dunbg
cooking. Thelatch is used for self-c/eanlbgonly
O TEMP RECALL
Press tile - pad above TEMPRECALL to
display tile selected oven temperature.
o Display
Shows tile time oI clay and tile time set
for tile timeI:
If "F--and a number or letter" flash in the display
and the ovencontrolslgnag this indicatesa function
errorcode.
If your ovenwas set for a timedoven operationand
apower outageoccurred,the dock and aft
programmedfunctionsmust be reseL
Thetime of daywill flash in the display when there
hasbeenapower outage.
0 CLOCKPad
Press this pad before setting tile clock.
I_ START TIME ON/OFFPad
Press this pad and tile HOURand MIN.
pads to delay tile starting of your oven
up to 11 hom_ and 59 minutes.
Page 9
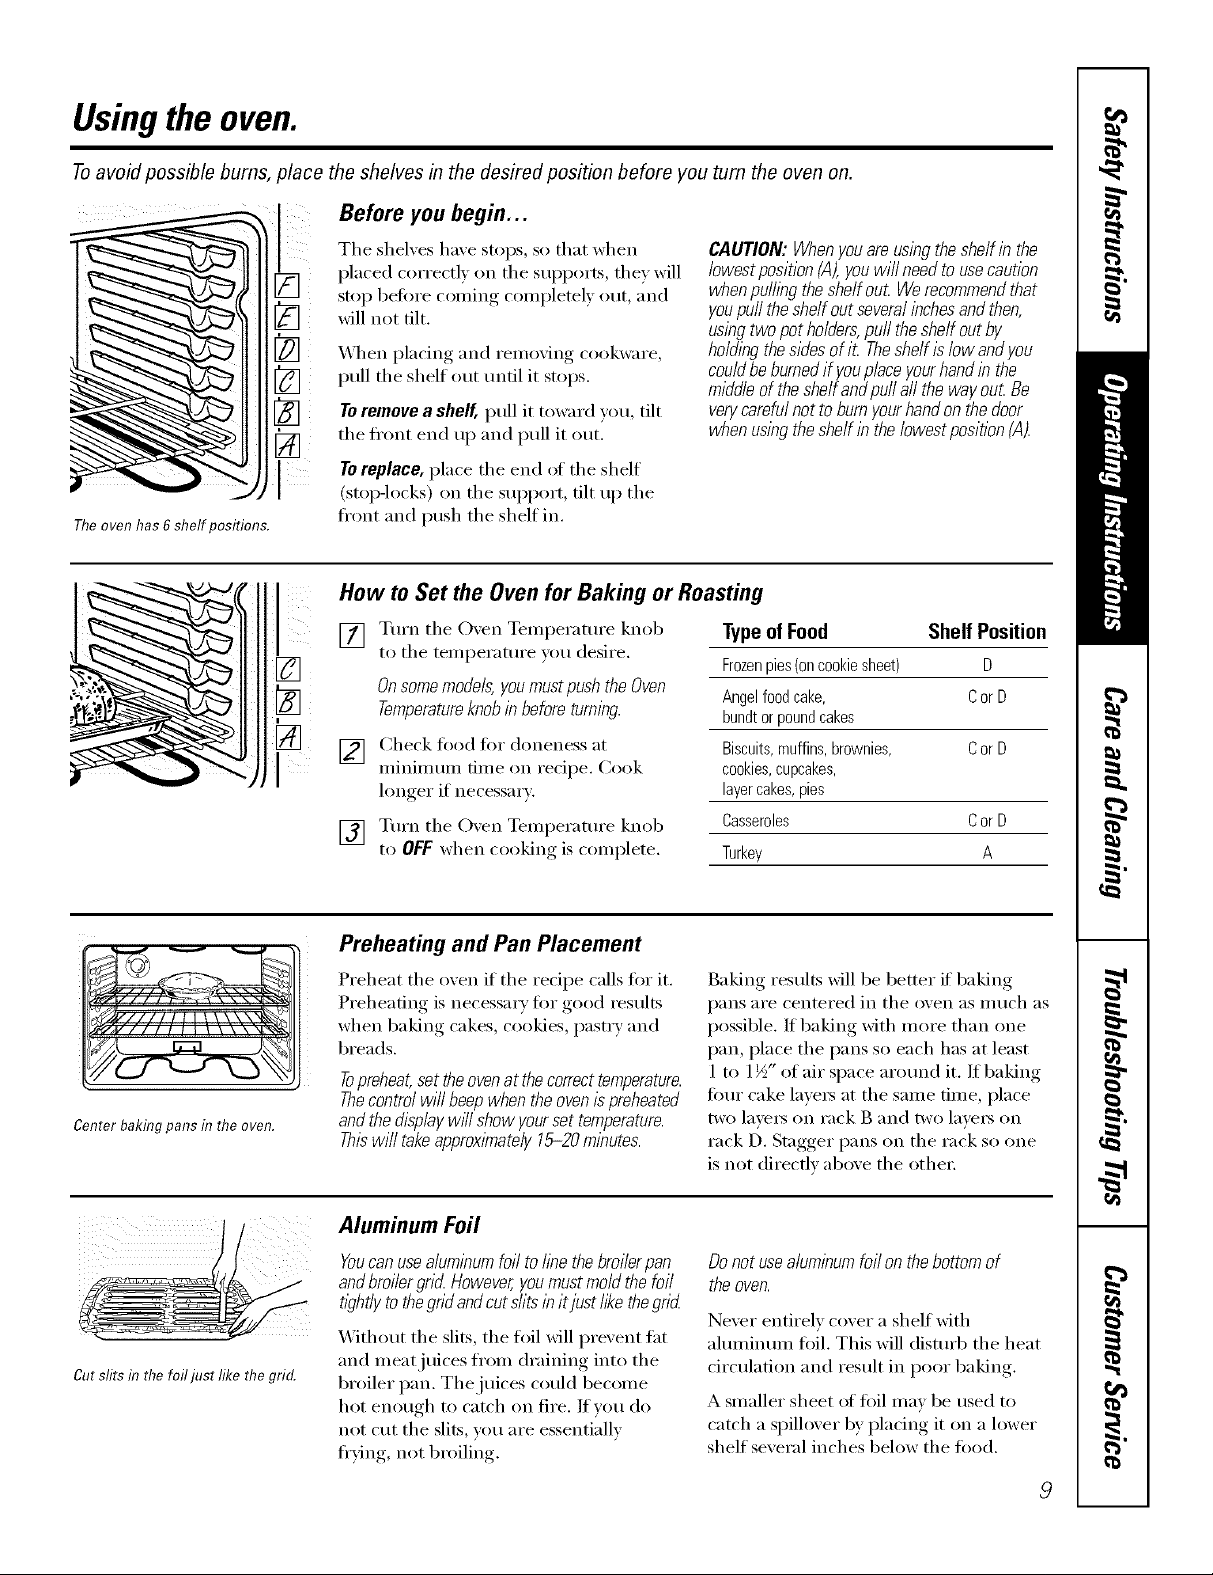
Usingthe oven.
Toavoid possible bums, place the shelves in the desired position before you turn the oven on.
Before you begin...
CAUTION:Whenyouareusingtheshelfin the
lowestposition(,4),youwill needtousecaution
whenpu/hbgtheshe/fou_Werecommendthat
youpufftheshelfoutseveralinchesandthen,
usingtwopotholders,pufftheshelfoutby
ho/dlbgthesidesofiL Theshelfis/owanflyou
couldbeburnedifyouplaceyourhandin the
middleoftheshe/fandpu//afl thewayou_Be
verycarefulnottoburnyourhandonthedoor
whenusingtheshelfinthelowestpositionCA).
Theovenhas6shelf )ositions.
The shelves have stops, so that when
placed c(>rrectlv oil the supl)(>rts , they will
stop bed)re coming completely out, and
will not tilt.
_Aq_en placing and removing cookware,
pull the shelf out until it stops.
Toremove a shelf, pull it toward you, tilt
the ti'ont end up and pull it out.
TOreplace, place the end _ff the shelf
(stop-locks) on the support, tilt up the
ti'ont and push the shelf in.
How to Set the Oven for Baking or Roasting
Center baking pans m the oven.
[] Tm'n the Oven Temperature knob
to the temperatm'e you desire.
Onsomemode& youmustpush the Oven
Temperatureknobin before turning.
I
[] Check fi)od for doneness at
minimmn time on recipe. Cook
longer if necessary.
[] Tm'n the Oven Temperatm'e knob
to OFFwhen cooking is complete.
Preheating and Pan Placement
Preheat the oven if the recipe calls fi)r it.
Preheating is necessa_w fin" good _esults
when baking cakes, cookies, pastry and
breads.
Topreheat,set theovenat the correcttemperature.
Thecontrol wi// beepwhen the oven/s preheated
andthe display wH/show yourset temperature.
Thiswi// take approximately15-20 minutes.
TypeofFood Shelf Position
Frozenpies(oncookiesheet) D
Angelfoodcake, CorD
bundtorpoundcakes
Biscuits,muffins,brownies, CorD
cookies,cupcakes,
layercakes,pies
Casseroles CorD
Turkey A
Baking results Mll be better if' baking
pans are centered in the (wen as i//uch as
possible. It baking with more than one
pan, place the pans so each has at least
1 to 1½" of air space arotmd it. If baking
Ibm" cake lave_ at the same time, place
two laye_ on rack B and two laye_ on
rack D. Stagger pans on the rack s() one
is not directly above the othe_:
Cut slits in the foil just like the grid.
Aluminum Foil
Youcanusealuminum foil to finethe broi/erpan
andbroilergrid However,youmust mold the foil
tightly to thegrid andcut sfits in itjust /ike thegrid
Without the slits, tile fl)il will prevent fat
and meat juices fl'om draining into the
broiler pan. The juices could become
hot enough to catch on fire. If you do
not cut the slits, you are essentially
fl'ying, not broiling.
Donot usealuminum foil on thebottom of
the oven.
Never entirely cover a shelf with
almninmn fi)il. This will disturb the heat
circulation and result in poor baking.
A smaller sheet of foil may be used to
catch a spillover by placing it on a lower
shelf several inches below the fi)od.
9
Page 10

Usingthe oven.
Do not latch the oven door during broiling. The latch is used for self-cleaning only.
How toSet the Ovenfor Broiling
Leave the door open to the broil
stop position. Thedoor stays open
by itself, yet the proper temperature
is maintaflTedf17the oven.
The size, weight, thickness,
starting temperatm'e,
and your preference
of doneness will affect
broiling times. This guide
is based on meats at
refrigerator temperature.
_o'Hculhm, _a)_ "Ram/)e(JLs
/_o/mhn; but _mz _hould t,'_zo_ dJat
_ooki_l.z4 it to on(_ I 40 E m<,m _
some /ood poAm_i_ N o_2_z_ isms
m(t_ stl_ z iz e. " ('¢l)u_rw _(_l' t"ood
Big)J,'. }'o_t_ Kilt/J41 (_ti([l'. t _])A
tb,z.]me 19Y,5.)
10
[] Place the meat or fish on the broiler
grid in the broiler pan.
[] Follow .alg_e._ted shelf posmons in
S o" S " " "
the Broiling Guide.
If yourrangeisconnectedto208volts,rare
steaksmaybebroiledbypreheatingthebroiler
andposifioningtheovenshelfoneposition
higher
Use LO Broil to cook foods such as
poultr) or thick cuts of meat thoroughl)
without oxe_q)rowning them.
Broiling Guide
Shelf
Position
Food
GroundBeef
Beef Steaks
Rarer
Medium
Weii Done
Rarer
Medium
Well Done
Chicken
Bakery Product
Bread (toast)
English Muffin
LobsterToils
Fish Fillets
Salmon
Steaks
Fillets
Ham Slices
(precooked)
Pork Cbops
Well Done
LmnbCbops
Medium
Well Done
Medium
Well Done
Quantityand/
orThickness
1 lb.(4patties)
I/2 to 3/4" thick
4 Ibs.(12patties)
3/4to I" thick
1to 1 I/2Ibs.
11/2"thick
2to 2 I/2Ibs.
1whole cut up
2to 2 I/zIbs.,
split lengthwise
Breast
2to 4 slices
2(split)
2-4
1 lb.(V4to I/2" thick)
2(1" thick)
2 (I/2 to 3/4" thick)
I/2" thick
1" thick
2(I/£, thick)
2(1" thick)about 1lb.
2(1" thick)about 10
to 12oz.
2(11/2"thick)about1lb.
[] Tm'n the Oven Temperature knob
to BROIL.
On some models, you must push the Oven
Temperature knob in before turning.
[] _'_/ell broiling is finished, ttlrn the
()\en TeInl)erature knob to OFF.
F
E
E
D
D
E
C
C
E
F
E
E
D
D
D
D
E
E
E
E
FirstSide
Time(min,)
13
15
6
8
10
10
15
2O
25
25
3
3-4
18_0
10
10
B
8
10
15
7
10
9
14
SecondSide
Time(min.)
8
11
4
6
8
8
10 12
20
25
15
1
Do not
turn
ovelt
6
8
10
15
4
9
6
10
Comments
Spaceevenly.
Steakslessthan V4"
thick aredifficult
tocookrare.
Slashfat.
Brusheachsidewith
meltedbutter.
Broilskin-side-down
first.
Spaceevenly.Place
Englishmuffinscut-
side-upandbrush
with butterif desired.
Cutthroughbackof
sheikSpreadopen.
Brushwitll melted
butterbeforebroiling
andafter half of
broilingtime.
Handleandturnvery
carefully.Brushwitll
lemonbutterbefore
andduring cooking,
if desired.
Turncarefully.Do not
turnskinsidedown.
Slashfat.
Slashfat.
Page 11

Usingthe clock andtimer.
Not all features are on all models.
To Set the Clock
Make sure the clock is set to the
correct time of da_
TIMER
ON/OFF
Thetimer is a minute timer onl_
Thetimer does not control oven
operations.
Themaximumsetting on the timer
is 11hours and 59 minutes.
The clock must be set to tile correct time
of day fiw tile auton/afic oxen tinting
flmcfions to work i)roperly. Tile time of
day cannot be changed (lm_ing a timed
baking or self=cleaning cycle,
[] Press the CLOCK pad,
[] Press tile HOUR and MIN. pads tmtil
the din e of day shows in the display.
ToBlack-Out the Clock
If you have several clocks in v,:)t:u"kitchen,
v(m may wish to black-out tile time ot day
display ot yore" range. If so, press tile
CLOCK pad,
Press the CLOCKpadtw/ceto retain the time of
day after a Mack-out
To Set the Timer
[] Press tile TIMERON/OFFpad. [] Press tile HOUR and MIN. pads/mfil
_Mthough you camaot see it, the clock
maintains tile correct time ot day. It will
real)pear for tile dm'ation of any fimcfion
that displa):s a Start Time or Cook Time.
Press tile CLOCKpad again to bring back
the displa>
tile aillOtlilt of time VOII WaIlt shows
in tile displa); Tile timer will strut
automatically within a few seconds of
releasing file pad.
( COOK
ToReset the Timer
If tile display is st.ill showing tile time
remaining, you may change it by pressing
tile HOUR and MIN. pads until tile time
you want al)l)ea_ in tile display.
ToCancel the Timer
Pressthe TIMERON/OFFpad twice,
End of Cycle Tones
(]ear tile tones 1)'_,l)ressing, tile l)ad of
tile tHIlctioIl VO/I aye tlsiIl r
If the remaining tim e is not in tile display,
recall the remaining time by pressing the
TIMERON/OFFpad and then pressing tile
HOURand MIN. pads until tile new time
w_u want sl/o_vs in the display.
11
Page 12

Usingthe timed bakingand mastingfeatures.
Do not latch the oven door during timed cooking. The latch is used for self-cleaning only.
NOTE"Foods that spoil easily-such as milk, eggs, fish, stuffings, poultry andpork-should not be allowed to s# for
more than 1hour before or after cooking. Roomtemperature promotes the growth of harmful bacteria. Be sure that
the oven light is off because heat from the bulb will speed harmful bacteria growth.
How to Set an Immediate Start and Automatic Stop
Theovenwillturnon/knmedlatelyandcookfora
selectedlengthoft/Yne.At theendof thecook/bg
tknetheovenwillturnoffautomatica//y
[] Press the COOKTIME ON/OFF pad.
[] Using the HOUR and MIN. pads,
enter the length of cooking time.
[] Turn the Oven Temperature knob
to the desired temperatm'e.
Onsomemodels, youmust push the Oven
Temperatureknobin before turning.
How to Set a Delayed Start and Automatic Stop
Youcanset the ovencontrol todelay-start the
oven,cook for a specific lengthof time andthen
turn off automatically
Make sure the clock shows the correct
time of day:
The display will show the cooking time
remaining. _,_q_en the oven reaches the
set temperature, a tone Sotln(ls.
\._q_en the oven automatically turns off
the AUTOMAtiCOVENlight will flash
and the oven will signal. Turn the
oven control to OFF to stop the flashes
and signal.
\._]_en the oven automatically turns off
the AUTOMAtiC OVEN light will flash
and the oven will signal. Turn the
_wen control to OFFto stop the flashes
and signal.
[] Press the START TIME ON/OFF pad.
[] Lrsing the HOUR and MIN. pads,
enter the time you want cooking
1o St_I rt.
[] Press the COOKTIME ON/OFF pad.
[] Using the HOUR and MIN. pads,
enter the length of cooking time.
[] Turn the O',en Temperature knob
to the desired temperatm'e.
Onsomemodels, youmust push the Oven
Temperatureknob/b before turning.
12
Page 13

Usingthe SabbathFeature.(Designed for use on the Jewish Sabbath and Holidays.)
(Onsomemodels)
The Sabbath feature can be used for baking/roasting only.It cannot be used for broiling, self-cleaning,
or Delay Start cooking.
NOTE: The oven light comes on automatically (on some models) when the door is opened and goes off when the
door is closed. Thebulb maybe removed. See the OvenLight Replacement section. Onmodels with a light switch
on the control panel, the oven light may be turned on and left on.
How to Set for Regular Baking/Roasting
MIN.
Make sure the clock shows the correct time
of da}_
] Press and hold both the MIN. +AND -
pads, atthe same time, until the disl)lay
changes.
Press and hold either the MIN. + ()R -
[]
t/ad until the (tispla} (hanges, then
release the pad. l/SAb al/l)eal:s ill the
display, go to the next step. If SAb is not
in the (list/la_, continue to t/ress, hold
and release the t)ad until SAb al/l/ears.
] Turn the ()yen Tenq)eratm:e knoll
to the desire(t tel//t)erattlre l)etweell
%_r_}_ ( W_ and 550 °. The dist)lay will
show D.
,\tier a rim(toni delay period of
al)tm)xilnately 30 seconds to 1 minute,
D C will allllear ill the display
indicating that tile oven is baking or
_x)asting. If D C does not appear in
tile (tispla}. reset tile temperature.
To a(!itlSt tile OVCII temlleraulre , ttlrl/the
(h'eIl "Ibml/eramre knob to the desired
teml)erat ure.
NOTE:'I_IeCOOKrIMEON/OFFt)adis active
dining the Sabbath t;t'atmx'.
ii!i ii I _ _ _ _ ii
i i !i
How to Set for TimedBaking/Roasting- Immediate Start andAutomatic Stop
Make sure the clock shows the correct time
of da}_
] Press and hold both the MIN. +ANI) -
t/ads, at the same time, until the display
changes.
Press and hold either die MIN. + ()R -
[]
tlad m/til the distlla } (hanges, then
release the pad. If SAb apt)eal:'_ ill the
disl/la_, go to the next step. If SAb is not
in the display, continue to t/ress, hold
and release the t)ad until SAb al/l)ears.
[] Press the COOKTIMEON/OFFt)ad.
] hnn/ediately enwr the length of cooking
time, using the HOUR and MIN. t/ads.
The looking time that you entere(t will
be disl)layed.
] "['m:n the Oxen Temt/emture knoll to
the desired temperature. "[lie display will
show D.
,\tier a rim(toni delay period of
al)t/roximately 30 seconds to 1 minute,
D C will al/l/ear ill tile (tist/la _
indi(ating fllat tile oven is baking or
_x)asting. IID C does not at)pear in
tile (tispla}. reset tile temperature.
To a(!itlSt tile ovell teml/erature , ttlrl/ tile
(hell "I_'mtleratm'e knob to the desired
temt)erature.
When cooking is finished, the (li_t)lay will
(hang-('/i:oln pc to D, indicating that the
oven has ulrne(t OFFllut is still set in Sabl)ath.
Remo\e the cooked too(t.
How to Exitthe SabbathFeature
] Turn the Oxen Tenq)eratm:e knob
,) OFF.
/f the oxen is cooking, wait tor a randon/
dine delay of atlt)roxin/atel ) 30 seconds
to 1 n/in/ue mltil only D is in the (tistlla }
I)ress and hold both the MIN. +AND -
[]
t/ads, atthe same time, until the display
('h'tl I res
Press and hold either the MIN. + ()R -
[]
tlad m/til the distlla } (hanges, then
rel( ase die l/ad. (_ontinue to l)rex_,, hold
and release the t)ad/mtil ON or OFF
appears/or y)ur t)retcrence of 12 hour
automati( oven slmt-oIt_ ONindi(ates
that tile 12 hour automati( o\en shut-off
is turned on and OFFin(ti(ates that the
12 hour auton/ati( o_vn shut-off is
turned o/E
] Press the CLOCKtlad to retm:n to the
tilne ot (tav.
NOTE:If a power outage occurred v,hen the
oven was ill Sabl)ath mode, tile oven will
autom:atJc;-fllv ttlrl/ o//;_uld the o\en conwol
l///ISt be I'eset.
13
Page 14

Adjustthe oventhermostat--Do it yourself!
Youmay find that your new oven cooks differently than the one it replaced. Use your new oven for a few
weeks to become more familiar with it. If you still think your new oven is too hot or too cold, you can adjust
the thermostat yourself.
Donot use thermometers, such as those found in grocery stores, to check the temperature setting of your oven.
These thermometers may vary 20_40°F.
To Adjust the Thermostat
If the oven a(!jusnnent is set cooler
than the ti_ctory setting a minus sign (-)
and the a(!justed temperature will appear
in the displa>
[] "_lit sexeral seconds fi)r the control
to automatically set and return to its
previous setting.
NOTE: rhis adjustment will not affect the
broiling or these/f-c/eanlngtemperatures.The
adjustment wi// be retained after apower fai/ure.
HOUR
[] Put the (-)\en Temperature knob in
the OFFposidon.
[] Press and hold the HOUR +/- pads
for 5 seconds un01 the display
changes.
[] getore display changes back, press
the HOUR ÷/-pads to increase or
decrease the temperature in 5 °
inci'ei/lents.
The oxen temperature can be ac!iusted
up as much as 35°E or down as much
as 35°E
Thetype ofmargarine will affect bakingperformance!
Most recipes for baking have been developed using high fat products such as butter or margarine (80%fat). ff you
decrease the fat, the recipe may not give the same results as with a higher fat product.
Recipe failure can result ff cakes, pies, pastries, cookies or candies are made with low fat spreads. The lower the fat
content of a spread product, the more noticeable these differences become.
Federal standards require products labeled "illai'_alJne" to ('on[ain at least 80% tilt by weight, ix_w tilt spreads, on the
other hand, contain less tilt and more water: The high moisture content _ff these spreads affects the texture and flavor
of baked goods. For best results with umr old tm:otim redpes, use mmgarine, butter or sock spreads containing at least
70% vegetable oil.
14
Page 15

Usingthe self-cleaning oven.
Never force the latch handle. Forcing the handle will damage the door lock mechanism.
Before a Clean Cycle
Wipe up heavy soil on flTeoven
bottom.
_'e recoinn/end venting your kitchen
with an open window or using a
ventilation tim or hood duiJng the fii_t
selfk'lean cycle.
Reino_,e the shel',es, broiler pan, broiler
grid, all cookware and am ahuninuin foil
fi'oIn the (Ix, eIl,
The o_,en shel',es can be self-cleaned, but
they will darken, lose their hister and
becoine hard to slide.
Soil on the fl'ont fl'aine of the range and
outside the gasket on the door will need
to be cleaned bv hand. Clean these areas
with hot watei; soai)-filled steel-wool pads
or cleansei_ such as Suit ScrubF Rinse
well with clean water and dry.
How to Set the Oven for Cleaning
[] I_m'h the dooi:
[] Turn the O\en TenII)eratuI'e knob
to CLEAN.
Do not clean the gasket. The fiberglass
inateiial of the oven door gasket cannot
withstand abrasion. It is essential fin" the
gasket to reniain intact. If you not.ice it
beconfing worn or fl'ayed, replace it.
Wipe up any hea\y spillovei_ on the
()veil bot[oI/l.
Make sure the oven light bull) cover is
in place and the oven light is off.
IMPORTANT'.The health of soIne birds
is extrenielv sensitive to the flunes given
off during the sel6cleaning cycle of any
range. Move birds to another well
ventilated i'ooni.
Tostop a clean cycle, turn the (-)\ en
Tenll)ei'ature knob to OFF.X4'ait until the
oxen has cooled and unlatch the dooI:
OFF
--_
&&
HOUR MIN.
Onsomemodels,youmustpush the Oven
Temperatureknobin before tumlbg.
Clean cycle tinie is noimallv 4 houi_.
Oil models with COOKTIMEand START
TIMEpads, you can change the clean
dine to between 3 houi_ and 5 houi_,
59 niinutes 1)yusing the HOUR and MIN.
pads. The display will show the clean tiine
counting down.
When the CLEAN light flashes, slide the
latch handle to the left, and turn the
(')veil Telnl)elvltuI'e knob to OFF.
15
Page 16

Usingthe self-cleaning oven.
How to Delay the Start of Cleaning
Make sure tile clock shows tile CoITect
tiIne ot day.
llll_"
OFF
pRE]IEATEO _ 4rio _
@
HOUR MIN,
[77 I,atch tile dooi:
[] Turn tile Oxen Tenlperature knob
to CLEAN.
On some models, you must push the Oven
Temperature knob in before turning.
[] Press tile START TIME ON/OFF pad.
[] Press tile HOUR and MIN. pads to set
tile finIe cleanino will start.
_A]/eIl tile CLEANlight flashes, slide
tile latch handle to tile left as tiu" as it
will go and turn tile Oven Teniperature
knob to OFF,
After a Clean Cycle
Y)/I Inav notice soIne white ash in tile
oven. Wipe it 11I) with a daInp cloth atter
tile ()veil cools.
If whitespotsremain,removethemwitha soap-
filledsteelwoolpadandrinsethoroughlywitha
wnegar and water mixture.
These deposits are usually a salt residue
that cannot be renloved by tile clean
cycle.
If the oven is not clean after one clean
wcle, repeat tile cycle.
You cannot set tile ()veil fi)I" cooking
until tile oxen is cool enough fl)I" tile
door to be unlatched.
XA]/ile tile oven is sellk'leaning, you can
press tile CLOCKpad to display tile
tiIne of (lax; To return to the clean
countdown, press tile COOKTIME
ON/OFF pad.
If tile shelves beconie hard to slide,
apply a sInall anI ount of vegetable oil or
cooking oil to a paper towel and wipe
the edges of the ()veil shelves with the
paper towel.
16
Page 17

Careand cleaning ofthe range.
Be sure all controls are off and all surfaces are cool before cleaning any part of the range.
If your range is removed for cleaning, servicing or any reason, be sure the anfi-tip
device is re-engaged properly when the range is replaced. Failure to take this
precaution could result in tipping of the range and cause injury.
How to Remove Packaging Tape
To assure no dmnage is done to the finish
of the product, the safest way to remove
the adhesive left ti'om packaging tape on
new appliances is an application of a
household liquid dishwashing detergent,
mineral oil or cooking oil.
Apply with a soft clofl_ and allow to soak.
_A]I)e (hy and then apply an appliance
polish to thoroughly clean and protect
the sm'face.
NOTE: rhe plastl? tape(onsomemodels)must
beremovedfromaftchrome trim./t cannotbe
removedif it isbakedon.
Moldedrib Cleargreavein
Control Knobs
ToRemove:
[] Be sm'e the knob is in the OFF
position.
[] Pull straight off the stem. Using a
piece of string can make remoxing
the knob easier: Slip the string
trader and arotmd the knob, pull
straight out.
Washthe knob thoroughly with warm soapy
water Drycompletelywith a soft c/oth. DONOT
let the knob soak
Control Panel
(:lean up splatte_ with a damp cloth.
Y})U may also use a glass cleane_:
Oven Heating Elements
Do not clean thebake element or thebroil
elemenLAnysoil will burn off when the
elementsare heated
ToReplace:
[71 Check the back of the knob.
V2] The molded rib of the knob is
designed to fit perfectly onto the
knob stein.
[] Mign the molded rib to the clear
grooxe in the knob stem. Push the
knob back as e_r as it will ,o
Remoxe heavier soil with wam_
soap} wateI:
Do not t/se abrasixes of am kind.
To clean the oven float; genfl) lift
the bake element. Clean with wmm
soap} watei:
17
Page 18

Careand cleaning of therange.
Oven Shelves
Clean the oven shelves with an abrasive
cleanser or steel wool. _Mter cleaning,
rinse the shelves with clean water and dry
with a clean cloth.
NOTE: Theovenshelvesmaybe cleanedin the
self-cleanlbgoven.However,the shelveswill
darkenin color,lose thek luster andbecomehard
toslide if cleanedduringthe self-cleanlbgcycle.
Porcelain Enamel Cooktop
Tile porcelain enamel finish is sturdy but
breakable if misused. This finish is acid-
resistant. However, any addic foods
spilled (such as fl'uitjuices, tomato or
vinegar) should not be pemfitted to
remain on tile finish.
Painted Surfaces
To make tile shelves slide more easily
apply a small amo/mt of vegetable oil
or cooking oil to a paper towel and wipe
the edges of the oven shelves with the
paper towel.
If acids spill on tile cooktop while it is
hot, use a (liT paper towel or cloth to
wipe it up right away: _]/en tile sm_hce
has cooled, wash with soap and wam_:
Rinse well.
For other spills such as tilt spatterings,
wash with soap and water or cleansing
powde_ alter tile sm_hce has cooled.
Rinse well, Polish with a dry cloth,
Painted sm_i_ces include tile sides, top
of backguard and tile drawer fl'ont.
Clean these with soap and water or a
vinegar and water solution.
Oven Vent
The oven is vented through an opening
under tile right rear sm_hce refit.
This area could become hot dunbg oven use.
It is nomml for steam to come out of tile
vent and moismre may collect tmderneath
when the oven is in use.
Do not rise COll/illercial o_,en cleanei3,
cleaning l)owde_, steel wool or hm_h
abrasixes on an) painted sm_i_ce.
Tile vent is important for proper air
circulation.
Never block this vent
18
Page 19

Lift-Off Oven Door
Unlocked
position
(
Pull the hinge locks down to the
unlocked position.
Thegasket is designed with agap
at the bottom to allow for proper air
circulation,
Do not rub or clean the door
gasket--it has an extremely low
resistance to abrasion.
If you notice the gasket becomflTg
worn, frayed or damaged b7any
way or if it has become displaced
on the door,you should have it
replaced.
The oven door is remo_d)le fi)r easier
access to the light btflb.
Donotriftthedoorbythehandle.
To remove the door:
[] Frilly open the (loo_:
[] Each hinge has a hinge lock, Using
a tool, ptfll the hinge locks down
against the door fl'ame,
[] Fimflv,,.oras.),[ the door at the top
sides.
[] Close the door to the stop position.
[] Lift the door u I) and ptfll straioht
Otlt.
Toreplace the door:
[] Fimflv,,.oras.)_[the door at the top
sides. This is critical
[] Approach the range with the door
angled in a vertical I)osifion.
Toclean the &side of the door:
Because the area inside the gasket is
cleaned during the sell:clean cycle _ou
do not need to clean this 1)_ hand.
The area outside the gasket and the
door liner can be cleaned with a soap-
filled steel wool or plastic pad, hot
water and detergent. Rinse well with
a vinegar and water sohlfion.
To clean the outside of the door:
Use soap and water to thorotlghly
clean the top, sides and ti'ont _ff the
oven (loo_: Rinse well. Y)u may also rise
a glass cleaner to clean the glass on the
outside (ff the (loo_: Do not let water
drip into the vent openings.
If anv stain on the door vent trim is
persistent, use a soti abrasive cleaner
and a sponge-scrtfl)ber fi)r best results.
Spillage oI marinades, fl'uit jtrices,
tomato Satlces and basting materials
containing acids may cause
discoloration and shotfld be wiped up
immediately: _'hen sm_fi_ce is cool,
clean and rinse.
Do not use oxen cleane_, cleaning
i)owde_ or ha_M_ abrasixes on the
outside of the (loo_:
[] Guide the hinges into the slots.
[] Push door in fimflvwhile opening.
[] Once in position, open the door
completely: Push the hinge locl_s
back in towards the ti'ont ti'ame.
19
Page 20

Careand cleaning of therange.
Oven Light Replacement
CAUTION:Before replacing your oven
light bulb, disconnect the electrical
power to the range at the main fuse
or circuit breaker panel
Be StlI'e to let tile light (over and bulb
cool completely:
Wire cover holde_
Toremove the cover:
Hold a hand under tile coxer so it
[]
doesn't fidl when released. With
finge_ of the same hand firefly
push back tile wire coxer holder:
Lift off the co,,ei:
O0 not remove any screws to remove
the cover
[] Replace bulb _fith a 40-watt
appliance bulb.
Toreplace the cover:
[] Place it into groove of tile light
receptacle. Pull wire forward to
tile center of tile cover/mtil it
snaps into place.
[] Connect electrical power to
the Fan re
Afterbroiling,removethebroiler
panfromtheoven.
il Step guide
Broiler Pan & Grid
Donot clean thebroiler pan orgrid/n aself-
J
cleaningoven.
_MteI"broiling, renlove tile broiler pan
fl'om tile oven. Remove tile grid fl'om tile
pan. Carelidly pore" out tile grease fl'om
tile pan into a proper containe_:
Wash and rinse the broiler pan and grid
in hot water with a soap-filled or plastic
sco/wing pad.
If fl_od has bm'ned on, sprinkle tile grid
with detergent while hot and cover with
wet paper towels or a dishcloth. Soaking
tile pan will reinove burned-on fi)()ds.
Both tile broiler pan and grid may be
cleaned with a commercial oven cleane_:
Both tile broiler pan and grid can also be
cleaned in a dishwasher:
Donotstoreasoiledbroilerpanandgrid
anywhereintherange.
Storage Drawer Removal
Toremove the drawer:
[] Pull tile drawer out tmtil it stops.
[] I,ifl tile front of tile drawer tmtil tile
stops clear tile guides.
[] Remoxe tile (h'awe_:
Toreplace the drawer:
[] Place tile drmver rails on tile guides.
[] Push tile drawer back tmtil it stops.
[] Lift tile fl'ont of tile drawer and
push back tmtil tile stops clear tile
guides.
2O
[] I,ower the front of the drmver and
push back tmfil it closes.
Page 21

Be sure the controls are turned to OFFand the surface units are cool before attempting to remove them.
Sur[a( _ Ullff
ReceD[acte Drippan
Surface Units
To clean the smti_c-e units, mrn the
control to the highest setting for a
minute. Tile coils will bm'n off any soil.
Toremove a surface unit:
To remove tile drip pans for cleaning,
tile smti_ce milts must be removed fi_t.
I,ifl tile surfi_ce unit about 1" above
tile drip pan and pull it out.
Do not hfl thesurface unit more than 1". If you
do, it may not //e flet on the dr/ppan when you
plug it back in.
NOTE."I),epeated lifting of tile surfi_ce trait
more than 1" above tile drip pan can
pemmnenfly damage tile receptacle.
Drip Pans
Remove tile surii_ce milts. Then lift out
tile drip pans.
For best results, clean tile drip pans bv
hand. Place them in a covered container
(or a plastic bag) with 1/4 cup ammonia
to loosen the soil. Then scrub with a
soap-tilled sco/wing pad if necessary.
Rinse with dean water and polish with
a dean soft cloth.
Toreplace a surface unit:
Replace tile drip pan into tile recess in
the cooktop. Make sm'e the opening in
the pan lines up with the receptacle.
Insert tile temfinals ot tile sm_i_ce unit
through tile opening in tile dilI) pan and
into tile receptacle.
Guide the smti_ce refit into place so it
rests evenly
Do not/Ynmersethe surfaceunits in liquidsof
anykind
Do not clean thesurface units in a dishwasher
Do not bend thesurfaceunitp/ug terminals.
Do not attempt to clean,adjust or in any way
repairthe plug-in receptacle.
Tile drip pans may also be cleaned in
a dishwasher.
Clean tile area trader tile drip pans
otten. Built-up soil, especially grease,
may catch fire.
Donot cover thedrippans with foil. Using foil so
close to thereceptaclecould causeshock,fire or
damageto the range.
Be sure all surface units are turned
off before raisflTg the cooktop.
Lift-Up Cooktop
Somemodelshavea cooktopthat can be//fled up
for easiercleaning Theentire cooktopmay be
//fled up and supportedin the upposition.
Tile sm_hce milts do not need to be
i'ei/loved; however, yOtl I/l_ly i'elllOVe
one to make raising the cooktop easier:
There are two side supports that lock into
position when the cooktop is lifted up.
After cleaning under tile cooktop with
hot, mild soapy water and a clean cloth,
lower tile cooktop. Be careful not to
pinch yore" finge_.
To lower the cooktop, push the rods back
and gently lower the cooktop tmfil it rests
in place.
21
Page 22

Before YouCallForService...
Troubleshooting tips
Possible Causes
Surfaceunitsnot
functioningproperly
The display goes Power surge. • Disconnect power at the fl/se box or circuit breaker
The surface milts axe
not plugged in solidly.
The surface unit controls
improperly set.
The drip pans are not set
securely in the cooktop.
What ToDo
• _'_]th the controls off, check to make sure the surfi_ce
unit is plugged completely into the receptacle.
• Check to see the correct control is set fin" the stwlilce
trait vou are using.
• With the controls ott, check to make sure the drip
pan is in the recess in the cooktop and that the
opening in the pan lines up with the receptacle.
blank orindicator for at least l 0 seconds. Turn l)OWer on and l)ower
lights come on when u l) your range. /f the indicator lights are still on,
range is not in use call fin" service.
Clock and timer do Plug on range is not completely • Make sure electrical l]lug, is l)lugged,, into a live, ln'operly
not work inserted in the electrical outlet, gr(mnded outlet.
A fuse in your home • Replace the fl/se or reset the circuit breaker:
may he blown or the
circuit breaker tripped.
Oven controls improperly set. • See the Using the clock and timer section.
Oven lightdoes Light bulb is loose or defective. • Tighten or replace the btdb.
not work
Switch operating light • (::ill h)r service.
is broken.
Oven will not work Plug on range is not completely • Make sure electrical l)lug, is l)lug_°ed into a live, l)roperly
h_serted in the electrical outlet, grounded outlet.
A fuse in your home may be • Replace the fl/se or reset the circuit breaker:
blown or the circuit
breaker tripped.
Oven controls improperly set. • See the Usingtheoven section.
Door left in the locked •/f uecessHl'V allow the oven to cool then unlock
position, the door.
Food does not bake Oven controis improperly set. • See the Using the oven secdou.
or roast properly
Shelf position is incorrect • See the Usingtheoven section.
or the shelf is not level.
Incorrect cookware or • See the Using the oven secdou.
cookware of improper
size being used.
Oven thermostat needs
adjustment.
• See the Adjust the oven thermostat--Do it yourself!
section.
22
Page 23

Possible Causes What ToDo
Fooddoes not Oven conlrols hnproperly set. * Make sure )'ou turn tile knob all tile way to tile
broilproperly BROILposition.
Door not open to the * See tile Using the oven section.
broil stop position as
recommended.
hnproper shelf position * See the Broiling Guide.
being used.
Cookware not suited * Use the broiling pan and grid that calue with your range.
for broiling.
Alumhmm foil used on the * See the Usingtheoven section.
broiling pan and grid has
not been fitted properly and
slit as recommended.
In some areas the power • Preheat the broil element fin" 10 minutes.
(voltage) may be low.
• Broil tbr the longest period of time recommended in
the Broiling Guide.
Oven temperature Oven therlnostat • See the Adjust the oven thermostat--Do it yourself!
too hot or too cold needs adjustlnent, section.
Power outage, Power outage or surge. • Some models will automaticall_ resUllle their setting
clock flashes once the power is restored. On models with a clock,
vet! must reset the clock. If the oven was in use, you
must reset it b)' turning the Oven Teml)erature knob
back to OFF, setting the clock and resetting any
cooking flmction.
Oven will not self-clean The oven temperature • Allow the range to cool to room temperature and reset
is too high to set a the controls.
self-clema operation.
Oven conlrols improperly set. • Make sure xou turn the control knob ;111the way to the
CLEANposition.
Oven door is not in • Make sure you move the door latch handle :111the
the locked position, way to the right.
Oven statl_ a self-clean Oven door locked during • Turn the Oven Temperature knob to OFF Allow the
cycle when you wanted cooking, oven to cool. Never force the door latch handle.
to bake, roast or broil
"Crackfing" or This is the Somld of the metal • This is noruial.
"popping" sound heating and cooling during
both the cooking and
cleaning functions.
Excessive smoking Excessive soil. • Turn the Oven Temperature knob to OFF.Open
during a clean cycle the windows to rid the room of smoke. Wait until
the CLEANlight goes off. Wipe u l) the excess soil
and reset the clean cycle.
Oven door will Oven too hot. • Allow the oven to cool below locking temperature.
notunlock
Oven not clean after Oven controls not • See the Using the self-cleaning oven section.
a clean cycle properly set.
Oven was heavily soiled. • Clean tq) hea\y sl)illovers heft)re starting the
clean c)'cle. Heavily soiled ovens may need to 2_
sell=clean again or fin" a hmger period of time.
Page 24

Before YouCallForService...
Troubleshooting -tips
Possible Causes
CLEANlightflashes • Move tile door latch handle to tile right before
Oven controls not
properly set.
Oven makes This is the sound of the • This is normal.
clicking noise heating element turning
off and on during
cooking functions.
What ToDo
setting tile (-)','ell Tel//l)el'attu'e knob to CLEAN.
CLEANlight is on The oven door was • Turn the Oven Temperature knob to OFF.Allow
when you want to cook accidentally locked, the oven to cool. Then move the latch to the flu" left.
"F--anda number You have a function • Turn the Oven Temperature knob to OFF. Put the oven
orletter"flash in error code. back into operation.
the display If the function code repeats. • Disconnect all power to the range for at least 30
Never flwce the door latch handle.
seconds and then reconnect power./f the flmction
elTOY code repeats, call t()Y service.
Thedisplaygoesblank Power surge. • Discmmect power at the fltse box or circuit breaker
or indicator lights come fin- at least 10 seconds. Turn power on and power
on when range is not up your range./f the indicator lights are still on,
in use call fl)l" service.
The clock is in the • See the Using the clock and tinier section.
black-out mode.
Oven door will Oven too hot. • TIwn the Oven Temperature knob to CLEAN. The
not lock gh_wing _wen cleaning light after the km:,b ix turned
indicates the oven is too hot from previous use. To cool
the oven, open the door wide, and allow the oven to
cool. _Mter the oven has cooled, close the door and slide
the latch handle all the way to the right.
"Burning" or "oily" This is normal in a new • To speed the process, set a sel6clean cycle for a
odor emitting from oven and will disappear minim tun ot 3 hours. See the Using the self-cleaning
the vent in time. oven section.
Strong odor An odor from the insuiation • This ix teml)orary.
around the inside of the
oven is normal for the first
few times the oven is used.
Storage drawer Rear drawer support is • Reposition the (lrawe_: See the Storage Drawer
is crooked on top of the guide rail. Removal instructions in the Care and cleaning of your
range section.
Storage drawer Power cord may be • Reposition the drawer and power cord. See tile
obs0cucth_g drawer Storage Drawer Removal instructions in the Care and
in the lower back cleaning of your range secfi_,n.
of the range.
Rear drawer support is Reposition the (h'awe_: See the Storage Drawer
on top of the guide rail. Removal instructions in the Care and cleaning of your
range section.
24
Page 25

GE Service Protection Plus rM
GE, a name recognized worldwide _br quality and dependability; oflers y'ou
Service Protection Plus'"--comprehensive protection on all y'our appliances--
No Matter What Brand!
Benefits Include:
• Backed by GE
• All brands covered
• Unlimited service cars
• All parts and labor costs included
• No out-of-pocket expenses
• No hidden deductibles
• One 800 number to call
You will be c()mpletel,_ satisfied with our set\ice protection or you ma} request }our inonev back
on tile remaining xalue of _o/u" contract. No questions asked. It's that simple.
Protect vom" refl_igerat(m dishwasher; washer and (hTe_; range, TV, VCR and much more--any brmad!
Plus there's iso extra charge tot elnergency ser;'ice and low monthly financing is available. Even icelnaker
coverage and tood spoilage protection is offered. You can rest eas> knowing that all vom" valuable
household products are protected against expensive repairs.
Place your confidence in (;E and call us in tile U.S. toll-free at _UU-_Z_I-ZZZ/-]:
for inoi'e illfoI'u/atioIl,
*M1 lmmds cov(_ed, up Io 20 y(ars old, in I1-1( continental U.S.
We71CoverAnyAppliance.
Anywhere. Anytime.*
__ _C/_ll'h__2e............
Please place in envelope and mail to:
General Electric Company
Warranty Registration Department
EO. Box 32150
Louisville, KY 40232-2150
25
Page 26

Consumer Product Ownership Registration
Dear Customer:
Thank you for purchasing our product and thank you for placing your confidence in us.
'_A/eare proud to haxe you as a customer'.
Follow these three steps to protect your new appliance investment:
Complete and mail
your Consumer
Product Ownership
Registration today.
tlaw' tim peace ot
mind of knowing wc
C_lll COlltact VOI/ ill
the tmlikely ev(nt of a
satbly modificalion.
Aiter mailing the
registration below,
store this docmnent
ill a sati' place. It
contains inl)mnation
you will need should
you require service.
Our selwice number is
800 GE CARES
(8t)0-432-2737).
Model Number Serial Number
, , , , , , i I , , , , ,
Important: If you did not get a registration card with your
product, detach and return the form below to
ensure that your product is registered, or register
online at www.geappliances.com.
Consumer Product Ownership Registration
Read your Owner's
Malmal careihllv.
It will help you
operat( your lie'*t`
appliance properly.
, i
._ (MI h(r(
Model Number Serial Number
Ms. M*>,. Mix_,
Fir,,1 I I L_sl]
Name I I I I I I I I I Nain(! I I I I I I I I I I I I
_1 r( (!1 I
Addr( ss I I I I I I I I I I I I I I I I I I I I I I I I
Ap_.#l, , , , , , , I EqnailAddress
()ccasionally, ,,,,e may all(),,,, sel(cmd companies to send you information.
(ihe(k h(r( if you do no1 ,,,,ant this intl)rmafion.
GEAppliances
General Electric Company
Louisville, Kentncky
26
www,GEApp/ianees,eom
I
I
Page 27

GEElectricRange Warranty.
All warranty service provided by our Factory Service Centers
or an authorized Customer Care®technician. For service,
call 800-GE-CARES.
GEWill Provide:
From the date of the
origina! purchase
Service trips to your home to teach you how to use the
product.
Improper hastaJlation.
Failure of the product if it is abused, misused, or used
for other thma the intended purpose or used
commercially.
During this full one-year warranty, GE will also provide, free of charge, all labor
and in-home service to replace the defective part.
Anypart )f the range v,,hlch fails due to a defect in materials or workmanship.
( {Y • , . ,
Replacement of house fuses or resetting of circuit
breakers.
Damage to the product caused by accident, f'we, floods
or acts of God.
h_cidentaJ or consequential damage caused by possible
defects with this appfimace.
This warranty is extended to the original purchaser and any succeeding owner for products purchased for
home use within the USA. In Alaska, the warranty excludes the cost of shipping or service calls to your home.
Some states do not aflow the exclusion or limitation of incidental or consequential damages. This warranty
gives you specific legal rights, and you may also have other rights which vary from state to state. Toknow
what your legal rights are, consult your local or state consumer affairs office or your state's Attorney General
Warrantor: General Electric Company.Louisville, KY40225
27
Page 28

ServiceTelephoneNumbers.
GEAnswerCenteP800.626.2000
The (;E Answer Cente_ _' is open 24 hom_ a day 7 (lms a week.
OR
Visit our _bsite at www.geappliances.com
In-HomeRepakService800-GE-CARES(800-_2-2737)
Expert GE repair service is only a phone call away.
SpecialNeedsService800.626.2000
800-TDD-GEAC(800-833-4322)
(;E offers, ti'ee of charge,, a broclmre to assist in I)lanning, a barfie>fi'ee kitchen fin" pe_ons
with limited mobility;
ServiceContracts800-626-2224
Purchase a GE service contract while yore" warranty is still in effect and _ou'll receive a
substantial discount. (;E Consumer Set\ice will still be there alier )our warren g expires.
PartsandAccessories800-626-2002
Individuals qualified to service their own appliances can have i)m_s or accessories sent directly
to their homes (VISA, MasterCard and Discover cards are accepted).
Instructions contained in this manual cover procedures to be performed by any user.Other servicing
generally should be referred toqualified service personnel Cautionmust be exercised, since
improper servicing may cause unsafe operation.
ServiceSatisfaction
If you are not satisfied with the setMce xou receixe fl'om (;E:
First contact the people who serviced your appliance.
Next, if you are still not pleased, write all the details--including your phone numbex_to:
Manage_; Customer Relations
GE Appliances
Appliance Park
i,ouisville, KY 40225
28 Printed in LaFayette, GA
 Loading...