

Page 1

@
vvvvw.GEAppliances.com
Safety I_ ............. 2-5
Opemang I_
Clock, Timer and Oven Lockout ...18
Convection Oven ............. 20-24
Roasting Guide ................ 24
Timed Features ............. 22, 23
Cookware ....................... 7
Oven ....................... 14, 15
Broiling Guide ................. 15
Oven Controls ............... 12, 13
Probe .......................... 17
Proofing Feature ................ 25
Range Lockout .................. 18
Sabbath Feature ................. 31
Self-Cleaning ................. 26, 27
Special Features .............. 28-30
Surface Units ................. 6-11
Knob-C_ntrolled Models ..... 10, 11
Touch Pad-Controlled Models ...8, 9
Thermostat Adjustxnent--
Do It Yourself ................... 19
Timed Baking and
Roasling Features ................ 16
Warming Feature ................ 25
JB905
JB968
JB988
Care and G-"/ea_g .......... 32-37
Troubleshooting Tips ........ 38--41
Ao_ .................... 46
Consumer Support
Consumer Support ...... Back Cover
Product Registration .......... 43, 44
Warranty ...................... 47
Write the model and serial
numbers here:
Model #
Serial #
You can find them on a label
behind the storage drawer
on the range frame.
164D4290P320 49-80164 04-03JR
Page 2
IMPORTANTSAFETYINFORMATION.
READALLINSTRUCTIONSBEFOREUSING.
A WARNING!
Foryoursafe_, the informationin this manualmustbe followed tominimizethe risk of fire, electric
shock, ortopreventproperty damage,personal injury,orloss offife.
A WARNINGANTI-TIPDEVICE
All ranges can tip andinjury could resulL
Toprevent accidental tipping of the range, attach it to the waftand floor byinstallingtheAnti-tip
device supplied.
If the Anti-Np device suppliedwith the range does not fit thisapplication, usethe universalAnti-tip
device WB2X7909.
Tocheck if the device is installed and engagedproperly, remove the storage drawer and inspect
the rear leveling leg. Make sure it fits securely into the slot
If you pull the range out from the wall for any reason, make sure the device is properly engaged when
you push the range back against the wall. If it is not, there is a possible risk of the range tipping over
and causing injury if you or a child stand, sit or lean on an open door.
Please refer to the Anti-Tip device information in this manual. Failure to take this precaution could
result in tipping of the range and injury.
IMPORTANTSAFELYNOTICE
The CalrfomiaSafe Drinking Water and Toxic Enforcement Act requires the Govemorof Califomiato
publish a list of substances known to the state to cause cancer, birth defecta or other repreductive
harm, and requires businesses to wam customers of potential exposure to such substances.
The fiberglass insulation inserf-clean ovensgives off a very smaflamount of carbon monoxideduring
the cleaning cycle. Exposure can be minimized by vendng with an open window or using a ven#7ation
fan or hood.
SAFELYPRECAUTIONS
When usingelectrical appliances,basicsafeb/preca_'ons should be followed, including the following:
R Use this appliance only for its intended
purpose as described in this Owner's Manual.
i Be sure your appliance is properly installed and
grounded by a qualified installer in accordance
with the provided installation instructions.
I Have the installer show you the location of
the circuit breaker or fuse. Mark it for easy
reference.
I Do not attempt to repair or replace any
part of your range unless it is specifically
recommended in this manual. All other
servicing should be referred to a qualified
technician.
Ill Before performing any service, disconnect
the range power supply at the household
distribution panel by removing the fuse or
switching off the circuit breaker.
I Do not leave children alone---children should
not be left alone or unattended in an area
where an appliance is in use. They should
never be allowed to sit or stand on any part
of the appliance.
I Do not allow anyone to climb, stand or hang
on the door, storage drawer or cooktop. They
could damage the range and even tip it over,
causing severe personal injury.
2
Page 3
wvvw.GEAppliances.oom
A WARNING!
SAFETYPRECAUTIONS
Do not operate the ovenor cooktopcontrols if the glass is broken.Food splatter or cleaning solution
may penetrate a broken controlpanel orcooktop and create a risk of electrical shock.Contacta
qualified technician immediately should Fourglass control panel or cooktop become broken.
i Do not store flammable materials in an oven
or near the cooktop.
i CAUTION: ofinteres,to
should not be stored in cab'mets above a range
or on the back of a range---children climbing
on the range to reach items could be seriously
injured.
i Never wear loose-fitting or hanging garments
while using the appliance. Be careful when
reaching for items stored over the range.
Flammable material could be ignited if
brought in contact with hot surface units or
heating elements and may cause severe burns.
• Use only dry pot holders---moist or damp
pot holders on hot surfaces may result in
burns from steam. Do not let pot holders
touch hot surface units or heating elements.
Do not use a towel or other bulky doth in
place of pot holders.
[] Do not use water on grease fires. Never pick
up a flaming pan. Turn the controls off.
Smother a flaming pan on a surface unit
by coveting the pan completely with
a well-fitting lid, cookie sheet or flat tray.
Use a multi-purpose dry chemical or
foam-type fire extinguisher.
Flaming grease outside a pan can be put
out by coveting it with baking soda or, if
available, by using a muld-purpuse dry
chemical or foam-type fire extinguisher.
Flame in the oven can be smothered
completely by dos'mg the oven door and
turning the oven offor by using a multi-
purpose dry chemical or foam-type fire
exdnguisher.
[] Do not let cooking grease or other flammable
materials accumulate in or near the range.
[] Do not touch the surface units, the heating
dements or the interior surface of the oven.
These surfaces may be hot enough to burn
even though they are dark in color. During and
after use, do not touch, or let clothing or other
flammable materials contact the surface units,
areas nearby the surface units or any interior
area of the oven; allow sufficient time for
cooling first.
Potentially hot surfaces indude the cooktop,
areas facing the cooktop, oven vent opening,
surfaces near the opening, crevices around the
oven door.
REMEMBER:The inside surface of the oven
may be hot when the door is opened.
i Do not store or use combustible materials,
gasoline or other flammable vapors and liquids
in the vicinity of this or any other appliance.
• Keep the hood and grease filters dean
to maintain good venting and to avoid
grease fires.
[] Teach children not to play with the controls
or any other part of the range.
[] Always keep dish towels, dish cloths, pot
holders and other linens a safe distance
from your range.
[] Alwayskeep wooden and plastic utens'tis and
canned food a safe distance from your range.
It Alwayskeep combustible wall coverings,
cttr_ns or drapes a safe d_mnce from
your range.
[] For your safety, never use your appliance
for warming or heating the room.
COOKMEATANOPOULTRYTHOROUGHLY...
Cookmeat andpoultry thoroughly---meat toat least anINTERNALtemperatureof 160°Fandpoultry to at least
an INTERNALtemperatureof 180°ECookingto thesetemperaturesusuallyprotectsagainst foodborneillness.
3
Page 4
IMPORTANTSAFETYINFORMATION.
READALLINSTRUCTIONSBEFOREUSING.
RADIANTSURFACEUNITS
Useproper pan size--select cookware havingflat bottoms large enough to cover the surface unit
heating element The usa of undersized cookware willexpose a pardon of the surface unit to direct
contact and may resultin ignitionof clothing.Proper relationshipof oookware to surface unit will
also improve efficiency.
II Never leave the surface units unattended at
high heat settings. Boilovers cause smoking
and greasy sp'dlovers that may catch on fire.
• Only certain types of glass, glass/ceramic,
earthenware or other glazed containers are
suitable for cooktop service; others may break
became of the sudden change in temperature.
• To minimize the posfib'_ of burns, ignidon
of flammable materials and spillage, the handle
of a container should be mined toward the
center of the range without extending over
nearby surface units.
• Always turn the surface units offbefore
removing cookware.
• When preparing flaming foods under the
hood, turn the fan on.
[] Use care when touching the cooktop.
The glass surface of the cooktop will retain
heat after the controls have been turned off.
• Keep an eye on foods being fried at high or
medium high heat settings.
• Foods for frying should be as dry as possible.
Frost on frozen foods or moisture on fresh
foods can cause hot fat to bubble up and
over the sides of the pan.
[] Use tittle fat for effective shallow or deep
fat frying. Filling the pan too full of fat can
cause spillovers when food is added.
• Ira combination of o'ds or fats will be used
in frying, stir together before heating, or
as fats melt slowly.
[] Always heat fat slowly, and watch as it heats.
[] Use a deep fat thermometer whenever
possible to prevent overheating fat beyond
the smoking point.
[] Avoid scratching the glass cooktop. The
cooktop can be scratched with items such
as sharp instruments, rings or other jewelry,
and rivets on clothing.
•Iarge scratches or impacts to glass doors or
cooktops can lead to broken or shattered glass.
• Do not operate the radiant surface units if the
glass is broken. Spillovers or cleaning solution
may penetrate a broken cooktop and create a
risk of electrical shock. Contact a qualified
technician immediately should your glass
cooktop become broken.
• Never use the glass cooktop surface as a
cutting board.
• Do not place or store items that can melt or
catch fire on the glass cooktop, even when it
is not being used.
• Be careful when placing spoons or other
stirring utensils on glass cooktop surface when
it is in use. They may become hot and could
cause burns.
• Clean the cooktop with caution. If a wet
sponge or cloth is used to wipe spills on a hot
surface unit, be careful to avoid steam burns.
Some cleaners can produce noxious fumes if
applied to a hot surface.
NOTE:We recommend that you avoid wiping
any surface unit areas until they have cooled
and the indicator light has gone off. Sugar
sp'dls axe the e-xc_pdun to this. Please see the
Cleaning the glass ceoktop section.
• When the cooktop is cool, use only the
CERAMA BRYI'E ®Ceramic Cooktop Cleaner
and the CERAMA BRYIE Ceramic Cooktop
Cleaning Pad to clean the cooktop.
• To avoid possible damage to the cooking
surface, do not apply cleaning cream to
the glass surface when it is hot.
• After cleaning, use a dry cloth or paper towel
to remove all cleaning cream residue.
• Read and follow all instructions and warnings
on the cleaning cream labels.
• Do not use plastic wrap to cover food. Plastic
may melt onto the surface and be very difficult
to remove.
4
Page 5
wvv_.GEAppliances.com
WARNING!
OVEN
Stand away from the range when opening theoven door.Hot air orsteam which escapes can cause
burnsto hands, face and/oreyes.
m Do not heat unopened food containers.
Pressure could build up and the container
could burst, causing an injury.
lit Keep the oven vent unobstructed.
Ill Keep the oven free from grease buildup.
INPlace the oven rack in the desired position
while the oven is cool. If racks must be handled
when hot, do not let pot holder contact the
heating elements.
IIWhen using cooking or roasting hags in the
oven, follow the manufacturer's directions,
m Pulling out the rack to the stop-lock isa
convenience in lifting heavy foods. It is also
a precaution against burns from touching
hot surfaces of the door or oven walls.
J Do not use the oven to dry newspapers.
If overheated, they can catch on fire.
[] Do not use the oven for a storage area. Items
stored in an oven can ignite.
J Do not leave paper products, cooking utensils
or food in the oven when not in use.
II Do not use aluminum foll to line oven bottoms,
except as suggested in this manual. Improper
installation of ahiminmn foil may result in a
risk of electric shock or fire.
SELF-CLEANINGOVEN
Do not use ovencleaners. No commercialoven cleaner or ovenlinerprotective coating ofany kind
should be used inor around any part of the oven. Residuefrom oven cleaners willdamage the inside
of theoven when the self-clean cycle isused.
[] Do not clean the door gasket. The door gasket
is essential for a good seal. Care should be
taken not to rub, damage or move the gasket.
m Before self-cleaning the oven, remove the
convection roasting rack, bixfder pan, grid
and other cookware.
[] Shiny, silver-colored oven racks (on some
models) should be removed from the over,
before beginning the self<lean cycle.
[] Gray porcelain-coated oven racks (on some
models) may be cleaned in the oven during
the self-clean cycle.
[] Be sure to wipe up excess spillage before
starting the self-cleaning operation.
[] If the self<leaning mode malfunctions, turn
the oven offand disconnect the power supply.
Have it serviced by a qualified technician.
[] Clean only parts listed in this Owner's Manual.
REAL?ANDFOLLOWTHISSAFETYINFORMATIONCAREFULLY
SAVETHESEINSTRUCTIONS
5
Page 6
Abouttheradiantsurfaceunits.
NOff: Throughoutthismanual,featuresandappearancemayvaryfromyourmodel.
About the radiant surlace units
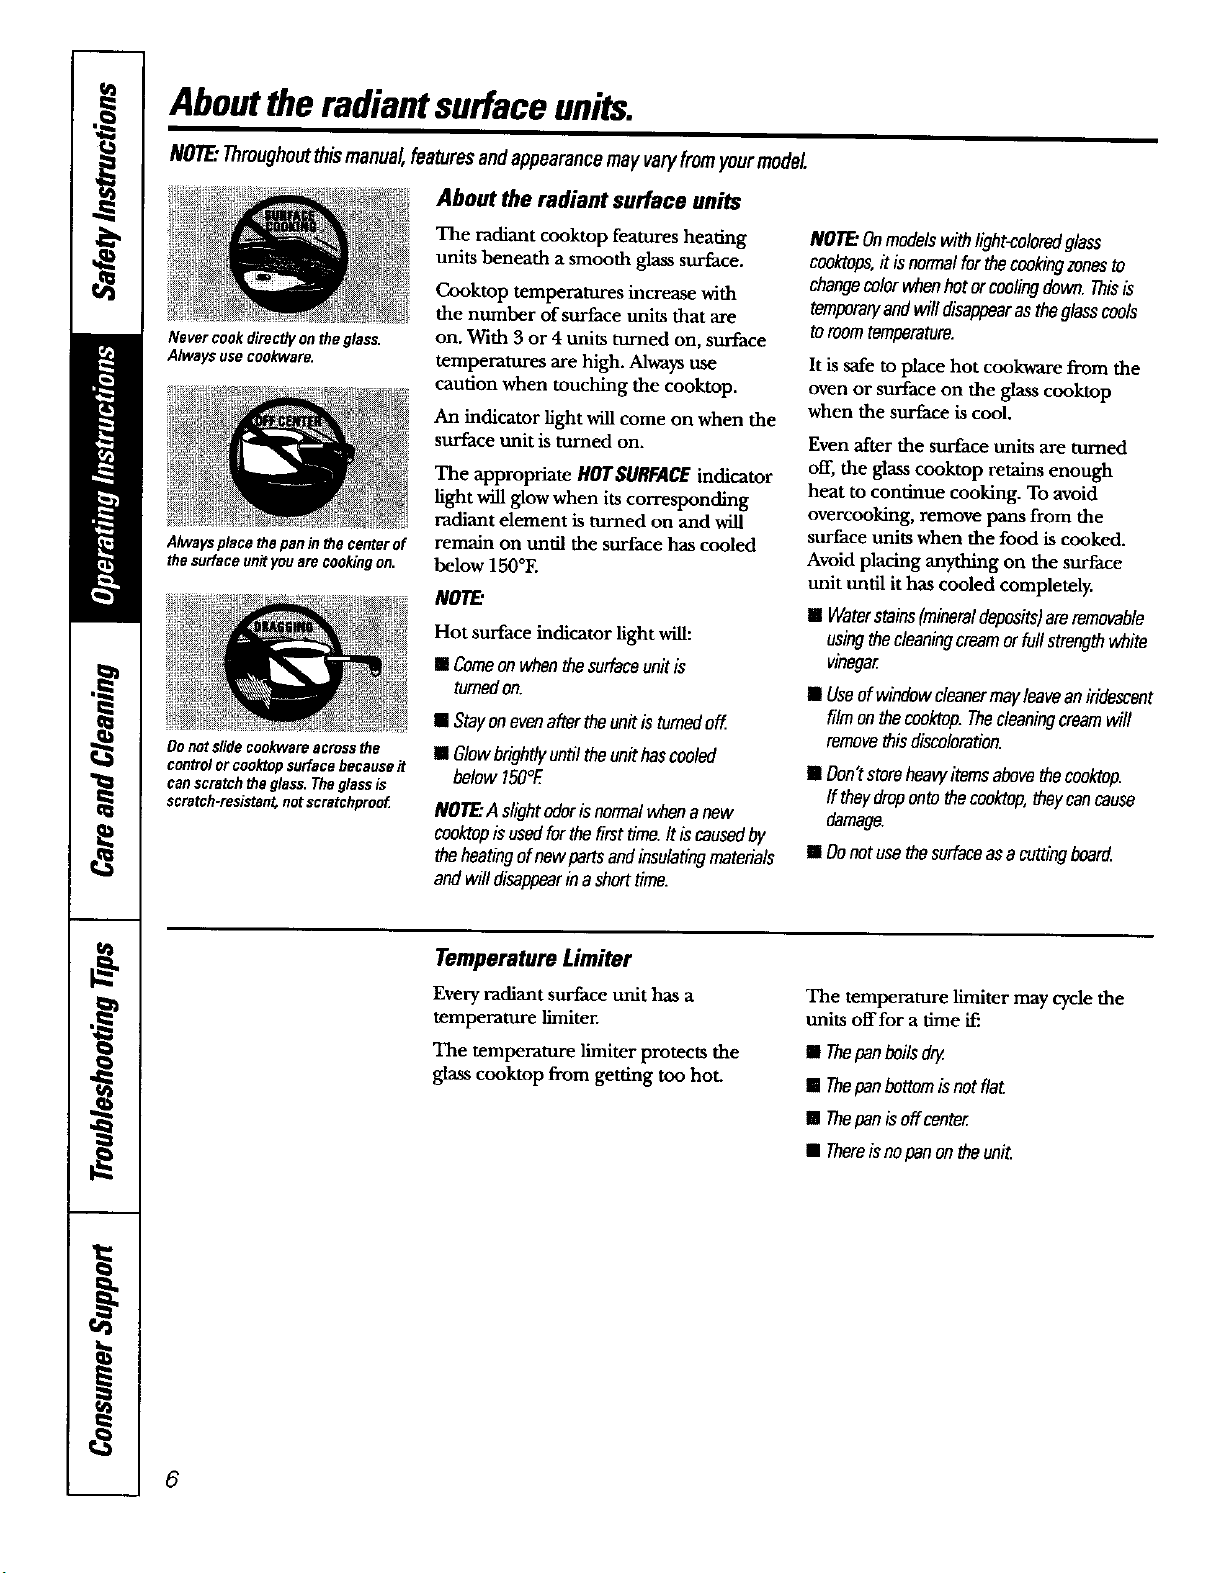
Never cookdirecgy on the glass.
Always usecookware.
Alwaysplace the pan in the centerof
the surface unityou are cookingon.
Donotslide cookwareacross the
controlorcooktop surface because it
canscratchthe glass. Theglassis
scratch-resistan_notscratchproof
The radiant cooktop features heating
units beneath a smooth glass surface.
Cooktop temperatures increase with
the number of surface units that are
on. With 3 or 4 units turned on, surface
temperatures are high. Always use
caution when touching the cooktop.
An indicator light will come on when the
surface unit is mined on.
The appropriate HOTSURFACEindicator
light will glow when its corresponding
radiant element is turned on and will
remain on until the surface has cooled
below 150°E
NOTE"
Hot surface indicator light will:
m Comeonwhenthesurfaceunitis
turnedon.
[] Stayonevenaftertheunitis turnedoff
[] Glowbrightlyuntiltheunithascooled
below150°E
NOTE:A slightodoris normalwhenanew
cooktopisusedforthefirsttime.Itiscausedby
theheatingof newpartsandinsulatingmaterials
andwilldisappearina shorttime.
NOTE"Onmodelswithlight-coloredglass
cooktops,it isnormalforthecookingzonesto
changecolorwhenhot orcoolingdown.Thisis
tempareffandwill disappearastheglasscools
toroomtemperature.
It issafe to place hot cookware from the
oven or surface on the glass cooktop
when the surface is cool.
Even after the surface units are turned
off, the glass cooktop retains enough
heat to continue cooking. To avoid
overcooking, remove pans from the
surface units when the food is cooked.
Avoid placing anything on the surface
unit until it has cooled completely.
[] Waterstains(mineraldeposits)areremovable
usingthecleaningcreamorfoil strengthwhite
vinega_
[] Useofwindowcleanermayleaveaniridescent
filmonthecooktop.Thecleaningcreamwill
removethisdiscoloration.
[] Don'tstoreheavyitemsabovethecooktop.
ff theydropontothecooktop,theycancause
damaga
[] Donotusethesurfaceasa cuttingboard
Temperature Limiter
Everyradiam surfaceunit hasa
temperature limiter.
The temperature limiter protects the
glass cooktop from getting too hot.
The temperature limiter may cycle the
units offfor a time if:
[] Thepanboilsdry
[] Thepanbettomisnotflat.
[] Thepanisoffcente_
• Thereisnopanontheunit.
6
Page 7
www.GEApplianee_com
The following informationwillhelp youchoose cookware which will givegood performance onglass cooktops.
Stainless Steel:
recommended
Porcelain Enamel Covered Cast Iron:
recommended
As long as the cookware is covered
completely with porcelain enamel, this
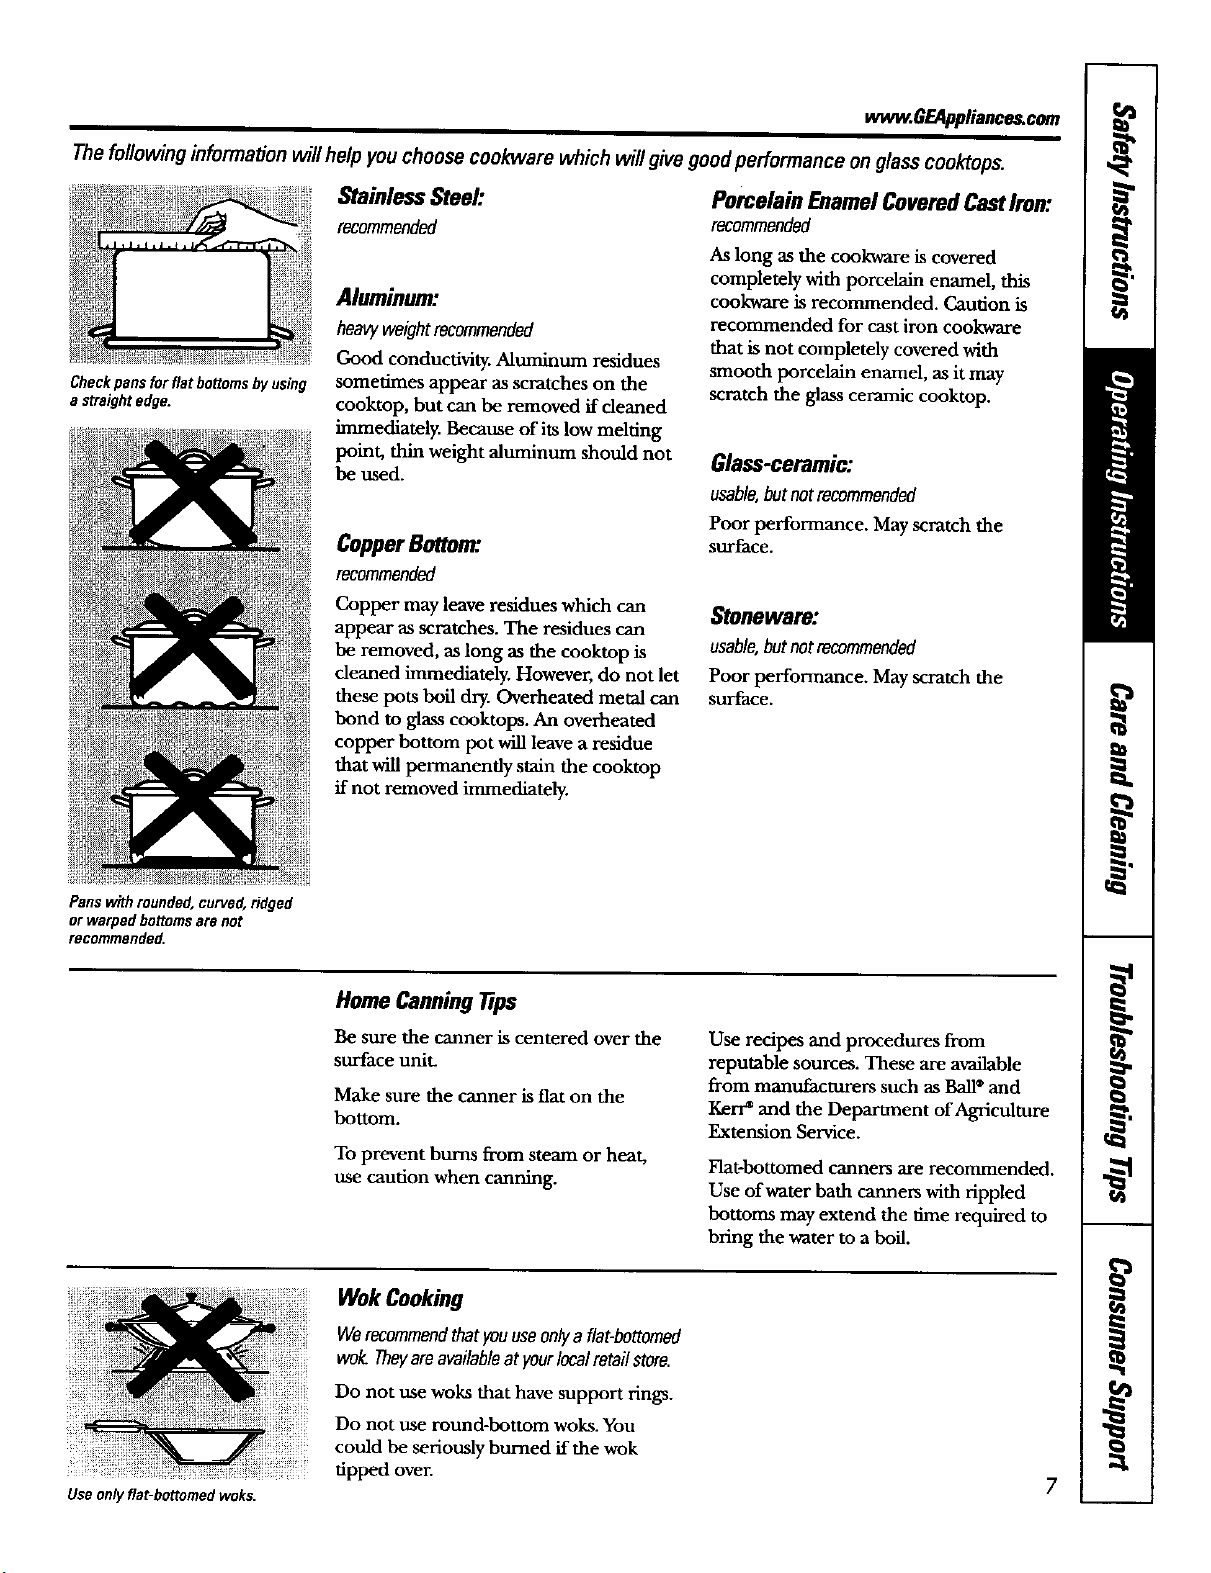
Checkpans for flat bottomsbyusing
a straightedge.
Aluminum:
heavyweightrecommended
Good conductivity. Aluminum residues
sometimes appear as scratches on the
cooktop, but can be removed if cleaned
cookware is recommended. Caution is
recommended for cast iron cookware
that is not completely covered with
smooth porcelain enamel, as it may
scmtch the glass ceramic cooktop.
immediately. Because of its low melting
point, thin weight aluminum should not
be used.
Glass-ceramic:
usable,butnotrecommended
Poor performance. May scratch the
CopperBottom:
surface.
recommended
Copper may leave residues which can
appear as scratches. The residues can
be removed, as long as the cooktop is
cleaned immediately. However, do not let
these pots boil dry. Overheated metal can
Stoneware:
usable,butnotrecommended
Poor performance. May scratch the
surface.
bond to glass cooktops. An overheated
copper bottom pot will leave a residue
that will permanendy stain the cooktop
if not removed immediately.
Panswith rounded, curved, ridged
or warped bottomsare not
recommended.
Use onlyflat-bottomed woks.
Home Canningtips
Be sure the canner is centered over the
surface unit
Make sure the canner is flat on the
bottom.
To prevent bums from steam or heat,
use caution when canning.
WokCooking
Werecommendthatyouuseonlyaflat-bottomed
welt Theyareavailableat yourlocalretailstore.
Do not use woks that have support rings.
Do not use round-bottom woes. You
could be seriously burned if the wok
tipped over.
Use recipes and procedures from
reputable sources. These are available
from manufacturers such as Ball* and
Kerr* and the Department of Agriculture
Extension Service.
Flat-bottomed canners are recommended.
Use of water bath canners with rippled
bottoms may extend the time required to
bring the water to a boil.
7
Page 8
Usingthesurfaceunits--Touchpad-controlledmodels.
Surface Unit Cook Settings
The controls for the radiant surface
units allow for 10 different heat settings:
LO, 2-9 and HI. The heating element
may not visibly glow at low heat settings.
NOllE Whenchangingfroma highheatsettingto
alowerheatsetting,thesurfaceunitmaystop
glowing.Thisisnormal.Theunitisstillonandhot.
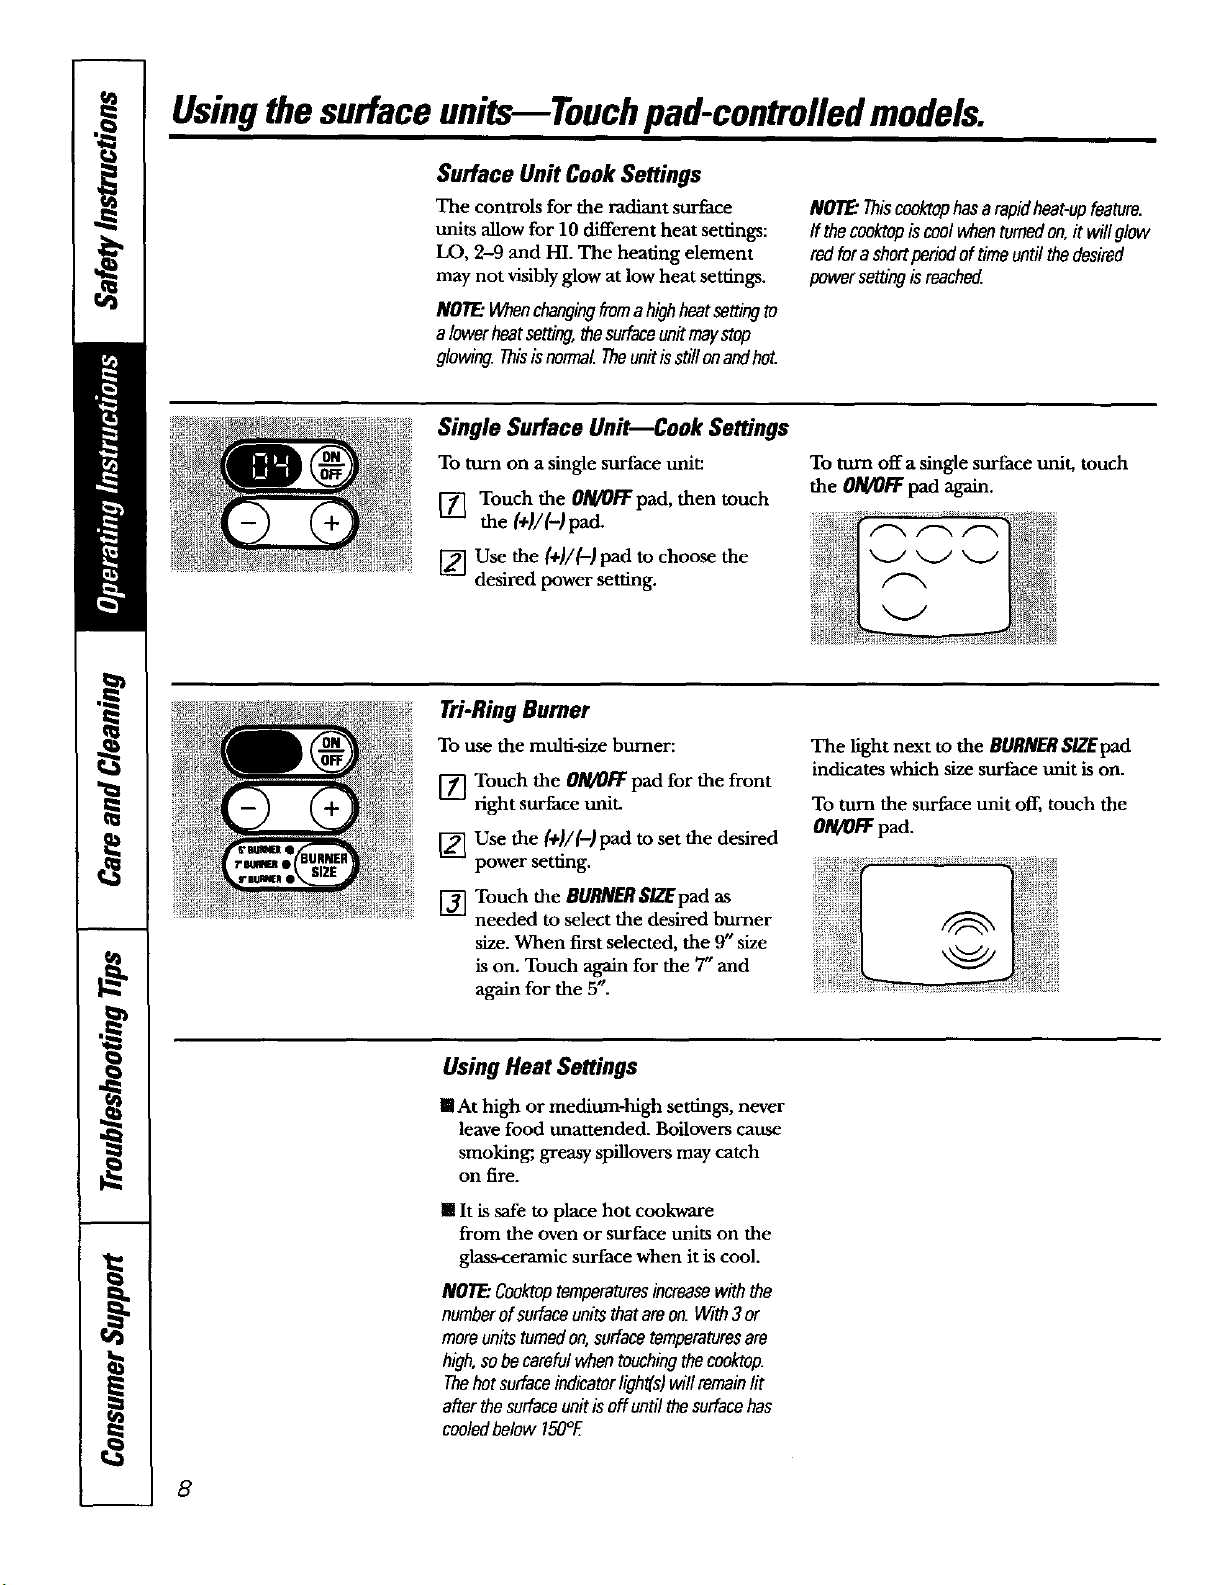
Single Surface Unit--Cook Settings
To turn on a single surface unit:
[] Touch the 0N/0FF"pad, then touch
the (+l/(-)pad.
[] Use the (+)/(-)pad to choose the
desired power setting.
NOTE:Thiscea/tophasarapidheat-upfeature.
ff theceaktopiscoolwhentumndon,it willglow
redforashortperiodof timeuntilthedesired
powersetUngisreachod
To turn off a single surface unit, touch
the 0N/0FF pad again,
Tri-Ring Burner
To use the multi-size burner:
[] Touch the 0N/0FF pad for the front
right surface uniL
[] Use the I+)//-) pad to set the desired
power setting.
[] Touch the BURNER S/ZEpad as
needed to select the desired burner
size. When first selected, the 9" size
is on. Touch again for the 7_ and
again for the 5".
Using Heat Settings
I At high or medium-high settings, never
leave food unattended. Boilovers cause
smoking;, greasy spillovers may catch
on fire.
m It is safe to place hot cookware
from the oven or surface units on the
glass-ceramic surface when it is cool.
NOTE:Coo/aoptemperaturesincreasewith the
numberof surfaceunitsthatareon.With3or
moreunitstumodon,surfacetemperaturesare
high,sobecarefulwhentouchingthecnoktop.
Thehotsurfaceindicatorlights)willremainlit
afterthesurfaceunitis offuntilthesurfacehas
cooledbelow150°E
The fight next to the BURNERSIZEpad
indicates which size surface unit is on.
To turn the surface unit off, touch the
ON/0FF pad.
8
Page 9
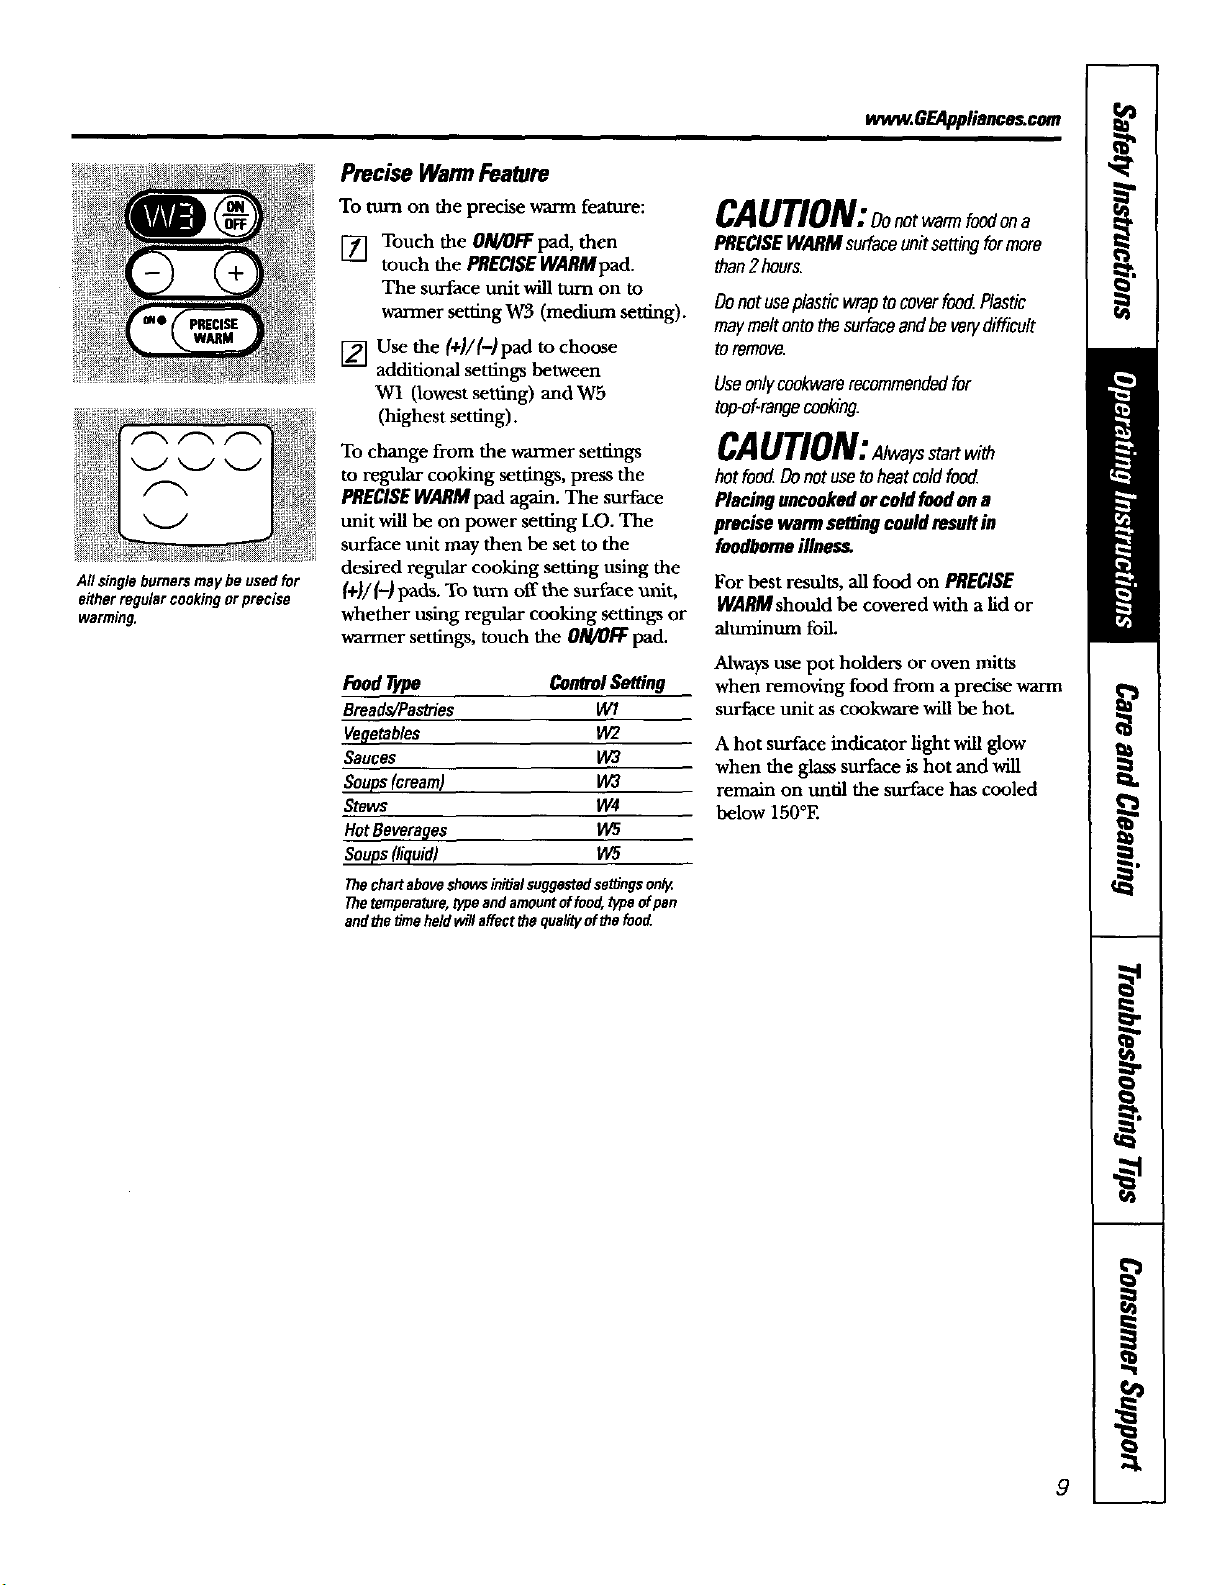
Agsingle burnersmay be used for
eitherregular cookingor precise
warming.
Precise WarmFeature
To turn on the precise warm feature:
[] Touch the ON/OFFpad, then
touch the PRECISEWARMpad.
The surface unit will turn on to
warmer setting W3 (medium setting).
[] Use the (+)/(-)pad to choose
additional settings between
W1 (lowest setting) and W5
(highest setting).
To change from the warmer settings
to regular cooking settings, press the
PRECISEWARMpad again. The surface
trait will be on power setting LO. The
surface unit may then be set to the
desired regular cooking setting using the
{+}/{-)pads. To turn off the surface mait,
whether using regular cooking settings or
warmer settings, touch the ON/OFFpad.
FoodType ControlSetting
Breads/Pastries WI
Vegetables W2
Sauces W3
Soups(cream) W3
Stews W4
HotBeverages W5
Soups(liquid) W5
Thechartaboveshows initial suggestedserdngsonig
Thetemperature, typeandamountof food,typeofpan
andthe timeheldwillaffectthe qualityofthe food.
vvw_.GEApplianoos.oom
CAUTION:Donot ona
PRECISEWARMsurfaceunitsettingformore
than2hours.
DOnetuseplasticwrapto coverfoodPlastic
maymeltontothesurfaceandbeverydifficult
toremove.
Useonlycookwarerecommendedfor
tel>of-rangecooking.
CAUTION: with
hotfoodDonotusetoheatcoldfoorL
Placinguncookedorcoldfoodona
precisewarmsettingcouldresultin
foodborneillness.
For best results, all food on PRECISE
WARMshouldbe covered with a lid or
ahuninum foil.
Always use pot holders or oven mitts
when removing food from a precise warm
surface unit as cookware will be hot.
A hot surface indicator light will glow
when the glass surface is hot and will
remain on until the surface has cooled
below 150°E
9
Page 10
Usingthesurfaceunits--Knob-controlledmodels.
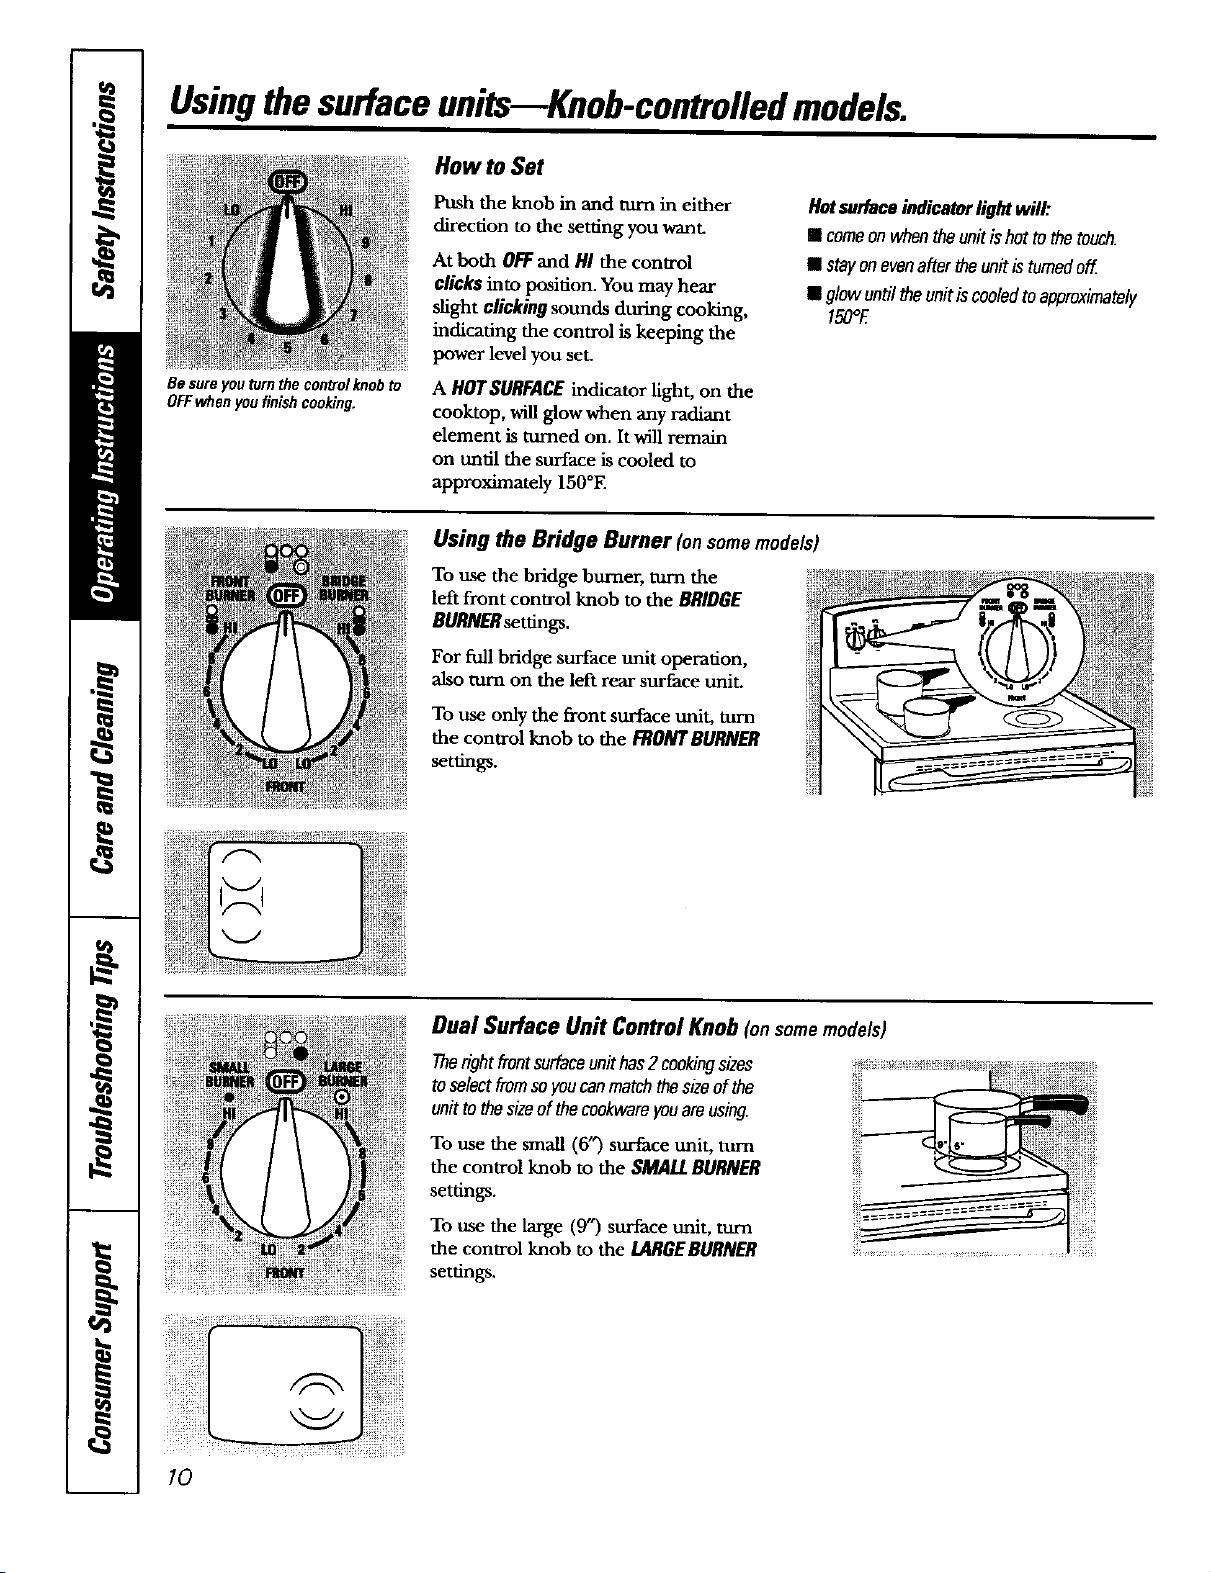
How to Set
Be sure you turn the control knob to
OFFwhen you finishcooking.
Push the knob in and turn in either
direction to the setting you want.
At both OFFand HI the control
clicksinto position. You may hear
slight clickingsounds during cooking,
indicating the control is keeping the
power level you set.
A HOTSURFACEindicator light, on the
cooktop, will glow when any radiant
element is turned on. It _ remain
on until the surface is cooled to
approximately 150°E
Hotsurfaceindicatorlight will:
• comeonwhentheunitis hot to thetouch.
• stayonevenaftertheunit isturnedoff
• glowuntiltheunitiscooledtoapproximately
Using the Bridge Burner (onsomemodels)
To use the bridge burner, turn the
left front control knob to the BRIDGE
BURNERsettings.
For full bridge surface unit operation,
also turn on the left rear surface unit.
To use only the front surface unit, turn
the control knob to the RtONTRURNER
settings.
150°E
10
Dual Surface Unit Control Knob(onsomemodels)
Therightfrontsurfaceunithas2cookingsizes
toselectfromsoyoucanmatchthesizeof the
unitto thesizeof thecookwamyouareusing.
To use the small (6") surface unit, turn
the control knob to the SMALLBURNER
settings.
To use the large (9') surface unit, turn
the control knob to the lARGEBURNER
settings.
Page 11
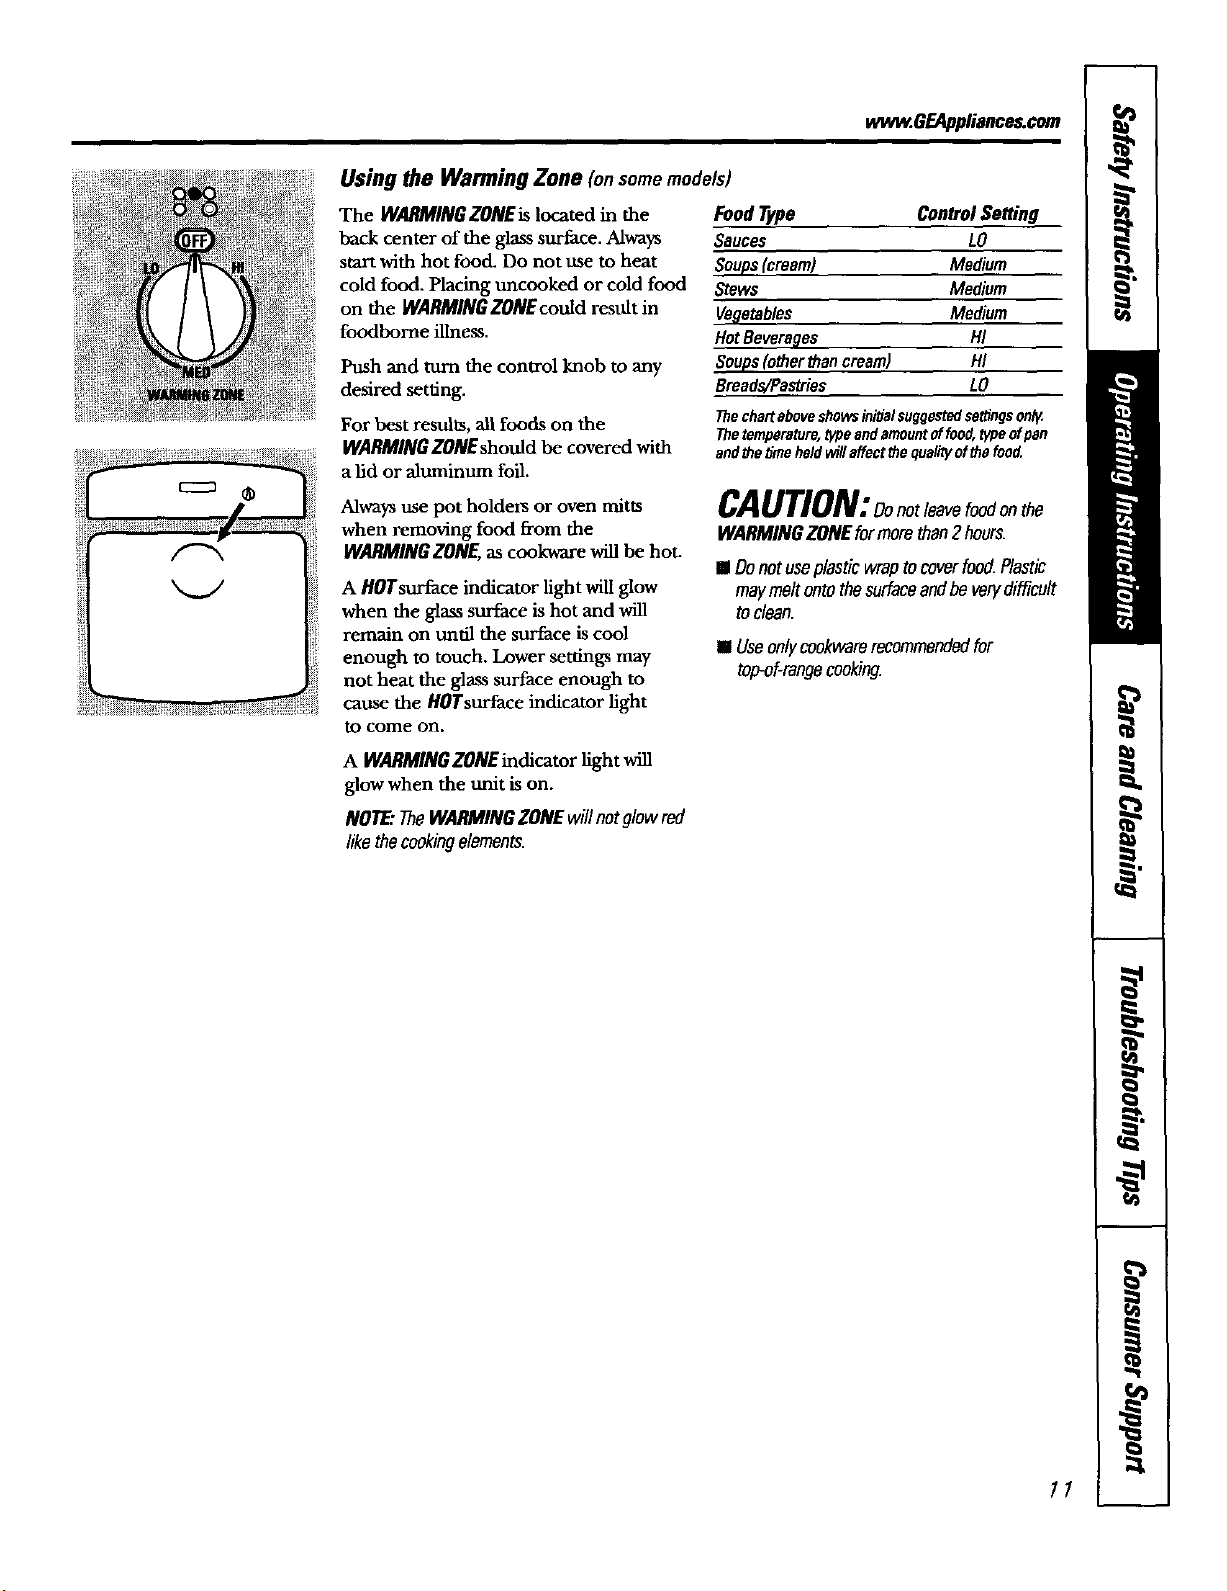
Using the Warming Zone (onsomemodels)
The WARMINGZONEislocated in the
back center of the glass surface. Always
start with hot food. Do not use to heat
cold food. Placing uncooked or cold food
on the WARMINGZONEcould result in
foodbome illness.
Push and turn the control knob to any
desired setting.
For best results, all foods on the
WARMINGZONEshould be covered with
a lid or aluminum foil.
Food Type Control Setting
Sauces LO
Soups(cream) Medium
Stews Medium
Vegetables Medium
HotBevereges HI
Soups(otherthancream) H/
Breads/Pastries LO
Thechart aboveshowsinitialsuggestedsettingsoni_.
Thetemperature,WPeandamountof food,typeofpan
and thetimeheldwillaffect the qualityofthefood.
www.GEAppliances.com
Always use pot holders or oven mitts
when removing food from the
WARMING ZONE, ascookware will be hot-
A HOTsurface indicator light will glow
when the glass surface is hot and will
remain on until the surface is cool
enough to touch. Lower settings may
not heat the glass surface enough to
cause the tlOTsurface indicator fight
to come on,
A WARMINGZONEindicatorlight will
glow when the unit is on.
NOTE."TheWARMINGZONEwillnotglowred
likethecookingelements.
CAUTlON: notleaveonthe
WARMINGZONEformorethan2 hours.
I Donotuseplasticwraptocoverfood.Plastic
maymeltontothesurfaceandbeverydifficult
toclean.
==Useonlycookwararecommendedfor
top-of-rangecooking.
11
Page 12
Usingtheovencontrols.
NOTE."Throughoutthis manual,featuresandappearancemayvaryfromyourmodel.
mayFeatureSvargand appearance 0 _ models)(°nsome
Onsomemodels
OvenControlClockandtimerFeaturesandSettings
12
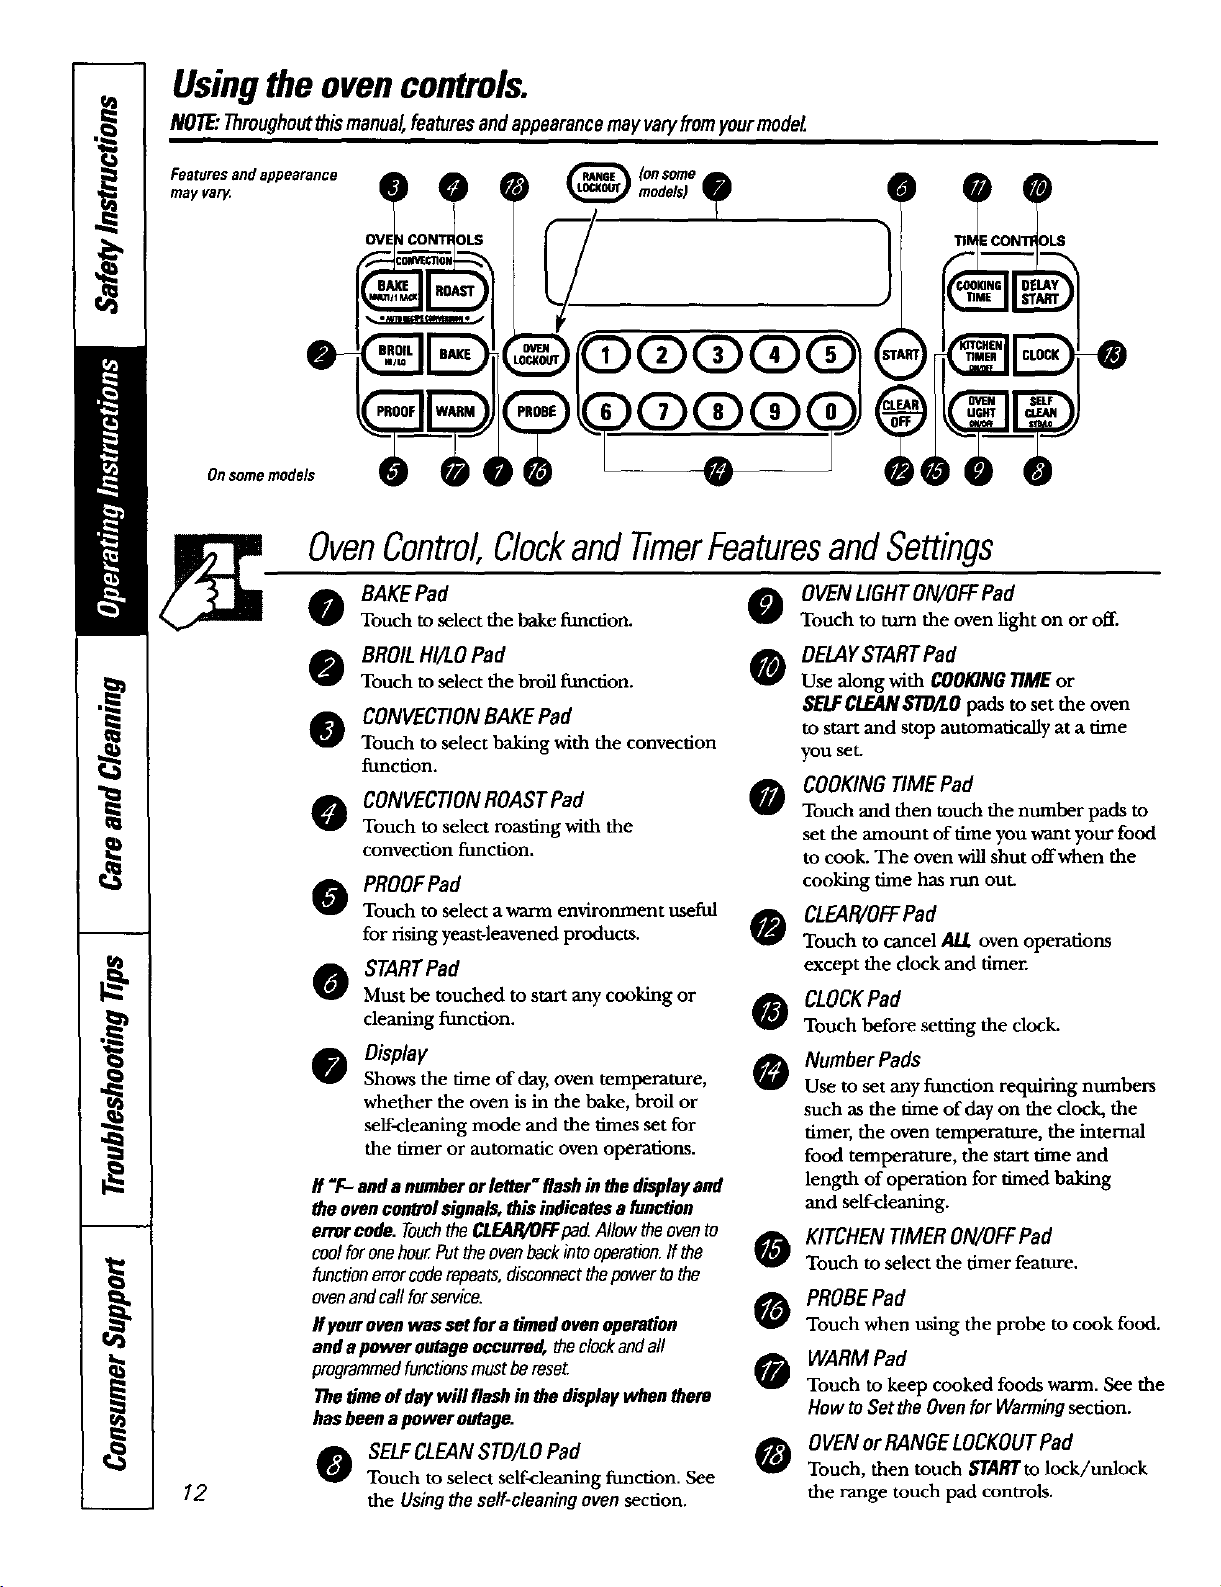
BAKEPad
Touch to select the bake function.
BROILHI/LO Pad 0
Touch to select the broil function.
CONVECTIONBAKEPad
Touch to select baking with the convection
function.
CONVECTIONROASTPad
Touch to select roasting with the
convection function.
O PROOFPad
Touch to select a warm environment useful
for rising yeast-leavened products. O
STARTPad
Must be touched to start any cooking or
cleaning function. O
0 Oisplay
Shows the time of day, oven temperature,
whether the oven is in the bake, broil or
self-cleaning mode and the times set for
the timer or automatic oven operations.
If'F- anda numberorletter"flashin thedisplayand
theovencontrolsignals,this indicatesa func_on
errorcode.TouchtheCLEAR/OFFpad.Allowtheovento
coolforonehour.Puttheovenbeckintooperation,ff the
functionerrorcoderepeats,disconnectthepowertothe
ovenandcallforservice.
Ifyourovenwassetfora timedovenoperation
andapower outageoccurred,theclockandall
programmedfunctionsmustbereseL
Thetimeof daywill flashinthe displaywhenthere
hasbeenapoweroutage.
SELFCLEANSTD/LOPad 0
Touch to select self-cleaning function. See
the Usingtheself-cleaningovensection.
OVENLIGHTON/OFFPad
Touch to turn the oven light on or off.
DELAYSTARTPad
Use along with COOKINGI1MEor
SELFCLEANSTD/LOpads toset the oven
to start and stop automatically at a thne
you set.
COOKINGTIME Pad
O
Touch and then touch the number pads to
set the amount of time you want your food
to cook. The oven will shut offwhen the
cooking time has run out.
CLEAR/OFFPad
Touch to cancel/ILL oven operations
except the clock and timer.
CLOCKPad
Touch before setting the clock.
Number Pads
O
Use to set any function requiring numbers
such as the time of day on the dock, the
timer, the oven temperature, the internal
food temperature, the start time and
length of operation for timed baking
and self-cleaning.
KITCHEN TIMERON/OFFPad
Q
Touch to select the timer feature.
PROBEPad
0
Touch when using the probe to cook food.
WARM Pad
0
Touch to keep cooked foods warm. See the
HowtoSetthe Ovenfor Warmingsection.
OVENor RANGE LOCKOUTPad
Touch, then touch STARTtolock/unlock
the range touch pad controls.
Page 13
Featuresand appearance
mayva_,.
www.GF_Appliances,com
!
7
Onsomemode_
0 0
OvenControlClockandtimerFeaturesandSettings
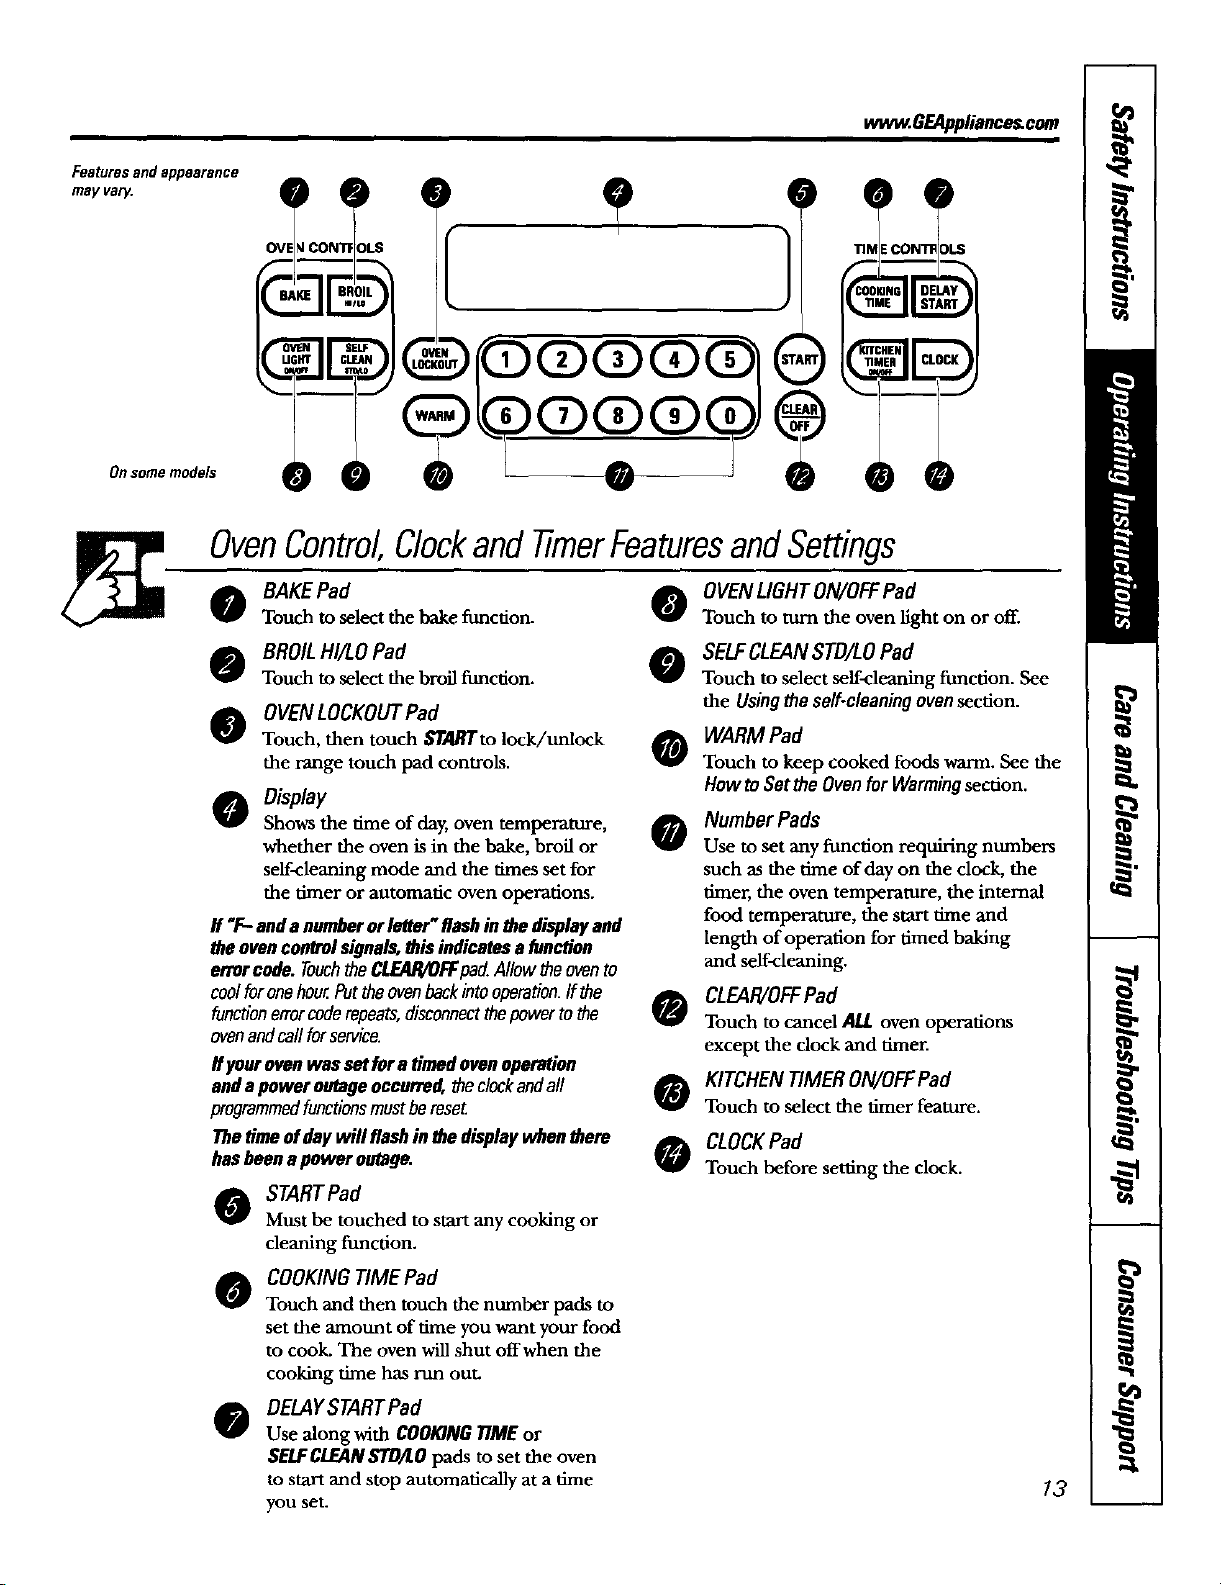
BAKEPad
Touch to select the bake function.
BROIL HI/I.O Pad
Touch to select the broil function.
OVENLOCKOUTPad
Touch, then touch $TA/_'to lock/tmlock
the range touch pad controls.
00isplay
Shows the time of day, oven temperature,
whether the oven is in the bake, broil or
self-cleaning mode and the times set for
the timer or automatic oven operations.
If "F--anda numberorletter"flashin thedisplayand
theovencontrolsignals,this indicatesa[unction
errorcode.TouchtheCLEAR/OFFpad.Allow theovento
coo/furonehour.Puttheovenbackintooperation.If the
functionerrorcoderepeats,disconnectthepowerto the
ovenandcallforservice
If your oven was setfor a timed ovenoperation
and apower outage occurred, the clockand all
programmedfunctions mustbe raseL
The time of day will flash in the display when there
has been a power outage.
STARTPad
Must be touched to start any cooking or
cleaning function.
COOKINGTIME Pad
Touch and then touch the number pads to
set the amount of time you want your food
to cook. The oven will shut offwhen the
cooking time has rim out.
DELAYSTART Pad
0
Use along with COOMNGTIMEor
SELFCLEANSTD/LOpads to set the oven
to start and stop automatically at a time
you set.
OVENLIGHT ON/OFFPad
0
Touch to turn the oventight on or off.
SELFCLEAN STD/LOPad
0
Touch to select self-cleaning ftmcfion. See
the Usingtheself-cleaningovensection.
WARM Pad
0
Touch to keep cooked foods warm. See the
How to Set the Oven for Warming section.
Number Pads
0
Use to set any fimction requiring numbers
such as the dine of day on the dock, the
diner, the oven temperature, the internal
food temperature, the start time and
length of operation for timed baking
and self-cleaning.
CLEAR/OFFPad
0
Touch to cancel ALL oven operations
except the clock and timer.
KITCHEN TIMERON/OFFPad
0
Touch to select the timer feature.
CLOCKPad
0
Touch before setting the clock.
13
Page 14
Usingtheoven.
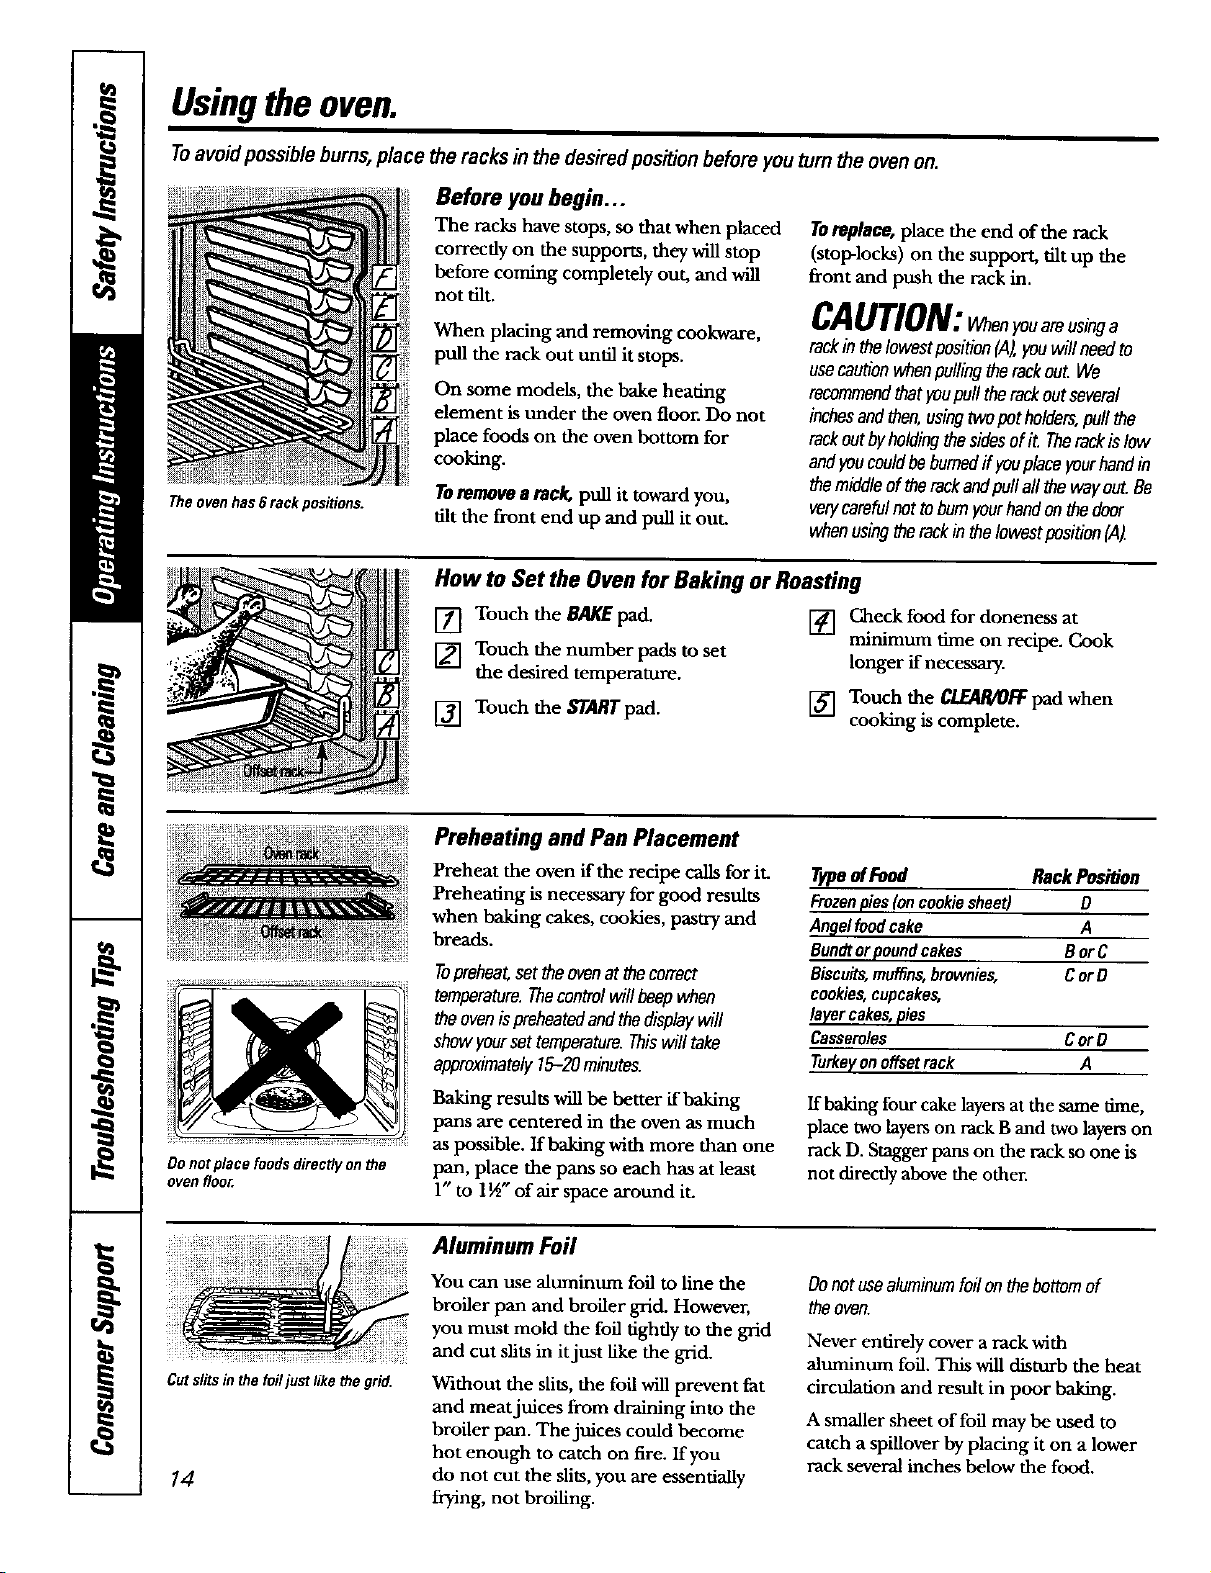
Toavoid possiblebums,place the racks in the desiredposition before you turn the ovenon.
Before you begin...
The ovenhas 6 rack positions.
The racks have stops, so that when placed
correctly on the supports, they will stop
before coming completely out, and will
not tilt.
When placing and removing cookware,
pull the rack out tmtil it stops.
On some models, the bake heating
element is under the oven floor. Do not
place foods on the oven bottom for
cooking.
Toremote a reck, pull it toward you,
tilt the front end up and pull it out.
How to Set the Oven for Baking or Roasting
Toreplace,place the end of the rack
(stop-locks) on the support, tilt up the
front and push the rack in.
CAUTION: enyouareosinga
rackin thelowestposition(,4),youwillneedto
usecautionwhenpullingtherackout.We
recommendthatyoupulltherackoutseveral
inchesandthen,usingtwoputholders,puffthe
rackoutbybe/dingthesidesofit. Therackis low
andyoucee/dbeburnedif youplaceyourhandin
themiddleof therackandpullallthewayout.Be
verycarefulnottobumyourhandonthedeer
whenusingtherackinthelowestposition(,4).
Do notplace foodsdirectlyon the
oven floor.
[] Touch the BAKEpad.
[] Touch the number pads to set
the desired temperature.
[] Touch the STARTpad.
Preheating and Pan Placement
Preheat the oven if the recipe calls for iL
Preheating is necessary for good results
when baking cakes, cookies, pastry and
breads.
Topreheatsettheovenatthecorrect
temperature.Thecontrolwillbeepwhen
theovenispreheatedandthedisplaywill
showyoursettemperature.Thiswill take
approximately15-20minutes.
Baking results will be better if baking
pans are centered in the oven as much
as possible. If baking with more than one
pan, place the pans so each has at least
1" to 1_" of air space around it.
[] Check food for doneness at
minimum time on recipe. Cook
longer if necessary.
[] Touch the CLEAR/OFFpad when
cooking is complete.
Typeof Food Rack Position
Frozenpies(oncookiesheet) O
Angelfood cake A
Bundtorpoundcakes B orC
Biscuits,muffins,brownies, CorD
cookies,cupcakes,
layercakes,pies
Casseroles CorD
Turkeyonoffsetrack A
ff baking four cake layers at the same time,
place two layers on rack B and two layers on
rack D. Stagger pans on the rack so one is
not clirecily above the other.
Cuts/its in the foiljust like the grid.
14
Aluminum Foil
You can use aluminum foil to line the
broiler pan and broiler grid. However,
you must mold the foil tightly to the grid
and cut slits in it just like the grid.
Without the slits, the foil will prevent fat
and meat juices from draining into the
broiler pan. The jnices could become
hot enough to catch on fire. If you
do not cut the slits, you are essentially
frying, not broiling.
Donotusealuminumfoilonthebottomof
theoven.
Never entirely cover a rack with
aluminum foil. This will disturb the heat
circulation and result in poor baking.
A smaller sheet of foil may be used to
catch a spillover by placing it on a lower
rack several inches below the food.
Page 15
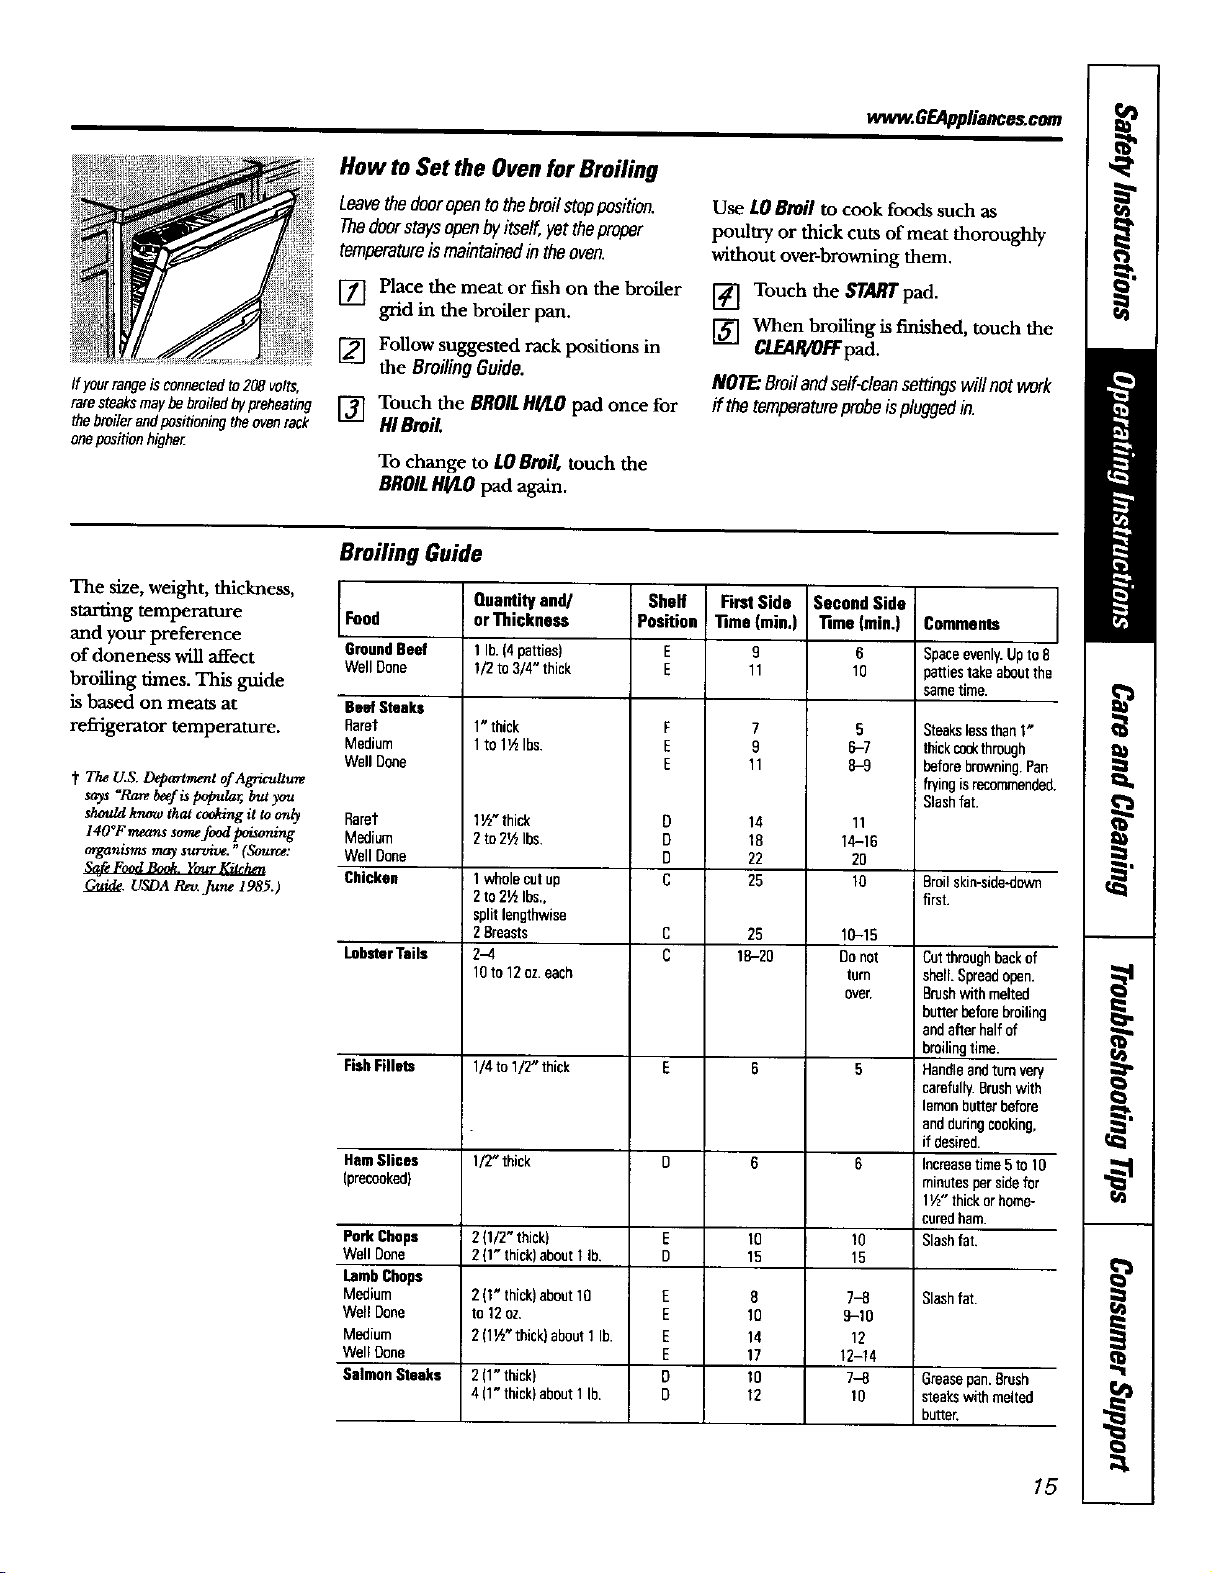
How to Set the Oven for Broiling
Leavethedooropentothebroilstopposition.
Thedoorstaysopenbyitself,yettheproper
temperatureis maintainedin theoven.
vvw_.GEAppliance_com
Use LOBroil to cook foods such as
poultry or thick cuts of meat thoroughly
without over-browning them.
[] Place the meat or fish on the broiler
[] Follow suggested rack positions in
ff yourrangeis connectedto208 volts,
raresteaksmaybe broiledbypreheating
thebroilerandpositioning the ovenrack
oneposition higher.
[] Touch the BROILHI/LOpad once for
Broiling Guide
The size, weight, thickness,
starting temperature
and your preference
of doneness will affect
broiling times. This guide
is based on meats at
refrigerator temperature.
t The U.& Department ofag,_ltu_
says =Ra_ beefis popular, but you
slu_dd know that cooking it to only Ramt
14O°F means somefood poisoning Medium
or_nL_w_may _." (_rce: Well Done
Safe Food B_ok. Your Kitdlert Chicken
Gu_. USDA P,_v.June 1985.)
Food
GroundBeef
Well Done
Beef Steaks
Rarer
Medium
Well Done
LobsterTails
FishFillets
HamSlices
(precooked)
Pork Chops
Well Done
LambChops
Medium
Well Done
Medium
Well Done
Salmon Steaks
grid in the broiler pan.
the Broiling Guide.
HI Broil.
To change to LOBroil, touch the
BROILHI/tO pad again.
Quantityand/
or Thickness
1lb. (4patties)
1/2to 3/4" thick
1"thick
1to 1_ Ibs.
1_" thick
2to 2_ Ibs.
1wholecutup
2to 2½ Ibs.,
splitlengthwise
2Breasts
2-4
10to 12 oz.each
1/4to 1!2"thick
1/2"thick
2(1/2"thick)
2 (1"thick)aboutI lb.
2 (I" thick)about10
to 12oz.
J2 (1½"thick)about1lb.
2 (1"thick)
4(l"thick)abeutllb.
Sheff
Poskien
F
E
E
D
D
O
C
D
E
D
E
E
E
E
D
O
[] Touch the STARTpad.
[] When broiling is finished, touch the
C/.EA/I/O/:Fpad.
NOTE:Broilandself-cleansettingswillnot work
if thetemperatureprobeispluggedin.
FirstSide
"lime(rain,)
9
11
7
9
11
14
18
22
25
25
18-20
10
15
8
10
14
17
10
12
SecondSide
"time(rain.)
6
10
5
6-7
8-9
11
14-16
2O
lO
10-15
Donot
turn
ovec
to
15
7-8
9-10
12
12-t4
7-8
10
Comments
Spaceevenly.Upto 8
pattiestakeaboutthe
sametime.
Steakslessthan1"
thickcookthreugh
beforebrowning.Pan
fryingis recornmende(
Slashfat.
Broilskin-side-down
first.
Cutthroughbackof
shell.Spreadopen.
Brushwithmelted
betterbeforebroiling
andafterhalfof
broilingtime.
Handleandturnvery
carefully.Brushwith
lemonbutter before
andduringcooking,
ifdesired.
Increasetime5to 10
minutespersidefor
1½" thickorhome-
curedham.
Slashfat.
Slashfat.
Greasepan.Brush
steakswith melted
butter,
15
Page 16

Usingthetimedbakingandmastingfeatures.
NOTE: Foodsthat spoileasily--such as milk, eggs, fish, stuffings,poultryandpork---should not be allowedto sit for
more than I hourbefore or after cooking.Roomtemperature promotes the growth ofharmfol bacteria.Be sure that
the ovenlight is off because heat from the bulbwill speed harmfulbacteria growth.
How to Set an Immediate Start and Automatic Stop
Theovenwill tomonimmediatelyandcookfor
aselectedlengthoftime.At theendofthe
cookingtimetheovenwill tomoffautomaticallg
[] Touch the BAKEpad.
[] Touch the number pads to set the
desired oven temperature.
[] Touch the COOKINGTIME pad.
NOTE."If yourreciperequirespreheating,youmay
needtoaddadditionaltimetothelengthofthe
cookingtime.
[] Touch the number pads to set the
desired length of cooking time. The
minimum cooking time you can set
is 1 minute.
The oven temperature that you set
and the cooking time that you
entered will be in the display.
The oven will turn ON,and the display will
show the cooking time countdown and the
changing temperature starting at 100°E
(The temperature display will start to
change once the oven temperature reaches
100°E) When the oven reaches the
temperature you set, 3 beeps will sound.
The oven will continue to cook for
the set amount of dme, then mm off
automatically, unless the WARM feature
w-asset- See the HowtoSettheOvenfor
Warmingsection.
[] Touch the C/EAR/OFFpad to clear
the display if necessary. Remove the
food from the oven. Remember,
even though the oven turns off
automatically, food left in the oven
will condnue cooking after the oven
turns off.
16
[] Touch the STARTpad.
NOTE:Anattontiontonewillsoundff youamusing
timedbakinganddooot toechthesTaRTpac_
How to Set a Delayed Start and Automatic Stop
Theovenwill turnonatthetimeofdayyouset,
cookforaspecificlengthoftimeandthentomoff
automatically.
Make sure the clock shows the correct
dine of day.
[] Touch the BAKEpad.
[] Touch the number pads to set the
desired oven temperature.
[] Touch the COOKINGTIME pad.
NOTE:ff yourreciperequirespreheating,youmay
needtoaddadditionaltimetothelengthof the
cookingtime.
[] Touch the number pads to set the
desired length of cooking time. The
minimum cooking time you can set
is 1 minute.
The oven temperature that you set
and the cooking time that you
entered will be in the display.
[] Touch the DEI.AYSTARTpad.
[] Touch the number pads to set the
time of day you want the oven to
turn on and start cooking.
[] Touch the STAffrpad.
NOT_Anattentiontonewillsoundifyouareusing
timedbakinganddonottouchtheSTARTpad.
NOTE:ffyouwouldliketo checkthetimes
youhaveset, touchtheDELAYSTARTpadto
checkthestarttimeyouhavesetortouchthe
COOKINGTIMEpadtocheckthelength
ofcookingtimeyouhaveset.
When the oven turns ONat the time
of day you set, the display will show the
cooking time countdown and the
changing temperature starting at 100°E
(The temperature display will start to
change once the oven temperature
reaches 100°E) When the oven reaches
the tempemtttre you set, beeps will sound.
The oven will condnue to cook for
the set amount of dine, then turn off
automatically, unless the WARM feature
was set- See the How to Set the Ovenfor
Warmingsecdon.
[] Touch the CLF.AR/OFFpad to clear
the display if necessary. Remove the
food from the oven. Remember,
even though the oven u.tms off
automatically, food left in the oven
will continue cooking after the oven
turns off.
Page 17

Usingtheprobe. (o,somemode/sJ
Formany foods,especially masts andpoultry,internal foodtemperature is thebest test for doneness.The
temperature probe takesthe guessworkout ofmasting by cooking foodsto the exact donenessyou want.
Use of probes other than the one
provided with this product may result in
damage to the probe or oven control.
Use the handles of the probe and plug
when inserting and removing them from
the food and outlet.
m Neverleaveyourprobeinsidetheovenduring
a self-cleaningorbroilcycle.
m Donotstoretheprobeintheoven.
CAUTION:ro ventpossiblebums,
donotunplugtheprobefromtheovenoutletuntil
theovenhascoolec(
For roasts with no bone, insert the probe
into the meatiest part of the roast. For
bone-in ham or lamb, insert the probe
into the center of the lowest large muscle.
Insert the probe into the center of dishes
such as meat loaf or casseroles.
Insert the probe into the meatiest part of
the inner thigh from below and parallel
to the leg of a whole turkey.
NOTE;Self-deanandBroilsettingswillnotwork
if thetemperatureprobeis pluggedinl
The temperatureprobe hasa
skewer-likeprobe at one end and
aplug at the otherend that goes
intothe outlet in the oven.
zz Toavoiddamagingyourprobe,donotuse
tongstopull onthecablewhenremovingit.
I Toavoidbreakingtheprobe,makesurefood
iscompletelydefrostedbeforeinserting.
After preparing the meat and placing it
on a trivet or on the broiler pan grid,
follow these directions for proper probe
placement.
Insert the probe completely into the
meat. It should not touch bone, fat
or grJ_e.
NOTE:Failureto fullyinserttheprobeintothe
meatmayresultin poorcookingperformance
becausetheprobewillsensetheovenairvs.
thefoodtemperetom.
How to Set _e Oven For Baking/_oasling When Using the Probe (onsamemodels/
Insert the probe fully into the food.
[]
Plug the probe into the outlet in the
[]
oven. Make sure it's pushed all the
way in. Close the oven door. Make
sure the probe cable is not touching
the broil element.
[] Touch the PROBE pad.
[] Touch the number pads to set the
desired intemal food or meat
temperature. The maximum
internal temperature for the food
that you can set is 200°E
[] Touch the BAKEpad.
[] Touch the number pads to set the
desired oven temperature.
[] Touch the STARTpad.
Thedisplaywill flashif theprobeisinserted
intotheoutletandyouhavenotsetaprobe
temperatureandtouchedtheSTARTpad
After the internal temperature of the
food reaches IO0°F, the changing internal
tempem_re will be showrt in the display,
[] When the internal temperature of
the food reaches the number you
have set, the probe and the oven
turn off and the oven control signals.
To stop the signal, touch the
CLEAR/OFFpad.Use hot pads to
remove the probe from the food.
Do not use tongs to pull on it--they
might damage it.
I If theprobeisremovedfromtheovenwhile
probecooking,theovenwill notautomatically
turnoff
To change the oven temperature during
the Bake/Roast cycle, touch the BAKE
pad and then the number pads to set the
new temperature.
m YoucanusetheKitchen"timereventhough
youcannotusetimedovenoperationswhile
usingtheprobe.
17
Page 18

Usingtheclock,kitchentimerandcontrollockout.
ToSet the Clock
Make surethe clockis set to the
correcttime ofday.
The clock must be set to the correct free
of day for the automatic oven timing
functions to work properly. The time of
day cannot be changed during a timed
baking or self-cleaning cycle.
ToSet the Kitchen Txmer
[] Touch the CLOCKpad.
[] Touch the number pads.
[] Touch the STARTpad.
The/6tchenT_er is an'.inutothneron_
TheKitchen Timerdoesnot control
ovenoperations,Themaximum
settingon the KitchenTimeris9hours
and 59minutes.
Touch the KITCHENTIMER
[]
ON/OFFpad.
Touch the number pads until the
[]
amount of time you want shows
in the display. For example, m set
2 hours and 45 minutes, touch 2, 4
and 5 in that order. If you make a
mistake touch the KITCHENTIMER
0/Ig0FFpad and begin again.
[] Touch the STARTpad.
AftertouchingtheSTARTpad,SETdisappaars;
thistellsyouthetimeiscountingdown,although
ToReset the Kitchen 7imer
ffthe display is still showing the time
remaining, you may change it by
touching the KITCHENTIMERON/OFFpad,
then touch the number pads until the
time you want appears in the display.
ToCancel the Kitchen 7"tmer
thedisplaydoesnotchangeuntiloneminutehas
passed.Secondswillnotbeshowninthedisplay
untilthelastminuteiscountingdown.
[] When the Kitchen Timer reaches .'_,
the control will beep B times followed
by one beep every 6 seconds until
the KITCHENTIMERON/OFFpad
is touched.
The6-secondtonecanbecanceledbyfollowing
thestepsin theSpecialfeaturesof youroven
controlsectionunderTonesattheEndofa
TtmedC_le.
If the remaining time is not in the display
(clock, delay start or cooking time are in
the display), recall the remaining time by
touching the KITCHEN TIMER ON/OFF pad
and then touch'rag the number pads to
enter the new time you want.
18
Touch the IOTCHENTIMERON/OFF
pad twice.
Oven or Range Lockout (dependingon model)
Yourcontrolwillallowyoutolockout thetouch
padssotheycannotbeactivatedwhenpressed.
To lock/unlock the touch pad controls:
[] Touch the OVENLOCKOUTorBAltlGE
LOCKOIfrpad, then touch the STAR'/"
pad.
The surface unit displays (on models
so equipped) will show LCand the
oven display will show _ Onfor
several seconds, then they will go
blank until a cooking pad is touched.
] To unlock the control, touch the
OVENLOCKOUTor RANGE LOCKOUT
pad, then touch the ,ffTARTpad.
If the range control is locked and a
cooking pad is touched, the appropriate
surface display (on models so equipped)
or the oven display will show that the
control is locked.
1=OnmodelswithOVENLOCKOUTonly,the
m TheRANGELOCKOUTmndeaffectsall
ovenwillbe/eckedout.Theknob-controlled
surfaceunitswillstillhaactive.
touchpads.Notouchpadswillworkwhen
thisfeatureis activated
Page 19

Adjust the oventhermostat--Do it yourself!
Youmay findthat yournew oven cooks differenUythan the one it replaced. Use yournew oven for afew weeks to
become more familiarwi_ it/fyou stillthinkyournew ovenis toohot or toocold,you can adjustthe thermostat
yourself.
Do not use thermometers, such asthose found ingrocery stores, to check the temperature setting of your oven.
These thermometers may vary 20-40 degrees.
NOTE:This adjustmentwill only affect bakingand masting temperatures;it will not affect broiling,convectionor
self-cleaning temperatures. The adjustmentwill be retainedin memoryafter apower failure.
To Adjust the Thermostat
[] Touch the BROILHVLOand BAKE
pads at the same time for 3 seconds
until the display shows SE
[] Touch the BAKEpad. A two digit
number shows in the display.
Touch BAKE again to alternate
between increasing and decreasing
the oven temperature.
] The oven temperature can be
adjusted up to (+) 35°F hotter or (-)
35°F cooler. Touch the number pads
the same way you read them. For
example, to change the oven
temperature 15°17,touch land 5.
[] When you have made the
adjustment, touchthe STARTpad to
go back to the time of day display.
Use your oven as you would normally.
Thetypeofmargarinewill affectbakingperformance!
Most recipes for bakinghave been developedusinghigh fatproductssuch as butter or margarine (80% fat). If you
decrease the fat the recipe maynot give the same resultsas with a higherfat producL
Recipe failurecan resultif cakes, pies,pastries, cookies or candies are made with low fat spreads. Thelower the
fat content of a spreadproduct the morenoticeable these differencesbecome.
Federal standards require products labeled "margarine" to contain at least 80% fat by weight. Low fat spreads, on the
other hand, contain less fat and more water. The high moisture content of these spreads affects the texture and flavor
of baked goods. For best results with your old favorite recipes, use margarine, butter or stick spreads containing at least
70% vegetable oil.
19
Page 20

Usingtheconvectionoven.(onsome models)
Convection Fan Operation
Ina convectionoven,a fancirculateshotairover,
underandaroundthefood
Thiscirculatinghotairis evenlydistributed
throughouttheevencavilyAs a msul_foodsare
evenlycookedandbrowned-_ften inlesstime
withconvectionheat.
Introduction
NOTE:To maximize cooking evenness,
the fan is designed to rotate in both
direcdous, with a pause in between.
This is normal.
The convection fan shuts offwhen the
oven door is opened. DONOTleave the
door open for long periods of time while
using convection cooking or you may
shorten the life of the convection heating
element.
Straightrack
Mula-rack posiOon.
The convection oven comes with two
convection baking modes started by
touching the CONVECTION BAKEMULTI/
I RACKpad once or twice, depending
on your cooking need:
MULTI--for convection cooking on more
than one rock. Touch the CONVECTION
Multi-Rack Convection Baking
Because heated air is circulated evenly
throughout the oven, foods can be
baked with excellent results using
multiple races.
Multi-rack baking may increase cook
times slightly for some foods but the
overall result is time saved. Cookies,
muffins, biscuits and other quickbreads
give verygood results with multi-rack
baking.
1-Rack Convection Baking
WhenconvectionbakingwithonlyI rack,use
CONVECTIONBAKE1RACKandfollowthe
rackpositionsrecommendedin theUsingthe
ovensection.
BAKEMULTUIRACKpad once.See the
Mural-RackConvectionBakingsection below.
I RACK---forconvection cooking on one
rack only. Touch the CONVECTIONBAKE
MULTU1RACgpad twice. See the l-Rack
ConvectionBakingsection below.
To cook food on more than one rack in
convection bake, use CONVECTIONBAKE
MULTI.
When baking on Braces, place one offset
rack in the third (C) position, the straight
rack in the fourth (D) position and one
offset rack in the sixth (F) position.
For two-rack baking, place one offset rack
in the second (B) rack position. Place
the straight rack in the fourth (D) rack
position.
==Idealforbakedfeedscookedon I rack.
20
Adapting Recipes...
You can use your favorite recipes in the
convection oven.
When convection baking, the Auto
Redpe" Conversion feature automatically
reduces the set regular baking temperature
by the recommended 25°E See Auto
RecipeT" Conversion in the Special
Features section.
m Usepansizerecommended
m Somepackageinstructionsforfrozen
casserolesormaindisheshavebeen
developedusingcommercialconvectionovens.
Forbestresultsinthisoven,preheattheoven
andusethetemperatureonthepackage.
Page 21

Convection Roast
wvv_.GEAppliance_com
Ill Good for large tender cuts of meat uncovered.
The convection fan circulates the heated
air evenly over and around the food.
Meat and poultry are browned on all
sides as if they were cooked on a
rotisserie. Using the roasting rack
provided, heated air will be circulated
over, under and around the food being
roasted. The heated air seals in juices
qttickly for a moist and tender product
while, at the same time, creating a rich
golden brown exterior.
When you are convection roasting it is
important that you use the broiler pan
and grid and the special roasting rack
How to Set the Oven for Convection
Touch the CONVECTIONBAKEMULTI/
[]
1RACKpad once for multi-rack
convection baking. This mode is used
for cooking food items on more than
one rack (i.e., 2, 3 or more racks) at
the same time in convection bake.
Seethe Mural-RackConvectionBaking
section for more information.
Touch the CONVECTIONBAKEMULTI/
IRACKpad twice for one rack
convection baking. This mode is used
for cooking food items on only one
rack in convection bake.
Touch the CONVECTIONROASTpad
for convection roasting.
[] Touch the number pads to set the
oven temperature.
[] Touch the STARTpad.
NOTE:If theAutoRecipe"ConversionFeature
ison,it willautomaticallyreducethesetregular
bakingtemperatureby 25°/:totheappropriate
for best convection roasting results. The
pan is used to catch grease spills and the
grid is used to prevent grease spatters,
while the rack allows the heated air to
circulate under the meat and increase
browning on the underside of the meat
or poultry.
[] Place a rack in the lowest rack position
(A).
[] Place the grid on the broiler pan
and put the roasting rack over them,
making sure the posts on the roasting
rack fit into the holes in brcifler pan.
[] Place the meat on the roasting rack.
Baking or Roasting
convectiontemperature.SeeAuto Recipe"
Conversionin theSpecialFeaturessection.
To change the oven temperature, touch
the CONVECTIONBAKEMULTI/I RACKor
CONVECTIONROASTpad and then the
number pads to set the new temperature.
When the oven starts to heat, the
changing temperature, starting at 100°F,
will be displayed. When oven reaches the
temperature you set, 3 beeps will sound.
[] Touch g/.EAR_tOBFpadwhen finished.
[] Youwillheara fanwhilecookingwith
convection.Thefanwillstopwhenthedoor
isopened,bat theheatwill not turnoff.
R Youmayheartheovenclickingduring
baking.Thisisnormal
[] Inconvectionbakemodes,formaximumcooking
evenness,thefanisdesignedtorotatein
bothdirections,withapausein between.
Thisis normal.
When bakingcookies, you will get
the bestresultsff youuse a flat
cookiesheet instead ofa pan with
low sides.
Cookware for Convection Cooking
Before using your convection oven, check
to see if your cookware leaves room for air
circulation in the oven. If you are baking
with several pans, leave space between
them. Also, be sure the pans do not touch
each other or the walls of the oven.
Paper andPlastic
Heat-resistant paper and plastic
containers that are recommended for
use in regular baking can also be used
for convection baking, but should not
be used at temperatures higher than
the temperature recommended by the
cookware manufacturer. Plastic cookware
that is heat-resistant to temperatures of
400°F can also be used.
Metal and Glass
Any type of cookware willwork in your
convection oven. However, metal pans
heat the fastest and are recommended
for convection baking.
! Darkenedormatte-finishedpenswillbake
fasterthanshinypans.
m Glassorceramicpanscookmereslowly.
For recipes like oven-baked chicken,
use a pan with low sides. Hot air
cannot circulate well around food
in a pan with high sides.
21
Page 22

Usingthetimedfeaturesforconvectioncooking.
Youwillhear a fan while cookingwith these features. Thefan will stop when the doorisopened,but the heat
will notturn off.
NOTE:Foods that spoil easily--such as milk, eggs, fish, stuffings,poultryandpork--should notbeallowed to sit
for more than I hour before or after cooking. Roomtemperature promotes the growth of harmful bacteria. Be sure
that the oven light is off because heat from the bulb will speed harmful bacteria growth.
How to Set an Immediate Start and Automatic Stop
Theovenwilltomonimmediatelyandcookfora
selectedlengthof time.Attheendofthecooking
time,theovenwilltomoffautomatical_
Make sure the clock shows the correct
time of day.
Touch the CONVECTIONBAKE
[]
MULTSqRACKpad once for multi-
rack convection baking. This mode
is used for cooking food items on
more than one rack (i.e., 2, 3 or
more racks) at the same time in
convection bake. See Multi-Rack
Baking section for more information.
Touch the CONVECTIONBAKEMUL77/
1RACKpad twicefor one rack
convection baking. This mode is used
for cooking food items on only one
rackin convection bake.
Touch the CONVECTIONROASTpad
for convection roasting.
[] Touch the nmnber pads to set the
oven temperature.
[] Touch the COOKINGTIMEpad.
NOTE:Ifyourreciperequirespreheating,youmay
needto addadditionaltimetothelengthofthe
cookingtime.
[] Touch the number pads to set the
desired length of cooking time. The
minimum cooking time you can set
is I minute. The oven temperature
that you set and the cooking time that
you entered will be in the display.
[] Touch the $/'_T pad.
The oven "afillturn ON,and the display will
show the cooking time countdown and the
changing temperature starting at IO0°E
(The temperature display willstart to
change once the oven tempmture reaches
IO0°F.)When the oven reaches the
temperature you set, 3 beeps will sound.
NOTE:IftheAutoRecipe"ConversionFeature
ison,it willautomaticallyreducethesetregular
bakingtemperatureby25°/:totheappropriate
convectiontemperature.SeeAutoRecipe"
Conversionin theSpecialFeaturessection.
The oven will continue to cook for the set
amount of time, then turn off automatically,
unless the WARMfeature was set. See the
HowtoSetthe Ovenfor Warmingsection.
After the oven turns off, the end-of-cycle
tone will sound.
[] Touch the CLFA/V0/=Fpadto clear
the displayif necessary. Remove
the food from the oven. Remember,
even though the oven turns off
automatically,food left in the oven
will continue cooking after the oven
tmaxsoff.
22
Page 23

How to Set a Delayed Start and Automatic Stop
Theovenwill turnonatthetimeofdayyouset,
cookforaspecificlengthoftimeandthentomoff
automatically.
Make sure the clock shows the correct
time of day.
[] Touch the CONVECTION BAKE
MULTVI RACK pad once for multi-
rack convection baking. This mode
is used for cooking food items on
more than one rack (i.e., 2, 3 or
more racks) at the same time in
convection bake. See Multi-Rack
Baking section for more information.
Touch the CONVECTIONBAKEMULTI/
'//lACK pad twice for one rack
convection baking. This mode isused
for cooking food items on only one
rack in convection bake.
Touch the CONVECTIONROASTpad
for convection roasting.
[] Touch the number pads to set the
oven temperature.
[] Touch the COOKINGTIMEpad.
NOTE."if yourreciperequirespreheating,youmay
needtoaddadditionaltimetothelengthofthe
cookingtime.
[] Touch the number pads to set the
desired length of cooking time. The
minimum cooking time you can set
is 1 minute.
The oven temperature that you set
and the cooking Ume that you entered
will be in the display.
[] Touch the DEIAYSTARTpad.
[] Touch the number pads to set the
time of day you want the overt to turn
on and start cooking.
[] Touch the STARTpad.
NOTE:Anattentiontonewillsoundifyouare
usingtimedbakingorroastinganddonottouch
theSTARTpad.
NOTE."ff youwouldliketocheckthetimesyouhave
set,touchtheDELAYSTARTpadtocheckthestart
timeyouhaveset,ortouchtheCOOKINGTIME
padtocheckthelengthofcookingtimeyouhaveset
When the oven turns ONat the time of day
you set, the display will show the cooking
time countdown and the changing
temperature starting at 100°E (The
temperature display willstart to change
once the oven temperature reaches 100°E)
When the oven reaches the temperature
you set, 3 beeps will sound.
NOTE:ff theAutoRecipe"ConversionFeature
ison,it willautomaticallyreducethesetregular
bakingtemperatureby25°Ftotheappropriate
convectiontemperature.SeeAutoBecipa"
Conversionin theSpecialFeaturessection.
The oven will continue to cook for the
programmed amount of time, then shut
off automatically, tmless the WARMfeature
wasset.See the Howto SettheOvenfor
Warmingsection.
After the oven turns off, the end-of_:ycle
tone willsound.
[] Touch the C/.F..ARc'OFFpad to clear
the display ifnecessary. Remove
the food from the oven. Remember,
even though the oven shuts off
automatically, food left in the oven
will continue cooking after the oven
turns ot_
wvvv_.GEAppliances,com
23
Page 24

Usingtheconvectionoven.
How to Set the Oven for Convection Roasting when Using the Probe
For best results when roasting large
turkeys and roasts, we recommend
using the probe included in the
convection oven.
Tochange the oven temperature
duringthe Convec_onRoast cycle,
touch the CONVECTIONROASTpad
and then touchthe numberpads to
set the new desiredtemperature,
[] Place the oven rack in the position []
that centers the food between the
top and bottom of the oven. Insert
the probe into the meat. Make sure
it is pushed all the way in.
[] Plug the probe into the outlet in the
oven. Make sure it ispushed all the
way in. Close the oven door.
[] Touch the PROBEpad.
[] Touch the number pads to set the
desired internal meat temperature.
[] Touch the CONVECTIONROAST pad.
[] Touch the number pads to set the
desired oven temperature.
The display will flash PROBEand the oven
control will signal if the probe is inserted
into the outlet, and you have not set a
probe temperature and pressed the
STARTpad.
[] Touch the STARTpad.
When the oven starts to heat, the word
LOwill be in the display.
After the internal temperature of the
meat reaches 100°E the changing
internal temperature will be shown in
the display.
When the internal temperature of
the meat reaches the number you
have set, the probe and the oven
turn offand the oven control signals.
To stop the sigzml, touch the
CLEAR/OFFpad. Use hot pads to
remove the probe fi-om the food.
Do not use tongs to pull on it--
they might damage it.
NOTE:ff theprobeisremovedfromthe
ovenwhileprobecooking,theovenwillnot
automaticallyturnoff
CAUTION:ropreventpossiblebums,
donotunplugtheprobefromtheovenoutletuntil
theovenhascooled.
NOTE:
II Youwillhearafanwhilecookingwiththis
feature.Thefanwillstopwhenthedooris
opene_,but theheatwillnotturnoff
II YoucanusetheKitchentimereventhoughyou
cannotusetimedovenoperations.
II Neverleaveyourprobeinsidetheovenduring
a self-cleaningcycle.
II Donotstoretheprobeintheoven.
II ProbenotforuseinBroilorSelf-Cleanfunctions.
24
Convection Roasting Guide
Meats
Beef
Pork
Ham
Lamb
Seafood
PouRw
Rib.BonelessRib. Rare
TopSirloin Medium
(3to 5 Ibs.) Well
BeefTenderloin Rare
Medium
Bone-In.Boneless13to 5 Ibs.)
Chops(1/2to 1"thick) 2 chops
4 chops
6 chops
Canned,Butt.Shank(3to 5 Ibs.fully cooked)
Bone-In.Boneless(3to 5 Ibs.) Medium
Well
Fish,Whole (3to 5 the.)
LobsterTails(6 to8 oz.each(
Whole Chicken(2½to3½ Ibs.)
CornishHens,Unstuffed (1to 1½ Ibs.)
Stuffed(11o1_ Ibs.)
Duckling(4 to 5Ibs.)
Turkey,Whole*
Unstuffed(10to 16Ibs.) 8-11
Unstuffed(18to 24Ibs.) 7-16
TurkeyBreast(410 6 Ihs.) 16-19
* Stuffed birds generally require 30-45 minutes additional roasting time. Shield It
overbrowning and drying of skin.
t The U.S.Department of Ag_cullure says =Rarebeef is popular, but you should know that cookingit to on_ 140*F raeans
somefood poisoning organismsmay suroiv¢." (Source:Safe Food Book. YourKitchen Guide. USDA Rev.June 1985.)
Minute_,.b.
20--24
24-28
28-32
10-14
14-18
23-27
36-35 total
35-46 total
40-45 total
14-16
17-20
20-24
30-40 total
20-25 total
24-26
50-55total
55-66total
24-26
Oven Temp, Internal Temp.
325°F 140°Ft
325°F 166°F
326°F 176°F
325°F 140°Ft
325°F 160OF
325°F 176°F
3250F 1760F
3250F 176OF
3250F 176%
325°F 146°F
325°F 166°F
325°F 176%
400°F
350%
350°F 186°-185%
350% 180"-186°F
360°F 180°-186°F
325°F 186°-185°F
325°F 180°-185%
325% 186°-185°F
325% 170°F
and brmst with foll to pevt_t
Page 25

Usingtheproofingand warming features.
Theproofingfeaturemaintainsa warmenvironmentusefulfor risingyeast-leavenedproducts.
How to Set the Oven For Proofing (onsomemodels)
[] Place the covered dough in a dish in
the oven on shelf B or C.
NOTEForbestresults,coverthedoughwitha
clothorwithgreasedplasticwrap(theplastic
mayneedtobeanchoredunderneaththe
containersotheovenfenwill not blowit off).
[] Touch the PROOFpad and then the
STARTpad.
The display will read /_ (proof).
The oven interior light turns on and
remains on during proofing,
The proofing feature automatically
provides the optimum temperature for
the proofing process, and therefore does
not have a temperature adjustment.
[] Set the MTCHENTIMERON/OI_ for
the minimum proof time.
How to Set the Oven For Warming (on
The WARMfeature keeps cooked
foods hoL
This feature is not designed to reheat
cold food.
To use the WARMfeature, touch the
WARMpad and then the STARTpad.
To use the WARMfeature after Thned
Baking or Roasting, follow these steps:
[] Touch the mode of cooking that
you want to use (BAKE,CON_CTION
BAKEMULTI,CONVECTIONBAKE
I RACKorCONVECTIONROAST).
[] Touch the number pads to set the
oven temperature.
[] Touch the COB/0NG TIMEpad.
[] Touch the number pads to set the
desired length of cooking time.
[] Touch the WARMpad.
[] Touch the STARTpad.
ToCrispStaleItert_
N Place food in low-sided dishes or pans.
IRFor best results, place the food items in
a single layer. Do not stack.
[] When proofing is finished, touch
the CLEAP,_FFpad.
U Toavoidloweringtheeventemperatureand
lengtheningproofingtime,donotopenthe
ovendoorunnecessarily
= Checkbreadproductsearlytoavoid
over-proofing.
NOTE
M Donotusetheproofingmodeforwarming
foodorkeepingfoodhot.Theproohngoven
temperatureis nothotenoughtoholdfoods
atsafetemperatures.UsetheWARMfeature
tokeepfoodwarm.
u Proofingwill notoperatewhenovenisabove
125°E"HOT"willshowin thedisplay
somemodels]
m Leave them uncovered.
Ill Check crispness after 20-30 minutes.
Add time as needed.
IMPORTANTNOTES:
mFoodshouldbekepthotin itscookingcontainer
ortransferredtoa heat-safeservingdish.
g Formoistfoods,coverthemwithanoven-safe
lidoraluminumfoil.
= Friedorcrispfoodsdonotneedtobecovered,
butcanbecometoodryif warmedfortoolong.
m Repeatedopeningofthedoorallowsthehot
air toescapeandthe foodtocooL
= AJ/owextratimeforthetemperatureinsidethe
oventostabilizeafteraddingitems.
! Withlargeloadsit mat/benecessarytocover
someofthecookedfooditems.
zzRemovesewingspoons,etc.,beforeplacing
containersin theoven.
U Onnotuseplasticcontainers,lidsor
plasticwrap.
CAUTION:Plasticcontainers,lidsor
plasticwrapwillmeltif placedin theoven.
Meltedplasticmaynotberemovableandisnot
coveredunder),ourwarrant_
25
Page 26

Usingtheself-cleaning oven.
The oven doormust be closed and allcontrolsset correctly forthe cycle to workproperly.
Before a Clean Cycle
®
Wipe upheavy soilon the oven
bottom.
We recommend venting your kitchen
with an open window or using a
ventilation fan or hood during the
first self-dean cycle.
Remove the convection roasting rack,
broiler pan, broiler grid, probe,
all cookware and any aluminum foil
from the oven.
NOIE
! If your oven is equipped with shiny,
silver-colored oven racks, remove them
before you begin the self-clean cycle.
m Ifyour oven is equipped with gray
porcelain-coated oven racks, they
may be left in the oven during the
self-clean cycle.
The shiny, silver-colored oven racks
(on some models) and the convection
roasting rack can be self-cleaned, but they
will darken, lose their luster and become
hard to slide.
Soil on the front frame of the range and
outside the gasket on the door will need
to be cleaned by hand. Clean these areas
with hot water, soap-filled steel-wool pads
or cleansers such as Soft Scrub _.Rinse
well with clean water and dry.
Do not clean the gasket. The fiberglass
material of the oven door gasket cannot
withstand abrasion. It isessential for the
gasket to remain intact. If you notice it
becoming worn or frayed, replace it.
Wipe up any heavy spillovers on the
oven bottom.
Make sure the oven light bulb cover is
in place and the oven light is off.
IMPORTAN'E:The health of some birds
is extremely sensitive to the fumes given
off during the self-cleaning cycle of any
range. Move birds to another well-
ventilated room.
How to Set the Oven for Cleaning
[] Touch the SEU:CLEANSTD/LOpad
once for a 4-hour clean time or
twice for a 3-hour dean time.
A 3-hour self-clean time is
recommended for use when
cleaning small, contained spills.
A self-clean time of 4 hours or
longer is recommended for
a dirtier oven.
Ira time other than 4 hours or
[]
3 hours is needed, use the number
pads and enter the desired
clean time.
You can change the clean time to any
time between 2½ hours and 5 hours,
depending on how dirty your oven is.
[] Touch the STARTpad.
The door locks automatically. The display
will show the clean time remaining. Itwill
not be possible to open the oven door
until the temperature drops below the
lock temperature and the LOClffDlight
goes off.
When the LOCKEDlightgoes off, you will
be able to open the door.
I The word LOCKEDwill flash and the
word doorwill display if you set the
clean cycle and forget to close the
oven door.
i To stop a clean cycle, touch the
CLEAR/OFFpad. When the LOCKEDlight
goes off indicating the oven has cooled
below the locking temperature, you
will be able to open the door.
26
Page 27

Theoven doormust be closedand all controlsset correctly for the cycle to work properly.
How to Delay the Start of Cleaning
ww_.GEAppliances_com
[] Touch the SELFCLEANSTB/LOpad
once for a 4-hour clean dine or
twice for a S-hour clean time.
A 3-hour self-clean time is
recommended for use when
cleaning small, contained spills.
A self-clean time of 4 hours or
longer is recommended for
a dirtier oven.
If a time other than 4 hours or
3 hours is needed, use the number
pads and enter the desired
dean time.
You can change the dean dine to any
time between 2½ hours and 5 hours,
depending on how dirty your oven is.
After a Clean Cycle
You may nodce some white ash in the
oven. Wipe it up with a damp cloth after
the oven cools.
ff whitespotsremain,removelhemwithasoap-
filledsteelwoolpadandrinse_oroughlywith
a vinegarandwatermixture.
These deposits are usually a salt residue
that cannot be removed by the clean
cycle.
ffthe oven is not dean after one clean
cycle, repeat the cyde.
[] Touch the DELAYSTARTpad.
[] Using the number pads, enter the
time of day you want the clean cycle
to stall
[] Touch the STARTpad.
The door locks automatically. The display
will show the start time. It will not be
possible to open the oven door until
the temperature drops below the lock
temperature and the LO_ED fight
goes off.
When the LOCKEDfight goes off, you
will be able to open the door.
IYou cannot set the oven for cooking or
another self-dean cycle until the oven
is cool enough for the door to unlock.
at While the oven is self-cleaning, you can
touch the CLOCKpad to display the
time of day.To return to the dean
countdown, touch the SE/acCLEAN
8"/'0//.0 pad.
at If the racks become hard to slide, apply
a small amount of cooking oLlto a
paper towel and wipe the edges of the
oven rocks with the paper towel.
27
Page 28

SpecialfeaturesofyourovencontroL
Yournew touchpad control has additionalfeatures that youmay choose to use. Thefollowing are the features
and how you may activate them.
The special featuremodes can onlybe activated while the displayis showingthe time ofday. They remain
in the control'smemory unOIthesteps are repeated.
When the displayshows your choice,touch theSTABTpad. The special features will remain in memoryafter
a power failure,except for the Sabbathfeature, which will have to be reseL
12-Hour Shutdown
• BROIL
Withthisfeature,shouldyouforgetandleavethe
ovenon,thecon_l will au_maticaliyternoffthe
ovenafter 12hoursduringbakingfunctionsor
after3hoursduringa broilfunction.
Ifyou wish to turn OFFthis feature, follow
the steps below.
[] Touch the BROILBI/LOand BAKE
pads at the same time for 3 seconds
until the display shows SF"
[] Touch the DELAYSTARTpad unul
noshda(no shut-off) appears in the
display.
[] Touch the START pad to activate the
no shut-off and leave the control
set in this special features mode.
Fahrenheit or Celsius Temperature Selection
YourovencontrolissettousetheFahrenheit
temperatureselectionsbutyoumaychangethis
tousetheCelsiusselections.
[] Touch the BROILHI/LOand BAKE [] Touch the COOKINGTiMEand BROIL
pads at the same time for 3 seconds BI/LOpads again at the same time.
until the display shows SF" The display will show C (Celsius).
[] Touch the COOKINGTiMEand BROIL
HI€tOpads at the same time. The
display will show F (Fahrenheit).
[] Touch the STARTpad.
Tonesat the Endof a l"tmedCycle
28
At theendofa timedcycle,3shortbeepswill
soundfollowedbyonebaepevery6seconds
untiltheCLEAR_FFpadis touchecLThis
continual6-secondbeepmaybecancele_
To cancel the 6-second beep:
[] Touch the BROIL HI/LO and BAKE
pads at the same time for 3 seconds
until the display shows SF.
[] Touch the KITCHENTIMERON/OFF
pad. The display shows CONBEEP
(continuous beep). Touch the
KITCHENTIMERON/OFFpad again.
The display shows BEEP.(T!fis cancels
the one beep every 6 seconds.)
[] Touch the STARTpad.
Page 29

Tone Volume
wwm.GEAppliance_com
Thisfeatureallowsyoutoadjustthetonevolumes
toamoreacceptablevolume.Therearethree
possiblevolumelevels.
[] Touch the BROILHI/LOand BAKE
pads at the same time for 3 seconds,
until the display shows SE
[] Touch the OVENUGHT0N/0FFpad.
The display win show 2 BEEP.This is
the middle volume level.
Touch the OVENLIGHTON/OFFPad
again. The display will show 3 BEEP.
This is the loudest volume level.
12-Hour, 24-Hour or Clock Blackout
Yourcontrolissettousea 12-hourclock.
If you would prefer to have a 24-hour
military time clock or black out the clock
display, follow the steps below.
[] Touch the BROILHI/gOand BAKE
pads at the same time for 3 seconds
until the display shows SF.
[] Touch the CLOCKpad once. The
display will show 12.hr.If this is
the choice you want, touch the
STARTpad.
Touch the OVENLIGHTON/OFFpad
again. The display will show I BEEP.
This is the quietest volume level.
For each dme the level is changed,
a tone will sound to provide an
indication of the volume level.
[] Choose the desired sound level
(I BEEP.ZBEEP,3 BEEP).
[] Touch the STARTpad to activate
the level shown.
Touch the CLOCKpad again to change
to the 94 hour military time docL The
display will show 24hr. If this is the choice
you want, touch the STARTpad.
Touch the CLOCKpad again to black out
the clock display. The display will show
OBE.If this is the choice you want, touch
the STARTpad.
NOTE:If theclockisintheblack-outmodeyou
willnotbeabletousetheDelayStartfunction.
29
Page 30

Specialfeaturesofyourovencontrol
Auto Recipe" Conversion
Whenusingconvectionbake,theAutoRecipe"
Conversionfeaturewillautomaticallyconvert
enteredregularbakingtemperaturesto
convectionbakingtemperatures.
Thisfeatureisactivatedsothatthedisplaywill
showtheactualconverted(reduced)temperature.
Forexample,if youenteraregularrecipe
temperatureof 350°/:andpresstheSTARTpad,
thedisplaywill showCONandtheconverted
temperatureof325°E
Todeac#vatethefeature:
[] Press the BAKEandBROILHI/LOpads
at the same time for 3 seconds, until
the display shows SF.
[] Press the CONVECTIONBAKE
MULI1/I RACKpad. The display win
show CONON.Press the
CONVEC770NBAKEMULT_IRACK
pad again. The display will show
CONOFF..
[] Press the STARTpad.
To reactivate the feature, repeat steps
1-3 above but press the STARTpad when
CONONis in the display.
30
Page 31

Usingthe Sabbathfeature.
(DesignedforuseontheJewishSabbathandHolidays)(Onsomemodels) wwvv.GEAppliance_.cmn
The Sabbath feature can be used for baking/roastingonlg It cannotbe used forconvection, broiling,self-cleaning or
Delay Start cooking,
N07_:Theovenfightcomesonautomatically(onsomemodels)whenthedoorisopenedandgoesoffwhenthedoorisclosed.Thebulbmaybe
removed.SeetheOvenUghtReplacementsection.Onmodelswithatightswitchon_e cenYo/pane/,theovenlightmaybeturnedonandlefton.
How to Set for Regular BakingtFIoasting
When the displayshowsD the
ovenis set inSabbath. Whenthe
displayshows D C the oven is
baking/roasting,
Makesuretheclockshowsthecorrecttimeofdayand
theovenisoff
] TouchandholdboththeBROILHI/LOand
BAKE pads, at Me same ffme, until the
displayshows SF.
N0/E'If bake or broil appears in the
display, the BROILHULOand BAKEpads
were not touched at the same time.
Touch the CLEARiOFFpadand begin
again.
[] Tap the OELAYSTARTPad until SAb hAft/
appears in the display.
[] Touch the STARTpad and D will appear
in the display.
[] Touch the BAKEpad. No signal will
be given.
Using the number pads, enter the
[]
desired temperature between 170°F and
550°E No signal or temperature will be
given.
Touch the STARTpad.
[]
After a random delay period of
[]
approximately 30 seconds to 1 minute,
D c will appear in the display
indicating that the oven isbaklng/
roasting. IfD c doesn't appear in the
display, start again at Step 4.
To adjust the oven temperature, touch the
Kq/ffpad, enter the new temperature using
the number pads and touch the STARTpad.
NOTE:The CLEAR/OFFand COOKINGTIMEpads
are active during the Sabbath feature.
When the displayshows_ the
oven isset in Sabbath.When the
displayshows _ C the ovenis
baking/roasting.
How to Set for l_med Baking/Floasting_lmmediatu Start and Automatic Stop
Makesoretheclockshowsthecofrecttimeofdayand [] Touch the START pad.
theovenis off
] Touch and hold _ the BROILHI/LOand Touch the BAKEpad. No signal will be
BAKEpads, atthesanmtime, until the [] given.
display shows $F.
NOTE."If bake or broil appears in the
display, the BROILHI/LOand BAKEpads
were not touched at the same time.
Touch the CLEARAOFFpadand begin
again,
Tap the DELAYSTARTpad until SAb bad/
[]
appears in the display.
Touch the START pad and D will appear
[]
in the display.
Touch the COOKINGTIMEpad.
[]
Touch the number pads to set the
[]
desired length of cooking time between
1 minute and 9 hours and 99 minutes.
The cooking time that you entered will
be displayed.
] Using the number pads, enter the
desired temperature. No signal or
temperature will be given.
]Touch the START pad.
[] After a random delay period of
approximately 30seconds to 1 minute,
D c will appear in the display indicating
that the oven is baking/roasting, ff_ c
doesn't appear in the display, start again
at Step 7.
To adjust the oven temperature, touch the
_l/(Epad, enter the new temperature using
the number pads and touch the _rARTpad.
When cooking is finished, the display will
change from _ c to D and #:00will appear,
indicating that the oven has turned ORCbut is
still set in Sabbath. Remove the cooked food.
How to Exit the Sabbath Feature
!i!:iii!_:+
[] Touch the CLEAR/OFFpad.
] If the oven is cooking, wait for a random
delay period of approximately 30
seconds to 1 minute, until only D
is in the display.
[] Touch and hold both the BROIL HI/tO
and BAKE pads, at the same time, until
the display shows SE
[] Tap the BELAYSTARTPad until 12shdn
or noshdnappears in the display.
] Choose 12sign, indicating that the oven
will automatically turn off after 12 hours
or no shdn, indicating that the oven will
not automatically turn offafter 12 hours.
]Press STARTwhen the option that you
want is in the display (12sh_ or noshdn).
NOTE"If a power outage occurred while
the oven was in Sabbath, the oven will
automatically turn offand stay off even
when the power returns. The oven
control must be reseL 3 1
Page 32

Careandcleaningoftherange.
Be sureall controls are offand allsurfaces are coolbefore cleaninganypart ofthe range.
ff your range isremovedfor cleaning,servicingor any reason,be sure the anti-tip
device is re-engaged properly when the range isreplaced. Failureto take this
precaution could result indpping of therange and cause inju_
How toRemovePackaging Tape
To assure no damage is done to the finish
of the product, the safest way to remove
the adhesive left from packaging tape and
cooktop labels on new appliances
is an appfication of a household fiquid
dishwashing detergent, mineral oil or
cooking oil.
Control Knobs(onsomemodels)
Thecontrolknobsmayberemovedforeasier
cleaning.
Before removing the knobs for cleaning,
please note that the knobs are in the
OR=position. When replacing the knobs,
check the OFFposition to insure proper
placement.
Oven Vent
Theovenventislocatedabovetherightrear
surfaceunit.
This area could become hot during
oven U,ge.
Apply with a soft cloth and allow to soak.
Wipe dry and then apply an appliance
polish to thoroughly clean and protect
the surface.
NOTE."Theadhesivemustberemovedfromall
parts./tcannotberemovedif it isbakedon.
Wash the knobs in soap and water or a
vinegar and hot water solution but do
not soak.
Itis normal for steam to come out of
the vent.
Theventisimportantforproperaircirculation.
Neverblockthisvent.
32
Control Panel
If desired,thetouchpadsmaybedeactivated
beforecleaning.
See the OvenorRangeLockoutinformation
in the Usingtheclock,timerandcontrol
lockoutsection in this manual.
Clean up splatters with a damp cloth.
You may also use a glass deaner.
Remove heavier soil with warm soapy
water. Do not use abrasives of any kind.
Reactivatethetouchpadsaftercleaning.
Page 33

Thegasketis designedwitha gapatthe
bottomto allow(orproperair circulation,
Donotruborcleanthe doorgasket-
#hasan extremelylow resistanceto
abrasion.
ffyounoticethegasketbecomingworn,
frayedor damagedinanywayorflit
hasbecomedisplacedonthe door,
you_oetd haveit replaced.
Cleaning the Oven Door
Tocleantheinsideofthedoor.
U Because the area inside the gasket is
cleaned during the self-dean cycle,
you do not need to clean this by hand.
• The area outside the gasket and
the door liner can be deaned with
a soap-fiUed steel wool or plastic pad,
hot water and detergent. Rinse well
with a vinegar and water solution.
www,GEAppliances_oom
Tocleantheoutsideofthedoor.
• Use soap and water to thoroughly
clean the top, sides and front of the
oven door. Rinse well. You may also
use a glass cleaner to clean the glass
on the outside of the door. Do not let
water drip into the vent openings.
• If any stain on the door vent trim is
persistent, use a soft abrasive cleaner
and a sponge-scrubber for best results.
• Spillage of marinades, fruitjuices,
tomato sauces and basting materials
containing acids may cause
discoloration and should be wiped
up immediately. When surface is
cool, clean and rinse.
• Do not use oven cleaners, cleaning
powders or harsh abrasives on the
outside of the door.
Slot
Hinge10ck
Pullhingeleeksdowntounlock.
Removalposition
Lift-Off OvenDoor
Thedoorisveryheavy..Becarefulwhen
removingandliftingthedoor.
Donotlift thedoorbythehandle.
Toremovethe door.
[] Fully open the door.
Pull the hinge locks down toward
[]
the door frame, to the unlocked
position. A tool, such as a small
flat-blade screwdriver, may be
required.
Firmly grasp both sides of the door
[]
at the top.
Close door to the door removal
[]
position, which is halfway between
the broil stop position and fully
closed.
[] Lift door up and out until the hinge
arm is clear of the slot.
Toreplacethedoor.
With the Bottom [[[ Hin_a
[]
door at the _:_0a
same angle as N
the removal
position, seat the
indentaO.on of Ind_mati_
the hinge arm
into the bottom
edge of the hinge slot. The notch in
the hinge arm must be fully seated
into the bottom of the slot.
Fully open the door. If the door will
[]
not fully open, the indentation is not
seated correctly in the bottom edge
of the slog
Push the hinge locks up against the
[]
front frame of the oven cavity to the
locked position.
Hinge
ofslot
[] Firmly grasp both sides of the door
at the top.
Hingelock'; _)
Pushhinge locksup to lock.
] Close the oven door.
33
Page 34

Careandcleaningoftherange.
Oven Light Replacement
Wire cover holder.
Donot stere a soiled broilerpan and
grid anwvhere in therange.
CAUTION."Beforereplacingyourovenlightbulb,
disconnecttheelectricalpowertotherangeatthe
mainfuseorcircuitbreakerpanel
Be sure to let the light cover and bulb
cool completely.
Toremove the cover.
I-f] Hold a hand under the cover so it
d '
oesn t fall when released. With
fingers of the same hand, firmly
push back the wire cover holder.
Lift offthe cover.
Donotremoveanyscrewstoremove
thecover
Broiler Pan and Grid
Donotcleanthebroilerpanorgridina self-
cleaningoven.
After broiling, remove the broiler pan
from the oven. Remove the grid from
the pan. Carefully pour out the grease
fi'om the pan into a proper container.
Washandrinsethebroilerpanandgridinhot
waterwitha soop-filledorplasticscouringpad
[] Replace bulb with a 40-watt
appliance bulb.
Toreplacethe cover.
[] Place it into groove of the light
receptacle. Pull wire forward to the
center of the cover tmdl it snaps
into place.
[] Connect electrical power to the
range.
If food has burned on, sprinkle the grid
with detergent while hot and cover with
wet paper towels or a dishcloth. Soaking
the pan will remove burned-on foods.
Boththebroilerpanandgridmaybecleanedwith
a commercialovencleaner
Both the broiler pan and grid can also be
cleaned in a dishwasher.
Wipe upheavy softon the oven
bottom.
34
Storage Drawer Removal
Toremovethedrawer.
] Pull the drawer out until it stops.
[] Lift the front of the drawer tmtil the
stops clear the guides.
[] Remove the drawer.
Oven Heating Bements
Do not clean the broil element. Any soil
will burn offwhen the element is heated.
Clean the oven floor with warm, soapy
water.
Toreplacethe drawer.
[] Place the drawer rails on the guides.
[] Push the drawer back tmtil it stops,
[] Lift the front of the drawer and push
back until the stops dear the guides.
[] Lower the front of the drawer and
push back tmdl it closes.
Onsomemodels,thebakeelementis not
exposedandisundertheovenfloorffspillovers,
residueorashaccumulateontheovenfloor,
wipeupbeforeself-cleaning.
Page 35

Oven Recks and Convection Roasting Rack
wvvw..GEApplianco_com
The convection roasting rack should be
removed from the oven before beginning
the self-clean cycle. Clean with an abrasive
cleanser or steel wool. After deaning,
rinse the rack with dean water and
dry with a clean cloth.
Ifyour oven is equipped with shiny,
silver-colored oven racks, they should be
removed from the oven before beginning
the self-clean cycle. Clean with an abrasive
cleanser or steel wool. After cleaning,
rinse the racks with dean water and dry
with a dean cloth.
If your oven is equipped with gray
porcdain-coated oven racks, they
may be cleaned in the oven during
the self-clean cycle.
Stainless Steel Surfaces (onsomemodels)
Do notusea steel-wool pad;it will
scratchthe surface.
[] Shake bottle well.
[] Place a small amount of CERAMA
BRYI'E® Stainless Steel Appliance
Cleaner on a damp cloth or damp
paper towel.
[] Caean a small area (approximately
8"x 80, rubbing with the grain of
the stainless steel if applicable.
NOTE"Theshiny,silver-coloradovenracks{on
somemodels)andtheconvectionroastingrack
may,becleanedin theself-cleaningoven.
However,therackswilldarkenincolor,losetheir
lusterandbecomehardtoslideffcleanedduring
theself-cleaningcycle.
To make the racks slide more emily,
apply a small amount of vegetable oil
to a paper towel and wipe the edges
of the oven racks with the paper towel.
Do not spray with Pam ®or other
lubricant sprays.
ToOrder
To order CERAMABRYIE ®Stainless
Steel Appliance Cleaner, please call our
toil-free number:
NationalParts Center 8flO._.f_02
www,GEAppliances.com
CERAMABRYTE_
StainlessSteelAppliance
Cleaner.................... # PMIOX311
[] D_] and buff with a dean, dry paper
towel or soft doth.
[] Repeat as necessary.
NOTE:It"a mineral oil-based stainless steel
appliance cleaner has been used before
to clean the appliance, wash the surface
with dishwashing liquid and water prior
to using the CERAMA BRYrE ®Stainless
Steel Appliance Cleaner. After washing
the surface with dishwashing liquid
and water, use a generous amount
of CERAMA BRYrE ®Stainless Steel
Appliance Caeaner to dean the appliance.
Painted Surfaces
Painted surfaces include the door,
top of the control panel and the drawer
fronL Clean these with soap and water or
a vinegar and water solution.
Do not use commercial oven cleaners,
cleaning powders, steel wool or harsh
abrasives on any painted surface.
35
Page 36

Cleaningtheglasscooktop.
Normal Daily Use Cleaning
ONLY use CERAMA BRYIE ®Ceramic
Cooktop Cleaner on the glass cooktop.
Other creams may not be as effective.
To maintain and protect the surface of
your glass cooktop, follow these steps:
Before using the cooktop for the
[]
first time, clean it with CERAMA
BRYrE ®Ceramic Cooktop Cleaner.
Cleanyour cooktopafter
each spill. UseCERAMA
BRYTE_ CeramicCooktop
Cleaner.
This helps protect the top and
makes cleanup easier.
[] Daily use of CERAMABRYIE ®
Ceramic Cooktop Cleaner will help
keep the cooktop looking new.
Burned-On Residue
Shake the cleaning cream well
[]
Apply a few drops of CERAMA
BRYIE ® Ceramic Cooktop Cleaner
directly to the cooktop.
Use a paper towel or CERAMA
[]
BRYTE ®Cleaning Pad for Ceramic
Cooktops to clean the entire
cooktop surface.
Use a dry cloth or paper towel
[]
to remove all cleaning residue.
No need to rinse.
NOTE:It isveryimportantthatyouDONOTheat
cooktopuntilit hasbeencleanedthoroughl_
Use a CERAMABRYTE° Cleaning
Pad for CeramicCooktops.
The CERAMABRYTE• Ceramic
CooktopScraper and all
recommended suppliesare
available throughour PartsCenter.
See instructionsunder "ToOrder
Parts" sectiononnext page,
NOTE:Donot usea dugor nicked
blade.
WARNING:DAMAGEto yourglasssurfacemay
occurff youusescrubpadsotherthanthose
recommended.
[] Allow the cooktop to cool.
[] Spread a few drops of CERAMA
BRYrE ®Ceramic Cooktop Cleaner
on the entire burned residue area.
Using the included CERAMA
[]
BRYIE ®Cleaning Pad for Ceramic
Cooktops, rob the residue area,
applying pressure as needed.
Heavy, Burned-On Residue
[] Allow the cooktop to cool.
[] Use a single-edge razor blade scraper
at approximately a 45 ° angle against
the glass surface and scrape the soil.
It will be necessary to apply pressure
to the razor scraper in order to
remove the residue.
After scraping with the razor scraper,
[]
spread a few drops of CERAMA
BRYI'E ® Ceramic Cooktop Cleaner
on the entire burned residue area.
Use the CERAMA BRYTE ®Cleaning
Pad to remove any remaining
residue.
[] Ifanyresidue remains, repeat the
steps listed above as needed.
[] For additional protection, after all
residue has been removed, polish
the entire surface with CERAMA
BRYrE ®Ceramic Cooktop Cleaner
and a paper towel.
[] For additional protection, after all
residue has been removed, polish
the entire surface with CERAMA
BRYrE ®Ceramic Cooktop Cleaner
and a paper towel.
36
Page 37

Metal Marks and Scratches
Be careful not to slide pots and pans
[]
across your cooktop. It will leave
metal markings on the cooktop
surface.
These marks are removable using
the CERAMA BRYrE ® Ceramic
Cooktop Cleaner with the CERAMA
BRYTE®Cleaning Pad for Ceramic
Cooktops.
Cooktop Seal
To clean the cooktop seal around the
edges of the glass, lay a wet cloth on it
for a few minutes, then wipe clean with
nonabrasive cleaners.
www.GEAppllancus_com
[] If pots with a thin overlay of
aluminum or copper are allowed
to boil dry, the overlay may leave
black discoloration on the cooktop.
This should be removed
immediately before heating again
or the discoloration may be
permanent.
WARNING: the
bottomofpansforroughnessthatwouldscratch
thecooktop.
Glasssurface potential forpermanentdamage.
Sugaryspillovets(suchas
jellies,fudge,candy,syrups)
ormoltedplasticscancause
pittingofthesurfaceofyour
cooktop(notcoveredbythe
warrant/)unlessthespill is
removedwhilestillhoL
Specialcare shouldbe token
whenremovinghot
substances_
Besuretousea new,sharp
razorscraper.
Donotuse adull ornicked
blade.
Damage from Sugary Spills and Melted Plastic
[] Turn off all surface units. Remove
hot pans.
[] Wearing an oven mitt:
a. Use a s'mgle-edge razor blade
scraper (CERAMA BRYIE ®
Ceramic Cooktop Scraper) to
move the spill to a cool area on
the cooktop.
b. Remove the spill with paper
towels.
ToOrder Parts
To order CERAMA BRYrE ®Ceramic
Cooktop Cleaner and the cooktop
scraper, please call our toll-free number:
NationaIPartsCenter 80_62620D2
ww_.GEAppliance_com
CERAMABRYTEe Ceramic
CooktopCleaner ........... # WXIOX300
CERAMABRYT_ Ceramic
CooktopScraper ........... # WXlOX0302
/_t ........................ # WB64XS027
(Kitincludescreamandcooktopscraper)
[] Any remaining spillover should be
left until the surface of the cooktop
has cooled.
[] Don't use the surface units again
until all of the residue has been
completely removed.
NOTE."ffpittingorindentationin theglass
surfacehasalreadyoccurred,thecooktopglass
willhavetobereplacec(Inthiscase,servicewill
benecessa_
CERAMABRYTE_ CleaningPadsfur
CeramicCooktops ......... # WXlOX350
37
Page 38

Beforeyoucall forservice...
Save time endmoney!Review the chartson the following
_ roubleshooting tips
pages first andyou may not need to carlforservice.
Possible Causes What ToDe
Improper cookware * Use pans which are flat and match the diameter of
being used. the surface unit selected.
In some areas, the power * Cover pan with a lid until desired heat is obtained.
(voltage) may be low.
A fuse in your home may be ° Replace the fuse or reset the circuit breaker.
blown or the citodt breaker
tripped.
Cooktop controls • Check to see the correct control is set for the surface
improperly set. unit you are using.
This is normal The unit
is still on and hot.
Incorrect deanlng
methods being used.
Cookware with rough bottoms
being used or coarse particles
(salt or sand) were between
the cookware and the surface
of the cooktop.
Cookware has been slid
across the cooktop surface.
Food spillovers not cleaned * See the Cleaning the glass cooktop section.
before next use.
Hot surface on a model • This is normal. The surface may appear discolored
with a Hght-colored eooktop, when it is hot. This is temporary and will disappear
Hot cooktop came into • See the Glass surface -potential for permanentdamage
contact with plastic placed section in the Cleaning the glass cooktop section.
on the hot cooktop.
Hot sugar mixture spilled • Call a qualified technician for replacement.
on the cooktop.
Improper cookware * Use only flat cookware to minimize cycling.
being used.
• Scratches are not removable. Tiny scratches will become
less visible in thne as a result of cleaning.
• To avoid scratches, use the recommended cleaning
procedures. Make sure bottoms of cookware are dean
before use, and use cookware with smooth bottoms.
as the glass cools.
Light bulb is loose. • Tighten or replace the bulb.
Plug on range is not completely • Make sure electrical plug is plugged into a live, properly
inse_ed in the electrical outlet, grounded outlet.
A fuse in your home may be * Replace the fuse or reset the circuit breaker.
blown or the circuit
breaker tripped.
Oven controls improperly set. • See the Using the oven section.
Oven too hot. • Allow the oven to cool to below locking temperature.
Page 39

ww_.GEAppliance_com
Possible Causes What ToDo
Oven controls improperly set. • See the Usingtheovensecuon.
Rackposition is incorrect • See the Usingtheoven secuon.
or the rack is not level.
Incorrect cookwareor * Seethe Usingtheovensecdon.
cookware of improper
Oven thermostat needs • See the Adjusttheoventhermostat- Do it yourself!
adjustment, section.
Oven controls improperly set. • Make sure you touch the BROILIt_0 pad.
Improper rack position • See the BroilingGuide.
Cookware not suited • Use the bruiting pan and grid that came with your range.
for broiling.
The probe is plugged into the • Unplug and remove the probe from the oven.
outlet in the oven.
(on some models)
Aluminum foil used on the • See the Usingtheovensecdon.
the broiling pan and grid has
not been fitted properly and
slit as recommended.
In some areas the power • Preheat the broil element for lO minutes.
(voltage) may be low. • Broil for the longest period of time recommended in
the Broiling Guide.
Oven thermostat • See the Adjustthe oventhermostat - Doit yourself!
needs adjustment, secdon.
Rear drawer support is • Reposition the drawer. See the Storage Drawer
on top of the guide rail. Removalinstructions in the Care andcleaningof your
rangesection.
• Check to make sure drawer is properly seated
if removed.
Power cord may be • Reposidon the drawer and power cord. See the
obstructingdrawer StorageDrawerRemovalinstructionsin the Careand
in the lowerback cleaningofyoerrangesection.
of the range.
Rear drawer support is • Reposition the drawer. See the Storage Drawer
on top of the guide rail. Removalinstrucfionsin the Careand cleaningof your
range section.
39
Page 40

Beforeyoucall forservice...
_ Troubleshooting tips
Possible Causes What ToDe
Plug on range is not completely * Make sure electrical plug is plugged into a live, properly
in the electricaloutlet, grounded oudet.
A fuse in your home * Replace the fuse or reset the circuit breaker.
may be blown or the
circuit breaker tripped.
Oven controls improperly sot. • See the Using the clock and timer secdon.
The oven temperature is • Allow the range to cool and reset the controls.
too high to set a self-clean
operation.
Oven controls improperly sot. * See the Usingtheself.cleaningovensection.
The probe is plugged into • Remove the probe from the oven.
the outlet in the oven.
(on some models)
This is the sound of the
metal heating and cooling
during both the cooking and
cleaning functions.
Excessive soil. • Touch the C/.EAR/0FFpad. Open the windows to
Oven too hot. • Allow the oven to cool below locking temperature.
Oven controls not properly set. * Seethe Osingtheself-cleaningovensection.
oven was heavily soiled. • Clean up heavy spillovers before starting the clean
The self-clean cycle has been • Close the oven door.
selected but the door is not
dosed.
The oven door is locked • Touch the CLEAR/0FFpad. Allow the oven to cool.
because the temperature
inside the oven has not
dropped below the
locking temperature.
• This is normal.
rid the room of smoke. Wait until the LOCKEDlight
goes off. Wipe up the excess soil and reset the clean
cycle.
cycle. Heavily soiled ovens may need to self-clean
again or for a longer period of time.
4O
You have a function error code. • Touch the C_FF (oven) or ON/OFF(surface units)
pad. Try reactivating the conlxols.
If the function code repeats. • Disconnect all power to the range for at least 30
seconds and then reconnect power. If the function
error code repeats, call for service.
Page 41

www.GEAppliance_com
Possible Causes What ToDo
The controls have • See the Oven orrange lockout section to unlock.
been locked.
You forgot to enter a • Touch the BAKEpad and desired temperature or
bake temperature or the SELFCLEANSTD/LOpad and desired clean time.
denning time.
A fuse in your home may be • Replace the fuse or reset the circuit breaker.
blown or the circuit
breaker tripped.
The clock is in the • See the Specialfeatures ofyouroven controlsection.
black-out mode.
Power failure. * Reset the clock.
Oven cona'ol pads were • The BROILHI/tO and BAKEpads must be touched at
not touched properly, the same time and held tor3$econds.
This is reminding you to • Enter a probe temperature.
enter a probe temperature
after plugging in the probe.
Power outage or surge. • Reset the clock. If the oven was in use, you must reset
it by touching the CLEAR/0R:pad, setting the clock
and resetting any cooking function.
When using the convection * This is normal.
feature, it is normal to see
steam coming out of the oven
vent. As the number of racks
or amount of food being
cooked increases, the amount
of visible steam will increase.
This is normal in a new oven • To speed the process, set a self-clean cycle for a
and will disappear in time. minimum of 3 hours. See the Usingthe self-cleaning
oven section.
An odor from the insulation • This is temporary.
around the inside of the oven
is normal for the first few times
the oven is used.
A convection fan may • This is normal. To maximize cooking evenness,
automatically turn on the fan is designed to operate in both directions,
and off. with a pause in between.
The shiny, silver-colored
racks were cleaned in a
self-dean cycle.
• Apply a small amount of vegetable oil to a paper
towel and wipe the edges of the oven racks with
the paper towel. Do not spray with Pam ®or other
lubricant sprays.
41
Page 42

== Notes.
.,_
i
m
LA_
b
m
m
m
I
42
Page 43

GE Service Protection Plus TM
GE, a name recognized worldwide for quality and dependability, offers you
Service Protection Plush'---comprehensive protection on all your appliances---
No Matter What Brand!
Benefits Include:
• Backed by GE
• All brands covered
• Unlimited service calls
• All parts and labor costs included
• No out-of-pocket expenses
• No hidden deductibles
• One 800 number to call
You will be completely satisfied with our service protection or you may request your money back
on the remaining value of your contract. No questions asked. It's that simple.
Protect your refrigerator, dishwasher, washer and dryer, range, TV, VCR and much more--any brand!
Plus there's no extra charge for emergency service and low monthly financing is available. Even icemaker
coverage and food spoilage protection is offered. You can rest easy, knowing that all your valuable
household products are protected against expensive repairs.
Place your confidence in GE and call us in the U.S. toll-free at 800.626.2224
for more information.
We'll CoverAny Appliance.
Anywhere. Anytime.*
*All brands covered, up to 20 years old, in the continental U.S.
__...Cu,her:..........
Pleaseplace inenvelopeandmail to:
GeneralElectricCompany
Warranty Registration Department
P.O. Box 32150
Louisville, KY 40232-2150
43
Page 44

Consumer Product Ownership Registration
Dear Customer:
Thank you for purchasing our product and thank you for placing your confidence in us.
We are proud to have you as a customer!
Follow these three steps to protect your new appliance investment:
Complete and mail
your Consumer
Product Ownership
Registration today.
Have the peace of
mind of knowing we
can contact you in
the unlikely event of a
safety modification.
After mailing the
registradon below,
store this document
in a safe place. It
contains information
you will need should
you require service.
Our service number is
800.GE.CARES
(800.482.2787).
Model Number Serial Number
,,,,,,,,,I I,,,,,,,I
Important: If you did not get a registration card with your
product, detach and return the form below to
ensure that your product is registered, or register
online at www.GEAppliances.com._ ......................... ,_e:c.._.h:r:....
Consumer Product Ownership Registration
Read your Owner's
Manual carefully.
It will help you
operate your new
appliance properly.
Model Number Serial Number
Mr.[[] MS.O Mrs.[[] Miss[[]
Fast [ I Last
Name , I I I I t I I I I , [ I I I I I
Suect I
Address I I I I I I I I I I r r I I I I I I I I I _ I I
ApL # ] I [ I I I ] r [ E-mail Address*
Dateplaced
InUre _ Day _L_ Year L-.---_ Phone
* Please provide your e-mail address to receive, via e-mail, discounts, special offers and other important
communications from GE Appliances (GEA).
[] Check here if you do not want to receive communications from GEA's carefully selected partners.
0
BE_F_e_b,
_r,emlE_ C_e_r
GEAppliances
FAILURE TO COMPLETE AND RETURN THIS CARD DOES NOT DIMINISH YOUR
WARRANTY RIGHTS.
For information about GEA's privacy and dam usage policy, go to www.GEAppliances.com and click
on "Privacy Policy" or call 800.626.2224.
44 "_"_"'°"
I
Name I I [ I
Number I I I I [ I_o.th i-I , iq I
I I I
Page 45

Notes.
_t
m
w
m
m
_m
i
45
TJ2
Page 46

Accessories.
Looking For Something More?
Youcan find these accessories and many more at _GEAppliances.com, or
call 800.626_002 (during normal business hours). Have your model number ready.
Surface Elements& DripPans OvenRacks
Oven Elements LightBulbs Knobs
Cleaner CleaningPads Scraper
BroilerPan
46
Tired of discolored racks? WLshing you had extra-heavy-duty oven racks?
NOWAVAILABLEfor your range:
GE's innovative, self-cleanable porcelain-coated oven racks!
• Heavy Duty
• Durable
• Able to be cleaned in a self<leaning oven
Visit ww_.GEAppliances.com for more information.
Page 47

GEElectricRangeWarranty.
Ag warranty service provided by our Factory Service
Centers, or an authorized Customer Care_ technician.
Toschedule service, on-fine, 24 hours a day, visit us at
wwvv.GEAppliances.com, or call 800.GE.CARES (800.432.2737).
GE Will Provide:
Anypartof the range which fails due to a defect in materials or workmanship. During this
fullone-year warranty, GE will also provide, free of charge, all labor and in-home service to
replace the defective part.
A replacement glass cooktopif it should crack due to thermal shock, discolor, crack at the
rubber seal between the glass cooktop and the porcelain edge, or if the pattern wears off.
A replacement radiant surface unitif it should burn out.
During this limited eddi_onal fuur-yearwarrant, you wilt be responsible for any labor or
in-home service.
[] Service trips to your home to teach you how to use
the product.
[] Improper installation, delivery or maintenance.
[]Failure of the product if it is abused, misused,
or used for other than the intended purpose or
used commercially.
[]Damage to the _ cooktop caused bynse of demzers
other than the recommended deaning cretans and
pads.
Stapleyourreceipthere.
Proofof the originalpurchase
dateisneededtoobtainservice
underthe warrant.
atReplacement of house fuses or resetting of drcuit
breakers.
[] Damage to the product caused by accident, fire, floods
or acts of God.
m Inddentalor consequr_afial damage caused by possible
defects with this appliance.
[] Damage caused after dellver_
[]Damage to the #ass cooktop caused by hardened
sp'llls of sugary materials or melted plastic that
are not dea0aed according to the directions in
the Owner's Manual.
This warranty is extended to the original purchaser and any succeeding owner for products purchased for
home use within the USA./n Alaska, the warranty excludes the cost of shipping or service calls to your home.
Some states do not allow the exclusion or limitation of incidental or consequential damages. This warranty
gives you specific legal rights, and you may also have other rights which vary from state to state. Toknow
what your legal rights are, consult your local or state consumer affairs office or your state's Attorney General
Warrantor. General Electric Comparq[.Louisville,KY 40225
47
Page 48

ConsumerSupport
GEAppliancesWebsite
Have a question or need assistance with your appliance? Try the GE Appliances Website 24 hours a day,
any day of the year! For greater convenience and faster service, you can now download Owner's Manuals,
order parts, catalogs, or even schedule service on-line. You can also "Ask Our Team of Experts '_"
your questions, and so much more...
ScheduleService
Expert GE repair service is only one step away from your door. Get on-line and schedule your service at
your convenience 24 hours any day of the yearl Or call 800.GE.CARES (800.432.2737) during normal
business hours.
RealLifeDesignStudio
GE supports the Universal Design concept--products, services and environments that can be used by
people of all ages, sizes and capabilities. We recognize the need to design for a wide range of physical and
mental abilities and impairments. For details of GE's Universal Design applications, including kitchen
design ideas for people with disabilities, check out our Website today. For the heating impaired, please call
800.TDD.GEAC (800.833.4322).
ExtendedWarranties
vvww.GEAppliances.com
www.GEAppliances.com
www..GEAppliances.com
www.GEAppliances.com
Purchase a GE extended warranty and learn about special discounts that are available while your warranty
is still in effect. You can purchase it on-line anytime, or call 800.626.2224 during normal business hours.
GE Consumer Home Services will still be there after your warranty expires.
PartsandAccessories
Individuals qualified to service their own appliances can have parts or accessories sent directly to their
homes (VISA, MasterC, ard and Discover cards are accepted). Order on-line today, 24 hours every day or
by phone at 800.626.2009 during normal business hours.
Instructionscontainedin thismanualcoverprocedurestobe performedby anyuser.Otherservicinggenerally
shouldbe referredtoqualifiedservicepersonnelCautionmustbeexercised,sinceimproperservicingmaycause
unsafeoperation.
ContactUs
If you are not satisfied with the service you receive from GE, contact us on our Website with all the details
including your phone number, or write to: General Manager, Customer Relations
GE Appliances, Appliance Park
Louisville, KY40225
RegisterYourAppliance
www.GEAppliances.com
www.GEAppliances.com
www.GEAppliances.com
Register your new appliance on-line--at yout convenience! Timely product registration _ allow for
enhanced communication and prompt service under the terms of your warranty, should the need arise.
You may also mail in the preprinted regisuafion card included in the packing material.
Printedinthe UnitedStates
 Loading...