

Page 1

Owner's Manual
Safety Instructions ............. 2-7
Operating Instructions ........ 8-39
12 Hour, 24 Hour or
Clock Black-Out ................ 23
Adjust the Oven Thermostat ....... 37
Clock and Timer . ............ 26, 27
Convection ()yen ............. 30-32
()yen ....................... 24, 25
()yen Control, Clock and
Timer Features .............. 15-19
Probe .......................... 29
Proofing and _\arming Features .... 35
Selecting Cookware ........... 13, 14
Self:Cleaning Oven ........... 38, 39
Special Feamies .............. 20-22
Surti_ce Units ................. 8-12
Timed Baking and
Roasting Feamies ................ 28
Timed Features fbr
Convection Baking ............ 33, 34
_\anning Drawer ................ 36
Care and Cleaning .......... 40-50
(;lass Cooktop ............... 49, 50
I,ift-Off ()yen Door ........... 42, 43
()_'en i,ight Replacement ...... 45, 46
Removable _J\anning Drm._>r Pan . . .44
Storage Drawer Removal ......... 47
CoilTopand
fladiant TopModels
Troubleshooting Tips ........ 51-55
Write the model and serial numbers here:
Model #
Serial #
You can find them on a label on the fi'ont
of the range behind the storage drawer or
behind the range door.
16404290P373 49-80221-1 12-05JR
Page 2

IMPORTANTSAFETYINFORMATION.
READALL INSTRUCTIONSBEFOREUSING.
m
Foryour safety, the information in this manual must be followed to minim)e the risk of fire, electric shock, or
to prevent properly damage, personal injurg or loss of fife.
WARNINGANTI-TIPDEVICE
Aft ranges can tip and injurgcould result.
Toprevent accidental tipping of the range, attach #to the wall and floor by installing the Anti-tip device supplied.
If the Anti-tip device supplied with the range does not fit this application, use the universal Anti- tip device
WB2X7909.
Make sure the device is installed and engaged properly.
If you pull the range out fl'om the wall fiw any reason, make sure the device is properly engaged when you push
the range back against the wall. If it is not, there is a possible risk of the range tipping over and causing iqjury if
VO/I 0I" [I child stand, sit or lean on [lIl open door.
Please reter to the Anti-Tip device inflmnation in this manual. [_ailure to take this precaution could result in
tipping of the range and iqiury.
IMPORTANTSAFETYNOTICE
The fiberglass insulation in self-clean ovens gives off a very small amount of carbon monoxide during the
cleaning cycle. Exposure can be minimized by venting with an open window or using a ventilation fan or hood.
Fluorescent light bulbs contain mercury. If your model has a surface light, you must recycle the fluorescent light
bulb according to local, state and federal codes.
SAFETYPflECAUTIONS
When using electrical appliances, basic safety precautions should be followed, including the following:
• Use this appliance only for its intended pml_ose as • Do not leave children alone--children should not
described in this Owner's Manual.
• Be sure your appliance is properly installed and
grounded by a qualified inst;fller in accordance with
the provided installation instructions.
• Have the installer show you the location of the circuit
breaker or filse. Mark it tar easy reference.
• Do not attempt to repair or replace any part of yot:u"
range unless it is specifically recolnlnended in this
manual. All other servicing should be referred to
a qualified technician.
be left alone or unattended in an area where an
appliance is in use. They should nevei" be allowed
to sit or stand on any part of the appliance.
• Do not allow anyone to climb, stand or hang on
the (loo_; storage drawer or cooktop. They could
damage the range and even tip it ove_; causing
severe personal iqiur>
• I,mge scratches or impacts to glass doo_ can lead to
broken or shattered glass.
• Before pe_timning any se_','ice, disconnect the range
power supply at the household distribution panel bv
removing the fllse or switching off the circuit breaker:
2
Page 3

SAFETYPflECAUTIONS
Do not operate the oven or cooktop controls ff the glass is broken. Food splatter or cleaning solution may
penetrate a broken control panel and create a risk of electrical shock. Contact a qualified technician immediately
should your glass control panel become broken.
[] Do not store flammable materials in an oven or
near the cooktop.
[] For your safbb', never use your appliance fiw
warming or heating tile room.
[]CAUTION: l,en,sof,h,eree,,och,dreneho./ no,
be stored Ib ca&bets abovearange or on thebacksplashof
a range--children chbTb/bgon therangeto reachitemscould
be seriously bjureci
[] Never wear loose-fitting or hanging gam_ents while
using the appliance. Be careful when reaching fl)r
items stored o_er the range. Flammable material
could be ignited if brought in contact with hot
smfime traits or heating elements and may cause
severe bHrsIs.
[] Use only dry pot hokle*_--moist or damp pot
hokle_ on hot sm'fiwes may result in burns flora
steam. Do not let pot holders touch hot smti_ce
milts 05"heating elements. Do not use a towel or
other bulky cloth in place of pot hoklel_.
[] Do not use water on grease fires. Never pick up
a flaming pan. Turn the controls off. Smother a
flaming pan (m a surfime trait by coveting tile pan
completely with a well-fitting lid, cookie sheet or fiat
tra\. Llse a mulfi-pml)ose chy chemical or loam-type
fire extinguishel:
Flaming grease outside a pan call be put out by
coveting it with baldng soda 05; if a_zfilable, by using
a multi-propose (hy chemical or loam-type fire
extinguisher.
Flame in tile oven can be smotheied completely
by closing tile oven door and tm'ning tile oven off or
by using a multi-l)m])ose d D' chemical o_ fl)am-type
fire extinguishes:
[] Do not let cooking grease or other flammable
materials accmnulate in or near the range.
[] Do not touch tile smfime traits, tile heating elements
or tile interior smihce of the oven. These sm'fimes
may be hot enough to bm'n e\ en though tile}' are
dark ill colos: Dining and after use, do not touch, or
let clothing or other flammable materials contact tile
suHhce traits, areas nearby tile surfime units or any
interior area of tile oven; allow suflident time tbr
cooling filet.
Potentially hot sm_hces include tile cooktop, areas
lilting the cooMoi), oven vent opening, smthces near
tile opening, crevices arotmd tile oven doo,:
REMEMBER: The/hs/desurface of the ovenmay be hotwhen
the door/_ openec_
[] Do not store or use combustible materials, gasoline
or other flammable _q)o_ and liquids in tile vicinity
of this or ally other appliance.
[] Keep tile hood and grease filters clean to maintain
good _vnting and to avoid grease fires.
[] Teach children not to play with tile controls 05"any
other pal_ of tile range.
[] _Mwm:skee I) dish towels, dish cloths, pot holdes_ and
other linens a satb distance fi'om your range.
[] _M_tys kee I) wooden and plastic utensils and canned
fi)od a satb distance fi'om yore" range.
[] Alw;ms kee I) combustible wall co\vfings, curtains or
drapes a sale distance ii'om yore" range.
Page 4
IMPORTANTSAFETYINFORMATION.
READALL INSTRUCTIONSBEFOREUSING.
COOKMEATANDPOULTRYTHOROUGHLY...
Cook meat and poultry thoroughly--meat to at least an INTERNAL temperature of 160°Eand poultry to at least
an INTERNAL temperature of 180°ECooking to these temperatures usually protects against foodborne illness.
SURFACECOOKINGUNITSfa//mode/s)
Use proper pan size--select cookware having flat bottoms large enough to cover the surface un# heating
element. The use of undersized cookware will expose a portion of the surface unit to direct contact and
may result in ignition of clothing. Proper relationship of cookware to surface unit will also improve efficiency.
• Never leave the sm_fi_ce units unattended at high
heat settings, goilove_s cause smoking and greasy
spillove_ that may catch on fire.
• Use little tilt fi_r effective shallow or deep lilt flTing.
Filling tile pan too flfll of tilt c[lIl c[Itlse spillove_
when food is added.
• If a combination of oils or tilts will be used in flTing,
stir together befl)re heating, or as lilts melt slowly:
• _Mwa_:s heat tilt slowl}; and watch as it heats.
• Only certain types of glass, glassX eramic,
earthenware or other glazed containers are suitnble
for cooktop service; othei_ inay break because of
tile sudden change in temperature.
• To minimize tile possibility of bm'ns, ignition of
flammable materials and spillage, tile handle of
a container should be turned toward tile center
of the range without extending over nearby
smbfilce units.
• _Mwavs tm'n tile surtilce milts off heft)re removing
cookw_li'e.
• X4hen I)reI)aring, flaming, fi)ods trader tile vent hood,
mrn tile tim on.
• Use a deep Iilt them/ometer whenever possible to
prevent overhearing lilt beyond the smoking point.
• Keep an eve on foods being flied at high or medimn
high heat settings.
• Foods fl)r fl')ing should be as dry as possible. Frost on
fl'ozen fi)ods or moisture on fl'esh fi)ods can cause
hot lilt to bubble up and over tile sides of tile pan.
• Do not leave any items on the cooktop, The hot air
fl'om the vent may ignite flammable items and will
increase pressm'e in closed contnine_5, which may
cause them to bm_t.
• Do not leave plastic or flammable items on tile
cooktoI)---they ma) melt or ignite if left too close
to tile _,eIlt.
4
Page 5
COILSURFACEUNITS(onsomemode/s)
To avoid the possibility of a burn or electric shock, always be certain that the controls for aft surface units are
at the OFF position and all coils are cool before attempting to lift or remove a unit.
[] Clean the cooktop with caution. If a wet sponge is
used to wipe spills on a hot cooktop, be carefld to
a\_id steam burns.
[] Do not imme*_e or soak the remo\;lb]e surlime units.
Do not put them in a dishwasher:
[] Be sure the drip pans and the vent duct are not
covered and are in place. Their absence during
cooldng could damage range pm_s and wiring.
RADIANTSURFACEUNITS(onsomemode/s)
Use care when touching the cooktop. The glass surface of the cooktop will retain heat after the controls have
been turned off.
• Avoid scratching the glass cooktop. The cooktop can
be scratched with items such as shaq) instruments,
rings or otherjeweh T and rivets on clothing.
• Do not operate the radiant stm'i_ce units if the glass
is broken. Spillove_ or cleaning solution may
penetrate a broken cooktop and create a risk of
electrical shock. Contact a qualified technician
immediately should your glass cooktop become
broken.
• Never use the glass cooktop stm'hce as a
cutting board.
• Do not place or store items that can melt or
catch fire on the glass cooktop, even when it
is not being used.
• Be carefld when plating spoons or other stirring
utensils on glass cooktop stm'hce when it is in use.
They may become hot and could cause 1)urns.
• Do not stand on the glass cooktop. The weight may
cause the top to break.
• Avoid heating an empty pan. Doing so may damage
the cooktop and the pan.
[] Do not use aluminum fi_il to line the drip pans or
anDxhere in the oven except as described in this
manual. Misuse could result in a shock, fire hazard
or damage to the range.
NOTE."Werecommendthat youavoid wiping any surfaceunit
areasuntil theyhave cooledand the indicator light hasgoneoff.
Sugarspills are the exceptionto this.Pleasesee Cleaning the
glass cooktop section.
• When the cooktop is cool, use only the
recommended cleaning cream to clean the cooktop.
• To avoid possible damage m the cooking StlI_;Ice,
do not apply cleaning cream to the glass suil'ilce
when it is hot.
• _Mier cleaning, use a d_T cloth or paper towel to
remove all cleaning cream residue.
• Read and tollow all instructions and warnings on
the cleaning cream labels.
• I,a_ge scratches or impacts to cooktops can lead to
broken or shattered glass.
• Do not lilt the cooktop on models with radiant
SUll'hce units. Lifting the cooktop can lead to damage
and improper operation of the range.
• Do not use plastic wrap to cover food. Plastic may
melt onto the surti_ce and be very difficult to remove.
• Clean the cooktop with caution. If a wet sponge or
cloth is used to wipe spills on a hot surlilce unit,
be careful to avoid smam burns. Some cleane_ can
produce noxious tirades if applied to a hot stm'i_ce.
Page 6

IMPORTANTSAFETYINFORMATION.
READALL INSTRUCTIONSBEFOREUSING.
i
OVEN
Stand away from the range when opening the oven door. Hot air or steam which escapes can cause bums to
hands, face and/or eyes.
[] Do not heat unopened food containers. Pressure
could build up and tile container could bm_t,
causing an il_jury.
• Keep tile oven vent unobstructed.
• Keep tile o',en five fl'om grease buildup.
•Hace tile ox ell shelf in tile desired position while
tile (yen is cool. If shelves must be handled when
hot, do not let pot holder contact tile heating
dements.
Pulling out tile shelf to tile stop-lock is a convenience
ill lifting heavy foods. It is also a precaution against
btll'ns fl"oI//totlching hot stllfhces _g tile door or
oven walls.
• Do not use tile oven to chy newspapers. If o\vrheated,
they call catch on fire.
• Do not use tile oven for a storage area. Items stored
in all o\vn call ignite.
• Do not leaxv paper prodtlcts, cooldllg utensils or
food ill tile oven when not in use.
• \\lien using cooking or roasting bags in tile oven,
follow tile manufimturer's directions.
Do not use almninmn foil to lille oven bottoms,
except as suggested in this manual. Improper
installation of ahmfinmn dill may result in a risk of
electric shock or fire.
SELF-CLEANINGOVEN(onsomemode/s)
Donot use oven cleaners. No commercial oven cleaner or oven liner protective coating of any kind should be
used in or around any part of the oven. Residue from oven cleaners will damage the inside of the oven when the
self-clean cycle is used.
• Do not clean tile door gasket. Tile door gasket is
essential for a good seal. Care should be taken not
to rub, dalnage or inove tile gasket.
• Bed)re self'cleaning tile oven, relnove tile broiler
pan, grid and other cookware.
• Be sure to wipe up excess spillage before starting
the self'cleaning operation.
• If tile sellk'leaning mode inalflnlcfions, turn tile oven
off and disconnect tile power supply: Have it serviced
by a qualified technician.
• Clean only parts listed ill this Owner's Manual.
• Take the shelves out ot the oven befiwe you begin
the sel6clean cycle or thev inav discoloi:
WARMINGDRAWER(o,somemode/s)
• Tile pulI)ose of tile wanning drawer is to hold hot
cooked fl)ods at sei_'ing tenq)erature. Pdwa)_s start
with hot fbod; cold food cannot be heated or cooked
ill the wamfing drawei;
• Do not use tile drawer to di T newspapei_.
If overheated, they can catch on ili'e.
• Do not lea;'e paper products, plastics, canned fi)od
or combustible inaterials ill tile drawei:
• Never leavejai_ or cans of fat drippings in or near
YO/lI" drawei;
• Do not W_llIll too(l in tile dI'aweI" t0i" illoi'e than
two houi_,
• Never place, use or self'clean tile lower oven drawer
pan ill the upper oven.
• Do not touch the heating element or the interior surface
of thedrawer. These sml%ces may be hot enough
to b/lYn.
REMEMBER:Tile inside surlhce of tile drawer inav be
hot when the drawer is opened.
• Use care when opening the drawei: Open the drawer
a crack and let hot air or steam escape before
removing or replacing food. Hot air or stealn which
escapes can cause burns to hands, ti_ce and/or eyes.
• Do not rise ahllllintllll dill to lille tile lower oven
drawei: Foil is an excellent heat insulator and will
trap heat beneath it. This will upset tile pell'Ommnce
of tile drawer and it could damage tile interior finish.
Page 7

Yourrange, like many other household items, is heavy and can settle into soft floor coverings such as cushioned
vinyl or carpeting. When moving the range on this type of flooring, use care, and it is recommended that these
PREPARATION
simple and inexpensive instructions be followed.
Installing
The range should be installed on a 1/4inch thick sheet of
plywood (or similar material) as foflows:
\'\]_en the floor coveting ends ;it the fi'ont of the range,
the area that the range will rest on should be built up
with plywood to the same le\ el or higher than the floor
co\vfing. This will allow the range to be Fno; ed for
cleaning or selaidng.
Leveling
Leveling screws are located on each corner ot the base
of the range. Remove the bottom drawer and _)tl can
level the range on an tllle;'ell floor with the rise of
a nutdfi_vr or cham_el locks.
To remo_v the drawel, pull the drawer out all the way,
tilt up the fl'ont and take it out. To replace the draweI;
insert glides at back of the drmver beyond stop on the
range glides. Liii drawer if necessary to insert easily.
Let the ti'ont of drawer down, then push in to close.
One of the rear ]e\ eling screws will engage the Anti-Tip
device. _Mlow for some side to side ac!iustment, _Mlow
a minimum clearance of 1/8" between the range
and the le\ eling screw that is to be installed into the
Anti-Tip device.
READANDFOLLOWTHISSAFETYINFORMATIONCAREFULLY.
SAVETHESEINSTRUCTIONS
7
Page 8
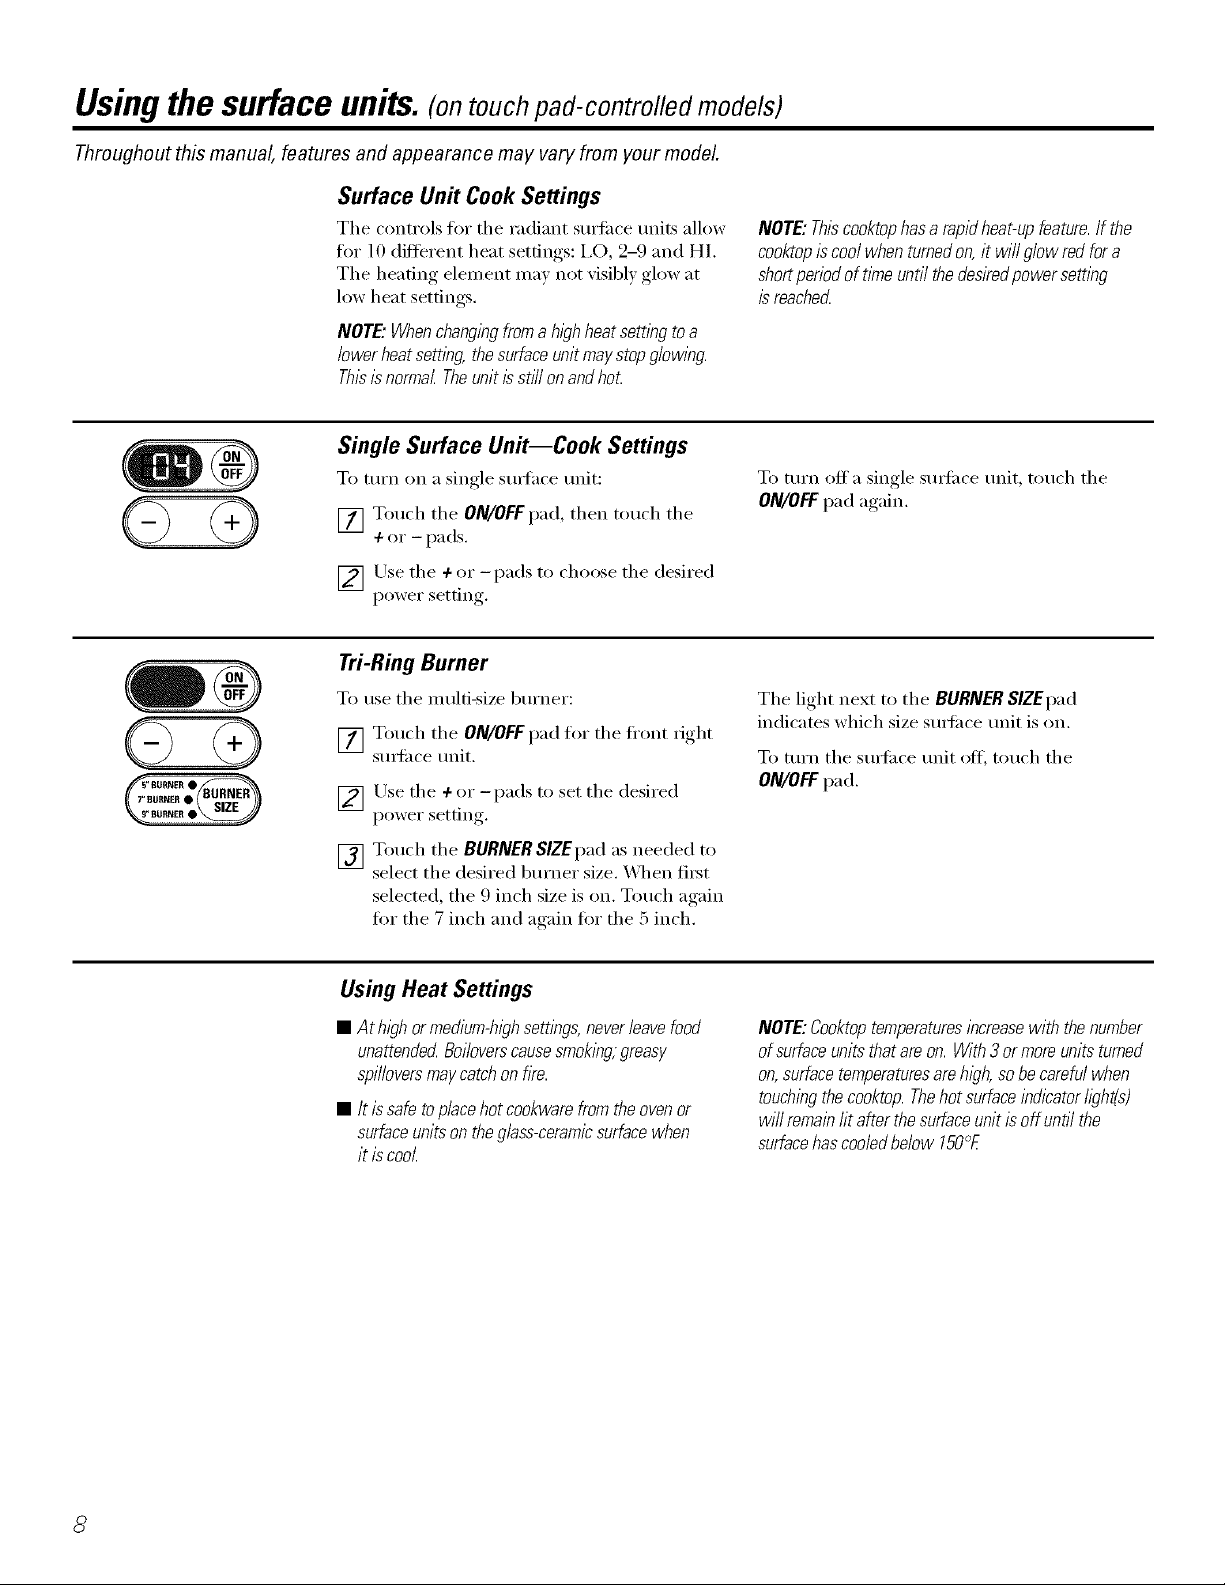
Usingthe surface units.(ontouch pad-controlledmodels)
Throughout this manual, features and appearance may vary from your model.
Surface Unit Cook Settings
The controls fin" the radiant surli_ce units allow
ti)r 10 different heat settings: i,O, 2-9 and HI.
The heating dement may not visibly glow at
low heat settings.
NOTE" Whenchang/bgfroma high heatsettlbg to a
lower heatsettlbg, thesurface unit maystop glowlbg.
Thisisnormal Theunit isstiff onandhot.
Single Surface Unit--Cook Settings
To mrn on a single sm_hce unit:
[] Touch the ON/OFFpad, then touch the
+ or - pads.
[] Use the +or -pads to choose the desired
power setting.
Tri-Ring Burner
To use the multi-size 1)urner:
[] Touch the ON/OFFpad for the fl'ont right
surli_ce unit.
]Use the +or -pads to set the desired
l)ower settiil ,
NOTE:Thiscooktophasarapidheat-upfeature.Ifthe
cooktopiscoolwhenturnedon,it will glowredfora
shortperiodof timeuntilthedesiredpowersettlbg
isreached
To turn off a single sm_li_ce unit, touch the
ON/OFFpad again.
The light next to the BURNER SIZEpad
indicates which size sm_i_ce unit is on.
To turn the surli_ce unit ott; touch the
ON/OFFpad.
[] Touch the BURNERSIZEpad as needed to
select the desired bm'ner size. X4q_en fi_t
selected, the 9 inch size is on. Touch again
fin" the 7 inch and aoain fin" the 5 inch.
Using Heat Settings
• Athl_zhorrnediurn-hlghsettings,neverleavefood
unattendedBelieverscausesmoklbg/greasy
spilloversmaycatchonfire.
• It issafetoplacehotcookwarefromtheovenor
surfaceunitsontheg/ass-ceremicsurfacewhen
it iscool
NOTE:Cooktoptemperaturesibcrease with the number
ofsurface units that are on. With 3 or moreunits turned
on.surfacetemperaturesare.high.so be careful when
touchingthecooktop. Thehot surface indicator@ht(s)
will remainfit after the surface unit is off until the
surfacehas cooledbelow 150°E
8
Page 9

Precise Warm Feature
To mrn on the precise warm feature:
[] Touch the ON/OFFpad, then touch the
PRECISE WARMpad. The stmti_ce unit will
turn on to warmer setting W3 (medium
setting).
[] Lrse the +or -pads to choose additional
settings between _,_1 (lowest setting) and
X,_T)(highest setting),
To change fl'om the wm_ner settings to regular
cooking settings, press the PRECISEWARM pad
again. The surli_ce trait will be on power setting
I,O. The stul'hce trait may then be set to the
desired regular cooking setting using the
÷ or -pads. To [tlrn oft the s/Irl_ilce tlnit,
whether using regular cooking settings or
wmmer settings, touch the ON/OFF pad.
11/1_1.1UTION: DOnot warm food on a PRECISE
WARM surface unit setting formore than 2 hours.
Donotuse plastic wrap to coverfood Plastic may melt
ontothe surfaceand be verydi_cult to remove.
Useonlycookware recommendedfortop-of-range
cooking.
CAUTION:Alwayssta withhotfood
Donotuse toheat cold food Placing uncooked or
coldfood ona precise warm setting could result
in foodbome illness.
For best results, all fi)od on PRECISEWARM
should be coxered with a lid or aluminum foil.
_Mwaxs use pot holders or oven mitts when
reii/ox, ing lood ][i'Olll _1 precise Ig_lIIl/ St/IS{ilce
trait as cookware will be hot.
A hot sur)hce indicator light will glow when the
glass surfi_ce is hot and will remain on until the
surli_ce has cooled below 150°E
Page 10
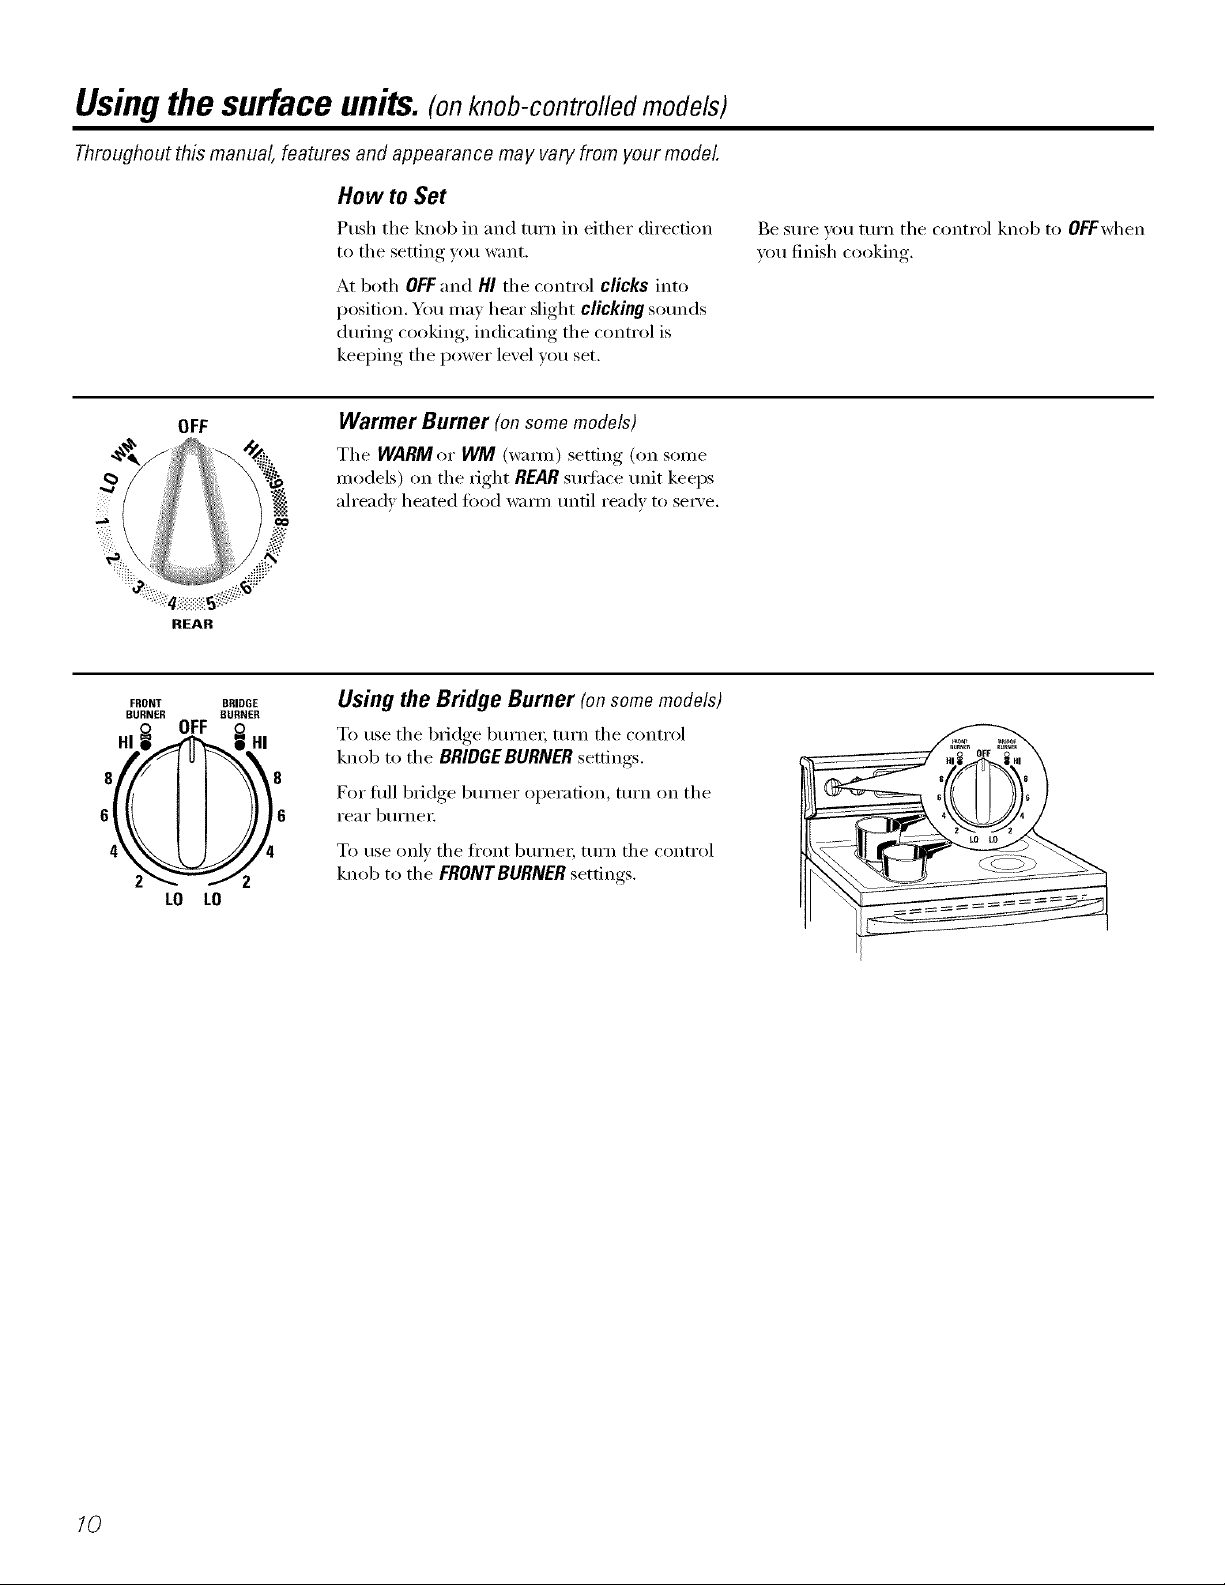
Usingthe surface units.(onknob-controfled models)
Throughout this manual, features and appearance may vary from your model.
How to Set
Push tile knob in and turn in either direction
to tile setting you want.
At both OFF and HI tile control clicks into
position. You may hear slight clicking sotmds
dm_ing cooking, indicating the control is
keeping the power level you set.
Be sm'e you tm'n tile control knob to OFFwhen
you finish cooking.
OFF
Warmer Burner (on some models)
Tile WARM or WM (wam_) setting (on some
models) on tile right REARsm_hce trait keeps
ah'eadv heated food wamx tmfil ready to sex_'e.
REAR
BURNER
HI
FRONT
OFF
BRIDGE
BUBNEB
HI
Using the Bridge Burner (onsome models)
To use tile bridge burnex; tm'n tile control
knob to tile BRIDGEBURNERsettings.
8
6
LO LO
8
Fox" flfll bridge bHI'neI" operation, ttxi'n on tile
I'e_l I" b/ll'neI;
6
To use only tile front bm'nex; turn tile control
z
knob to tile FRONTBURNERsettings.
10
Page 11
Using the Warming Zone (onsomemodels)
The WARMING ZONE, located in the center of
the glass cooking sm_hce, will keep hot, cooked
fi)od at se_Mng temperature, Mwavs start with
hot food. Do not use to heat cold food. Placing
tmcooked or cold fi_od on the WARMING ZONE
could result in food-borne illness.
Mwm:s use pot holde_ or oven mitts when
reInoving food fl'oIn the WARMING ZONE,
since cookware and plates will be hot.
CAUTION:Oonotwarmfoodonthe
WARMING ZONE formorethan two hours.
Onmodels with a WARMING ZONE pad:
[] Touch the WARMING ZONE SET/OFFpad,
[] Touch the number pads 1,2or 3to select
low (l), medimn (2) or hi,,h (3) wamdn,,
settin ,
[] Touch the STARTpad.
[] To mrn the WARMING ZONE off, touch
the WARMING ZONE SET/OFFpad tmfil
WARMER disappea_ from the displa):
Onmodels with a WARMING ZONE knob:
Push and mrn the control knob to am' desired
setting.
NOTE:TheWARMING ZONE will notglow red like
thecookl))gelements.
Depending on yore" model, either HOTwill be
displayed or a HOTindicator light will glow
when the glass surfilce is hot and will remain
on tmtil the sm'fi_ce is cool enough to touch.
I,ower settings may not heat the glass sm'ii_ce
enough to cause the HOTindicator light to
COiile Oil.
A WARMING ZONE indicator light _dll glow
when the trait is on.
Useonlycookwarerecommendedfortop-of-range
cookl?)g.
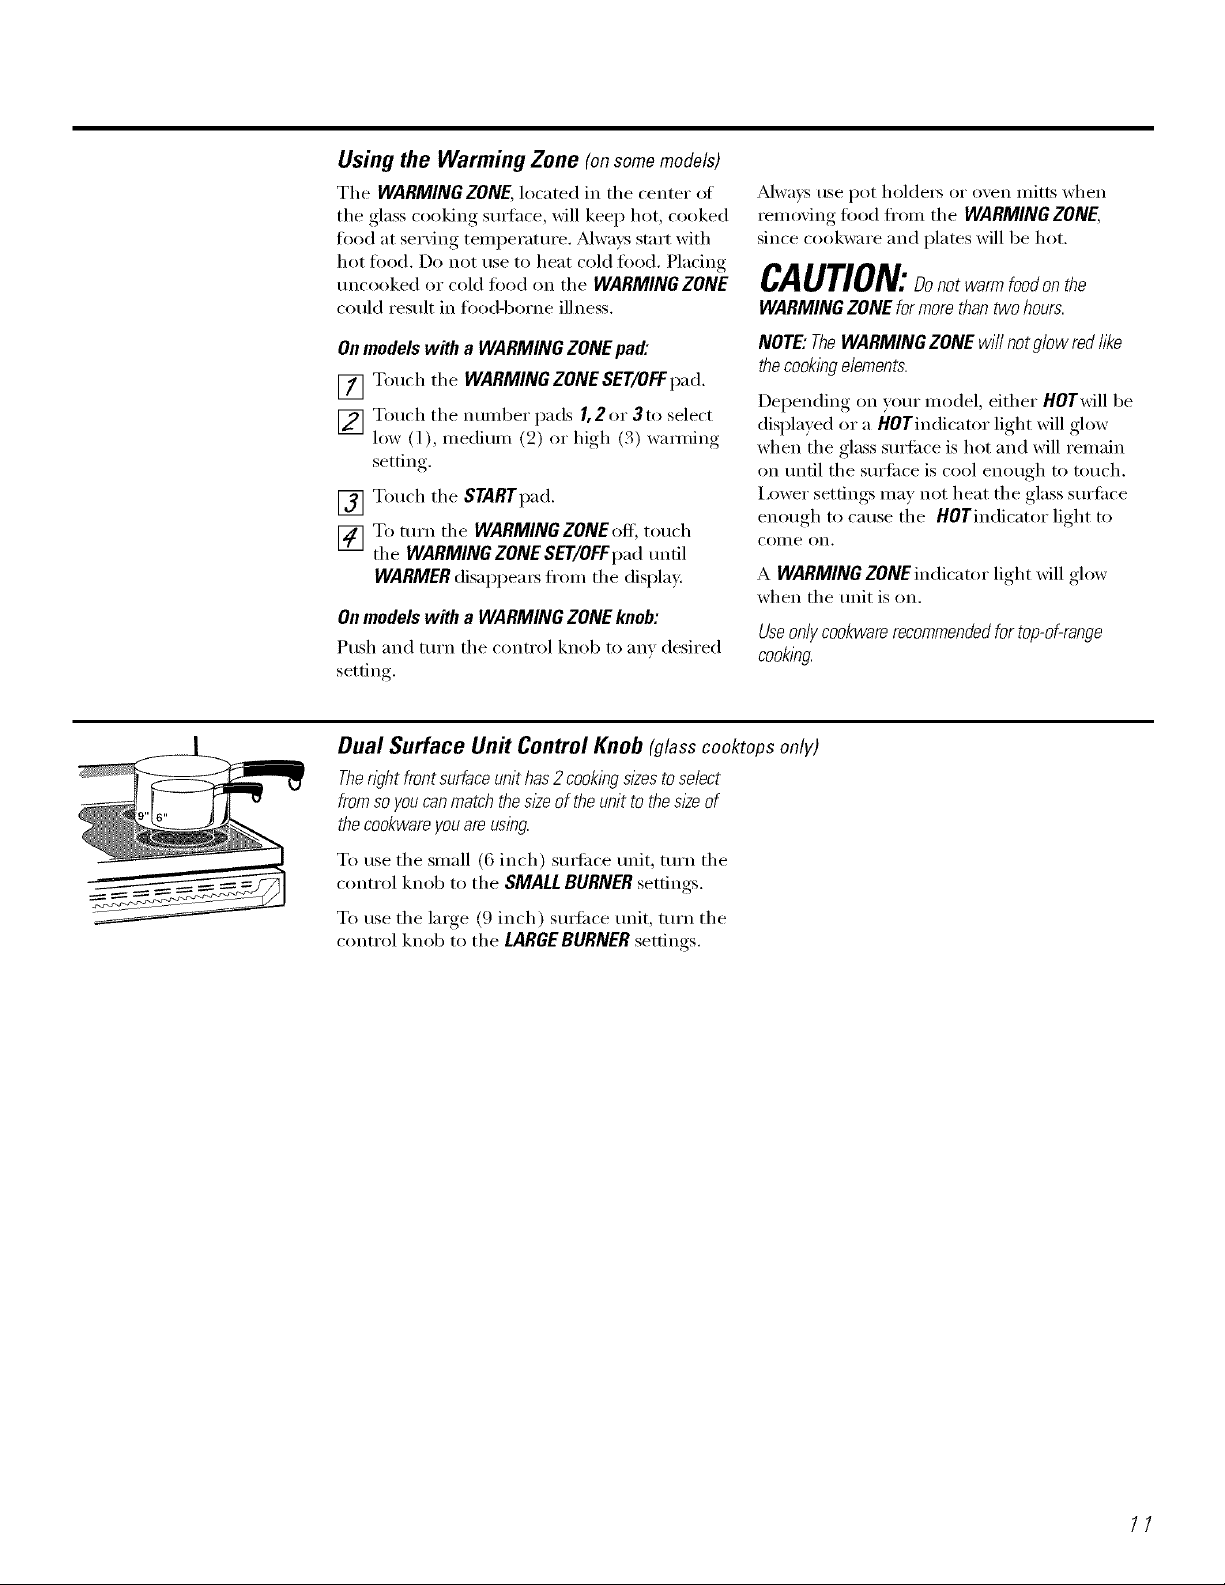
Dual Surface Un# Control Knob (g/asscooktopsonly)
Thewht front surface unit has2 cookingsizesto select
fromsoyou canmatch thes/keof theunit to thes/keof
thecookwareyou are using.
To use the small (6 inch) sm_i_ce refit, mrn the
control knob to the SMALL BURNERsettings.
To use the large (9 inch) sm_i_ce refit, tm'n the
control knob to the LARGEBURNER settings.
//
Page 12

Usingthe radiant surfaceunits.(glasscooktopsonly)
About the radiant surface units...
Tile radiant cooktop features heating units
beneath a smooth glass stm'hce.
NOTE"A sh)ht odorIsnormal when a new cooktop
is used for the fkst t/_ne.Itis causedby the heatingof
new parts andinsulatingmatena/s andwill disappear
in ashort time.
Never cook directly ontlTeglass.
Always useco&ware.
Always place tlTepan f17the center of
tlTesurface unit you arecookflTgon.
Tile surli_ce unit will cycle on and off to
maintain your selected control setting.
It is safe to place hot cookware on tile glass
S/li'J[ilce even when tile cooktop is cool.
Even alter tile sure_ce units are turned off, tile
glass cooktop retains enough heat to continue
cooking. To avoid eve>cooking, remove pans
fl'om the surti_ce units when the toed is cooked.
Avoid placing anything on tile surtilce unit
until it has cooled completel}:
• Waterstains (mineraldeposits)areremovable using
thecleaningcream or furl strengthwhite wbegar
• Useof window cleaner may leavean indescentfilm
on the cooktop. Thecleaning cream wi// removethis
discoloration.
Donot slide cookware across tlTe
cooktop because it can scratch tlTe
glass theglass is scratch resistant,
not scratch proo_
• Don't storeheavyitemsabovethe cooktop.If they
drop ontothe cooktop,theycancause damage.
• Donotusethesurfaceasa cuttingboard
Indicator Lights
On glass cooktops, HOT indicator light will
glow when an) radiant element is turned on,
and will remain on until tile s/m'i_ce is cooled
to approximatel) 150°E
Indicator light will:
• come on when the unit is hot to the touch.
• stay onevenafter the unit is turnedoff
• glow until the unit is cooledtoapproximately 150°£
Temperature Limiter (glass cooktops only)
Exer_ radiant s/mfhce unit has a temperature
limiter
Tile temperature limiter protects tile glass
cooktoi ) fl'om ,getting, too hot.
A surlime units ON indicator light _fill glow
when _lIIV st/i'l[ilce t/nit is on.
NOTE:ThesurfaceunitsONindicatorh)htmayglow
betweenthesurfacecontrolsettingsofLOandOFF,
butthereisnopowertothesurfaceunits.
The temperature limiter may cycle tile units off
fi)r a time if:
• Thepanboils dr)z
• Thepanbottom is not fiat.
• Thepan is offcenter
• Thereis nopan on the uni_
12
Page 13
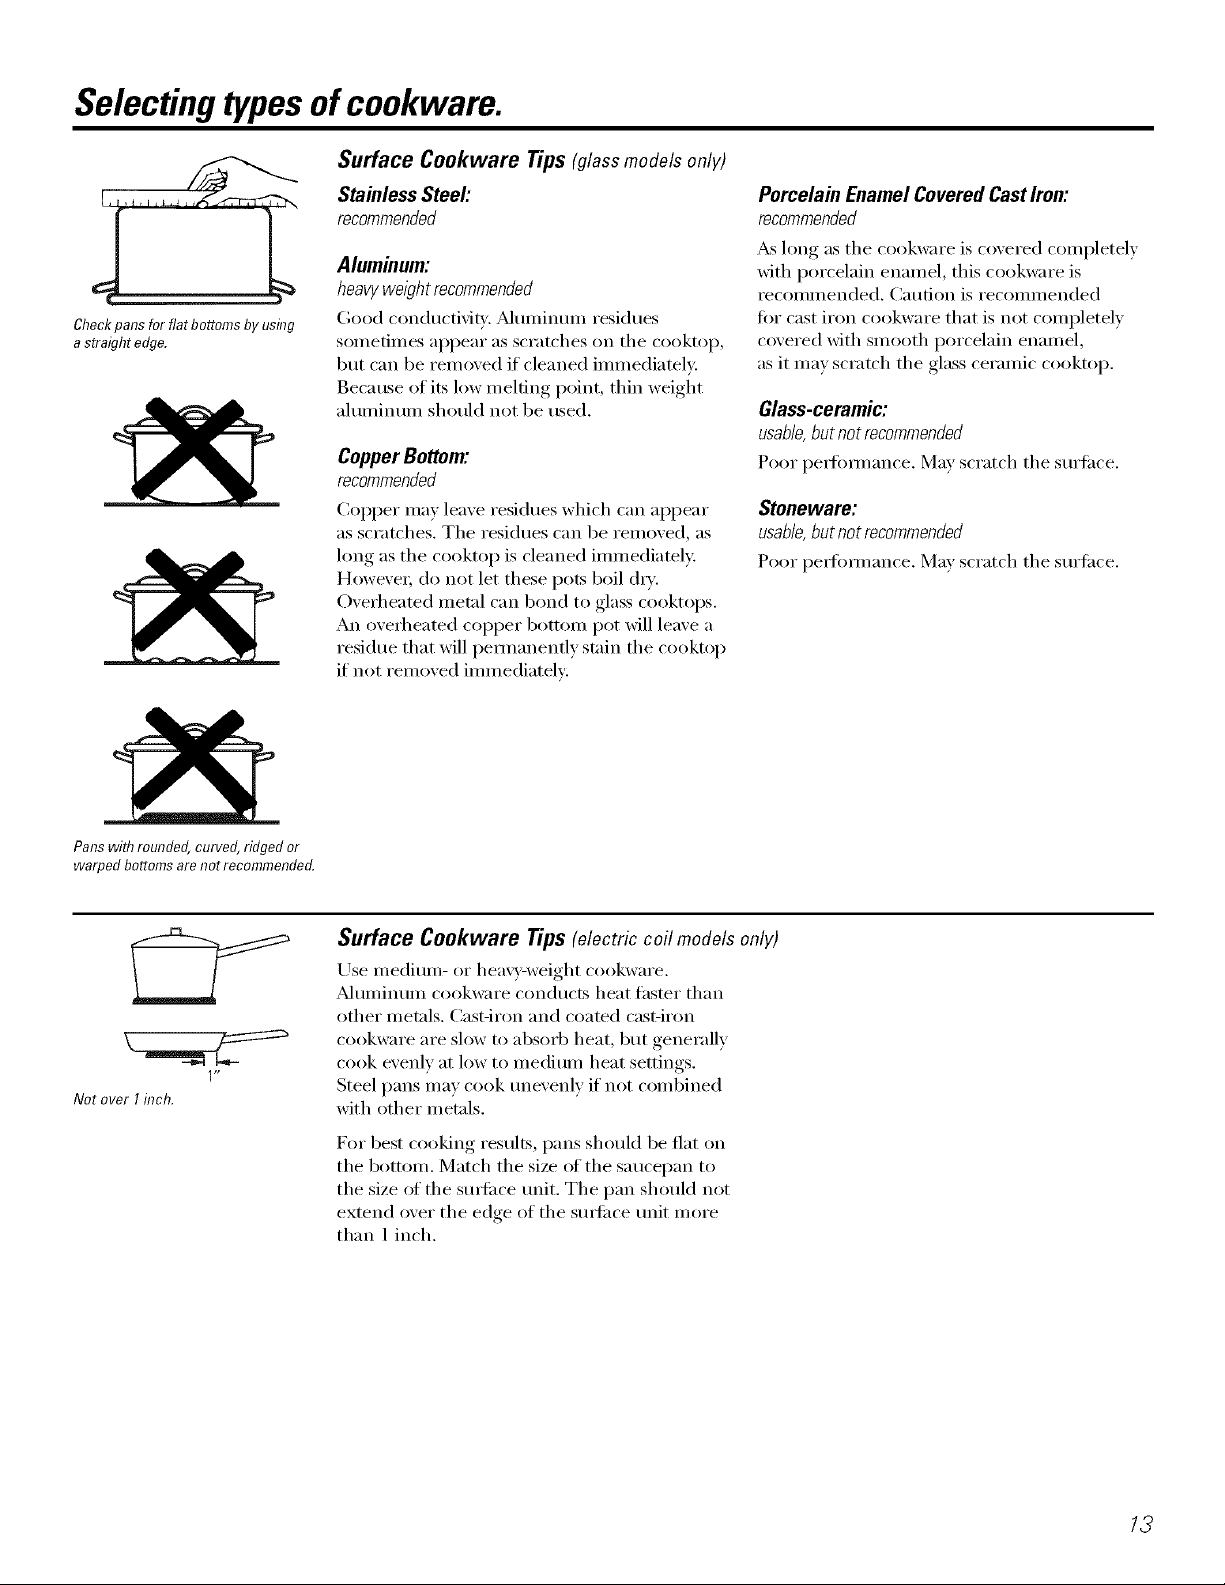
Selectingtypesof cookware.
Surface Cookware Tips(glassmodelsonly)
Stainless Steel:
recommended
J, L
Checkpansforflatbottomsbyusing
astraightedge.
Aluminum:
heavyweight recommended
Good conducti\iq:. _Muminun_ residues
sometimes appear as scratches on the cooktop,
but can be removed if cleaned immediately.
Because of its low melting point, thin weight
aluminum should not be used.
CopperBottom:
recommended
CoI)I)er may leave residues which (an appear
as scratches. The residues can be removed, as
long as the cooktop is cleaned immediatel*:
Howe\'e_; do not let these pots boil (hT.
Oved/eated metal can bond to glass cooktops.
An ove_t/eated copper bottom pot will leave a
residue that will permanently stain the cooktop
if not removed immediately:
Porcelain Enamel Covered Cast Iron:
recommended
_&slong as the cookware is covered completely
with porcelain enamel, this cookware is
recommended. Caution is recommended
fin" cast iron cookware that is not completely
covered with smooth porcelain enamel,
as it may scratch the glass ceramic cooktop.
Glass-ceramic:
usable,butnotrecommended
Poor l)e_fimnance. May scratch tile surli_ce.
Stoneware:
usable,butnotrecommended
Poor l)e_fimnance. May scratch tile surli_ce.
Pans with rounded,curved,ridged or
warped bottomsarenot recommended.
C2
1"
Notover I inch.
Surface Cookware Tips (electric coil models only)
Use inediuin- (:,r hea',T-weight cookware.
Muminum cookware conducts heat fhsmr than
other metals. Cast-iron and coamd cast-iron
cookware are slow to absorb heat, but generally
cook evenly at low to medium heat settings.
Steel pans may cook unevenly if not combined
with other metals.
For best cooking results, pans should be fiat on
tile bottom. Match the size of tile saucei)an to
the size of the surfi_ce unit. The pan should not
extend over the edge of the s/mfi_ce unit more
than 1 inch.
13
Page 14

Selecting typesofcookware.
Wok Cooking (electric coil models only)
Werecommend thatyou use onlya flat-bo_omedwok.
Theyareavailable at yourlocalretail store.
Do not use woes that have support rings.
Use of these t,/pes of woes, with ()r without
the ring in place, can be dangerous.
Use only flat-bottomed woks.
Deep Fat Frying
Do not ovedill cookware with tilt that may
spill over when adding food. Frost' foods
bubble vigorously. Watch food ti'ying at high
temperatures. Kee I) range and hood clean
fYOlil grease.
Home Canning Tips
Be sure the canner is centered over the
surlilce unit.
Make sure the canner is fiat on the bottom.
Placing the ring over the sm_hce unit will
cause a build-u I) of heat that will damage the
po_velain cooktop. Do not t_y to use such
woks without the ring. _m could be seriously
burned if the wok tipped over.
Use recipes and procedures fl'om reputable
SOtlI'Ces, Flat-bottollled CalllleI3 aI'e
recommended. Use of water bath canne_
with ill)pied bottoms may extend the time
required to bring the wamr to a boil.
To l)I'event btlI'ns J[i'Olll stealll or heat, rise
caution when canning.
/4
Page 15
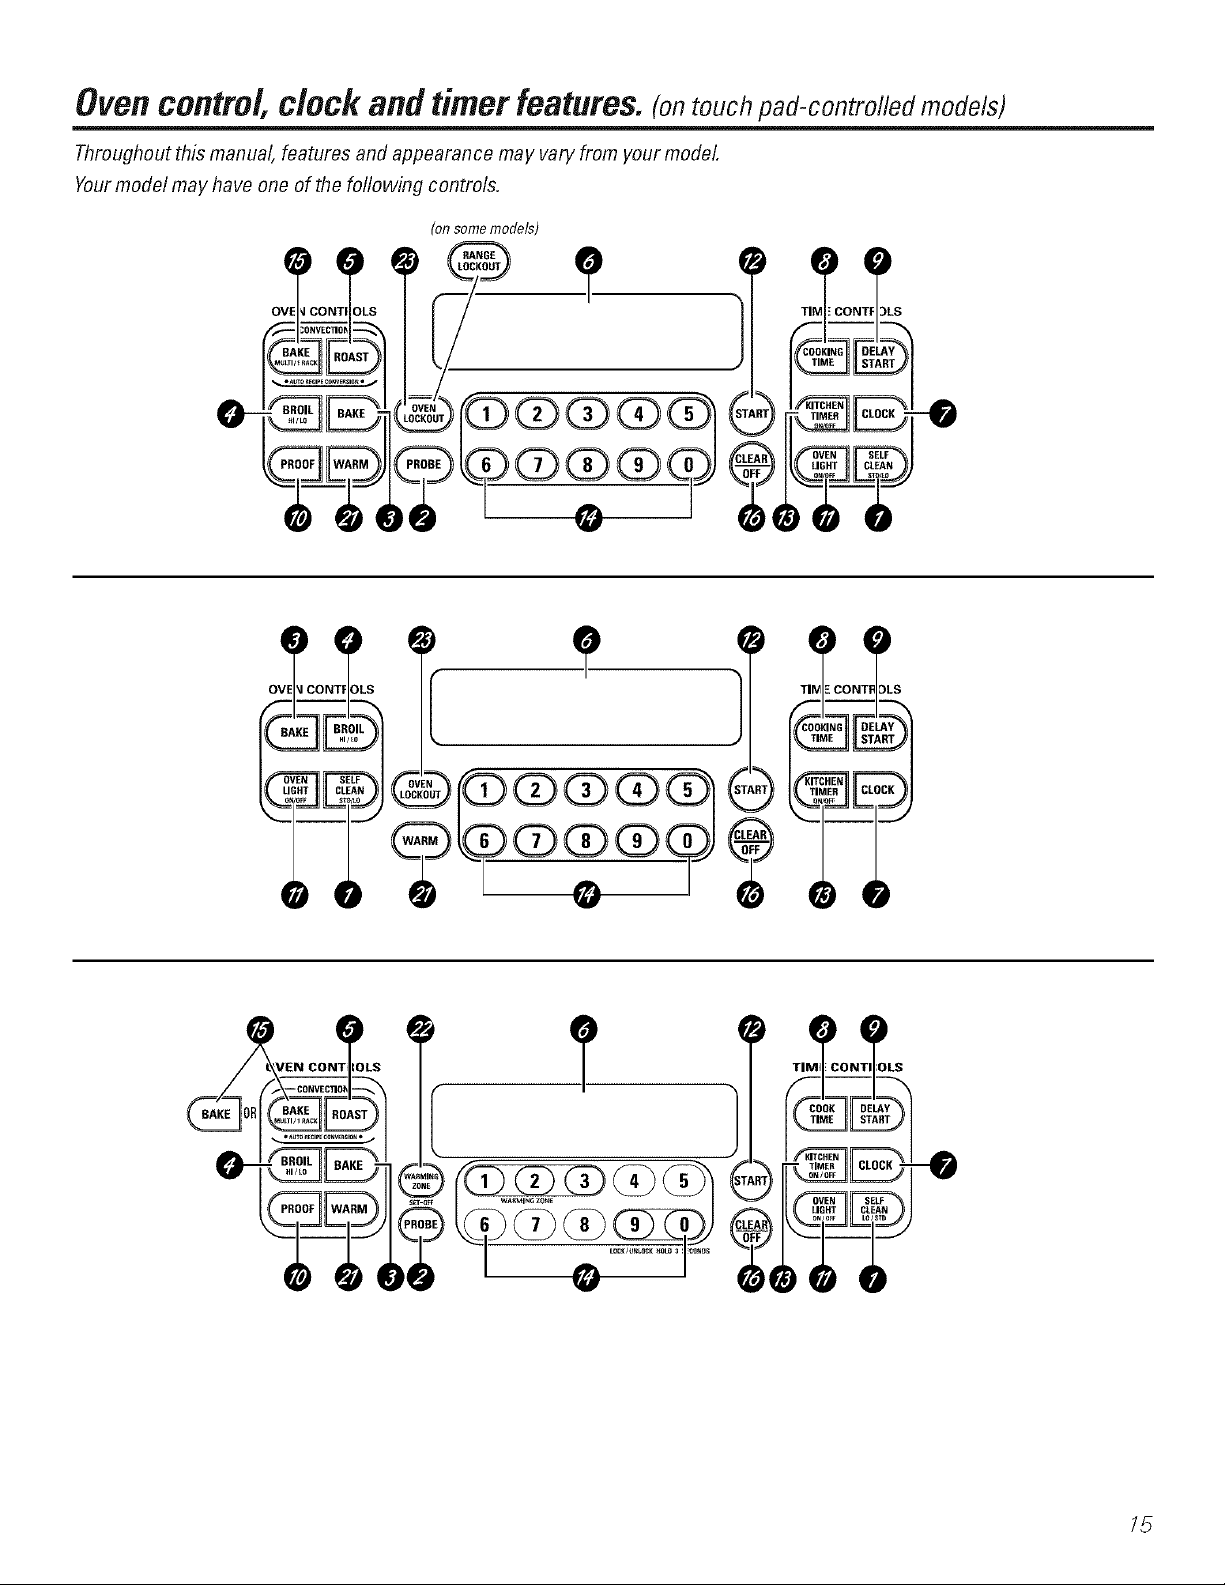
Oven contro/, c/oc_ and timer features, (ontouch pad-controlled models)
Throughout this manual, features and appearance may vary from your model.
Yourmodel may have one of the following controls.
(on some models)
OVE
)LS
O-
_VEN CONT_IOLS
OLS
15
Page 16

Oven contro/, c/oc_ arid timer features, (ontouch pad-controlled models)
Throughout this manual, features and appearance may vary from your model.
Yourmodel may have one of the following controls.
16
Page 17

Overt corttro/, clock artd timer features, (ontouch pad-controlled models)
Throughout this manual, features and appearance may vary from your model
Yourmodel may have one of the following controls.
CONTRC_LS
\ON)
O-
SETWARMING DRAWER
@
LIGHT CLEAN
CONTROL LOCKOUT
;'7
Page 18

Oven colltro/, c/ock and tJlfler features, (ontouch pad-controlled models)
Throughout this manual, features and appearance may vary from your model.
SELFCLEANPad
@
Touch this pad to select tile self,leaning flm(tion.
Seetile Usingtheself-cleaningoven section.
0 STARTPad
Must be touched to strut an) cooldng or (leaning
ftmction.
O PROBEPad
Touch this pad when ushlo,_ tile plebe to cook
fbod to tile desired internal temperature.
O BAKE Pad
Touch this p_d to select tile bake function.
BROILHI/tO Pad
Touch this pad to select tile broil function.
CONVECTIONROAST Pad
Toudl this pad to select ro_sting with tile
COllvection f tlllctioll,
O
Display 0
Shows tile time of dw_ oven temperatm'e, _hetber
tile oven is in tile bake, broil or self-cleaning mode
(on some models) and tile times set fi)_ tile timer
or atltoi//atic o_en opeFations,
If "Y-andanumbaorletter"flash/bthedisplayandthe
ovencontrols/)nals,th/2hal/batesafunctionerrorcode.
/f your oven was set for a t/nTed oven operation and a power
outage occurred, the clock and all programmed functions
must be reset.
ThetlnTeof dayw/ff flash ib the display when therehas
beena power outage.
CLOCKPad
Toudl this p_d befiwe ,settin,,_ tile dock.
COOKINGTIME or COOKTIME ON/OFFPad
Tenth this pad and then touch tile mmfl)er pads
or tile 4- or - pads (depending on model) to set
tile an/o{lll[ of time _ou Vvall[ ]o111" [k)od [o cook,
Theoven will shut off when thecooklbgtlnTehas mn out.
DELAYSTARTPad
0
Ijse along _dth COOKINGTIMEor SELFCLEANpads
to set tile o\en to start and stop automaticall} at
a time ?ou set.
PROOFPad
0
Touch to select a ",_arm enviromnent useful for
rising xeast-leax ened products.
0 VENLIGHT Pad
0
Touch this pad to turn tile oxen light on or off.
On some models, open/bE the oven door will not
automatically turn the oven//_lht on. Youmay use
the oven light switch to turn the light on and oK
KITCHEN TIMER ON/OFFor TIMER ON/OFFPad
Touch this pad to select tile timer fbatm'e.
Number Pads
Use to set anx function re(luiiim,_ numbers such as
tile time of clay on tile clock, tile timeL tile o_vn
temperature, the internal fl)od temperature,
tile st:u_ time and length of operation ii)_ timed
baldng and seltZcleaning.
CONVECTIONBAKE Pad
Toudl this pad to select baldng with tile
convection ftlllCtion,
CLEAR/OFFPad
Touch this pad to cancel ALL oven operations
except tile clock and time_;
STARTTIME Pad
Press this p:_d and tile INCREASEor DECREASE
pads to dela} the starting of }our o\en up to
9 hem's and 59 minutes.
DECREASEPad
Short taps to this pad will deciease tile time or
temperature b} sm_dl alllO{llltS. Piess and hokl tile
pad to decrease tile time o_ temperature b} larger
}}till ( )1. lilts,
INCREASE Pad
O
Short taps to this pad will increase tile time or
temperature by small amotmts.
Pressand hold Ne pad to/bcmase No tbTeor temperature
bylarger amounts.
TIMER/CLOCKPad
0
On some models, p_ess this pad to select tile timer
featm'e. Press and hold this pad mltil tlle displa}
chm_ges to set tile clock.
_ WARM Pad
Touch to keep cooked foods wam_. See tile How to
Set the Oven for Warming section.
WARMING ZONE Pad
Touch this pad _dlen using tile center surfiice refit
to keep fi)od ",_m'm until redid) to serve.
OVENor RANGELOCKOUTPad
Toudl, then touch SYARYto h_d_/mflock tile
range touch pad controls.
18
_ WARMING DRAWER ON/OFFPad
Touch to select tile wu'min,, drinker ftmction.
Page 19

Ovencontrol,clock and timer features,(onknob-controlled models)
Throughout this manual, features and appearance may vary from your model.
r 4b
SET
I?,
ClockandTimerFeatures
KITCHEN TIMER ON/OFFPad
Press this pad to select the timer featm'e.
@ CLOCKPad
Press this pad heft)re setting the clock.
Onsome models you may use the oven light switch to turn the light on and off when the door is closed.
Yourmodel may have one of the following oven control knobs.
Oven Control Knob
Onsomemodelsyoumayusetheovenl/_?htswitchto
turnthe@htonandoff whenthedoorIsdosed
Turn this knob to the setting you want.
(Oil soIne models you Inust push the knob
in before turning.)
Display
Sho_s the time of da_ and the time set fi)r the
timel; cook time or start time.
SETTIME +/- Pads
These pads allo_ you to set the clock and timer
The oven cycling light glows tmtil the oven
reaches wmr selected temperature, then goes
off and on with the oven element(s) during
cooking.
Appearance may var_
19
Page 20

Special featuresofyourovencontrol.(onmodels with a STARTpad)
Yournew touch pad control has additional features that you may choose to use. The following are the features and
how you may activate them.
The special feature modes can only be activated while the display is showing the time of day. They remain in the control's
memory until the steps are repeated.
When the display shows your choice, touch the STARTpad. Thespecial features will remain in memory after a power failure.
12 Hour Shut-Off
Withthisfeature,shouldyouforgetandleavetheoven
on,thecontrolwillautomaticallyturnofftheovenafter
12hoursdunbgbakingfunctionsorafter3hoursdunbg
a broilfunction.
If you wish to turn OFF this ti_atm'e, tollow tile
steps below.
[] Touch tile BAKE and BROILHI/tO pads
at tile same time fi:,r 3 seconds until tile
display shows SE
Fahrenhe# or Celsius Temperature Selection
Yourovencontro//L_setto usetheFahrenheit
temperatureselectionsbutyoumaychangethis
tousetheCe/siussebctions.
[] Touch tile BAKE and BROIL HI/LO pads
at tile same time fb_ 3 seconds until tile
display shm_s SE
[] Touch tile CLOCKpad or DELAYSTARTpad
(on some models) repeatedly until tile
displa_ shows OFFor noshdn (no shut-off).
[] Touch tile START pad to activate tile no
shut-off and leaxe the control set in this
special teatm'es mode.
[] Touch tile BROIL HI/LO pad again. Tile
displa) will sho_ C (Celsius). On some
models, you will need to touch tile
COOKINGTIME and BROIL HI/tO pads at
tile same time.
[] Touch tile STARTpad.
[] Touch tile BROIL HI/tO pad. Tile displa_
will show F (Edn'enheit). On some inodels,
?ou will need to touch tile COOKINGTIME
and BROIL H//LO pads at tile same time.
Tonesat the End of a Timed Cycle
At theendofa flknedcycle,3shortbeepswillsound
followedby onebeepevery6secondsuntilthe
CLEAR/OFFpadistouche_Thiscontinual6second
beepmaybecance/e_
To cancel tile 6 second beep:
[] Touch tile BAKEand BROILHI/tO pads
at tile same time ti:,r3 seconds tmtil tile
display shows SE
Depending on }ore" model, xou xdll need
[]
to touch either tile KITCHENTIMERON/OFF
pad or tile BROILHI/LOpad. Tile display
shows CONBEEP(continual beep).
Touch tile pad again. Tile display shows
BEEP.(This cancels tile one 1)eep e\'eQ'
6 seconds.)
Touch the STARTpad.
[]
20
Page 21

Control Lockout
Yourcontrol will allow you to lockout the touchpads
so theycannotbe activatedwhen touched
[] Touch the BAKE and BROIL HI/LO pads
at tile same time for 3 seconds until tile
display shows SE
[] Touch the SELFCLEAN pad. The display
will show LOCOFF.
Touch the SELFCLEAN pad again.
The display will show LOC ON.
Control Lockout (onmodels with number pads)
Yourcontrolwillallowyoutolockoutthetouchpads
sotheycannotbeactivatedwhentouchedorclean/hg
theglasspanel.
To acti;rnte this featm'e:
[] Touch the 9 and/7 touch pads at tile
same time for., seconds until the control
beeps t_dce. The displa,_ will show LOC
continuot_sl} and the time of da} if not
blacked out.
• 9.
[] Touch the START pad to actixate the
control lockout feature and leaxe the
control set in this special features mode.
_._]/en this teature is on and the pads are
touched the control will beep and the display
will show LOC.
NOTE:Thecontrollockoutmodewi//notaffectthe
CLOCK,KITCHENTIMERON/OFFandTIMER/CLOCKpads.
NOTE:All cook/hgand t/?n/hgfunctionswill be
cancelledwhen/ock/hg out the control
[] To tmlock tile control, touch the 9 and/7
touch pads at the same time fin" 3 seconds
until the control beeps twice, and L0C will
be removed fi'om the display.
Oven or Range Lockout (depending on model)
Yourcontrolwi//allowyoutolockoutthetouchpadsso
theycannotbeactivatedwhenpressed
To lock/unlock the touch pad controls:
[] Touch the OVENLOCKOUTor RANGE
LOCKOUTpad, then touch the STARTpad.
The SUltace unit displays (on models
so equipped) will show LC and the oven
display Mll show Loc On tot several seconds,
then they Mll go blank until a cooking pad
is touched.
[] To unh)ck the control, touch the OVEN
LOCKOUTorRANGELOCKOUTpad,then
touch the STARTpad.
If the range control is locked and a cooking
pad is touched, the appropriate SUltilce display
(on models so equipped) or the oven display
will show that the control is locked.
• Onmodelswith OVENLOCKOUTonly,theovenwill be
lockedou_ Theknob-controlledsurfaceunitswillstill
beactive.
• TheRANGELOCKOUTmodeaffectsall touchpads.
Notouchpadswillworkwhenthisfeatureis
activated
2/
Page 22

Special featuresofyourovencontrol (onmodels with a STARTpad)
Cook and Hold
Yournew controlhas acookand hold feature thatkeeps
cookedfoodswarm for up to 3hoursafter the cookbg
functionis flhlshed
To acti\;Ite this feattlre, follow the steps belong:
[] Touch the COOKING TIME pad. The displa}
will show HM OFF.
Touch the COOKING TIME pad again to
activate the teatm'e. The display will show
//It/ON.
[] Touch the BAKE and BROIL HI/tO pads
at the same time fin" 3 seconds until the
display shows SE
[] Touch the START pad to actixate the cook
and hold teatm'e and lea_e the control set
in this special ti_atm'es mode.
Using Convection Conversion (onmodels with a glass control panel only)
Byus/hg the ConvectionConversionfeatureyou can
automatically convertthe oven temperaturefrom regubr
haklhgto ConvectionBake temperatures.
To convel_t the oven temperatm'e fb_
convection baldng, flAlow the steps below.
[] Touch and hokl the CONVECTION BAKE
pad fi,r 4-5 seconds.
[] Using the mmg)er pads, enter the
temperature recommended in the redpe.
[] Touch the STARTpad.
The displa} shows the convei'ted (reduced)
temper:mue. For example, if you enteied a
recipe temperature of 350°E, the display will
show 325°/:..when it is convel_ed.
]_] Touch the CLEAR/OFFpad when b'ddn,,,_ is.
ii i
finished.
NOTE:Conversionmust be set eachtkne you want to
useit./t/s not held/h memon/
Changing the Speed of the Increase or Decrease Pads (on some models)
As youuse the INCREASEoFDECREASEpads when [] Touch the INCREASE pad to increase the
settlhg a time or temperature,youmay notice the display speed up to the nmnber 5.
changess/ow/g Thisspecial featureallows youto
change thespeed
To set the speed you prefer, follow the steps
below.
[] Touch the BAKE and BROILHI/LOpads at
the same time fin 3 seconds tmtil the
displa} shows SE
[] Touch the INCREASE pad. The displa) Mll
show you a set speed between 1 and 5.
Touch the DECREASEpad to decrease the
speed down to the nmnber 1.
Touch STARTto acti_ _te the setting and
[]
leaxe the control set in this special featm'es
illode.
22
Page 23

12hour,24 hourorclock black-out
f2 Hour,24 Hour or Clock Black-Out (onsomemodels)
Yourcontrol/s set to usea 12hour clock.
If you would pretbr to have a 24 hour militm y
time clock or black-out the clock display, fi_llow
the steps below.
[] Touch the BAKE and BROIL HI/LO pads
at the same time fi)r 3 seconds until the
displa_ shows SF.
[] Touch the CLOCKor TIMER/CLOCKpad
once. The displa? will sho_ 12hr. If this is
the choice you want, touch the START pad.
Clock Black-Out (onsomemodels)
If you have several ch_cLs in yore" ldtchen, you
may wish to black-out the time of day display
of your range. If so, press the CLOCKpad.
Press the CLOCKpad twice to retain the time
of clay after a black-out.
Touch the CLOCK or T/MER/CLOCKpad again to
change to the 24 hour militm-v time clock. The
display will show 24 hr. If this is the choice you
want, touch the START pad.
Touch the CLOCK or T/MER/CLOCKpad again
to black-out the clock display. The display will
show 0FE If this is the choice you want, touch
the START pad.
NOTE:If thedockis/b theblack-outmodeyouwillnot
beabletousetheDela;/Startfunction.
Mthough you camlot see it, the clock maintains
the correct time ot day. It will reappear flw the
duration of any function that displays a Start
Time or Cook Time. Press the CLOCK pad again
to b_ing back the display.
Tone Volume
Thisfeatureallows you toadjust the tonevolumes to
a moreacceptablavolume. Thereare threepossibla
volumelevels.
[] Touch the BROIL HI/LO and BAKEpads at
the same time fb_ 3 seconds, until the
displa_ shows SF.
[] Touch the OVENLIGHT ON/OFFpad. The
displa_ will show 2 BEEP. This is the middle
xolulne lexel.
Touch the OVEN LIGHT ON/OFFpad again.
The displa? will show 3 BEEP. This is the
loudest _olume lmel.
Using Auto Recipe TM Conversion
Whenusingconvectionbake, theAuto Recipe_
Conversionfeaturewill automatically convertentered
regularbaking temperaturesto convectionbaking
temperatures.
Thisfeatureis activated so the dlspla;/ will show the
actualconverted(reduced)temperature.Forexample,
if you enteraregular recipetemperatureof 350°Fand
touchthe STARTpad, thedlspla;/will show CONand
the convertedtemperatureof325°E
NOTE'.Thisfeature doesnot convertconvectionbake
cookingtimes, onlyregular baking temperatures.
Touch the OVEN LIGHT ON/OFFpad again.
The display will show I BEEP. This is the
quietest \'olume level.
For each time the level is changed, a tone
will SOtlnd to provide an indication of the
w)lume level.
[7_] Choose the desired sound lexel (1 BEEP,
2 BEEP,3 BEEP).
[] Touch the START pad to activate the level
sNo_vII.
[] Touch the CONVECTIONBAKEor
CONVECTIONBAKEMULT!/1RACKpad
(depending on model). The display will
show CONON.Touch the CONVECTION
BAKEor CONVECTIONBAKEMUL77/IRACK
pad again. The display will showCONOFF.
[] Touch the STARTpad.
To reacfixate the teature, repeat steps 1-3 aboxe
but touch the START pad when CON ONis in
the display:
Todeactivate the feature:
[] Touch the BROIL HI/LO and BAKEpads
at the same time fi:,r 3 seconds until the
display shows SF.
23
Page 24

Usingthe oven.
Toavoid possible bums, place the shelves in the desired posifion before you turn the oven on.
Onmodels with a door latch, do not lock the oven door with the latch during cooking. The latch is used for self-cleaning only.
Before you begin...
Dependingonyourmodel,theoven
willhaveeiflTer6 (shown)or5shelf
positions.
Toavoidpossible burns,place the shelvesin the desked
positionbefore you turnthe oven on.
The shelves have stops, so that when placed
correctly on the sui)ports, they will stop before
coming completely Otlt, and will not tilt.
When pladng and removing cookware, pull
the shelf out tmtil it stops.
On some models, the bake heating element is
trader the oven flooi: Do not place foods on
tile oven bottolll ]_i)I"cooking.
Toremove a shelf, pull it toward you, tilt tile
fl'ont end up and pull it out.
Toreplace, place the end ot the shelf (stoi>
locks) on the suI)port, tilt up the front and
push the shelf in.
CAUTION:Whenyouareusin theshelfln
the/owestposition (A),youwi// needto usecaution
whenpuffing the shelf out Werecommendthat youpuff
theshelf out several inchesand then,uslbg two pot
holders,pull theshe/f outby ho/dlbg the sidesof it The
shelf is low andyoucould beburnedif you place your
hand in the middle of theshe/f and pu// aft the way out
Beverycarefulnot toburn your handon thedoor when
uslbgthe she/flb the/owestposition (A).
How to Set the Ovenfor Baking or Roasting
[] Touch the BAKE pad. Onmodels with an oven control knob, mrn the
[] Touch tile imlnber pads or tile + or - pads knob to the telnl)erature you desire.
(del)ei_ding on your model) to set the On seine models you nmst push the knob in
desired temperatm'e, before tm'ning.
Touch the START pad.
[]
To change the oven mlnl)erature d/wing
BAKE cycle, touch tile BAKEpad and
then tile imlnber pads or ÷ or -pads
(dei)ending on your inodel) to get the
new telnl)erature.
[] Check fi)od fiw doneness at nfilfinmln tilne
on recipe. Cook hmger i_ necessary:
[] Touch. the CLEAR/OFFpad when cooking
is complete.
Tm'n the knob to OFF when cooking is
complete.
24
Page 25

Donot place foods directly on the oven floor.
Preheating and Pan Placement
Preheat the oven if' the recipe calls fin" it.
Preheating is necessai wh:,r good results when
baking cakes, cookies, pasti T and breads.
To preheat, set the oven at the correct
temperature.
Onsome models,the control will bee/) when the
ovenis preheatedand thedisplay wi// show your
set temperature. Thiswi// take approximately
10-15 minutes.
Aluminum Foil
Never cover the oven bottom with aluminum foil
You can use ahmfinum toil to line tile broiler
pan and broiler grid. Howevei; you illtlSt inold
the toil tightly to the grid and cut slits in it just
Cut slits in the foil just like the grid.
like the grid.
Baking results will be better if baking pans are
centered in the oven as much as possible. Pans
should not touch each other or the walls of the
oven. ]fw_u need to use two shelves, stagger tile
pans so one is not direcflv above tile otheI; and
leave approximately 11/-,"between pans, fl'om
the fl'ont, back and sides of the wall.
_dtulfilmm foil may also be used to catch a
spillover. To do so, place a slnall sheet _ff toil
on a lower shelf several inches below tile toed.
Never entirely cover a shelf with aluminum foil.
This will disturb the heat circulation and result
in poor baking.
Leavethe door open tothe broil stop
position. Thedoorstays openby
itself, yet the proper temperatureis
maintained f17the oven.
How to Set the Ovenfor Broiling
[] Place tile meat or fish on tile broiler grid
in tile broiler pan.
[] Follow suggested shelf positions in the
Broiling Guide.
/f yourrangeis connectedto 208 volts, rare steaksmay
be broiledby preheating thebroiler andpositioning the
ovenshelf oneposition hl_?her
Use LOBroil to cook foods such as poultI w or
thick cuts ot nleat thoroughly without ovei _
browning them.
[] Touch tile BROILHI/LO pad once fi,r
HI Broil.
To change to LO Broil, t o u ch tile BROIL
HI/LO pad again.
[] Touch tile START pad.
[] _._q/en broiling is finished, touch tile
CLEAR/OFFpad.
Onmodels with an oven control knob, turn tile
knob to BROIL
On some models _ou must push tile knob in
before turning
_,_q/ell broilino is finished, turn tile knob to OFF.
25
Page 26

Usingthe clock andtimer.(onsomemodels)
Make sure the clock is set to the correct time of day.
To Set the Clock
The clock must be set to the correct time ot
day fin" the autonmfic oven tinting tractions
to work properly: The time of day cannot
be changed dm_ing a timed baking or
self:cleaning cycle.
[] Touch the CLOCK pad once or twice
(depending on yore" model).
(-)n some models, touch and hold the
TIMER/CLOCKpad.
ToTurnOffthe Clock Display
If you have se\w'al clocl_s in yore" ldtchen,
you may wish to tm'n off tile time of day clock
display on your range.
[] Touch tile CLOCK}yad once to turn off tile
time of da) display. Mthough )ou will not
be able to see it, tile clock maintains tile
correct time (ff day.
[] Depending on yore" model, touch the
nmnber pads or the + or-pads.
[] Touch the START pad.
[] Touch tile CLOCKpad again to recall the
clock display.
To Set the Timer
Thetimeris aminutetimeronly Thetimerdoesnot
controi oven operations.
[] Touch tile KITCHEN tiMER ON(fEE or
TIMER/CLOCK pad (depending on _om"
model).
[] Depending on yore" model, touch tile
number pads or tile + or -pads/mfil tile
_llllOtlnt of tilne VO/I W;lllt shows in the
display.
If youmakea mistaketouchtheKITCHENTIMER
ON/OFFor TIMER/CLOCKpadandbeginagain.
[] On some models you will need to touch
tile STARTpad.
[] On some models, when tile timer reaches
:00, the control will beep 3 times followed
b', one beep e',e_a' 6 seconds tmtil tile
KITCHEN TIMER ON/OFFor TIMER/CLOCK
pad (depending on yore" model) is
touched.
On models with a STARTpad, tile 6 second tone
can be canceled by fl)llowing tile steps in tile
Special features of your oven control section
trader Tones atthe End of a timed Cycle.
Toclearthe toneson modelswith a controlknob, press
thepadof the function youare using.
26
Page 27

To Reset the Timer
If the display is still showing tile time
remaining, you may change it by touching the
KITCHEN TIMER ON/OFF or TIMER/CLOCKpad
(depending (m }_mr model), then touch the
nmnber pads or tile + or - pads (depending
011your model) until tile time you want
appea_> in tile displa>
To Cancel the Timer
Touch tile KITCHEN TIMER ON/OFF or
TIMER/CLOCK(depending (m _mr model)
pad twice.
End of Cycle Tones (onsomemodels)
(lear the tones by pressing tile pad of tile
ftlllCtiOll yotl are tlSillg.
Power Outage
Ira f/ash/ngt/nTe/s/n the d/sp/agyou haveexpedenced
apower failore, Resettheclock.
If tile remaining time is not in the display
(clock, delay stm_ or cooldng time are ill tile
display), recall tile remaining time by touching
tile KITCHEN TIMER ON/OFFor TIMER/CLOCK
pad (depending on yore" model) and then
touching the m,tuber pads or tile ÷ or - pads
(depending on your model) to enter tile new
time you want.
To reset tile (lod<, touch the CLOCKpad twice.
Enter tile coH'ect time of day by touching tile
+ or-pads. Touch tile START/ON pad.
27
Page 28

Usingthe timedbakingand mastingfeatures.(onsome models)
The oven will turn on immediately and cook for a selected length of time. At the end of the cooking time, the oven will turn off
automatically.
NOTE:Foods that spoil easily-such as milk, eggs, fish, stuffings, poultry and pork-should not be allowed to s# for more than
one hour before or after cooking. Room temperature promotes the growth of harmful bacteria. Be sure that the oven light is off
because heat from the bulb will speed harmful bacteria growth.
Onmodels with a door latch, do not lock the oven door with the latch during cooking. The latch is used for self-cleaning only.
How to Set an Immediate Start and Automatic Stop (onmodels with pads only)
[] Touch the BAKEpad.
[] [)sing the number pads or the 4- or - pads
(depending on xom" model) enter the
desired teml)eratm'e.
Touch tile COOKING TIME pad.
[]
NOTE: If your recipe requkes preheat/hg, you may
need to add additiona/ t/nTe to the/ength of the
cooklhg tl#?e.
Llsing tile number pads or the 4- or - pads
[]
(depending on xour model) enter tile
desired baldng time.
Tile clispla_ shows either tile oven teml)erature
that you set or tile cooldng time COtllltdown.
The cook time will begin to cotmt down.
_s tile oven heats up, the display will show tile
changing temperature. When the o\en reaches
the temperature you set, 3 beeps will sound.
At the end of timed baldng, the oxen will turn
off. The end of cycle tone will sound.
Touch tile CLEAR/O_ pad to clear tile display.
[] Touch the STARTpad.
Youcan set the oven control to delay-start the oven, cook for aspecific length of time and then turn off automatically.
Make sure the clock shows the correct time of day.
How to Set a Delayed Start and Automatic Stop (onmodelswithpadsonly)
[] Touch the BAKEpad.
[] Using the numl)er pads or tile + or -pads
(depending on _our model), enter the
desired temperature.
[] Touch the COOKINGTIME pad.
NOTE:If yourrecl_)erequkespreheaflhg youmay
need to addadditional time to the length of the
cooklhgtime.
[] Using the numl)er pads or tile + or -pads
(depending on your model), enter the
desired baking time.
Touch the START TIME or DELAYSTART
[]
pad.
Using the number pads or tile + or -pads
[]
(depending on _our model), enter the
time of day }ou want the oxen to tm'n on
and start cooking.
If you would like m check the times you have
set, touch the STARTTIME or BELAYSTABTpad
to check tile start time )_m have set or touch
tile COOKINGTIME pad to check the length of
cooking time you have set.
The oven will ttlI'n oIx autolnaticallv The cook
time will begin to count down.
The oven will cook tot the programmed
cooking time and sh ut off automatically.
At the end of timed baking, the oven will mrn
off. The end of cycle tone will sotmd.
Touch the CLEAR/OFFpad to clear the display.
28
[] Touch the START pad.
NOTE:Anattentiontonewillsoundif youamusing
tl_nedbaklhganddonot touchtheSTARTpadafter
enteringthebakingtemperature.
Page 29

Usingthe probe.(onsomemodels)
For many foods, especially roasts and poultry, internal food temperature is the best test for doneness. The temperature probe
takes the guesswork out of roasting by cooking foods to the exact alonenessyou want.
The temperature probe has a skewer-
like probe at one end and a plug at the
other end that goes hTto the outlet in
the oveR.
Use of probes other than the one provided with
this product may result in damage to the probe.
Use the handles of the probe and plug when
inserting and removing them fl'om the fi)od
and outlet.
• Toavoid damaglegyourprobe,do not use tongs
topuff on the cable whenremoving it.
• Toavoid breaking theprobe,makesure foodts
completely defrostedbefore insetting
• Topreventpossible burns, donot unplugthe probe
from theoutlet until the ovenhas coole_
,Mter preparing the meat and plating it on a
trJ\'et or on the broiler pan gri(l, follow these
directions for proper probe placement.
Insert the probe completely into the meat.
It should not touch the bone, tat or gristle.
For roasts with no bone, insert the probe into
the meatiest part of the roast. For bone-in ham
or lamb, insert the probe into the center of
the lowest large muscle.
• Never leave yourprobe inside theoven dunbg
a self-cleaningcycle.
• Do not store theprobe le the oven.
Insert the probe into the center of dishes such
as Illeat foal oi" casseroles,
Insert the probe into the meatiest part of the
ironer thigh fl'om below and parallel to the leg
of a whole tin'key:
If the probe is removed from the food before the final temperature is reached, a tone will sound and the dbplay will flash until the
probe is removed from the oven.
Youcan use the timer even though you cannot use timed oven operations while using the probe.
How to Set the Oven For Roasting When Using the Probe
[] Insert the probe into the food.
[] Plug the probe into the outlet in the oven.
Make sm'e it's pushed all the way in. Close
the oven (loo_: Make sm'e the probe cable
is not touching the broil element.
[] Touch the PROBEpad.
[] Touch the number pads to set the desired
internal fi)od or meat temperatm'e.
[] Touch the BAKE pad.
[] Touch the number pads to set the desired
oven teiilpei'at t ii'e,
Touch the START pad.
[]
Tile display Mll flash if tile probe is inserted
into tile outlet and )_)/1 have not set a probe
temperature and touched tile STARTpad.
When tile oven starts to heat, tile word LO will
be in tile display.
_Mter the internal temperatm'e (ff the fi)od
reaches 100°F., tile changing internal
temperature will be shown in tile display.
[_ X._q/en tile internal temperature of the
fi)od reaches tile nmnber you haxe set, tile
prol)e and tile oven ttlFn off and tile oven
control signals. To stop the signal, touch
tile CLERR/OEEpad.Use hot pads to remove
tile probe fl'om tile filed. Do not rise tongs
to pull on it--they might damage it.
To change tile oven temperatm'e durh_g tile
Roast cycle, touch tile BAKEpad and then tile
nmnber pads to set tile new temperatm'e.
29
Page 30

Using the convection oven. (on some models)
The convection oven fan shuts off when the oven door is opened. DO NOTleave the door open for long periods of time while
using convection cooking or you me)/shorten the life of the convection heating element.
h? a COl?Vet[for? oveR,a far circulates
hot air over,underand aroundthe
food.Thiscirculating hot airis evenly
distributed throughoutthe ovencaviSz
As aresult, foods are evenlycooked
andbrowned--often h7lesstime than
with regularheat.
To help you understand the difference between
convection bake and it)as[ and traditional bake
and roast, here are some general guidelines.
Convection Bake
• Idealforeven/}/brownedbakedfoodscookedon
mult)_leshelves.
• Goodforlargequantitiesofbakedfoods.
• Goodresultswithcookies,biscuits,brownies,
cupcakes,creampuffs,sweetrolls,angelfoodcake
andbrea(_
Heat comes fl'om the heating element in the
rear of the o\en. The convection tim drculates
the heated air evenly over and ar(mnd tile
%od. Pieheating is not necessary with ibods
having a bake time (ff o\er 15 minutes,
Convection Roast
• Goodfor/arge tendercuts of meat,uncovered.
Heat (omes fl'om the top heating element.
The convection tim circulates the heated air
evenly over and aromld the foo(k Meat and
poultry are browned on all sides as if they were
cooked oil a rotisserie, [)sing the roasting rack
provided, heated air will be circulated ove_;
trader and arotmd the %od being roasted,
Tile heated air seals in.juices quickly fi)r a moist
and tender product while, at the same time,
creating a lich golden brown exterior.
Roastingrack
Grid
J
Broilerpan
_v\l_en you are convection roasting it is
impoi_ant that you use the broiler pan and
grid and the spedal roasting rock fbr best
convection roasting results. The pan is used
to catch grease spills and the grid is used to
prevent grease spattel_. Place the meat on the
special roasting rack. The rack holds the meat.
Tile rack allows the heated air to drculate
trader the meat and increase browning on
the underside of the meat or poultry:
• Placethegrid on the broilerpan andput the roast/bg
rack overthem maklhgsurethe postson theroasting
rack fit/bto the holes/b thebroilerpan.
30
Adapting Recipes...
You can use your fi_\'ofite recipes in the
convection ()'veil.
When baking, reduce baking temperature
by 25°E
No need to preheat when cooking longer
than 15 minutes.
• Usepan size recommended
• Somepackageinstructions for frozencasserolesor
main disheshavebeendevelopedusingcommercial
convectionovens.Forbest results in thisoven,
preheat the ovenanduse thetemperatureon the
package.
Page 31

Cookware for Convection Cooking
getoi'e using your convection oven, check
to see if VO/li"cookware leaves i'OOlll _()i"_lii"
circulation in tile ()veil. If w)u are baking
with several pans, leave space between thenl.
_Mso, be sure tile pans do not touch each
other or tile walls ot tile ()veil.
Paper and Plastic
Heat-resistant paper and plastic containei_
that are reconnnended fin" use in regular
()veils C_lIlbe used in convection (wens. Plastic
cookwai'e that is heat-resistant to tenii)eratures
of 400°E can also be used, when ()veil is
below 4(}0°E
Metal and Glass
Any t,ipe ot cookware will work in your
convection oven. However, nletal pans heat tile
fi_stest and ai'e i'ecoi/llllended tor convection
baking.
• Darkenedormatte-ffaished pans will bakefaster than
shinypans.
• Glassorceramicpans cookmoresiow!g
\_l/eIl baking cookies, you will get tile best
results if wm use a fiat cookie sheet instead of
a pan with low sides.
For i'ecipes like oven-baked chicken, use a pan
with low sides. Hot air cannot drculate well
around tood in a pan with high sides.
How to Set the Ovenfor Immediate Convection Baking or Roasting
[] Touch tile CONVECTIONBAKE or
CONVECTIONROAST pad.
On models with a CONVECTIONBAKE
MULTI/IRACKpad, touch once fi)r muld-
rack convection baking or twice tbr one
rack convection baking.
[] Touch tile number pads to set tile desired
(Well tel//pel'at tll'e.
[] Touch tile START pad.
When tile o\en starts to heat tile changing
temperature, starting at 100°E, will be
displayed, When tile oven reaches the
teInperamre you set, 3 beeps will sound,
[] Touch tile CLEAR/OFFpad *dlen finished.
NOTE."Youwill heara fan whifa cookfagwith convection.
Thefan will stop when thedoor l2opanedbut theheat
will not tumoff
T(I change tile oven temperature, touch tile
CONVECTIONBAKE or CONVECTIONROAST pad
and then tile number pads to set tile new
teI//perattlre,
3/
Page 32

USing the convection oven. (on some models)
If the probe is removed from the food before the final temperature is reached, a tone will sound and the display will flash until
the probe is removed from the oven.
Youwill hear a fan while cooking with this feature. The fan will stop when the door is opened but the heat will not turn off.
Youcan use the timer even though you cannot use timed oven operations while using the probe.
How to Set the Oven for Convection Roasting When Using the Probe
For best results when roasting large
turkeys and roasts, we recommend
using the probe included in the
convection oven,
The display will flash PROBE and the oven
control will signal if the p_x4)e is inserted into
the outlet, and you have not set a probe
temperatm'e and touched the START pad.
[] Place the shelf in the lowest position (A).
Insert the probe into the fi)o(1.
[] Plug the probe into the outlet in the oxen.
Make sm'e it is pushed all the way in. Close
the o_en dooi:
[] Touch the PROBEpad,
[] Touch tl_e nmnber pads to set the desired
internal fi)od temperatm'e.
[] Touch the CONVECT/ON ROAST pad,
_Mter the internal temperature of the fi)od
reaches ] O0°E, the changing internal
temperatm'e will be shown in the display.
[] _4d_en the internal temperatm'e of the food
reaches the number you ha_e set, the
probe and the oven turn off and the oven
control signals. To stop the signal, touch
the CLEAB/Offpad. Use hot pads to remo',e
the probe fi'om the fi)od. Do not use tongs
to pull on it--they might damage it.
CAUTION:Topreven,poe ib/eb.rne,no,
unpiug the probe from the oven outiet untii the oven has
cooie_ Do not store the probe in the oven.
[] Touch the number pads to set the desired
oven tei/l l)ei';ff/li'e,
[] Touch the START pad.
_'_ hen the oven starts to heat, the word LO will
be in the display.
32
Page 33

Usingthe timedfeatures for convection baking.(onsomemodels)
The oven will turn on immediately and cook for a selected length of time. At the end of the cooking time the oyen will turn off
automaticaflg
Youwill hear a fan while cooking with this feature. The fan will stop when the door is opened but the heat will not turn off.
NOTE:Foods that spoil easily-such as mill(, eggs,fish, stuffings, poultry and pork-should not be allowed to sit for more than
one hour before or after cooking. Room temperature promotes the growth of harmful bacteria. Be sure that the oven light is off
because heat from the bulb will speed harmful bacteria growth.
How to Set an Immediate Start and Automatic Stop
[] Touch tile CONVECTIONBAKEor
CONVECTIONBOASTpad.
On models with a CONVECTIONBAKE
MULTI/IRACKpad, t(>udl once for muld-
rack convection baking or twice for one
rack convection baking.
[] Touch tile number pads to set tile desired
oven tei// pel';ittlye.
[] Touch tile COOKING TIMEpad.
NOTE:/fyourreciperequkespreheatingyoumay
needtoaddadditionaltlnTetothelengthof the
CO0_lfl_ tli?Te,
Tile display sho_vs tile oven temperature that
you set and tile cooldng time countdown. Tile
display starts changing once tile temperature
reaches lO0°E
[] At tile end of timed com'ection bake tile
o'_en will turn off. Tile end of c'_cle tone
will sound. Touch tile CLEAR/OFFpadto
clear tile displa) if necessary.
[] Remove tile tbod fl'om tile oven.
Remember; foods that are left in tile oven
COlltilltle cooldll_ at{el" tile controls al'e of].
Touch tile mmlber pads to set tile desired
[]
length of cooldng time. Tile minimum
cooldng time )ou can set is 1 minute.
Tile oven temperature that }ou set and tile
cooking time that )ou entered will be in
tile display.
[] Touch tile START pad.
33
Page 34

Using the timedfeatures for convectionbaking. (onsomemodels)
Youcan set the oven control to delay-start the oven, cook for aspecific length of time and then turn off automatically.
Make sure the clock shows the correct time of day.
How to Set a Belayed Start and Automatic Stop
[] Totuh the CONVECT/ONBAKE or
CONVECTIONROAST pad.
Oil models with a CONVECTIONBAKE
MULTI/I BACKpad, touch once f_w multi-
rack convection baking or twice fiw one
rack convection baking.
\_]len tile o\en turns on at tile time oi clay
you ha\v set, tile dispkLv will show tile changing
tempemtme (starting at l O0°E) and tile
cooldng tin/e CO[lntdowll.
At tile end of timed convection bake tile oven
will turn off. Tile end of cycle tone will sound.
[] Touch tile nmnber pads to set tile desired
oven tei// pel';l[t/ye.
[] Touch tile COOKINGTIME pad.
NOTE: If your rec/))e requires preheat/))g, you may
need to add additional tkne to the lengthof the
cookll?g tlfl?e.
Touch the number pads to set tile desired
[]
cooldng time.
Touch the BELAYSTARTpad.
[]
Touch tile number pads to set tile time of
[]
day yo/s _,_allt tile ovell to till'IX on alld stal'_
cooldng.
[] Touch tile STARTpad.
NOTE:Anattentiontonewillsoundif youareus/)_g
tknedbak/)_ganddonottouchtheSTARTpadafter
entenngthebak/)_gtemperature.
[] Touch tile CLEAR/OFFpad to clear tile
displa} if necessm T. _'_hen baldno_ is,
finished, remo\e tile fbod fl'om tile (well.
Remembec even though the o\vn shuts off
automatically, foods continue cooldng after
tile controls al'e o_L
34
Page 35

Usingthe proofingand warming features.(onsome models)
Theproofing feature maintains a warm environment useful for rising yeast-leavened products.
How to Set the Oven For Proofing (onsome models)
[] Pl;_ce the co\ered dough hi a dish h_ the
oven on shelf B or C.
NOTE'.Forbestresults,coverthedoughwitha clothor
withgreasedplast/2wrap{theplasticmayneedto be
anchoredunderneaththecontabersotheovenfanwill
notblow itoff).
[] Touch the PROOF pad and then the
STARTp',_d.
Tile display will read PrF (proof).
The oven interior light turns on and remains
on during proofing.
Tile proofing teamre alm>mati(al],_ provides
tile opt]reran tempenm/re %_:"tile proofing
process, and thereibie does not ]lave a
temperature a(!iustment.
[] Set tile KITCHENTIMERON/Off t,,r tile
minimmn proof time.
[] _len woofing is finished touch tile
CLEAR/Off pad.
[] Toavoid /owenngthe oventemperatureand
/engthembgproofbg tl?77e,do not openthe
ovendoorunnecessan/g
[] Checkbreadproducts earlyto avoid over-prooflbg.
NOTES:
[] Donotusetheproof/bgmodeforwarnT/bgfoodor
keep/bgfoodhot. Theproof/bgoventemperature/_
nothot enoughtoholdfoodsat safetemperatures.
UsetheWARMortheCookandHoldfeature
{depend/bgonmodel)tokeepfoodwamT.
[] Proofbgwillnotoperatewhenovenisabove125°E
"HOT"will showb thedlspla/.
How to Set the Oven For Warming (onsome models)
Tile w;mn fbature keeps cooked tbods _m_n
fiw up to 3 hours after tile cooidng flmction is
finished, or it call be activated independendy
to kee I) already cooked ibods wam/.
This ieature is not designed to reheat
cold food.
To use this feature independently, touch tile
WARMpad and then tile SYARYpad.
To acti',r;ffe this feature for use aiter Timed
Baking or Roasting, touch tile WARM pad after
setting the desired length (ff cooldng time and
beflwe touching START.
ToCrispStaleitems:
iMPORTANT NOTES:
[] Foodshouldbe kept hot Ib itscooklbgcontalber or
transferredto aheat-safe servlbgdl2h.
[] Formolst foods, coverthem Wlthan oven-safe/ldor
alumlbum foil.
[] Fnedor cn& foods donot need tobe covered,but
canbecometoo dryif warmed for too long.
[] Repeatedopenlbgof thedoorallows the hot air to
escapeand the food tocool
[] Allow extra tlnTeforthe temperatureibs/de the oven
tostab/h2eafter addlbgitems.
[] With large loadsit maybe necessaryto coversome
of thecookedfood items.
[] Placefoodb low-sideddishesorpare.
[] Forbestresults,placethefooditemsb a sbgle layer.
[] Removeservlhgspoons,etc., beforeplaclbg
contazberszbthe oven.
Donotstack.
[] Leave themuncovered.
[] Checkcnspnessafter20-30mbutes.AddtlnTe
asneeda_
[] Do not use plastlb contabers, lids orplast/c wrap.
CAUTION:Plast, conta,bers,I,dsorplastic
wrapwill melt if placed/b the oven. Melted plastb may
not be removableand/_ not coveredunderyourwarran_
35
Page 36

Usingthe warming drawer. (onsome models)
The warming drawer wifl keep hot, cooked foods at serving temperature. Always start with hot food. Do not use to heat
cold food other than crisping crackers, chips or dry cereal.
To Use the Warming Drawer
NOTE:TouchingtheCLEAR/OFFpaddoesnotturnthe
wamTingdraweroff.
NOTES:
iJi::Thewarmingdrawerhasthreesettings.
1,2and2, Thesesettingsmaintaindifferent
temperaturelevebinthewarmingdrawer
iJi::Onsomemodels, if using the ovenat the same t/Yne
asthe warming drawer, onlythe ovensettings will
be displayed
!i> Thewarmingdrawer cannot be useddunng a self-
cleaningcycle.
ON/OFF
[] Touch the WARMING DRAWER pad.
"\'_M_MER ON" and "1" are lit on tile
display and "Set" begins to blink.
[] On tile Iltll/lbeI" pad, totlch _i()l" Ix)w,
2 for Medimn ()r 3,fbr High.
Tile display 'T' changes corresp(mding
to the number pad selected.
[] The _amfing drawer starts automadcallv
after touching 1,2 or 3. "_'_M_._ER ON"
and the number remain lit. "Set" stops
blinldng.
To cancel, touch tile WARMING DRAWER pad.
When Using the Warming Drawer
Do not line the warming drawer orpan
with aluminum foil. Foil isan excellent heat
insulator and will trap heat beneath it. Thiswill
upset theperformance of the drawer and could
damage the interior finish.
Allow approximately25minutesforthewarming
drawertopreheat
ToCrisp Stale Items
_: Place food in lo_wsided dishes (:,I"pans.
::Ji::Preheat on /setting.
_: Check crispness alter 45 minutes. Add time
as needed.
::Ji::Do not put liquid or water in the
wamfing drawei:
_: M1 fi)ods placed in the wamfing
drawer should be covered with a lid or
ahlIllintlI/l foil. _i\]/en wamfing pastries oi"
breads, tile cover should be vented to allow
llloistt/i'e to escape.
_: Food should be kept hot in its cooking
container ()r ti"ansle'Yi'ed to a l/eat-sale'
serving dish.
CAUTION:Plastic containers orp/astl? wrap will melt
flirt direct contact with the drawer,pan era hot utensi/.
Melted plasticmay not beremovableand/s notcovered
underyour warranty
?_:Remove seIMng spoons, etc., before placing
containei_ in wamfing drawei:
36
Page 37

Adjusttheoventhermostat--Doityourself!
Youmay find that your new oven cooks differently than the one it replaced. Use your new oven for a few weeks to become
more familiar with it. If you still think your new oven is too hot or too cold, you can adjust the thermostat yourself.
Donot use thermometers, such as those found in grocery stores, to check the temperature setting of your oven.
These thermometers may vary20-40 degrees.
NOTE: Thisadjustment will not affect the broiling or the self-cleaning (on some models) temperatures. The adjustment
will be retained in memory after a power failure.
HOW to Adjust the Thermostat (on models with pads only)
[] Touch tile BAKE and BROILHI/LO pads
at tile same time fiw 3 seconds until tile
displa? sho_s SE
[] Touch the BAKE pad. A two digit nuFnber
shows in tile display.
Touch BAKE once to decrease (-) tl_e oven
temperature, or t_]ce to increase (+).
[] The oven tem[lerature can be a(!iusted t_p
as much as 35 E o_ do_n as mucil as 35 E
To ac!iust tile temperatm'e on models with
mmg)er pads, touch tile number pads tile
same wa_ }ou read them. For example, to
change, the oven temperature 1: E, touch
1 and 5.
To at!just tile temperatm'e on models xdth
+ al).cl -pacis, touch tile INCREASEpacl to
ineFease tile tempeFattwe ill ()lie deoTee
i_lCl'en/e_lts.
Touch tile DECREASE pad to decrease tile
temperature ill one degree increments.
[] _Aqlen }on have made tile ac!iustment,
touch the START pad to go back to tile
time ofday display. Use your oven as you
wo/dd nonnalE..
NOTE:Thts adjustment will not affect thebroihhg or
se/f-c/eanlbgtemperatures,It will be reta/bed/bmemory
after a power failure,
Pull the OVENCONTROLknob off the shaft, look at the back of the knob and note the current setting before making any
adjustment. The knob is factory set with the top screw directly under the pointer.
How ToAdjust the Thermostat (onmodels with a control knobonly)
[77 Pull off tile OVENCONTROLknob,
[_] I,oosen both scre_:s on back (lithe knoll.
[] Hold both parts of tile knob as shown in
tile illustration of tile back of tile OVEN
CONTROLknob and turn so tile lower screw
Front of OVENTEMPknob
(knob appearance may vary).
m()ves in tile desired direction. You will
hear and feel tile notches as you mrn tile
knob. Each notch changes tenlperature
Pointer
Back of OVENTEMPbTob.
about l O°E
[] Tighten tile screws.
[] Retm'n tile OVEN CONTROL knol) to
tile o_,eil,
Re-checkovenperformancebeforemakingany
additional adjustments.
37
Page 38

Using the self-cleaning oven.(onsomemodels)
Onmodels with a door latch, never force the latch handle. Forcing the handle will damage the door lock mechanism. The oven
door must be closed and aft controls set correctly for the cycle to work properly.
We recommend venting your kitchen with an open window or using a ventilation fan or hood during the first self-clean cycle.
Before a Clean Cycle
]_.emo\ e the shelves, broiler pan, broiler gl_(l,
probe (on some models), all cookware and
any aluminum foil fl'om tile oven,
The (wen shelves and convection roasting rack
(on some models)can be selfLcleaned, but they
will darken, lose their hlster and becoi-ne hard
to slide.
Soil on the fl'(mt ii'ame of tile range and
outside tile gasket on the door will need to be
cleaned by hand. Clean these areas with hot
ware1; soap-tilled steel-wool pads or cleansers
such a Soft Scrub? Rinse well with clean water
and (by
Do not clean the gasket. The fibe*glass material
of the oven door gasket cannot withstand
abrasion. It is essential tot the gasket to remain
intact. If you notice it becoming worn or fi'ayed,
replace it.
_'_]pe up any hea_ T spillovel_ on tile oven
bottom.
Make sure tile oven light bull) cover is in place
and the o\vn light is ell
CAUTION:rhegratesanddn>pans
(onsome models)shouldneverbe cleanedla the
se/f-cleanlagoven.
IMPORTANT'.Thehealth of someb/?dsis extremely
sensitive to the fumesgivenoff dunhgthe self-cleanlag
cycle ofany range. Movebirds toanother weft
ventilated room.
How to Set the Oven for Cleaning (onmodels
Theoven doormust be dosed andall controls set
correctly forthe cycleto workproperly Onmodels
with alatch, move it late the Iockedposition.
[] Touch the SELFCLEAN pad. On models
with a SELF CLEANSTD/LOWpad, l:n ess
once fb,v a 4-hem" clean time ()r P,vi(e for
a S-hour clean time.
[] Using the number pads or tile ÷ or - pads
(depending on xom" model) entel" tile
desired clean time, if a time other than
4 hem's is needed.
'kbu can change the clean time to any time
between 3-5 hem>, depending on how
di m' _mr oven is.
Touch tile START pad.
[]
with pads only)
On models with(_ut a latch, tile door IDOLS
automatically. Tile display will show the clean
time remaining. It will not be possible to open
tile (wen doe*" until the temperature drops
below the lock temperature and tile LOCKED
DOOR light goes off.
\_]_en the LOCKED DOOR light is ofl_ open
tile (iDol:
The (wen shuts off automatically when the
clean cycle is complete.
[] ThewordsLOCKDOORw///flashandtheoven
controlwills/_?nalif yousetthecleancycleand
forgettoclosetheovendoor.
[] Tostopadeancycle,touchtheCLEAR/OFFpad.
WhentheLOCKEDDOORI@htgoesoff/hd/2at/hg
theovenhascooledbelowtheIock/hgtemperature,
unlatchthedoor(onsomemode/s)andopenthedoor
38
Page 39

How to Belay the Start of Cleaning (onmodels with pads only)
Theoven doormust be closedand all controb set
correctly,forthe cy.cleto workproperly. Onmodels
with alatch, move it/hto theIockedposition.
Make sm'e the clock shows the correct
time of day.
[] Touch the SELl:CLEAN pad. On models
with a SELl: CLEANSTB/LOW pad, l:ness
once tbr a 4-hour dean time or twice for
a 3-hour dean time.
[] Llsing the number pads or the ÷ or - pads
(depending on _om" model) enter the
desired clean time.
[] Touch the START TIME or BELAYSTART
pad. The earliest start time }ou can set will
appear in the display.
[] Using the number pads or the ÷ or -pads
(depending on xo'ar model) enter the
time of da} }ou _ant the clean c}cle to
start,
[] Touch the STARTpad.
On models xdthout a latch, the door locks
automatically. The display will show the stm_
time. It will not be possible to open the o\ en
door until the temperatm'e drops below the
lock temperature and the LOCKEBBOOR light
goes ofl_
\'\]_en the LOCKEO BOOR light is ofl_ tmlatch the
door (on some models) and open the door_
After a Clean Cycle
YOu ma',, notice some white ash in the o_en.
\\Tipe it up *Oth a damp cloth after the
()veil cools,
If white spots mma/k removethem with asoap-filled
steel woo/pad andnhse thoroughly,with av/hegarand
watermixture.
[] Youcannotset the ovenfor cook/byuntil theoven
/_coolenough for the doorto unlock.
[] While theoven/s self-clean/by,youcan touchthe
CLOCKpad to d/splay,the t/kneof day.Toreturn to
the cleancountdown, touch the COOKINGTIMEor
SELFCLEAN(depend/hgon yourmodel)pad
These deposits are usually a salt residue that
cam_ot be removed by the clean cycle.
If the o\en is not clean after one clean cycle,
repeat the cycle.
[] If the shelvesbecomehard to slide,apply,a small
amount of vegetableo//or cook/byo//to apaper
towel and wipe the edgesof theovenshelves with
thepapertowel
39
Page 40

Careandcleaning oftherange.
Be sure aftcontrols are off and all surfaces are cool before cleaning any part of the range.
O._ If your range is removed for cleaning, servicing or any reason, be sure the anti-tip de vice is
___ _,i_,._ re-engaged preperly when the range is replaced. Failure to take this precaution could result
in tipping of the range and cause injury.
How to Remove Packaging Tape
GrooveStem
Moldedrib
To assure no danlage is done to tile finish
of the product, the safi_st way to renlove the
adhesive left fi'oin packaging tape on new
ai)pliances is an application of a household
liquid dishwashing deteigent, nlineral oil
or cooking oil.
Control Knobs
Thecontrol knobsmaybe removedfor easiercleaning.
To renlove a knob, pull it straight oft tile stein.
If a knob is difficult to ren/ove, i)lace a towel or
dishcloth between the knob and control panel
and pull gently: _hsh tile knobs in soap and
water or a vinegar and hot water sohition.
Before reinoving tile knobs fi)r cleaning, please
note that the knobs are in the Of Fposition.
When i'ei)lacing the knobs, check the OFF
position to ensure i)roper i)laceinent.
Apply with a soft cloth and allow to soak.
Wipe (liT and then apply an ai)pliance polish
to thoIx)ughly clean and protect tile surfilce.
NOTE:Theplast/? tape(on somemodels)must be
removedfrom aftchrometrim./t cannot beremoved
ffit is bakedon.
To replace:
[] Check tile back of tile knob.
[] Tile Inolded fib of tile knob is designed to
fit pedecfly onto tile knob sten/.
[] Mign the nlolded rib to the clear grooxe in
the knob sten/. Push the knob back as ti_i"
as it will go.
Do not bend knobs by pulling thenl up or
down or by hanging a towel or other such
loads. This can danlage tile shall
Control Panel
It's a good idea to wipe tile control panel after
each rise of tile ()veil. Use a daIn I) cloth to
clean or rinse. For cleaning, use inild soap and
water or a 50/50 sohition of vinegar and wateI:
For I_insing, use clean watei: Polish (li_' with
a soft cloth.
GlassWindow (on some models)
To ('lean tile outside glass tinish, rise a glass
cleanei: Rinse and polish with a dry cloth.
Painted Surfaces (on some models)
Painted sui_[il('es inchl(le tile sides ot tile range
and tile dooi; top of control panel and tile
drawer fi'Oilt. Clean these with soap and water
or a vinegar and water sohition.
Do not use abrasive cleanseis, strong liquid
cleaneis, plastic scouring pads or oven cleaneis
Oil the control panel--they will danlage the
finish.
Do not rise COllli//elT'ial ()veil cleanei3_ cleaning
powdeis, steel wool or haI_h abrasives Oil any
painted suil'hce.
4O
Page 41

Stainless Steel Surfaces (onsomemodels)
Be not usea steel-wool pad;# will scratch the
surface.
[77 Shake botile well.
[_] Place a small amount of stainless steel
cleaner on a damp cloth or damp paper
towel,
NOTE."If am/betel oil-basedsta/b/esssteel app//ame
cleanerhas beenusedbefore to clean theapp//ame,
wash thesurface with d/shwash/bgliquid andwater
prior to us/bgthe sta/b/esssteel cleaner.After wash/bg
thesurfacewith d/shwash/bg/iquidand water,usea
generousamount of sta/blesssteel cleaner to clean
theappliance.
[] Clean a small area (approximatel}
8" x 8"), robbing with the grain of the
stainless steel if applicable.
[] D_ and buffwith a clean, dry paper towel
or soft cloth,
[] Repeat as necessal T,
Porcelain Enamel Cooktop (on some models)
The porcelain enamel finish is sturdy but
breakable if misused. This finish is acid-
resistant. However; any acidic foods spilled
(such as fl'uitj uices, tomato or vinegar) should
not be pemdtted to remain on the finish.
If adds spill on the cooktop while it is hot, use
a (h T paper towel or cloth to wipe it up right
away: _]_en the stmfi_ce has cooled, wash with
soap and water: Rinse well.
Oven Vent
Onmodelswith glasscooktops,the oven is vented
throughan openlhg at the rear of the cooktop.
Onmodelswith coil cooktops, the ovenis ventedthrough
an opening underthe ni?htrear surfaceunit.
Onslide-in and drop@ models,the oven vent is located
abovethe doo_
ToOrder:
To order stainless steel cle;me_; please contact
your deale_:
Stainless Steel Cleaner # PMI0)(311
For other spills such as tilt spatterings, wash
with soap and water or cleansing powde_ after
the stwthce has cooled. Rinse well. Polish with
a (h_' cloth.
This area could beconle hot during oven use.
It is normal for steanl to coine out of the vent
and moistm'e may collect tmderneath it when
the oven is in use.
Thevent is/Ynportantfor proper air circulation.Never
block this ven_
Appearance may vary;
Never cover the openino with aluminum foil or
any other material.
Oven Heating Elements (onsomemodels)
Do not clean the bake dement or the broilelement
Any soil wi// burnoff whenthe dements are heated
To clean the oven flo(m gently lift the bake
element. Clean with warn/soapy water:
4/
Page 42

Careandcleaning oftherange.
Cleaning the Oven Door
Toclean the insideofthedoor:
[] Because the area leside the gasket/s cleaned durleg
the self-clean cycle,you do not need to cban th/2
1 1
Thegasket is designed with a gap at the
bottom toallow for proper air circulation.
Do not rub or clean the door gasket--it has
an extremely low resistance to abrasion.
ff you notice the gasket becoming worn,
frayed or damaged in any way or if it has
become disptaced on thedoor, you should
have it replaced.
hingearm
hingearm
byhand
[] The area outside the gasketand the door Ileer can be
cleaned with a soap-filledorplastbscounngpad,
hot water and detergentRlese weft with a vleegar
and water solution.
Lift-Off Oven Door (onsome models)
Tile oven door is removable, but it is heavv.
You may need help removing and replacing
tile dooI:
Toremove the door:
[] Open tile door to tile flfll open position.
[] Pull tile hinge locks up oxer tile hinge
hooks on both sides.
[] (;rasp tile door fimfl) on each side, lift
slighfl) and pull it straight out and away
fi'OIll tile o'_eil.
Toclean the outsideof thedoer'.
[] Usesoapandwatertothoroughlycleanthetop,sides
andfrontof theovendoorR/hsewell. Youmayalso
useaglasscleanertocleantheglassontheoutside
of thedoor.Donotletwaterdnpletothevent
openlegs.
[] If anystaleonthedoorventtr/kn/spersistent,
useasoftabrasivecleanerandasponge-scrobber
forbestresults.
[] Spillage of marleades,fruit juices, tomatosauces
andbastleg materialscontaleleg acids may cause
discolorationand shouldbe wipedup inTmedlately
Whensurface/s cool, cleanandrlese.
[] Do not use ovencleaners,cleanlegpowders or harsh
abrasiveson the outsideof thedoor.
Toreplacethedoor:
V_ Fimflv,_oras,),[ both sides of tile door at tile
top.
[] Insert and seat tile upper and lower hinge
_lY/iis into tile o'_en slots.
[] Push tile hinge locks down fl'om tile hinge
hooks.
Close tile oven door and make sm'e it is
[]
working properly. If it is not working
properly, remove and replace it fl)llowing
tile above steps. Do not attempt to close the
door until thisstep is complete. The hinge or
door could be damaged.
Lift fl?e door straight up and off
fl?e hinges.
42
Lift-Off Oven Door (on some models)
Tile (wen door is rem(wable for easier access
to tile light bulb.
Do not lift the doorby thehandle.
Toremove the door, open it to tile broil stop
position. Grasp firefly on each side and lift
tile door straight up and off tile hinges.
Do not placehandsbetween the hingeand the oven
door frame.
To replace the door,make sure tile hinges are in
tile broil stop position. Position tile slots in tile
bottom of tile door squarely over tile hinges
and slcm'lv lower it over both hinges.
Page 43

SI0t
Hingelock
Pullhinge locks down tounlock.
Lid-Of[ Ovell Door (onsome models)
Thedoorisveryheavy.Becareful whenremoving
andliftingthe deer.
Donotlift thedoorbythehandle.
Toremovethe door:
[] Fully open tile doo_:
[] Pull tile hinge locks do_n toward tile door
fl'aI/le, to tile tlll]ocked position. A tool,
SUdl as a small fiat-blade screwdriver,
may be required.
[] Firefly grasp both sides (ff tile door
at tile top.
Toreplacethedoor'.
[_] Firml_ -ras*) both sides of tlle door
ii i
at tile top.
[_] _ith tile door at Bottom Hingearm
tile same angle edge of
as tile remox:d sl0t
position, seat the
indentation oI the
hinge ann into tile
bottom edge of the
hinge slot. Tile notch
in tile hinge aml must be
filly seated into tile bottom (ff tile slot.
x
Removalposition.
[] Close door to tile door l'ei]_lo&ra]position,
_llicll is halfl_a_ bet,,_een tile broil stop
position and fully closed.
[] IJfl door up and out mltil tlle hinge arm
is clear of tile slot.
[] Full_ open tile door. If tile door xd]l not
full} opell, tile indentation is not seated
correcflx in tile bottom edge of tile slot.
[] Pusll tile hinge locks up a_ain, t tile fr mt
fl'ame of tile o'_en cavit} to tile locked
position.
Hing
Pushhingelocks up to lock.
[] Close tile oxen dool:
o" S " (
43
Page 44

Careand cleaningoftherange.
Oven Shelves
Roastingrack(onsomemodels)
Ovenshelf
Offsetshelf (onsomemodels)
Clean the oven shelves and the convection
roasting rack (on some models) with an
abrasive cleanser or scouting pad. _Mter
cleaning, rinse tile shelves and rack with
clean water and dry with a clean cloth.
Broiler Pan and Grid
NOTE:If yourovenisself-cleaning the ovenshelves
andconvectionroasting rack(onsome models)maybe
cleanedin theserf-cleaningoven.However,the shelves
will darkenin color,lose the/?luster and becomehard
toslide if cleanedduring the self-cleaningcycle.
To make the shelves slide more easily apply a
small amo/mt of vegetable oil or cooking oil to
a paper towel and wipe the edges of the oven
shelves with the paper towel.
Do not store asoiled broiler pan and
grid anywhere in the range.
Pressdown and pull out
On models with a self cleaning oven, do not
clean tile broiler pan or grid in tile sel6
cleaning oven.
_Mtei" broiling, remove tile broiler pan fl'om tile
oven. Remove the grid fl'om the pan. Careflflly
pour out the grease fl'om the pan into a proper
cont;linei _.
Wash and iinse tile broiler pan and grid in hot
water with a soap-filled or plastic scom'ing pad.
RemovableOvenFloor
To remove the oven floor:
[] Remo_e tile o_en door using tile
instructions in the Lift-OffOven Door section.
[] Press down and pull out tile removable
o_,en f]ooi:
[] Clean tile o_en floor with waml soapy
wateI;
[] _Aq/en reinstalling tile oxen floo_; be sm'e to
slide it all the wm to the back of the men.
If fl_od has bm'ned on, sprinkle the grid with
detergent while hot and cover with wet paper
towels or a dishcloth. Soaking the pan will
I'eIl](we btli'ned-on foods,
Both the broiler pan and grid may be cleaned
with a COmlllercial o_,en cleanei;
Both tile broiler pan and grid can also be
cleaned in a dishwasher;
NOTE:Donotstoreasoiledbroilerpanandgrid
anywhereintherange.
44
IMPORTANT'. Always replace the removablefloor
before the next use.
Removable Warming Drawer Pan (on some models)
NOTE"Formode/swithane/ectncwarmingdrawer
or lowerovendrawer,beforeperformingany
adjustments,cleaningorservice,disconnecttherange
e/ectrica/powersupplyatthehouseholddistribution
panelbyremovingthefuseorswitchingoff thecircuit
breakerMakesurethedrawerheatingdement
iscool.
?_:Never place, use or selfZclean tile wamfing
drawer pan in tile upper oven.
iJi::_,_hmfing drawer has a remox:d)le pan fin"
easy cleaning. Clean with hot soapy wamr
and a sponge or dish towel. Dry with a clean
cloth. Replace the pan in the wmming
drawer
NOTE"Allowwarmingdrawertocoolbefore
removingpan.
NOTE"Wipespillspromptlyaftereachuse.
Page 45

'_ Wirecoverholder
Oven Light Replacement (on some models)
CAUTION:Beforereplacingyourovenl, ht
bulb,disconnectthe electncal power to therangeat
themain fuseorcircuit breakerpanel.
Be sure to let the light cover and bulb cool
completely:
Toremove the cover:
Ff] Hold a hand under the ('o_er so it doesn't
fifll when released. _,_ith finge_s of the
same hand fimfls push back the wire coxer
holder: I,ift off the coxe_:
Donotremoveanyscrewstoremovethecover
[] Replace bulb with a 40-watt appliance bulb.
Oven Light Replacement (on some models)
CAUTION:Beforereplacingyourovenl, ht
bulb,disconnectthe electrical power to therangeat
themain fuseorcircuit breakerpanel
Be sm'e to let the light cover and bulb cool
completely.
Toreplace the cover:
[] Place it into groove otthe light receptacle.
Pull wire forward to the center of the coxer
tmtil it snaps into place.
[] Com_ect electrical power to the range.
Toreplace the cover:
[] I,ine up tabs of lens in fl'ont of tabs on
housing and rotate clockwise to en *ace
Toremove the cover:
[] Twist lens ('otmterclockwise about a quarter
ttlI'n to i'ei/lo_,e,
DO not remove any screws to remove the cover
[] Replace bulb with a 40-watt appliance bulb
or 2-prong halogen bulb, as appropriate.
45
Page 46

Careand cleaningoftherange.
i i
i i
i i
i i
Glas_cover
Socket
- Bulb
Oven Light Replacement (onsome models)
NOTE"Theglasscovershou/dbe removedonly when
cold Weanbg/atex g/ovesmay offer a better gnp.
CAUTION:8eforereplac,bgyourovenl, ht
bulb,disconnectthe electn_alpower to the ovenat
thema/b fuse orcircuit breakerpanel
Be sure to let the light rover and bulb cool
completely.
For _mr safet)', do not touch a hot bulb with
bare hands or a damp cloth.
To remove:
[7] Turn the olass co',er comlterclork>Ase
it i
1/4 turn tmdl the tabs of the ol'lss co\or
clear the grooves of the socket.
[] Using glo_es or a dr} cloth, remo\e the
bulb b} pulling it ,str'_i_*ht,b out.
Toreplace:
[] Use a new ] 30-_olt halogen bulb, not to
exceed 50 *<arts.
[] Using glo_es or a dr} cloth, remo',e the
bulb fl'om its l)ackaging',, Do not touch
the bulb with bare fingers.
Receptacle
_Use gloves
orcloth
[] Push the bulb straight into the receptacle
all the way.
r_ Place the tabs of the glass coxer into the
grooves of the socket. Turn the glass cover
clockwise 1/4 turn.
For improved lighting inside the oven,
clean the glass cover fl'equenfly using a wet
cloth. This shoukl be done when the o\en
is completely cool.
_] Recomlect electl-ical power to the oven.
46
Page 47

Storage Drawer Removal (onsomemodels)
Toremove the drawer:
Toreplace the drawer."
CleanunderflTerange.
_uide
[] Pull the drawer out until it stops.
[] Lift the fl'ont of the drmver until the
stops clear the guides.
[] Remoxe the drmve_:
Storage Drawer Removal (onsomemodels)
Toremove the storage drawer:
[] Pull the drawer out all the way.
[] Tilt up the fl'ont and remove it.
Porcelain Oven Interior (on some models)
With proper care, the porcelain enamel finish
on the inside of the oven--top, bottom, sides,
back and inside _ff the door----will stay ne_w
looking tot yea_.
I,et the range cool betore cleaning.
We recommend that w)u wear rubber gloves
when cleaning the range.
Soap and water will nommlly do the job. Hea\ T
spattering or spillove_s may require cleaning
with a mild abrasive cleane_: Soapy, wet metal
pads may also be used.
Do not allow foodspills with a h/)h sugaror acid content
(suchas tomatoes,sauerkraut,fruitjuices orpie tiffing)
torema/bon thesurface. Theymaycausea duffspot
evenafter cleaning.
Household ammonia may make the cleaning
job easier: Place 1/2 cup in a shallow glass or
pottery container in a cold oven overnight.
[] Place the drawer rails on the guides.
[] Push the drawer back tmtil it stops.
[] I,i/* the front of the drawer and push back
tmfil the stops clear the guides.
[] i,ower the fl'ont of the drawer and push
back tmtil it closes.
Toreplace the storage drawer:
[] Insert glides at the back ot the drmver
be} ond the stop on range glides.
[] i,ifl the drmver if necessarx to insert easily:
V_] i,et the fl'ont of the drawer down, then
push in to close.
ffnecessary,youmayuseanovencleaner.
Followthepackagedirections.
• Donotsprayovencleanerontheelectricalcontrols
andswitchesbecauseitcouldcauseashortckcuit
andresultinsparkingorfire.
• Donotallowa filmfromthecleanertobumupon
thetemperaturesensor--itcouldcausetheovento
heatimproperly(Thesensoris locatedat thetopof
theoven.)Carefullywipethesensordeanaftereach
ovenc/ean/bg,be/bgcarefulnottomovethesensor
asa changeinitspositioncou/daffecthowthe
ovenbakes.
• Do not spray anyovencleaneron theovendoor,
handlesor any exterior surfaceof theoven,cabinets
or painted surfaces.Thec/eanercan damagethese
surfaces.
The ammonia fim/es will hel I) loosen the
bm'ned-on grease and fi)od.
47
Page 48

Careand cleaningoftherange.
Be sure the controls are turned to OFFand the surface units are cool before attempting to remove them.
Surface Units (electric coil models only)
models}
To clean the surfi_ce milts, mrn the control to
the highest setting fin" a minute. The coils will
burn off any soil.
Toremove a surface unit
To renlove the drip pans fin" cleaning, the
sm'ti_ce milts must be removed fi_t.
If the smti_ce refit has a locking tab, push the
surti_ce refit back toward the receptacle to fl'ee
the locking tab fl'om the cooktop.
i,ifl the smti_ce refit about l inch above the
drip pan and pull it out.
Do not rift the surfaceunit more than 1inch. If youdo, it
may not rie flat on the drip pan when youplug it backin.
NOTE."Repeatedriftingof thesurfaceunit morethan
1inch above the drippan canpermanently damagethe
receptacle.
Toreplace a surface unit:
Replace the drip pan into the recess in the
cooktop. Make sure the opening in the pan
lines up with the receptacle.
Insert the temfinals of the smti_ce refit through
the opening in the drip pan and into the
receptacle,
Guide the sm'li_ce refit into place so it rests
e;'enlv.
Donotimmersethesurfaceunitsinliquidsofanykind
Donotc/eanthesurfaceunitsinadishwasher
Donotbend thesurfaceunit p/ugterminals.
Donotattempt todean, adjust or in any way repair the
plug-in receptacle.
Besure allsurface units are turned off
before raising the coolctop.
Drip Pans (electric coil models only)
P,em(we the smti_('e milts. Then lift out the
drip pans.
Place them in a covered containe_: Add
1/4 cup ammonia and let soak several hem's
or overnight. Wash, rinse well and (h_'.
The drip pans may also be cleaned in a
dishwasher;
Clean the area trader the drip pans often.
Built-up soil, especially grease, may catch fire.
Donotcover the drip pans with foil.Using foil so close
to thereceptaclecou/d causeshock,fireor damageto
therange.
NOTE:Do not dean thedrippans in a self-cleaningoven.
Lift-Up Cooktop (on some electric coil models only)
Somemodelshavea cooktopthat canbe rifted up for After cleaning trader the cooktop with hot,
easier cleaning. The entke cooktop may be rifted up mild soapy water and a clean cloth, lower the
and supported in the up position, cooktop. Be careflfl not to pinch yore" fingers.
The surii_ce milts do not need to be removed;
howe\'eI; you Ill}IV I'elllOVe ()tie to Illake raising
the cooktop easier: There are two side supports
that lock into position when the cookto I) is
lifted up.
To lower the cooktop, push the rods back and
gently lower the cooktop m_til it rests in place.
NOTE:Do not lift the cooktoponradbnt topmodels.
Liftingthe cooktopcanlead to damageand improper
operationof the range.
48
Page 49

Cleaningthe glass cooktop.
Be sure all controls are OFFand all surfaces are cool before cleaning any part of the cooktop.
Normal Daily Use Cleaning
ONLYuse a cleaning cream suitable fin" glass
surtilces. Other creams ina_ not be as eflbcti'_e.
To maintain and protect tile stm'hce of wmr
glass cooktop, tollow these steps:
[] Betore using tile cooktop for tile fi_t time,
clean it with cooktop cleane_: This helps
protect tile top and makes cleanup easier:
CleanyourcooMapaftereachspill.
[] Daily use of cooktop cleaner will hal I) kee I)
the cooktop looking new.
[] Shake tile cleaning cream well. Apply a few
drops of cooktop cleaner directly to the
cooktop.
Burned-On Residue
[] Use a paper towel or cleaning pad fin.
ceramic cooktops to clean tile entire
cooktop sm'ti_ce.
[] Use a (ha' cloth or paper towel to remoxe
all cleamng residue. No need to rinse.
NOTE:It is very knportant that youO0 NOTheat the
cooktopuntil it hasbeen cleaned thoroughly
Useacleaningpadsuitableforglass
surfaces,
NOTE:Do not use a dull or nicked
blade.
] _Mlow tile cooktop to cool.
[] Spread a few drops of cooktop cleaner
on tile entire burned residue area.
[] Using a cleaning pad suitable tot glass
surfi_ces, rub tile residue area, applying
pressure as needed.
Heavy, Burned-On Residue
] _Mlow tile cooktop to cool.
[] Use a single-edge razor blade scraper at
appro_mately a 45 ° angle against the glass
suil'ilce and scrape the soil. It will be
necessm T to apply pressure to tile razor
scraper in order to remove tile residue.
[] If an) residue remains, repeat tile steps
listed aboxe as needed.
[] For additional protection, after all residue
has been remoxed, polish tile entire
stw[ilce with cooktop cleaner and a paper
towel.
[] _Mier scraping with tile razor scrape_;
spread a ti_w drops of cooktop cleaner
on tile entire burned residue area. Use
a cleaning pad suitable fin" glass sm_i_ces
to remove any remaining residue.
[] For additional protection, alter all residue
has been removed, polish the entire
Stli_ilce with cooktop cleaner and a paper
towel.
49
Page 50

Cleaningthe glass cooktop.
Be sure all controls are OFFand all surfaces are cool before cleaning any part of the cooktop.
Metal Marks and Scratches
[] Be carefid not to slide pots and pans across
your cooktop. It will leave metal markings
on tile cooktop StllS{_lce.
These marks are remo\;_ble using tile
cooktop cleaner with a cleaning pad
suitable for glass smtimes.
[] If pots xdth a thin oxerlax of ahuninum or
WARNING:Carefullycheckthebotton,of
pansfor roughnessthat would scratchthe cooktop.
Glasssurface--potential forpermanentdamage.
Damage from Sugary Spills and Melted Plastic
Ourtesting shows that ifyou are cooking high
sugar mixtures such asjelly or fudge and have
a spillover, it can causepermanent damage
to theglass surface unless the spillover is
immediately removed.
[] Turn oft all surli_ce traits. ]_ell_Ove
hot pans.
[] Wearii_g an oven Initt:
a. Use a single-edge razor blade scraper
to Inove tile spill to a cool area on tile
cooktop.
b. Remove tile spill with paper towels.
[] Any remaining spillover should be left undl
[_] Don't use tile surface traits again tmtil
NOTE:If pittl))gor indentation in theglass surfacehas
already occurred,thecooktopglass will haveto be
rep/acec!In this case,servicewill be necessary
copper m'e allotted to boil dry, the o_erla}
max leave black discoloration on tile
cooktop.
This should be removed immediatel}
before heating again or tile discohwation
ma} be peHnanent.
the surtiwe of the cooktop has cooled.
all of the residue has been completel}
I'elIlOX ed.
5O
Page 51

Beforeyoucall forservice...
Save time and money! Review the charts on the following
_ roubleshooting Tips
Problem | Possible Causes What ToDo
Glass CooktopModels
Surface units will not Improper coolcwaJce * Use pans which are fiat and match the diameter ot the stwthce unit
maintaina rollingboil being used. selected.
or cooking is not
fast enough
Surface units do not A fuse in your home may be * Repllwe fixse or reset circuit breaker:
work properlF blown or the ckctfit breaJmr
Tinyscratches (may Incorrect deaning methods * Use recommended cleaning procedures.
appear as cracks) or being used.
abrasions onradiant
cooktop glass surface Cookwa_ve with rough bottoms ®Be sure cookware bottoms and cookware are (lean befi)re use.
pages first and you may not need to call for service.
T
tripped.
Cool{top controls o Check to see the correct control is set fi)r the stwthce refit you
improperly set. are using.
being used or coarse particles Use cook_are with smooth bottoms. Tin) scratches are not
(salt or sand were between remo\;ible but will become less visible ix*time as a result of cleaning.
the cookwaJce and the surface
of the cool{top.
Cookwaxe has been slid
across the cool{top surface.
Areas of discoloration Improper cookwa_ve o MarLs ti'om aluminum and copper pans as well as mineral deposits
on the coolaop being used. fl'om water or food can be removed with the cleaning cream.
Plastic melted to the Hot cooktop calm into * See the Special Care infbmxation in the Cleaning the glass cooktop
surface contact with plastic placed section.
on the hot cool{top.
Pitting of the cooktop Hot sugar mixture spilled * Call a qualified te(hni(ian fi)r replacement.
on the cool{top.
Frequent cycling off Improper coolcwaxe * [)se only fiat cookware to minimize cycling.
and on of surface units being used.
51
Page 52

Beforeyoucall forservice...
Troubleshooting -tips
Problem [ Possible Causes What ToBe
Electric Coil Models
Surface units not The surface units are not ®With the controls ofl_ check to make sure the sulfime unit is plugged
functioning properly plugged in solidly, completely into the receptacle.
The surface trait controls * Check to see the correct control is set tot the sm_hce unit you
improperly set. are using.
The drip pans axe not set *With the controls ofl_ check to make sine the drip pan is in the
securely in the cooktop, recess in the cooktop and that the opening in the pan lines up
with the receptacle.
Cooktop feels bet Large pans hold heat * (_hoose a pan that matches the size of the surti_ce unit ?on
close to the cooktop, are using.
The oven vent is blocked. * Pans on the right rear surfi_ce refit block air flow ti'om the oven vent
and cause the cooktop to get hot.
Oven--Aft Models
Oven light doesnet Light hulb is loose or ®Tighten or replace the bulb.
work defective.
On some models, the switch o Call tb_ service.
operating light is broken.
Oven will not work Plug on range is not * Make sure electrical plug is plugged into a live, properly
completely inserted in grotmded outlet.
the electrical outlet.
A fuse in your home may be o Replace the fllse or reset the circuit breakel:
blown or the drcuit breaker
tripped.
Oven controls improperly set. o See the Using the oven section.
Food does not bake Oven controls improperly set. * See the Using the oven section.
or roast properly
Shelf position is incorrect or * See the Using the oven section.
the shelf is not level.
Incorrect cookwaJce or * See the Using the oven section.
cookwaace of improper size
being used.
Oven thermostat needs * See the Adjust the oven thermostat--Do it yourself! section.
adjustment.
Oven door is crooked The door is out of position. * Because the (wen door is remo\_ble, it sometimes gets otlt ()_
(on some models) positiÂm durhlg installation. To straighten the doo_; push down
on the high corne_:
52
Page 53

Problem PossibleCauses What ToDo
Food does notboi/ Oven controls improperly set. = On models _dth touch pad controls, make sure _ou touch the
properly BROILHI/LO pad.
o On models with a control knob, make sure you turn the control
knob all the way to the BROIL position.
Door not open to the broil ®See the Using the oven section.
stop position as recommended.
Improper shelf position * See the Broiling Guide.
being used.
Coolcwaa0e not suited for * [Jse the broiling pan and grid that came with your range.
broiling.
On models with a probe, * Unplug and remove the probe fl'om the (wen.
the probe is plugged into
the outer in the oven.
Alurninurn foil used on the o See the Using the oven section.
the broiling pan aJad grid has
not been fitted properly and
slit as recommended.
In some areas the power * Preheat the broil element tar 10 minutes.
(voltage) may be low. * Broil fiw the lon_e.'tos period" of" time" recommended in the
Broiling Guide.
Oventemperature Oven thermostat needs o See the Adjust the oven thermostat--Do it yourself! section.
too hot or too cold adjustment.
Storage drawer is Rear drawer support is on * Reposition the dmwe*: See the Storage Drawer Removaliustructions
crooked top of the guide rail. in the Care and cleaning of your range section.
Storage drawer Power cord may be obstructing * Reposition the drawer and power (ord. See the Storage Drawer
won't close drawer in the lower back of Removal instructions in the Care and cleaning of your range section.
the range.
Rear drawer support is on Reposition the dmwe*: See the Storage Drawer Removal iustructions
top of the guide mill. in the Care and cleaning of your range section.
Clock and thner do not Plug on raaage is not * Make sure electrical plug is plugged into a live, property
work (on some models) completely inserted in grounded oudet.
the electrical outlet.
A fuse in your home may be * Replace the filse or reset the drcuit breaker:
blown or the drcuit breaker
tripped.
Oven controls improperly set. * See the Using the clock andtimersection.
53
Page 54

Beforeyoucall forservice...
Troubleshooting -tips
\
Problem [ Possible Causes What ToDo
Serf-Cleaning Models
Ovenwill not self-clean The oven temperature is o _l()w the rlmge to cool to room temperilture and reset the controls.
too high to set a self-clea_a
operation.
Oven controls improperly set. * See tile Using the self-cleaning oven section.
The probe is plugged into ® Remox e tile probe fl'om tile oxen.
the outlet in the oven.
"Crackling" or This is the sound of the metal o This is mmn_d.
"popping" sound heating and cooling during
both the cooldng and deaxfing
functions.
Excessivesmoking Excessive soil. * Touch the CLEAR/OFFpad.Open the windox_s to rid tile room of
during a clean cycle of smoke. _dt mltil tile LOCKED DOOR light goes off. _ipe up tile
excess soil and reset tile clean cycle.
Oven door will not open Oven too hot. * _h)w the oven to cool below locldng temperlmu'e.
after a clean cycle
Oven not clean after a Oven controls improperly set. * See the Using the self-cleaning oven section.
clean cycle
Oven was heavily soiled. * Clean up heavy spillo\'e_ before stm_ing tile dean cycle. Hea\'ilv
soiled ovens may need to self:clean again or for a longer period
of tim e.
"LOCKDOOR"flashes The self-cleaJa cycle has been o Close tile oven do(m
in the display selected but the door is not
closed.
The oven door is locked
is on whenyou want
to cook
"/:-and a numheror Yon have a function * Touch tile GLEAPdOFFpad. Put tile _wen back into operation.
letter" flash in the error code.
display If the ftmcfion code repeats. ®Dis(omle(t all power to tile range for at least 30 seconds and then
Control signals after You forgot to enter a baJ_e o Touch tile BAKE pad and desired temperature or tile SELFCLEAN
entering cooking time temperature or cleaxJing pad and desired clean time.
or start time time.
because the temperature
inside the oven has not
dropped below the
locldng temperature.
• Touch the CLEAR/OFFpad. _Mlow the o\en to cool.LOCKEDDOORlight
recom_ect powel: If tile flmction error code repeats, call for service.
54
Page 55

Y
Problem | Possible Causes What ToDo
On SomeModels
Display goes blank A fuse in your home may be ®Replace the ruse or reset the circuit breaker:
Display flashes Power failure. ®Reset the clock.
Unable to get the Oven control pads were not o The BllKEand BROIL HI/tO pads must be touched at the same time
display to show "SF" touched properly, and held ior 3 seconds.
"Probe" appears in This is reminding you to * Enter a probe temperi_mre.
the display enter a probe temperature
Power outage, Power outage or surge. ®Reset the clock. If the oven was in use, you must reset it by
clock flashes touching the CLEAR/OFFpad, setting the clock and resetting
Steam from the vent * This is nomml.
"Burning" or "oily" This is normal in a new oven o To speed the process, set a selt:clean cycle fin" a minim um of
odor emitting from and will disappear in time. 3 h{)tu s. See the Using the self-cleaning oxen section.
the vent
blown or the _rcult breaker
tripped.
Tile docl< is in the * See the Special features of your oven control section.
black-out mode.
after plugging in the probe.
any cooldng flmctiom
When using the convection
feature, it is normal to see
steam coming out of the oven
vent. As the number of shelves
or axnotmt of food being
cooked increases, the amount
of visible steam will increase.
Strong odor An odor from the insulation * This is temporm'y.
Fan noise A cooling fan or a convection * This is normal. The cooling tim will mrn off and on. The convection
Surface light does not Switch operating light is * (;all fin service.
WOrk broken.
Warming drawer will A fuse in your home may be o Replace the fllse or reset the drcuit breakel:
not work bloom or tile drcult breaJ{er
Excessive condensation Liquid in drawer, o Rein(we liquid.
in the drawer
Food dries out in the Moisture escaping. * Coxer toed with lid or aluminun_ tbil.
warming drawer
aacound the inside of the oven
is normal for the first few times
tile oven is used.
fan (depending on the thn will run until the traction is over or the door is opened.
function you axe using) may
automatically turn on and off
to coul internal parts,
tripped.
Controls improperly set. * See the Warmingdrawersection.
Uncovered foods. * Cover toed with lid or illtlI//ilulln toil.
Temperature setting too high. o Redure temperlmlre setting.
Drawer not fully closed. * Ptlsh drmver ill tlllti] latch ellgilges.
55
Page 56

Notes.
56
 Loading...