

GE JB730SN1SS, JB730DN1WW, JB720SN1SS, JB720CN1WW, JB720CN1CC Owner’s Manual
...
ge.com
Safety InsO'uctiom" . ........ 2-6
Operating Instructiom"
(;lock and Timer ............. 15
Oven .................... 10-22
Broiling, Broiling Guide . .13, 14
Controls ................ 10, 11
Sabbath Feature ......... 18, 19
Self:Cleaning ............ 2'.4, 24
Special Features ............ 17
Thermostat ................ 20
Timed Baking
and Roasting ............... 16
Warming Drawer ........ 21, 22
Surface Units .............. 7-9
Care and Cleaning
Control Knobs .............. 25
(;lass Cooktop ........... 29, 30
i,ifi-Off Oven Door .......... 26
Light ...................... 28
Oven Vent .................. 25
Shelves ..................... 27
Removable Warming
Drawer Pan ................. 27
Storage Drawer ............. 28
,]B690
,]B700
,I_710
,IF,720
i 73o
,]BPS1
Troubleshooting Tips .... 31-34
Accessories. ................ 38
Consumer Support
Consumer Support .... Back Cover
Product Registration ........ 35, 36
Warranty ................... 39
Write the model and serial
numbers here:
Model #
Serial #
You can find them on a label
behind the storage drawer on
the flont of the range flame.
49-80531-1 08-08JR
IMPORTANTSAFETYINFORMATION.
READALLINSTRUCTIONSBEFOREUSING.
WARNING!
For your safety, the information in this manual must be followed to minimize the risk of fire,
electric shock, or to prevent property damage, personal injury, or loss of life.
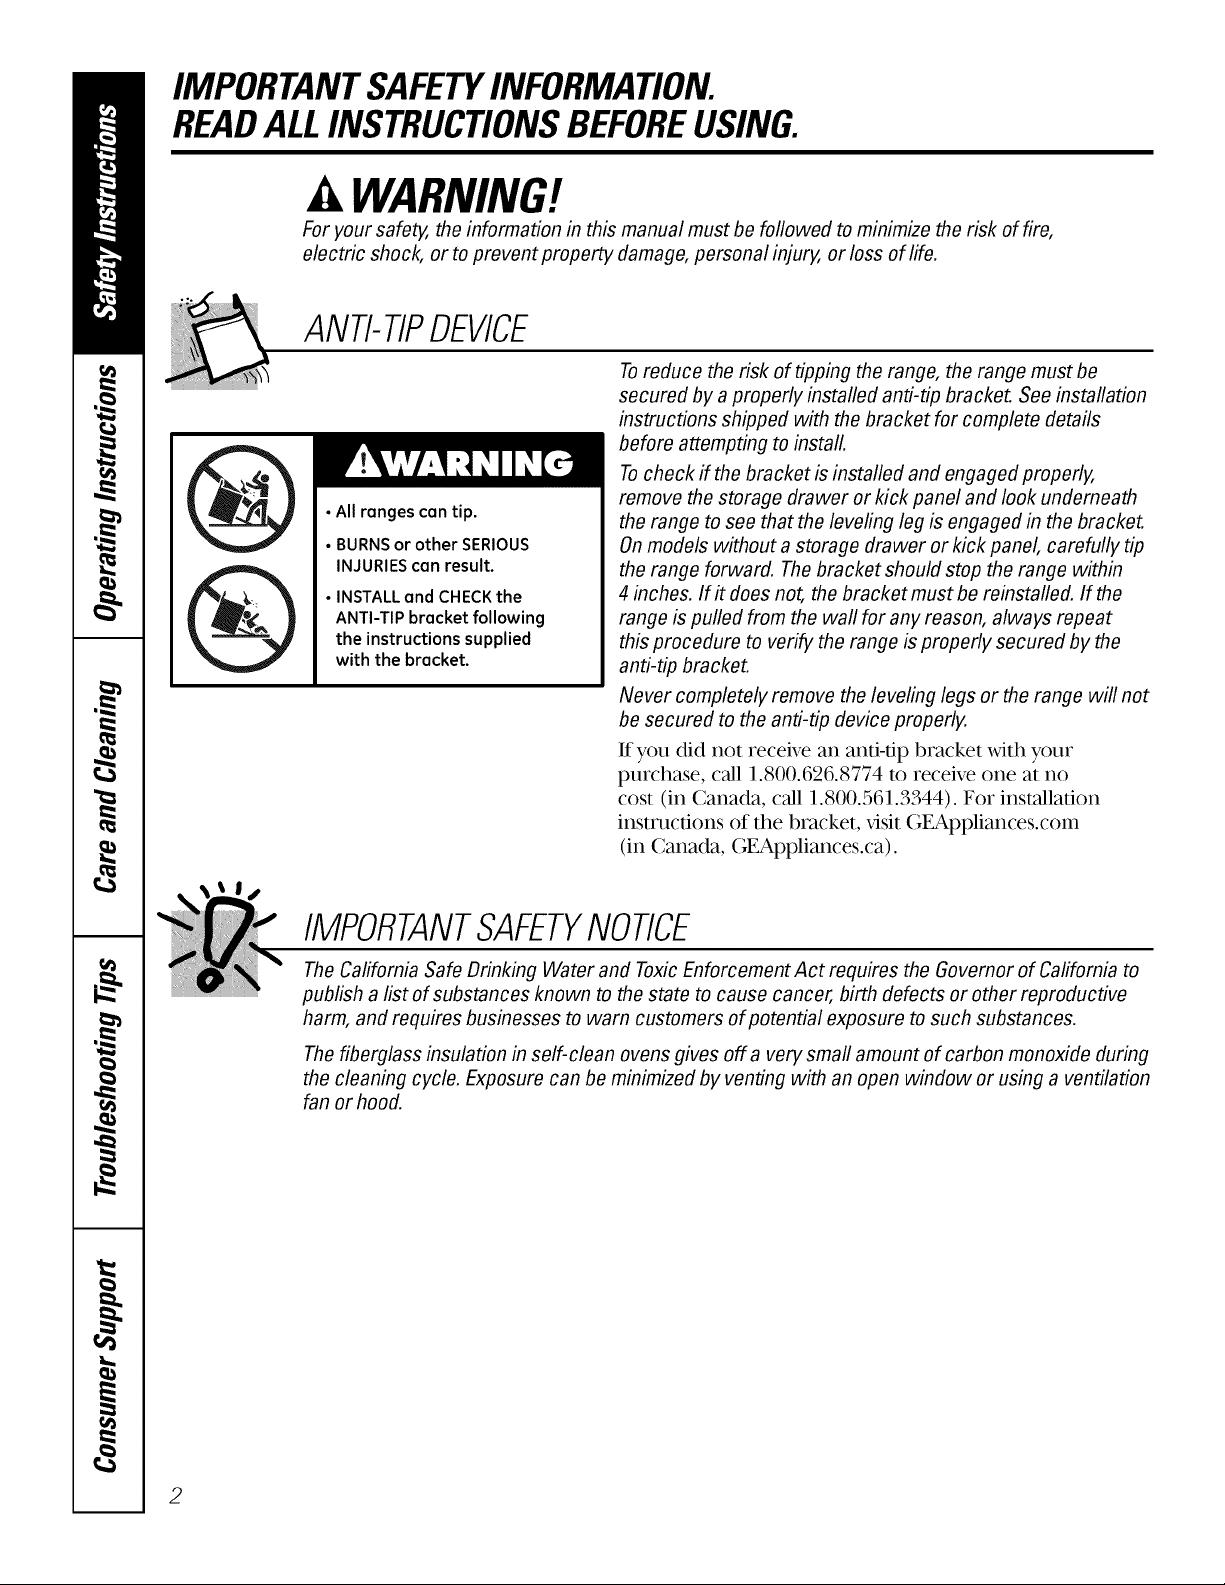
ANti-TIPDEVICE
Toreduce the risk of tipping the range, the range must be
secured by aproperly installed anti-tip bracket. Seeinstallation
instructions shipped with the bracket for complete details
before attempting to install.
Tocheck if the bracket isinstalled and engaged properly,
• All ranges can tip.
• BURNSor other SERIOUS
INJURIEScan result.
• INSTALLand CHECKthe
ANTI-TIP bracket following
the instructions supplied
with the bracket.
remove the storage drawer or kick panel and look underneath
the range to see that the leveling leg is engaged in the bracket.
On models without a storage drawer or kick panel, carefully tip
the range forward. The bracket should stop the range within
4 inches. If# does not, the bracket must be reinstalled. If the
range is pulled from the wall for any reason, always repeat
this procedure to verify the range is properly secured by the
anti-tip bracket.
Never completely remove the leveling legs or the range will not
be secured to the anti-tip device properly.
If you did not receive an anti-tip bracket with your
purchase, call 1.800.626.8774 m receive one at no
cost (in Canada, call 1.800.561.3344). For installation
instructions of the bracket, x,isit GEAppliances.com
(in Canada, GEAppliances.ca).
IMPORTANTSAFETYNOtiCE
TheCalifornia Safe Drinking Water and Toxic Enforcement Act requires the Governor of California to
publish a list of substances known to the state to cause cancer, birth defects or other reproductive
harm, and requires businesses to warn customers of potential exposure to such substances.
Thefiberglass insulation in self-clean ovens gives off a very small amount of carbon monoxide during
the cleaning cycle. Exposure can be minimized by venting with an open window or using a ventilation
fan or hood.
2
ge.com
SAFETYPRECAUTIONS
When using electrical appliances, basic safety precautions should be followed, including the following:
Use this appliance only for its intended
propose as descnbed in flus Owner's
Manual.
Be sure your appliance is properly
installed and _ounded by a qualified
installer in accordance xdth the prox,ided
installation instructions.
Have the installer show you the location
of the circuit breaker or fuse. Mark it fk)r
easy reference.
Do not attempt to repair or replace any
part of your range unless it is specifically
recommended in this manual. All other
serx,icing should be referred to a qualified
technician.
Before perfk)rming any ser\,ice, disconnect
the range power supply at the household
distribution panel by remox,ing the fuse or
switching off the circuit breaker-
Do not leave children alone---children
should not be left alone or unattended in
an area where an appliance is in use. They
should never be 'allowed to sit or stand on
any part of the appliance.
Do not allow anyone to climb, stand or
hang on the door, storage drawer or
cookmp. They could damage the range
and even tip it over, causing severe
persorral in,ju U.
it WARNING'!
SAFETYPRECAUTIONS
Do not operate the oven or cooktop controls if the glass is broken. Food splatter or cleaning solution
may penetrate a broken control panel and create a risk of electrical shock. Contact a qualified
technician immediately should your glass control panel become broken.
Do not store flammable materials in Do not use water on grease fires. Never
an oven or near the cooktop.
CAUTION: temsofi.terestto
children should not be stored in cabinets
above a range or on the backsplash of a
range--children climbing on the range
to reach items could be seriously injured.
Never wear loose-fitting or han_ng
garments while using the appliance.
Be careful when reaching fk_ritems stored
over the range. Flammable material could
be ignited if brought in contact with hot
surface units or heating elements and may
cause severe burns.
Use only dPi pot holders--moist or damp
pot holders on hot surfaces may result in
burns fiom steam. Do not let pot holders
touch hot surface units or heating
elements. Do not use a towel or other
bulky cloth in place of pot holders.
pick up a flaming pan. Turn the controls
ore Smother a flaming pan on a surface
unit by covering the pan complewly with
a welMitting lid, cookie sheet or fiat tray.
Use a multi-purpose dU chemical or
fkmm-type fire extinguisher.
Flaming _ease outside a pan can be put
out by coveting it with baking soda or;
if available, by using a multi-purpose dU
chemical or foam-type fire extinguisher.
Flame in the oven can be smothered
completely by closing the oven door and
turning the oven off or by using a multi-
propose dU chemical or fk)am-type fire
extinguisher
3
IMPORTANTSAFETYINFORMATION.
READALLINSTRUCTIONSBEFOREUSING.
WARNING!
SAFETYPRECAUTIONS
For your safety, never use your appliance
for warming or heating the room.
Do not let cooking grease or other
flammable materials accumulate in or
near the range.
.....Do not touch the surface units, the
heating elements or the interior surface
of the oven. These surfaces may be hot
enough m bum even though they are
dark in color. During and 'after use, do not
touch, or let clothing or other flammable
materials contact the surface units, areas
nearby the surface units or any interior
area of the oven; allow sufficient time for
cooling first.
Potentially hot surfaces include the
cooktop, areas facing the cooktop, oven
vent opening, surfaces near the opening,
crex,ices around the oven door:
REMEMBER:The inside surface of the oven
may be hot when the door is opened.
.....Do not store or use combustible materials,
gasoline or other flammable vapors and
liquids in the x,icinity of this or any other
appliance.
Keep the hood and grease filters clean
to maintain good venting and to avoid
_ease fires.
Teach children not to play xdth the
controls or any other part of the range.
Always keep dish towels, dishcloths, pot
holders and other linens a s_e distance
fiom your range.
Always keep wooden and plastic utensils
and canned food a s_e distance fiom
your range.
Always keep combustible wall coverings,
curtains or drapes a s_e distance from
your range.
COOKMEATANDPOULTRYTHOROUGHLY...
Cookmeat andpoultry thoroughly--meat toat least an INTERNALtemperatureof 160°Fandpoultry toat least
an INTERNALtemperatureof 180°ECookingto thesetemperaturesusuallypmtects againstfoodbomeillness.
RADIANTSURFACEUNITS
Use proper pan size--select cookware having flat bottoms large enough to cover the surface unit
heating element. The use of undersized cookware will expose a portion of the surface unit to direct
contact and may result in ignition of clothing. Proper relationship of cookware to surface unit will
also improve efficiency.
Never leave the surface units unattended
at high heat settings. Boilovers cause
smoking and greasy spillovers that may
catch on fire.
Only certain types of glass, glass/ceramic,
earthenware or other glazed containers
are suitable for cooktop serx@e; others
may break because of the sudden change
in temperature.
iiiiiiiiiiii_iii
To minimize the possibility of burns,
i_fifion of flammable mamfials and
spillage, the handle of a container
should be turned reward the center of
the range without exmnding over nearby
surface units.
.....Always turn the surface units off before
removing cookware.
.....When preparing flaming foods under
the hood, turn the fan on.
4
RADIANTSURFACEUNITS(cont.)
ge.com
.....Use care when touching the cooktop. The
glass surface of the cooktop will retain heat
•after the controls have been turned oft
.....Keep an eye on foods being flied at high
or medium high heat settings.
.....Foods for flTing should be as dU as
possible. Frost on frozen foods or moisture
on flesh foods can cause hot fat to bubble
up and over the sides of the pan.
.....Use little fat for effective shallow or deep
fat flTing. Filling the pan too full of fat can
cause spillovers when food is added.
.....If a combination of oils or fats will be
used in flTing, stir together before heating,
or as fats melt slowly.
Always heat fat slowly, and watch as it heats.
.....Use a deep fat thermometer whenever
possible to prevent overheating fat beyond
the smoking point.
.....Avoid scratching the glass cookmp.
The cooktop can be scratched with items
such as sharp instruments, rings or other
jeweh T, and rivets on clothing.
.....Do not operate the radiant surface units if
the glass is broken. Spillovers or cleaning
solution may penetrate a broken cooktop
and create a risk of electrical shock.
Contact a qualified technician immediately
should your glass cookmp become broken.
.....Never use the glass cooktop surface as
a cutting board.
.....Do not place or store items that can melt
or catch fire on the glass cooktop, even
when it is not being used.
.....Be careful when placing spoons or other
stirring umnsils on glass cookmp surface
when it is in use. They may become hot
and could cause burns.
.....Clean the cooktop with caution. If a wet
sponge or cloth is used to wipe spills on a
hot surface unit, be careful to avoid smam
burns. Some cleaners can produce
noxious fumes if applied to a hot surface.
NOTE: We recommend that you avoid
wiping any surface unit areas until they
have cooled and the indicator light has
gone ott. Sugar spills are the exception
to this.Please see the Cleaning the glass
cooktop section.
.....When the cooktop is cool, use only
CERAMA BRYTE _>Ceramic Cooktop
Cleaner and the CERAMA BRYTE _>
Cleaning Pad m clean the cookmp.
.....To avoid possible damage to the cooking
surface, do not apply cleaning cream to
the glass surface when it is hot.
.....After cleaning, use a d U cloth or paper
towel m remove 'all cleaning cream
residue.
.....Read and follow all instructions and
warnings on the cleaning cream labels.
.....i,arge scratches or impacts m glass doors
or cooktops can lead to broken or
shattered glass.
.....Do not leave any items on the cooktop.
The hot air flom the vent may i_fite
flammable imms and will increase pressure
in closed containers, which may cause
them to burst.
.....Do not leave plastic items on the
cooktol>--they may melt if left too close
to the vent.
.....Do not lift the cooktop. Lifting the
cooktop can lead to damage and improper
operation of the range.
5

IMPORTANTSAFETYINFORMATION.
READALLINSTRUCTIONSBEFOREUSING.
WARNING!
OVEN
Standaway fromtherange whenopeningtheovendoor.Hot
hands,faceand/oreyes.
Do not heat unopened food containers. Pressure
could build up and the container could burst,
causing an injur)_
Keep the oven vent unobstructed.
Keep the oven flee flom grease buildup.
Place the oven shelf in the desired position while
the oven is cool. If shelves must be handled when
hot, do not let pot holder contact the heating
elements.
When using cooking or roasting bags in the oven,
follow the manufacturer's directions.
Pulling out the shelf to the stop-lock is a
convenience in lifting hem,y foods. It is also a
WARMINGDRAWERronso e ode/s)
The purpose of the x_:arming drawer is to hold
hot cooked foods at sei_,ing temperature. Ahvays
start xdth hot food; cold food cannot be heated
or cooked in the wamfing drawer
Do not use the drawer to dU ne_vspapers.
If overheated, they can catch on fire.
Do not leave paper products, plastics, canned
food, or combustible materials in the drawer
Never leave jars or cans of fat drippings in or
near your drawer
Do not warm fbod in the drawer for more than
two hours.
air orsteamwhich escapescan causebums to
precaution against burns flom touching hot
surfaces of the door or oven walls.
Do not use the oven to dU newspapers.
If overheated, they can catch on fire.
Do not use the oven for a storage area. Items
stored in an oven can ignite.
Do not leave paper products, cooking utensils or
food in the oven when not in use.
Do not use aluminum fuil to line oven bottoms.
Improper installation of aluminum fuil may
result in a risk of electric shock or fire.
Donottouchtheheatingelementortheinterior
surfaceofthedrawer.These surfaces may be hot
enough to burn.
REMEMBER:The inside surface of the drawer
may be hot when the drawer is opened.
Use care when opening the drawer. ()pen the
drawer a crack and let hot air or steam escape
before removing or replacing food. Hot air or
steam which escapes can cause burns to hands,
face and/or eyes.
Do not use aluminum fbil to line the warming
drawer. Foil is an excellent heat insulator and
xdlltrap heat beneath it. This will upset the
perfbrmance of the drawer and it could
damage the interior finish.
SELF-CLEANINGOVEN
Donotuse ovencleaners.No commercialoven cleanerorovenlinerprotectivecoatingof anykind shouldbe
usedin oraroundanypart ofthe oven.Residuefromovencleanerswill damagethe insideof theovenwhen the
self-cleancycleis used.
Do not clean the door gasket. The door gasket is
essential fbr a good seal. Care should be taken
not to rub, damage or move the gasket.
Befbre self:cleaning the oven, remove shin);
silver-colored oven shekes (on some models) and
all other cookware.
Gray porcelain-coated oven shelves (on some
models) may be cleaned in the oven during
the self:clean cycle.
Be sure to wipe offexcessspillage beff)restarting
the sel6cleaning operation.
If the self:cleaningmode malfhnctions, turn the
oven offand disconnect the power supply.Have
it serdced bya qualified technician.
Clean only parts listed in this ()x_/er's Manual.
READANDFOLLOWTHISSAFETYINFORMATIONCAREFULLY.
SAVETHESEINSTRUCTIONS
6
Usingthe surfaceunits, geoom
Throughout this manual, features and appearance may vary from your model
OFF
Besureyouturnthe contro/knobtoOFF
whenyoufinishcooking.
How to Set
Push the knob in and mrn in either directkm
to the setting you want.
At both OFFand HI the control clicksinto
position. _bu may hear slight clickingsounds
during cooking, indicating the conu'ol is
keeping the power le_l you set.
A HOTCOOl(TOPindicator light willglow
when any radiant element is turned on, and
willremain on until the surf:aceis cooled m
approximately 150°E
Indicatorlightwill:
comeonwhentheunitisturnedonorhottothe
touch.
stayonevenaftertheunitisturnedoff
glowuntiltheunitiscooledtoapproximately150°F.
sMALL
BURNER _ BURNER
LARGE
OFF
Dual Surface Unit (onsomemodels)
Thedualsurfaceunithas2 cookingsizestoselect
fromsoyoucanmatchthesizeoftheunittothe
sizeof thecookwareyouareusing.
To use the small surface unit, push in
the SMALLBURNERportion of the switch
above the control knob.
u _::&':".:_'7
To use the lmge surface unit, push in
the LARGEBURNERportion of the switch
above the control knob.
SM_tt _.GE Dual Surface Unit Control Knob (onsomemode/s)
BURNER OFF BURNER
HI ,z, _ @HI Theduatsuffaceunithas2cookingsizestoselectfrom
To//se the small Stll'J_ace//nit, t//rn the contFol
4_,,_ _ J_ 6 knob to the SMALLBURNERsettings.
_'_ To use the large surface unit, turn the control
LO 2 knobtothe LARGEBURNERsettings.
OFF
Tri-Ring Surface Element (onsomemodels)
Therearcentersurfaceelementoffers3cookingareas
tomatchthesizeofthecookwareyou
Push down and turn the control knob to the
desired setting.
areusing.
To use the smallest cooking area, tlli'll the
To use the largest cooking area, push in and
turn the SELECTORknob to 12".Push and
turn the control knob to the desired setting.
!ii
5
To use the medium cooking area, press and
turn the SELECTORknob to 9".
SELECTORknob to 6". Push and mrn the
conu'ol knob to the desired setting. This will
activamonly the smallest inside heating area.
Usingthe surfaceunits.
Throughout this manual, features and appearance may vary from your model
Using the Warming Zone
CAUTION:DonotwarmfoodontheWARMINGZONE
formorethantwohours.
NOTE."Thesurfacewarmerwillnotg/owredlikethe
cookingelements.
A HOTsurface indicator light will glow when
the glass surface is hot and will remain on
undl the surf:ace is cool enough to touch.
I,ower settings may' not heat the glass surface
enough to cause the HOTsurface indicator
light to come on.
A WARMINGZONEindicator light will glow
when the unit is on.
, Donotuseplasticwraptocoverfood.Plasticmay
WARMER GUIDE
SETTING FOOD
(Low) Bread/Pastries
(Medium) Chocolate/Butter
(Medium) Sauces,Stews,
CreamSoups
(Medium) Vegetables
(High) Soups(liquid)
(High) TeaorCoffee
TheWarmerGuideis forreference
onlyandthe SETTINGthatyouneed
willdependontheamountandtypeof
food,thestartingtemperatureofthe
foodandthe lengthoftheholdingtime.
The WARMINGZONE,located in the hack
center of the glass surface, will keel) hot,
cooked food at serving temperature. Ahvays
start xfith hot food. Do not use to heat cold
food. Placing uncooked or cold food on the
WARMINGZONEcould result in food-horne
illness.
Push and turn the control knob to any
desired setting.
For best results, all %ods on the
WARMINGZONEshouldbe coxered with a lid
or alumimml foil. *dizen wamfing pasuies or
breads, the coxer should be xented to allow
moisture to escape.
Always use pot hoMers or oven mitts when
removing food fl'om the WARMING ZONE,
since cookware and plates will be hot.
meltontothesurfaceandbeverydifficulttoclean.
Useontycookwarerecommendedfortop-of-range
cooking.
Temperature Limiter
Eve_y radiant surface unit has a
mmperamre limimL
The mmpemtme limimr protects the
glass cookmp fiom getting mo hot.
Home Canning Tips
Be sure the canner is centered over the
surface unit.
Make sure the canner is flat on the
bottom.
To prevent burns flom steam or heat,
use caution when canning.
WokCooking
We recommendthat youuse onlya flat-bottomed
wok. Theyare availableat your local retailstore.
Do not use woks that have support rings.
The mmpemmre limimr may cycle
die units off for a dine if:
Thepanboilsdry.
Thepanbottomisnotflat.
Thepanisoff-center.
Thereis nopanontheunit.
Use recipes and procedures flom
reputable sources. These are available
flom manufacturers such as Ball®and
Kerr®and the Depamnent of Agriculture
Extension Service.
Flat-bottomed cmmers are
recommended. Use ofwamr bad1
cannei_ wifll rippled bottoms may
extend the time required m bring
the water m a boil.
Do not use round bottom woks.
You could be seriously burned if the
wok dpped oveL
Use only flat-bottomed woks.
8
The following information will help you choose cookware which will give good performance on glass cooktops.
About the radiant surface units...
The radiant cooktop features heating
NOTE'.Aslightodorisnormalwhenanew ...... _
ii i (ii ii il
Never cook directly on the glass,
Always use cookware,
Always place thepan in the center of
the surface unit you are cooking on.
cooktopisusedforthefirsttime.Itiscausedby
.,,itsbe,,e ,thsmood,gl.ss
theheatingofnewpartsandinsulatingmaterials
andwilldisappearin ashorttime.
NOTE'.Onmodelswithlight-coloredglass
co&tops,it isnormalforthecookingzonesto
changecolorwhenhotorcodingdown.Thisis
temporaryandwill disappearastheglasscoolsto
roomtemperature.
The surface unit will cycle oi1and off to
maintain your selecmd control setting.
It is safe to place hot cookware on file
glass surface even when file cooktop
is cool.
Even after the surface units are turned
off, the glass cooktop retains enough
heat m continue cooking. To avoid
overcooking, remove pans from the
surface units when the food is cooked.
Avoid placing anything on the surface
unit until it has cooled complemly.
Do not slide cookware across the
cooktop because it can scratch the
glass--the glass is scratch-resistant,
not scratchproof.
Waterstains(mineraldeposits)areremovable
usingthecleaningcreamorfull-strengthwhite
vinegar
Useof windowcleanermayleaveaniridescent
filmonthecooktop.Thecleaningcreamwill
removethisdiscoloration.
Don'tstoreheavyitemsabovetheco&top.
If theydropontotheco&top,theycancause
damage.
Donotusethesurfaceasacuttingboard.
ge.com
Selectingtypesofcookware.
Stainless Steel'.
recommended
Check pans for flat bottoms by
using a straight edge,
Pans with rounded, curved, ridged
or warped bottoms are not
recommended.
Aluminum:
heavyweightrecommended
Good conductivit T.Aluminum residues
sometimes appear as scratches o,1 tlle
cooktop, but can be removed if cleaned
immediamly. Because of its low melting
point, thin weight aluminum should not
be used.
CopperBottom:
recommended
Copper may leave residues which can
appear as scratches. The residues can be
removed, as long as the cookmp is
cleaned immediately. Howeve,; do not let
these pots boil dry. Overheated metal can
bond m glass cookmps. An overheated
copper bottom pot will leave a residue
that will permanendy stain the cooktop
if not removed immediamly.
PorcelainEnamel-CoveredCastIron:
recommended
As long as file cookware is covered
completely wifll porcelain enamel, dds
cookware is recommended. Caution is
recommended for cast iron cookware
tllat is not complemly covered with
smooth porcelain enamel, since it m W
scratch the glass ceramic cooktop.
Glass-Ceramic:
usable,butnotrecommended
Poor performance. May scratch die
Stlrface.
Stoneware:
usable,butnotrecommended
Poor performance. May scratch die
Stlrface.
9
Usingthe ovencontrols.
Throughout this manual, features and appearance may vary from your model
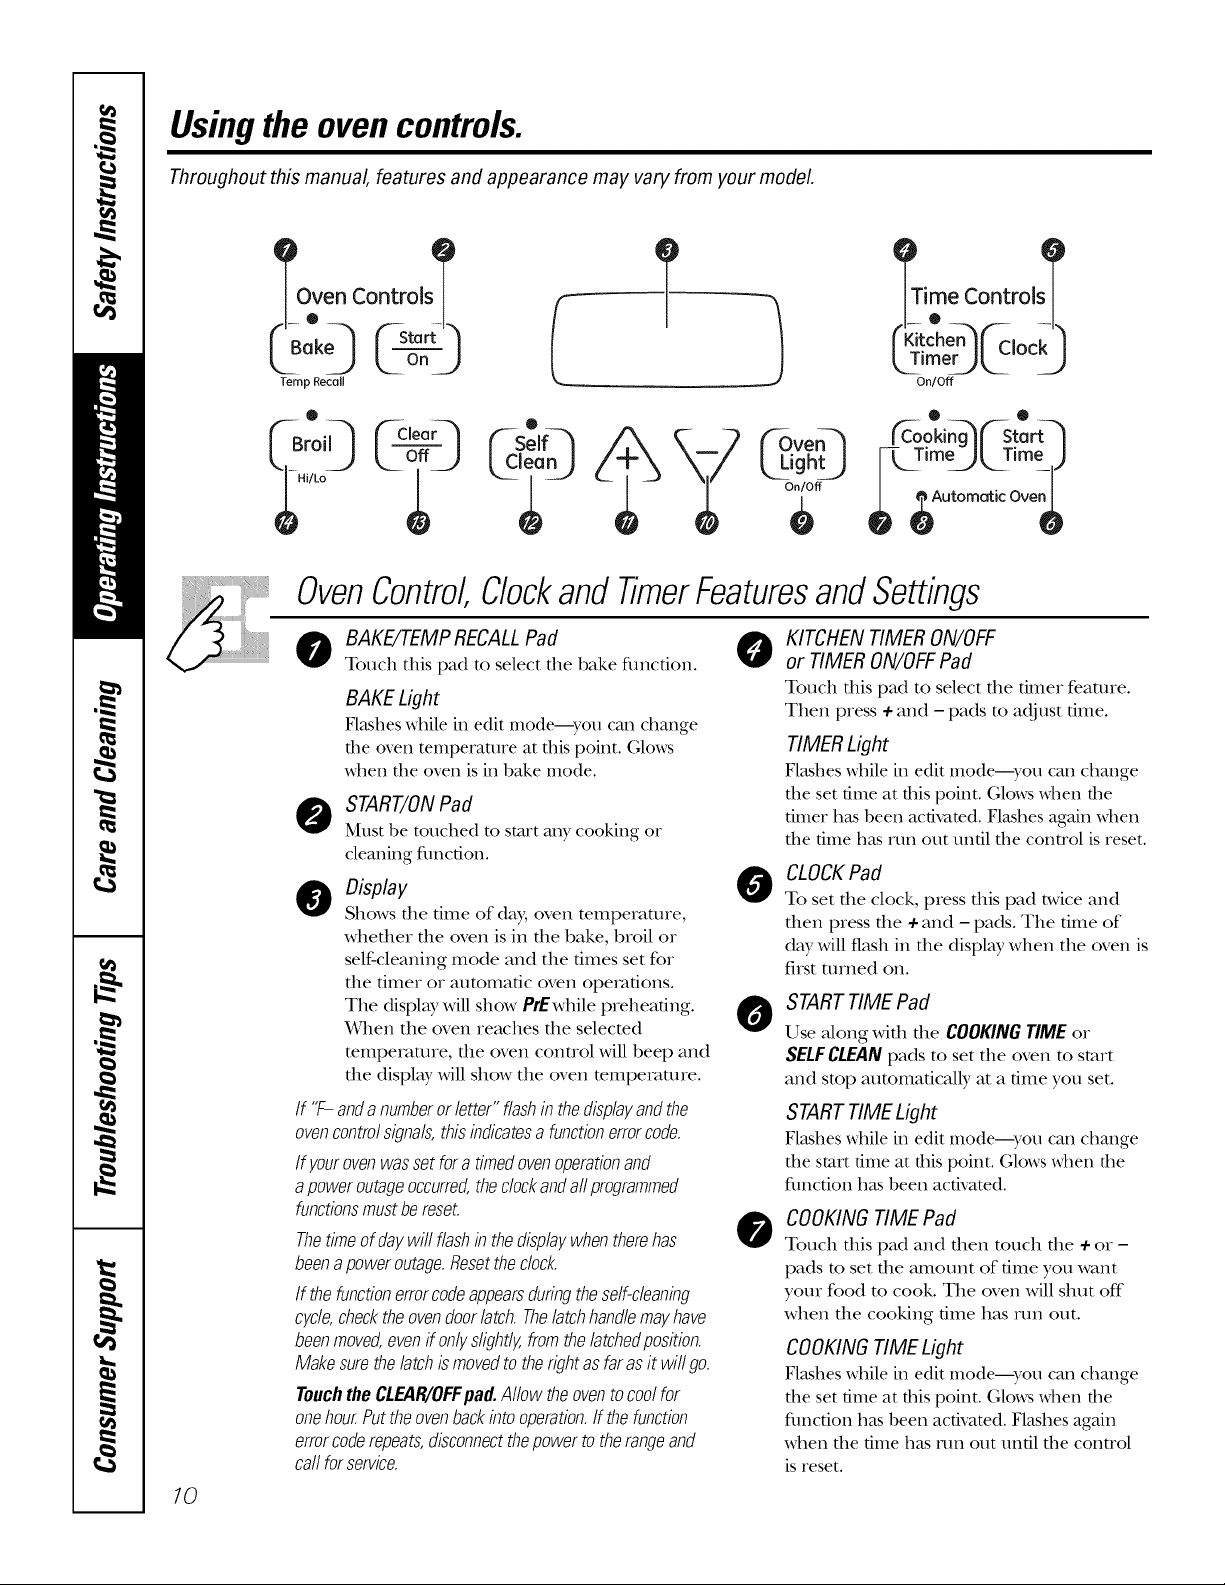
1'
,,._r ,m 30'°
..... I-., ] Kitchen°..... c_
Temp Recgll On/Off
o
CSeIF3
T dave
OvenControlClockandTimerFeaturesandSettings
Time Time,)
I-L_ _,
_ SAutomatic Ove_
70
O AKE/TEMP RECALLPad 0
Touch this pad to select the hake fimcfion.
BAKE Light
Flashes while in edit mode--you can change
the oven temperature at this point. Glo_s
when tile oven is in bake mode.
O START/ONPad
Must be touched to start any cooking or
cleaning traction.
0 Display
Shows die time of day, oven temperature,
whether the oven is ill the bake, broil or
self-cleaning mode and the times set for
the timer or automatic oven operations.
The displ W willshow PrEwhile preheating.
When the oven reaches the selecmd
mmperamre, the oven control will beep and
the displ W will show the oven mmpemmre.
If "F-anda numberorletter"flashinthedisplayandthe
ovencontrolsignals,thisindicatesafunctionerrorcode.
If yourovenwassetforatimedovenoperationand
apoweroutageoccurred,theclockandaftprogrammed
functionsmustbereset.
Thetimeofdaywill flashinthedisplaywhentherehas
beenapoweroutage.Resettheclock.
If thefunctionerrorcodeappearsduringtheself-cleaning
cycle,checktheovendoorlatch.Thelatchhandlemayhave
beenmoved,evenff onlyslightly,fromthelatchedposition.
Makesurethelatchismovedto therightasfarasit wit go.
TouchtheCLEAP,/OFFpad.Albw theoventocoolfor
onehour.Puttheovenbackintooperation.Ifthefunction
errorcoderepeats,disconnectthepowertotherangeand
callforservice.
KITCHEN TIMER ON/OFF
or TIMER ON/OFFPad
Touch tiffs pad to select file fimeI featuIe.
Then press + and - pads to adjust time.
TIMER Light
Flashes MWe in edit mode---you call change
the set time at tiffs point. (;lo_ \dlen the
timer has been activated. Flashes again xdlen
the time has run out until the contl'ol is reset.
CLOCK Pad
0
To set file clock, press tiffs pad twice and
then press the +and -pads. The time of
dW will flash in the displ Wwhen the oven is
first turned on.
START TIME Pad
0
Use along widl die COOKINGTIMEor
SELFCLEANpads to set file oven to start
and stop automatically at a time you set.
START TIMELight
Flashes MWe in edit IIlo(te---yotl call change
the start time at this point. Glows \d/en the
fllllCtiOI1 has been activated.
COOKINGTIME Pad
0
Touch this pad and then touch the + or -
pads to set the amount of time you want
your food m cook. The oven will shut off"
when the cooking time has run out.
COOKINGTIME Light
Flashes \_hile in edit mode---you call change
tile set time at this point. Glows vdlen tile
flllactiolahas been activated. Flashes again
when the time has run out until the control
is reset.
OvenControlClockand TimerFeaturesandSettings
ge.com
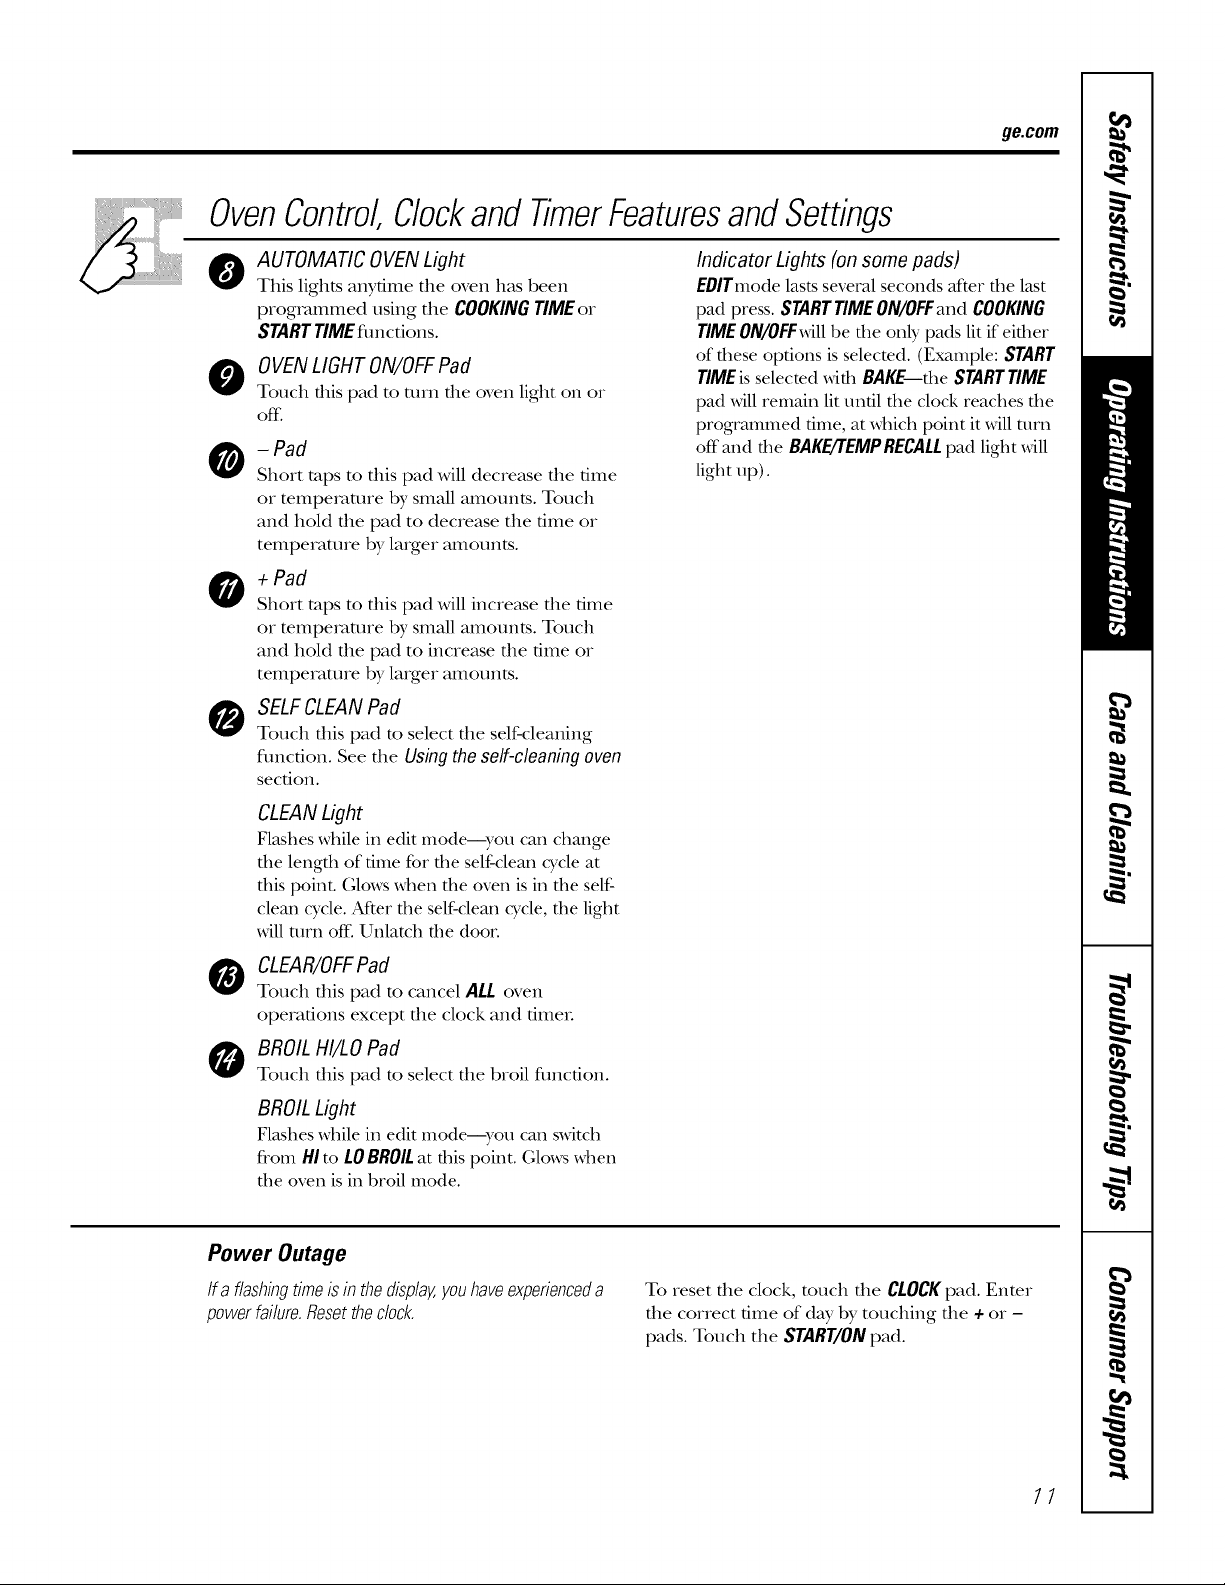
AUTOMATIC OVENLight
0
This lights anydme file oven has been
programmed using tile COOKINGTIMEor
STARTTIMEflmcdons.
O OVENLIGHTON/OFFPad
Touch this pad to turn tile oven light on or
off.
- Pad
Short raps to this pad will decrease tile time
or temperature by small amounts. Touch
and hold tile pad to decrease the time or
temperature by larger amounts.
O +Pad
Short raps to this pad will increase tile time
or mmpemmre by small amounts. Touch
and hold the pad to increase the time or
temperature by larger amounts.
O SELFCLEANPad
Touch this pad to select tile self-cleaning
flmcfion. Seethe Usingtheself-cleaningoven
section.
CLEANLight
Flashes while ill edit mode--you call change
the length of time for the self-clean cycle at
this point. Glows when the oven is ill tile self-
cleml wcle. After file self-cleml cycle, the light
will turn oft: Unlatch the doon
Indicator Lights (on some pads)
EDITmodelasts several seconds after file last
pad press. STARTTIMEON/OFFand COOKING
TIMEON/OFFwillbe the only pads lit if either
of these options is selected. (Example: START
TIMEisselected,dth BAKE the STARTTIME
pad Mll remain lit until file clock reaches file
prograuuned time, at which point it willturn
off mid tile BAKE/TEMPRECALLpad light Mll
light up).
O CLEAR/OFFPad
Touch this pad to cancel ALLoven
operations except file clock and dmeL
BROIL HI/LO Pad
Touch this pad to select tile broil function.
BROIL Light
Flashes while ill edit mode---yell call switch
from HI to LOBROILat this point. Glows when
file oven is ill broil mode.
Power Outage
If aflashingtimeis inthedisplay,youhaveexperienceda
powerfailure.Resettheclock.
To reset tile clock, touch tile CLOCK pad. Enter
tile correct time of day by touching tile + or -
pads. Touch tile START/ONpad.
77
Usingthe oven.
Toavoid possible bums, place the shelves in the desired position before you turn the oven on.
Before you begin...
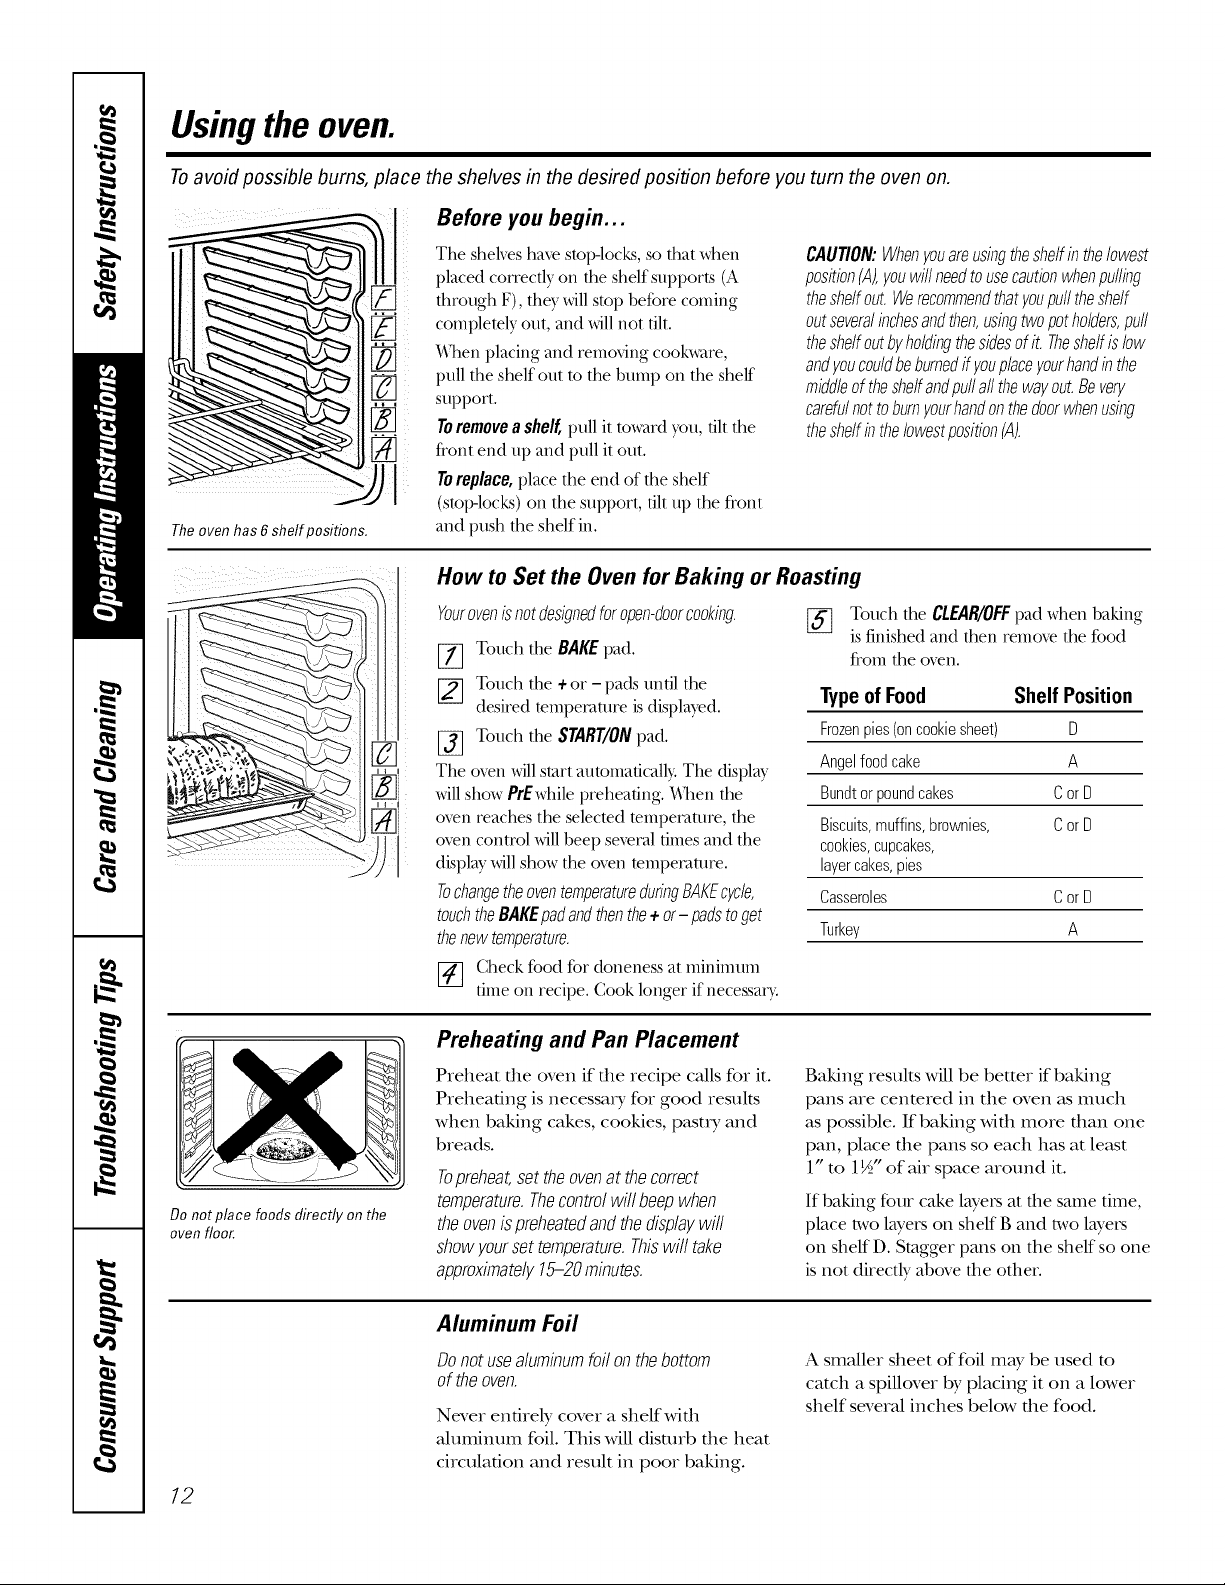
The oven has 6 shelf positions.
%
%i
The shelves haxe stopqocks, so that when
placed correctly on the shelf supports (A
through F), the)' will stop before coming
complemly out, and will not flit.
_]mn placing and removing cookware,
pull the shelf out m the bump on the shelf
support.
Toremovea shelf, pull it towaM you, flit the
front end up and pull it out.
TOreplace, place the end of the shelf
(stop-locks) on the support, flit up the front
and push the shelf in.
CAUTION:Whenyouareusingtheshelfinthelowest
position(A),youwillneedtousecautionwhenpuffing
theshelfout.Werecommendthatyoupufftheshelf
outseveralinchesandthen,usingtwopotholders,pull
theshelfoutbyholdingthesidesofit.Theshelfislow
andyoucouldbeburnedifyouplaceyourhandinthe
middleoftheshelfandpu//allthewayout.Beyen/
carefulnottoburnyourhandonthedoorwhenusing
theshelfinthelowestposition(A).
How to Set the Oven for Baking or Roasting
Yourovenisnotdesignedforopen-doorcooking.
[_] Touch the BAKE pad.
[] Touch the + or - pads until the
desired temperature is displayed.
[_] Touch the START/ONpad.
The oxen will start automaflcally. The display
will show PrEwhile preheaflng, h]_en the
oxen reaches the selected tempevatm'e, the
o_en conu'ol will beep several flmes and the
displ W willshow the o_en mmpevatm'e.
TochangetheoventemperatureduringBAKEcycle,
touchtheBAKEpadandthenthe+ or- padstoget
thenewtemperature.
[_ Touch the CLEAR/OFFpad when baking
Type ofFood Shelf Position
Frozenpies(oncookiesheet) D
Angelfoodcake A
Bundtorpoundcakes CorD
Biscuits,muffins,brownies, CorD
cookies,cupcakes,
layercakes,pies
Casseroles CorD
Turkey A
is finished and then remove the %o(t
fl'om the oven.
Do not place foods directly on the
oven floor.
12
[_] (.]heck food for doneness at minimum
nine on recipe. Cook longer if necessary.
Preheating and Pan Placement
Preheat file oven if file recipe cMlsfor it.
Preheating is necessary for good results
when baking cakes, cookies, pasu y and
breads.
Topreheat,settheovenat thecorrect
temperature.Thecontrolwillbeepwhen
theovenispreheatedandthedisp/a;/will
show;loutset temperature.Thiswill take
approximate/;/15-20minutes.
Aluminum Foil
Donotusealuminumfoilonthebottom
of theoven.
Never entirely cover a shelfwifll
Muminum foil. This Mll disturb file heat
circulation and result in poor baking.
Baking results Mll be better if baking
pans are cenmred in the oven as much
as possible. If baking with more than one
pan, place the pans so each has at least
1" to 1½" of air space around it.
If baking fbur cake layeIs at file stone time,
place two layers on sheff B mad/wo layers
on shelf D. Stagger pmls on the shelf so one
is not directly above the other.
A smaller sheet of foil may be used to
catch a spillover by placing it on a lower
shelf several inches below the food.
 Loading...