

Page 1
ge.com
Safety InsO'uctiom" . ........ 2-6
Operating Instructiom"
(;lock and Timer ............. 15
Oven .................... 10-22
Broiling, Broiling Guide . .13, 14
Controls ................ 10, 11
Sabbath Feature ......... 18, 19
Self:Cleaning ............ 2'.4, 24
Special Features ............ 17
Thermostat ................ 20
Timed Baking
and Roasting ............... 16
Warming Drawer ........ 21, 22
Surface Units .............. 7-9
Care and Cleaning
Control Knobs .............. 25
(;lass Cooktop ........... 29, 30
i,ifi-Off Oven Door .......... 26
Light ...................... 28
Oven Vent .................. 25
Shelves ..................... 27
Removable Warming
Drawer Pan ................. 27
Storage Drawer ............. 28
,]B690
,]B700
,I_710
,IF,720
i 73o
,]BPS1
Troubleshooting Tips .... 31-34
Accessories. ................ 38
Consumer Support
Consumer Support .... Back Cover
Product Registration ........ 35, 36
Warranty ................... 39
Write the model and serial
numbers here:
Model #
Serial #
You can find them on a label
behind the storage drawer on
the flont of the range flame.
49-80531-1 08-08JR
Page 2
IMPORTANTSAFETYINFORMATION.
READALLINSTRUCTIONSBEFOREUSING.
WARNING!
For your safety, the information in this manual must be followed to minimize the risk of fire,
electric shock, or to prevent property damage, personal injury, or loss of life.
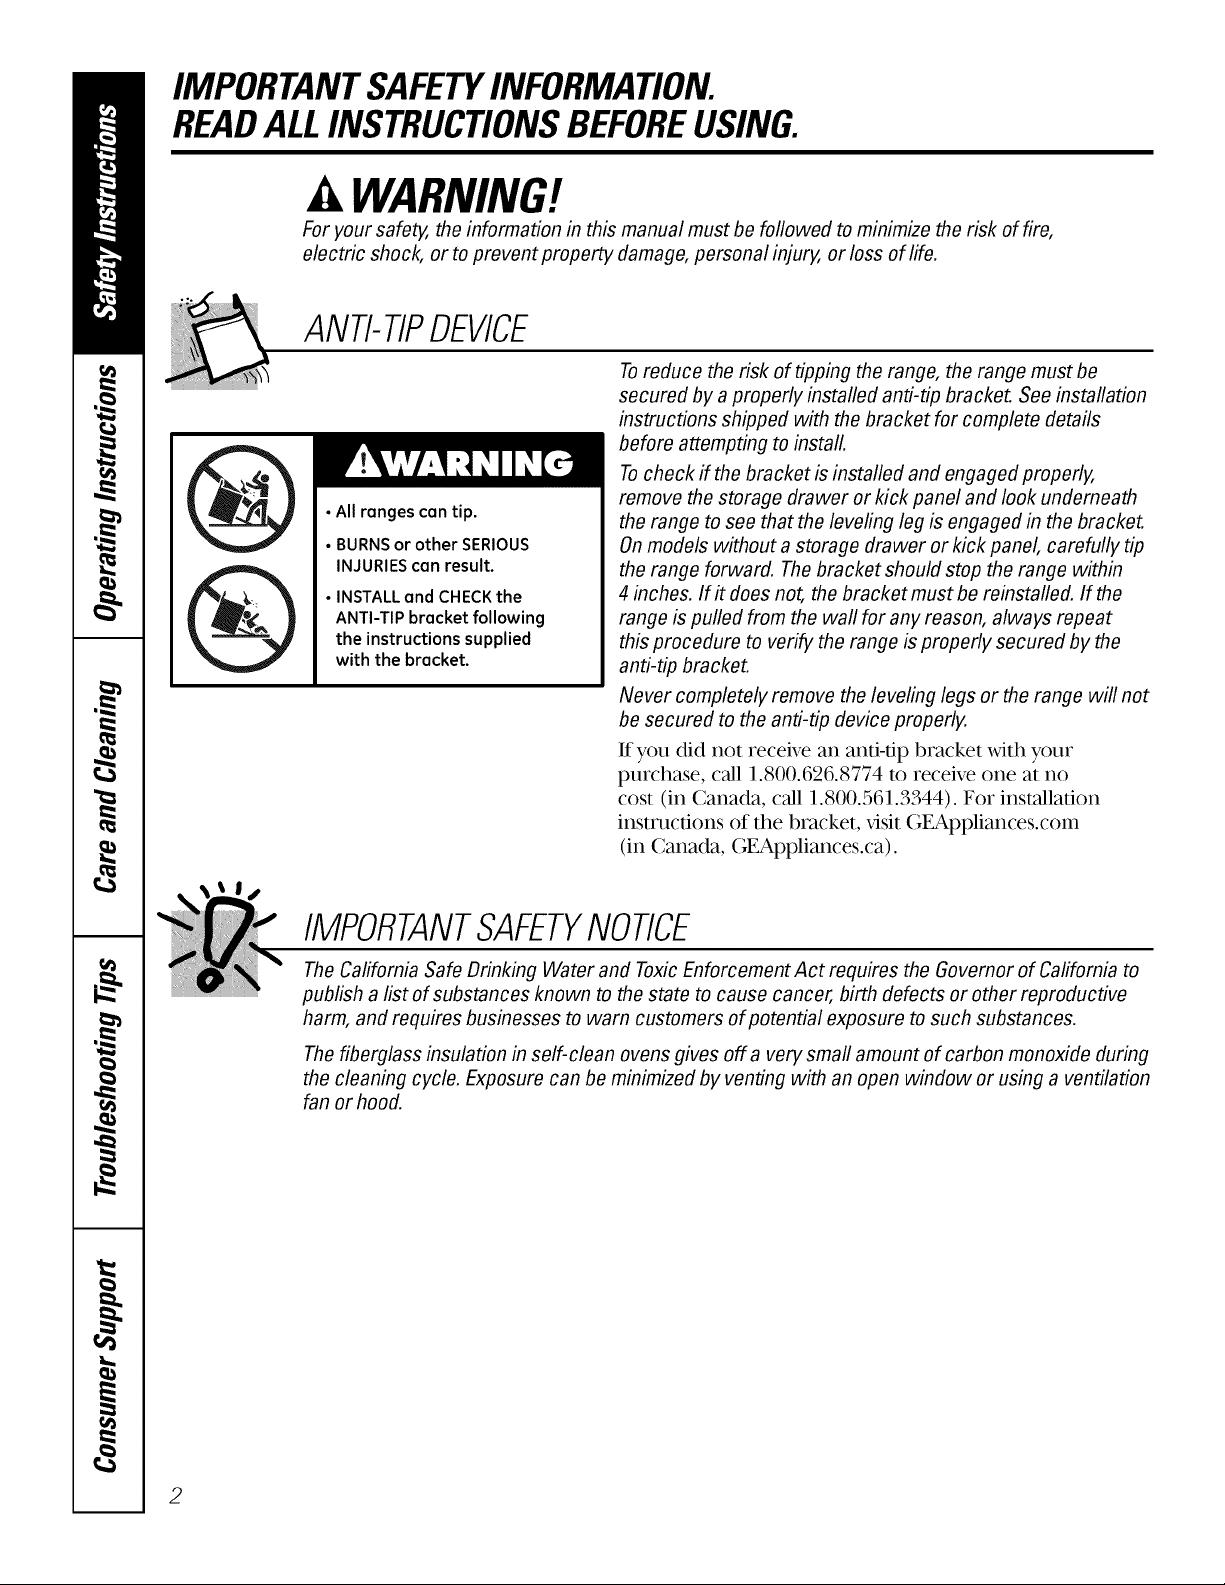
ANti-TIPDEVICE
Toreduce the risk of tipping the range, the range must be
secured by aproperly installed anti-tip bracket. Seeinstallation
instructions shipped with the bracket for complete details
before attempting to install.
Tocheck if the bracket isinstalled and engaged properly,
• All ranges can tip.
• BURNSor other SERIOUS
INJURIEScan result.
• INSTALLand CHECKthe
ANTI-TIP bracket following
the instructions supplied
with the bracket.
remove the storage drawer or kick panel and look underneath
the range to see that the leveling leg is engaged in the bracket.
On models without a storage drawer or kick panel, carefully tip
the range forward. The bracket should stop the range within
4 inches. If# does not, the bracket must be reinstalled. If the
range is pulled from the wall for any reason, always repeat
this procedure to verify the range is properly secured by the
anti-tip bracket.
Never completely remove the leveling legs or the range will not
be secured to the anti-tip device properly.
If you did not receive an anti-tip bracket with your
purchase, call 1.800.626.8774 m receive one at no
cost (in Canada, call 1.800.561.3344). For installation
instructions of the bracket, x,isit GEAppliances.com
(in Canada, GEAppliances.ca).
IMPORTANTSAFETYNOtiCE
TheCalifornia Safe Drinking Water and Toxic Enforcement Act requires the Governor of California to
publish a list of substances known to the state to cause cancer, birth defects or other reproductive
harm, and requires businesses to warn customers of potential exposure to such substances.
Thefiberglass insulation in self-clean ovens gives off a very small amount of carbon monoxide during
the cleaning cycle. Exposure can be minimized by venting with an open window or using a ventilation
fan or hood.
2
Page 3
ge.com
SAFETYPRECAUTIONS
When using electrical appliances, basic safety precautions should be followed, including the following:
Use this appliance only for its intended
propose as descnbed in flus Owner's
Manual.
Be sure your appliance is properly
installed and _ounded by a qualified
installer in accordance xdth the prox,ided
installation instructions.
Have the installer show you the location
of the circuit breaker or fuse. Mark it fk)r
easy reference.
Do not attempt to repair or replace any
part of your range unless it is specifically
recommended in this manual. All other
serx,icing should be referred to a qualified
technician.
Before perfk)rming any ser\,ice, disconnect
the range power supply at the household
distribution panel by remox,ing the fuse or
switching off the circuit breaker-
Do not leave children alone---children
should not be left alone or unattended in
an area where an appliance is in use. They
should never be 'allowed to sit or stand on
any part of the appliance.
Do not allow anyone to climb, stand or
hang on the door, storage drawer or
cookmp. They could damage the range
and even tip it over, causing severe
persorral in,ju U.
it WARNING'!
SAFETYPRECAUTIONS
Do not operate the oven or cooktop controls if the glass is broken. Food splatter or cleaning solution
may penetrate a broken control panel and create a risk of electrical shock. Contact a qualified
technician immediately should your glass control panel become broken.
Do not store flammable materials in Do not use water on grease fires. Never
an oven or near the cooktop.
CAUTION: temsofi.terestto
children should not be stored in cabinets
above a range or on the backsplash of a
range--children climbing on the range
to reach items could be seriously injured.
Never wear loose-fitting or han_ng
garments while using the appliance.
Be careful when reaching fk_ritems stored
over the range. Flammable material could
be ignited if brought in contact with hot
surface units or heating elements and may
cause severe burns.
Use only dPi pot holders--moist or damp
pot holders on hot surfaces may result in
burns fiom steam. Do not let pot holders
touch hot surface units or heating
elements. Do not use a towel or other
bulky cloth in place of pot holders.
pick up a flaming pan. Turn the controls
ore Smother a flaming pan on a surface
unit by covering the pan complewly with
a welMitting lid, cookie sheet or fiat tray.
Use a multi-purpose dU chemical or
fkmm-type fire extinguisher.
Flaming _ease outside a pan can be put
out by coveting it with baking soda or;
if available, by using a multi-purpose dU
chemical or foam-type fire extinguisher.
Flame in the oven can be smothered
completely by closing the oven door and
turning the oven off or by using a multi-
propose dU chemical or fk)am-type fire
extinguisher
3
Page 4
IMPORTANTSAFETYINFORMATION.
READALLINSTRUCTIONSBEFOREUSING.
WARNING!
SAFETYPRECAUTIONS
For your safety, never use your appliance
for warming or heating the room.
Do not let cooking grease or other
flammable materials accumulate in or
near the range.
.....Do not touch the surface units, the
heating elements or the interior surface
of the oven. These surfaces may be hot
enough m bum even though they are
dark in color. During and 'after use, do not
touch, or let clothing or other flammable
materials contact the surface units, areas
nearby the surface units or any interior
area of the oven; allow sufficient time for
cooling first.
Potentially hot surfaces include the
cooktop, areas facing the cooktop, oven
vent opening, surfaces near the opening,
crex,ices around the oven door:
REMEMBER:The inside surface of the oven
may be hot when the door is opened.
.....Do not store or use combustible materials,
gasoline or other flammable vapors and
liquids in the x,icinity of this or any other
appliance.
Keep the hood and grease filters clean
to maintain good venting and to avoid
_ease fires.
Teach children not to play xdth the
controls or any other part of the range.
Always keep dish towels, dishcloths, pot
holders and other linens a s_e distance
fiom your range.
Always keep wooden and plastic utensils
and canned food a s_e distance fiom
your range.
Always keep combustible wall coverings,
curtains or drapes a s_e distance from
your range.
COOKMEATANDPOULTRYTHOROUGHLY...
Cookmeat andpoultry thoroughly--meat toat least an INTERNALtemperatureof 160°Fandpoultry toat least
an INTERNALtemperatureof 180°ECookingto thesetemperaturesusuallypmtects againstfoodbomeillness.
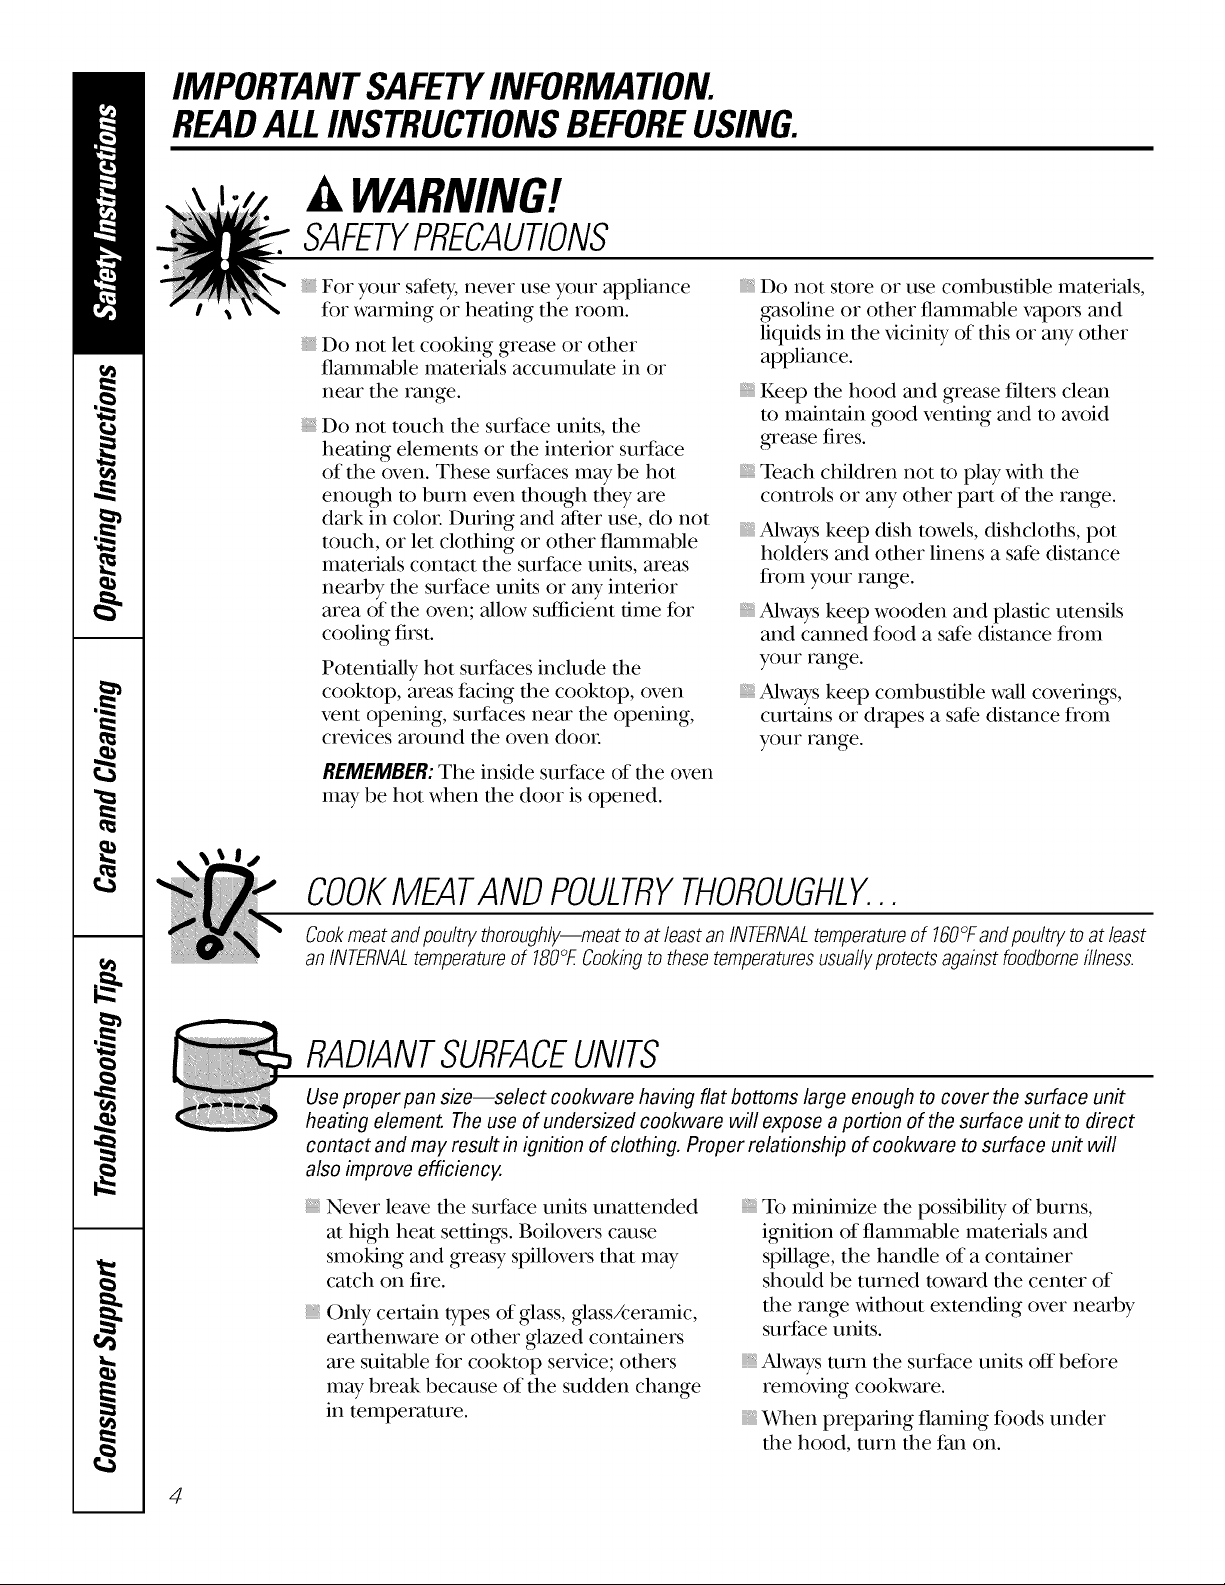
RADIANTSURFACEUNITS
Use proper pan size--select cookware having flat bottoms large enough to cover the surface unit
heating element. The use of undersized cookware will expose a portion of the surface unit to direct
contact and may result in ignition of clothing. Proper relationship of cookware to surface unit will
also improve efficiency.
Never leave the surface units unattended
at high heat settings. Boilovers cause
smoking and greasy spillovers that may
catch on fire.
Only certain types of glass, glass/ceramic,
earthenware or other glazed containers
are suitable for cooktop serx@e; others
may break because of the sudden change
in temperature.
iiiiiiiiiiii_iii
To minimize the possibility of burns,
i_fifion of flammable mamfials and
spillage, the handle of a container
should be turned reward the center of
the range without exmnding over nearby
surface units.
.....Always turn the surface units off before
removing cookware.
.....When preparing flaming foods under
the hood, turn the fan on.
4
Page 5
RADIANTSURFACEUNITS(cont.)
ge.com
.....Use care when touching the cooktop. The
glass surface of the cooktop will retain heat
•after the controls have been turned oft
.....Keep an eye on foods being flied at high
or medium high heat settings.
.....Foods for flTing should be as dU as
possible. Frost on frozen foods or moisture
on flesh foods can cause hot fat to bubble
up and over the sides of the pan.
.....Use little fat for effective shallow or deep
fat flTing. Filling the pan too full of fat can
cause spillovers when food is added.
.....If a combination of oils or fats will be
used in flTing, stir together before heating,
or as fats melt slowly.
Always heat fat slowly, and watch as it heats.
.....Use a deep fat thermometer whenever
possible to prevent overheating fat beyond
the smoking point.
.....Avoid scratching the glass cookmp.
The cooktop can be scratched with items
such as sharp instruments, rings or other
jeweh T, and rivets on clothing.
.....Do not operate the radiant surface units if
the glass is broken. Spillovers or cleaning
solution may penetrate a broken cooktop
and create a risk of electrical shock.
Contact a qualified technician immediately
should your glass cookmp become broken.
.....Never use the glass cooktop surface as
a cutting board.
.....Do not place or store items that can melt
or catch fire on the glass cooktop, even
when it is not being used.
.....Be careful when placing spoons or other
stirring umnsils on glass cookmp surface
when it is in use. They may become hot
and could cause burns.
.....Clean the cooktop with caution. If a wet
sponge or cloth is used to wipe spills on a
hot surface unit, be careful to avoid smam
burns. Some cleaners can produce
noxious fumes if applied to a hot surface.
NOTE: We recommend that you avoid
wiping any surface unit areas until they
have cooled and the indicator light has
gone ott. Sugar spills are the exception
to this.Please see the Cleaning the glass
cooktop section.
.....When the cooktop is cool, use only
CERAMA BRYTE _>Ceramic Cooktop
Cleaner and the CERAMA BRYTE _>
Cleaning Pad m clean the cookmp.
.....To avoid possible damage to the cooking
surface, do not apply cleaning cream to
the glass surface when it is hot.
.....After cleaning, use a d U cloth or paper
towel m remove 'all cleaning cream
residue.
.....Read and follow all instructions and
warnings on the cleaning cream labels.
.....i,arge scratches or impacts m glass doors
or cooktops can lead to broken or
shattered glass.
.....Do not leave any items on the cooktop.
The hot air flom the vent may i_fite
flammable imms and will increase pressure
in closed containers, which may cause
them to burst.
.....Do not leave plastic items on the
cooktol>--they may melt if left too close
to the vent.
.....Do not lift the cooktop. Lifting the
cooktop can lead to damage and improper
operation of the range.
5
Page 6

IMPORTANTSAFETYINFORMATION.
READALLINSTRUCTIONSBEFOREUSING.
WARNING!
OVEN
Standaway fromtherange whenopeningtheovendoor.Hot
hands,faceand/oreyes.
Do not heat unopened food containers. Pressure
could build up and the container could burst,
causing an injur)_
Keep the oven vent unobstructed.
Keep the oven flee flom grease buildup.
Place the oven shelf in the desired position while
the oven is cool. If shelves must be handled when
hot, do not let pot holder contact the heating
elements.
When using cooking or roasting bags in the oven,
follow the manufacturer's directions.
Pulling out the shelf to the stop-lock is a
convenience in lifting hem,y foods. It is also a
WARMINGDRAWERronso e ode/s)
The purpose of the x_:arming drawer is to hold
hot cooked foods at sei_,ing temperature. Ahvays
start xdth hot food; cold food cannot be heated
or cooked in the wamfing drawer
Do not use the drawer to dU ne_vspapers.
If overheated, they can catch on fire.
Do not leave paper products, plastics, canned
food, or combustible materials in the drawer
Never leave jars or cans of fat drippings in or
near your drawer
Do not warm fbod in the drawer for more than
two hours.
air orsteamwhich escapescan causebums to
precaution against burns flom touching hot
surfaces of the door or oven walls.
Do not use the oven to dU newspapers.
If overheated, they can catch on fire.
Do not use the oven for a storage area. Items
stored in an oven can ignite.
Do not leave paper products, cooking utensils or
food in the oven when not in use.
Do not use aluminum fuil to line oven bottoms.
Improper installation of aluminum fuil may
result in a risk of electric shock or fire.
Donottouchtheheatingelementortheinterior
surfaceofthedrawer.These surfaces may be hot
enough to burn.
REMEMBER:The inside surface of the drawer
may be hot when the drawer is opened.
Use care when opening the drawer. ()pen the
drawer a crack and let hot air or steam escape
before removing or replacing food. Hot air or
steam which escapes can cause burns to hands,
face and/or eyes.
Do not use aluminum fbil to line the warming
drawer. Foil is an excellent heat insulator and
xdlltrap heat beneath it. This will upset the
perfbrmance of the drawer and it could
damage the interior finish.
SELF-CLEANINGOVEN
Donotuse ovencleaners.No commercialoven cleanerorovenlinerprotectivecoatingof anykind shouldbe
usedin oraroundanypart ofthe oven.Residuefromovencleanerswill damagethe insideof theovenwhen the
self-cleancycleis used.
Do not clean the door gasket. The door gasket is
essential fbr a good seal. Care should be taken
not to rub, damage or move the gasket.
Befbre self:cleaning the oven, remove shin);
silver-colored oven shekes (on some models) and
all other cookware.
Gray porcelain-coated oven shelves (on some
models) may be cleaned in the oven during
the self:clean cycle.
Be sure to wipe offexcessspillage beff)restarting
the sel6cleaning operation.
If the self:cleaningmode malfhnctions, turn the
oven offand disconnect the power supply.Have
it serdced bya qualified technician.
Clean only parts listed in this ()x_/er's Manual.
READANDFOLLOWTHISSAFETYINFORMATIONCAREFULLY.
SAVETHESEINSTRUCTIONS
6
Page 7
Usingthe surfaceunits, geoom
Throughout this manual, features and appearance may vary from your model
OFF
Besureyouturnthe contro/knobtoOFF
whenyoufinishcooking.
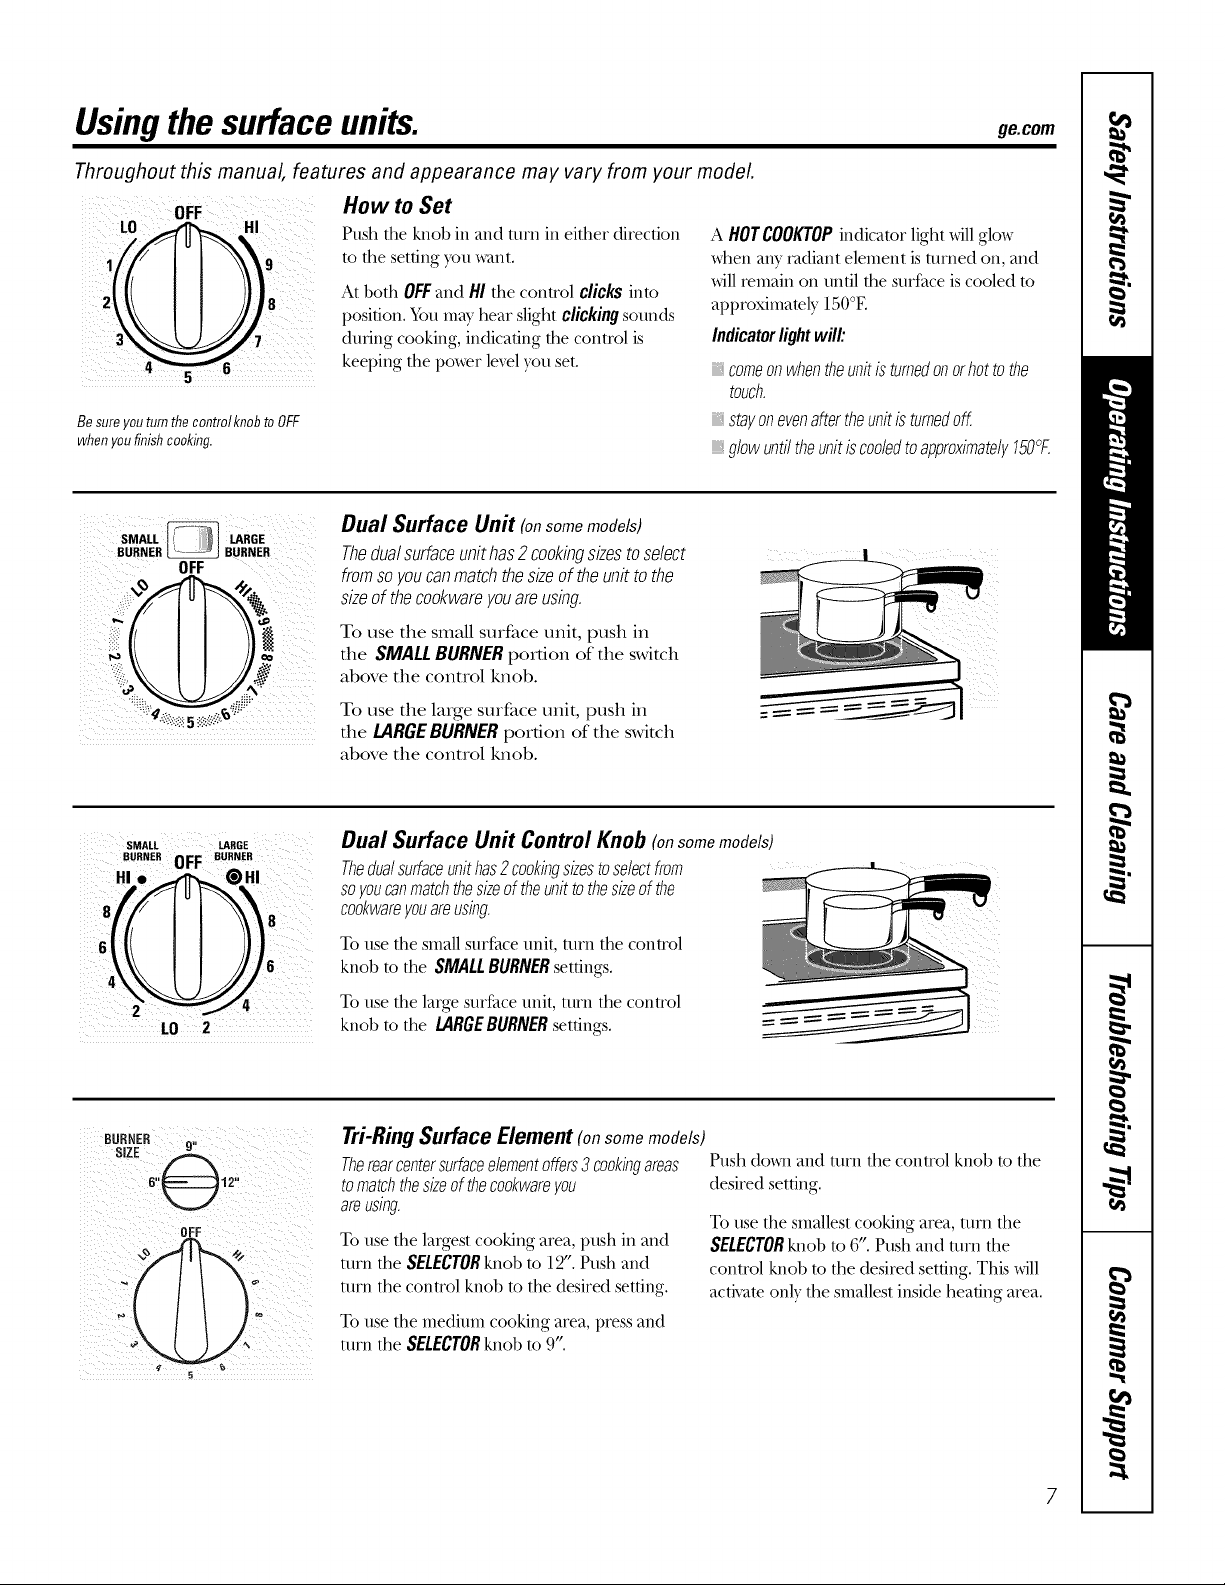
How to Set
Push the knob in and mrn in either directkm
to the setting you want.
At both OFFand HI the control clicksinto
position. _bu may hear slight clickingsounds
during cooking, indicating the conu'ol is
keeping the power le_l you set.
A HOTCOOl(TOPindicator light willglow
when any radiant element is turned on, and
willremain on until the surf:aceis cooled m
approximately 150°E
Indicatorlightwill:
comeonwhentheunitisturnedonorhottothe
touch.
stayonevenaftertheunitisturnedoff
glowuntiltheunitiscooledtoapproximately150°F.
sMALL
BURNER _ BURNER
LARGE
OFF
Dual Surface Unit (onsomemodels)
Thedualsurfaceunithas2 cookingsizestoselect
fromsoyoucanmatchthesizeoftheunittothe
sizeof thecookwareyouareusing.
To use the small surface unit, push in
the SMALLBURNERportion of the switch
above the control knob.
u _::&':".:_'7
To use the lmge surface unit, push in
the LARGEBURNERportion of the switch
above the control knob.
SM_tt _.GE Dual Surface Unit Control Knob (onsomemode/s)
BURNER OFF BURNER
HI ,z, _ @HI Theduatsuffaceunithas2cookingsizestoselectfrom
To//se the small Stll'J_ace//nit, t//rn the contFol
4_,,_ _ J_ 6 knob to the SMALLBURNERsettings.
_'_ To use the large surface unit, turn the control
LO 2 knobtothe LARGEBURNERsettings.
OFF
Tri-Ring Surface Element (onsomemodels)
Therearcentersurfaceelementoffers3cookingareas
tomatchthesizeofthecookwareyou
Push down and turn the control knob to the
desired setting.
areusing.
To use the smallest cooking area, tlli'll the
To use the largest cooking area, push in and
turn the SELECTORknob to 12".Push and
turn the control knob to the desired setting.
!ii
5
To use the medium cooking area, press and
turn the SELECTORknob to 9".
SELECTORknob to 6". Push and mrn the
conu'ol knob to the desired setting. This will
activamonly the smallest inside heating area.
Page 8
Usingthe surfaceunits.
Throughout this manual, features and appearance may vary from your model
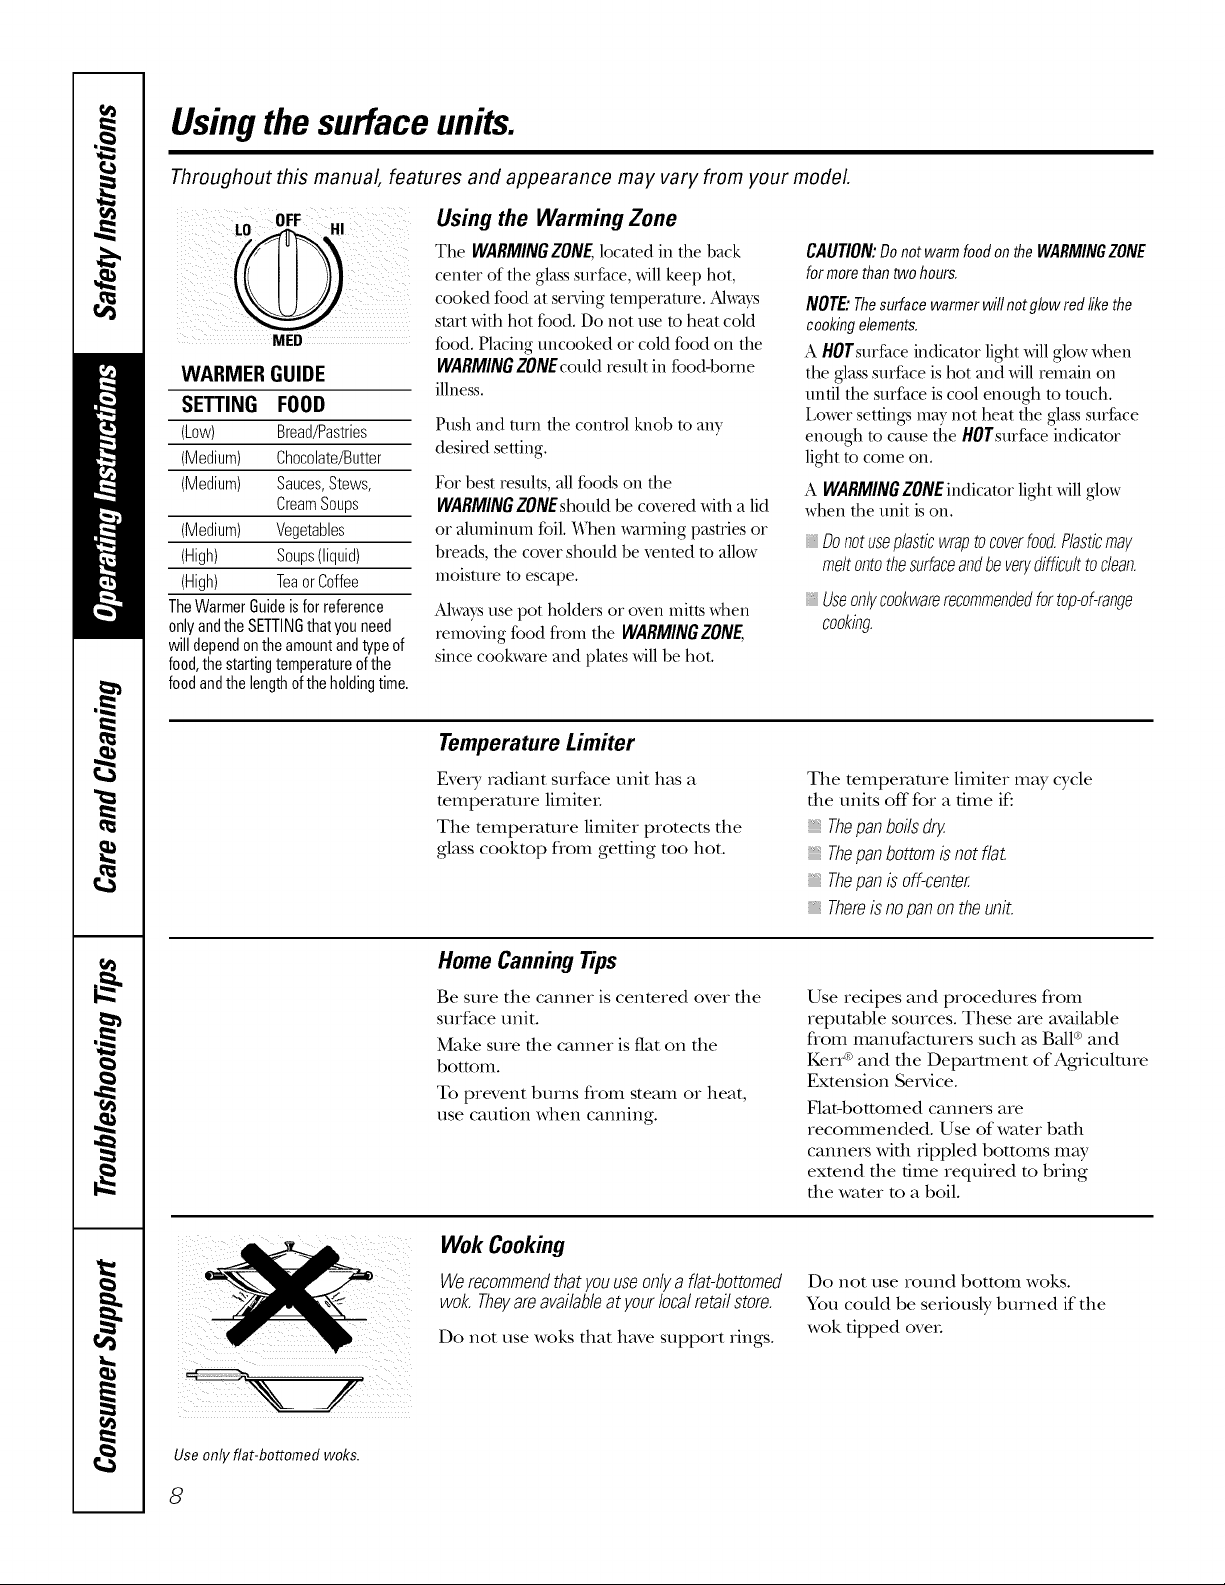
Using the Warming Zone
CAUTION:DonotwarmfoodontheWARMINGZONE
formorethantwohours.
NOTE."Thesurfacewarmerwillnotg/owredlikethe
cookingelements.
A HOTsurface indicator light will glow when
the glass surface is hot and will remain on
undl the surf:ace is cool enough to touch.
I,ower settings may' not heat the glass surface
enough to cause the HOTsurface indicator
light to come on.
A WARMINGZONEindicator light will glow
when the unit is on.
, Donotuseplasticwraptocoverfood.Plasticmay
WARMER GUIDE
SETTING FOOD
(Low) Bread/Pastries
(Medium) Chocolate/Butter
(Medium) Sauces,Stews,
CreamSoups
(Medium) Vegetables
(High) Soups(liquid)
(High) TeaorCoffee
TheWarmerGuideis forreference
onlyandthe SETTINGthatyouneed
willdependontheamountandtypeof
food,thestartingtemperatureofthe
foodandthe lengthoftheholdingtime.
The WARMINGZONE,located in the hack
center of the glass surface, will keel) hot,
cooked food at serving temperature. Ahvays
start xfith hot food. Do not use to heat cold
food. Placing uncooked or cold food on the
WARMINGZONEcould result in food-horne
illness.
Push and turn the control knob to any
desired setting.
For best results, all %ods on the
WARMINGZONEshouldbe coxered with a lid
or alumimml foil. *dizen wamfing pasuies or
breads, the coxer should be xented to allow
moisture to escape.
Always use pot hoMers or oven mitts when
removing food fl'om the WARMING ZONE,
since cookware and plates will be hot.
meltontothesurfaceandbeverydifficulttoclean.
Useontycookwarerecommendedfortop-of-range
cooking.
Temperature Limiter
Eve_y radiant surface unit has a
mmperamre limimL
The mmpemtme limimr protects the
glass cookmp fiom getting mo hot.
Home Canning Tips
Be sure the canner is centered over the
surface unit.
Make sure the canner is flat on the
bottom.
To prevent burns flom steam or heat,
use caution when canning.
WokCooking
We recommendthat youuse onlya flat-bottomed
wok. Theyare availableat your local retailstore.
Do not use woks that have support rings.
The mmpemmre limimr may cycle
die units off for a dine if:
Thepanboilsdry.
Thepanbottomisnotflat.
Thepanisoff-center.
Thereis nopanontheunit.
Use recipes and procedures flom
reputable sources. These are available
flom manufacturers such as Ball®and
Kerr®and the Depamnent of Agriculture
Extension Service.
Flat-bottomed cmmers are
recommended. Use ofwamr bad1
cannei_ wifll rippled bottoms may
extend the time required m bring
the water m a boil.
Do not use round bottom woks.
You could be seriously burned if the
wok dpped oveL
Use only flat-bottomed woks.
8
Page 9
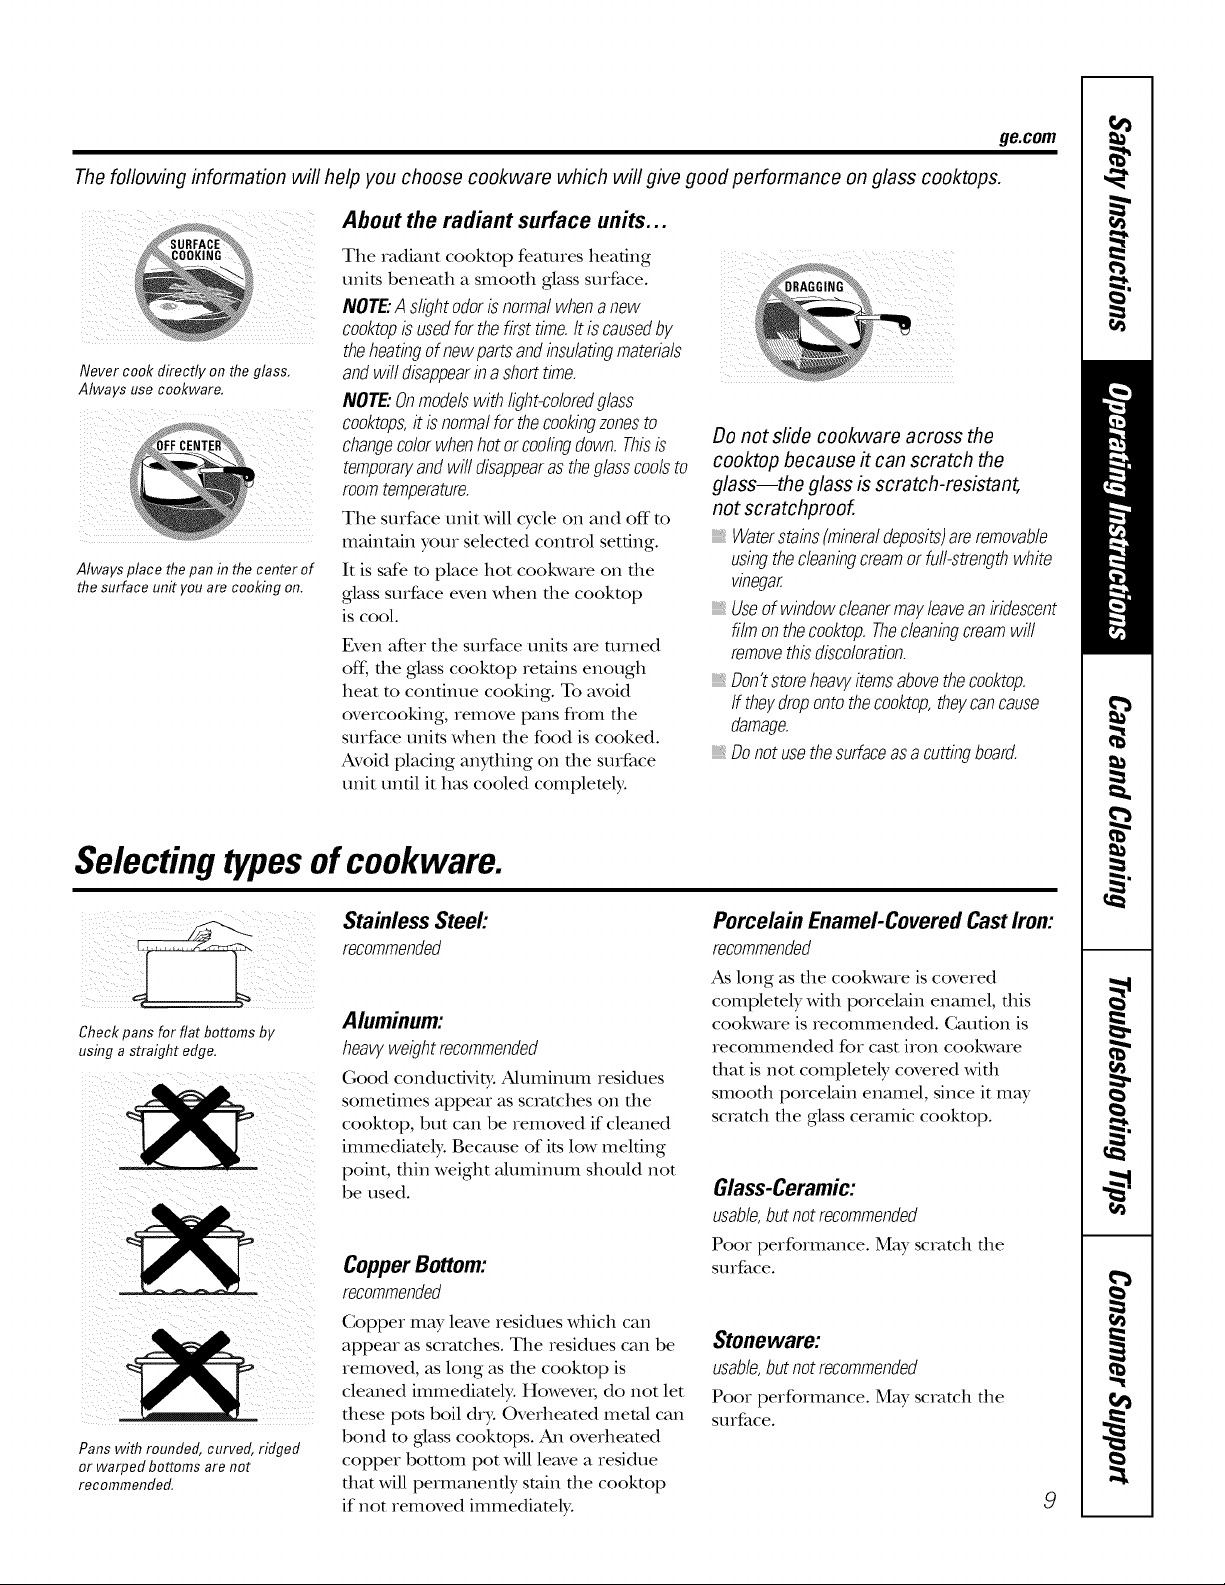
The following information will help you choose cookware which will give good performance on glass cooktops.
About the radiant surface units...
The radiant cooktop features heating
NOTE'.Aslightodorisnormalwhenanew ...... _
ii i (ii ii il
Never cook directly on the glass,
Always use cookware,
Always place thepan in the center of
the surface unit you are cooking on.
cooktopisusedforthefirsttime.Itiscausedby
.,,itsbe,,e ,thsmood,gl.ss
theheatingofnewpartsandinsulatingmaterials
andwilldisappearin ashorttime.
NOTE'.Onmodelswithlight-coloredglass
co&tops,it isnormalforthecookingzonesto
changecolorwhenhotorcodingdown.Thisis
temporaryandwill disappearastheglasscoolsto
roomtemperature.
The surface unit will cycle oi1and off to
maintain your selecmd control setting.
It is safe to place hot cookware on file
glass surface even when file cooktop
is cool.
Even after the surface units are turned
off, the glass cooktop retains enough
heat m continue cooking. To avoid
overcooking, remove pans from the
surface units when the food is cooked.
Avoid placing anything on the surface
unit until it has cooled complemly.
Do not slide cookware across the
cooktop because it can scratch the
glass--the glass is scratch-resistant,
not scratchproof.
Waterstains(mineraldeposits)areremovable
usingthecleaningcreamorfull-strengthwhite
vinegar
Useof windowcleanermayleaveaniridescent
filmonthecooktop.Thecleaningcreamwill
removethisdiscoloration.
Don'tstoreheavyitemsabovetheco&top.
If theydropontotheco&top,theycancause
damage.
Donotusethesurfaceasacuttingboard.
ge.com
Selectingtypesofcookware.
Stainless Steel'.
recommended
Check pans for flat bottoms by
using a straight edge,
Pans with rounded, curved, ridged
or warped bottoms are not
recommended.
Aluminum:
heavyweightrecommended
Good conductivit T.Aluminum residues
sometimes appear as scratches o,1 tlle
cooktop, but can be removed if cleaned
immediamly. Because of its low melting
point, thin weight aluminum should not
be used.
CopperBottom:
recommended
Copper may leave residues which can
appear as scratches. The residues can be
removed, as long as the cookmp is
cleaned immediately. Howeve,; do not let
these pots boil dry. Overheated metal can
bond m glass cookmps. An overheated
copper bottom pot will leave a residue
that will permanendy stain the cooktop
if not removed immediamly.
PorcelainEnamel-CoveredCastIron:
recommended
As long as file cookware is covered
completely wifll porcelain enamel, dds
cookware is recommended. Caution is
recommended for cast iron cookware
tllat is not complemly covered with
smooth porcelain enamel, since it m W
scratch the glass ceramic cooktop.
Glass-Ceramic:
usable,butnotrecommended
Poor performance. May scratch die
Stlrface.
Stoneware:
usable,butnotrecommended
Poor performance. May scratch die
Stlrface.
9
Page 10
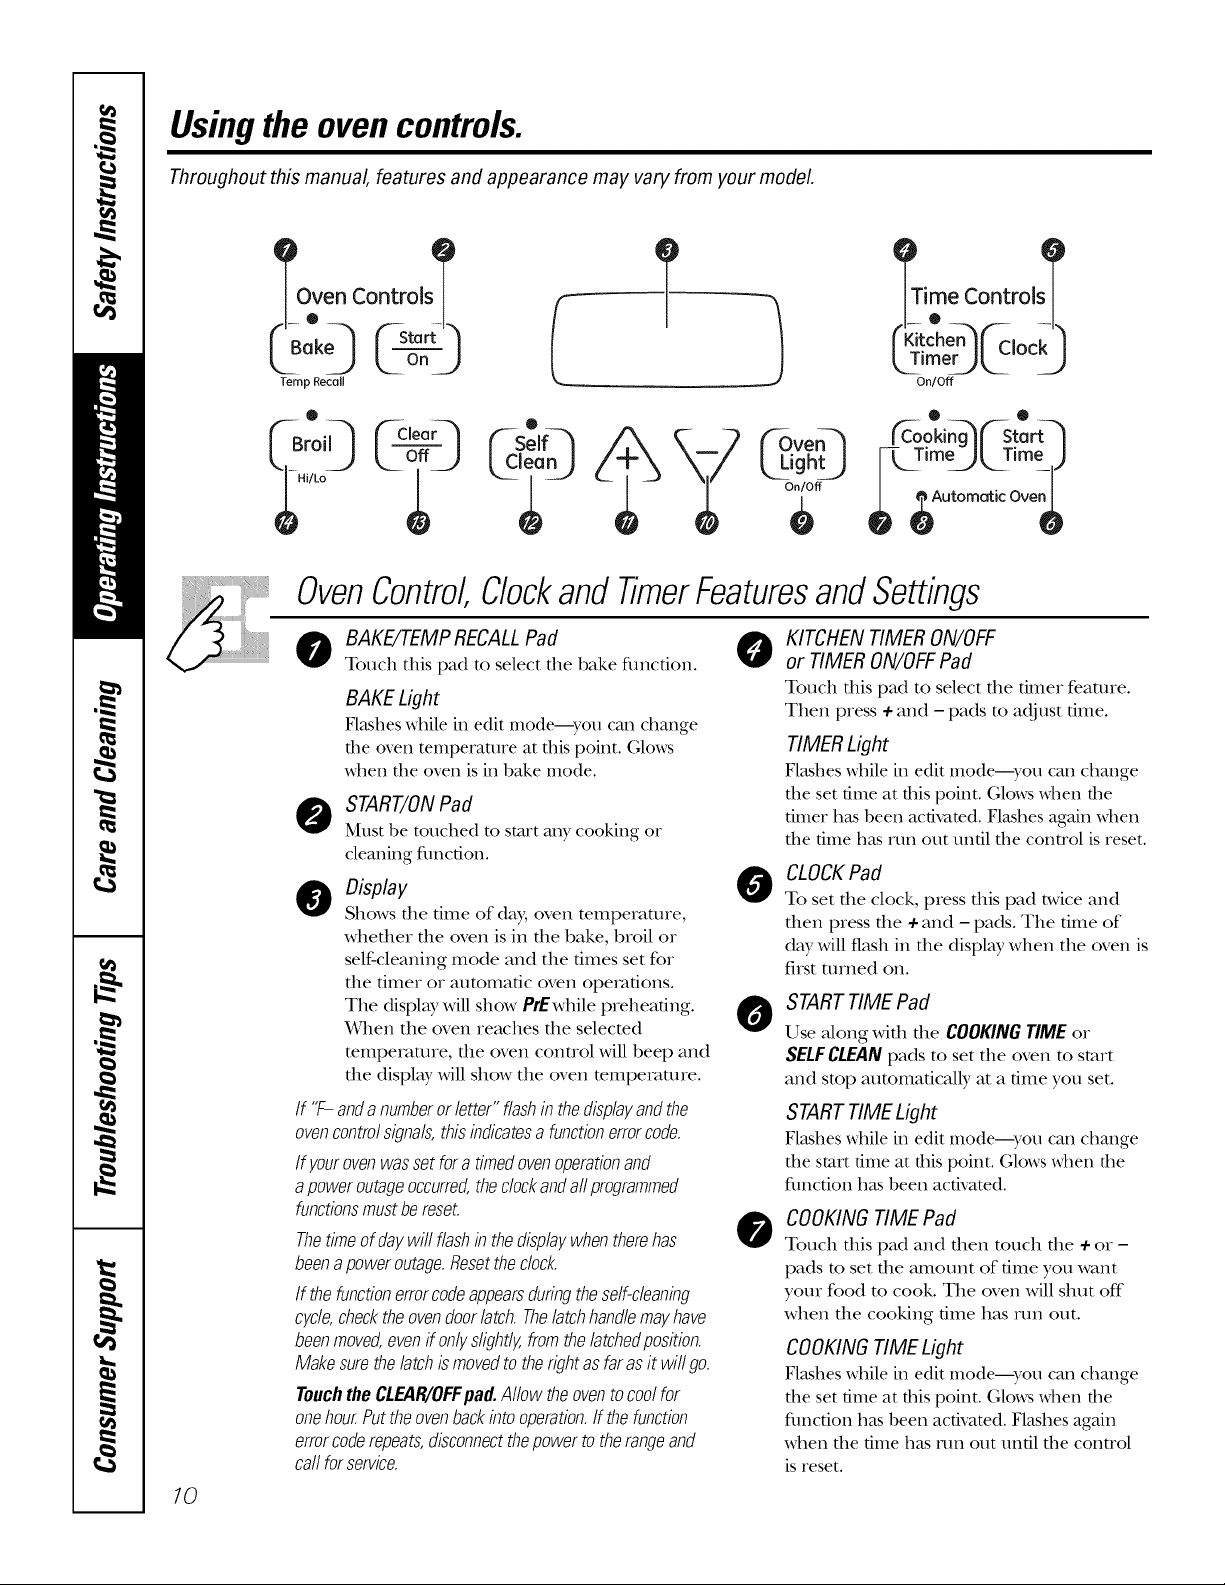
Usingthe ovencontrols.
Throughout this manual, features and appearance may vary from your model
1'
,,._r ,m 30'°
..... I-., ] Kitchen°..... c_
Temp Recgll On/Off
o
CSeIF3
T dave
OvenControlClockandTimerFeaturesandSettings
Time Time,)
I-L_ _,
_ SAutomatic Ove_
70
O AKE/TEMP RECALLPad 0
Touch this pad to select the hake fimcfion.
BAKE Light
Flashes while in edit mode--you can change
the oven temperature at this point. Glo_s
when tile oven is in bake mode.
O START/ONPad
Must be touched to start any cooking or
cleaning traction.
0 Display
Shows die time of day, oven temperature,
whether the oven is ill the bake, broil or
self-cleaning mode and the times set for
the timer or automatic oven operations.
The displ W willshow PrEwhile preheating.
When the oven reaches the selecmd
mmperamre, the oven control will beep and
the displ W will show the oven mmpemmre.
If "F-anda numberorletter"flashinthedisplayandthe
ovencontrolsignals,thisindicatesafunctionerrorcode.
If yourovenwassetforatimedovenoperationand
apoweroutageoccurred,theclockandaftprogrammed
functionsmustbereset.
Thetimeofdaywill flashinthedisplaywhentherehas
beenapoweroutage.Resettheclock.
If thefunctionerrorcodeappearsduringtheself-cleaning
cycle,checktheovendoorlatch.Thelatchhandlemayhave
beenmoved,evenff onlyslightly,fromthelatchedposition.
Makesurethelatchismovedto therightasfarasit wit go.
TouchtheCLEAP,/OFFpad.Albw theoventocoolfor
onehour.Puttheovenbackintooperation.Ifthefunction
errorcoderepeats,disconnectthepowertotherangeand
callforservice.
KITCHEN TIMER ON/OFF
or TIMER ON/OFFPad
Touch tiffs pad to select file fimeI featuIe.
Then press + and - pads to adjust time.
TIMER Light
Flashes MWe in edit mode---you call change
the set time at tiffs point. (;lo_ \dlen the
timer has been activated. Flashes again xdlen
the time has run out until the contl'ol is reset.
CLOCK Pad
0
To set file clock, press tiffs pad twice and
then press the +and -pads. The time of
dW will flash in the displ Wwhen the oven is
first turned on.
START TIME Pad
0
Use along widl die COOKINGTIMEor
SELFCLEANpads to set file oven to start
and stop automatically at a time you set.
START TIMELight
Flashes MWe in edit IIlo(te---yotl call change
the start time at this point. Glows \d/en the
fllllCtiOI1 has been activated.
COOKINGTIME Pad
0
Touch this pad and then touch the + or -
pads to set the amount of time you want
your food m cook. The oven will shut off"
when the cooking time has run out.
COOKINGTIME Light
Flashes \_hile in edit mode---you call change
tile set time at this point. Glows vdlen tile
flllactiolahas been activated. Flashes again
when the time has run out until the control
is reset.
Page 11
OvenControlClockand TimerFeaturesandSettings
ge.com
AUTOMATIC OVENLight
0
This lights anydme file oven has been
programmed using tile COOKINGTIMEor
STARTTIMEflmcdons.
O OVENLIGHTON/OFFPad
Touch this pad to turn tile oven light on or
off.
- Pad
Short raps to this pad will decrease tile time
or temperature by small amounts. Touch
and hold tile pad to decrease the time or
temperature by larger amounts.
O +Pad
Short raps to this pad will increase tile time
or mmpemmre by small amounts. Touch
and hold the pad to increase the time or
temperature by larger amounts.
O SELFCLEANPad
Touch this pad to select tile self-cleaning
flmcfion. Seethe Usingtheself-cleaningoven
section.
CLEANLight
Flashes while ill edit mode--you call change
the length of time for the self-clean cycle at
this point. Glows when the oven is ill tile self-
cleml wcle. After file self-cleml cycle, the light
will turn oft: Unlatch the doon
Indicator Lights (on some pads)
EDITmodelasts several seconds after file last
pad press. STARTTIMEON/OFFand COOKING
TIMEON/OFFwillbe the only pads lit if either
of these options is selected. (Example: START
TIMEisselected,dth BAKE the STARTTIME
pad Mll remain lit until file clock reaches file
prograuuned time, at which point it willturn
off mid tile BAKE/TEMPRECALLpad light Mll
light up).
O CLEAR/OFFPad
Touch this pad to cancel ALLoven
operations except file clock and dmeL
BROIL HI/LO Pad
Touch this pad to select tile broil function.
BROIL Light
Flashes while ill edit mode---yell call switch
from HI to LOBROILat this point. Glows when
file oven is ill broil mode.
Power Outage
If aflashingtimeis inthedisplay,youhaveexperienceda
powerfailure.Resettheclock.
To reset tile clock, touch tile CLOCK pad. Enter
tile correct time of day by touching tile + or -
pads. Touch tile START/ONpad.
77
Page 12
Usingthe oven.
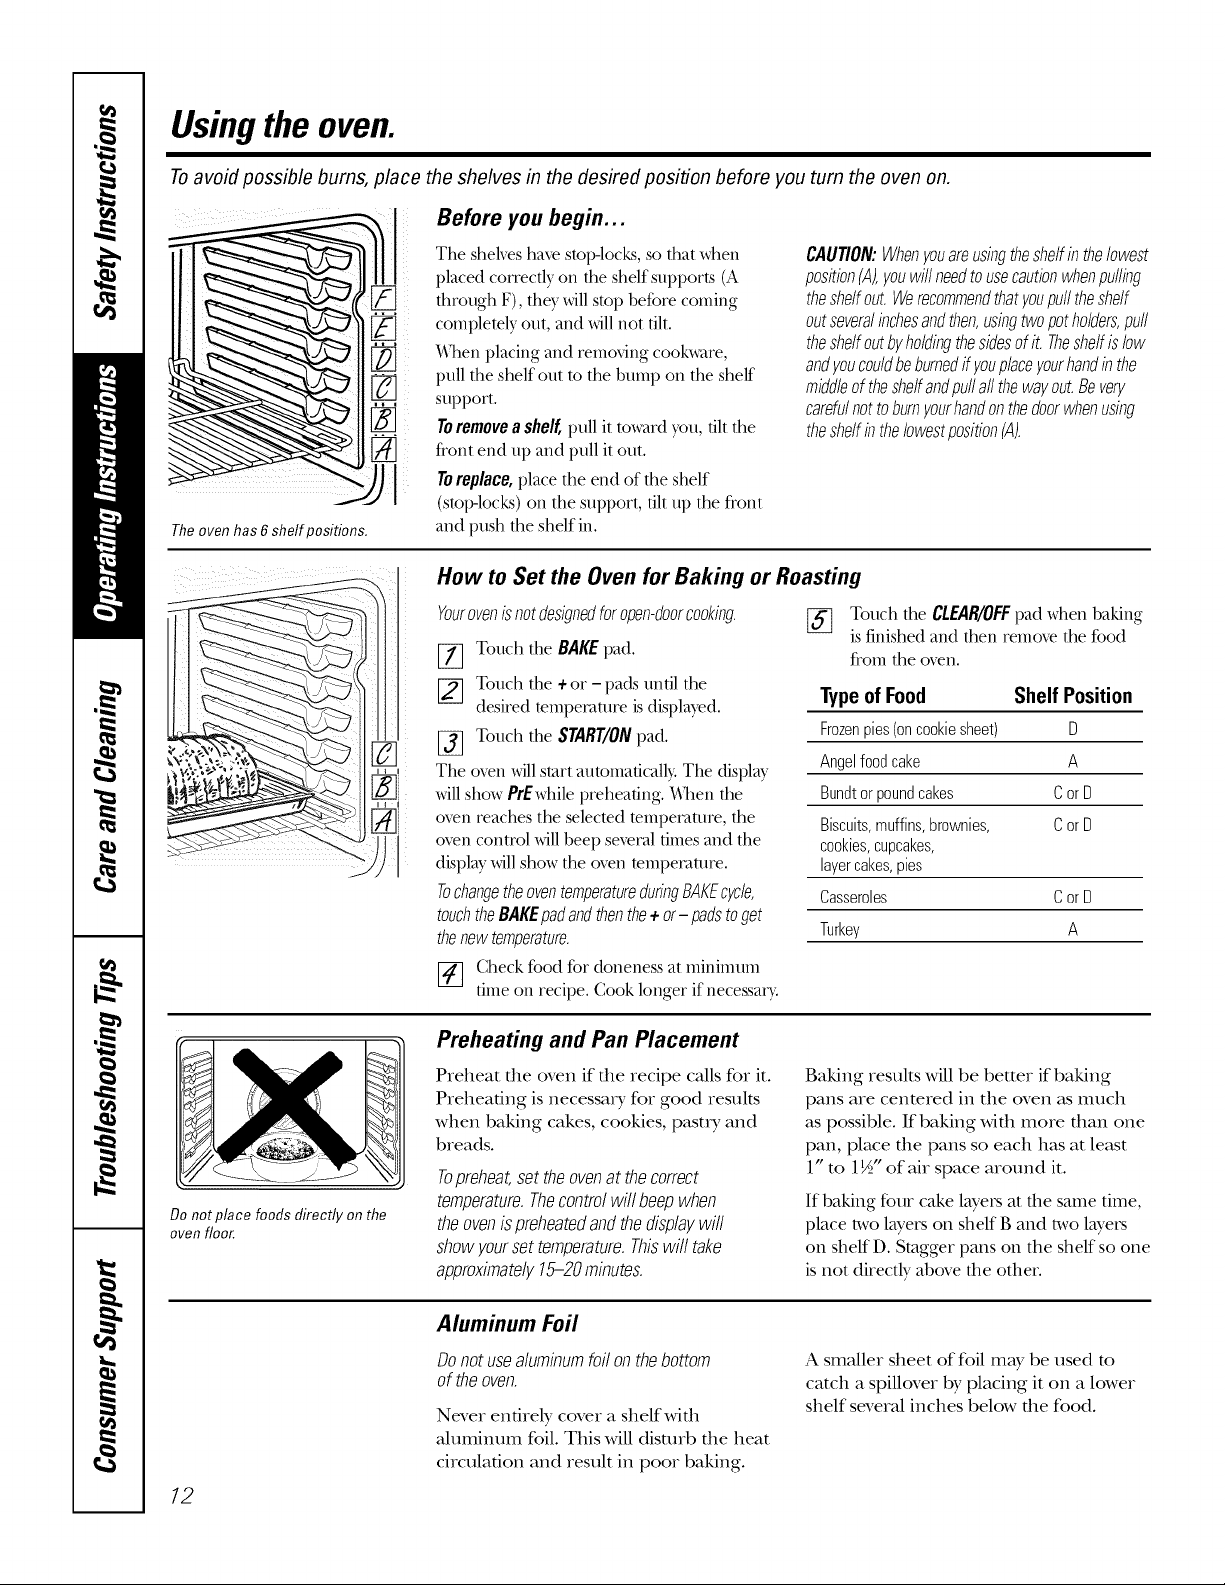
Toavoid possible bums, place the shelves in the desired position before you turn the oven on.
Before you begin...
The oven has 6 shelf positions.
%
%i
The shelves haxe stopqocks, so that when
placed correctly on the shelf supports (A
through F), the)' will stop before coming
complemly out, and will not flit.
_]mn placing and removing cookware,
pull the shelf out m the bump on the shelf
support.
Toremovea shelf, pull it towaM you, flit the
front end up and pull it out.
TOreplace, place the end of the shelf
(stop-locks) on the support, flit up the front
and push the shelf in.
CAUTION:Whenyouareusingtheshelfinthelowest
position(A),youwillneedtousecautionwhenpuffing
theshelfout.Werecommendthatyoupufftheshelf
outseveralinchesandthen,usingtwopotholders,pull
theshelfoutbyholdingthesidesofit.Theshelfislow
andyoucouldbeburnedifyouplaceyourhandinthe
middleoftheshelfandpu//allthewayout.Beyen/
carefulnottoburnyourhandonthedoorwhenusing
theshelfinthelowestposition(A).
How to Set the Oven for Baking or Roasting
Yourovenisnotdesignedforopen-doorcooking.
[_] Touch the BAKE pad.
[] Touch the + or - pads until the
desired temperature is displayed.
[_] Touch the START/ONpad.
The oxen will start automaflcally. The display
will show PrEwhile preheaflng, h]_en the
oxen reaches the selected tempevatm'e, the
o_en conu'ol will beep several flmes and the
displ W willshow the o_en mmpevatm'e.
TochangetheoventemperatureduringBAKEcycle,
touchtheBAKEpadandthenthe+ or- padstoget
thenewtemperature.
[_ Touch the CLEAR/OFFpad when baking
Type ofFood Shelf Position
Frozenpies(oncookiesheet) D
Angelfoodcake A
Bundtorpoundcakes CorD
Biscuits,muffins,brownies, CorD
cookies,cupcakes,
layercakes,pies
Casseroles CorD
Turkey A
is finished and then remove the %o(t
fl'om the oven.
Do not place foods directly on the
oven floor.
12
[_] (.]heck food for doneness at minimum
nine on recipe. Cook longer if necessary.
Preheating and Pan Placement
Preheat file oven if file recipe cMlsfor it.
Preheating is necessary for good results
when baking cakes, cookies, pasu y and
breads.
Topreheat,settheovenat thecorrect
temperature.Thecontrolwillbeepwhen
theovenispreheatedandthedisp/a;/will
show;loutset temperature.Thiswill take
approximate/;/15-20minutes.
Aluminum Foil
Donotusealuminumfoilonthebottom
of theoven.
Never entirely cover a shelfwifll
Muminum foil. This Mll disturb file heat
circulation and result in poor baking.
Baking results Mll be better if baking
pans are cenmred in the oven as much
as possible. If baking with more than one
pan, place the pans so each has at least
1" to 1½" of air space around it.
If baking fbur cake layeIs at file stone time,
place two layers on sheff B mad/wo layers
on shelf D. Stagger pmls on the shelf so one
is not directly above the other.
A smaller sheet of foil may be used to
catch a spillover by placing it on a lower
shelf several inches below the food.
Page 13

How to Set the Upper Oven for Broiling
Leavethedooropentothebroilstopposition.
Thedoorstaysopenbyitself,yettheproper
temperatureismaintainedin theoven.
ge.com
Use LOBroil m cook foods such as
poultxy ox thick cuts of meat thoxoughly
without owe_-t)mwning them.
tf yourrangeis connectedto208volts,
raresteaksmaybebroiledbypreheating
thebroiler andpositioningtheovenshelf
oneposition higher
The size, weight, thickness,
smidng tempe_atuie
and youi pIefeIence
of doneness will affbct
bioiling dines. This guide
is based on meats at
_efl{ge_atof tempe_atu_e.
')" The { ".S. l)GtJartme_zt g{/Ag'ric,zltu_z,
sco's "l_a_'_,b_,C/h po/Ju&_nbut you
should I:*zow that cooki*_q" it to o_z!_'
140'1" ,_,c_*_,sson_e /_od poiso_zi,_q"
o_qr_*zi,sm,s"*W survive. " (,Nou_'cw:
Sc{/i"bbod t_ooh. Dur Kitche_z
Theoven has 6 sheff positions.
Pass
4 3 2 1
, [_
Center baking pans in the oven.
[_ Place the meat o_ fish on a bioile_
grid in a bioile_ pan designed
for bioiling.
[_ Follow suggested shelf positions in
the Broiling Guide.
[_ Touch the BROILHI/LOpad once fox
HIBroil.
To change to LOBroil,touch the
BROILHI/LOpad again.
Broiling Guide - 4 Pass Broil Element
Food
GrouudBeef
Beef Steaks
Rarer
Medium
Well Done
Rarer
Medium
Well Done
Chicken
Bakery Product
Bread (toast)
English Muffin
LobsterTails
FishFillets
Salmou
Steaks
Fillets
HamSlices
(precooked)
Pork Chops
Well Done
_See illustration for description of shelf positions.
Quantityand/ Shelf* FirstSide
orThickness Position Time(rain.)
1lb. (4patties)
I/2 to s/4"thick
4 Ibs.(12patties)
s/4to 1"thick
1to 172Ibs.
172"thick
2to 272Ibs.
1wholecut up
2to 2V_Ibs.,
split lengthwise
Breast
2to 4 slices
2 (split)
2-4
1lb. (1/4 to I/2** thick)
2 (1"thick)
2 (I/2 to s/4"thick)
I/S*thick
1" thick
2 (I/2"thick)
2 (1"thick)about 1 lb.
F
E
E
D
D
E
C
C
E
F
E
E
D
D
D
D
[_ Touch the STARTpad.
[-ff--]X_qlen b_oiling is finished, touch the
CLEAR/OFFpad.
NOTE: Broil and self-clean settingswill not work
if the temperatureprobeispluggedin.
SecondSide
Comments
Spaceevenly.
Steakslessthans/4"
thick aredifficult
tocookrare.
Slashfat.
Brusheachsidewith
meltedbutter.
Broilskin-side-down
first.
Spaceevenly.Place
Englishmuffins cut-
side-upandbrush
with butterif desired.
Cutthroughbackof
shell. Spreadopen.
Brushwithmelted
butterbeforebroiling
andafter halfof
broilingtime.
Handleandturnvery
carefully.Brushwith
lemonbutterbefore
andduringcooking,
if desired.
Turn carefully. Do not
turn skin side down.
Slashfat.
13
15
6
8
10
10
15
20
25
25
3
3-4
18-20
10
10
6
8
10
15
Time(rain.)
4
6
8
8
10-12
20
25
15
1
Donot
turn
oveE
6
8
10
15
13
Page 14

Usingthe oven.
Broiling Guide - 6 Pass Broil Element
The size, weight, thickness,
starting temperature
and your preference
of doneness will aft_ct
broiling times. This guide
is based on meats at
refrigerator temperature.
'i" The U.S. l)_JJartment q[ Ag'Hculture
says 'Ware beq[ h popular; but you
should know that coohi*_q" it to o_@'
140 'F mea*_,s some/hod poiso_zi*_g,"
o_gr_ni,sm,s m W survive. " (£'ou_rY,:
Sqfi, Food t3ooh. }bur Kitchen
Guide. _S'I)A R_,v.,]une 19_75.)
Theoven has 6 sheff positions.
Pass
6 54321
l/i[\\
Preheat the broiler for 2 minutes for improved performance.
Food
GroundBeef
Well Done
Beef Steaks
Rarer
Medium
Well Done
Rarer
Medium
Well Done
Chicken
Fish Fillets
Pork Chops
ill: ii
Well Done
Salmon Steaks
Quantityand/ Shelf FirstSide
orThickness Position Time(rain.)
1 lb.(4patties) E 9
1/2to 3/4" thick E 11
1"thick F 7
1to 11½Ibs. E 9
E 11
11½-thick D 14
2to 21½Ibs. D 18
D 22
1whole cut up C 25
2to 21½Ibs.,
split lengthwise
2 Breasts C 25
1/4to 1/2"thick E 6
2(1/2" thick) E 10
2(1"thick)about 1 lb. D 15
2(1" thick) D 10
4(1"thick) about1 lb. D 12
SecondSide
Time(min.)
6
10
5
6-7
8-9
11
14-16
2O
10
10-15
5
10
15
7-8
10
Comments
Spaceevenly.Upto 8
pattiestakeaboutthe
sametime.
Steakslessthan 1"
thickcookthrough
beforebrowning.Pan
fryingis recommended
Slashfat.
Broilskin-side-down
first.
Handleandturnvery
carefully.Brushwith
lemonbutterbefore
andduringcooking,
if desired.
Slashfat.
Greasepan.Brush
steakswith melted
butter.
Center baking pans in the oven.
14
Page 15

Usingthe clock and timer, ge.oom
Not all features are on all models.
To Set the Clock
_loc 0
(Startq
k ooJ
Make sure the clock is setto the
correct time of day.
The clock nmst be set to file correct time
of day for tile automatic oven timing
flmcfions m work properly. Tile time of
day cannot be changed during a delayed
cooking or a delayed self-cleaning cycle.
[_] Touch tile CLOCKpad twice.
[_ Touch tile + or - pads.
If tile + or - pads are not touched within
one minute after you touch tile CLOCK
pad, the display reverts to the original
To Turn Off the Clock Display
If you have several clocks ill your kitchen,
you may wish to turn off tile time of day
clock display on your range.
[_ Touch tile CLOCKpad once to turn
off tile time of day display. Although
you will not be able to see it, tile
setting. If this happens, touch tile CLOCK
pad twice and reenter tile dine of day.
[] Touch tile START/ONpad until tile
time of day shows ill tile display.
This entels tile time and starts tile
clock.
Tocheckthetimeofdaywhenthedisplayis
showingotherinformation,simplytouchthe
CLOCKpad.Thetimeofdayshowsuntilanother
padistouched.
clock maintains tile correct time
of day:
Touch tile CLOgKpad twice to recall
tile clock display.
(_tchen_
On/Off
(--Starq
k ond
Thetimer isa minute timer only.
The ClEAR/OFFpad doesnot affect
the timer.
To Set the Timer
Thetimerdoes not control ovenoperations.
Themaximumsetting on the timer is9 hours
and59 minutes.
Touch tile KITCHEN TIMERON/OFF
pad.
Touch tile + or-pads until tile
amount of time you want shows ill
tile display. Tile maxinmm time that
can be entered ill minutes is 59.
Times more than 59 minutes should
be changed to hours and minutes.
To Reset the Timer
If file display is sOU showing file time
remaining, you may change it by
touching the KITCHEN TIMER ON/OFFpad,
then touching tile + or - pads until tile
time you want appears ill tile displ W.
If youmakeamistake,touchtheKITCHEN
TIMERON/OFFpadandbeginagain.
Touch tile START/ONpad. Tile time
%
will start counting down, although
tile display does not change un61
one minute has passed.
x_qlen tile timer reaches :00, tile
control will beep 3 times followed by
one beep every 6 seconds until tile
KITCHENTIMERON/OFFpad is
touched.
If file remaining time is not ill file display
(clock, start time or cooking time are ill
file display), recall file remaining time by
touching the KITCHEN TIMER ON/OFFpad
and then touching tile + or - pads to
enter the new time you want.
To Cancel the Timer
Touch die KITCHENTIMERON/OFF
pad twice.
75
Page 16

Usingthetimedbakingandmastingfeatures.(onsomemodels)
Do not lock the oven door with the latch during timed cooking. Thelatch is used for self-cleaning only.
NOTE: Foods that spoil easily--such as milk, eggs, fish, stuffings, poultry and pork--should not be allowed to sit for
more than 1hour before or after cooking. Room temperature promotes the growth of harmful bacteria. Be sure that
the oven light is off because heat from the bulb will speed harmful bacteria growth.
ii i i i
Temp Recall
i((-clear-')7
L off)
o
Temp RecQII
®
L rim
0
torQ
L Tim%)
KstorQ
Loo)
KaeoQ
L_°%)
16
How to Set an Immediate Start and Automatic Stop
Theovenwill turnonimmediate/}/andcookfora
selectedlengthoftime.At theendof thecooking
time,theovenwi//turnoffautomatica//y.
[_ Touch the BAKEpad.
[_ Touch the + or - pads to set the
ovell tempei_tture.
[_ Touch the COOKING TIME pad.
NOTE:If}/ourreciperequirespreheating,}/ouma}/
needtoaddadditionaltimetothelengthofthe
cookingtime.
[_] Touch the 4-or - pads to set the
baking time.
The cooking time that you entered
will be displayed. (If you select Cooking
Time first and then adjust the Bake
Temperature, the oven temperature
will be displayed instead).
[_ Touch the START/ONpad.
The display shows eifller the oven
mmpemture fllat you set or file cooking
time countdown. (The displ W starts with
PrEif showing the oven mmpemmre.)
The oven will continue to cook for the
programmed amount of time, then turn
off"automadcall):
[_] Touch the CLEAR/OFFpad to clear
the display if necessary.
Removethefoodfromtheoven.Remember,even
thoughtheovenshutsoffautomatically,foods
continuecookingaftercontrolsareoff.
How to Set a Delayed Start andAutomatic Stop
Theovenwill turnonat thetimeofda}/}/ouset,
cookforaspecificlengthof timeandthenturnoff
automatically.
Make sure the clock shows the correct
time of day:
[77 Touch the BAKEpad.
[_] Touch the 4-or - pads to set the
ovell tempei_tture.
[_] Touch the COOKINGTIME pad.
[-_ Touch the 4-or - pads to set the
desired length of cooking time.
[_ Touch the STARTTIMEpad.
[_ Touch the + or - pads to set the time
of day you want the oven to turn on
and start cooking.
V7] Touch the START/ONpad.
NOTE:Anattentiontonewillsoundif }/ouare
usingtimedbakinganddonottouchthe
START/ONpad.
NOTE:ffyou would like m check file times
you have set, much die STARTTIMEpad m
check the start time you have set or much
the COOKINGTIMEp_,dmcheck the
length of cooking time you have set.
When the oven turns on at the time of
day you have set, the display will show Prf
until it reaches the selected temperature,
then it will display the oven temperature.
At the end of cooking time, the oven
will turn off and the end-of-cycle tone
will sound.
[_ Touch the CLEAR/OFFpad to clear
the display if necessary.
Removethefoodfromtheoven.Remember,even
thoughtheovenshutsoffautomatically,foods
continuecookingaftercontrolsareoff.
Page 17

Special featuresofyourovencontrol ge.oom
Yournew touch pad control has additional features that you may choose to use. The following are the features and
how you may activate them.
Thespecial feature modes can only be activated while the display is showing the time of day. They remain in the
control's memory until the steps are repeated.
When the display shows your choice, touch the START/ONpad. Thespecial features will remain in memory after
a power failure.
NOTE: TheSabbath feature and the Thermostat Adjustment feature are also Special Features, but they are addressed
separately in the following sections.
12Hour Shut-Off
® ®
Temp Recall Hi/Lo
Withthisfeature,shouldyouforgetandleavethe
ovenon,thecontrolwit automaticallyturnoff the
ovenafter12hoursduringbakingfunctionsorafter
3 hoursduringabroilfunction.
If you wish to turn OFFthis feature, follow
the steps below.
{_ Touch the BAKE and BROILHI/LO
pads at the same time until the
display shows SE
Touch the CLOCKpad. The display
[]
will show ON (12 hour shut-off).
Touch the CLOCKpad repeatedly
until the display shows OFF(no
shut-off).
Touch the START/ON pad to acdvate
%
the no shut-off and leave the control
set in this special features mode.
17
Page 18

Usingthe SabbathFeature.
(Designed for use on the Jewish Sabbath and Hofidays) (onsome models)
The Sabbath feature can be used for baking/roasting only.It cannot be used for broiling, self-cleaning or
Delay Start cooking.
NOTE:On models with a light switch on the control panel, the oven light may be turned on and left on.
How to Set Sabbath Feature for Regular Baking/Roasting
o:0"Gr'O
Temp Recall Hi/Lo
to,.Q
k_00J
O
Temp Recall
k_°°J
When the display shows D the
oven is set in Sabbath. When the
display shows D c the oven is
baking/roasting.
l"%to t
£. On_)
When the display shows D the
oven is set in Sabbath. When the
display shows D c the oven is
baking/roasting.
NOTE."Tounderstandhow the oven control works, [_q
practice usingregularbaking (non-Sabbath)before
Sabbathmode. [77entering
Make sure the clock shows thecorrect time of day
and theoven is off
[77 Touch and hold both the BAKE and
BROIL HI/LO pads, at the same time,
until the display slLo_VsSE
_-] Tap the CLOCK pad until SAbappears
in tlLe display.
[] ouclL the START/ON pad and 2 will
appear in tile display.
[] ouclL the BAKE pad. No signal will
be gix en.
[] ILe preset starting tempeFature will
automaticall) be set to 350.° Tap the +
or -pads to increase or decrease the
tempelature in 25 ° increments. TILe
tempeF, tture can be set between 17:5°
and 550. ° No signal or tempel_amre
will be given.
ToUCIL tile START/ON pad.
After a 1.mdom delay period of
approximately 30 seconds to 1 minute,
c will appear in the display indicating
tlLat the oven is baking/r0asting. If D c
doesn't appear in tile displa); start aK, tin
at Step 4.
To adjust tile oven tempeFature, touch the
BAKEpad and tap the + or - pads to increase
or decrease tile temperature in 2:5°
increments. Touch tile START/ONpad.
NOTE."T1LeCLEAR/OFFandCOOKINGrlMf pads
are active during tile Sal)batlL feature.
How to Set Sabbath Feature for Timed Baking/Roasting--Immediate Start and
Automatic Stop
NOTE."Tounderstandhow the oven contro/ works,
practice usingregu/ar (non-Sabbath)immediate Start
andAutomatic Stop before entering the Sabbath mode.
Make sure the dock shows thecorrect timeof day
and theoven is off
[_ ouch and hold both the BAKE and
BROIL HI/LO pads, at the same time,
until the display slLo_V_SE
Tap the CLOCK pad until SAb appears
in tlLe display.
[_ ouch the START/ON pad and 2 will
appear in tile display.
ToUCIL tile COOKING TIME pad.
Touch tile + or - pads to set tile desired
lengtlL of cooking time between 1
minute and 9 hours and 59 minutes.
TILe cooking time tlLat }ou entered will
be displa} ed.
TouclL tile START/ON pad.
_] TouclL the BAKEpad. No signal will
l)e gixen.
TILe preset starting tempelature will
%
automatically be set to 350. ° Tap the +
or -pads to increase or decrease the
tempelamre in 25 ° increments. TILe
tempeF, tture can be set 1)etween 175 °
and 550. ° No signal or mmpemture
will be given.
ToUCIL tlLe START/ON pad.
%
After a 1,mdom delay period of
approximately 30 seconds to 1 minute,
D c will appear in the display indicating
tlLat the oven is baking/r0asting. If D c
doesn't appear in tile displa); start aK, tin
at Step 7.
To adjust tile oven tempelature, toucl-I the
BAKEpad and tap the + or - pads to increase
or decrease tile temperature in 25 °
increments. TouclL tile START/ON pad.
When cooking is finislLed, tile display will
clLange tiom D C to D indicating that tile
oven has turned OFFbut is still set in Sal)batlL.
Remove tile cooked food.
18
Page 19

Usingthe SabbathFeature.
(Designed for use on the Jewish Sabbath and Hofidays) (onsome models) ge.cam
How to Exit the Sabbath Feature
_'--Clea r_
Lo"J
® Q
GakO + (Bro_
Temp Recall HI/Lo
k__°°J
[_ Touch the CLEAR/OFFpad.
_] f the oxen is cooking, wait tar a landom
dela} period of approximatel} 30
seconds to 1 minute, until onl} D is in
the displa}c
[_ ouch and hold both the BAKE and
BROIL HI/LO pads, at the same time,
until the displa_ sho_:s SF.
_] ap the CLOCK pad until ONor OFF
appears in the display. ON indicates that
the oven will mmmmfically turn off after
12 hours. OFFindicams that the oven
will not automatically turn oft: See
the Special Features section for an
explanation of the 12Hour Shut-Off
teatm_e.
_-] Touch the START/ONpad.
NOTE:ff a power outageoccurred while theoven was
in Sabbath, the ovenwill automatically turnoff andstay
off even when the power returns. Theoven controlmust
bereseL
19
Page 20

Adjust the oven thermostat--Do it yourself!
Youmay find that your new oven cooks differently than the one it replaced. Use your new oven for a few
weeks to become more familiar with it. If you still think your new oven is too hot or too cold, you can adjust
the thermostat yourself.
Do not use thermometers, such as those found in grocery stores, to check the temperature setting of your oven.
These thermometers may vary 20-40 degrees.
NOTE: This adjustment will not affect the broiling or the self-cleaning temperatures. The adjustment will be
retained in memory after a power failure.
To Adjust the Thermostat
Touch the BAKE and BROILHI/LO
Temp Recall HilLo
®
Temp Recall
[]
pads at the same time until the
display shows SE
Touch the BAKEpad. A two<ligit
[]
number shows in the display:
The oven temperature can be
%
adjusted tap to (+) 35°F hotter or (-)
35°F cooler. Touch the 4-pad to
increase the temperaune in 1-degree
increments.
Touch the - pad to decrease the
temperaune in 1-degree increments.
[_ x_qlen you have made the
adjusmlent, touch the START/ON pad
to go back to the time of day display.
Use your oven as you would
normally:
NOTE:Thisadjustmentwillnotaffectthebroiling
orself-cleaningtemperatures.Itwill beretained
inmemoryafterapowerfailure.
Thetype ofmargarine will affect bakingperformance!
Most recipes for baking have been developed using high-fat products such as butter or margarine (80% fat). If you
decrease the fat, the recipe may not give the same results as with a higher-fat product.
Recipe failure can result ff cakes, pies, pastries, cookies or candies are made with low-fat spreads. The lower the fat
content of a spread product, the more noticeable these differences become.
Federal standards require products labeled "margarine" m contain at least 80% fat by weight. I,ow-fat spreads,
on the other hand, contain less fat and more wamt. The high moisture content of these spreads affects the
mxture and flavor of baked goods. For best results with your old favotim recipes, use margarine, butter or
stick spreads containing at least 70% vegetable oil.
2O
Page 21

Usingthe warming drawer.(on somemodels) ge.com
The warming drawer will keep hot, cooked foods at serving temperature. Always start with hot food. Do not
use to heat cold food other than crisping crackers, chips or dry cereal
WARMINGDRAWER
NED
To Use the Warming Drawer
Push and turn the control knob to any
desired setting.
When Using the Warming Drawer
The warming drawer will keep hot, cooked
foods waml. Always start with hot food. Do
not use to heat cold food other than
crisping crackers, chips or dry cereal.
Donotlinethewarmingdrawerorpan
withaluminumfoil.Foilis anexcellentheat
insulatorandwill trapheatbeneathit. This
will upsettheperformanceofthedrawer
andcoulddamagetheinteriorfinish.
Allow approximately25minutesforthe
warmingdrawertopreheat.
Do not put liquid or water in die
warming draweL
All foods placed in die warming
drawer should be covered wifli a lid or
alulilinuii1 foil. When wamling pastries
or breads, the cover should be vented to
allow moisture m escape.
Food should be kept hot in its cooking
container or mmsferred to a heat-safe
serving dish.
CAUTION:Plasticcontainersorp/asticwrapwill
meltif indirectcontactwiththedrawer,panora hot
utensil.Meltedplasticmaynotberemovableandis
notcoveredunderyourwarranty.
Remove se_Mng spoons, etc., before
placing containers in wamdng draweL
21
Page 22

Usingthe warming drawer.(on somemodels)
Temperature Selection Chart
To keep several different foods hot,
set file control m die food needing the
highest setting.
The temperature, tTpe and amount of
food, and the time held will affect the
quality of the food.
Repeaed opening of file drawer allows
file hot air to escape and file food to
cool.
Widl large loads it may be necessai T to
rise a higher wamdng drawer setdng
and cover some of the cooked food
items.
Do not use plastic containers or
plastic wrap.
CAUTION:Donotkeepfoodin thewarming
drawerformatethantwohours.
To Crisp Stale Items
Place food in low-sided dishes or pans.
Preheat on LOsetfing.
Check crispness after 45 minums. Add
time as needed.
FoodType ControlSetting
Bacon HI
Breads LO
Casserole MED
Chicken,fried HI
Ham HI
Muffins LO
Pies LO
Pizza HI
Potatoes,baked HI
TortillaChips LO
22
To Warm Serving Bowls and Plates
To warn1 serving bowls and plates, set the
conuol on tO.
Use only heat-_fe dishes.
If you want m heat fine china, please
check with the manufacturer of the
dishes for their maximum heat
mlemnce.
You may warm empty serving dishes
while preheating the draweL
CAUTION:Disheswillbehot.Usepotholdersor
mittswhenremovinghotdishes.
Page 23

Usingthe self-cleaning oven. geoom
Before a Clean Cycle
Wipe up heavy soil on the oven
bottom.
®
UseIF"i
leo 2
We recommend venting your
kitchen wifll an open window or
using a ventilation fan or hood during
the first self-clean cycle.
Remove broiler pan, broiler grid,
all cookware and any aluminum foil
flom tile oven.
NOTE:
If your oven is equipped wkh shiny,
silver-colored oven shelves, remove
them before you begdn the self-clean
cycle.
If your oven is equipped wkh gray
porcelain-coamd oven shelves, dley
may be left in tile oven dining tile
self-clean cycle.
Tile shiny, silver-colored oven shelves
(on some models) can be self-cleaned,
but they will darken, lose their luster and
become hard to slide.
How to Set the Oven for Cleaning
Follow tile directions in tile Before a
Clean Cycle section.
[-_ I,atch tile dooL
NOTE:Never force tile latch. If tile oven is
mo hot, you will not be able to slide the
latch. Allow the oven to cool.
[_ Touch tile SELFCLEANpad.
[_] Touch tile ÷ or- pads until tile
desired Clean Time is displayed.
TheCleanTimeis normally4 hoursand20
minutes.YoucanchangetheCleantimetoany
timebetween3and5hours,dependingonthe
amountofsoilinyouroven.
Soil on file flont flame of file range and
outside tile gasket on tile door will need
m be cleaned by hand. Clean these areas
with hot wam_; soap-filled scouring pads
or cleansers such as Soft Scrubq Rinse
well with clean wamr and dry.
Do not clean tile gasket. Tile fiberglass
mamfial of die oven door gasket cannot
withstand abrasion. It is essential for the
gasket m remain intact. If you notice it
becoming worn or flayed, replace it.
Wipe up any heaxT spillovers on tile
oven bottom.
Make sure tile oven light bulb cover is
in place and tile oven light is off:
IMPORTANT'.Tile healdl of some birds
is exnemely sensitive m die flmles gNen
off during tile self-cleaning cycle of any
range. Move birds to anodler well-
ventilated room.
While file oven is self-cleaning, you can
touch tile CLOCKpad to display die time
of day: To return to tile clean countdown,
much tile SELFCLEAN pad.
Tile oven shuts off automatically when
tlle clean cycle is complete, and 0:00 will
flash in tile display:
[_ Slide tile latch handle to tile left as
far as it willgo and open tile dooL
NOTE:Neverforcethelatchhandle.Forcingthe
handlewilldamagethedoorlockmechanism.
[_ Touch tile START/ONpad.
Tile self-clean cycle will automatically
begin after CLEANis displayed and tile
time countdown appears in tile display:
23
Page 24

Usingthe self-cleaning oven.
How to Delay the Start of Cleaning
Make sure the clock shows the correct
time of day:
[_ Latch the dooL
®
UseIF'
Lgeo
o
[_ Touch the SELFCLEANpad.
[_ Using the + or - pads, enter tile
desired clean time.
Touch tlle STARTTIMEpad. The
[]
earliest start time you can set will
appear in tile display:
Using the + or - pads, enter the
%
time of day you want the clean cycle
to start.
[_ Touch tile START/ONpad.
The display will show the start time. It
will not be possible m unlatch die oven
door until the temperature drops below
the lock mmperamre.
The oven struts off automatically when
tlle clean cycle is complete, and 0:00 will
flash in the display:
ToStopa Clean Cycle
Touch tlle CLEAR/OEFpad.
Wait until the oven has cooled below die
locking temperature to unlatch the dooL
You Mll not be able to open die door
_-igbt away unless die oven has cooled
below the locking mmpemmre.
After a Clean Cycle
You may notice some white asia in the
oven. Wipe it up wkb a damp cloth after
the oven cools.
If whitespotsremain,removethemwitha soap-
filledscouringpadandrinsethoroughlywith
a vinegarandwatermixture.
These deposits are usually a stilt
residue tllat cannot be removed by
tile clean cycle.
If tile oven is not clean after one clean
cycle, repeat tile cycle.
You cannot set tlle oven for cooking
until the oven is cool enough for the
door to be unlatched.
{{{iiiiiiili
While the oven is self-cleaning, you
can press die CLOCKpad m display
tile time of dw: To return m the
clean countdown, press the COOKING
TIMEpad.
{{{iiiiiiili
Apply a smaU amount of vegetable oil
m a paper towel and Mpe die edges of
the oven sheNes with the paper towel.
Do not spIW with Pam ®or other
lubricant spews.
24
Page 25

Careand cleaningof therange, g,oom
Be sure all controls are off and all surfaces are cool before cleaning any part of the range.
If your range is removed for cleaning, servicing or any reason, be sure the anti-tip
device is reengaged properly when the range is replaced. Failure to take this
precaution could result in tipping of the range and cause injury.
How to Remove Protective Shipping Film and Packaging Tape
Gareflflly grasp a corner of the protective
shipping fihn wifll your fingers and slowly
peel it from d_e appliance surfi_ce. Do
not use any shaIp items to remove file
fihn. Remove all of the film before using
the appliance for the first time.
Control Knobs
Thecontrolknobsmayberemovedforeasier
cleaning.
Make sure the knobs are in the OF/:
positions and pull them straight off the
stems for cleaning.
Oven Vent
Theovenventislocatedbehindtherightrear
surfaceunit.
This area could become hot during
oven use.
To assure no damage is done to file
finish of file product, file safest way to
remove the adhesive flom packaging
tape on new appliances is an application
of a household liquid dishwashing
detergent. Apply with a soft cloth and
allow to soak.
NOTE:Theadhesivemustberemovedfromall
parts.Itcannotberemovedif it isbakedon.
The knobs can be cleaned in a
dishwasher or flley may also be washed
Mill soap and wateL Make sure the inside
of file knobs are dry before replacing.
Replace the knobs, in the OFFposition to
ensure proper placement.
It is normM for steam to come out
of the vent, and moisture mW collect
underneath it when the oven is in use.
Theventisimportantforproperaircirculation.
Neverb/ockthisvent.
25
Page 26

Careand cleaningof therange.
Painted Surfaces
Slot_
Hinge-"
_/ii
!ock
Pull hinge locks down to unlock.
Removalposition
Thegasket is designed with agap at
the bottom to allow for proper air
circulation.
Do not rub or clean the door
gasket--it has an extremely low
resistance to abrasion.
If you notice the gasket becoming
worn, frayed or damaged in any way
or if it has become displaced on the
door, you should haveit replaced.
26
Painmd surfaces include the sides of die
range and die doox; top of conuol panel
and the drawer flont. Clean these with soap
and wamr or a vinegar and water solution.
Control Panel
It's a good idea to wipe die conuol panel
after each use of die oven. Use a damp
cloth m clean or rinse. Fox cleaning, use
mild soap and water or a 50/50 solution
of vinegar and wateL Fox rinsing, use
clean WamL Polish dxT with a soft cloth.
Lift-Off Oven Door
Thedooris veryheavy.Becarefulwhen
removingandliftingthedoor.
Donotlift thedoorbythehandle.
Toremovethedoor:
[_] Fully open the dooL
_] Pull tile hinge locks down toward
tile door flame, to tile unlocked
position. A tool, such _ksa sxmdl flat-
blade screwdfivex; m Wbe required.
[_ Firmly grasp bodl sides of tile door
at the top.
(;lose door to the door removal
position, which ishalfiw_ybetween the
broil stop position and dilly dosed.
[_] I,ift door up and out until tile hinge
arm is clear of tile slot.
Toreplacethedoor:
[_] Firmly grasp bodl sides of tile door
at the top.
_¥ith the Bottom arm
door at the edge
same angle as
the removal
position, seat the
indentation of
the hinge am1
into die bottom
edge of die hinge slot. The notch in
the hinge am1 must be flflly seated
into die bottom of die slot.
Fully open die dooL If die door Mll
%
not filly open, die indentation is
not seated correcdy in die bottom
edge of die slot.
Push tlle hinge locks up against tile
flont flame of tile oven cavib_ to tile
locked position.
e
Do not use coxllnlercial oven cleaners,
cleaning powders, steel wool or haxMl
abrasives on any painted surface.
Do not use abrasive cleansers, strong
liquid cleanexs, plastic scouring pads or
oven cleanexs on the conuol panel--
they will damage the finish.
lock
HingeI
arm _
Push hinge locks up to lock.
_ (;lose tile oven dooL
Tocleantheinsideofthedoor:
Do not Mlow excess water to run into
any holes or slots in the dooL
Because die area inside die gasket is
cleaned during the self-clean cycle, you
do not need m clean this by hand.
The area outside the gasket and
the door liner can be cleaned with a
soap-filled plastic pad, hot wamr and
demrgent. Rinse well with a vinegar
and wamr solution.
Tocleantheoutsideofthedoor:
Use soap and water m dloroughly
clean the rap, sides and flont of tile
oven dooL Rinse well. You may also use
a glass cleaner m clean the glass on the
outside of the dooL Do not let wamr
drip into the vent openings.
If any stain on the door vent uim is
persismnt, use a soft abrasive cleaner
and a sponge-scrubber for best results.
Spillage of marinades, fluitjuices,
tomato sauces and basting mamfials
contMning acids m W cause
discoloration and should be wiped up
immediately: When surface is cool,
clean and rinse.
Do not use oven cleanexs, cleaning
powders or hax_h abrasives on tile
outside of the dooL
Page 27

Oven Shelves
ge.com
All oven shelves may be cleaned by hand
Mill an abrasive cleaner or steel wool.
AtYer cleaning, rinse the shelves with
clean water and d_T with a clean cloth.
Gray porcelain-coamd oven sheNes m W
remMn in the oven during file self-
cleaning cycle without being damaged.
The shiny, sih'er<olored oven shekes
m W remain in the oven during the self-
cleaning cycle, but they will lose their
luster and become hard to slide.
Removable Warming Drawer Pan
NOTE:Formodelswithanelectricwarming
drawer,beforeperforminganyadjustments,
cleaningorservice,disconnecttherange
electricalpowersupplyatthehousehold
distributionpanelbyremovingthefuseor
switchingoff thecircuitbreaker.Makesure
thedrawerheatingelementiscool
NOTE: Aflow warming drawer to coolbefore
removingpan.
It Mll be necessm T m grease M1 oven
shelf side edges Mill a light coating of
vegetable oil after cleaning them by hand
or in the oven. This will help maintain
the ease of diding the sheh'es in and
out of the oven.
Wamfing drawer has a removable pan
for easy cleaning. Clean with hot soapy
wamr and a sponge or dish towel. Dry
with a clean cloth. Replace the pan in
the lower oven dmweL
NOTE:Wipespillspromptlyaftereachuse.
Stainless Steel Surfaces (on some models)
Donotusea steel woolpa&it will scratch
thesurface.
To clean file stainless smel surface,
use warm sudsy wamr or a stainless steel
cleaner or polish. Ahvays wipe the surface
in the direction of the groin. Follow the
cleaner insmlcdons for cleaning the
To inquire about purch_tsing stainless
smel appliance cleaner or polish, or to
find the location of a dealer nearest you,
please call our roll-free number:
NationalPartsCenter
ge.com
stainless smel surface.
1.800.626.2002
27
Page 28

Careand cleaningof therange.
Storage Drawer Removal (onsomemodels)
Toremove the drawer:
Toreplace the drawer:
Wire cover holder.
il Stopguide
[_ Pull the drawer out until it stops.
[_ Lift the flont of the drawer until the
stops clear the guides.
[_ Remove the dmweL
Oven Light Replacement
CAUTION:Before replacing your oven
light bulb, disconnect the electrical
power to the range at the main fuse or
circuit breaker panel.
Be sure to let the light cover and bulb
I
cool completely:
Toremovethecover:
Hold a hand under the cover so it
%
doesn t fall when _ele_tsed. X_ith
fingers of the same hand, firefly
push back the wire cover hoMeL
I,ift off the cover.
[_ Place the drawer rails on the guides.
[_ Push the drawer back until it stops.
[_] I,ift the front of the drawer and push
back undl the stops clear the guides.
I,ower the flont of the drawer and
push back until it closes.
Donotremoveanyscrewstoremovethecover.
[_ Replace bulb with a 404vatt
appliance bulb.
Toreplacethecover:
[_ Place it into groove of the light
receptacle. Pull wire foIward to
the cenmr of the cover until it
snaps into place.
r
_] Connect electrical power to
the range.
Oven Floor
Do not clean the broil element. Any soil
will burn off when the element is heated.
Clean the oven floor with warm, soap),
wateL
Onsomemodels,thebakeelementisnot
exposedandisundertheovenfloor,ffspi//overs,
residueorashaccumulateontheovenfloor,
wipeupbeforeself-cleaning.
28
Page 29

Cleaningtheglasscooktop, gecom
Normal Daily Use Cleaning
Cleanyourcooktopafter
eachspill. Use CERAMA
BRYTE® CeramicCooktop
Cleaner.
ONLY use CERAMA BRYTE®Ceramic
Cooktop Cleaner on the ,glasscooktop.
Other creams may not be as eft_ctive.
To maintain and protect the surface of
your ,glasscooktop, follow these steps:
Before using the cooktop for the
%
filSt time, clean it with CERAMA
BRYTE®Ceramic Cooktop CleaneL
This helps protect the top and
makes cleanup e_tsieL
[_ Daily use of CERAMA BRYTE®
Ceramic Cooktop Cleaner will help
keep the cooktop looking new.
Burned-On Residue
Shake the cleaning cream well.
%
Apply a few drops of CERAMA
BRYTE® Ceramic Cooktop Cleaner
directly to the cooktop.
Use a paper towel or CERAMA
[]
BRYTE® Cleaning Pad for Ceramic
Cooktops to clean the entire
cooktop surface.
[_] Use a dxy cloth or paper towel
to remove all cleaning residue.
No need to rinse.
NOTE:It is veryimportantthat youDONOT
heatthecooktopuntil it hasbeencleaned
thoroughly.
Use a CERAMABRYT£_Cleaning
Pad for Ceramic Cooktops.
The CERAMABRYTEC_Ceramic
CooktopScraper and all
recommended supplies are
available through our Parts Center.
See instructions under "To Order
Parts" section on next page.
NOTE:Do not use a dullor
nicked blade.
WARNING:DAMAGEtoyourglasssurface
mayoccurif youusescrubpadsotherthan
thoserecommended.
[_ Allow the cooktop to cool.
[_ Spread a few drops of CERAMA
BRYTE®Ceramic Cooktop Cleaner
on the entire burned residue area.
Using the included CERAMA
%
Heavy, Burned-On Residue
%
®
BRYTE Cleaning Pad for Ceramic
Cooktops, rub the residue area,
applying pressure as needed.
Allow the cooktop to cool.
Use a single-edge razor blade
scraper at approximately a 45°
angle against the glass surface
and scrape the soil. It will be
necessary to apply pressure to
the razor scraper in order to
xemove the xesidue.
At_ex scraping with the razor
scraper, spread a few drops of
CERAMA BRYTE®Ceramic
Cookmp Cleaner on the entire
burned residue area. Use the
CERAMA BRYTE®Cleaning Pad to
remove any remaining residue.
If any residue remains, repeat the
steps listed above as needed.
Fox additional protection, after
all residue has been removed,
polish the entire surface with
CERAMA BRYTE ® Ceramic
Cooktop Cleaner and a paper towel.
Fox additional protection,
after all residue has been
removed, polish the en6re
surface with CERAMA BRYTE ®
Ceramic Cooktop Cleaner
and a paper towel.
29
Page 30

Cleaningtheglass cooktop.
Metal Marks and Scratches
[_] Be careflll not to slide pots and
pans across your cooktop. It will
leave metal markings on the
cooktop surface.
These marks are removable using
the CERAMA BRYTE®Ceramic
Cooktop Cleaner with the CERAMA
BRYTE®Cleaning Pad for Ceramic
Cooktops.
[_ If pots with a thin overlay of
aluminum or copper are allowed
to boil dry, the overlay mW leave
black discoloration on the
cooktop.
Cooktop Seal
To clean the cooktop seal around the for a few minutes, then wipe clean with
edges of the glass, lay a wet cloth on it nonabrasive cleaners.
Glass surface--potential forpermanent damage.
This should be removed
immediately before heating
again or the discoloration
may be permanent.
CAUTION:Carefullycheckthebottomof
pansforroughnessthatwouldscratch
thecooktop.
Ourtestingshows thatif
youare cooking highsugar
mixturessuchas jelly or
fudgeandhave a spillover,
it cancause permanent
damageto theglass surface
unlessthe spillover is
immediatelyremoved.
3O
Damage from Sugary Spills and Melted Plastic
[_] Turn off all surface units. Remove
hot pans.
[_ Wearing an oven mitt:
a. Use a single-edge razor blade
scraper (CERAMA BRYTE ®
Ceramic Cooktop Scraper) to
move the spill to a cool area on
the cooktop.
b. Remove the spill with
paper towels.
To Order Parts
To order CERAMA BRYTE®Ceramic
Cooktop Cleaner and the cooktop
scrapm; please call our toll-free
ntlIIlbeI:
National PartsCenter 800.626.2002
CERAMABRYTE®Ceramic
CooktopCleaner .......... # WXIOX300
CERAMABRYTE®Ceramic
CooktopScraper ......... # WXIOX0302
Kit ....................... # WB64XS027
(Kitincludescreamandcooktopscraper)
CERAMABRYTE®CleaningPadsfor
CeramicCooktops ........ # WXIOX350
[_ Any remaining spillover should be
left until the surface of the cooktop
has cooled.
[_ Don't use the surface units again
until all of the residue has been
completely removed.
NOTE:Ifpitting or indentationinthe glass
surfacehasalreadyoccurred,thecooktop
glasswill havetobe replaced.Inthiscase,
servicewill benecessar_
Page 31

Before YouCall ForService... gecom
Troubleshooting -tips
Save time and money! Review the charts on the following
pages first and you may not need to call for service.
Possible Causes What ToDo
Surfaceunitswill not
maintaina rolling boil
Improper cookware
being used.
• Use pans which are fiat and match the diameter
of the surface unit selected.
or cookingisnot
fast enough
Surfaceunitsdo
notworkproperly
Surfaceunitstops
A fuse in your home may be
blown or the circuit breaker
tripped.
Cooktop controls
improperly set.
• Replace file fllse or reset file circuit breakeL
• Check to see the correct control is set for the surface
unit you are using.
• This is hernial. The unit is still on and hot.
glowingwhenturned
toalower setting
Scratches(mayappear
ascracks)oncooktop
glasssurface
Areas of discoloration Food spillovers not cleaned • See the Cleaning the glass cooktop section.
on the cooktop before next use.
Incorrect cleaning
methods being used.
Cookware with rough bottoms
being used or coarse particles
(salt or sand) were between
the cookware and the surface
of the cooktop.
Cookware has been slid
across the cooktop surface.
• Scratches are not removable. Tiny scratches will become
less visible in time as a result of cleaning.
• To avoid scratches, use the recommended cleaning
procedures. Make sure bottoms of cookware are clean
before use, and use cookware with smooth bottoms.
Hot surface on a model • This is normal. The surface may appear discolored
with a light-colored glass when it is hot. This is temporary and will disappear
cooktop, as the glass cools.
Plastic melted to Hot cooktop came into • See the Glass surface--potential for permanent damage
the surface contact with plastic placed section in the Cleaning the glass cooktop section.
on the hot cooktop.
Pitting (or indentation) Hot sugar mixture spilled • (;all a qualified technician for replacement.
of the cooktop on the cooktop.
Frequent cycling Improper cookware • Use only fiat cookware to minimize cycling.
off and on of being used.
surface units
Food does not bake Oven controls improperly set. • See the Using the oven section.
or roast properly Shelf position is incorrect • See the Using the oven section.
or the shelf is not level.
Incorrect cookware or • See the Using the oven section.
cookware of improper
size being used.
Oven thermostat needs
adjustment.
• See the Adjust the oven thermostat--Do it yourself!
section. 3 /
Page 32

Before YouCall ForService...
Troubleshooting -tips
Possible Causes What ToDo
Clockandtimerdo
notwork
Ovenlightdoes Light bulb is loose or defective. • Tighten or replace the bulb.
Plug on range is not completely • Make sure electrical plug is plugged into a live, properly
inserted in the electrical outlet, grounded outer.
A fuse in your home may • Replace the fl_se or reset the circuit breakeL
be blown or the circuit
breaker tripped.
Oven controls improperly set. • See the Using the clock and timer section.
not work
Switch operating light • Gall for service.
is broken.
Fooddoesnot Door not open to the broil stop • See the Using the oven section.
broil properly position as recommended.
Oven controls improperly set. • Make sure you press the BROILHI/LO pad.
Improper shelf position • See the Broiling Guide.
being used.
Cookware not suited • For best results, use a pan designed for broiling.
for broiling.
In some areas the power • Preheat the broil element for 10 minutes.
(voltage) may be low.
• Broil for the longest period of time recommended in
the Broiling Guide.
Oven temperature too Oven thermostat • See the Adjust the oven thermostat--Do it yourself!
hot or too cold needs adjustment, section.
Plug on range is not • Make sure electrical plug is plugged into a live,
completely inserted in properly g_ounded outlet.
the electrical outlet.
Abreakerbefuseblownintripped.YOurortheh°mecircuitmay • Replace the fl_se or reset the circuit breakeL
Oven controls improperly set. • See the Using the oven section.
Door left in the locked • If necessary, allow the oven to cool; then unlock
position, the dooL
Storagedrawe,
is crooked
Rear drawer support is
on top of the guide rail.
• Reposition the drawer. See the Storage Drawer
Removalinsuucdons in the Care and cleaning of
your range secdon.
32
Page 33

i Possible Causes What To Do
Storage drawer Power cord may be • Reposition the drawer and power cord. See the
won't close obstructing drawer Storage Drawer Removal instructions in the Care and
in the lower back cleaning of your range secdon.
of the range.
Rear drawer support is * Reposifion the drawer. See the Storage Drawer
on top of the guide rail. Removalinstrucfions in the Care and cleaning of your
range section.
Ovenwill notself-clean The oven temperature is • Allow file oven to cool to room temperature and
too high to set a self-clean reset the controls.
operation.
Oven controls improperly set. • See the Using the self-cleaning oven section.
Oven door is not in the • Make sure you move the door latch handle all the
locked position, way to the right.
"Crackling" or This is the sound of the • This is normal.
"popping" sound metal heating and cooling
during both the cooking
and cleaning functions.
ge.com
Excessive smoking Excessive soil. • Press the CLEAR/OFF pad. Open the windows
during a clean cycle to rid the room of smoke. \_fit until the light
on the SELF CLEAN pad goes off'. Wipe up the excess
soil and reset the clean cycle.
Oven door willnot Oven too hot. • Allow the oven to cool below locking temperature.
unlock
Ovennotclean after Oven controls not properly set. • See the Using the self-cleaning oven section.
a clean cycle Oven was heavily soiled. • Clean up hem T spillovers before starting the clean
cycle. Heavily soiled ovens may need to self-clean
again or for a longer period of time.
Drawer does notslide The drawer is out of • Fully extend the drawer and push it all the way in.
smoothly or drags alignment. See the Care and cleaning of the range section.
Drawer is over-loaded or load • Reduce weight. Redistribute drawer contents.
is unbalanced.
Warming drawer will A fuse in your home may be • Replace the fl_se or reset the circuit breaker.
not work blown or the circuit breaker
tripped.
Controls improperly set. • See the Warming drawer secdon.
Excessive condensation Liquid in drawer. • Remove liquid.
in the drawer
Uncovered foods. • Cover food with lid or alunainuna foil.
Temperature setting too high. • Reduce temperature setting.
Fooddriesoutin the Moisture escaping. • Cover food with lid or alunainuna foil.
warming drawer
Drawer not fully closed. • Push drawer in until latch engages. 33
Page 34

Before YouCall ForService...
Troubleshooting 77ps
Possible Causes What ToDo
"F--andanumber You have a function * Press file CLEAR/OFFpad. Put file oven back into
or letter" flash error code. operation.
in the display If the function code repeats. * Disconnect till power to the range for tit least 30
seconds and then reconnect power. If tim flmcfion
error code repeats, call for service.
• On self-cleaning models, if a flmction error code
appears during the self-cleaning cycle, check the oven
door latch. The latch may have been moved, if only
slightly, from the locked position. Make sure tim latch
is moved to the right as far as it will go. Press the
CLEAtg/OFFpad. Allow the oven to cool for one houL
Put the oven back into operation.
Display goes blank A fuse in your home may be • Replace the fl_se or reset the circuit breakeL
Display flashes Power failure. • Reset the clock.
Unable to get the Oven control pads were • The BAKE and BROIL HI/LO pads must be pressed
blown or the circuit
breaker tripped.
The clock is turned off • See tim Using the clock and timer section.
from showing in the display,
displayto show "SF" not pressed properly, at tim same time and held for 3 seconds.
Power outage or surge. • Reset the clock. If the oven was in use, you must reset
it by pressing tim CLEAR/OFF pad, setting tim clock
and resetting any cooking flmction.
"Burning" or "oily" This is normal in a new • To speed tim process, set a self-clean cycle for a
odor emitting from oven and will disappear mininmm of 3 hours. See tim Using the self-
the vent in time. cleaning oven section.
An odor from the insulation • This is temporary.
around the inside of the
oven is normal for the first
few times the oven is used.
34
Page 35

GE Service Protection Plus TM
GE, a name recognized worldwide tbr quality and dependability, offers you
Service Protection Plus'_--comprehensive protection on all your appliances--
No Matter What Brand!
Benefits Include:
* Backed by GE
* All brands covered
* Unlimited service calls
* All parts and labor costs included
* No out-of-pocket expenses
* No hidden deductibles
* One 800 number to call
We71CoverAnyAppfiance.
Anywhere. Anytime.*
You will be completely satisfied with our service protection or you may request your money back
on the remaining value of your contract. No questions asked. It's that simple.
Protect your refligeratox; dishwasher, washer and dryer, range, TV, VCR and much more--any brand!
Plus there's no exua charge for emergency service and low monthly financing is available. Even icemaker
coverage and food spoilage protection is off>red. You can rest easy, knowing that all your valuable
household products are protected against expensive repairs.
Place your confidence in GE and call us in the U.S. toll-free at 800.626.2224
for more information.
_%11brands cover_ d, up lo 20 years old, in lhe conlinenlal U.S.
._.._ Cu t here
Pleaseplace in envelope and mail to:
General Electric Company
Warranty Registration Department
EO. Box 32150
Lotfisville, KY 40232-2150
35
Page 36

Consumer Product Ownership Registration
Dear Customer:
Thank you for purchasing our product and thank you for placing your confidence in us.
We are proud to have you as a customer!
Follow these three steps to protect your new appliance investment:
Complete and mail
your Consumer
Product Ownership
Registration today.
Have the peace of
mind of knowing we
can contact )ou in
the unlikely event of a
satet} modification.
After mailing the
registration belcm,
store this document
in a sate place. It
contains intormation
)ou will need should
)ou require service.
Our service nmnber is
800. GE. (;ARES
(800.432.2737).
Model Number Serial Number
Important: If you did not get a registration card with your
product, detach and return the form below to
ensure that your product is registered, or register
online at ge.com.
Consumer Product Ownership Registration
Read }our Owner's
Mamml carefully.
It will help )ou
operate }otlr ilew
appliance properly.
...,,_ Cut here
Model Number Serial Number
Mr. [ M[s. [I Mrs. [I Miss[
First I I I'ast I
Name I I I I I I I I I Name I I I I I I I I I I
Street I
Address I I I I I I I I I I I I I I I I I I I I I I I
#I , , , , I I I I E-mai,Ac c ress*
I)at< Pla<d
36
'"_'!, I Da,I, I _arl, I Phone
Month
* Please provide your e-mail address to receive, via e-mail, discotmts, special offers and other impormm
GE Consumer & Industrial
Appliances
General Electric Companu
Louisville, KY40225
ge.com
commm]ications fi'om GE Appliances (C,EA).
:: Check here if)'ou do not _m]t to receive commm]ications fl'om C, EA's careftdl) selected partnel_.
FAII,[)RE TO COMPI,ETE AND RETURN THIS CARD DOES NOT DIMINISH YOUR
X,tS_RRANTY RIGHTS.
For more inti)rmation about GEA's privac) and clam usage policy, g<) t<) ge.com and click on
"PrJwm) Policf' or call 800.626.2224.
_.mberl I, I-I,, I-I , ,
Page 37

Notes.
ge.com
_L
w
_P
!
37
m
!
!
;:x
Page 38

Accessories.
Looking For Something More ?
You can find these accessories and many more at ge.com, or call 800.626.2002
(during normal business hours). Have your model number ready.
(l i q _n_[/lrfl[Iflll't\'t\_\_\ \_)
Oven Shelves
Light Bulbs
Cleaner Cleaning Pads Scraper
Broiler Pan
Knobs
38
Tired of discolored shelves? Wishing you had extra-heaxy-duly oven shelves?
NOWA VAIl.ABLEtier your range:
GE's innovative, selt=cleanable porcelain-coated oven shelves!
• Heaxy Du W
• Durable
• Able to be cleaned in a self-cleaning oven
Visit ge.com ti)r more intimnation.
Page 39

GEElectricRange Warranty.
All warranty service provided by our Factory Service Centers,
or an authorized Customer Care®technician. Toschedule service,
call us at 800.GE.CARES(800.432.2737).Please have serial number
and model number available when calling for service.
GE Will Provide:
Anypart of the range which fails due to a defect in materials or workmanship.
Fromthedate ofth e
originalpurchase
Service trips to your home to teach you how to use
the product.
Improper installation, delivery or maintenance.
Failure of the product if it is abused, misused, or used
for other than the intended purpose or used
commercially.
Replacement of house fuses or resetting of circuit
breakers.
During this limitedone-yearwarranty,GE will also provide, free ofcharge, all labor
and in-home se_'ice m replace the defective part.
Staple your receipt here.
Proof of the originalpurchase
dateis needed to obtain service
under the warranty.
Damage to the product caused by accident, fire, floods
or acts of God.
Incidental or consequential damage caused by possible
defects with this appliance.
Damage caused after delivery.
Product not accessible to provide required service.
Warranty.Any impfied warranties, including the implied warranties of merchantability or fitnessfor aparticular purpose,
I XCLUSION OFIMPLIED WARRANTIES--Your sole and exclusive remedy is product repair asprovided in this Limited
are limited to one year orthe shortestperiod allowed by law.
This warranty is extended to the original purchaser and any succeeding owner for products purchased for
home use within the USA. If the product is located in an area where service by a GEAuthorized Servicer is not
available, you may be responsible for a trip charge or you may be required to bring the product to an Authorized GE
Service location for service. In Alaska, the warranty excludes the cost of shipping or service calls to your home.
Some states do not allow the exclusion or limitation of incidental or consequential damages. This warranty
gives you specific legal rights, and you may also have other rights which vary from state to state. Toknow
what your legal rights are, consult your local or state consumer affairs office or your state's Attorney General
Warrantor: General Electric Company.Louisville,KY40225
39
Page 40

ConsumerSupport.
GEAppliancesWebsite
Have a question ov need assistance with your appliance? TD_the GE Appliances Website 24 hours a day,
any day of the year! Fox greater convenience and fi,tster service, you can now download Owner's Manuals,
order parts ox even schedule sex_qceon-line.
ge.com
ScheduleService ge.com
Expert GE repair service is only one step away fiom your dooL Get on-line and schedule your sex_ice at
your convenience any day of the year! Or call 800.GE.GARES (800.432.2737) dux-ing norm_d business hours.
RealLifeDesignStudio
GE supports the Universal Design concept--products, services and environments that can be used by
people of aU ages, sizes and capabiliues. We vecogmize the need m design for a wide range of physical and
mental abili0es and impaixments. Fox details of GE's Univexsal Desigm applica0ons, including kitchen
design ideas for people with disabili0es, check out our Website today. Fox the hearing impaired, please call
800.TDD.GEAG (800.833.4322).
ExtendedWarranties
ge.com
ge.com
Purchase a GE extended warranty and learn about special discounts that ave available while your warranty
is still in eft>ct. You can purchase it on-line anytime, or call 800.626.2224 during nomlal business hoxu5.
GE Gonsumer Home Sex-viceswill still be there _ffteryour warranly expires.
PartsandAccessories
IndMduals qualified to service their own appliances can have parts or accessox-ies sent directly to their
homes (VISA, MasterGard and Discover cards ave accepted). Order on-line today, 24 houxs every day or
by phone at 800.626.2002 during normal business hours.
Instructionscontainedinthismanualcoverprocedurestobeperformedbyanyuser.Otherservicing generally
shouldbereferredtoqualifiedservicepersonnelCautionmustbeexercised,sinceimproperservicingmaycause
unsafeoperation.
ContactUs
If you ave not satisfied wifll die service you receive flom GE, contact us on our Website wifll all die details
including your phone numbex, or wx-imm: General Managex, Gusmmer Relations
GE Appliances, Appliance Park
I.ouisville, KY40225
RegisterYourAppliance
ge.com
ge.com
ge.com
Register your new appliance on-line--at your convenience! Timely product vegismlfion will allow for
enhanced communication and prompt sexMce under die temls of your war_antT, should file need arise.
You m W also mail in the pre-prinmd regism_fion card included in the packing mamx-ial, or detach and use
the form in the Owner's Manual.
Printed in the United States
 Loading...