

Page 1
0
GEAppliances.com
C
Q_
0
-0
c-
E3
C
(1)
-0
OE
m
Lf3
C
OE
-0
C
E3
Or)
(D
LL
Safety Instructions ......... 2-6
I
I
Operating Instructions
Clock and Timer ................... 18
EnerggSaver Mode ...............20
Oven .......................... 11-24
Adjust the Oven Thermostat ..... 20
Broiling, Broiling Guide ........... 14
Controls ...................... 11, 12
Convection Oven ................. 15
Lower Oven Drawer .............. 17
Power Outage ................... 12
Sabbath Feature ................. 21
Self-Cleaning ................. 22, 23
Special Features ................. 20
Steam Cleaning .................. 24
Timed Baking .................... 19
Warming Drawer ................ 16
Surface Units ................... 7-10
Ouickset III and
Quickset IV Models
Care and Cleaning
Coil Surface Units ................. 32
Control Knobs .................... 25
Drip Pans ......................... 32
Glass Cooktop ................ 30, 31
I
Lift-Off Oven Door ................ 27
Lift-Up Cooktop ................... 32
Light .............................. 29
Oven Heating Elements ........... 28
Rocks ............................. 28
Removable Lower Oven
Drawer Pan ....................... 26
Removable Worming
Drawer Pan ....................... 26
Standard-Cleon Oven Interior .... 26
Storage Drawer ................... 28
Vent .............................. 26
For a Spanish version of this
manual, visit our Website at
GEAppliances.com.
Para consultar una version
en espafiol de este manual de
instrucciones, visite nuestro sitio
de internet GEAppliances.com.
In Canada contact us at:
www.G EAppliances.ca
Troubleshooting Tips .... 33-36
Accessories .................... 37
Consumer Support
Consumer Support ...... Back Cover
Warrantg ......................... 39
Write the model and serial
numbers here:
Model #
Serial #
You can find them on a label
behind the drawer or behind the
lower oven door on the front of
the range frame.
Printed on
Recgcled Paper
49-80591-105-09JR
Page 2

IMPORTANT SAFETY INFORMATION.
READ ALL INSTRUCTIONS BEFORE USING.
i-4,WARNING i
Read all safety instructions before using the product. Failure to follow these instructions may result in fire, electric
shock, serious injury or death.
ANTI-TIP DEVICE
To reduce the risk of tipping the range, the range must
be secured by a properl_l installed anti-tip bracket. See
installation instructions shipped with the bracket for complete
• All ronges con tip.
• BURNS or other SERIOUS
INJURIES can result.
• INSTALL and CHECK the
ANTI-TIP bracket following
the instructions supplied
with the bracket.
details before attempting to install
For Freestanding Ranges:
To check ff the bracket is installed and engaged properly,
remove the storage drawer or kick panel and look underneath
the range to see that the leveling leg is engaged in the
bracket. On models without a storage drawer or kick panel,
carefully tip the range forward. The bracket should stop the
range within 4 inches. If it does not, the bracket must be
reinstalled. If the range is pulled from the wall for any reason,
always repeat this procedure to verify the range is properly
secured by the anti-tip bracket.
Never completely remove the leveling legs or the range will
not be secured to the anti-tip device properly.
For Slide-In Ranges:
To check if the bracket is installed and engaged properly,
remove the storage drawer or kick panel and look
underneath the range to see that the leveling leg is engaged
in the bracket.
For Drop-In Ranges:
To check if the bracket is installed and engaged properly,
lower the oven door and gently apply medium force at
the handle end until movement of the range is detected.
Continue pressing until the anti-tip bracket is engaged
and movement stops. A small amount of movement is
acceptable at the back of the range top, but it should be
stable and not tip once the anti-tip bracket isengaged.
If it does not, the bracket must be reinstalled.
If you did not receive an anti-tip bracket with your purchase,
call 1.800.626.8774 to receive one at no cost (in Canada, call
1.800.561.3Bq4). For installation instructions of the bracket,
visit GEAppliances.com (in Canada, GEAppliances.ca).
i-&WARNING ] IMPORTANTSAFETYNOTICE
The California Safe Drinking Water and Toxic Enforcement Act requires the Governor of California to publish a list
of substances known to the state to cause cancer, birth defects or other reproductive harm, and requires
businesses to warn customers of potential exposure to such substances.
The fiberglass insulation in self-clean ovens gives off a very small amount of carbon monoxide during the cleaning
cycle. Exposure can be minimized by venting with an open window or using a ventilation fan or hood.
2
Page 3

[-&WARNING ] GENERALSAFETYINSTRUCTIONS
GEAppliances.com
Use this appliance for its intended purpose as
described inthis Owner's Manual.
Be sure your appliance is properly installed and
grounded by a qualified installer in accordance with
the provided installation instructions.
_::Do not attempt to repair or replace any part of your
range unless it is specifically recommended in this
manual. All other servicing should be referred to
a qualified technician.
Before performing any service, unplug the range
or disconnect the power supply at the household
distribution panel by removing the fuse or switching
off the circuit breaker.
Do not leave children alone-children should not
be left alone or unattended in an area where an
appliance is in use.They should never be allowed
to climb, sit or stand on any part of the appliance.
CAUTION:Do not store items of interest to
children above a range or on the backguard of a
range-children climbing on the range to reach
items could be seriously injured.
_::Use only dry pot holders-moist or damp pot
holders on hot surfaces may result in burns from
steam. Do not let pot holders touch hot surface
units or heating elements. Do not use a towel or
other bulky cloth in place of pot holders.
Never use your appliance for warming or heating
the room.
iiiiiil
Do not touch the surface units, the heating
elements or the interior surface of the oven.
These surfaces may be hot enough to burn even
though they are dark in color. During and after use,
do not touch, or let clothing or other flammable
materials contact the surface units, areas nearby
the surface units or any interior area of the oven;
allow sufficient time for cooling first. Other surfaces
of the appliance may become hot enough to cause
burns. Potentially hot surfaces include the cooktop,
areas facing the cooktop, oven vent opening,
surfaces near the opening and crevices around the
oven door.
iiiiiiili_
Do not heat unopened food containers. Pressure
could build up and the container could burst,
causing an injury.
iiiiiiili_
Do not use aluminum foil to line the drip pans or
anywhere in the oven, except as described in this
manual. Misuse could result in damage to the range
and shock or fire hazard.
iiiiiiili_
Avoid scratching or impacting glass doors, cook
tops or control panels. Doing so may lead to glass
breakage. Do not cook on a product with broken
glass. Shock, fire or cuts may occur.
iiiiiiili_
Cook meat and poultry thoroughly-meat to at
least an internal temperature of 160°F and poultry
to at least an internal temperature of 180°F. Cooking
to these temperatures usually protects against
foodborne illness.
[_/i,WARNING i KEEPFLAMMABLEMATERIALSAWAYFROtvl
THERANGE.
Do not store or use flammable materials in an oven
or near the cooktop, including paper, plastic, pot
holders, linens, wall coverings, curtains, drapes and
gasoline or other flammable vapors and liquids.
Never wear loose-fitting or hanging garments while
using the appliance. These garments may ignite if
they contact hot surfaces causing severe burns.
Do not let cooking grease or other flammable
materials accumulate in or near the range. Grease
in the oven or on the cooktop may ignite.
Clean ventilating hoods frequently. Grease should
not be allowed to accumulate on the hood or filter.
3
Page 4
IMPORTANT SAFETY INFORMATION.
READ ALL INSTRUCTIONS BEFORE USING.
l-& WARNING ] IN THE EVENT OFA FIRE,TAKETHE FOLLOWING
STEPSTO PREVENTTHE FIREFROM SPREADING:
_:,Donot use water on grease fires. Never pick up
a flaming pan. Turn the controls off. Smother a
flaming pan on a surface unit by covering the
pun completely with a well-fitting lid, cookie sheet
or flat tray. Use a multi-purpose dry chemical or
foam4ype fire extinguisher.
::, If there is a fire in the oven during baking, smother
the fire by closing the oven door and turning the
oven off or by using a multi-purpose dry chemical
or foam4ype fire extinguisher.
If there is a fire in the oven during self-clean,
turn the oven off and wait for the fire to go out.
Do not force the door open. Introduction of fresh
air at self-clean temperatures may lead to a burst
of flame from the oven. Failure to follow this
instruction may result in severe burns.
i-4,WARNING i COOKTOPSAFETYINSTRUCTIONS
Never leave the surface units unattended at
medium or high heat settings. Boilovers cause
smoking and greasy spillovers that may catch
on fire.
_:,Never leave oil unattended while frying. Ifallowed
to heat beyond its smoking point, oil may ignite
resulting in fire that may spread to surrounding
cabinets. Use a deep fat thermometer whenever
possible to monitor oil temperature.
To avoid oil spillover and fire, use a minimum
amount of oil when shallow pan-frying and avoid
cooking frozen foods with excessive amounts of ice.
_:,Use proper pan size-select cookware having flat
bottoms large enough to cover the surface heating
element. The use of undersized cookware will
expose a portion of the surface unit to direct
contact and may result in ignition of clothing.
Proper relationship of cookware to surface unit
will also improve efficiency.
iii::,Only certain types of glass, glass/ceramic,
earthenware or other glazed containers are suitable
for cooktop service; others may break because of
the sudden change in temperature.
To minimize the possibility of burns, ignition of
flammable materials and spillage, the handle of a
container should be turned toward the center of the
range without extending over nearby surface units.
When preparing flaming foods under a hood, turn
the fan on.
Page 5
GEAppliances.com
WARNING J
(Some models)
Use care when touching the cooktop. The glass
surface of the cooktop will retain heat after the
controls have been turned off.
*:, Do not cook on a broken cooktop. If glass cooktop
should break, cleaning solutions and spillovers may
penetrate the broken cooktop and create o risk of
electric shock. Contact a qualified technician
immediately.
*:, Avoid scratching the glass cooktop. The cooktop
con be scratched with items such as knives, sharp
instruments, rings or otherjewelrg, and rivets on
clothing.
Do not place or store items that can melt or catch
fire on the glass cooktop, even when it is not being
used. If the cooktop is inadvertentlg turned on, theg
WARNING i
RADIANT COOKTOPSAFETY INSTRUCTIONS
COIL COOKTOP SAFETYINSTRUCTIONS
mog ignite. Heat from the cooktop or oven vent
offer it is turned off mag cause them to ignite also.
iiiiiil
UseCERAMABRYTE®ceramic CooktopCleanerand
CERAMABRYTE®Cleaning Padto clean the cooktop.
Wait until the cooktop cools and the indicator light
goesout beforecleaning.A wet sponge or cloth
ona hot surfacecan cause steam burns.Some
cleanerscan produce noxiousfumes if appliedto
a hot surface.Note: Sugarspills are an exception.
Theg should be scraped off while still hot usingan
oven mitt and a scraper.Seethe Cleaningthe glass
cooktopsectionfor detailed instructions.
iiiiiiili_
Read and follow all instructions and warnings on
the cleaning cream label.
(Some models)
Do not immerse or soak the removable surface
units. Do not put them in a dishwasher. Do not self-
clean the surface units inan oven. Doing so mag
cause them to fail presenting a burn or fire hazard.
To avoid the possibilitg of a burn or electric shock,
alwags be certain that the controls for all surface
units are at the OFFposition and all coils are cool
before attempting to lift or remove a coil surface unit.
Be sure the drip pans are not covered and are in
place. Their absence during cooking could damage
range parts and wiring.
WARNING i OVENSAFETYINSTRUCTIONS
Stand awag from the range when opening the oven
door. Hot air or steam which escapes can cause
burns to hands, face and/or eges.
Keep the oven vent unobstructed.
Keep the oven free from grease buildup. Grease
in the oven mag ignite.
Place oven racks in desired location while oven
is cool. If rack must be moved while oven is hot,
do not let pot holder contact hot heating element
in oven.
Pull the oven rack to the stop-lock position when
loading and unloading food from the oven. This
helps prevent burns from touching hot surfaces
of the door and oven walls.
Do not leave items such as paper, cooking utensils
or food in the oven when not in use. Items stored in
an oven can ignite.
Do not use aluminum foil to line the oven bottom.
Foil mag trap or reflect heat leading to a shock or
fire hazard.
When using cooking or roasting bags in the oven,
follow the manufacturer's directions.
5
Page 6
IMPORTANT SAFETY INFORMATION.
READ ALL INSTRUCTIONS BEFORE USING.
[_ WARNING j
(Some models)
SELF-CLEANINGOVENSAFETYINSTRUCTIONS
Theself-cleaning feature operates the oven at temperatures high enough to burn away food soils in the
oven. Follow these instructions for safe operation.
_:,Before operating the self-clean cycle, remove pans, _:,
shiny metal oven rocks and other utensils from the
oven. Only grog porcelain-coated oven rocks may
be left in the oven. Do not use self-clean to clean
other ports, such as drip pans or bowls. }
*:, Before operating the self-clean cycle, wipe grease
and food soils from the oven. Excessive amount of
grease may ignite leading to smoke damage to
your home.
If the self-cleaning mode malfunctions, turn the
oven off and disconnect the power supply. Have it
serviced by a qualified technician.
Do not clean the door gasket. The door gasket is
essential for a good seal. Care should be taken not
to rub, damage or move the gasket.
Do not use oven cleaners. No commercial oven
cleaner or oven liner protective coating of any kind
should be used in or around any part of the oven.
[-&WARNING 1WARMING DRAWER/LOWER OVEN DRAWER
SAFETYINSTRUCTIONS Isomemode_s)
*:,The purpose of the warming drawer is to hold hot
cooked foods at serving temperature. Bacteria will
grow in food while it is below 140%. Do not put cold
food in warming drawer. Do not heat food for more
than 2 hours. Failure to follow these instructions
may result in foodborne illness.
*:, Do not leave paper products, plastics, canned food
or combustible materials in the drawer. They may
ignite.
*:, Do not touch the heating element or the interior
surface of the drawer. These surfaces may be hot
enough to cause burns.
Use care when opening the drawer. Open the
drawer a crack and let hot air or steam escape
before removing or replacing food. Hot air or
steam that escapes can cause burns to hands,
face and/or eyes.
Do not use aluminum foil to line the warming
drawer. Foil is an excellent heat insulator and
will trap heat beneath it. This will upset the
performance of the drawer and potentially
cause a fire hazard.
Page 7
"'-usingthe surface units. (on some models) GEAppliances.com
WARNINGI °nor high settings. Keep flammable items awabl from the cooktop. Turn off all
controls when done cooking. Failure to follow these instructions can result in
fire, serious injur_l or death.
Throughout this manual, features and appearance mabt varbt from btour model.
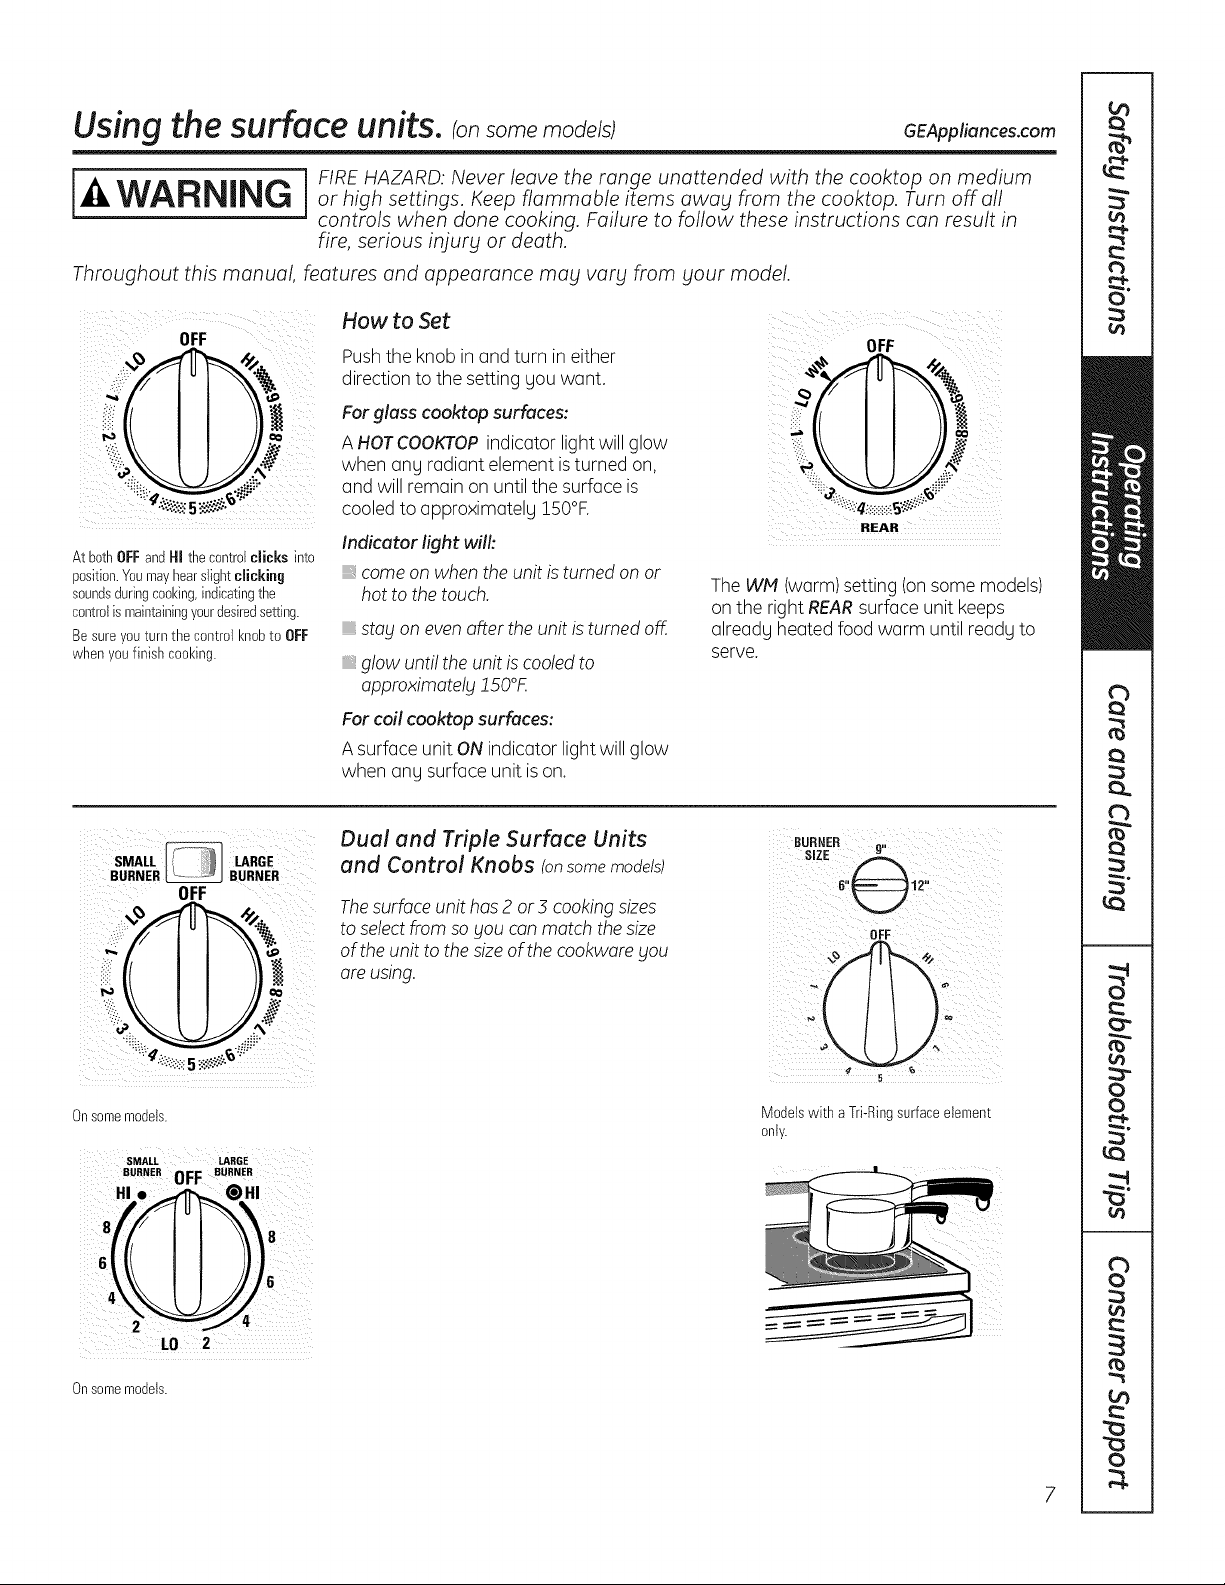
How to Set
OFF OFF
,::i_ direction to the setting gou want.
_il _ Forglass cooktop surfaces:
_ A HOTCOOKTOPindicator light will glow
: and will remain on until the surface is .:
AtbothOFFandHI thecontrolclicks into
position.Youmayhearslightclicking come on when the unit isturned on or
soundsduringcooking,indicatingthe hot to the touch. TheWM (warm)setting (on some models)
controlismaintainingyour@siredsetting, on the right REARsurface unit keeps
Besure youturnthecontrol knobto OFF already heated food warm until ready to
whenyoufinish cooking, serve.
Pushthe knob in and turn in either
when any radiant element is turned on,
cooledto approximatelu 150°F.
Indicator fight will:
stag on evenafter the unit is turned off.
glow unti! the unit iscooledto
approximotelg JSO°K
Forcoil cooktop surfaces:
A surface unit ON indicator lightwill glow
when any surface unit ison.
REAR
SMALL LARGE
BURNER _ BURNER
OFF
i,i_iO
Onsomemodels.
SMALL LARGE
BURNER 0FF BURNER
HI.
L0 2
Onsomemodels.
Dual and Triple Surface Units
and Control Knobs !onsome models)
The surface unit has 2 or3 cooking sizes
to select from so gou can match the size
of the unit to the size of the cookware gou
are using.
OFF¸¸¸ )
Modelswith a Tri-Ringsurfaceelement
only.
Page 8
Using the surface units.
Throughout this manual, features and appearance mag varg from gout model.
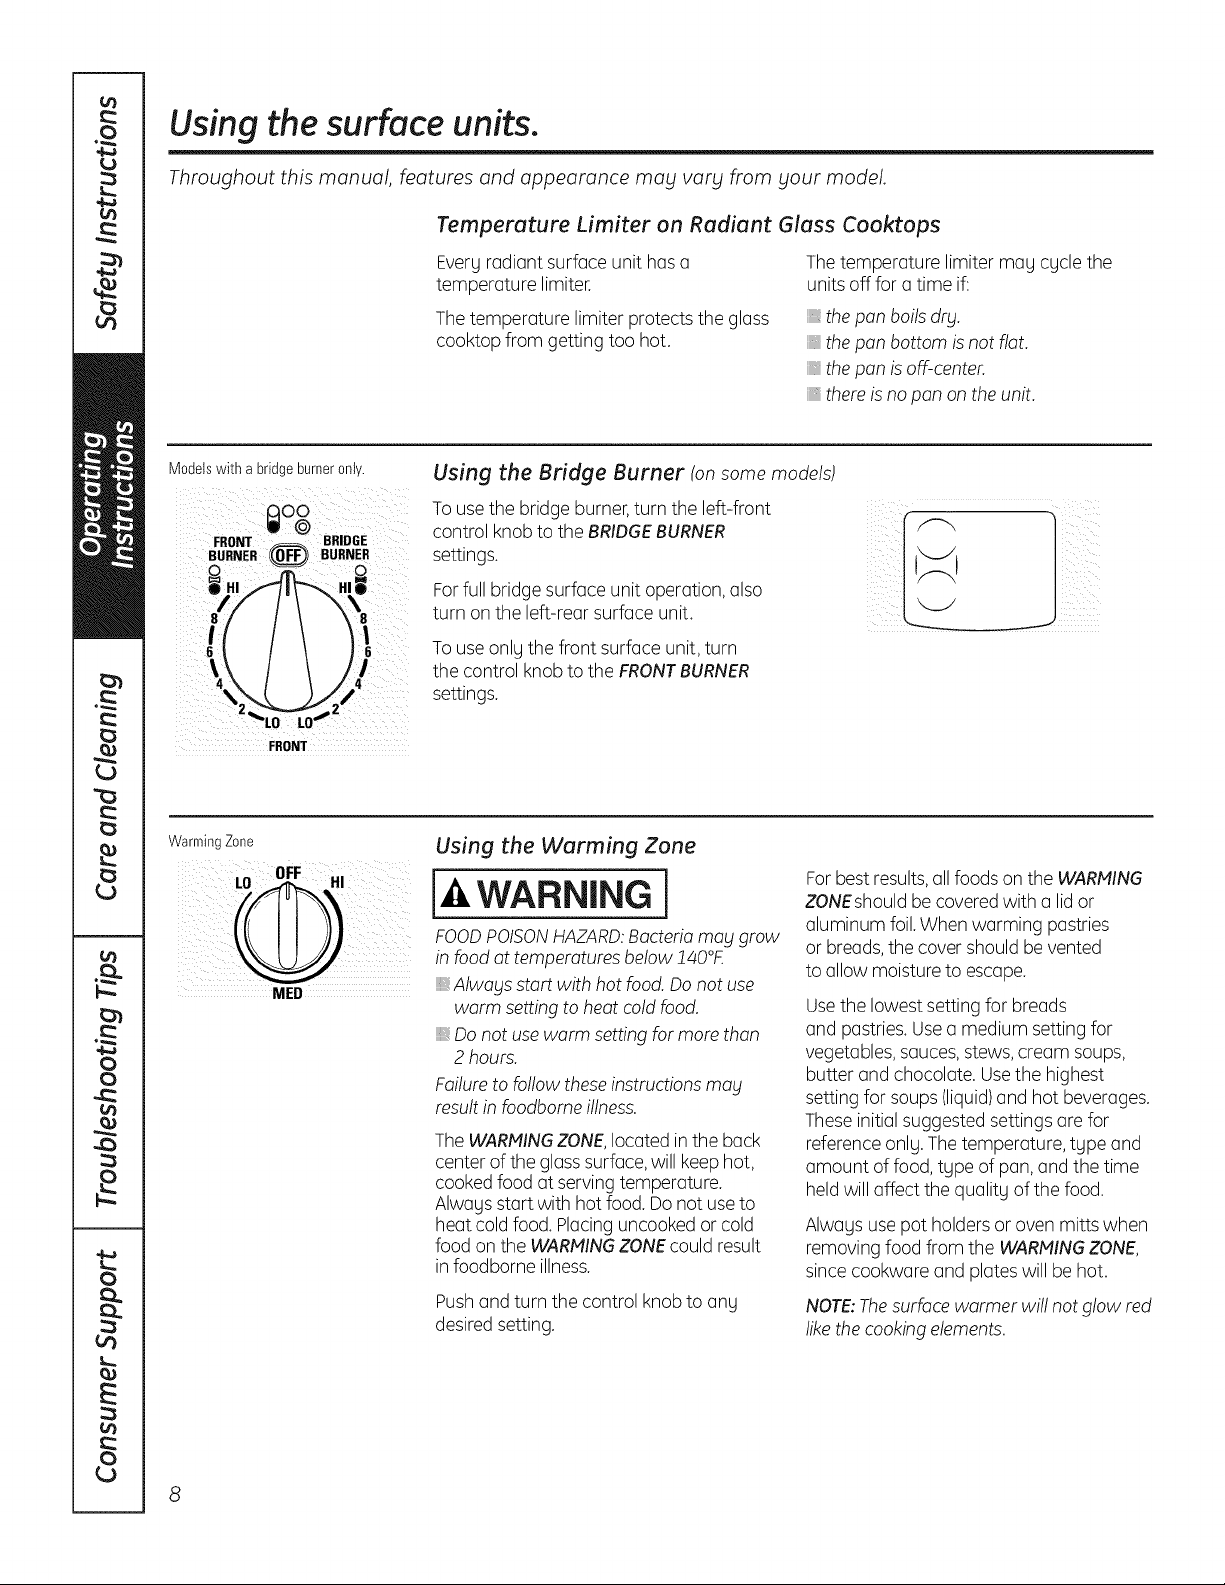
Temperoture Limiter on Redient Gloss Cooktops
Modelswith a bridgeburneronly.
FRONT
WarmingZone
NED
Every radiant surface unit hasa
temperature limiter.
Thetemperature limiter protects the glass
cooktop from getting too hot.
Using the Bridge Burner (onsome models)
Touse the bridge burner,turn the left-front
control knob to the BRIDGEBURNER
settings.
Forfull bridge surface unit operation, also
turn on the left-rear surface unit.
Touse only the front surface unit, turn
the control knob to the FRONTBURNER
settings.
Using the Warming Zone
WARNINGI
FOODPOISONHAZARD:Bacteriamablgrow
in food at temperatures below !40°£
,, Alwablsstart with hot food. Do not use
warm setting to heat cold food.
,, Do not usewarm settingfor more than
2 hours.
Failureto follow theseinstructionsmag
result in foodbome illness.
TheWARMINGZONE,located inthe back
center of the glasssurface,will keep hot,
cooked food at serving temperature.
Always start with hot food. Donot use to
heat cold food. Placinguncooked or cold
food on the WARMINGZONEcould result
in foodborne illness.
Pushand turn the control knob to any
desiredsetting.
Thetemperature limiter may cycle the
units off for atime if:
.; the pan boils dry.
_,there is no pan on the unit.
Forbest results,allfoods onthe WARMING
ZONEshouldbe covered with a lidor
aluminum foil.When warming pastries
or breads,the cover shouldbe vented
to allow moistureto escape.
Usethe lowest setting for breads
and pastries. Usea medium setting for
vegetables, sauces,stews,cream soups,
butter and chocolate. Usethe highest
setting for soups (liquid)and hot beverages.
Theseinitial suggestedsettings are for
reference only. Thetemperature, type and
amount of food, type of pan, and the time
held will affect the quality of the food.
Always use pot holders or oven mitts when
removing food from the WARMINGZONE,
since cookware and plateswill be hot.
NOTE:Thesurface warmer wi!! not glow red
likethe cooking elements.
the pan bottom is not flat.
the pan is off-center.
Page 9
GEAppliances.com
The following information will help you choose cookware which will give good performance on glass cooktops.
Home Canning Tips
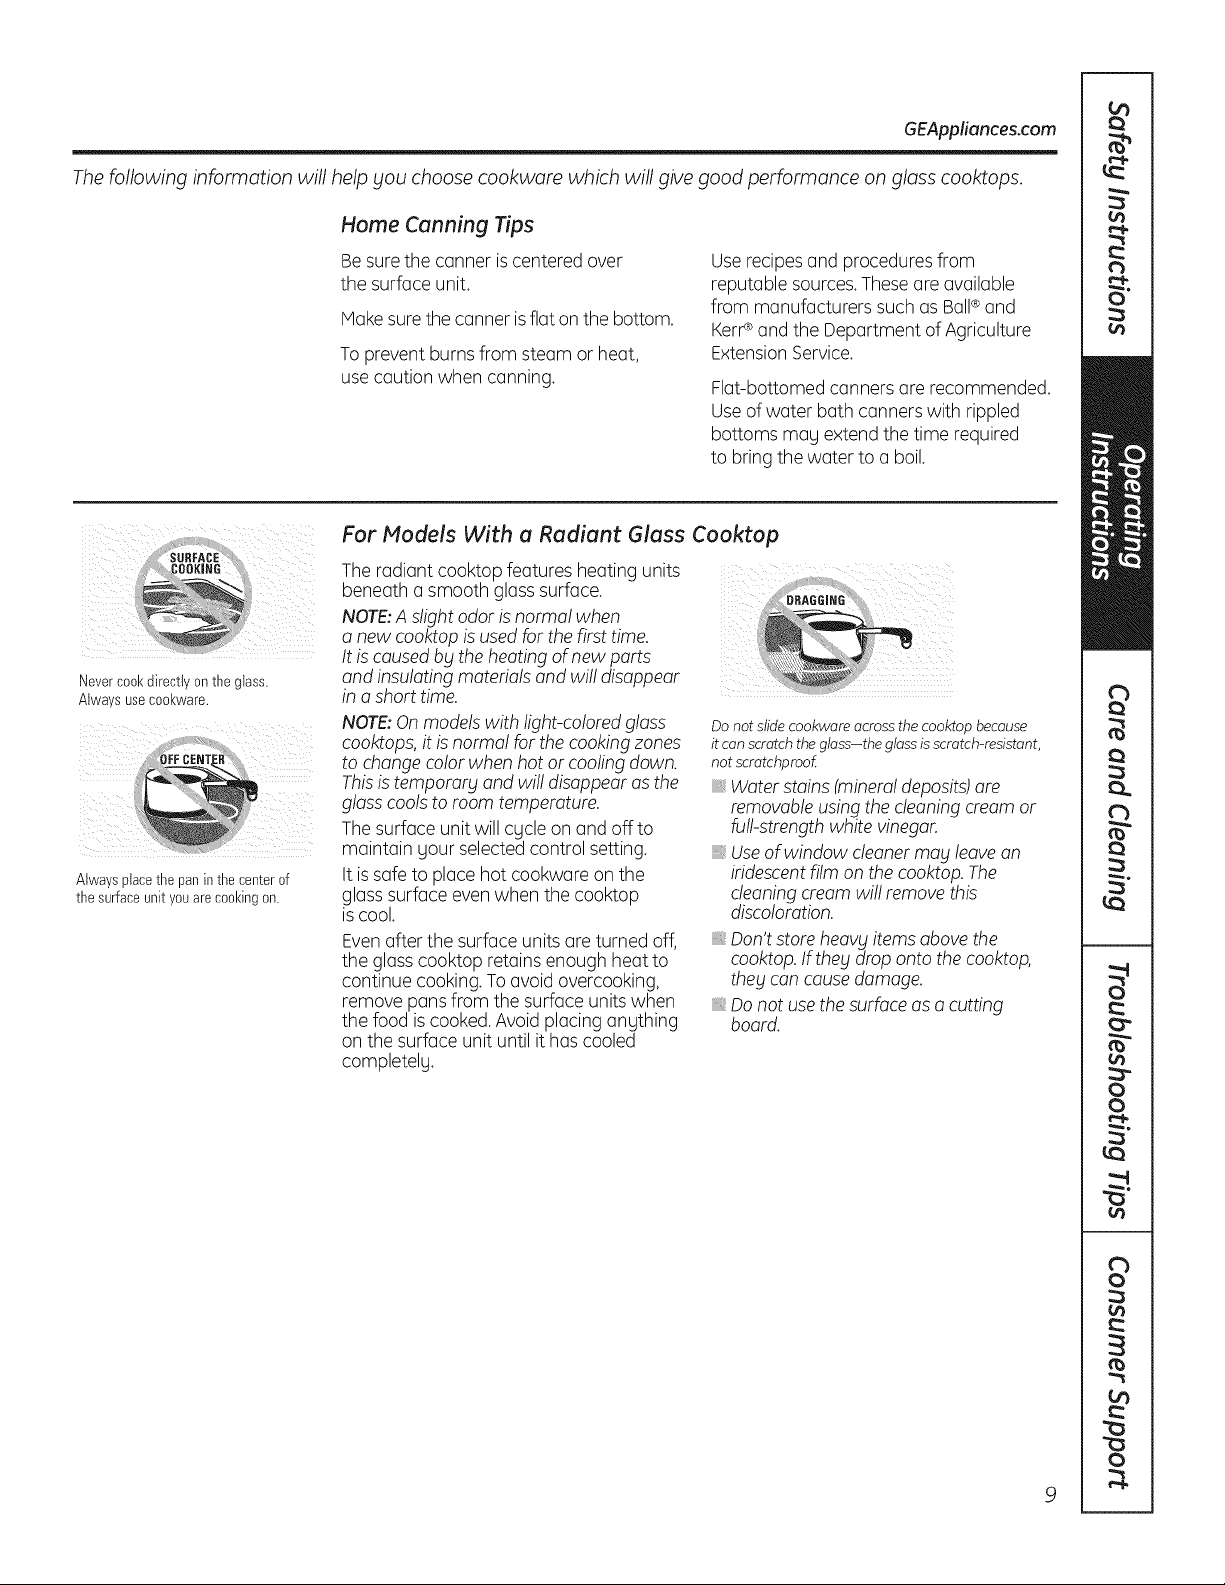
Nevercool(directtv ontne glass.
Alwa s useCOOl(ware,
Alwaysplacethe panin thecenterof
thesurfaceunityouarecookingon.
Be surethe canner iscentered over
the surface unit.
Makesurethe canner isflat on the bottom.
To prevent burns from steam or heat,
usecaution when canning.
For Models With a Radiant Glass Cooktop
The radiant cooktop features heating units
beneath a smooth glass surface.
a new cooktop isusedfor the first time.
NOTE:As!ight odor isnormal when
It iscausedby the heating ofnew parts :_
and insu!atingmaterials and wil!disappear
in a short time.
NOTE:Onmodels with light-colored glass
cooktops,it is norma! for the cooking zones
to changecolor when hot or coolingdown.
Thisis temporarg and wi!! disappearas the
glass cools to room temperature.
Thesurface unit will cgcle on and offto
maintain your selected control setting.
It issafe to place hot cookware on the
glasssurface evenwhen the cooktop
iscool.
Evenafter the surface units are turned off,
the glass cooktop retains enough heatto
continue cooking. Toavoid overcooking,
remove pans from the surface unitswhen
the food is cooked.Avoid placing anything
on the surface unit until it has cooled
completelg.
Use recipesand procedures from
reputable sources.Theseare available
from manufacturers such as Ball®and
KerP and the Department of Agriculture
ExtensionService.
Flat-bottomed canners are recommended.
Useof water bath canners with rippled
bottoms mag extend the time required
to bring the water to a boil.
Do not slide cookware acrossthe cooktop because
it can scratchthe glass-the glassis scratch-resistant,
not scratchproof
_,Water stains (mineraldeposits)are
removableusing the cleaningcream or
furl-strengthwhite vinegar.
_,Useofwindow cleanermay leavean
iridescentfilm on the cooktop. The
cleaningcream wi!!remove this
discoloration.
Don'tstore heavy itemsabove the
cooktop.If thebtdrop onto thecooktop,
they can causedamage.
Donot use the surface as a cutting
board.
Page 10
Selecting types of cookware for radiant glass cooktop models.
The following information will help you choose cookware which will give good performance on glass cooktops.
Porcelain Enamel on Cast Iron:
.....
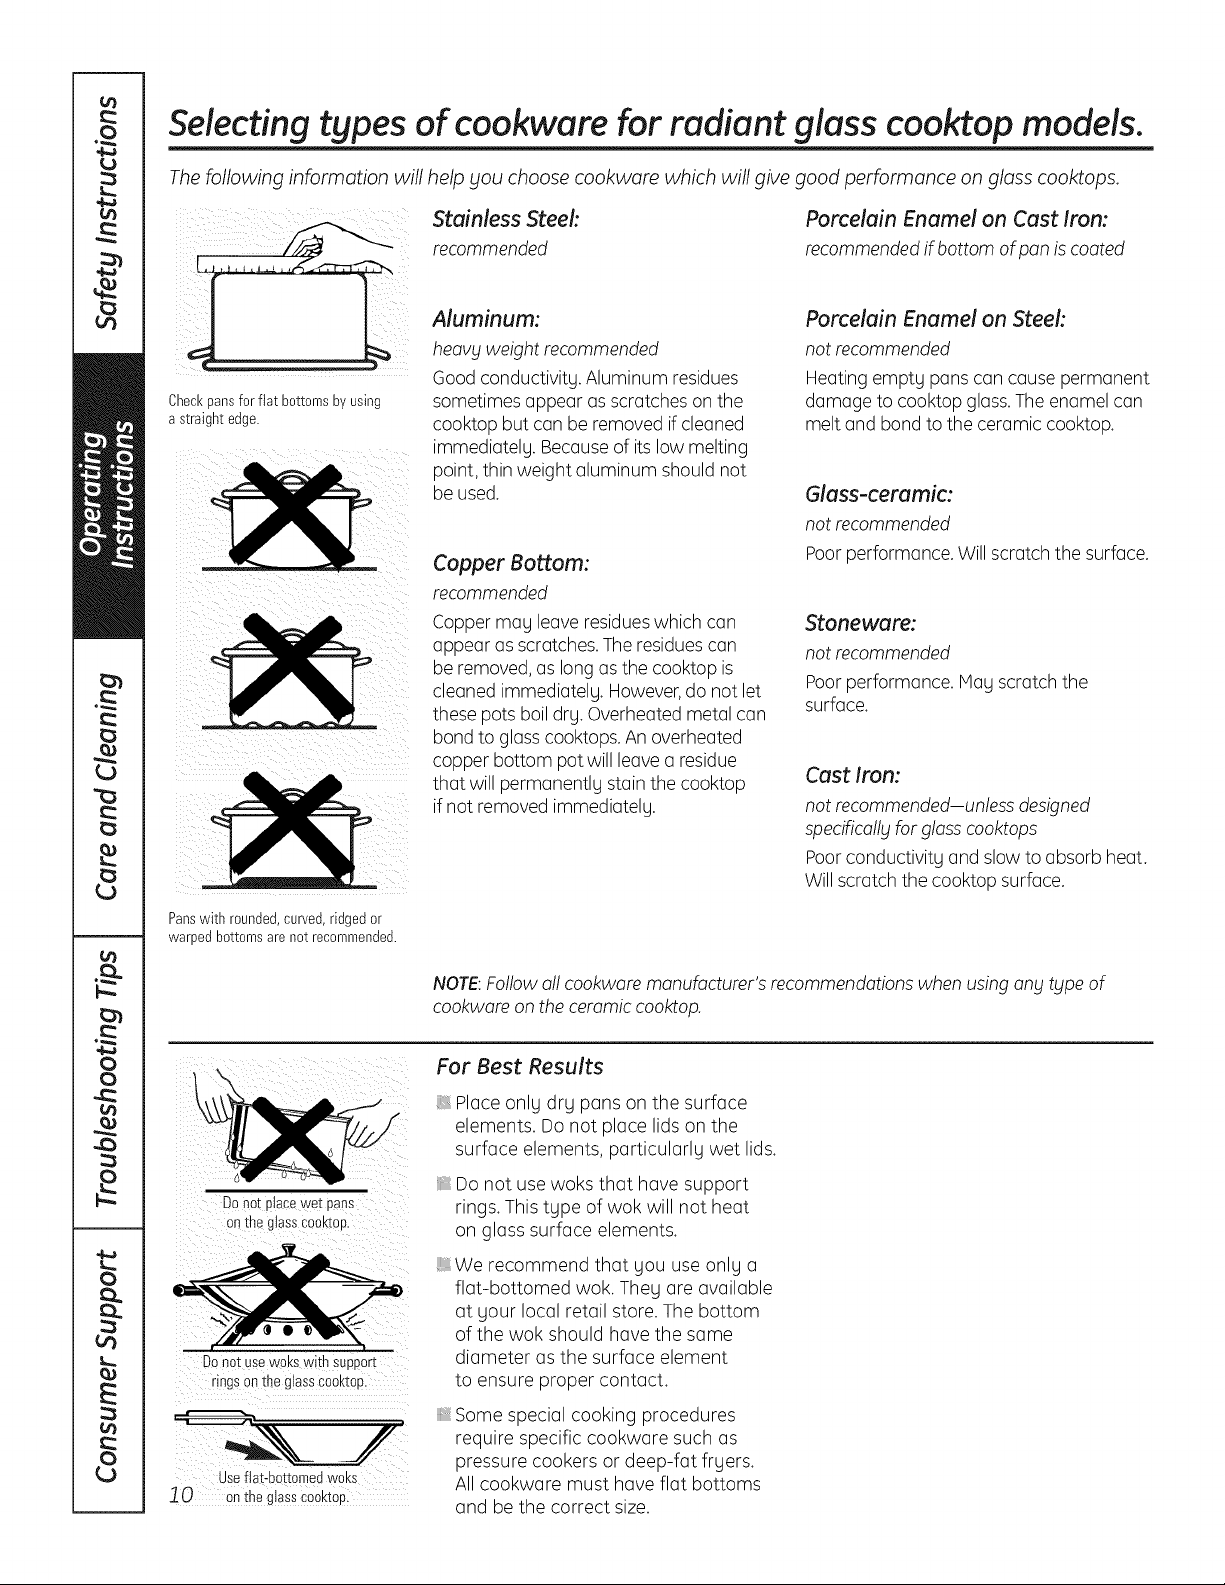
Checkpansfor flat bottomsby using
astraight edge.
stainlessrecommendedSteel:
Aluminum:
heavy weight recommended
Good conductivity. Aluminum residues
sometimes appear as scratches on the
cooktop but can be removed ifcleaned
immediately. Becauseof its low melting
point, thin weight aluminum should not
be used.
Copper Bottom:
recommended
Coppermay leave residueswhich can
appear as scratches. Theresiduescan
be removed, as long asthe cooktop is
cleaned immediately. However,do not let
these pots boildry. Overheatedmetal can
bond to glass cooktops.An overheated
copper bottom pot will leave a residue
that will permanently stain the cooktop
if not removed immediately.
recommendedif bottom of pan iscoated
Porcelain Enamel on Steek
not recommended
Heating empty pans can cause permanent
damage to cooktop glass.The enamel can
melt and bond to the ceramic cooktop.
Glass-ceramic:
not recommended
Poor performance. Will scratch the surface.
Stoneware:
not recommended
Poor performance. Mayscratch the
surface.
Cast Iron:
not recommended-unless designed
specifica!!_jfor glasscooktops
Poorconductivity and slow to absorb heat.
Willscratch the cooktop surface.
Panswith rounded,curved,ridgedor
warpedbottomsarenot recommended.
DOnotptacewet pans
onthe glassCoaktop.
Donotusew0ks with SUpport
rings on the glass€00ktop
useflat-bottomedwoks
10 o"thsgiaiSc_Okto_
NOTE:Followa!! cookware manufacturer's recommendationswhen usingany type of
cookware on the ceramiccooktop.
For Best Results
Placeonly dry pans on the surface
elements. Do not place lids on the
surface elements, particularly wet lids.
Do not use woks that have support
rings. This type of wok will not heat
on glass surface elements.
We recommend that gou use onlg a
flat-bottomed wok. Theg are available
at gour local retail store. The bottom
of the wok should have the same
diameter as the surface element
to ensure proper contact.
Some special cooking procedures
require specific cookware such as
pressure cookers or deep-fat frgers.
All cookware must have flat bottoms
and be the correct size.
Page 11
Usingthe ovencontrol, clock
and timer features and settings.
Throughout this manual, features and appearance may vary from your model.
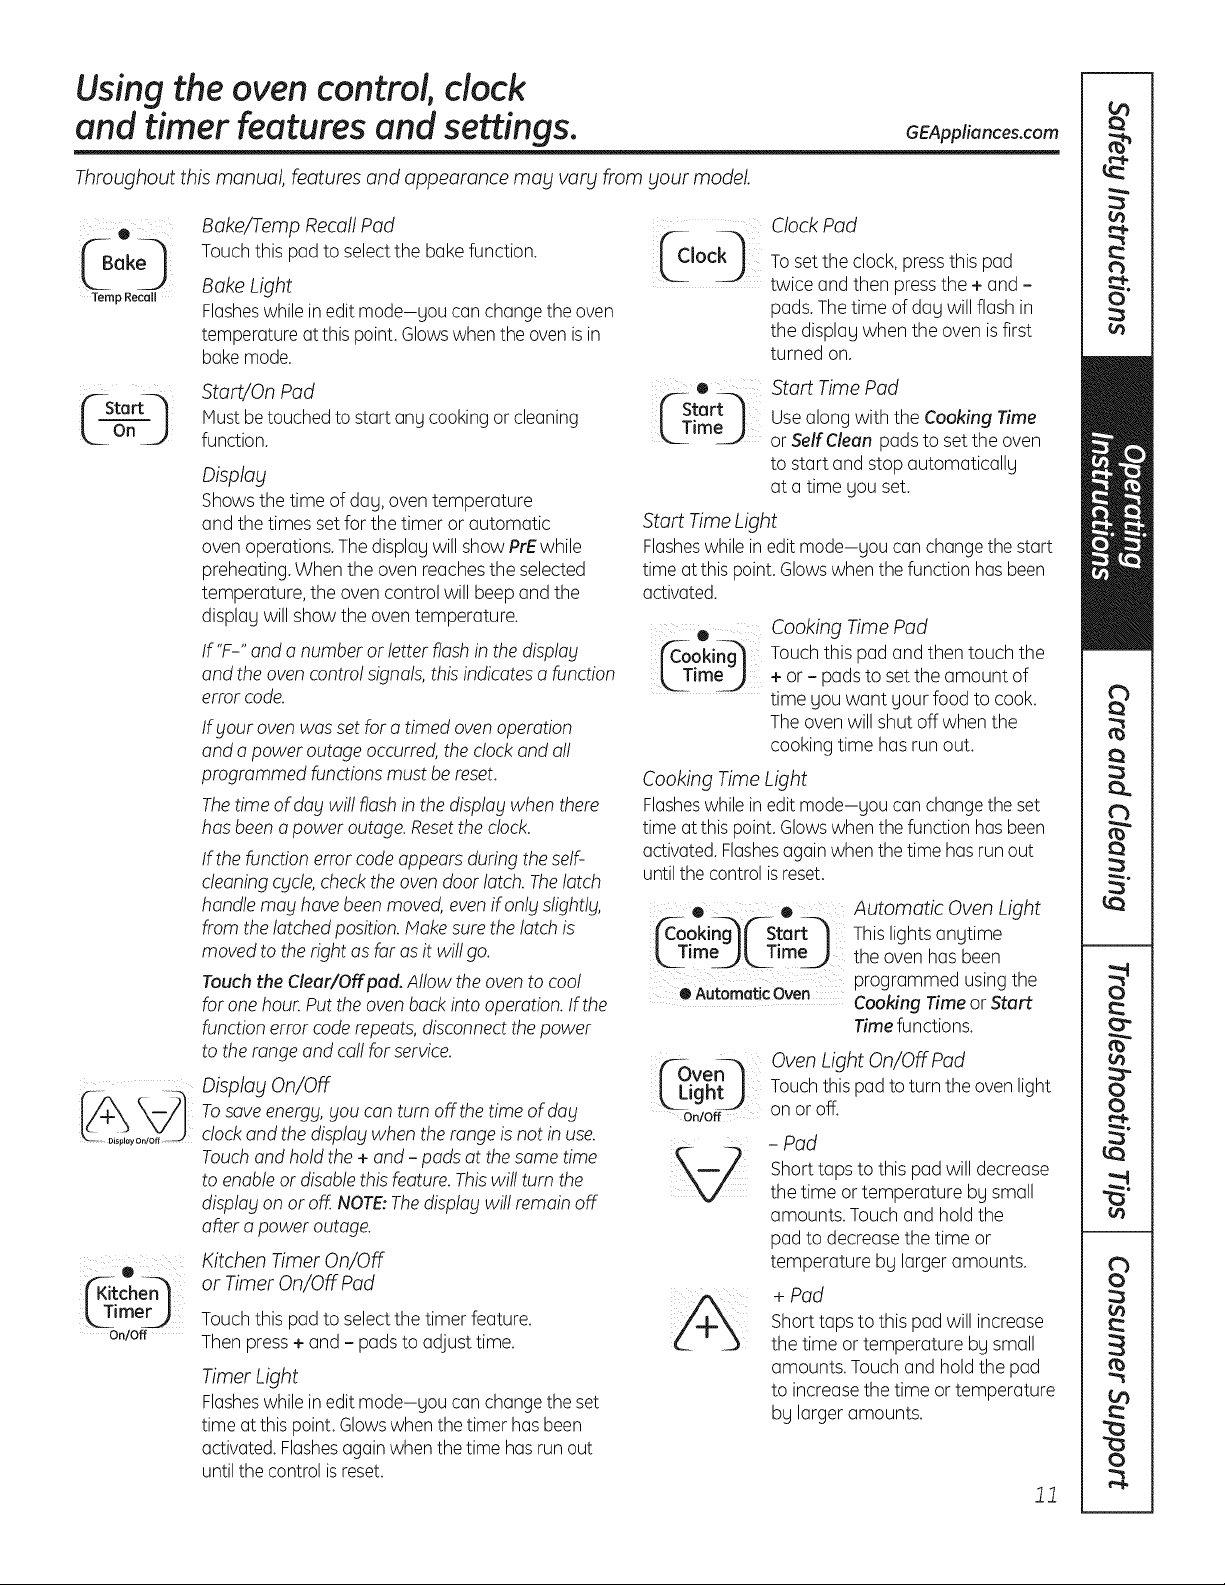
® Bake/Temp Recall Pad
ok
(B 0 Touch this pad to selectthe bake function. _Jock_
Temp Recall Bake Light
Flasheswhile inedit mode-gou can change the oven
temperature at this point.Glowswhen the oven is in
bakemode.
| rL|f--Sta -- _ StartJOn Pad ('--Start_t
On
L
_imer_
On/Off
J
Mustbetouched to start any cookingor cleaning m Tim,, I_--" U
function.
Display
Showsthe time of dag, oven temperature
and the times set for the timer or automatic
ovenoperations. The displag will show PrEwhile
preheating.When the oven reachesthe selected
temperature, the oven control will beep and the
displagwill show the oven temperature.
If'F-" and a number or letter flash in the display
and the ovencontro!signals,this indicates a function
error code.
Ifblouroven was set for a timed ovenoperation
and a power outage occurred,the clockand al!
programmed functions must be reset.
Thetime ofdablwi!!flash in the display when there
hasbeen a power outage.Resetthe clock.
If thefunction error codeappearsduring theself-
cleaningcycle,checkthe oven door latch. Thelatch
handle may havebeen moved,even if onlblslightlg,
from the latched position.Makesure the latch is
moved to the right asfar as it wi!!go.
Touch the Cleur/Off pod. Allow theoven to coo!
for one hour.Putthe ovenback into operation. If the
function error coderepeats,disconnectthe power
to the range and ca!!for service.
Display On/Off
Tosaveenergy, you can turn off the time of dabl
clockand the display when the range isnot in use.
Touchand hold the + and - pads at the same time
to enableor disable this feature.Thiswi!! turn the
display on oroff.NOTE:Thedisplay wil! remain off
after a power outage.
Kitchen Timer On/Off
or Timer On/Off Pad
Touch this padto selectthe timer feature.
Then press+ and - padsto adjust time.
Timer Light
Flasheswhile inedit mode-gou can change the set
time at this point.Glowswhenthe timer has been
activated.Flashesagainwhen the time has run out
untilthe control isreset.
Start Time Light
Flasheswhilein edit mode-gou can change the start
time at this point.Glowswhenthe function hasbeen
activated.
® Cooking Time Pad
j_-ooking_ Touch this pad and then touch the
[_TmeJ + or - pads to set the amount of
Cooking Time Light
Flasheswhilein edit mode-gou can change the set
time at this point.Glowswhenthe function hasbeen
activated.Flashesagain when the time hasrun out
untilthe control isreset.
• • Automatic Oven Light
jfC-ooki@('-Start-] Thislights angtime
[ T meal, Time_ the oven has been
OAutomaticOven Cooking Time or Start
_ven_
_Light_
On/Off
GEAppliances.com
Clock Pad
Toset the clock, pressthis pad
twice and then pressthe + and -
pads.Thetime of dag will flash in
the displag when the oven isfirst
turned on.
Start Time Pad
Use along with the Cooking Time
or Self Cleon pads to set the oven
to start and stop automaticallg
at a time gou set.
time you want your food to cook.
The ovenwill shut off when the
cooking time hasrun out.
programmed using the
Time functions.
OvenLight On/OffPad
Touch this padto turn the ovenlight
on or off.
- Pad
Shorttaps to this pad will decrease
the time or temperature bg small
amounts. Touch and hold the
pad to decreasethe time or
temperature bg larger amounts.
+ Pad
Short taps to this pad will increase
the time or temperature bg small
amounts. Touchand hold the pad
to increasethe time or temperature
bg larger amounts.
11
Page 12
Usingthe ovencontrol, clock
and timer features andsettings.
Throughout this manual, features and appearance may vary from
¸¸¸01
('-Self--_
Lc eo
e
J Bake I
_mp Recal_
e
(Steam_
_lean j
C-€,oor l
o.j
(Br° 0
Hi/Lo
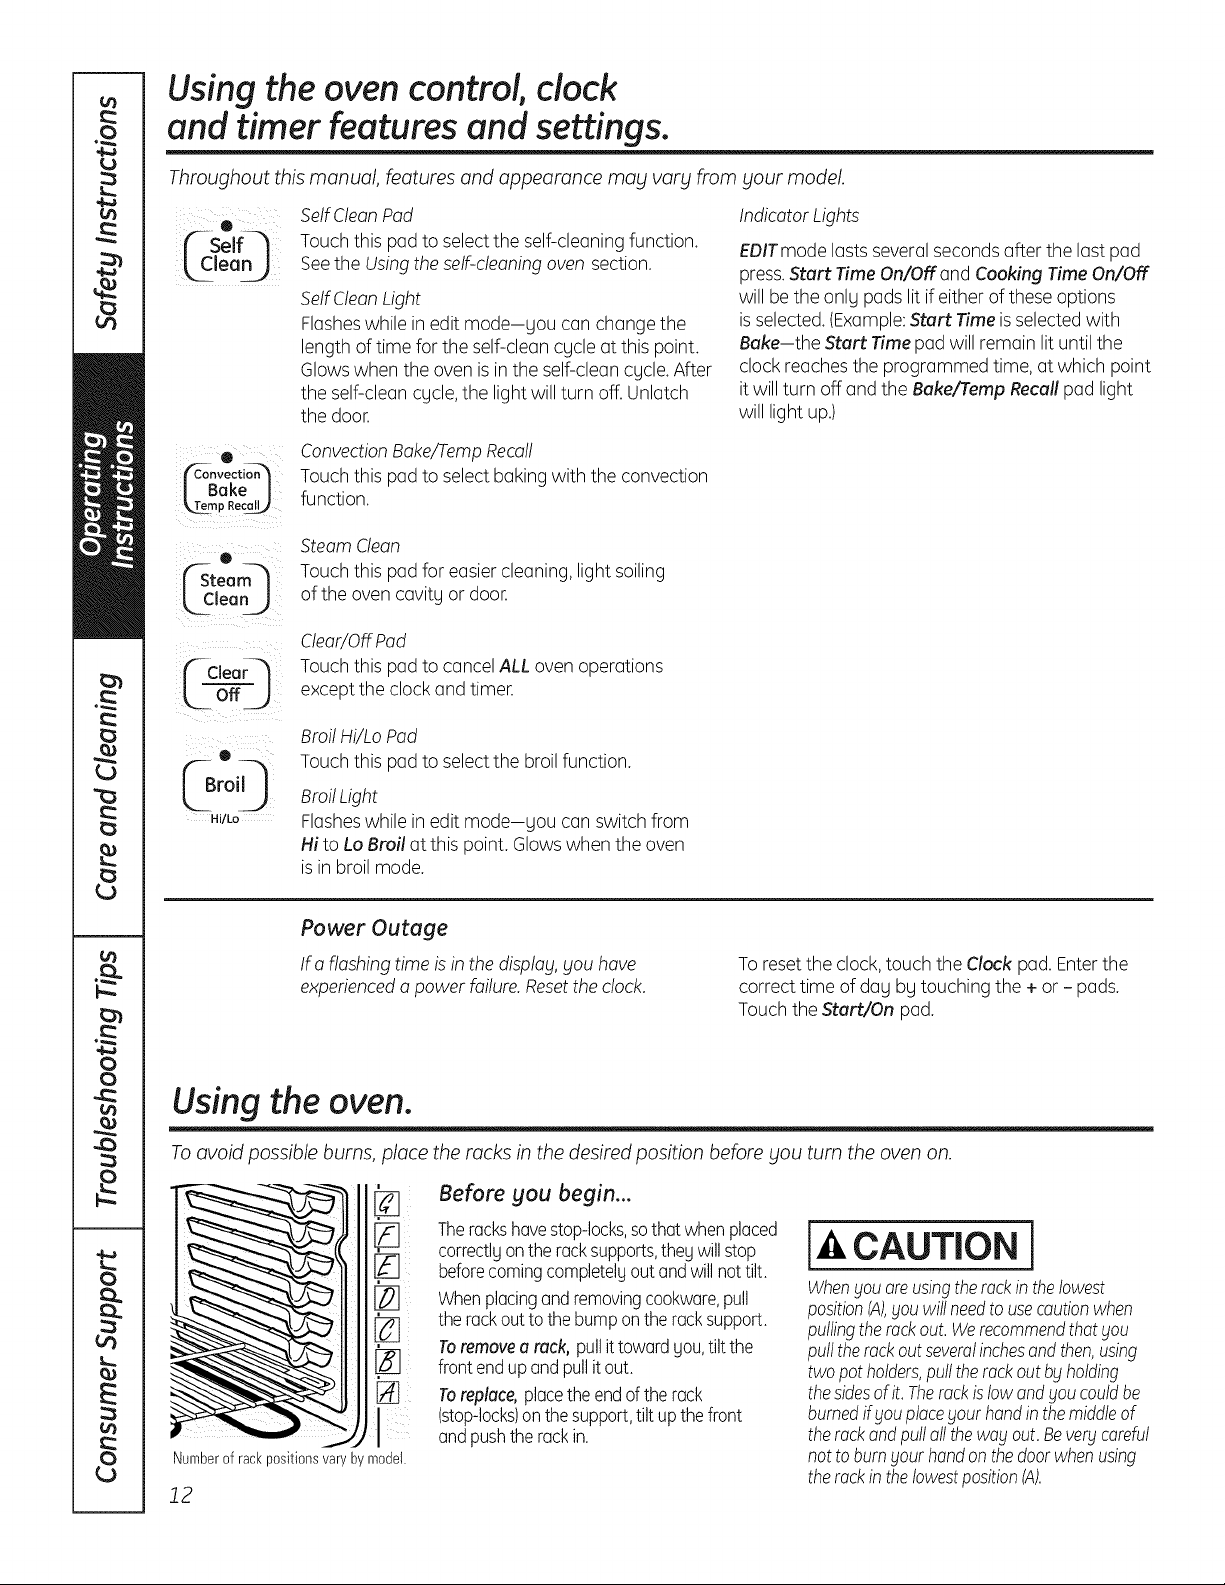
SelfClean Pad
Touchthis pad to selectthe self-cleaningfunction.
Seethe Usingthe self-cleaningoven section.
SelfClean Light
Flasheswhile in edit mode-sou can change the
length oftime for the self-cleancycle at this point.
Glowswhen the oven isin the self-clean cycle.After
the self-clean cycle,the light will turn off.Unlatch
the door.
ConvectionBake/TampRecall
Touchthis pad to selectbaking with the convection
function.
Steam Clean
Touchthis pad for easiercleaning, light soiling
of the oven cavity or door.
Clear/OffPad
Touchthis pad to cancel ALL oven operations
except the clock and timer.
Broil Hi/Lo Pad
Touchthis pad to selectthe broil function.
BroilLight
Flasheswhile in edit mode-you can switch from
Hi to Lo Broil at thispoint. Glowswhen the oven
is in broil mode.
sour model.
Indicator Lights
EPITmode lasts severalsecondsafter the last pad
press.Start Time On/OFFand Cooking Time On/OFF
will be the only pads lit if either of these options
isselected.(Example:Start Timeisselectedwith
Bake-the Start Time pad will remain lit untilthe
clock reaches the programmed time, at which point
it will turn off and the Bake/TampRecall pad light
will light up.)
Power Outage
If a flashingtime isin the disp!ag,SOUhave
experienceda power failure.Resettheclock.
To resetthe clock,touch the Clock pad. Enterthe
correct time of day by touching the + or - pads.
Touch the Start/On pad.
Using the oven.
To avoid possible burns, place the rocks in the desired position before you turn the oven on.
Before you begin...
Thereckshavestop-locks,sothat whenplaced
[]
Numberof rackpositionsvaryby model.
12
correctlgonthe racksupports,thegwillstop
beforecomingcompletelyoutandwillnottilt.
Whenplacingandremovingcookware,pull
the rackoutto the bumpontheracksupport.
Toremovearack, pullittowardgou,tilt the
front endup andpullitout.
Toreplace,placetheendof the rack
(stop-locks)on thesupport,tiltupthefront
andpushtherackin.
CAUTION l
WhenSouoreusingtherockin thelowest
positionIA),Souwillneedtousecautionwhen
pullingthereckout.WerecommendthatSou
pulltherackoutseveralinchesandthen,using
two potholders,pulltherackout bgholding
thesidesofit. Therockislow andSoucouldbe
burnedifSouplacegouthandin themiddleof
therackandpulloilthewagout.Bevergcareful
notto burnsour handonthedoorwhenusing
therockinthelowestposition(A).
Page 13

Using the oven. GEAppliances.com
To avoid possible burns, place the racks in the desired position before you turn on the oven.
Preheating and Pan Placement
Donotplacefoodsor bakingstone
directlyonthe ovenfloor.
Preheattheovenif therecipecallsforit.
Preheatingisnecessaryfor goodresultswhen
bakingcakes,cookies,pastriesandbreads.
Thedisplaywillshow"PrE"whilepreheating.
Whentheovenreachestheselectedtemperature,
theovencontrolwillbeepandthedisplaywill
showtheoventemperature.
If bakingfourcakelayersatthe
sametime,placetwo layerson
rackCandtwo layerson rackE
Staggerpansontheracksoone
isnotdirectlyabovetheother.
Bakingresultswillbebetterifthefoodis
centeredintheovenasmuchaspossible.
AngelFoodcakeistheexceptionandshould
beplacedonthe bottomovenreck(positionA).
Followpackagedirectionon prepackagedand
frozenfoodsfor panplacement.Pansshould
nottoucheachotherorthewallsoftheoven.
Ifyouneedto usetwo racks,staggerthe pans
sooneis notdirectlyabovetheother.Leave
approximately1W'betweenpansandfrom
thefront,backand sidesofovenwall.
How to Set the Oven for Baking
[71 TouchtheBake pad.
[_ Touchthe+ or- padsuntilthedesired
temperatureisdisplayed.
_l TouchtheStart/On pad.
Theovenwillstartautomatically.Thedisplay
willshowPrEwhilepreheating.Whentheoven
reachesthe selectedtemperature,the oven
controlwillbeepseveraltimesandthedisplay
willshowthe oventemperature.
Tochangethe oventemperatureduringBAKE
cycle,touch the Bake pad and then the + or-
padsto getthenewtemperature.
[_l Checkfoodfor donenessatminimumtime
onrecipe.Cooklongerifnecessary.
15] TouchtheClear/Offpadwhenbakingis
finishedandthenremovethefoodfrom
theoven.
Aluminum Foil
Donotusealuminumfoilonthebottomoftheoven.
Neverentirelycovera rackwithaluminumfoil.
Thiswilldisturbthe heatcirculationandresult
inpoorbaking.
Asmallersheetoffoilmaybeusedto catch
a spilloverbyplacingitona lowerrackseveral
inchesbelowthefood.
The type of margarine will affect baking performance!
Mostrecipesfor baking havebeen developedusing high-fat productssuch asbutter or margarine (80%fat).If you decrease
the fat, the recipemabl not givethe same resultsas with a higher-fat product.
Recipefailure canresult if cakes,pies,pastries,cookiesor candiesare made with low-fat spreads.Thelower thefat content of
a spreadproduct, themore noticeable thesedifferencesbecome.
Federalstandardsrequireproductslabeled"margarine"to containat least80%fat bg weight. Low-fatspreads,onthe otherhand,
contain lessfat andmorewater.Thehigh moisturecontentof thesespreadsaffectsthetextureand flavor ofbaked goods.For !3
best resultswith gearold favoriterecipes,usemargarine,butter or stickspreadscontainingat least70%vegetableoil.
Page 14
Using the oven.
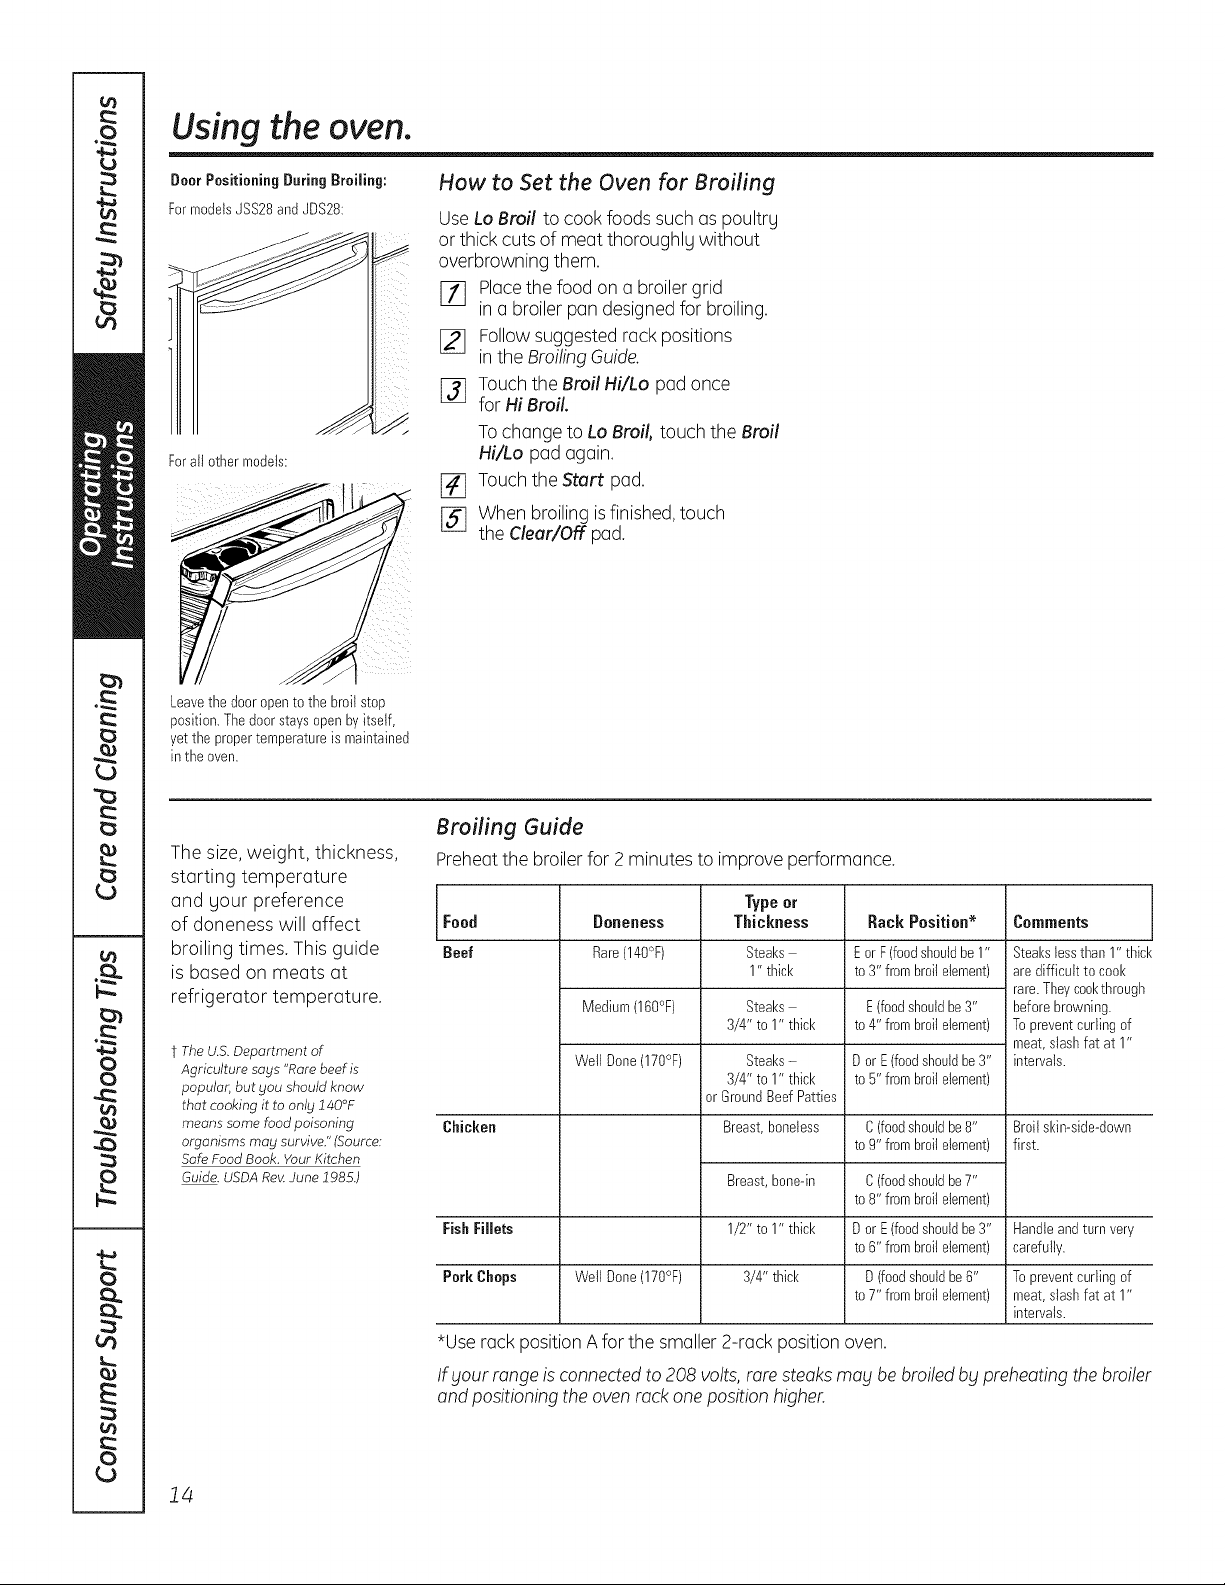
DoorPositioningDuringBroiling:
FormodelsJSS28and JDS28:
Forall othermodels:
Leavethedooropento the broil stop
position.Thedoorstaysopenbyitself,
yetthe propertemperatureis maintained
in theoven.
How to Set the Oven for Broiling
UseLo Broil to cook foods such aspoultry
or thick cuts of meat thoroughlg without
overbrowning them.
Placethe food on a broiler grid
]71 in a broiler pan designed for broiling.
Followsuggested rack positions
[_ in the BroilingGuide.
j_j Touchthe Broil Hi/Lo pad once
for Hi Broil.
Tochange to Lo Broil, touch the Broil
Hi/Lo pad again.
[_ Touchthe Start pad.
[] When broiling isfinished,touch
the Clear/Off pad.
The size,weight, thickness,
starting temperature
and gour preference
of doneness will affect
broiling times. This guide
is based on meats at
refrigerator temperature.
t The U.S. Department of
Agriculture says "Rare beef is
popular, but you should know
that cooking it to only 140°F
means some food poisoning
organisms may survive." (Source:
Safe Food Book. Your Kitchen
Guide. USDA Rat4June 1985.)
Broiling Guide
Preheatthe broiler for 2 minutes to improve performance.
Food Doneness Thickness Rack Position* Comments
Beef Rare(140°F) Steaks E orF(foodshouldbe1" Steakslessthan1" thick
Medium(160°F) Steaks E(foodshouldbe3" beforebrowning.
Well Done(170°F) Steaks- D or E(foodshouldbe3" intervals.
Chicken Breast,boneless C(foodshouldbe8" Broil skin-side-down
Fish Fillets Dor E(foodshouldbe3" Handleandturn very
Pork Chops Well Done(170°F) D(foodshouldbe6" Topreventcurlingof
Type or
1" thick to 3" frombroilelement) aredifficult to cool<
rare.Theycool<through
3/4" to1" thick to 4" frombroilelement) Topreventcurlingof
3/4" to1" thick to 5" frombroilelement)
or GroundBeefPatties
to 9" frombroilelement) first.
Breast,bone-in
1/2" to1" thick
3/4" thick
C(foodshouldbe7"
to 8" frombroilelement)
to 6" frombroilelement) carefully.
to 7" frombroilelement) meat,stashfat at 1"
meat,stashfat at 1"
intervals.
*Use rack position Afor the smaller 2-rack position oven.
If _/ourrange isconnectedto 208 volts,rare steaks ma£ be broiled b£ preheating thebroiler
and positioning the ovenrack one position higher.
14
Page 15

Using the convection oven. Ionsome models) GEAppliances.com
Ina convectionoven,afancirculateshot
airover,underandaroundthefood.This
circulatinghotairisevenlydistributed
throughouttheovencavity.Asaresult,
foodsareevenlycookedandbrowned
oftenin lesstimethanwith regularheat.
Convection Baking
Ideal for evenly browned baked foods
cooked on multiple shelves.
How to Set the Oven for
Convection Baking
E_ Touch the Convection Bake pad.
• Good for large quantities of baked
foods.
[_ Touch the + or- pads until the
Good results with cookies, biscuits,
brownies, cupcakes, cream puffs, [_
sweet rolls, angel food cake and
bread. The convection fan circulates [_
the heated air evenly over and
around the food.
The Convection Fan
During Convection Bake, the fan will
operate continuously. The fan will stop
when the oven door is opened, but the [_
heat will not turn off. The fan will resume
operation when the door is closed.
During preheating (PrE)the fan will come [_
on for 10 seconds and then shut off.
Auto Temp Conversion
When convection baking, the Auto Temp
Conversion feature automatically
reduces the set regular baking
temperature by 20°F.
Increase the Convection Baking
temperature setting 20°F higher
for faster cooking of large cuts
of meat and poultry.
To change the oven temperature during
Convection Bake, touch the Convection
Bake pad and then the + or - pads
to set the new temperature.
desired temperature is displayed.
Touch the Start/On pad.
The oven will start automatically.
The display will show PrE while
preheating. When the oven reaches
the selected temperature, the oven
control will beep several times and
the display will show the oven
temperature.
Check food for doneness
at the minimum time on the recipe.
Cook longer if necessary.
Touch the Clear/Off pad when
baking is finished, and then remove
the food from the oven.
bestresultsif youusea fiat cookiesheet
i Whenbakingcookies,youwill getthe
insteadofa panwith low sides.
Cookware for Convection
Cooking
Before using your convection oven,
check to see if your cookware leaves
room for air circulation in the oven. If
you are baking with several pans, leave
space between them. Also, be sure the
pans do not touch each other or the
walls of the oven.
Paper and Plastic
Heat-resistant paper and plastic
containers that are recommended for
use in regular baking can also be used
for convection baking but should not be
used at temperatures higher than the
temperature recommended by the
cookware manufacturer. Plastic
cookware that is heat-resistant to
temperatures of 400°F can also be used.
Metal and Glass
Any type of cookware will work in your
convection oven; however, metal pans
heat the fastest and are recommended
for convection baking.
Darkened or matte-finished pans will
bake faster than shiny pans.
Glass or ceramic pans cook more
slowly.
For recipes like oven-baked chicken,
use a pan with low sides. Hot air cannot
circulate well around food in a pan with
high sides.
15
Page 16

Using the wurming druwer, ionsome models)
WARNING JFoo_ POISONnAZAn_: Bacteriama_lgrow in food at temperatures below140°F
l
. Always start with hot food. Do not use warm settings to heat cold food.
. Donot warm food for more than 2 hours.
Failure to follow these instructions may result in foodborne illness.
The warming drawer will keep hot, cooked foods at serving temperature. Alwags start with hot food.
Do not use to heat cold food other than crisping crackers, chips or drg cereal.
WARMINGDRAWER
When Using the Werming Drewer
Push and turn the control knob to ang
desired setting.
Thewarming drawerwill keephot, cooked
foodswarm.
Do not line the warming drawer or pan
with aluminum foil Foil is an excellent heat
insulator and will trap heat beneath it. This
will upset the performance of the drawer
and could damage the interior finish.
Allow approximately 25 minutes for the
warming drawer to preheat.
Do not put liquid or water in the warming
drawer.
, Allfoodsplaced inthe warming drawer
shouldbecoveredwith a lidor aluminum
foil.Whenwarming pastriesorbreads,the
covershouldbeventedto allow moisture
to escape.
, Foodshouldbe kepthot in itscooking
containeror transferredto a heat-safe
servingdish.
NOTE:Plasticcontainersorplasticwrapwill
melt if in directcontact with the drawer, pan
or a hot utensil. Helted plastic may not be
removable and is not covered under your
warranty.
, Remove serving spoons, etc., before
placingcontainersinwarming drawer.
Temperuture Selection Chert
Tokeepseveraldifferentfoodshot,setthe
controltothe foodneedingthehighestsetting.
Thetemperature,tgpe and amountof food,
and thetime heldwillaffectthe qualitgof
thefood.
Repeatedopeningofthe drawerallows
the hotairto escapeandthefoodto cool.
With largeloadsit magbe necessargto
usea higherwarming drawer settingand
coversomeofthe cookedfood items.
Donot useplasticcontainersorplasticwrap.
To Crisp Stale Items
Placefood in low-sideddishesor pans.
PreheatonLOsetting.
To Werm Serving Bowls end Pletes
cAuTIo,i
Disheswillbehot. Usepot holdersor mitts
whenremovinghot dishes.
Towarm servingbowls and plates,setthe
control onLO.
FoodType Control Setting
Casserole MED
Chili HI
Pizza MED
Potatoes,baked HI
TortillaChips LO
Waffles LO
Checkcrispnessafter45 minutes.Addtime
asneeded.
Useonlg heat-safedishes.
Ifgouwant to heat fine china,pleasecheck
with the manufacturerof the dishesfor
theirmaximum heattolerance.
Youmay warm emptg servingdishes
whilepreheatingthe drawer.
16
Page 17

Using the lower oven drawer, ionsome models) GEAppliances.com
The lower oven drawer may be used to bake foods using the same times and temperatures as a standard oven.
Foods ideal for baking in the lower oven drawer include pizza, frozen foods, casseroles, biscuits, rolls and many
desserts.
LOWER
OVEN
e
WARN t
0
3011 • 3511 • 41111
o
Pushinand turn the lower ovendrawer
knobto anydesiredsetting.
To Use the Lower Oven Drawer
[_ Pushinand turn the lower oven
drawer knob to ang desired setting.
[] Allow the lower ovendrawer to
preheat.
TheON signal light is located above the
knoband glows when the knob isin the
ONposition. It remains ON until the knob
ismoved to the OFFposition.
The"Heating" signal light is located below
the knob and glows when the heating
elements are active.Preheat iscomplete
after the "Heating" signal has turned
off for the first time after the knob is
turned on.
The lower ovendrawer useslessenergg than the upper oven.
Allowthe following approximate times for preheating:
Desired Lower Preheat
Oven Temperature Time
WARM 20 minutes
350°F J5 minutes
NOTES:
_,Always use the included drawer rack
when usingthe lower oven drawer.
_,Thelower oven drawer cannot be used
during a self-cleancycle of the upper
oven.
iiiilDiiii_,
Do notput food, foi! or cookware directly
on the bottom of the lower ovendrawer.
Always usethe included drawer rack.
If foods requirea cover,useonly
foi! or lidsable to withstand baking
temperatures.Do not use plastic.
Maximum height of foods that can be
baked in the lower ovendrawer is31/2".
Do notput liquid or water in the lower
ovendrawer.
_,Neverplace plastics,paper, canned foods
or combustiblematerial in the lower oven
drawer.
425°F 25 minutes
When Using the Lower Oven Drawer Warm Setting
TheWARMSETTINGof the !ower oven
drawer can beusedto keephot cooked
foodsat servingtemperatures.Always start
with hot food. Donot use the WARM
SETTINGto heat cold food other than
crisping crackers,chipsor dry cerea!.
NOTE:The beginning temperature of the
food, the amount of food, the type of food,
the container and the amount of time the
food is in the drawer wi!! affect the quality
and ending temperature of the food.
Pushin and turn the control knobto
the warm setting.
J7
Page 18

Using the clock and timer.
Not all featuresareon allmodels.
To Set the Clock
Theclock must be setto the correct time
of day for the automatic oven timing
functions to work properly.Thetime of day
cannot be changed during a delayed
cooking or a delayed self-cleaning cycle.
[11 Touchthe Clock pad twice.
I_ Touchthe + or - pads.
_ On )
Makesurethe clockis setto thecorrect
time ofday.
Ifthe + or - pads are not touched within
one minute after you touch the Clock pad,
the display reverts to the original setting.
To Turn OFFthe Clock Display
Ifthis happens,touch the Clock pad twice
and reenter the time of day.
I_ Touchthe Start/On pad until the time
of day shows in the display.This
enters the time andstarts the clock.
Tocheckthe time of day when the display
isshowing other information, simply touch
the Clockpad. Thetime of dog shows unti!
another pad is touched.
0
itcho
kTimerJ
On/Off
FSta rtq
_LOn j j
Thetimerisaminutetimeronly.
TheClear/Offpaddoesnotaffect
thetimer.
If you have severalclocks in your kitchen,
you may wish to turn off the time of day
clock display on your range.
Touchthe Clock pad once to turn
%
off the time of day display.Although
you will not be able to seeit, the clock
maintains the correct time of day.
To Set the Timer
Thetimer doesnot contro! ovenoperations.
Themaximum setting on the timer is
9 hours and 59 minutes.
Touchthe Kitchen Timer On/Off pad.
Touchthe + or - pads until the
[]
amount of time you want shows in
the display.The maximum time that
can be entered in minutes is 59.
Timesmore than 59 minutes should
be changed to hours and minutes.
If bloumake amistake,touch the Kitchen
Timer On/Off pad and begin again.
[_ Touch the Clock pad twice to recall
the clockdisplay.
NOTE:Ifthe clock cannot be recalled or it
will not stay permanently displayed,the
EnergySaver Mode feature ison.Toturn
the feature off, seethe EnergySaverMode
section.
Touch the Start/On pad.Thetime will
%
start counting down, although the
display does not change until one
minute has passed.
When the timer reaches :00, the
control will beep 3times followed by
one beep every 6 seconds until the
Kitchen Timer On/Off pad istouched.
18
To Reset the Timer
Ifthe display is still showing the time
remaining, you may change it by touching
the Kitchen Timer On/OFFpad, then
touching the + or- pads until the time you
want appears in the display.
To Cancel the Timer
Touch the Kitchen TimerOn/OFF
pad twice.
If the remaining time isnot in the display
(clock,start time or cooking time are in
the display),recall the remaining time by
touching the Kitchen Timer On/OFFpad
and then touching the + or - padsto
enter the new time you want.
Page 19

Usingthe timed baking feature, ionsomemodels) GEAppliances.com
Do not lock the oven door with the latch during timed cooking. The latch is used for self-cleaning only.
NOTE: Foods that spoil easily-such as milk, eggs, fish, stuffings, poultry and pork-should not be allowed to sit
for more than 1 hour before or after cooking. Room temperature promotes the growth of harmful bacteria. Be sure
that the oven light is off because heat from the bulb will speed harmful bacteria growth.
How to Set an Immediate Start and Automatic Stop
Temp Reca! I
f---cloor--/
off_)
(40
Temp Recall
AW
o
L TimeJ
o
k_TimoJ
"--Stor
Or1 J
¢C,eorQ
Theoven wi!! turn on immediately and cook
for a selectedlength of time.At the end of
the cooking time,the ovenwi!!turn off
automatica!!g.
[_ Touch the Bake pad.
[_ Touch the + or - pads to set the
oven temperature.
j_j Touch the Cooking Time pad.
NOTE:Ifyour recipe requires preheating,
you may need to add additiona! time
to the length ofthe cooking time.
[_ Touch the + or - pads to set the
baking time.
Thecooking time that you enteredwill be
displayed.(If you select CookingTimefirst
and then adjust the BakeTemperature,
the oven temperature will be displayed
instead.)
[] Touch the Start/On pad.
Thedisplay shows either the oven
temperature that you set or the cooking
time countdown. (Thedisplay starts with
PrE if showing the oventemperature.)
Theoven will continue to cook for the
programmed amount of time,then turn
off automatically.
[_ Touch the Clear/Offpad to cancel
if necessary.
Removethe food from the oven.
Remember,eventhough the oven shuts off
automatically, foods continue cooking after
controls are off.
How to Set a Delaged Start and Automatic Stop
Theoven wi!! turn on at thetime of day you
set, cook for a specificlength of time and
thenturn off.automatically.
Hake sure the clock shows the correct
time of day.
[_ Touch the Bake pad.
12] Touch the + or - padsto set the
oventemperature.
[_ Touch the Cooking Time pad.
[_ Touch the + or - pads to set the
desiredlength of cooking time.
[_ Touch the Start Time pad.
j_j Touch the + or - padsto set the time of
day you want the oven to turn on and
start cooking.
[Z] Touch the Start/On pad.
NOTE:An attention tone wi!!sound if you
are usingtimed bakingand donot touch
theStart/On pad.
NOTE:Ifyou would liketo checkthe times
you haveset, touch the Start Time pad to
check the start time you have set ortouch
the Cooking Time pad to check the length
of cooking time you haveset.
When the oventurns on at the time of day
you have set,the display will show PrE until
it reachesthe selected temperature, then it
will display the oven temperature.
At the end of cooking time, the oven
will turn off and the end-of-cycle tone
will sound.
j_ Touch the Clear/Offpad to cancel
ifnecessary.
Removethe food from theoven.
Remember,eventhough the oven shuts off
automatically, foodscontinue cooking after
controls are off.
19
Page 20

Special features of your oven control.
Energy Saver Mode
To save energy, you can turn off the time
of day clock and the display when the
range is not in use.
Your new touch pad control has additional features that you may choose to use. The following are the features
and how you may activate them.
Thespecial feature modes can only be activated while the display is showing the time of day. They remain in the
control's memory until the steps are repeated.
When the display shows your choice, touch the Start/On pad. The special features will remain in memory after
a power failure.
NOTE: The Sabbath feature and the Thermostat Adjustment feature are also Special Features, but they are
addressed separately in the following sections.
12 Hour Shutoff
With this feature, should you forget
Temp Recall Hi/Lo
(_stort--'-!
and leave the oven on, the contro! wi!!
outomotico!lg turn off the ovenoffer
!2 hours during baking functions or after
3 hours during abroi!function.
If you wish to turn OFFthis feature, follow
the steps below.
Pressand hold the + and- pads
at the same time to enable or disable
this feature. This will turn the display
on or off.
NOTE:The disp!og wil! remain off offer
o power outage.
Touch the Clock pad.Thedisplay will
show ON (12hour shutoff).Touch the
Clock pad repeatedly until the display
showsOFF(noshutoff).
Touch the Start/On pad to activate
the no shut-off and leavethe control
set in thisspecial features mode.
Looj
[_ Touch the Bake and Broil Hi/Lo pads
at the same time until the display
showsSR
Adjust the oven thermostat--Do it yourself!
You may find that your new oven cooks differently than the one it replaced. Use your new oven for a few
weeks to become more familiar with it. If you still think your new oven is too hot or too cold, you can adjust
the thermostat yourself.
Do not use thermometers, such as those found in grocery stores, to check the temperature setting of your oven.
These thermometers may vary 20-40 degrees.
NOTE: This adjustment will not affect the broiling or the self-cleaning temperatures. The adjustment will be
retained in memory after a power failure.
0 . 0
Temp Recall Hi/ko
Temp Recoil
20
To Adjust the Thermostat
[_ Touch the Bake and Broil Hi/Lo pads
at the some time until the display
showsSR
Touch the Bake pad. Atwo-digit
number shows in the display.
The oventemperature can be
adjusted up to (+)35°Fhotter or
(-)35°F cooler.Touch the + pad to
increasethe temperature in 1-degree
increments.
Touch the - padto decreasethe
temperature in 1-degree increments.
When you havemade the
[]
adjustment, touch the Start/On pad
to go back to the time of day display.
Useyour oven asyou would normally.
NOTE:Thisadjustment wi!!not affect the
broiling or self-cleaningtemperatures. It wi!!
be retained in memory offer o power failure.
Page 21

"'-usingthe Sabbath feature. (onsomemode/sJ
(Designed for useon the Jewish Sabbath and Holidabts) GEAppliances.com
TheSabbathfeaturecanbeusedforbakingonly.Itcannotbeusedforbroiling,self-cleaning,convectionbaking,steamcleaningordelaystart
cooking.
NOTE:TheovenlightcomesonautomaticallyIonsomemodels)whenthedoorisopenedandgoesoffwhenthedoorisclosed.Thebulbmaybe
removed.SeetheOvenLightReplacementsection.Onmodelswitholightswitchonthecontrolpanel,theovenlightmaybeturnedonandlefton.
How to Set Sabbath Feature for Regular Baking
WhenthedisplayshewsD the evenis
set in Sabbath.Whenthedispia7shews
D C theevenis baking/roasting.
NOTE;Tounderstandhowtheovencontrolworks,
practiceusingregularbaking(non-Sabbath)before
enteringSabbathmode.
Makesuretheclockshowsthecorrecttimeof dogand
theovenisoff.
rl] TouchandholdboththeBakeandBroilHi/Lo
pads,atthesametime,untilthedisplayshowsSF.
[] TaptheClockpaduntilSAbappears
inthe displag.
[] Touchthe Start/On padandD wilt
appearinthe displag.
[_ Touchthe Bakepad.Nosignalwill
begiven.
[_The presetstartingtemperaturewill
automaticallgbesetto 550.°Tapthe+ or-
padsto increaseor decreasethetemperature
in 25°increments.Thetemperaturecanbeset
between175° and 550?Nosignalor
temperaturewiltbegiven.
[_] TouchtheStart/On pad.
[_ Afterarandomdelagperiodofapproximatelg
30secondsto 1 minute,D C willappear
inthedisplagindicatingthatthe ovenis
baking/roasting.IfD C doesn'tappear
inthedisplag,startagainatStep4.
Toadjustthe oventemperature,touchthe
Bakepadandtap the +or- padsto increase
ordecreasethetemperaturein 25°increments.
TouchtheStart/On pad.
NOTE:The dear/Off andCookingTimepadsare
activeduringtheSabbathfeature.
0. 0.
_Bake_ ÷_Br°i 9
Ternp Recall H!!Lo
iii I i
("-Start4
ton )
Whenthedispla7shewsD theevenis
set in Sabbath.Whenthedispia7shews
D C theevenis baking/roasting.
(_aear_I
LoffJ
e
@°,9
How to Set Sabbath Feature for Timed Baking--Immediate Start and
Automatic Stop
NOTE:Tounderstandhowtheovencontrolworks,
practiceusingregular(non-Sabbath)ImmediateStart
andAutomaticStop before enteringtheSabbath mode.
I_akesure the clock shows the correcttime of dog and
theovenisoff.
TouchandholdboththeBakeandBroilHi/Lo
pads,atthesametime,untilthedispiagshowsSF.
[_] Tapthe Clockpaduntil SAbappears
inthe displag.
F3] Touchthe Start/On padandD wilt
appearinthe displag.
[_] Touchthe CookingTimepad.
[_] Touchthe + or - padsto setthe desiredlength
ofcookingtime between1minuteand ghours
and59minutes.Thecookingtimethat Sou
enteredwiltbedisplaged.
[_] Touchthe Start/On pad.
[Z] TouchtheBakepad.Nosignalwillbegiven.
How to Exit the Sabbath Feature
Touchthe dear/Offpad.
I-_ Ifthe oveniscooking,waitfor a random delos
periodof approximatelg30seconds to ! minute,
untilonlgD isinthe displag.
I-_ Touchand holdboth the Bake and BroilHi/Lo
pods,at the same time, untilthe displagshows SF.
Thepresetstartingtemperaturewill
%
automaticallgbesetto 350.° Tapthe+
or- padsto increaseordecreasethe
temperaturein25°increments.The
temperaturecanbesetbetween175° and
550.° Nosignalortemperaturewill begiven.
TouchtheStart/On pad.
%
Aftera randomdelagperiodof approximatelg
[]
30secondsto 1 minute,D c willappear
inthedisplagindicatingthatthe ovenis
baking/roasting.IfD c doesn'tappear
inthedisplag,startagainatStep7.
Toadjustthe oventemperature,touchthe
Bakepadandtap the +or- padsto increase
ordecreasethetemperaturein 25°increments.
TouchtheStart/On pad.
Whencookingisfinished,thedisplagwillchangefrom
D c toDindicatingthat theovenhasturnedOFFbut
isstillsetinSabbath.Removethecookedfood.
J_q TaptheClockpaduntilONorOFFappearsinthe
displag.ONindicatesthattheovenwillautomaticallg
turnoffafter12hours.OFFindicatesthattheovenwill
notautomaticallgturnoff:SeetheSpecialFeatures
sectionforanexplanationofthe12-HourShutoff
feature.
[_] TouchtheStart/On pad.
NOTE:Ifapoweroutageoccurredwhiletheovenwasin
Sabbath,theovenwillautomaticallgturnoffandstayoff
evenwhenthepowerreturns.Theovencontrolmust 2 "1
bereset.
Page 22

Usingthe self-cleaningoven.Consomemode/s
WARNING jFaiUretodosomauresultinanovenfire
C-self-]
ean_
] FIRE HAZARD: Wipe grease and heav_l soil from oven before self-cleaning.
If gour range has this control pad, it has a self-cleaning oven.
Follow these instructions.
Ifnot, refer to the PorcelainOven Cleaningsection for oven cleaning instructions.
Before a Clean Cycle
We recommend venting gour kitchenwith
an open window or usinga ventilation fan
or hood during the first self-clean cgcle.
Removebroiler pan, broiler grid,all
cookware and ang aluminum foil from
the oven.
Wipe up heavy soil on the oven bottom.
NOTE:
If gour oven isequipped with
shing, silver-coloredoven racks,we
recommend to remove them before
gou begin the self-cleancgcle. Theg
mag remain in the oven during the
self-clean cgcle,but theg will darken,
losetheir luster and become hard
to slide.
If gour oven isequipped with grag
porcelain-coated oven racks,theg
mag be left inthe ovenduring the
self-clean cgcle.
Soilon the front frame of the range and
outside the gasket on the door will need
to be cleaned bg hand.Clean these areas
with hot water, soap-filled or plastic
scouring pads or cleanserssuch as
Soft Scrub_.Rinsewell with cleanwater
and drg.
Donot clean the gasket.Thefiberglass
material of the oven door gasketcannot
withstand abrasion. It isessentialfor the
gasket to remain intact. If gou notice it
becoming worn or fraged,replace it.
Makesure the oven light bulb cover
isin place and the oven light is off.
IMPORTANT:The health of some birds
isextremelg sensitiveto the fumes given
off during the self-cleaning cgcle of
ang range. Move birdsto another
well-ventilated room.
22
0
L!,eo
How to Set the Oven for Cleaning
Followthe directions in the Before a Clean
Cyclesection.
_7] Latchthe door.
NOTE:Neverforce the latch. Ifthe oven
istoo hot, gou will not be able to slide
the latch. Allowthe oven to cool.
[_ Touch theSelfClean pad.
[]_] Touchthe + or- pads until the
desiredCleanTime isdisplaged.
TheClean Timeis normally 4 hours and
20 minutes. Youcan changethe Clean
Timeto any time between 3 and 5 hours,
depending on the amount of so!!in your
oven.
_-] Touchthe Start/On pad.
The self-cleancgcle will automaticallg
begin after Clean isdisplaged and the
time countdown appears in the displag.
While the oven isself-cleaning, gou can
touch the Clock pad to displag the time
of dag.To return to the clean countdown,
touch the Self Clean pad.
Theoven shuts off automaticallg when the
clean cgcle is complete, and 0:00will flash
in the displag.
[]_] Slidethe latch handleto the left as far
as it will go and open the door.
NOTE:Neverforcethe latch handle.
Forcing thehandle wi!! damage the door
lock mechanism.
Page 23

Usingthe self-cleaningoven.consomemodels; GEAppliances.com
How to Delag the Start of Cleaning (onsome models)
o
_--Self-_
®
L3imeJ
n
Hake sure the clock shows the correct time
ofdag.
[_ Latch the door.
[_] Touch the SelfClean pad.
[]_] Usingthe + or- pads,enter
the desiredclean time.
[_ Touch the Start Time pad.
Theearliest start time gou can set
will appear in the displag.
[] Usingthe + or - pads,enter the time
ofdag gou want the clean cgcleto
start.
[_ Touch the Start/On pad.
Thedisplay will show the start time. It will
not be possibleto unlatch the oven door
until the temperature drops below the lock
temperature.
Theoven shuts off automaticallg when the
clean cgcle is complete, and 0:00will flash
in the displag.
To Stop a Clean Cgcle
Touch the Clear/Off pad.
Wait until the oven has cooled below the
lockingtemperature to unlatch the door.
Youwill not be able to open the door right
awag unlessthe oven hascooled below
the locking temperature.
After a Clean Cgcle
You mag notice somewhite ash inthe
oven.Wipe it up with a damp cloth after
the oven cools.
If white spots remain,removethem with
a soap-filled steelwoo! pad and rinse
thoroughlg with o vinegarand water
mixture.
Thesedeposits are usuallg a salt residue
that cannot be removed bgthe clean
cgcle.
If the oven isnot cleanafter one clean
cgcle,repeat the cgcle.
Youcannot set the ovenfor cooking until
the oven iscool enough for the door to
be unlatched.
While the oven isself-cleaning, gou
can pressthe Clock pad to displag the
time of dog. To return to the clean
countdown, pressthe Self Clean pad.
Applg a smallamount ofvegetable oil
to a paper towel and wipe the edgesof
the oven rackswith the paper towel. Do
not sprag with Pam®orother lubricant
sprags.
23
Page 24

UsingSteamClean.
[_1_ ] During the steam cleanCAUTION cycle,theovenbottom
becomes hot enough
to cause burns. Wait until the cycle is over
(30 minutes) before wiping the inside surfaces
of the oven. Failure to do so mag result in burns.
The Steam Clean cgcle makes it easier to clean light
soiling off the standard-clean porcelain oven interior.
To Begin Steam Clean Cgcle:
The range should be at room temperature before
beginning the Steam Clean cgcle. If the oven istoo hot,
"hot" will appear on the displog and the cgcle will not
activate until the oven cools down.
The Steam Clean cgcle performs best on new spills
or soils. Burned-on food is more difficult to remove.
Pour8ouncesof water ontothe oven
floor.
O
_team
[,Clean )
Startq
L ooJ
¢_Clear---_
off_.)
[] Remove rocksond occessories
fromtheovencovitg.Do notploce
cookworeorotheritemsintheoven
during the Steam Cleancgcle.
Pour i cup (8oz.)room-temperature
water onto the recessed area of the
oven bottom. Do not odd cleaning
solutionsor chemicals of any kind
to the water.
[_] Closethe door.
[] Pressthe Steam Clean pod;then press
Start/On.
[_ A ]0-minute cgcle will begin to count
down on the displog.
When the Steam Cleancgcle is
%
complete, the oven control will beep
and the Steam Clean light will blink.
Pressthe Clear/Off pod.
The oven bottom and remaining water
[]
will still beverg warm otthe end of the
cgcle.This isnormal.
Removesoilsusing o scrub brush or
%
nglon scouring pod.A soap-filled steel
wool pad mog be used onlg on the
porcelain oven interior.Theuseof
abrasive pads will scratch the door
glass. Do not wipe soil or woter onto
the door gasket.
[_ Remove ang remaining water with
a dry cloth or sponge.
[] Leavethe door open to air drg.
IMPORTANTNOTES:
• Ifo steam cleon cgcle isinitiated
without water,pressthe Clear/Off pod
to end the cgcle.Wait for the range
to coolto room temperature before
pouring water into the recessedarea
and initiating another steam cgcle.
Donot open the door during the Steam
Cleancgcle. An error beep will sound
upon opening the door.
PressClear/Off pod at ong time to end
the cgcle.
If mineral deposits remain in the oven
bottom offer cleaning, useo cloth or
spongesoaked invinegar to remove
them.
Somewater mog drip from the bottom
ofthe oven door. Ifthis happens,wipe
it up at the end of the cgcle.
Thedoor gasket mog be wet when
the Steam Cleancgcle finishes.This
isnormal. Donot clean the gasket.
If soilstill remainsoffer cleaning the
oven,seethe Careand cleaningof the
range sectionof the Owner's Manualfor
additional options.
24
Page 25

Care and cleaning of the range. GEAppliances.com
Be sure all controls are off and
all surfaces are cool before cleaning any part of the range.
j I If your range is removed for cleaning, servicing or
-4,WARNING , any reason,be sure the anti-tip device is reengaged
properly when the range is replaced. Failureto take this precaution could result in
tipping of the range and cause injury.
How to Remove Protective Shipping Film and Packaging Tape
Carefullggrasp a corner ofthe protective Toensure no damage isdone to the finish
shipping filmwithgour fingersand slowlgpeel ofthe product, the safest wag to remove
itfrom theappliancesurface.Donot useang the adhesivefrompackagingtapeon new
sharpitemsto removethefilm.Removeallof appliancesisanapplicationofa household
thefilmbeforeusingtheapplianceforthe first liquiddishwashingdetergent.Applgwith
time. asoftclothandallowto soak.
NOTE:Theadhesivemustberemovedfrom
allparts.Itcannotberemovedifitisbakedon.
Control Knobs
Thecontrolknobsma_jberemovedfor easier
cleaning.
MakesuretheknobsareintheOFFpositions
and pullthemstraightoffthestemsfor
cleaning.
Theknobscanbecleanedina dishwasheror
thegmaUalsobewashedwith soapandwater.
MakesuretheinsideoftheknobsaredrU
beforereplacing.
Replacethe knobs,intheOFFpositionto
ensureproperplacement.
Control Panel
It'sagoodideatowipethecontrolpanelafter
eachuseoftheoven.Useadamp clothto
cleanor rinse.Forcleaning,usemildsoapand
wateror a 50/50solutionofvinegarandwater.
Forrinsing,usecleanwater.Polishdrgwitha
softcloth.
Donot useabrasivecleansers,strongliquid
cleaners,plasticscouringpadsorovencleaners
onthecontrolpanel-theUwilldamagethe
finish.
Painted Surfaces
Paintedsurfacesincludethesidesofthe range
andthedoor,top of controlpanelandthe
drawerfront.Cleanthesewithsoapandwater
or a vinegarandwatersolution.
Stainless Steel Surfaces ton some models)
Do not use a steel wool pad; it will
scratch the surface.
To cleanthe stainlesssteel surface, use
warm, sudsg water ora stainlesssteel
cleaner or polish.Alwags wipe the surface
in the direction of the grain. Followthe
cleaner instructions for cleaning the
stainlesssteel surface.
Do not use commercial oven cleaners,cleaning
powders, steel wool or harsh abrasives on ang
painted surface.
Toinquire about purchasing stainlesssteel
appliance cleaner or polish,or to find the
location of a dealer nearest gou, pleasecall
our toll-free number:
National Parts Center 1.800.626.2002
GEAppliances.com
Porcelain Enamel Cooktop (onsomemodels)
The porcelainenamel finish issturdg but
breakable if misused.Thisfinish is acid-
resistant. However,ang acidic foods spilled
(suchasfruit juices, tomato or vinegar)
should not be permitted to remain
on the finish.
If acids spillon the cooktop while it ishot,
usea drg paper towel or cloth to wipe it up
right awag. When the surface hascooled,
wash with soap and water. Rinsewell.
Forother spillssuch as fat spatterings,
wash with soap and water or cleansing
powders after the surface hascooled.
Rinsewell. Polishwith a drg cloth.
25
Page 26

Careand cleaning of the range.
Porcelain Oven Interior (on standard-clean models)
Withpropercare,theporcelainenamelfinishon
theinsideoftheoven-top, bottom,sides,back
andinsideof the door-will staynew-lookingfor
years.
Letthe oven cool before cleaning.
We recommend that you wear rubber gloves
when cleaning the oven.
Soapandwaterwillnormallydothejob. Heavy
spatteringor spilloversmay requirecleaning
witha mildabrasivecleaner.Soap-filled
scouringpadsmayalsobeused.
Donot allowfoodspillswitha highsugaror
acidcontent(suchastomatoes,sauerkraut,
fruitjuicesorpiefilling)toremainonthesurface.
Thebtmo_jcausea dullspotevenaftercleaning.
Householdammoniamaymakethe cleaning
job easier.Place1/2cupina shallowglassor
potterycontainerinacoldovenovernight.
Theammoniafumeswillhelploosen
theburned-ongreaseandfood.
Removable Warming/Lower Oven Drawer Pan (onsome models)
NOTE:Formodels with an electric
warming drawer or lower ovendrawer,
beforeperforming any adjustments,
cleaning or service,disconnectthe
range electricalpower supply at the
householddistribution pane! by
removing the fuse orswitching offthe
circuit breaker.Makesure thedrawer
heating element iscool
Ifnecessary,youmay usean ovencleaner.
Followthepackagedirections.
Donotsprabtovencleaneronthe electrical
controlsandswitchesbecauseit couldcause
a shortcircuitandresultinsparkingorfire.
Donotallowafilmfromthecleanerto build
up onthetemperaturesensor-itcouldcause
theoventoheatimproperlbt.(Thesensoris
locatedat thetop oftheoven.)Carefullbtwipe
thesensorcleonaftereachovencleaning,
beingcarefulnotto movethesensoras
a changeinitspositioncouldaffecthow
theovenbakes.
Donotsprabtan_tovencleanerontheoven
door,handlesoranbtexteriorsurfaceof the
oven,cabinetsorpaintedsurfaces.Thecleaner
candamagethesesurfaces.
Thedrawerhasa removablepanforeasy
cleaning.Cleanwith hot,soapywateranda
spongeor dishtowel.Drywitha cleancloth.
Replacethepaninthe lowerovendrawer.
Neverplace,useorself-cleantheloweroven
drawerpanintheupperoven(onsome
models).
Radiantglassmodels:
Coilcool<topmodels:
26
NOTE:Allowdrawerto coolbeforeremoving
pan.
NOTE:Wipespillspromptlbtaftereachuse.
Oven Vent on Radiant Glass or Coil Cooktops
Onglasscooktopmodels,theovenventis
locatedbehindtheright-rearsurfaceunit.
Oncoilcooktopmodels,theovenisvented
throughanopeningundertheright-rear
surfaceunit.
Thisareacouldbecomehotduringovenuse.
Itisnormalforsteamto comeout of thevent,
andmoisturemaycollectunderneathit when
theovenisinuse.
Theventisimportantforproperaircirculation.
Neverblockthisvent.
Page 27

Thegasketisdesignedwith agapatthe
bottomto allowforproperair circulation.
Donotruborcleanthedoorgasket it has
anextremelylowresistanceto abrasion.
Ifyounoticethegasketbecomingworn,
frayedordamagedinanywayorif it has
becomedisplacedonthe door,youshould
haveitreplaced.
Cleaning the Oven Door
Toclean the inside of the door:
Onselficleanmodels:
Becausetheareainsidethegasketis
cleanedduringtheself-cleancycle,
youdonotneedto cleanthis byhand.
iiiiiii
Theareaoutsidethegasketandthedoor
linercanbecleanedwitha soap-filled
orplasticscouringpad,hotwaterand
detergent.Rinsewellwitha vinegar
andwatersolution.
Onstandard-deanmodels:
Soapandwaterwillnormallgwork.Heavg
spatteringor spilloversmagrequirecleaning
witha mildabrasivecleaner.Soap-filled
scouringpadsmagalsobeused.
SeealsoPorcelainOvenInteriorsection.
Lift-Off Oven Door
GEAppliances.com
To clean the outside of the door:
iiiiiii
Usesoapandwatertothoroughlyclean
thetop,sidesandfront oftheovendoor.
Rinsewell.Youmayalsouseaglasscleaner
to cleantheglassontheoutsideofthedoor.
Donot letwaterdripintotheventopenings.
iiiiiii
Ifanystainonthedoorventtrimis
persistent,useasoftabrasivecleaner
andasponge-scrubberforbestresults.
iiiiiii
Spillageof marinades,fruitjuices,tomato
saucesandbastingmaterialscontaining
acidsmaycausediscolorationandshould
bewipedupimmediately.Whensurfaceis
cool,cleanandrinse.
iiiiiii
Donot useovencleaners,cleaningpowders
orharshabrasivesontheoutsideofthe door.
Thedoor is very heavy. Be careful when
removing and lifting the door.
Donot liftthe doorbbtthehandle.
To remove the door:
E_ Fullyopenthedoor.
[_j Pullthehingelocksdowntowardthedoor
frame,totheunlockedposition.Atool,
suchasa smallflat-bladescrewdriver,
may berequired.
[_ Firmlygraspbothsidesofthedoor
atthe top.
[_ Closedoorto the doorremovalposition,
whichishalfwaybetweenthebroilstop
positionandfullyclosed.
Liftdoorupandout untilthehingearm
[SJ isclearof the slot.
Toreplace the door:
[7] Firmlggrasp both sides ofthe door
at the top.
Withthe Bottom
doorat the edgeof
sameangle slot
asthe removal
\
position,seatthe
indentationof the
hingearmintothe
bottomedgeof the
hingeslot.Thenotchinthe hingearm
mustbefullyseatedintothe bottom
oftheslot.
Fullyopenthedoor.Ifthedoorwillnot
%
fully open,theindentationisnotseated
correctlyinthe bottomedgeof theslot.
Pushthehingelocksupagainstthefront
frameoftheovencavitytothelocked
position.
Hinge
lock
Hinge
arm _
Pushhingelocksupto lock.
Hingearm
[] Closethe ovendoor.
27
Page 28

Care and cleaning of the range.
Oven Racks
Stopguide
All oven racksmay becleaned by hand
with an abrasive cleaner or steelwool.
After cleaning,rinse the racks with clean
water and dry with a clean cloth.Gray
porcelain-coated oven racks may remain
in the oven during the self-cleaningcycle
without being damaged. The shiny,silver-
colored oven racks may remain in the oven
during the self-cleaning cycle, but they will
losetheir luster and become hard to slide.
Storage Drawer Removal
Toremove the drawer:
_] Pullthe drawer out until it stops.
[_j Liftthe front of the drawer until
the stops clear the guides.
[_ Removethe drawer.
Oven Heating Elements
Donot clean the bake element orthe broil
element.Any sol! wi!!burn off when the
elementsare heated.
Itwill be necessary to grease all oven rack
sideedges with a light coating of vegetable
oil after cleaning them by hand or in the
oven.Thiswill help maintain the easeof
slidingthe racks in and out of the oven.
To replace the drawer:
Ell Placethe drawer railson the guides.
[_ Pushthe drawer back until itstops.
[_ Liftthe front of the drawer and push
back until the stopsclear the guides.
r4] Lower the front of the drawer and
push back until it closes.
Toclean the oven floor,gently lift the bake
element (ifelement is above oven floor).
Cleanwith warm, soapy water.
28
Page 29
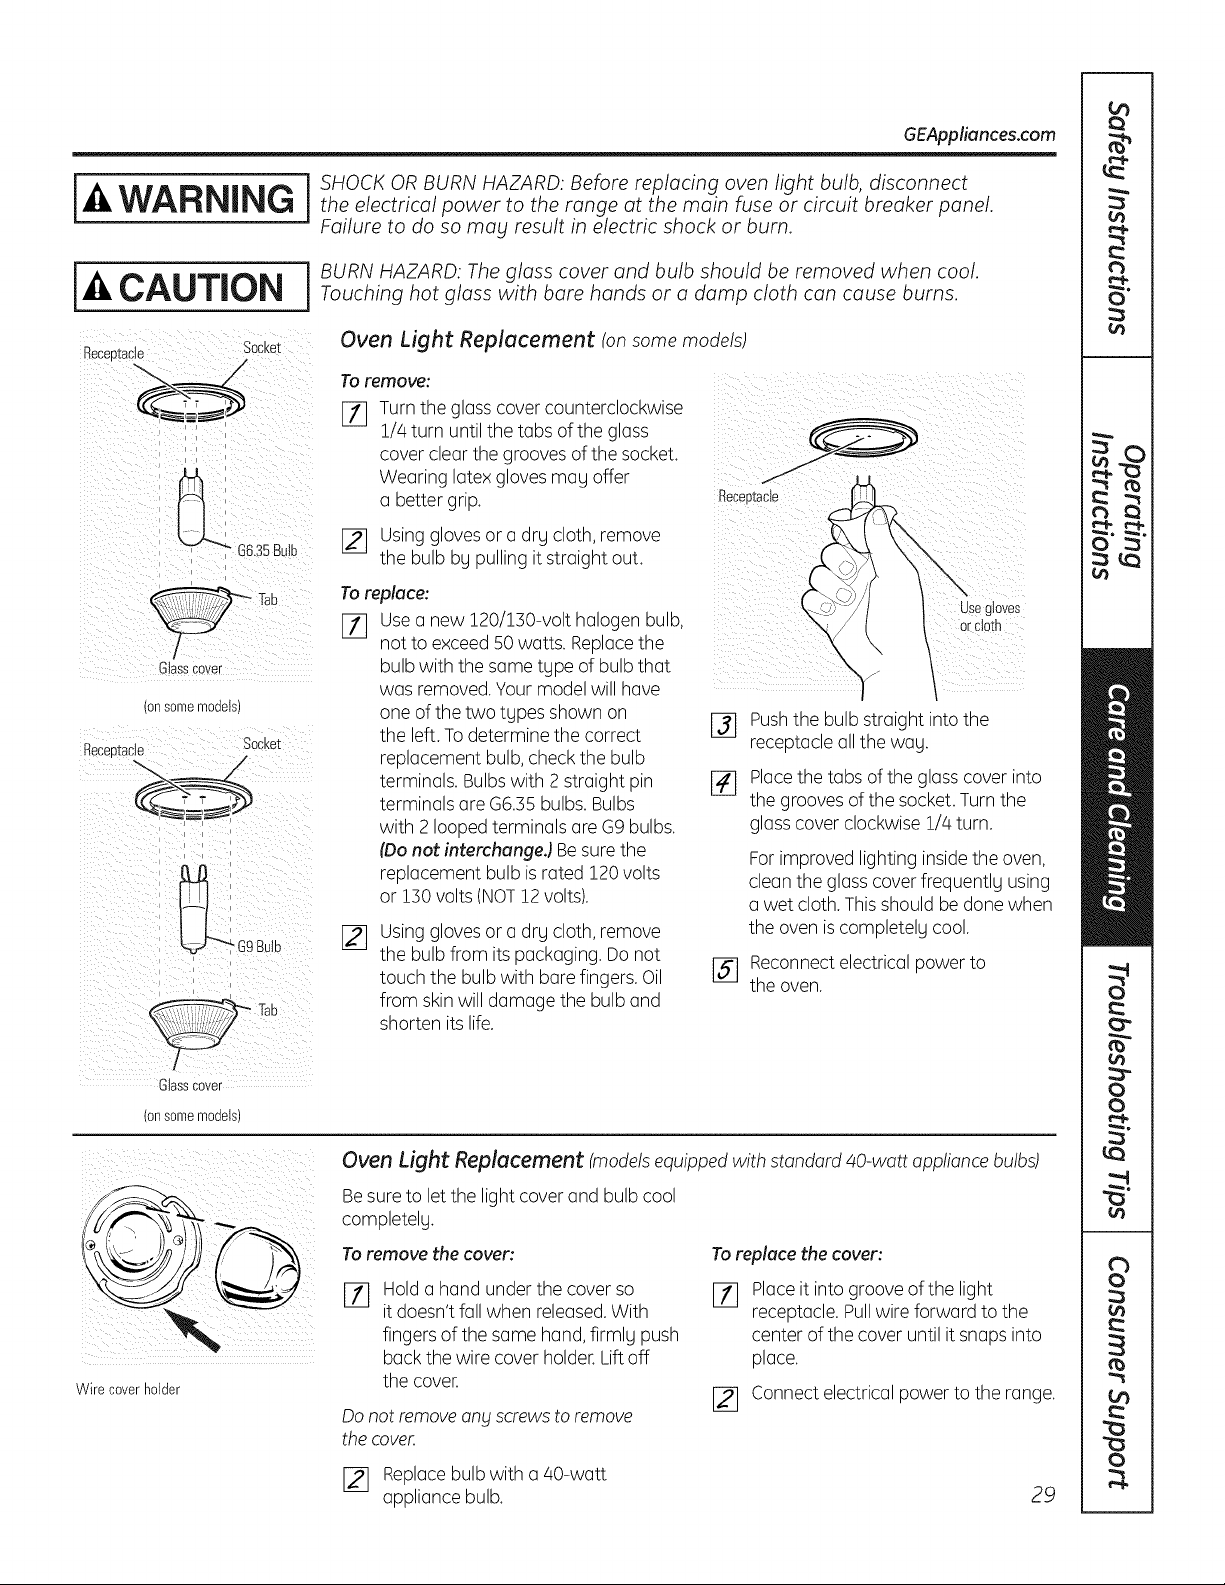
GEAppliances.com
j j SHOCK OR BURN HAZARD: Before replacing oven light bulb, disconnect
WARNING j theelectricalpowertotherangeatthemainfuseorcircuitbreakerpanel
Failure to do so mag result in electric shock or burn.
-&CAUTION Touchinghotglasswithbarehandsoradampclothcancauseburns
i J BURN HAZARD: The glass cover and bulb should be removed when cool.
Becee_acle Socket
/
C ass Cover
(onsomemodels)
Receptacle Socket
i i k
Oven Light Replacement ton some models)
Toremove:
F11 Turn the glass cover counterclockwise
1//4turn until the tabs of the glass
cover clear the grooves of the socket.
Wearing latex gloves may offer
a better grip.
[_ Using glovesor a drg cloth, remove
the bulb by pulling it straight out.
To replace:
[77 Usea new 120/150-volt halogen bulb,
not to exceed50 watts. Replacethe
bulb with the sametype of bulb that
was removed.Your model will have
one of the two types shown on
the left. Todetermine the correct
replacement bulb,check the bulb
terminals. Bulbs with 2 straight pin
terminals are G6.55bulbs. Bulbs
with 2 looped terminals are G9 bulbs.
(Donot interchungeJ Besure the
replacement bulb israted 120 volts
or 150volts (NOT12volts).
Using glovesor a drg cloth, remove
_q
the bulb from itspackaging. Do not
touch the bulb with bare fingers. Oil
from skinwill damage the bulb and
shorten its life.
[_ Placethe tabs of the glass cover into
[_ Reconnectelectrical power to
Pushthe bulb straight into the
receptacleall the wag.
the grooves ofthe socket.Turnthe
glass cover clockwise 1/4 turn.
Forimproved lighting insidethe oven,
cleanthe glass cover frequently using
a wet cloth.This should be done when
the oven iscompletely cool.
the oven.
Glasscover
(onsomemodels)
Wire coverholder
Oven Light Replacement (models equipped with standard 40-watt appliance bulbs)
Besureto let the light cover and bulb cool
completelg.
To remove the cover:
Holda hand under the cover so
rT]
it doesn't fall when released.With
fingers of the same hand,firmlg push
back the wire cover holder.Liftoff
the cover.
Donot removeang Screws to remove
thecover.
[_ Replacebulb with a 40-watt
appliance bulb.
To replace the cover:
Placeit into groove of the light
F_
receptacle. Pullwire forward to the
center of the cover until it snaps into
place.
[_ Connect electrical power to the range.
29
Page 30
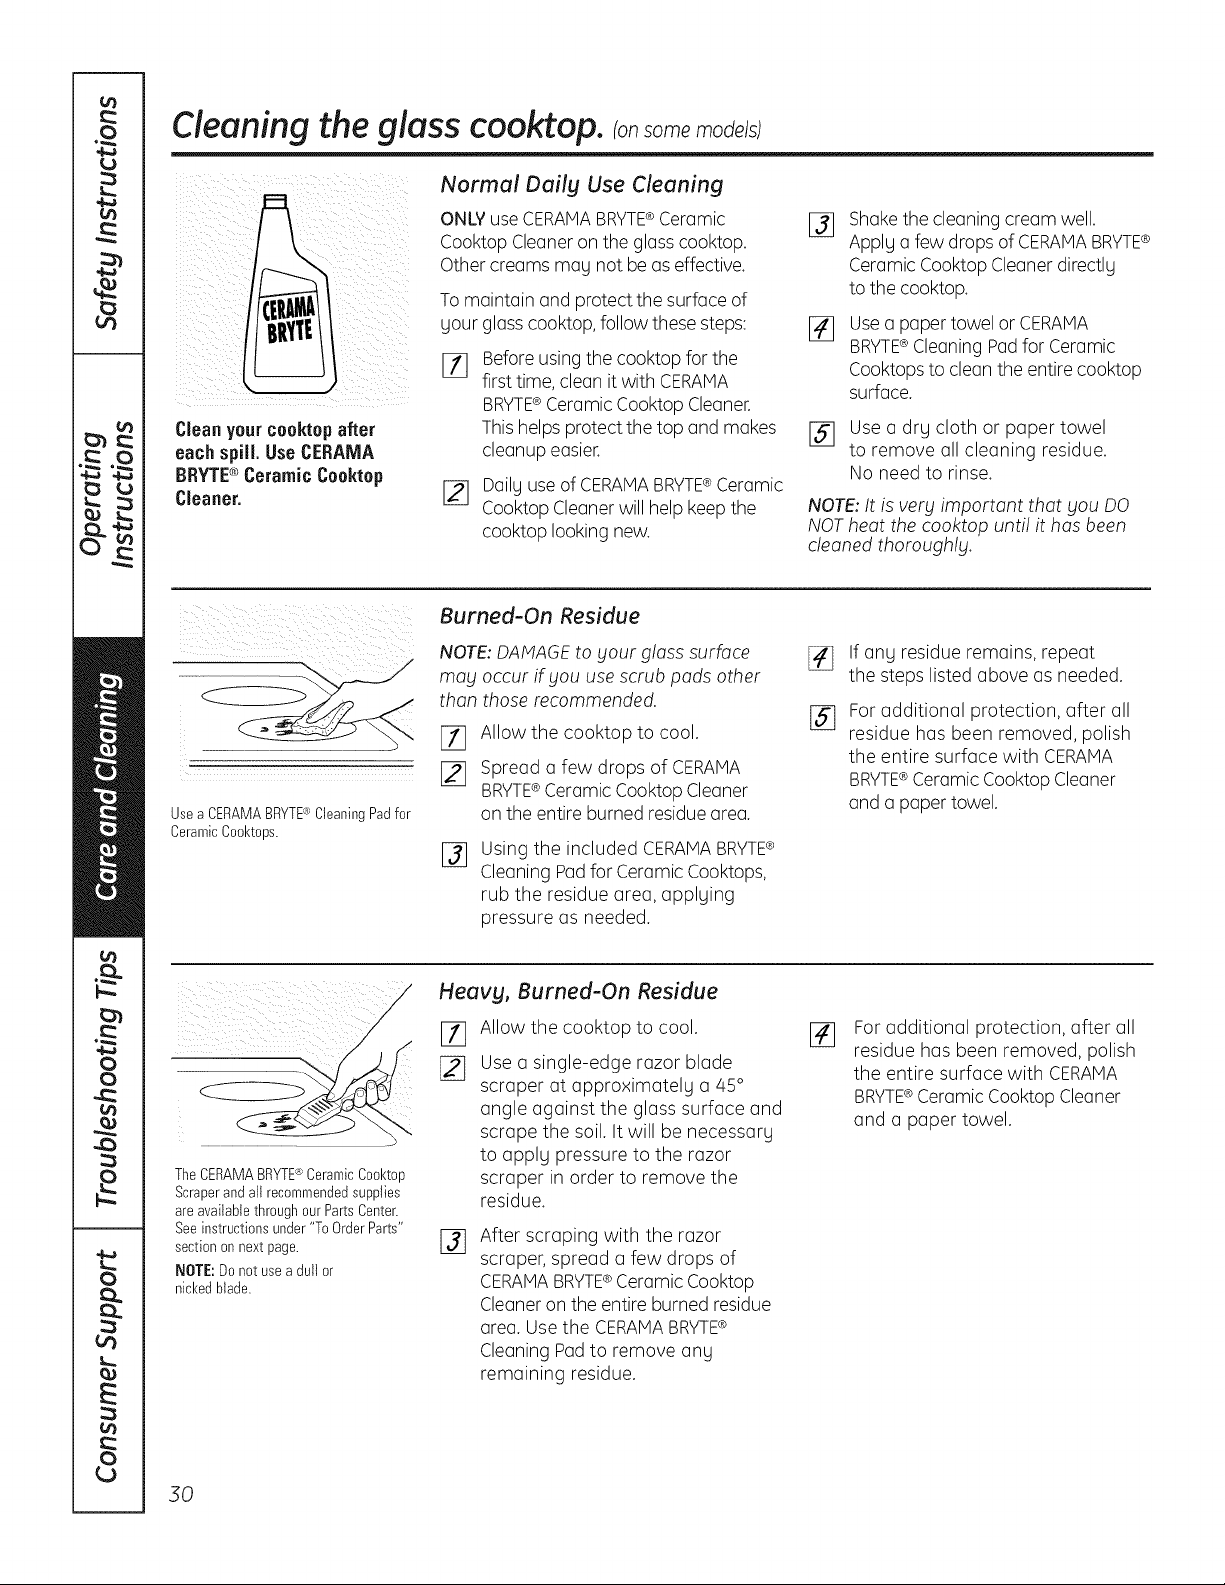
Cleaningthe glass cooktop, ransomemode/s
Normal Dailg Use Cleaning
ONLY useCERAMABRYTE®Ceramic
Cooktop Cleaneron the glass cooktop.
Other creams nag not be as effective.
To maintain and protect the surface of
gour glass cooktop, follow these steps:
Beforeusing the cooktop for the
first time,clean it with CERAMA
BRYTE® CeramicCooktop Cleaner.
Clean yourcooktopafter
eachspill. Use CERAMA
BRYTE® Ceramic Cooktop
Cleaner.
This helpsprotect the top and makes
cleanup easier.
[_ Dailg useof CERAMABRYTE®Ceramic
CooktopCleaner will help keep the
cooktop lookingnew.
Burned-On Residue
Shakethecleaningcreamwell.
%
Applga few dropsofCERAMA BRYTE®
CeramicCooktopCleanerdirectlg
tothecooktop.
Usea paper towel or CERAMA
BRYTE®CleaningPadfor Ceramic
Cooktopsto clean the entire cooktop
surface.
[] Use a drg cloth or paper towel
to remove all cleaning residue.
No need to rinse.
NOTE:It is very important that you DO
NOT heat the cooktop unti! it has been
cleaned thoroughly.
Usea CERAMABRYTE®CleaningPadfor
CeramicCool<tops.
TheCERAMABRYTE®CeramicCool<top
Scraperandall recommendedsupplies
areavailablethrough ourPartsCenter.
Seeinstructionsunder"To OrderParts"
sectiononnextpage.
NOTE:Do notusea dull or
nickedblade.
NOTE:DAMAGEto Four glass surface
may occur if you use scrub pads other
than those recommended.
I-f] Allow the cooktop to cool.
[] Spread a few drops of CERAMA
BRYTE®Ceramic Cooktop Cleaner
on the entire burned residuearea.
Using the included CERAMABRYTE¢
%
Cleaning Padfor CeramicCooktops,
rub the residue area, applging
pressure as needed.
Heavg, Burned-On Residue
Allow the cooktop to cool.
[]
Use a single-edge razor blade
scraper at approximatelg a 45°
angle against the glass surface and
scrape the soil. It will be necessarg
to applg pressure to the razor
scraper in order to remove the
residue.
After scraping with the razor
%
scraper, spread a few drops of
CERAMABRYTE®Ceramic Cooktop
Cleaneron the entire burned residue
area. Use the CERAMABRYTE®
CleaningPadto remove any
remaining residue.
If ang residue remains, repeat
[]
the steps listed above as needed.
For additional protection, after all
%
residue has been removed, polish
the entire surface with CERAMA
BRYTE®Ceramic Cooktop Cleaner
and a paper towel.
Foradditional protection, offer all
[]
residue has been removed, polish
the entire surface with CERAMA
BRYTE®CeramicCooktop Cleaner
and a paper towel.
30
Page 31

Metal Marks and Scratches
GEAppliances.com
Eli Be careful not to slide pots and
pans across your cooktop. It will
leave metal markings on the
cooktop surface.
These marks are removable using
the CERAMABRYTE®Ceramic
Cooktop Cleanerwith the CERAMA
NOTE: Carefu!lg check the bottom of
pans for roughness that would scratch
the cooktop.
BRYTE®Cleaning Padfor Ceramic
Cooktops.
j_] If pots with a thin overlay of
aluminum or copper are allowed
to boil dry, the overlay may leave
black discoloration on the cooktop.
Cooktop Seal
To clean the cooktop seal around the
edges of the glass, lay a wet cloth on it
for a few minutes, then wipe clean with
nonabrasive cleaners.
Glass surface--potential for permanent damage.
This should be removed
immediately before heating
again or the discoloration
may be permanent.
Our testing shows that
if gou are cooking high
sugar mixtures such as
jelly or fudge and have
a spillover, it can cause
permanent damage to the
glass surface unless the
spillover is immediately
removed.
Damage from Sugarg Spills and Melted Plastic
Ell Turn off all surface units. Remove
hot pans.
[21 Wearing an oven mitt:
a. Use a single-edge razor blade
scraper (CERAMABRYTE®
Ceramic Cooktop Scraper)
to move the spill to a cool
area on the cooktop.
b. Remove the spill with
paper towels.
To Order Parts
To order CERAMABRYTE®Ceramic
CooktopCleaner and the cooktop
scraper, please call our toll-free number:
National Parts Center
800.626.2002
CERAFfA BRYTE ®Ceramic
Cool<top Cleaner ......... #WX2 0X300
CERAMA BRYTE® Ceramic
Cool<top Scraper .......... #WXJ0X0302
Kit ....................... #WB64XS027
(Kitincludes cream and cooktop scraped
J_ Any remaining spillover should be
left until the surface of the cooktop
has cooled.
]41 Don't use the surface units again
until all of the residue has been
completely removed.
NOTE: If pitting or indentation in the
glass surface has already occurred, the
cooktop gloss wi!! hove to be replaced.
In this case, service wi!! be necessary.
CERANA BRYTE®Cleaning Pads for
Ceramic Cool<tops ....... #WXl OX350
31
Page 32

Careand cleaning of the coil cooktop, consomemode/s
Be sure the controls are turned to OFF and the surface units are cool before attempting to remove them.
Surface Units
Locl<inltab rim
Whenproperlyseated,the lockingtab
shouldlock ontothecool<toprim through
thenotchin the drip pan.
Cool<top
Tocleanthesurfaceunits,turnthecontrolto
thehighestsettingfora minute.Thecoilswill
burnoff anUsoil.
Toremoveasurfaceunit:
Toremovethedrippansforcleaning,
thesurfaceunitsmustberemovedfirst.
[] Pushthesurfaceunitbacktoward
thereceptacletofreethelockingtab
fromthecooktop.
Surface unii
Receotacle
Drioaan
[_ Liftthesurfaceunitabout i inchabove
thedrippanandpullitout.
Donotlift thesurfaceunit morethan1 inch.
lfgoudo,itmagnotlieflatonthedrippan
when£ouplugit backin.
NOTE:Repeatedliftingofthe surfaceunit
morethan i inchabovethedrippancan
permanentlUdamagethereceptacle.
Toreplacea surfaceunit:
[_ Replacethedrippanintotherecess
inthecooktop.Hakesuretheopening
inthepan linesupwiththereceptacle.
[] Inserttheterminalsofthesurfaceunit
throughthe openinginthedrippanand
intothe receptacle.
[_ Pushthesurfaceunitinanddownto lock
thetab inplacesoit restsevenlUinthe
cooktop.
Donot immersethesurfaceunitsinliquidsof
angkind.
Donot cleanthesurfaceunitsino dishwasher.
Donot bendthesurfaceunitplugterminals.
Donot attempttoclean,adjustorin ongwag
repairtheplug-inreceptacle.
Besure all surfaceunitsareturnedoff
before raising the cool<top.
32
Drip Pans
Removethesurfaceunits.Thenliftoutthedrip
pans.
Forbestresults,cleanthedrippansbUhand.
Placethemina coveredcontainer(ora plastic
bag)with Y4cupammoniato loosenthesoil.
Rinsewithcleanwaterand polishwith aclean
softcloth.
Thedrippansmaualsobecleanedina
dishwasher.
Cleantheareaunderthedrippansoften.
Built-upsoil,especiallugrease,mau catchfire.
Donotcoverthedrippanswithfoil.Usingfoil
soclosetothereceptaclecouldcauseshock,
fireordamagetotherange.
Lift-Up Cooktop
Theentirecooktopmagbeliftedupand
supportedintheuppositionforeasiercleaning.
Thesurfaceunitsdonotneedtobe removed;
however,you mayremoveoneto makeraising
thecooktopeasier.Therearetwo sidesupports
that lockintopositionwhenthe cooktopis
liftedup.
NOTE:If goutcooktopisequippedwithshing,
silver-coloreddrippans,donotcleanthem
in theself-cleaningoven.Permanentdamage
to thefinishconoccur.
Ifgoutcooktopis equippedwithblackorgrog
porcelain-coateddrippans,the£canbecleaned
in theovenduringtheself-cleaningcgcle.Before
goubeginaself-cleaningcgcte,removeang
heaWsoilfromthedrippansandplacethem
on theporcelain-coatedovenrocks.Donotplace
thedrippansdirectlgontheovenbottom.After
theself-cleaningcgcleiscompletedandthedrip
pansarecool,wipethemwitha dampclothto
removeangremainingashor residue.
Aftercleaningunderthecooktopwithhot,
mildsoapywaterandacleancloth,lowerthe
cooktop.Becarefulnotto pinchyourfingers.
Tolowerthecooktop,pushtherodsbackand
gentlUlowerthecooktopuntilitrestsinplace.
Page 33

Before Sou call for service... 6EAppliances.com
Troubleshooting Tips
Save time and manes! Review the charts on the following
pages first and Sou mag not need to call for service.
Possible Causes What To Do
Surface units will not Improper cookware • Use pans which are flat and match the diameter
maintain a rolling boil being used. of the surface unit selected.
or cooking is not
fast enough
Radiant surface units A fuse in sour home mag be • Replacethe fuse or resetthe circuit breaker.
do not work properlg blown or the circuit breaker
tripped.
Cooktop controls , Check to see the correct control is set for the surface
improperlg set. unit you are using.
Surface unitstops , Thisisnormal. The unit is still onand hot.
glowing when turned
to a lower setting
Scratches (mag a_ear Incorrect cleaning • Scratches arenot removable.Tiny scratcheswill become
as cracks) on radiant methods being used. lessvisible in time as a result of cleaning.
coo_op glass surface Cookware with rough bottoms , Toavoid scratches,usethe recommended cleaning
being used or coarse particles procedures.Make sure bottoms of cookware are clean
(salt or sand}were between before use,and usecookware with smooth bottoms.
the cookware and the surface
of the cooktop.
Cookware has been slid
across the cooktop surface.
Areas of discoloration Food spillovers not cleaned • See the Cleaning the g!oss cooktop section.
on the radiant glass before next use.
cooktop Hot surface on a model . This is normal. The surface may appear discolored
with a light-colored glass when it is hot. This is temporary and will disappear
cooktop, as the glass cools.
Plastic melted to Hot cooktop came into • See the Glosssurface potentia! for permanent damage
the radiant surface contact with plastic placed section in the Cleaning the glass cooktop section.
on the hot cooktop.
Pitting (or indentation Hot sugar mixture spilled • Call a qualified technician for replacement.
of the radiant glass on the cooktop.
cooktop
Frequent cgcling off Improper cookware • Useonly flat cookware to minimize cycling.
and on of radiant being used.
surface units
Control signals after You forgot to enter a • Touch the Bake pad and desired temperature or the
entering cooking time bake temperature or Self Clean pad and desired clean time.
or delag start cleaning time.
Coilsurface units do The surface units are . With the controls off, check to make sure the surface
not work properlg not plugged in solidlg, unit is plugged completely into the receptacle.
Thesurface unit controls • Checkto see the correct control isset for the surface
improperlg set. unit you are using.
The drip pans are not set , With the controls off, check to make sure the drip
securelg in the cooktop, pan is in the recess in the cooktop and that the
opening in the pan lines up with the receptacle. .53
Page 34

Before gou call for service...
Troubleshooting Tips
Possible Causes What To Do
Food does not bake Oven controls improperly set. • Seethe Usingtheoven section.
or roast properlg Rackposition is incorrect, ,,Seethe Usingtheoven section.
or the rack is not level.
Incorrect cookware or cookware, Seethe Usingtheoven section.
of improper size being used.
Oven thermostat needs , See the Adjust the oven thermostat Do it gourself/
adjustment, section.
Clock and timer do Plugon range is not completelg • Makesure electrical plug is plugged into a live,properly
not work inserted in the electrical outlet, grounded outlet.
A fuse in gout home meg • Replacethe fuse, or resetthe circuit breaker.
be blown or the circuit
breaker tripped.
Oven controls improperly set. • See the Using the clock and timer section.
Control is in Energy Sever • Seethe Energy Saver Mode section.
Mode.
Ovenlight does Light bulb is loose or defective. • Tightenor replace the bulb.
not work
Food does not Door not open to the broil stop • Seethe Usingthe oven section.
broil properly position as recommended.
Oven temperature too Oven thermostat ,, See the Adjust the oven thermostat Do it yourself!
hot or too cold needs adjustment, section.
Oven will not work Plugon range is not • Makesure electrical plug is plugged into a live,
Switch operating light • Call for service.
is broken.
Oven controls improperlg set. • Make sure gou touch the Broil Hi/Lo pad.
Improper rack position • See the Broiling Guide.
being used.
Cookware not suited ,, For best results,usea pan designed for broiling.
for broiling.
Insome areas the power • Preheatthe broil element for 10 minutes.
(voltage} mag be low.
completelg inserted in properly grounded outlet.
the electrical outlet.
• Broil for the longest period of time recommended
in the Broiling Guide.
34
A fuse in gout home mag • Replacethe fuse or reset the circuit breaker.
be blown, or the circuit
breaker tripped.
Oven controls impropedg set.
Door left in the locked
position.
• Seethe Usingthe oven section.
• If necessarg,allow the oven to cool;then unlock
the door.
Page 35

GEAppliances.com
Storage drawer
is crooked
Possible Causes
Rear drawer support is
on top of the guide rail.
What To Do
• Reposition the drawer. Seethe Storage Drawer
Remova! instructions in the Careand cleaning
of the range section.
Storage drawer
won't close
Power cord mag be
obstructing drawer
in the lower back
• Repositionthe drawer and power cord. Seethe
StorageDrawer Removalinstructions in the Careand
cleaningof the range section.
of the range.
Rear drawer support is
on top of the guide rail.
• Reposition the drawer. Seethe Storage Drawer
Removal instructions in the Care and cleaning of the
range section.
=
Oven will not self-clean The oven temperature is • Allowthe oven to cool to room temperature and
too high to set a self-clean reset the controls.
operation.
Oven controls impropedg set. • See the Using the self-cleaning oven section.
Oven door is not in the locked • Hake sure Sou move the door latch handle all the
position, wag to the right.
"Crackling" or This is the sound of the • This is normal.
"popping" sound metal heating and cooling
during both the cooking and
cleaning functions.
Excessive smoking Excessive soil. • Touch the Clear/Off pad. Open the windows to
during a clean cgcle rid the room of smoke. Wait until the light on the
Self Clean pad goes off. Wipe up the excess soil and
reset the clean cycle.
Oven door will not Oven too hot. • Allow the oven to cool below locking temperature.
unlock
Ovennot clean after Oven controlsnot properlg set. • Seethe Usingthe self-cleaning ovensection.
a clean cgcle Oven was heavilg soiled. • Clean up heavg spillovers before starting the clean
cgcle. Heavilg soiled ovens mag need to self-clean
again or for a longer period of time.
"F-" and a number You have a function • Disconnect all power to the range for at least
or letter flash error code. 50 seconds and then reconnect power. Ifthe function
in the display error code repeats, call for service.
• On self-cleaning models, if a function error code
appears during the self-cleaning cgcle, check the oven
door latch. The latch mag have been moved, if onlg
slightlg, from the locked position. Hake sure the latch
is moved to the right as far as it will go. Touch the
Clear!Off pad. Allow the oven to cool for one hour.
Putthe oven back into operation.
Water remaining on This is normal.
oven floor after Steam
• Remove ang remaining water with a drg cloth
or sponge.
Clean cycle
55
Page 36

Before gou call for service...
Troubleshooting Tips
Possible Causes What To Do
Displag flashes "bAd" The installed connection • Contact installer or electrician to correct miswire.
then "linE" with a from the house to the unit
loud tone is miswired.
Displag goes blank A fuse in gour home mug be • Replacethe fuse or reset the circuit breaker.
blown, or the circuit breaker
tripped.
The clock is turned off from , See the Using the clock and timer and/or the Energy
showing in the displag. Saver Hode section.
Displag flashes Power failure. • Resetthe clock.
Unable to get the- control pads were
displag to show "SF" Oven • The Bake and Broil Hi/Lo pads must be touched
Power outage, Power outage or surge. • Resetthe clock. Ifthe oven was in use, you must reset
clock flashes it by touching the Clear/Off pad, setting the clock
"Burning" or "oilg" This is normal in a new oven , To speed the process, set a self-clean cycle for a
odor emitting from and will disappear in time. minimum of 3 hours. See the Using the self-cleaning
the vent oven section.
not pressed properlg, at the same time and held for 5 seconds.
and resetting any cooking function.
Strong odor An odor from the insulation • This istemporary.
around the inside of the
oven is normal for the first
few times the oven is used.
Drawer does not slide The drawer is out of ,, Fullg extend the drawer and push it all the wag in.
smoothlg or drags alignment. Seethe Care and cleaning of the range section.
Drawer is overloaded or load , Reduceweight. Redistribute drawer contents.
is unbalanced.
Warming/lower oven A fuse in gour home mug be • Replace the fuse or reset the circuit breaker.
drawer will not work blown, or the circuit breaker
tripped.
Controls improperly set. • See the Warming drawer section.
Excessivecondensation Liquid in drawer. • Remove liquid.
in the drawer
Food dries out in the Moisture escaping. • Cover food with lid or aluminum foil.
worming/lower oven
drawer Drawer not fullg closed. • Push drawer in until latch engages.
Fan Noise A convection fan will turn on • This is normal operation of the convection fan.
Uncovered foods. • Cover food with lid or aluminum foil.
Temperature setting too high. • Reduce temperature setting.
for 10 seconds during the oven
preheat cgcle of the convection
bake and then turn off.
36
After oven is preheated, • This is normal operation of the convection fan.
the convection fan will run
continuouslg in one direction
during convection baking.
Page 37

Accessories. GEAppliances.com
Looking For Something More?
You can find these accessories and many more at GEAppliances.com (U.S.)
or www.GEAppliances.ca (Canada), or call 800.626.2002 (U.S.) or 800.661.1616
(Canada) (during normal business hours). Have your model number ready.
Grates
SurfaceBurnerHeadsandCaps SurfaceElementsandDripPans
Knobs
i ¸¸
Griddle OvenRacks Oven Elements
Experience these other great products to keep your kitchen looking great!
_"_ ....... Ceramic Cool<top _ Ceramic Cool<top _ Stainless Steel
scraper and pad
___ Inctudes cteaner, Wipes
/_°_'A_'I'_°_"°t Cleaning Kit: _ Cleaning Wipes _ Appliance Polish
WXIOX117GCS WXlOX305 WXlOXlO001
Get the most out of your Broiler Pan! (Not for use with Broiler Drawer models.)
Usegour pan and grid cover to broil hamburgers, seafood,steaks, vegetables,bacon, chops and somuch
more! Thepan below catches the excessfats and oils.
EasyTo Clean
GenuineGEPart
One-YearWarranty .. ..
Limited Time Offe!! Free Shipping!
When gou order gour broiler pan within 30days of purchasing gour GEcooking product.
Small
U.S. Part # WB48X10055
Canada Part # 222D2097GO01
Dimensions 8-3/4" Wx 1-1/4" H x 13-1/2"D
Price US$10.50t
t Plus applicable state sales tax (PST/HST and GST)
* The large (standard) broil pan does not fit in 20'/24" ranges.
** The XL pan does not fit in 24" wall ovens, 27" drop-ins or 20'/24" ranges.
12-5/4"Wxl-1/4"Hxlg-1/2"D 17"Wxl-1/4"Hxlg-1/4"D
Large* XL**
WB48X10056 WB48X1005 7
222D2097GO02 N/A
US$14.50 * US$15.75 t
Light Bulbs
Appliance
Cleaner
StainlessSteel
PM10X311
Toplaceyour order,call 800.626.2002(U.S.),800.661.1616(Canada)or mail this form to:
Inthe U.S.:GEParts,RO.Box221027, Memphis, TN38122-1027. In Canada: GEParts, 1 Factory Lane,Moncton, N.B.EIC9M3
Broiler Pan Order Form
Quantity
Model Number
First Name
Address
City
Phone
Credit Card
Visa
Exp. Dote: Month
Serial Number Brand Date of Purchase
Check __ Money Order
MasterCard Discover AmEx Credit Card #
Part Number
Last Name
State Zip Code
E-Mail
Year Signature:
37
Page 38
Notes.
L_
o
c)
c)
E
C)
L_
58
Page 39

GE Electric Range Warranty. GEAppliances.com
All warrant_l service provided bg our Factors Service Centers,
or an authorized Customer Care ®technician. To schedule
service, visit us on-line at GEAppliances.com, or call
800.GE.CARES (800.432.2737). Please have serial number
and model number available when calling for service.
GE Will Provide:
One Year
From the date of the
origina!purchase
Service trips to gout home to teach SOUhow to use
the product.
Improper installation, delivers or maintenance.
Failure of the product if it is abused, misused, or used
for other than the intended purpose or used
commerdallg.
Replacement of house fuses or resetting of circuit
breakers.
Any pert of the range which fails due to a defect in materials orworkmanship.
During this limited one-year warranty, GEwill also provide,free of charge, all labor
and in-home service to replacethe defective part.
Staple your receipt here.
Proof of the original purchase
date isneeded to obtain service
under the warranty.
Damage to the product caused bg accident, fire, floods
or acts of God.
Incidental or consequential damage caused bg possible
defects with th isappliance.
Damage caused after delivers.
Product not accessible to provide required service.
EXCLUSION OF IMPLIED WARRANTIES--Your sole and exclusive remedy is product repair as provided in this Limited
Warranty. Any implied warranties, including the implied warranties of merchantabilitg or fitness for a particular
purpose, are limited to one year or the shortest period allowed by law.
This warranty is extended to the original purchaser and any succeeding owner for products purchased for
home use within the USA. If the product is located in an area where service by a GE Authorized Servicer is not
available, you may be responsible for a trip charge or you may be required to bring the product to an Authorized
GE Service location for service. In Alaska, the warranty excludes the cost of shipping or service calls to your home.
Some states do not allow the exclusion or limitation of incidental or consequential damages. This warranty
gives you specific legal rights, and _lOUma_l also have other rights which var_l from state to state. To know
what Four legal rights are, consult _tour local or state consumer affairs office or _tour state's Attorne_t
General.
Warrantor: General Electric Company. Louisville, KY 40225
39
Page 40

Consumer Support.
GEAppliances Website GEAppliances.com
Have a question or needassistancewith your appliance? Try the GEAppliancesWebsite 24 hours a day,
any day ofthe gear! For greater convenience and faster service,you can now download Owner's Manuals,
order parts or evenschedule service on-line.
Schedule Service GEAppliances.com
Expert GErepair service isonly one step away from your door.Geton-line and schedule your service at
your convenience any day of the gear!Or call 800.GE.CARES(800./432.2737)duringnormal businesshours.
Real Life Design Studio GEAppliances.com
GEsupports the UniversalDesignconcept-products, services and environments that can be usedby
people of all ages,sizesand capabilities.We recognizethe need to design for a wide range of physical and
mental abilities and impairments. For details of GE'sUniversalDesignapplications, including kitchendesign ideas
for people with disabilities,check out ourWebsite today. Forthe hearing impaired, pleasecall 800.TDD.GEAC
(800.855.4522).
Extended Warranties
Purchasea GEextended warranty and learn about special discounts that are available while your warranty
isstill in effect. You can purchase it on-line anytime, or call800.626.2224during normal businesshours.
GEConsumer Home Serviceswill still be there after your warranty expires.
Parts and Accessories
Individualsqualified to service their own appliances can have parts or accessoriessent directly to their homes
(VISA,MasterCardand Discovercards are accepted).Orderon-line today, 24 hours every day or by phone at
800.626.2002during normal business hours.
Instructions contained in this manual cover procedures to be performed by any user. Other servicing
generally should be referred to qualified service personnel. Caution must be exercised, since improper
servicing may cause unsafe operation.
Contact Us
If you are not satisfiedwith the service you receivefrom GE,contact uson our Website with all the details
including your phone number,or write to: General Manager,Customer Relations
GEAppliances,Appliance Park
Louisville,KY40225
GEAppliances.cam
GEAppliances.cam
GEAppliances.com
] Register Your Appliance GEAppliances.com
enhanced communication and prompt serviceunder the terms of your warranty, should the need arise.
Register your new appliance on-line-at your convenience! Timely product registration will allow for
Youmay also mail inthe pre-printed registration card included inthe packing material, or detach and use
the form in the Owner's Hanual.
Printed in the United States
 Loading...