

Page 1
—
SAVE
See energy saving tips cm page 5.
e Section entitled “Before YOLJCM’ For
z
on pa$ywl .
Page 2
.—.———.——
it is our sincere hope that you enjoy every feature of your new range. It is designed to give you dependable cooking
resuits while conserving energy and saving you money.
In addition, extra savings are possible through wise use and care procedures. This booklet explains how you can
get the best use from your range by following tried and true cooking procedures outlined here. These recommended
procedures were developed using safe and energy conserving techniques.
If you have any questions about your new range, how to use any feature a different way, or special cooking techniques that are not answeredin this booklet, please write or call the GE Consumer Coordinator near you whosejob is
to help you and your family get the most out of your new range. The number is available from your dealer, from the
local GEMajor Appliance Sales Office, or contact me directly. Wewould like to hear from you.
fVlANAt3EJ3-CONSUMEiRS INSTITUTE
GENERAL ELECTRIC COMPANY
APPLIANCE PARK AP2-235
LOWSVILLE, KENTUCKY40225 ‘
.———-—.——
YourGeneralElectricrangehasa nameplateonwhich isstamped‘themodelnumberandserialnumber.
To locate nameplate,openovendoor and look at frameaboveovenopening.
Modeland serial numbersare also on the PurchaseRecordCardwhich carqewith your range.Before
sendingin this card, pleaserecordthe numbersin the spacebelow,or get them from nameplatede-
scribedabove,and recordhere.
ModelNumber
Pleasereferenceboththese numbersin anyfuture correspondenceor product”servicecalls concern-
ingyour range.
Serial Number
..,.,.
When you get yam new range . . .
Have it installed and properlygrounded bya qualified installer.
Have the installer showyou the location ofthe range circuit breaker or fuse, and
mark it for easyreference.
Don’t assume that you know howto operate all partsof the range. Some features
may work differently from those on your previousrange.
Do take the time to read our suggestionsfor best use,
When using your mmge . . .
DO NOT TOUCH HEATING ELEMENTS of? INTERIOR SURFACE OF OVEN. DO
~
NOT TOUCH SURFACE UNITS OR AREAS NEAR UNITS OF COOKTOP. Surface units and oven heating elements
to burn even though they are dark in color,
During and after use, do not touch, or let clothing or otherflammable materials
contact surface’units, areas nearby surface units or anv interior area of oven until all of these areas have had sufficient time to COOL”Potentially hot surface
included are:
Around surface units: the cooktop and areas facing
Around oven: oven vent openings and surfaces near
crevices around the oven door and the edges of the
—also areas nearby—may be hot enough
~
the cooktop.
the openings,
door window,
1
Page 3

Don’t leave children alone or unattended in the area where a range is in
operation.
Don’t allow anyoneto climb, stand or hang on the door, drawer or top surface of
the range. They could damage the rangeand eventip it over,
CAUTION: DO NOT STORE ITEMS OF INTEREST TO CHILDREN IN CA131NETS ABOVE A RANGE OR ON THE BACKSPLASHOF A RANGE— CHILDREN
CLIMBING ON THE RANGE TO REACH ITEMS COULD BE SERIOUSLY U’+
J! JRED.
Never useyour appliance for warming orheating the room.
Be sure reflector pansand vent ducts are unobstructed and in place. Their ab-
sence during cooking could damage components and wiring.
Turn off all surface cooking units and allow them to cool before cleaning i.mder any of therm
Use Proper Pan Size — This appliance is equipped with one or more surface
units of different size. Select utensils having flat bottoms large enough to
cover the surface unit heating element. The use of undersized utensils will ex-
posea portion of the heating element to direct contact and may result in ignition
of clothing. Proper relationship of utensil to burner will also improve efficiency.
Wear proper apparel — loose fitting or hanging garments should never be worn
while using the appliance.
e
Never leave surface units unattended at high heat settings. Boilover causes
smoking and greasy spillovers that may ignite.
Use only dry potholders— moist or damp potholders on hot surfaces may result in burns from steam. Do not let potholderstouch hot heating elements. Do
not use a towel or other bulky cloth.
Glazed cooking utensils —
only certain types of glass, glass/ceramic, ceramic,
earthenware, or other glazed utensils are suitable for range-top service without
breaking due to the sudden change in temperature.
Utensil handles should be turned inward and not extend over adjacent surface
units — to minimize burns, ignition of flammable materials, and spillage due
to unintentional contact with the utensil, the handle of a utensil should be positioned so that it is turned inward and does not extend over adjacent surface
units.
$9
When flaming foods under the hood, turn the fan off. The fan, if operating,
may spread the flame.
Stand away from range when opening oven door to let hot air or steam escape
before removing or placing food inside.
Place oven racks in desired position while oven is cool. If racks must be handled
when hot, do not let potholder contact hot heating element in oven.
Pulling out shelf all the way to the shelf stop is a convenience in lifting heavy
foods. R is also a precaution against burns from touching hot surfaces of the
door or oven walls,
Don’t heat unopened food containers in the oven, Pressurecould build up and
the container could burst, resulting in injury,
s’
When using cooking or roasting bags in oven, follow manufacturer’s directions.
.—
2
Page 4
Don’t usealuminum foil to line reflector pans or anywhere in the oven except as
described in this booklet. Improper installation could result in a shock, fire
hazard, or damage to the range.
Keep hood and grease filters clean according to instructions to maintain good
ventingand toavoidgreasefires.
Don’t immerse or soak removable surface units. Don’t put them in a dishwasher.
Do not store flammable Materials in an ovenor nearthe cooktop.
DO NOT USE WATER ON GREASE FIRES. NEVER PICK UP A FLAMING PAN.
Smother flaming pan on surface unit bycoveringpan completely with well fitting
lid, cookie sheet or flat tray. ~
Flaming grease outside pan can be extinguished by baking sodaor, if available,
~ multi-purpose dry chemical or foam type extinguisher,
Whencooking in the oven, flame can be smothered by completely closing door
and turning OVEN SET to OFF.
Also see frying tips, surface unit pages.
...
st?~..cle~~~%%g ovens
Do not clean door gasket. The door gasket is essential
s
. .
for a good seal. Care
should be taken not to rub, damage, or movethe gasket
~ Do not use oven cleaners. No commercial ovencleaner
or ovenliner motective
coating of any kind should be used in or around any part of the oven.
~ Cleanonly parts listed in this Use & Care booklet.
~ Before self-cleaning the oven, remove broiler pan and other utensils.
1~ ~oti
need semice. .,
Read “Before You Call for Product Service” at rear ofbook.
Don’t attempt to repair or replace anypart of yourrangeunless it isspecifically
recommended in the book. All other servicing should be referred to a qualified
technician.
Read the warranty on the back cover of this Use and Care Book,
Disconnect range at range circuit breaker or
main fuse before performing any
service.
Range Irzstallation. . .
range, like many other household items,
‘VOur
flow covtiringssuch is cushioned vinyl or ca~peting. When moving the ran~e-o;
this type of flooring, use care, and it is recoin-mended that these simple and inexpensive instructions be followed.
The range should be installed on a sheet of plywood (or similar material) as fol-
lows: When the floor coveringextends under the range, a %& thick piece of
wood should be installed under the range. When the.floor coveringis terminated
at the front of the range,
with plywood to the same level or higher than the floor covering, This will then
allow the range tb be moved for cleaning or servicing,
the area that the range will rest on should be built up
is twavv ml can settle into soft
Page 5
NEW
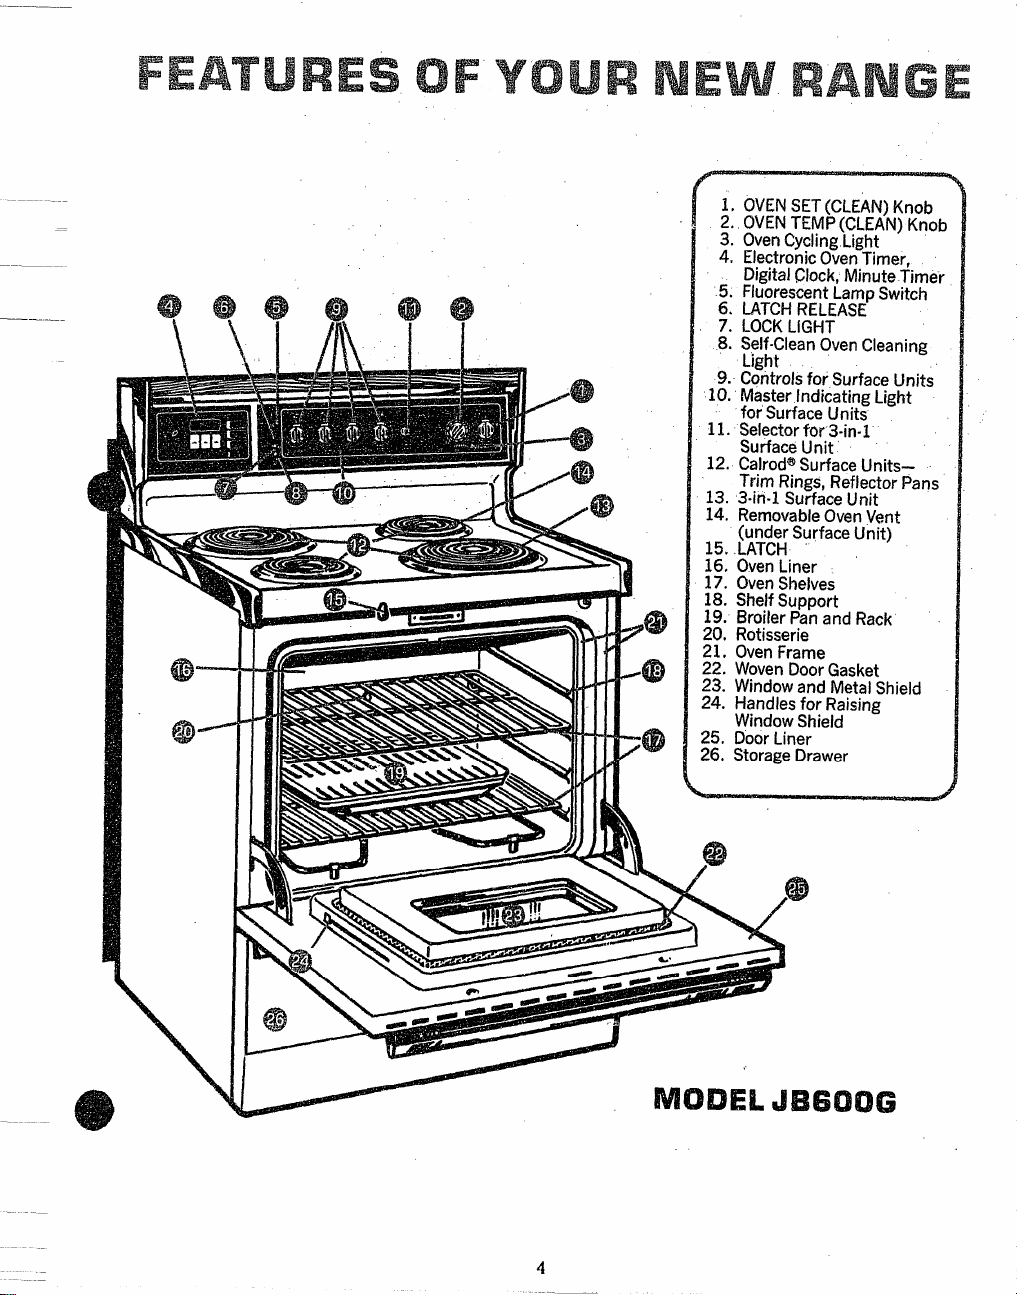
1, OVENSET(CLEAN)Knob
2. OVENTEMP(CLEAN)Knob
3. OvenCyclingLight
4. ElectronicOvenTimer,
DigitalClock,MinuteTimer
5. FluorescentLampSwitch
6, LATCHRELEASE
7. LOCKLIGHT
8. SeIf-CleanOvenCleaning
Light
9. Controlsfor SurfaceUnits
10. MasterIndicatingLight
for SurfaceUnits
11. Selectorfor3-in-l
SurfaceUnit
12. Calrod@SurfaceUnNs–
Trim F?ings,Reflectorpans
13. 3-in-l SwfaceUnit
14, RemovableOvenVent
(underSurfaceUnit)
15. LATCH
16, OvenLiner
17. OvenShelves
18. ShelfSupport
19. BroiferPanandRack
20, Rotisserie
21. OvenFrame
22, WovenDoorGasket
23. WindowandMetaJShield
24. HandJesfor Raising
WindowShield
25. DoorLiner
26. StorageDrawer
b
4
&
Page 6
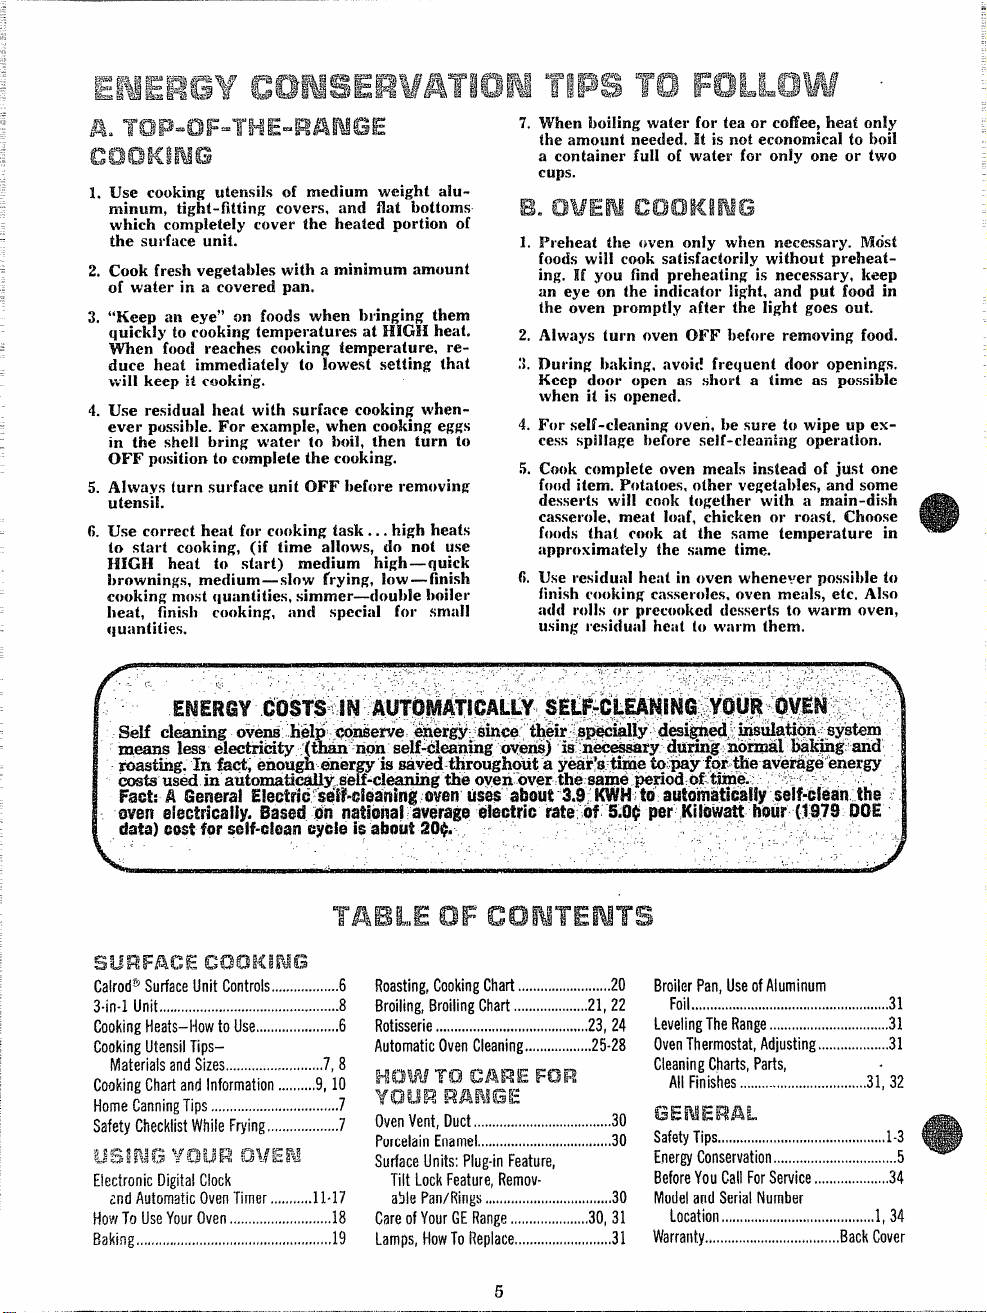
l.kw cooking utensils of medium weight aluminum, tight-fitting covers, and flat bottoms
which completely cover the heated portion of
the surface unit.
2.
Cook fresh vegetables with a minimum amount
of water in a covered pan.
3.
Weep am eye”
quickly to cooking temperatures at HIGH heat.
When food reaches cooking
duce heat immediately to lowest setting that
wiN keep ii cooking.
4.
Use residual heat with surface cooking whenever possible. For exampIe, when cooking eggs
in the sheU bring water to boil, then turn to
OFF position to comp!eie the cooking.
Always turn surface unit OFF before removing
5.
utensiL
6.
Use correct heat for cooking task . . . high
start cooking, (if time allows, do not use
to
HIGH heat to start) medium high—quick
i)rownings, medium—slow frying, low—finish
cooking most quantities, simmer—-double boiler
heat, finish cooking, and special
quantities.
on foods when bringing them
iemperatumtre-
for ~midl
heats
7. When boiling water for tea or coffee, heat only
ihe amount needed. It is not economical to boil
a container full of water for only one or two
cups.
1.
Preheat the oven only when necessary. M6st
foods will cook satisfactorily without preheating. If you find preheating is necessary, keep
an eye on the indicator light, and put food in
the oven promptly after the light goes out.
2,
Always turn oven OFF More removing food.
:1.
During baking, avoi{! frequent {ioor openings,
Keep door open as short a time as possible
when it is opened.
4.
For self-cleaning oven, be sure to wipe up excess spillage before self -clermiilg operation.
5. .
Cook complete oven meals instead of just one
food item. Potatoes, other vegetables, and some
desserts wiH cook together with a main-dish
casserole. meat loaf, chicken or roast, Choose
foods fhal cook at the same temperature in
itppro~imiit”ely the same time.
6.
residuitl heat in oven whenever nossib]e to
IJse
finish cooking casseroles, oven meal;, etc. Also
iidd IWIIS or precooked desserts to warm oven,
i’~siduid hei~t to Wiirm them.
using
CalrodSJSurfaceUnitControls..................6
3-in-1Unit
CookingHeats–liowto Use......,..........,....6
Cooking
....... .......... .............. .......... .......
UtensilTips–
MaterialsandSizes
......... ................. ,
8
18
CookingChartandInformation..........9, 10
HomeCanningTips
.,.,,............ .................
7
SafetyCheckiistWhileFrying...................7
~jkzJ: p$g,~< ygjjg)j @ ~$f~ p~
ElectronicDigitalClock
a-idAutomaticOven“I_imer.....,.....11“17
HowTo UseYourOven
,’,...,,..,.,.,.,,,.,......
Bakirig,,..,,.,4.,..,,.’.,.............................,#.,
18
19
Roasting,CookingChart.........................20
Broiling,BroilingChart....................21,22
Rotisserie,..,!.,,.,.,.....!,,,,,...... ........... .
23,24
AutomaticOvenCleaning..................25”28
Hfi2RfwTo ~j$fjq~ g=~~
V’CIU?Rl!wkiMGE
OvenVent,Duct........................,, .,..,...,!.
PorcelainEnamel....................................3O
SurfaceUnits:Plug.inFeature,
Tilt LockFeature,Remov-
akdePan/Rings
CareofYourGERang~
Lamps,HowToReplace
. .. ................... .........,.,.
. .4.!.1.00....0...,...30,31
,..,......,.,, .4,,........31
30
30
BroilerPan,UseofAlumirrum
Foil..................... ........................ ........ 31
LevelingTheRange,0,..,,.,.,.,,,.!...,,..........31
OvenThermostat,Adjusting...................3l
CleaningCharts,Parts,
All Finishes.......,-.,!,,....,.,,.!,.!.,.....3~,32
SafetyTips,,..,,...,,,0,,,,...,,,.. ....................i-3
EnergyConservation
.......... ....................... 5
BeforeYouCallForService....................34
ModelandSerialNumber
Location 1 34,,,,,,,, ...,,,.,,,,.,.,,,.,...,,,,,,.,.., ,
Warranty.,,,..,,..,.,,,..,,,,,,,,.,,,,,,,,.,BackCover
—-
Page 7
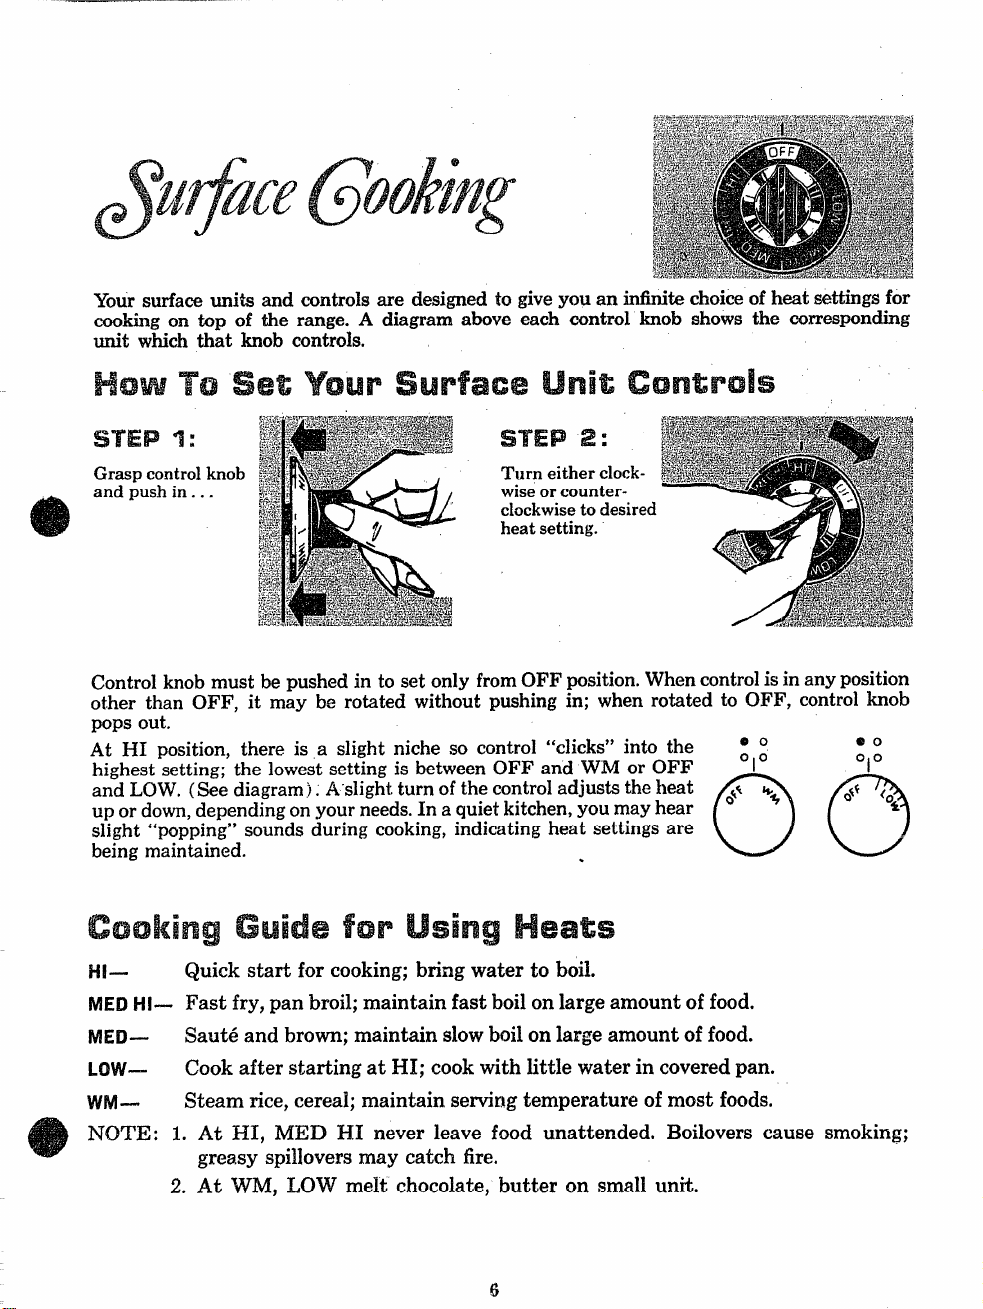
Your surfaceunits and controlsare designedto
cooking on top of the range.A diagramabove
giveyou aninfinitechoiceof heatsettingsfor
each control knob shows the corresponding
unit which that knob controls.
STEP 2:
Graspcontrolknob
and pushin. . .
Controlknob mustbe pushedin to set only fromOFF position.Whencontrolisin anyposition
other than OFF, it may be rotated without pushingin; when rotatedto OFF, controlknob
pops out.
At HI position, there is a slight niche so control “clicks” into the ~1~
highestsetting;the lowestsettingis betweenOFF and WM or OFF
andLOW, (See diagram). A-slightturnof thecontroladjuststheheat
upordown,dependingonyourneeds.In a quietkitchen,you mayhear
slight “popping” soundsduringcooking, indicatingheat settingsare
beingmaintained.
Turn eitherclockwiseor counterclockwiseto desired
heatsetting.
.
06
00
t
I
(0
*
#11—
Mm 111——
MED—
Low—— Cook after starting at HI; cook with little water in coveredpan.
wwl——
Quick start for cooking; bring water to boil.
Fast fry, pan broil; maintain fast boil on large amount of food.
Saut6 and brown;maintain slowboilon large amount of food.
Steam rice, cereal; maintain serving temperature of most foods.
NOTE: 1. At HI, MED HI never leave food unattended. Boilovers cause smoking;
greasy spillovers may catch fire.
2. At WM, LOW melt chocolate, butter on small unit.
Page 8
carmingshould be done on range top only. DO NOT CAN IN ANY CONVENTIONAL
OR MICROWAVE OVEN.
In surfacecookingof foods otherthancanning,the useof largediameterutensils(extending
more than l-inch beyond edge of trimring) is notrecommended.However,whencanningwith
water-bathor pressurecanner,large-diameterutensilsmay be used. ‘I?& is becauseboiling
water temperatures(even underpressure) are not harmfulto cooktop surfacessurrounding
heatingunit.
HOWEVER, DO NOT USE LARGE DIAMETER CANNERS OR OTHER LARGE DIAMETER UTENSILS FOR BOILING OR FRYING FOODS IOTHERTHAN WATER. Most
syrup or sauce mixtures—andall
boiling water.Such temperaturescould eventuallyharm cooktop surfacessurroundingheatingunits.
1. Bringwaterto boil on HKXIheat (useHIGH BOIL on automaticunit), theziafter boiling
hasbegun,adjustheatto lowestsettingto maintainboil (saves energyand best usessurface
unit).
2. Be sure
be centeredon surfaceunit,use smallerdiametercontainersfor goodcanningresults.
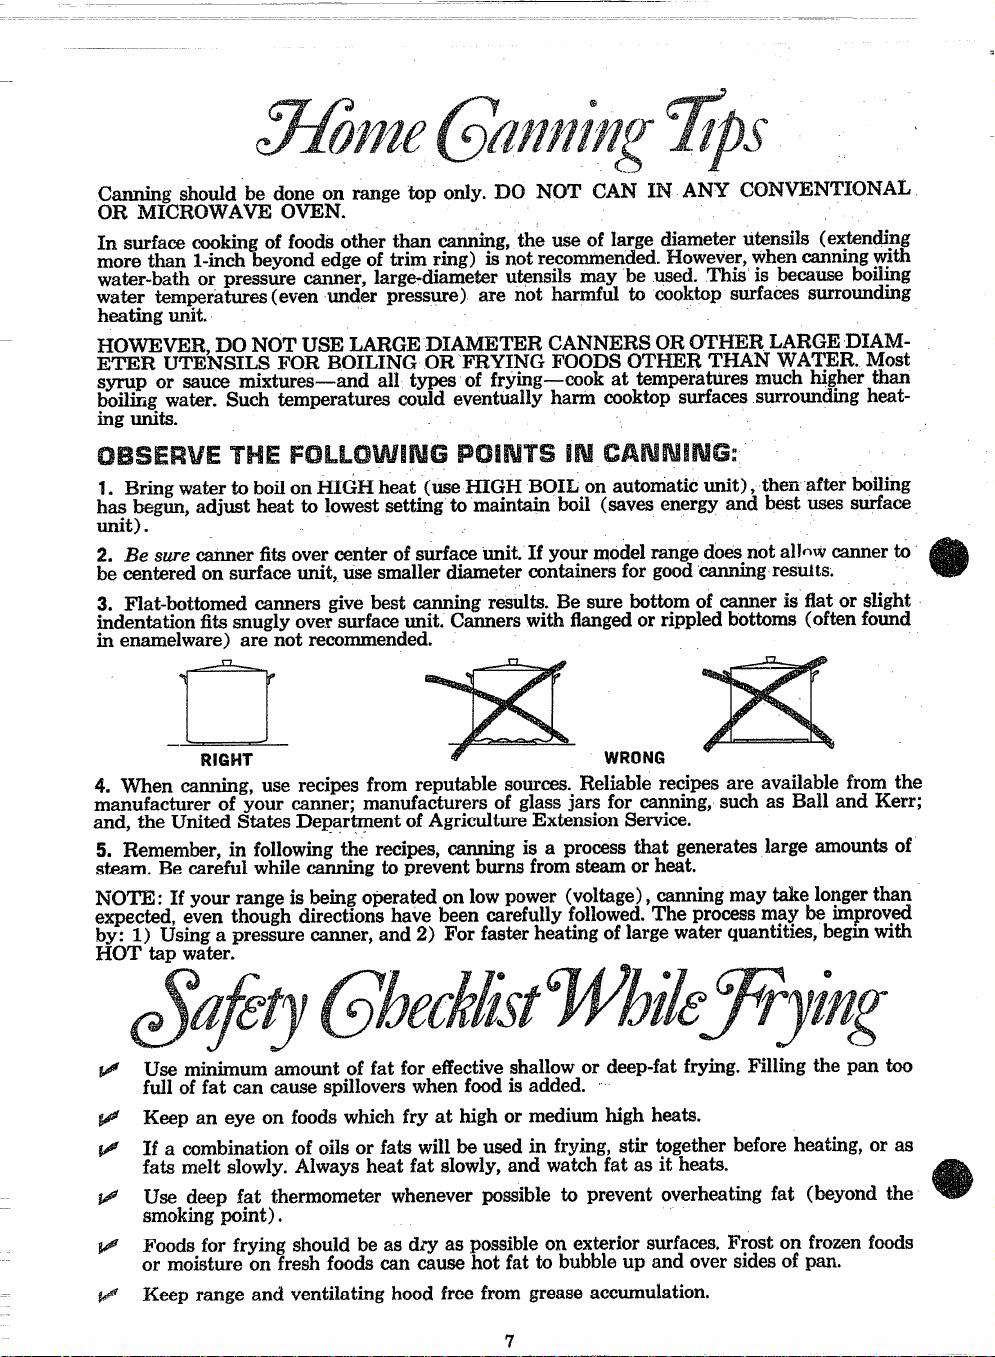
3. Flat-bottomedcannersgive best canningresults.Be surebottomof canneris flator slight
indentationfitssnuglyoversurfaceunit.Cannerswithflangedorrippled
in enamelware)arenot recommended.
cannerfitsovercenterof surfaceunit.If yourmodelrangedoesnotalhv cannerto
types of frying
—cook at temperaturesmuch higherthan
i$l!l
bottoms(oftenfound
—.——
-n
RIGHT
4. When canning,use recipesfrom reputablesources.Reliable recipesare availablefrom the
manufacturerof your canner; manufacturersof glassjars for canning,such as Ball and Kerr;
and,theUnitedStatesDepartmentofAgricultureExtensionService.
5. Remember,in followingthe recipes,canningis a processthat generateslargeamountsof
steam.Be carefuiwhilecanningto preventburnsfromsteamor heat.
NOTE: If yourrangeis beingoperatedonlowpower (voltage), -ing may take~o~ger than
expected,even thoughdirectionshave beencarefullyfollowed.The processmay be improved
by: 1) Usinga pressurecanner,and2) For fasterheatingof largewaterquantities,begin with
tap water.
HOT
Use minimumamountof fat for effectiveshallowor deep-fatfrying.Filling the pan too
full of fat can causespilloverswhenfood is added.
Keep an eye on foods whichfry at highor mediumhigh heats.
If a combinationof oils or fatswill be usedin frying, stirtogetherbefore heating,or as
fats melt slowly.Alwaysheatfat slowly, andwatchfat as it heats.
Use deep
smokingpoint).
Foods for fryingshouldbe as dry as possibleon exteriorsurfaces.Froston frozenfoods
or moistureon freshfoodscancausehot fatto bubbleup andoversidesof pan.
!?.#
Keep rangeand ventilatinghood free from greaseaccumulation.
fat thermometerwheneverpossible to preventoverheatingfat (beyondthe
WRONG
7
Page 9
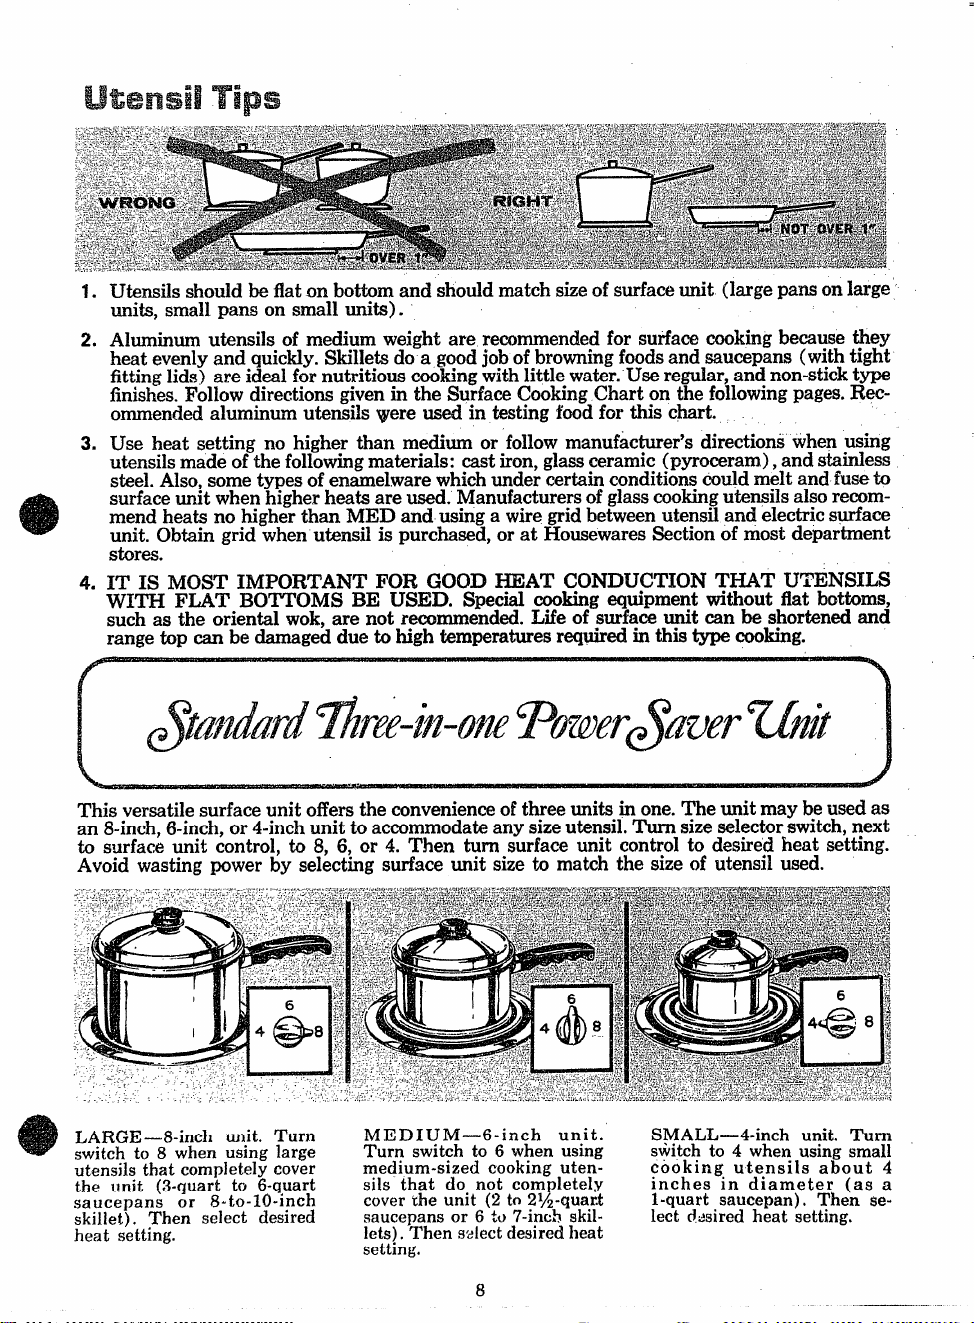
Utensilsshodd be flaton bottomandshouldmatchsizeof surfaceunit (largepansonlarge’
1.
units,smallpanson smallunits).
2.
Aluminumutensilsof mediumweight are recommendedfor surfacecookingbecausethey
heatevenlyand quickly.Skilletsdo a goodjobof browningfoodsandsaucepans(withtight
fittinglids) areidealfornutritious
finishes.Followdirectionsgivenin theSurfaceCookingCharton thefollowingpages.Rec-
ommendedaluminumutensilswereusedin testingfood for this chart.
3.
Use heat settingno higherthanmediumor follow manufacturer’sdirectionswhenusing
utensilsmadeof thefollowingmaterials:castiron,glassceramic(pyrocerarn),andstainless
steel.Also,sometypesof enamelwarewhichundercertainconditionscouldmeltandfuseto
surfaceunitwhenhigherheatsareused.Manufacturersof glasscookingutensilsalsorecommendheatsno higherthanMED andusingawiregridbetweenutensilandelectrics@ace
unit.Obtaingridwhenutensilis purchased,orat HousewaresSectionof most department
stores.
4.
IT IS MOST IMPORTANT FOR GOOD HEAT CONDU~TION T-T UTENSILS
WITH FLAT BOTTOMS BE USED. Special cooking equipmentwithoutflat bottoms,
such as the orientalwok,arenot recommended.Life of surfaceunit can be shortened
rangetop canbe damageddueto hightemperaturesrequiredinthistypecooking.
cookingwithlittlewater.Useregular,andn~n-s~icktype
-—_.-—.———.-
and
This versatilesurfaceunitofierstheconvenienceofthreeunitsinone.The unitmaybe used as
an8-inch,6-inch,or 4-inchunittoaccommodateanysizeutensil.Turnsizeselectorswitch,next
~ surface~it control,~ 8, 6, or 4. Then turnsurfaceunit controlto desiredheat setting.
Avoid wastingpower by selectingsurfaceunit sizeto matchthe sizeof utensilused.
LARGE—8-inch unit. Turn
switch to 8 when using large
utensilsthat completely cover
the unit (3-quart to 6-quart
saucepans or 8-to-10-inch
skillet). ,Then select desired
heat setting.
MEDIUM—6-inch unit.
Turn swit:h to 6 when using switchto 4 when using small
medium-sized cooking uten- cooking utensils about 4
sils that do not com letely
cover the unit (2 to 21Z-quart
saucepansor 6 to 7-inch skil- Iect chired heat setting.
lets), Then selectdesiredheat
setting.
J’
SMALL—4-inch unit. Turn
inches in diameter (as
l-quart saucepan). Then se-
—
—
a
Page 10

d.- -’>/
\*-
CERW.
Cornmeal
Grits
Oatmeal
Rice, etc.
HI—Bring water to boii. Before
adding cereal, switch to
LOWor WM, then stir in
cereai, Finish according to
package directions.
1. Cereals bubble and
expand when cooking.
Use iarge enough pan
to prevent boilover,
2. For steamed rice, switch
to Whl; cover and cook
25 minutes.
Etws
Cooked in shell
Frijj “Sunny Side
Poached
Scrambled
MEATS
Braised (Pork
Chops, Pot
Swiss Steak, etc.)
?an Fried (Lamb
choirs,Thin
(3/2 to %
Steairs
inch), Minute
Steaks, Hamburgers, Franks, etc)
Fried Chicken
Pan Broiled ffacon
Water. Codmd
fChicken, Corned
f3eef, Smoked
Pork Shoulder,
Tongue, etc.)
$%ELT’IR6
Chocolate Sauares.
Chocolate:
Butterscotch Bits,
Butter, etc.
fkmst,
}!1—At first perk .s.witdrfprt
to
HI —Caver eggs with caoi
water. Cover pan and bring to
steaming point switch to
MED— Melt butter. Add eggs
and cover skillet; or da not
cover but baste with fat.
HI —Quickly bring water to
steaming point. Switch to
HI —To heat butter until light
goiden coior. Switch to
H1—1’o rneit fat. Switch to
MEi) Ht to richly brtwfn meat,
Add iiquid and switch to
Hi —Preheat skiilet
then grease lightly. Witch to
V2 min.
.,
Hl --To melt arrd heat fat,
Switch to MED Hi to brown pre
pared chicken pieces, Then
cover skiliet, and switch to
Hi —Put slices in sirigle layer
in coid skillet. When just
sizziirrg, switch to
Hi—Cover meat with water;
cover kettle. When steaming
freeiy, switch to
Wkf— pllt in smaii saucepan
small surface unit. Cover for
semisweet chocoiate or
butterscotch pieces.
MEW--TO heat skiiit?t 8-10
minutes. Grease iightly.
LOW, to maintain gentle
steady perk
LOWor WM. Cook 3.4 min.
for soft eggs, about 15 min.
for hard-cooked.
Continue cooking untii white
is “just set”, about 3-5
more minutes.
MED or LOW. Carefuily add
eggs. Cook uncovered about
5 minutes for medium
doneness.
MED or LOW. Add egg mixture,
cook stirring to desired
doneness. Remove from heat.
LObV.Cover, cook siowiy until
fork tender.
fvtEfl H1 or MED.’
brownand cookto desired
doneness.
LOW, cook until just lender+
tfqcover
skillet Iaritfew
mmutes to crispchiclwn,
MEI) HI or MED. Cook, turning
occasionally to desired
doneness.
LOW or’ MEt3 so water boiis
S1OWIY.Cook until fork tender
Ailow about 1.0-15 min. to
o
meit through, Stir to smooth.
Cook pancakes 2.3 mirr. each
side. (Aliow sllghtly tonger
for thick batter.) -
Lrut
Radmeat,
Percolate tsmlominutes for
8 cups, less for fewer
~ücups,
Begin timing when {irst
wisps of free steam
come from cover.
‘Variation: Start heating
fat at HI; when meited,
switch to LOW, add eggs.
When bottoms are just set
turn eggs “over easy” to
cook ather side.
Eggs are easy to handl
wide shallow skillet or
Remove with slotted SDOO
or pancake turner to
drain,
Eggs continue to set
slightly after removing
from heat.
Allow approximately 1 hour
for thick chops or steaks,
2 or more hours for pot
roast.
1) Turn franks, sausage
often to cook eveniy.
2) Cook minute steaks at
MED HI for 1.2 min.
each side.
Southernstyle chicken—
cook (after browning) 15
min. covered and 10.20
min. uncovered,
If desired, cook from
beginning at MEi) heat.
Add salt or other season.
ings before cooking if
meat is uncured,
1.) if desired, melt butter,
unsweetened chocoiate
squares about 5-10 min. at
LOW, watching carefuiiy.
2.) t.opg, slow melting of
chocoiate and butter cives
best results.
When bubbles in batter . #to surface of pancakes turn
to second side,
P
.
::.’.&
@
Page 11
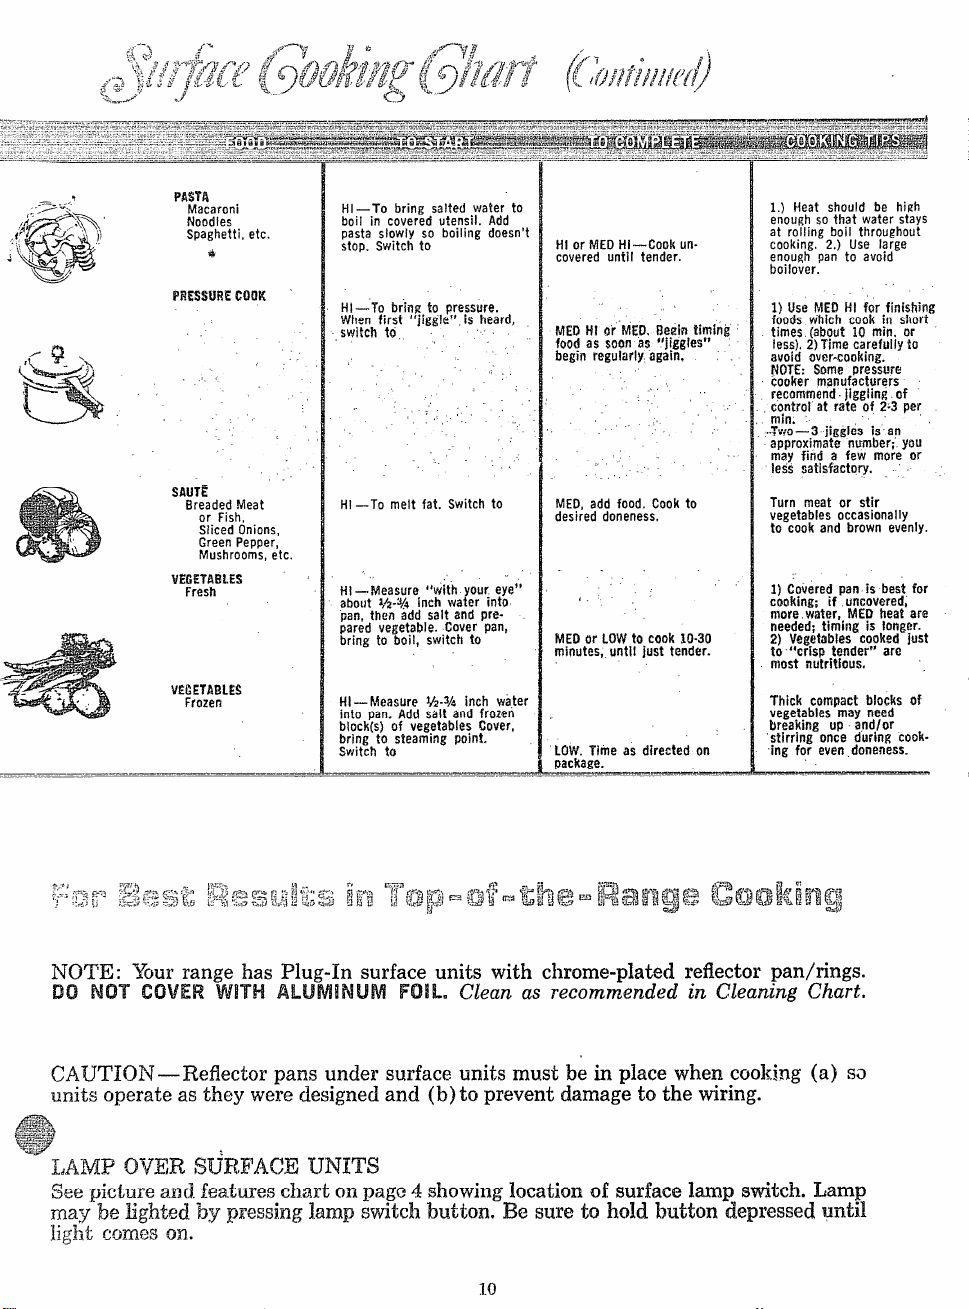
Pflwfi
Macaroni
NOo(fIes
Spaghetti, etc.
*
WWSSWKCOW
SAUTE
Breaded Meat
or Fish,
Sliced Onions,
Green Pepper,
Mushrooms, etc.
vEGETABLES
Fresh
HI —To bring salted water to
boil in coveredutensil. Add
pasta slowly so boiling doesn’t
stop. Switch to
HI—To brirrs to pressure.
When first “jigg!e”, is heard,
switch to
HI —To melt fat. Switch to
HI –. Measure “with your eye”
about %4-% inch water into
pan, then add salt and prepared vegetable. Cover pan,
bring to boil, switch to
tfl or MED Hi—Cook um
covered until tender.
MEfl IN or W!). flerzin timhrh
food as soon as “jiggles”
begin regularly again,
. .
,,
fvlED,add food. Cook to
desired doneness.
MED m’ LOW to cook 10.30
minutes, until just tender.
1.) Heat should be hi~h
enough so that water stays
at rolling boil throughout
cooking. 2.) Use large
enough pan to avoid
boilover.
1) Use MED HI fcrr finishing
foods which cook in sf’iort
times (about 10 min. or
less), 2) Time carefuily to
avoid cwer.cooking.
NOTE: Some presstm
cooker manufacturers
recommend. jiggling of
control at rate of 2.3 per
min.
,.~i.;~
—3 jiggles is arr
approxhrrate number; you
may find a few more or
less satisfactory.
Turn meat or stir
vegetables occasionally
to cook and brown evenly.
1) Covered pan is best for
coot(ing; if uncovered,
more water, NW) heat are
needed; timing is iorrgcw.
Vegetablescookedjust
2)
%risp tender” are
to
most rrutritious,
H1—MeasUre %-% inch water
into pan. Add salt and frozen
block(s) of vegetables Cover,
bring to steaming point.
~ Switch to
LOW. Time as directed on
package.
—_.___.L-
Thick compact blocks of
vegetables may need
up and/or
tx~aking
stirring once during cooking for even doneness.
NOTE: !ibur range has Plug-h surface units with chrome-plated reflector pan/rings.
DO t401’ Cf3VlU?VWW H3!L.
Clean as recommended ~~2 Cleaning(3iart.
CA’UTION-Reflector pans under surface units must be in place when.cooking (a) sa
q?erate as t~ey were defiignedand (b) to prevent damage to the wiring.
units
,
LAMP OVER fX.iRFA.CEtJNH’S
Page 12
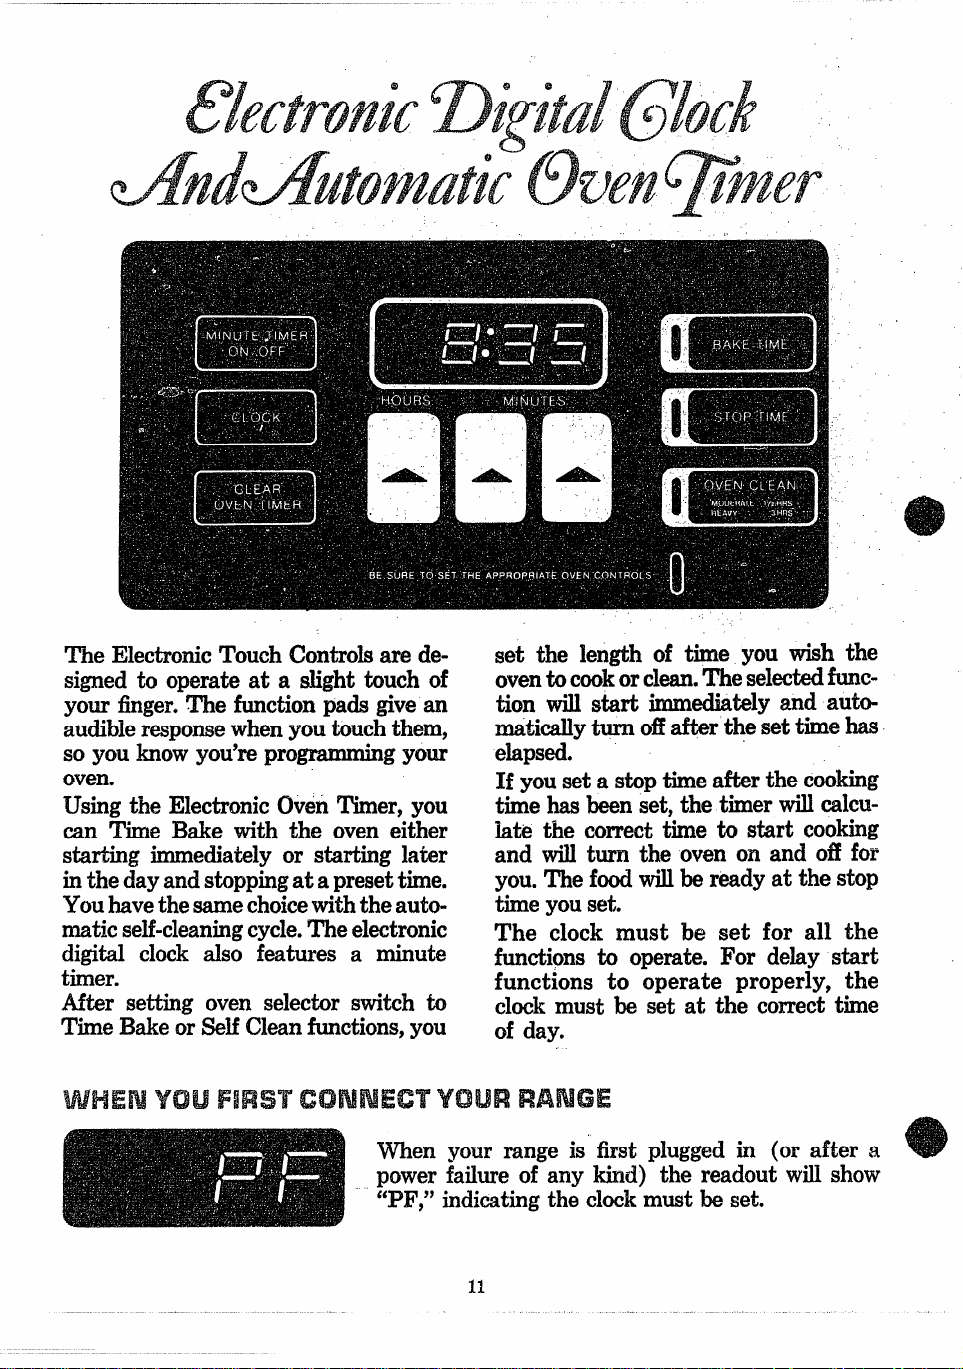
ElectronicTouch Controlsare de-
The
signed to operate at a slight touch of
yikr iinger.-Thefunctionpads givean
audibleresponsewhenyoutouchthem,
so youknowyou’reprogrammingyour
oven.
Usingthe ElectronicOvenTimer,you
can ‘HrneBake with the oven either
starting immediatelyor starting later
inthe dayandstoppingat apresettime.
Youhavethe samechoicewiththe automaticself-cleaningcycle.Theelectronic
digital clock aIso features a minute
timer.
After setting oven selector switch to
TimeBakeor SelfCleanfunctions,you
When your range is first plugged in (or after a
power failure of any kind) the readout will show
“PF/’ indicatingthe clockmust be set.
set the length of time you wish
the
oventocook-orclean.The-selectedfunction will start immediatelyand automaticallyturn offafter the set timehas
elapsed.
If youset a stoptimeafter the cooking
time hasbeenset, the timer willcalculate the correct time to start cooking
and will turn the oven on and off for
you.The foodwillbeready at the stop
timeyouset.
The clock must be set for all the
functions to operate. For delay start
functions to operate properly, the
clockmust be set at the correcttime
of day.
Page 13

L Touch the CLOCKimi. The readout will now
Wade’o:oo.’) -
.
the cor-
~OUChl ~he ~~~if?~ pat! and Md it
2.
qpti.1
rect hour appearson the readout.
3. ToucheachOfthe MINUTES pa(k and holduntil
the correct minutes appear on the readout.
CLOCKis nowset.
CL Why did ‘VP appear an rt?adout display after 11touched CLOCKpad?
A.
You didnotenterthe time fastencmgh.
Touch CLOCKpad to start again. (“H?’)
appears within 15 seconds.)
Q. Aft@r’I touched HOURS pad, WEEP’
flashed on readout display and a signal
sounded. What does this mean?
A. You have entered the time without an
HOUR entry. Start over from Step 1.
Q.
WIIydoesW+colonflash?
A. The flashing means that the CLOCK
is keeping time. It flashes d the rate of
1 flash each second or 60 per minute.
“U’HE
@ MY CLOCK shows incorrect tim~. HOW
can 1reset it?
A. To reset or change the CLOCK, you
must touch the CLOCK pad first, then
the HOURS and MINUTES pads.
Q- MY C~OCK seems to have iost a
seconds time. How can this happen with
an accurate electronic timer?
A. If you touch the CLOCK pad at any
time without touching HOURS or MIN-
UTES to change the time, the colonstops
flashing for 15 seconds to allow you time
to reset the clock. These 15 seconds are
lost. It is suggested that you do not touch
CLOCK pad unless resetting CLOCK,
12
few
Page 14

——..-——.-
—
select AutomaticTimeBake instead ofthe regularBAKEsetting whenyoucan’t
be in the kitchen to turn the ovenoffor turn it on or offat a later time. Simply
preparethe foodsnormallyand placethem in the oven.Set your ElectronicOven
Timerto dothe rest foryou.Pot roastis apopularfoodto automaticallytimecook,
as in the examplebelow.
Turn theOVENSETknobtoTIME BAKEand
1.
turn the OVENTEMP knobto
325” forcooking
the pot roast.
Touchthe BAKETIME pad. Appropriateindi-
20
catorlightswillappearandreadoutshows6’0:00.”
Enter oven cooking time by touching the
3“
EKXJRSand MINUTES pads until the correct
amount oftime appearson readout.For the pot
roast,set 2hoursand30minutes (orappropriate
time dependingon the size of roast).
PWYllE:After touchingBAKE TIME pad, you
have 15 secondsto enter ovencookingtime. If
you do not entm time fast enough,displaywill
showtimeofday;touchBAKETIME and then
enter bakingtime again.
Nowthe oven
30 minutes
has elapsed.Time of day-&lllshowon-display.me oven is baking,
is autOmaticalIy
timingyourcookingand willstopwhen2hoursand
you mn checkbakingtime remaining
ontimer by touchingBAKE TIME pad.
13
Page 15

Whenyouwant to leaveyourhomebeforethefoodshouldstart bakingyoucanuse
the automatic
to leavethe house
followsteps 1 through 3 and add
oven timer to delay starting the bake time.For example,if youwish
at noon tmt wanted the pot roast to be ready for swxwrat 6:00,
these additionalsteps: “ “-
4.
Touchthe STOP‘TIMEpad.The STOPTIME
indicator light will comeon. The readout wiU
show“0:00.”
. ...
5.
Enter time vouwant the ovento automatically
turn off by-touchingeach of the HOURS and
MINUTESpadsuntil the correctstoppingtimti
appears on readout. For the pot roast to stop
cookingat 6 o’clock,set 6 hours There is no
needto setminutesbecausethe readoutalready
shows “:QO~’
NOTE: Youhave30secondsto set Steps4and
5. If youdo not, bakingwillbeginimmediately.
That% ALL! oven automatically calculatesthe correctstarting time basedon the
stoppingtime you set and the length of cookingtime. It willturn itself on automaticallyat the dculated starting timeand offautomaticallyat the stoppingtime
you set.
7~/’
After the timedbakingoperation,removethe food
fromthe oven,turn the OVENSET knob to OFF.
The indicatorlights on the ElectronicOvenTimer
go Offautomatically.
Page 16

a whenwsuki 1 select automatic oven
timing?
Q. What foods would ! still prefer to cook
with the oven selector switch at BAKE?
A. The
most common use would be when
no one will be home to start or stop the
oven and you want to have an oven meal
readyfora familydinner.Some peopleset
TIME BAKE right after breakfast to
have a hot lunch ready at noon. TIME
BAKE allows you to leave the house for
last-minute errands, and it is also con-
venient forpartieswhen you must be gone
before the party. Such occasions might
occur when you planned to serve a meal
after a concert, a play or a religiousservice; after a caroling session or a sporting
event; or when bringing a friend home
after work.
Q. Are there certain foods that TIME
BAKE better than others?
A.
Most foodssuch as pot roasts,poultry,
casseroles,vegetables, fruitsandfruit des-
serts, TIME BAKE well!
Q. Are there any foods I should be espe-
cially careful with when choosing TIME
BAKE?
A. Yes. Careshouldbe taken with perish-
able foods
such as milk,eggs, fish,stuflings
and pork in not letting them stand for
more than 2 hours before or
cooking time.
2 hours after
A. Delicate foodslikecakes,breads,cookies and sometimes pies which need attention at the finishof the baking time. After
testing them for doneness,you might find
they need continued cooking, and you
would prefer the oven remain hot rather
than turning itself off. If the food were
done just right, it might become overbrowned and dried out after being Time
Baked automatically then ‘left in the
turned-offoven for any length of time.
Q. SIIoUk!Ikeep foods refrigerated before
cooking?
A. Yes, especially when using a delayed
start and stop timed baking.
Q. Iset all the oven controls for time bak-
ing properly, but the light marked *4Be
Sure TO Set Appropriate Oven Controls9’
still continued to flash. Why?
A. This light remindsyou to set the Time
Bake and Baking Temperature controls.
It is atimed light which flashesfor 15 seconds then goes off.
6L1 touched BAKE TIME but before I
could enter the cooking time, the time of
day came on the readout, Why?
Q. Would I ever want to use TIME BAKE
instead of BAKE when 1 plan on being
home?
A. Yes,
oven timing, you set the oven to automatically turn off after the bake time has
elapsed. You do not have to remember to
turn the oven off. TIME BAKE can prevent overcooking when you are doing
other home tasks away from the kitchen,
because by using the automatic
A, You must enter hours and minutes
within 15 seconds or you must
start over
by touching BAKE TIME again.
Q. Will I know when the oven has auto-
matically turned off?
A. Yes, a short signal will sound to let
you know the TIME
BAKE cycle is - —–—====
completed. Lights next to BAKE TIME
will go off.
Page 17

Q. H 1donotenter a STOP TIME will the
oven turn off automatically?
IL Yes, the
oven will begin bakingimme-
diately and turn off after the baking time
that you have set.
Q.
Doi have to set the oven controls be-
fore setting the automatic timing centw?
IL No, you may do either one first, but
you must makesureyou set boththe oven
controls and the oven timer.
Q. Can ! cheek the amount of time left
to TIME BAKE while the oven is baking?
A. Yes, touch the BAKE TIME pad .at
anytime duringthe cycle and the readout
will show time remaining.
Q.
Can11check the amount of time that 1
wanted to TIME IBAKEeven if the oven is
set to start later in the day?
A. Yes, touchBAKE TIMEand the readout will showthe amount oftime that you
originally set.
CL Can 1 use the top of my oven go cook
while the oven is timed baking?
A.
Yes.
Q. Can i touch both of the MINUTES pads
at the sanw time?
A. No, only
the farrightpad will activate
when both are touched at the same time.
CL Am i changing the correct time of day
on the CLOCK when I am setting the timing center for TIME BAKE?
A. No, because the CLOCK can only be
changed by touching CLOCK pad and
then resetting.
Q. I seem
HOW?!l
to havetrou~le sett~ngthe
and MINUTES pads correctly.
When 1touch and hold the pads, the num-
bers change so fast that, before i can re-
move my finger, the number ! want has
alreac!ychanged to a bigger one.
A. Try
brief taps. The numbers will change one
at a time and you ‘canstop exactly where
YOU wish. ,
Q. Why did 46EE:EE?9appearon the readout
after ! set the Stop Time?
A. ‘CEE:EEJ)tells youthat the Stop Time
you have set isn’~ compatible with the
Bake Time. The Stop Time must allow
sufficienttime for the BAKE TIME you
set. (For example,if you set a Bake Time
of 2 hours, a Stop Time of only 1 hour
ahead would be incompatible.) Just like
any electric alarm clock or timer, you
cannot set a Stop Time for more than 12
hours ahead of the present time.
Q. What do I do if 4’EE:EP flashes on the
readout?
A. Review the answer above. If you have
set an incompatible Stop Time, reset by
touching the STOP TIME pad again and
touching the correct HOURS and MINUTES pads, or you may prefer to touch
CLEAR OVEN TIMER and reset both
the BAKE TIME and the STOP TIME.
CL May I clean the electronic touch con-
trol panel while the oven is timed baking?
A. It is better to wipe the timing center
while the oven is not in a timed cycle.
Clean the timer with a dry or slightly
damp cloth.
Q.
atelyafterI set allcontrols.Whatis wrong?
i% This is normal. After setting BAKE or
SELF-CLEAN functions, there is about a
30to 40 second delay before oven begins.
touching the pad with short or
Myovendidnot begin bakinghrnedi-
Page 18

—
1.
Touch the MHWTE TIMER ON/CIFFpad.
me IwackmtWmnow show“:00”.‘“rkcolon-will
not flash.
2.
TouchappropriateMINUTESpad untilreadout
showsthe desiredtime up to 99 minutes. The
colonwillbeginflashingand the readoutwillbe-
gincountingdown.
When time is UP,the readout will show“:00”
3.
and the colonfi be steady. An audiblesignal
will sound until you touch the MINUTE
TIMER ON/OFFpad.The readoutwillthengo
back to showingthe time of day.
Q. Can I use the MINUTE T!ME!? to time
food being cooked on top of the range?
A. Yes, you can even use the MINUTE
TIMER to time a phone call or other
household activities.
Q. Why did my oven stop Timed Baking
during minute timing function?
A. If
YOU touch CLEAR OVEN TIMER
to either cancel orchange
ing function, you have stopped the timed
baking already started in your oven. You
must touch only MINUTE TIMER
ON/OFl? pad.
Q. Why didn’t the minute timing function
stop when I touched CLEAR OVEN TIMER
pad?
A. You must touch MINUTE TIMER
ON/OFF pad to clear the function.
theminute tim-
Q. Will I interrupt ordelay the Timed Baking function if 1use the M!IUUTE T!MER?
A. No, you may use MINUTE TIMER
during either the TIME BAKE or
CLEAN cycles without affecting the oven
timing in any way.
Q. Why couldn9t i use the HOURS
pad
toset time in the minute timing function?
A. MINUTE TIMER is for minutes only
and HOURS pad will not activate when
usingMINUTE TIMER.
(il. Can I check the time of day while the
MINUTE T!MER is coun~ing down?
ii. Yes, by simply touching the CLOCK
pad, the time of day will appear on the
readout and then the readout will revert
back to showing the IMINUTE TIMER
countdown.
Page 19

—
—
——.—...—...——
Yourovenk designedtogiveyoutopresultsin
baking,roasting,and broilingwhen used as
recommended.
1. Look at the controls. Be sure you understand
how to set them
ctionsfor the Electronic OvenTimer so you un-
derstzmdits use with the controls.
2. Check oven interior. Look at the shelves.
Take a practice run at removing and replacing
them properly, to give sure sturdy support.
3. Read over information and tips that follow.
4. Keep thisbode handy so you can refer to it,
especially during the first weeks of getting ac-
quainted with your oven.
properly.Read over the dire-
—.
For CLEAN, rotatetheknob
theright (clockwise) until
to
—.-— —..—-
Polrilua
the blue pointer is pointing
up, towardtheindexmarker.
When this location is
reached, the control should
snap into final position.
OWN TOdP SETTINGFOR
CLEANCYCLE
The shelve(s) are designed with stop-iocks so
thatwhenplaced correctly on theshelfsupports}
(a) will stop before coming completely from the
oven, (b) wilt not tilt when removingfood nor
when placingfood on them.
TO REMOVE shelvesfrom the oven,whencool,
lift up rear of shelf,pullforward withstop-locks
(curvedextensionundershelf) alongtop of shelf
The controlsfor theoven(s) are markedOVEN
SET and OVEN TEMP. OVEN SET has settings for BAKE, TIME BAKE, BROIL,
CLEAN (and on ovexisso equipped, ROTU3SERIE), andOFF. When you turn the knob to
the desiredsetting,theproper heatingunitsare
then activatedfor that operqtion.
OVEN’ TEMP maintainsthe temperature you
supports.
TO REPLACE shelve(s) in oven, insert shelf
with stop-locks resting on shelf supports. Push
shelf toward rear of oven;,it will fall into place.
When shelf is in proper position,stop-lockson
shelf will run under shelf support when shelf
is pulled forward.
set from WARM (150°) to 13ROIL (550°) and
alsoat CLEAN ($80°). .4 lightnearthiscontrol
glows until oven reaches the selected temperature, then goesoff and on with the ovenunit(s)
during cooking.PRE-HEATING the oven,even
to high temperaturesettings,is speedy—rarely
The lightcomeson automaticallywhenthe door
is mxmed.
ligh~on and off whendoor is closed.
more than about 10 minutes.Preheat theoven
only whennecessary.Most foods will cook satisfactorily withoutpreheating.If you find preheat-
ing is necessary, keep an eye on the indicator
1ightand put food in the oven promptly after
light goes out.
IMPORTANT: The OVEN ,.O,X
TEMP control has a blue ‘A”’En~*
pointer thatis used only for
CLEAN. For normal cooking, line up the desired temperature (marked on the
outer edge of the control
+=
knob) withtheindexmarker ~v~~7c~P,~,T,~o~O~o’~lER
located immediately above
the control.
NORMALCOOKING
IJse switch on window door tc turn
I
I
I
I
I
I
18
Page 20

When cooking a food for the first time in your
new oven, use time givenon recipes as a guide.
Oven thermostats,over a period of years,
may
“drift” from the factory settingand differences
in timing between an old and a new oven of 5
to 10minutesare not unusualand you may be
inclined to think that the new oven is not performing correctly. However,your new oven has
beenset correctly at thefactory andis moreapt
to be accurate than the oven it replaced.
1. It is recommended that you operate the
rangefor a numberof weeksto become familiar
with your new oven’sperformance.However,if
you find that your foods consistentlybrowntoo
little or too much, you may make a simple adjustment in the thermostat (OVEN ‘1’EMP)
knob. See section titled “Care of Your New
Oven.”
2. Use tested recipes from reliable sources.
Measure ingredients accurately and combine
carefully. Use correct size baking utensil.
3. Place shelfat positionsuggestedon chart below. Lettersare markedon wall of oven.
4. Preheat the oven only whennecessary.Most
foods willcook satisi’actorily’withoutpreheating,
If you findpreheatingis necessary,keep an eye
cmthe indicatorlight and put food in the oven
promptly after lightgoesout.
5. To set oven: Close oven door. Turn OVEN
SET to BAKE and OVEN TEMP to temperature on recipe or on Baking Chart.
& Place food in oven, being certain to leave
about l-inch of space between pans and walls
of oven for good circulationof heat. Closeoven
door. Duringbaking,avoid frequent door openings to prevent undesirableresults.
7. Cheek foods for donenessat minimumtime
on recipe. Cook longer if necessary. Remove
foods and switch off heat. When cooking food
for first time in this oven,use times on recipes
as a guide. Be certain foods are done before
removing from oven. See Baking, Before You
CaU for Product Service.
NOTE: Informationabout bakingat high altitudes can usuallybe obtainedat your state agriculturalstation.
BREADS,QUICK
Biscuits
Coffee Cake
Corn Bread
Gingerbread
Piain Muffins
Popovers
Quick Loaf Bread
BREADS, YEAST?
2 foaves
Rot!%plain
%115,Sww?t
CAKES1
(without shortening)
Angel Food
Sponge
Jelly Roll
1 For best results, use shiny aluminum utensils, with dull finish on bottom. To RAISE YEAST DOUGHS, cover lightly -
with cloth and place in your welI inSUiatedoven to keep away frOm drafts. YeaSt doughs raise best at 85 to 110 , so
oven Iarm should be off durin~ risin~. FRUIT CAKES: place larEe ones on lower shelf ~osition: Dlace small or loaf
pan typeon shelf in center of ov%n. –
2 To brown meringue only, use 400, 8-10 mirr; to cook meringue through, use lower temperatures for times niven,
NOTE: When two shelf positions are !istecJ,the first cmegives welI browned and cooked food. If you desire a different
browning, use the second shelf position the next time you cook. Foods listed with three shelf positions cook SUC.
cessfu\]y on
any position Iisted, alone dr in an oven meal,
B, C
B, A
A, B
A, B
A. B
8, A
A
A
a
A, El
B
A, PI
a
E
El
B
B
B
B
. .
425-475
350-400
425-450
350
400-425
375
350-375
375-425
375.425
3!50-375‘
325-375
325-350
375-400
325”350
350-375
275-300
350-375
350-375
350
10-20
20-30
25-40
30-45
20-30
45-60
45-60
45”60
1025
20-30
30-55
45-60
10-15
45-65
20-25$
hrs.
2-4
20-35
~1.30
40-fm
COOKIES’
Brownies
Drop
Refrigerator
Rolled or Sliced
For best resulk use
glass utensils; place
sheet.
Frozen
Meringue?
m-wcrust
PastryShell
TwoCrust
MISCELLANEOUS
Apples, Baked
Custard,Cup
Potatoes,Baked
Puddings, Rice
and Custard
Scalloped Dishes
Souffles
B, C
B, C
C, B
C, B
atin-finisl
rozen pie
A
B, A
A, !3
Et
B
A, B, C
B
A, B, C
B
A, B,C
B
325-350
350-400
400-425
375-400
‘anodizckf
in foil PI
,,
400.425
325+50
400-425
450
400-425
350-400
300-350
325-400
325
325-375
300-350
. .
25-35
10-20
6-12
7-12
.r
minum w
on baking
45-70
- 15=25
45-60
12-15
40-60
30-60
30-60
60-90
60-90
30-60
30-75
...
Page 21

Roasting is ovencookingof tendermeator poul-
try by dry heat. Roasting temperaturesshould
be steaciy anci low. (Low temperatures keep
spattering and oven cleaning to a minimum.)
It is not necessaryto sear, cover, baste or add
water.
HBiNiT%FOR
1. Check weightof meat,and place, fat side up,
on roastingrack in a shallowpan. (Broiler pan
with rack is a goodpan for this.)**
2. l?~acein oven on shelf in A or E position.N-o
preheatingisnecessary.
/3, Switch QW?J$JSET tQ’13A&iEand OVEN
TEMl? to 325.~mallpbultrym~y beco’okeci‘a!
375for bestbrowning. :
4. The chart below givesapproximate time in
minutesper pound. These times shouldonly be
used as a guide. A meat thermometer,inserted
13EEY2
Standing Rib
Rare
Medium
Well Done
Rolled Rib
UMVIE
Le&
Stmu!der
~()~~, fresh
Lo!n
Fresh Ham, Shoulder
W3$lf(, cured
Ham, Precooked
Ham, Cookbefore
Eating
Shoulder, Picnic
Add 5-10 min./pound to times given for standing rib roasts,
Fof bckiedancjrolled shoulder,add 10 min. / pound to times given.
3-5 tbs.
24-30 min. 18-22 min.
30-35 min. 22-26 min.
35-45 min. 28-33 min.
3-5 Ibs.
25-30 min.
3-5 tbs.
35-40 min. 30-35 min.
14-18 min. per H3.
Under 10 tbs.
20-30 min. ~17-20 min.
25-35 min.
5, Most meats continue to cook slightly while
standingafterbeingremovedfrom theoven.FoI’
rareor mediuminterna~doneness,if meatis to
stand 10-20minuteswhilemakinggravy or for
easier carving, you may wish to remove meat
from oven when internaltemperatureis 5-10°1?
below temperature suggested on chart. If’ no
standingisplanned,cook meatto suggestedtemp-
erature on chart.
a. Frozen roastsof beef,pork, lamb,etc., can be
started without thawing, but allow 10-25min-
utes per pound additional time (10 min. per
poundfor roastsunder 5 pounds,more timefor
largerroasts).
b. Thaw mostfrozen poultry before roastingto
ensureeven doneness.Some commercialfrozen
poultrycanbecookedsuccessfullywithoutthawing.Followdirections givenon packer’slabel.
6-8 lbs,l
6-8 ibs. ~
25-30 “min.
6-8 Ibs.
30.40 min.
10-15 Ibs.
130-140
150-160
170-185
170-175
170-175
170-175
185-190
130
—
POULTRY
Chicken
Ready-to-Cookwt.
Turkey Under 10 Ibs.
Ready-to-Cookwt.
? For roasts over 8 pounds, roast at 300 and reduce time. Figure the estimated time from the above chart, After V2
that time has passed, check meat thermometer for internal temperature at half-hour intervals.
2 Tendered beef, found in some markets, may require lesscooking time than regular beef, When cooking tendered beef,
estimate cook]ng time using shortest time given in minutes/,pound for desired doneness, Also this type of beef
is usuall>~well-done at 170 internaI temperature.
**f~o”~E:Line broiIer pan with aIuminum foiI when usin~ pan for marinating, cooking with frUits, cooking heavily cured
meats, or for basting food during cooking, Avoid
charts, Care Section.
3-5 Ibs.
35-40 min.
20-30 min.
3-5 Ibs.
30-40 min. 25-35 min.
spil[lng these materials on oven Iin~r or door, See cleaning note, on
30-35 min.
10-15 lbs.
20-25 min.
Over 5 Ibs.
Over 15 lbs.
15-20 min.
6-8 Ibs.
In Thigh
185-190
180-185 165
-.-.
In
Stuffing
165
17r3-s.ao
20
Page 22

Broiling is cooking foods by intense radiant heat
from the upper unit in the oven.
Most fish and tender cuts of meat can be
broiled. Follow these steps to keep spattering and smoking to a minimum.
1. If meathas fat orgristlenear edge, cut
vertical slashes through both about 2-in.
apart.If desiredfatmaybe trimmed,leaving a layer about ~8-in.thick.
2. Place meat on broiler rack in broiler
pan which comes with range. Always use
rack so fat drips into broiler pan; otherwise juices may become hot enough to
catch fire.Aluminum foil may be used to
line broilerpan and rack. But, be CER-
TAIPNto cut openings in foil, to correspond with rack so fat drips into pan
below. See note below before marinating
and using barbecue sauce.
3. Letters on oven wall, and chart below,
indicate where to position shelf for best
browning while cooking inside of food to
desired doneness. Placing food closer to
top of ovenincreasessmoking, spattering,
exteriorbrown on meat and thepossibilityy
of fats on foods catching fire.
4. LEAVE DOOR AJAR about 3 inches
—door stays open by itself, and keeps
heating unit at proper temperature for
broiling.
5, SWITCH OVEN SET and OVEN
TEMP CONTROLS TO BROIL. Preheating unit is not necessary.~t
6. Turn food only once during cooking.
Time foods forfirstside as on chart.Turn
food, then use times given forsecond side
as a guide to preferreddoneness. (Where
two thicknesses and times are given together, use first times given for thinnest
food.)
7. Turn oven off, serve foodimmediately,
leavepan
for easiest cleaning.
Cooking times given are approximate and
should be used only as a guide; they are
based on meat at refrigeratortemperature
when placed in oven.
outsideoven to cool duringmeal
?tf401’& If your range is being operated on low power (voltage), broiled foods may be
lighterbrownthan expected, even thoughdirections have beencarefullyfollowed.
Browning can be improvedas follows:
1, Follow directions given on this page for setting up the oven, preparing food,
setting controls and leaving door ajar.
2. Preheat the broil unit f9r 10minuteswith food and broilerpan.outside the oven.
3, Place food in oven, leave door ajar and time first side of food as directed. Turn
food and time second side, BUT for the LONGEST time given on the chart for
your particular food type, thickness, etc.
Page 23

Thin steaks,%-% inch thick cook through veryquickly. For best outside browning,pan frying is
recommended,SeeSurfaceCookingChart, If ovenbroiling is preferred, use D shelf position, To
achieve best browningon second side, cook first side just to change meat color then turn and
cookto donenesspreferred.
Rare
Medium
Well Done
F?are
fvledim
Weli Done
fwiiwii “
Fisil“ -
i-lamSlices
RawCookBeforeEating
1 in.,thick
(1-1Y2Ibs.)
1?/2in. thick
(2-2Y2Ibs.)
32./f;$b%,Splii“.’
1 lb.fillets
?+4.3/2in.
‘ 2&3
oz.’.eaih) ~
1-2 slices, V2 in.
about 1 lb.
1Y2.in
(ly2 Ibs,)
6-9
6-8
8-10
1:;6
c
4-5
c
B
9“11
2(% in.]
20 in.)
about 1 lb.
LambChops
Medium
Well Done
Medium
Well Done
2 (1
in.)
about 10-12
(1!/2in.)
2
about 1 lb.
OZ.
c
c
4-7
8-10
c
B
c
BakeryProducts
Bread(Toast)or
ToasterPastries
2-4slices
1pkg.(2)
2--split
D
D
%2
..- ,-
.—
—————...—— ——-
.-
all.weightsof chicken, BROILWITH
mtrruteslongerthan time given on
4. Cut lobster lengthwise thrcwgh hard back with sharp knife–-break-openand bru~hwith melted
oii or butter andagainafter half thecooking.
NOTE: Line broiler pan with aluminum foil when using pan for marinating, cooking with fruits,
cookingheavilycuredmeats,orfor bastingfoodduringcooking,Avoidspilling thesematerials
on oven liner or door. If spilled, wipe up immediately with a papertowel; when surface is
coo!,clean and rinse.
DOOR
chart.
Page 24

3. SwitchOVEN SET TO ROTISSERIE. This
starts broil unit and rotisseriemotor operating.
Spit can be inserted and removed easier when
motor is operating.NOTE: Make certainwhen
touchingspit that no part of body or pot holder
touchescoils of broil unit.
Food is cookedby revolvingon a spit under the
(upper) broil unit. As food turns,it bastes.itself
to produce a succulbntbrown and tenderroast.
Meat tender enough’ for roasting may be
rotissed.
!. Assemble rotisserie. In-
<“
.!.
\>
b
.
sert curved ends of frame
into large holes of broiler
pan handles. Lock frame in
place by fittingstraight ends
of support into holesin center handles.
2. Secure food on spit. Whensecuredcorrectly,
food willbelocatedin centerarea of spitleaving
4 inchesfree at the pointed end (thispart goes
into motor).
3. To secure food on spit: Push on 2-pronged
fork onto spit near handie end. Tighten with
screw.Pushspit throughfood (tie food securely
and compactly), distributing weight evenly on
each side of spit.
To check weightdistributionon spit, hold spit
(andfood) betweenhands,palmsup; spitshould
roll smoothly from palms to fingertips when
nalms
are tipped forward.
.
1. Put oven shelf in lowest position in oven.
With food on spit place spit on ovenshelf.
2. Set OVEN TEMP assuggestedonRotisserie
Time andTemperature Chart.Settingsare 300400 to get foods juicy and do~e without overbrowning.
.-
Finishsecuring food on spit
by sliding second 2-pronged
fork onto spit with prongs
toward food. Tighten screws
to a flat surface on spit.
4, Place spit on frame so
handleend is innarrowsupport, and pointed end is in
wide U-shaped support.
4. Insert spit intomotor. Grasp handleon spit.
Using point of spit, move to one side thecover
over motor outlet in rem of. oven; push spit
firmly into motor outlet as far as it will go.
Remove handle.
5. Check rotation of food. Tighten or adjust
forks if necessary. During cooking, forks may
need tighteningdue to normal meat shrinkage.
& AS FOOD COOKS LEAVE DOOR AJAR
IN “BROIL” POSITION; door stays open by
itself.
7. Baste food if desired. With pot holders, pull
out pan and shelf togetherto shelfstop. Attach
handle to spit to revolve food by hand while
basting. To continue cooking push shelf and
broiler pan into oven, insert spit into motor,
remove handle.
e Do not use electric meat thermometer, on
models so equipped, while operating the
rotisserie.A regular,non-electric meat thermometermay be used while rotissingproviding it doesn’t touch the oven, frame or pan
while meat revolves. (Or, if desired, cook
estimateddonenessthenpull meatfrom oven
to insert meat thermometer. Wait about 2
minutesfor temperature to register. If meat
is not done, remove thermometer and continue cooking if necessary.)
e If rotissing turkey, let stand in warm oven
10to 20minutesafter cooking to assurejuicy
meat and complete doneness.
@ At end of cooking pull out pan and shelf
together,usingpot holders.Turn OVEhTSET
to OFF, Remove food from spit. Cool pan
outside oven; soak forks and screws for easiest clean up.
. .
to
.
23
Page 25

BEEF
Ro#:derib
M&tium
well done
LAMB
Leg, boned ~
anti rcdit?d
.-.
PORK, fresh
Loin
Spareribs
(barbecued)
Sp~a&ri~~
~Of?& cured .,
Ham
Cook-Before-Eating”
b~ne in
Fully Cooked
Pol.fLTiY”
Capon*
(6-8 Ibs.)
Chicken*
(2-3 Ibs.)
Chickent
(1:,2.2 Ibs.)
Cornish lien*
(1 lb.)
Duckling”
(4-5 It)s.)
Turkey*
(8.12. Ibs.)
325
325
325
350-
350
350
400
375
400
400
400
350
350
.,
24-27
25-34
11/!.11/2 hrs.
t~~e)
(tc$e~
. .
26-30
33-42
48-62
About 1 hr.
(total time)
31-35
17-27
;;(J-’:;:
170:185
175-1$5’
170-195
185-190
t
t
t
185-190
180-185
NOTE: 1. For roasts OVER 10
poundscook about
time, then check
tervals with meat thermometer
for internal doneness. 2, Thin
ro~sts, 3-4 pounds, may require
sllghtly longer times per pound
than those given on chart.
Brush with melted butter or
margarine, basting or barbe-
sauceseveral times dur-
cue
ing cooking.
asabove,
Same
If desired, thread 4-5 of this
size chicken crosswiseon spit.
Let revolve to within V2 hOUr
of doneness time, then brush
every 10 minutes with barbecue sauce.
Brush with butter, or butter
and lemon juice mixed.
Thread hens on spjt either
lengthwise or crosswise.
Do not brush with fat.
V2 estimated
at V2 hour in-
Vav.s
Shol:ld!?r,
boned& rolled
BOLOGNA
Cl%?wfwi?’dWW(3N
LUNCHEONMm-r
(12-ourw can)
large
350
350
350
350
3(9-33
23-25
23-37
23-32
(total time)
23-32
(total time)
180
l&D
160
Brush with sauce if desired.
Brush with sauce if desired.
Brush’ with sauce if desi%?dt
-——–— —
. >.-
...—
———-—
Page 26

SLIDE SHIEEDI IN DOOR TO THE FIJKLY CMM3DI
JW POSITION. BE SURE ROTISSERIE
?
THEN 4XOSE DOOR.
* SIlidd must be up so door
b
am be latched for own to operate.
., ..–
llECEPT~~~E M CLOSED,
slide Door shield.
RotisserieReeeptack’
shouldIX?‘AWCL
.BeSW%?oven Dgm Is on-d
Page 27

H.JSHAND IHOLDLATCHRELEASEBUTT(3NWHILE SLIDING
OVEN LATCHTO CLEAN. (YVENSET KNOBMUST BE IN (XW’
OR CLEAN POSITIONBEFORE LATCH (2AN BE RKWED.
KEEPDEPRESSEDW,,
I
LATCH
RELEA
1
I WHIMLATCHING,.’ I
5
TURN OVEN SET AND (YVEN
CLEAN.
“When this
nositiono
s.
location is reached
‘Toid”itb OVENCLEAN pd. The light by OVEN
e
CLEANpadwill
next to “Be Sureto Set the AppropriateOven Controk” Readoutdisplaywill show “0:00”for H seconds. If you do not begin setting clean time, it will
revertbacktotimeof dayandyoumusttouchOVEN
CLEAN pad again.
IWJChth~ HOLJRSp~d and if necessaryeach of the
MINUTESpads and hold until the
YOU
wish tO clean appearson readout display.For
heavy soil, set the EKXJRSpad at “2”or“3”.
is no need to set minutes because readout already
shows “0:00”.
TEMl?KNOBS CL(XXWISE TO
the control skmld snap into final
appearaswellasthereminderlight
a~WNIt d time
There
Nowovenis set and
show onreadoutdisplay.Whenovenhas finishedcleaning,lock light (see
followingpage) will go off and ovenmay be unlatched.
Note: After setting Self-Cleaning function, there will be about a 30 to
second delay before oven begins. This is normal.
40
cleaning will begin automatically.Timeof day will
26
Page 28

—-
--
-—
——- ———
TO START AND STOP CXEANINC A’FA LArH?3TIME
Somestates offerlower electricratesat spedic timeswhen ehw&cal 4mnsmnpticmis Iowest$Cheek with your local utility companyto see if and
when your areaoffersthese rates.Because these ratesoften occurlate at
night when you may lx sieeping~you may want to set your oven before
going to bed, so cleaning times coincideIwith these lower ratese
If you wish to Startand StopSelf-Cleaningat a latertime, follow Steps 1
through6 on priorpages and siqdy add the followingtwo steps:
‘T(NJCi’iSTOP‘TIME pi. Light next to S’IKWTIME
appears,Readoutdisplay
S~OWS “~:~~”s ~0~ ~av~ ~~ ,
secondstosetstop time.If you do not set stoptime,
then the readoutdisplayrevertsback to the time of
day andovenbeginscleaningimmediately.Toreset,
touch CLEAR OVEN TIMER and repeat steps 5
through7.
-,
TOUChtk HOURSpi and each of the MINWTES
pads and hold until
to
StOpcleaning appearson readoutdisplay.
the time of day that’ you want
oven is set and
Now
on readoutdisp~ay.Wh& oven has finishedcleaning,lock light (see
show
followingpage) wifi go off and oven may be Unlatched.
e
cleaning will begin automatically.Time of day will
Lo~klight goes off.
Push & hold latch release button while
latch backto “cook.”
Lowerwindow shield by pushinghandles
bottomof window.
OVENSET knob to OFF.
‘hum
e
Turn OVEN TEMI?knob to left past BROIL.
27
sliding
toward
Page 29

TO
Whenyou set the oven to startand stop cleaning
at a later time,“EE:EE’gon the readouttells you
that the AutomaticOvenCleaningtime isn’tcompatible with the Stop Time.TIMStopTimemust
allows@cient time forthe cleaningtimeyouset.
(Forexample,ifyousetacleaningtimeof2hours,
a StopTimeofonly 1hourahead-wouldbe incom-
patible.) Justlikean electric
yim cannot set a Stop Time for more than 12 hours
alarm clock or timer,
ahead.
To correct,you must either touch STOP TIME
pad and enter correctstop timeor touch CLEAR
OVEN THUERpad and startoverfrom STEP L ~
You must set OVEN CONTROLknobsin MMition
to the ElectronicTouchControls.If youhaveperformedall of these steps correctly,both the light
next to the OVEN CLEAN pad on the control
panel and the light next to CLEANINGon the
oven wiil be onaif not, all steps have not been
performedproperly. (H you have set a delayed
start and stop, then only the light by OVEN
CLEANwill be 1ighted.)
If youwantto checktimeremainingin cleancycle,
touchOVENCLEANpm?andtime will show for
4 seconds, then readout display revertsback to
time of day.
If you want to change the setting or start over,
touch the CLEAROVEN TIMERpad and enter
a new SeH-C1etmsetting, followingthe steps preo
viously described.
WhenLOCKLIGHTfirstcomeson,this indicates
that the oven is hot and the door will soon be
LOCKED. This light stays on during cleaning
time and until oven heat decreases again. Also
see Questionsand Answersnext page.
Page 30

A. The oven is cleaned by very high heat
and a devicein the oven causes the soil to
convert into an odorless and colorless
vapor.
Q. Should there be any odor during the
cleaning?
A. Yes, there ma37be a slight odor during
the first few cleanings. Excessive grease
might cause an odor when cleaning older
ranges.
WWhatshouldI doif smoking occurs dur-
(3.
ing cleaning?
A. This is caused by excessive grease and
YOU should SWITCH OVEN SET TO
OFF, open windows and door to rid the
roomof smoke,and allowoven to cool for
AT LEAST ONE HOUR before opening
oven door. Remove excess grease and reset the clean function.
Q. Why do I have ash left in my oven after
cleaning?
A. Some types of soilwill leave a deposit
which is ash and can be removedby a wipe
of a wet sponge orcloth.
Q. Why is there still some Mack soil left
after cleaning?
A. You dicl not time the oven to clean
long enough.This deposit will be removed
in later cleaning.
Q. Can i clean the Woven Gasket around
the oven door?
A, No, this gasket is essential for a good
oven seal and care must be taken not to
rub, damage or move this gasket.
Q. Can i use commercial oven cleaners
on any part of my se!f-cleaning oven?
A. No cleanersorcoatings should be used
around any part of this oven. If you do
use them and do not wipe the oven abso-
lutely clean, the residue can scarthe oven
surface the next time the oven is auto-
matically cleaned.
(L if the inside of my oven door is soi!ed,
will it be cleaned during the cleaning
cycle?
A. No, only the area on the inside which
is exposed to the heat generated during
the cleaning function. You should clean ~
the doorand framepriorto oven cleaning
since the high heats during the cleaning
cycle tend to “bakeon” the soilandmake
cleaningmore difficult.
Q. MY oven shelves have become gray
after several cleanings. is this normal?
A. Yes. After many cleanings,the shelves
may lose some luster and discolorto this
deep gray color.
Q. Can i clean my reflector pan rings in
th~ oven during cleaning cyc~e?
A. No, because they are chrome-plated
and will discolor.
(1. Can plug-in units be cleaned in the
oven?
A. No. To
Q. Myovenshelvesdo not slide
dosowoulddamagethem.
easily.
What is the matter?
A. After many cleanings, oven shelves
may become so clean they do not slide
easily. If you wish shelves to slide more
easily, dampen fingertips with a small
amount of cookingoil and rublightly over
sides of shelf where they contact shelf
supports.
(l. What causes the hair-like lines on the
enameled surface of my oven?
A. This is a common condition resulting — ----
fromheating and cooling duringcleaning.
They do not affect oven performance.
Q. Why did the LOCK LIGHT come on
when 1first set the oven for CLEAN?
A. If you have just finished cooking with
high temperatures, then the light indicates that the oven may be too hot for
LATCH to be movedto CLEAN and oven
must be cooled first.
Q. Isthe %rac!dingrr sound $ hear during
cleaning normal?
A. Yesj this is simply the metal heating
and cooling during both cooking and
cleaning.
29
Page 31

Proper care and cleaning procedures are essentialfor a long and satisfactory life for your
range. Xnchded in this section are directions
and CLEANING CHARTS for cleaning all
parts of the range.When cleaning rangemanually, wearingof rubberglovesis recommended
to protect the hands.
The porcelainenamelfinishissturdy but breakable if misused. This finish is acid resistant.
However, any acid foods spilled (such as fruit
juices, tomato, or vinegar) should not be per-
mitted to remainon the finish.
The oven is ventedthrough a duct which is located under a rearsurface unit. Cleanthis duct
frequently. To remove, lift rear surface unit,
remove reflector pan, and
position, place solid part of duct over round
openingunder the cooktop. Then position hole
in duct so it setsdirectly under round opening
in reflector DamDuct must be in correct Dosition so rnoi;ture and vapors from oven cah be
vented during use.
liftoutduct. To re-
NEVER COVER HOLE in ovenventduct with
al
uminurnfoil or any other material.To do so
prevents the oven vent from functioning prop-
er~yduring cooking.
fWTi%The standard 3-in-1 power saver unit,
explainedon page 8, is stationary,not a plug-in
unit. Oo
-nottryto remove.For cleaning, unit
may be hfted up.
Cleanareaunder reflectorpans frequently. Ac-
cumulated soils, especially grease, may ~tch
fire. To make your cleaningjob easier,the sur-
face units on your range are Plug-Ins which
can be removed.
TO REMOVE PLUG-IN SURFACE UNIT:
a. Always be certain that the control for that
surface unit is at OFF position and the unit
coils are cool before attempting to remove the
unit.
b. Raise the unit coil, at point opposite recep~
tzwle.about one inch above the trim rin~ and
pull
it away from the receptacle.
.
c. Carefullypulltheunit terminalsthroughthe
openingin the reflectorpan.
After removingthe Plug-In surface unit, remove the chrome-plated reflector pan/ring to
cleanunderthe unit.
NOT COVER WITH ALUMINUM FOIL. ~lean M rec.
~(1
orrwmmdedin Cleaning Chart.
Wipe around edgesof the surfaceunit opening
in the cooktop, clean the bowl-shapedarea below the unit and rinse with damp cloth or
sponge.
CAUTION: TURN OFF all surfaceuniteprior
to cleaningunder any of them.
CAU7’1ON: DO NOT immersePlug-In surface
units in liquid of any kind. See the Cleaning
Chart for cleaning of surface unit coils. If the
spider or medallion are cleaned, be certain to
wipe all cleaningmaterialsthoroughlyfromthe
unitcoils before returningtheunit to the range.
DO NOT attempt to clean Plug-In surface
unitsin an automaticdishwasher.
DO NOT let the two electrical ends of the
Plug-In surface unit get damagedor bent.The
terminalsare sturdy and will not be damaged
if handled with reasonablecare. The Plug-h
unit terminals and receptacle are designed to
line up automaticallywhenpluggedtogether.If
the terminals are badly bent and cannot be
plugged into the receptacle, the unit should,be
taken to the GE product service center for
replacement.
DO NOT attemptto clean,adjustor in anyway
repair the Plug-In receptacle. If an abundance
of liquid should accidentally spill and collect
inside the receptacle, call your GE product
serviceman,
TO REPLACE PLUG-IN UNIT:
a. Place chrome-plated reflector pan/ring into
the unit recess in the cooktop so the unitreceptacle can be seen through opening in reflector
pan.
b, Insert the terminalsof Plug-h unit through
opening in c!hrome-platedpan/ring and into
receptacle.
c. Guide the surface unit into place so it fits
evenly.
RECEPTACLE
TE
~—~
MEDALLION
1. Self-Cleaningoven
a.
Remove the three slotted screws in lamp
cover; see diagram,Remove cover; replacelamp
with40 watt appliance lamp.
G
b. Replace lampcover withthree screws.
c, Connectelectric powerto range,
.-v-—
x)
Page 32

CAUTION: BEFOR REPLACING ANY”
LAMP, DISCONNE&
To RANGE AT THE M“AIN
CIRCUIT BREAKER PANEL. LET LAMP
(OR BULB) AND LAMP COVER COOL
COMPLETELY.
WHEN CHANGING A FLUORESCENT
LAMP, DO NOT TOUCH THE METAL AT
ENDS OF LAMP.
ELECTRIC POWER
FUSE OR
a. Place fingers-underends of woodgrainc.o~er.
Lift forward thenup so cover is in open posatlon.
b. Place thumbs on bottom near each end of
lamp. Press and roll bottom of lamp gently toward front of range until it stops. Remove.
c. Check type and wattage of lamp; replace
with samekind. Hold lamp near each end and
insert prongs into. sockets. Gently roll bottom
of lamp toward rear of range untii it stops.
d. Swing down lamp cover so it snaps into
closed position.
e. Connect electric power to range.
A levelingscrewis locatedat each corner of the
base of the rangeat the front. By removingthe
bottom drawer, you can level the range to an
uneven floor with the use of a nut driver or by
using pliers on the hex flatx~of the leg.
When cookinga food for the first time in your
new oven, use time given on recipe as a guide.
Oven thermostats,over a period of years, may
“drift” from the factory setting and differences
in timing between an old and a new oven of 5
to 10 minutesare not unusual,Your new oven
hasbeen set correctly at the factoryandis more
apt to be accurate than the oven which it replaced. However, if you find that your foods
consistently brown too little or too much, you
may make a simple adjustmentin the thermostat (Oven Temp) knob,
PULL KNOB OFF OF SHAFT, LOOK AT
BACK OF KNOB AND NOTE CURRENT
SETTING, BEFORE MAKING ANY AD-
JUSTMENT. To increase oven temperature,
adjust toward HI or RAISE; to decrease temperature adjust toward LO or LOWER. Each
notch changes oven temperature 10 degrees.
Oven temperaturecan be raised by 20 degrees
or lowered by 30 degrees.
See sketchesbelow. One of the two type knobs
shown will be on your range. To adjust, follow
directions under the applicablesketch.
F-’
1. Remove knob, and hold so pointer is at top
of knob.Usinga pot holder or similarmaterial,
hold “skirt” of knob firmly in one hand. Grasp
handleof knob in other hand.Note position of
pointerand turn handleto movepointertoward
Raise or Lower. Pointer is designed not to
move easily. If it is seated so it is difficultto
move,pointer maybeloosenedslightly.Inserta
thin screwdriver,knife blade or siml]ar instrumentandlift up end of pointer slightly.
2. After a~,justmentis made, press pointer
firmly against knob. Return knob to range,
matchingflat area on knob and shaft. Recheck
oven performancebefore makingan additional
adjus~ment.
,/——
1. Pull off knol?,loosen both screwson back of
knob.2. Lift pointer and move one notchin desired direction. Tighten screws. 3. Return knob
to range,matching flat area of knob to shaft.
Recheck oven performance before making an
additionaladjustment.
\
/r
1. If desired,broilerpanmay be linedwith foil
and broiler rack may be covered with foil for
broiling.ALWAYS BE CERTAIN TO MOLD
FOIL THOROUGHLY TO BROILER RACK
AND SLIT ‘F-OIL ‘TO CONFORM WITH
SLITS XN RACK. Broiler rack is designed to
minimizesmokingand spattering, and to keep
drippingscool duringbroiling.Stopping fat and
meatjuicesfrom draining}0 thebroder panprevents rack from serving Its purpose, and may
let juices becomehot enoughto catch fire.
2. DO NOT place a sheet of aluminumfoil on
shelf.To do somay resultin improperly cooked
foods, damage to oven finish, and increase in
heat on outside surfaces of the range.
—.—————
Page 33

Bake Unit
[Heatirr Unit Near
o Oven)
Floor
f
Control Knobs,
Rotary, Surface
and Cwerr
Metal, including
13rustred Chrome
Cooktop
Porcelain
!5warnelx
Oven Gasket
Siiicone Flubber,
(Heat Resistant)
Woven Fiberglass
Oven Liner
Suap-Filied
Scouring Pad
P!astio Scouring
Pad
$
Mild Soap and Water
Soap and Water
Soap and Water
Page; &~gl or
Soap and Water
See Column at Right
Soapand Water
None
Soap and Water
Co~~a;rk2;al Oven
Soap-Filled
Scouring Pad
Heating units do not require manual cleaning: soil burns off when unit
is heated, The bake unit is hinged so you can lift it tcrreach overrfloor.
{Do not Iet”soiledpan and rack starrd in oven to cool.j Drain fat,’coed
pan tw!drack slightly. Sprinkle orI detergent; fill pan with warm water.
Spread cloth orpaper towel over rack, let stand.a few minutes. Wash,
scouring if necessary. Rinse and dry. [Or wash in dishwasher.)
Pull off knobs. Wash gently but do not soak. Dry and return controls
to range, matching flat area on knob and shaft,
,r
Wash ail glass with clottYdampened in soapy water. Rinse and poiish ‘ ~ð
with dry cloth. Knobs on control panel are removable, if desirer%H
knobs am removed,”do not allow water. to run down inside surface of
,4ass while cleaning.
Wash, rinse then pclish with dry cloth. UC)N6TUSE steel WOOI,abrasives,ammonia, acids or commercial oven cleaners which may damage
$:*:r.h
~;i’t%c~if range is hot, use dry aper towel or cloth to wipe tIp right
away. When surface is cool, wasKand rinse. Other-such as fat s$5atterings, etc., washwith soapand water when cooled, rinse.’Polish with
dry cloth.
Avoidc!eaning powdersor harshabrasives which may cause scratching
of surface. See note on porcelain enamel, Care
On NON SELF-CLEANINGoven, remove door; see directions, Care Section. DO NOT ~lace door under running water.
On SELF-CLEANINGOVEN door, clean ONLY door liner outside the gasket. Do not rub or damage gasket. Avoid getting ANYcleaning materuals
on gasket, (Do~r is removable, but removing is not recommended.)
Locate when door is open, Clean off soil with sudsy water and rins@
thoroughly.
Section.
.Avoidgetting ANY cleaning materials on gaske~.
Cool before cleaning.
FOR LIGHT SOIL: Frequent wiping with mild soap and water (particu-
larly after cooking meat) will prolong the time between major cleaning.
Rinse thot”oughly.NOTE: Soap left on liner causes additional stains
when oven is reheated.
FOR HEAVY SOIL: Choose a non-abrasive clearwr and follow label instructions, using thin layer of cleaner, Use of rubber gloves is recom-
mended, Wipe or rub lightly on stubborn spots.
Rinse well. Wipe off any oven cleaner that gets on thermostat bulb.
When rinsing ovenafter cleaning, also wipe off thermostat bulb, found
in back, or on side, near top of oven,
Page 34

*
Chrome-Plated
Reflector -
Pari/RinEs .
Soap and Water
Soap and
Stiff-f3rist!eci Brush
Soap-FiUed,
Water
Scouring Pa,d ,
.,
,1- ,.
,.
>~,
!’
:
,. >
,,
. .
.,
,,
,-,
,,
;.
-,
f,
“
:, ,
‘Clean as below or in distrwashe~.bb- NOTJCLEXM4IN ‘SELF-CLEAN
OVEN, they will discoiof.
Wipe.all rings after eacfi codking, so’~nhaticed s~kr will nbt ‘;lkrn
con Snext time you cocik. To rernovd “burned*n”,
=11cleaning mqterials mentioned, Ry,b ,]i*htly wit
P=?vqnt$cfatChlng of surface. See p!cture on.Surface Cooking page
for azes of-pans to use to preverrt-pmynanent discoloration. ~f
. . .’ ,. .
‘, ‘
‘.
i-
Rotisserie
Spit, Forks
Screws, Frame
Shelves
{See Self.
Cleaning Oven
directions.)
Storage Drawers
Surface Unit Coils
Soap and Water
Co;~a~rcJal Oven
Soap and Water
Cornmercial$-Oven
Clew03r
Soap and Water
---------
,’
For hand ck%ning, any and all rnemtio~edmaterials can be r+ecl. Rinse
thoroughly to remove all materials after cleaning.. .
Note: Some commercial oven cleaners cause darkenin and discolot’ation. When usirrg for first time, test cleaner on sma I part of shelf
and check for dmcoloration before completely cleaning.
Spatters and spills burn away when coils are heated.
heat soiled un!ts at HIGH, let soil burn, off “about a tnirmte,’’’switch
units OFF. Avoid getting cleaning rnateriais on ‘~oils. Wipe off any
cleaning materials with damp paper
Letunit. cool completely before handling. ~
towel befcm heating unit.
F
At end of meal,
DOnot clean Plug lrI units in the self-clean oven.
33
Page 35

Read this bookto be certain you understandhow rangefeaturesoperate.Throughoutthe book,you
will find points to check on how to determineif you need service. AISOcheck the listing below for
further hint-sof possiblesource of the problem. -
cleaned leaves a heavy layer of ash in spots
which could have insulatedthe area from fur-
therheat.SeepageXlconcerningash.(d) Both
ELECTRONICOVENTIMER.Check to be certain
step-by-step directionswere followed correctly.
Review pageson use of timer.
BAKING.Check materialandsizeof baking’uteri-
sil; placementof shelf and food in oven. If the
ovenwasusedfor broiling,just beforebakinga
food, turnthe oven completelyoff and open the
door widesoit can cool (5 or 10minutes).Then
oven may beused for baking.
OVEN SET and OVEN TEMP must be at
CLEAN setting.
SNlOKIPIG.Cooking utensils and excessive
amounts of spillovers and liquid grease not
baked on were not removed before starting
SELF-CLEANING OVEN.
i3Rf31LlPlG.Be sure OVEN TEMP is set at
BROIL. If there was excessive smoking and
spattering: Were shelfand broiler pan at position suggestedon broiling chart.?If aluminum
foil was usedon broil rack, was it handledaccording to directions?
UNITS. If lights on range are working but the
oven or surface units do not heat, cal~serviceman.
CAN’TLATCHDOOR.Checkthe step by step directionsfor latchingdoor: (a) Did you pushand
hold in latch release while moving latch? (b)
Turn OvenSet knob to CLEAN. GlowingLock
Lightafter knobis turnedshows ovenis too hot
from previous oven use and door won’t latch.
Open door wide so oven can cool, then latch
can be moved. (c) Be sure the door shieldis in
up positionand is firmlyin place. (d) OvenSet
mustbe at CLEAN or OFF before latchcan be
moved.
ODOR,SOUMIS.CheckMore Zn/ormation on the
Self-Cleaning Oven, Care 5’ection,
OVENDOESN’TCLEAN.Check
the directions to
be certain ALL operations were done,correctly
for startingthecleaningcycle.
Possible causesof the problem: (a) Failure to
set proper Electronic Timer pads. The STOP
TIME pad must be set and advanced beyond
the time noted on the digital Electronic Clock.
(b) The STOP TIME pad was not setfor long
enoughtime. (c) A thick pile of spilloverwhen
If ovenand surface unitsdo not heat,andlights
on the range are not working,check firstto see
that the three-prongedplug connected on back
of rangeis fully insertedin wall receptacle.
Range ll+tMKN3!Fuse
The difficultymight also he in the main clistri-
bution panel of your house by a blown range
circuit fuse,a tripped rangecircuit breaker,the
main fuse, or the main circuit breaker,depending upon the nature of the power supply, If a
circuit breakerisinvolved,resetit. If thecontrol
box employs fuses,the range fuse (a cartrldgetype) should be changecl, BUT ONLY BY
SOMEONE FAMILIAR WITH ELECTRICAL CIRCUITS.
. .
Apartment tenants and condominium owners
should request their building managementto
perform this check before calling for service.
If after replacing the oven circuit fuse or resetting the circuit breaker, the fuse blows or
~ircuitbreaker trips open again,call your serviceman.
WHEN YOU CALL GENERAL ELECTRIC
FOR SERVICE help them give you prompt
service by:
1. Givingan accuratedescriptionof thetrouble.
2. Giving‘the complete model number of your
oven. Below is an example of name plate. To
locate name plate open oven door and look on
frameaboveoven.Model andserialnumbersare
also on the Purchase Record Card which came
with your oven. If desired, copy the numbers
from cardbefore sendingit in.
‘(’”’’’General @ ELECTR’!C’“5* @ ‘;’[;
1,$1(,t,#/,,!4(M8s/At
0!,1,
F:,.=.a
. —— ..—- —
——.—-.
Page 36

*
Your GeneralElectricapplianceisoutstandinginfeatures
and has been well-designed,withthe help of homeeconomists, with the homemakerin mind. You will find it dependable,precision-builtand reliablein performance.
Similarly, intensiveefforts have establishedan.efficient,
well trained,nationwideproductserviceorganization.No
matter where you live—or move—the’ networkof thou- ~
sandsof GeneralElectric franchiseddistributors,dealers
and service techniciansarehappy to serveyou and make
doubly sureyour newappliancegivesyou continued,satisfactoryperformance.
%0
For ProfessionalMaintenance,call
General Electric Franchised Serv-
—it’s nearby. Get telephone
ice
number from your dealer or the
“yellow pages” and write it here.
General Electric wants you to be pleased with
your new GE Appliance. Part of our commit-
ment to keeping you pleased is providing the
best possibleservice we can.
Should your GE appliance need servicing, call
your local dealer. He may provide the service
himself, or refer you to a qualified servicer in
your area,
If you do not have a servicing dealer, call the
Factory Service office in your area, A list of
these offices and telephone numbers is in-
cluded with your appliance.
If the service you receive is not to your satisfaction, here are three steps you should fol!ow
to makeit right:
1.First, contact the people who serviced your
GE appliance. Explain your point of view and
whyyouare displeased,In mostcases,this first
step will solve mostproblems,
2. If you still have not resolved your problem,
write al! details, including your telephonenum-
5%MJs~rwice aftm~ the
warranty period:
Eventhefinestprecision-builtappliancesmay”tkquiresew-
ice from timeto time.In some areas,franchisedCustomer
Care@serviceorganizationsofferservicecontracts,beyond
the original warrantyperiod, which enable you to budge
for suchpossibleoccurrences.
Contact your local franchised CustomerCare service organizationto ascertainwhetherservicecontractsare available in your area,and to learnthedetailsof theirplan and
its termsand conditions.
ber and the model and seriai number,to General Electric direct. The address is:
MANAGER—CUSTOMERRELATIONS
GENERALELECTRICCO.
WATTERSONCITY EAST 312
APPLIANCEPARK,LOUISVILLE,KY:40225
3. If you are dissatisfied with the action taken,
the final step would be to send full information
to: MAJORAPPLIANCE
CONSUMERACTIONPANEL
20 NORTHWACKERDRIVE,
CHICAGO,ILL.60606
This panel, known as MACAP,is a group of independent consumer experts under the sponsorship of several industry associations. Its
purpose is to study industry practices and to
advise the -industry of ways to improve cus-
tomer service.
Freeof industry control and influence, MACAP
is able to make impartial recommendations,
considering eachcase individually.
—.——.———.—,— .—.
Appliance Park, Louisville, Kentucky 40225
”—,—.—.—-,— ——.-——-.—.—-———
RANGE PRODUCT MANAGEMENT
GENERAL ELECTRIC COMPANY
Page 37

GENERAL iELEcTRlc RANGE
(includesfreestandingand built-in, built=inovens,built-in cooktops am! hoods] ~:
FULLfXWLYWU%WAItWUW’Y
FROM GENERAL ELECTRIC TO YOU
ginal purchaser and to any succeeding owner andappliesto productspurchasedin the UnitedStates, ~:
retained within the 48 contiguousstates,the state of Hawaii, or the District of Columbia, and em- 5?J’
ployedin ordinary homeuse.
WHAT WE WILL DO - If your GeneralElectric Rangefailsbecauseof a manufacturingdefectwithin $$,
one year from the date of original purchase,we will repair the product without chargeto You. Parts ~~
and servicelabor are included.Servicewill be providedin the home in the48 contiguousstates,the ~{
stateof Hawaii,or in the Qistrict of Columbia.
HOW TO OBTAIN SERVICE - Servicewill be providedby our localCustomerCare
organizationor by one of our franchisedCustomerCare servicersduringnormalbusinesshoursafter
you notify usof the needfor service.Servicecanbearrangedby telephone.
Look up “Service” under.General Electric Company or “General Electric Factory Service”in the
White pagesof your telephone directory or “General Electric CustomerCare Service”in the Yellow
pagesor write to the addressgivenbelow.
WHAT IS NOT COVERED - Thiswarranty doesnot coverthe failureof your Rangeif it isdamaged
while in vour ~ossession,usedfor commercialpurpcxes,or if the failure iscausedby unreasonableuse
including faiiure to provide reasonableand necessarymaintenance. in no event shall the General
Electric Company be liable for consequential damages. This warranty doesnot apply
Alaska por to the Virgin islands, Guam, American
PuertoRico.
Somestatesdo not allow the exclusion or imitation of incidental or consequentialdamages,sothe
above limitation or exclusion may not apply to
andyou may alsohaveother rightswhichvary from stateto state.
- This warranty isextendedby GeneralElectric to the ori” ~~,
o factory service
..
to tit-dstate of
Samoa, the Canal Zone or the Commonwealth of
YOU. Thiswarrantygivesyou specific”legalrights,
LIMITEDWARRANTY
Applicableto the State of Alaska
In the state of Alaska freeserviceincludingpartswill be providedto correctmanufacturingdefectsat =$
our nearestserviceshoplocation or in your home, but we do not coverthe costof transportationof ~~,
the product to the shopor for the travel cost of a technicianto your home. You areresponsiblefor ~$
thosecostz.All other provisionsof this limited warranty arethe sameasthosestated in the fuli war- %-
ranty above.
WHERE TO GET FLIRI”HE$?HELP rarity, contact:
Manaaer- Customer Relations
If you wish further help or information concerningthis war- ~.
WARRANTOR–
&<>
-
&-&;
-1
—.
Z:,
w’
-.:
~,!
~;
g\
s:
w,’
G“
w.
*)
-.
Z’x
w,
Z&:
~<
&q
-r
A bill of sale, cancelledcheckor other payment recordshouldbe kept to verify the original purchase
date andto establishthe warranty period.
Pub.No.494417 “Rev.}
RANGE PRODUCT MANAGEMENT
GENERAL ELECTRIC
AppliancePark,Louisville,Kentucky40225
COklPANY
3/81
 Loading...