

Page 1
—
+.....,..--.,,. ,,,
..
}
,--
.,
—
Aluminuti FM 18
Anti-Tip Bracket
Appliance Registration
Canning Tips
Care and Cleaning
ClocklTirner
Energy-Saving Tips
Features
Installation Instructions 5
Leveling
Model an~ Serial Numbers
Oven
Baking/Baking Gtiide 14,15
Broiling/Broiling Chide
Control Settings
Door Removal
Light; Bhlb Replacement 22,23
Preheating
RoastingRoasting Guide 16,17
Self-Cleaning Instructions 20,21
3,5 Vent Duct.
22-25 Safety Instructions
6,7 Cookware Tips
13
18,19
13
22
13
Thermostat Adjustment
2
9 Repair Service
12 Surface Cooking
5
5 Warranty
2
Problem Solver
Control Settings
$in-1 Burners
24 .
.
22
26, 2’7
27 “’
3,4
8-11.
$- ~ ‘.,
lo, ~~ - . “’”;
8
Back Cover
‘%.
..
.,:
,.
,, ,
,,
:;%<
,i
-,,
,.
$.-=
JB55KX4
Page 2
—
U$ingym.wrange,
red thi$
M’youreceived
a damagedmqy!. *.
<.
———
~
Itisintendedtohelpyouoperate
andmaintainyournewrange
properly.
Keepithandyforanswerstoyour
questions.
Ifyoudon’tunderstandsomething
or needmorehelp,write(include
yourphonenutiber): ~
ConsumerAffhirs
“ GEAppliances
AppliancePark
Louisville,KY40225
Wtit$?dowmthemodel
andserialmmbers.
You’llfmdthemonaIabelon
thefrontoftherangebehindthe
ovendoor.
Thesenumbersarealsoonthe
ConsumerProductOwnership
RegistrationCardthatcamewith
yourrange.Beforesendinginthis
card,pleasewritethesenumbers
here:
Immediatelycontactthedealer(or
builder)thatsoklyoutherange.
sawmm!andmoney.
Beforeyourequest
service.
ChecktheProblemSolveron
pages26and27.It listscausesof
minoroperatingproblemsthatyou.
cancorrectyourself.
● o
,,
“,
.,
ModelNumber
SerialNumber
Usethesenumbersinany
correspondenceor servicecalls
concerningyourrange.
2
A
Page 3
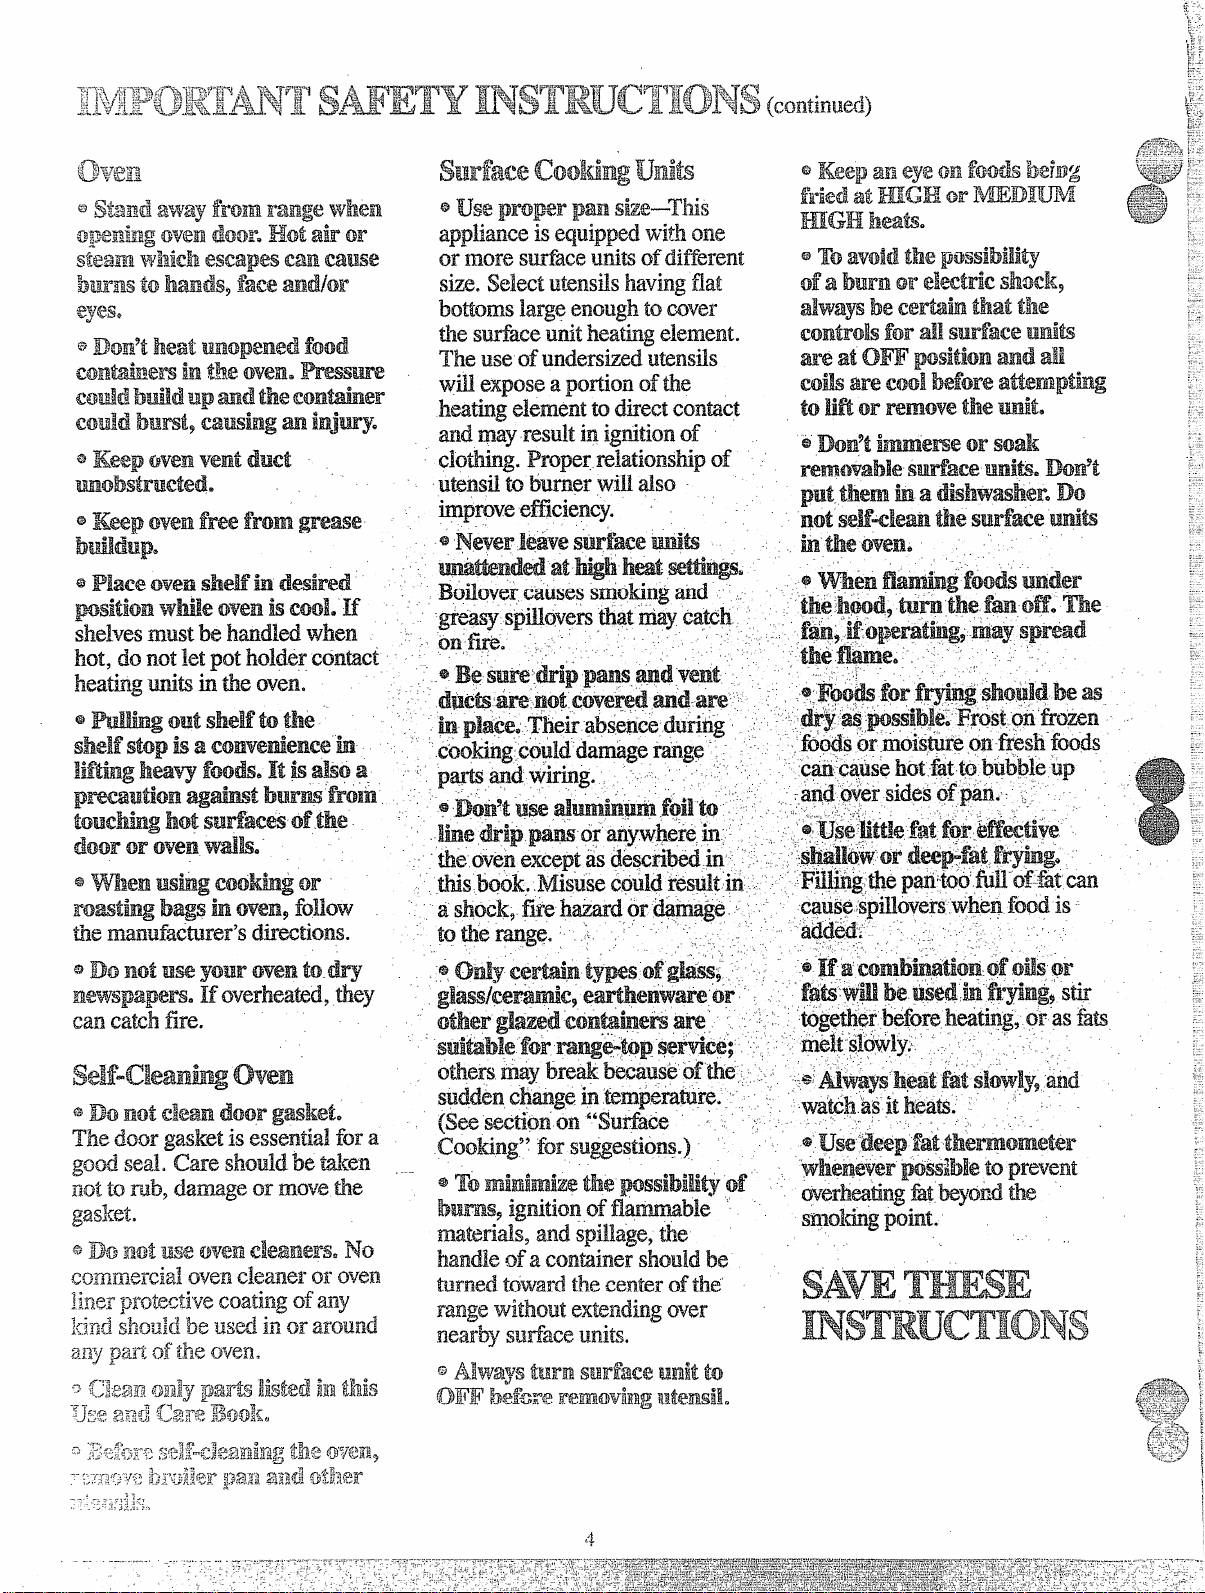
VvkmI.}singdedrid
basic safetypmcwhm should
iiimwi%a,ind’mh-lgtie
be
fiibwillg:
f%+~~ ~gj~~=~fj
should
01 in.anareawhere
notbe kit done
~~Q~e—
an isinl.lse. ‘They
3
Page 4
aD@Ex$tKk?m.door$?J3$k%?te
The door gasketisessential fora
godsad.‘ckE ‘@km
nott~r=db,damge ormovethe.
gasket.
,-
---
Page 5
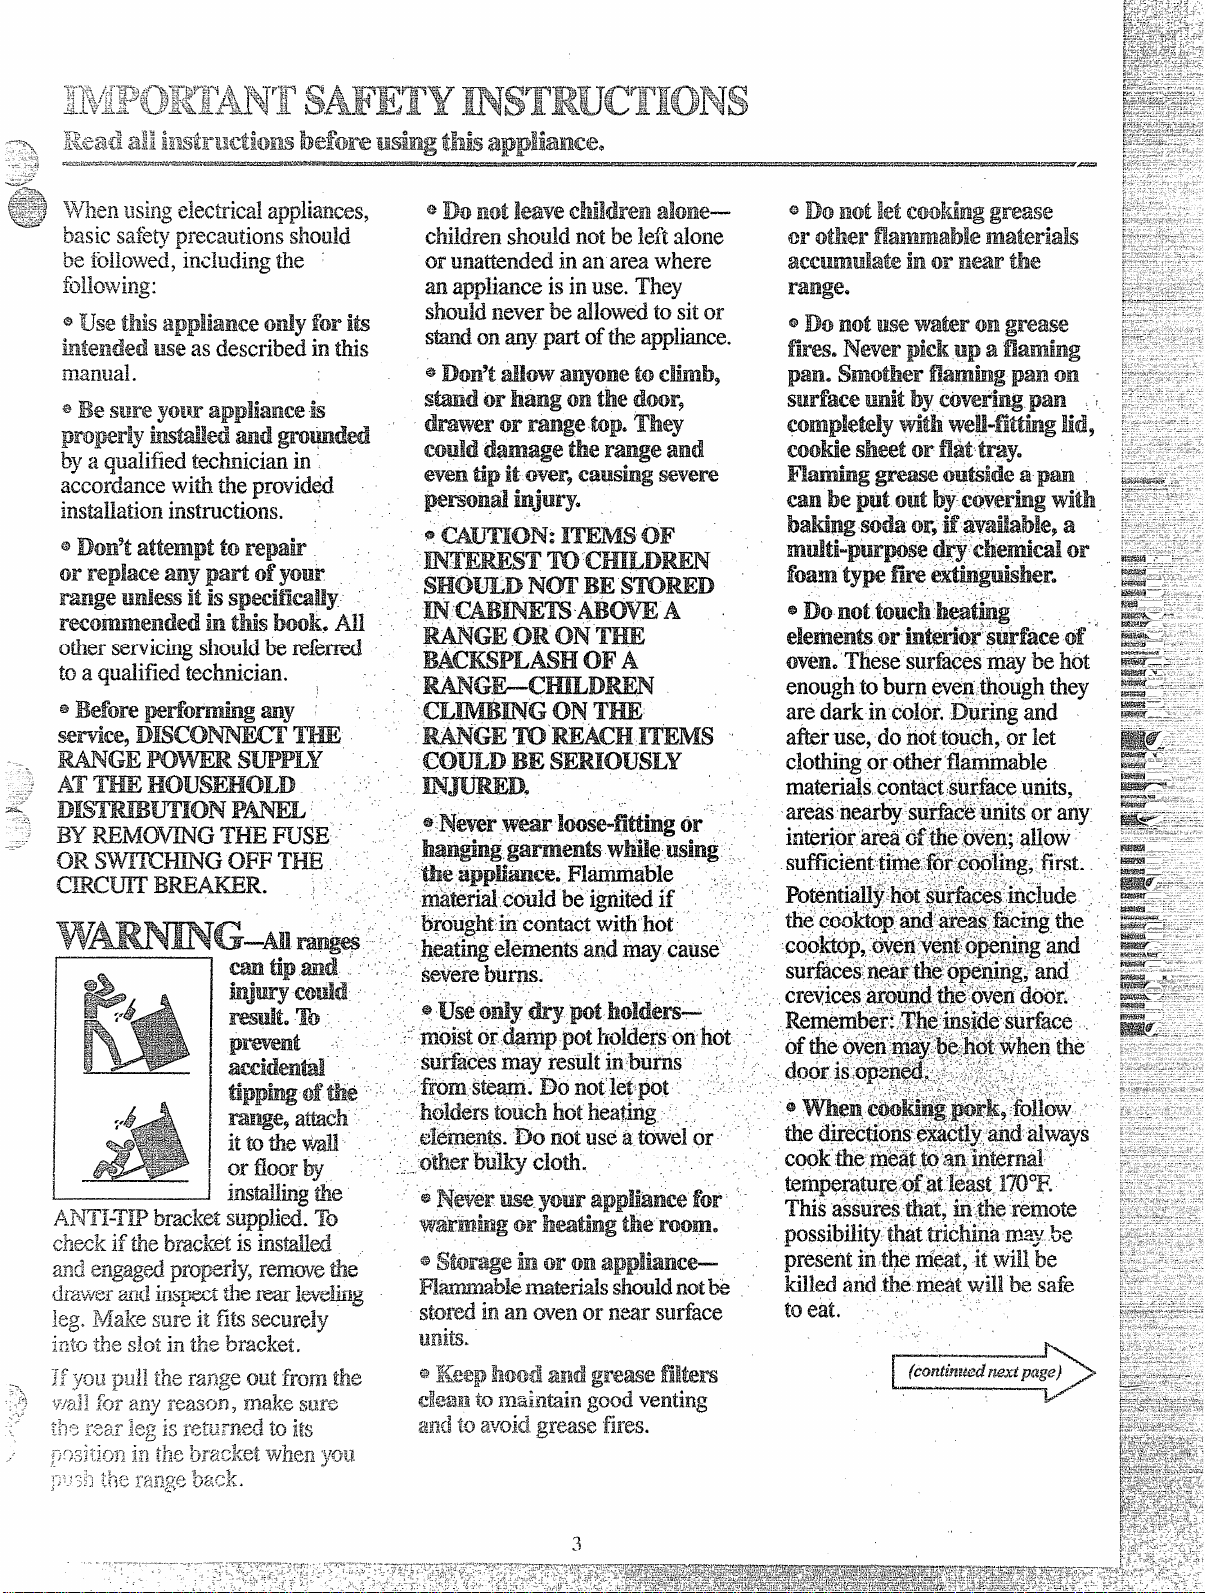
merangeshouldbeinstalledon
sheetdp@wxd.(orsimilar
a
material)asfollows:Whenthe
jl’m- Um?tizg’t?mhat th?jhmt tof
tiwrange, theareathattherange
willrestm shouldbe’builtl.lpwith
plywoodtothesamekvd orhigher
thanthefloorcovering.Thiswill
allowtherangeto bemovedfor
cleaningor servicing.
Levelingscrewsarelocatedon
eachcomer ofthebaseofthe
Iange.Remove
and.you.canleveltherangeon
anunevenfloorwiththeuseof
aKWihiwx.
%’0Ii%?move&%Wer,pun dri%lwer
03.3$au the way9tilt Ti3pdk fEWnlt
and td.e it ORRILlb ITephx!
ikawer~insertglidesat backof
drawerbeyond.stopon rangegkks.
Liftdrawerifnecessarytoinsert
easily.Letfrontofdrawerdown,
thenpushintodose.
@fj ?f)fl-~~real’leveling!SCmws
will,engagetheANTI-TIP bracket
(mm’ fix somesidetoside
a.dj?mmnt)bAw3wa minimum
c~eflza12c~Of1/8”betweentherange
andth.fikvdjng smw thatk tobe
in%dkdintothe.ANTI-TWbracket.
thebottomdrawer
.,
,..-
J
.
Page 6
.
6
Page 7
+’
Model
IExpMlled JB550GJ
seam%Index on page JBX!WXA
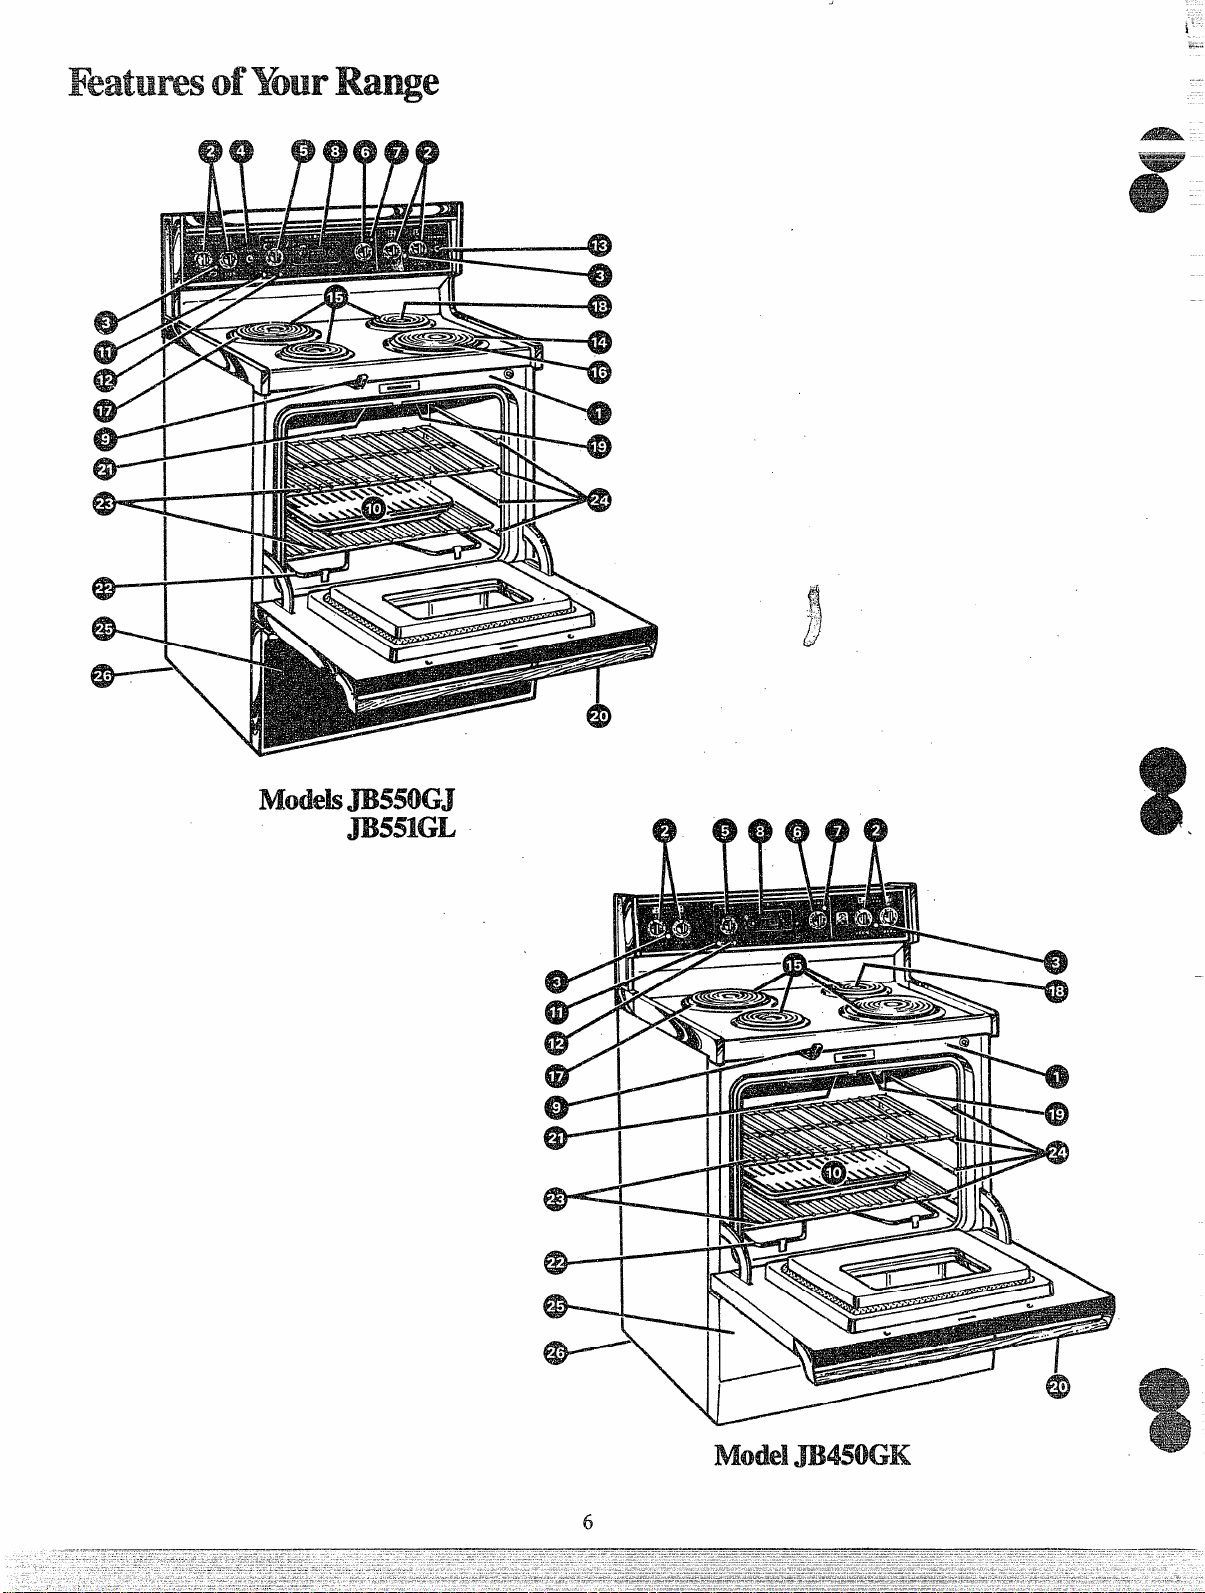
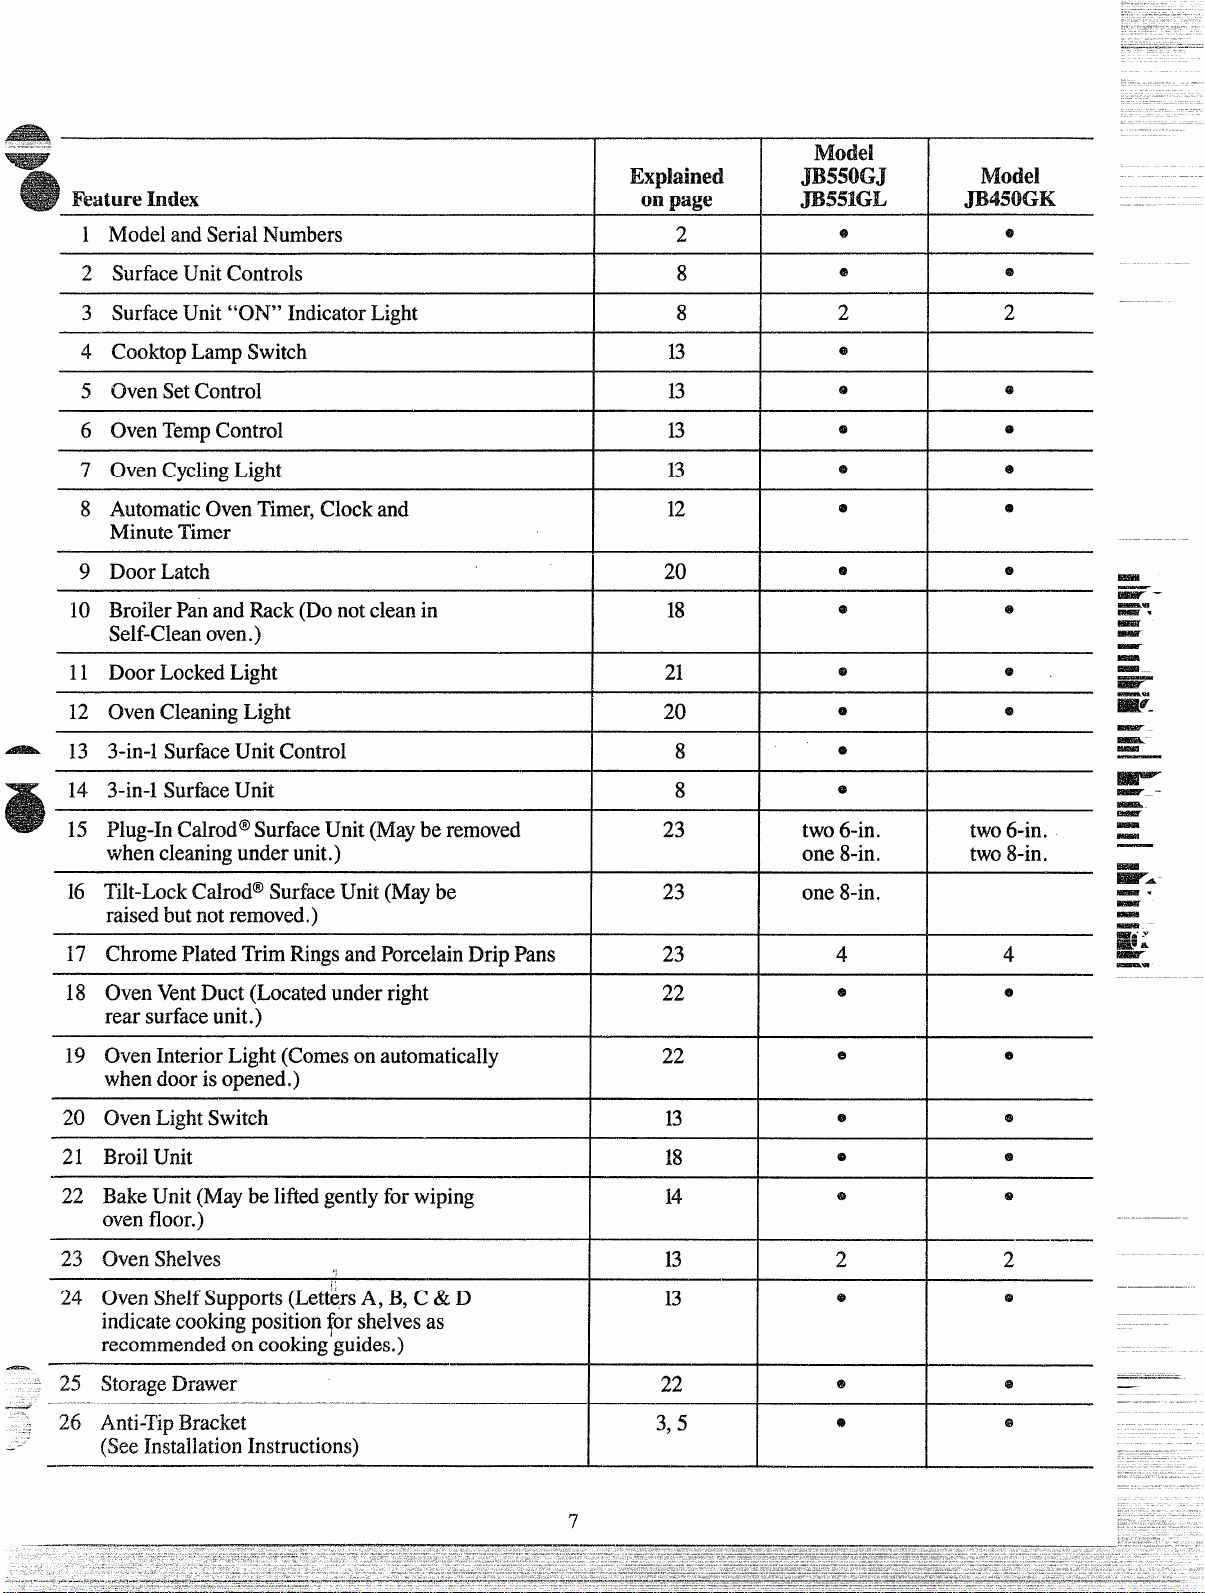
1 NIodelandSerialNumbers
2
e
MOM
.
JB450GK
13
13
12
20
20
23
8
@
e
@
e
e
e
e
@
e
e
e
one8-in.
I
one8-in.
2 SurfaceUnitControls
3 SurfaceUnit’’ON’’IndicatorLight 8 2
4 CooktopLampSwitch 13
5 OvenSetControl
6 OvenTempControl
7 OvenCyclingLight 13
8 AutomaticOvenTimer,Clockand
MinuteTimer
9 DoorLatch
10 BroilerI?anandRack(Donotcleanin 18
Self-Cleanoven.)
11 DoorLockedLight 21
12 OvenCleaningLight
13 3-in-lSurfaceUnitControl 8
14 3-in-l SurfaceUnit 8
15 Plug-h Cah-od”SurfaceUnit(Mayberemoved 23 two6-in.
wh& cleaningunderunit.)
16 Tilt-LockCalrod”SurfaceUnit(Maybe
raisedbut notremoved.)
I
2
e
two6-in.
two8-in.
Emil
Giii?-”
lmsa --
-.
17 ChromePlatedTrimRingsandPorcelainDripPans
18
OvenVentDuct(Locatedunderright
rearsurfaceunit.)
19 OvenInteriorLight (Comesonautomatically
whendooris opened.)
20 OvenLightSwitch
21 BroilUnit
22 BakeUnit(Maybelifiedgentlyforwiping
ovenfloor.)
23 OvenShelves
24 OvenShelfSupports(Lett.&A,B,C&D
indicatecookingpositionforshelvesas
—
.-—
.—
——
recommendedoncookingguides.)
25 StorageDrawer
26 Anti-TipBracket
(SeeInstallationInstructions)
.,
I
7
23
22
22
14
13
13
22
3,5
4 4
e
e
@
2
e
e
@
@
e
Page 8
“.-=
seesurfacecooking‘GKxideonpagesml
Yoursurfaceunitsandcontrolsare
designedtogiveyouan infinite
choiceofheatsettingsforsurface
unitcooking.
AtbothOH?andHIpositions,
thereisasligb.tnichesocontrol
“clicks”at thosepositions;“click”
onI-Hmarksthe highestsetting;the
lowestsettingisbetweenthewords
LOandOFF.In aquietkitchenyou
mayhearslight“cl~ck.ing”soun&
duringcooking,indicatingheat
settingsselectedarebeing
maintained.
Switchingheatstohighersettings
alwaysshowaquickerchangethan
switchingto lowersettings.
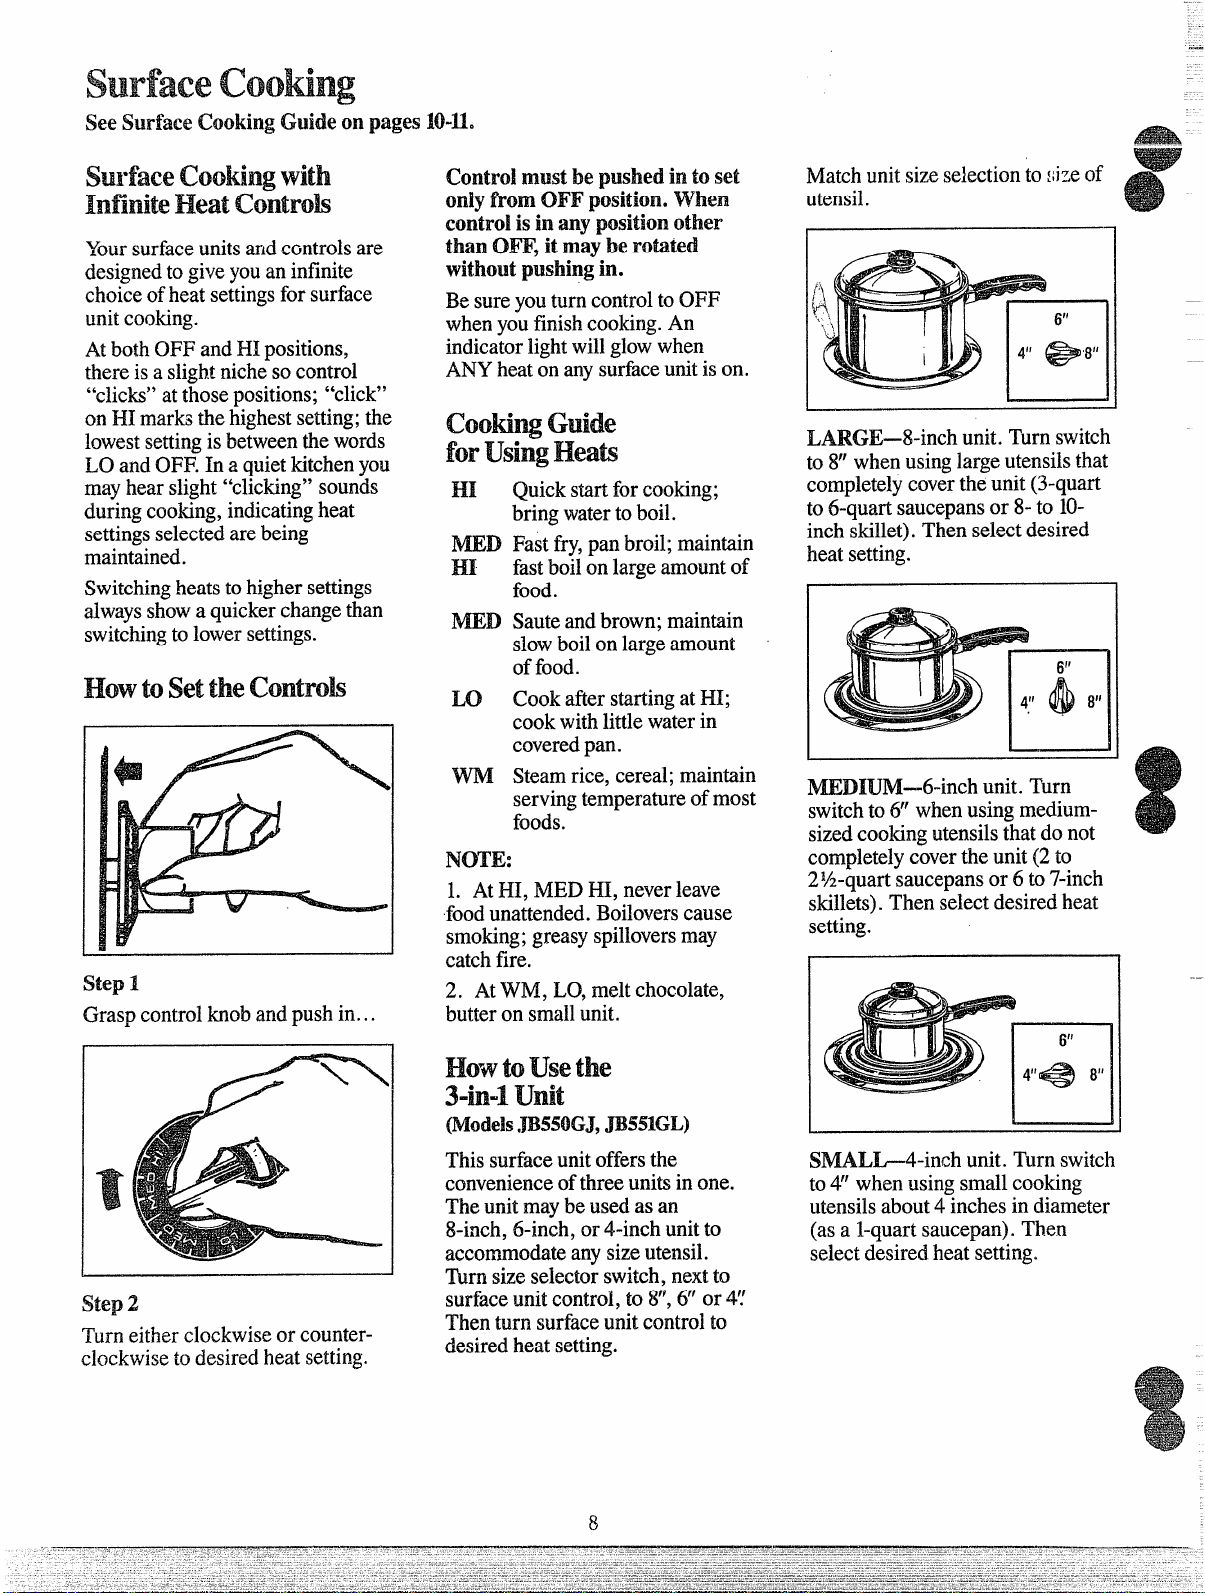
How to set the Control$
step1
Graspcontrolknobandpushin...
Controlmustbepushed
onlyf?mx-1Om position. when
Controltis
thanCM&itmayberotated.
withoutpushing
BesureyouturncontroltoOFF
whenyoufinishcooking.An
indicatorlightwillglowwhen
ANYheatonanysurfaceunitison.
cool&R$?JGuide
for
En
m~
HI
MED
Lo
NOTE:
L AtHI, MEDHI, neverleave
foodunattended.Boiloverscause
smoking;greasyspilloversmay
catchfire.
2. AtWM, LO,mekchocolate,
butteronsmallunit.
inany position other
in.
Quickstartforcooking;
bringwatertoboil.
Fastfry,panbroil;maintain
fastboilonlargeamountof
food.
Sauteandbrown;maintain
slowboilonlargeamount
offood.
CookafterstartingatHI;
cookwithlittlewaterin
coveredpan.
Steamrice,cereal;maintain
servingtefiperatureofmost
foods.
into set
Matchunit sizeselectiontot~izeof
utensil.
LA.RGE-8-inchunit.Turnswitch
to8“whenusinglargeutensilsthat
completelycovertheunit(3-quart
to6-quartsaucepansor 8-to 10inchskiHet).Thenselectdesired
heatsetting.
MEDIUM-6-inch unit.Turn
switchto6“whenusingmediumsizedcookingutensilsthatdonot
completelycovertheunit(2to
2~-qua~ saucepansor 6 to
skillets).Thenselectdesiredheat
setting.
7-inch
step2
Turneitherclockwiseorcounterclockwisetodesiredheat setting.
How%’0Usethe
3-M unit
Thissurfaceunit offersthe
convenienceofthreeunitsinone.
Theunitmaybeusedas an
8-inch,6-inch,or4-inchunitto
accommodateanysizeutensil.
Tbrnsizeselectorswitch,nextto
surfaceunitcontrol,to 8“,6“or4!’
Thenturnsurfaceunitcontrolto
desiredheatsetting.
8
SIWALL-4-inchunit. Turnswitch
to4“whenusingsmallcooking
utensilsabout4 inchesin diameter
(asa l-quartsaucepan).Then
selectdesiredheatsetting.
Page 9
—
“ Q.MayIctm foodsand preserves
—
onmysurface units?
A. Yes,but onlyusecookware
designedforc&g purposes.Check
ihe manufacturer’sinstructionsand
recipesfor preservingfoods.Be
surecanneris flat-bottomedand [j
fitsoverthecenterofyourCalrod?’;’
unit.Sincecanninggenerateslarg%
amountsofsteam,becarefulto
avoidburnsfromsteamorheat.
Canningshouldonlybedoneon
surfaceunits.
Q. CanIcovermydrippanswith
foil?
A. No. Cleanasrecommendedin
C1eaningGuide.
Q.
canI usespecialcooking
equipment,likean orientalwok9
onmy surfaceunits?
A. Cookwarewithoutflatsurfaces
isnot recommended.Thelifeof
your surfaceunitcanbeshortened
andtherangetopcanbedamaged
fromthehighheatneededforthis
type ofcooking.
Q. WhyamI notgettingtheheat
Ineedfrommyunitseventhough
Ihavetheknobsontheright
setting?
A. Afterturningsurfaceunitoff
andmakingsureitiscool,checkto
makesurethatyourplug-inunits
aresecurelyfastenedintothe
surfaceconnection.
Q.Whydoesmycookwaretilt
whenIIplacethemontheSUB4”WX2
unit’?
A. Becausethesurfaceunitis
notflat.Makesurethatthe“feet”
onyourCalrod@unitsaresitting
tightlyintherangetopindentation
andthereflectorringis flatonthe
rangesurface.
Q. Whyistheporcelainfinishon
mycookwarecomingoff?
A. HyousetyourCalrod”unit
higherthanrequiredforthecookware
material,andleaveit, thefinish
maysmoke,crack,pop,orburn
dependingonthepotor pan.Also,
atoohighheatforlongperiods,
andsmallamountsofdry food,
maydamagethefinish.
—
Canningshouldbe doneon
Cooktoponly.
Insurfacecookingoffoodsother
thancanning,theuseoflargediameterpots(extendingmore
thanl-inchbeyondedgeoftrimring)
isnotrecommended.However,when
canningwithwater-bathor pressure
canner,large-diameterpotsmaybe
used.Thisisbecauseboilingwater
temperatures(evenunderpressure)
arenotharmfultocooktopsurfaces
surroundingheatingunit.
HOWEVER,DONOTUSE
LARGEDIAMETERCANNERS
ORCXCHERLARGEDIAMETER
IUI’SFORFRYINGORBOILING
FOODSOTHERTHANWATER.
Mostsyruporsaucemixtures—
andalltypesoffrying-cookat
$ernperaturesmuchhigherthan
boilingwater.Suchtemperatures
cmddeventuallyharmcooktop
=ltiacessurroundingheatingunits.
inGinning -
1. BringwatertoboilonHIGH
heat,thenafterboilinghasbegun,
adjustheattolowestsettingto
maintainboil(savesenergyandbest
usessurfaceunit.)
2. Besurecannerfitsovercenterof
surfaceunit.Ifyourrangedoesnot
allowcannertobe centeredon
sutiaceunit,usesmaller-diameter
potsforgoodcanningresults.
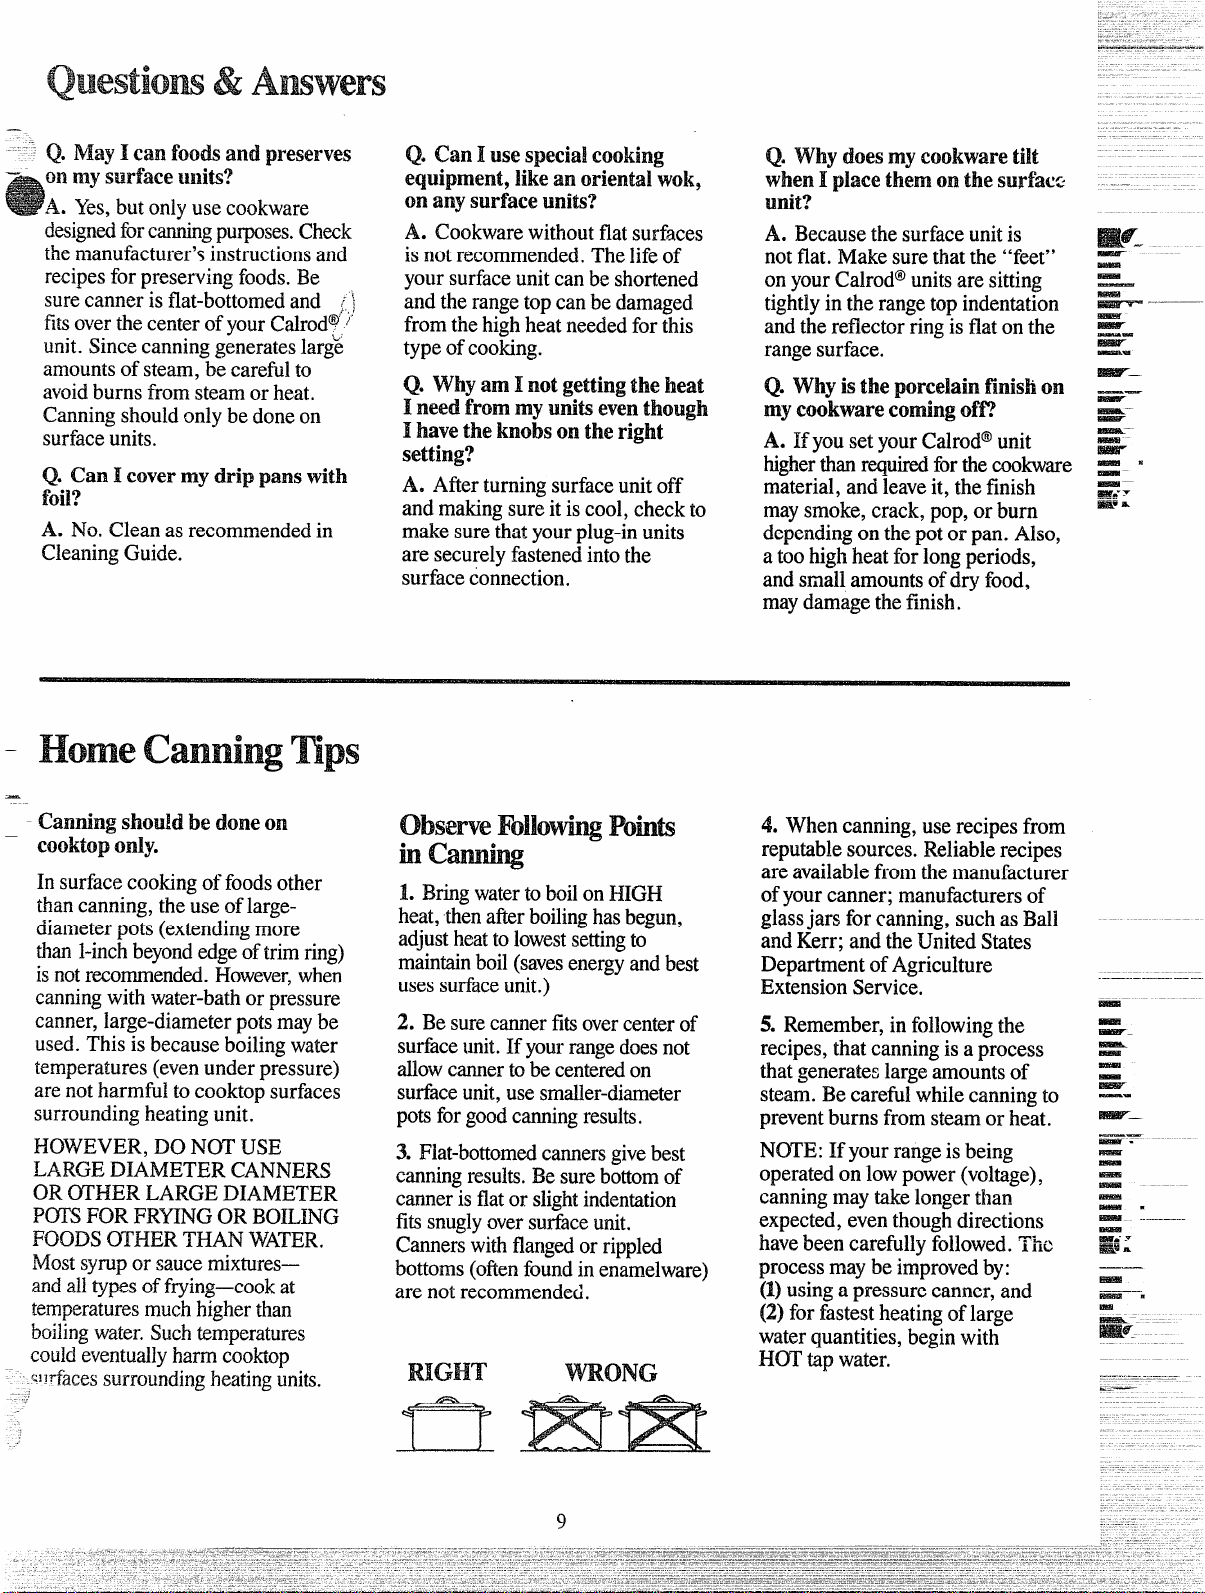
3. Flat-bottomedcannersgivebest
canningresults.Besurebottomof
cannerisflator slightindentation
fitssnuglyoversurfaceunit.
Cannerswithflangedor rippled
bottoms(oftenfoundinenamelware)
arenotrecommended.
4. Whencanning,userecipesfrom
reputablesources.Reliablerecipes
areavailablefromthemanufacturer
ofyourcanner;manufacturersof
glassjars forcanning,suchasBall
andKerr;andtheUnitedStates
DepartmentofAgriculture
ExtensionService.
5. Remember,in followingthe
recipes,thatcanningisaprocess
thatgenerateslargeamountsof
steam.Becarefulwhilecanningto
preventburnsfromsteamorheat.
NOTE:Ifyour rangeisbeing
operatedon lowpower(voltage),
canningmaytakelongerthan
expected,eventhoughdirections
havebeencarefullyfollowed.Tim
processmaybe improvedby:
(1)usingapressurecanner,and
(2)forfastestheatingoflarge
waterquantities,beginwith
HOI’tapwater.
9
Page 10

1.Usemedium-orheavy-weight
cookware.Aluminumcookware
conductsheatfasterthanother
metals.Castironandcoatedcast
ironcookwareisslowtoabsorb
heat,but generallycooksevenlyat
LOorNED settings.Steelpans
maycookunevenlyif notcombined
withothermetals.
Usenon-stickor coatedmetal
cookware.FlatgroundFyroceram”
saucepansor skilletscoatedonthe
bottomwithaluminumgenerally
cookevenly.
2.Toconservethemostcooking
energy,pansshouldbeflatonthe
bottom,havestraightsidesandtight
fittinglids.Matchthesizeofthe
sauc:panto thesizeofthesurface
unit.A panthatextendsmorethan
aninch‘beyondtheedgeofthe@im
ringtrapsheatwhichcauses
“cr~zin~”(finehairlinecracks)on
porceia~n,anddiscoloration
rangingfrombluetodarkgrayon
chrometrimrings.
Food
Cereal
Cornmeal,grits,
oatmeal
Cocoa
Coffee Percolator HI.Atfirstperk,switch
Eggs
Cookedinshell Covered
Friedsunny-side-up Covered
Friedovereasy Uncovered
Poached Covered
Scrambledoromelets Uncovered
Fruits HI.Incoveredpanbring
Cookware
Covered
Saucepan
Uncovered
Saucepan
Saucepan
Skillet
Skillet
Skillet
Skillet
Covered
Saucepan
DirectionsandSetting
toStartCooking
I-H.Incoveredpanbring
watertoboilbeforeadding
cereal.
HI.Stirtogetherwateror
milk,cocoaingredients.
Bringiusttoa boil.
heattoLO.
HI.Covereggswithcool
water.Coverpan,cook
untilsteaming.
MEDHI. Meltbutter,add
eggsandcoverskillet.
HI. Meltbutter.
HI. Incoveredpanbring
watertoa boil.
I-H.Heatbutteruntillight
goldenincolor.
fruitandwatertoboil.
—.
Meats,Poultry
Braised:Potroastsof
beef,lamborveal;
porksteaksand
chops
Pan-fried:Tender
chops;thinsteaksup
to3/4-inch;minute
steaks;hamburgers;
franksandsausage;
thinfishfillets
Covered
Skillet
Uncovered
Skillet
H1.Meltfat,thenaddmeat.
SwitchtoMEDHIto
brownmeat.Addwateror
otherliquid.
IiI. Preheatskillet,then
greaselightly.
SettingtoComplete
Cooking
LOorWM,thenaddcereal.
Finishtimingaccording
topackagedirections.
MED,tocook1or2minutes
tocompletelyblendingredients.
LOtomaintaingentlebut
steadyperk.
LO.Cookonly3to4
minutesforsoftcooked;
15minutesforhardcooked.
ContinuecookingatMEDHI
untilwhitesarejustset,about
3to5 moreminutes.
LO,thenaddeggs.When
bottomsofeggshavejustset,
carefullyturnovertocook
otherside.
LO.Carefullyaddeggs.
Cookuncoveredabout5
minutesat MEI)Hi.
MED.Addeggmixture.
Cook,stirringtodesired
doneness.
LO.Stiroccasionallyand
checkforsticking.
LO.Simmeruntilfork
tender.
MEDHIorMED.Brownand
cooktodesireddoneness,
turningoverasneeded,
Comments
Cerealsbubbleandexpandas
theycook;uselargeenough
saucepantopreventboilover.
Milkboilsoverrapidly.Watchas
boilingpointapproaches.
Percolate8to 10minutesfor
8
CUPS, lessforfewer cups.
Ifyoudonotcover skillet,baste
eggswithfattocooktopsevenly.
Removecookedeggswithslotted
spoonor pancaketurner.
Eggscontinuetosetslightlyafter
cooking.Foromeletdonotstir
lastfewminutes.Whenset,fold
inhalf.
Freshfruit:Use1/4to 1/2cup
waterperpoundoffruit.
Driedfruit:Usewateraspackage
directs.Timedependsonwhether
fruithasbeenpresoaked.If not,
allowmorecookingtime.
Meatcanbeseasonedandfloured
beforeitisbrowned,ifdesired.
Liquidvariationsforflavorcould
bewine,fruitortomatojuiceor
meatbroth.
Timing:Steaks1to2-ifich5s:I to
2hours.BeefStew:2 to3hours.
PotRoast:2%to4 hours.
Panfryingisbestforthinsteaks
andchops.Ifrareisdesired,preheatskilletbeforeaddingmeat.
10
Page 11

~.DeepFatFrying.Do notoverfill
kettlewithfatthatmayspillover
whenaddingfood.Frostyfoods
bubblevigorously.Watchfoods
fryingat HIGHtemperaturesand
keeprangeandhoodcleanfrom
accumulatedgrease.
RIGHT
CookwareFood
FriedChicken Covered
Pan friedbacon Uncovered
Sauteed:Lesstender
thinsteaks(chuck,
round,etc.);liver;
thickor wholefish
Simmeredorstewed
meat;chicken;corned
beef;smokedpork;
stewingbeef;tongue;
etc.
Meltingchocolate,
butter,marshmallows
Pancakesor
Frenchtoast
Pasta
INoodiesor spaghetti Covered
Pressure Cooking Pressure
Puddings,Sauces,
Candies,Frostings
Vegetables
Fresh
Frozen Covered
Sauteed:Onions;
greenpeppers;
mushrooms:celerv:etc.
Riceand Grits
Skillet
Skillet
Covered
Skillet
Covered
DutchOven,
Kettleor
Large
Saucepan
Small
Uncovered
Saucepan.
Usesmall
surt%ceunit
Skilletor
Griddle
LargeKettle
orPot
Cookeror
Canner
Uncovered
Saucepan
Covered
Saucepan
Saucepan
Uncovered
Skillet
Covered
Saucepan
i--
DirectionsandSetting
tostartcooking
I-H.Meltfat. SwitchtoMED
HItobrownchicken.
HI.Incoldskillet,arrange
baconslices.Cookjust
untilstartingtosizzle.
HI. Meltfat.SwitchtoMED
tobrownslowly.
HI.Covermeatwithwater
andcoverpanorkettle.
Cookuntilsteaming.
WM.Ahv
meltthrough.Stirtosmooth.
MEDHI. Heatskillet8to
10minutes.Greaselightly.
HLIncoveredkettle,bring
saltedwatertoa boil,uncover
andaddpastaslowlyso
boilingdoesnotstop.
HI.Heatuntilfirstjiggleis
heard.
HI. Bringjusttoboil. LO.Tofinishcooking.
HI.MeasureU2to1inch
waterinsaucepan. Add
saltandpreparedvegetable.
Incoveredsaucepanbring
toboil.
HI. Measurewaterandsalt
asabove.Addfrozenblock
ofvegetable.Incovered
saucepanbringtoboil.
HI. Inskilletmeltfat.
HI,Bringsaltedwatertoa
boil.
i-----
10to15minutesto
—
SettingtoComplete
Cooking
LO.Coverskilletand
cookuntiltender.
Uncoverlastfewminutes.
MEDHI. Cook,turning
overasneeded.
LO.Coverandcook
untiltender.
LO.Cookuntilfork
tender.(Watershould
slowlyboil).Forverylarge
loads,mediumheatmay
beneeded.
Cook2 to3
MEDHI.Cookuncovered
untiltender.Forlarge
amounts,HImaybe
neededtokeepwaterat
rollingboilthroughout
entirecookingtime.
MEDHIforfoodscooking
10minutesorless.MEDfor
foodsover10minutes.
MED.Cook1pound10
to30ormoreminutes,
dependingontenderness
ofvegetable.
LO.Cookaccordingto
timeonpackage,
MED.Addvegetable.
Cookuntildesired
tendernessisreached.
WM.Coverandcook
accordingtotime.
minutes perside.
Comments
Forcrispdrychicken,cover only
afterswitchingtoLOfor 10
minutes.Uncoverandcook,turning
occasionally10to20minutes.
Amoreattention-freemethod
isto startandcookat MED.
Meatmaybebreadedor
marinatedin sauce beforefrying.
Addsaltorotherseasoning
beforecookingifmeathasnot
beensmokedorotherwise
cured.
Whenmeltingmarshmallows,add
milkorwater.
Thickbattertakesslightlylonger
time.Turnoverpancakeswhen
bubblesrisetosurface.
Uselargeenoughkettleto
preventboilover.Pastadoubles
insizewhencooked.
Cookershouldjiggle2to3 times
perminute.
Stirfrequentlytoprevent
sticking.
Uncoveredpanrequiresmore
waterma longertime.
Breakup or stirasneededwhile
cooking.
Turnoverorstir vegetableas
necessaryforevenbrowning.
Tripleinvolumeaftercooking.
TimeatWM.Rice: 1cupriceand
2cupswater—25minutes.Grits:
1cupgritsand4cupswater—
40minutes,
L
.——
Page 12

is
.-
tothe
Four8’saredisplayedandsignal
@Woverwordsidentifying
lights
theoperationsyoucanprogramthe
automatictimertocontrol.After 15
seconds,the8’sgoout and “PF”
appearsalongwitha flashingsignal
lightabovethewordCLOCK.Set
theclockand VW” isreplacedby
timeofday.Nowyoucanprogram
thetimerwiththetouchofabutton
anda turnofa knob.
If poweris disruptedat anytime,
theabovesequencereoccursand
youmustresettheclockbeforeyou
canproceedtoprogramthetimer.
To set the clock
1.Pushandreleasethe
PROGRAMSELXI’ buttonuntil
thesignallightappearsabovethe
wordCLOCK.
2. ThrntheTIMESELECTknob
ineitherdirectionto setthe Clock
numeralstothe correcttime.Timing
thenbeginsautomatically4 seconds
later,orimmediatelyifyoupushand
releasethePROGRAM SELECT
button.
TO set the
mer
1. PushandreleasethePROGRAM
SELECTbuttonuntilthe signal
lightappearsabovethewords
MDWHXTIMER.
2. nun theTIMESELECT’knob
untilthenumberofminutesand
secondsyouwanttotime(upto
99:OQ)appearsinthedisplay–for
example,1:30for 1minuteand
30seconds.
Timerthenbeginscountingdown
automatically4 secondslater,or
immediatelyifyoupushandrelease
thePROGRAMSELECTbutton.
Beepssoundcontinuouslywhenset
timehaselapsed.Tosilencethe
beeps,pushandreleasethe
PROGRAMSELECTbutton.
UsingtheAutomaticTimer,you
canTIMEBAKEwiththeoven
startingimmediatelyandturning
offattheSTOPTIMEset, starting
immediatelyandcookingforthe
lengthofCOOKTIMEset...or you
canset bothCOOKandSTOP
TIMESto automaticallystartand
stopovenatalatertimeofday.It
takestheworryoutofnotbeing
hometostartor stoptheoven.
SettingtheTimerforTIMEBAKE
isexplainedindetailon page14.
uses
‘Timer
Theself-cleaningfunctiononyour
rangeusestheAutomaticTimerto
setthelengthoftimeneededto
clean,whetheryouwishtoclean
immediatelyordelaytheoperation
tocleanatlowenergytimesduring
thenight.
AnexplanationofsettingtheTimer
forself-cleaningappearsonpages
20and21.
--
Q. HowcamI Usemy Minute/’
second ‘rim?r
cooking
A. YourMinute/SecondTimer
willhelptimetotalcookingwhich
includestimetoboilfoodand
changetemperatures.Donotjudge
cookingtimebyvisiblesteamonly.
Foodwillcookincoveredcontainers
eventhoughyoucan’tseeanysteam.
Q. Mustthe mck be
toWN3the AutomaticTimer
wish
tomakemy.sW’face
easier?
setwhen I
forbaking?’
A. Yes,ifyouwishtosetthe
Timertoturnthe ovenonandoff
atpresettimes.
canI u!lsethelwnwxk!corld
Q.
Timer duringmm cooking?
A. Yes,theMinute/SecondTimer
canbeusedduringanycooking
function.Itdoesnotturntheoven
onandoff.
Q. Gin I change
I’mTim Cookinginthemm?
A. No.TheClockcannotbe
changedduringanyprogramthat
usestheAutomaticTimer.You
musteitherstopthoseprograms
or waituntiltheyarefinished
beforechangingtime.
Q. Howcm Icand a timed
function?
A. PushandreleasethePROGRAM
SELECTbuttonuntilthesignal
light appearsovertheappropriate
function.Then,tocancelaSTOP
TIME,turntheTIMESELECI’knob
counterclockwiseuntilpresentTime
ofDayappearsinthedisplay...
or to cancel a MINlJT13/SECOND
TIMERsetting,COOKTIMEor
CLEANTIME,turntheTIME
SELECTknobcounterclockwise
until:00appearsinthedisplay.
theClockwhile
-
Page 13

—......
.—
————.—
using ‘wowoven
L Lookatthecontrols.Besure
youunderstandhowto setthem
properly.Readoverthedirections
fortheAutomaticOvenTimer
so
youunderstanditsusewiththe
controls.
2. Checkoveninterior.Lookat
theshelves.Takea practicerunat
removingandrephicingthem
properly,to givesure, sturdy
support.
3. Readoverinformationandtips
that follow.
4. Keepthisbookhandysoyoucan
refertoit, especiallyduringthe
firstweeksofgettingacquainted
withyourrange.
ovenCmtrds
Thecontrolsfortheovenare
markedOVENSET’andOVEN
TEMI?TheOVENSETcontrolhas
settingsforBAKE,TIMEBAKE,
BROIL,CLEANandOFF.When
youturn theknobto thedesired
setting,theproperheatingunitsare
thenactivatedforthatoperation.
TheOVEN TEMPcontrolmaintains
[hetemperatureyouset, from
WiARM(150°F.)toBROIL(550°E)
andako atCLEAN(880°F.).
Preheattheovenonlywhen
necessary.Mostfoodswillcook
satisfactorilywithoutpreheating.
Ifyoufindpreheatingis necessary,
keepaneyeonthe indicatorlight
andputfoodintheovenpromptly
afterthelightgoesout,
shelves
Theshelvesaredesignedwithstoplockssothat whenplacedcorrectly
ontheshelfsuppor~s,they(a)willstopbeforecomingcompletely
fromtheoven,and(b)willnotti~t
whenremovingfoodfromor
placingfoodonthem.
Toremoveshelffromtheoven,lift
uprear ofshelf,pullforwardwith
stop-locks(curvedextensionunder
shelf)alongtop ofshelfsupports.
Becertainthatshelfiscoolbefore
touching.
Torepke shelfin oven,insert
shelfwithstop-locksrestingon
shelfsupports.Pushshelftoward
rearofoven;itwillfallintoplace.
Whenshelfis inproperposition,
stop-locksonshelfwillrununder
shelfsupportwhenshelfispulled
forward.
ovenLight
Thelightcomesonautomatically
whenthedoorisopened.Use
switchonfrontofdoor toturnlight
onandoffwhendoorisclosed.
Lamp over surface Utit
(Models
Pushandholdswitchuntillight
comeson.
J“B550GJ,JIMmx)
iiiii=”
Ee4m
-–
~
~–
Esaa
FEEa
m
--
E%?Er
_-
-.
lss%—.
m
m3w9.
-
W&ii
Eawr
—.
Hail
e“
EmK.
——
Hsa
I$wEr
B7#aK
BEw.
—.
-
_-
meowncycling Light#gIovvs
untiltheovenreachesyoursekdedl
ternpemttrre,thengoesoffandon
withtheovenunit(s)duringcooking.
f?REHEATH+JGthe oven,evento
igh temperaturesettings,is speedy
—rarelymorethanabout10minutes.
Theovenhasfourshelfsupports—
A (bottom),B,CandD (top).
Shelfpositionsforcookingfood
aresuggestedon Baking,Roasting
andBroilingpages.
.
Page 14

ensettingStopTime,time-bakedfoodscontinuecookingafiertheoventurnsoR)
(Wh
HowtoBake
1. Placefoodinoven,beingsureto
leaveabout1“betweenpansand
ovenwallsforgoodcirculationof
heat.Closeovendoor,andavoid
frequentdooropeningsduringbaking
topreventundesirableresults.
2. TurnC)VENSETknobtoBAKE
andOVENTEMPknobtotempemtme
onrecipeorBakingGuide.
3. Checkfoodfordonenessat
minimumtimeonrecipe.Cook
longerifnecessary.Switchoff
heat andremovefoods.
HOWto mme Bake
Theoventimercontrolsare
designedtoturntheovenonand
offautomaticallyatspecifictimes
youwantbakingto startandstop.
Howto
Mart&
MopTimeFeature.(Oventurnson
right away,cooksforpresetlength
oftime,andturnsoffautomatically.)
1.PushandreleasePRCX3RAM
SEIJNT.buttonuntilsignallightin
displayappearsabovethewordsSTOP
TIME.DisplaywillshowpresentTime
ofDay—forexample,1:00o’clock.
2. TurntheTIMESEIJXI’ knob
untiltheTimeof Dayyouwant
foodto stopcookingappearsin the
dis~lay;forexample,4:00 o’clock.
3. TurnOVENSETknobtoTIME
BAKE.
todesiredoventemperature;for
example,250°F.Foodwillcookfor
3hours,the ovenwilltumoffat
4:00o’clock,and4beepswillsound.
L$.TurnOVENSET toOFFa~ld
removefoodfromoven.
setTimerforImmediate
AutomaticStopUsingthe
TLWnOVENTEMPknob
How
toset‘rhmr forIhmm?diate
&AutomaticStopUsing
Start
theCookThe Feature.(Oven
turnsonrightaway,cooksfor
presetlengthoftime,andturnsoff
automaticallyatpresetStopTime.)
1. PushandreleasethePIVXMU4M
SEL13~ buttonuntilthesignal
lightappearsabovethewords
COOKTIME. Thedisplaywill
show0:00.
2. TurntheTIMESELECTknob
untilthelengthoftimeyouwant
foodstocookappears;forexample,
2:30for2hours,30minutes.
3. Turn0V13NSETknobtoTIME
BAKE.TurnOVEN TEMPknobto
desiredoventemperature.Foodwill
cookfor2 hoursand30minutes,
theovenwillturnoff,and4 beeps
willsound.
4. ‘IbmOVENSETtoOFFand
removefoodfromoven.
Howto set TimerforDelay
Start&Stop.(Ovenautomatically
turnsonlater,cooksforpresetlength
oftimeandturns offatpresetStop
Time.)
1. Make SUN?rangeC1O$Ashows
correct time of day–-forexample,
1:00o’clock.
2. PushandreleasethePROGRAM
SIILECTbuttonuntilthe signal
lightinthedisplayappearsabove
thewordsCOOKTIME.
3. TurntheTIMESELECTknob
untilthelengthoftimeyouwant
foodtocookappears;forexample,
2:30for2 hours and30minutes.
4. PushandreleasethePROGW
SELECI’buttonuntilthesignal
lightappearsabovethe words
STOPTIME.Thedisplaywill
showthesumofthepresentTime
ofDayplusthesetCOOKTIME.
5. TurntheTIMESELECTknob
clockwiseuntilthetimeyouwant
foodto stopcookingappearsinthe
display;forexample,6:00o’clock.
Note:Youcannotdiala StopTime
thatkmorethan11hoursand59
minuteslaterthanthepresentTime
ofDayonyourrangeclock Ifyou
shouldattempttodoso, numerals
andsignallightsin thedisplaywill
flash onandoffanda continuous
tonewillsounduntilyou turn
theTIMELWUKTdia[toan
acceptableS;opTime.
6. Tim OVENSETknob to TIME
BAKE.TurnOVENTEMPknob
todesiredoventemperature.
Ovenwill
at3:30.
shutoffautomatically,and4 beeps
willsound.Timeofdaywillbe
displayed.
7’.TurnOVENSETtoON?and
removefoodfromoven.
turnm
At6:00o’clockovenwill
Page 15

L Ahminurnpans conductheat
quickly.Formostconventional
baking,light,shinyfinishesgenerally
givebestresultsbecausetheyhelp
preventoverbrowning.Forbest
2. Darkor non-shinyfinishes,
glassandPyroceram”cookware,
generallyabsorbheat,whichmay
resultin dry,crispcrusts.Reduce
ovenheat2501?.iflightercrustsare
browningresults,werecommend desired.Rapidbrowningofsome
dull bot~m surfacesforcakepans
andpieplates.
foodscanbe achievedby
preheatingcastironcookware.
3.Preheatingtheovenisnot always
necessary,especiallyforfoods
whichcooklongerthan30to40
minutes.Forfoodwithshort
cookingtimes,preheatinggives
best appearanceandcrispness.
4. Opentheovendoorto check
foodaslittleaspossibleto prevent
unevenheatingandto saveenergy.
Food
Bread
Biscuits(Win. thick)
Coffeecake
Cornbreadormuffins
Gingerbread
Muffins ShinyMetalMuffinPans
Popovers
Quickloafbread
Yeastbread(2loaves)
Plainrolls
Sweetrolls
Cakes
(withoutshortening)
Angelfo~
Jellyroll
Sponge
Cakes
Bundtcakes
Cupcakes ShinyMetalMuffinPans
Fruitcakes
Layer ShinyMetaiPanwith
Layer,chocolate
Loaf
Cookies
Brownies
Drop
Refrigerator CookieSheet B,C
Rolledor sliced
Fruits,
other Desserts
Bakedapples Ghassor MetalPan A,B,C
Custard
Puddings,Rice
andCustard Casserole
Pies
Frozen
Meringue Spreadtocrustedges B,A
Dnecrust
IWOcrust GlassorSatin-finishMetal B 400°-4250 40-60
Pastryshell
%ii.scelhmfxms
Bakedpotatoes Seton OvenShelf A, B,C
kailopeddishes Glassor MetalPan A, B,C 325°-375” 30-60 or size.
%uffles Glass B 300°-3500 30-75
Container Position
ShinyCookieSheet
ShinyMetalPanwith
satin-finishbottom
CastIronor Glass
ShinyMetalPanwith
satin-finishbottom
DeepGlassorCastIronCups B
MetalorGlassLoafPans
MetalorGlassLoafPans A,B
ShinyOblongor MuffinPans
ShinyOblongor MuffinPans
Aluminumlhbe Pan A
MetalJellyRollPan B 375°-4000
MetalorCeramicPan
MetalorCeramicPan A,B
MetalorGlassLoafor A, B
TubePan
satin-finishbottom
ShinyMetalPanwith
satin-finishbottom
MetalorGlassLoafPans B
MetalorGlassPans B,C 325°-3500
CookieSheet B,C 350°-4000
CookieSheet B,C
GlassCustardCupsorCasserole B 300°-3500 30-60
(setinpanofhotwater) custard.Cookbreador ricepudding
GlassCustardCupsor
FoilpanonCookieSheet A 400°-4250 45-70 Largepiesuse400”F.andincrease
GlassorSatin-finishMetal A, B
GlassorSatin-finishMetal B 450° 12-15
Shelf
B,C 400°-4750
B,
A 350°-4000
B 400°-4500
B 350° 45-55
A,B
B 350°-3750 45-60
A, B
B,A
A ‘ 325°-3500 45-60
B 350°-3750
B 350°-3750
B 350°-375” 25-30
B 325°
Oven
Temperature Minutes
400°-425”
375°
375”-425”
375°-4250
350°-3750 20-30
325°-3750 30-55
325°-3500
275°-3000 2-4hrs. Use300°F.andShelfBforsmallor
350° 40-60
400°-4250
375°-4000 742
350°-4000 30-60
325°-3500 15-25
400”-425° 40-60
325°-400”
Time,
15-20
20-30
20-40
20-30 Decrease about5 minutesformuffin
45-60
45-60 Darkmetalorglassgivedeepest
10-25
10-15
45-65
20-25
20-35
25-35
10-20 UseShelfCandincreasetemp.
(jq’2
50-90
60-90
Coxnrnents
Canned,refrigeratedbiscuitstake
2to4 minuteslesstime.
Preheatcastironpanforcrispcrust.
mix,orbakeat450”F.for25minutes,
thenat 350°F.for10to 15minutes.
browning.
Forthinrolls,ShelfBmaybeused.
Forthinrolls,ShelfBmaybeused.
Two-piecepanisconvenient.
Linepanwithwaxedpaper.
Paperlinersproducemoremoist
crusts.
individualcakes.
Barcookiesfrommixusesametime.
25”F.to 50”F.formorebrowning.
Reducetemp.to300”F.forlarge
withcustardbase80to90minutes.
time,
Toquicklybrownmeringue,use
400°F.for8to 10minutes.
Custardfillingsrequirelower
temperature,longertime.
increasetimefor largeamount
—.
Page 16

Roastingiscookingbydryheat.
-—
Tendermeatorpoultrycanbe
roasteduncoveredinyouroven.
Roastingtemperatures,which
shouldbelowandsteady,keep
spatteringtoaminimum.When
roasting,itisnotnecessaryto
sear,baste,coveroraddwater
toyourmeat.
Roastingisredly abaking
procedweusedformeats. Therefore,
ovencontrolsaresettoBAKEor
TIMEBAKE.(Youmayheara
slightclickingsound,indicatingthe
ovenisworkingproperly.)Roasting
iseasy;justfollowthesesteps:
‘-’’.C2===TI
Step1:Check weight ofmeat,and
place,fatsideup,onroastingrack
ina shallowpam(Broilerpanwith
rackisagoodpanforthis.)Line
broikxpanwithaluminumfoilwhen
usingpanformarinating,cooking
withfruits,cookingheavilycured
meats,orforbastingfoodduring
cooking.Avoidspillingthese
materialsonovenlineror door.
Step2: Placeinovenonshelfin
AorBposition.Nopreheatingis
necessary.
Step4: Mostmeatscontinueto
cookslightlywhilestanding,after
beingremovedfromtheoven.
Standingtimerecommendedfor
roastsis 10to20minutestoallow
roasttofirmupandmakeit easierto
carve.Internaltemperaturewillrise
about5°to IO°F.;tocompensatefor
temperaturerise,ifdesired,remove
roastfromovenat5°to IO”F.less
thantemperatureonguide.
NOTE:You.maywishtouse TIME
BAKE,asdescribedonpage14,to
turnovenonandoffautomatically.
Rememberthatfoodwillcontinue
tocookinthehotovenandtherefore
shouldberemovedwhenthedesired
internaltemperaturehasbeen
reached.
For’
~Frozenroastsofbeef,pork,
Iamb,etc.,canbestartedwithout
thawing,butallow10to25minutes
perpoundadditionaltime(10
minutesperpoundforroastsunder
5pounds,moretimeforlarger
roasts).
oThawmostfrozenpoultry
roastingtoensureevendoneness.
Somecommercialfrozenpoultry
canbecookedsuccessfullywithout
thawing.Followdirectionsgiven
onpacker’slabel.
before
Q.Is it necessary to checkfor
I&mm?ss
A. Checkingthefinishedinternal
temperatureatthecompletionof
cookingtimeisrecommended.
TemperaturesareshowninRoasting
Guideonoppositepage.Forroasts
over8 Ibs., cookedat 300°F.with
reducedtime,checkwiththermometer
athalf-hourintervalsafterhalfthe
timehaspassed.
why ismy rwLstmmbling
Q.
when I try toam% it?
A. Roastsareeasiertosliceif
allowedtocool10to20minutes
afterremovingfromoven.Besure
tocutacrossthegrainofthe meat.
Q.DoI need
oven
eachtimeI cook 43roast
or poultry?
to pr’ekat my
A. Nis rarelynecessarytopreheat
your oven, onlyforverysmall
~oasts,whichcooka sfiortlength
oftime.
~. ~en buyinga
there my special tips that would
IYMSt,are
hdp me cookit more evenly?
A. Yes.Buyaroastasevenin
thicknessaspossible,or buyrolled
roasts.
Q.Can I
seal thesides of my foil
6%ent’9whenroastingaturkey?
A. Sealingthefoilwillsteamthe
meat.Leavingitunsealedallowsthe
air tocirculateandbrownthemeat.
Step3: TurnOVENSET’toBAKE
andCWENT’EMPto32501?.Small
poultrymaybe cookedat375°F.
forbestbrowning.
Page 17

.—...--—-
L PositionovenshelfatBfor
small-sizeroasts(3to7lbs.)and
atA forlargerro&ts.
Place meatfat-sideup,orpoultry
2.
breast-sideup,onbroilerpanor
othershallowpanwithtrivet.Do
not cover.Donotstuffpoultryuntil
justbeforeroasting.Usemeat
probeformoreaccuratedoneness.
Controlsignalswhenfoodhas
3.Removefatanddrippingsas
necessary.Basteasdesired.
4. Standingtimerecommendedfor
roastsis10to20minutestoallowroast
tofirmupandmakeit easierto
carve.Internaltemperaturewillrise
about5° to IOOE;tocompensatefor
temperaturerise,ifdesired,remove
roastfromovenat5°to 10”Eless
thantemperatureon guide.
reachedsettemperature.(Donot
placeprobein stuffing.)
oven
‘rYP
Meat
Tendercuts;rib,highqualitysirlointip,
rumportopround*
LambLegorbone-inshoulder*
Veaishouider,iegor ioin*
Porkioin,riborshouider*
Ham,precooked
Ham,raw
*Forboneiessroiiedroastsover6-inchesthick,add,5to 10minutesperpoundtotimesgivenabove.
Temperature
325°
325° Rare:
325°
325° WeiiDone:
325°
325°
Doneness
Rare:
Medium: 30-35
WellDone: 35-45
Medium:
WellDone: 30-35
WeiiDone:
ToWarm:
Weii Done:
ApproximateRoastingTime,
inMinutesperP@md
3toWM.
24-30 18-22
21-25
25-30 ~
35-45
35-45
10minutesperpound(anyweight)
UnderMMbs.
20-30
5.I?rozenroasts canbe
conventionallyroastedbyadding
10to25minutesperpoundmore
timethangiveninguidefor
refrigeratedroasts.(10minutes
perpoundforroastsunder5pounds.) -Defrostpoultrybeforeroasting.
Internal
Temperature‘1?
6to$-]bs.
22-25 150°-1600
28-33
20-23 130°-1400
24-28
28-33 170°-1850
30-40
30-40
10to15-lbs.
17-20
130°-1400
170°-1850
150°-1600
170°-1800
170°-1800
125°-1300
160°
Poultry
Chickenor Duck
Chickenpieces
Turkey
325°
375° WeiiDone:
325°
Weii Done: 35-40 30-35
WeiiDone: 20-25
3to5-lbs.
35-40
10to15-lbs. OverIiWbs.
over 5-lbs.
15-20
185°-1900
185°-1900
Inthigh:
185°-1900
Page 18

Broilingis cookingfoodbyintense
radiantheatfromthe upperunitin
theoven.Mostfishandtendercuts
ofmeatcanbebroiled.Follow
thesestepstokeepspatteringand
smokingtoaminimum.
Step1:Ifmeathas fatorgristlenear
edge,cutverticalslashesthrough
bothabout2“apart. Hdesired,fat
maybetrimmed,leavinglayer
about1/8”thick.
StepI2: Placemeatonbroile~rack
inbroilerpanwhichcomeswith
range.Alwaysuseracksofatdrips
intobroilerpan;otherwisejuices
maybecomehotenoughtocatchfire.
Step3:Pmitionshelfonrecommended
shelfpositionassuggestedinBroiling
Guideonoppositepage.Most
broilingisdone onCposition,but
ifyourrangeisconnectedto208
volts,youmaywishtousehigher
position.
I
IIII
I ic-f A&??
I
f-+:.
/’ M
Step6:Turnfoodonlyonceduring
cooking.Timefoodsforfirstside
perBroilingGuide.
Turnfood,thenusetimesgivenfor
secondsideasaguideto p~eferred
doneness.(Wheretwothicknesses
andtimesaregiventogether,use
firsttimesgivenforthinnestfood.)
Step7: TurnOVENSETknob
toOFF.Servefoodimmediately,
andleavepanoutsideoventocool
duringmealforeasiestcleaning.
use Foil
Q.
why should I km the door
duls(i!dwhenIbmilingdkken?
A..Chickenistheonlyfood
recommendedforclosed-door
broiling.Thisisbecausechickenis
relativelythickerthanotherfoods
youbroil.Closingthedoorholds
moreheatintheovenwhichallows
chickentocookevenlythroughout.
whenIbrwng, isitnecessary
Q’.
to alwaysusearackinthepan?
A. Yes.Usingtheracksuspends
themeatoverthepan.Asthemeat
cooks,thejuicesfallintothepan,
thuskeepingmeatdrier.Juices
areprotectedbythe rackandstay
cooler,thus preventingexcessive
spatterandsmoking.
Q.$bdd I saltthemeat before
broiling?
A. No. Saltdrawsoutthe juices
andallowsthemtoevaporate.
Alwayssaltaftercooking.Turn
meatwithtongs;piercingmeat
witha forkalsoallowsjuicesto
escape.Whenbroilingpoultry
or fish,brusheachsideoften
withbutter.
Step4: Leavedoorajara fewinches
(exceptwhenbroilingchicken).
Thedoorstaysopenbyitself,yet
thepropertemperatureismaintained
intheoven.
Step5: TurnbothOVENSETand
~VENTEMPknobsto13R01L.
Preheat@ unitsis notnecessary.
(Seenotes in BroilingGuide.)
L Ifdesired,broilerpanmaybe
linedwithfoilandbroilerrackrnay
be coveredwithfoilforbroiling.
ALWAYSBECERTAIN‘IOMOLD
FOILTHOROUGHLYTO
BROILERRACK,ANDSLIT
FOILTOCONFORI’vlWITH
SLITSINRACK.Broilerrackis
designedtominimizesmokingand
spattering,andtokeepdrippings
coolduringbroiling.Stoppingfat
andmeatjuicesfromdrainingto
thebroilerpanpreventsrackfrom
servingitspurpose,andjuicesmay
becomehotenoughtocatchfire.
2. IN NOTplaceasheetof
aluminumfoilonshelf.Todoso
mayresultiiiimproperlycooked
foods,damagetoovenfinishand
increaseinheatonoutsidesurfaces
ofthe oven.
Q.Whyaremymeatsnotturning
outasbrownastheyshould’?
A. In someareas,thepower
(voltage)tothe rangemaybelow.
In thesecases,preheatthebroil
unitfor 10minutesbeforeplacing
broilerpanwithfoodin oven.
Checktoseeifyouareusingthe
recommendedshelfposition.Broil
forlongestperiodoftimeindicated
intheBroilingGuide.Turnfood
onlyonceduringbroiling.
Q.Do1need to greasemy!imikr
racktopreventmeatfromsticking?
A. No.Thebroilerrackis designed
toreflectbroilerheat, thuskeeping
thesurfacecoolenoughtoprevent
meatstickingtothesurfiice.However,
sprayingthebroilerracklightlywith
avegetablecookingspraybefore
cookingwillmakecleanupeasier.
Page 19

L Alwaysusebroilerpanandrack
thatcomeswithyouroven.Itis
designedtominimizesmokingand
spatteringbytrappingjuicesinthe
shieldedlowerpartofthepan.
2. Ovendoorshould.beajarforall
foodsexceptchicken;thereis a
specialpositionondoorwhich
holdsdooropencorrectly.
30Forsteaksandchops,slashfat
evenlyaroundoutsideedgesofmeat.
Toslash,cutcrosswisethrough
outerfatsurfacejusttotheedgeof
themeat.Usetongsto turnmeat
overtopreventpiercinglmeatand
losingjuices.
4. Ifdesired,marinatemeatsor
chickenbeforebroiling.Orbrush
withbarbecuesaucelast5 to 10
minutesonly.
5. Whenarrangingfoodcmpan,
donotlet fattyedgeshangover
sides,whichcouldsoilovenwith
fatdripping.
6. Broilerdoesnotneedtobe
preheated.However,forverythin
foods,ortoincreasebrowning,
preheatifdesired.
7.FrozenSteakscanbe
conventionallybroiledby
positioningtheovenshelfatnext
lowestshelfpositionandincreasing
cookingtimegiveninthisguide
l%times
perside.
& Ifyourrangeisconnectedto
208Volts,raresteaksmaybebrotied
bypreheatingbroilheaterand
positioningtheovenshelfone
positionh[gher.
Quantityzmcl/or
Food
Bacon
GroundBeef
WellDone
BeefSteaks
Rare l-inchthick c 7 7 Steakslessthan1inchcookthrough
Medium (1to l%lbs.) c 9 9 beforebrowning.Panfryingis
WellDone c 13 13 recommended,
Rare
Medium (2to2%-lbs.) c
WellDone c 25
Chicken 1whole A 35 10-15 Reducetimesabout5 to10minutesper
BakeryProducts
Bread(Toast)or 2to4slices c
ToasterPastries 1pkg.(2)
EnglishMuffins 2(split) c 3-4
IAster ‘MIs 2-4 B
(6to8-oz.each)
Fish l-lb.fillets%to c
HamSlices l-in.thick B
(precooked)
PorkChops 2 (Minch)
WellDone 2(1-in.thick) B
Lamb
(%FS
Medium 2(1inch) c
WfeiiDone
Medium 2(1% inch)
WellDone
—
Wienersandsimilar
precookedsausages,
bratwurst
Thickness I%sition Time,Minutes Time,Minutes
%-lb.(about8 c 3% 3% Arrangeinsinglelayer.
thinslices)
l-lb.(4patties) Spaceevenly.
Y2 to %-in.thick c 7 4-5 Upto8pattiestakeaboutsametime.
1%-in.thick
(2to2%-lbs.),
splitlengthwise
‘h-in.thick
abouti lb.
about10to 12oz.
about1lb. B
l-lb. pkg,(10)
shelf
c If) 7-8
c
FirstSide SecondSide
15
1~-z
13-16 Do not
turnover. open.Brushwithmeltedbutter
5 5
8
10 10
13
8
c 10
c
c
10
17
6 1-2
14-16
20-25
‘/2
8
13
4-7
10
4-6
12-14
Comments
Slashfat.
sideforcut-upchicken.Brusheachside
withmeltedbutter,Broilwithskin
downfirstandbroilwithdoorclosed.
Spaceevenly.PlaceEnglishmuffins
cut-side-upandbrushwithbutter,if
desired,
Cutthroughbackofshell.Spread
beforeandafterhalftime.
Handleandturnverycarefully,
Brushwithlemonbutterbeforeand
duringcookingif desired.Preheat
broilertoincreasebrowning.
Increasetimes 5to 10minutesperside
for 1%-inchthickorhomecured.
Slashfat,
Slashfat.
Ifdesired,splitsausagesinhalf
lengthwise;cutinto5to6-inchpieces,
Page 20

‘.
(lBt!ckThese
step1:
Removebroilerpan, broilerrack
andothercookwarefromtheoven.
(Ovenshelvesmaybeleftinoven.
Note:Shelveswilldiscolorafter
theself-cleancycle.)
step 2:
Wipeupheavysoil on oven
bottom.
— - —— .— -—-—
I
c1
o
lieovenFrontFrame’
ovenDoor‘Gasket
B.
!
c.openingsinDoor
ovenLight
D.
step3:
Cleanspattersor spillsonoven
frontframe(A)andovendoor
outsidegasket(B)with adampened
cloth. Polishwitha dry cloth.Do
not cleangasket(B).Donotallow
waterto run downthroughopenings
intopofdoor(C). Neverusea
commercialovencleanerinor
aroundself-cleaningoven.
step4:
C1oseovendoorandmakesure
ovenlight(D) isoff.
Step5:
Theporcelain-enameleddrippans
that camewithyourrangecanbe
cleanedautomaticallyintheselfcleaningoven.Wipeoffboilovers
thatarenot stuckonbeforeplacing
twopans,upsidedown,oneach
ovenshelf.
Caution:Chrometrimrings
aroundthesurface.unitsshould
neverbecleanedinthe selfcleaningoven.Neithershould
reflectorpansoffoilor shiny
chrome.
Howtosetoven
for
cleaning
Step1:
‘rum OVENSET’and OVEN
TEIWPknobsto CLEAN.Controls
willsnapintofinalpositionwhen
theCLEANlocationis reached.
f
step2:
SlidetheLAKH HANDLEto the
rightasfarasitwillgo.
TheSeIf-cleaningoperationwill
beginimmediately.
Numerals3:00for3hourscleaning
timewillstartcountingdowninthe
display,andthesignallightwillappear
overthewordsCLEANTIME.
Theautomaticallyprogrammed
cleaningtimeforaheavily-soiled
ovenwithheavy,greasyspillsand
spatteris3 hours.Therecommended
cleaningtimefora moderately-soiled
ovenwiththinspillsandlight
spatteris2hours.If lessthan 3
hourscleaningtimeis desired,turn
theTIMESELEC17knobaccordingly.
‘Ibstart se~f-cleaningkiter,follow
precedinginstructions.Then
programSTOPTIMEas follows:
Step.3:
Pushandrelease.thePR0GIL4M
SELECTbuttonuntilthesignal
lightappearsabovethewordsSTOP
TIME.Numeralsinthedisplaywill
bethesumofthepresentTimeof
Dayplusthe setCleanTime.
Step4:
TurntheTIMESELECTknob
clockwiseuntilthetimeyouwant
cleaningto stopappears.
If youhadsettheTIME SELECT
knobfor2hourscleaningtimeand
programmedcleaningtostopat
midnight,the self-cleaning
operationwouldautomaticallystart
at 10:00p.m.
Note:men dialingaStopTimeEo
deiay theself-cleaningoperation,
youcannotseta StopTimethatk
morethan11hoursand59minutes
laterthanthepreserztTimeof.llay
onyour rangeclock.Ifyouattempt
todoso, numeralsandsignallights
in thedisplaywillflash on andoff
anda continuoustonewillsound
untilyouturnthe TIMESELECT
dialtoanacceptableStopTime.
20
Page 21

———-—-—.-—.
— —
..
Thesesteps after
Aftercleaningis complete,the
ovendoorwill staylockeduntilthe
ovencoolsandthe LOCKEDlight
goesoff.Thistakesabout30
minutes.
step1:
WhenLOCKEDlight is off, slide
theLATCHHANDLEtotheleflas
farasitwillgoandopenthedoor.
1
1
step2:
Ibrn OVENSETknobto Ol?F.
(
b
step 3:
,
IMnOVENTEMPknobtoWM.
Q.why won’tmyUYw3n‘dean
immediatelyeventhoughI
set
allthetimeanddean knobs
correctly?
A. Checkto be suretheLA~H
HANDLEis movedtotheright.
Q. MmyovenchXkisnotworking,
can I Stiliself-cleanmyoven?
A. No. YourAutomaticOven
Timerusestherangeclocktohelp
startandstopyourself-cleaning
cycle.
Q. can I Usecommercialoven
cieanerson anypartofmy
self-cleaningmm?
A. NOcleanersorcoatingsshould
beusedaroundanypart ofthis
oven.If youdousethemanddonot
wipetheovenabsolutelyclean,the
residuecanscartheovensurface
anddamagemetalpartsthenext
timetheovenisautomatically
cleaned.
Q. CanI ckanthe WovenGasket
aroundtheovendoor?
A. No, thisgasketisessentialfor
a good ovenseal, andcaremustbe
takennotto rub, damageor move
thisgasket.
Q. After hwingjust usedthe
oven9the LOCKED lightcame
on andIcould notmovethe
LATCHEL4JwLEe
why?
A. Afterseveralcontinuoushightemperaturebakingsor broilings,
theLOCKEDlightmaycomeon.
Theovendoorcan’tbelatchedfor
self-cleaningwhilethe LOCKED
lightis on. If thishappens,letthe
ovencool untiltheLOCKEDlight
goes off. Thentheovendoorcan
belatchedforself-cleaning.
Q. what should I do Nexcessive
smokingoccursduring cleaning?
A. Thisiscausedbyexcessivesoil,
andyou.shouldswitchtheOVEN
SETknobto OFF.Openwindows
toridroomofsmoke.Allowthe
oventocool foratleastonehour
beforeopeningthedoor.Wipeup
theexcesssoilandresettheclean
cycle.
Q. Is the “crackling” sound I
hear during cleaningnormal?
A. Yes.Thisisthe metalheating
andcoolingduringboththe
cookingandcleaningfimctions.
Q. Shouldtherebeanyodor
duringthecleaning’?
A. Y&,theremaybea slightodor
duringthefirstfewcleanings.
Failuretowipeoutexcessivesoil
mightalsocauseanodorwhen
cleaning.
Q. Whatcausesthehair-like
linesontheenameledsurface
ofmyoven?
A. Thisisanormalcondition
resultingfromheatingandcooling
duringcleaning.Theydonotaffect
howyourovenperforms.
Q. WhydoIhaveashM inmy
ovenaftercleaning?
A. Sometypesofsoilwillleavea
depositwhichisash.It canbe
removedwithadampspongeor
cloth.
Q. IMyovenshelvesdo not slide
easily.Whatisthematter?
A. Aftermanycleanings,oven
shelvesmaybecomesocleanthey
donotslideeasily.Ifyouwish
shelvestoslidemoreeasily,
dampenfingerswithasmall
amountofcookingoilandrub
lightlyoversidesofshelfwhere
theycontactshelfsupports.
Q. My ovenshelveshavebecome
grayaftertheself-cleanIcyde.Is
thisnormal?
A. Yes.Afierthe self-cleancycle,
theshelvesmaylosesomeluster
anddiscolortoadeepgraycolor.
21
Page 22

Propercareandcleaning are
importantsoyourrangewillgive
youefficientandsatisfactory
service.Followthesedirections
carefullyincaringforyourrange
toassuresafeandproper
maintenance.
own‘vim Duct
Yourrangeisventedthrougha
ductlocatedundertherightrear
Calrod@unit.Cleantheductoften.
‘oven
CAUTION:Beforereplacingyour
ovenbulb,disconnecttheelectrical
powerforyourrangeatthemain
fuseor circuitbreakerpanel.Be
~suretoletthelampcoverand
bulbcoolcompletely.
Theporcelainenamelfinishissturdy
butbreakableifmisused.This
finishisacidresistant.However,
anyacidfoodsspilled(suchasfruit
juices,tomato,or vinegar)should
notbepermittedto remainonthe
finish.
ckming under theRange
Theareaundertherangecanbe
reachedeasilyforcleaningby
removingthebottomdrawer.To
remove,pulldraweroutalltheway,
tiltupthefrontandremoveit. To
replace,insertglidesatbackof
drawerbeyondstopon range
glides.Liftdrawerifnecessaryto
inserteasily.Letfrontofdrawer
down,thenpushinto close.
‘ovenDwr
remove:
To
~ Makesureunitiscool.
@Liftuprightrearsurfaceunit.
@Removereflectorpanandring.
@Liftout oven ventduct.
Toreplace:
@Placethepartovertheovenvent
locatedbelowthecooktopwith
openingoftheductuncle;theround
openinginthereflectorpan.It
isimportantthattheductis in
thecorrectpositionsomoisture
andvaporsfromtheovencanbe
releasedduringovenuse.N0H5:
Nevercoverthe holeintheoven
ventductwithaluminumfoilor
anyothermaterial.Thisprevents
theovenventfromworkingproperly
duringanycookingcycle.
-/
~
‘u
Theovenlamp(bulb)iscovered
withaglassr~rnovablecoverwhich
isheldinplacewitha bail-shaped
wire.Removeovendoor,ifdesired,
toreachcovereasily.
Toremove:
@Holdhandundercoversoit
doesn’tfallwhenreleased.With
fingersof samehand,firmlypush
backwirebailuntilitclearscover.
Liftoffcover.DONOTREMOVE
ANYSCREWSTOREMOVE
,1
‘G*”
)
@
)
\
\
)
COVER
~
Replacebulbwith40-watthome
appliancebulb.
Toreplace cover:
@Placeitintogrooveoflamp
receptacle.Pullwirebail forward
tocenterofcoveruntilit snapsinto
place.Wheninplace,wireholds
coverfirmly.Becertainwirebailis
indepressionincenterofcover.
~Connectelectricpowertooven.
ToREMOVEdoor,opento13R01L
position,or whereyohfeelhinge
catchslightly.Graspdooratsides;
liftdoorupandawayfromhinges.
ToREPLACE,graspdooratsides.
Lineupdoor withhingesandpush
door firmlyintoplace.
Page 23

surfaceLamp
(Models JB550GJ,JB55NNJ
WHEN
LAMP,IX)NOTTOUCHTHE
METALATENDSOF LAMP.
Yourcooktoplightiseasilyreplaced
witha fluorescenttubeofthesame
wattage.Makesurethepowerto
therangeisdisconnectedatmain
fuseor circuitbreakerpanelorpull
plug.
Toremove:
CHANGINGACOOKIXIP
(Ml-1 UnitonJ’B550GJ,m55~~u
TW-hck
unitscannotbe removed.
Repeatedliftingoftheplug-in .
unitmorethan1“abovethetrim
ringcanpermanentlydamage
thereceptacle.
/’
Terminals
I
i
-
@Liftlampcover.
@Placefingersontopneareach
endoflightbulb.
@Pressdownandrolltopofbulb
gentlytowardfrontofrangeuntilit
stops.
@Removebulbgentlyfromunit
makingsureit doesn’thitlamp
cover.
TOreplace:
@Placefingersontopneareach
endoflightbulb.
@Pressbulbgentlyintoslotsand
rolltopofbulbgentlytowardback
ofrangeuntilitstops.
*Movelampcoverdown.
surface Ufib
Cleantheareaunderthedrip
pan/ringsoften.Built-upsoil,
especiallygrease,maycatchfire.
Tomakecleaningeasier,tilt-lock
unitsMlupandlockinthe up
position,andplug-inunitsare
removable.
Caution: Besure allcontrolsare
tm=ned!toOFUandsurfaceunits
are cod beforeattemptingtoM
orremovethem.
Afterliftingthetilt-lockunitor
removinga plug-inunit,remove
thedrip pan/ringsundertheplug-in
unitsandthe trim ringanddrippan
under thetilt-lockunitandclean
themaccordingto directionsinthe
CleaningGuideon page25.Wipe
a.rmmdthe.edgesofthesurfaceunit
ommimz.CXeantheareabelowthe
u~it.Rinseallwashedareaswith
adampclothor sponge.
Youc~nlifta tilt-lockunitupward
about6“ anditwilllockintheup
position.
lb repositionthetilt-lockunit:
~Replacethedrippanintothe
recessinthecooktop.
~Putthetrimringinplaceover
thedrippan.Thedrippanmustbe
underthetrimring.
~Guidethesurfaceunit intop].ace
soitfitsevenlyintothe trim ring.
Plug-hiunits
Plug-inunits canberemoved.
Liftaplug-inunitabout1“above
thetrimring—justenoughtograsp
it—andyoucanpull itout.
DO notma phqij-inunlitmore
than 1!’Myou do,it maynotlie”
flat m the trimringwhenyou
@Rgitbackin.
23
lb replacea plug-inad:
@Firstplacethedrippan,thenthe
trimriig into thestifice unitcavity
foundontopofthecooktopsothe
unitreceptaclecanbe seenthrou@
theopeningin thepan.
e ~nse~ the terminalsof theplug-in
unit throughtheopeningin thedrip
panandintothereceptacle.
@Guidethesurfaceunitintoplace
soitfitsevenlyintothetrimring.
G4wrmN
@Donot.attempttocleanplug-in
surfaceunitsinanautomatic
dishwasher.
~Do notimmerseplug-insurface
unitsin liquidsofanykind.
@Donot bendtheplug-insurface
unitplugterminals.
e D. notattempttoclean,adjust
or in anywayrepairtheplug-in
rece~tacle.
A
(continuednextpage)
I
——
-.
-
-
EiiEiF-
—.
-.
-
-
-
msar
_— -
E#srr
—.
-.
-.
-
Page 24

Usetimegivenonrecipewhen
—
cookingforfirsttime.Oven
thermostatsmay“drift” fromthe
factorysettingovertheyears,and
5 to KMninutedifferencesin timing
betweenanoldandanewovenare
not unusual.Yourovenhasbeenset
correctlyatthefactoryandismore
apt to beaccuratethantheoven
whichitreplaced.However,ifyou
findthatyourfoodsconsistently
browntoolittleortoomuch,you
maymakea simpleadjustmentin
theOVENTEMPthermostatknob.
PULLKN013OFFSHAFT.LOOK
ATBACKOF KNOBANDNOI’E
CURRENTSETTINGBEFORE
MAKING ANYADJUSTMENT.
Toincreaseternperatu~e,turn
towardHIor RAISE;to decrease,
turntowardLOorLOWER.Each
notchchangestemperatureIO”F.
(continued)
1. Pulloffknob.Loosenboth
screwsonbackofknob.
2. Movepointeronenotchin
desireddirection.Tightenscrews.
3. Returnknobtooven,matching
flatareaofknobtoshaft.
Recheckovenperformancebefore
makingan additionaladjustment.
Page 25

-====NOTELetnmgehvenipartscoolbeforetouchingor
MATERIALSm
USE GENERALIIXREC..KMNS
Do notcleanthebake
unit or broil unit. Any soil will burn off when the unit is
andBroilUnit heated.IWIW: Bakeunit ishingedand can be lifted gently to clean ovenfloor.
If spiilover,residue or ash accumulates
aroundbakeunit,gentlywipearound
unitwithwarmwater.
BroilerPanand Rack
@
SoapandWater
Drainfat,coolpanandrackslightly.(Donotlet soiledpanandrackstandin
@Soap-FilledScouringPad oventoCOOL)Sprinkleondetergent.Fillpanwithwarmwaterand spreadcloth
@PlasticScouringPad
orpapertoweloverrack.Letpanandrackstandfora fewminutes.Wash;scour
ifnecessary.Rinseanddry.OIT.U3N:Cleanpanandrackindishwasher.
ControlKnobs: o MildSoapandWater Pulloff knobs.Washgentlybutdonotsoak.Dry andreturncontrolstorange,
RangeTopandOven
OutsideGlassl?inish
@SoapandWater Cleanoutsideofcooledblackglassdoorwitha glasscleanerthatdoesnot
makingsuretomatchflatareaonknobandshaft.
containammonia.Washotherglasswithclothdampenedinsoapywater.Rinse
andpolishwitha dry cloth.Ifknobsareremoved,donotallowwatertorun
downinsidesurfaceofglasswhilecleaning.
Metal, including * SoapandWater
ChromeSideTrims
amdlkim Str’ips
PorcekainEnamel
Surface*
* PaperTowel
@Drycloth
~Soapand Water
Wash,rinse,andthenpolishwithadrycloth.DONOI’USEsteelwool,
abrasives,ammonia,acids,orcommercialovencleanerswhichmaydamage
thefinish.
Avoidcleaningpowdersorharshabrasiveswhichmayscratchtheenamel.
Ifacidsshouldspillontherangewhiieitishot,usea drypapertowelor cloth
towipeuprightaway.Whenthe sutiacehascooled,washandrinse.
Forotherspills,suchasfatsmatterings,etc., washwithsoapandwaterwhen
cooledandthenrinse.Polishwithadrycloth.
PaintedSurfaces o SoapandWater
Usea mildsolutionofsoapandwater.Donotuseanyharshabrasivesor
cleaningpowderswhichmayscratchormarsurface.
InsideOvenDoor*
~SoapandWater CleanONLYthedoorlineroutsidethegasket.Thedoor is automatically
cleanedwhentheovenisinthe self-cleaningcycle.Ifspilloveror spattering
shouldoccurincooking,wipethedoorwithsoapandwater.DONOTrubor
damagegasket.
OvenGasket*
OvenLiner
IIISoapand Water
Avoidgettj.ngANYcleaningmaterialsonthegasket.
Coolbeforecleaning.Frequentwipingwithmildsoapandwaterwillprolong
thetimebetweenmajorcleanings.Besuretorinsethoroughly.
OvenVentDuct
~SoapandWater RemovetheOvenVentDuctfoundundertherightrearsurfaceunit.Washin
hot,soapywater,dryandreplace.(Openingshouldmatchopeningindrippan.)
Shelves
(SeeSelf-Cleaning
@SoapandWater Shelvescanbe cleanedinSeM-Cleaningovenordishwasher,orby hand,
usingsoapandwater,Rinsethoroughlytoremovesoapaftercleaning.
OvenDirections)
StorageDrawer
~SoapandWater For cleaning,removedrawerbypullingitallthewayopen,tiltingupthefront
andthenliftingthedrawerout.Wipewithadampclothorspongeandreplace ‘
thedrawer.Neveruseharshabrasivesorscouringpads.
Cdrod”Surface
UnitCoils
Spattersandspillsburnawaywhencoilsareheated.Aftermeal,removeall
cookwarefromsurfaceunitsandheatsoiledunitsatI-H.Letsoilburnoffabouta
minuteandswitchunitstoOFF.Trynottogetcleaningmaterialsoncoils.Ifyou
do,wipeoffwithda~p papertowelbeforeheatingsurfaceunit.
DO NOThandletheunitbeforecompletelycooled.
DONOTattempt tocleantheplug-inunitsintheself-cleaningoven.
DO NUI’immerseplug-inunitsinanykindofliquid.
-----
Chrome-Plated
TrimRings
1
BSoapandWater
o Stiff-BristledBrush
Ml N~ washindishwash~r-
Cleanasdescribedbeloworindishwasher.DOFdU1’CLEANINSELF-
CLEANINGOVEN.Ringswilldiscolor.Wipeaftereachcookingsounnoticed
~ Soap-FilledScouringPad spatterwillnot“burnon”nexttimeyoucook.Toremove“burned-on”spatters,
(Non-metallic) useanyorall cleaningmaterialsmentioned.Rublightlywithscouringpad to
preventscratchingofthesurface.
PmceiaifiE~amel *SoapandWater Drippanscanbecleanedinself-cleaningovenordishwasheror byhand–
e DripRMls @Soap-l?iHedScouringPad afterpanscoolslightly,sprinkleondetergent,washor scourwithhotwater,
--
-
~%~ ~]ageof ~larinade~,
care being taken to not touch any hot portion of the oven. When the surface is cool, clean and rinse.
~PlasticScouringPad rinseanddry.
fnli~juices,~ndbasti~gMaterialsconminingacidsmaycausediscoloration.Spi!!~’:eisshouldbewipedup immediately,with
25
Page 26

—.
~8-• 8-•¼9-••:-•(Ç¥•p
.....-—.
.—-..+-=-..-=.-—
,..L%c4---
.... .. -
-.-.—..
m..—-=.=...~!*--
. .
—.-:.--y-T...If——
.. —.--,-..,
—.. -—-.l$—----<
==.~;~>
==-===--=+’K-
:——=——’&-LJL----J
..——
.-—
——.——-.-.—
~>~~
—..
.——
.—-
CWENLJG”HT
DOESNOTWORK
CMJSEAND
Plugonrangeisnotcompletelyinserted.intheelectl-icaloutlet.
Thecircuitbreakerinyourhousehasbeentripped,or afusehmbeenblown.
Ovencontrolsnot properlyset.
Doorleftinlockedpositionaftercleaning.
...
Lightbulbis looseor defective.‘Nghten-orreplace.
Switchoperatingovenlightisbroken.Callforservice.
FOODDOESNOT’
BROILPRoPIiRL--
FOODImlzsNOTROAST
ORBAKEPROPERLY
CL4.1XOD@SURFACEUNITS
NOTHJNCTKXWNG
PRQPERLY
O“EFIWILLNo’l’
~~~~-cmpoi
OVENSET’knob
CWEN TEHvW
notsetatERC)L
knobnotsetatBROIL.
Doornotleftajarasrecommended.
Impropershelfpositionbeingused.CheckBroilingGtiid6.
Necessarypreheatingwasnotdone;
Foodis beingcookedonhotpan.
Cookwareisnotsuitedforbroiling.‘
Aluminumfoilonbroilpanracknot fittedproperlyandslit asrecornrnended.
Clocknotset. ClockmustbesetbeforeyoucanprogramTimeBaking/Roasting.
Insufficientcookingtimeprogrammedwhensettingtimerfordelayedbaking
~~asting.TimedifferencebetweenS@pTimeandTimeofDayonrange
CM
clockmustbeequaltoorgreaterthantheprogrammedCook?3me—otherwise
theovenwillnotcookasIpng
CWEN
SEThob notsetqn.BAKEiI~
OVENTEMPhobnOiset.corke~t~Y;-.
Shelf~ositionis
oven she]fis rmtleve~. “ ,, ‘ “ , “’ “, . ~< ‘-‘ “
~n~~rr,ectcookware
A foil tentwasnotusedw~enn$ede~,toMowd~wnb&y~ingduring~oasting.
Surfaceu~i&~~en~tP1ugg~’~~$~~i~~~:,~‘ ‘ .“;”, ‘ <“’”“ .’,”,“”:,:’.’ ;,‘‘
incor~ect.,Che@k~b~st~ngOEBid611gG~@~s. ‘, ‘
or cmikwaie&in@y@ersuzei$,beingu~~d: ‘
M YOUWMIt i! to. , ~ ‘‘ ~‘ ~яяяяяяяяя-
!. ~:
...
?-
,J
,,
...
“
,“
,’
..
,.,
,.
! ,- “
,-+ . .
., ,
.,
.+ . :.,. . ,
TrimringsanddriP.~ansare.rmtset&$l.J@yifi~e”’liluggsiop~,, ,
Sur~ace~nitcqntro~~arenot’pidp+lyS&.”’ - ‘ ~ ,’~,,? ~- - ““ , .
Clock~otset. Clockmustbk set‘befo~e~gucanpriig~atiilianing tirna.
,’ ,4
,.
,.
..
\ ~ ,. “
,,
Insufficientclearingtimepmgrtirned when&tting”timgrfordeki~ed
cleaning.Timedifference.btween StopTi~e an~TimeofDay‘mlrangeclock
mustbeequaltoor
greaterthantheprcigramrnedCH~anT’im+-dherwisethe ~ ,
ovenwillnotcleanaslongasyouwantitto.
BothQVENSETaridOVENTEH?@knobsmustbe set at
CLEANse&ng.
A=thickpileofspikwer, whencleaned,leavesaheavylayerofashinspots
whichcouldhaveinsulatedtheareafromfurtherheat.
26
Page 27

&!Rs2.
.-.
.Lr—
t,.+-..—.-)–%
.,
,&.. --s
:,.q”
%
@?
PRoBLEM
PaNmMJE CAUSEAND
OW3NDCM3R
1 ‘R’’OPJ’TLA2KX3
i
I
‘
mmOVENSETbob toCLEAN.GlowingLcldcedLightafterknobisturned
in@catesovegistoohotfroinpxeviow+useand@or won’tlatch.Tocooloven,
opendom wideyth~$lLatch&anbe‘in&kxi.
.OVENSET
If you need more help. e.Cail,tollfree:
Gz Answer center@
Cmlsuurmer service
orOFFbef”reLatchganb~moved.
‘ -,.
,,’ .
,.
Toobtainservice,seeyourwarranty
onthe backpageofthisbook.
We’reprowlofourserviceand
wantyoutobepleased.Ifforsome
reasonyouarenot happywiththe
serviceyoureceive,herearethree
stepstofollowforfurtherhelp.
FIRST,contactthepeoplewho
servicedyourappliance.Explain
whyyouarenotpleased.In most
cases,thiswillsolvetheproblem.
NEXT,ifyouare stillnotpleased,
writeallthedetails—including
yourphone number—to:
Manager, Consumer Relations
GE Appliances
Appliance
Park
Louisville,Kentucky40225
FUNALLY,ifyourproblemis still
notresolved,write:
ll+dlajorAppliance
Consumer Action Panel
20NorthWackerDrive
Chicago,Illinois60606
,,,
27
Page 28

Saveproofcdoriginal purchase date such as your salesslip or cancelkd check to establish warranty period.
J
Iis
FULL
Foroneyearfromdateoforiginal
purchase,wewillprovide,freeof
charge,partsandservicelabor
inyourhometorepairorrep6ace
anypart of the rangethatfails
becauseofa manufacturingdefect.
.. .
B ‘ ~e~i~etri~stoyourhom~to
teachyouhowtousetheproduct.
Readyour the and(We materia!.
Ifyouthenhaveanyquestions
aboutoperatingtheproduct,
pleasecontactyourdealerorour
ConsumerAffairsofficeatthe
addressbelow,orcall,tollfree:
GEAnswerCente@
800.626.2000
consumerinformationservice
@improperinstallation.
Thiswarrantyisextendedto
theoriginalpurchaserandany
succeedingownerforproducts
purchasedforordinaryhomeu$~
inthe48mainlandstates,Hawaii
andWashington,DC.InAlaskathe
war~antyisthesameexceptthatitis
UMITH3becauseyoumustpayto
shiptheproducttotheserviceshop
orfortheservicetechnician’stravel
coststoyourhome.
AHwarrantyservicewillbeprovided
byourFactoryServiceCentersor
byourauthorizedCustomerCare@
servicersduringnormalworking
hours.
LookintheWhiteorYelldw Pages
ofyourtelephonedirectoryfor
GENERAL.ELECTRICIUXVIPANY,
GENERAL ELECTRIC!FAC7FOFlY
SEFMCE,GENERAL!ELHXRK2IIIOTFXMJTFAGKIFIYSERVICEor
GENERALELECTRICCWSKM4EFt
CA~E@~El%/!CE.
@Replacementofhousefusesor
resettingofcircuitbreakers.
~Failureoftheproductifitisused
forotherthanitsintendedpurpose
orusedcommercially.
~-Damagetoproductcaused
byaccident,fire,floodsoracts
ofGod.
WARRANK)R1SNOTRESP(3NSM3LE
FORCONSKNJENT!ALDAMAGES.
Somestatesdonotallowtheexclusionorlimitationofincidentalorconsequentialdamages,sothe abovelimitationorexclusion
maynotapplytoyou.Thiswarrantygivesyouspecificlegalrights,andyoumayalsohaveotherrightswhichvaryfromstateto state.
Toknowwhatyourlegalrightsareinyourstate,consultyourlocalorstateconsumeraffairsofficeoryourstate’sAttorneyGeneral.
~ F%rtNo,164!X352P240
Ifyouhaveaninstallationproblem,
contactyourdealerorinstaller.
YOUareresponsibleforproviding
adequateelectrical,gas,exhausting
andotherconnectingfacilities.
Gerae@lEiectric Company
if helpk needed ccmcmmingthis
Affairs, GE Appliances,lhwkwilk, KY’40225
I
warranty,write:
{
L!!
 Loading...