

Page 1

GEAppliances.com
Safety Instructions ......... 2-6
C_
C
E3
(D
LL_
U
_m
U
LLJ
Operating Instructions
Clock and Timer ................... 17
Control Lock Out .................. 18
Energy Saver Mode ............... 18
Oven .......................... 11-20
Controls .......................... 11
Power Outage ................... 12
I
Aluminum Foil ................... 13
Broiling Guide ................... 14
Clock and Timer ............. 15-16
AdJust the Oven Thermostat ..... 17
Special Features ................. 17
Sabbath Feature ................. 18
Self-Cleaning ................. 19, 20
Surface Units...................... 7,8
Glass Cooktop .................. %10
Care and Cleaning
control Knobs .................... 21
Coil Surface Units ................. 22
Drip Pans ........................ 22
Lift-Up Cooktop ................... 22
Standard-Clean Oven Interior .... 25
Oven Vent ........................ 25
Porcelain Oven Interior ........... 25
Lift-Off Oven Door ................ 24
Oven Heating Elements ........... 24
Oven Racks ...................... 24
Storage Drawer Removal ........ 24
Light ............................. 25
Stainless Steel Handles .......... 25
Glass Cooktop ................ 26, 27
For a Spanish version of this
manual, visit our Website at
GEAppliances.com.
Para consultar una version
en espafiol de este manual de
instrucciones, visite nuestro sitio
de internet GEAppliances.com.
In Canada contact us at:
www. GEAppliances.ca
Troubleshooting Tips..... 28-s1
Accessories ................... 32
Consumer Support
Consumer Support ...... Back Cover
Warranty ......................... 35
Write the model and serial
numbers here:
Model #
Serial #
You can find them on a label
behind the drawer or behind the
lower oven door on the front of
the range frame.
@
Printed on
Recycled Paper
49-88056-1 07-13 GE
Page 2
IMPORTANT SAFETY INFORMATION.
READ ALL INSTRUCTIONS BEFORE USING.
[A WARNING I
Read all safety instructions before using the product. Failure to follow these instructions may result in fire, electric shock,
serious injury or death.
ANTI-TIP DEVICE
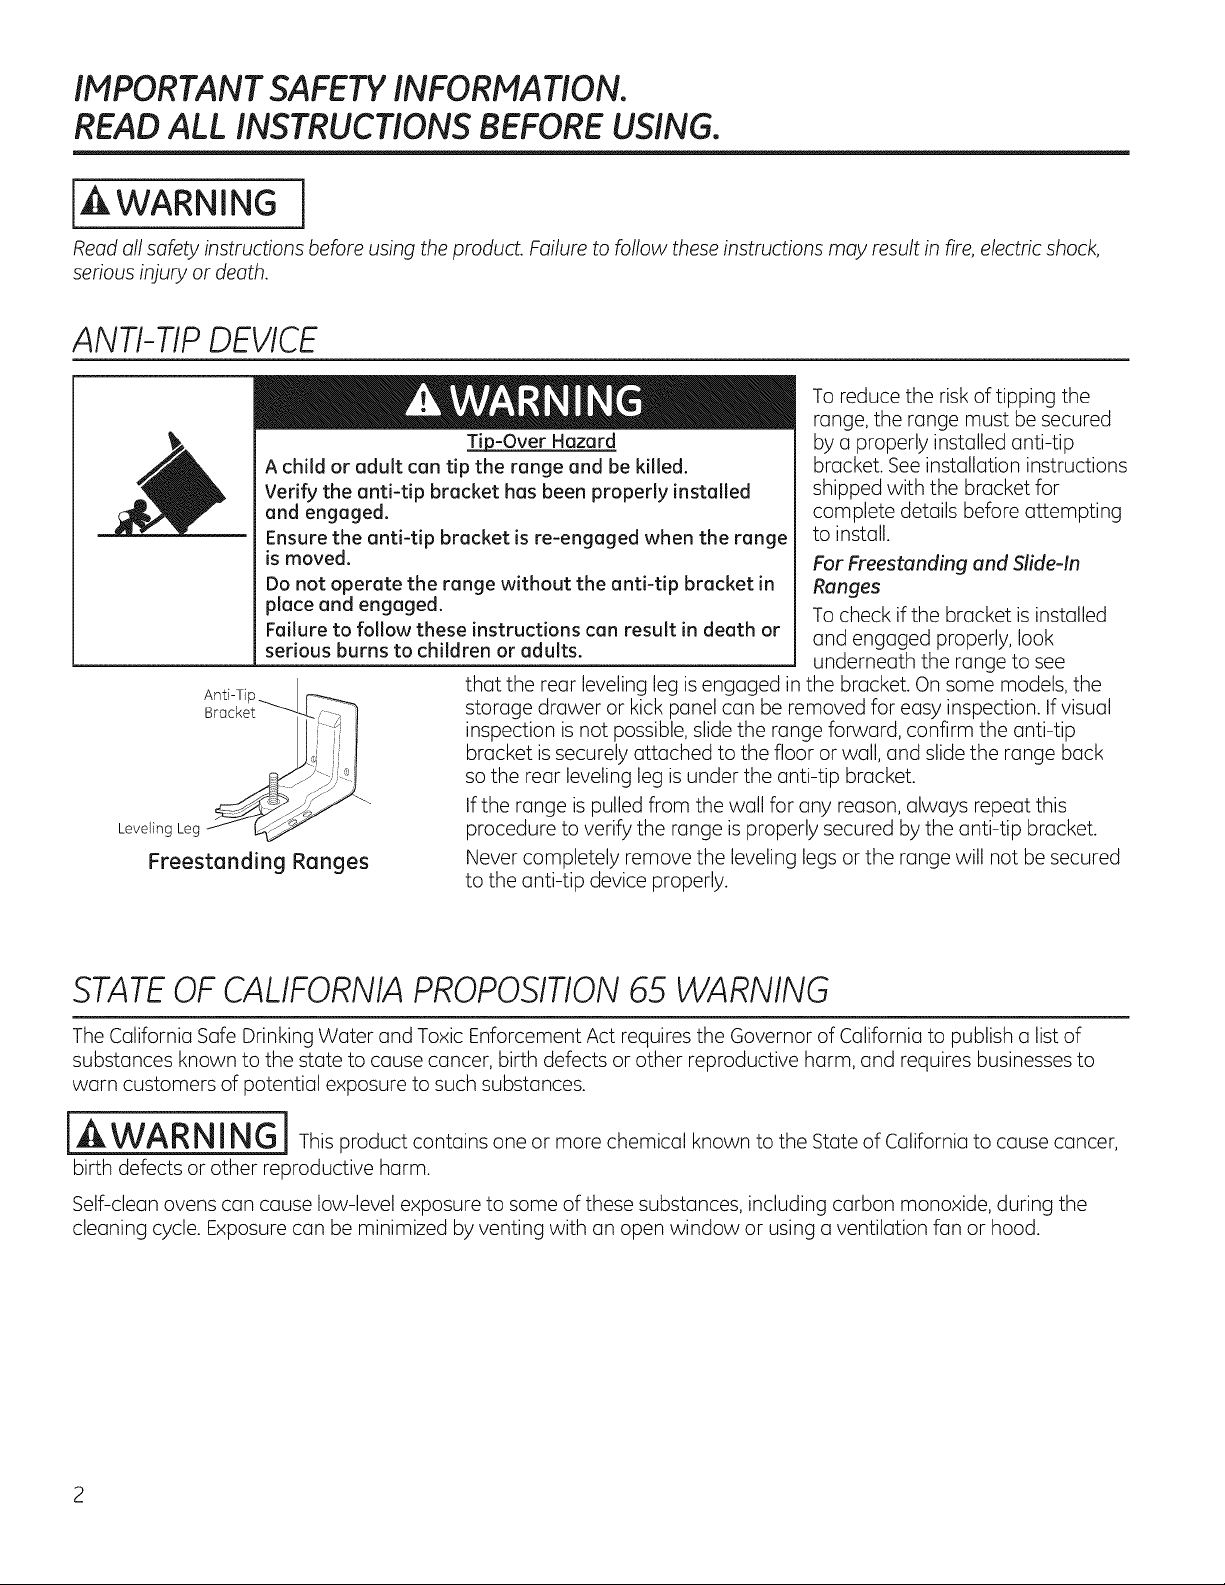
To reduce the risk of tipping the
range, the range must be secured
A child or adult can tip the range and be killed.
Verify the anti-tip bracket has been properly installed
and engaged.
Ensure the anti-tip bracket is re-engaged when the range
is moved.
Do not operate the range without the anti-tip bracket in
place and engaged.
Failure to follow these instructions can result in death or
serious burns to children or adults.
Anti-Tip _
Leveling Leg
Freestanding Ranges
i- i
Tip-Over Hazard
that the rear leveling leg isengaged in the bracket. On some models, the
storage drawer or kick panel can be removed for easy inspection. If visual
inspection is not possible, slide the range forward, confirm the anti-tip
bracket issecurely attached to the floor or wall, and slide the range back
so the rear leveling leg is under the anti-tip bracket.
If the range is pulled from the wall for any reason, always repeat this
procedure to verify the range is properly secured by the anti-tip bracket.
Never completely remove the leveling legs or the range will not be secured
to the anti-tip device properly.
by a properly installed anti-tip
bracket. See installation instructions
shipped with the bracket for
complete details before attempting
to install.
For Freestanding and Slide-In
Ranges
To check if the bracket is installed
and engaged properly, look
underneath the range to see
STATEOF CALIFORNIA PROPOSITION 65 WARNING
The California Safe Drinking Water and Toxic Enforcement Act requires the Governor of California to publish a list of
substances known to the state to cause cancer, birth defects or other reproductive harm, and requires businesses to
warn customers of potential exposure to such substances.
IA WARNING IThis product contains one or more chemical known to the State of California to cause cancer,
birth defects or other reproductive harm.
Self-clean ovens can cause low-level exposure to some of these substances, including carbon monoxide, during the
cleaning cycle. Exposure can be minimized by venting with an open window or using a ventilation fan or hood.
Page 3
[A WARNING ] GENERALSAFETYINSTRUCTIONS
GEAppliances.com
Use this appliance for its intended purpose as described
in this Owner's Manual.
Be sure your appliance is properly installed and
grounded by a qualified installer in accordance with the
provided installation instructions.
Do not attempt to repair or replace any part of your
range unlessit isspecifically recommended inthis
manual.Allother servicing should be referredto a
qualifiedtechnician.
Before performing any service, unplug the range
or disconnect the power supply at the household
distribution panel by removing the fuse or switching off
the circuit breaker.
Do not leave children alone-children should not be left
alone or unattended in an area where an appliance is in
use. They should never be allowed to climb, sit or stand
on any part of the appliance.
CAUTION:Do not store items of interest to
children above a range or on the back guard of a
range-children climbing on the range to reach items
could be seriously injured.
Use only dry pot holders-moist or damp pot holders on
hot surfaces may result in burns from steam. Do not let
pot holders touch hot surface units or heating elements.
Do not use a towel or other bulky cloth in place of pot
holders.
Do not touch the surface units, the heating elements
or the interior surface of the oven. These surfaces may
be hot enough to burn even though they are dark in
color. During and after use, do not touch, or let clothing
or other flammable materials contact the surface units,
areas nearby the surface units or any interior area of
the oven; allow sufficient time for cooling first. Other
surfaces of the appliance may become hot enough
to cause burns. Potentially hot surfaces include the
cooktop, areas facing the cooktop, oven vent opening,
surfaces near the opening and crevices around the
oven door.
Do not heat unopened food containers. Pressure could
build up and the container could burst, causing an
injury.
Do not usealuminum foil to linedrip pans or anywhere
in the oven, except asdescribed in this manual. Foilcan
trap heat or melt, resulting in damage to the product
and a shock orfire hazard.
Avoid scratching or impacting glass doors, cook tops or
control panels. Doing so may lead to glass breakage. Do
not cook on a product with broken glass. Shock, fire or
cuts may occur.
Cook meat and poultry thoroughly-meat to at least an
internal temperature of 160°F and poultry to at least
an internal temperature of 180°F. Cooking to these
temperatures usually protects against food borne
illness.
Never use your appliance for warming or heating the
room.
iA WARNING
1KEEPFLAMMABLE MATERIALSAWAY FROM
THERANGE.
Do not store or use flammable materials in an oven or
near the cooktop, including paper, plastic, pot holders,
linens, wall coverings, curtains, drapes and gasoline or
other flammable vapors and liquids.
Never wear loose-fitting or hanging garments while
using the appliance. These garments may ignite if they
contact hot surfaces causing severe burns.
Do not let cooking grease or other flammable materials
accumulate in or near the range. Grease in the oven or
on the cooktop may ignite.
Clean ventilating hoods frequently. Grease should not
be allowed to accumulate on the hood or filter.
Page 4
IMPORTANT SAFETY INFORMATION.
READ ALL INSTRUCTIONS BEFORE USING.
"--I_WARNING IIN THE EVENT OFA FIRE,TAKE THE FOLLOWING STEPS
TOPREVENTTHE FIREFROM SPREADING:
Do not use water on grease fires. Never pick up a
flaming pan. Turn the controls off. Smother a flaming
pan on o surface unit by covering the
pan completely with a well-fitting lid, cookie sheet or flat
troy. Useo multi-purpose dry chemical or foam-type fire
extinguisher.
If there is a fire in the oven during baking, smother the
fire by closing the oven door and turning the oven off or
by using a multi-purpose dry chemical or foam-type fire
extinguisher.
If there is a fire in the oven during self-cleon, turn the
oven off and wait for the fire to go out. Do not force
the door open. Introduction of fresh air at self-cleon
temperatures may lead to a burst of flame from the
oven. Failure to follow this instruction may result in
severe burns.
iA WARNING l COOKTOP SAFETYINSTRUCTIONS
Never leave the surface units unattended at medium or
high heat settings. Boilovers cause smoking and greasy
spillovers that may catch on fire.
Never leave oil unattended while frying. If allowed to
heat beyond its smoking point, oil may ignite resulting
in fire that may spread to surrounding cabinets. Use a
deep fat thermometer whenever possible to monitor oil
temperature.
To ovoid oil spillover and fire, use a minimum amount of
oil when shallow pan-frying and ovoid cooking frozen
foods with excessive amounts of ice.
Useproper pan size--select cookware having flat
bottoms large enough to cover the surface heating
element.The useof undersizedcookware will expose
a portion of the surfaceunit to direct contact and may
result in ignition of clothing. Properrelationship of
cookware to surfaceunit will also improve efficiency.
Onlycertaintypes of glass/ceramic,earthenware or
other glazed containers are suitablefor cooktop service;
others may break because of the sudden change in
temperature.
To minimize the possibility of burns, ignition of
flammable materials and spillage, the handle of a
container should be turned toward the center of the
range without extending over nearby surface units.
When preparing flaming foods under a hood, turn the
fan on.
If power is lost to on electric cooktop while o surface
unit is ON, the surface unit will turn back on as soon
as power is restored. Inthe event of power loss, failure
to turn oil surface unit knobs to the OFF position may
result in ignition of items on or near the cooktop, leading
to serious injury or death.
Page 5
IA WARNING 1RADIANT COOKTOP SAFETYINSTRUCTIONS
(Some models)
GEAppliances.com
Use care when touching the cooktop. The glass surface
of the cooktop will retain heat after the controls have
been turned off.
Do not cook on a broken cooktop. If glass cooktop
should break, cleaning solutions and spillovers
may penetrate the broken cooktop and create a
risk of electric shock. Contact a qualified technician
immediately.
Avoid scratching the glass cooktop. The cooktop can be
scratched with items such as knives, sharp instruments,
rings or other jewelry, and rivets on clothing.
Do not place or store items that can melt or catch fire
on the glass cooktop, even when it is not being used. If
the cooktop is inadvertently turned on, they may ignite.
[A WARNING
(Some models)
Do not immerse or soak the removable surface units.
Do not put them in a dishwasher. Do not self-clean the
surface units in an oven. Doing so may cause them to
fail presenting a burn or fire hazard.
Do not use a surface unit (heating element)if it develops
a glowing spot during use or shows other signs of
damage. A glowing spot indicates the surface unit may
fail and present a potential burn, fire, or shock hazard.
Turn the surface unit off immediately and have it
replaced by a qualified service technician.
i COIL
COOKTOPSAFETYINSTRUCTIONS
Heat from the cooktop or oven vent after it isturned off
may cause them to ignite also.
Use CERANA BRYTE®ceramic Cooktop Cleaner and
CERANA BRY]-E®Cleaning Pad to clean the cooktop.
Wait until the cooktop cools and the indicator light goes
out before cleaning. A wet sponge or cloth on a hot
surface can cause steam burns. Some cleaners can
produce noxious fumes if applied to a hot surface. Note:
Sugar spills are an exception. They should be scraped
off while still hot using an oven mitt and a scraper. See
the Cleaning the glass cooktop section for detailed
instructions.
Read and follow all instructions and warnings on the
cleaning cream label.
To ovoid the possibility of a burn or electric shock, always
be certain that the controls for all surface units are at the
OFFposition and all coils are cool before attempting to lift
or remove a coil surface unit.
Do not use aluminum foil to line drip pans. Foil can trap
heat or melt, resulting in damage to the product and a
shock or fire hazard.
Be sure the drip pans are not covered and are in place.
Their absence during cooking could damage range
parts and wiring.
[A WARNING j OVEN SAFETYINSTRUCTIONS
Stand away from the range when opening the oven
door. Hot air or steam which escapes can cause burns
to hands, face and/or eyes.
Do not use the oven if a heating element develops
a glowing spot during use or shows other signs of
damage. A glowing spot indicates the heating element
may fail and present a potential burn, fire, or shock
hazard. Turn the oven off immediately and have
the heating element replaced by a qualified service
technician.
Keep the oven vent unobstructed.
Keep the oven free from grease buildup. Grease in the
oven may ignite.
Place oven rocks in desired location while oven is cool.
If rock must be moved while oven is hot, do not let pot
holder contact hot heating element in oven.
When using cooking or roasting bags in the oven, follow
the manufacturer's directions.
Pull the oven rock to the stop-lock position when
loading and unloading food from the oven. This helps
prevent burns from touching hot surfaces of the door
and oven walls.
Do not leave items such as paper, cooking utensils or
food in the oven when not in use. Items stored in an
oven can ignite.
Do not use aluminum foil to line the oven bottom.
Foil can trap heat or melt, resulting in damage to the
product and a shock or fire hazard.
Page 6
IMPORTANT SAFETY INFORMATION.
READ ALL INSTRUCTIONS BEFORE USING.
[_ WARNING
(Some models)
The self-cleaning feature operates the oven at temperatures high enough to burn away food soils in the oven.
Follow these instructions for safe operation.
Do not touch oven surfaces during self-clean operation. If the self-cleaning mode malfunctions, turn the oven off
Keep children away from the oven during self-cleaning, and disconnect the power supply. Have it serviced by a
Failure to follow these instructions may cause burns, qualified technician.
Before operating the self-clean cycle, remove pans,
shiny metal oven racks and other utensils from the
oven. Only gray porcelain-coated oven racks may be
left in the oven. Do not use self-clean to clean other
parts, such as drip pans or bowls.
Before operating the self-clean cycle, wipe grease and
food soils from the oven. Excessive amount of grease
may ignite leading to smoke damage to your home.
j SELF-CLEANINGOVENSAFETYINSTRUCTIONS
Do not clean the door gasket. The door gasket is
essential for a good seal. Care should be taken not to
rub, damage or move the gasket.
Do not use oven cleaners. No commercial oven cleaner
or oven liner protective coating of any kind should be
used in or around any part of the oven.
Page 7
":-usingthe surface units, consomemode sI GEAppliances.com
settings. Keep flammable items away from the cooktop. Turn off all controls when
done cooking. Failure to follow these instructions can result in fire, serious injury or
death.
Throughout this manual, features and appearance may vary from your model.
OFF
!: _ ;_',,
_ilit;.::_ ._d_ii"_"
_":.::'::..d.-'
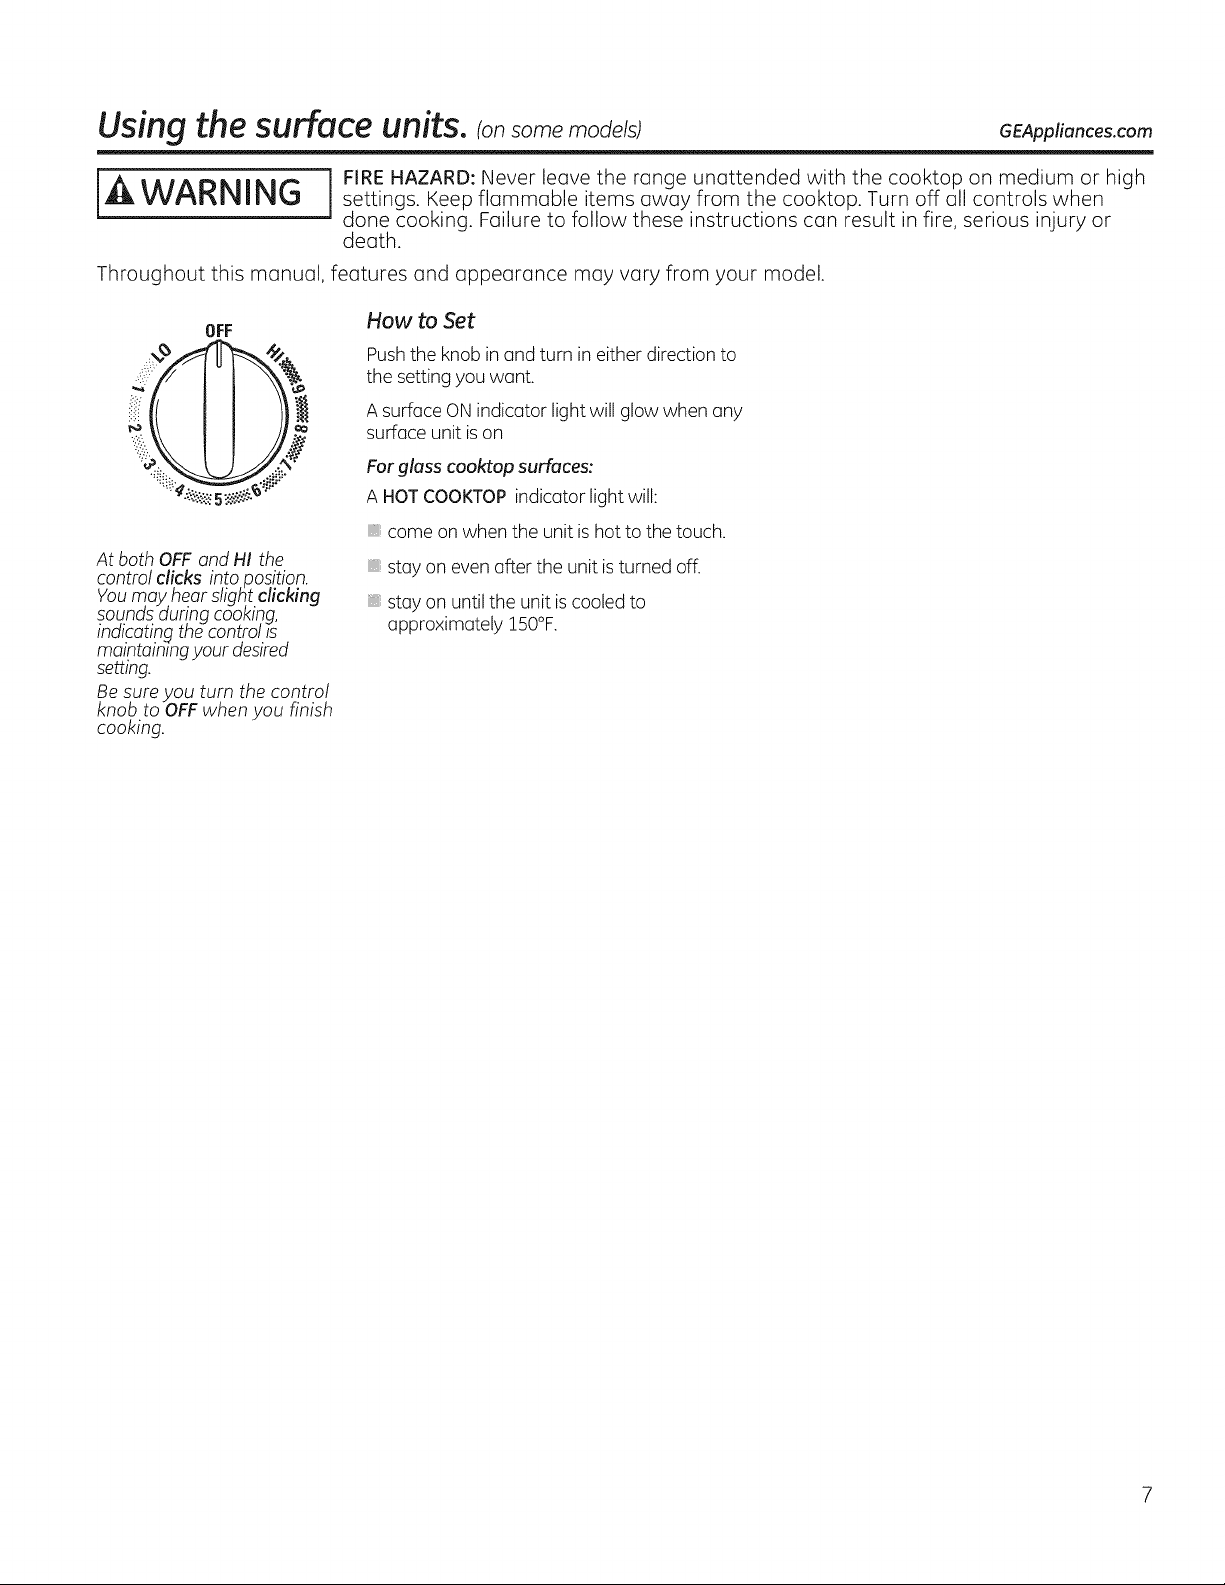
At both OFF and HI the
control clicks into position.
Youmay hearslight clicking
sounds dur!ng cooking,
indicating the controlss
maintainingyour desired
setting.
Be sure you turn the control
knob to OFFwhen you finish
cooking.
How to Set
Pushthe knob in and turn in either direction to
the setting you want.
A surface ONindicator light will glow when any
surface unit ison
Forglass cooktop surfaces:
A HOTCOOKTOPindicator light will:
come on when the unit is hot to the touch.
stay on even after the unit isturned off.
stay on until the unit is cooled to
approximately 150°F.
Page 8
Using the surface units,
Throughout this manual, features and appearance may vary from your model.
Home Canning Tips
Be surethe canner iscentered over the surface
unit.
Hake surethe canner isflat on the bottom.
Toprevent burns from steam or heat, use
caution when canning.
Use recipesand procedures from reputable
sources.Theseare availablefrom
manufacturers such as Ball®and Kerr®and the
Department of Agriculture ExtensionService.
Flat-bottomed canners are recommended. Use
of water bath canners with rippled bottoms
may extend the time required to bring the
water to a boil.
8
Page 9
GEAppliances.com
The following information will help you choose cookware which will give good performance on glass cooktops.
For Models With a Radiant G/ass Cooktop
,COOKI
The radiant cooktop features heating units
beneath a smooth glass surface.
NOTE:Aslightodor is normal when a new
.......
cooktop isusedfor the first time. It iscaused
bythe heating of new parts and insulating
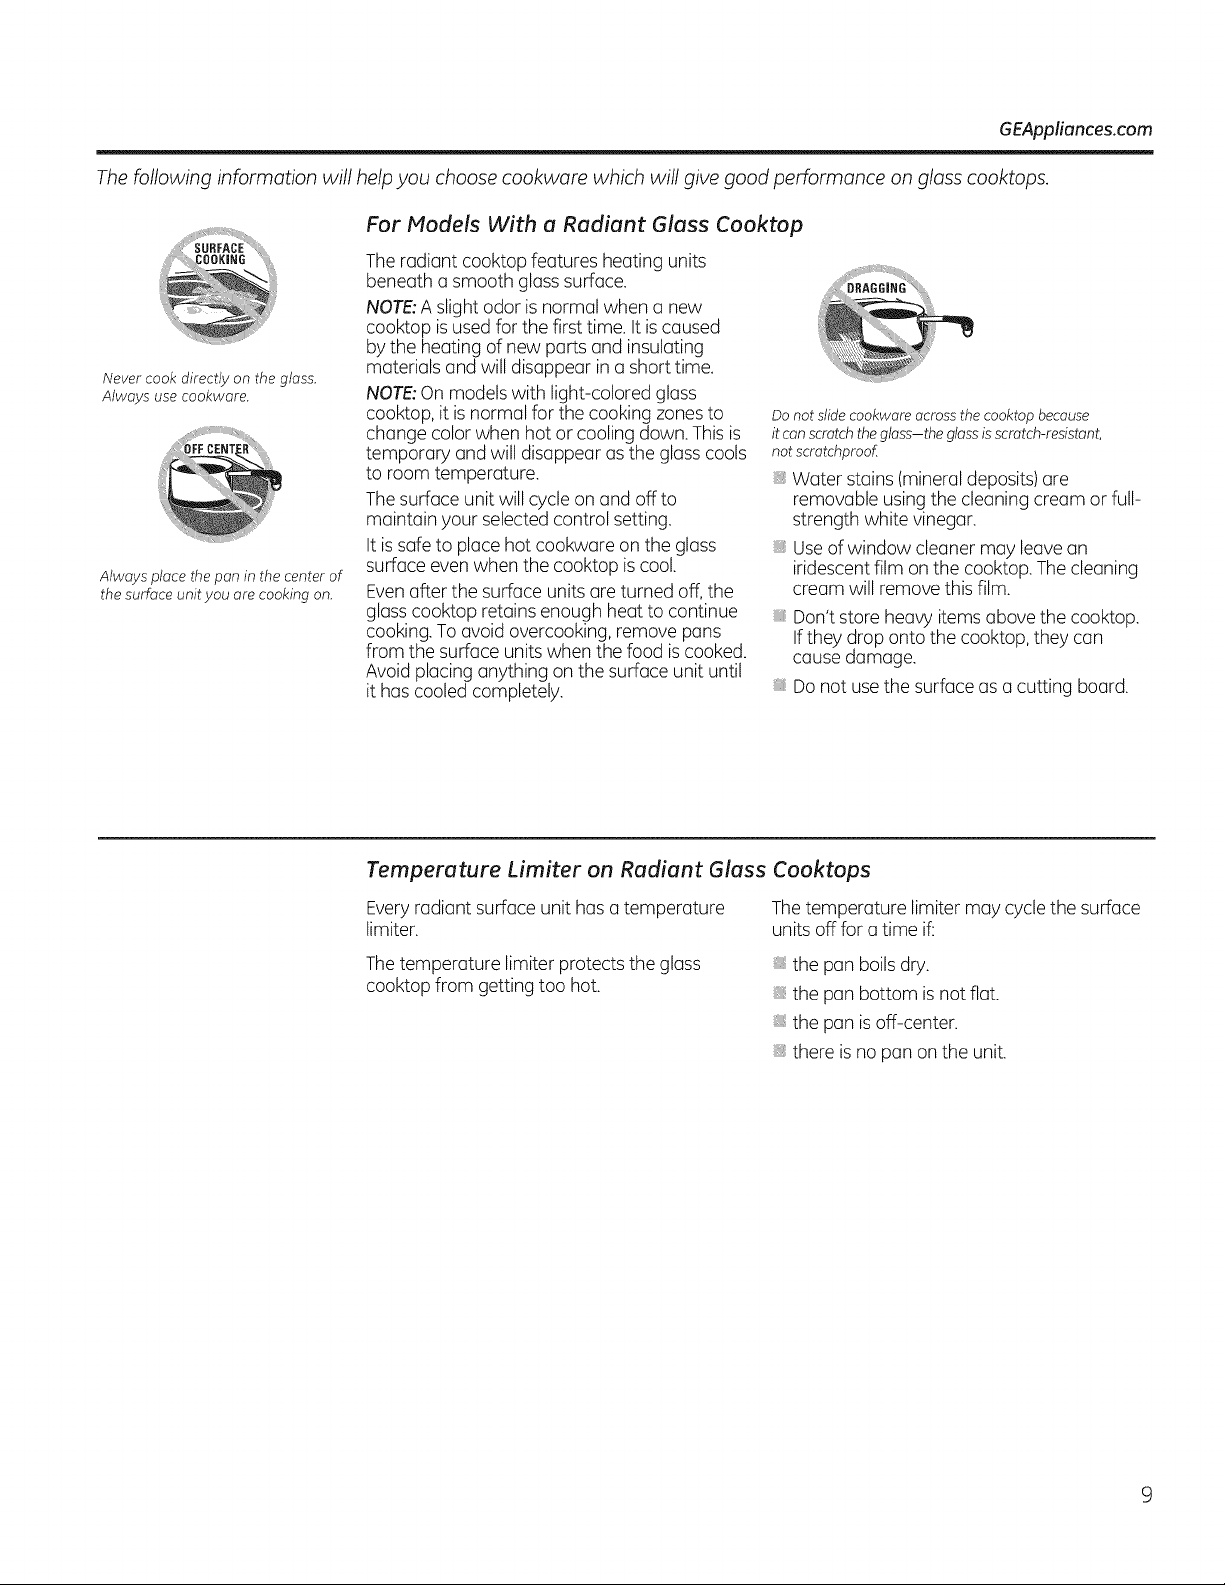
Never cook directly on the glass.
Always use cookware.
Always place the pan inthe center of
the surface unit you are cooking on.
materials and will disappear in a short time.
NOTE:Onmodelswith light-colored glass
cooktop, it isnormal for the cooking zonesto
change color when hot or cooling down. This is
temporary and will disappear as the glass cools
to room temperature.
Thesurface unit will cycle onand off to
maintain your selected control setting.
It issafe to place hot cookware on the glass
surface evenwhen the cooktop is cool.
Evenafter the surface units are turned off,the
glasscooktop retains enough heat to continue
cooking.Toavoid overcooking, remove pans
from the surface units when the food iscooked.
Avoid placing anything on the surface unit until
it has cooled completely.
Do not slide cookwam acrossthe cooktop because
it can scratch theglass-the glassis scratch-resistant,
not scratchproof
Water stains (mineral deposits)are
removable using the cleaning cream or full-
strength white vinegar.
Useof window cleaner may leavean
iridescentfilm on the cooktop. The cleaning
cream will remove this film.
Don't store heavy items above the cooktop.
If they drop onto the cooktop, they can
cause damage.
Do not usethe surface as a cutting board.
i@Y
Temperature Limiter on Radiant G/ass Cooktops
Everyradiant surface unit hasa temperature Thetemperature limiter may cyclethe surface
limiter, units off for a time if:
Thetemperature limiter protects the glass
cooktop from getting too hot.
the pan boils dry.
, the pan bottom isnot flat.
the pan is off-center.
there is no pan onthe unit.
Page 10
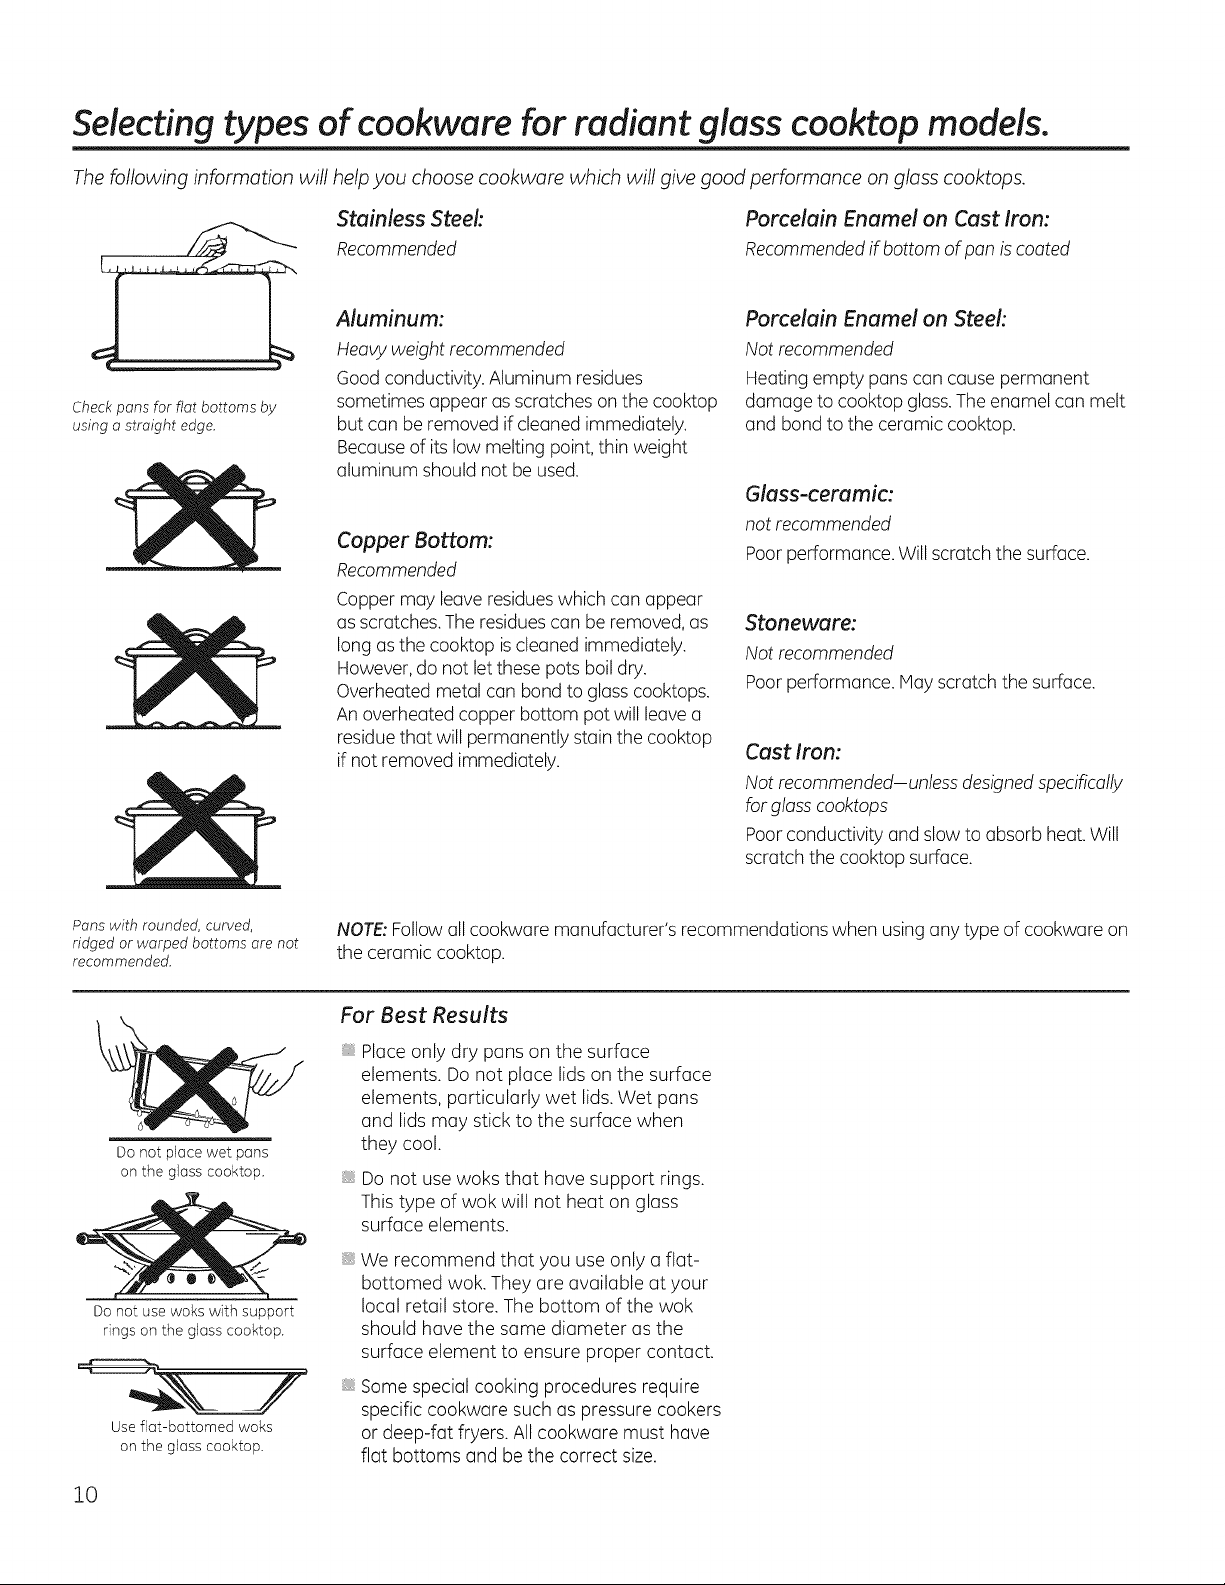
Selecting types of cookware for radiant glass cooktop models.
The following information will help you choose cookware which will give good performance on glass cooktops.
Check pans for fiat bottoms by
using a straight edge.
Stainless Steek
Recommended
Aluminum:
Heavyweight recommended
Good conductivity. Aluminum residues
sometimes appear as scratches on the cooktop
but can be removed ifcleaned immediately.
Becauseof its low melting point, thin weight
aluminum should not be used.
Copper Bottom:
Recommended
Copper may leave residueswhich can appear
as scratches.The residuescan be removed,as
long as the cooktop iscleaned immediately.
However, do not let these pots boil dry.
Overheated metal can bond to glass cooktops.
An overheated copper bottom pot will leave a
residuethat will permanently stain the cooktop
if not removed immediately.
Porcelain Enamel on Cast Iron:
Recommendedif bottom ofpan is coated
Porcelain Enamel on Steel:
Not recommended
Heating empty pans can cause permanent
damage to cooktop glass.The enamel can melt
and bond to the ceramic cooktop.
Glass-ceramic:
not recommended
Poor performance. Willscratch the surface.
Stoneware:
Not recommended
Poor performance. Mayscratch the surface.
Cast Iron:
Not recommended-unless designed specifically
for glass cooktops
Poor conductivity andslow to absorb heat.Will
scratch the cooktop surface.
Pans with rounded, curved,
ridged or warped bottoms are not
recommended.
Do not place wet pans
on the glass cooktop.
Do not use woks with support
rings on the glass cooktop.
Use flat-bottomed woks
on the glass cooktop.
10
NOTE:Followallcookware manufacturer's recommendations when usingany type of cookware on
the ceramic cooktop.
For Best Results
Placeonly dry pans on the surface
elements. Do not place lids on the surface
elements, particularly wet lids.Wet pans
and lids may stick to the surface when
they cool.
Do not use woks that have support rings.
This type of wok will not heat on glass
surface elements.
We recommend that you use only a flat-
bottomed wok. They are available at your
local retail store. The bottom of the wok
should have the same diameter as the
surface element to ensure proper contact.
Some special cooking procedures require
specific cookware such as pressure cookers
or deep-fat fryers. All cookware must have
flat bottoms and be the correct size.
Page 11
Usingthe oven control clock
and timer features and settings.
Throughout this manual, features and appearance may vary from your model.
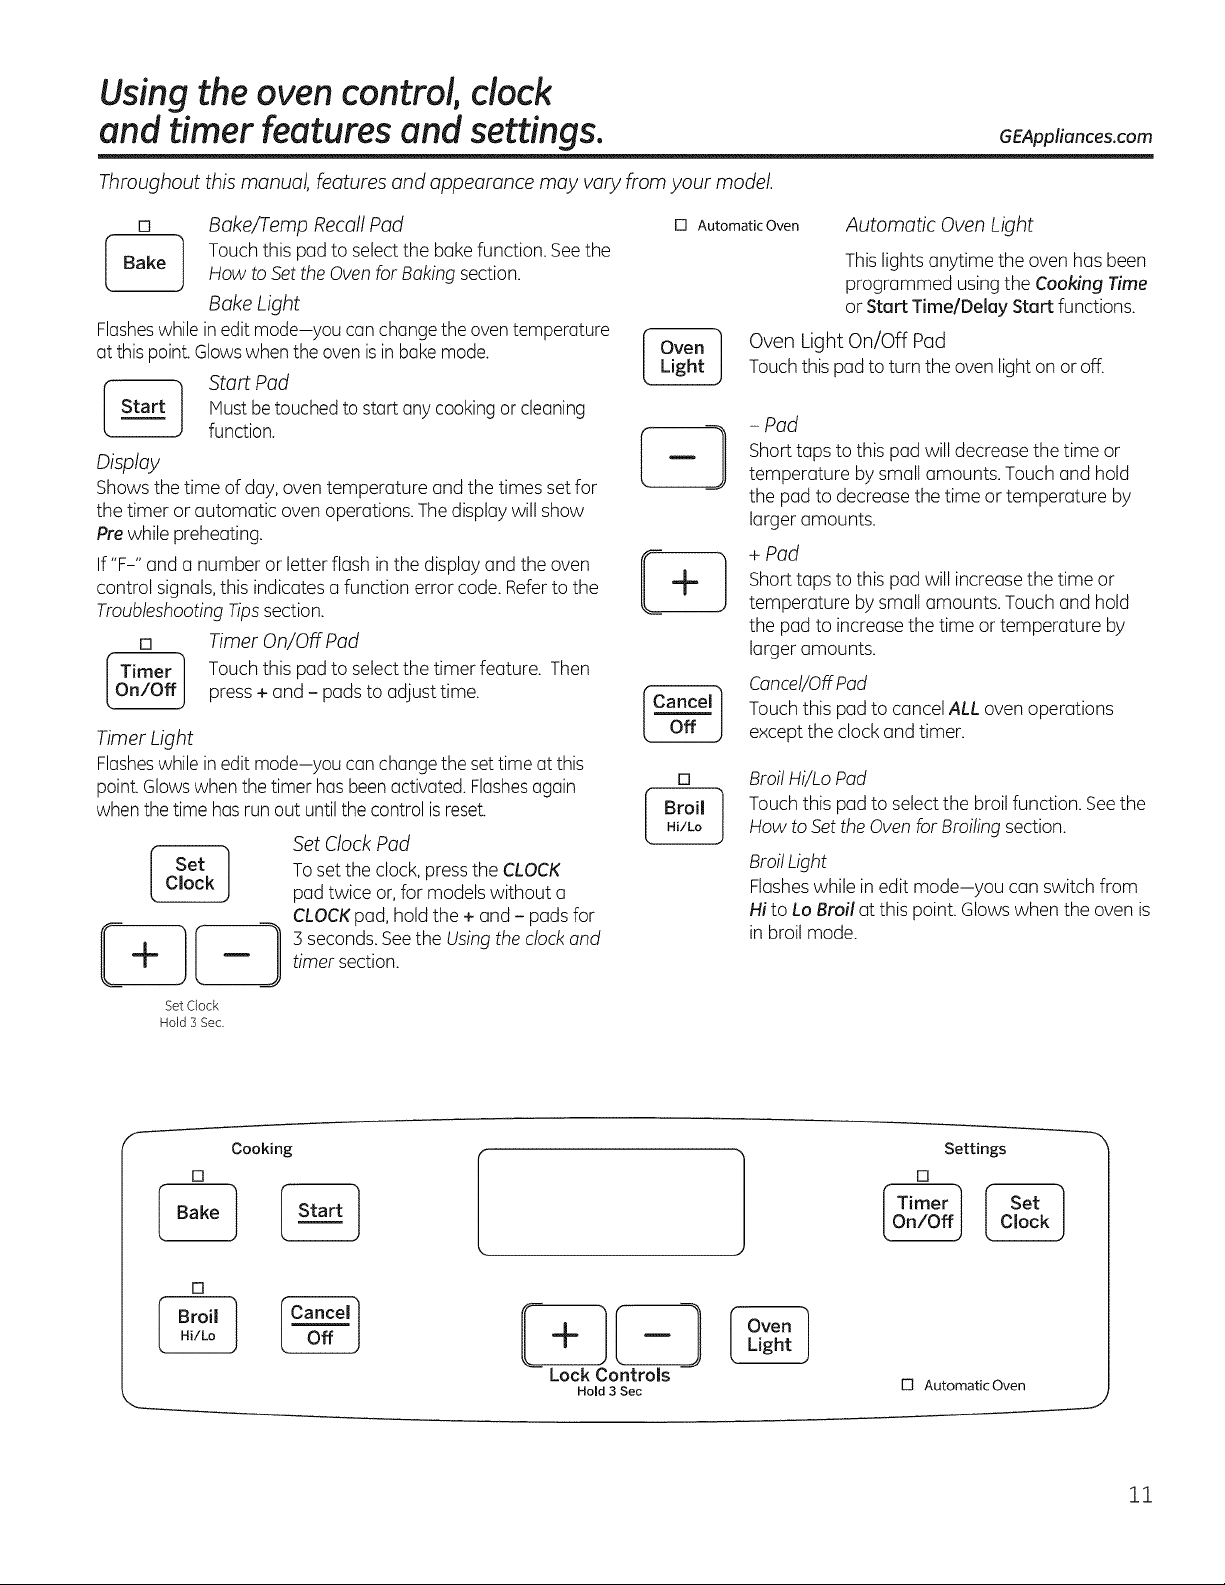
[] Bake/Temp Recall Pad
[_ Touch this pad to selectthe bakefunction. Seethe
How to get the Ovenfor Baking section.
Bake Light
Flasheswhile inedit mode-you canchangethe oven temperature
at this point.Glowswhen the oven isin bake mode.
Hust betouched to start any cooking orcleaning
Start Pad
function.
Display
Shows the time of day, oven temperature and the times set for
the timer or automatic oven operations. Thedisplay will show
Prewhile preheating.
If "F-" and a number or letter flash in the display and the oven
control signals, this indicates a function error code. Referto the
TroubleshootingTipssection.
[] Timer On/OFFPad
Touch this padto selectthe timer feature. Then
press + and - pads to adjust time.
Timer Light
Flasheswhile inedit mode-you canchangethe settime at this
point.Glowswhen the timer hasbeenactivated.Flashesagain
when thetime hasrun out until the control is reset.
Set Clock Pad
Tosetthe clock, pressthe CLOCK
pad twice or, for models without a
CLOCKpad, hold the + and - pads for
3 seconds. Seethe Usingthe clockand
timer section.
[] Automatic Oven Automatic Oven Light
Oven Light On/Off Pad
Touchthis pad to turn the ovenlight onor off.
- Pad
Shorttaps to this pad will decrease the time or
temperature by small amounts. Touchand hold
the pad to decreasethe time or temperature by
larger amounts.
+ Pad
Shorttaps to this pad will increase the time or
temperature by small amounts. Touchand hold
the pad to increasethe time or temperature by
larger amounts.
Cancel/OffPad
Touch this padto cancel ALL ovenoperations
except the clock and timer.
[]
Broil Hi/Lo Pad
Touch this padto select the broil function. Seethe
How to Set theOvenfor Broiling section.
BroilLight
Hi to Lo Broil at this point. Glowswhen the oven is
in broil mode.
GEAppliances.com
Thislights anytime the oven has been
programmed using the Cooking Time
or Start Time/Delay Start functions.
Flasheswhile in edit mode-you can switch from
Set Clock
Hold 3 Sec.
[]
[]
Cooking
Lock Controls
Hold 3 Sec
Settings
[]
[] Automatic Oven
J
11
Page 12

Using the oven control clock
and timer features and settings.
Throughout this manual, features and appearance may vary from your model.
Flashing Display - Power Outage
Ifa flashing time isin the display,you have experienced
a power failure. Resetthe clock. Seethe Usingthe clock
and timer section.
Ifyour oven was setfor a timed oven operation and a
power outage occurred, the clock and all programmed
functions must be reset.
Usingthe oven.
To avoid possible burns,place the racks in the desired position before you turn the oven on.
Before you begin...
[]
__F
Number of rack positions vary by
model.
Rackposition 'R' is for roasting
large cuts of meat.
Theracks have stop-locks, sothat when placed
correctly on the rack supports, they will stop
before coming completely out and will not tilt.
When placing and removing cookware, pull the
rack out to the bump on the rack support.
To remove a rack, pull ittoward you, tilt the
front end up and pull it out.
To replace, place the end of the rack (stop-
locks)on the support, tilt up the front and push
the rack in.
IA CAUTION
BURNHAZARD:Avoid touching the hot door
surface when using the oven rack in the lowest
position.Always use 2 hands and 2 mitten pot
holders to move the rack.Pullthe rack out a
few inches and then carefully grasp the sides of
the rack to pull it out the rest of the way.
To avoid possible bums, place
Do not place foods or baking stone
directly on the oven floor.
the racks in the desired position before you tum on the oven.
Preheating and Pan Placement
Preheatthe oven if the recipe calls for it.
Preheating isnecessaryfor good results when
baking cakes,cookies, pastries and breads.
Thedisplaywill show "PrE"while preheating.
When the oven reachesthe selected
temperature, the oven control will beep and the
displaywill show the oven temperature.
If baking four cake layers at the same time,
placetwo layers on rack B and two layerson
rack D.Stagger pans on the rack so one isnot
directly abovethe other.
Baking resultswill be better if the food is
centered in the oven as much as possible.
Angel Foodcake isthe exception and should
be placed on the bottom oven rack (position R).
Follow package direction on prepackaged and
frozen foods for pan placement. Pans should
not touch each other or the walls of the oven.
If you need to use two racks,stagger the pans
soone isnot directly above the other. Leave
approximately !1_ '' between pansand from
the front, back and sidesof oven wall.
12
Page 13

Using the oven. GEAppliances.com
How to Set the Oven for Baking
I
D
I
OVEN TEP1P
( }
TouchtheBakepad.
%
Touchthe+or- padsuntilthedesired
[]
temperatureisdisplayed.
TouchtheStart/On pad.Theovenwillstart
@
automatically.ThedisplaywillshowPrEwhile
preheating.Whenthe ovenreachesthe
selectedtemperature,the ovencontrolwill
beepseveraltimesandthedisplaywill show
theoventemperature.
Aluminum Foil
Do not use aluminum foilto line oven bottoms.
The foil willtrap heat below, and upset the
performance of the oven. Foilcan melt and
permanently damage the oven bottom.
Damage from improper use of aluminum foil is
not covered by the product warranty.
Oven Temperature Knob (on some models)
Turnthe OVENTENPknobto thesettingyouwant.
Preheattheovenfor10minutesforbaking.
The"ovenon"lightcomesonwhentheburneris
on.tt willcycleonandoffduringcooking.
TochangetheoventemperatureduringBAKEcycle,
touchtheBakepadandthenthe+or- padsto get
thenewtemperature.
[] Checkfood fordonenessat minimumtimeon
recipe.Cooklongerif necessary.
[] TouchtheClear/Offpadwhenbakingis
finishedandthenremovethefoodfromthe
oven.
Foilmay be used to catch spillsby placing a
sheet on alower rack,several inches below
the food. Do not usemore foil than necessary,
and never entirely cover an oven rack with
aluminum foil. Keepfoil at least ! !/2" from the
oven walls to prevent poor heat circulation.
Front of OVENTEIP knob
(knob appearance may vary)
To AdJust the Thermostat (on models with an OVENTEMPKnob)
Eachclickwill changetheoventemperature
approximately10°F.(Rangeisplusorminus
60°Ffromthe arrow.)Wesuggestthatyou
maketheadjustmentoneclickfromthe
originalsettingandcheckovenperformance
beforemakinganyadditionaladjustments.
Aftertheadjustmentismade,retightenscrews
@
sotheyaresnug,butbecarefulnot to
overtighten.
Replacetheknob,matchingtheflatareaofthe
[71
knobto theshaft,andcheckperformance.
Back of OVENTEIP knob
(knob appearance may vary)
Pullthe OVENTEMPknobofftherangeand
%
lookat thebackside.Tomakean adjustment,
loosen(approximatelyoneturn),butdo not
completelyremove,the two screwsonthe
backoftheknob.
Withthebackoftheknobfacingyou,holdthe
outeredgeof theknobwithonehandandturn
thefrontofthe knobwith the otherhand.
Toincreasetheoventemperature,movethe
top screwtowardthe right.You'llhearaclick
for eachnotchyou movetheknob.
Todecreasetheoventemperature,movethe
top screwtowardthe left.
The type of margarine will affect baking performance!
Host recipes for baking have been developed using high-fat products such as butter or margarine (80%fat). Ifyou decrease the fat,
the recipemay not givethe same results as with ahigher-fat product.
Recipefailure can result if cakes,pies,pastries,cookiesor candiesare made with low-fat spreads.Thelower the fat content of a
spread product, the more noticeable these differences become.
Federalstandardsrequireproducts labeled"margarine"to contain at least80%fat byweight.Low-fatspreads,on the other hand,contain
lessfat and morewater.Thehigh moisture content ofthesespreadsaffects thetexture andflavor of bakedgoods.Forbest resultswith
youroldfavoriterecipes,usemargarine,butter orstick spreadscontainingat least70%vegetableoil. 13
Page 14

Usingthe oven.
Door Positioning During Broiling:
How to Set the Oven for Broiling
UseLo Broil to cook foods such us poultry
or thick cuts of meat thoroughly without over
browning them.
[Z] Placethe food on u broiler grid ina broiler
pun designed for broiling.
[] Followsuggested rack positions in the
Broiling Guide.
r_ Theoven must be closed during broiling.
[] Touch the Broil Hi/Lo pad once for Hi
Broil.
Tochange to Lo Broil, touch the Broil Hi/
Lo pad again.
r_ Touch the Start pad.
[] When broiling isfinished,touch the Clear/
Off pad.
The size,weight, thickness,
starting temperature and
your preference of doneness
will affect broiling times. This
guide is based on meats at
refrigerator temperature.
Adjust rack position or broil
setting to achieve different
results. Move food closer
to the broil element for
greater searing and less
internal doneness. For less
searing,meat that iscooked
through, and thicker cuts
of meat use rack positions
further from the broiler or use
broil low.
1-Cook food thoroughly to help
protect against food borne
illness. Minimum safe food
temperature recommendations
for food safety can be found at
www.lsltOoneVet.gov. Hake
sure to use a food thermometer
to take food temperatures.
Broiling Guide
Preheatthe broiler for 2 minutes to improve performance.
Type or
Food Doneness Thickness Rack Position Comments
Beef Rare Steaks - 1" Eor F(food should be 1" to 5" Steakslessthan1"thickare difficult to
thick from broil element) cook rare.Theycookthrough before
browning. To prevent curling of
meat, slash fat at 1" intervals.
Medium Steaks - 5/4" to E (food should be 5" to 4" from
1" thick broil element)
Well Done Steaks - 5/4" D or E (foodshould be 5" to 5"
to 1"thick or from broil element)
Ground Beef
Patties
Chicken Breast, C(food should be 8" to 9" from Broil skin-side-down first.
boneless broil element)
Breast, bone-in C(food should be 7" to 8" from
broil element)
Fish 1/2" to 1' thick D or E (foodshould be 5" to 6" Handle and turn very carefully.
Fillets from broil element)
Pork Well Done 3/4" thick D (food should be 6" to 7" from i To prevent curling of meat, slash fat
Chops broil element) at 1"intervals.
Ifyour range isconnected to 208 volts, rare steaksmay be broiled by preheating the
broiler and positioningthe oven rack one position higher.
14
Page 15

Using the clock and timer.
Not oil features ore on oil models.
Clock (on some models)
Theclock on your range is powered by the
range itself. Nobatteries are necessary.The
time is displayed with no timer or audible alarm.
To set the clock, turn the stem left or right.
To clean the clock, see instructions on page23.
Forany repairs, call a qualified service
technician.
Not oil feotures ore on oil models.
To Set the Clock
GEAppliances.com
Make sure the clock is set to the
correct time of day.
Theclock must be set to the correct time
of day for the automatic oven timing functions
to work properly.Thetime of day cannot be
changed during a delayed cooking or a delayed
self-cleaning cycle.
[Z] Touch the Clock pad twice.
Formodelswithout a Clock pad:
Holdthe + and - padsfor 3 seconds.
[] Touch the + or - pads.
To Turn Off the Clock Display
Ifyou haveseveral clocks inyour kitchen,you
may wish to turn off the time of day clock
display on your range.
[Z] Touch the Clock pad once to turn off the
time of day display. Although you will not
be able to see it,the clock maintains the
correct time of day.
Touch the Clock padtwice to recallthe
clock display.
Ifthe + or - pads are not touched within one
minute after Step 1,the display revertsto the
original setting. Ifthis happens, repeat Step 1
and reenter the time of day.
r_ Touch the Start/On pad until the time of
day shows in the display.Thisenters the
time and starts the clock.
To checkthe time of day when the display is
showing other information, simplytouch the
Clockpad.The time of day shows until another
pad istouched.
Formodelswithout a Clock pad:
ry] Touch the Bakeand Broil Hi/Lo pads at
the same time until the display shows SF.
F_ Touch the Timer pad. Thedisplay will show
ON(Clockdisplay on).Touch the Timerpad
again until the display shows OFF(Clock
display off).
Touch the SturtYOn pad to leavethe
r_ control setin this mode.
NOTE:If the clock cannot be recalled or it
will not stay permanently displayed,the Energy
SaverModefeature ison.To turn the feature
off,seethe EnergySaver Modesection.
15
Page 16

Using the clock and timer.
[]
The timer is a minute timer only.
The Clear/Off pad does not affect
the timer.
To Set the Timer
Thetimer does not control oven operations.
Themaximum setting on the timer is9 hours
and 59 minutes.
Touch the Kitchen TimerOn/Off pad.
%
Touch the + or - pads until the amount of
r2]
time you want shows in the display.The
maximum time that can be entered in
minutes is59.Times more than 59
minutes should be changed to hours and
minutes.
To Reset the Timer
Ifthe display is still showing the time remaining,
you may change it by touching the Kitchen
Timer On/Off pad,then touching the + or-
pads untilthe time you want appears in the
display.
To Cencel the Timer
Touch the Kitchen Timer On/Off pad twice.
Ifyou make amistake,touch the Kitchen Timer
On/Off pad and begin again.
Touch the Start/On pad.Thetime will start
%
counting down, although the display does
not change until one minute has passed.
When the timer reaches :00, the control
%
will beep 3 times followed by one beep
every 6 seconds until the Kitchen Timer
On/Off pad is touched.
If the remainrngtime is not inthe display (clock,
start time or cooking time arein the display),
recallthe remaining time bytouching the
Kitchen Timer On/Off pad and then touch the
+ or - pads to enter the new time you want.
16
Page 17

Special features ofyour oven control. GEApplioncescom
Energy Saver Mode Consome models)
To save energy, you can turn off the time of
day clock and the display when the range is
not in use.
Control Lockout Consome models)
Your control will allow you to lock out the
touch pads so they cannot be activated when
Lock Controls
Hold 3 Sec
Your new touch pad control has additional features that you may choose to use. The following are the features and how
you may activate them.
Thespecial feature modes can only be activated while the display is showing the time of day. They remain in the
control's memory until the steps are repeated.
When the display shows your choice, touch the Start/On pad. The special features will remain in memory after
a power failure.
NOTE: The Sabbath feature and the Thermostat Adjustment feature are also Special Features, but they are addressed
separately in the following sections.
touched.
To lock/unlock the controls:
[] Touch the + and- pads at the same time
for 3 seconds, until the display shows
LOC ON.
[] To unlock the control, touch the + and- pads
atthe same time for 3 seconds,untilthe
Pressand hold the + and- pads at the same
time to enable or disable this feature. This will
turn the display on or off.
NOTE:The display will reset after a power
outage.
display shows LOC OFF.
When this feature is on and the touch pads
are touched, the control will beep and show
LOC ON.
. The control lockout mode affects all touch
pads. No touch pads will work when this
feature is activated.
. The adjustment will be retained in memory
after a power failure.
12 Hour Shutoff
[] []
With this feature,shouldyou forget and leavethe
ovenon,the control willautomatically turn off the
ovenafter 12hours during bakingfunctions or
after 3 hoursduring a broilfunction.
Ifyou wish to turn OFF this feature, follow the
steps below.
[7] Touch the Bake and BroilHi/Lo pads at the
same time untilthe display shows SF.
Touchthe Clock pad,or for modelswith no
Clock pad, touch the Cooking Time pad.
Thedisplaywill show ON(12 hour shutoff).
Touchthe Clock pad (orCooking Time pad
for models with no Clack pad)repeatedly
until the display shows OFF(noshutoff).
r_ Touchthe Start/On pad to activate
the no shut-off and leave the control set in
this special features mode.
Adjust the oven thermostat--Do it yourseifl
Youmay find that your new oven cooks differently than the one it replaced. Useyour new oven for a few weeks to become more
familiar with it. Ifyou still think your new oven istoo hot or too cold, you can adjust the thermostat yourself
Do not use thermometers, such as those found in grocery stores, to check the temperature setting of your oven. These
thermometers may vary 20-40 degrees.
NOTE: This adjustment will not affect the broiling or the self-cleaning temperatures. The adjustment will be retained in
memory after a power failure.
[] _ To Adjust the Thermostat
Touch the Bake and Broil Hi/Lo pads at
[] the same time until the display shows SF.
[_ Touch the Bake pad.A two-digit number
r2] []
shows in the display.
r_ Theoven temperature can be adjusted up
to (+)35°Fhotter or (-) 35°Fcooler. Touch
the + pad to increase the temperature in
!-degree increments.
Touch the - padto decreasethe
temperature in !-degree increments.
When you have made the adjustment,
touch the Start/On pad to go back to the
time of day display. Useyour oven as you
would normally.
17
Page 18

-'-usingthe Sabbath feature. (onsomemode/s
(Designed for use on the Jewish Sabbath and Holidays)
TheSabbathFeaturecanbeusedforbakingonly.ItcannotbeusedForbroiling,selF-cleaning,convectionbaking,steamcleaningordelaystartcooking.
NOTE:Theovenlightcomesonautomatically(onsomemodels)whenthedoorisopenedandgoesoffwhenthedoorisclosed.Thebulbmayberemoved.See
theOvenLightReplacementsection.Onmodelswithalightswitchonthecontrolpanel,theovenlightmaybeturnedonandlefton.
[] []
[] Sabbathmode.
_ or IT im/_r I Make the clockshowsthe of and the
[] r21
When the display shows D the oven
is set in Sabbath. When the display
shows pc the oven is baking/roasting.
[] []
[]
Whenthe displayshowsD the 161
ovenis set in Sabbath.Whenthe
displayshows:::x:zthe ovenis [7]
baking/roasting.
How to Set Sabbath Feature for Regular Baking
NOTE:Tounderstandhow theovencontrolworks,practice
usingregularbaking(non-Sabbath)beforeentering
sure
ovenisoff.
TouchandholdboththeBakeandBroilHi/Lopads,at
thesametime,untilthedisplayshowsSF.
rTfl
Tapthe Clockpad (orCookingTimepad for models
with noClockpad)until SAbappearsinthe display.
TouchtheStart/On padand D wiltappearinthe
display.
TouchtheBakepad.Nosignalwilt begiven.
@
Thepresetstartingtemperaturewillautomaticallybe
setto 350. Tapthe + or- padsto increaseor
decreasethetemperaturein25° increments.The
temperaturecanbesetbetween175°and 550° No
signalortemperaturewittbegiven.
How to Set Sabbath Feature for Timed Baking--Immediate Start and Automatic Stop
NOTE:Tounderstandhowtheovencontroiworks,practice [] ThepresetstartingtemperaturewiitautomaticaiJybe
usingregular(non-Sabbath)ImmediateStartandAutomatic setto 350. Tapthe + or- padstoincreaseor
StopbeforeenteringtheSabbathmode.
Makesurethe clockshowsthecorrecttimeofdayand the
ovenisoff.
TouchandholdboththeBakeandBroilHi/Lopads,at
%
thesametime,untilthedisplayshowsSF.
m
Tapthe Clockpad (orCookingTimepad for models
with noClockpad)until SAbappearsinthe display.
TouchtheStart/On padand D wiltappearin the
display.
TouchtheCookingTime pad.
%
Touchthe+ or- padsto setthedesiredlengthof
cookingtimebetweeni minuteand 9hoursand59
minutes.Thecookingtime thatyouenteredwittbe
displayed.
TouchtheStart/On pad.
Touchthe Bakepad.Nosignalwiltbegiven.
correcttime
How to Exit the Sabbath Feature
day
[6-] TouchtheStart/On pad.
I-if]After a randomdelayperiodofapproximately50
secondsto i minute,PC witi appearinthe display
indicatingthatthe ovenisbaking/roasting.IfPC
doesn'tappearinthe display,start againat Step4.
Toadjusttheoventemperature,touch theBakepad
andtap the +or- padsto increaseor decreasethe
temperaturein25°increments.TouchtheStart/On pad.
NOTE:TheClear/OffandCookingTimepadsareactive
duringtheSabbathfeature.
decreasethetemperaturein25° increments.The
temperaturecanbesetbetween!75°and 550.° No
signalortemperaturewittbegiven.
TouchtheStart/On pad.
%
Aftera randomdelayperiodofapproximately30
[]
secondsto ! minute,PC wittappearinthe display
indicatingthatthe ovenisbaking/roasting.IfPC
doesn'tappearinthe display,start againat Step7.
Toadjusttheoventemperature,touch theBakepad
andtap the +or- padsto increaseor decreasethe
temperaturein25°increments.TouchtheStart/On pad.
Whencookingisfinished,thedisplaywittchangefromPC
toD indicatingthattheovenhasturnedOFFbutisstillsetin
Sabbath.Removethecookedfood.
E_ TouchtheClear/Offpad.
[-_ Iftheoveniscooking,wait forarandomdelayperiod
ofapproximately30secondsto i minute,untilonly
isinthedisplay.
[_] TouchandholdboththeBake and BroilHi/Lo
pads,at the sametime,untilthe displayshowsSF.
r_ TaptheClockpad(orCookingTimepadfor models
with noClockpad)untilONorOFFappearsinthe
display.ONindicatesthattheovenwillautomatically
turnoffafter!2 hours.OFFindicatesthattheovenwill
notautomaticallyturnoff.SeetheSpecialFeatures
sectionforanexplanationof the12-HourShutoff
feature.
[5--] TouchtheStart/Onpad.
NOTE: If a power outage occurred while the oven was
in Sabbath, the oven witt automatically turn off and
stay off even when the power returns. The oven control
must be reset.
Page 19

Usingthe self-cleaning oven.Ionsomemodds) GEAppliances.com
J I FIRE HAZARD: Wipe grease and heavy soil from oven before self-cleaning. Failure to do soA CAUTION may result in an oven fire.
j j Never place cooking utensils, baking stones, foil, or any other items on the oven floor. Even
A CAUTIONj items rated for high temperature may permanently adhere to oven bottom or cause heat
damage to the oven, flooring or items in storage drawer.
If your range has this knob, it has a self-cleaning oven. Follow these
instructions.
0
(On some models-
appearance will vary)
Before a Self-Clean Cycle
Wipe up heavy soil on the oven
bottom.
We recommend venting your kitchen with an
open window or using a ventilation fan or hood
during the first self-clean cycle.
Removebroilerpan, broiler grid, all cookware
and any aluminum foil from the oven.
NOTE:
If your oven isequipped with shiny,silver-
colored oven racks,we recommend
to remove them beforeyou beginthe
self-clean cycle.They may remain in the
oven during the self-clean cycle, but they will
darken, losetheir luster and become hard to
slide.
If your oven isequipped with gray porcelain-
coated oven racks,they may be left inthe
oven during the self-clean cycle.
How to Set the Oven for Self-Cleaning
Followthe directions in the Before a SelfClean
Cyclesection.
[Z] Latch the door.
NOTE:Neverforce the latch. If the oven is too
hot,you will not be ableto slidethe latch.Allow
the ovento cool.
Soilon the front frame of the rangeand outside
the gasketon the doorwill needto be cleaned
by hand.Cleantheseareaswith hotwater,
soap-filledor plasticscouringpads or cleansers
such asSoftScrub_.Rinsewell with cleanwater
and dry.
Donot clean the gasket.Thefiberglass material
of the ovendoor gasketcannot withstand
abrasion. It isessentialfor the gasket to remain
intact. If you notice it becoming worn or frayed,
replace it.
Makesure the oven light bulb cover isin place
and the oven light is off.
IMPORTANT:Thehealth of somebirds is
extremelysensitiveto the fumesgivenoff during
the self-cleaningcycleofany range.Movebirds
to anotherwell-ventilatedroom.
Slidethe latch handle to the left asfar as it
will go and open the door.
Neverforce the latch handle.
Forcing the handle will damage the door lock
mechanism.
0
(On some models-
appearance will vary)
[-_ Turn knob to Self Cleanposition
Theself-clean cycle will automatically begin.
While the oven isself-cleaning, the selfclean
light will be on.
Theoven shuts off automatically when the
clean cycle iscomplete, and the self clean light
will be off.
19
Page 20

Usingthe sdf-deaning oven. some
To Stop a Self-Clean Cycle
Turn knob to off position and wait for self clean
lightto go off.
Wait until the oven hascooled below the
locking temperature to unlatch the door.You
will not be able to open the door right away
unlessthe oven has cooled below the locking
temperature.
After a Self-Clean Cycle
You may notice some white ash in the oven.
Wipe it up with adamp cloth offer the oven
cools.
If white spots remain, remove them with a
soap-filled steel wool pad and rinse thoroughly
with a vinegar and water mixture.
These depositsare usually a salt residuethat
cannot be removed by the clean cycle, i
If the oven is not clean offer oneclean cycle,
repeat the cycle.
You cannot setthe ovenfor cooking until
the oven iscool enough for the door to be
unlatched.
While the oven isself-cleaning,you
can pressthe Clock pad to display the time
of day. To return to the clean countdown,
pressthe SelfClean pad.
Apply a small amount of vegetable oil
to a paper towel and wipe the edgesof the
oven rackswith the paper towel. Do not
spray with Pam®or other lubricant sprays.
20
Page 21

Care and cleaning of the range. GEAppliances.com
Be sure all controls are off and all surfaces are cool before cleaning any part of the range.
Ifyour range is removed for cleaning, servicing or any reason, be
WARNING j
How to Remove Protective Shipping Film and Packaging Tape
Carefullygraspa corneroftheprotectiveshipping
film withyourfingersandslowlypeelitfromthe
appliancesurface.Donotuseanysharpitemsto
removethe film.Removeallofthefilm beforeusing
theapplianceforthe firsttime.
Control Knobs
Thecontrolknobsmayberemovedfor easier
cleaning.
Makesuretheknobsarein theOFFpositionsand
pullthemstraightoffthestemsforcleaning.
sure the anti-tip device isreengaged properly when the range is
replaced. Failure to take this precaution could result in tipping of
the range and can result in death or serious bums to children or
adults.
Toensurenodamageisdonetothefinishofthe
product,the safestwayto removetheadhesivefrom
packagingtapeon newappliancesisan application
ofahouseholdliquiddishwashingdetergent.Apply
witha soft clothandallowto soak.
NOTE:Theadhesivemustberemovedfrom allparts.
ttcannotberemovedifit isbakedon.
Theknobscanbecleanedina dishwasherorthey
mayalsobewashedwithsoapandwater.Hake
suretheinsideofthe knobsaredrybeforereplacing.
Replacethe knobs,intheOFFpositionto ensure
properplacement.
Control Panel
it'sa goodideatowipe the controlpanelaftereach
useoftheoven.Usea dampclothto cleanor rinse.
Forcleaning,usemildsoapandwater ora 50/50
solutionof vinegarandwater.Forrinsing,useclean
water.Polishdry witha softcloth.
Donot useabrasivecleansers,strongliquidcleaners,
plasticscouringpadsor ovencleanersonthecontrol
panel-they willdamagethefinish.
Painted Surfaces
Paintedsurfacesincludethesidesofthe rangeand
thedoor,topofcontrolpanelandthedrawerfront.
Cleanthesewithsoapandwateror avinegarand
water solution.
Stainless Steel Surfaces (onsome models)
Do not use a steel wool pad; it will scratch the
surface.
Toclean the stainless steelsurface, usewarm,
sudsywater or astainless steelcleaner or
polish.Always wipe the surface in the direction
of the grain. Followthe cleaner instructions for
cleaning the stainlesssteel surface.
Donot usecommercialovencleaners,cleaning
powders,steelwoolor harshabrasivesonany
paintedsurface.
Toinquire about purchasing stainlesssteel
appliance cleaneror polish,or to find the
location of a dealer nearest you, pleasecall our
toll-free number:
National Parts Center :1.800.626.2002
GEAppliances.com
Porcelain Enamel Cooktop Ionsomemodels)
The porcelain enamel finish is sturdy but
breakable if misused.Thisfinish isacid-
resistant. However,any acidic foods spilled
(suchasfruit juices, tomato or vinegar)should
not be permitted to remain on the finish.
If acids spill on the cooktop while it ishot, use
a dry paper towel or cloth to wipe it up right
away. When the surface hascooled,wash with
soap and water. Rinsewell.
Forother spillssuch as fat spattering,wash
with soap and water or cleansing powders
after the surface has cooled. Rinsewell. Polish
with a dry cloth.
21
Page 22

Care and cleaning of the range,
Be sure the controls are turned to OFFand the surface units are cool before attempting to remove them.
IDi_PSurface Units
Tocleanthesurfaceunits,turn thecontralto the
highestsettingfor a minute.Thecallswillburnoff
anysoil.
To remove a surfaceunit:
Toreplace a surfaceunit:
ry] Replacethe drippanintotherecess
inthecooktop.Hakesuretheopening
inthepan linesupwiththereceptacle.
Locking tab rim
Cooktop
When properly seated, the locking
tab should lock onto the cooktop
rim through the notch inthe drip
pan.
Toremavethedrippansforcleaning,
thesurfaceunitsmustberemovedfirst.
r_ Pushthesurfaceunitbacktoward
thereceptacletofreethelockingtab
fromthecooktop.
_ii__oc'kin g
\ Drip pan
Receptacle
/ tab
r_ Liftthesurfaceunitabout1 inchabovethedrip
panand pullit out.
Donot liftthesurfaceunitmorethan1inch.
Ifyoudo,itmaynotlieflaton thedrippan
whenyouplugit backin.
NOTE:Repeatedliftingofthesurfaceunit
morethan 1inchabovethedrippancan
permanentlydamagethereceptacle.
Drip Pans
Removethesurfaceunits.Thenliftout the drippans.
Forbestresults,cleanthe drippansbyhand.Place
themina coveredcontainer(ora plasticbag)with
¼cupammoniato loosenthesoil.Rinsewith clean
waterandpolishwith acleansoftcloth.
Thedrippansmayalsobecleanedina dishwasher.
Cleantheareaunderthedrippansoften.Built-up
soil,especiallygrease,maycatchfire.
Donot coverthedrippanswithfoil.Usingfoilso
closeto the receptaclecouldcauseshock,fire or
damageto therange.
[] Inserttheterminalsofthesurfaceunitthrough
theopeninginthe drippanandintothe
receptacle.
Locking tab
r_ Pushthesurfaceunitin anddownto lockthe
tabinplacesoit restsevenlyinthe cooktop.
Donot immersethesurfaceunitsinliquidsof any
kind.
Donot cleanthesurfaceunitsin adishwasher.
Donot bendthesurfaceunitplugterminals.
Donot attemptto clean,adjustor inanyway repair
theplug-inreceptacle.
NOTE:tfyourcooktopisequippedwithshiny,silver-
coloreddrippans,donot cleanthemintheself-
cleaningoven.Permanentdamagetothefinishcan
occur.
tfyourcooktopisequippedwith blackor gray
porcelain-coateddrippans,theycan becleanedin
theovenduringtheself-cleaningcycle.Beforeyou
beginaself-cleaningcycle,removeanyheavysoil
from thedrippansandplacethemontheporcelain-
coatedovenracks.Donotplacethedrippans
directlyontheovenbottom.Aftertheself-cleaning
cycleiscompletedandthedrippansarecool,wipe
themwith a dampclothtoremoveanyremaining
ashorresidue.
_I;_ ......__
Besure all surface units are turned
off before raising the Cooktop.
22
Lift-Up Cooktop
Theentirecooktopmaybeliftedupandsupportedin
the uppositionforeasiercleaning.
Thesurfaceunitsdo notneedto beremoved;
however,youmayremoveoneto makeraisingthe
cooktopeasier.Therearetwo sidesupportsthat lock
intopositionwhenthecooktopis
liftedup.
Aftercleaningunderthecooktopwithhot,
mildsoapywaterandacleancloth,lowerthe
cooktop.Becarefulnotto pinchyourfingers.
Tolowerthecooktop,pushtherodsbackand gently
lowerthecooktopuntilit restsinplace.
Page 23

Care and cleaning of the range, GEAppliances.com
Porcelain Oven Interior (on standard-clean models)
Radiant glass models:
With propercare,the porcelainenamelfinish on
the insideof the oven-top, bottom, sides,back
and insideofthe door-will staynew-lookingfor
years.
fumeswillhelp loosenthe burned-on greaseand
food.
If necessary,you may usean ovencleaner.Follow
the packagedirections.
Letthe oven coolbeforecleaning.Werecommend
that you wear rubber gloveswhen cleaningthe
ave n.
Soapand water will normallydo thejob. Heavy i
spatteringorspilloversmayrequirecleaningwith
a mildabrasivecleaner.Soap-filledscouringpads
may alsobeused.
Donotallow food spillswith ahigh sugar or acid
content(suchastomatoes, sauerkraut,fruitjuices
or piefilling)to remainonthe surface.Theymay
causea dull spotevenafter cleaning. 1
Householdammonia may makethe cleaningjob
easier.Place1/2 cup ina shallowglassor pottery
containerin a coldovenovernight.Theammonia
Oven Vent on Radiant Glass or Coil Cooktops
On glasscooktop models, the ovenvent is
located behind the right-rear surface unit.
On coilcooktop models,the oven isvented
through an opening under one of the rear
surface units.
and moisture may collect underneath it when
the oven isinuse.
Thevent isimportant for proper air circulation.
Do not spray oven cleaner on the electrical
controls and switches because itcould cause
a short circuit and result in sparking or fire.
Donot allow a film from thecleanerto buildup
on the temperaturesensor-it couldcausethe
ovento heat improperly.(Thesensoris located
at thetop ofthe oven.)Carefullywipe the sensor
cleanaftereachovencleaning,beingcareful
notto movethe sensorasa changein its
positioncouldaffect howthe ovenbakes.
Donot sprayany oven cleaneron the oven
door,handlesor any exterior surfaceof the
oven,cabinetsor paintedsurfaces.Thecleaner
can damagethesesurfaces.
It isnormal for steam to come out of the vent,
Never block this vent.
Coil cooktop models:
Thegasket isdesigned with agap
at the bottom to allowfor proper air
circulation.
Donot rub or clean the door gasket-it
has anextremely low resistance to
abrasion.
Ifyou notice the gasketbecoming
worn,frayed or damaged in any way
or if it has becomedisplaced on the
door,you should haveit replaced.
This area could become hot during oven use.
Cleaning the Oven Door
Toclean the inside of the door:
On self-cleanmodels:
Becausethe area insidethe gasket is
cleaned during the self-clean cycle,you do
not need to cleanthis by hand.
The area outside the gasket and the door
liner can be cleaned with a soap-filled
or plastic scouring pad, hot water and
detergent. Rinsewell with a vinegar and
water solution.
On standard-clean models.
Soap and water will normally work. Heavy
spattering or spillovers may require cleaning
with a mild abrasive cleaner. Soap-filled
scouring pads may also be used.
See alsoPorcelainOvenInterior section.
Toclean the outside of the door'.
Usesoap and water to thoroughly clean the
top, sidesand front of the oven door. Rinse
well. You may also usea glass cleaner to
cleanthe glasson the outside of the door.
Donot letwater drip into the vent openings.
If any stain onthe door vent trim is
persistent,usea soft abrasive cleaner and a
sponge-scrubber for best results.
Spillageof marinades, fruit juices, tomato
saucesand basting materials containing
acids may causediscoloration and should be
wiped up immediately. When surface is cool,
clean and rinse.
Donot useoven cleaners, cleaning powders
or harsh abrasives on the outside of the
door. 23
Page 24

Care and cleaning of the range.
Lift-Off Oven Door
I
The door is very heavv. Be careful when
removing and lifting the door. Do not lift door
by the handle.
iA WARNINGi'f'mpr°per'y
door hinges may suddenly open and can
cause personal injury to appendages near
the hinge. Follow instructions below to
avoid a risk of injury when removing and
re-installing the oven door.
Pull hinge locks up to unlock
Removal position
Toremove the door',
[71 Fullyopen the oven door.
[] On each hinge, slide the hinge lock up,
making sure it snaps into its fully raised
position.
r-_ Firmlygrasp both sides of the door at near
the top.
[] Closedooruntilthetopof thedooris
approximatelyY'fromthe rangeframe.
r_ Liftdoor up and away from the range until
both hinge arms are clear of the slots in
the range frame.
removed, oven
To replace the door',
Firmlygrasp both sides of the door near
%
the top.
With the door at the
same angle asthe
removal position, rest
the notch in the
bottom of the left
hinge arm on the
bottom edge of the Notch
left hinge slot.Thenotch in the hinge arm
must be fully seated onto the bottom of
the slot. Repeatfor the right side.
Fullyopen the door. If the door will not fully
@
open,the notches in the bottoms of the
hinge arms arenot seated correctly onto
the bottom edge of the slot. Liftthe door
off the range and repeat Step2.
r_ Pushthe hinge
locksdown to
the locked
position
r_ Closethe oven
door.
24
Rail Stopguide
Oven Racks
All oven racks may becleaned by hand with an
abrasive cleaner or steel wool. After cleaning,
rinsethe racks with clean water and dry with
a clean cloth. Gray porcelain-coated oven
racksmay remain in the oven during the self-
cleaning cyclewithout being damaged. The
shiny,silver-colored oven racks may remain in
Storage Drawer Removal
To remove the drawer'.
Pullthe drawer out until it stops.
%
Lift the front of the drawer until the stops
clearthe guides.
Removethe drawer.
@
Oven Heating Elements
Do not clean the bake element or the broil
element.Any soil will burn off when the
elements are heated.
Push hinge locks down to lock
the oven during the self-cleaning cycle, but they
will losetheir luster and become hard to slide.
It will be necessaryto grease all oven rack side
edges with a light coating of vegetable oilafter
cleaning them by hand or in the oven. Thiswill
help maintain the easeof sliding the racks in
and out of the oven.
Toreplace the drawer',
JT] Placethe drawer railson the guides.
Pushthe drawer back until it stops.
r_ Liftthe front of the drawer and push back
until the stopsclear the guides.
r4] Lower the front of the drawer and push
back until it closes.
To cleanthe ovenfloor, gently lift the bake
element. On some models, the bake element is
not exposed and isunder the ovenfloor. Clean
with warm, soapy water.
Page 25

Care and cleaning of the range. GEAppliances.com
[,_)A i SHOCK OR BURN HAZARD: Before replacing oven light bulb, disconnect
WARNING Itheelectricalpowertotherangeatthemainfuseorcircuitbreakerpanel.
Failure to do so may result in electric shock or burn.
BURN HAZARD: The glass cover and bulb should be removed when cool.
[A CAUTION
Touching hot glass with bare hands or a damp cloth can cause burns.
Oven Light Replacement (onsome models)
\
Wire cover holder
Toremove the cover:
r7] Holda hand under the cover so it doesn't
fall when released.With fingersof the
same hand, firmly push back the wire
cover holder. Lift off the cover.
Donot removeanyscrews to remove the
COVer.
r_ Replacebulb with a 40-watt household
appliance bulb.
Stainless Steel Handles (on some models)
The stainless steel handles (on some
models) can be cleaned with a commercially
available stainless steel cleaner. Cleaners
with oxalic acid such as Bar Keepers Friend
Soft CleanserTM will remove rust, tarnish, and
small blemishes. Use only a liquid cleanser
free of grit and rub in the direction of the
brush lines with a damp soft sponge. Do not
use appliance wax or polish on the stainless
steel.
To replace the coven
r-fJ Place it into groove of the light receptacle.
Pullwire forward to the center of the cover
until it snaps into place.
r_ Connectelectrical power to the range.
For models JBS27DI and JBS27RI:Replace
oven lamp with 240 volts lamp only.
Do not wipe the handle with a soiled dish
cloth or wet towel. Do not use scouring
pads, powdered cleaners, bleach or cleaners
containing bleach because these products
can scratch and weaken the finish.
25
Page 26

Cleaning the glass cooktop. Consomemode/s
Normal Daily Use Cleaning
ONLYuseCERAMABRYTE®Ceramic Cooktop
Cleaneronthe glasscooktop. Other creams
may not be aseffective.
Tomaintain and protect the surface of your
glasscooktop, follow these steps:
Beforeusing the cooktop for the
%
first time,clean itwith CERAMABRYTE®
Ceramic Cooktop Cleaner.This helps
Clean your cooktop after
each spill. Use CERAHA
BRYTE®Ceramic Cooktop
Cleaner.
protect the top and makes cleanup easier.
[] Dailyuseof CERAMABRYTE®Ceramic
Cooktop Cleanerwill help keepthe
cooktop lookingnew.
Burned-On Residue
r-_ Shakethe cleaning cream well. Applya
few drops of CERAMABRYTE®Ceramic
Cooktop Cleanerdirectly to the cooktop.
r_ use a paper towel orCERAIVlABRYTE®
CleaningPadfor CeramicCooktops to
cleanthe entire cooktop surface.
Use a dry cloth or paper towel to
remove all cleaning residue. No need to
rinse.
NOTE:It is very important that you DO NOT
heat the cooktop until it has been cleaned
thoroughly.
Use a CERAMABRVTE®Cleaning
Pad for Ceramic Cooktops.
The CERAMABRVTE®Ceramic
Cooktop Scraper and all
recommended supplies are
available through our Parts
Center. See instructions under "To
Order Parts" section on next page.
NOTE: Do not use a dull or
nicked blade.
NOTE:DAMAGEto your glass surface may
occur if you use scrub pads other than those
recommended.
r_ Allow the cooktop to cool.
Spread a few drops of CERAiVlABRYTE®
Ceramic CooktopCleaneron the entire
burned residue area.
Using the included CERAMABRYTE®
@
Cleaning Padfor Ceramic Cooktops,rub
the residue area, applying pressure as
needed.
Heavy, Burned-On Residue
Allow the cooktop to cool.
F71
Use a single-edge razor blade scraper
at approximately a 45° angle against
the glass surface and scrape the soil. It
will be necessary to apply pressure to
the razor scraper in order to remove
the residue,
After scraping with the razor scraper,
@
spread a few drops of CERAMABRYTE®
CeramicCooktop Cleaner on the entire
burned residue area. Usethe CERAMA
BRYTE®Cleaning Padto remove any
remaining residue.
If any residue remains, repeat the steps
%
listed above as needed.
For additional protection, after all
@
residue has been removed, polish the
entire surface with CERAMABRYTE®
Ceramic Cooktop Cleaneranda paper
towel.
For additional protection, after all
%
residue has been removed, polish the
entire surface with CERAMABRYTE®
CeramicCooktop Cleaner and a paper
towel.
26
Page 27

Cleaning the glass cooktop, con GEAppliances.com
Metal Marks and Scratches
r_ Be careful not to slide pots and pans
across your cooktop. It will leave metal
markings on the cooktop surface,
These marks are removable using the
CERAMABRYTE®CeramicCooktop Cleaner
with the CERAMABRYTE®Cleaning Pad
for Ceramic Cooktops,
r_ if pots with a thin overlay of aluminum
or copper are allowed to boil dry, the
overlay may leave black discoloration
on the cooktop.
Cooktop Seal
To cleon the cooktop seal around the edges
of the glass, lay a wet cloth on it for a few
Glass surface--potential for permanent damage.
Our testing shows that
if you are cooking high
sugar mixtures such as
jelly or fudge and have
a spillover, it can cause
permanent damage to the
glass surface unless the
spillover is immediately
removed.
Damage from Sugary Spills and Melted Plastic
r_ Turn off all surface units. Remove hot
puns.
[] Wearing an oven mitt:
a. Usea single-edge razor blade scraper
(CERAIVlABRYTE®Ceramic Cooktop
Scraper) to move the spill to u cool
urea on the cooktop.
b. Remove the spill with paper towels.
This should be removed immediately
before heating again or the
discoloration may be permanent.
NOTE:Carefully check the bottom of pans
for roughness that would scratch the
cooktop.
minutes, then wipe clean with nonabrasive
cleaners.
r4] Don't use the surface units again until all
of the residue has been completely
removed.
NOTE:If pitting or indentation in the glass
surface has already occurred, the cooktop
glass will have to be replaced.
In this case, service will be necessary.
[] Any remaining spillover should be left until
the surface of the cooktop has cooled.
To Order Parts
To order CERAMABRYTE®Ceramic Cooktop
Cleaner and the cooktop scraper, please call
our toll-free number:
National Parts Center 800.626.2002
CERAMABRYTE®Ceramic
Cooktop Cleaner .......... #WXIOX300
CERAMABRYTE®Ceramic
Cooktop Scraper .......... #WXZOX0302
Kit ........................ #WB64XS027
(Kitincludes cream and cooktop scraper)
CERAMA BRYTE® Cleaning Pads for
Ceramic Cooktops ...... #WX!OX350
27
Page 28

Before you call for service...
Troubleshooting Tips
Save time and money! Review the charts on the following
pages first and you may not need to call for service.
Possible Causes What To Do
Surface units will not Improper cookware . Use pans which are flat and match the diameter
maintain a rolling boil being used. of the surface unit selected.
or cooking is not
fast enough
Radiant surface units A fuse in your home may be * Replacethe fuse or reset the circuit breaker.
do not work properly blown or the circuitbreaker
tripped.
Cooktop controls * Check to see the correct control is set for the surface
improperly set. unit you are using.
Surface unitstops . Thisis normal.The unit isstill on and hot.
glowing when turned
to a lower setting
Scratches (may appear Incorrect cleaning . Scratches are not removable.Tiny scratches will become
as cracks) on radiant methods being used. lessvisible in time as a result of cleaning.
cooktop glass surface Cookware with rough bottoms * Toavoid scratches, usethe recommended cleaning
being used or coarse particles procedures. Make surebottoms of cookwure are clean
{salt or sand} were between before use,and use cookware with smooth bottoms.
the cookware and the surface
of the cooktop.
Cookware has been slid
across the cooktop surface.
Areas of discoloration Food spillovers not cleaned * See the Cleaning the glass cooktop section.
on the radiant glass before next use.
cooktop Hot surface on a model * This isnormal. The surface may appear discolored
with a light-colored glass when it is hot. This is temporary and will disappear
cooktop, as the glass cools.
Plastic melted to Hot cooktop came into ,, See the Glass surface potential for permanent damage
the radiant surface contact with plastic placed section in the Cleaning the glass cooktop section.
on the hot cooktop.
Pitting (or indentation} Hot sugar mixture spilled ,, Call a qualified technician for replacement.
of the radiant glass on the cooktop.
cooktop
Frequent cycling off Improper cookware ,, Use only flat cookware to minimize cycling.
and on of radiant being used.
surface units
Control signals after You forgot to enter a ,, Touch the Bake pad and desired temperature or the
entering cooking time bake temperature or Self Clean pad and desired clean time.
or delay start cleaning time.
Coilsurface units do The surface units are * With the controls off, check to make sure the surface
not work properly not plugged in solidly, unit is plugged completely into the receptacle.
The surface unit controls * Check to see the correct control isset for the surface
improperly set. unit you are using.
The drip pans are not set * With the controls off, check to make sure the drip
securely in the cooktop, pan is in the recess in the cooktop and that the
28
opening in the pan lines up with the receptacle.
Page 29

Before you call for service...
m
Troubleshooting Tips
Save time and money! Review the charts on the following
pages first and you may not need to call for service.
Possible Causes What To Do
Food does not bake Oven controls improperly set. • Seethe Usingthe oven section.
or roast properly Rack position is incorrect, . Seethe Usingthe oven section.
or the rack is not level.
Incorrectcookwareor cookware • Seethe Usingthe oven section.
of improper size being used.
Oven thermostat needs . See the Adjust the oven thermostat Do it yourself!
adjustment, section.
Clock and timer do Plug on range isnot completely . Makesure electrical plug isplugged into a live,properly
not work inserted in the electrical outlet, grounded outlet.
A fuse in your home may • Replacethe fuse, or resetthe circuit breaker.
be blown or the circuit
breaker tripped.
Oven controls improperly set. • See the Using the clock and timer section.
GEAppliances.com
Control is in Energy Saver . Seethe Energy Saver Mode section.
Mode.
Oven light does Light bulb is loose or defective.. Tighten or replace the bulb.
not work
Food does not Door not open to the broil stop • Seethe Usingthe oven section.
broil properly position as recommended.
Oven temperature too Oven thermostat . Seethe Adjust the oven thermostat Do it yourself!
hot or too cold needs adjustment, section.
Oven willnot work Plugon range isnot . Hake sure electrical plug is plugged into a live,
Switch operating light . Call for service.
is broken.
Oven controls improperly set. • Makesure you touch the Broil Hi/Lo pad.
Improper rack position • Seethe BroilingGuide.
being used.
Cookware not suited • Forbestresults,usea pan designedfor broiling.
for broiling.
Insome areas the power . Preheatthe broil elementfor !0 minutes.
(voltage) may be low.
completely inserted in properly grounded outlet.
the electrical outlet.
. Broil for the longest period of time recommended
in the Broiling Guide.
A fuse in your home may • Replacethe fuse or resetthe circuit breaker.
be blown, orthe circuit
breaker tripped.
Oven controls improperly set.
Door left in the locked
position.
• Seethe Usingthe oven section.
. If necessary,allow the ovento cool;then unlock
the door.
29
Page 30

Before you call for service...
Troubleshooting Tips
Save time and money! Review the charts on the following
pages first and you may not need to call for service.
Possible Causes What To Do
Storage drawer Rear drawer support is . Reposition the drawer. Seethe Storage Drawer
is crooked on top of the guide rail. Removal instructions in the Care and cleaning
of the range section.
Storage drawer Power cord may be • Repositionthe drawer and power cord. Seethe
won't close obstructing drawer StorageDrawer Removalinstructions in the Care and
in the lower back cleaningof the range section.
of the range.
Rear drawer support is . Reposition the drawer. Seethe Storage Drawer
on top of the guide rail. Removal instructions in the Care and cleaning of the
range section.
Oven will notself-clean The oven temperature is . Allowthe oven to cool to room temperature and
too high to set a self-clean reset the controls.
operation.
Oven controls improperly set. • See the Using the self-cleaning oven section.
Oven door is not in the locked . Make sure you move the door latch handle all the
position, way to the right.
"Crackling" or This is the sound of the . Thisis normal.
"popping" sound metal heating and cooling
during both the cooking and
cleaning functions.
Excessive smoking Excessive soil. . Touch the Clear/Off pad. Open the windows to
during a clean cycle rid the room of smoke. Wait until the light on the
Self Clean pad goes off. Wipe up the excess soil and
reset the cleon cycle.
Oven door will not Oven too hot. . Allow the oven to cool below locking temperature.
unlock
Ovennot clean after Oven controls not properly set. • Seethe Using theself-cleaning ovenor Usingsteam clean section.
a clean cycle Oven was heavily soiled. . Clean up heavy spillovers before starting the clean
cycle. Heavily soiled ovens may need to be cleaned again.
30
Page 31

Before you call for service... 6EAppliances.com
Troubleshooting Tips
Save time and money! Review the charts on the following
pages first and you may not need to call for service.
Possible Causes What To Do
"F -" and o number
or letter flash
in the display
Display flashes "bAd" The installed connection . Contact installer or electrician to correct miswire.
then "linE" with a from the house to the unit
loud tone is miswired.
Display goes blank A fuse inyour home may be • Replacethe fuse or reset the circuit breaker.
Unable to get_e Oven control pads were . The Bake and Broil Hi/Lo pads must be touched
display to shaw "SF" not pressed properly, at the same time and held for 3seconds.
Clock flashes, Power outage or surge. . Resetthe clock. If the oven was in use,you must reset
power outage it by touching the Clear/Off pad, setting the clock
"Burning" or "oily" This is normal in a new oven . To speed the process, set a self-clean cycle for a
odor emitting from and will disappear in time. minimum of 3 hours. See the Using the self-cleaning
thevent oven section.
You have a function
error code.
blown, or the circuit breaker
tripped.
The clock is turned off from . Seethe Using the clock and timer and/or the Energy
showing in the display. Saver Mode section.
. Disconnect all power to the range for at least
30 seconds and then reconnect power. If the function
error code repeats, call for service.
. On self-cleaning models, if a function error code appears during
the self-cleaning cycle, check the oven door latch. The latch
may have been moved, if only slightly, from the locked position.
Hake sure the latch is moved to the right as far as it will go.
Touch the Cleor/Offpad. Allow the oven to cool for one hour.
Putthe oven back into operation.
and resetting any cooking function.
Strong odor An odor from the insulation . This istemporary.
around the inside of the
oven is normal for the first
few times the oven is used.
Drawer does not slide The drawer is out of • Fully extend the drawer and push it all the way in smoothly or
drags alignment. See the Care and cleaning of the range section.
Drawer is overloaded or load . Reduce weight. Redistribute drawer contents.
is unbalanced.
31
Page 32

Accessories.
Looking For Something More? (Not all accessories are available for all models.)
You can find these accessories and many more at GEAppliances.com (U.S.) or www.GEAppliances.ca
(Canada), or call 800.626.2002 (U.S.) or 800.661.1616 (Canada) (during normal business hours). Have your
model number ready.
J CE_AMmC
_s_ COOKTOP
_E/j CL_ANINGKIT
Grates Surface Burner Headsand Caps Surface Elements and Drip Knobs
Oven Racks Oven Elements
Cleaning Kit: Cleaning Wipes Appliance Polish Appliance
Includes cleaner, Wipes Cleaner
scraper and pad
eamc oo o e e
WXIOXII7GCS WXIOXSO5 WXIOXI0001 PMIOX311
Pans
or
Light Bulbs
Get the most out of your Broiler Pan! (Not for use with Broiler Drawer models.I
Useyour pan and grid cover to broil hamburgers, seafood,steaks,vegetables,
bacon, chops andso much more! Thepan below catches the excessfats and oils.
. GenuineGEPart
. EasyToClean
. One-Year Warranty
Limited Time Offe!! Free Shipping!
Whenyou orderyour broiler pan within 30 days of purchasing your GEcooking product.
Small Large*
Part# WB¢8X10055 WB¢8X10056
Dimensions 8-3/4" Wx 1-1/4" H x 13-1/2" D 12-5/4" Wx 1-1/4" Hx 15-1/4"D
* The large (standard) broil pan does not fit in 20"/24" ranges.
** TheXL pan does not fit in 24" wall ovens, 27" drop-ins or 20"/24" ranges.
XL**
WB/48X1005 7
15-1/2" Wx 1-1/4" H x 19" D
32
Toplaceyour order, call 800.626.2002 (U.S.),800.661.1616 (Canada)or mail this farm to:
Inthe U.S.:GEPorts,P.O.Box221027, Memphis,TN 58122-1027. In Canada: GEPorts,1 Factory Lone,Ploncton, N.B.EIC9M5
Broiler Pun Order Form
Quantity
Model Number
First Name
Address
City
Phone
Check
Call 800.626.2002 in the U.S. or 800.661.6161 in Canada for current pricing. All credit card orders must be called in.
Money Order
Serial Number Brand Date of Purchase
Port Number
Last Name
State Zip Code
E-Mail
Page 33

Notes. GEAppliances.com
33
Page 34

Notes.
34
Page 35

> Thank You! for your purchase of c]GEBrand appliance.
ooo
Z Register Your Appliance: Register your new appliance on-line at your conveniencet
www.geapplia nces.com/service_a nd_support/register/
Timely product registration will allow for enhanced communication and prompt service under the terms of your warranty,
_:: should the need arise. You may also mail in the pre-printed registration card included in the packing material.
GE Gas Range Warranty
GEAppliances.com
All warranty service is provided by our Factory Service Centers, or an authorized Customer Care+ technician.
To schedule service, onqine, visit us at www.geappliances.com/service_and_support/, or call 800.GE.CARES
(800.432.2737). Please have serial number and model number available when calling for service.
Servicing your appliance may require the use of the onboard data port for diagnostics. This gives a GE factory
service technician the ability to quickly diagnose any issues with your appliance and helps GE improve its products
by providing GE with information on your appliance. If you do not want your appliance data to be sent to GE, please
advise your technician not to submit the data to GE at the time of service.
For the period of one year from the date of the original purchase. GE will provide any part of the range which fails due
to a defect in materials or workmanship. During this limited one-year warranty, GE will also provide, free of charge, all
labor and in-home service to replace the defective part.
What GE will not cover:
, Service trips to your home to teach you how to use
the product•
, Improper installation, delivery or maintenance.
, Failure of the product if it is abused, misused,
modified or used for other than the intended purpose
or used commercially.
Replacement of house fuses or resetting of circuit
breakers•
09
Damage to the product caused by accident, fire,
floods or acts of God.
Incidental or consequential damage caused by
possible defects with this appliance.
Damage caused after delivery.
, Product not accessible to provide required service.
, Marks or stains (including surface rust stains) that can
be removed by following cleaning instructions•
m
.
EXCLUSION OF IMPLIED WARRANTIES
,O,. z-
Your sole and exclusive remedy is product repair as provided in this Limited Warranty. Any implied warranties,
including the implied warranties of merchantability or fitness for a particular purpose, are limited to one year or the
O
shortest period allowed by law.
This warranty is extended to the original purchaser and any succeeding owner for products purchased for home use
O I1)
within the USA. If the product is located in an area where service by a GE Authorized Servicer is not available, you
may be responsible for a trip charge or you may be required to bring the product to an Authorized GE Service location
for service. In Alaska, the warranty excludes the cost of shipping or service calls to your home.
I1) C
Some states do not allow the exclusion or limitation of incidental or consequential damages. This warranty gives you
specific legal rights, and you may also have other rights which vary from state to state. To know what your legal rights
_o
._ o
are, consult your local or state consumer affairs office or your state's Attorney General.
o I1)
_.__
Extended Warranties: Purchase a GE extended warranty and learn about special discounts that are available while
_ uJ
m _
_ M
,our warranty is still in effect• You can purchase it on-line anytime
Warrantor: General Electric Company. Louisville, KY 40225
www•geappliances.com/service and support/shop-for-extended-service-plans.htm
or call 800.626.2224 during normal business hours• GE Consumer Home Services will still be there after your
warranty expires•
35
Page 36

Consumer Support.
GEAppliances Website GEAppliances.com
Have a question or need assistancewith your appliance? Try the GEAppliances Website 24 hours a day,
any day of the year! For greater convenience and faster service,you can now download Owner's Manuals,
order parts or even scheduleservice on-line.
Schedule Service GEAppliances.com
Expert GE repair service is only one step away from your door. Get on-line and schedule your service at
your convenience any day of the year! Or call 800.GECARES(800.432.2737) during normal business hours.
Real Life Design Studio GEAppliances.com
GEsupports the UniversalDesignconcept-products, servicesand environments that can be usedby
people of all ages, sizesand capabilities.We recognize the needto design for a wide range of physical and
mental abilities and impairments. For details of GE'sUniversalDesignapplications, including kitchen design
ideasfor peoplewith disabilities,check out our Website today. For the hearing impaired,pleasecall 800.TDD.
GEAC(800.833.4322).
Extended Warranties
Purchasea GEextended warranty and learn about special discounts that are available while your warranty
isstillin effect. You can purchase it on-line anytime, or call 800.626.222/4during normal businesshours.
GEConsumer Home Serviceswill still be there after your warranty expires.
PartsandAccessories
Individualsqualified to service their own appliances can have parts or accessoriessentdirectly to their homes
(VISA,MasterCardand Discovercards are accepted).Orderon-line today, 24 hours every day or by phone at
800.626.2002during normal businesshours.
Instructions contained in this manual cover procedures to be performed by any user. Other servicing
generally should be referred to qualified service personnel. Caution must be exercised, since improper
servicing may cause unsafe operation.
Contact Us
Ifyou are not satisfied with the serviceyou receive from GE,contact us on our Website with all the details
includingyour phone number, orwrite to: General Manager,Customer Relations
GEAppliances,Appliance Park
Louisville,KV40225
GEAppliances.com
GEAppliances.com
GEAppl iances.corn
Register Your Appliance GEAppliances.com
Register your new appliance on-line--at your convenience! Timely product registration willallow for
enhanced communication and prompt service under the terms of your warranty, should the need arise.
You may also mail in the pre-printed registration card included inthe packing material, or detach and use
the form inthe Owner's Manual.
Printed in Mexico
 Loading...