

Page 1
Use and Care & Installation Guide
Electric Range
Safety Instructions
........................ 3, 4
Operating Instructions, Tips
Aluminum Foil .................................... 4, 9, 11
Features ........................................................... 5
Oven .......................................................... 7–10
Baking/Roasting ........................................ 8
Broiling, Broiling Guide...................... 9, 10
Control Settings.......................................... 7
Surface Cooking ............................................ 6
Control Settings.......................................... 6
Cookware Tips............................................ 6
Care and Cleaning
Broiler Pan and Grid.................................... 13
Control Knobs.............................................. 13
Lift-Off Oven Door....................................... 12
Porcelain Oven Interior.............................. 13
Shelves .......................................................... 11
Surface Units and Drip Pans .................... 11
....................... 11–13
Problem Solver
More questions ?…call
................................... 18
GE Answer Center® 800.626.2000
Installation, Adjustments
Anti-Tip Device........................................ 3, 14
Flooring Under the Range......................... 17
Leveling ......................................................... 17
Consumer Services
Appliance Registration................................. 2
Important Phone Numbers....................... 19
Model and Serial Number Location.......... 2
Warranty ....................................... Back Cover
Models: JAS02 JAS24
......................... 19
.. 14–17
GE Appliances
Page 2

HELP US HELP YOU…
Before using your range, read this
guide carefully.
It is intended to help you operate and maintain
your new range properly.
Keep it handy for answers to your questions.
If you don’t understand something or need more
help, call:
GE Answer Center
800.626.2000
24 hours a day, 7 days a week
®
Write down the model and serial numbers.
You’ll find them on a label under the cooktop on the
right side wall.
These numbers are also on the Consumer Product
Ownership Registration Card that came with your
range. Before sending in this card, please write these
numbers here:
Model Number
Serial Number
If you received a damaged range…
Immediately contact the dealer (or builder) that sold
you the range.
Save time and money .
Before you request service…
Check the Problem Solver in the back of this guide. It
lists causes of minor operating problems that you can
correct yourself.
Use these numbers in any correspondence or service
calls concerning your range.
IF YOU NEED SER VICE…
To obtain service, see the Consumer Services page in
the back of this guide.
We’re proud of our service and want you to be
pleased. If for some reason you are not happy with the
service you receive, here are three steps to follow for
further help.
FIRST, contact the people who serviced your
appliance. Explain why you are not pleased.
In most cases, this will solve the problem.
NEXT, if you are still not pleased, write all the
details—including your phone number—to:
Manager, Consumer Relations
GE Appliances
Appliance Park
Louisville, KY 40225
FINALLY, if your problem is still not resolved, write:
Major Appliance Consumer Action Program
20 North Wacker Drive
Chicago, IL 60606
2
Page 3
IMPOR TANT SAFETY INSTRUCTIONS
Read all instructions before using your appliance.
When using electrical appliances, basic safety
precautions should be followed, including the
following:
• Use this appliance only for its intended use
as described in this guide.
• Be sure your appliance is properly installed
and grounded by a qualified technician in
accordance with the provided installation
instructions.
• Don’t attempt to repair or replace any part of
your range unless it is specifically
recommended in this guide. All other servicing
should be referred to a qualified technician.
• Before performing any service, DISCONNECT
THE RANGE POWER SUPPLY AT THE
HOUSEHOLD DISTRIBUTION PANEL BY
REMOVING THE FUSE OR SWITCHING OFF
THE CIRCUIT BREAKER.
WARNING—All ranges can tip and
injury could result. To prevent accidental tipping of
the range, attach it to the floor by
installing the Anti-Tip device
supplied. The device engages one of
the rear leveling legs (see Installation
Instructions). To check if the device
is installed properly, carefully tip the
range forward.
If you pull the range out from the wall
for any reason, make sure the rear leg
is returned to its position in the device when you
push the range back.
• Do not leave children alone—children should
not be left alone or unattended in an area where an
appliance is in use. They should never be allowed
to sit or stand on any part of the appliance.
• Don’t allow anyone to climb, stand or hang on
the door or range top. They could damage the
range and even tip it over, causing severe
personal injury.
• CAUTION: ITEMS OF INTEREST TO
CHILDREN SHOULD NOT BE STORED IN
CABINETS ABOVE A RANGE OR ON THE
BACKSPLASH OF A RANGE—CHILDREN
CLIMBING ON THE RANGE TO REACH
ITEMS COULD BE SERIOUSLY INJURED.
• Never wear loose-fitting or hanging garments
while using the appliance. Flammable material
could be ignited if brought in contact with hot
heating elements and may cause severe burns.
• Use only dry pot holders—moist or damp pot
holders on hot surfaces may result in burns from
steam. Do not let pot holders touch hot heating
elements. Do not use a towel or other bulky cloth.
• For your safety, never use your appliance for
warming or heating the room.
• Storage in or on appliance—Flammable
materials should not be stored in an oven or near
surface units.
Important Safety Instructions
• Keep hood and grease filters clean to maintain
good venting and to avoid grease fires.
• Do not let cooking grease or other flammable
materials accumulate in or near the range.
• Do not use water on grease fires.
Never pick up a flaming pan.
Smother flaming pan on surface unit
by covering pan completely with well-
fitting lid, cookie sheet or flat tray. Flaming grease
outside a pan can be put out by covering with
baking soda or, if available, a multi-purpose dry
chemical or foam type fire extinguisher.
• Do not touch heating elements or interior
surface of oven. These surfaces may be hot
enough to burn even though they are dark in
color. During and after use, do not touch, or let
clothing or other flammable materials contact
surface units, areas nearby surface units or any
interior area of the oven; allow sufficient time
for cooling first.
Potentially hot surfaces include the cooktop and
areas facing the cooktop, oven vent opening and
surfaces near the opening, and crevices around the
oven door. Remember: The inside surface of the
oven may be hot when the door is opened.
• When cooking pork, follow the directions
exactly and always cook the meat to an internal
temperature of at least 170°F. This assures that, in
the remote possibility that trichina may be present
in the meat, it will be killed and the meat will be
safe to eat.
(continued on next page)
3
Page 4
IMPOR TANT SAFETY INSTRUCTIONS
(continued)
Oven
• Stand away from range when opening oven
door. Hot air or steam which escapes can cause
burns to hands, face and/or eyes.
• Don’t heat unopened food containers in the
oven. Pressure could build up and the
container could burst, causing an injury.
• Keep oven free from grease buildup.
• Place oven shelf in desired position while oven
is cool. If shelves must be handled when hot, do
not let pot holder contact heating units in the oven.
• Pulling out shelf to the shelf stop is a
convenience in lifting heavy foods. It is also a
precaution against burns from touching hot
surfaces of the door or oven walls.
• When using cooking or roasting bags in oven,
follow the manufacturer’s directions.
• Do not use your oven to dry newspapers.
If overheated, they can catch fire.
Surface Cooking Units
• Use proper pan size—This
appliance is equipped with one or
more surface units of different size.
Select cookware having flat bottoms large enough
to cover the surface unit heating element. The use
of undersized cookware will expose a portion of
the heating element to direct contact and may
result in ignition of clothing. Proper relationship
of cookware to burner will also improve efficiency.
• Never leave surface units unattended at high
heat settings. Boilover causes smoking and
greasy spillovers that may catch on fire.
• Be sure drip pans are in place. Their absence
during cooking could damage range parts and
wiring.
• Only certain types of glass, glass/ceramic,
earthenware or other glazed containers are
suitable for range-top service; others may break
because of the sudden change in temperature.
• To minimize the possibility of burns, ignition
of flammable materials, and spillage, the handle
of a container should be turned toward the center
of the range without extending over nearby
surface units.
• Always turn surface unit to OFF before
removing cookware.
• Keep an eye on foods being fried at HI or
MEDIUM HIGH heats.
• To avoid the possibility of a burn or electric
shock, always be certain that the controls for
all surface units are at OFF position and all
coils are cool before attempting to lift or
remove the unit.
• Don’t immerse or soak removable surface
units. Don’t put them in a dishwasher.
• When flaming foods are under the hood, turn
the fan off. The fan, if operating, may spread
the flame.
• Foods for frying should be as dry as possible.
Frost on frozen foods or moisture on fresh foods
can cause hot fat to bubble up and over sides
of pan.
• Use little fat for effective shallow or deep-fat
frying. Filling the pan too full of fat can cause
spillovers when food is added.
• If a combination of oils or fats will be used in
frying, stir together before heating, or as fats
melt slowly.
• Always heat fat slowly, and watch as it heats.
• Use deep fat thermometer whenever possible to
prevent overheating fat beyond the smoking point.
• Don’t use aluminum foil to line drip pans or
anywhere in the oven except as described in this
guide. Misuse could result in a shock, fire hazard
or damage to the range.
4
SAVE THESE
INSTRUCTIONS
Page 5
FEATURES OF YOUR RANGE
Important Safety Instructions Features of Your Range
13
2
1
4
3
Rear
6
5
oven
7
Front
Rear
Oven
surface
8
9
10
11
12
Feature Index
(Not all models have all features. See
Appearance of features varies.) page(s)
1 Chrome Plated Drip Pans 11
2 Plug-In Surface Units 11
(may be removed when
cleaning under the unit)
3 Surface Unit Controls 6
4 Oven Cycling Light 7
5 OVEN TEMP Knob 7
6 “ON” Indicator Light 6
for Surface Units
Feature Index
(Not all models have all features. See
Appearance of features varies.) page(s)
7 Model and Serial Numbers 2
8 Broil Element 9, 12
9 Oven Shelf Supports 7, 8, 11
10 Oven Shelves 7, 8, 11
11 Broiler Pan and Grid 9, 13, 17
12 Bake Element (may be lifted 12
gently for wiping oven floor)
13 Anti-Tip Device 3, 14
5
Page 6
SURFACE COOKING
Surface Cooking Controls
Your surface units and controls are designed to give you a variety of heat
settings for surface unit cooking.
At both OFF and HI positions, there is a slight niche so control ‘‘clicks’’ at
those positions; HI marks the highest setting; LO, the lowest setting. In a
quiet kitchen, you may hear slight ‘‘clicking’’ sounds during cooking,
indicating heat settings selected are being maintained.
Switching heats to higher settings always shows a quicker change than
switching to lower settings.
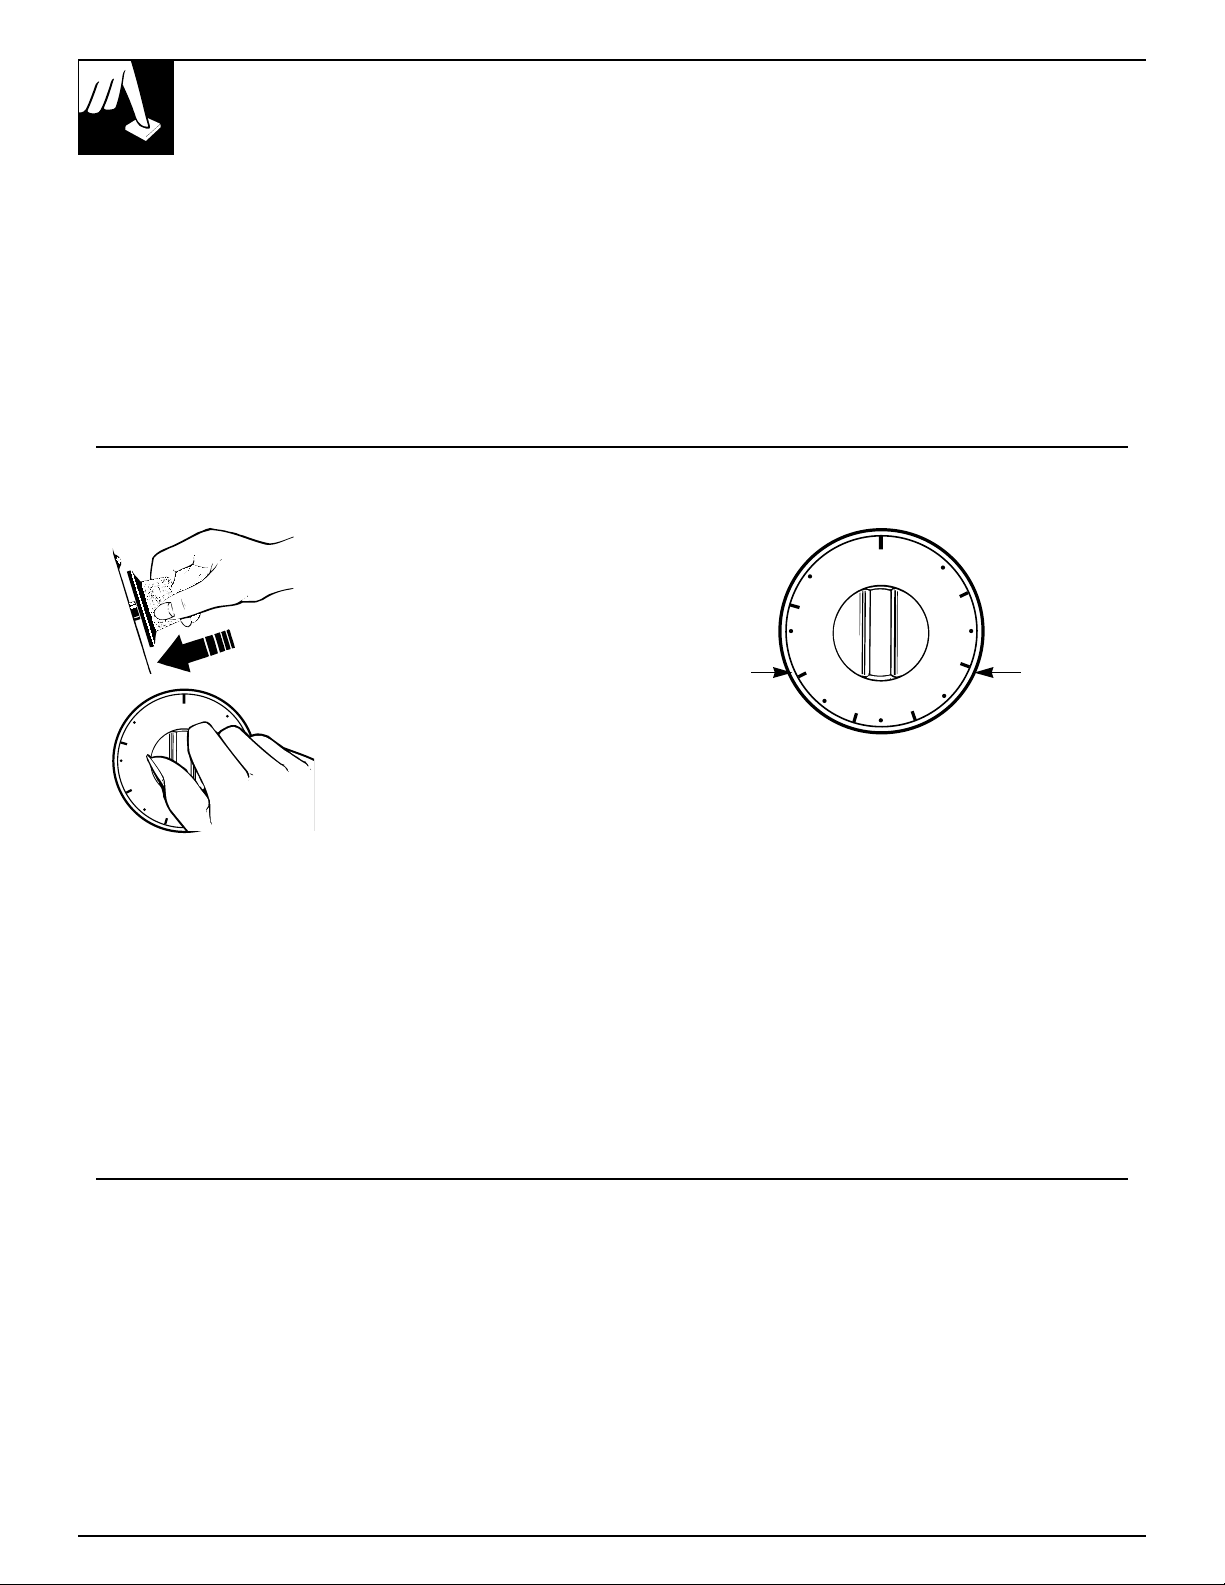
How to Set the Controls Heat Setting Guide
1. Push the control knob in.
I
H
6
F
F
O
L
O
2
2. Turn either clockwise or
F
F
O
L
I
H
6
5
O
2
3
4
counterclockwise to
desired heat setting.
Control must be pushed in to set only from the
OFF position. When control is in any position
other than OFF, you can turn it without pushing in.
Be sure you turn control to OFF when you finish
cooking. An indicator light will glow when ANY heat
on any surface unit is on.
Cooking Tips
Medium High Medium Low
5
3
4
HI—Quick start for cooking; bring water to boil.
MEDIUM HIGH—Fast fry, pan broil; maintain fast
boil on large amount of food.
MED—Saute and brown; maintain slow boil on large
amount of food.
MEDIUM LOW—Steam rice, cereal; maintain
serving temperature of most foods.
LO—Cook after starting at HI; cook with little water
in covered pan.
NOTE:
1. At HI or MEDIUM HIGH, never leave food
unattended. Boilovers cause smoking; greasy
spillovers may catch fire.
2. At MEDIUM LOW or LO, melt chocolate, butter
on small unit.
1. Use medium- or heavy-weight
cookware. Aluminum cookware
conducts heat faster than other
metals. Cast-iron and coated
cast-iron cookware is slow to
absorb heat, but generally cooks
evenly at low or medium heat
settings. Steel pans may cook
unevenly if not combined with
other metals.
6
2. To conserve the most cooking
energy, pans should be flat on the
bottom, have straight sides and
tight fitting lids. Match the size
of the saucepan to the size of the
surface unit. A pan that extends
more than an inch beyond the
edge of the drip pan traps heat,
which causes “crazing” (fine
hairline cracks) on porcelain, and
discoloration ranging from blue
to dark gray on chrome drip pans.
3. Do not overfill cookware with
fat that may spill over when
adding food. Frosty foods
bubble vigorously. Watch foods
frying at high temperatures. Keep
range and hood clean from
accumulated grease.
Page 7

Oven Temperature Control
The OVEN TEMP knob is located on the control
F
F
O
B
R
O
I
M
W
0
0
2
0
5
2
0
0
3
L
5
0
0
4
5
0
4
0
0
3
5
0
panel on the front of the range.
Simply turn the knob to the desired cooking
temperatures, which are marked in 25°F.
increments on the dial. OVEN TEMP maintains
the temperature you set, from WM (170°F.) to
BROIL (550°F.).
The Oven Cycling Light glows until the oven
reaches your selected temperature, then goes off
and on with the oven unit(s) during cooking.
Oven Shelves
USING YOUR OVEN
Surface Cooking Using Your Oven
Bump
The shelves are
designed with stoplocks so when placed
correctly on the shelf
supports, they will stop
before coming
completely out of the
oven and will not tilt
when you are
removing food from
them or placing food
on them.
When placing cookware on a shelf, pull the shelf out
to the bump on the shelf support. Place the cookware
on the shelf, then slide the shelf back into the oven.
This will eliminate reaching into the hot oven.
Shelf Positions
The oven has four shelf supports—A (bottom),
B, C and D (top). Shelf positions for cooking
are suggested on Baking and Roasting pages.
D
C
B
A
To remove the shelves
from the oven, pull
them toward you, tilt
front end upward and
pull them out.
To replace, place shelf
on shelf support with
stop-locks (curved
extension of shelf)
facing up and toward
back of oven. Tilt up
front and push shelf toward back of oven until it goes
past the bump on the shelf support. Then lower front
of shelf and push it all the way back.
7
Page 8

BAKING/ROASTING
How to Set Your Range for Baking/Roasting
1. Position the shelf or shelves in the oven. If cooking
on two shelves at the same time, stagger the pans
for best heat circulation.
2. Close oven door. Turn OVEN TEMP knob
clockwise to desired temperature. Preheat oven for
at least 10 minutes if preheating is necessary.
3. Place food in oven on center of shelf. Allow at least
2 inches between edge of bakeware and oven wall
or adjacent cookware.
4. Check food for doneness at minimum time on
recipe. Cook longer if necessary. Turn OVEN
TEMP knob to OFF and remove food.
Shelf Positions Preheating
Most baking is done on the second shelf position (B)
from the bottom. When baking three or four items,
use two shelves positioned on the second and fourth
sets of supports (B & D) from bottom of oven. Bake
angel food cakes on first shelf position (A) from
bottom of oven.
Roasting is usually done on the bottom shelf
position (A).
Preheating the oven takes about 10 minutes. Preheat
the oven only when necessary, usually for baking.
Most roasts will cook satisfactorily without
preheating. If you find preheating is necessary, keep
an eye on the indicator light and put food in the oven
promptly after light goes out.
Baking and Roasting Tips
• Follow a tested recipe and measure the ingredients
carefully. If you are using a package mix, follow
label directions.
• Do not open the oven door during a baking
operation—heat will be lost and the baking time
might need to be extended. This could cause poor
baking results. If you must open the door, open it
partially—only 3 or 4 inches—and close it as
quickly as possible.
• Roasting is cooking by dry heat. Tender meat or
poultry can be roasted uncovered in your oven.
Roasting temperatures, which should be low and
steady, keep spattering to a minimum. When
roasting, it is not necessary to sear, baste, cover or
add water to your meat.
• Frozen roasts of beef, pork, lamb, etc., can be started
without thawing, but allow 10 to 25 minutes per
pound additional time (10 minutes per pound for
roasts under 5 pounds, more time for larger roasts).
• Thaw most frozen poultry before roasting to ensure
even doneness. Some commercial frozen poultry can
be cooked successfully without thawing. Follow
directions given on package label.
When baking or roasting, NEVER turn the knob to BROIL
VERY IMPORTANT NOTE:
When baking or roasting, NEVER turn the
OVEN TEMP knob to BROIL and back to the
desired temperature. Turning the OVEN TEMP
knob to BROIL sets the thermostat in a BROIL
mode. See the Broiling section in this guide. To
reset the thermostat to Bake, turn the OVEN
TEMP knob to OFF then back to the desired
Bake/Roast temperature.
F
F
O
B
R
O
I
M
W
0
0
2
0
5
2
0
0
3
and back to the bake temperature.
L
5
0
0
4
5
0
4
0
0
3
5
0
8
Page 9

BROILING
Broiling may be slightly different from any previous
broiling you may be acquainted with, so be sure to
read this section completely.
Broiling is cooking food by intense radiant heat from
the upper element in the oven. Most fish and tender
cuts of meat can be broiled. Follow these steps to
keep spattering and smoking to a minimum.
Step 1: If the meat has fat or gristle around the edge,
cut vertical slashes through both about 2″ apart. If
desired, fat may be trimmed, leaving layer about
1/8″ thick.
Step 2: Place the meat on the broiler grid in the
broiler pan which comes with your range. Always use
the grid so the fat drips into the broiler pan; otherwise
the juices may become hot enough to catch fire.
Step 3: Place the shelf in position C for most broiling.
Use of Aluminum Foil
1. You can use aluminum
foil to line your broiler
pan and broiler grid.
However, you must
mold the foil tightly to
the grid and cut slits in
it just like the grid.
Without the slits, the foil will prevent fat and meat
juices from draining to the broiler pan. The juices
could become hot enough to catch on fire. If you do
not cut the slits, you are frying, not broiling.
Step 4: Close the door. Always broil with the
door closed.
Step 5: Turn the OVEN TEMP knob clockwise
to BROIL. You will feel a slight niche at the
broil position. You may then turn the knob
counterclockwise to broil at a lower temperature.
Step 6: Turn food only once during cooking.
Step 7: Turn the OVEN TEMP knob to OFF. Serve
food immediately, and leave the pan outside the oven
to cool during the meal for easiest cleaning.
VERY IMPORTANT NOTE:
To reset the oven for Baking you must turn the
OVEN TEMP knob to OFF. This gets it out of
the BROIL mode.
2. DO NOT place a sheet of aluminum foil on the
shelf. To do so may result in improperly cooked
foods, damage to oven finish and increase in heat
on outside surfaces of the oven.
3. If desired, a sheet of aluminum foil may be used
on floor of the oven under the bake element. BE
CERTAIN FOIL DOES NOT TOUCH BAKE
ELEMENT. Aluminum foil used in this way may
slightly affect the browning of some foods. Change
foil when it becomes soiled.
Baking/Roasting Broiling
Questions and Answers
Q. When broiling, is it necessary to always use a
grid in the pan?
A. Yes. Using the grid suspends the meat over the
pan. As the meat cooks, the juices fall into the pan,
thus keeping meat drier. Juices are protected by the
grid and stay cooler, thus preventing excessive
spatter and smoking.
Q. Should I salt the meat before broiling?
A. No. Salt draws out the juices and allows them to
evaporate. Always salt after cooking. Turn meat
with tongs; piercing meat with a fork also allows
juices to escape. When broiling poultry or fish,
brush each side often with butter.
Q. Why are my meats not turning out as brown as
they should?
A. In some areas, the power (voltage) to the range
may be low. In these cases, preheat the broil
element for 10 minutes before placing broiler pan
with food in oven. Check to see if you are using
the recommended shelf position. Broil for longest
period of time indicated in the Broiling Guide.
Turn food only once during broiling.
Q. Do I need to grease my broiler grid to prevent
meat from sticking?
A. Yes. The broiler grid is designed to absorb
broiler heat. Spraying the broiler grid lightly with
a vegetable cooking spray before cooking will
make cleanup easier.
9
Page 10

BROILING GUIDE
1. If desired, marinate meats or chicken before
broiling, or brush with barbecue sauce last 5 to 10
minutes only.
2. When arranging food on pan, do not let fatty edges
hang over sides because the dripping fat will soil
the oven.
3. Frozen steaks can be broiled by positioning the
oven shelf at next lowest shelf position and
increasing cooking time given in this guide 1
1
times per side.
4. If your range is connected to 208 volts, rare
steaks may be broiled by preheating the broiler and
2
⁄
positioning the oven shelf one position higher.
The times in this guide are approximate. They may vary depending on the weight and shape of the food.
Time in Minutes
Food Amount/Thickness Shelf Position 1st Side 2nd Side Comments
Bacon 1/2 lb. (about 8 C 31⁄2 min. 31⁄2 min. Arrange in single layer.
thin slices)
Ground Beef 1 lb. (4 patties) C 7 min. 5 min. Space evenly.
1/2 to 3/4 inch thick
Beef Steaks 1 inch thick C 9 min. 9 min. Steaks less than 1 inch thick cook
Medium (1 to 11⁄2lbs.) through before browning. Pan frying
is recommended. Slash the fat.
Chicken 1 whole A 35 min. 15 min. Reduce time about 5 to 10 minutes
(2 to 21⁄2lbs.), per side for cut-up chicken. Brush
split lengthwise each side with melted butter. Broil
skin-side-down first.
Fish 1-lb. fillets 1/4 to C 5 min. 5 min. Handle and turn very carefully. Brush
1/2 inch thick with lemon butter before and during
cooking, if desired. Preheat broiler to
increase browning.
10
Page 11

CARE AND CLEANING
Proper care and cleaning are important so your range will give you efficient
and satisfactory service. Follow these directions carefully in caring for your
range to assure safe and proper maintenance.
Porcelain Enamel Cooktop Oven Shelves
The porcelain enamel finish is sturdy but breakable
if misused. This finish is acid-resistant. However,
any acidic foods spilled (such as fruit juices, tomato
or vinegar) should not be permitted to remain on
the finish.
Clean the shelves with an abrasive cleanser or
steel wool. After cleaning, rinse the shelves with
clean water and dry with a clean cloth.
Surface Units and Drip Pans
To clean the surface units, turn the control to the
highest setting for a minute. The coils will burn off
any soil.
CAUTION
• Do not immerse the surface units in liquids of
any kind.
• Do not clean the surface units in a dishwasher.
• Do not bend the surface unit plug terminals.
• Do not attempt to clean, adjust or in any way
repair the plug-in receptacle.
To remove the drip pans for cleaning, the surface units
must be removed first.
Surface Unit
Receptacle
Drip Pan
Lift the surface unit about 1 inch above the drip pan
and pull it out.
Do not lift the surface unit more than 1 inch.
If you do, it may not lie flat on the drip pan
when you plug it back in.
Repeated lifting of the surface unit more than
1 inch above the drip pan can permanently
damage the receptacle.
To replace a surface unit:
• Replace the drip pan into
the recess in the cooktop.
Make sure opening in
the pan lines up with
the receptacle.
• Insert the terminals of the surface unit through
the opening in the drip pan and into the receptacle.
• Guide the surface unit into place so it rests evenly.
To clean the drip pans:
Drip pans can be cleaned in the dishwasher or by
hand. If you use a scouring pad, rub lightly to prevent
scratching.
Q. Can I cover the drip pans with foil?
A. No, because using foil so close to the receptacle
could cause shock, fire or damage to the range.
Broiling Guide Care and Cleaning
(continued next page)
11
Page 12

CARE AND CLEANING
(continued)
Lift-Off Oven Door
The oven door is removable (on some models) but it
is heavy. You may need help removing and replacing
the door.
To remove the door,
open it to the full
open position. Raise
the locking
mechanism by
applying force
to the locking
mechanism lever.
Close the door until it
stops against the
locking mechanism.
Grasp firmly on each
side and lift the door
straight up and off
the hinges.
(on some models)
Locking mechanism lever
Oven Heating Elements
Do not clean the bake element or the broil element.
Any soil will burn off when the elements are heated.
The bake element can be lifted gently to clean the
oven floor. If spillovers, residue or ash accumulate
around the bake element gently wipe around the
element with warm water.
To replace the door,
position the slots in
the bottom of the
door squarely over
the hinges. Then
lower the door
slowly and evenly
over both hinges at
the same time.
Open the door to the
full open position
and press the locking
mechanism back into
its original position.
DO NOT ATTEMPT TO CLOSE THE DOOR
UNTIL THIS STEP IS COMPLETE. THE HINGE
OR DOOR COULD BE DAMAGED.
To lock
apply
force
To unlock apply force
Broil Element
Bake Element
12
12
Page 13

Broiler Pan and Grid
After broiling, remove the broiler pan from the oven.
Remove the grid from
the pan. Carefully
pour out grease from
the pan into a proper
container. Wash and
rinse the broiler pan
and grid in hot water
with a soap-filled or
plastic scouring pad.
Control Knobs
The control knobs may be removed for easier
cleaning.
Before removing the knobs for cleaning, please note
that the knobs are in the proper OFF position. When
replacing the knobs, check the OFF position to insure
proper placement.
Painted Surfaces
If food has burned on, sprinkle the grid with
detergent while hot and cover with wet paper towels
or a dishcloth. Soaking the pan will remove burned
on foods.
Both the broiler pan and grid can also be cleaned in
the dishwasher.
Do not store a soiled broiler pan and grid anywhere
in the range.
To remove a knob, pull it straight
off the stem.
Wash the knobs in soap and
water but do not soak. Avoid
getting water down in the knob
stem holes.
Care and Cleaning
Painted surfaces include the sides and kick panel. Clean these with soap and
water or a vinegar and water solution. Do not use commercial oven
cleaners, cleansing powders, steel wool or harsh abrasives on any
painted surface.
Porcelain Oven Interior
With proper care, the porcelain enamel interior will
retain its attractive finish for many years.
Soap and water will normally do the job. Heavy
spattering or spillovers may require cleaning with a
mild abrasive cleanser. Soapy, wet pads may also be
used. Do not allow food spills with a high sugar or
acid content (such as milk, tomatoes, sauerkraut, fruit
juices or pie filling) to remain on the surface. They
may cause dull spots even after cleaning.
Household ammonia may make the cleaning job
easier. Place 1/2 cup ammonia in a shallow glass pan
and leave in a cold oven overnight. The ammonia
fumes will help loosen the burned-on grease and food.
When necessary, you may use a commercial oven
cleaner. Follow the package directions.
Cautions about using spray-on oven cleaners:
• Do not spray the oven cleaner on the electrical
controls and switches because it could cause a short
circuit and result in sparking or fire.
• Do not allow a film from the cleaner to remain on
the temperature sensor—it could cause the oven to
heat improperly. (The sensor is located at the top of
the oven.) Carefully wipe the bulb clean after each
oven cleaning, being careful not to move the sensor
as a change in its position could affect how the oven
bakes.
• Do not spray any oven cleaner on the outside oven
door, handles or any exterior surface of the oven,
cabinet or painted surfaces. The cleaner can damage
these surfaces.
13
Page 14

INSTALLATION INSTRUCTIONS
ANTI-TIP BRACKET INSTALLATION INSTRUCTIONS
WARNING
• ALL RANGES CAN TIP
• INJURY COULD RESULT
• INSTALL ANTI-TIP DEVICE
PACKED WITH RANGE
• SEE INSTRUCTIONS
TOOLS YOU WILL NEED
• Phillips head screwdriver
3
⁄8″ or adjustable wrench
• 1
• Flat blade screwdriver
Anti-tip bracket attaches to the floor to hold
either rear range leg. When fastening to the
floor, be sure that the screw does not penetrate
electrical wiring or plumbing. If you cannot be
sure of this, use a shorter screw that will not
penetrate through the flooring.
1. Decide whether the anti-tip bracket will be
installed on the right or left side of the range
location.
2. If the bracket side of the range is next to a
cabinet, place the bracket against back wall and
cabinet.
If there is no adjacent cabinet, determine where
the location of the range side (painted outside
panel) will be. Place the bracket with its outside
edge at this location and against the back wall.
Outside edge of bracket
should be flush with the
outside of the range
Adjacent
cabinet
or final
location
of range
side panel
Wall behind range
3. Screw the bracket securely to the floor with
the screw provided. The screw is self-drilling in
wood, plywood, particle and chip board, and
most metal framing. If attaching to masonry, you
can buy suitable screws and/or anchors at
hardware stores. Use a masonry drill to drill the
required holes.
Wall
Anti-Tip Bracket
4. Using the wrench, back out the four range
legs at least two turns. Level the range. See the
Flooring/Leveling section of this book for
leveling information.
5. Slide the range into place.
ELECTRICAL CONNECTION
We recommend that you have the electrical
hookup of your range done by a qualified
electrician. Have the electrician show you where
your range disconnect is located.
Call your Electric Company and ask which codes
apply in your area. If there are no codes, you
must follow the NATIONAL ELECTRICAL
CODE, ANSI/NFPA NO. 70, latest edition. You
can get a copy by writing:
National Fire Protection Association
Batterymarch Park
Quincy, MA 02269
If you fail to wire your range in accordance with
governing codes, you may create a hazardous
condition.
You must use a three-wire, single-phase AC
208/240 Volt, 60 Hertz electrical system to
operate your range.
Use #8 wire and 40 Amp fuse or circuit breaker
for 240 Volt and 208 Volt systems.
Do not use aluminum wiring to connect your
range to the household circuit.
14
Page 15

TO MAKE ELECTRICAL CONNECTION:
1. Remove the junction block access cover
(on range back).
2. Effective January 1, 1996 the
National Electrical Code requires that
new construction (not existing) utilize a
4-conductor connection to an electric range.
Use only 3-conductor or 4-conductor U.L. listed
range cord. You must use the strain relief clamp
provided with the range to hold the cord.
Use a range cord rated at 40 amps with
125/250 minimum volt range and closed loop
terminals. Care should be taken to center cable
and strain relief within knockout hole to keep the
edge from damaging the cable.
NOTE: A 4-conductor cord is to be used when
the appliance is installed in a mobile home or
when local codes do not permit grounding
through the neutral.
HARD WIRING
The power cord bracket also incorporates a
7/8″ diameter opening for hard wiring (armored
cable, flexible conduit, romex wire, etc.). If this
type of wire is used, remove the strain relief
clamp and bracket and reposition the bracket so
the 7/8″ diameter hole is at the bottom to accept
the hard wiring.
THREE-WIRE CORD CONNECTION
Junction Block
on Range Back
Black
Top Nut
Ground Strap
Black Lead
1. Remove the top nuts on the junction
block studs.
2. Tighten the back nuts.
3. Install the three wire cord and the strain
relief in the hole in the strain relief bracket.
4. Connect the red and black leads to the
outer terminals and the white lead to the
center terminal.
5. Push the cord upward (to relieve strain),
while tightening the strain relief clamp.
If local codes require an ungrounded
neutral:
Follow steps 1 through 5 above.
Black
Red
White Lead
Red Lead
Strain Relief Clamp
Junction Block
on Range Back
Red
Ground Wire
Top Nut
Ground Strap
Black Lead
White Lead
Red Lead
Strain Relief Clamp
Then loosen the screw from the ground strap
and fasten a #10 copper wire to the range.
Secure the other end of the wire to a grounded
cold water pipe or use another approved
grounding method.
(continued next page)
15
Page 16

INSTALLATION INSTRUCTIONS
(continued)
ELECTRICAL CONNECTION (continued)
FOUR-WIRE CORD CONNECTION
Red
Black
Black Lead
Ground Screw
White Lead
1. Remove the top nuts on the junction block
studs.
2. Tighten the back nuts.
3. Remove the ground screw; then remove the
ground strap.
4. Install the four wire cord and strain relief in
the hole in the strain relief bracket.
5. Connect the red and black leads to the
outside terminals and the white lead to the
center terminal.
6. Attach the green lead below the junction
block with the ground screw that was removed
earlier (step 3).
7. Push the strain relief upward (to relieve
strain) while tightening the strain relief clamp.
Ground Strap
Removed
Green Lead
Red Lead
INSTALLATION OF RANGE
IMPORTANT: Save these instructions for
the local electrical inspector’s use.
GENERAL
• See the illustration below for all rough-in and
spacing dimensions. These dimensions must be
met for safe use of your range.
• To eliminate the risk of burns or fire when
reaching over hot surface elements, cabinet
storage space above the cooktop should be
avoided. If cabinet storage space is to be
provided above the cooktop, the risk can be
reduced by installing a range hood that sticks
out at least 5″ beyond the front of the cabinets.
Cabinets installed above a cooktop may be no
deeper than 13″.
3
• The range may be placed with 1
the back wall and 0″ clearance (flush) at side
walls of the range if the front edges of the range
side panels stick out beyond the cabinet fronts at
least 1/4″.
B
20-3/8″
Max.
13″
30″
5″
5″
5-1/4″
From
bottom
of range
to strain
relief
clamp
24″
5″
40-1/2″
24″
2-1/2″
36″
Max.
Flush
Mount
Outlet
2″
34″
Surface
Mount
Outlet
⁄4″ clearance at
From
combustible
walls above
cooking
Counter
height
should not
A
20″
surface
C
2″
18″
Min.
exceed 36″
36″
16
Models A B C
3
JAS02 20″ 20
JAS24 24″ 24
⁄8″ 2″
3
⁄8″ 0″
Page 17

INSTALLATION OF RANGE (continued)
PREPARATION
• Remove all tape and packaging.
• Take the accessory pack out of the oven.
• Check to be sure that no range parts have
come loose during shipping.
PROTECT YOUR FLOOR
Your range, like many other household
items, is heavy and can settle into soft
floor coverings such as cushioned vinyl or
carpeting. When moving the range on this type
of flooring, use care, and it is recommended that
these simple and inexpensive instructions be
followed.
The range should be installed on a sheet of
plywood (or similar material) as follows: When
the floor covering ends at the front of the range,
the area that the range will rest on should be
built up with plywood to the same level or higher
than the floor covering. This will allow the range
to be moved for cleaning or servicing.
LEVELING THE RANGE
For proper cooking and baking the range must
be leveled. Leveling legs are located on each
corner at the base of the range.
Install the oven shelves (see use and care section
for instructions). Put a spirit level or a glass
measuring cup partially filled with water on
one of the oven shelves.
INSTALLING THE BACKGUARD
1. Place the backguard on top of the end panels
at the rear of the range.
2. Insert two machine screws
through the holes at the
bottom of each end cap. Secure
the screws to the range frame
with the hex nuts provided.
3. Insert two machine screws
through the front of the
backguard at each end. Secure
the screws to the range frame
with the hex nuts provided.
Use a 1
wrench to back out the four leveling legs two
or three turns each. Now use the wrench to
adjust the leveling legs until the range is level.
Slide range back towards the wall being careful
not to damage the sides or top of the range,
or the adjacent cabinets.
3
⁄8″ open end wrench or an adjustable
17
Page 18

QUESTIONS?
USE THIS PROBLEM SOLVER
PROBLEM POSSIBLE CAUSE
OVEN WILL NOT WORK • Plug on range is not completely inserted in the electrical outlet.
• The circuit breaker in your house has been tripped, or a fuse has been blown.
• OVEN TEMP knob not properly set.
FOOD DOES NOT • OVEN TEMP knob not set at BROIL.
BROIL PROPERLY
FOOD DOES NOT • OVEN TEMP knob not set on correct temperature.
ROAST OR BAKE
PROPERLY
• Improper shelf position being used. Check Broiling Guide.
• Food is being cooked on hot pan.
• Cookware is not suited for broiling.
• Aluminum foil used on the broil pan rack has not been fitted properly and
slit as recommended.
• OVEN TEMP knob was turned to broil before being set at a bake temperature.
Turn the knob to OFF and then to the bake temperature.
• Shelf position is incorrect.
• Oven shelf is not level.
• Necessary preheating was not done.
• Incorrect cookware or cookware of improper size is being used.
• A foil tent was not used when needed to slow down browning during roasting.
SURFACE UNITS NOT • Surface units are not plugged in solidly.
FUNCTIONING PROPERLY
If you need more help…call, toll free:
GE Answer Center
®
• Drip pans are not set securely in the cooktop.
• Surface unit controls are not properly set.
800.626.2000
consumer information service
18
Page 19

We’ll Be There
With the purchase of your new GE appliance, receive the assurance that if you ever need
information or assistance from GE, we’ll be there. All you have to do is call—toll-free!
GE Answer Center®
800.626.2000
Whatever your question about any GE major appliance, GE Answer Center®
information service is available to help. Your call—and your question— will be
answered promptly and courteously. And you can call any time. GE Answer
Center® service is open 24 hours a day, 7 days a week.
In-Home Repair Service
800-GE-CARES (800-432-2737)
A GE consumer service professional will provide expert repair service,
scheduled at a time that’s convenient for you. Many GE Consumer Service
company-operated locations offer you service today or tomorrow, or at your
convenience (7:00 a.m. to 7:00 p.m. weekdays, 9:00 a.m. to 2:00 p.m. Saturdays).
Our factory-trained technicians know your appliance inside and out—so most
repairs can be handled in just one visit.
For Customers With Special Needs…
TBXTOLITE
ON WALL
800.626.2000
6’ 10"
6"
1’ 0"
Upon request, GE will provide
Braille controls for a variety of GE
appliances, and a brochure to
assist in planning a barrier-free
kitchen for persons with limited
1"
SCALE 1’
=
mobility. To obtain these items,
free of charge, call 800.626.2000.
Consumers with impaired hearing or speech who have
access to a TDD or a conventional teletypewriter may
call 800-TDD-GEAC (800-833-4322) to request
information or service.
SINGLE CONTROL
FAUCET
8"
5"
1/8
3’
"
R SHALLOW DEPTH SINKS (6") WITH REAR DRAIN.
SINK SHOULD ALSO BE UNDERCOATED
SECTION A-A
2’ 6"
5"
7"
FLUORESCENT
FIXTURE
THIS LIGHT CAN
BE INSTALLED
IN BOTTOM OF
WALL CABINETS
2’ 10"
The Problem Solver Consumer Services
Service Contracts
800-626-2224
You can have the secure feeling that GE Consumer Service will still be there
after your warranty expires. Purchase a GE contract while your warranty is still
in effect and you’ll receive a substantial discount. With a multiple-year contract,
you’re assured of future service at today’s prices.
Parts and Accessories
800-626-2002
Individuals qualified to service their own appliances
can have parts or accessories sent directly to their home.
The GE parts system provides access to over 47,000
parts…and all GE Genuine Renewal Parts are fully
warranted. VISA, MasterCard and Discover cards
are accepted.
User maintenance instructions contained in this guide
cover procedures intended to be performed by any user.
Other servicing generally should be referred to qualified
service personnel. Caution must be exercised, since
improper servicing may cause unsafe operation.
Page 20

YOUR GENERAL ELECTRIC RANGE
WARRANTY
Staple sales slip or cancelled check
here. Proof of original purchase date
is needed to obtain service
under warranty.
WHA T IS COVERED
WHA T IS NOT COVERED
FULL ONE-YEAR WARRANTY
For one year from date of original
purchase, we will provide, free
of charge, parts and service labor
in your home to repair or replace
any part of the range
because of a manufacturing defect.
*******************************
This warranty is extended to
the original purchaser and any
succeeding owner for products
purchased for ordinary home use
in the 48 mainland states, Hawaii
and Washington, D.C. In Alaska the
warranty is the same except that it
is LIMITED because you must pay
to ship the product to the service
shop or for the service technician’s
travel costs to your home.
• Service trips to your home to
teach you how to use the product.
Read your Use and Care material.
If you then have any questions
about operating the product please
contact your dealer or our
Consumer Affairs office at the
address below, or call, toll free:
GE Answer Center
800.626.2000
consumer information service
• Improper installation.
If you have an installation problem,
contact your dealer or installer.
You are responsible for providing
adequate electrical, gas, exhausting
and other connecting facilities
as described in the Installation
Instructions provided with the
product.
that fails
®
All warranty service will be
provided by our Factory Service
Centers or by our authorized
Customer Care®servicers during
normal working hours.
Should your appliance need
service, during warranty period or
beyond, call 800-GE-CARES
(800-432-2737).
• Replacement of house fuses or
resetting of circuit breakers.
• Failure of the product if it is used
for other than its intended
purpose or used commercially.
• Damage to product caused
by accident, fire, floods or acts
of God.
WARRANTOR IS
RESPONSIBLE FOR
CONSEQUENTIAL DAMAGES.
NOT
Some states do not allow the exclusion or limitation of incidental or consequential damages, so the above limitation or exclusion
may not apply to you. This warranty gives you specific legal rights, and you may also have other rights which vary from state to state.
To know what your legal rights are in your state, consult your local or state consumer affairs office or your state’s Attorney General.
Part No. 164D3333P007
Pub No. 49-8743
184-6C088
1-96 CG
Warrantor: General Electric Company
If further help is needed concerning this warranty, write:
Manager—Consumer Affairs, GE Appliances, Louisville, KY 40225
JAS02
JAS24
Printed in the United States
 Loading...