

Page 1
?Jsem.d
Iek
JSSOl~
JSS2(P
JSS27
Tips
Features
Surfacecooking
ovencooking
Jfi
pm
.-.
-ji@s
Questions?
Useth.eProblemSolver p26
~
—-
.———-
“KmDirectLinetoGeneral!Electric
The~~hswer
Page 2
BeforeUsingYourRange.... ....2
—
-—
SafetyInstructicms. . ... ... s., 3-4
EnergySavingTips, .,.... ,. ....5
Featuresof YourRange., .....6-9
SurfaceCooking .. .........10-1 I
AutomaticTimerand Clocks ...12
LJsingYmwQven.... .........,13.
HowTo13akeandTimeBake...]4
HowTo Roast
HowTo Broil
HowToCare For
.. .. ... .?. ......15
.... .. ..... ......16
,-
YourRange .. . . . . . . . . . . . 17-~8”
RemovableOvenDoor . .......17
CleaningYourRange... ,.,. ...1$?
SurfaceCookingChart ... ,.20-21
BakingChart
RoastingChart
.**.*.. .*.*.***
● ***.*.*,.***@*
● *
~22.
23
BroilingChart. ......., ... ....24
HomeCanningTips . . .. . . . . . . .
25
TheProblemSolver. . .. . .......26
IfYiiuNeedService
. .. . . . . . . . . .
27’
Warranty . .. . .. .. . . . BackCover
.,. .
Itisintendedtohelpyouoperate
andmaintainyournewrange
properly.
Keepithandyforanswerstoyour
questions.
Ifyoudon’tunderstandsomething
orneedmorehelp, write(include
yourphonenumber):
ConsumerAffairs
GeneralElectricCompany
AppliancePark
Louisville,KY40225
writedown themodel
andserial
You’llfindthem on a labelon
thefrontoftherangebehindthe
ovendoor.
Thesenumbersarealsoonthe
ConsumerProductOwnership
RegistrationCardthatcamewith
yourrange.Beforesendinginthis
card,pleasewritethesenumbers
here:
numbers.
Ifym
a range...
Immediatelycontactthedealer(or
builder)thatsoldyoutherange.
savetimeandmoney.
Beforeyourequest
service.,0
ChecktheProblemSolvercm
page26.It listsminorcausesof
operatingproblemsthatyoucan
correctyourseif.
.—.
ModelNumber
Serial Number
Usethesenumbersinany
correspondenceor servicecalls
concerningyourrange.
—
2
Page 3
.
2311 beforeusingthis
~hen usingelectricalappliances
icsafetyprecautionsshould be
olbwed, includingthe following:
~ Usethis applianceonlyfor its
intendeduseas describedin this
Marmal.
@ Be$ureyour applianceis properlyinstalledand grounded by a
qualifkd technicianin accordance
wi~hthe
pmvkkxiinstallation
instructions.
@ Don’t attempt to repair or
replaceany part of your range
unlessit is specifixdlyrecommendedin this book. All other
servicingshouldbe referred to
a qualifledtechnician.
* Beforeperforming any service,
DISCONNECT THE RANGE
POWER SUPPLY AT THE
HOUSEHOLD DISTRIBUTION
PANEL BYREMOVING THE
FUSE OR SWITCHING OFF
THE CIRCUIT BREAKER.
.
s Do not leavechiidrenakme-
‘:’ikii should not be leftalone
unattended in area where
appiianceis in use. Theyshould
neverbe allowedto sit or stand
on any part ofthe appliance.
* Don%allowanyoneto climb,
standor hangon thedoor,drawer
orrangetop. Theycoulddamage
therangeandeventipit over
causingseverepersonalinjury.
s cAUTION: DO NOTSTORE
ITEMSOF INTERESTTO
CHILDRENU’+?CABINETS
ABOVEA RANGE ORON THE
BACKSPLASHOFA RANGECHILDRENCLIMBINGON
THERANGETOREACH
ITEMSCOULDBESERIOUSLY
@ Wear proper clothing.Loose
fittingor hanginggarmentsshould
neverbe worn whileusingthe
appliance.Flammablematerial
could be ignitedif brought in contact with hot heatingelements and
may causesevereburns.
* Useonly drypoth&iers-—
moist or damp potholderson hot
surfacesmay resultin burns from
steam. Do not let potholders
touch hot heatingelements.Do
not use a towelor other bulky
cloth.
* Never useyourappliancefor
warmingorheatingtheroom.
@ Storageinoron AppIiance--
Flammable materialsshould not
be stored in an oven or near surfaceunits.
@ Keephood andgreasefilters
cleanto maintain good venting
and to avoid greasefires.
@ Do not letcookinggreaseor
otherflammablematerialsaccumulateintherangeornearit.
4$Do not usewateron grease
fries.Neverpickupa flamingpan.
Smotherflamingpanon surface
wit bycoveringpan
wellfittinglid,cookiesheet
with
MM?@eteiy
orflattray.Flaminggreaseoutsidea pancanbeput outby
coveringwithbakingsoda or,if
available,a multi-purposedry
chemicalorfoam.
@ DOInottouch heatingelements
orinteriorsurfaceof oven.These
surfacesmay be hot enough to
burn even though they are dark in
color. During and after use,do
not touch, or let clothingor other
flammablematerialscontact surfaceunits, areas nearby surface
units or any interiorarea of the
oven;allow sufficienttime for
cooling, first.
Potentiallyhot surfacesinclude
the couktop and areas facingthe
cooktop, oven ventopeningand
surfacesnear the openings, and
crevicesaround the oven door.
Remember:Theinsidesurfaceof
the oven may be hot when the
door is opened.
@ Whencookingporkfollow our
directionsexactlyand alwayscook
the meat to at least 17(P.This
assuresthat, in theremote possibilitythat trichina may be present
in the meat, it willbe killedand
meat willbe safe to eat.
E#fssw’-.
—-
——
—.
—
—
—
—
—.
—
—
—.
—
—
—
—.
——
E@as?-
—.
~
—
=&.
—
— ––
—
—
~
—.
—
—.
—
—
—
——
~fl ----=
(continued next page)
Page 4
@ standmwyfmn tki?mrge
———.———-- .
when openingoven Ckw.me hot
airm Wan whichescapesam
causeburnsto hmds9faceand/
oreyes.
@ Don%heatunopenedfoodcontainersintheoven.Pressurecoukl
buildupandthe containercou~d
bwst causingan imjury.
@ Keep oven vent ducts
unobstructed.
@ Keepovenfree from grease
Up.
build
s
Place oven rack in desiredposition whileovenis cool. If racks
must be handledwhen hot, do not
let potholdercontact heatingunits
in the oven.
@ Pulling out shelfto the shelf
stop is a conveniencein lifting
heavyfoods. It is also a precaution againstburns from touching
hot surfacesof the door or oven
walls.
@ When usingcooking or
roasting bagsin oven, followthe
manufacturer’sdirections.
* Do not useyour ovento dry
newspapers.If overheated,they
can catch fire.
Sw’’face units:
@ Use Proper Pan Size-This
applianceis equippedwith one
more surfaceunits of different
size.Selectutensilshavingflat
bottoms largeenough to cover
surfaceunit-heating-elernqnt.The
use of undersizedutensilswill
exposea po~ion of the heating
elementto dn-ectcontactand may
result in ignition of clothing.
Proper relationshipof utensil
to burner willalso improve
efficiency.
Nwer ?eavesurfaceunits
@
unattendedathighheatsettings.
130ilovercausessmokingand
greasyspilloversthat may catch
on fire.
@ Besure drip pansand vent
ducts are not coveredand are in
place. Their absence during cooking could damage rangeparts and
wiring.
* Donl usealuminumfoil to line
drippansor anywherein the oven
exceptas describedin this book.
Misusecould result in a shock,
fire hazard, or damage to the
range.
@ Only certaintypes of glass,
glass/ceramic,ceramic,earthenware, or other glazedcontainers
are suitablefor range-top service;
others may break becauseof the
sudden changein.temperature
(SeeSectionon “SurfaceCooking”
for suggestions.)
@ TOminimizeburns,ignitionof
flammable materials, and spil~age;
the handle of a container should
be positionedso that it is turned
toward the center of the range
without extendingover nearby
surfaceunits.
@ Donl immerseorsoakremov-
ab~esurfaceunits.Donl put them
in a dishwasher.
or
the
@ Always turn surfaceunitto
(IFF beforeremovingWensiL
@ Keep an eyeon foods being
friedat HIGH or MEDIUM
HIGH heats.
@ TOavoid the possibilityofa
burnorelectricshock,alwaysbe
certainthatthecontioisforail
surfaceunitsareat OFF position
andaiilcoilsarecoolbefore
attemptingto removethe unit.
* Whenflamingfoods underthe
hood,turnthefanoff. Thefan,if
operating,mayspreadtheflame.
43 FOOdSfor fryingshmrkiibe as,
dryaspossiliie.Frost on frozen
foods or moistureon fresh foods
can causehot fat to bubble up
and over sidesof pan.
@ Use littlefat for effective
shallowor deep-fatfrying. Filling
the pan too full.offat can cause
spilloverswhenfood is added.
@ If a
combination of oilsor fats
willbe used“infrying,stir together
beforeheating,or as fats melt
slowly.
@ Alwaysheatfat@ow]y9and
watch as it heats.
IS Use deep fat thermometer
wheneverpossibleto prevent overheatingfat beyond the smoking
point.
.
—
4
Page 5
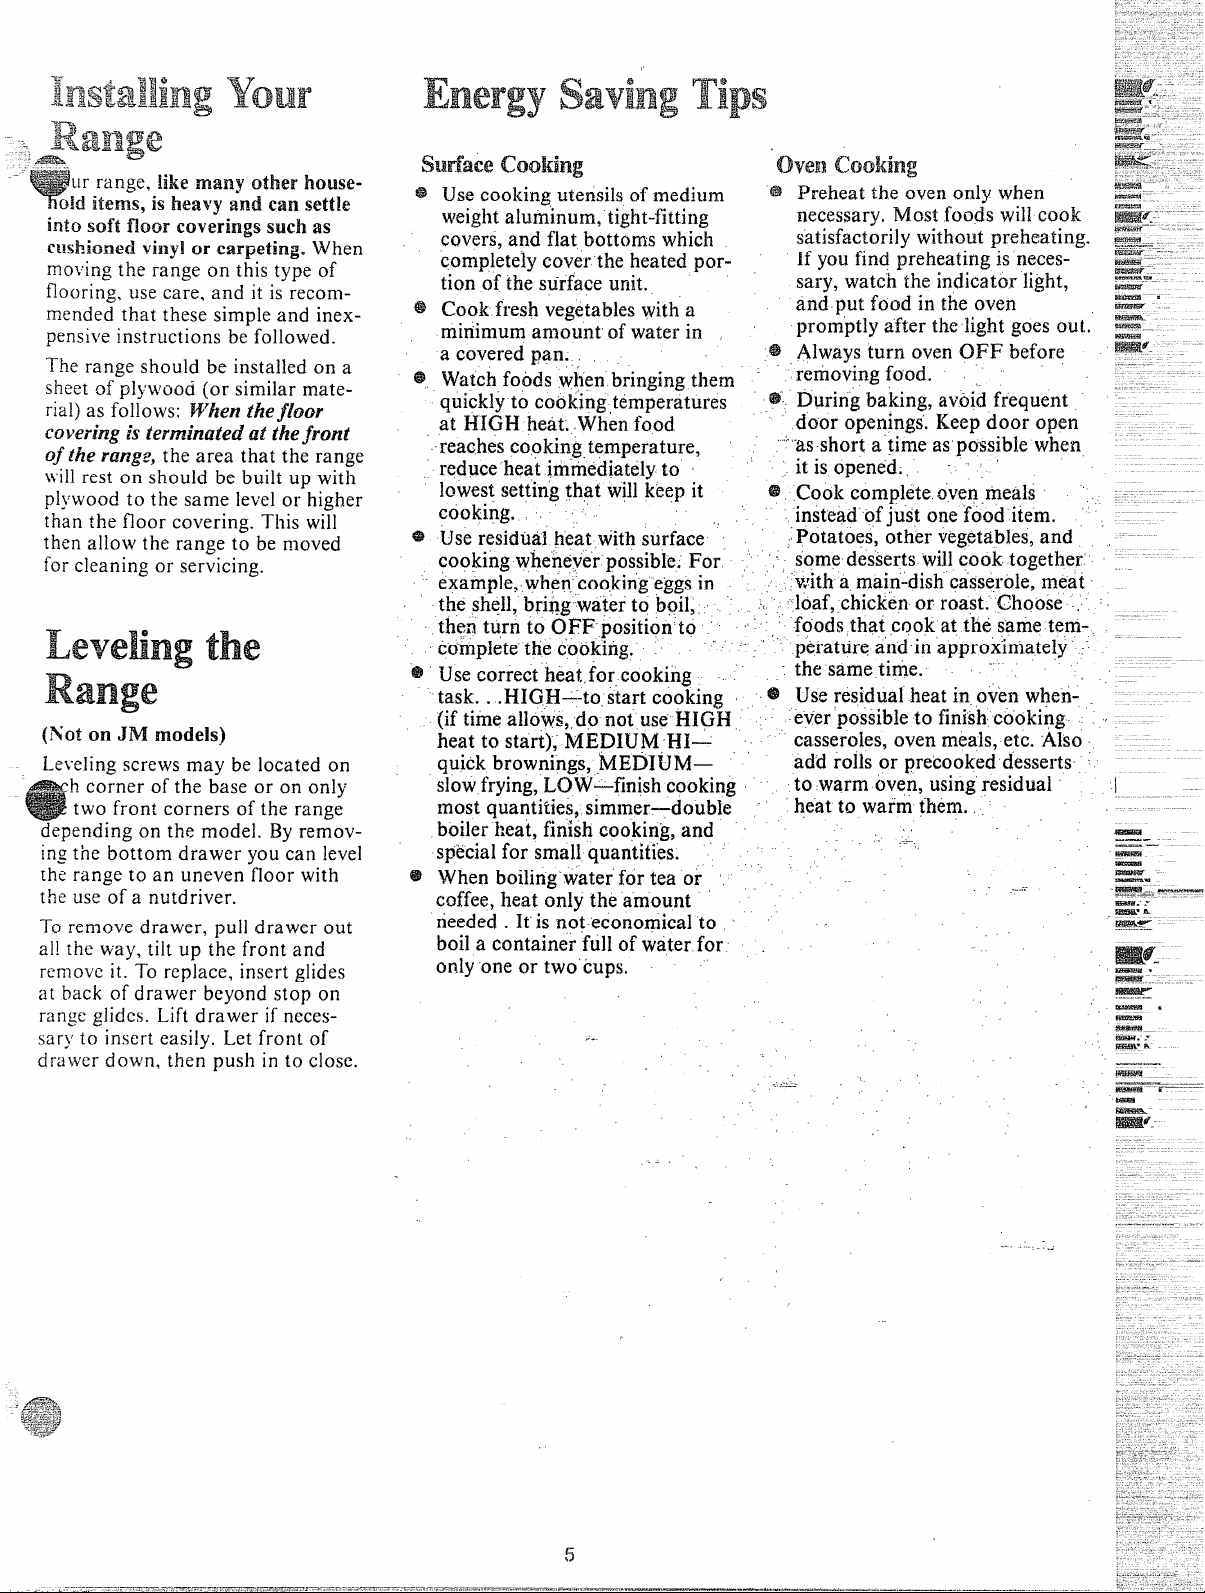
ur range, ‘likemany other househcddhn-rm,is heavy and can settle
into soft floor
CWMOIAvinylor carpeting.
mo~’ingthe range on this type of’
flooring, use care, and it is reconlmended that these simple and inexpensiveinstructions be followed.
The range should be installed on a
sheet of plj’wooa (or similar material)as follows:
cowing is terminated at the front
oj the range,
willrest on should be built up with
plywood to the same levelor higher
than the floor covering. This will
then allow the range to be moved
for cleaning or servicing.
coveringssuchas
When
When thejkw
the area that the range
(NotcmJIMmodels)
i.e~”elingscrews may be located on
-ah corner of the base or on only
two front corners of the range
depending on the model. By removingthe bottom drawer you can level
th; range to an uneven ‘floor with
the use of a nutdriver.
TOremove drawer, pull drawer out
a]!the way, tilt up the
remove it. TCIreplace, insert glides
at back of drawer beyond stop on
range glides. Lift drawer if necessarj’to insert easily. Let front of
drawer down, then push in to C1OSC.
front and
UsecookingLlt(XMikd’medium
~feightaiuminum,tight-fitting
covers,and flatbottomswhich
completelycoverthe heatedporticmofthe stirfaceunit.
Cookfreshvegetableswitha
minimumamountofwaterin
a coveredpan. ,
Watchfoodswlq bringingthem “
quicklyto cook’ing,temperatures
at HIGH heat,Whenfood
reachescookingtemperature, ,
reduceheat irn-tiediatelyto ~i
lowes~settingthat willk~epit
cboking.
@ Preheatthe oven onlywhen
necessary.Mostfoodswillcook
satisfactorilywithoutpreheating.
H?youfindpreheatingis neces-
sary,watchthe indicatorlight,
and put food in theoven
promptlyafter thelight goesout.
@ Alwaysturn ovenOFF before
removingfood. :
@“Duringbaking,avbidfrequent
door openings.Keepdoor open
““”Wshorta timeaspossible when
it is opened:, ~ .
@ Cookcompletetivenrneals
insteadofjust onefood item.
Useresiduajheatwithsurface “. Potatoes, other v~getables,and
copkingwhe’neverpossible;For ‘“
exatiple, when-cookingeggsin ‘
the shell,bring waterto boil,, ,‘,
th~nturn to OFF-position’to ~~
cd-repletethecookirig. ‘ .
Usecorrectheat,~orcooking
task. .
.I+IGH-_-tostart cookinsz
(iftimeallotis,,do’notuseHIGIl
heatto start),
MEDIUM:HI- ,
quickbrownings,MEDILJM—
slowfrying,LOW—fir@hcooking
mostquantities,simmer-double
boilerheat,finishcooking,and
specialfor smallquantities.
Whenboiling’waterfor tea or ~ ““
coffee,heatonlytheamount
somedessertswillcook together
,.
v~itha main-dishcasserole,meat
Iloaf,chickenor roast. choose ~
f~odsthat,cookat the sanietem-
,’
peratureand in approximately
thesametime. ‘“
@ Useresidualheatin ovknwheri-
everpossibleto finishco’oki~g. . ~
casseroles,ovenmeals,etc.Also
roilsor precookeddesserts-~
add
to warmbveq usingresiduai
~ heatto warm them.
,,
-—!.
._,----
rieeded. It’is not econorriicalto ~
boil a containerfullofwaterfor
onlyoneor two cups,
,-..
.-.--=.
\
I
Rs%ma
—e—.
—.
—
—
-~ A
E&%x&e- --
.. ...——-
—.
—-
e- “-‘-‘-
._—-—
5
Page 6

of
—
0
R
J\
--
(Ii?
Model~AfiN)3
Models
—
—
Page 7
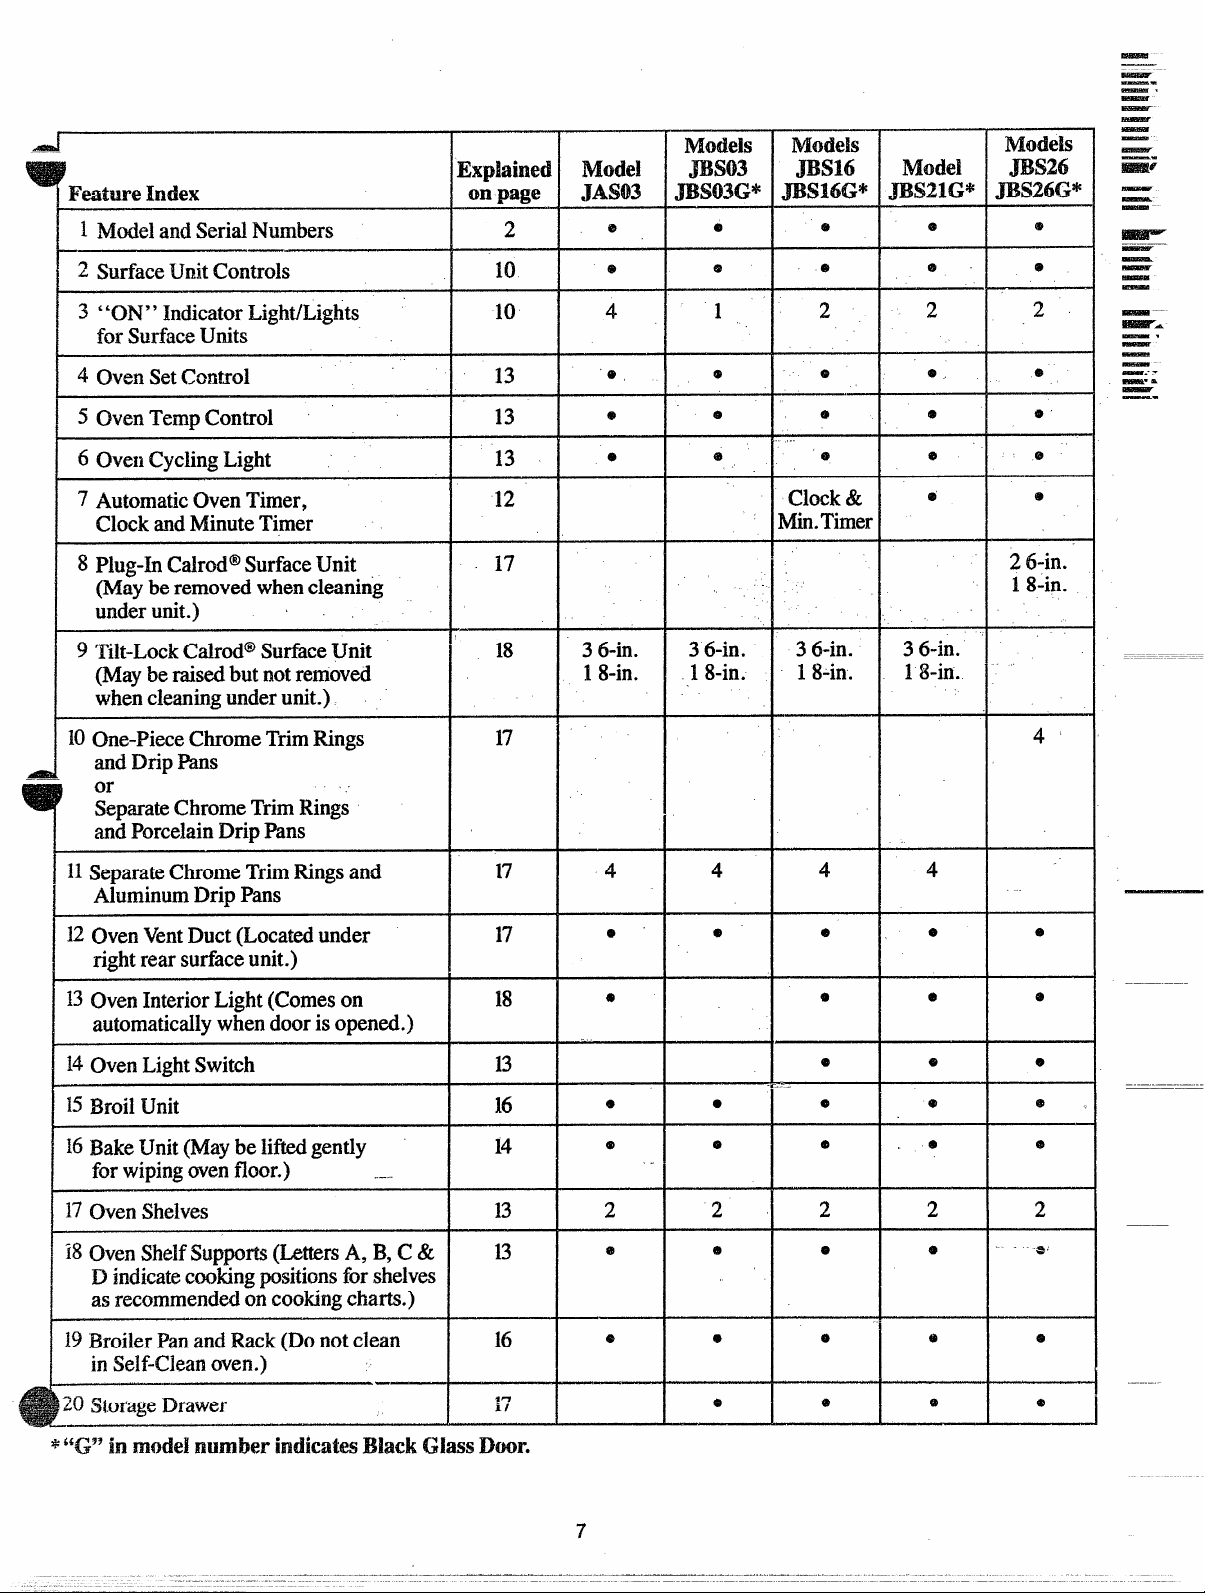
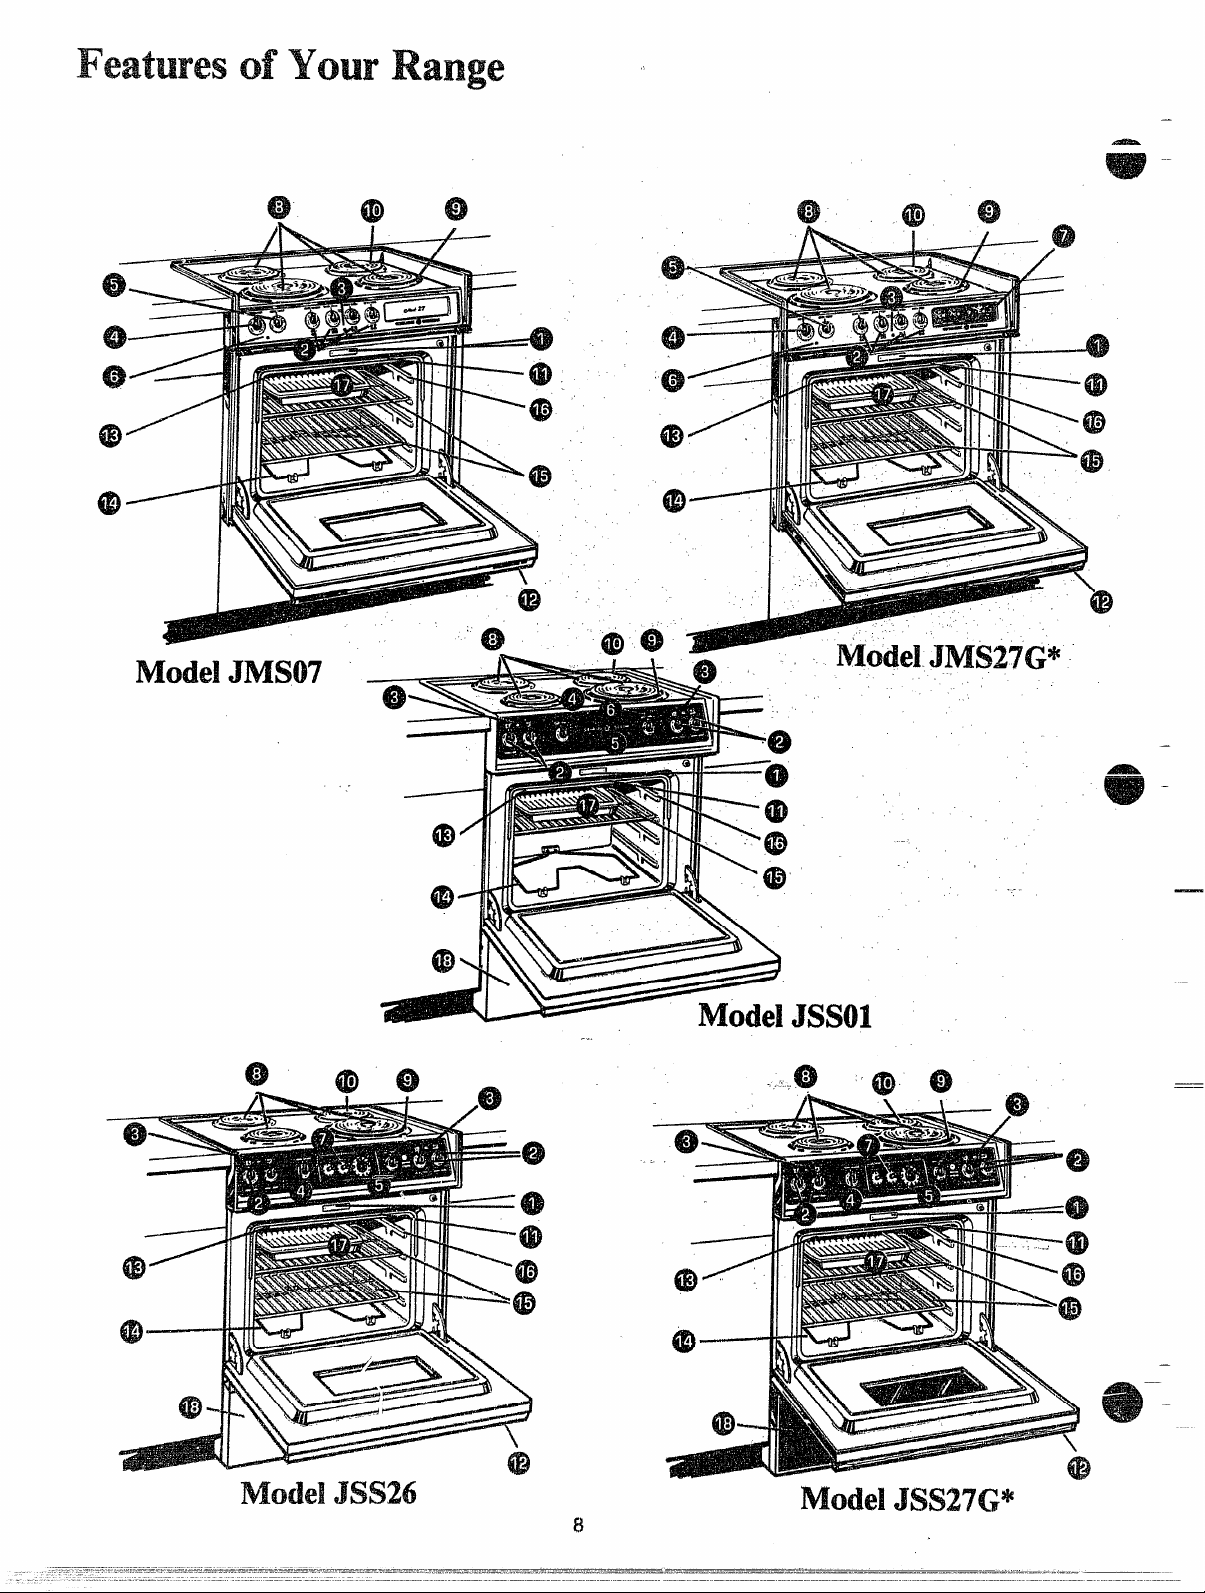
Featlm?
1 ModelandSerialNumbers
2 SurfaceUnitControls
Mex m page
Explained
2
——
—
—.
—.
—
—
Mows
JBS03
JBS03G*
e
e
NMds
JBFJ6
JBSNXY
Model
JEWHG*
Mows
JBS26
JBS26G*
—
—
—
—–
—
—
—
3 “ON” IndicatorLight/Lights
for SurfaceUnits
4 Qwl setC(XNK)I
oven TernpControl
.5
6 OVen CyclingLight
7 AutomaticOvenTimer,
ClockandMinuteTimer
8 plug-~ CaIrod@SurfaceUnit
(Mayberemovedwhencleaning
underunit.)
9 Tilt-LockCahod@SurfaceUnit
(Mayberaisedbut notremoved
whencleaningunderunit.)
10one-PieceChromeTrimRings
andDrip Pans
or
SeparateChromeTrimRings
andPorcelainDripPans
SeparateChromeTrimRingsand
11
AluminumDripPans
10
13
13
I-7
4
e
36-in.
18-in.
4
1
36-in.
18-in.
4
2
Clock&
l!Jlin.Timer
36-in.
18-in.
4 4
2 2
@
@
3 6-in.
18-in.
e
2 6-in.
18-in.
4
mi?isr.
—.
—
12OvenVentDuct(Locatedunder
rightrearsurfaceunit.)
13oven InteriorLight (Comeson
automaticallywhendooris opened.)
14OvenLightSwitch
15BroilUnit
[6BakeUnit(Maybeliftedgently
forwipingovenfloor.) .-.
17OvenSheIves
i8OvenShelfSuppo~ (LettersA, B, C &
D indicatecookingpositionsforshelves
asrecommendedoncookingcharts.)
9 BroilerPanandRack(Donotclean
in Self-Cieanoven.)
——
:0StorageDrawer
14
13
16
8
2 2 2
e
9
2 2
o
@
7
Page 8
@
.-
i
(D
—
Iml
60
*
0
43
ModelJIW$07
:
0
,.
----T
-T==--
+6!)
..
...
irssol
—
—
—
\&9---
ail
8
Page 9
i&v
-.
-.
\
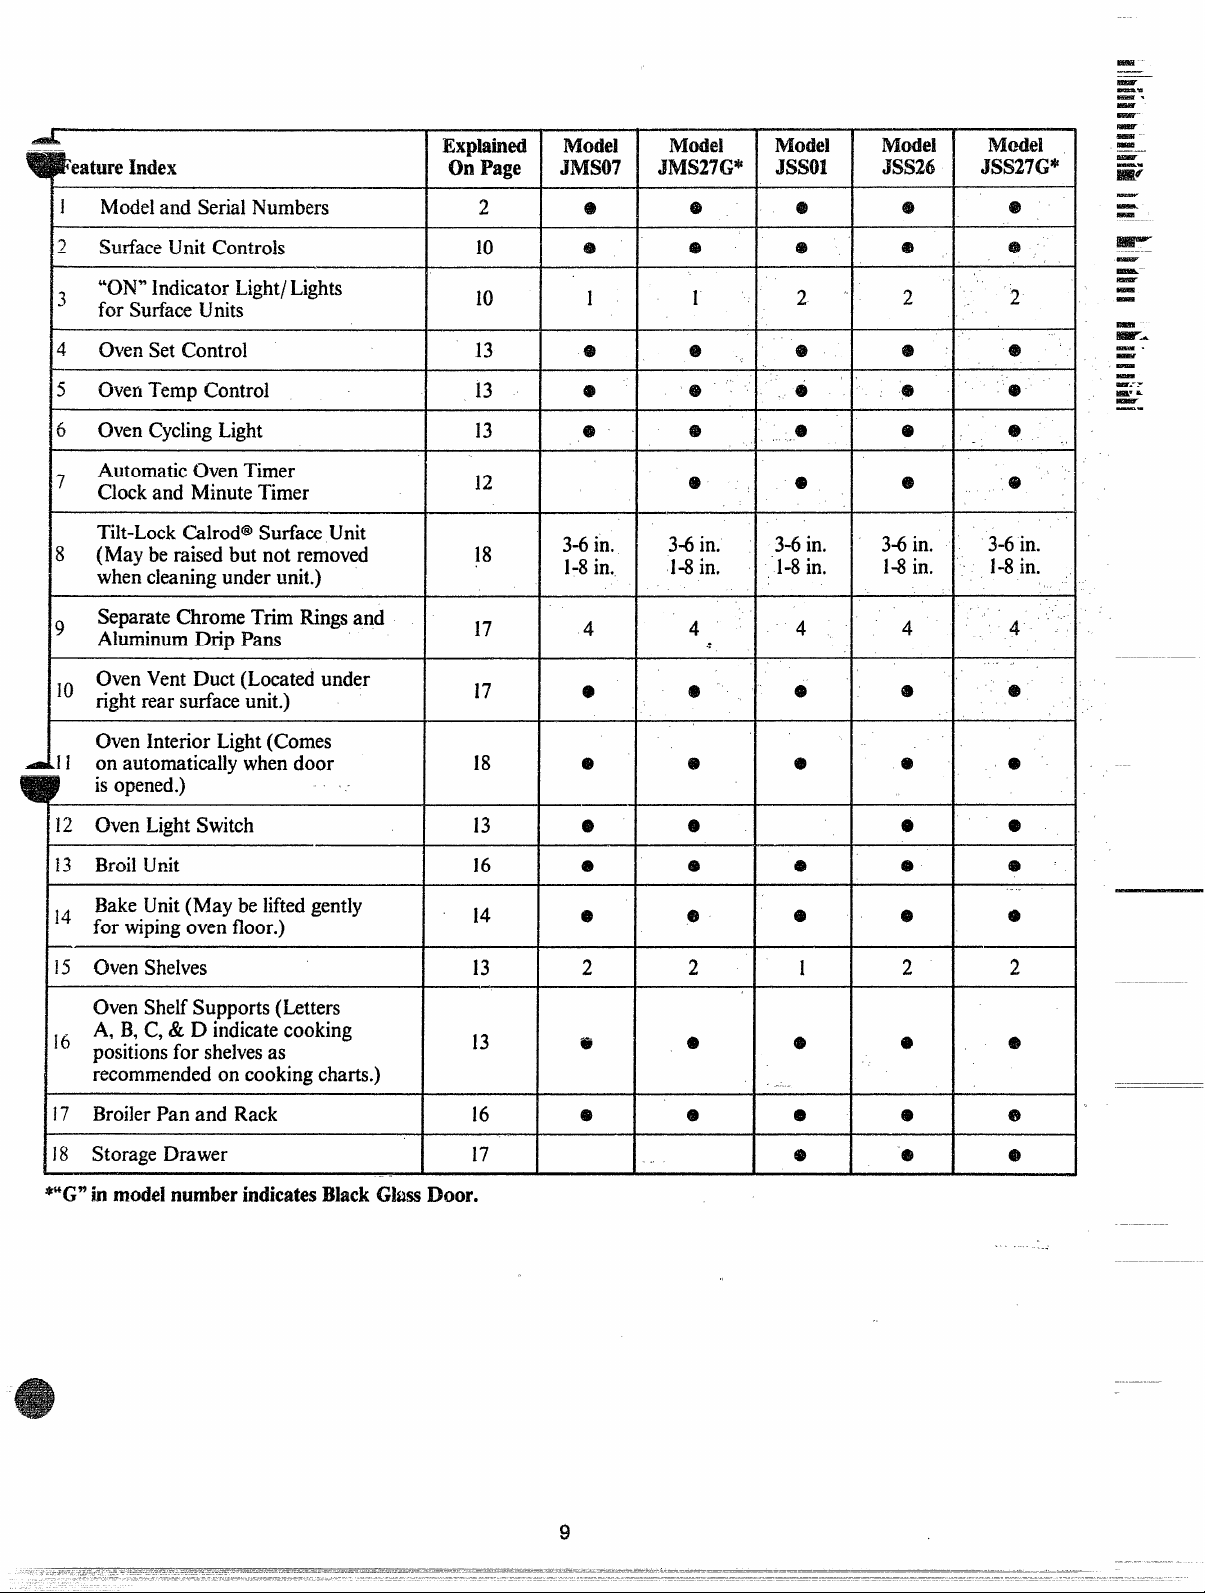
ModelandSerialNumbers
~
SurfaceUnitControls
“ON”IndicatorLight/Lights
3
for SurfawUnits
4
OvenSetControl
5 OvenTempControl
6 OvenCyclingLight
AutomaticOvenTimer
7
Clockand MinuteTimer
Tilt-LockCalrod@SurfaceUnit
? (Mayberaisedbutnot removed
whencleaningunderunit.)
SepamteChromeTrimRingsand
9
AluminumDripPans
*O OvenVentDuct(Locatedunder
rightrearsurfaceunit.)
Expk3ined
OnPage
2
13
13
13
12
18
17
Model
Mwiw7
1
4$
3-6in.
1-8in.
4
Model
JMS27G*
MOM
Jssol
4s
1 2 2
6
3-6in.
1-8in.
4
.:
3-6in.
‘1-8in.
Model
Jssxi
345in.
1-8in.
44
lvh-dd
JSS27G*
e
@
2
49,@
e
3-6in.
1-8in.
4-
.,
OvenInteriorLight(Comes
[1 on automaticallywhendoor
~ isopened.)
~12 OvenLightSwitch
13 BroilUnit
14 BakeUnit(Maybeliftedgently
for wipingovenfloor.)
15 OvenShelves
OvenShelfSupports(Letters
16 A, B,C,& D indicatecooking
positionsforshelvesas
recommendedoncookingcharts.)
17 BroilerPanand Rack
18 StorageDrawer
13
16
14
13
13
16
17
e
@
2
2
1
2 2
...
Page 10

seesurfaceGMddngchart on pages20-21.
—
SurfaceCooking with
infinite Heat Controls
Yoursurfaceunitsand controlsare
designedto giveyou an infinite
choiceof heatsettingsfor surface
unitcooking.
At both OFF and HIGH positions,
thereis a slight nicheso control
“clicks”at thosepositions;“click”
on HIGH marksthe highestsetting;
the lowestsettingisbetweenthe
words WMand OFF. In a quiet
kitchen you may hear slight“clicking”sounds during cooking,indicatingheat settingsselectedare
beingmaintained.
Switchingheatsto highersettings
a~waysshowa quickerchangethan
switchingto lowersettings.
9
Features
L SurfaceUnitControls
2. MasterIndicatingLightfor SurfaceUnits
3. Calrod@SurfaceUnits
Howto Setthe Cmtrds
—
step1
Graspcontolknob and pushin. . .
Cooking(hide
for I..Jshlg
En Quickstart for cooking;
MED
HI
MED
Low
WM
NOTE:
1. At HIGH, MED HI, neverleave
food unattended.Boiloverscause
smoking;greasyspilloversmay
catchfire.
2. At WARM, LOW,meltchocolate,butter on smallunit.
Heats
bringwaterto boil.
Fast fry,pan broil;maintain
fast boil on largeamountof
food.
Sauteand brown;maintain
slowboilon large amount ~
of’food.
Cookafter startingat
HIGH;cook withlittle
waterin coveredpan.
Steamrice,cereal;maintain
servingtemperatureof most
foods.
step 2
Turneitherclockwiseor counter-
clockwiseto desiredheatsetting.
Contd mustbe pushedinto set
only from OFF position. When
controlis in my position other
than OFF, it may be rqtated
withoutpushingin.
Besureyouturn controlto OFF
whenyoufinishcooking,An indi-
cator lightwill glowwhenANY
heat on any surfaceunitis on,
.—
—
-——
Page 11

Q. MayI am finds md p’w?n%!s
on my surfaceunits?
A. Yes, but only use utensils de-
signedfor canningpurposes.Check
the manufacturer’sinstructionsand
recipesfor preservingfoods.Be
surecanneris fiat-bottomedand
fits overthecenterof yourCalrod@
unit. Sincecanninggenerateslarge
amountsof steam,becarefulto
avoidburnsfrom steamor heat.
Canningshouldonlybe done on
surfaceunits.
Q. Why do my utensilstilt whenI
placethemon
A.
Becausethe surfaceunitis not
the surfaceunit?
flat. Makesurethat the “feet”on
your Calrod@tinitsare sitting
tightlyin the rangetop indentation
and the trim ringisflai onthe
rangesurface. ‘
Q. 43WI usispecid cooking equip- ~
ment likean orierrtdwok, on any
surfaceunits?
A. Utensilswithoutflat surfacesare
not recommended.Thelifeof your
surfaceunitcan beshortenedand
the rangetop can bedamagedfrom
the highheatneededfor thistype
ofcooking.
Q“
cmI cover myrefiwtorpm
with foil?
A. No.Cleanas recommendedin
CleaningChart.
Q. Whyis the porcelainfinishon
mycontainerscomingoff?
A.If you setyour Calrod@unit
higherthan requiredfor thecontainermaterial,aridleaveit, the
finishmay smoke,crack,pop, or
burndependingon thepot or pan.
Also,a too highheat for long
periods,and smallamountsof dry
~ood,
Maydamagethefinish.
..
—
—.
—
—
—.—
—
—.
.. .
Page 12

Theautomatictimerand clockon Tiln$ Bake Uses
your Rangeare he!pfuldevicesthat
serveseveralpurposes.Theknob
locationson somerangemodels
mayvaryaridwilllooklikeone of
the two setsoftimersbelow.
Models:JBS26,JBS2f5G,JBS21G
JNB27G,JSS2~ amd3SS27G
AutomaticTimer
UsingAutomaticTimer,youcan
TIME BAKEwiththe ovenstartingimmediatelyand turningoffat
the Sto~Timeset or setboth Start . . . . . . . . - .
and St@ dialsto automatically
start and stop ovenat a latertime
of day. It takestheworryout of
not being hometo start or stop the
oven.
Settingthedialsfor TIME BAKE
isexplainedin detailon page14.
Modek JBS16 and
Clock&
MinuteTimer
‘b setclock
TOSET THE CLOCK,
centerknob
in and turn theclock
pushthe
handsto thecorrecttime.(The
Minute Timerpointerwillmove
also,letknob out, turn the Timer
pointerto OFF.)
ToS(4 Minute Timer
The MinuteTimerhas beencombinedwiththe rangeclock.Useit
to timeall yourprecisecooking
Thismodelhasa timeof dayclock
and minutetimerbut doesnot have
Start and Stop dialsneeded for %
TIME BAKEfunction.
operations.You’llrecognizethe
Minute Timeras the pointerwhich
isdifferentin colorand shapethan
the clockhands.
TOSET THE MINUTETIMER,
turn the centerknob,
ing in9
untilpointerreachesnumber
withoutpush-
of minutesyouwishto time.(Minutesare marked,up to 60,in the
centerringon the clock.)At the
endof thesettime,a buzzersounds
to teilyoutimeisup. Turnknob,
without
pushingin, until pointer
reachesOFF and buzzer stops.
J-BSMG
..
Questions
–a
and Answers
Q. How canI usemy Minute Timex’
to makemy surfacecookingeasier’?
A. Your MinuteTimerwillhelp
timetota~cookingwhichincludes
timeto boilfood and changetemperatures. Do notjudge cooking
timeby visibiesteamonly.Food
willcookin coveredcontainers
eventhoughyoucan’tseeany
steam.
Q. Must the Clockbe set cmcorrect
time of dav whenI wiishto usekhe
Automati; Timerfor baking?
A. Yes, ifyou wishto setthe Start
or Stop Dialsto turn on and offat
settimesduringtimedfunctions.
Q. Can I
duringoven cooking?
A.
usethe Minute Timer
The MinuteTimercan beused
duringanycookingfunction.The
AutomaticTimers(Start and Siop
Dials)are used with TIME BAKE
functiononly.
Q. Cm I changethe clock whileI’m~ ‘
Time Cooking in the oven?
A. No.
Theclockcannotbe
changedduring any programthat
usesthe oventimer. Youmust
eitherstop thoseprogramsor wait
untiltheyare finishedbefore
changingtime.
12
..
—
Page 13

—
——
~’::’: usingYourOWm
wLookatthecontrols. Besure
youunderstandhowto setthem
properly.Readoverthedirections
forthe AutomaticOvenTimerso
youunderstanditsusewiththe
controls.
2. Checkoveninterior.Lookat the
shelves.Takea practicerunat removingandreplacingthemprop-
erly,to givesuresturdysupport.
3. Read over informationand tips
thatfollow.
4. Keepthisbook handyso youcan
referto it, especiallyduringthefirst
weeksofgettingacquaintedwith
youroven.
owncontrols
Thecontrolsforthe oven(s)are
markedOVENSETandOVEN
TEMI?OVENSEThassettingsfor
BAKE,TIMEBAKETBROILand
OFF.Whenyouturntheknobtothe
desiredsetting,the properheating
@ts arethenactivatedforthat
rdtion.
ENTEMPmaintainsthe
temperatureyousetfromWARM
(150°F.)toBROIL(550°F.).
TheOvenCyclingLightglowsuntil
ovenreachestie selectedtemWrature,
thengoesoffandonwiththeoven
unit(s)duringcooking.
PREHEA~G theoven,eventohigh
temperaturesettings,isspeedy-rarely
morethanabout10minutes.Preheat
theovenonlywhennecessary.Most
fds willcooksatisfactorilywithout
preheating.Ifyoufindpreheatingis
necesary,keepaneyeontheindicator
lightandput fd intheoven
promptlyafterlightgoesout.
,.
IMPORTANT: For normal
cooking,lineup the desiredtemperatures(markedon the outer
edge of thecontrol knob)withthe
indexmarkerlocatedimmediately
abovethe control. ~
OverIInteriqrSW4ves ~.
The sh’el~e(s)are designedwith
stop-lockssothat whenplacedcor-
rectlyonthe shelfsupports,(a) will
stop beforecomingcompletely
from theoven,(b) willnottiltwhen
removingfoodnor whenplacing
food on them.
TO REMOVEshelve(s)fromthe
oven,liftup rearof shelf,pullforward with stop-locksalongtop of
shelfsupports.Becertainthat shelf
iscoolbeforetouching.
TO REPLACE shelve(s)jn oven,
insertshelfwith stop-locksresting
on shelfsupports.Push shelf
toward rear of oven;it willfallinto
place.Whenshelfisin properposi-
tion, stop-lockson shelfwillrun
undershelfsupport whenshelfis
pulledforward.
—
—
—
—
—
—
—
—
—-
—
—
—.
—
—.
—-
—
—
—
—
—.
—
—.
—
—
—
—–
—
—
—
—
—
—-
Theovenhas four shelfsupports =
markedA (bottom),B,C and D
(top). Shelfpositionsfor cooking
-foo@are suggestedonBaking,
Roasting-andBroilingpages.
,,
Oven”Light
&fodelsSOEquipped) -
(On
rhelightcomeson automatically
“,
—
—.
—
—
when~hedoor is opened.(On modelswith ovenwindow)use ——
switchto turn light on and off
whendoor is closed.
—–
—
—
—
Switchis locatedon front ofdoor. ~c
—
—.
—
—
————
%nmodelsequippedwithllmeBake
.
13
Page 14

seeIBakingchart on Page 220
—...
—
Whencookinga food for thefirst
timein yournewoven,usetime
givenon recipesasa guide. Oven
thermostats,overa periodof years,
may“drift”fromthe factorysetting
and differencesin timingbetween
an old anda newovenof 5 to 10
minutesare not unusualand you
maybe inclinedto thinkthat the
newovenisnot performingcorrectly.However,yournewovenhas
beenset correctlyat ~hefactoryand
ismoreapt to beaccuratethan the
ovenit replaced.
HowtoSetYomRange
for Baking
step&~~= foodin oven,being
certainto leaveal$butl-inch of
spacebetweenpansand wallsof
ovenfor goodcirculationof heat.
Closeovendoor. Duringbaking,
avoidfrequentdoor openingsto
prevent undesirableresults.
Step2:TurnOVENSET Knobto
BAKEand OVENTEMP Knobto
temperatureon recipeor on Baking
Chart.
f$tep3:Checkfood for doneness
at minimumtime on recipe.Cook
longer if necessary.Switchoffheat
and removefoods.
Howm“rimelk3ke* ‘
yousetit to turn offautomatically)
or DelayStart and Stop (settingthe
ovento turn on automaticallyat a
latertimeand turn offat a preset
stoptime)willbedescribed.
Howtosethnmedkite sttmt* ‘
~and Automatic Stop .
NOTE:Before”beginningmakesure
the handsof the rangeclockshow
Step 1:TOsetstart time,push in
knob on STARTdialand turn
pointertotime youwantovento
turn on, for example3:30. ‘
thecorrecttimeof day.
ImmediateStart is simplysetting
ovento start baking nowand
turningoffat a latertimeautomatically.Remember,foodscontinue
cookingafter controlsare off.
Step 2:TOsetStop Time,push in’
knob on STOPdial and turn
pointerto timeyouwantovento
turn off,for example6:00.This
meansyourrecipe-calledfor two
and one-halfhours‘of’bakingtime.
StepI:TOset Stop T’irne,push ~
in knobon STOPdialand turn
pointerto timeyouwantovento
NOTE:Timeon Stop Dial mustbe
laterthan timeshownon range A==
clockand StartDial.
turn off;for example6:00.The
Start Dial shouldbeat the same
positionas the time ofday on
clock.
Step 3:TurnOVENSET Knobto
TIME BAKE.Turn OVENTEMP
Knobto 250°or recommended
temperature.
Step 2:Turn OVENSET Knobto
TIME BAKE.Turn OVENT13MP
Knobto oventemperature,for
example250°.
Placefood in oven,closethedoor
and automaticallytheovenwillbe
turned on and offat the timesyou
haveset, Turn OVENSETto OFF
and removefoodfrom oven.
—
—
—
..
Theautomatic oventimercontrols
are designedto turn theovencmor
offautomaticallyat specifictimes
that youset. Examplesof ImmediateStart (oventurns on nowand
—
Howto setDelay start
and Stop*
DelayStart and Stop is settingthe
oventimerto turn theovenon and
offautomaticallyat a latertime
than the presenttimeof day.
*0~ ModelsEquippedwithTIME
BAKE.
14
OVENINDICATORLIGHT{s)-at
TIME BAKEsettingmayworkdifferentlythan theydo at BAKEsetting.Carefullyrecheckthe steps
givenabove.If all operations are
doneas explained,ovenwilloper-
ate as it should.
.
—
—
—
-—
Page 15

to
SW chart onPage23.
~
astingiscooking by dry“heat.
endermeator poultrycanbe
roasteduncoveredin youroven.
Roastingtemperatures,which
shouldbelowand steady,keep
spatteringto a minimum.When
roasting,it isnot necessaryto sear,
baste,cover,or add waterto your
meat.
Roastingis reallya bakingprocedureuse~for m~ats.Therefore,
ovencontrolsare setto BAKE.
(Youmayheara slight clicking
noiseto indicatethe ovenis
workingproperly.)Roastingis
easy,just followthesesteps:
—-”-=--.—--
~ep 1:Checkweightof meat,and
ce,fat sideup, on roastingrack
(Broilerpan with
rackisa goodpan for this.)Line
broilerpan withaluminum foil
whenusingpanfor marinating,
cookingwithfruits,cookingheavily
curedmeats,or for basting food
duringcooking.Avoidspilling
thesematerialson ovenlineror
door.
Step2:Placein ovenon shelfin A
or Bposition.No preheating is
necessary.
Step 4:Mostmeatscontinueto
cook slightlywhilestandingafter
beingremovedfromthe oven.For
rare or mediuminternal doneness,
if meatis to stand 10-20minutes
whilemakinggravyor for easier
carving,youmaywishto remove
meatfrom ovenwheninternal temperatureis 5-10°F belowtemperature suggestedon chart. If no
standingis planned,,cook meat to
suggestedtemperatureon chart on
page 23.
NOTE:Youmaywishto useTIME
BAKEas describedon preceding “
pageto turn ovenon and off
automatically.
Rememberthat foodwillcontinue
to cook inthe hot ovenand therefore shouldbe removedwhenthe
desiredinternaltemperaturehas
beenreached.
For FrozenRoasts
e Frozenroastsof beef,pork,
lamb,etc., can be started without
thawing,but allow10-25minutes
per poundadditionaltime(10min.
per pound for roastsunder5
pounds,moretimefor larger
roasts).
e Thawmostfrozenpoultrybefore
roastingto ensureevendoneness.
Somecommercialfrozenpoultry
can becookedsuccessfullywithout
thawing.Followdirectionsgivenon
packer’slabel.
Qwxdions and Answers
Is it necessaryto checkfor d4me-
Q.
ness with a meatthermometer?
A.
Checkingthe finishedinternal
temperatureat the completionof
cookingtimeis recommended.Temperaturesare shownon Roasting
Chart onpage23.For roastsover
8 lbs.,cookedat 300°withreduced
time,checkwiththermometerat
half-hourintervalsafter~2of time
haspassed.
Q. ‘WByis my roastcrumbling
whenI tryto carveit?
A.
Roastsareeasierto sliceif
allowedto cool 10to 20minutes
after rem”ovingfrom oven. Besure
to cut acrossthe grain of themeat.
IQ.Do I needto preheat’myoven
eachtime I cook a roastor poultry?
A.
Itis rarelynecessaryto preheat
youroven,onlyfor verysmall
roasts,whichcook a shortlength
oftime.
Q. Whenbuyinga roastarethere
any specialtips that wouldhelp me
cook it more evenly?
A. Yes.
Buya roast asevenin
thicknessaspossibleor buyrolled
roasts.
CanI sealthe sidesof my foil
Q.
“tent”when roastinga turkey?
A.
Sealingthe foilwillsteamthe
meat. Leavingit unsealedallows
theair to circulate and brownthe
meat,
...
-
—
~-
~---
—.
—
—
—
—
—.
—
—
—
—
—
—
—
—
-
—
—.
—
—.
-
—
—
—
—
—
—
.—
step3:Turn~~~~ SETtO BAKE
and OVENTEMP to 325°.Smali
poultrymay be cookedat 375°for
bestbrowning.
—
Page 16

see chart on Page 24.
—
Broilingiscookingfood byintense
radiantheatfrom the upperunitin
theoven.Mostfishand!tendercuts
ofmeatcan be broiled.Follow
thesestepsto keepspatteringand
smokingto a minimum.
Step 1: If meathas fat or gristle
nearedge,cutverticalslashes
throughboth about 2-in. apart. If
desiredfat maybe trimmed,leaving
layerabout~$-in.thick.
Step 2: Placemeat onbroilerrack
in broilerpan whichcomeswith
range.Alwaysuserack so fat drips
into broilerpan;otherwisejuices
maybecomehot enoughto catch
fire.Ahuninum foil maybe usedto
linebroilerpan and rack. But,be
CERTAINto cut openingin foil,to
correspondwith slotsin the rack so
fat dripsinto pan below.
Step3: Positionshelfon recommendedshelfpositionas suggested
on BroilingChart on page24.Most
broilingis~one on Cpo~ition,but
ifyourrangeisconnectedto 208
volts,youmaywishto usehigher
position.
Step4: Leavedoor ajar a few
inches.Thedoorstaysopenby
itself,yetthepropertemperature
ismaintainedintheoven.
Step 5: TurnOVENSET Knoband
OVENTEMPKnobto BROIL.I?reheatingunitsisnot necessary.(See
noteson BroilingChartpage24.)
Step 6:Turnfood onlyOnceduring
cooking.Timefoodsfor firstside
as on BroilingChartpage24.Turn
food, then usetimesgivenfor see- ~~•
ond sideas a guideto preferred
doneness.(Wheretwo’thicknesses
and timesare giventogether,use
first timesgivenfor thinnest food.)
Step 7: Turn OVENSET Knobto
OFF. Servefoodimmediately,
leavepan outsideovento c901
- duringmealfor easiestcleaning.
and Amww?rs
Q. ‘Whyshould I leave the door
closed when broiling chicken?
A. Chickenisthe onlyfood recommended for closed-doorbroiling.
Thisis becausechickenisrelatively
thickerthan otherfoodsyoubroil.
Closeddoor holds more heat in
oven,so chickenmaybe broiled
wel!-doneinside.
Q. Wren broiling, is it necessaryto
id%Jaysuse a rackin the pan?
A. Yes.Usirigtherack suspendsthe
meatoverthe pan. As the meat
cooks,thejuicesfall into the pan
thuskeepingmeatdryer.Juicesare
protectedbythe rack and stay
cooler,thus preventingexcessive,
spatterand smoking.
Q. Shouid I saltthe meatbefore
broiiing?
A. No. Saltdrawsout thejuices
and allowsthemto evaporate.
Alwayssalt aftercooking.Turn
meatwith tongs;piercingmeatwith –
a fork alsoallowsjuicesto escape. ===
Whenbroiling”poultryor fish,
brusheachsideoftenwithbutter.
Q. Whyaremy meatsnot turning
out as brown asthey should?
A.
In someareas, the power(vohage)to the range maybe low.In
thesecases,preheatthe broil unit
for 10minutesbeforeplacing
broilerpan withfood in oven,
Checkto seeif youare usingthe
recommendedshelfposition.Broil
for the longestperiodof timeindicatedin the BroilChart in this
book.Turn food onlyonceduring
broiling,
Q. Do I needto grease my Imoihw
rackto preventmeat fromsticking?
A. No. The broilerrack isdesigned
to reflectbroilerheat thuskeeping
the surfacecoolenoughtciprevent
meatstickingto thesurface.
—
—
16
Page 17

Propercareand cleaningare
importaMso your Rangewillgive
youefficientand satisfactory
service.Followthesedirections
carefullyin caringfor yourrange
to assuresafeand proper
maintenance.
VentDuct
@Calrod@SurfaceUnits
@Oven La&p ‘ =
—-
—
Finishes
Theporcelainenamelfinishis
sturdybut breakable if misused.
Thisfinishisacidresistant.How- ,
ever,any acidfoods spilled(suchas
fruitjuices,tomato, or vinegar)
shouldnot bepermittedto remain
onthe finish.
Cleating Underthe Range
Thearea underthe rangeof models
equippedwitha bottomd~awercan
bereachedeasilyfor cleaningby
removingthe bottomdrawer.To
remove,pulldrawerout allthe way,
tiltup the front and remove it. To
replace,insertglidesat back of
down,then push into close.
Removable oven Door
To REMOVEdoor, opento BROIL
position, or whereyoufeelhinge
catchslightly.Grasp door at sides;
Mtdoor up and awayfrom hinges.
ToREPLACE,graspdoor at sides.
Lineup door with hinges and push
doorfirmlyinto place.
: ~---’/
Toremove:
@Make-sureunit iscool.
@Liftup rightrear surfaceunit.
@Removedrip pan and ring.
* Liftout ovenventduct.
Toreplace:
@Placethepart overthe ovenvent
locatedbelowthe cooktopwith
openingof theduct underthe
round openingin the drippan. It is
important that the duct isin the
correctpositionso moistureand
vaporsfrom the ovencanbe
releasedduring ovenuse.NOTE:
Nevercoverthe holein theoven
ventduct withaluminumfoil or
any other material.Thisprevents
the ovenventfrom workingproperlyduring anycookingcycle.
Oven Lamp
CAUTION:Beforereplacingyour
ovenbulb, disconnecttheeieqtrical
-powerfor your rangeat the main
fuseor circuitbreakerpanelor pullplug.Besure to letthe lampcover
and bulb coolcompletelybefore
removingor replacing.
Theovenlamp (bulb)is covered
witha glass,removablecoverwhich
is heldin placewith a bail-shaped ‘
wire.Removeovendoor, if desired,
to reach covereasily.~ ~
TOREMOVE,holdhand under
coversoitdoesn’tfallwhenreleased.
-Wiihfingersofsamehand firmly
I
pushdownwirebailuntil it clears
cover.Liftoffcover.DOINOT
REMOVEANYSCREWSTO
REMOVETHIS TYPE OF
COVER.
2. Replacelamp with40-watt,
homeappliancebulb.
3. TO REPLACEcover,piaceit
into grooveof lampreceptacle.Lift
wirebailup to centerofcoveruntil
it snapsinto place.Wheninplace,
holds covef firmly,but becer-
wire
tain wirebailis notbelow depressionin centerof cover.
.....
4. Connect electricpowerto range.
Plug-h SurfaceUnits
(C)nIWodelsso
equipped)
Cleanthe area underthe drip Pans
often. Built-upsoil,especially”
grease,maycatch fire. To make
cleaningeasier,the plug-insurface , ~-—–===
unitsa~eremovable:
RECEPTACLE
MEDALLION
—.
—
—
—.
—.
—
—
—-
—
—
—
~.
—
—
—.-Y
—.=
—.
-ventD1.wt
‘own
ur Rangeis ventedthrough a
ct locatedunder the rightrear
wrface unit. Cleanthe ductoften.
TERMINALS
I
SPIDER
CHROME-PLATED
DRIP PAN/RING
(cpnthued next page)
—
Page 18

RI
SPIDER
TiIdean:
e wipe around the edgesof the
surfaceunitopeningin the range
top. Cleanthe areabelowthe unit.
Rinseallwashedareaswitha damp
cloth or sponge.
Caution:13esureallcontrolsare
turned OFF beforeattemptingto
cleanunder the cooktopor re-
movingthe Calrod@units.
Toremove:
@Raisetheunit coiloppositethe
receptacle.Liftabout oneinch
abovethetrim ringand pullaway
from the receptacle.Caution:Be
surethe coilsare coolbeforeremovinga Calrod@unit.
o After removingthe plug-insur-
faceunit, liftthe drip pan/ring to
cleanunder the unit.
Toreplace:
@Placethe drip pan/ring in the
surfaceunitcavityfoundon top of
the range.Lineup thedrip pan so
the unit receptaclecan be s~en.
o insert the terminalsof theplug-
in unit throughthe openingin the
pan/ring and into thereceptacle.
@Guidethe surfaceunitinto place
so it fitsevenlyandfitssnugly into
drip pan or trim ring.
Note: If yourrangehasseparate
trim rings,the drip pan
mustbe
underthe trim ring.
CAUTION
Do not attempt to cleanplug-in
surfaceunits in an automatic
dishwasher.
Do not immerseplug-insurface
unitsin liquidsof anykind.
Do not bendthe plug-insurface
unitplugterminals,
Do not attemptto clean,adjust
or inany wayrepairtheplug-in
receptacle.
Tilt-Lock&ihMhq9)
surfaceunits
Tilt-Locksurfaceunitscan belifte~
upwardand locked in that position
for cleaningunderunit.Be
unitis cool beforeRiftingcoil up.
Afterliftingcoilunit, removetrim
ringand drip pan to cleanunder
unit.Cleanpan and trimringas
recommendedon CleaningChart
on page 19.
RepositionStiace Unit:
To
~ Replacedrip pan into recessin
cooktop.
@Put trim ringin placeover drip
pan.
@Guidethe surfaceunitinto place
so itfitsevenlyinto trim ring.Pan
mustbe undertrim’-~ing.
AdjustingOvenThermostat
Usetimegivenon recipewhen
cookingfirst time. Oventhermostats,in time,may“drift”from the
factorysettingand differencesin
timingbetweenan old and a new
ovenof 5to 10minutesare not
unusual.Yourovenhas beenset
correctlyat the factoryand ismore
to be accuratethan theoven
apt
whichit replaced.However,ifyou
findthat yourfoodsconsistently
browntoo littleor too much,you
maymakea simpleadjustmentin
thethermostat(OvenT’emp)knob,
PULL KNOBOFF OF SHAFT,
LOOKAT BACKOF KNOB
AND NOTE CURRENTSETTING, BEFORE MAKINGANY
ADJUSTMENT,
18
certain
To increasetemperature,turn
.-
toward HI or RAISE;to decrease
turn toward LO or LOWER,Each
notchchangestemperature10degree~.Temperaturecan be raised
by 20degreesor Iowcredby 30
degrees.
For Model JAS(H
1.Remove knob, and holdso
pointeris at top of knob. Hold
“skirt”ofknob firmiyin onehand.
Withother hand, turn knob to
move pointertoward Raiseor
Lower.Pointerisdesignednot to
moveeasily.If it isseatedso itis
difficultto move,pointermaybe
loosenedslightly.Inserta thin
screwdriver,knifebladeor similar ~
instrumentand liftup end of
pointerslightly.
2. Afteradjustmentismade,press
monitorfirmlyagainstkrmb.Return knob to rangt!,matchingflat
area on knoband shaft. Recheck
ovenperformancebeforemaking
an additionaladjustment.
Forothermodels
1. Pull off knob,loosenboth
screwson back of knobholding
skirt of knob firmly.2. Turn black
handleto movepointeronenotch
in desireddirection.Tightenscrews. –
3. Return knob to range,matching
flat area of knobto shaft, Recheck
ovenperformancebeforemaking
an additionaladjustment.
—
Page 19

-—
Note:Letrangepartscool beforecleaning,
MA3WRL4LS‘IOUSE
BroilUnit
Ih-der Pm ad Rack e SoapandWater
GM-d Knobs:
RangeTopandoven
OutsideGlass Finish @SoapandWater
Metal,inch.lding
BrushedChrome
*Soap-FilledSouringPad
~CommercialOvenCleaner
eMildSoapandWater
0SoapandWater Wash,rinse,andthenpolishwithadrycloth,DONCYI’USEsteelwool,abrasives,
Donotcleanthebakeunitorbroilunit.Anysoilwillbum offwhentheunitisheated,
NtXE: Thebakeunitishingedandcanbeliftedgentlytocleantheovenfloor.If spillover,
residue,orashaccumulatesaroundthebakeunit,gentlywipearoundtheunitwithwarm
water.
Drainfat,coolpanandrackslighdy.(Donotletsoiledpanandrackstandinoventocool).
Sprinkleondetergent.Fillthepanwithwarm waterandspreadclothorpapertowelover
therack,Letpanandrackstandfora fewminutes.Wash;scourifnecessary,Rinseanddry.
OITION:Thebroilerpanandrackmayalsobecleanedinadishwasher.
Pulloffknobs.Washgentlybutdonotsoak.Dryandreturncont$olsto rangemakingsure
tomatchflatareaontheknobandshaft,
Washallglasswithclothdampenedinsoapywater.Rinseandpolishwithadrycloth.If
knobsareremoved,donotallowwatertorundqwninsidethesurfiweofghisswhileckxning.
ammonia,acids,orcommercialovencleanerswhichmaydamagethefinish.
GENERALIllRE~T!fO~~
Cooktop
PorcelainEnamel
Surk?$
e PaperTowel
* Drycloth
~SoapandWater
R&ted
~urfa~ea
InsideOvenDoofi
OvenLined
(CAUTION:Whenin
use,lightbulbscan
becomewarmenoughto
~mik if touchedwith
oSoapandWater
oSoapandWater
o Soap-FilledScouringPad
o CommercialOvenCleaner
@SoapandWater
0Soap-FilledScouringPad
*CommercialOvenCleaner
istclothortowel.
warmkmpswithcleaning
clothsif lampcoveris
removed.)
oSoapandWater
Shelves
CaIrod@%wface
unit coils
StorageDrawers
AhnninmrBDrip E%ns
Chrome-PlatedRings
or Chrome‘Mm
Rings
and Ems
PorcelainDrip
Pam
?i[iageof marinades,fruitjuices, andbastingm:iten’alscontainingacidsmaycausediscoloration,Spilloversshouldbe wipedup immediately,withcare being
m nottotouchanyhotportionoftheoven.Whentkesurfaceiscool,clettnandrinse,
● SoapandWater
@Soap-FilledScouringPad
OCommercialOvenCleaner
*SoapandWater Forcleaning,removedrawerbypullingit allthewayopen,tiltup thefrontandliflout.
● Soap-FilledScouringPad
oSoapandWater
● Stiff-BristledBrush
0Soap-Fi~ledScouringPad
(NonMetallic)
DSoapandWater
eSoap-FilledScouringPad
oPlasticScouringPad
@Dishwasher
Avoidcleaningpowdersorharshabrasiveswhichmayscratchtheenamel.Ifacidsshould
spillontherangewhileitis hot,usea dry papertowel,orclothtowipeuprightaway.
Whenthesurfacehascooled,washandrinse.Forotherspills,suchas&t smatterings,etc.,
washwithsoapandwater whencooledandthenrinse.Polishwithdrycloth.
Useamildsolutionofsoapandwater.Donotuseanyharshabrasivesorcleaningpowders
whichmayscratchormarsurface.
Tocleanovendoor;removebyopeningtoBROILpositionandgraspingdooratsides.Lift
doorupandawayfromhinges.Cleanwithsoapandwater.Replacebygraspingdoorat
sidesandlining
Coolbeforecleaning.
FORLIGHTSOIL:Frequentwipingwithmildsoapandwater(especiallyaftercooking
meat)willprolongthetimebetweenmajorcleaning.Rinsethoroughly.N~E: Soapleft
onlinercausesadditionalstainswhenovenisreheated,
FORHEAVYSOIL:Chooseanon-abrasivecleanerandfollowlabelinstructions,using
thinlayerofcleaner.Useofrubberglovesisrecommended.Wipe orrublightlyon
stubbornspots,Rinsewell.Wipeoffanyovencleanerthatgetsonthermostatbulb.When
“rinsingovenaftercleaningalsowipethermostatbulb.
RemovetheOvenVentDuctfoundundertherightrearsurface unit.Washinhot, soapy
wateranddryandreplace.
Yourshelvescanbecleanedbyusinganyandallmentionedmaterials.Rinsethoroughlyto
removeallmaterialsaftercleaning.N(YI’E:Somecommercialovencleanerscause
darkeninganddiscoloration.Whenusingforfirsttime,testcleaneron smallpartofshelf
andcheckfordiscolorationbeforecompletelycleaning,
Spattersandspillsburnawaywhenthecoilsareheated,Attheendofameal,removeall
utensilsfromtherCalrod@unitandheatthesoiledunitsatHI.Letthesoilburnoffabouta
minuteandswitchtheunitstoOFF.Avoidgettingcleaningmaterialson thecoils.Wipeoff
anycleaningmaterials withadamppapertowelbejioreheatingtheCalrod’@unit.
DO N~ handletheunitbeforecompletelycooi&d.
DONm self-cleanplug-inunits.
DO NCYI’immerseplug-inunitsin any
updoor with hinges.Pushdoorfirmlyintoplace.
kindofliquid.
Wipewithdampclothorspongeandreplace.Neveruseharshabrasivesorscouringpads.
Removepansfrequentlyandrublightlywithscouringballorwashindishwasher.
Cleanasdescribedbelowor inthedishwasher.
Wipeallringsaftereachcookingsounnoticedspatterwillnot“bumon”nexttimeyou ‘cook,Toremove“burned-on”spatterswseanyorallcleaningmaterials mentioned.Rub
lightly withscouringpadtopreventscratchingof thesurface,
Coolpanslightiy.Sprinkleondetergentandwashorscourpanwithwarmwater.Rinse
anddry,Inaddition,pin mayalsobecleartedinthedishwasher,
%mav——
-—
-
.—.
-
—
—
-–
—
—
—
—
-
EaurA
—-
—
—
—
-----
-. n
—
—.
—
—..—
—.
—-
—
—–
—
—
—
—
-----
--n
—
—
—.
—
—
—
———..
19
Page 20

1. Usemediumor heavy-weightcookingcontainers.
Aluminumcontainersgenerallyconductheatfaster
than othermetals.Castiron and coatedcastiron
containersare slowto absorb heat,butgenerally
cookevenlyat LOWor MEDIUM settings.Steel
pans maycook unevenlyif not combinedwithother
metals.Usenon-stickcoated or coatedmetalcontainers.Flat groundpyroceramsaucepansor skillets
coated on the bottom withaluminumgenerallycook
eveniy.Glasssaucepansshouldbeusedwiththe
heat--spreadingtriv;ts availablefor that purpose.
Directions and Setting
Food
Cereal
Cornmeal,grits,
oatmeal
cocoa Uncovered
Coffee
Eggs
Cookedin shell
Fried sunny-side-up
Fried over easy
Poached
Scrambledor omelets
Fruits
Meats, Pou]fry
‘Braised:Pot roasts of
beef, lamb or veal;
pork steaks and
chops
Pan-fried:Tender
chops: thin steaks up
to %-in.;minute
St.%ks:hamburgers;
franks; and sausage;
thin fish fillets
Covered
Saucepan
Saucepan
Percolator
Covered
Saucepan
Covered
Skillet
Uncovered
Skiilet
Covered
Skillet
Uncovered
Skillet
Covered
Saucepan
Covered
Skillet
Uncovered
Skillet
to WartCooking
waterto boilbefore adding
cereal.
HL Stir together water or
milk,cocoaingredients.
Bringjust to a boil.
HI. At first perk,switch
heat to LOW.
H1.Covereggswith cool
water. Coverpan, cook
untilsteaming,
MED H]. Melt butter, add
eggsand coverskillet.
HI. Meltbutter,
H], In coveredpan bring
water to a boil.
HI, Heat butter untillight
goldenin color,
HI. In coveredpan bring
fruit and water to boil.
HI, Meltfat then add meat,
Switchto MED Hi to
brownmeat. Addwater or
other liquid.
HI, Preheatskillet, then
greaselightly.
2. To conservethemostcookingenergy,pansshould
beflat on thebottom,havestraightsidesand tight
fittinglids. Matchthesizeofthe saucepanto thesize
ofthesurfaceunit,A pan that extendsmorethan
oneinghbeycmdthe edgeof the trimringtrapsheat
whichcauses“crazing”(finehairlinecracks)on the
porcelainand discolorationrangingfrom blueto
dark grayon thetrim rings.
. .
SettingtoComplete
CookingContainer
LOWor WM, thenadd
cereal. Finishtiming.
accordingto ,package
directions,
MED,to cook 1or 2rein:
to completelyblend
ingredients.
LOW,to maintaingentle
but steady perk. cups, lessfor fewercups.
LOW.Cook only3 to 4
min.for softcooked; 15
min.for hard cooked.
Continukcookingat MED
HI until whitesarejust set,
abo,ut3to 5 min.
LOW,then add eggs.
Whenbottomsof eggs “
havejust set, carefully
turn overto cook other
side.
LOW.Carefullyadd eggs.
Cookuncoversdabout 5
min.at MED. H!.
MED. Addeggmixture,
Cook,stirring to desired
.—
doneness.
LOW.Stir occasionally-
and checkfor sticking.
\
LOW.Simmeruntilfork
tender,
M13DHI or MED. Brown
and cook to desired
doneness,turning overas
needed.
Comments
Cerealsbubbleand expandasHI. In coveredpan bring
theycook; uselargeenough
saucepanto preventboiiover.
Milkboilsoverrapidly. Watchas
boilingpointapproaches.
Percolate8 to 10 min. for 8
If you do not coverskillet,baste
eggswithfat to cooktops ~venly.
Removecookedeggswithslotted
spoon or pancaketurner,
Eggscontinueto set slightlyafter
cooking,For omeletdo notstir
last few minutes.Whensetfold in
half.
Freshfruit: Use!4to %cupwater
per pound offruit.
Driedfruit: Usewateras package
directs. Timedependson whether
fruit has beenpresoaked.If not,
allowmore cookingtime.
Meat can be seasonedand floured
beforeit is browned, if c&wi.
~.iquidvariationsfor flavorcould
be wine,fruit or tomatojuice or
meat broth.
Timing:Steaks 1to 2-in.: 1to
2 hrs. BeefStew:2 to 3hrs.
Pot roast: 2Hto 4 hrs,
Pan fryingis bestfor thin steaks
and chops, Ifrare is desired, preheat skillet beforeaddingmeat,
..
20
Page 21

!.JknsilTips(Umtinwd)
—
~, DeepFat l?r~ing. lX not overfillkettlewithfat
.
-----i mayspilloverwhenaddingfood. Frostyfoods
bblevigorously.Watchfoodsfryingat HIGH
temperaturesand keeprangeand hood cIeanfrom
accumulatedgrease,
Food
Fried Chicken
Pan broiledbacon
Sauteed:Lesstender
thin steaks(chuck,
round,etc.); liver;
thick or wholefish
Simmeredor stewed
meat;chicken;corned
beef;smokedpork;
stewingbeef;tongue;
etc.
Meltingchocolate,
butter,
marshmallows
French
toast
Pasta
Noodlesor spaghetti
Pressure
Puddings, Sauces,
Candies, Frostings
Vegetables
Fresh
Fraze.n
Sauteed:Onions;
greenpeppers;mushrooms;celery;etc.
Eke
Cooking
and Grits
Container
Covered
Skillet
Uncovered
Skillet
Covered
Skillet
Covered LOW.Cook until fork
Dutch Oven,
Kettleor
Large
Saucepan
Small
Covered
saucepan.
Usesmall -
surface unit
Skilletor
Griddle
Covered
Large Kettle
or Pot
Pressure
Cookeror
Canner
Uncovered
Saucepan
Covered
Saucepan
Covered
Saucepan
Uncovered
Skillet
Covered
Saucepan
DirectionsandSetting
toStart
HI. Meltfat. Switchto MED
HI to brownchicken.
HI. In cold skilletarrange
baconslices.Cookjust
untilstarting to sizzle.
HL Meltfat. Switchto MED
to brownslowly.
HL Covermeat with water
andcover pan or kettle.
Cookuntil steaming,
WM.Allow 10to 15min. to
meltthrough. Stir to
smooth.
MED H], Heat skillet 8to
10min. Greaselightly.
HI. In coveredkettle,bring
saltedwater to a boil,
uncoverand add pasta
slowlyso boilingdoesnot
stop.
HI. Heat until firstjiggle is ~eard,
ill. Bringjust to boil.
Hi.Measure %to l-in.
waterinsaucepan, Add
alt and prepared vegeable. In coveredsaucepan
mingto boil.
41,Measure water and salt
.sabove. Addfrozen block
~fvegetable,Incovered
aucepan bringto boil.
31.In skillet meltfat.
41,Bringsalted water to 8
}0;1.
Cooking
w
‘iGHTm -xc,,,.
Setting to Complete
Cooking
LOW,Coverskiiletand
cookuntil tender.
Uncoverlastfew minutes.
MED HI. Cook, turning ~
overas needed.
LOW.Coverand cook
untiltender.
lender.(Watershould
dow]yboil). For verylarge
oads mediumheat may
be needed.
Cook2 to 3 min.per side.
MEDHI. Cookuncovered
mtil tender. For large
imounts HI may be
~eededto keepwaterat
‘oilingboil throughout
retirecookingtime,
MED H] for foodscooking
10min. or less. MED for
‘oodsover 10min.
.OW. Tofinishcooking.
WED,Cook l-lb. 10 to 30
noremin., dependingon
endernessof vegetable,
.OW.Cookaccordingto
imeon package,
dED, Addvegetable,
;ook until desiredten-
ernessis reached.
NM.Coverand cook
Iccordingto time.
Comments
For crispdry chicken,coveronly —
after switchingto LQW for 10
min. Uncoverand cook turning
occasionally10to 20min.
A more attention-freemethod
isto start and cook at MED.
Meat may be breadedor mari-
nated in saucebeforefrying.
Addsalt or other seasoning
beforecookingifmeat has not’ ~
beensmokedor otherwise
cured.
Whenmeltingmarshmallows,add
milkor water.
Thickbatter takes.slightlylonger
time. Turnover pancakeswhen
bubblesriseto s~rface.
Uselargeenoughkettle to prevent boilover.Pasta doublesin
sizewhencooked.
Cooker shouldjiggle2 to 3times
per minute.
Stir frequentlyto prevent ,
sticking,
Uncoveredpan requires more
water and longertime,
Breakup or stir as neededithile
cooking.
Turnover or stir vegetableas
necessaryfor evenbrowning,
Triples in volumeafter cooking.
I-itneat WM.Rice:1cup riceand
2cups water—25reins. Grits: 1
cup grits and 4 cups water—40
rein,
.. ..
—
—
—
—.
—
—
—-
—
—.
Bass& -..
-——
—
—
—
—
~
—-
—
—
----
mwm
— ‘=
—
—.
—
—
.——
21
Page 22

1. Aluminumpans conduct heat quickly. For most conventional
baking light shiny finishes generally give best results because they
help preventoverbrowninginthe time it takes for heat to cook the
center areas. Dull(satin-finish)bottom surfaces of pans are recommendedfor cake pansand pie platesto be sure those areas brown
completely.
2. Dark or non-shinyfinishes,also glassand pyroceram,generally
absorb heat whichmay resultin dry,crisp crusts, Reduceovenheat
25°if lightercrusts are desired.Preheat cast ironfor bakingsome
foodsfor rapid.browningwhenfoodis added.
3, Preheatingthe ovenis not alwaysnecessary,especiallyfor foods
whichcook longerthan 30 or 40minutes. For food withshort
cookingtimes,preheatinggivesbestappearance and crispness.
4.
opentheovendoor to checkfood as little as possibleto prevent
unevenheatingand to saveenergy.
—
~
—
Food
Bread
Biscuits(%-in.thick)
. Coffee cake
Corn bread or muffins
Gingerbread
Muffins
Popovers
Quick Loaf Bread
Yeastbread (2 loaves)
Plain rolls
Sweet rolls
Cakes
(without shortening)
Angelfood
Jelly roll
Sponge
Cakes
Bundt cakes
Cupcakes
Layer
Layer, Chocolate
Loaf
Cookies
Brownies
Drop
Refrigerator
Rolled or sliced
Fruits,
WiserDesserts
Bakedapples
Custard
Puddings, Riceand
Custard
Pies
Frozen
Meringue
One crust
Two crust
Pastry Shell
Miscellssfieous
Bake{!potatoes
Scalloped dishes
%)uffles
Shelf
Container
Shiny Cookie Sheet 15-20
Shiny Metal Pan with
Satin-finish bottom
Cast Iron or Glass
Shiny Metal Pan with
Satin-finish bottom
Shiny Metal Muffin Pans
DeepGlass or Cast’Iron Cups
Metal or Glass Loaf Pans
Metal or Glass Loaf Pans
Shiny Oblong or Muffin Pans
ShirwOblong or Muffin F’ans
Aluminum Tube Pan
Metal Jelly Roll Pan
Metal or Ceramic Pan
Metal or Ceramic Pan
Shiny Metal Muffin Pans
Metal or Glass Lotifor
Tube Pan
Shiny Metal Pan with
Satin-finish bottom
Shiny Metal Pan with
Satin-finish bottom
Metal or Glass Loaf Pans
Metal or Glass Pans
Cookie Sheet
Cookie Sheet
Cookie Sheet
Glass or Metal
Glass Custard Cups or
Casserole(set in pan of
hot water) Glass Custard Cups or
Casserole
FoilPan on Cookie Sheet
Spread to crust edges
Glass or Satin-finish Metal
Glass or Satin-finish Metal
Glass or Sati’,t-finishMe[al
-Seton Ovcn Ststlf
Glass m Metal
Glass
Position
B, C
B, A
B
B
A, B
B
B
A, B
, A, B
B, A
A
B
A
A, B
B
A, B
B
B
B
B, C
B, C
B,C ‘
B,C
A. B.C
B
B
A
B, A
A, i?
B
B
A, B,C
A, B,C’
B
oven
Temp.
400”-475”
350°-400°
400”-450”
350”
40W-425°
375”
350°-375°
375°-425°
375°-4250
35P-375”
325”-375”
375°-400”
325”-35V
325°-350°
350’’-375”
275°-300”
350°-3750
350”-375°
350”
325”-350”
350”-400”
400°-425°
375”-400”
350”-40(P
3oo”-35@’
325°
400”-425°
325°-350°
400°-4250
400”-425°
450”
325C-40W’
325°-375”
300Q-350”
mm?,
Min.
20.30
20-40
45-55
20.30
45-60
45-40
45-60
10-25
20-30
30-55
10-15
45-60
45-65
20-25
Z-4hrs.
20-35
25-30
40-60
25-35
10-20
6-12
7-12
30-60
30-60
50-90
4.5-70
15-25
45-60
40-60
12-15
60-90
30-60
30-7s
Comments
Canned refrigerated biscuitstake
2-4min.lesstime,
Freheat cast iron pan for crisp crust.
Decreaseabout 5 min. for muffin mix.
Or bake at 450° for 25 min., then at
350” for 10-15min.
Dark metal or glass give deepest
browning,
For thin rolls, Shelf Bmaybe used.
For thin rolls, Shelf Bmaybe used.
Two piece pan is convenient.
Linepan with waxed paper.
Paper liners produce more moist
crusts.
IJsc 300° and Shelf B for small or indi-Fruit cakes
vidual cakes.
Bar cookies from mix use same time.
UseShelfC andincrcasctcmp.
for more browning.
Reduce temp. to 30tY’for large custard. Cook bread or rice pudding
with custard base 80to 90 minutes.
Large piesusc 400° and increase
time.
To quickly brown mcringtse usc 400°
for 8-10min.
Custard filiingsrequire Iowcr tcmp,,
longer time,
Increasetime for large amount or
sii:c,
25-5@’
~
--
22
Page 23

u
A Position ovenshelf at ~ for sma~l.sizeroasts (3 to 7 lbs,) and at
—
for larger roasts.
. PIace meat fat side UDor Doultrybreast-side UPon broiler pan about 5° to I@ internal temperature; to corn~ensate for tem~eraor other shaHow pan w;th trket. ~o not cover, ~o not stuff potdtry until just before roasting. Use meat thermometer, for
more accurate doneness. (Do not place thermometer in stuffing.)
3.
Remove fat and drippings as n;cessary. Baste as desired. - min. per pound more time than given-inchart fo~refrige~ated,
4. Standingtime recommended for roasts is iOto 20 min. to
allow roast to firm up and make it easier to carve, It will rise
ture rise, if desired, remove ;oast fro& oven ;t 5° to 1(P less-than _
temperature on
5. Frozenroasts can be conventionally roasted by adding 10to 25 =
chart.
(10min. per lb. for roasts under 5-ibs.) Defrost pouitry before
roasting.
Uszfi#l
--—-
-
--
—
—
~.- .d. k
~.
—.
—.
—
Meat
Tendercuts: rib. high quality
sirloin tip, rump or top round*
Lamb Legor bone-inshoulder*
VeaIshoulder, legor loin*
Pork loin, rib or shouided
Ham, pre-cooked
Ham, raw
*For boneless rolledroasts over6-in. thici
Poultry
—
~Chicken or Duck
— ickcn pieces
Turkev
Oven
Temp.
325°
325°
325°
325°
325”
325°
dd 5 to 10 min.
325°
375”
325°
——
Doneness
Rare:
Medium:
Well Done:
Rare:
Medium:
Well Done:
Well Done:
WCNDone:
To Warm:
Well Done:
r lb. to timesgivenabov
Well Done:
Well Done:
Well Done:
,.
Approximate
inMinutesper
3 to5-Bbs.
24-30
30-35
35-45
21-25
25-30
30-35
35-45
35-45
10reins. per lb
10-lbs.
Under
20-30
to5-lbs,
3
35-40
35-40
10tol$ibs,
20-25
RoastingTime,
)u’nd”
6 to 84bs.
18-22
22-25
28-33
20-23
24-28
28-33
3040
30-40
ny weight)
10to15-ibs.
17-20
Over5 Ibs.
30-35
Over15-lbs.
15-20
Internal
Temp.0F
130°-140’
150°-160”
17(Y-185°
13(P-140”
1500-16CP
17(P-185°
170=-18(P
1700-18CP
125°-13W’
160°
185”-190”
185°-190”
Inthigh:
..
—
—- —
—.
~ff
—
—-
-
—
w...-
g%a-A
IsEsK.
—
—.
-
-.
—
23
Page 24

1. Alw’ajsusebroiler pan and rackthat comeswithyour oven,lt is
designedto minimizesmokingand spatteringbytrappingjuices in the
shieldedlowerpari ofthe pan.
2. Ovendoor shouldbe ajar for most foods;there isa specialposition
on door whichholdsdoor open.correctly.
3.
For steaks and chops, slash fat evenly around outside edges of
meat. To slash, cut crosswise through outer fat surfacejust to the
edgeofthe meat. Usetongsto turn meat overto preventpiercing
meatand loosingjuices,
4. Ifdesired,marinate meats or chickenbeforebroiling.Or, brush
withbarbequesaucelast 5 to 10minutesonly.
Quantity
Food
Bacon
and/or
Thickness
I/z-lb.(about 8
shelf
Position
c
thin slices)
Ground Beef,
done
Well
Beef Steaks
Rare
Medium
Well Donee
Rare
Medium
WellDone
Chicken
l-lb, (4 patties)
92to s~-in.thick
1inchthick
(1-lMlbs.)
l%in. thick
(2-2%Ibs.)
1whole
c
c
c
c
c
c
c
A
(2 to 2Y+lbs.),
split lengthwise
BakeryProducts
Bread(Toast)or
ToasterPastries
English Muffins
Lobstertails
(6 to 8-oz. each)
Fish
2-4slices
1 pkg.(2)
2-split
2-4
l-lb. fillets %to
c
c
B
c
I/z-in. thick
Hamslices
l-in. thick
B
(nrecooked)
Pork chops
WellDone
2(% inch)
2(1-in.thick)
c
B
about I lb.
Lamb chops
Medium
WellDone
Medium
Wel\Done
Wienersand similar
2(1 inch)
about 10-12oz.
2 (1%inch)
about 1 lb.
l-lb. pkg.(10)
c
c
c
B
——
c 1-2
precookedsausages,
bratwurst
FirstSide
Time,Min.
3!4
7
7
9
13“
10
15
25
35
1%-2
3-4
13-16
5
8
10
13
8
10
10
17
6
K When arranging food on pan, do not let fatty edges hang over
sides,whichcouldsoil oven with drippingfat.
6. Broilerdoesnot needto be preheated. However,for very thin
foodsor to increasebrowning,preheat ifdesired.
7. FrozenSteakscan be conventionallybroiledby positioningthe
ovenshelfat next lowestshelfpositionand increasingcookingtime
givenin thischar! ]% timesper side.
8. If yourrange isconnectedto 208VoJtsrare steaksmaybe broiled
by~reheatingthe broil heater and positioningtheovenshelfone
pos]tionhigher,
Second Side
Time,Min. Comments
Arrange in single layer.
Spaceevenly.
4-5
Upto 8 pattiestake about same
time.
7
9
13
7-8
14-16
20-25
Steaksless than l-in. cook through
beforebrowning.Panfryingis
recommended.
Slashfat.
10-15 Reducetimesabout 5-10min. per side
for cut-upchicken. Brusheach sidewith
meltedbutter, Broilwithskin sidedown ~
first and broilwithdoor closed.
‘/2
Spaceevenly.”PlaceEnglishmuffins
cut-side-upand brushwithbutter, if
desired.
(Do not
turn
over)
5
Cut through back of shell.Spread open,
Brushwithmeltedbutter beforeand
after half time.
Handleand turn verycarefully.Brush
withlemonbutter beforeand during
..
8
10
cookingifdesired. Preheat broiler to
increasebrowning,
Increasr times 5-10min. per sidefor
1~-in, thick or home cured.
Slash fat. .
13
4-7
Slash fat.
10
4-6
12-14
If desireci,.split sausagesin half lengthwiseinto 5 to 6-in. pieces,
—
~
.
.
.
..
—
—.
Page 25

—
-~’!!.ng SImuld be done on Codm)p
—
Insurfacecookingof’foodsother
thancanning,the-useoflarge-
diameterutensils(extendingmore
thanl-inchbeyondedgeoftrimring)
isnotrecommended.However,when
canningwithwater-bathor pressure
canner,Iargediameterutensilsmay
beused.Thisisbecauseboilingwater
temperatures(evenunderpressure)
arenotharmfulto cooktopsurfaces
surroundingheatingunit.
HOWEVER,DO NOTUSE
LARGEDIAMETERCANNERS
OROTHERLARGEDIAMETER
UTENSILSFORFRYINGOR
BOILINGFOODSOTHERTHAN
W.ATER.Mostsyrupor sauce
mixtures-and alltypesoffrying—
cookat temperaturesmuchhigher
thanboilingwater.Suchtemperaturescouldeventuallyharmcooktop
surfacessurroundingheatingunits.
(m?4m%? Pdnf$
h fcmnh’ig:
1. Bringwater to boilon HIGH
heat,then after boilinghas begun,
adjustheat to lowestsettingto
maintainboil(savesenergyand ~
bestusessurfaceunit.)
2. Besurecannerfits overcenterof “
surfaceunit. If yourmodelsurface
sectiondoesnotallowcannerto be.
centeredon surfaceunit,use ,,
smaller-diametercontainersfor
goodcanningresults.
3. Flat-bottomedcannersgivebest
canningresults.Be”surebottomof
cannerisflat or slightindentation
fitssnuglyoversurfacetinit.Cannerswithflangedor‘rippledbottoms(oftenfound in.enamel-ware)
are not recommended.
.-
,:
-r
IUGEI’I’ ‘ WRONG
_.
Ei?aL--
-
——.—
—–
—
—.
-
-—
4, Whencanning,
reputablesources,
are availablefrom
userecipesfrom ==
Reliablerecipes
themanufac-
~—
——
-
turer ofyourcanner;manufacturers =.
of glassjars for canning;suchas
-
Balland Kerr;and, the United —
StatesDepartment’ofAgriculture
Exteri,sionService.
5. Remember,infollowingthe
recipes,canningisa processthat
generateslargeamountsof steam.
Be carefulwhilecanningto prevent
burnsfrom steamor heat.
NOTE:If yoursurfacesectionis
beingoperatedon low power(voltage),canningmaytake longerthan
expected,eventhoughdirections
havebeencarefullyfollowed.The
processmaybeimprovedby:(1)
usinga pressurecanner,and (2)for
fastestheatingof large water quantities,beginwith HOTtap water.
....
.,.
..
—
!a?zx&——
—
—
—
—.
~—
—.
—
—–
—
—
—
—.
—
—
-----
A
-.
25
Page 26

.
- .--—
.-
—-
...-——
---- —.
---g*!$&::,
.a=.*-
—-—.---—-
—=——— +----
—
———-----——
.—--.—
.———.—-———-
‘:gk~: ?ii3eThis
...—..—
--.—..—.
..———..
.—.
———-z=—— - .= ~. -—
.
POSSHMJ3 CAUSE AND REMEDY
~~E~ WILL N(H’ WORK
OVENLIGHT
DOESNOTWORK
FOOD
BROILPROPERLY
FOOD DOES NOTROAST
OR BAKEPROPERLY
~LROD@ SURFACEUNITS
NOTFUNCTIONING
PROPERLY
DOESNO-F
Plug on
The circuitbreakerin you~house has beentripped, or a fuse has been
blown.
Ovencontrolsare not properlyset.
Lightbulb is loose.
Bulbisdefective.Replace.
Switchoperatingovenlightisbroken.Callfor service.
OVENSET Knobnot setat BROIL.
OVENT’EMPKnobnot setat BROIL.
Door not leftajar asrecommended.
Impropershelfposition is beingused.Check~roiiingChart.
Necessarypreheatingwasnot done.
Food is beingcookedon hot pan.
Utensilsarenot suitedfor broiling.
OVENSET Knobnot seton BAKE.
OVENTEMP’Knob not set correctly.
Shelfpositionis incorrect.CheckRoastingor BakingCharts.
Ovenshelfisnot level.
Wrongcookwareis beingused.Whenroasting,pan is too small.
Surfaceunitsare not seatedproperly‘inp,antrim rings.
Trim rings~drippansare not setsecurelyin the range top. ‘‘
Surfaceunitcontrolsare not properlyset.
rangeis not completelyinsertedin the outletreceptacle.
.
If youneed morehdp.. .G3M,W free:
GE AnswerCenter@
TIE
consumer
service
26
Page 27

We’reproudofour serviceand
-–
–-—
wantyoutobepleased.If forsome
reasonyouarenothappywiththe
serviceyoureceive,herearethree
stepstofollowforfurtherhelp.
FIRSI’,contactthepeoplewho
servicedyourappliance.Explain
whyyouarenotpkased. Inmost
cases,thiswillsolvetheproblem.
NEXT,ifyouarestillnotpleased,
writeallthedetails-including
yourphonenumber-to:
Manager,ConsumerRelations
GeneralElectric
AppliancePark
Louisville,Kentucky40225
FINALLY,ifyourproblemisstill
not resolved,write:
MajorAppliance
ConsumerActionPanel
20 NorthWackerDrive
Chicago,Illinois60606
27
,.
..
mw15
——
E!tf!ET---
——
— ——
—
-
-
—
—.
—
-
--
SEHr
—.
Page 28

. ..
–—
B=+!
—#z
.==
S%?!
--
-&;
Saveproofof origirtal purcha$~ date SUCI’Ias your ~al$s slip ar ~anc~ll~d chexA to t?stablish wzmanty period.
I––y’
:~; 1s
.%!1
z:1$
M11
-=31
=~i!
.—..
...
~~~~
. mII
=21[
~%11
==II
y$~~
= =Ii
-[
!
Y3Bi
~gl
~g!
‘~~~
x*I
–~~~
==11
-71!
==-II
.~~~
==11
-~
‘—3I
‘- 1
xxi!
71,
-?.-i
.~~~
x 1!
-~~~
==1/
—.
-.,
——--ii
.~!!
= =11
==!1
–“—-i:
YsXy
,.,
T511
.—
—.—
——.-
——-
OP4E”YEAR
Flu
Foroneyearfrom dateof original
purchase,we will provide,freeof
charge,parts andservicelaborin
yourhometo repairor replace
partoftherange
that fails because ‘ash’ ngton’‘Cc” ‘n ‘Iaska ‘he
of a manufacturingdefect.
..--. ——---——.— —.-... ..——.—-—
~Servicetrips to yourhometo
teachyou howto usethe product.
RtiadyOllrlJseandCarematerial.
If youthen haveanyquestions
aboutoperatingthe product,
pleasecontact yourdealeror our
ConsumerAffairs officeat the
addressbelow,orcall, toll free:
TheGEAnswerCenter@
800.626.2000
consumerinformationservice
g Improperinstallation.
Ifyou havean installationproblem,
contactyourdealeror installer.
Youareresponsiblefor providing
adequateelectrical,gas,exhausting andother connectingfacilities.
any ‘ain~~nd‘tates~‘awaii and
Ii;
IIL-
II.
II-
,——~!~
‘1-
,,
‘Thiswarrantyis extendedto the ~
originalpurchaserandany succeed-
ing ownerfor productspurchased
for ordinaryhomeusein the48
warrantyISthe sameexceptthat it
is LIMITEDbecauseyoumust pay
to ship the productto the service
shopor for the service technician’s
travelcosts to yourhome.
All warrantyservicewill be provided
byour FactoryServiceCentersor
byour authorizedCustomerCare@
servicersduring normalworking
hours.
Lookin the Whiteor YellowPages
of yourtelephonedirectoryfor
GENERAL”ELECTRIGCOMPANY, ;;;
GENERALELECTRICFACTORY
SERVICE,GENERALELECTRIC-
1;
!;
1:
:j:
1;
,l&
1.
:s-
!~=
!!:
,,,
!1;
Ilk
Il.
]1.=
ii:
II:”
~~:
II
II=
j~;
11:’
Ilk
11’
..—
,,,
11=
Ii&.
11.
HOTPOINTFACTORYSERVICEor ~~~
GENERALELECTRICCUSTOMER
CARE?SERVICE.
~Replacementof housefuses
11>
,,,
ii=
Ii&
1!.
,,-
.-
pK-
11 -
,ir—
11:
or resettingof circuit breakers.
. Failureof the product if it is
usedfor other thanits intended
purposeor usedcommercially.
11:
* Damage10productcaused
by accident,fire,floods or acts
of God.
Ilk
Ila
11
II :
;:,—
11 —
..—
,..
II:
WARRANTORISNOTRESPON-
SIBLEFORCONSEQUENTIAL
DAMAGES.
11 -
11>
,,,
11:
r. —
[:a—
..—
,,,
.E!u
=X11
.g’!~
===-?j
I-hi
J5-:il
—’:!
- ,,
.-3!?1!
.:4 ]!
31:
%l:;
=31
‘ R@ $&).205CXIXRM
-—
1-
@kL NO.4$4708
7?:35
Somestatesdo notallowtheexclusionorlimitationof incidental or consequentialdamages,sotheabovelimitation or exclusion
maynot applyto you.Thiswarranty gives youspecificlegalrights,andyoumay also haveotherrightswhichvaryfromstateto state.
TOknow what
——
your Iegaf rights are inyourstate,consultyour localor stateconsumeraffairs office oryourstate’sAttorneyGeneral. ;::
Warrantor:Genera!EhmtricCompany
Hfwther IMp Is neededcumxming thisvwtrrmty,contact:
Affairs, GwIwal Eki@lricCompany,Applkmc~ Park,Louisville,KY 40225
JASC13JEIS26 JSS26
+
JEW3 JMS07 JSS27
J13S16 JPJIS27
JEW21 JSSO1
,’-
l*r1I2
It&
1[.
~:c
,nr-
1[:
!Ib
Ii n
II
11:
11
;:u,,,
Ii:
 Loading...