

Page 1

Television User's Guide
Page 2
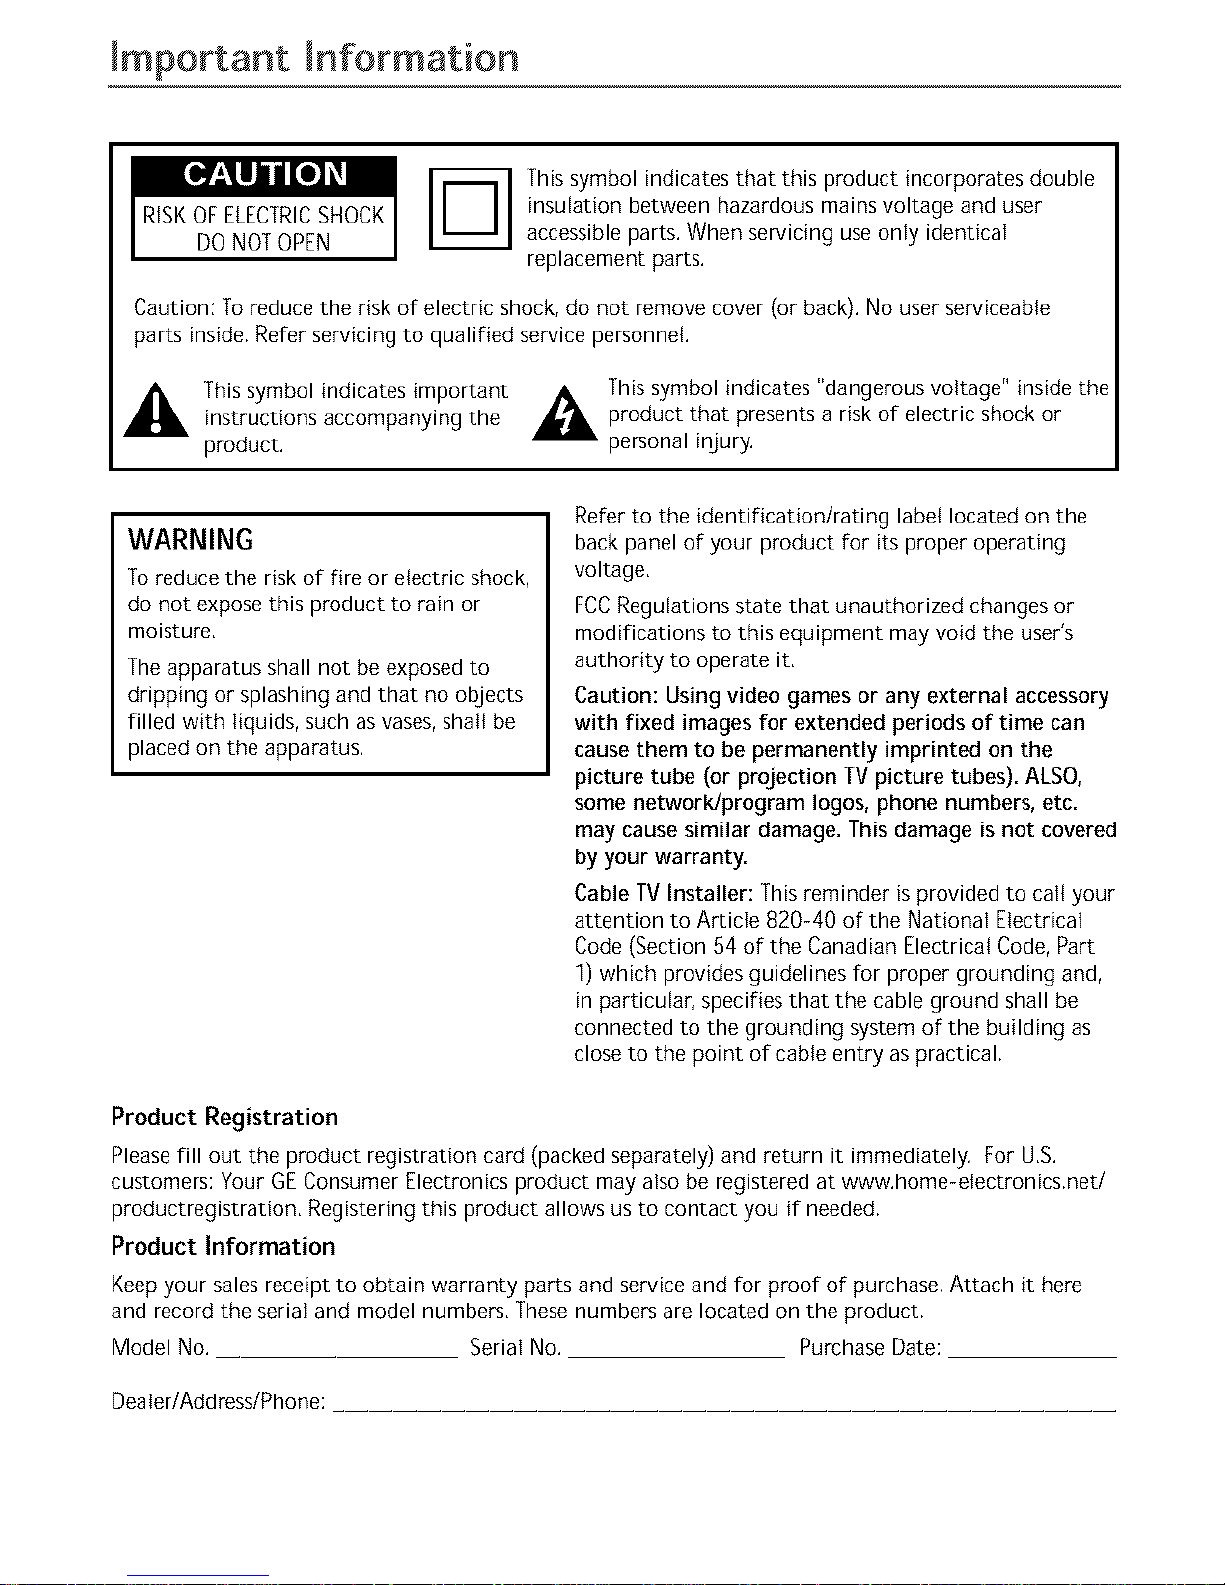
Important Information
RiSKOFELECTRICSHOCK
DONOTOPEN
This symbol indicates that this product incorporates double
insulation between hazardous mains voltage and user
accessible parts. When servicing use only identical
replacement parts.
Caution: To reduce the risk of electric shock, do not remove cover (or back). No user serviceable
parts inside, Refer servicing to qualified service personnel.
_, This symbol indicates important A This symbol indicates "dangerous voltage" inside the
instructions accompanying the _,_ product that presents a risk of electric shock or
product, personal injury.
WARNING
To reduce the risk of fire or electric shock,
do not expose this product to rain or
moisture,
The apparatus shall not be exposed to
dripping or splashing and that no objects
filled with liquids, such as vases, shall be
placed on the apparatus.
Refer to the identification/rating label located on the
back panel of your product for its proper operating
voltage.
FCC Regulations state that unauthorized changes or
modifications to this equipment may void the user's
authority to operate it,
Caution: Using video games or any external accessory
with fixed images for extended periods of time can
cause them to be permanently imprinted on the
picture tube (or projection TV picture tubes). ALSO,
some network/program Iogos, phone numbers, etc.
may cause similar damage. This damage is not covered
by your warranty.
Cable TV Installer: This reminder is provided to call your
attention to Article 820-40 of the National Electrical
Code (Section 54 of the Canadian Electrical Code, Part
1) which provides guidelines for proper grounding and,
in particular, specifies that the cable ground shall be
connected to the grounding system of the building as
close to the point of cable entry as practical,
Product Registration
Please fill out the product registration card (packed separately) and return it immediately, For U,S,
customers: Your GE Consumer Electronics product may also be registered at www.home-etectronics,net/
productregistration, Registering this product allows us to contact you if needed.
Product Information
Keep your sales receipt to obtain warranty parts and service and for proof of purchase. Attach it here
and record the serial and model numbers, These numbers are located on the product.
Model No. Serial No. Purchase Date:
Dealer/Address/Phone:
Page 3
Table of Contents
Chapter 1: Connections & Setup
Things to Consider Before You Connect ....................................................................... 3
Protect Against Power Surges ........................................................................... 3
Protect Components from Overheating ........................................................... 3
Position Cables Properly to Avoid Audio Interference .................................... 3
Important Stand and Base Safety Information ................................................ 3
Use Indirect Light ............................................................................................... 3
Cables Needed to Connect Components to Your TV ....................................... 3
TV + DVD.......................................................................................................................... 4
Fxplanation of Jacks ....................................................................................................... 5
The Front of Your TV ...................................................................................................... 6
Front Input Jacks ................................................................................................ 6
Front Panel Buttons ........................................................................................... 6
Plug in the TV .................................................................................................................. 6
Put batteries in the remote ........................................................................................... 6
How to Use the Remote Control to Complete the Initial Setup ................................ 7
Turn on the TV................................................................................................................. 7
Complete the Initial Setup ............................................................................................. 7
Complete Auto Channel Search ........................................................................ 7
The Buttons on the Remote Control ............................................................................. 8
Using the INPUT Button ..................................................................................... 8
Chapter 2: Using the TV's Features
Channel Banner ............................................................................................................... 9
Why You Should Use the Auto Tuning Feature ........................................................... 9
How to Set Up the Auto Tuning Feature .......................................................... 9
Parental Controls and V-Chip ..................................................................................... 10
How V-Chip Works ........................................................................................... 11
USA V-Chip Rating System ............................................................................... 11
Canadian English V-Chip Rating System ......................................................... 12
Canadian French V-Chip Rating System .......................................................... 13
USA V-Chip TV Rating Limit ............................................................................. 13
Blocking Specific Content Themes .................................................................. 15
Viewing Specific Content Themes ................................................................... 15
Blocking Canadian V-Chip Ratings .................................................................. 16
V-Chip Movie Rating Limit ............................................................................... 16
V-Chip Exempt Program Block ......................................................................... 16
V-Chip Active .................................................................................................... 17
Front Panel Lock ............................................................................................... 17
Change Password ............................................................................................. 17
Page 4
Table of Contents
Chapter 3: Using the TV's Menu System
Sound Menu .................................................................................................................. 18
Picture Menu ................................................................................................................ 18
Setup Menu .................................................................................................................. 19
Parental Control Menu ................................................................................................ 20
Time Menu .................................................................................................................... 20
Chapter 4: Other Information
Troubleshooting ............................................................................................................ 21
Care and Cleaning ........................................................................................................ 23
Limited Warranty ......................................................................................................... 24
2
Page 5

Things to Consider Before You Connect
Protect Against Power Surges
Connect all components before you plug any of their power cords into the wall outlet,
]urn off the TVand/or component before you connect or disconnect any cables,
Make sure all antennas and cables are properly grounded, Refer to the Important Safety Instructions
packed separately.
Protect Components from Overheating
Don't block ventilation holes on any of the components. Arrange the components so that air can
circulate flee[y.
Don't stack components.
If you place components in a stand, make sure you allow adequate ventilation,
If you connect an audio receiver or amplifier, place it on the top shelf so the heated air from it won't
flow around other components.
Position Cables Properly to Avoid Audio Interference
Insert each cable firmly into the designated jack,
If you place components above the TV, route all cables down the side of the back of the TV instead
of straight down the middle of the TV.
If your antenna uses 300-ohm twin lead cables, do not coil the cables, Also, keep the twin lead
cables away from audio/video cables.
Important Stand and Base Safety Information
Choose the location for your TV carefully, Place the TV on a stand or base that is of adequate size and
strength to prevent the TVfrom being accidentafly tipped over, pushed off, or pulled off. This could
cause personal injury and/or damage the TV. Refer to the important Safety Instructions packed
separately.
Use Indirect Light
Don't place the TVwhere sunlight or room lighting will be directed toward the screen. Use soft or
indirect lighting,
Cables Needed to Connect Components to Your TV
The pictures below show the cables needed for the connections represented in this book.
Coaxial cable S Video cable
Audio/Video cables
Chapter 1 Graphics contained within this publication are for representation only 3
Page 6
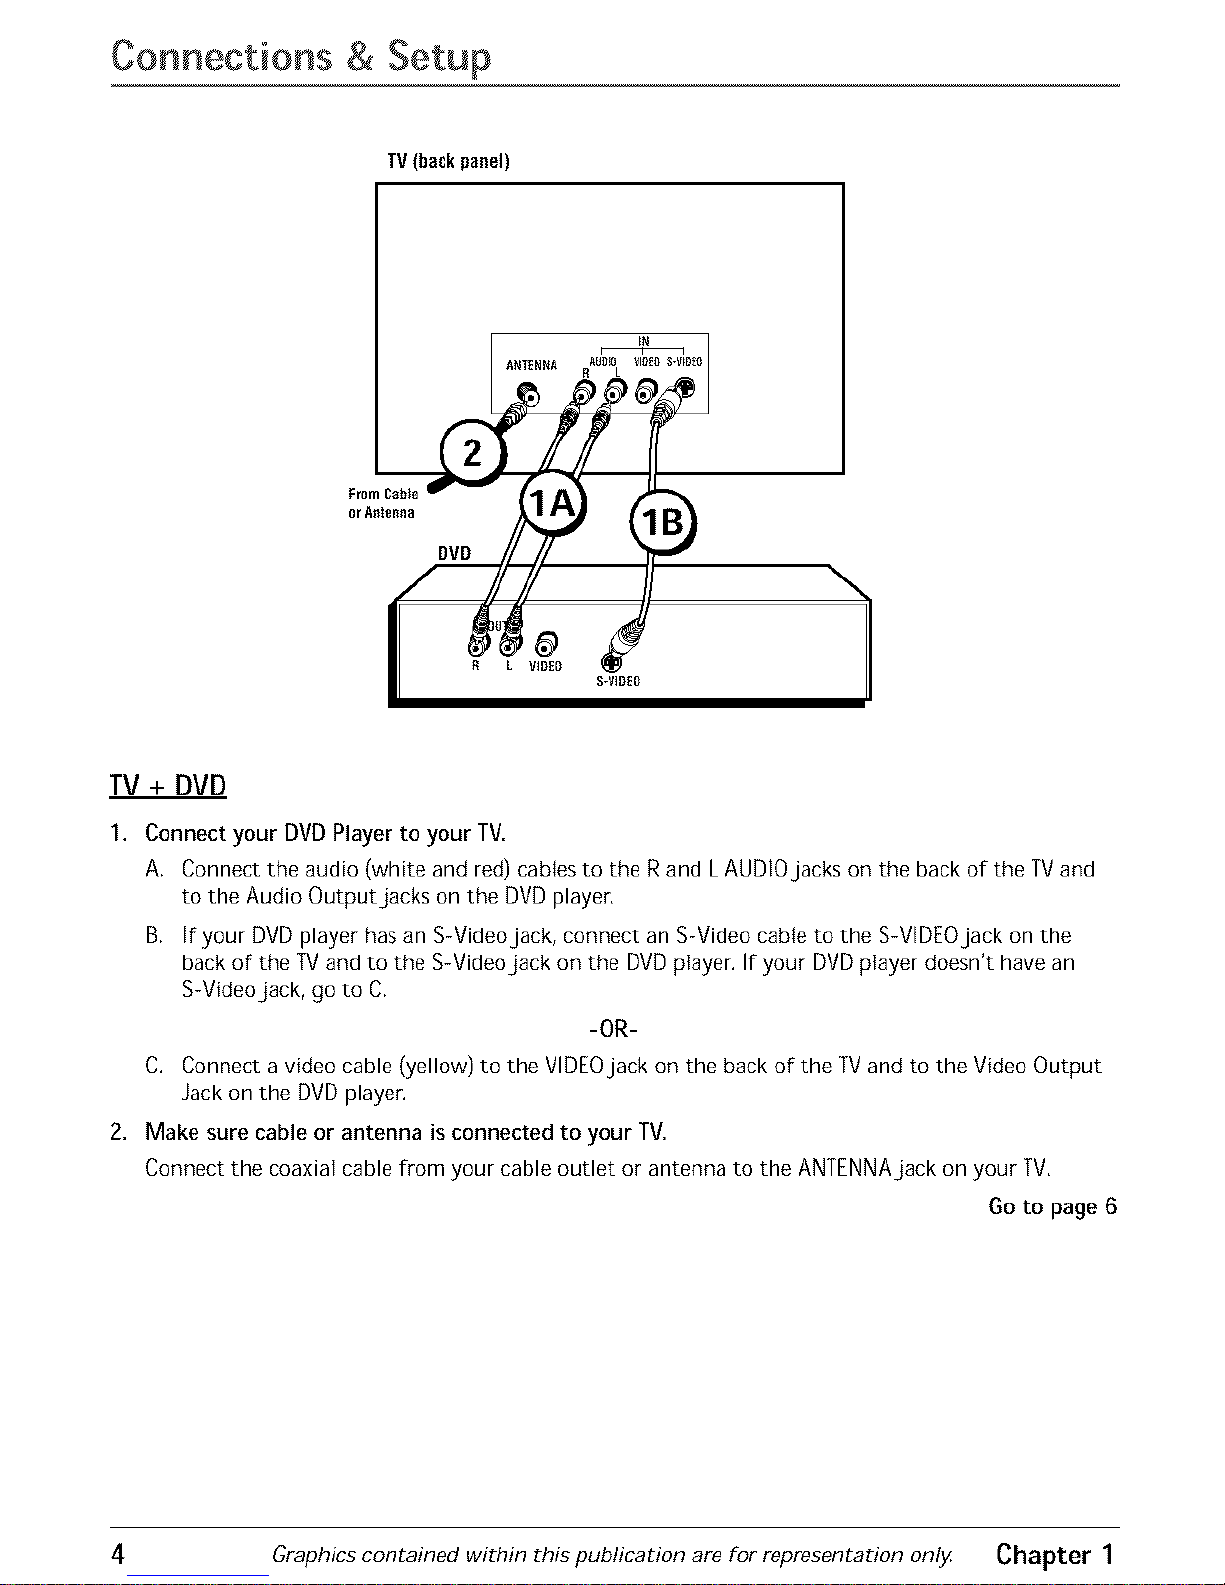
Connections & Setup
TV (back panel)
_ _ _ANTEBNA R&B_ B_
":"
TV + DVD
1. Connect your DVD Player to your TV.
A. Connect the audio (white and red) cables to the R and LAUDLOjacks on the back of the TVand
to the Audio Output jacks on the DVD player,
B. If your DVD player has an S-Videojack, connect an S-Video cable to the S-VlDEOjack on the
back of the TV and to the S-Videojack on the DVD player. If your DVD player doesn't have an
S-Video jack, go to C.
-OR-
C. Connect a video cable (yellow) to the VIDEOjack on the back of the TV and to the Video Output
Jack on the DVD player.
2, Make sure cable or antenna is connected to your TV,
Connect the coaxial cable from your cable outlet or antenna to the ANTENNA jack on your TV,
Go to page 6
4 Graphics contained within this publication are for representation only Chapter 1
Page 7
Connections & Setup
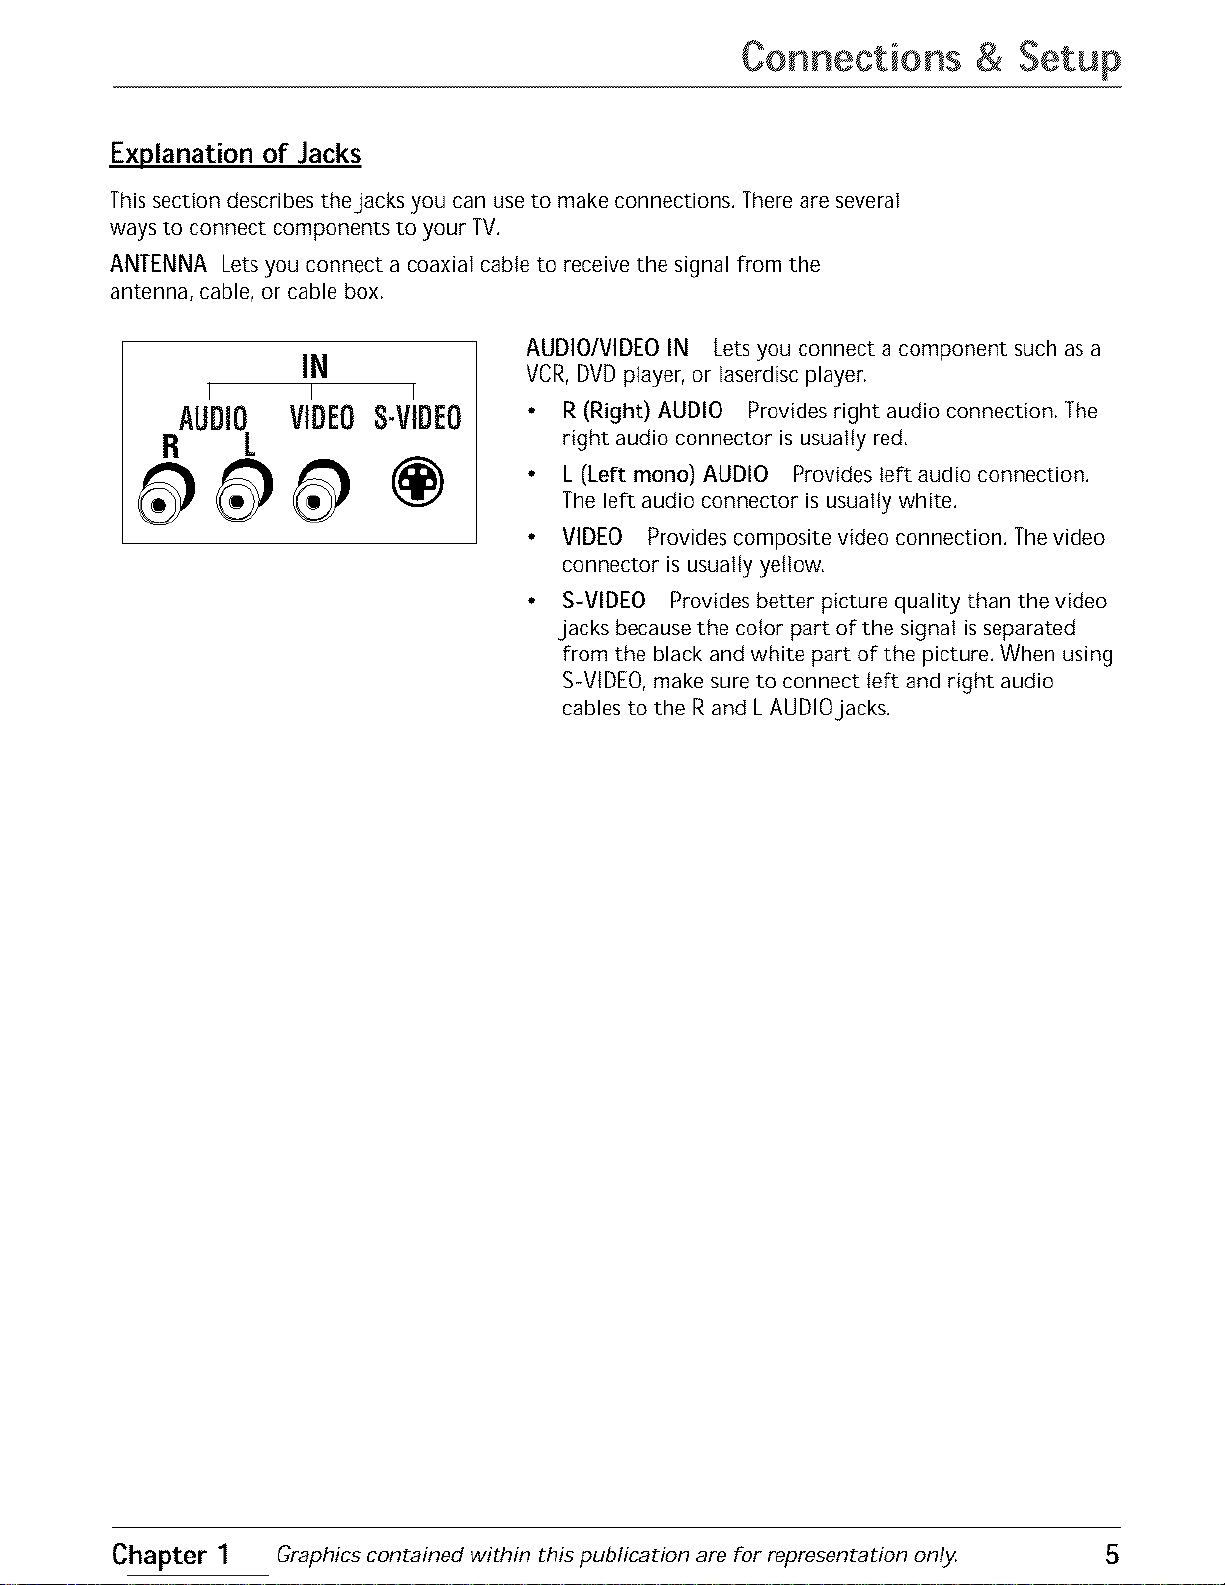
Explanation of Jacks
This section describes the jacks you can use to make connections. There are several
ways to connect components to your TV,
ANTENNA Lets you connect a coaxial cabie to receive the signal from the
antenna, cable, or cable box.
IN
I I I
AUDIO VIDEOS-VIDEO
R L
AUDIO/VIDEO IN Lets you connect a component such as a
VCR, DVD player, or laserdisc player.
R (Right) AUDIO Provides right audio connection. The
right audio connector is usually red,
L (Left mono) AUDIO Provides left audio connection.
The left audio connector is usually white.
VIDEO Provides composite video connection. The video
connector is usually yellow,
S-VIDEO Provides better picture quality than the video
jacks because the color part of the signal is separated
from the black and white part of the picture. When using
S-ViDEO, make sure to connect left and right audio
cables to the R and L AUDIO jacks.
Chapter 1 Graphics contained within this publication are for representation only 5
Page 8

Connections & Setup
The Front of Your TV
Front Input Jacks
The TV has one set of front audio/video input jacks for your convenience. These
`jacks are on the front of the TV. To access the component you connected to the
front of the TV,press the INPUT button on your remote until FRNTappears on the
screen. Thejacks are ideal for connecting a video game console or a camcorder.
No_e:Whonconnec£n_g_,,componentd_atonly hasonc,audiojack, surh assomocamcorders,
u_ethe TV'sAUDIOL/MONOjac_to hr,artheaudio
VIDEO Receives video from another component such as a VCR, camcorder, or
video game console.
UMONO and R AUDIO Receives audio from another component such as a VCR,
camcorder, or video game console,
Front Panel Buttons
If you cannot locate your remote, you can use the buttons on the front of your TV
to operate many of the TV's features,
MENU/OK Brings up the Main menu. In the menu system, it selects highlighted
items,
CH- Scans down through the current channel list. In the menu system, acts like
the down arrow button on the remote control and adjusts menu controls,
CH+ Scans up through the channel list. In the menu system, acts like the up
arrow button on the remote control and adjusts menu controls.
VOL- Decreases the volume, tn the menu system, acts like the left arrow button
on the remote control and adjusts menu controls.
VOL+ Increases the volume. In the menu system, acts like the right arrow button
on the remote control and adjusts menu controls.
POWER Turns the TVon and off.
Plug in the TV
Plug the end of the power cord into a grounded wall outlet. Insertthe plug
completely into the outlet.
Put batteries in the remote
Remove the battery compartment cover from the back of the remote by
pushing down on and sliding off the cover.
Insert 2 "AAA" fresh batteries. Make sure the polarities (+ and -) are aligned
correctly.
Replace the cover.
6 Graphics contained within this publication are for representation only. Chapter 1
Page 9
Connections & Setup
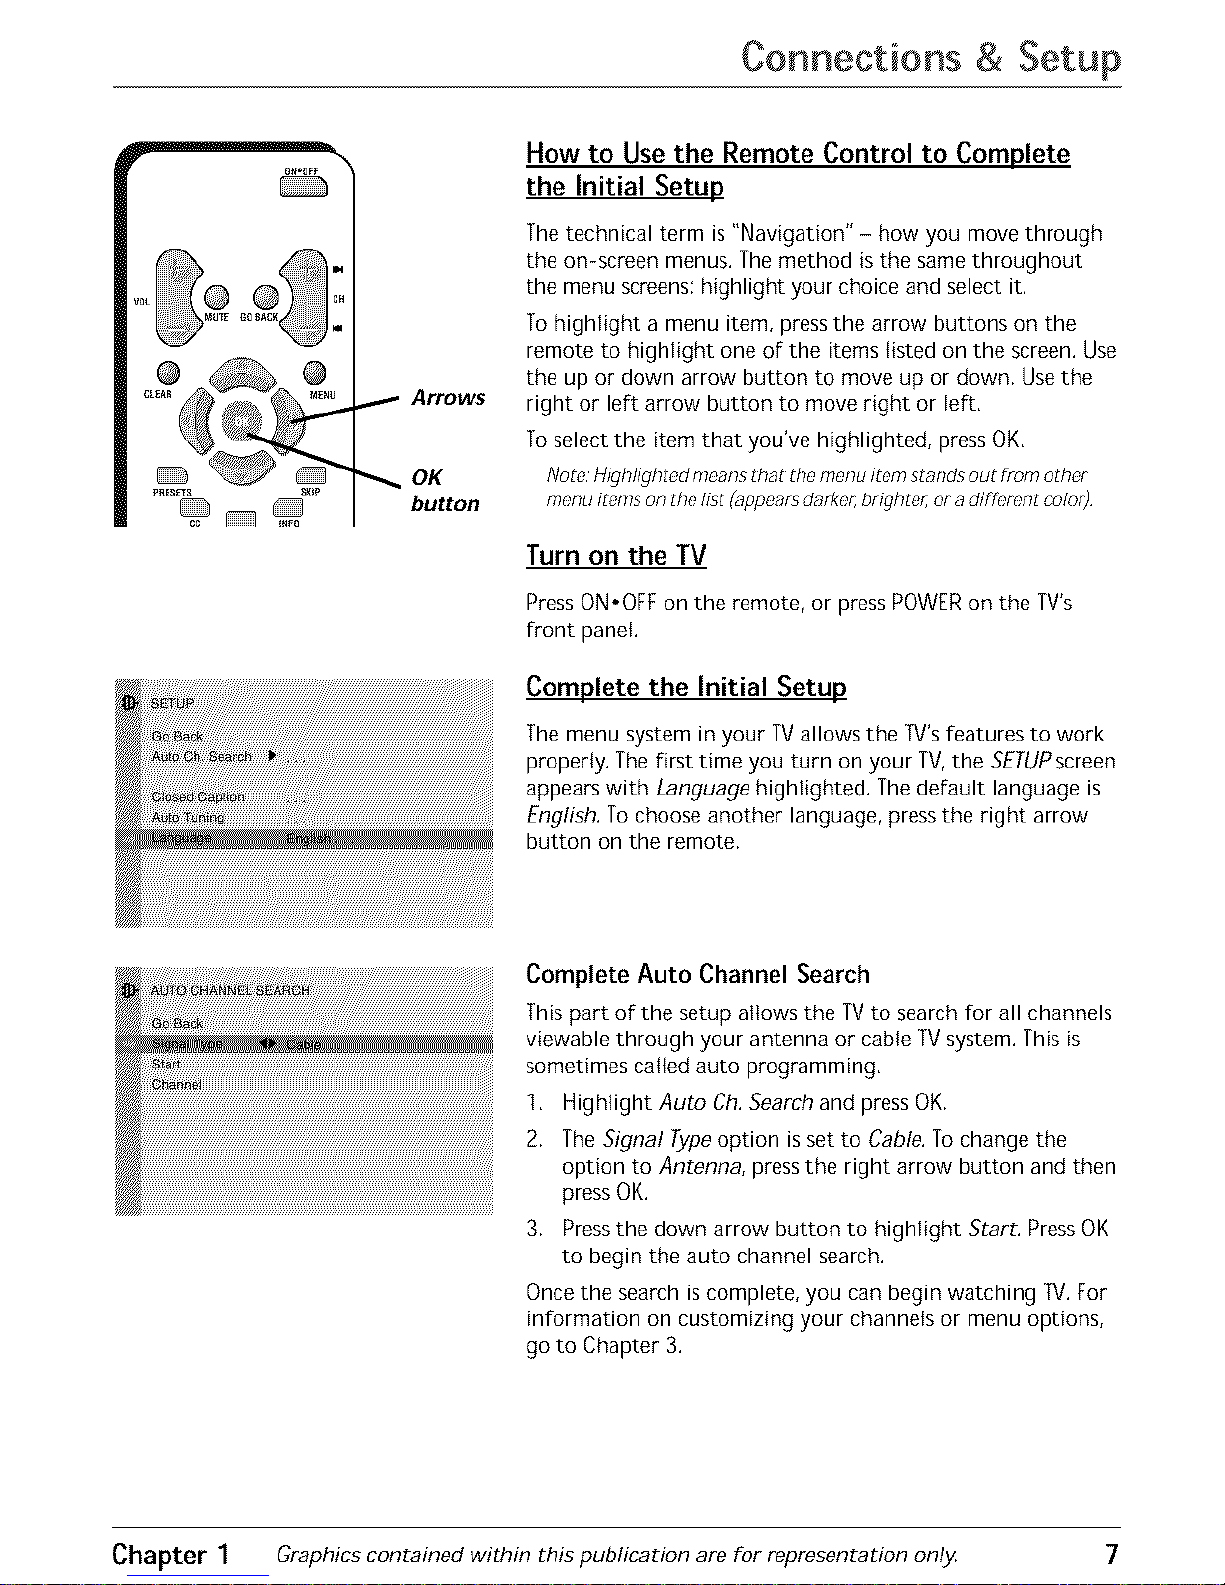
_- Arrows
OK
button
How to Use the Remote Control to Complete
the Initial Setup
The technical term is "Navigation" - how you move through
the on-screen menus. The method is the same throughout
the menu screens: highlight your choice and select it.
To highlight a menu item, press the arrow buttons on the
remote to highlight one of the items listed on the screen. Use
the up or down arrow button to move up or down. Use the
right or left arrow button to move right or left,
To select the item that you've highlighted, press OK,
Note,H_ghhghtedmeansthat the menu itemstand_out from other
menu immsonthehst (appearsdarke_brighter, or adfffc,mntco/u_)
Turn on the TV
PressON.OFFontheremote,orpressPOWERon theTV's
front panel
Complete the Initial Setup
The menu system in your TVallows the [V's features to work
properly. The first time you turn on your TV,the SETUPscreen
appears with Language highlighted. The default language is
English. To choose another language, press the right arrow
button on the remote.
Complete Auto Channel Search
This part of the setup allows the TV to search for all channels
viewable through your antenna or cable TV system. This is
sometimes catted auto programming,
1, Highlight Auto Ch. Search and press OK.
2. The Signal Type option is set to Cable. To change the
option to Antenna, press the right arrow button and then
press OK.
3. Press the down arrow button to highlight Start. PressOK
to begin the auto channel search.
Once the search is complete, you can begin watching TV. For
information on customizing your channels or menu options,
go to Chapter 3.
Chapter 1 Graphics contained within this publication are for representation only 7
Page 10

Connections & Setup
ON=OFF
PRESETS SKIP
CC INFO
SLEEP
iNPUT
The Buttons on the Remote Control
(0-9) Number Buttons Enter channel numbers and time
settings directly through the remote control,
To enter a one-digit channel, enter a zero first, To enter a
two-digit channel, press the two digits and expect a few
seconds delay, This is if you want to enter a third digit,
Arrows Used to highlight to different items in the TV menu
and to adjust the menu controls,
CC Toggles closed captioning on and off,
CH + or CH - Scans up or down through the current
channel list, Press once to change the channel up or down;
press and hold to continue changing channels,
CLEAR Removes any menu or display from the screen and
returns you to normal viewing,
GO BACK Returns you to the previous channel,
INFO Brings up channel banner,
INPUT Toggles through the available input sources (V/D,
5VID, FRNT and current channel),
MENU Brings up the Main menu,
MUTE Reduces the TV's volume to its minimum level, Press
again to restore the volume,
OK When in the menu system, selects highlighted items,
ON,OFF Turns the TV on and off,
PRESETS Brings up sound and picture presets,
SKIP Press once before changing channels and the TV will
wait 30 seconds before returning to the original channel,
Press repeatedly to add more time,
SLEEP Sets the TVto turn off, Each time you press SLEEP
the clock adds 15 minutes (up to four hours), To cancel,
continue to press SLEEP until you reach g,
VOL - or VOL + Decreases or increases the TV's volume,
Using the INPUT Button
Use the INPUT button to scroll through the available video
input channels and view components you have connected to
the TV,
1, Make sure the component you want to view is turned ON.
2, Press INPUT to tune to an available video input source
and view the component,
3, To return to the previous channel, continue pressing
INPUT.
8 Graphics contained within this publication are for representation only Chapter 1
Page 11

Channel Banner
There are several items that might appear on-screen when
you press the INFO button on the remote, This display is
called the Channel Banner. The following list describes the
items on the Channel Banner screen (left to right and top to
bottom).
SAP
CC
Stereo or Mono
Skip:0:30
07:78am
06 ABCDEF
(Ix
Displayed when the current channel
is broadcasting SAP (Second Audio
Program) information.
Displayed when V-Chip has been
activated.
Displayed when Closed Captioning is
available on the current channel.
Stereo displayed when the current
channet is broadcasting in stereo.
Mono displayed when the current
channel is broadcasting in mono.
Corresponds to the SKiP button.
Shows the amount of time left before
the TV switches back to the previous
channel.
Displays the current time.
Displays the current channel and
labet assigned to the channel,
Displayed when you mute the sound.
Why You Should Use the Auto Tuning Feature
The auto tuning feature tunes the TV to the correct channel for different
components you have connected to your TV (like a VCR, DVD Player, etc.) When
you set up auto tuning in the menu system you don't have to remember to change
your TV to channet 3, for exampie, when you want to watch the tape in your VCR.
NotE,Auto tun#lg Jsno_avaflablewl_hyour remote }4_umu_ havea universalremote,(_old
s_aratu/y) touse_heauto tuning feature
How to Set Up the Auto Tuning Feature
The way you set up the auto tuning feature in the TV'smenu corresponds to the
component buttons on the remote and the way you have each component
connected to your TV.When you set up auto tuning, you're telling the TV what
channel to tune to when you press the VCR1, VCR2, DVD, or SAT,CABLE button on
the remote control.
1, PressMENU(the MAIN MENU appears).
2. Highlight Setupand pressOK on your remote control.
3. Highlight Auto Tuningand pressOK.
Chapter 2 Graphics contained within this publication are for representation only 9
Page 12

Using the TV's Features
4, Choose which channel you want to set:
Set VCR1 Lets you set up the channel the TVtunes to when you press the
VCR1 button,
Set VCR2 Letsyou set up the channel the TVtunes to when you pressthe
VCR2button,
SetSAT/CABLE Letsyou set up the channel the TVtunes to when you press
the SAT.CABLEbutton.
Set DVD Letsyou set up the channel the TVtunes to when you pressthe
DVDbutton,
5, Press the right arrow button to setect the choice that matches the way you
have the component connected to this TV,
The choices and a brief explanation follow:
N/A Choose this if you don't have this particular
component connected to the TV, or if you don't want the TV
to automatically tune to the correct channel when you're
using this component,
CHO2(SAT/CABLE only) Component is connected to the
ANTENNA jack on the back of the TV, and you want the TVto
tune to channel 2 when you press the SAT*CABLE button on
the remote, Reminder: make sure the component's Channel
2/3/4 switch is set to channel 2. Usually this switch ison the
back of the component,
CHO3or 04 Component is connected to the ANTENNA jack
on the back of the TV, and you want the TVto tune to
channel 3 when you press the corresponding button on the
remote, Reminder: make sure the component's Channel 3/4
switch is set to the appropriate channel,
VII:)7 Component is connected to the VIDEO or S-VIDEO jack
on the back of the TV and you want the TVto tune to a video
input channel when you press the corresponding button,
FRNT(FrontVideolnput) Component is connected to the
VIDEOjack on the front of the TV and you want the TV to
tune to the front video input channel when you press the
corresponding button.
Parental Controls and V-Chip
The choices in the USA V-CHIP menu involve software inside your TV(referred to
as V-Chip) which allows you to block TV programs and movies based on violence,
sex, or other content you may believe children should not view,
Once you block programs, you can unblock programs by entering a password,
By default, the software inside your TV is turned "off," For instructions to turn on
V-Chip, go to page 17,
10 Graphics contained within this publication are for representation only Chapter 2
Page 13

Using the TV's Features
How V-Chip Works
V-Chip reads the program's age-based rating (TV-MA, TV-14, etc,) and content
themes [(Violence (V), Adult Language (L), etc,)], Efyou have blocked the rating
and/or content themes that the program contains, you will receive the message
7his channel has not been approved for viewing, Change channel or press OK to enter
password and temporarily deactivate the Parental Control,
Broadcasters are not required to provide content themes, so programs received
with no content themes wilt only be blocked if you block their age-based rating,
You can also block out programs that have been given a rating of Not Rated, and
programs that are considered unrated, The TVage-based ratings and content
themes you can block follow:
USA V-Chip Rating System
TV-MA (Mature Audience Only) Specifically designed to be viewed by adults and
may be unsuitable for children under 17, It contains one or more of the following
content themes: crude indecent language (L), explicit sexual activity (S), or
graphic violence (V),
TV-14 (Parents Strongly Cautioned) Contains some material that many parents
would find unsuitable for children under 14, Parents are strongly urged to exercise
greater care in monitoring this program and are cautioned against letting children
under the age of 14 watch unattended. This program contains one or more of the
following content themes: intensely suggestive dialogue (D), strong coarse
language (L), intense sexual situations (S), or intense violence (V),
TV-PG (Parental Guidance Suggested) Contains material that parents may find
unsuitable for younger children. Many parents may want to watch it with their
younger children. The program contains one or more of the following content
themes: some suggestive dialogue (D), infrequent coarse language (L), some sexual
situations (S), or moderate violence (V),
TV-G (General Audience) Most parents would find this program suitable for all
ages, It contains little or no sexual dialogue (D) or situations (S), no strong
language (L), and little or no violence (V),
TV-Y7 (Directed to Children 7 years and older) Designed for children ages 7 and
above, It may be more appropriate for children who have acquired the
developmental skills needed to distinguish between make-believe and reality.
Themes and elements in this program may include mild fantasy violence (FV) or
comedic violence, or may frighten children under the age of 7,
TV-Y (All Children) Themes and elements in this program are designed for a young
audience, including children from ages 2-6. It is not expected to frighten younger
children.
Chapter 2 Graphics contained within this publication are for representation only 11
Page 14

Using the TV's Features
Canadian English V-Chip Rating System
18+ (Adults) Programming intended for adults 18 and older, tt may contain
elements of violence, language, and sexual content which could make it unsuitable
for viewers under 18. Violence Guidelines: May contain violence integral to the
development of the plot, character or theme, intended for adult audiences, Other
Content Guidelines: May contain graphic language and explicit portrayals of
nudity and/or sex.
14+ (Viewers 14 and over) Programming contains themes or content which may
not be suitable for viewers under the age of 14, Parents are strongly cautioned to
exercise discretion in permitting viewing by pre-teens and early teens, Violence
Guidelines: May contain intense scenes of violence, Could deal with mature themes
and societal issues in a realistic fashion. Other Content Guidelines: May contain
scenes of nudity and/or sexual activity, There could be frequent use of profanity.
PG (Parental Guidance) Programming intended for a general audience but which
may not be suitable for younger children (under the age of 8). Parents may
consider some content inappropriate for unsupervised viewing by children aged
8-13. Violence Guidelines: Depictions of conflict and/or aggression wilt be limited
and moderate; may include physical, fantasy, or supernatural violence. Other
Content Guidelines: May contain infrequent mild profanity, or mildly suggestive
language. Could also contain brief scenes of nudity.
G (General Audience) Programming considered acceptable for all age groups.
While not designed specifically for children, it is understood younger viewers may
be part of the audience, Violence Guidelines: Wilt contain very little violence,
either physical or verbal or emotional. Will be sensitive to themes which could
frighten a younger child, will not depict realistic scenes of violence which
minimize or gloss over the effects of violent acts. Other Content Guidelines: There
may be some inoffensive slang, no profanity and no nudity,
C8+ (Children 8 and Older) Programming generally considered acceptable for
children 8 years and over to watch on their own. Violence Guidelines: Violence will
not be portrayed as the preferred, acceptable, or only way to resolve conflict or
encourage children to imitate dangerous acts which they may see on television.
Any realistic depictions of violence will be infrequent, discreet, of low intensity and
will show the consequences of the acts. Other Content Guidelines: There will be no
profanity, nudity or sexual content,
C (Children) Programming intended for children under age 8. Violence Guidelines:
Careful attention is paid to themes which could threaten children's sense of
security and well being, There wilt be no realistic scenes of violence. Depictions of
aggressive behaviour will be infrequent and limited to portrayals that are clearly
imaginary, comedic or unrealistic in nature. Other Content Guidelines: There will be
no offensive language, nudity or sexual content.
12 Graphics contained within this publication are for representation only Chapter 2
Page 15

Using the TV's Features
Canadian French V-Chip Rating System
18+ (Adults) Programming is for adults only, This program contains sustained
violence or extremely violent scenes.
16+ (Viewers 16 and over) Programming is not suitable for those under age 16.
This program contains frequent scenes of violence or intensely violent scenes,
13+ (Viewers 13 and over) Programming may not be suitable for children under
the age of 13, This program either contains several violent scenes or one or more
scenes that are violent enough to affect them. Viewing in the company of an adult
istherefore strongly recommended for children under the age of 13.
8+ (Viewers 8 and over) Not recommended for young children. This program is
suitable for most audiences, but it contains mild or occasional violence that could
upset young children, Viewing in the company of an adult is therefore
recommended for young children (under the age of 8) who do not distinguish
between reality and imagination,
G (General Audience) This program is suitable for audiences of all ages. Lt contains
no violence, or any violence that it does contain is either minimal or is presented
in a humorous manner, as a caricature, or in an unrealistic way,
USA V-Chip TV Rating Limit
The V-Chip TV Rating Limit lets you decide which TV
programs can and cannot be viewed.
To set TV programming limits:
t, Choose ParentalControlfrom the MAIN MENU (the
PASSWORD screen appears the first time you enter the
Parental Control menu). Create your password using the
number buttons on the remote.
2, Highlight and select USA V-Chip.Then select TV
Ratings.
3, Onceyou gettothe TVRAflNGLtMITscreen, usethe
arrow buttons and OK on your remote to change the
status of a TV program rating or content theme from
View to Block,
4. For TVrating limits to take effect, turn on V-Chip active
in the PARENTALCONTROLmenu (box hascheck mark),
The foflowing sections give you more details about how to
change the status of TV program limits.
Note Ifyuu Forgetyour passwoldyou canresetit Makesumtile
TVJsoff Simultaneous/ypressandhold VOLon the TV_front
panel andCLEARon theremoteForapproximately 5seconds Enter
anew passwordnext timeyou accessthePARENTALCONTROL
fZldWLl
Chapter 2 Graphics contained within this publication are for representation only 13
Page 16

Using the TV's Features
The V-Chip Rating Screen
The following is an example of where items are located within the TV RATtNG LIMIT
screen.
Rating Status Field
Lets you select whether the status of the age-based rating limit
to the left is View or Block,
Rating Field
Lets you select from
a list of age-based
ratings you can
block or view.
Content Themes
Lists the content themes
you can block or view.
Content Status Fields
content themes to view
for the selected rating,
and whether the status of
the content theme is
currently View (V) or Block
(B).
Rating Settings Area
Lets you see the current block/view state of age-based ratings and
associated content.
Hierarchy of Age-Based Ratings
TV-MA Mature Audience Only
TV 14 Parents Strangly Cautioned
TVPG Parental Guidance Suggested
TVG GeneralAudience
TV Y7 D_rectedto Children 7 years and
older
TV Y All Children
Blocking Age-Based Ratings
You can automatically block all program ratings above a
specified age-based rating level,
To block programs with higher ratings:
1. Press the up or down arrow button to scroll to the rating
corresponding with the lowest rating you do not want
the child to watch,
2. Press the OK button to toggle between VlewandBtock,
[he status for the rating listed to the left and all higher
ratings automatically changes to Block.
3. Press the up or down arrow button to highlight Go back
and press OK,
4. Turn on V-Chipactive in the PARENTALCONTROLmenu
(box has check mark) for rating limits to take effect.
Viewing Age-Based Ratings
After you block age-based ratings, you can change some of
the ratings back to Vie_z
1. Press the up or down arrow button to select the rating
with a status of Block.
2. PressOKto select Vie_
14 Graphics contained within this publication are for representation only Chapter 2
Page 17

Using the TV's Features
D
L
S
V
FV
Content Themes
Sexually expficit dialogue
Adult language
Sexualsituations
Violence
Fantasy Violence
Blocking Specific Content Themes
You can biock programs based on their content, (Content is
represented by the D, L, S,V and FV on your screen.) When
you block a content theme for a particular rating, you
automatically block that content theme for higher rated
programs as well,
To block program content:
t, Determine the content themes you want to block,
2, Press the down arrow button to scroll to the rating
whose content theme you want to change,
3, Press the right arrow button to move the highlight to a
particular content theme status,
4, Press the OK button to change its status to B, (tn the
example to the left, you block the language (L)
corresponding with TV-14. The language for TV-MA is
blocked as welt),
NOtOS; BfoadcBstdf5 Bfe riot required tO provide contdnt thofT?es o7
ago basedmt_ngs
Youmustrememberto acdvateParentalg'ontml_for mdng kmits to
takeeffect
Viewing Specific Content Themes
if you block specific content themes, you have the option of
going back and changing some of the content themes back
to (V)Vie_
1. Determine the content themes you want to changeto (V)
W_e_z
2, Press the down arrow button to scroll to the rating
whose content theme you want to change, such as B
under language ([) corresponding with TV-14.
3. Press the right arrow button to move the highlight to a
particular content theme status,
4. Press the OK button to change the status back to _Z Your
child wou[d then be able to watch programs with the
TV-14 adult language content, but not programs with
TV-MA language content.
Note, Onlythe content themestatus correspondingto TV 74[L)
languagechangesto (V) Vi_,wH_gherratedcontent themes,suchas
that for ]3/MA languagE!do not change
Chapter 2 Graphics contained within this publication are for representation only. 15
Page 18

Usin9 the TV's Features
Blocking Canadian V-Chip Ratings
tf you receive Canadian programs you can block Canadian
English and French V-Chip by ratings only, When you block a
particular rating, you automatically block the higher rated
programs as well,
[o block Canadian English and French program ratings:
1, Select Canada V-Chipfrom the PARENTAL CONTROL
menu,
2, Highlight English Ratings or FrenchRatings and press
OK,
3, Determine the rating you want to block,
4, Press the down arrow button to scroll to the rating you
want to change.
5. Press the OK button to change its status to block (the
lock icon appears and all ratings above the one you
selected change to lock).
V-Chip Movie Rating Limit
Set movie rating limits by blocking movies rated above a specified level.
To access the Movie Rating Limit menu:
1. Press MENU on the remote control (the MAtNMENUappears).
2. Select ParentatControl.
3. Select USA V-Chip.
4. Select Movie Ratings.
Blocking Movie Ratings
Once you are in the Movie Rating Limit menu, follow the same steps described for
blocking Canadian V-Chip Ratings.
V-Chip Exempt Program Block
The Exempt Prgms, option lets you decide if programs that the V-Chip recognizes
as unrated can be viewed. Hnrated TV programs may include news, sports, political,
religious, local and weather programs, emergency bulletins, public announcements,
and programs without ratings. The Exempt option applies to both USA and
Canadian unrated programs and Canadian programs rated E.
Unlocked All unrated programs are available,
Locked All unrated programs are not available.
Note:Youmu_t rememberto activate F g'h/pForradng limits to takeeffect
Press the down arrow to highlight Exempt Prgms. Then press the right arrow to
toggle between the lock and unlock icon.
16 Graphics contained within this publication are for representation only. Chapter 2
Page 19

Using the TV's Features
V-Chip Active
Selecting this option lets you activate and deactivate parental control settings,
1. From the PARENTAL CONTROL menu, press the up or down arrow to highlight
V-Chip active.
2, Pressthe right or left arrow to turn on (box has check mark) or off (box doesn't
have check mark) V-Chip active,
If you do not activate V-Chip, none of the settings for V-Chip will take effect,
If you forget your password you can reset it, Make sure the TV is off,
Simultaneously press and hold VOL- on the TV's front panel and CLEAR on the
remote for approximately 5 seconds, Enter a new password next time you access
the PARENTAL CONTROL menu,
Front Panel Lock
Selecting this option lets you {ock (disable) or unlock (enable) the TV's front panel.
The remote still tunes to any channel, When using this as a Parental Control
method, remove access to any remote that is capable of operating the television,
1, From the PARENTAL CONTROL menu, press the up or down arrow to highlight
Lock Fr, Panel,
2. Pressthe right or left arrow to turn on (box has check mark) or off (box doesn't
have check mark) front panel lock,
Change Password
Selecting this option lets you simply create a new password at any time, Once you
enter a new password from Change Passwd. in the PARENTAL CONTROLmenu it is
the password you use until you change it again.
Chapter 2 Graphics contained within this publication are for representation only 17
Page 20

Sound Menu
7_ebte [ncreases or decreases the treble,
Bass Increases or decreases tbe bass.
Balance Press the right arrow to increase the audio output
in the right speaker; press the left arrow to increase the
audio output in the left speaker.
Sound Type Press the right arrow to scroll through the
available audio types, which control the way the sound
comes through your speakers: Mono piays the sound in mono
only, Use this setting when receiving broadcasts with weak
stereo signals; and Stereo to split the incoming stereo audio
signal into left and right channels. Most TVprograms and
recorded materials have stereo audio, The word Stereo
appears on the TV when you tune to a program that is
broadcast in stereo.
SAP (Second Audio Program) Plays the program's audio in
a second language, if one is available. The TVdispiays the
word SAP when you tune to a program that is broadcast with
SAP information. SAP audio is broadcast in mono. SAP is also
used to broadcast a program's audio with descriptions of the
video for the visuafly impaired.
Picture Menu
The PICTUREmenu options apply to the video for the main
TV and video input selections.
Picture Preset Press the right arrow to scroll through the
available picture preset settings: Natural, Bright, Soft, and
Personal. Choose the setting that is best for your viewing
environment.
Auto Color Turn this option on to automatically correct the
color of the picture, This is especially useful for tracking
realistic flesh tone colors as you switch channels.
Brightness Adjusts the brightness of the picture.
Color Adjusts the richness of the color.
Contrast Adjusts the difference between the light and dark
areas of the picture,
Sharpness Adjusts the crispness of the edges in the picture.
77nt Adjusts the balance between the red and green levels.
When you change any of these picture settings, the Picture
Preset changes to Personal. Use the left or right arrow
button to make adjustments. To return to the PICTURE menu,
press the up or down arrow button.
18 Graphics contained within this publication are for representation only Chapter 3
Page 21

Using the TV's Menu System
Setup Menu
Auto Ch. Search (Auto Channel Search) Allows you to
choose your signal type and begin an auto channel search.
Signal Type Press the left or right arrow to toggle
between the signal your TV is receiving. Choose Cable if
you are currently using cable or a cable box for TV
signals. Choose Antenna if you are currently using an
off-air antenna for TV signals.
Start Searches for channels the signal is receiving and
stores them in the TV'schannel list. Go to page 7 for
more information.
List & Labels Edit the channels in the list or choose labels
for each channel, To delete a channel from the channel list,
highlight Channel and use the left or right arrow to select
the channel. Then highlight In list and press the OK button.
The box should no longer display a check mark, To add a label
to a channel, select the channel in the Channel option, Press
the down arrow to highlight Label Press the right arrow to
highlight the first space. Use the up or down arrow to ascend
or descend through the characters. Continue to press the
right arrow to highlight the space and the up or down arrow
to add a character. Press OK when you're done adding a label.
Closed Caption Many programs are encoded with closed-
captioning information, which lets you display the audio
portion of a program as text on the TV screen.
Closed captioning is not available on all channels at all times.
Only specific programs encoded with closed-captioning
information are applicable, When a program is closed
captioned, CC is displayed in the channel banner. Go to
Chapter 2 for more information about the channel banner.
The closed caption options are:
CCDisplay Lets you choose the way closed captioning
information is shown on the screen,
Off No captioning information displayed,
On Captioning information always appears, when
available.
Muted On Displays captioning information, when
available, whenever the TV's sound is muted by
pressing the MUTE button. The captioning
information is not displayed when the sound is not
muted.
Chapter 3 Graphics contained within this publication are for representation only 19
Page 22

Using the TV's Menu System
CC Mode Choose which captioning mode is used for displaying captioning
information. If you are unsure of the differences among the modes, you may
prefer to leave the closed captioned mode set to CO1, which displays complete
text of the program in the primary language in your area,
Auto Tuning Not available with your remote. Go to Chapter 2 for details about
the Auto Tuning feature.
Language Lets you select your preferred language for the menus.
Parental Control Menu
TheParentalControl menu was explained in Chapter 2. Goto page 10 for more
information,
Time Menu
SleepTimer Lets you set the TV to turn off after a given
time, Press the right arrow to add 15 minutes to the clock
(up to four hours),
Time ref, Ch Choose a channel so the TVsets the time for
you, Note that local channels usually broadcast the time.
Time Time is set if you select a reference channel (see
above). If time is not obtained, then enter it manually, If it is
8:25, for example, you must first press the number 0 on the
remote, then number 8, then 2 and then 5. Use the OK
button to choose between AM and PM
Wake-Up Timer Lets you set the TVto turn itself on,
NotE, Whendie TVturns on by thewake Liptimer and no mmo_c,or
front panelbuttons arepressedfor 2 hours,the TVwill Olin itsolf ofL
Wake-Up Time Lets you set the time you want the TV to
turn itself on.
Wake-Up Ch Lets you select a specific channel the TVtunes
to when the wake-up timer is set.
20 Graphics contained within this publication are for representation only Chapter 3
Page 23

Troubleshooting
Most problems you encounter with your TV can be corrected by consulting the
following troubleshooting list.
Nute for LLS cusEomels: If you prefer, we carl provide you w_th the name of an Authorized
Serwce Rdpresentadve who wlfl ws/_your home for a fee _o lnstall your elc,ctmn_¢
entertalnmen_ sys[c,m and to/nstrLlct you lu /_soperr_oon Fur dL,taiS about this sefwce call
7 888 206 3359 Foraddldonal assistance while usingyour GEproduc_, plc,ase vlsz_
wwwhonTe e/octyof?lcs l?eU_u_ott?eysupRoFt:
TVProblems
TVwon't turn on
Make sure the TV is plugged in.
Check the wall receptacle (or extension cord) to make sure it is "live" by plugging in
something else.
Something might be wrong with your remote control, Pressthe POWERbutton on
the front of the TV.If the [V turns on, check the remote control solutions on page
22,
The front panel controls may be locked (disabled). Usethe remote control to unlock
the front panel controls by selecting the Lock F_Panel in the PARENTALCONTROL
menu and pressOK (box won't have check mark),
Buttons don't work
The front panel controls may be locked (disabled). Usethe remote control to unlock
the front panel controls by selecting the Lock fr Panel in the PARENTALCONTROL
menu and pressOK (box won't have check mark),
Unplug the TVfor two minutes and then plug it back in, Turn the TVon and try
again,
TV turns off unexpectedly
Sleep timer might have been activated. Goto page 20 for instructions.
Wake-Up timer turned on the TV and no remote or front panel buttons were
pressed for two hours,
Electronic protection circuit may have been activated because of a power surge,
Wait 30 seconds and then turn on again. If this happens frequently, the voltage in
your house may be abnormally high or low.
Unplug TV.Wait five minutes. Plug it in again,
TV turns on unexpectedly
Wake_Up timer might have been activated. Go to page 20 for instructions.
You might have pressed OH+, CH= or OK on the remote accidentally,
Chapter 4 Graphics contained within this publication are for representation only 21
Page 24

Other Information
Blank screen
Make sure the component connected to the TV isturned on.
Try another channel.
No sound, picture okay
Maybe the sound is muted, [ry pressing the volume up button to restore sound.
If using S-Video remember to also connect the component's left and right audio
outputjacks to the TV'sAUDIOjacks,
Can't select certain channel
Channel may be blocked or not approved through the V-Chip,
If using a VCR,check to make sure the [V/VCR button on the VCRis in the correct
mode (pressthe TV/VCRbutton on your VCR).
Noisy stereo reception
May be a weak station, Access the SOUND menu, highlight Sound Type and
then choose Mono,
No picture, no sound but TV is on
Maybe the signal type is set wrong, Goto page 19 for detailed instructions,
The channel might be blank -- change channels,
If you're watching your VCRand it's connected with coaxial cable to the ANTENNA
jack, tune the TVto channel 3 or 4 (whichever channel is selected on the 3/4 switch
on the back of your VCR),Also check to make sure the TV/VCRbutton on the VCR is
in the correct mode (pressthe TWVCRbutton on your VCR).
Sound okay, picture poor
Check antenna connections. Make sure aft of the cables are firmly connected to the
jacks,
Try adjusting sharpness function to improve weak signals, Go to page 18 for more
instructions,
Black box appears on the screen
Closed caption might be on, Check Closed Caption in the SETUPmenu. Go to page
19 for more instructions,
The Remote Control Doesn't Work
Something might be between the remote and the remote sensor on the component,
Make sure there is a clear path,
Maybe batteries in remote are weak, dead, or installed incorrectly, Put new
batteries in the remote,
You might need to drain the remote's microprocessor: remove batteries and press
the number 1 button for at least 60 seconds. Releasethe 1 button, replace the
batteries.
22 Graphics contained within this publication are for representation only Chapter 4
Page 25

Other Information
Problems with V-Chip/Parental Controls
The rating limits don't work
Youmust activate the settings.Goto the MAINMENU(pressMENUonyour
remote),selectParentalControl,highfight andturn on V-Chipactive(boxhascheck
mark),
I don't remember my password and I want to unlock the TV
if you forget your password you call reset it, Make sure the TV is off, Simultaneously
pressand hold VOL- on the TV's front panel and CLEARon the remote for
approximately 5 seconds. Enter a new password next time you access the PARENTAL
CONTROLmenu,
The V-Chip won't let me watch a program even though it's not rated as
violent.
Maybethe movie wasgivena NR(Not Rated)status.After you block movieratings,
you must unlock NRseparatelyin orderto view movieswith an NRrating.
Care and Cleaning
CAUTION: Turn OFFyour TV before cleaning,
You can clean the TV as required, using a soft lint-free cloth. Be sure to
occasionally dust the ventilation slots in the cabinet to help assure adequate
ventilation.
The TV's screen may be cleaned with a soft, lint-free cloth as well. Take care
not to scratch or mar the screen. If necessary, you may use a cloth dampened
with warm water. Never use strong cleaning agents, such as ammonia-based
cleaners, or abrasive powder. These types of cleaners will damage the TV.
While cleaning do not spray liquid directly on the screen, or allow liquid to run
down the screen and inside the TV, Also, never place drinks or vases with water on
top of the TV, This could increase the risk of fire or shock hazard or damage to the
TV.
Caution: Using video games or any external accessory with fixed images for
extended periods of time can cause them to be permanently imprinted on the
picture tube (or projection TV picture tubes). ALSO, some network/program logos,
phone numbers, etc. may cause similar damage. This damage is not covered by your
warranty,
Chapter 4 Graphics contained within this publication are for representation only 23
Page 26

Other Information
Limited Warranty
What your warranty covers:
Defects in materials or workmanship.
For how long after your purchase:
90 days from date of purchase for labor charges.
One year from date of purchase for parts.
]wo years from date of purchase for the picture tubes.
The warranty period for rental units begins with the first rental or 45 days from
date of shipment to the rental firm, whichever comes first.
What we will do:
Pay any Authorized GE Television Service Center the labor charges to repair
your television.
Pay any Authorized GE Television Service Center for the new or, at our option,
refurbished replacement parts and picture tubes required to repair your
television,
How you get service:
For screen sizes of 26" and smaller: Take your GEtelevision to any Authorized
GETelevision Service Center and pick up when repairs are complete,
For screen sizes larger than 26": Request home or pick up, repair, and return
service from any Authorized GETelevision Service Center, provided that your
television is located within the geographic territory covered by an Authorized
GETelevision Service Center. If not, you must take your television to the
Service Center location at your own expense, or pay for the cost the Service
Center may charge to transport your television to and from your home.
To identify your nearest Authorized GETelevision Service Center, ask your
dealer, look in the Yellow Pages, or call 1-800-447-1700,
Proof of purchase in the form of a bill of sale or receipted invoice which is
evidence that the product is within the warranty period must be presented to
obtain warranty service. For rental firms, proof of first rental is also required.
What your warranty does not cover:
Customer instruction. (Your Owner's Manual describes how to install, adjust,
and operate your television. Any additional information should be obtained
from your dealer).
hstallation and related adjustments,
Signal reception problems not caused by your television.
Damage from misuse or neglect.
Batteries.
Customer replacement fuses.
Damage from images burnt onto the screen.
A television that has been modified or incorporated into other products or is
used for institutional or other commercial purposes.
24 Graphics contained within this publication are for representation only Chapter 4
Page 27

Other Information
A television purchasedor servicedoutside the U.S.A.
Acts of nature, such as but not limited to lightning damage.
Product registration:
Pleasecomplete and mail the Product Registration Cardpackedwith your TV,
It wilt make it easierto contact you should it ever be necessary,Thereturn of
the card isnot required for warranty coverage.
Limitation of Warranty:
THEWARRANTYSTATEDABOVEIS THEONLYWARRANTYAPPLICABLETO
THIS PRODUCT.ALLOTHERWARRANTIES,EXPRESSOR IMPLIED(INCLUDING
ALL IMPLIEDWARRANTIESOFMERCHANTABILITYORFITNESSFORA
PARTICULARPURPOSE)AREHEREBYDISCLAIMED.NO VERBALORWRITTEN
INFORMATIONGIVENBYTHOMSONINC.,ITSAGENTSOREMPLOYEESSHALL
CREATEAGUARANTYOR IN ANYWAY INCREASETHESCOPEOFTHIS
WARRANTY.
REPAIROR REPLACEMENTAS PROVIDEDUNDERTHISWARRANTYIS THE
EXCLUSIVEREMEDYOFTHECONSUMER.THOMSONINC.SHALLNOTBE
LIABLEFORINCIDENTALORCONSEQUENTIALDAMAGESRESULTINGFROM
THEUSEOFTHISPRODUCTORARISINGOUTOFANY BREACHOFANY
EXPRESSORIMPLIEDWARRANTYON THISPRODUCT.THISDISCLAIMEROF
WARRANTIESAND LIMITEDWARRANTYAREGOVERNEDBYTHELAWSOF
THESTATEOF INDIANA. EXCEPTTOTHEEXTENTPROHIBITEDBY APPLICABLE
LAW,ANY IMPLIEDWARRANTYOFMERCHANTABILITYORFITNESSFORA
PARTICULARPURPOSEON THISPRODUCTISLIMITEDTO THEAPPLICABLE
WARRANTYPERIODSETFORTHABOVE.
How state law relates to this warranty:
Somestates do not allow the exclusion nor limitation of incidental or
consequential damages,or limitations on how long an implied warranty lasts,
sothe above limitations or exclusionsmay not apply to you,
Thiswarranty givesyou specific legal rights, and you also may have other
rights that vary from state to state,
If you purchased your television outside the United States:
Thiswarranty does not apply, Contact your dealer for warranty information.
Servicecalls which do not involve defective materials or workmanship are not
covered by this warranty. Costs of such service calls are the sole responsibility
of the purchaser.
Chapter 4 Graphics contained within this publication are for representation only 25
Page 28

Other Information
Remote Control This is
the remote control that
came packed with your
TV, Replacements or
_ _ spares can be ordered as
_ _ needed.
RCGl11TB1
2-way Signal Splitter
helps you connect to a
second TVor VCR.
VH47
Amplified VHF/UHFI
FM Antenna allows
you to easily switch
from the antenna
signal to cable or
satellite easily without
disconnecting
ANT2O0 antenna.
Screw-on Cable
attaches to the round
antenna connectors
(called 75-ohm F-type)
VH81 (3-ft) on the back of your
VH82 (6-ft) VCR or TV. The ends
screw onto the
connectors for a
secure connection,
Standard Audio/Video
VH83 cable with RCA-type
phono plugs.
S-Video Cable has
VH913 multi-pin connectors
on each end for
connecting S-Video
components to your
TV,
Description
Screw on antenna cable (3 ft)
Screw on antenna cable (6 ft)
Push on antenna cable (6 It)
Monaural VCR Dubbing Cable (6 It)
Steleo VCR Dubbing Cable (6 ft)
S Video Cable (6 It)
S Video Cable (12 ft)
2 way Signal Splitter
Amplified Antenna
Remote Control (RCG111TB1)
Audio°Video Adapter (not shown)
Surge Protector
Part No,
VH81
VH82
VH89
VH83
VH84
VH976
VH913
VH47
ANT2OO
260603
228449
SCTV4OOOC
Prices are subject to change without notice.
SCTV4000C
Price
;395
;495
;595
;595
;995
;795
;1495
;395
;4995
;31130
;445
$4995
Surge Protector
provides eight outlets,
coaxial and telephone
line protection. Audible
alarm for surge failure.
HOWTOORDER
BY PHONE: To place your order by phone, have your
Visa, MasterCard or Discover Card ready and call
1-800-338-0376, Use this number only to place an
order for accessory items listed on this page,
BY MAIL: mail money order or check in US currency
(made payable to Thomson Inc,), along with ordering
information (part numbers), phone number and
shipping address, to the following address:
Video Accessories
PO Box 8419
Ronks, PA 17573
Ait accessories are subject to availability,
Where applicable, we will ship a superseding model,
26 Graphics contained within this publication are for representation only Chapter 4
Page 29

Page 30

Page 31

Page 32

This equipment has been tested and found to comply with the limits for a Class Bdigital device,
pursuant to Part t5 of the FCC Rules. These limits are designed to provide reasonable protection against
harmful interference in a residential installation, This equipment generates, uses, and can radiate radio
frequency energy and, if not installed and used in accordance with the instructions, may cause harmful
interference to radio communications, However, there is no guarantee that interference will not occur in
a particular installation, If this equipment does cause harmful interference to radio or television
reception, which can be determined by turning the equipment off and on, the user is encouraged to try
to correct the interference by one or more of the following measures:
• Reorient or relocate the receiving antenna,
• Increase the separation between the equipment and receivec
• Connect the equipment into an outlet on a circuit different from that to which the receiver is
connected,
• Consult the dealer or an experienced radio/TV technician for help.
This Class B digital apparatus complies with Canadian ICES-O03
Please do not send any products to the Indianapolis address listed in this manual or on
the carton. This will only add delays in service for your product.
Thomson Inc.
10330 North Meridian Street
Indianapolis, IN 46290
@2003 Thomson Inc.
Trademark(s)® Registered
Marca(s) Registrada(s)
TOCOM 16161870
THOMSON
 Loading...