

Page 1
g
Auxiliary Drive to ISBus Interface Board
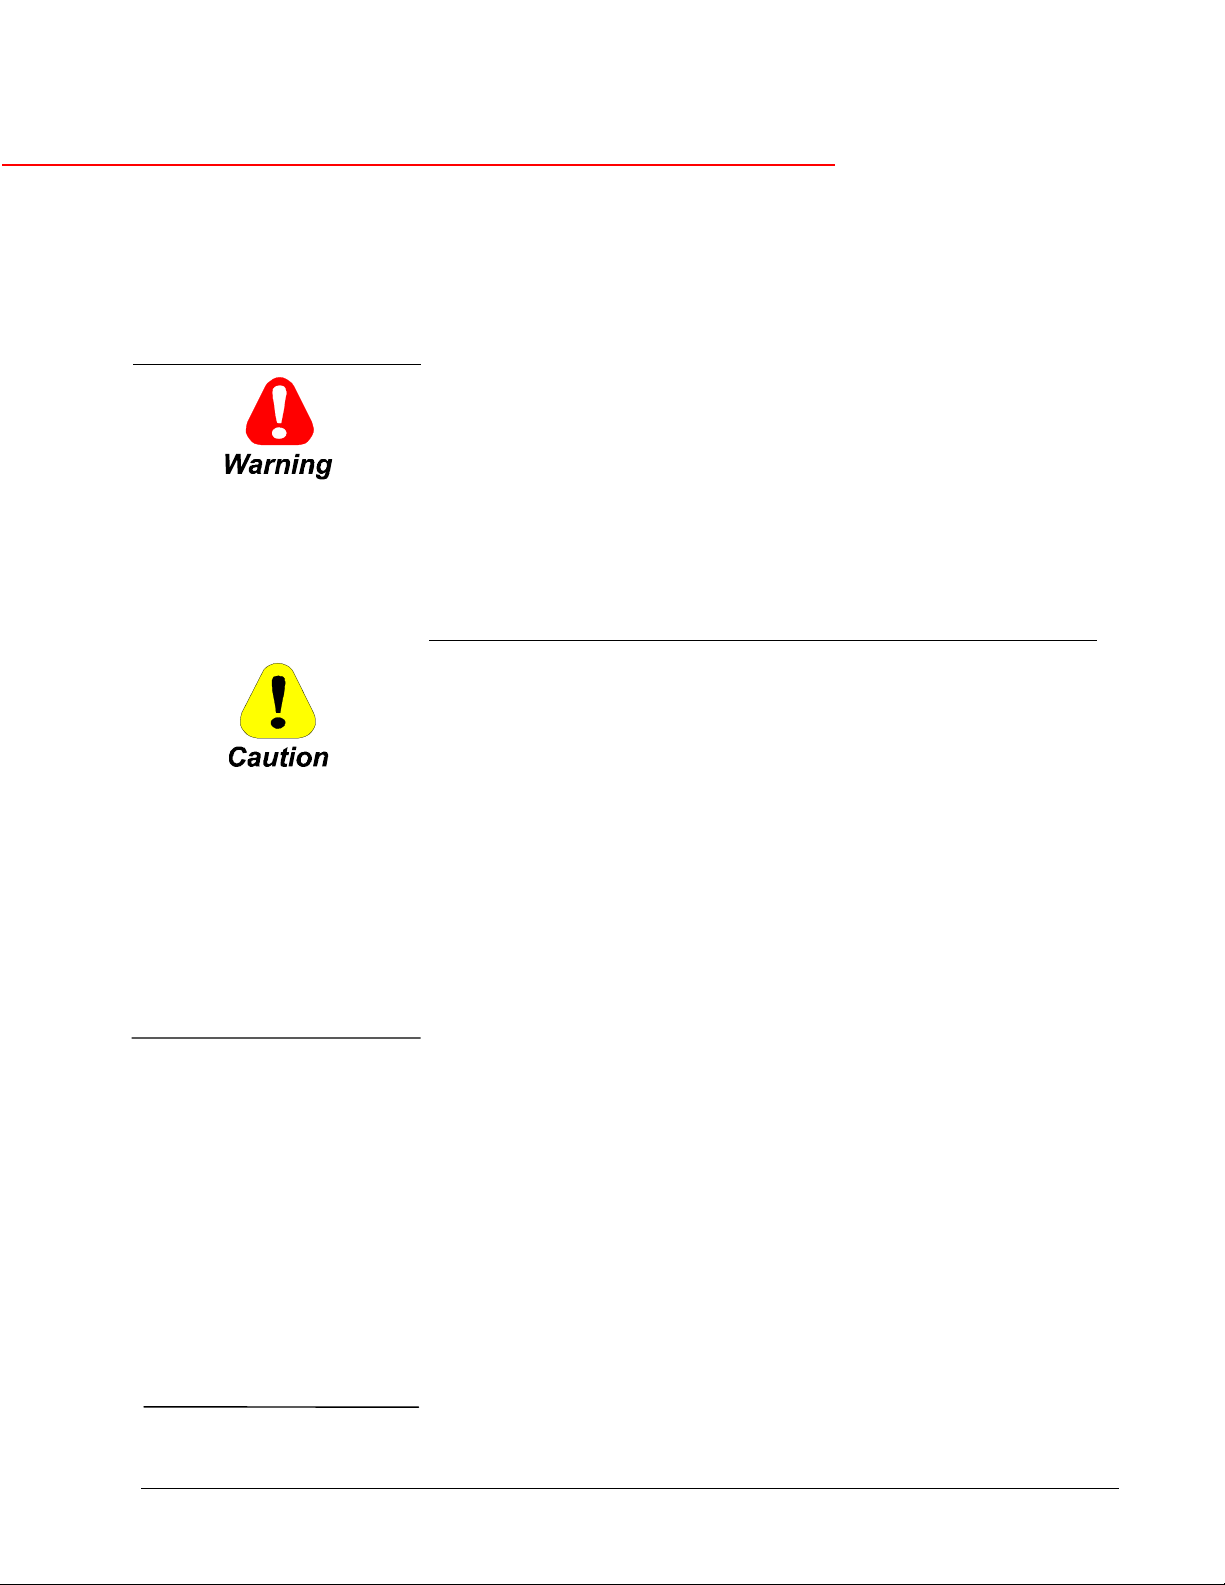
Safety Symbol Legend
Indicates a procedure or
condition that, if not strictly
observed, could result in
personal injury or death.
GEI-100305
GE Industrial Systems
IS200ADIIH_A_ _
These instructions do not purport to cover all details or variations in equipment, nor to
provide every possible contingency to be met during installation, operation, and
maintenance. If further information is desired or if particular problems arise that are not
covered sufficiently for the purchaser’s purpose, the matter should be referred to GE
Industrial Systems.
This document contains proprietary information of General Electric Company, USA, and is
furnished to its customer solely to assist that customer in the installation, testing,
operation, and/or maintenance of the equipment described. This document shall not be
reproduced in whole or in part, nor shall its contents be disclosed to any third party
without the written approval of GE Industrial Systems.
Section Page
Indicates a procedure or
condition that, if not strictly
observed, could result in damage
to or destruction of equipment.
Note Indicates an essential or
important procedure or
statement.
Functional Description............................................................................................ 2
ISBus ............................................................................................................... 3
Connections ................................................................................................ 3
Performance................................................................................................ 4
Data Mapping.............................................................................................. 5
Drive Parameters ............................................................................................. 7
LAN Validation .......................................................................................... 7
LAN Faults ................................................................................................. 8
Application Data..................................................................................................... 9
LED Indicators............................................................................................... 11
Testpoints....................................................................................................... 12
Connectors..................................................................................................... 12
Installation and Renewal/Warranty Replacement................................................. 14
How to Order a Board.................................................................................... 14
Board Identification .................................................................................. 14
Warranty Terms ........................................................................................ 15
Placing the Order ...................................................................................... 15
Handling Precautions..................................................................................... 15
New Installations ........................................................................................... 16
ADII Required Parts ................................................................................. 16
Installation Procedures.............................................................................. 17
Replacement Procedures................................................................................ 18
Innovation Series is a trademark of General Electric Company, USA
Page 2
••••
Functional Description
The IS200ADII Auxiliary ISBus (Innovation Seriesä Bus) Interface board (ADII)
interfaces an AcDc2000 drive to an ISBus Local Area Network (LAN). The ADII
board resides on the backside of the first board carrier of the AcDc2000 drive.
The ADII board connects to the DS200LDCC Drive Control/LAN Communications
board (LDCC) through the LNPL ribbon cable and COM1 wire. The ADII board
receives power through the 2PL power cable from the AcDc2000 drive's power
supply board. The ADII board includes a bypass relay to maintain ISBus electrical
continuity if the drive is powered down (no external bypass module is required).
The interface signal map is derived from the Innovation Series drive system
applications signal map. Many references and feedbacks are generic and AcDc2000
drive blockware must be created to imitate the Innovation Series drive functionality.
The ADII board provides an integer variable map between the drive and controller.
The integers must be scaled to the AcDc2000 units (given in the signal map
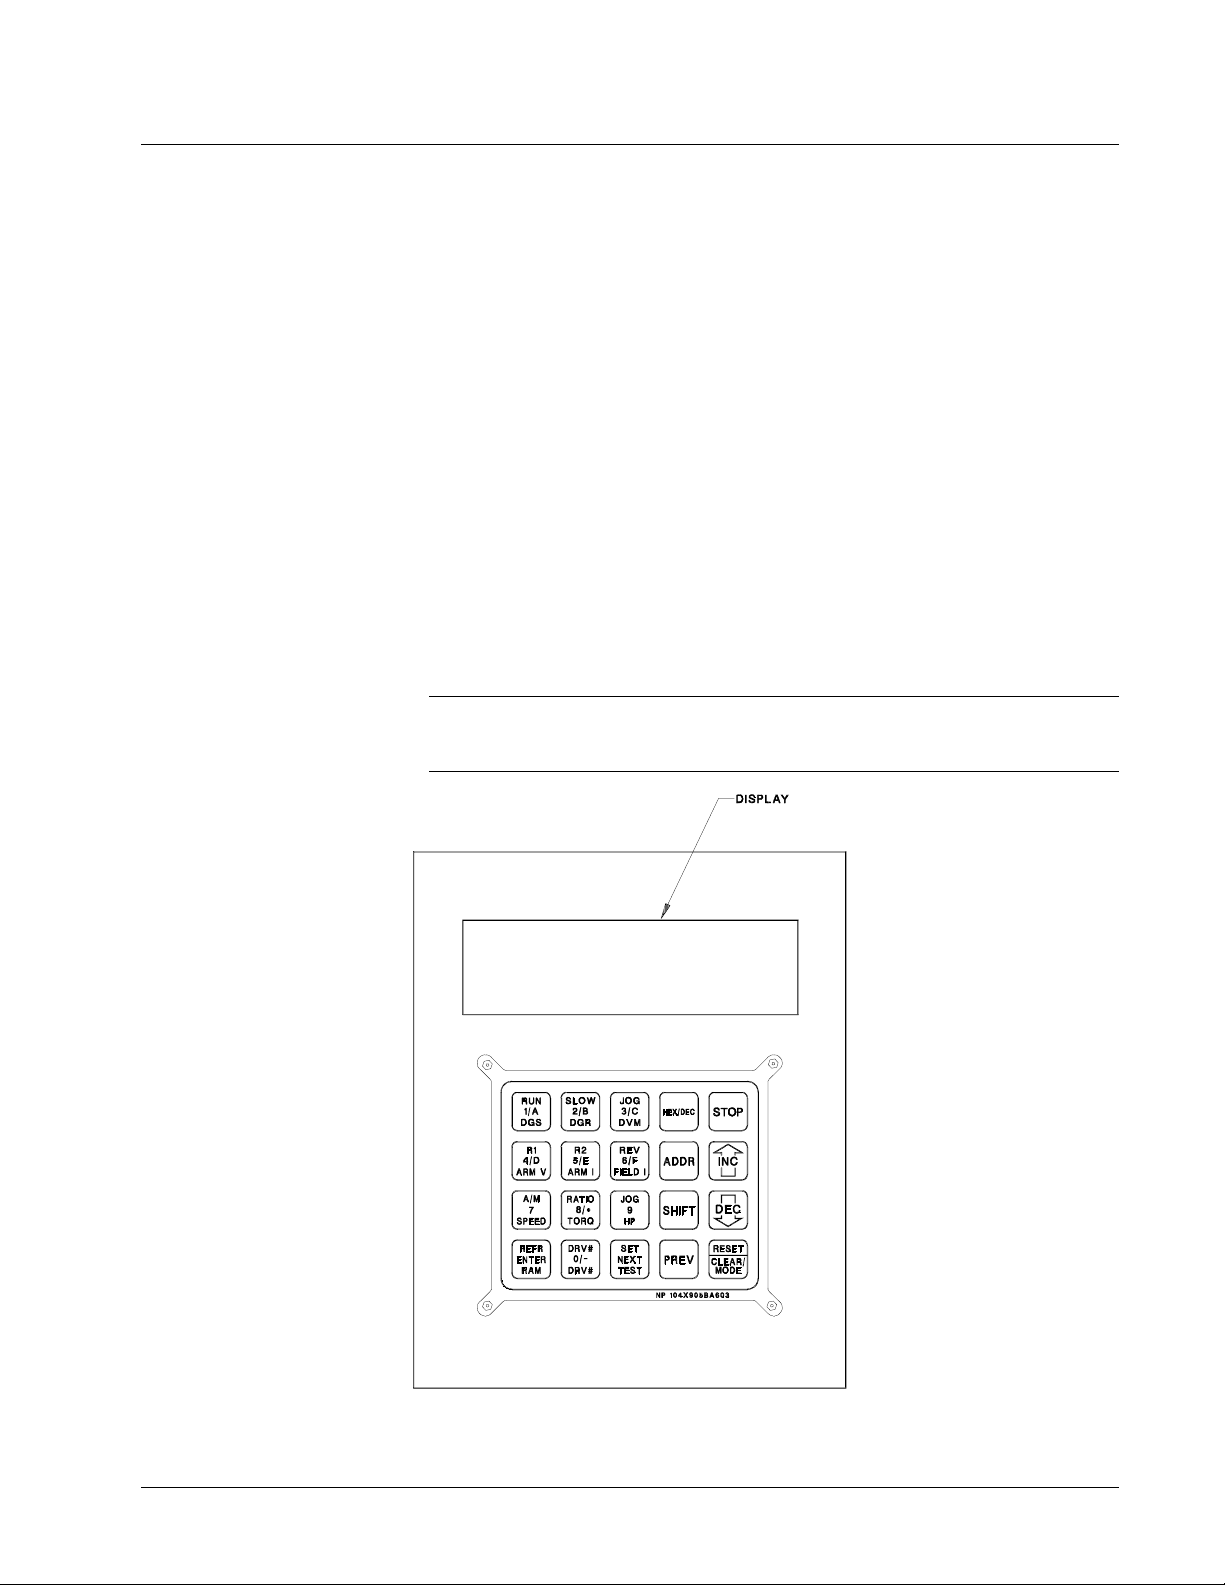
definition). Configuration of the interface is done with either the local keypad on the
LDCC board (see Figure 1) or the GE Control System Toolbox (toolbox). Refer to
the section, Data Mapping.
The ADII board has no fuses or hardware jumpers. Refer to the section, Application
Data for information on the LED indicators, testpoints, and connectors that are on
the board.
Note The ADII board can only be used in AcDc2000 drives that have the LDCC
board. It cannot be used with previous design drive control and LAN communication
boards.
Figure 1. Keypad with Display
2
Auxiliary Drive to ISBus Interface Board IS200ADII GEI-100305
Page 3
••••
ISBus
The ISBus has one controller (drop 0) and no more then 31 nodes (1-31). The master
sends out a stream of bytes containing each ISBus node's references. As the nodes
receive the stream of bytes, they pass the stream on to the next node substituting
their own feedback data in place of their reference data in the stream. When the
stream of bytes return to the master, it contains each nodes feedback data.
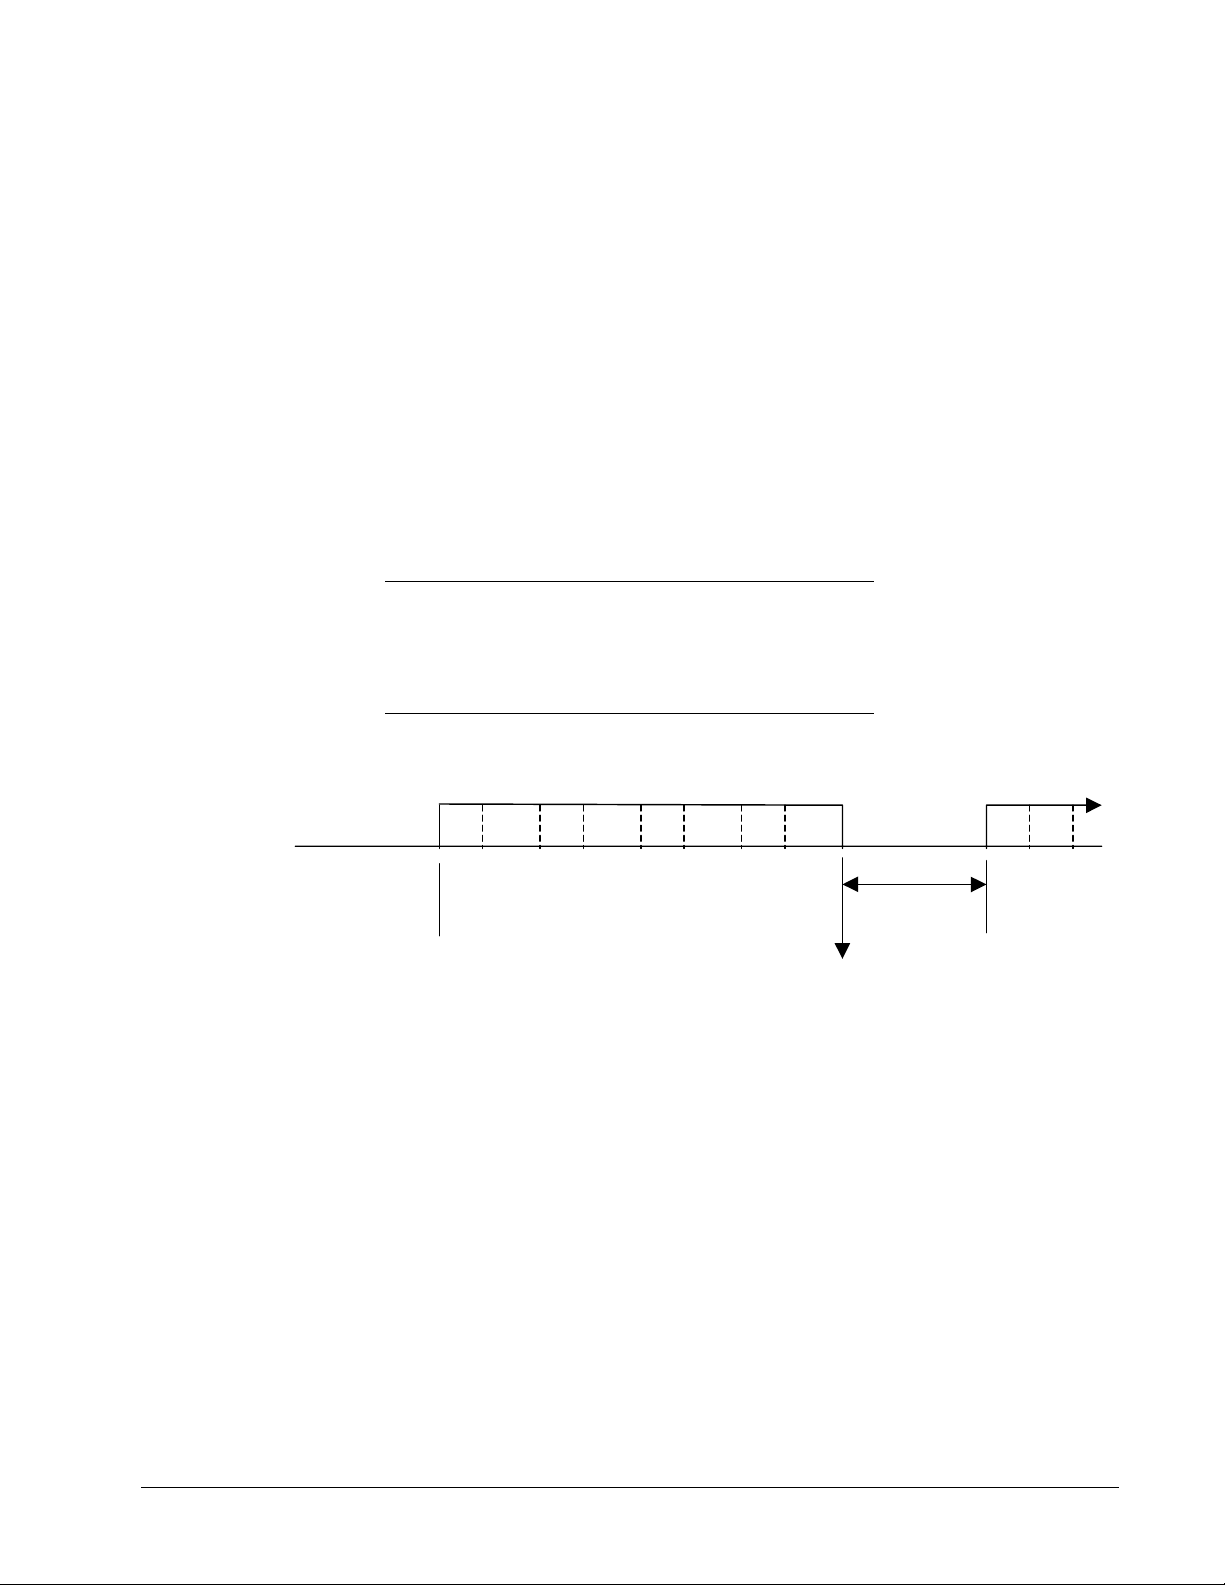
The ISBus frame rate is programmable and can be 1, 2, 4, or 8 milliseconds (ms).
The ADII board requires a time delay of 200 µsec. This allows the LAN Control
Processor (LCP on the LDCC board) to write the drive’s feedbacks into the ISBus
controller prior to the start of the next frame. The delay time at the end of a frame is
shown in Table 1. This time is valid as long as the number of pages per the frame
rate is not exceeded.
Table 1. Frame End Delay Time
Frame
Rate (ms)
1 4 200
2 8 400
4 16 800
8 32 1600
*AcDc2000 drives use a double page (refer to the following timing diagram).
Number of
AcDc2000 drives*
End of Frame
Delay Time (µµµµs)
pg
time delay
Frame à Frame à
2 µs per byte (5 Mbits/s baud rate)
64 µs per page
1 page = 1 cell = 8 variables (variable = 4 bytes in length)
1 double page = 2 cells = 16 variables
End Of Serial Data (EOSD)
(ADII ISBus controller introduction to LCP)
Connections
The ADII board interfaces to the ISBus through two RJ45 connectors, P2 (TX/OUT)
and P3 (RX/IN). The user’s cables are run into the drive package and directly to the
ADII board.
The TX/OUT connector (P2) ties to the RX/IN connector (P3) of the next device on
the ISBus. The RX/IN connector (P3) ties to the TX/OUT connector (P2) of the
previous device on the ISBus.
GEI-100305 Auxiliary Drive to ISBus Interface Board IS200ADII
3
Page 4

••••
Performance
On the ISBus, the controller sends control bits and references for each drive in a
single stream of bytes. The first drive wired to the controller receives the stream of
bytes, retrieves its command bits and references, and passes the stream of bytes onto
the next drive substituting its feedback bits and variables for the command bits and
references. When the controller receives the stream of bytes from the bus, it is
receiving the feedback bits and feedback variables from the drives.
The ISBus scan time can be selected to be 1, 2, 4, or 8 ms. These times are limited to
the number of devices on the bus. See Table 2 for performance factor descriptions.
Performance
Factor Description
Table 2. Performance Factors
Control logic
sweep rate
Configured frame
time of the ISBus
Types of devices
on the bus
Quantity of
devices on the bus
AC/DC2000 LCP
to DCP
AD/DC2000 DCP
Algorithms
AD/DC2000 DCP
Algorithms
LCP to ISBus LCP obtains drive feedbacks from the LCP/DCP dual-port RAM at the
Time required for a sweep of the control logic being executed in the
controller (typically measured in ms).
1, 2, 4, or 8 milliseconds (Set by the master).
The contribution of each device to the bus sweep rate varies with the
quantity of I/O data being exchanged with the controller. Each AcDc2000
drive contributes about 0.20 ms (200 µs). This data is used in calculating
what the frame time should be.
As the number of devices on the bus grows, so does the bus sweep rate.
This data is used in calculating what the frame time should be.
LCP will pass the reference bits and references to the drive control
processor (DCP) in one ms time with an average of 500 µs.
Many of the references are passed to the DCP in generic setpoint
variables. These variables are read by the DCP at different update times
(11, 22, or 44 ms).
Many of the feedbacks are passed from the DCP in generic feedback
variables. These variables are written by the DCP at different update
times (11 ms, 22 ms, 44 ms).
end of a frame and loads these feedbacks into the controller. These
feedbacks are sent to the master in the next ISBus frame.
4
Auxiliary Drive to ISBus Interface Board IS200ADII GEI-100305
Page 5

••••
Data Mapping
The drive is configured through its keypad or by the toolbox. Once configured, the
drive exchanges a fixed set of integer variables with the controller during each ISBus
scan.
• Variables sent to the drive are defined as references
• Variables retrieved from the drive are defined as feedbacks.
The integer variable interface map consists of 17 words of reference and 17 words of
feedback. The first two words of reference and feedback contain 32 bits. The
remaining 15 words of reference and feedback contain signed integer variables.
Tables 3 and 4 define the system application signal map and Boolean signals. Table
5 contains AcDc2000 reference and feedback values.
Table 3. Signal Map
Page 1 References
Innovation Series
1 Request Bits
2 Auto Speed Ref LAN_SPD_REF MMSSETP (V.204)
3 Spd Ref Aux RPM LAN_AUX_RPM SPDSETP (V.205)
4 Torque Ref LAN_TRQ_REF LOADADJ (V.225)
5 Spd Ref Aux Appl LAN_AUX_SPD GS1 (V.218,219) DW5LCPCFB (V.559) LAN_I_MAG Motor Current
6 Ramp Time Ref LAN_RAMP_TM GS3DWA (V.1438)
7 GP LAN Ref 1 LAN_R01_REF LANV0SP (V.206)
8 GP LAN Ref 2 LAN_R02_REF LANV1SP (V.207)
Page 2 References
Innovation Series
1 Torque Ref Aux LAN_TRQ_AUX GS3DWB (V.1439) 1 (EE.771) LFBVAR5 (V.588) LAN_R05_ADR GPLAN Fbk Reg 5
2 Speed Ratio LAN_SPD_ADJ DRAWSETP (V.209) 2 (EE.772) LFBVAR6 (V.589) LAN_R06_ADR GPLAN Fbk Reg 6
3 Diameter Ratio LAN_DIAM_ADJ DIAMSETP (V.224) 3 SPEEDREF (V.560) LAN_SREF_FBK Net Spd Ref Fbk
4 Inertia Ref LAN_J_REF GS2 (V.220,221) DW 4 Undefined
5 Undefined
6 Undefined
7 GP LAN Ref 3 LAN_R03_REF LANV2SP (V.208) 7 (EE.743) LFBVAR3 (V.568) LAN_R03_ADR GP LAN Fbk Reg 3
8 GP LAN Ref 4 LAN_R04_REF LANV3SP (V.210) 8 (EE.744) LFBVAR4 (V.569) LAN_R04_ADR GP LAN Fbk Reg 4
Innovation
AcDc2000 Feedbacks
Series
Mnemonic
Innovation
Request Bits
AcDc2000 Feedbacks
Series
Mnemonic
AcDc2000
Innovation
Series
Innovation
Series
Mnemonic
Feedback Bits
1
FAULT (V.500) LAN_FLT_CODE Fault Number
2
LCPSFB (V.558) LAN_SPD_FBK Speed Feedback
3
(EE.5627) LFBVAR7 (V.593) LAN_TRQ_FBK Motor Torque
4
Undefined
6
(EE.769) LFBVAR1 (V.566) LAN_R01_ADR GP LAN Fbk Reg 1
7
(EE.770) LFBVAR2 (V.567) LAN_R02_ADR GP LAN Fbk Reg 2
8
Innovation
AcDc2000
Series
Feedback Bits
Innovation
Series
Mnemonic
5 Undefined
6 Undefined
GEI-100305 Auxiliary Drive to ISBus Interface Board IS200ADII
5
Page 6

••••
Table 4. Boolean Signals
Request Bits
Innovation Series
bit #
0
Heartbeat ref, lan LAN_HTBT_REF AUXCMD00
1
Fault reset req, lan LAN_FLT_RST SOFTRES
2
Trip request, lan LAN_TRP_REQ CFGCMD32 (V.1422)
3
Alarm request, lan LAN_ALM_REQ CFGCMD33 (V.1423)
4
Undefined
5
Undefined
6
Undefined
7
Undefined
8
Run request, lan LAN_RUN_REQ RUNRQ (V.650)
9
Jog request, lan LAN_JOG_REQ JOGRQ (V.651)
10
X stop request, lan LAN_XSTP_REQ CFGCMD34 (V.1424)
11
Full flux req, lan LAN_FFLX_REQ CFGCMD35 (V.1425)
12
Rev mode req, lan LAN_REV_REQ REVCMD (V.675)
13
Torque mode req, lan LAN_TREF_ENB CURFOLRQ (V.684)
14
Droop disab req, lan LAN_DRP_INH BIASDINH (V.724)
15
Trq lim 2 sel, lan LAN_TLIM_SEL RCLILIM (V.695)
16
Ramp rate 2 sel, lan LAN_RMP_SEL ALTRAJSU (V.643)
17
Ramp hold req, lan LAN_RMP_HOLD HOLDSPD (V.699)
18
Auto mode req, lan LAN_AUTO_REQ AUTOCMD (V.683)
19
Undefined
20
Undefined
21
Undefined
22
Undefined
23
Undefined
24
GP lan req bit 1 LAN_B01_REQ AUXCMD01 (V.661)
25
GP lan req bit 2 LAN_B02_REQ AUXCMD02 (V.662)
26
GP lan req bit 3 LAN_B03_REQ AUXCMD03 (V.663)
27
GP lan req bit 4 LAN_B04_REQ AUXCMD04 (V.664)
28
GP lan req bit 5 LAN_B05_REQ AUXCMD05 (V.665)
29
GP lan req bit 6 LAN_B06_REQ AUXCMD06 (V.666)
30
GP lan req bit 7 LAN_B07_REQ AUXCMD07 (V.667)
31
GP lan req bit 8 LAN_B08_REQ AUXCMD08 (V.738)
Innovation
AcDc2000 Feedback Bits
Series
Mnemonic
Innovation
AcDc2000
bit #
0
AUXFB00 LAN_HTBT_FBK Heartbeat fbk, lan
1
NOFAULT NO_FLT No faults active
2
TRIPFLT TRIP_FLT Trip fault active
3
AUXFBW32.0 LOC_FLT Local Fault string
4
AUXFBW32.1 SYS_FLT System fault string
5
AUXFBW32.2 RUN_RDY Ready to Run
6
MPWRENAB BRG_PWR_ENB Bridge is on
7
RUNNING RUNNING Running
8
RUNACT RUN_ACT Run Active
9
JOGACT JOG_ACT Jog Active
10
AUXFBW32.3 X_STP_CMD X stop active
11
AUXFBW32.4 FLX_ENB_STAT Flux enable status
12
AUXFBW32.5 REVERSE Reverse mode
13
AUXFBW32.6 TRQ_MODE_ACT Torque mode
14
AUXFBW32.7 SPD_MODE_ACT Speed mode active
15
AUXFBW32.8 TRQ_LIM_ACT In cur or trq limit
16
AUXFBW32.9 LOCAL_MODE Local mode active
17
AUXFBW32.10 MA_ENB_STAT MA cont enable stat
18
Undefined
19
ZEROSPD ZERO_SPD Zero speed active
20
Undefined
21
Undefined
22
Undefined
23
Undefined
24
(EE.781) AUXFB01 LAN_B01_ADR LAN_B01_ADR
25
(EE.782) AUXFB02 LAN_B02_ADR LAN_B02_ADR
26
(EE.783) AUXFB03 LAN_B03_ADR LAN_B03_ADR
27
(EE.784) AUXFB04 LAN_B04_ADR LAN_B04_ADR
28
(EE.785) AUXFB05 LAN_B05_ADR LAN_B05_ADR
29
(EE.786) AUXFB06 LAN_B06_ADR LAN_B06_ADR
30
(EE.787) AUXFB07 LAN_B07_ADR LAN_B07_ADR
31
(EE.788) AUXFB08 LAN_B08_ADR LAN_B08_ADR
Series
Mnemonic
Innovation
Series
active
active
Notes:
For CFGCMDx reference bits to be active, drive EE.762.8 (LDRVJP.8) must be set.
For AUXFBW32.x feedback bits to be active, drive EE.5626 (AUXFBJP) must be set to 3 (bits .1 & .0 must be set).
6
Auxiliary Drive to ISBus Interface Board IS200ADII GEI-100305
Page 7

••••
Table 5. AcDc2000 References and Feedback Values (1pu)
Variable AcDc2000 Signal (1pu)
Armature Current Refr LOADADJ 5000
Speed Refr MMSETP 20000
Ramp Refr
Droop Gain R
Field Flux Refr
Speed Rate Reg Output
Voltage Fdbk
Field Current Fdbk
Armature Current Fdbk LCPCFB 5000
Speed Fdbk LCPSFB 20000
20000
10000
5000
5000
20000
5000
Drive Parameters
All of the ADII board configuration parameters are stored in the drive and loaded
into the ADII board when the drive is powered up or reset. The parameters can be
modified using the drive’s keypad or the toolbox, either through the ISBus LAN or
through the drive’s RS-232C port.
The following parameters configure the application interface:
• ADII Jumper 1 (ADIIJP1)
ADIIJP1.0 = Enables the ADII interface
When ADII is enabled, all other LAN interfaces must be disabled.
ADIIJP1.14 = Disables the ISBus controller ASIC watchdog.
This is a special diagnostic bit that is normally not set. Setting this bit
disables the ISBus controller watchdog detection.
ADIIJP1.15 = Enables Loop Back Mode
This is a special diagnostic mode that loops the references received back
into the feedbacks. The references do not go to the drive’s regulator
processor but are short circuited to the feedback area of the ISBus
controller.
• ADII Node Number (ADINID)
ADINID = The drive’s ISBus node ID (1−31).
The controller is drop number 0 and the drives may be drops 1−31.
Drive blockware patterns should be set up to accept the references and perform the
required functions. Drive blockware patterns must also be set up to load the feedback
data appropriately.
LAN Validation
The drive has two levels of validation, the LAN watchdog and the LAN heartbeat
functions.
GEI-100305 Auxiliary Drive to ISBus Interface Board IS200ADII
7
Page 8

••••
The LAN watchdog function is made up of three parts:
• First, the LAN Control Processor (LCP) monitors the ISBus controller’s fault
bits and displays an ADII fault, if the ISBus controller is in a fault state.
• Second, the LCP monitors it’s own communication with the ISBus controller
and if for any reason the ISBus controller is not communicating to LCP, then a
drive fault FLT.xxx ADIIRTM displays.
• If the LCP and the Drive Control Processor (DCP, on the LDCC board) fail to
communicate with each other, then a drive fault is triggered and displays.
The LAN heartbeat function can loop back a signal between the drive and any level
in the LAN hierarchy, such that a higher-level controller can validate the entire
connection pathway, including the drive.
A Programmable Logic
Controller (PLC) used as a
master controller can
generate a heartbeat to the
drive by inverting the
heartbeat from the drive and
sending that value back to the
drive.
The first bit in the drive’s feedback map is used as a heartbeat from the drive to the
master controller. The drive LCP always writes the heartbeat feedback to the same
state as the heartbeat reference. Thus, the master controller can monitor the status of
the communication with the drive by continually toggling the heartbeat to the drive
and monitoring the heartbeat from the drive.
The LCP sets AUXCMD0 if references are being received from the LAN and clears
AUXCMD0 if references are not being received from the LAN. The drive blockware
may be set up to monitor AUXCMD0 and cause a fault FLT.359 LINKLOSS if
AUXCMD0 is cleared.
LAN Faults
The following signals determine LAN health and declare faults:
• AUXCMD0 (master link presence)
• Heartbeat ref, LAN (Lan_Htbt_Ref)
• Heartbeat fbk, LAN (Lan_Htbt_Fbk)
The following faults are associated with the LAN interface: (See Table 6 for
descriptions.)
• FLT.359 LINKLOSS
• FLT.446 LADIINIT
• FLT.447LADIIWDG
• FLT.448 LADIIRTM
• FLT.449 LADIISEL
8
Auxiliary Drive to ISBus Interface Board IS200ADII GEI-100305
Page 9

••••
Table 6. Fault Codes for ADII Board and ISBus Interface
Fault
No.
359 FLT_LINK_LOS
446 FLT_LADIINIT ADII board failed initialization Check/replace LNPL and 2PL connections
447 FLT_LADIIWDG ISBus controller and/or LCP has failed
448 FLT_LADIIRTM ADII board run time fault
449 FLT_LADIISEL Another drive LAN is enabled besides
Fault Name Description Corrective Action to Take
(May be set up to
monitor
AUXCMD.00 bit.
If AUXCMD.00 =
0, the cause fault
FL359.) *
The ISBus controller is not receiving
data from the ISBus LAN.
(LCP ADII interrupt is not being
triggered)
the watchdog
The ISBus controller has a fault or LCP
has detected a problem with the ADII
board or ISBus controller interface.
ISBus.
Check to make sure there is a master
controller on the ISBus and that it is
communicating.
Check ADII board JP1 for a 1-2
connection.
Check/replace LNPL and 2PL connections
and cables.
Check the ISBus connections (RJ45 – P2
& P3)
Replace ADII board
and cables.
Replace ADII board
Check/replace LNPL and 2PL connections
and cables.
Check the ISBus connections (RJ45 – P2
& P3)
Replace ADII board
Check/replace LNPL and 2PL connections
and cables.
Check the ISBus connections (RJ45 – P2
& P3)
Replace ADII board
Modify the drive’s parameters (EEROM)
to disable the other LANs
DLAN – LCPJP1.0 (EE615.0 ) = 1
DLAN + – ARCJP1.0 (EE706.0) = 0
GENIUS – GENJPR.0 (EE725.0) = 0
ADCI – LCPJP3.0 (EE617.0) = 0
(CPL/CBUS/FBUS)
* = AUXCMD.00 will be set if the LCP is interrupted by the ADII board's interrupt line (the ISBus controller received
data from the master), AUXCMD.00 will be cleared if the interrupt does not happen for 80 ms.
Application Data
The ADII board has no fuses or hardware jumpers. The ADII board has LED
indicators and testpoints for diagnostic and setup purposes. Any ISBus or ADII
board faults will be displayed on the drive’s display. The testpoints on the ADII
board are for manufacturing, diagnostic, and setup purposes. See Figure 2 for the
locations of these devices.
GEI-100305 Auxiliary Drive to ISBus Interface Board IS200ADII
9
Page 10

••••
2PL
BUS ACTIVE 1
CHASSIS
RX/IN RX/TX
TX/OUT
DS1
E2
P3
TP1TP3 TP2
P24 P5 DCOM
ISBus Cable
Strain Reliefs
P2
DS5
DS6
DEBUG G1A
BUS ONLINE 1
DS2
DEBUG G1B
DS3
DS4
XMIT DATA IN RELAYS ENABLED
0BACTIVE1
DBG1A
0ONLN1
TP6
TP7
DBG1B
TP4
TP5
IS200ADIIH1A
U6
U5
U2
U4
E1
LNPL
COM1
Figure 2. ADII Board Layout Diagram
10
Auxiliary Drive to ISBus Interface Board IS200ADII GEI-100305
Page 11

••••
LED Indicators
The LEDs on the ADII board are only intended for diagnostic purposes. See Table 7
for a description of the LED indications. The drive’s display will show any ISBus
faults or ADII board interface faults.
Note Debug LEDs DBG1A (DS3) and DBG1B (DS4) are for manufacturing test
only.
Table 7. ADII Board LED Indicator Descriptions
LED Mnemonic Description
DS1 Bus Active On if LAN pulses are detected and in an active state. If this LED
is not on, then the ISBus Controller has not detected any LAN
pulses and is not in an active state.
DS2 Bus Online On or flashing if modulation on the LAN is detected. If this LED is
not on, then the ISBus Controller is not online. See Table 8 for a
description of flashing indications.
DS3 Debug1A Manufacturing use only
DS4 Debug1B Manufacturing use only
DS5 Bypass Relays
Enabled
DS6 Xmit Data On if there is data being transmitted. If this relay is not lit (dimly),
On if these relays are being driven (meaning the drive’s P5 is
OK). If this LED is not on, then P5 (+5 V) is below 4.6 V or P24
(+24 V) is too low to drive these relays.
then there is no transmitted data.
(because this LED is directly across the differential transmit lines,
it is being pulsed and will appear to be very dim)
Table 8. DS2 LED Indicator Flashing Indications
Modulatio
n Present
No x Off Solid
Yes RESET 1
Yes OFF LINE 2
Yes STANDBY 3
Yes ONLINE On Solid
GEI-100305 Auxiliary Drive to ISBus Interface Board IS200ADII
ISBus
Controller
Core State
DS2
Flashes/Second
11
Page 12

••••
Testpoints
There are seven testpoints on the ADII board as follows:
Table 9. Testpoint Descriptions
Testpoint Nomenclature Description
TP1 P5 Positive 5 V dc
TP2 DCOM Digital common
TP3 P24 Positive 24 V dc
TP4 DBG1A Manufacturing use only
TP5 DBG1B Manufacturing use only
TP6 0BACTIVE1 Manufacturing use only
TP7 0ONLN1 Manufacturing use only
Connectors
There are four plug connectors and two stab-on connectors on the ADII board. Refer
to the following tables for complete descriptions of these connectors:
Table Description
10 Stab-on Connectors
11 2PL Power Connector
12 LNPL Connector to LDCC Board
13 P3 ISBus Connector
14 P2 ISBus Connector
Table 10. Stab-on Connector Descriptions
Connector Nomenclature Description
E1 COM1 Common (to LDCC board)
E2 CHASSIS Chassis ground
Table 11. Connector 2PL, Power Supply to ADII Board
Pin No. Nomenclature Description
1 P24 +24 V dc
2 N24 Not connected
3 DCOM Digital common
4P5 +5 V dc
5P5 +5 V dc
6 DCOM Digital common
12
Auxiliary Drive to ISBus Interface Board IS200ADII GEI-100305
Page 13

••••
Table 12. Connector LNPL, I/O Between the LDCC Board and ADII Board
Pin No. Nomenclature Description
1, 2 DCOM Digital common ground
3 − 10 LND0 − LND7 ADII board data signals (D0 − D7)
11 DCOM Digital common ground
12 LNRST Reset signal going to ADII board
13 LNINT ADII board interrupt
14 DCOM Digital common ground
15 LNRDY Ready/busy signal from ADII board DPRAM
16 DCOM Digital common ground
17 LNALE NC
18 DCOM Digital common ground
19 LNRD ADII board read control signal
20 LNWR ADII board write control signal
21 DCOM Digital common ground
22 − 34 LNA0 − LNA12 ADII board address signals (A0 − A12)
35 P5 +5 V dc
36 LNACS Not connected
37 LNCS1 ADII board DPRAM select
38 LNCS2 ADII board ISBus controller select
39, 40 DCOM Digital common ground
Table 13. P3 Connector, RJ45 ISBus RX/IN RX/TX
Pin No. Nomenclature Description
1, 2 NC Not connected
3 ISBRXP ISBus receive positive
4
5
6 ISBRXN ISBus receive negative
7, 8 NC Not connected
9, 10 Shield Shield connection
GEI-100305 Auxiliary Drive to ISBus Interface Board IS200ADII
4 − 5
4 − 5
Pin 4 is tied to pin 5
Pin 5 is tied to pin 4
13
Page 14

••••
Table 14. P2 Connector, RJ45 ISBus TX/OUT
Pin No. Nomenclature Description
1, 2 NC Not connected
3 ISBTXP ISBus transmit positive
4, 5 NC Not connected
6 ISBTXN ISBus transmit negative
7, 8 NC Not connected
9, 10 Shield Shield connection
Installation and Renewal/Warranty Replacement
How to Order a Board
When ordering a replacement board for a GE drive, you need to know:
• How to accurately identify the part
• If the part is under warranty
• How to place the order
This information helps ensure that GE can process the order accurately and as soon
as possible.
Board Identification
A printed wiring board is identified by an alphanumeric part (catalog) number
located near its edge. Figure 3 explains the structure of the part number.
The board’s functional acronym, shown in Figure 3, is normally based on the board
description, or name. For example, the ADII board is described as the Auxiliary
Drive to ISBus Interface board.
IS 200 ADII H# A A A
Artwork revision
Functional revision
Functional revision
Group (variation, G or H)
Functional acronym
Assembly level
Manufacturer (DS & IS for GE in Salem, VA)
1
Backward compatible
2
Not backward compatible
3
200 indicates a base-level board; 215 indicates a
higher-level assembly or added components (such
as PROM)
3
Figure 3. Board Part Number Conventions
1
1
2
14
Auxiliary Drive to ISBus Interface Board IS200ADII GEI-100305
Page 15

••••
5
(“+” indicates the
international access code
required when calling from
outside of the USA.)
Warranty Terms
The GE Terms and Conditions brochure details product warranty information,
including warranty period and parts and service coverage. The brochure is
included with customer documentation. It may be obtained separately from the
nearest GE Sales Office or authorized GE Sales Representative.
Placing the Order
Parts still under warranty may be obtained directly from the factory:
GE Industrial Systems
Product Service Engineering
1501 Roanoke Blvd.
Salem, VA 24153-6492 USA
Phone: + 1 800 533 5885 (United States, Canada, Mexico)
+ 1 540 378 3280 (International)
Fax: + 1 540 387 8606 (All)
Renewals (spares or those not under warranty) should be ordered by contacting the
nearest GE Sales or Service Office.
Be sure to include the following when ordering any warranty or renewal parts:
• Complete part number and description
• Drive serial number
• Drive Material List (ML) number
Note All digits are important when ordering or replacing any board. The factory
may substitute later versions of replacement boards based on availability and design
enhancements. However, GE Industrial Systems ensures backward compatibility of
replacement boards.
Handling Precautions
To prevent component damage caused by static electricity,
treat all boards with static sensitive handling techniques.
Wear a wrist grounding strap when handling boards or
components, but only after boards or components have
Printed wiring boards may contain static-sensitive components. Therefore, GE ships
all replacement boards in antistatic bags.
Use the following guidelines when handling boards:
• Store boards in antistatic bags or boxes.
• Use a grounding strap when handling boards or board components (per previous
Caution criteria).
been removed from potentially energized equipment and
are at a normally grounded workstation.
GEI-100305 Auxiliary Drive to ISBus Interface Board IS200ADII
1
Page 16

••••
New Installations
ADII Required Parts
When installing an ADII board in a drive that has not had this board in it previously,
GE kit number 277A8496G01 is required. This kit includes the ADII board, LNPL
cable, DCOM wire, and chassis wire (see Table 15 for individual part numbers).
Note When adding the ADII board in the field, a new 2PL cable assembly will also
be needed. The part number for the 2PL cable assembly differs for different drives.
Refer to Table 16 for the 2PL part number of the applicable drive/frame size.
Table 15. ADII Board New Installation Part Numbers
Part Description Part Number
ADII board Auxiliary drive to ISBus interface board IS200ADIIH_A_ _
2PL Power cable from the power supply board to
the LDCC board and ADII board
LNPL 40-pin ribbon cable to the LDCC board 336A3493AA G01
DCOM wire Common wire from the LDCC board to the
ADII board (runs parallel to the LNPL cable)
CHASSIS wire Ground wire from the ADII board to the
drive's chassis
See Table 16
336A3438AT G15
277A8495G01
Table 16. AcDc2000 Frame Size/Drive 2PL Part Numbers
Frame/Drive Part Number
BM 36B605787ACG06
C 36B605787ACG01
G 36B605787ACG01
M 36B605787ACG06
J 36B605787ACG06
AA 36B605787ACG03
AP 36B605787ACG03
AQ 36B605787ACG06
AT 36B605787ACG06
AS/AW 36B605787ACG08
SilcoMatic 2000 246B235JLG01
IM2000 36B605787ACG03
CV2000 36B605787ACG06
16
Auxiliary Drive to ISBus Interface Board IS200ADII GEI-100305
Page 17

••••
7
Installation Procedures
To prevent electric shock, turn off power to the drive,
then test to verify that no power exists in the drive
before touching it or any connected circuits.
To prevent equipment damage, do not remove, insert, or
adjust board connections while power is applied to the
equipment.
ØØØØ To install a new ADII Board in a drive
1. Make sure that the drive in which the board is to be installed has been
deenergized. (Refer to the appropriate User's Guide for complete de-energizing
procedures and follow all local practices of lock out/tag out.)
2. Open the drive’s cabinet door, and using equipment designed for high voltages,
test any electrical circuits before touching them to ensure that power is off.
3. Install the ADII board in the drive as follows:
a. Release the two board carrier retainers by pulling them forward.
b. Lift up and rotate the front board carrier out and down until it is resting on
its stops.
c. Place the board in position on the four tabs (on left side) of the back of this
board carrier and press it firmly into position on these tabs.
4. Install the LNPL ribbon cable into the LNPL connector on the ADII board and
the LNPL connector on the LDCC board.
5. Install the COM1 wire onto the E1 (COM1) stab-on terminal on the ADII board
and the E1 (COM1) terminal on the LDCC board.
6. Install the CHASSIS wire onto the E2 stab-on terminal on the ADII board and
secure the other end to an accessible screw on the drive chassis.
The chassis wire must be securely mounted to the drive’s
chassis to shunt the ISBus shield to ground.
Care must be taken to keep the chassis wire tight to the ADII
board and away from the power supply board at all times. Use
a wire tie down strap connected to the bottom of the board
carrier to keep it away from the power supply board.
7. Plug the 2PL cable connector into the 2PL receptacle on the ADII board.
8. Install an ISBus cable into the RX/IN RJ45 jack (P3) on the ADII board and the
TX/OUT jack (P2) of the previous device on the ISBus.
9. Install an ISBus cable into the TX/OUT RJ45 jack (P2) on the ADII board and
the RX/IN jack (P3) of the next device on the ISBus.
GEI-100305 Auxiliary Drive to ISBus Interface Board IS200ADII
1
Page 18

••••
Care must be taken to keep the ISBus cables away from any
high voltage wires and any electrically noisy wires. Keep the
cables tight to the ADII board carrier and use the tie down strap
holders to hold the cables close to the ADII board and away
from the power supply board.
10. Install cable ties to the ISBus cables on the ADII board strain reliefs and on the
other cables/locations as necessary to keep the cables tight to the board and
board carrier, and away from the power supply board.
11. Raise the board carrier back up into its normal position, slide the board carrier
retainers in to secure it in this position, and close the drive cabinet door.
Replacement Procedures
To prevent electric shock, turn off power to the board,
then test to verify that no power exists in the board
before touching it or any connected circuits.
To prevent equipment damage, do not remove, insert, or
adjust board connections while power is applied to the
equipment.
ØØØØ To remove the ADII Board from the drive
1. Make sure that the drive in which the board is to be removed has been
deenergized. (Refer to the appropriate User's Guide for complete de-energizing
procedures and follow all local practices of lock out/tag out.)
2. Open the drive’s cabinet doors, and using equipment designed for high voltages,
test any electrical circuits before touching them to ensure that power is off.
3. Carefully remove the board from the drive as follows:
a. Release board carrier retainers by pulling them forward.
b. Lift up and rotate the front board carrier out and down until it is resting on
its stops.
c. Disconnect all cables and wires from the ADII board (2PL, TX and RX
ISBus, CHASSIS ground wire, LNPL, and COM1 wire). (The COM1 wire
runs parallel to the LNPL cable.)
d. Pull back on the four locking tabs and lift board up and off of the board
carrier.
18
Auxiliary Drive to ISBus Interface Board IS200ADII GEI-100305
Page 19

••••
ØØØØ To install the new (replacement) board on the board carrier
1. Orient the new board in the same position as the one removed, and seat the
board by firmly pressing the board onto the four tabs (on left side) of the back of
the front board carrier. (LDCC board is on front of this carrier.)
2. Reinstall all cables that were removed from the old ADII board (COM1 wire,
CHASSIS ground wire, LNPL, 2PL, TX and RX ISBus).
The chassis wire must be securely mounted to the drive’s
chassis to shunt the ISBus shield to ground.
Care must be taken to keep the chassis wire tight to the ADII
board and away from the power supply board at all times. Use
a wire tie down strap connected to the bottom of the board
carrier to keep it away from the power supply board.
Care must be taken to keep the ISBus cables away from any
high voltage wires and any electrically noisy wires. Keep the
cables tight to the ADII board carrier and use the tie down
strap holders to hold the cables close to the ADII board and
away from the power supply board.
3. Reinstall cable ties to the ISBus cables on the ADII board strain reliefs and on
the other cables/locations as necessary to keep the cables tight to the board and
board carrier, and away from the power supply board.
Note If the ADII board must be configured in any way, refer to the applicable
User's Guide for the drive/source for procedures.
4. Raise the board carrier back up into its normal position, slide the board carrier
retainers in to secure it in this position, and close the drive cabinet door.
GEI-100305 Auxiliary Drive to ISBus Interface Board IS200ADII
19
Page 20

••••
Notes
A
g
GE Industrial Systems
Issue date: 2000-04-05
1999 by General Electric Company, USA.
ll rights reserved.
20
Auxiliary Drive to ISBus Interface Board IS200ADII GEI-100305
General Electric Company
1501 Roanoke Blvd.
Salem, VA 24153-6492 USA
 Loading...