

GE Interlogix KTD-125, Interlogix KTD-125-24, Interlogix KTD-125P, Interlogix KTD-125P-24, Interlogix KTD-127 User Manual
...Page 1

KTD-125/125-24
KTD-125P/125P-24
KTD-127/127W
PTZ Receivers
Page 2

© 2003 Kalatel, a GE Interlogix company
All Rights Reserved.
Any GE Interlogix, Kalatel division, software
supplied with GE Interlogix, Kalatel division,
products is proprietary and furnished under
license and can be used or copied only in
accordance with the terms of such license.
This document contains proprietary
information that is protected by copyright. No
part of this document may be reproduced or
transmitted in any form or by any means
without the prior written permission of GE
Interlogix, Kalatel division.
The information contained in this document is
subject to change without notice. GE
Interlogix, Kalatel division, in keeping pace
with technological advances, is a company of
product innovation. Therefore, it is difficult to
ensure that all information provided is entirely
accurate and up-to-date. GE Interlogix, Kalatel
division, accepts no responsibility for
inaccuracies or omissions and specifically
disclaims any liabilities, losses, or risks,
personal or otherwise, incurred as a
consequence, directly or indirectly, of the
use or application of any of the contents of
this document.
For the latest product specifications, visit
GE Interlogix, Kalatel division, online at
www.GE-Interlogix.com or contact your
Kalatel sales representative.
For technical support before and after installation, call 800-469-1676.
Technical support is available 24 hours a day, 7 days a week.
Call: Tech Support 800-469-1676 (6 A.M. – 5 P.M. PST Monday through Friday)
Tech Support 541-740-3589 (all other times)
Main 800-343-3358 or 541-754-9133
Fax: Tech Support 541-752-9096 (available 24 hours a day)
Main 541-754-7162
Web: www.GE-Interlogix.com
1040823A / June 2003
This equipment has been tested and
found to comply with the limits for a
Class A digital device, pursuant to part
15 of the FCC Rules. These limits are
designed to provide reasonable
protection against harmful interference
when the equipment is operated in a
commercial environment. This
equipment generates, uses, and can
radiate radio frequency energy and, if
not installed and used in accordance
with the instruction manual, may cause
harmful interference to radio
communications.
You are cautioned that any changes or
modifications not expressly approved
by the party responsible for compliance
could void the user's authority to
operate the equipment.
Page 3

KTD-125/127 PTZ Receivers User Manual Table of Contents
TABLE OF CONTENTS
BEFORE YOU BEGIN................................................................4
1 I
NTRODUCTION ..................................................................5
2 SETTING THE AUTOPAN JUMPER ........................................6
3 I
NSTALLING KTD-125 UNITS .............................................8
3.1 M
3.2 M
4 I
NSTALLING THE KTD-127...............................................18
4.1 M
4.2 M
OUNTING THE UNIT .................................................8
AKING CABLE CONNECTIONS .................................11
3.2.1 KTD-125P Preset Positioning.....................................16
OUNTING THE UNIT ...............................................18
AKING CABLE CONNECTIONS .................................20
5 INSTALLING THE KTD-127W............................................23
5.1 MOUNTING THE UNIT ...............................................23
5.2 M
AKING CABLE CONNECTIONS .................................26
6 COMPLETING THE INSTALLATION (ALL UNITS) ...................29
7 P
ROGRAMMING THE UNITS ...............................................30
7.1 ASSIGNING A SITE ADDRESS ....................................32
7.2 T
ERMINATION..........................................................32
APPENDIX A. DETERMINING THE TYPE OF PAN/TILT DRIVE.......33
A
PPENDIX B. USING ON-SITE TOGGLE SWITCHES ...................33
A
PPENDIX C. AUXILIARY POWER OUTLET (KTD-125/125P) ....34
APPENDIX D: ASSIGNING DIP SWITCH VALUES.......................34
T
ROUBLESHOOTING...............................................................36
1040823A / June 2003 3
Page 4

Before You Begin KTD-125/127 PTZ Receivers User Manu al
BEFORE YOU BEGIN
Read these instructions before installing or operating this product.
Note: This installation should be made by a qualified service person and should conform to
local codes.
This manual provides installation and operation information. To use this
document, you must have the following minimum qualifications:
• A basic knowledge of CCTV systems and components
• A basic knowledge of electrical wiring and low-voltage electrical
hookups
Use this product only for the purpose for which it was designed.
Customer Support
For assistance in installing, operating, maintaining, and troubleshooting
this product, refer to this document and any other documentation
provided. If you still have questions, contact Kalatel Technical Support:
GE Interlogix, Kalatel division
Call: 800-46 9-1676
Fax: 541-752-9096
Note: You should be at the equipment, ready with details before calling Technical Support.
Conventions Used in this Manual
Boldface or button icons highlight command entries. The following
WARNING, CAUTION, and Note statements identify potential hazards:
* WARNING:
Improper use of this equipment can cause severe bodily injury or
equipment damage.
** CAUTION:
Improper use of this equipment can cause equipment damage.
Note: Notes contain important information about a product or procedure.
* This symbol indicates electrical warnings and cautions.
** This symbol indicates general warnings and cautions.
4 1040823A / June 2003
Page 5

KTD-125/127 PTZ Receivers User Manual Introduction
1 INTRODUCTION
Use a KTD-125/127 PTZ receiver and a Kalatel keypad to interface with
equipment from other manufacturers and simplify common security
system functions. See Table 1 for an overview of KTD-125 and KTD-127
PTZ receiver features. See Figure 1 for a typical system diagram.
Table 1. Receiver descriptions and housing types
Receiver Description Housing Type
KTD-125 Drives a medium- or heavy-duty
115 VAC PTZ
KTD-125-24
KTD-125P The KTD-125 with a preset option that
KTD-125P-24
KTD-127 Drives a light-duty 24 VAC PTZ
KTD-127W The KTD-127 in a weatherproof housing Weatherproof
Drives a medium- or heavy-duty
24 VAC PTZ
allows up to 10 programmed presets
The KTD-125-24 with a preset option
that allows up to 10 programmed
presets
requiring less than one amp
Weatherproof
Weatherproof
Weatherproof
Weatherproof
Indoor only
PTZ units
(2)
Receivers
(2)
Additional
RS422
receivers
Keypad
Figure 1. KTD-125/127 receiver typical system diagram
1040823A / June 2003 5
Page 6
Setting the Autopan Jumper KTD-125/127 PTZ Receivers User Manual
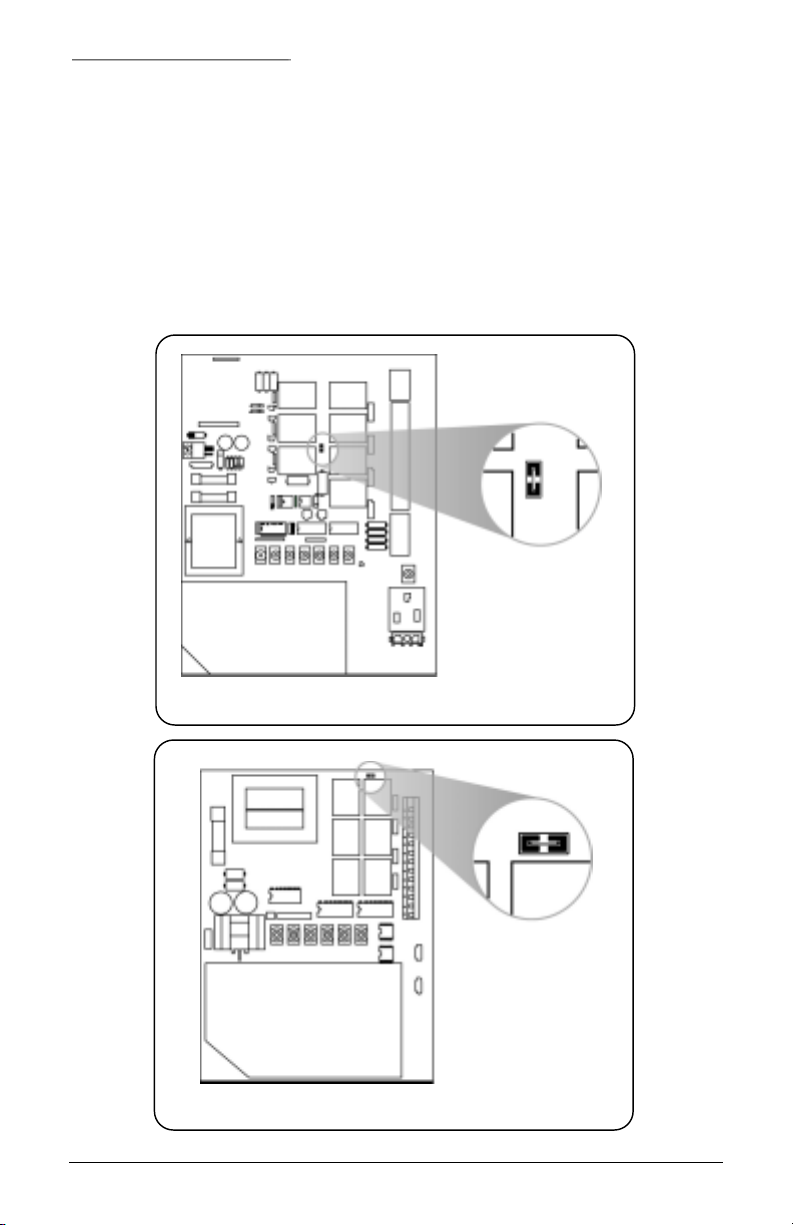
2 SETTING THE AUTOPAN JUMPER
Note: Make the autopan jumper selection before you supply power to the unit.
1) Determine whether or not your pan/tilt drive has an internal
reversing switch. (See Appendix A, Determining the Type of
Pan/Tilt Drive.)
2) Locate the autopan jumper. For KTD-125 units see Figure 2; for
KTD-127 units see Figure 3.
Figure 2. KTD-125 autopan jumper location
Figure 3. KTD-127 autopan jumper location
6 1040823A / June 2003
Page 7

KTD-125/127 PTZ Receivers User Manual Setting the Autopan Jumper
3) See Figure 4 to set the autopan jumper.
Connect for pan/tilt units without
an internal reversing switch
Disconnect for pan/tilt with an
internal reversing switch
Figure 4. Selecting the autopan jumper setting
Note: If the pan/tilt drive has an internal reversing switch, connect the pant/tilt drive’s
AUTO output to the receiver when making cable connections.
Note: If the pan/tilt units does not have an internal reversing switch, the left and right limit
switches will determine the points where the unit will reverse during autopan.
1040823A / June 2003 7
Page 8
Installing KTD-125 Units KTD-125/127 PTZ Receivers User Manual
3 INSTALLING KTD-125 UNITS
CAUTION:
Complete all instruction steps before supplying power to the unit.
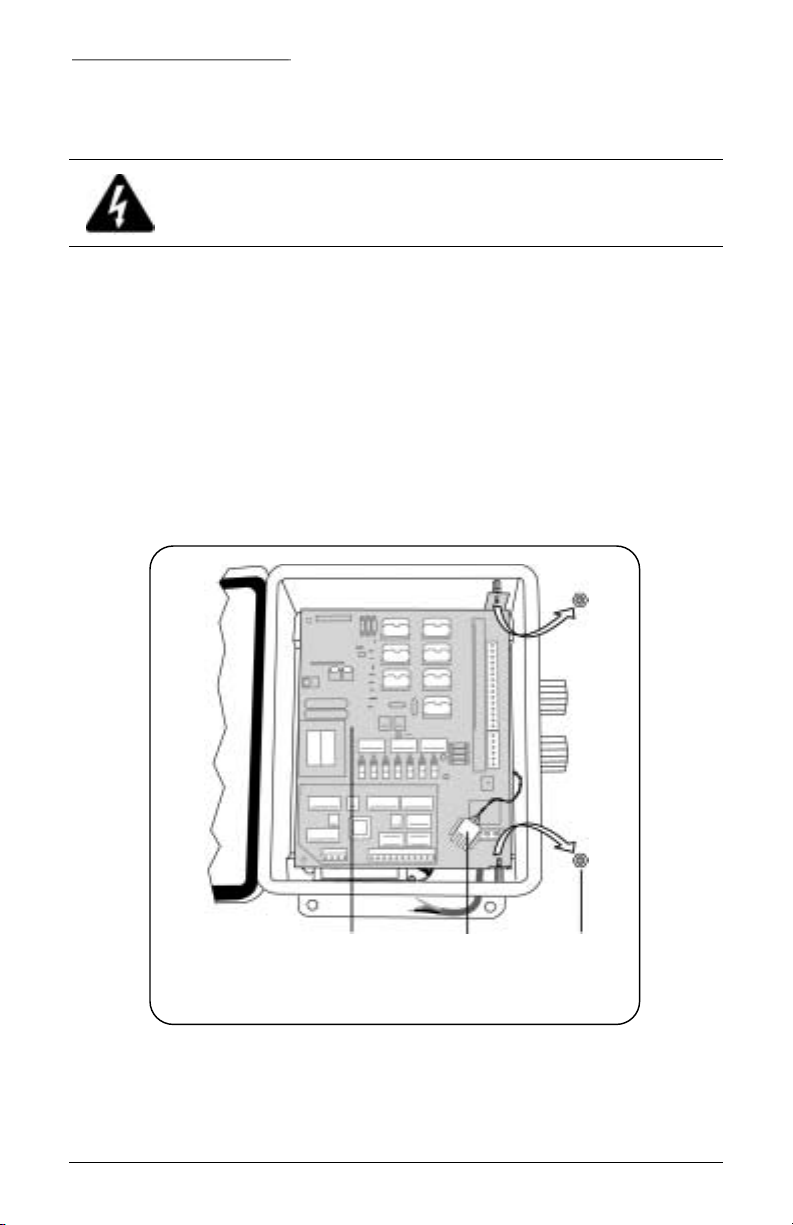
3.1 MOUNTING THE UNIT
To mount the unit see Figure 5, Figure 6, and Figure 7 and perform the
following.
1) Disconnect the power cable connector from the power input on the
main relay board.
Note: In most cases, it is easier to mount the unit with the main relay board
removed.
2) Remove the main relay board from the housing.
Main relay
board
Figure 5. Removing the finger nuts (KTD-125P-24 shown)
Power cable
connector
Finger
nuts
8 1040823A / June 2003
Page 9
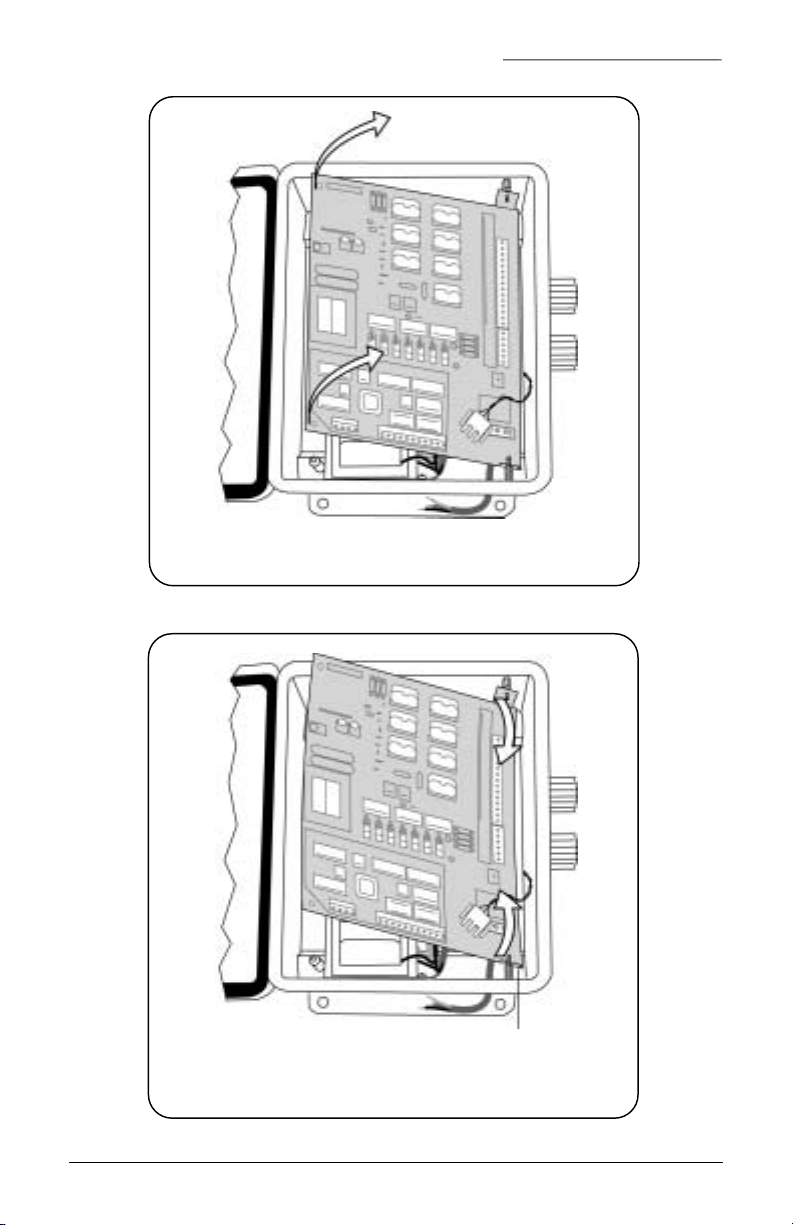
KTD-125/127 PTZ Receivers User Manual Installing KTD-125 Units
Figure 6. Pulling the main relay board away from the standoffs
(KTD-125P-24 shown)
Note: You may need to bend the board slightly to remove it from the housing.
Board brackets (2)
Figure 7. Pushing the board brackets inward to free the board
from the housing. (KTD-125P-24 shown)
1040823A / June 2003 9
Page 10
Installing KTD-125 Units KTD-125/127 PTZ Receivers User Manual
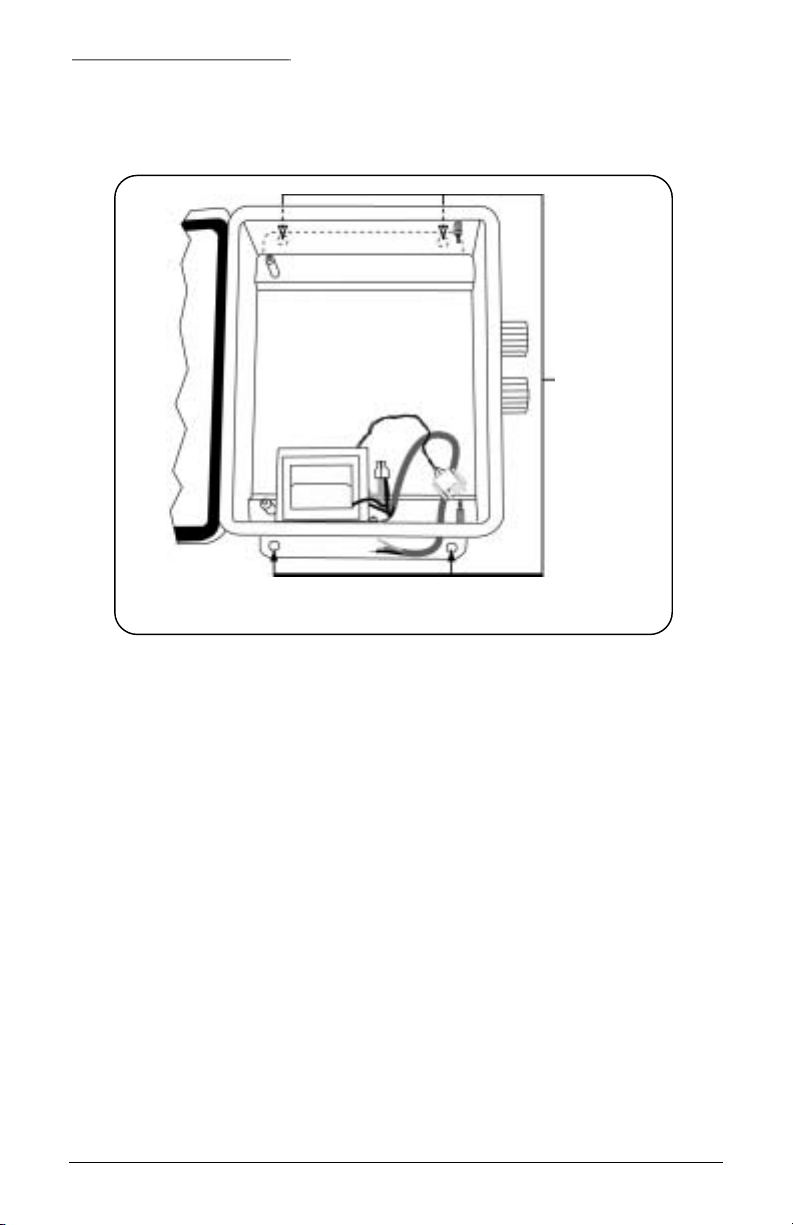
3) To mount the housing use installer-provided fasteners and the four
mounting holes in the mounting flanges (Figure 8).
Note: Install the housing so that it is level and the door opens to the left.
Mounting
holes (4)
Figure 8. Holes in the housing’s mounting flanges (KTD-125P-24
shown)
Note: Do not reinstall the main relay board until instructed to do so in section 6, Completing
and Testing the Installation.
10 1040823A / June 2003
Page 11
KTD-125/127 PTZ Receivers User Manual Installing KTD-125 Units
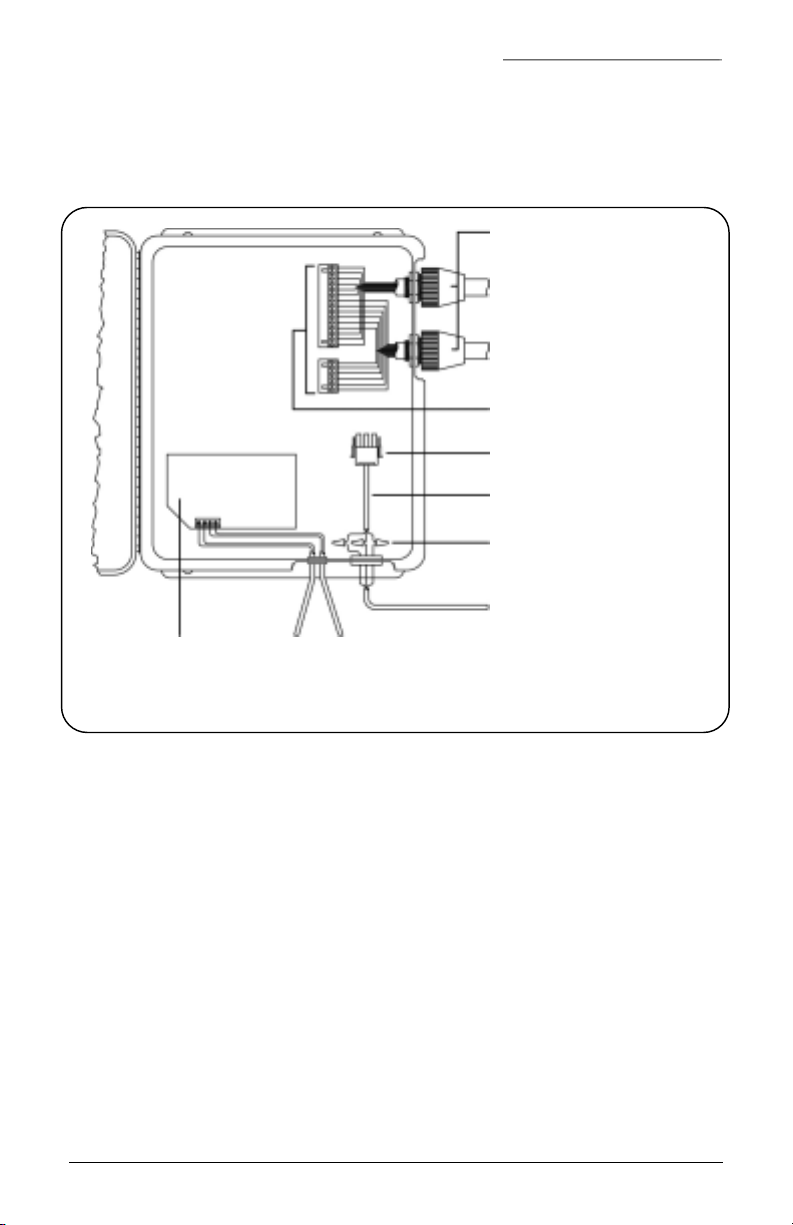
3.2 MAKING CABLE CONNECTIONS
For the following procedures, see Figure 9 for KTD-125/125P units and
Figure 10 for KTD-125-24/125P-24 units.
Watertight cable openings
Camera power/zoom lens
Pan/tilt
Removable terminal strips
24 VAC power connector
24 VAC power pigtail
Wire nut connections to the
power pigtail
24 VAC power in
Receiver
card
Figure 9. KTD-125/125P Cable routing
1040823A / June 2003 11
RS422
control in
RS422
control out
Page 12
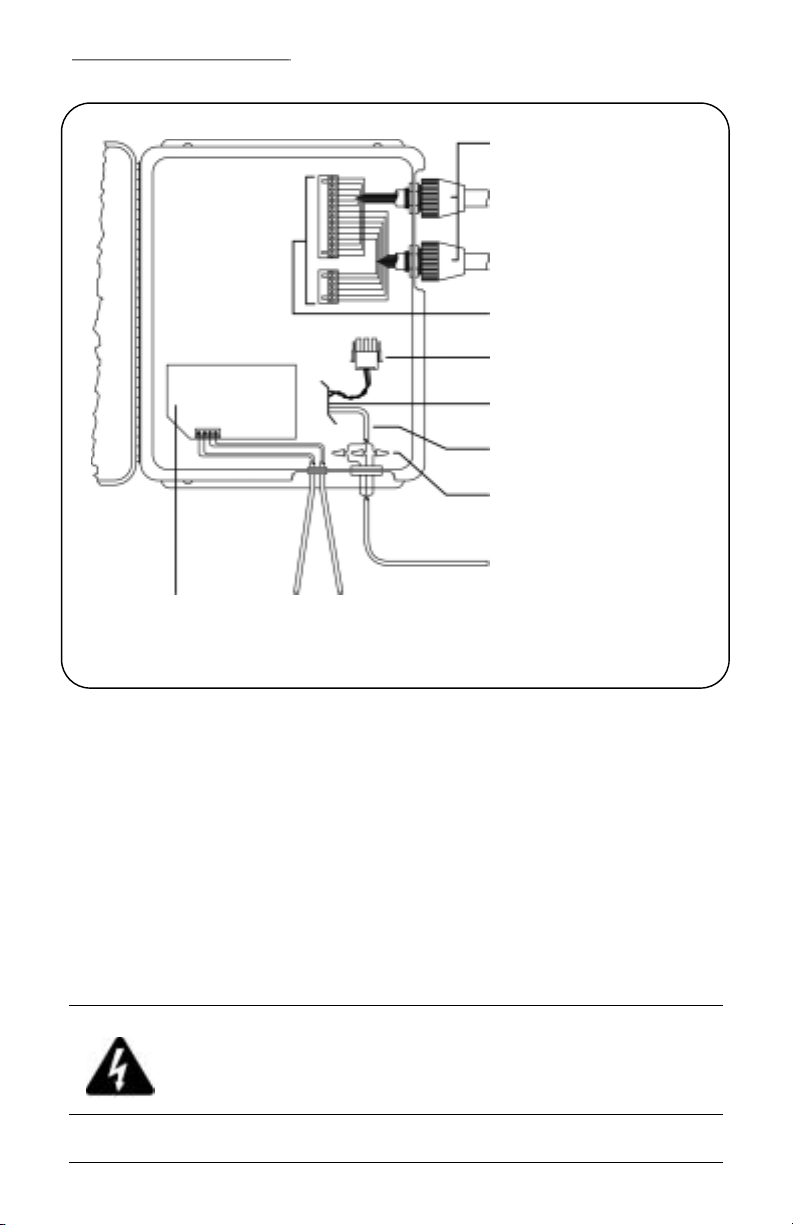
Installing KTD-125 Units KTD-125/127 PTZ Receivers User Manual
Watertight cable openings
Camera power/zoom lens
Pan/tilt
Removable terminal strips
24 VAC power connector
To power transformer
110 VAC power pigtail
Wire nut connections to the
110 VAC power pigtail
110 VAC power in
Receiver
card
Figure 10. KTD-125-24/125P-24 cable routing
RS422
control in
RS422
control out
To prepare the cables for connection perform the following.
1) Route the cables into the housing.
2) Remove 6 inches of the outer casing of the camera/lens, pan/tilt,
and power cables.
3) Tie a knot in the RS422 cable(s) six inches from the end on the
inside of the housing to act as a strain relief.
4) Remove the outer casing from the end of the RS422 cable(s).
To make the cable connections perform the following.
CAUTION:
For the KTD-125-24 and KTD-125P-24 units, connect only
110 VAC input to the power cable pigtail.
12 1040823A / June 2003
Page 13

KTD-125/127 PTZ Receivers User Manual Installing KTD-125 Units
CAUTION:
For the KTD-125 and KTD-125P units, connect only
24 VAC input to the power cable pigtail.
1) Use wire nuts to connect the power cable conductors to the power
cable pigtail. (See Table 2.)
Table 2. Power cable pigtail connectors
Connector color Description
Black = Hot
White = Neutral
Green = Ground
2) Remove the terminal strip(s) from the main relay board.
3) Make the remaining cable connections as shown in Figure 11
through Figure 14.
Camera power
GND. = Ground HOT = Hot NEU. = Neutral
Figure 11. KTD-125 Camera Power Connections
1040823A / June 2003 13
Page 14

PTZ Receivers User Manual Installing KTD-125 Units KTD-125/127
Pan/tilt control
COM. = Common U = Up L = Left
D = Down R = Right A = Auto
Figure 12. KTD-125 Pan/Tilt Connections
cable
Spare relay
contact
R = Relay Contact
Figure 13. KTD-125 Spare Relay Connections
Lens control
cable
I = Iris F = Focus Z = Zoom COM. = Common
Figure 14. KTD-125 Zoom Lens Connections
14 1040823A / June 2003
Page 15

KTD-125/127 PTZ Receivers User Manual Installing KTD-125 Units
4) Remove the four-connection terminal strip from the receiver card
on the main relay board.
Note: Observe polarity when you connect the RS422 control cables.
5) Connect the RS422 control cable(s) as shown in Figure 15.
RS422 control in RS422 control out
Figure 15. KTD-125 RS422 control cable connections to the receiver card
6) For the programming preset positions with the KTD-125P, see
section 3.2.1, KTD-125P Preset Positioning.
For final installation steps see section 6, Completing and Testing the
Installation (All Units).
1040823A / June 2003 15
Page 16

Installing KTD-125 Units KTD-125/127 PTZ Receivers User Manual
3.2.1 KTD-125P PRESET POSITIONING
The KTD-125P/125P-24 receivers can find up to 10 preset positions if
the camera lens and pan/tilt drive are equipped with feedback
potentiometers. If you program the 10 positions from the controller
keypad, you can find a maximum of eight through contact closures into
the receiver’s KTD-125C receiver card.
Note: You can also find the preset positions using the controller keypad keys, through
contact closures into the KTD-463 Alarm Interface, and through commands issued from an
external computer through the KTD-312 Interface Module.
The KTD-125P/125P-24 receivers include a relay that activates when
one or more preset alarm contacts are closed. This allows switching of
the alarmed site’s video to the monitor screen while the camera moves to
the alarmed preset position.
To find preset positions using contact closures into the receiver card see
Figure 16 and Figure 17 and perform the following.
1) Connect the preset positioning input cable to the removable
terminal strip from the main relay board.
Preset positioning input cable
COM. = preset common T.P. = tilt position F.P. = focus position
5V = +5 Volts DC P.P. = pan position Z.P. = zoom position
Figure 16. Preset contact connections
2) Make the preset alarm contact connections to the preset
connection terminal strip on the receiver card.
3) To connect the output relay to an alarm interface unit.
16 1040823A / June 2003
Page 17

KTD-125/127 PTZ Receivers User Manual Installing KTD-125 Units
Relay output Preset alarm input contacts
Figure 17. Preset and output relay contact connections
1040823A / June 2003 17
Page 18

Installing the KTD-127 KTD-125/127 PTZ Receivers User Manual
4 INSTALLING THE KTD-127
CAUTION:
Complete all instruction steps before supplying power to the unit.
4.1 MOUNTING THE UNIT
Note: In most cases, it is easier to mount the unit with the main relay board removed.
1) Remove the main relay board from the housing as shown in
Figure 18 and Figure 19.
Figure 18. Removing the KTD-127 cover
18 1040823A / June 2003
Page 19

KTD-125/127 PTZ Receivers User Manual Installing the KTD-127
Figure 19. Sliding out the KTD-127 card
2) To mount the housing use the two mounting holes in the housing
(Figure 20) and installer-provided fasteners.
Mounting
holes (2)
Figure 20. Mounting holes in KTD-127 housing
Note: Do not reinstall the main relay board until instructed to do so in section 6, Completing
and Testing the Installation (All Units).
1040823A / June 2003 19
Page 20

Installing the KTD-127 KTD-125/127 PTZ Receivers User Manual
4.2 MAKING CABLE CONNECTIONS
See Figure 21 for the following procedures.
Removable terminal strip
Receiver card
Camera power/zoom lens
Pan/tilt
24 VAC power
RS422 control out
RS422 control out
Figure 21. KTD-127 cable connections
To prepare the cables for connection perform the following.
1) Route the cables into the housing.
2) Remove 6 inches of the outer casing from the camera/lens, pan/tilt,
and 24 VAC power cables.
3) Remove the outer casing from the end of the RS422 cable(s).
To make the cable connections perform the following.
1) Remove the terminal strip from the main relay board.
2) Make connections as shown in Figure 22 through Figure 24.
20 1040823A / June 2003
Page 21

KTD-125/127 PTZ Receivers User Manual Installing the KTD-127
To power
1/HOT = Hot 2/COM. = Common
Figure 22. KTD-127 Terminal Strip Connections, Power
To camera
3 / HOT = Hot 11 / I = Iris 13 / Z = Zoom
4 / COM. = Common 12 / F = Focus 14 / COM. = Common
Figure 23. KTD-127 Terminal Strip Connections, Camera
To pan/tilt
5 / COM. = Common 7 / U = Up 9 / L = Left
6 / D = Down 8 / R = Right 10 / A = Auto
Figure 24. KTD-127 Terminal Strip Connections, Pan/Tilt
1040823A / June 2003 21
Page 22

Installing the KTD-127 KTD-125/127 PTZ Receivers User Manual
3) Remove the four-connection terminal strip from the receiver card
on the main relay board.
Note: Observe polarity when you connect the RS422 control cables
4) Connect the RS422 control cable(s) as shown in Figure 25.
RS422 control in RS422 control out
Figure 25. KTD-127 RS422 control cable connections to the receiver card
For final installation steps see section 6, Completing and Testing the
Installation (All Units).
22 1040823A / June 2003
Page 23

KTD-125/127 PTZ Receivers User Manual Installing the KTD-127W
5 INSTALLING THE KTD-127W
CAUTION:
Complete all instruction steps before supplying power to the unit.
5.1 MOUNTING THE UNIT
Note: In most cases, it is easier to mount the unit with the main relay board removed.
1) Remove the board from the housing as shown in Figure 26,
Figure 27 and Figure 28.
Main relay board Finger nuts
Figure 26. Removing the finger nuts
1040823A / June 2003 23
Page 24

Installing the KTD-127W KTD-125/127 PTZ Receivers User Manual
Figure 27. Pulling the board away from the standoffs
Note: You may need to bend the board slightly to remove it from the housing.
Figure 28. Pushing the board brackets inward to free the
board from the housing.
24 1040823A / June 2003
Page 25

KTD-125/127 PTZ Receivers User Manual Installing the KTD-127W
2) To mount the housing use installer-provided fasteners and the four
mounting holes in the mounting flanges (Figure 29).
Note: Install the housing so that it is level and the door opens to the left.
Mounting
holes (4)
Figure 29. Holes in the housing’s mounting flanges
Note: Do not reinstall the main relay board until instructed to do so in section 6, Completing
and Testing the Installation (All Units).
1040823A / June 2003 25
Page 26

Installing the KTD-127W KTD-125/127 PTZ Receivers User Manual
5.2 MAKING CABLE CONNECTIONS
See Figure 30 for the following procedures.
Removable terminal strip
Receiver card
Camera power/zoom lens
Pan/tilt
24 VAC in
RS422 control out
RS422 control in
Figure 30. KTD-127W cable routing
To prepare the cables for connection perform the following.
1) Remove 6 inches of the outer casing of the camera/lens, pan/tilt,
and power cables.
2) Tie a knot in the RS422 cable(s) six inches from the on the inside
of the housing to act as a strain relief.
3) Remove the outer casing from the end of the RS422 cable(s).
To make the cable connections perform the following.
1) Remove the terminal strip from the main relay board.
2) Make the connections as shown in Figure 31 through Figure 33.
26 1040823A / June 2003
Page 27

KTD-125/127 PTZ Receivers User Manual Installing the KTD-127W
To power
1/HOT = Hot 2/COM. = Common
Figure 31. KTD-127W Terminal Strip Connections, Power
To
camera
3 / HOT = Hot 11 / I = Iris 13 / Z = Zoom
4 / COM. = Common 12 / F = Focus 14 / COM. = Common
Figure 32. KTD-127W Terminal Strip Connections, Camera
To
pan/tilt
5 / COM. = Common 7 / U = Up 9 / L = Left
6 / D = Down 8 / R = Right 10 / A = Auto
Figure 33. KTD-127W Terminal Strip Connections, Pan/Tilt
1040823A / June 2003 27
Page 28

Installing the KTD-127W KTD-125/127 PTZ Receivers User Manual
3) Remove the four-connection terminal strip from the receiver card
on the main relay board.
Note: Observe polarity when you connect the RS422 control cables
4) Connect the RS422 control cable(s) as shown in Figure 34.
Figure 34. KTD-127W RS422 control cable connections to the receiver
card
For final installation steps see section 6, Completing and Testing the
Installation (All Units).
28 1040823A / June 2003
Page 29

KTD-125/127 PTZ Receivers User Manual Programming
6 COMPLETING AND TESTING THE INSTALLATION
(ALL UNITS)
To finalize the cable installation, perform the following.
1) Reinstall the main relay board into the housing.
2) Reinstall the removable terminal strips onto the main relay board
and receiver card.
3) Reconnect the power cable connector to the power input on the
main relay board.
4) If you have a unit with a weatherproof housing, tighten the
watertight cable openings.
To test for proper installation, perform the following.
1) Check all connections.
2) Supply power to the unit.
3) If you have a KTD-125 unit, confirm that the power switch on the
main relay board is on.
4) Test for proper operation using the on-site toggle switches on the
main relay board. (See Appendix B, Using On-Site Toggle
Switches)
1040823A / June 2003 29
Page 30

Programming KTD-125/127 PTZ Receivers User Manual
7 PROGRAMMING THE UNITS
The KTD-125 and KTD-127 PTZ receivers have several mode-ofoperation choices that you must program before you operate the units.
Typically, you would program the receiver with a Kalatel controller
keypad.
To program the units manually using the DIP switches on the receiver
card, perform the following.
Site select Programming Termination
Figure 35. KTD-125, KTD-127, and KTD-127W DIP Switches
1) Disconnect power from the receiver.
2) Set DIP switch 10 to ON to put the receiver in programming mode.
3) Set the DIP switches for the desired mode of operation as shown in
Table 3.
30 1040823A / June 2003
Page 31

KTD-125/127 PTZ Receivers User Manual Programming
Note: When reentering programming mode, you must reprogram all mode-of-operation
choices, even if you are only changing one.
Table 3. Setting DIP switches for the desired mode of operation
DIP
Switch
Function Setting
OFF = Zoom in positive, zoom out negative 1 Zoom Polarity
ON = Zoom in negative, zoom out positive
OFF = Iris open positive, iris close negative 2 Iris Polarity
ON = Iris open negative, iris close positive
OFF = Not DC motors 3 Pan/Tilt Drive
ON = DC motors
4 and 5 Autopan
Power-Up
Voltage
Down Tilt
4 OFF + 5 OFF = Normal
4 OFF + 5 ON = Random pan
4 ON + 5 OFF = 50% duty cycle
4 ON + 5 ON = Disable autopan
OFF = Yes 6 Autopan on
ON = No
OFF = 12 VDC 7 Zoom Lens
ON = 6 VDC
OFF = Not inverted 8 Invert Up and
ON = Inverted
4) Supply power to the receiver.
5) Wait 5 seconds.
6) Set DIP switch 10 to the off position to place the receiver in normal
mode.
To change mode-of-operation choices, repeat steps 1 through 6.
1040823A / June 2003 31
Page 32

Programming KTD-125/127 PTZ Receivers User Manual
7.1 ASSIGNING A SITE ADDRESS
CAUTION:
Make sure the receiver is in normal operating mode before
changing DIP switches 1 through 9 for site addressing.
To assign a site address perform the following.
Note: You can assign a site address while the unit has power.
1) Confirm that DIP switch 10 is in the off position or normal mode.
2) Determine which DIP switch values combine to equal the desired
site number. (See Appendix D: Assigning DIP Switch Values.)
3) Set the DIP switches that correspond to those values to ON.
7.2 TERMINATION
If the RS422 cable does not loop out of the receiver to another unit, set
DIP switches 11 and 12 to ON to terminate.
32 1040823A / June 2003
Page 33

KTD-125/127 PTZ Receivers User Manual
Appendix
APPENDIX A. DETERMINING THE TYPE OF PAN/TILT DRIVE
• If the pan/tilt drive unit has an output labeled AUTO, it is has an
internal reversing switch.
• If the pan/tilt drive unit does not have an output labeled AUTO, it
does not have an internal reversing switch.
APPENDIX B. USING ON-SITE TOGGLE SWITCHES
See Figure 36 and Figure 36 for the location of the on-site toggle
switches.
On-site toggle switches On-site toggle switches
Figure 36. All KTD-125 units Figure 37. KTD-127 units
Up
Down
Figure 38. On-site toggle switch positions for all KTD-125 units
1040823A / June 2003 33
Zoom ▼ Focus▼ Iris ▼ Spare▼ Pan
▼
In Near Open Off Manual Left Up
►
Out Far Close On Auto Right Down
►
Pan
▼
Tilt
▼
Page 34

Appendix KTD-125/127 PTZ Receivers User Manual
Zoom▼ Focus▼ Iris
▼
Pan
▼
Pan
▼
Tilt
▼
Up
►
Down
►
Figure 39. On-site toggle switch positions for KTD-127 units
In Near Open Manual Left Up
Out Far Close Auto Right Down
APPENDIX C. AUXILIARY POWER OUTLET (KTD125/125P)
Use the auxiliary power connection on the main relay board to power a
test monitor on site or an auxiliary transformer for low voltage camera
supplies.
APPENDIX D: ASSIGNING DIP SWITCH VALUES
One way to determine which switches to use is to subtract the highest
possible switch value from the address you want, then subtract the
highest possible switch value from that difference. Continue to subtract
the highest possible switch value from the difference until you have zero.
For example, if you want address 209:
Switch Address 209
209
81 – 64 = 17 7
17 – 16 = 1 5
1 – 1 = 0 1
34 1040823A / June 2003
Switch
Value
– 128 = 81
Difference
Switch
On
8
Page 35

KTD-125/127 PTZ Receivers User Manual Appendix
Therefore, for address 209, you would use switches 1 (1), 5 (16), 7 (64),
and 8 (128). (See Figure A1)
Figure A1. Zone address 209 (1 + 16 + 64 + 128)
1040823A / June 2003 35
Page 36

Troubleshooting KTD-125/127 PTZ Receivers User Manual
TROUBLESHOOTING
Diagnostic check: Use the toggle switches on the main relay board to confirm
that you have control of the camera from the receiver on.
• If YES, then check your RS422 connections from the keyboard to
the receiver.
• If NO, then check your connections from the receiver to the
camera/lens.
Diagnostic check: Meter across the RS422 cable connections at the keyboard
and receiver card. Confirm that you have 1 – 2 VDC flowing.
• If YES, then check your connections from the receiver to the
camera/lens.
• If NO, then check your RS422 connections from the keyboard to
the receiver.
Problem Probable Cause Solution
No control of unit Break in RS422
connection(s)
No control of lens Break in
camera/lens
connection(s).
36 1040823A / June 2003
Check to see that both ends of
the RS422 cables are connected.
Confirm that the wires are
stripped enough to make a good
connection.
Reattach the receiver card to the
main relay board to make sure it
correctly seated.
Use a voltage meter and the onsite toggles to check each
camera/lens connection. If there
is a problem, confirm that the
wires are stripped enough to
make a good connection.
Page 37

 Loading...