

Page 1

Indoor
SunSmart™ Wireless Timer System
INSTALLATION:
Wireless Battery Operated Timer
1. On the back of the wireless timer, remove the plastic tab keeping the battery from making
connection. You may need to remove the battery door if the tab doesn’t pull out easily.
A. If the clock has not started, remove the batteries and reinstall them following the “+” and “–”
polarities, ensuring they match the marked information within the battery housing.
B. Replace the plastic battery door ensuring that it snaps back into place.
Plug-In Receiver Module
1. Plug in the light or electronic device you wish the wireless timer to control into your
receiver module.
2. Plug the receiver module into your wall outlet.
3. Make sure your light/device is turned to the On position. The lamp or device should not turn on.
SETTING THE DATE AND TIME
NOTE: If no buttons are pushed for 30 seconds while in programming mode, the timer
will default back to the clock screen. Push the Time button until you return to the step
where the timer reset.
1. Press RESET button on your wireless battery operated timer using a toothpick or a pencil
and clear all settings.
2. Press the Time button once, and the year will be blinking. Press the Up or Down button to set the
current year then press the Time button.
3. The month will be blinking. Press the Up or Down button to set the current month then press
the Time button.
4. The day will be blinking. Press the Up or Down button to set the current day then press
the Time button.
5. Daylight Savings Time (DST) needs to be set next. DST with On blinking will be displayed. If your
area observes DST, then press the Time button and move to the next step. If your area does not
observe DST, then set it to Off by pressing the Up or Down button and press the Time button to
continue to next step.
NOTE: DST will automatically reset the times in the timer to match the current time change, if DST
is set to On. The default DST time change is 2:00 am, the second Sunday of March, and then the
first Sunday in November.
6. Next step is to set the current time. The hour should be flashing, press the Up or Down button to
select the current hour ensuring that AM/PM is correct then press the Time button.
7. The minute should be flashing, press the Up or Down button to select the current minute then
press the Time button.
SETTING THE SUNSMART™ FEATURE
1. NOR (North) will be flashing on your screen, press the Up or Down button to choose your location.
A. NOR (North)
B. CEN (Central)
C. SOU (South)
2. Press the Time Button once you have chosen your correct location.
3. Your programmed sunrise time will now be on your screen with the time blinking. If the time is
correct, press the Time button and continue to the next step (If the time is not correct, press
the Up or Down button to fine tune the correct time the sun rises in your location then press
the Time button).
4. Your programmed sunset time will now be on your screen with the time blinking. If the time is
correct, press the Time button and continue to the next step. (If the time is not correct, press
the Up or Down button to fine tune the correct time the sun rises in your location then press
the Time button).
5. Your timer should now be returned to the clock screen showing the current time.
SETTING THE TIMER ON/OFF PROGRAMS
NOTE: If no buttons are pushed for 30 seconds while in programming mode, the timer
will default back to the clock screen. Push the Program button until you return to the
correct program you were setting, then press the Time button to return to the correct
step where the timer reset (you can scroll through all 7 On/Off programs by pushing
the Program button).
1. Press the Program button to begin setting the times you wish your connected light or electronic
device to turn On/Off.
2. “-- -- 1 ON” will be on the screen, press the Time button to program your first On program time.
3. The day of the week will be flashing, press the Up or Down button to choose the days you wish
this program to work. Your options are:
A. Monday thru Sunday
B. Each day individually
C. Monday thru Friday
D. Saturday & Sunday
E. Monday, Wednesday & Friday
F. Tuesday & Thursday
4. Press the Time button once you have chosen the days of the week you want to control the device.
5. The hour will now be blinking. You have three options to choose from:
A. Sunset time: Press the Down button once to choose your pre-programmed sunset time or
scroll untill the preset programmed time shows on the screen. If you choose to use the preprogrammed sunset time, press the Time button and then press the Program button to move
to 1 Off program and skip to step 6.
B. Sunrise Time: Press the Down button a second time to choose your pre-programmed sunrise
time or scroll untill the preset programmed time shows on the screen. If you choose to use the
pre-programmed sunrise time, press the Time button and then press the Program button to
move to 1 Off program and skip to step 6.
C. Custom Time: Pressing the Down button a third time or scrolling with the Up button will let you
manually select any hour and minute desired.
i. If you chose to use a custom time, the hour will be blinking. Keep pressing the Down button
to choose the hour you wish the timer to turn on (keeping in mind AM/PM). Press the Time
button once you have selected your hour.
ii. The minute will now be blinking, press the Up or Down button to choose the minute then
press the Time button.
iii. Press the Program button again to program your first Off program time.
6. The screen should read “-- -- 1 OFF”. Repeat the previous steps above for choosing your days of
the week and program time.
7. Repeat these steps for up to 7 different programs setting as many On/Off cycles as desired. At any
time, push the On/Off button to complete programming and return to clock mode.
DELETING A PROGRAM
Press the Program button until you get to the program you would like to delete. Press the
Mode/Resume button and the program setting will be deleted.
TIMER MODE OPTIONS
• AUTO: Timer functions using all programs you have set.
• RDM (Random): Timer uses all programs you have set +/- 30 minutes of On/Off times
giving your home a more lived in look while away.
• None (Manual mode): Timer does not use programs at all and is only on manual mode.
USING TIMER AS A REMOTE CONTROL
1. Simply press the On/Off button to override timer programs to turn your lights or devices On/Off.
2. If timer is in AUTO mode, it will follow the next timer program setting to turn your light or
device On/Off.
3. If the timer is in RDM (Random) mode, it will follow the next timer program setting to turn your
light or device On/Off within an hour.
4. If the timer is in Manual Mode (Blank on your screen not showing AUTO or RDM), then the light or
device will stay On/Off until you change your timer mode option or you manually use the On/Off
button again.
This device complies with part 15 of the FCC rules. Operation is subject to the following
two conditions: (1) this device may not cause harmful interference, and (2) this
device must accept any interference received, including interference that may cause
undesired operation.
FCC NOTE: The manufacturer is not responsible for any radio or TV interference caused
by unauthorized modifications to this equipment. Such modifications could void the
user’s authority to operate the equipment .
NOTE: This equipment has been tested and found to comply with the limits for a Class
B digital device, pursuant to Part 15 of the FCC Rules. These limits are designed to
provide reasonable protection against harmful interference in a residential installation.
This equipment generates, uses and can radiate radio frequency energy and, if not
installed and used in accordance with the instructions may cause harmful interference
to radio communications. However, there is no guarantee that interference will not
occur in a particular installation. If this equipment does cause harmful interference
to radio or television reception, which can be determined by turning the equipment
off and on, the user is encourage to try to correct the interference by one or more of
the following measures:
• Reorient or relocate the receiving antenna.
• Increase the separation between the equipment and receiver.
• Connect the equipment into an outlet on a circuit different from that to which the
receiver is connected.
• Consult the dealer or an experienced radio/TV technician for help.
See www.jascoproducts.com for troubleshooting and frequently asked questions (FAQs).
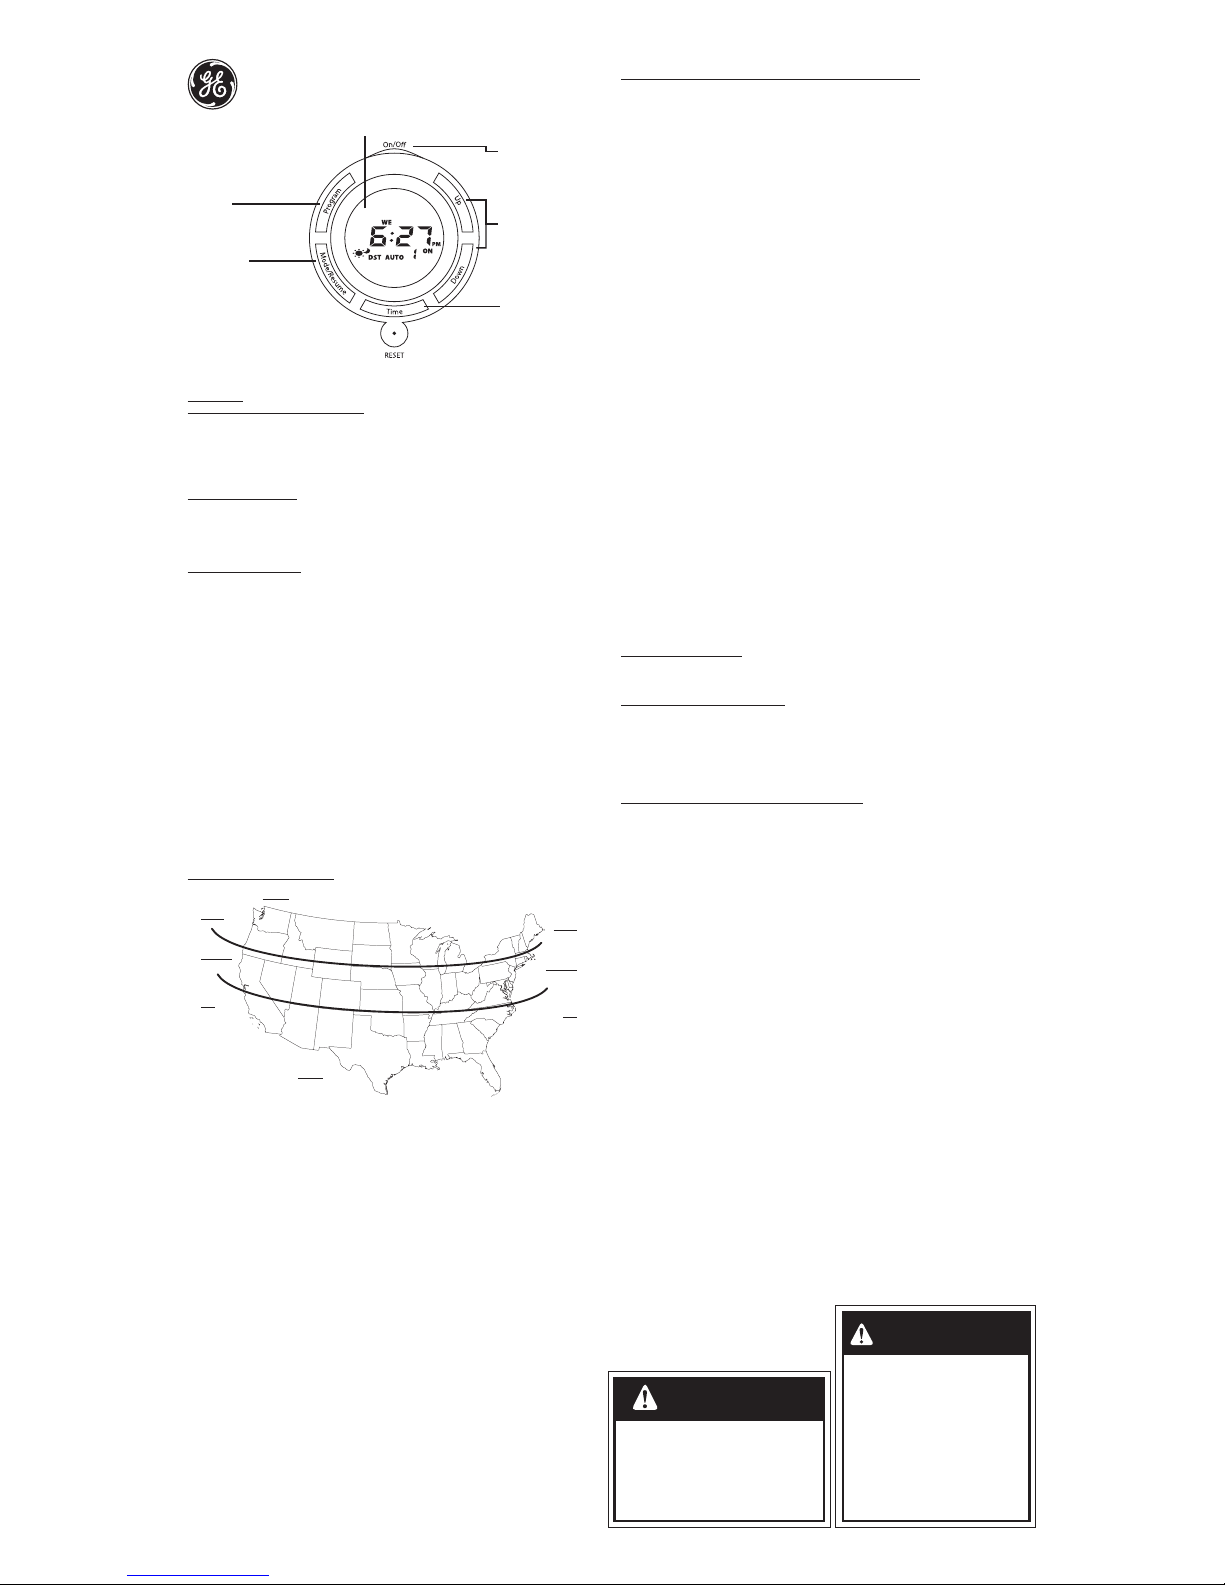
NORTH
ALASKA
HAWAII
NORTH
CENTRAL
CENTRAL
SOUTH
SOUTH
RISK OF ELECTRIC SHOCK
• DO NOT USE WITH AN EXTENSION CORD
• FULLY INSERT PLUG
• KEEP CHILDREN AWAY
• USE INDOORS ONLY
• DO NOT USE IN WET LOCATIONS
• UNPLUG BEFORE CLEANING
RISK OF FIRE
• DO NOT EXCEED ELECTRICAL RATINGS
• DO NOT USE TO CONTROL APPLIANCES
THAT CONTAIN HEATING ELEMENTS (COOKING
APPLIANCES, HEATERS, IRONS, ETC.)
WARNING
BATTERIES MAY LEAK HARMFUL LIQUIDS OR IGNITABLE
MATERIALS OR EXPLODE CAUSING INJURY AND
PRODUCT DAMAGE
• DO NOT MIX OLD AND NEW OR OTHER BATTERY TYPES
• REPLACE ALL BATTERIES AT THE SAME TIME
• REPLACE FULLY DISCHARGED BATTERIES IMMEDIATELY
• REMOVE BATTERIES IF PRODUCT IS TO BE UNUSED FOR
AN EXTENDED PERIOD OF TIME.
CAUTION
Up/Down
- Scroll through
settings options
Time
- Press to set the date/time.
- Press to confirm choices
when programming.
USE PENCIL OR TOOTHPICK TO RESET ALL SETTINGS.
Mode/Resume
- Toggle between Auto, Random
(RDM), and Manual modes.
- In programming mode, deletes
a set program.
Program
- Press to set/view
programming.
DISPLAY SHOWN IN STANDARD “CLOCK” MODE.
On/Off
- Turns all wireless receivers
within range On/Off
- Returns to Clock Mode when
in programming mode.
Total ratings for both outlets:
125V 60 Hz:
15A General Purpose
15A Resistive
1000W Tungsten
1/3HP
500VA Electronic Ballast
120VAC 60 Hz:
8.3A Ballast
MADE IN CHINA
GE is a trademark of General Electric Company and is under
license by Jasco Products Company LLC, 10 E. Memorial Rd.,
Oklahoma City, OK 73114.
This Jasco product comes with a 1-year limited warranty.
Visit www.jascoproducts.com for warranty details and
product registration.
Questions? Contact us at 1-800-654-8483 between
7:30AM—5:00PM CST.
AC POWERED RECEIVER OUTLET
BATTERY-OPERATED TRANSMITTER
26684 VERSION 01
12/04/14
GE5399R
Page 2
Sistema de temporizador inalámbrico
SunSmart™ para interior
INSTALACIÓN:
Temporizador inalámbrico operado por pilas
1. Retire de la parte posterior del temporizador inalámbrico la lengüeta plástica que evita que la pila haga
contacto. Si no es fácil tirar de la lengüeta, quizá tenga que retirar la tapa del compartimiento de las
pilas.
A. Si el reloj no se ha puesto en marcha, retire las pilas y vuelva a instalarlas de modo que la polaridad
“+” y “–” de estas coincida con las indicaciones al interior de la carcasa.
B. Vuelva a colocar la tapa plástica de las pilas y asegúrese de que encaje a presión en su lugar.
Enchufe el módulo receptor
1. Enchufe en el módulo receptor el dispositivo de iluminación o electrónico que desea controlar con el
temporizador inalámbrico.
2. Enchufe el módulo receptor en el tomacorriente de pared.
3. Asegúrese de que la lámpara o dispositivo esté encendido. La lámpara o dispositivo no debe encenderse.
AJUSTE DE LA FECHA Y HORA
NOTA: si al estar en modo de programación no se presiona ningún botón durante 30
segundos, el temporizador volverá por defecto a la pantalla del reloj. Presione el botón Time
(hora) hasta volver al paso en el que se restablece el temporizador.
1. En el temporizador inalámbrico operado por pilas presione el botón RESET (restablecer) usando
un palillo de dientes o un lápiz, y borre todos los ajustes.
2. Presione el botón Time (hora) una vez; el año empezará a destellar. Presione el botón Up (subir) o
Down (bajar) para establecer el año actual y a continuación presione el botón Time (hora).
3. Empezará a destellar el mes. Presione el botón Up (subir) o Down (bajar) para establecer el mes
actual y a continuación presione el botón Time (hora).
4. Empezará a destellar el día. Presione el botón Up (subir) o Down (bajar) para establecer el día
actual y a continuación presione el botón Time (hora).
5. A continuación debe establecerse el adelantamiento de la hora en verano (DST). Aparece en
pantalla DST con On destellando. Si en su región se observa el DST, presione el botón Time (hora)
y continúe con el siguiente paso. Si en su región no se observa el DST, desactívelo (Off)
presionando el botón Up (subir) o Down (bajar) y luego Time (hora) para continuar con el siguiente
paso. NOTA: Si el DST se deja en On (activado), este restablecerá automáticamente las horas en
el temporizador según el cambio de hora actual. El cambio por defecto de DST se hace a las 2:00
am el segundo domingo de marzo, y luego el primer domingo de noviembre.
6. El siguiente paso es ajustar la hora actual. La hora debe estar destellando; presione el botón Up
(subir) o Down (bajar) para seleccionar la hora actual, compruebe que AM/PM es correcto y luego
presione el botón Time (hora).
7. El minuto debe estar destellando; presione el botón Up (subir) o Down (bajar) para seleccionar el
minuto actual y luego presione el botón Time (hora).
AJUSTE DE LA FUNCIÓN SUNSMART™
1. NOR (Norte) destellará en la pantalla; presione el botón Up (subir) o Down (bajar) para seleccionar su
ubicación.
A. NOR (Norte)
B. CEN (Central)
C. SOU (Sur)
2. Presione el botón Time (hora) después de haber seleccionado su ubicación.
3. La hora programada de salida del sol aparecerá en pantalla, destellando. Si la hora es correcta, presione
el botón Time (hora) y continúe con el próximo paso (si la hora no es correcta, presione el botón Up [subir]
o Down [bajar] para seleccionar la hora correcta en la que sale el sol en su región y a continuación
presione el botón Time [hora]).
4. La hora programada de la puesta del sol aparecerá en pantalla, destellando. Si la hora es correcta,
presione el botón Time (hora) y continúe con el siguiente paso. (Si la hora no es correcta, presione el
botón Up [subir] o Down [bajar] para seleccionar la hora correcta en la que sale el sol en su región y a
continuación presione el botón Time [hora]).
5. El temporizador debe volver a la pantalla del reloj y mostrar la hora actual.
AJUSTE DE LOS PROGRAMAS DE ENCENDIDO/APAGADO DEL TEMPORIZADOR
NOTA: si al estar en modo de programación no se presiona ningún botón durante 30
segundos, el temporizador volverá por defecto a la pantalla del reloj. Presione el botón
Program (programar) hasta volver al programa correcto que estaba ajustando y a
continuación presione el botón Time (hora) para volver al paso correcto de restablecer
el temporizador (para desplazarse por todos los siete programas de encendido/apagado
presione el botón Program [programar]).
1. Presione el botón Program (programar) para empezar a ajustar las horas en las que desea encender/
apagar las lámparas o dispositivos electrónicos conectados.
2. Aparecerá en pantalla “-- -- 1 ON”; presione el botón Time (hora) para programar la primera hora de
encendido del programa.
3. Destellará en pantalla el día de la semana; presione el botón Up (subir) o Down (bajar) para seleccionar
los días en que desea que se active este programa. Las opciones son:
A. De lunes a domingo
B. Días individuales
C. De lunes a viernes
D. Sábado y domingo
E. Lunes, miércoles y viernes
F. Martes y jueves
4. Presione el botón Time (hora) después de seleccionar los días de la semana en los que desea el control
del dispositivo.
5. La hora destellará en pantalla. Puede escoger entre tres opciones:
A. Hora de la puesta del sol: presione el botón Down (bajar) una vez para seleccionar la hora
preprogramada de puesta del sol o desplácese hasta que la hora ajustada antes aparezca en
pantalla. Si opta por utilizar la hora preprogramada de puesta del sol, presione el botón Time (hora)
y a continuación presione el botón Program (programar) para desplazarse hasta 1 programa Off
(apagado) y salte hasta el paso 6.
B. Sunrise Time: Press the Down button a second time to choose your pre-programmed sunrise time
or scroll untill the preset programmed time shows on the screen. If you choose to use the preprogrammed sunrise time, press the Time button and then press the Program button to move to 1 Off
program and skip to step 6.
C. Hora personalizada: al presionar el botón Down (bajar) una tercera vez, o desplazarse con el botón Up
(subir) podrá seleccionar manualmente cualquier hora y minuto que desee.
i. Si opta por utilizar una hora personalizada, la hora destellará en pantalla. Continúe presionando
el botón Down (bajar) para seleccionar la hora en la que desea que se encienda el temporizador
(tenga en cuenta si es AM o PM). Cuando tenga seleccionada la hora, presione el botón Time
(hora).
ii. El minuto aparecerá en pantalla destellando; presione el botón Up (subir) o Down (bajar) para
seleccionar el minuto y luego presione el botón Time (hora).
iii. Presione de nuevo el botón Program (programar) para programar su primera hora de apagado
(Off) del programa.
6. Aparecerá en pantalla “-- -- 1 OFF”. Repita los pasos anteriores para seleccionar los días de la semana y
la hora programados.
7. Repita estos pasos con hasta siete programas diferentes, ajustando el número de ciclos de encendido/
apagado que desee. Podrá en cualquier momento presionar el botón On/Off (encender/apagar) para
completar la programación y volver al modo reloj.
CÓMO BORRAR UN PROGRAMA
Presione el botón Program (programar) hasta llegar al programa que desea borrar. Presione el botón Mode/
Resume (modo/reanudar) y se borrará el ajuste del programa.
OPCIONES DE MODO DEL TEMPORIZADOR
• AUTO: el temporizador funciona utilizando todos los programas que usted ha configurado.
• RDM (aleatorio): el temporizador activa todos los programas que usted ha configurado pero a +/-30
minutos de las horas de encendido/apagado, lo cual da una impresión más realista, cuando usted no
está, de que hay alguien en casa.
• None (modo manual): el temporizador no activa los programas en absoluto, y se mantiene solo en modo
manual.
CÓMO UTILIZAR EL TEMPORIZADOR COMO CONTROL REMOTO
1. Basta con presionar el botón On/Off (encender/apagar) para tomar el control de los programas del
temporizador para encender/apagar sus lámparas o dispositivos.
2. Si el temporizador se encuentra en modo AUTO, seguirá el ajuste del siguiente programa para encender/
apagar su lámpara o dispositivo.
3. Si el temporizador se encuentra en modo RDM (aleatorio), seguirá el ajuste del siguiente programa para
encender/apagar (+/- 30 minutos) su lámpara o dispositivo.
4. Si el temporizador se encuentra en modo manual (el espacio en blanco de la pantalla no muestra AUTO
ni RDM), la lámpara o dispositivo se mantendrá encendida/apagada hasta que usted cambie la opción de
modo del temporizador o hasta que utilice de nuevo manualmente el botón de encender/apagar.
Este dispositivo cumple con el apartado 15 de las normas de la FCC y con las especificaciones de las
normas radioeléctricas RSS del Ministerio de Industria de Canadá aplicables a aparatos exentos de licencia.
El funcionamiento está sujeto a las siguientes dos condiciones: (1) este dispositivo no debe provocar
interferencia perjudicial, y (2) este dispositivo debe aceptar toda interferencia que reciba, incluso la que
pudiera causar un funcionamiento no deseado.
NOTA DE LA FCC: el fabricante no se hace responsable de ninguna interferencia de radio o TV ocasionada
por modificaciones no autorizadas efectuadas a este aparato. Dichas modificaciones podrían anular la
autoridad del usuario para utilizar este aparato.
NOTA: este aparato ha sido probado y cumple con los límites para aparatos digitales de Clase B, de
conformidad con el apartado 15 de la normativa de la FCC. Estos límites están diseñados para proveer
protección razonable contra interferencias perjudiciales en instalaciones residenciales. Este aparato genera,
usa y puede irradiar energía de radiofrecuencias y, si no se instala y usa según las instrucciones, puede
provocar interferencia perjudicial a las radiocomunicaciones. No obstante, no hay garantías de que no
ocurrirá interferencia en una instalación en particular. Si este aparato provoca interferencia perjudicial a la
recepción de radio o televisión, lo que puede determinarse encendiendo y apagándolo, se recomienda que
el usuario intente corregir la interferencia por medio de la implementación de una o más de las siguientes
medidas:
Reorientar o reubicar la antena receptora.
Incrementar la separación entre el equipo y el receptor.
Conectar el equipo a un tomacorriente de un circuito diferente del circuito al que el receptor está conectado.
Consultar al distribuidor o a un técnico con experiencia en radio/televisión para solicitar asistencia.
Este dispositivo y sus antenas no deben colocarse ni deben operar en conjunto con cualquier otra antena o
transmisor.
Consulte la guía de solución de problemas y la respuesta a las preguntas frecuentes en
www.jascoproducts.com.
NORTE
ALASKA
HAWAII
NORTE
CENTRAL
CENTRAL
SUR
SUR
RIESGO DE CHOQUE ELÉCTRICO
• NO DEBE UTILIZARSE CON UN CORDÓN DE
EXTENSIÓN
• INSERTE EL ENCHUFE COMPLETAMENTE
• NO LO DEJE AL ALCANCE DE LOS NIÑOS
• USE SOLAMENTE EN ESPACIOS INTERIORES
• NO LO USE EN LUGARES HÚMEDOS
• DESENCHUFE ANTES DE LIMPIAR
RIESGO DE INCENDIO
• NO EXCEDA LOS LÍMITES ELÉCTRICOS
PERMITIDOS
• NO USE PARA CONTROLAR
ELECTRODOMÉSTICOS QUE CONTENGAN
ELEMENTOS CALORÍFICOS (APARATOS PARA
COCINAR, CALENTADORES, PLANCHAS, ETC.)
LAS BATERÍAS PUEDEN DERRAMAR LÍQUIDOS NOCIVOS
O MATERIALES INFLAMABLES O ESTALLAR CAUSANDO
LESIONES Y DAÑOS AL PRODUCTO.
• NO MEZCLE BATERÍAS VIEJAS Y NUEVAS NI TAMPOCO
DISTINTOS TIPOS DE BATERÍAS.
• REEMPLACE TODAS LAS BATERÍAS AL MISMO TIEMPO.
• REEMPLACE LAS BATERÍAS TOTALMENTE
DESCARGADAS INMEDIATAMENTE.
• QUITE LAS BATERÍAS SI EL DISPOSITIVO NO VA A SER
UTILIZADO POR UN TIEMPO L ARGO.
Subir/bajar
- Desplazarse por las
opciones de ajuste.
Hora
- Presionar para ajustar la
fecha y hora.
- Presionar para confirmar
las selecciones de
programación.
UTILICE UN LÁPIZ O UN PALILLO DE DIENTES PARA RESTABLECER TODOS LOS AJUSTES.
Modo/reanudar
- Alternar entre los modos
automático (Auto), aleatorio
(RDM) y manual.
- En el modo de programación,
borra un programa configurado.
Programar
- Presionar para
ajustar/ver
programación.
EN LA PANTALLA: MODO RELOJ ESTÁNDAR.
Encendido/apagado
- Enciende/apaga todos los
receptores inalámbricos
dentro del radio de alcance.
- Vuelve al modo reloj
si se está en modo de
programación.
Valor nominal total para
ambos tomacorrientes:
125 V 60 Hz:
15 A uso general
15 A carga resistiva
1000 W tungsteno
1/3 HP
500 VA estabilizador
electrónico
120 VAC 60 Hz:
8.3 A establilizador
TOMACORRIENTE RECEPTOR
ALIMENTADO POR CA
TRANSMISOR OPERADO POR PILAS
26684 VERSION 01
12/04/14
GE5399R
HECHO EN CHINA
GE es una marca registrada de la companía General Electric
Company y es utilizada bajo licencia a la companía Jasco
Prodcucts Company LLC, 10 E. Memorial Rd., Oklahoma City,
OK 73114.
Este producto de Jasco Products tiene una garantía limitada
de 1 Año. Visite www.jascoproducts.com para detalles.
¿Tiene preguntas? Comuníquese al 1-800-654-8483 entre las 7:30
a.m. y las 5:00 p.m. CST ( hora central estándar).
PRECAUCIÓN
ADVERTENCIA
 Loading...