

Page 1
IM-5D
Safety Information ................ 2
Operating Instructions ............3
Automatic Icemaker ....................3
Preparing for Vacation .................3
When You Should Set the
Icemaker to OFF .......................3
Installation Instructions
Water Line Installation ...............4-7
Icemaker Installation ................8-12
Before You Call For Service .........13-15
Normal Sounds You May Hear ..........15
Owner’s Manual and
Installation Instructions
Trousse
Machine à glaçons
Manuel d’utilisation
et d’installation
Consumer Support
Warranty ............................ 16
Consumer Support ................... 18
Equipo de Accesorios
Máquina de Hielos
Manual del propietario
e instalación
Icemaker Accessory Kit
239D4769P001 49-60740-1 01-16 GE
Page 2
SAFETY
GE Appliances website
For more information on your refrigerator’s operation, visit www.GEAppliances.com or
call 800.GECARES (800.432.2737). In Canada visit GEAppliances.ca or call 800.561.3344.
REFRIGERATOR SAFETY INFORMATION
This is the safety alert symbol. This symbol alerts you to potential hazards that can kill or hurt you and others. All safety
messages will follow the safety alert symbol and the word “DANGER”, “WARNING”, or “CAUTION”. These words are defined as:
DANGER
Indicates a hazardous situation which, if not avoided, will result in death or serious injury.
WARNING
Indicates a hazardous situation which, if not avoided, could result in death or serious injury.
CAUTION
Indicates a hazardous situation which, if not avoided, could result in minor or moderate injury.
IMPORTANT SAFETY INSTRUCTIONS
WARNING
To reduce the risk of injury when using your refrigerator, follow these basic
safety precautions.
n Unplug the refrigerator before installing ice
maker. Note: Power to the refrigerator cannot be
disconnected by any setting on the control panel.
n Replace all parts and panels before operating
refrigerator.
READ AND FOLLOW THIS SAFETY INFORMATION CAREFULLY.
READ AND SAVE THESE INSTRUCTIONS
n Avoid contact with the moving parts of the ice maker
mechanism and with the heating element that
releases the cubes. Do not place fingers or hands on
the ice making mechanism while the refrigerator is
plugged in.
2
Page 3
About the automatic icemaker. GEAppliances.com
A newly-installed refrigerator may take 12 to 24 hours to begin making ice.
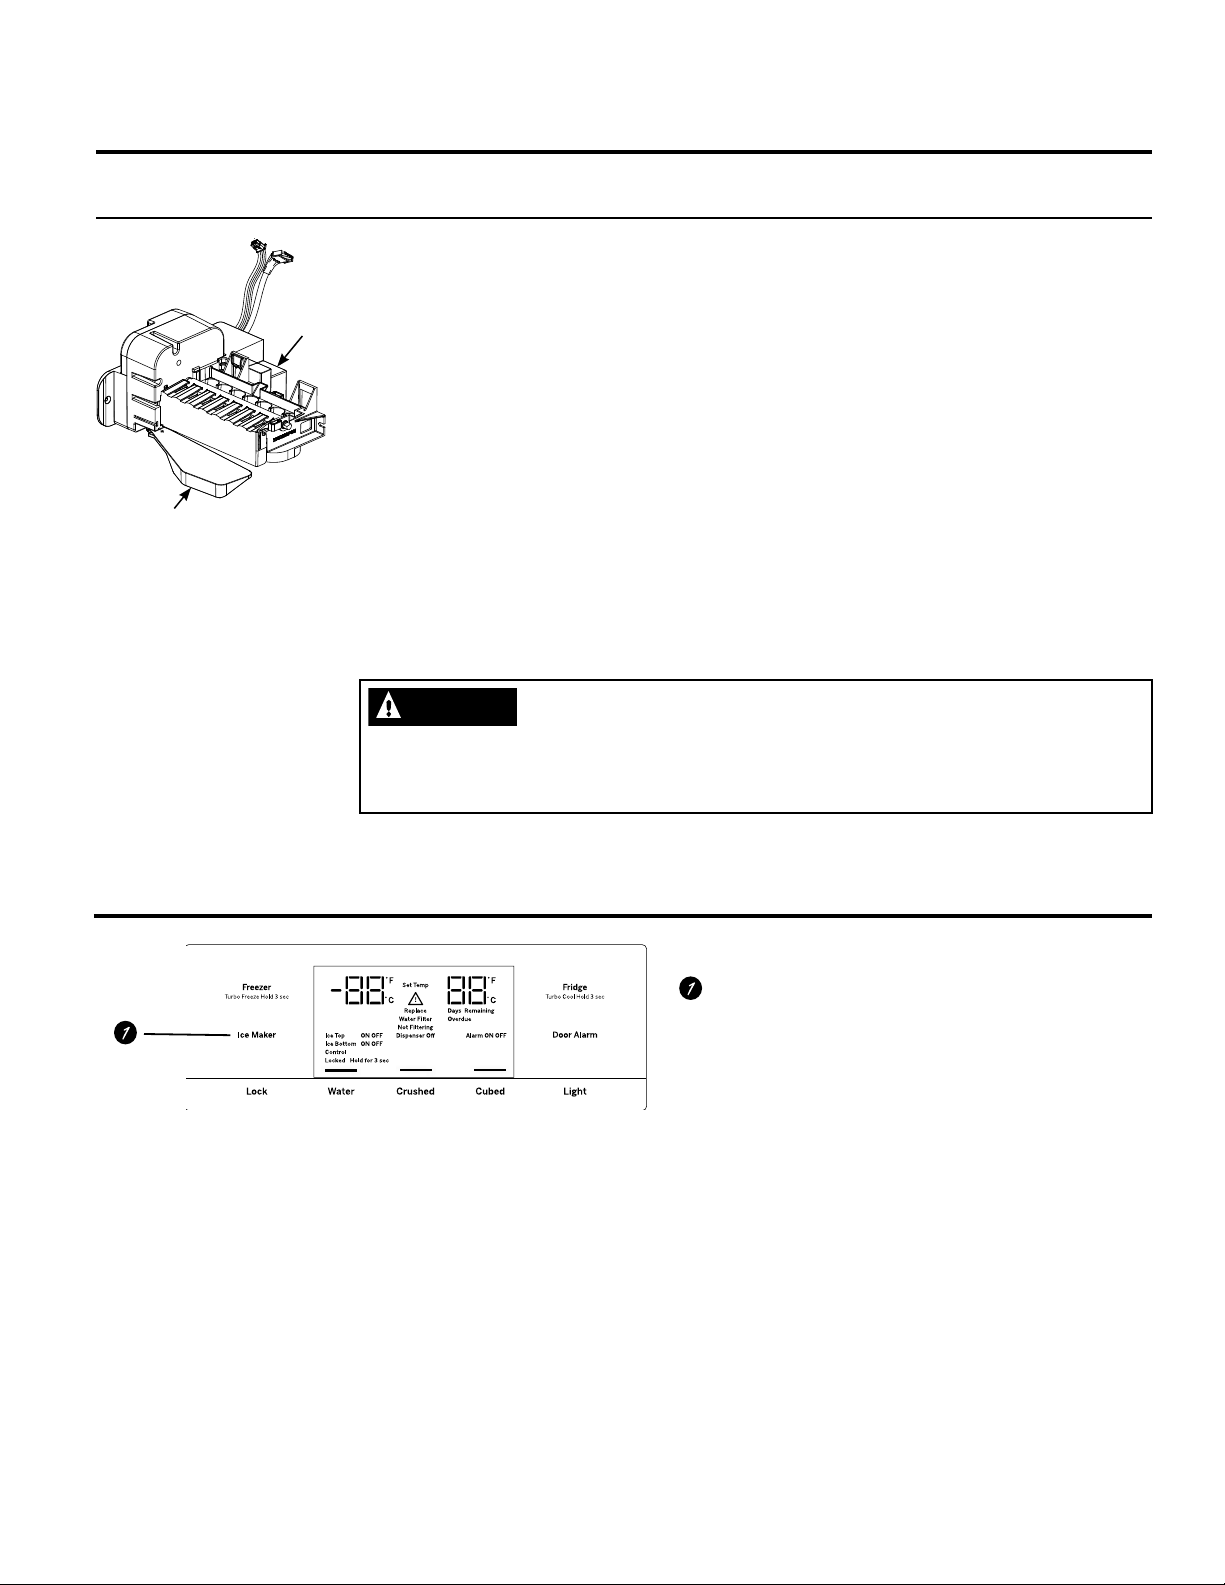
Automatic Icemaker
Feeler Arm
Icemaker
The icemaker will produce seven cubes
per cycle approximately 100–130 cubes
in a 24-hour period, depending on freezer
compartment temperature, room temperature,
number of door openings and other use
conditions.
The icemaker will fill with water when it cools to
15°F (–10°C). A newly installed refrigerator may
take 12 to 24 hours to begin making ice cubes.
If the refrigerator is operated before the water
line connection is made to the unit or if the
water supply to an operating refrigerator is
turned off, make sure that the icemaker is
turned off. Once the water has been connected
to the refrigerator, the icemaker may be turned
on. To turn the icemaker on or off, use the ICE
MAKER button on the control.
You may hear a buzzing sound each time the
icemaker fills with water.
Throw away the first few batches of ice to allow
the water line to clear.
Be sure nothing interferes with the sweep of the
feeler arm.
When the bin fills to the level of the feeler arm,
the icemaker will stop producing ice. It is normal
for several cubes to be joined together.
If ice is not used frequently, old ice cubes will
become cloudy, taste stale and shrink.
NOTE: In homes with lower-than-average water
pressure, you may hear the icemaker cycle
multiple times when making one batch of ice.
WARNING
To minimize the risk of personal injury, avoid contact with the moving parts of the ice
maker mechanism and with the heating element that releases the cubes. Do not place
fingers or hands on the ice making mechanism while the refrigerator is plugged in.
Refrigerator controls.
When you should turn the icemaker OFF
■ When the ice storage bin is removed for more than a minute
or two.
■ When the water supply will be shut off for several hours.
■ When the refrigerator will not be used for several days.
For long vacations or absences, remove food and unplug the
refrigerator. Clean the interior with a baking soda solution of
one tablespoon (15 ml) of baking soda to one quart (1 liter) of
water. Leave the doors open.
Turn refrigerator off at control (see Quick Install Guide).
If the temperature can drop below freezing, have a qualified
service technician drain the water supply system to prevent
serious property damage due to flooding.
Icemaker setting
Press and hold to turn your icemaker on/off.
Before going on vacation
1) Turn the cooling system off (see Quick Install Guide) or unplug
the refrigerator.
2) Empty ice bucket
3) Turn water supply off
If you cut the water supply off, turn off the icemaker (see
above).
Upon returning from vacation:
1) Replace the water filter (see Owner’s Manual).
2) Run 2 gallons of water through the cold water dispenser
(about 5 minutes) to flush the system.
3) Turn cooling system on (see Quick Install Guide).
4) Reset Filter Status message (see Quick Use & Care Guide). If
you cut the water supply, turned on icemaker (see above).
3
Page 4
Installing the water line.
BEFORE YOU BEGIN
Recommended copper water supply kits are WX8X2,
WX8X3 or WX8X4, depending on the amount of
tubing you need. Approved plastic water supply
lines are GE SmartConnect
(WX08X10006, WX08X10015 and WX08X10025).
When connecting your refrigerator to a GE Reverse
Osmosis Water System, the only approved installation
is with a GE RVKit. For other reverse osmosis water
systems, follow the manufacturer’s recommendations.
If the water supply to the refrigerator is from
a Reverse Osmosis (RO) Water Filtration System
AND the refrigerator also has a water filter,
use the refrigerator’s filter bypass plug. Using
the refrigerator’s water filtration cartridge in
conjunction with the RO water filter can result in
hollow ice cubes.
This water line installation is not warranted
by the refrigerator or icemaker manufacturer.
Follow these instructions carefully to minimize
the risk of expensive water damage.
Water hammer (water banging in the pipes)
in house plumbing can cause damage to
refrigerator parts and lead to water leakage
or flooding. Call a qualified plumber to correct
water hammer before installing the water supply
line to the refrigerator.
To prevent burns and product damage, do not
hook up the water line to the hot water line.
If the refrigerator is operated before the water
connection is made to the icemaker, press and
release the ICE MAKER button on the control panel
to disengage the icemaker. When the refrigerator
has been connected to the water supply, press and
release the ICE MAKER button on the control panel
to re-engage the icemaker.
™
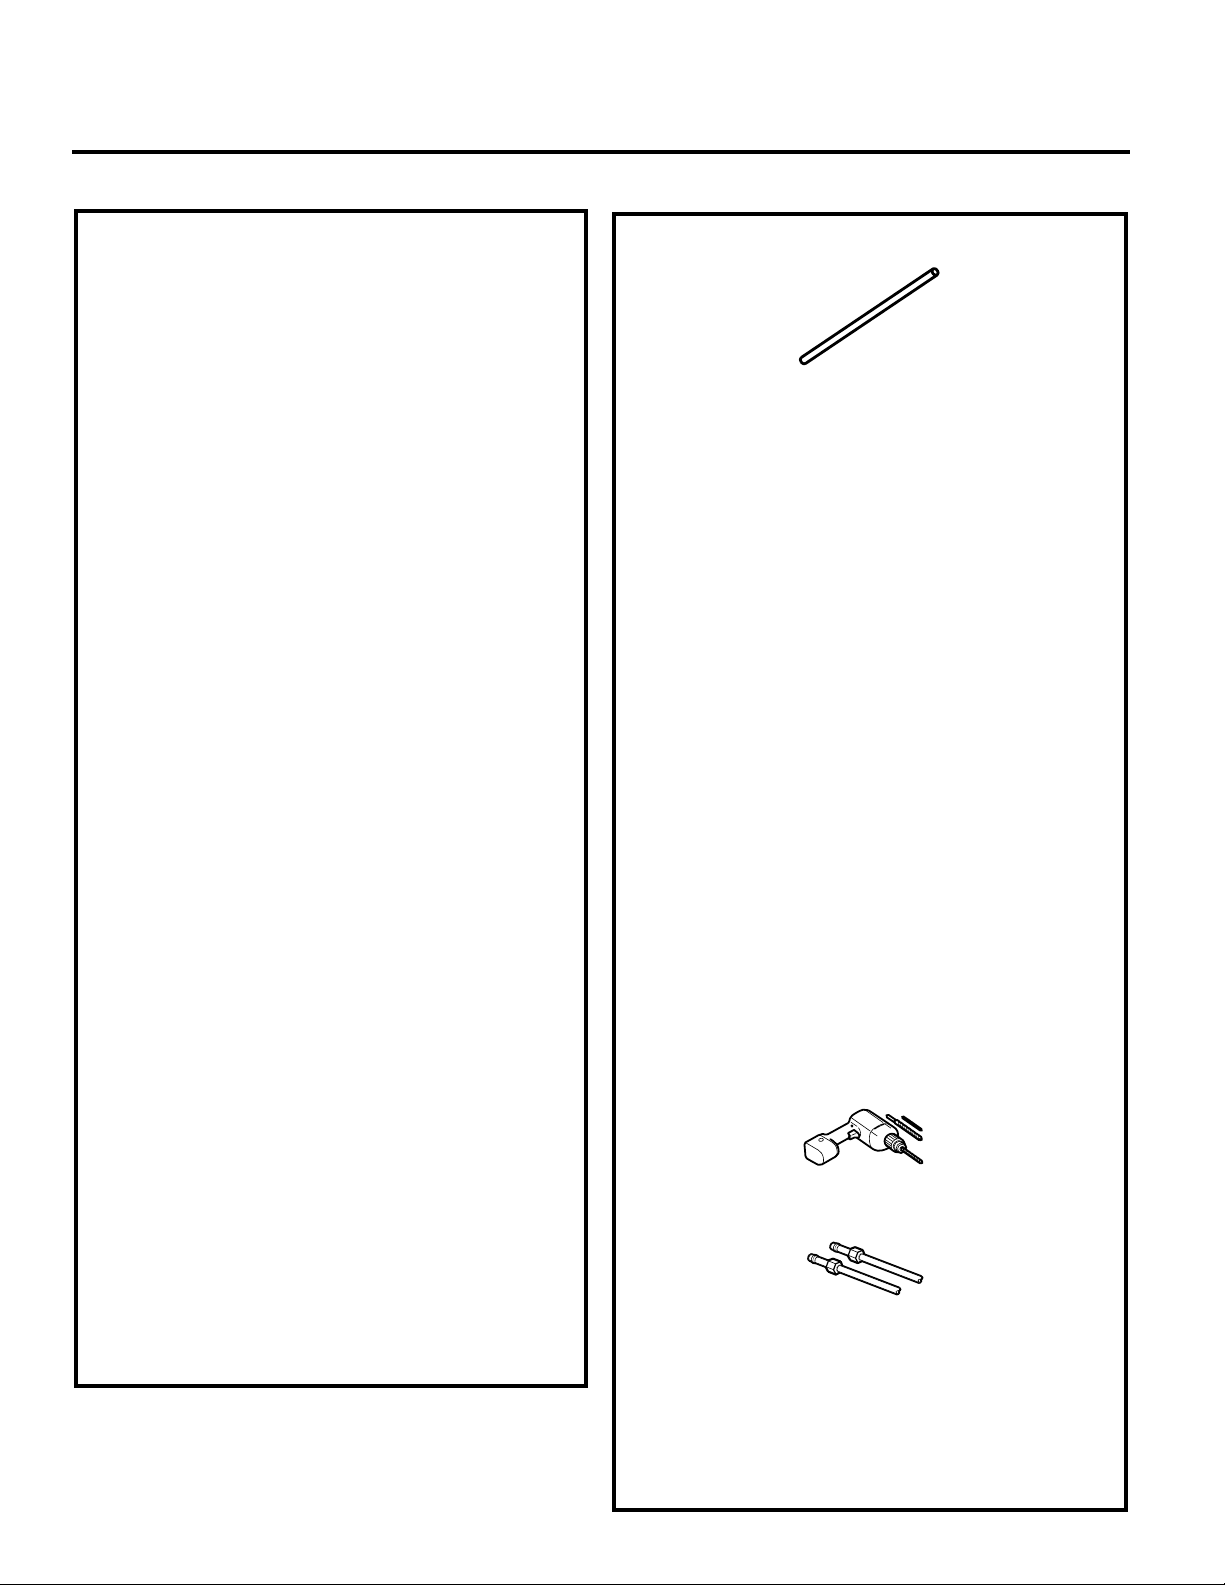
Refrigerator Tubing
WHAT YOU WILL NEED
• Copper or GE SmartConnect™ Refrigerator Tubing
kit, 1/4” outer diameter to connect
the refrigerator to the water supply. If using
copper, be sure both ends of the tubing are
cut square.
To determine how much tubing you need:
measure the distance from the water valve
on the back of the refrigerator to the water supply
pipe. Be sure there is sufficient extra tubing to allow
the refrigerator to move out from the wall after
installation.
™
GE SmartConnect
available in the following lengths:
8’ (2.4 m) – WX08X10006
15’ (4.6 m) – WX08X10015
25’ (7.6 m) – WX08X10025
NOTE: The only GE approved plastic tubing
is that supplied in GE SmartConnect
Tubing kits. Do not use any other plastic water
supply line because the line is under pressure at all
times. Certain types of plastic will crack or rupture
with age and cause water damage to your home.
• A GE water supply kit (containing tubing,
shutoff valve and fittings listed below) is available
at extra cost from your dealer or from Parts
and Accessories, 800.626.2002 (in Canada
1.800.661.1616).
• A cold water supply. The water pressure must be
between 20 and 120 p.s.i. (1.4–8.1 bar).
Refrigerator Tubing Kits are
™
Refrigerator
Do not install the icemaker tubing in areas where
temperatures fall below freezing.
When using any electrical device (such as a
power drill) during installation, be sure the device
is double insulated or grounded in a manner to
prevent
the hazard of electric shock, or is battery powered.
All installations must be in accordance with local
plumbing code requirements.
4
• Power drill.
• 1/2” or adjustable wrench.
• Straight and Phillips blade screwdriver.
• Two 1/4” outer diameter compression nuts
and 2 ferrules (sleeves)—to connect the copper
tubing to the shutoff valve and the refrigerator
water valve.
OR
™
• If you are using a GE SmartConnect
Refrigerator Tubing kit, the necessary fittings
are pre-assembled to the tubing.
Page 5
GEAppliances.com
WHAT YOU WILL NEED (CONT.)
• If your existing copper water line has a flared
fitting at the end, you will need an adapter
(available at plumbing supply stores) to connect
the water line to the refrigerator OR you can cut
off the flared fitting with a tube cutter and then
use a compression fitting. Do not cut formed end
from GE SmartConnect
• Shutoff valve to connect to the cold water line.
The shutoff valve should have a water inlet with
a minimum inside diameter of 5/32” at the point of
connection to the COLD WATER LINE. Saddle-type
shutoff valves are included in many water supply
kits. Before purchasing, make sure a saddle-type
valve complies with your local plumbing codes.
Install the shutoff valve on the nearest frequently used
drinking water line.
™
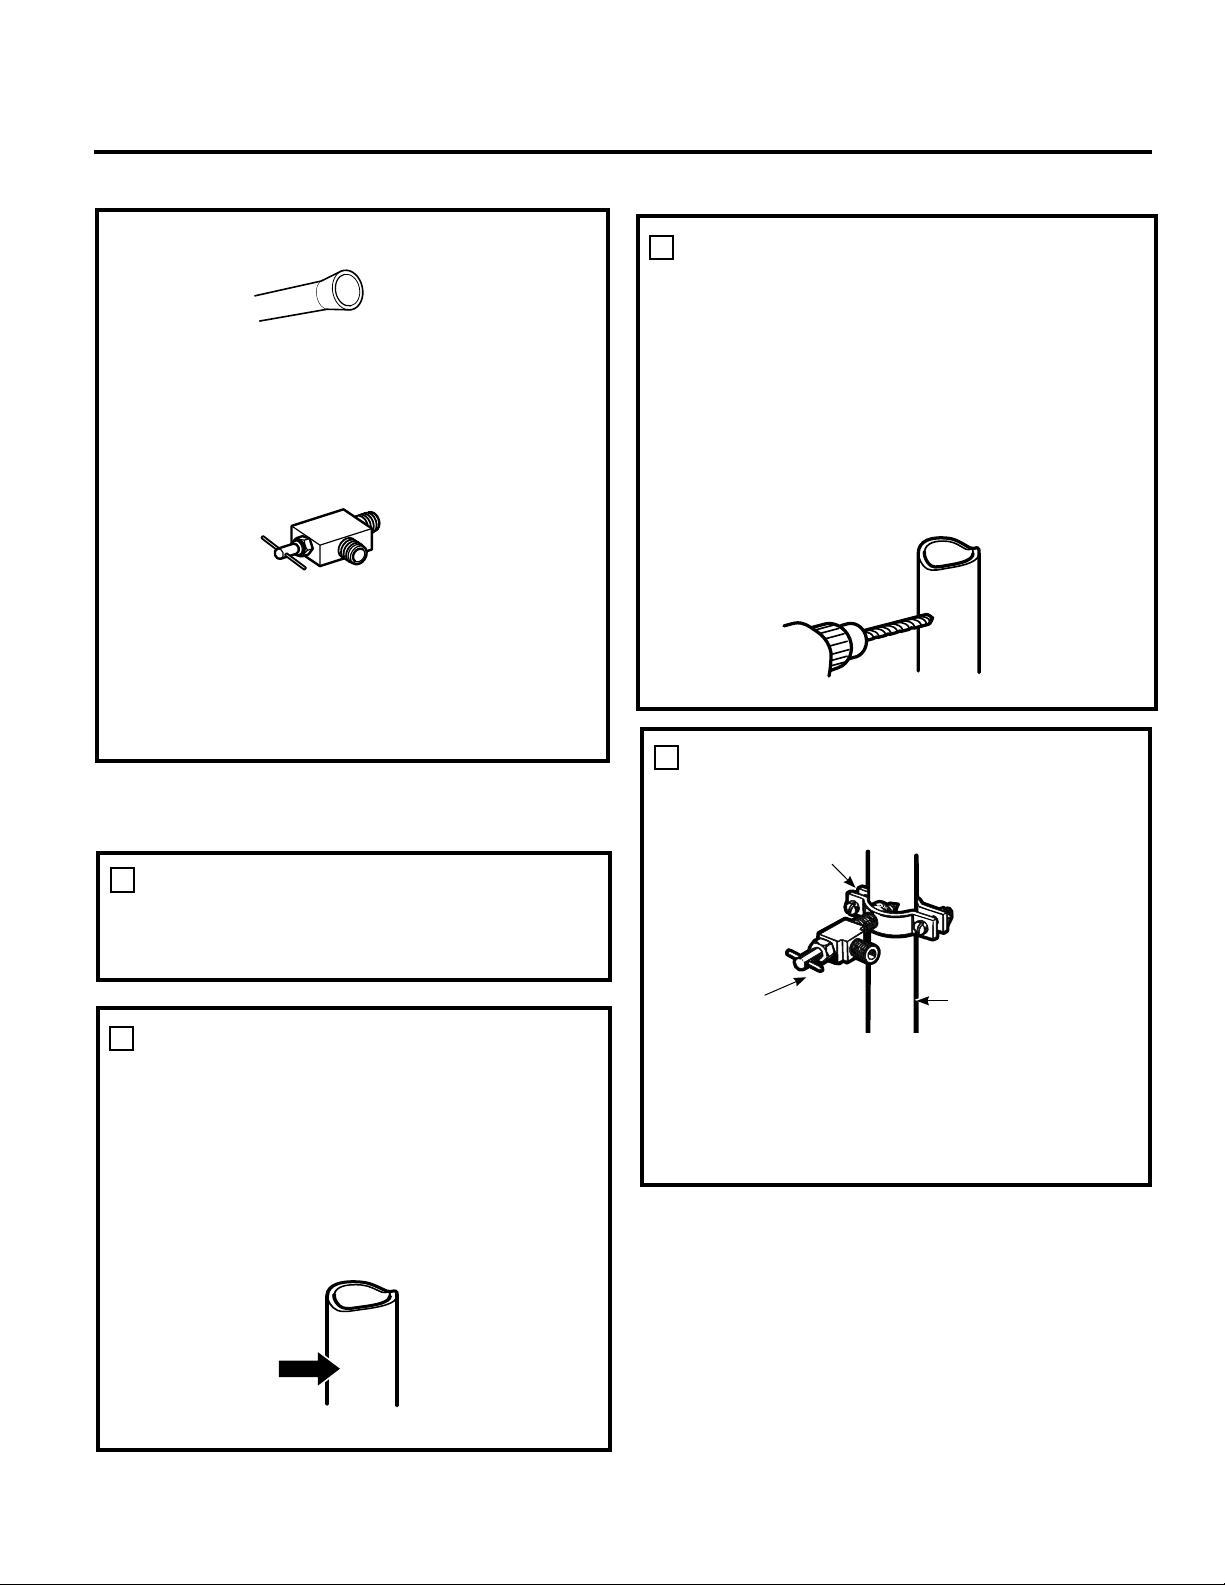
Refrigerator tubing.
DRILL THE HOLE FOR THE VALVE
3
Drill a 1/4” hole in the water pipe (even if using
a self-piercing valve), using a sharp bit. Remove
any burrs resulting from drilling the hole in
the pipe.
Take care not to allow water to drain into
the drill.
Failure to drill a 1/4” hole may result in reduced
ice production or smaller cubes.
4
FASTEN THE SHUTOFF VALVE
Fasten the shutoff valve to the cold water pipe
with the pipe clamp.
1
SHUT OFF THE MAIN WATER SUPPLY
Turn on the nearest faucet long enough to clear
the line of water.
2
CHOOSE THE VALVE LOCATION
Choose a location for the valve that is easily
accessible. It is best to connect into the side
of a vertical water pipe. When it is necessary
to connect into a horizontal water pipe, make
the connection to the top or side, rather than at
the bottom, to avoid drawing off any sediment
from the water pipe.
Pipe Clamp
Saddle-Type
Shutoff Valve
NOTE: Commonwealth of Massachusetts
Plumbing Codes 248CMR shall be adhered
to. Saddle valves are illegal and use is not
permitted in Massachusetts. Consult with your
licensed plumber.
Vertical Cold Water
Pipe
5
Page 6
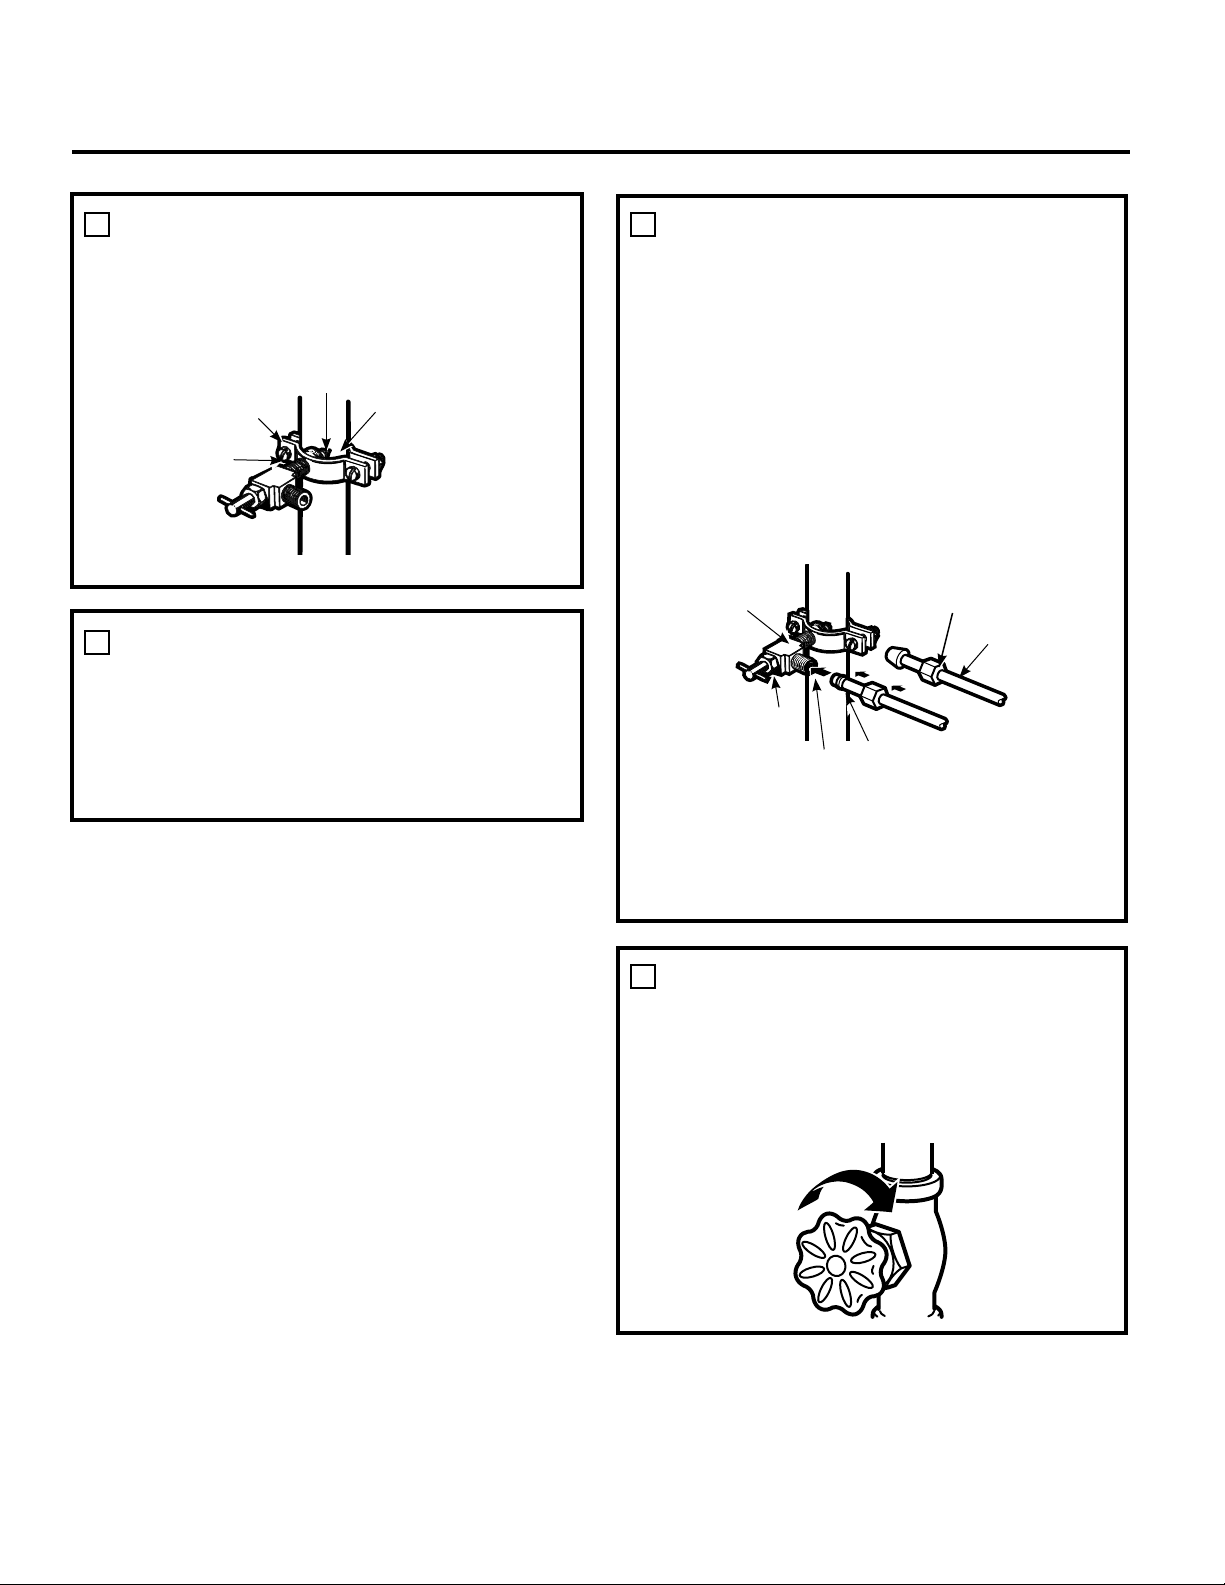
Installing the water line. (cont.)
TIGHTEN THE PIPE CLAMP
5
Tighten the clamp screws until the sealing
washer begins to swell.
NOTE: Do not over tighten or you may crush
the tubing.
Washer
Pipe Clamp
Clamp
Screw
Inlet End
7
CONNECT THE TUBING TO THE VALVE
Place the compression nut and ferrule (sleeve)
for copper tubing onto the end of the tubing
and connect it to the shutoff valve.
Make sure the tubing is fully inserted into
the valve. Tighten the compression nut securely.
For plastic tubing from a GE SmartConnect
Refrigerator Tubing kit, insert the molded end
of the tubing into the shutoff valve and tighten
compression nut until it is hand tight, then
tighten one additional turn with a wrench. Over
tightening may cause leaks.
™
ROUTE THE TUBING
6
Route the tubing between the cold water line
and the refrigerator.
Route the tubing through a hole drilled in the
wall or floor (behind the refrigerator or adjacent
base cabinet) as close to the wall as possible.
Saddle-Type
Shutoff Valve
Packing Nut
Outlet Valve
Ferrule (sleeve)
Compression Nut
SmartConnect™
Tubing
NOTE: Commonwealth of Massachusetts
Plumbing Codes 248CMR shall be adhered
to. Saddle valves are illegal and use is not
permitted in Massachusetts. Consult with your
licensed plumber.
8
FLUSH OUT THE TUBING
Turn the main water supply on and flush out
the tubing until the water is clear.
Shut the water off at the water valve after
about one quart (1 liter or 2 minutes) of water
has been flushed through the tubing.
6
Page 7
GEAppliances.com
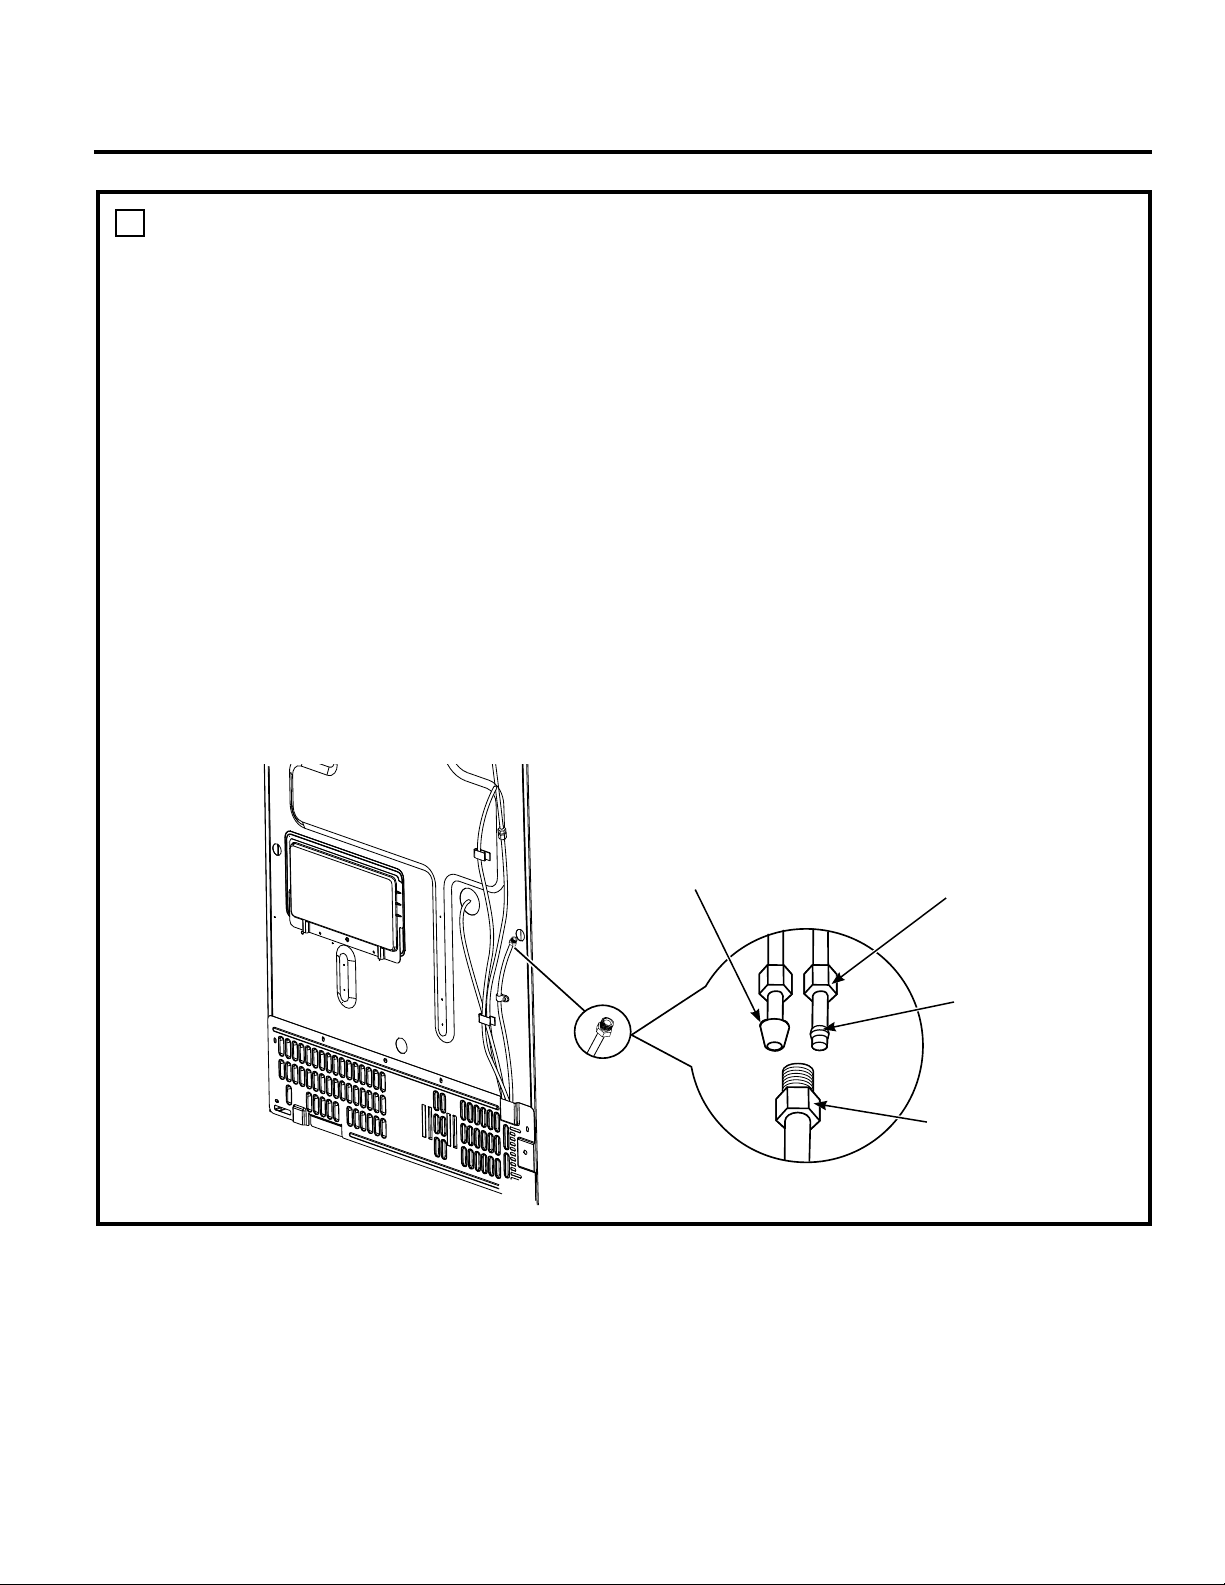
CONNECTING THE REFRIGERATOR
9
TO THE HOUSE WATER LINE
A cold water supply is required for automatic icemaker
operation. If there is not a cold water supply, you will
need to provide one. See Installing the Water Line
section.
NOTES:
• Before making the connection to the refrigerator, be
sure the refrigerator power cord is not plugged into
the wall outlet.
• If you are not using your refrigerator water filter, we
recommend installing one if your water supply has
sand or particles that could clog the screen of the
refrigerator’s water valve. Install it in the water line
near the refrigerator. If using GE SmartConnect
Refrigerator Tubing Kit, you will need an additional
tube (WX08X10002) to connect the filter. Do not cut
plastic tube to install filter.
• Before connecting the water line to the house, purge
the house line for at least 2 minutes.
• If you are using copper tubing, place a compression
nut and ferrule (sleeve) onto the end of the tubing
coming from the house cold water supply.
™
If you are using the GE SmartConnect
tubing, the
nuts are already assembled to the tubing.
• If you are using copper tubing, insert the end of the
tubing into the refrigerator connection, at the back of
the refrigerator, as far as possible. While holding the
tubing, tighten the fitting.
™
If you are using GE SmartConnect
tubing, insert
the molded end of the tubing into the refrigerator
connection, at the back of the refrigerator, and tighten
the compression nut until it is hand tight. Then tighten
one additional turn with a wrench. Over tightening
™
may cause leaks.
• Fasten the tubing into the clamp provided to hold it in
position. You may need to pry open the clamp.
SmartConnect™
Tubing
1/4”
Compression
Nut
Ferrule
(sleeve)
Refrigerator
Connection
7
Page 8
Installation IM-5D
Instructions Icemaker Kit
Questions? Call 800.GE.CARES (800.432.2737) or Visit our Website at: GEAppliances.com
In Canada, call 1.800.561.3344 or Visit our Website at: geappliances.ca
BEFORE YOU BEGIN
Read these instructions completely and carefully.
•
IMPORTANT – Save these instructions
for local inspector’s use.
•
IMPORTANT – Observe all governing
codes and ordinances.
• Note to Installer – Be sure to leave these
instructions with the Consumer.
• Note to Consumer – Keep these instructions
for future reference.
• Skill level – Installation of this appliance requires
basic mechanical and electrical skills.
• Completion time – 20–60 minutes
• Proper installation is the responsibility of the
installer.
• Product failure due to improper installation is not
covered under the Warranty.
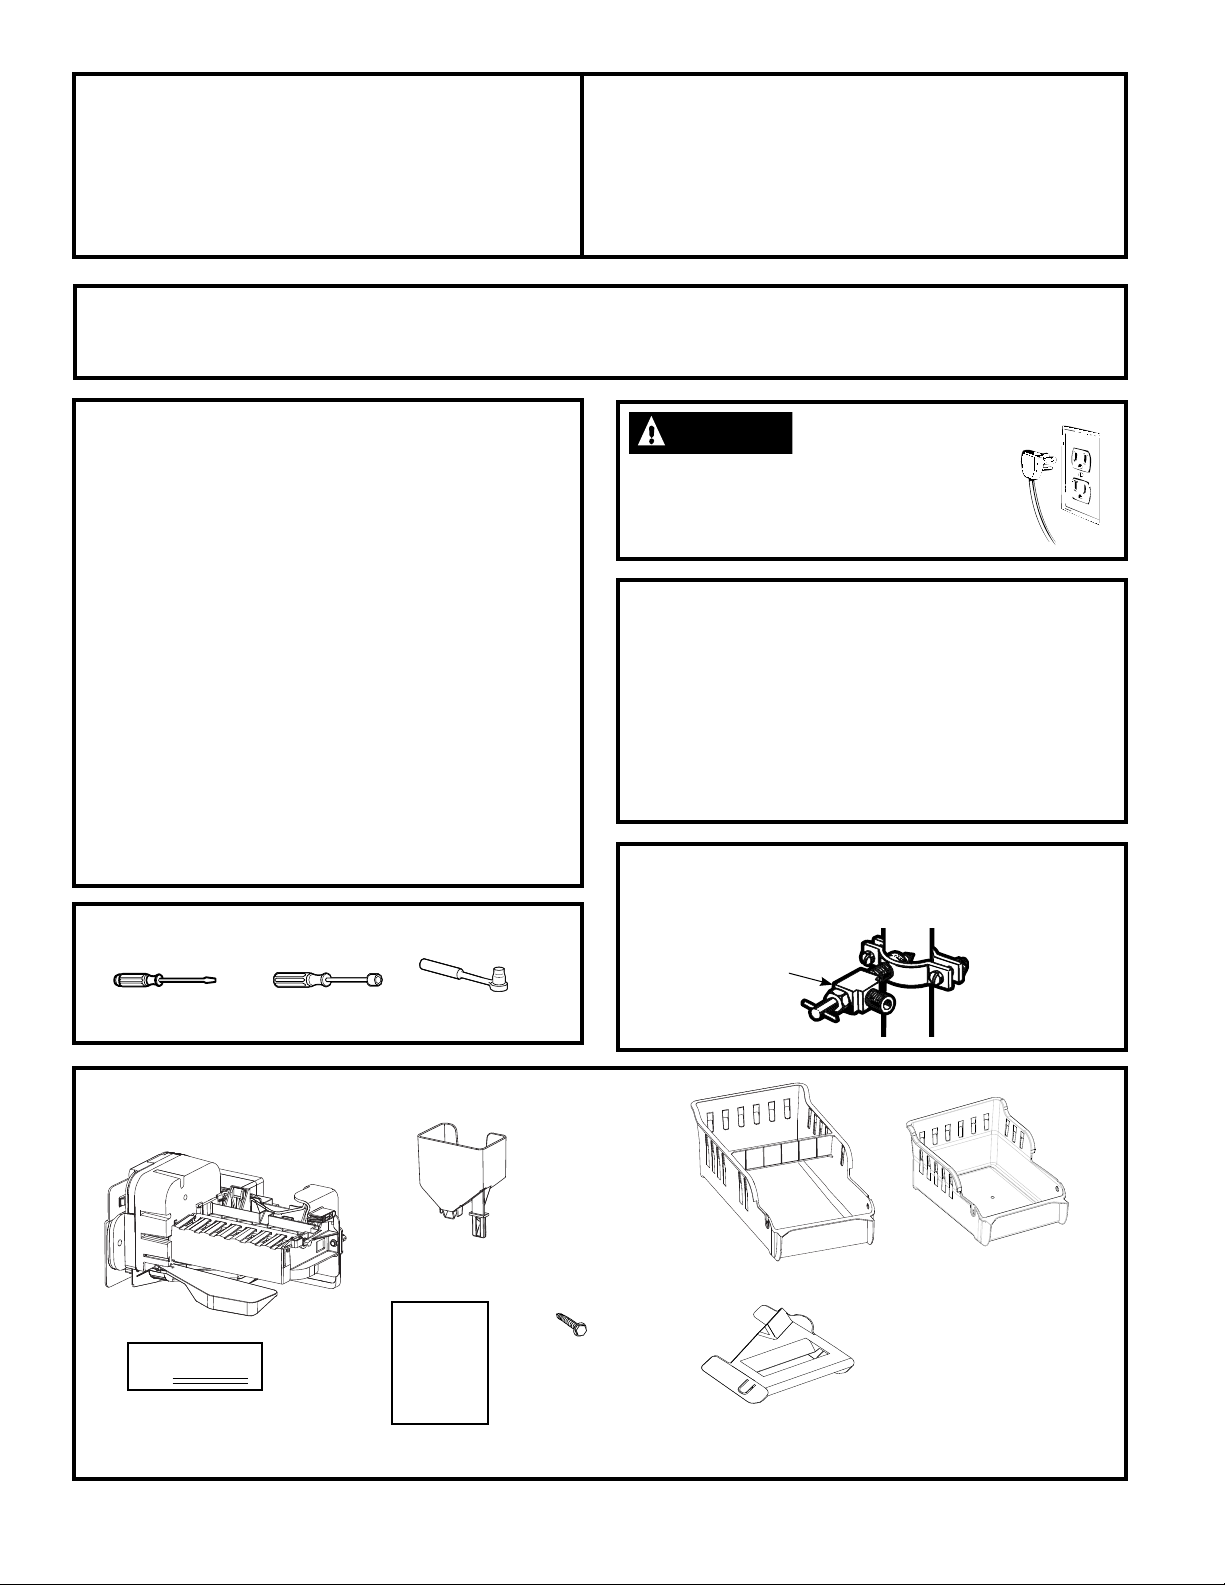
TOOLS YOU WILL NEED
Small Flat-head
Screwdriver
1/4” Nut Driver
3/8” Socket
Ratchet/Driver
WARNING
electric shock or injury during installation,
you must first unplug the refrigerator
before proceeding. Failure to follow these
instructions can result in electrical shock.
To eliminate the risk of
DAMAGE – SHIPMENT/INSTALLATION
• If the unit is damaged in shipment, return the unit to the
store in which it was bought for repair or replacement.
• If the unit is damaged by the customer, repair or
replacement is the responsibility of the customer.
• If the unit is damaged by the installer (if other than
the customer), repair or replacement must be made by
arrangement between customer and installer.
SHUT OFF THE WATER SUPPLY
Shut the water off at the water vlave.
Saddle-Type
Shutoff Valve
CONTENTS OF KIT IM-5D
Icemaker
ICEMAKER
WARRANTY VERIFICATION
Warranty Label
8
Icemaker Fill Cup
Installation
Instructions
Installation
Instructions
Hex Head Screw
(3/4”)
Large Ice Bucket*
Ice Bucket Cover
(for large ice bucket)
Small Ice Bucket*
(for counter depth models)
*Kit comes with 2 ice buckets.
The smaller is for counter
depth models. Use extra
bucket for additional ice
storage or recycle.
Page 9
Installation Instructions
INSTALLING ICEMAKER
PREPARE FOR INSTALLATION
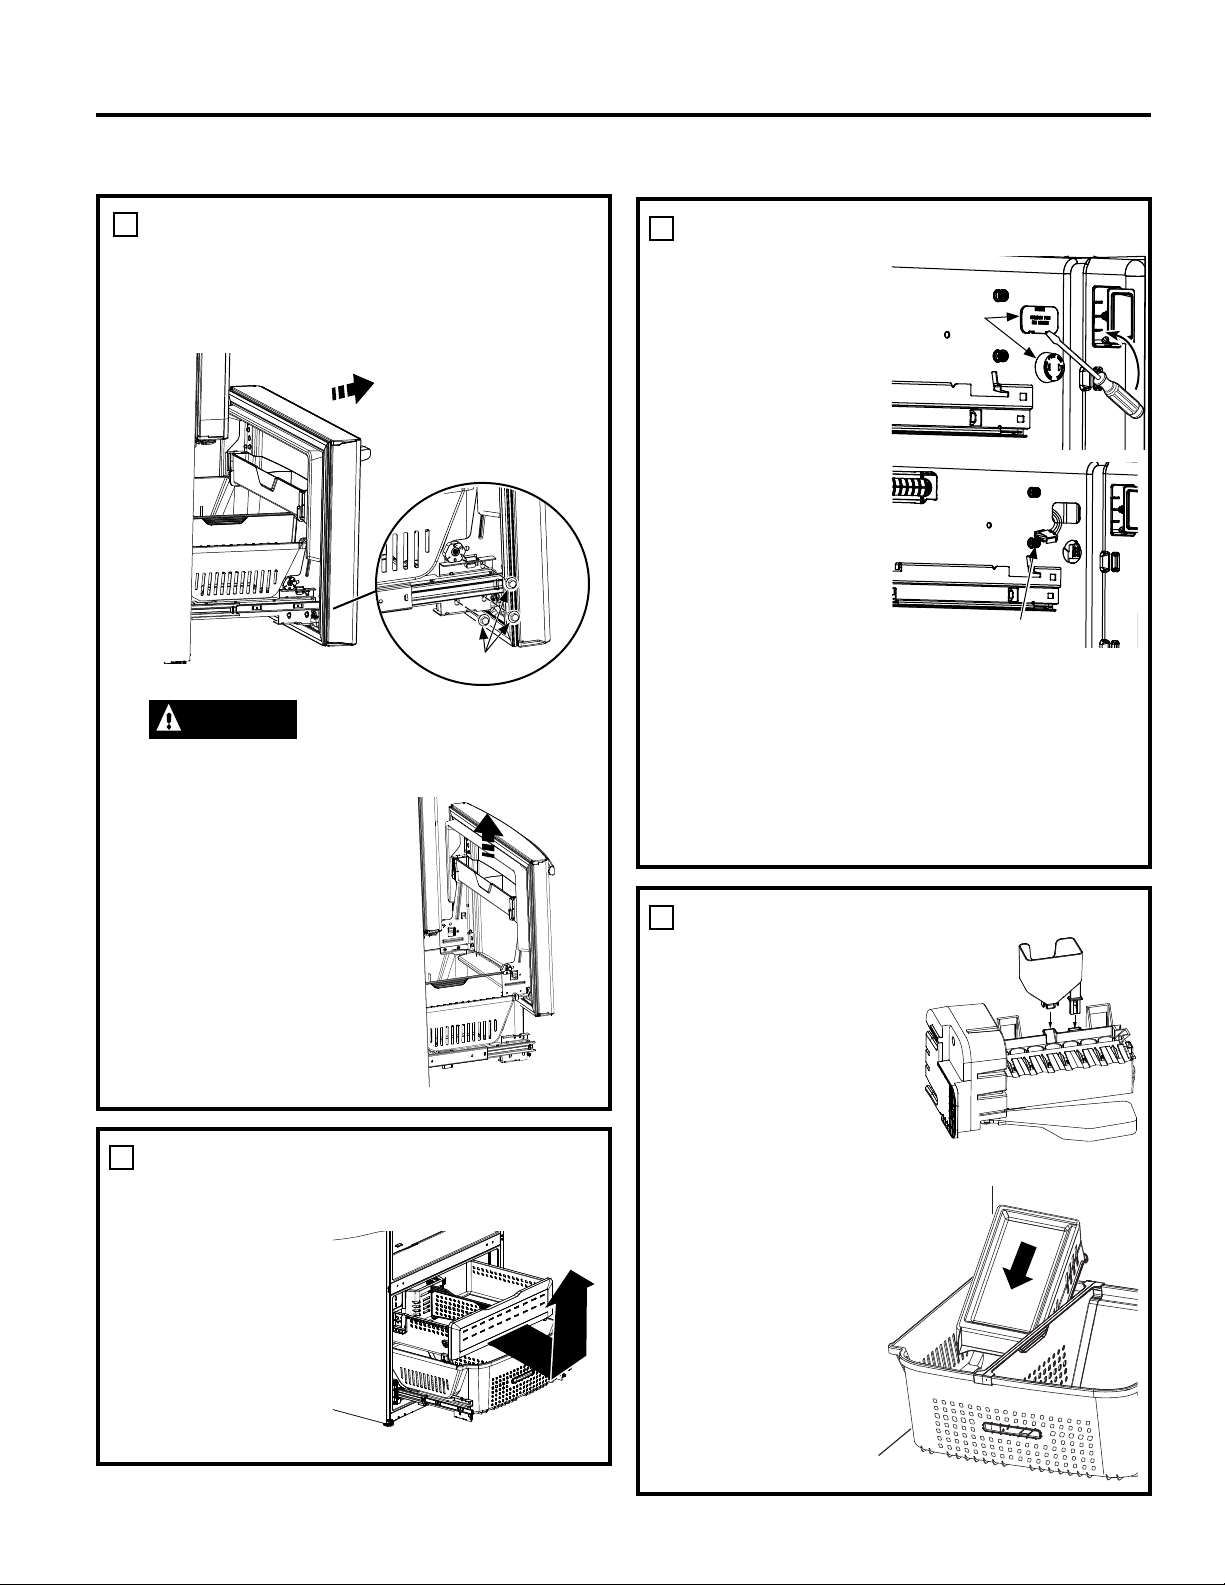
1
• Pull the freezer door open to full extension.
• Remove 3 attachment screws, located at
the bottom on each side of the freezer door
using 3/8” hex socket driver.
3 Screws
CAUTION
Freezer door is heavy Use both hands to
secure the door before lifting.
• Lift the freezer
door to
disengage it
from the slide
mechanism
• The door can
safely rest on
the bottom. Do
not rest the door
on any other
surfaces to avoid
scratches.
Lifting Hazard
REMOVE THE OUTLET COVERS
3
• Inside the freezer,
remove the 2
outlet covers from
the side wall.
• Remove the outlet
covers with a
small flat-blade
screwdriver.
For round
cover: Insert the
screwdriver into
one of the smaller
outermost slots
and push in firmly
to release the
round cover.
For rectangular
cover: insert the screwdriver into the slot at
the top of the cover. Lift the screwdriver up
to release the snap and pull the cover out
away from liner. (This part is disposable and
may break when removed.)
• Remove the icemaker power cord plug from
the pocket in the side wall.
INSTALL THE ICEMAKER FILL CUP
4
• Remove the ice maker
from the kit, install the
icemaker fill cup that
came with your kit
into the icemaker as
shown.
Outlet covers
Icemaker power cord
REMOVE FREEZER DRAWER
2
• Remove the top freezer drawer by fully
extending the drawer then lifting up and out.
• Push the bottom
basket back
until the slide
mechanism self
retracts.
For New Install
• Choose the
appropriate size
ice bucket from
the kit. Place the
ice bucket in the
left side of the
freezer basket,
upside down,
with taller end
toward the rear
of the basket.
9
Page 10

Installation Instructions
INSTALLING ICEMAKER (cont.)
PLUG IN THE ICEMAKER
5
• Place icemaker and fill cup on top of lower
basket contents, or ice bucket (for support),
with the wire and connectors facing up.
Install the six pin connector first and then
the four pin connector.
4-Pin Connector
6-Pin Connector
4-Pin Connector
6-Pin Connector
CHECK INSTALLATION
7
• Push the icemaker back toward the rear
of the cabinet so the mounting screw
hole in the icemaker flange aligns with
the mounting hole in the freezer side wall,
making sure wires are not hanging outside
of wire housing.
• Install self-tapping
hex head screw
from the kit into
the hole in the
flange of the
icemaker.
Hex Head
Mounting Screw
MOUNT THE ICEMAKER
6
• Lift the icemaker up and rotate to align the
slots on the side of the icemaker with the
mounting pins
in the freezer
wall. Slide the
icemaker back
so the fill tube
on the top
wall fits inside
the fill cup
opening.
• Make sure:
- The connector plugs are still firmly in the
sockets.
- The fill tube extends into the fill cup
opening at the back of the icemaker.
- The icemaker is level.
• Check the wiring to make sure the ice maker
is plugged in correctly.
Screw
Hole
Mounting Pins
Mounting Screw
Fill Tube
Fill Cup
8
REMOVE THE ICE BUCKET
• Remove the ice bucket from the basket.
• For non-counter depth modles: Install the ice
bucket cover onto the ice bucket by snapping
pins into holes at the back of the ice bucket.
Ice Bucket
Cover
Ice Bucket
(Front)
10
NOTE: Kit comes with two ice buckets. Counter
depth models will use smaller bucket. Use extra
bucket (in models with “Y” in model number
such as GYE) for additional ice storage or it can
be recycled.
Page 11
Installation Instructions
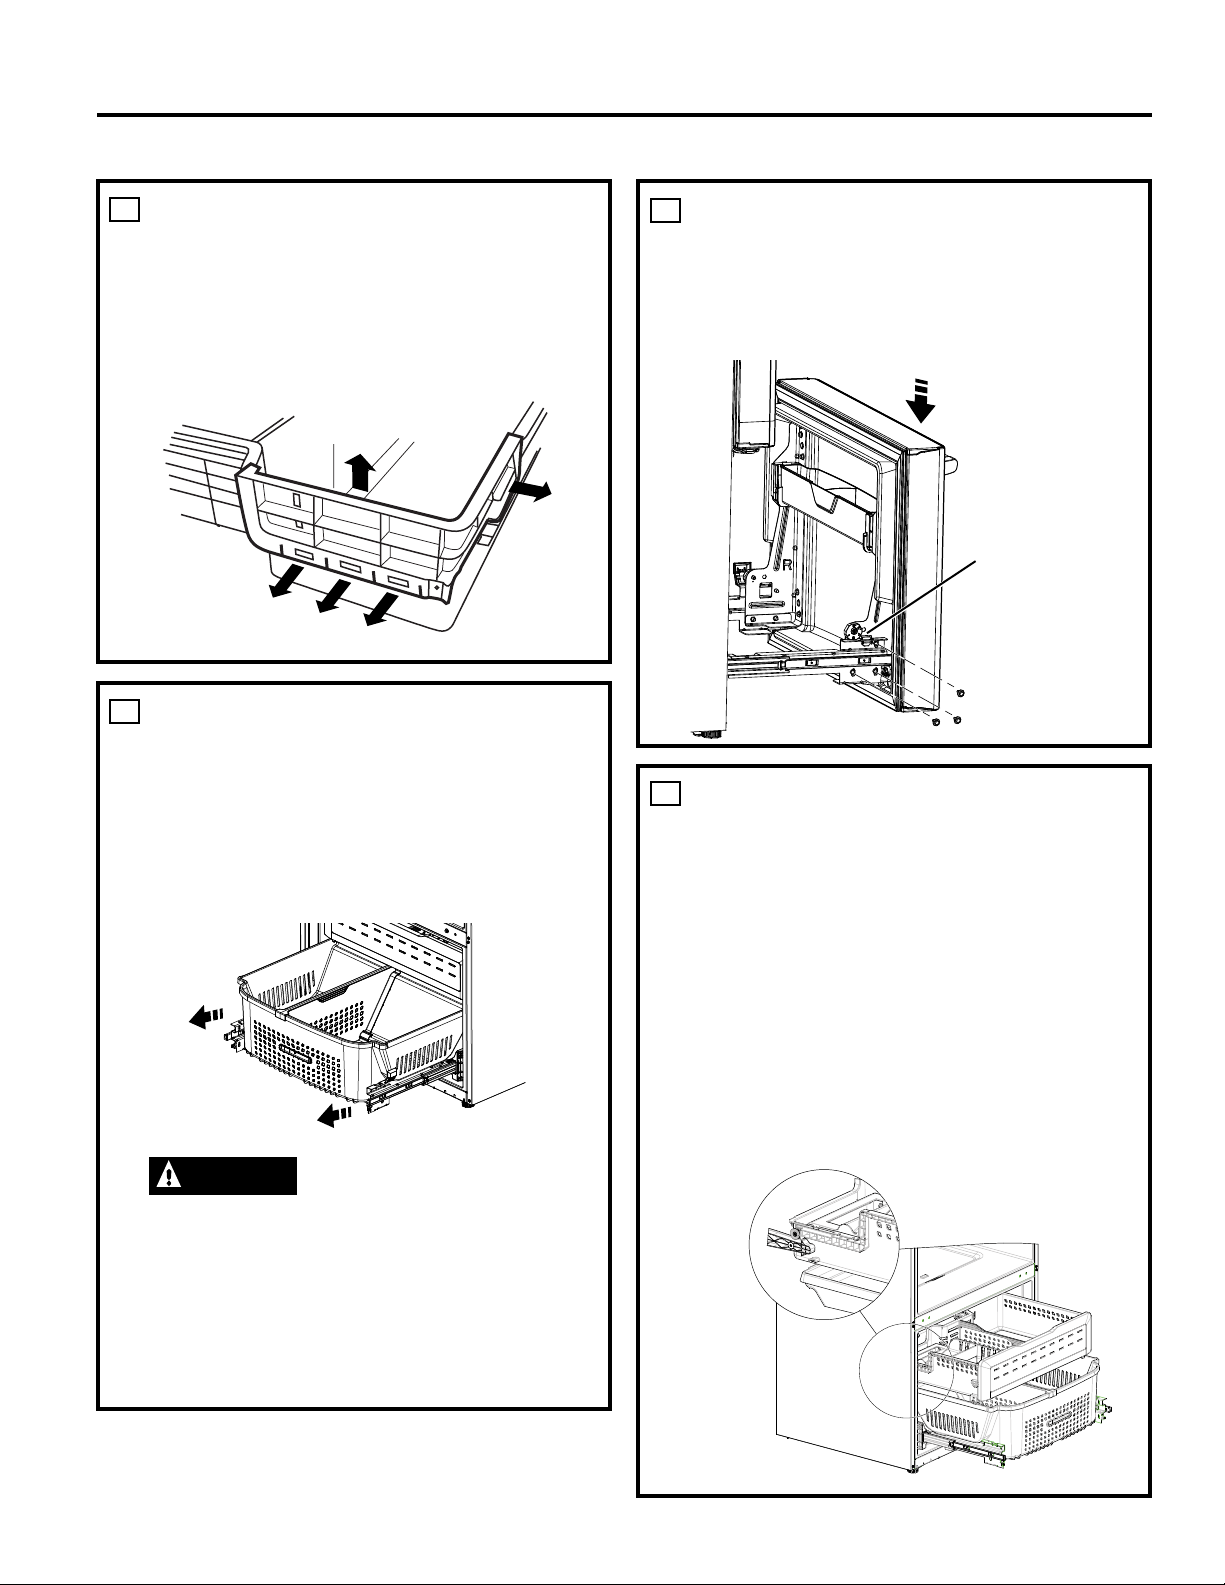
9
REMOVE FREEZER DRAWER CORNER
• Remove the drawer corner piece by pulling
out and up on three tabs while pushing
down on the back of the drawer. Then pull
out the side flange while pulling up on the
corner piece to complete the removal.
10
REPLACE FREEZER DOOR
• Pull the lower basket and slide mechanism
to full extension using both hands.
• Remove the basket resting on the slides.
If the basket is full of frozen goods, lift the
basket and set to the rear of the freezer
compartment until after the freezer door is
located on slides.
CAUTION
Freezer door is heavy Use both hands to
secure the door before lifting.
Lifting Hazard
10
REPLACE FREEZER DOOR (Cont.)
• For adjusting freezer door gaps, follow the
instructions in the Owner’s Manual.
• Replace freezer basket onto the slide
brackets and make sure the freezer door
operates and closes freely.
Align and insert tab
on Freezer Door
Bracket with slot
on Freezer Slide
Bracket.
NOTE: Place one
side in first and
then align the other
side.
11
RE-INSTALL FREEZER DRAWER
• Re-install freezer drawer by placing the rear
drawer wheels onto the top of the track
mounted to the side of the freezer walls. The
front wheels on the freezer drawer should
be on top of the bottom basket sides. Place
the ice bucket in the drawer and push the
drawer into the freezer with the front of
the bucket (see page 10) to the front of the
basket,.
• Make sure:
- The ice bucket does not hit the icemaker
arm and the freezer drawer retracts
completely into the freezer compartment.
- The fill tube extends into the fill cup
opening at the back of the icemaker.
• Lift the freezer door and align the tabs on
the door bracket sides with the square holes
in slide mechanisms.
• Replace the attachment screws and torque
the screws to 65 in-lb.
11
Page 12
Installation Instructions
INSTALLING ICEMAKER (cont.)
12
ATTACH WARRANTY LABEL
• A label is provided with this kit to record the
date of installation for warranty purposes.
Apply it to the inside of the refrigerator
under existing model/serial number label on
the side wall of the fresh food compartment.
13
KEEP THIS MANUAL
The warranty for the icemaker is printed in
this manual. Keep this manual with your
Refrigerator Owner’s Manual.
The icemaker installation inside the freezer is
now complete.
14
TURN THE WATER ON AT THE
SHUTOFF VALVE
Tighten any connections that leak.
PLUG IN THE REFRIGERATOR
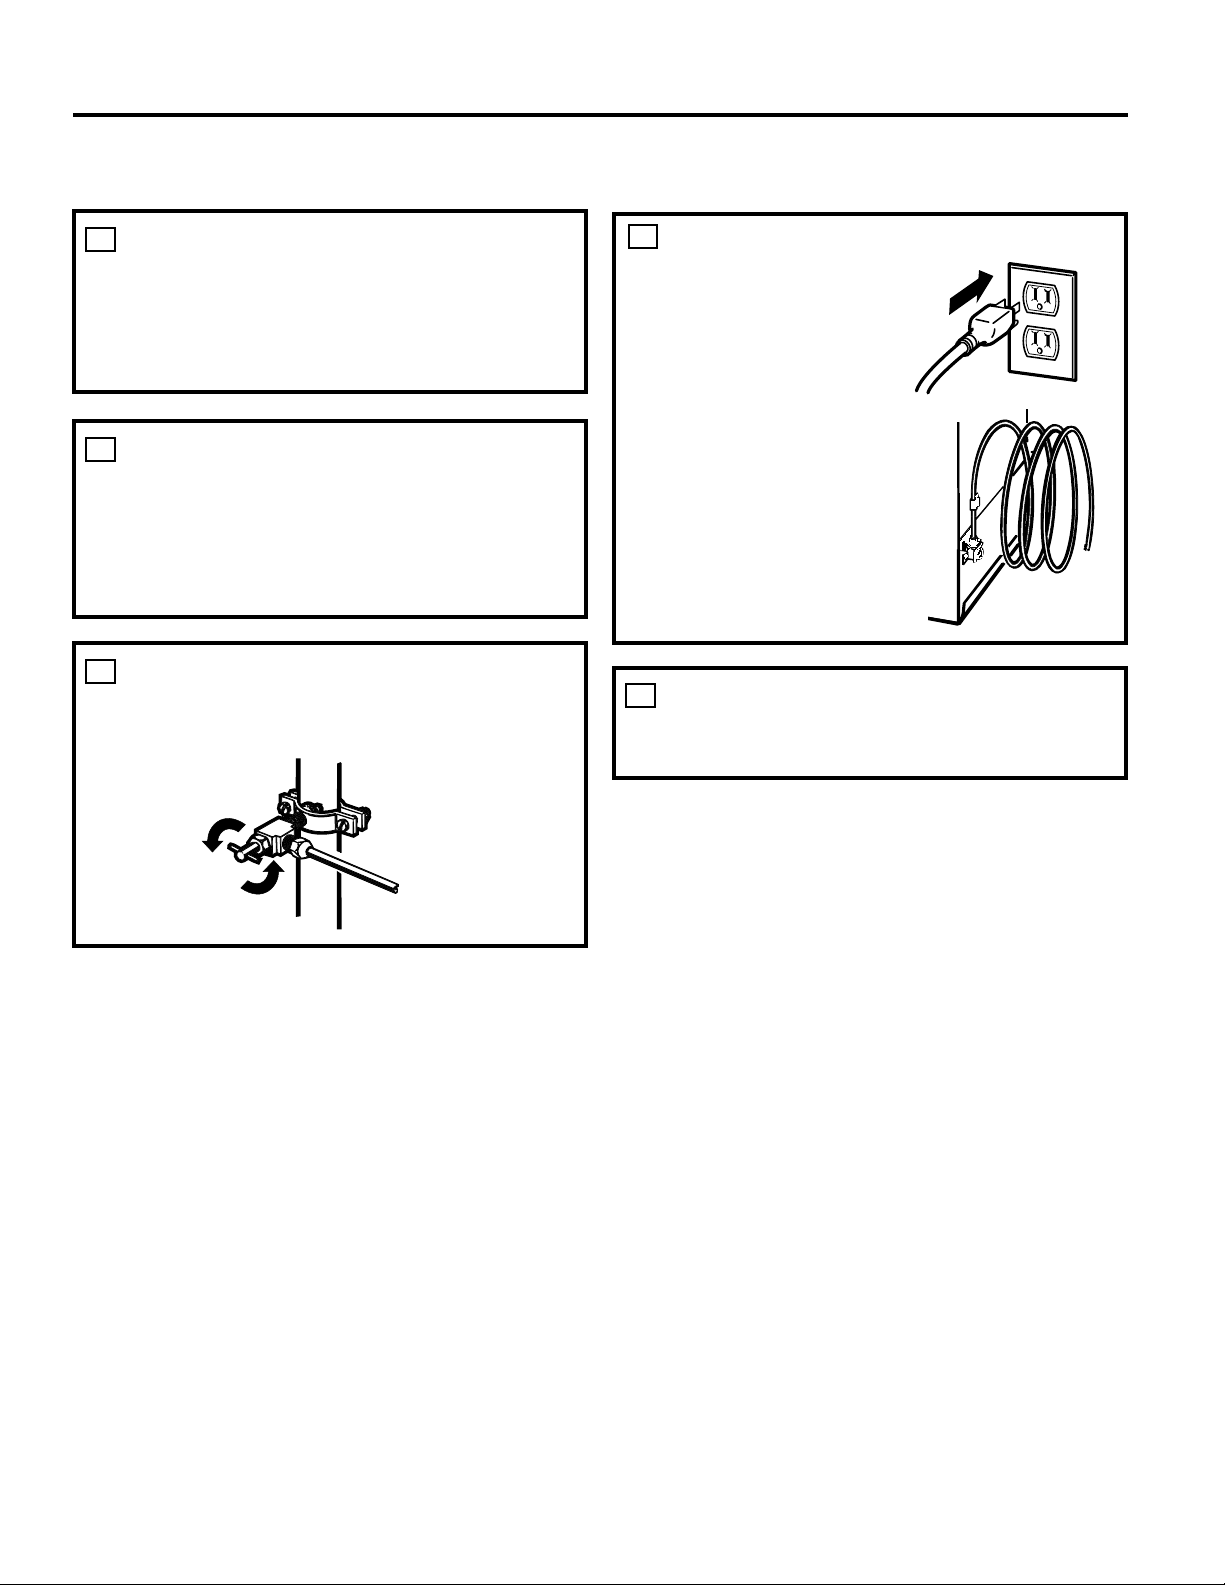
15
Plug in the refrigerator.
Arrange the coil of tubing
so that it does not vibrate
against the back of the
refrigerator or against the
wall. Push the refrigerator
back to the wall.
16
START THE ICEMAKER
Set the icemaker to ON. See page 3.
12
Page 13

Before you call for service…
Troubleshooting Tips
Save time and money! Review the following chart first
and you may not need to call for service.
Problem Possible Causes What To Do
Automatic icemaker does not
work
Freezer compartment too
warm.
Icemaker is not turned on Use the ICE MAKER button on the control.
Icemaker is not plugged in
correctly
After installing the kit, allow the refrigerator to
completely cool down for 24 hours. Once the
compartment is cool, the icemaker will begin ice
production.
Check that the icemaker cord pug is fully inserted into
the socket. See Plug in the Icemaker, page 10.
GEAppliances.com
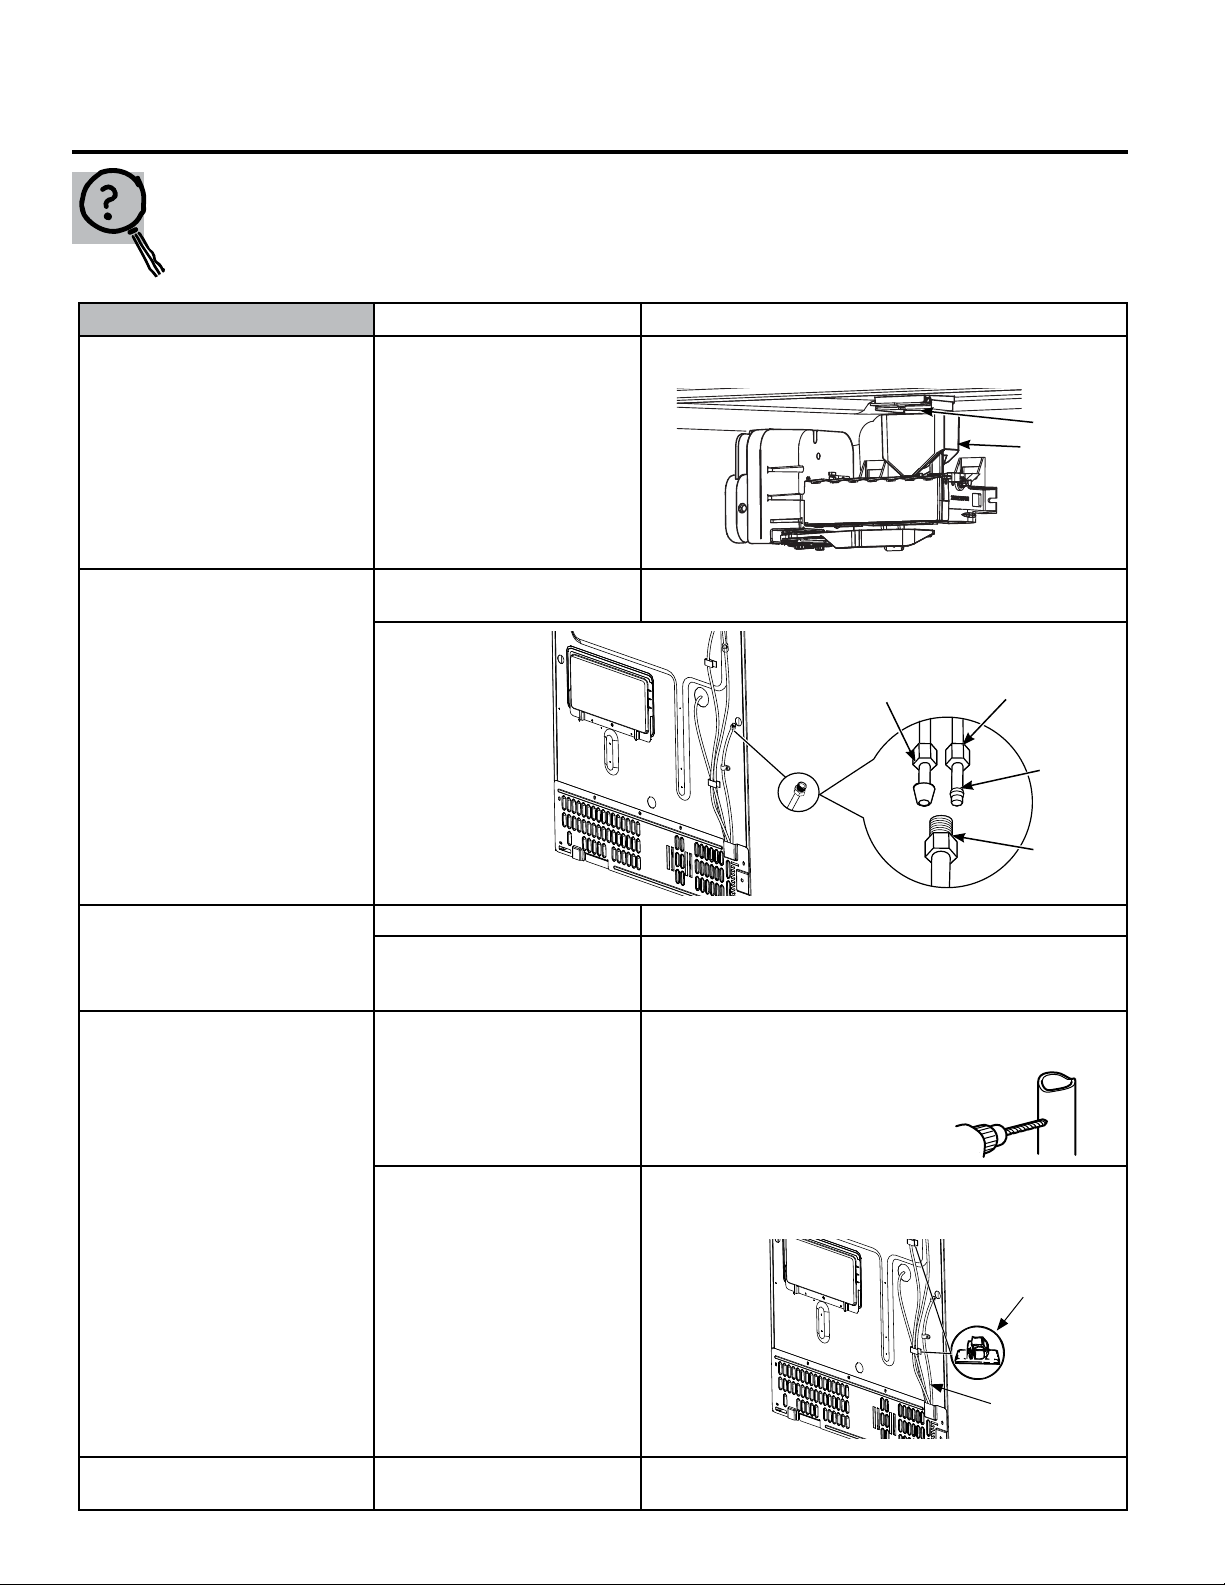
Water line is kinked Check that the plastic water line running from the valve
to the water tube inlet is not kinked. See Connect the
Water Line. A kink in the water line will restrict flow of
water.
Adhesive-backed
Fasteners
Water Line
Tubing
Water supply tuned off or not
connected
Piled up cubes in the storage
bin cause the icemaker to shut
off
After installing the kit, make sure the house water
supply to the refrigerator has been turned on.
Level cubes by hand.
13
Page 14
Before you call for service…
Troubleshooting Tips
Save time and money! Review the following chart first
and you may not need to call for service.
Problem Possible Causes What To Do
Leaking water around the fill cup Fill tube not correctly seated
in the fill cup
Check that the fill tube is correctly inserted in the fill cup
opening. See Mount the Icemaker.
Fill Tube
Fill Cup
Leaking water behind the
refrigerator
Slow ice/freezer not cold enough Door left open Check to see if package is holding door open.
Ice cubes too small/slow ice Water shutoff valve
House supply not properly
connected to the water valve
Water line not
connected to
the water tube
inlet
Temperature control not set
cold enough
connecting refrigerator to
house water line may be
clogged
Check that the house supply is firmly attached to the
water valve. See Water Line Installation Instructions.
1/4”
SmartConnect™
Tubing
See Controls-Temperature Settings in the Owner’s Manual
(Web only) or the Quick Installation Guide - Controls of the
refrigerator.
We recommend drilling a 1/4” hole in the water pipe to
connect the water shut-off valve. Failure to drill a 1/4”
hole may result in reduced ice
production or smaller cubes.
See Installing the Water Line.
Compression
Nut
Drill 1/4" hole
in water pipe
Ferrule
(sleeve)
Refrigerator
Connection
14
Water line is kinked Check that the plastic water line running from the valve to
the water tube inlet is not kinked. See Connect the Water
Line. A kink in the water line will restrict flow of water.
Adhesive-backed
Fasteners
Water Line
Tubing
Check water filter See Owner’s Manual (Web Only), and the Quick Use and
Care.
Page 15
GEAppliances.com
Problem Possible Causes What To Do
Ice cubes not landing in bucket Icemaker cord causing
icemaker bucket misalignment
Ice cubes have odor/taste Ice storage bin needs cleaning Empty the wash bin. Discard old cubes
Food transmitting odor/taste
to ice cubes
Interior of refrigerator needs
cleaning
Ice cubes hollow Water supply in RO Water
Filtration System.
Interior of refrigerator needs
cleaning
Frequent “buzzing” sound Normal operation During normal operation, the water valve will “buzz” when
Be sure ice maker wires are not hanging outside of the
wiring enclosure on back of ice maker. (See step 7 page 10)
Wrap foods well. Move strong tasting foods away from ice
bucket, meat, etc.
See Care and Cleaning in the Owner’s Manual (Web Only,)
and the Quick Installation guide of the refrigerator.
See Installing Water Line, use Filter bypass plug.
See Care and Cleaning in the Owner’s Manual (Web Only,)
and the Quick Installation guide of the refrigerator.
the icemaker fills with water.
Normal sounds you may hear
■ The icemaker water valve will buzz when the icemaker fills
with water. If the icemaker is on it will buzz even if it has
not yet been hooked up to water. Keeping the icemaker on
before it is hooked up to water can damage the icemaker. To
prevent this, turn the icemaker off. This will stop the buzzing.
■ The sound of cubes dropping into the bin and water running
in the pipes as the icemaker refills.
15
Page 16
Icemaker Warranty.
All warranty service provided by our Factory Service Centers, or an
®
authorized Customer Care
technician. To schedule service, on-line,
visit us at GEAppliances.com, or call 800.GE.CARES (800.432.2737). In
Canada, call 1.800.561.3344. Please have serial number and model
Staple your receipt here.
Proof of the original purchase
date is needed to obtain service
under the warranty.
number available when calling for service.
For The Period Of: We Will Replace:
One Year Any part of the icemaker which fails due to a defect in materials or workmanship.
From the date of the During this limited one-year warranty, GE will provide, free of charge, replacement parts
original purchase for any defective part in your icemaker kit.
What Is Not Covered (for customers in the United States):
■ Service trips to your home to teach you how to use
the product.
■ Improper installation.
You are responsible for providing adequate electrical,
plumbing, and other connecting facilities, including the
water line to the icemaker and the water line installation.
■ Failure of the product if it is abused, misused, or used for
other than the intended purpose or used commercially.
■ Replacement of house fuses or resetting of circuit
breakers.
■ Damage to the product caused by accident, fire, floods
or acts of God.
■ Incidental or consequential damage caused by possible
defects with this appliance.
■ Product not accessible to provide required service.
EXCLUSION OF IMPLIED WARRANTIES—Your sole and exclusive remedy is product repair as provided in
this Limited Warranty. Any implied warranties, including the implied warranties of merchantability or
fitness for a particular purpose, are limited to one year or the shortest period allowed by law.
This warranty is extended to the original purchaser and any succeeding owner for products purchased for home
use within the USA. If the product is located in an area where service by a GE Authorized Servicer is not available,
you may be responsible for a trip charge or you may be required to bring the product to an Authorized GE Service
location for service. In Alaska, the warranty excludes the cost of shipping or service calls to your home.
Some states do not allow the exclusion or limitation of incidental or consequential damages. This warranty gives
you specific legal rights, and you may also have other rights which vary from state to state. To know what your
legal rights are, consult your local or state consumer affairs office or your state’s Attorney General.
Warrantor: General Electric Company. Louisville, KY 40225
What Is Not Covered (for customers in Canada):
■ Service trips to your home to teach you how to use
the product.
Read your Owner’s Manual. If you then have any questions
about
operating the product, please contact
our Consumer Relations office at:
General Manager, Customer Relations
GE Appliances, Appliance Park
Louisville, KY 40225
your dealer or
■ Improper installation.
If you have an installation problem, contact your dealer
or installer. You
electrical, exhausting and other connecting facilities.
■
Replacement of house fuses or resetting
breakers.
■ Failure of the product if it is misused, or used for other
than the intended purpose or used commercially.
■
Damage to product caused by accident,
acts of God.
are responsible for providing adequate
of circuit
fire, floods or
16
WARRANTOR IS NOT RESPONSIBLE FOR CONSE QUEN TIAL DAMAGES.
Page 17

Notes.
GEAppliances.com
17
Page 18

Consumer Support.
GE Appliances Website In the U.S.: GEAppliances.com
Have a question or need assistance with your appliance? Try the GE Appliances Website 24 hours a day,
any day of the year! For greater convenience and faster service, you can now download Owner’s Manuals,
order parts or even schedule service on-line. In Canada: www.geappliances.ca
Schedule Service In the U.S.: GEAppliances.com
Expert GE repair service is only one step away from your door. Get on-line and schedule your service at your
convenience any day of the year! Or call 800.GE.CARES (800.432.2737) during normal business hours.
In Canada, visit www.geppliances.ca
Real Life Design Studio In the U.S.: GEAppliances.com
GE supports the Universal Design concept—products, services and environments that can be used by people of
all ages, sizes and capabilities. We recognize the need to design for a wide range of physical and mental abilities
and impairments. For details of GE’s Universal Design applications, including kitchen design ideas for people with
disabilities, check out our Website today. For the hearing impaired, please call 800.TDD.GEAC (800.833.4322).
In Canada, visit www.geppliances.ca.
Extended Warranties In the U.S.: GEAppliances.com
Purchase a GE extended warranty and learn about special discounts that are available while your warranty is still
in effect. You can purchase it on-line anytime, or call 800.626.2224 during normal business hours. GE Consumer Home
Services will still be there after your warranty expires. In Canada, call 1.800.290.9029
Parts and Accessories In the U.S.: GEApplianceParts.com
Individuals qualified to service their own appliances can have parts or accessories sent directly to their homes
(VISA, MasterCard and Discover cards are accepted). Order on-line today, 24 hours every day or by phone at
800.626.2002 during normal business hours.
Instructions contained in this manual cover procedures to be performed by any user. Other servicing generally
should be referred to qualified service personnel. Caution must be exercised, since improper servicing may cause
unsafe operation.
Customers in Canada should consult the yellow pages for the nearest GE Appliances Service Center or
www.geappliacnes.ca.
Contact Us In the U.S.: GEAppliances.com
If you are not satisfied with the service you receive from GE, contact us on our Website with all the details including
your phone number, or write to: General Manager, Customer Relations
GE Appliances, Appliance Park
Louisville, KY 40225
In Canada, visit www.geppliances.ca.
Register Your Appliance In the U.S.: GEAppliances.com
Register your new appliance on-line—at your convenience! Timely product registration will allow for enhanced
communication and prompt service under the terms of your warranty, should the need arise. You may also
mail in the pre-printed registration card included in the packing material, or detach and use the form in this
Owner’s Manual. In Canada: www.geappliances.ca
Printed in the United States
Page 19

IM-5D
Mesures de sécurité ............................ 2
Instructions de fonctionnement ...............3
La machine à glaçons automatique ..................3
Préparation à un départ de longue durée ............3
Quand devez-vous éteindre la machine à glaçons? ...3
Instructions d’installation
Installation de la conduite d’eau .................. 4-7
Installation de la machine à glaçons pour ........8-12
Avant d’appeler un réparateur ..................13-15
Bruits normaux que vous pouvez entendre ......... 15
Services aux consommateurs
Garantie ..........................................16
Soutien au consommateur ........................18
Manuel d’utilisation
et d’installation
Trousse Machine à glaçons
Page 20

SÉCURITÉ
Site Internet d’Électroménagers GE
Pour de plus amples informations sur le fonctionnement de votre réfrigérateur, consultez le
site www.electromenagersge.ca ou composez le 800.561.3344.
CONSIGNES DE SÉCURITÉ POUR LE RÉFRIGÉRATEUR
Ce symbole représente une alerte de sécurité. Ce symbole vous avise de dangers possibles pouvant causer
la mort, des blessures ou autres. Tous les messages de sécurité seront précédés du symbole d’alerte de sécurité
ainsi que des mots « DANGER », « AVERTISSEMENT » ou « MISE EN GARDE ». Ces messages sont les suivants :
DANGER
graves, voire la mort.
AVERTISSEMENT
blessures graves, voire la mort.
ATTENTION
blessures mineures ou graves.
AVERTISSEMENT
n Débranchez le réfrigérateur avant d’installer la
machine à glaçons. Remarque : L’alimentation
électrique à l’appareil ne peut pas être débranchée à
partir du panneau de commande.
n Replacez toutes les pièces et les panneaux avant de
faire fonctionner le réfrigérateur.
Signale une situation qui présente un danger imminent et qui, si elle n’est pas évitée, entraînera des blessures
Signale une situation qui présente un danger imminent et qui, si elle n’est pas évitée, peut entraîner des
Signale une situation qui présente un danger imminent et qui, si elle n’est pas évitée, peut entraîner des
.
IMPORTANTES CONSIGNES DE SÉCURITÉ
Pour réduire le risque d’incendie, d’explosion, de choc électrique ou de blessures
lorsque vous utilisez votre réfrigérateurde , veuillez suivre ces consignes de sécurité :
n Évitez de toucher les pièces mobiles du mécanisme
de la machine à glaçons ainsi que l’élément chauffant
qui libère les cubes. Ne placez ni les doigts ni les mains
sur le mécanisme de la machine à glaçons lorsque le
réfrigérateur est branché.
LISEZ ET SUIVEZ SOIGNEUSEMENT CES MESURES DE SÉCURITÉ.
LISEZ ET CONSERVEZ CES INSTRUCTIONS.
2
Page 21

La machine à glaçons automatique. electromenagersge.ca
Un réfrigérateur nouvellement installé peut prendre de 12 à 24 heures pour commencer à produire des glaçons.
Machine à glaçons automatique
Bras de détection
Machine à
glaçons
La machine à glaçons produit sept glaçons par
cycle, soit environ 100 à 130 glaçons par 24 heures,
selon la température du compartiment congélation,
la température de la pièce, le nombre de fois que la
porte est ouverte et les autres conditions d’utilisation.
La machine à glaçons se remplit d’eau lorsque
sa température atteint 15°F (-10°C). Il faut prévoir
entre 12 et 24 heures avant qu’un réfrigérateur
nouvellement installé commence à produire des
glaçons.
Si le réfrigérateur est mis en marche avant que la
machine à glaçons ne soit raccordée à l’alimentation
en eau ou si l’alimentation en eau du réfrigérateur
est fermée, assurez-vous que la machine à glaçons
est éteinte. Une fois que l’eau a été raccordée au
réfrigérateur, la machine à glaçons peut être mise
en marche. Pour allumer ou éteindre (ON ou OFF)
la machine à glaçons, utilisez le bouton ICE MAKER
(Machine à glaçons) sur le panneau de commande.
Vous pouvez entendre un bourdonnement chaque
fois que la machine à glaçons se remplit d’eau.
Jetez les premiers lots de glaçons pour permettre à
la conduite d’eau de se purger.
Assurez-vous que rien ne gène la course du bras
palpeur.
Quand le bac se remplit jusqu’au niveau du bras
palpeur, la machine à glaçons s’arrête de produire
des glaçons. Il est normal de trouver des glaçons qui
soient soudés ensemble.
Si vous n’utilisez pas souvent vos glaçons, les vieux
glaçons deviennent opaques, prennent un mauvais
goût et rétrécissent.
REMARQUE : Dans les maisons qui ont une pression
d’eau plus faible que la moyenne, vous entendrez
peut-être la machine à glaçons recommencer
plusieurs fois son cycle pour produire un lot de
glaçons.
AVERTISSEMENT
Pour réduire le risque de blessure, évitez de toucher les pièces mobiles du mécanisme
de la machine à glaçons ainsi que l’élément chauffant qui libère les cubes. Ne placez
ni les doigts ni les mains sur le mécanisme de la machine à glaçons lorsque le
réfrigérateur est branché.
Commandes du réfrigérateur.
Quand devez-vous éteindre la machine à glaçons?
■ Lorsque le bac à glaçons est retiré pour plus d’une minute ou
deux
■ Lorsque l’alimentation d’eau sera coupée durant plusieurs
heures.
■ Lorsque le réfrigérateur ne sera pas utilisé durant plusieurs
jours.
Encas d’absences ou de vacances prolongées, retirez tous les
aliments du réfrigérateur et débranchez-le. Nettoyez l’intérieur
avec une solution de bicarbonate de soude (environ une cuillère
à soupe (15 ml) de bicarbonate de soude dans un litre d’eau).
Laissez les portes ouvertes.
Éteindre le réfrigérateur au niveau des commandes (voir le
Guide d’installation abrégé).
Dans le cas où la température pourrait descendre en dessous
de zéro, demandez à un technicien qualifié de vidanger le
système d’alimentation en eau pour éviter les dégâts des eaux.
Réglage de la machine à glaçons
Maintenez une pression pour allumer/
éteindre la machine à glaçons.
Avant de partir en vacances:
1) Éteignez le système de refroidissement (voir le Guide
d’installation abrégé).
2) Videz le seau à glaçons.
3) Fermez l’arrivée d’eau
Si vous fermez l’alimentation en eau, éteignez la machine à
glaçons (voir ci-dessus).
Retour de vacances :
1) Remettez le filtre à eau.
2) Faites passer 2 gallons (7,5 litres) d’eau dans le distributeur
d’eau froide (pendant environ 5 minutes) pour purger le
système.
3) Allumez le système de refroidissement (voir le Guide
d’installation abrégé).
4) Réinitialisez le message de l’état du filtre (voir le Guide
d’utilisation et d’entretien abrégé). Si vous fermez
l’alimentation d’eau, éteignez la machine à glaçons (voir
ci-dessus).
3
Page 22

Installation de la conduite d’eau.
AVANT DE COMMENCER
Nous recommandons les trousses d’alimentation
d’eau en cuivre WX8X2, WX8X3, WX8X4, selon le
montant de conduite dont vous avez besoin. Nous
approuvons les conduites d’eau en matière plastique
GE SmartConnect™ Refrigerator Tubing (WX08X10006,
WX08X10015 and WX08X10025).
Si vous installez un système d’eau GE Reverse
Osmosis dans votre réfrigérateur, la seule installation
approuvée est celle de la trousse GE RVKIT. Pour
les autres systèmes d’osmose de l’eau, suivez les
recommandations du fabricant.
Si le réfrigérateur est alimenté en eau à partir
d’un système de filtration d’eau par osmose inversée,
et si le réfrigérateur comporte également un filtre à
eau, utiliser le bouchon du circuit de dérivation du filtre
du réfrigérateur. Si la cartouche de filtration d’eau du
réfrigérateur est utilisée en conjonction avec le système
de filtration par osmose inversée, on peut observer
une réduction du débit d’eau au point de puisage, et la
production de cubes de glace creux..
Cette installation de conduite d’eau n’est pas garantie
par le fabricant de réfrigérateur ou de machine à
glaçons. Suivez soigneusement ces instructions pour
minimiser le risque de dommages onéreux d’inondation.
Les coups de bélier (eau qui donne des coups dans
les tuyaux) dans la tuyauterie de la maison peuvent
occasionner des dommages aux pièces de votre
réfrigérateur, ainsi que des fuites ou des inondations.
Appelez un plombier certifié pour corriger les coups
de bélier avant d’installer la conduite d’eau de votre
réfrigérateur.
Pour prévenir toute brûlure et tout dommage à votre
réfrigérateur, ne branchez jamais la conduite d’eau
à une canalisation d’eau chaude.
Si le réfrigérateur est utilisé avant le raccordement de
l’alimentation d’eau à la machine à glaçons, pressez
et relâchez le bouton ICE MAKER sur le panneau de
commande pour désactiver la machine à glaçons. Une
fois le réfrigérateur raccordé à l’alimentation d’eau,
pressez et relâchez le bouton ICE MAKER sur le panneau
de commande pour réactiver la machine à glaçons.
N’installez jamais les tuyaux de la machine à glaçons
dans des endroits où la température risque de
descendre en dessous du point de congélation.
Si vous utilisez un outil électrique (comme une perceuse
électrique) pendant l’installation, assurez-vous que
l’isolement ou le câblage de cet outil empêche tout
danger de secousse électrique cela vaut aussi pour un
outil à batterie.
Vous devez procéder à toutes vos installations
conformément aux exigences de votre code local
de plomberie.
CE DONT VOUS AUREZ BESOIN
• Tuyaux en cuivre ou trousse GE SmartConnect™
Refrigerator Tubing, diamètre extérieur de 1/4 po
pour brancher le réfrigérateur à l’alimentation d’eau.
Si vous utilisez un tuyau en cuivre, assurez-vous que
les deux extrémités du tuyau soient coupées bien
droit.
Pour déterminer la longueur de tuyau dont vous avez
besoin : mesurez la distance entre le robinet d’eau
à l’arrière du réfrigérateur et le tuyau d’alimentation
en eau. Assurez-vous d’avoir une longueur de tuyau
suffisante pour permettre d’éloigner le réfrigérateur
du mur après l’installation.
Les trousses GE SmartConnect™ Refrigerator Tubing sont
disponibles dans les dimensions suivantes :
2,4 m (8 pi) – WX08X10006
4,6 m (15 pi) – WX08X10015
7,6 m (25 pi) – WX08X10025
NOTE : Les seuls tuyaux en matière plastique approuvés
par GE sont ceux qui font fournis dans les trousses GE
SmartConnect™ Refrigerator Tubing. N’utilisez jamais un
autre tuyau en matière plastique, car le tuyau d’alimentation
d’eau est tout le temps sous pression. Certaines catégories
de tuyaux en matière plastique peuvent devenir cassants
avec l’âge et peuvent se fendre, en occasionnant des
dommages d’inondation dans votre maison.
• Vous pouvez acheter une trousse d’alimentation
d’eau GE (contenant un tuyau, un robinet d’arrêt
et les joints énumérés ci-dessous) chez votre distributeur
local ou en le commandant au service de pièces et
accessoires, au 800.626.2002..
Une alimentation d’eau froide. Pour les modèles
•
sans filtre à eau, l’eau doit avoir une pression de
1,4 à 8,2 bars (20 à 120 p.s.i.).
• Une perceuse électrique.
• Une clé de 1/2 po ou une clé anglaise.
• Un tournevis à lame plate et un tournevis Phillips.
• Deux écrous à compression d’un diamètre extérieur
de 6 mm (1/4 po) et deux bagues (manchons)—pour
brancher le tuyau en cuivre au robinet d’arrêt et
au robinet d’eau du réfrigérateur.
OU BIEN
• Si vous utilisez une trousse GE SmartConnect
Tubing, les garnitures nécessaires sont déjà montées au
tuyau.
™
Refrigerator
4
Page 23

electromenagersge.ca
CE DONT VOUS AUREZ BESOIN (SUITE)
•
Si votre canalisation d’eau actuelle a un raccord évasé
à une extrémité, vous aurez besoin d’un adaptateur
(que vous trouverez dans votre magasin de matériel de
plomberie) pour brancher le tuyau d’eau au réfrigérateur,
OU BIEN vous pouvez couper le raccord évasé à l’aide d’un
coupe-tube, puis utiliser un raccord à compression. Ne
coupez jamais l’extrémité finie d’un tuyau de la trousse GE
SmartConnect™ Refrigerator Tubing.
• Un robinet d’arrêt pour brancher le tuyau d’eau froide.
Le robinet d’arrêt doit avoir une entrée d’eau avec un
diamètre intérieur minimal de 5/32 po au point de jonction
avec LA CONDUITE D’EAU FROIDE. Des robinets d’arrêt à
étrier sont souvent inclus dans les trousses d’alimentation
d’eau. Avant d’acheter, assurez-vous que le robinet à étrier
se conforme à vos codes de plomberie locaux.
Installez le robinet d’arrêt sur la canalisation d’eau potable
la plus fréquemment utilisée.
PERCEZ UN TROU POUR LE ROBINET
3
Percez un trou de 1/4 po dans le tuyau d’eau,
à l’aide d’un foret dur, même si vous utilisez un
robinet auto-forant. Enlevez toutes les bavures
dues au perçage du trou dans le tuyau.
Faites attention de ne pas laisser de l’eau couler
dans votre perceuse électrique.
Si vous ne percez pas un trou de 1/4 po, vous
obtiendrez une alimentation d’eau réduite et des
glaçons plus petits.
4
FIXEZ LE ROBINET D’ARRÊT
Fixez le robinet d’arrêt au tuyau d’eau froide à
l’aide du collier de serrage.
1
FERMEZ L’ALIMENTATION
PRINCIPALE D’EAU
Ouvrez le robinet le plus proche suffisamment
longtemps pour purger le tuyau.
2
CHOISISSEZ L’EMPLACEMENT
DU ROBINET
Choisissez un emplacement pour le robinet qui
soit facilement accessible. Il est préférable de se
connecter sur le côté d’un tuyau vertical. Si vous
devez vous connecter à un tuyau horizontal,
faites le branchement vers le haut ou sur le
côté, plutôt qu’en bas du tuyau pour éviter de
recevoir des sédiments provenant de la conduite
d’eau.
Collier de
serrage
Robinet d’arrêt à
étrier
NOTE : Vous devez vous conformer aux Codes
de plomberie 248CMR du Commonwealth
of Massachusetts. Les robinets d’arrêt à étrier
sont illégaux et leur utilisation n’est pas autorisée
au Massachusetts. Consultez votre plombier local.
Tuyau vertical d’eau
froide
5
Page 24

Installation de la conduite d’eau.
5
SERREZ LE COLLIER DE SERRAGE
Serrez les vis du collier jusqu’à ce que la rondelle
d’étanchéité commence à enfler.
NOTE : Ne serrez pas trop. Vous risquez d’écraser
le tuyau de cuivre.
Collier de
serrage
Vis du
collier
Rondelle
Entrée
7
BRANCHEZ LE TUYAU AU ROBINET
Placez un écrou de compression et une bague
(manchon) à l’extrémité du tuyau et branchez-les
au robinet d’arrêt.
Assurez-vous que le tuyau soit bien inséré dans le
robinet. Serrez fort l’écrou de compression.
Pour le tuyau en matière plastique d’une trousse
™
GE SmartConnect
Refrigerator Tubing, insérez
l’extrémité moulée du tuyau dans le robinet d’arrêt
et serrez l’écrou de compression à la main, puis
serrez un autre tour avec une clé. Si vous serrez
trop fort, vous pouvez occasionner des fuites.
6
ACHEMINEZ LE TUYAU
Acheminez le tuyau du tuyau d’eau froide
au réfrigérateur.
Faites passer le tuyau par un trou percé dans le
mur ou le plancher (derrière le réfrigérateur ou au
niveau de l’armoire de cuisine adjacente), aussi
près du mur que possible.
Robinet
d’arrêt
à étrier
Presse-joint
Robinet
de sortie
NOTE : Vous devez vous conformer aux Codes
de plomberie 248CMR du Commonwealth of
Massachusetts. Les robinets d’arrêt à étrier sont illégaux
et leur utilisation n’est pas autorisée au Massachusetts.
Consultez votre plombier local.
8
PURGEZ LE TUYAU
Écrou de
compression
Tuyau
SmartConnect
Bague (manchon)
Ouvrez le robinet d’alimentation principale d’eau et
purgez le tuyau jusqu’à ce que l’eau soit claire.
Fermez l’eau au niveau du robinet d’eau après
écoulement d’environ 1 litre (1 quart) d’eau par le
tuyau.
™
6
Page 25

electromenagersge.ca
RACCORDEMENT DU RÉFRIGÉRATEUR
9
À LA CONDUITE D’EAU DE LA MAISON
Une alimentation d’eau froide est requise pour faire
fonctionner la machine à glaçons automatique. Vous
devrez en fournir une si elle n’existe pas. Consultez la
section « Installation de l’alimentation en eau ».
REMARQUES :
• Avant de raccorder la conduite d’eau au réfrigérateur,
assurez-vous que le cordon d’alimentation électrique
du réfrigérateur n’est pas branché à la prise murale.
• Si vous n’utilisez pas votre filtre à eau de réfrigérateur,
nous recommandons d’en monter un si votre
alimentation d’eau contient du sable ou des
particules qui peuvent boucher la grille du robinet
d’eau du réfrigérateur. Installez le dans la conduite
d’alimentation d’eau froide près du réfrigérateur.
Si vous utilisez une trousse GE SmartConnect™
Refrigerator Tubing, vous aurez besoin d’un tuyau
supplémentaire (WX08X10002) pour brancher le filtre.
Ne coupez pas le tuyau en plastique pour installer le
filtre.
• Avant de raccorder la conduite d’eau à la maison,
purgez la ligne de la maison pendant au moins 2
minutes.
• Si vous utilisez un tuyau de cuivre, placez un écrou de
compression et une bague (manchon) à l’extrémité
du tuyau qui vient de l’alimentation d’eau froide de la
maison.
Si vous utilisez le tuyau GESmartConnect™, les écrous
sont déjà assemblés au tuyau.
• Si vous utilisez un tuyau de cuivre, insérez aussi loin
que possible l’extrémité du tuyau dans le raccord
à l’arrière du réfrigérateur. Tout en tenant le tuyau,
serrez le raccord.
Si vous utilisez un tuyau GE SmartConnect™, insérez
l’extrémité moulée du tuyau dans le raccord à l’arrière
du réfrigérateur, puis serrez l’écrou à compression à la
main. Serrez ensuite d’un autre tour à l’aide d’une clé.
Des fuites peuvent survenir si l’écrou est trop serré.
• Fixez le tuyau dans le collier de serrage fourni pour
le maintenir en position. Vous aurez peut être besoin
d’écarter la bride.
Tuyau
SmartConnect™
Écrou de
compression
d’1/4 po
Embout
(manchon)
Raccord du
réfrigérateur
7
Page 26

Instructions IM-5D Trousse de
d’installation machine à glaçons
Vous avez des questions? Au Canada, appelez au numéro 1.800.561.3344
ou visitez notre site Web à l’adresse electromenagersge.ca
AVANT DE COMMENCER
Lisez ces instructions complètement et
attentivement.
•
IMPORTANT – Conservez ces
instructions pour votre inspecteur local.
•
IMPORTANT – Observez tous les codes
et les ordonnances en vigueur.
• Note à l’installateur – Assurez-vous
de laisser ces instructions au consommateur.
• Note au consommateur – Conservez
ces instructions pour références futures.
• Niveau de compétence – L’installation de
cet appareil électroménager nécessite des
compétences mécaniques et électriques de base.
• Durée requise pour l’installation – 20–60 minutes
• L’installateur est responsable d’une bonne
installation.
• Toute panne de l’appareil due à une mauvaise
installation est exclue de la garantie.
OUTILS NÉCESSAIRES
Petit tournevis
à lame plate
Tournevis à
douille ¼ po
Clé à cliquet/
douille 3/8 po
AVERTISSEMENT
de choc électrique ou de blessure durant
l’installation, vous devez d’abord débrancher
le réfrigérateur avant de procéder. L’omission
de suivre ces instructions pose un risque de
choc électrique.
Pour éliminer le risque
DOMMAGES – EXPÉDITION/INSTALLATION
• Si votre appareil a été endommagé pendant son
expédition, renvoyez-le au magasin où vous l’avez
acheté. Il le réparera ou le remplacera.
• Si c’est le client qui a endommagé votre appareil, il est
responsable de sa réparation ou de son remplacement.
• Si c’est l’installateur (autre que le client) qui a
endommagé l’appareil, c’est l’accord qui lie l’installateur
au client qui détermine celui qui est responsable de la
réparation ou du remplacement.
FERMER L’ALIMENTATION D’EAU
Fermez l’alimentation d’eau au robinet de sectionnement.
Robinet de
sectionnement
à étrier
CONTENU DE L’ENSEMBLE IM-5D
Installation
Machine
à glaçons
ICEMAKER
WARRANTY VERIFICATION
Étiquette de garantie
8
Instructions
Instructions
d’installation
Récipient de
remplissage de la
machine à glaçons
Vis à tête
hexagonale
(3/4 po)
Bac à glace grand format*
Couvercle de bac à glace
(pour grand format)
Bac à glace petit format *
(pour les modèles à
profondeur de comptoir)
*L’ensemble est livré avec 2
bacs à glace. Le petit format est
destiné aux modèles à profondeur
de comptoir. Utilisez le bac
supplémentaire pour augmenter
le stockage de glace, ou mettez-le
au recyclage.
Page 27

Instructions d’installation
INSTALLATION DE LA MACHINE À GLAÇONS
PRÉPAREZ VOTRE INSTALLATION
1
• Tirez sur la porte du congélateur jusqu’à ce qu’elle
soit complètement ouverte.
• Retirez les 3 vis de fixation, situées au bas de
chaque côté de la porte du congélateur en
utilisant le tournevis à cliquet hexagonal de 3/8 po.
3 vis
ATTENTION
La porte du congélateur est lourde. Utilisez les deux
mains pour maintenir la porte
avant de la soulever
•
Soulevez la porte du
congélateur et placez-la sur
le mécanisme à glissières.
•
La porte peut reposer en
toute sécurité sur le fond. Ne
posez pas la porte sur toute
autre surface pour éviter les
rayures.
RETIRER LE TIROIR DU CONGÉLATEUR
2
• Retirez le tiroir supérieur du congélateur en
le tirant jusqu’au bout, puis le soulevant et le
tirant vers l’extérieur.
• Une fois le tiroir retiré, repoussez les bras
d’extension dans le congélateur. Repoussez
le panier inférieur
jusqu’à ce que
le mécanisme
coulissant se
rétracte.
Risque lors du levage de charge
RETIRER LES COUVERCLES DES
3
ORIFICES DE SORTIE
• À l’intérieur du
congélateur, retirez
les 2 couvercles des
orifices de sortie de
la paroi latérale.
• Retirez les
couvercles des
orifices à l’aide d’un
petit tournevis à lame
plate.
Couvercle rond :
Insérez le tournevis
dans l’une des petites
fentes les plus vers
l’extérieur et poussez
fermement pour
dégager le couvercle
rond.
Couvercle
rectangulaire : Insérez le tournevis dans la fente
en haut du couvercle. Soulevez le tournevis
pour dégager le fermoir et tirer le couvercle à
l’écart de la carrosserie. (Cette pièce est jetable
et peut se briser lors de son retrait.)
• Retirez le cordon électrique de la machine à
glaçons de son logement dans la paroi latérale.
INSTALLEZ LE RÉCIPIENT DE
4
REMPLISSAGE DE LA MACHINE À
GLAÇONS
• Retirez la machine à
glaçons de l’ensemble,
installez le godet de
remplissage (fourni
avec l’ensemble) dans
la machine à glaçons
tel qu’illustré.
Nouvelles installations
• Placez le bac à
glace de format
approprié fourni
avec l’ensemble.
Placez le bac à
glace du côté
gauche du tiroir
du congélateur, à
l’envers, extrémité
la plus longue vers
l’arrière du panier.
Couvercles
des orices
de sortie
Cordon électrique de la
machine à glaçons
9
Page 28

Instructions d’installation
INSTALLATION DE LA MACHINE À GLAÇONS (SUITE)
BRANCHEZ LA MACHINE À GLAÇONS
5
• Placez la machine à glaçons et le godet de
remplissage sur le dessus du contenu du
panier inférieur, ou sur le bac à glace (pour le
support), câble et connecteurs orientés vers
le haut. Installez le connecteur à 6 broches en
premier puis celui à 4 broches.
Connecteur à
4 broches
MONTEZ LA MACHINE À GLAÇONS
6
Connecteur à 6
broches
Connecteur
à 4 broches
Connecteur
à 6 broches
• Soulevez la machine à glaçons et tournez-la
pour aligner les fentes de son côté sur les
tenons de
la paroi du
congélateur.
Glissez la
Trou
de vis
Tube de
remplissage
machine à
glaçons en
place de
façon que
le tube de
remplissage
de la paroi
supérieure
Tenons de montage
Vis de montage
s’insère dans l’orifice du godet de
remplissage.
Godet de
remplissage
VÉRIFIEZ L’INSTALLATION
7
• Poussez la machine à glaçons en place à
l’arrière de l’armoire de façon que le trou de
la vis de montage du rebord de la machine
s’aligne sur le trou de la paroi latérale du
congélateur, en vous assurant que les fils ne
pendent pas à l’extérieur de leur logement.
• Posez la vis
hexagonale
autotaraudeuse
(fournie avec
l’ensemble) dans le
trou du rebord de la
machine à glaçons.
RETIREZ LE BAC À GLACE
8
• Retirez le bac à glace du panier.
• Modèles qui ne sont pas à profondeur de
comptoir : Posez le couvercle du bac à glace
sur le bac en insérant les tenons dans les
trous à l’arrière du bac.
Vis de montage
hexagonale
Couvercle du
bac à glace
Bac à glace
(devant)
• Vérifiez les éléments suivants :
- Les fiches du connecteur sont insérées
fermement dans les prises.
- Le tube de remplissage se prolonge dans
l’ouverture du godet à l’arrière de la
machine à glaçons.
- La machine à glaçons est de niveau.
• Vérifiez que
la machine
à glaçons
est branchée
correctement.
10
REMARQUE : L’ensemble comprend deux bacs
à glace. Les modèles à profondeur de comptoir
utilisent un bac de petit format. Utilisez le bac
supplémentaire pour augmenter le stockage
de glace, ou mettez-le au recyclage.
Page 29

Instructions d’installation
9
RETIREZ LE COIN DU TIROIR DU
CONGÉLATEUR
• Retirez le coin du tiroir en tirant sur les trois
languettes vers l’extérieur et le haut tout en
poussant l’arrière du tiroir vers le bas. Puis
tirez le bord latéral tout en soulevant le coin
pour le dégager complètement.
10
REPLACEZ LA PORTE DU
CONGÉLATEUR
•
Tirez le panier inférieur et glissez le mécanisme
jusqu’au bout avec les deux mains.
• Retirez le panier reposant sur les glissières. Si le
panier est plein de produits congelés, soulevez le
panier et placez-le à l’arrière du congélateur en
attendant que la porte du congélateur soit placée
sur les rails.
ATTENTION
La porte du congélateur est lourde. Utilisez les deux
mains pour maintenir la porte avant de la soulever.
•
Soulevez la porte du congélateur et alignez les
languettes des côtés du support de porte sur
les orifices carrés des mécanismes coulissants.
•
Remettez les vis de fixation en place et serrezles au couple de 65 po-lb.
Risque lors du levage de charge
10
REPLACEZ LA PORTE DU
CONGÉLATEUR (suite)
• Pour ajuster le jeu de la porte, suivez les
instructions du manuel d’utilisation.
• Replacez le panier du congélateur sur les supports
coulissants et assurez-vous que la porte s’ouvre
et se ferme librement.
Alignez et insérez
la languette
sur le support
de la porte du
congélateur dans
la fente du support
du mécanisme
à glissières du
congélateur.
REMARQUE : Rentrez un côté en premier puis alignez
l’autre côté.
11
RÉINSTALLEZ LE TIROIR DU
CONGÉLATEUR
• Réinstallez le tiroir du congélateur en
plaçant ses roulettes arrière sur le dessus
des rails montés sur le côté des parois du
congélateur. Les roulettes avant du tiroir
doivent se trouver sur le dessus des côtés
du panier inférieur. Placez le bac à glace
dans le tiroir et poussez celui-ci dans le
congélateur avec le devant du bac (voir
page 10) à l’avant du panier.
• Vérifiez les éléments suivants:
- Le bac à glace ne doit pas heurter le bras
de la machine et le tiroir du congélateur
se rétracte complètement dans le
compartiment congélateur.
- Le tube de remplissage se prolonge dans
l’ouverture
du godet à
l’arrière de
la machine à
glaçons.
11
Page 30

Instructions d’installation
INSTALLATION DE LA MACHINE À GLAÇONS (SUITE)
BRANCHEZ LE RÉFRIGÉRATEUR.
12
FIXEZ L’ÉTIQUETTE DE GARANTIE
• Une étiquette est fournie avec l’ensemble
pour enregistrer la date d’installation à des
fins de garantie. Apposez-la sur l’intérieur du
réfrigérateur sous l’étiquette présente des
numéros de modèle et de série sur la paroi
latérale du compartiment réfrigérateur.
13
CONSERVEZ CE MANUEL
La garantie de la machine à glaçons est
imprimée dans ce manuel. Conservez ce
manuel avec le manuel d’utilisation de votre
réfrigérateur.
L’installation de la machine à glaçons à
l’intérieur du congélateur est maintenant
terminée.
14
FERMEZ L’EAU AU NIVEAU
DU ROBINET D’ARRÊT
Resserrez tout joint qui fuit.
15
Branchez le réfrigérateur.
Disposez la spirale de tuyau
en cuivre de manière à ce
qu’elle ne vibre pas contre
l’arrière de votre réfrigérateur
ou contre le mur. Mettez votre
réfrigérateur à sa place contre
le mur en le poussant.
16
METTEZ EN MARCHE LA MACHINE À
GLAÇONS
Allumez la machine à glaçons (ON). Voir la
page 18.
12
Page 31

Avant d’appeler un réparateur…
Liste de vérifications préventives
Économisez votre temps et votre argent! Consultez
le tableau suivante; vous éviterez peut-être d’appeler
un réparateur.
Votre problème Causes possibles Solutions
La machine à glaçons
automatique ne fonctionne pas
Le compartiment congélation
est trop chaud.
La machine à glaçons n’est pas
allumée (ON)
La machine à glaçons n’est pas
bien branchée.
La conduite d’eau est coudée. Assurez-vous que la conduite d’eau en matière
Après avoir installé l’ensemble, attendez 24 heures que
le réfrigérateur soit complètement refroidi. Quand le
compartiment est froid, la machine à glaçons se met à
produire des glaçons.
Utilisez le bouton ICE MAKER (Machine à glaçons) sur le
panneau de commande.
Veillez à ce que la fiche du cordon d’alimentation de
la machine à glaçons est bien insérée dans la prise.
Consultez la section Branchez la machine à glaçons,
page 10.
plastique qui va du robinet à l’entrée de conduite
d’eau de la machine ne soit pas coudée. Consultez
Branchement de la conduite d’eau. Un coude dans la
conduite d’eau réduit la circulation dans la conduite
d’eau.
electromenagersge.ca
L’alimentation d’eau est
fermée ou non branchée.
L’entassement des glaçons
dans le bac à glaçons
occasionne un arrêt de la
machine à glaçons.
Après avoir installé l’ensemble, assurez-vous que
l’alimentation d’eau de la maison au réfrigérateur soit
bien ouverte.
Fixations avec
endos adhésif
Conduite
d’eau
Égalisez les glaçons à la main.
13
Page 32

Avant d’appeler un réparateur…
Liste de vérifications préventives
Économisez votre temps et votre argent! Consultez le tableau suivante; vous
éviterez peut-être d’appeler un réparateur.
Votre problème Causes possibles Solutions
L’eau fuit autour de la tasse
de remplissage
La conduite de remplissage ne
repose pas bien dans la tasse
de remplissage.
Vérifiez que la conduite de remplissage soit bien finsérée dans
l’ouverture de la tasse de remplissage.Consultez Montez la
machine à glaçons.
Tube de
remplissage
Godet de
remplissage
L’eau fuit derrière le
réfrigérateur
La formation de glaçons
est lente/ Le compartiment
congélateur n’est pas
suffisamment froid
Les glaçons sont trop
petits/ La formation de
glaçons est lente
L’alimentation d’eau de
la maison n’est pas bien
branchée au robinet d’eau.
La conduite
d’eau n’est pas
bien branchée
à l’entrée
Vérifiez que l’alimentation d’eau soit bien branchée au robinet
d’eau. Consultez Instructions pour l’installation de la conduite
d’eau.
Écrou de
Tuyau
SmartConnect™
compression
1/4 po
de conduite d’eau.
Bague
(manchon)
Raccord du
réfrigérateur
La porte est restée ouverte Vérifiez qu’un paquet de nourriture n’empêche pas une bonne
fermeture de la porte.
La température n’est
pas réglée à une valeur
suffisamment froide
Le robinet d’arrêt de l’eau
qui relie le réfrigérateur à la
canalisation d’alimentation
d’eau peut être bouché
Voir Commandes-Réglages de température dans le Manuel
d’utilisation (Web seulement) ou le Guide d’installation abrégé
– Commandes du réfrigérateur.
Nous recommandons de percer un trou de 1/4 po dans la
conduite d’eau pour brancher le robinet d’arrêt d’eau. Si vous
ne percez pas un trou de 1/4 po, vous pouvez occasionner
une réduction dans la production
de glaçons ou dans la taille des
glaçons produits. Voir Installation
Percez un trou
de 1/4 po dans
la conduite d’eau
de la conduite d’eau.
La conduite d’eau est coudée. Vérifiez que la conduite d’eau en matière plastique qui va
du robinet à l’entrée de conduite d’eau ne soit pas coudée.
Consultez Branchement de la conduite d’eau.
Un coude brusque
sur la conduite d’eau
restreint le débit
d’eau.
Fixations avec
endos adhésif
14
Conduite d’eau
Vérifiez le filtre à eau Voir le Manuel d’utilisation (Web seulement), et le Guide
d’utilisation et d’entretien abrégé.
Page 33

Votre problème Causes possibles Solutions
Les cubes de glace ne tombent
pas dans le bac
Les glaçons ont une odeur ou
un goût
Vide dans les cubes de glace L’alimentation d’eau passe par
Il y a un bourdonnement
fréquent
Le cordon de la machine
à glaçons cause un
désalignement de la machine/
du bac
Le bac à glaçons doit être
nettoyé
Les aliments donnent de
l’odeur ou du goût aux glaçons
L’intérieur du réfrigérateur a
besoin d’être nettoyé
un système de filtration par
osmose inversée.
L’intérieur du réfrigérateur doit
être nettoyé
C’est normal Pendant le fonctionnement normal du réfrigérateur, le
Be sure ice maker wires are not hanging outside of the
wiring enclosure on back of ice maker. (See step 7 page
25)
Videz et lavez le bac à glaçons. Jetez les vieux glaçons
Emballez bien les aliments. Éloignez les aliments au
goût prononcé du bac à glace, de la viande, etc.
Voir la section Entretien et nettoyage dans le Manuel
d’utilisation (Web seulement), et le Guide d’installation
abrégé du réfrigérateur.
Consultez la section Installez la conduite d’eau, utilisez
un bouchon de dérivation de filtre.
Voir la section Entretien et nettoyage dans le Manuel
d’utilisation (Web seulement), et le Guide d’installation
abrégé du réfrigérateur.
robinet d’eau bourdonne quand la machine à glaçons
se remplit d’eau
electromenagersge.ca
Bruits normaux que vous pouvez entendre
■ Le robinet d’eau de la machine à glaçons émettra
un bourdonnement lorsque la machine à glaçons se
remplit d’eau. Si la machine à glaçons est allumée, le
bourdonnement se fera entendre même si elle n’est
pas encore raccordée à l’alimentation d’eau. Laisser la
machine à glaçons allumée avant son raccordement peut
l’endommager. Pour éviter cette situation, éteignez la
machine à glaçons. Le bourdonnement cessera.
■ Les glaçons qui tombent dans le bac et l’eau qui coule dans
les tuyaux quand la machine à glaçons se remplit font un
bruit normal.
15
Page 34

Garantie de la machine à glaçons.
Tout service en vertu de cette garantie est fourni par nos Centres de service
d’usine ou par un technicien autorisé de soins à la clientèle. Pour obtenir ce service,
visitez-nous en direct à l’adresse Internet ge.com ou appelez-nous au 800.GE.CARES
aux États-Unis ou au 1.800.561.3344 au Canada. Veuillez fournir le numéro de série
et le numéro de modèle lorsque vous appelez pour obtenir le service.
Agrafez votre reçu ici. Vous
aurez besoin d’une preuve
d’achat original pour obtenir
un service en vertu
de cette garantie.
Pour une période de : Nous remplacerons :
Un an Toute pièce de la machine à glaçons qui tombe en panne à la suite d’un vice de matériel ou
Á partir de la date de main-d’œuvre. Pendant cette année de garantie limitée, GE fournira, gratuitement, pièces de
d’achat original remplacement pour remplacer toute pièce défectueuse dans la trousse de la machine à glaçons.
Ce qui n’est pas couvert (pour nos clients des États-Unis) :
■
Les déplacements de service à votre maison pour vous
apprendre à utiliser le produit.
■
Une mauvaise installation.
Vous êtes responsable de fournir une bonne installation électrique,
la plomberie et toute connexion nécessaire, y compris la conduite
d’eau jusqu’à la machine à glaçons et l’installation de la conduite
d’eau.
■
Toute panne du produit s’il n’a pas été traité proprement,
s’il a été utilisé à des fins autres que celles auxquelles il est
destiné, ou s’il a été utilisé commercialement.
■
Tout remplacement de fusible ou toute remise en marche
du disjoncteur de la maison.
■
Tout dommage au produit causé par un accident, un incendie,
une inondation ou un cas de force majeure.
■
Le garant n’est pas responsable des dommages índirects.
■
Le service s’il est impossible d’avoir accès au produit pour
ce faire.
EXCLUSION DE GARANTIES IMPLICITES – Votre seul et unique recours est la réparation du produit selon les dispositions de
cette Garantie limitée. Toutes les garanties implicites, incluant les garanties de commercialité et d’adéquation à un usage
spécifique, sont limitées à une année ou à la période la plus courte autorisée par la législation.
Cette garantie couvre l’acheteur original et tout acheteur ultérieur de produits achetés à des fins domestiques à l’intérieur des ÉtatsUnis. Si le produit est installé dans une région où ne se trouve aucun réparateur autorisé GE, vous devrez peut-être assumer les frais
de transport ou apporter expédier le produit à un centre de service autorisé GE. En Alaska, cette garantie exclut le coût d’expédition
et les appels de service à la maison.
Certains États ne permettent pas l’exclusion ou la limitation des dommages accessoires ou indirects. La présente garantie vous donne
des droits juridiques spécifiques et vous pouvez également avoir d’autres droits qui varient d’un État à l’autre. Pour connaître vos droits
juridiques, consultez votre bureau d’affaires des consommateurs local ou de l’État ou le procureur général de votre État.
Garant : General Electric Company, Louisville, KY 40225
Ce qui n’est pas couvert (pour nos clients du Canada) :
■
Les déplacements de service à votre maison pour vous
apprendre à utiliser le produit.
Lisez votre Manuel du propriétaire. Si vous avez des questions sur
le fonctionnement de ce produit, veuillez contacter votre revendeur
ou le bureau des relations avec la clientèle à l’adresse suivante :
Directeur, Relations avec la clientèle
Mabe Canada Inc.
1 Factory Lane, Suite 310
Moncton, N.B.
E1C 9M3
■
Une mauvaise installation.
Si vous avez un problème d’installation, contactez votre revendeur
ou votre installateur. Vous êtes responsable de fournir une bonne
installation électrique, la plomberie et toute autre connexion.
■
Tout remplacement de fusible ou toute remise en marche
du disjoncteur de la maison.
■
Toute panne du produit s’il n’a pas été traité proprement,
s’il a été utilisé à des fins autres que celles auxquelles il est
destiné ou s’il a été utilisé commercialement.
■
Tout dommage au produit causé par un accident, un incendie,
une inondation ou un cas de force majeure.
16
LE GARANT N’EST PAS RESPONSABLE DE DOMMAGES INDIRECTS.
Garant : MABE CANADA INC.
Page 35

Notes.
electromenagersge.ca
17
Page 36

Soutien au consommateur.
Site Web appareils électroménagers GE electromenagersge.ca
Vous avez une question ou vous avez besoin d’aide pour votre appareil électroménager? Contactez-nous par
Internet au site electromenagersge.ca 24 heures par jour, tous les jours de l’année.
Service de réparations 1.800.561.3344
Service de réparations GE est tout près de vous.
Pour faire réparer votre électroménager GE, il suffit de nous téléphoner.
Studio de conception réaliste
Sur demande, GE peut fournir une brochure sur l’aménagement d’une cuisine pour les personnes
à mobilité réduite.
Écrivez: Directeur, Relations avec les consommateurs, Mabe Canada Inc.
Bureau 310, 1 Factory Lane
Moncton, N.B. E1C 9M3
Prolongation de garantie electromenagersge.ca
Achetez un contrat d’entretien GE avant que votre garantie n’expire et bénéficiez d’un rabais substantiel. Ainsi
le service après-vente GE sera toujours là après expiration de la garantie.
Visitez notre site Web ou appelez-nous au 1.800.461.3636.
Pièces et accessoires
Ceux qui désirent réparer eux-mêmes leurs électroménagers peuvent recevoir pièces et accessoires
directement à la maison (cartes VISA, MasterCard et Discover acceptées).
Les directives stipulées dans le présent manuel peuvent être effectuées par n’importe quel utilisateur. Les
autres réparations doivent généralement être effectuées par un technicien qualifié. Soyez prudent, car
une réparation inadéquate peut affecter le fonctionnement sécuritaire de l’appareil.
Vous trouverez dans les pages jaunes de votre annuaire le numéro du Centre de service Mabe le plus proche.
Autrement, appelez-nous au 1.888.261.3055.
Contactez-nous
Si vous n’êtes pas satisfait du service après-vente dont vous avez bénéficié :
Premièrement, communiquez avec les gens qui ont réparé votre appareil.
Ensuite, si vous n’êtes toujours pas satisfait envoyez tous les détails–numéro de téléphone compris–au
General Manager, Customer Relations
GE Appliances, Appliance Park
Louisville, KY 40225
18
Inscrivez votre appareil électroménager
Inscrivez votre appareil électroménager en direct, aussitôt que possible. Cela améliorera nos
communications et notre service après-vente. Vous pouvez également nous envoyer par la poste
le formulaire d’inscription joint à votre documentation.
Page 37

IM-5D
Información de seguridad ..................... 2
Instrucciones de operación ....................3
Máquina de Hielos Automática ......................3
Cómo prepararse para las vacaciones ...............3
Cuándo se Debe Apagar la Máquina de Hielos .......3
Instrucciones para la instalación
Instalación del Suministro de Agua ............... 4-7
Instalación de la Máquina de Hielos .............8-12
Antes de llamar a solicitar servicio ..............13-15
Sonidos normales que puede escuchar ............15
Servicio al consumidor
Garantía .......................................... 16
Ayuda al consumidor .............................. 20
Manual del propietario
e instalación
Equipo de Accesorios Máquina
de Hielos
Page 38
SEGURIDAD
Sitio Web de Electrodomésticos de GE
Para más información sobre el funcionamiento de su refrigerador, visite www.
GEAppliances.com
INFORMACIÓN DE SEGURIDAD DEL REFRIGERADOR
Éste es el símbolo de alerta de seguridad. El mismo alerta sobre potenciales riesgos de muerte o lesiones tanto para usted
con para otras personas. Todos los mensajes de seguridad estarán a continuación del símbolo de alerta de seguridad y con la
palabra “PELIGRO”, “ADVERTENCIA” o “PRECAUCIÓN”. Estas palabras se definen como:
o comuníquese al 1-800-GECARES (432-2737).
PELIGRO
ADVERTENCIA
PRECAUCIÓN
Indica una situación de riesgo que, si no se evita, resultará en la muerte o en lesiones graves.
Indica una situación de riesgo que, si no se evita, podría resultar en la muerte o en lesiones graves.
Indica una situación de riesgo que, si no se evita, podría resultar en lesiones menores o moderadas.
INSTRUCCIONES IMPORTANTES DE SEGURIDAD
ADVERTENCIA
n Desenchufe el refrigerador antes de instalar la
máquina de hielos. Nota: la corriente que va al
refrigerador no puede ser desconectada por ninguna
configuración del panel de control.
n Reemplace todas las piezas y paneles antes de utilizar
el refrigerador.
A fin de reducir el riesgo de incendio, explosión, descargas eléctricas o lesiones al usar
su refrigerador, siga estas precauciones básicas de seguridad:
LEA Y SIGA ESTAS INSTRUCCIONES DE SEGURIDAD CUIDADOSAMENTE.
LEA Y CONSERVE ESTAS INSTRUCCIONES
n Evite el contacto con las partes móviles de la máquina
de hielos y con el elemento de calefacción que libera
los cubos. No coloque los dedos ni las manos en
el mecanismo de producción de hielos mientras el
refrigerador esté enchufado.
2
Page 39

Sobre la máquina automática de hielos. GEAppliances.com
Un refrigerador recién instalado puede tomar desde 12 hasta 24 horas para empezar a hacer hielo.
Máquina automática de hielos
Descarte las primeras cantidades de hielo para
permitir que el suministro de agua se despeje.
Asegúrese de que nada interfiera con la extensión del
brazo indicador.
Cuando el cubo se llene hasta el nivel del interruptor
de energía, la máquina de hacer hielo dejará de
producir hielo. Es normal que varios cubos queden
juntos.
Si el hielo no se usa con frecuencia, los cubos de
hielo viejos se volverán turbios, con sabor rancio y su
tamaño se reducirá.
NOTA: En hogares con un nivel de presión inferior
a la normal, es posible que escuche que la válvula
de agua de la máquina de hacer hielo realice varios
ciclos para producir una cantidad de hielo.
Interruptor de Energía
Máquina de
hacer hielo
La máquina de hielos producirá siete cubos por
ciclo, aproximadamente entre 100–130 cubos en un
período de 24 horas, dependiendo de la temperatura
en el compartimiento del congelador, la temperatura
del sitio, las veces que se abra la puerta y otras
condiciones.
La máquina de hacer hielo se llenará de agua cuando
se enfríe y llegue a los 15°F (–10°C). Puede llevar entre
12 y 24 horas que un refrigerador recién instalado
comience a fabricar hielo.
Si el refrigerador es utilizado antes de realizar
las conexiones de la tubería de agua a la unidad
o si el suministro de agua a un refrigerador en
funcionamiento es apagado, asegúrese de que la
máquina de hacer hielo esté apagada. Una vez que el
agua haya sido conectada al refrigerador, la máquina
de hacer hielo podrá ser encendida. Para encender o
apagar la máquina de hielos, use el botón ICE MAKER
(Máquina de Hielos) en el control.
Es posible que escuche un zumbido cada vez que la
máquina de hacer hielo se llene de agua.
ADVERTENCIA
Para minimizar el riesgo de lesiones personales, evite el contacto
con las partes móviles de la máquina de hielos y con el elemento de calefacción que
libera los cubos. No coloque los dedos ni las manos en el mecanismo de producción de
hielos mientras el refrigerador esté enchufado.
Controles del Refrigerador
Cuándo se debe apagar la máquina de hielos
■ Cuando el cesto para almacenamiento de hielos sea retirado por
más de uno o dos minutos.
■ Cuando el suministro de agua esté cerrado durante varias horas.
■ Cuando no se use el refrigerador por varios días.
Si estará de vacaciones o ausente por tiempo prolongado, retire la
comida y desenchufe el refrigerador. Limpie el interior con una solución
de bicarbonato de sodio de una cuchara sopera (15 ml) de bicarbonato de
sodio para un cuarto de galón (1 litro) de agua. Deje las puertas abiertas.
Apague el refrigerador desde el control (consulte la Guía Rápida de
Instalación).
Si la temperatura puede llegar a estar por debajo de la congelación, solicite
a un técnico calificado que drene el sistema de suministro de agua a fin de
prevenir daños graves sobre la propiedad debido a una inundación.
Configuración de la máquina de hacer hielo
Mantenga presionado para encender/ apagar la
máquina de hielos.
Antes de salir de vacaciones:
1) Apague el sistema de refrigeración (consulte la Guía Rápida de
Instálación) o desenchufe el refrigerador.
2) Vacíe la hielera
3) Cierre el suministro de agua
Si cierra el suministro de agua, apague la máquina de hacer hielo (see
above).
Al regresar de sus vacaciones:
1) Reemplace el filtro de agua.
2) Deje correr 2 galones de agua a través del dispensador de agua fría
(aproximadamente 5 minutos) a fin de eliminar el aire del sistema.
3) Encienda el sistema de refrigeración (consulte la Guía Rápida de
Instalación).
4) Mensaje de Estado de Reinicio del Filtro (consulte la Guía Rápida de Uso
y Cuidado). Si corta el suministro de agua, con la máquina de hielos
encendida (ver más arriba).
3
Page 40

Instalación de la Tubería de Agua.
ANTES DE INICIAR
Los kits de cobre recomendados para el suministro de agua
son WX8X2, WX8X3 o WX8X4, dependiendo de la cantidad
de tubería necesaria. Las tuberías plásticas aprobadas para
el suministro de agua son las tuberías para el refrigerador
SmartConnect™ de GE (WX08X10006, WX08X10015 and
WX08X10025).
Al conectar su refrigerador a un Sistema de Agua de
Ósmosis Inversa de GE, la única instalación aprobada es
con un kit de Ósmosis Inversa de GE. Para otros sistemas
de agua de ósmosis inversa, siga las instrucciones del
fabricante.
Si la alimentación de agua a su refrigerador proviene de
un sistema de filtración de agua de ósmosis inversa Y el
refrigerador también cuenta con un filtro de agua, use
el tapón de derivación del filtro del refrigerador. El uso
conjunto del cartucho de filtración de agua del refrigerador
con el filtro de RO (ósmosis inversa) pudiera resultar en la
producción de cubos de hielo huecos.
Esta instalación de la tubería del agua no está garantizada
por el fabricante del refrigerador o de la máquina de hielos.
Siga estas instrucciones cuidadosamente para minimizar el
riesgo de un daño costoso debido al agua.
El martilleo del agua (agua golpeando contra la tubería)
en la tubería de la casa puede causar daños a las partes del
refrigerador y conducir a un goteo o inundación por el agua.
Llame a un plomero calificado para corregir el martilleo del
agua antes de instalar la tubería del agua al refrigerador.
Para evitar quemaduras y daños con el producto, no
conecte la tubería del agua a la tubería del agua caliente.
Si el refrigerador es utilizando antes de haber realizado
la conexión del agua a la máquina de hielos, presione y
libere el botón ICE MAKER (Máquina de Hielos) en el panel
de control para desconectar la máquina de hielos. Cuando
el refrigerador haya sido conectado al suministro de agua,
presione y libere el botón ICE MAKER (Máquina de Hielos) en
el panel de control para volver a conectar la máquina de
hielos.
No instale la tubería de la máquina de hielos en lugares
donde la temperatura caiga por debajo del nivel de
congelamiento.
Al usar cualquier aparato eléctrico (como un taladro
eléctrico) durante la instalación, asegúrese de que el aparato
esté aislado o conectado de manera que evite el peligro de
una descarga eléctrica, o se opere por baterías.
Todas las instalaciones se deben realizar según los requisitos
del código local de plomería.
QUÉ NECESITA
• Kit de tubería de cobre para el refrigerador o
SmartConnect™ de GE, 1/4” de diámetro externo para
conectar el refrigerador al suministro de agua. Si usa
cobre, asegúrese de que ambos extremos de la tubería se
corten uniformemente.
Para determinar la cantidad de tubería que necesita: mida
la distancia desde la válvula del agua en la parte posterior
del refrigerador hasta el tubo de suministro de agua. Luego
agregue 8 feet (2,4 m). Asegúrese de que haya suficiente
tubería adicional (unos 8 feet [2,4 m] enrollado en tres
vueltas de unas 10” [25 cm]
de diámetro) para permitir que el refrigerador se pueda
mover de la pared después de la instalación.
Los kits de tubería para el refrigerador SmartConnect™
de GE están disponibles en las siguientes longitudes:
8’ (2.4 m) – WX08X10006
15’ (4.6 m) – WX08X10015
25’ (7.6 m) – WX08X10025
NOTA: La única tubería de plástico aprobada de GE
es la que viene provista con los kits de tubería para el
refrigerador SmartConnect™ de GE. No use ninguna otra
tubería plástica para el suministro del agua ya que la
tubería está bajo presión todo el tiempo. Ciertos tipos de
plástico se fracturarán o se romperán con el tiempo y
causarán daños en su casa debido al agua.
• Un kit de suministro de agua de GE (contiene tubería,
válvula de cierre y accesorios enumerados abajo) está
disponible a un costo adicional en su tienda o por medio
de Partes y Accesorios, 800.626.2002.
• Un suministro de agua fría. La presión del agua debe
estar entre 20 y 120 p.s.i. (1,4–8,2 bares)
• Taladro eléctrico.
• Llave de 1/2” o ajustable.
• Destornillador plano y de estrella.
• Dos tuercas de compresión de 1/4” de diámetro
exterior y 2 férulas (mangas)—para conectar la
tubería de cobre a la válvula de cierre y la válvula del
agua del refrigerador.
O BIEN
• Si está usando un kit de tubería para el refrigerador
SmartConnect™ de GE, los accesorios necesarios
ya vienen preinstalados en la tubería.
4
Page 41

GEAppliances.com
QUÉ NECESITA (CONT.)
• Si su tubería de agua de cobre existente posee
una unión con avellanado en su extremo,
necesitará un adaptador (disponible en las tiendas
de suministros) para conectar la tubería de
agua al refrigerador O puede cortar la unión con
avellanado con un cortador de tubo y luego usar
una unión de compresión. No corte los extremos
con forma de la tubería para refrigerador de GE
TM
SmartConnect
.
• Si su tubería existente de cobre para el agua tiene
un accesorio con vuelo en el extremo, necesitará
un adaptador (disponible en las tiendas de
suministros de plomería) para conectar la línea
del agua al refrigerador O BIEN, podrá cortar el
accesorio con vuelo con un cortador de tubos y
luego usar un accesorio de compresión. No corte el
extremo formado de la tubería para el refrigerador
SmartConnect de GE.
Instale la válvula de cierre en la tubería del agua de consumo
más frecuentemente utilizada.
1
CIERRE EL SUMINISTRO PRINCIPAL
DE AGUA
Abra el grifo más cercano por suficiente tiempo para
limpiar la tubería del agua.
3
TALADRE EL AGUJERO DE LA
VÁLVULA
Taladre un agujero de ¼” en la tubería de agua
(incluso si usará una válvula auto-perforante),
usando una punta afilada. Elimine cualquier
zumbido que resulte de haber taladrado el
agujero en la tubería.
Tenga cuidado de no permitir que el agua se
drene en el taladro.
Si no se taladra un agujero de ¼” se podrá ver
reducida la producción de hielo o los cubos de
hielo podrán ser más pequeños.
4
INSTALE LA VÁLVULA DE CIERRE
Una la válvula de cierre a la tubería de agua fría
con la abrazadera para el tubo.
Abrazadera
para
el tubo
Tubería
Válvula de
cierre tipo silla
vertical
de agua fría
2
SELECCIONE LA UBICACIÓN DE LA
VÁLVULA
Seleccione una ubicación para la válvula que sea
fácilmente accesible. Es mejor conectarla en el
costado de una tubería vertical de agua. Cuando sea
necesario conectarla en una tubería horizontal de
agua, haga la conexión en la parte superior o al lado,
en vez de hacerlo en la parte de abajo, para evitar
retirar cualquier sedimento de la tubería del agua.
NOTA: Se deberán seguir los Códigos 248CMR
de Plomería para el Estado de Massachusetts.
Las válvulas tipo silla son ilegales y su uso no está
permitido en Massachusetts. Consulte con un
plomero licenciado.
5
Page 42

Instalación de la Tubería de Agua.
AJUSTE LA ABRAZADERA DE LA
5
TUBERÍA
Ajuste los tornillos de la abrazadera hasta que la
arandela de sellado comience a hincharse.
NOTA: No ajuste en exceso o se podrá romper la
tubería.
Abrazadera
de la tubería
Tornillos con
Abrazadera
ENRUTE LA TUBERÍA
6
Enrute la tubería entre la entrada de agua fría y
el refrigerador.
Enrute la tubería a través de un agujero
perforado en la pared o el piso (detrás del
refrigerador o del gabinete con base adyacente)
tan cerca a la pared como sea posible.
Lavadora
Extremo de
la Entrada
7
CONECTE LA TUBERÍA A LA VÁLVULA
Coloque la tuerca de compresión y la
abrazadera de refuerzo (manga) para colocar la
tubería de cobre en el extremo de la tubería y
conecte la misma a la válvula de cierre.
Asegúrese de que la tubería esté completamente
insertada en la válvula. Ajuste la tuerca de
compresión de forma segura.
Para usar una tubería de plástico del kit de
Tuberías para Refrigerador GE SmartConnectTM,
inserte el extremo moldeado de la tubería
en la válvula de cierre y ajuste la tuerca
de compresión hasta que quede ajustada
manualmente, y luego dé un giro de ajuste
adicional con una llave. Un ajuste excesivo podrá
ocasionar pérdidas.
Válvula de Cierre
Tipo Montura
Tuerca de
Embalaje
Válvula de Salida
Abrazadera de refuerzo
(manga)
Tuerca de Compresión
Tubería de
SmartConnect
NOTA: Se deberá cumplir con los Códigos de
Plomería del Commonwealth de Massachusetts
248CMR. Las válvulas tipo montura son ilegales
y su uso está prohibido en Massachusetts.
Consulte a un plomero matriculado.
TM
8
DESPEJE LA TUBERÍA
Abra el suministro de agua principal y despeje la
tubería hasta que el agua esté limpia.
Cierre el agua usando la válvula de agua luego
de haber dejado correr aproximadamente un
galón (1 litro), o 2 minutos, de agua a través de
la tubería.
6
Page 43

GEAppliances.com
CÓMO CONECTAR EL REFRIGERADOR
9
AL SUMINISTRO DE AGUA DEL HOGAR
Se requiere un suministro de agua fría para el
funcionamiento de la máquina de hielo automática. Si
no se cuenta con un suministro de agua fría, deberá
proveer uno. Consulte la sección sobre Cómo Instalar el
Suministro de Agua.
NOTAS:
• Antes de realizar la conexión al refrigerador,
asegúrese de que el cable de corriente del mismo no
se encuentre enchufado al tomacorriente.
• Si usted no utiliza su filtro de agua del refrigerador le
recomendamos que instale uno si el suministro de
agua posee arena o partículas que podrían atascar
la rejilla de la válvula de agua del refrigerador.
Instale el mismo en la tubería de agua más cercana
al refrigerador. Si usará el Kit de Tuberías para
Refrigeradores de GE SmartConnectTM, necesitará
una tubería adicional (WX08X10002) para realizar la
conexión al filtro. No corte la tubería de plástico para
instalar el filtro.
• Antes de conectar la tubería de agua al hogar, purgue
la cañería del hogar durante por lo menos 2 minutos.
• Antes de conectar la tubería de agua al hogar, purgue
la tubería del hogar durante por lo menos 2 minutos.
• Si usará una tubería de cobre, coloque una tuerca de
compresión y una abrazadera de refuerzo (mango) en
el extremo de la tubería proveniente del suministro de
agua fría del hogar.
TM
Si usará tuberías de GE SmartConnect
, las tuercas
ya están ensambladas en la tubería.
• Si usará tuberías de cobre, inserte el extremo de la
tubería en la conexión del refrigerador, en la parte
trasera del refrigerador, lo más lejos posible. Al
sostener la tubería, ajuste la unión.
TM
Si usará tuberías de GE SmartConnect
, inserte el
extremo moldeado de la tubería en la conexión del
refrigerador, en la parte trasera del refrigerador, y
ajuste la tuerca de compresión hasta que quede
ajustada manualmente. Luego realice un ajuste
adicional con un giro de llave. Un ajuste excesivo
podrá ocasionar pérdidas.
• Ajuste la tubería en la abrazadera provista para
sostener la misma en la posición correcta. Será
necesario que abra la abrazadera haciendo palanca.
Tubería
SmartConnect™:
Tuerca de
Compresión de
1/4 po
Abrazadera
de refuerzo
(manga)
Conexión del
Refrigerador
7
Page 44

Instrucciones para Kit para hielos
la instalación IM-5D
¿Preguntas? Llame 800.GE.CARES (800.432.2737) o Visite nuestra página en la red en:
GEAppliances.com
ANTES DE EMPEZAR
Lea estas instrucciones completa
y cuidadosamente.
•
IMPORTANTE – Guarde estas
instrucciones para el uso del inspector local.
•
IMPORTANTE – Cumpla con todos
los códigos y ordenanzas gubernamentales.
• Nota para el instalador – Asegúrese
de dejar estas instrucciones con el consumidor.
• Nota para el consumidor – Guarde estas
instrucciones para futura referencia.
• Nivel de destrezas – La instalación de este aparato
requiere de destrezas básicas de mecánica y
electricidad.
• Tiempo de instalación – 20–60 minutos
• La instalación apropiada es responsabilidad
del instalador.
• La falla del producto debido a una instalación
inapropiada no está cubierta por la garantía.
HERRAMIENTAS NECESARIAS
ADVERTENCIA
de descarga eléctrica o lesión durante la
instalación, primero deberá desenchufar
el refrigerador antes de proceder. Si no se
siguen estas instrucciones, se podrá producir
descarga eléctrica.
A fin de eliminar el riesgo
DAÑOS EN EL ENVÍO / INSTALACIÓN
• Si la unidad se daña durante el envío, devuelva
la unidad al almacén donde la adquirió para
su reparación o reemplazo.
• Si el cliente daña la unidad, la reparación
o el reemplazo es responsabilidad del cliente.
• Si el instalador daña la unidad (si no es el cliente),
la reparación o reemplazo se debe hacer por medio
de un arreglo entre el cliente y el instalador.
CIERRE EL SUMINISTRO DE AGUA
Cierre el suministro de agua desde la válvula de agua.
Válvula de Cierre
Tipo Montura
Destornillador con
cabeza plana pequeño
Llave de tuercas
de 1/4”
CONTENIDO DEL KIT IM-5D
Máquina
de hielos
ICEMAKER
WARRANTY VERIFICATION
Etiqueta de garantía
8
Trinquete /
Destornillador de 3/8”
Taza de llenado
de la máquina de hielos
Installation
Instructions
Instrucciones para
la instalación
Tornillo de cabeza
hexagonal (3/4”)
Hielera Grande*
Tapa de la Hielera
(para hielera grande)
Hielera Pequeña* (para
modelos con profundidad
para armario)
*El kit incluye 2 hieleras. La
más pequeña es para modelos
con profundidad de armario.
Use una hielera adicional para
almacenamiento adicional de
hielo o para reutilizar.
Page 45

Instrucciones de Instalación
INSTALACIÓN DE LA MÁQUINA DE HIELOS
RETIRE LA PUERTA DEL FREEZER
1
• Abra la puerta del freezer hasta su extensión
completa.
• Retire los 3 tornillos adheridos, ubicados en la parte
inferior a cada lado de la puerta del freezer usando
un destornillador con cabeza hueca hexagonal de
3/8”.
3 Tornillos
PRECAUCIÓN
La puerta del freezer es pesada. Use ambas manos para
asegurar la puerta antes de levantar la misma.
• Levante la puerta del freezer para desconectarla del
mecanismo de
deslizamiento.
• La puerta puede
descansar de
forma segura en la
parte inferior. No
apoye la puerta
sobre ninguna otra
superficie a fin de
evitar rayones.
Riesgo al levantar la puerta
RETIRE LAS TAPAS DE LOS ENCHUFES
3
• Dentro del freezer,
retire las 2 tapas de
los enchufes de la
pared interna.
• Retire las
tapas de los
tomacorrientes con
un destornillador
de punta plana
pequeño.
Para la tapa
redonda: Inserte el
destornillador en una
de las ranuras más
pequeñas y alejadas
y empuje de manera
firme hacia dentro
para liberar la tapa
redonda.
Para la tapa rectangular: Inserte el destornillador
en la ranura ubicada en la parte superior de la
tapa. Levante el destornillador hacia arriba para
liberar el ajuste y empuje la tapa hacia fuera,
lejos del cobertor. (Esta parte es descartable y se
podrá romper cuando sea retirada).
• Retire el cable del enchufe de la máquina de
hielos del bolsillo ubicado en la pared lateral.
INSTALE LA TAZA DE LLENADO
• Retire la máquina de
4
hielos del kit, instale
la taza de llenado de
la máquina de hielos
incluida con su kit de
la máquina de hielos
como se muestra.
Tapas de los
enchufes
Cable de corriente de la
máquina de hielos
RETIRE EL CAJÓN DEL FREEZER
2
• Retire el cajón del freezer superior extendiendo
completamente el cajón, y luego levantando el
mismo hacia arriba y afuera.
• Luego de retirar
el cajón, empuje
los brazos
de extensión
nuevamente
hacia el
compartimiento
del freezer.
Empuje la
canasta inferior
nuevamente hasta que el mecanismo de
deslizamiento se repliegue.
Para una Nueva Instalación
• Coloque la hielera
del tamaño
adecuado del kit.
Coloque la hielera
del lado izquierdo
de la canasta del
freezer, al revés,
con el extremo
más alto hacia la
parte trasera de la
canasta.
9
Page 46

Instrucciones de Instalación
INSTALACIÓN DE LA MÁQUINA DE HIELOS (cont.)
ENCHUFE LA MÁQUINA DE HIELOS
5
• Coloque la máquina de hielos y la taza de
llenado sobre los contenidos de la canasta
inferior, o en la hielera (para dar soporte), con
el cable y los conectores mirando hacia arriba.
Instale el conector de seis clavijas primero y
luego el conector de cuatro clavijas.
Conector de 4 clavijas
MONTE LA MÁQUINA DE HIELOS
6
• Levante la máquina de hielos y rote la misma
para alinear las ranuras laterales con las clavijas
de montaje en
la pared del
freezer. Vuelva
a deslizar la
máquina de
hielos de modo
que el tubo de
llenado de la
pared superior
se pueda
insertar en la
abertura de la taza de llenado.
• Asegúrese de que:
- El conector se conecte de manera firme en los
enchufes.
- El tubo de llenado se extiende en la abertura
de la taza de llenado en la parte trasera de la
máquina de hielos.
- La máquina de hielos está nivelada.
• Controle el cableado para asegurar que la
máquina de hielos esté conectada de forma
correcta.
Agujero
para
tornillo
Clavijas de Montaje
Conector de 6 clavijas
Conector de 4
clavijas
Conector de 6
clavijas
Tornillo de Montaje
Tubo de Llenado
Taza de Llenado
CONTROLE LA INSTALACIÓN
7
• Empuje la máquina de hielos hacia la parte
trasera del gabinete de modo que el agujero
del tornillo de montaje del borde de la máquina
de hielos se aliñe con el agujero de montaje de
la pared lateral del freezer, asegurando que los
cables no estén colgado fuera del cableado del
hogar.
• Instale el tornillo con
cabeza hexagonal
autorroscante del
kit en el agujero
ubicado en el borde
de la máquina de
hielos.
RETIRE LA HIELERA
8
• Retire la hielera de la canasta.
• Para modelos sin profundidad de armario: instale
la tapa de la hielera en esta última presionando
las clavijas en los agujeros en la parte trasera de la
hielera.
NOTA: El kit incluye dos hieleras. Los modelos
con profundidad de armario utilizan una hielera
más pequeña. Use una hielera adicional para
almacenamiento adicional de hielo o para reutilizar.
Tornillo de Montaje con
Cabeza Hexagonal
Tapa de la
Hielera
Hielera
(Frente)
10
Page 47

Instrucciones de Instalación
RETIRE LA ESQUINA DEL CAJÓN DEL
9
FREEZER
• Retire la pieza de la esquina del cajón
empujando hacia fuera y arriba sobre las
tres lengüetas mientras empuja hacia abajo
en la parte trasera del cajón. Luego empuje
hacia fuera el borde lateral mientras empuja
hacia arriba sobre la pieza de la esquina para
completar el retiro.
10
REEMPLACE LA PUERTA DEL FREEZER
• Empuje la canasta inferior y deslice el
mecanismo hasta su extensión completa usando
ambas manos.
• Retire la canasta que se apoya sobre los
deslizadores. Si la canasta está llena de
productos congelados, levante la misma y ajuste
la parte trasera del compartimiento del freezer
hasta que la puerta del freezer esté ubicada
sobre los deslizadores.
PRECAUCIÓN
La puerta del freezer es pesada. Use ambas manos
para asegurar la puerta antes de levantar la misma.
• Levante la puerta del freezer y aliñe las
lengüetas sobre los costados de los soportes
de la puerta con los agujeros cuadrados en los
mecanismos de deslizamiento.
• Reemplace los tornillos adheridos y ajuste los
tornillos con giros de torsión de 65 libras pulgada.
Riesgo al levantar la puerta
10
REEMPLACE LA PUERTA DEL FREEZER
(Cont.)
• Para ajustar las brechas de la puerta del freezer,
siga las instrucciones del Manual del Propietario.
• Reemplace la canasta del freezer en los soportes
de deslizamiento y asegúrese de que la puerta
del freezer funcione y se cierre libremente.
Alinee e inserte
la lengüeta en
el soporte de la
puerta del freezer
dentro de la
ranura del soporte
de deslizamiento
del freezer.
NOTA: Coloque un
lado hacia dentro
primero y luego
alinee el otro lado.
11
VUELVA A INSTALAR EL CAJÓN DEL
FREEZER
• Vuelva a instalar el cajón del freezer colocando
las ruedas traseras del cajón en la parte superior
del riel montado sobre el costado de las paredes
del freezer. Las ruedas frontales del cajón del
freezer deben estar apoyadas sobre los costados
de la canasta inferior. Coloque la hielera en el
cajón y empuje este último en el freezer con el
frente de la hielera (lea la página 10) hacia el
frente de la canasta.
• Asegúrese de que:
- La hielera no golpee el brazo de la máquina de
hielos y que el cajón del freezer se repliegue
completamente en el compartimiento del
freezer.
- El tubo de llenado se extiende en la abertura
de la taza de llenado en la parte trasera de la
máquina de hielos.
11
Page 48

Instrucciones de Instalación
INSTALACIÓN DE LA MÁQUINA DE HIELOS (cont.)
ENCHUFE EL REFRIGERADOR
12
PEGUE LA ETIQUETA DE GARANTÍA
Se suministra una etiqueta con este kit para
registrar la fecha de instalación para propósitos de
la garantía. Coloque la misma en la parte interna
del refrigerador, debajo de la etiqueta con el
número de modelo/serie sobre la pared lateral del
compartimiento de comidas frescas.
13
GUARDE ESTE MANUAL
La garantía para la máquina de hielos está impresa en
este manual. Guarde este manual junto con el manual
del propietario de su refrigerador.
Ahora ha completado la instalación de la máquina
de hielos dentro del congelador.
14
ABRA LA LLAVE DEL AGUA
EN LA VÁLVULA DE CIERRE
Apriete cualquier conexión que pueda presentar
fugas.
15
Enchufe el refrigerador.
Organice el cable de la tubería
de manera que no vibre
contra la parte trasera del
refrigerador o contra la pared.
Empuje el refrigerador hacia la
pared.
16
INICIE LA MÁQUINA DE HIELOS
Configure la máquina de hielos en ON
(Encender). Lea la página 34.
12
Page 49

Antes de llamar a solicitar servicio…
Consejos para la solución de averías.
¡Ahorre tiempo y dinero! Revise primero la siguiente tabla
primero y quizás no necesite llamar a solicitar servicio.
Problema Posibles causas Qué hacer
La máquina automática de
hielos no funciona
El compartimento del
congelador está muy cálido
La máquina de hielos no está
encendida
La máquina de hielos no está
conectada.
Después de instalar el kit, permita que el refrigerador
se enfríe completamente por 24 horas. Una vez
el compartimento esté frío, la máquina de hielos
comenzará la producción de hielo.
Use el botón ICE MAKER (Hielera) en el control.
Cerciórese de que el enchufe del cable de la
máquina de hielos está totalmente introducido en el
tomacorriente. Ver Cómo conectarla máquina de hielos.
GEAppliances.com
La línea de agua está retorcida Cerciórese de que la línea de agua plástica que va
desde la válvula de la entrada del tubo de agua no
está retorcida. Ver Cómo conectar la línea de agua. Una
torcedura en la línea de agua evitará el flujo de agua
Accesorios para
adherir el tubo de
agua
Tubería para la
línea de agua
El suministro de agua está
desconectado o cerrado
Cubitos apilados en el depósito
causan que la máquina de
hielos se apague.
Después de instalar el Kit, cerciórese de que el
suministro de agua de la casa hacia el refrigerador no
está cerrado o desconectado.
Nivele los cubitos manualmente.
13
Page 50

Antes de llamar a solicitar servicio…
Consejos para la solución de averías.
¡Ahorre tiempo y dinero! Revise primero la siguiente tabla
primero y quizás no necesite llamar a solicitar servicio.
Problema Posibles causas Qué hacer
Fuga de agua alrededor
de la copa de llenado
El tubo de llenado no está
sentado correctamente en la
copa de llenado
Cerciórese de que el tubo de llenado esté insertado
correctamente en la apertura de la copa de llenado. Ver Cómo
montar la máquina de hielos
Tubo de
llenado
Tubo de llenado
Fuga de agua detrás del
refrigerador
Congelamiento lento/
elcongelador no está lo
suficientemente frío
Los cubos de hielo son
demasiado pequeños/
hielo lento
El suministro de la casa
no está conectado
apropiadamente a la válvula
Cerciórese de que el suministro de la casa esté ajustado
firmemente a la válvula de agua. Ver Instrucciones de
instalación de la línea de agua.
de agua.
La línea de agua
no está conectada
a la entrada del
tubo de agua.
Tubería
SmartConnect™:
Tuerca de
Compresión de
1/4 po
Abrazadera
de refuerzo
(manga)
Conexión del
Refrigerador
Dejó la puerta abierta Cerciórese de que no exista ningún objeto evitando que la
puerta cierre.
El control de la temperatura
no está ajustado a un nivel lo
suficientemente frío.
La válvula de desconexión
de agua que conecta el
refrigerador con la línea de
agua de la casa podría estar
obstruida
Consulte las Configuraciones de Control - Temperatura en el
Manual del Propietario (solo en Internet) o la Guía rápida de
Instalación - Controles del refrigerador.
Recomendamos que taladre un
agujero de 1/4 de pulgada en
la tubería del agua para conectar
Taladre un agujero
de 1/4 de pulgada
en la tubería del agua
la válvula de desconexión. No taladrar
este agujero de 1/4 de pulgada podría
resultaren la reducción de la producción de hielo o en
menorescubitos de hielo. Ver Cómo instalar la línea de agua.
La línea de agua está retorcida Cerciórese de que la
línea de agua plástica
que va desde la válvula
Accesorios para
adherir el tubo
de agua
de la entrada del tubo
de agua no está
retorcida. Ver Cómo
conectar la línea de agua.
Una torcedura en la línea
de agua evitará el flujo
de agua en la máquina
Tubería para
la línea de
agua
de hielos.
Controle el filtro de agua Consulte el Manual del Propietario (sólo en Internet), y la Guía
Rápida de Uso y Cuidado.
14
Page 51
GEAppliances.com
Problema Posibles causas Qué hacer
El hielo no cae en el balde El cable de la máquina
de hielos ocasiona la
desalineación de la máquina
de hielos/ balde.
Los cubos de hielo tienen olor /
sabor
Cubos de hielo huecos Suministro de agua al Sistema
Zumbido frecuente Operación normal Durante la operación normal, la válvula de agua
El recipiente de
almacenamiento necesita
limpieza.
La comida está transmitiendo
olor / sabor a los cubos de
hielo.
El interior del refrigerador
necesita limpieza.
de Filtración de Agua por
Ósmosis Inversa
La parte interna del
refrigerador necesita limpieza
Asegúrese de que los cables de la máquina de hielos
no estén colgado fuera del espacio de protección del
cableado en la parte trasera de la máquina de hielos.
(Lea el paso 7 en la página 41)
Desocupe y lave el recipiente. Deseche los cubos viejos.
Empaque bien los alimentos. Coloque las comidas con
gustos fuertes lejos de la hielera, tales como carne, etc.
Consulte la sección de Cuidado y Limpieza en el Manual
del Propietario (solo en Internet) o la Guía rápida de
Instalación del refrigerador.
Consulte la Instalación de la Tubería de Agua, uso del
tapón del bypass del filtro.
Consulte la sección de Cuidado y Limpieza en el Manual
del Propietario (solo en Internet) o la Guía rápida de
Instalación del refrigerador.
zumbará
Sonidos normales que puede escuchar
■ La válvula de agua de la máquina de hielo zumbará cuando
esta última se llene de agua. Si la máquina de hielo se
enciende, zumbará incluso aunque no se haya enchufado
al suministro de agua. Mantener la máquina de hielos
encendida, antes de conectar la misma al suministro de
agua, puede ocasionar daños sobre la máquina de hielos. A
fin de evitar esto, apague la máquina de hielos. Esto detendrá
el zumbido.
■ El sonido de los cubos al caer en la bandeja, y el agua
corriendo en la tubería a medida que la máquina de hielos se
vuelve a llenar.
15
Page 52

Garantía de la máquina de hielos.
Todos los servicios de garantía los proporcionan nuestros Centros de
®
Reparación de Fábrica o nuestros técnicos Customer Care
autorizados. Para
concertar una cita de reparación, en línea, visíte nos al GEAppliances.com, o
llame al 800.GE.CARES (800.432.2737). Cuando llame para solicitar servicio,
por favor tenga a mano el número de serie y el número de modelo.
Pegue aquí su recibo.
La prueba de compra original
es necesaria para obtener
servicio bajo la garantía.
Por el período de: Reemplazaremos:
Un año Cualquier parte de la máquina de hielos que falle debido a un defecto de materiales o de mano
A partir de la fecha de obra. Durante esta garantía limitada de un año, GE ofrecerá, sin costo, las partes de repuesto
compra original para cualquier parte defectuosa en el kit de máquina de hielos.
Qué no está cubierto (para clientes en los EE.UU.):
■ Visitas de servicio hasta su casa para enseñarle cómo usar
el producto.
■ Instalación inapropiada.
Usted es responsable por suministrar la instalación adecuada
eléctrica y de plomería, incluyendo la tubería hasta la máquina
de hielos y la instalación de la tubería del agua.
■ Falla del producto si es abusado, mal utilizado o usado
con un fin diferente al propósito pretendido o usado
comercialmente.
■ La reposición de fusibles caseros o arreglo de cortocircuitos.
■ Daño al producto causado por accidente, incendio, inundación
o actos de la naturaleza.
■ Daños incidentales o consecuentes causados por posibles
defectos con este aparato.
■ Producto no accesible para facilitar el servicio requerido.
EXCLUSIÓN DE GARANTÍAS IMPLÍCITAS—Su único y exclusivo derecho es la reparación del producto,
tal y como se indica en esta Garantía limitada. Cualquier garantía implícita, incluyendo las garantías
implícitas de comerciabilidad o adecuación para un fin determinado, están limitadas a un año
o el período de tiempo más breve permitido por la ley.
Esta garantía se extiende al comprador original y cualquier comprador posterior de productos comprados para uso residencial dentro
de Estados Unidos. Si el producto está situado en un área que no dispone de servicio por parte de un proveedor de servicio autorizado
de GE, podría tener que hacerse cargo de los costes de envío o bien podría solicitársele que lleve el producto a una centro de servicio
de GE autorizado para realizar la reparación. En Alaska, la garantía excluye el costo de envío o las visitas de servicio a su casa.
Algunos estados no permiten la exclusión o las limitaciones de daños incidentales o consecuenciales. Esta garantía da derechos
legales específicos, y usted podría tener otros derechos que variarán de estado a estado. Para saber cuáles son sus derechos legales,
consulte a la oficina de asuntos del consumidor local o la oficina del Attorney General en su localidad.
Garante: General Electric Company. Louisville, KY 40225
Qué no está cubierto (para clientes en Canadá):
■ Visitas de servicio hasta su casa para enseñarle cómo usar
el producto.
Lea su Manual del propietario. Si tiene cualquier pregunta sobre
la operación del producto, por favor contacte a su concesionario
o a la oficina de Relaciones del consumidor en:
Manager, Consumer Relations
Mabe Canada Inc.
1 Factory Lane, Suite 310
Moncton, N.B.
E1C 9M3
■ Instalación inapropiada.
Si tiene un problema con la instalación, contacte al concesionario
o al instalador. Usted es responsable por suministrar la instalación
adecuada eléctrica y de escape, y la conexión.
■ La reposición de fusibles caseros o arreglo de cortocircuitos.
■ Falla del producto si es abusado, mal utilizado o usado con
un fin diferente al propósito pretendido o usado comercialmente.
■ Daño al producto causado por accidentes, incendios,
inundaciones o actos de la naturaleza.
16
EL GARANTE NO ES RESPONSABLE POR DA—OS CONSECUENTES.
GARANTE: MABE CANADA INC.
Page 53

Notas.
GEAppliances.com
17
Page 54

Notas.
18
Page 55

GEAppliances.com
19
Page 56
Soporte al Consumidor.
Página Web de GE Appliances GEAppliances.com
¿Tiene alguna pregunta sobre su electrodoméstico? ¡Pruebe la página Web de GE Appliances 24 horas al día,
cualquier día del año! Para mayor conveniencia y servicio más rápido, ya puede descargar los Manuales de los
Propietarios, pedir piezas o incluso hacer una cita en línea para que vengan a realizar una reparación.
Solicite una reparación GEAppliances.com
El servicio de expertos GE está a tan sólo un paso de su puerta. ¡Entre en línea y solicite su reparación cuando
le venga bien 24 horas al día cualquier día del año! O llame al 800.GE.CARES (800.432.2737) durante horas
normales de oficina.
Real Life Design Studio
(Estudio de diseño para la vida real)
GE apoya el concepto de Diseño Universal—productos, servicios y ambientes que pueden usar gente de todas
las edades, tamaños y capacidades. Reconocemos la necesidad de diseñar para una gran gama de habilidades
y dificultades físicas y mentales. Para más detalles cobre las aplicaciones de GE Diseño Universal, incluyendo
ideas de diseño para la cocina para personas con discapacidades, mire nuestra página Web hoy mismo. Para
personas con dificultades auditivas, favor de llamar al 800.TDD.GEAC (800.833.4322).
GEAppliances.com
Garantías ampliadas GEAppliances.com
Compre una garantía ampliada y obtenga detalles sobre descuentos especiales disponibles mientras su garantía
está aún activa. Puede comprarla en línea en cualquier momento, o llamar al (1.888.261.2133) durante horas
normales de oficina. GE Consumer Home Services estará aún ahí cuando su garantía termine.
Piezas y accesorios GEApplianceParts.com
Aquellos individuos con la calificación necesaria para reparar sus propios electrodomésticos pueden
pedir que se les manden las piezas o accesorios directamente a sus hogares (aceptamos las tarjetas
VISA, MasterCard y Discover). Haga su pedido en línea hoy, 24 horas cada día o llamar por teléfono
al 1.800.661.1616 durante horas normales de oficina.
Las instrucciones descritas en este manual cubren los procedimientos a seguir por cualquier usuario. Cualquier
otra reparación debería, por regla general, referirse a personal calificado autorizado. Debe ejercerse precaución
ya que las reparaciones incorrectas pueden causar condiciones de funcionamiento inseguras.
Póngase en contacto con nosotros GEAppliances.com
Si no está satisfecho con el servicio que recibe de GE, póngase en contacto con nosotros en nuestra página
Web indicando todos los detalles así como su número de teléfono o escríbanos a:
General Manager, Customer Relations
GE Appliances, Appliance Park
Louisville, KY 40225
Registre su electrodoméstico GEAppliances.com
¡Registre su nuevo electrodoméstico en línea—cuando usted prefiera! El registrar su producto a tiempo le
proporcionará, si surgiera la necesidad, una mejor comunicación y un servicio más rápido bajo los términos de
su garantía. También puede enviar su tarjeta de registro pre-impresa que se incluye en el material de embalaje.
 Loading...