

Page 1
GEAppliances.com
IM -4B
Safety Information ......... 1
Operating Instructions .....2
Before You Call For Service ....3-5
Normal Sounds You May Hear ....2
Preparing for Vacation ..........2
When You Should Set the
Feeler Arm to OFF ...............2
Installation Instructions
Icemaker .....................8, 9
Water Line .....................10
Parts List ........................7
Consumer Support
Consumer Support .....Back Page
Warranty ..................... 11
. .6-10
Owner’s Manual and
Installation Instructions
Trousse
Machine à glaçons
Manuel d’utilisation
et d’installation
La section française commence à la page 19
Equipo de Accesorios
Máquina de Hielos
Manual del propietario
e instalación
La sección en español empieza en la página 37
SAFETY PRECAUTIONS
FOR YOUR SAFETY:
Do not place fingers or hands in the automatic
icemaking mechanism while the refrigerator
is plugged in. This will help protect you from
possible injury.
It will also prevent interference with moving
parts of the ejector mechanism and the heating
element that releases the cubes, located on the
bottom of the icemaker.
READ AND FOLLOW THIS SAFETY INFORMATION CAREFULLY.
READ AND SAVE THESE INSTRUCTIONS
Icemaker Accessory Kit
162D4614P015 49-60684 05-13 GE
Page 2
About the automatic icemaker.
A newly-installed refrigerator may take 12 to 24 hours to begin making ice.
Automatic Icemaker (on some models)
You will hear a buzzing sound each time the
icemaker fills with water. Throw away the first
few batches of ice to allow the water line to clear .
Be sure nothing interferes with the sweep of the
feeler arm.
When the bin fills to the level of the feeler arm,
the icemaker will stop producing ice. It is normal
for several cubes to be joined together. If ice is
not used frequently, old ice cubes will become
cloudy, taste stale, shrink or fuse together.
NOTE: In homes with lower-than-average water
pressure, you may hear the icemaker cycle
multiple times when making one batch of ice.
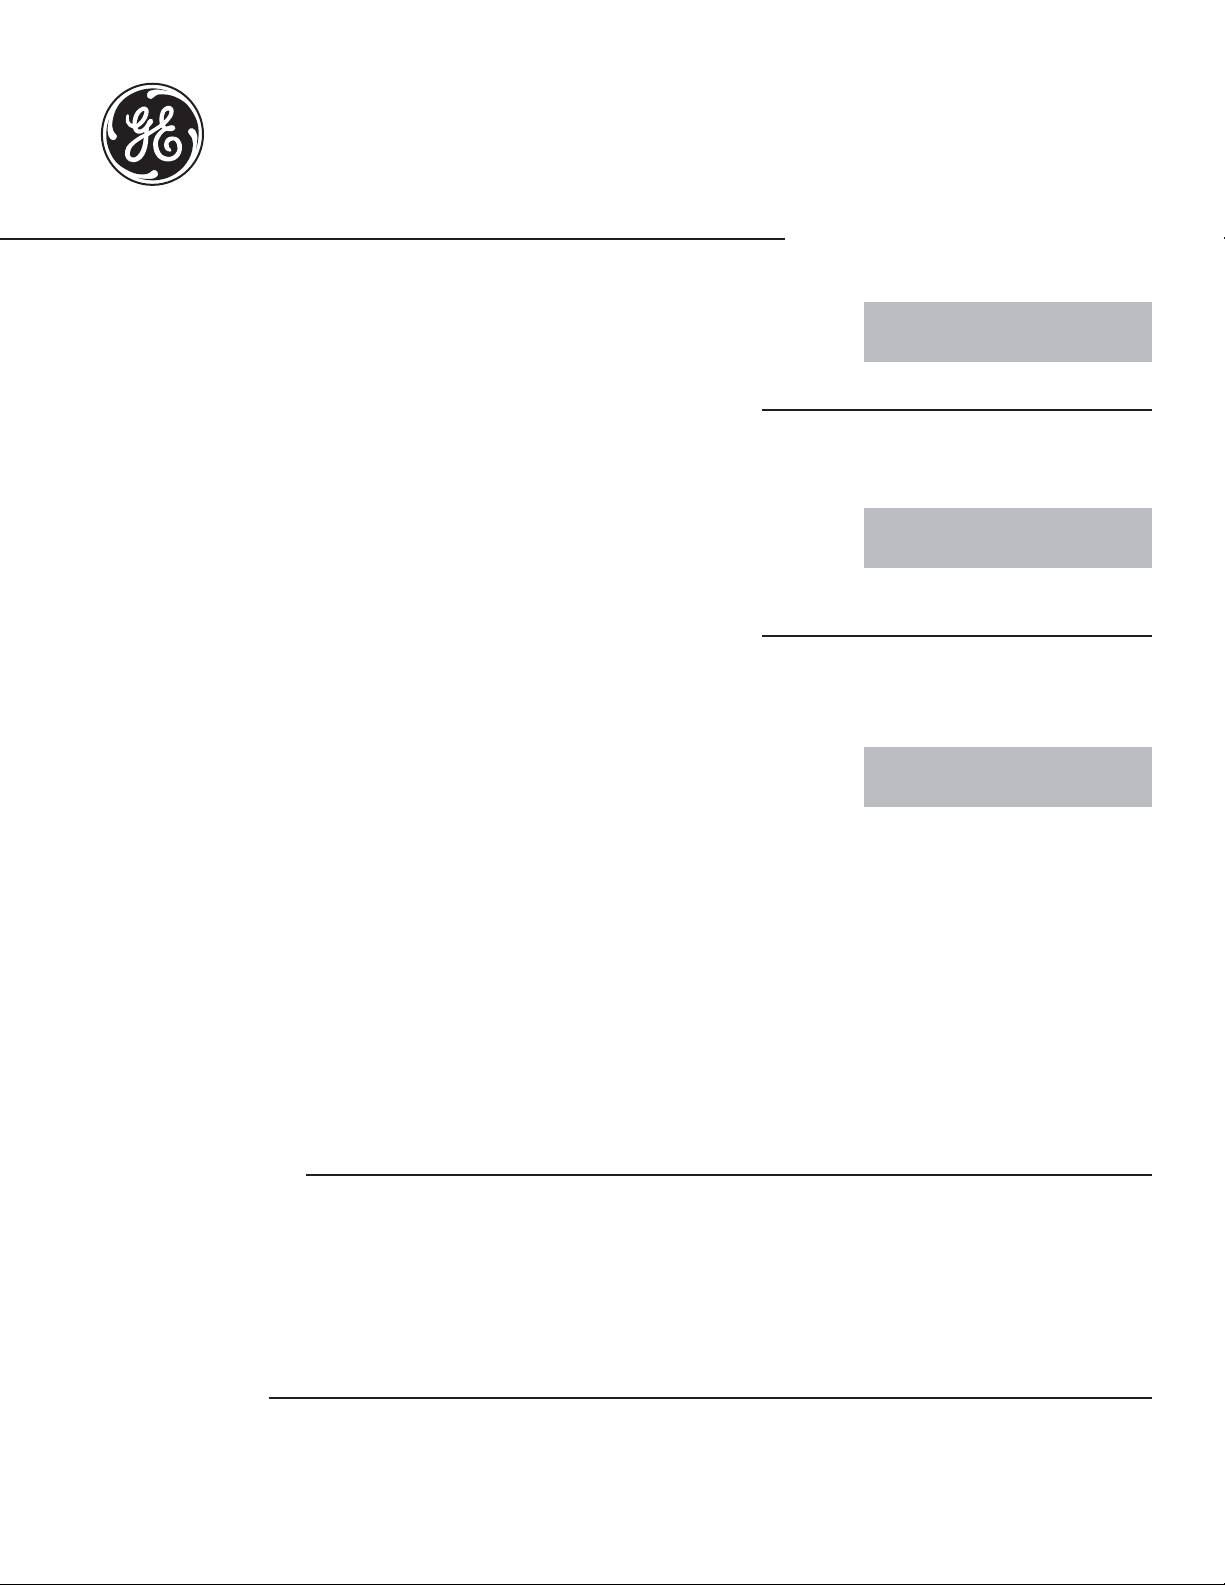
Icemaker
ON
The icemaker will produce approximately 3 to
3½ lbs. of ice in a 24-hour period, depending on
the freezer compartment temperature, room
temperature, number of door openings and
other use conditions.
If the refrigerator is operated before the water
connection is made to the icemaker
feeler arm to the STOP (up) position.
When the refrigerator has been connected to
the water supply, move the feeler arm to the ON
OFF
(down) position.
The icemaker will fill with water when it cools to
15°F. A newly-installed refrigerator may take 12
to 24 hours to begin making ice cubes.
Once the icemaker starts to make ice, it may
take up to 48 hours to fill the bin, depending on
the temperature settings and number of door
openings.
, move the
Preparing for Vacation
Move the feeler arm to the STOP (up) position
and shut off the water supply to the refrigerator.
If the temperature can drop below freezing,
have a qualified servicer drain the water supply
system (on some models) to prevent serious
property damage due to flooding.
When you should set the icemaker feeler arm to the STOP (up) position
When the ice storage bin is removed for more
than a minute or two.
When the water supply will be shut off for
several hours.
When the refrigerator will not be used for
several days.
Normal sounds you may hear
The icemaker water valve will buzz when the
icemaker fills with water. If the feeler arm is
in the ON (down) position, it will buzz even
if it has not yet been hooked up to water.
Keeping the feeler arm in the ON position
before it is hooked up to water can damage
the icemaker. To prevent this, move the feeler
arm to the STOP (up) position. This will stop
the buzzing.
The sound of cubes dropping into the bin and
water running in the pipes as the icemaker
refills.
2
Page 3

Before you call for service…
GEAppliances.com
Troubleshooting Tips
Save time and money! Review the following chart first
and you may not need to call for service.
Problem Possible Causes What To Do
Automatic icemaker Freezer compartment • After installing the kit, allow the refrigerator to completely
does not work too warm. cool down for 24 hours. Once the compartment is cool,
the icemaker will begin ice production.
Icemaker is not turned on. • Move the icemaker
feeler arm to the
ON (down) position.
Icemaker is not plugged • If using a power cord adapter, make sure that it is fully
in correctly. connected. Also, check that the icemaker cord plug is fully
inserted into the socket. See Plug in the icemaker.
Hook
Feeler Arm
Model
Feeler Arm in the
STOP (up) position
Feeler Arm in the ON
(down) position
Locking
Tabs
Clip Restraints
onto Locking
Tabs
Water line kinked. • Check that the plastic water
line running from the valve
to the water tube inlet is not
kinked. See Connect the
water line. A kink in the
water line will restrict flow
to the water line.
Adhesive-backed
Fasteners for
Water Tube
Water supply turned off or • After installing the kit, make sure the house water supply
not connected. to the refrigerator has been turned on.
Piled up cubes in the storage bin • Level cubes by hand.
cause the icemaker to shut off.
Water valve is not plugged in • Check that the valve wire
correctly. adapter is completely
plugged onto the male
Male Connector
Plug
connector plug and the
terminals on the water valve.
See Attach the water valve.
Valve
Terminals
3
Page 4
Before you call for service…
GEAppliances.com
Troubleshooting Tips
Save time and money! Review the following chart first
and you may not need to call for service.
Problem Possible Causes What To Do
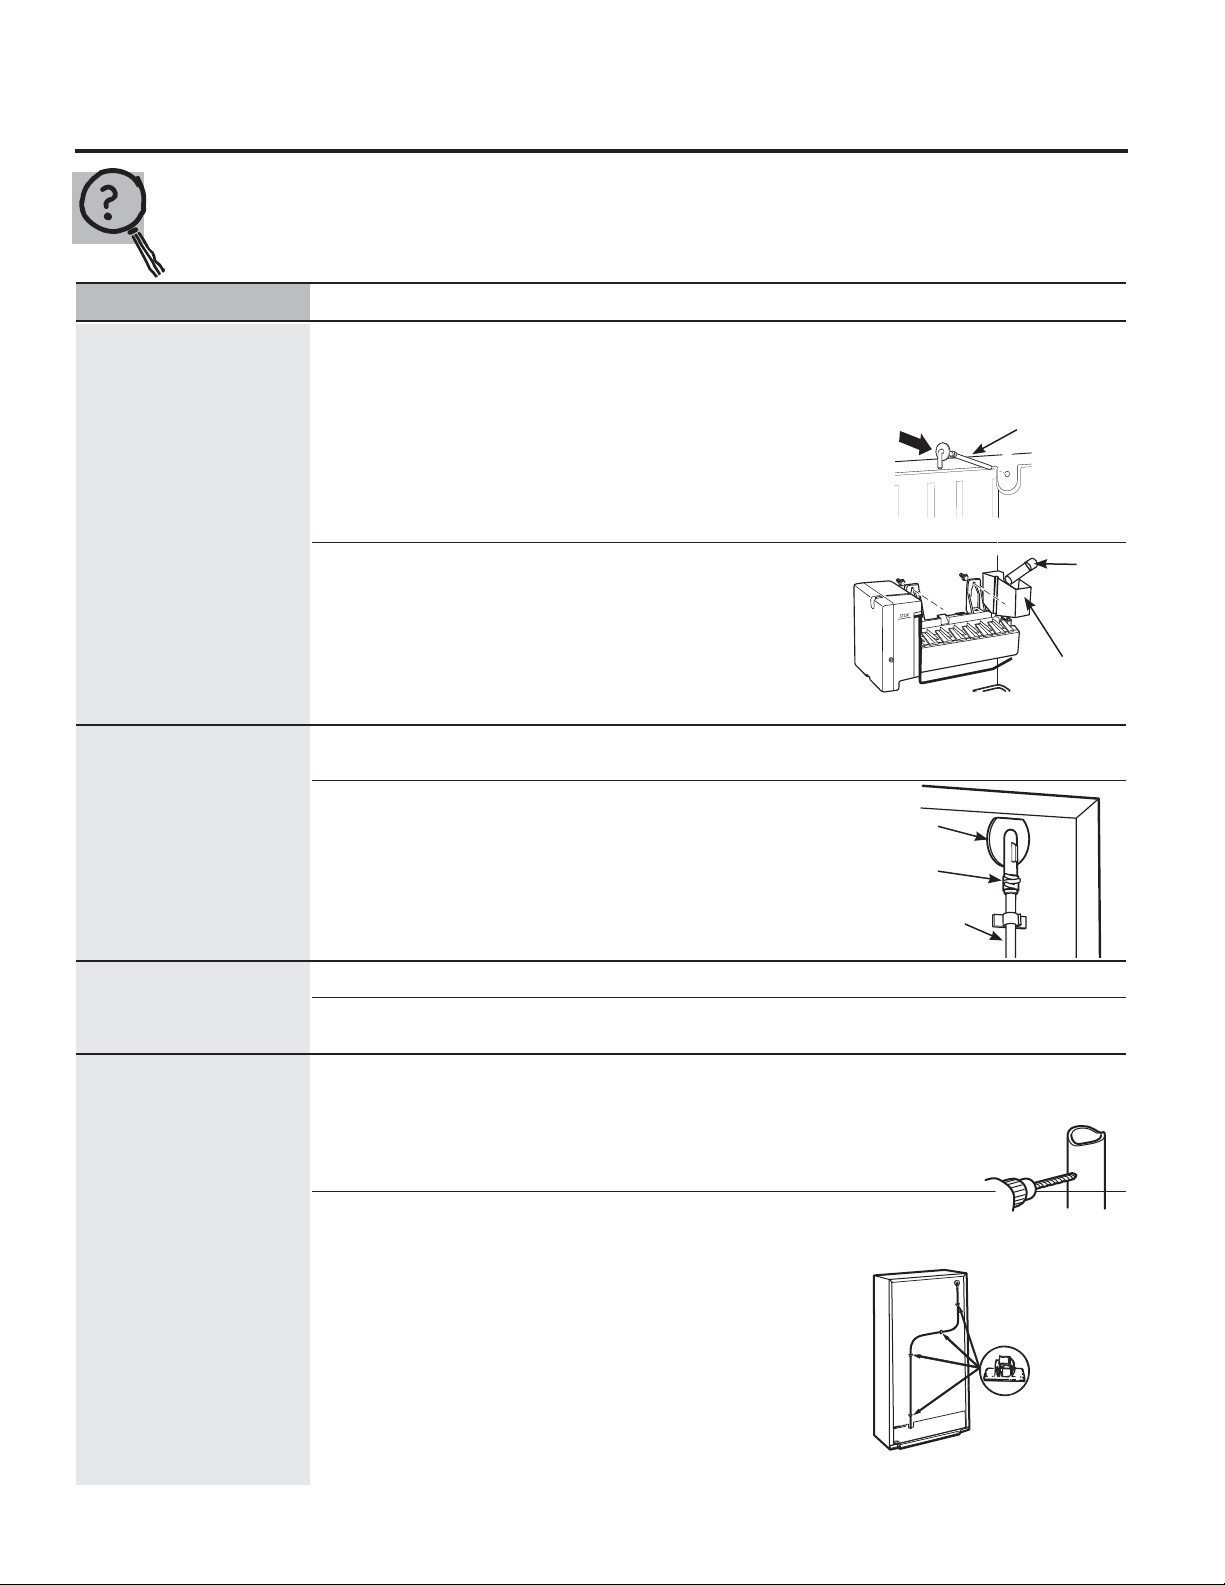
Leaking water around Foam in the fill cup from • If the fill tube was installed by sliding it through the back
the fill cup installing the fill tube. of the refrigerator, it may have picked up pieces of foam
as it was pushed through. This foam can interfere with
the water flow in the fill cup. Check the cup and make
sure there are no foam pieces.
Fill tube not correctly seated • Check that the fill tube is
in the fill cup. correctly inserted in the
fill cup opening. See Mount
the icemaker.
Fill Tube
Fill
Tube
Fill Cup
Leaking water behind House supply not properly • Check that the house supply is firmly attached to
the refrigerator connected to the water valve. the water valve. See Water line installation instructions.
Water line not connected • Check that the plastic
to the water tube inlet. water line running from
the valve to the water tube
inlet is firmly attached with
the hose clamp. See Connect
the water line.
Water
Tube Inlet
Hose
Clamp
Water Line
Slow ice/freezer not Door left open. • Check to see if package is holding door open.
cold enough
Temperature control not • See About the Temperature Control.
set cold enough.
Ice cubes too small/ Water shutoff valve connecting • We recommend drilling a 1/4” hole
slow ice refrigerator to house water line in the water pipe to connect the water
may be clogged. shut-off valve. Failure to drill a 1/4”
hole may result in reduced ice
production or smaller cubes.
Drill 1/4” hole
in water pipe
See Installing the water line.
Water line kinked. • Check that the plastic water
line running from the valve
to the water tube inlet is not
kinked. See Connect the
water line. A kink in the
water line will restrict flow
to the icemaker.
Adhesive-backed
Fasteners for
Water Tube
4
Page 5
Before you call for service…
Troubleshooting Tips
Save time and money! Review the following chart first
and you may not need to call for service.
Problem Possible Causes What To Do
Ice cubes have Ice storage bin needs cleaning. • Empty and wash bin. Discard old cubes.
odor/taste
to ice cubes.
Interior of refrigerator • See Care and cleaning.
needs cleaning.
Frequent “buzzing” Normal operation. • During normal operation, the water valve will “buzz”
sound when the icemaker fills with water.
Food transmitting odor/taste • Wrap foods well.
5
Page 6
Installation IM-4B
Instructions Icemaker Kit
Questions? Call 800.GE.CARES (800.432.2737) or visit our Website at: geappliances.com.
In Canada, call 1.800.561.3344 or visit our Website at: geappliances.ca.
BEFORE YOU BEGIN
Read these instructions completely and carefully.
•
IMPORTANT – Save these instructions
for local inspector’s use.
•
IMPORTANT – Observe all governing
codes and ordinances.
• Note to Installer – Be sure to leave these
instructions with the Consumer.
• Note to Consumer – Keep these instructions
for future reference.
• Skill level – Installation of this appliance requires
basic mechanical and electrical skills.
• Completion time – 20–60 minutes
• Proper installation is the responsibility of the
installer.
• Product failure due to improper installation is not
covered under the Warranty.
ARE YOU REPLACING AN ICEMAKER
WITH THIS KIT?
It’s important that you use the water valve and fill tube
extension that come with this kit, even though your
refrigerator may already have them installed.
The old valve will not allow enough water through to fill the
icemaker properly and will cause damage.
The fill tube extension needs to be a different length than
the original tube for proper water flow. Cut the tube to the
length indicated for your model of refrigerator.
DAMAGE – SHIPMENT/INSTALLATION
• If the unit is damaged in shipment, return the unit to the
store in which it was bought for repair or replacement.
• If the unit is damaged by the customer, repair or
replacement is the responsibility of the customer.
• If the unit is damaged by the installer (if other than
the customer), repair or replacement must be made by
arrangement between customer and installer.
6
Page 7
Installation Instructions
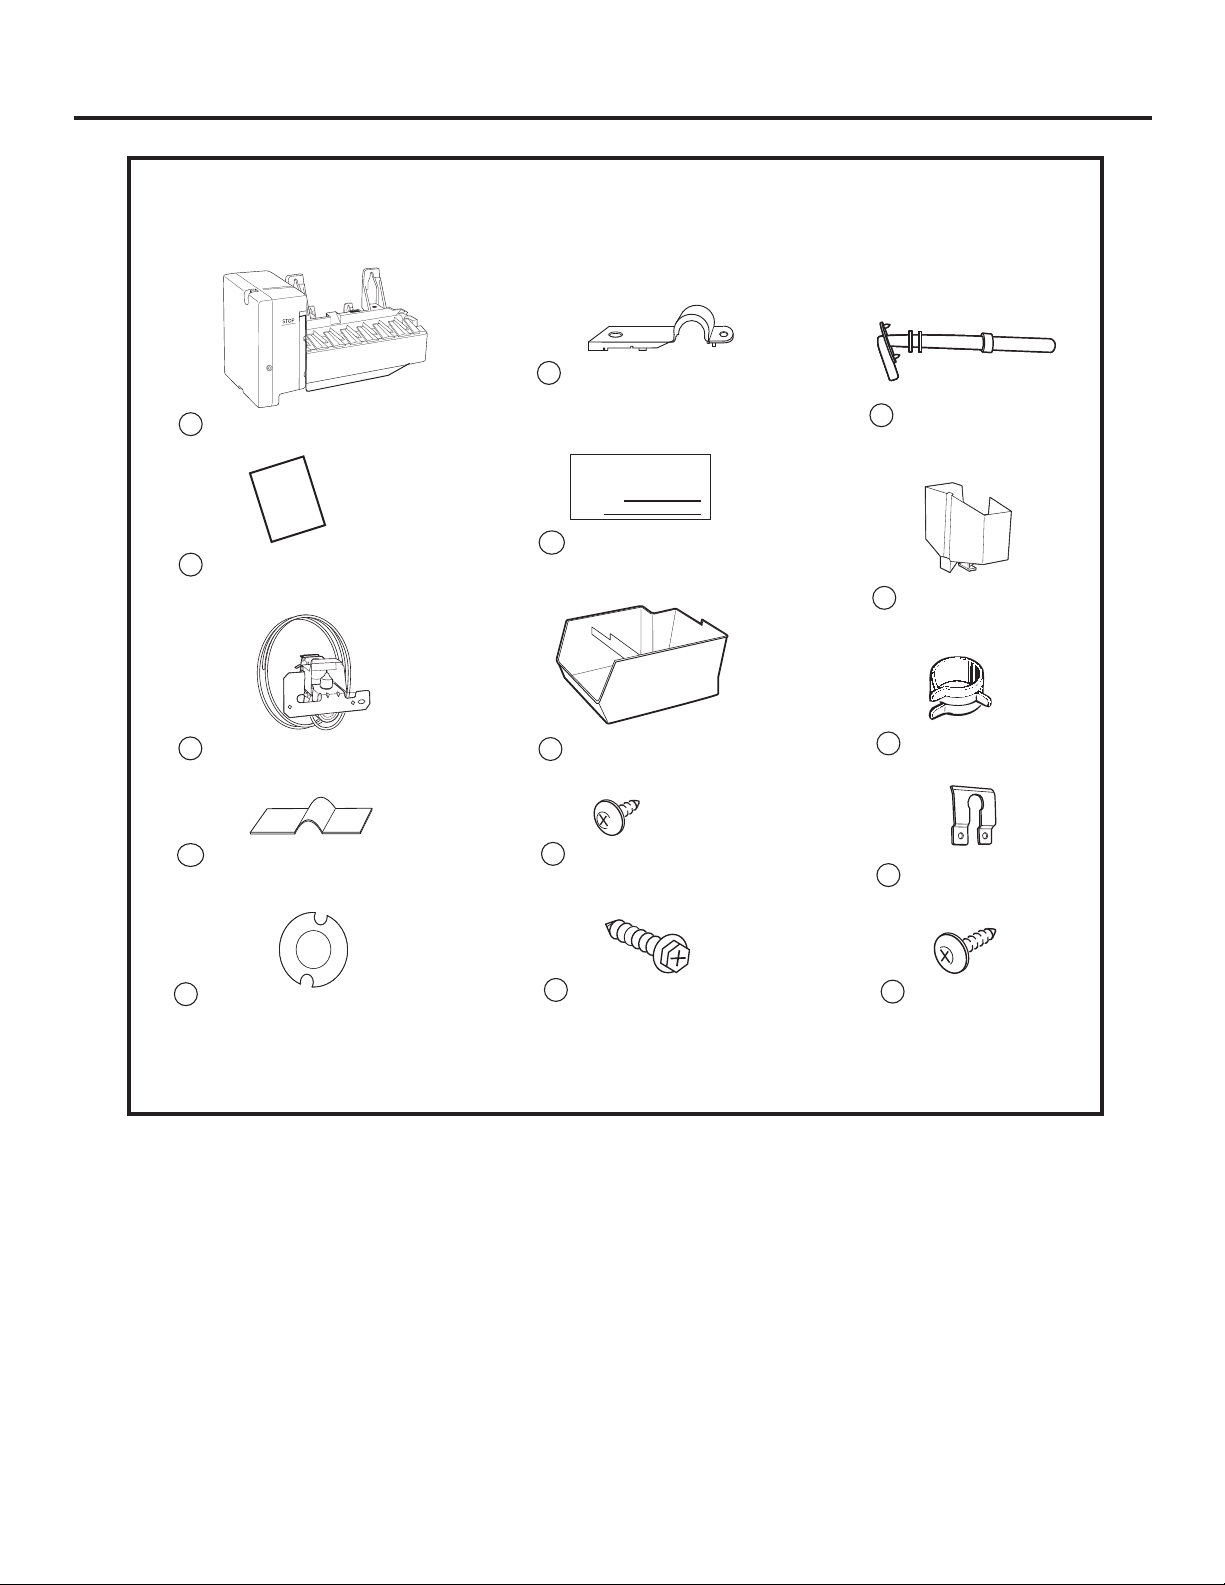
CONTENTS OF KIT IM-4B
P
STO
6
Water Line Clamp (strain relief),
Water Tube Inlet
Icemaker (Appearance may vary)
1
Installation
Instructions
Owner’s Manual &
2
Installation Instructions
ICEMAKER
WARRANTY VERIFICATION
Date Installed
Dealer
Warranty Label
7
11
Icemaker Fill Cup
12
3
Water Valve and Tube Assembly
4
Adhesive-Backed Water Tube
Fasteners, to secure plastic water
tube (4)
5
Water Inlet Gasket
8
Ice Bucket
9
Phillips Head Screw, for
attaching water valve (2)
10
Hex Head Screws, for
mounting ice maker (2)
13
Hose Clamp
Water Tube Inlet
14
Cover
15
Phillips Head Screws, for
attaching water tube
inlet cover and water line
clamp (3)
7
Page 8
Installation Instructions
ICEMAKER INSTALLATION INSTRUCTIONS
BEFORE YOU BEGIN
Read each step thoroughly before proceeding.
•
CAUTION – Unplug the
refrigerator. To eliminate the danger of
electric shock during installation, you
must unplug the refrigerator from its
electrical outlet.
TOOLS YOU WILL NEED
3
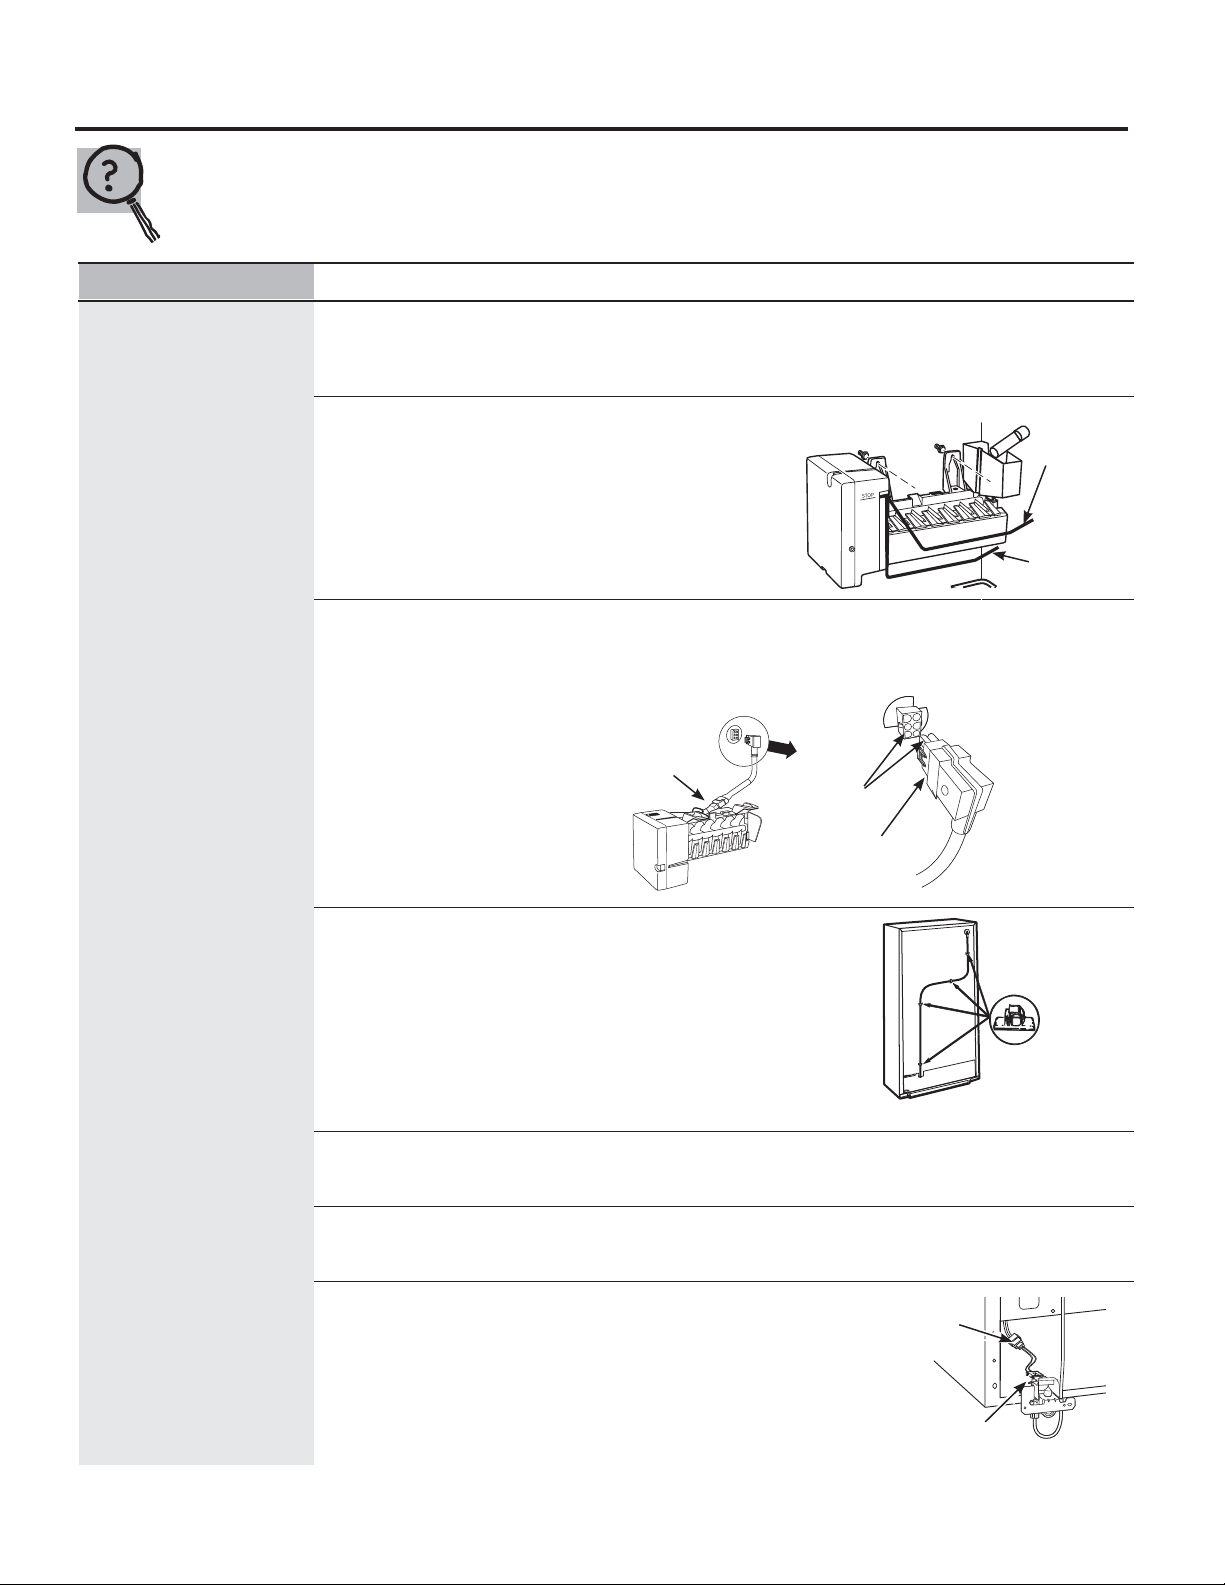
INSTALL THE ICEMAKER FILL CUP
Install the icemaker fill cup (side-mounted) into the
icemaker as shown.
Fill Cup
12
Phillips screwdriver
1/4” Nutdriver or adjustable wrench
1
PREPARE FOR INSTALLATION
• Remove and discard the large white plug from the
rear freezer wall.
2
MOVE FEELER ARM TO THE STOP
Pliers
Remove
plug
Sharp knife
POSITION
Move the feeler arm to the STOP (up) position. Leave the
feeler arm in the STOP position until the refrigerator is
connected to the water supply to prevent premature
operation.
P
STO
4
PLUG IN THE ICEMAKER
Holding the icemaker in place, insert the icemaker power
cord plug into the socket, making sure that the prongs
and holes are matched. Press the plug firmly into the
socket. Lock the plug in place by clipping the restraints
onto each side of the plug. Make sure the restraints click
into place. Make sure the power cord is still in the hook on
the back of the icemaker.
Hook
Ice Maker
5
MOUNT THE ICE MAKER
Inside the freezer, loosen the 2 mounting screws but
do not screw them all the way out. If your model does
not have the screws already in the freezer wall, look for
two plug buttons. Remove the plug buttons and insert
the 2 philips head screws.The screws should extend
approximately 1/2” (13mm) out from the freezer wall.
1
(Appearance may vary)
Feeler
Arm
Mounting Screws
10
8
Page 9

Installation Instructions
ICEMAKER INSTALLATION INSTRUCTIONS (cont.)
6
MOUNT THE ICEMAKER
• Hang the icemaker on the two mounting screws (10).
Mounting Screws
Make sure:
• The power cord is still firmly in the socket.
• The icemaker mounting screws are located in the
uppermost position of the mounting slots.
• The icemaker is level.
TIGHTEN THE ICEMAKER MOUNTING SCREWS
SECURELY.
10
10
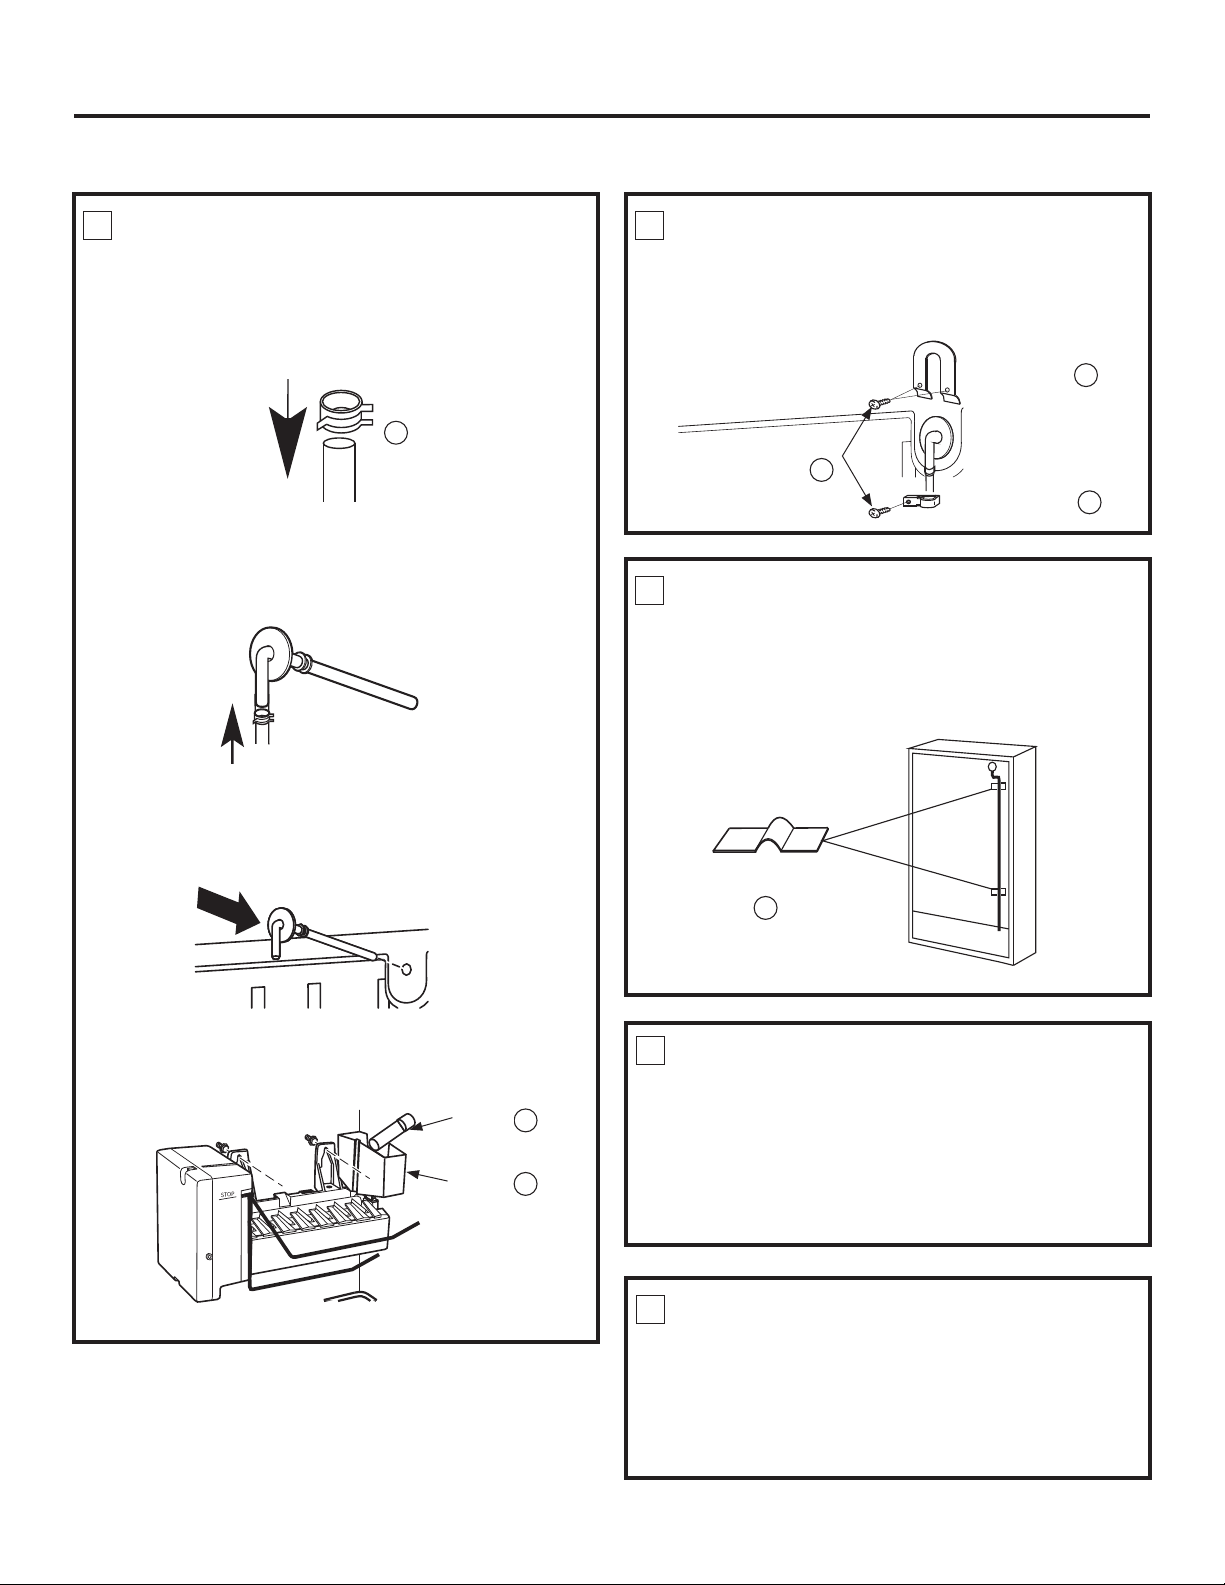
ATTACH THE WATER VALVE
• Locate the female connector plug. Plug the female
connector onto the male terminals on the water
valve. Either wire can go on either terminal.
Female
connector
Male
terminals
11
FASTEN THE WATER VALVE
• Fasten the water valve (3) to the cabinet by driving
the Phillips-head screw (9) from the kit into the hole
in the cabinet leg.
7
INSTALL THE ICE BUCKET
Put the ice bucket (8) in
place under the icemaker.
Make sure the icemaker
power switch is set to OFF.
8
8
ATTACH WARRANTY LABEL
A label (7) is provided with this kit to record the date of
installation for warranty purposes. Apply it to the back of
the refrigerator.
9
REMOVE THE COVER
At the bottom rear of the refrigerator, remove the
screw(s) holding the access cover.
Bend the cover back for access to the compartment.
Be sure to save the screws as the access cover must be
reinstalled later to ensure your refrigerator will function
properly.
9
3
12
INSTALL INLET TUBE SEAL
Peel one side of the paper away from the water fill tube
seal, slide the seal along the tube and affix to the back
side of the water tube inlet flange.
Water Inlet
Tube
11
Gasket
5
9
Page 10
Installation Instructions
ICEMAKER INSTALLATION INSTRUCTIONS (cont.)
INSTALL WATER LINE
13
Make sure there is enough plastic water line to
extend from the water valve to well into the water
tube inlet. Cut off any excess tubing.
Squeeze the ends of the hose clamp from the kit with
pliers and slide the clamp over the water tube inlet.
Hose Clamp
13
While still squeezing the clamp, insert the plastic water
line into the inlet as far as it will go (approximately 1”
(25 mm). Then slide the clamp downward to capture
the plastic water line in place. Make sure the fill tube
is aimed down.
Remove the adhesive backing on the opposite side of
the water fill tube seal and slide the tube into the hole
near the top at the back of the refrigerator. Firmly
press on the inlet to secure it to the refrigerator.
INSTALL WATER LINE CLAMP
14
Attach the water tube inlet cover and water line
clamp to the refrigerator. Drive the screw from the
kit through the fixtures at the indent into the back of
the cabinet.
Water Tube
Inlet Cover
Phillips Head
Screws
ROUTE AND ATTACH THE WATER
15
15
Water Line Clamp
TUBE
Fasten the plastic water tube to the back of the
refrigerator with adhesive-backed fasteners, spacing
the fasteners as shown to take up slack in the tube.
Water Tube Fastener
4
14
6
Note: Prior to use, verify water tube inlet is fully
seated in the fill cup.
Fill Tube
Fill Cup
11
12
16
WATER VALVE INSTALLED
Once the home water line is connected to the water
valve and turned on, set the feeler arm to the ON
position.
The icemaking cycle will not begin until the
icemaker and freezer compartment reach
operating temperature, then icemaking will begin
automatically.
17
KEEP THIS MANUAL
The warranty for the icemaker is printed in this
manual. Keep this manual with your Refrigerator
Owner’s Manual.
The icemaker installation inside the freezer is now
complete. Continue to the Water Valve Assembly section.
10
Page 11
Icemaker Warranty.
All warranty service provided by our Factory Service Centers, or an
®
authorized Customer Care
technician. To schedule service, on-line,
visit us at ge.com, or call 800.GE.CARES (800.432.2737). In Canada,
call 1.800.561.3344. Please have serial number and model number
Staple your receipt here.
Proof of the original purchase
date is needed to obtain
service under the warranty.
available when calling for service.
For The Period Of: We Will Replace:
One Year Any part of the icemaker which fails due to a defect in materials or workmanship.
From the date of the During this limited one-year warranty, GE will provide, free of charge, replacement parts
original purchase for any defective part in your icemaker kit.
What Is Not Covered (for customers in the United States):
Service trips to your home to teach you how to use the
product.
Improper installation. You are responsible for providing
adequate electrical, plumbing, and other connecting facilities,
including the water line to the icemaker and the water line
installation.
Failure of the product if it is abused, misused, or used for
other than the intended purpose or used commercially.
Replacement of house fuses or resetting of circuit breakers.
Damage to the product caused by accident, fire, floods or
acts of God.
Incidental or consequential damage caused by possible
defects with this appliance.
Product not accessible to provide required service.
(;&/86,212),03/,(':$55$17,(6³<RXUVROHDQGH[FOXVLYHUHPHG\LVSURGXFWUHSDLUDVSURYLGHGLQWKLV
Limited Warranty. Any implied warranties, including the implied warranties of merchantability or fitness for
a particular purpose, are limited to one year or the shortest period allowed by law.
This warranty is extended to the original purchaser and any succeeding owner for products purchased for home use
within the USA. If the product is located in an area where service by a GE Authorized Servicer is not available, you may
be responsible for a trip charge or you may be required to bring the product to an Authorized GE Service location for
service. In Alaska, the warranty excludes the cost of shipping or service calls to your home.
Some states do not allow the exclusion or limitation of incidental or consequential damages. This warranty gives
you specific legal rights, and you may also have other rights which vary from state to state. To know what your legal
rights are, consult your local or state consumer affairs office or your state’s Attorney General.
Warrantor: General Electric Company. Louisville, KY 40225
What Is Not Covered (for customers in Canada):
Service trips to your home to teach you how to use the
product.
Read your Owner’s Manual. If you then have any questions
about
operating the product, please contact
our Consumer Relations office at:
Manager, Consumer Relations
Mabe Canada Inc.
1 Factory Lane, Suite 310
Moncton, N.B.
E1C 9M3
your dealer or
Improper installation. If you have an installation problem,
contact your dealer or installer. You
providing adequate
connecting facilities.
Replacement of house fuses or resetting
Failure of the product if it is misused, or used for other
than the intended purpose or used commercially.
Damage to product caused by accident,
of God.
electrical, exhausting and other
are responsible for
of circuit breakers.
fire, floods or acts
WARRANTOR IS NOT RESPONSIBLE FOR CONSE QUEN TIAL DAMAGES.
11
Page 12

electromenagersge.ca
IM -4B
Mesures de sécurité ........... 1 2
Instructions de
fonctionnement. . . . . . . . . . . . . . . . .13
Avant d’appeler
un réparateur ..................14–15
Bruits normaux que vous
pouvez entendre ...................13
Préparation à un départ
de longue durée ...................13
Vous devez mettre le commutateur
de marche de la machine à glaçons
à glaçons
en position OFF (arrêt) ..............13
Instructions d’installation ...19-21
Machine à glaçons .............19, 20
Conduite d’eau froide ..............21
Liste de pièces .....................18
Services aux consommateurs
Garantie ...........................22
Soutien au consommateur .........23
Trousse
Machine à glaçons
Manuel d’utilisation
et d’installation
MESURES DE PRÉCAUTION
POUR VOTRE SÉCURITÉ:
Ne mettez jamais vos doigts ou vos mains dans
la machine à glaçons automatique quand le
réfrigérateur est branché. Vous éviterez ainsi
de vous blesser.
Vous éviterez également de gêner le
fonctionnement du mécanisme d’éjection
et de l’élément de chauffage qui libère les
glaçons qui sont situés en bas de la machine
à glaçons.
LISEZ ET CONSERVEZ CES INSTRUCTIONS.
LISEZ ET SUIVEZ SOIGNEUSEMENT CES MESURES DE
SÉCURITÉ.
Trousse d’accessoires pour machine
162D4614P015 49-60684 05-13 GE
Page 13

La machine à glaçons automatique. electromenagersge.ca
Un réfrigérateur nouvellement installé peut prendre de 12 à 24 heures pour commencer à produire des glaçons.
Machine à glaçons automatique
Machine à glaçons
SUR
La machine à glaçons produit sept glaçons
par cycle, soit environ 100 à 130 glaçons
par 24 heures, selon la température du
compartiment congélation, la température
de la pièce, le nombre de fois que la porte est
ouverte et les autres conditions d’utilisation.
Si le réfrigérateur est mis en marche avant
le raccordement de l’alimentation d’eau à la
machine à glaçons, placez le bras tâteur à la
OFF
position STOP (Arrêt) (haut).
Déplacez le commutateur de marche vers
à la position ON (vers le bas - en marche) si le
raccordement d’eau de la machine à glaçons se
fait alors que le réfrigérateur est déjà en marche.
La machine à glaçons se remplit d’eau
quand elle atteint le point de congélation. Un
réfrigérateur nouvellement installé prend de
12 à 24 heures pour commencer à produire
des glaçons.
Une fois que la machine à glaçons commence
à produire de la glace, il peut s’écouler jusqu’à
48 heures avant que le bac ne se remplisse, tout
Préparation à un départ de longue durée
Déplacez le commutateur de marche à la
position STOP (vers le haut - arrêt) pour fermer
de la conduite d’eau vers le réfrigérateur.
dépendant du réglage de température et de la
fréquence d’ouverture de la porte.
Vous entendrez un bourdonnement chaque fois
que la machine à glaçons se remplit d’eau. Jetez
les premiers lots de glaçons pour permettre à
la conduite d’eau de se purger. Assurez-vous
que rien ne gène la course du bras palpeur.
Quand le bac se remplit jusqu’au niveau du
bras palpeur, la machine à glaçons s’arrête de
produire des glaçons. Il est normal de trouver
des glaçons qui soient soudés ensemble. Si
vous n’utilisez pas souvent vos glaçons, les
vieux glaçons deviennent opaques, prennent
un mauvais goût et rétrécissent.
NOTE: Dans les maisons qui ont une pression
d’eau plus faible que la moyenne, vous pouvez
entendre la machine à glaçons recommencer
plusieurs fois son cycle pour produire un lot de
glaçons.
Si la températeur risque de s’abaisser en
dessous de la température de congélation,
demandez à un technicien qualifié de
purger votre système d’alimentation d’eau
(sur certains modèles) pour empêcher toute
inondation pouvant occasionner des dégâts
sérieux.
Moment où vous devez régler le commutateur de marche à la position
STOP (vers le haut - arrêt)
Quand le bac à glaçons est enlevé pendant
plus d’une minute ou deux.
Quand l’alimentation d’eau est coupée
pendant plusieurs heures.
Quand vous n’utilisez pas votre réfrigérateur
pendant plusieurs jours.
Bruits normaux que vous pouvez entendre
Le robinet d’eau de la machine à glaçons
émet un bourdonnement lorsque la
machine à glaçons se remplit d’eau. Si le
commutateur de marche est à la position
ON (vers le bas - en marche), le robinet
émettra un bourdonnement même s’il n’est
pas encore raccordé à la conduite d’eau.
Un commutateur de marche qui demeure
à la position ON (en marche) avant le
raccordement à la conduite d’eau risque
d’endommager la machine à glaçons.
Les glaçons qui tombent dans le bac et l’eau
qui coule dans les tuyaux quand la machine
à glaçons se remplit font un bruit normal.
Déplacez le commutateur de marche à la
position STOP (vers le haut - arrêt) pour
prévenir les dommages. Ceci arrêtera
également le bourdonnement.
13
Page 14
Avant d’appeler un réparateur…
Liste de vérifications préventives
Économisez votre temps et votre argent! Consultez le
tableau suivante; vous éviterez peut-être d’appeler un
réparateur.
Votre problème Causes possibles Solutions
La machine à glaçons Le compartiment congélation • Après avoir installé l’ensemble, attendez 24 heures
automatique est trop chaud. que le réfrigérateur soit complètement refroidi. Quand
ne fonctionne pas/ le compartiment est froid, la machine à glaçons
produit pas de glaçons se met à produire des glaçons.
La machine à glaçons n’est •
pas en marche.
Déplacez le
commutateur
de marche à la
position STOP (vers
le haut - arrêt).
Machine
à glaçons
La machine à glaçons n’est • Si vous utilisez un adaptateur de cordon d’alimentation,
pas bien branchée. assurez-vous qu’il est bien branché. Veillez aussi à ce que
la fiche du cordon d’alimentation de la machine à glaçons
est bien insérée dans la prise. Consultez Branchement
de la machine à glaçons.
Crochet
Taquets
de
verrouillage
Agrafes dans
les taquets de
verrouillage
Commutateur
de marche à la
position STOP
(vers le haut -
Commutateur
de marche à
la position ON
(vers le bas - en
arrêt)
marche)
La conduite d’eau est coudée. • Assurez-vous que la conduite
d’eau en matière plastique
qui va du robinet à l’entrée
de conduite d’eau de la
Dispositifs de fixation
avec envers adhésif
pour la conduite
d’eau
machine ne soit pas coudée.
Consultez Branchement de
la conduite d’eau. Un coude
dans la conduite d’eau réduit
la circulation dans la conduite
d’eau.
L’alimentation d’eau est fermée • Après avoir installé l’ensemble, assurez-vous que
ou non branchée. l’alimentation d’eau de la maison au réfrigérateur
soit bien ouverte.
L’entassement des glaçons • Égalisez les glaçons à la main.
dans le bac à glaçons occasionne
un arrêt de la machine à glaçons.
Le robinet d’eau • Assurez-vous que l’adaptateur
n’est pas bien branché. du fil du robinet soit
complètement branché
dans le connecteur mâle et
Bouchon
connecteur
mâle
les contacts sur le robinet d’eau.
Consultez Attachement
du robinet d’eau.
Contacts
du robinet
14
Page 15

Avant d’appeler un réparateur… electromenagersge.ca
Liste de vérifications préventives
Économisez votre temps et votre argent! Consultez le tableau suivante;
vous éviterez peut-être d’appeler un réparateur.
Votre problème Causes possibles Solutions
L’eau fuit autour de Il y a de la mousse dans la tasse • Si vous avez installé la conduite de remplissage en
la tasse de remplissage de remplissage resultant de la faisant glisser par l’arrière du réfrigérateur, vous pouvez
l’installation de la conduite avoir entraîné des morceaux de mousse en le poussant.
de remplissage. Cette mousse gênera la circulation de l’eau dans la tasse de
remplissage. Vérifiez la tasse et assurez-vous qu’il n’y ait pas
de morceaux de mousse.
Conduite de remplissage
La conduite de remplissage • Vérifiez que la conduite
Conduite de remplissage
ne repose pas bien dans la tasse de remplissage soit bien
de remplissage. finsérée dans l’ouverture
de la tasse de remplissage.
Consultez Montez la machine
à glaçons.
Tasse de
remplissage
L’eau fuit derrière L’alimentation d’eau • Vérifiez que l’alimentation d’eau soit bien branchée
le réfrigérateur de la maison n’est pas bien au robinet d’eau. Consultez Instructions pour l’installation
branchée au robinet d’eau. de la conduite d’eau.
La conduite d’eau n’est pas bien • Vérifiez que la conduite
branchée à l’entrée de conduite d’eau en matière plastique
d’eau. qui va du robinet à l’entrée
de conduite d’eau soit bien
fixée par le collier de serrage.
Consultez Branchement
de la conduite d’eau.
Entrée de
conduite d’eau
Collier de
serrage
Conduite d’eau
La formation La porte est restée ouverte. • Vérifiez qu’un paquet de nourriture n’empêche pas
de glaçons est lente/ une bonne fermeture de la porte.
Le compartiment
congélateur n’est pas
suffisamment froid
Le bouton de réglage • Consultez Bouton de réglage de température.
de température est mis
à une réglage trop basse.
Les glaçons sont trop Le robinet d’arrêt de l’eau • Nous recommandons de percer
petits/ La formation qui relie le réfrigérateur un trou de 1/4 po dans la conduite d’eau
de glaçons est lente à la canalisation d’alimentation pour brancher le robinet d’arrêt d’eau.
Percez un trou
de 1/4 po dans
la conduite d’eau
d’eau peut être bouché. Si vous ne percez pas un trou de 1/4 po,
vous pouvez occasionner une réduction
dans la production de glaçons ou dans
la taille des glaçons produits. Voir Installation
de la conduite d’eau.
La conduite d’eau est coudée. • Vérifiez que la conduite
d’eau en matière plastique
qui va du robinet à l’entrée
de conduite d’eau ne soit
pas coudée. Consultez
Branchement de la conduite
d’eau. Un coude réduira
la circulation à la machine
à glaçons.
15
Dispositifs
de fixation avec
envers adhésif pour
la conduite d’eau
Page 16

Avant d’appeler un réparateur…
Liste de vérifications préventives
Économisez votre temps et votre argent! Consultez le
tableau suivante; vous éviterez peut-être d’appeler un
réparateur.
Votre problème Causes possibles Solutions
Les glaçons ont Le bac à glaçons doit être nettoyé. • Videz et lavez le bac à glaçons. Jetez les vieux glaçons.
une odeur ou un goût
ou du goût aux glaçons.
L’intérieur du réfrigérateur • Consultez Soins et nettoyage de votre réfrigérateur.
a besoin d’être nettoyé.
Il y a un bourdonnement C’est normal. • Pendant le fonctionnement normal du réfrigérateur,
fréquent le robinet d’eau bourdonne quand la machine à glaçons
se remplit d’eau.
Les aliments donnent de l’odeur • Emballez bien les aliments.
16
Page 17

Instructions I M- 4B Tro us se de
d’installation machine à glaçons
Vous avez des questions? Au Canada, appelez au numéro 1.800.561.3344 ou
visitez notre site Web à l’adresse electromenagersge.ca
AVANT DE COMMENCER
Lisez ces instructions complètement et attentivement.
•
IMPORTANT – Conservez ces instructions
pour votre inspecteur local.
•
IMPORTANT – Observez tous les codes et
les ordonnances en vigueur.
• Note à l’installateur – Assurez-vous de laisser
ces instructions au consommateur.
• Note au consommateur – Conservez ces
instructions pour références futures.
• Niveau de compétence – L’installation de cet
appareil électroménager nécessite des compétences
mécaniques et électriques de base.
• Durée requise pour l’installation – 20–60 minutes
• L’installateur est responsable d’une bonne installation.
• Toute panne de l’appareil due à une mauvaise
installation est exclue de la garantie.
REMPLACEZ-VOUS UNE MACHINE
À GLAÇONS EXISTANTE PAR CETTE
TROUSSE?
Il est important que vous utilisiez le robinet d’eau et la
rallonge de conduite qui sont contenus dans cette trousse,
même si votre réfrigérateur a déjà un robinet d’eau et une
rallonge déjà installés.
Le vieux robinet peut occasionner une alimentation d’eau
insuffisante pour un bon remplissage de la machine à
glaçons et cela risque de provoquer des dommages.
La rallonge de conduite d’eau doit être d’une longueur
différente que celle qui existe, pour permettre une bonne
alimentation d’eau. Coupez la conduite à la longueur
indiquée pour votre modèle de réfrigérateur.
DOMMAGES – EXPÉDITION/INSTALLATION
• Si votre appareil a été endommagé pendant son
expédition, renvoyez-le au magasin où vous l’avez acheté.
Il le réparera ou le remplacera.
• Si c’est le client qui a endommagé votre appareil, il est
responsable de sa réparation ou de son remplacement.
• Si c’est l’installateur (autre que le client) qui a
endommagé l’appareil, c’est l’accord qui lie l’installateur
au client qui détermine celui qui est responsable de la
réparation ou du remplacement.
17
Page 18

Instructions d’installation
CONTENU DE LA TROUSSE IM-4B
P
STO
6
Collier de serrage de
1
Machine à glaçons
(L’aspect peut varier)
Installation
Instructions
2
Manuel du propriétaire et
instructions d’installation
conduite d’eau (collier de
serrage)
ICEMAKER
WARRANTY VERIFICATION
Date Installed
Dealer
Étiquette de garantie
7
Inlet Tube d’eau
11
Récipient de remplissage
12
de la machine à glaçons
3
Ensemble de robinet
et de conduite d’eau
4
Dispositifs de fixation de
conduite d’eau avec envers
adhésif, pour attacher la
conduite d’eau en matière
plastique (4)
5
Joint d’étanchéité de l’entrée
d’eau
8
Bac de glaçons
9
Vis à tête Phillips pour
fixer le robinet (2)
10
Vis à tête hexagonale,
pour monter la machine à
glaçons (2)
13
Collier de serrage
Couvercle d’entrée de
17
conduite d’eau
Vis à tête Phillips, pour fixer
18
le couvercle d’entrée de
conduite d’eau et le collier de
serrage de conduite d’eau (3)
18
Page 19

Instructions d’installation
INSTRUCTIONS D’INSTALLATION DE LA MACHINE À GLAÇONS
AVANT DE COMMENCER
Lisez soigneusement chaque étape avant de
commencer.
•
MISE EN GARDE –
Débranchez le réfrigérateur. Pour
éliminer tout danger de secousse
électrique pendant l’installation, vous
devez débrancher la fiche de votre
réfrigérateur de sa prise électrique
murale.
OUTILS NÉCESSAIRES
Tournevis de Phillips
Tourne-écrous de 1/4 po ou clé anglaise
1
PRÉPAREZ VOTRE INSTALLATION
• Enlevez le grand capuchon blanc de la paroi arrière
du compartiment congélation et jetez-le.
• Enlevez le couvercle de la prise avec un tournevis à
lame plate.
Pinces
Couteau aiguisé
3
INSTALLEZ LE RÉCIPIENT DE
REMPLISSAGE
Installez le récipient de remplissage de la machine à
glaçons (montage de côté) dans la machine à glaçons
comme l’indique la figure.
Récipient De
Remplissage
12
4
BRANCHEZ LA MACHINE À GLAÇONS
Insérez la fiche
de cordon
d’alimentation
électrique de
la machine à
glaçons dans
la prise située
sur la paroi
arrière, en vous
assurant de mettre les bonnes broches dans les bons
trous. Pressez fort la fiche dans la prise. Fixez la fiche
en place en agrafant les dispositifs de retenue des deux
côtés de la fiche. Assurez-vous que les dispositifs de
retenue soient fixés en place. Assurez-vous que le cordon
d’alimentation soit toujours sur le crochet de la machine
à glaçons.
Crochet
Machine À
Glaçons
1
Enlevez le
capuchon
2
DÉPLACEZ LE COMMUTATEUR DE
MARCHE À LA POSITION STOP (ARRÊT).
Déplacez le commutateur de marche à la position STOP
(vers le haut - arrêt). Laissez le commutateur de marche
à la position STOP (arrêt) jusqu’à ce que la conduite
d’eau soit raccordée au réfrigérateur afin de prévenir un
démarrage prématuré.
P
O
ST
Commutateur
(L’aspect peut varier)
de marche
19
5
MONTEZ LA MACHINE À GLAÇONS
À l’intérieur du congélateur, desserrer les 2 vis de
montage sans les dévisser totalement. Si votre modèle ne
comporte pas déjà de vis dans les parois du congélateur,
recherchez les deux capuchons de boutons. Enlevez les
capuchons de bouchons et insérez les 2 vis à tête Phillips.
Laissez une longueur d’environ 13 mm (1/2 po) ressortir
de la paroi du congélateur.
Vis de montage
10
Page 20

Instructions d’installation
INSTRUCTIONS D’INSTALLATION DE LA MACHINE À GLAÇONS (suite)
6
MONTEZ LA MACHINE À GLAÇONS
• Accrochez la machine à glaçons aux deux vis de
montage (10).
Vis de montage
Assurez-vous bien que:
• Le cordon d’alimentation électrique soit toujours
bien fixé à la prise.
• Les vis de montage se trouvent dans la position
supérieure des fentes de montage.
• La machine à glaçons est bien horizontale.
SERREZ ALORS FORT LES VIS DE MONTAGE DE LA
MACHINE À GLAÇONS.
10
10
BRANCHEZ LE ROBINET
• Repérez le connecteur femelle. Branchez le
connecteur femelle sur les bornes mâles du robinet.
Chaque fil peut s’apparier indifféremment avec l’une
ou l’autre borne.
Connecteur
femelle
Bornes
mâles
11
FIXEZ LE ROBINET
• Fixez le robinet (3) à la carrosserie en vissant la vis
à tête Phillips (9) de la trousse dans le trou du pied
de carrosserie.
7
INSTALLEZ LE BAC À GLAÇONS
Mettez le bac à glaçons (9)
en place sous la machine
à glaçons.
Assurez-vous que le
commutateur de marche
de la machine à glaçons
soit en position OFF (arrêt).
8
COLLEZ L’ÉTIQUETTE DE GARANTIE
Vous trouverez dans cette trousse une étiquette (7), sur
laquelle vous devez noter la date de l’installation, à des
fins de garantie. Collez-la à l’arrière du réfrigérateur.
9
ENLEVEZ LE COUVERCLE
Enlevez la/les vis qui tient/tiennent le couvercle de
compartiment du compresseur en bas de l’arrière du
réfrigérateur.
Pliez le couvercle vers l’arrière pour avoir accès au
compartiment.
Assurez-vous de conserver les vis, car vous devrez
remettre en place le couvercle pour assurer le bon
fonctionnement de votre réfrigérateur.
8
9
3
12
POSEZ LE JOINT D’ÉTANCHÉITÉ DU
TUBE D’ENTRÉE D’EAU
• Pelez un côté du papier pour le dégager du joint
d’étanchéité du tube de remplissage, glissez le joint le long
du tube et apposez-le sur la face arrière de la collerette de
l’entrée de conduite d’eau.
5
Tube d’entrée
d’eau
11
Joint d’étanchéité
20
Page 21

Instructions d’installation
INSTRUCTIONS D’INSTALLATION DE LA MACHINE À GLAÇONS (suite)
INSTALLEZ LA CONDUITE D’EAU
13
Assurez-vous de prévoir une longueur suffisante de
conduite d’eau en plastique pour aller du robinet
jusque profondément dans l’entrée de conduite d’eau.
Coupez toute longueur de conduite excédentaire.
Avec une pince, pressez les extrémités du collier de
serrage de tuyau fourni dans la trousse et glissez le
collier au-dessus de l’entrée de conduite d’eau.
Collier de serrage de tuyau
13
En continuant de presser les extrémités du collier,
insérez la conduite d’eau en plastique dans l’entrée
d’eau aussi profondément que possible (environ 25
mm [1 po]). Glissez ensuite le collier vers le bas pour
immobiliser la conduite d’eau plastique en place.
Assurez-vous que le tube de remplissage soit orienté
vers le bas.
INSTALLEZ LE COLLIER DE SERRAGE
14
DE CONDUITE D’EAU
Installez le collier de serrage de conduite d’eau Fixez
le couvercle d’entrée de conduite d’eau et le collier
de serrage de conduite d’eau sur le réfrigérateur.
Vissez la vis (fournie avec la trousse) dans les points
de fixations aux encoches à l’arrière de la carrosserie.
Vis à tête
Phillips
PLACEZ LA CONDUITE D’EAU ET
15
15
Collier de
serrage de
conduite d’eau
Couvercle
d’entrée de
conduite
d’eau
14
6
FIXEZ-LA AU RÉFRIGÉRATEUR
• Attachez la conduite d’eau en matière plastique
à l’arrière du réfrigérateur avec les dispositifs de
fixation avec envers adhésif restants en espaçant
les dispositifs de fixation comme l’indique la figure
pour bien aligner la conduite.
Retirez l’envers adhésif sur le côté opposé du joint
d’étanchéité du tube de remplissage puis glissez le
tube dans l’orifice situé dans le haut de l’arrière du
réfrigérateur. Pressez fermement le joint sur l’orifice
d’entrée pour le fixer au réfrigérateur.
Remarque : Avant l’utilisation, vérifiez que l’entrée
de conduite d’eau repose à fond dans le récipient de
remplissage.
Tube de
remplissage
Récipient de
remplissage
11
12
Fixation de conduite d’eau
avec envers adhésif
4
16
UNE FOIS LE ROBINET D’EAU INSTALLÉ
Une fois la conduite d’eau du domicile raccordée au
robinet et ouverte, placez le bras tâteur à la position
ON (Marche).
Le cycle de formation des glaçons ne commence que
lorsque la machine à glaçons et le compartiment
congélation atteignent leur température de
fonctionnement. La formation de glaçons commence
alors automatiquement.
17
CONSERVEZ CE MANUEL
La garantie de la machine à glaçons est imprimée sur
ce Manuel. Conservez ce Manuel avec votre Manuel du
propriétaire du réfrigérateur.
Vous avez maintenant terminé d’installer votre machine à
glaçons à l’intérieur de votre compartiment congélation.
Passez à la section L’ensemble de robinet d’eau.
21
Page 22

Garantie de la machine à glaçons.
Tout service en vertu de cette garantie est fourni par nos Centres de service d’usine
ou par un technicien autorisé de soins à la clientèle. Pour obtenir ce service, visiteznous en direct à l’adresse Internet ge.com ou appelez-nous au 800.GE.CARES aux
États-Unis ou au 1.800.561.3344 au Canada. Veuillez fournir le numéro de série et le
numéro de modèle lorsque vous appelez pour obtenir le service.
Agrafez votre reçu ici. Vous
aurez besoin d’une preuve
d’achat original pour
obtenir un service en vertu
de cette garantie.
Pour une période de: Nous remplacerons:
Un an Toute pièce de la machine à glaçons qui tombe en panne à la suite d’un vice de matériel ou
Á partir de la date de main-d’œuvre. Pendant cette année de garantie limitée, GE fournira, gratuitement, pièces de
d’achat original remplacement pour remplacer toute pièce défectueuse dans la trousse de la machine à glaçons.
Ce qui n’est pas couvert (pour nos clients des États-Unis):
Les déplacements de service à votre maison pour vous apprendre
à utiliser le produit.
Une mauvaise installation. Vous êtes responsable de fournir
une bonne installation électrique, la plomberie et toute connexion
nécessaire, y compris la conduite d’eau jusqu’à la machine à glaçons
et l’installation de la conduite d’eau.
Toute panne du produit s’il n’a pas été traité proprement, s’il a été
utilisé à des fins autres que celles auxquelles il est destiné, ou s’il a
été utilisé commercialement.
EXCLUSION DE GARANTIES IMPLICITES – Votre seul et unique recours est la réparation du produit selon les dispositions de
cette Garantie limitée. Toutes les garanties implicites, incluant les garanties de commercialité et d’adéquation à un usage
spécifique, sont limitées à une année ou à la période la plus courte autorisée par la législation.
Tout remplacement de fusible ou toute remise en marche du
disjoncteur de la maison.
Tout dommage au produit causé par un accident, un incendie,
une inondation ou un cas de force majeure.
Le garant n’est pas responsable des dommages índirects.
Le service s’il est impossible d’avoir accès au produit pour ce faire.
Cette garantie couvre l’acheteur original et tout acheteur ultérieur de produits achetés à des fins domestiques à l’intérieur
des États-Unis. Si le produit est installé dans une région où ne se trouve aucun réparateur autorisé GE, vous devrez peut-être
assumer les frais de transport ou apporter expédier le produit à un centre de service autorisé GE. En Alaska, cette garantie
exclut le coût d’expédition et les appels de service à la maison.
Certains États ne permettent pas l’exclusion ou la limitation des dommages accessoires ou indirects. La présente garantie
vous donne des droits juridiques spécifiques et vous pouvez également avoir d’autres droits qui varient d’un État à l’autre.
Pour connaître vos droits juridiques, consultez votre bureau d’affaires des consommateurs local ou de l’État ou le procureur
général de votre État.
Garant: General Electric Company, Louisville, KY 40225
Ce qui n’est pas couvert (pour nos clients du Canada):
Les déplacements de service à votre maison pour vous apprendre
à utiliser le produit.
Lisez votre Manuel du propriétaire. Si vous avez des questions sur le
fonctionnement de ce produit, veuillez contacter votre revendeur ou le
bureau des relations avec la clientèle à l’adresse suivante :
Directeur, Relations avec la clientèle
Mabe Canada Inc.
1 Factory Lane, Suite 310
Moncton, N.B.
E1C 9M3
LE GARANT N’EST PAS RESPONSABLE DE DOMMAGES INDIRECTS.
Une mauvaise installation. Si vous avez un problème d’installation,
contactez votre revendeur ou votre installateur. Vous êtes responsable
de fournir une bonne installation électrique, la plomberie et toute
autre connexion.
Tout remplacement de fusible ou toute remise en marche du
disjoncteur de la maison.
Toute panne du produit s’il n’a pas été traité proprement, s’il a été
utilisé à des fins autres que celles auxquelles il est destiné ou s’il a
été utilisé commercialement.
Tout dommage au produit causé par un accident, un incendie, une
inondation ou un cas de force majeure.
Garant: MABE CANADA INC.
22
Page 23

Soutien au consommateur.
Site Web appareils électroménagers GE
Vous avez une question ou vous avez besoin d’aide pour votre appareil électroménager? Contactez-nous par
Internet au site electromenagersge.ca 24 heures par jour, tous les jours de l’année.
electromenagersge.ca
Service de réparations 1.800.561.3344
Service de réparations GE est tout près de vous.
Pour faire réparer votre électroménager GE, il suffit de nous téléphoner.
Studio de conception réaliste electromenagersge.ca
Sur demande, GE peut fournir une brochure sur l’aménagement d’une cuisine pour les personnes
à mobilité réduite.
Écrivez: Directeur, Relations avec les consommateurs, Mabe Canada Inc.
Bureau 310, 1 Factory Lane
Moncton, N.B. E1C 9M3
Prolongation de garantie electromenagersge.ca
Achetez un contrat d’entretien GE avant que votre garantie n’expire et bénéficiez d’un rabais substantiel.
Ainsi le service après-vente GE sera toujours là après expiration de la garantie.
Visitez notre site Web ou appelez-nous au 1.800.461.3636.
Pièces et accessoires electromenagersge.ca
Ceux qui désirent réparer eux-mêmes leurs électroménagers peuvent recevoir pièces et accessoires
directement à la maison (cartes VISA, MasterCard et Discover acceptées).
Les directives stipulées dans le présent manuel peuvent être effectuées par n’importe quel utilisateur. Les
autres réparations doivent généralement être effectuées par un technicien qualifié. Soyez prudent, car une
réparation inadéquate peut affecter le fonctionnement sécuritaire de l’appareil.
Vous trouverez dans les pages jaunes de votre annuaire le numéro du Centre de service Mabe le plus proche.
Autrement, appelez-nous au 1.888.261.3055.
Contactez-nous electromenagersge.ca
Si vous n’êtes pas satisfait du service après-vente dont vous avez bénéficié :
Premièrement, communiquez avec les gens qui ont réparé votre appareil.
Ensuite, si vous n’êtes toujours pas satisfait envoyez tous les détails–numéro de téléphone compris–au
Directeur, Relations avec les consommateurs, Mabe Canada Inc.
Bureau 310, 1 Factory Lane
Moncton, N.B. E1C 9M3
Inscrivez votre appareil électroménager electromenagersge.ca
Inscrivez votre appareil électroménager en direct, aussitôt que possible. Cela améliorera nos
communications et notre service après-vente. Vous pouvez également nous envoyer par la poste le formulaire
d’inscription joint à votre documentation.
23
Page 24

GEAppliances.com
IM -4B
Información de seguridad
Instrucciones de operación ..............25
Antes de llamar a
solicitar servicio............................................ 26-28
Cómo prepararse para
las vacaciones .....................................................25
Cuándo debe fijar el interruptor
de energía en la posición
de apagado (OFF) ...............................................25
Sonidos normales que
podría escuchar ..................................................25
Instrucciones para la instalación ..29-33
Máquina de hacer hielo ..........................31, 32
Guías para el tubo de llenado ......................33
Lista de partes .....................................................30
Servicio al consumidor
Ayuda al consumidor ...................................... 35
Garantía ................................................................. 34
................ 24
Equipo de Accesorios
Máquina de Hielos
Manual del propietario
e instalación
PRECAUCIONES DE SEGURIDAD
POR SU SEGURIDAD:
No coloque los dedos o las manos en el
mecanismo automático de la máquina de hielos
mientras el refrigerador esté conectado. Esto le
ayudará a protegerse de posibles lesiones.
También evitará la interferencia con las partes
móviles del mecanismo eyector y el elemento
de calefacción que libera los cubos, el cual se
encuentra en la parte inferior de la máquina de
hielos.
LEA Y SIGA ESTAS INSTRUCCIONES DE SEGURIDAD
CUIDADOSAMENTE.
LEA Y CONSERVE ESTAS INSTRUCCIONES
Kit de Accesorios de la Máquina de Hacer Hielo
162D4614P015 49-60684 05-13 GE
Page 25

Sobre la máquina automática de hielos. GEAppliances.com
Un refrigerador recién instalado puede tomar desde 12 hasta 24 horas para empezar a hacer hielo.
Máquina de hielos
ENCENDIDO
APAGADO
Máquina automática de hielos
La máquina de hielos producirá siete cubos
por ciclo, aproximadamente entre 100–130
cubos en un período de 24 horas, dependiendo
de la temperatura en el compartimiento del
congelador, la temperatura del sitio, las veces
que se abra la puerta y otras condiciones.
Si el refrigerador se utiliza antes de realizar la
conexión del agua a la máquina de hacer hielo,
mueva el brazo indicador a la posición STOP
(Detener) (hacia arriba).
Cuando el refrigerador haya sido conectado
al suministro de agua, mueva el interruptor de
energía la posición ON (Encendido) (hacia abajo).
La máquina de hielos se llenará con agua
cuando se enfríe hasta congelarse. Un
refrigerador recién instalado puede tomar
desde 12 hasta 24 horas para empezar a
hacer cubos de hielo.
Una vez que la máquina de hacer hielo
comienza a hacer el hielo, podrá tardar hasta
Cómo prepararse para las vacaciones
Mueva el interruptor de energía a la posición
STOP (Detener) (hacia arriba) y cierre el
suministro de agua del refrigerador.
48 horas en llenar el cubo, dependiendo de
las configuraciones de la temperatura y de la
cantidad de veces que se abra la puerta.
Escuchará un zumbido cada vez que la
máquina de hielos se llene de agua. Des eche
los primeros cubos de hielo para permitir
que la tubería se limpie. Asegúrese de que
nada interfiera con el recorrido del brazo
indicador.
Cuando el recipiente se llena hasta el nivel
del brazo indicador, la máquina dejará
de producir hielos. Es normal que varios
cubos se peguen. Si el hielo no se utiliza
frecuentemente, los cubos de hielo viejos
se volverán oscuros, con sabor a viejo y se
reducirán de tamaño.
NOTA: En hogares con una presión de agua
por debajo del promedio, es posible que
escuche el ciclo de la máquina de hielos
varias veces al producirse un lote de hielos.
Si la temperatura puede caer por debajo del
punto de congelación, haga que un técnico
calificado le drene el sistema de suministro
de agua (en algunos modelos) para prevenir
daños serios a la propiedad debidos a
inundaciones.
Cuándo es necesario configurar el interruptor de energía de la máquina
de hacer hielo a la posición STOP (Detener) (hacia arriba)
Cuando retire el compartimiento para el
almacenamiento de hielos por más de un
minuto o dos.
Cuando el suministro de agua se vaya a
cerrar por varias horas.
Cuando no se vaya a usar el refrigerador
por varios días.
Sonidos normales que puede escuchar
La válvula de agua de la máquina de hacer
hielo zumbará cuando esta última se llene
de agua. Si el interruptor de energía se
encuentra en la posición ON (Encendido)
(hacia abajo), zumbará incluso aunque aún
no se haya conectado al suministro de
agua. Mantener el interruptor de energía en
la posición ON (Encendido) antes de haber
conectado el mismo al suministro de agua
podrá dañar la máquina de hacer hielo.
Para evitar esto, mueva el interruptor de
energía a la posición STOP (Detener) (hacia
arriba). Esto detendrá el zumbido.
El sonido de los cubos al caer en la bandeja,
y el agua corriendo en la tubería a medida
que la máquina de hielos se vuelve a llenar.
25
Page 26

Antes de llamar a solicitar servicio…
Consejos para la solución de averías.
¡Ahorre tiempo y dinero! Revise primero la siguiente tabla
primero y quizás no necesite llamar a solicitar servicio.
Problema Posibles causas Qué hacer
La máquina automática El compartimento del • Después de instalar el kit, permita que el refrigerador
de hielos no funciona/ congelador está muy cálido. se enfríe completamente por 24 horas. Una vez
no hace hielos el compartimento esté frío, la máquina de hielos comenzará
la producción de hielo.
La máquina de hielos • Mueva el interruptor
no está encendida. de la máquina de
Modelo con Interruptor de
Energía
hielos a la posición
ON (encendido).
(La apariencia
podría variar)
El Interruptor de Energía
se encuentra en la
posición ON (Encendido)
(hacia abajo)
La máquina de hielos • Si usted está usando un cable adaptador, cerciórece de
no está conectada.
que esté totalmente conectado. También cerciórese de que
el enchufe del cable de la máquina de hielos está totalmente
introducido en el tomacorriente. Ver
la máquina de hielos
.
Cómo conectar
Gancho
Orejillas
de cierre
Abrazaderas
de agarre sobre
las orejillas
de cierre
El Interruptor
de Energía se
encuentra en
la posición
STOP
(Detener)
(hacia arriba)
La línea de agua está retorcida. • Cerciórese de que la línea
de agua plástica que va desde
la válvula de la entrada
del tubo de agua no está
retorcida. Ver Cómo conectar
la línea de agua. Una torcedura
en la línea de agua evitará
el flujo de agua.
El suministro de agua está
• Después de instalar el Kit, cerciórese de que el suministro
Accesorios para
adherir el tubo
de agua
desconectado o cerrado. de agua de la casa hacia el refrigerador no está cerrado
o desconectado.
Cubitos apilados en el depósito • Nivele los cubitos manualmente.
causan que la máquina de
hielos se apague.
La válvula de agua no está • Cerciórese de que el cable
conectada correctamente.
adaptador de la válvula está
completamente conectado
Enchufe
conector
henbra
a los terminales en la válvula
de agua. Ver
la válvula de agua.
26
Cómo pegar
Terminales
en la válvula
Page 27

Antes de llamar a solicitar servicio… GEAppliances.com
Consejos para la solución de averías.
¡Ahorre tiempo y dinero! Revise primero la siguiente tabla
primero y quizás no necesite llamar a solicitar servicio.
Problema Posibles causas Qué hacer
Fuga de agua alrededor Espuma adquirida durante • Si el tubo de llenado fue instalado deslizándolo a través
de la copa de llenado la instalación del tubo de llenado. de la parte posterior del refrigerador, es posible que haya
agarrado pedazos de espuma cuando fue empujado a través
de la espuma. Esta espuma puede interferir con el flujo del
agua en la copa de llenado. Cerciórese de que no exista
espuma en la copa.
El tubo de llenado no está • Cerciórese de que el tubo
sentado correctamente en de llenado esté insertado
la copa de llenado. correctamente en
la apertura de la copa de
llenado. Ver Cómo montar
la máquina de hielos.
Tubo de llenado
Tubo de
llenado
Copa de
llenado
Fuga de agua detrás El suministro de la casa no está • Cerciórese de que el suministro de la casa esté ajustado
del refrigerador conectado apropiadamente firmemente a la válvula de agua. Ver Instrucciones de
a la válvula de agua. instalación de la línea de agua.
La línea de agua no está • Cerciórese de que la línea
conectada a la entrada de agua plástica que va desde
del tubo de agua. la válvula hasta la entrada
del tubo de agua está ajustado
firmemente con la abrazadera
de la manguera. Ver Cómo
Entrada del
tubo de agua
Abrazadera
de la manguera
conectar la línea de agua.
Línea de agua
Congelamiento lento/ Dejó la puerta abierta. • Cerciórese de que no exista ningún objeto
evitando que
elcongelador no está la puerta cierre.
lo suficientemente frío
El control de la temperatura • Ver Cómo ajustar el control de la temperatura.
no está ajustado a un nivel
lo suficientemente frío.
Los cubos de hielo son La válvula de desconexión de • Recomendamos que taladre
demasiado pequeños/ agua que conecta el refrigerador un agujero de 1/4 de pulgada en
hielo lento con la línea de agua de la casa la tubería del agua para conectar
podría estar obstruida. la válvula de desconexión. No
taladrar este agujero de 1/4 de
Taladre un
agujero de
1/4 de pulgada
en la tubería
del agua
pulgada podría resultar en la
reducción de la producción de hielo
o en menores cubitos de hielo. Ver Cómo
instalar la línea de agua.
La línea de agua está retorcida. • Cerciórese de que la línea
de agua plástica que va desde
Accesorios para
adherir el tubo
de agua
la válvula de la entrada del
tubo de agua no está retorcida.
Ver Cómo conectar la línea
de agua. Una torcedura en
la línea de agua evitará el flujo
de agua en la máquina de hielos.
27
Page 28

Antes de llamar a solicitar servicio…
Consejos para la solución de averías.
¡Ahorre tiempo y dinero! Revise primero la siguiente tabla
primero y quizás no necesite llamar a solicitar servicio.
Problema Posibles causas Qué hacer
Los cubos de hielo El recipiente de almacenamiento • Desocupe y lave el recipiente. Deseche los cubos viejos.
tienen olor / sabor necesita limpieza.
La comida está transmitiendo • Empaque bien los alimentos.
olor / sabor a los cubos de hielo.
El interior del refrigerador • Consulte la sección Cuidado y limpieza.
necesita limpieza.
Zumbido Operación normal. • Durante la operación normal, la válvula de agua zumbará
frecuente cuando la máquina de hielos se llene de agua.
28
Page 29

Instrucciones para Kit para hielos
la instalación IM-4B
¿Preguntas? Llame 800.GE.CARES (800.432.2737) o Visite nuestra página en la red en:
GEAppliances.com
ANTES DE EMPEZAR
Lea estas instrucciones completa
y cuidadosamente.
•
IMPORTANTE – Guarde estas
instrucciones para el uso del inspector local.
•
IMPORTANTE – Cumpla con todos
los códigos y ordenanzas gubernamentales.
• Nota para el instalador – Asegúrese
de dejar estas instrucciones con el consumidor.
• Nota para el consumidor – Guarde estas
instrucciones para futura referencia.
• Nivel de destrezas – La instalación de este aparato
requiere de destrezas básicas de mecánica y
electricidad.
• Tiempo de instalación – 20–60 minutos
• La instalación apropiada es responsabilidad
del instalador.
• La falla del producto debido a una instalación
inapropiada no está cubierta por la garantía.
¿ESTÁ REEMPLAZANDO LA MÁQUINA
DE HIELOS CON ESTE KIT?
Es importante que utilice la válvula del agua y
la extensión del tubo de llenado que vienen con este
kit, aunque es posible que su refrigerador ya los tenga
instalados.
La válvula antigua no permitirá que ingrese suficiente
agua para llenar correctamente la máquina de hielos
y causará daños.
La extensión del tubo de llenado necesita tener una
longitud diferente a la tubería original para un flujo
de agua apropiado. Corte el tubo a la longitud indicada
para su modelo de refrigerador.
DAÑOS EN EL ENVÍO / INSTALACIÓN
• Si la unidad se daña durante el envío, devuelva
la unidad al almacén donde la adquirió para
su reparación o reemplazo.
• Si el cliente daña la unidad, la reparación
o el reemplazo es responsabilidad del cliente.
• Si el instalador daña la unidad (si no es el cliente),
la reparación o reemplazo se debe hacer por medio
de un arreglo entre el cliente y el instalador.
29
Page 30

Instrucciones para la instalación
CONTENIDO DEL KIT IM-4B
P
STO
1
Máquina de hielos (La
apariencia podría variar)
Installation
Instructions
2
Manual del propietario e
instrucciones para la instalación
6
Abrazadera para la tubería del
agua (alivio de presión), para
la tubería del agua de la casa
ICEMAKER
WARRANTY VERIFICATION
Date Installed
Dealer
Etiqueta de garantía
7
11
Entrada del tubo
del agua
12
Taza de llenado de
la máquina de hielos
(montada al costado)
3
Ensamble de válvula y
de tubo del agua
4
Sujetadores del tubo del agua
con adhesivo posterior, para
sujetar el tubo del agua plástico
5
Junta de la Entrada de Agua
8
Cubeta para el hielo
9
Tornillo con Cabeza
Phillips, para adherir
la válvula de agua (2)
10
Tornillos con Cabeza
Phillips, para montar la
máquina de hacer hielo (2)
13
Abrazadera de la
manguera
Cubierta de la entrada
14
del tubo de agua
Tornillos con Cabeza Phillips,
15
para adherir la tapa de la
entrada del tubo de agua y la
abrazadera del suministro de
agua (3)
30
Page 31

Instrucciones para la instalación
INSTRUCCIONES PARA LA INSTALACIÓN DE LA MÁQUINA DE HIELOS
3
INSTALE LA TAZA DE LLENADO
ANTES DE EMPEZAR
Lea cada paso completamente antes de proceder.
•
PRECAUCIÓN – Desconecte
el refrigerador. Para eliminar el peligro de
una descarga eléctrica durante la instalación,
debe desconectar el refrigerador de su
tomacorriente.
HERRAMIENTAS NECESARIAS
Destornillador Phillips
Destornillador de tuercas de 1/4”
1
RETIRE LA TAPA BLANCA Y LA CUBIERTA DEL
Alicates
ENCHUFE
• Retire la cubierta del enchufe con un destornillador de pala
plana ubicada en la pared izquierda o la pared posterior del
congelador, cerca de la parte superior.
• Retire y deseche la tapa blanca de la esquina superior
izquierda de la pared del congelador.
Cuchillo
afilado
Instale la taza de llenado de la máquina de hielos (montada al
costado) (15) en la máquina de hielos como se muestra.
Taza de Llenado
15
4
CONECTE LA MÁQUINA DE HIELOS
Sosteniendo la
máquina de hielos
en su lugar, inserte
el enchufe del
cable de corriente
de la máquina
de hielos en el
orificio de la pared
lateral o trasera
(depe n diendo del modelo), asegurándose de que las patas y
los orificios se ajusten. Presione el enchufe firmemente en el
orificio. Asegure el enchufe en su lugar fijando los sujetadores
en cada costado del enchufe. Asegúrese de que los
sujetadores encajen en su lugar. Cerciórese de que el cable
de corriente permanece en el gancho en la parte posterior de
la máquina de hielos.
Gancho
Máquina
de hielos
1
Retire
la tapa
2
MOVE FEELER ARM TO STOP POSITION
Mueva el interruptor de energía a la posición STOP
(Detener) (hacia arriba). Deje el interruptor de energía
Fije el interruptor de corriente de la máquina de hielos
en la posición STOP (Detener) hasta que el refrigerador
en la posición de OFF (apagado) hasta que el refrigerador
esté conectado al suministro de agua para evitar un
se conecte al suministro de agua para evitar la operación
funcionamiento prematuro.
prematura de la misma.
P
STO
Interruptor
de energía
(La apariencia podría variar)
31
5
CÓMO MONTAR LA MÁQUINA DE
HACER HIELO
Dentro del freezer, afloje los 2 tornillos montantes pero
no los desenrosque totalmente. Si su modelo no cuenta
con los tornillos en la pared del freezer, busque los dos
botones del enchufe. Retire los botones del enchufe e
inserte los 2 tornillos con cabeza Phillips. Los tornillos se
deberían extender aproximadamente ½” (13mm) fuera
de la pared del freezer.
Tornillos de Montaje
10
Page 32

Instrucciones para la instalación
INSTRUCCIONES PARA LA INSTALACIÓN DE LA MÁQUINA DE HIELOS
6
MONTE LA MÁQUINA DE HIELOS
• Cuelgue la máquina de hielos sobre los dos tornillos de
montaje (10).
Mounting Screws
Asegúrese de que:
• El cable de la corriente todavía esté firmemente en el
enchufe.
• Los tornillos de montaje de la máquina de hielos se
encuentran en la posición más alta de las ranuras de
montaje.
• La máquina de hielos esté nivelada.
LUEGO APRIETE FIRMEMENTE LOS TORNILLOS DE
MONTAJE DE LA MÁQUINA DE HIELOS.
10
10
ADHIERA LA VÁLVULA DE AGUA
• Ubique el enchufe de conexión hembra. Enchufe el conector
hembra en las terminales macho de la válvula de agua. Se
puede usar cualquiera de los cables en cualquiera de las
terminales.
Conector
hembra
AJUSTE LA VÁLVULA DE AGUA
11
• Ajuste la válvula de agua (3) al gabinete colocando un
tornillo con cabeza Phillips (9) del kit en el agujero de la
pata del gabinete.
Terminales
macho
7
INSTALE LA CUBETA
DE HIELOS
Coloque la cubeta de hielos
(9) debajo de la máquina de
hielos.
Asegúrese de que el
interruptor de corriente de la
máquina de hielos esté en la
posición de OFF (apagado).
8
PEGUE LA ETIQUETA DE GARANTÍA
Se suministra una etiqueta (7) con este kit para registrar la
fecha de instalación para propósitos de la garantía. Colóquela
en la parte posterior del refrigerador.
9
RETIRE LA CUBIERTA
Retire la cubierta de acceso del compartimiento del
compresor. Esto requiere retirar los tornillos que unen la
cubierta a la parte posterior de la caja del refrigerador.
Asegúrese de guardar los tornillos ya que la cubierta de
acceso se debe reinstalar más adelante para asegurar que
su refrigerador funcione correctamente.
9
9
3
INSTALE EL PRECINTO DE LA TUBERÍA DE
12
ENTRADA
Retire un lado del papel del precinto del tubo de llenado
de agua, deslice el precinto por el tubo y anexe la parte
trasera del borde de la entrada del tubo de agua.
Tubo de
Entrada de
Agua
11
Junta
5
32
Page 33

Instrucciones para la instalación
INSTRUCCIONES PARA LA INSTALACIÓN DE LA MÁQUINA DE HIELOS
CÓMO INSTALAR EL SUMINISTRO DE AGUA
13
Asegúrese de que haya suficiente tubo plástico de agua,
de modo que se extienda desde la válvula de agua hasta
la entrada de la tubería de agua. Corte el sobrante de la
tubería.
Apriete los extremos de la abrazadera de la manguera del
kit con pinzas, y deslice la abrazadera sobre la entrada de
la tubería de agua.
Mientras aún esté apretando la abrazadera, inserte la
tubería plástica de agua en la entrada hasta donde sea
posible (aproximadamente 1” (25 mm). Luego deslice la
abrazadera en dirección descendente a fin de capturar
la tubería plástica de agua en su posición adecuada.
Asegúrese de que la tubería de llenado apunte hacia abajo.
Abrazadera de
la Manguera
13
CÓMO INSTALAR LA ABRAZADERA DEL
14
SUMINISTRO DE AGUA
Adhiera la tapa de la entrada de la tubería de agua y la
abrazadera de la tubería de agua al refrigerador. Coloque
el tornillo del kit a través de la marca fija en la parte trasera
del gabinete.
Tapa de la
Entrada de
la Tubería de
Agua
Cabeza Phillips
Tornillos
DIRIJA E INSTALE EL TUBO DEL AGUA
15
• Una el tubo plástico del agua a la parte posterior del
refrigerador con los sujetadores con adhesivo posterior
(4), separando los sujetadores como se muestra para
tensar el tubo.
15
Abrazadera de la
Tubería de Agua
14
6
Retire el refuerzo adhesivo del lado opuesto del precinto
del tubo de llenado de agua y deslice el tubo sobre el
agujero cerca de la parte superior, en la parte trasera
del refrigerador. Presione el mismo firmemente sobre la
entrada para que quede ajustado al refrigerador.
Nota: Antes del uso, verifique que la entrada de la tubería
de agua esté completamente apoyada en la taza de
llenado.
Tubería
de Llenado
Taza
de Llenado
11
12
Sujetador de la Tubería de Agua
4
16
VÁLVULA DEL AGUA INSTALADA
Una vez que la tubería de agua del hogar es conectada a la
válvula de agua y luego encendida, configure el interruptor
de energía en la posición ON (Encendido).
El ciclo de la máquina de hielos no iniciará sino hasta que
la máquina de hielos y el compartimiento del congelador
alcancen la temperatura de operación, luego la producción
del hielo empezará automáticamente.
17
GUARDE ESTE MANUAL
La garantía para la máquina de hielos está impresa en
este manual. Guarde este manual junto con el manual del
propietario de su refrigerador.
Ahora ha completado la instalación de la máquina de hielos
dentro del congelador. Continúe con la sección Ensamble de la
válvula del agua.
33
Page 34

Garantía de la máquina de hielos.
Todos los servicios de garantía los proporcionan nuestros Centros de
®
Reparación de Fábrica o nuestros técnicos Customer Care
autorizados. Para
concertar una cita de reparación, en línea, visíte nos al ge.com, o llame al
800.GE.CARES (800.432.2737). Cuando llame para solicitar servicio, por favor
tenga a mano el número de serie y el número de modelo.
Pegue aquí su recibo.
La prueba de compra original es
necesaria para obtener servicio
bajo la garantía.
Por el período de: Reemplazaremos:
Un año Cualquier parte de la máquina de hielos que falle debido a un defecto de materiales o de mano
A partir de la fecha de obra. Durante esta garantía limitada de un año, GE ofrecerá, sin costo, las partes de repuesto
compra original para cualquier parte defectuosa en el kit de máquina de hielos.
Qué no está cubierto (para clientes en los EE.UU.):
Visitas de servicio hasta su casa para enseñarle cómo usar el
producto.
Instalación inapropiada. Usted es responsable por suministrar la
instalación adecuada eléctrica y de plomería, incluyendo la tubería
hasta la máquina de hielos y la instalación de la tubería del agua.
Falla del producto si es abusado, mal utilizado o usado con un fin
diferente al propósito pretendido o usado comercialmente.
(;&/86,Ï1'(*$5$17Ë$6,03/Ë&,7$6³6X~QLFR \H[FOXVLYRGHUHFKR HVODUHSDUDFLyQGHO SURGXFWRWDO\
como se indica en esta Garantía limitada. Cualquier garantía implícita, incluyendo las garantías implícitas
de comerciabilidad o adecuación para un fin determinado, están limitadas a un año o el período de tiempo
más breve permitido por la ley.
La reposición de fusibles caseros o arreglo de cortocircuitos.
Daño al producto causado por accidente, incendio, inundación o
actos de la naturaleza.
Daños incidentales o consecuentes causados por posibles defectos
con este aparato.
Producto no accesible para facilitar el servicio requerido.
Esta garantía se extiende al comprador original y cualquier comprador posterior de productos comprados para uso residencial dentro de
Estados Unidos. Si el producto está situado en un área que no dispone de servicio por parte de un proveedor de servicio autorizado de
GE, podría tener que hacerse cargo de los costes de envío o bien podría solicitársele que lleve el producto a una centro de servicio de GE
autorizado para realizar la reparación. En Alaska, la garantía excluye el costo de envío o las visitas de servicio a su casa.
Algunos estados no permiten la exclusión o las limitaciones de daños incidentales o consecuenciales. Esta garantía da derechos legales
específicos, y usted podría tener otros derechos que variarán de estado a estado. Para saber cuáles son sus derechos legales, consulte a
la oficina de asuntos del consumidor local o la oficina del Attorney General en su localidad.
Garante: General Electric Company. Louisville, KY 40225
Qué no está cubierto (para clientes en Canadá):
Visitas de servicio hasta su casa para enseñarle cómo usar el
producto.
Lea su Manual del propietario. Si tiene cualquier pregunta sobre la
operación del producto, por favor contacte a su concesionario o a la
oficina de Relaciones del consumidor en:
Manager, Consumer Relations
Mabe Canada Inc.
1 Factory Lane, Suite 310
Moncton, N.B.
E1C 9M3
EL GARANTE NO ES RESPONSABLE POR DAÑOS CONSECUENTES.
Instalación inapropiada. Si tiene un problema con la instalación,
contacte al concesionario o al instalador. Usted es responsable
por suministrar la instalación adecuada eléctrica y de escape, y la
conexión.
La reposición de fusibles caseros o arreglo de cortocircuitos.
Falla del producto si es abusado, mal utilizado o usado con un fin
diferente al propósito pretendido o usado comercialmente.
Daño al producto causado por accidentes, incendios,
inundaciones o actos de la naturaleza.
GARANTE: MABE CANADA INC.
34
Page 35

Servicio al Consumidor.
Página Web de GE Appliances GEAppliances.com
¿Tiene una pregunta o necesita asistencia con su electrodoméstico? ¡Ensaye la página Web de GE 24 horas al día,
cualquier día del año! Para mayor conveniencia y un servicio más rápido, ahora puede descargar el Manual del
Propietario, solicitar partes o incluso programar un servicio en línea.
Programación de servicio GEAppliances.com
El servicio experto de reparaciones de GE está tan solo a un paso de distancia de su puerta. ¡Conéctese en línea y
programe el servicio a su conveniencia cualquier día del año! O llame al 800.GE.CARES (800.432.2737) durante horas
normales de atención.
Estudio de diseño de la vida real GEAppliances.com
GE apoya los conceptos, productos, servicios y ambientes de Diseño Universal que puedan usarse por personas
de todas las edades, tamaños y capacidades. Reconocemos la necesidad de diseñar para un amplio rango de
capacidades e impedimentos físicos y mentales. Para detalles de las aplicaciones del Diseño Universal de GE,
incluyendo las ideas de diseño de cocinas para personas con incapacidades, consulte nuestra página Web hoy
mismo. Para personas con deficiencia auditiva, por favor llame a 800.TDD.GEAC (800.833.4322).
Garantía ampliada GEAppliances.com
Compre una garantía ampliada de GE y conozca los descuentos especiales que están disponibles mientras su
garantía sigue vigente. Podrá comprarla en línea en cualquier momento, o llame al 800.626.2224 durante horas
normales de atención. El Servicio al Hogar para los Clientes de GE estará todavía disponible después del vencimiento
de su garantía.
Partes y accesorios GEApplianceparts.com
Individuos calificados para realizar servicios de mantenimiento a sus propios aparatos pueden solicitar partes
y accesorios para ser enviados a sus hogares (se aceptan las tarjetas VISA, MasterCard y Discover). Haga su
pedido en línea hoy mismo, 24 horas al día o por teléfono al 800.626.2002 durante horas normales de atención.
Las instrucciones contenidas en este manual cubren los procedimientos que debe seguir cualquier usuario. Otros
servicios se deberán referir por lo general a personal de servicio calificado. Se deberá tener precaución ya que un
servicio inapropiado puede causar una operación insegura.
Contáctenos GEAppliances.com
Si no está satisfecho con el servicio que recibe de GE, contáctenos en nuestra página Web con todos los detalles
incluyendo su número telefónico, o escríbanos a: : General Manager, Customer Relations
GE Appliances, Appliance Park
Louisville, KY 40225
Registre su electrodoméstico GEAppliances.com
£5HJLVWUH VX QXHYR HOHFWURGRPpVWLFR HQ OtQHD³FXDQGR XVWHG SUHILHUD El registrar su producto a tiempo le
proporcionará, si surgiera la necesidad, una mejor comunicación y un servicio más rápido bajo los términos de su
garantía. También puede enviar su tarjeta de registro pre-impresa que se incluye en el material de embalaje.
35
Page 36

Consumer Support.
GE Appliances Website In the U.S. GEAppliances.com
Have a question or need assistance with your appliance? Try the GE Appliances Website 24 hours a day, any day of
the year! For greater convenience and faster service, you can now download Owner’s Manuals, order parts or even
schedule service on-line. In Canada: www.GEAppliances.ca.
Schedule Service In the U.S. GEAppliances.com
Expert GE repair service is only one step away from your door. Get on-line and schedule your service at your
convenience 24 hours any day of the year! Or call 800.GE.CARES (800.432.2737) during normal business hours.
In Canada, call 800.561.3344.
Real Life Design Studio In the U.S. GEAppliances.com
*(VXSSRUWVWKH8QLYHUVDO'HVLJQFRQFHSW³SURGXFWVVHUYLFHVDQGHQYLURQPHQWVWKDWFDQEHXVHGE\SHRSOHRI
all ages, sizes and capabilities. We recognize the need to design for a wide range of physical and mental abilities
and impairments. For details of GE’s Universal Design applications, including kitchen design ideas for people with
disabilities, check out our Website today. For the hearing impaired, please call 800.561.3344.
In Canada contact: Director, Consumer Relations, Mabe Canada Inc.
Suite 310, 1 Factory Lane
Moncton, N.B. E1C 9MC
Extended Warranties In the U.S. GEAppliances.com
Purchase a GE extended warranty and learn about special discounts that are available while your warranty is still in
effect. You can purchase it on-line anytime, or call 800.626.2224 during normal business hours. GE Consumer Home
Services will still be there after your warranty expires. In Canada, please visit our Website or contact your local
extended warranty provider.
Parts and Accessories In the U.S. GEApplianceparts.com
Individuals qualified to service their own appliances can have parts or accessories sent directly to their homes (VISA,
MasterCard and Discover cards are accepted). Order on-line today, 24 hours every day or by phone at 800.626.2002
during normal business hours.
Instructions contained in this manual cover procedures to be performed by any user. Other servicing generally
VKRXOGEHUHIHUUHGWRTXDOLILHGVHUYLFHSHUVRQQHO&DXWLRQPXVWEHH[HUFLVHGVLQFHLPSURSHUVHUYLFLQJPD\
cause unsafe operation.
Customers in Canada should consult the yellow pages for the nearest GE parts distributor or call 800.661.1616.
Contact Us In the U.S. GEAppliances.com
If you are not satisfied with the service you receive from GE, contact us on our Website with all the details including
your phone number, or write to: General Manager, Customer Relations
GE Appliances, Appliance Park
Louisville, KY 40225
In Canada: GEAppliances.ca, or write: Director, Consumer Relations, Mabe Canada Inc.
Suite 310, 1 Factory Lane
Moncton, N.B. E1C 9MC
Register Your Appliance In the U.S. GEAppliances.com
5HJLVWHU\RXUQHZDSSOLDQFHRQOLQH³DW\RXUFRQYHQLHQFH Timely product registration will allow for enhanced
communication and prompt service under the terms of your warranty, should the need arise. You may also mail in
the pre-printed registration card included in the packing material. In Canada: www .GEAppliances.ca.
36
 Loading...