

Page 1
tinvertible Dishwasher
ModelHDB720
Keep this leaflet with
your Use and Care Book
S-iall Features
*
ENERGY SAVER DRY option pushbuttons let you saveelectrica~power by shuttingoff the
heater in the dry cycle when fast drying is not needed.
*
WASH CYCLES:
e 2 pushbuttonautomatic cyc!es—NORMAL SOIL and RINSE & HOLD.
~ SHORT WASH setting on control dial to save water.
*
SOUND INSULATED for quiet operation.
UfW!COUPLEFAUCET CONNECTOR makes it easy to hookup dishwasher to faucet with
oneeasy motion. Letsyou continueto usefaucet while dishwasher is operating.
SO~ FOOD DISPOSER-Load dirty disheswithout pre-rinsing . . . just tip off large or
hard scraps. The soft food disposer pulverizes soft food scraps and flushes them away.
AdditionalQualityIFmtures
TWO LEVEL WASH ACTION
CALROD@HEATING UNIT
WASH-WATERTEMPERATUREMAINTENANCE *
CYCLE-INDICATOR CONTROL
I
CUSHION-COATED
I
FULL-EXTENSIONRACKS
* Dimensions: Height 363A’:Width 24Y8’~
e Electrical requirements:
volts: 115
Amps: 15 amp circuit breaker or regular fuse.
Hertz: 60
Three-prong gr~’Jnding type receptacle ~ fi
is required.
Depth 24X” including handle.
Door swings out 24%”.
DIAL
T
+
n
n
~
w
e
AUTOMATICDUALDETERGENT
DISPENSER
WHITEPORCELAIN-ENAMELINTERIOR
e
AUTOMATICRETRACTINGSTABILIZERS
e
AUTOMATICWATER-LEVELCONTROL
. Total cycle time (normal cycle): 67 minutes
* Water consumption (normal cycle): 11.4 gallons
e Machine electrical energy (normal cycle): 0.73 Kwh.
e White porcelain enamel interior.
. Inlet water pressure required: 15 to 120 Ibs. per
square inch.
. Inlet water temperature recommended: 140° F.
e Underwriters’ Laboratories, Inc. listed.
~ Conversion Kit (Cat. No, WD35X5073) to convert
dishwasher to permanent installation is available
from your dealer or service organization
3g
37.S13V
Page 2
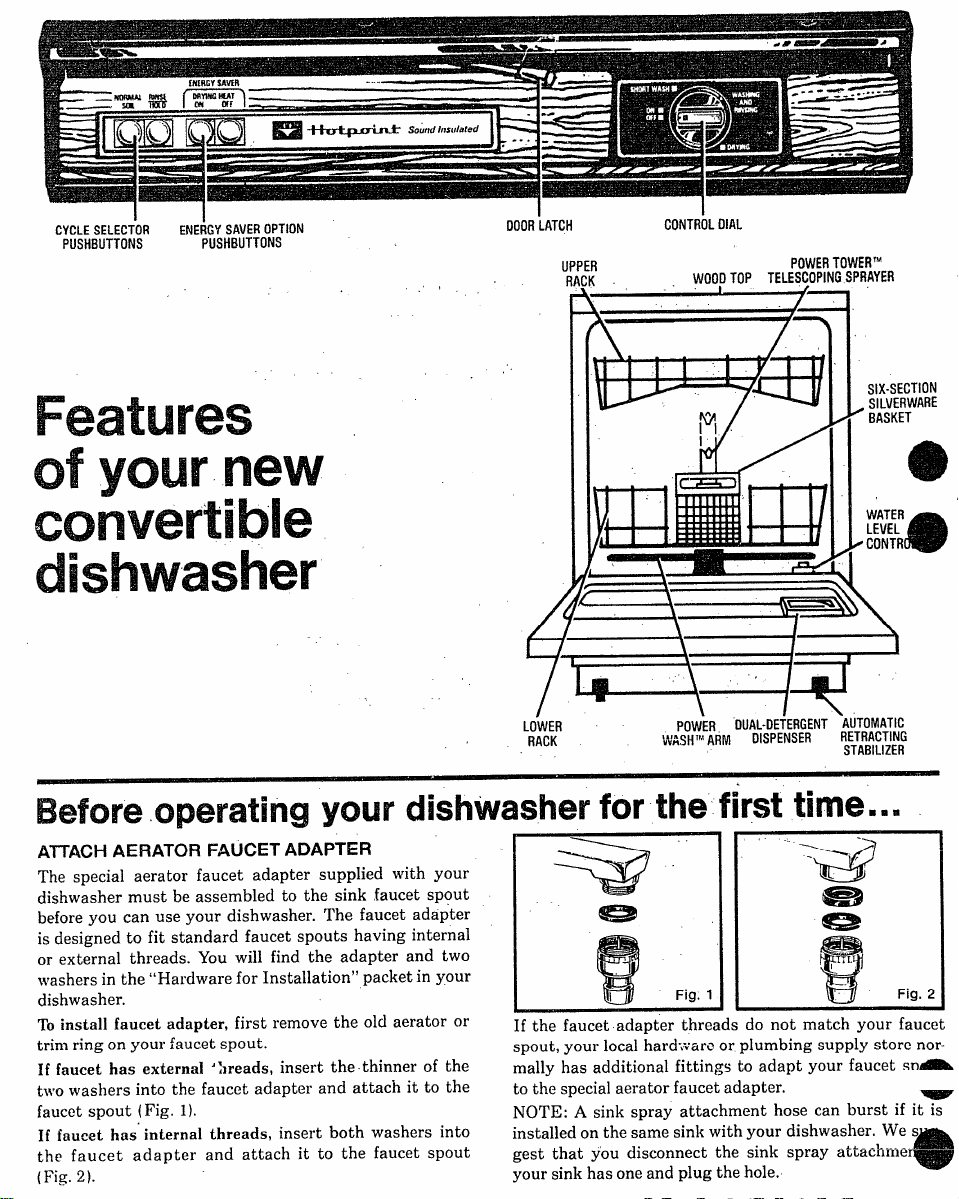
CYCLESELECT’OR
PUSHBUTTONS
ENE;GYSAVEROPTION
PUSHBUTTONS
Features
DOOR LATCH
UPPER
R~K
CONTROLDIAL
WOOD TOP TELESCOPING
POWERT(
#
ER ‘M
‘RAYER
of
convertible
yournew
WATER
LEVEL
● CONTR
dishwasher
\
LiWER POWiR DuAL-DEfERGENT‘AuToMATlc
RACK
WASH’’”ARM
DISPENSER
RETRACTING
STABILIZER
Beforeoperating your dishwasherfor the first time.. .
‘- \
AITACH AERATOR FAUCET ADAPTER
The special aerator faucet adapter supplied with your
dishwasher must be assembled to the sink faucet spout
before you can use your dishwasher. The faucet adapter
is designed to fit standard faucet spouts having internal
or external threads. You will find the adapter and two
~f,ashers in the “Hardware
dishwasher.
To install faucet adapter, first remove the old aerator or
trim ring on your faucet spout.
If faucet
two washers into the faucet adapter and attach it to the
faucet spout (Fig. 1).
If
the faucet adapter and attach it to the faucet spout
(Fig. 2).
has external ‘l]reads, insert the thinner of the
faucet has’ internal threads, insert both washers into
for Installation” packet in your
Q ““
1““
R
If the faucet adapter threads do not match your faucet
spout, your local hard-~are or plumbing supply store norreally has additional fittings to adapt your faucet sn~
to the special aerator faucet adapter.
NOTE: A sink spray attachment hose can burst if it is
installed on the same sink with your dishwasher. We s
gest that you disconnect the sink spray attachnier
your sink has one and plug the hole.
Fig.1
‘-
,’
‘d
m
p
TL
-.
H
o
a
4
Fig.2
Page 3

TooperateyouF dishwasher.,-
!.
PREPAREYOUR TABLEWARE, POTS &
Iq
PANS, AND LOAD DISHWASHER PROPEF?LY
See ycur Use & Care Bocik.
~ ADD DETERGENT
❑
Proper detergents are very important to achieve good
dishwashing resuits. Use only fresh detergents designed
for automatic dishwashers, Review the detergent section
of thc~Use and Care Book to become fully familiar with
detergent-loahing procedure.
3 CONNECT THE UNICOUPLE AND HOSES
a
Refer to your Use & Care Book.
PLUG IN POWER CORD
@
R PERSONAL SAFETY,
THIS APPLIANCE MUST BE
OPERLY GROUNDED.
e power cord of this appliance
is equipped with a three-prong
(grounding) plug which mates
with a standard three-prong (grounding) wall receptacle
to minimize the possibility of electrical shock hazard from
this appliance. The customer should have the wall receptacle and circuit checked by a qualified electrician to
make sure the receptacle is properly grounded.
IF DIFFERENT CONDITIONS ARE ENCOUNTERED, SEE YOUR USE &CARE BOOK.
If wall out~et is controlled by a switch, turn on switch.
‘“ ~ SELECT THE CYCLE
D
S NORhIAL SOIL
dishes. glasses and cookware with light to heavy soils.
-~ RINSE & HOLD cycle should be selected when you have
only a partial load and plan to wait until the dishwasher
is filled before washing. DO NOT USE DETERGENT IN
THE RINSE & HOLD CYCLE.
cycle is for most loads of everyday
~
,., ,
,.
..:.
NOTE: ,~.fter using the RINSE & HOLD cycle, ‘be sure
you select the desired wash cycl~ for the next lo;d’. ‘
@SHORT WASH cycle is for tableware that is mildly soiled
with “soilsthat have not dried on. NTormally,you’will not
require two detergent washes with this cycle,
@ ENERGY SAVER OPTION BUTTONS
DRYING HEAT ON– Depress this button and the drying
heater is energized to circulate heated air over the dishes
for fast drying.
DRYING HEAT OFF–Depress this button hd the drying
heater is disconnected to save electrical energy and allow --
the dishes to dry by their own heat over time. This option
is best used when the dishes are washed at night and can
remain in the dishwasher until the next morning. Natural
drying time will be reduced if you open the dishwasher
door after the cycle is complete..
Use of this option reduces the electrical energy used by
this model approximately 8Y0..” . ,’ ~ ,,
Estimated yearly savings, depending onyour local electric
rates, are as follows:’
Electric Rate (per Kwh)
Estimated Yearlv Savings $ 5.20 $ 8.32
STARTYOUR DISHWASHER
❑
Be
su’resink drain is open. ‘If your dishwasher’ drains into
a food waste disposer, run disposer until it is, completely
empty before starting dishwasher. ,
TO STARTDISHWASHER:.
0 For NORMAL SOIL or RINSE & HOLD cycles:
door and move door latch to the right to locked position.
Slowly turn control dial toward
the ON
hear the dishwasher start.
To obtain the benefits of a complete cycle, be careful that you do not turn the dial any
further than necessary to start the dishwasher.
@ For SHORT WASH cycle: Close door but do not latch
it. Slowly rotate dial clockwise to SHORT WASH
tion on dial, Then move door latch to the right to locked
position.
❑ position or until you
!.
,,!~ ;.. .“. :: ’’-,: ,. . -.
,.
$ .05 $ .08 $ .11
. .
,“
‘,’
$11.44
Close
❑ posi-
INTERRUPTING A CYCLE
– Aget
‘will cut off the washing action.
.6
a dish?
u>li door latch to the Ieft. Door safety interlock switch
Wait a few seconds for water action to subside, then
pen door.
o. Add dishes you may have forgotten ...or remove items.
4. Close door and push latch to right. Cycle will automat-
ically resume operation.
NOTE: Soiled dishes should not be added after the
main detergent wash portion of the cycle.
Interrupt the wash and, rinse periods as seldom as possible. Water temperature is reduced, decreasing washability, when door is opened on any dishwasher.
Page 4

Whathap~ns during thecycle...
~ Dishwasherwill complete cycle squence aubmatically
aridcontrol dial will advance to OFF position.
CYCLESEQUENGE Normal
(minutes–approx.) Soil
Wash/Rinse
Rinse
Rinse
MainDetergentWash
Rinse
Rinse
“Electric Dry
TotalTime
(approx.) 67
‘Ibis portion of the cycle is eliminated with Drying Heat Off.
: : :
3 –
18 –
; :
23 –
Rinnd& }t~~
1;
:
23
10 57
—.
@Occasional clicking sounds that occur are caused by:
0 soft food disposer mechanism shredding action.
*drain valve at start of pump out of wash and rinse
water.
e timer control as cycle progresses.
* detergent cup when it opens in the main wash.
~ The motor stops during the drying period.
~ Water vapor is released through the vent under the –
door handle during drying cycle. It maybe visible.
Todis-connectdishwasher... .
1. Remove the power cord plug from the receptacle.
2. firn off hot water.
3. Release water pressure by raising tabs on Unicouple
handle.
4. Release Unicouple by pushing movable thumb tab
down.
5. Shake excess water out of Unicouple and return it
its hoses to the storage compartment.
NOTE: When motor stops at end of final rinse, the U “
couple can be disconnected and returned to storage.
BEFOREYouCALLFORSERVICE..■
Check the TROUBLE-SHOOTING GUIDE in your USE AND CARE BOOK, It lists many minor causes of
problems that you can correct and may save you an unnecessary service call.
)
.
‘ .
HDB720
7-80
Part No. 218A3664P75
Pub. No. 39-5138
a
o
APPLIANCE PARK, LOUISVILLE, KENTUcKY40225
+
n-~
A QUALITY PROOUCT OF
+
GENERAL ELECTRIC COMPANY
 Loading...