

Page 1
REQUIRED TOOLS FOR INSTALLATION
■ Phillips screwdrivers
■ Pliers
■ Adjustable wrench
REQUIRED PARTS FOR INSTALLATION
• 3/8″ Tubing (Pex or Plastic)
• 2-3/8″ NPT Fittings
• Teflon Tape
®
• 2-3/8″ Nuts
• 2 Tube Inserts
• Sump Wrench - UCWRNCH
OPTIONAL KITS AND TOOLS FOR INSTALLATION
NOTE:
Sump wrench (UCWRNCH) and faucet (UNFCTBL)
are sold separately for model GX1S01R.
■ Drill and 1/4″ bit (saddle valve installation)
■ Drill and drill bit for 3/4″ hole (type as required)
if mounting hole is needed for faucet
■ Pipe cutter
■ File
CAUTION:To avoid damaging the sink, consult a
qualified plumber or installer for drilling procedures. Special
drill bits may be needed for porcelain or stainless steel.
This GX1S01R is Tested and
Certified by NSF international
against NSF/ANSI Standard 42
for materials and structural
integrity requirements and
against CSA B483.1.
1
49-50247-1 JR 10-08
GENERAL ELECTRIC COMPANY, Appliance Park, Louisville, KY 40225
SAFETY PRECAUTIONS
■
Check with your local public works department
for plumbing codes. You must follow these guidelines
as you install the Water Filtration system.
■ Use the Water Filtration system on a potable, safe-to-drink,
home COLD water supply only. The filter cartridge
will not purify the water or make it safe to drink.
■ DO NOT use on a hot water supply. Cold water supply only
(40-100° F)
.
■
Install or store where it will not be exposed to temperatures
below freezing or exposed to any
type of weather. Water
freezing in the system will damage it.
■
Your Water Filtration system will withstand up to 125 pounds
per square inch (psi) water pressure. If your house water
supply pressure is higher than 100 psi, install a pressure
reducing valve before installing the Water Filtration system.
WARNING: Do not use with water that
is microbiologically unsafe or of unknown quality
without adequate disinfection before or after the system.
Systems certified for cyst reduction may be used
on disinfected water that may contain filterable cysts.
Discard all unused and packaging material after installation.
Small parts remaining after installation could be a choke hazard.
Installation Water Filtration System
Instructions GX1S01R
COMPONENT
CUS
Page 2
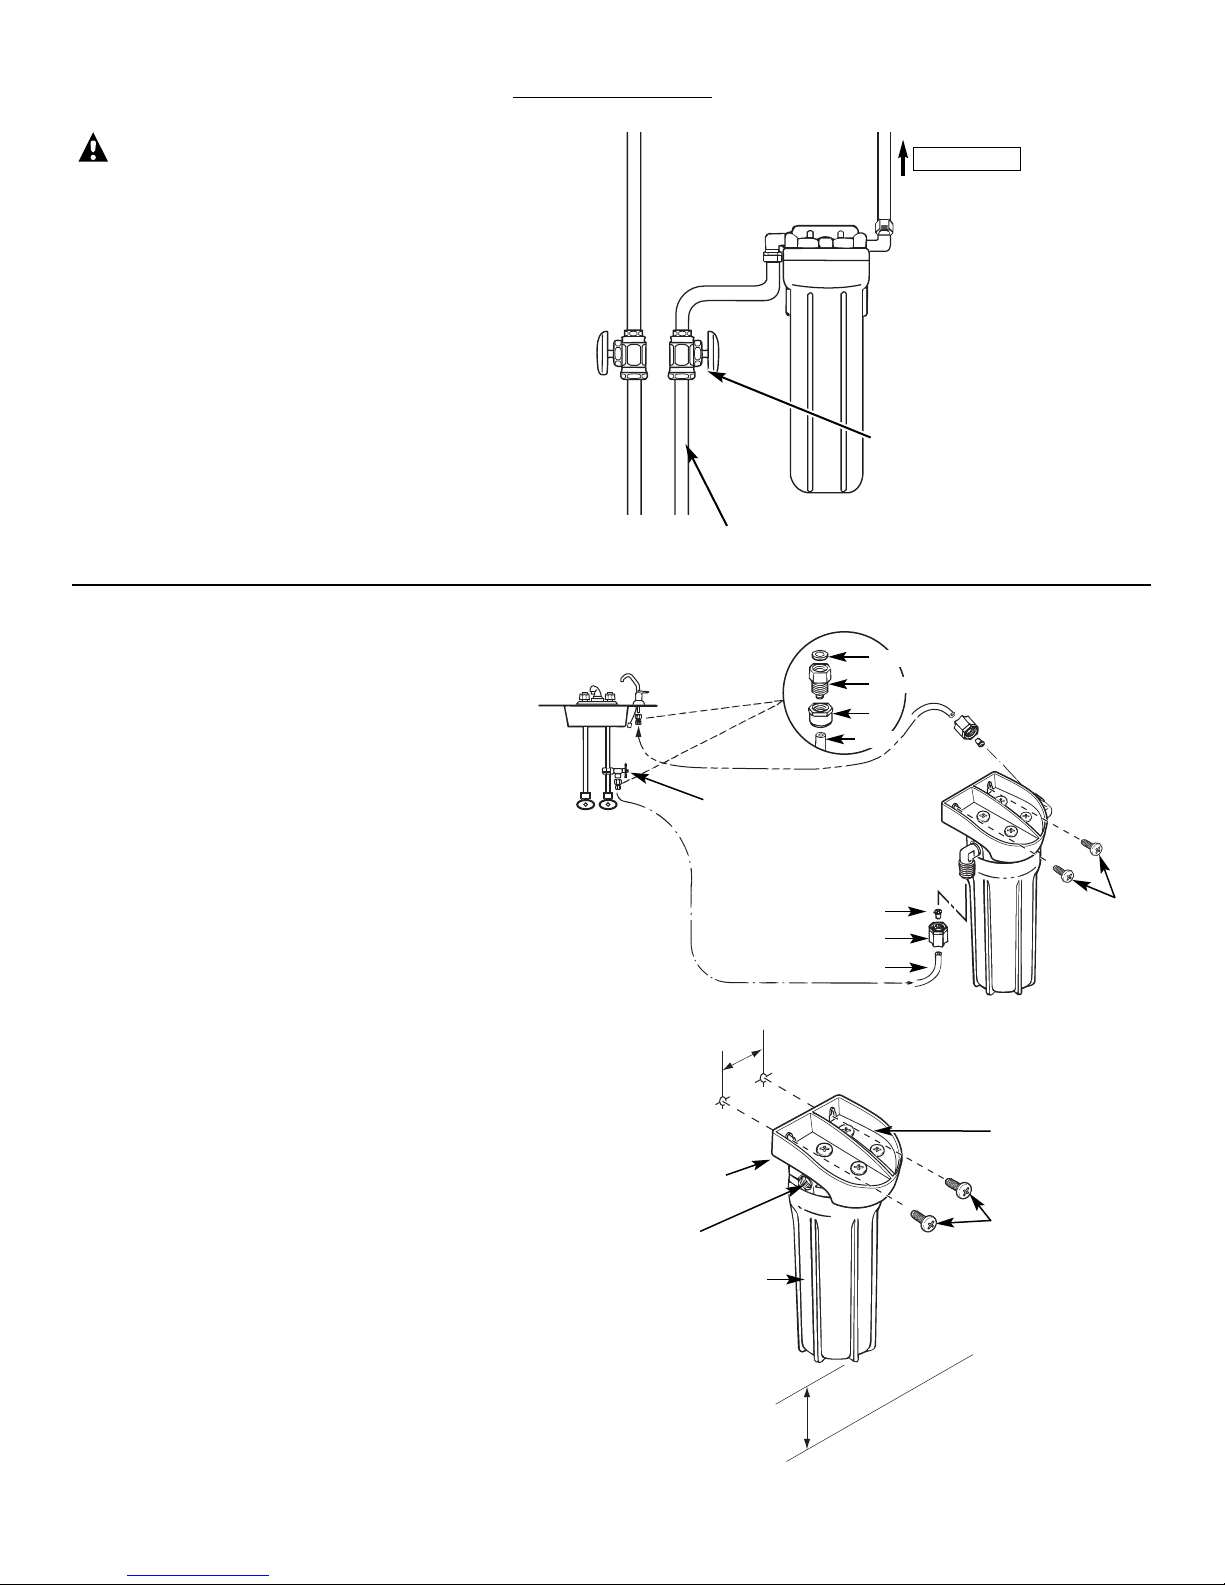
INSTALLATION OPTIONS
CAUTION:
For connection to cold water line only.
Option 1: For connection to primary sink faucet
NOTE: For use with filter element FXUTC ONLY.
Use of other filter elements could adversely affect
main faucet flow rate.
1. Shut off cold water supply.
2. Cut out a section of pipe.
3. Make connections as shown.
4. Fully open the cold water faucet.
5. Slowly turn on the cold water supply valve
and check for leaks.
6. Allow cold water to run until air is removed
from water.
Option 2: For connection to secondary filtered
water faucet
NOTE: For use with FXUTC or FXULC (rev. 2)
filter elements.
■ See Required Parts for Installation on page 1.
■ Faucet – UCFCTBL or UCFCTWW
■ Sump Wrench – UCWRNCH
1. Shut off cold water supply.
2. Make connections as shown.
3. Fully open cold water faucet.
4. Slowly turn on cold water supply valve
and check for leaks.
5. Allow cold water to run until air is removed
from water.
NOTE: Sump wrench (UCWRNCH) and faucet (UNFCTBL)
are sold separately for model GX1S01R.
Mounting bracket to wall
The bracket can be used as a template for marking
the location of the mounting screws. When determining
the location of the bracket make sure you leave 11⁄2″
to 2″ of free area under the sump to allow for sump
removal and enough space on either side to make
the tubing connections.
NOTE: Predrill 1/4″ holes in wall for easy installation.
Filtered
water faucet
Sink
Hot
Cold
Water Supply
Saddle Valve
Washer
Adapter
Nut
Water in
Water out
Tubing
Insert
Mounting
screw (2)
Nut
Tubing
Mounting
screws
Mounting
bracket
Sump
23/4″
1
1
⁄2″ to 2″
Cold water line
Water supply
valve
Inlet
Outlet
2
To main faucet
Page 3
3
FLUSH PROCEDURE
Whenever water of unknown quality is passed through
the GE Water Filtration system, filter elements should
be discarded and the filtration system flushed.
Circumstances that may require flushing the system are:
■ Boil-water advisory.
■ Flooding of the GE Water Filtration system.
■ Long-term nonuse.
The procedure for flushing the GE Water Filtration system is:
See Filter Cartridge Installation or Replacement section
and follow steps 1, 2, 3 and 4.
Next, reinstall the sump (without the filter element),
turn water on and flush water through the faucet.
Then, turn water off, remove sump, empty water out of sump
and install new filter element.
Follow steps 5-10 in the Filter Cartridge Installation
or Replacement section to complete.
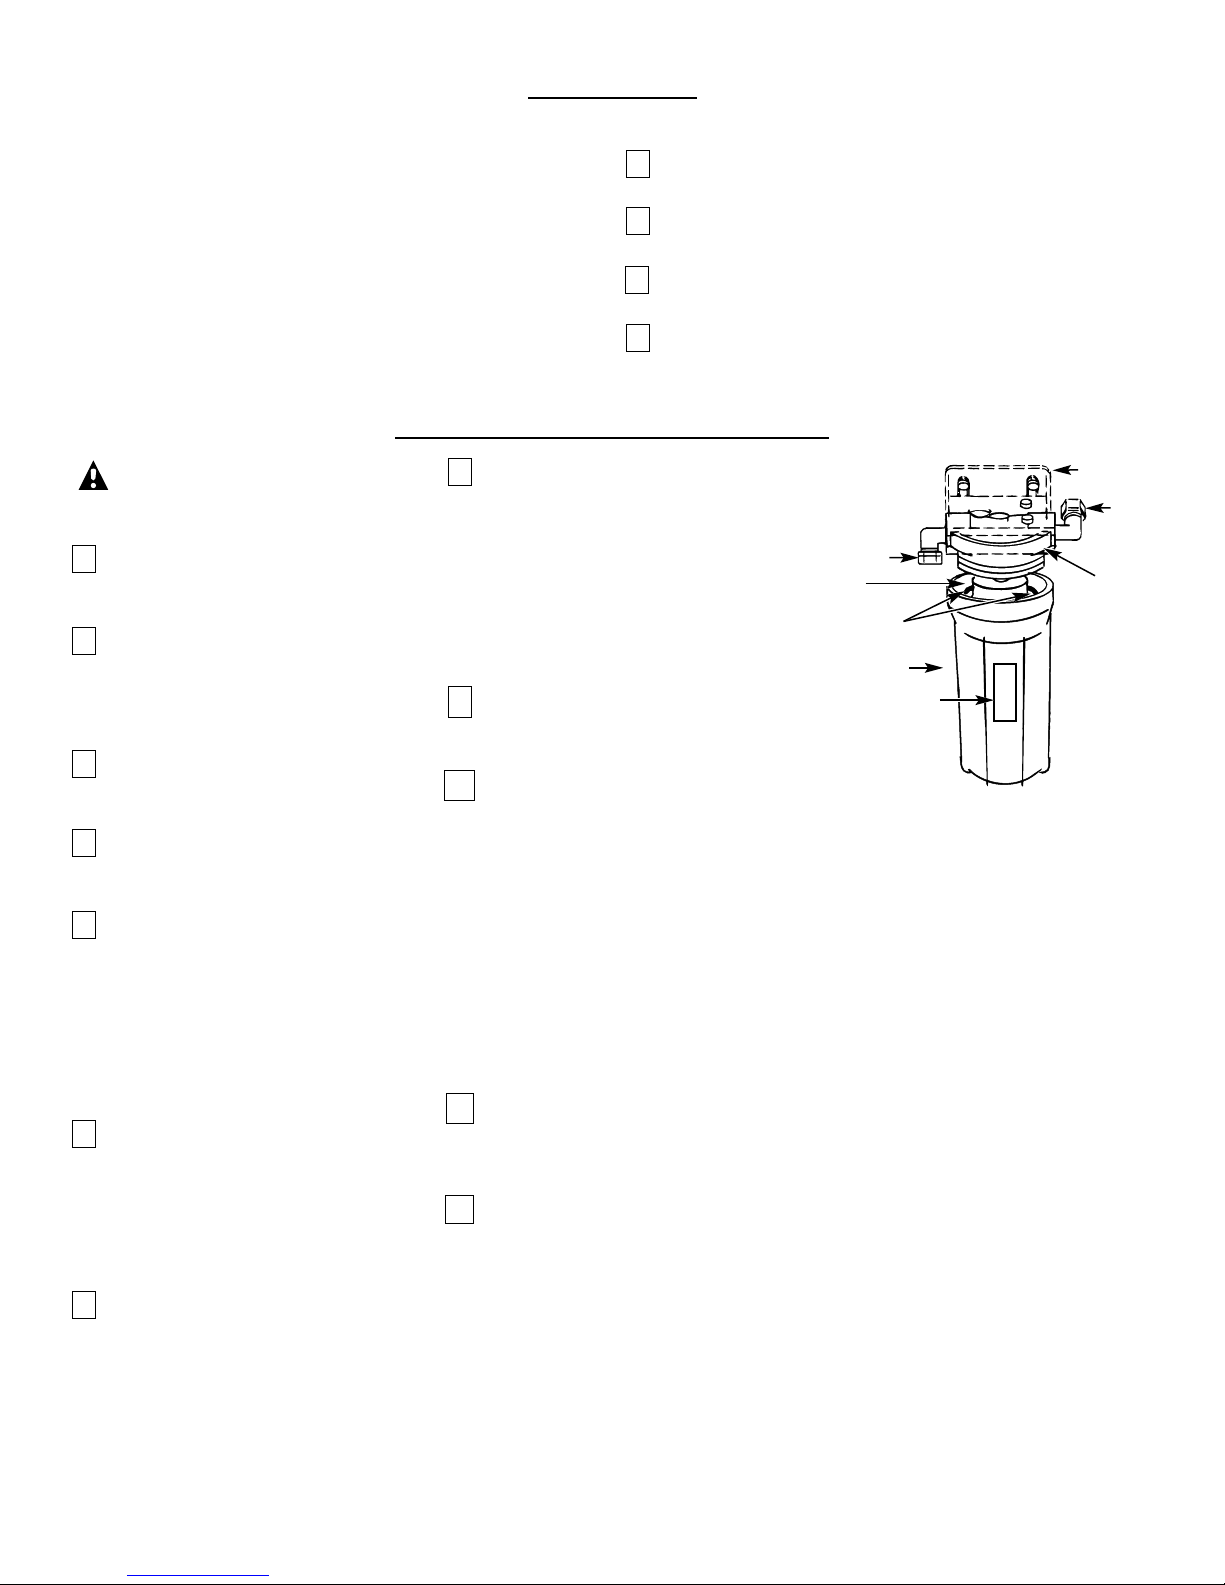
FILTER CARTRIDGE INSTALLATION OR REPLACEMENT
CAUTION: Never remove
the sumps when water pressure is
in the Water Filtration system.
Close the water supply/saddle valve
to the filter. Open the filtered water
faucet.
Remove the sump, using the sump
wrench tool (not included), from the filter
head by rotating the sump. Be careful,
the sump may be full of water. Be sure
to keep the large o-ring seal.
If you are replacing a filter cartridge,
remove and discard the used filter
cartridge.
Be sure the inside of the sump is clean.
Thoroughly wash the inside of the sump
with hot, soapy water and rinse.
Remove the wrapper from the new filter
cartridge and insert the filter cartridge
in the sump.
Some cartridges fit either
way, while others fit only one way.
Observe markings on the cartridge.
NOTE: The Water Filtration system
uses different types of filter cartridges.
Be sure to install them correctly.
Lightly lubricate the o-ring seal
in the sump with clean food grade
silicone grease (silicone grease
is available through GE Parts
and Service: 1.800.626.2002, Part
number WS60X10005). Be sure it is fully
seated in its groove.
Hold the sump up to the filter head,
aligning the center hole in the cartridge
with the protrusion on the bottom
of the head. Failure to obtain proper
alignment may cause damage
to the filter and/or filtration system
which will degrade filter performance.
Being careful not to cross-thread, rotate
the sump onto the filter head
and tighten securely by hand.
NOTE: If the sump will not tighten
up to the head or if you feel resistance,
you may have the cartridge in upside
down or misaligned. Take the cartridge
out and check for correct orientation
and reassemble.
Turn on the filtered water faucet. Then,
slowly open the water supply/saddle
valve and allow the filter housing to fill.
Close the filtered water faucet. Then,
check for leaks between the sump
and the head.
NOTE: If leaking, turn off the water
supply and turn on the filtered
water
faucet. Disassemble the filter housing
and check the o-ring for cuts, flat spots,
etc., and sealing surfaces for foreign
material. Clean the o-ring and lightly
lubricate with clean silicone grease.
Carefully press into the groove
in the sump. Reassemble and check
for leaks.
The filter cartridges contain activated
carbon. When new, turn on the filtered
water faucet for five minutes to flush
the system.
Place filter change label on sump, inside
cabinet door, or in another convenient
location. Write in date of filter change
for future reference. Filters should
be changed every six months.
O-ring seal
Cartridge
Sump I
Label
Head
OUTLET
INLET
Bracket
1
2
3
4
5
6
7
8
9
10
11
12
1
2
3
4
Cartridge
Page 4
GE WATER FILTRATION SYSTEM WARRANTY
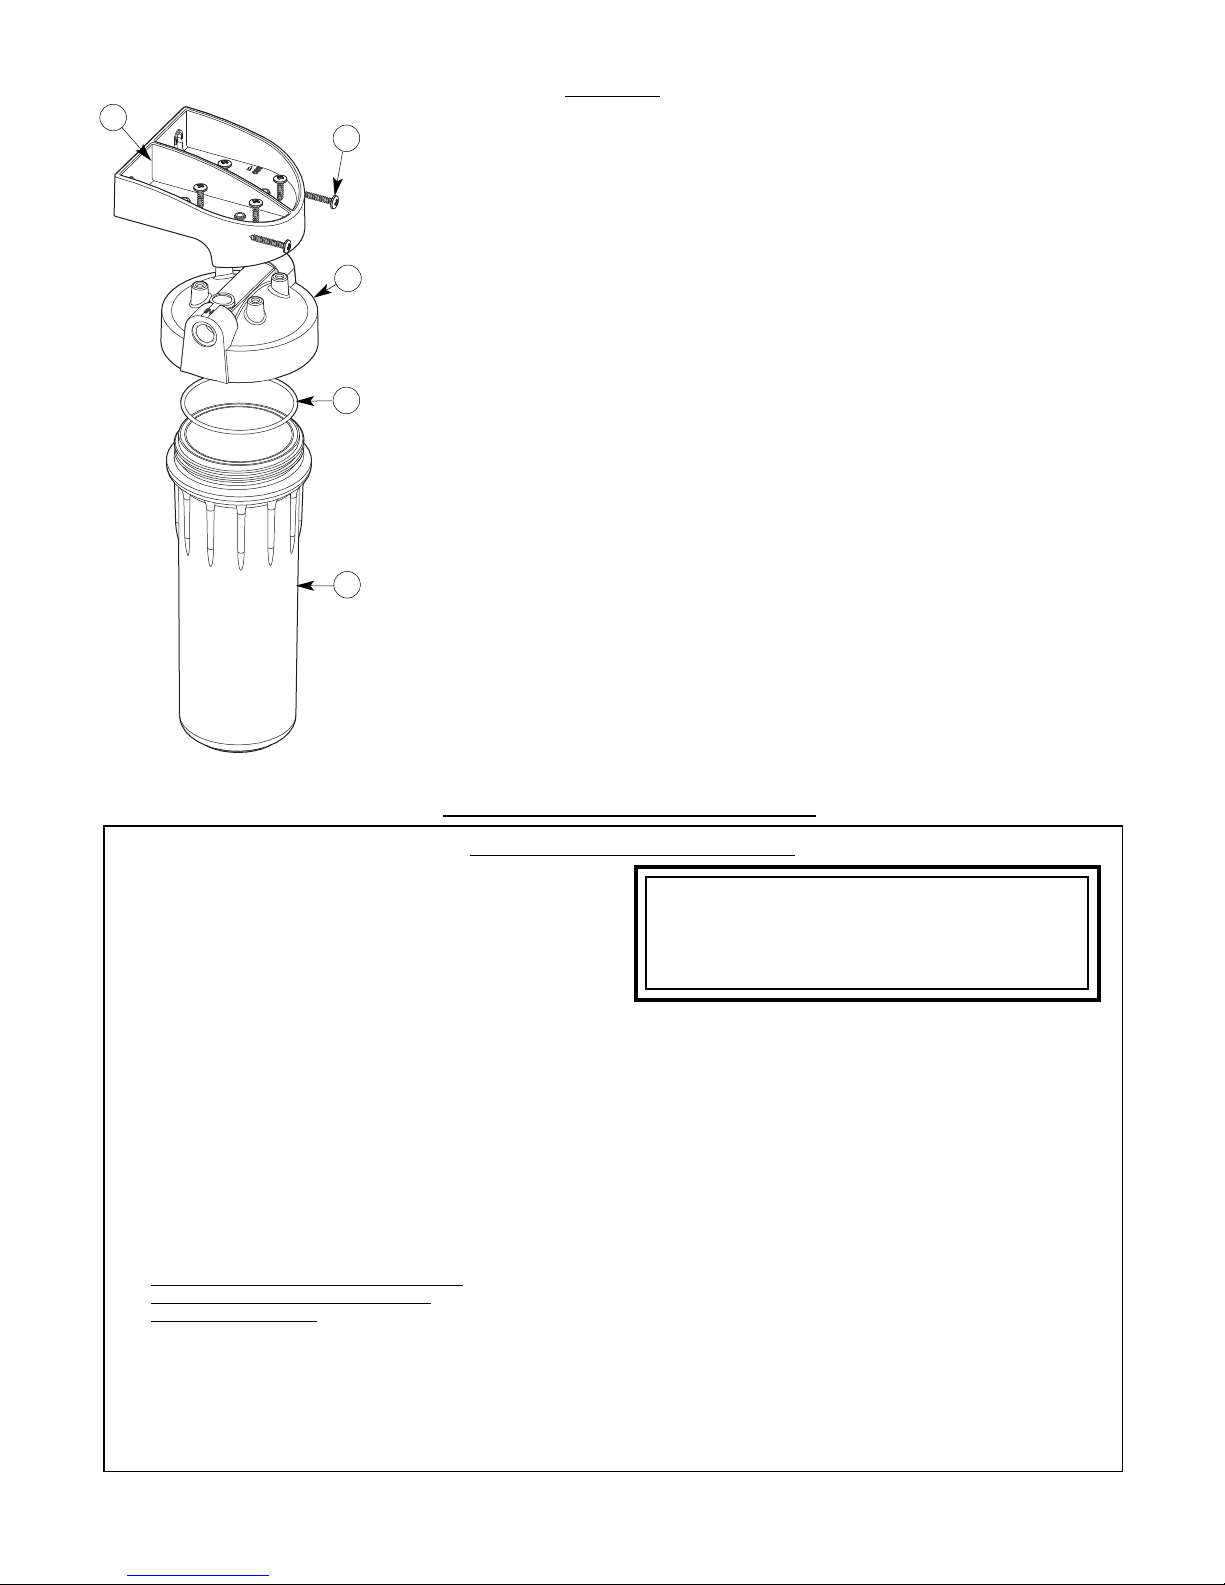
PARTS LIST
REF. NO. PART NO. PART DESCRIPTION
1 WS28X10063 MOUNTING BRACKET 1
2 WS31X10026 HOUSING HEAD 1
3 WS03X10038 O-RING, SUMP HOUSING 1
4 WS20X10007 SUMP HOUSING 1
5 WS02X10057 MOUNTING SCREWS 2
General Electric Parts Catalog
*NOTE: Codes in the state of Massachusetts require installation by
a licensed plumber and do not permit the use of the saddle valve.
For installation, use plumbing code 248-CMR of the Commonwealth
of Massachusetts.
To obtain replacement parts or optional tools, call toll-free 800.626.2002 (US),
800.663.6060 (Canada-English), 800.361.3869 (Canada-French).
4
LIMITED ONE-YEAR WARRANTY
• What does this warranty cover?
— Any defect in materials or workmanship in the manufactured
product.
• What does this warranty not cover?
— Filter Cartridges.
— Service trips to your home to teach you how to use the product.
— Improper installation, delivery or maintenance.
— Failure of the product if it is abused, misused, altered or used
for other than the intended purpose.
— Defects that result from improper installation or damage
not caused by GE.
— Liability on the part of GE under this or any other warranty
for any indirect or consequential damage.
— Products that are used for commercial or industrial applications.
— Use of this product where water is microbiologically unsafe
or of unknown quality, without adequate disinfection before
or after the system. Systems certified for cyst reduction may
be used on disinfected water that may contain filterable cysts.
— Damage to the product caused by accident, fire, floods or acts
of God.
— Incidental or consequential damage caused
by possible defects with this appliance,
its installation or repair.
• For how long after the original purchase?
— One year.
• How do I make a warranty claim?
— Return to the retailer from which it was purchased, along
with a copy of the “Proof of Purchase.” A new or reconditioned
unit will be provided. This warranty excludes the cost of shipping
the product to your home.
This warranty is extended to the original purchaser
and any succeeding owner for products purchased for home
or office use within the USA. In Alaska, the warranty excludes
the cost of shipping or service to your home or office.
Some states do not allow the exclusion or limitation of incidental
or consequential damages. This warranty gives you specific legal
rights, and you may also have other rights, which vary from state
to state. To know what your legal rights are, consult your local
or state consumer affairs office or your state’s Attorney General.
Contact us at ge.com, or call toll-free at 800.952.5039 in the U.S.,
or 866.777.7627 in Canada.
EXCLUSION OF IMPLIED WARRANTIES—Your sole and exclusive
remedy is product exchange as provided in this Limited Warranty.
Any implied warranties, including the implied warranties
of merchantability or fitness for a particular purpose, are limited
to one year or the shortest period allowed by law.
1
2
3
4
5
Page 5

OUTILLAGE NÉCESSAIRE POUR L’INSTALLATION
■ Tournevis Phillips
■ Pince
■ Clé réglable
PIECES REQUISES POUR L’INSTALLATION
• Tube 3/8 po (Pex ou Plastique)
• Accessoires de tuyauterie 2-3/8 po NPT
• Ruban Téflon
®
• Écrous 2-3/8 po
• 2 Inserts de tube
• Clé pour corps de filtre – UCWRNCH
PIÈCES ET OUTILS OPTIONNELS POUR L’INSTALLATION
NOTE :
Les produits suivants sont vendus séparément pour
le modèle GX1S01R : clé pour corps de filtre (UCWRNCH)
et robinet (UNFCTBL).
■ Perceuse et foret 1/4po (pour l’installation du robinet
de prise en charge)
■ Perceuse et foret pour trou de 3/4 po (type approprié)
pour trou de montage d’un robinet.
■ Coupe-tube
■ Lime
MISE EN GARDE :
Pour éviter
d’endommager l’évier, consulter un installateur ou
plombier qualifié au sujet de la méthode de perçage;
l’emploi d’un foret spécial peut être nécessaire pour
le perçage sur acier inoxydable
ou matériau émaillé.
Le GX1S01R a été testé et
homologué par NSF International
selon la norme ANSI/NSF 42
relative à la sécurité matérielle
et l'intégrité structurale et selon
CSA B483.1.
1
49-50247-1 JR 10-08
GENERAL ELECTRIC COMPANY, Appliance Park, Louisville, KY 40225
MESURES DE SÉCURITÉ
■
Consulter le service municipal de distribution d’eau au sujet
des codes de plomberie applicables. L’installation
du système de filtration d’eau doit être conforme aux
prescriptions du code.
■ Utiliser le système de filtration d’eau uniquement sur une
canalisation d’eau potable FROIDE. La cartouche de filtration
ne purifie pas l’eau et ne peut pas rendre potable l’eau qui ne
l’est pas.
■ NE PAS utiliser ce produit sur une canalisation d’eau chaude.
Alimentation en eau froide seulement (40-100° F/4,4-38° C).
■
Protéger le produit contre le gel et les intempéries
(emplacement d’installation approprié). La congélation d’eau
dans le produit l’endommagerait.
■
Le système de filtration d’eau peut résister à une pression
maximale de 125 lb/po2. Si la pression de distribution locale
est supérieure à 100 lb/po2, installer un robinet
de réduction de pression en amont du système de
filtration d’eau.
AVERTISSEMENT
:
Ne pas utiliser ce produit
avec de l’eau microbiologiquement polluée ou de qualité
inconnue sans avoir installé un dispositif de désinfection
approprié avant ou après le système.
Les systèmes
homologués pour la retenue des spores peuvent être
utilisés pour la filtration d’une eau désinfectée qui peut
contenir des spores filtrables.
Éliminer après l’installation tous les matériaux d’emballage
et matériaux non utilisés; les petites pièces qui ne sont pas
utilisées pourraient susciter un danger d’étouffement pour
un enfant.
Consignes Système de filtration d’eau
d’installation GX1S01R
COMPONENT
CUS
Page 6

OPTIONS POUR L’INSTALLATION
MISE EN GARDE :
Installer ce produit uniquement sur une canalisation
d
’
eau froide.
Option 1: Raccordement sur canalisation du robinet
principal de l’évier
NOTE : Pour utilisation UNIQUEMENT avec l’élément
de filtration FXUTC. L’emploi d’un autre élément de
filtration pourrait réduire le débit du robinet principal.
1. Fermer l’arrivée d’eau froide.
2. Coupez une section de tuyau.
3. Exécuter les raccordements selon l’illustration.
4. Ouvrir complètement le robinet d'eau froide.
5. Ouvrir lentement l’arrivée d’eau froide et s’assurer
qu’il n’y a pas de fuite.
6. Laisser couler l’eau froide jusqu’à ce que l’air soit
éliminé de l’eau.
Option 2: Raccordement sur canalisation du robinet
secondaire d’eau filtrée
NOTE : Pour utilisation avec les éléments de filtration
FXUTC ou FXULC (rév. 2).
■ Se référer à la page 1 pour les pièces requises pour
l’installation.
■ Robinet – UCFCTBL ou UCFCTWW
■ Clé pour corps de filtre – UCWRNCH
1. Fermer l’arrivée d’eau froide.
2. Exécuter les raccordements selon l’illustration.
3. Ouvrir complètement le robinet d'eau froide.
4. Ouvrir lentement l’arrivée d’eau froide et s’assurer
qu’il n’y a pas de fuite.
5. Laisser couler l’eau froide jusqu’à ce que l’air soit
éliminé de l’eau.
NOTE : Pour le modèle GX1S01R,
la clé pour corps de filtre (UCWRNCH)
et le robinet (UNFCTBL) sont vendus séparément.
Fixation de la bride de montage sur un placard
On peut utiliser la bride de montage comme un gabarit
pour marquer l’emplacement des vis de montage. Lors
du choix de l’emplacement de fixation de la bride, veiller
à disposer d’un espace libre de 11⁄2 po à 2 po au-dessous
de corps de filtre pour permettre l’extraction, et d’un
espace suffisant des deux côtés pour le raccordement
des canalisations.
NOTE : Percer à l’avance des trous de 1/4 po dans le mur
pour une installation facilitée.
Robinet
d’eau filtrée
Évier
Eau
chaude
Eau
froide
Robinet-vanne à étrier
pour l’arrivée d’eau
Joint
Raccord d’adaptation
Écrou
Arrivée
d’eau
Sortie
d’eau
Tub e
Virole insérée
2 vis de
montage
Écrou
Tub e
Vis de
montage
Bride du
montage
Corps
de filtre
23/4 po
1
1
⁄2 po
à 2 po
Canalisation d’eau froide
Robinet d’arrêt
Entrée
d’eau
Sortie d’eau
2
Vers le robinet
principal
Page 7

3
MÉTHODE DE PURGE
Chaque fois que le système de filtration GE est exposé à de l’eau
de qualité inconnue, on devrait jeter les éléments de filtration
et rincer le circuit.
Circonstances qui peuvent nécessiter un rinçage du circuit :
■ Notification de la nécessité de faire bouillir l’eau.
■ Inondation du système de filtration d’eau GE.
■ Inutilisation prolongée.
Méthode de rinçage du système de filtration GE :
Voir la section Cartouche de filtration – Installation
ou remplacement; exécuter les étapes 1, 2, 3 et 4.
Réinstaller le corps de filtre (sans l’élément de filtration) faire
circuler l’eau et laisser l’eau s’écouler par le robinet.
Fermer l’arrivée d’eau; enlever le corps de filtre; vider toute
l’eau du corps de filtre, puis installer l’élément de filtration
neuf.
Pour terminer le processus, voir la section Cartouche
de filtration – Installation ou remplacement; exécuter
les étapes 5 à 10.
CARTOUCHE DE FILTRATION – INSTALLATION OU REMPLACEMENT
MISE EN GARDE :
Ne jamais enlever le corps de filtre
lorsque le système de filtration est
sous pression.
Fermer le robinet d’arrêt de la
canalisation qui alimente le filtre.
Ouvrir le robinet d’eau filtrée.
Enlever le corps de filtre (utiliser la clé
spéciale non fournie). Faire tourner le corps
de filtre selon. Travailler prudemment –
le corps de filtre peut être plein d’eau. Veiller
à conserver le grand joint torique.
Pour le remplacement de la cartouche de
filtration, enlever et jeter la cartouche usée.
Vérifier la propreté de l’intérieur du corps
de filtre. Laver parfaitement l’intérieur
du corps de filtre avec de l’eau chaude
savonneuse, puis rincer.
Retirer la cartouche de filtration neuve
de son emballage; insérer la cartouche
dans le corps de filtre. Il peut être
nécessaire de respecter une orientation
particulière; ceci est alors indiqué par
des marques apposées sur la cartouche.
NOTE : Diverses cartouches de filtration
sont utilisables avec le système
de filtration d’eau. Veiller à installer chaque
type de cartouche correctement.
Lubrifier légèrement le joint torique
du corps du filtre avec une graisse aux
silicones de qualité alimentaire (graisse
aux silicones – n°
WS60X10005
) disponible
auprès de GE – pièces et service – tél.
1.800.626.2002). Veiller à ce que le joint soit
parfaitement en place dans la rainure.
Tenir le corps de filtre sous la tête
de montage; aligner le trou central
de la cartouche avec la pièce en saillie
sous la tête. Un défaut d’alignement
pourrait faire subir des dommages
au filtre et/ou au système de filtration,
ce qui en dégraderait la performance.
Visser le corps de filtre sur la tête
de montage – veiller à ne pas détériorer
le filetage; bien serrer à la main.
NOTE: Si on perçoit une résistance ou
si le corps de filtre ne se visse pas bien,
c’est peut-être parce que la cartouche
de filtration n’est pas correctement
alignée, ou est incorrectement orientée.
Retirer la cartouche et veiller à l’orienter
correctement avant de visser le corps
de filtre.
Ouvrir le robinet d’eau filtrée. Ouvrir
ensuite lentement le robinet d’arrêt sur
la canalisation, et laisser le corps de filtre
se remplir d’eau.
Fermer le robinet d’eau filtrée. Rechercher
ensuite d’éventuelles fuites entre le corps
de filtre et la tête de montage.
NOTE : S’il y a une fuite, fermer l’arrivée
d’eau et ouvrir le robinet d’eau filtrée.
Démonter le corps du filtre; rechercher
d’éventuelles détériorations du joint torique
(coupure, zone d’écrasement, etc.) ou la
présence de matières étrangères sur les
surfaces d’étanchéité. Nettoyer le joint
torique; lubrifier légèrement le joint avec
de la graisse aux silicones propre. Veiller
à bien placer le joint dans la rainure du
corps de filtre. Visser le corps de filtre;
puis inspecter pour rechercher des fuites.
Les cartouches de filtration contiennent
du charbon actif. Laisser initialement
le robinet d’eau filtrée ouvert pendant cinq
minutes pour rincer le système.
Inscrire la date de changement du filtre sur
l’étiquette, et placer l’étiquette sur le corps
du filtre, à l’intérieur de la porte du placard,
ou en un autre endroit pratique. On devrait
changer les filtres à intervalles de six mois.
Joint torique
Cartouche
de filtration
Corps de filtre I
Étiquette
Tête
SORTIE
D’EAU
ENTRÉE
D’EAU
Bride de
fixation
1
2
3
4
5
6
7
8
9
10
11
12
1
2
3
4
Page 8

SYSTÈME DE FILTRATION D’EAU GE – GARANTIE
LISTE DES COMPOSANTS
Catalogue des pièces General Electric
*NOTE : Dans l’État du Massachusetts, les codes en vigueur exigent que cet
équipement soit installé par un plombier licencié, et que le raccordement
à la canalisation d’alimentation ne soit pas effectué par un robinet de prise
en charge. Avant l’installation, consulter le code de plomberie 248-CMR
du Commonwealth of Massachusetts..
Pour obtenir des pièces de rechange ou des outils facultatif, appelez sans frais
au (800) 626-2002 (États-Unis), au 800.663.6060 (Canada-Anglais),
au 800.361.3869 (Canada-Français).
4
GARANTIE LIMITÉE D’UN AN
• Que couvre la garantie?
— Tout défaut de matériel ou de main d’oeuvre du produit.
• Q’est-ce qui n’est pas couvert par la garantie?
— Les cartouches de filtre.
— Les déplacements à votre domicile pour vous enseigner comment
utiliser le produit.
— Une installation incorrecte.
— Une panne du produit causée par un abus d’utilisation, une mauvaise
utilisation, toute modification ou une utilisation du produit dans un
but non prévu.
— Défauts entraînés par une installation incorrecte ou tout dommage
non imputable à GE.
— Responsabilité de GE couvert par cette garantie ou toute autre
garantie couvrant tout dommage indirect.
— Produits utilisés pour des applications industrielles ou commerciales.
— Utilisation de ce produit lorsque l’eau est microbiologiquement impure
ou de qualité inconnue sans qu’une désinfection adéquate n’ait eu lieu
avant l’entrée et sortie dans le circuit. Les systèmes homologués pour
une réduction des microbes peuvent être utilisés après désinfection de
l’eau pouvant contenir des microbes filtrables.
— Tout dommage causé au produit par accident, incendie, inondation
ou acte de Dieu.
— Tout dommage fortuit ou indirect causé par des défauts éventuels
de cet appareil, son installation ou les réparations effectuées.
• Quelle est la durée de la garantie après l’achat?
— Un an.
• Comment dois-je faire ma réclamation?
— Ramenez le produit au magasin où vous l’avez acheté avec une
exemplaire de la “Preuve d’achat”. Cette garantie exclut les coûts
d’expédition ou les déplacements de service à votre domicile.
Cette garantie est étendue à l’acheteur d’origine et aux propriétaires
suivants pour tout produit acheté pour une utilisation domestique
ou au bureau aux Etats-Unis. En Alaska, cette garantie exclut le coût
d’expédition ou de dépannage à votre domicile ou votre bureau.
Certains états n’acceptent pas d’exclusion ou de limites aux
dommages indirects consécutifs. Cette garantie vous donne des
droits juridiques précis. Certains autres droits peuvent varier d'un
état à l'autre. Pour connaître vos droits juridiques, veuillez consulter
le bureau local ou le bureau d'état des affaires aux consommateurs
ou le Procureur Général de votre état.
Contactez nous sur www.ge.com ou appelez sans frais
le 800.952.5039 (USA) ou le 866.777.7627 (Canada).
EXCLUSION DES GARANTIES TACITES —Votre recours exclusif est
l’échange du produit suivant les modalités de la Garantie Limitée.
Toutes garanties tacites, y compris les garanties de valeurs
marchandes ou d’adéquation à des fins particulières, sont limitées
à une durée d’un an ou à la durée la plus courte autorisée par la loi.
1
2
3
4
5
NoDE RÉF. NoDE PCE DESCRIPTION
1 WS28X10063 SUPPORT 1
2 WS31X10026 TETE DE LOGEMENT 1
3 WS03X10038 JOINT CIRCULAIRE,
LOGEMENT DE CARTER DE VIDANGE 1
4 WS20X10007 LOGEMENT DE CARTER DE VIDANGE 1
5 WS02X10057 VIS DE SUPPORT 2
Page 9

HERRAMIENTAS REQUERIDAS
PARA LA INSTALACION
■ Destornilladores Phillips
■ Alicates
■ Llave ajustable
PIEZAS REQUERIDAS PARA LA INSTALACION
• Tubería de 3/8″ (polietileno o plástico)
• 2 Accesorios NPT de 3/8″
• Cinta Teflon
®
• 2 Tuercas de 3/8″
• 2 Insertos de tubería
• Llave para sumidero - UCWRNCH
JUEGOS Y HERRAMIENTAS OPCIONALES
PARA LA INSTALACION
NOTA:
Llave inglesa (UCWRNCH) y llave de agua (UNFCTBL)
se venden separadamente para el modelo GX1S01R.
■ Taladro punta de 1/4″ (instalación de válvula
tipo montura)
■ Taladro y punta para hacer un hoyo de 3/4″
(tipo como se requiera) si se requiere un
hoyo de montaje para la llave de agua
■ Cortador de cañerías
■ Lima
PRECAUCION:Para evitar que se dañe el
lavaplatos, consulte con un plomero o instalador calificado
acerca de los procedimientos para hacer hoyos. Puntas para
taladros speciales podrían ser necesitadas para porcelana o
acero inoxidable.
El GX1SO1R se encuentra
probado y certificado por NSF
International en cumplimiento
con la Norma 42 ANSI/NSF
para requerimientos de
materiales e integridad
estructural y en cumplimiento
con CSA B483.1
1
49-50247-1 JR 10-08
GENERAL ELECTRIC COMPANY, Appliance Park, Louisville, KY 40225
PRECAUCIONES DE SEGURIDAD
■
Consulte con su departamento de obras públicas local para
los códigos de plomería. Usted debe seguir estas reglas
a medida que instala el sistema de Filtración de Agua.
■ Use el sistema de Filtración de Agua solamente en una línea
de agua FRIA de hogar que sea potable, segura para ser
bebida. El cartucho del filtro no purificará el agua,
o la hará segura para tomar.
■ NO LO use en una línea de agua caliente. Sólo suministro
de agua fría (40 – 100°F).
■
Instale o guarde donde no estará expuesto a temperaturas
bajo el punto de congelación o expuesto a cualquier tipo
de clima. El agua que se congele en el sistema lo dañará
.
■
Su sistema de Filtración de Agua soportará hasta 125 libras
por pulgada cuadrada (psi) de presión de agua. Si la presión
del agua en la línea de abastecimiento de su hogar es más
de 100 psi, instale una válvula para reducir la presión antes
de instalar el sistema de Filtración de Agua.
ADVERTENCIA: No use con agua que no sea
microbiológicamente segura o de calidad desconocida sin
una desinfección adecuada antes o después del sistema.
Sistemas certificados para reducción de quistes pueden
ser usados en aguas desinfectadas que podrían contener
quistes filtrables.
Deshágase de todos los materiales sin usar y de empaque
después de la instalación. Las partes que sobren después
de la instalación podrían ser un peligro para atragantarse.
Instrucciones Sistema de filtración de agua
de instalación GX1S01R
COMPONENT
CUS
Page 10

OPCIONES DE INSTALACION
PRECAUCION:
Para conexión a linea de agua fria solamente.
Opción 1: Para conexión a la llave primaria de la llave
del lavaplatos.
NOTA: Para uso con el elemento de filtro FXUTC
SOLAMENTE. El uso de otros elementos podrían
afectar adversamente el valor del paso de la llave
principal.
1. Cierre el paso del agua fría.
2. Corte et quite un tramo de la tubería.
3. Haga las conexiones como se muestra.
4. Abra el grifo de agua fría por completo.
5. Lentamente abra el suministro de agua fría y verifique
que no haya pérdidas.
6. Deje correr el agua fría hasta que desaparezca
el aire del agua.
Opción 2: Para conexión a la llave secundaria de agua
filtrada.
NOTA: Para uso con los elementos de filtro FXUTC
o FXULC (rev. 2).
■ Ver las piezas requeridas para la instalación de la
página 1.
■ Llave de agua – UCFCTBL o UCFCTWW
■ Llave inglesa para receptáculos – UCWRNCH
1. Cierre el paso del agua fría.
2. Haga las conexiones como se muestra.
3. Abra el grifo de agua fría por completo.
4. Lentamente abra el suministro de agua fría y
verifique que no haya pérdidas.
5. Deje correr el agua fría hasta que desaparezca el
aire del agua.
NOTA: Llave inglesa para receptáculos (UCWRNCH) y
llave de agua (UNFCTBL) son vendidas separadamente
para el modelo GX1S01R.
Instalacion de la abrazadera a la pared del gabinete
La abrazadera puede ser usada como modelo para
marcar la ubicación de los tornillos de montaje. Cuando
determine la ubicación de la abrazadera asegúrese de
dejar un área libre de 11⁄2″ a 2″ debajo del receptáculo
para permitir sacar los receptáculos y suficiente espacio
en uno de los lados para hacer las conexiones de las
cañerías.
NOTA: Perfore previamente orificios de 1/4” en la pared
para una instalación sencilla.
Llave de agua
filtrada
Fregadero
Caliente
Fría
Válvula de montura
de suministro de agua
Arandela
Adaptador
Tuerca
Entrada del agua
Salida
del agua
Cañería
Inserción
Tornillos de
montaje (2)
Tuerca
Cañería
Tornillos
de montaje
Abrazadera
de montaje
Receptáculo
23/4″
1
1
⁄2″ a 2″
Línea de agua fría
Válvula de línea
de agua
Entrada
Salida
2
Hacia el grifo
Page 11

3
PROCEDIMIENTO DE LAVADO
Cada vez que agua de calidad desconocida pasa a través
del sistema de Filtración de Agua GE, el elemento del filtro debería
ser deshechado y el sistema de filtración lavado.
Circunstancias que podrían requerir el lavado del sistema son:
■ Una advertencia de que hay que hervir el agua.
■ Inundación del sistema de Filtración de Agua GE.
■ Cuando no ha sido usado por un largo tiempo.
El procedimiento para lavar el sistema de Filtración de Agua GE es:
Vea la sección Instalación y Reemplazo del Cartucho del Filtro
y siga los pasos 1, 2, 3 y 4.
Luego, reintale el receptáculo (sin el filtro del elemento), abra
el paso del agua, y vacie el agua a través de la llave del agua.
Entonces, cierre el paso del agua, saque el receptáculo, vacie
el agua del receptáculo e instale el elemento nuevo del filtro.
Siga los pasos 5-10 de la sección Instalación o Reemplazo de
los Cartuchos del Filtro para completar.
INSTALACION O REEMPLAZO DEL CARTUCHO DEL FILTRO
PRECAUCION:
Nunca saque los receptáculos
cuando la presión del agua está
en el sistema de Filtración de Agua.
Cierre el paso del agua/válvula de agua
hacia el filtro. Abra la llave para el agua
filtrada.
Saque el receptáculo, usando la llave
inglesa para receptáculos (no incluida),
de la cabeza del filtro haciendo rotar el
receptáculo como se muestra. Tenga
cuidado, el receptáculo podría estar lleno
de agua. Asegúrese de guardar el sello
grande en forma de anillo.
Si está reemplazando un cartucho de filtro,
saque y bote el cartucho del filtro usado.
Asegúrese de que el interior del
receptáculo esté limpio. Lave bien
el interior del receptáculo con agua
caliente con jabón y enjuague.
Saque el envoltorio del cartucho del filtro
nuevo y meta el cartucho del filtro en
el receptáculo. Algunos cartuchos calzan
de cualquier manera, mientras que otros
calzan sólo de una manera. Observe
las marcas sobre el cartucho.
NOTA: El sistema de Filtración de Agua usa
diferentes tipos de cartuchos de filtro.
Asegúrese de instalarlos correctamente.
Lubricar ligeramente el sello de anillo
tórico en el sumidero con grasa de silicona
limpia de calidad alimenticia (GE Parts and
Service, 1.800.626.2002, tiene disponible
la grasa de silicona, número de parte
WS60X10005). Cerciórese que esté bien
asentada en su ranura.
Sujete el receptáculo hacia la cabeza
del filtro, alineando el hoyo del centro
del cartucho con la marca sobresaliente
en el fondo de la cabeza. El fallar
de obtener un alineamiento adecuado
podría causar daño al filtro y/o al sistema
lo cual disminuirá le eficiencia del filtro.
Con cuidado de no cruzar los hilos, haga
rotar el receptáculo en la cabeza del filtro
y apriete bien con la mano.
NOTA: Si el receptáculo no se aprieta
a la cabeza o si siente resistencia, usted
podría tener el cartucho en forma
invertida o desalineada. Saque el cartucho
y revise para la correcta orientación
y coloque nuevamente.
Abra la llave del agua filtrada. Luego, abra
lentamente la línea del agua/válvula
de paso y permita que la caja del filtro
se llene.
Cierre la llave del agua filtrada. Luego,
vea que na hayan goteras entre
el receptáculo y la cabeza.
NOTA: Si hay goteras, cierre el paso
del agua y abra la llave del agua filtrada.
Desarme la caja del filtro y revise el anillo
para ver si tiene cortaduras, lugares planos,
etc., y revise las superficies de sellado para
que no hayan materias extrañas. Limpie
el anillo y lubrique levemente con grasa
de silicón limpia. Cuidadosamente empuje
hacia dentro de la ranura en el receptáculo.
Arme nuevamente y vea que no hayan
goteras.
Los cartuchos de filtro contienen carbón
activado. Cuando estén nuevos, abra
la llave del agua filtrada por cinco minutos
para lavar el sistema.
Coloque la etiqueta para cambio de filtro
sobre el receptáculo, dentro de la puerta
del gabinete, o en otra ubicación
conveniente. Escriba la fecha del cambio
de filtro para una referencia futura.
Los filtros deberían ser cambiados cada
seis meses.
Sello tipo anillo
Cartucho
Receptáculo I
Etiqueta
Cabeza
SALIDA
ENTRADA
Abrazadera
1
2
3
4
5
6
7
8
9
10
11
12
1
2
3
4
Page 12

GARANTIA DEL SISTEMA DE FILTRACION DE AGUA GE
LISTA DE PARTES
Catálogo de partes de GE
*NOTA: Los códigos del estado de Massachusetts requieren que
la instalación sea hecha por un plomero licenciado y no permite el usa
de la válvula tipo montura. Para la instalación, use el código de plomería
248-CMR del Commonwealth de Massachusetts.
Para obtener piezas de recambio o las herramientas opcionales,
llámenos gratuitamente al 800.626.2002 (USA), al 800.663.6060
(Canadá-Inglés) o al 800.361.3869 (Canadá-Francés).
4
GARANTÍA LIMITADA POR UN AÑO
• ¿Qué cubre esta garantía?
— Cualquier defecto de fábrica en los materiales o la manufactura
del producto.
• ¿Qué no cubre esta garantía?
— Cartuchos del filtro.
— Viajes a su casa para enseñarle cómo usar el producto.
— Instalación inadecuada.
— Falla del producto debido a abuso, mal uso, o alteración o uso
diferente al propósito deseado con este producto.
— Defectos que resulten de una instalación inadecuada o daños
no causados por GE.
— Responsabilidad de parte de GE bajo esta o cualquier otra garantía
por cualquier daño indirecto o por consecuencia de otro evento.
— Productos que son usados con fines comerciales o industriales.
— Uso de este producto donde el agua está microbiológicamente
insegura o de calidad desconocida, sin la adecuada desinfección,
antes y después de ser procesada por el sistema. Los sistemas
certificados para reducir el nivel de quistes pueden ser usados en
agua desinfectada que pueda contener quistes que se puedan filtrar.
— Daños causados al producto debido a accidentes, incendio,
inundaciones o actos de la naturaleza.
— Daños secundarios o por consecuencia causados por posibles
defectos en el producto, su instalación o reparación.
• ¿Por cuánto tiempo después de la compra?
— Un año.
• ¿Cómo hago la reclamación de la garantía?
— Devuélvala al minorista a quien le compró el producto con una copia
de “Proof of Purchase”(prueba de compra). Esta garantía excluye
los costos de envío o llamadas de servicio a domicilio.
Esta garantía se extiende al comprador original y a cualquier
propietario subsecuente para productos comprados para uso
doméstico dentro Estados Unidos. Si el producto está situado
en un área que no dispone de servicio por parte de un proveedor
de servicio autorizado de GE, podría tener que hacerse cargo
de los costes de envío o bien podría solicitársele que lleve
el producto a un centro de servicio de GE autorizado para realizar
la reparación. En Alaska, la garantía excluye el costo de envío
o las visitas de servicio a su casa.
Algunos estados no permiten la exclusión o limitación de daños
imprevistos. Esta garantía le da sus derechos legales específicos,
y es posible que usted tenga otros derechos legales que varian
de estado a estado. Para informarse de cuáles son sus derechos
legales, consulte a su oficina de asuntos del consumidor local
o estatal o póngase en contacto con la Oficina de su Procurador
General.
Éntrenos en contacto con en ge.com, o llamada gratis
en 800.952.5039 en los U.S., o 866.777.7627 en Canada.
EXCLUSIÓN DE GARANTÍAS IMPLÍCITAS—Su único y exclusivo
derecho es la reparación del producto, tal y como se indica
en esta Garantía limitada. Cualquier garantía implícita,
incluyendo las garantías implícitas de comerciabilidad
o adecuación para un fin determinado, están limitadas a un
año o el período de tiempo más breve permitido por la ley.
1
2
3
4
5
REF. NO. PARTE NO. DESCRIPCION DE LA PARTE
1 WS28X10063 CONSOLA DE MONTAJE 1
2 WS31X10026 CABEZA DE LA CUBIERTA 1
3 WS03X10038 ANILLO O,
CUBIERTA DEL COLECTOR DE ACEITE 1
4 WS20X10007 CUBIERTA DEL COLECTOR DE ACEITE 1
5 WS02X10057 TORNILLOS DE MONTAJE 2
 Loading...