

Page 1
GEAppliances.com
Safety Instructions .......... 2,s
Operating Instructions
Care and Cleaning
of the Washer .................... 13
Features .......................... 12
Loading and Using
the Washer ...................... lZ
Operating instructions ......... 4-10
Installation Instructions. 14-18
Troubleshooting Tips..... 19-24
Consumer Support
Consumer Help Indicator ......... 10
Consumer Support ................ 26
Parts and Accessories ........... 3, 26
Warranty .......................... 25
GTW485*
GTW460
ENERGYSTAR
*As an ENERGY STAR ® partner,
GE has determinedthatthis
product meetstheENERGYSTAR®
guidelinesforenergyefficiency.
Write the model and serial
numbers here:
Model #
Serial #
You can find /-----D
them under
the lid of the
Printed in the United States
washer.
49-90549 06-15GE
Page 2
IMPORTANT SAFETY INFORMATION.
READ ALL INSTRUCTIONS BEFORE USING.
m
Thisisthe safety alert symbol. Thissymbol alerts to potential hazards that can kill or hurt and others.Allsafety
messageswill follow the safety alert symbol and the word "DANGER","WARNING",or "CAUTION".Thesewords are defined as:
Indicates a hazardous situation which, if not avoided, will result in death or serious inJury.
Indicates a hazardous situation which, if not avoided, could result in death or serious inJury.
you you you
_ Indicates hazardous situation which, if not avoided, could result in minor moderate
a or
inJury.
IMPORTANT SAFETYINSTRUCTIONS
To reduce the risk of death, fire, explosion,electric shock,or injury to persons when usingyour appliance,
follow basic precautions, including the following:
[] Readall instructionsbefore usingthe appliance.
[] DONOTwash or dry articles that have been previously cleaned in,washed in,soaked in or spotted with gasoline, dry-
cleaning solvents, or other flammable or explosive substances, as they give off vapors that could ignite or explode.
[] DONOTadd gasoline, dry-cleaning solvents, or other flammable or explosive substances to the wash water. These
substances give off vapors that could ignite or explode.
[] Under certain conditions, hydrogen gas may be produced in a hot-water system that has not been used for 2 weeks
or more. HYDROGENGASISEXPLOSIVE.If the hot water system has not been used for such a period, before using a
washing machine, turn on all hot-water faucets and let the water flow from each for several minutes. This will release
any accumulated hydrogen gas. As the gas is flammable, DO NOTsmoke or use an open flame during this time.
[] DONOTallow children to play on or in this appliance. Close supervision of children is necessary when this appliance is
used near children. Before the washer is removed from service or discarded, remove the door or lid. Failure to follow
these instructions may result in death or injury to persons.
[] DONOTreach into the appliance if the tub or agitator is moving to prevent accidental entanglement.
[] DONOTinstall or store this appliance where it will be exposed to the weather.
[] DONOTtamper with controls, repair or replace any part of this appliance or attempt any servicing unless specifically
recommended in the user maintenance instructions or in published user repair instructions that you understand and
have the skills to carry out.
[] DO NOToperate this appliance if it is damaged, malfunctioning, partially disassembled, or has missing or broken parts
including a damaged cord or plug.
[] Unplug the appliance or turn off the circuit breaker before servicing. Pressingthe Power button DOESNOTdisconnect power.
[] See "Electrical Requirements" located in the Installation Instructions for grounding instructions.
SAVETHESE INSTRUCTIONS
Page 3
GEAppliances.com
PROPERINSTALLATION
This washer must be properly installed and located in accordance with the Installation Instructions before it is used.
[] Ensurethat the hot water hose is connected to the "H" []
valve and the cold water hoseisconnected to the "C"
valve.
[]
Installor store where it will not be exposed to
temperatures below freezing or exposedto the weather,
which could cause permanent damage and invalidate the
warranty.
[]
Properlyground washer to conform with all
governing codes and ordinances. Follow details
in Installation Instructions.
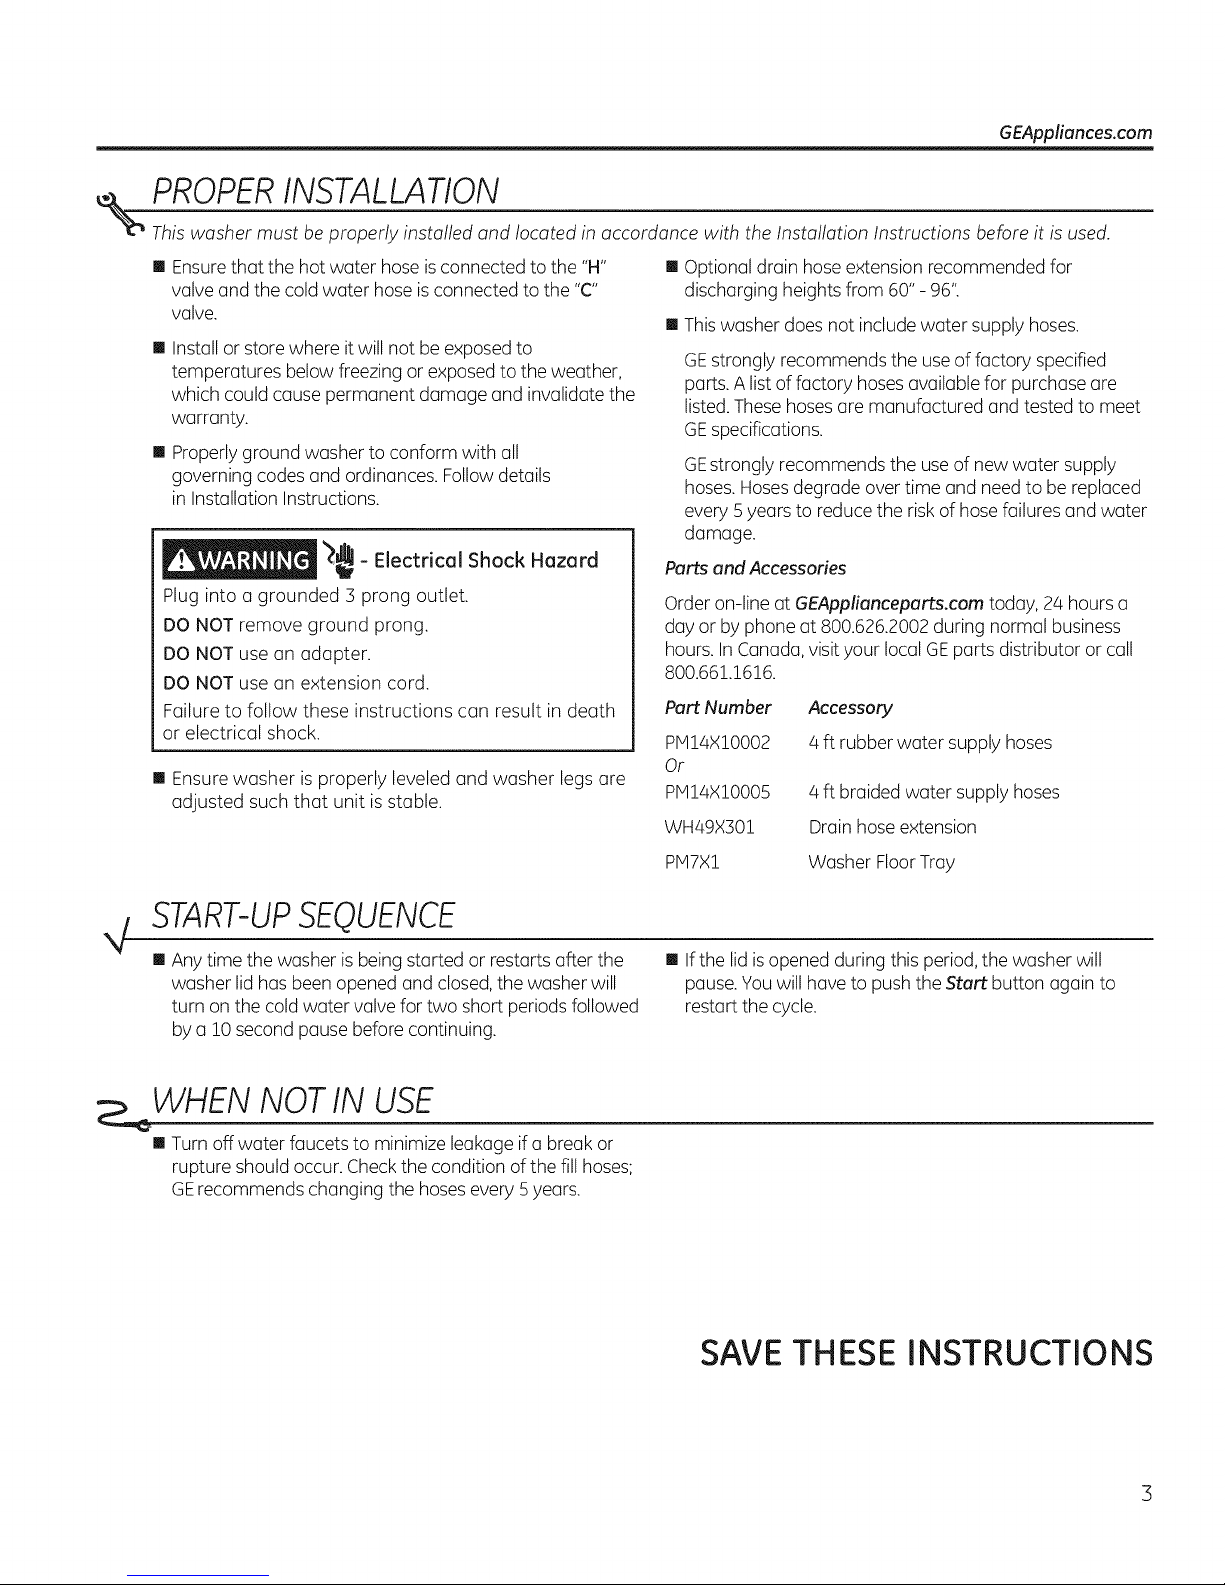
)_ Electrical Shock Hazard
Plug into a grounded 3 prong outlet.
DO NOT remove ground prong.
DO NOT use an adapter.
DO NOT use an extension cord.
Failure to follow these instructions can result in death
or electrical shock.
[] Ensurewasher is properly leveled and washer legs are
adjusted such that unit isstable.
Optional drain hose extension recommended for
discharging heights from 60" - 96"
[] This washer does not include water supply hoses.
GEstrongly recommends the useof factory specified
parts.A list of factory hoses availablefor purchase are
listed.These hosesare manufactured and tested to meet
GEspecifications.
GEstrongly recommends the useof new water supply
hoses.Hosesdegrade over time and need to be replaced
every 5 years to reduce the risk of hose failures and water
damage.
Parts and Accessories
Order on-line at GEApplianceparts.com today, 2/4hoursa
day or by phone at 800.626.2002during normal business
hours. InCanada, visit your localGEparts distributor or call
800.66!.1616.
Purt Number
PH!4X!O002
Or
PM!4X!O005
WH49X30!
Accessory
4ft rubberwatersupply hoses
4 ft braided water supply hoses
Drain hose extension
START-UPSEQUENCE
4
[] Any time the washer is beingstarted or restarts after the
washer lid has been opened and closed,the washer will
turn on the cold water valve for two short periodsfollowed
by a !0 second pause before continuing.
WHEN NOT IN USE
[] Turn off water faucets to minimize leakage ifa break or
rupture should occur.Checkthe condition of the fill hoses;
GErecommends changing the hoses every 5 years.
PH7X! Washer FloorTray
[] If the lid isopened during this period, the washer will
pause.You will have to push the Start button again to
restart the cycle.
SAVE THESE INSTRUCTIONS
Page 4
Operating instructions.
Throughout this manual, features and appearance may vary from your model.
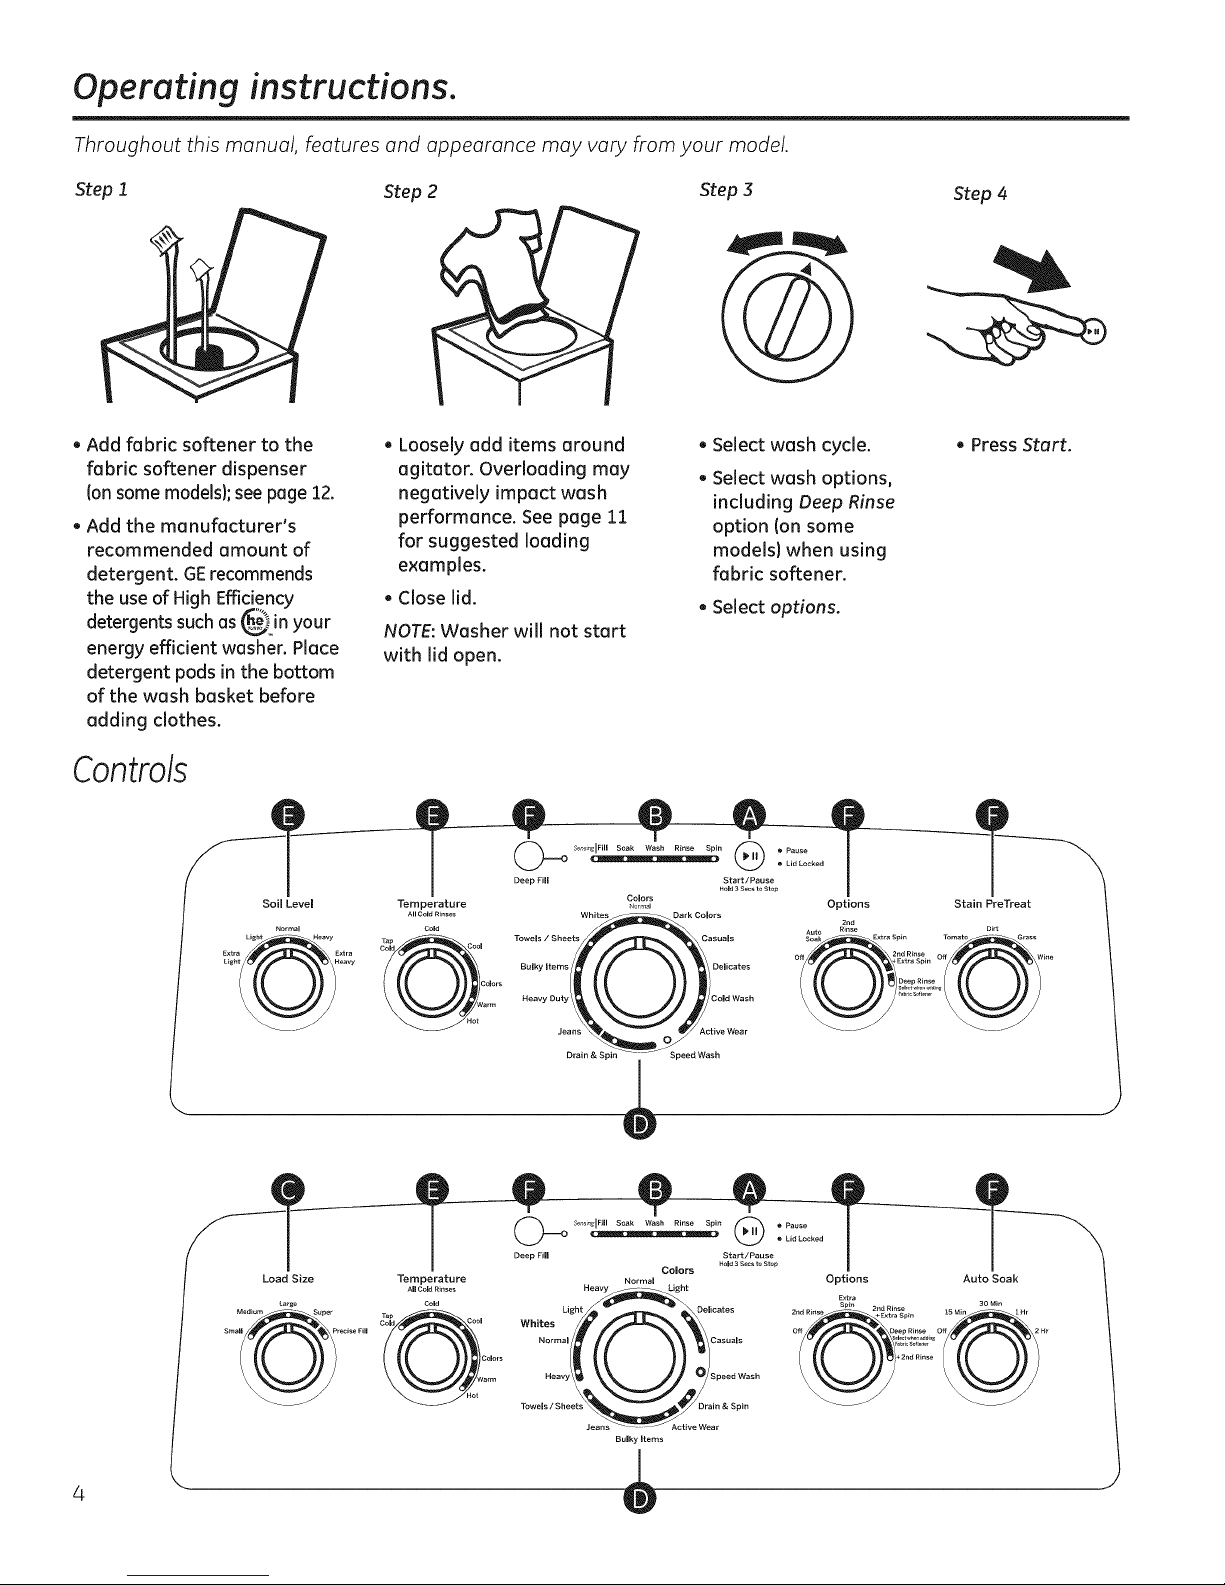
Step 1
, Add fabricsoftenerto the
fabricsoftener dispenser
(onsome models);see page 12.
, Add the manufacturer's
recommended amount of
detergent.GE recommends
the use ofHigh Efficiency
detergentssuch as@)n your
energy efficient washer. Place
detergent pods in the bottom
of the wash basket before
adding clothes.
Controls
Step 2
. Loosely add items around
agitaton Overloading may
negatively impact wash
performance. See page 11
for suggested loading
examples.
. Close lid.
NOTE:Washer will not start
with lid open.
Step 3
. Select wash cycle.
. Select wash options,
including Deep Rinse
option (on some
models) when using
fabric softener.
. Selectoptions.
Step 4
, Press Stort.
Load Size Temperature
Large Cold
sin+ recis+ Fill
_ o ¢ooi
All Cold Rinses
_s_ i oa as inse in
Towels / Sheets
Bulky Items
Heavy Duty
Heavy Light
Colors
a_m
+_or,_+_ Options Stain PreTreat
Dark Colors
Casuals
Cold Wash
e Wear
2n_
A to mnse Dia
S_k ...... Extra Spin Tomato ...... Grass
off + Extra Spin me
2rid Rinse Off_ I
q
Normal
Bulky Items
Options Auto Soak
Page 5

NO teS. GEAppliances.com
Page 6
Operating instructions.
Start/Pause
PressStart to begin the cycle.NOTE:The lid must be closed for the washer to start the cycle. Ifthe lid is closed,the lid will lock and the Lid
Locked light will illuminate.
Pressing Pausewill unlock the lid (if lockedat that time), pause the cycle and the Pause indicator light will blink.
Tocontinue the cycle, pressStart again. If machine is paused more than 24 hours,the cycle will be cancelled. If water remains in the
machine, selectthe Drain &Spincycleto drain basket and spin water out of the washer basket.
Cycle Status Lights
Shows whether the washer is in the Fill, Soak, Wash, Rinse or Spin portion of the cycle.
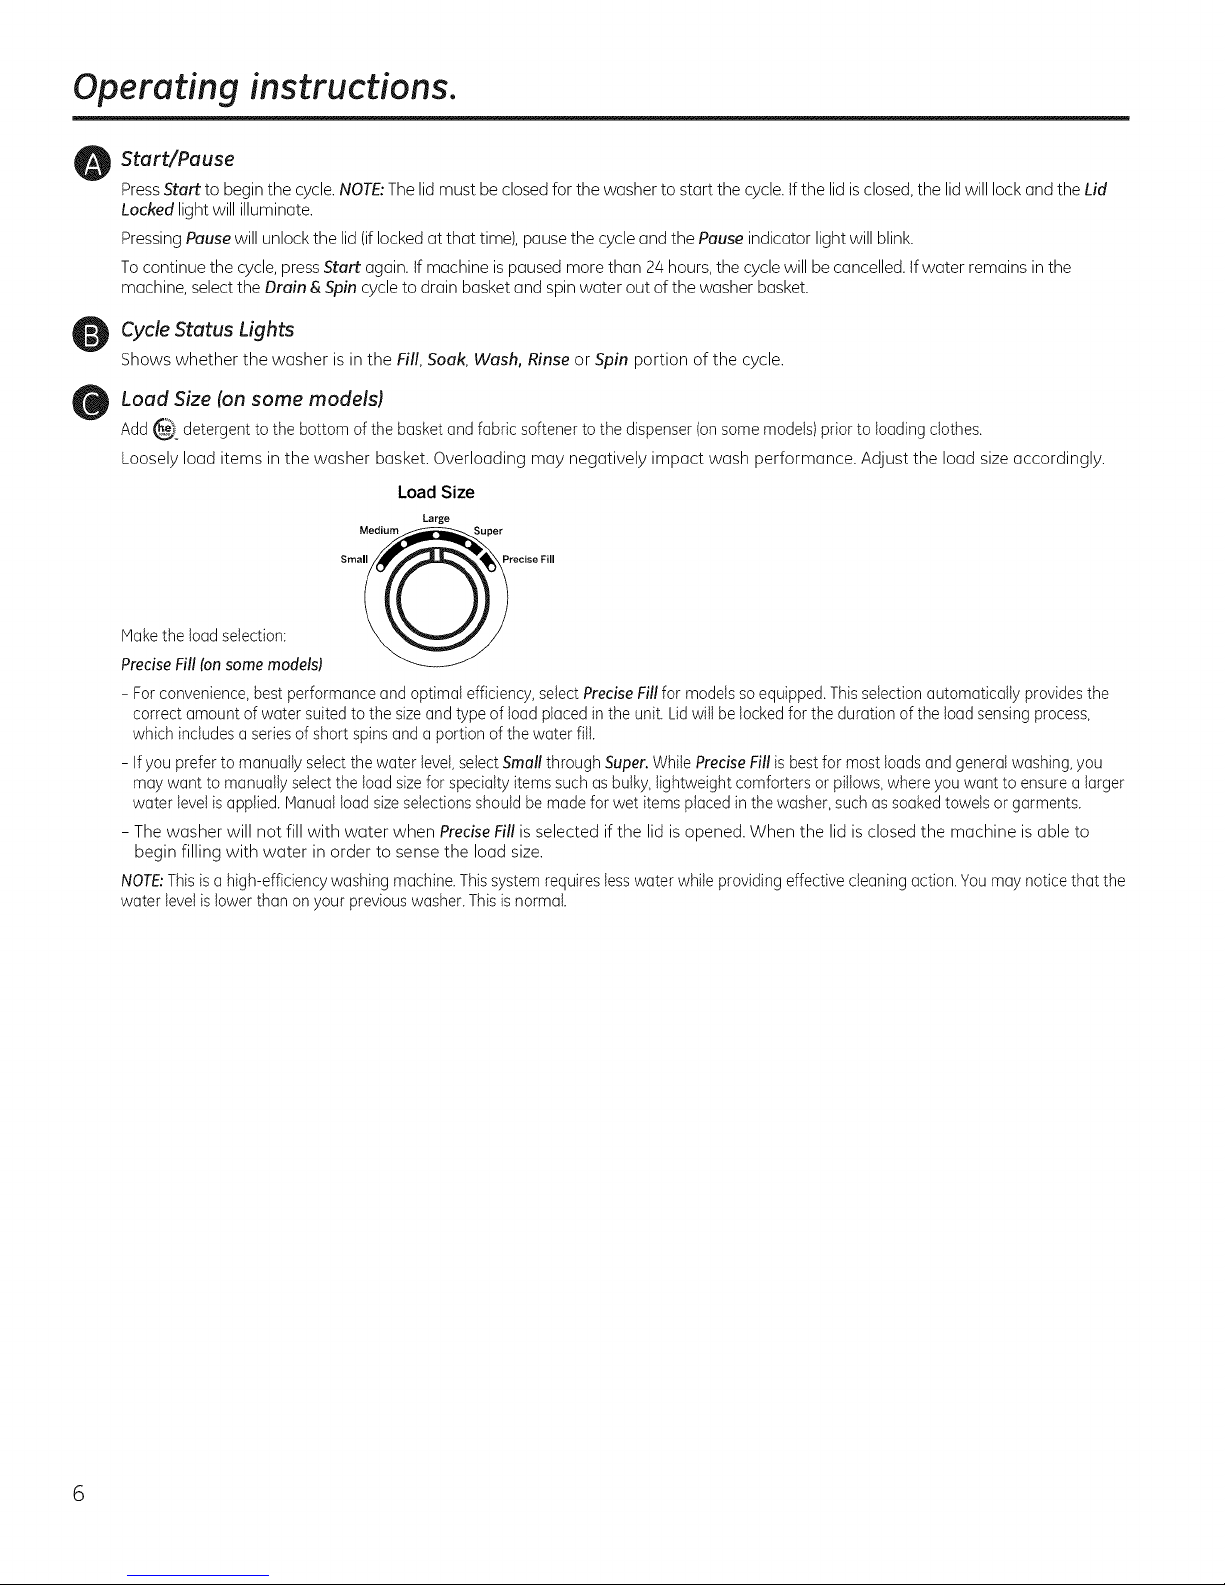
Load Size (on some models)
Add _ detergent to the bottom of the basket andfabric softenerto the dispenser (onsome models)prior to loading clothes.
Loosely load items in the washer basket. Overloading may negatively impact wash performance. Adjust the load size accordingly.
Load Size
Large
Med_er
Makethe load selection: Sma.______j_/rec_ser_,_/_,_"_'_
PreciseFill (onsomemodels)
- Forconvenience,bestperformanceand optimal efficiency,selectPreciseFill for modelsso equipped.Thisselectionautomatically providesthe
correct amount of water suited to the sizeand typeof load placedin the unit. Lidwitt belockedfor the duration of the load sensingprocess,
which includesa seriesof short spinsanda portion of the water fill.
- If you prefer to manually select thewater level,selectSmallthrough Super.WhilePreciseFill is bestfor most loadsand generalwashing,you
may want to manuallyselect the load sizefor specialty itemssuchas bulky,lightweight comforters or pillows,whereyou want to ensurea larger
water level isapplied.Manual loadsizeselectionsshouldbe madefor wet items placedin the washer,suchas soakedtowels or garments.
- The washer will not fill with water when PreciseFillis selected if the lid is opened. When the lid is closed the machine is able to
begin filling with water in order to sense the load size.
NOTE:Thisisa high-efficiencywashing machine.Thissystem requireslesswater while providingeffective cleaning action.Youmay notice that the
water level islower than onyour previouswasher.Thisisnormal.
Page 7
GEAppliances.com
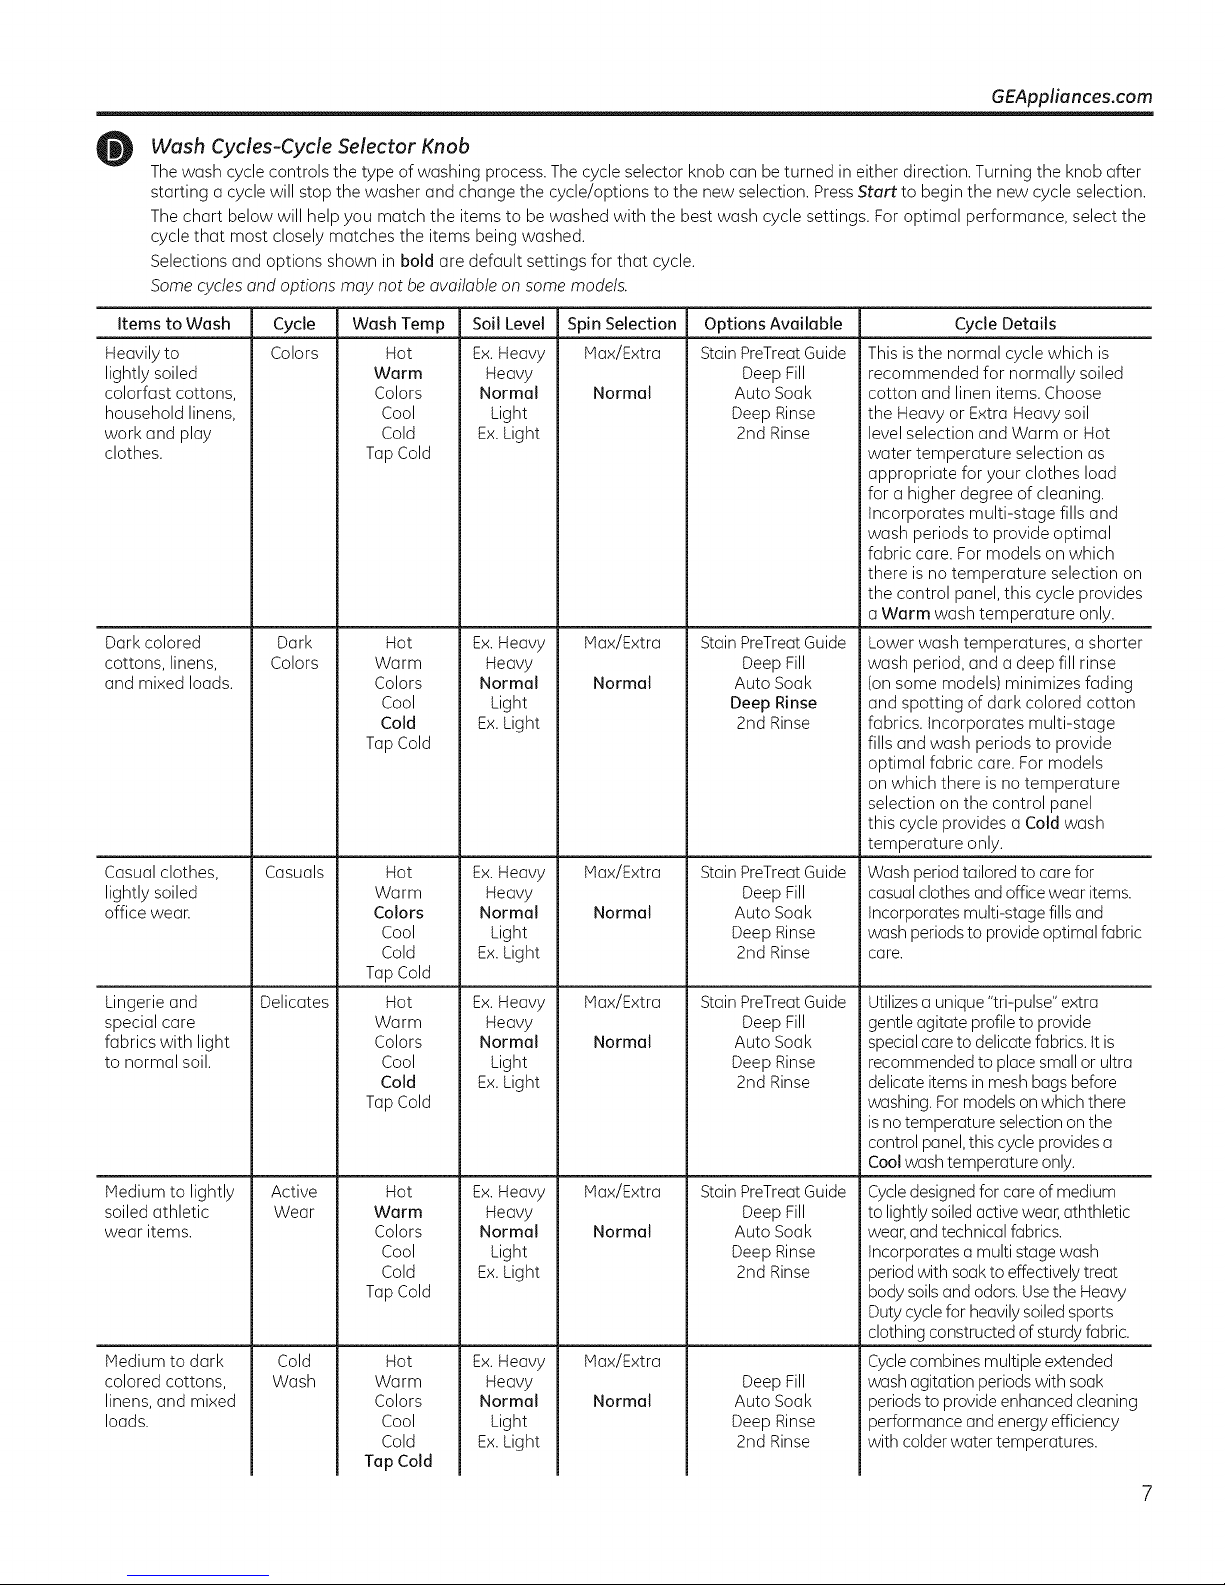
Wash Cycles-Cycle Selector Knob
Thewash cycle controls the type of washing process. The cycle selector knob can be turned in either direction. Turning the knob after
starting a cycle will stop the washer and change the cycle/options to the new selection. PressStart to begin the new cycle selection.
The chart below will help you match the items to be washed with the best wash cycle settings. For optimal performance, select the
cycle that most closely matches the items being washed.
Selections and options shown in bold are default settings for that cycle.
Some cycles and options may not be available on some models.
items to Wash Cycle Soil Level Spin Selection Cycle Details
Heavily to
Colors Max/Extra
lightly soiled
colorfast cottons,
household linens,
work and play
clothes.
Wash Temp
Hot
Warm
Colors
Cool
Cold Ex.Light
Tap Cold
Ex.Heavy
Heavy
Normal
Light
Normal
Options Available
Stain PreTreatGuide
Deep Fill
Auto Soak
Deep Rinse
2nd Rinse
This isthe normal cycle which is
recommended for normally soiled
cotton and linen items. Choose
the Heavy or Extra Heavy soil
level selection and Warm or Hot
water temperature selection as
appropriate for your clothes load
for a higher degree of cleaning.
Incorporates multi-stage fills and
wash periods to provide optimal
fabric care. For models on which
there isno temperature selection on
the control panel, this cycle provides
a Warm wash temperature only.
Dark colored
cottons, linens,
and mixed loads.
Dark Hot
Colors Warm
Colors
Cool
Cold
Tap Cold
Ex.Heavy
Heavy
Normal
Light
Ex.Light
Max/Extra
Normal
Stain PreTreatGuide
Deep Fill
Auto Soak
Deep Rinse
2nd Rinse
Lower wash temperatures, a shorter
wash period, and a deep fill rinse
(on some models) minimizes fading
and spotting of dark colored cotton
fabrics. Incorporates multi-stage
fills and wash periods to provide
optimal fabric care. For models
on which there is no temperature
selection on the control panel
this cycle provides a Cold wash
temperature only.
Casual clothes,
lightly soiled
office wear.
Casuals Hot
Warm
Colors
Cool
Cold
Ex.Heavy
Heavy
Normal
Light
Ex.Light
Max/Extra
Normal
Stain PreTreatGuide
Deep Fill
Auto Soak
Deep Rinse
2nd Rinse
Wash period tailored to carefor
casual clothes and office wear items.
Incorporates multi-stage fillsand
wash periods to provide optimal fabric
care.
Tap Cold
Lingerie and
special care
fabrics with light
to normal soil.
Delicates Hot
Warm
Colors
Cool
Cold
Tap Cold
Ex.Heavy
Heavy
Normal
Light
Ex.Light
Max/Extra
Normal
Stain PreTreatGuide
Deep Fill
Auto Soak
Deep Rinse
2nd Rinse
Utilizesa unique "tri-pulse" extra
gentle agitate profile to provide
special care to delicate fabrics. Itis
recommended to place small or ultra
delicate items in mesh bags before
washing. Formodels on which there
isno temperature selection onthe
control panel, thiscycle provides a
Coot wash temperature only.
Medium to lightly
soiled athletic
wear items.
Active Hot
Wear Worm
Colors
Cool
Cold
Tap Cold
Ex.Heavy
Heavy
Normal
Light
Ex.Light
Hax/Extra
Normal
Stain PreTreatGuide
Deep Fill
Auto Soak
Deep Rinse
2nd Rinse
Cycledesigned for care of medium
to lightly soiledactive wear, aththletic
wear,and technical fabrics.
Incorporates a multi stage wash
period with soak to effectively treat
bodysoilsandodors. Use the Heavy
Dutycyclefor heavily soiled sports
clothing constructed of sturdy fabric.
Medium to dark
colored cottons,
linens, and mixed
loads.
Cold Hot
Wash Warm
Colors
Cool
Cold
Ex.Heavy
Heavy
Normal
Light
Ex.Light
Hax/Extra
Normal
Deep Fill
Auto Soak
Deep Rinse
2nd Rinse
Cyclecombines multiple extended
wash agitation periods with soak
periods to provide enhanced cleaning
performance and energy efficiency
with colderwater temperatures.
Top Cold
Page 8
Operating instructions.
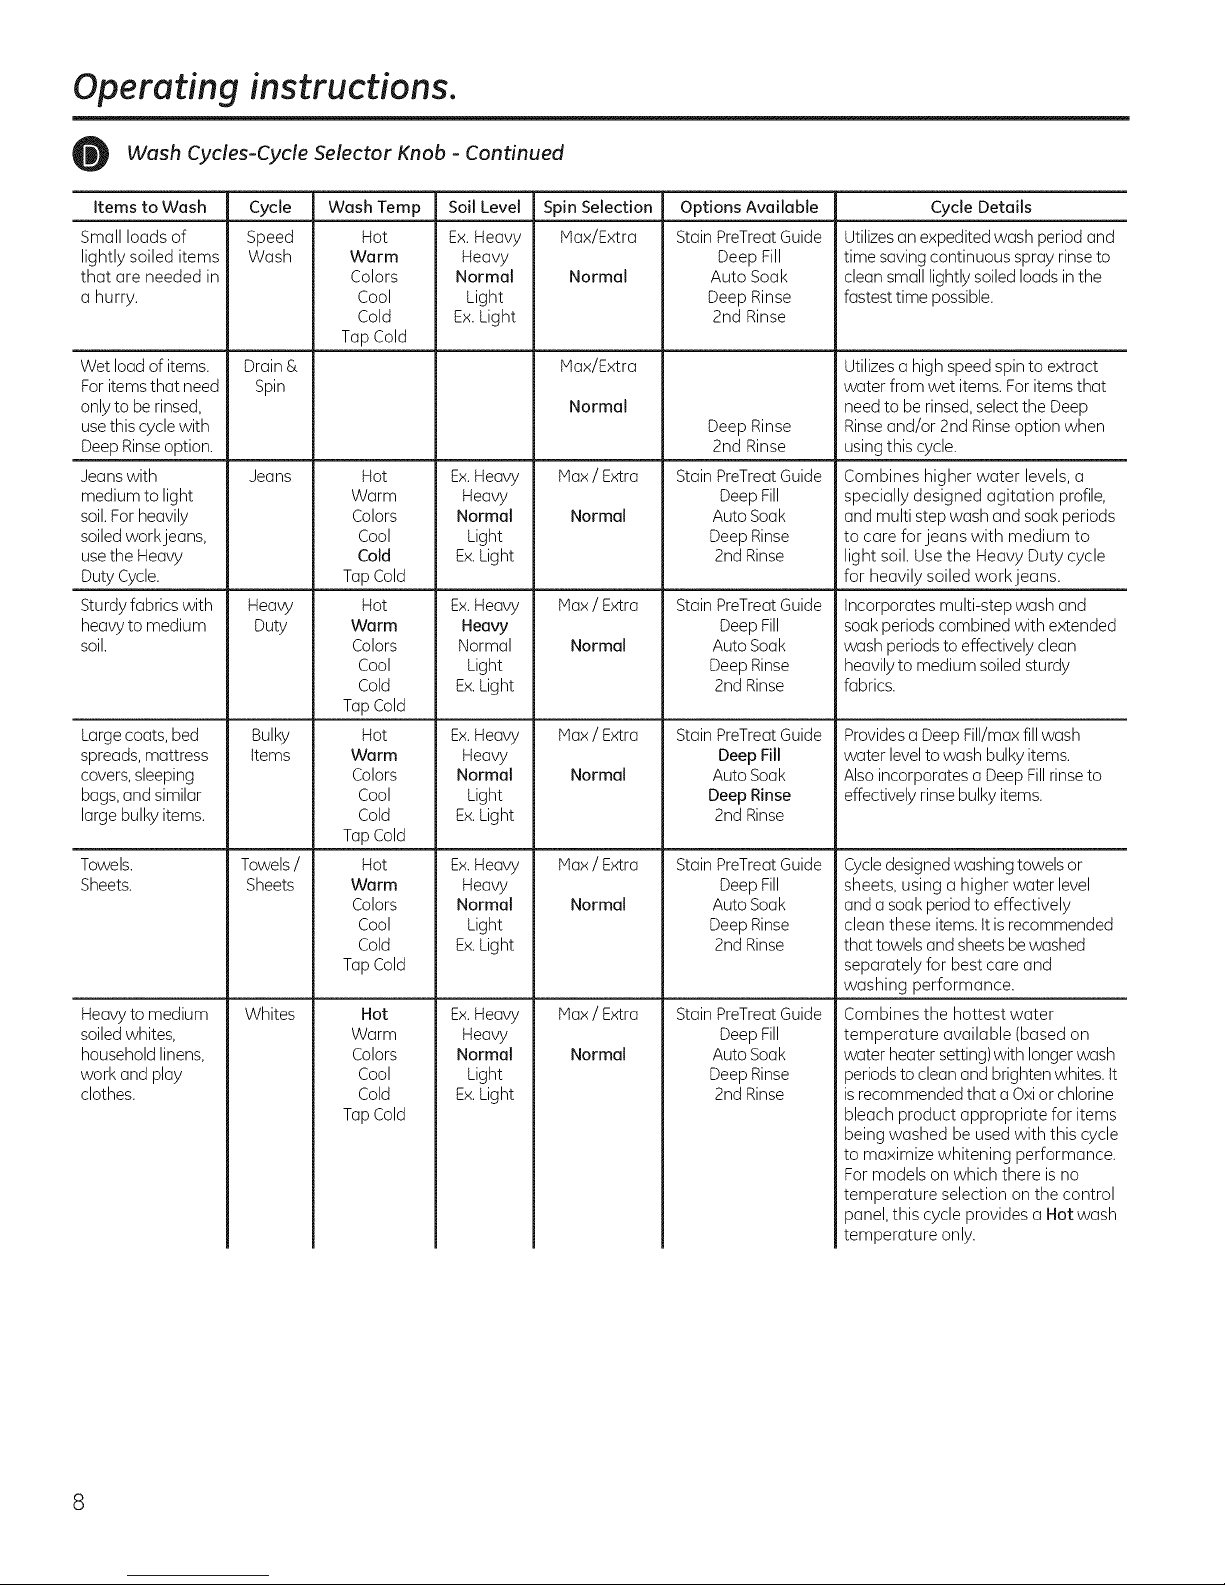
Wash Cycles-Cycle Selector Knob - Continued
Items to Wash Soil Level Spin Selection Options Available Cycle Details
lightly soiled items
that are needed in
a hurry.
Wet load of items.
For items that need
only to be rinsed,
usethis cycle with
Deep Rinseoption.
Jeanswith
medium to light
soil.For heavily
soiledwork jeans,
usethe Heavy
Duty Cycle.
Sturdy fabrics with
heavyto medium
soil.
Largecoats, bed
spreads,mattress
covers,sleeping
bags,and similar
large bulky items.
Towels.
Sheets.
Heavy to medium
soiledwhites,
household linens,
work and play
clothes.
Cycle
Speed
Wash
Drain &
Spin
Jeans
Heaw
Duty
Bulky
Items
Towels/
Sheets
Whites
Wash Temp
Hot
Warm
Colors
Cool
Cold
Tap Cold
Hot
Warm
Colors
Cool
Cold
TapCold
Hot
Warm
Colors
Cool
Cold
TapCold
Hot
Warm
Colors
Cool
Cold
TapCold
Hot
Warm
Colors
Cool
Cold
TapCold
Hot
Warm
Colors
Cool
Cold
TapCold
Ex.Heavy
Heavy
Normal
Light
Ex.Light
Ex.Heavy
Heavy
Normal
Light
Ex.Light
Ex.Heavy
Heavy
Normal
Light
Ex.Light
Ex.Heavy
Heavy
Normal
Light
Ex.Light
Ex.Heavy
Heavy
Normal
Light
Ex.Light
Ex.Heavy
Heavy
Normal
Light
Ex.Light
Max/ExtraSmall loads of
Normal
Max/Extra
Normal
Max/ Extra
Normal
Max/ Extra
Normal
Max/ Extra
Normal
Max/ Extra
Normal
Max/ Extra
Normal
Stain PreTreatGuide
Deep Fill
Auto Soak
Deep Rinse
2nd Rinse
Deep Rinse
2nd Rinse
Stain PreTreatGuide
Deep Fill
Auto Soak
Deep Rinse
2ndRinse
Stain PreTreatGuide
Deep Fill
Auto Soak
Deep Rinse
2ndRinse
Stain PreTreat Guide
Deep Fill
Auto Soak
Deep Rinse
2nd Rinse
Stain PreTreatGuide
Deep Fill
Auto Soak
Deep Rinse
2ndRinse
Stain PreTreatGuide
Deep Fill
Auto Soak
Deep Rinse
2ndRinse
Utilizesan expedited wash period and
time saving continuous spray rinse to
clean small lightly soiled loads in the
fastest time possible.
Utilizesa high speed spinto extract
water from wet items. Foritems that
needto be rinsed,select the Deep
Rinseand/or 2nd Rinseoption when
using this cycle.
Combines higher water levels, a
specially designed agitation profile,
and multi step wash and soak periods
to care for jeans with medium to
light soil. Use the Heavy Duty cycle
for heavily soiled workjeans.
Incorporates multi-step wash and
soak periods combined with extended
wash periods to effectively clean
heavilyto medium soiled sturdy
fabrics.
ProvidesaDeepFill/max fill wash
water level to wash bulky items.
Alsoincorporates a Deep Fillrinse to
effectively rinse bulkyitems.
Cycledesigned washing towels or
sheets, using a higher water level
and a soakperiod to effectively
clean these items. Itis recommended
that towels and sheets bewashed
separately for best care and
washing performance.
Combines the hottest water
temperature available (based on
water heater setting)with longer wash
periodsto clean and brighten whites. It
isrecommended that a Oxior chlorine
bleach product appropriate for items
being washed be used with this cycle
to maximize whitening performance.
For models on which there is no
temperature selection on the control
panel,this cycle provides a Hot wash
temperature only.
Page 9
GEAppliances.com
Settings
Select settings for agitation (Soil) and water temperature (Temp).
NOTE:Longer Spin times typically reduce dryer time/energy usage (i.e.reduces total energy when using both a washer and a dryer).
Cycle Options
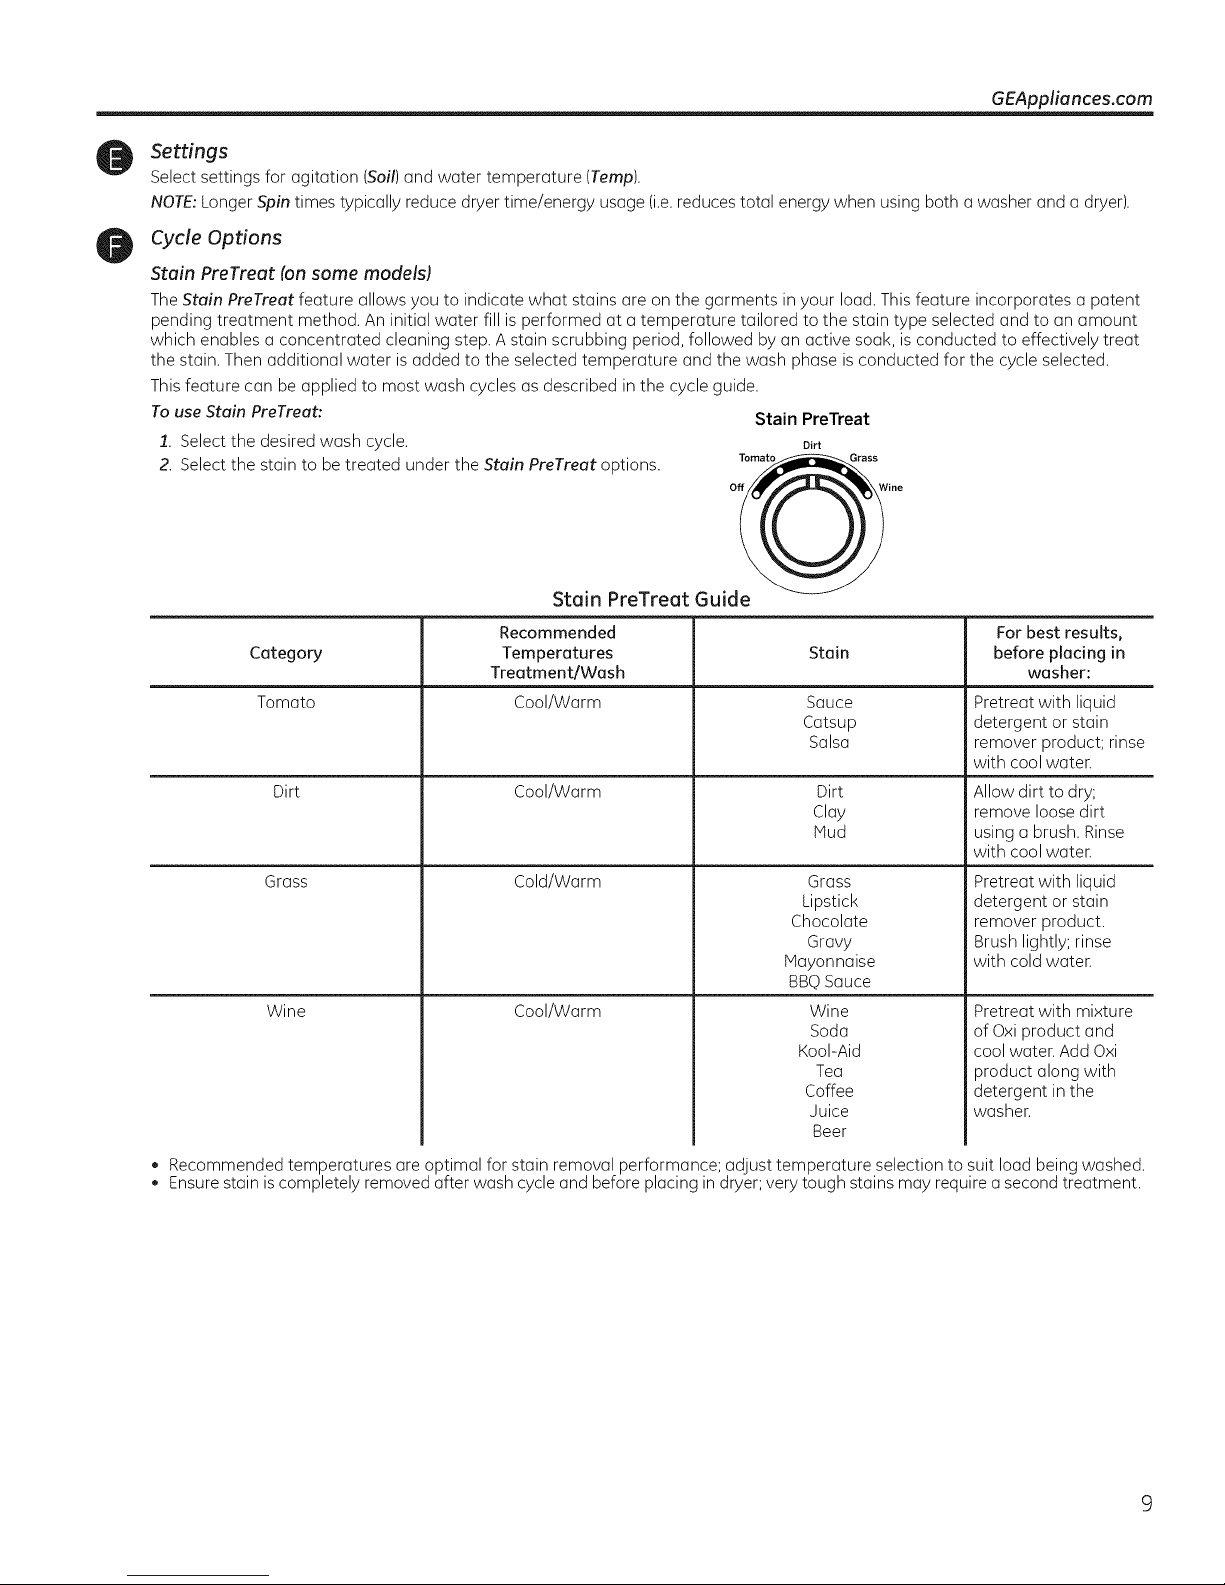
Stain PreTreat (on some models)
The Stain PreTreat feature allows you to indicate what stains are on the garments in your load. This feature incorporates a patent
pending treatment method. An initial water fill is performed at a temperature tailored to the stain type selected and to an amount
which enables a concentrated cleaning step. A stain scrubbing period, followed by an active soak, isconducted to effectively treat
the stain. Then additional water is added to the selected temperature and the wash phase is conducted for the cycle selected.
This feature can be applied to most wash cycles as described in the cycle guide.
To use Stain PreTreat: Stain PreTreat
1. Select the desired wash cycle. D_t
2. Select the stain to be treated under the Stain PreTreat options. Tomato Grass
Off Wine
Stain PreTreat Guide
Category
Tomato
Dirt
Grass
Wine
Recommended
Temperatures
Treatment/Wash
Cool/Warm
Cool/Warm
Cold/Warm
Cool/Warm
Stain
Sauce
Catsup
Salsa
Dirt
Clay
Mud
Grass
Lipstick
Chocolate
Gravy
Mayonnaise
BBQSauce
Wine
Soda
KooI-Aid
Tea
Coffee
Juice
Beer
For best results,
before placing in
washer:
Pretreat with liquid
detergent or stain
remover product; rinse
with cool water.
Allow dirt to dry;
remove loose dirt
using a brush. Rinse
with cool water.
Pretreat with liquid
detergent or stain
remover product.
Brush lightly; rinse
with cold water.
Pretreat with mixture
of Oxi product and
cool water. Add Oxi
product along with
detergent in the
washer.
• Recommended temperatures are optimal for stain removal performance; adjust temperature selection to suit load being washed.
• Ensure stain iscompletely removed after wash cycle and before placing in dryer; very tough stains may require a second treatment.
Page 10
Operating instructions.
Cycle Options - Continued
Deep Fill
Selectthe Deep Fillfeature for loads where extra water is needed.
Pressthe Deep Fill button once before starting the cycle to add an incremental amount of water to the wash load. Holding the Deep Fill
button for 5seconds will provide the deepest fill levelpossible;this will increase cycletime due to the additional time it takes to fill the
washer
Tocancel the option if desired,pressthe Deep Fill button again.
NOTE:TheDeep Fill button can also be pressed after the washer has completed filling and is in the wash phase if additional water is
desired.Tostop the extra fill, pressthe Deep Fill button again and the water will stop.
Auto Soak
This option begins with a brief agitation, soaks for a specified period of time, then moves through the restof the cycle automatically.
2nd Rinse
When you useextra detergent or bleach to clean heavily soiled clothes,use the 2rid Rinse option to better remove additional residues.
Extra Spin
Select to provide additional spin time, increasing energy efficiency through reducing drying times.
2nd Rinse + Extra Spin
Providesboth a second rinse and an extra spin.
Deep Rinse
Setthis option to provide a deep rinse or when using fabric softener. Thisoption may change other settings (e.g.Spin may go to a higher
setting)to maximize performance.
NOTE:Donot usefabric softener dispensing ballswith this washer. Theydo not work correctly in high efficiencywashers.
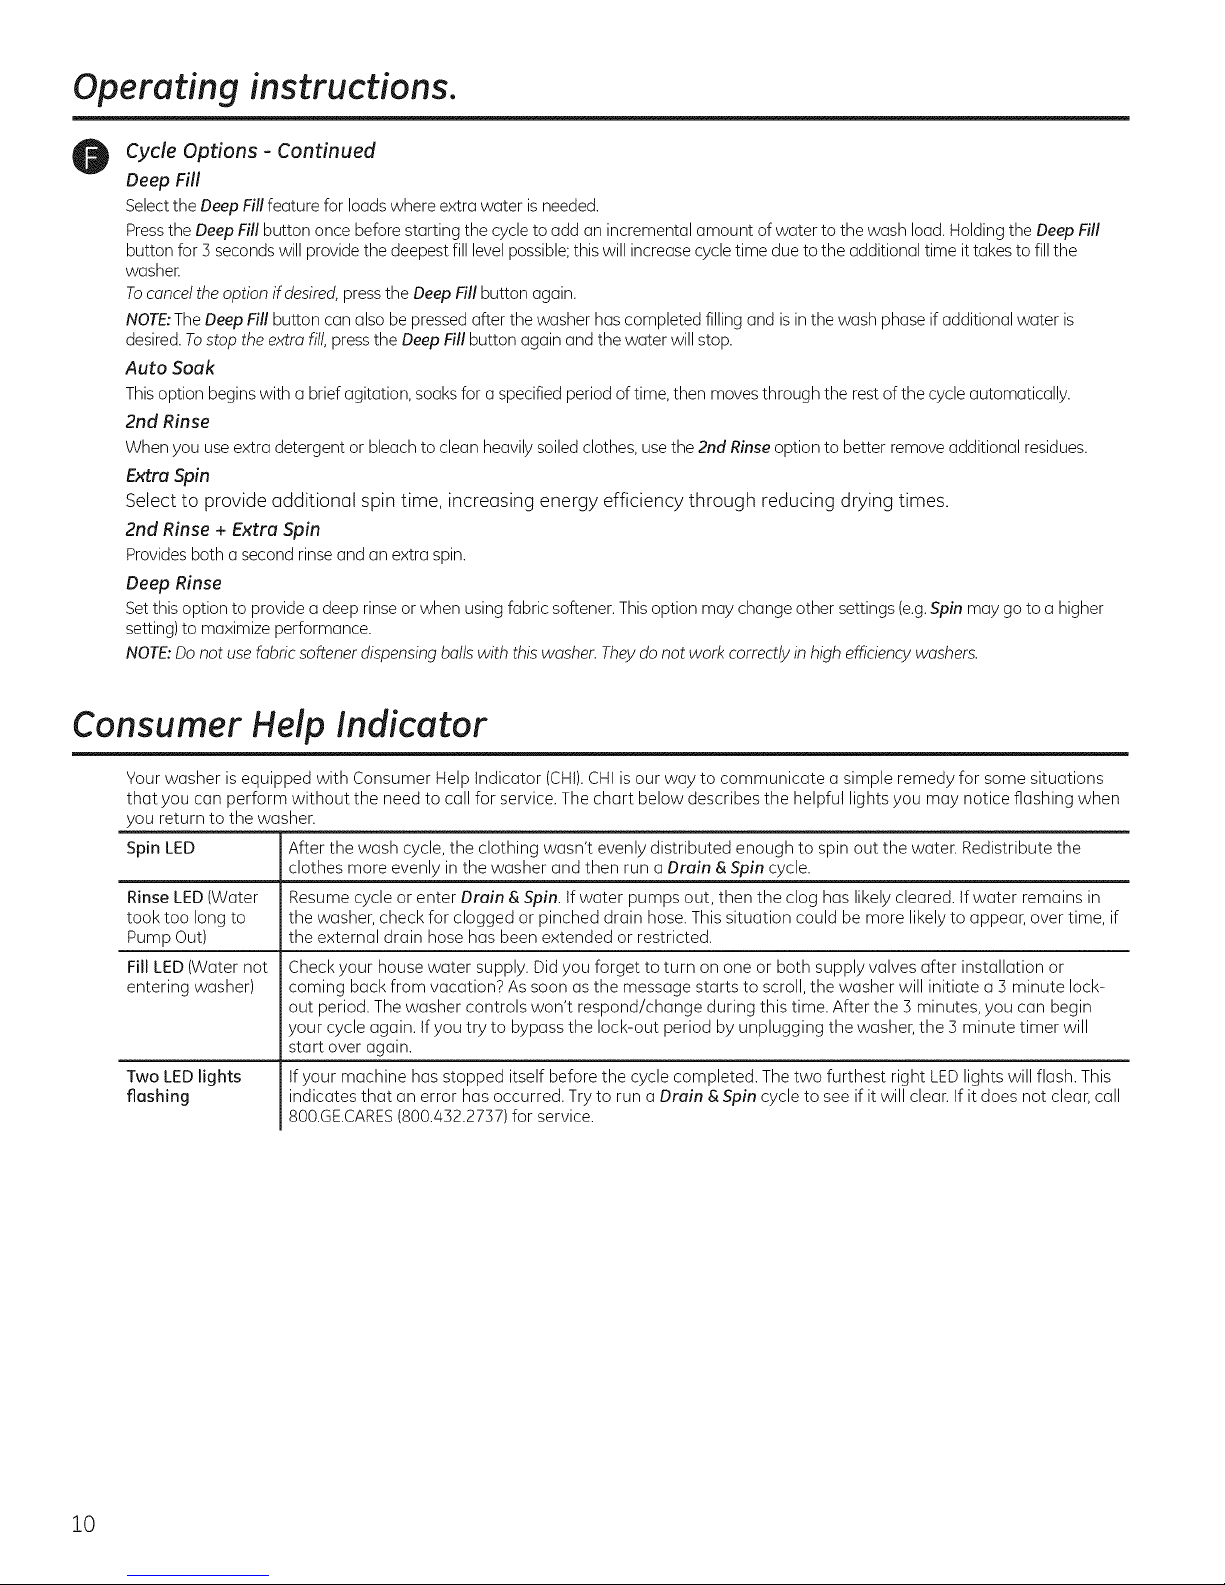
Consumer Help Indicator
Your washer isequipped with Consumer Help Indicator (CH!).CHIis our way to communicate a simple remedy for some situations
that you can perform without the need to call for service. The chart below describes the helpful lights you may notice flashing when
you return to the washer.
Spin LED After the wash cycle, the clothing wasn't evenly distributed enough to spin out the water. Redistribute the
clothes more evenly in the washer and then run a Drain & Spin cycle.
Rinse LED(Water Resume cycle or enter Drain & Spin. If water pumps out, then the clog has likely cleared. If water remains in
took too long to the washer, check for clogged or pinched drain hose. This situation could be more likely to appear, over time, if
Pump Out) the external drain hose has been extended or restricted.
Fill LED (Water not
entering washer)
Two LED lights
flashing
Check your house water supply. Did you forget to turn on one or both supply valves after installation or
coming back from vacation? As soon as the message starts to scroll, the washer will initiate a 5 minute lock-
out period. The washer controls won't respond/change during this time. After the 5 minutes, you can begin
your cycle again. If you try to bypass the lock-out period by unplugging the washer, the 5 minute timer will
start over again.
Ifyour machine has stopped itself before the cycle completed. The two furthest right LEDlights will flash. This
indicates that an error has occurred. Try to run a Drain & Spin cycle to see if it will clear. If it does not clear, call
800.GE.CARES(800.432.2737) for service.
10
Page 11
and using the washer. GEAppliances.comLoading
Always follow fabric manufacturer's care label when laundering.
ProperUseof Detergent
Using too little or too much detergent is a common
cause of laundry problems.
Uselessdetergent ifyou have soft water, (] smaller
loud or u lightly soiledload.
Forspots,apply pre-treotment to itemsus
recommendedon the product label.Application should
be made inthe basketto preventoverspruy which may
causethe coloring on the lid or graphics to fade.
Placedetergent pods in the bottom of the wash basket
before adding clothes.
GErecommends_,,,,,the use of High Efficiencydetergents
such us _ in your energy efficient washer.
HEdetergen'ts_"are formulated to work with low
water wash and rinse systems.HEdetergents reduce
the oversudsing problems commonly associated with
regular detergents.
When using high efficiency or concentrated
detergents, consult the product label to determine
amount required for optimum performance. Excessive
detergent will negatively impact wash performance.
SortingWashLoads
Sort by color (whites,lights,colors),soillevel,fabric type (sturdy cottons, easy care, delicates)and whether the
fabric produces lint (terry cloth,chenille)or collects lint (velveteen,corduroy).Wash lint producers such as cotton
towels and socks separate from lint collectors including synthetic garments and dress pants.
- Fire Hazard
Never place items in the washer that ore dampened with gasoline or other fl(lmmable liquids.
Nowasher con completely remove oil.
Do not dry anything that has ever hod any type of oil on it (including cooking oils).
Doing so so con result in death, explosion,orfire.
ClothesLevel
Water
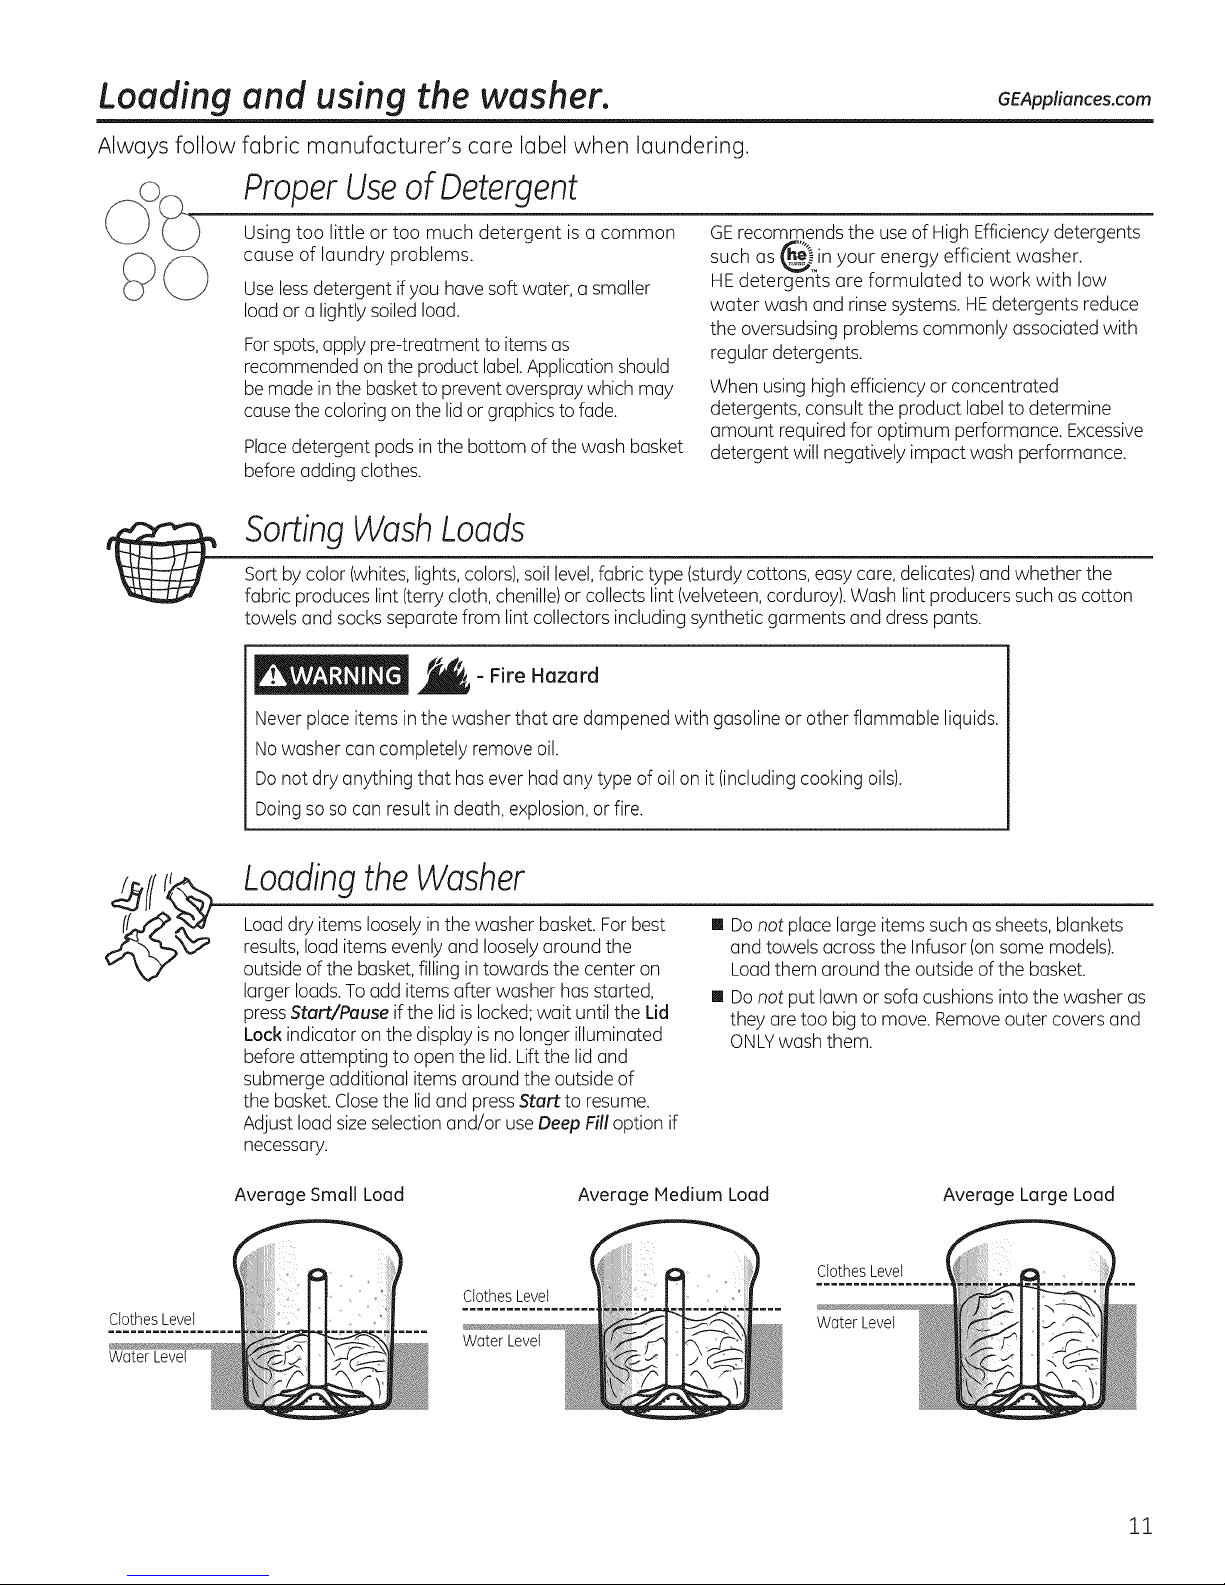
LoadingtheWasher
Load dry items loosely in the washer basket. Forbest
results,loud items evenly and loosely around the
outside of the basket,filling in towards the center on
larger loads.To add items after washer hasstarted,
pressStart/Pause ifthe lid islocked;wait untilthe Lid
Lock indicator on the display is no longer illuminated
before attempting to open the lid.Liftthe lid and
submerge additional items around the outside of
the basket.Closethe lidand pressStart to resume.
Adjust load sizeselection and/or use DeepFill option if
necessary.
Average Small Load Average Hedium Load Average Large Load
ClothesLevel
WaterLevel
[] Donot place large items such as sheets, blankets
and towels across the Infusor (onsome models).
Loud them around the outside of the basket.
[] Donot put lawn or sofa cushions into the washer as
they are too big to move. Remove outer covers and
ONLYwash them.
ClothesLevel
WaterLevel
11
Page 12
About washer features.
Automatic Load Sensing (on some models)
This determines the correct agitate profile, agitate duration and amount of water suited to the sizeand type of load placed in the washer.
The washer will not start the wash cycle or fill with water if the lid is open. When the lid is closed the machine isable to begin filling with
water in order to sense the load size.
NOTE:Automatic Load Sensing initiates a spin at the beginning of the cycle and will take as much as 3 minutes to complete (significantly
shorter for smaller loads); this is normal operation.
NOTE:Thisis a high efficiency washing machine with agitator wash action. Thissystem requires/ess water while providing effective cleaning
action. Youmay notice that the water level is lower than on your previous washer. This is normal for an agitator-equipped washer.
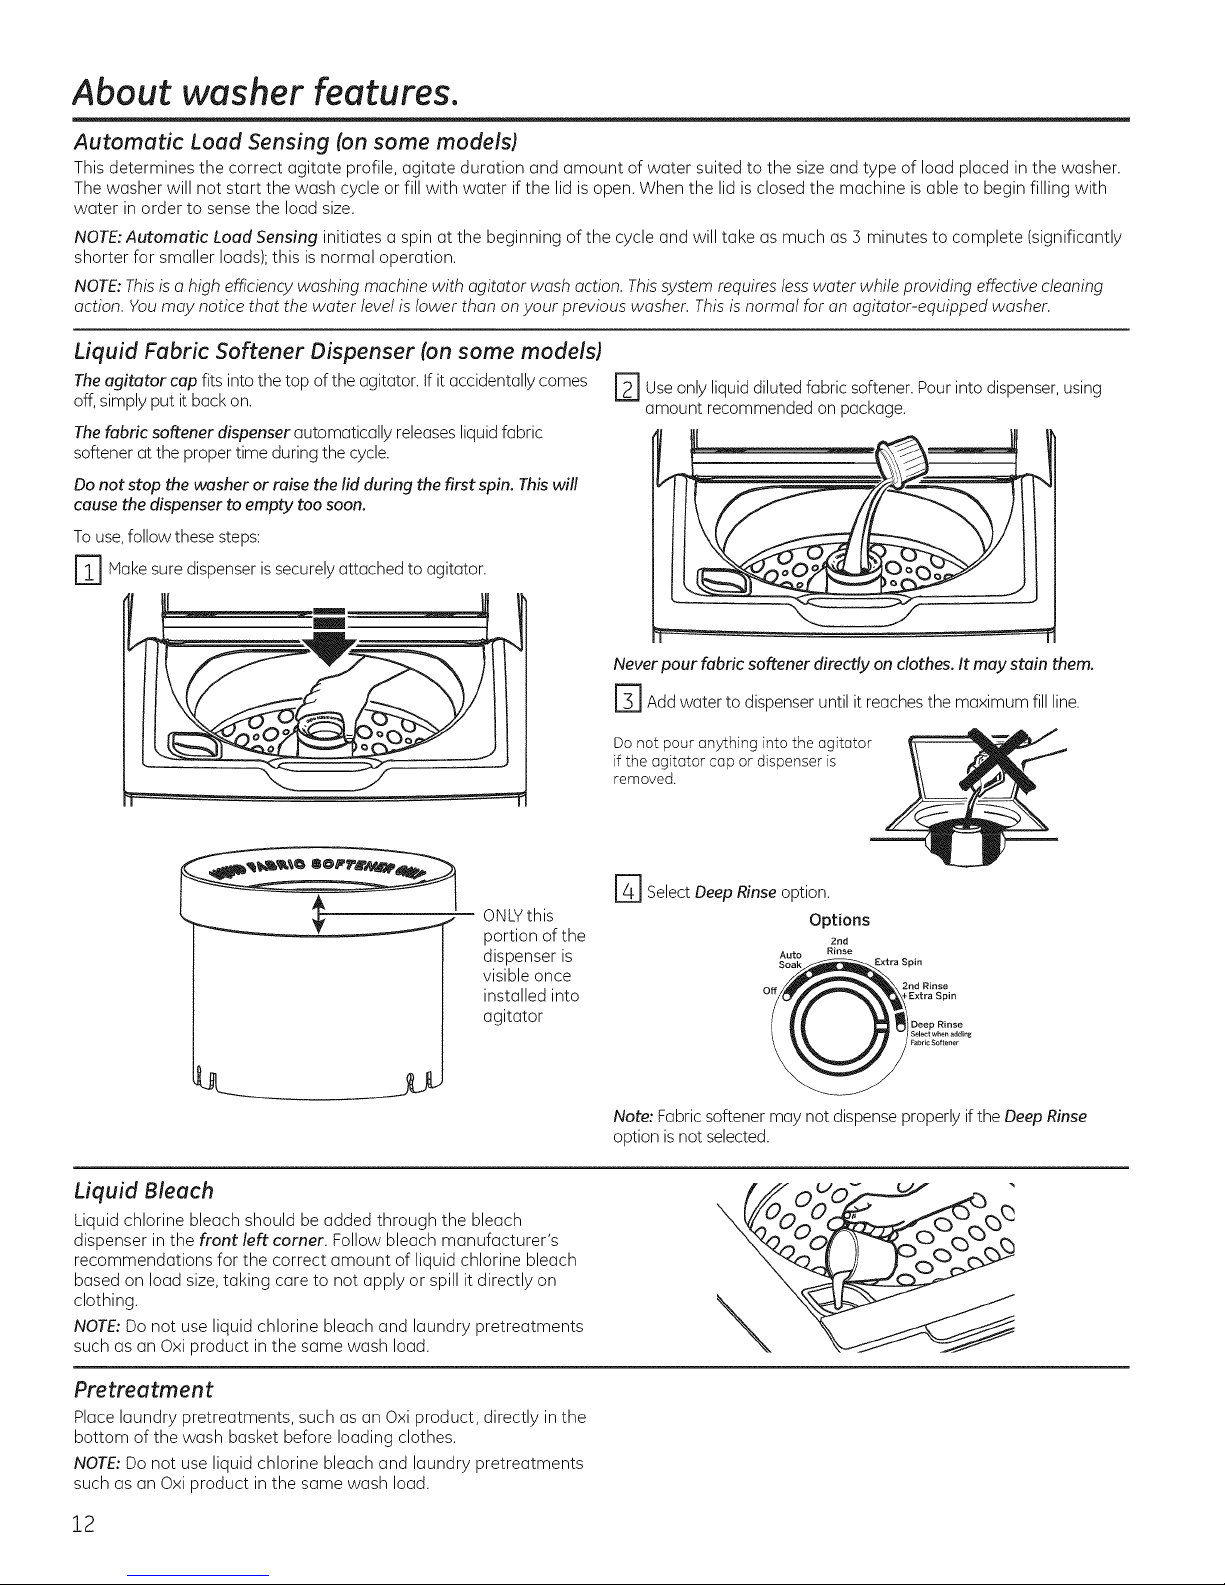
Liquid Fabric Softener Dispenser (on some models)
Theagitator cap fits into the top of the agitator. If it accidentally comes
off, simply put it back on.
Thefabric softener dispenser automatically releases liquidfabric
softener at the proper time during the cycle.
Do not stop the washer or raise the lid during the first spin. This will
cause the dispenser to empty too soon.
To use,follow these steps:
D Makesure dispenser securely agitator.
is attached to
r21 use only liquid Pour into dispenser,using
amount recommended on package.
Never pour fabric softener directly on clothes. It may stain them.
diluted fabric softener.
ONLYthis
portion of the
dispenser is
visible once
installed into
agitator
Liquid Bleach
Liquid chlorine bleach should be added through the bleach
dispenser in the front left corner. Follow bleach manufacturer's
recommendations for the correct amount of liquid chlorine bleach
based on load size, taking care to not apply or spill it directly on
clothing.
NOTE:Donot use liquid chlorine bleach and laundry pretreatments
such as an Oxi product in the same wash load.
F_l Add water to dispenser until it reaches the maximum fill line.
Do not pour anything into the agitator
if the (]gitator cop or dispenser is
removed.
F_ Select Deep Rinseoption.
Options
2rid
Rinse
Soak
2nd Rinse
I-Extra Spin
Deep Rinse
Note: Fabric softener may not dispense properly if the Deep Rinse
option is not selected.
0 0-
Pretreatment
Place laundry pretreatments, such as an Oxi product, directly in the
bottom of the wash basket before loading clothes.
NOTE:Donot use liquid chlorine bleach and laundry pretreatments
such as an Oxi product in the same wash load.
12
Page 13
Care GEAppliances.comand cleaning of the washer.
Exterior of the Washer
immediately wipe off any spills with a damp cloth.
Interior of the Washer
Leave the lid open after washing to allow
moisture to evaporate, if you want to clean the
basket, use a clean soft cloth dampened with
liquid detergent; then rinse. (Do not use harsh or
gritty cleaners.)
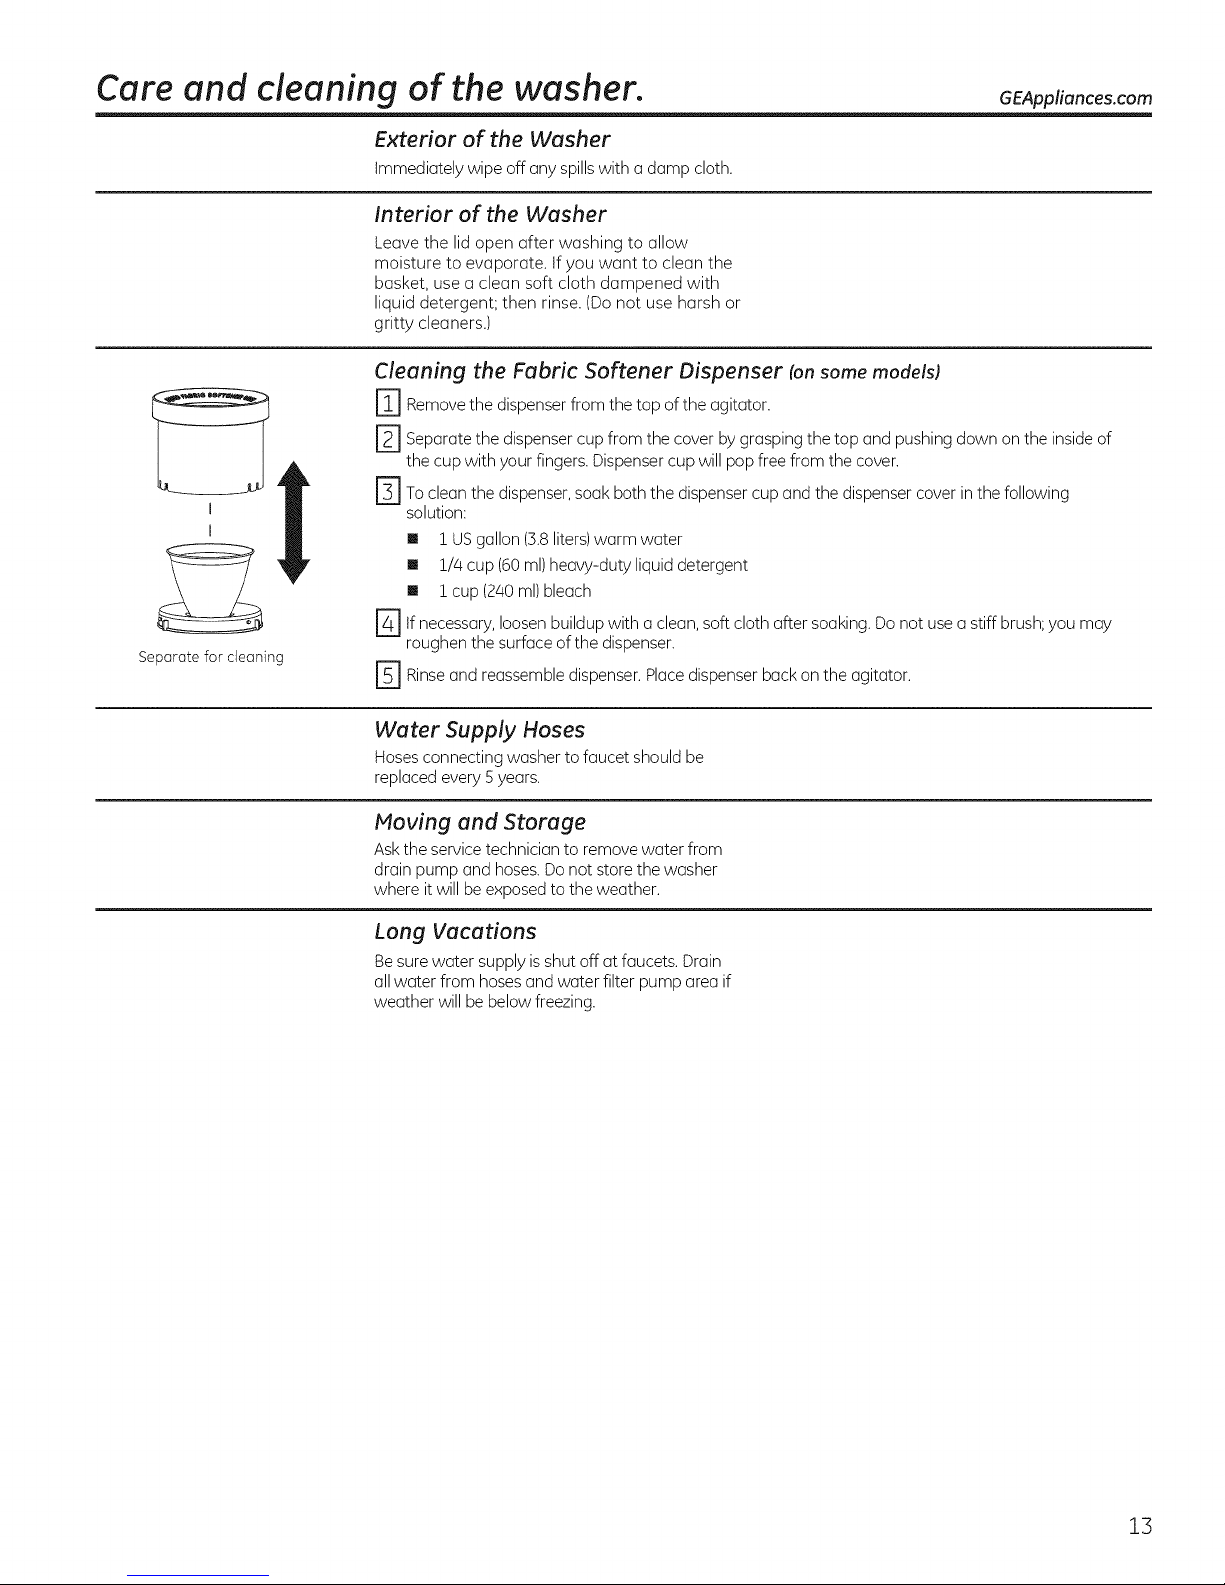
Cleaning the Fabric Softener Dispenser (on some modelsl
r_ Remove the dispenser from the top of the agitator.
dispenser by
loosen with soft cloth after Do stiff
cup
dispenser. dispenser on
I
!
Separate for cleaning
D Separate the from the the and down the inside of
the cup with your fingers. Dispensercup will pop free from the cover.
D To cleanthe dispenser,soak both the dispenser cup and the dispensercover in the following
solution:
[] 1 USgallon (5.8liters)warm water
[] 1/4 cup (60ml)heavy-duty liquid detergent
[] 1cup (240 ml)bleach
r_]if necessary, buildup a clean, soaking, not use a brush;you may
roughen the surface of the dispenser.
r51 Rinseand reassemble Place back the
cover grasping top pushing on
agitator.
Water Supply Hoses
Hoses connecting washer to faucet should be
replaced every 5 years.
Moving and Storage
Ask the service technician to remove water from
drain pump and hoses. Do not store the washer
where it willbe exposed to the weather.
Long Vacations
Be sure water supply is shut off at faucets. Drain
all water from hoses and water filter pump area if
weather will be below freezing.
13
Page 14
Insta atio
W her
I structi
If you have any questions, call 800.GE.CARES (800.432.2737)
or visit our Website at: GEAppliances.com
In Canada, call 1.800.561.3344 or visit www.GEAppliances.ca
This is the safety alert symbol. This symbol alerts you to potential hazards that can kill you or hurt you and others.
A
All safety messages will follow the safety alert symbol and the word "DANGER","WARNING", or "CAUTION".These
words are defined as:
Indicates a hazardous situation which, if not avoided, will result in death or serious injury.
Indicates a hazardous situation which, if not avoided, could result in death or serious injury.
Indicates a hazardous situation which, if not avoided, could result in minor or moderate injury.
BEFORE YOU BEGIN
Read these instructions completely and carefully.
. IMPORTANT -Savetheseinstructions
for local inspector's use.
. IMPORTANT - ObserveaI,governing
codes and ordinances.
. Note to Installer - Be sure to leave these
instructions with the Consumer.
. Note to Consumer - Keepthese instructions
for future reference.
. Skill level - Installation of this appliance requires
basic mechanical and electrical skills.
. Completion time - 1-3 hours
. Proper installation isthe responsibility of the installer.
. Product failure due to improper installation is not
covered under the Warranty.
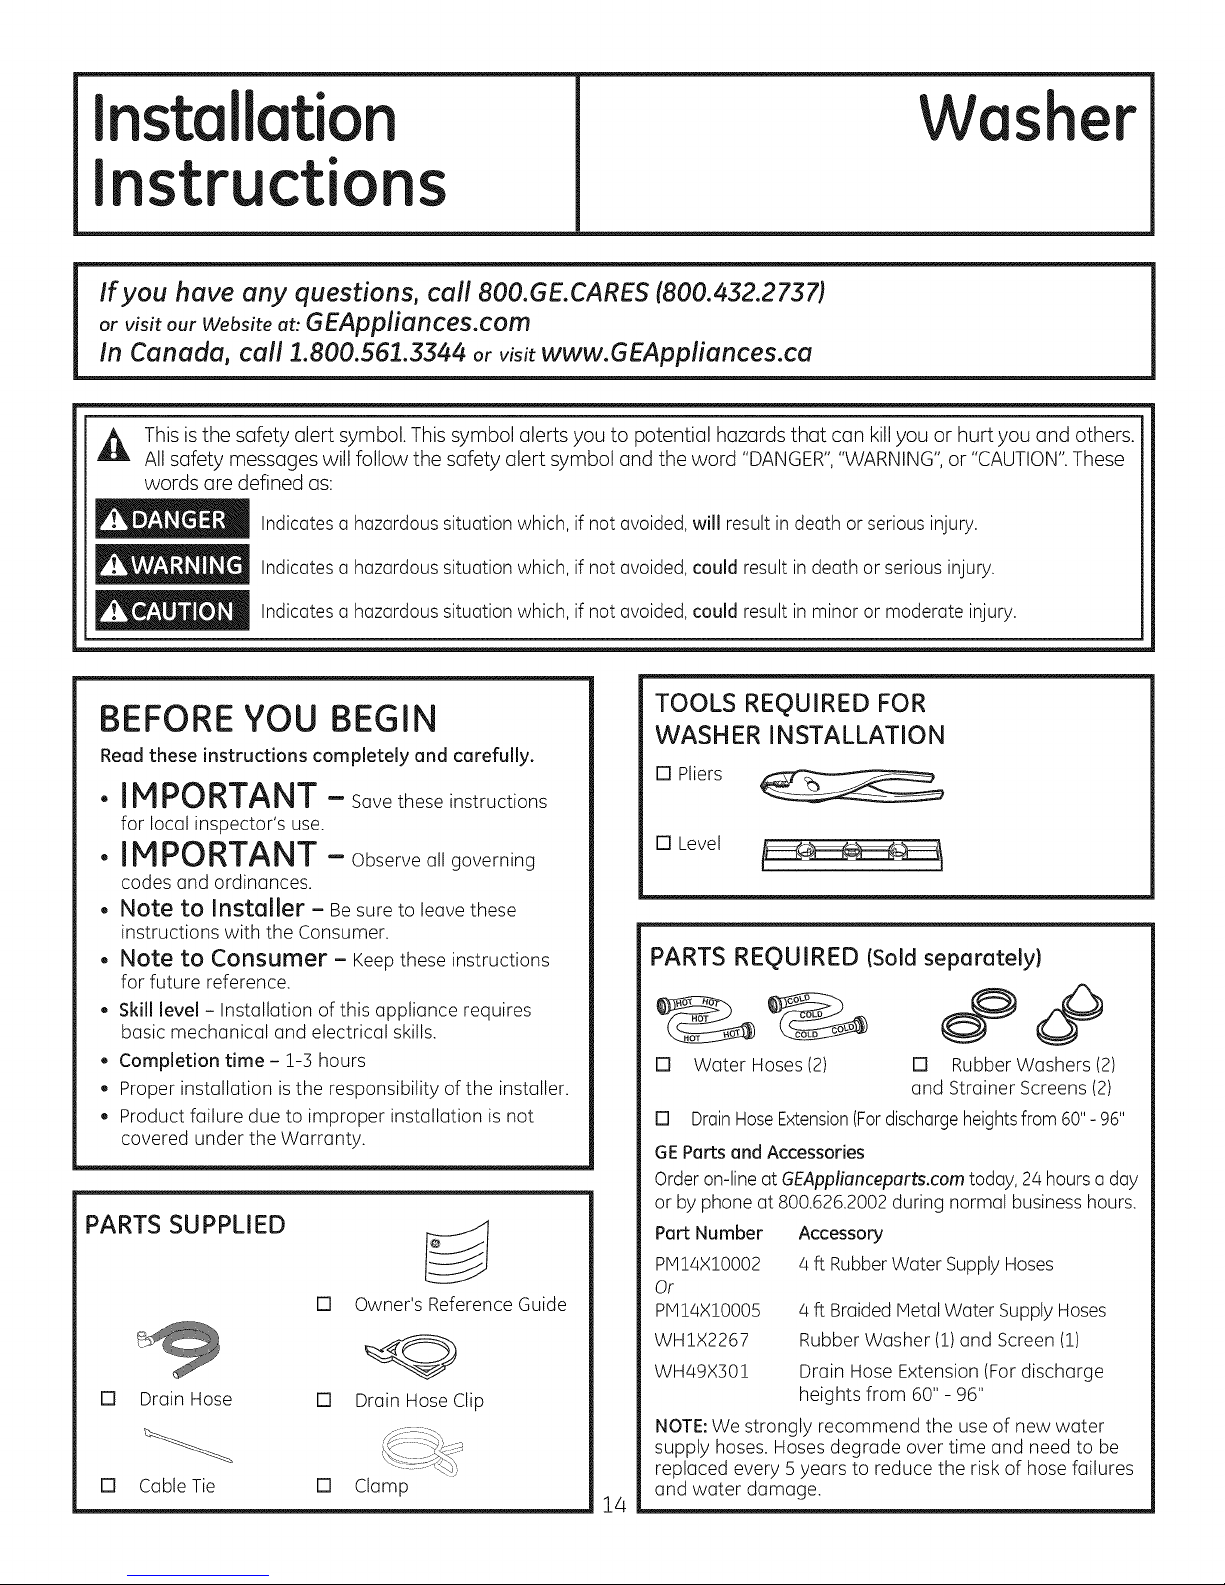
PARTS SUPPLIED
U
[]
Owner's Reference Guide
[] Drain Hose
[] Cable Tie
[]
Drain Hose Clip
[] Clamp
TOOLS REQUIRED FOR
WASHER INSTALLATION
[] Pliers
PARTS REQUIRED (Sold separately}
[] Water Hoses(2)
[] DrainHoseExtension(Fordischargeheightsfrom 60"-96"
GEParts and Accessories
Orderon-line at GEApplianceparts.com today, 24 hours a day
or by phone at 800.626.2002during normal business hours.
Part Number Accessory
PMI4XIO002
Or
PMI4XIO005
WH1X2267
WH49X301
NOTE:We strongly recommend the use of new water
supply hoses. Hoses degrade over time and need to be
replaced every 5years to reduce the risk of hose failures
and water damage.
14
4 ft RubberWater Supply Hoses
4 ft Braided Metal Water SupplyHoses
Rubber Washer (1)and Screen (1)
Drain Hose Extension (Fordischarge
heights from 60" - 96"
[] Rubber Washers (2)
and Strainer Screens (2)
o
Page 15
Installation Instructions
LOCATION OF YOUR WASHER
Do Not Install the Washer:
1.In an area exposed to dripping water or outside
weather conditions. The ambient temperature
should never be below 60°F (!5.6°C) for proper
washer operation.
2.In an area where it will come in contact with curtains or
drapes.
S.On carpet. The floor MUST be a hard surface with
a maximum slope of 1/2" per foot (1.27cm per
30 cm).To make sure the washer does not vibrate
or move, you may have to reinforce the floor.
NOTE:Iffloor is in poor condition, use 3/4" impregnated
plywood sheet solidly attached to existing floor covering.
IMPORTANT: Minimum Installation Clearances
- Alcove or Closet
. Ifyour washer is approved for installation in an alcove
or closet, there will be a label on the back of the
machine describing requirements.
. Hinimum clearance between washer and adjacent
walls or other surfaces: 0" either side, 2"front, 3"
rear.Verticalspace from floor to overhead shelving,
cabinets, ceiling, etc. = 60".
. Closet doors must be Iouvered or otherwise ventilated
and require 60 square inches of opening near the top
of the door and 60 square inches near the bottom of
the door. If a dryer is located in the same closet, then
these areas must be doubled.
NOTE:The clearances stated on this label are minimums.
Consideration must be given to providing adequate
clearances for installing and servicing.
WATER SUPPLY REQUIREMENTS
WATERPRESSURE- Must be20psiminimum to 120 psi maximum.
WATERTEHPERATURE- Householdwater heater should besetto deliver water at 120°to !50°F (50°to 66°@TOTHEWASHERwhen
hotwash isselected.
SHUTOFFVALVES- Bothhot and cold shutoff valves (faucets)should be supplied.
DRAIN- Water should be drained into standpipe. Dischargeheight HUSTNOTBELESSTHAN30 INCHES,and no more than 8 feet
above the base ofthe washer.Standpipe must be 1-1/2 inches minimum inside diameter and must be open to atmosphere.
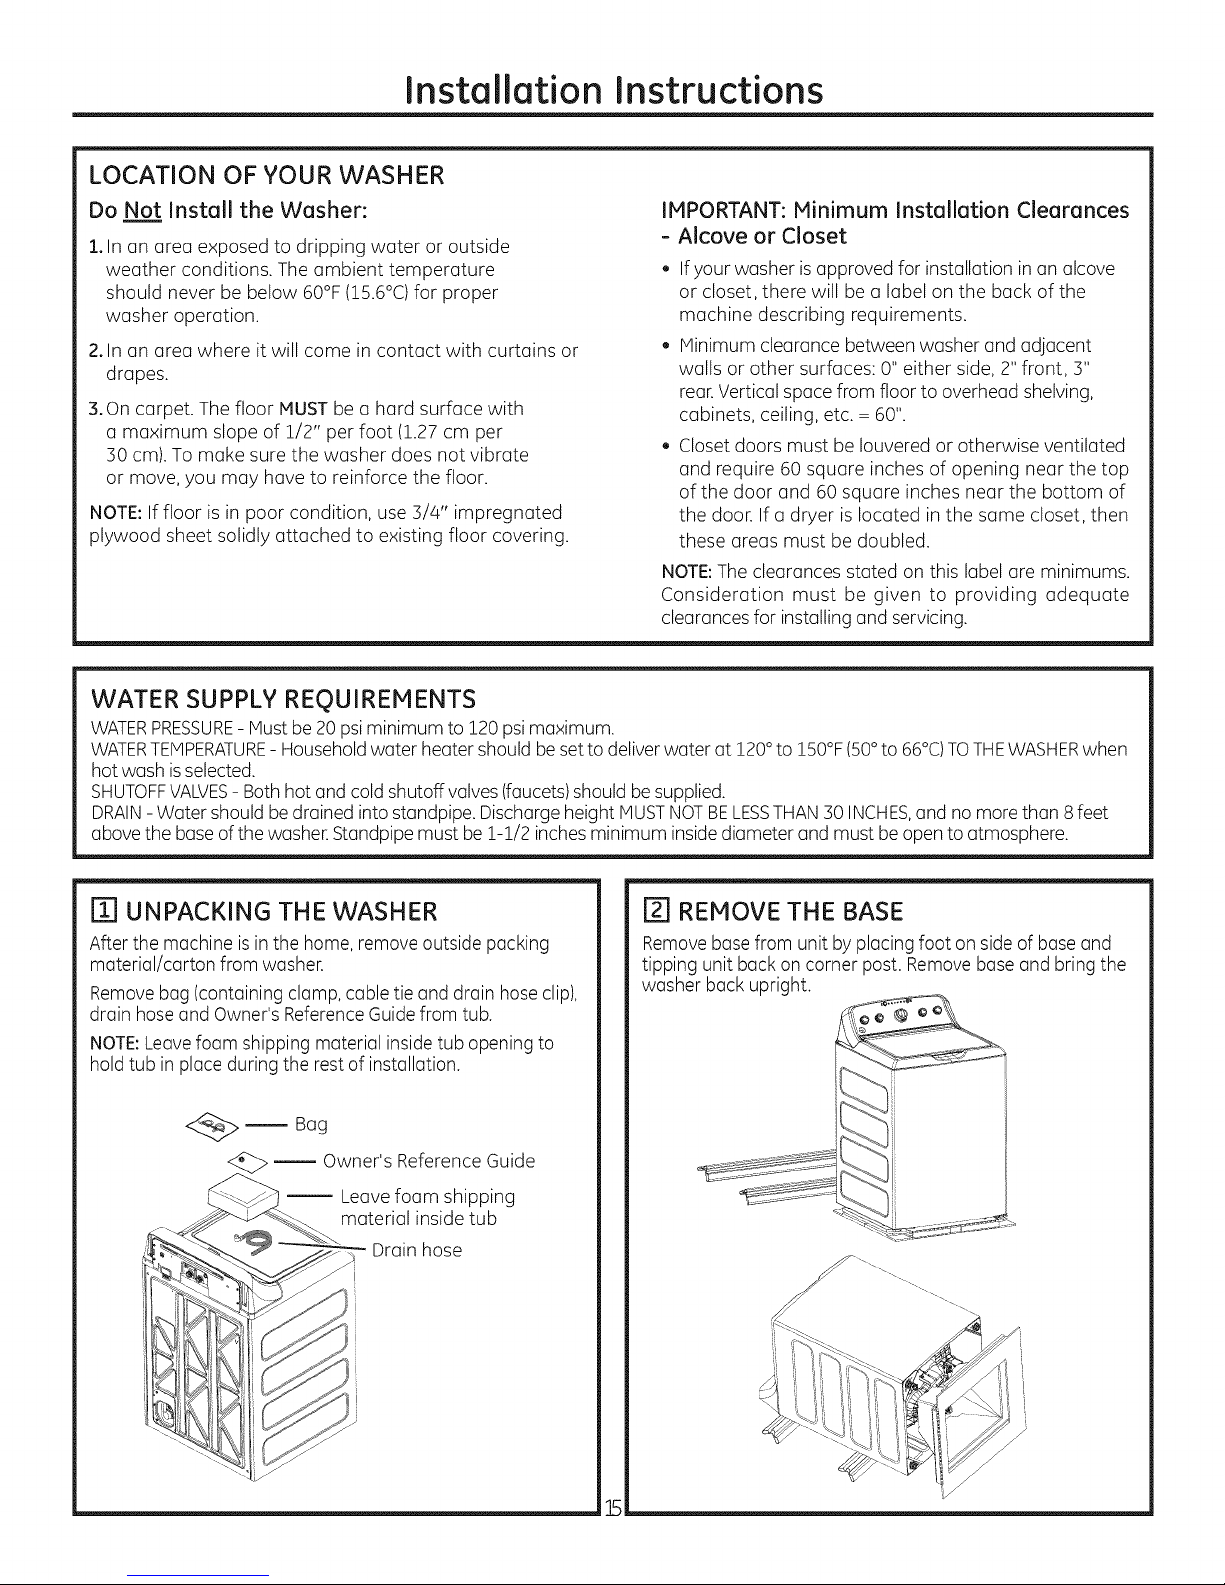
[!] UNPACKING THE WASHER
After the machine isinthe home, remove outside packing
material/carton from washer.
Removebag (containing clamp, cable tie and drain hose clip),
drain hoseand Owner's ReferenceGuidefrom tub.
NOTE:Leavefoam shipping material inside tub opening to
hold tub in placeduring the rest of installation.
_._ _ Bag
Owner's Reference Guide
Leave foam shipping
material inside tub
F2]REMOVE THE BASE
Removebase from unit by placing foot on sideof base and
tipping unit back on corner post. Remove baseand bring the
washer back upright.
5
Page 16
Installation Instructions
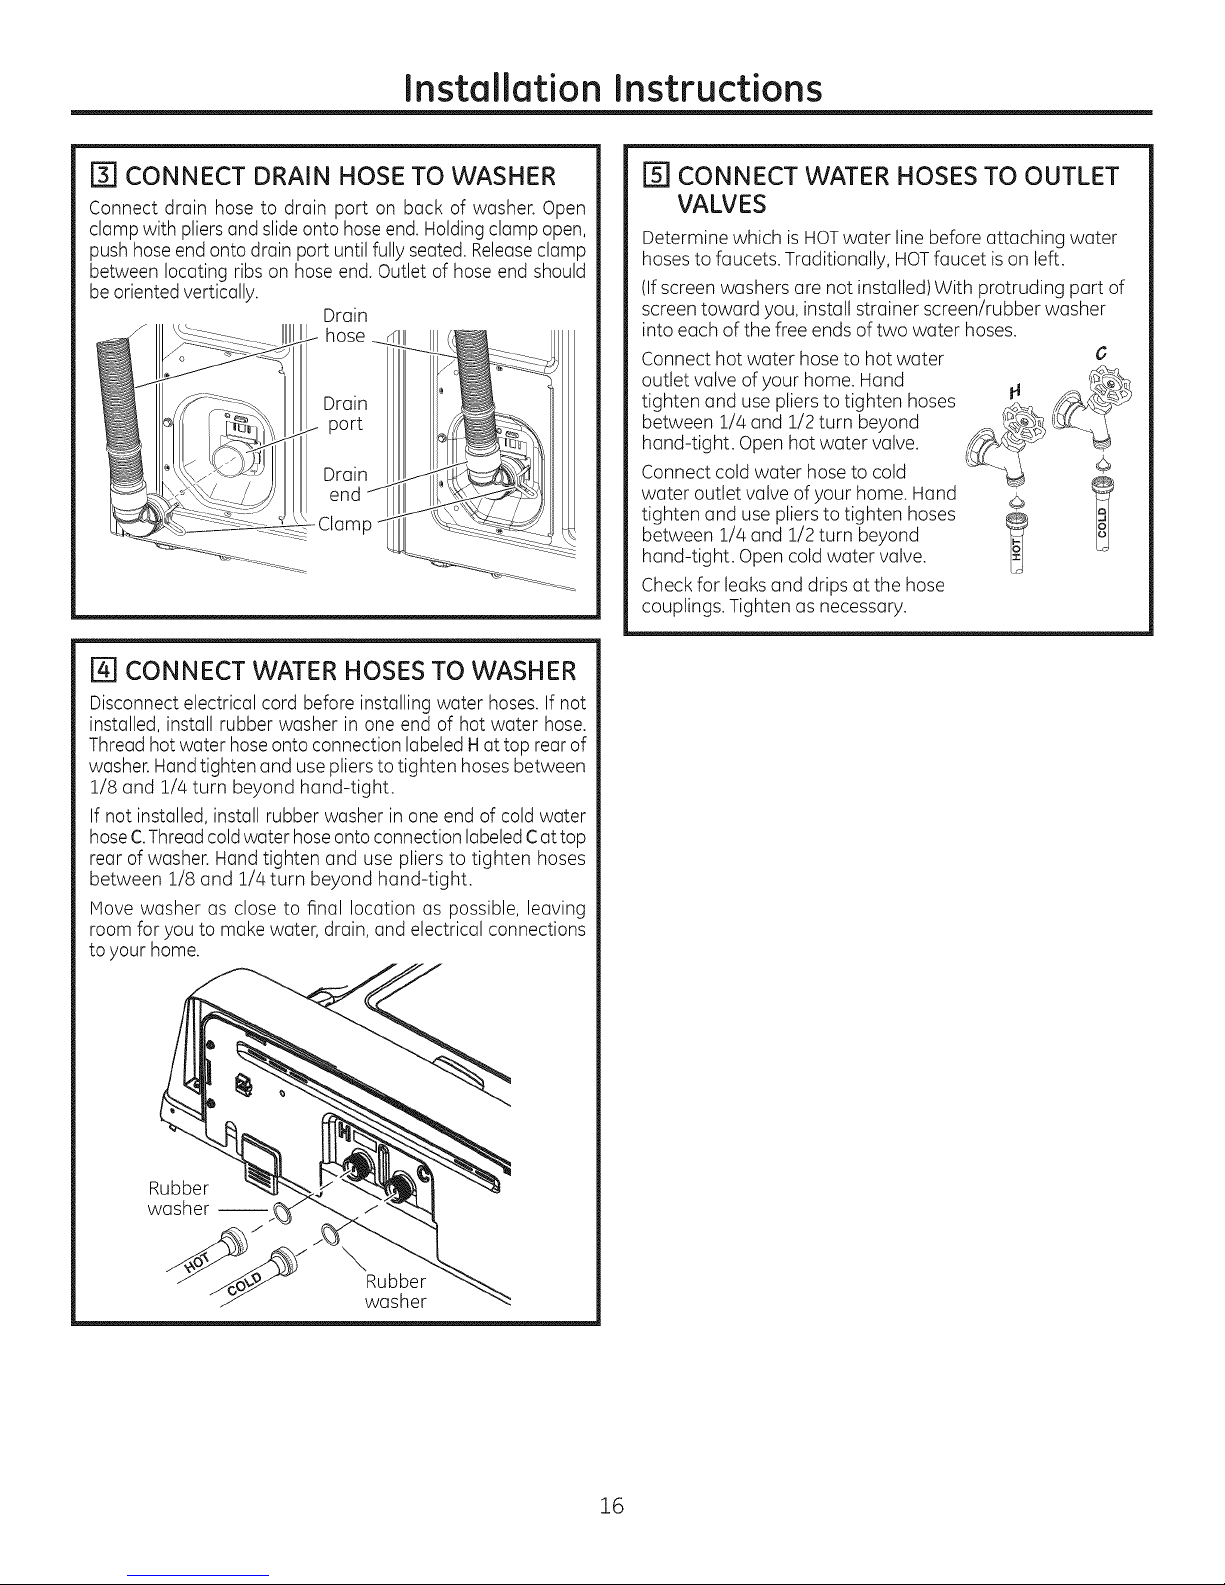
_] CONNECT DRAIN HOSE TO WASHER
Connect drain hose to drain port on back of washer. Open
clamp with pliers and slideonto hoseend. Holdingclamp open,
pushhose end onto drain port until fully seated. Releaseclamp
between locating ribs on hose end. Outlet of hoseend should
be orientedvertically.
Drain
[_] CONNECT WATER HOSES TO WASHER
Disconnect electrical cord before installing water hoses.If not
installed, install rubber washer in one end of hot water hose.
Thread hot water hose onto connection labeled Hat top rear of
washer.Hand tighten and use pliers to tighten hoses between
1/8 and 1/4 turn beyond hand-tight.
If not installed, install rubber washer in one end of cold water
hoseC.Threadcoldwater hose ontoconnection labeledCattop
rear of washer.Hand tighten and use pliers to tighten hoses
between 1/8 and 1/4 turn beyond hand-tight.
Move washer as close to final location as possible, leaving
room for you to make water, drain, and electrical connections
to your home.
_] CONNECT WATER HOSES TO OUTLET
VALVES
Determine which is HOTwater line before attaching water
hoses to faucets. Traditionally, HOTfaucet ison left.
(If screen washers are not installed) With protruding part of
screen toward you, install strainer screen/rubber washer
into each of the free ends of two water hoses.
Connect hot water hose to hot water
outlet valve of your home. Hand
tighten and use pliers to tighten hoses
between 1/4 and 1/2 turn beyond
hand-tight. Open hot water valve.
Connect cold water hose to cold
water outlet valve of your home. Hand
tighten and use pliers to tighten hoses
between 1/4 and 1/2 turn beyond
hand-tight. Open cold water valve.
Check for leaks and drips at the hose
couplings. Tighten as necessary.
Rubber
washer --
\
Rubber
washer
16
Page 17
Installation Instructions
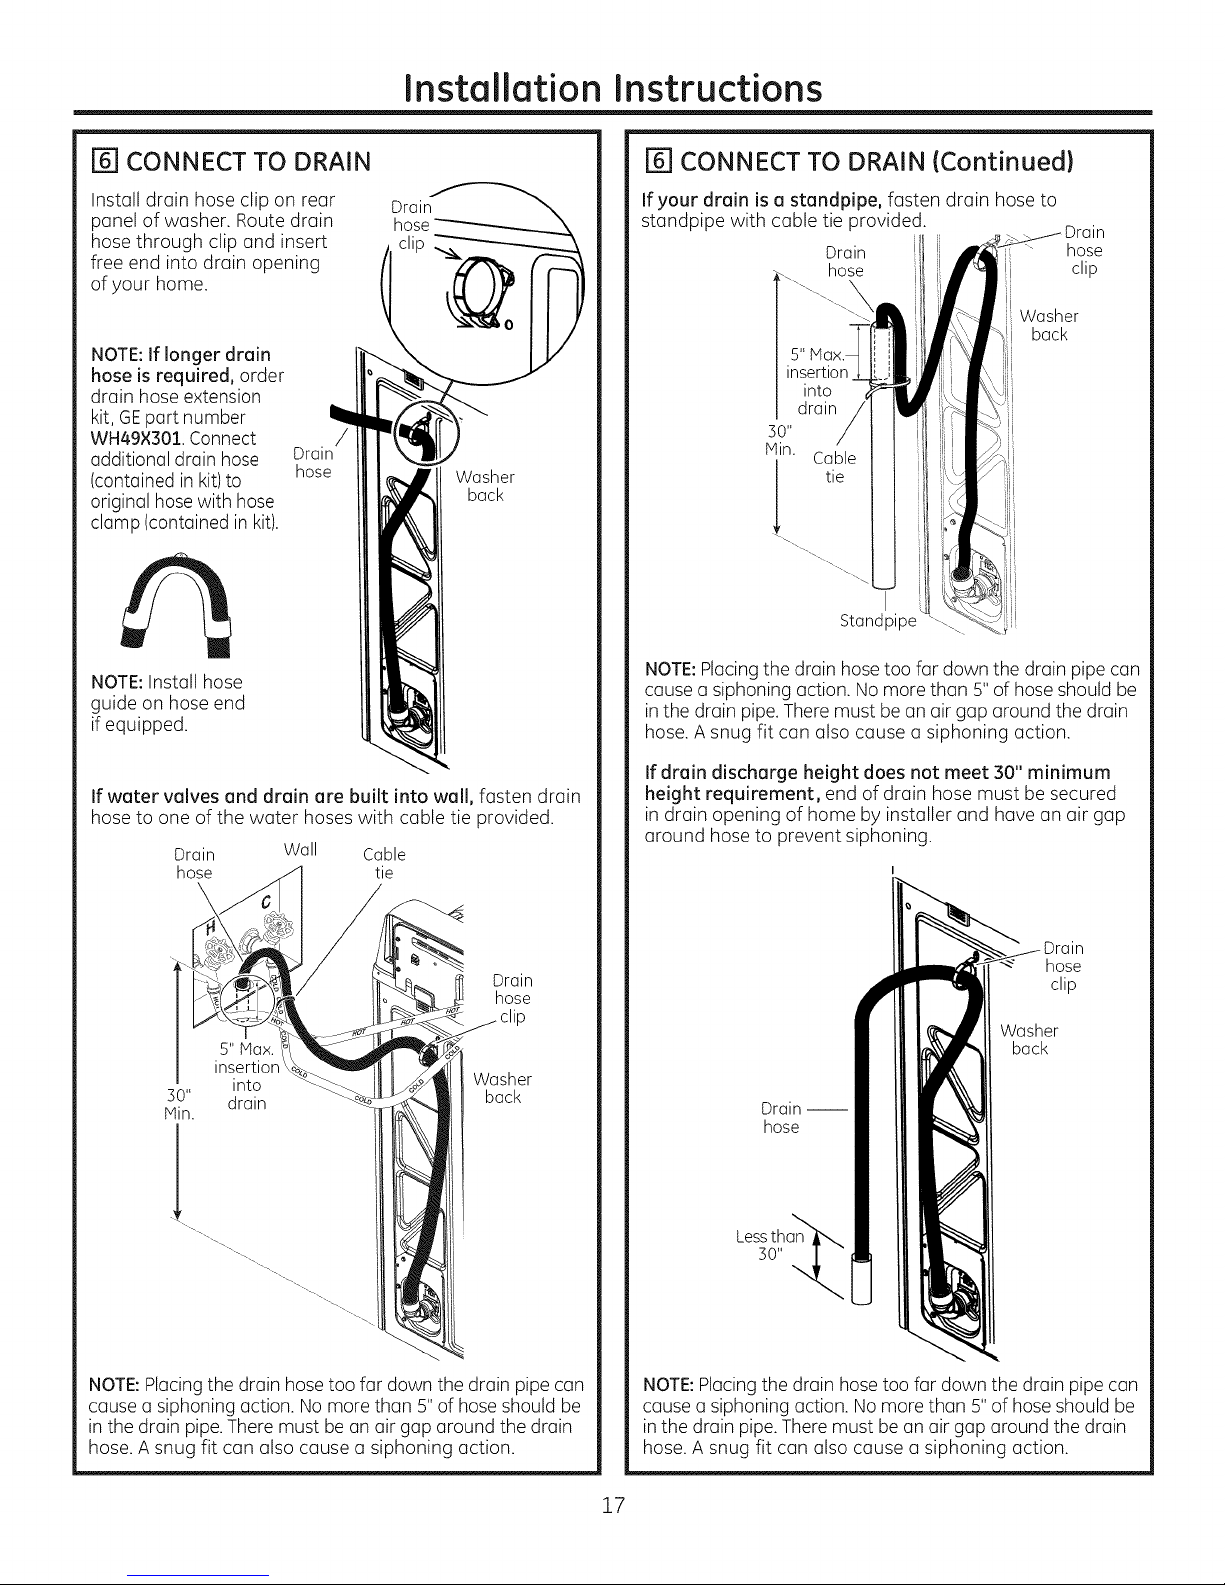
[] CONNECT TO DRAIN
Install drain hose clip on rear
panel of washer. Route drain
hose through clip and insert
free end into drain opening
of your home.
NOTE:If longer drain
hose is required, order
drain hose extension
kit, GEpart number
WH49×301. Connect
additional drain hose
(contained in kit)to
original hosewith hose
clamp (contained in kit).
NOTE:Install hose
guide on hose end
if equipped.
Drain/
hose
_rain_
clip__
)
Washer
back
CONNECT TO DRAIN (Continued}
If your drain is a standpipe, fasten drain hose to
standpipe with cable tie provided.
Drain
hose
Standpipe
NOTE:Placing the drain hosetoo far down the drain pipe can
cause a siphoning action. No more than 5" of hose should be
in the drain pipe.There must be an air gap around the drain
hose. A snug fit can also cause a siphoning action.
hose
clip
Washer
back
If water valves and drain are built into wall, fasten drain
hose to one of the water hoses with cable tie provided.
Drain Wall Cable
hose tie
\
Drain
hose
Washer
back
If drain discharge height does not meet 30" minimum
height requirement, end of drain hose must be secured
in drain opening of home by installer and have an air gap
around hose to prevent siphoning.
hose
clip
Washer
back
Drain --
hose
NOTE:Placing the drain hose too far down the drain pipe can
cause a siphoning action. Nomore than 5" of hose should be
in the drain pipe.There must be an air gap around the drain
hose. A snug fit can also cause a siphoning action.
NOTE:Placing the drain hose too far down the drain pipe can
cause a siphoning action. No more than 5" of hose should be
in the drain pipe.There must be an air gap around the drain
hose. A snug fit can also cause a siphoning action.
17
Page 18
Installation Instructions
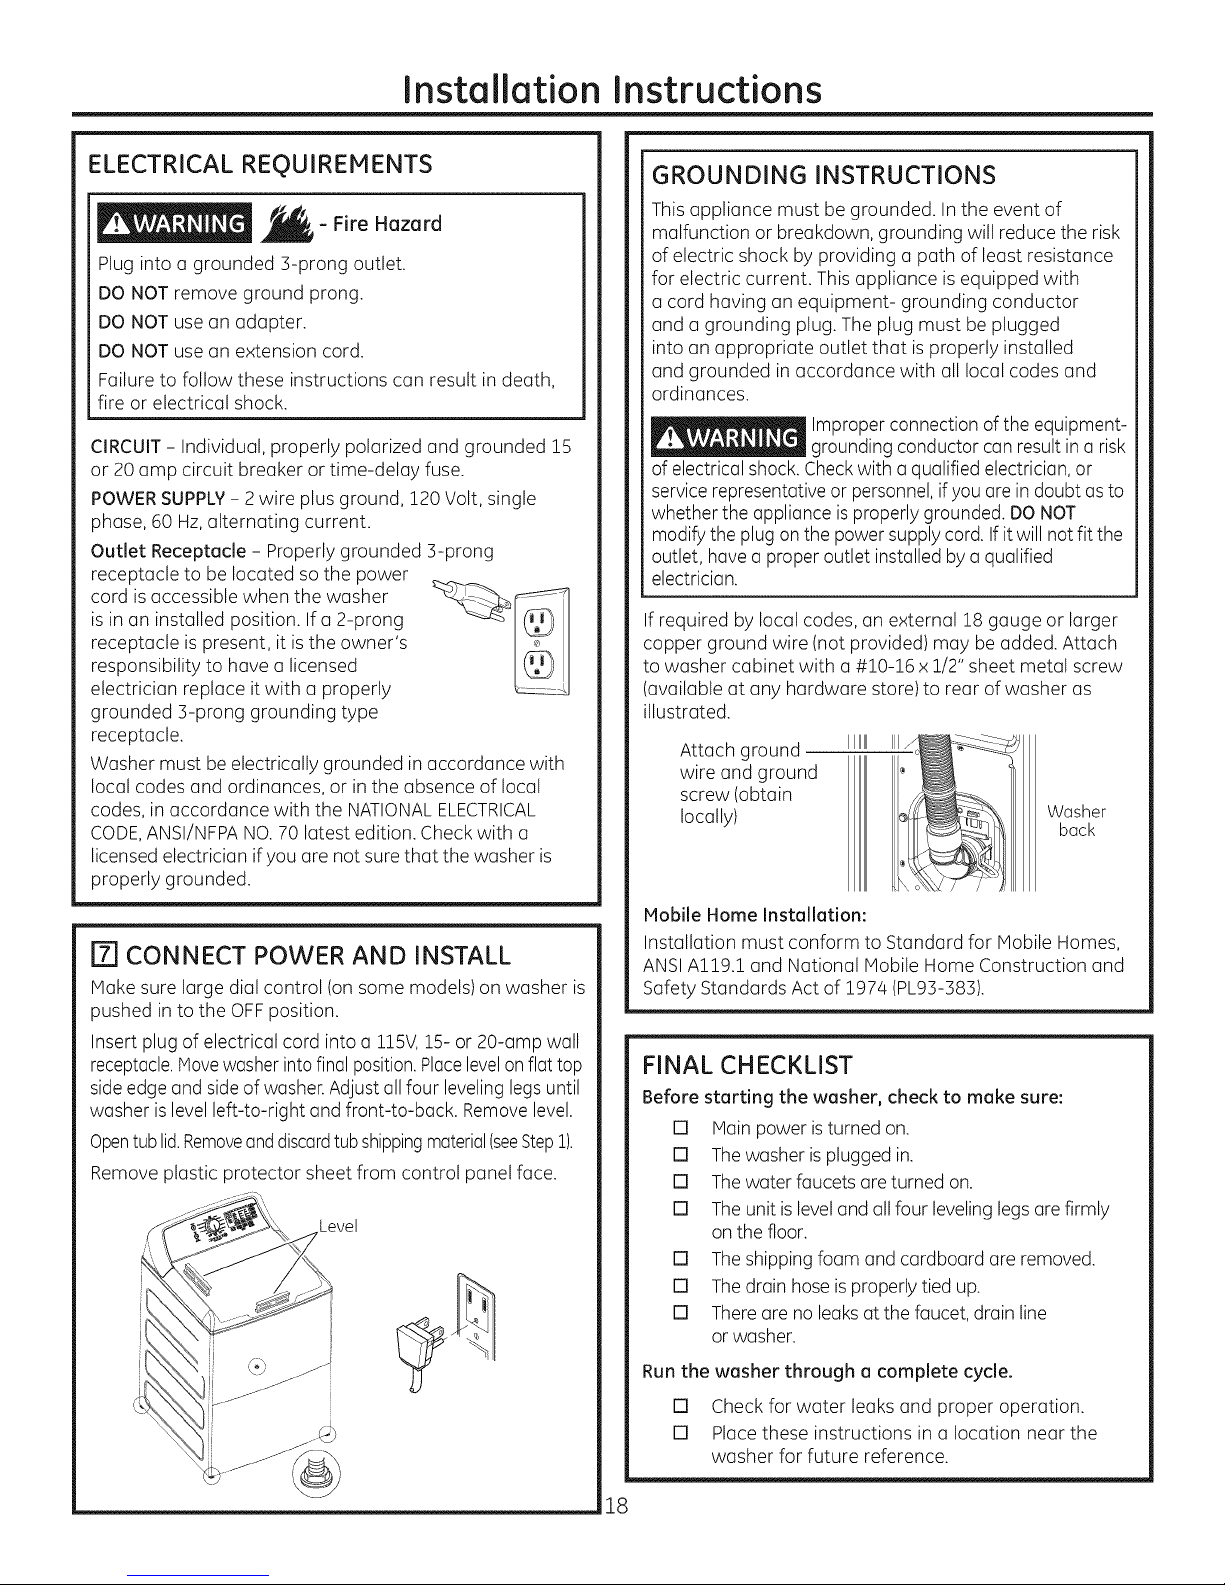
ELECTRICAL REQUIREMENTS
- Fire Hazard
Plug into a grounded 3-prong outlet.
DO NOT remove ground prong.
DO NOT use an adapter.
DO NOT use an extension cord.
Failure to follow these instructions can result in death,
fire or electrical shock.
CIRCUIT- Individual, properly polarized and grounded 25
or 20 amp circuit breaker or time-delay fuse.
POWERSUPPLY- 2 wire plus ground, 120 Volt, single
phase, 60 Hz,alternating current.
Outlet Receptacle - Properly grounded 3-prong
receptacle to be located so the power
cord isaccessible when the washer
is in an installed position. If a 2-prong
receptacle is present, it is the owner's
responsibility to have a licensed
electrician replace it with a properly
grounded 3-prong grounding type
receptacle.
Washer must be electrically grounded in accordance with
local codes and ordinances, or in the absence of local
codes, in accordance with the NATIONALELECTRICAL
CODE,ANSI/NFPANO.70 latest edition. Check with a
licensed electrician ifyou are not sure that the washer is
properly grounded.
[] CONNECT POWER AND INSTALL
Make sure large dial control (on some models) on washer is
pushed in to the OFFposition.
Insert plug of electrical cord into a 115V,15- or 20-amp wall
receptacle.Movewasher intofinal position.Placelevelon flat top
sideedgeand sideof washer.Adjust all four levelinglegs until
washer islevel left-to-right and front-to-back. Removelevel.
Opentub lid.Removeanddiscardtubshippingmaterial(seeStep1).
Remove plastic protector sheet from control panel face.
Level
GROUNDING INSTRUCTIONS
This appliance must be grounded. In the event of
malfunction or breakdown, grounding will reduce the risk
of electric shock by providing a path of least resistance
for electric current. This appliance is equipped with
a cord having an equipment- grounding conductor
and a grounding plug. The plug must be plugged
into an appropriate outlet that isproperly installed
and grounded in accordance with all local codes and
ordinances.
Improper connection of the equipment-
grounding conductor can result in a risk
of electrical shock. Checkwith a qualified electrician, or
service representative or personnel,ifyou are in doubt as to
whether the appliance isproperly grounded. DO NOT
modifythe plug on the power supply cord. If it will not fit the
outlet, havea proper outlet installed by a qualified
electrician.
If required by local codes, an external 18 gauge or larger
copper ground wire (not provided) may be added. Attach
to washer cabinet with a #10-16 x 1/2" sheet metal screw
(available at any hardware store) to rear of washer as
illustrated.
Attach ground
wire and ground
screw (obtain
locally)
Mobile Home Installation:
Installation must conform to Standard for Mobile Homes,
ANSIAl19.1 and National Mobile Home Construction and
Safety Standards Act of 1974 (PL93-383).
IIIIIII
Washer
back
FINAL CHECKLIST
Before starting the washer, check to make sure:
[] Main power isturned on.
[] The washer is plugged in.
[] The water faucets are turned on.
[] The unit is leveland all four leveling legsare firmly
on the floor.
[] The shipping foam and cardboard are removed.
[] The drain hose is properly tied up.
[] There are no leaks at the faucet, drain line
or washer.
Run the washer through a complete cycle.
[] Check for water leaks and proper operation.
[] Place these instructions in a location near the
washer for future reference.
18
Page 19
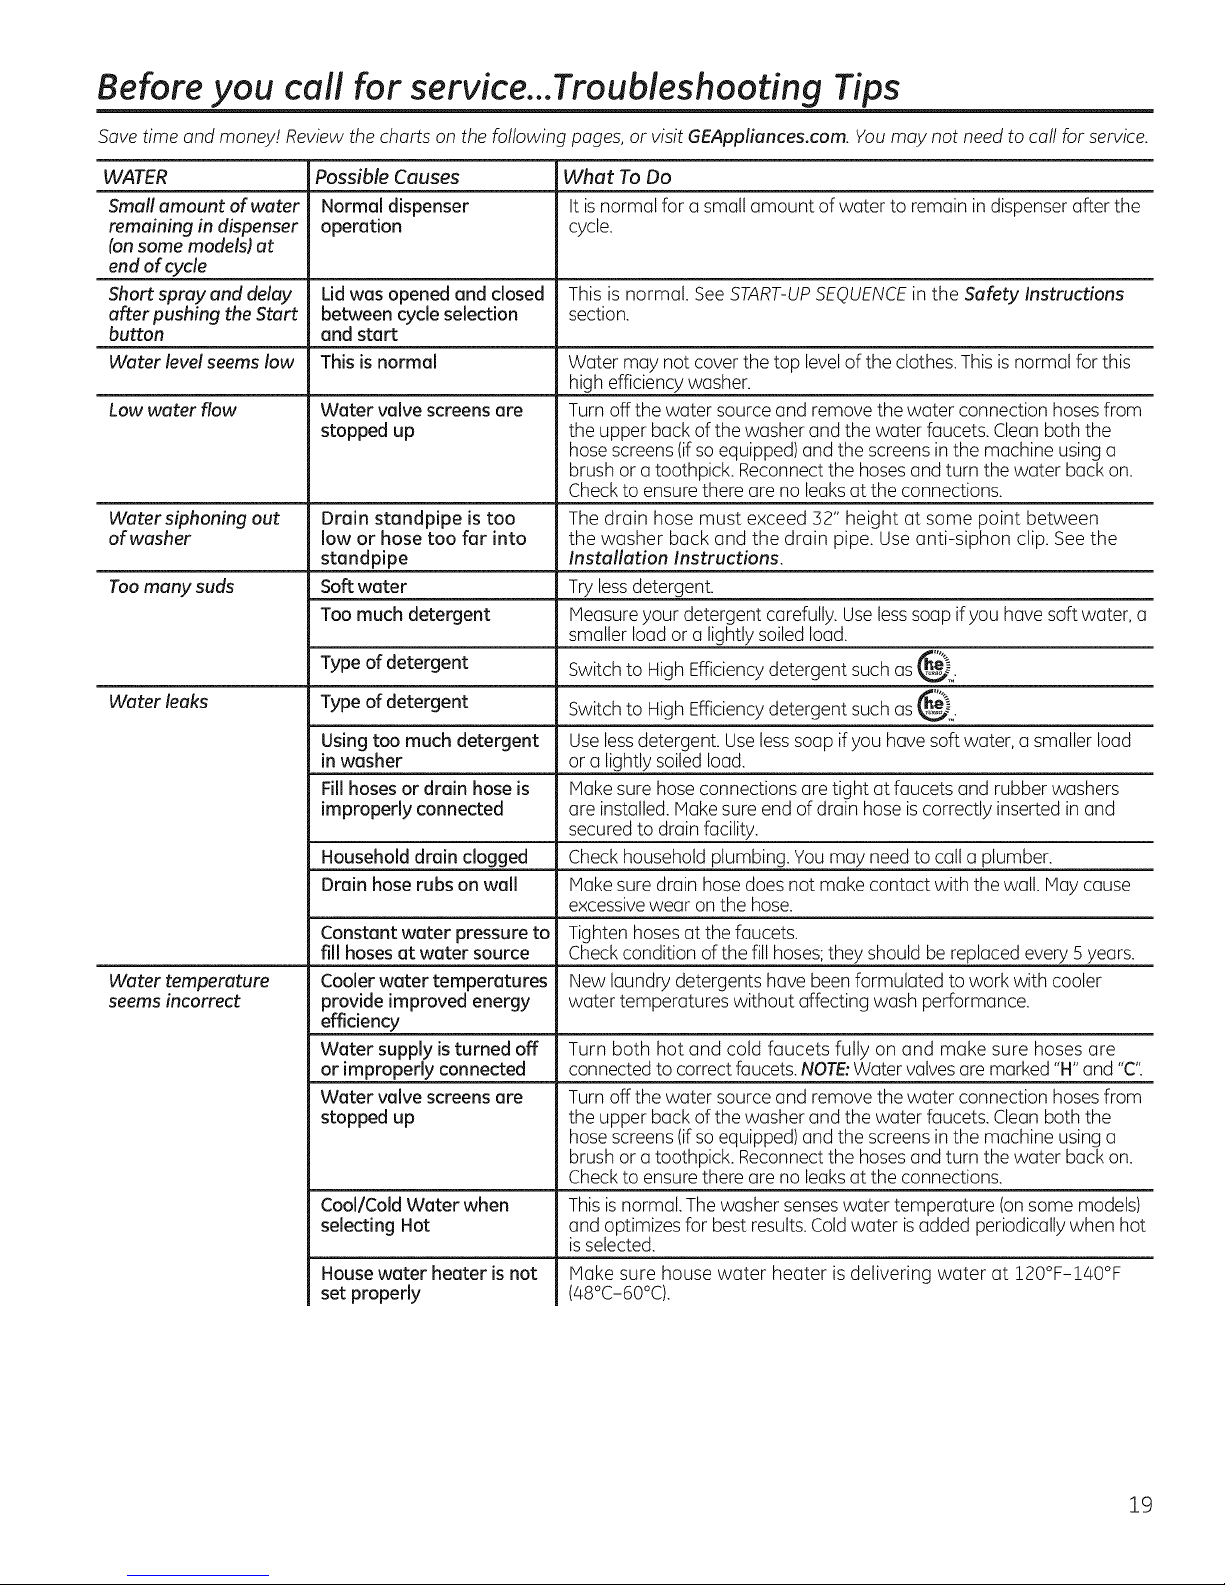
Before you call for service...Troubleshooting Tips
Save time and money! Review the charts on the following pages, or visit GEAppliances.com. You may not need to call for service.
WATER Possible Causes What To Do
Small amount of water Normal dispenser It isnormal for a small amount of water to remain in dispenserafter the
remaining in dispenser operation cycle.
(onsome models)at
end ofcycle
Short spray and delay Lidwas openedand closed This is normal. SeeSTART-UPSEOUENCEinthe Safety Instructions
after pushing the Start between cycle selection section.
button and start
Water level seems low This is normal Water may not cover the top level of the clothes. This is normal for this
high efficiency washer.
Low water flow Water valve screens are Turn off the water source and remove the water connection hoses from
stopped up the upper back of the washer and the water faucets. Clean both the
hose screens (ifso equipped) and the screens in the machine using a
brush or a toothpick. Reconnect the hoses and turn the water back on.
Check to ensure there are no leaks at the connections.
Wutersiphoning out Drain standpipe is too The drain hose must exceed 32" height at some point between
of washer low or hose too far into the washer back and the drain pipe. Use anti-siphon clip. See the
standpipe Installation Instructions.
Too many suds Soft water Tryless detergent.
Too much detergent Measure your detergent carefully. Use less soup ifyou have soft water, a
smaller loud or a lightly soiled loud.
of
Type
Water leaks
Water temperature Cooler water temperatures New laundry detergents have beenformulated to work with cooler
seems incorrect provide improved energy water temperatures without affecting wash performance.
Typeofdetergent
Using too much detergent Uselessdetergent. Uselesssoap ifyou havesoft water, a smaller load
in washer or a lightly soiled load.
Fillhosesor drain hose is Make sure hose connections are tight at faucets and rubber washers
improperly connected are installed. Makesure end of drain hose is correctly inserted in and
Household drain clogged Checkhousehold plumbing. You may need to call a plumber.
Drain hose rubs on wall Make sure drain hose does not make contact with the wall. May cause
Constant water pressure to Tighten hoses at the faucets.
fill hoses at water source Checkcondition of the fill hoses:they should be replaced every 5 years.
efficiency
Water supply is turned off Turn both hot and cold faucets fully on and make sure hoses are
or improperly connected connectedto correctfaucets.NOTE:Water valves are marked "H" and "C".
Water valve screens are Turnoff the water source and remove the water connection hosesfrom
stopped up the upper back of the washer and the water faucets. Clean both the
Cool/Cold Water when Thisisnormal. The washer senseswater temperature (on some models)
selecting Hot and optimizes for best results.Coldwater isadded periodically when hot
Housewater heater is not
set properly
detergent
Switchto High Efficiencydetergent such as_[.
Switchto High Efficiencydetergent such as_.
secured to drain facility.
excessivewear on the hose.
hose screens(ifso equipped) and the screensinthe machine using a
brush or a toothpick. Reconnectthe hoses and turn the water back on.
Checkto ensurethere are no leaksat the connections.
isselected.
Make sure house water heater is delivering water at 120°F-140°F
(48°C-60°0.
19
Page 20
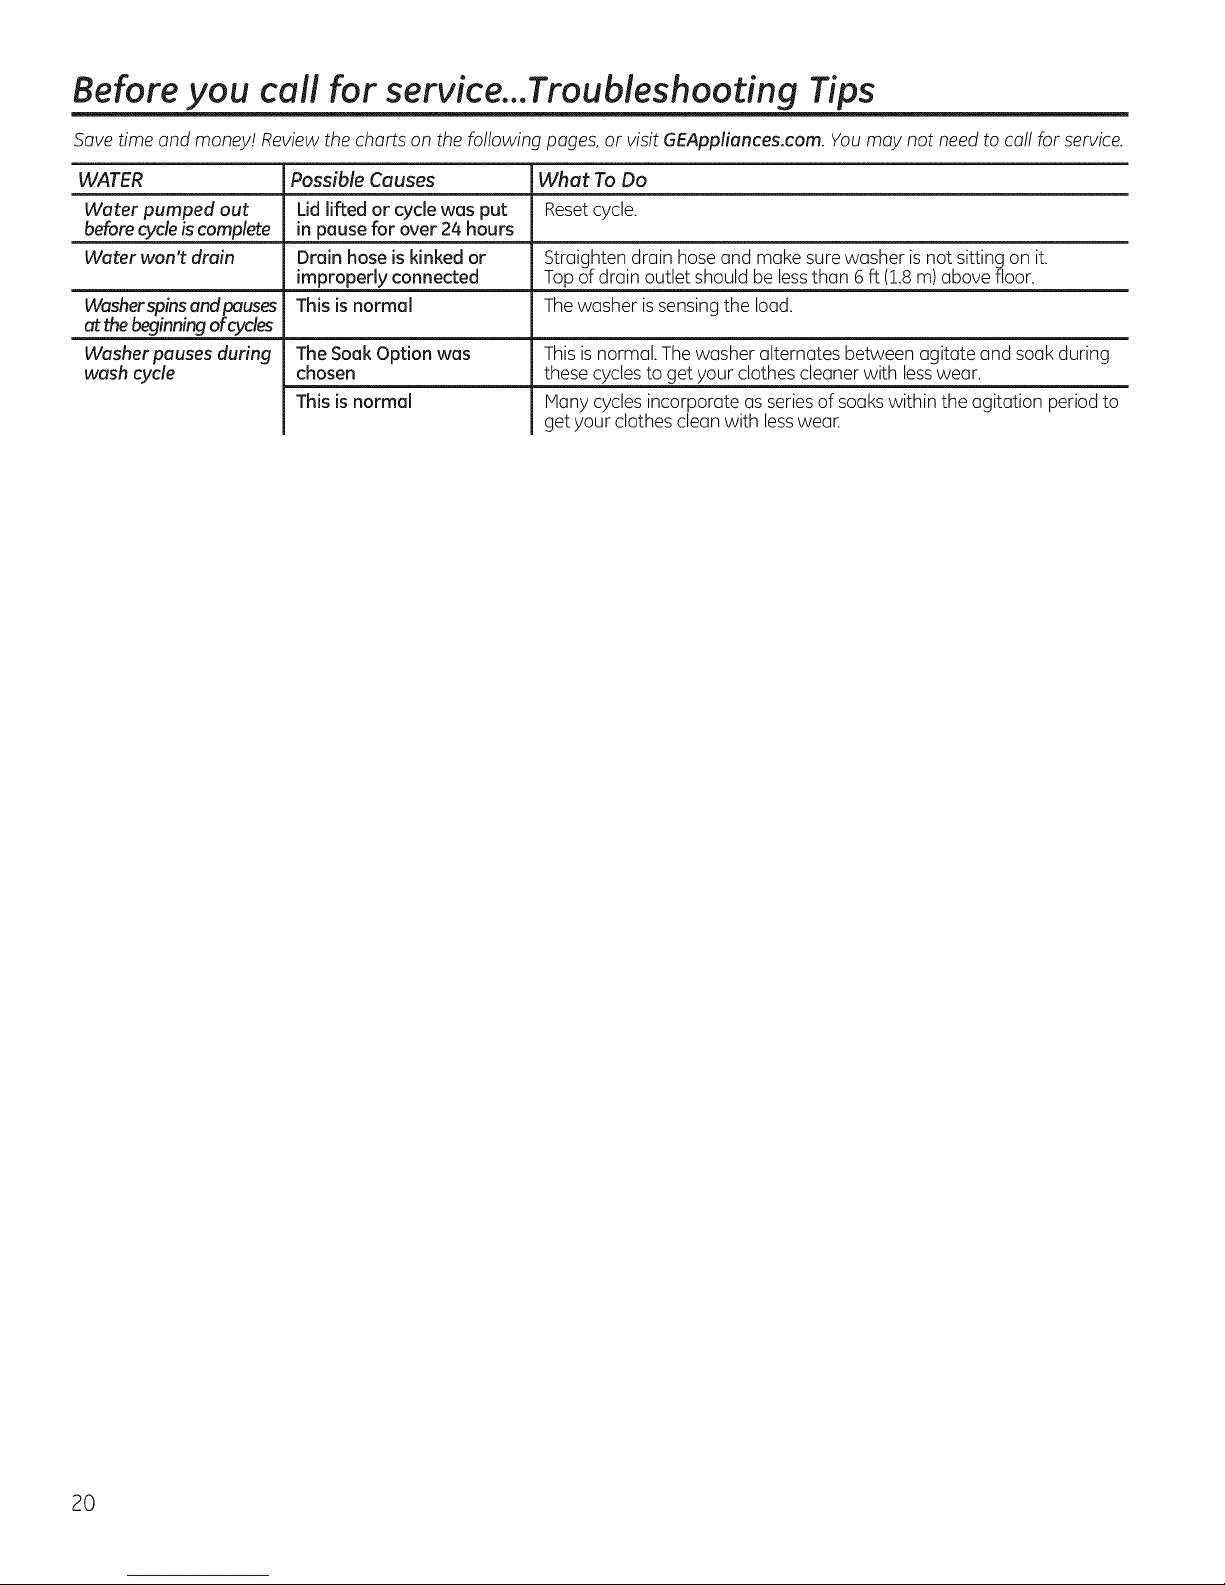
Before you call for service...Troubleshooting Tips
Save time and money! Review the charts on the following pages, or visit GEAppliances.com. You may not need to call for service.
WATER Possible Causes What To Do
Water pumped out Lidlifted or cycle was put Reset cycle.
before cycle is complete in pause for over 24 hours
Water won't drain Drain hose is kinked or Straighten drain hose and make sure washer is not sitting on it.
improperly connected Top of drain outlet should be less than 6 ft (1.8 m) above floor.
Washer spins and pauses This is normal The washer is sensing the load.
at the beginning of cydes
Washer pauses during The Soak Option was
wash cycle chosen
This is normal
This isnormal.Thewasher alternates between agitate and soak during
these cyclesto get your clothes cleaner with lesswear.
Many cycles incorporate as seriesof soakswithin the agitation period to
getyour clothes clean with lesswear.
20
Page 21
GEAppliances.com
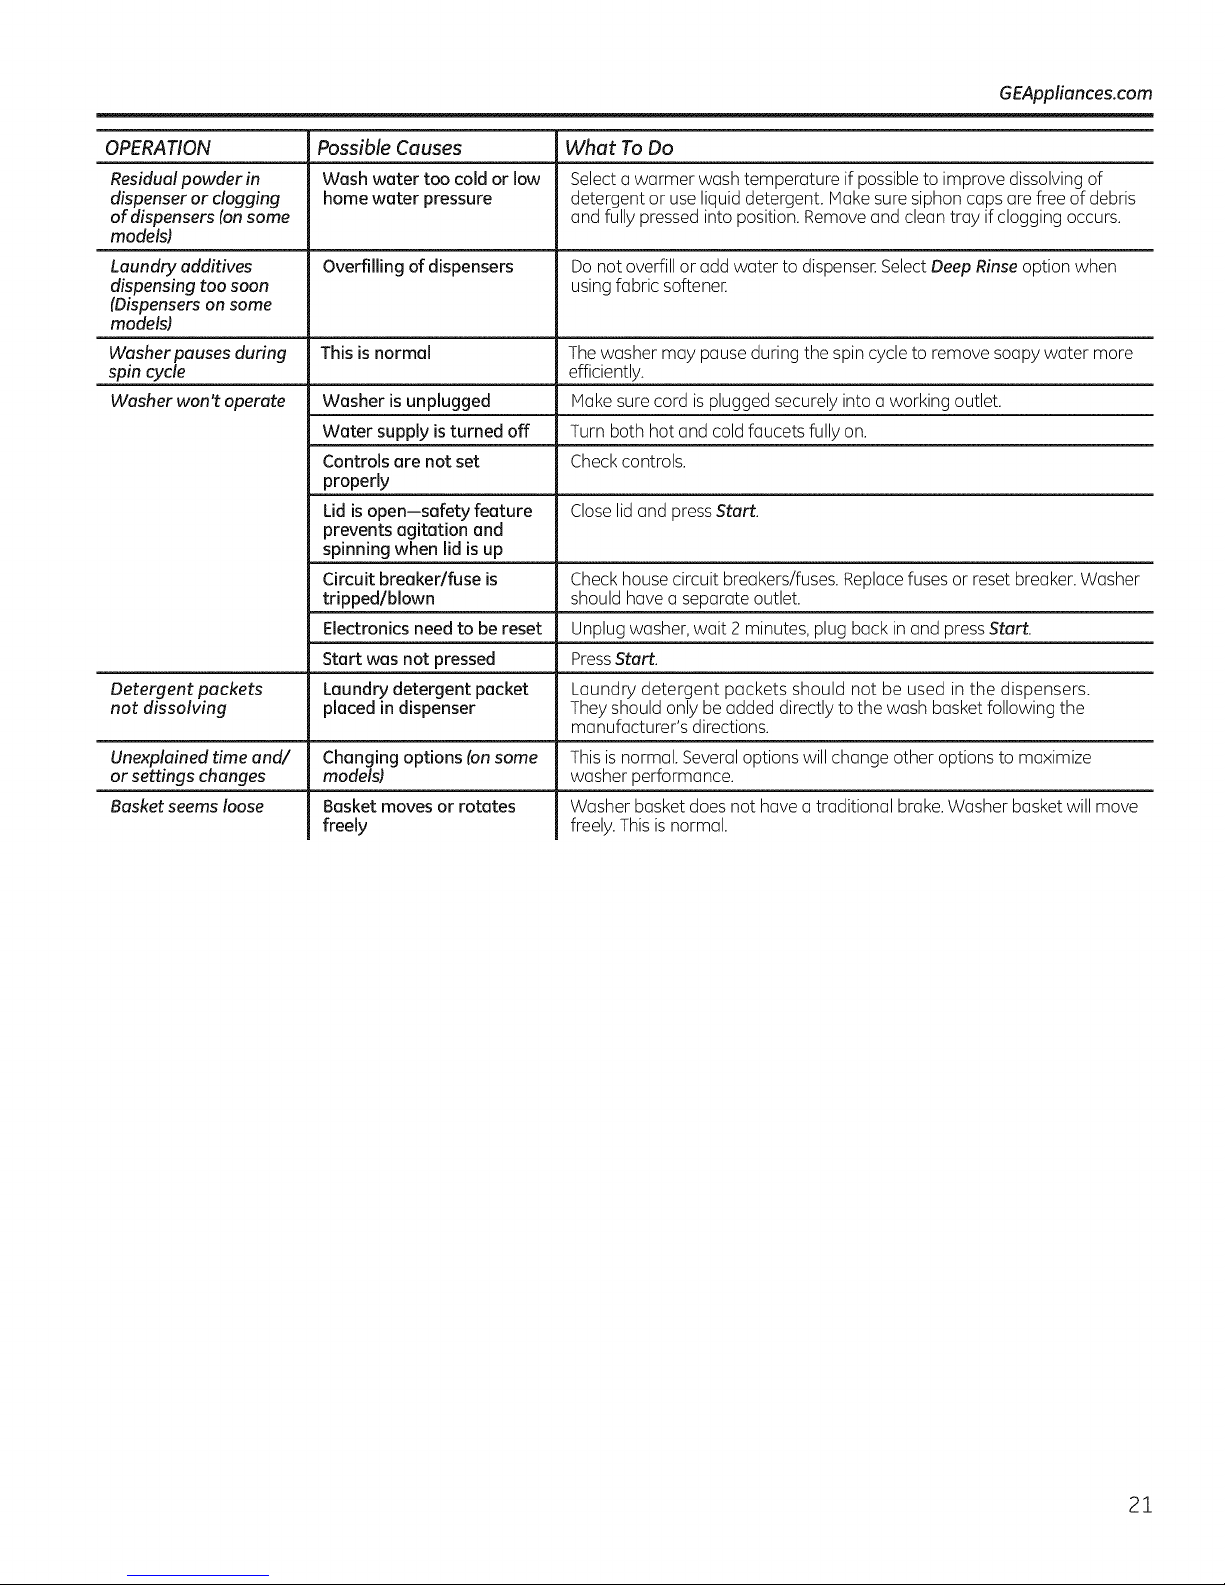
OPERATION Possible Causes What To Do
Residual powder in Wash water too cold or low Select a warmer wash temperature if possible to improve dissolving of
dispenser or clogging home water pressure detergent or use liquid detergent. Make sure siphon caps are free of debris
of dispensers (on some and fully pressed into position. Remove and clean tray if clogging occurs.
models)
Laundry additives Overfilling of dispensers Do not overfill or add water to dispenseE Select Deep Rinse option when
dispensing too soon using fabric softeneE
(Dispensers on some
models)
Washer pauses during This is normal The washer may pause during the spin cycle to remove soapy water more
spin cycle efficiently.
Washer won't operate Washer is unplugged Make sure cord is plugged securely into a working outlet.
Water supply is turned off Turn both hot and cold faucets fully on.
Controls are not set Check controls.
properly
Lid is open--safety feature Close lid and press Start.
prevents agitation and
spinning when lid is up
Circuit breaker/fuse is Check house circuit breakers/fuses. Replace fuses or reset breaker. Washer
tripped/blown should have a separate outlet.
Electronics need to be reset Unplug washer, wait 2 minutes, plug back in and press Start.
Start was not pressed PressStart.
Detergent packets Laundry detergent packet Laundry detergent packets should not be used in the dispensers.
not dissolving placed in dispenser They should only be added directly to the wash basket following the
Unexplained time and/ Changing options (on some This is normal. Several options will change other options to maximize
or settings changes models) washer performance.
Basket seems loose Basket moves or rotates
freely
manufacturer's directions.
Washer basket does not have a traditional brake. Washer basket will move
freely. This is normal.
21
Page 22
Before you call for service...Troubleshooting Tips
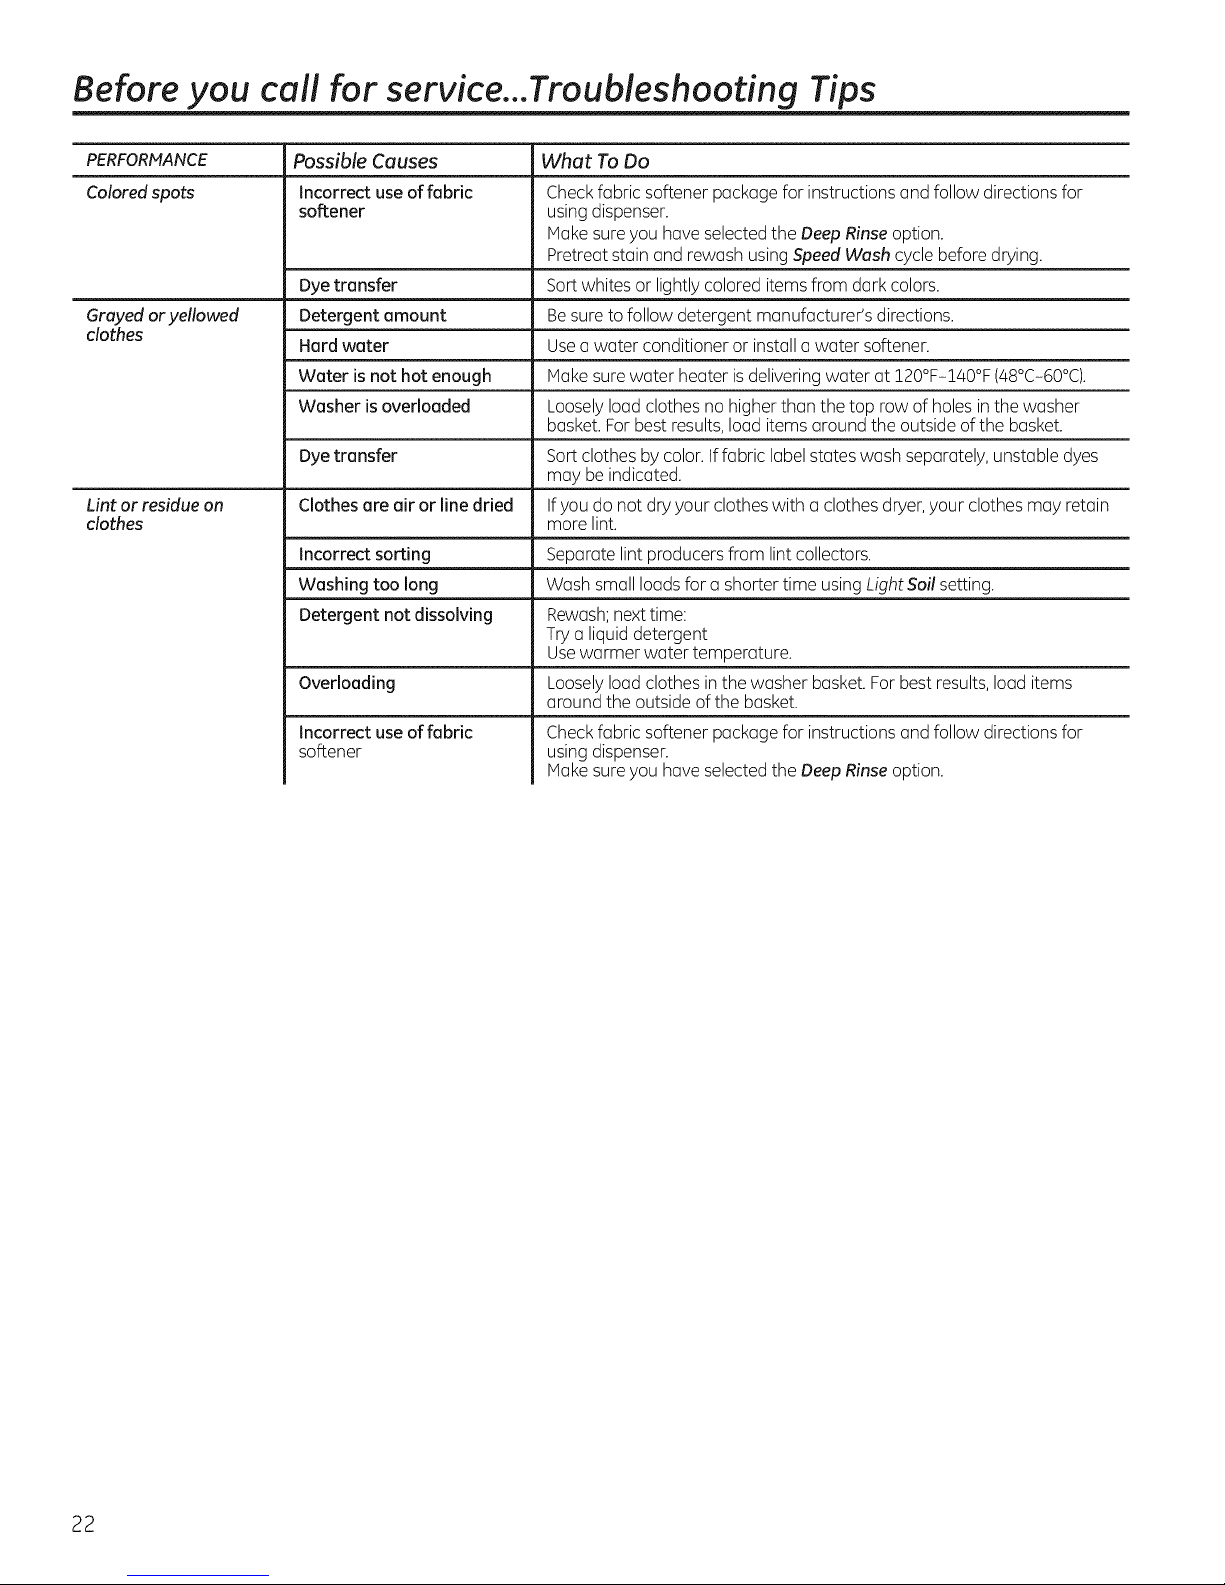
PERFORMANCE Possible Causes
Colored spots Incorrect use of fabric
Grayed or yellowed Detergent amount
clothes
Lint or residue on Clothes are air or line dried
clothes
softener
Dye transfer
Hard water
Water is not hot enough
Washer is overloaded
Dye transfer
Incorrect sorting
Washing too long
Detergent not dissolving
Overloading
Incorrect use of fabric
softener
What To Do
Check f(]bric softener p(]ck(]ge for instructions (]nd follow directions for
using dispenser.
M(]ke sure you hove selected the Deep Rinse option.
Pretreot st(]in ond rewosh using Speed Wash cycle before drying.
Sort whites or lightly colored items from d(]rk colors.
Be sure to follow detergent monufocturer's directions.
Use o woter conditioner or inst(]ll o woter softener.
loke sure woter heoter is delivering woter ot !20°F-!40°F (48°C-60°C).
Loosely Iood clothes no higher thon the top row of holes in the wosher
bosket. For best results, Iood items oround the outside of the bosket.
Sort clothes by color. If fobric I(]bel st(]tes wosh sep(]rotely, unst(]ble dyes
moy be indic(]ted.
Ifyou do not dry your clothes with o clothes dryer, your clothes moy ret(]in
more lint.
Sep(]rote lint producers from lint collectors.
Wosh smoll Ioods for o shorter time using Light Soil setting.
Rew(]sh;next time:
Try (] liquid detergent
Use wormer woter temperoture.
Loosely Iood clothes in the w(]sher b(]sket. For best results, Iood items
(]round the outside of the b(]sket.
Check f(]bric softener p(]ckoge for instructions (]nd follow directions for
using dispenser.
M(]ke sure you hove selected the Deep Rinse option.
22
Page 23
GEAppliances.com
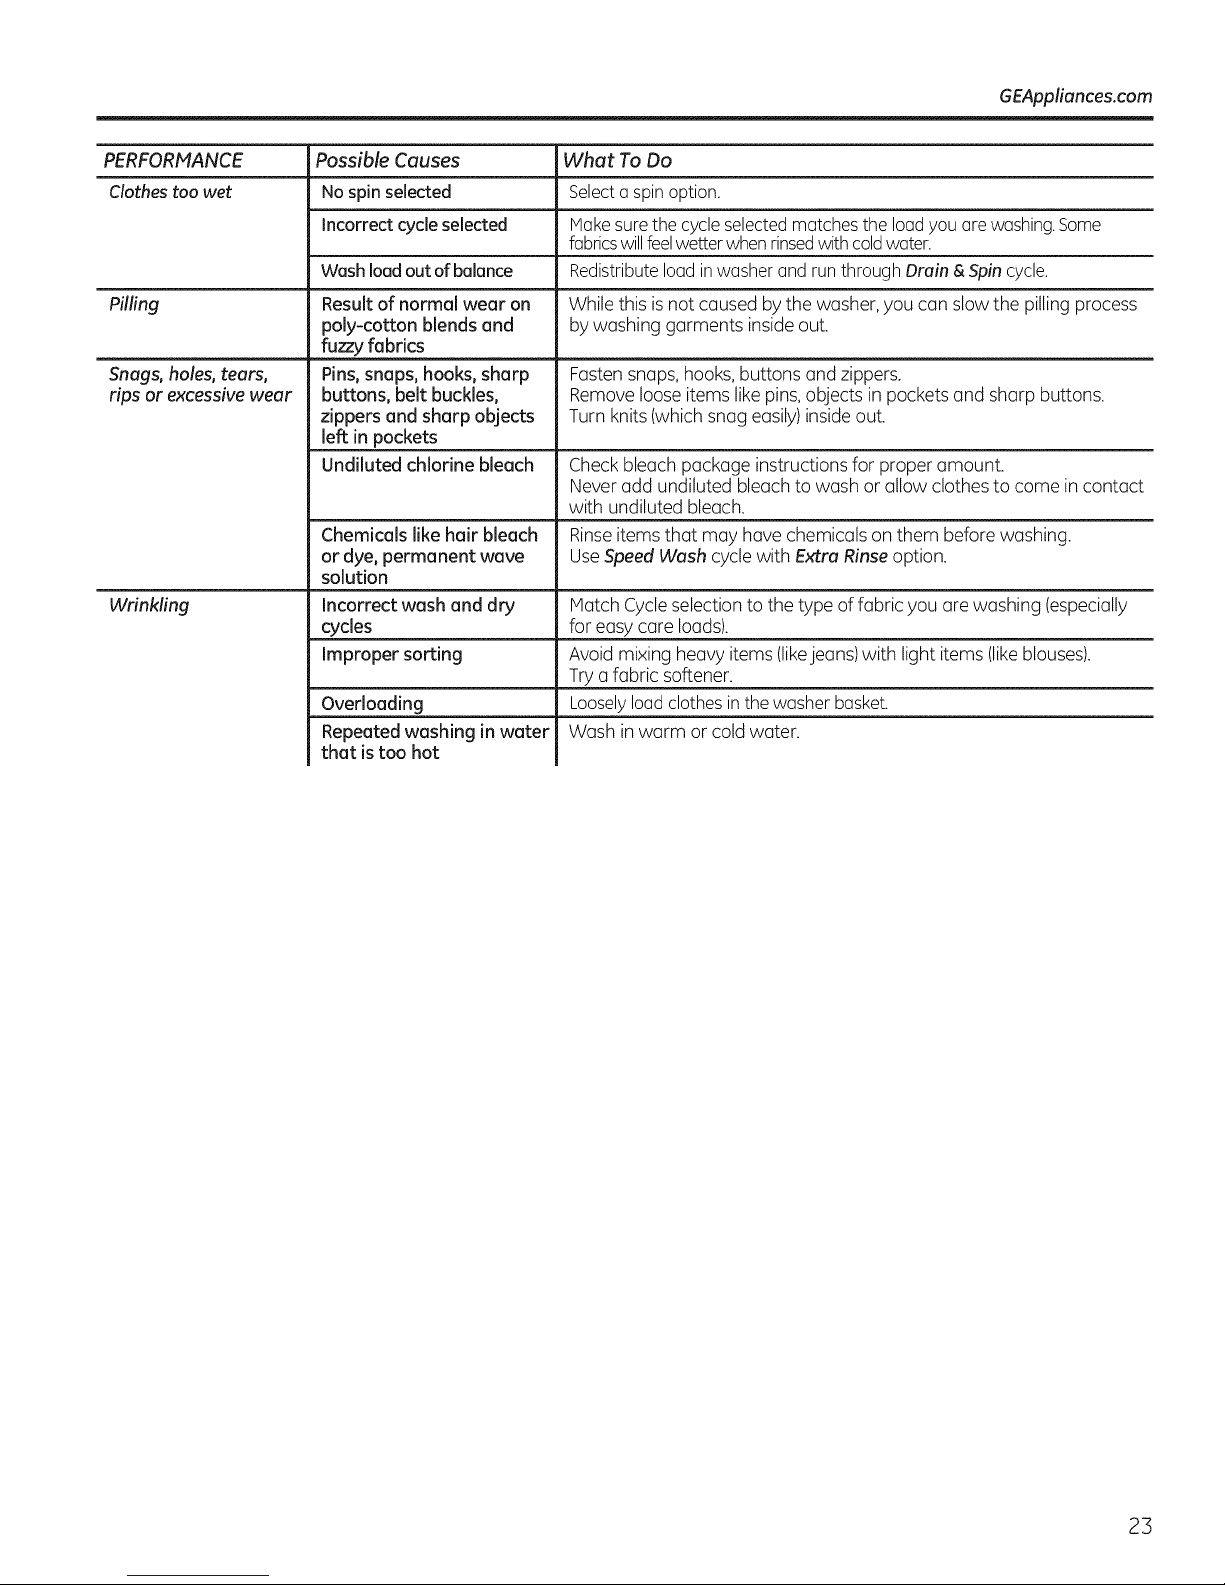
PERFORMANCE Possible Causes What To Do
Clothestoo wet Nospinselected Selecta spinoption.
incorrect cycle selected P1Gkesurethe cycle selectedmatchestheloadyou are washing.Some
fabricswillfeelwetterwhenrinsedwithcoldwater.
WoshIoodout ofbolonce Redistributeload inwasherand run through Drain & Spincycle.
Pilling Resultof normol weor on While this is not caused by the washer,you can slow the pilling process
poly-cotton blends ond by washing garments inside out.
fuzzy fobrics
Snags, holes, toots, Pins,snops, hooks, shorp Fastensnaps, hooks,buttons and zippers.
rips or excessivewear buttons, belt buckles, Removeloose items likepins,objects in pockets and sharp buttons.
zippers end shorp objects Turn knits(which snag easily)inside out.
left in pockets
Undiluted chlorine bleoch Checkbleach package instructions for proper amount.
Neveradd undiluted bleach to wash or allow clothes to come in contact
with undiluted bleach.
Chemicols like heir bleoch Rinseitems that may have chemicals on them before washing.
or dye, permonent wove UseSpeed Wash cycle with Extra Rinse option.
solution
Wrinkling Incorrect wosh ond dry Match Cycleselection to the type of fabric you are washing (especially
cycles for easy care loads).
Improper sorting Avoid mixing heavy items (likejeans)with light items (likeblouses).
Try a fabric softener.
Overlooding
Repeoted woshing in woter
thot is too hot
Looselyloud clothesin thewasherbasket.
Wash in warm orcold water.
23
Page 24
Before you call for service...Troubleshooting Tips
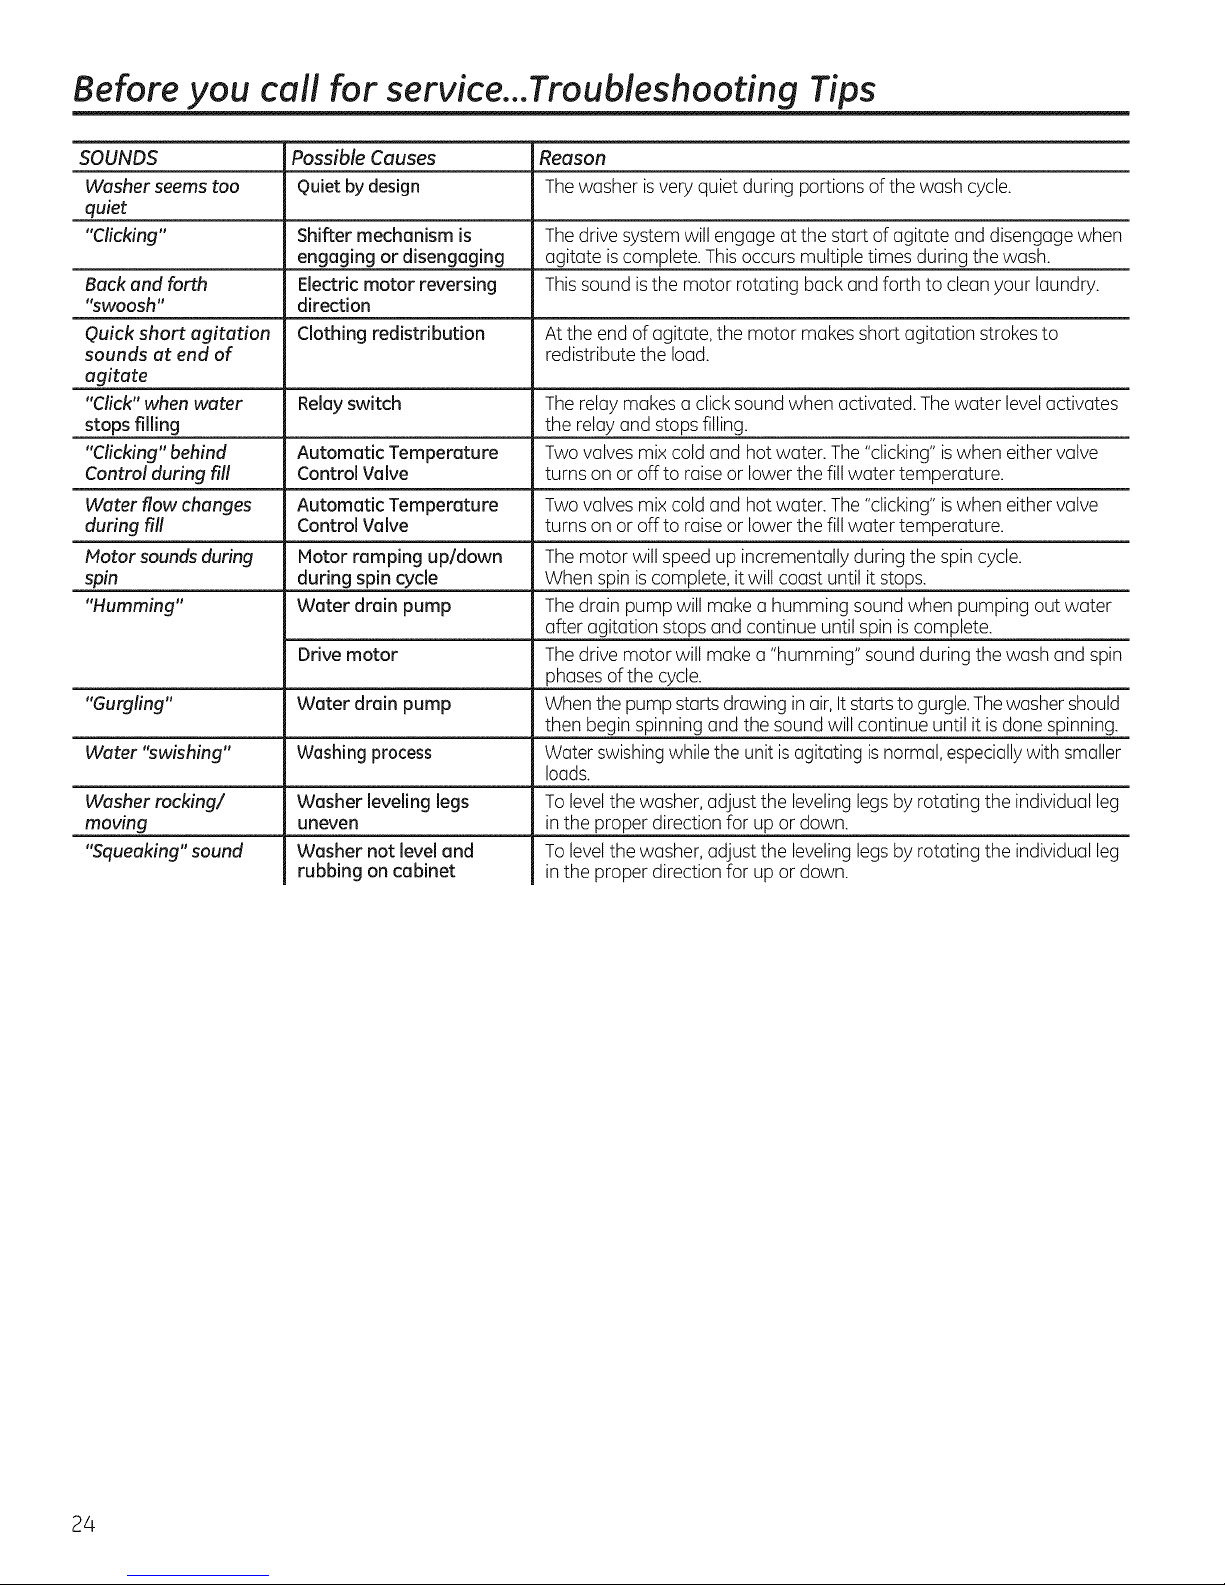
SOUNDS Possible Causes Reason
Washer seems too Quiet by design The washer isveryquiet during portions of the wash cycle.
quiet
"Clicking" Shifter mechanism is The drive system will engage at the start of agitate and disengage when
engaging or disengaging agitate iscomplete.Thisoccurs multiple times during the wash.
Back and forth Electric motor reversing Thissound isthe motor rotating back and forth to cleanyour laundry.
"swoosh" direction
Quick short agitation Clothing redistribution Atthe end of agitate, the motor makes short agitation strokes to
sounds at end of redistribute the load.
agitate
"Click" when water Relayswitch Therelay makes a click sound when activated.Thewater levelactivates
stops filling the relay and stops filling.
"Clicking" behind Automatic Temperature Two valves mix cold and hot water. The"clicking"iswhen eithervalve
Control during fill Control Valve turns on or off to raise or lower the fill water temperature.
Water flow changes Automatic Temperature Two valves mix cold and hot water. The "clicking" iswhen eithervalve
during fill Control Valve turns on or off to raiseor lower the fillwater temperature.
Motor soundsduring Motor ramping up/down Themotor will speed up incrementally during the spin cycle.
spin during spin cycle When spin iscomplete, itwill coast until it stops.
"Humming" Water drain pump Thedrain pump will make u humming sound when pumping out water
after agitation stops and continue until spin iscomplete.
Drive motor Thedrive motor will make u "humming" sound during the wash and spin
phases of the cycle.
"Gurgling" Whenthe pump starts drawing in air, It startsto gurgle.Thewasher should
Water "swishing" Water swishingwhile the unit isagitating is normal, especiallywith smaller
Washer rocking/
moving
"Squeaking" sound
Water drain pump
Washing process
Washer leveling legs
uneven
Washer not level and
rubbing on cabinet
then begin spinning and the sound will continue until it isdone spinning.
loads.
Tolevelthe washer, adjust the leveling legsby rotating the individual leg
in the proper direction for up or down.
Tolevelthe washer, adjust the leveling legsby rotating the individual leg
in the proper direction for up or down.
24
Page 25

GE Appliances Washer Warranty.
All warranty service provided by our Factory Service Centers, or an
authorized Customer Care ®technician. To schedule service, in the
United States, visit us on-line at GEAppliances.com, or call 800.GE.CARES
(800.432.2737). In Canada, visit GEAppliances.ca or call 1.800.561.3344
Please have serial number and model number available when calling
Staple your receipt here.
Proof of the original purchase
date is needed to obtain
service under the warranty.
for service.
Servicing your appliance may require the use of the onboard data port for diagnostics. This gives a GE
Factory Service technician the ability to quickly diagnose any issues with your appliance and helps GE
improve its products by providing GE with information on your appliance. If you do not want your appliance
data to be sent to GE, please advise your technician NOT to submit the data to GE at the time of service.
For The Period Of:
One Year
From the dote of the
original purchase
We Will Replace:
Any factory specified part of the washer which fails due to a defect in materials or workmanship.
During this limited one-year warranty, we willalso provide, free of charge, all labor and related
service to replace the defective part.
What Is Not Covered:
[] Service trips to your home to teach you how to use
the product.
[] Improper installation, delivery or maintenance.
[] Failure of the product if it is abused, misused, or
used for other than the intended purpose or used
commercially.
[] Replacement of house fuses or resetting of circuit breakers.
[] Products which are not defective or broken, or which are
working as described in the Owner's M(]nuol.
[] Damage to the product caused by accident, fire, floods
or acts of God.
[] Incidental or consequential damage caused by possible
defects with this appliance.
[] Defects or damage due to operation in freezing
temperatures.
[] Damage caused after delivery.
[] Product not accessible to provide required service.
EXCLUSION OF IMPLIED WARRANTIES--Your sole and exclusive remedy is product repair as provided in this Limited
Warranty. Any implied warranties, including the implied warranties of merchantability or fitness for u particular purpose,
are limited to one year or the shortest period allowed by law.
In the United States:
This warranty is extended to the original purchaser and any succeeding owner for products purchased for home use
within the USA.If the product is located in an area where service by a GEAuthorized Servicer is not available, you may be
responsible for a trip charge or you may be required to bring the product to an Authorized GEService location for service.
In Alaska, the warranty excludes the cost of shipping or service calls to your home.
Some states do not allow the exclusion or limitation of incidental or consequential damages. This warranty gives you
specific legal rights, and you may also have other rights which vary from state to state. To know what your legal rights are,
consult your local or state consumer affairs office or your state's Attorney General.
Warrantor: General Electric Company. Louisville, KY 40225
In Canada:
This warranty is extended to the original purchaser and any succeeding owner for products purchased in Canada for
home use within Canada. If the product is located in an area where service by a GEAuthorized Servicer is not available,
you may be responsible for a trip charge or you may be required to bring the product to an Authorized GEService location.
Some provinces do not allow the exclusion or limitation of incidental or consequential damages. This warranty givesyou
specific legal rights, and you may also have other rights which vary from province to province. To know what your legal
rights are, consult your local or provincial consumer affairs o_ce.
Warranton MC Commercial, Burlington, ON, L7R 5B6
25
Page 26

Consumer Support.
GEAppliances Website Inthe U.S.:GEAppliances.com
Have a question or need assistancewith your appliance? Trythe GEAppliancesWebsite 24 hours aday,
any day of the year! Forgreater convenience and faster service,you can now download Owner's Manuals,
order parts or even schedule serviceon-line. In Canada: www.GEAppliances.ca
Schedule Service Inthe U.S.:GEApplionces.com
Expert GErepair service is only one step away from your door. Get on-line and schedule your service at your
convenience any day of the year! Or call 800.GE.CARES(800.432.2737) during normal business hours.
In Canada, call 1.800.561.3344
RealLifeDesignStudio Intheu.s.:GEAppliances.com
GEsupports the Universal Designconcept-products, servicesand environments that can be used by people of
all ages, sizesand capabilities.We recognize the need to design for a wide range of physical and mental abilities
and impairments. Fordetailsof GE'sUniversalDesignapplications, including kitchen design ideasfor people with
disabilities,check out our Website today. For the hearing impaired, pleasecall 800.TDD.GEAC(800.833.4322).
In Canada, contact: Manager, Consumer Relations,lvlCCommercial
Suite310, 1 Factory Lane
Moncton, N.B.ElC 9M3
Extended Warranties
Purchase a GEextended warranty and learn about special discounts that are available while your warranty is still
in effect. Youcan purchase iton-line anytime, or call 800.626.2224during normal businesshours.GEConsumer Home
Serviceswill still be there after your warranty expires.In Canada, consult your local listings for an emended
warranty provider.
Partsand Accessories
Individuals qualified to service their own appliances can have parts or accessoriessent directly to their homes
(VISA,iVlasterCardand Discovercards are accepted).Order on-line today, 24 hours every day or by phone at
800.626.2002during normal businesshours.
Instructions contained in this manual cover procedures to be performed byany user.Other servicinggenerally should
be referred to qualified service personnel.Cautionmust be exercised,since improper servicing may cause unsafe
operation.
In Canada, consult your local listings for your nearest GE parts distributor or call 800.661.1616.
Contact Us
Ifyou are not satisfiedwith the serviceyou receivefrom GE,contact us on our Websitewith all the details includingyour
phone number, or write to: General Manager, Customer Relations
GEAppliances,Appliance Park
Louisville,KY40225
In Canada: www.GEAppliances.ca, or write to: Director, Consumer Relations,IvlCCommercial
Suite310, 1 Factory Lane
Moncton, N.B.ElC 9M3
Inthe U.S.:GEAppliances.com
Inthe U.S.:GEAppliances.com
Inthe U.S.:GEAppliances.com
Forquestions on installation call 1-800-626-2000 (US)and 1-800-561-3344 (Canada).
Register Your Appliance Inthe U.S.:GEAppliances.com
Register your new appliance on-line--at your convenience! Timely product registration willallow for enhanced
communication and prompt service under the terms of your warranty, should the need arise. You may also
mail in the pre-printed registration card included in the packing material. In Canada: www.GEAppliances.ca
26
Page 27

www.electromenagersGE.cu
S_curit_ ............................. 2 et 3
Utilisation
CaractGristiques .......................... 12
Chargement et utilisation de la laveuse ... !1
Entretien et nettoyage de la laveuse ...... !3
Utilisation .............................. /4-10
Instructions d'installation ....... 14-18
DGpannage ........................ 19-24
Service _ la clientele
Indicateur d'aide au consommateur .......... !0
Garantie ................................. 25
Pi@ces et accessoires ................... 3, 26
Service a la client@le...................... 26
GTW485*
GTW460
ENERGYSTAR
*En tant que partenaire ENERGY
STARMD,GEa d@termin# que ce
procluit satisfait aux exigences
@nerg@tiquesENERGYSTARMD.
Inscrivez ici les numGros de
module et de sGrie :
N° de module
N° de s_rie
Vous pouvez les /F_ 7
trouver sousle
couverclede Io
Ioveuse.
Page 28

CONSIGNES DE SECURITE IMPORTANTES.
LISEZTOUTESLESINSTRUCTIONSAVANTD'UTILISERVOTREAPPAREIL.
11s'agit du symbole d'avertissement de s6curit6. IIvous avertit des dangers potentiels qui pourraient provoquer la mort
ou des blessures, 6 vous ou 6 autrui. Tousles messages de s6curit6 suivent ce symbole d'avertissement de s6curit6 et
les mots <<DANGER>>,<<AVERTISSEMENT>>ou ¢ ATTENTION>>.Voici la d6finition de ces mots •
_ ndique une situation dangereuse qui, si elle n'est pas #vit#e, entraTnera la mort ou des blessures
CONSIGNES
[] Lisez toutes les instructions avant d'utiliser I'appareil.
[] NE nettoyez et NE s_chez PASd'articles qui ont _t6 nettoy6s, lav6s, tremp6s ou tach_s avec de I'essence,du solvant
pour nettoyage 6 sec ou d'autres produits combustibles ou substances explosives, car ces derniers peuvent d6gager
des vapeurs qui pourraient s'enfiammer ou exploser.
[] N'ajoutez PASde I'essence, du solvant pour nettoyage 6 sec ou d'autres produits combustibles ou substances explosives
6 I'eau de lavage. Ces substances peuvent d6gager des vapeurs qui pourraient s'enflammer ou provoquer une
explosion.
[] Dans certaines conditions, de I'hydrog_ne peut seformer dans un circuit d'eau chaude qui n'a pas 6t6 utilis6 pendant
deux semaines ou plus. L'HYDROGENEESTUN GAZEXPLOSIF.Sile circuit d'eau chaude n'a pas 6t6 utilis_ pendant une
telle p@iode, ouvrez tousles robinets d'eau chaude et laissez I'eau couler pendant plusieurs minutes avant d'utiliser
votre laveuse. Ainsi, I'hydrog_ne accumul_ sera 6vacu6 du syst_me. Ce gaz @ant inflammable, NE fumez PASet
n'utilisez pas de flamme nue pendant cette op@ation.
[] NE laissez PASles enfantsjouer sur ou 6 I'int@ieur de cet appareil. La pr6sence d'enfants pros de cet appareil Iorsqu'il
est en marche doit faire I'objet d'une @roite supervision. Avant de mettre la laveuse au rebut ou hors service, retirez la
porte ou lecouvercle. Le non-respect de ces instructions peut entraTner le d6c_s ou des blessures.
[] NE mettez PASla main dans I'appareil Iorsque le tambour ou I'agitateur est en mouvement pour 6viter d'etre happ6
accidentellement.
seneuses.
Indique une situation dangereuse qui, si elle n'est pas 6vit6e, pourrait entraTner la mort ou des
blessuress@ieuses.
Indique une situation dangereuse qui, si elle n'estpas 6vit6e, pourrait entraTnerdes blessures mineures ou
plus s@ieuses.
DE SI CURITI IMPORTANTES
Pour r6duire les risques de d6c_s, d'incendie, d'explosion, de choc 61ectrique ou de blessures
Iorsque vous utilisez votre appareil, suivez les mesures de s6curit6 de base, notamment •
[] N'installez ou n'entreposez PAScet appareil dans un endroit o_ il sera expos6 aux intemp@ies.
[] NE modifiez PASles commandes, ne r6parez ou ne remplacez pas de piece de cet appareil et ne tentez pas d'effectuer
une r_paration, saul si cette procedure est recommand6e express6ment dans les instructions d'entretien de I'utilisateur
ou dans les instructions de r6paration de I'utilisateur et que vous poss6dez les connaissances et les aptitudes requises
pour le faire.
[] N'utilisez PAScet appareil s'il est endommag6, s'il fonctionne mal, s'il est partiellement d6mont6 ou si certaines de ses
pisces manquent ou sont cass6es (y compris le cordon d'alimentation ou la fiche).
[] D6branchez I'appareil ou fermez son disjoncteur avant de proc6der 6 I'entretien. Appuyer sur le bouton d'alimentation
Power de I'appareil NEle d6connecte PASde I'alimentation.
[] Consultez la section sur le <<Branchement 61ectrique >>des instructions d'installation pour obtenir les proc6dures de
mise 6 laterre.
CONSERVEZ CES INSTRUCTIONS
Page 29

www.electromenugersGE.cu
INSTALLATIONAPPROPRIEE
Cette laveuse doit _tre installde conformdment aux instructions d'installation avant d'etre utilisde.
[] Assurez-vous que le boyau d'eau chaude est raccord# []
au robinet <<H >>et que le boyau d'eau froide est
raccord6 au robinet <<C >>.
[] Installez ou entreposez I'appareil a un endroit oO il ne []
sera expos# ni a des temp@atures en dessous du point
de cong#lation ni aux intemp@ies; I'appareil pourrait
subir des dommages permanents et la garantie serait
annul#e.
[] Hettez la laveuse a la terre conform#ment aux codes
et rSglements en vigueur. Suivez les instructions
d@aill#es de la section <<Instructions d'installation >>.
__ - Risque
Brancher a une prise de courant a 3 broches mise a
la terre.
NEPASretirer la broche de contact de mise a la terre.
N'UTILISEZpas de rallonge #lectrique.
N'UTILISEZpas d'adaptateur de prise.
Le non-respect de ces instructions pourrait entraTner
un d#cSs ou un choc #lectrique.
[] Ensurewasher is properly leveled and washer legs are
adjusted such that unit isstable.
d'_lectrocution
Une rallonge de tuyau d'#vacuation optionnelle est
recommand#e pour les hauteurs d'#vacuation allant
de 60 (396 po (152,4 (3243,8 cm).
Cette laveuse n'est pas fournie avec des boyaux
d'alimentation en eau.
GErecommande fortement d'utiliser les pisces
sp#cifi#es du fabricant. Une liste de boyaux
manufactur#s disponibles pour I'achat est indiqu#e.
Ces boyaux ont #t# fabriqu#s et test#s afin de
r#pondre aux sp#cifications de GE.
GErecommande fortement d'utiliser de nouveaux
boyaux d'alimentation en eau. Lesboyaux se
d#gradent avec le temps et doivent _tre remplac#s
tousles cinq ans afin de r#duire le risque de bris de
boyau et de d#g0ts d'eau.
Pi_ces et accessoires
Consultez votre annuaire local pour un d#taillant de
pisces authoris# ou applez-nous au 1-800-661-1616.
Num#ro de piece
PHI4XI0002
Ou
PH14X10005
WH49X301
Boyaux d'alimentation en eau en
caoutchouc de 4 pi (1,2 m)
Boyaux d'alimentation en eau de type
tress# de 4 pi (1,2 m)
Rallonge de tuyau d'#vacuation
Accessoire
SaLQUENCEDEDaLMARRAGE
q
[]/_ chaque d#marrage ou red#marrage suite (3I'ouverture
ou la fermeture du couvercle, la laveuse ouvre le robinet
d'eau froide durant deux courtes p#riodessuiviesd'une
pause de 10 secondes avant de poursuivre.
LORSQUE L'APPAREIL N'EST PAS UTILISE
[] Fermez les robinets d'eau pour r#duire les fuites
en cas de tuyau cass#. V#rifiez I'#tat des tuyaux de
remplissage. GErecommande de les remplacer tousles
5 ans.
CONSERVEZ CES INSTRUCTIONS
PH7X1
[] Sile couvercle estouvert pendant cette p#riode, la laveuse
effectuera une pause. IIvous faudra rappuyer sur le
bouton Start (d#part) pour red#matter le programme.
Plateaude plancher pour laveuse
Page 30

Utilisation
Loscaractdristiques et I'apparence de la cuisini_re montrde duns ce manuel peuvent varlet salon le module.
Etape I Etape 2 Etape3
, Ajoutez de Vassouplissant dens
le distributeur d'assouplissant
(sur certains modules);
consultez la page 12.
, Ajoutezla quantit_ ded_tergent
recommand_epar lelubricant.
GE recommande I'utilisation
de d6tergents Haute Efficacit6
tels qua _. duns votre laveuse
_co_nerg_tique. Placez los
dosettes de d_tergent dans
le fond du tambour avant
d'ajouter des v_tements.
, Chargez le linge sans le
tasser en le r6partissant
autour de I'agitateur.
Charger trop de linge pout
avoir un impact n6gatif sur
la performance de lavage.
Consultez la page 11 pour
obtenir des suggestions de
chargement.
, Fermez le couvercle.
REMARQUE: La Ioveuse
ne se d6morrera pas si le
couvercle est ouvert.
, S61ectionnez un
programme de lavage.
, S61ectionnez les options
de lavage, y compris
Deep Rinse (rin_age
en profondeufl (sur
certains modules)Iors
de I'utilisation d'un
assouplissant.
, S61ectionnez des
options.
F.tape4
, Appuyez sur
Start (d_part).
Page 31

NO _ e s . www.electromenagersGE.ca
Page 32

Operating instructions.
Start/Pause (d6part/pause)
Appuyez sur Start (d6part) pour lancer le programme. REPIARQUE: Le couverde doit 6tre ferm6 pour que la laveuse pour d6marrer le cycle. Si le
couvercle est ferm6 et le voyant Lid Lacked (couverde verrouill6) s'allumera.
Une pression sur Pause d6verrouillera le couvercle (s'il est verrouill6 6 ce moment), mettra le programme en pause et le voyant Pause dignotera.
Pour relancer le programme, appuyez de nouveau sur la touche Start (d6part). Si lalaveuse est mise en pause pendant p4usde 24 heures, le
programme sera annul& S'il reste de I'eau darts Io laveuse, s61ectionnez le programme Drain & Spin (vidange et essorage) pour 6vacuer I'eau et Io
vidanger.
Voyants de progression
II indique si Io laveuse est en mode Fill (remplissage), Soak (trempage), Wash (lavage), Rinse (rinCage)ou Spin (essorage).
Load Size(Charge tailleJ(surcertains modules)
Ajoutez led@ergent@_ HEaufond du panier et I'assouplissantdons ledistributeur (surcertains modules)avant decharger )esv_tements dons lalaveuse.
Placez les v6tements dons le panier de 10 Ioveuse sons les comprimer. Toute surcharge pourrait avoir un impact n6gatif sur les performances de
laveuse. Load Size
Large
Me_er
Adaptez la toille de la brass6e en cons6quence: sma recisel_l_ll_l_x _
Precise Fill (Fill pr6cise) (sur certains modules)
- Pourplus decommoditY,une meilleureperformance et une efficacit_ optimale, s_lectionnezPreciseFill (Fillprecise)(surcertains mod6les).Cette s_lectionvous
donne automatiquement )aquantit_ d'eau appropri@ pour la tailleet )etype de brass@ plac6e donsla laveuse.Lecouvercle seraverrouill6 durant le processus
de d_tection de la charge,ce qui comprend unes6ried'essoragecourts et une partie du remp)issaged'eau.
- Sivous pr6f@ezs6lectionner manuellementle volume d'eau, choisissezdeSmall (Petite)6 Super(tr6s grande).La fonction PreciseFill (Fillpr6cise)est adapt6e6 la
mojorit6des brass_es.Pourcertains articles particuliers,te)s quedes couettes oudes oreillersvolumineux ett6gers,oQunvolume d'eauplus important peut 6tre
requis,il est pr_f6rablede s_lectionner manuellement latail)ede labrassie. Los61ectionmanueltedela brass6edoit _tre utilis@ pour desarticles mouill6splac6s
dons la laveuse,te)sque desserviettesou desv6tements.
- Lo laveuse ne se remplira pas d'eau si Io d6tection automatique de brass6e est s61ectionn6e et le couverde n'est pas ferm6. Lorsque le couverde
est ferm6, Io Ioveuse commence 6 se remplir d'eau pour estimer la brass6e.
REPIARQUE:Ceciest une laveuseu)tra-performante qui demande une mainsgrande quantit6 d'eautout en affront unlavage efficace.Vousremarquerez peut-_tre
que le niveaud'eau estplus basque donsvotre pr6c6dente laveuse.Ceciest normal.
Fill
Page 33

www.electromenagersGE.ca
Programmes de lavage - Bouton de s@lection de programme
Le programme de lavage commande le type de processus de lavage. Le bouton de s#lection de programme peut 6tre tourn6 vers la droite ou la
gauche. La rotation du bouton de sGlection de programme apr_s ]e dGbut d'un programme arrGte la laveuse et r_gle le programme/les options sur
le nouveau programme sGlectionnG. Appuyez sur Start (dGpart) pour lancer le nouveau programme sGlectionnG.
Le tableau d-dessous vous aidera c3apparier Jesarticles c] laver avec les meilleurs rGglages des cycles de lavage. Pour un rendement optimal,
sGlectionnez le cycle qui s'approche le plus des articles c3laver.
Les sG]ections et les options en gras sont les rGglages par dGfaut du cycle correspondant.
Certains cycles et options ne sont pos offerts sur tousles modules.
Articles a laver Cycle Temp. Lavage salet6 essorage Options disponibles Description du cycle
foncGe de salet6
prononcGe 6 16gGre,
linge de maison,
vGtements de
travail et dejeux.
Cotons et lins de
couleur foncGe,
charges mGlangGes.
VGtements de
Ioisir, vGtements de
bureau 16gGrement
soles.
Pour la lingerie
fine et les tissus 6
entretien spGcial,
16gGrement 6
normolement soles.
VGtements de sport
de salet6 modGrGe
5 16gGre.
Cotons, lins et
charges mGIongGes
de couleur
modGrGment
foncGe 6 foncGe.
Couleurs Max!ExtraCotons de couleur
Couleurs TrGs chaude
sombres Choude
Vate- Tras chaude
ments de Chaude
Ioisir Couleurs
Tissus Traschaude
dGlicats Chaude
Tenue Tras chaude
active Chaude
Lovoge Tr_schaude
Froide Chaude
TrGschaude
Chaude
Couleurs
FraTche
Froide
Froide du
robinet
Couleurs
FroTche
Froide
Froide du
robinet
FraTche
Froide
Froidedu
robinet
Couleurs
FraTche
Froide
Froide du
robinet
Couleurs
FraTche
Froide
Froide du
robinet
Couleurs
FraTche
Froide
Froide du
robinet
Degr_ S61ection
Extr#m. sale
TrGssale
Normal
LGg#re
ment
Extr#m.
LGg#re
ment
Extr#m. sale
TrGssole
Normal
LGg#re
ment
Extr#m.
LGg#re
ment
Extr#m. sale
TrGssole
Normal
LGg#re
ment
Extr#m.
LGg#re
ment
Extr#m. sole
TrGssale
Normal
Lag_re
ment
Extr_m.
LGgGre
ment
Extr#m. sole
TrGssole
Normal
LGg#re
ment
Extr#m.
LGg#re
ment
Extr#m. sole
TrGssole
Normal
LGg#re
ment
Extr#m.
LGg#re
ment
Normal
Max!Extra
Normal
Max!Extra
Normal
Max!Extra
Normal
Max!Extra
Normal
Max!Extra
Normal
Guide de dGtachage
Remplissage profond
Trempage
automatique
Rinqage en
profondeur
Rinquge n °. 2
Guide de d@tochage
Remplissageprofond
Trempage
automatique
Ringage en
profondeur
Rinquge no. 2
Guide de d@tochage
Remplissageprofond
Trempage
automatique
Rinqage en
profondeur
Rinqage no.2
Guide de d@tochage
Remplissageprofond
Trempage
automatique
Rinqage en
profondeur
Rinqage no.2
Guide de d@tochoge
Remplissageprofond
Trempage
automatique
Rinqage en
profondeur
Rinqage no.2
Remplissage profond
Trempage
automotique
Rinqoge en
profondeur
Rinqoge no. 2
IIs'agit du cycle normal recommand6
pour le coton et le lin de salet6 normale.
Choisissez les options de degr6 de solet6
TrGssale ou ExtrGmement sale et les
tempGratures Chaude ou TrGs chaude
selon la charge de vGtements et le degr6
de nettoyage 6 obteni[ Comprend des
pGriodes de remp%soge et de lavage
en plusieurs phases Grin de procurer un
traitement optimal des tissus. Duns le
cos de modGtes qui ne sont pus dotGs
d'une sGlection de tempGrature sur
le ponneau de commande, ce cycle
procure uniquement une tempGrature de
lavage Warm (Chaude).
Des tempGratures de lavage plus basses,
une pGriode de lavoge plus courte, et un
rin_age en profondeur (certains modGtes)
rGduisent le risque de dGcotoration des
tissus de coton foncGs. Comprend des
pGriodes de remplissage et de lavoge
en plusieurs phases afin de procurer un
traitement optimal des tissus. Dons le cas
de modGles qui ne sont pus dotGs d'une
sGtectionde temp@ature sur le panneau de
commande, ce cycle procure uniquement
une temp@ature de lavage Cold (Froide).
Cycle de lavage conqu pour I'entretien
des v@tements de Ioisir ou de bureau.
Comprend des p@iodes de remplissage
et de lavage en plusieurs phases afin de
procurer un traitement optimal des tissus.
Utilise une sGquence d'agitation <<tri-putse
>>exclusive trGsdGticate pour procurer un
traitement spGciataux tissus dGticats. IIest
recommand_ de placer les articles tr_s
dGlicats ou petits dans des sacs en filet
avant le lavage. Dans te cas de modales
qui ne sont pas dot@s d'une s@lection
de temp@rature sur le panneau de
commande, ce cycle procure uniquement
une temp@ature de lavage Coot(FraTche).
Cycle conqu pour I'entretien des tenues
actives, des v_tements de sport et des
tissus techniques de salet_ mod@_e _]
I_g@e.Comprend une p@iode de lavage
en plusieurs phases avec trempage afin
d'61iminerefficacement les souitlures et tes
odeurs corporetles. Utilisez lecycle Heavy
Duty (LingerGsistant)pour lesv@ements de
sport tr@ssalesfabriqu@sdetissus r@sistants.
Cycle qui combine plusieurs p@iodes de
brassage et des p@iodes de trempage
afin de procurer un nettoyage amGlior6
et une efficacit6 6nergGtique _]des
temp@atures d'eau froides.
Page 34

Utilisation
Programmes de lavage - Bouton de s_lection de programme - Suite
Articles _ lover Temp. Lovoge essoroge Options disponibles Description du cycle
Petites charges
d'articles
I@g@ementsales
dont on a un
besoin pressant.
Cycle
Lavage
Rapide
Tr@schaude
Choude
Couleurs
Fratche
Froide
Froide du
robinet
Degr_
solet_
Extr@m.sale
Tr@ssale
Normal
L@g@re-
merit
Extr@m.
L@g@re-
S_lection
Max/Extra
Normal
Guide de d@achage
Remplissage profond
Trempage
automatique
Rin_age en
profondeur
Rinqage no.2
Utilise une p@iode de lavage
acc@l@r@eainsiqu'un rinqage vaporis@
continu afin de nettoyer les petites
charges I@g@ementsales le plus
rapidement possible.
merit
Charge d'articles
mouill@s.Pourles
articles qui n'ont
besoinque de
rin¢age,utilisez ce
cycle avec I'option
Drainer et
essorer
Max/Extra
Normal
Rinqage en
profondeur
Rinqage no.2
Utilise un essorage a haute vitesse
pour extraire I'eau des articles
mouill_s. Pourlesarticles qui doivent
@trerinc@s,utilisezce cycle avec
I'option Deep Rinse (Rinqageen
profondeur).
Deep Rinse(Rinqage
en profondeur).
Jeansde salet_
mod@@ea I@g@e.
Pourlesjeans de
travail tr_s sales,
utilisezlecycle
HeavyDuty (Linge
r@sistant).
Tissusr@sistants
de salet@@lev@e
mod@@e.
Grands manteaux,
jet@sdelit,couvre-
matelas, sacsde
couchage et autres
articles volumineux
similaires.
Serviettes
Draps.
Blancs,linge
de maison et
v@tementsde
travail et dejeux
de salet@@lev@e
mod@@e.
Jeans
Linge
r@sistant
Articles
volum-
ineux
Serviettes/
Draps
Blancs
Tr@schaude
Chaude
Couleurs
Fratche
Froide
Froide du
robinet
Tr@schaude
Choude
Couleurs
Fratche
Froide
Froide du
robinet
Tr@schaude
Choude
Couleurs
Fratche
Froide
Froide du
robinet
Tr@schaude
Choude
Couleurs
Fratche
Froide
Froide du
robinet
Tr@schaude
Chaude
Couleurs
Fratche
Froide
Froide du
robinet
Extr@m. sale
Tr@ssale
Normal
L@g@re-
ment
Extr@m.
L@g@re-
ment
Extr@m. sale
Tr_s sole
Normal
L_g_re-
ment
Extr_m.
L_g@e-
ment
Extr_m. sale
Tr_s sale
Normal
L_g@e-
ment
Extr_m.
L_g@e-
ment
Extr_m. sale
Tr_s sale
Normal
L_g@e-
ment
Extr_m.
L_g@e-
ment
Extr_m. sale
Tr_s sale
Normal
L_g@e-
ment
Extr_m.
L_g@e-
ment
Max/ Extra
Normal
Max/ Extra
Normal
Max/ Extra
Normal
Max/ Extra
Normal
Max/ Extra
Normal
Guide de d@achage
Remplissage profond
Trempage
automatique
Rin_age en
profondeur
Rinqage n°.2
Guide de d@achage
Remplissage profond
Trempage
automatique
Rinqage en
profondeur
Rinqage no.2
Guide de d@achage
Remplissoge profond
Trempage
automatique
Rin_oge en
profondeur
Rinqage no.2
Guide de d@achage
Remplissage profond
Trempage
automatique
Rin_age en
profondeur
Rinqage n°.2
Guide de d@achage
Remplissage profond
Trempage
automatique
Rin_age en
profondeur
Rinqage no.2
Combine des niveaux d'eau
sup@burs, une s@quencede brassage
sp@cialeainsi que des p@iodes de
lavage et de trempage en plusieurs
phases afin de traiter lesjeans de
salet@mod@@e6 I@g@e.Utilisez le
cycle Heavy Duty (Linge r@sistant)pour
lesjeans de travail tr@ssales.
Comprend des p@iodesde lavage
et detrempage en plusieurs phases
combin@esavec des p@iodesde
lavage prolong@esafin de nettoyer
efficacement lestissus r@sistantsde
salet@@lev@e6 mod@@e.
Procureunniveaud'eauDeepFill/Max
Fill(Remplissageprofond/Remplissage
maximal)avecs@quencede brassage
sp@cialementconquepourlesarticles
volumineux.Comprendaussiun
rinqageenprofondeurafinderincer
efficacementlesarticlesvolumineux.
Cycleconqu pour laver lesserviettes et
lesdraps, utilisant un niveaud'eau plus
@lev@et une p@iodede trempage plus
Iongueafinde nettoyer efficacement
cesarticles.IIestrecommand@de laver
lesserviettes et lesdraps s@par@ment
pour les meilleurs r@sultatsd'entretien
et de lavage.
Combine les plus chaudes
temp@atures d'eau disponibles
(selon le r@glagedu chauffe-eau)
avec des p@iodes de lavage plus
Iongues afin de nettoyer et @claicir
les blancs. Pour ce cycle, ilest
recommand@d'utiliser Oxi ou un
agent de blanchiment au chlore qui
convient aux articles @laver afin
d'optimiser le blanchiment. Dans le
cas de mod@lesqui ne sont pas dot@s
d'une s@lectionde temp@ature sur
le panneau de commande, ce cycle
)rocure uniquement une temp@ature
de lavage Hot (Tr@schaude).
Page 35

www.electromenagersGE.ca
R_glages
S61ectionnez les r6glages pour le brassage (Soil/Soletd) et la temp6rature de I'eau (Tamp).
REMARQUE: L'aJlongement des temps d'essorage r6duisent g6n6ralement le temps de s6chage/de consummation d'6nergie (c.-6-d. qu'elles
diminuent la consummation totale d'6nergie dans le cas de I'utiFsation combin6e d'une laveuse et d'une s6cheuse).
Options de programmes
Stain PreTreat (D_tachage) (sur certains modules)
La function Stain PreTreat (Stain PreTreat) vous permet d'indiquer le type de taches pr6sentes sur vos v_tements. Cette function comporte un
traitement en instance de brevet. Un remplissage d'eau initial est ex6cut6 6 une temp@ature correspondant au type de tache s61ectionn6, dans
une quantit6 permettant un nettoyage concentr6. Une phase de frottage suivie d'un trempage actif est ex6cut6e pour traiter la tache. De I'eau
suppl6mentaire 6 temp@ature s61ectionn6e est ajout6e et la phase de lavage s'enclenche au cycle s61ectionn6.
Pour utiliser la fonction Stain Pretreat (D_tachage_ : Stain PreTreat
1. %lectionnez le programme de lavage d6sir6.
2. S61ectionnez la tuche 6 traiter duns les options sous Stain PreTreat (Ddtachuge).
Off Wine
Dirt
Grass
Guide de d_tachage
Cat_gorie Temperatures de traitement/lavage Pour les meilleurs r_sultats,
recommand_es Tache avant de mettre dans la laveuse :
Tomate FraTche/Chaude Sauce Pr@raiter avec un d6tergent
Ketchup Iiquide ou un d6tachant. Rincer 6
Salsa I'eau froide.
Crasse FraTche/Chaude Crasse Laisser s6cher la crasse; enlever
Argile la crasse I@cheavec une brosse.
Boue Rincer 6 I'eau froide.
Herbe Froide/Chaude
Herbe
Rouge 6 I_vre
Chocolat
Pr6traiter avec un d6tergent
liquide ou un d@achant. Brosser
16g_rement; rincer 6 I'eau froide.
Sauce
Nayonnaise
Sauce BBQ
Vin FraTche/Chaude
Vin
Boisson gazeuse
KooI-Aid
Th6
Pr6traiter dans une solution
d'eau et d'Oxi. Ajouter de I'Oxi
avec le d6tergent darts la
laveuse.
Caf6
Jus
Bi_re
o Les temp6ratures recommand6es visent 6 optimaliser I'efficacit6 du d@achage; r6glez la temp@ature en function de la charge 6 laver.
o Assurez-vous qua la tache a 6t6 compl_tement nettoy6e apr_s le cycle delavage et avant le s6chage; lestaches rebelles peuvent n6cessiter un second
traitement.
Page 36

Utilisation
Options de programmes
Deep Fill (remplissage profond)
S61ectionnez la fonction Deep Fill pour les charges n6cessitant un suppl6ment d'eau.
Appuyez sur le bouton Deep Fill une fois avant de d6marrer le cycle pour ajouter une quantit6 d'eau suppl6mentaire 6 la charge 6 laver. Une
pression de 3 secondes sur le bouton Deep Fill procure le plus profond remplissage possible; la dur6e du cycle en sera augment6e en raison du
temps requis pour remplir la laveuse.
Pour annuler ]'option au besoin, appuyez sur le bouton Deep Fill de nouveau.
REMAROUE : On peut aussi appuyer sur le bouton Deep Fill une lois le remplissage termin6 et la phase de lavage commenc6e si I'on souhaite un
suppl6ment d'eau. Pour arr6ter le remplissage suppl6mentaire, appuyez sur le bouton Deep Fill de nouveau et I'apport d'eau cessera.
Auto Soak (auto trempage)
Cette option d6bute par un bref brassage, fait tremper leIinge pendant une dur6e pr6cis6e, puis passe au reste du cycle automatiquement.
2nd Rinse (rincage suppl_mentaire)
Lorsque vous utilisez du d@ergent suppl6mentaire ou de I'agent de blanchiment pour laver le Iinge tr6s sale, s61ectionnez I'option 2rid Rinse
(rinCagesuppl6mentaire) pour mieu× 6Fminer les r6sidus.
Extra Spin (Essorage suppl_mentaire)
S61ectionnez cette option pour ajouter du temps d'essorage, augmentant ainsi l'efficacit6 6nerg6tique en r6duisant le temps de s6chage.
2nd Rinse + Extra Spin (Rincage suppl_mentaire + Essorage suppl_mentaire)
Procure 6 la fois un rinCage suppl6mentaire et un essorage suppl6mentaire.
Deep Rinse (rincage en profondeufl
S61ectionnez cette option pour obtenir un rinCage en profondeur ou Iorsque vous ajoutez I'assouplissant. EIlepeut modifier d'autres r6glages
(l'essorage Spin peut passer 6 une vitesse plus 61ev6e)pour optimiser ]a performance.
REMARQUE: N'utilisez pos de boules distributrices pour ossouplissant ovec cette laveuse. Ellesne fonctionnent pos correctement ovec des laveuses
haute efficocit4.
lndicateur d'aide au consommateur
Votre laveuse est _quip6e d'un Indicateur d'aide au consommateur (lAG.). L'IAC est notre faqon de communiquer une solution simple dans
certaines situations o5 un appel de service n'est pas n6cessaire. Le tableau ci-dessous d6crit la signification des voyants que vous pourriez
voir clignoter Iorsque vous retournez 5 la laveuse.
Voyant essorage
Voyant rin_age
(Evacuation de
I'eau trop Iongue)
Voyant
remplissage
(Alimentation d'eau
danslalaveuse)
Deux voyants qui
clignotent
Apr@s le cycle de lavage, la r6partition du linge n'6tait pas suMsamment uniforme pour I'essorer correctement.
R6partissez le linge plus uniform6ment dans la laveuse puis d6marrez un cycle Drain & Spin (Drainer et essorer)
Poursuivez lecycle ou entrez Drain & Spin (Drainer et essorer). Si I'eau s'_vacue, alors I'obstruction s'est
probablement d6bloqu6e. Si de I'eau subsiste dans la laveuse, v@ifiez si le tuyau d'6vacuation est obstru6 ou pinc6.
Cette situation est susceptible de survenir avec le temps si le tuyau d'6vacuation e×t@ieur a 6t6 6tir6 ou restreint
V6rifiez Mimentation d'eau de votre domicile. Avez-vous oubli6 d'ouvrir un ou les deu× robinets d'admission d'eau
apr@sI'installation ou au retour de vacances? Aussit6t que le message commence 6 d6filer, la laveuse lance une
p@iode de verrouillage de 3 minutes. Les commandes de la laveuse ne r_pondront pas durant cette p@iode ni
ne pourront _tre chang_es. Apr_s 3 minutes, vous pouvez red_marrer votre cycle. Sivous tentez d'outrepasser la
p@iode de verrouillage en d6branchant la laveuse, la minuterie de 3 minutes se mettra en marche de nouveau.
Si votre appareil a cess6 de fonctionner par lui-m@me avant la fin du cycle, les deu× voyants les plus 6 droite vont
dignoter. Cela indique qu'une erreur est survenue. Essayez de lancer un cycle Drain & Spin (Drainer et essorer) pour
voir si I'erreur sera corrig6e. Si ce n'est pas le cas, composez le 800.GE.CARES (800.432.2737) pour obtenir du service.
10
Page 37

Chargement et utilisation de la laveuse www.electromenagersGE.ca
Respectez toujours 1'6tiquette d'entretien du fabricant Iors de la lessive.
Emploi approprid du ddtergent
L'exc6s ou le manque de d6tergent constitue un des
probl6mes courants Iors de Io lessive.
Vous pouvez utiliser moins de d6tergent si votre eau
est douce, si votre linge est moins volumineux ou s'il est
16g6rement sole.
En cos de taches, appliquez du d6tachant en suivant les
recommandations figurant sur 1'6tiquette des articles. Cette
applicotion doit 6tre effectu6e dons le tambour pour 6viter
d'6clabousser le couvercle ou les graphiques, ce qui pourrait
ternir leurs couleurs.
Plocez les dosettes de d6tergent dons le fond du tambour
avant d'ojouter des v6tements.
GE recommande d'utiliser des d6tergents haute efficocit6 tels
Che'_dans votre laveuse 6co6nerg6tique. Les d6tergents HE
que
sont formul6s pour 6tre utilis6s avec les syst6mes de lavage
et de rinqage _ foible quantit6 d'eau. Les d6tergents HE
diminuent les probl6mes de production excessive de mousse
couramment associ6s aux d6tergents troditionnets.
Lorsque vous utilisez des d6tergents houte efficacit6 ou
concentr6s, reportez vous _] 1'6tiquette des ortides pour
d6terminer Io dose requise pour une performance optimale.
Une quantit6 excessive de d6tergent aura un impact n6gatif
sur la performance du lavage.
Tri du tinge
Triez le linge par couleur (bloncs, dairs, couleurs), degr6 de salet6, type de tissu (coton robuste, tissu _] entretien facile, tissu d61icat)
et en fonction de Io charpie qu'il produit (tissu Sponge, tissu chenille) ou qu'il romasse (velv6tine, velours c6tel6). Lavez les ortides qui
g6n6rent de la charpie, tels que lesserviettes de coton et les has, s6par6ment des artides qui la collecte, por exemple les v6tements
synth6tiques et les pontalons hobill6s.
- Risque d'incendie
Ne placezjamais des articles imbibes d'essence ou d'autres produits inflammables duns la laveuse.
Aucune laveuse ne permet d'_liminer compl_tement I'huile.
Ne placez aucun article _]la s6cheuse ayant d6j_] eu des traces de tout type d'huile (y compris les huiles
de cuisson).
Cela pourrait entraTner la mort, une explosion ou un incendie.
Niveau du
linge
Niveau de
I'eau
Chargement de la laveuse
Chargez le linge suns I'entasser duns le tambou[ Pour de
meilleurs r_sultats, chargez le linge en le r_partissant de mani_re
uniforme sur le tour ext_rieur du tambour, et vers le centre
pour les charges plus volumineuses. Pour ajouter des articles
une fois la laveuse en marche, appuyez sur le bouton Start/
Pause (d_part!pause) si le couverde est verrouill_; attendez
que le voyant lid locked (Couvercle verrouill6) de I'afl:ichage
soit _teint avant d'ouvrir le couverde. Soulevez le couverde
et immergez les articles suppl6mentaires sur le tour ext6rieur
du tambour. Pour reprendre le lavage, fermez le couverde et
appuyez sur Start (d_part). R_glez la taille de la charge et!ou
utilisez I'option Deep Fill (Remplissage profond) si n6cessaire
Petit volume de linge
Niveau du
linge
Niveau de
I'eau
Volume de linge moyen
IR Ne mettez pos d'artides comme des drops, des
couvertures ou des serviettes sur le dispositif Infusor (sur
certains modules). Chargez tes en les r_partissant sur le
tour ext_rieur du tambour.
IR Ne mettez pas de coussins d'ext_rieur ou de canap_ duns
la laveuse, car ils sont trop gros pour bouger. Retirez les
housses ext6rieures et lavez UNIQUEMENT celles ci.
Grand volume de linge
Niveau du
linge
Niveau de
I'eau
11
Page 38

propos des caract6ristiques de la laveuse
D6tection automatique du volume de linge (sur certains modules)
Cette fonction d6termine la s6quence de brassage correcte, la dur6e du brassage et la quantit6 d'eau qui convient 5 la taille et au type de charge
plac6e dons la laveuse. La laveuse ne d6marrera pas le cycle de lavage ou le remplissage d'eau si le couverde est ouvert. Lorsque le couverde est
ferm6, la machine peut commencer 6 se remplir d'eau pour d6tecter le volume de linge.
REMARQUE : La d6tection automatique du volume de linge d6marre un essorage en d6but de cycle et mettra jusqu'h 3 minutes h s'accomplir
(beaucoup mains de temps pour les petites charges); ils'agit d'une op6ration normale.
REMARQUE : Cet appareil est une laveuse haute efficacitd avec action de lavage agitateur. Ce syst_me requiert mains d'eau tout en affront une
action de lavage efficace. Vous pouvez remarquer que le niveau d'eau est infdrieur 8 celui de votre prdcddente laveuse. Ceci est normal pour une
laveuse dquipde du dispositif agitateur.
Distributeur d'assouplissant (sur certains modules)
Le couvercle de I'agitateur se pose sur le haut de I'agitateur. S'il tombe
acddentellement, remettez te simplement en place.
Le distributeur d'adoucissant lib_re automatiquement I'adoucissant
liquide. GrOce au bouton sur la bonne position, I'adoudssant est lib6r6 au
ban moment.
N'urr_tez pus la laveuse et n'ouvrez pas le couvercle pendant son
premier essorage sinon le distributeur se videra pr_cocement.
Pour utiliser le distributeur, suivez les 6tapes suivantes •
D Assurez le distributeur est correctement fi×6 6
que I'agitateur.
r_ N'utilisez que de I'assouplissant liquide dilu6. Versezde dans le
distributeur en utilisant la quantit6 recommand6e sur I'emballage.
SEULEMENT
cette partie du
distributeur
est visible
une fois
install@dans
I'agitateur
Agent de blanchiment liquide
L'agent de blanchiment au chlore doit _tre ajout_ par le distributeur
d'agent de blanchiment dans le coin event gauche. Suivez les
recommandations du fabricant de I'agent de blanchiment pour
connaTtre la quantit_ appropri_e selon la taille de la charge, en veillant
_]ne pas appliquer ni verser directement sur le linge.
REMAROUE : N'utilisez pas d'agent de blanchiment liquide au chlore et
de d6tachant tel qu'un produit O×i dans la m_me charge.
Ne versezjamais I'assouplissant directement sur les v@tements.lls
pourraient @tretach_s.
r3-] Ajoutez de I'eau au distributeur jusqu'6 la ligne de remplissage
maximal.
Ne versez den dons I'agitateur sir le __
couverde ou le distributeur est retir&
[_] S6tectionnez I'option Deep Rinse
(Rinqage en profondeur). Options
2rid
Auto Rinse
Soak -xtra Spin
Remarque : La distribution de I'assouplissant peut s'av_rer incorrecte si
I'option Deep Rinse (Rinqage prafand) n'est pas s61ectionn6e.
D_tachant
Placez le d6tachant, par exemple un produit O×i, directement dans le
fond du tambour avant de charger le linge.
REtffARQUE : N'utilisez pas d'agent de blanchiment liquide au chlore et
de d_tachant tel qu'un produit O×i dans la m_me charge.
12
Page 39

Entretien et nettoyage de la laveuse
E×t_rieur
Essuyezimm6diatement tout produit renvers6 _ I'aide d'un chiffon humide.
Nettoyage de I'int_rieur de la laveuse
Laissez le couverde ouvert apr_s une lessive pour
permettre I'_vaporation de I'humidit_. Si vous
souhoitez nettoyer le panier, utilisez un linge propre
et dou× I_g_rement imbib_ de d_tergent liquide,
puis rincez. (N'utilisez p(]s de produits nettoy(]nts
abrasifs).
Nettoyage du distributeur d'assouplissant (sur certains modules)
r_ Retirezle distributeur du hout de I'ogitoteur.
D %parez le comportiment distributeur du couvercle en ottrapant le haut et en poussant vers le hasdans
le compartiment.Le compartiment seraalors s_par_ du couvercle.
D Pournettoyer le distributeur, faites tremper le compartiment distributeur et le couvercle dans la solution
J
I
S6porez pour nettoyer
suivante:
[] 3,8 litres(! gallon) d'eau tilde
[] 60 ml (1/4 tasse) de d_tergent liquide
[] 240 ml (! tasse)dejavellisant
n_cessaire,
[4-'] Si d_crocher les r_sidusaccumul_s _ I'aide d'un chiffon doux
N'utilisezpas de brosse dure, la surface du distributeur pourrait _tre ray_e.
r_ Rincezet r_assemblez ledistributeur. Placezle distributeur sur I'agitateur.
propre
et
apr6s
trempage.
Flexibles d'alimentation d'eau
Les Fle×ibles d'(]liment(]tion d'eau connect(]nt I(] k]veuse
au robinet devr(]ient 6tre remplacer tousles cinq (Ins.
D_m_nagement et entreposage
Demondez _] un r_porateur de vidanger I'eau de Io
pompe et des tuyau×. Entreposez la laveuse (_I'(]bri
des intemp6ries.
Vacances prolong_es
Coupez I'alimentation en eau au nive(]u des robinets.
Vidangez I'eau des tuyau× et de k] zone de I(] pompe de
filtration de I'eau en cas de risque de gel.
13
Page 40

Instructi
L e
d'install
Des questions?Appelez le 1.800.561.3344 ou Visitez notre site Web 8 I'odresse: www.electromenugersge.cu ]
Ceci est un symbole d'alerte de s6curit6. Ce symbole pr6vient d'un risque mortel ou de blessures encouru par
vous et d'autres personnes. Tousles messages de s#curit# s'inscriront 6 la suite du symbole d'alerte et du mot
<<DANGER >>,<<AVERTISSEMENT>>ou <<MISE EN GARDE >>.Ces mots sont associ#s aux d6finitions suivantes
Indique une situation dangereuse qui, si elle n'est pas 6vit6e, causera des blessuress6v@es,voire la mort.
tio
Indique une situation dangereuse qui, si elle n'est pas 6vit6e, peut causer des blessures s6v6res,
voire la mort.
Indique une situation dangereuse qui, si elle n'est pas 6vit6e, peut causer des blessures mineures
ou mod6r6ment graves.
OUTILS NI_CESSAIRES POUR INSTALLER
AVANT DE COMMENCER
LA LAVEUSE
Lisez ces instructions entJ_rement et soigneusement.
[] Pince6joint coulissant
. IMPORTANT - Conservezces instructions
pour I'inspecteur local
. IMPORTANT - Observeztouslescodes
et les ordonnances en vigueur
. Note a J°JnstaJJateur - Assurez vous de laisser
ces instructions au consommateur
. Noteau consommateur - conservez ces
instructions a titre de r6f@ence
, Niveau de comp@tences - L1nstallation de cet
appareil 61ectom6nager n6cessite des comp6tences
m6caniques et 61ectriques de base
, Temps d'installation - 1-3 heures
, L'installateur est responsable de bien installer
cet appareil
, Toute panne de produit due 6 une mauvaise
installation n'est pas couverte par la garantie
PII_CES FOURNIES
[] Guide de rd@ence
I'utilisateur
[] Tuyau d'6vacuation
[] Attache de c0ble
[] Bride detuyau
d'#vacuation
[] Collier deserrage
[] Niveau __/
PII_CES REQUISES
[] Flexibles d'eau (2))
[] Rallonge de tuyau d'@vacuation(pour hauteurs
d'@vacuationde 60 6 96 po (1,56 2,5 m)
Pi_ceset accessoires GE
Commandez en ligne sur www.electromenugersge.cu
24 heures sur 24 d@saujourd'hui, ou par t@l@phoneau
1.800.561.3344 durant les heures normales de bureau.
Num_mdepi_ce Accessoire
pivl!4X!O002 Flexiblesd'alimentation d'eau en
Ou
PMI4XIO005 Flexiblesd'alimentation d'eau en m@al
WHIX2267 Rondelles en caoutchouc et grillages
WH49X301 Rallongedetuyau d'#vacuation(pourhauteurs
NOTE:Nousrecommande fortement d'utiliser des tuyaux
d'alimentation en eau neuf. Lestuyaux sed#gradent avec le
temps et doivent @re remplac_stousles 5 ans pour r#duire
le risque de rupture des tuyaux et/ou de d#gats des eaux.
caoutchouc - 1,2m (4 pi)
tress6- 1,2m (4 pi)
d'#vacuation de 60 6 96 po (1,5 6 2,5 m)
(vendues s_par_ment)
[] Rondellesen
caoutchouc (2) et grillages
pour cr@pine(2)
14
Page 41

Instructions d'installation
EMPLACEMENT DE VOTRE LAVEUSE
N'installezjamaJs votre laveuse •
i. Duns un endroit expos6 6 de I'eau qui coule ou aux
conditions climatiques ext6rieures. La temp6rature
ambiante ne doitjamais _tre inf6rieure 6 15,6°C
(60°F)pour que la laveuse fonctionne bien.
2.Duns un endroit o0 elle entre en contact avec des
tentures ou des rideaux.
3.Sur un topis. Le sol DOlT _tre une surface dure avec une
pente maximum de 1,27 cm per 30 cm (1/2 pouce par
pied). Pour vous assurer que k] laveuse ne vibre pus ou
ne bouge pus, il est possible que vous deviez renforcer
le plancher.
REMARQUE: Si le plancher est en mauvais 6tat, utilisez
une feuille de contreplaqu6 trait6 de 3/4 po. fix6
solidement 6 la couverture de pk]ncher actuelle.
IMPORTANT" Espaces libres minimum pour
l'installation - R_duit ou un Placard
. Si on recommande I'installation de votre machine (_
lover duns un r6duit ou un placard, vous trouverez
les normes d'installation correspondantes sur une
6tiquette au dos de la machine.
. D6gagement minimal entre la machine et les
surfaces mitoyennes :0 cm (0 po) de port et d'autre,
5 cm (2po)c3I'avant. Espace vertical depuis le
plancher jusqu'aux tablettes ou armoires suspendues,
plafond, etc. = 60 po (152.4cm).
Lesportesdeplacarddoivent_tre surbaiss_esou autrement
ventil6es pour requiert une ouverture de 387 cm2 (60
po2) prosdu haut de la porte et 387 cm2 (60 po2)prosdu
has de la porte. Cette espaced'ouverture doit_tre doubl_
Iorsqu'une s6cheuse se trouve duns le m_me placard.
REMARQUE: Lesjeux indiqu6s sur cette affiche
constituent desjeux minimaux. IIconvient 6galement
de pr6voir un d6gagement suffisant pour les op6rations
d'installation et d'entretien.
E×IGENCES D'ALIMENTATION D'EAU
PRESSIOND'EAU- Celle-cidoit sesituerentre un minimumde1,4kgf/cm2(20psi)et un maximum de8,4kgf/cm2(120psi).
TEMPE_RATURED'EAU- Lechauffe-eoudomestiquedoit_trer_gl_defa¢on 6 olimenterLAMACHINEALAVERovecdeI'eauchoudeentre
50°Cet65°C(120°Fet 150°F)quondon choisitle mode" hotwash" (Iovoge6 choud).
ROBINETSD'ARRI_T- Desrobinetsd'orr_td'eauchoudeet d'eoufroidedoivent_tre pr_vus.
EVACUATION- L'eaudevidongepeut_tre_vocu_eou moyend'untuyou de renvoi.L'eauDOlTETRE_vocu_e6unehauteurMINIMALE
DE76cm (30po)etma×imalede2,/4m (8pieds)par rapport 6 Iobose deIomachine.Letuyou de renvoidoit ovoirundiometreint_rieur
minimalde 3,8cm (_l-1/2po)et _tresitu_6 I'oirlibre.
rTl DEBALLAGE DE VOTRE LAVEUSE
Lorsquela machine est (_destination, enlevezI'ensemble des
mat_riaux ext_rieur et cartons d'emballage.
Retirezle sac (comprenant collier de serrage, attache de c_ble
et bride de tuyau d'_vacuation), letuyau d'_vacuation et le
guide de rd_rence de I'utilisateur de la cuve.
REMARQUE:Laissezlemateriel d'emballage en mousse
duns I'ouverture de la cuve pour maintenir la cuve en place
pendant le reste de I'installation.
__ Le sac de pisces
<_> _ Guidede rd_rence I'utilisateur
Laissezlemateriel d'emballage en
mousse duns I'ouverture de la cuve
Tuyaud'6vacuation
[] ENLEVEMENT DE LA BASE
Pour enleverla bosedeI'appareil,placezunpiedsur lec6t_
et renversez I'opporeilversI'orrieresur les montonts de coin.
RetirezIo bosepuis remettez IoIoveuse6 I'endroit.
15
Page 42

Instructions d'installation
RACCORDEMENT DU TUYAU
D'I_VACUATION #, LA LAVEUSE
Raccordezletuyau d'6vacuation 6 I'orificed'6vacuation6I'arri@e
de la laveuse. Ouvrez le collier de serrage avec une pince et
glissez-lesur le bout du tuyau. Enmaintenant le collier ouvert,
poussezle bout du tuyau dans I'orificed'6vacuationjusqu'6 ce
qu'il repose au fond. Rebchez le collier entre les nervures de
Iocalisation sur le bout du tuyau
Tuyau
d'6vacuation
de
serrage
[_] RACCORDEMENT DES FLE×IBLES
D'EAU ,A LA LAVEUSE
ITI RACCORDEMENT DES FLE×IBLES
D'EAU AU× ROBINETS D'ADMISSION
Rep@rezlerobinet d'eau CHAUDEavant de raccorder les
flexibles. Celui-ci setrouve normalement _ gauche.
(Silestamis/joints en caoutchouc ne sont pas presents)Avec
le c6t@en saillie du tamis vers vous, introduisez un ensemble
tamis/joint caoutchouc _ I'autre extr@mit@desflexibles
d'alimentation d'eau, c
Branchezleflexibled'eauchaudeau robinet_ _._
de sortied'eau chaudedomestique.Serrez6
lamain,puisutilisezdespincespoursetterles
flexiblesde 1/4_ 1/2detour suppl6mentaire.
Ouvrez le robinet d'eau chaude.
Branchezleflexibled'eaufroideIS)au robinet _
de sortied'eaufroide domestique.Serrez_ la
main,puisutilisezdespincespoursetter les
flexiblesde1/4 _ 1/2detour suppl@mentaire.
Ouvrez le robinet d'eau froide.
V@ifiezI'absencede fuite et de suintement au niveau des
raccords de tuyaux. Resserrezsi n@cessaire.
I
I
Retirezlecordond'alimentationde son Iogementavant d'installer
lesflexiblesd'alimentation d'eau.S'ilnest paspresent,installezun
joint encaoutchoucdans undesraccordsduflexibled'eauchaude.
Vissezleflexibled'eauchaude surleraccordd'eauchaude(rep@e
"H")qui setrouve dans la partie sup@ieuredu dosde la machine.
Serrez_lamain,puisutilisezdespincespourserrerlesflexiblesde
1/8_ 1/4 detour suppl@mentaire.
S'il n'est pas present, installezun joint en caoutchouc dans un
desraccords du flexibled'eau froide (repere"C").Vissezleflexible
d'eau froide surle raccord d'eaufroide (rep@re"C")quisetrouve
dansla partiesup@ieuredu dos de la machine.Serrez_ la main,
puisutilisezdespincespourserrerlesflexiblesde1/8 _ 1/4detour
suppl@mentaire.
D@lacezlamachine pourqu'ellesetrouveaussipresque possible
de son emplacement ddinitif, tout en vous laissant assezde
placepour raccorderlesflexiblesd'alimentation d'eau,lerenvoiet
I'alimentation@lectrique.
Jointen
caoutchouc --
/,
oin
caoutchouc
16
Page 43

Instructions d'installation
[] RACCORDEMENT AU DRAIN
Posezla bride du tuyau
d'@acuation sur le punneau
arri@e de la laveuse. Fuites
passer le tuyuu d'@acuation
dans la bride et ins@ezson
bout libre dans I'orifice du drain
de votre domicile.
REMARQUE- Sila
Iongueur du tuyau
d'_vacuation se r_v_le
insuffisante, commandez
la trousse de Tuyau
rallonge, no d'6vacuation
de piece GE
WH49×301. Branchez
la rallonge de tuyau
d'@acuation faisant partie
de la trousseau tuyau
d'@acuation d'origine 6
I'aidedu collier pr@u 6
cette fin.
REHARQUE:Installez guide
de tuyau sur I'extr6mit6 du
tuyau si6quip6.
Si les robinets d'admission d'eeu et le drain sont int_gr_s
dens le tour, attachez le tuyau d'@acuation 6 Fun des
flexibles d'alimentation en eau 6 I'aide de I'attache de cable
fournie.
Tuyau Mur Attache de
d'@acuation cable
\
Bride de tuyau
d'@ucuation
Arri@e de la
laveuse
RACCORDEHENT AU DRAIN {suite)
Si votre drain se pr_sente comme une conduite
verticale, uttachez le tuyau d'@ucuation a cette conduite
a I'uide d'une attache de cable fournie
Tuyau d'@acuation
d'@acuation
Arri@e de la
laveuse
dansle
drain
30 po(76,2
cm)min.
I Attache
_[de cable
Conduiteverticale
REHARQUE: Sivous mettez le tuyau de vidange trop bas,
le tuyau d'6gout peut causer un effet de siphon. On ne peut
pas mettre plus que !2,7 cm (5 po) de tuyau dans le tuyau
d6gout. IIdoit y avoir un espace d'air autour du tuyau de
vidange. Un ajustement trop serf6 peut _galement produire
un effet de siphon. Attache de cable Attache de cable.
Si la hauteur d'@vacuation du drain ne satisfeit pas
le 30 po (76,2 cm) minimum requis, le bout du tuyau
d'@acuation doit @trefix6 dans I'orifice du drain de votre
domicile par un installateur et une coupure antirefoule-
ment doit entourer le tuyau pour pr6venir I'effet de siphon.
_yau
Bride de tuyau
d'@acuation
Insertion
de 5 po
30 po (76,2
cm) min.
REMARQUE: Sivous mettez le tuyau de vidange trop bas,
le tuyau d'6gout peut causer un effet de siphon. On ne peut
pas mettre plus que !2,7 cm (5 po) de tuyau dans le tuyau
d6gout. IIdoit y avoir un espace d'air autour du tuyau de
vidange. Un ajustement trop serf6 peut 6galement produire
un effet de siphon. Attache de cable Attache de cable.
(12,7 cm)
max.
dans le
drain
Arri@e de la
laveuse
Bride de tuyau
d'6vacuation
Arri@e de la
laveuse
Tuyau
d'6vacuation --
Moinsde30po _'-,.
(76,2cm)
4C
REHARQUE: Sivous mettez le tuyau de vidange trop bas,
le tuyau d'6gout peut causer un effet de siphon. On ne peut
pas mettre plus que 12,7 cm (5 po) de tuyau dans le tuyau
d6gout. IIdoit y avoir un espace d'air autour du tuyau de
vidange. Un ajustement trop serf6 peut 6galement produire
un effet de siphon. Attache de cable Attache de cable.
Page 44

Instructions d'installation
E×IGENCES I LECTRIQUES
f_- Risque d'incendie
Brancher 6 une prise de courant 6 3 broches mise 6 la
terre.
NE PASretirer la broche de contact de mise 6 la terre.
N'UTILISEZpas de rallonge #lectrique.
N'UTILISEZpus d'adaptateur de prise.
Le non-respect de ces instructions pourrait entra_ner
un d#c_s, un incendie ou un choc #lectrique.
CIRCUIT- Individuel,correctement polaris# et mis (3la terre,
disjoncteur ou fusible temporis# de 15 ou 20 amp@es.
ALIMENTATIONI_LECTRIQUE- 2 ills plus la mise 6 la terre,
120 volts, monophas#, 60 Hz,courant alternatif.
PRISEI_LECTRIQUE- Prise6 3 voles correctement mise
6 la terre situ#e de faqon c3ce que
le cordon salt accessible Iorsque la __
laveuse est install_e duns so position
d#finitive. Sila prise n'est qu'(_2 voles, il
est de la responsabilit_ du propri@aire
de demander 6 un #lectricien agr## de
la remplacer par une prise 6 3 voles
correctement mise 6 la terre.
La laveuse dolt _tre correctement mise 6 la terre
conform#ment aux codes Iocaux de I'_lectricit_, ou en
I'absence de codes Iocaux, conform_ment (3la derni@e
#dition du NATIONALELECTRICALCODE,ANSI/NFPANO.70.
Demandez 6 un #lectricien agr_ de v@ifier la connexion
sivous n'_tes pas certain que la laveuse est correctement
mise 6 la terre.
r71 BRANCHEMENT DE L'ALIMENTATION
I LECTRIQUE ET INSTALLATION
V@ifiezquelegrandboutondecommon@(surcertainsmo@les)de
la machine6 loversetrouveenpositionOFF(arr_t).
Branchezlaficheducordond'alimentationdonsuneprisemuralede
115V,15/20amperes.Placezla machine6 lover6 sonemplacement
ddinitif.PlacezunniveauVsurlebardlat@alsup@ieur6 platetsurle
c6t_delamachine6lover.Ajustezlesquatrepattesdemise6 niveau
jusqu'6cequelamachine6 loversaltauniveaudegauche6 droite
etd'avantenor@re.Enlevezleniveau.
Ouvrezlecouvercledutambour.D@oseret mettreaurebut6
remousmat@iauxd'exp_dition(voirI'_tape1).
Enlevezlafeuilledeplastiquequirecouvrelepanneaudecommon@.
_ Nlveau
,, .o. /
INSTRUCTIONS DE MISE A LA TERRE
Cet appareil dolt _tre mis 6 la terre. Dons I'_ventualit_
d'un malfonctionnement oud'une panne, la mise 6 la
terre r#duit le risque de choc #lectrique en procurant
un circuit de moindre r#sistance au courant #lectrique.
Cet appareil comporte un cordon dot_ d'un conducteur
de mise 6 la terre de I'appareillage et d'une fiche de mise
6 la terre. Lafiche dolt _tre branch#e dons une prise
compatible correctement install#e et mise 6 la terre
conform#ment 6 tousles codes et r_glements en vigueur.
Uneconnexion incorrecte du
conducteur de mise 6 la terre de
I'appareillagepeut poser un risquede choc _lectrique.
Consultez un _lectricien ou r@arateur qualifi_ si vous
doutez que I'appareil salt correctement mis 6 laterre. NE
modifiez PASlafiche du cordon d'alimentation. Sielle ne
s'ins@epusdons la prise,demandez 6 un _lectricien agr_
de poserune prise appropri_e.
Si les codes Iocaux I'exigent, un fil de terre ext@ieur en
cuivre de calibre 18 ou sup@ieur (non fourni) peut _tre
ojout& Fixer (3I'enceinte de la laveuse (3I'oide d'une vis
6 t61e#10-16 x 1/2 po (danstoute bonne quincaillerie) @
I'arri_re de la laveuse, comme illustr&
Attacher le fil IIIIIII
de terre et so
vis (obtenir
Iocalement)
Installation en maison mobile :
L'installation dolt satisfaire les normes suivantes :
Standard for Mobile Homes, ANSIAlZ9.Z et National
Mobile Home Construction and Safety Standards Act of
1974 (PL93-383).
FINAL CHECKLIST
Avant de mettre en marche la laveuse, v@rJfiezque tout
est en ordre :
[] L'alimentation principale de courant est branch#e.
[] La laveuseest branch#e 6 la prise.
[] Les robinets d'eau sont ouverts.
[] L'appareilestbien horizontal et lesquatre pattes
de nivellement reposent fermement sur le plancher.
[] La mousse et le carton d'emballage et est retir#e.
[] Letuyau de vidange est bien attach#.
[] Lerobinet, les rondelleset letuyau de vidange
ne fuient pas.
Faites marcher la laveuse pendant un cycle complet.
[] V@ifiez qu'il n'y a aucune fuite d'eau et qu'elle
fonctionne bien.
[] Rangez ces instructions dons un emplacement
proche de la laveuse pour r#f@ence future.
18
Arri@e de la
laveuse
Page 45

Avant de contacter un service de d pannage...Conseils de d pannage.
Economisez du temps et de I'argent! Vdrifiez les tableaux des pages qui suivent, ou consultez www.electromenugersGE,cu. Vous pourriez vous dviter un appel.
EAU Causes possibles Solutions
Petite quantit6 d'eau Fonctionnement normal du IIest normal qu'une petite quantit6 d'eau demeure dans le distfibuteur apr6s le cycle.
r6siduelle duns le distributeur
distributeur (certuins
modules) 6 la fin du cycle
Br6ve pulv6risation et d6lai Le couvercle a _t6 ouvert et Ceci est normal. Consultez SEQUENCEDE DEMARRAGEdans la section Consignes de
apr_s I'uppui sur Start ferm6 entre la s61ection du s_curit_.
(d#part) programme et le d6part
Le niveau de I'eau semble Ceci est normal L'eau peut ne pas recouvrir tout le linge,
bus Ceci est normal pour cette laveuse haute efficacit6.
Fuible d_bit d'eau Lesfiltres des robinets d'eau FermezI'alimentation d'eau et d6branchez lesflexibles d'eau dela partie sup@ieure
L'eau est siphonn_ dela Le tuyau de vidange est trap Lo hauteur du tuyau d'6vacuation doit d6passer 52 po (81,5 cm) 6 un moment entre
laveuse bas ou le tuyau est trap enfonc6 I'arri_re de la laveuse et le tuyau de vidange. UtiFsez une bride anti-siphonnage. Voir
Trap de mousse Eau douce
Fuites d'eau
sont obstru@s arri@rede la laveuse et des robinets. Nettoyez les deux grilles des flexibles (s'ilssont
pr6sents)ainsi que lesgrilles dans I'appareil 6 I'aided'une brosse ou d'un cure-dents.
Raccordez de nouveau les boyaux et r6tablissez I'alimentation en eau. Assurez-vous de
I'absencede fuites aux connexions. Assurez-vous de I'absence defuites aux connexions.
dans la conduite verticale les Instructions d'installatian.
Essayez d'utiliser mains de d6tergent.
Trap de d6tergent
Type de d6tergent
Type de d6tergent
Utilisation de trap de d6tergent
dans la laveuse
Les boyaux de remplissage
ou d'6vacuation sont mal
raccord6s
Le tuyau d'_vacuation de votre
domicile est peut-6tre bouch6
Le tuyau d'6vacuation frotte
contre le mur
Pression constante de I'eau
dans les boyaux de remplissage
a la source d'alimentation en eau
Dosez soigneusement votre d6tergent. Vous pouvez utiliser mains de d6tergent si
votre eau est douce, si votre linge est mains volumineux ou s'il est 16g6rement sale.
Passez _ un d6tergent haute efficacit6 tels que _.
Passez _ un d6tergent haute efficacit6 tels que _.
Utilisez mains de d6tergent. Vous pouvez utiliser mains de d6tergent si votre eau est
douce, si votre linge est mains volumineux ou s'il est 16g6rement sale.
V6rifiez que les raccordements des boyaux sont bien serr6s aux robinets et que des
rondelles en caoutchouc sont install6es. Assurez-vous que I'extr6mit6 du boyau de
vidange est correctement ins6r6e et fix6e au tuyau d'6vacuation.
V6rifiez la plomberie de votre domicile. II vous faut peut-6tre appeler un plombier.
Veillez @ce que le tuyau d'6vacuation ne soit pas en contact avec le tour. Cela
pourrait entraTner une usure excessive du tuyau.
Serrezlesraccords des boyaux aux robinets,
V6rifiez 1'6tatdes boyaux de remplissage. IIs devraient 6tre remplac6s tousles Sans.
19
Page 46

Avant de contacter un service de d pannage...Conseils de d pannage.
Economisez du temps et de I'argent! Vdrifiez les tableaux des pages qui suivent, ou consultez www.electromenugersGE.cu. Vous pourriez vous dviter un appel.
EAU Causes possibles Solutions
La temperature de I'eau ne Une temp@rature d'eau plus Les nouveau× d6tergents 6 lessive ant 6t6 formul6s pour des temp@atures plus
semble pas hanna froide permet une meilleure froides sans affecter les performances de lavage.
L'eau est vidang6e avant Couvercle soulev@ou R6glez de nouveau le programme.
qua le programme ne salt programme interrompu pendant
termin_ plus de 24 heures
L'eau ne se vidange pas Le tuyau d'@vacuation est tordu Redressez letuyau d'6vacuation et v6rifiez qua la laveuse ne repose pas dessus.
Lalaveusetoursets'interrom_ Ceci est normal La laveuse d6tecte le volume de linge.
au d_but des programmes
La laveuse s'interrompt L'option Soak {trempage) a _t_
pendant le programme de s@lectionn_
lavage Ceci est normal
efficacit@ @nerg@tique
L'alimentation en eau est Ouvrez compl6tement les robinets d'eau chaude et d'eau froide, puis v6rifiez que les
couple ou real raccord_e bayou× sont raccord6s au× bans robinets. REMARQU5: Les robinets d'alimentation
en eau sont identifi6s par H (chaud) et C (froid).
Les filtres des robinets d'eau FermezI'alimentation en eau et d6branchez les fle×ibles d'eau de la partie sup@ieure
sont obstru@s arri6rede la laveuse et des robinets. Nettoyez lesdeu×gfiNes des fle×ibles (s'ilssont
pr6sents)ainsi qua lesgrilles dans I'appareil 6 I'aided'une brosse ou d'un cure-dents.
Raccordez de nouveau les boyau× et r6tablissez I'alimentation en eau. Assurez-vous de
I'absencede fuites au× canna×ions.
De I'eau froide sort quand Hot Ceci est normal. La laveuse d6tecte la temp@ature de I'eau (sur certains mod61es)
Ichaud) est s@lectionn@ et I'optimise pour de meilleurs r6sultats. De I'eau froide est ajout6e r6guli6rement
Iorsque hot (chaud) est s61ectionn6.
Le chauffe-eau de votre Assurez-vous qua le ehauffe-eau de votre domicile fournit de I'eau de 120 6 140 °F
domicile est real r_gl_ (48 6 60 °C).
ou real raccord@ Le haut du tuyau de vidange doit se trouver 6 mains de 6 pi (1,8 m) du sol.
Ceci est normal. La laveuse alterne entre le brassage et le trempage pendant ces
programmes pour un Iinge plus propre, mais moins us6.
Plusieurscycles int6grent des s6riesde trempages durant la p6riode debrassage afin de
nettoyer vos v_tements avec moins d'usure.
20
Page 47

www.electromenagersGE.ca
FONCTIONNEMENT Causes possibles Solutions
Poudre r#siduelle dans le Eau de lavage trap froide S61ectionnez une temp@ature de lavage plus chaude si possible afin d'augmenter
distributeur ou obstruction ou faible pression d'eau au la dissolution du d6tergent ou utiFsez du d6tergent Fquide. Assurez-vous que les
des distributeurs (certains domicile capuchons des siphons sent exempts de d6bris et bien pouss6s en position. Retirez
mod_les) et nettoyez le tiroir du distributeur si une obstruction survient.
Les additifs pour lessive Remplissage excessif des Ne remplissezpus trap le distributeur et n'y ajoutez pus d'eau. S61ectionnezI'option Deep
sent distribu_s trap tSt distributeurs Rinse (Rinqogeenpmfondeur) Iorsque vous utilisez un assouplissant.
(distributeurs sur certains
mod_les)
Lo laveuse s'interrompt Ceci est normal Lo laveuse peut sqnterrompre pendant i'essorage pour extraire I'eau savonneuse de
pendant I'essorage mani_re plus efficuce.
La laveuse ne d_marre pas La laveuse est d6branch6e V6rifiez qua le cordon d'alimentation est branch# sur une prise sous tension.
L'alimentation en eau est Ouvrez compl_tement ies robinets d'eau chaude et d'eau froide.
coup6e
Les commandes ne sent pas V6rifiez les commandes.
correctement r6gl6es
Lecouverde est ouvert : le Fermez le couvercle et appuyez sur Start (d6part).
dispositif de s6curit6 emp@che
le brassage et l'essorage lorsque
Je couverde est ouvert
Ledisjoncteur s'est d6clench6/ V6rifiez les dis]oncteurs/fusibles de votre domicile. Remplacez les fusibles ou
le fusible a grill6 r#endenchez le disjoncteur. Lo luveuse doit @rebranch6e sur une prise s6pur#e.
Les composants 61ectroniques D6branchez la laveuse, attendez 2 minutes, rebranchez-la et appuyez sur Start
doivent @trer6initialis6s (d6part).
Vous n'avez pas appuy_ sur Start Appuyez sur Start (d#part).
{d6part)
Les capsules de d_tergent ne Des capsules de d6tergent ant Les capsules de d6tergent ne doivent pas _tre utilis6es dans les distributeurs. Elles
se dissolventpas 6t6 plac6es dens le distributeur doivent uniquement #tre ajout6es directement dans le tambour, conform6ment aux
Modification inexpliqu#e du
temps et/ou des r#glages
Le tambour ne semble pas
attach_
Modification des options
{certains mod@les)
Letambour bouge ou tourne
librement
instructions du fabdcant.
Ceci est normal. Plusieurs options changeront d'autres options pour optimiser la
performance de la laveuse.
Letambour de la laveuse ne poss_de pas un frein traditionnel. Letambour tournera
librement. Ceci est normal.
21
Page 48

Avant de contacter un service de d pannage...Conseils de d punnuge.
PERFORMANCE Couses possibles Solutions
Taches de couleur Utilisation inappropri_e de Lisez l'6tiquette de I'assouplissant et suivez les instructions pour I'utilisation avec un
Linge terni oujauni Ouantit_ de d_tergent Vdllez 6 suivre les instructions du fabdcant du d#tergent.
Churpie ou r_sidus le linge Lelinge s_che a I'air libre ou sur Sivous ne s6chez pasvotre linge en machine, il se peut qu'il retienne plus de charpie.
I'assouplissant distributeur.
Linge qui a d@teint S#parez les blancs ou eouleurs daires des eouleurs fonc6es.
Eau dure Utilisez un produit anticalcaire ou installez un adoucisseur d'eau.
L'eau n'est pas assez chaude Assurez-vous qua le ehauffe-eau de votre domicile fournit de I'eau de 120 6 140 °F
La laveuse est trap charg_e Chargez le linge sans I'entasser et sans d6passer la rang6e sup6deure de trous du
Linge qui a d_teint Triez le lingo par couleur. Si1'6tiquette pr6cise de laver un article s6par#ment, il se
corde
Hauvais tri du linge S#parez les articles qui produisent de la charpie de ceux qui I'attirent.
Lavage trap long Lavezlespetites charges mains Iongtemps en utilisant le r6glage Light Soil (Solar4Idg6re).
Led_tergent ne se dissout pas
Surcharge
Utilisation inappropri_e de
I'assouplissant
Assurez-vous d'avoir s#lectionn6 I'option de Deep Rinse (rinqage en prafondeur).
Appliquez un d6tachant et relavez le lingo en effectuant un Speed Wash (lavage
rapide) avant le s6chage.
148c560 °C).
tambour. Pour de meilleurs r#sultats, ehargez le lingo en le positionnant sur le tour
e×t6rieur du tambour.
peut qua les eouleurs d#teignent.
Relavez ;la prochaine fois :
Essayez un d#tergent liquide.
Utilisez une temp#rature d'eau plus ehaude.
Chargez le lingo dans le tambour sans I'entasser. Pour de meilleurs r6sultats, ehargez
le lingo en le positionnant sur le tour ext6rieur du tambour.
Lisez 1'6tiquette de I'assouplissant et suivez les instructions pour I'utilisation avec un
distributeur.
Assurez-vous d'avoir s61ectionn#I'option de Deep Rinse (rinqageen prafandeur).
22
Page 49

www.electromenagersGE.ca
PERFORMANCE(suite) Possible Causes What To Do
Linge trap mouill_ Aucune s61ectiond'essorage S#lectionnez une option d'essorage.
S61ection de programme Assurez-vous qua le programme s61ectionn6 correspond 6 votre type de linge.
inappropri6 Certains tissus semblent plus mouill6s Iorsqu'ils sent finc6s 6 I'eau froide.
La charge est d6s6quilibr6e R6partissez le linge dens la laveuse et lancez un programme Drain & Spin (vidange et
Boulochage Usure normale des m61anges a IV]@mesi ce probl6me n'est pas dO6 la laveuse, vous pouvez att6nuer le boulochage
base de polycoton et des tissus en lavant ies v#tements sur leur envers.
pelucheux
Accrocs, trous, d_chirures, I_pingles, boutons-pression, Fermez les boutons-pression, crochets et fermetures 6 glissi@reet boutonnez
fentes ou usure excessive crochets, boutons aux coins les v_tements.
tranchants, boucles de ceinture, Retirez les objets amovibles comma ies 6pingles, le contenu des poches et les
fermetures a glissi_re et objets boutons aux coins tranchants.
pointus laiss6s dens les poches Retournez les tricots (dent ies fils se tirent plus facilement).
Agent chlor6 de blanchiment V6rifiez le dosage recommend6 duns les instructions sur I'emballage.
non dilu6 N'ujoutezjamais d'agent de blanchiment non dilu6 lots du lavage et ne le laissez pus
Produits chimiques comme le Rincez les articles qui peuvent contenir des produits chimiques event de les
colorant ou led_olorant capillaires, lover. Effectuez un Speed Wash (lavage rapide) avec I'option Extra Rinse (rinqage
la solution a permanente suppl6mentaire).
Plis Programmes de lavage et de Faites correspondre le programme s61ectionn6 au type de linge 6 laver
s6chage inappropri6s (particuli6rement pour le linge 6 entretien facile).
Triage inad6quat Evitez de m61anger ]es tissus Iourds (comme lesjeans) avec les 16gers (chemisiers).
Surcharge
Lavages r6p6t6s dans une eau
trap chaude
essorage).
entrer en contact avec le linge.
Ajoutez un assouplissant.
Chargez le linge duns le tambour sans I'entasser.
Lavez le linge 6 I'eau tilde ou froide.
23
Page 50

Avant de contacter un service de d pannage...Conseils de d pannage.
SONS Possible Causes Motif
La laveuse semble trap Quiet by design La laveuse est tr_s silencieuse pendant certaines parties du lavage.
silencieuse
Cliquetis Le m6canisme d'embrayage Le syst_me d'entrainement embraye au d6but du brassage et d6braye 6 la fin Cela
s'enclenche et se d6senclenche se produit plusieurs fois pendant ie lavage.
Bruissement Le moteur 61ectrique change de Leson produit est celui du moteur qui tourne dons un sens, puis dons I'autre pour
Bruits courts et rapides 6 R6partition du linge A la fin du brassage, le moteur brasse avec des petits mouvements pour r6partir la
la fin du brassage charge.
Cliquetis Iorsque I'eau Commutateur du relais Le relais 6met un diquetis Iorsqu'il est activ& Le niveau de I'eau active le relais et
arr_te de couler arr_te le remplissage.
Cliquetis derriere le Le moteur acc61@re/ralentit de Deu× robinets m61angent I'eau chaude et I'eau froide. Le diquetis se produit Iorsque
tableau de commande lars la temp6rature Fun des robinets s'ouvre ou se ferme pour augmenter ou diminuer la temp6rature de
du remplissage I'eau de remplissage.
Le d6bit de I'eau change Le moteur acc61_re/ralentit de Deux robinets m61angent l'eau chaude et I'eau froide. Led6bit change Iorsque Fun
lars du remplissage la temp6rature des robinets s'ouvre ou se ferme pour augmenter ou diminuer la temp@ature de
Bruits de mateur durant Le moteur acc616re/ralentit lots Le moteur acc61@repar paliers Iors de I'essorage. Lorsque I'essorage est termin6, il
I'essarage de I'essorage tourne librementjusqu'6 ee qu'il s'arr@te.
Baurdannement Pompe de vidange de I'eau La pompe de vidange 6met un bourdonnement Iorsqu'elle aspire I'eau apr@sle
Glauglautement Pompe de vidange de I'eau Lorsque la pompe commence 6 aspirer de I'air, elle produit un glougloutement. La
Bruissement de I'eau Processus de lavage
La laveuse bauge/se
balance
Bruit de <<grincement >>
direction laver votre Iinge.
I'eau de remplissage.
brassage et eontinuejusqu'6 ee qua I'essorage soit termin6.
Noteur d'entraTnement Le moteur d'entratnement 6mettra un bourdonnement durant les phases de lavage et
d'essorage du cycle.
laveuse doit alors commencer 6 essorer et le son continue jusqu'6 ce que I'essorage
soit termin6.
II est normal que l'eau bruisse Iorsque le brassage est en cours, particuli@rement
avec Jes plus petits volumes de Jinge.
Les pieds de nivetlement de la
laveuse ne sont pas de niveau
La laveuse n'est pas de niveau et
elle frotte contre une armoire
Pour mettre la laveuse de niveau, r6glez les pieds de mise 6 niveau en tournant
chaque pied individuellement darts le sens appropri6 pour le lever ou le baisser.
Pour mettre la laveuse de niveau, r6glez les pieds de mise 6 niveau en tournant
chaque pied individuellement darts le sens appropri6 pour le lever ou le baisser.
24
Page 51

Garantie de la laveuse GE Appliances.
Toutes les rdparations sous garantie sont effectudes par nos Centres de
rdparation ou par nos rdparateurs agrdds. Pour faire la demande d'une
rdparation, appelez au 1-800-561-3344. Veuillez avoir les numdros de sdrie
et de module de votre appareil _ portde de main Iorsque vous appelez pour
obtenir un service.
Pour le diagnostic, la r_paration de votre appareil peut n_cessiter I'utilisation du port de donn_es embarqu& Celui-ci permet au
technicien de r_paration GE de diagnostiquer rapidement des probl_mes avec votre appareil. II permet _galement _ GE d'am_liorer
ses produits en fournissant 6 ces derniers des informations sur votre appareil. Si vous ne voulez pas que les donn_es de votre
appareil soient envoy_es _ GE, veuillez demander _ votre technicien de NE PAS soumettre les donn_es _ GE pendant la r_paration.
Agrafez votre facture ici.
Unepreuve de/a dote d'achat
d'origine est requise pour
bdndficier du service de rdparation
sous garantie.
Pendant la p_.riode de : Nous remplacerons :
Un an Toute piece d_fectueuse en raison d'un vice de mat_riau ou de fabrication. Au cours de cette garantie
Acompter de la date limit_e d'un an, nous fournirons _galement, sans frais, les pisces et la main-d'oeuvre pour remplacer la
d'achat d'origine piece d_fectueuse.
Cequi n'est pas couvert :
[] Toute visite 8 votre domicile pour vous expliquer le
fonctionnement de I'appureil.
[] L'instollotion, lu livruison ou I'entretien inud_quuts de
I'uppureil.
[] Toute d_fectuosit_ du produit ottribuoble 8 une utilisotion abusive
ou inadequate, s'il o _t_ utilis_ _ toute autre fin que celle pour
luquetle il o _t_ cone;u, ou s'il o _t_ utilis_ a des fins commerciules.
[] Le remplocement des fusibles ou le r_enclenchement des
disjoncteurs de votre domicile.
[] Les produits qui ne sont pus d_fectueux ou bris_s, ou qui
fonctionnent tel que d_crit duns le Manuel de I'utilisuteur.
[] Tout dommoge ou produit ottribuoble 8 un accident, un
incendie, une inondation ou une cotostrophe noturelle.
[] Tout dommoge occessoire ou indirect, cous_ par des
d_foillonces possibles de I'opporeil.
[] Les d_fectuosit_s ou les dommages cous_s por une utilisotion
de I'oppareil _)des temperatures situ_es sous le point de
cong_lotion.
[] Tout dommage cous_ apr&s Io livraison.
[] Tout produit auque! il n'est pus possible d'occ_der pour
effectuer les r_parations n_cessoires.
EXCLUSION DES GARANTIES IMPLICITES : votre seulet unique recours est de loire r_parer le produit dans le cadre de cette
garantie limit_e. Toute garantie implicite, incluant la garantie de qualit_ marchande ou d'adaptabilit_ du produit _ un
usage particulier, est limit_e _ un an ou _ la p_riode la plus courte autoris_e par la Ioi.
Cette garantie est offerte _ I'acheteur initial, ainsi qu'_ tout propridtoire subsdquent d'un produit achetd ou Canada en rue d'une utilisation
domestique au Canada. 5i le produit se situe dons une zone o_ aucun rdparateur agrdd par GE n'est disponible, vous devrez peut-_tre
assumer les frais de ddptacement de celui-ci ou apporter le produit _ un atelier de rdparation agrdd par GE.
5i vous avez besoin de pi_ces de rechange, nous vous recommondons de n'utiliser que des pi_ces d'origine spdcifides de GE.Cespi_ces ant
dtd conques pour fonctionner avec votre appareil et ant dtd fabriqudes et testdes olin de rdpondre aux spdcifications de GE.
Dons certains Etats ou province, il est interdit d'exclure ou de limiter les dommages indirects ou accessoires. 11est alors possible que les
limitations ou exclusions ci-dessus ne s'appliquent pas dons votre cos. Lo prdsente garantie vous confute des droitsjuridiques spdcifiques.
Vous pouvez bdndficier d'autres droits, qui varient d'un Etat ou d'une province _ I'autre. Pour connaFtreles droits dont vous bdndficiez,
communiquez avec le bureau des Relations avec les consommateurs de votre rdgion ou de votre province.
Garant : PIC Commercial, Burlington, ON, L7R 5B6
25
Page 52

Service a la clientele
SiteWebappareils dlectromdnagers GE Au×UU:GE4ppliances.com
Vousavez une question ou vous avez besoin d'aide pour votre appareil 61ectrom6nager?Visiteznotre site Web
consacr6 aux appareils 61ectrom6nagersGE,et ce 24 heures parjour, tous lesjours de I'ann6e!Pourdes raisons
de commodit6 et pour acc616rerle service,vous pouvez maintenant t616chargerlesmanuels du propri6taire,
commander despi@ceset m6me programmer lesvisitesde serviceen ligne.Au Canada: www.GEAppliances.ca
Service de r@aration Auxbu.: GEAppliances.corn
Un service de r6paration expert GEse trouve a quelques pas de chez vous. Visitez notre site et programmez, a votre
convenance, une visite de service a n'importe queljour de I'ann6e! Ou composez le 800.GECARES(800./432.2737)
durant les heures normales de bureau.
Au Canada, composez le 1.800.561.3344
Studio de conception universal Au× .-u:GEAppliances.com
GE appuie le concept de design universel-des produits, des services et des environnements qui peuvent 6tre
utilis6s par des personnes de tous 0ges, tallies et capacit6s. Nous reconnaissons le besoin de concevoir des produits
pour un vaste 6ventail d'aptitudes et d6ficiences mentales et physiques. Visitez notre site Web aujourd'hui pour
obtenir plus de renseignements sur I'application du design universel par GE,y compris des conceptions de cuisine
pour les personnes handicap6es. Dans le cas de personnes malentendantes, veuillez composer le 800.TDD.GEAC
(800.833.4322).
Au Canada, contactez : Manager, Consumer Relations,ivlc Commercial
Suite310, 1 Factory Lane
Moncton, N.B.EIC9M3
Pro/ongotion de arantie Auxbu.: GEAppliances.com
Achetez un contrat d'entretien GEet informez-vous des rabais sp6ciaux en vigueur pendant toute la dur6e de votre
garantie. Vous pouvez vous le procurer en ligne ou en composant le 800.GE.CARES(800.432.2737) durant les heures
k,. - J normales de bureau. Les services a domicile GE seront toujours disponibles apr_s I'expiration de la garantie.
Au Canada, veuillez consulter votre annuaire pour trouver un fournisseur de garantie prolong6e local.
Pi ces et accessoires
Lespersonnes ayant lescomp6tences requises pour r6parer elles-m@mesleurs appareils peuvent recevoir
directement a la maison des pi_cesou accessoires tiescartes VISA,MasterCard et Discoversont accept6es).
Commandez en ligne d_saujourd'hui, 24 heures sur 24tous lesjours, ou en t616phonantau 800.626.2002durant les
heuresnormales de bureau.
Les instructions contenues dans le present manuel comportent des procedures que tout utilisateur peut
effectuer. Les autres types de r_paratian doivent g_n_ralement _tre confi_s (_un technician qualifi_. Usez de
prudence: une r6paration ou un entretien mal effectu6s peuvent rendre I'utilisation de I'appareil dangereuse.
Au Canada, veuillez consulter votre annuaire pour trouver un distributeur local de pi_ces GE.Autrement,
appelez-nous au 800.661.1616.
Aux_,-U.: GEAppliances.corn
Communiquez avec nous Aux_.-u.:GEAppliances.corn
Sivous n'@es pas satisfait du service apr@s-vente de GE,communiquez avec nous sur notre site Web en fournissant
tousles d6tails et votre num6ro de t616phone, ou 6crivez a : General Manager, Customer Relations
GE Appliances, Appliance Park
Louisville,KY40225
Au Canada: www.GEAppliances.ca, ou 6crivez a : Director,Consumer Relations,ivlcCommercial
Suite310, ! Factory Lane
Moncton, N.B.E1C9M3
jq votre dlectromdnoger Au×bu.: GE4ppliances.com
| Enregistrez votre nouvel appareil en ligne au moment qui vous convientle mieu×! L'enregistrement de votre
| _ produit dans les d61aisprescritspermet une meilleurecommunication et un service rapide,selon lesmodalit6s de
k_ J votre garantie, si besoinest.Vouspouvez6galement envoyer par courrier la carte d'enregistrement pr6-imprim6e
26
qui setrouve dans I'emballage de votre appareil. Au Canada: www.GEAppliances.ca
Page 53

GEAppliances.com
Instrucciones
de seguridad .................. 2,]
Instrucciones de operaci6n
C6mo cargary usar
la lavadora....................... 11
Cuidadoy limpieza
de la lavadora.................... 13
Funciones......................... 12
Instrucciones de uso........... 4-10
Instrucciones de
instalaci6n ................. 14-18
Consejos para la soluci6n
de problemas .............. t9-24
Soporte al consumidor
Indicador de Ayuda al Consumidor. 10
Garantia .......................... 27
Piezas y accesorios ........... 3, 28
Soporte al consumidor ............ 28
GTW485*
GTW460
ENERGYSTAR
*Como socio de Energy Star ®,GE
ha confirmado que este producto
cumple las directrices de Energy
Star ®relativas al rendimiento
energ@ico.
Escriba el n4mero de modelo
y de serie uqu[:
No. de modelo
No. de serie
bajo la puerta
Puedeencontrarlos _
de la lavadora.
Page 54

INFORMACi6N DESEGURIDAD INIPORTANTE.
LEATODASLAS INSTRUCCIONESANTES DE USAR.
A ste es elsimbolode alertadeseguridad.Elmismoalerta sabrepotencialesriesgosque lepuedenproducirlamuerteolesiones
tanto a ustedcoma a otras personas.Todoslosmensajesde seguridadestar6na continuaci6ndelsimbolode alertadeseguridad
y con la palabra"PELIGRO',"ADVERTENCIA"o"PRECAUCION'.Estaspalabrassedefinen coma:
Indica una situaci6n de riesgo que, si no se evita, producir(i la muerte o lesiones graves.
_ Indica una situaci6n de riesgo que, si no se evita, podria producir la muerte o lesiones graves.
_ Indica una situaci6n de riesgo que, si no se evita, podria resultar en lesiones menores o moderadas.
INSTRUCCIONESIMPORTANTESDE SEGURIDAD
Para reducir el riesgo de muerte, incendio, explosi6n,descargas el_ctricas o lesionessabre laspersonasal
usar su electrodom6stico, siga las precauciones b6sicas, incluyendo Iosiguiente
[] Leatodas lasinstruccionesantesde usaresteelectrodom_stico.
[] NOlave ni seque prendas queen forma previa hayan sido secadas, lavadas, mojadas o manchadas con gasolina, solventes
de limpieza en seco,u arras sustanciasinflamables o explosivas,ya que despidenvaporesquese podrfanencendero explotar.
[] NOagregue gasolina, solventes de limpieza en seco, Uotras sustancias inflamables o explosivas al agua de lavado. Estas
sustancias despiden vapores que se podrfan prender fuego o explotar.
[] Bajociertas condiciones, se podr6 producir gas de hidr6geno en un sistema de agua caliente que no fue usado par 2
semanas o m6s. ELGASDEHIDROGENO ESUN EXPLOSIVO.Siel sistema de agua caliente no fue usado par dicho perfodo,
antes de usar una lavadora, abra todos los grifos de agua caliente y deje que corra agua de cada uno durante varios minutos.
Estoliberar6 cualquier gas de hidr6geno acumulado. Debido a que el gas es inflamable, NOfume ni use una llama abierta
durante este proceso.
[] NOpermita que los ninosjueguen sabre o dentro de este electrodom6stico. Cuando el electrodom6stico se use cerca de
ninos, ser6 necesario supervisarlos de cerca. Antes de dejar la lavadora fuera de servicio o de deshacerse de @sta,quite la
puerta o la tapa. Si no se siguen estas instrucciones, se podra producir la muerte o lesiones personales.
[] NOintroduzca lasmanos en el electrodom@sticosi el tambor o agitador seencuentra en movimiento a fin de evitar enredos
accidentales.
[] NOinstale ni guarde este electrodom@sticodonde quede expuesto a los factores climciticos.
[] NOmanipule indebidamente los controles, reparar ni reemplazar cualquier parte del electrodom6stico o realizar cualquier
otro trabajo t6cnico, a menos que esto sea especfficamente recomendado en las instrucciones de mantenimiento del
usuario o en instrucciones publicadas sabre reparaciones del usuario, que entienda y para las cuales posea las destrezas
necesarias.
[] NOintente usar esteelectrodom@sticosi seencuentra daflado, funcionando mal, parcialmente desensamblado, o sitiene
partes faltantes o rotas, incluyendo un cable o enchufe da_ado.
[] Desenchufeel electrodom@sticoo apague el disyuntor antes de realizar el servicio t@cnico.Presionarel bot6n Power
(Encendido)NOdesconecta el encendido.
[] Paraacceder alas instruccionesdeconexi6natierra, lea los"RequisitosEl@ctricos"ubicados en las Instruccionesde Instalaci6n.
GUARDE ESTAS INSTRUCCIONES
Page 55

GEAppliances.com
INSTALACIONCORRECTA
"_ La lavadorase debeinstalar y colocar correctamente de acuerdocon las instruccionesde instalaci6n,antes de utilizarla.
Aseg6resede que la manguera de agua caliente est#
conectada a la v61vula"H"y que la manguera de agua
fria est6 conectada a la v61vula"C".
Instaleo almacenela lavadora en un lugardonde
no est@expuestaa temperaturas bajo cero ni alas
inclemenciasclimaticas,ya que esto puede provocarda_os
irreversibleseinvalidarlagarantfa.
Conectecorrectamente a tierra la lavadora de conformidad
contodos losc6digosy ordenanzasregulatorias.Sigala
informaci6n de Instrucciones
de instalaci6n.
Riesgo de Descarga El_ctrica
Enchufe a un tomacorriente de 3 clavUas con conexi6n
a tierra.
NO retire la terminal de tierra.
NO UTILICE un cable de extensi6n.
NO UTILICE un enchufe adaptador con este artefacto.
Si no se siguen estas instrucciones, se podr6 producir
la muerte o descargas el@ctricas.
[] Aseg6rese de que la lavadora est# correctamente
nivelada y que sus patas est#n ajustadas de modo que
la unidad se encuentre estable.
Serecomienda una extensi6n opcional de la manguera
de drenaje para descargas en alturas de 60" a 96".
Esta lavadora no incluye mangueras de suministro de
agua.
GErecomienda enf6ticamente el usa de piezas
especificadas de f6brica. A continuaci6n seencuentra
una lista de mangueras de f6brica disponibles para la
compra. Estas mangueras est6n fabricadas y probadas
para cumplir con las especificacionesde GE.
GErecomiendaenf6ticamenteel usade manguerasnuevas
de suministrode agua.Lasmanguerassedesgastancon el
tiempoy debenreemplazarsecada 5 ahosparareducirel
riesgodefallasenlasmanguerasydahosprovocadospar el
agua.
Piezas y accesorios
Solidteloson-line hay mismo a GEAppfianceparts.com, las
24 horas del d[a o par tel#fono a1800.626.2002en horatio
normal de trabajo.
N6mero de Pieza Accesorio
p[vll4XlO002
0
p[vl14XlO005
WH49X30!
PM7X!
Mangueras de goma de
suministro de agua de 4 pies
Mangueras trenzada de
suministro de agua de 4 pies
Extensi6nde lamanguera de drenaje
Bandeja del Pisode la Lavadora
SECUENCIA DE INICIO
4
[] Encualquier momenta en que la lavadora se inicie o
se reinicie una vezabierta y cerrada su tapa, la misma
activar6 la v61vulade agua fria durante dosperiodos
cortos seguidos par una pausa de !0 minutos antes de
continuar.
.,=CUANDO NO ESTEEN USO
[] CierrelasIlavesde paso minimizar lasfugas en caso
de que se produzca una rotura o grieta. Compruebe el
estado de lasmangueras de Ilenado;GErecomienda el
cambio de las mangueras cada 5 a_os.
[] Si la tapa es abierta durante este perbdo, la lavadora
se pausar6. Sedeber6 presionar el bot6n Start (Iniciar)
nuevamente para reiniciarelciclo.
GUARDE ESTASINSTRUCCIONES
Page 56

Instrucciones de uso.
Esposible que las funciones y apariencias varien con relaciOn a su modelo a Io largo del manual.
Paso I
, Agregue el suavizante al
dosificador para suavizante;
para m6s detalles (enalgunos
modelos), lea la p6gina 12.
, Agreguelacantidad dedetergente
recomendadapor elfabricante.
GErecomienda el uso de
detergentes de Alta Eficiencia
tales como @en su lavadora ,
de energia eficiente. Coloque
los recept6culos de detergente
en la parte inferior de la
canasta de lavado antes de
agregar la ropa.
Paso 2
Agreguelasprendassinajustar
alrededor del agitador.
Sobrecargar el tambor puede
producirun impactonegativo
en el desempe6o de lavado.
Consulte la p6gina 11para
obtener ejemplos de carga
sugeridos.
Cierre la tapa.
NOTA:La lavadora no se
iniciar6 con la tapa abierta.
Z
Paso 3
. Seleccione el ciclode
lavado.
. Seleccione el opciones
de lavado, incluyendo
la opci6n Deep Rinse
(EnjuagueProfundo) (en
algunos modelos) al
usar suavJzante para
telas.
, SeleccJone las opcJones.
Paso 4
. Oprima Start.
Controles
Soil Level Temperature
Normal
Light Heavy
yie_v
Extra_xtraLgh
AllColdR_,lses
Temperature
AnCold_nses
_o s_,,_J_ i oa as i_se in
Normal Options Stain PreTreat
Whites
Towels / Sheets
Bulky Items_Heavy Duty
Dark Colors
O_suals
Speed Wash
Delicates
Cold Wash
tive We ar
_n_
A t R_nse O_
SoUa_ ...... E×tra Spin Tomato ....... Grass
off ÷£xtra Spin 0 _ne
Bulky Items
Page 57

Notas. GEAppliances.com
Page 58

Operating instructions.
Start/Pause (Inicio/Pausa)
PresioneStart (lnicio)para comenzar el ciclo.NOTA:Latapa se debera cerrar para que la lavadora el ciclo comience. Sila tapa estci cerrada,
la tapa sebloqueara y la luz de Lid Lock (TapaBloqueada)se iluminara.
Presionar Pause (Pausa)desbloqueara la tapa (siseencuentra bloqueada en ese momento), pausara el cicloy la luz del indicador de Pause
(Pausa)titilar&
Para continuar elciclo,presione Start (tnicio)nuevamente. Sila maquina queda pausada por mas de 2/4horas, el ciclo sera cancelado. Siel
agua permanece en la maquina, seleccione el ciclo Drain & Spin (Drenary Girar)para drenar el tubo y desagotar el agua de la lavadora.
Los Luces de Estatus Ciclo
Muestra si la lavadora esta en el ciclo Fill (tlenado),Soak (Enjuagar),Wash fLavor),Rinse(Enjuagar)oSpin (Girar).
Load Size(Tomato de cargo) (enalgunos moddos)
Agregue _. detergente en el fondo del tambor y suavizante de telas en el dosificador (en algunos modelos) antes de cargar la
ropa.
Agregue las prendas sin apretar en el tambor de la lavadora. Sobrecargar el tambor puede producir un impacto negativo en el
desempe_o de lavado. Ajuste el tamar_o de la carga seg0n corresponda.
Load Size
Medium Super
Small Precise Fill
Large
Realice la selecci6n de carga:
PreciseFill (precisorelleno)(en algunos modelos)
- Para Iograr comodidad, un buen desempe_o y una eficiencia 6ptima, seleccione Precise Fill (preciso relleno) (enalgunos modelos).
Esta selecci6n proporciona automciticamente la cantidad correcta de agua que se ajusta al tamar_o y tipo de carga colocada en
la unidad. Latapaquedar5 btoqueadaa 1olargo del procesocon sensordela carga, elcualinduye una seriede giroscortos y una parte del
Itenadode agua.
- Si prefiere seleccionar el nivel de agua en forma manual, seleccione desde Small (pequer_a)hasta Super (sLiper).Mientras que
Precise Fill (preciso relleno) (en algunos modelos) es mejor para la mayor[a de las cargas y el lavado general, quizcis sedeban
seleccionar en forma manual el tamar_o de carga para elementos especiales tales como cubrelechos o almohadas voluminosos
y livianos, donde se quiere garantizar la aplicaci6n de un nivel mayor de agua. Las selecciones manuales de tamar_o de carga
deben realizarse para elementos hOmedos colocados en la lavadora, tales como toallas o prendas mojadas.
- La lavadora no se Ilenarci de agua cuando se elUa la funci6n de Precise Fill (preciso relleno), si la tapa se encuentra abierta.
Cuando se cierre la tapa, la mciquina podrci comenzar a Ilenarse de agua a fin de activar su sensor sobre el tamar_o de la carga.
NOTA: Esta es una lavadora de alta eficiencia. Este sistema requiere menos agua al tiempo que brinda una acci6n de limpieza
excepcional. Usted puede notar que el nivel de agua es menor que el de su lavadora anterior. Esto es normal.
Page 59

GEAppliances.com
Perilla de Ciclos de Lavado-Selector de Ciclo
Elciclo de lavado controla el tipo de proceso de lavado. LGperilla Selector de Ciclo se puede girar en cualquier direcci6n. Girar la
perilla luego de iniciar un ciclo detendra la lavadora y modificara el ciclo/opciones en la nueva selecci6n. Presione Start (Iniciar)
para comenzar lu selecci6n del nuevo ciclo.
Elsiguiente cuadro le uyudara a encontrar la mejor combinaci6n entre las prendas que seran lavadas y las mejores configuraciones
de ciclos de lavudo. Para un rendimiento 6ptimo, seleccione el ciclo mas conveniente para las prendas que seran lavadas.
Las selecciones y opciones en negrita son configuraciones par omisi6n para ese ciclo.
Esposible que algunos ciclos y opciones no estdn disponibles en algunos modelos.
Prendas a Lavar
Ropa de algod6n
que no destifle
desde muy sucia
a poco sucia,
ropa blanca, ropa
de trabajo o de
juego.
Cargas de
algodones
oscuros, ropa
blanca y
mezclacta.
Ropa de uso
diario, de oficina
apenas sucia.
Lencer[a y telas
que requieren
cuidado especial
con suciedad
entre leve y
normal.
Prendas
deportivas con
nivel de suciedad
entre media y
leve.
Cargas de
algodones entre
medios y oscuros,
ropa blanca y
mezclacta
Ciclo
Colores
Colores
oscuros
Ropa
de uso
diario
Prendas
delicadas
Ropa
informal
Lavado
Frio
Temperatura
de Lavado
Caliente
Tibia
Colores
Fresca
Fria
Fria del Grifo
Caliente
Tibio
Colores
Fresca
Fria
Fria del Grifo
Caliente
Tibio
Cotores
Fresca
Fr[a
Fr[a del Grifo
Caliente
Tibio
Colores
Fresca
Fria
Fr[a del Grifo
Caliente
Tibio
Colores
Fresca
Fria
Fria del Grifo
Caliente
Tibio
Colores
Fresca
Fr[a
Fria del Grifo
Nivel de
Suciedad
Ext. Sucia
Sucia
Normal
Apenas
Sucia
Ext.Apenas
Sucia
Ext. Sucia
Sucia
Normal
Apenas
Sucia
Ext.Apenas
Sucia
Ext. Sucia
Sucia
Normal
Apenas
Sucia
Ext.Apenas
Sucia
Ext. Sucia
Sucia
Normal
Apenas
Sucia
Ext.Apenas
Sucia
Ext. Sucia
Sucia
Normal
Apenas
Sucia
Ext.Apenas
Sucia
Ext. Sucia
Sucia
Normal
Apenas
Sucia
Ext.Apenas
Sucia
Selecci6n
det Giro
M6x./Extra
Normal
M6x./Extra
Normal
M6x./Extra
Normal
Mcix./Extra
Normal
M6x./Extra
Normal
M6x./Extra
Normal
Opciones
Disponibles
Gu[ade Pretrata-
miento de Manchas
LlenadoIntenso
RemojoAutomcitico
Enjuague Intenso
EnjuagueSegundo
Gu[ade Pretrat-
amiento de Manchas
Llenadointenso
RemojoAutomcitico
Enjuague Intenso
EnjuagueSegundo
Gu[ade Pretrata-
miento de Manchas
Llenadointenso
RemojoAutomcitico
Enjuague Intenso
EnjuagueSegundo
Gu[ade Pretrata-
miento de Manchas
Llenadointenso
RemojoAutomcitico
Enjuague Intenso
EnjuagueSegundo
Gu[ade Pretrata-
miento de Manchas
Llenadointenso
RemojoAutomcitico
Enjuague Intenso
EnjuagueSegundo
Llenadointenso
RemojoAutomcitico
Enjuague intenso
EnjuagueSegundo
Detalles del Ciclo
Estees elciclo normal recomendado
para prendas de algod6n oblanca con
suciedad normal. Elija la selecci6n de
nivelde suciedad Heavy (Sucio)o Extra
Heavy (Muy Sucio)o la selecci6n de
temperatura HotWater (AguaCaliente),
segOnseaapropiadopara sucargade
ropa en un nivel de lavado mcis alto.
IncorporaIlenadoscon pasosmLiltiples
y per[odos de lavado para brindar un
cuidado 6ptimo de las telas. Para los
modelosen loscualesno hayselecci6nde
temperatura en el panel decontrol, este
ciclo brinda una temperatura de lavado
tibia Linicamente.
Lastemperaturas de lavado mcis
bajas,un per[adode lavadomciscorto
y un enjuague con Ilenado intenso
(en algunos modelos) minimizan el
desgaste y las manchas sabre las telas
de algod6n oscuras. Incorpora Ilenados
con pasos mLiltiplesy per[odosde lavado
para brindar un cuidado 6ptimo de las
telas. Para los modelos en los cuales
no hay selecci6n de temperatura en
el panelde control,esteciclobrinda una
temperatura de lavadofrio Linicamente.
Ciclo de lavado ajustado para el
cuidado de prendas casuales y de
oficina, tncorpora Ilenados con pasos
m01tiplesy per[odos de lavado para
brindar un cuidado 6ptimo de las telas.
Utiliza un perfil de agitaci6n extra
suave de "tres pulsos" para brindar
cuidado especial alas telas delicadas.
Se recomienda colocar las prendas
pequefias o ultra delicadas en bolsas
de malla antes del lavado. Para los
modelosen loscualesno hayselecci6nde
temperatura en el panelde control,este
ciclo brinda una temperatura de lavado
fresco 0nicamente.
Ciclo diseflado para el cuidado de la
tela de ropa informal, deportiva y de
uso t6cnico con un nivel de suciedad
entre medioy leve.tncorporaunperiodode
lavado con pasos m01tiplescon un remojo
para tratar efectivamente la suciedad
y losoloresdelcuerpo. Useelciclo Heavy
Duty(CargaPesada)para ropadeportiva
muysuciafabricada contela resistente).
Elciclo combina periodos de ampliada
agitaci6n de lavados m01tiplescon
)eriodos de remojo, afin de brindar un
rendimiento mejorado de la limpiezay
una mayor eficacia con temperaturas
mcisbajas de agua.
Page 60

Instrucciones de uso.
Perilla de Ciclos de Lavado-Sdector de Cido - Continuado
Prendas a Lavar
Parapequer_as
cantidadesde
prendascon poca
suciedadque
senecesitande
forma rapida.
Carga de prendas
mojadas. Para
aquellas prendas
que s61onecesitan
ser enjuagadas,
use este ciclo con
la opci6n Deep
Rinse(Enjuague
Profundo).
Vaqueros con
suciedad entre
media y leve.
Sisetrata de
vaqueros usados
para trabajar con
mucha suciedad,
use elciclo Heavy
Duty Cycle(Ciclode
Carga Pesada).
Telasresistentes
con suciedad entre
pesada y media.
Abrigosgrandes,
acolchados,
cobertoresde
colchones,balsas
dedormiryprendas
voluminosas
similares
Toallas
Sabanas
Ropablancaentre
muysuciaycon
suciedadmedia,
ropablanca,ropa
detrabajoy para
jugan
Ciclo
Lavado
Rapido
Drenajey
Giro
Vaqueros
Carga
Pesada
Prendas
Volumi-
nosas
Toallas/
Sabanas
Blancos
Temperatura
de Lavado
Caliente
Tibio
Colores
Fresca
Fria
Fria del @ifo
Caliente
Tibia
Colores
Fresca
Fria
Fr[a del @ifo
Caliente
Tibia
Colores
Fresca
Fr[a
Fr[a del Grifo
Caliente
Tibia
Colores
Fresca
Fr[a
Fr[a del Grifo
Caliente
Tibia
Colores
Fresca
Fr[a
Fr[a del Grifo
Caliente
Tibio
Colores
Fresca
Fria
Fria del Grifo
Nivel de
Suciedad
Ext. Sucia
Sucia
Normal
Apenas
Sucia
Ext.Apenas
Sucia
Ext. Sucia
Sucia
Normal
Apenas
Sucia
Ext.Apenas
Sucia
Ext. Sucia
Sucia
Normal
Apenas
Sucia
Ext.Apenas
Sucia
Ext. Sucia
Sucia
Normal
Apenas
Sucia
Ext.Apenas
Sucia
Ext. Sucia
Sucia
Normal
Apenas
Sucia
Ext.Apenas
Sucia
Ext. Sucia
Sucia
Normal
Apenas
Sucia
Ext.Apenas
Sucia
Selecci6n
del Giro
IVkix./Extra
Normal
N6x./Extra
Normal
N6x./Extra
Normal
N6x./Extra
Normal
N6x./Extra
Normal
IVkix./Extra
Normal
IVkix./Extra
Normal
Opciones
Disponibles
Gu[ade Pretrata-
miento de Manchas
Llenado Intenso
RemojoAutomcitico
EnjuagueIntenso
EnjuagueSegundo
EnjuagueIntenso
EnjuagueSegundo
Gu[ade Pretrata-
miento de Manchas
Llenado Intenso
RemojoAutomcitico
EnjuagueIntenso
EnjuagueSegundo
Gu[ade Pretrata-
miento de Manchas
Llenado Intenso
RemojoAutom6tico
EnjuagueIntenso
EnjuagueSegundo
Gu[ade Pretrata-
miento de Manchas
Llenado Intenso
RemojoAutomcitico
Enjuague Intenso
EnjuagueSegundo
Gu[ade Pretrata-
miento de Manchas
Llenado Intenso
RemojoAutom6tico
EnjuagueIntenso
EnjuagueSegundo
Gu[ade Pretrata-
miento de Manchas
Llenado Intenso
RemojoAutom6tico
EnjuagueIntenso
EnjuagueSegundo
Detalles del Ciclo
Utilizaunperiodode lavadoacelerado,
yunenjuagueconspraycontinuapara
ahorrartiempo,afin delavarcargas
pequenasqueest6napenassuciasenel
menortiempoposible.
Utiliza un giro de alta velocidad para
extraer el agua de las prendas mojadas.
Para aquellas prendas que necesitan ser
enjuagadas, seleccione la opci6n Deep
Rinse(Enjuague Profundo) al usar este
ciclo.
Combina niveles de agua superiores,
un perfil de agitaci6n diseflado
especialmente, y un lavado con pasos
mOltiples y periodos de remojo para
el cuidado de vaqueros con suciedad
entre media y leve. Use el ciclo Heavy
Duty (Carga Pesada) para vaqueros de
trabajo con mucha suciedad.
Incorpora de lavado de varios pasos
y tomar periodos combinados con
per[odos prolongados de lavado para
limpiar con eficacia en gran medida al
media sucio telas resistentes.
Brinda un nivel de agua para lavado con
Llenado Intenso/Ilenado m6ximo, con
un perfil de agitaci6n especialmente
diseflado para lavar prendas
voluminosas. Tambi6n incorpora un
enjuague con Llenado Intenso para
enjuagar de forma efectiva prendas
voluminosas.
Ciclodise_ado para lavar toallaso
s6banas,usando un nivel deagua m6s
altoy un periodo de remojo para lavar
de forma efectiva estas prendas.Se
recomienda que lastoallas y s6banas
seanlavadas deforma separada para un
mejar cu!dadoy rendimientodel !avado:
Combina la temperatura m6s caliente
del agua disponible (en base a la
configuraci6n del calentador de
agua) con periodos de lavado mas
prolongados para limpiar y aclarar
los blancos. Se recomienda usar
un producto de Oxi o un producto
blanqueador de clara apropiado para
prendas lavadas con este ciclo, a fin
de maximizar el rendimiento para
aclarar el blanco. Para los modelos
en los cuales no hay selecci6n de
temperatura en el panel de control, este
ciclo brinda una temperatura de lavado
caliente 0nicamente.
Page 61

GEAppliances.com
Settings (Configuraciones)
Seleccione las configuraciones para agitaciGn (Soil)(Suciedad)y temperatura del agua (Temp).
NOTA:Tiempos de giro mas prolongados t[picamente reducen el tiempo de la secadora/uso de energ[a (esdecir: reduce el uso de la
energ[a total al usar tanto una lavadora como una secadora).
Opciones de ciclo
Stain PreTreat (Pretratamiento de manchas) (en algunos modelos)
ka caracter[stica Stain PreTreat (pretratamiento de manchas) le permite seflalar las manchas que se encuentran en las prendas de
la carga. Esta funci6n incorpora un m6todo de tratamiento pendiente de patentamiento. Un Ilenado de agua inicial es realizado a
una temperatura ajustada al tipo de manchas seleccionado y a una cantidad que permite un paso de limpieza concentrado. Un
per[odo de fregado de manchas, seguido por un remojo activo, es conducido para tratar de forma efectiva la mancha. Luego se
agrega agua a la temperatura seleccionada y la fase de lavado es conducida para el ciclo seleccionado.
C6mo usar Stain PreTreat (pretratamiento de manchas):
1. Seleccione el ciclo de lavado deseado.
2. Seleccione la mancha que ser6 tratada bajo las opciones
Stain PreTreat
Dirt
Tom_ss .
de Stain PreTreat (pretratamiento de manchas).
Off.Wine
Guia de Pretratamiento de Manchas
Para obtener mejores
resultados, antes de colocar
la ropa en la lavadora:
Precalentar con detergente
liquido o con un producto
para eliminar manchas.
Categoria
Tomate
Temperaturas Recomendadas
Tratamiento/Lavado
Fresca/Tibio
Hancha
Salsa
Salsa de tomate
Salsa
Enjuaguar con agua fresca.
Suciedad
Fresca/Tibio
Suciedad
Barro
Lodo
Espere a que la suciedad se
seque; elimine la suciedad
suelta con un cepillo.
Enjuague con agua fria.
C6sped
Fria/Tibio
C6sped
Lapiz Labial
Chocolate
Salsa Espesa
Hayonesa
Precalentar con detergente
liquido o con un producto
para eliminar manchas.
Cepillar suavemente;
enjuaguar con agua fr[a.
Salsa de BBQ
Vino
Fresca/Tibio
Vino
Fria/Tibia
Vino
Gaseosa
Kool-aid
Precaliente con la mezcla del
producto de Oxi y agua fria.
Agregue el producto de Oxi
junto con el detergente en el
agua.
T6
Caf6
Jugo
Cerveza
• Las temperaturas recomendadas son 6ptimas para la eliminaci6n de manchas; ajuste la selecci6n de temperatura para ajustar la carga
que se est@lavando.
Aseg0rese de que la mancha sea completamente eliminada luego del ciclo de lavado y antes de colocar la ropa en la secadora; es posible
que las manchas muy dificiles requieran un segundo tratamiento.
Page 62

Instrucciones de uso.
Opciones de ciclo
Deep Fill (Relleno profunda)
Seleccione lafunci6n Deep Fill (Llenadolntenso) para cargas donde es necesario el uso de agua adicional.
Presioneel bot6n Deep Fill (LlenadoIntenso)una vez antes de iniciar elciclopara agregar una cantidad adicional de agua a la carga del
lavado, lantener presionado el bot6n Deep Fill(LlenadoIntenso)durante 5 segundos brindara el nivel mas intenso de Ilenado posible; esto
incrementara el tiempo del ciclo debido al tiempo adicional que IlevaIlenar la lavadora.
Afin de cancelar la opci6n,si asfIo desea, presione el bot6n Deep Fill (klenadalntenso)nuevamente.
NOTA:Elbot6n Deep Fill (Llenadolntenso) tambi6n puede ser presionado una vez que la lavadora haya completado el Ilenado y se
encuentre en la fasede lavado,si se desea agregar mas agua. Paradetener el Ilenado adicional, presione el bot6n Deep Fill (Llenadolntenso)
nuevamente y el agua se detendr&
Auto Soak (Auto remojo)
Esta opci6n comienza con una breve agitaci6n, realiza el remojo durante un periodo de tiempo especifico, y luego realiza el resto del
ciclo de forma autom6tica.
2nd Rinse (Enjuague segundo)
AIusar detergente o blanqueador adicional para limpiar ropa muy sucia, use la opci6n 2nd Rinse (Enjuague segundo) para eliminar
mejor los residuos adicionales.
Extra Spin (Giro Adicional)
Selecdoneesta opci6nparabdndar tiempo de giroadicional,incrementandola eficienciaenerg6ticaa trav6s dela reducci6ndelostiempos de
secado.
2nd Rinse + Extra Spin (2do Enjuague + Giro Adicional)
Bfindatanto un segundoenjuaguecomo un giro adicionaL
Deep Rinse (Enjuague profundo)
Configure esta opci6n para brindar un enjuague profundo o cuando use un suavizante para telas. Esto podra modificar otras
configuraciones (es decir: Spin (Girar) se podra activar en una configuraci6n mas alta) a fin de maximizar el rendimiento.
NOTA:No use bolas de dispensador de suavizante de tela en esta lavadora. No funcionan correctamente con lavadoras con alto nivel
de eficiencia.
Indicador de Ayuda al Consumidor
Su lavadora est6 equipada con la funci6n Consumer Help indicator (Indicador de Ayuda al Consumidor, CHI).CHI esnuestra forma
de comunicar una soluci6n simple para algunas acciones que usted puede realizar sin la necesidad de Ilamar al servicio t6cnico.
Elsiguiente cuadro describe las luces 0tiles que es posible que observe titilar al regresar a la lavadora.
LEDde Giro
LEDde Enjuague
(Elagua demora
demasiado en ser
extraida)
LEDde Llenado
(Elagua no entra
a la lavadora)
Dos luces LED
titilando
Luego del ciclo de lavado, la ropa no qued6 distribuida de forma Io suficientemente pareja como para hacer
salir el agua. Redistribuya la ropa de forma m6s pareja en la lavadora y luego active un ciclo de Drain & Spin
(Drenary Girar).
Reinicieel ciclo o ingrese Drain & Spin (Drenary Girar).Si elagua esextraida, entonces el atascamiento fue
claramente despejado. Siel agua permanece en la lavadora, controle que la manguera no est6 atascada ni
enroscada. Esmay posible que esta situaci6n surja, con el paso del tiempo, si la manguera de desag0e externa
fue extendida orestringida.
Controle el suministro de agua del hogan LOIvid6 abrir una o ambas v61vulasluego de la instalaci6n o al volver
de sus vacaciones? Tan pronto como el mensaje comience a pasar, la lavadora iniciar6 un periodo de bloqueo
de 5 minutos. Los controles de la lavadora no responden/cambian durante este tiempo. Luego de 3 minutos,
puede comenzar el ciclo nuevamente. Si intenta eludir el periodo de bloqueo desenchufando la lavadora, el
temporizador de 5 minutos se iniciar6 nuevamente.
Sisumaquinasedetuvoantesde queel ciclose hayacompletado.LasdoslucesLEDderechasmaslejanas
titilar6n. Estoindica que unerrortuvo luganIntente usarun ciclodeDrain&Spin(Drenary Girar)paraver sise
soluciona.Sinosesoluciona,Ilameal 800.GE.CARES(800./432.2737)parasolicitarelserviciot6cnico.
10
Page 63

C6mo cargar y usar la lavadora. 6EAppliances.com
giempre siga las instrucciones del fabricante de la ropa cuando lave.
Usocorrectodeldetergente
Elusodedemasiado poco o cantidadesexcesivasdedetergente
escausa comtin de problemascon lacolada.
Usemenosdetergente sitiene aguablanda, una carga m6s
livianao ropa poco sucia.
Paratratar manchas,apliquepretratamiento a lasprendas
segLinserecomiendaen la etiqueta delproducto. Laaplicaci6n
deberealizarseen ettambor para evitar unapulverizaci6n
excesivaquepodriaprovocar que loscoloresdela tapa o delos
gr6ficospierdansu intensidad.
Coloque los receptaculos de detergente en la parte inferior
de la canasta de lavado antes de agregar la ropa.
GErecomienda el uso de detergentes de Alta Eficiencia tales
como _'J},_)su lavadora de energ[a eficiente. Losdetergentes
HEestan'_-'fc_rmuladospara funcionar en sistemas de lavadoy
enjuaguecon poca agua. Los detergentes HE reducen los
problemas de espuma excesiva comLinmente asociados
con los detergentes comunes.
Cuando utilice detergentes de alta eficiencia o concentrados,
consulte la etiqueta del producto para determinar la cantidad
requerida para un desempeno 6ptimo. Una cantidad excesiva
de detergente puede tener un impacto negativo en el
desempeflo de lavado.
Separaci6ndecargas
Separepor color (blancos,claros, colores),nivel de suciedad, tipo de tela (algodones rListicos,limpieza facil,delicados)y si la tela
produce pelusa (telade toalla, felpilla) ojunta pelusa (terciopelo, pana).Lave los productores de pelusastalescomo toallas de
algod6n y medias aparte de los recolectores de pelusas, incluyendo prendas sint6ticas y pantalones devestin
__- de incendio
Nunca coloque prendas en la lavadora que est@nhumedecidas con gasolina u otros fluidos
inflamables.
Ninguna lavadora puede eliminar el aceite por completo.
Noseque nada que alguna vez hayatenido algOntipo de aceite (incluyendo aceites de cocina).
Si no secumple con esto, se podrci producir la muerte, una explosi6n o un incendio.
Riesgo
Lineade
ropa
Linea del
agua
Cargadelalavadora
Agregue las prendas secas sin apretar en el tambor de la
lavadora. Para mejores resultados, cargue las prendas en
forma uniforme y sin apretarlas alrededor de la parte exterior
deltambor, Ilenando hacia las parte del centro en cargas
grandes. Para agregar prendas una vezque se inici6 un ciclo
en la lavadora, presione Start/Pause (lniciar/pausa)si la tapa
esta bloqueada; espere hasta que el indicador de Lid
Locked (Btoqueode la Tapa) que aparece en la pantalla ya
no est6 iluminado, antes de intentar abrir la tapa. Levante
la tapa y sumerja prendas adicionales alrededor de la parte
externa de la canasta. Cierrelatapa y presione Start (lniciar)
para reanudar el lavado.Ajuste la selecci6n del tamar_o de
la carga y/o use la opci6n Deep Fill(LlenadoIntenso),si es
necesario.
Carga Pequefia Promedio Carga Mediana Promedio Carga Grande Promedio
Lineade
ropa
Linea del
agua
[] No coloque prendas grandes tales como sabanas, colchas
y toallas sobre el tnfusor (en algunos modelos).C@guelas
alrededor de la parte exterior deltambor.
[] No coloque almohadones dejardin o sofa en la lavadora,
ya que son demasiado granges para poder moverlos.
Retirelastapas externas y SOLOlave las mismas.
Lineade
ropa
Linea del
agua
11
Page 64

Funciones de la lavadora.
Sensor de Carga Autom_tico (en algunos modelos)
Esto determina el perfil de agitaci6n correcto, la duraci6n de la agitaci6n y la cantidad de agua adecuada al tama_o y tipo de carga
colocado en la lavadora. La lavadora no iniciarci el ciclo de lavado ni se Ilenara de agua si la tapa se encuentra abierta. Cuandosecierrala
tapalamciquinapuedecomenzaraItenarsedeagua parapoderdetectorettomato delacargo.
NOTA: La funci6n Automatic Load Sensing (Sensor de Cargo Automdtica) inicia un giro al comenzar el ciclo y tardarci hasta 3 minutos en
completar la misma (significativamente mcis corto para cargas mcis pequeflas); _ste es el funcionamiento normal.
NOTA:Estaesunalavodorodeoltoeficiencioconunaoccidndelavodoogitodor.Estesistemarequiemmenosoguool tiempoquebrindounoocd6ndefimpiezo
excepcionat.UstedpuedenotorqueetnivddeoguoesmenorqueeldesuIovodomanterior.Estoesnormolporeunalavodoroequipadaconunogitador.
Liquid Fabric Softener Dispenser (en algunos modelos)
La tapa del agitador entra en la parte superior del agitador. Si se r_
Use suavizante
sale accidentalmente, simplemente vuelva a colocarla en su lugar. _ utilizando la cantidad recomendada en el envase.
El dosificador de suavizante libera automcXicamente el suavizante
liquido en el momento adecuado del ciclo.
No detenga la lavadora durante el primer centrifugado. Esto
har(7 que el dosificador se vacie antes de tiempo.
Para usarlo, siga estos pasos:
exclusivamente. Vi@talo
liquido
el
en
dosificador,
D Aseg@ese de el dosificador est# bien adherido al
que
agitador.
SOLOesta
parte del
dispensador
queda visible
una vez
instalado en
el agitador
No vierta el suavizante directamente sobre las prendas; ya que
podria mancharlas.
[_ Agregue agua al dosificador hasta que Ilegue a la linea de
Ilenado mciximo.
No vierta nada en el agitador si se retira
la tapa del agitador o el dosificador.
F_l Seleccione la opci6n
Deep Rinse(Enjuague Options
/ntenso). 2nd
Auto Rinse
Off
Sxtra Spin
2nd Rinse
_Extra Spin
Deep Rinse
_bdeSof_ner
Nora: Es posible que el suavizante para tela no dispense de forma
apropiada sila opci6n DeepRinse(Enjuaguelntenso)noes seleccionada.
Blanqueador Liquido
El blanqueador liquido de cloro debe ser agregado a tray,s del
dispensador del blanqueador en la esquina frontal izquierda.
Siga las recomendaciones del fabricante del blanqueador para
utilizar la cantidad correcta de blanqueador liquido de cloro en
base al tamar_o de la carga, evitando aplicar o salpicar el mismo
directamente sobre la ropa.
NOTA:No use blanqueador liquido de cloro ni pretratamientos de
lavado tales como el producto Oxi en la misma carga a lavan
Pretratamiento
Coloque los pretratamientos de lavado, tales como el producto
Oxi, directamente sobre el fondo de la canasta de lavado antes de
agregar la ropa.
NOTA:No use blanqueador liquido de cloro ni pretratamientos de
lavado tales como el producto Oxi en la misma carga a lavar
12
Page 65

Cuidado y limpieza de la lavadora. GEAppliances.com
La porte exterior de la lavadora
Limpie inmediatamente cualquier clase de derrame con un paso hOmedo.
La parte interior de la lavadora
Deje la tapa abierta despu_s de lavar para que se
evapore la humedad. Sidesea limpiar el cesto, use
un paBosuavey limpio empapado en detergente
liquido; luego enju6guelo. (Nouse limpiadores
duros.)
Limpieza del dosificador de suavizante (en algunos modelos)
E] Retireel dosificador de la parte superior del agitador.
J21Separelataza dosificadora de la cubierta tomando la parte superior y empujando con sus
dedoshacia abajo, en el interior de la taza. La taza dosificadora se liberarc_de la cubierta.
I
I
Separe para la limpieza
J31Paralimpiar eldosificador,remoje lataza y lacubierta dosificadora en la siguiente soluci6n:
[] ! gal6n (3,8litros)de agua caliente
[] !/4 taza (60ml)de detergente liquido reforzado
[] ! taza (240 ml) de blanqueador
r_ sies necesario,reduzcala acumulaci6n con un paho suavey limpio despu6sdelremojo. No
utilice un cepillo duro; podria daBar la superficie del dosificador.
_] Enjuaguey vuelva a montar eldosificador.Vuelvaa colocarlo sobreelagitador.
Mangueras de suministro de aguas
Lasmanguerasque conectan la lavadoraalgrifo
debencambiarsecada Sa_os.
Desplazamiento y almacenamiento
Solicite al t6cnico que elimine toda el agua de
la bomba de drenaje y de las mangueras. No
almacene la lavadora donde se yea expuesta a
las inclemencias del tiempo.
Vacaciones prolongadas
Aseg0rese de que elsuministro de agua est6
cortado desde todos los grifos. Drene toda el
agua de las manguerasy el area de la bomba
de filtro de agua si la temperatura puede Ilegar a
bajo cero.
13
Page 66

Instruccion
• J
Lavadora
de i stalac
Si tiene alguna pregunta, Ilame a 800.GE.CARES (800.432.2737) o visite nuestro sitio Weben: GEAppliances.com
Estees el s[mbolo de alerta de seguridad. El mismo alerta sobre potenciales riesgos que le pueden producir la muerte
A
_:l o lesiones tanto a usted como a otras personas. Todos los mensajes de seguridad estar@na continuaci6n del s[mbolo
de alerta de seguridad y con la palabra "PELIGRO","ADVERTENCIA"o "PRECAUCION".Estas palabras se definen como:
Indica una situaci6n de riesgoque, si no seevita, producir6 la muerte o lesiones graves.
Indica una situaci6n de riesgo que,si no se evita, podria producir la muerte o lesiones graves.
_ Indica una situaci6n de riesgo que,si no se evita, podria resultar en lesiones menores o moderadas.
ANTES DE COIENZAR
Lea detenidamente todas las instrucciones.
. IIPORTANTE - Guar eestas
instrucciones para uso del inspector local.
. IMPORTANTE - Cumplatodos
los c6digos y ordenanzas regulatorias.
, Nota al instalador - AsegOresede dejar
estas instrucciones al usuario.
,Nota aJ usuario - guarde estas instrucciones
para consultas futuras.
, Nivel de habilidad - la instalaci6n de este
electrodom6stico requiere habilidades mecdnicas
y el6ctricas bc_sicas.
Duraci6n- de ! a 3 horase
e
La instalaci6n adecuada es responsabilidad
del instalador.
La garantia no cubre fallas producidas por
la instalaci6n inadecuada del producto.
PIEZAS INCLUIDAS
[] Gufa de referencia
propietario
[] Manguera de
Desag0e
[] Abrazadera de cable
[] Sujetadordela Manguera
de Desag0e
[] Abrazadera
HERRAMIENTAS NECESARIAS PARA
LA INSTALACI6N DE LA LAVADORA
[] Pinzade Corte
[] Nivel
PIEZAS NECESARIAS (Seadquiere por separado)
%
Suministrodeagua (2)
[] [] Arandelas de
Caucho (2)y Pantallas de
Filtro (2)
[] Extensi6n de la Manguera de Desag(Je(Paraalturas
de descarga de entre 60"y 96")
GEPiezasy accesorios
Solic[teloson-line hoy mismoa GEApplianceparts.com, las
24 horas del diGo por tel#fono a1800.626.2002en horatio
normal de trabajo.
N6mero de Pieza
PM!4X!0002
0
PMI4XIO005
WH1X2267
WH49X301 Extensi6ndelaIVlangueradeDesag0e(Para
NOTA:Serecomiendaenf6ticamenteelusodemanguerasnuevas
de suministro de agua. Las mangueras se desgastan con el
tiempoy debenreemplazarsecada5a_ospara reducirel riesgo
defallasenlas manguerasy da_osprovocadosparelagua.
14
Accesorio
Mangueras de goma de suministro de
agua de/4 pies
klangueras trenzada de
suministro de agua de 4 pies
Arandelas de Caucho y Pantallas
alturas de descarga de entre 60"y 96")
Page 67

Instruccionesde instalaci6n
UBICACI6N DE LA LAVADORA
No instale la lavadora:
1. En un 6rea expuesta a goteras o a las condiciones
del exterior. La temperatura ambiente no debe set
nunca inferior a 60°F (15,6°C)para que la lavadora
funcione correctamente.
2.Enuna monaen la que pueda entrar en contacto
con cortinas u otras telas.
3. Sobre una alfombra. El suelo DEBE ser una superficie
dura con una inclinaci6n m6xima de 1/2" pot pie
(1,27cm pot cada :30cm). Para asegurarse de que
la lavadora no vibre ni se mueva, es posible que tenga
que reformat el suelo.
NOTA: Si el suelo se encuentra en mal estado, utilice
una plancha con 3/4" de contrachapado bien fUa
al revestimiento existente en el suelo.
IMPORTANTE:Distancias minimas de separaci6n
para la instalad6n - Nicho o Armario
Si la lavadora ha sido aprobada para ser instalada en
un nicho o armario, debe haber una etiqueta en la parte
posterior de la m6quina que describa los requisitos.
Distancia minima entre la lavadora y las paredes
adyacentes o cualquier otra superficie: 0 cm (0 pulg.)
a los lados, 5 cm (2 pulg.) alfrente. Espaciovertical
desde el piso a losestantes superiores,gabinetes, cielo
rasos,etc. = 60".
Laspuertas de los armarios deben tener persianas
o ventilaci6n y las puertas de los armarios deben
tenet persianas o ventilaci6n y requieren 60 pulgadas
cuadradas de abertura cerca de la parte superior de la
puerta y 60 pulgadascuadradascercade la parte inferior
de la puerta. Sila secadora est6 ubicada en el mismo
armario, entonces estas 6teas deber6n set duplicadas.
NOTA:Los espacios mencionados en las etiquetas
son los m[nimos. Se clebe clar una gran importancia al
suministro de un espacio aclecuado para la instalaci6n
y el mantenimiento de los aparatos.
REQUISITOS DE SUMINISTRO DE AGUA
PRESIONDEAGUA- Debe ser de 1,4 kgf/cm 2(20psi) como m[nimo y de 8,4 kgf/cm 2(120 psi)como m6ximo.
TEMPERATURADEAGUA- Se debe regular el calentador de agua de la vivienda para que proporcione agua a una temperatura de 50 °Ca
65°C(120°Fa 150°F)ALALAVADORA,al seleccionarelciclode lavadoen caliente.
VALVULASDECIERRE- Sedebensuministrardosv61vulasde cierre(llaves),una paraelagua calientey otra para lafrfa.
DRENAJE- Sepuededrenarelagua hacia untubo vertical.Laaltura dedescargaNODEBESERMENORDE76cm(30pulg.),nidebe
encontrarsea m6sde 2,4m (8pies)dela basedela lavadora.Eldi6metro interno deltuboverticaldebesetde 3,8cm (1-1/2pulg.)como
minimoy debeencontrarseabierto a laatm6sfera.
DESEMBALAJE DE LA LAVADORA
Cuandola lavadora se encuentre en su hogar,deseche el
material de empaque sobrante de la lavadora.
Retire la bolsa (con la abrazadera, el enlace para cable y el
sujetadorpara la mangueradedrenaje),la mangueradedrenaje
Manguerade drenajey guia de referenciapropietariodelenvase.
NOTA:Dejeel material de embalaje de gomaespuma Fdentro
del envase para sostenerelmismo en su lugar durante el
resto de la instalaci6n.
_-_ Bolsa
Guia de referencia propietario
Dejeelmaterial de embalaje
de gomaespuma dentro del
envase
_ klanguerade DesagOe
ITI RETIRE LA BASE
Retirela basede la unidad colocando el pie al costado de la
basee inclinando la unidad nuevamente hacia la posici6ndel
6ngulo. Retirela base y vuelva a enderezar la lavadora.
Page 68

Instruccionesde instalaci6n
CONECTE LA HANGUERA DE DESAGUE
A LA LAVADORA
Conectelamanguera dedesagOeal puertodedrenojeenla porte
traserade lalavadora.Abrala abrazaderaconlospinzasydeslice
los mismas sabre el e×tremo de la manguera. Manteniendo la
abrazadera abierta, presione el extremo de la manguera sabre
el puertodedrenojehastaque quedecompletamente insertada.
Liberelaabrazaderaentrelosresortesdeubicaci6nenele×tremo
dela manguera.Lasalidadelextremodelamangueradebeestar
orientada verticalmente
Man-
guera
de
Fgl CONECTE LAS MANGUERAS DE AGUA A
LASVALVULAS DE SALIDA
AverigQecu61eslatuberfa deaguaCALIENTEantesdeconectar
losmanguerasde agua a los Ilaves.Generalmente,h Ihve de
agua CALIENTEseencuentra a la izquierda.
(Silosfiltros/arandelasdecauchonoestanpresentes)Conh porte
conve×adelfiltrohaciausted,coloqueelfiltroy h arondeladecaucho
en coda uno de losextremos libresde los mangueras deagua.
Conectela manguera de agua calientea C
una v61vulade salidadeaguacalienteen su _L
hogar.Ajustemanualmente y use una pinza
para ojustar losmanguerasentre:]./4y 1/2 (_
giro luegodelajuste manual.Abrala v61vula
de agua caliente. ÷
Conectela manguera de agua fr[a S a una
v61vuladesalidadeaguafrfaensuhoganAjuste d_
manualmentey useunapinzaparaajustarlas I_
manguerasentre1/a,y1/2giroluegodelajuste
manual. Abra la v61vulade agua frfa.
Controlela presenciadep@didasy goteos
en lasunionesde lasmangueras.Ajusteseg0nseanecesano.
@
CONECTE LAS MANGUERAS DE AGUA A
LA LAVADORA
Antesdeinstalarlasmanguerasdeagua,saqueelcord6nel@ctrico
de su lugar de almacenamiento. Sino esta presente, instale la
arandela de caucho en un extremo de la manguera de agua
caliente.Enrosquela manguera de agua calienteen lapiezapara
conexi6nconetiquetaHenlaparteposteriorsuperiordelalavadora.
Apri@telaconlamanoy luegogfrelaun octavo devuelta m6s con
una pinza.Ajustemanualmentey use una pinzaparaajustarlas
mangueras entre 1/8 y 1/4tde giro luego del ajuste manual.
sinoestapresente,instalelaarandeladecauchoenunextremode
lamangueradeaguafrfa(C).Enrosquelamangueradeaguafrfaen
la piezaparaconexi6ncon etiquetaCenlaparte posteriorsuperior
de la lavadora.Ajustemanualmentey useuna pinza paraajustar
las mangueras entre 1/8 y 1/4tde giro luego del ajuste manual.
Coloque la lavadora Io m6s cerca posible a su lugar definitivo
dejando espacio para que sepueda drenar elaguay sepuedan
efectuar las conexiones el@ctricas.
Arandela
de caucho
\
Aran
de caucho
16
Page 69

Instruccionesde instalaci6n
CONECTE AL DRENAJE
Instaleel sujetador de la manguera Sujetadorde
de drenaje en el panel trasero de la manguera
la lavadora. Oriente la manguera dedesa( -
de drenaje a tray,s del sujetador
e inserte el extremo libre en la
abertura del drenaje de su hogar.
NOTA:Siserequiereuna
manguera de drenaje
m6s larga, mande a pedir
elequipode extensi6nde
la mangueradedrenaje,
n0merode piezaGE
WH49×30:LConectela Manguera
mangueradeclrenaje de
adicional(incluidaen desag0e
elequipode extensi6n)
a la mangueraoriginal
usandolaabrazaderapara
la manguera(tambi6n
incluiclaen elequipode
extensi6n).
NOTA:Instale gufa de la
tuber[a en elextremo dela
manguera si est6equipado.
Si las v61vulas de agua y el drenaje est6n adheridos a
la pared, ajuste la manguera de desag0e a una de las
mangueras de agua con el enlace para cable provisto.
Manguerade Pared Enlacedel
desag0e cable
\
Parte
trasera
dela
lavadora
CONECTE AL DRENAJE (ContinOa)
Si el drenaje es un tubo de subida, ajuste la manguera de
drenaje al tubo de subida con el enlace de cable provisto.
Manguera de de la
desag0e manguera
drenaje
Mfn.de
30" Enlace
del
cable
Tubo de subida
NOTA: Colocar la manguera de drenaje muy debajo de la
tuberia de drenaje puede provocar un efecto de sif6n. No
debe haber m6s de 5 pulgadas de manguera en la tuberia
de drenaje. Debe haber un espacio de aire alrededor de la
manguera de drenaje. Si la manguera est6 muy ajustada,
tambi6n puede provocarse un efecto de sif6n.
Sila altura de la descargadel drenaje no cubre el requisito
de altura minima de 30", el extremo de la manguera de
desag0e debe ser asegurado por un instalador en la abertura
del desag0e del hogar y se deber6 dejar una brecha de
aire alrededor de la manguera para evitar sifonajes.
Sujetador
de
desag0e
Parte
trasera
de la
lavadora
Sujetador
de la
manguera
de desag0e
Parte
Mfn.de drenaje trasera
30" dela
lavadora
NOTA: Colocar la manguera de drenaje muy debajo de la
tuberia de drenaje puede provocar un efecto de sif6n. No
debe haber m6s de 5 pulgadas de manguera en la tuberia
de drenaje. Debe haber un espacio de aire alrededor de la
manguera de drenaje. Si la manguera est6 muy ajustada,
tambi6n puede provocarse un efecto de sif6n.
la manguera
de desag0e
Parte
trasera
de la
lavadora
Manguera --
de desag0e
Menos de
30"
NOTA: Colocar la manguera de drenaje muy debajo de la
tuberia de drenaje puede provocar un efecto de sif6n. No
debe haber m6s de 5 pulgadas de manguera en la tuberia
de drenaje. Debe haber un espacio de aire alrededor de la
manguera de drenaje. Si la manguera est6 muy ajustada,
tambi6n puede provocarse un efecto de sif6n.
17
etador de
Page 70

Instruccionesde instalaci6n
REQUISITOS ELECTRICOS
_- de incendio
Enchufe a un tomacorriente de 3 clavijas con conexi6n
a tierra.
NO retire la terminal de tierra.
NO UTILICE un cable de extensi6n.
NO UTILICE un enchufe adaptador con este artefacto.
Si no se siguen estas instrucciones, se podr6 producir la
muerte, incendio o descargas el6ctricas.
CIRCUITO- individual, correctamente polarizado y
conectado a un disyuntor de 15 o 20 amperes o a un
fusible con retardo.
SUMINISTRODECORRIENTE- 2 cables y conexi6n a
tierra, 120 voltios, fase simple, 60 Hz.,corriente alterna.
Recept6culo E×terno - recept6culo de
3 clavijas correctamente conectado a _!.__t---v
tierra, ubicado de modo que el cable --i/','_)
de corriente est6 accesible cuando la
lavadora est6 en una posici6n instalada.
Si hay un recept6culo de 2 clavUas,es
responsabilidad del propietario solicitar
a un electricista matriculado que reemplace el mismo por
un recept6culo de 3 clavijas con conexi6n a tierra, que
est6 correctamente conectado a tierra.
La lavadora deber6 estar correctamente conectada a
tierra de acuerdo con los c6digos y ordenanzas locales, o
en ausencia de c6digos locales, de acuerdo con el CODIGO
NACIONALDEELECTRICIDAD(NATIONALELECTRICAL
CODE),ANSI/NFPANO.70, edici6n m6s reciente. Encaso
de no estar seguro de que la lavadora est_ correctamente
conectada a tierra, consulte a un electricista matriculado.
Riesgo
[Z] CONECTE LA CORRIENTE E INSTALE
AsegOresedequelaperilladecontrol(enalgunosmodelos)dela
lavadoraseencuentrapresionado,enla posici6ndeapagado(OFF).
Enchufeelcord6nel6ctricoenuntomacorrientede115voltiosy de15
6 20amperios.Desplacelalavadorahaciasuposici6nfinal.Coloqueel
nivelenelextremosuperiorlateralyen ellateraldelalavadora.Ajuste
loscuatropatasniveladorashastaquelalavadoraest6niveladade
izquierdaa derechay del frente a la partetrasera.Quiteelnivel.
Abralatapadeltambor.Quitetinamaterialevio(consulteelpaso1).
Quitela16minaprotectoradepl6sticodelfrentedeltablerodecontrol.
?
INSTRUCCIONES DE CONE×ION A TIERRA
Este electrodom6stJco deber6 estar conectado a tJerra.
Encaso de averia o mal funcJonamJento, JaconexJ6n
a tJerra reducJr6 el rJesgode descargas el6ctrJcas aJ
brindar un camino con una resistencia menor para la
corriente el6ctrica. Esteelectrodom6stico est6 equipado
con un cable con un conductor para la conexi6n a tierra
del equipo y un enchufe con conexi6n a tierra. Elenchufe
deber6 estar conectado a un tomacorriente instalado en
forma adecuada y con conexi6n a tierra de acuerdo con
todos los c6digos y ordenanzas locales.
Unaconexi6ninapropiadadelconductor
de conexi6n a tierra del equipo puede
provocar riesgos de descargas el6ctricas. Consulte a un
electricistacalificado o personalo representantesdelservicio
t6cnicosi tienedudasde queel electrodom6sticoseencuentre
conectadoatierra apropiadamente.NO modifique elenchufe
en el cable de suministro de corriente. Si no coincide con la
toma de corriente, contrate a un electricista calificado para
que instale una toma de corriente en forma adecuada.
Silosc6digos locales Io requieren,sepodr6 agregar un cable
a tierra externo de cobre de calibre 18 o m6s grande (no
provisto).Adhiera el gabinete de la lavadora con un tornillo de
chapamet61icaN°10-16x 1/2"(disponibleencualquiertienda de
repuestos)a lapartetraserade lalavadora,siguiendola ilustraci6n.
Conecte el IIIIIII
cable a tierra
y el tornillo de Porte
conexi6n a trasera
tierra (adquirido de la
Iocalmente)
Instalaci6n en Casas Rodantes:
La instalaci6n se deber6 realizar conforme con la Leyde
Est@ndarpara CasasRodantes(Standardfor MobileHomes),
ANSIAl19.1 y de Est6ndares Nacionales de Construcci6n
y Seguridad de Casas Rodantes (National Mobile Home
Construction and SafetyStandardsAct)de1974 (PL93-383).
FINAL CHECKLIST
Antes de poner en funcionamiento la lavadora,
aseg6rese de comprobar Io siguiente:
[] Laalimentaci6n est6 conectada.
[] Lalavadora est6 enchufada.
[] Las Ilavesde pasoest6n abiertas.
[] Lalavadoraest6niveladay que cada una de lascuatro
patasniveladorasest6nen contacto conelpiso.
[] Lagomaespumadelembalajey cart6ndebeserretirada.
[] Latuberia de@sag@ sehaaseguradocorrectamente.
[] No existe ninguna fuga en la Ilave de paso, la tuberia
de desagOeni la lavadora.
Ponga en funcionamiento la lavadora en un ciclo completo.
[] Compruebe que no haya fugas de aguay que
funcione correctamente.
[] Coloque las instrucciones en un lugar pr6ximo a
18
la lavadora para futuras consultas.
Iovodoro
Page 71

Antes de llamar pare solicitar servicio...consejos pare la soluci6n de problemas.
iAhorre tiempo y dinero! Consulte primero lostablas de los p&ginas siguientes o visite GEAppliances.com y quiz&s no necesite Ilamar al servicio.
AGUA Causes posibles Oue hacer
Qued6 una cantidad Funcionamiento normal del Es normal qua una cantidad pequefla de ague permanezca en el dispensador
pequeBa de ague en el dispensador luego del ciclo.
dispensador (an algunos
modelos) al final del ciclo
Espray carte y retraso La tape fee abierta y Esto es normal. Lea la secci6n SECUENCIADEINICIOen las Instrucciones de
luego de presionar el cerrada entre la selecci6n seguridad.
bot6n Start (Iniciad del ciclo y el inicio
Elnivel de ague parece Esto es normal Elague puede no cubrir el nivel superior de las prendas. Esto es normal pare
bajo esta lavadora de alta eficiencia.
Flujo bajo de ague Los filtros de malla de la Cierre la Ilave del ague y quite las mangueras de conexi6n de ague de la parte
vStvula de ague est6n superior trasera de la lavadora y de los grifos de ague. Limpie ambos filtros de
tapados las mangueras (si estan equipadas con estos) y los filtros de la m6quina usando
un cepillo o un cepillo de dientes. Vuelvaa conectar lasmangueras y abra elague
de nuevo.AsegOresede qua no haya p6rdidas en las conexiones.
El ague genera un El tuba de alimentaci6n La manguera de drenaje debe superar las 32" en algOn punto entre la parte
efecto de sif6n hacia del drenaje est6 demasiado trasera de la lavadora y el tuba de drenaje. Use un sujetador anti sifonaje.
afuera de la lavadora bejo o le manguera est6 Lea las Instrucciones de Instalaci6n.
demasiado lejos del tuba de
subida
Demasiada espuma Ague blanda
Demasiado detergente
Tipo de detergente
Fugas de ague Tipo de detergente
Demesiado detergente en la
lavadora
La menguera de Ilenado
o la de desag0e est6 mal
conectada
Desag_ede la casaest6tapado
La manguera de desagOe roza
la pared
Presi6n de agua constante a
las mangueras de Ilenado en
la fuente de ague
Pruebe con menos detergente.
Mida el detergente con cuidado. Use menosjab6n si tiene ague blanda, una
carga m6s liviana o rope poco sucia.
Cambie a detergente de Alta Eficienciatales coma _.
Cambie a detergente de Alta Eficienciatales coma _.
Use menos detegente. Use menosjab6n si tiene ague blanda, una carga
m6s liviana o rope poco sucia.
AsegOresede qua las conexiones de la manguera est6n firmes en los grifos y
qua las arandelas de game est6n instaladas. AsegOrese de qua el extremo
de la manguera de desag0e est6 insertado coma corresponde y bien
seguro al desag0e.
Examinela tuber[ade la case.Tendraqua Ilamar alfontanero.
AsegOresede qua la manguera de desag0e no haga contacto con la pared.
Estopuede provocar un desgaste excesivo en la manguera.
Ajuste lasmangueras a los grifos.
Verifique la condici6n de lasmangueras de Ilenado; sedeben reemplazar cada
5aflos.
19
Page 72

Antes de llamar para solicitor servicio...consejos para la soluci6n de problemas.
jAhorre tiempo y dinero! Consulte primero lostobias de los paginos siguientes o visite OEAppliances.com y quizas no necesite Ilamor al servicio.
AGUA Causas posibles Qu_ hacer
La temperatura delagua Temperaturas m6s frias del Sehon formulodo nuevosdetergentes poro colodo que trobojon con
parece incorrecta agua proporcionan mayor temperaturas m6s frias delagua sin afectar el rendimiento del lavado.
Agua bombeada antes de La puerta est8 levantada o Reconfigure elciclo.
compietarse el cic/o el ciclo se puso en pausa par
Elagua no drena La manguera de desagQe est8 Enderece Iomonguero de desog0e y osegOresede que IoIovodoro no est6
Lalavadorasegirosypausa Esto es normal Lo Iovodoro esta sintiendo Iocargo.
en el inicio de los ciclos
La lavadora se interrumpe Seseleccion6 la opci6n Soak Estoes normal. Lo Iovodoro olterno entre ogitor y remojer duronte estos ciclos
durante ei cic/o delavado (Remojo) poro que sus prendos se limpien mejor con menos desgoste.
eficiencia energ_tica
La provisi6n de agua est6 Sehartformulado nuevosdetergentesparacoladaque Imanguerasest6n conectadas
cerrada o mat conectada a los grifos correctos. NOTA:Losvalvulas de agua est6n marcadas con "H"y "C".
Los filtros de malla de la Cierrela Ilavedelagua y quite las mangueras de conexi6n de agua de la parte
v6tvula de agua est6n superior trasera de la lavadora y de los grifos de agua. Limpie ambos filtros de
tapados lasmangueras (siest6n equipadas con estos) y losfiltros de la m6quina usando
un cepillo o un cepillo de dientes.Vuelvaaconectar lasmanguerasy abra elagua
de nuevo.Aseg0rese de que no haya p6rdidas en las conexiones.
Agua fresca/fria cuando se Estoes normal. La lavadora detecta la temperatura delagua (en algunos
selecciona caliente, modelos)y la optimiza para mejores resultadosse. Elagua fria seagrega en
Elcalentador de agua de la AsegOresede que el calentador est6 suministrando agua a !20°F-!40°F (48°C-
casa no est6 configurado 60°C).
correctamente
mSs de 24 horas
doblada o mal conectada opoyodo sabre ella. Loporte superior de Io solido del desog0e debe estor o
Esto es normal
farina peri6dica cuando se selecciona agua caliente.
menos de 6 pies(1,8 m)par encimo del piso.
Muchos ciclos incorporon uno serie de opciones de remojo dentro del pedodo
de ogitoci6n, o fin de dejor su ropo limpio con menor desgoste.
20
Page 73

GEAppliances.com
OPERACION Causas posibles Ou_ hater
Polvo residual en El agua usada para el Seleccione una temperatura de lavado m6s caliente, si es posible,
el dispensador o lavado es demasiado fria o para que el detergente se disuelva de mejor manera o use detergente
atascamiento de los la presi6n de agua es baja I[quido. AsegOrese de que los tapos de sifoneo est_n libres de suciedad y
dispensadores (an en et hogar completumente presionudos en sus respectivos posiciones. Retirey limpie
algunos modelog la bandeja en caso de atascamiento.
Los editivos de lavado Desborde de los No sobrecargue ni agregue agua al dispensadon Seleccionelaopci6n Deep
sedispensen demesiado dispensadores Rinse (EnjuogueProfundo)al usar el suavizante para telas.
r_pido (Dispensadores en
algunos modelos)
La lavadora se Esto es normal Lo IGvGdoropuede hocer pGUSGSduronte el ciclo de centrifugodo poro eliminor
interrumpe durante el el agua jabonosa con mcis eficiencia.
cido de centrifugado
Lo lavadora no funciona Lalavadom no est6 enchufada AsegOresedequa etcable est_bienenchufudo u un tomacorriente quafuncione.
Lafuente deagua estd cerrada Abru porcompletolosgrifos deuguu fifoy culiente.
Controles noestan bien puestos Verifiqueloscontroles.
La puerta est6 abierta-una ¢ierre lupuertoy optima Start.
caracteristica de seguridad
impidelaagitad6n ycentrifugado
cuando lapuerta esta levantada
Eldisyuntor/fusible est(i
cortado/quemado
Hayquareajustar la electr6nica
Noseoprimi6 Start
Los paquetes de El paquete de detergente
detergente no se para rope sucia se coloc6
disuelven en el dispensador
Cambiossinexplicaci6nen el
tiempoy/o la contiguraci6n
Eltambor parece suelto
Opdones de cambios (en
algunos modelos}
Eltambor se mueve o gira
libremente
Verifiqueet disyuntor/fusibles.Reemplucelosfusiblesoreajusteetdisyuntor. Lu
luvudorudebe tener untomacorrienteseparado.
Desenchufelu luvudoru,espere2minutos,vuetvu uenchufurluy oprima Start.
Optima Start
Los puquetes de detergente de ropo suciu no deberfon ser usodos en el
dispensodor. $61ose deberfun ogregor directumente o lu conostu de lu
luvodoro, siguiendo los instrucciones del fobricunte.
Esto es normal. Varias opciones cambiar6n otras opciones a fin de
moximizor el desempeno del luvodo.
Eltombor de lu Iovodom no cuentu con un freno trodicionul. Eltumbor se
mueve libremente. Esto es normal.
21
Page 74

Antes de llamar para solicitar servicio...consejos para la soluci6n de problemas.
RENDItfflENTO Causas posibles Qu6hacer
t4anchas decolores Usaincorrecto del tejido Lea lasinstruccionesenetenvasedetsuavizantey siga lasrecomendacionespara
Prendasgrises o Cantidad dedetergente Aseg0resedeseguirlos instruccionesdetfabricante del detergente.
amarillentas Agua pesada Useun acondicionadorde aguao instaleunsuavizadordeagua.
Pdusa o residuos enlos Losprendas son secadasal aire Sino secasucolada con una secadora,susprendaspueden retenermcispelusa.
prendas o eneltendedor
suavizante elusadetdosificador.
Verifiqueque haya seteccionadolaopci6n de DeepRinse(EnjuogueProfundo).
Tratemanchas enforma previay vuetvaa lavar usandoetcido SpeedWash
(Lavado Rdpido)antesde secar.
Transferencia de colores Separelos prendasblancas odecolorestiaras de losde coloresoscuros.
Elagua noesta Io Aseg0resedeque etcalentador de aguaest6 suministrandoaguaa 120°F-140°F
suficientemente caliente (48°C-60°C).
Lalavadora est8 sobrecargada Cargueropa deforma noexcesivademodoquenosuperela ilia superiordela
canasta dela lavadora.Paraun mejor resultado,carguelos itemsalrededordela
porte exteriorde la canasta.
Transferencia de colores Separelos prendaspar color.Silaetiqueta dela teia indicalavar separadamente,
puedenestar indicadoslos coloresinestables.
Separaci6n incorrecta
Lavadodemasiado prolongado
Eldetergente no sedisuelve
Sobrecarga
Usaincorrecto del tejido
suavizante
Separelos productoresde petusade losque lacapten.
Love contidodes pequenos dur(]nte un per[ado m6s corto, us(]ndo I(]
configuraci6n Light Soil (Suciedad Level
Vuelva a Iovar; Io pr6xima vez:
Pruebeun detergente tiquido.
Useunatemperatura detagua mOscaliente.
Agreguelasprendassinapretar enel tambor dela lavadora.Paraun mejorresultado,
carguelositemsalrededordelaparte exteriorde lacanasta.
Lealosinstruccionesen elenvasedetsuavizantey siga losrecomendacionespara
el usadetdosificador.
Verifiqueque haya seteccionadolaopci6n de DeepRinse(EnjuogueProfundo).
22
Page 75

GEAppliances.com
RENDIMIENTO (cont.) Causas posibles (?u_ hacer
La ropa est5 demasiado No se seleccion6 ningOn giro Seleccione una opci6n de giro.
mojada Ciclo seleccionadoincorrecto AsegOreseque etciclo seteccionadocoincidacon la carga queest_ lavando.
Algunastetas sesentirOnmOshOmedascuando seenjuaguencon agua fria.
Carga de lavado Redistribuya la carga en la lavadora y active etciclo de Drain & Spin (Secary
desbalanceada Centrifugar).
Formaci6ndebolitas Resultadodeldesgastenormal Sibienestonosedebea la lavadora,puedereducirlavetocidaddetprocesode
Enganches,agu]eros, Alfileres, broches,ganchos, Cierrebroches,ganchos,botonesy cierres.
desgarros,rasgoneso botones cortantes, hebillas Retirelosobjetossuettoscomoalfiteres,objetosenlosbotsittosy botonescortantes.
desgasteexcesivo de cintur6n, cierres y objetos Devuettalasprendasdepunto(queseenganchanfScitmente).
Arrugas Ciclosde lavado y secado Hagacoincidirtasetecci6ndetcido conettipode telaqueest6lavando(especialmente
de mezclasde algod6n y formaci6ndebotitaslavandolasprendasdadasvuetta.
poli_ster telas con pelusa
cortantesdejadosen losbolsillos
Blanqueadorconcloronodiluido Vealasinstruccionesenelenvasedeiblanqueadorparaverlacantidadcorrecta.
Quimicoscomo el blanqueador Enjuaguelasprendasquepuedantenerquimicosantesdelavarlas.UseelcidoSpeed
para elcabelloo tintura, soluci6n Wash (LavadoRdpido)conlaopci6nExtraRinse(EnjuagueAdicional).
para permanente
incorrectos paracargasfScitesdelimpiar).
Separad6n incorrecta Evitemezclarlasprendaspesadas(comovaqueros)conotraslivianas(comoblusas).
Sobrecarga
Lavado repetido en agua
demasiado caliente
Noagregueblanqueadorsindituira lacotadani permitaquelasprendasentrenen
contactoconetblanqueadorsindituir.
Pruebecon unsuavizante.
Agregue las prendas sinapretar en el tambor de la lavadora.
Laveenaguatibiao fria.
23
Page 76

Antes de llamar para solicitar servicio...consejos para la soluci6n de problemas.
SONIDOS Causas posibles Motivo
La lavadora parece estar Disefiado para funcionar de La lavadora permanece muy inm6vil durante partes del ciclo de lavado.
demasiado inm6vil forma tranquila
"Clic" Elmecanismodeconmutaci6n Elsistemadetransmisi6nseenganchaaliniciodelaagitaci6ny sesueltacuando6sta
est6enganchadoosuelto secompieta.Estoocurrevariasvecesduranteetlavado.
"Silbidos"oscilantes Elmotor el_ctricorevierte la Esteesetsonidoquehaceetmotor alrotorhaciaatr6spara limpiar la lavado.
Sonidode agitaci6ncorta al Redistribuci6ndelaropa AIfinal de la agitaci6n, el motor hace golpes de agitaci6n cortos para distribuir
finaldela agitaci6n lacargo.
Haceunchasquidocuando Rel_ Eltel6 hace un chasquido cuando se activa. Elnivel de agua activa al tel6 y deja
elagua dejadeIlenarse de Ilenarse.
Sonidode "dic" detr4s el V61vulade controlde la Dosv61vulamezclaelaguafr[ay lacaliente.El"clic"escuandocualquierv61vulase
panel de control mientras temperatura delagua enciendeo apagaparaetevaroreducirla temperaturadeItenadodeagua.
Ilena
Elflu]adeaguacambia V61vulade controlde la Dosv61vulamezciaetaguafriay lacaliente.Etflujocambiacuandocualquierv61vulase
duranteel Ilenado temperatura delagua enciendeo apagaparaetevaroreducirla temperaturadeItenadodeagua.
Sonidos del motor Elmotorcambiela velocidadde Elmotorvaaumentandolavetocidadduranteel cidodecentrifugado.Cuandoet
durante los giros la temperatura delagua centrifugadosecompteta,seir6deteniendohastaquepare.
"Zumbido" BombadedesagiJe La bomba de desag0e hat6 un zumbido cuando elimine el agua tras la
"Gorgoteo" BombadedesagiJe Cuandola bombacomienzaa aspiraraire,haceungorgoteo.Lalavadoracomenzar6et
Elagua"borbotea" Procesode lavado Resulta normal que el agua borbotee mientras la unidad realiza
Lalavaderasebalancea/ Lalavadorapatasniveladoras Paranivetartatavadora,ajustetaspatasde nivetaci6ngirandotapataindividualen ta
mueve torcida direcci6napropiadaparasubirobajar.
Sonido de "chillido" Lalavadora no est6 nivelada
direcci6n
agitaci6n y continuar6 hasta que se complete el centrifugado.
Motor de conducci6n Elmotor de conducci6n generar6 un "zumbido" durante ellavado y lasrases de
giro del ciclo.
centrifugadoyelsonidocontinuar6hastaquesecompleteetcentrifugado.
la agitaci6n, especialmente con cargas peque_as.
Paranivetarlalavadora,ajustelospatasdenivetaci6ngirandolapataindividualenla
y hay roce en el gabinete
direcci6napropiadaparasubirobajar.
24
Page 77

GEAppliances.com
25
Page 78

Notas.
26
Page 79

GaranUa de la lavadora GEAppliances.
Todos los servicios de garantia se ofrecen a travds de nuestros
centros de asistencia tdcnica o un tdcnico autorizado de
Customer Care®.Para programar servicio, visite la p@ina
GEAppliances.com o Ilame al 800.GE.CARES (1.800.452.2737).
Cuando Ilame para solicitar servicio, pot favor tenga a mano el
Engrape el recibo aquL
Se necesita el comprobante con
la fecha de compra original para
que la garantia cubra
los servicios.
nOmero de seriey el nOmero de modelo.
Para realizar el servicio t_cnico de su electrodom_stico sepodr(7requerir el uso de datos del puerto de abordaje para su
diagn6stico. Esto da al t_cnico del 5ervicio de F(Tbficade GEla habilidad de diagnosticar de forma r(_pida cualquier problema
con su electrodom_stico, y de ayudar a GEa mejorar sus productos al bfindarle a GEla informaci6n sobre su dectrodom_stico.
5i no desea que los datos de su electrodom_stico sean enviados a GE,solicitamos que le indique a su t_cnico NO entregar los
datos a GEen el momento del servicio.
Por el periodo de: Reemplazaremos:
Un aria Cualquierpiezaespecificadadef6bricadelalavadoraque falledebidoa un defecto de losmateriales
Delafechade la o la mano de obra.Duranteestagarantia Iimitada deun afio, tambi6n ofrecemos,enformagratuita,
compra original toda la mano de obra y los costos de servicio para reemplazar la piezadefectuosa.
Lo que no est6 cubierto:
[] Viajes del personal de servicio a su casa para ensefarle [] Dafos al producto causados por accidentes, incendios,
c6mo usar su producto, inundadones o actos de la naturaleza.
[] Instalad6n, entrega o mantenimiento inapropiada.
[] Fallas del producto si es maltratado, mal usado, o usado
para un prop6sito diferente del que se cre6 o si es usado
para usos comercJales.
[]
DaSos imprevistos resultantes causados por posibles
defectos con este electrodom6stico.
[] Defectos o daSos debido a la puesta en funcionamiento a
temperaturas de congelaci6n.
[] Cambio de los fusibles de su casa o reajuste del drcuito de
interruptores.
[] DaSos causados despu6s del envio.
[] Producto no accesible para facilitar el servicio requerido.
[] Productos sindefectos o rotos, o los cualesse encuentran
funcionando como se Jndicaen el Manual
del propietario.
EXCLUSION DE GARANTiAS IMPLiCITAS--Su Bnico y exclusivo derecho es la reparaci6n de! producto, tal y camo
se indica en esta Garantia fimitada. Cualquier garantia implicita, incluyendo las garantias implicitas de comerciabifidad
o adecuaci6n para un fin determinado, est6n limitadas a un afio o el periodo de tiempo m6s breve permitido pot la ley.
Esta garanda se extiende al comprador original y a cualquier propietario subsecuente para productos comprados para uso
domdstico dentro Estados Unidos.Si el producto estd situado en un drea que no dispone de servicio por parte de un proveedor
de servicio autorizado de GE,podrfa tener que hacerse cargo de los costes de envfo o bien podrfa solicitdrsele que Ileve el
producto a un centro de servicio de GEautorizado para realizar la reparaci6n. EnAlaska, la gamntfa excluye
el costode envfo o las visitas deservicioasu casa.
Sinecesitasolicitarpiezasde repuesto,lerecomendamosque utilices61olaspiezasde GEespecificadasde fdbrica.Estaspiezasestdn
disehadaspara funcionarconsu aparatoy se encuentranfabricadasy probadasparacumplircon lasespecificacionesde GE.
Algunos estados no permiten la exclusi6n o limitaci6n de dahos imprevistos. Esta garanda le da sus derechos legales
espedficos, yes posible que usted tenga otros derechos legales que varian de estado a estado. Para informarse de cudles son
sus derechos legales, consulte a su oficina de asuntos del consumidor local o estatal o p6ngase en contacto con
la Oficina de su Procurador General.
Garante: General Electric Company. Louisville, KY /40225
27
Page 80

Soporteu! consumidor.
Pdgina Web de GEAppliances GEAppliances.com
_LTienealguna pregunta sabre suelectrodom6stico? iPruebela p6gina Web de GEAppliances 24 horas al dfa,
cualquier d[a del aho! Paramayor convenienciay servicio m6s r6pido,ya puede descargar los IVlanualesde los
Propietarios,pedir piezas o incluso hacer una cita en I[neapara que vengan a realizaruna reparaci6n.
Solicite una reparaci6n GEAppliances.com
Elserviciode expertos GEest6 a tan s61oun paso de su puerta, iEntreen Ifneay solicitesu reparaci6n cuando
le venga bien al dia cualquier dia del a_o! O llama a1800.GE,CARES(800./432.2737)durante horas normales
de oficina.
RealLifeDesignStudio(Estudiodedisehoparalavidareal)
GEapoya el concepto de Dise_o Universal-productos, servicios y ambientes que pueden usar gente de todas
las edades, tama_os y capacidades. £econocemos la necesidad de disehar para una gran gama de habilidades
y dificultades fisicas y mentales. Para m6s detalles cobre las aplicaciones de GE Dise_o Universal, incluyendo
ideas de dise_o para la cocina para personas con discapacidades, mire nuestra p6gina Web boy mismo. Para
personas con dificultades auditivas, favor de Ilamar al 800.TDD.GEAC(800.855.4522).
GEAppliunces.com
Garantios ampliadas GEAppliances.com
Compre una garantia ampliada y obtenga detalles sobre descuentos especiales disponibles mientras su
garant[a estc_aOnactiva. Puede comprarla en I[nea en cualquier momento, o Ilamar a1800.626.2224 durante
horas normales de oficina. GEConsumer Home Services estar6 a0n ah[ cuando su garant[a termine.
Plazasy accesorios GEAppl ianceparts.com
Aquellosindividuos con la calificaci6n necesaria para reparar sus propios electrodom6sticos pueden pedir que
seles manden las piezas o accesorios directamente a sus hogares (aceptamos lastarjetas VISA,MasterCard
y Discover).Hagasu pedido en linea hay, 24 horas cada dia o Ilamar par tel6fono a1800.626.2002durante
horas normales de oficina.
Sinecesita solicitar piezasde repuesto, le recomendamos que utilice s61olaspiezasde GEespecificadas de
f6brica. Estas piezasest6n disehadas para funcionar con su aparato y seencuentran fabricadas y probadas
para cumplir con lasespecificacionesdeGE.
Las instrucciones descritas en este manual cubren los procedimientos a seguir par cualquier usuario.
Cualquier otra reparaci6n deberia, pot regla general, referirse a personal calificado autorizado. Debe ejercerse
precauci6n ya que las reparaciones incorrectas pueden causer condiciones de funcionamiento inseguras.
P6ngose en contacto con nosotros GEAppliances.com
Sino estc_ satisfecho con el servicio que recibe de GE,p6ngase en contacto con nosotros en nuestra p6gina Web
indicando todos los detalles as[ como su n0mero de tel6fono o escr[banos a:
General Manager, Customer Relations
GEAppliances, Appliance Park
Louisville,KY40225
Registre su electrodomdstico GEAppliances.com
iRegistre su nuevo electrodom_stico en linea-cuando usted prefiera! Elregistrar su producto a tiempo le
proporcionar6, si surgiera la necesidad, una mejor comunicaci6n y un servicio mc_s r6pido bajo los t@minos de
su garant[a, mambi6n puede enviar su tarjeta de registro pre-impresa que se incluye en el material de embalaje.
28
 Loading...