

GE GTUP240GM0WW, GTUP270GM0WW, GTUP270GM1WW, GTUP240GM1WW, GTUP240EM1WW Owner's Manual
...
GEAppliances.com
Safety Instructions ............ 2-s
Operating Instructions
Care and Cleaning
ofthe Dryer ...................... 11
Care and Cleaning
of the Wosher ...................... 9
Control Ponel Dryer ............... 10
Control Ponel Wosher .............. 6
Control Settings Dryer ............. 10
Control Settings Wosher ......... 6, 7
Feotures Wosher ................... 8
Looding ond Using
the Dryer ......................... 12
Looding ond Using
the Wosher ........................ 9
Troubleshooting Dryer ........ 16, 17
Troubleshooting Wosher ....... 13-15
Consumer Support
Consumer Support ................ 20
Warranty .......................... 19
Write the model ond seriol
number here:
Model #
Seriol #
Open Dryer door for Model
ond Seriol number tog.
189D7218P001 49-90417-1 02-11GE
IMPORTANT SAFETY INFORMATION.
READ ALL INSTRUCTIONS BEFORE USING.
WARNING!
For your safety, the information in this manual must be followed to minimize the risk
of fire or explosion, electric shock, or to prevent property damage, personal injury, or
death.
• Do not store or use gasoline or other
flammable vapors and liquids in the
vicinity of this or any other appliance.
• Installation and service must be
performed by a qualified installer,
service agency or the gas supplier.
WHAT TO DO IF VOU SMELL GAS:
[] Do not try to light a match, or
cigarette, or turn on any gas or
electrical appliance.
[] Do not touch any electrical switch;
do not use any phone in your building.
r_ Clear the room, building or area of all
occupants.
California Safe Drinking Water and Toxic Enforcement Act
Thisact requires the governor of California to publisha list of substances known to the state to cause
cancer, birth defects or other reproductive harm and requires businessesto warn customers of potential
exposure to such substances.
Gasappliancescan cause minor exposureto four of these substances,namely benzene,carbon monoxide,
formaldehyde and soot, caused primarily by the incomplete combustion of natural gas or LPfuels.
Properlyadjusted dryers will minimize incomplete combustion. Exposureto these substances can be
minimized further by properly venting the dryer to the outdoors.
r-_Immediately call your gas supplier
from a neighbor's phone. Follow the
gas supplier's instructions carefully.
r-_ifyou cannot reach your gas supplier,
call the fire department.
WATER HEATER SAFETY
Under certain conditions, hydrogen gas may be produced in a water heater that has not been
used for two weeks or more. Hydrogen gas can be explosive under these circumstances.
If the hot water has not been usedfor two weeks or more, prevent the possibility of damage or injury by
turning on all hot water faucets and allowing them to run for several minutes. Dothis before usingany
electrical appliance which is connected to the hot water system. Thissimple procedure will allow any
built-up hydrogen gasto escape. Sincethe gas isflammable, do not smoke or use an openflame or
appliance during this process.
GEApplances.com
PROPERINSTALLATION
This appliance must be properly installed and located in accordance with the Installation Instructions
before it is used. If you did not receive an Installation Instructions sheet, you can receive one by visiting
GEAppliunces.com or by calling 800.GE.CARES (800.432.2737). In Canada visit www.GEAppliunces.cu
or coil 888.561.3344.
• Properlyground appliance to conform with all
governing codes and ordinances.Follow details in
Installation Instructions.
• Installor store where it will not be exposed to
temperatures below freezing or exposed to the
weather, which could cause permanent damage and
invalidate the warranty.
• Connectto a properly rated, protected and sized
power supply circuit to avoid electrical overload.
• Removeallsharp packingitems and dispose of
all shipping materials properly.
Exhaust/Ducting
i-i-]Gas dryers MUSTbe exhausted to the outside.
r21use only rigid metal 4" diameter ductwork insidethe
dryer cabinet. Useonly ULapproved rigid metal or
flexible metal 4" diameter ductwork for exhausting to
the outdoors. Neveruse plastic or other combustible,
easy-to-puncture ductwork.
Forcomplete details, follow the Installation Instructions.
WARNING!
YOUR LAUNDRY AREA
• Keepthe area underneath and around your
appliances free of combustible materials,
(lint,paper, rags,etc.),gasoline,chemicals and
other flammable vapors and liquids.
• Keepthe floor around your appliances clean
and dry to reduce the possibility of slipping.
• Keepall laundry aids (suchas detergents,
bleaches,etc.)out of the reach of children,
preferably in a locked cabinet. Observeall
warnings on container labels to avoid injury.
• Neverclimb on or stand on the Stack unit -
LaundryCenter.
Note: This appliance is designed for the washer and dryer to be operated at the same time if desired.
• Do not allow anyone, in particular children,to climb on,hang from, stand on, play on or in the appliance. Closesupervisionof
children is necessarywhen the appliance isused near children.
• Do not store itemsthat may burn or melt (suchas clothing, paper material, plastics or plastic containers, etc)on top of the appliance
or hanging from the door.
IMPORTANT SAFETY INFORMATION.
READ ALL INSTRUCTIONS BEFORE USING.
WHEN USING YOURAPPLIANCE
• Do not mix chlorine bleach with ammonia or acids •
such as vinegar and/or rust remover. Mixing different
chemicals can produce a toxic gas which may cause
death. •
Never attempt to operate this appliance if it is
damaged, malfunctioning, partially disassembled,or
has missingor broken parts, including a damaged
cord or plug.
Never reach intothe appliance while it is moving.
Beforeloading, unloading or adding clothes,wait until
the machine has completely stopped.
Use this
appliance
only for its
intended
purpose as
described in
this Owner's
Manual.
Cleanthe lint filter before each load to prevent lint
accumulation inside the dryer or inthe room. DONOT
OPERATETHEDRYERWITHOUTTHELINT FILTERIN
PLACE.
Do not wash or dry articlesthat have been
cleaned in,washed in,soaked in or spotted
with combustible or explosive substances (suchas
wax, oil,paint, gasoline,degreasers,dry-cleaning
solvents,kerosene,etc.).Thesesubstances give
off vapors that may ignite or explode.Donot add
these substances to the wash water. Do not use
or place these substancesaround your appliance
during operation.
Do not place items exposed to cooking oils in
your dryer. Items contaminated with cooking oils may
contribute to a chemical reaction that could cause a
clothes load to catch fire.
Anyarticle on which you have used a cleaning
solvent or that contains flammable materials (such
ascleaning cloths, mops,towels used in beauty
salons,restaurants or barber shops,etc.) must not
be placed in or near the appliance until solvents or
flammable materials have been removed. Thereare
many highly flammable items used in homes such as
acetone, denatured alcohol,gasoline, kerosene,some
household cleaners,some spot removers,turpentines,
waxes,wax removers and products containing
petroleum distillates.
Thelaundry process can reduce the flame retardancy
of fabrics.To avoid such a result,carefully follow the
garment manufacturer's care instructions.
Do not dry articles containing rubber, plastic
or similar materials such as padded bras,tennis
shoes,galoshes, bath mats, rugs, bibs,baby pants,
plastic bags, pillows,etc.that may melt or burn.
Somerubber materials, when heated, can under
certain circumstances produce fire by spontaneous
combustion.
Do not store plastic,paper or clothing that may burn
or melt on top of the dryer during operation.
Garments labeled DryAway from Heat or Do Not
Tumble Dry (suchas lifejackets containing Kapok)
must not be put in your dryer.
Do not dry fiberglass articles inyour dryer.
Skinirritation could result from the remaining particles
that may be picked upby clothing during subsequent
dryer uses.
Tominimize the possibility of electric shock, unplug
this appliance from the power supply or disconnect
the appliance at the household distribution panel by
removing the fuse or switching off the circuit breaker
before attempting any maintenance or cleaning
(exceptthe removal and cleaning of the lint filter).
NOTE:Turningthe CycleSelectorknob to an off position
or pressing PAUSEdoesNOT disconnectthe appliance
from the power supply.
Theinterior of the machine and the exhaust duct
connection insidethe dryer should be cleaned at least
once a year by a qualified technician. Seethe Loading
and Usingthe Dryersection.
If yours isa gas dryer, it is equipped with an
automatic electric ignition and does not have a pilot
light. DONOTATTEMPTTOLIGHT WITHA MATCH.
Burns may result from having your hand in the vicinity
of the burner when the automatic ignition turns on.
You may wish to soften your laundered fabrics or
reduce the static electricity inthem by using a dryer-
applied fabric softener oran anti-static conditioner.
We recommend you useeither a fabric softener in
the wash cycle,according to the manufacturer's
instructions for those products, ortry a dryer-added
product for which the manufacturer gives written
assurance on the package that their product can be
safely usedin your dryer. Serviceor performance
problems caused byuse of these products are the
responsibility of the manufacturers of those products
and are not covered under the
warranty to this appliance.
WHEN NOT IN USE
GEApplances.com
• Graspthe plug firmly when disconnecting this
appliance to avoid damage to the cord while pulling.
Placethe cord away from traffic areas so itwill not be
stepped on,tripped over or subjected to damage.
• Turn off water faucets to relievepressure on hoses
and valves and to minimize leakage if a breakor
rupture should occur.Check the condition of the fill
hoses;GErecommends changing the hosesevery 5
years.
• Beforediscarding the appliance, or removing it
from service,remove the washer and dryer lidsto
prevent children from hiding inside.
• Donot attempt to repair or replace any part of this
appliance or attempt any servicingunlessspecifically
recommended inthis Owner's Manual or in published
user-repairinstructions that you understand and have
the skillsto carry out.
• Do not tamper with controls.
READANDFOLLOWTHISSAFETYINFORMATIONCAREFULLY.
SAVETHESEINSTRUCTIONS
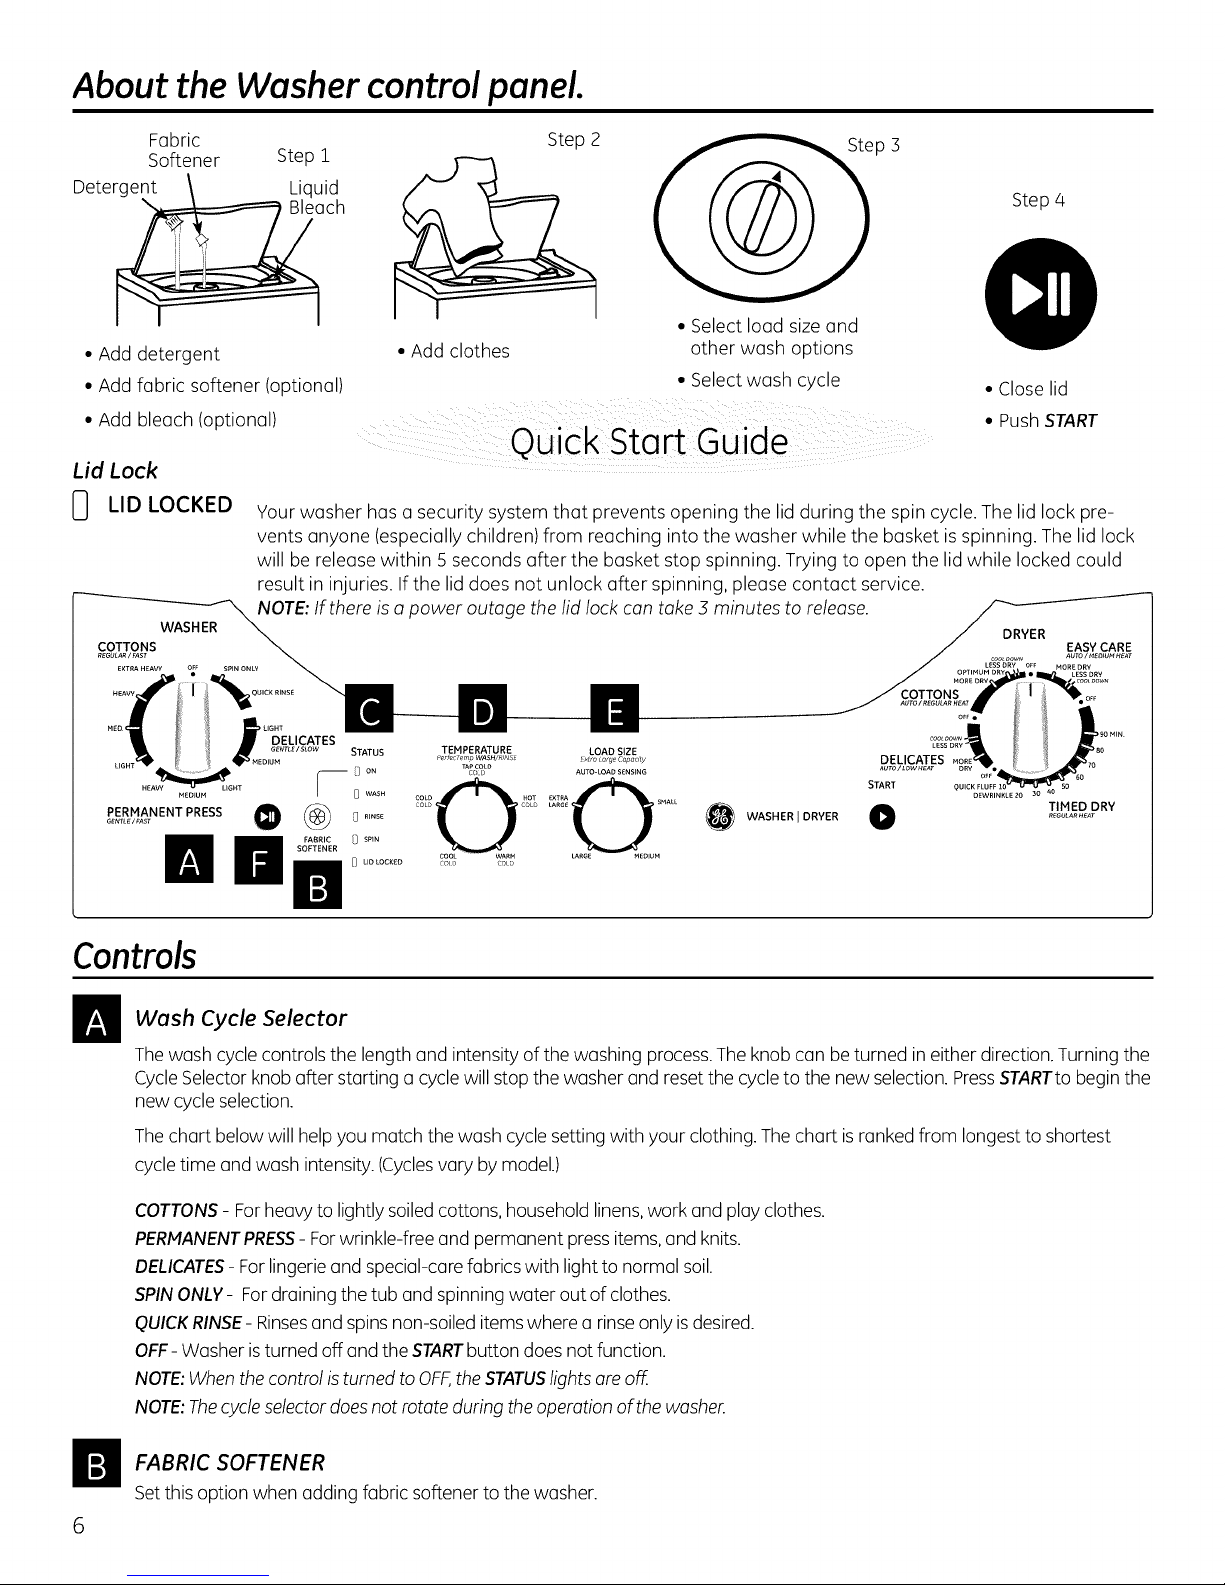
About the Washer control panel.
Fabric Step 2
Softener Step 1
• Add detergent
• Add fabric softener (optional)
• Add bleach (optional)
Lid Lock
• Add clothes
• Select load size and
other wash options
• Select wash cycle
Step 4
• Close lid
• Push START
LID LOCKED
G_NT_E/_AST
PERMANENT PRESS _ @ O ..... WASHER I DRYER
mill" ..........
Your washer has a security system that prevents opening the lid during the spin cycle. The lid lock pre-
vents anyone (especially children) from reaching into the washer while the basket is spinning. The lid lock
will be release within 5 seconds after the basket stop spinning. Trying to open the lid while locked could
result in injuries. If the lid does not unlock after spinning, please contact service.
NOTE: If there is a power outage the lid lock can take 3 minutes to release.
_II_ B ._OTTONS
STATUS TEMPERATURE LOAD SIZE
ON TAPCOLDCOLD AUT_LOAD SENSING
SOFTENER
_]_ 0 UOLOCK_D CO_D COLD
....Q O° °
p_rfe¢_ernpWASH/RfNSI xtro _argeCapacty
COLD HOT EXTRA
COLD COLD LARGE SMAtL
LARGE MEOlUH
Controls
Wash Cycle Selector
The wash cycle controls the length and intensity of the washing process. The knob can be turned in either direction. Turning the
Cycle Selector knob after starting a cycle will stop the washer and reset the cycle to the new selection. Press STARTto begin the
new cycle selection.
DELICATES
AUTO/LOWHEAr
START
/ IJRYI-N
/ EASY CARE
c_o,_ovw AUTOIMEO_U_HE_T
Thechort belowwill helpyou match the wash cycle setting with your clothing. The chart is ranked from longest to shortest
cycle time and wash intensity. (Cyclesvary by model.)
COTTONS- For heavy to lightly soiledcottons, household linens,work and play clothes.
PERMANENTPRESS-Forwrinkle-free and permanent press items,and knits.
DELICATES- Forlingerie and special-carefabrics with lightto normal soil.
SPINONLY- Fordraining the tub and spinning water out of clothes.
QUICKRINSE- Rinsesand spins non-soiled itemswhere a rinse only isdesired.
OFF- Washer isturned off and theSTARTbutton does not function.
NOTE:Whenthe control isturned to OFF,theSTATUSlights are off.
NOTE:Thecycleselector doesnot rotate duringthe operation of thewasher.
FABRIC SOFTENER
Setthis option when adding fabric softener to the washer.
GEApplances.com
STATUS lights
TheSTATUSlights showthestage the washerisin.Whentheselectorknobissettoa new cycle,the STATUSlights willflash
momentarily, showing the stages the cycle willgothrough.
STATUSlight Illuminates
ON When the fabric softener option has been selected.
WASH When the washer is in the wash portion of the cycle.
RINSE When the washer is in the rinse portion of the cycle.
SPIN When the washer draining and/or spinning.
LID LOCKED
When the washer lid is locked. This feature prevents the lid from being opened while the
washer is in the spin cycle or coasting to cl stop.
NOTE: If the STATUSlights ore blinking, the operation of the washer has been paused. To resume operation
press the STARTbutton (the lid must be closed).
_ Temperature
Selectthe water temperature for the wash and rinse cycles.Always follow fabric manufacturer's care labelor instructions
when laundering.
PerfecTemp sensesthe incoming water temperature and adjusts the fill water to obtain amore precisetemperature range
for all wash temperatures. Forexample, in a COLDwash selection,some warm water may beadded to reach a temperature
needed to better dissolvedetergents. Often,detergents are not completely dissolvedin very cold water, especiallyin cooler
climates.
Duringwinter months, when the water entering your home iscolder, or for locations with very cold water year round,use the
PerfecTemp plus COLDto help dissolve powdered detergents and to improve the cleaning of your clothes.
TheTAPCOLDfeature turns the PerfecTemp feature on your washer off, and usesyour household tap water temperature for a
COLDwash.This can provide energy savings by reducing the amount of hot water usedin your wash.
Load Size
Looselyload clothes no higherthan the top row of holes inthe washer basket.
AUTOLOADSENSING-Thisselectionautomatically providesthe correct amount of water suited to the sizeand type of load
placed inthe unit.
START
PressSTARTto begin the cycle.With the lid closed pressingSTARTagainwill PAUSEthe cycle and STATUSlightswill blink.To
continue the cycle,close the lid and press STARTagain.Thewater fillwill continue with the lidopened, except when AUTO
LOADSENSINGisselected as the load size.(Thelid must be closed to continue filling when AUTOLOADSENSINGisselected.
Ifthe lid isopened during the cycle,the cycle will PAUSEandthe STATUSlightswill blink.To resume the cycle,close the lid and
press START.
Ifthe machine is paused for more than 2/4hours,the cycle will be cancelled.To stop the cycle,turn the CycleSelectorto the
OFFposition.
About the Washer features.
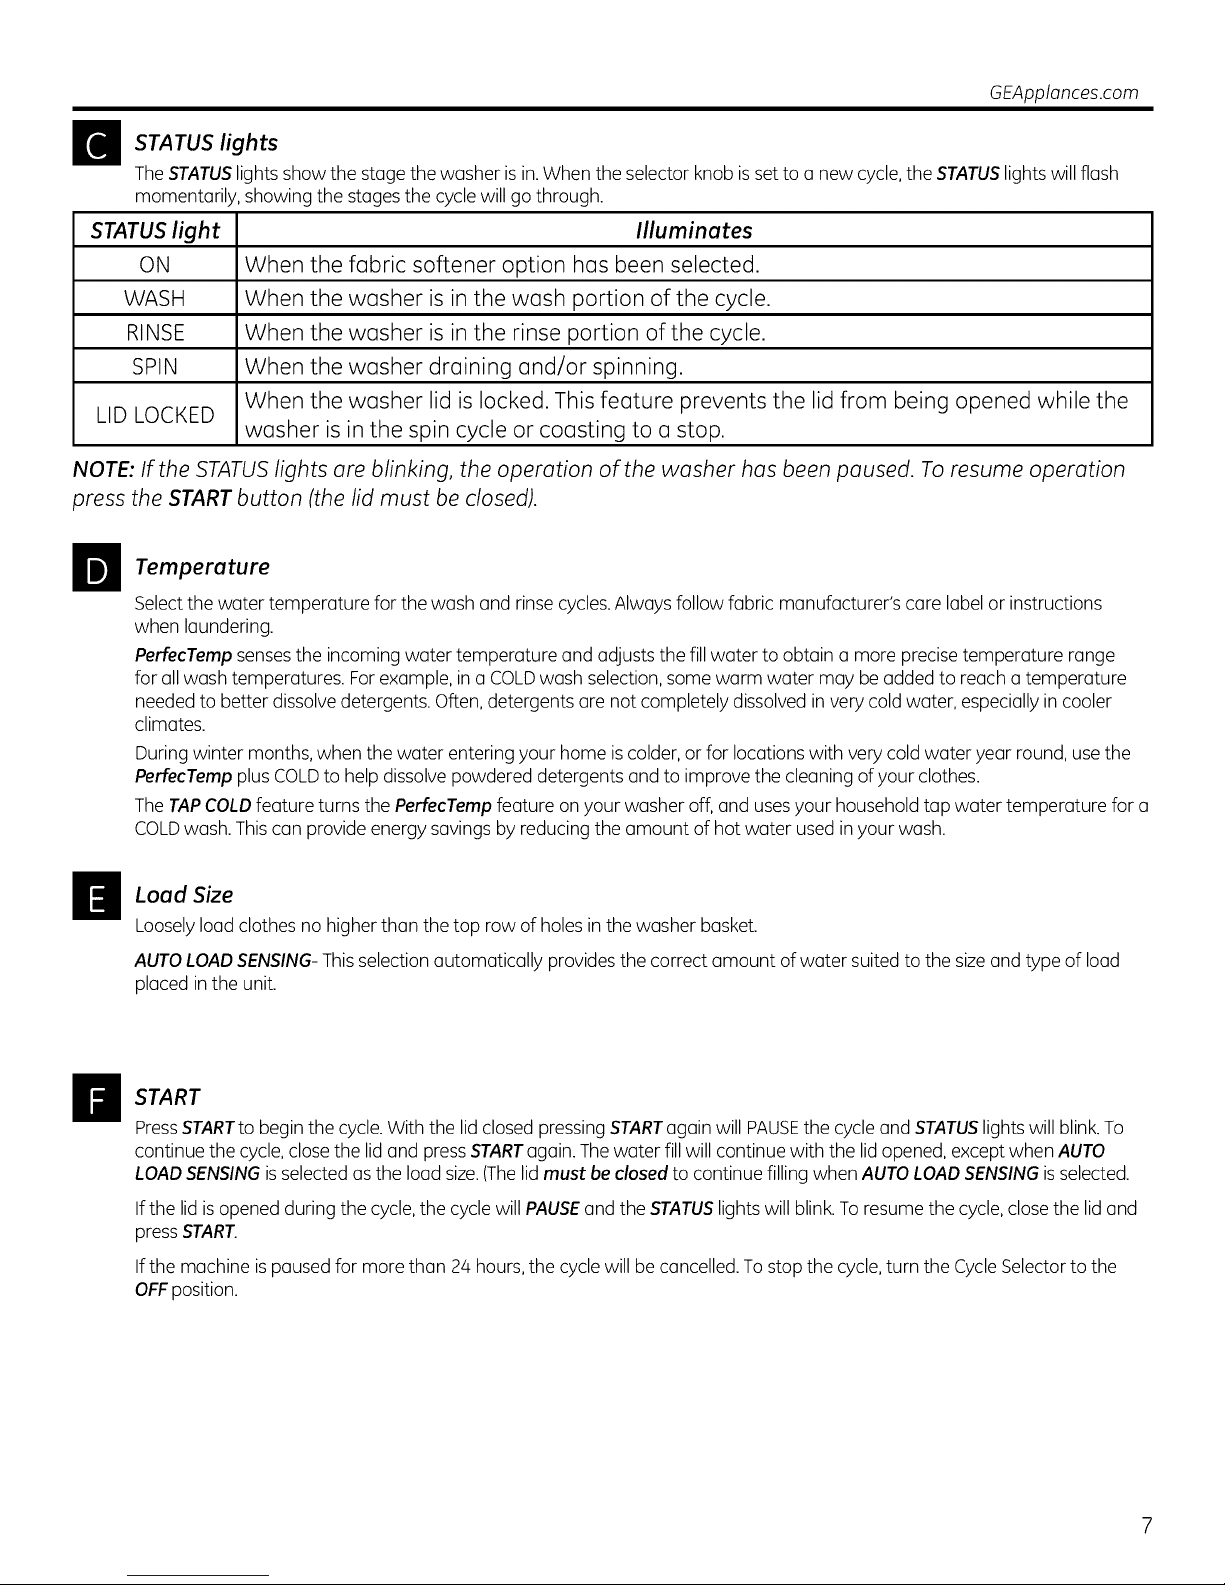
The Fabric Softener Dispenser
Separatefor cleaning
The fabric softener dispenser automatically
releases liquid fabric softener at the proper time
during the cycle.
Do not stop the washer during the first spin.
This will cause the dispenser to empty
too soon.
To use, follow these steps:
D Make sure dispenser is securely attached to
agitator.
_] Useonly diluted liquid fabric softener.
Pourinto dispenser,using amount
recommended on package.
Never pour fabric softener directly on clothes. It
may stain them.
NOTE:Do not pour bleach into FABRICSOFTENER
dispenser.
r_Add water to dispenser until it reaches the
maximum fill line.
Do not pour anything into the
agitator if the dispenser is removed.
E] SelectFABRICSOFTENERbutton on control
panel for proper dispersion ofthe fabric
softener.
Cleaning the Fabric Softener Dispenser
rl-] Remove the dispenser from the top of the agitator.
F] Separate the dispenser cup from the cover by grasping the top and pushing down on the inside of
the cup with your fingers. Dispenser cup willpop free from the cover.
r_] To clean the dispenser, soak both the dispenser cup and the dispenser cover inthe following
solution:
• 1 USgallon (3.8liters)warm water
• 1/4 cup (60ml) heavy-duty liquiddetergent
• 1 cup (240ml)bleach
[41 If necessary,loosenbuildup with a clean, soft cloth after soaking. Donot use a stiff brush;you may
roughen the surface of the dispenser.
[5] Rinseand reassemble dispenser.Placedispenser back on the agitator.
Liquid Bleach Funnel
Thewater fill dilutes liquid chlorine bleach asthe washer fills for the wash cycle.
r_ Checkclothing care labels for special instructions.
_] IVleasureliquid bleach carefully,following instructions on the bottle.
• Never pour undiluted liquid chlorine bleachdirectly onto clothesor into the wash basket.
• Oo not pour powdered bleachinto bleachfunnel.
F31Beforestarting the washer, pour measured amount of bleach directly into bleach funnel. Avoid
splashing or over-filling dispenser.Ifyou prefer to use powdered bleach,add it intothe wash basket
with your detergent.
• Do not mix chlorinebleach with ammonia or acidssuch as vinegarand/or rust remover.Mixing
can produce a toxic gas which may causedeath.
NOTE: Do not pour bleach into FABRIC SOFTENER dispenser.

Loading
Always follow
and using the washer.
fabric manufacturer's care label when launderinc,i.
Sorting Wash Loads
Sort by color (whites,lights,colors),soillevel,
fabric type (sturdycottons, easy care, delicates)
and whether the fabric produces lint (terry cloth,
chenille)or collects lint (velveteen,corduroy).
ProperUseofDetergent
GEAppliances.com
Add detergent and start the washer before adding
clothes so that the detergent can work effectively.
Usingtoo little or too much detergent is a common
cause of laundry problems.
Loadingthe Washer
Loaddry items loosely,no higher than the top row of
holesin the washer basket.When loading wet items,
make sureyou set the load/water levelhigh enough
to allow the itemsto move freely.Water levelshould
just cover the clothes.Toadd items after washer has
started, lift the lid and submerge additional items next
to the agitator.
Youcan uselessdetergent ifyou have soft water,
a smaller loador a lightly soiled load.
• Donot wrap long items likesheetsor pants
around the agitator.
• Donot wash fabrics containing flammable materials
(waxes,cleaning fluids,etc).
• Agitation will not start with thelid up.
Care and cleaning of the washer.
Wash Basket: Leavethe lid open after washing to allow
moisture to evaporate. If you want to clean the basket,
use a clean soft cloth dampened with liquid detergent;
then rinse.(Donot use harsh or gritty cleaners.)
Fill Hoses:GErecommends changing the hosesevery
5 years.
Exterior'.Immediately wipe off any spills.Wipewith
damp cloth. Trynot to hit surface with sharp objects.
Moving and Storage: Ask the service technician to
remove water from drain pump and hoses.Seethe
Installation Instructions packed with product for
information on how to reinstall the shipping rod to keep
the tub stationary when moving the washer. Formore
information, visit GEAppliances.com or call
800.GE.CARES(800.432.2737).In Canada,visit
GEAppliances.ca or call 888.561.3344.Donot store the
washer where it will be exposed to the weather.
Long Vacations: Besure water supply is shut off at
faucets. Drain all water from hoses ifweather will be
below freezing.
About the Dryer control panel.
HE _i¸'I 0.........
....._. l¸¸ ! ,_...... STATUS
HE HT [_ WASH
PSR,_A,NENT :1.....
II
OP. SS
FABRIC D SP{N
SOFTENER
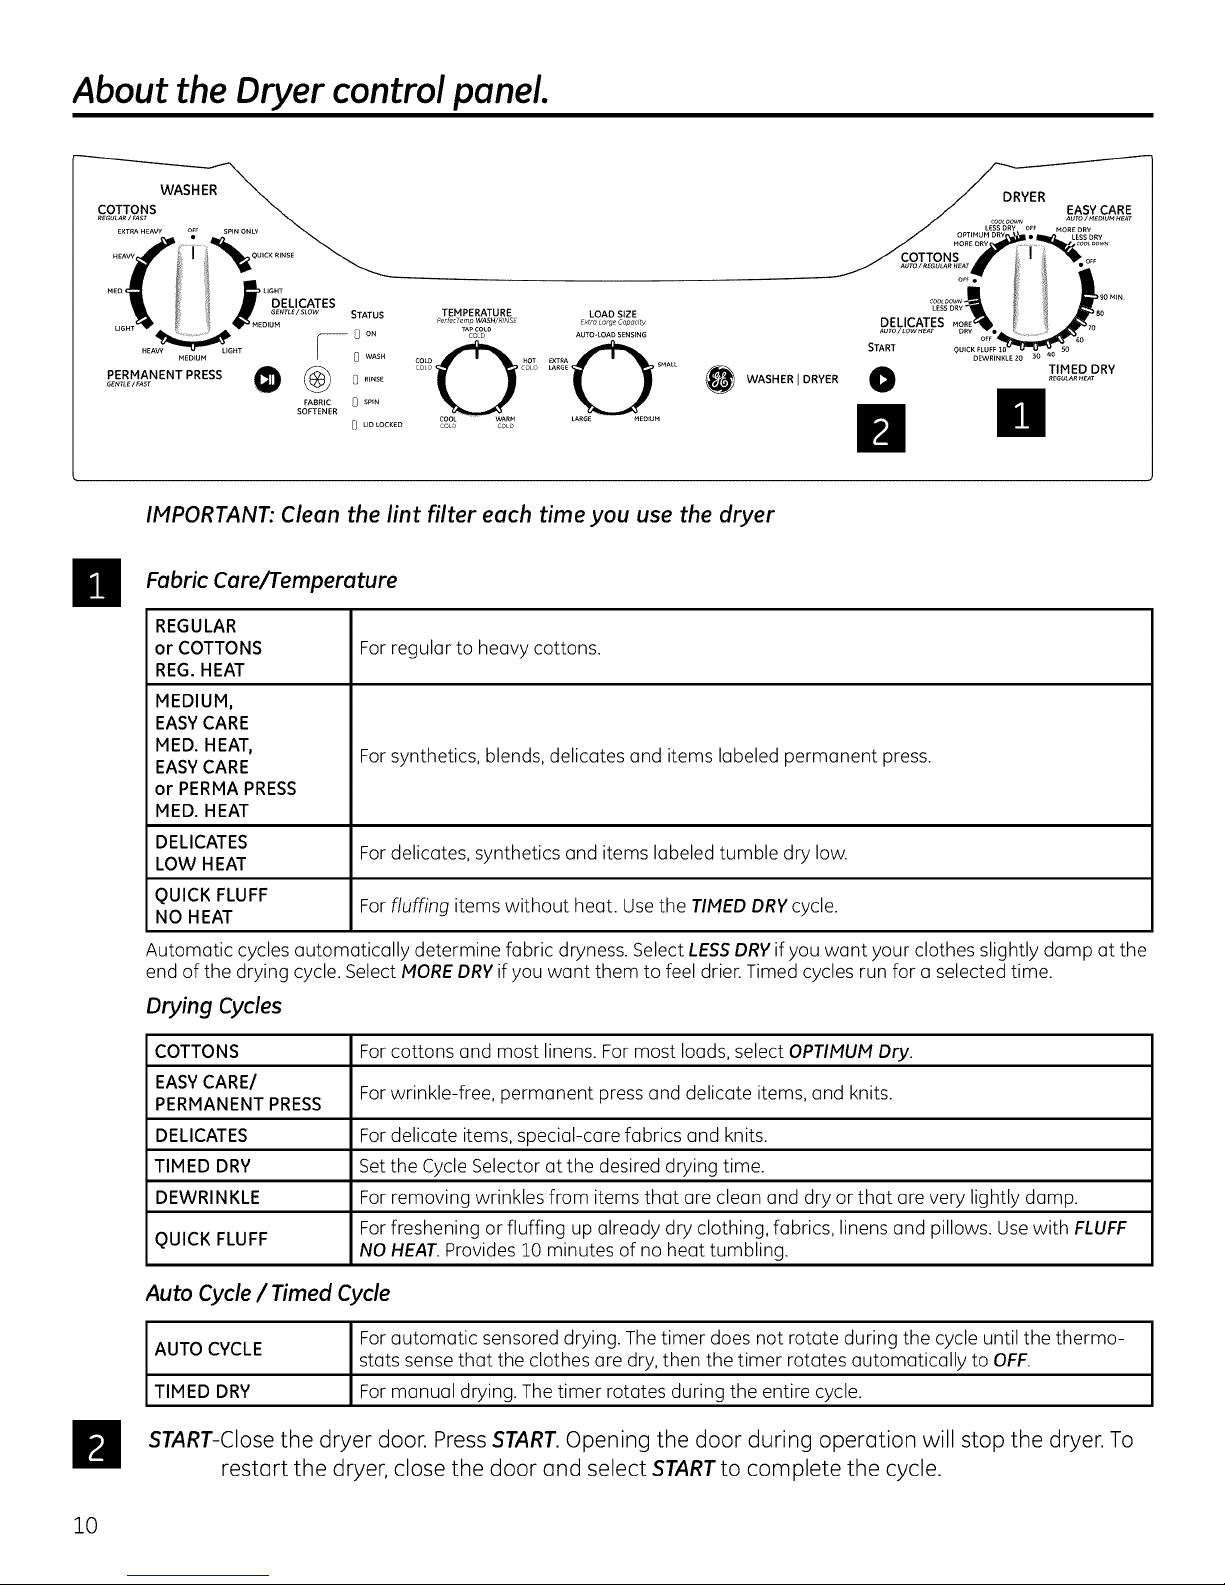
IMPORTANT: Clean the lint filter each time you use the dryer
Fabric Care/Temperature
REGULAR
or COTTONS
REG. HEAT
MEDIUM,
EASYCARE
MED. HEAT,
EASYCARE
or PERMA PRESS
MED. HEAT
DELICATES
LOW HEAT
TEMPERATURE LOAD SIZE
Eluo_.ocK_o
pertecempWASH/RflVSE Extr_LorgeCap_oty
TAgCOLD
COLD AUTO-LOAD SENSING
LARG_ MEOIUM
WASHER IDRYER O
DELICATES
AUTOI LOWHEAT
START
Forregular to heavy cottons.
Forsynthetics, blends, delicates and items labeled permanent press.
Fordelicates, synthetics and items labeled tumble dry low.
'OTToNS
DEWRINKLE 2O 30
II
TIMED DRY
REGULAR HEAT
QUICK FLUFF Forfluffing items without heat. Use the TIMED DRYcycle.
NO HEAT
Automatic cycles automatically determine fabric dryness. Select LESSDRYif you want your clothes slightly damp at the
end of the drying cycle. Select MOREDRYif you want them to feel drier.Timed cycles run for a selected time.
Drying Cycles
COTTONS Forcottons and most linens. For most loads, select OPTIMUMDry.
EASYCARE/ Forwrinkle-free, permanent press and delicate items, and knits.
PERMANENTPRESS
DELICATES For delicate items, special-care fabrics and knits.
TIMED DRY Set the Cycle Selector at the desired drying time.
DEWRINKLE Forremoving wrinkles from items that are clean and dry or that are very lightly damp.
Forfreshening or fluffing up already dry clothing, fabrics, linens and pillows. Use with FLUFF
QUICK FLUFF NO HEAT.Provides 10 minutes of no heat tumbling.
Auto Cycle / Timed Cycle
AUTO CYCLE
TIMED DRY Formanual drying. The timer rotates during the entire cycle.
Forautomatic sensored drying. The timer does not rotate during the cycle until the thermo-
stats sense that the clothes are dry, then the timer rotates automatically to OFF.
START-Close the dryer door. Press START.Opening the door during operation will stop the dryer. To
restart the dryer, close the door and select STARTto complete the cycle.
10
Care and Cleaning of the Dryer.
GEAppliances.com
The Exterior: Wipe or dust any spills or washing
compounds with a damp cloth. Dryer control panel
and finishes may be damaged by some laundry
pretreatment soil and stain remover products. Apply
these products away from the dryer. The fabric may
then be washed and dried normally. Damage to your
dryer caused by these products is not covered by your
warranty.
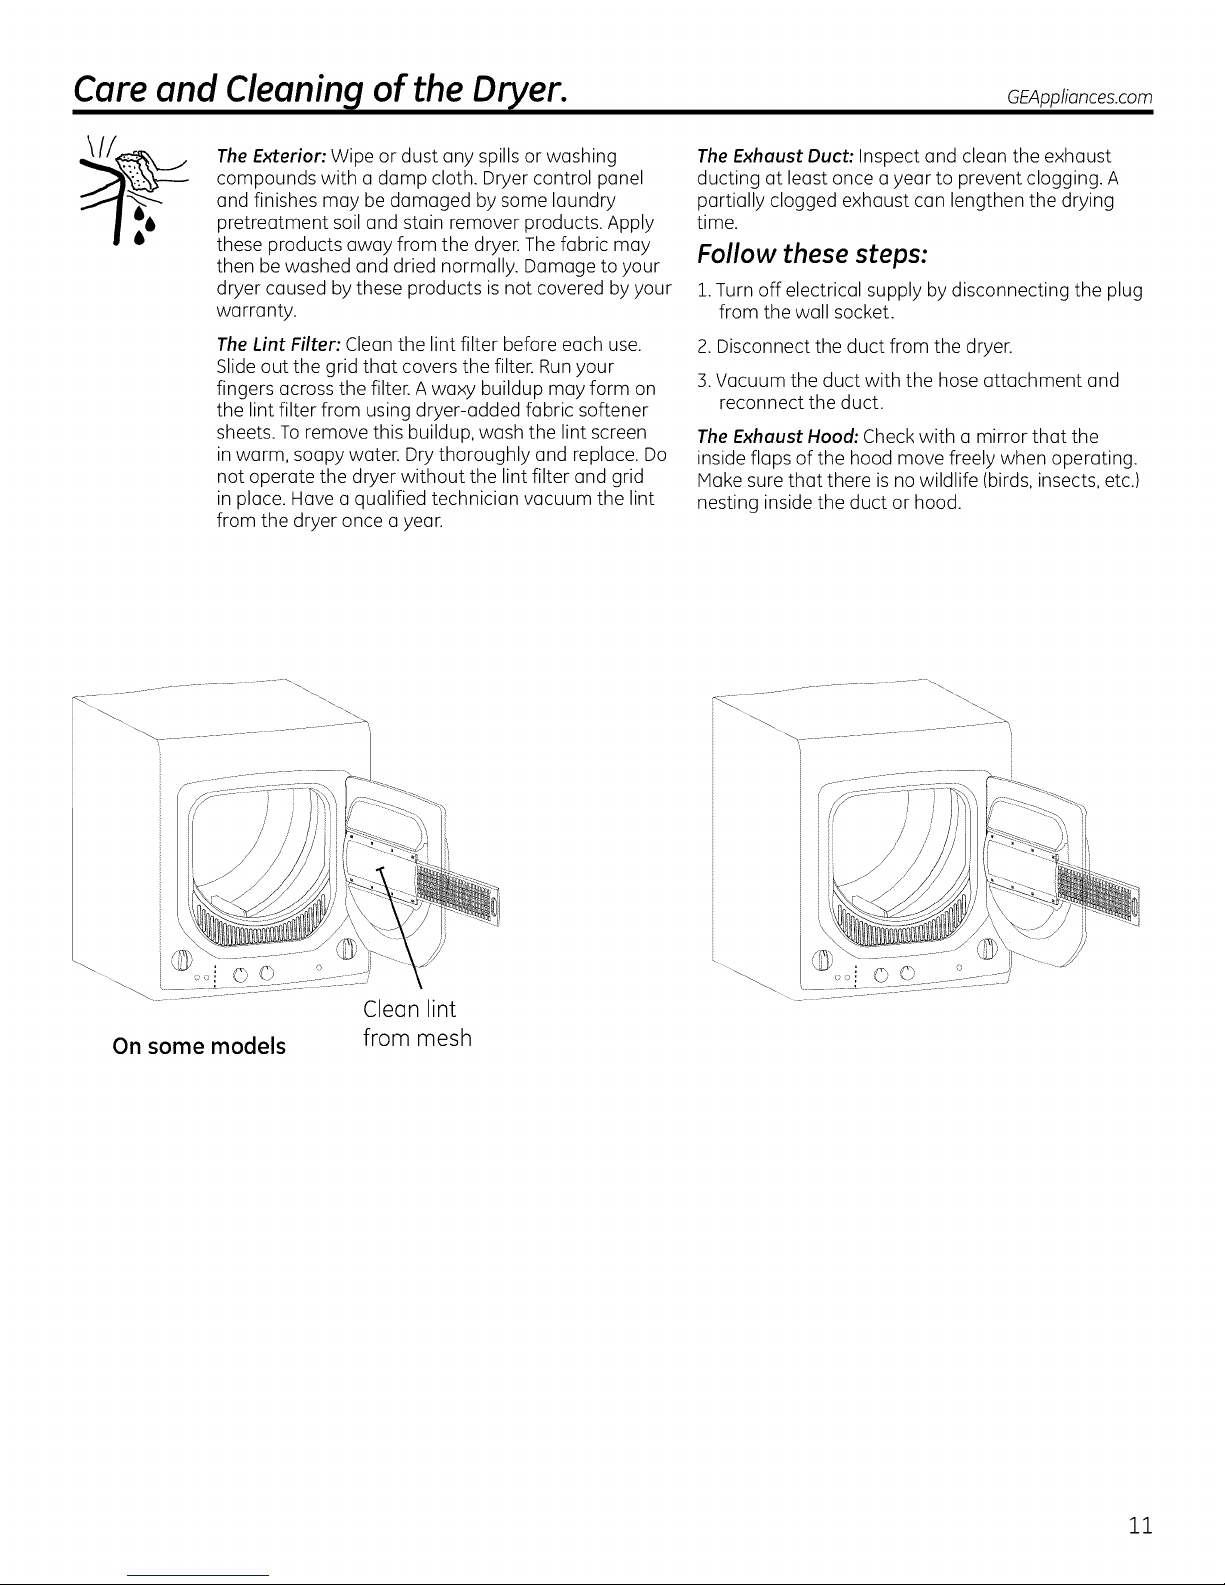
The Lint Filter: Cleanthe lint filter before each use.
Slide out the grid that covers the filter. Runyour
fingers across the filter. A waxy buildup may form on
the lint filter from using dryer-added fabric softener
sheets. To remove this buildup, wash the lint screen
in warm, soapy water. Dry thoroughly and replace. Do
not operate the dryer without the lint filter and grid
in place. Have a qualified technician vacuum the lint
from the dryer once a year.
The Exhaust Duct: Inspect and clean the exhaust
ducting at least once a year to prevent clogging. A
partially clogged exhaust can lengthen the drying
time.
Follow these steps:
i. Turn off electrical supply by disconnecting the plug
from the wall socket.
2. Disconnect the duct from the dryer.
3.Vacuum the duct with the hose attachment and
reconnect the duct.
The Exhaust Hood: Check with a mirror that the
inside flaps of the hood move freely when operating.
Make sure that there is no wildlife (birds, insects, etc.)
nesting inside the duct or hood.
Clean lint
On some models
from mesh
11
Loading and using the Dryer.
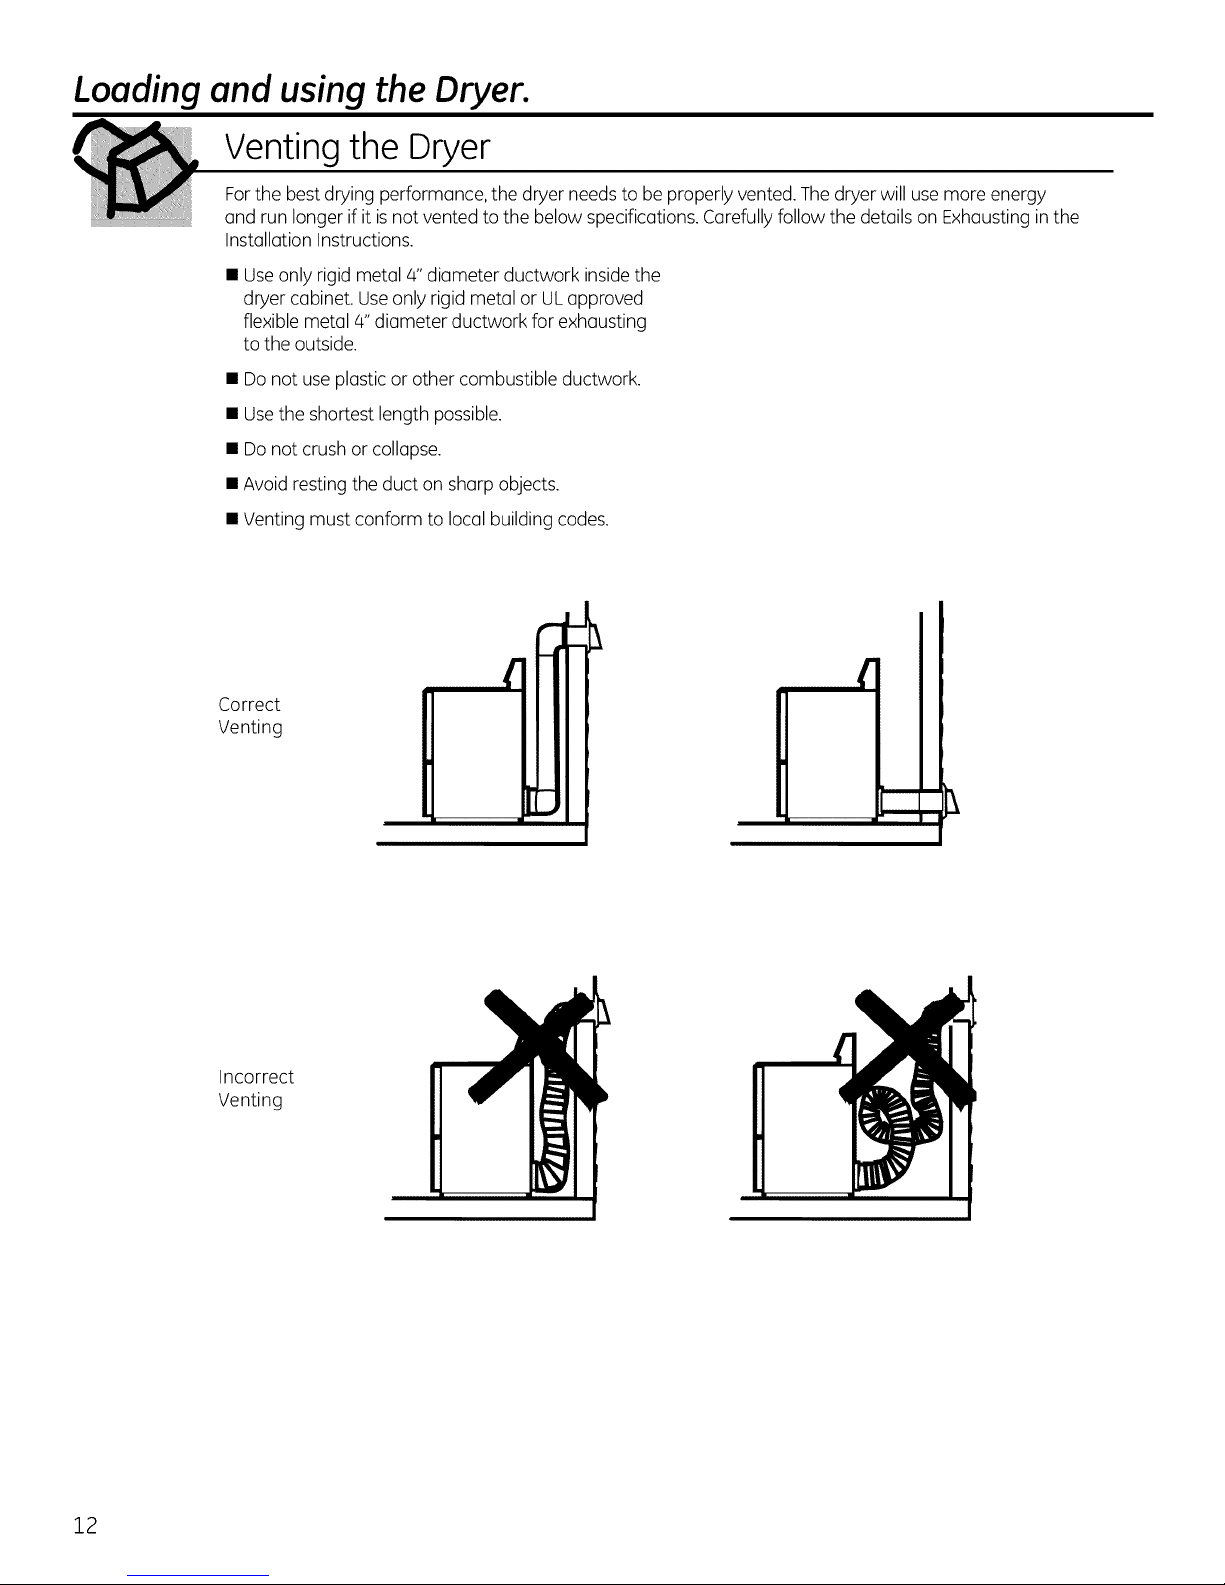
Venting the Dryer
Forthe best drying performance, the dryer needsto be properly vented. Thedryer will usemore energy
and run longer if it isnot vented to the below specifications.Carefully follow the detailson Exhausting in the
Installation Instructions.
• Useonly rigid metal 4" diameter ductwork insidethe
dryer cabinet Useonly rigid metal or ULapproved
flexible metal 4"diameter ductwork for exhausting
to the outside.
• Donot useplastic or other combustible ductwork.
• Usethe shortest length possible.
• Donot crush or collapse.
• Avoid resting the duct on sharp objects.
• Venting must conform to local building codes.
Correct
Venting
Incorrect
Venting
C
C
[
12
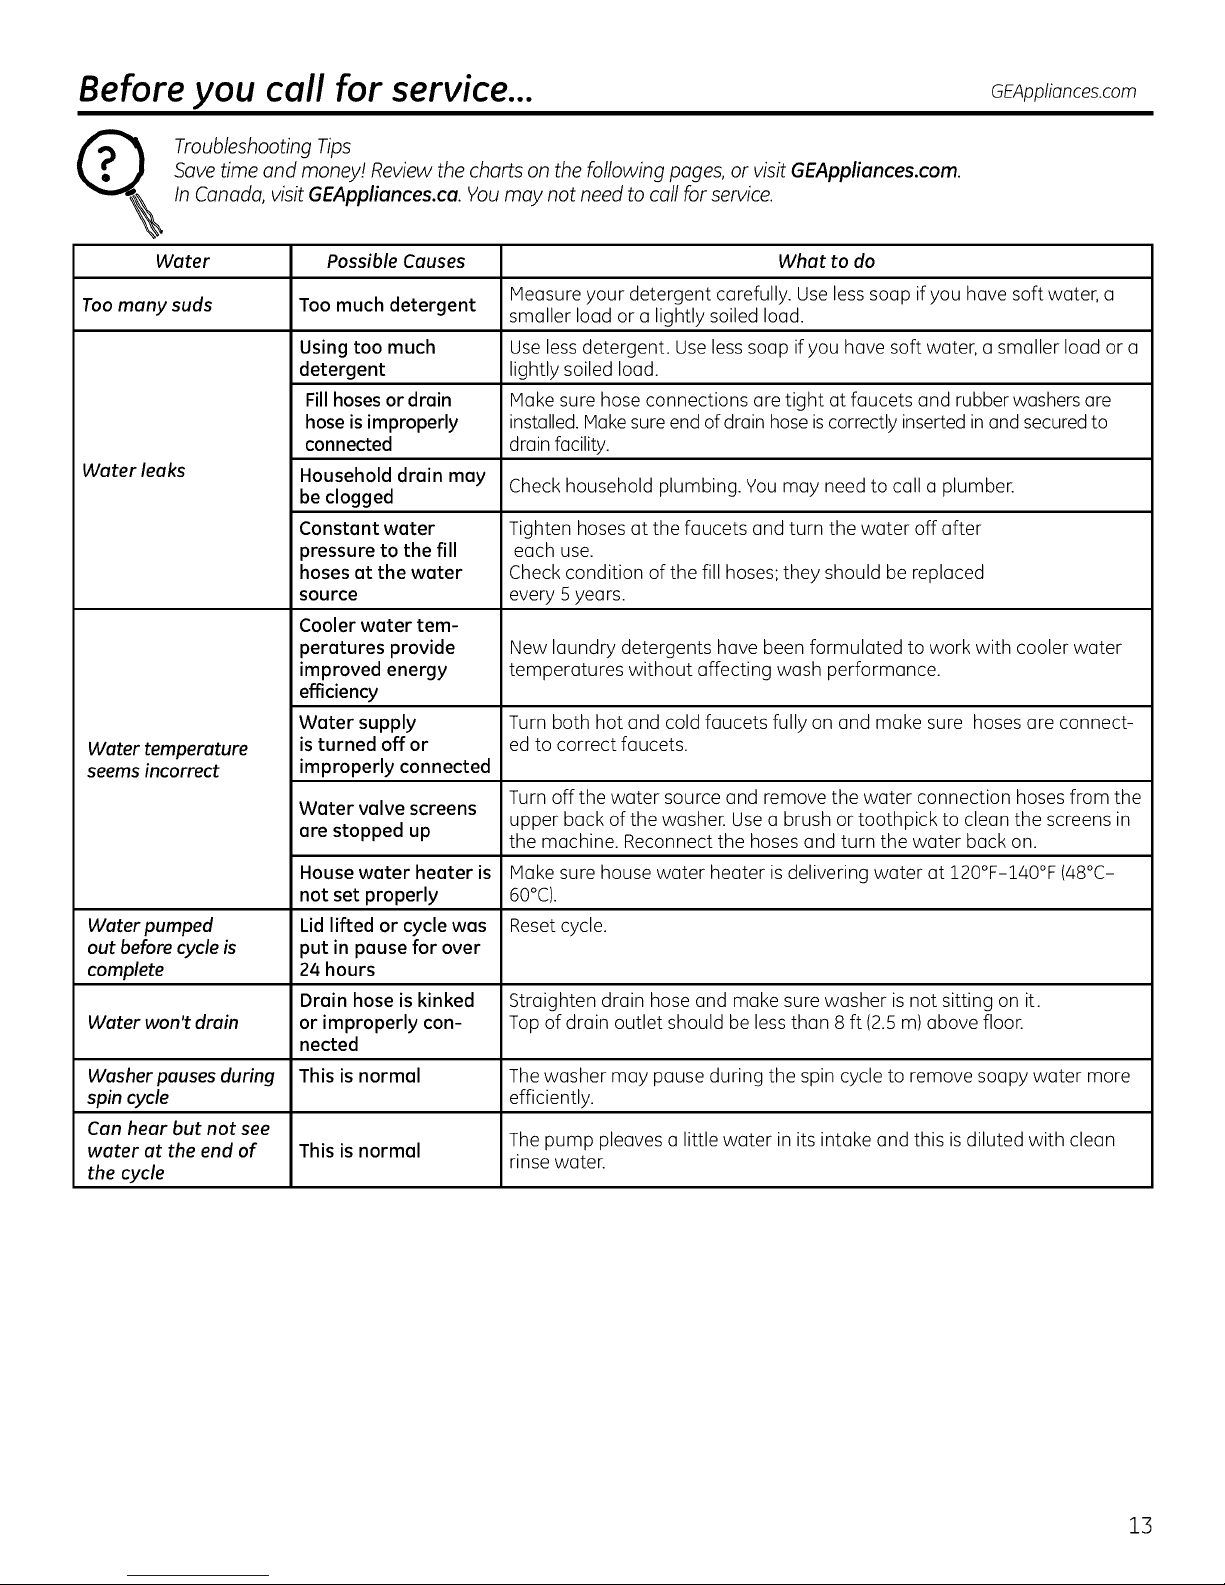
Before you coil for service... GEA o ce .co
Troubleshooting Tips
Save time and money! Review the charts on the following pages, or visit GEAppliances.com.
In Canada, visit GEAppliances.ca. You may not need to call for service.
Water Possible Causes What to do
Measure your detergent carefully. Use less soap if you have soft water, a
Too many suds Too much detergent smaller load or a lightly soiled load.
Using too much Useless detergent. Use less soap if you have soft water, a smaller load or a
detergent lightly soiled load.
Fillhoses or drain Make sure hose connections are tight at faucets and rubber washers are
hose is improperly installed. Makesure end ofdrain hose is correctly inserted inand secured to
connected drain facility.
Water leaks Household drain may Check household plumbing. You may need to call a plumber.
Water temperature isturned off or ed to correct faucets.
seems incorrect improperly connected
Water pumped Lid lifted or cycle was Reset cycle.
out before cycle is put in pause for over
complete 24 hours
Water won't drain or improperly con- Top of drain outlet should be less than 8 ft (2.5m) above floor.
Washer pauses during This is normal Thewasher may pause during the spin cycle to remove soapy water more
spin cycle efficiently.
Can hear but not see
water at the end of This is normal The pump pleaves a little water in its intake and this is diluted with clean
the cycle rinse water.
be clogged
Constant water Tighten hoses at the faucets and turn the water off after
pressure to the fill each use.
hoses at the water Check condition of the fill hoses; they should be replaced
source every 5 years.
Cooler water tem-
peratures provide New laundry detergents have been formulated to work with cooler water
improved energy temperatures without affecting wash performance.
efficiency
Water supply Turn both hot and cold faucets fully on and make sure hoses are connect-
Water valve screens
are stopped up the machine. Reconnect the hoses and turn the water back on.
House water heater is Makesure house water heater is delivering water at 120°F-140°F (480C-
not set properly 60°C).
Drain hose is kinked Straighten drain hose and make sure washer is not sitting on it.
nected
Turn off the water source and remove the water connection hoses from the
upper back of the washer. Usea brush or toothpick to clean the screens in
13
Before you coil for service...
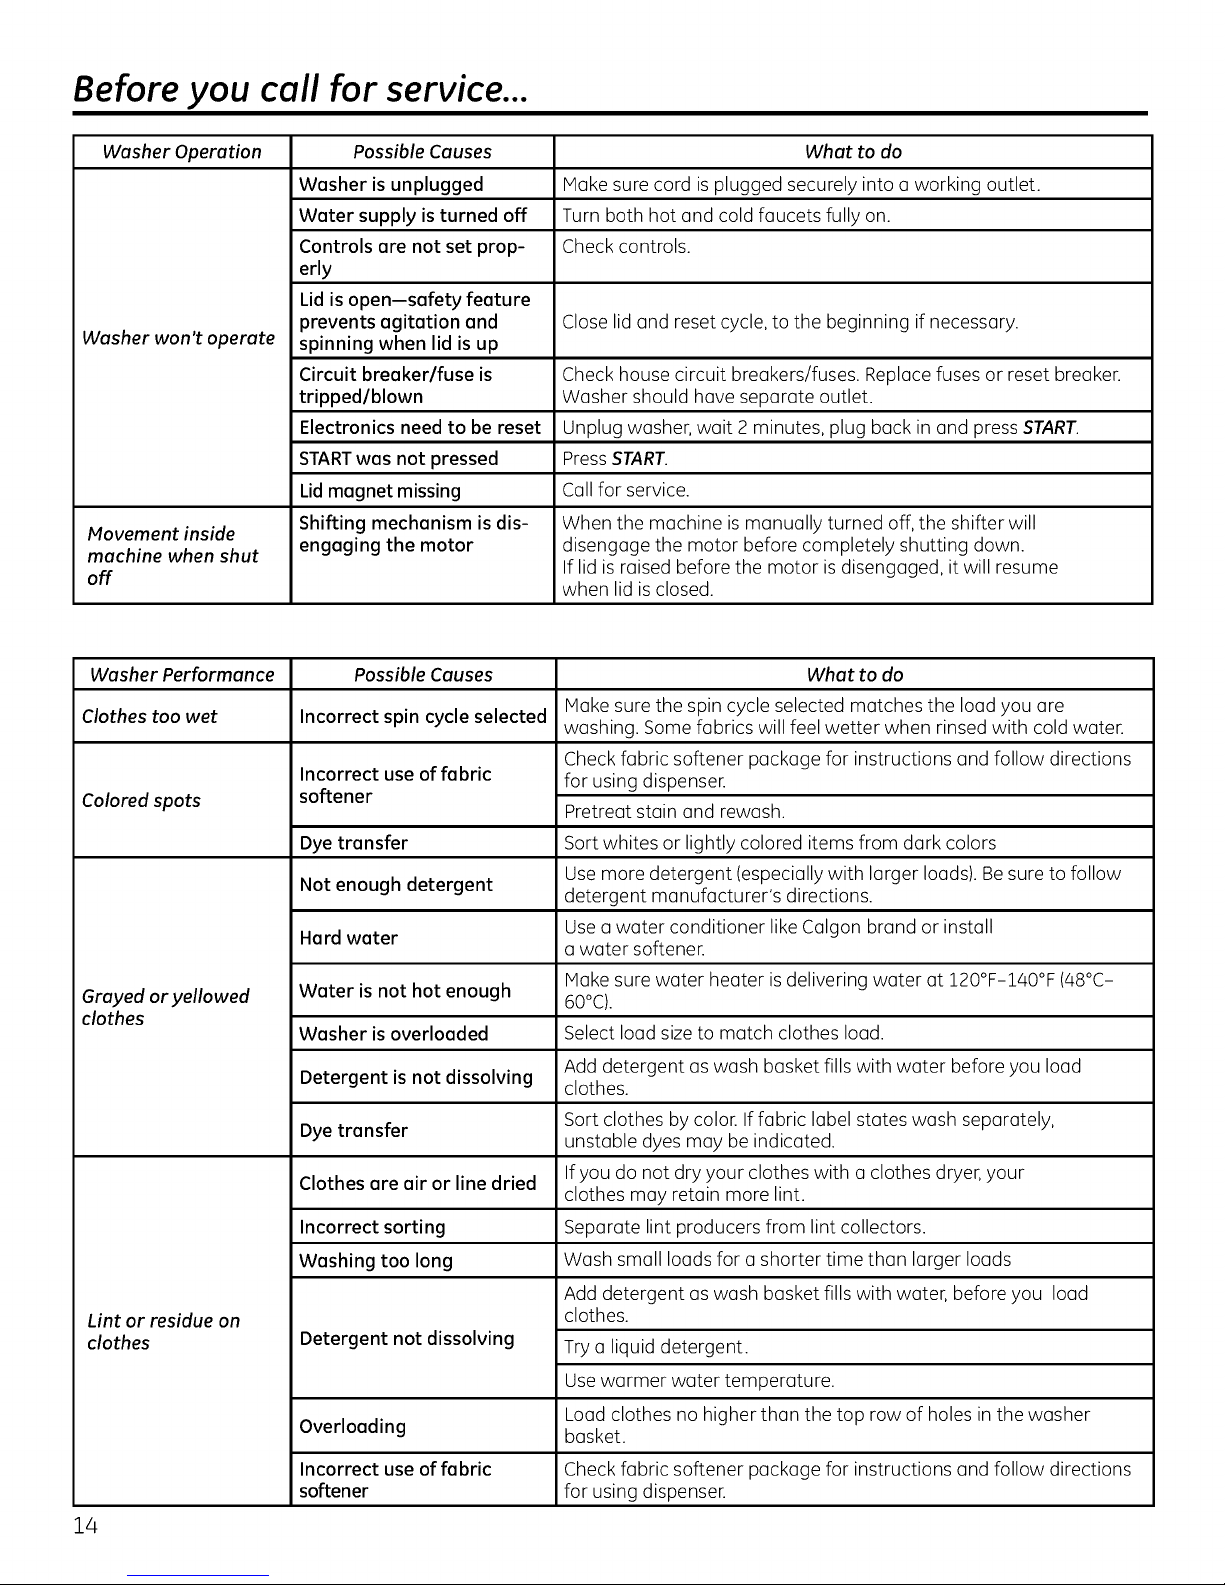
Washer Operation Possible Causes What to do
Washer is unplugged Make sure cord is plugged securely into a working outlet.
Water supply is turned off Turn both hot and cold faucets fully on.
Controls are not set prop- Check controls.
erly
Lid is open--safety feature
prevents agitation and Close lid and reset cycle,to the beginning if necessary.
Washer won't operate spinning when lid is up
Circuit breaker/fuse is Check house circuit breakers/fuses. Replace fuses or reset breaker.
tripped/blown Washer should have separate outlet.
Electronics need to be reset Unplug washer, wait 2 minutes, plug back in and press START.
STARTwas not pressed PressSTART.
Lid magnet missing Callfor service.
Movement inside Shifting mechanism is dis- When the machine is manually turned off, the shifter will
machine when shut engaging the motor disengage the motor before completely shutting down.
off when lid isclosed.
If lid is raised before the motor is disengaged, it will resume
Washer Performance Possible Causes
Clothes too wet Incorrect spin cycle selected
Incorrect use of fabric
Colored spots
Grayed oryellowed Water is not hot enough
clothes
Lint or residue on
clothes
14
softener
Dyetransfer
Not enough detergent
Herd water
Washer is overloaded
Detergent is not dissolving
Dye transfer
Clothes are air or line dried
Incorrect sorting
Washing too long
Detergent not dissolving
Overloading
Incorrect use of fabric
softener
What to do
Make sure the spin cycle selected matches the load you are
washing. Some fabrics will feel wetter when rinsed with cold water.
Check fabric softener package for instructions and follow directions
for using dispenser.
Pretreot stain and rewosh.
Sort whites or lightly colored items from dark colors
Use more detergent (especially with larger loads). Besure to follow
detergent manufacturer's directions.
Use o water conditioner like Colgon brand or install
o water softener.
Make sure water heater is delivering water at 120°F-140°F (48°C-
60°C).
Select load size to match clothes load.
Add detergent as wash basket fills with water before you load
clothes.
Sort clothes by color. If fabric label states wash separately,
unstable dyes may be indicated.
If you do not dry your clothes with a clothes dryer, your
clothes may retain more lint.
Separate lint producers from lint collectors.
Wash small loads for a shorter time than larger loads
Add detergent as wash basket fills with water, before you load
clothes.
Try a liquid detergent.
Use warmer water temperature.
Load clothes no higher than the top row of holes in the washer
basket.
Check fabric softener package for instructions and follow directions
for using dispenser.
Before you coil for service... GEA o ce .co
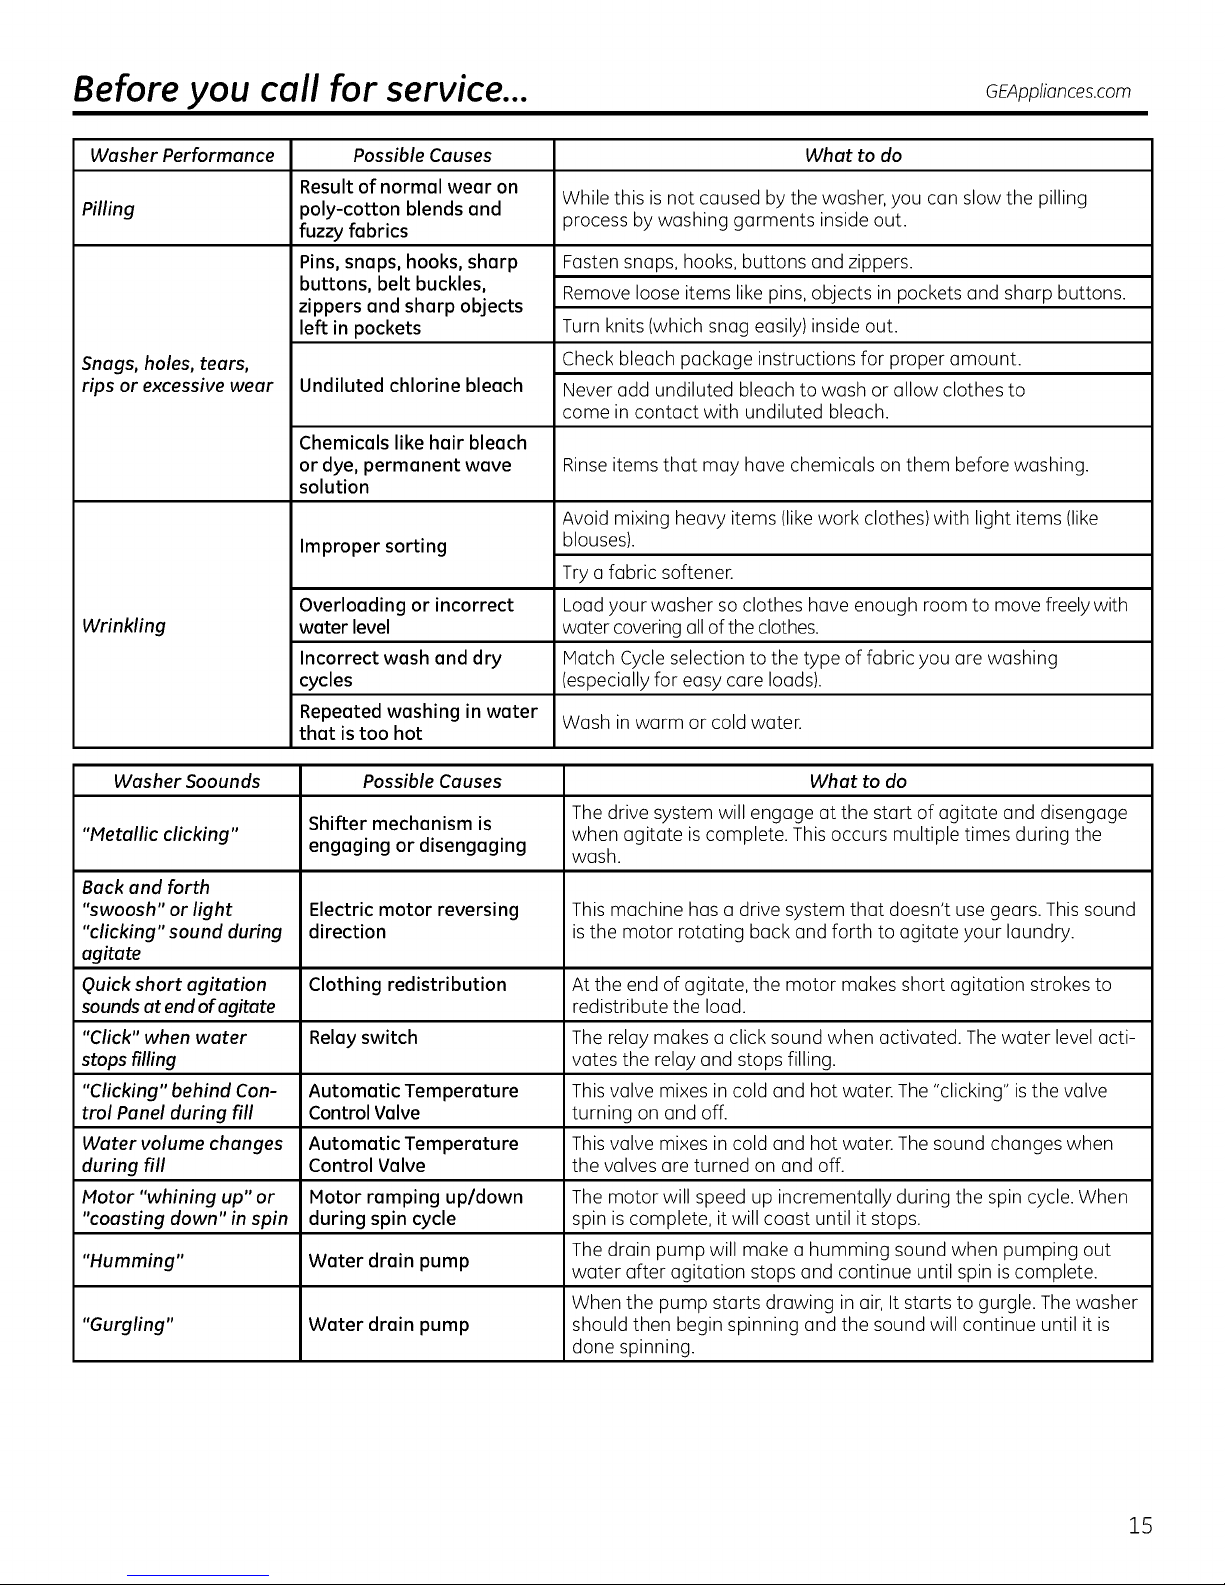
Washer Performance Possible Causes What to do
Result of normal wear on
Pilling poly-cotton blends and
fuzzy fabrics process by washing garments inside out.
Pins, snaps, hooks, sharp
buttons, belt buckles,
zippers and sharp obJects
left in pockets
Snags, holes, tears,
rips or excessive wear
Wrinkling water level water covering all ofthe clothes.
Undiluted chlorine bleach
Chemicals like hair bleach
or dye, permanent wave
solution
Improper sorting
Overloading or incorrect Load your washer so clothes have enough room to move freelywith
Incorrect wash and dry Hatch Cycle selection to the type of fabric you are washing
cycles (especially for easy care loads).
Repeated washing in water
that is too hot
While this is not caused by the washer, you can slow the pilling
Fasten snaps, hooks, buttons and zippers.
Remove loose items like pins, objects in pockets and sharp buttons.
Turn knits (which snag easily)inside out.
Check bleach package instructions for proper amount.
Never add undiluted bleach to wash or allow clothes to
come in contact with undiluted bleach.
Rinse items that may have chemicals on them before washing.
Avoid mixing heavy items (likework clothes) with light items (like
blouses).
Try a fabric softener.
Wash in warm or cold water.
Washer Soounds Possible Causes What to do
The drive system will engage at the start of agitate and disengage
"Metallic clicking" engaging or disengaging wash.
Back and forth
"swoosh" or light Electric motor reversing This machine has a drive system that doesn't use gears. This sound
"clicking" sound during direction isthe motor rotating back and forth to agitate your laundry.
agitate
Quick short agitation Clothing redistribution At the end of agitate, the motor makes short agitation strokes to
sounds at end ofagitate redistribute the load.
"Click" when water Relay switch The relay makes a click sound when activated. The water level acti-
stops filling vates the relay and stops filling.
"Clicking" behind Con- Automatic Temperature This valve mixes in cold and hot water. The "clicking" isthe valve
trol Panel during fill Control Valve turning on and off.
Water volume changes Automatic Temperature This valve mixes in cold and hot water. The sound changes when
during fill Control Valve the valves are turned on and off.
Motor "whining up" or Motor ramping up/down The motor will speed up incrementally during the spin cycle. When
"coasting down" in spin during spin cycle spin is complete, it will coast until it stops.
"Humming" Water drain pump The drain pump will make a humming sound when pumping out
"Gurgling" Water drain pump should then begin spinning and the sound will continue until it is
Shifter mechanism is when agitate is complete. This occurs multiple times during the
water after agitation stops and continue until spin is complete.
When the pump starts drawing in air, It starts to gurgle. Thewasher
done spinning.
15
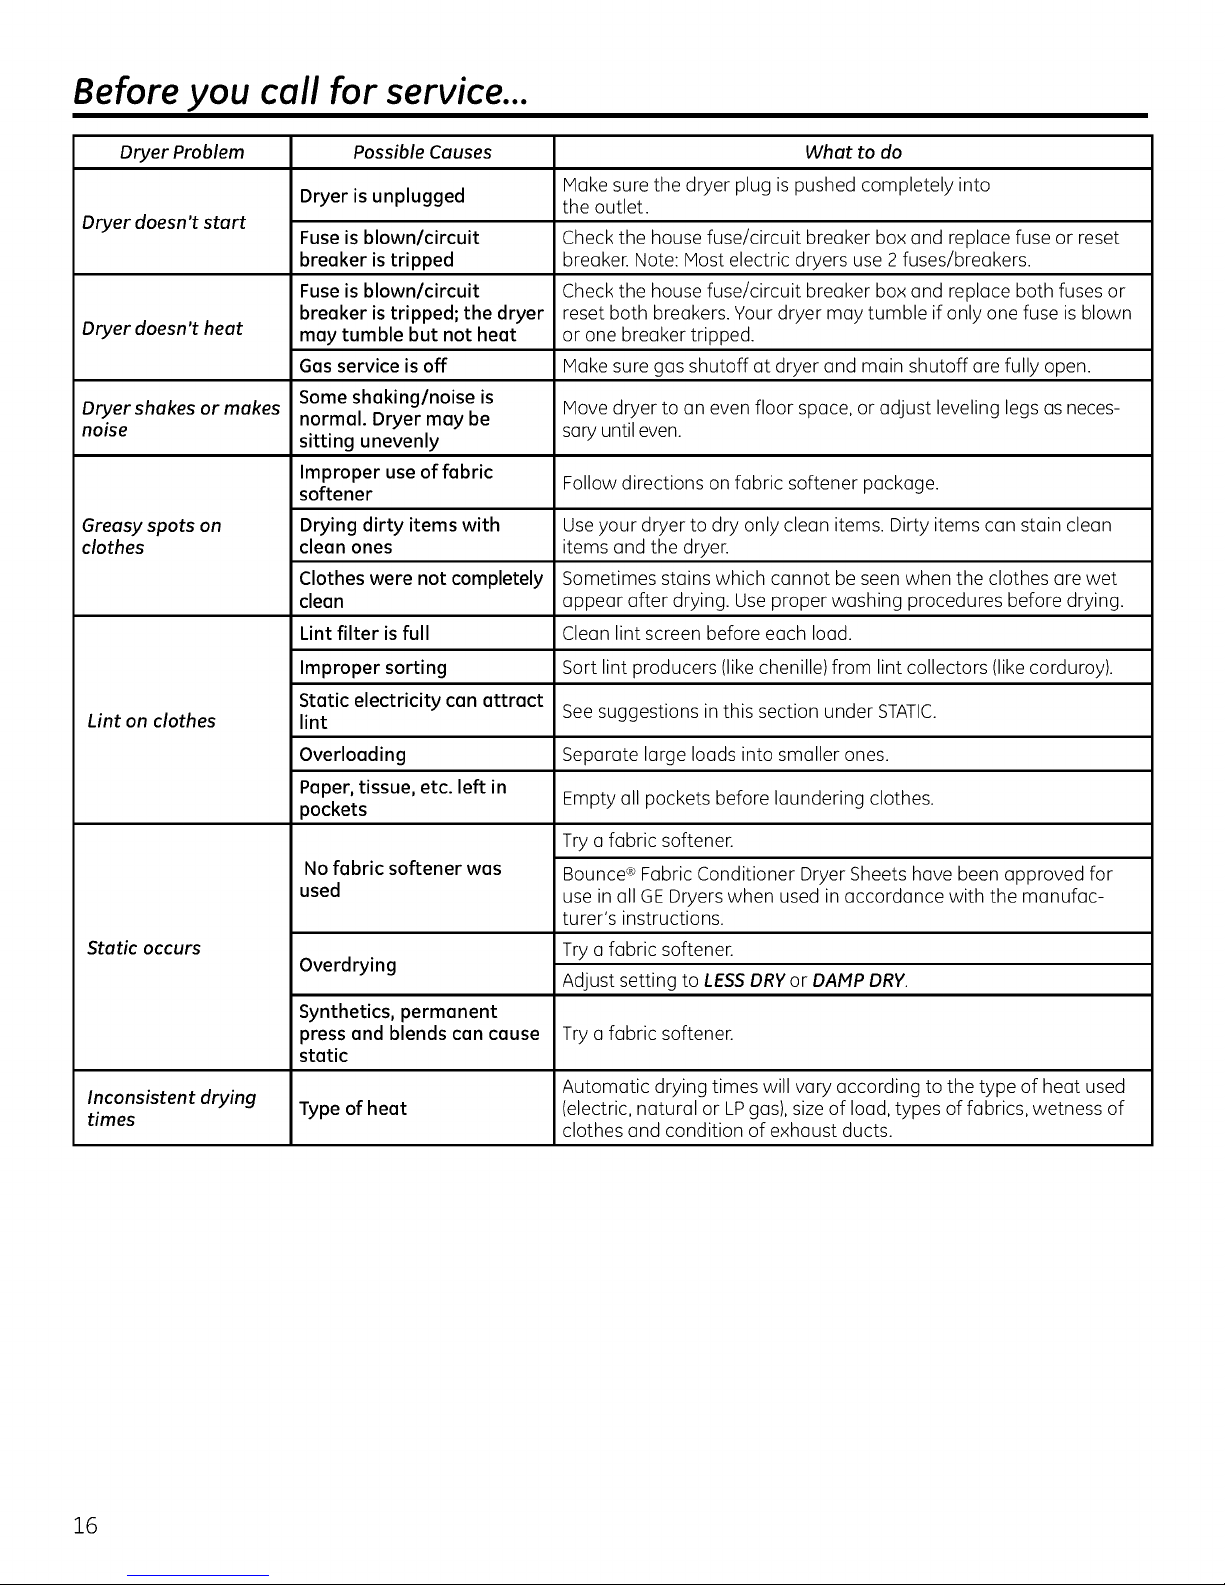
Before you coil for service...
Dryer Problem Possible Causes
Dryer is unplugged
Dryer doesn't start
Dryer doesn't heat
Dryer shakes or makes normal. Dryer may be
noise
Greasy spots on Drying dirty items with
clothes clean ones
Lint on clothes lint
Static occurs
Inconsistent drying
times
Fuse is blown/circuit
breaker is tripped
Fuse is blown/circuit
breaker is tripped; the dryer
may tumble but not heat
Gas service is off
Some shaking/noise is
sitting unevenly
Improper use of fabric
softener
Clothes were not completely
clean
Lint filter is full
Improper sorting
Static electricity can attract
Overloading
Paper, tissue, etc. left in
pockets
No fabric softener was
used
Overdrying
Synthetics, permanent
press and blends can cause
static
Type of heat
What to do
Hake sure the dryer plug is pushed completely into
the outlet.
Check the house fuse/circuit breaker box and replace fuse or reset
breaker. Note: Host electric dryers use 2 fuses/breakers.
Check the house fuse/circuit breaker box and replace both fuses or
reset both breakers. Your dryer may tumble if only one fuse is blown
or one breaker tripped.
Hake sure gas shutoff at dryer and main shutoff are fully open.
Hove dryer to an even floor space, or adjust leveling legs as neces-
sary until even.
Follow directions on fabric softener package.
Use your dryer to dry only clean items. Dirty items can stain clean
items and the dryer.
Sometimes stains which cannot be seen when the clothes are wet
appear after drying. Use proper washing procedures before drying.
Clean lint screen before each load.
Sort lint producers (like chenille) from lint collectors (like corduroy).
See suggestions in this section under STATIC.
Separate large loads into smaller ones.
Empty all pockets before laundering clothes.
Try a fabric softener.
Bounce<_ Fabric Conditioner Dryer Sheets have been approved for
use in all GEDryers when used in accordance with the manufac-
turer's instructions.
Try a fabric softener.
Adjust setting to LESSDRYor DAMP DRY.
Trya fabric softener.
Automatic drying times will vary according to the type of heat used
(electric, natural or LPgas), size of load, types of fabrics, wetness of
clothes and condition of exhaust ducts.
16

Before you
coilfor service... GEA o ce .co
Dryer Problem
Clothes toke too long
to dry
Clothes ore wrinkled
Clothes shrink
Possible Causes Whet to do
Seporote heovy items from lightweight items (generolly, o well-
Improper sorting sorted wosher Iood is o well-sorted dryer Iood).
Large, heovy fobrics contoin more moisture ond toke longer to dry.
Large loads of heavy fabrics Seporote Iorge, heovy fobrics into smoller Ioods to speed drying
(like beach towels} time.
Controls improperly set Motch control settings to the Iood you ore drying.
Lint filter is full Cleon lint filter before every Iood.
Check instollotion instructions for proper ducting/venting.
Improper or obstructed
ducting
Blown fuses or tripped cir-
cuit breaker
Overloading/combining
Ioods Do not put more thon one wosher Iood in the dryer ot o time.
Underloeding
Overdrying
Letting items sit in dryer
ofter cycle ends Remove items when cycle ends ond fold or hong immediotely.
Overloading
Some fabrics will noturolly
shrink when washed. Oth-
ers can be safely washed,
but will shrink in the dryer
Hake sure ducting is cleon, free of kinks and unobstructed.
Check to see if outside woll domper operotes eosily.
Check the Instollotion Instructions to moke sure the dryer venting is
correct.
Reploce fuses or reset circuit breokers. Since most dryers
use 2 fuses/breokers, moke sure both ore operoting.
If you ore drying only one or two items, odd o few items
to ensure proper tumbling.
Select o shorter drying time.
Remove items while they still hold o slight omount of
moisture. Select o LESSDRYor DAMP DRYsetting.
Seporote Iorge Ioods into smoller ones.
Toovoid shrinkoge, follow gorment core Iobels exoctly.
Some items moy bepressed bock into shope ofter drying
If you ore concerned obout shrinkoge in o porticulor
item, do not mochine wosh or tumble dry it.
17

Notes.
18
 Loading...