

GE GTT18CBDERWW, GTT18CBDERCC, GTT16DBEMRWW, GTT16DBEMRCC Owner’s Manual
(D
N
(D
(D
L¢..
I
_
0
GEAppliances.com
Safety Information
Safety Precautions ................. 2
Extension Cords .................... 2
Adapter Plugs ...................... 3
Connecting Electricity .............. 3
Operating Instructions
Temperature Controls ............... 4
Shelves ........................... 5, 6
Storage Drawers .................. 6, 7
Automatic Icemuker ................. 7
Care and Cleaning ................. 8
Installation Instructions
Preparing to Install
the Refrigerator .................... 9
Water Line Installation ........ 10-13
Reversing the Door Swing ..... 1/4-17
Models
16, 17, 18
0
Troubleshooting Tips
Normal Operating Sounds .......... 18
Before You Call for Service ...... 19, 20
Write the model and serial numbers
here:
Model #
Serial #
You can find them on (l label on the upper
left side of the fresh food compartment.
.÷_' Printed in the United States
_ Printed on Recycled Paper
EXPORT 19108622,0003 /49-60657-3 08-_!_3 GE
IMPORTANT SAFETY INFORMATION.
READ ALL INSTRUCTIONS BEFORE USING.
WARNING!
Use this appliance only for its intended purpose as described in this Owner's Manual.
SAFETY PRECAUTIONS
When using electrical appliances, basic safety precautions should be followed, including the following:
This refrigerator must be properly installed and
located in accordance with the Installation
Instructions before it is used. Also see the How To
Connect Electricity section.
Donot allow children to climb, stand or hang on
the shelves in the refrigerator. They could damage
the refrigerator and seriously injure themselves.
Donot touch the cold surfaces in the freezer
compartment when hands are damp or wet. Skin
may stick to these extremely cold surfaces.
Donot store or use gasoline or other flammable
vapors and liquids in the vicinity of this or any other
appliance.
Keep fingers out of the "pinch point" areas;
clearances between the doors and between the
doors and cabinet are necessarily small. Be careful
closing doors when children are inthe area.
Inrefrigerators with automatic icemakers, avoid
contact with the moving parts of the ejector
mechanism, or with the heating element (located on
the bottom of the icemaker) that releases the cubes.
Do not place fingers or hands on the automatic
icemaking mechanism while the refrigerator is
plugged in.
Unplug the refrigerator before cleaning and making
repairs.
NOTE:Westrongly recommend that any servicing
be performed by a qualified individual.
Before replacing a burned-out light bulb, the
refrigerator should be unplugged in order to avoid
contact with a live wire filament. (A burned-out
light bulb may break when being replaced.)
Turning the control to the OFFposition does not
remove power to the light circuit.
Do not refreeze frozen foods which have thawed
completely.
DANGER! RISK OF CHILD ENTRAPMENT
PROPER DISPOSAL OF THE REFRIGERATOR
Child entrapment and suffocation are not problems
of the past. Junked or abandoned refrigerators are
still dangerous_even if they will sitfor "just a few
days." Ifyou are getting rid of your old refrigerator,
please follow the instructions below to help prevent
accidents.
Before You Throw Away Your Old
Refrigerator or Freezer:
Take off the doors and discard separately.
Leavethe shelves in place so that children may not
easily climb inside.
If the refrigerator has a lock make it unusable.
Refrigerants
All refrigeration products contain refrigerants, which
under federal law must be removed prior to product
disposal. Ifyou are getting rid of on old refrigeration
product, checkwith the company handling the disposal
about what to do.
USE OF EXTENSION CORDS
Because of potential safety hazards under certain conditions, we strongly recommend against the
of an extension cord.
However, if you must use an extension cord, it is absolutely necessary that it be a UL-listed, 3-wire grounding
type appliance extension cord having a grounding type plug and outlet and that the electrical rating of the cord
be 15 amperes (minimum) and 120volts.
IMPORTANT SAFETY INFORMATION.
READ ALL INSTRUCTIONS BEFORE USING.
WARNING!
HOW TO CONNECT ELECTRICITY
Do not, under any circumstances, cut or remove the third (ground) prong from the power cord.
For personal safety, this appliance must be properly grounded.
The power cord of this appliance is equipped with
(] 3-prong (grounding) plug which mates with (]
standard 3-prong (grounding) wall outlet to minimize
the possibility of electric shock h(]zurd from this
(]ppli(]nce.
Have the wall outlet and circuit checked by a
qualified electrician to m(]ke sure the outlet is
properly grounded.
Where (]n ungrounded
2-prong w(]ll outlet is
encountered, it is your
person(]l responsibility
(]nd oblig(]tion to h(]ve it
repl(]ced with (] properly
grounded 3-prong w(]ll
outlet.
The refriger(]tor should (]lw(]ys be
plugged into its own individu(]l electric(]l outlet. This
provides the best perform(]nce (]nd (]lso prevents
overlo(]ding house wiring circuits which could c(]use
(] fire h(]z(]rd from overhe(]ted wires. Ple(]se refer to
the r(]ting pl(]te on the refriger(]tor for the correct
volt(]ge, w(]tt(]ge (]nd frequency. If the product plug
does not fit your outlet, the product should be fitted
with (] new plug.
11/7 Insureproper
/,/,jJ ?round exists
beforeusing.
IMPORTANT:Therefitting of electric plugs and cables
should bedone by a qualified technician or service
agent. In some countries the refitting of electric
plugs and cables is only permitted when the work is
completed by a qualified technician.
If the power supply cord becomes damaged, it must
be replaced by a qualified service (]gent in order to
(]void (] s(]fety h(]z(]rd.
Never unplug your refriger(]tor by pulling on the
power cord. AIw(]ys grip plug firmly (]nd pull str(]ight
out from the outlet.
Rep(]ir or repl(]ce immedi(]tely (]11power cords th(]t
h(]ve become fr(]yed or otherwise d(]m(]ged. Do not
use (] cord th(]t shows cr(]cks or (]br(]sion d(]m(]ge
(]long its length or (]t either end.
When moving the refriger(]tor (]w(]y from the w(]ll, be
c(]reful not to roll over or d(]m(]ge the power cord.
Mains Lead Replacement
If the m(]ins le(]d on your refriger(]tor needs
repl(]cing (]t (]ny time, it must be repl(]ced by (]
speci(]l le(]d which is obt(]in(]ble from your Ioc(]l
de(]ler. A ch(]rge will be m(]de for the repl(]cement of
the m(]ins le(]d if you h(]ve d(]m(]ged the le(]d.
GEAppliances.com
USE OF ADAPTER PLUGS
Because of potential safety hazards under certain conditions, we strongly recommend against the
use of an adapter plug.
However, if you must use (]n (]d(]pter, where Ioc(]l
codes permit, (] temporary connection m(]y be m(]de
to (] properly grounded 2-prong w(]ll outlet by use of
(] UL-listed (]d(]pter (]v(]il(]ble(]t most Ioc(]lh(]rdw(]re
stores.
The I(]rger slot in the (]d(]pter must be (]ligned with the
I(]rger slot in the w(]ll outlet to provide proper pol(]rity
in the connection of the power cord.
When disconnecting the power cord from the
(]d(]pter, (]lw(]ys hold the (]d(]pter in pl(]ce with one
h(]nd while pulling the power cord plug with the
other h(]nd. If this is not done, the (]d(]pter ground
termin(]l isvery likely to bre(]k with repe(]ted use.
If the (]d(]pter ground termin(]l bre(]ks, DO NOT
USEthe refriger(]tor until (] proper ground h(]s been
est(]blished.
Attaching the adopter ground terminal to o wall
outlet cover screw does not ground the appliance
unless the cover screw is metal, and not insulated,
and the wall outlet is grounded through the house
wiring. You should hove the circuit checked by
o qualified electrician to make sure the outlet is
properly grounded.
READ AND FOLLOW THIS SAFETYINFORMATION CAREFULLY.
SAVE THESEINSTRUCTIONS
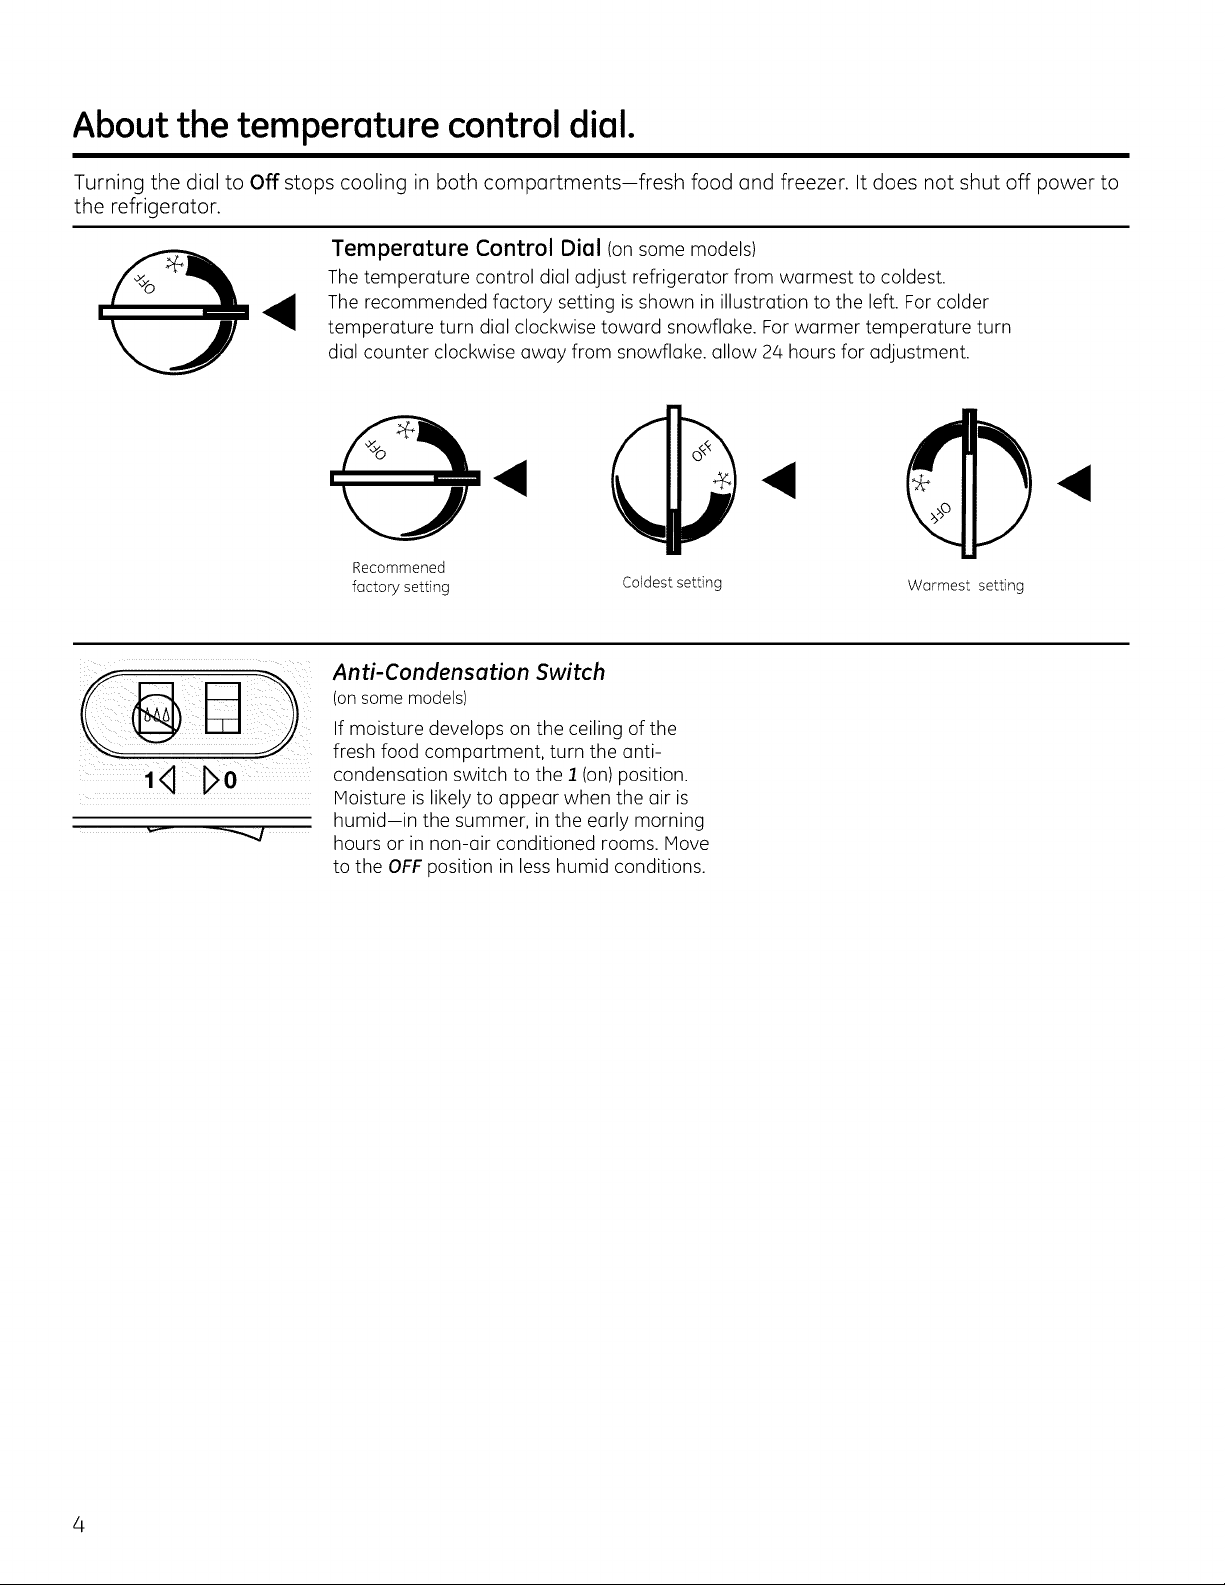
About the temperature control dial.
Turning the dial to Off stops cooling in both compartments-fresh food and freezer. It does not shut off power to
the refrigerator.
Temperature Control Dicll (on some models)
The temperature control dial adjust refrigerator from warmest to coldest.
The recommended factory setting is shown in illustration to the left. For colder
temperature turn dial clockwise toward snowflake. Forwarmer temperature turn
dial counter clockwise (]way from snowflake, allow 24 hours for adjustment
Recommened
factory setting Coldest setting Warmest setting
Anti-Condensation Switch
(on some models)
If moisture develops on the ceiling of the
fresh food compartment, turn the anti-
condensation switch to the 1 (on)position.
Moisture is likely to appear when the air is
humid-in the summer, in the eorly morning
hours or in non-air conditioned rooms. Move
to the OFFposition in less humid conditions.
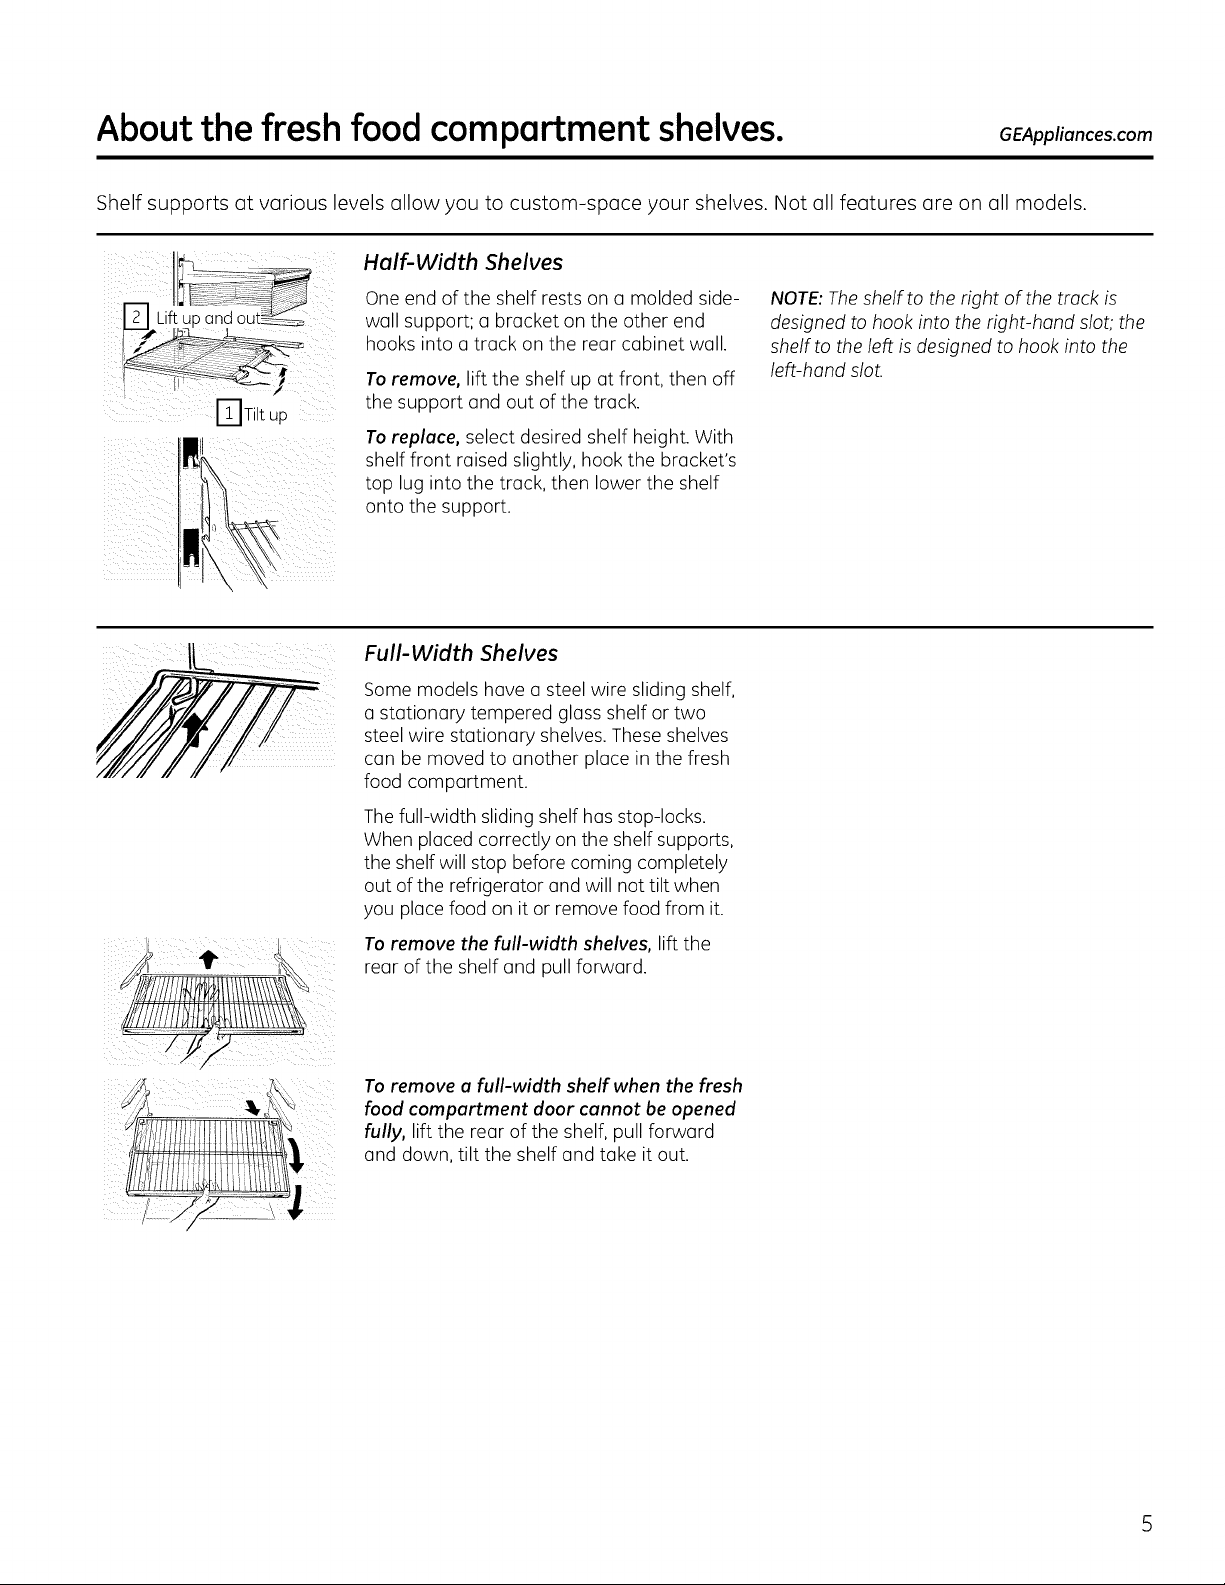
About the fresh food compartment shelves. GEAppliancescom
Shelf supports (it v(]rious levels (]llow you to custom-sp(]ce your shelves. Not (]11fe(]tures (]re on (]11models.
Half-Width Shelves
ITITilt up
One end of the shelf rests on (] molded side-
wall support; (] bracket on the other end
hooks into (]track on the rear cabinet wall.
Toremove, lift the shelf up (it front, then off
the support and out of the track.
Toreplace, select desired shelf height. With
shelf front raised slightly, hook the bracket's
top lug into the track, then lower the shelf
onto the support.
Full-Width Shelves
Some models have (] steel wire sliding shelf,
(] stationary tempered glass shelf or two
steel wire stationary shelves.These shelves
can be moved to another place in the fresh
food compartment.
The full-width sliding shelf has stop-locks.
When placed correctly on the shelf supports,
the shelfwill stop before coming completely
out of the refrigerator and will not tilt when
you place food on it or remove food from it.
To remove the full-width shelves, lift the
rear of the shelf and pull forward.
NOTE:The shelf to the right of the trock is
designed to hook into the right-bond slot; the
shelf to the left is designed to hook into the
left-hond slot.
To remove a full-width shelf when the flesh
food compartment door cannot be opened
fully, lift the rear of the shelf, pull forward
and down, tilt the shelf and take it out.
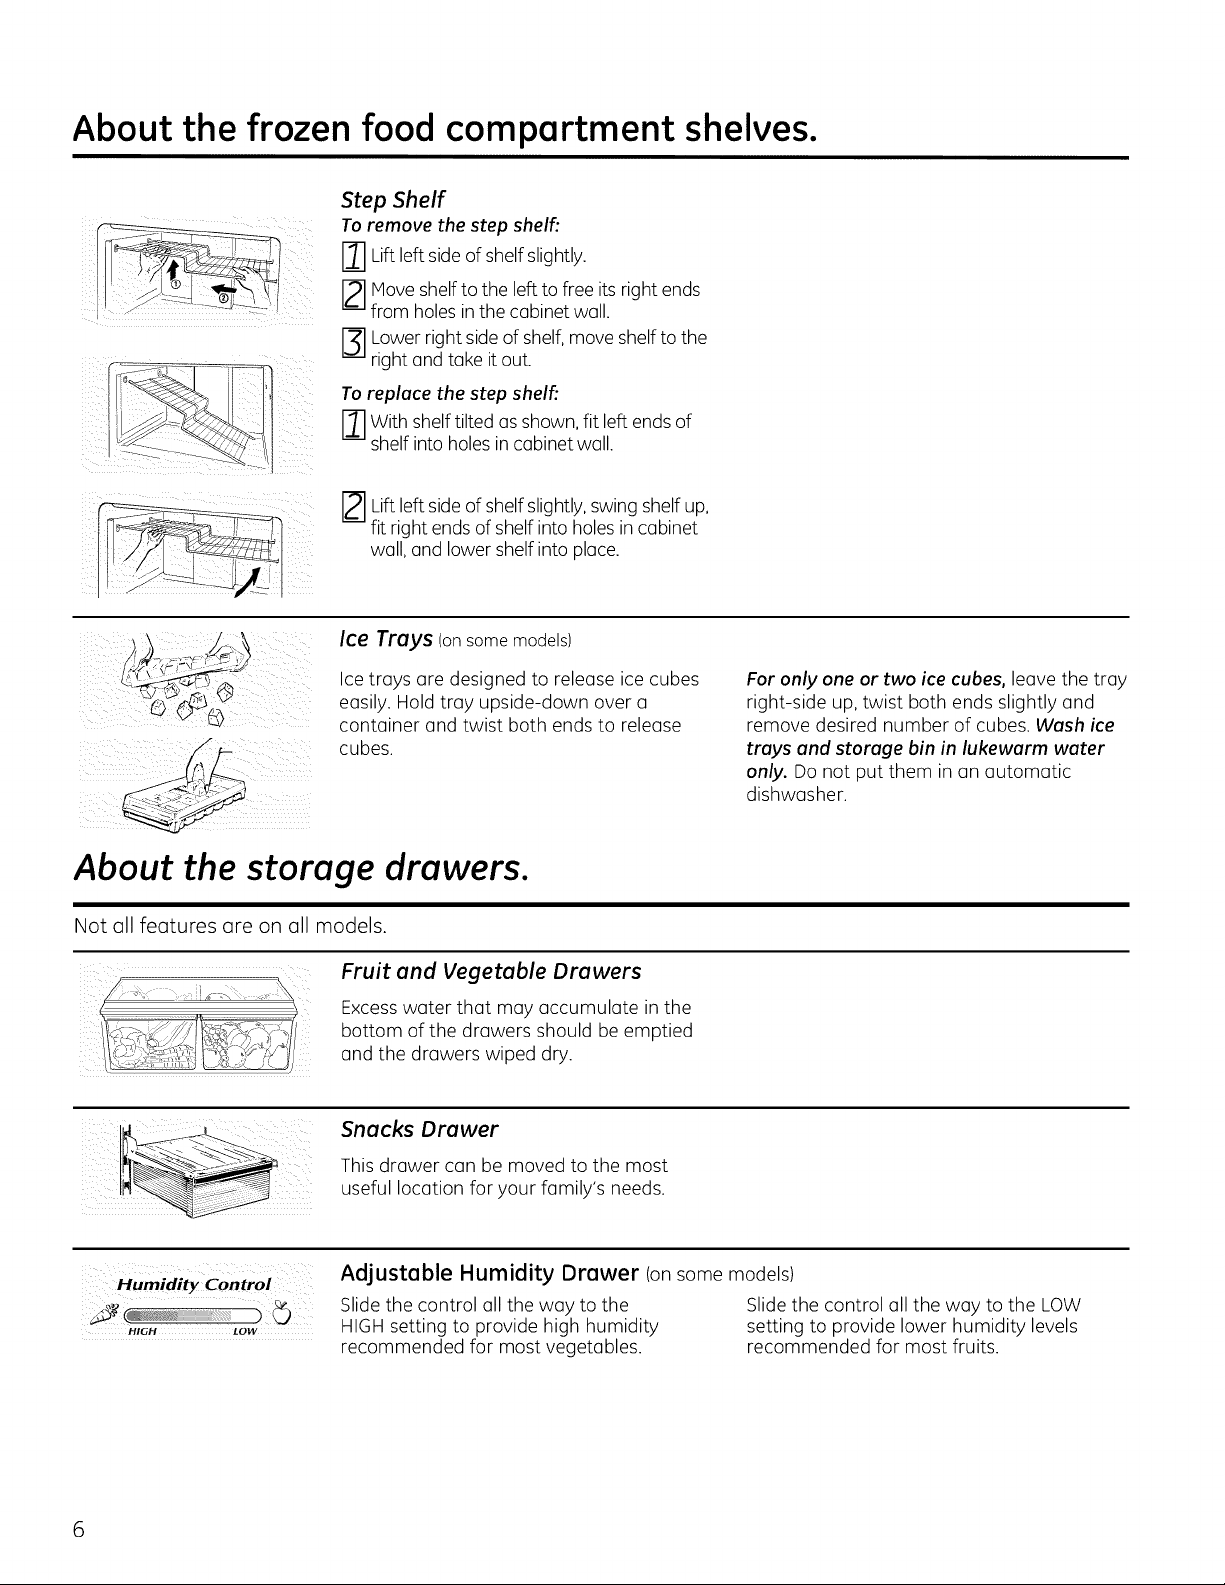
About the frozen food compartment shelves.
Step Shelf
To remove the step shelf:
r_] Liftleft sideof shelf slightly.
Moveshelf to the left to free its right ends
from holes in the cabinet wall.
Lowerright sideof shelf,move shelf to the
right and take itout.
To replace the step shelf:
r_] With shelf tilted asshown, fit left endsof
shelf into holes in cabinet wall.
E Liftleft sideof shelf shelf
fit right ends of shelf into holesin cabinet
wall, and lower shelf into place.
Ice Trays (onsomemodels)
Ice trays are designed to release ice cubes
easily. Hold tray upside-down over a
container and twist both ends to release
cubes.
About the storage drawers.
Not (]11fe(]tures (]re on (]11models.
Fruit and Vegetable Drawers
Excesswater that may accumulate inthe
bottom of the drawers should be emptied
and the drawers wiped dry.
slightly, swing
up,
For only one or two ice cubes, leave the tray
right-side up, twist both ends slightly and
remove desired number of cubes. Wash ice
trays and storage bin in lukewarm water
only. Do not put them in an automatic
dishwasher.
Humi'dit)
Snacks Drawer
This drawer can be moved to the most
useful location for your family's needs.
Adjustable Humidity Drawer (on some models)
Slide the control all the way to the
HIGH setting to provide high humidity
recommended for most vegetables.
Slide the control all the way to the LOW
setting to provide lower humidity levels
recommended for most fruits.
 Loading...