

GE GTT18BBSARWW, GTT17BBSERCC, GTT18HBSBRWW, GTT16BBSERWW, GTT17HBSARCC Owner's Manual And Installation Instructions
...Page 1
Top-Freezer
Refrigerators
Safety Information
Adapter Plugs ................. 3
Connecting Electricity .......... 3
Extension Cords ............... 2
Safety Precautions ............. 2
Operating Instructions
Automatic Icemaker ............ 8
Care and Cleaning .......... 9, 10
Shelves ..................... 5, 6
Storage Drawers .............. 6, 7
Temperature Controls ........... 4
Installation Instructions
Preparing to Install
the Rel_rigerator .............. 11
Reve_sing the Door Swing ... 15-21
Water Line Installation ...... 12-15
Troubleshooting Tips
Belbre You Call for Service . . .22-24
Normal Operating Sounds ...... 22
Write the model and serial numbers here:
Model #
Serial #
You can find them on a label on the upper
left side of tile fi'esh food compartment.
f_, Printedin theUnitedStates EXPORT 162D7737PO06 49-60251 02-03 JR
_-_<_"._;,,PrintedonRecycledPoper
Page 2
IMPORTANTSAFETYINFORMATION.
READALLINSTRUCTIONSBEFOREUSING.
A WARNING!
Use this appliance only for its intended purpose as described in this Owner's Manual
SAFETYPRECAUflONS
When using electrical appliances, basic safety precautions should be followed, including the following:
NThis reDigerator must be properly installed
and located in accordance with tile Ins 'tallation
Instructions before it is used. Also see the
How ToConnect Electricity section.
/;;;Do not attempt to stand on top of the refrigerator:
Doing so may result in bodily injury or damage
to the refrigerator.
g_Do not allow children to climb, stand or hang
on the shelves in the refl'igeraton They could
damage tile refl'igerator and seriously injure
themselves.
NDo not allow children to play with the refrigerator
or tamper with the controls.
g_Do not touch tile cold surfaces in tile fl'eezer
compartment when hands are damp or wet.
Skin may stick to these extremely cold surfaces.
@Do not store or use gasoline or other flammable
vapors and liquids in the xdcinity of this or any
other appliance.
g_Keep fingers out of the "pinch point" areas;
clearances between tile doors and between
tile doors and cabinet are necessarily small.
Be careful closing doors when children are
in the area.
NIn refrigerators with automatic icemakers, avoid
contact with tile moving parts of tile ejector
mechanism, or with tile heating element that
releases the cubes. Do not place fingers or hands
on the automatic icemaking mechanism while the
refrigerator is plugged in.
g_Unplug the refl'igerator before cleaning and
making repairs.
NOTE:Westronglyrecommendthat anyservicingbe
performedby a quafifiedindividual
N Before replacinga burned-outlight bulb,the
refrigeratorshouldbe unpluggedin order to avoid
contact with a live wire filament. (A burned-out
light bulb may break when being replaced.)
NOTE:Turningthe controlto the0positiondoesnot remove
powerto thelightcircuit.
_Do not refl'eeze fl'ozen toods which have thawed
completely.
2
A DANGER!RISKOFCHILDENTRAPMENT
PROPERDISPOSALOFTHEREFRIGERATOR
Child entrapment and suffocation are not problems
of the past..Junked or abandoned refrigerators are
still dangerous...even if they will sit tot '_ust a few
days." If you are getting rid of your old refrigerator;
please follow the instructions below to help prevent
accidents.
Before You Throw Away YourOld Refrigerator
or Freezer:
5;;;_Pake off the doors and discard separately.
%Leave the shelves in place so that children may
not easily climb inside.
% If the refl'igerator has a lock make it unusable.
Refrigerants
_MIrefrigeration products contain refrigerants, which
under federal lawmust be removed prior to product
disposal. Kyou are getting rid of an old refrigeration
product, check with the company handling tile disposal
about what to do.
USEOFEXTENSIONCORDS
Because of potential safety hazards under certain conditions, we strongly recommend against the use of
an extension cord.
Howevm; if you must use an extension cord, it is absolutely necessary that it be a UL-listed, 3-wire grounding
type appliance extension cord having a grounding type plug and outlet and that the electrical rating of the
cord be 15 amperes (minimum) and 190 volts.
Page 3
A WARNING!
HOWTOCONNECTELECTRICITY
Do not, under any circumstances, cut or remove the third (ground) prong from the power cord.
For personal safety, this appliance must be properly grounded.
The power cord of this appliance is equipped Mth
a 3-prong (grounding) plug which mates with a
standard g-prong (grounding) wall outlet m
minimize the possibility of electric shock hazard
from this appliance.
Have the wall outlet and circuit checked by a
qualified electrician to make sure the outlet is
properly grounded.
Where an ungrounded ,a-all outlet is encountered,
it is your personal responsibility and obligation
to have it replaced with a properly grounded
3-prong wall outlet.
The refrigerator should
al,a-ays be plugged into
its own individual
electrical outlet. This
provides the best
performance and also
prevents overloading
house wiring circuits
which could cause a fire hazard from overheated
wires. Please refer to the rating plate on the
refrigerator fbr the correct voltage, wattage and
frequency. If the product plug does not fit your
outlet, the product should be fitted with a new plug.
IMPORTANT:Therefitting of electricplugsandcablesshould
bedonebya quafifiedtechnicianor serviceagent.Insome
countriestherefittingofelectricplugsandcablesis only
permittedwhentheworkis completedbya qualified
technician.
If the power supply cord becomes damaged, it must
be replaced by a qualified service agent in order to
avoid a safety hazard.
Never unplug your refrigerator by pulling on the
power cord. Al,a-ays grip plug firmly and pull straight
out from the outlet.
Repair or replace immediately all power cords that
have become frayed or otherwise damaged. Do not
use a cord that shows cracks or abrasion damage
along its length or at either end.
When moving the refrigerator a,a-ayfrom the wall,
be careful not to roll over or damage the power cord.
Mains Lead Replacement
If the mains lead on your refrigerator needs
replacing at any time, it must be replaced by a
special lead which is obtainable from your local
dealen A charge will be made for the replacement
of the mains lead if you have damaged the lead.
USEOFADAPTERPLUGS
Because of potential safety hazards under certain conditions, we strongly recommend against the use of
an adapter plug.
Howevm; if you must use an adapter, where local
codes permit, a temporary¢omlection may be made
to a properly grounded 2-prong wall oudet by use
of a UL-listed adapter available at most local
hardv,-are stores.
The larger slot in the adapter must be aligned with
the larger slot in the wall outlet to provide proper
polarity in the connection of the power cord.
When disconnecting the power cord from the
adaptm; always hold the adapter in place with one
hand while pulling the power cord plug with the
other hand. If this is not done, the adapter ground
terminal is very likely to break with repeated use.
If the adapter ground terminal breaks, DO NOTUSE
the refrigerator until a proper ground has been
established.
Attachingthe adaptorgroundterminaltoa waftoutletcover
screwdoesnotgroundtheapplianceunlessthe coverscrew
ismetal,andnot insulated,andthewaftoutletis grounded
throughthehousewiring.Youshouldhavethe circuit checked
bya quafifiedelectriciantomakesurethe outlet isproperly
grounded.
READANDFOLLOWTHISSAFETYINFORMATIONCAREFULLY.
SAVETHESEINSTRUCTIONS
3
Page 4
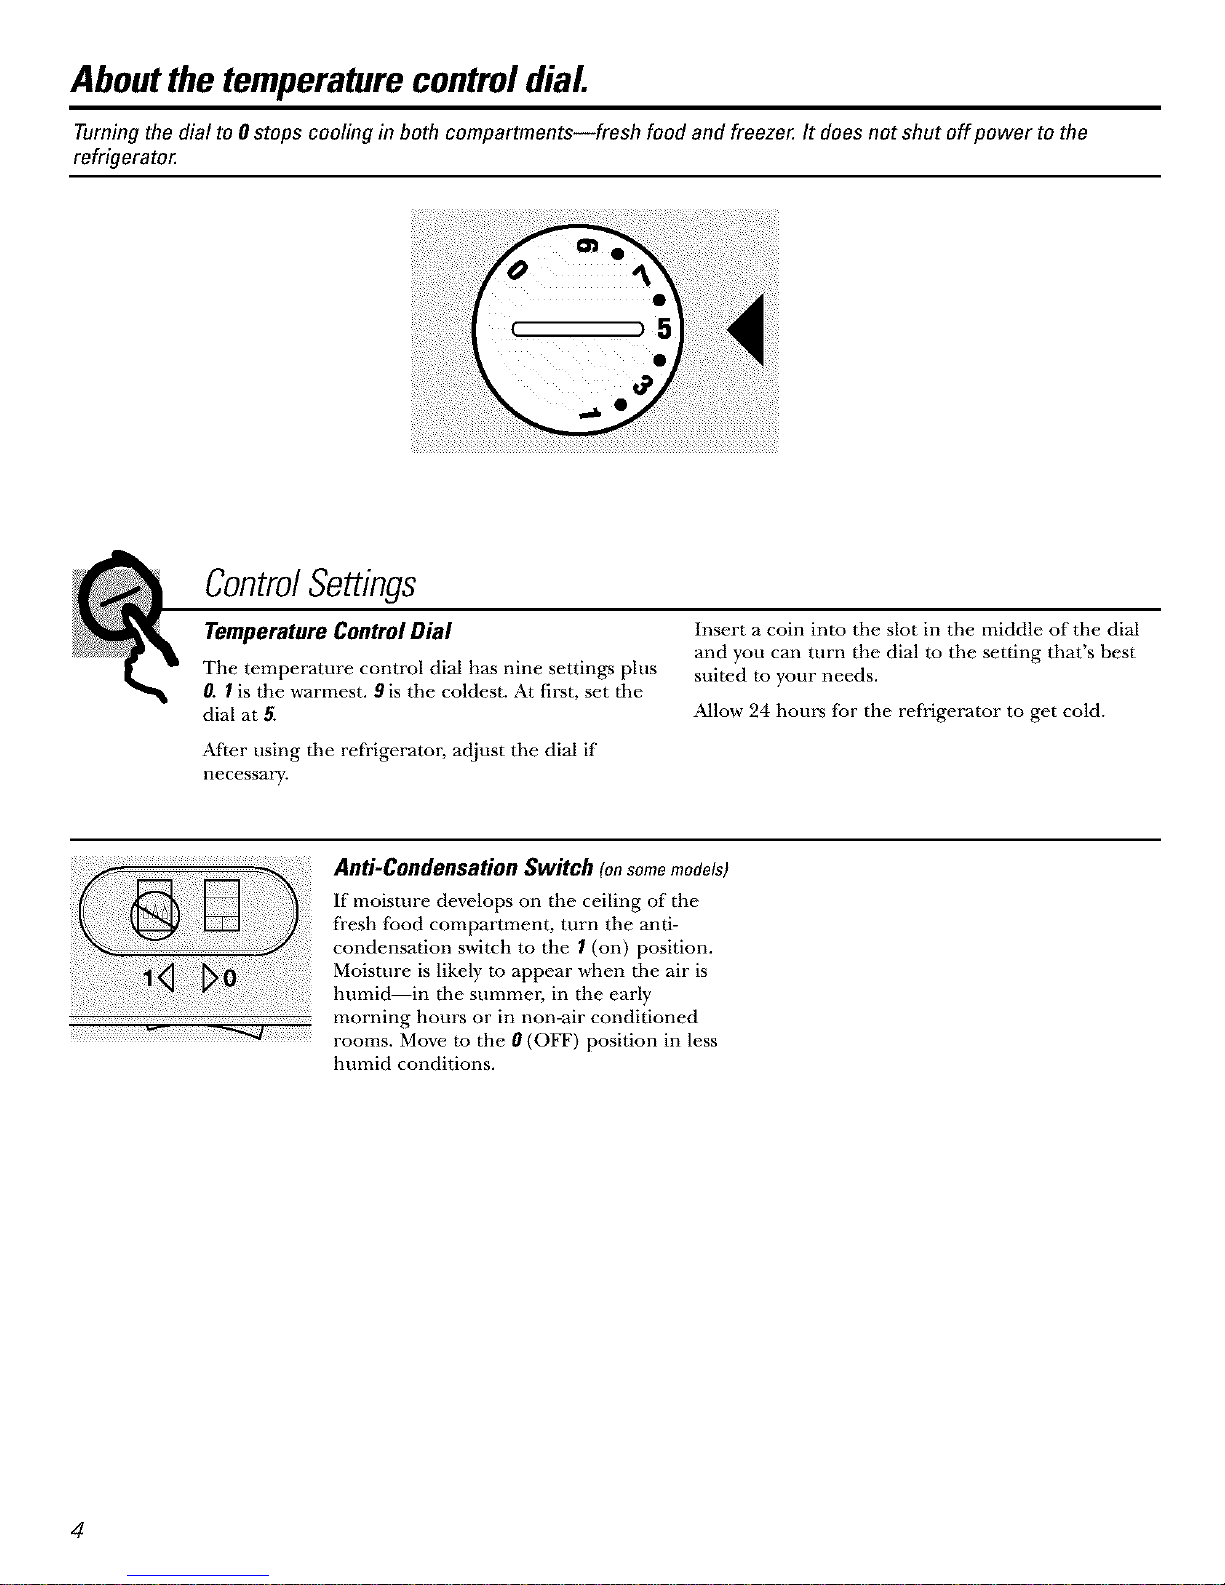
Aboutthetemperaturecontroldial
Turning the dial to 0stops cooling in both compartments--fresh food and freezer. It does not shut off power to the
refrigerator.
ControlSettings
Temperature ControlDial
The temperature control dial has nine settings plus
0. 1 is the warmest. 9 is the coldest. At first, set tile
dial at 5.
Insert a coin into the slot in the middle of the dial
and you can turn the dial to the setting that's best
suited to your needs.
Allow 94 hours for the refrigerator to get cold.
After using tile refl'igeratol, adjust the dial if
necessa_ T.
Anti-Condensation Switch (on somemodels)
If moisture develops on the ceiling of the
fl'esh food compartment, turn the anti-
condensation switch to the 1(on) position.
Moisture is likely to appear when tile air is
humid--in tile summm; in the early
.......................................................................................morning hours or in non-air conditioned
rooms. Move to the 0 (OFF) position in less
humid conditions.
4
Page 5
Aboutthefreshfoodcompartmentshelves.
Shelf supports at various levels allow you to custom-space your shelves. Not all features are on all models.
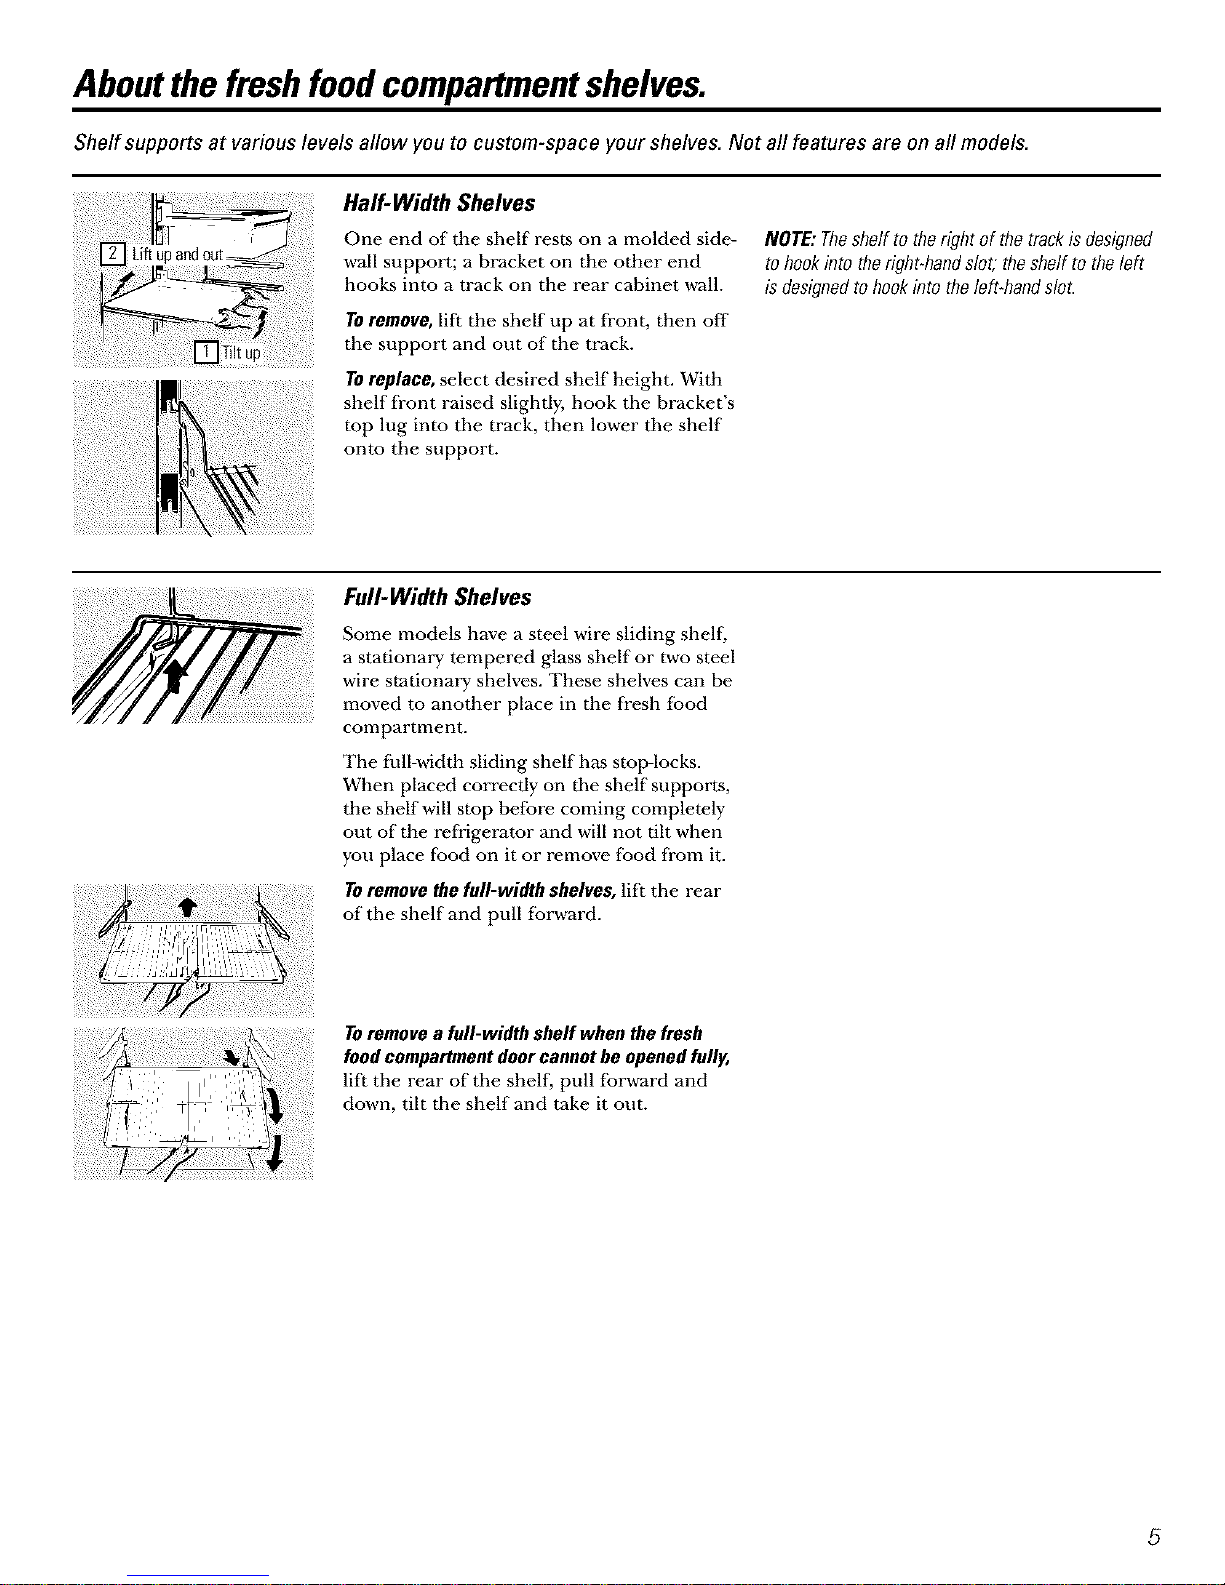
Half-Width Shelves
One end of the shelf rests on a molded side-
wall support; a bracket on the other end
hooks into a track on the rear cabinet wall.
TOremove, lift the shelf up at fi'ont, then off
the support and out of the track.
TOreplace, select desired shelf height. With
shelf fi'ont raised slightly, hook the bracket's
top lug into the track, then lower the shelf
onto the support.
NOTE:Theshelftothe right of thetrackis designed
to hookinto therighbhandslot, theshelf to theleft
isdesignedtohookinto the left-handslot.
Full-Width Shelves
Some models have a steel wire sliding shelf,
a stationary tempered glass shelf or two steel
wire stationary shelves. These shelves can be
moved to another place in the fi'esh food
compartment.
The fhll:width sliding shelf has stop-locks.
When placed correctly on tbe shelf supports,
the shelf will stop before coming completely
out of the refiigerator and will not tilt when
you place food on it or remove food from it.
TOremove the full-width shelves, lift the rear
of the shelf and pull forward.
Toremovea full-width shelf when thefresh
foodcompartmentdoorcannotbe openedfully,
lift tile rear of tile shelf, pull forward and
down, tilt tim shelf and take it out.
5
Page 6
Aboutthe frozenfoodcompartmentshelves.
Some models have an ice-tray shelf and some have a full-width step shelf.
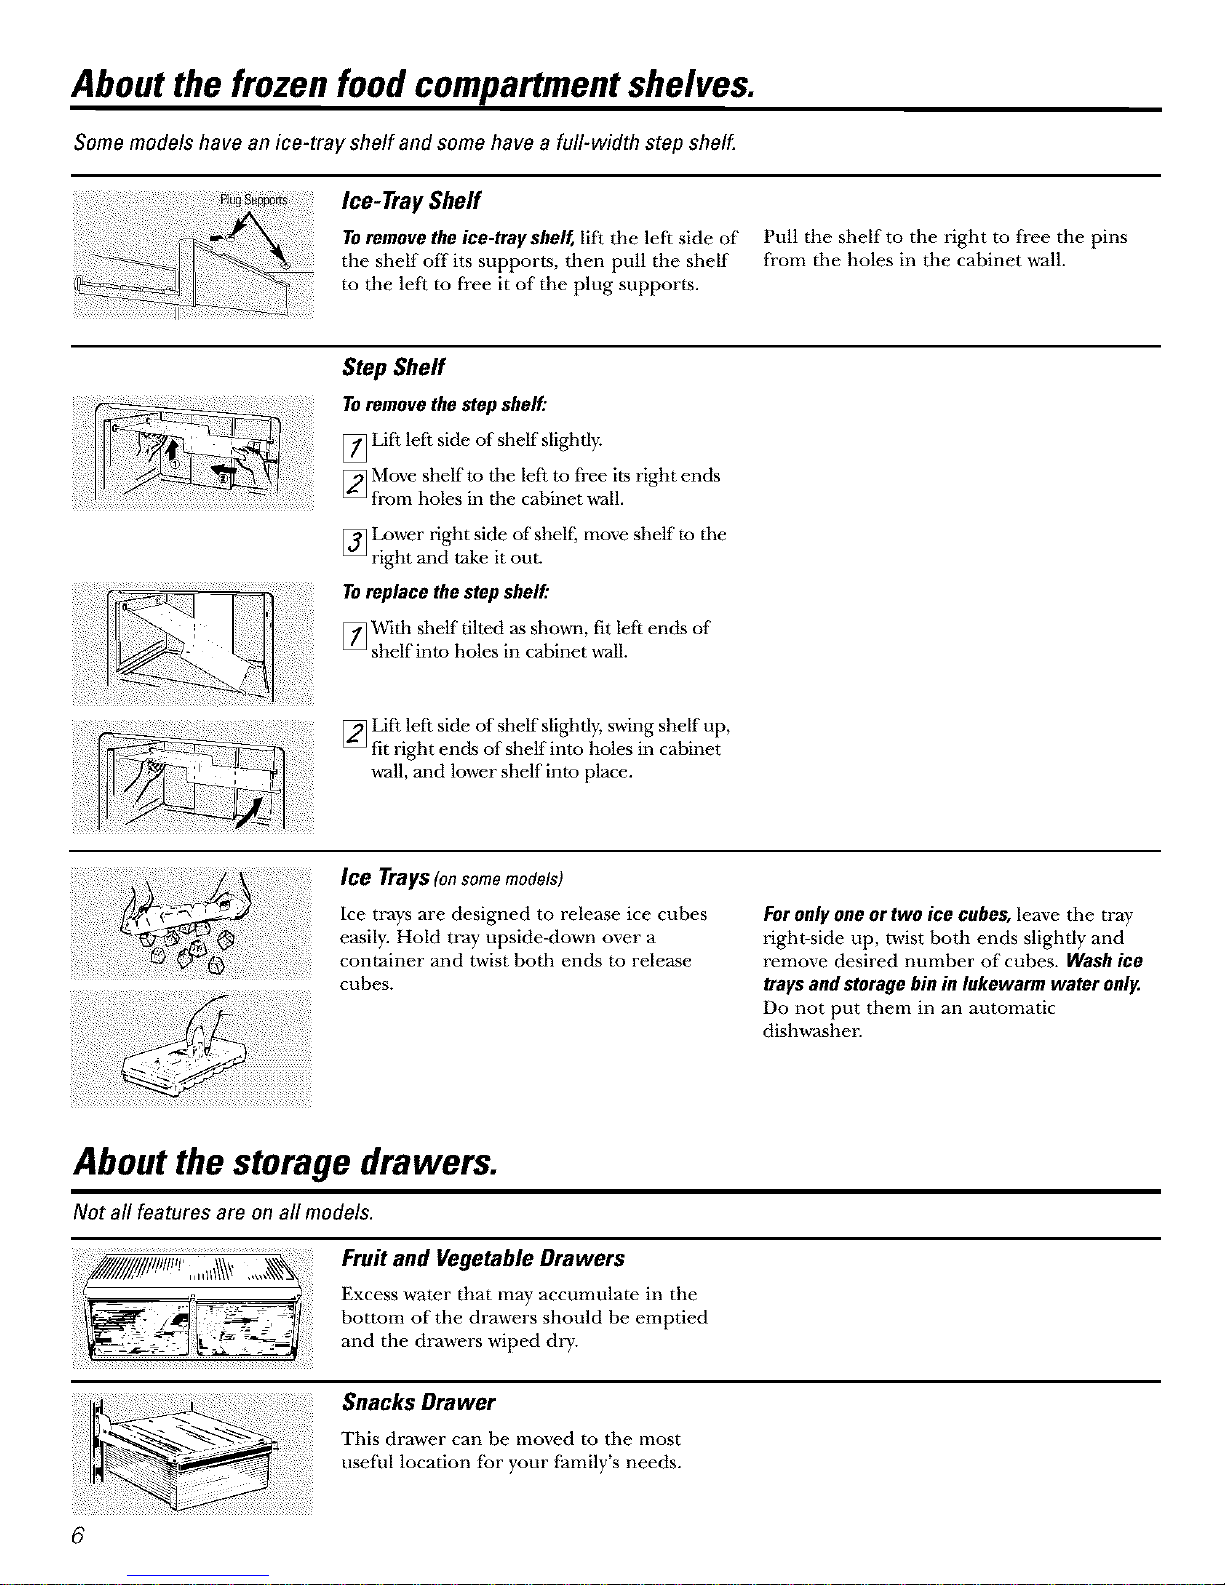
Ice- TrayShelf
To remove the ice-trayshelf, lift the left side of
the shelf off its supports, then pull the shelf
to the left to free it of the plug supports.
Pull the shelf to the right to free the pins
from the holes in the cabinet wall.
Step Sheff
To remove the step shelf:
[_Lifl left side of shelf slighdy.
[_ Move shelf to tlle left to fi'ee its right ends
from holes in the cabinet wall.
[]Lower right side of shelf; move shelf to the
right and take it out.
To replace the step shelf:
[_ With shelf tilted as shown, fit left ends of
shelf into holes in cabinet wall.
[_ Lift left side of shelf slightly, swing shelf up,
fit right ends of shelf into holes in cabinet
wall, and lower shelf into place.
Ice TraitsIon some models)
Ice trays are designed to release ice cubes
easily. Hold tray upside<lown over a
container and twist both ends to release
cubes.
For only one or two ice cabes, leave the tray
right-side up, tudst both ends slightly and
remove desired number of cubes. Wash ice
trays and storage bin in lukewarm water only.
Do not put them in an automatic
dish,a-ashen
About the storage drawers.
Not all features are on all models.
Fruit and Vegetable Drawers
Excess water that may accumulate in the
bottom of the drawers should be emptied
and the drawers wiped dry.
Snacks Drawer
This drawer can be moved to the most
useful location for your family's needs.
6
Page 7
About storage drawer and cover removal
Not all features are on all models.
Drawer and Cover Removal
Drawers can be removed easily by grasping
tile sides and lifting up slightly while pulling
drawers past the step location.
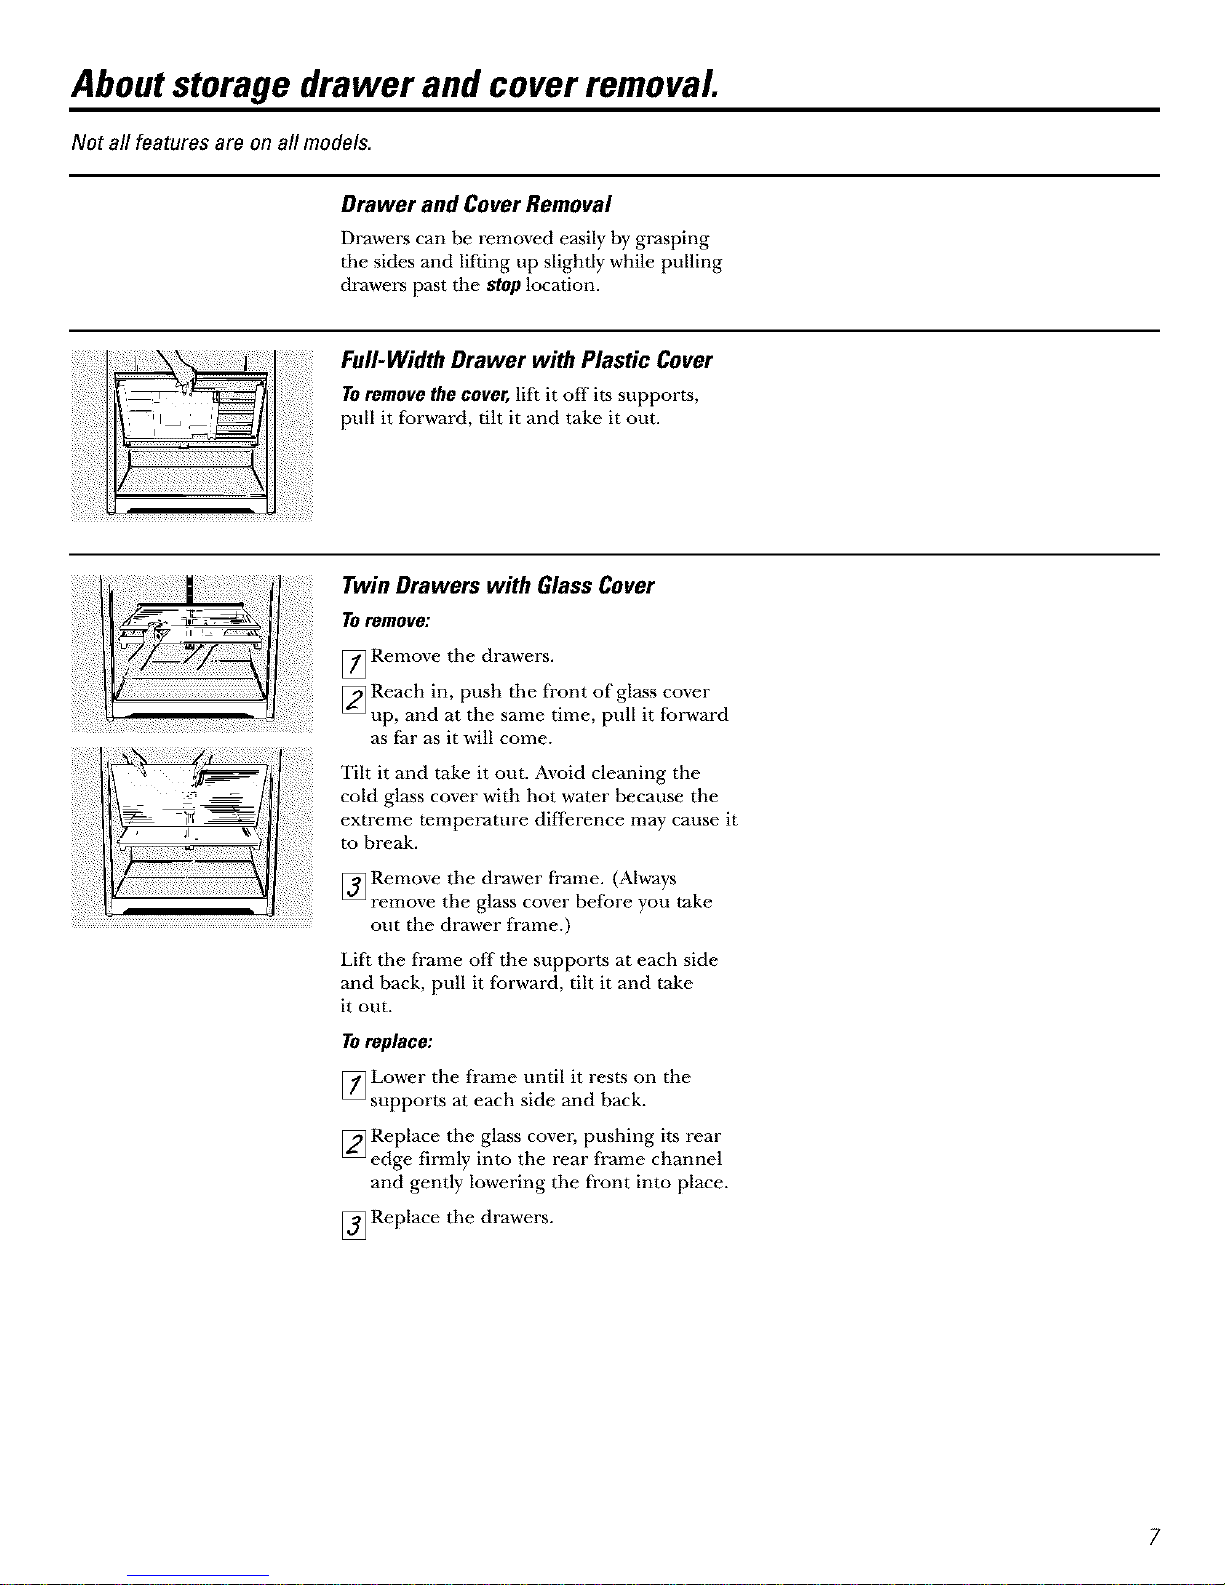
Full-Width Drawer with Plastic Cover
TOremovethecover,lif} it off its supports,
pull it forward, tilt it and take it out.
Twin Drawers with Glass Cover
To remove:
[Remove the drawers.
[]Reach in, push the front of glass cover
up, and at the same time, pull it forward
as fhr as it will come.
Tilt it and take it out. Avoid cleaning the
cold glass cover with hot water because the
extreme temperature difference may cause it
to break.
[]Remove the drawer frame. (Al,a-ays
remove the glass cover before you take
out the drawer frame.)
Lif} the frame off the supports at each side
and back, pull it forward, tilt it and take
it out.
Toreplace:
[]Lower the frame until it rests on the
supports at each side and back.
[]Replace the glass covm; pushing its rear
edge firmly into the rear frame channel
and gently lowering the fi'ont into place.
[]Replace the drawers.
Page 8
About the automatic icemaker. (onsome models)
A newly-installed refrigerator may take 12 to 24 hours to begin making ice.
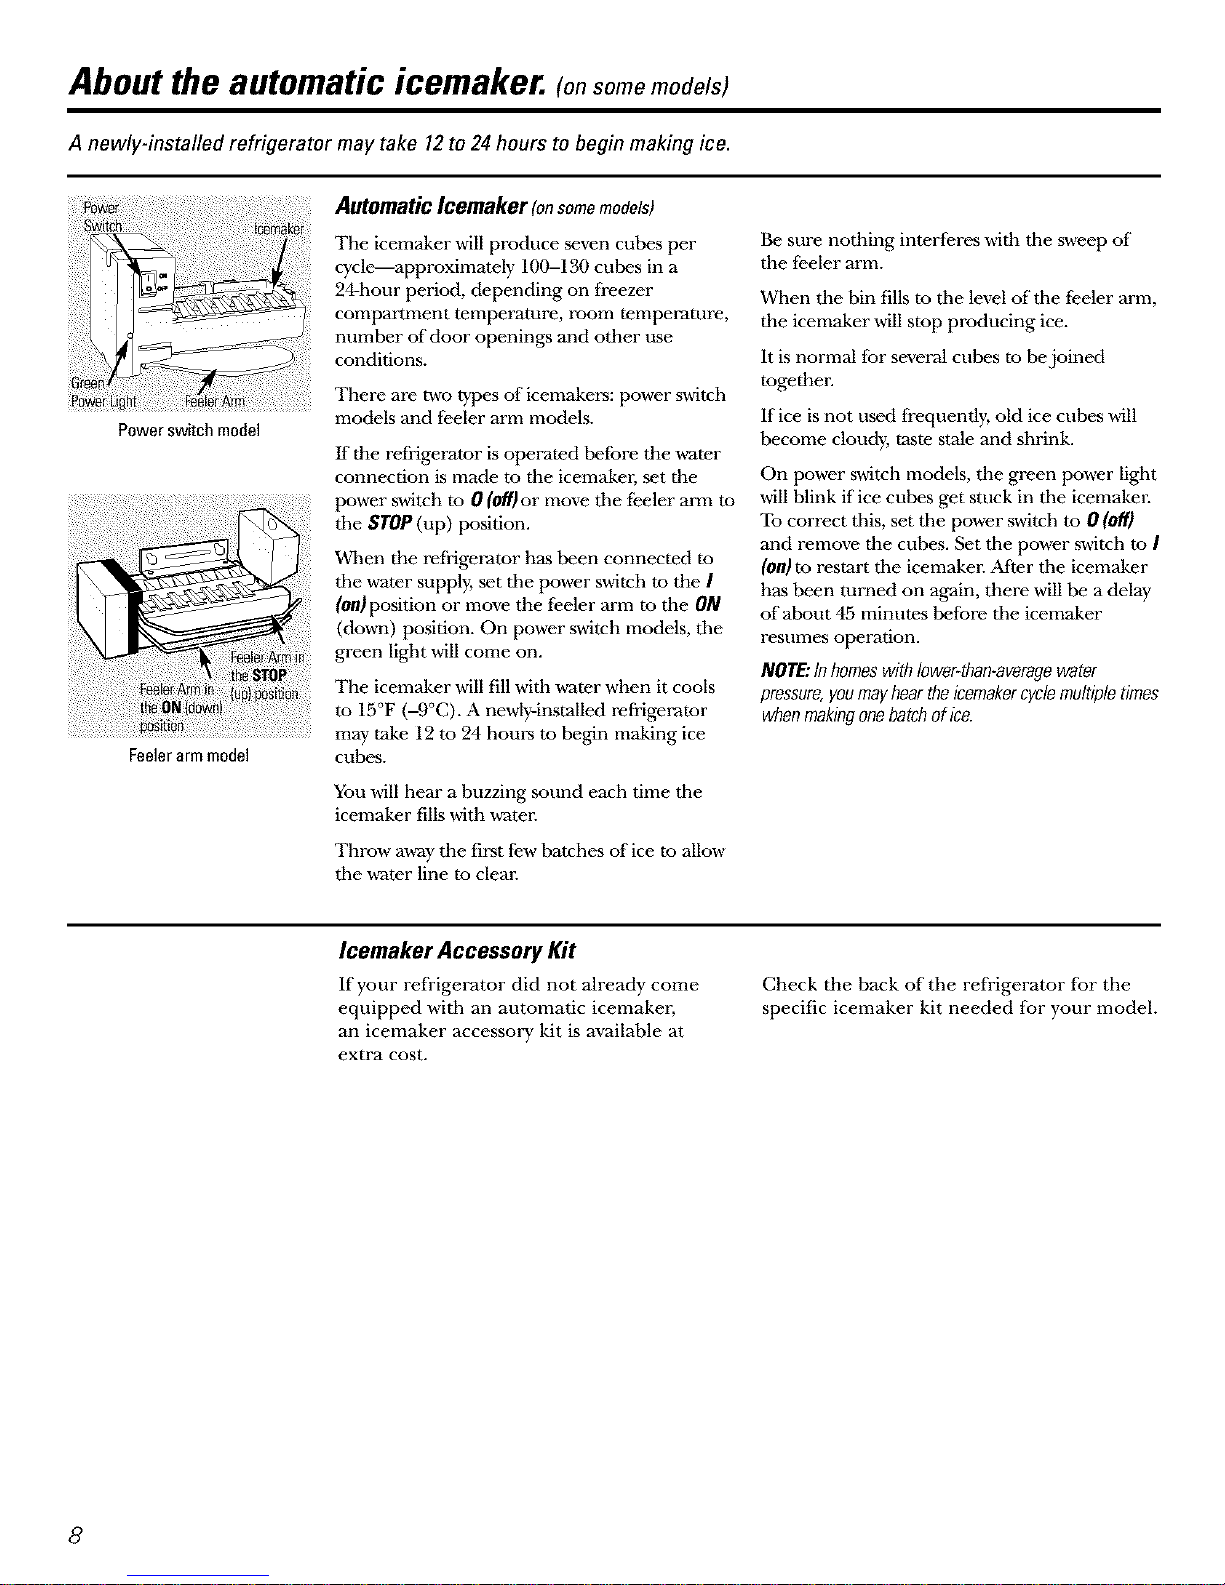
Automatic Icemaker (onsomemodels)
The icemaker will produce seven cubes per
cycle,---approximately 100-130 cubes in a
24-hour period, depending on freezer
compamnent temperature, room temperarure,
number of door openings and other use
conditions.
There are two types of icemakers: power switch
models and feeler arm models.
Powerswitchmodel
If the refrigerator is operated betore the water
connection is made to the icemakm; set the
powertheSTOP(up)position.SWitchre 0 (off)or move the teeler arm to
Whentherefrigeratorhasbeenconnectedto
the water supply, set the power switch to the I
(on)position or move the teeler arm to the ON
(do,m) position. On power switch models, the
green light _MIIcome on.
The icemaker will till with water when it cools
d_ to 15°F (-9°C). A newly-installed refrigerator
may take 12 to 24 hom_ to begin making ice
Feelerarmmodel cubes.
You will hear a buzzing sound each time the
icemaker fills with water
Throw away the first few batches of ice to allow
the water line to clean
Be sure nothing interferes with the sweep of
the feeler arm.
When the bin fills to the level of the teeler arm,
the icemaker will stop producing ice.
It isnormal for several cubes to be joined
togethen
If ice is not used fi'equently, old ice cubes will
become cloudy, raste stale and shrink.
On power switch models, the green power light
will blink if ice cubes get stuck in the icemaken
To correct this, set the power switch to 0 (off)
and remove the cubes. Set the power swirch to I
(on)to resrart the icemaken After the icemaker
has been turned on again, there will be a delay
of about 45 minutes before the icemaker
resumes operation.
NOTE:Inhomeswithlower-than-averagewater
pressure,youmayheartheicemakercyclemultipletimes
whenmakingonebatchof ice.
Icemaker Accessory Kit
If your refrigerator did not already come
equipped with an automatic icemakm;
an icemaker accessory kit is available at
extra cost.
Check the back of the refrigerator 1or the
specific icemaker kit needed for your model.
8
Page 9
Care and cleaning of the refrigerator.
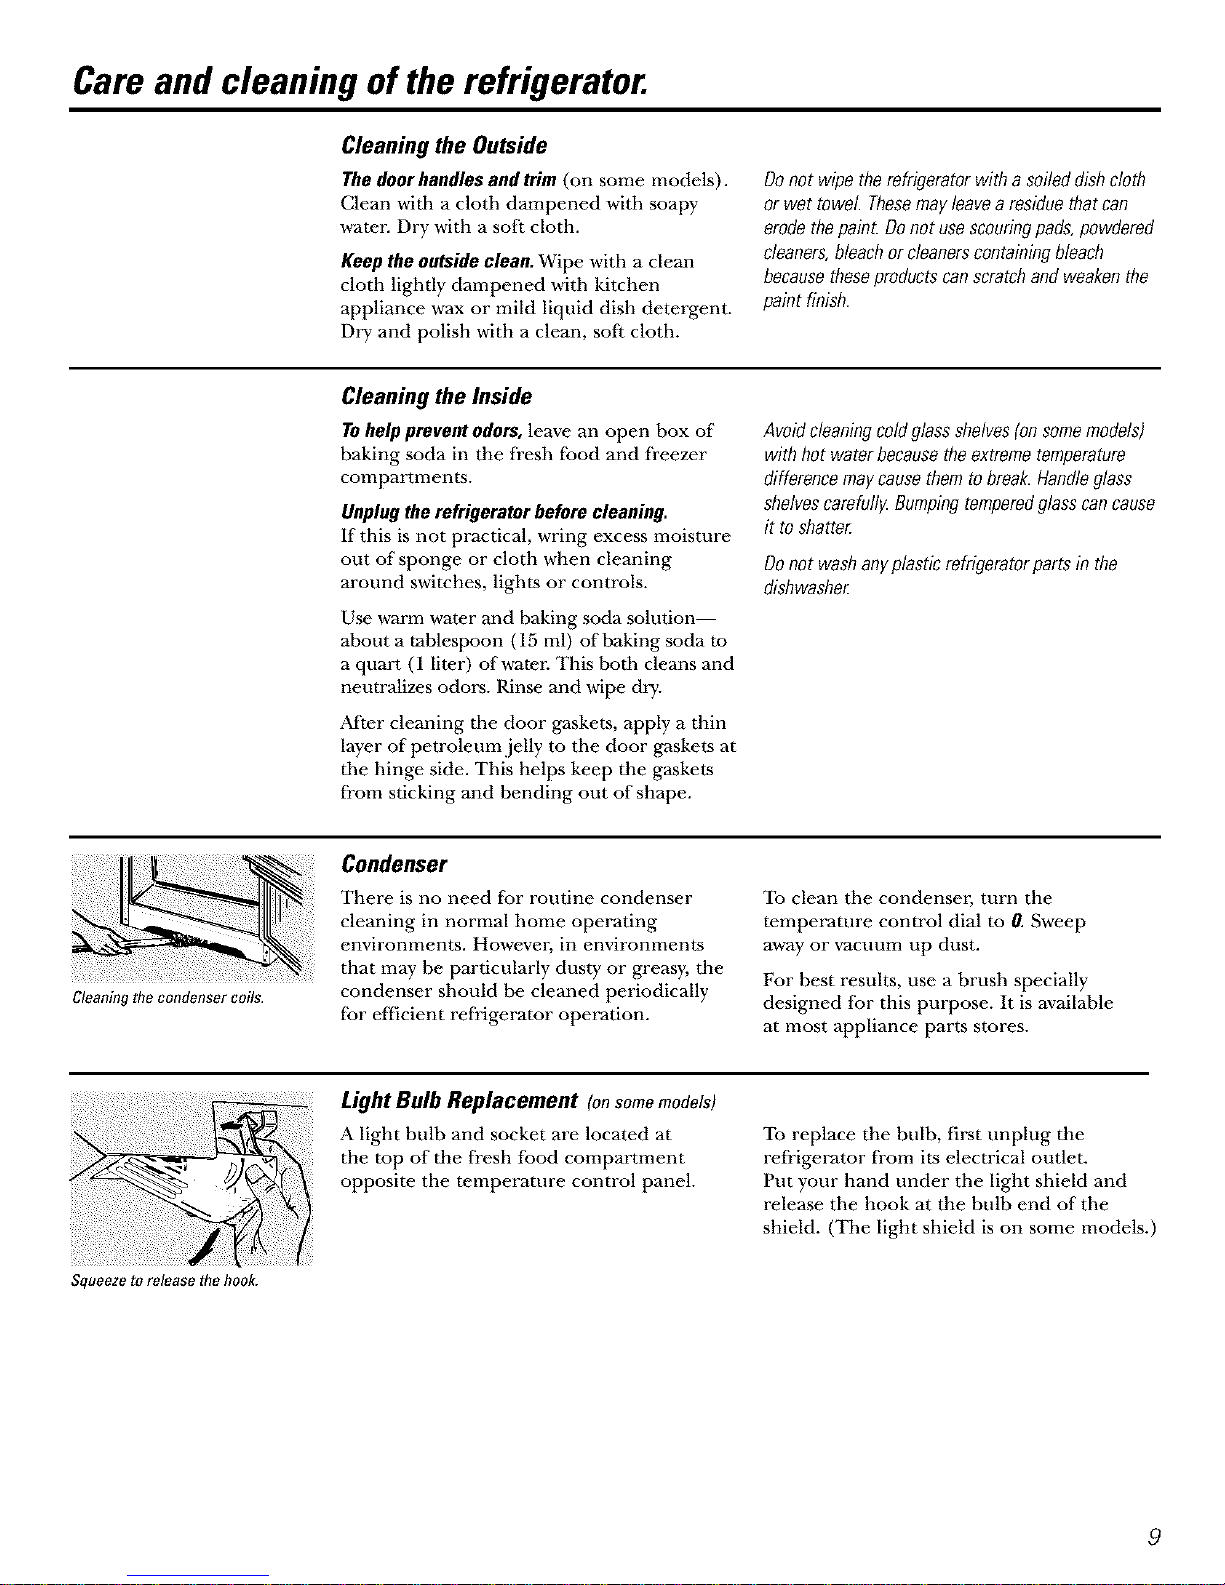
Cleaning the condenser coils,
Cleaning the Outside
The door handles and trim (on some models).
Clean with a cloth dampened with soapy
,a_aten Dry with a soft cloth.
Keep the outside clean. Wipe with a clean
cloth lightly dampened with kitchen
appliance wax or mild liquid dish detergent.
Dry and polish with a clean, soft cloth.
Donot wipe therefrigeratorwith asoileddishcloth
or wet towel Thesemayleavea residuethatcan
erodethepaint. Donotusescouringpads,powdered
cleaners,bleachor cleanerscontainingbleach
becausetheseproductscanscratchandweakenthe
paint finish.
Cleaning the Inside
TOhelp prevent odors, leave an open box of
baking soda in the fresh food and freezer
compartments.
Unplug the refrigerator before cleaning.
If this is not practical, wring excess moisture
out of sponge or cloth when cleaning
around switches, lights or controls.
Use warm water and baking soda solution--
about a 'tablespoon (15 ml) of baking soda to
a quart (1 liter) of watm: This both cleans and
neutralizes odors. Rinse and wipe dry.
After cleaning the door gaskets, apply a thin
layer of petroleum .jelly to the door gaskets at
the hinge side. This helps keep the gaskets
from sticking and bending out of shape.
Avoidcleaningcoldglassshelves(onsomemodels)
with hot waterbecausethe extremetemperature
differencemaycausethemtobreaL Handleglass
shelvescarefully.Bumpingtemperedglasscancause
it to shatte_
Donot washanyplasticrefrigeratorparts inthe
dishwasher
Condenser
There is no need for routine condenser
cleaning in normal home operating
environments. Howevm, in environments
that may be particularly dusty or greasy, the
condenser should be cleaned periodically
for efficient refrigerator operation.
To clean the condensm; turn the
temperature control dial to 0. Sweep
away or vacuum up dust.
For best results, use a brush specially
designed for this purpose. It is available
at most appliance parts stores.
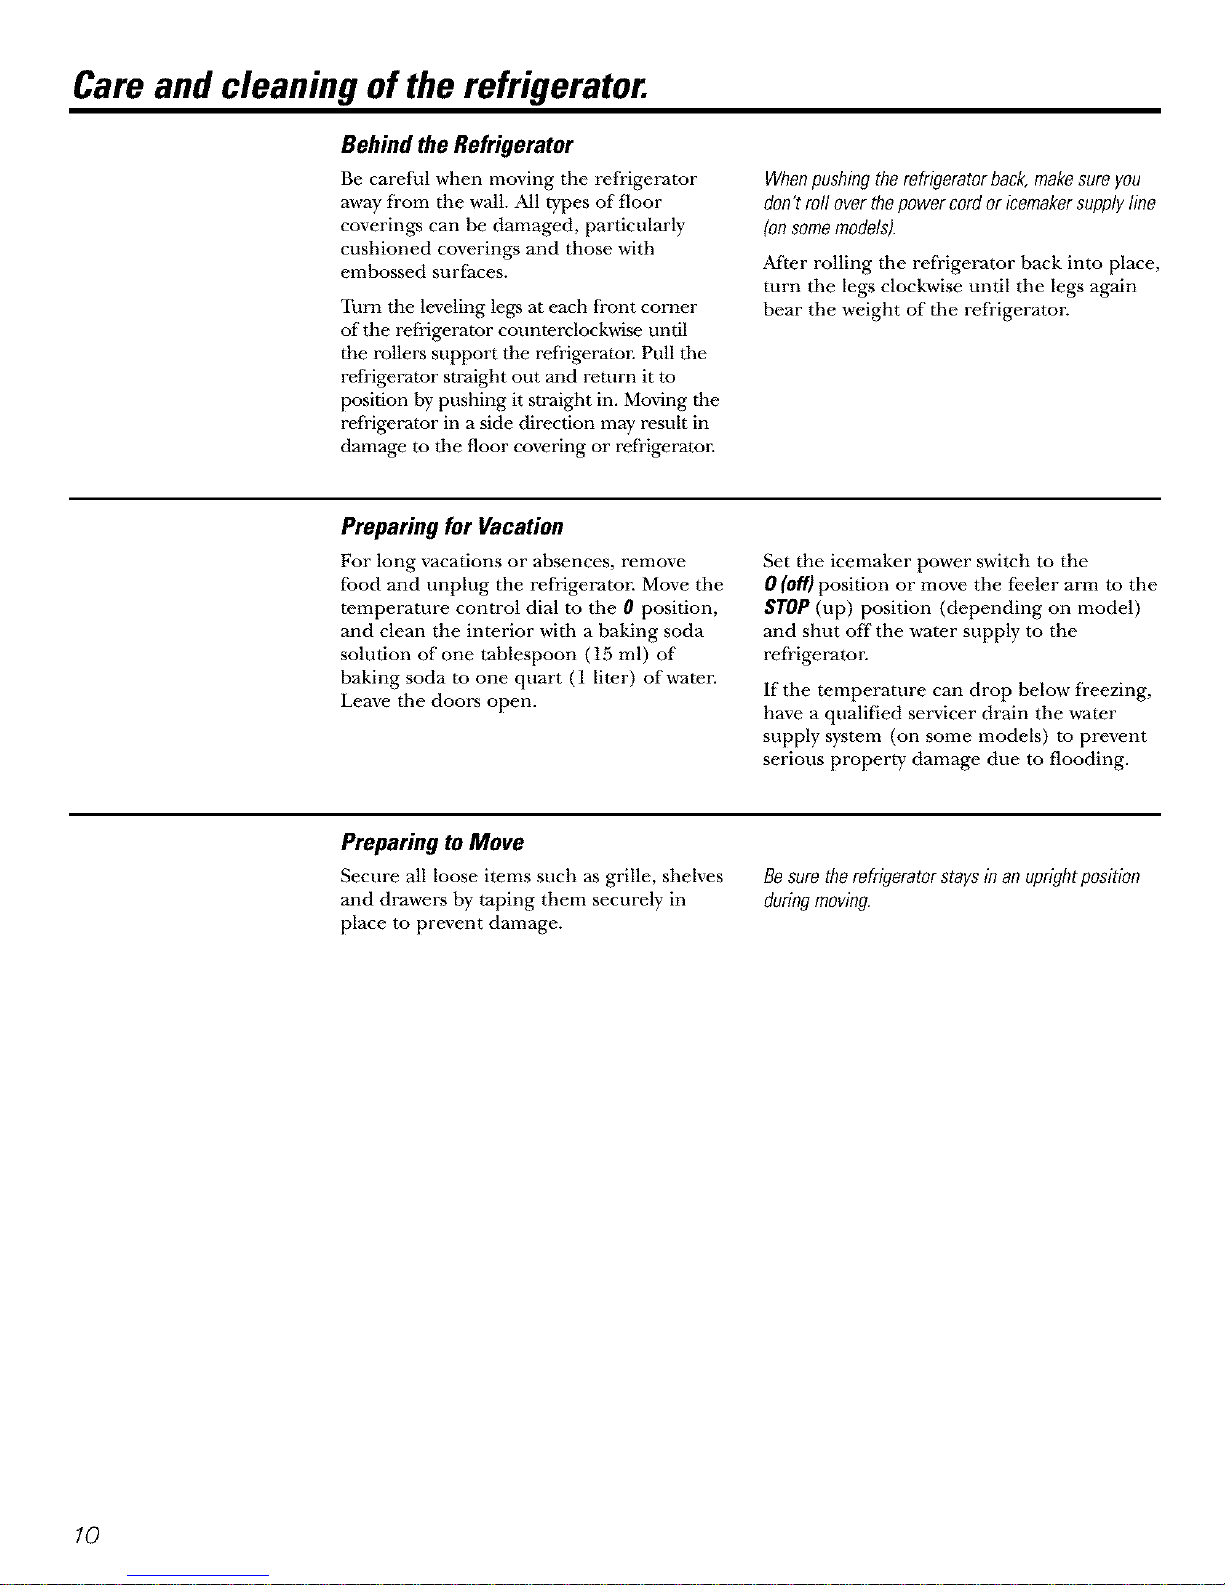
Light Bulb Replacement (onsomemodels)
A light bulb and socket are located at
the top of the flesh food compartment
opposite the temperature control panel.
To replace the bulb, first unplug the
refrigerator from its electrical outlet.
Put your hand under the light shield and
release the hook at the bulb end of the
shield. (The light shield is on some models.)
Squeezeto release the hook.
9
Page 10
Care and cleaning of the refrigerator.
Behind the Refrigerator
Be careful when moving the refrigerator
away from the wall. MI types of floor
coverings can be damaged, particularly
cushioned coverings and those with
embossed surfaces.
Turn the leveling legs at each front corner
of the refrigerator counterclockwise until
the rollers support the refrigerator. Pull tile
refrigerator straight out and return it to
position by pushing it straight in. Moxdng the
refrigerator in a side direction may result in
damage to tile floor covering or refrigerator.
Whenpushingthe refrigeratorback,makesureyou
don'trail overthepowercordor icemakersupplyline
fensomemodels).
After rolling tile refrigerator back into place,
turn the legs clockwise until the legs again
bear the weight of tile refrigeratol:
Preparing for Vacation
For long vacations or absences, remove
food and unplug the refrigeratoi: Move the
temperature control dial to the 0 position,
and clean the interior with a baking soda
solution of one tablespoon (15 ml) of
baking soda to one quart (1 liter) ofwaten
Leave the doors open.
Set the icemaker power switch to the
0 (off)position or move the fizeler arm to the
STOP (up) position (depending on model)
and shut off the water supply to the
refrigeraton
If the temperature can drop below freezing,
have a qualified servicer drain the v_-ater
supply system (on some models) to prevent
serious property damage due to flooding.
Preparing to Move
Secure all loose items such as grille, shelves
and drawers by taping them securely in
place to prevent damage.
Besuretherafrigeratorstaysinan up@t position
duringmoving.
10
Page 11
Installation
Instructions
BEFORE YOU BEGIN
Read these instructions completely and carefully.
• IMPORTANT - Savethese
instructions for local inspector's use.
• IMPORTANT - Obso ,,call
governing codes and ordinances.
• Note to Installer - Besure to leave these
instructions with the Consumes:
• Note to Consumer - Keep these instructions
for future reference.
• Skill level - Installation of this appliance requires
basic mechanical skills.
• Completion time - Refrigerator Installation
15 minutes
Reversing the Door Swing
1 hour
• Proper installation is the responsibility of the
installer.
• Product failure due to improper installation is not
covered under the Warranty.
WATER SUPPLY TO THE ICEMAKER
(on some models)
If the refrigerator has an icemakm; it Mll have to be
connected to a cold drinking water line. A water supply
kit (containing copper tubing, shutoffvalve, fittings
and instructions) is available at extra cost from your
dealm: Installation of the icemaker must be done by
a qualified service technician.
REFRIGERATOR LOCATION
• Do not install the refrigerator where the temperature
will go below 60°F (16°C) because it will not run often
enough tu maintain proper temperatures.
• Install it on a floor strong enough to support it Ihlly
loaded.
CLEARANCES
Allow the following clearances for ease of installation,
proper air circulation and plumbing and electrical
connections.
• Sides 3/4" (19 mm)
• Top 1" (25 mm)
• Back 1" (25 mm)
Refrigerato
Models 15,16,17 and 18
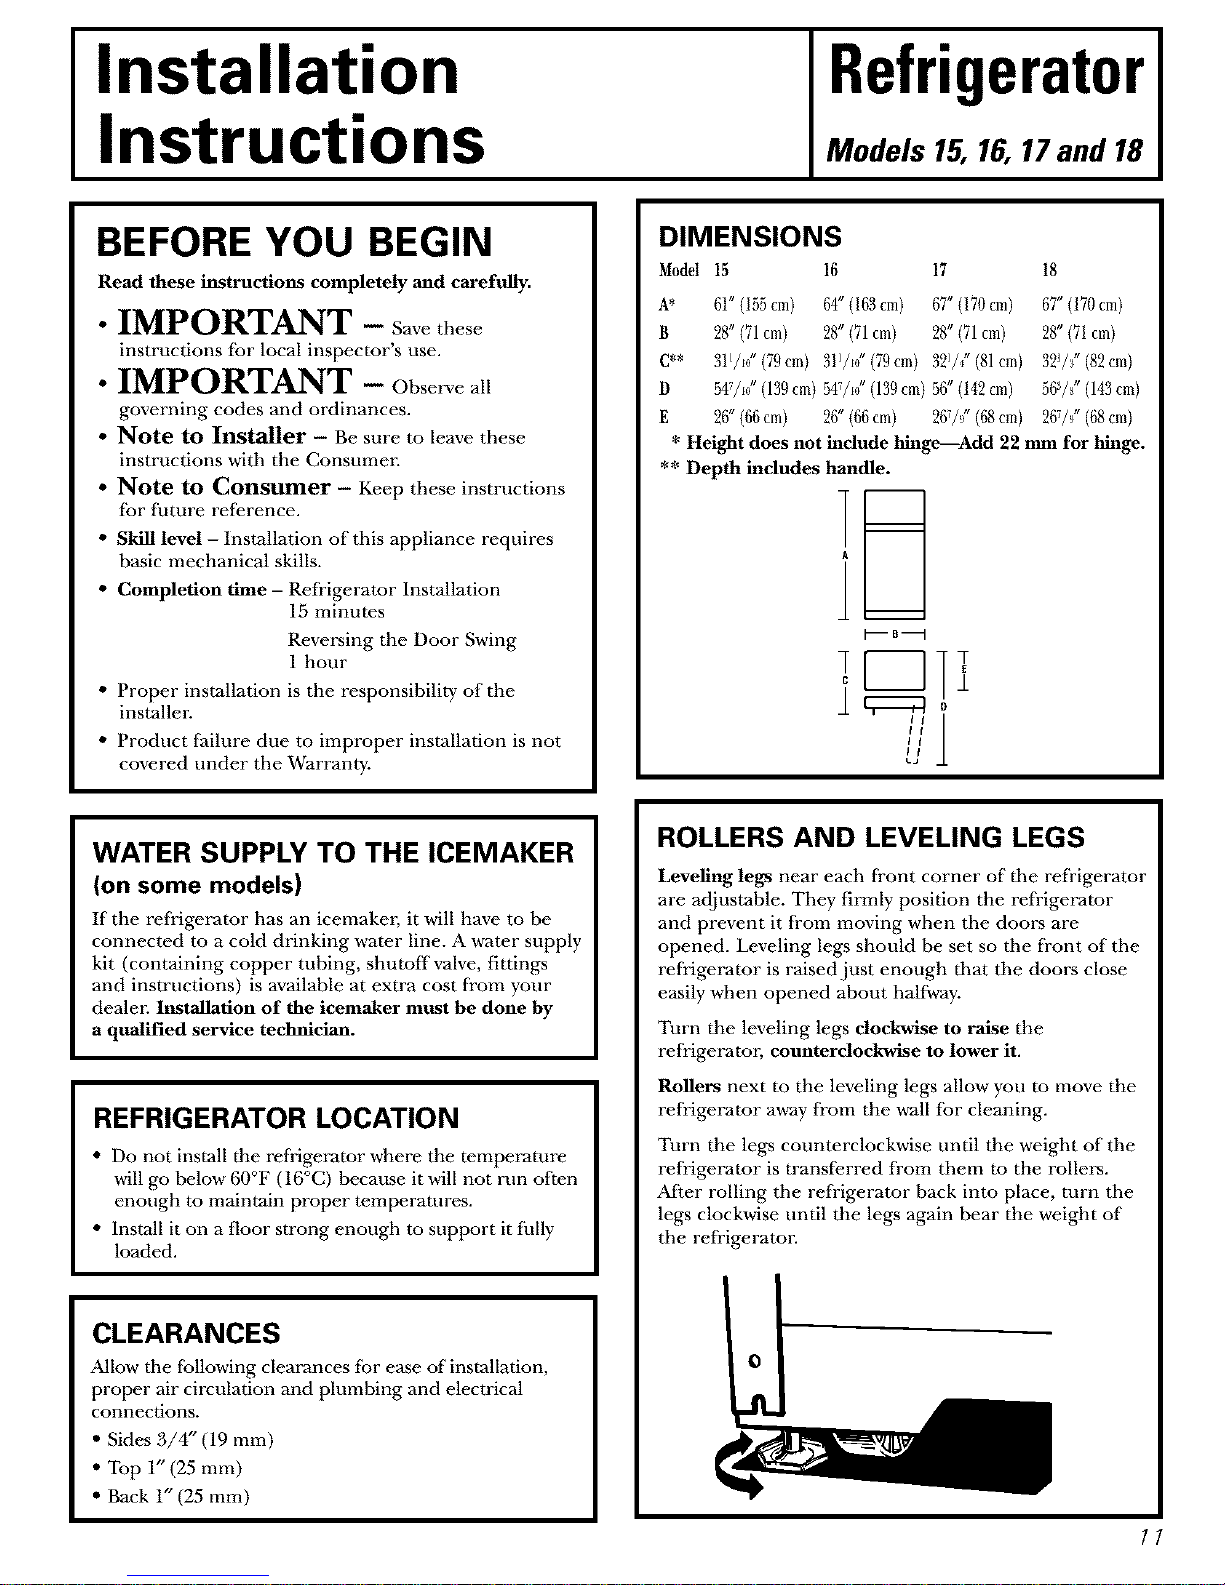
DIMENSIONS
Model 15 16 17 18
A* 61" (155cm) 64" (163cm) 67" (170cm) 67" (170cm)
B 28" (71cm) 28" (71cm) 28" (71cm) 28" (71 cm)
C** 317J(79cm) 317J(79cm) 327(' (81cm) 321//' (82cm)
D M7/_#(139cm) M7/J (139cm) 56"(142cm) 563/s" (143cm)
E 26" (66cm) 26" (66cm) 267/' (68 cm) 267/,/(68 cm)
* Height does not include hinge--Add 22 mm for hinge.
** Depth includes handle.
J
ROLLERS AND LEVELING LEGS
Leveling legs near each front corner of the refrigerator
are adjustable. They firmly position the refrigerator
and prevent it from moving when the doors are
opened. Leveling legs should be set so the front of the
refrigerator is raised just enough that the doors close
easily when opened about halfway.
Turn the leveling legs clockwise to raise the
refrigerator; counterclockwise to lower it.
Rollers next to the leveling legs allow you to move the
refrigerator away from the wall for cleaning.
Turn the legs counterclocDMse until the weight of the
refrigerator is transfizrred from them tu the rollers.
After rolling the refrigerator back into place, turn the
legs clocDMse until the legs again bear the weight of
the refrigeraton
Page 12
Installation Instructions
Kll INSTALLING THE WATER LINE
BEFORE YOU BEGIN
This w-ater line installation is not w-arranted by the
refrigerator or icemaker manufacturer. Follow these
instructions carefully to minimize the risk of expensive
water damage.
Water hammer (water banging in the pipes) in house
plumbing can cause damage to refrigerator parts and
lead to water leakage or flooding. Call a qualified
plumber to correct,a-ater hammer before installing
the water supply line to the refrigeratoE
To prevent burns and product damage, do not hook
up the water line to the hot water line.
If you use your refrigerator before connecting the
water line, make sure tile icemaker power switch is
in the OFF position (on power switch models) or
the feeler arm is in the STOP (up) position
(on feeler arm models).
Do not install the icemaker tubing in areas where
temperatures fall below fi'eezing.
When using any electrical device (such as a power
drill) during installation, be sure tile device is
insulated or wired in a manner to prevent the hazard
of electric shock.
All installations must be in accordance with local
plumbing code requirements.
Installation of the icemaker must be done by a
qualified service technician.
WARNING! Connect to potable
water supply only.
WHAT YOU WILL NEED
To determine how much copper tubing you need:
Measure the distance from the water valve on the back
of the refrigerator to the water supply pipe. Then add
8 feet (244 cm). Be sure there is sufficient extra tubing
[about 8 leer (244 cm) coiled into 3 turns of about
10" (25 cm) diameter] to allow the refrigerator to
move out from the wall after installation.
• A water supply kit (containing copper tubing, shutoff
valve and fittings listed below) is available at extra cost
from your local distributor:
• A cold drinking water supply. The water pressure must
be between 20 and 120 p.s.i. (1.4-8.1 bar).
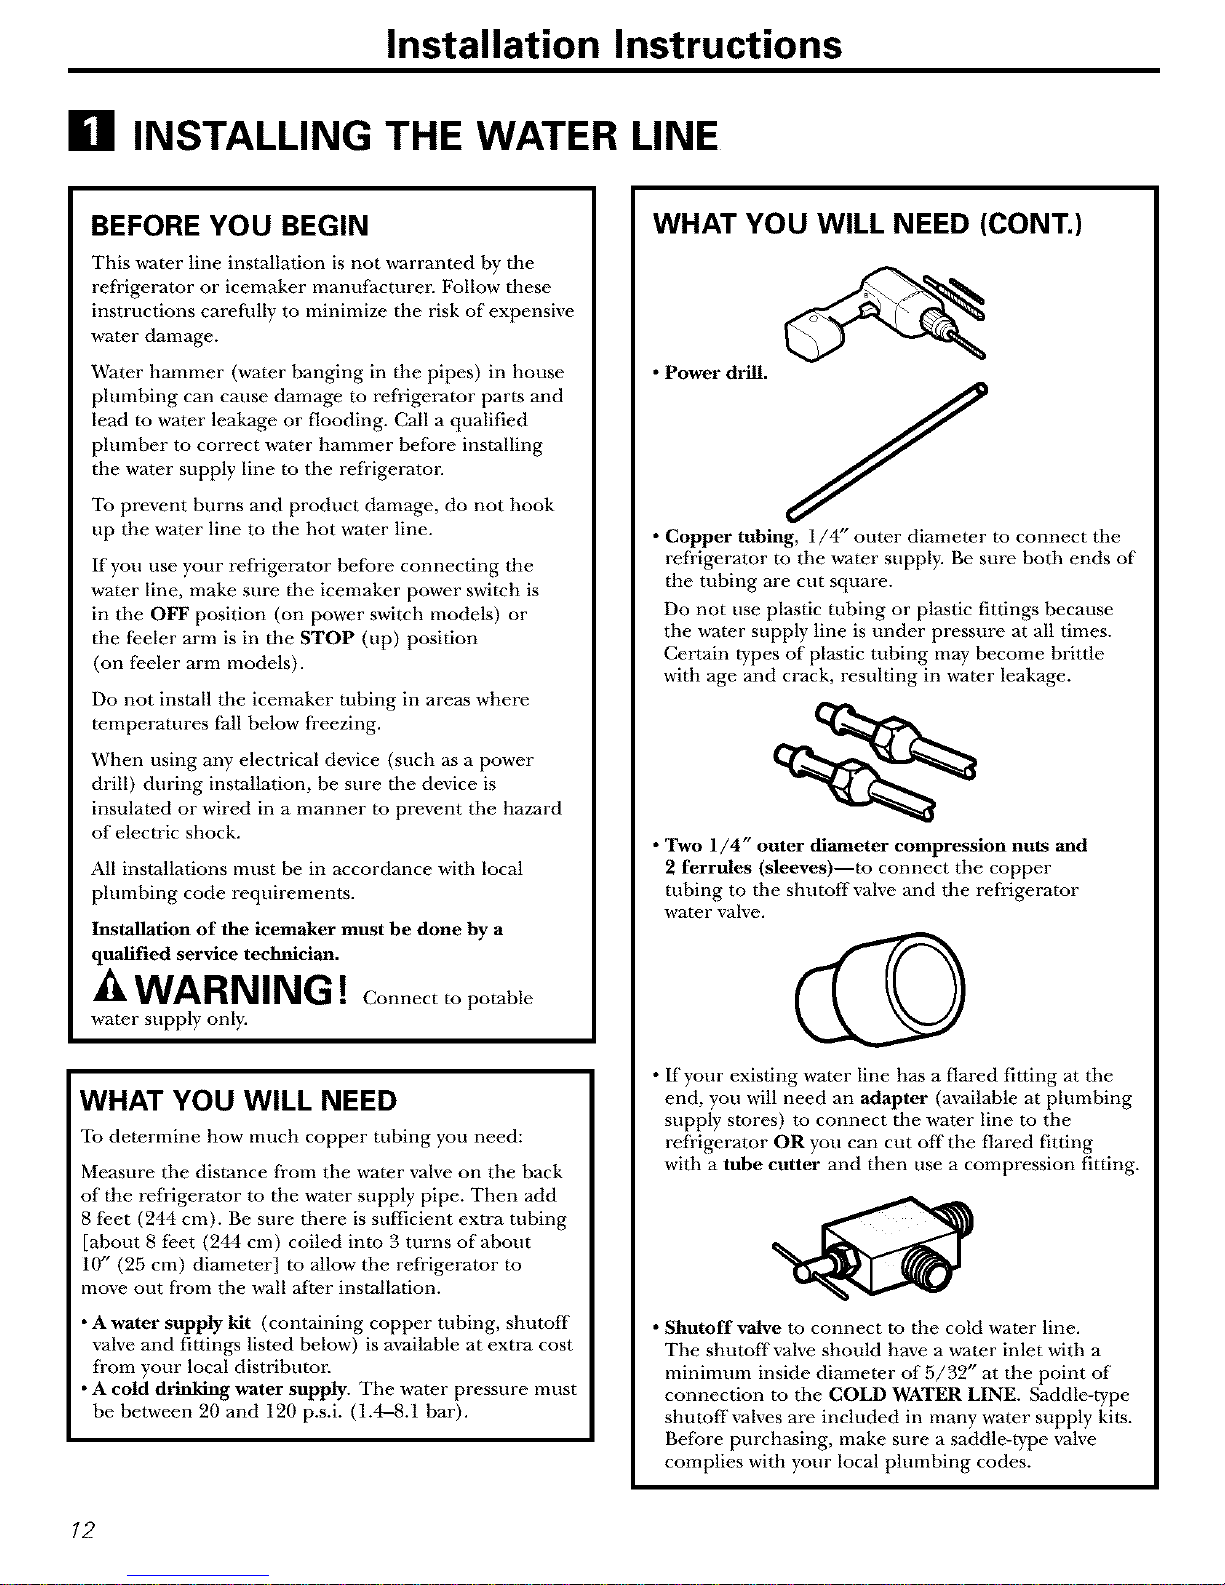
WHAT YOU WILL NEED (CONT.)
• Power drill.
• Copper tubing, 1/4" outer diameter to connect the
refrigerator to the w-ater supply. Be sure both ends of
the tubing are cut square.
Do not use plastic tubing or plastic fittings because
the water supply line is under pressure at all times.
Certain types of plastic tubing may become brittle
with age and crack, resulting in w-ater leakage.
• Two l/4 " outer diameter compression nuts and
2 ferrules (sleeves)--to connect the copper
tubing to the shutoffvalve and the refrigerator
water valve.
• If your existing water line has a flared fitting at the
end, you will need an adapter (available at plumbing
supply stores) to connect the water line to the
refrigerator OR you can cut off the flared fitting
with a tube cutter and then use a compression fitting.
• Shutoff valve to connect to the cold water line.
The shutoffvalve should have a ,a_ater inlet Mth a
minimum inside diameter of 5/32" at the point of
connection to the COLD WATER LINE. Saddle-vype
shutoff valves are included in many water supply kits.
Before purchasing, make sure a saddle-type valve
complies with your local plumbing codes.
12
Page 13

Installation Instructions
Install the shutoff valve on the nearest frequently used
drinking water line.
[] SHUT OFF THE MAIN WATER
SUPPLY
Turn on the nearest faucet long enough to clear
the line of water.
[] CHOOSE THE VALVE LOCATION
Choose a location for the valve that is easily
accessible. It is best to connect into the side of a
vertical ,a-ater pipe. When it is necessary m connect
into a horizontal ,a-ater pipe, make the connection
to the top or side, rather than at the bottom,
to avoid drawing offany sediment from tile
,a-ater pipe.
[] DRILL THE HOLE FOR THE VALVE
Drill a 1/4" hole in the water pipe, using a sharp
bit. Remove any burrs resulting fi'om drilling the
hole in the pipe.
[] FASTEN THE SHUTOFF VALVE
Fasten the shutoff valve to the cold water pipe with
the pipe clamp.
PipeClamp
Saddle-Type_
ShutoffValve
,)
VerticalColdWaterPipe
[] TIGHTEN THE PIPE CLAMP
Tighten the clamp screws until the sealing washer
begins to swell.
NOTE: Do not overtighten or you may crush the
copper tubing.
Washer
Inlet End
[] ROUTE THE TUBING
Route the copper tubing between the cold water
line and the refi'igerator.
Route the tubing through a hole drilled in the _a-all
or floor (behind the refi'igerator or adjacent base
cabinet) as close to the wall as possible.
NOTE: Be sure there is sufficient extra tubing
[about 8 feet (944 cm) coiled into 3 turns of about
lO" (25 cm) diameter] to allow the refi'igerator to
move out from the wall after installation.
13
Page 14
Installation Instructions
B INSTALLING THE WATER LINE (CONT.)
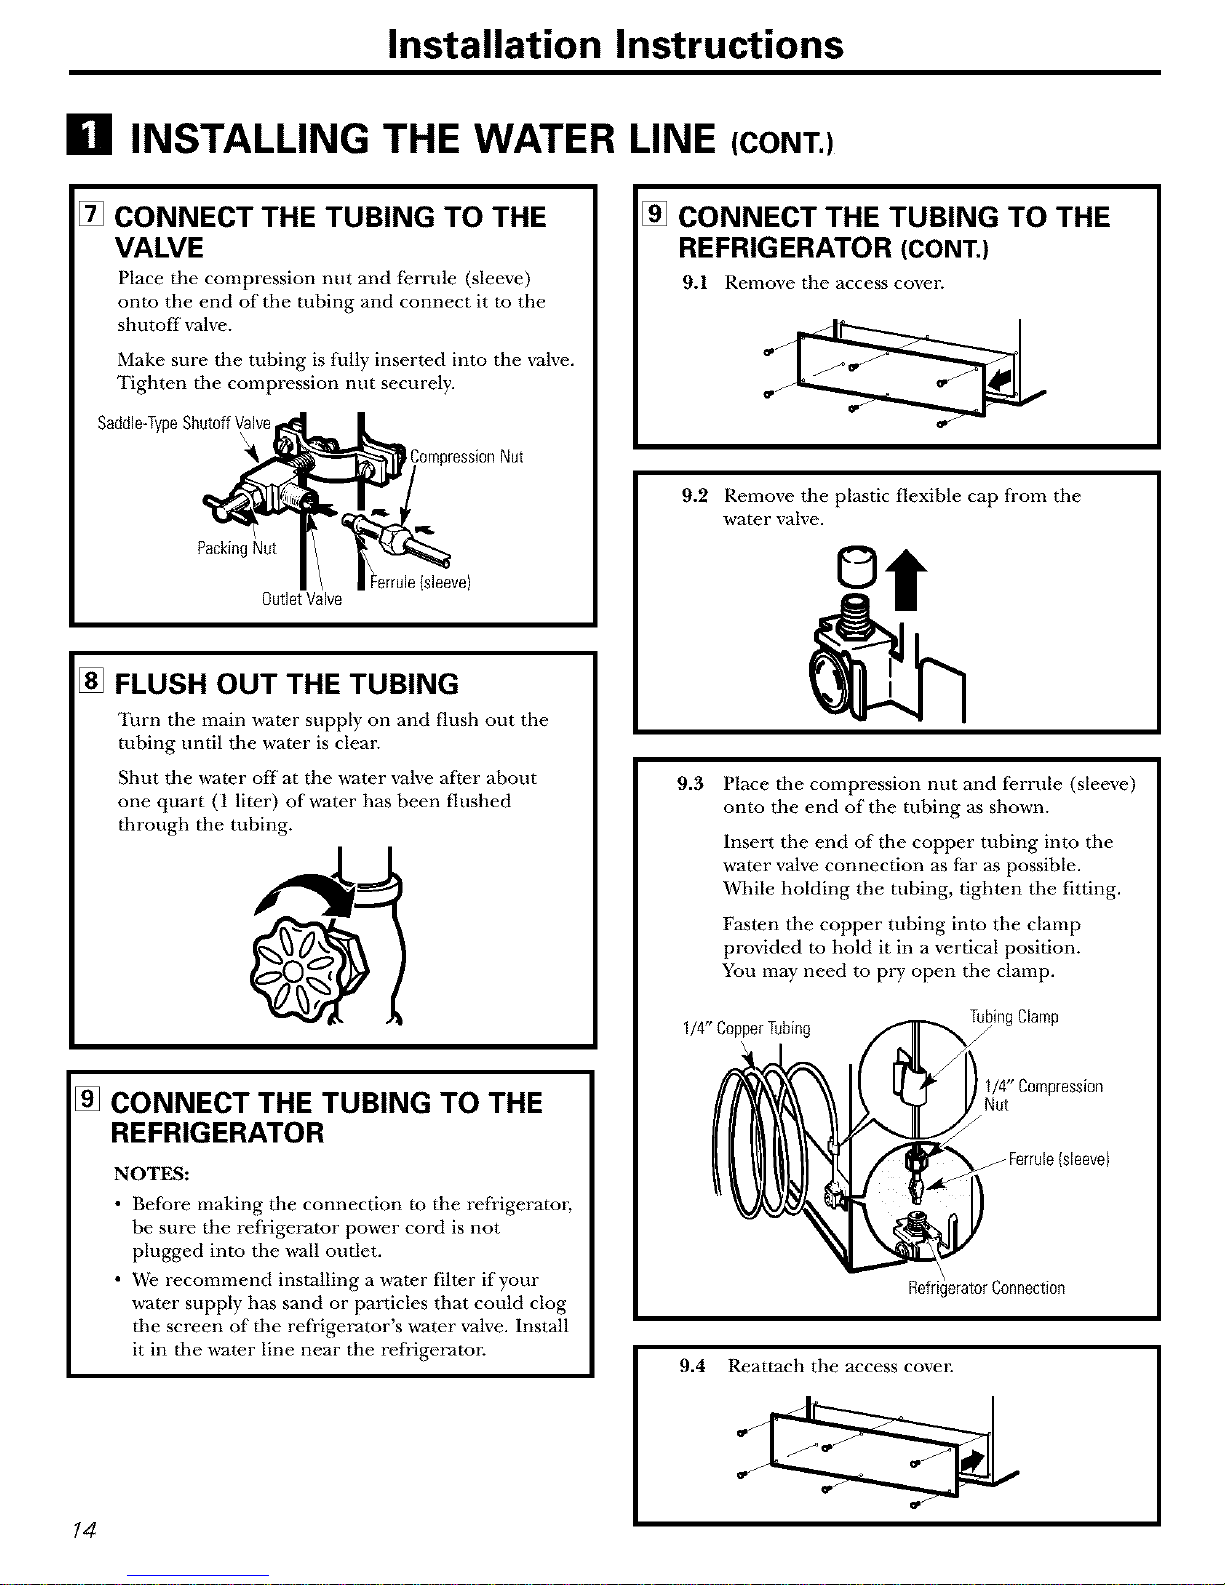
[] CONNECT THE TUBING TO THE
VALVE
Place the compression nut and ferrule (sleeve)
onto the end of the tubing and connect it to the
shutoff valve.
Make sure the tubing is fully inserted into the valve.
Tighten tile compression nut securely.
Saddle-TypeShutoffValve
\
3mpressi0nNut
PackingNut
OutletValve
[] FLUSH OUT THE TUBING
Turn the main water supply on and flush out the
tubing until the water is clear.
Shut the water offat the water valve after about
one quart (1 liter) of water has been flushed
tbrough the tubing.
[] CONNECT THE TUBING TO THE
REFRIGERATOR
NOTES:
• Before making the connection m the refrigerator,
be sure the refrigerator power cord is not
plugged into the ,a-all outlet.
• We recommend installing a water filter if your
water supply has sand or particles that could clog
tile screen of tile refi'igerator's water valve. Install
it in tile water line near the refrigerator:
[] CONNECT THE TUBING TO THE
REFRIGERATOR (CONT.)
9.1 Remove the access cover.
9.2 Remove the plastic flexible cap fi'om the
water valve.
9.3
Place tile compression nut and ferrule (sleeve)
onto the end of the tubing as shown.
Insert the end of tbe copper tubing into the
water valve connection as far as possible.
While holding the tubing, tighten the fitting.
Fasten the copper tubing into the clamp
provided to hold it in a vertical position.
You may need to pry open the clamp.
1/4" CopperTubing
1/4" Compression
/
fFerrule(sleeve)
9.4 Reattach the access covm:
_J
14
Page 15
Installation Instructions
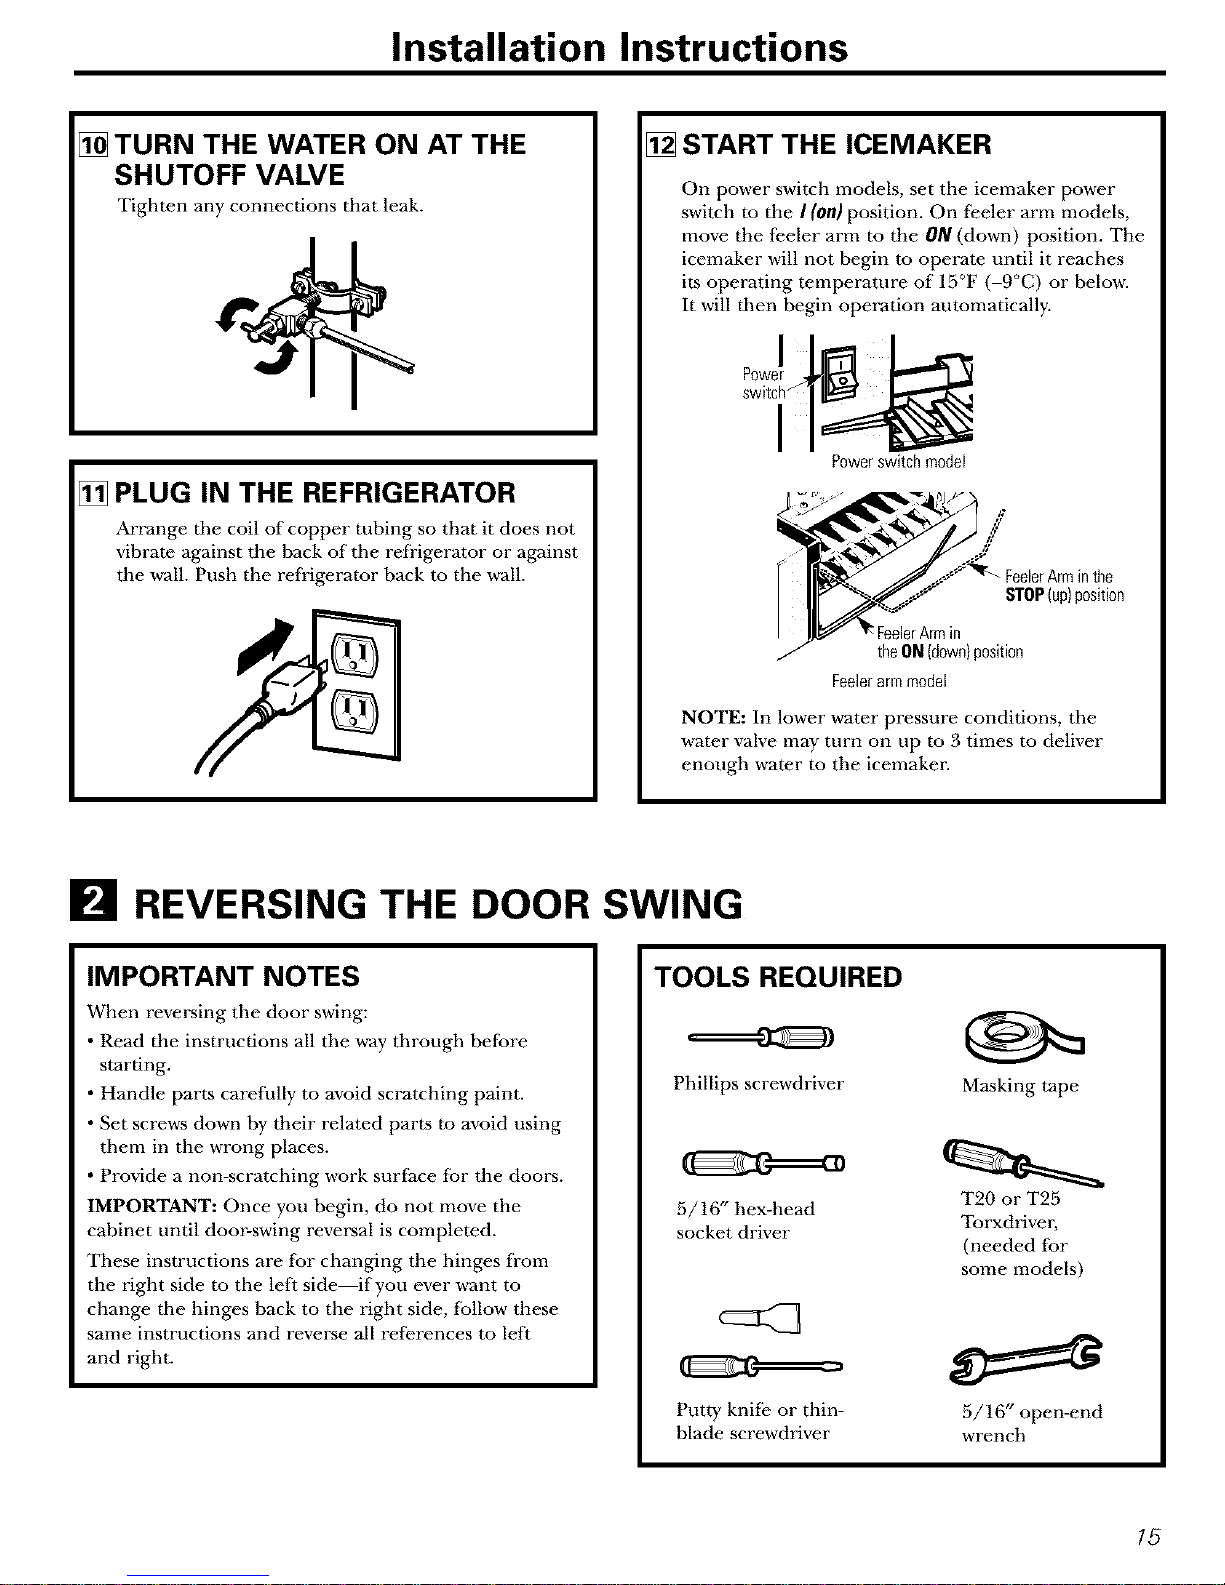
[] TURN THE WATER ON AT THE
SHUTOFF VALVE
Tighten any connections that leak.
[] PLUG IN THE REFRIGERATOR
Arrange tile coil of copper tubing so that it does not
vibrate against the back of the refrigerator or against
the w_all.Push the refrigerator back to the w_all.
[] START THE ICEMAKER
On power switch models, set the icemaker power
switch to the ! (on) position. On feeler arm models,
move the feeler arm to the ON (down) position. The
icemaker will not begin to operate until it reaches
its operating temperature of 15°F (-9°C) or below.
It will then begin operation automatically.
Powerswitchmodel
STOP (up} position
rArmin
theON{down)position
Feelerarmmodel
NOTE: In lower water pressure conditions, the
water valve may turn on up to 3 times to deliver
enough water to the icemaker.
IFJIREVERSING THE DOOR SWING
IMPORTANT NOTES
When reversing the door swing:
• Read the instructions all the way through before
starting.
• Handle parts carefully to avoid scratching paint.
• Set screws down by their related parts to avoid using
them in the wrong places.
• Provide a non-scratching work surface for the doors.
IMPORTANT: Once you begin, do not move the
cabinet until door-swing reversal is completed.
These instructions are fbr changing the hinges fl'om
the right side to the left side--if you ever want to
change tile hinges back to the right side, follow these
same instructions and reverse all references to left
and right.
TOOLS REQUIRED
Phillips screwdriver
5/16" hex-head
socket driver
Putty knifie or thin-
blade screwdriver
Masking tape
T20 or T25
Torxdriveg
(needed fbr
some models)
5/16" openmnd
wrench
15
Page 16

Installation Instructions
IFJIREVERSING THE DOOR SWING (CONT.)
[] BEFORE YOU START
l.l Unplug tbe refrigerator fi'om its electrical
outlet.
1.9 Empty all door shelves, including the dai W
compartment.
CAUTION: Do not let either door drop to tile
floor. To do so could damage the door stop.
[] REMOVE THE FROZEN FOOD
COMPARTMENT DOOR
2.1 Tape the door shut with masking tape.
[] REMOVE THE FROZEN FOOD
COMPARTMENT DOOR (CONT.)
2.2Witb a 5/16" hex-head socket drivel; remove tile
screws that hold the top hinge to tile cabinet.
9.3 Lift the hinge (and the shim glued to it) straight
up to free the hinge pin from the socket in tbe
top of the door and set it aside, along with its
screws.
9.4 Remove the tape and tilt the door away fi'om the
cabinet. Lift it off the center hinge pin.
9.5 Set tile door on a non-scratching surface with
the outside up.
16
Page 17

Installation Instructions
[] REMOVE THE FROZEN FOOD
COMPARTMENT DOOR (CONT.)
2.6 Transfer the 2 screws from the opposite side of
tile cabinet to the screw holes vacated by the
top hinge removal.
[] REMOVE THE FRESH FOOD DOOR
3.1 Tape the door shut wdth masking tape.
3.2 Using a 5/16" hex-head socket screwdriver and
a 5/16" open-end wrench, remove the two
screws holding the center hinge (and the shim
glued to it) to the cabinet. Lift the center hinge
to fi'ee its pin from the socket in the top of the
doo_, and set hinge and screws aside. Be careful
not to lose the center hinge spacer and washer.
3.3 Remove the tape and tilt dm door away from the
cabinet. Lift tile door from tile pin in tile t>otmm
hinge bracket. (ffthe plastic washer sticks to tile
door bottom, put it back on the hinge.)
[] REMOVE THE FRESH FOOD
DOOR (CONT.)
3.4 Set the door outside-up on a non-scratehing
surface.
3.5 Transter the two screws from the opposite side of
the cabinet to the screw holes vacated by the center
hinge removal.
3.6 Transfer the washer (if your model has one) to the
opposite side.
3.7 _Pake one of the scre,a_ removed in step 2 and start
it in the outermost screw hole on dm opposite side.
Do not drive it all the way down--leave enough
space under the screw head for thickness of shim
and bracket.
IJ
17
Page 18

Installation Instructions
IRII REVERSING THE DOOR SWING (CONT.)
[] REVERSING THE HARDWARE
4.1 Remove the base grille (if your refrigerator has
one) by pulling it straight out.
4.2 Move the bottom hinge bracket (and shim glued
to it) and plastic washer from the right side to the
left side.
Plastic Plastic
Washer Washer
Bracket
Modelswith ahingebracket
thathas2 screwholes.
Hinge
Bracket
Modelswith a hingebracket
that has4screwholes.
Switchthe hingepinto the
oppositesideofthe bracket.
4.3 Interchange hinge (and the shim glued to it) and
screws at top right with screws at top left of cabinet.
Do not tighten screws on hinge side at this time.
Installingthe hingeonthe left.
Installingthehingeonthe right.
NOTES:
• Some hinges have four holes. Which holes you
use for installing tile hinge depends on which
side you install tile hinge.
• The outer edge of the hinge should be parallel
to the edge of the case for correct installation.
[_REVERSING THE DOOR HANDLES
5.1 Transfer fresh food door handle
5.1.1 Remove the bottom cap by pushing it
toward the bottom of the door, and
remove the screw underneath.
Remove tile two screws holding the
handle to the top of the dool:
i
5.1.2 Remove the handle.
5.1.3 Remove the screws from the right edge of the
door top and insert them into the handle screw
holes on the opposite side.
18
Page 19

Installation Instructions
[_REVERSING THE DOOR HANDLES
(CONT.)
5.1 Transfer fresh food door handle
(cont.)
5.1.4 With tape-tipped putty knife or thin-
blade screwdrivm, pry out the plug
button from the hinge hole on the lef}
side of the door and insert it into the
hole on the opposite side that ,a-as
vacated by removal of the top hinge.
5.1.5 Pull the plug button from the front of the door
and transfer it to the opposite side.
Toreattachthe handleonthe
oppositeside.
5.2 Transfer door stop
5.2.1 Move the metal door stop from the right
end to the lef} end.
DoorStop
5.2 Transfer door stop (cont.)
5.2.2 Move any screws fi'om the left end to the
right end.
5.3 Reinstalling the Fresh Food Door
Handle
5.3.1 Attach the handle to tile right side of the
door with screws at tile top and under the
handle plug.
5.3.2 Reinstall the handle plug.
19
Page 20

Installation Instructions
IRII REVERSING THE DOOR SWING (CONT.)
5.4 Transfer Frozen Food Compartment
Door Handle
5.4.1 Remove the screw holding the handle to
the top of the door and the two screws
holding the handle to the bottom of the
dool:
5.4 Transfer Frozen Food Compartment
Door Handle (cont.)
5.4.4 Transfer the door stop as shown on the
preceding page.
5.4.5 Attach the handle to the right edge of tile door
with screws at top and bottom, using bottom
holes vacated by removal of the door stop
screws.
5.4.2 Remove the handle.
5.4.3 Remove the screw from the right top edge of the
door and insert it into the handle screw hole on
tile left side.
2O
Page 21

Installation Instructions
[]REHANGING THE DOORS
6.1 Rehang the fresh food door
6.1.1 Lower the fresh tood door onto the
bottom hinge pin. Be sure the washer
is in place on the pin.
6
Washer
Bracket
Modelswith a hingebracket
that has2screwholes.
Plastic
Washer
8racket
Modelswith ahingebracket
that has4screwholes.
[_REHANGING THE DOORS (CONT.)
6.2 Rehang the frozen food
compartment door
6.2.1 Lower the freezer door onto the center
hinge pin. Be sure the washer and spacer
are in place on the pin.
CenterHingePin,
PlasticWasher
andSpacer
6.1.2 Insert the pin on the center hinge into the
socket in the top of the dool: Place tbe spacer,
then the u-ashe_; on the hinge pin.
NOTE: The center hinge must be turned over
as shown when mounted on the left side.
HingePin
PlasticWasher
andSpacer
6.1.3 Tilt the door toward the cabinet. As the door is
brought into position, slide the hinge under the
head of the screw which earlier had been partly
driven into the outermost hole. Insert the
remaining screw, then tighten both screws
securely.
6.2.2 Tilt the door toward the cabinet, lifting the top
hinge so the pin fits into the socket on the top
of the doon
6.2.3 Make sure the door is slightly above the top of
the cabinet and the gap between tile doors is
even across the front. Tighten the top hinge
screws. Do not overtighten these screws--
tighten them until they are just snug, then turn
them another one-half turn.
21
Page 22

Normal operating sounds.
Newer refrigerators sound different from older refrigerators. Modern refrigerators
have more features and use newer technology.
Do you hear what I hear? These sounds are normal
HUMMM...
WHOOSH...
• The new high efficiency compressor may run faster
and longer than your old refrigerator and you may
heal" a high-pitched hum or pulsating sound while
it is operating.
• You may heal" a whooshing sound when tile doors close.
This is due to pressure equalizing within tile refrigerator.
CLICKS, POPS,
CRACKS and CHIRPS
• You may hear cracking or popping sounds when the
refrigerator is first plugged in. This happens as the
refrigerator cools to the correct temperature.
• The compressor may cause a clicking or chirping
sound when attempting to restart (this could take
up to 5 minutes).
• Expansion and contraction of cooling coils during
and after defrost can cause a cracking or popping
sound.
• On models with an icemaker, after an icemaking
cycle, you may hear the ice cubes dropping into
the ice bucket.
WRY!
• You may hear the fans spinning at high speeds.
This happens when the refrigerator is first plugged
in, when the doors are opened frequently or when
a large amount of food is added to the refrigerator
or freezer compartments. The fans are helping to
maintain the correct temperatures.
WATERSOUNDS
6
The flow of refrigerant through the freezer cooling
coils may make a gurgling noise like boiling water.
Water dropping on the defrost heater can cause a
sizzling, popping or buzzing sound during the
defrost cycle.
A water dripping noise may occur during the defrost
cycle as ice melts from the evaporator and flows into
the drain pan.
Closing the door may cause a gurgling sound due to
pressure equalization.
22
Page 23

Before you call for service...
Troubleshooting lips
Save time and money! Review the charts on the following
pages first and you may not need to call for service.
Possible Causes What ToDo
Refrigerator in defrost cycle. * Wait about 30 minutes tor defrost cycle to end.
Temperature control dial • Move the temperature control dial to a temperature
in 0 position, setting.
Refrigerator is unplugged. • Push the plug completely into the outlet.
The fuse is blown/clrcuit • Replace fuse or reset the breaker:
breaker is tripped.
Roller screws or leveling legs • See Rollers and Leveling Legs.
need adjusting.
Normal when refrigerator • Wait 24 hours for tile refrigerator to completely
is Fn_t plugged in. cool down.
Often occurs when Large • This is normal.
amounts of food are
placed in refrigerator.
Door left open. • Check to see if package is holding door open.
Hot weather or frequent • This is normal.
door openings.
Temperature control dial • See About the temperature control diaL
set at the coldest setting.
Grille and condenser • See Care and cleaning.
need cleaning.
Temperature control dial • See About the temperature control dial.
not set cold enough.
Warm weather or frequent • Set the temperature control dial one step colden
door openings. See About the temperature control dial
Door left open. • Check to see if package is holding door open.
Package blocking air duct in • Check to see if package is blocking air duct in freezer
freezer compartment, compartment.
• Check to see if package is holding door open.
_o_withinpackage:
Door left open.
Too frequent or too long
door openings.
23
Page 24

Before you call for service...
Troubleshooting 77ps
Possible Causes What ToDo
Icemaker power switch • On power switch models, set the power switch to dm
is not on. I(on) position. On feeler arm models, move the feeler
arm to the ON (down) position.
Water supply turned off or • See Installing the water line.
not connected.
Freezer compartment • Wait 24 hours for the refrigerator to completely
too warm. cool down.
Piled up cubes in the storage • Level cubes by hand.
bin cause the icemaker
to shut off.
leemaker is on but the water • Turn the icemaker off. On power switch models, set the
supply to the refrigerator has power switch to the 0 (Off)position. On teeler arm
not been connected, models, move the feeler arm to the STOP (up) position.
Keeping it on will damage the water valve.
Water shutoff valve connecting • Call the plumber to clear the valve.
refrigerator to water line may
be clogged.
Door left open. • Check to see if package is holding door open.
Temperature control dial • See About the temperature control dial.
not set cold enough.
Ice storage bin needs denning. • Empty and wash bin. Discard old cubes.
Food transmitting odor/taste • Wrap leeds well
to ice cubes.
Interior of refrigerator • See Care and cleaning.
needs cleaning.
Not unusual during •Wipe surFace dly and reset temperature control dial
periods of high humidity, one setting colden
Too frequent or too
long door openings.
Foods transmitting • Foods with strong odors should be tightly wrapped.
odor to refrigerator. • Keep an open box of baking soda in the refrigerator;
replace every three months.
Interior needs cleaning. • See Care and cleaning.
24
Page 25

con congelador en la parte superior
Refrigeradores
Informaci6n de seguridad
Cables de extensi6n ............ 2
C6mo conectar la electricidad .... 3
Enchufes adaptadores .......... 3
Precaudones de seguridad ....... 2
Instruccqones de operaci6n
Controles de la temperatura ...... 4
Cuidado y limpieza .......... 9, 10
Estantes .................... 5, 6
Gavetas de almacenamiento .... 6, 7
M_iquina para hielo automfitica . . .8
Instruccqones para la instala_q6n
C6mo inverdr el vaiv_n
de la puerta ............... 15-21
C6mo preparar la instalaci6n
del refrigerador ............... 11
Instalaci6n de la lfnea
del agua ................. 12-15
Cons_os para la soluci6n de
aver(as
Antes de llamar a
solicitar servicio ............ 22-24
Sonidos normales de operaci6n . .22
Escriba el modelo y numero de serie aqui:
Modelo #
Numero de serie #
Los puede encontrar en una etiqueta en el
lado superior derecho del compartimiento
de alimentos fi'escos.
Mo&los
1E 16, 17, I8
EXPORTATION 162D7737PO06 49-60251 02-03 dB
Page 26

IMPORTANTEINFORMACIONDESEGURIDAD.
LEATODASLASINSTRUCCIONESANTESDELUSO.
iADVERTENCIA!
Use este aparato sSle para el prepSsito establecido come se describe en este Manual del propietarie.
PRECAUCIONESDESEGURIDAD
AI usar aparatos el6ctricos, se deber#n seguir precauciones b#sicas de seguridad, incluyendo las siguientes:
NEste refrigerador debe instalarse correctamenre y
ubicarse de acuerdo con las Instrucciones para la
instalacidn antes de su uso. Tambi_n consulte la
seccidn COme conectar la electricidad.
g_No intente pararse sobre el refrigeradon Hacerlo
puede resultar en dafios fisicos o dafios al
refi'igerador.
NNo permita que los nifios se suban, se paren o se
cuelguen de los estantes del refi'igerador. Podrfan
dafiar el refl'igerador y sufi'ir un serio accidenre.
g_No permita que los nifiosjueguen con el
refi'igerador o con los controles.
NNo toque las superficies frfas en el
compartimiento del congelador con las manos
hfimedas o mojadas. La piel se podrfa pegar a
estas superficies extremadamente fl'fas.
g_No almacene ni use gasolina ni otros vapores
inflamables alrededor de _ste u orro aparato.
NMantenga los dedos alejados de las greas
estrechas; el espacio entre las puertas y entre _stas
y los gabinetes es muy pequefio. Tenga cuidado al
cerrar las puertas cuando haya nifios en el grea.
NEn refrigeradores con mgquina autom_itica
de hielos, evite el contacto con las partes en
mmdmiento del mecanismo expulsou o con el
elemenm de calefacci6n que expulsa los cubos.
No coloque los dedos o las manos en el
mecanismo autom_itico de la mgquina de hielo
mientras el refiigerador est_ conectado.
g_Desconecte el refrigerador antes de limpiarlo y
hacer reparaciones.
NOTA:Recomendadosfuertementequecualquierservicio
searealizadoperunindividuocafificado.
NAntes de reponerunbombillofundido,usteddebe
desconectarel refrigeradorpara evitm- el contacto
con un filamento de cable encendido. (Es posible
que un bombillo fundido se rompa mientras se
reemplaza).
NOTA:Bajarel controlala posicidn0 noeliminala
corrientedel circuitode la luz.
g_No vuelva a congelar alimenms que han sido
descongelados por completo.
A iPELIGRO!RIESGODEENCIERRODENIl[lOS
2
DESECHEELREFRIGERADORCORRECTAMENTE
El encierro o sofocacidn de niflos no es un
problema del pasado. Los refrigeradores desechados
o abandonados son todavi'a peligros, incluso si s61o
van a permanecer "unos pocos dfas". Siva a
desechar su refrigeradm; por favor siga las
siguientes instrucciones para ayudar a evitar
accidentes.
Antes de desechar su viejo refrigerador o
congelador:
/}SfRetire las puertas y des&helas de forma separada.
NDeje los estantes en su lugar de manera que los
nifios no puedan subir fgcilmente.
NSi el refrigerador tiene una llave, pdng-ala en uso.
Refrigerantes
Todos los aparatos de refrigeracidn contienen
refrigerantes, los cuales se deben retirar antes de
la eliminacidn del producm de acuerdo con la ley
federal. Si"_aa desechar algfin aparam antiguo de
refrigeracidn, consulte con la compafifa a cargo
de desechar el aparato para saber qu_ hacer.
USODECABLESDEEXTENSION
Oebido a peligros potenciales de seguridad bajo ciertas condiciones, nos oponemos al use de cables
de extensiSn.
Sin embargo, si debe usar un cable de extensidn, es absolutamente necesario que sea un tipo de cable de
extensidn para aparatos con conexidn a tierra de tres cables, que estd en la lista de UL, que tenga un enchufi_
de tipo conexidn a tierra y salida y que el grado el_ctrico del cable sea de 15 amperios (mfnimo) y 190 voltios.
Page 27

A iADVERTENCIA!
COMOCONECTARLAELECTRICIDAD
Bajo ninguna circunstancia corte ni retire la tercera pata (conexi6n a tierra) del cable de electricidad.
Per seguridad personal, este aparato debe estar cerrectamente cenectado a tierra.
El cable el4ctrico de este aparato est_ proxdsto de un
enchufi? de tres patas (conexi6n a tierra) que encaja
en un mmacorriente estfindar de 3 orificios
(conexi6n a tierra) para minimizar la posibilidad de
peligro de una descarga el4ctrica.
Haga que el tomacorriente de la pared y el circuito
sean revisados por un elecrricista calificado para
asegurar que el romacorriente tiene la conexi6n a
tierra apropiada.
Cuando haya un tomacorriente sin conexi6n a
tierra, es su responsabilidad y obligaci6n personales
reemplazarlo con un romacorriente adecuado de
rres orificios.
El refi'igerador deberg
siempre estar conectado en
su propio romacorriente
elg_ctrico individual. Esto
ofi'ece el mejor desempmSo
y tambi_n evita sobrecargar
los circuitos el&rricos de la
casa que podrfan causar un
incendio a partir de los cables
recalentados. Por favor consulte la placa de
clasificacidn en el refi'igerador para el voltaje, vatiaje
y fi'ecuencia adecuados. Si el enchufiz del producto
no encaja en su tomacorriente, el producto deberg
ser provisro de un nuevo enchufi?.
IMPORTANTE:ElajustedeenchufeselfictricosycablesIo
deberealizaruntficnicocafificadoo unagentedeservicios.
Enalgunosparsesel ajustede encbufesycablesel#ctricos
soloest#permitidocuandoel trabajoes llevadoa cabopor un
t#cnicocafificado.
Si el cable del suministro de energfa se dafla, debe
ser repuesm por tin agente de servicio calificado
con el fin de eviVar peligros de seguridad.
Nunca desconecte su refrigerador halando el cable
elg_ctrico. Siempre tome el enchufe firmemente y
hglelo directamente del tomacorriente.
Repare o reemplace de inmediato todos los cables
eldctricos que se hayan desgastado o dafiado. No use
tin cable que tenga grietas o dafios de abrasidn en
su longitud o en cualquier extremo.
AI retirar el refrigerador de la pared, tenga cuidado
de no enrollar o dafiar el cable el&trico.
Reposici6n del terminal
Si el terminal de su refrigerador necesita reposici6n
en cualquier momento, debe ser reemplazado por
tin terminal especial que lo puede obtener de su
proveedor local. Se harg un cargo pot la reposici6n
del terminal si se ha estropeado.
USODEENCHUFESADAPTADORES
Oebido a peligros potenciales de seguridad bajo ciertas condiciones, nos oponemos al use de un enchufe
adaptador.
Sin embargo, si debe usar un adapvadol, donde los
cddigos locales lo permimn, se puede hacer una
conexion temporala tin tomacorrienm de dos paras
con el uso de tin adaptador en la lisva de UL,
disponible en la mayorfa de las ferreterfas.
E1 orificio m;is grande en el adaptador deberg
alinearse con el orificio mgs grande en el
tomacorriente para brindar la polaridad adecuada
en la conexidn del cable eldctrico.
_Mdesconectar el cable el6ctrico del adaptado_;
siempre sostenga el adapvador en su lugar con una
mano, mientras hala el enchufe del cable el4crrico
con la otra. Si no hace esto, es probable que el
terminal a tierra del adapmdor se rompa con el uso
repetido.
Si el terminal a tierra del adapmdor se rompe,
NO USEd refiigerador hasta que se haya esvablecido
una conexi6n a tierra adecuada.
Unirel terminalatierradeladaptadorauntomillo dela tapa
deuntomacorrientenoequivaleaunaconexidna tierra,a
menosqueel tornillode la tapaseamet#lico,ynoestO
aislado,y eltomacorrientetongaconexidna tierrapermedio
delcableadode la casa.Deber#hacerqueunelectricista
cafificadorevisesi el tomacorrienteest#correctamente
conectado a tierra.
LEAYSIGACUIDADOSAMENTEESTAINFORMACIONDESEGURIDAD.
CONSERVEESTASINSTRUCCIONES
3
Page 28

Sobreel discodecontroldela temperatura.
Girar el disco a 0 descontin_a el enfriamiento en ambos compartimientos: alimentos frescos y congelador. No apaga la
corriente hacia el refrigerador.
Nive/esdelcontrol
Disco de control de la temperatura
El disco de control de la remperatura tiene nueve
niveles rags 0. I es el nags calieme, 9 es el rags fifo.
AI inicio, fije el disco en 5.
Despug_s de usar el refrigerado_; ajusre el disco
si es necesario.
lnserte una moneda en el oriticio en el centro del
disco y podr:i girar el disco al nivel que mejor se
adapte a sus necesidades.
Espere 24 horas para que el reffigerador se enfrfe.
Interruptor de anti-condensaci6n
(enalgunosmode&s)
Si se crea humedad en el techo del
compartimiento de alimentos frescos, gire
el inrerruptor de anfi-condensaci6n a la
posici6n de encendido ¢1J.La humedad
tiende a aparecer cuando el aire es h6medo,
en el verano, en las horas de la mafmna o en
salones sin aire acondicionado. Mudvalo a la
posici6n de apagado {0}en condiciones
menos h(lmedas.
4
Page 29

Sobrelosestantesdeloscompartimientosdealimentosfrescos.
Los estantes se apoyan en varios niveles permiti6ndole adaptarlos segOn sus necesidades. No todas las caracterfsticas
est#n presentes en todos los modelos.
Estantes de media extensi6n
Un extremo del estante se apoya en un
soporte moldeado hacia el lado de la pared;
un g-ancho en el orro extremo se encaja en
un carril en la pared posterior del gabinete.
Poro retirarlo,levante el estante hacia el
ffente, luego flmra del soporte y hacia
flmra del carril.
Para reemplazarlo,seleccione la altura
deseada del estante. Con el frente del
estante levantado ligeramente, encaje la
lengfieta superior del gancho en el carril,
luego baje el estante al soporte.
NOTA:Elestantehaciala derechadelcarril hasido
disefiadoparaencajarenel orificiode la derecha;
el estantehaciala izquierdahasidodisefiadopara
encajarenel orificioizquierdo.
Estantes de extensi6n completa
Algunos modelos fienen un estante
deslizante metglico en acero, un estante de
vidrio templado estacionario o dos estantes
estacionarios metglicos en acero. Estos
estantes se pueden mover hacia otra parte
en el compartimiento de alimentos fl'escos.
E1 estante deslizante de extensi6n completa
tiene seguros de freno. Cuando se colocan
correctamente en los soportes del estante,
el estante pararg antes de salirse
completamente del refrigerador y no se
inclinar_i cuando haya colocado o retirado
alimentos de 4ste.
Para retirar losestantesdeextensioncompleta,
levante la parte posterior del estante y hale.
Pararetirar unestante de extensi6n completa
cuandola puertadel compartimientode
alimentosfrescosnosepuedaabrir
completamente,levante la porte posterior
del estante, hale hacia delante y luego
hacia abajo, incline el estante y s_iquelo.
5
Page 30

Sobrelos estantesdel compartimientode alimentosfrescos.
Algunos modelos tienen un estante de bandeja para hielos y otros tienen un estante de escalSn de extensiSn completa.
Estante de la bandeja de hielos
Para retirar el estante dela bandejade hielos,
levante el lado izquierdo de la bandeja de
sus soportes, luego hale el estame hacia la
izquierda para liberarlo de los soportes de
tapdn. Hale el estante hacia la derecha para
liberar los pasadores de los orificios en la
pared del gabinete.
Estante de escal6n
Pararetirar el estantedeescalon:
[_Levante ligeramente el costado izquierdo
_2 del estante.
[_ Mueva el estante hacia la izquierda para
_m2liberar los extremos de la derecha de los
orificios en la pared del gabinete.
[]Baje el lado derecho del esmnte, mueva el
esmnte hacia la derecha y retfrelo.
Parareponerel estantede escalon:
[]Con el estante inclinado como se muestra,
encaje los extremos de la izquierda del
esmnte en los orificios en la pared del
gabinete.
[] Ligeramente levante el lado izquierdo del
es'tante, voltee el estante hacia arriba,
encaje los extremos del estante en los
orificios en la pared del gabinete y baje
el estante a su lugan
Bandejas de hielo (enalgunosmodelos)
Las bandejas de hielo estgn disefiadas para
liberal" cubos de hielo fgcilmente. Sostenga
la bandeja hacia abajo sobre un contenedor
y gire ambos extremos para liberar los
cubos.
Para unoo doscubosde hielogmicamente,
deje la bandeja hacia arriba, gire ambos
extremos ligeramente y retire el n6mero
deseado de hielos. Lavelas bandejasde hielo
y el recipiente dealmacenamientoen agua
tibia #nicamente. No las ponga en la lavadora
de platos.
Sobre las gavetas de almacenamiento.
No todas las caracterfsticas est#n en todos los modelos.
Gavetas para frutas y vegetales
El exceso de agua que pueda acumularse
al fbndo de las gavetas debe retirarse y se
deben limpiar las gavetas.
Gaveta deservicio
La gavem de smwicio puede colocarse
en la ubicaci6n mgs 6til dependiendo
de las necesidades de su familia.
6
Page 31

Sobre como retirar la gaveta de almacenamiento y la cubierta.
No todas las caracterfsticas est_n presentes en todos los modelos.
Remoci6n de la gaveta y cubierta
Las gavetas pueden retirarse f_icilmente
mmgndolas de los lados y levan 'tando
ligeramente mientras se halan las gave'ms
pasando el punto de fren0.
Gavetas de extensi6n completa con cubierta plastica
Para retirarla cubierta,]evgnte]a de sus
soportes, hale hacia el fi'ente, inclfnela y
s_iquela.
Gavetas id_nticas con cubierta de vidrio
Pararetirarlas:
[] Redre las gavetas.
[] lntroduzca la mano, empt{je el fi'ente de
la cubierta de vidrio hacia arriba, y al
mismo tiempo, hglela hacia delante 1o
mgs que pueda.
Inclinela y sgquela. Exdte limpiar la cubierta
de vidrio fi'fa con agua caliente ya que por la
diferencia de remperaturas exrremas podrfa
romperse.
[]Retire la estructura de la gaveta.
(Siempre retire la cubierta de vidrio
antes de sacar la estructura de la gaveta).
Levante la estructura de los soportes en cada
lado y atrgs, hglela hacia delante, inclfnela y
s_iquela.
Para reemplazarla:
[]Baje la estructura hasta que descanse en
los soportes en cada lado y atrgs.
[] Reemplace la cubierta de vidrio,
empt_jando su borde trasero firmemente
hacia el canal de la estructura posterior y
suavemente bajando el fi'ente a su lugar.
[ Reemplace las gavetas.
Page 32

Sobre la maquina de hielo automMica. (enalgunosmodelos)
Un refrigerador recientemente instalado puede tomar entre 12y 24 horas para empezar a hacer hielo.
M_quina dehielo automMica
Modelo delInterruptor deenergia
La m%uina de hielos producir:_ siete
cu[yos por ciclo, aproximadamente entre
100 y 130 cubos en un peri'odo de 24 horas,
dependiendo de la temperatura del
compartimiento del congelado_; la temperaUlra
del cuarm, el ndmero de veces que se abre la
puerto y on'as condiciones de uso.
Hay dos tipos de m:_quinas de hielos: los
modelos de interruptor de energia y los
modelos de brazo de llenado.
de hielo, fije el interruptor de corriente en la
posicidn de 0 (apagado)o mueva el brazo de
llenado hacia la posicidn STOP(hacia arriba).
Cuando se haya conectado el refrigerador al
suministro de agua, f!je el interruptor de
corriente en la posicidn de ! (oncendido) o
mue'_a el brazo de llenado hacia la posici6n ON
i_ (hacia abajo). En los modelos de intermptor
abaj01 de enmgia, la luz verde se encenderfi.
ModelodelBrazodeIlenado
La m%uina de hielos se llenar_ de
agua cuando se enfrie hasta 15°F (-9°C). Un
refrigerador recidn instalado se puede mmar
entre 12 y 24 horas para empezar a hacer
cubos de hielo.
Escuchar_ un zumbido cada vez que la
mgquina de hielos se llene de agua.
Deseche los primeros cubos de hielo para
permitir que la lfnea del agua se limpie.
Asegxirese de que nada interfiera con el
movimiento del brazo indicador.
Cuando el contenedor se llene al nivel
del brazo indicadol; la mgquina de hielos
dejarfi de producir hielos.
Es normal que varios cubos de hielo sejunten.
Si el hielo no se usa con frecuencia,
los cubos de hielo viejo se volvergn mrbios,
con sabot rancio y se encogev_in.
En los modelos de interruptor de energfa, la
luz verde se volverfi intermitente si los cubos de
hielo se atascan en la mgquina de hielos. Para
corregir esm, ponga el intermptor de corriente
en la posicidn de 0 (apagadc)y retire los cubos.
Regrese el intermpmr de corriente a la
posicidn de ! (oncondido) para reiniciar la
m%uina de hielos. Despu& de haber
encendido de mmvo la m_iquina de hielos,
habr_i una demora de 45 minums antes de que
la m%uina de hielos reinicie las operaciones.
NOTA:EnhogaresconpresiOndeaguainferioral
promedio,esposibleClUeescucheelciclodelambquina
dehielosvariasvecesal hacerunloredehielo.
Kit de accesorios de la m_quina de hielo
Si su refl'igerador no viene ya equipado con
una m_iquina de hielo autom_itica, existe un
kit accesorio para la m_iquina de hielo que
est_i disponible pot un costo adicional.
Revise en la parte posterior del reli'igerador
en busca del kit para la m_iquina de hielo
especitica que necesita para su modelo.
8
Page 33

Cuidadoy limpieza del refrigerador.
Limpieza exterior
Lasmanijas dela puerta yaccesorio (en algunos
modelos). Limpie con un patio humedecido
con aguajabonosa. Seque con un patio seco.
Mantenga el exterior limpio. Lfmpielo con un
patio ligeramente humedecido con cera de
cocina para electrodom_sticos o detergente
lfquido suave para platos. Seque y brille con
un patio limpio y seco.
Nolimpieel refrigeradorconunpatiosuciopara
platoso conunatoalla mojada.Estospuedendejar
residuosypuedenerosionarla pintura.No use
almohadillasderestregar,limpiadoresenpolvo,
blanqueadoreso limpiadoresquecontengan
blanqueadoresya queestosproductospueden
raspary debilitarelacabadodepintura.
Limpieza interior
Para ayudar a evitar olores, deje una caja
abierta de bicarbonato en los compartimientos
de alimentos frescos yen el congelador.
Desconecte el refrigerador antes de limpiarlo.
Si esto no es prfictico, escurra la humedad
excesiva con una espoi_,ja o patio al limpiar
alrededor de los interruptores, luces o
controles.
Use una solucidn de agua dbia y bicarbonato--
una cucharada (15 ml) de bicarbonato para
un cuarto (1 litro) de agua. Esto limpia y
neutraliza los olores. Enjuague y seque.
Despu& de limpiar lasjuntas de las puertas,
aplique una capa delgada de petrolato en
lasjuntas de las puertas en el lado de las
bisagras. Esm ayuda a evitar que lasjuntas
se peguen y desformen.
Evitelimpiarlos estantesde vidriofrfos(enalgunos
modelos)conaguacalienteyaquela diferenciade
lastemperaturasextremaspuedecausarquese
quiebren.Manipulelosestantesde vidriocon
cuidado.Golpearel vidriotempladopuedecausar
quesequiebre.
Nolaveningunapartepl#sticadel refrigeradoren
la lavadoradeplatos.
iiiii! !i!! I
Limpieze de los e__irales del
condensade_
Condensador
No hay necesidad de una limpieza de rutina
del condensador en ambientes de operacidn
de hogares normales. Sin embargo, en
ambientes que puedan ser pardcularmente
polvorienms o grasosos, el condensador
debe limpiarse periddicamente para una
operacidn eficiente del refrigeradon
Para limpiar el condensado_; gire el disco de
control de la temperatura a 0. Barra o aspire
el polvo.
Para mejores resultados, use un cepillo
especialmente disetiado con este propdsito,
el cual est_ disponible en la mayorfa de
dendas de repuestos para aparatos.
Apriete para liberar elganche.
Reposici6n de la bombilla (onelgunosmodelos)
En la parte superior del compartimienm
de alimentos frescos, opuesto al panel de
control de la temperatura se encuentran
una bombilla y una roseta.
Para reponer la bombilla, primero
desconecte el refi'igerador de su
tomacorriente. Ponga su mano debajo del
protector de la luz y libere el gancho en
el extremo de la bombilla del protector.
(El protector de la luz est_ presente en
algunos modelos).
9
Page 34

Cuidadoy limpieza del refrigerador.
Detrbs del refrigerador
Tenga cuidado al mover el refrigerador lejos
de la pared. Todos los tipos de cubiertas de
piso se pueden dafial, particularmente las
cubiertas acojinadas y aquellas con
superficies con disefios en relieve.
Gire las paras niveladoras en cada esquina
frontal del refrigerador en el sentido de las
manecillas del reloj hasta que los rodillos
soporten al refrigeradon Hale el
refi'igerador en l/nea recta y regr&elo a su
posicidn empt0_ndolo de la misma forma.
Mover el refl'igerador en una direccidn
lateral puede resultar en dafios a la
superficie del piso o al refi'igeradon
Cuandoempujedo nuevoel refrigerador,asegOrese
de nopisarel cableel#ctricoo laIfneadesuministro
a lam#quinadohielo(enalgunosmodelos).
Despu& de emptgar el refrigerador de
nuevo hacia su lugar, gire las patas en el
sentido de las manecillas del reloj hasta que
las paras de nuevo sostengan el peso del
refi'igerador.
C6moprepararse para las vacaciones
Para vacaciones o ausencias prolongadas,
retire los alimentos y desconecte el
refi'igeradon Gire el disco de control de la
temperatura hacia la posicidn 0, y limpie el
interior con una solucidn de una cucharada
de bicarbonato (15 ml) y un cuarto (1 litro)
de agua. Deje las puertas abiertas.
F!ie el interruptor el_ctrico en la posicidn de
0 _apagado)o mueva el brazo de llenado a la
posicidn STOP (hacia arritm) dependiendo del
modelo y cierre el suministro del agua hacia el
refrigeradol:
Si la temperatura puede caer por debajo
del punto de congelamiento, haga que una
persona calificada drene el sistema del
suministro de agua (en algunos modelos)
para evitar serios dafios a la propiedad
causados por inundaciones.
C6mo prepararse para trasladarse
z-ksegure todos los artfculos suelms como
la rejilla, los estantes y cajones peg_indolos
con cinta en su lugar para evitar dafios.
AsegOresedo queel refrigeradorpermaneceenuna
posicidnvorticalduranteel traslado.
10
Page 35

Instrucciones
para la instalaci6n
Refrigerado
Modelos 15,16,17,18
ANTES DE INICIAR
Lea estas instrucciones completa y cuidadosamente.
• IMPORTANTE - Guardeestas
insrrucciones para uso del inspector local.
• IMPORTANTE - Obsorvetodoslos
c6digos y 6rdenes legales.
• Nota al instalador - Asegfirese de dejar estas
instrucciones con el consumidor.
• Nota al consumidor - Conserve estas
insn'ucciones para referencia futura.
• Nivel de destreza - La instalaci6n de este aparato
requiere de destrezas mec_inicas b_sicas.
• Tiempo de ejeeuei6n - lnstalaci6n del refl'igerador
15 rninutos
Cambio del vai%n de la puerta
1 hora
• La instalacidn apropiada es la responsabilidad del
insmlador.
• La fhlla del producto debido a una instalaci6n
inadecuada no es_ cubierta pot la garantfa.
DIMENSIONES
M0delo 15 16
A*
B
C**
D
E
17 18
61" (155cm) 64" (163cm) 67" (170cm) 67" (170cm)
28" (71 cm) 28" (71cm) 28" (71cm) 28" (71cm)
311/_1_"(79 cm) 317Z (79 cm) 327(' (81 cm) 3273" (82cm)
547/1_"(139cm) _7/j (139cm) 56"(142cm) 563/8" (143cm)
26" (66 cm) 26" (66cm) 267/v" (68cm) 267/!_"(68 cm)
* La altura no incluye la bisagra--Agregue 22 mm para
la bisagra.
** La profundidad incluye la manija.
SUMINISTRO DE AGUA
HACIA LA MAQUINA DE HIELO
(en algunos modelos)
Si el refl'igerador tiene una m_iquina de hielo, se
tendril que conectar a una lfnea de agua potable frfa.
Un kit de suministro de agua (contiene tuberfa de
cobre, vglvula de apagado, accesorios e instrucciones)
est5 disponible con tin costo adicional a travds de su
proveedon La instalaci6n de la mfiquina de hielo la
debe realizar un t6cnico calificado de servicio.
UBICACION DEL REFRIGERADOR
• No instale el rel¥igerador donde la temperamra
baje de 60°F (16°C) ya que no correrg con suficienre
frecuencia para manmner las remperamras
apropiadas.
• lnsNlela en tin piso flmrte para que lo soporte con
carga completa.
AREA
Permita el siguiente espacio para una f_icil insmlacidn,
apropiada circulacidn del aire y conexiones de plomerfa
yel_ctricas.
• Costados 3/4" (19 mm)
• Arriba 1" (25 mm)
• Art:is 1" (25 mm)
RODILLOS Y PATAS NIVELADORAS
Las patas niveladoras cerca de cada esquina del
refl'igerador son ajustables. Esms colocan firmemente el
refi'igerador y evitan que se rnueva cuando las puertas
est,4n abiertas. Las paros niveladoras deben fijarse de
manera que el frente del refl'igerador est_ levanmdo lo
suficienre para que las puertas se cierren fficilmente al
abrirse hasta la mitad.
Gire las patas niveladoras end sentido de las
manecillas reloj para levantar el refrigeradot, en el
sentido contrario a las manecillas del reloj para bajarlo.
Los rodillos al lado de las paras niveladoras le permiten
retirar el refrigerador de la pared para limpieza.
Gire las patas en el sentido de las manecillas del
reloj hasta que el peso del rel¥igerador se traslade
desde &tas hacia los rodillos. Despu& de rodar el
rel¥igerador a su posicidn, gire las paras en el senrido
de las manecillas del reloj hasta que las patas de nuevo
sostengan el peso del refi'igeradon
11
Page 36

Instrucciones para la instalacion
ill COMO INSTALAR LA LiNEA DEL AGUA
ANTES DE INIClAR
Esta instalacidn de la lfnea del agua no estg
garamizada por el fabricante del refi'igerador o
de la m_iquina de hielo. Siga estas instrucciones
cuidadosamente para minimizar el riesgo de costosos
dafios causados por el agua.
E1 martilleo de agua (ruido del agua en la tuberfa)
en la tuberia de la casa puede causar dafios alas
partes del reffigerador y llevar a escapes de agua o
inundacidn. Llame a un plomero calificado para
corregir el martilleo del agua antes de instalar la lfnea
del suministro de agua hacia el refi'igeradol:
Para evitar que el producto se funda o se dafie, no
conecte la linea del agua a la linea del agua caliente.
Si usa su refrigerador antes de conectar la 1inea del
agua, asegtirese de que el interruptor de corriente de
la mS_quina de hielo est_ en la posicidn de apagado
(OFF) (modelos con interruptor) o el brazo de llenado
estd en la posicidn STOP(hacia arriba) (modelos con
brazo de llenado).
No instale la tuberfa de la m_iquina de hielo en greas
donde las temperaturas caig-an por debajo del punto
de congelamiento.
A1 usar cualquier aparato eldctrico (como un taladro
el_ctrico) durante la instalacidn, asegfirese de que el
dispositivo est_ aislado o conectado de manera que
evite el riesgo de un choque el_ctrico.
Todas las instalaciones se deben realizar segfin los
requisitos locales del cddigo de plomerfa.
La instalad6n de la m_iquina de hielo debe ser
instalada solamente por un t_cnico calificado.
iADVERTENClA! Conecteal
suministro de agua portgtil solameme.
QUE NECESITA
Para determinar la cantidad de tuberfa de cobre que
necesim:
Mida la distancia desde la vglvula del agua en la parte
posterior del refrigerador hacia la tuberfa de suministro
de agua. Luego agregue 8 pies (244 cm). Asegfirese de
que tiene suficiente mberfa adicional [unos 8 pies
(244 cm) enrollados en tres giros de unas 10 pulgadas
(25 cm) de digmetro] para permitir que el refiigerador
se pueda mover de la pared despu_s de la instalacidn.
• Un kit para suministro de agua (contiene tuberfa de
cobre, una vglvula de apagado y accesorios
relacionados a continuaci6n) estg disponible por un
costo adicional a tray,s de su distribuidor local.
• Un suministro de agua potable. La presidn del agua
debe ser entre 90 y 190 p.s.i. (1.4-8.1 bar).
12
QUE NECESITA (CONTINUACI( N)
• Taladro el_ctrico.
/
• Tuberia de cobre, 1/4" de digmetro externo para
conectar el refrigerador al suministro de agua.
Asegfirese de que ambos extremos de la tuberia se
corten cuadrados.
No use tuberfa plfistica o accesorios plfisticos ya que
la lfnea del suministro de agua est_ bajo presi6n todo
el tiempo. Ciertos tipos de tuberia de plgstico se
pueden debilitar con el tiempo y romperse, lo que
resulta en escapes de agua.
• Dos tuercas de compresi6n de 1/4" de difimetro
externo y 2 fdrulas (mangas) --para conecmr la
tuber/a de cobre a la vglvula de apagado y la vglvula
de agua del refi'igeradol:
• Si su l/nea de agua existente tiene un accesorio
abocinado en el extremo, necesitar_i tin adaptador
(disponible en las tiendas de suministros de
plomerfa) para conectar la l/nea del agua al
refi'igerador O BIEN puede cortar el accesorio
abocinado con un cortador de tubos y hmgo usar
tin accesorio de compresidn.
• V_ilvula de apagado para conectar a la l/nea de agua
fi'ia. La v:_lvula de apagado debe tener una entrada
de agua con tin digmetro m/nin)o interno de 5/32"
en el punto de conexi6n a la LINEA DE AGUA
FRIA. Las vglvulas de apagado de tipo silla est_n
incluidas en varios kits de suministro de agua. Antes
de compral, asegfirese de que una vfilvula de tipo
silla cumpla con sus cddigos locales de plomerfa.
Page 37

Instrucciones para la instalacion
Instale la vglvula de apagado en la lfnea de agua
potable mgs cercana de uso m_is fi'ecuente.
[] APAGUE EL SUMINISTRO
PRINCIPAL DE AGUA
Abra el grifo m_s cercano pot suficiente tiempo
para limpiar la lfnea del agua.
[] SELECCIONE LA UBICACI(_N DE
LA VALVULA
Seleccione una ubicaci6n para la v_lvula que sea de
f_icil acceso. Es mejor conectarla en el costado de
una mberfa de agua vertical. Cuando sea necesario
conectar en una tuberfa de agua horizontal, haga
la conexi6n a la parte superior o lateral, en vez de
hacerlo abajo, para evitar sacar cualquier
sedimento de la tuberfa de agua.
[] PERFORE EL ORIFIClO PARA LA
VALVULA
Perfbre un orificio de 1/4"en la tuberfa del agua,
usando una broca puntiaguda. Retire cualquier
rebaba que resulte de perfbrar el orificio en la
mberfa.
[] UNA LA VALVULA DE APAGADO
Una la vglvula de apagado de la tuberfa de agua frfa
con la grapa de la tuberfa.
Grapadelatuberia
VNvulade
apagadotiposilla
,)
Tuberiaverticaldeaguafria
[] APRIETE LA GRAPA DE LA
TUBERiA
Apriete los tornillos de la grapa hasta que la
arandela de sellar empiece a abultarse.
NOTA: No apriete demasiado o podr_i romper la
tuberfa de cobre.
krandela
Grapadela tuberia _ Extremode entrada
Tornillode_
la gr_l_
[] DIRIJA LA TUBERiA
Dirija la tuberfa de cobre entre la lfnea de agua fi'fa
y el refi'igerador.
DirOa la tuberfa a trav4s de un orificio perforado
en la pared o en el piso (detr_is del refi'igerador o
gabinete de la base adyacente) tan cerca de la
pared como sea posible.
NOTA: Asegtirese de que haya suficienre tuberfa
adicional [unos 8 pies (224 cm) enrollado en tres
giros de cerca de 10" (25 cm) de digmetro] para
permirir que el refi'igerador se mueva de la pared
despu4s de la instalacidn.
13
Page 38

Instrucciones para la instalacion
ill COMO INSTALAR LA LiNEA DEL AGUA (CONTINUACION)
[] CONECTE LA TUBERiA A LA
VALVULA
Coloque la tuerca de compresidn y fi}rula (manga)
al extremo de la tuberia y con_ctela a la vglvula de
apagado.
Asegtirese de qua la tuberfa est4 completamente
insertada en la vglvula. Apriete la tuerca de
compresi6n firmemente.
V_ivula
detipo sflla
Tuercadel prensaastopas
V_lvulade safida
[] ENJUAGUE LA TUBERiA
Abra el suministro principal de agua y enjuague
la tuberfa hasta qua el agua est4 limpia.
Apague el agua y la vfilvula del agua hasta qua cerca
de un cuarto (1 litro) de agua haya pasado pot la
tuberfa.
[] CONECTE LA TUBERiA AL
REFRIGERADOR
NOTAS:
• Antes de hacer la conexidn al reffigerado_;
asegfirese de qua el cable el&trico del
refl'igerador no est6 conectado al tomacorrienm.
• Recomendamos la instalacidn de un filtro de
agua si su suministro de agua tiene arena o
partfculas qua podrfan obstruir la rejilla de la
vglvula de agua del refi'igerado_: lnstglelo en la
linea del agua cerca al refligeradon
14
[] CONECTE LA TUBERiA AL
REFRIGERADOR (CONTINUACI()N)
9.1 Retire la cubierta de acceso.
9.2 Retire la tapa de plgstico flexible de la v_ilvula
de agua.
9.3 Coloque la tuerca de compresidn y la fi}rula
(mang-a) en el extremo de la tuberfa como se
muestra.
Inserte el extremo de la tuberfa de cobre en la
conexi6n de la vglvula de agua lo m_s que se
pueda. Mientras sostiene la tuberfa, apriete el
accesorio.
Apriete la tuberfa de cobra en la grapa
provista para sostenerlo en una posicidn
vertical. Quiz_is necesite apalancar la grapa
para abrirla.
gubariadecobrade1/4" G_pa'_
delatuber_a
Tuercade
compresi6nde 1/4"
F_rula{manga}
Conexi6nde[ refrigerador
9.4 Vuelva a unir la cubierta de acceso.
Page 39

Instrucciones para la instalacion
[] ABRA EL AGUA EN LA VALVULA
DE APAGADO
Apriete cualquier conexi6n que tenga fugas.
[] CONECTE EL REFRIGERADOR
Arregle el resorte de la tuberfa de cobre de
manera que no vibre contra la parte posterior
del reii'igerador o contra la pared. Emptoe el
refi'igerador de nuevo hacia la pared.
[] INIClE LA MAQUlNA DE HIELO
En los modelos de intermptor de energia, t_jeel
interruptor de la m_iquina de hielos en la posicidn de
I(oncendido).En losmodelos de brazo de llenado, mueva
el brazo de llenado a la posicidn ON(hacia abajo).
La m_iquina de hielos no empezar:i a operar hasta que
alcance su temperamra de operacidn de 15°F (-9°C) o
menon Luego, empezar:i a operar automS.ticamente.
ModelodelInterruptordeenerg[a
Brazode
llenadohaciala
posici6nON
(haciaabajo)
de
llenadohacia
la posiciOn
STOP(hacia
arriba)
ModelodelBrazode llenado
NOTA: En condiciones de menor presi6n del agua,
la vglvula de agua puede encenderse hasta 3 veces
para suministrar suticiente agua a la m_iquina de
hielos.
B COMO INVERTIR EL VAIVI N DE LA PUERTA
NOTAS IMPORTANTES
AI invertir el vaivdn de la puerta:
• Lea las instrucciones completamente antes de
empezaE
• Manejo las partes con cuidado para evitar raspar la
pintura.
• Ponga los tornillos con su parte correspondiente para
evitar usarlas en el lugar equivocado.
• Dispong-a de una superficie de trabajo que no se
raspe para las puertas.
IMPORTANTE: Una vez que empiece, no mueva el
g-abinete hasta que haya completado el proceso de
invertir el vaivdn de la puerta.
Estas instrucciones son para cambiar las bisagras del
lado derecho al izquierdo, si alguna vez desea cambiar
las bisagras al lado derecho nuevamente, siga las
mismas instrucciones e invierta toda las reti?rencias
hacia la izquierda y derecha.
HERRAMIENTAS REQUERIDAS
Destornillador Phillips Cinta de enmascarar
Destornillador de
casquillo de cabeza
hexagonal de 5/16"
Destornillador Torx
T20 6 T25,
(necesitado para
algunos modela)
Cuchillo para masilla
(esp_itula) o destornillo
delgado
Llave abierta de 5/16"
15
Page 40

Instrucciones para la instalacion
IRI COMO INVERTIR EL VAIVI_N DE LA PUERTA
(CONTINUACI(_N)
[] ANTES DE INICIAR
1.1 Desconecte el refrigerador del tomacorriente.
1.2 Desocupe todos los estantes de la puerta,
incluyendo el compartimiento de productos
lgcteos.
PRECAUCION: No deje que ninguna de las
puertas caiga al piso. Hacerlo podrfa dafiar el
tope de las puertas.
[] RETIRE LA PUERTA DEL
COMPARTIMIENTO DE
ALIMENTOS CONGELADOS
2.1 Pegue la puerta cerrada con cinta de
enmascara_:
[] RETIRE LA PUERTA DEL
COMPARTIMIENTO DE
ALIMENTOS CONGELADOS
(CONTINUAClC)N)
2.2 Con un destornillador de casquillo de cabeza
hexagonal de 5/16", retire los tornillos que
sostienen la bisagra superior del gabinete.
2.3 Levante la bisagra (y la lgmina pegada a _sta)
derecho hasva liberar el pasador de la hisagra
del casquillo en la parte superior de la puerta y
pdngala a un lado,junto con sus tornillos.
BisagrasuDerior
2.4 Retire la cinta e incline la puerta hacia flmra
del gabinete. Levgntela del pasador de la bisagra
del centro.
2.5 Ponga la puerta en una superficie que no se
raye con la parte exterior hacia arriba.
16
Page 41

Instrucciones para la instalacion
[] RETIRE LA PUERTA DEL
COMPARTIMIENTO DE ALIMENTOS
CONGELADOS (CONTINUACl0N)
2.6 Traslade los dos tornillos del lado opuesro del
gabinete hacia los orificios de los tornillos
desocupados al retirar la bisagra superioE
[] RETIRE LA PUERTA DE LOS
ALIMENTOS FRESCOS
3.1 Cierre la puerta y p_guela con cinta de
enmascarar.
[] RETIRE LA PUERTA DE LOS
ALIMENTOS FRESCOS
(CONTINUACl0N)
3.3 Retire la cin 'ta de enmascarar e incline la puerta
lejos del gabinete. Lewante la puerta del pasador en
el gancho de la bisagra inferiol: (Si la arandela de
plgstico se pega a la parte de debajo de la puerta,
pdngala de nuevo en la bisagra.)
3.4 Pong_ la puerto hacia arriba en una superficie que
no raye.
3.2 Con un desmrnillador de casquillo de cabeza
hexagonal de 5/16" y una llave abierta de
5/16", retire los dos tornillos que sostienen la
bisagra del centro (y la l_imina pegada a &ta)
con el gabinete. Levante la bisagra del centro
para liberar su pasador del casquillo en la parte
superior de la puerta, y ponga la bisagra y los
tornillos a un lado. Tenga cuidado de no aflojar
el separador y la arandela de la bisagra del
centro.
3.5 Traslade los dos tornillos del lado opuesto del
gabinete hacia los orificios de los tornillos
desocupados al retirar la bisagra del cenrro.
3.6 Traslade la arandela (si su modelo tlene una) hacia
el lado opuesto.
17
Page 42

Instrucciones para la instalacion
IRII Ct3MO INVERTIR EL VAIVI N DE LA PUERTA
(CONTINUACI(_N)
[] RETIRE LA PUERTA DE LOS
ALIMENTOS FRESCOS
(CONTINUACI(SN)
33 Tome uno de los tornillos retirados en el paso 2 y
pdng'alo en el orificio de tomillo m',is extremo en
el lado opuesm. No 1o lleve hasta el fondo, deje
suficiente espacio debajo de la cabeza del tornillo
para el espesor de la lgmina y el g_ncho.
I/
_O 0
[] C(_MO INVERTIR LOS ACCESORIOS
4.1 Retire la rejilla de la base (si su refrigerador
tiene una) hal_indola derecho.
4.9 Mueva el gancho de la bisagra inferior (y l_imina
pegada a 4sta) y la arandela pl:istica del lado
derecho al izquierdo.
11 I Arandela
_/stica
labisagra/"
Modelosconunsoportede
bisagraquetiene dosorificios
paratomillo.
Arandela
Pl_stica
SopoRed_
labisagra
Modelosconunsoportede
bisagraquetienecuatroorificios
paratornillo
Cambieel pasadorde la bisagra
al ladoopuestodelsoporte.
4.3 Intercambie la bisagra (y la l_imina pegada a 4sta)
y los tornillos en la parte superior derecha con
tornillos en la parte superior izquierda del
gabinete. No apriete los tornillos en el lado
de las bisagras en este momento.
Instalaci6nde labisagra
ala izquierda.
Instalaci6nde labisagra
a laderecha.
NOTAS:
• Algunas bisagras tienen cuatro orificios. Qu6
orificios use para instalar la bisagra depende
que cu_il lado instale la bisagra.
• El borde exterior de la bisagra deber_i estar
paralelo al borde de la caja para una instalaci6n
correct.
[_C()MO INVERTIR LAS MANIJAS
DE LAS PUERTAS
5.1 Traslade la manija de la puerta de
alimentos frescos
5.1.1
Retire la tapa inferior empqj_indola
hacia la parte inferior de la puerta, y
retire el tornillo de abajo. Retire los
dos tornillos sosteniendo la manija en
la parte superior de la puerta.
18
Page 43

Instrucciones para la instalacion
[_COMO INVERTIR LAS MANIJAS
DE LAS PUERTAS (CONTINUACION)
5.1 Traslade la manija de la puerta de
alimentos frescos (Continuacion)
5.1.2 Retire la manija.
5.1.3 Retire los tornillos del borde derecho de la
parte superior de la puerta e insdrtelos en los
orificios de los tornillos de la man_a en el lado
opuesto.
5.1.4 Con una espgtula con cinta o un desmrnillador
delgado, apalanque el botdn del tapdn desde el
orificio de la bisagra en el lado izquierdo de la
puerta e ins_rrelo en el orificio en el lado
opuesto que se desocup6 al retirar la bisagra
superiol:
Bot6nde_
5.1.5 Hale el bot6n del tapdn del frente de la puerta
y traslgdelo al lado opuesto.
Bot6ndeltap6n
Paravolverapegarla manijaen
ellado opuesto.
5.2 Traslade el tope de la puerta
5.2.1 Mueva el tope metglico de la puerta del
extremo derecho al izquierdo.
_Tope de la puerta
Lad0 izquierd0
5.2.2 Mueva cualquier tornillo del extremo
izquierdo hacia el extremo derecho.
Ladoderecho
5.3 Como reinstalar la manija de la
puerta de alimentos frescos
5.3.1 Pegue la man_a al lado derecho de la
puerta con rornillos en la parte superior y
debajo del tapdn de la manija.
5.3.2 Vuelva a instalar el tapdn de la manOa.
19
Page 44

Instrucciones para la instalacion
IRII COMO INVERTIR EL VAIVI N DE LA PUERTA
(CONTINUACI(_N)
5.4 Traslade la manija de la puerta del
congelador
5.4.1 Retire el tornillo que sostiene la man!ja
en la parte superior de la puerta y los dos
rornillos que sostienen la manija de la
parte inferior de la puerta.
5.4.2 Retire la manija.
5.4.3 Retire el tornillo de borde superior derecho de
la puerta e insdrtelo en el orificio del tornillo
de la manija en el lado izquierdo.
5.4 Traslade la manija de la puerta del
congelador {Continuacibn)
5.4.4 Traslade el rope de la puerta como se
muesrra en la pggina anterior:
5.4.5 Pegue la man!ja al borde derecho de la puerta
con tornillos en la parre superior e inferior.
usando los orificios de abajo desocupados al
retirar los tornillos del tope de la puerta.
_C0MO VOLVER A COLGAR
LAS PUERTAS
6.1 Vuelva a colgar la puerta de los
alimentos frescos
6.1.1 Baje la puerta de los alimentos frescos al
pasador de la bisagra inferim: Asegtirese
de que la arandda est_ en su lugar en el
pasador.
Arandela
pl_stica
Soporte
Arandela 8 de la
I
de la bisagra
bisagra
Modelosconunsoportede
bisagraquetienedosorificios
paratornillo.
Modelosconunsoportede
bisagraquetiene cuatroorificios
paratomillo.
2O
Page 45

Instrucciones para la instalacion
[_C6MO VOLVER A COLGAR
LAS PUERTAS (CONTINUACION)
6.1.2 Inserte el pasador en la bisagra central en
la parte superior de la puerta. Coloque el
separado_; luego la arandela, en el pasador de
la bisagra. NOTA: La bisagra del centro debe
volrearse como se muestra al mon 'tarse en el
lado izquierdo.
Pasadordelabisagra
ArandelaN_stica
yespaciador
6.1.3 Incline la puerta hacia el gabinete. A medida
que la puerta vuelve a su posicidn, deslice la
bisagra debajo de la cabeza del tornillo que
anteriormente se habfa insertado parcialmente
en el orificio m_is exrerno, lnserte el mrnillo
restante, luego apriere ambos tornillos
firmemente.
[_C0MO VOLVER A COLGAR
LAS PUERTAS (CONTINUACI()N)
6.2 Vuelva a colgar la puerta del
compartimiento de alimentos
congelados
6.2.1 Baje la puerVa del congelador al pasador
de la bisagra central. Asegfirese de que la
arandela y el espaeiador est_n en su lugar
en el pasador.
Pasad0r de la /
bisagra central
Arandela pl_stica
y espaciad0r
6.2.2 Incline la puerta hacia el gabinete, levantando
la bisagra superior de manera que el pasador
encaje en el casquillo en la parre superior de la
puerta.
6.2.3 Asegfirese de que la puerta est4 ligeramente
por encima del gabinete y que el espacio entre
las puertas sea unifbrme a lo ancho del frenre.
Apriere los mrnillos de la bisagra superiol:
No apriere demasiado esms tornillos, apri4relos
hasta que est4n ajustados, luego gfrelos otro
medio giro.
21
Page 46

Sonidosnormales de operacion.
Oependiendo de la ubicaci6n del refrigerador en su cocina,
quiz_s quiera colocar un pedazo de alfombra con soporte
de caucho debajo del refrigerador para reducir el ruido.
Ustedescucha Io queyo escucho?Estossonidossonnormales.
HMMMM...
WHOOSH....
• El nuevo compresor de alta eficiencia puede
funcionar mgs r_ipido y durar m_is que el de su
refl'igerador anterior y puede escuchar un zumbido
de tono alto o un sonido pulsante mientras opera.
• Puede escuchar un sonido de soplido cuando las
puertas se cierran. Esto se debe a que la presidn se
estfi estabilizando dentro del refiigeradon
CHASQUIDOS,
ESTALLIDOS, CRUJIDO,
GORJEOS
• Puede escuchar sonidos como de crt_jido o estallidos
cuando el refl'igerador se conecta por primera vez.
Esto pasa a medida que el refligerador se enfl'fa
hasta la temperatura correcm.
• El compresor puede causar un chasquido o un
goljeo cuando intenta volver a arrancar (esto puede
tomar hasta 5 minutos).
• Expansidn y contracci6n de las bobinas durante o
despu4s del ciclo de descongelaci6n puede causar
sonidos como de crtoido o estallidos.
• En modelos con m_iquina de hielos, despu4s de
completar tin ciclo de hacer hielo, se pueden
escuchar los cubos de hielo cuando caen a la
bandeja de hielos.
iWHIR!
• Puede escuchar los ventiladores movi_ndose a gran
velocidad. Esm pasa cuando el reffigerador se
conecta pot primera vez, cuando la_spuertas se abren
frecuentemente o cuando se guarda gran cantidad
de alimentos en el refrigerador o en los
compartimienms del congelado_: Los ventiladores
estfin ayudando a mantener las temperamras
COFFeC_s.
SONIDOSDEA6UA
6
El fluido del refrigerante a tray& de las bobinas
puede producir tin sonido de borboteo como de
agua hirviendo.
El agua que cae en el calentador de descongelacidn
puede causar tin chisporroteo, estallido o zumbido
durante el ciclo de descongelaci6n.
• Un ruido de agua cayendo se puede escuchar
durante el ciclo de descongelacidn a medida que el
hielo se derrite del evaporador y fluye hacia la
bandeja de drenaje.
• El cierre de las puertas puede producir tin sonido de
gorgoteo debido a la estabilizaci6n de la presi6n.
22
Page 47

Antes de Ilamar a solicitar servicio...
Consejos pard la soluci6n de averfas
iAhorre tiempo y dinere! Revise las tablas en las siguientes
p#ginas primere y quiz#s no necesite Ilamar a seficitar el
servicio.
Posibles causas Qu6 hater
E1refrigerador estA en * Espere unos 30 minutos hasra que el ciclo de
el cido de descongelado, descongelado termine.
El disco de control de la • Mueva el disco del control de la temperarura
temperatura esN en la posici6n 0. aun nivel de la remperarura.
El refrigerador estfi desconectado. • Empt_e el enchute comple 'tamente en el tomacorriente.
El fusible esUl quemado/el • Reemplace el filsible o vuelva a arrancar el inrerrupron
interruptor autom_itico se salt6.
Los tornillos de los rodillos • Consulte la secci6n de Rodillos y Patas nivoladoras.
o las paras niveladoras necesitan
ajuste.
Normal cuando el refrigerador • Espere 24 horas pard que se enDfe completamente.
se conecta inlcialmente.
Con frecuencia ocurre • Esro es normal.
cuando grandes cantidades de
alimentos se almacenan en
el refrigerador.
La puerta se deja abierta. • Revise si un paquete estA reteniendo la puerta abierm.
El clima caliente o abrir la • Esro es normal.
puerta frecuentemente.
El disco del control de la • Consulte la secci6n Sobre el disco de control de la
texnperatl_a est,_en el five] temperatura.
mils frio.
La rejilla y el condeusador • Consulte la secci6n de Cuidado y limpieza.
necesitan limpieza,
El disco del control de la • Consulte la secci6n Sobre el disco de control de la temperatora.
temperatura no est_ en un
nivel suficientemente frlo.
El clima callente o abrir la • Fije el disco de control de la temperatura un nivel rags frfo.
puerta frecuentemente. Consulte la secci6n Sobre el disco de control do la temperatura.
La puerta se deja abierta. • Revise si un paquete est_ rereniendo la puerto aUlerta.
Un paquete est_ bloqueando • Revise si un paquete est_ bloqueando el conducro del aire en el
el conducto dd aire en el comparfimiento del congeladon
compartimiento del congelador.
La puerta se deja abierta. • Revise si un paquete est_ reteniendo la puerto afflerta.
Abrir la puerta con mucha
frecuencia o por mucho tiempo.
23
Page 48

Antesde Ilamar a solicitar servicio...
Consejos para la soluci6n de aver[as
Posibles causas Qu6 hacer
E1 interruptor de corriente • En los re•delos de interruptor de enelgia, mueva el
de la m_iquina de hielos no estfi interruptor a la posicidn de I (encendido). En los re•delos
encendido, de brazo de llenado, mtleva el bl'aZo de llenado a la
posicidn ON (hacia abajo).
El S_llO del agua es_ • Consulte la seccidn C6mo instalar la linea del agua.
apagado o no estfi conectado.
El compartimiento del • Espere 24 horas para que el refiigerador se enfi'fe
congelador no es muy frio. complemmente.
Hay cubos amontonados en el • Nivele los cubos con la man•.
recipiente de almacenamiento
que causan que la rrulquina de
hielo se apague.
El interruptor de la nulquina • Fije el interruptor en la posici6n 0 (apagado};,
de hielos est,q en la posici6n de mantener el intcrrupror en la posici6n de encendido
I(encendido), per• el suministm daflarg la vglvula del agcla.
de agua hada el refrigerador no
estfi conectado.
La vfilvula de apagado del agua •Llamealplomeropm'alimpim'lav_h,ula.
que conecta el refrigerador
estar obstruida,a la llnea del agua puede
La puerta se deja abierta. • Revise si tin paquete est_ reteniendo la puerta abierta.
niveltemperatnraE1disco del control de lasuficientementeno estA enfrio.Un .ConsultelaseccidnSobrooldiscodocontroldolatemperatura.
El recipiente de almacenamiento • Desocupe el recipiente y lgvelo. Deseche los cubos xdejos.
de hielos necesita limpieza.
Hay alimentos clue lrasmiten • Envuelva bien los alimentos.
• lot/sabot a los cubos de hielo.
E1 interior del refrigerador • Consulre la secci6n de Cuidado Y limpieza.
necesita limpieza.
No es inusual durante los • Limpie la superficie basra que est4 seca y vuelva a fijar el disco
perfodos de alta hurnedad, del control de la temperatura en tin nivel m_is frfo.
la_#enas
Abrir la puerta con mucha
frecuencia o por much• dempo.
refrigerador cuando la_
_uertas_abren)
Hay alimentos clue lrasmiten • Los alimenros coil •lores fherres deben envolverse firmemente.
• lot/sabot a los cubos de hielo. • Mantenga una caja abierta de bicarbonato en el refrigerado_;
reemplgcela cada rres meses.
El interior necesita limpieza. • Consulte la seccidn de Cuidado y limpieza.
24
 Loading...