

GE PTS25, PTS25LBMBRWW, PTS25LBMBRCC, STS22ICMARWW, GTS22QBNARBB Owner's Manual And Installation Instructions
...Page 1
www.GEAppliances.com
©
S_fety Information
Adapler Plugs ..................... 4
Connect Electricity ................ 4
Extension Cords ................... 3
Pz'oper DLsposal ...................... 3
Safety Precautions ................. 2
Operating lmtructions
Additional Features ................ 8
Automatic Icemaker ............... 9
Controls ......................... 5
Shelves and Bins ................. 6, 7
Crispers and Pans ............... 8, 9
Care and Cleaning
Care and Cleaning ............ 1O, 11
Replacing the Lightbulbs .......... 12
Installation Instructions
Prepaling to Install
the Refrigeralor .................. 1,3
Reversing the Door Swing ..... 18-2.3
Water Line Installation ........ 14-17
Troubleshooting Tips
Refore You Call For Servace .... 25, 26
Normal Operating Sounds ......... 24
Consumer Support
Consumer Support ....... Back Cover
Product Re_slratinn ........... 27, 28
Warranty tor Canadian Customers . .29
Warranty for U.S, Customers ....... 30
Models 22,25
Writethemodelandserial numbershere:
.e.,,
Serial#
Find these numbers on the gray label
on the leh side, near the top of the
retiJgerator t:Olltpar tnlent.
200D2462PO01
:::::::::::::=
:iiiiiiiiiiiiiiiiiiiiiiii
il ¸ _
f_2;iiiiii i_iiiii!iiiiiiiiiiiiiiiiiiiiiiiiiiiiiii_i_
:_. iiiii_ _ii!iiiiii_iiiiiii
49-60103 02-01 d,rl
Page 2
IMPORTANTSAFETYINFORMATION.
READALLINSTRUCTIONSBEFOREUSING.
WARNING!
Usethisapplianceonly foritsintendedpurposeasdescribedinthis Owner'sManual
SAFETYPRECAUTIONS
Whenusing electricalappliances,basicsafetyprecauttbns should be followed,includingthefollowing:
:_ This refrigerator must he proper_ installed
and located in accordance with the Installation
Instructions hefbre it is used.
_ Do not allow children to climb, stand or hang
on die shelves in the rl.4iigmrator, They could
damage file refrigerator and seriously injure
themsek'es.
Keep finge_ out of the "pinch txfint" areas;
clem'ances between the doors and hetween
the doors and cabinet are necessarily small.
Be caretul dosing doors when children are
in the area.
Unplug the rdbigta-ator before cl_raning and
making repairs.
Do not totldz die cold surtaces in the ti'e c_zer
cnmpanrnent when hands are damp or wet. Skin
may stick to these extremely cold surf_aces.
@ Do riot store or use _asnline or other tlanmmble
x-apors and liquids in tile vicinity of this or any
()flier appliance.
In refkigerators with anu)inatic icemakers,
avoid contact with the moving parts of the
ejector mechanism, or with the heating element
that releases the cubes. Do not pl_e fingers or
hands on the automatic icemaking mechanism
while the refi'igerator k_plugged in.
NOTE:Westronglyrecommendthatanysewicingbe
performedbyaqualifiedindividual
Setting either or both controls ta)the 0 (off)
[x)sifinn does not remove power to the light
chcnit.
Do not refi-ec_ze t;_)zen foods w|fich have
thmved completely.
2
Page 3
www.GEAppliancescom
A DANGER!RISKOFCHILDENTRAPMENT
PROPERDISPOSALOFTHEREFRIGERATOR
Child elllY&plllei1 [Rnd Suff(xa[Joi1arenot
problems of the past.Junked or abandoned
refrigerators are sdll dailgen)us...even if they will sit
for "just a few days." If you are getting rid ofyoor
old refrigeralor, ple_L_efi)llow the instnactions
below to help preverJt acddents.
Before YouThrowAway Your Old
Refrigerator or Freezer.
_ Take off lhe doors.
l_ave Ihe shelves in place so that children may
not easilyclimb inside.
CFCDisposal
Yotw old refrigerator may have a _x×)ling system
fl_at ttsed C_Cs (,:hlorofl uoro(_-boz_). CFCs ate
believed u)hatTn stratospheric ozone.
If you are throwing away your old retVlgerat_)r,
make sore the CFC refrigea-ant is removed for
proper disposal by a qualified servicer, ffyou
intentionally release this (_C refrigerant you
can be subject to fines mad impl:hsonmem under
pr ovisiol_s of environ menial legislation.
USEOFEXTENSIONCORDS
Because ofpotential safety hazards undercertainconditions, we strong/y recommend against
the use ofan extensioncord.
However, if you mtLStttse an extel_sion cord, it is absolutely necessm'y that it be a ULqisted (in the Uitited
States) or a C.%\4isted (in Catmda), _wire ga_unding .type appliance extension cord having a gq'ounding
type plug and outlet and that the electrical rating of the cord be 15 anaperes (minimum) mad 120 volts.
3
Page 4
IMPORTANTSAFETYINFORMATION.
READALLINSTRUCTIONSBEFOREUSING.
A WARNING!
HOWTOCONNECTELECTRICITY
Do not, underany circumstances,cutor remove the third (ground)prong from the power cord. For
personal safe_ this appliance mustbeproperly grounded.
The power cord of this appliance is equipped with a
3.-prong (grounding) plug which mates _*]th a
standard 3-prong (grounding) wall oudet to
nfinirnize the t_)ssibilJty of'electric _zea:k hazard
from this appliauce.
Have the vrall outlet and circuit chec.ked by a
qualified electrician to make sure the oudet is
properly gaxmnded.
ff the outlet isa statzdard 2-prong outlet, it is your
personal r_spoLxsibilily and obliffation to have it
replaced with a properly gromaded 3-prong w-a]l
oudet.
The refrigerator should alwa_ be plugged into its
own individual electrical outlet which h_._ a vohage
rating that matches the radng p "late.
"Ibis provides dze I_st peribl'mance and also
prevents overloading house wiring circuits which
could cattse a fire hazard fixma overheated _ires.
Never unplug your refrigerator by pulling on the
lX)wer cord. Always grip plug fitxnly and pull sUaight
out from the outlet.
Repair or replace immediately all _)wer cords that
have become frayed or otherwise damaged. I_) not
use a cord that shows (a'aclcsor abraskm damage
along its length or at eidaer end.
When moving the retiigerau)r away from the
wall. be careful not to ron over or damage the
power cord,
USEOFADAPTERPLUGS(Adapt_rpluganotpermittedinCanada)
Because of potential safety hazards under certain conditions, we strongly recommend against
the use of an adapter plug.
However. if you must use an "adapter, where local
codes perufit, a tempomq cmmection may be made
to a properly grotmded 2-prong wall oudet by u_
ofa UlAisted adapter available at most local
hal'dware stores.
The la_er slot in the adapter must be aligned with
the ku'ger slot in the _s"alloudet to provide proper
polarity in the connection of the l:x)wer cord.
When di._on nec dng the power cord from the
adapter, al_-ays hold the adapter in place with one
hand while pulling the power cord plug with die
other hand. If this is nut done, the adapter ground
terminal is rely likely to break _*ithrepeated u_'.
If the adapter gt'ound termimd breaks, DO NOTUSE
the refiigerator until a proper ground has been
established.
Attaching the adapter groundterminal to a waft outlet
coverscrew does not ground the applianceunlessthe
coverscrewis metal and not insulated, and the wall
outlet is groundedthroughthe house wl_'ing.Youshould
havethecircuit checkedby a quafified electrician tomake
surethe outlet is properlygrounded.
READANDFOLLOWTHISSAFETYINFORMATIONCAREFULLY.
SAVETHESEINSTRUCTIONS
Page 5
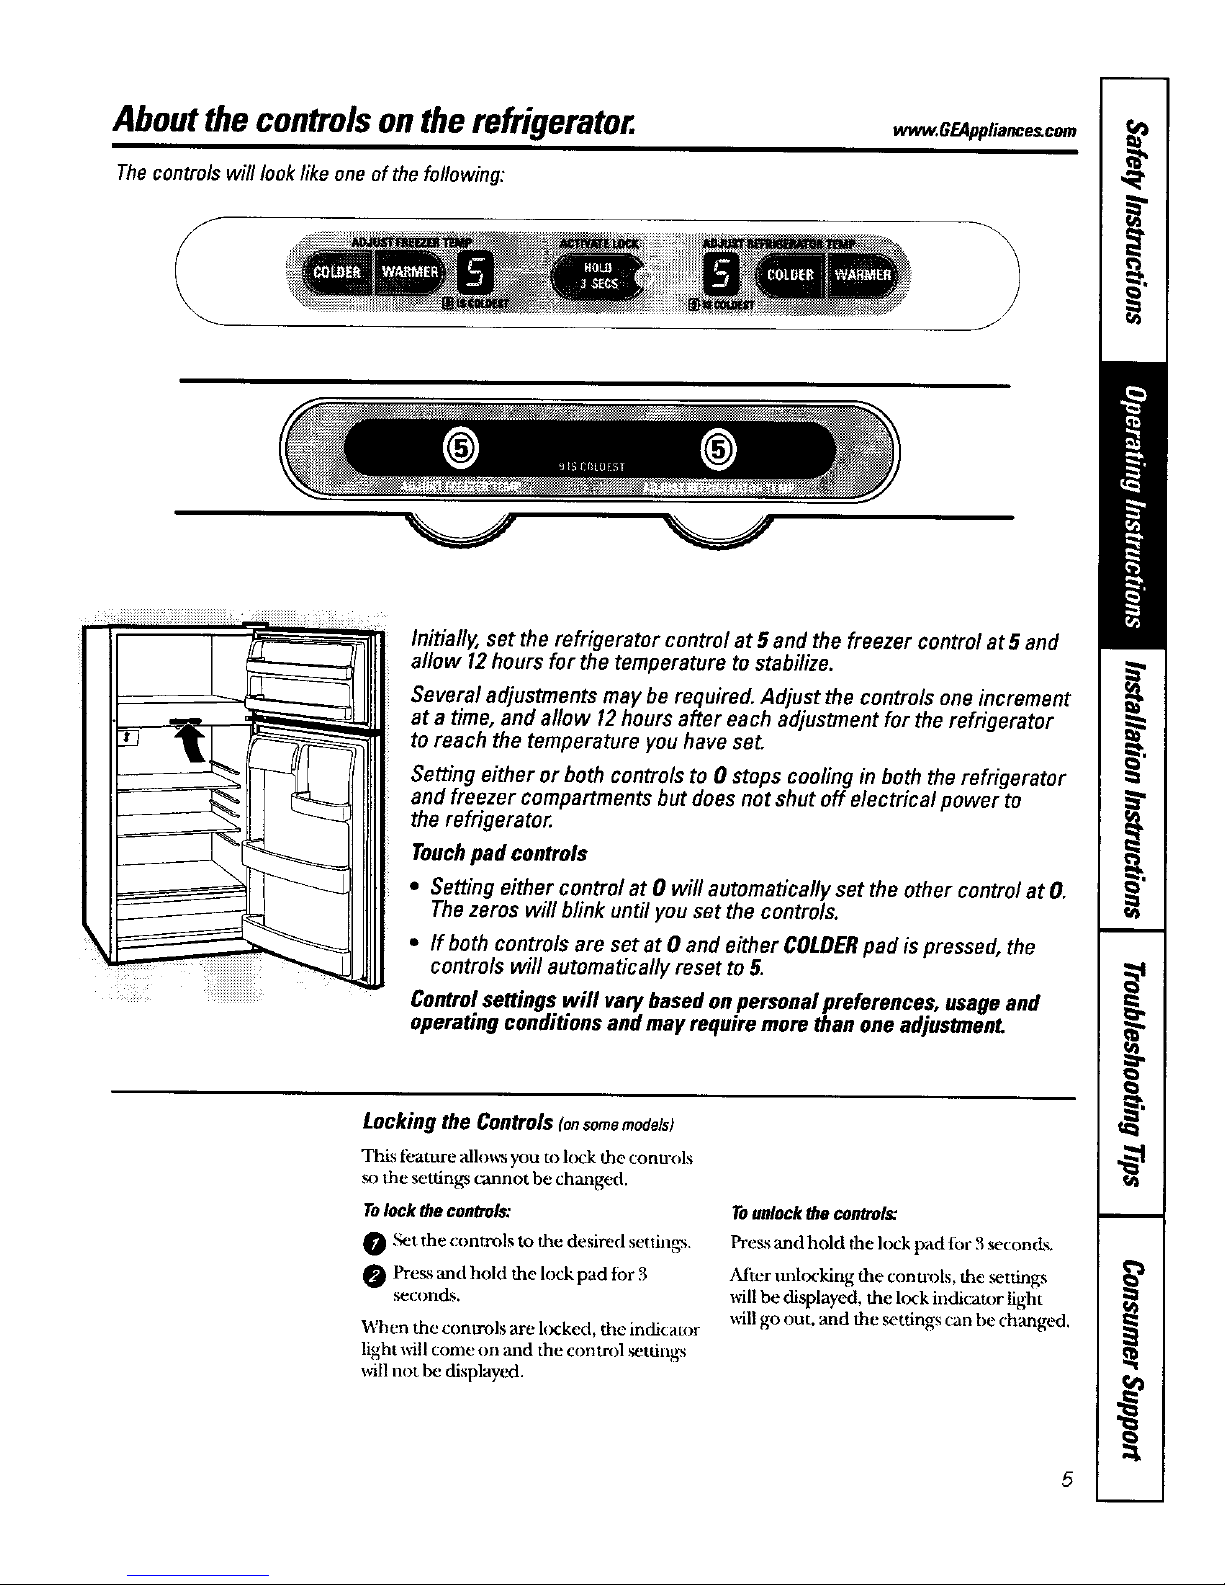
Aboutthe controlson the refrigerator. .,, .e plin,.es'co
The controls will look like one of the following:
f
/
J
Initially, set the refrigerator control at 5 and the freezer control at 5 and
allow 12hours for the temperature to stabilize.
Several adjustments may be required. Adjust the controls one increment
at a time, and allow 12hours after each adjustment for the refrigerator
to reach the temperature you have set.
Setting either or both controls to 0 stops cooling in both the refrigerator
and freezer compartments but does not shut off electrical power to
the refrigerator.
Touch pad controls
• Setting either control at 0 will automatically set the other control at O.
The zeros will blink until you set the controls.
• If both controls are set at 0 and either COLDER pad is pressed, the
controls will automatically reset to 5.
Control settings will vary based on personal preferences, usage and
operating conditions and may require more than one adjustmenL
Locking the Controls Ionsomemodels)
This feattzre allo_,'s you to lock tile conu-ols
the settings cannot be changed.
Tolock the cco_rols:
O .'+ztthe controls to the desired sethngs.
Press and hold the l<')okpad tor 3
seconds.
When the controls are h)cked, tire indicator
light will come on and the conm)l settings
will not be displayc, d.
Tounlock the controls."
Pregs and hold the lock pad for 3 secon cLs_
Aider index'king the conu'ols, the ,_ttings
will be displayed, the lock indicator fight
will go out. and the ,_ttings can he changed.
Page 6
Aboutthe shelvesandbins,
Not all features are on all models.
Rearranging the Shelves
Shelves in the refiigerator and freezer compartments are adjustable.
Refrigerator Compartment
Toremove:
0 Tilt the shelf up at the h'ont.
Lift the shelf up at the ba_:k and bl'ing
the shelf out.
Somemodelshave_re shelvesthat
canbeadjustedin thesamemanne_
TOrep/ace,"
While dlfing the shelf'up, in,_r t the top
hook at the back of the shelf in a slnt on
the mack.
Lower tile front of the shelf until the
bottom of the shelf'locks into place.
FreezerCompartment
Toremove:
0 Lift up die left _de of the shelf and slide
it left into the center of the shelf
supports.
Rotate the right ,side of the shelf tip and
out nf the shelf sup|×)rts.
Toreplace:
Holding the Mlelf diagc, naily, itu_.,n the
left end (ffthe shelf into the center of+
the shelf snpports on the side w-,dl at the
desired level.
Inert the right end (ff the sheUinto the
shelf supports at the same level. Rest
each end of the shelf on the bottom of
die shelf supfx)rts.
NOTE:Formodelswith an automatic icemaker,
the freezershelf must be in the lower position
for theice cubebucket to catch the cubes,
Spillproof Shelves (onsomemodels)
Spillplxxffshelves have spedal edges tx)
help prevent spilL_ fix)m dripping to lower
shelves. To reinove or ]'el)lace the sheh't,%
see Rearranging the Shelves.
6
Page 7
vvww.GEAppliancescem
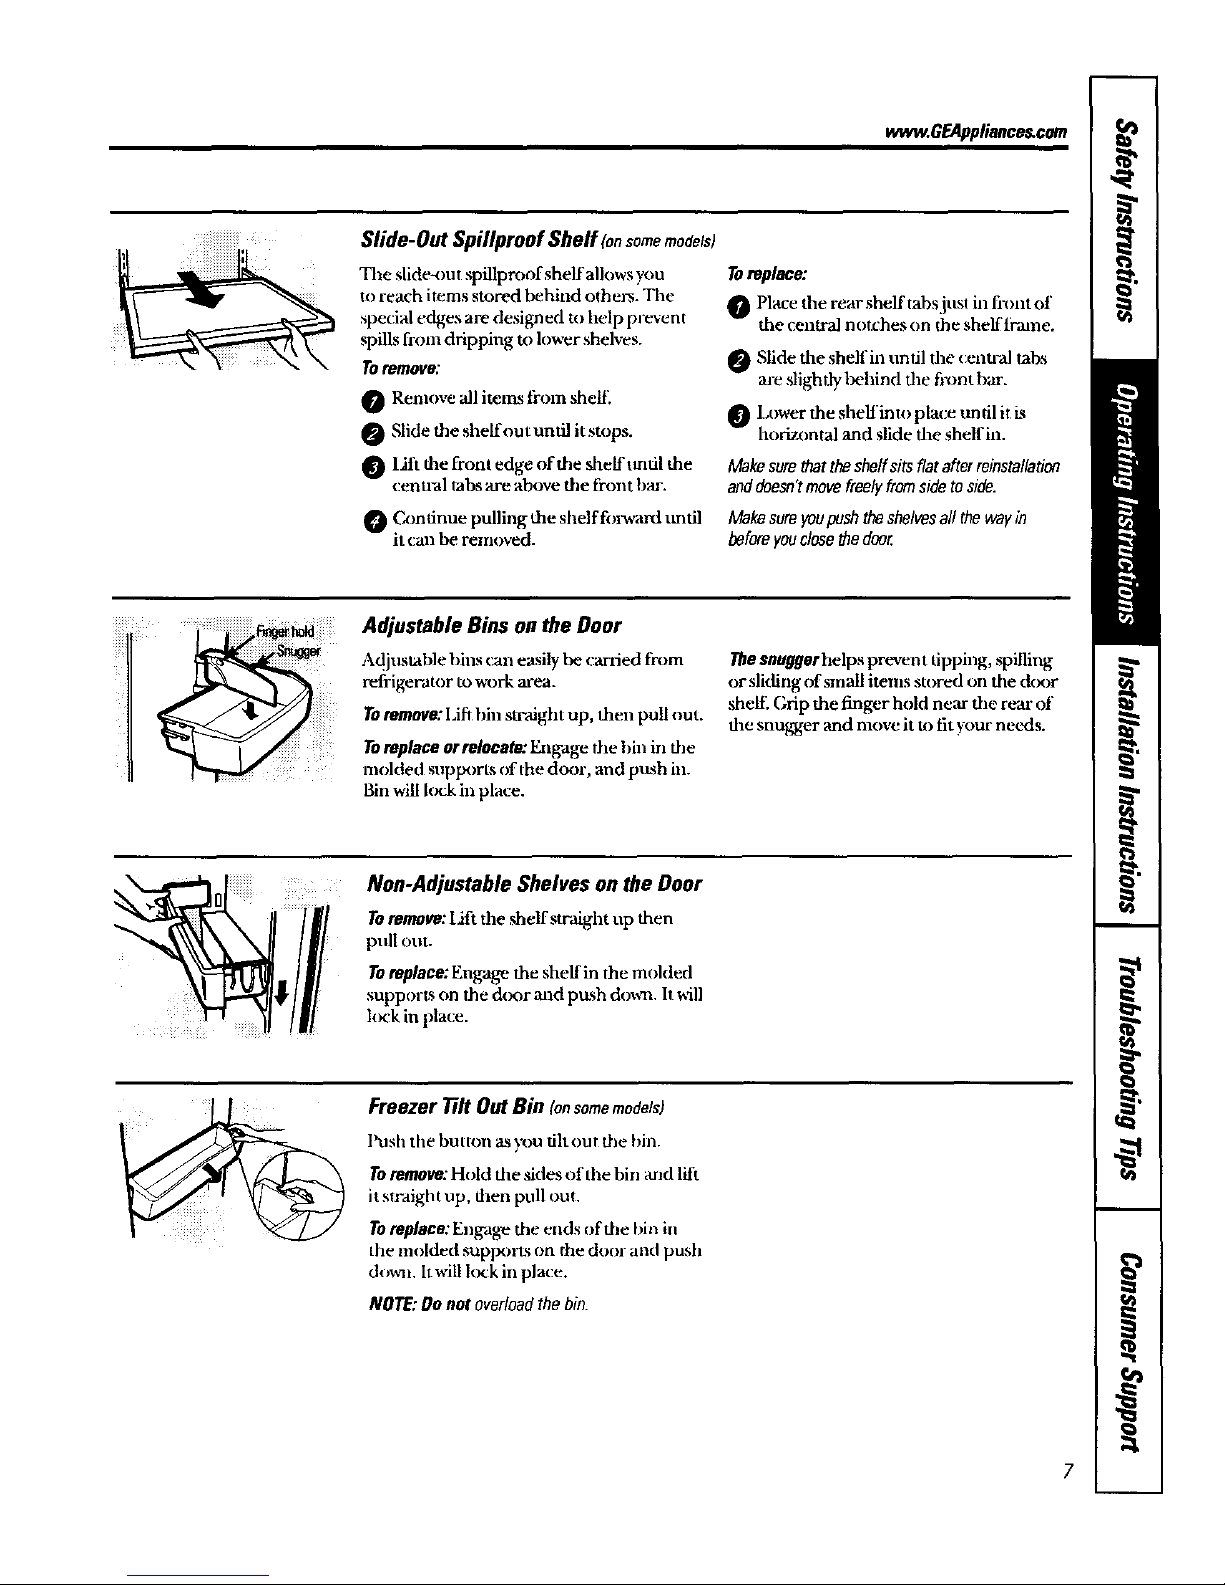
Slide-Out Spillproof Sheff (onsomemodels)
The slide-out spillproofshelf allows you
to reach items stored behind others. The
_pecial edges are designed to help prevent
spills from dripping to lower shelves.
Toremove:
O Renmve 'all itezrLsfrom sheik
Slide tile sheffout until it StOl_S.
Lift the front edge of die shelf ttnfil the
cenuul tabs"are above the front bar.
Continue pulling the shelf forward tmtil
it can be removed.
Toreplace:
Place the rear shelf tabsjus! in front of
the central nut_'hes on _he shelf ii-,une.
_ Slide flee shell'in un til the cenu;al tabs
are slightly behind the fix)nt bat-.
Lower the shelf lind place tm til it kg
horizontal and slide flee shelf in.
Makesurethattheshelfsits flat after reinstallation
anddoesn'tmovefreelyfromside toside.
Makesureyoupushriteshelvesall thewayin
beforeyouclose_e deer.
.....
Adjustable Bins on the Door
Adjuslable bil_s (;all easily be carried from
refrigerator to va)rk area.
Toremove:Ihfi hie stvaight up, then pull out.
Toreplace orrelocete: E_zgage the hh_ in the
molded supports of the dc_)r, and push hz.
Bin will lock in place.
Thesnuggerhelps prevent tipping, _illing
or slkting of small items stored on the tk×)r
,shell'. (;tip the finger hold near the rc_arof
the snugger and move it u) fit your nec_ls.
Non-Adjustable Shelves on the Door
T0remo_:lJfttheshelfstraightupthen
pull nut.
Toreplace: Engage the shelf in the molded
supports on the d_x_r mad push down. h will
hx'k in place.
Freezer Tilt Out Bin (onsomemodels)
lkzsh the buuon ms)x)u flit out the bin.
Toremove: Hold the skies of the bin and litt
it straight up, d_en pull out.
Toreplace: Engage the ends of the bin in
the molded suplx)rts on the door and push
dowll. It will lock in place.
NOTE:Do not overloadthe bin.
7
Page 8
Aboutthe additional features.
Not all features are on all models.
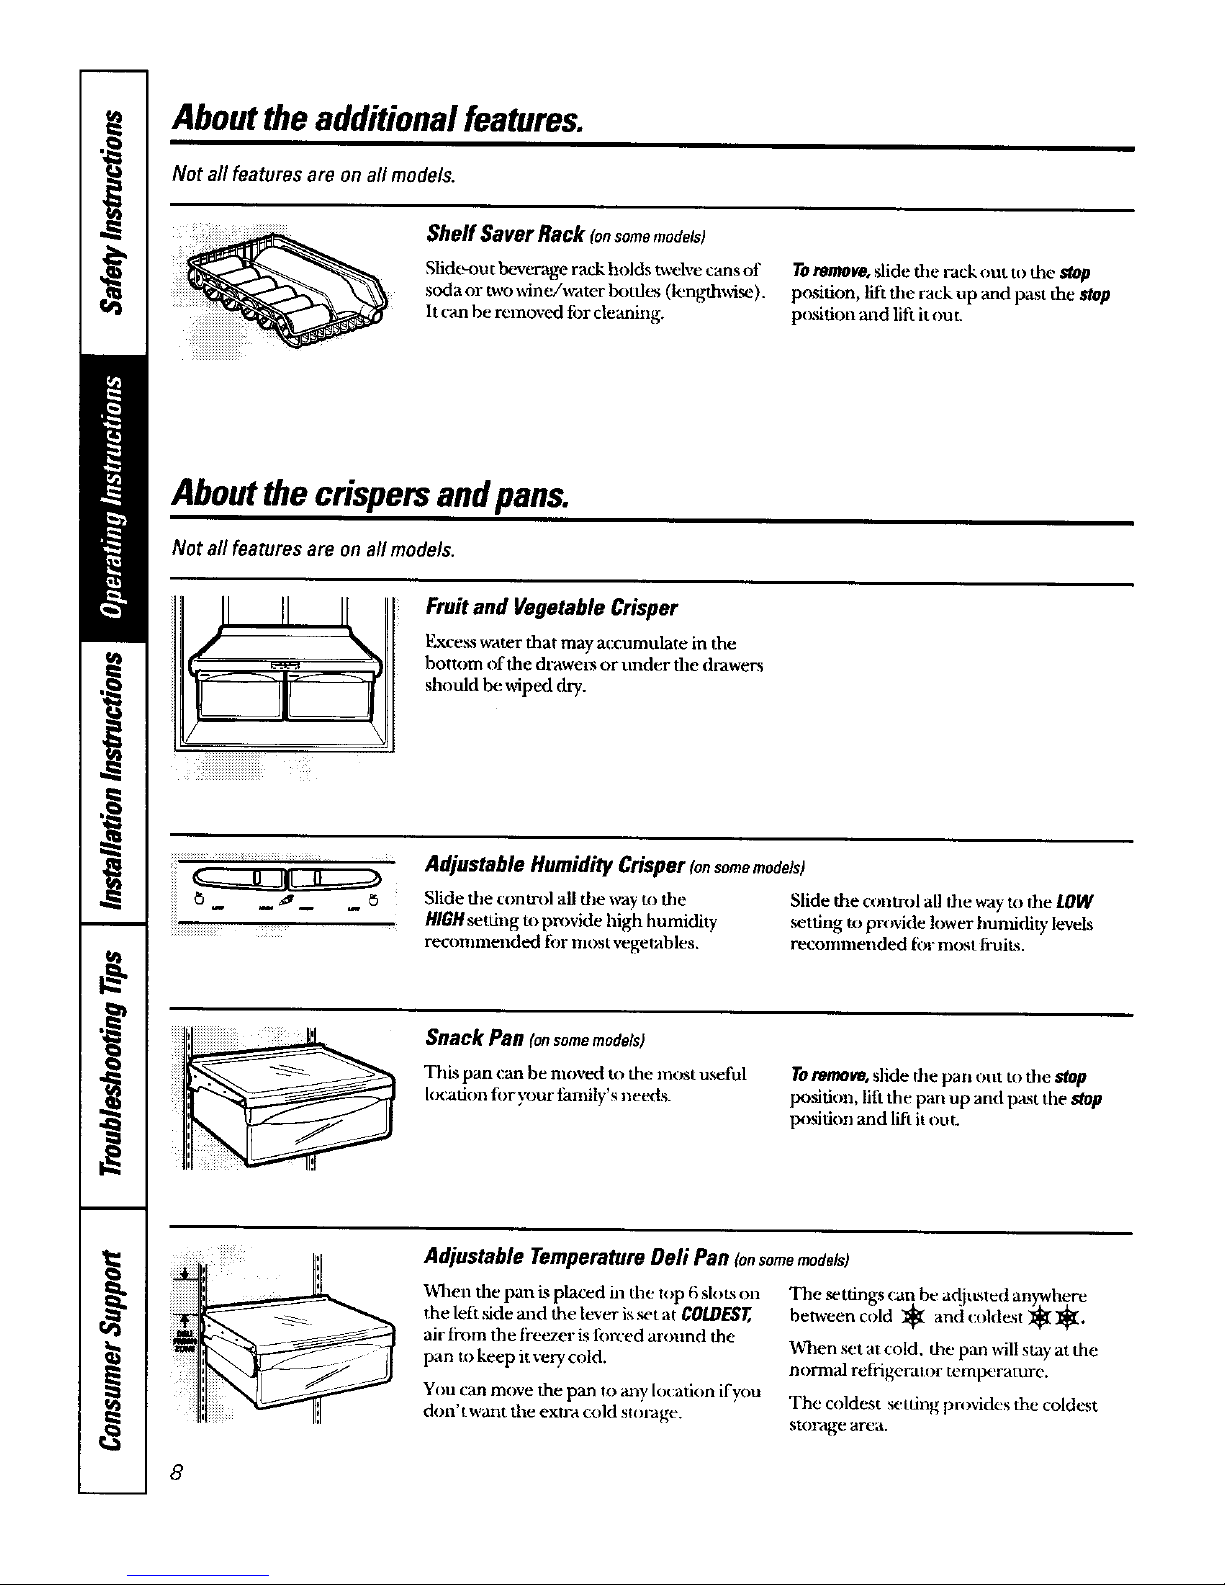
Shelf Saver Rack lonsomemodels)
Sfide-ou t b*.werage rack holds twelve cans of
s :,da or two wineA_rater b<)tdt_ (lengthwL_)
It can be removed tor clemaing.
Toremove,slide file Fack out to the Mop
position, lift the rack up and past the stop
p(xsition and lift it ou
Aboutthecrispersandpans.
Not all features are on all models.
; i: ii iiiiiiiiiiiiiiiiiiiiiiiiiiiiiiiiiiiiii i
Fruit and Vegetable Crisper
Excess ++raterthat may accumulate in the
bottom ¢,f the dl-awet_ or under the drawers
should be wiped dry'.
iiiii -°
iliiiiiiiiiiiiiiiiiiiiiiiiiiiiiil_ _iiiiiii_iiii__
Adjustable Humidity Crisper ton somemodels)
Slide tile control all the way to the
HIOHsetting to pzx)vide high humidity
recon.nended for lltost vegetables.
Slide the conrail all the way to the LOW
,setting _t)provide lower humidity levels
recommended tbr most fruits.
Snack Pan (onsomemodels)
This pan (:an be movtxt to the most useful
I x_tUon for xx)ur tanuly s _ee_ts.
Toremove,slide the part out to the Mop
IXXslfion, lift the pan up anti past the Mop
posidon and lift it out.
!iii!ii!
Adjustable Temperature Deli Pan (onsomemodels)
When the pan is placed in the top 6 slots on
the left +sideand the lever is set at COLDEST,
air fi'om the fi'eezer is forced m'ound the
pan to keep it very.cold.
You can move the pan to m_y Iocadon ifyou
d m want the exwa cold su)t'age.
The +tfings (:at+,be adjtLsted an'rwhere
between cold _ and coldest _l[]_l[.
When set at cold, the pan ,+411stay at the
_torma] refiiger, tlor tempe2rattu-e.
The coldest setdng pr,)vides the coldes't
storage area.
8
Page 9

Aboutcrisper removal wwvv.GEApplianne com
Nora//features are on all models.
Crisper Removal
ToRemove:
These dr_awers can be removed easily by
lifting up sligh flywhile pulling tile drawer
past tile stop k_'afion.
VVhnnthedoorcannotbe fully opened,
remove the drawec _rthest ti'ouz file d_)or
first. Make sure the drawer closest to the
&)or is fully closed, There Lsa latch at the
thmt of the center slide rail. Push down on
the latch and slide the center slide rail, to
which the drawer is attached, away lixan the
door. Remove the drawer.
Aboutthe automatic icemaker.
A newly.installed refrigerator may take 12-24 hours to begin making ice,
Automatic Icemaker (onsomemodels)
The icemaker will produce seven cubes
t_'r (Tcle-approxinaately 100-130 cubes
in a 24-hour period, depending on freezer
ConlpaFtnlen t tempel-ature, r¢)om
temperature, number of d_)or openings
mad other use condifiot_s.
If the reti'igezator ksoperated betore the
w-ater connection is made to the icemaker,
set the t)ower switch to 0 (off1.
When the refrigerator has been conuected
to the water supply, set. the power s_'itch to
I(nn). The green light will come Oil.
The icemaker will till with _vater when it
cc_)ls to 15 ° F. A newly-installed refrige]-atnr
may take 12 to 2,t hours to begin makiug
ice cubes.
Ihrow mx-aythe first f_zavhatches of ice to
annw the water line to clear.
Be sure nothing interfi_res with the sweep
of the f_eler arm.
When the bin fills to the level of the feeler
arm, the icemaker _¢dlstop producing ice.
It is normal tor several cubes to be joined
together.
If ice ksnot u_d frequently, o d ice cubes
win become cloudy, taste stale and shrink.
Ifice cubes get stuck in the icemaker, the
green power light will blink. To correct this,
set the ix)wer m_4tch to 0 (off) and renlove
the cxtbes..Set the power switch to I (on)to
restart the icemaker.
After the icemaker has been turned on
again, there will be a delay of about
45 minutes before the k:emaker resumes
operati oiL%,
NOTE:In homeswith lower-than-averagewater
pressure,youmayheartheicemakerc_le multiple
timeswhenmaklhgonebatch of ice
Icemaker Accessory Kit
If )oltr reti'igecator did not come already
equipped with an automatic kelnaker,
an icemaker acce_,_)t), kit _ available at
ex tl*d COst,
Check the hack of the re|iS.gel*,ttor lk_r
the specifuzicemaker kit needed for
your model
9
Page 10
Careand cleaning oftherefrigerator.
Cleaning the Outside
Thedoorhandlesandtrint(;lean witha
cloth dampened with soaW _,,-ater.Dry
_dth a soRcloth.
Keep the outside clean. Wipe with a clean
doth figh_ °dampened with mild liquid
dish detergenl. Dry v,5th a clean. _)ft cloth.
Donot wipe the refrigerator with a soiled dish
cloth or wet towel Thesemayleavea residue
that can erode the paint. Do not usescouring
pads,powdered cleaners,bleach or cleaners
containing bleachbecausetheseproductscan
scratch and weaken thepaint finish.
Cleaning the Inside
Tohelppreventodors,leave an ()pen box of
baking s(_la in the reti'iger-ator and fi'eezer
eolnpm-tmenLs.
Unplugthe refrigeratorbeforecleaning.If this
is not practical, v,a-ing excess moisture out of
SF<,nge or cloth when cleaning around
switches, lighls or controls.
Use _rann water and baking _)da _)lufiot_--
alzout a tablesp(x)n ( 15 ml) of baking soda
u) a quart (l liter) otk_ater. This both cleans
and neutralizes odors. Thoroughiy rit_se
and wipe dr)'.
Avoid cleaningcoldglass shelves(onsome
models)with hot water becausethe extreme
temperaturedifferencemay causethem to break.
Handleglassshelvescarefully.Bumping
temperedglasscan causeit to shatter.
Donot washanyrefrigeratorpartsin the
dishwasher.
Washice traysin lukewarm wateronly--
do not put themin an automaticdishwashez
Condenser
There is no need tbr routine condenser
clemaings in normal home operating
environments. Hnwever, in environments
that may be particularly dttsty or gre a.sT,the
condenser should he cleaned periodic;ally
fbr efficient reli'igerat(w operation.
Cleaningthe condenser:.1]te condenser is
located inside dte hack of the refiigemror.
To access it, first un plug the reliigerau)r,
then remove the cover, The condenser Ls
on the right side.
10
Page 11

www.GEAppliance_com
Behind the Refrigerator
Be careful when moving the reli-igerator
away from the wall. All types ot tl_×w
coverings can be damaged, particularly
cushioned covelings aaad those with
eraho_ed .surfaces.
Pull the refrigerator s_raight out and return
it m lx_sifion by ptLshing it straight in.
McMng the rei¥igeramr in a,side direction
mayresult in damage m the fl_x_rcovering
or refrigerator.
Whenpushingtherefrigerator back, makesure
youdon_troll over thepower cordor icemaker
supply line {onsomemodels).
Preparing for Vacation
For long _-aeatiorls or absences, remove
fi_(_t and unplug the refrigerau n'. Move
the freezer conm)l to the 0 (offJposifion,
and clean the interior with a baking mda
solution of one tablespoon (15 m[) _ff
haking _)da to one quart (1 liter) ofvrater.
Leave the doors open.
Set timicemaker power _+'itch m tim0 (0f/)
position and shut off the w-atersuppb.i to
the refrigerator.
ffthe teraperature can drop below freezing,
have a qtudified servicer drain the water
supply systera (_m some models) to prevent
serious proper g danmge thle to flc×_ling.
Preparing to Move
Secttre all loose items such as base grille,
shrives mid dz-awers I_,,taping them securely
in place to prevent daaz_ge.
Besuretherefrigeratorstaysinanupright
positionduringmoving.
11
Page 12

Replacing thelightbulbs.
Turning the control to the O (off) position does not remove power to the light circuit.
........ . Refrigerator Compartment
CAUTION:Lightbulbsmaybehot.
0 Unplug the refrigerator.
Tbe bulhs are located at the top of
the refrigerator compazlmeut near
the opening, On some models, a light
shield will have to be removed.
To remove the light shield, grasp the
shield _.sshown. _tueeze the shield
and rotate tbe ,'shield to_-ard,s the back
of the reti'igea-ator. The light shield will
pop out.
Replace the bulh with an appliance
bulb of the s_mae or h)wer vrattage.
On m_×lels _th a light shield, replace
the light ,shield.
Plug the reliigerau_r backin.
ii!ili;:::iiiiiiiiiiiiiiiiiiiiiiiiiTiii!iiii¸¸:
Pocket
Freezer Compartment Dome Light Ionsomemode/sl
CAU770N:Lightbulbsmaybehot.
Unping the refrigerator.
The bulb is k×_ated at the top of the
freez_er compartment inside the dome
light shield. To remove the shield, p'lace
your finger in the I_-ket at the back
of the shield. Plfll the shield fbr_rd
After replacing with an appliance
bulh of the same or lower wattage,
replace the shield.
Plug the refrigerator back in.
and do_L
12
Page 13

Installation
Instructions
Refrigerator
Models 22 and 25
I ffyouhavequestions, cafll-8OO-GECARESorvisit,,urWehsiteat:Www.GEAppliances.com
I
BEFORE YOU BEGIN
Read these instructions completely and carefully.
•IMPORTANT - ,Save,he.,e
instructions for local inspector's use
•IMPORTANT - O,,serve
governing codes :rod ordinances.
• Note to Installer - Besuretoleave these
instructions with the Consumer.
• Note to Consumer - Keep these instructions
for future ret_rence.
• Skill level- Installation of this appliance requires
basic mechanical skills,
• Completion time - Refrigerator Installation
15 minutes
• Proper installation is the responsibility of the
installer.
• Product failure due to inlproper installation is not
covered under the Warranty.
WATER SUPPLY TO THE ICEMAKER
(on some models)
If the refrigerator ha_*an icemaker, it will have to be
connected to a cold water line. AGE water supply kit
(containing uthing, shutoffvalve, fittings and
instntctions) is available at extra cost from your dealer,
byvisifing our Website at _m'w.G/L,\ppliances.com or
from Parts and Acce._sories, 800-626-2002.
REFRIGERATOR LOCATION
• Do not install the refiigerator where the temperature
will go helow 60°F ( 16°C) because it will not run o/i.en
enough to maintain proper temperatures.
•Do not install the reti'igerator where the temperature
_dUgo above 100°F (37°(;) be{_auseit will not perform
properly.
• Install it on a tloor su-ong enough m support it full),
loaded.
CLEARANCES
Allow the fi)llowing dearances for ease of installation,
proper air cir_xdafion and plumbing and electrical
connefilions.
• Sides 1/8" (4 mm)
• Top 1" (25 mm)
• Back 1" (25 rant)
If the refrigerator is against a wall on either side, "allowa
1/8" (3 mm) door dear, race.
ROLLERS
The roDers have 3 purposes:
• Rollers adjust so the doors close on their owtt when
opened alxmt 45 °.
• Rullers adju.st so the refrigerator is firmly positioned
on the fl(_r and does not.wobble.
• Rollers allow you to move the l'eti'igeramr away li-om
the wall fi_r cleaning.
To adjust the rogers:
Remove the hase grille by
positioning haaads as sh O'¢,TL
Rotate the bottom ofthe
grille ouuvard until die (
snap onL
Pull the gtille away fi-om the
refrigerator.
Using a screwdriver, turn
the two tixmt roller
adjusting scrt_'s dockwise
to raise the refi-igeramr,
counterclockwise to lower iL
Replace the grille so the
nntch in the _ille will fit
around the hottom door
hinge.
O Tih the t°P°fthe grille 11 /
tot_'ard the refrigerator arid II I
insert the long metal clips [_'_
into the top of the o_-al
openings at the hottom ,,f _NN
the refrigerator. "_'N_,%._
Rotate the bc, ttom ot the "_ /
gTille tov,"ard the refrigerator x40_
until it snaps into place.
13
Page 14

Installation Instructions
INSTALLING THE WATER LINE (ONSOMEMODELS)
BEFORE YOU BEGIN
Recummeodedcopper_ater supplykitsareWXSX2,9,XSX3or_A'XSX4,
dependingImtheamountof tubingyouneed.Apprnvedpl_t,;fi,:_aler supply
linesareGESmartCormectTMRefrigel_aturTubing(WXO8XI_XJl)2.
_,_X08X10006,WX08XI0015and 9LX08XI0025).
_,\'henc_)nnec_,g yourrefrigeratort0a GERtwe_eOsmosis_,\;aterSy_tern,
theonlyapprnvedh_stallati0niswithaGERVKit.Forolher reverieosmofis
,,,,,-ate r s_Stelns, fulkr¢ithe tuanufacmrer'srecnnnnendafimts.
Thiswaterlineinstallatiun isnotwarrantedby drerefrigeratoror
icemakermanufacturer. Followthe_ instructions carefldlytominimize
the riskof expunfivewaterdamage.
Waterhammer (_ater banging in the pipes) in hnuse plumbing cancause
damageto rfffigel'ator parts and lead to'_ater leakageor flooding.Calla
qu',difiedplumbertocorrectx*aterhammer befnre installing the water
supplyline to the reffigeratur.
Toprevent burns and prmiuct damage, donut hookup the'_:ater lineto
the hot water line.
Ify'ouuseyour refrigerator Betbreconnectingthewaterline,makesm'e
the icemaker t_wer switchis in the fl (0ff)posithm.
Donot install the ieemaker tubingin areaswheretemperaturesPallbelow
freezing.
Vrq_ennsingair,'electrical device (suchasapowerdrill) during
installation,be sure the do'ice isdouble insulatedor gruunded in a
manner to prevent the hazard ofelectric shuck, or is batteff powered.
Allinstallationsmuslbein accordance"_,,'ithhz_alplumbingcode
requirements.
WHAT YOU WILL NEED
,CopperorGESmartCunnectrMRefrigeratorTubingkit, I/4"nuter
diameter to ennnect the refrigerator to the watersuppb:,ffusing copper,
be sureboth ends of dre tubingare cutsquare.
To determine howmuchrobingyouneed: measure the distance bom the
_-atervalveon the backtffthe refrigerator tn thewatersupplypipe. Then
add8 li.el (2.4m). Besure there issufBeientextra tubing (about 8 teet
[2A mIcoiledinul3 turns ofabout 10int:hes [25tm] dianteter) tualln;v
the redigeratnr k_inure out from thewallalter installaliotl.
GESmartConnect'vRd_gerator Tubillg Kitsare a:'ailableinthe
li)llowinglengths:
2'(.6 m) - \VX08×10002
6' (t,8 m) - WX08XI00t}6
15'(4.6m)-WX08X10015
25' (7.6nil- WX08XI0025
Besure that Ihe kily_uselectallo'*_atleast8leet (2.4in}as descriBed
above.
NOTE:The onlyGEapprovedplastictuFmgisthat suppliedinGE
SmartCounectTM RefrigeratorTubingkits.Donot usean}"otherplastic
watersupplylinebecausethe lineisunderpressureat all limes.Certain
iypes of plasticwillcrackorrupture with ageandcausewaterdamageto
yourhome.
WHAT YOU WILL NEED (CONT.)
• AGE water supply kit (containing tubing, shutoff
valve and tittings listed below) is available at extra
cost from your dealer or fronl F'ar t,sand Accessories,
800-626-2002.
• A cold water supply. The water pre.._sure must be
between 20 and 12t) p.s.i. (1.4-8.1 bar).
• Power drill.
• 1/2" or adjustable wrench.
• Straight and Phillips blade s_ewdriver.
• Two 1/4 #outer diameter compression nuts and
2 ferrules (sleeves)--to connect the copper tubing to
the shutoffvab:e and the rel?igerator water vah,e.
OR
•lfyou are using a GE SmartConnect TM Refrigerau_r
Tubing kit, the neccs_ry fittings are preasaembled to
the tubing.
• If your existing copper v,-ater line has a flared fitting
at the end, you will need an adapter (available at
plumbing supp_, stores) to connect the water line to
the refi'igerator OR you can cut off the flared tilting
•,,,'ida a tube cutter and then use a compression fitting.
Do not cut formed end fi-om GE SIuartConnect TM
Refrigerator tubing.
•Shutoff valve to connect to the cold _-ater line.
The shuloft valve should have a water inlet with a
minimum inside dimueter of 5/32" at the poinl of
connection to the COLD WATER LINE. Saddle-lype
shutoffvalves are included in urany water supply kits.
Before pl:,rchasing, make sure a saddle-type valve
complies with your local plumbing codes.
14
Page 15

Installation Instructions
Install the shutoffvalve on the nearest frequently used
drinking water line.
_] HUT OFF THE MAIN WATER
SUPPLY
Turn on the nearest tancet long enough to clear the
line of _ater.
[] CHOOSE THE VALVE LOCATION
Choose a location for the valve that is easily
accessible. It is best to connect into the side of a
verdcal water pipe. When it is neces_sary to connect
irlto a horizontal water pipe, make the connectitm
to tile top or side, rather than at the bottom,
to avoid drawing off :my sediment fhma the
_rater pipe.
[] DRILL THE HOLE FOR THE VALVE
Drill a I/4" hole in the water pipe (even if using a
sell=piercing _-alve) using a sharp bit. Remove any
burrs resulting frolll drilling die hole in the pipe.
Take care not to allow water to drain into the drill.
Failure to drill a 1/4" hole may result in reduced ice
production or smaller cubes.
[] FASTEN THE SHUTOFF VALVE
Fasten tile shutoffvah, e to the cold water pipewith
the pipe clamp.
Saddle-TypeJ VerticalCold
ShutoffValve WaterPipe
NOTE: Commonweahh of'Massachusetts Plumbing
Codes 248CMR shall be adhered to. ,Saddle valves
are illegal and use is nnt permitted in Mzts_chtLsetts.
Consult with your licensed plumber.
[] TIGHTEN THE PIPE CLAMP
Tighter] the clamp screws undl the sealing washer
begins to swell.
NOTE: 1)o not overtighten or you may crush the
tubing.
Clam_
[] ROUTE THE TUBING
Route the tubing between the cold water line and
the refrigerator.
Route the tubing through a hole drilled in d)e wall
or floor (behind the refiigerator or adjacent base
cabinet) as close to the wall as possible.
NOTE: Be sure there is sufficient extra tubing
[about 8 tk'et (244 cm) coiled iuto 3 turns of about
10" (25 cm) diameter] to allow the refrigerator to
move out froin the wall after installation.
15
Page 16

Installation Instructions
INSTALLING THE WATER LINE (CONT.)
[] CONNECT THE TUBING TO THE
VALVE
Place the compression nut and ferrnle (sleeve) fur
copper tubing onto the end of the tubing and
connect it to tile shutnffvalve.
Make sure the tubing is fully inserted into the valve.
Tighten the compre_ion nut securely.
For plastic tubing from a GE SmartConnect TM
Refrigerator Tubing kit, insert the molded end
of the tubing into the shutoffvalve and tighten
compression nut until it is hand tight, then tighten
one additional turn with a wl'ellch. Overtightening
may cause leaks.
Nut
Saddle-Type"_k
Shutoff Valve _ Smer_ConnectTM
Packing
OutletValve --Ferrule [sleeve)
NOTE: Commonwealth uf Massachusetts Plumbing
Codes 248CMR shall be adhered to. Saddle vanes
,are illegal and use is nut permitted in Massachusetts.
Consuh _th your licensed plumber.
[] FLUSH OUT THE TUBING
Turn the ntain _s-ater supply on and flush out the
tubing until the water is clear.
Shut tilt* water off at the water valve after about
one quart (1 liter) of water has been fiusbed
througti the tubing.
[] CONNECT THE TUBING TO THE
REFRIGERATOR
NOTES:
• Before making tile connection to the refrigerator,
be sure the refrigerator power cord is nut plugged
into the wall outlet.
• We recolnmend installing a water filter if your
water supply has sand ur particles that could clog
the screen of the refrigerator's water valve. Install
it in the _-ater line near the rt,f'rigerator. If using
GE Smart(kmnect Refrigerator Tubing kit, you
will need an additional tube (WX08XI0002) to
connect the filter. Du nut cut plastic tube to
install filter.
Remuve the access cover.
Remove the plastic flexible cap from the water vah,e
(refrigerator connection).
Place the compression nut and ferrule (sleeve)
nnto the end of the tubing as shown. On GE
Smartf'onnect TM Reli'igerator Tubing "kit, the nuts
are already assembled to the tubing.
16
Page 17

Installation Instructions
[] CONNECT THE TUBING TO THE
REFRIGERATOR (CONT.)
lnsert the end of the tubing into the water vah'e
connection as far as possible. While holding the
tuhing, tighten the fitting.
For plastic tubing from a GE SmartCnnnect TM
Refrigeralor Tubing "kit, insert the molded end of
the tubing into the shutoffvalve and tighten
cnmpression nut until it is hand tight, then tighten
one additional tuna with a wrench. Overtightening
may cause leaks.
Fasten flae tubing into the clamp provided tn hold
it in a vertical position. You may need to ply open
the clamp.
Tubing
Nut
SmaagonnectTM tubing
I_TURN THE WATER ON AT THE
SHUTOFF VALVE
Tighten any connections that leak.
Reattach tile access cover,
[] PLUG IN THE REFRIGERATOR
Arrange the coil of tuhing so that it does not vii)rate
against the back of the refrigerator or against the
wall. Push the refrigerator back _o the waU.
START THE ICEMAKER
Set flae icemaker power switch to the I (On)position,
The icemaker will not begin to operate until it
reaches it.s operating temperature of 15°F
(-9 °C) or below. It will then begin operation
automatically if the icemaker power switch is in
tie I (on) position.
I
NOTE: In lower water pressure conditions, the
•a_ater valve may turn on up to 3 times to deliver
enough water to tile icelnaker.
17
Page 18

Installation Instructions
REVERSING THE DOOR SWING
IMPORTANT NOTES
When reversing the door swing:
• Read the instructions all tile _-ay through before
starting.
• Handle parts carefully to avoid scratcbing paint,
• Set screws down by their related parts m avoid ufing
them in the wrong places,
• Provide a non-scratching work surface tbr
the doors,
IMPORTANT: Once you begin, do not move the
cabinet until door-swing reversal is completed.
These instructions are for changing d}e hinges ti'om
file right side to the left side--if you ever want m change
the hinges back to the right side, folh)w these same
instructions and reverse all retErences to left and right.
Unplug the refrigerator from its electrical outlet.
Empty all door shelves, including the dairy
compartment.
TOOLS YOU WILL NEED
Phillipsscrewdriver 3/4" Headsocket driver
Is 6-point socket is
recommended}
Masking tape
[20 or 125Torxddver,
whichever your model
requires
Puttyknifeor
thin-bladescrewdriver
[_REMOVE THE FREEZER DOOR
Tape the door shut with masking tape.
Remove the hinge cover on top of the fre(2er dnor
(on some models).
Remcwe tbe two Torx screws, then rift the hinge
sU'aigb t up to flee the hinge pin fi'om the scx:ket in
die trip of the door.
Remove die tape and tilt the dm)r away front the
cabinet. Lift it off the center hinge pin.
Set the door on a non-scratching surface with
the inside up.
18
Page 19

Installation Instructions
[] REMOVE THE REFRIGERATOR
DOOR
Tape the door shut with masking tape.
Remove the center hinge pin with a 3/4" socket.
HingePin-
/
U
Remove the tape and tilt the d<×>raw_,y from the
cabinet. Lift the door straight off the IxJttoin hinge
bracket.
,Setthe door on a non-_ratching sudb.ce with the
inside up.
CAUTION: Do not let door drop to the tloor.
To do so could damage the door stop.
[] TRANSFER TOP HINGE TO
THE LEFT
lnlerchange hinge and _rews at top rigllt with _rew.'s
at the top left.of cabinet.
Do not tighten screws on hinge side at this time.
19
Page 20

Installation Instructions
REVERSING THE DOOR SWING (CONT.)
[] TRANSFER BOTTOM HINGE
BRACKET TO THE LEFT
Remove Ihe hase gaille by pullingit straight out.
Using a Torx [)river, move tile bottom hinge bracke_
fronJ the right fide to the left sMe.
NOTE: If the _t_her is not on die hinge hcacket, check u)
see if it is stuck to the bottora of the dcxm
[] TRANSFER CENTER HINGE
BRACKET TO THE LEFT
Remove the center hinge bracket hy removing file
three Torg screws
NOTE: Keep them _'rews vAth the hinge bracket.
They are Iotlg screws and _dll be used wben installirg
tile [tinge on the other side,
You will need to remove the (xflor-matc.hed cap from
the ,screw head before you can remove the .serew. Use
the edge of a thin flat blade to gently pry the caps off
the screw heads. (A pn t_, knKe works well for tills.)
Cover the blade wifll tape re)prevent scratching the
paint.
Remove tbe mullion cover from the left side using
the thin flat blade. Assemble it to the right side.
Remove the Torx screw from the center left side
of the cabinet. Screw it into tbe boles on the
,igbt side.
Place the center hinge bracket over the hol_s at the
center left fide of the cabinet. Insert and tighten
tile three long screws.
Replace tile cap by snapping it over the _rew'Mth
yottr finger.
MullionCover
[] RANSFER DOOR STOPS
On each door. move the metal d(_n" stop from die
right to the left.
Move ally sc_rewsfit)In the left to die right.
2O
Page 21

Installation Instructions
[] TRANSFER REFRIGERATOR
DOOR HANDLE TO THE RIGHT
To remove the handle: Retnove the plug butu_n by
carefidly pr),firlglulder the edge with aputty knife.
Remove the exposed screw holding d,e haaldle.
f
HandlePlug
Remove the two ,screws holding the handle to the
top of the door.
LongHandle
Short t. _
Screw
t
Hole
\
ShortHandle
andle
F:l_
Hendl_
After removing the handle: Move the small plug
buttuns fix)m the top right, side of the dtx)r top and
insert them into the holes on the opl_xsite side.
Move the large plug butu)n fi'_)m the leti edge tff the
chx,r a11dinsert it into the hole on tht. opposite skte.
PlugSutton
[] TRANSFER REFRIGERATOR DOOR
HANDLE TO THE RIGHT (CONT.)
Trar,st_.r the d_)r plug button to the opposite side.
Reinstalling the handle: Attach the handle to the
right side of the d(x)r.
LongHandle
Short Handle
Handle
Plug
I
21
Page 22

Installation Instructions
REVERSING THE DOOR SWING (CONT.)
[] TRANSFER FREEZER DOOR
HANDLE TO THE RIGHT
Remove the screws holding the handle to the top and
Ix)from of the door. Remove handle.
__ _'-- _______-
Move the plug tmtton on the right side of the dt_)r to
the handle screw hole on the left side.
Re'attach tile handle on tile opposite side using the
holes tin,st to the edge tff the door.
m
[] REHANG THE REFRIGERATOR
DOOR
lx)wer the r_igera_nr (k_r nnto the bottnm
hinge pin.
Straighten the door mad fine it up with the center
hinge bracket.
Reinstall the center hinge pin _dth a 3/4",socket.
Turn it until it _tends through the hinge bracket
and into the door.
HingePin_
CenterHinge
Bracket
22
Page 23

Installation Instructions
[] REHANG THE FREEZER DOOR
Lower die freezer d(_>r onto the center hinge pin.
CenterHingePin _
Lift tile top hinge so the pin fitsinto the door sockek
Support file dtn)r on the hmldle,side and make sure
the door Lssu-aight and file gap between tile dtx_rs Ls
even acn)ss tile front. While holding the d_)r in place,
tighten tile top hinge ,,_'re'_.
23
Page 24

Normaloperatingsounds.
These soundsare normal and
are due mostlytohighlyefficient
operation.
O lcemaker (onsomemodels).OccasionaUy you will hear ice cubes dropping into
the k:e bin. If this is y(ntr first icemaker you'll hem _ccasional ,sounds the tmay be
unfamiliar. They are normal icema "_ng sounds and are not a cattse fbr concern.
The icemaker v,,'atervalve will buzz when the icemaker fills with _-ater. If' the
power s_itch is in the I (on) position it _x411bur_, even it"it has not yet been hooked
up to v,-ater. Keeping the Ix)wet switch in the I(an) posidon befbre it Lghooked up
to water can damage the icemaker. To prevent this, _t the power switch to the
0 (Off)position. This will stop the bu_ing.
Evaporator Fan.* You may hear air being forced through the cabinet by the t-an.
The tZanoperates at different speed,s depending on ccx)ling needs, If either door
re)nains open for more than 3 minutes, the fazi will come on.
_Evaporatm:. The flow of refrigerant throttgh die evaporator m_" ca'eate a sfight
bubbling or gurgling sound.
_)Defrost Heater. During defrost Q'cles, water dripping onto the heater may cattse a
hLssing or sizzling sound. After defrosting, a popping _mld may occur and the
evaporator may create a slight bubbling or gtugling._)und.
_Plastic Liner. Cracking or popping _mnds due to expansion of the plastic linea-.
This oetaws mainb r, when cooling down from r_K)m temperature.
Water Valve(onmodelsequipped with an automaticicemaker).When the icemaker
fills with _-ater, a bttz_ing Solmd alld running _-ater "Mllbe heard, lfyou have low
_rater pressure, you may bear tile icemaker cycle several thn_ when making one
batch of ice.
_)Wator Pan, Water may 1×"heard rurming into the m;finten ance&ee drain pall
during the defi-ost cycle.
Compressor.* Modern high efficiency cnmpressoi_ )petite much faster thazz
older modeLs. The compres*)r may have a high pitched hun or pulsating sound.
Condenser Fan.* You may hear air being fi_vced over the condenser b)"the Pan.
* Whenthecontrolsettingsarechange_,thecompressorand fansmaynotreactimmediately
24
Page 25

Before youcall forservice.., www.GEAppliances.com
Troubleshooting 77ps
i_ Save time and money! Review the charts on the foflowing
_ pages first and you may not need to carl for service.
_,_,_ ...._;,,, Possible Causes What ToDo
Refrigerator in defrost cycle. • Wait about 40 nfioutes for defrost cyc]e 1£)end.
Either or both controls • Move the refrigerator and ti'eezer conU't_l to a
set to 0 (off)portion. temperature ,setting.
Refrigerator is unplugged. • lhLsh the plug completely ix , tae outlet
The fuse is blown/circuit • Replace fnse or reset the breaker.
breaker is tripped.
Rollers need adjusting. • See Rollers.
(sligltt vibration
nmmotl
Normal whoa refrigerator • Wait 24 hours tot the refi'igevator to completely
is first plugged in. cc_>ldown.
Often occm,s whoa large • This is normal.
amounts of food m-e
placed in refrigerator.
Door left open. • (_eek to ,see if'package is holding door open.
Hot weather or frequent • Tht_ is nonoal.
tomaintain even door openings,
Temperature controls * ,SeeAboutthe controls.
set at the coldest
Temperature controlnot set • ,_'_eAbout the controls.
comparaonattanwarm cold enough.
Warlal weather or _l_tle_t • _t the teln_rature colltro] one step cokler.
door openings. ,SeeAbout the controls.
Door left open. *Check to _e if'package is holding door open.
Door left olma. • Cbeck to see if'package is holding door open.
onlrozonfood
(trostwithia p:mkage Too frequent ortoolong
iS oormM) door openings.
Automatic icier lcemaker power switch • ,Set the power s_vitcb tu the I (on}position,
(onsome models) isin the 0(o#)posJfion.
dOeS a_ work Water supply turned off or • ,See Installingthe water line.
not connected.
Freezer compm-O'noat * Wait 24 hours for the refrigerator to completely
too Warln. c(x)l dowo.
Piled up cubes in the storage * Level cubes by band.
bin cause the icemaker
to shut off.
Ice cubes stuck in icemaker.
(Green power fight on
icemaker blinking).
• Turn elf the icemaker, remove cubes, ;rod turn the
icemaker back on.
25
Page 26

Before youcall for service...
Troubleshooting tips
_:_b/efft_:_==== ._!, Possible Causes What ToDe
Icucubeehave Ice storage bin needs cleaning. * Empty and vrash bin. l?fis_ard old cubes.
odor/tsste
Food transmitting odor/taste • \_-ap foods well
to ice cubes.
Interior of refrlgexator • S_ze Careandcleaning.
needs deanlng.
Door left open. • Check to see ff package is holding door open.
Temperature control not set • See Aboutthe controls.
cold enough.
No ice cube Supplyline or shutoff • Call a plumber.
predation valve is dogged.
Foods transmitting • Foods with strong odors should be dghtly wrapped.
odor to refrigerator. • Keep an open tx)x of baking soda in the refi'iger-a tor;
replace cwc_, three months.
Interior needs cleaning. • See Care andcleaning.
Moisture collects imide Too frequent or too
tin humidwnoth_ air long door openings.
currie_ moisture iMn
are opened)
No pearler at outlet. • Replace fhse or reset the breaker.
not work
Lightbulb burned out. • ,%e Replacingthe lightbzdbs.
Hota# from bormm
ofrefrigerator
Normal air flow cooling
motor. In the refrlgeradon
process, it is normal that
heat be expelled in the
area under the refrigerator.
Some floor coverings are
sen_tive and will discolor
at these normal and
safe temperatures.
Food freezingm Food too close to air venL • M(we the fi)od away from the air vent (neat" the controls).
tim refrigerator
Refrigerator control is set * Move the reti'igeraV)r conta'o] u) a _rmer tempcK_Vare
too cold.
Door doesnot close Rollers need adjusting. • See Rollers.
by itseff
Orangeglow io Defrost heater is on. *This isnormal.
the freezm
26
Page 27

GE Service Protection Plus"
GE, a name recognized worldwide for quality and dependability, offers you
Service Protection Phts"--comprehensive protection on all your appliances--
NoMatterWhatBrand.* We'll CoverAnyAppliance.
Benents[ncl.de: Anywhere. Anytime.*
• Backed by GE
• All brands covered
• Unlimited service calls
• All parts and labor costs included
• No out-of-pocket expenses
• No hidden deductibles
• One 800 number to call
You will be completely satisfied with our setxice protection or you may request your money back
on the remaining value of your contract. N questions asked. It sthat smiple.
Protect your refrigerator, dishwasher, washer and dryer, range, TV, VCR and much more--any brand!
Plus there's no extra charge for emergency selxice and low monthly financing is available. Even icemaker
coverage and tbod spoilage protection is offered. You can rest easy, knowing that al! your valuable
household products are protected against expensive repairs.
Place your confidence in GE and call us in the U.S. toll-free at 800-626-2224
for more information.
*All br au¢L_ ¢ i_ered, iq) to 20 yeat_ old, in the tun dnental U.S,
Pleaseplace in envelope and mail to:
GeneralElectric Company
Warranty Registration Department
P.O. Box 32150
Louisville, KY 40232-2150
27
Page 28

Consumer Product Ownership Registration
Deal- Customer:
Thank you for purchasing our prod_ct and thank you for placing your confidence ill us,
We are proud lo have you as a customer!
Follow these three steps to protect your new appliance investment:
Complete and mail
_o_r Cotm_amer
Product Ownership
Registration today.
H_tvc the pcn¢;e of
mind of knowing wc
can contact you in the
unlikely event of a
safety m¢_'lific_tion.
2
±M'ter mailing die
regi_ralh)n below,
_tore this doctlBlent
ill a safe place. It
cor_tairls inti)t-illation
you will need _houkt
you require service.
Our set.'ice ntlmllcr is
80O GE (._'_RES
(80O-432-2737).
3
Read your Owner's
M;mual rarefifily.
It _ill help yml
opct ale your new
appliance properly.
Model Number Serial Number
,,, , , , , , I I , , , , , , , I
Important: If you did not get a registration card with your
product, detach and return the form below to
ensure that your product is registered, or register
online at www.GEAppliances.com. _ C.,llor_
Consumer Product Ownership Registration
Model Number Serial Number
I I I I l I I I l I I I I i _ I I , I
I
N_e] IIIIlllll[l]
Add,vess I I I I I I I I I I I I I I I I I I I I [ I I I I
Ap,. _ [ I I I I I [ ] ] E-ln:kil_-ddl_ss*
Mol_lh L_ [|,t, _ "it_al" _ ]'l't,,lle
@
* Pfea._e provide your e-mail addt ess Io receive. \ia e-noil, discotmts, speci;fl offe, rs and other important
conanl_micallo*ls horn (;E Appliances tGtL_).
i_ ( _hc2c_kh_r(! if )oll d_l not _.'illrlt to r(!t;t![vc (:omill i1rzit;atJol__,fl oill (_E_I.'_ (:_ffe fU]ly selc_c[ed pal tllev_
G_r_e_f[h*c_ C_mpm_y
28
Page 29

CONSUMER WARRANTY
(for customers in Canada)
Your refrigerator is warranted to be free of defects in material and workmanship.
What is covered How Long Warranted Parts Labour
(From Date of Sale) Repair or Replace
at Camco's Option
Compressor Five (5) Years Five (5) Years Five (5) Years
Sealed System (including Five (5) Years Five (5) Years Five (5) Years
evaporator, condenser
tubing and refrigerant)
All Other Parts One (1) Year One (1) Year One (1) Year
TERMS AND CONDITIONS=
This warranty applies only for single family
domestic use in Canada when the
Refrigerator has been properly installed
according to the instructions supplied by
Camco and is connected to an adequate
and proper utility service.
Damage due to abuse, accident, commercial
use, and alteration or defacing of the serial
plate cancels all obligations of this warranty.
Service during this warranty must be
performed by anAuthorized Camco
Service Agent.
Neither Camco nor the Dealer is liable for
any claims or damages resulting from any
failure of the Refrigerator or from service
delays beyond their reasonable control.
To obtain warranty service, purchaser must
present the original bill of sate. Components
repaired or replaced are warranted through the
remainder of the original warranty period only.
This warranty is in addition to any statutory
warranty.
WHAT IS NOT COVERED=.
• Service trips to your home to teach you
how to use the product.
• Damage to finish after delivery.
• Improper installation--proper installation
includes adequate air circulation to the
refrigeration system, adequate electrical,
plumbing and other connecting fadlities.
• Replacement of house fuses or resetting
of circuit breakers.
• Replacement of lightbulbs.
• Damage to product caused by accident,
fire, floods or acts of God.
Loss of food due to spoilage.
Proper use and care of product as listed
in the owner's manual, proper setting of
controls.
• WARRANTOR IS NOT RESPONSIBLE
FOR CONSEQUENTIAL DAMAGES.
IMPORTANT
Keep this warranty and your bill of sale as proof of odginal purchase and purchase date.
Camco Service is available coast to coast.
If further help is needed concerning this
warranty, contact:
Manager, Consumer Relations
Camoo inc.
Suite 310
1 Factory Lane
Moncton, NB.
E1C 9M3
Staple your receipt here.
Proof of the original purchase
date isneeded to obtain service
under the warranty
29
Page 30

Refrigerator Warranty.(For customers in the United States)
All warranty service provided by our Factory Service Centers,
or an authorized Customer Care_ technician. Toschedule service,
on-line, 24 hours a day, contact us at wvvw.GEAppllances.com, or
carl 800-GEoCARES.
Staple your receipt here.
Proof of the original purchase
date is needed to obtain service
under the warranty.
ofthe
GE Will Replace:
Anypart of the refrigerator (excluding vrater filter cartridge) wftich fails Clueto a defect in
materia s or workJnanship. During this full one-year warranty, GE will also provide, free ofcherge,
'alllal×)r and in-honle sel'vice to replace the defective part.
Any part of the sealed refrigerating system (the compressor, condenser, ev-aporator and 'all
connecting tubing) which fails due to a defect in materi_ds or workmansffip. Duling this
five-yeer warranty, GE x_ll'also provide, free of charge, all labor and in-hoine service to replace
the def_'cfive part in the _aled refi'igerating s_,'stem,
Service tripsto your home to teach youhow to use
the product.
Zmproperinstagadon.
Faihu_ of the product if itis abused, _, or
used for other than the intended purpose or
used commercially.
_ Loss of food due to spoilage.
_ Replacement of house fuses orresetting of circuit
breakers.
Damage to the product caused by accident, fire, floods
or acts of God.
Incidental orconsequential damage caused byposslble
defects withthis appliance.
This warranty is extended to the original purchaser and any succeeding owner for products purchased for home
use within the USA. InAlaska, the warranty excludes the cost of shipping or service calls to yourhome.
Some states do not allow the exclusion or limitation of incidental or consequential damages. This warranty gives
youspecific legal rights, and you may also have other rights which vary from state to state. Toknow what your
legal rights are, consultFour local or state consumer affairs office or your state's Attorney General
Warrantor:General Electric Company.Louisville,KY40225
30
Page 31

Notes.
www.GEAppliances.com
q
la]
i
i
I
_P
31
Page 32

ConsumerSupport.
GEAppliancesWebsite www.GEAppliances.com
Have a question or need assistance x_itlayour applia_lce? Try file GE Appliances Website 24 hours a day,
an)' day of tile year! For greater convenience an d tSster service, you can now do_load Owner's Manuals,
order parts, catal<gs, or even ,_hedule service on-line. You can also "Ask Our Tean_ of Experts _"
your questions, and st) much more...
@
ScheduleService
www.GEAppliances.com
Exlxer t GE repatr _rvl__e is only one step away from ),,our dix_r. Get onqme and _hedule your servtce at
),_mr convenience 24 hours any day eft the year! Or call 8004;E-(2kRILS (800-432-2737) during normal
business hours.
RealLifeDesignStudio
wvvw.GEAppliances.com
GE supporLs the Universal Design c(>ncept--pl_ducts, services and environments that can be nsed by
people of all ages, sizes and capabilities. We recognize the need to design for awide l_ange nf physical and
mental abilities laid impaillnen ts. For details of GE's Universal l)esign applications, including kitchen
design ideas t'_wpeople with di_bilities, check out our Website t(xlay. For the hearing impaired, please call
80I_-TI)I)-GIL&C (800-83,%'t322).
ExtendedWarranties
www.GEAppliances.com
Pui chase a GE extended wan-as _oand lea rab Jut special discomlts that are a_-allable while your x_-arraslb,
is still in effect. You can purchase it on-line anytime, or c',d18004526-2224 during normal blLsiness hours.
(;E Consumer Home Services wi still be there after yottr x,-an-aslly expires.
PartsandAccessories
vvww.GEAppliances.com
Individuals qualitied to service their own appliances c:m have parts or accessories ._nt directly to their homes
r I _ . • •
(X, SA, IVlaster(_ard aaad DL_co_er cards are acccpted). Order on-line today, 2,1 hours ever)'dayor by phone at
800-626-2002 during normal bttsiness hours.
Insb_vctionscontainedin this manualcoverprocedurestobeperformedby anyuser.Otherservicing generally
shouldbereferredto qualified service personnel Cautionmustbe exercised, since improperseraicingmaycause
unsafeoperation.
ContactUs wvvvv.GEAppliances,com
Ifyou art" not satisfiedwith the _t-vice you receive from GE, contact us on our Website _4th all the details
including yotu" phone numl×,r, or wcite ro: (;en er-al Mallager, Cl_tomer Relations
GE Appliam:es, Applizmce Park
Ix>uis_"ille, K¥ 40225
RegisterYourAppliance
www.GEAppliances.com
Register yotar new appfiance on-fine-at your convenience[ Timely product r_.glsu-ad_)n will allow for
cnhanced communication and prompt servict, under the terms of your w;uran ty. should the nec'd arise.
"t ou may also mail in the pre-pnnted regqstrauon card ncluded in tile packing matt.rial, or detach and
use the torm in this Owner's Manual.
Printed in the United States
 Loading...