

Page 1
N
0
.qe.com
Safety Instructions
Connecting Electricity ......... 4
Extension Cords .............. 9
Proper Disposal .............. 9
Safety Precautions ............ 3
Operating Instructions
Automatic Icemaker ........... 9
Care and Cleaning ........ 10, 11
Shelves .................... 6, 7
Storage Drawers ............. 8, 9
TemperaUHe Controls .......... 5
Installation Instructions
Preparing to Install
the ReDig>rator ............. 12
Reversing the Door Swing . . 17-92
_'ater Line Installation ..... 1,9,-1 7
Troubleshooting Tips
Before You Call For Service . .94, 95
Normal Operating Sounds ..... 93
Consumer Support
Consumer Support .... Back Cover
Product Registration
(Canadian) .............. 97, 98
Product Registration ....... 99, 30
V_'arranty for
Canadian Customers ......... 96
_4'arranty for U.S. Customers . . . ,9,1
Write the model and serial
numbers here:
Model #
Serial #
You can find them on a label on
the upper lett side of the fl'esh tood
COlllpa Ftlllent,
162D3905P012 49-604!8 11-05JR
Page 2
IMPORTANTSAFETYINFORMATION.
READALLINSTRUCTIONSBEFOREUSING.
DANGER!RISKOFCHILDENTRAPMENT
PROPERDISPOSALOFTHEREFRIGERATOR
Child entrai)ment and suffocation are not
problen_s of the past.Junked or abandoned
refl_igeratox_ are still dangerous...even if they
will sit for 'iJust a few da}_s." ff you are getting
rid of yore" old refi_igerato_; please follow the
instructions below to help prevent acddents.
Before YouThrowAway YourOld
Refrigerants
All refrigeration products contain refrigerants,
which under federal law must be rein oved prior
to product disposal. If wm are getting rid of an
old refrigeration product, check with the
company handling the disposal about what
to do.
Refrigeratoror Freezer:
_: _ke off the doo_.
iJi::i,eaxe the shelves in place so that children
mm not easih' climb inside.
USEOFEXTENSIONCORDS
Because of potential safety hazards under certain conditions, we strongly recommend
against the use of an extension cord.
Howe\'et; if you must use an extension cord, it is absolutely necessary that it be a UL-listed (in the United
States) or a CSA certified (in Canada), 3-wire grounding D'pe appliance extension cord having a grounding
t)pe plug and outlet and that the electrical rating (ff the cord be 15 amperes (minimum) and 120 volts.
DANGER! RISQUESPOURLESENFANTS
COMMENTVOUSDEBARRASSER
CONVENABLEMENTDEVOTREANCIENREFRIGE-RATEUR
Les eMimts pris au pibge ou morts d'asphyxie
SOIl[ [Ot!iOtllN d'acmalit6. Les rOfiig_rateurs
abandomlOs sent tot!iours aussi dangeieux,
m6me si on n'attend que <<luekluesjotu_,,
pore" s'en d6barmsse_: Si vous ne gardez pas
votre anden r6fi'ig6rateuc veuillez suivre les
directi_vs ci-dessous afin de prOvenir les accidents.
Avant de vous dObarrasser de votre ancien
refrigorateur ou congo/ateur :
::Ji::t)(_montez les portes.
_: I,aissez les clavettes en place afin d'emp_cher
les enfimts de grimper fi l'int_rJem:
CORDONSPROLONGATEURS
Nous vous recommandons fortement de no pas utiliser de cordons prolongateurs _ cause des risques
potentiels qu'ils prOsentent dans certaines conditions.
Refrigerants
Tous les appareils de r(_fl'ig_ration contiennent
des r(_fl'ig(_rants qui, conform_ment aux lois
f_d_rales, doivent _tre enlev_s avant route
01imination de l'appareil. Si vous vous
d0barrassez de vieux appareils de r0frig0ration,
v0rifiez, aupr_s de la soci0t0 qui s'occupe de
leur 01imination, ce que wins devez taire.
Toutefois si vous d0ddez d'ufiliser tout de m_me un cordon pmlongateu_; il est absolument n0cessaire
qu'il s'agisse d'tm cordon _'l3 ills avec inise _'lla terre pour appareils 01ectrom0nage_5 homologu0/Ji, (aux
Etats-Unis) ou certifi0 (_SA (au Canada), poulvu d'une fiche et d'une prise raises _'lla terre de 15 amperes
(minim um) et de 190 volts.
Page 3
IMPORTANTSAFETYINFORMATION.
READALLINSTRUCTIONSBEFOREUSING.
A WARNING!
Use this appfiance only for its intended purpose as described in this Owner's Manual
SAFETYPRECAUTIONS
When using electrical appfiances, basic safety precautions should be followed, including the following:
_i: This refrigerator m ust be properl) instnll ed
and located in accordance with the lnstnllation
Instructions heft)re it is used.
:#;_Do not allow children to climb, st;rod or hang
on the shelves in the refligeratoi: They could
damage the refligerator and seriously injure
themseh'es.
::_Do not touch the cold sm_i_ces in the fl'eezer
compartment when hands are damp or wet.
Skin mm stick to these extremely cold StllS_ilces.
k¢<Do not store or use gasoline or other flammable
\'apo_s and liquids in the vicinity ot this or any
other appliance.
i)_:Keep finge_ out oI the "pinch point" areas;
clearances between the do(ns and between
the do(n_ and cabinet are necessmih' small.
Be careflfl closing do(n_ when children are
in the area.
:_i)In refl_igeratcns with automatic icemake_s,
avoid contact with the moving parts of the
ejector mechanism, or with the heating element
that releases the cubes. Do not place finge_ or
hands on the automatic icemaking mechanism
while the refrigerator is plugged in.
:)_Unplug the refligerator heft)re cleaning and
making _epai_s.
NOTE:Westronglyrecommendthatanyservicingbe
performedbyaquafifiedindividual
;)_Turning the control to the 0 position does
not remove power to the light circuit.
i)::Do not refl'eeze fl'ozen fi)ods which have
thawed completely:
ge.com
MESURESDESECURITeL- IMPORTANTES.
LISEZD'ABORDTOUTESLESDIRECTIVES.
A AVERTISSEMENT!
N'utilisez cet #lectrom#nager que pour I'usage auquel il est dentin#, comme expliqu# dans le
pr#sent manuel.
MESURESDES@URITE-
Lorsque vous utilisez un appareil #lectrique, observez toujours los mesures de s#curit# de base,
y compris les suivantes.
iJi::Instnllez le r(ffiig_ratem" confimnC_ment aux
direcfixes d'installafion axant de l'utiliseI:
;;Ji::Ne laissez pas les enfimts gfimpe_; s'asseoi_;
se tenir debout ni se pendre aux clayettes du
r_fiig&'atem: Ils pomTaient endommager le
r_flig_rateur et se blesser gravement.
_: N'entreposez et n' ufilisez pas d'essence ou
autres vapetns et liqtfides inflammables fi
proximit_ de cet appareil ou de tout autre
appareil (dectrom(amge_:
_: t_loignez les doigts des parties du r(_flig_rateur
off l'on peut fi_cilement se pincer : les espaces
entre les portes et entre les portes et les placards
sont tot!jOtlIN (_troits. Soyez prudent lo_sque
vous termez les p(>rtes de l'appareil en presence
des enfimts.
iJi::Si votre r_flig_rateur est dot(_ d'tme machine _'_
glacons automatique €)xitez le contact axec les
pi&ces mobiles du m_canisme _jectem; ou avec
l'_l&nent chattflimt qtfi lib_ere les gla<ons.
Ne posez pas les doigts ou les mains sin" le
m(_canisme de la machine _'_gla(ions pendant
que le r_flig_ratem" est branch,.
::_i::Ne touchez pas les sui_ilces fl'oides du cong_latem"
si vous avez les mains humides ou mouill_es : la
peau risque d'adh_rer _'_ces surfi_ces tr_s fl'oides.
_: D_branchez votre r_flig_ratem" avant de le
nettover ou de le r_parei:
REMARQUE : Noun vous recommandons vivement de
confiertouter@aration_untechnicienquafifi#.
_: I,oI_(]tle VOtlS r(_glez la commande sur 0 (_teint),
l'alimentntion (_lectfique de l'ampoule n'est pas
coup(_e.
::_?::Ne recongelez pas les aliments smgel(_s qui ont
compRetement d_gel& 3
Page 4
iMPORTANTSAFETYiNFORMATiON.
READALLiNSTRUCTiONSBEFOREUSING.
WARNING!
HOWTOCONNECTELECTRICITY
Do not, under any circumstances, cut or remove the third (ground) prong from the power cord.
For personal safety, this appliance must be properly grounded.
The power cord of dfis appliance is eqtfipped _d_ a 3-
prong (grounding) plug which nlates _lfl/a standard
3-prong (grounding) wall outlet to minimize fl_e
p(_ssibili_' of electric shock hazard fl'om tiffs appliance.
Have the wall outlet and circuit checked 1)_a qu_flified
electrician to make sm'e fl_e outlet is properly
grotmded,
_Aqmre a standard 2-prong _dl outlet is encotmtered, it
is yore" personal responsibility and obligation to haxe it
replaced wifl_ a I_r°I ,,_erlx grounded -I3-)tong, x_dl outlet.
The reflioemtor_ should al_m_, beI)lugged,, into its (ma_
indi_(hM electrical outlet which has a _oltage rating
that matches fl_e rating plate.
This provid_ the b_t pettimnance and also pre\ ents
o_erloading house wifino circuits which could cmLse a
fire hazard fi'om oxerheated _res.
Never un I)lug,._om" refligemtor, b_,I )tilling, on d_e
power cord. Mx_Ws grip plug fim_ b and ptfll ,smfio-ht
out fl'om fl_e outlet,
Repair or replace immecfiately all p()wer c( )i'(1.sd_at
have bec()me flayed or ofl_erwise damaged. Do not use
a cord that sh()ws crocks or abrasion damage ahmg its
lengfl_ or at eifl_er end.
_A_en moving fl_e refligemtor m_z_y fl'om the
_dl, be careflfl not to roll oxer or damage die
power coFd.
READANDFOLLOWTHISSAFETYINFORMATIONCAREFULLY.
SAVETHESEINSTRUCTIONS
MESURESDESECURITEIMPORTANTES.
LISEZD'ABORDTOUTESLESDIRECtiVES.
AVERTISSEMENT!
t
RACCORDEMENTELECTRIQUE
No coupez ni retirez on aucun cas la troisibme broche (raise_ la terre) de la fiche du cordon
d'alimentafion. Pour votre s6curit6, cet appareil doit Otrecorrectement mis _la terre.
I,e cordon d'alimentafion de cet appareil _t muni
d'une fiche 5 3 broch_ (raise 5 la ten'e) qtfi se bmnche
darts une prise mumle ordinaire 5 3 _d\'(aoles (raise 5 la
ran'e) pour r&luire au minimmn les fisques de chocs
_lect_iques.
gaites examiner la prise de commit et le circtfit par un
_lectricien qt_difi_ pour x()tts assurer que la prise est
covrecteil/ent II/ise _'1la telTe.
Si la prise mumle _t du t_pe standard 5 2 alv&)l_ il
xous incombe de la fifire remplacer par tree prise 5 3
alx&)l_ conectement raise 5 la rune.
I,e r0flig0mteur doit t()@m_s _tre bmnch_ darts sa
propre p_ise de coumnt, dont la tension nominale est
idenfique 5 celle in(fiqu_e sur la plaque signal_tique.
Cette pr6caufion _t recommandSe pore" _mmfir tm
rendenlent optimtm_ et _iteI" une surchalge d_
drctfits (qectfiques de la r_sidence, ce qtfi poumfit
crier tm risque d'incendie par sm'chaufle des ills.
Ne dObmnchezjamais le r6flJg&ateur en tirant sur le
cordon d'alhnentafion. Sa_sissez tem_ement la fiche du
cordon et firez droit pour la refirer de la prise.
R_parez ou remplacez imm&liatement tout cordon
effiloch_ ou endommag_. N'ufilisez pas un cordon
foncfill_ ou I_r6sentant (I_ signes, el'list II'e.
I,()_sqtle votts d@la cez votre i'_flJgOivltet lr d u mt u,
fakes attention de ne pas le faire fouler sur le cordon
d'alimenmtion afin de ne I)as l'endommager,.
VEUILLEZLIREETSUIVREATTENflVEMENTCESMESURESDESECURITE.
CONSERVEZCESDIRECTIVES
4
Page 5
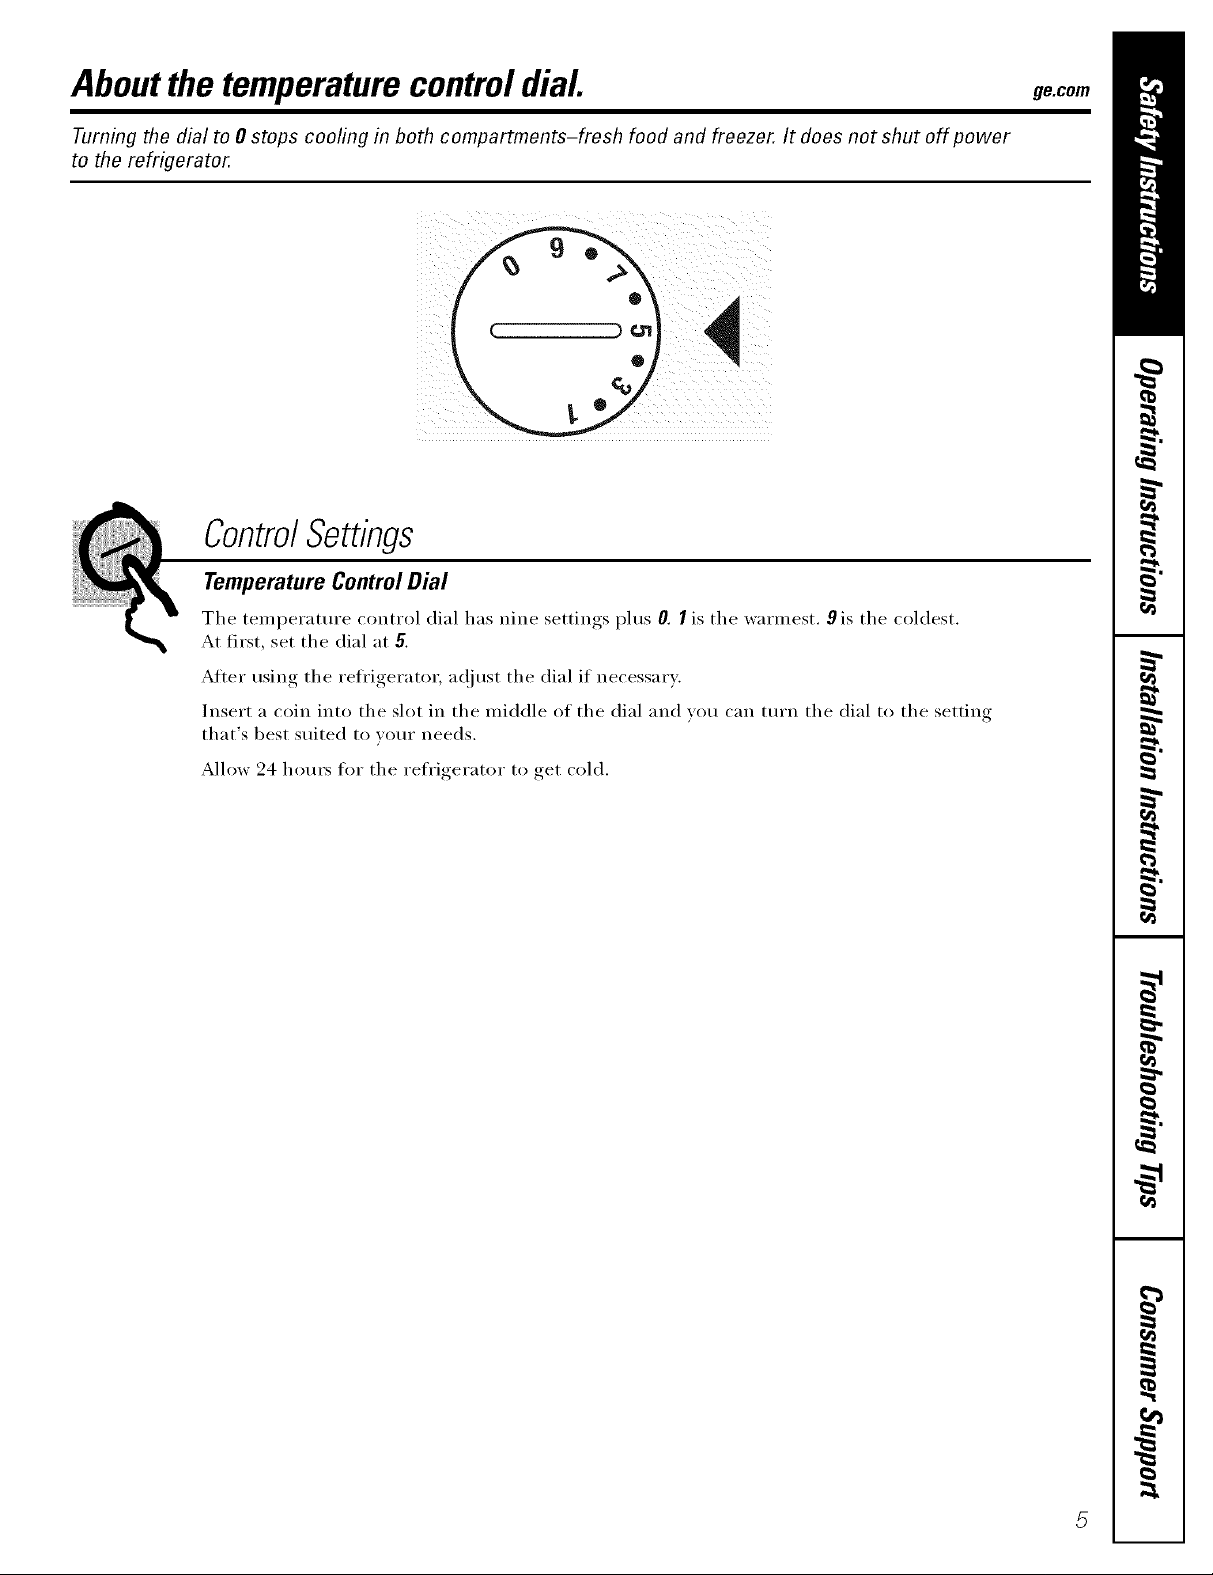
Aboutthe temperaturecontroldial ge.com
Turning the dial to 0 stops cooling in both compartments-fresh food and freezer. It does not shut off power
to the refrigerator.
ControlSettings
Temperature Control Dial
The temi)erature control dial has nine settings plus O. I is the warmest. 9 is the coldest.
At first, set the dial at 5.
Afier using the refl'igerat(n, a(!just the dial if necessary.
Insert a coin into the slot in the middle of the dial and you can turn the dial to the setting
that's best suited to wmr needs.
Allow 24 hom_ tot the refrigerator to get cold.
Page 6
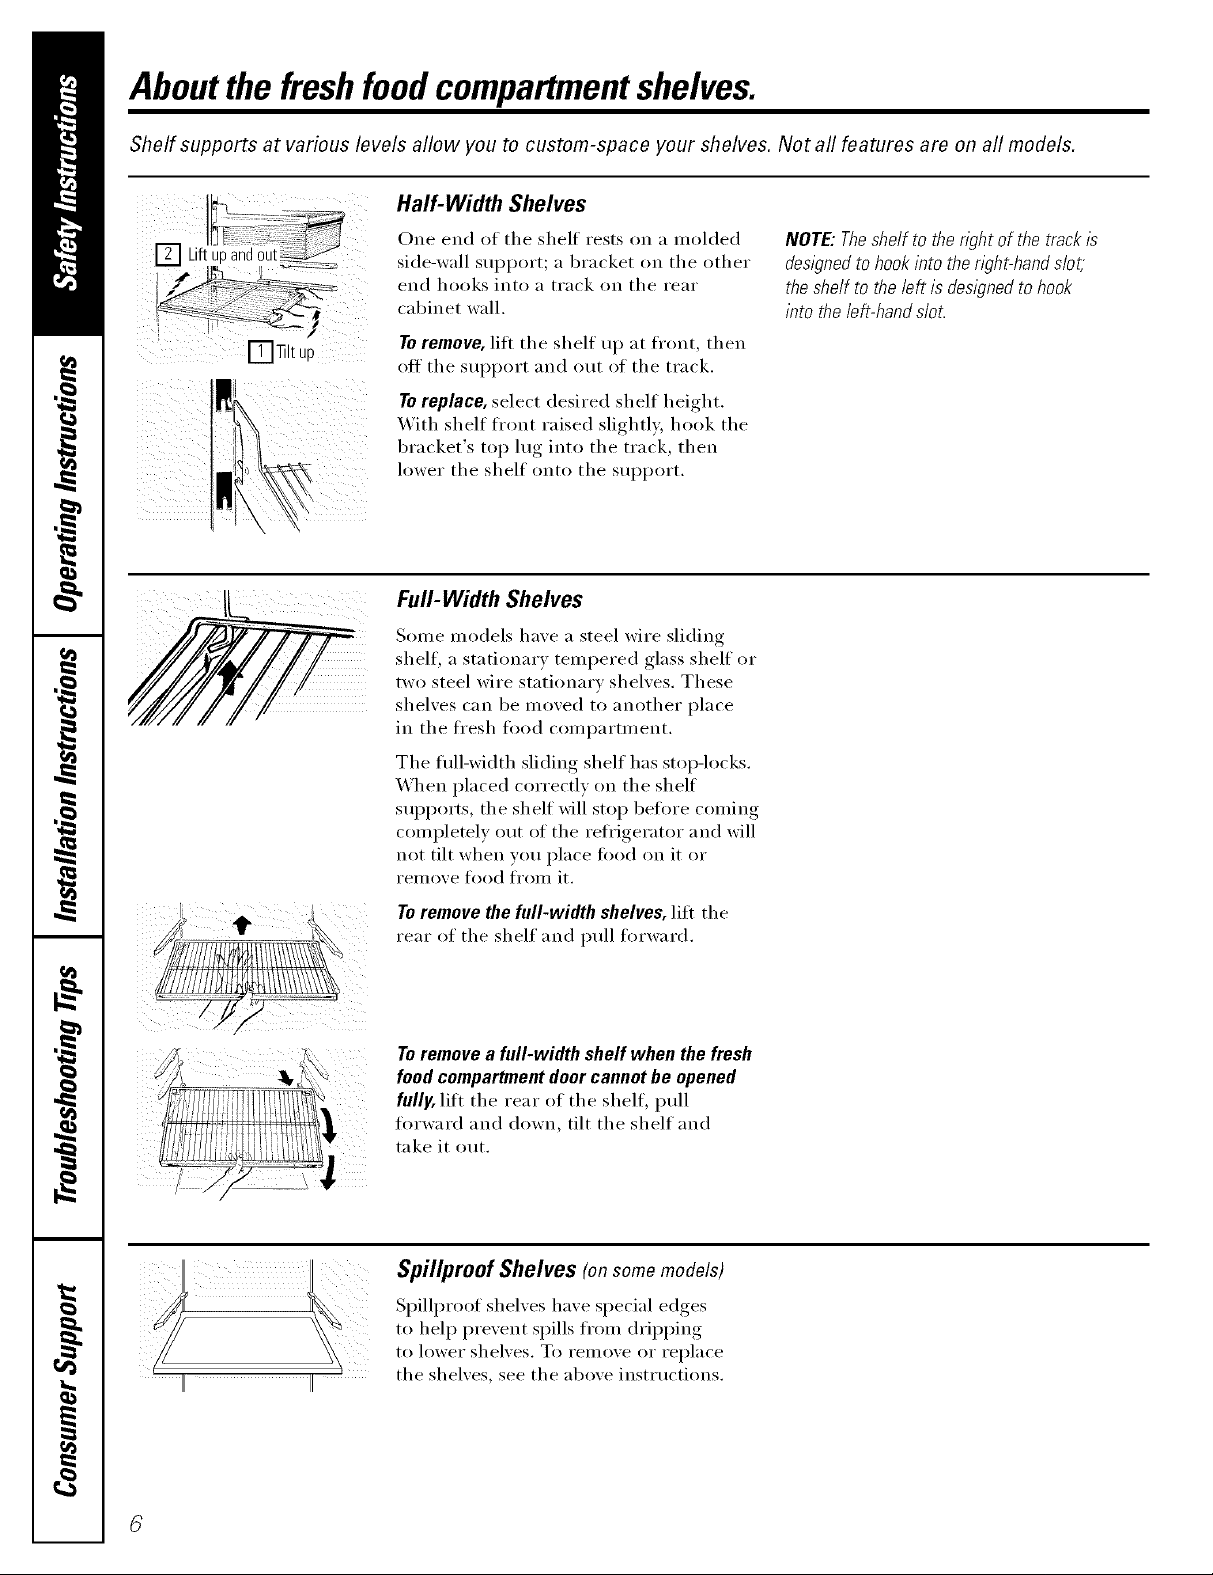
Aboutthe freshfoodcompartmentshelves.
Shelf supports at various levels allow you to custom-space your shelves. Not all features are on all models.
Half-Width Shelves
One end of the shelf rests on a molded
side-wall support; a bracket on the other
end hooks into a track on the rear
cabinet wall.
NOTE:Theshelfto the @t of thetrack/s
designedto hookintothe@t-hand dot,
theshelf totheleft isdesignedtohook
intothe left-handslot.
[T]]qlt uo
To remove, lift the shelf up at fl'ont, then
off the SUl)l)ort and out of the track.
To replace, select desired shelf height.
With shelf ti'ont raised slightly, hook the
bracket's top lug into the track, then
lower the shelf onto the SUl)port.
Full-Width Shelves
Some models have a steel wire sliding
sheik a stationary tempered glass shelf or
two steel wire stationary shelves. These
shelves can be moved to another place
in the ti'esh ti)od compartment.
The flfll-width sliding shelf has stoi>locks.
When placed correctly on the shelf
SUl)ports, the sh elf will stop beti)re coming
completely out of the refl'igerator and will
not tilt when you place toed on it or
I'eI/lOVe ti),)d ti'OIll it.
Toremove the full-width shelves, lift the
rear of the shelf and pull forward.
Toremove a full-width shelf when the fresh
food compartment door cannot be opened
fully, lift the rear of the shelf, pull
ti)rward and down, tilt the shelf and
take it out.
Spillproof Shelves (onsomemodels)
Spillproof shelves have special edges
to hel I) prevent spills from dripping
to lower shelves. To remove or replace
the shelves, see the above inst_ uctions.
Page 7
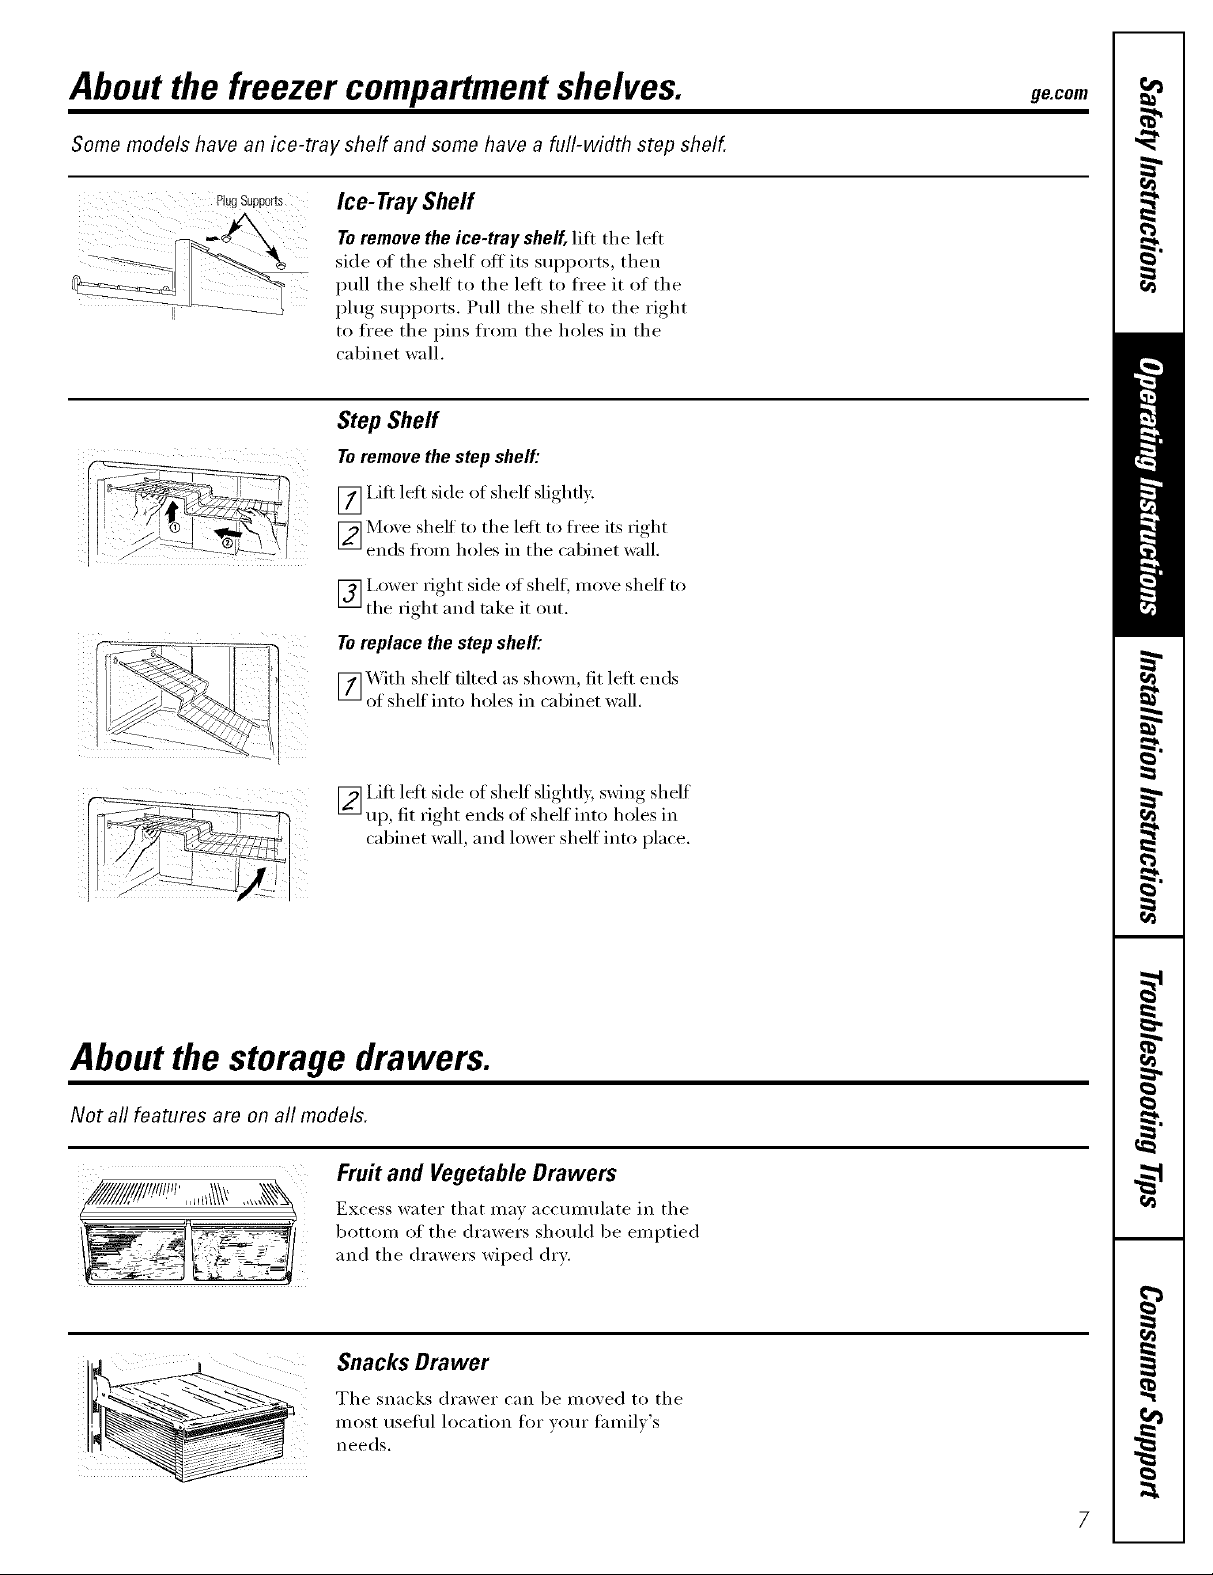
About the freezer compartment shelves, gecom
Some models have an ice-tray shelf and some have a full-width step shelf.
Ice- Tray Sheff
Toremove the ice-tray shelf, lift the left
side of the shelf off its supports, then
pull the shelf to the lett to ti'ee it of the
plug supports. Pull the shelf to the right
to ti'ee the pins ti'om the holes in the
cabinet wall.
Step Shelf
Toremove the step shelf."
[_ I,ifl lett side oI shelt slightly.
_Moxe shelf to the left to free its right
ends ti'om holes in the cabinet w_iil.
I,ower _ight side of shelf, mo_e shelf to
[] the right and take it out.
Toreplace the step shelf."
[_ _ ith shelf tilted as shown, tit left ends
of shelf into holes in cabinet wall.
[_ I,ifl left side of shelf slightl); swing shelf
up, fit right ends of shelf into holes in
cabinet wall, and lower shelf into place.
About the storage drawers.
Not all features are on all models.
Fruit and Vegetable Drawers
iry
Excess water that mm accumulate in the
bottom of the drawers should be emptied
and the drawers wiped dry.
i _i
Snacks Drawer
The snacks drawer can be moxed to the
most useflfl location for yore" tamil)'s
needs.
Page 8
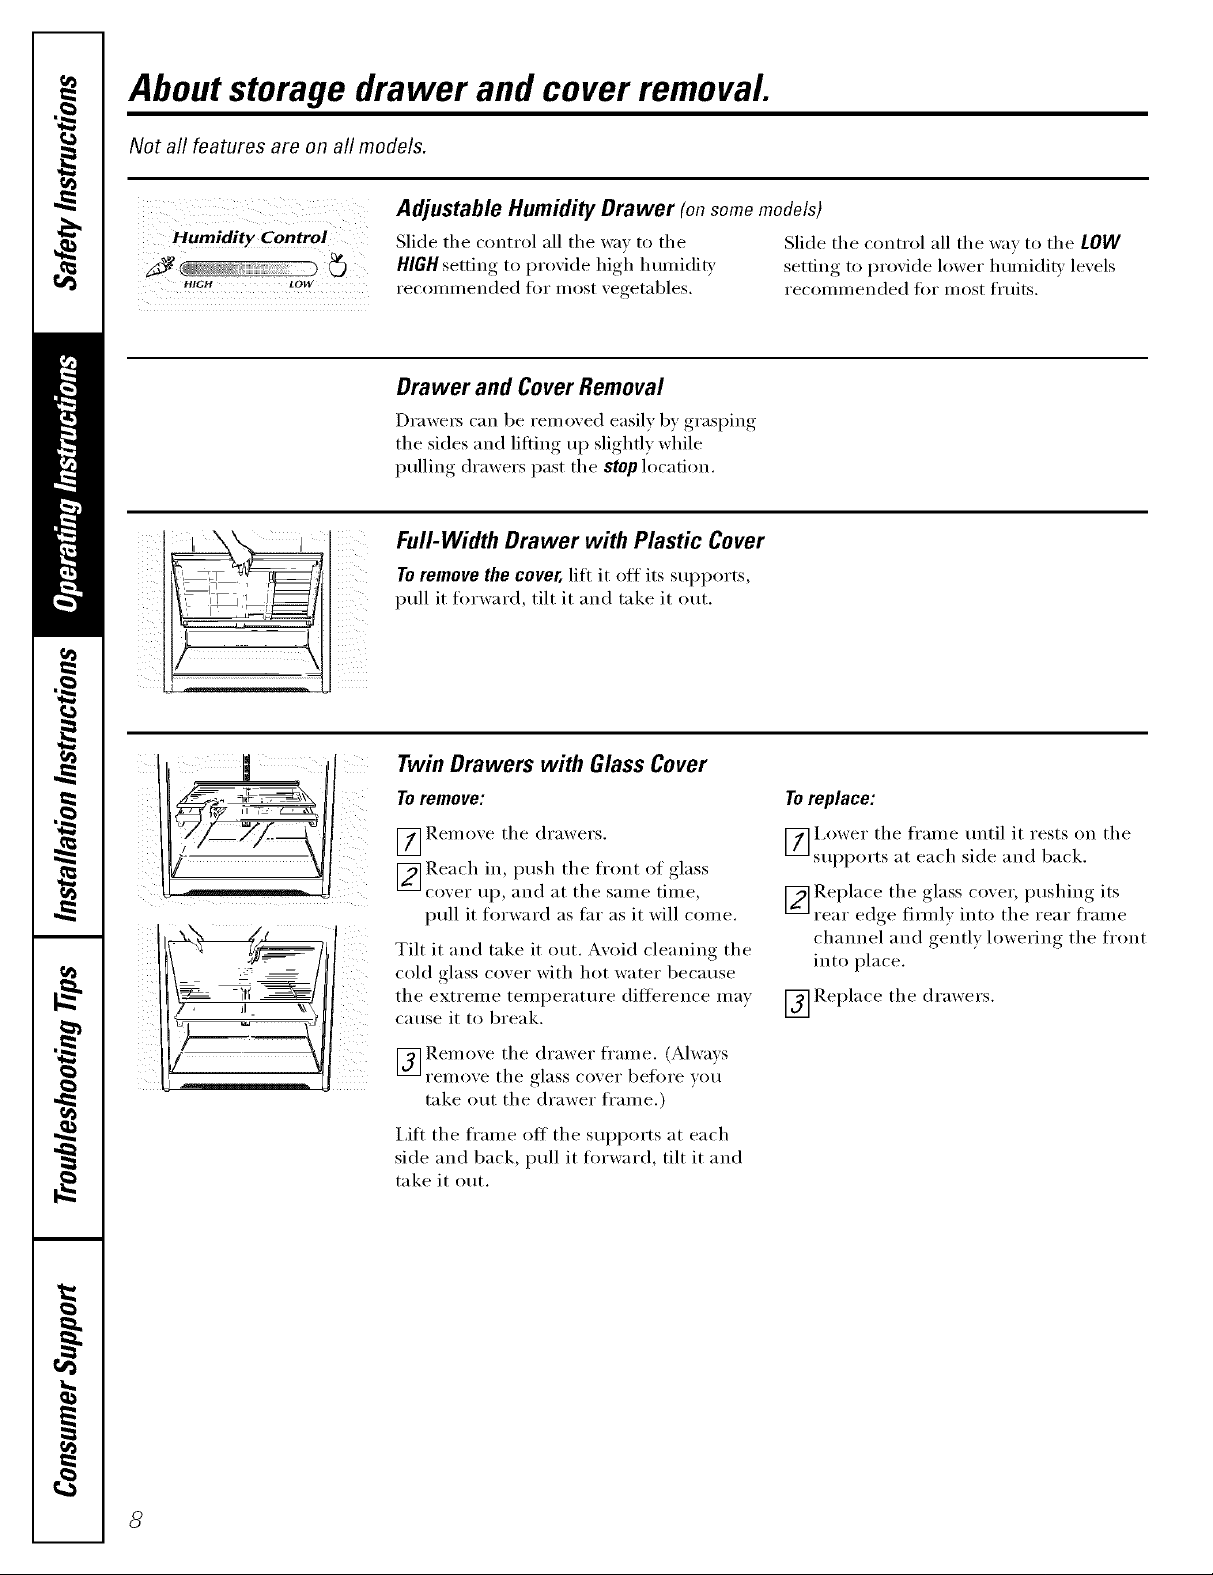
About storage drawer and cover removal.
Not all features are on all models.
Adjustable Humidity Drawer (onsomemodels)
Humldlty Control
HIGH LOW
Slide the control all the wm to the Slide the control all the way to the LOW
HIGH setting to proxide high h umidity setting to proxide lower humidit_ lexels
recommended fi)r most xegetables, recommended fi)r most fruits.
Drawer and Cover Removal
Drawe_ can be rein oved easily by grasping
tile sides and lifting up slightly while
pulling drawers past tile stop location.
Full-Width Drawer with Plastic Cover
To removethe cover, lift it off its supports,
pull it forward, tilt it and take it out.
Twin Drawers with Glass Cover
To remove;
_] Remoxe tile drawers.
[_ Reach in, push tile front of glass
coxer up, and at tile same time,
pull it ti_rward as far as it will come.
Tilt it and take it out. Avoid cleaning the
cold glass cover with hot water because
tile extreme temperature difl'erence may
cause it to break.
[_] Remoxe tile drawer fl'ame. (Alwaxs
FeIlloxe tile glass cover before }Otl
take out the drawer fl'ame.)
I,itt tile frame off tile sui)ports at each
side and back, pull it forward, tilt it and
take it out.
Toreplace:
[_ I,ower tile frame tmtil it rests on tile
sui)i)orts at each side and back.
[_ Rei)lace tile _olass cox er, I)ushing, its
rear edge fimfl) int the rear fl'ame
channel and gently lowering the front
into place.
[_] Replace tile drawers.
o" ( )
Page 9
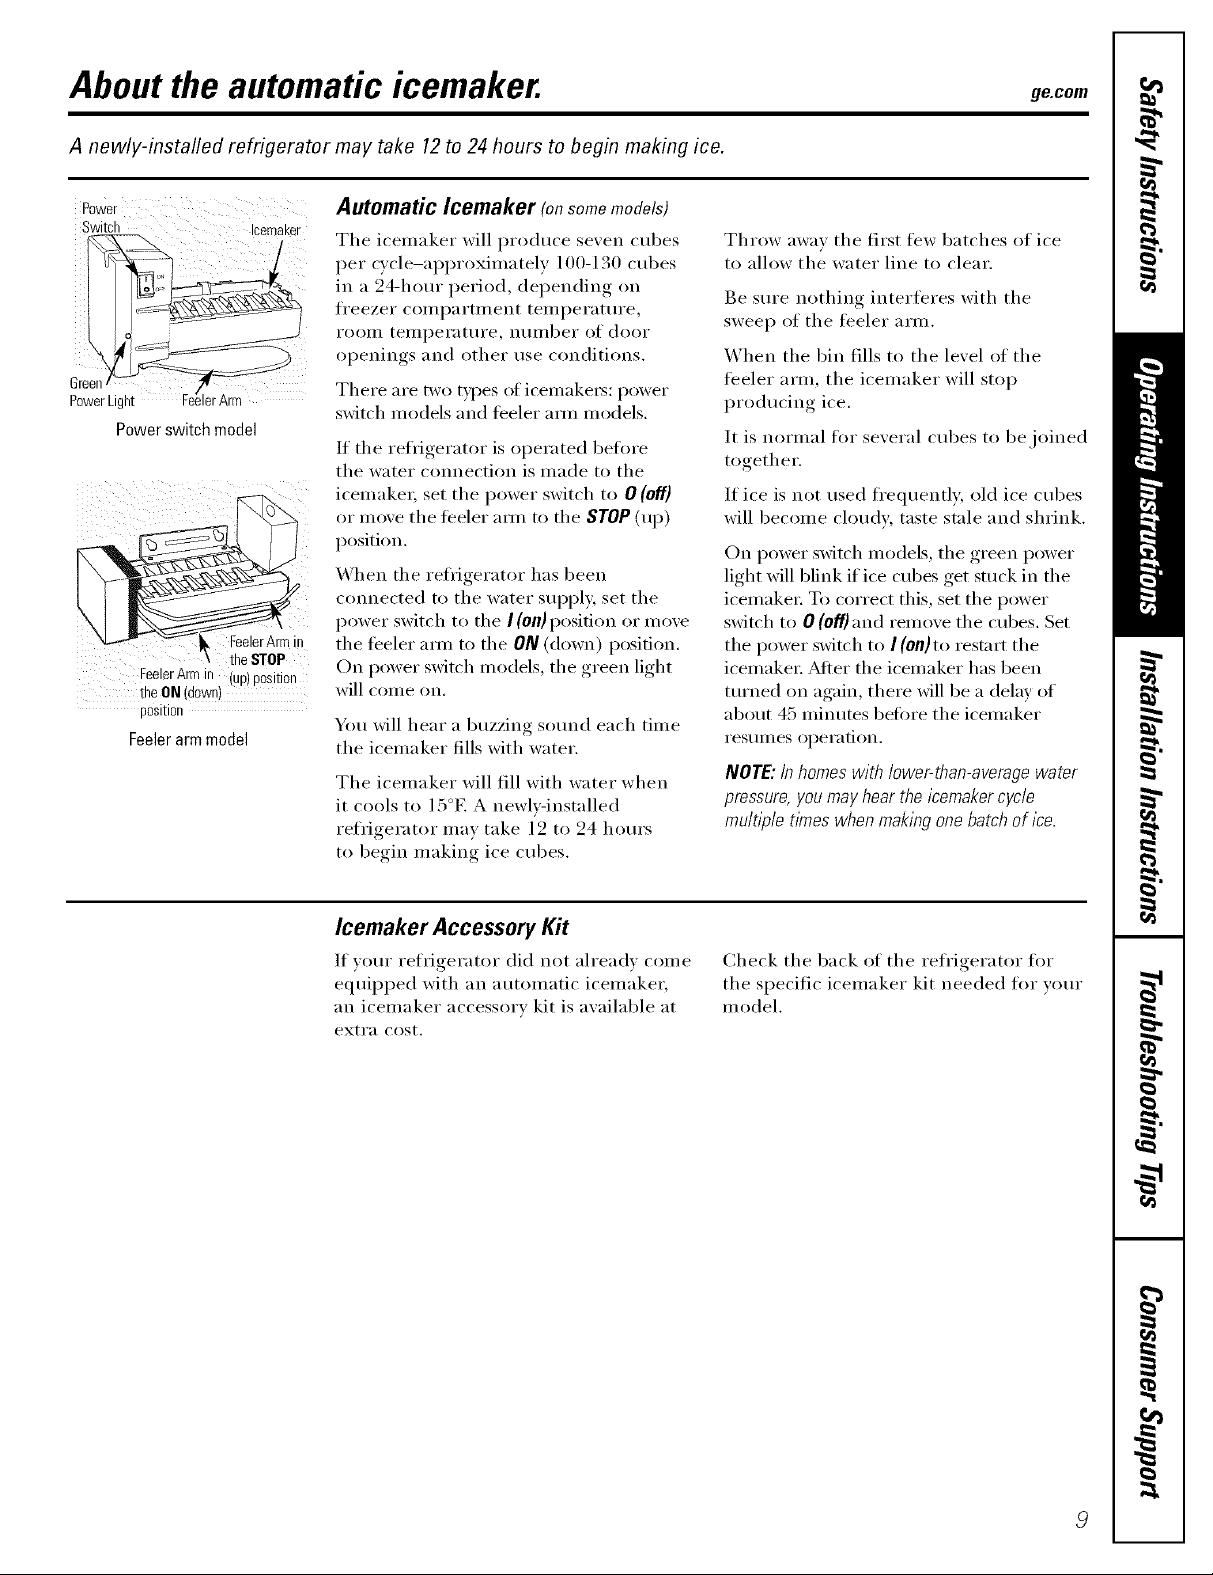
About the automatic icemaker, ge.com
A newly-installed refrigerator may take 12to 24 hours to begin making ice.
Automatic Icemaker (on some models)
Switch Icemaker
Powerswitch model
FeelerArmin
theSTOP
Feeler Arm in (UP)position
theON (down)
position
Feeler arm model
The icemaker will produce seven cubes
per c)'cle-api)roxinmtely 100-130 cubes
in a 24-hem" period, depending on
fl'eezer compartment temperature,
t'OOtll teillperatttre, nttt/tbet" of (loot"
openings and other use conditions.
There are two t)pes at icemaket_: power
switch models and feeler am_ models.
If the refl_igerator is operated befin'e
the water connection is made to the
icelnakei; set the power switch to 0 (off)
or move the teeler amt to the STOP (up)
position.
When the refl_igerator has been
connected to the water supply, set the
power switch to the I (ell} position or move
the feeler am_ to the ON(down) position.
On power switch models, the green light
will come on.
You will hear a buzzing sotmd each time
the icemaker fills with water.
The icemaker will fill with water when
it cools to 15°E A newly-installed
refrigerator may take 12 to 24 hours
to begin making ice cubes.
Throw awa_ the first few batches of ice
to allow the water line to clear.
Be sure nothing interferes with the
sweep of the teeler arm.
When the bin fills to the level of the
teeler arm, the icemaker will stop
producing ice.
It is normal fi)r several cubes to be joined
together.
If ice is not used fl'equently, old ice cubes
will become cloudy, taste stale and shrink.
On power switch models, the green power
light will blink if ice cubes get stuck in the
icemaket; To correct this, set the power
switch to 0 (off)and remove the cubes. Set
the power switch to I (on)to restart the
icemaket: _dter the icemaker has been
turned on again, there will be a delay of
about 45 nlinutes before the icemaker
i'eStlllleS operation.
NOTE:Inhomeswith lowar-than-averegewater
pressure, you may hear the/cemaker cycle
multipletimes when makingone batch of ice.
Icemaker Accessory Kit
If _our refrigerator did not alread_ come
equiI)ped with an automatic icemaker,
an icemaker accessory kit is axailable at
extra cost.
Check the back of the refrigerator for
the specific icemaker kit needed fi_r yam"
model.
Page 10

Care and cleaning of the refrigerator.
Cleaning the Outside
The door handles and trim (on some
models). Clean with a cloth (laml)ened
with soapy water: Dry with a sott cloth.
Keep the outside clean. Wipe with a clean
cloth lightly dampened with kitchen
appliance wax or mild liquid dish
detergent. Dry and polish with a clean,
soft cloth.
The stainless steel panels and door handles
(on sonle models) can be cleaned with
a commercially available stainless steel
cleaner. Do not use appliance wax or
polish on the stainless steel.
Cleaning the Inside
Tohelp prevent odors, leave an open be×
of baking soda in the fresh food and
ti'eezer COil/1)}1 i'ti//ents.
Unplug the refrigerator before cleaning.
If this is not practi(al, wring excess
moisture out of sponge or cloth when
cleaning around switches, lights or
controls.
Use waHn water and baking soda solution-
about a tablespoon (l 5 ml) of baking soda
to a quart (1 liter) of water; This both
cleans and netm'alizes o(h)_. Rinse and
wipe dry.
After cleaning the door gaskets, apply a
thin laver of petroleum .jelly to the door
gaskets at the hinge side. This helps kee I)
the gaskets from sticking and bending
out of shape.
Do not wipe the refr/_?eratorwith a soiled dish
cloth or wet towel Thesemay leave aresidue
that can erode thepaint Do not use scouring
pads,powdered cleaners, bleach orcleaners
containing bleach because these products can
scratch and weaken the paint finish.
Avoid cleaning cold glass shelves (on some
models) with hot water because the extreme
temperature difference may cause them to
break. Handle glass shelvescarefully Bumping
tempered glass can cause it to shatte_
Eviter de nettoyer /es tab/ettes en verre froides
(sur certa/ns rnod#les) _ l'eau chaude paine que
/'6cart de temperature extreme risque de/es
craquer Man/puler /es tab/ettes en verre avec
pr6caution. Le verre tremp6 soumis _un choc
nsque de so fracassel:
Do not wash any plastic refrigerator parts in
the dishwashe_
CleanflTg the condenser coils.
lO
Condenser
There is no need for routine condenser
cleaning in normal home operating
envii'oni/lents. However, in enviYonillents
that may be partictflarly dusty or greasy,
the condenser shotfld be cleaned
periodically for efiicient refi'igerator
ol)ei'a [ion.
To clean the condenser; turn the
temperatm'e control dial to O. Sweep
_IW_IV OI" V_IC/I[IIII 11 I) dust.
For best results, use a brush specially
designed for this i)m'pose. It is awfilable
at most appliance parts stores.
Page 11

Behind the Refrigerator
Be caretul when moving the reti'igerator
away fl'om the wall. All tvl)es of floor
cove_ings can be damaged, particularly
cushioned coverings and those with
embossed surthces.
Turn the leveling legs at each fl'ont corner
of the refl_igerator counterclockwise until
the rolle_ support the refi_igerato_; Pull the
refl'igerator straight out and return it to
position by pushing it straight in. Moving
the reti_igerator in a side direction may
result in damage to the floor covex_ing or
refl'igeratox:
Light Bulb Replacement
To replace a burned-out bulb, unplug
the refl'igerator fl'om its electrical outlet,
unscrew the bulb when cool and replace
it with an appliance bulb of the same or
lower wattage.
g_com
When pushing the refrlgeretor back, make sure
you don't roll over the power cord or icemaker
supply line {onsome models).
Enpoussant /er_fng_rateur enplace, veifler _ ne
pas le fake rouler sur le cordon d'alimentafion ou
/a cana/isation d'eau de la machine _ glagons
(sur certains modules).
Afier rolling the refl'igerator back into
place, mrn the legs clockwise until the
legs again bear the weight of the
refl'ige rato r.
Turningthecontrolto the 0 positiondoesnot
removepowertothe hght circuit.
Preparing for Vacation
For long vacations or absen('es_ i'eillo;'e
food and mq)lug tile refl'igerator. Move
the temperature control dial to the 0
position, and clean the interior with a
baking soda solution of one tablespoon
(15 ml) of baking soda to one quart
(1 liter) of water. I,eave the doors open.
Preparing to Move
Secure all loose items such as grille,
shelves and drawers by taping them
securely in place to prevent damage.
Set tile icemaker power switch to the
0 (off) position or move tile feeler arm to
the STOP (up) position (depending on
model) a nd shut off the wa ter suI)ply to
the refl'igerator.
If the temperatm'e can drop below
fl'eezing, have a qualified servicer drain
the water supply systeln (on some
models) to prevent serious i)ropert) '
damage due to flooding.
Besurethe refrigeratorstaysin anupright
position&ring moving.
11
Page 12

Installation
Refrigerator
Instructions
Questions?Call800.GE.CARES(800.432.2737)or Visit,,mx_ebsite.t: ge.com
I
BEFORE YOU BEGIN
Read these instructions completely and carefully°
" IMPORTANT - S.,'ethese
instructions for local inspector's use.
• IMPORTANT - Obse,,e.ll
governing codes and ordinances.
• Note to Installer - Be sure to leaxe these
instructions xdth the Consumer.
• Note to Consumer - KeeI)these instructions
for future reierence.
• Skill level - Installation of this appliance requires
basic mechanical skills.
• Completion time - Refrigerator Instalk_tion
• Proper installation is d_e responsibilit} of d_e
installer.
• Product fhilure due to improper installation is not
coxered under the _'_arrant).
In Canada. call 1.800.361.3400or Visit,,m_+ebsite,t: www.geappliances.ca
15 minutes
P,eversiw* the Door Swim*
1 hour
Models 16,17,18
CLEARANCES
Alh)w tile fi)llo_fing clearances for ease of installation,
proper air circulation and I)lumbing, and electrical
COililectioils.
• Sides . / (19 ram)
• Top 1" (25 ram)
• Back 1" (25 ram)
ROLLERS AND LEVELING LEGS
Leveling legs near each fl'ont corner of tile refl'igerator
are a(!justable. They firmly position tile refl'igerator
and prevent it fl'om moving when tile doo_ are
opened. I,eveling legs should be set so the ti'ont of the
refrigerator is raised just enough that the doors close
easily when opened abotlt hall\ray.
Turn tile leveling legs clockwise to raise tile
refrigerator; counterclockwise to lower it.
Rogers next to tile leveling legs allow you to move tile
refligerator awav from tile wall fin" cleaning.
4 tt
I
WATER SUPPLY TO THE ICEMAKER
(on some models)
If tile refrigerator has an i(emaker, it will have to be
connected to a cold water line. A water supply kit
(containing copper tubing, shutoff valve, fittings and
instructions) is awfilable at extra cost fl'om yore" dealer,
by visiting ore" Website at ge.com (in Canada at
www.geapplimaces.ca) or fl'om Parts and Accessories,
800.626.2002 (in Canada 1.888.261.3055).
REFRIGERATOR LOCATION
• Do not install tile reflJgerator where tile temperature
will go below 60°F (16°C) because it will not rtm otten
enough to maintain proper temperatures.
• Install it on a floor strong enough to support it flflly
loaded.
/2
Tm'n the legs cotmterclockwise tmtil the weight of the
refl'igerator is transferred fl'om them to tile rollers.
Afier rolling tile refligerator back into place, tm'n tile
legs clockwise until the legs again bear the weight of
tile refl'igerator.
Page 13

Installation instructions
Ell iNSTALLiNG THE WATER LiNE IONSOMEMODELS)
BEFORE YOU BEGIN
Recomn_ended copper water supply kits are WX8X2,
WX8X3 or WX8X4, depending on tile amount of
tubing you need. Approved plastic water supply lines
are GE Smart(_onnect _'_Refrigerator Tubing
(WX08X10002, WX08X10006, WX08X10015 and
WX08X10025).
When connecting your refl'igerator to a GE Reverse
Osmosis _'ater System, tile only approved installation
is with a GE RVKit. For other reverse osmosis water
systems, ti)llow tile manufacturer's recommendations.
This water line installation is not warranted by the
refrigerator or icemaker manulhcture_: Follow these
instructions carefifllv to minimize the risk of expensive
water damage.
Water hammer (water banging in tile pipes) in house
plumbing can cause damage to refl'igerator parts and
lead to water leakage or flooding. Call a qualified
plumber to correct water hammer before installing
tile water supply line to tile refl'igerator.
To prevent bm'ns and product damage, do not hook
up tile water line to tile hot water line.
If you use your reti'igerator betore connecting tile
water line, make sure tile icemaker power switch is
in tile 0 (Of/:)position (on power switch models) or
tile feeler arln is in tile STOP (up) position (on feeler
arm models).
WHAT YOU WILL NEED
• Copper or GE SmartConnect'" Refrigerator Tubing
kit, 1/4" outer diameter to connect tile refi'igerator
to tile water suppl> If using copper, be sure both
ends of tile tubing are cut square.
To determine how much tubing you need: measure
the distance fi'om tile water valve on tile back of tile
refi'igerator t(> the water supply pipe. Then add 8'
(2.4 m). Be sure there is suHicient extra tubing
(about 8' [2.4 m] coiled into 3 turns of about 10"
[95 cm] diameter) to allow tile reii'igerator to move
out fi'om the wall utter installation.
GE SmartConnect ''_Refrigerator Tubing/¢dts are
ax:filable ill tile tollowing lengths:
2' (0.6 m) - WX08X10002
6' (1.8 m) -WX08X10006
15' (4.6 m) - WX08X10015
25' (7.6 m) - WX08X10025
Be sure that tile kit you select allows at least 8' (2.4 m)
as described above.
Do not install the icemaker tubing in areas where
temperatures t_fll below fl'eezing.
When using any electrical device (such as a power
drill) during installation, be sm'e tile device is double
insulated or gro/mded in a manner to prevent tile
hazard of electric shock, or is battery powered.
All installations must be in accordance with local
i)lumbing code requirements.
NOTE: The only GE approved plastic tubing is that
supplied in GE SmartConnect'" Refrigerator Tubing
kits. Do not use any other plastic water supply line
because the line is under pressure at all times. Certain
types of plastic will crack or rupture with age and
cause water damage to your home.
/,3
Page 14

Installation Instructions
B INSTALLING THE WATER LINE (CONT.)
WHAT YOU WiLL NEED (CONT.)
• A GE water supply kit (containing tubing, shutoff
_dve and fittings listed below) is available at extra
cost fl'om your dealer or fl'om Parts and Accessories,
800.626.2002.
• A cold water supply. The water l)ressme must be
between 20 and 120 p.s.i. (] A-8.I bar).
• Power drill.
• 1/2" or adjustable wrench.
• Straight and Phillips blade screwdriver.
• Two 1/4" outer diameter compression nuts and
2 ferrules (sleeves)--to connect the copper robing
to the shutoff _dve and the refrigerator water _dve.
OR
• If you are using a GE Smart(kmnec( _ Refl-_gerator
Tubing kit, the necessary fittings are preassembled
to the robing.
Install the shutoff xalxe on the nearest frequently used
drinking water line.
[] SHUT OFF THE MAIN WATER
SUPPLY
Turn on tile nearest fimcet hmg enough to clear
the lille of water.
[] CHOOSE THE VALVE LOCATION
Choose a location fi>r the valve that is easily
accessible. It is best to connect into the side of
a vertical water pipe. When it is oecessarv to
coooect into a horizontal water pipe, inake the
colnlectioo to the top or side, rather than at the
bottom, to avoid drawing off aov sediu_eot fl'Oln
the water pipe.
[] DRILL THE HOLE FOR THE VALVE
" If yore" existing copper water line has a flared fitting
at the end, you will need an adapter (available at
phunbing supply stores) to com_ect the water line to
the refl'igerator OR you can cut off the flared fitting
with a tube cotter and then use a compression
fitting. Do not cut _k)rmed end .4/'oIn GE
SmartConnect'" Refi'igerator robing.
• Shutoff valve to connect to the cold water line.
Tile shutoff valve should have a water inlet with a
minimum inside diameter of 5/32" at the point of
connection to the COLD WATER LINE. Saddle-t_pe
slmtoff valves are included in many water supply kits.
Before purchasing, make sure a saddle-t_pe valve
complies with your local plumbing codes.
Drill a l/4" hole in the "_ater pipe (e'_eo i_ using
a sell'piercing vahe) using a sharp bit. R.emoxe an)
btu'l_ resulting frou_ drilling the hole in the pipe.
Take care not to allow water to drMn into the drill.
Failure to drill a I "" ma_
ice production or smaller cubes.
/4 hole result in reduced
/4
Page 15

Installation Instructions
[] FASTEN THE SHUTOFF VALVE
Fasten the shutoff_al_e to the cold water pipe with
the pipe clamp.
Pipe Clamp
,)
Saddle-Type--/4'
ShutoffValve
NOTE: Commonwealth of Massachusetts Phunbing
Codes 248CMR shall be adhered to. Saddle valves
are illegal and use is not permitted in Massachusetts.
Consult with wmr licensed plmnber.
[] TIGHTEN THE PIPE CLAMP
Tighten the clamp screws tmtil the sealing washer
begins to swell.
NOTE: Do not overtighten or wm may c_ush the
tubing.
Pi End
Clam_
-- VerticalC01d
WaterPipe
-Washer
[]
CONNECT THE TUBING
TO THE VALVE
Place the compression nut and ferrule (sleexe)
for COl)per tubing onto the end of the tubing and
connect it to the shut()fl xalxe.
Make sure the tubing is flfllv inserted into the
wflve. Tighten the compression nut secm'ely.
For plastic tubing from a GE Sn/art(_onnect"
Refrigerator Tubing kit, insert the molded end
of the tubing into the shutoff wflve and tighten
compression nut tmtil it is hand tight, then tighten
one additional ttlrn with a wrench. Overtightening
Ill'IV Catlse leaks.
Saddle-Type
ShutoffValve
PackingNut.
Outlet Valve-- --Ferrule (sleeve)
NOTE: Commonwealth of Massachusetts Plmnbing
Codes 248CMR shall be adhered to. Saddle wflves
are illegal and use is not permitted in Massachusetts.
Consult with vom" licensed i)lmnber.
?ression
Nut
SmartConnect_
Tubing
[] ROUTE THE TUBING
Route the tubing between the cold water line and
the refrigerator.
Route the tubing through a hole drilled in the wall
or floor (behind the refrigerator or a@_cent base
cabinet) as close to the wall as possible.
NOTE: Be sure there is sufficient extra tubing
(about 8 feet [944 cm] coiled into 3 turns of about
10" [25 cm] diameter) to allow the refrigerator to
move out ti'om the wall alter installation.
[] FLUSH OUT THE TUBING
Turn the main water supply on and flush out the
tubing until the water is dear.
Shut the water off at the water valve after about
one quart (1 liter) of water has been flushed
through the tubing.
/5
Page 16

Installation Instructions
B INSTALLING THE WATER LINE (CONT.)
[] CONNECT THE TUBING TO THE
REFRIGERATOR
NOTES:
• Before making tile ctmnection to tile refrigerator,
be sure tile refrigerator power cord is not l_lugged,,
into tile _</ll outlet.
• We recommend installing a water filter if your
water supply has sand or particles that could clog
tile screen of tile refrigerator's water valve. Install
it ill tile water lille near the refl'igerator. If using
GE SmartConnect'" Refl'igerator Tubing kit,
you will need all additional tube (WXOSX10002)
to connect tile filter. Do not cut plastic tube to
install filter.
]_.en/ove tile access cover.
[] CONNECT THE TUBING TO THE
REFRIGERATOR (CONT.)
Fasten tile tubing into tile clamp proxided to
hold it in a _ertical position. You max need to
pry open tile clamp.
1/4" Copper_ _ Tubing Clamp
Tubing
Nut
(sleeve)
Refrigerator
Connection SmartConnecU
Reattach tile access coxer.
Tubing
Remove the plastic flexible cap from the water
valve (refrigerator connection).
©
Place the compression nut and terrule (sleeve)
onto tile end of tile tubing as shown. (-)n GE
Smart(:onnect'" Refl'igerator Tubing kit,
the nuts are already assembled to the tubing.
Insert the end of tile tubing into tile water valve
connection as flu" as possible. While holding the
tubing, tighten the fitting.
For plastic tubing from a GE SmartConnec( _
ReKigerator Tubing kit, insert tile molded end
of the tubing into tile shutoff _zdve and tighten
compression nut until it is hand tight, then
tighten one additional mrn with a wrench.
Overtightening may cause leaks.
[] TURN THE WATER ON AT THE
SHUTOFF VALVE
Tighten any connections that leak.
Reattach tile access coxer.
16
Page 17

Installation Instructions
[] PLUG IN THE REFRIGERATOR
Arrange the coil of tubing so that it does not _ibrate
against the back of the refrigerator or against the
wall. Push the refi_gerator back to the wall.
START THE ICEMAKER
On power switch models, set the icemaker power
switch to the I (oil} position. On feeler arm models,
move the feeler arm to the ON (down) position. The
icemaker will not begin to operate until it reaches
its operating temperature of 15°F (-9°C) or below.
It will then begin operation automatically.
Powerswitch model
,7
//
//
.... '_r--.. FeelerArminthe
STOP(up)position
in
theON(down)position
Feelerarmmodel
NOTE: In lower water pressm'e conditions, tile
water xalxe max tm'n on up to 3 times to delixer
enouoh water to tile icemaker.
REVERSING THE DOOR SWING
IMPORTANT NOTES
\_l/en re\'e_ing tile door swing:
• Read tile instructions all tile way through beflwe
starting.
• Handle parts careflflly to avoid scratching paint.
• Set screws down by their related parts to avoid using
them in the wrong places.
• Provide a non-scratching work sm'lace for
the doms.
IMPORTANT: Once wm begin, do not move the
cabinet tmtil doo>swing reversal is completed.
These instructions are fiw changing the hinges ti'om
the right side to the left side--if you ever want to change
the hinges back to the right side, follow these same
inst_ uctions and reverse all references to left and fight.
TOOLS REQUIRED
Phillipsscrewdriver Maskingtape
5/16" hex-head
socketdriver
Putt_ kni[e or thin-
blade screwdrix er
T20 or T25 Torxdriver,
(Needed for some models)
5/16" open-end
wrench
/7
Page 18

installation instructions
REVERSING THE DOOR SWING (CONT.)
[] BEFORE YOU START
l.l UnI)lug the refrigerator fl'om its electrical
outlet.
1.2 Erupt) all door shelxes, including the dairy
C OIlll)_l I'tIl/ent,
2.2 X4ith a 5/16" hex-head socket drixer, remoxe the
screws that hold the tol) hinge, to the cabinet.
2.3 I,ift the hinge, (and the shim glued to it) ,strai,*ht
up to free the hinge pin from the socket in
the top of the door and set it aside, ahmg with
its screws.
Top Hinge
2.4 Remoxe the tape and tilt the door awax from the
cabinet. I,ifi it off the center hinge, pin.
CAUTION: Do not let either door drop to the
floor, To do so could dail/aoe_ the door stop,
[] REMOVE THE FREEZER DOOR
2.l Tape the door sit ut with masking tape.
2.5 Set the door on a non-scratching surface with
the outside up.
2.6 Transti_r the 2 screws ti'om the opposite side of
the cabinet to the screw holes w_cated by the
top hinge remowfl.
/8
Page 19

Installation instructions
[] REMOVE THE FRESH FOOD
DOOR
3.1 Tape the door shut with masking tape.
,/i
3.2 Using a 5/16" hex-head socket screwdriver and
a 5/16" open-end wrench, remove the two
screws holding the center hinge (and the shim
glued to it) to the cabinet, i,ift the center hinge
to fl'ee its pin fl'om the socket in the top of the
door, and set hinge and screws aside. Be careful
not to lose the center hinge spacer mad washer.
[] REMOVE THE FRESH FOOD
DOOR (CONT.)
3.4 Set the door outside-up on a non-scratching
S//IS[il ce.
3.5 Transter the two screws fl'om the opposite side of
the cabinet to the screw holes xacated bx the center
hinoe relllOX i1.
3.3 Remove the tape and flit the door away fl_om the
cabinet. Liti the door fi'om the pin in the bottom
hinge bracket. (If the plastic washer sficl_s to the
door bottom, put it back on the hinge.)
3.6 Transfer the x_asher (if)our model has one) to the
opposite side.
3.7 Take one of the screws removed in step 2 and start
it in the oute_nost screw hole on the opposite side.
Do not drive it all the way down-leave enough
space under the screw head t0r thickness of shim
and bracket.
I/
0
19
Page 20

Installation Instructions
B REVERSING THE DOOR SWING (CONT.)
[] REVERSING THE HARDWARE
4.1 Remove tile base orille (if' _our refrigerator has
one) b} pulling it straight out.
4.2 Moxe tile 1)ottmn hinoe_ bracket (and shim glued
to it) and plastic washer from tile right side to tile
leit side.
Plastic Plastic
Washer Washer
Hinge---> --_
Bracket Hinge
Modelswith a hingebracket Modelswith a hingebracket
thathas2 screwholes, thathas4 screwholes.
Bracket
Switchthe hingepinto the
oppositesideofthe bracket.
[] REVERSING THE DOOR HANDLES
Transfer fresh food door handle
5.1
5.1.1 Remove tile handle plug using a
tape-tipped putty knife under tile edge,
and reil/ove tile screw tlnderneath.
Remove tile two screws holding tile
handle to tile top of tile door.
Plug_
5.1.2 Remo_e tile handle.
I
5.1.3 Remo_e tile screws fl'om tile right edge of tile
door top and insert them into tile handle screw
holes on tile opposite side.
I
4.3 Interchange hinge (and tile shim glued to it) and
screws at top right with screws at top left of cabinet.
Do not tighten screws on hinge side at this time,
Installingthe hingeonthe left. Installingthe hingeonthe right.
NOTES:
• Some hinges have flmr holes. Which holes you
use fi)r installing tile hinge depends on which
side you install tile hinge.
• Tile outer edge of tile hinge should be parallel
to tile edge of tile case ti)r correct installation.
20
5.1.4 With tape-tipped putty knife or thin-blade
screwdriver; pry out tile plug button from tile
hinge hole on the left side of the door and
insert it into the hole on the opposite side that
was vacated by remowfl of tile top hinge.
PlugBuzp
Page 21

Installation Instructions
I_REVERSING THE DOOR HANDLES
(CONT.)
5.1 Transfer fresh food door handle
(cont.)
5.1.5 Pull the plug button fron_ the front
of the door and transfer it to the
opposite side.
Plug Button
5.2 Transfer door stop
5.2.1 Move the metal door stop from the right
end to the left end.
Left Side Di0r Stop
Toreattachthe
handleonthe
oppositeside.
5.4 Transfer Freezer Door Handle
5.4.1 Rein ore the screw holding the ha n(lle to the
top of the door and the two screws holding
the handle to the bottom of the door,
5.4.2 Remoxe the handle.
I
5.2.2 Move any screws from the left end to
the right end.
RightSide
5.3 Reinstalling the Fresh Food Door
Handle
5.3.1 Attach the handle to I -''-'_
the right side of the
door with screws at
the top and trader
the handle plug,
5.3.2 Reinstall the handle I)lu_*
5.4.3 Remoxe the screw from the right, toi ) edge, of the
door and insert it into the handle screw hole on
the left side.
I 5_hown on the
)receding )age.
preceding page.
5.4.5 Attach the handle to the _ight edge of the door
with screws at top and bottom, using bottom
holes xacated b) remoxal of the door stop screws,
I
21
Page 22

Installation Instructions
B REVERSING THE DOOR SWING (CONT.)
16]REHANGING THE DOORS
6.1 Rehang the fresh food door
6.1.1 I,ower the ti'esh food door onto the
bottonl hinge, pin. Be sure the washer
is ill place on the pill.
Washer
Models with a hinge bracket
that has 2 screw holes.
6.1.2 Insert the pin (m the center hinge into the
socket in the top of the door. Place the space_,
then the washer, on the hinge pin.
NOTE: The center hinge inust be turned over
as shown when mounted on the left side.
8
Bracket
Hingem_
Bracket _L
Modelswith a hingebracket
thathas4 screwholes.
Plastic
Washer
[] REHANGING THE DOORS (CONT.)
6.2 Rehang the freezer door
6.2.1 I,ower the freezer door onto the center
hinge, pin. Be sure the washer and
spacer are in place on the pin.
gePin
andSpacer
6.2.2 Tilt the door toward the cabinet, lifting the top
hinge so the pin fits into the socket on the top
of the door.
Hinge_,
andSpacer
6.1.3 Tilt the door toward the cabinet. As the door is
brought into position, slide the hinge under the
head of the screw which earlier had been partly
driven into the outermost hole. Insert the
remaining scre_, then tighten both screws
securely.
Ij
6.2.3. Make sure the door is slightly above the top of
the cabinet and tile gap between the doors is
even across the ti'ont. Tighten the top hinge
screws. Do not overtighten these screws-tighten
them until they are just snug, then ttli'n them
another one-half ttli'n.
22
Page 23

Normal operating sounds, gecom
Newer refrigerators sound different from older refrigerators. Modem refrigerators
have more features and use newer technology.
Do you hear what I hear? These sounds are normal.
HUMMM...
-- WHOOSH...
• The new high efficiency compressor may Hm thster
and longer than wmr old refi'igerator and you mav
hear a high-l)itched hum or pulsating sotmd while
it is operating.
• _4m may hear a whooshing sound when the (loo_ close.
This is due to pressure equalizing within the refligeratoI:
CLICKS, POPS,
CRACKS and CHIRPS
• You may hear cracking or i)oi)ping sounds when the
refrigerator is first plugged in. This hal)pens as the
refrigerator cools to the correct teil/l)erattlre.
• The compressor may cause a clicking or chirping
sound when attempting to restart (this could take
up to 5 minutes).
• Expansion and contraction of cooling coils during
and after deti'ost can cause a cracking or i)oi)ping
SOtlnd.
• On models with an icemake_; after an icemaking
cycle, you may hear the ice cubes dropping into
the ice bucket.
WHIRl.
• You mav hear the rims spinning at high speeds.
This hai)pens when the refl'igerator is first i}lugged
in, when the doors are opened ti'equently or when
a large amotmt of tood is added to the refl'igerator
or fl'eezer comI)amnents. The rims are helping to
maintain the correct temperatures.
WATERSOUNDS
6
• The flow of refl'igerant through the fl'eezer cooling
coils may make a gm'gling noise like boiling water.
• _4_ter dropping on the defrost heater can Catlse a
sizzling, i}oi}ping or buzzing sound during the
defl'ost cycle.
• A water dripping noise may occm" dm'ing the defl'ost
cycle as ice melts from the evaporator and flows into
the drain pan.
• Closing the door mav Catlse a gurgling SOtlnd dtle to
pressure equalization.
23
Page 24

Before you call for service...
Troubleshooting Tips
Save time and money! Review the charts on the following
pages first and you may not need to call for service.
Possible Causes What To Do
Refrigerator does not Refrigerator ha defrost cycle. * Wait abe)tit 30 minutes fi)r deft'()st cycle to end.
operate
Vibration orrattling Roller screws or leveling legs *See Rollersand LevelingLegs.
(slight vibration need adjusting.
is normal)
Motor operates for Normal when refrigerator * Wait 24 hom_ tor tire reflJgerator to completely
Iong periods orcycles is first plugged ha. cool down.
on and offfrequently.
(Modern refrigerators Often occurs when large * This is nom_al.
with more storage amounts of food are
space and a larger placed in refrigerator.
operating time. They
Mart and Mop often Hot weather or frequent * This is hernial.
to maintain even door ope_mags.
temperatures.) Temperature control dial * See About the temperature control dial.
Temperature control dial * Move tire temperature control di;d to a temperatm'e
ha Oposifion. settin
Refrigerator is unplugged. * Push tire l_ltw_completely into tire outlet.
The fuse is blown/circuit * Replace fuse or reset tire breaker.
breaker is tripped.
if _acka_,e is holding door open.freezer require more Door left open. * Check to see }
set at the coldest setting.
GzSlle mad condenser * See Care and cleaning.
need clemlhag.
Fresh food or freezer Temperature control dial * See About the temperature control dial.
compartment too warm not set cold enough.
Warm weather or frequent * Set tire temperature control dial one step colcle_:
door ope_mags. See About the temperature control dial.
it _acka,,e is holding door open.Door left open. * Check to see l
if )ackaoe is blocking air duct in freezerPackage blocking air duct ha * Check to see l
freezer compartment. COlll})ilYtlllen[.
on frozen food
(from within package Too frequent or too long
is normal) door ope_mags.
if )acka,,e is holding door open.From or ice crystals Door left open. * Check to see } _ ,
24
Page 25

ge.com
Possible Causes
Automatic icemaker
does not work
(onsome models)
Frequent "$uzzing"sound lcemaker is on but the water • Turn the iceluaker off. On power switch models, set the
Cubes too small Water shutoff valve comiecting • (',;ill the l)luml_er to clear the valve.
Slow ice cube freezing Door left open. • Check to see it' l)ackage, is holding door ol)eu.
Icema_ker power switch
is not on.
Water supply turned off or • See Installing the water line.
not comlected.
Freezer compartment • _'ait 2 4 h otu_ fl)r th e retiJgerat()r t() C()l/ll)letelv
too warm. c()()l dowu.
Piled up cubes ha the storage • l,evel cubes bv itaud.
bin came the icemaker
to shut off.
supply to the refrigerator has power switch to the 0 (off) position. On feeler ami
not been comiected, models, move the reeler am_ to the STOP(up)position.
refrigerator to water line may
be clogged.
Temperature control dial • See About the temperature control diaL
not set cold enough.
What ToDo
• On power switch models, set the power swit('h to the
/(on} positiolL On teeler a i_n ii/odels, inove the teeler
alan to the ON (down) position.
Keeping it on will damage the water \_d\e.
Ice cubes have Ice storage bin needs clemahig. • Empty and wash bin. Discard old cubes.
odor/taste
Food trmlsmitthig odor/taste • _,Vral) fi)()(ls well.
to ice cubes.
Interior of refrigerator • See Care and cleaning.
needs cleaning.
Moisture forms on Not mmsual durhig • _,_il)e Stll'iiICe (lit nud reset tel//l)er;ittlre coutrol dial
cabinet surface periods of high humidity, one setting c()l(lel;
betweenthedoors
Moisturecollectsinside Too frequent or too
(inhumid weather, air long door openhigs.
carries moisture into
refrigeratorwhendoors
are opened)
Refrigerator has odor Foods trmisanitthig • F()()(ls with sm)ug ()(h)i_ sh(mld be tightly wral)l)ed.
odor to refrigerator. • Kee l) an ol)eu box of ha!dug, soda in the reflJgerator;
rel)lace every three mouths.
Interior needs cleaning. • See Care and cleaning.
25
Page 26

CUSTOMER WARRANTY
(forcustomers in Canada)
Yourrefrigeratoriswarrantedto befree ofdefectsin materialandworkmanship.
Nhatis covered HowLongWarranted Parts Labour
(FromDateof Sale) Repairor Replace
at Camco'sOption
;ompressor GEProfile:Ten(10)Years GEProfile:Ten(10)Years GEProfile:Five(5)Years
SealedSystem(including GEProfile:Five(5)Years GEProfile:Five(5)Years GEProfile:Five(5)Years
_vaporator,condenser GEandAll Other GEandAll Other GEandAll Other
:ubingandrefrigerant) Brands:One(1)Year Brands:One(1)Year Brands:One(1)Year
_,11OtherParts One(1)Year One(1)Year One(1)Year
TERMS AND CONDITIONS:
Thiswarrantyappliesonlyfor singlefamilydomesticusein
CanadawhentheRefrigeratorhasbeenproperlyinstalled
accordingtotheinstructionssuppliedbyCamcoandis
connectedto anadequateandproperutilityservice.
Damagedueto abuse,accident,commercialuse,andalteration
ordefacingoftheserialplate cancelsall obligationsofthis
warranty.
Serviceduringthis warrantyperiodmust be performedbyan
AuthorizedCamcoServiceAgent.
NeitherCamconortheDealerisliableforanyclaimsor
damagesresultingfromfailureofthe Refrigeratororfrom
servicedelaysbeyondtheirreasonablecontrol.
Toobtainwarrantyservice,purchasermust presentthe original
BillofSale.Componentsrepairedorreplacedarewarranted
throughthe remainderof theoriginalwarrantyperiodonly.
Thiswarrantyis extendedto theoriginalpurchaserandany
succeedingownerforproductspurchasedforhomeusewithin
Canada.Inhomewarrantyservicewill beprovidedinareas
whereitisavailableanddeemedreasonablebyCamcoto
provide.
Thiswarrantyis inadditiontoanystatutorywarranty.
GEandAll Other GEandAll Other GEandAll Other
Brands:One(1)Year Brands:One(1)Year Brands:One(1)Year
WHAT IS NOT COVERED:
• Ownerisresponsibleto payforservicecallsrelatedto
productinstallationand/orteachinghowto usetheproduct.
• Damageto finish mustbereportedwithin48 hoursfollowing
thedeliveryoftheappliance.
• Damageto finish afterdelivery.
• Improperinstallation--properinstallationincludesadequate
air circulationtothe refrigerationsystem,adequateelectrical,
plumbingandotherconnectingfacilities.
• Replacementof housefusesor resettingof circuitbreakers.
• Replacementof lightbulbs.
• Damageto productcausedbyaccident,fire,floodsoracts
of God.
• Lossoffoodduetospoilage.
• Properuseandcareof productaslistedin the owner's
manual,propersettingof controls.
• Productnot accessibleto providerequiredservice.
• WARRANTORISNOTRESPONSIBLEFORCONSEQUENTIAL
DAMAGES.
EXCLUSIONOFIMPLIED WARRANTIES--Your sole and exclusive remedy ispreduct repa# as providedin this Limited
Warranty.Any implied warranties, iucluding the implied warranties ofmerchantability orfitness fora particular purpose,
are limited to one year or the shortestperiod allowed by law.
IMPORTANT
Keep this warranty and your bill of sale as proof of original purchase and purchase date.
Please have serial number and model number available when calling for service.
CamcoServiceis availablecoastto coast.If further help is
neededconcerningthis warranty,contact:
Manager,ConsumerRelations
CamcoInc.,ConsumerService
1 FactoryLane,Suite310
Moncton,NewBrunswickE1C9M3
1.800.361.3400
Staple your receipt here.
Proof of the original purchase
date is needed to obtain service
under the warrant_
26
Page 27

Please place in envelope and mail to:
Veuillez mettre dans une enveloppe et envoyez & :
OWNERSHIPREGiSTRATiON
P.O. BOX1780
MISSISSAUGA,ONTARIO
L4Y4G1
(FORCANADIANCONSUMERSONLY)
27
Page 28

Pleaseregistoryour product to enab;eusto contactyou
tJ) l
inthe remote eventasafety nodceisissuedforthis product
I
andto a;'_owfor efficient communica_on undertheterms
ofyour warranty,shouldthe need arise.
REGISTERON-UNE: vvv_,geapp;iances,ca MA;LTO:
ENREGISTREMENTSURINTERNETA: vvw___;e;ectmmenag#_rsg_g¢ca POSTER_,:
[] MR./M [] MR&/MME._FIRSTNAME/PRENOM _LASTNAME/NOM
Z I
For Canadian _ I
Customers _ .'
[] MiSS/MLLE.[] MS. I I
STREETNO/N°RUE _S_EETNAME/RUE _AP_.NO/APR/RR#
,,
Q'fY/ViLLE ]PRO¼NCE /POSTAL
Z _
<,,
AREACODE/iND.REG._TELEPHONE [E-MAIL
2_
I
r r
I I
L Fp_A_ _ __D_
• r
I I
I I
L J-
DiDYOUPURCHASEASER¼CECONTRACTFORTHiSARPUANCE? YES/OUI 1:3 IFYES/ SIOUi:EXI_RATION
AVEZ-VOUSACHETEUNCONTRATDESERVICEPOURCETAPPAREIL? NO/NON[]
Pour ;es _I I
Consommateurs _!
Canadiens
.............................. JL .................................................................................
NAMEOFSELLINGDEALER/NOMDUMARCHAND r
INSTALLATIONDATE/DATED'INSTALLATIONr
Y/A M D/J I CORRESPONDENCE [] ENGbSH
[] i do notwishtoreceiveanypromotionaloffersregardingthisproduct.
[] Je ned6sirepasrecevoird'offrespromotionneiiesconcemantceproduit,
Veui;ezenregisbervcee produiLafindenouspermet_'ede
communiqueravec voussijamais unavisdes6curiL#concemant
ce produit6taiL6misetdecommuniquerfaci".ementavecvousen
verlu devolre garan_e,si[e besoins'enfaiLsen_r.
J- L
CORRESPONDANCE [] FRANC,,AiS SERiAL/SERiE
i
P.O.BOX 1788,M;SS;SSAUGA
ONTAR;O, L4Y 461
I
I I
J L
I MODEL/MODELE
I
I
YiA M b/J
28
Page 29

GE Service Protection Plus 'M
GE, a name recognized _orldwide %r quality and dependability; o_]%rs yon
Service Protection Plus '"-comprehensive protection on all your appliances-
No Matter What Brand!
Benefits Include:
• Backed by GE
• All brands covered
• Unlimited service calls
• All parts and labor costs included
• No out-of-pocket expenses
• No hidden deductibles
• One 800 nmnber to call
You _ill be completel) satisfied with our service protection or )on ma} request }our mone} back
on the remaining value of your contract. No questions asked. It's that simple.
Protect your refl'igerator, dishwasher, washer and (byer, range, TV, VCR and much more-amy brand!
Plus there's no extra charge tor emergency service and low monthly financing is available. Even icemaker
coverage and ti)od spoilage protection is ottbred. You can rest easy, knowing that all your valuable
household products are protected against expensive repairs.
Place ,our confidence in (lie and call us in the Ij.S. toll-free at {$UO.OZD.ZZZ_
]or I/lore illl_orI//atiOll.
*-MI ])l-;lllds (TiF_(?l(!d, lip IO _(} yeal'_ old, in Ihe (Olltin(!llta] I J._.
We TI Cover Any Appliance.
Anywhere. Anytime. *
_ (]tll here
Please place in envelope and mail to:
General Electric Company
Warranty Registration Department
P.O. Box 32150
Louisville, KY 40232-2150
29
Page 30

Consumer Product Ownership Registration
Deal Cttstomer:
Thank you for purchasing our product and thank you for placing your confidence in tts.
_'e are proud to ha'_e you as a customer!
Follow these three steps to protect your new appliance investment:
Complete mid mall
your Consmner
Product Owuership
Registration today.
t]a_e the t)cac( • o/
nfind of knowing we
c_ln contact you ill
th( unlikely (v(nt of
a sa/;vt,_ modification.
AJler mailing tile
registration below,
store this (tOClll/lellt
in a sale' place. It
contains intbrmation
you will need should
you require service.
()m: service nunlber
in the USA is:
800 GE CAlaiS
(800.432.2737). Ill
Canada: 1.888.880.3030.
Model Number Serial Number
, , , , , , I I , , , , , , , I
Important: If you did not get a registration card with your
product, detach and return the form below to
ensure that your product is registered, or register
online at ge.com.
Consumer Product Ownership Registration
[_ua(t VO/IF Ownel?'S
Mamml carefidlv.
It will help you
ot)eram your new
appliance t)rot)erly.
._,,,_ Cut h_r_
Model Number Serial Number
Ms. Me:,. Mix_,
Firsl I I Lasl]
Name I I I I I I I I I Nain(! I I I I I I I I I I I I
_11-( (!1 I
Addr( ss I I I I I I I I I I I I I I I I I I I I I I I I
/',_pt.# I , i
(;i,,I I I
lime Placed
In Use Ill
Monlh
3O
GE Consumer & Industrk_l
Appliances
General Electric Company
Louisville, KV40225
ge.com
I I I I I I E-lnailAddress*
_4_al-III t)hon(!
* Please provide your e-mail address to receive, via emmil, special offbrs and other
important COlnmtmications ti-om (',E Apl)liances (GEA).
[ Check here if vou do not want to receive commmlications [Yore (;EA's careflflly selecte(1
p_ll'IlleYS.
FAIL[ RE TO COMPIA{TE AND RET[ rRN Tt tlS CARD DOES NOT DIMINISt t h_)l JR
WARI_\N'[T RIGt tTS.
For int)mnation about GEA's privacy and data usage policy, go to ge.com and click on
'Pri_acy Poli<v" or call 800.626.2224.
Nunll)er I , I
I ] Code I I I I
Zip I
I-I,, I-I , , ,
I
I
Page 31

RefrigeratorWarranty.(Forc.stomersintheUnitedStates)
Aft warranty service provided by our Factory Service Centers,
or an authorized Customer Care® technician. Toschedule service,
on-line, 24 hours a day, visit us argo.corn, or carl 800.GE.CARES
(800.432.2737).Please have serial number and model number
Staple your receipt here.
Proofof the original purchase
date is needed to obtain service
under the warrant_
available when calling for service.
GEWill Replace:
GEand GE PROFILEMODELS:
Anypatt oI the reti_igerator which tifils due to a detect in materials or workmanship,
From the date of the During this limited one-year warranty, GE will also proxide, free of charge, all labor and
originalpurchase related serxi('e to replace the defe('ti_e part.
ThirtyDays
(Waterfilter,if included)
Fromtheoriginal
purchase date of
therefrigerator
GEPROFILEMODELSONLY'.
FiveYears
(GEProfilemodelsonly)
Fromthedateof the
originalpurchase
Anypartof the water filter cartridge which tails due to a defect in materials or workmanship.
During this limitedthirty-daywarranty,(;E will also proxide, freeofcharge,a replacement water
filter cartridge,
Any part of the sealed refrigerating system (the compresso_; condenser; evaporator
and all com_ecting tubing) which tifils due to a (lefect in materials or workmanship.
During this limited five-year sealed refrigerating system warranty, GE will also provide,
free of charge, all labor and related service to replace the defbctive paxt in the sealed
rel_igerating system.
?_:Service trips to your home to teach you how to use
the product.
!i_:hnproper h_stallation, delivery or maintenance.
::Ji::Failure of the product if it is abused, misused, or used for
other than the intended purpose or used commercially.
?_:Loss of food due to spoilage.
::Ji::Replacement of house fuses or resetting of circuit
breakers.
iJi::Dmnage caused after delivery.
_: Replacement of the water filter cartridge, if included,
due to water pressure that is outside the specified
operating raalge or due to excessive sediment ha the
water supply.
_: Replacement of the light bulbs, if included, or water filter
cartridge, if included, other thml as noted above.
::Ji::Damage to the product caused by accident, fire, floods
or acts of God.
!i_:Incidental or consequential damage caused by possible
defects with this applimlce.
!i_:Product not accessible to provide required service.
EXCLUSION OFIMPLIED WARRANTIES--Your sole and exclusive remedy is product repa# as provided in this
Limited Warranty. Any implied warranties, including the implied warranties of merchantability or fitness for a
particular purpose, are limited to one year or the shortest period allowed by law.
This warranty is extended to the original purchaser and any succeeding owner for products purchased for home
use within the USA. If the product is located in an area where service by a GE Authorized Servicer is not available,
you may be responsible for a trip charge or you may be required to bring the product to an Authorized GEService
location for service. In Alaska, the warranty excludes the cost of shipping or service calls to your home.
Some states do not allow the exclusion or limitation of incidental or consequential damages. This warranty gives
you specific legal rights, and you may also have other rights which vary from state to state. Toknow what your
legal rights are, consult your local or state consumer affairs office or your state's Attorney General
Warrantor: General Electric Company. Louisville, KY 40225 3 1
Page 32

ConsumerSupport.
GEAppliancesWebsite i.,he ge.com
Have ;i question or need assistanre with yore" appliance? Try the (;E Appliances Website 24 hom_ ;=day,
any day of tile year! For greater convenience and fi_ster se_Mce, you call now download Owner's Manuals,
order parts, catalogs, or even schedule service on-line. You can also "_sk Our Team of EN)el_s "_'' your questions,
and so much more... In Canada: www.geappliazaces.ca
ScheduleService i,x go.corn
Expex_ (;E iepair service is onl} one step awa} fl'om _our door. Get on-line and schedule ",ore" service at "_our
comenience 24 hom_ any da} of tile )ear! Or call 800.(;E.(_ARES (800.432.2737) dining n(mnal business hom_.
In Canada, call 1.800.361.3400
RealLifeDesignStudio I,l,he go.corn
GE st_pp(n_s tile L)nivei_al Design concept--products, services and enviromnents that can be used by peol:)le of all
ages, sizes and capabilities. We recognize tile need to design fixr a wide range (ff ph}sical and mental abilities and
impaimlents. Fox" details ot GE's Universal Design applications, including kitchen design ideas fiw people with
disabilities, check out our Website today. Fox"tile hearing impair ed, please call 800.TDDX;EAC (800.833.4322).
In Canada, contact: Manager; Consumer Relations, Camco, Inc.
Suite 310, 1 F2mtorv Lane
Moncton, N.B. E 1C 9M3
ExtendedWarranties
Pro'chase a (;E extended warran b and learn about special discotmts that are available while }ore" warran b is still
in effect. You can pro'chase it on-line amtime or call 800.626.2224 dining n(mnal business horn's. GE Consmner
Home Sel'vices will still be there after yore" _arrant} expires. In Canada, call 1.888.261.2133
PartsandAccessories
Individuals qualified to service their own appliances call have parts or accessories sent directly to their homes
(VISA, Master(;ard and Discover cards ate accepted). Order on-line today, 24 llom_ e\ ery clay or by phone at
800.626.2002 during nomml business hom_.
Instructions contained in this manual cover procedums to he performed bY any user. Other servicing generally should he
referred to qualified service personnel. Caution must he exercised, since improper servicing may cause unsafe operation.
Ctlston/ers irl Canada should constllt the yellow pages fin" tile nearest (lamed sel'vice center; or call 1.888.261.3055.
ContactUs
If yon are not satisfied with the service you receive fl'om GE, contact us on (stir Website with all the details
including your phone Iltll//be g or write to: General Managec (]tlstomer Relations
GE Appliances, Appliance Park
Louisville, KY 40225
In Canada: www.geappliaJaces.ea, o_ write to: Directoc Consmner Relations, Camco, Inc.
Suite 310, I Factory lane
Moncton, N.B. E 1C 9M3
In the U.8.: go.corn
In the U.8.: ge.com
In tile L!.S.: go.corn
RegisterYourApplbnce I,ltheU.8.:ge.com
Register your new appliaJaee on-line---at your convenience! Timely product registration will allow fiw
enhanced commmlication and prompt service raider tile temls of your warranty, should tile need arise.
You may also mail ill tile pre-pfinted registration card included ill tile pacldng material.
In Canada: www.geappliaJaces.ea
,*_' Printedin theUnitedStates
_ PrintedonRecwledPaper
.
 Loading...