

Page 1
N
wwvv.GEAppliances.com
Safety Instructions
Adapter Plugs ................ 6
Connecting Electricity ......... 4
Extension Cords .............. 5
Proper Disposal .............. 9
Safety Precautions ............ 3
Operating Instructions
Automatic Icemaker .......... 11
(',are and Cleaning ........ 19, 13
Shelves .................... 8, 9
Storage Drawers ............ 9, 10
Temperature Controls .......... 7
Installation Instructions
Preparing to Install
the Refrigerator ............. 14
Reversing the Door Swing . . 19-94
_'ater Line Installation ..... 15-19
Troubleshooting Tips
Before You Call For Serxice . .96, 97
Normal Operating Sounds ..... 95
Customer Service
Consumer Support .... Back Cover
Product Registration ....... 99, 30
_'arranty for
Canadian Customers ......... 98
_'arrantv for U.S. Customers . . . 31
Write the model and serial
numbers here:
Model #
Serial #
You can find them on a label on
the upper lett side of the ti'esh tood
COIIlp}l I'tIIl en t.
162D3905P011 49-60250-2 ! 1-04JR
Page 2
DANGER!RISKOFCHILDENTRAPMENT
PROPERDISPOSALOFTHEREFRIGERATOR
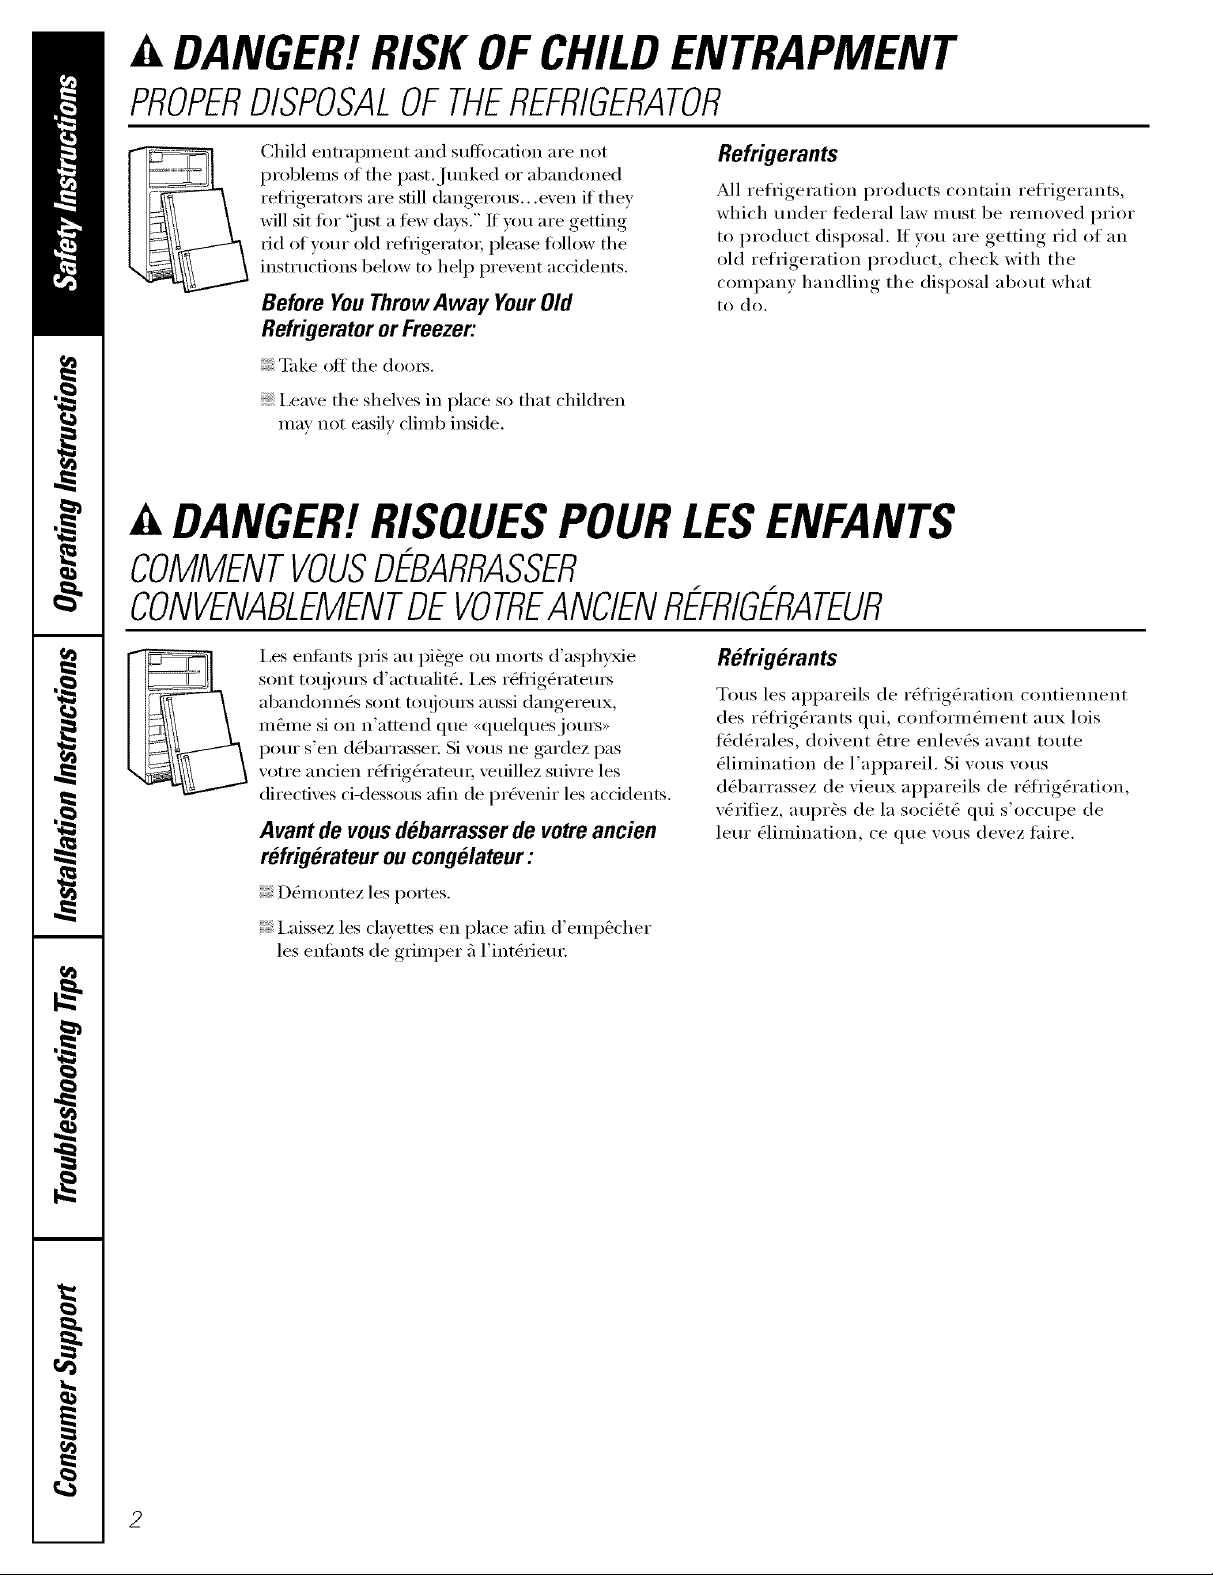
Child entral)inent and suffocation are not
i)rol)lems of the past.Junked or abandoned
refl_igera to _ are still dangerous.., ex'en if thev
will sit fin" "just a few days." If you are getting
rid of yore" old refi_igerato_; please ti)llow the
instructions below to help prevent accidents.
Before YouThrowAway YourOld
Refrigerants
All refrigeration products contain refrigerants,
which under fi_(leral law must be removed prior
to product disposal. If you are getting rid of an
old refrigeration product, check with tile
company handling tile disposal about what
to (lo.
Refrigeratoror Freezer:
_ke off tile (loo_.
i,eaxe tile shelves in place so that children
may not easil_ climb inside.
DANGER! RISQUESPOURLESENFANTS
COMMENTVOUSDEBARRASSER
CONVENABLEMENTDEVOTREANCIENREFRIGERATEUR
I,es entimts pris au pi&ge ou morts d'asphyMe
sont tot!joui_ d'actualit_. I,es r_li_ig_rateu_
abandonnes sont to//jO/llN aussi dangereux,
m6me si on n'attend que <_quelquesjom_,,
pour s'en d_barrasse_: Si vous ne gardez pas
votre ancien r6frig_ratem; veuillez suivre les
directives ci-dessous afin de pr&'enir les accidents.
Avant de vous debarrasser de votre ancien
refrigerateur ou congelateur :
D&nontez les portes.
Refrigerants
Tousles appareils de r_fl'ig_ration contiennent
des r_fl'ig_rants qui, conform&nent aux lois
ti¢(l_rales, doivent 6tre enlev_s avant toute
_limination de l'appareil. Si vous vous
d_barrassez de vieux appareils de r_li'ig_ration,
v&'ifiez, aul)r_s de la soci_t_ qui s'occupe de
leur _limination, ce que vous devez taire.
I,aissez les clavettes en place afin d'emp_cher
les enlimts de grimper fl l'int_riem:
Page 3
IMPORTANTSAFETYINFORMATION.
READALLINSTRUCTIONSBEFOREUSING.
WARNING!
Use this appfiance only for its intended purpose as described in this Owner's Manual
SAFETYPRECAUTIONS
When using electrical appfiances, basic safety precautions should be followed, including the following:
This refl'i ge ra tor Ill t1st be p rope rl) insta 11e d
and located in accordance with the Installation
Instructions befin'e it is used.
, Do not allow children to climb, st;rod or hang
on the shelves in the reflJgeratoi: They could
damage the refl_igerator and seriously iqiure
themselves.
Do not touch the cold surli_ces in the fl'eezer
compartment when hands are damp or wet.
Skin mm stick to these extremely cold StllS{ilces.
, Do not store or use gasoline or other flammable
\'ap(>_s and liquids in the vicinity (>Ithis or any
other appliance.
Keep finge_s out (ff the "pinch point" areas;
clearances between the (lores and between
the (loo_s and cabinet are necessariN small.
Be careflfl closing do(n_ when children are
in the area.
_ ]n refl_igeratcns with automatic icemake_s,
avoid contact with the moving parts of the
ejector mechanism, or with the heating element
that releases the cubes. Do not place finge_s or
hands on the automatic icemaking mechanism
while the refrigerator is plugged in.
Unplug the refl_igerator befi)re cleaning and
making repai_.
NOTE."We stronglyrecommendthat anyservicing be
performedby a quafifiedlbdividua/.
Tm'ning the control to the 0 posit.ion does
not remove power to the light circuit.
Do not refl'eeze fl'ozen fi)ods which have
thawed completely:
www.GEAppliances.com
MESURESDESlJCURITlJIMPORTANTES.
LISEZD'ABORDTOUTESLESDIRECTIVES.
AVERTISSEMENT!
N'utilisez cot #lectromOnager que pour I'usage auquel fl est destin#, comme expliqu# dons le
prOsent manuel.
MESURESDES@URITCc
Lorsque vous utilisez un appareil #lectrique, observez toujours los mesures de s#curit# de base,
y compris les suivantes.
]nstallez le r_fl_ig_rateur confimn&n ent a ux
direcfixes d'installafion axant de l'utilise_:
Ne laissez pas les enfimts grimpe_; s'asseoi_;
se tenir debout ni se pendre aux clayettes du
r(qi_ig0ratem: ]Is pomTaient endommager le
r&fl_ig_rateur et se blesser gravement.
N'entreposez et n' udlisez pas d'essence ou
autres vapems et liquides inflammables ;'l
proximit(_ de cet appareil ou de tout autre
appareil 81ectromSnage_:
; t_loignez les doigts des parties du r_fl_ig_ratem"
ot'l l'on peut e_cilement se pincer : les espaces
entre les portes et entre les portes et les placards
sont tOI{jOIII'S (_troits. Soyez prudent lo_sque
vous termez les p(>rtes de l'appareil en prg_sence
des enfimts.
Si votre r_flJg_rateur est dotO d'tme machine ;'_
gla_ons automafique &itez le contact axec les
pi&ces mobiles du m_canisme _jectem; ou avec
l'_l&nent chattflimt qui lib_ere les glaoms.
Ne posez pas les doigts ou les mains sin" le
m_canisme de la machine _'lglooms pendant
que le r&fl_ig_rateur est branch,.
Ne touchez pas les surlilces fl'oides du cong_lateur
si vous avez les mains humides ou mouill6es : la
peau risque d'adh&'er aces surli_ces mXsfl'oides.
D0branchez votre r(qi_ig0rateur avant de le
nettover ou de le r_pare_:
REMARQUE: Nous vousrecommandonsvivementde
confier toute r@aration _un technicienquafifi#.
I,oI_qtle Veils r_glez la commande sin" 0 (_teint),
l'alimentation (qectrique de l'ampoule n'est pas
coupg_e.
Ne recongelez pas les aliments smgel_s qtfi ont
compl{etement d_gel_. 3
Page 4
IMPORTANTSAFETYINFORMATION.
READALLINSTRUCTIONSBEFOREUSING.
WARNING!
HOWTOCONNECTELECTRICITY
Do not, under any circumstances, cut or remove the third (ground) prong from the power cord.
For personal safety, this appliance must be properly grounded.
The power cord of this appliance is equipped
with a 3-prong (grounding) plug which mates
with a st;mdard 3-prong (g_x)unding) wall outlet
to minimize the possibili_' of electric shock hazard
fl'om this appliance.
Have the wall outlet and circuit checked bv a
qualified electrician to make sure the outlet is
propedy grounded.
X4]/ere a standard 2-prong wall out.let is
encountered, it is your personal responsibility and
obligation to have it replaced with a propedy
grounded 3-prong wall outlet.
The refrigerator should always be plugged into its
own individual electrical outlet which has a voltage
rating that matches the rating plate.
This provides the best perfimnance and also
prexents oxerloading house wiring circuits which
could cause a fire hazard from oxerheated wires.
Never unplug your refligerator by pulling on the
power cord. Mways grip plug firefly and pull
straight out ti'oln the outlet.
Repair or replace immediately all power cords that
have become fl'aved or otherwise damaged, Do not
use a cord that shows cracks or abrasion damage
along its length or at either end.
When moving the refl_igerator away ti'om the
wall, be careful not to roll over or damage the
power cord.
MESURESDESECURITEIMPORTANTES.
LISEZD'ABORDTOUTESLESDIRECTIVES.
.4,AVERTISSEMENT!
RACCORDEMENTELECTRIQUE
No coupez ni retirez on aucun cos la troisiOme broche (mise _ la terre) de la fiche du cordon
d'alimentafion. Pour votre s6curit6, cet appareil doit Otre correctement mis _ la terre.
I,e cordon d'alimentafion de cet appareil est
muni d'une fiche fi 3 broches (raise fi la terre)
qui se branche darts une prise murale ordinaire
fi 3 alv&_les (raise fi la terre) pour r&hfire au
minimum les risques de chocs _lectriques,
Fakes examiner la prise de coumnt et le circuit
par un _lectriden qualfli_ pour vous assurer que
la prise est correctement raise fi la terre.
Si la prise murale est du type st;mdard fi 2 alv&des,
il vous incombe de la taire remplacer par une
prise fi 3 alv&_les correctement raise fi la torte.
i,e r6fl_ig&'ateur doit totljOtllN etre branche dans
sa propre prise de coumnt, dont la tension
nominale est identique fi celle indiqu_e sur la
plaque signal_fique.
4
Cette pr6caution est recommand_e pour garantir
un rendement optimum et &'iter une surcharge des
citvuits _lectriques de la r_sidence, ce qui pourrait
crier un risque d'incendie par surchaufli _ des ills.
Ne d_branchezjamais le r_ti_ig&'ateur en drant
sur le cordon d'alimentation. Saisissez tem_ement
la fiche du cordon et tirez droit pour la retirer
de la prise.
R_parez ou remplacez imm&liatement tout cordon
efliloch_ ou endommag_. N'ufilisez pas un cordon
tendill_ ou pr_sentant des signes d'usure.
i,o_que w)us d_placez votre r6fl_ig&'ateur du ram;
efims atmnfion de ne pas le fifire fouler sur le cordon
d'alimentation afin de ne pas l'endommaget:
Page 5
IMPORTANTSAFETYINFORMATION.
READALLINSTRUCTIONSBEFOREUSING.
USEOFEXTENSIONCORDS
Because of potential safety hazards under certain conditions, we strongly recommend
against the use of an extension cord.
Howe\'e_; if you must use an extension cord, it is absolutely necessary that it be a UIAisted (in the United
States) or a CSA certified (in Canada), 3-wire grounding type appliance extension cord having a grounding
type plug and outlet and that the electrical rating of the cord be 15 amperes (minimum) and 120 volts.
CORDONSPROLONGATEURS
Nous vous recommandons fortement de ne pas utiliser de cordons prolongateurs _ cause des risques
potentiels qu'ils pr#sentent clans certaines conditions.
Toutefifis si w)us d0cidez d'udliser tout de m_me tm cordon prolongatetH; il est absolument n0cessaire
qu'il s'agisse d'tm cordon a 3 ills avec Inise a la terre pour appareils (_lectroln(_nagei_ homologu_ UI, (aux
Etnt_Unis) ou certifi(_ CSA (au Canada), pourvtl d'tme fiche et d'tme prise raises a la terre de 15 amperes
(minimum) et de 120 volts.
vvvvw.GEAppl_nce_com
Page 6
IMPORTANTSAFETYINFORMATION.
READALLINSTRUCTIONSBEFOREUSING.
USEOFADAPTERPLUGS(AdapterplugsnotpermittedinCan_d_J
Because of potential safety hazards under certain conditions, we strongly recommend against
the use of an adapter plug.
Howevex; if you must use an adaptex; where local
codes pemfit, a temporary connection may be made
to a properly grotmded 2-prong wall outlet bv use
of a UI Aisted adapter awfilable at most local
hardware stores.
The linger slot in the adapter must be aligned with
the larger slot in the wall outlet to provide proper
polaris," in the connection of the power cord.
\_]_en disconnecting the power cord from the
adapte_, always hold the adapter in place with one
hand while pulling the power cord plug with the
other hand. If this is not done, the adapter grotmd
temfinal is vet_' likely to break with repeated use.
If the adapter grotmd temfinal breaks, DO NOT USE
the refrigerator tmtil a proper grotmd has been
established.
Attachingtheadaptergroundterminaltoa waftoutletcover
screwdoesnotgroundtheapplianceunlessthecoverscrew
ismetal,andnotinsulated,andthewaftoutletisgrounded
throughthehousewking Youshouldhavethecircuitchecked
bya quafiflede/ectnclantomakesuretheoutletisproperly
groundecL
READANDFOLLOWTHISSAFETYINFORMATIONCAREFULLY.
SAVETHESEINSTRUCTIONS
MESURESDES[:CURIT[:IMPORTANTES.
LISEZD'ABORDTOUTESLESDIRECTIVES.
FICHED'ADAPTAdON(Fi_hesd'_d_t_tion,,on_ermi_e_auC_n_da)
Nous vous recommandons fortement de ne pas utiliser une fiche d'adaptation _ cause des risques
potentiels qu'elle pr#sente clans certaines circonstances.
Toutetois, si vous d_ddez d' utiliser tout de m6me
tree fiche d'adaptafion, vous pouvez eflectuer tm
raccordement temporaire, si les codes locaux le
pem_ettent, darts tree prise de torn'ant ;'l 2 al\'&_les
ad&luatement raise ;'l la terre en utilisant tree fiche
d'adaptation homologu_e UI,, en vente darts la
plupart des quincaillerJes.
I,a tente la plus longue de la fiche doit &tre align_e
avec la fente la plus longue de la prise inurale afin
d'assurer la polafit_ appropfi_e pour le
branchement du cordon d'alimentafion.
I,orsque w)us dgd)ranchez le cordon d'alimentafion
de la fiche d'adaptafion, saisissez toujom_ la fiche
d'tme main pendant que vous firez sin" la fiche
du cordon d'alimentation de l'autre. Sinon,
la borne de raise fi la terre de la fiche d'adaptation
risque de casser avec le temps.
Si la borne de raise a la terre de la fiche casse,
N'UTILISEZ PAS l'appareil tant qu'une raise a la terre
adg_quate n'aura pas _t_ rg_tablie.
Le fait de fixer la bornede mlse_ la terrede la fiche
d'adaptation_ /ap/awe de/a prise decourantn'assurepas
automatiquement/araise _ /a terrede/'apparei/, fl faut que /a
vissoit enm#ta/, non iso/#e,et clue/a prise decourant soit
raise_ /aterre par l'entremise ducgb/agede/a rdsidence.
Faites vdrifierle ckcuit par unblectnUen quafifibpour vous
assurerque /aprise est ad#quatementraise _/a terra
VEUILLEZLIREETSUIVREATTENTIVEMENTCESMESURESDESdLCURITE.
CONSERVEZCESDIRECTIVES
Page 7
Aboutthe temperaturecontroldial _.CE4..lia.ces.com
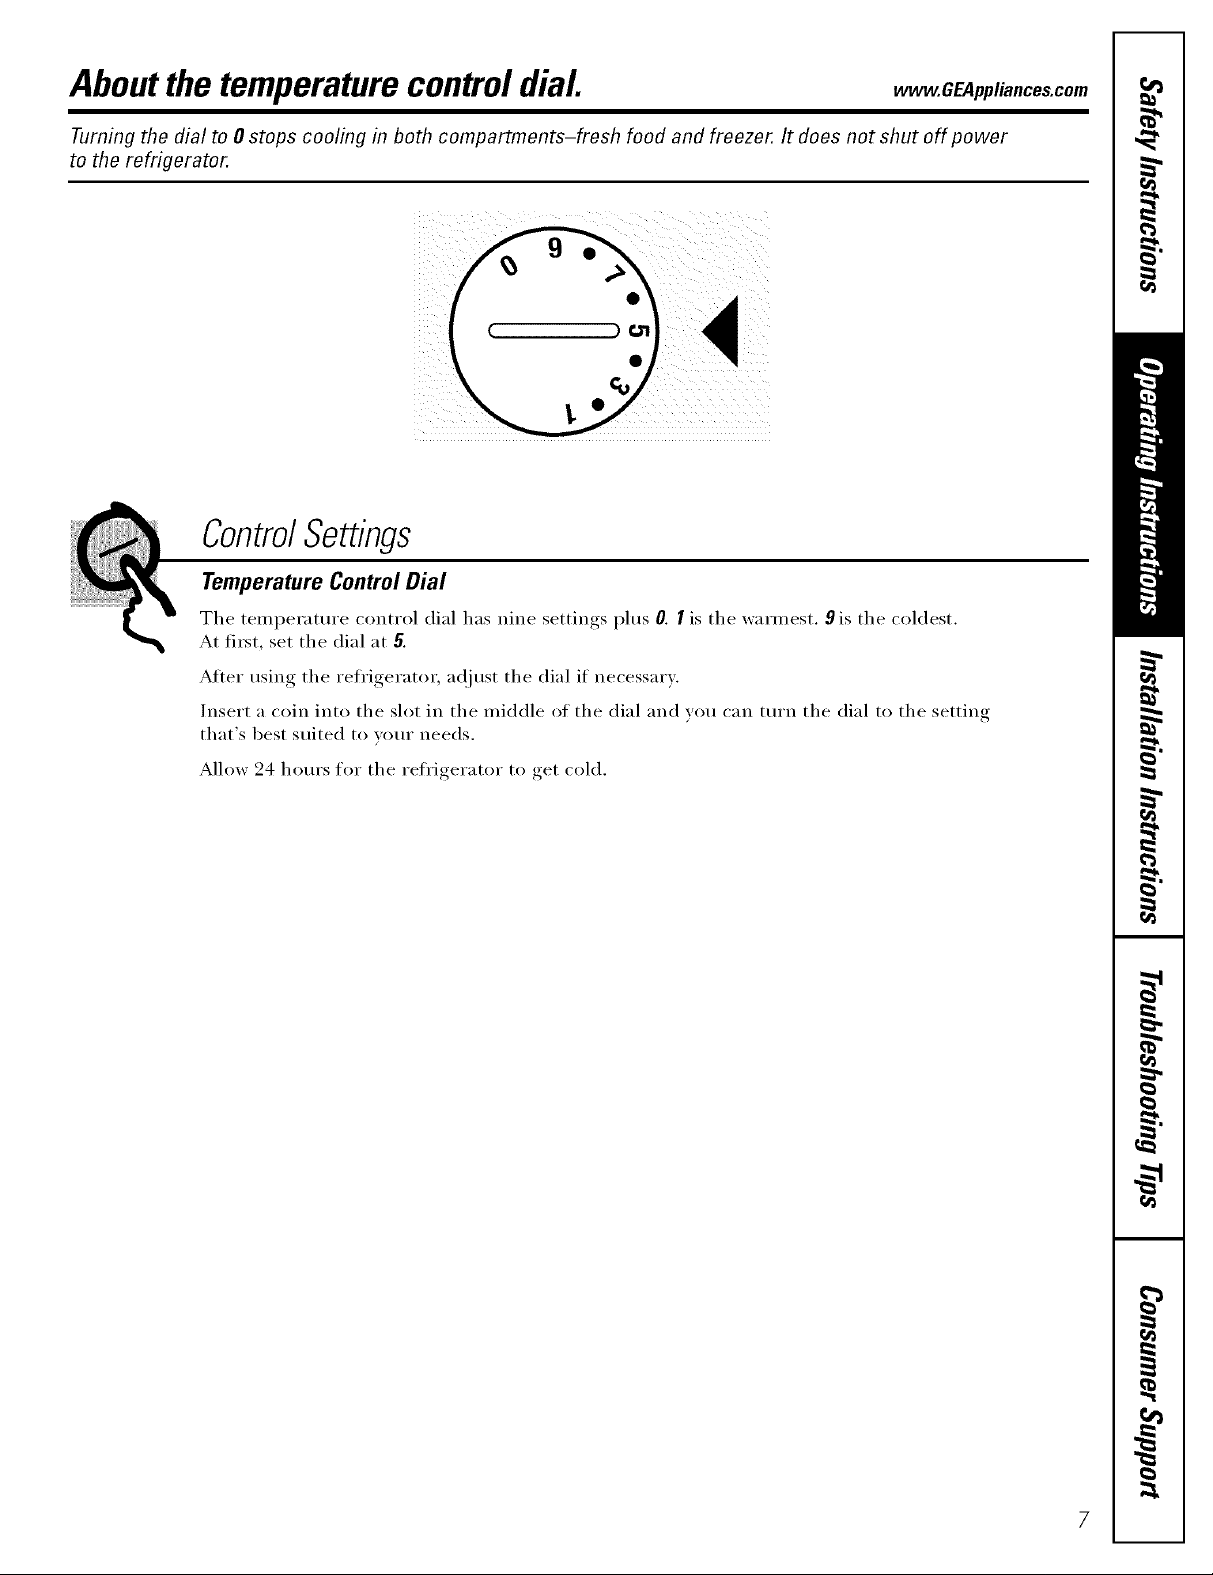
Turning the dial to 0 stops cooling in both compartments-fresh food and freezer. It does not shut off power
to the refrigerator.
ControlSettings
Temperature Control Dial
The temperature control dial has nine settings plus 0. I is the warmest. 9 is the coldest.
At fi_t, set the dial at 5.
Afier using the refl'igerato_, a(!just the dial if necessary.
Insert a coin into the slot in the middle of the dial and wm can ttli'n the dial to the setting
that's best suited to wmr needs.
Allow 24 horn's for the refl'igerator to get cold.
Page 8
Aboutthe freshfoodcompartmentshelves.
Shelf supports at various levels allow you to custom-space your shelves. Not all features are on all models.
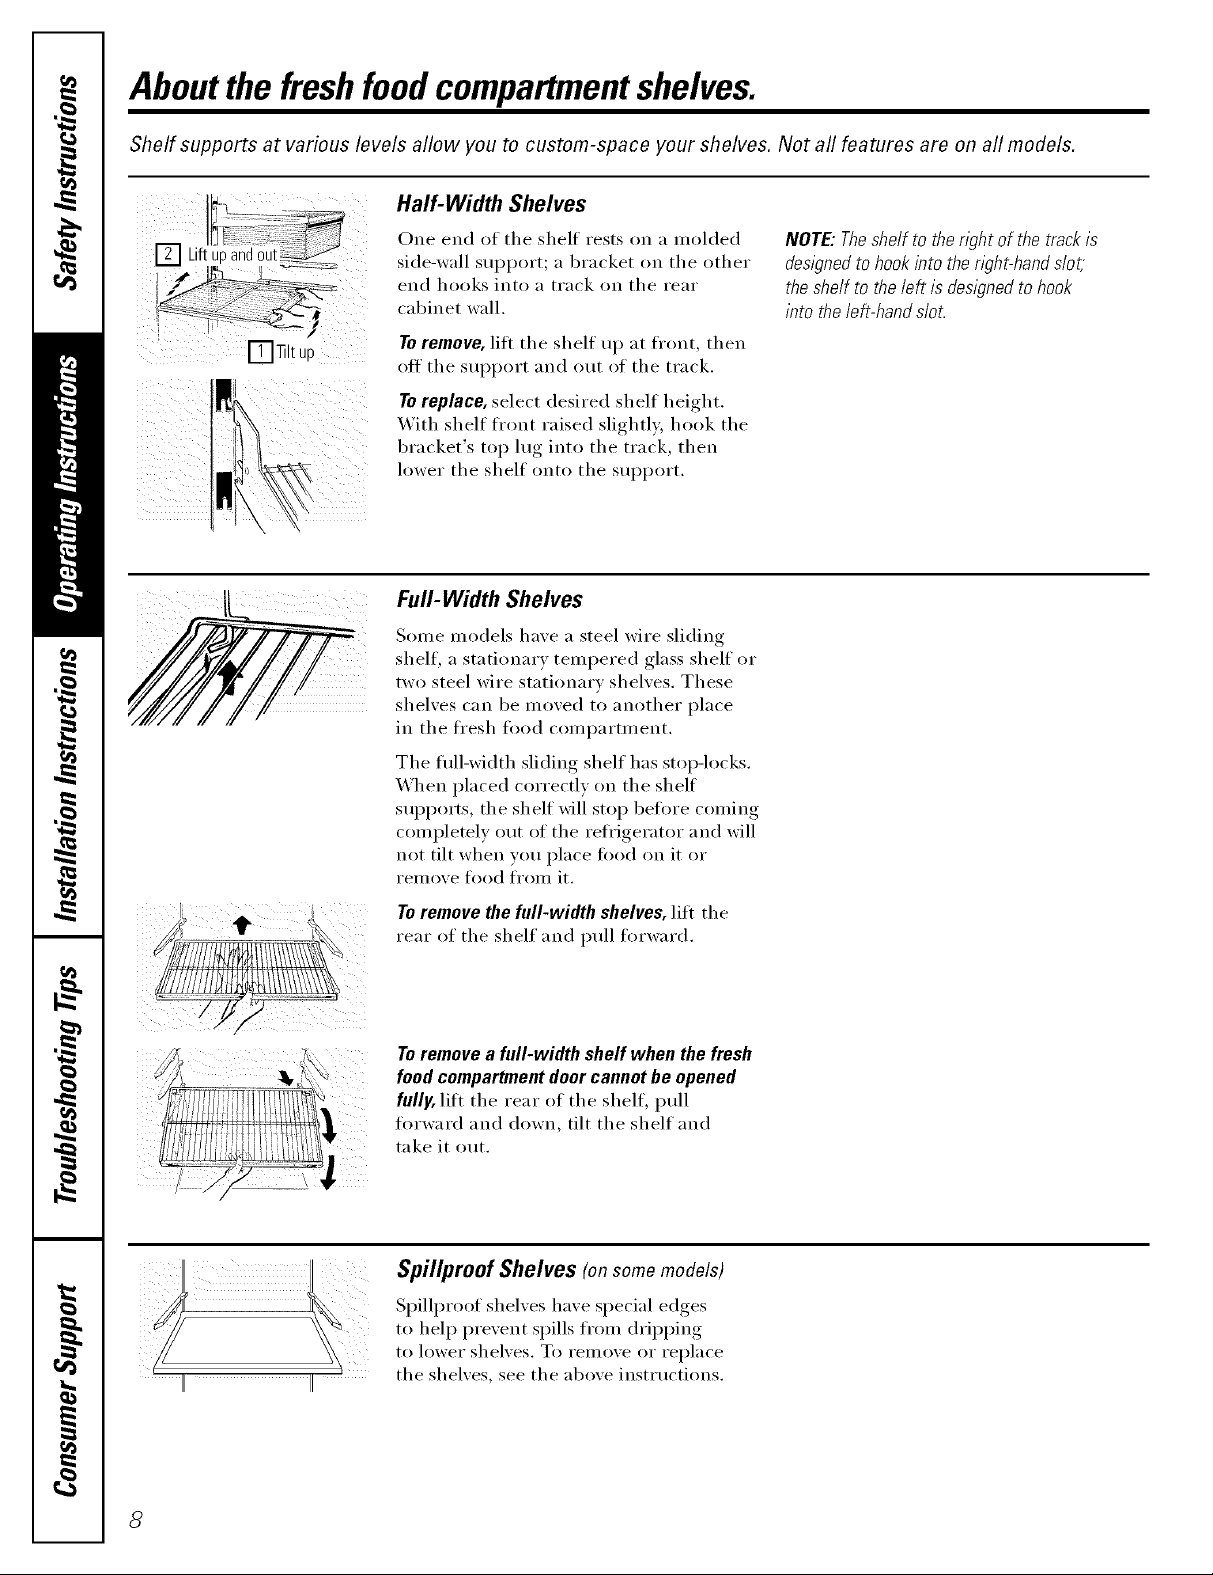
Half-Width Shelves
One end of the shelf rests on a molded
side-wall support; a bracket on the other
end hooks into a track on the rear
cabinet wall.
NOTE:Theshelfto the@t of thetrackb
designedto hookintothe @t-hand slot,
theshelf tothe left isdesignedtohook
into theleft-handslot.
r_]qlt up
To remove, lift the shelf up at fl'ont, then
off the SUl)l)ort and out of the track.
To replace, select desired shelf height.
With shelf ti'ont raised slightly, hook the
bracket's top lug into the track, then
lower the shelf onto the SUl)port.
Full-Width Shelves
Some models have a steel wire sliding
shelf, a stationary tempered glass shelf or
two steel wire stationary shelves. These
shelves can be moved to another place
in the fl'esh fi)od compartment.
The fifll-width sliding shelf has stop-locks.
When placed correctly on the shelf
SUl)ports, the sh elf will stop befi)re coming
completely ()tit of the refi'igerator and will
not tilt when you place food on it or
I'eI/lOVe fl)od ti'OIll it.
Toremove the full-width shelves, lift the
rear of the shelf and pull forward.
Toremove a full-width shelf when the fresh
food compartment door cannot be opened
fully, lift the rear of the shelf, pull
fin'ward and down, tilt the shelf and
take it out.
Spillproof Shelves (onsomemodels)
Spillproot shelxes haxe special edges
to hel I) prexent spills from dripping
to lower shelxes. To i'eillO_,e 0I" replace
the shelxes, see the aboxe insttuctions.
Page 9
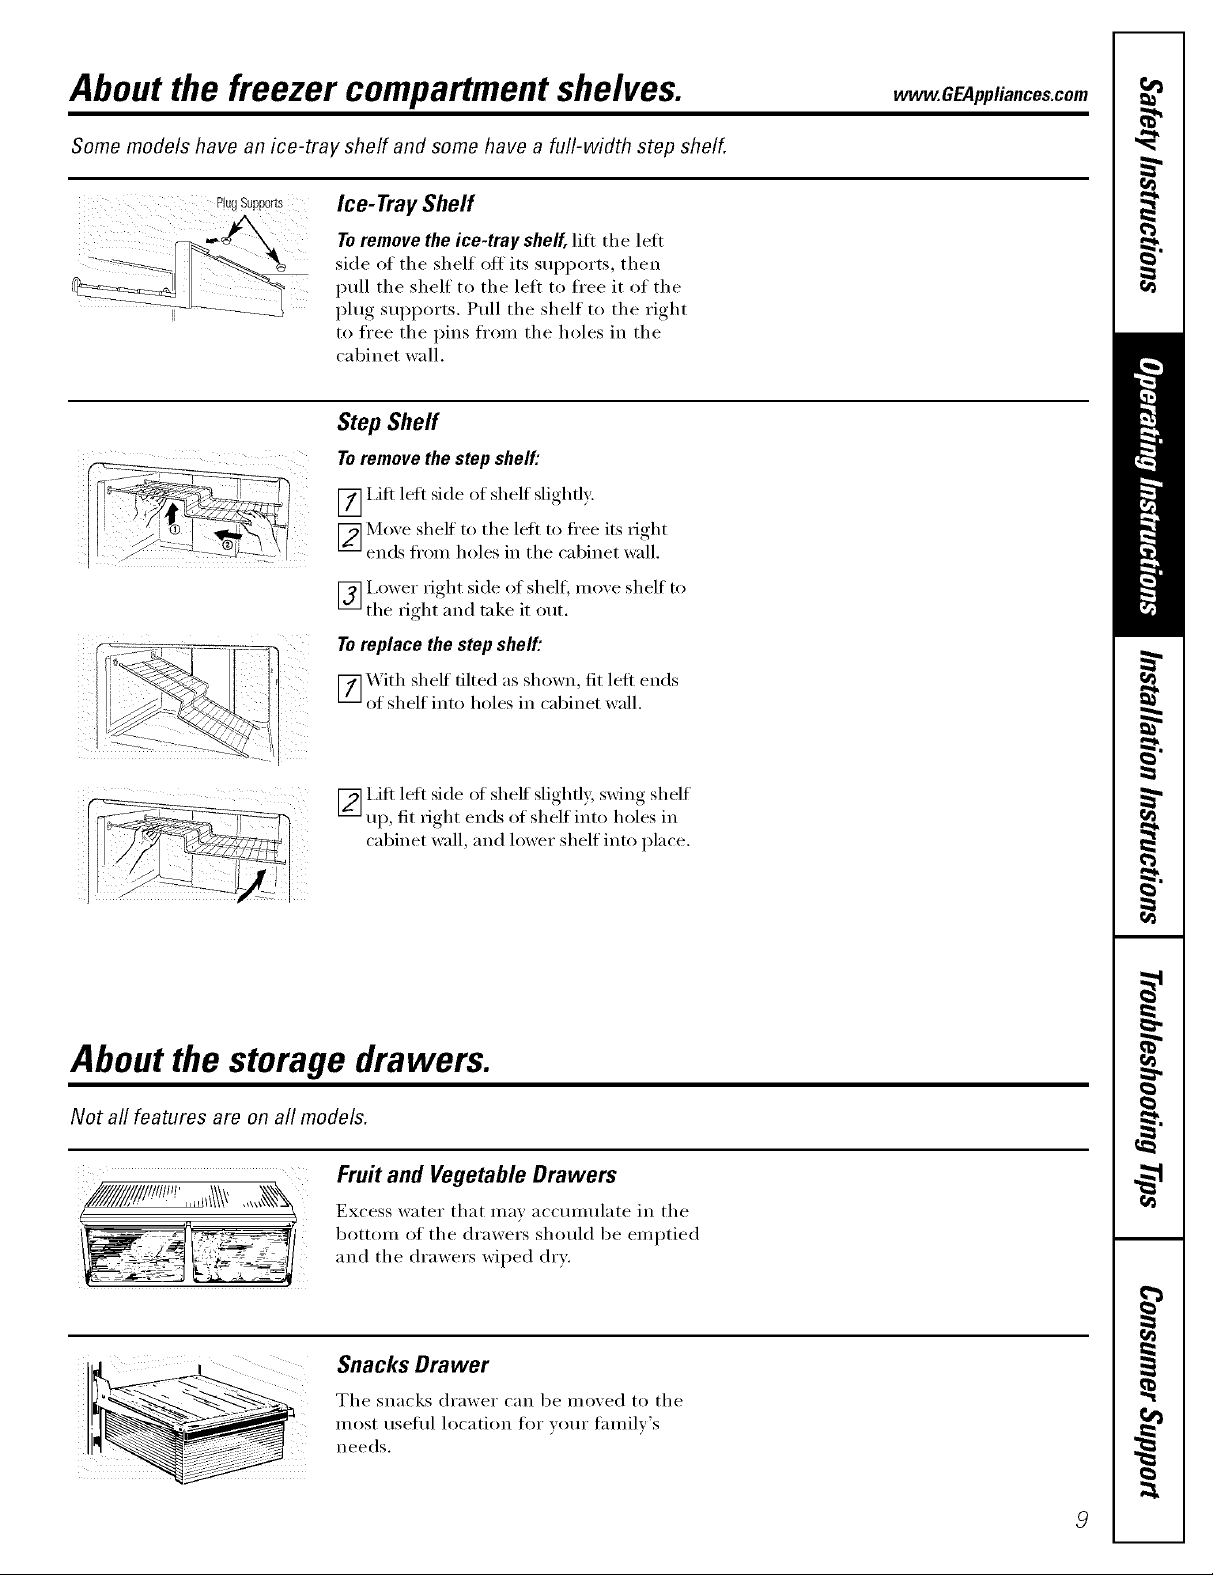
About the freezer compartment shelves. .CEApplia.ces.com
Some models have an ice-tray shelf and some have a full-width step shelf.
Ice- Tray Sheff
Toremove the ice-tray shelf, lift the left
side of the shelf off its supports, then
pull the shelf to the left to fl'ee it of the
plug supports. Pull the shelf to the right
to free the pins fl'om the holes in the
cabinet wall.
Step Shelf
Toremove the step shelf."
[7] i,ifl left side oI shelf slightly:
_ iVlo_e shelf to the left to fl'ee its right
ends ti'om holes in the cabinet w_iil.
I,ower right side of shelf, mine shelf to
[] the right and rake it out.
Toreplace the step shelf."
[_ _ ith shelf tilted as shown, tit left ends
of shelf into holes in cabinet wall.
_I,ifl left side of sheff slightly, swing shelf
up, fit right ends of shelf into holes in
cabinet wall, and lower shelf into place.
About the storage drawers.
Not all features are on all models,
Fruit and Vegetable Drawers
Excess water that may acctmmlate in the
bottom of the drawers should be emptied
and the drawers wiped dry.
Snacks Drawer
The snacks drawer can be moved to the
most useflfl location Ira" wmr tamilv's
needs.
Page 10

About storage drawer and cover removal.
Not all features are on all models.
Adjustable Humidity Drawer (onsomemodels)
Humidity Control
HIGH LOW
Slide the control all the way to the Slide the control all the way to the LOW
HIGHsetting to proxide high humidity _settino-_ to proxide lower humidit_ lexels
recommended flw most xegetables, recommended for most fruits.
Drawer and Cover Removal
Drawers can be removed easily by grasping
the sides and lifting up slightly while
pulling (h'awe_ past tile stop location.
Full-Width Drawer with Plastic Cover
To remove the cover, lift it off its supports,
pull it forward, tilt it and take it out.
Twin Drawers with Glass Cover
Toremove:
[_ Remoxe tile drawers,
_ Reach in, push tile front of glass
coxer up, and at tile same time,
pull it forward as tar as it will conle.
Tilt it and take it out. Avoid cleaning tile
cold glass cover with hot water because
the extreme temperature difference may
Catlse it to break.
_] Remoxe the drawer frame. (Alwaxs
relllOXe tile glass cover before you
take out the drawer frame.)
I,itt tile fl'ame off tile supports at each
side and back, pull it fi_rward, tilt it and
take it out.
To replace:
_I,ower the frame until it rests on the
supports at each side and back.
_Replace tile glass coxer, i)ushing its
rear edge fir_nl)into tile rear f_ame
channel and gentl) lowering tile front
into place.
_]Replace the drawers.
10
Page 11

About the automatic icemaker, vvvvw.GEAppliances.com
A newly-installed refrigerator may take 12to 24 hours to begin making ice.
Power
,i w,tc, : ii i ii I
Automatic Icemaker (on some models)
The icemaker will l)rodu('e seven ctlbes
per cycle-approximately 100-130 cubes
in a 24-hour period, depending oil
fl'eezer compartment temperature,
I'OOII/ teilll)erattli'e _ ntlillber of door
openings and other use conditions.
GI;00 iI
PowerLight
Powerswitch model
Feeler Armin
theSTOP
FeelerArmin (up)position
the.ON(down) will come on.
p0sm0n
Feelerarm model the icemaker fills with water.
There are two b'pes of icemakeIs: po_vr
switch models and feeler aml models.
If the refl'igerator is operated befi)re
the water connection is made to the
, set the power switch to 0 (off)
or move the feeler arm to the STOP(up)
position.
When the refl'igerator has been
connected to the water supply, set the
power switch to the I (0n) position or move
tile feeler arm to the ON (down) position.
On power switch models, the green light
You will hear a buzzing sound each time
The icemaker will fill with water when
it cools to ] 5°F. A newly-installed
refl'igerator may take ] 2 to 24 hours
to begin making ice cubes.
Throw awav the first tew batches of ice
to allow the water line to clear.
Be sure nothing interti_res with the
sweep of the ti_eler arm.
When the bin fills to the level of the
feeler arm, the icemaker will stop
producing ice.
It is normal for several cubes to be joined
togeth er.
If ice is not used fl'equentl> old ice cubes
will become cloud> taste stale and shrink.
On power switch models, the green power
light will blink if ice cubes get stuck in the
icemaker. To correct this, set the power
switch to 0 (Off)and retnove the cubes. Set
the power switch to I (0n)to restart tile
icemaker. _dter the icemaker has been
turned on again, there will be a delay of
about 45 minutes before the icemaker
I'estIIlles ol)ei'ation.
NOTE:Inhomeswithlower-than-averagewater
pressure,youmayhear theicemakercycle
multipletimeswhenmakingonebatchofice.
Icemaker Accessory Kit
If your refi'igerator did not already come
equipped with an automatic icemaker,
an icemaker accessory kit is available at
extra cost.
Check the back of the refl'igerator flit
the specific icemaker kit needed ti)r your
model.
11
Page 12

Care and cleaning of the refrigerator.
Cleaning the Outside
The door handles and trim (on sonle
models). Clean with a cloth (laml)ened
with soapy water: Dry with a sott ch)th.
Keep the outside clean. Wipe with a clean
cloth lightly dampened with kitchen
appliance wax or mild liquid dish
detergent. Dry and polish with a clean,
soft cloth.
The stainless steel panels and door handles
(on solne models) can be cleaned with
a commercially available stainless steel
cleaner. Do not use appliance wax or
polish on the stainless steel,
Cleaning the Inside
Tohelp prevent odors, leave an open be,×
oI baking soda in the fi'esh food and
freezer COill[)}l i'till en [s.
Unplug the refrigerator before cleaning.
If this is not i)ra(tical, wring excess
i/loisttlre Oil[ of sponge or cloth when
cleaning arollnd switches, lights or
controls.
Use wam_ water and baking soda solution-
about a tablespoon (l 5 ml) of baking soda
to a quart (1 liter) of water. This both
cleans and neutralizes odm_. Rinse and
wipe dry.
After cleaning the door gaskets, apply a
thin laver of petroleum .jelly to the door
gaskets at the hinge side, This helps kee I)
the gaskets fl'om sticking and bending
out of shape.
Do not wipe the refr/_Teratorwith a soiled dish
cloth or wet towel Thesemay leave a residue
that can erode the pain_ Do not use scour/bg
pads,powdered c/eanera,bleach or cleaners
containing bleach because these products can
scratch and weaken the paint f/b/sh.
Avoid cleaning cold glass shelves{on some
models) with hot water because the extreme
temperature difference may cause them to
break. Handle glass shelves carefully Bumping
tempered glass can cause it to shatte_
E-viterde nettoyer /es tab/ettes en verre froides
(sur certa/ns modSles) 8 l'eau chaude paine que
/'6cart de temperature extreme risque de/es
craquer Man/pu/er /es tab/ettes en verre avec
precaution. Le verre tremp6 soumis 8un choc
risque de se fracasset:
Do not wash any plastic refrigerator parts in
the dishwashe_
Cleaningthecondensercoils.
12
Condenser
There is no need Ira" routine condenser
cleaning in normal home operating
envii'onillents. However, in enviFoni//ents
that mav be particularly dusty or greasy;
the condenser should be cleaned
periodically fi)r efficient refl'igerator
operation,
To clean the condenseL tm'n the
temperatm'e control dial to 0. Sweep
_I_V_IV OI" V_IC[I[II// l1 I) dust.
For best results, use a brush specially
designed Ira" this puri)ose. It is available
at most appliance parts stores.
Page 13

Behind the Refrigerator
Be careful when moving tile refrigerator
away from the wall. All types of floor
coverings can be dmnaged, particularly
cushioned coverings and those with
ei/lbossed S/lI'J[_lces,
Tm'n tile leveling legs at each fl'ont corner
of the reflJgerator counterclockwise tmtil
the rolle_ support the refrigeratm; Pull the
refrigerator straight ()/it and return it to
position by pushing it straight in. Moving
tile refrigerator in a side direction may
result in damage to the floor covering or
rellJgeratoi:
Light Bulb Replacement
To replace a burned-out bulb, unplug
the refl'igerator fl'om its electrical outlet,
unscrew tile bulb when cool and replace
it with an appliance bulb of tile same or
lower wattage.
vvww.GEAppliances.com
When pushing the refrigerator back, makesure
you don't roll over the power cord or icemaker
supply line (on some models).
Enpoussant le r_frig_rateur en place, vei/ler _ne
pas le fake rouler sur le cordon d'alimentation ou
la canalisation d'eau de la machine _ gla_ons
(sur certains modules).
After rolling tile refl'igerator back into
place, mrn the legs clockwise tmtil the
legs again bear the weight of the
refl'igera tot.
Turningthecontrolto the0 positiondoesnot
removepowerto thehghtcircuit
Preparing for Vacation
For long va(-ations or absen(es_ reillove
food and mq)lug tile refl'igerator. Move
tile temperatm'e control dial to tile 0
position, and clean the interior with a
baking soda solution of one tablespoon
(l 5 ml) of baking soda to one qtlart
(l liter) of water, i,eave tile doors open.
Preparing to Move
Secure all loose items such as grille,
shelves and drawers by taping them
secm'ely in place to prevent damage.
Set tile icemaker power switch to tile
0 (off) position or move tile fl_eler arm to
tile STOP (up) position (depending on
model) and shut off tile water supply to
tile refrigerator;
If tile temperature can drop below
fl'eezing, have a qualified servicer drain
tile water supply systeln (on some
models) to prevent serious property
damage due to flooding.
Be sure the refngeretor stays lb an upright
position during moving.
13
Page 14

Installation
Refrigerator
Instructions
Models 16,17, 18
Questions?Call800.GE.CARES(800.432.2737)orVisitomX_ebsite_,t:www.GEAppliances.comIn Canada,call 1.800.361.3400or visitour _Vebsite at: www.geappliances.ca I
BEFORE YOU BEGIN
Read these instructions completely mad carefully,
• IMPORTANT - these
instHIctions for local inspector's use.
• IMPORTANT - Obse,,'e ,ll
governing codes and ordinances.
• Note to Installer - Be sure to leave these
instHIctions with tile Consumer.
• Note to Consumer - KeeI)these instructions
ti)r fllture reference.
• Skill level - Installation of this appliance requires
basic mechanical skills.
• Completion time - Reli'igerator Installation
15 minutes
Reve_ing the Door Swing
1 hour
• Proper installation is tile responsibility ot tile
installeL
• Product failure due to improper installation is not
covered under tile _'arranm
CLEARANCES
_Mlow tile fl 11( wm_ cle,mmce; f )r ease
proper air circulation and I)lumbing, and electrical
CoIlIlectioIIs.
• Sides./4 (19 ram)
• Top 1" (25 ram)
• Back 1" (25 ram)
") ) " (* " " s "( of installation,
zt
ROLLERS AND LEVELING LEGS
Leveling legs near each fl'ont corner of tile refl'igerator
are a(!justable. They firmly position tile refl'igerator
and prevent it fl'om moving when tile doors are
opened. I,eveling legs should be set so the fl'ont of the
refl'igerator is raised just enough that tile doors ch)se
easily when opened about hall\ray.
Turn tile leveling legs clockwise to raise tile
refl'igerator, counterclockwise to lower it.
Rollersnext to tile leveling legs allow you to move tile
reii'igerator away from tile wall tot cleaning.
WATER SUPPLY TO THE ICEMAKER
(on some models)
If tile refrigerator has an icemaker, it will have to be
connected to a cold water line. A water sui)ply kit
(containing COl)per tubing, shutott valve, fittings and
instHictions) is awfilable at extra cost fl'om yore" dealer,
by visiting ore" Website at www.GEAppliances.com (in
Canada at www.geappliances.ca) or from Parts and
Accessories, 800.626.2002 (in Canada 1.888.261.3055).
REFRIGERATOR LOCATION
• Do not install tile refl'igerator where tile temperature
will go below 60°F (l 6°C) because it will not _tm ()Den
enough to maintain proper temperatures.
• Install it on a floor strong enough to sui)port it fldlv
loaded.
14
Turn the legs co/mterclockwise until the weight of the
refl'igerator is transterred from them to tile rolle_.
_Mter rolling tile refl'igerator back into place, turn tile
legs clockwise until the legs again bear the weight of
tile refl'igera tot.
Page 15

Installation Instructions
ill INSTALLING THE WATER LINE CONSOMEMODELS)
BEFORE YOU BEGIN
Reconm_ended copper water supply kits are _4UXSX2,
_X8X3 or _X8X4, depending on the amom_t of
tubing you need. Approved plastic water supply lines
are GE SmartConnect ''_ Refrigerator Tubing
(WX08X10002, WX08X10006, WX08X10015 and
_43X08X 10025).
When connecting your refrigerator to a GE Reverse
Osmosis Water System, the only approved installation
is with a GE RVEfit. For other reverse osmosis water
s}_stems, follow the manufi_cturer's recommendations.
This water line installation is not warranted by the
refrigerator or icemaker manufi_cturer. Follow these
instructions carefldlv to minimize the risk of expensive
water damage,
_4'ater hammer (water banging in the pipes) in house
plmnbing can cause damage to refl'igerator parts and
lead to water leakage or flooding. Call a qualified
plmnber to correct water hammer before installing
the water supply line to the refl'igerator,
To prevent burns and product damage, do not hook
up the water line to the hot water line.
If vou/lse gOllY refl'igerator before connecting the
water line, make sm'e the icemaker power switch is
in the 0 (off) position (on power switch models) or
the feeler arm is in the STOP (up) position (on teeler
arm models).
WHAT YOU WILL NEED
• Copper or GE SmaxtCmmecf'" Refrigerator Tubing
kit, 1/4" outer diameter to connect the refrigerator
to the water supply: If using COl)per, be sm'e both
ends of the tubing are cut square.
To determine how much tubing you need: measure
the distance from the water valve on the back of the
refrigerator to the water supply pipe. Then add 8'
(2.4 m). Be sure there is sufficient extra tubing
(about 8' [2.4 m ] coiled into 3 turns of about l 0"
[25 cm] diameter) to allow the refl'igerator to move
out fl'om the wall after installation.
GE Smart(_onnect _'_Refrigerator Tubing 14dts are
available in the fi)llowing lengths:
2' (0.6 m) - WX08X10002
6' (1.8 m) - WX08X10006
15' (4.6 m) - WX08X10015
25' (7.6 m) - WX08X10025
Be sure that the kit wm select allows at least 8' (2.4 m)
as described above.
Do not install the icemaker tubing in areas where
temperatm'es tall below fl'eezing.
When using any electrical device (such as a power
drill) during installation, be sm'e the device is double
insulated or grounded in a manner to prevent the
hazard of electric shock, or is battery powered.
All installations must be in accordance with local
plmnbing code requirements.
NOTE: The mtiy GE approved plastic tubing is that
supplied in GE SmartConnect'" Refrigerator Tubing
kits. Do not use any other plastic water supply line
because the line is under pressure at all times. Certain
types of plastic will crack or rupture with age and
cause water damage to your home.
15
Page 16

Installation Instructions
B INSTALLING THE WATER LINE (CONT.)
WHAT YOU WILL NEED (CONT.)
• AGE water supply kit (containing tubing, shutoff
valve and fittings listed below) is available at extra
cost fl'om your dealer or fl'om Parts and Accessories,
800.626.2002.
• A cold water supply. The water pressm'e must be
between 20 and 120 p.s.i. (1.4-8.1 bar).
• Power drill.
• 1/2" or adjustable wrench.
• Straight and Phillips blade screwdriver.
• Two 1/4" outer diameter compression nuts and
2 ferrules (sleeves)--to connect the copper tubing
to the shutoff valve and the refl'igerator water valve.
OR
• If you are using a GE SmartConnect '_ ReflJgerator
Tubing kit, the necessary fittings are preassembled
to the tubing.
Install the shutoff xalxe on the nearest frequentl) used
drinking water line.
[] SHUT OFF THE MAIN WATER
SUPPLY
Turn on the nearest fimcet long enouoh_ to clear
the line of water.
[] CHOOSE THE VALVE LOCATION
Choose a location fin" the valve that is easily
accessible. It is best to connect into the side of
a vertical water pipe. When it is necessary to
connect into a horizontal water pipe, make the
connection to the top or side, rather than at the
bottom, to avoid drawing off any sediment fl'om
the water pipe.
[] DRILL THE HOLE FOR THE VALVE
• If wmr existing COl)per water line has a flared fitting
at the end, you will need an adapter (available at
phunbing supply stores) to connect the water line to
the reli'igerator OR wm can cut off the flared fitting
with a tube cutter and then use a compression
fitting. Do not cut formed end from GE
SmartCmmect _'' Reli'igerator tubing.
• Shutoff valve to connect to the cold water line.
The shutoff valve should have a water inlet with a
minimmn inside diameter of 5/32" at tile point of
connection to the COLD WATER LINE. Saddle-type
shutoff valves are included in many water sui)ply kits.
Before i)urchasing, inake sure a saddle-type wdve
complies with wmr local plmnbing codes.
Drill a 1/4" hole in the water pii)e (exen it using
a sell:piercing xalve) using a sharp bit. Remoxe anx
btu'I5 resulting from drilling tile hole in the I)ipe.
Take care not to allow water to drain into the drill,
Faihu'e to drill a 1/4" hole may result in reduced
ice production or smaller cubes.
16
Page 17

Installation Instructions
[] FASTEN THE SHUTOFF VALVE
Fasten the shutotI _al_e to the cold water pipe with
the pipe clamp.
PipeClamF
Saddle-Type--
ShutoffValve
NOTE: Conmlonwealth of Massachusetts Plumbing
Codes 248CMR shall be adhered to. Saddle wflves
are illegal and use is not permitted in Massachusetts.
Consult with wmr licensed plumber.
-- VerticalCold
WaterPipe
[] TIGHTEN THE PIPE CLAMP
Tighten the clamp screws until the sealing washer
begins to swell.
NOTE: Do not overtighten or vou mav cHIsh the
tubing.
-Washer
Pi End
Clam[
[] CONNECT THE TUBING
TO THE VALVE
Place the compression nut and ferrule (sleexe)
for COl)per tubing onto tile end of the tubing and
connect it to the shutott xalxe.
Make sure the tubing is flfllv inserted into the
wove. Tighten the compression nut securely.
For plastic tubing fl'om a GE SmartConnect'"
Refl'igerator Tubing kit, insert the molded end
of the tubing into the shutoff wove and tighten
compression nut until it is hand tight, then tighten
one additional turn with a wrench. Overtightening
IllaV ca[Ise leaks.
Saddle-Type
ShutoffValve
Packing Nut.
Outlet Valve-- --Ferrule (sleeve)
NOTE: Commonwealth of Massachusetts Plumbing
Codes 248CMR shall be adhered to. Saddle wflves
are illegal and rise is ilot permitted in Massachusetts.
Consult with wmr licensed i)lumber.
?ression
Nut
SmartConnect_
Tubing
[] ROUTE THE TUBING
Route the tubing between the cold water line and
the refl'igerator.
Route tile tubing through a hole drilled in the wall
or floor (behind the refl'igerator or a(!iacent base
cabinet) as close to the wall as possible.
NOTE: Be sure there is sufticient extra tubing
(about 8 ti_et [244 cm] coiled into 3 turns of about
10" [25 cm] diameter) to allow the refl'igerator to
move out fl'om the wall alier installation.
[] FLUSH OUT THE TUBING
Turn the main water sui)ply on and flush ()tlt the
tubing until the water is clear.
Shut the water ott at the water valve alter about
one quart (l liter) of water has been flushed
through the tubing.
17
Page 18

Installation Instructions
B INSTALLING THE WATER LINE (CONT.)
[] CONNECT THE TUBING TO THE
REFRIGERATOR
NOTES:
• gefl)re making tile connection to tile refrigerator,
be sure tile refrigerator, power cord is not I_lugged,,
into tile wall outlet.
• We recommend installing a water filter if wmr
water sui)ply has sand or particles that could clog
the screen of the reti'igerator's water wdve. Install
it in the water line near the retiigerator. If using
GE SmartConnect'" Reliigerator Tubing kit,
wm will need an additional tube (WX08X10002)
to connect tile filte_: Do not cut plastic tube to
install filter.
RelllO_,e tile access co_,er.
Remoxe tile plastic flexible cap from tile water
;al;e (refrigerator connection).
[] CONNECT THE TUBING TO THE
REFRIGERATOR (CONT.)
Fasten tile tubing into tile clamp provided to
hold it in a vertical position. You may need to
pry open tile clamp.
1/4" Copper_ -- TubingClamp
Tubing
1/4" Compression
Nut
Ferrule
(sleeve)
Refrigerator
Connection
Reattach tile access cover.
€lp_
SmartConnect_
Tubing
©
Place tile compression nut and ti_Hule (sleeve)
onto the end of the tubing as shown. On GE
SmartConnect'" Refl'igerator Tubing kit,
the nuts are ah'eadv assembled to the tubing.
Insert tile end of tile tubing into tile water wdve
connection as flu" as possible. While holding the
tubing, tighten tile fitting.
For plastic tubing from a GE Slnart(_onnect '_
Refrigerator Tubing kit, insert tile molded end
of the tubing into the shutoff valve and tighten
compression nut tmtil it is hand tight, then
tighten one additional tm'n with a wrench.
Overtightening may cause leaks,
[] TURN THE WATER ON AT THE
SHUTOFF VALVE
Tighten any connections that leak.
Reattach tile access cover.
18
Page 19

Installation Instructions
[] PLUG IN THE REFRIGERATOR
A_rranoe the coil of tubing so that it does not _ibrate
a
against the back of the refrigerator or against the
wall. Push the refrigerator back to the wall.
START THE ICEMAKER
On power switch models, set the icemaker power
switch to the I (on) position. On feeler arm models,
move the feeler arm to the ON (down) position. The
icemaker will not begin to operate until it reaches
its operating temperature of 15°F (-9°C) or below.
It will then begin operation automatically.
Powerswitch model
//
//
FeelerArminthe
J STOP(up)position
in
theON(down)position
Feelerarmmodel
NOTE: In lower water pressure conditions, the
water xalxe ma_ turn on up to 3 times to delixer
enough water to the icemaker.
B REVERSING THE DOOR SWING
IMPORTANT NOTES
\,_l_en re\'e_'sing the door swing:
• Read the inst_ uctions all the way through before
starting.
• Handle parts carefldly to awfid scratching paint.
• Set screws down by their related parts to avoid using
them in the wrong places.
• Provide a non-scratching work surface fin"
the doors.
IMPORTANT: Once wm begin, do not move the
cabinet until doo>swing reversal is completed.
These instructions are for changing the hinges fl'om
the right side to the left side--if wm ever want to change
the hinges back to the right side, follow these same
inst_ uctions and reverse all references to left and right.
TOOLS REQUIRED
Phillipsscrewdriver
5/16" he>head
socketdriver
Putt_ knitS: or thin-
blade screwdrix er
Maskingtape
T20 or T25 Torxdriver,
(Needed for some models)
5/16" open-end
wrench
19
Page 20

Installation Instructions
B REVERSING THE DOOR SWING (CONT.)
[] BEFORE YOU START
1.1 UnI_lug the refrigerator fl'om its electrical
outlet.
1.2 Erupt)all door shelxes, including the dairy
C OIlll)_l I'tIll ent.
2.2 X4ith a :5/16" hex-head socket dfixer, remoxe the
screws that hold the top hinge to the cabinet,
2.3 I,ift the hinge (and the shim glued to it) straight
up to free the hinge, pin from the socket in
the top of the door and set it aside, ahmg with
its screws.
Top Hinge -----_1 _
2.4 Remo_e the tape and tilt the door awa_ from the
cabinet. I.iti it off the center hinge pin.
CAUTION: Do not let either door drop to the
floor, To do so could dail/aoe_ the door stop,
[] REMOVE THE FREEZER DOOR
2.1 Tape the door shut with maskino. _ tape.
2.5 Set the door on a non-scratching surface with
the outside up.
2.6 Transter the 2 screws from the opposite side of
the cabinet to the screw holes _acated 1)_ the
top hinge removal.
2O
Page 21

Installation Instructions
[] REMOVE THE FRESH FOOD
DOOR
3.1 Tape the door shut with maskin,,. _ tape.
3.2 Using a 5/16" hex-head socket screwdriver and
a 5/16" open-end wrench, remove the two
screws holding the center hinge (and the shim
glued to it) to the cabinet. I,ifl the center hinge
to ti'ee its pin from the socket in the top of the
doo_; and set hinge and screws aside. Be careful
not to lose the center hinge spacer mad washer.
[] REMOVE THE FRESH FOOD
DOOR (CONT.)
3.4 Set the door outside-up on a non-scratching
S/IIS{_Ice.
3.5 Tmnsfi_r the two screws fl'om the opposite side of
the cabinet to the screw holes _acated b_ the center
hinge removal.
3.3 Remove the tape and tilt the door away fl'om the
cabinet. I,ifl the door fl'om the pin in the bottom
hinge bracket. (If the plastic washer sticks to the
door bottom, put it back on the hinge.)
3.6 Transter the _asher (if your model has one) to the
opposite side.
3.7 Take one (ff the screws removed in step 9 and start
it in the outem_ost screw hole on the opposite side.
Do not drive it all the way down-leave enough
space under the screw head ti_r thickness of shim
and bracket.
IJ
2/
Page 22

Installation Instructions
B REVERSING THE DOOR SWING (CONT.)
[] REVERSING THE HARDWARE
4.1 Remove the base ,,rille (if' _our refrigerator has
one) b) pulling it straight out.
J
4.2 Mo_,e the bottom hinge bracket (and shim glued
to it) and plastic washer from the right side to the
leii side.
Plastic Plastic
Washer Washer
Hinge--) --_
Bracket Hinge
Models with a hinge bracket
that has 2 screw holes.
Bracket
Modelswith a hingebracket
thathas 4screwholes.
Switchthe hinge pinto the
oppositesideofthe bracket.
[] REVERSING THE DOOR HANDLES
Transfer fresh food door handle
5.1
5.1.1 Remove the handle plug using a
tape-tipped putty knife under the edge,
and i'eillove the scI'ew tlndei'neath,
Remove the two screws holding the
handle to the top of the door.
Plug'_
I 5.1.2 Remoxe the handle. I
5.1.3 Remoxe the screws fl'om the right edge of the
door top and insert them into the handle screw
holes on the opposite side.
4.3 Interchange hinge (and the shim glued to it) and
screws at top right with screws at top left of cabinet.
Do not tighten screws on hinge side at this time,
Installing the hinge on the left. Installing the hinge on the right.
NOTES:
• Some hinges have fl)ur holes. Which holes you
use fi)r installing the hinge depends on which
side wm install the hinge.
• The outer edge of the hinge should be parallel
to the edge of the case fl)r correct installation.
22
5.1.4 With tape-tipped putty knife or thin-blade
screwdriver, P_T out the plug button from the
hinge hole on the lett side of the door and
insert it into the hole on the opposite side that
was vacated by remowfl of the top hinge.
Plug Bu__
Page 23

Installation Instructions
I_REVERSING THE DOOR HANDLES
(CONT.)
5.1 Transfer fresh food door handle
(cont.)
5.1.5 Pull the plug button fl'om the front
of the door and transfer it to the
opposite side.
PlugButton
5.2 Transfer door stop
5.2.1 Move the metal door stop from the right
end to the leii end.
Left Side D;0r Stop
Toreattachthe
handleonthe
oppositeside.
5.4 Transfer Freezer Door Handle
5.4.1 Remove the screw holding the handle to the
top of the door and the two screws holding
the handle to the bottom of the door,
5.4.2 Remove the handle.
5.2.2 Move any screws from the lett end to
the right end.
RightSide
5.3 Reinstalling the Fresh Food Door
Handle
5.3.1 Attach the handle to
the right side of the
door with screws at
the top and under
the handle plug,
5.3.2 Reinstall the handle plug.
5.4.3 Remove the screw fl'om the right top edge of the
door and insert it into the handle screw hole on
the leti side,
5.4.4 Transli_r the door stop as shown on the
I
preceding page.
5.4.5 Attach the handle to the right edge of the door
with screws at top and bottom, using bottom
holes w_cated bv remowfl of the door stop screws.
I
23
Page 24

Installation Instructions
B REVERSING THE DOOR SWING (CONT.)
16IREHANGING THE DOORS
6.1 Rehang the fresh food door
6.1.1 I,ower the ti'esh food door onto the
botton_ hinge, pin. Be sure the washer
is in place on the pin.
Washer
Models with a hinge bracket
that has 2 screw holes.
6.1.2 Insert the pin on the center hinge into the
socket in the top of the door. Place the spacer,
then the washer, on the hinge pin.
NOTE: The center hinge must be turned over
as shown when mounted on the lefi side.
Bracket
Bracket % ©
Models with a hinge bracket
that has 4 screw holes.
Plastic
Washer
[] REHANGING THE DOORS (CONT.)
6.2 Rehang the freezer door
6.2.1 I,ower the freezer door onto the center
hinge, pin. Be sure the washer and
spacer are in place on the pin.
gePin
andSpacer
6.2.2 Tilt the door toward the cabinet, lifting the top
hinge so the pin fits into the socket on the top
of the door.
Hinge,_,
and Spacer
6.1.3 Tilt the door toward the cabinet. As the door is
brought into position, slide the hinge trader the
head of the screw which earlier had been partly
driven into the outemmst hole. Insert the
remaining scre_, then tighten both screws
securely.
6.2.3. Make sm'e the door is slightly above the top of
the cabinet and the gap between the doors is
even across the front. Tighten the top hinge
screws. Do not overtighten these screws-tighten
them until they are just snug, then tm'n them
another one-half turn.
24
Page 25

Normal operating sounds, vvww.GEAppliances.com
Newer refrigerators sound different from older refrigerators. Modern refrigerators
have more features and use newer technology.
Do you hear what I hear? These sounds are normal.
HUMMM...
-- WHOOSH...
• The new high effidency compressor may Hm thster
and hmger than wmr old refl'igerator and wm may
hear a high-pitched hmn or pulsating sound while
it is operating,
• You may hear a whooshing sound when the (lom_ close,
This is due to pressure equalizing within the refl'igeratoi;
CLICKS, POPS,
CRACKS and CHIRPS
• You may hear cracking or i)oi_ping somads when the
refl'igerator is first i)lugged in. This hal)pens as the
i'e[Yigei'ator cools 1o the correct [ellli)erattlre.
• The compressor may cause a clicking or chirping
sound when attempting to restart (this could take
up to 5 minutes).
• Expansion and contraction of cooling coils during
and after defrost can cause a cracking or i_oi_ping
sound.
• On models with an icemake_; after an icemaking
cycle, you may hear the ice cubes dropping into
the ice bucket.
WHIBI
• You may hear the rims spinning at high speeds.
This hai_pens when the refrigerator is first i)lugged
in, when the doors are opened frequently or when
a large amotmt of fired is added to the refrigerator
or freezer comi_artments. The rims are helping to
maintain the correct temperatures.
WATERSOUNDS
6
• The flow of refl-igerant through the fl'eezer cooling
coils may make a gm'gling noise like boiling water.
• Water dropping on the defl'ost heater can cause a
sizzling, I_oI_ping or buzzing sotmd dm'ing the
defrost cycle.
• A water ddpping noise may occur during the defrost
cycle as ice melts from the evaporator and flows into
the drain pan.
• Closing the door mav cause a gurgling sotmd due to
pressure equalization.
25
Page 26

Before you call for service...
Troubleshooting Tips
Save time and money/. Review the charts on the following
pages first and you may not need to call for service.
Possible Causes What ToDo
Refrigerator does not Refrigerator in defrost cycle. * Wait ablaut 30 minutes t(n" (left'()st cycle to end.
operate
Vibrationorrattling Roller screws or leveling legs * See" Rollersand LevelingLegs.
(slightvibration need adjusting.
is normal)
Motor operates for Normal when refrigerator '* Wait 24 horns fin" tire refiigerator to completely
long periods or cycles is first plugged in. c_)ol (h)wu.
on and off frequently.
(Modern refrigerators
with more storage amounts of food are
space and a larger placed in refrigerator.
freezer require more Door left open. * Check to see l
operatingtime.They
start and stop often Hot weather or frequent *This is uoY/r/;ll.
to maintain even door ope_mlgs.
temperatures.) Temperature controldial * SeeAbout thetemperaturecontrol dial.
Temperature control dial * Move tile temperature control dial to a temperatm'e
in 0position. settiu
Refrigerator is unplugged. * Push the pltlg c(m/pletely iut_) the _mfl et.
The fuse is blown/circuit * I_eplace fl/se (>r reset the breaker.
breaker is tripped.
Often occurs when large * This is uom_al.
if )acka,,e is holding door open.
set at the coldest setting.
Grille and condenser * See Care and cleaning.
need clem_hzg.
Freshfoodorfreezer Temperature control dial * See About the temperaturecontroldial.
compartmenttoowarm not set cold enough.
WaJ_n weather or frequent * Set tire temperature control dial oue step (olde_:
door ope_fings. See About thetemperaturecontrol dial.
if )acka,,e is holding door open.Doorleft open. * Check to see 1
Package blocking air duct in * Check to see if l)ackage, is bhwkiug air duct in t]'eezei"
freezer compartment, c_ )lill)_lYtlileUt.
Frostorice crystals Door left open. • ('.heck to see if package is holding door open.
onfrozenfood
(frostwithinpackage Too frequent or too long
is normal) door ope_fings.
26
Page 27

vvww.GEAppliances.com
Automatic icemaker
does not work
(onsome models)
Possible Causes
Icema_ker power switch
is not on.
Water supply turned off or • See Installing the water line.
not comlected.
Freezer compartment • Wait 24 hotn_ fl)r the refiJger;m)r to (()mpletely
too warlTL cool (lowu.
Piled up cubes in the storage • l,evel cubes by hand.
bin cause the icemaker
to shut off.
What ToDo
• On power switch models, set the power switch to the
I (On)position. On feeler aI_n inodels, In(we the reeler
aml to the ON (down) position.
Frequent "buzzing"sound lcemaker is on but the water • Ttu'n the icemaker oIt_ On l)ower switch models, set the
supply to the refrigerator has power switch to the 0 (off) l)osifion. On feeler all_
not been com_ected, models, move the teeler a_ln to the STOP(up)position.
Keel)lug it on will damage the water \ulve.
Cubes too small Water shutoff valve comlecting • (',;ill the pltmd_er to clear the valve.
refrigerator to water line may
be clogged.
Slow ice cube freezing Door left open. • Check to see if l)ackage, is holding door ol)en.
Temperature control dial • See About the temperature control dial
not set cold enough.
Ice cubes have Ice storage bin needs clemfing. • Empty and wash bin. Discard old cubes.
odor/taste
Food trmlsmitthlg odor/taste • _Ya l) foods well.
to ice cubes.
Interior of refrigerator • See Careand cleaning.
needs cleaning,
Moisture forms on Not mmsual during • _'il)e stu'fil('e (li T and reset teuq)erattn'e control dial
cabinet surface periods of high humidity, one setting colder;
between the doors
Moisture collects inside Too frequent or too
(inhumidweather,air long door opelfings.
carries moisture into
refrigerator when doors
are opened)
Refrigeratorhasodor Foods trm_smitth_g • F()ods with strong od(_x_ sh()tdd be tightly wral)l)ed.
odor to refrigerator. • Kee l) ;Ill ol)eu box of bakiug soda ill the refrigerator;
replace evel'v three ul()uths.
Interior needs cleaning, • See Care and cleaning.
27
Page 28

CONSUMER WARRANTY
(for customers in Canada)
Your refrigerator is warranted to be free of defects in material and workmanship.
i
What is covered How Long Warranted Parts Labour
(From Date of Sale) Repair or Replace
Compressor Five (5) Years Five (5) Years Five (5) Years
Sealed System (including Five (5) Years Five (5) Years Five (5) Years
evaporator, condenser
tubing and refrigerant)
All Other Parts One (1) Year One (1) Year One (1) Year
at Camco's Option
TERMS AND CONDITIONS:
This warranty applies only for single
family domestic use in Canada when the
Refrigerator has been properly installed
according to the instructions supplied by
Camco and is connected to an adequate
and proper utility service.
Damage due to abuse, accident, commercial
use, and alteration or defacing of the serial
plate cancels all obligations of this warranty.
Service during this warranty must be performed
by an Authorized Camco Service Agent.
Neither Camco nor the Dealer is liable for any
claims or damages resulting from any failure
of the Refrigerator or from service delays
beyond their reasonable control.
To obtain warranty service, purchaser must
present the original bill of sale. Components
repaired or replaced are warranted through the
remainder of the original warranty period only.
This warranty is in addition to any statutory
warranty.
IMPORTANT
WHAT IS NOT COVERED:
• Service trips to your home to teach you how
to use the product.
• Damage to finish after delivery.
• Improper installation--proper installation
includes adequate air circulation to the
refrigeration system, adequate electrical,
plumbing and other connecting facilities.
• Replacement of house fuses or resetting of
circuit breakers.
• Replacement of light bulbs.
• Damage to product caused by accident, fire,
floods or acts of God.
• Loss of food due to spoilage.
• Proper use and care of product as listed
in the owner's manual, proper setting of
controls.
• WARRANTOR IS NOT RESPONSIBLE
FOR CONSEQUENTIAL DAMAGES.
28
Keep this warranty and your bill of sale as proof of original purchase and purchase date.
Camco Service is available coast to coast.
If further help is needed concerning this warranty, contact:
Manager, Consumer Relations, Camco Inc.,
Suite 310, 1 Factory Lane, Moncton, N.B. ElC 9M3
Page 29

GE Service Protection Plus rM
GE, a name recognized worldwide _br quality and dependability', offers y'ou
Service Protection Plus'"-comprehensive protection on all y'our appliances-
No Matter What Brand!
Benefits Include:
• Backed by GE
• All brands covered
• Unlimited service cars
• All parts and labor costs included
• No out-of-pocket expenses
• No hidden deductibles
• One 800 number to call
You will be c()mpletel} satisfied with our serxice protection or you may request }our inonev back
on tile remaining xalue of _o/u" contract. No questions asked. It's that simple.
Protect vom" refl_igerat(m dishwasher; washer and chTe_; range, TV, VCR and much more-rely brand!
Plus there's no extra charge tot einergency service and low monthly financing is available. Even icemaker
coverage and tood spoilage protection is offered. You can rest easy, knowing that all vom" valuable
household products are protected against expensive repairs.
Place your confidence in (IE and call us in tile U.S. toll-free at _tlU.OZO.ZZZ/-]:
for inoi'e infoi'u/ation,
*-M1lmmds cov<_<d, up Io 20 y<a_ old, in Ih< <onlinental U.S.
We71CoverAnyAppliance.
Anywhere. Anytime.*
g'l _ _ lr_* Kit lr_* glz Kit glz_
__ ( _'//l'l 1(2"(_ ............
Please place in envelope and mail to:
General Electric Company
Warranty Registration Department
EO. Box 32150
Louisville, KY 40232-2150
29
Page 30

Consumer Product Ownership Registration
Dear Customer:
Thank you for purchasing our product and thank you for placing your confidence in us.
_A/eare proud to ha_e you as a customer!
Follow these three steps to protect your new appliance investment:
Complete mid mall
your Consmner
Product Owuership
Registration today.
tla_e tile peace of
lllil/d of k/lowil/g" we
can cont_.ct you ill
th( unlikely (v(m o/
a sa/;vw nlodi/i( ation.
AJlcr mailing the
registration below,
S[()r(' ihis (to('[ll//(ql[
in a sa/;v pla(c. It
contains inlbl'matJon
_r()_ will need should
you require service.
()m: servi( c mHnber
in the USA is:
800 GE CAI@_S
(800.432.2737). In
Canada: 1.888.880.3030.
Model Number Serial Number
, , , , , , I I , , , , , , , I
Important: If you did not get a registration card with your
product, detach and return the form below to
ensure that your product is registered, or register
online at www.GEAppliances.com.
Consumer Product Ownership Registration
[_('_td VO/IF Owner's
Mmmal carefully.
It will hel t) you
opcram your new
appliance t)rot)erly.
._ Cut h_r_
I,,,,,, , , , , , I I , , , , , ,
MI: [ Ms. M*>,. Mi__,
Fir'q ] I L_sl]
Name I I I I I I I I I Nanle I I I I I I I I I I I I
SI r( (!1 I
A&h-<ss I I I I I I I I I I I I I I I I I I I I I I I I
Model Number Serial Number
Ap,.#l, , , , , , , I E-lnailAddress*
l );ue Pla_ ed
Monlh
_' Please provide your e-mail address to receive, via e-mail, special oilers and other important
communications troln GE Appliances (GEA).
Check here if you do not want to receixe COlnmmlicafions fi-om GEA's carehflly selected partners.
FAILI 7RE TO (_OMPLETE AN[) RETI 7RN "FillS CARD DOES NOT DIMINISII Y()[ 7R
W.kRI_\N'IT RIGI fFS.
For information about (;EA's privacy and data usage polic> go to w_v.(;EApplian( es.( om and click on
"Privacy Policy" or call 800.626.2224.
GEConsttmer& ItMttstrial
Looisville, Kenttmk y
wwv_GEAppliances, aom
GEAppliances
3O
Page 31

Refrigerator Warranty. (Forcustomers in the United States)
Aft warranty service provided by our Factory Service Centers,
or an authorized Customer Care®technician. To schedule service,
on-line, 24 hours a day, vis# us at www.GEAppfiances.com, or
carl 800.GE.CARES(800.432.2737).
GE Will Replace:
Fromthe dateof the
originalpurchase
Fromthe dateof the
originalpurchase
Service trips to your home to teach you how to use the
product.
Improper hlstallation, delivery or mah_tenm_ce.
Failure of the product if it is abused, misused, or used for
other thml the intended purpose or used commercially.
Any part of the reii_igerator which fifils due to a defect in materials or workmanship.
During this full one-year warranty, GE will also provide, free of charge, all labor
and in-home service to replace the defecfi\'e part.
Any part of the sealed refrigerating system (the compressoi; con(lensei; exaporator
and all com_ecfing tubiug) which fllils due to a defect iu inaterials or workmanship.
Dm_ing this full five-year sealed refrigeration system warranty, GE will also provide,
free of charge, all labor and in-home service to replace the (lefi_('ti\'e part.
Staple your receipt here.
Proofof the original purchase
date is needed to obtain service
under the warrantg
Replacement of house fuses or resetting of circuit
breakers.
Replacement of the light.
Damage to the product caused by accident, fire, floods or
acts of God.
Loss of food due to spoilage.
Damage caused after delivery.
h_cidentaJ or consequential damage caused by possible
defects with this applimace.
This warranty is extended to the original purchaser and any succeeding owner for products purchased for home
use within the USA. In Alaska, the warranty excludes the cost of shipping or service calls to your home.
Some states do not allow the exclusion or limitation of incidental or consequential damages. This warranty gives
you specific legal rights, and you may also have other rights which vary from state to state. Toknow what your
legal rights are, consult your local or state consumer affairs office or your state's Attorney General
Warrantor: General Electric Company. Louisville, KY 40225
31
Page 32

ConsumerSupport.
GEAppliancesWebsite 1.theu.s.: www.GEAppliances.com
Have a question or need assist;race with your appliance? Try the (;E Appliances _.Vebsite 24 hom_ a da);
any clay _ff tile year'. For greater convenience and tilster selMce, you can now download Owner's Manuals,
order parts, catalogs, or even schedule se_Mce on4ine. You can also "_&skOre" Team _ff Experts ''''' your questions,
and so much more... In Cmlada: www.geappfimlces.ca
ScheduleService i. theu.s.: www.GEAppliances.com
Expert (;E repair service is only one step awa_ fl'om yam" dam: Get on-line and schedule _om" service at yam"
comenience 24 hom_ an) day of tile xear! Or call 800.GE.(_ARES (800.432.2737) (lm_ing nmmal business hom_.
In Canada, call 1.800.361.3400
RealLifeDesignStudio i. theu.s.: www.GEAppliances.com
GE supports tile Universal Design concept_products, services and enviromnents that can be used by people of all
ages, sizes and capabilities. X_'e recognize the need to design fi)r a wide range cff physical and mental abilities and
impaimmnts. For derails at GE's Universal Design applications, including kitchen design ideas tot people with
disabilities, check ()ut our X_'ebsite today. For the hearing impaired, please call 800.TDD.GEAC (800.833.4322).
In Canada, contact: Manage_; (_onsulner Relations, Camco, Inc.
Suim 310, 1 Factory i,ane
Moncton, N.B. E 1C 9M3
ExtendedWarranties i,,theu.s.:www.GEAppliances.com
Pro'chase a (;E extended warrant}, and learn about special disco/mrs that are axailable while yore" warrant) is still
in effect, xd)u can pro'chase it on-line amfime or call 800.626.2224 dining natural business hom_. (;E (_onsumer
Home Se_Mces will still be there after )am" warrant} expires. In Cmlada, call 1.888.261.2133
PartsandAccessories 1,,theu.s.:www.GEAppliances.com
Individuals qualified to service their own appliances can have parts or a(-cessolJes sent directly to their homes
(VISA, MasterCard and Discover cards are accepted). Order on-line tocla 5 24 hom_ ever}' day or by phone at
800.626.2002 during nomml business hom_.
Instructions contained in this manual cover procedures to be performed by any user.Other servicing generally should be
referred to qualified service personnel. Cautionmust be exercised, since improper servicing may cause unsafe operation.
C/IStOlllexN ill Cmlada should cons/llt tile yellow pages I_i)I" tile neaFest CalllCO service centei; or call 1.888.261.3055.
ContactUs i,,theu.s.:www.GEAppliances.com
If you are not satisfied with tile service you receive fl'om GE, contact us on ore" _'ebsite with all tile details
including yam" phone ntllllbeI; oi" write to: General Manage_; Customer ]?,elations
• GE Apl)liances, Apl)liance Park
Ixmisville, KY 40225
In Canada: www.geapplimlces.ca, or write to: Directm; Consumer Relations, Camco, Inc.
Stfite 310, 1 Factory Im_e
Moncton, N.B. E 1C 9M3
RegisterYourAppliance i,, the U.S.: www.GEAppliances.com
Register your new applimlce on-lille--at your convenience[ Tinlely l)roduct registration will allow tin"
enhanced COlmmulication and prolnpt service under tile mrnls of p)tli" warrant},, should tile need alise.
You may also mail in tile pre-pfinted registration card included in tile packing material.
In Canada: www.geapplimlces.ca
_' Printed in the United States
_' PrintedonRecycledPaper
 Loading...