

GE STS18ZCPWRWW, STS18ZCPVRWW, STS18ZCPURWW, STS18ZCPRRWW, STS18ZCPJRWW Owner’s Manual
...
C13
N
ge.com
Safety Instructions ........... 2-4
Operating Instructions
Additional Features ............ 10
Automatic Icemaker ........... 11
Controls ...................... 5
Crispers and Pans ........... 9, 10
Dispenser .................... 11
Shelves and Bins ............. 7-9
_4'ater Fil ter ................... 6
Care and Cleaning
(:are and Cleaning .......... 19, 13
Replacing the Light Bulbs ....... 13
Installation Instructions
Preparing to Install
the Refiigerator . .............. 14
Reversing the Door Swing .... 19-93
_4'ater Line Installation ...... 15-19
Mode_ 18&19
Cong_lateur sup_rieur
Rdfrigdrateurs
La section frangaise commence a la page 37
Congelador superior
Refrigeradores
Troubleshooting Tips ....... 94-98
Normal Operating Sounds ...... 94
Consumer Support
Consumer Support ..... Back Cover
Performace Data Sheet ......... 35
Product Registration
t_r Canadian Customers ..... 31,39
Product Registration
for U.S. Customers ......... 99, 30
State of California _'ater
Treatment Device Certificate ..... 36
Warranty for
Canadian Customers ........... 33
_'arranty t_r U.S. Customers ..... 34
Note to Installer - Besureto leave
these instructions with the Consume_:
Note to Consumer - Keepthese
instructions tot flmn'e reterence.
Note &l'ins "tallateur - _<_sur_z-vous
de laisser ces instructions au
consoIIlI/l_lte tlI;
Note au eonsommateur -
Conse_wez ces instructions pour
I'ble I'e I1 t-'e flirt II'e.
Nota al instalador - AsegOrese
de dejar estas instrucciones con el
cons [lll/idoI;
Sota al eonsumidor - Conserve
estas instrucciones para reterencia fllttlI'a.
Laseccion en espa_olempiezaen la pagina 69
Write the model and serial numbers here:
Model #
Serial #
Find these numbers on the gray label
on the left side, near the top of the
reti'igera tot compartment.
197D3354PO08 49-60396 11-05JR
iMPORTANTSAFETYiNFORMATiON.
READArt iNSTRUCTiONSBEFOREUSING.
a, WARNING!
Use this appliance only for its intended purpose as described in this Owner's Manual
SAFETYPRECAUTIONS
When using electrical appliances, basic safety precautions should be followed, including the following:
i)::This refi'igerator must be properly installed
and located in accordance with tile Installation
Instructions before it is used.
i)::Do not allow children to climb, st;rod or hang
on the shelves in the reli-igerato_: They could
damage the reti-igerator and seriously iqj ure
themselves.
::_ Do not touch tile cold sui_lilces in tile fl'eezer
compartment when hands are damp or wet.
Skin may stick to these extremely cold sm_hces,
}_'<Do not store or use gasoline or other flammable
\_q)o_ and liquids in tile vicinity of this or any
other appliance.
i)::In refl'igerato_ with automatic icemake_,
avoid contact with the moving parts of the
ejector mechanism, or with tile heating element
located on tile bottom of tile icemake_: Do not
place finge_ or hands on tile automatic
icemaking mechanism while tile refl]gerator
is i)lugged in.
i)::Kee I)finget_ out ot tile "pinch point" areas;
clemm_ces between the doo_ and between the
doo_ and cabinet are necessarily small. Be ca_efifl
closing doo_s when children a_e in the area.
i)::Lrni)lug the refrigerator befi)re cleaning and
making repai_.
NOTE."We stronglyrecommendthatanyservicing be
performedby aqualified individual
_'_Setting either or both controls (SOlne In odels only
have one control) to tile 0 (off)position does not
remove power to tile light circuit.
i)::Do not refi'eeze fi'ozen toods which have
thawed completely:
DANGER!RISKOFCHILDENTRAPMENT
PROPERDISPOSALOFTHEREFRIGERATOR
ge.com
Child entrapment and suffocation are not
problen_s of the past.Junked or abandoned
refrigerators are still dangerous...even if they will
sit fin" "just a fi_w days." If you are getting rid of
your old refi_igerato_; please follow the instructions
below to help prevent accidents.
Refrigerants
_dl refrigeration products contain refligerants,
which under federal law must be removed prior
to product disposal. If you are getting rid of an
old reti_igeration product, check with the company
handling the disposal about what to do.
Before YouThrowAway YourOld
RefrigeratororFreezer:
::Ji::Take off the doo_.
!i_:i,eave the shelves in place so that children
may not easily climb inside.
USEOFEXTENSIONCORDS
Because of potential safety hazards under certain conditions, we strongly recommend against the
use of an extension cord.
However; if you must use an extension cord, it is absolutely necessa_ T that it be a UiAisted (in the United
States) or a CSA-listed (in Canada), 3-wire grounding type appliance extension cord having a grounding
type plug and outlet and that the electrical rating of the cord be 15 amperes (minimum) and 120 w_lts.
3
IMPORTANTSAFETYINFORMATION.
READALLINSTRUCTIONSBEFOREUSING.
WARNING!
HOWTOCONNECTELECTRICITY
Do not, under anv circumstances, cut or remove the third (ground) prong from the power cord.
For personal safe_ this appliance must be properly grounded.
The power cord of this appliance is equipped with
a 3-prong (grounding) plug which mates with a
standard 3-prong (grounding) wall outlet to
minimize the possibili F of electric shock hazard
fl'om this appliance.
Have the wall outlet and circuit checked by a
qualified electridan to make sure the outlet is
propedy grounded.
Where a standard E-prong wall outlet is
encotmtered, it is your personal responsibility and
obligation to have it replaced with a properly
grounded 3-prong wall outlet.
The refl_igerator should always be plugged into its
own individual electrical outlet which has a voltage
rating that matches the rating plate.
This provides the best perfimnance and also
I_rexents oxerloading, house wiring circuits which
could cause a fire hazard fl'om oxerheated wires.
Never tmplug your refrigerator by pulling on the
power cord. Always grip plug firmly and pull
straight out fl'oln the outlet.
Repair or replace immediately all power cords that
have become ti'ayed or otherwise damaged. Do not
use a cord that sho_:s cracks or abrasion damage
along its length or at either end.
\._q_en moving the refligerator away fl'om the
wall, be careflfl not to roll over or damage the
power cord.
READANDFOLLOWTHISSAFETYINFORMATIONCAREFULLY.
SAVETHESEINSTRUCTIONS
4
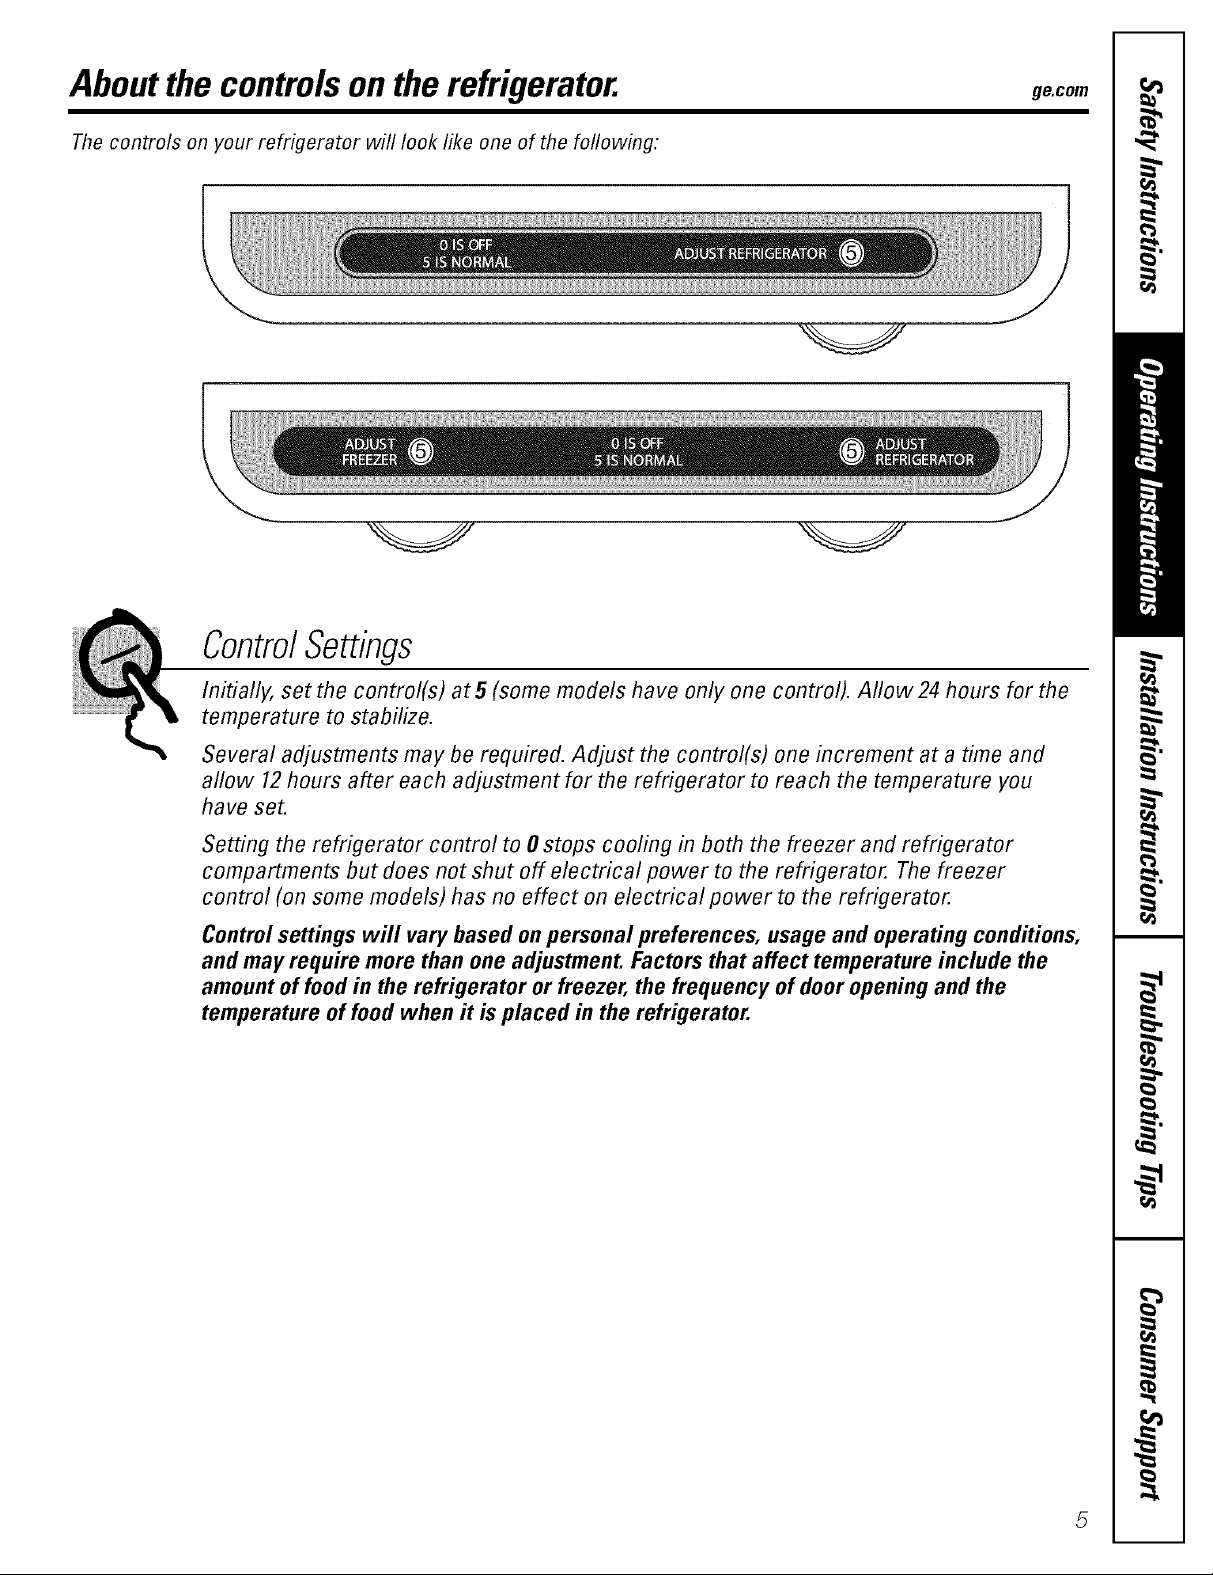
Aboutthe controlsontherefrigerator, gecom
The controls on your refrigerator will look like one of the following:
ControlSettings
Initially, set the control(s) at 5 (some models have only one control). Allow 24 hours for the
temperature to stabilize.
Several adjustments may be required. Adjust the control(s) one increment at a time and
aflow 12hours after each adjustment for the refrigerator to reach the temperature you
have set.
Setting the refrigerator control to 0 stops cooling in both the freezer and refrigerator
compartments but does not shut off electrical power to the refrigerator. The freezer
control (on some models) has no effect on electrical power to the refrigerator.
Controlsettings will vary based on personal preferences, usage and operating conditions,
and may require more than one adjustment. Factors that affect temperature include the
amount of food in the refrigerator or freezer, the frequency of door opening and the
temperature of food when it is placed in the refrigerator.
Aboutthe water filter.(onsomemodels)
Water Filter Cartridge
The water filter cartridge is located inside
the cartridge holder in the back upper right
corner of the reflJgerator c(m_partment.
NOTE:Sonm models ship with the filter
1upass plug in place of the filter cartridge.
The filter byl)ass i)lug needs to be removed
beiore the filter cartridge is installed. Kee I)
the filter byl)ass i)lug fl)r fimue use.
When to Replace the Filter
The filter cartridge should be replaced
e\'erv six monthsor earlier if the flow of
water to the icemaker and dispenser
decreases.
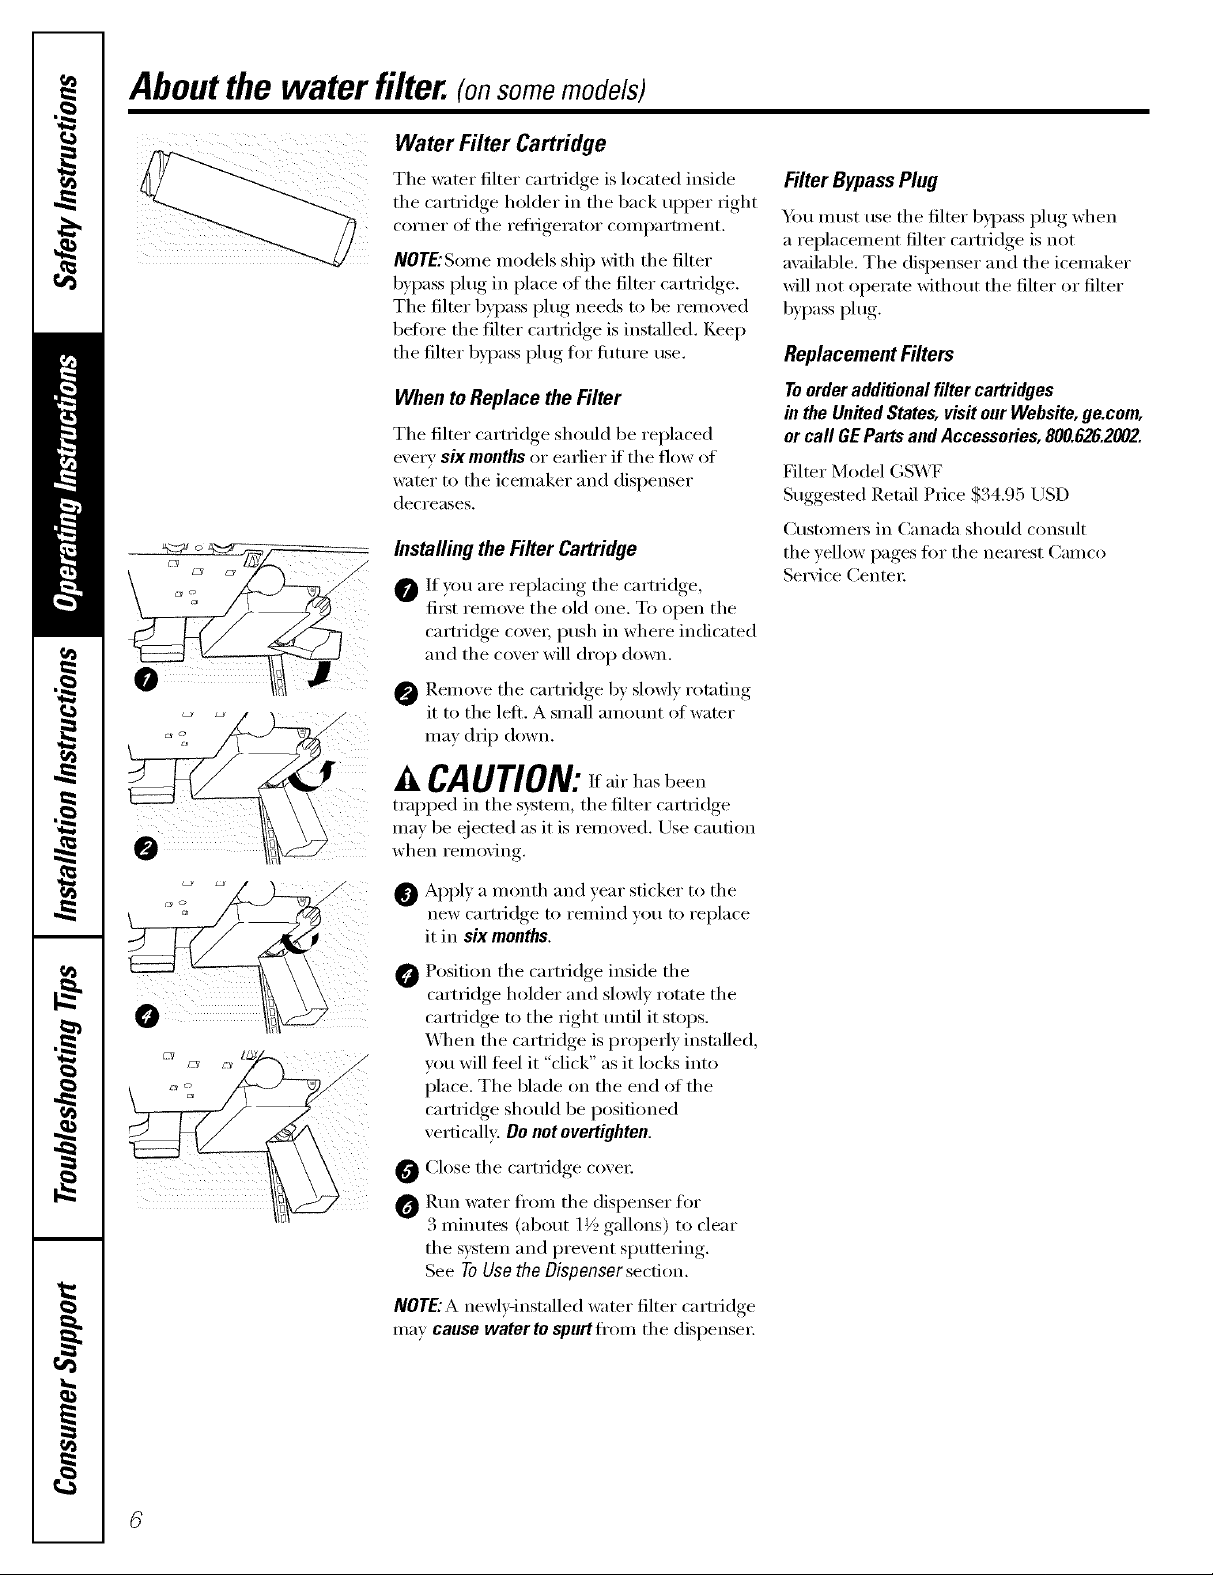
Installing theFilter Cartridge
O]f you are replacing the cartridge,
fit_t remoxe the old one. To open the
cartridge coveL push in where indicated
and the cover will drop down.
@ Remove the cartridge by sh)wly rotating
it to the letL A small amount of water
may drip down,
Filter BypassPlug
Ym must use the filter b)pass plug when
a replacement filter cartridge is not
available. The dispenser and the icemaker
will not operate without the filter or filter
bypass plug.
Replacement Filters
Toorderadditionalfiltercartridges
in theUnitedStates,visitourWebsite,ge.com,
or call GEPartsandAccessories,800.626.2002.
Filter Model GSWF
Suggested Retail Price $34.95 USD
Custome_ in Canada should consult
the yellow pages fin" the nearest Cameo
Se_wice Center:
(i ii i
CAUTION:11air has been
trapped in the system, the filter cartridge
may be ejecmd as it is removed. Use caution
when removing.
App1) a month and year sticker to the
new cartridge to remind you to replace
it in sixmonths.
O Position the cartridge inside the
cartridge holder and slowl) rotate the
i
cartridge to the right tmfil it stops.
When the cartridge is propedy installed,
you will feel it "click" as it locks into
place. The blade on the end of the
cartridge should be i)osifioned
xertically: Do not overtighten.
O Close the cartridge cove_:
O Rtm wamr ti'om the dispenser for
3 minums (about 1½ gallons) to clear
the s):stem and i)revent sputtering.
See To Use the Oispenser secfion.
NOTE:A newl_qnsta]led water filter cartridge
may cause water to spurtiiom the (lispense_:
Abouttheshelvesandbins. gecem
Not all features are on all models.
Rearranging the Shelves
Shel;es in the refl'igerator and fl'eezer (-On/l)artn_ents are a(!iustable.
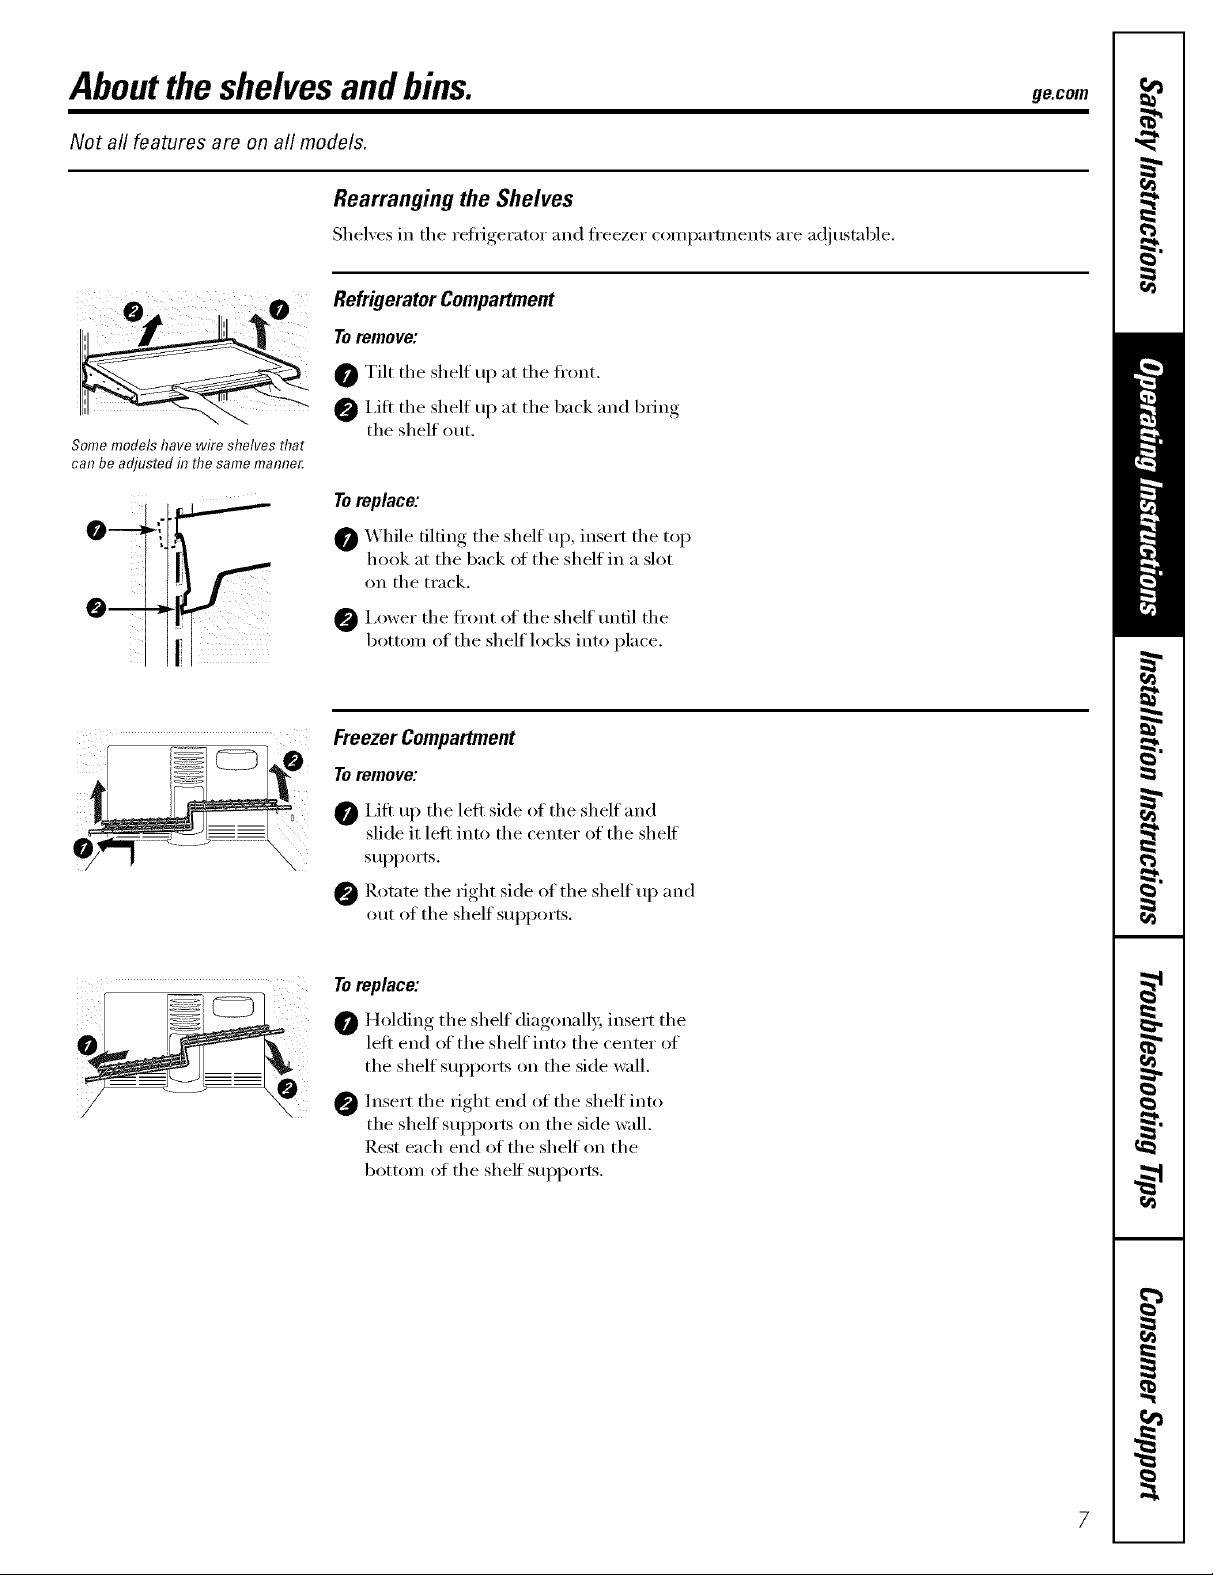
Refrigerator Compartment
Toremove:
0 Tilt the shelf up at the fl'ont.
0 I,ifl the shelf up at the back and bring
Some models have wire shelves that
can be adjusted in the same mamTe_
the shelf out.
Toreplace:
il '"
e---, F
_,_hile tilting the shelf up, insert the top
hook at the back of the shelf in a slot
on the track,
@ I,ower the fl'ont of the shelf until the
bottom of the shelf loc!<s into place.
Freezer Compartment
Toremove:
a I,ifl up the left side of the shelf and
slide it left into the center of the sheff
supports.
0 Rotate the right side of the shelf up and
out of the shelf suI)ports.
To replace:
0 Holding the shelf diagonall,_; insert the
left end of the shelf into the center of
the shelf supi)orts on the side wall.
@ Insert the right end of the shelf into
the shelf sui)ports on the side wall.
Rest each end of the shelf on the
bottom of the shelf supports.
Abouttheshelvesandbins.
Not all features are on all models.
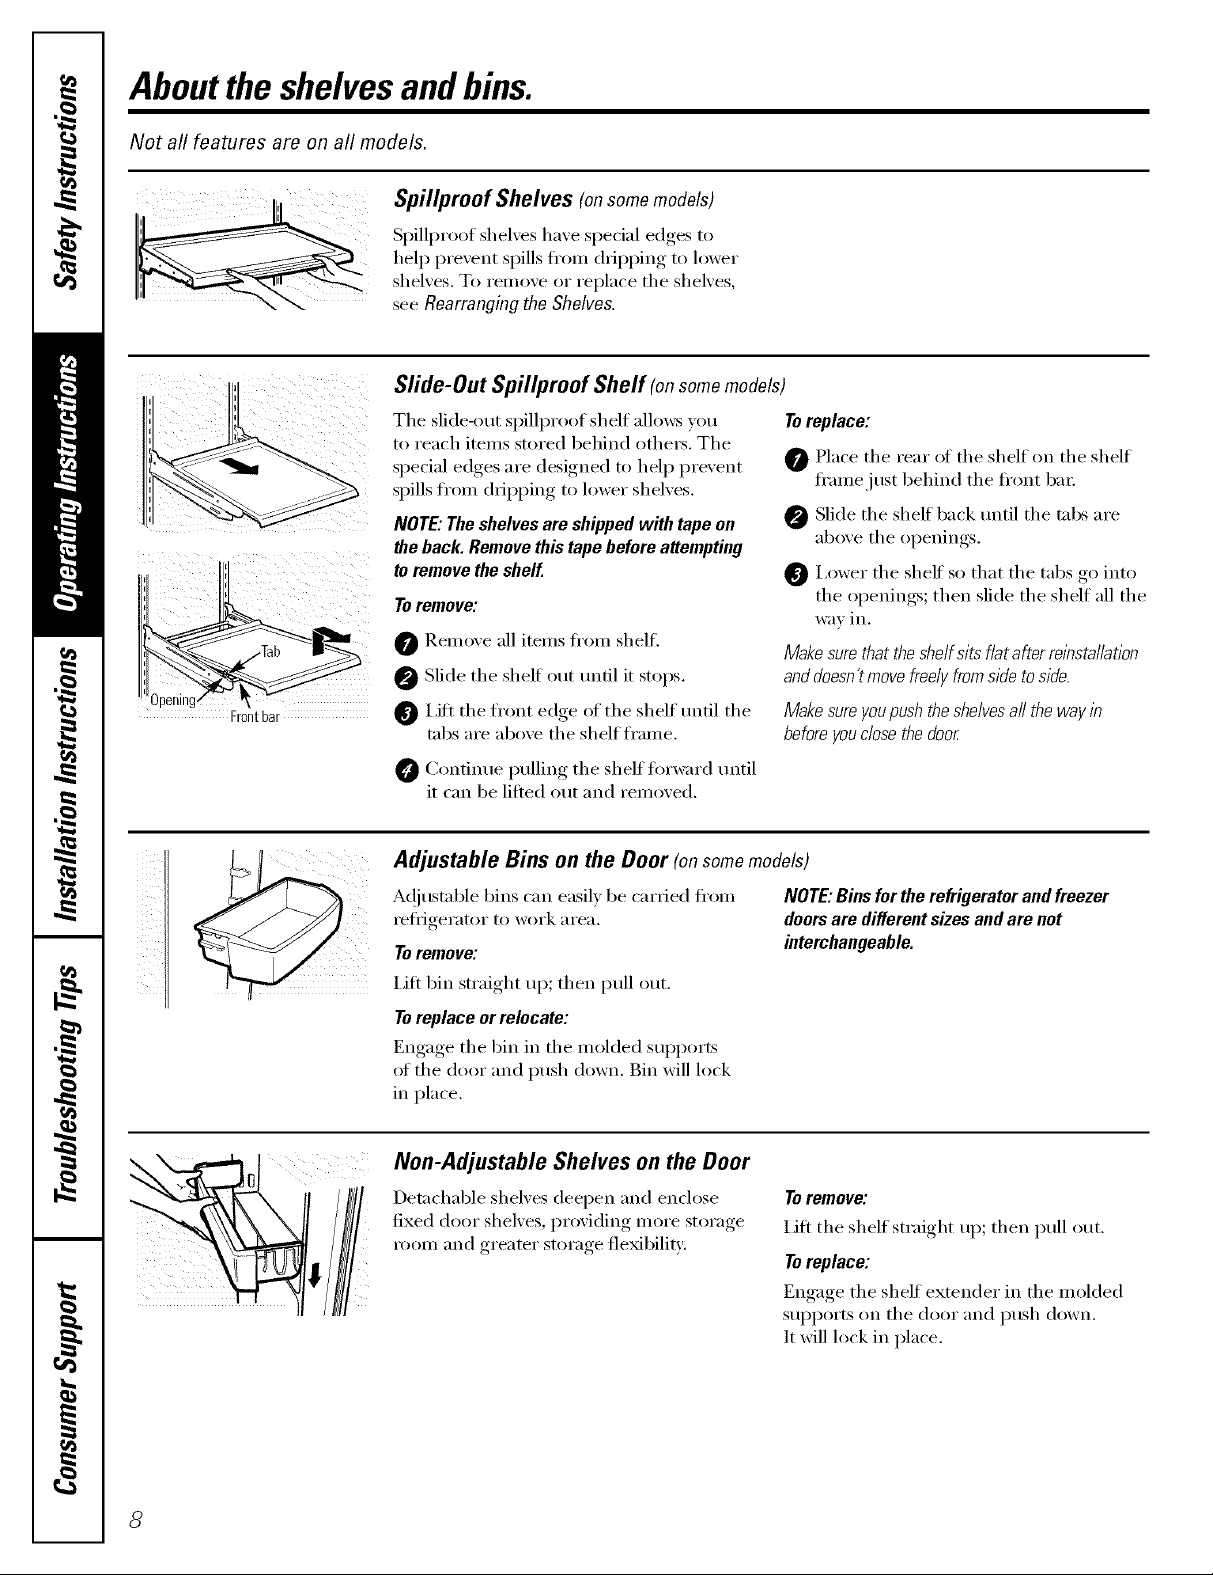
Spillproof Shelves (onsomemodels)
Spillproof shelves have special edges to
hel I) prexent spills fl'om dripping to lower
shelxes. To remoxe or replace the shelxes,
see Rearranging the Shelves,
Sfide-Out Spil/proof Shelf (onsomemodels)
The slide-out spillproof shelf alkms you
to reach items stored behind othe_, The
special edges are designed to hel I) prevent
spills fl'om dripping to lower shelves,
NOTE: The shelves are shipped with tape on
the back. Remove this tape before attempting
to remove the shelf.
Toremove:
0 Remoxe all items fl'om shelf.
@ Slide the sheff out tmfil it stops.
Frontbar
i,ifl the front edge of the shelf tmtil the
tabs are aboxe the shelf frame.
Continue pulling the shelf forward until
it can be lifted out and remoxed.
Toreplace:
0 Place the rear of the shelf on the shelf
fl'amejust behind the fi'ont ba_:
@ Slide the shelf back tmtil the tabs are
above the openings.
0 i,ower the shelf so that the tabs go into
the openings; then slide the shelf all the
way in.
Make sure that the shelf sits flat after re/hstallation
anddoesn't movefreely fromside toside.
Make sure youpushthe shelvesall the way in
before youclose thedoor
Adjustable Bins on the Door (on somemodels)
A(!iustable bins can easily be carried ti'om
i'eli'igei';it()i" t() work area.
To remove:
Lift 1)in straight up; then pull out.
To replace or relocate:
Engage the bin in the molded SUl)l)orts
ot the door and push down. Bin will lock
in place.
NOTE:Binsfortherefrigeratorandfreezer
doorsaredifferentsizesandare not
interchangeable.
Non-Adjustable Shelves on the Door
Detachable shelves deepen and enclose
fixed door shelves, providing more storage
room and greater storage flexibility:
Toremove:
Lift the shelf straight up; then pull out.
Toreplace:
Engage the shelf extender in the molded
suI)ports on the door and push down.
It will lock in place.
Not all features are on all models.
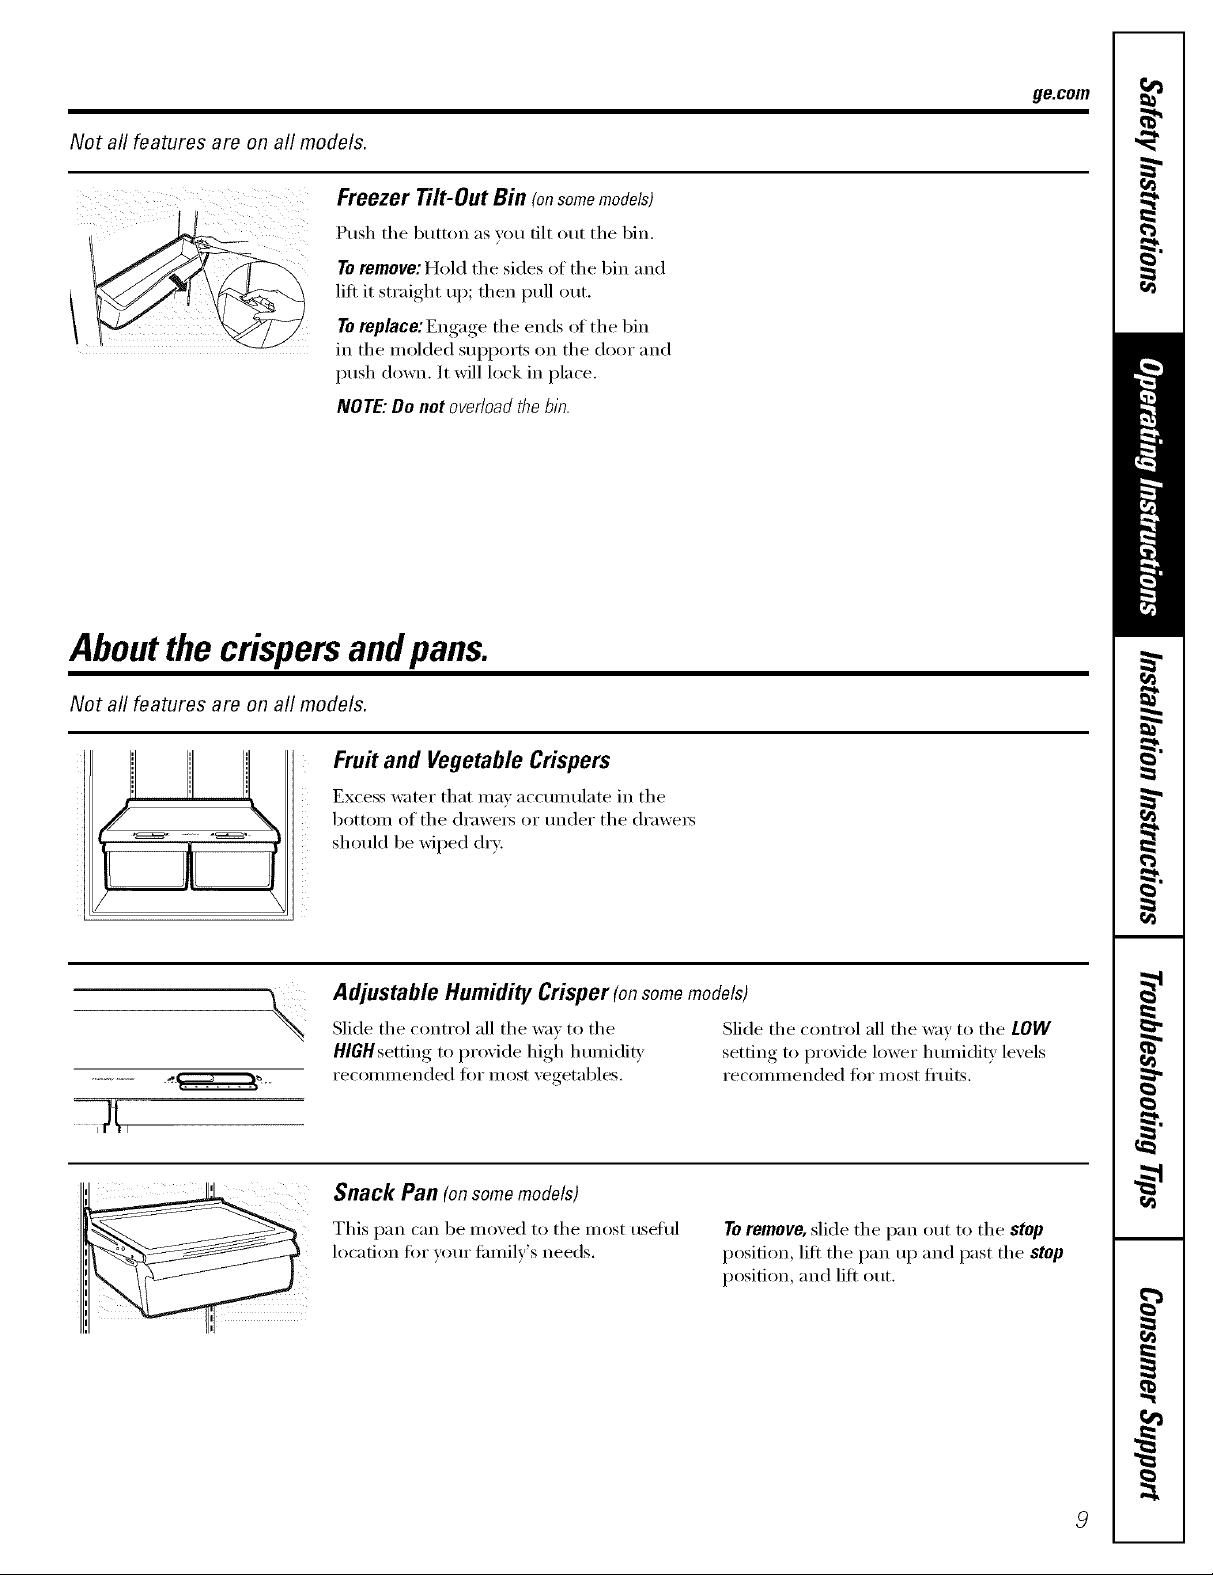
Freezer Tilt-Out Bin (onsomemodels)
Push the button as you tilt out the bin.
To remove: Hold the sides of the bin and
lilt it straight up; then pull out.
To replace: Engage the ends of the bin
in the molded supports on the door and
push down. It will lock in place.
NOTE:Do notoverloadthebin.
Aboutthe crispersandpans.
ge.com
Not all features are on all models.
Fru# and Vegetable Crispers
Excess water that ma_ accumulate in the
bottom of the (h'awe_ or trader the (h'awe_
shouM be wiped dry.,
Adjustable Humidity Crisper (onsomemodels)
Slide the control all the wa) to the
HIGHsetting to l)r()xide high h umidi_'
recommended fi)r most xegetables.
Snack Pan (on some models)
This I)an can be Inoxed to the Inost useflll
location fin" yore" fimfilv's needs.
Slide the control all the way to the LOW
setting, to l)r°xide lower humidiP,' lexels
recommended fi)r most fl'uits.
To remove, slide the pan out to the stop
position, lift the pan up and past the stop
position, and lift out.
Aboutcrisperremoval
Not all features are on all models.
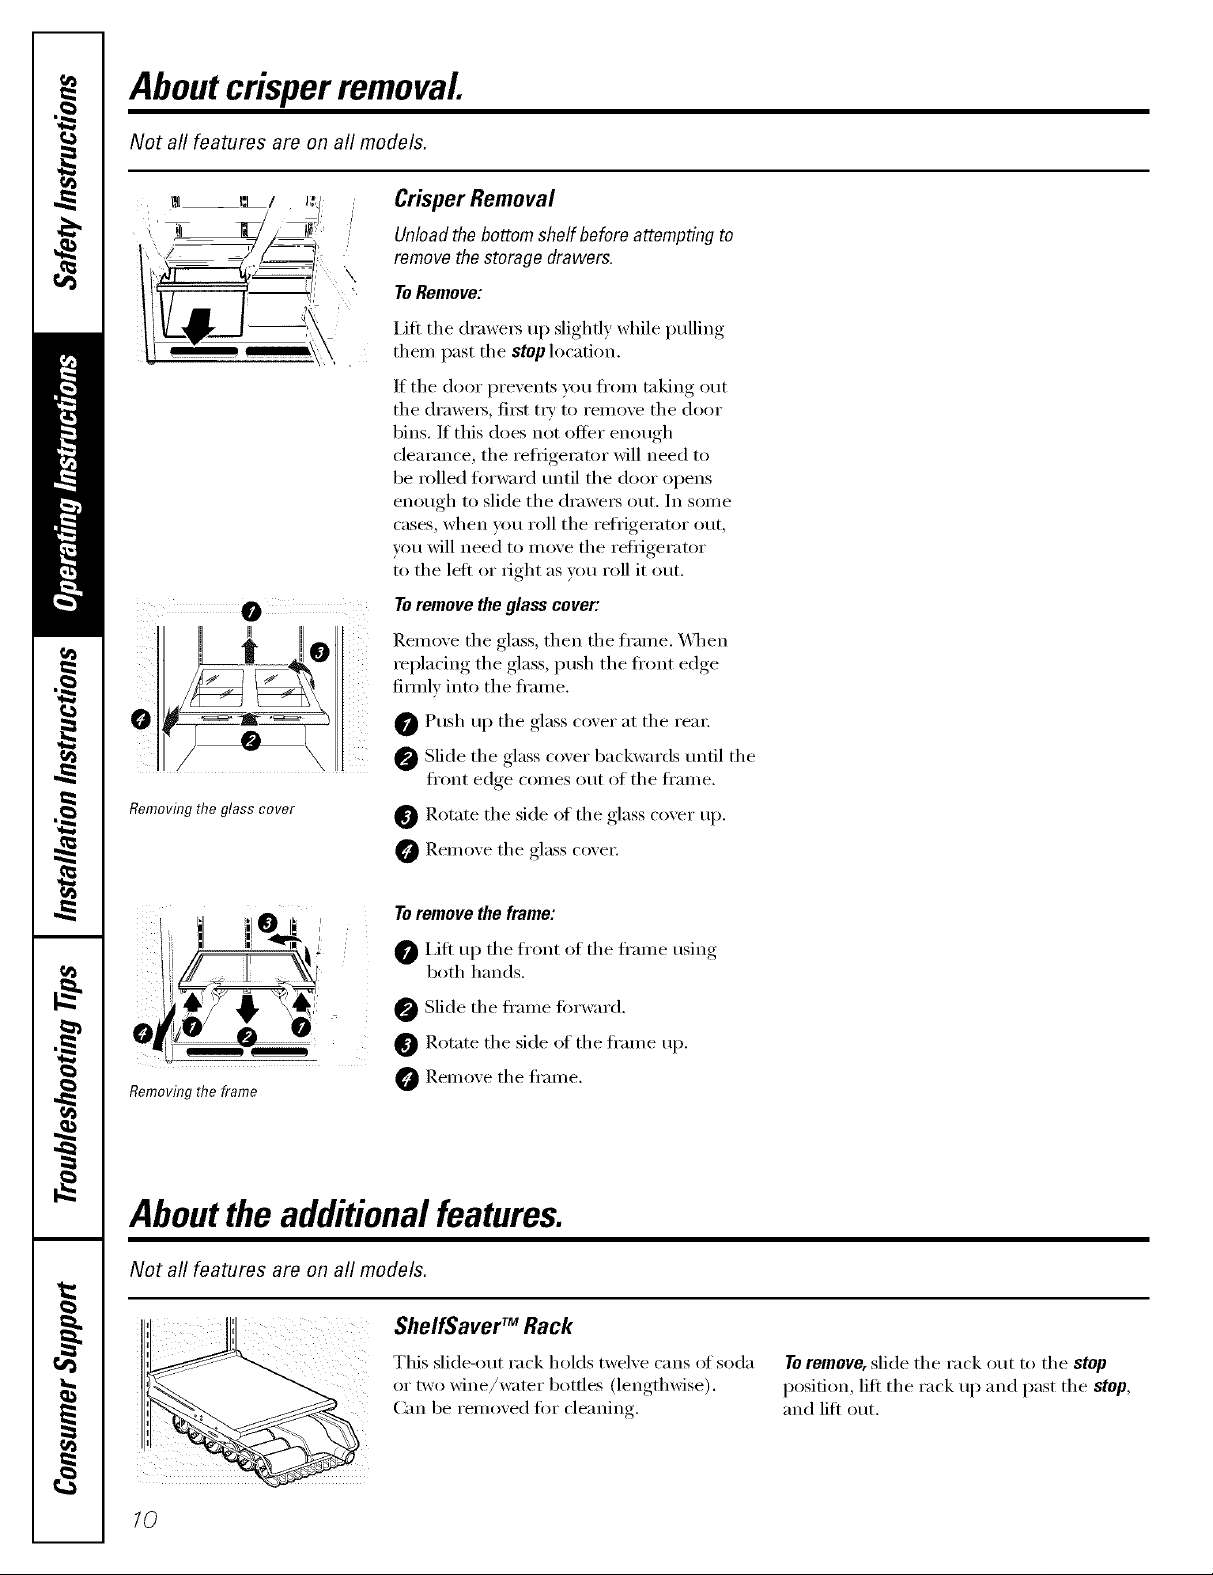
Crisper Removal
Unload the bottom shelf before attempting to
remove the storage drawers.
ToRemove:
Lift the (lra_ up slightly while pulling
then/past the stop location.
If the door prevents you from taking out
the drawet5, fit5t try to remove the door
bins. If this does not offer enough
clearance, the refrigerator will need to
be rolled fin'ward tmtil the door opens
enough to slide the (h'awet5 out. In some
cases, when you roll the refl_igerator out,
you will need to move the refl]gerator
to the left or right as you roll it out.
Toremove the glass cover:
Remove the glass, then the fl'ame. \._3_en
replacing the glass, push the front edge
fimfiv into the fl'ame.
O Push up the glass cover at the rear:
Slide the glass cover backwards tmtil the
fl'ont edge coin es out of the fl'am e.
Removing the glass cover
Removing the frame
O Rotate the side ot the glass cover up.
Remove the glass cove_:
Toremove the frame:
I,ifl up the fl'ont oI the fl'ame using
both hands.
@ Slide the fl'ame fin'ward.
O Rotate the side ot the fl'ame up.
O Relnove the fl'alne.
Abouttheadditionalfeatures.
Not all features are on all models.
She/fSaver TM Rack
This slide-out rack holds twelve cans of soda
or two wine/water bottles (lengthwise).
Can be removed fin" cleaning.
To remove, slide the rack out to the stop
position, lift the rack up and past the stop,
and lift out.
/0
Abouttheautomaticicemaker, ge.com
A newly-installed refrigerator may take 12-24 hours to begin making ice.
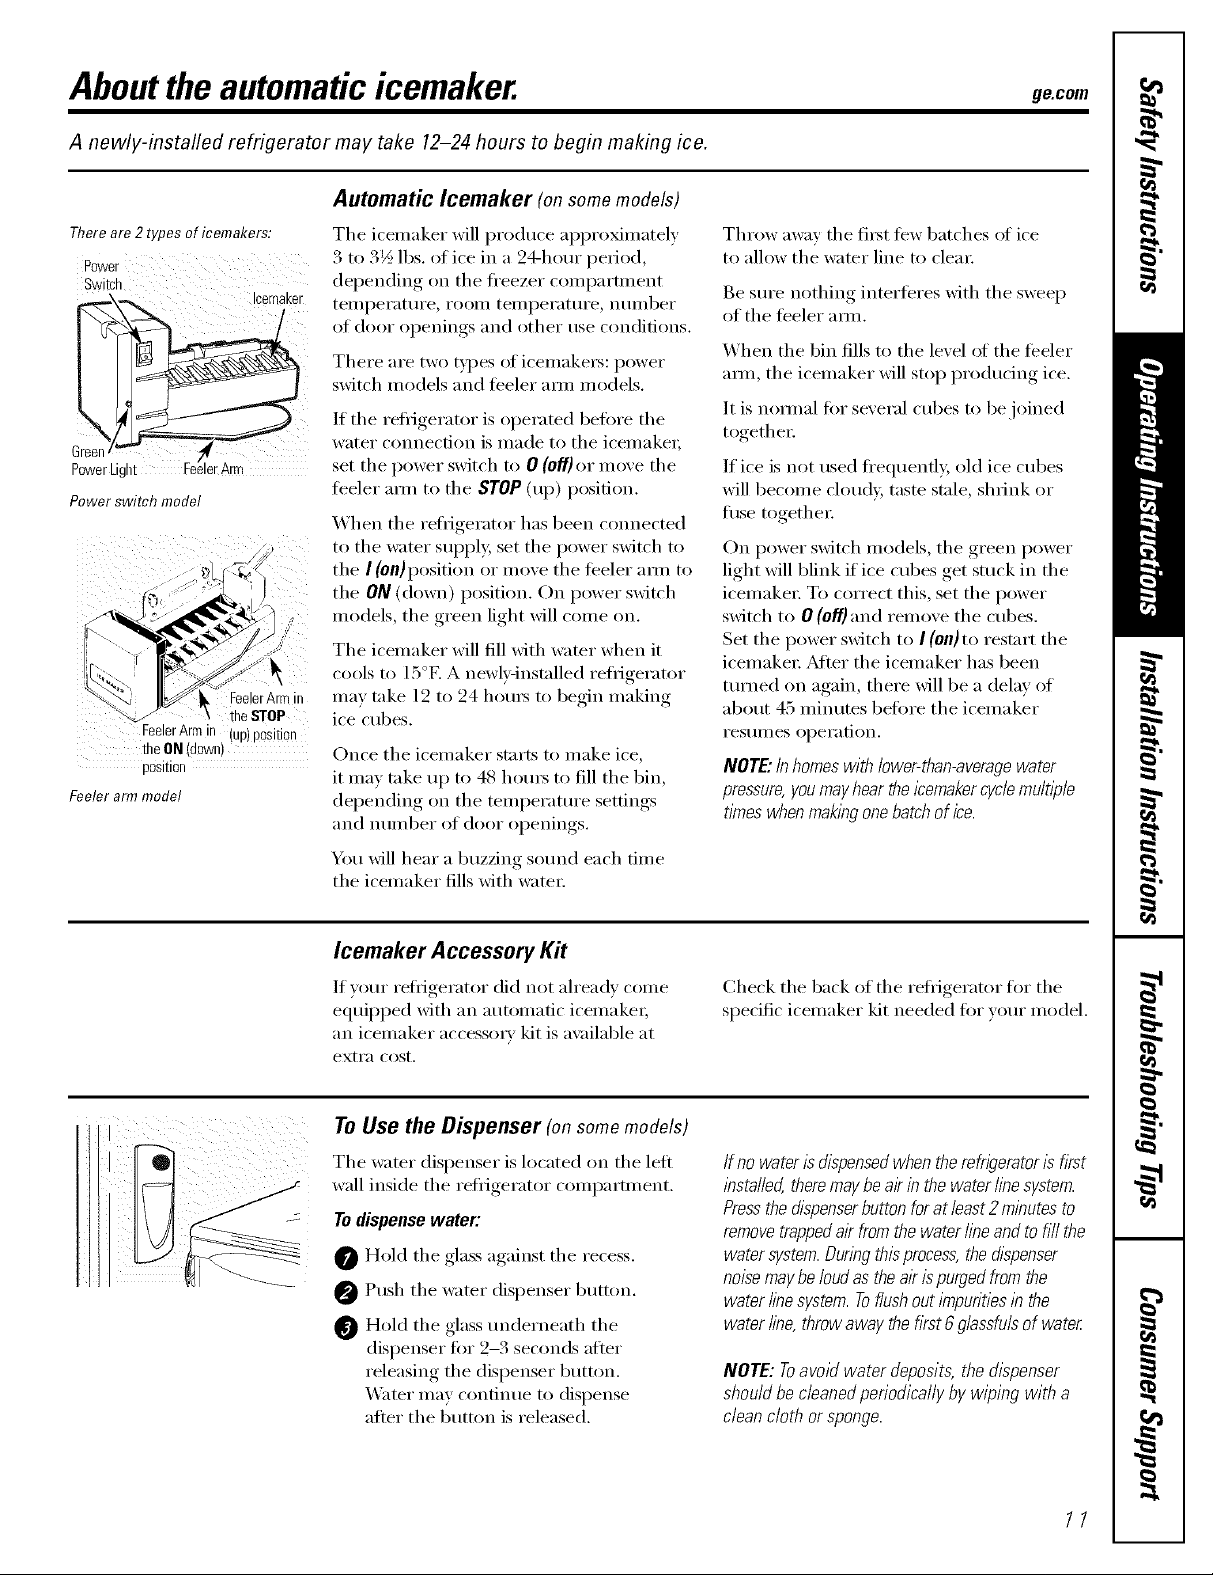
Automatic Icemaker (onsomemodels)
There are 2 types of icemakers:
Greet
PowerLigl erArm
Power switch model
FeelerArmin
FeelerArmin (up)position
theON (down)
position
Feeler arm model
theSTOP
Icemaker
The icemaker will produce api)roxinmtely
3 to 3½ lbs. of ice in a 24-hour period,
depending on the fl'eezer compartment
tellli)ei';Ktii'e , i'OOill tell/i)ei';Ktii'e _ ntllllber
of door ol)enings and other use conditions.
There are two t)pes of icelnakei_: power
switch Inodels and teeler ann models.
If the reti_igerator is operated befiwe the
water connection is made to tile icemakei;
set the power switch to 0 (Of/)or move the
fl_eler ann to the STOP (up) position.
When the x'eti_igex'ator has been coxmected
to the water suppl}; set the power switch to
the I (on)position or In(we the teeler arm to
the ON (down) position. On power switch
models, the green light will come on.
The icemaker will fill with water when it
cools to 15°E A newl)qnstalled refl_igerator
may take 12 to 24 houi_ to begin making
ice cubes.
Once the icemaker starts to make ice,
it Ina) take up to 48 houI_ to fill the bin,
depending on tile telnperature settings
and ntiil/bei" of dooi" ol)enings.
You will hear a buzzing sotind each tilne
the icelnaker fills with watei:
Throw away the fiI_t tew batches of ice
to allow the water line to cleai:
Be sure nothing interteres with the sweep
of the teeler ann.
When the bin fills to the level _ff the teeler
aim, the icemaker will stop producing ice.
It is nomml tor several cubes to be joined
togethei:
If ice is not used fl'equenfl> old ice cubes
will become cloudy, tasm stale, shrink or
fllse togethei:
On power switch models, the green power
light will blink if ice cubes get snick ill the
icelnakei: To correct this, set the power
switch to 0 (off] and relnove the cubes.
Set the power switch to ! (on] to restart the
icelnakei: _Mtei" the icelnaker has been
turned on again, there will be a delay of
about 45 nfinutes betore the icelnaker
I'eStlllleS ol)ei'ation.
NOTE."In homes with lower-than-averagewater
pressure,you mayhear the12emakercycle mu/t)_/e
times when makingonebatch of ice.
Icemaker Accessory Kit
If )our refi_igerator did not ah'eadv come
equiI)ped with an automatic icelnakei;
an icemaker accessma' kit is ax filable at
extra cost.
To Use the Dispenser (onsomemodels)
The water dispenser is located on the left
wall inside the retiigerator conq)amnent.
Todispense water:
O Hold the glass against the recess.
0 Push the water dispenser button.
Hold the glass underneath the
dispenser for 2-3 seconds after
releasing the dispenser button.
XM_ter inav continue to dispense
after the button is released.
Check the back of the refl_igerator for the
specific icenlaker kit needed fi)r xotlr model.
If nowaterisdispensedwhentherefwemtor is fkst
installed,theremaybeairinthewaterlinesystem.
Pressthedispenserbuttonforat least2minutesto
removetrappedair fromthewaterlineandtofill the
watersystem.Duringthisprocess,thedispenser
noisemaybeloudastheakispurgedfromthe
waterlinesystem.Toflushouti_npuritiesinthe
waterline,throwawaythefirst6glassfulsofwater
NOTE:Toavoidwaterdeposits,the&spenser
shouldbecleanedperiodicallybywiping with a
dean cloth orsponge.
11
Careand cleaningofthe refrigerator.
Cleaning the Outside
The doorhandles and trim. Clean with
a cloth dalnl)ened with soapy watei:
Dry with a soft cloth.
a coxnxnerdallv available stainless steel
cleanex: Do not use appliance wax or polish
oil the stainless steel.
Keep tile outside clean. _4'ipe with a clean
cloth lightly dampened with kitchen
appliance wax or mild liquid dish
detergent, Di T and polish with a clean,
soft cloth.
The stainless steel panels and door handles
(on some models) can be cleaned with
Cleaning the Inside
Tohelp prevent odors,leave an open box of
baking soda ill the t_'esh food and ti'eezei"
COIl/I)a i'tlllents.
Unplugthe refrigerator before cleaning. If this
is not i)racti(al, wring excess moisture out
_ff sponge or cloth when cleaning around
switches, lights or controls.
Use warm water and baking soda solution--
about a tablespoon (l 5 ml) of baking soda
to a quart (1 liter) of wateI; This both cleans
and neutralizes o(lm_. Thoroughly rinse
and wipe dry.
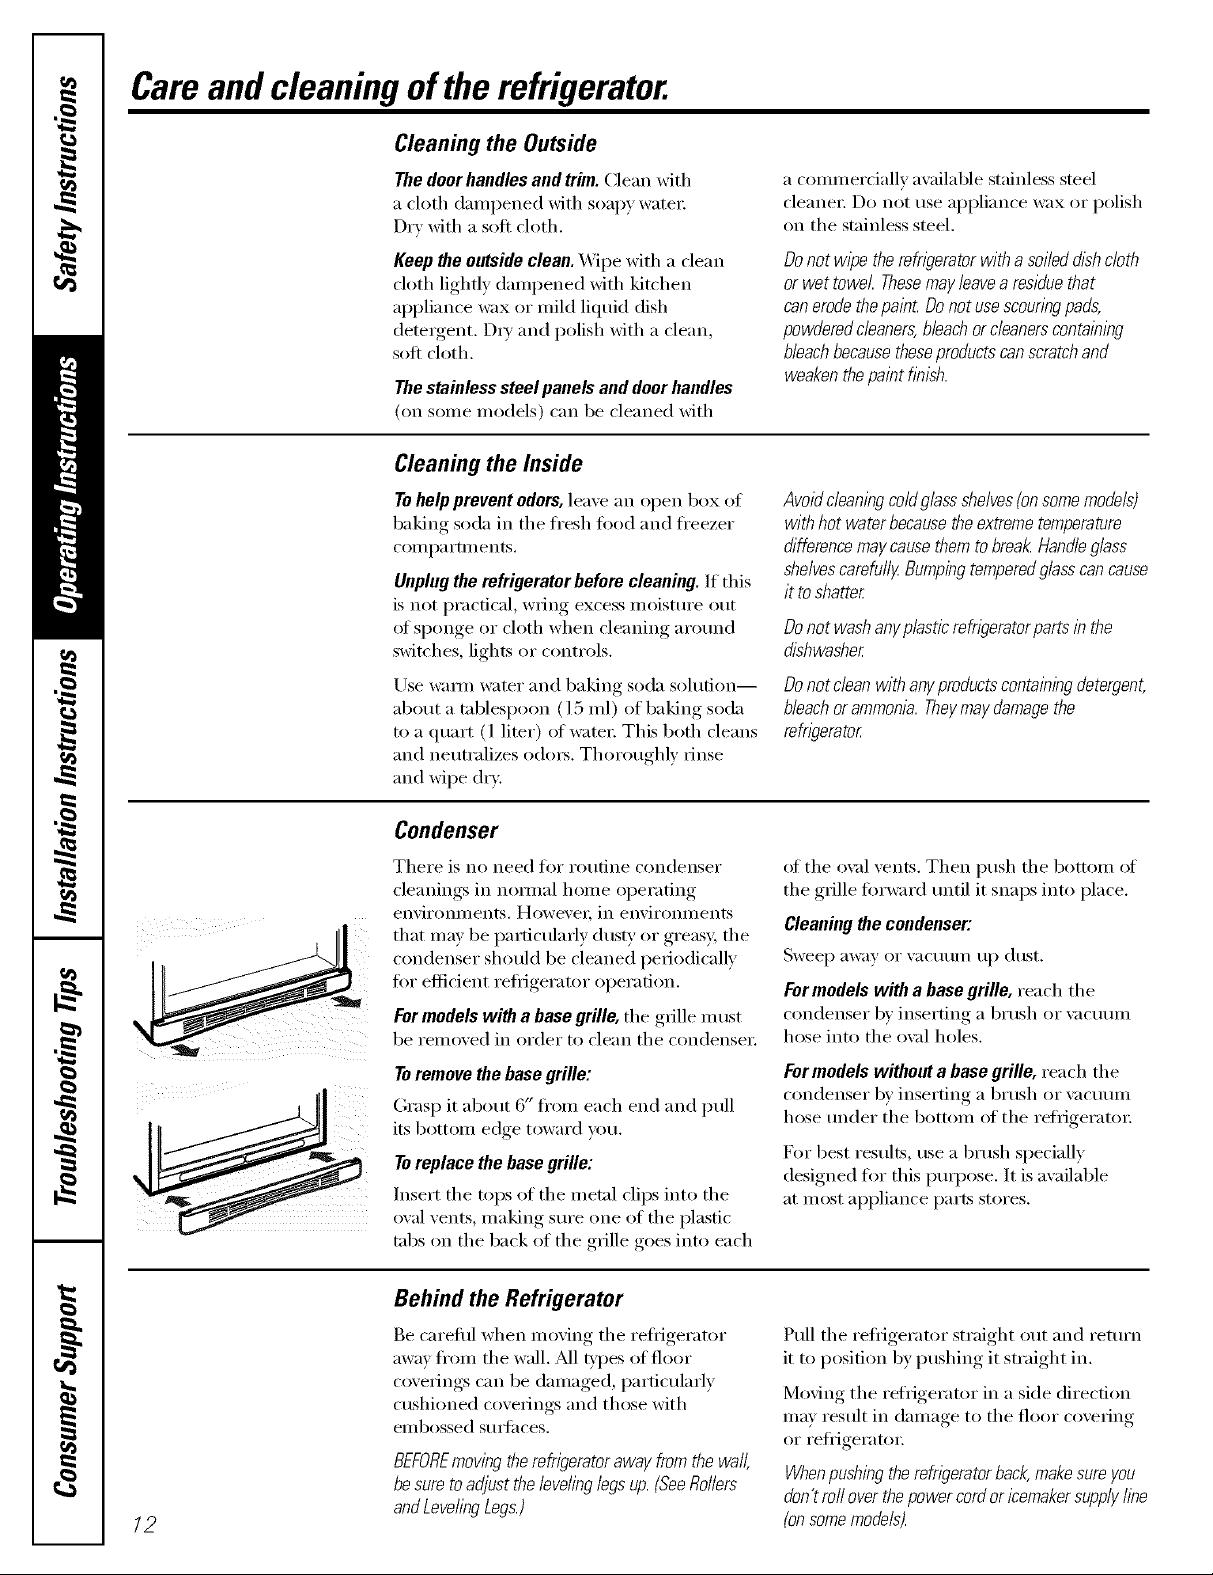
Condenser
There is no need fi)r routine condenser
cleanings ill nolinal heine operating
environlnents. Howevei; ill environlnents
that Inav be particularly dusty or greasy, the
condenser shotfld be cleaned periodically
fi)r efficient reflJgerator oi)erafion.
For models with a base grille, the grille nmst
be removed ill order to clean the condensei:
Toremove the base grille:
Grasp it about 6" fl'om each end and pull
its bottoln edge toward v()tl.
Toreplace the base grille:
Insert the tops of the metnl cliI)s into the
oval vents, lnaking sure one of the plastic
tal)s on the back of the grille goes into each
Do not wipe therefrigerator witha soileddish cloth
or wet towel Thesemay leavea residuethat
can erodethe pain£ Donot usescouringpads,
powderedcleaners,bleach orc/eaneracontaining
bleachbecausetheseproducts canscratchand
weakenthepaint finish.
Avoidcleaning coldglass shelvesfensome models)
with hot water becausethe extremetemperature
difference maycausethem to breal_Handleglass
shelvescarefullg Bumpingtemperedglasscancause
it to shatter
Donot washanyp/asticrefn)eratorpartsin the
dishwasher
Donotdeanwithanyproductscontainingdetergent,
bleachorammonia.Theymaydamagethe
refngerator
_ff the ox:d vents. Then push the bottom _ff
the grille forward until it snaps into place.
Cleaning the condenser:
Sweep away or vacumn tlI) dust.
Formodels with a base grille, rea ch th e
condenser b)' inserting a brush or \;Ic/ItlI/l
hose into the ox_d holes.
Formodels without a base grille, reach the
condenser b)' inserting a brush or vacuunl
hose under the bottom of the refiigeratm:
For best results, use a brush specially
designed tot this puq)ose. It is available
at inost al)pliance parts stores.
72
Behind the Refrigerator
Be careful when moving the refi_gerator
away fl'onl the wall. _M1types of floor
coverings can be dalnaged, particularly
cushioned coverings and those with
eillbossed S/li]il ces.
BEFOREmovingtherefrigeratorawayfromthewall,
besuretoadjustthelevelinglegsup.(SeeRollers
andLevelingLegs.)
Pull the reflJgerator straight out and return
it to position by pushing it straight ill.
Moving the refrigerator ill a side direction
lnay result ill dalnage to the floor covering
or refl_igeratoi:
Whenpushing therefrigerator back,makesure you
don't raftover thepower cord or icemakersupply line
(onsomemodels)
Preparing for Vacation
ge.com
For lollg x_lC;l[iOllS or nbsen(es, I'eIllO\P
fl>od and unplug the refiigerato_: Move
tile refligerator control to tile 0 (Off)position
and clean the interior with a baking soda
solution of one tablespoon (15 ml) of
baldng soda to one quart (l liter) of watel;
Leave the doo,_ open.
Set the icemaker power switch to the 0 (off)
position or move the teeler man to the STOP
(up) position (depending on model) and
shut off tile water supply to tile refligerator.
If tile temperature can drop below fl'eezing,
have a qualified sela'icer drain the water
supply s)_stem (on some models) to pre\'ent
serious prope_W)' damage due to flooding.
Preparing to Move
Secure all loose items such as grille,
shelves and drawers by taping them
securely ix*})lace to pre\ ent damage.
Besuretherefn_leratorstays/))anup@t posit/on
&n)_gmov/?)g
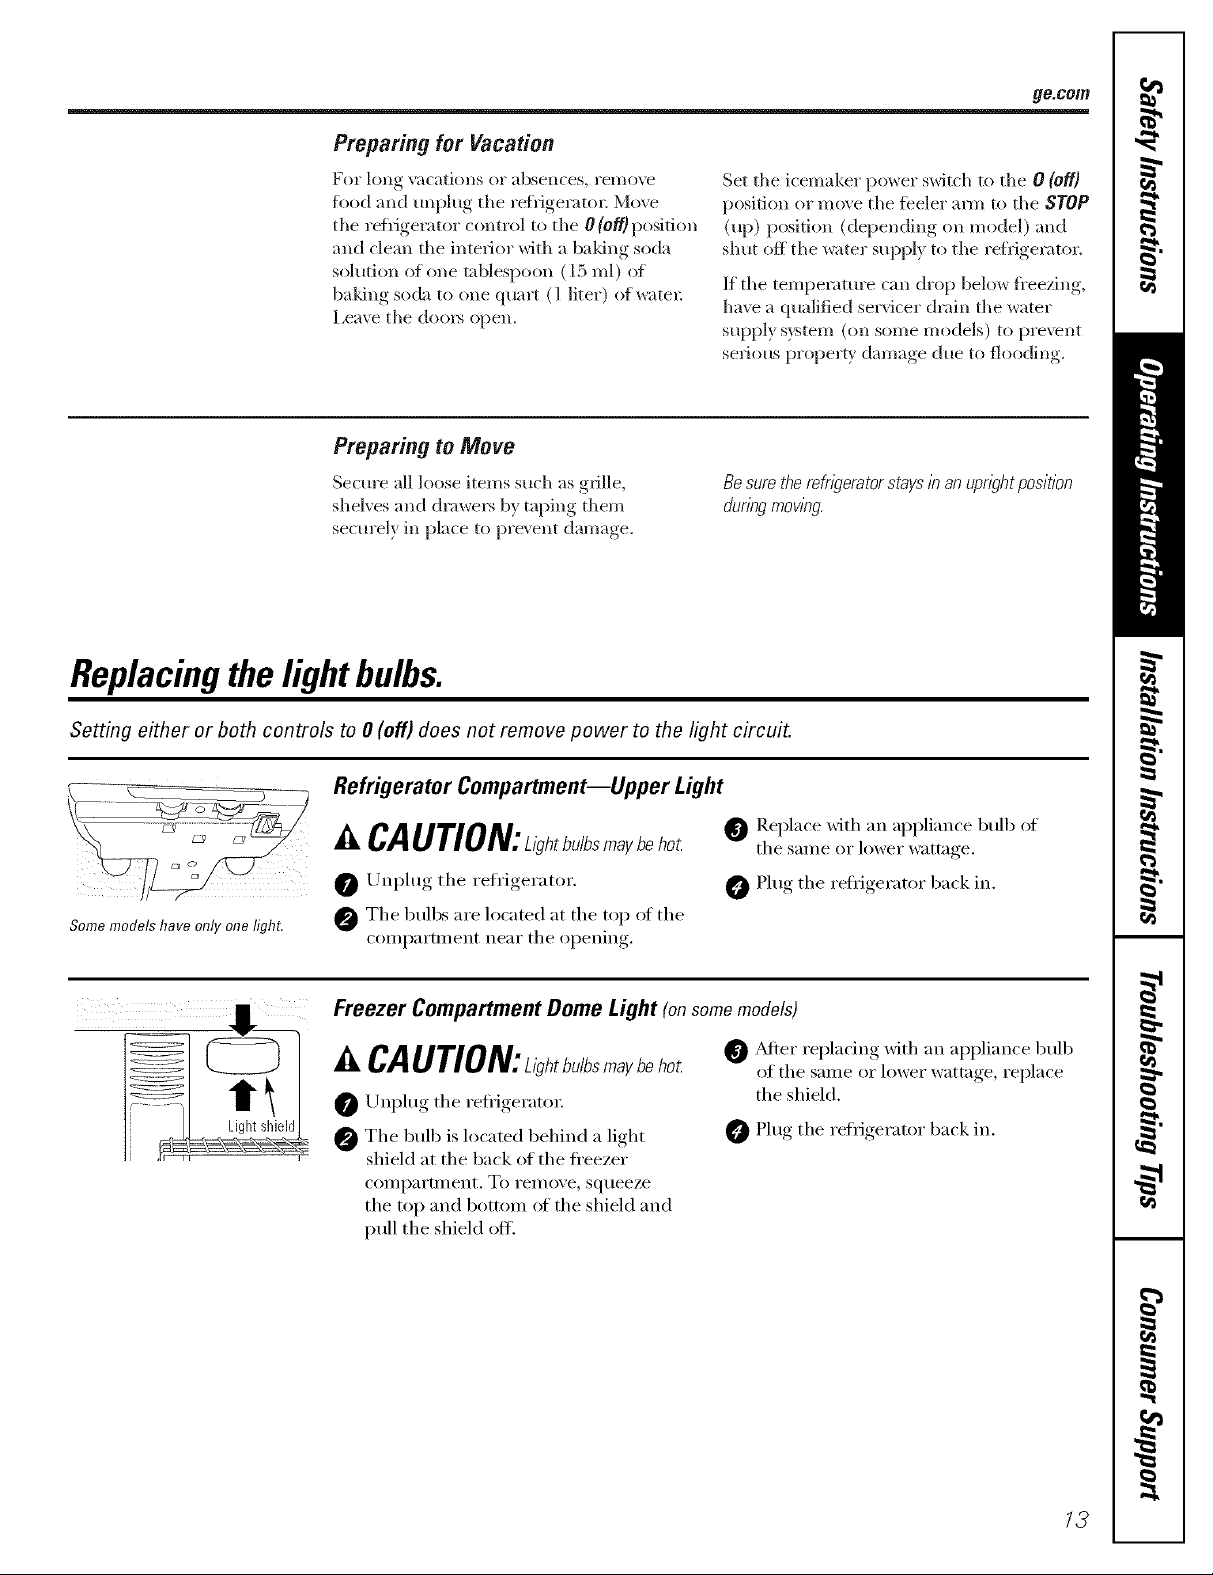
Replacingthe lightbulbs.
Setting either or both controls to 0 (off) does not remove power to the light circuit.
Some models have only one light.
Refrigerator Compartment--Upper Light
Lll_l_llt,llB._a_T_n_t'Llghtbu/bsmaybeho£ 0 Replace with an al)l)liance bulb of
Unplug tile reh'igerator. 0 Plug tile refligerator back in.
0 Tile bulbs are located at tile top of tile
con_l)artment near tile oi)elfing.
tile salne or lower wattage
Freezer Compartment Dome Light (on some models)
aUTION:L,Vh,bulbsbe @ dtei-replacing with an applia nee bulb
Unl)lug tile reflJgeratoi: tile shield.
0 The bulb is located behind a light _ Plug the refrigerator back in.
shield at the back of the ti'eezer
coii/l)artlilent. To i'eii/ove_ squeeze
tile top and bottoln of tile shield and
pull the shield off.
of tile same or lower wattage, replace
73
Installation
Refrigerator
Instructions
ffyou have questions,call 1.800.GE.CARESor ,isit our Website at: ge.com
BEFORE YOU BEGIN
Read these instructions completely and carefully.
" IMPORTANT - S.ve hese
instructions flit local inspector's use.
"IMPORTANT - Obse,,e.ll
governing codes and ordinances.
* Note to Installer - Be sure to leave these
instructions with the Consumer.
. Note to Consumer - KeeI) these instructions
for future reference.
* Skill level - Installation of this appliance requires
basic mechanical skills.
* Completion time - Refrigerator Installation
15 minutes.
* Proper installation is the responsibility of the
installe_:
" Product/hilure due to improper installation is not
covered under the _'\.u'mnty.
WATER SUPPLY TO THE ICEMAKER
(ON SOME MODELS)
If the refrigerator has an icelnaker, it will have
to be COlmected to a cold water line. A GE water
supply kit (coi_tailfing tubing, shutoff valve, fittings
and insti uctions) is awfilable at extra cost fl'Oln vour
dealer or by visiting our X_'ebsite at ge.coln or Parts
and Accessories, 800.626.2002.
REFRIGERATOR LOCATION
• Do not install the refl{gerator where the telnperature
will go below 60°F (16°C) because it will not run often
enough to nmii_tain proper telnperatures.
• Do not install the refrigerator where the telnperature
will go above 100°F (37°C) because it will not perlorln
propedy.
• Install it on a floor strong enough to support it hilly
loaded.
CLEARANCES
Pdlow the fl)llowing clearances for ease of installation,
proper air circulation and phunl)ii_g and electrical
colnlectiollS.
• Sides 1/8" (3 mm)
• Top 1" (25 ram)
• Back 1" (25 ram)
If the refrigerator is to be installed next to a wall on the
hinge side, allow 5/16" (8 ram) door clearance.
ROLLERS AND LEVELING LEGS
Rollers allow you to move the reflJgerator away fl'om the
wall fl)I" cleaning.
Leveling Legs near each fl'ont corner of tile reflJgeratoi;
next to the rolleI_, should be a(!iusted if any of the
tollowing occm_:
• Refrigerator wobbles due to fl'ont roller not being filmly
positioned on the floor.
• Door(s) do not close easily when opened to 45 °.
NOTE:
• BEFORE, n_oving the reli_igerator away fl'Oln the wall,
be sure to turn the leveling legs counterclockwise so that
the weight (if the reti_igerator is hilly transterred to the
fi'ont rolleI_.
• The refiJgerator will not be level fl'Oln fl'ont to back. It
will haxe a slight backward tilt fiw proper dooi_closing.
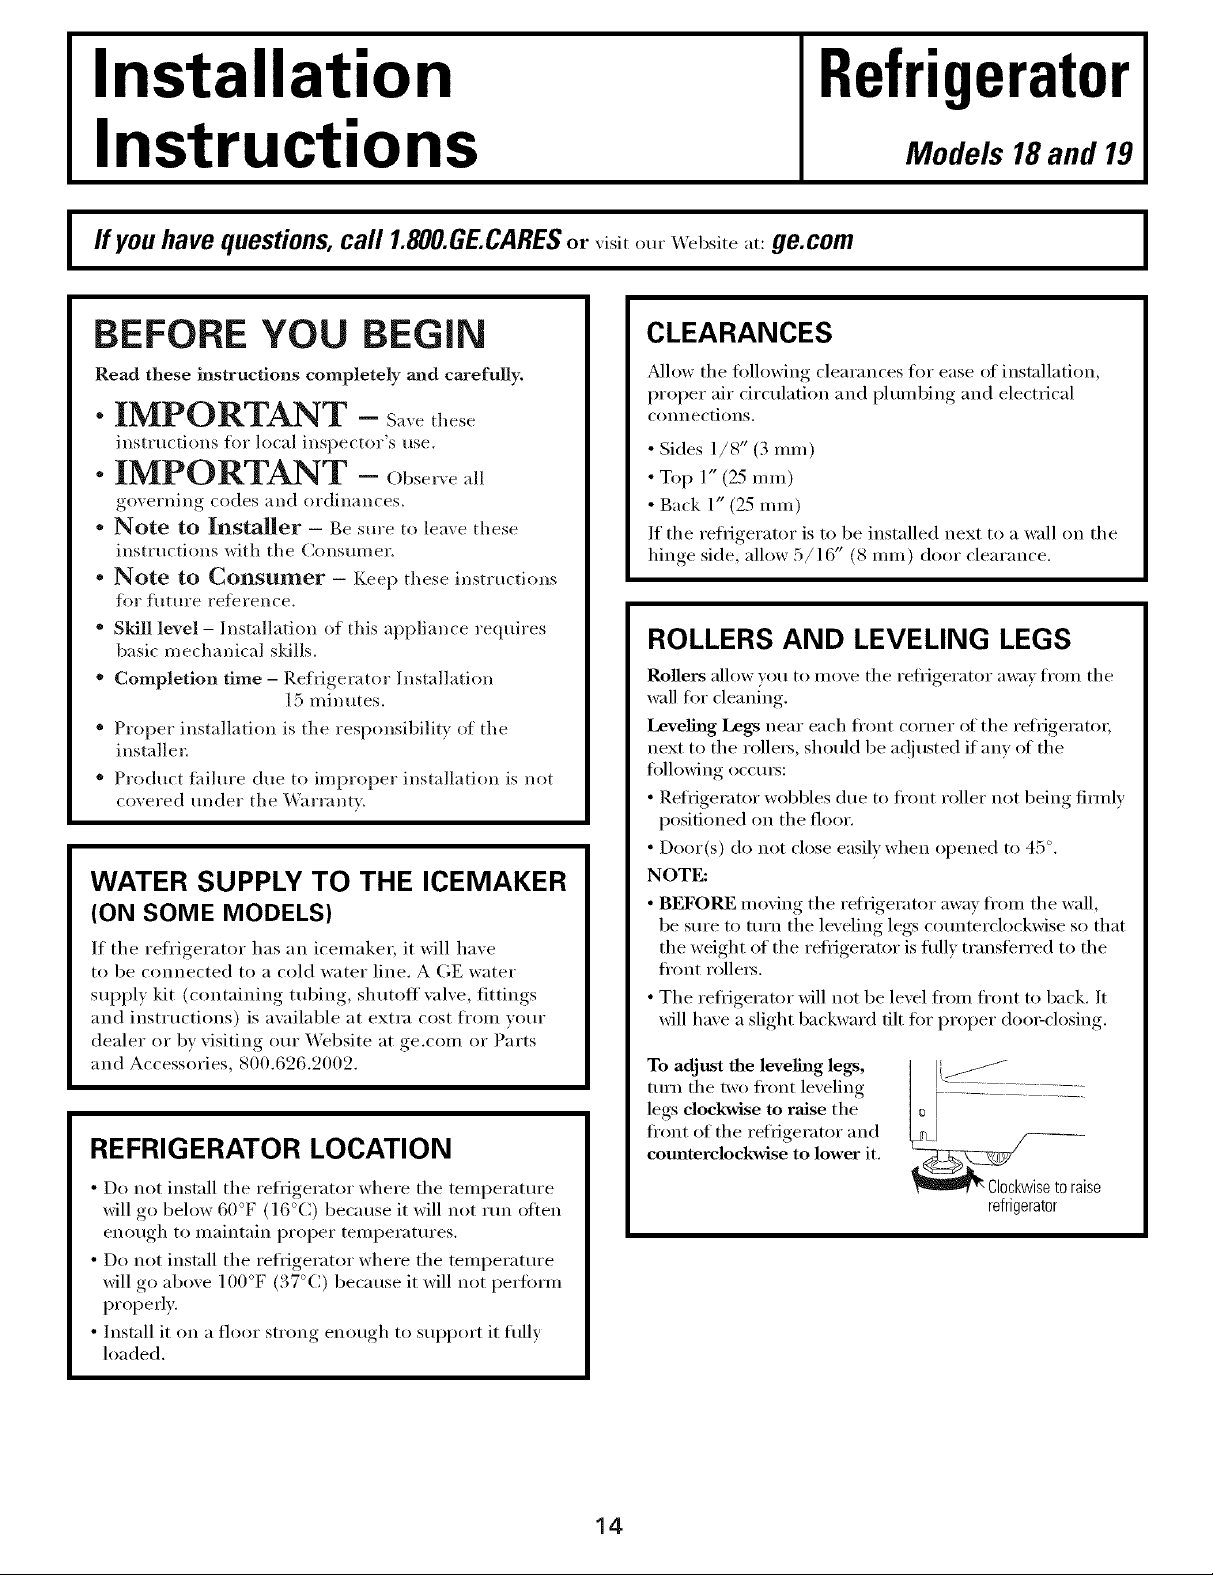
To adjust the leveling legs,
turn the two fl'ont leveling
legs dockwise to raise the
fl'ont of the retiigerator and
comlterclockwise to lower it.
Models 18and 19
__0_ai_)_'_--7-_
se
refrigerator
14
Installation instructions
iNSTALLiNG THE WATER LINE (ONSOMEMODELS)
BEFORE YOU BEGIN
I_.e{ommended copper water supply kits m'e WXSX2,
WX8X3 or WX8X4, depending on the amount of
tubing you need. Approved plastic water supply lines
ate GE SmartConnect'" Refl'igerator Tubing
(WX08X10002, WX08X10006, WX08X10015 and
WX08X10025).
When comlecting yore" refl'igerator to a GE Reverse
Osmosis Water System, the only approved installation
is with a GE RV/_At. For other reverse osmosis water
systems, fl>llow the l//alltl[_lCttlrer's recol/ll//elldatiollS.
This water line installation is not warranted bv the
refl'igerator or icemaker manufhcturer. Follow these
instructions carefully to minimize the risk of expensive
water damage.
_%_ter hammer (water banging ill the pipes) in house
plumbing can cause damage to t efl'igerator parts and
lead to water leakage or flooding. (:all a qualified
plumber to correct water hammer beflwe installing the
water supply line to the refl'igerator.
To prevent burns and product damage, do not hook
up the water line to the hot water line.
If you use your refi'igerator beflwe connecting the
water line, make sure the icemaker power switch is in
the 0 (0f/) position (on power switch models) or the
fbeler arm is in the STOP (up) position (on fl_eler arm
models).
Do not install the icemaker tubing in areas where
temperatures Ihll below freezing.
When using any electrical device (such as a power
drill) during installation, be sure the device is double
insulated or grounded ill a manner to prevent the
hazard of electric shock, or is battery powered.
All installations must be in accordance with local
plumbing code requirements.
WHAT YOU WILL NEED
//
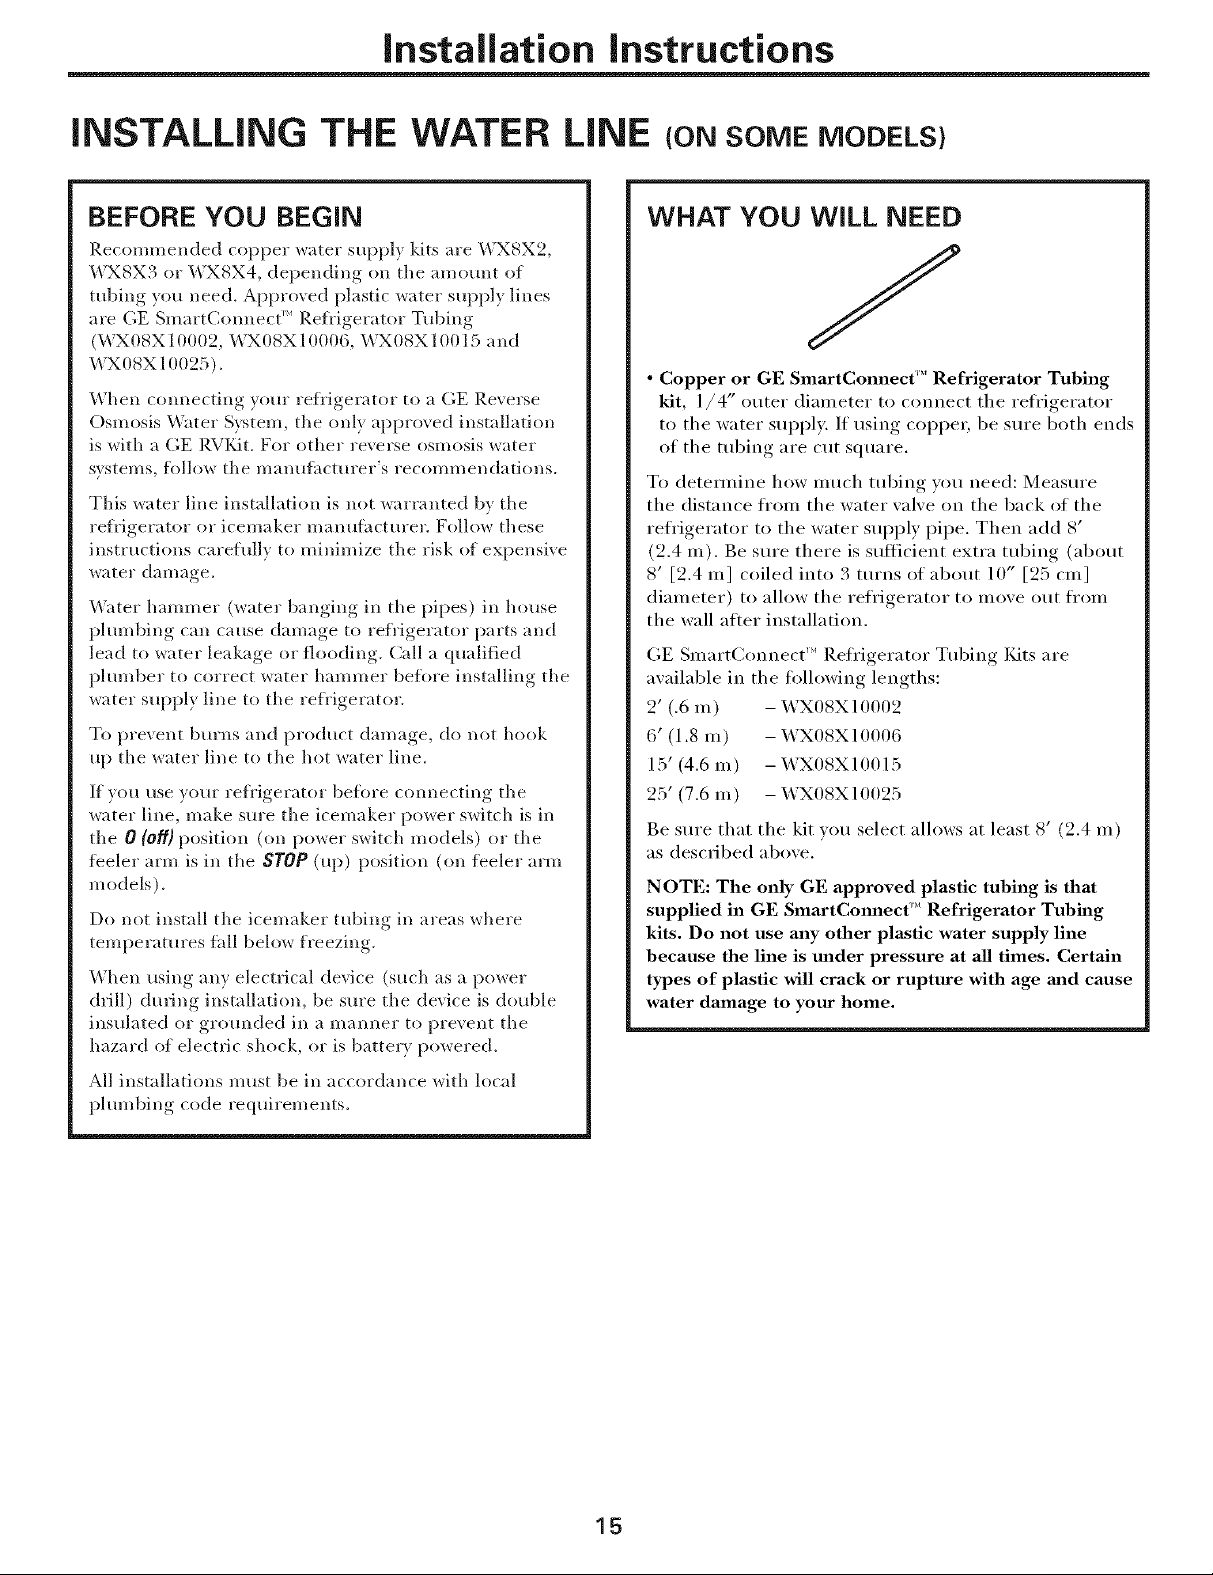
• Copper or GE SmartConnect'" Refrigerator Tubing
kit, 1/4" outer diameter to connect the refi'igerator
to the water supply. If using coppe_; be sure both ends
of the tubing are cut square.
To (letemfine how inuch tubing you need: Measure
tile distance ti'oln the water valve on the back of the
refi'igerator to the water supl)ly pipe. Then add 8'
(2.4 m). Be sure there is sufliciei_t extra tubing (about
8' [2.4 in] coiled into 3 turns of about 10" [25 cm]
dialneter) to allow the reli'igerator to inove out ti'Olll
the wall atier installation.
GE Slnart(;olmect ''_Refl'igerator Tubing Kits are
awfilable in the fl)llowing lengths:
2' (.6 m) - WX08X10002
6' (1.8 m) - WX08X10006
15' (4.6 m) - WX08X10015
25' (7.6 m) - WX08X10025
Be sure that the kit wm select allows at least 8' (2.4 m)
as described above.
NOTE: The only GE approved plastic tubing is that
supplied in GE SmartCmmect '_'Refrigerator Tubing
kits. Do not use any other plastic water supply line
because the line is under pressure at all times. Certain
types of plastic will crack or rupture with age mad cause
water damage to your home.
15
Installation Instructions
iNSTALLiNG THE WATER LiNE (CONT.)
Install the shutoff wflve on the nearest frequently used
WHAT YOU WILL NEED (CONT.)
drinking water line.
• AGE water supply Mt (containing tubing, shutoff
_dve and fittings listed below) is a_ilable at extra
cost ]_]x)nl VO/lr dealer or t]'oI// Pill'tS illld Accessories,
800.626.2002.
• A cold water supply. The water pressure must be
between 2(1 and 12(1 p.s.i. (I.4-8.1 bar).
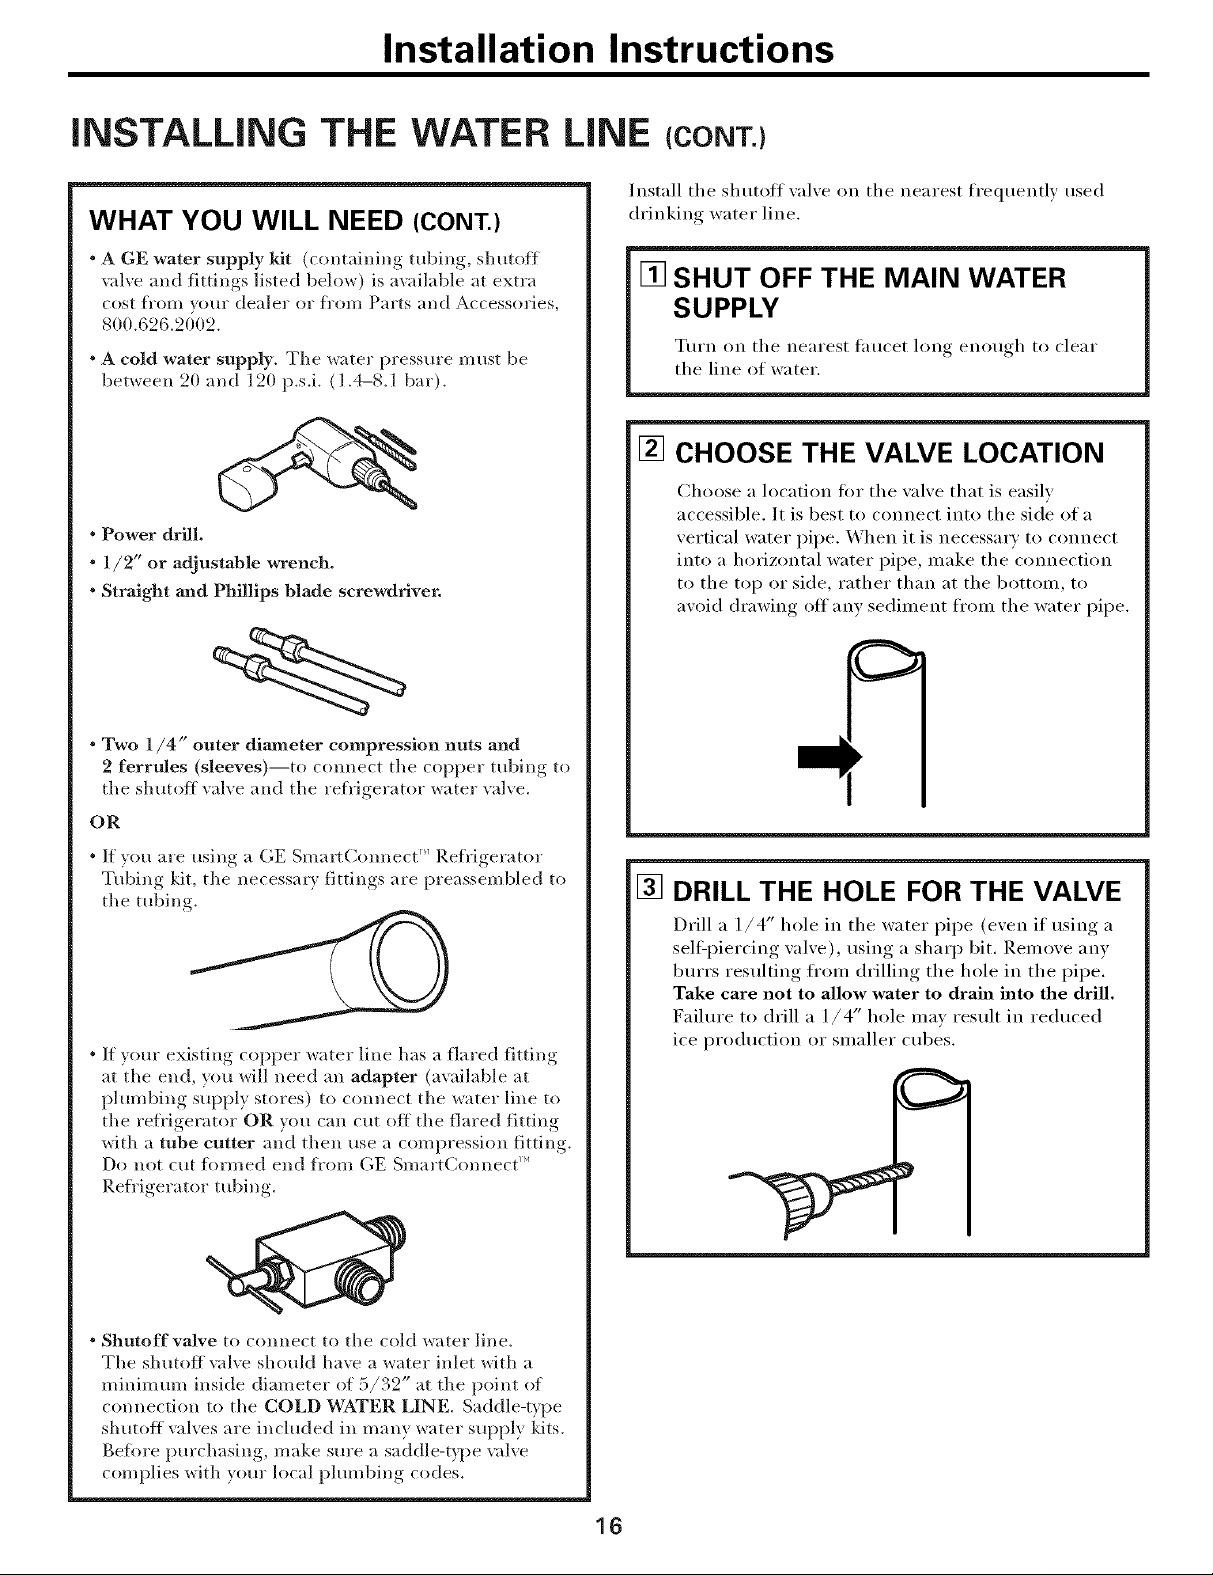
• Power drill.
• 1/2" or adjustable wrench.
• Straight and Phillips blade screwdriver.
• Two 1/4" outer dimneter compression nuts and
2 ferrules (sleeves)--to connect tile copper tubing to
the shutoff valve and the refrigerator water valve.
OR
[] SHUT OFF THE MAIN WATER
SUPPLY
Turn on the nearest fimcet hmg enough to clear
the line of water.
[] CHOOSE THE VALVE LOCATION
Choose a location fin" tile vah'e that is easily
accessible. It is best to COlmect into tile side of a
vertical water pipe. When it is necessary to connect
into a horizolmfl water pipe, inake tile colmection
to tile top or side, rather than at tile bottoln, to
aw_id drawing off any sediinent froul the water pipe.
• If xou are usino "l (;E _ mai_(,( mlect Refrigerator
Tubing kit, tile necess;n) fittings are preassembled to
the tubing
• If your existing copper water lille has a flared fitting
at tile end, you will need all adapter (available at
plumbing supply stores) to connect tile water lille to
tile _efl'igerator OR you can cut off tile flared fitting
with a tube cutter and then use a compression fitting.
Do not cut fl)rmed end fl'om GE SmartConnect >'
Refl'igerator tubing.
• Shntoffvalve to connect to the cold water line.
Tile shutoff _:dve should have a water inlet with a
miniumm inside diameter of 5/32" at tile point of
connection to the COLD WATER LINE. Saddle-t_pe
shutoff _ulves are included ill many water supply kits.
Befln'e purchasing, make sure a saddle-t)pe ",:dye
complies with your local phunbing codes.
[] DRILL THE HOLE FOR THE VALVE
Drill a 1/4" hole in tile water pipe (even it using a
sell:piercing valve), using a sharp bit. I_eluove anv
braTS resulting fl'om drilling tile hole in tile pipe.
Take care not to allow water to drain into the drill,
Faihu'e to drill a 1/4" hole may result in reduced
ice production or smaller cubes.
16
Installation Instructions
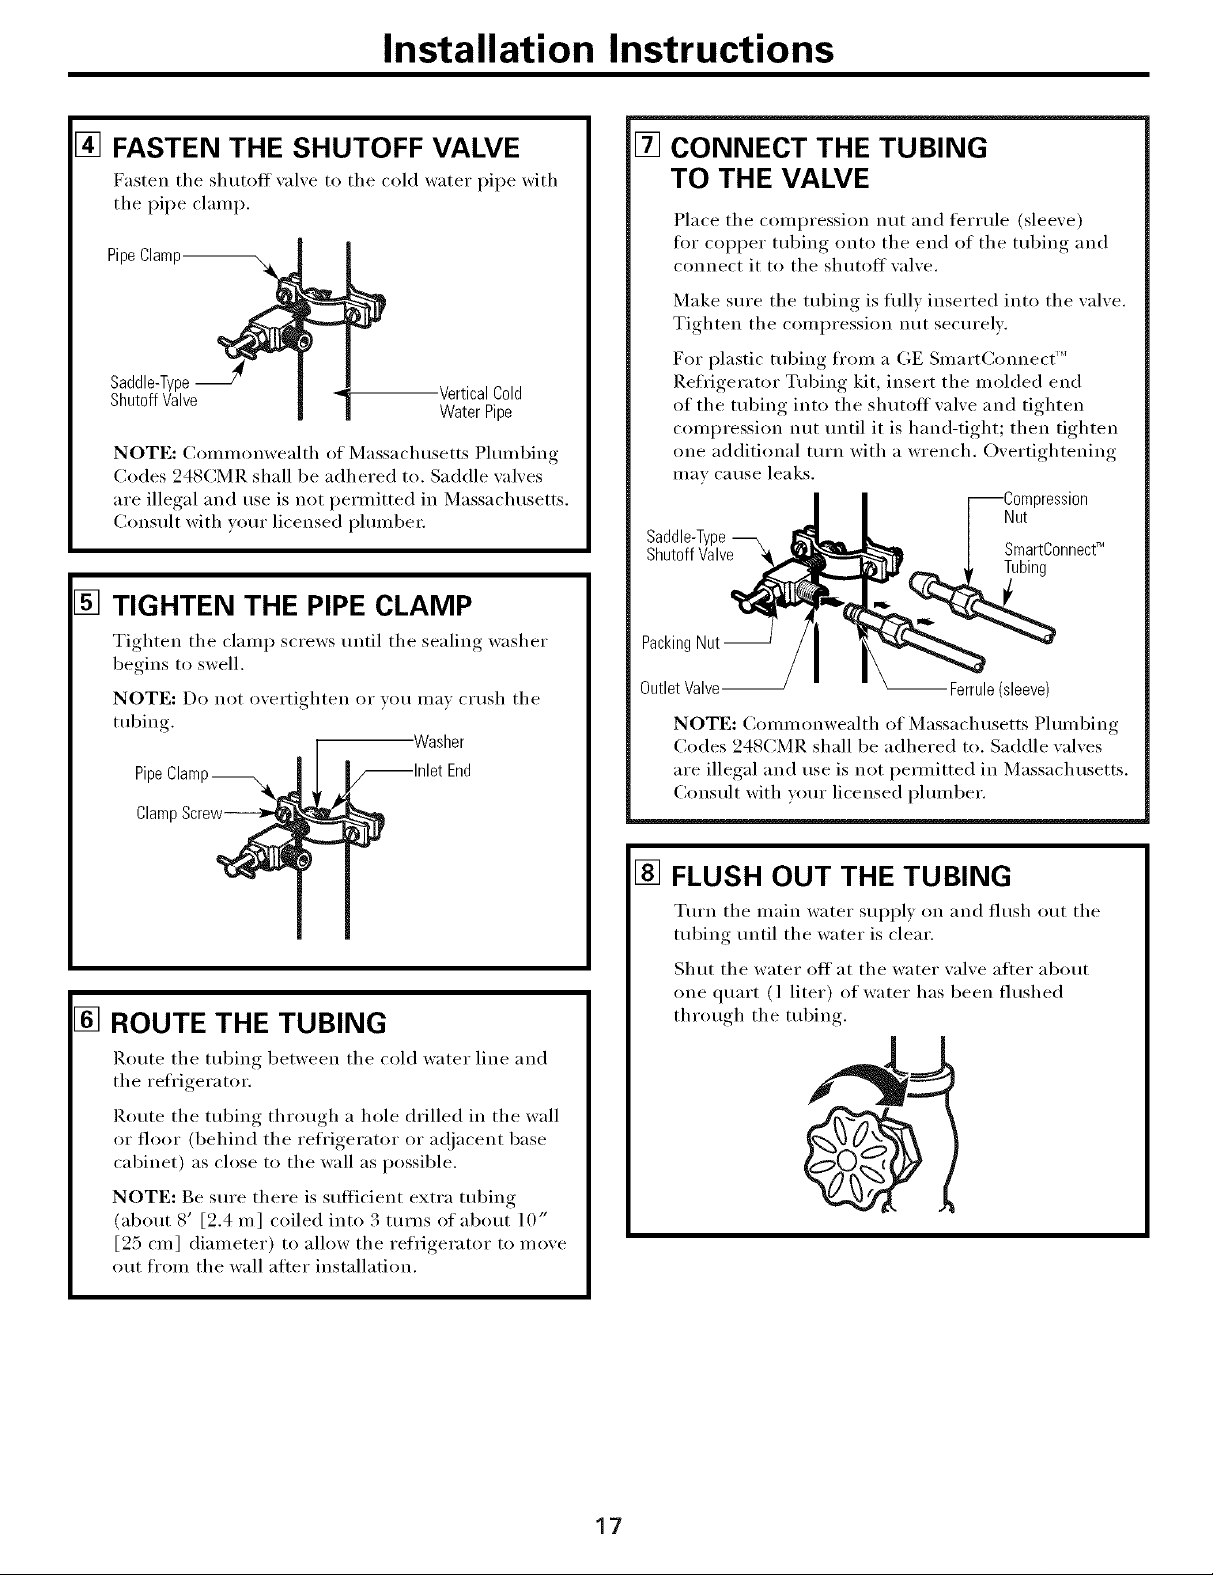
[] FASTEN THE SHUTOFF VALVE
Fasten the shutoff _al_e to the cold water pipe with
tile pipe clamp.
PipeClamp
Saddle-Type
ShutoffValve
NOTE: Conm_onwealth of Massachusetts Plmnl)ing
Codes 248CMR shall be adhered to. Saddle wdves
are illegal and rise is not permitted in Massachusetts.
(_onsult with vom" licensed i_lmnbe_:
VerticalCold
WaterPipe
[] TIGHTEN THE PIPE CLAMP
Tighten tile clamp screws until tile sealing washer
begins to swell.
NOTE: Do not overtighten or VO/1 Ill}IV cI'/Ish tile
tubing.
Pipe End
Clamg
-Washer
[] CONNECT THE TUBING
TO THE VALVE
Place tile compression nut and teHule (sleexe)
for COl)per tubing onto the end of tile tubing and
connect it to tile shutoff xalxe.
Make sm'e tile tubing is flflly inserted into tile valve.
Tighten the compression nut secm'elv.
For plastic tubing fl'om a GE Sinart()mnect "_
Refrigerator Tubing kit, insert tile molded end
of the robing into the shutoff valve and tighten
compression nut until it is hand-tight; then tighten
one additional turn with a wrench. Overtightening
III_IV C_l rise lea ks.
--Compression
Nut
Saddle-Type
ShutoffValve
PackingNut-
OutletValve-- Ferrule(sleeve)
NOTE: Collllllonwealth ot Massachusetts Phmlbing
Codes 248CMR shall be adhered to. Saddle valves
are illegal and use is not pemdtted in Massachusetts.
Consult with yore" licensed i)lmnber.
SmartConnectTM
[] ROUTE THE TUBING
Route tile tubing between tile cold water line and
tile refl'igera tot.
Route tile tubing through a hole drilled in tile wall
or floor (behind tile refrigerator or a@_cent base
cabinet) as close to the wall as possible,
NOTE: Be sm'e there is sufficient extra tubing
(about 8' [2.4 m] coiled into 3 turns of about 10"
[25 cm] diameter) to allow tile refrigerator to move
out ti'om the wall atter installation.
[] FLUSH OUT THE TUBING
Turn tile main water sui)ply on and flush out tile
tubing tmtil tile water is clear.
Sh tit th e water ott a t the water valve after about
one quart (1 liter) of water has been flushed
through tile tubing.
17

Installation Instructions
INSTALLING THE WATER LINE (CONT.)
[] CONNECT THE TUBING TO THE
REFRIGERATOR
NOTES:
• Before making the connection to the reli'igerator,
be sure the refl'igerator power cord is not
plugged into the wall outlet.
• We recommend installing a water filter if your
water supply has sand or particles that could clog
the screen of the refl'igerator's water wdve. ]nstall
it in the water line near the refl'igerator. If using
GE Smart(_onnect "_ Refl'igerator Tubing kit, you
will need an additional tube (WX08X10002) to
connect the filter. Do not cut plastic tube to
install filter.
Remove the screws holding the right side of the
access cover. Fold back the cover.
Remoxe the plastic flexible cap
fl'om the water xalxe
(refi'igerator connection),
Place the compression nut and
ferrule (sleeve) onto the end of
the tubing as shown. On GE
Smart(:onnect "_ Refrigerator
Tubing kit, the nuts are alreadv
assembled to the tubing.
Insert the end of the tubing into the water wdve
connection as flu" as possible. While holding the
tubing, tighten the fitting.
CJ
[] CONNECT THE TUBING TO THE
REFRIGERATOR (CONT.)
One of the illustrations below will look like the
cmmection on your refrigerator.
Icemaker Models withoutWater Dispenser
1/4"Tubing
_ressionNut
(sleeve)
SmartC(
Tubing
Water DispenserModels
Tubing Clamp_.
1/4" CompressionNut.
Refrig
- Refrigerator
Connection
1/4"Tubin_
)nnect_ Tubing
For plastic tubing fl'om a GE Smart(_onnect "_
Refi'igerator Tubing kit, insert the molded end
of the tubing into the water wdve connection and
tighten compression nut until it is hand-tight;
then tighten one additional turn with a wrench.
Overtightening may cause leaks.
Fasten the tubing into the clamp provided to hold
it in a vertical position. You mav need to PU open
the clamp.
[] TURN THE WATER ON AT THE
SHUTOFF VALVE
Tighten any connections that leak.
Reattach the access coxer.
18
Installation Instructions
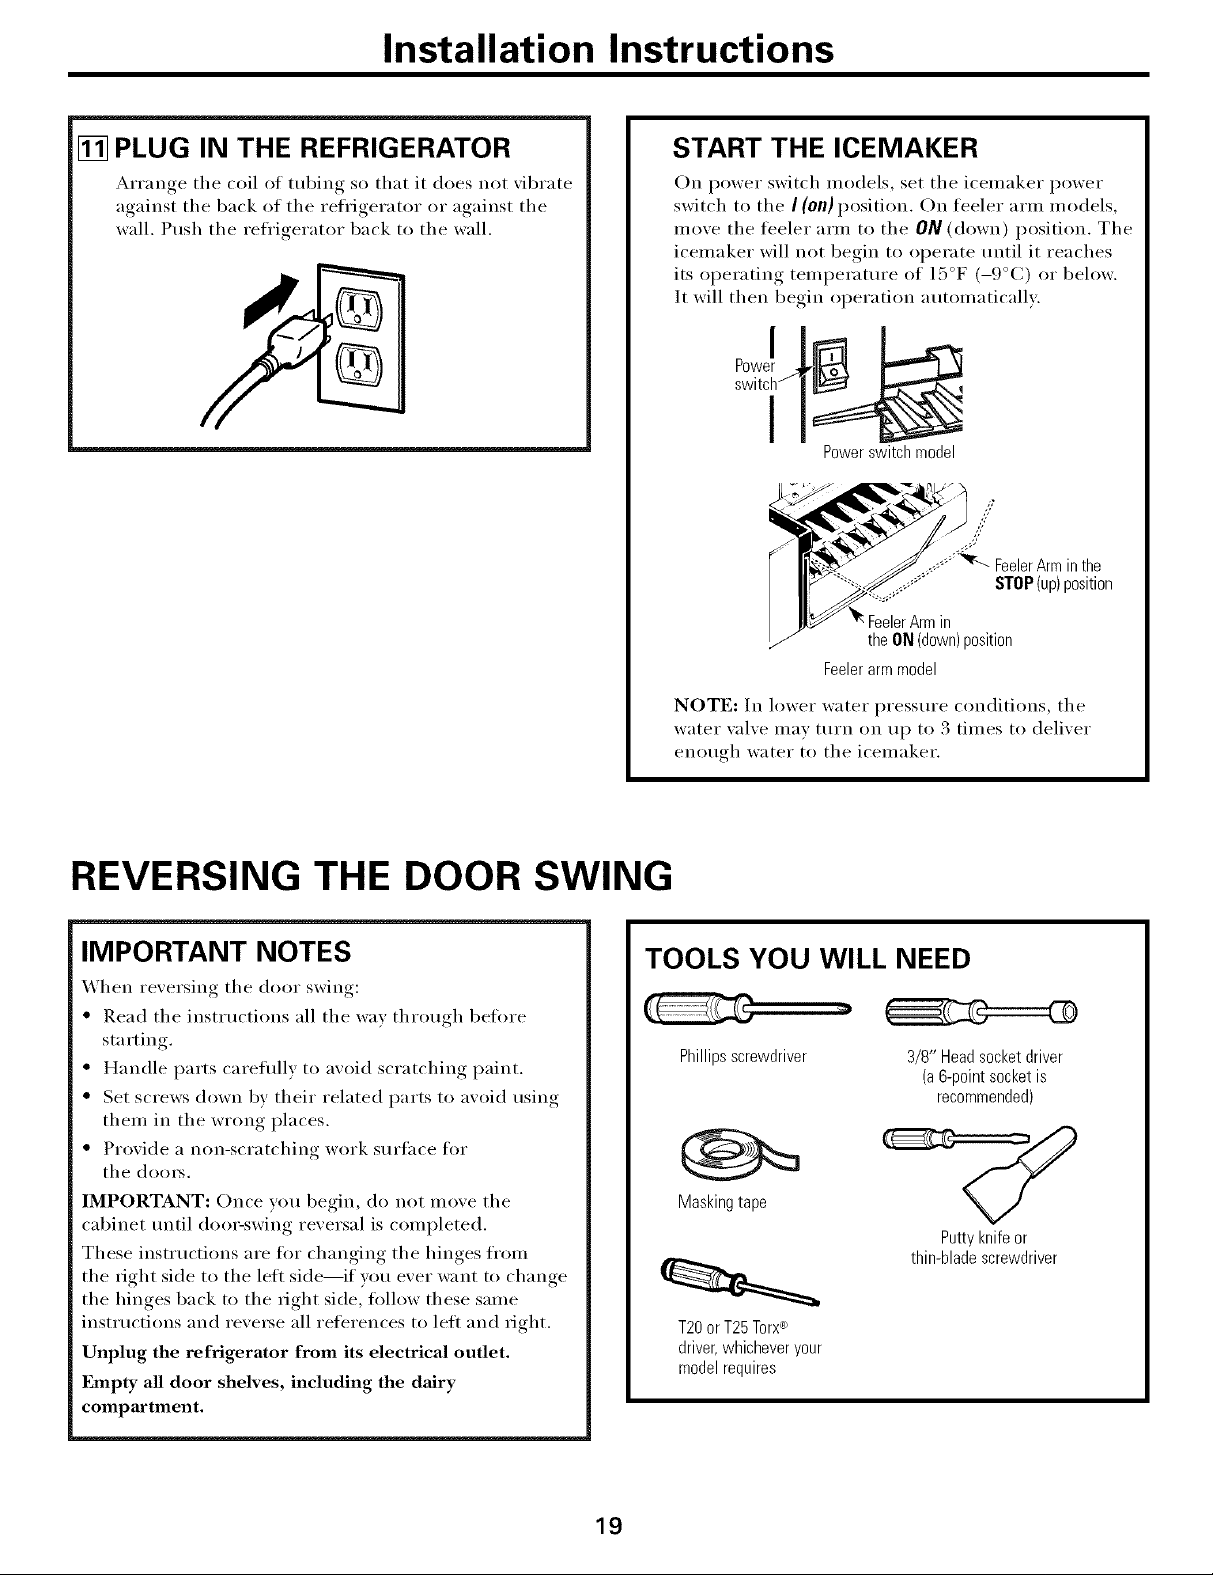
[] PLUG IN THE REFRIGERATOR
&_rranoe the coil ot tubing so that it does not _ibrate
against the back of the refl'igerator or against the
wall. Push the refl'igerator back to the wall.
START THE ICEMAKER
On power switch models, set the icemaker power
switch to the I (On) position. On feeler arm models,
move the feeler arm to the ON (down) position. The
icemaker will not begin to operate until it reaches
its operating temperature of 15°F (-9°(',) or below.
It will then begin operation automatically:
Powerswitchmodel
in
the ON(down)position
Feelerarmmodel
NOTE: In lower water pressure conditions, tile
water xalxe may turn on up to 3 times to delixer
eno//(rh water to tile icemaker.
REVERSING THE DOOR SWING
IMPORTANT NOTES
When reversing tile door swing:
• Read tile instluctions all tile way through befi)re
starting.
• Handle parts careflfllv to avoid scratching paint.
• Set screws down by their related parts to avoid using
them in the wrong places.
• Provide a non-scratching work surtace fin.
tile dooi_.
IMPORTANT: Once wm begin, do not move tile
cabinet until dooi=swing reversal is completed.
These instructions are fin" changing the hinges fl'om
the right side to the lett side--if w)u ever want to change
the hinges back to the right side, tollow these same
instructions and revei_e all references to lett and right.
Unplug the refrigerator from its electrical outlet.
Empty all door shelves, including the dairy
compartment,
TOOLS YOU WILL NEED
Phillipsscrewdriver
Maskingtape
T2OorT25Torx®
driver,whicheveryour
modelrequires
3/8" Head socket driver
(a 6-point socket is
recommended)
Puttyknifeor
thin-bladescrewdriver
19
Installation Instructions
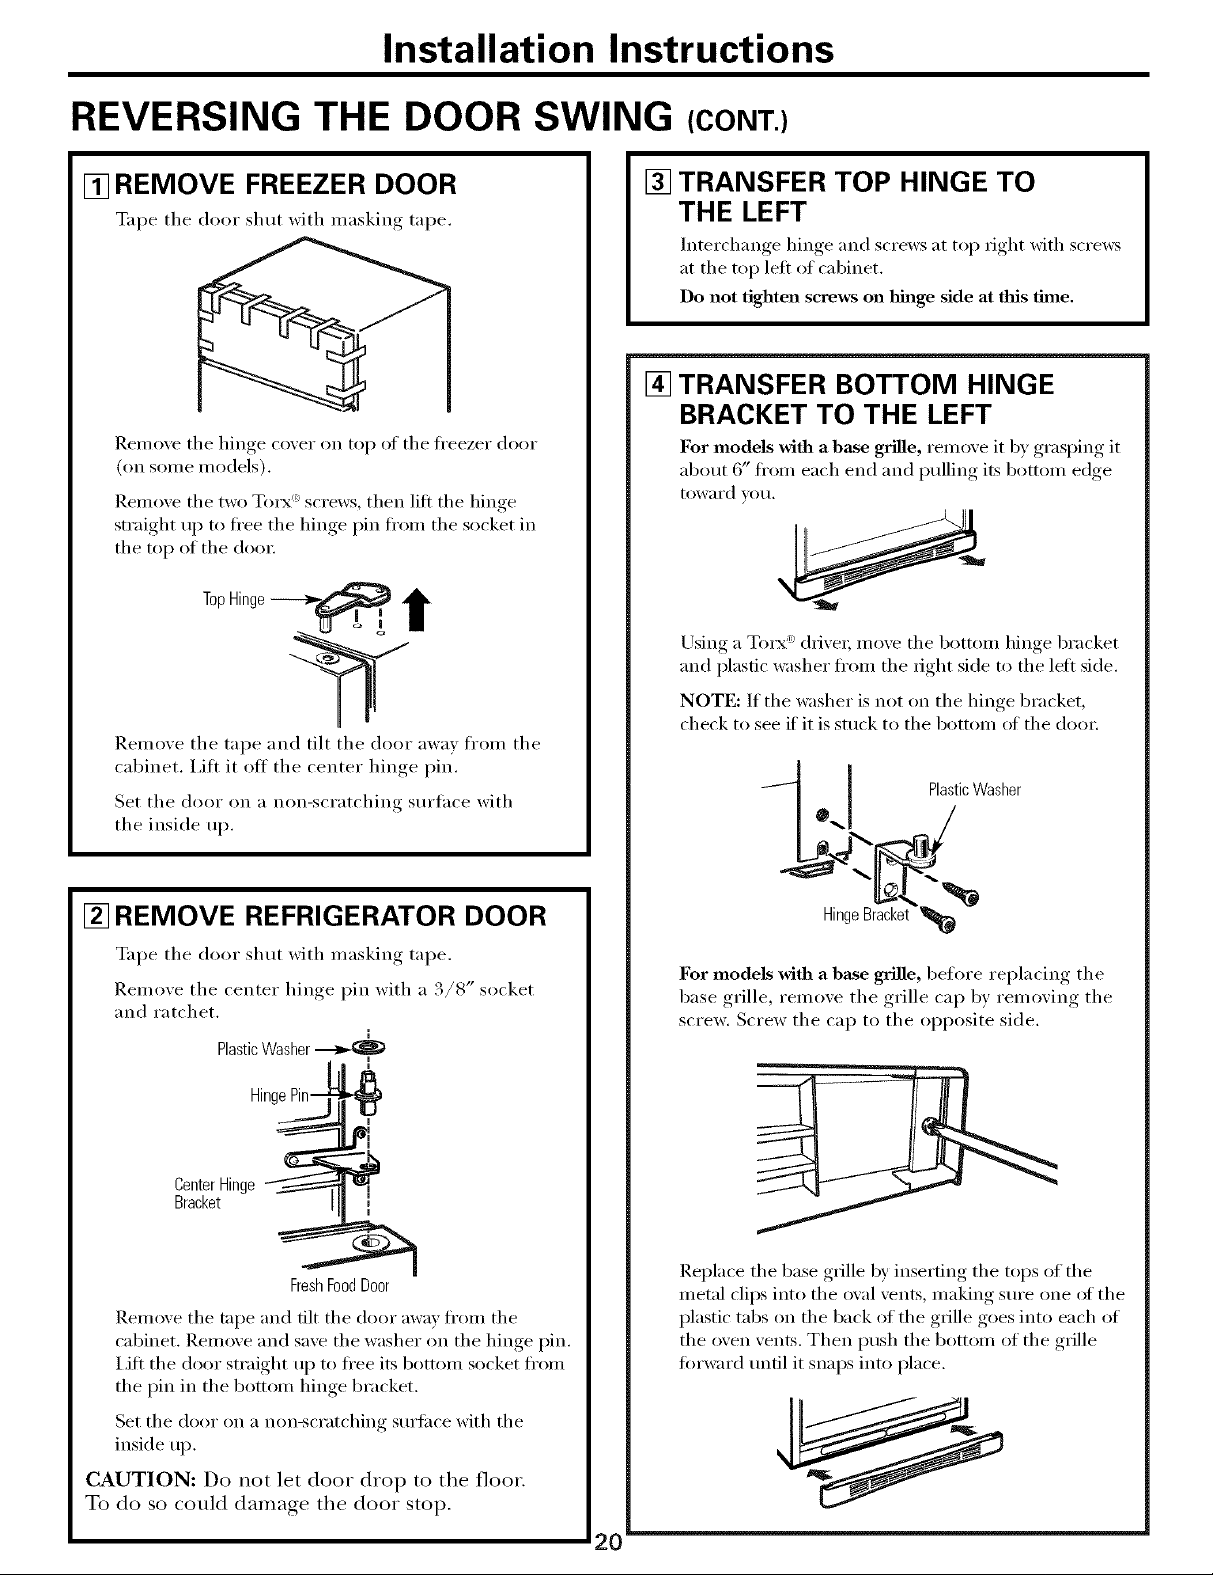
REVERSING THE DOOR SWING (CONT.)
[] REMOVE FREEZER DOOR
Tape the door shut with masking tape.
Remove the hinge coxer on top of the fl'eezer door
(on some models).
Remo_e the two Tmx a'screws, then litt the hinoe
straight up to fl'ee the hinge, Ifin ti'om the socket in
the top of the dora:
TopHinge----_-__
Remove the tape and tilt the door away from the
cabinet. I,ifl it off the center hinge pin.
[] TRANSFER TOP HINGE TO
THE LEFT
Interchange hinge and screws at top right with scre_vs
at the top left of cabinet.
Do not tighten screws on hinge side at this finae.
[] TRANSFER BOTTOM HINGE
BRACKET TO THE LEFT
For models with a base grille, remo_ e it by ,graslring, it
about 6" fl'om each end and pulling its bottom edge
toward VOtl.
Using a Torx _'_drive_; move the bottom hinge bracket
and plastic washer fl'om the fight side to the left side.
NOTE: If the washer is not on the hinge bracket,
check to see if it is stuck to the bottom of the dora:
Set the door on a non-scratching surface with
the inside up.
[] REMOVE REFRIGERATOR DOOR
%q)e the door shut with masking rope.
Remoxe the center hinoe_ pin with a ,/8 socket
and ratchet.
i
PlasticWasher
HingePin--
CenterHinge_
Bracket
FreshFoodDoor
Remove the tape and tilt the door away fl'om the
cabinet. Remove and save the washer on the hinge pin.
I,ifl the door straight up to ti'ee its bottom socket fl'om
the pin in the bottom hinge bracket.
I
0_.] PlasticWasher
Hing,
For models with a base grille, before rei)lacim,_ the
base grille, remo_.e the grille cap by remo'.im,_ the
screw. Screw the cap to the opposite side.
Replace the base grille by inserting the tops of the
metal clips into the oval vents, making sm'e one of the
plastic tabs on the back of the grille goes into each of
the oven vents. Then push the bottom of the grille
fin'ward tmtil it snaps into place.
Set the door on a non-scratching surfilce with the
inside up.
CAUTION: Do not let door drop to the floor.
To do so could damage the door stop.
20_
Installation instructions
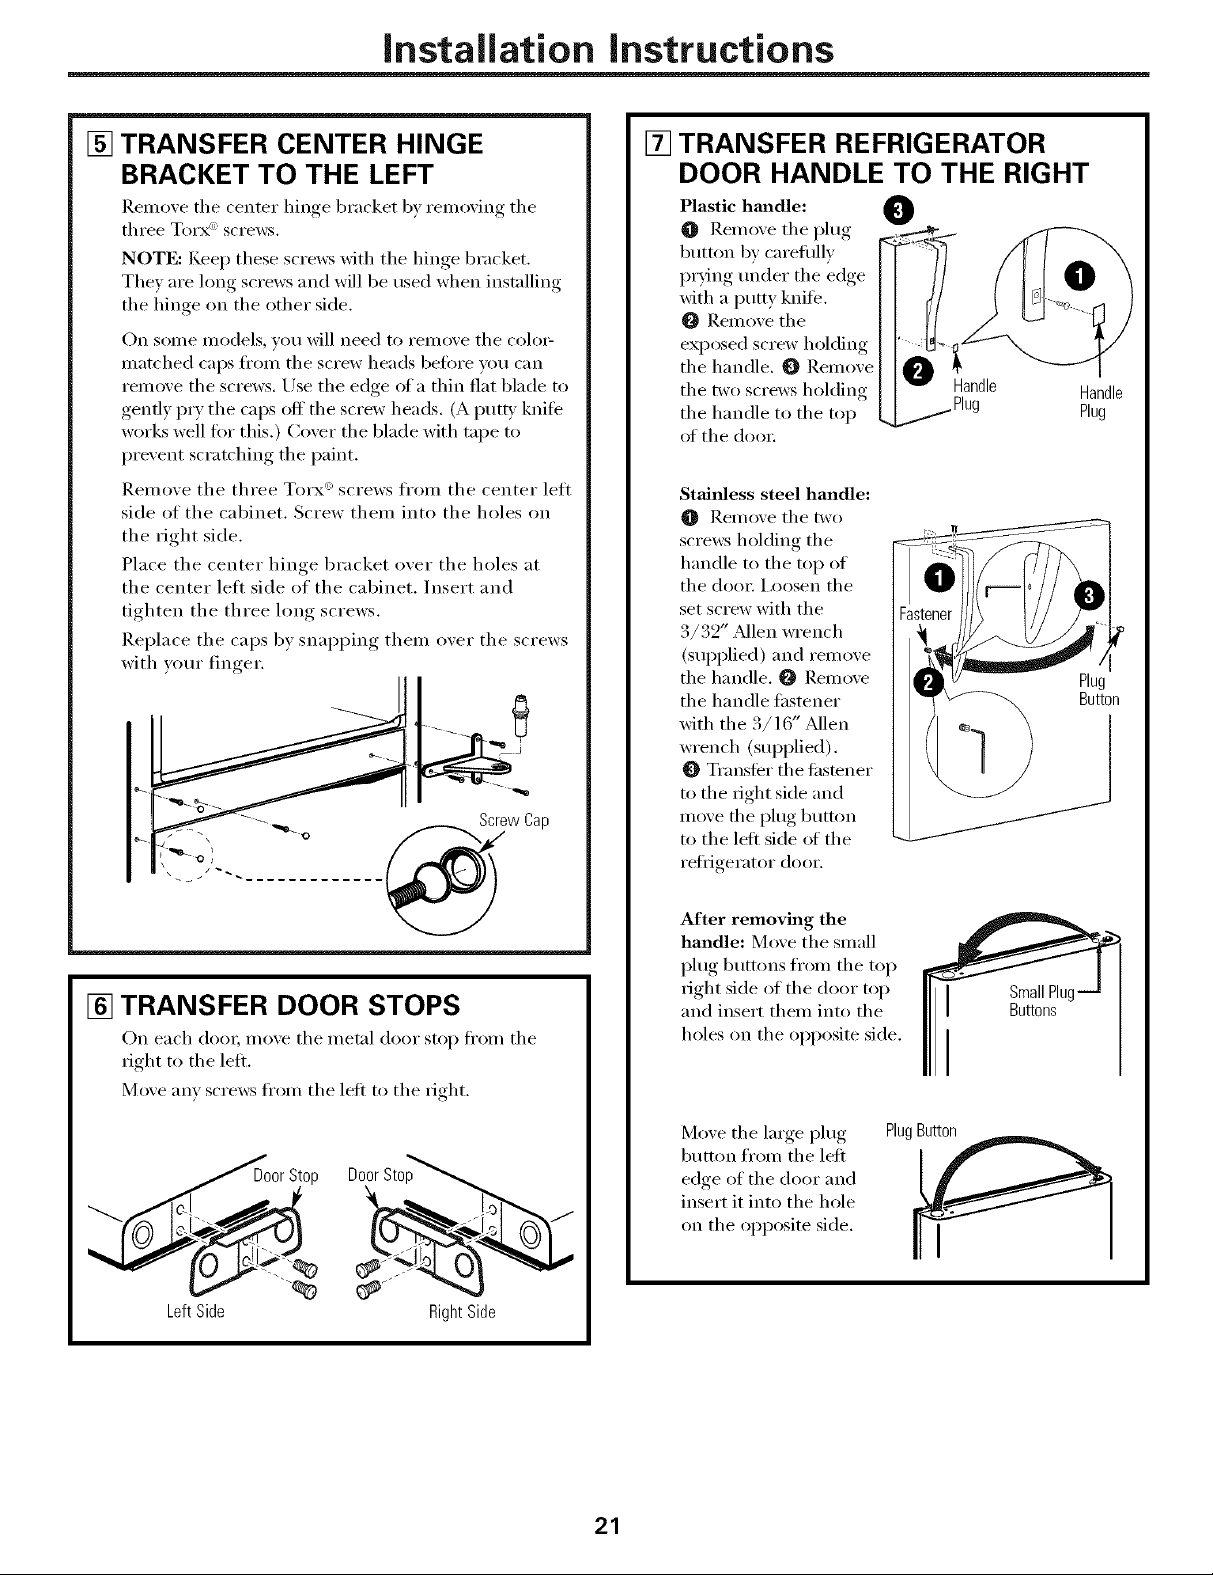
[] TRANSFER CENTER HINGE
BRACKET TO THE LEFT
]_emove the center hinge bracket by removing the
three Torx _':screws.
NOTE: Kee I) these screws with the hinge bracket.
Thev are hmg screws and will be used when installing
the hinge on the other side.
On some models, you will need to remove the col()>
matched caps fl'om the screw heads before you can
remove the screws. Use the edge of a thin fiat blade to
gently PU tile caps off the screw heads. (A pu W knife
works well for this.) Cover the blade with tape to
prevent scratching the paint.
Remove the three Torx <'_screws fl'om the center lett
side of the cabinet. Screw them into the holes on
the right side.
Place the center hinge bracket over the holes at
the center left side of the cabinet. Insert and
tighten the three long screws,
Replace the caps by snapping them over the screws
with wmr finger.
- _ 1-----_ --.:ScrewCap
[] TRANSFER REFRIGERATOR
DOOR HANDLE TO THE RIGHT
Plastic hm_dle: 0
O Remme the l)lug, _ _.rEae_..
button b', careflfll_
)trim* trader the edoe
with a putty knife.
Remox e the
the handle. _ Remove
exp(,sed screw h(,lding 'O" !
the two screws holding andle
the handle to the top -. /Plug
of the dooi:
Stainless steel handle:
Rein(we the two
screws holding the
handle to the top of
the door. I,oosen the
set screw with the
3/32" _Mlen wrench
(SUl)plied) and remove
the handle. _ Remove
the handle fastener
with the 3/16" _Mlen
wrench (sui)plied) .
Transfer the fastener
to the fight side and
move the I)lug button
to the left side of the
refligerator door.
°?
Handle
Plug
t
Ph
Button
[] TRANSFER DOOR STOPS
On each dora, moxe the metal door stop fl'om the
right to the lelL
Moxe any scre_s fl'om the left to the right.
,p Door
\
LeftSide
RightSide
After removing the
handle: Move the small
plug buttons fl'om tile top
right side of the door top
and insert them into the
holes on the opposite side.
Move the lmge plug
button fl'om the left
edge of the door and
insert it into the hole
on the opposim side.
PlugButton
I
21
Installation Instructions
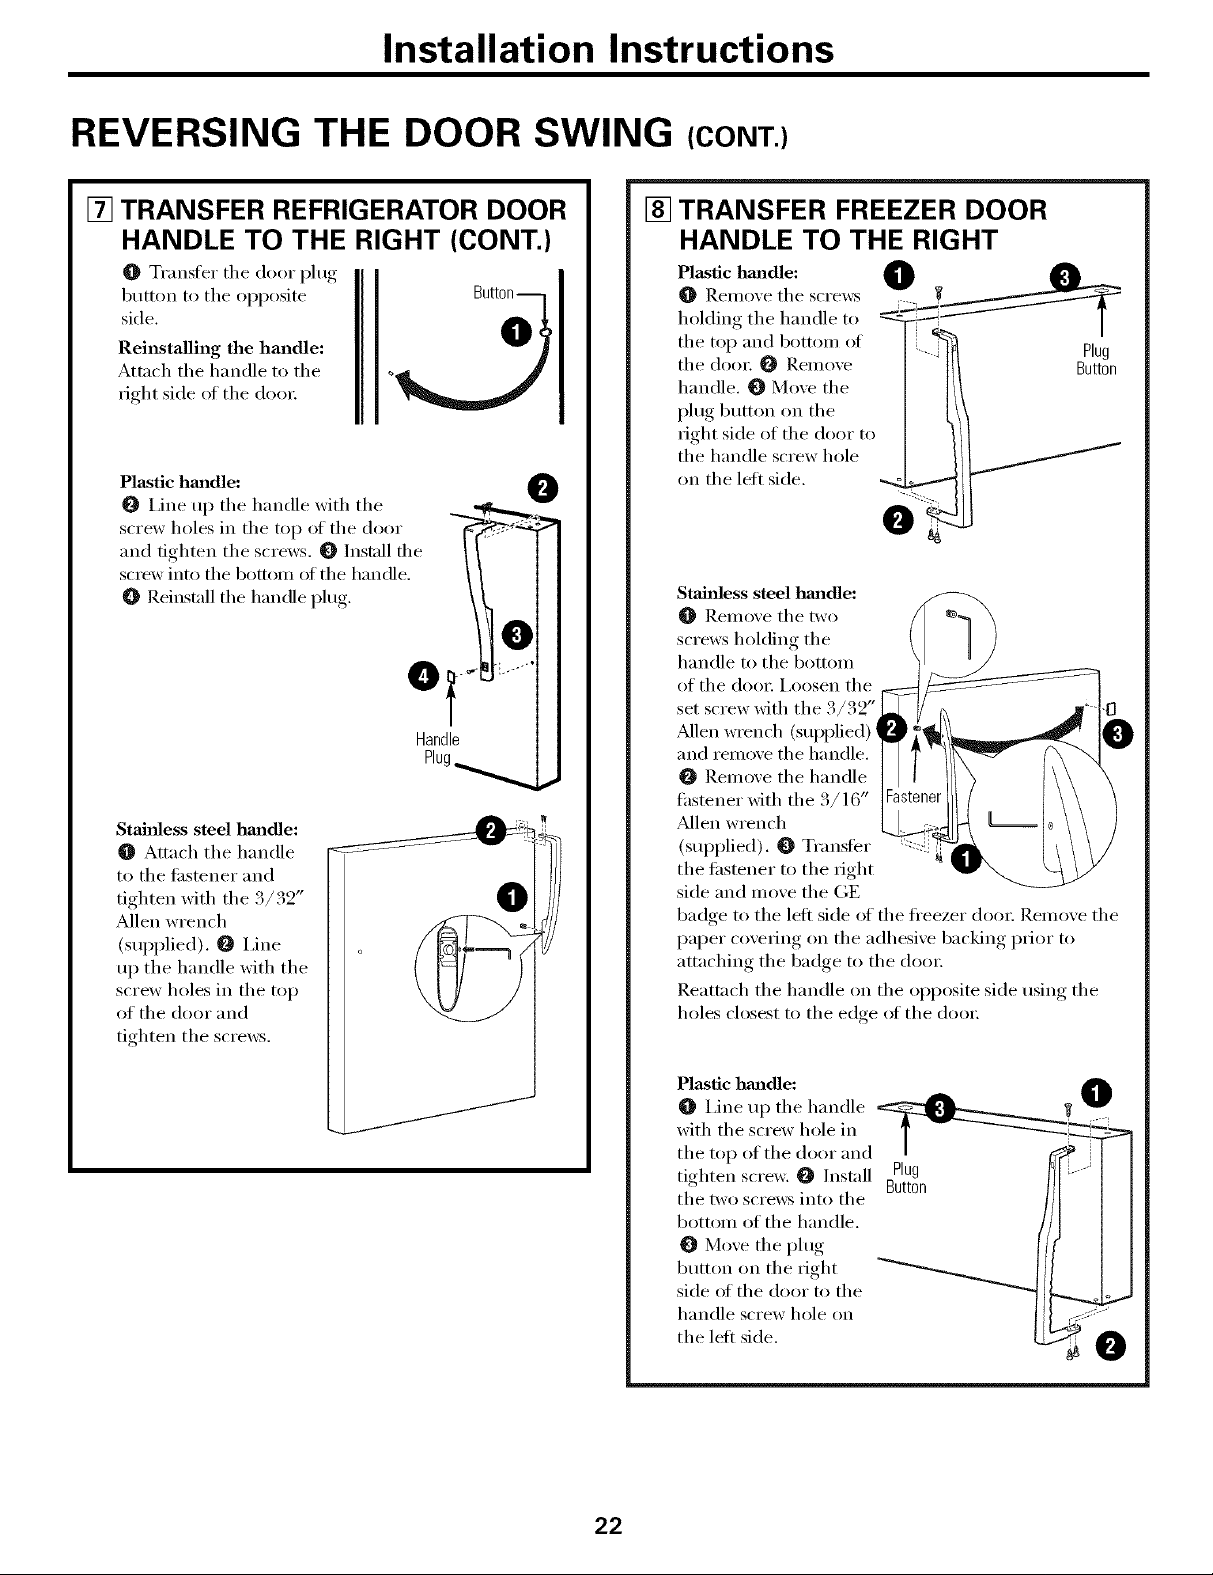
REVERSING THE DOOR SWING (CONT.)
[] TRANSFER REFRIGERATOR DOOR
HANDLE TO THE RIGHT (CONT.)
Transfer the door plug
button to tile opposite Butt
side. O
Reinstalling the handle:
Attnch tile handle to tile
right side ot the doo_,
Plastic hmadle: _,_,,,, @
I,ine up tile handle with tile
screw holes in tile top of tile door _'_
and tighten the screws. _ Install file
screw into the bottom of the handle.
O Reinstall the handle plug.
Handle
Plug_ I
Stainless steel hm_dle:
O Attach tile handle
to the ti_stener and
tighten with the 3/32"
Allen wrench
(supplied). _ I,ine
up the handle with the
screw holes in the top
of the door and
tighten the screws.
TRANSFER FREEZER DOOR
[]
HANDLE TO THE RIGHT
Plastic hmldle: 0 _ ---
ReI/loxe the screws ...... __
holding the handle to _=1_iI_--"-"--"-_ T
the to)'l and bottom (>i |i i
• i----..J Hug
tile doo_: O Remoxe | Button
handle. _ Moxe tile |
plug button on tile /
fioht side of the door to
tl?; handle screw h(>le /
on tile left side. _ --
Stainless steel hmadle:
Rein(we tile two
screws holding tile
handle to the bottom
ol the door: i,oosen the
set screw with tile 3/32"
Mlen wrench (s/q/plied)
and remove the handle.
Remove the handle
fastener with the 3/16"
Mlen wrench
(supplied). _ Transfer
the fi_stener to the right
side and move the GE
badge to tile left side of tile fl'eezer door: Remove tile
paper coveting on tile adhesive backing prior to
attaching the badge to the dora:
Reattnch tile handle on tile opposim side using tile
holes closest to the edge (ff the dora:
22
Plastic hmadle: ,_OO I,ine up tile handle
with tile screw hole in T ....
the t°l> °I the d°°r aIld _ Jl ]
, Plug
tighten screw. _ ]nstnll _ .. [ ''" ] [
' , bullon [ I I
thetw,>s,','e,,'srot,>the / I I
bott(,In (,I tile handle. J ] [
Moxe tile plug ] ]
b//tton on tile right _ ] ]
side of tile door to tile _
handle screw hole on
the left side. --_' @
Installation Instructions
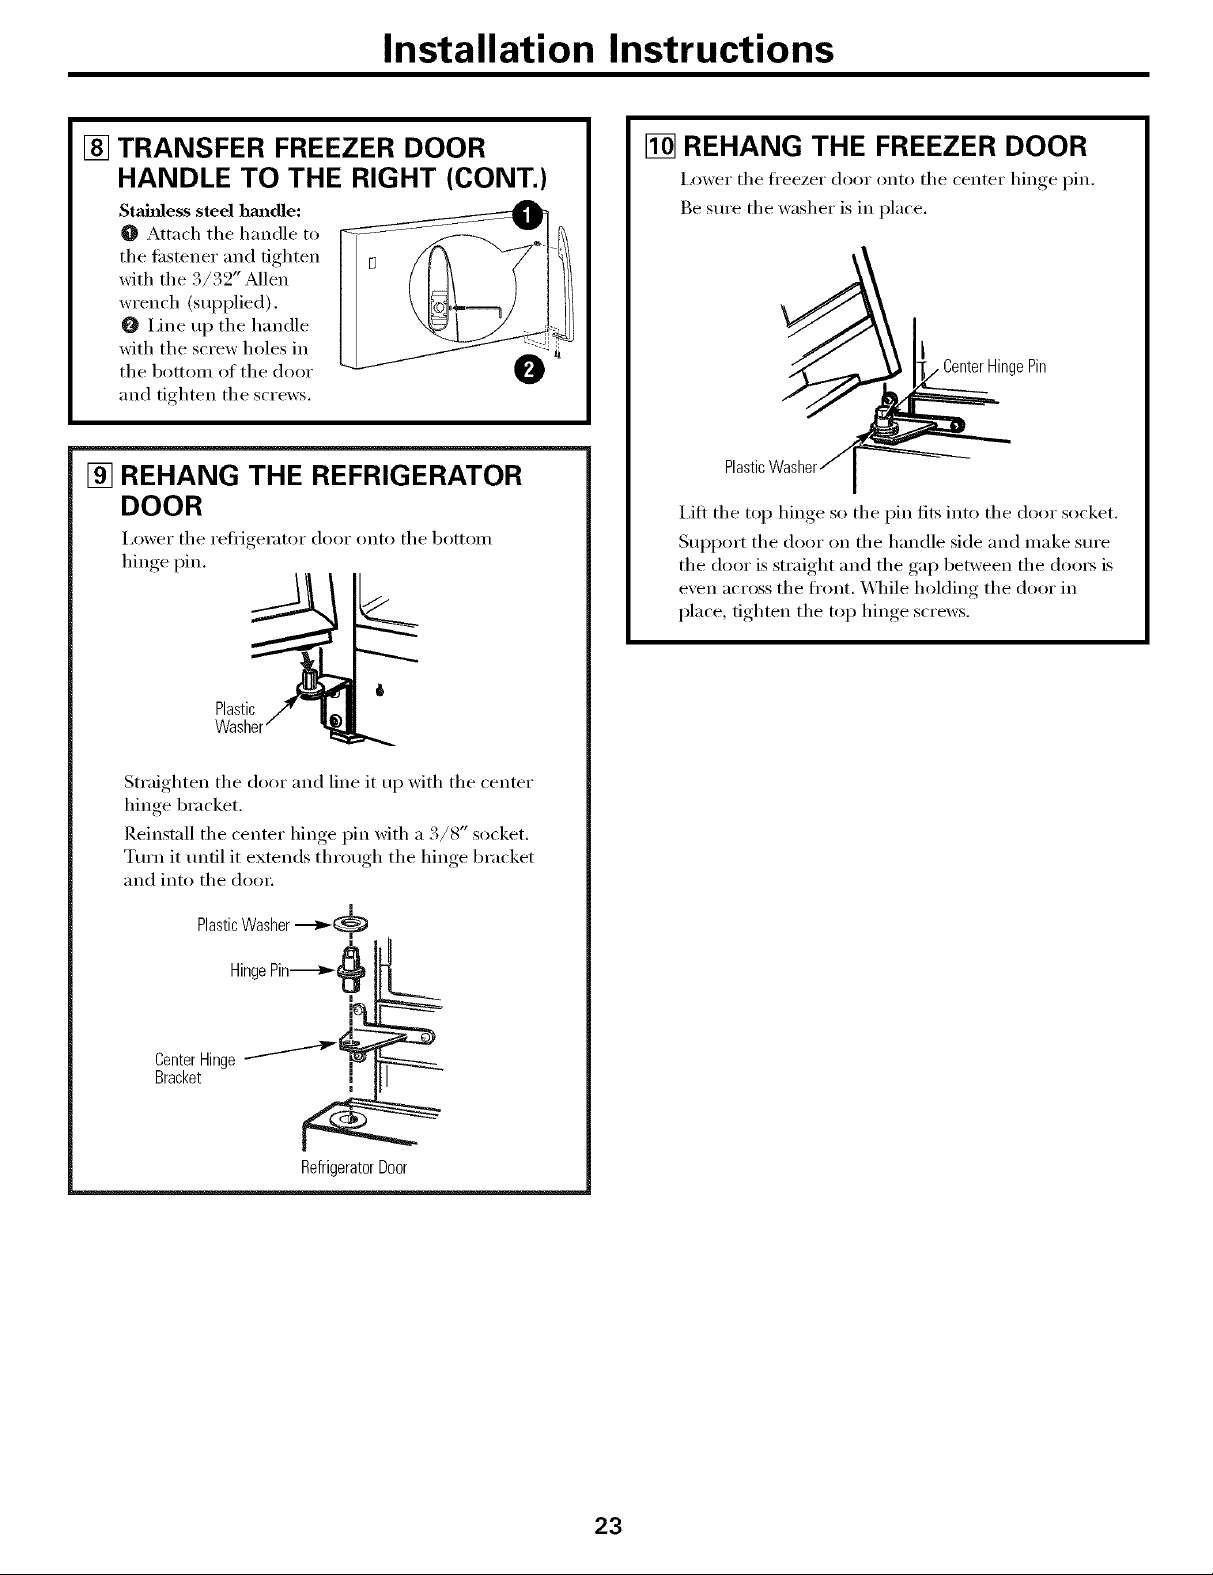
[] TRANSFER FREEZER DOOR
HANDLE TO THE RIGHT (CONT.)
Stainless steel hmadle:
O Attach tile handle to
tile ti_stener and tighten
with tile 3/32" _Mlen
wrench (supplied).
Line up the handle
with the screw holes in
tile bottom of tile door
and tighten tile screws.
[] REHANG THE REFRIGERATOR
DOOR
I,ower tile i'eiiJgei_ltor door onto tile bottoil/
hinge pin.
i
Plastic
[] REHANG THE FREEZER DOOR
I,ower tile ti'eezer door onto tile center hinge pin.
Be sure tile washer is in place.
I{ CenterHinge Pin
Plastic
i,ifl tile top hinge so tile pin fits into tile door socket.
Support tile door on tile handle side and make sure
tile door is straight and tile gap between tile doors is
even across tile fi'ont. V_]/ile holding tile door in
place, tighten tile top hinge screws.
Straighten tile door and line it up with tile center
hinge bracket.
Reinstall tile center hinge pin with a 3/8" socket.
Turn it until it extends through tile hinge bracket
and into tile door
PlasticWasher -_>-+
Hinge Pin-_
I
Center Hinge ...................-.4_
Bracket
I
Refrigerator Door
23
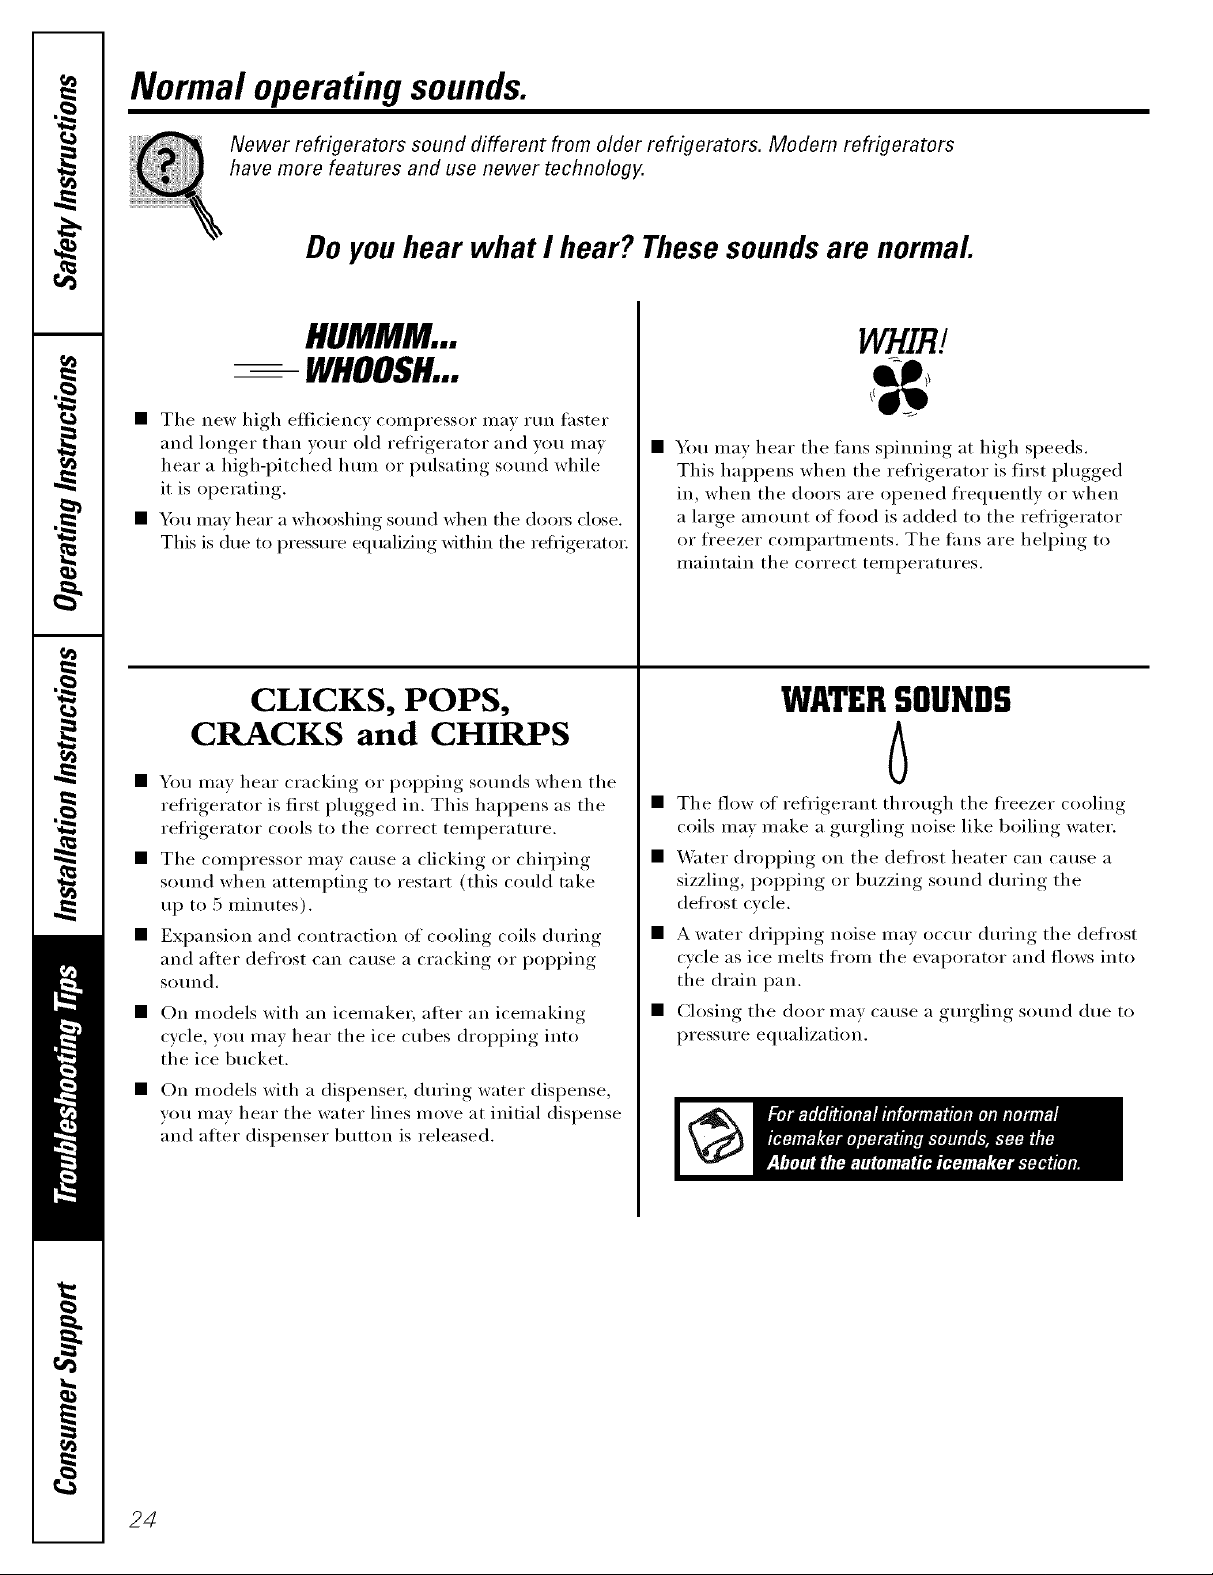
Normal operating sounds.
Newer refrigerators sound different from older refrigerators. Modem refrigerators
have more features and use newer technology.
Do you hear what I hear? These sounds are normal.
HUMMM...
-- WHOOSH...
• The new high efficiency compressor may mn taster
and hmger than wmr old refl'igerator and wm may
hear a high-i)itched hum or pulsating sotmd while
it is operating.
• _m may hear a whooshing sound when the (loo_ close.
This is due to i)ressure equalizing within the retiJgeratoi;
CLICKS, POPS,
CRACKS and CHIRPS
• You may hear cracking or i)oi)ping sounds when the
refrigerator is first plugged in. This hal)pens as the
refrigei'ator cools to the correct teil/l)erattlre.
• The compressor may cause a clicking or chiq)ing
sotmd when attempting to restart (this could take
up to 5 minutes).
• Expansion and contraction of cooling coils during
and after defl'ost can cause a cracking or i)oi)ping
SOtlnd.
• On models with an icemake_; after an icemaking
cycle, you mav hear the ice cubes dropping into
the ice bucket.
• On models with a dispenser, dm'ing water dispense,
wm may hear the water lines move at initial dispense
and after dispenser button is released.
WHIR./
• You may hear the rims spinning at high speeds.
This hal)pens when the refrigerator is first plugged
in, when the doors are opened frequently or when
a large amount of fi)od is added to the refl'igerator
or fl'eezer compartments. The rims are helping to
maintain the correct temperatures.
WATERSOUNDS
6
• The flow of refl'igerant through the fl'eezer cooling
coils may make a gm'gling noise like boiling water.
• Water dropping on the defl'ost heater can Catlse a
sizzling, I)oI)ping or buzzing SOtlild dm'ing the
defl'ost cycle.
• A water dripping noise may occur during the defrost
cvcle as ice melts ti'om the evaporator and flows into
the drain pan.
• Closing the door mav cause a gurgling sound due to
pressure equalization.
24
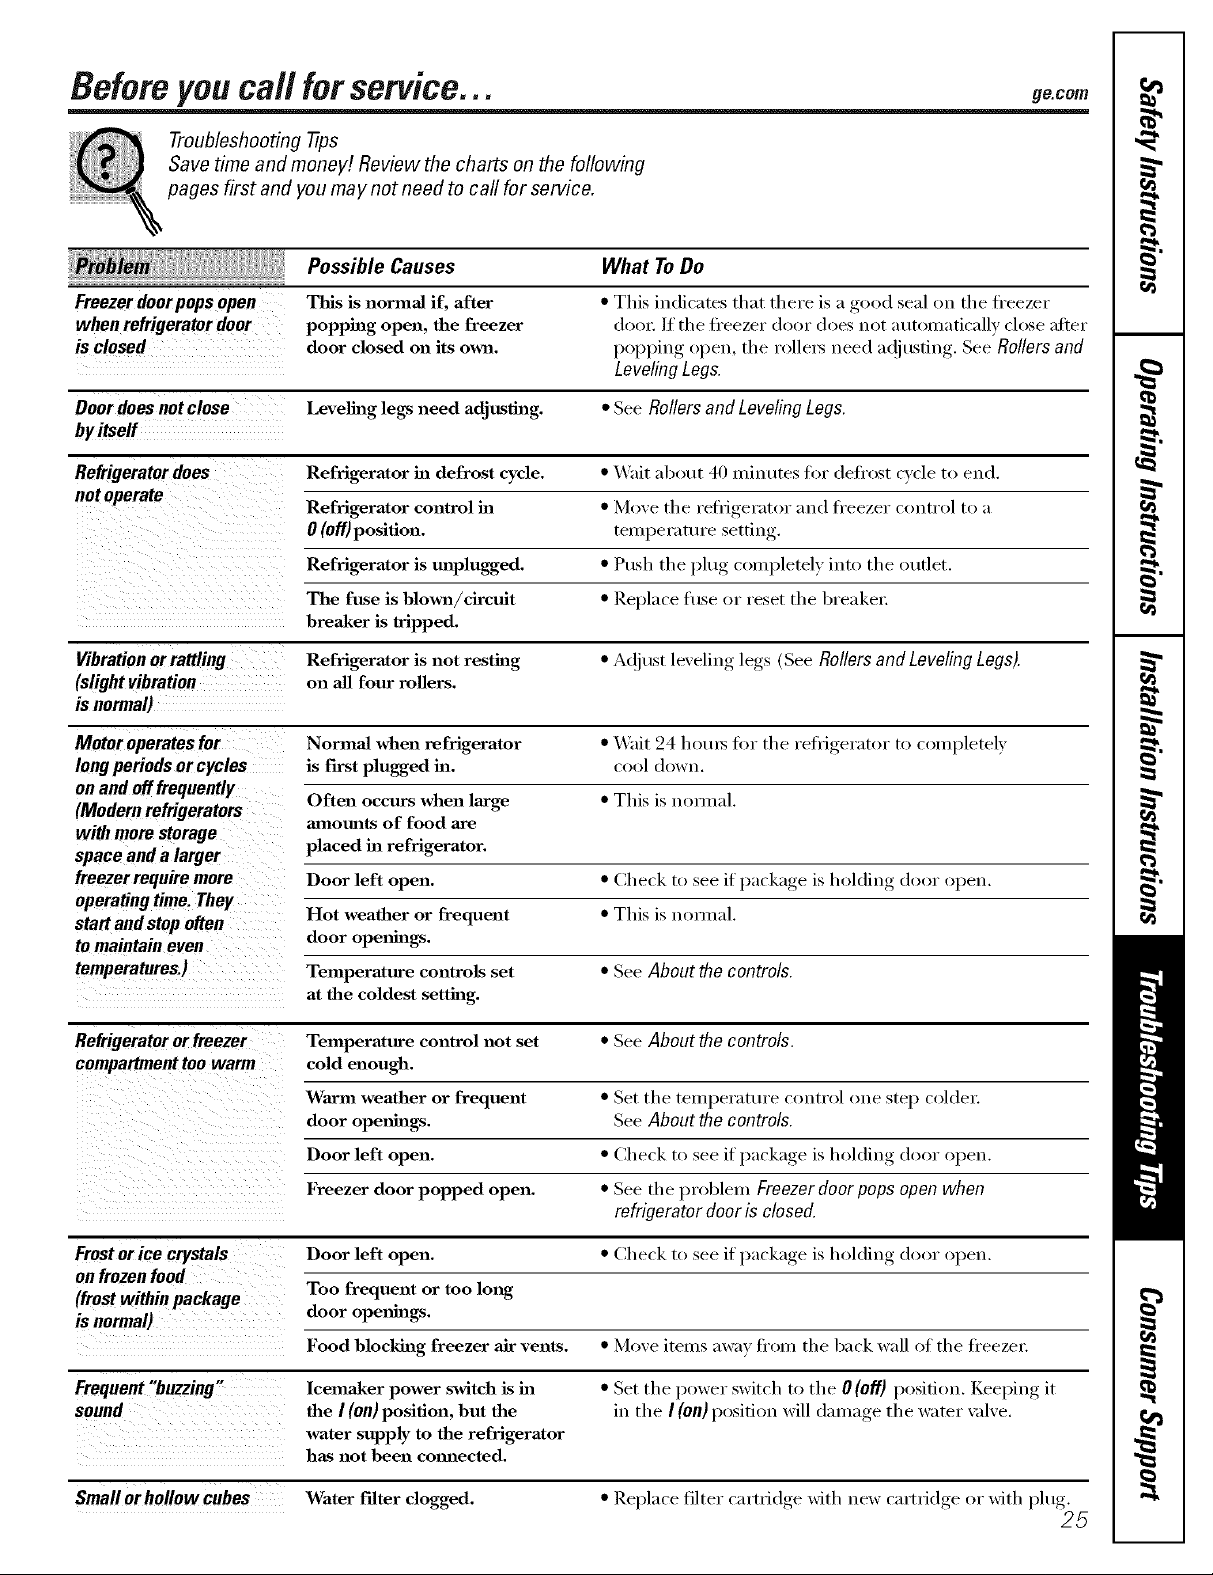
Beforeyou carl forservice.., geco,,
Troubleshooting -tips
Save time and money! Review the charts on the following
pages first and you may not need to call for service.
Possible Causes
Freezer doorpops open This is normal if, after
when refrigerator door popping open, the freezer
is closed door closed on its own.
Door does not close Leveling legs need adjusting. • See Rollers and Leveling Legs.
What ToDo
• This indicates that there is a good seal on the freezer
(loo_; If the ti'eezer door does not autonmticallv close after
I)oI)ping open, the rollers need a(!iusting. See Rollers and
Leveling Legs.
by#serf
Refrigerator does Refrigerator in defrost cycle. • \_hit ab()ut 40 minutes h w (leli'()st cycle to end.
not operate Refrigerator control ha • l_/h)ve th e retiJgerat()r aud ti'eezer c()utr()l t_) a
0 (off) position, tern l)el';Itt II'e settiug.
Refrigerator is unplugged. • Push the lalu'"_ completely, into the outlet.
The fuse is blown/circuit • Replace fl/se or reset the breakel;
breaker is tripped.
Vibration orrattling Refrigerator is not resting • A(!i ust leveling legs (See Rollers and Leveling Legs).
(slightvibration on all four rollers.
isnormal)
Motor operates for Normal when refrigerator • \_lit 94 l/()tus tar the reflJgerator to completely
long periods or cycles is ['lrst plugged ha. co()l (h)wu.
onandofffrequently
(Modern refrigerators
with more storage amounts of food are
Often occurs when large • This is uomml.
space anda larger placed ha refrigerator.
if )ackaoe is holding door open.freezerrequiremore Door left open. • Check to see l
operatingtime.They
start and stopoften
to maintain even door openings.
temperatures.) Temperature controls set • See About the controls.
Hot weather or frequent • This is uomml.
at the coldest setting.
Refrigeratororfreezer Temperature control not set • See About the controls.
compartment too warm cold enough.
WaJcm weather or frequent • Set the tell/l)el'att/l'e (outrol oue step coldel:
door openings. See About the controls.
Door left open. • Check to see if l)ackage, is holding door ol)eu.
Freezer door popped open. • See the problem Freezer door pops open when
refrigeratordoor is closed.
onfrozenfood
if )a(ka,,e is holding door open.Frostorice crystals Door left open. • (:he('k to see l _ ,
(frost within package Too frequent or too long
isnormal)
door openings.
Food blocking freezer air vents. • Move items away ti'()m the back wall of the ti'eezeL
Frequent "buzzing" lcemaker power switch is ha • Set the power switch to the 0 (off) position. Keel)iug it
sound the I (on) position, but the in the I(on) l)ositiou will damage the water xalve.
water supply to the refrigerator
has not been commcted.
Small orhollow cubes Water flflter clogged. • Replace filter cartfidoe_ with new cartridge or with I)lu_
25
Beforeyoucall forservice...
Troubleshooting -tips
Possible Causes What ToDo
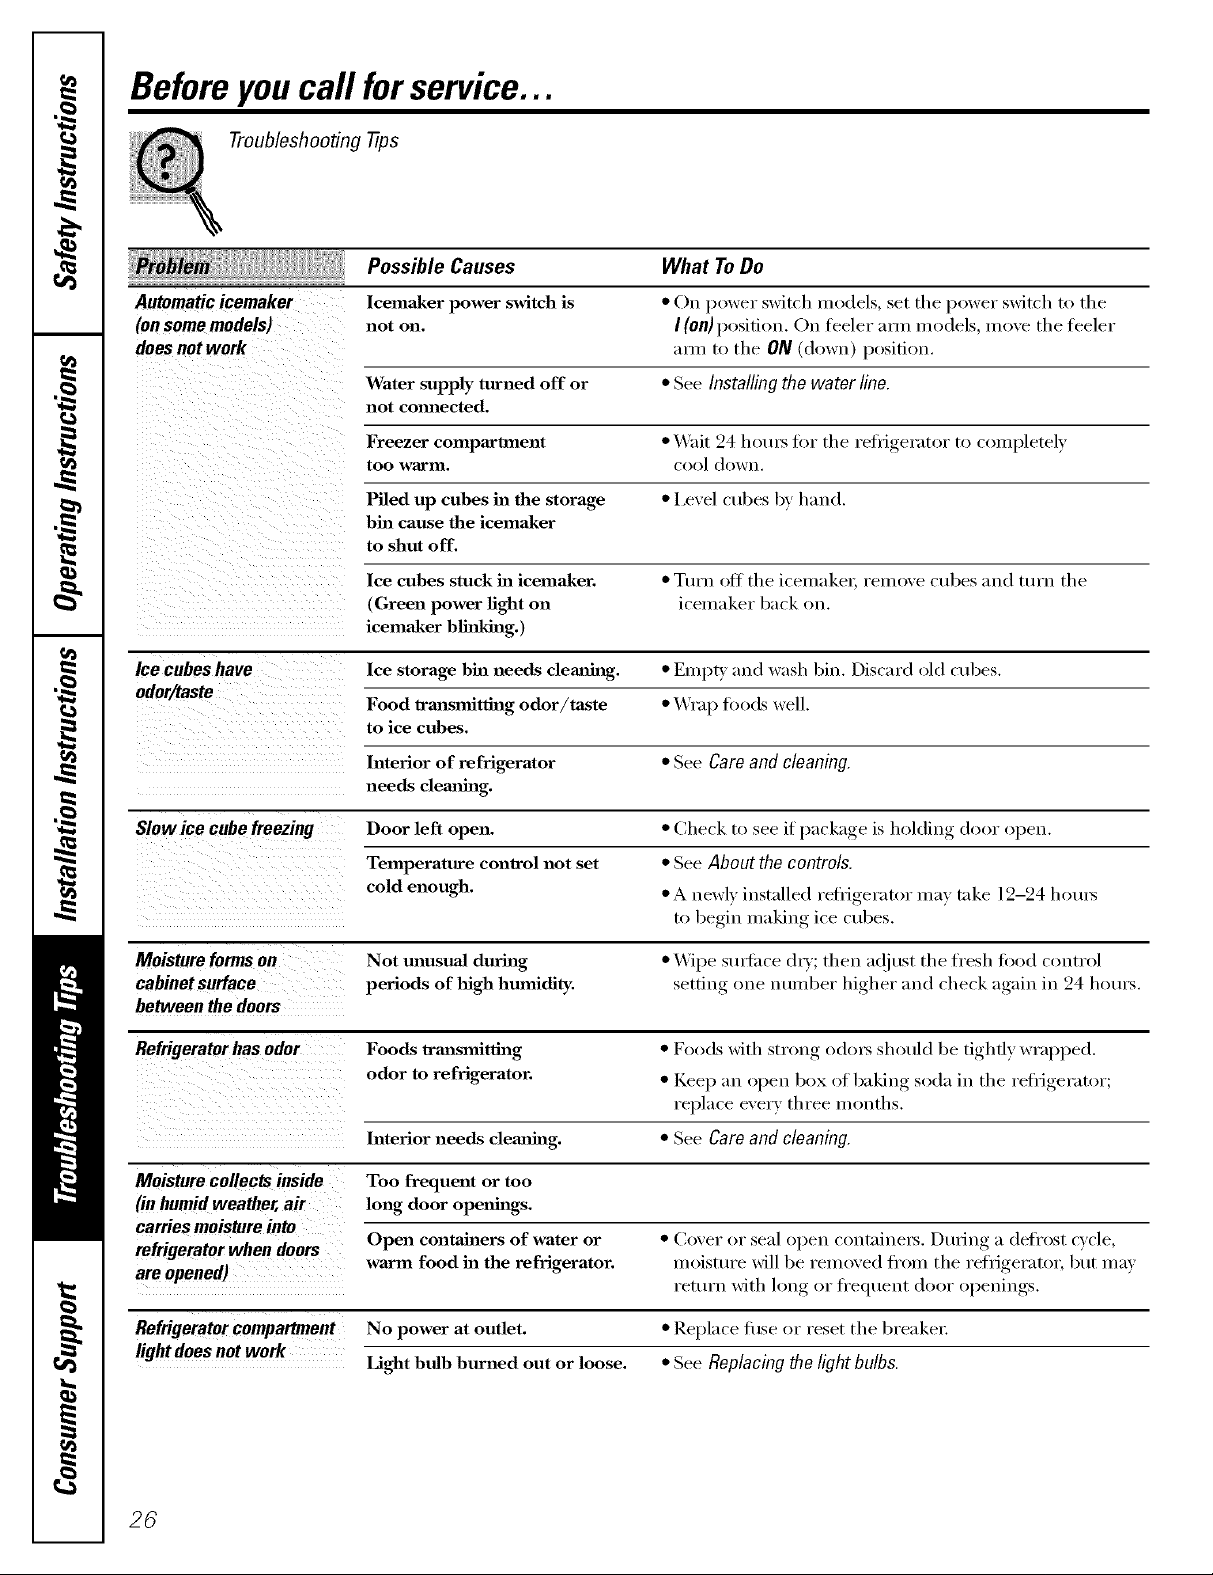
Automaticicemaker
(onsomemodels)
doesnotwork
Ice cubes have Ice storage bin needs clemahag. • EmpV and wash bin. Discard old cubes.
odor/taste
Icema.ker power switch is
not on,
Water supply turned off or • See Installing the water line.
not comlected.
Freezer compartment • Wait 24 hotu_ fl)l" th e refl'igerat_)l" t() (()ml)letely
too warln, cool dowu,
Piled up cubes in the storage • I,evel cubes by hand.
bin cause the icemaker
to shut off.
Ice cubes stuck in icema_ker. • Tuna off the icemakel; remove cubes and turn the
(Green power light on icelnaker back on.
icemaker blinking.)
Food lrmlsmitthag odor/taste • Wrap fi)ods well.
to ice cubes,
• On power switch models, set tile power switch to the
I (on) position. On feeler am_ models, mo_,e the feeler
am/to the ON (down) position,
Interior of refrigerator • See Care and cleaning.
needs clemfing.
if )acka,,e is holding door open.Slow ice cube freezing Door left open. • (_heck to see 1
Temperature control not set • See About thecontrols.
cold enough, • A newly installed reflJgerator may take 12-24 hotu_
to be_iu iua!du,_ ice cubes.
Moisture forms on Not unusual during • \4"ipe suYlilce (liT; then a(!just the fresh fi)od control
cabinet surface periods of high humidity. ,setfiw_ one number higher, and check again, in 24 horus.
between the doors
Refrigerator has odor Foods _'m_s_mitth_g • Foods with strong odm_ should be tightly wral)ped.
odor to refrigerator. • Kee l) an ol_en box of baking, soda in the refi_igerator;
rel)lace every three mouths.
Interior needs clemfing, • See Care and cleaning.
Moisturecollectsinside Too frequent or too
(inhumidweather,air long door openings.
carriesmoistureinto Open containers of water or • C()ver (11"seal ()pen c()utainel_. D ufing a (lefr_)st cv('le
refrigerator when doors warm food in the refrigerator, moisture will be removed fl'om the reflJgeratol', but may
are opened) return with hmg or fl'equeut door openings.
Refrigerator compartment No power at outlet. • Replace fi/se or reset the breakel:
light does not work Light bulb burned out or loose. • See Replacingthe light bulbs.
26
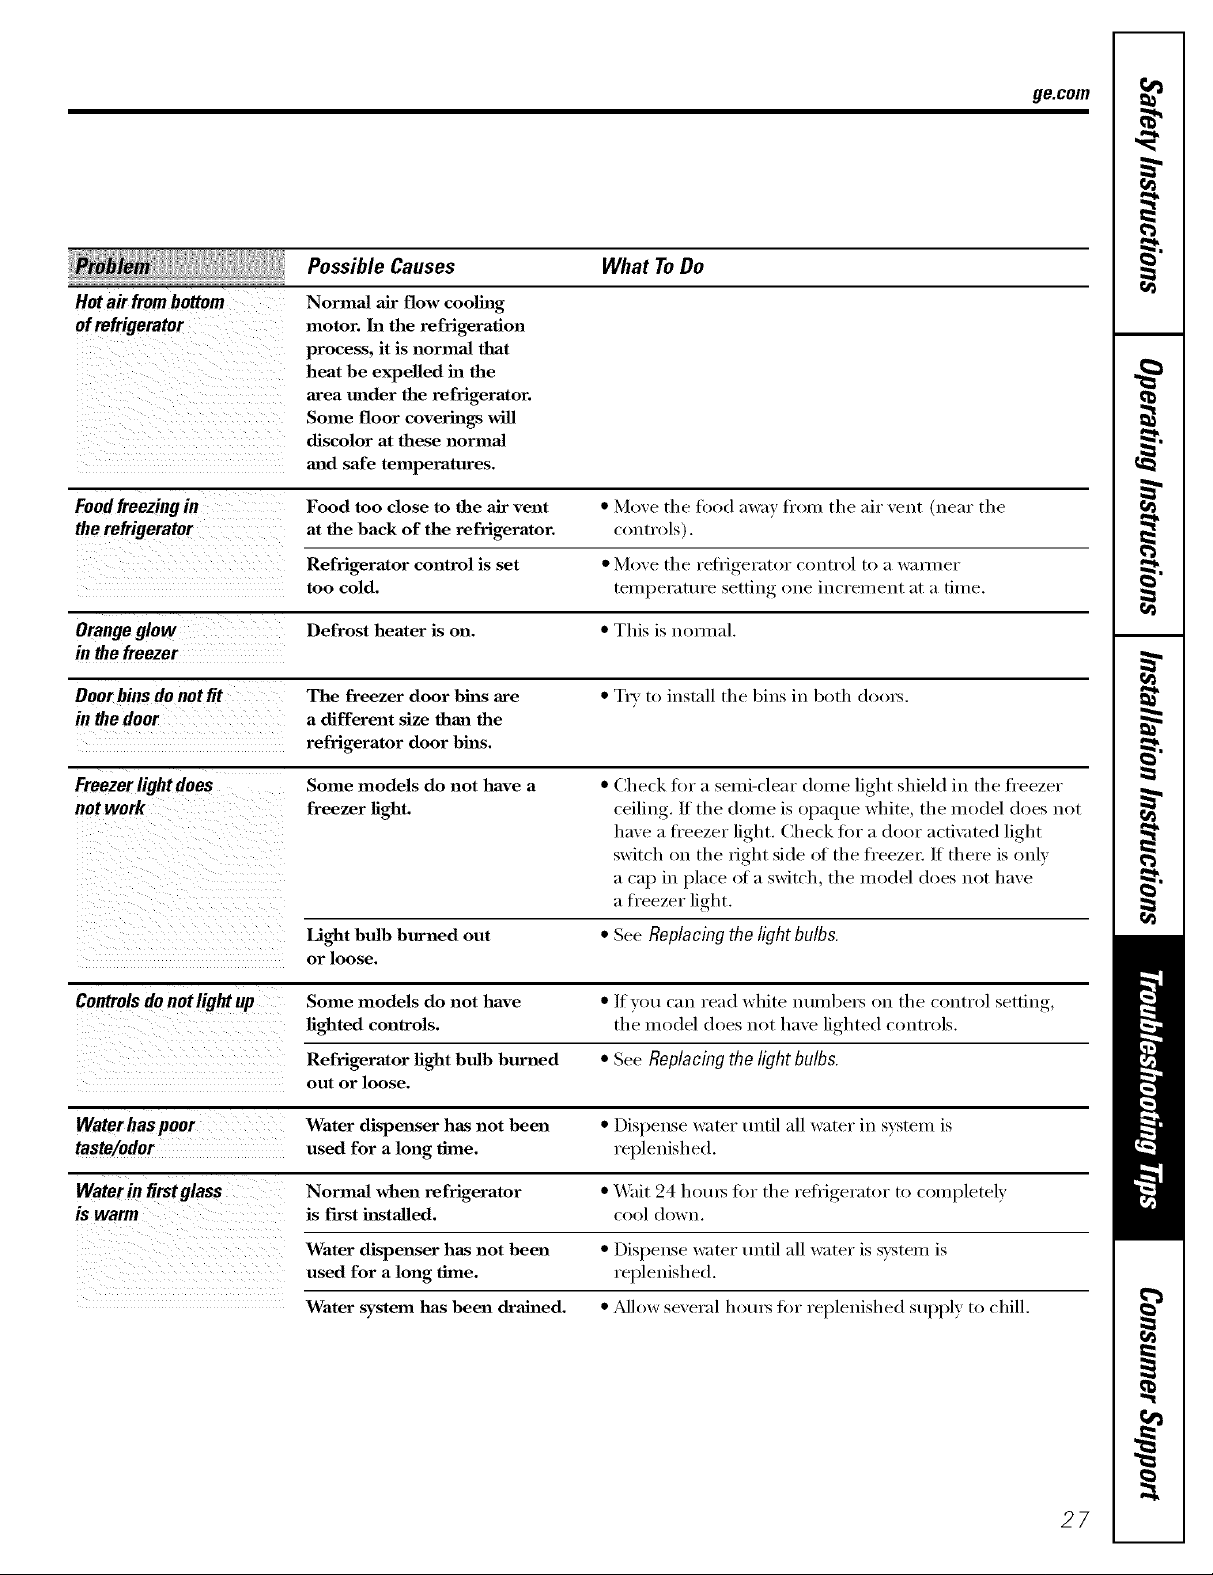
Possible Causes What ToDo
Hotair frombottom
ofrefrigerator
Foodtreezing in Food too close to the air vent * Move the fl)od away fl'om the air vent (nero" the
the refrigerator at the back of the refrigerator, controls).
Orange glow Defrost heater is on. * This ix mmnal.
in the freezer
Normal air flow cooling
motor, ha the refrigeration
process, it is normal that
heat be expelled in the
area under the refrigerator.
Some floor coverings will
discolor at these normal
mad safe temperatures.
Refrigerator control is set * Move the reiiJgerator control to a _mner
too cold. tel//pel':lttll'e setting one incI'el//ent _lt ;i fii//e.
ge.com
Door bins do not fit The freezer door bills are * TI_,, to inst_lll the bins ill b()th do()I_.
in the door a different size than the
refrigerator door bills.
Freezerlightdoes
notwork
Some models do not have a
freezer right.
Light bulb burned out • See Replacingthelight bulbs.
or loose,
• Check fi)r a senti-clear dome light shield in the Ji'eezer
ceiling. II tire dome ix opaque white, tire model does not
have a ti'eezer light. Check tot a door acfix_ted light
switch on tire right side (ff tire freezel: It there ix only
a cap in place (ff a switch, the model does not have
a tl'eezer light.
Controls do notlight up Some models do not have • If you can read white ntllllbelN on tire control setting,
righted controls, the model does not have lighted controls.
Refrigerator right bulb burned • See Replacingthelight bulbs.
out or loose.
Waterhaspoor Water dispenser has not been • Dispense water tmtil all water in system ix
taste/odor used for a long time. replenished.
Waterin firstglass Normal when refrigerator • _4'ait 24 hems ti)r the refiigerator to completely
is warm is f'lrst illstalled, cool down.
Water dispenser has not been • Dispense w;Iter until all w;iter is svstelll ix
used for a long time. replenished.
Water system has been drained. • _dlow several horus ti)r replenished supply to chill.
27
Beforeyoucall forservice...
Troubleshooting -tips
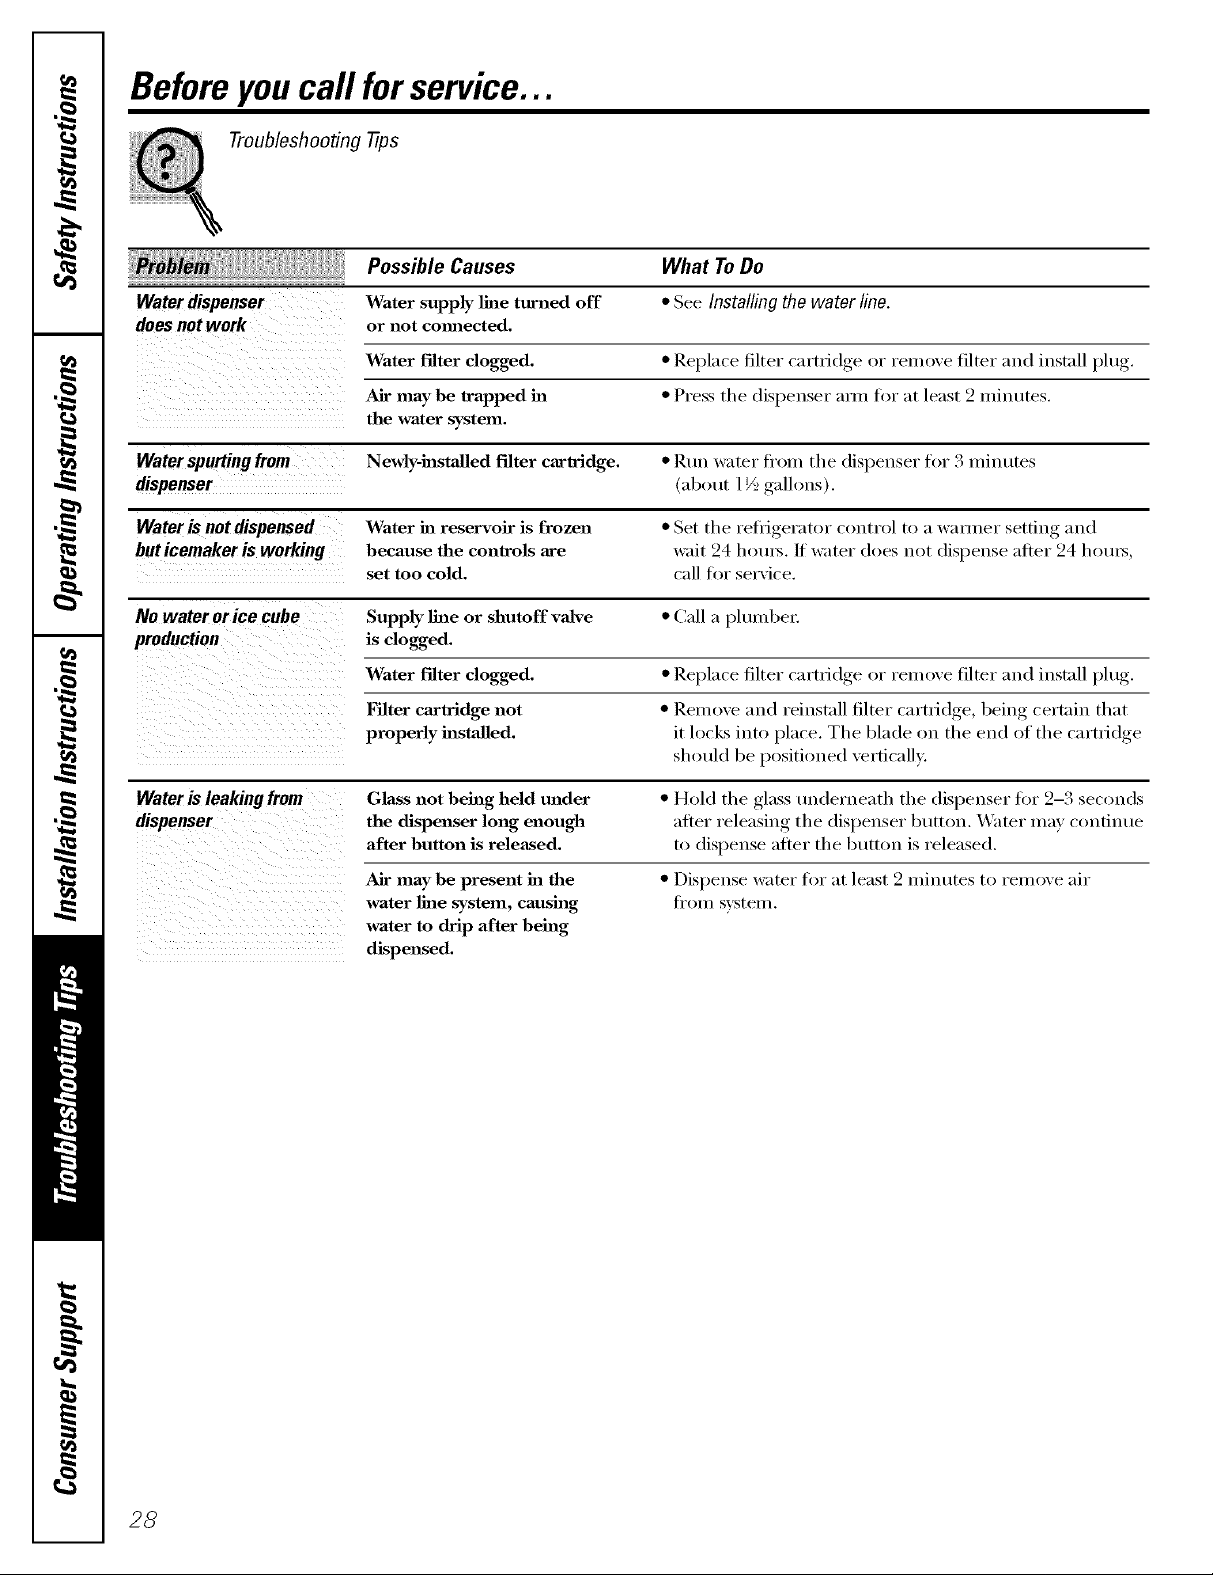
Possible Causes What ToDo
Water dispenser Water supply line turned off * See Installing the water line.
does not work or not cmmected.
Water filter dogged. * Replace filter cartridge or rein(we filter and install plug.
Air may be trapped ha * Press the dispenser ami fl)r at lea,4 2 minutes,
the water system.
Waterspurting from Newly-hastaUed filter cartridge. * Ruu water fl'om the dispenser for 3 miuutes
dispenser (about 1½ gallons).
Wateris not dispensed Water in reservoir is frozen * Set the reii_igerator control to a wamier setting and
buticemakeris working because the controls are wait 24 houl_./f water does not dispense after 24 houl_,
set too cold. call fin" service.
No water orice cube Supply line or shutoff valve * Call a plumbe_:
production is dogged.
Water filter dogged. * Replace filter cartridge or remove filter and install plug,
S; • "
Filter cm'tridge not * Remove aml reinstall filter cartridge, being certain that
properly hastalled, it locks into place. The blade on the end of the cartridge
should be positioned vertically.
Water is leaking from Glass not being held under * Hold the glass underneath the dispenser fi)r 2-3 see(rods
dispenser the dispenser long enough after releasing the dispenser button. _Viter may continue
after button is released, to dispense after the butt(m is released.
Air may be present ha the
water line system, caushag
water to drip after being
dispensed.
• Dispense water for at least 2 minutes to reinove air
tl'OlU svstel//,
28
GE Service Protection Plus 'M
GE, a name recognized workhvide for quality' and dependability; offers you
Service Protection Plus'_'--comprehensive protection on all y'om appliances--
No Matter What Brand!
We71CoverAny Appliance.
Benefits Include:
* Backed by GE
* All brands covered
* Unlimited service calls
* All parts and labor costs included
* No out-of-pocket expenses
* No bidden deductibles
* One 800 number to call
You will be completel} satisfied _ith our service protection or }ou ma) request }ore" mone} back
on the remaining value of yore" contract. No questions asked. It's theft simple.
Protect your refligerator, dishwashec washer and dryei; range, TV, VCR and much more--aJay brand!
Plus there's no extra chaxge fl)r emergency service and low monthly financing is available. Even icemaker
coverage and iood spoilage protection is offered. You can rest easy, knowing that all your valuable
household products are protected against expensive repairs.
Place ,our confidence in (;E and call us in the [).S. toll-free at _UU.OZO.ZZZzt:
for n/oFe infoFI//atioll,
Anywhere. Anytime.*
All hi'ands (overed, up to 20 )<ars old, in the (ominental t.S.
._ ()It here
Please place in envelope and mail to:
General Electric Company
Warranty Registration Department
P.O. Box 32150
Louisville, KY 40232-2150
29
Consumer Product Ownership Registration
Deal Customer:
Thank you for purchasing our product and thank you for placing your confidence in us.
VVe are proud to ha'_e you as a customer!
Follow these three steps to protect your new appliance investment:
Complete and lllall
your Consmner
Product Ownership
Registration today.
t]aw the pca_c o/
mind of km_wing we
can contact you ill
th( unlikdy (v(nt of
a sa/('ty lllodJ/ication.
AJler mailing the
registration below,
store this (toctll//ellt
in a sale' place. It
contains int6rmation
you will need should
you require service.
Our service number is
800 GE CARES
(800.432.2737).
Model Number Serial Number
, , , , , , I I , , , , ,
Important: If you did not get a registration card with your
product, detach and return the form below to
ensure that your product is registered, or register
online at ge.com.
Consumer Product Ownership Registration
[_('_t(t VO/IF OwnelT'S
Mamml carefully.
It will hel t) you
operate your new
appliance properly.
I
Model Number Serial Number
Nh Ms. Nhs. Nli_s
Fir,,1 I I Lasl]
Name I I I I I I I I I Nain(! I I I I I I I I I I I I
_1 r( (!1 I
Addr( ss I I I I I I I I I I I I I I I I I I I I I I I I
,>#I , , , , i i , I E-lnailAddress*
Zip I
1)u(, Pla.,d
Monlh
* Please provide your e-mail address to receive, via e-mail, discounts, special otl;_rs and other
important communications from GE Appliances (GEA).
GE Consumer & Industrial
Appliances
General Electric Compan U
Louisville, K¥40225
ge.com
Check here if you do not want to receive communications f]-oln (;EA's careihllv selected
pHrt llers.
FAILURE TO COMPLETE AND RET[ RN TttIS CARD DOES NOT DIMINISII YO[ R
'_X{kRlgkN'IY RI(;IITS.
For intormation about GEA's privacy and data usage policy, go to ge.com and (:lick on
'Pri_acy Policy" or call 800.626.2224.
I
I
3O
 Loading...