

GE STS18ZBPFRWW, GTS18SHSPRSS, GTS18SHSLRSS, GTS18SHPPRBS, GTS18SHPCRBS Owner’s Manual
...
_e° COrn
Safety Instructions ........... 9-4
N
Operating Instructions
Additional Features ............ 10
Automatic Icemaker ........... 11
Controls ...................... 5
Crispers and Pans ........... 9, 10
Dispenser .................... 11
Shelves and Bins ............. 7, 8
_A'ate r Fi] te r ................... 6
Care and Cleaning
Care and Cleaning .......... 19, 13
Replacing the I,ight Bulbs ....... 13
Installation Instructions
Preparing to Install
the Refligerator . .............. 14
Reversing the Door Swing .... 19-23
VCater i,ine Installation ...... 15-19
Troubleshooting Tips ....... 24-28
Normal Operating Sounds ...... 94
Consumer Support
Consumer Support ..... Back Cover
Performace Data Sheet ......... 35
Product Registration
for Canadian Customers ..... 31,32
Product Registration
for U.S. Customers ......... 29, 30
State of Calitbrnia ¼'ater
Treatment Device Certificate ..... 36
_A'arranty fbr
Canadian Customers ........... 33
VCarrantv for U.S. Customers ..... 34
Mode_ 18&19
Cong_lateur sup&ieur
R(Sfrig(Srateurs
La sectionfran_aise commencea la page 37
Congelador superior
Refrigeradores
Laseccion en espa#olempieza en la pagina69
Write the model and serial numbers here:
Model #
Serial #
Find these numbers on the gray label
on the left side, near the top of the
refligerator compartment.
197D3354PO07 05-05JR49-60367

IMPORTANTSAFETYINFORMATION,
READALLINSTRUCTIONSBEFOREUSING.
WARNING!
Use this appliance only for its intended purpose as described in this Owner's Manual.
SAFETYPRECAUTIONS
When using electrical appliances, basic safety precautions should be followed, including the following:
This refrigerator must be properl)installed
and located in accordance with the Installation
Instructions befiwe it is used.
Do not allow children to climb, st;rod or hang
on the shelves in the reflJgeratoi: They could
damage the refi-igerator and seriously iqj ure
themseh'es.
Do not touch the cold surfi_ces in the fl'eezer
compartment when hands are damp or wet.
Skin may stick to these extrelnelv cold SUll'hces.
Do not store or use gasoline or other flammable
\:q_o_s and liquids in the vicinity oI this or any
other appliance.
In refl'igerato_s with automatic icemake_,
avoid coma ct with th e in eying parts of th e
ejector mechanism, or with the heating element
locamd on the bottom _ff the icemake_: Do not
place finge_ or hands on the aUtolnatic
icemaking mechanism while the refiigerator
is plugged in.
Keep finge_s out ot the "pinch point" areas;
clearances between the doo_s and between the
doo_s and cabinet are necessarily small. Be carefifl
closing doo_s when children are in the area.
Unplug the refiJgerator before cleaning and
making repairs.
NOTE'.We stronglyrecommendthatanyservicingbe
performedby a qualified individual
_ Setting either or both controls (some models only
have one control) to the 0 (off} position does not
remove power to the light circuit,
Do not refl'eeze fl'ozen fi)ods which have
thawed completely:

vvvvw.GEAppliances.com
DANGER!RISKOFCHILDENTRAPMENT
PROPERDISPOSALOFTHEREFRIGERATOR
Child entrapnmnt and suffocation are not
i)rol)lems of the past, Junked or abandoned
refrigerators are still dangerous,, .even if they will
sit fin" "just a f_'w days." If you are getting rid of
your old refiigerato_; please follow the instructions
below to hel I) prevent accidents.
Before You Throw Away YourOld
Refrigerants
_dl refrigeration products contain refi_igerants,
which under ti_deml law must be removed prior
to product disposal. If you are getting rid of an
old reli_igeration product, check with the company
handling the disposal about what to do.
RefrigeratororFreezer:
Take off the doo_.
i,eaxe the shelxes in place so that children
may not easily climb inside.
USEOFEXTENSIONCORDS
Because of potential safety hazards under certain conditions, we strongly recommend against the
use of an extension cord.
However; if you must use an extension cord, it is absolutely necessa_ T that it be a UiAisted (in the United
States) or a CSA-listed (in Canada), 3-wire grounding type appliance extension cord having a grounding
type plug and outlet and that the electrical rating of the cord be 15 amperes (minimum) and 120 w_lts.
3
IMPORTANTSAFETYINFORMATION.
READALLINSTRUCtiONSBEFOREUSING.
WARNING!
HOWTOCONNECTELECTRICITY
Do not, under anv circumstances, cut or remove the third (ground) prong from the power cord.
For personal safe_ this appliance must be properly grounded.
The power cord of this appliance is equipped with
a 3-prong (grounding) plug which mates with a
standard 3-prong (grounding) wall outlet to
minimize the possibili F of electric shock hazard
fl'om this appliance.
Have the wall outlet and circuit checked by a
qualified electridan to make sure the outlet is
properly grounded.
Where a standard 2-prong wall outlet is
encountered, it is your personal responsibili V and
obligation to have it replaced with a properly
grounded 3-prong wall outlet.
The refiigerator should always be plugged into its
own inclividual electrical outlet which has a w)ltage
rating that matches the rating plate,
This provides the best perfommnce and also
I)rexents oxerloading, house wiring circuits which
could cause a fire hazard fl'om oxerheated wires,
Never tmplug your refrigerator by pulling on the
power cord. Mways grip plug firefly and pull
straight out fl'om the outlet.
Repair or replace immediately all power cords that
have become fl'ayed or otherwise damaged. Do not
use a cord that shows cracks or abrasion damage
along its length or at either end.
When moving the refi_igerator away from the
wall, be carefld not to roll over or damage the
power cord.
READANDFOLLOWTHISSAFETYINFORMATIONCAREFULLY.
SAVETHESEINSTRUCtiONS
4
Aboutthe controlsonthe refrigerator, www.GEAppliances.com
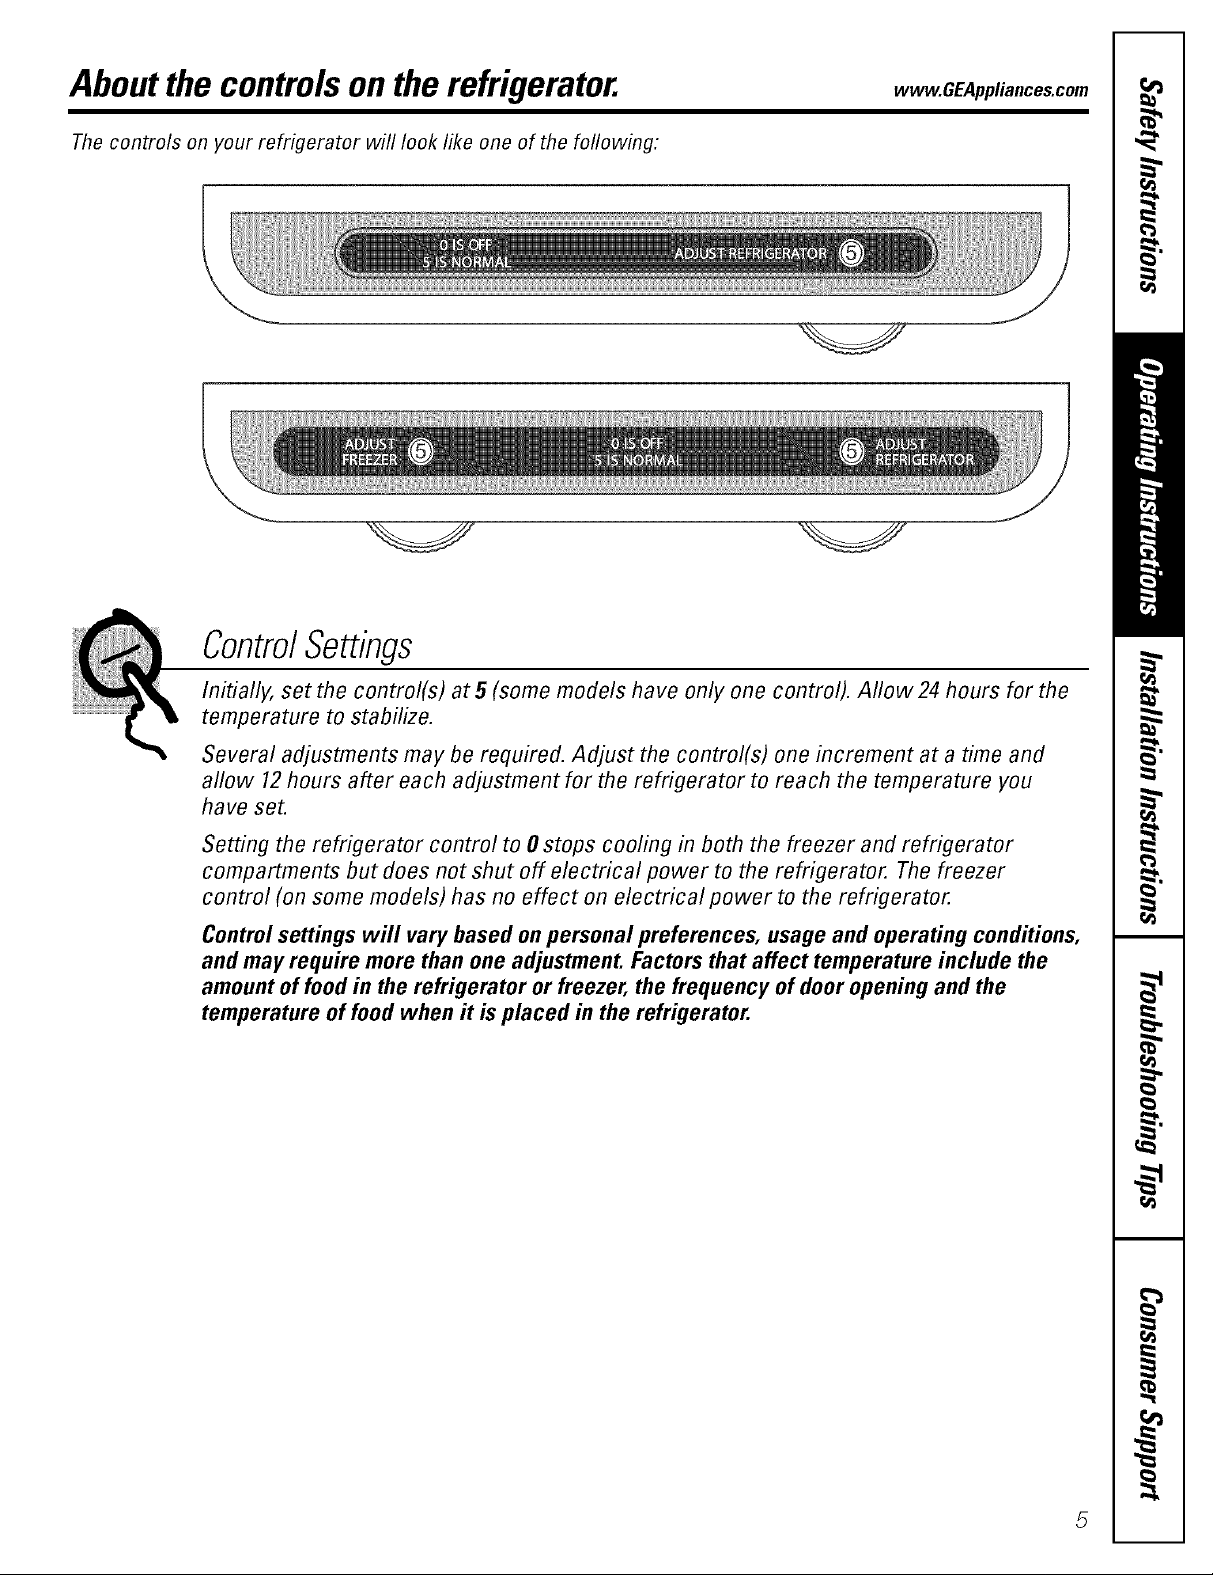
The controls on your refrigerator will look like one of the following:
ControlSettings
Initially, set the control(s) at 5 (some models have only one control). Allow 24 hours for the
temperature to stabilize.
Several adjustments may be required. Adjust the control(s) one increment at a time and
aflow 12hours after each adjustment for the refrigerator to reach the temperature you
have set.
Setting the refrigerator control to 0 stops cooling in both the freezer and refrigerator
compartments but does not shut off electrical power to the refrigerator. The freezer
control (on some models) has no effect on electrical power to the refrigerator.
Controlsettings will vary based on personal preferences, usage and operating conditions,
and may require more than one adjustment. Factors that affect temperature include the
amount of food in the refrigerator or freezer, the frequency of door opening and the
temperature of food when it is placed in the refrigerator.

Aboutthe water filter.(onsomemodels)
Water Filter Cartridge
The water filter cartridge is located inside
the cartridge holder in the back upper right
corner of the refl'igerator c()ml)artment.
/VOTE:Some models ship with the filter
byl)ass plug in place of the filter cartridge.
The filter byl)ass i)lug needs to be removed
heft)re the filter cartridge is installed. Kee I)
the filter byl)ass i)lug fin" fimue use.
When to Replace the Filter
The filter cartridge should be replaced
every six monthsor earlier if the flow of
water to the icemaker and dispenser
decreases.
Installing theFilter Cartridge
O]f }ou are replacing the cartridg-e,
fit_t remove the old one. To open the
cartridge coveL push in where indicated
and the cover will drop down.
@ Remove the cartridge by sh)wly rotating
it to the letL A small amotmt of water
may drip down,
Filter BypassPlug
Y)u must use the filter b)pass plug when
a replacement filter cartridge is not
available. The dispenser and the icemaker
will not operate without the filter or filter
bypass plug.
Replacement Filters
Toorderadditionalfiltercartridges
in the UnitedStates,visitourWebsite,
www.GEAppliances.com,orcall
GEPartsandAccessories,800.626.2002.
Filter Model (;SX4'F
Suggested Retail Price $34.95 USD
CtlStOlllei_ in Canada should constllt
the yellow pages fin" the nearest Camco
Service Center:
c:_c>
CAUTION:11air has been
trapped in the s}'stem, the filter cartridge
may be ejected as it is removed. Use caution
when removing.
tz
Appl) a month and year sticker to the
new cartridge to remind you to replace
it in six months.
O Position the cartridge inside the
cartridge holder and slowl) rotate the
cartridge to the right tmfil it stops.
_]_en the cartridge is I)rol)e_ty installed,
you will feel it "click" as it locks into
place. The blade on the end of the
cartridge should be i)ositioned
xertically: Donot overtighten.
O Close the cartridge cove_:
O Rtm wamr fl'om the dispenser fin.
3 minums (about 1½ gallons) to clear
the system and i)revent sputtering.
See To Use the Disponser section.
NOTE:A newl_qnstalled water filter cartridge
may cause water to spurtffom the (lispense_:

Abouttheshelvesandbins. www.GEAppliances.com
Not all features are on all models.
Rearranging the Shelves
Shel;es in the refl'igerator and fl'eezer comi_artn_ents are a(!iustnble.
Refrigerator Compartment
Toremove:
0 Tilt the shelf up at the fl'ont.
0 I,ifl the shelf up at the back and bring
Some models have wire shelves that
can be adjusted in thesame manne_
,4
0 --,
the shelf out.
Toreplace:
_'_hile tilting the shelf uI), insert the top
hook at the back of the shelf in a slot
on the track.
0 I,ower the fl'ont of the shelf tmtil the
bottom of the shelf locks into place.
Freezer Compartment
Toremove:
a I,ifl up the left side of the shelf and
slide it left into the center of the shelf
suI_po_ls.
Rotnm the right side of the shelf up and
out of the shelf sui_ports.
Toreplace:
0 Holding the shelf diagonall}; insert the
left end tff the shelf into the center of
the shelf sui_ports on the side wall.
0 Insert the right end of the shelf into
the shelf supports on the side wall.
Rest each end of the shelf on the
bottom of the shelf suI)ports.
Abouttheshelvesandbins.
Not all features are on all models.
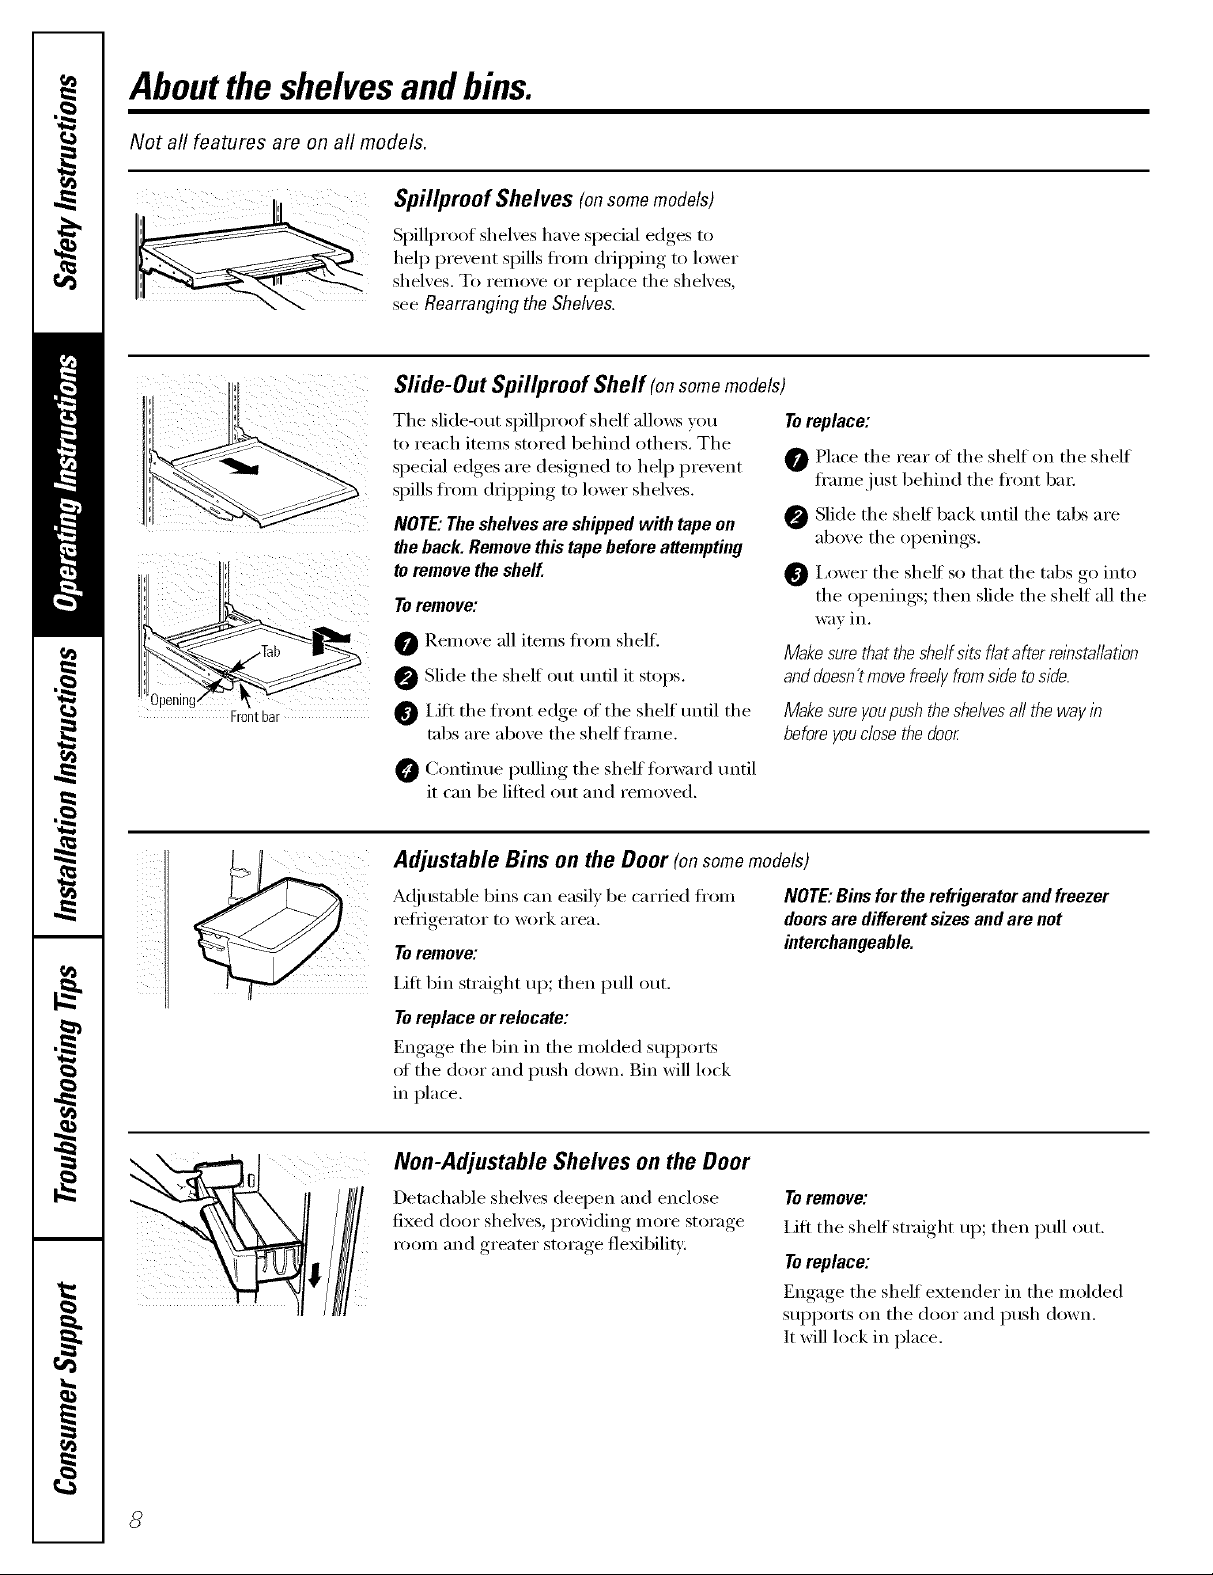
Spillproof Shelves (onsomemodels)
Spillproo_ shelves have special edges to
hel I) prexent spills fl'()m dripping to lower
shelxes. To remoxe or replace the shelxes,
see Rearranging the Shelves,
Sfide-Out Spillproof Shelf (onsomemodels)
The slide-out spillproof shelf alkms you
to reach items stored behind othe_. The
special edges are designed to hel I) prevent
spills fl'om dripping to lower shelves.
NOTE: The shelves are shipped with tape on
the back. Remove this tape before attempting
to remove the shelf.
Toremove:
0 Remoxe all items fl'om shelf.
@ Slide the shelf Otlt tlntil it stops.
i,ifl the front edge of the shelf tmtil the
tabs are aboxe the shelf frame.
Continue )ullim* the shelf forward tmtil
it can be lifted out and remoxed.
Toreplace:
0 Place the rear of the shelf on the shelf
fl'amejust behind the fi'ont bat:
@ Slide the shelf back m_til the tabs are
above the openings.
0 i,ower the shelf so that the tabs go into
the openings; then slide the shelf all the
WaY in.
Make surethat the shelf sits flat after relhsta/lation
anddoesn't move freely fromside toside.
Make sureyoupush the shelvesall the way in
before youclose the door
Adjustable Bins on the Door (onsomemodels)
A(!justable bins can easily be carried ti'om
reflJgerator t(:, work aI'ea.
Toremove:
I,ift 1)in straight up; then pull out.
Toreplace or relocate:
Engage the bin in the molded supl)orts
of the door and push down. Bin will lock
in place.
Non-Adjustable Shelves on the Door
Detachable shelves deepen and eralose
fixed door shelves, providing more storage
room and greater storage flexibility:
NOTE:Binsfortherefrigeratorandfreezer
doorsare differentsizesandarenot
interchangeable.
Toremove:
I,ift the shelf straight up; then pull out.
Toreplace:
Engage the shelf extender in the molded
supl)orts on the door and push down.
It will lock in place.
Aboutthe crispersandpans. wvvw.GEAppliances.com
Not all features are on all models.
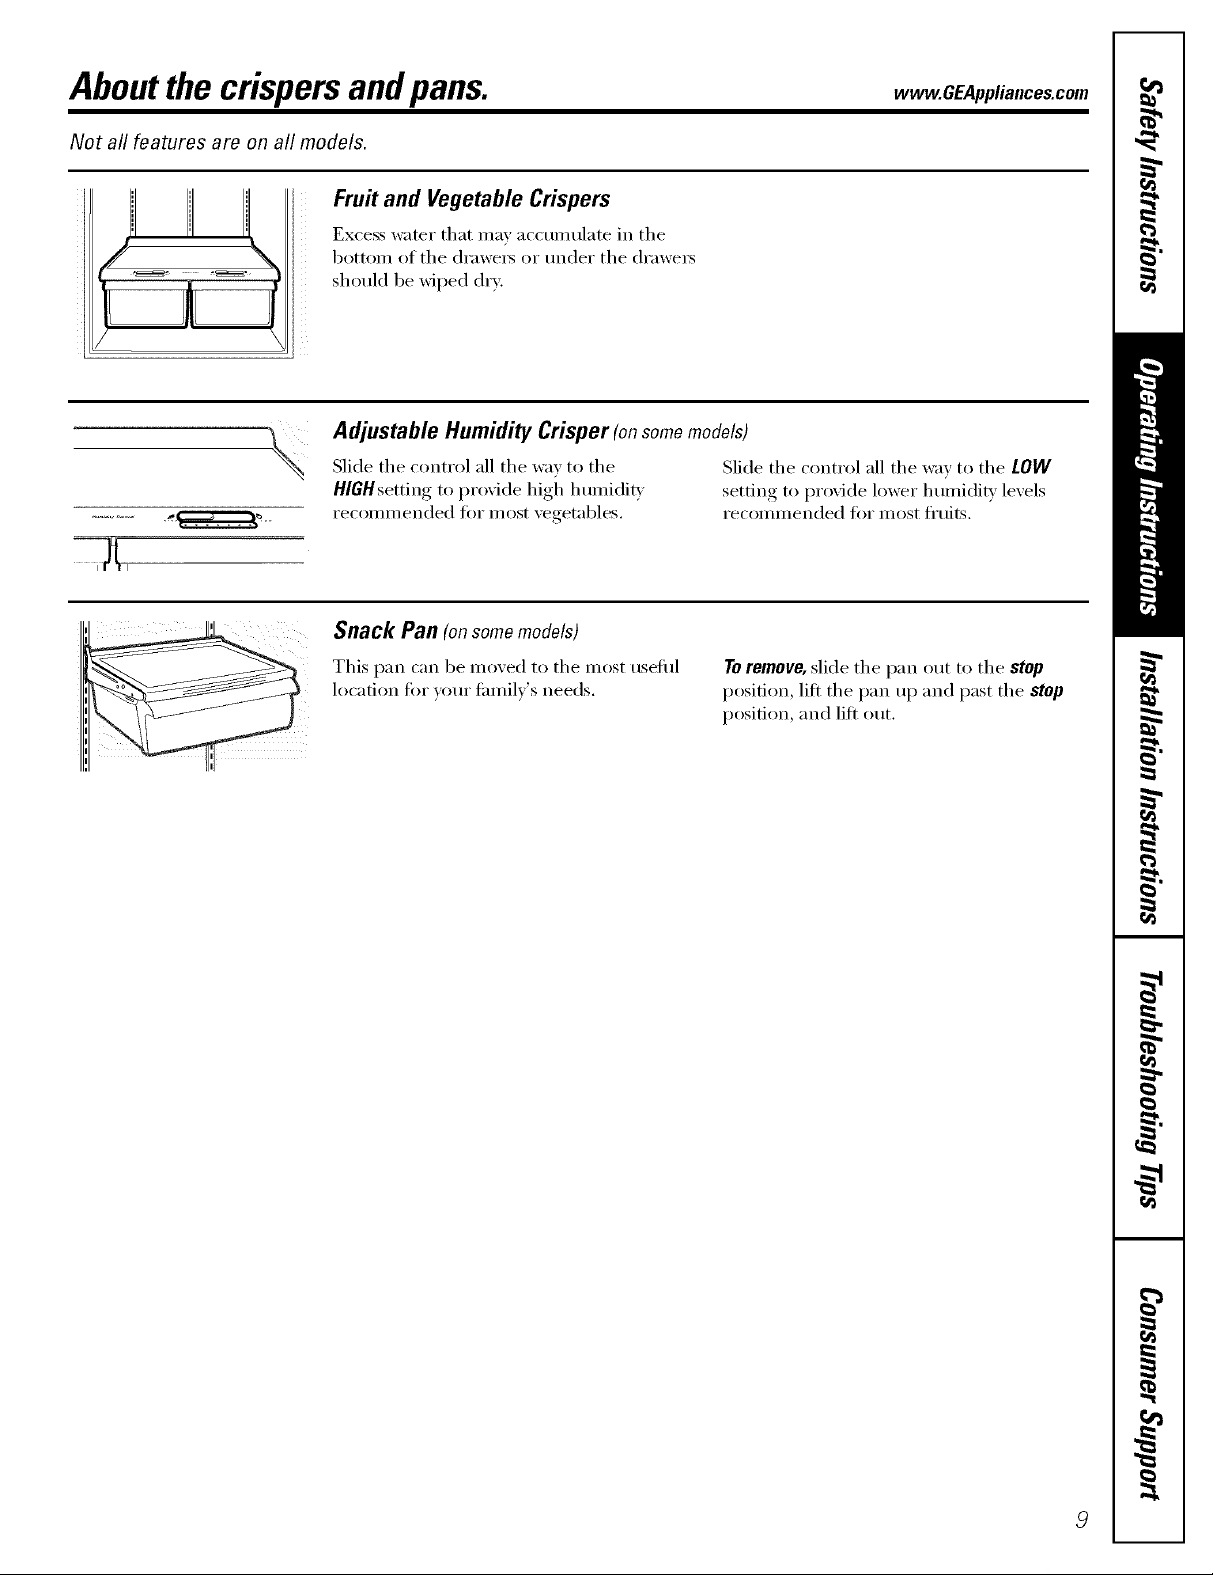
Fru# and Vegetable Crispers
Excess water that mar ac(unmlate in the
botton_ of the (h'awe_ or under the (h'awe_
should be wiped dry.,
Adjustable Humidity Crisper (onsomemodels)
Slide the control all the way to the Slide the control all the way to the LOW
HlGHsetting to provide high humidit} setting, to I_r°vide lower humidity lexels
recomm ended fi)r most xegetables, recommended fi)r most fl'uits.
Snack Pan (onsomemodels)
This pan can be mo_,ed to the most tlseflll
location tot your timfilx's needs.
Toremove, slide the pan out to the stop
position, lift the pan up and past the stop
position, and lift out.
Aboutcrisperremoval
Not all features are on all models.
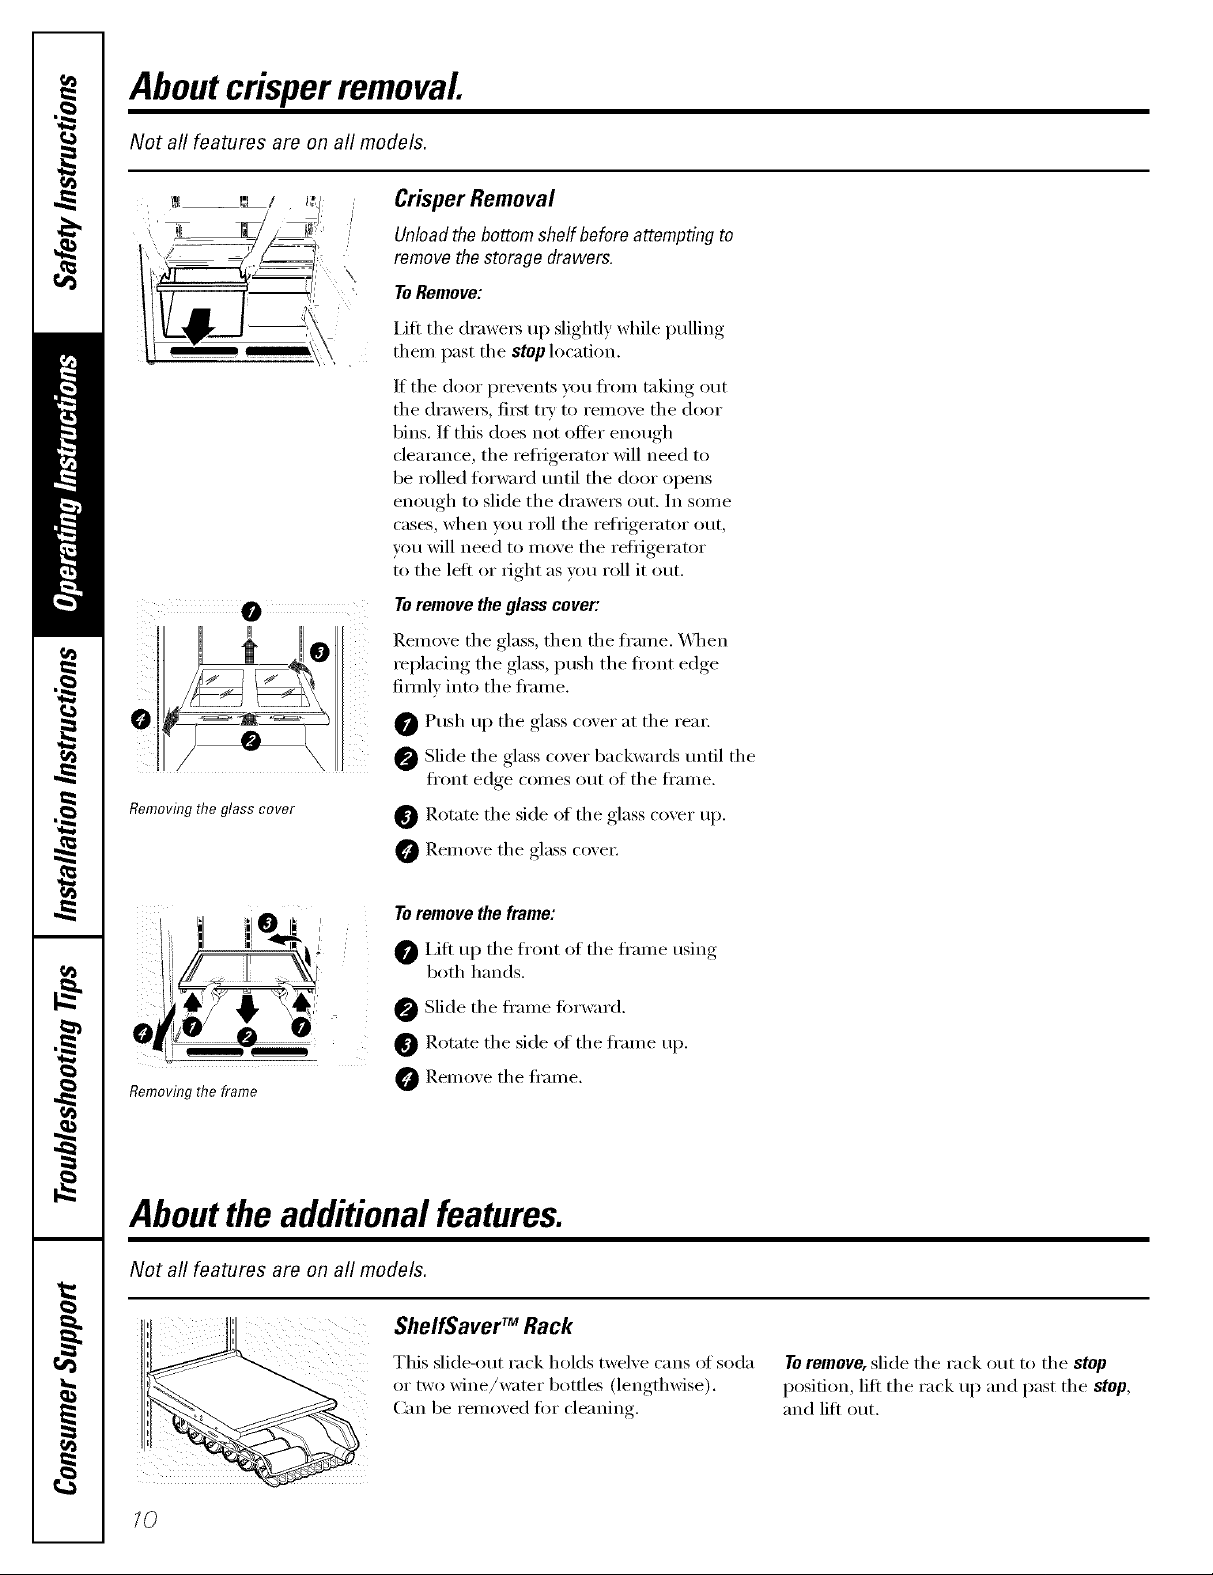
Crisper Removal
Unloadthe bottomshelfbeforeattemptingto
remove thestoragedrawers.
\,
, ToRemove:
Lift the (lrawe_ up slightly while pulling
them past the stop location.
If the door prevents you from taking out
the drawe_s, fi_st try to remove the door
bins. If this does not offer enough
clearance, the refrigerator will need to
be rolled fin'ward tmtil the door opens
enough to slide the (h'awe_ out. In some
cases, when you roll the refi_igerator out,
you will need to move the refi_igerator
to the left or right as you roll it out.
Toremove the glass cover:
Remove the glass, then the fl'ame. \,_l_en
replacing the glass, push the fl'ont edge
firefly into the fl'ame.
0 Push up the glass cover at the teat;
Slide the glass cover backwards tmtil the
fl'ont edge corn es out of the fl'am e.
Removing the glass cover
i *' ' _"1_,,
Removing the frame
0 Rotate the side of the glass cover up.
O Remove the glass cox'e_;
To remove the frame:
0 I,ifl up the fl'ont of the fl'ame using
both hands.
@ Slide the fl'ame fin'ward.
0 Rotate the side of the fl'ame up.
@ Remove the fl'ame.
Abouttheadditional features.
Not all features are on all models,
10
ShelfSaver TM Rack
This slide-out rack holds twelve cans of soda
or two wine/water bottles (lengthwise).
Can be removed fin" cleaning.
To remove, slide the rack out to the stop
position, lift the rack up and past the stop,
and lift out.
Abouttheautomaticicemaker, www.GEAppliances.com
A newly-installed refrigerator may take 12-24 hours to begin making ice.
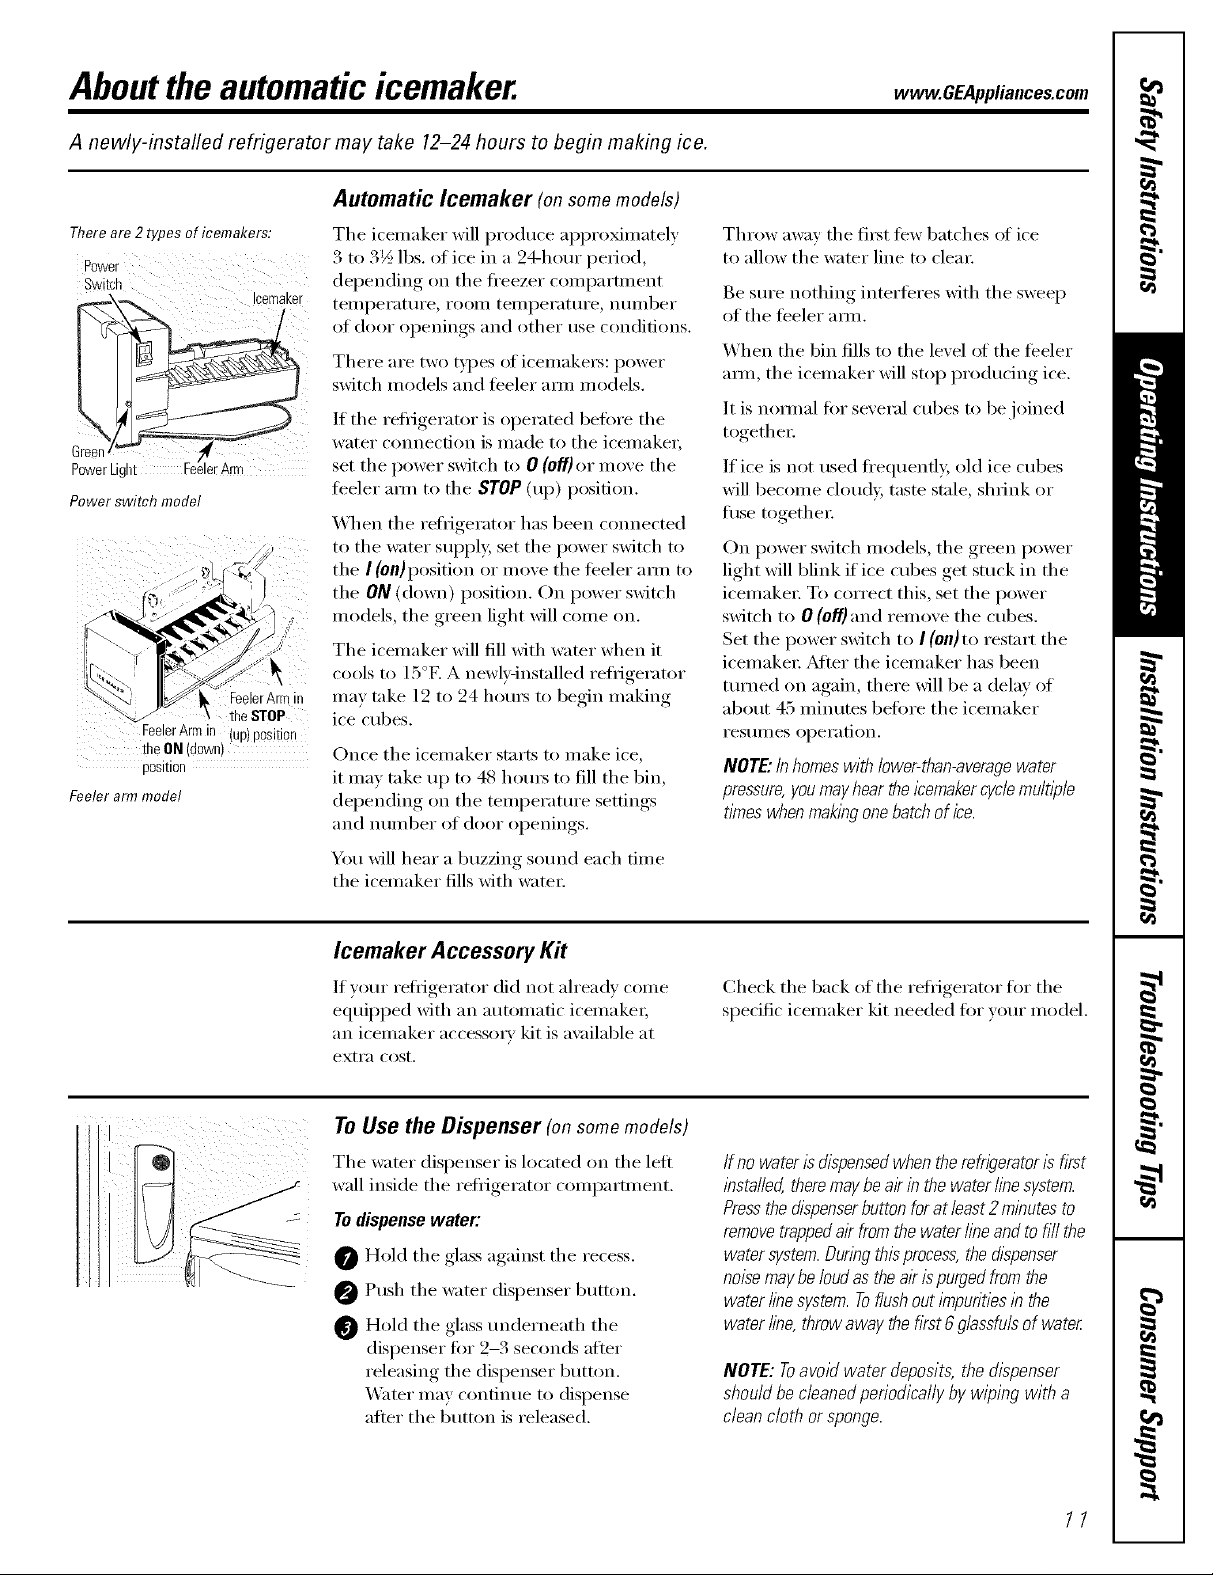
Automatic Icemaker (onsomemodels)
Thereare2 typesoficemakers:
Po_,
Switch
PowerLight F
Powerswitchmodel
FeelerArmin (up)Position
the.ON(down)
position
Feeler arm model
Icemaker
, FeelerArmin
theSTOP
The icemaker will produce ai)i)roMnmtely
3 to 3½ lbs. of ice in a 24-hour period,
depending on the fl'eezer compartment
teilli)ei';ittli'e _ i'OOill [eilli)ei';ittli'e _ ntlillbeY
of door openings and other use conditions.
There are two t}pes of icemake_: power
switch models and feeler am/models.
If the reli_igerator is operated befiwe the
water cmmection is made to the icemake_;
set the power switch to 0 (off)or move the
libeler am/to the STOP (up) position.
When the refi_igerator has been com_ected
to the water sui)i)ly, set the power switch to
the I (on)position or move the feeler aml to
the ON (down) position. On power switch
models, the green light will come on.
The icemaker will fill with wamr when it
cools to 15°1. A newl}qnstalled refiigerator
may take 12 to 24 hems to begin making
ice cubes.
Once the icemaker starts to make ice,
it ma) take up to 48 hom_ to fill the bin,
depending on tile temperatm'e ,setfimm_,
and ntlIl/beY (If dooI" ol)enings.
You will hear a buzzing sound each time
the icemaker fills with water:
Throw away the fi_t troy batches of ice
to allow the water line to clea_:
Be sm'e nothing interteres with the sweep
of the feeler aml.
When the bin fills to the level (ff the teeler
aml, the icemaker will stop producing ice.
It is nomml tOTseveral cubes to be joined
together:
If ice is not used fi'equentl> old ice cubes
will become cloudy, taste stale, shrink or
fiBe together
On power switch models, the green power
light will blink if ice cubes get stuck in the
icemake_: To correct this, set the power
switch to 0 (off)and remove the cubes.
Set the power switch to I (on)to restart the
icemake_: _Mter the icemaker has been
turned on again, there will be a delay of
about 45 minutes heft)re the icemaker
I'eStlllleS ol)ei'ation.
NOTE"Inhomes with lower-than-averagewater
pressure,you mayhear the12emakercycle multiple
times when makingonebatch of ice.
Icemaker Accessory Kit
If )our refi_igerator did not ah'eadv come
equii)i)ed with an automatic icemake_;
an icemaker accessocv kit is available at
extra cost.
To Use the Dispenser (onsome models)
The water dispenser is located on the left
wall inside the retiigerator comI)armmnt.
Todispense water:
Hold the glass against the recess.
O Push the water dispenser 1)utt(m.
Hold the glass underneath the
dispenser for 2-3 seconds after
releasing the dispenser button.
XA'ater may continue to dispense
after the button is released.
Check tile back of the refl_igerator for the
specific icemaker kit needed for _om" model.
If nowaterisdispensedwhentherefrigeratoris first
installed,theremaybeairinthewaterlinesystem.
Pressthedispenserbuttonforat least2minutesto
removetrappedairfromthe waterlineandtofill the
watersystem.Duringthisprocess,thedispenser
noisemaybeloudastheairispurgedfromthe
waterlinesystem.Toflushouti_npuritiesin the
waterline,throwawaythefirst6glassfulsofwater
NOTE:Toavoidwater deposits,thedispenser
shouldbecleanedperiodicallyby wipingwith a
cleancloth orsponge.
11

Careand cleaning ofthe refrigerator.
Cleaning the Outside
The doorhandles and trim. Clean with
a cloth daml)ened with soapy water:
Dry with a soft cloth.
a commercially axailable stainless steel
cleaner. Do not use appliance wax or polish
on the stainless steel.
Keep the outside clean. Wipe with a clean
cloth lightly dampened Mth kitchen
apl)liance wax or mild liquid dish
detergent. DU and polish Mth a clean,
soft cloth.
The stainless steel panels and door handles
(on some models) can be cleaned with
Cleaning the Inside
Tohelp prevent odors,leaxe an open box of
baking soda in the h'esh food and fl'eezer
coII/l)a i'tlilents.
Unplugthe refrigerator before cleaning. If this
is not i)ractical, wring excess moisture out
of s )onge or cloth whenI , cleamng arotmd
switches, lights or controls.
Lrse wam_ water and baking soda solution--
about a tablespoon ( 15 ml) of baking soda
to a quart (1 liter) ()f water. This both cleans
and neumflizes odms. Thoroughl) rinse
and wipe dry.
Condenser
There is no need fi)r routine condenser
cleanings in nomml home operating
envii'oni//ents. Howevei; iI1 en','ii'onlilents
that may be particularly dusty or greas B the
condenser shotfld be cleaned periodically
t0r efficient retiigerator operation.
Formodels wi_ abase grille, the grille must
be removed in order to clean the con(lense_:
Toremove the base grille:
Grasp it about 6" fl'om each end and pull
its bottom edge toward you.
Toreplace the base grille:
Insert the tops of the metal cliI)s into the
oval vents, making sure one of the plastic
tabs on the back of the grille goes into each
of the oval vents. Then push the bottom of
the grille fi)rward tmtil it snaps into place.
Do not wipe therefn)erator with a soiled dishcloth
or wet towel Thesemayleavea residuethat
can erodethe palb£ Do not usescounbgpads,
powderedcleaners,bleach orcleanerscontaining
bleachbecausetheseproducts canscratchand
weakenthepaint hbl}h.
Avoidcleaning coldglass shelves(onsomemodels)
with hot water becausethe extremetemperature
difference maycause them to breal_Handleglass
shelvescarefully Bumpingtemperedglasscan cause
it to shatter
Donot washanyplasticrefn)eratorpartslb the
dishwasher
Donotdeanwithanyproductsconta/blhgdetergent,
bleachorammonb.Theymaydamagethe
refngerator
Cleaning the condenser:
Sweep away or \_('uum up dust.
Formodels with a base grille, reach the
condenser b)' inserting a brush or \:_ctmm
hose into the ox:fl holes.
For models without a base grille, reach the
condenser by inserting a brush or \:muum
hose tin(let the bottom of the reliigeratm;
For best results, use a brush specially
designed fiw this propose. It is available
at most appliance parts stores.
12
Behind the Refrigerator
Be careflfl when moving the retiigerator
away ti'om the wall. M1 b'pes of floor
coverings can be damaged, particularly
cushioned coverings and those with
elllbossed S/li]ilces.
Pull the refligerator ,_ " "_ )ut and I'ettlYn
it to position by, I)ushing, it straight, in.
sthll(*ht (
Mo\ing the reliJgerator in a side direction
may result in damage to the floor cove_ing
or refligerator
Whenpushing therefrigerator back,makesure you
don't rofl over thepower cordor icemakersupply fine
(onsome models).

Preparing for Vacation
www.6EApp/iances.coln
For long vacatiom_s or absences, remove
food am](]m_p]l_g the re[Xgerato_: Move
t]_e rei_Jge_:_tor control to t]_e 0 (OH) posidom_
m_d c]eaN_ the im_terior wid] a bakim_g soda
so]lltioll of o]_ e tab]espoo]_ ( ]l5 m l) of
bakim_g soda to once quart (1 ]iter) of _ate_;
l,ea_e the dools open.
Set the ]cemaker power switch to the O {off)
position or move the }beler arm to the STOP
(up) posidon (dependh_g on model) m_d
s]mt of} the water slq_p]y to the ref_'ige_to_:
If the temperature cm_ drop be]ow }i'eezim_g,
have a ql_a]ified servicer draim_the _ater
slq_p]y sys[em (on some models) [o prevent
seiJol_s proper V damage due to floodim_g.
Preparing to Move
Secm'e all loose items such as grille,
she]yes am_(t drawers by taping d_em
secm'e]v ]m_p]ace to pre _,en[ damage.
Besure,tirerefrigeratorstaysI_ anuprightpos/fion
duringmovbg.
Replacingthelightbulbs.
Setting either or both controls to 0 (off) does not remove power to the light circuit.
o .........
no
Some models have only one light.
Refrigerator Compartment--Upper Light
Lil-lq,li,Lllyl._a_'r_nAt'/_lghtbu/bsmaybeho£ 0 Replace with an appliance bulb of
the same or lower wattage
Unplug the reh'igerator. 0 Plug the refligerator back in.
0 The bulbs are located at the top of the
compartment near the opening.
Freezer Compartment Dome Light (onsomemodels)
CAUTION:ah,b./bsmaybe
0 Unplug the refl_igeratm:
0 The bulb is located behind a light
shield at the back of the fl'eezer
_Mter replacing with an appliance bull)
of the same or h)wer wattage, replace
the shield.
Plug the refrigerator back in.
coI/lpaF[lIlellt. To i'ei//ove_ squeeze
the top and bottom of the shield and
pull the shield off.
13
Installation
Refrigerator
Instructions
Models 18and 19
ffyou have questions,call 1.800.GE.CARESor ,isit ore" _,%bsite at: www.GEAppliances.com
BEFORE YOU BEGmN
Read these i]]strnctlons completely and carefully:
" IMPORTANT - these
i_structions {or local inspector's i_se.
° IMPORTANT - Obse ,'e
governim_g codes ;md ordim_aN_ces.
* Note to Installer = Be sure to leave these
im_structions with the Consm_er.
* Note to Consumer = Keep these im_strl*ctiom_s
ti)r hmu'e re{erence.
* Skill level - In staHati on of this applia m_ce req I_ires
basic mecha_*ical skills_
° Completion time - Rehigemtor h_stallation
]5 m im_I_tes.
* Proper im_sta]]ation is the respom_sibi]ity of the
im_sta]ler.
° Product thilm'e due to improper im_stallation is m_t
covered imder the Warl_mtv.
CLEARANCES
_Mhav the fl_llowing clearances for ease of installation,
proper air circulation and plumbing and electrical
connections.
• Sides 1/8" (3 ram)
• Top 1" (25 ram)
• Back 1" (25 ram)
If the refl_igerator is to be installed next to a wall on the
hinge side, allow 5/16" (8 ram) door clearance.
ROLLERS (ON SOME MODELS)
The rollers have 3 purposes:
• RolleI_ a_!just so the door closes easiE when opened
about 45 °.
• RolleI_ a(!just so the refl_igerator is firmly positioned on
the floor and does not _obble.
• Rollei_ allow win, to inoxe the refrigerator away fl'Oln the
wall tot cleanim*
WATER SUPPLY TO THE ICEMAKER
(ON SOME MODELS)
If the refrigerator has an icemaker, it will have to be
cmmected to a cold water line. AGE water supply kit
(contaii]ii]g robing, shutoff valve, fittings and
instructions) is awfilable at extra cost from vom" dealer
or by visiting ore" Website at w_v.GEAppliai]ces.coln
or Parts and Accessories, 800.626.2002.
REFRIGERATOR LOCATION
• Do not install the reflJgerator where the temperature
will go below 60°F (l 6°C) because it will not run o[_ten
enough to nlaintain proper telnperatures.
• Do not install the refrigerator where the temperature
will go above 100°F (37°C) because it will not perlorm
properly:
• Install it on a floor strong enough to suppoi_t it flflly
loaded.
NOTE: X&hen rollels are properly a(!justed, the top
of the refrigerator will not be lexe[ but will haxe a slioht
backward til t,
For models with a base grille, the grille m ust be rein oxed
to access the roller a(!justing screws.
To remove the base grille:
Grasp it about 6" fl'om each
end and pull its bottom edge
toward VOtl.
To replace the base grille:
Insert the tops of the metal
clips into the o\;d vents,
making sm'e one _ff the
plastic tabs on the back ot
the grille goes into each ot
the oxal vents. Then Imsh the
bottoln of the grille fi>rward
tmtil it snaps into place,
To adjust the milers, turn
the two fl'ont roller a(!jusfing
screv,:s clockwise to raise the
fl'ont of the reffigeratoi;
comlterclockwise to lower it.
14
mnstaliation mnstructions
mNSTALLING THE WATER LINE IONSOMEMODELS}
BEFORE YOU BEGIN
Recomme]/ded copper _ater slq)p]y kits are WX8X2,
WXSX3 or WXSX4, depe{/dim/g o{/ die amom/t of
mbh/g you _lee(L Approved plastic water slq)ply lim/es
are GE SmartCom/ect '_Re{i'igerator Tubi_lg
(WXOSX 100(}2, WX 08X 1 (1(1(16, WX 08X 1 (1(1]l5 amid
WX 08X 10025).
W]]e{] comlectim/g yore" re{Hgerator to a GE Reverse
Osmosis _2_ter System, the o{/]y approved im/sta]]atio{/
is wit]] a (;E RVKit. Fox" other reverse osmosis water
systems, tbHow the mamlti_cmrer's recomme{/dations.
This water lim/e im/sta]lati(m is m/or warrm/ted bv the
icemaker maml[i_ctm'er. FoH({w these
im/strllcti{ms carefll]]y to mim/imize the risk of expe{/sive
Water hammer (water bam/gim/g ira/ the pipes) 1{/ ]]ollse
phm/bim/g cam/ Gmse damage to re_Hgerator parts amid
lead to water leakage or floodi_]g. Ca]]a qlla]ified
phm/ber to correct water hammer betore im/sta]]h/g the
water slq)p]y lim/e to the re_Hgerator.
To preve{/t bin'{is aN/d product damage, do m/or hook
Iq) the water ]im/e to the hot water lim/e.
If v()ll Ilse yore" re{_'igerator be[ore co{mecth/g the
water Jim/e, make sure the icemaker power switch is ira/
the 0 (Off)positi{m (ol/ power switch models) or the
ieeler arm is ira/ the STOP (Iq>) positi{m (o{/ iee]er arm
Do m/or ]m/stall the icemaker mbim]g ]m/areas where
temperatm'es fid] below freezh/g.
W]]em/ ilsh/g any electrical device (smh as a poD, rel"
dr]]]) durim]g im/sta]]ati{m, be sllre the device is dollb]e
im/sl_]ated or groin/tied i_] a ma_/_/er to prevent the
hazard of electric shock, or is batter} powered.
A]] ]_/sta]]atitms m_lst be 1_/ accorda_/ce with Iota]
phm/bi_/g code req_fireme_/ts.
WHAT YOU WILL NEED
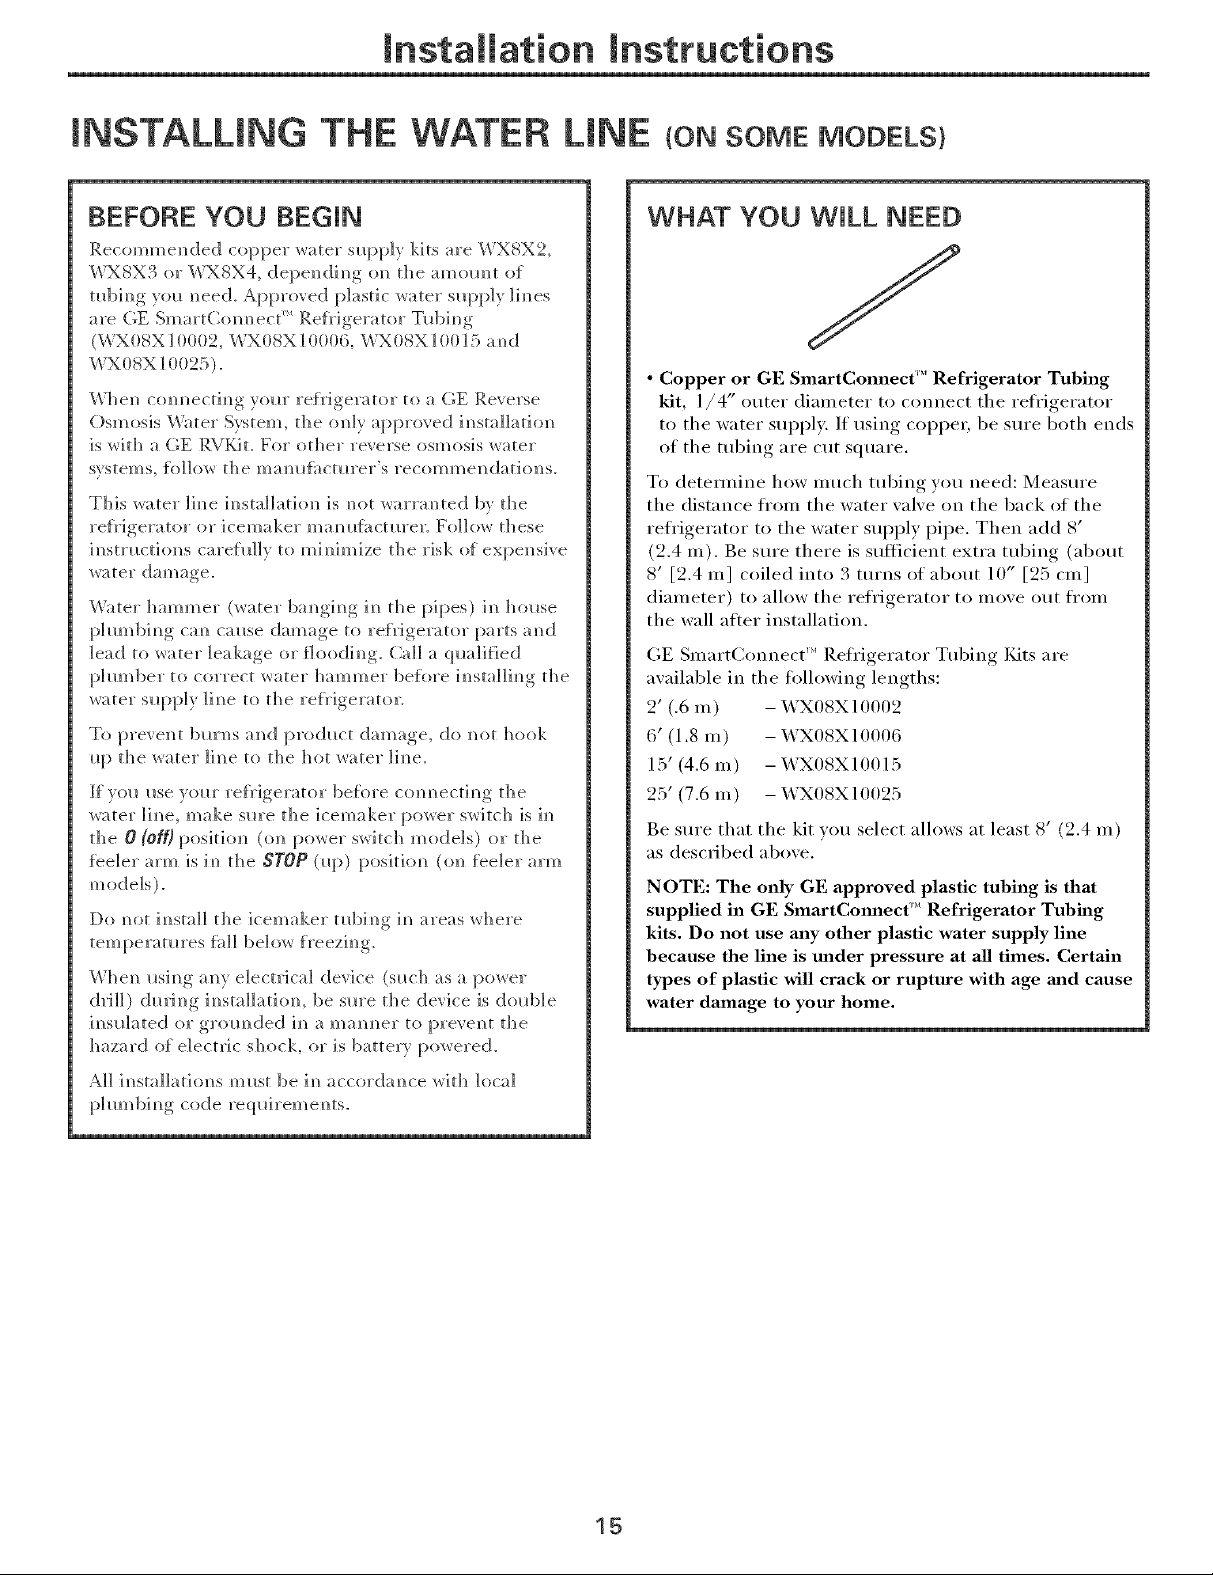
• Copper or GE SmartConnect'" Refrigerator Tubing
kit, l/4" outer diameter to connect the refi'igerator
t{>the water supply. If using copper, be stlre both ends
of the tubing are cut square.
To detemxine how much tubing you need: Measure
the distance ti'om the water valve on the back of the
refi'igerator t{>the water supply pipe. Then add 8'
(2.4 m). Be sure there is sufliciei]t extra tubii]g (about
8' [2.4 m] coiled into 3 turns of about 10" [25 cin]
diameter) to allow the reii'igerator to move out ti'oXl]
the wall atier installation.
GE SmartConnect ''_Refl'igerator Tubing Kits are
awfilable ix] the tolh>wing lengths:
2' (.6 m) - WX08X10002
6' (1.8 m) - WX08X10006
15' (4.6 m) - WX08X10015
25' (7.6 m) - WX08X10025
Be sure that the kit you select allows at least 8' (9.4 m)
as described above.
NOTE: The only GE approved plastic tubing is that
supplied in GE SmartCmmect '_ Refrigerator Tubing
kits. Do not use any other plastic water supply line
because the line is reader pressure at all times. Certain
types of plastic will crack or rupture with age mad cause
water damage to your home.
15
Installation Instructions
mNSTALLING THE WATER LINE {CONT.)
Install the shutoff valve on the nearest frequently used
WHAT YOU WILL NEED (CONT.)
drinking water line.
* A GE water snppty kit (comai_im_g mbim_g, shmoff
valve and fittJm_gs listed below) Js awd]ab]e at extra
cost {]'(}m yore" dealer or t_'om Parts am/(1Accessories,
S00.626.2002.
* A cold water supply. The water pressm'e midst be
90 = p.s.i.betweeN/ 2 amid 190 ([_4-S_1 bar).
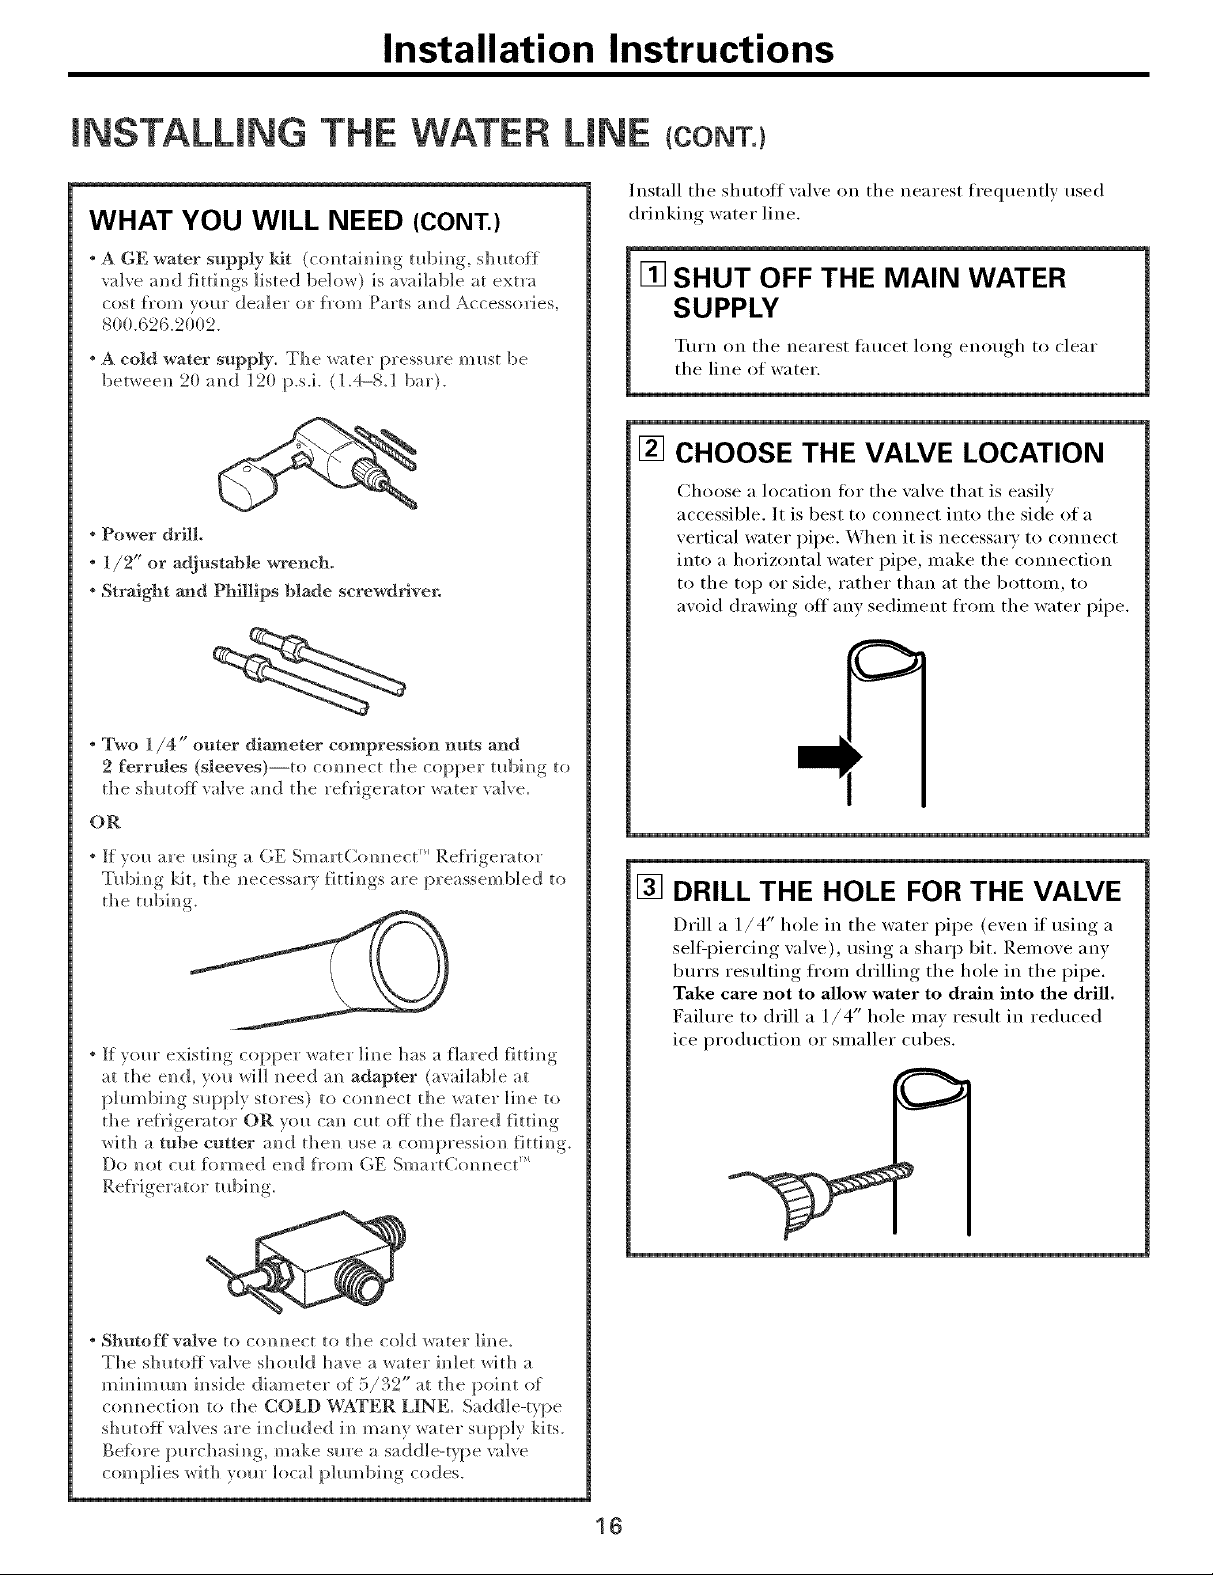
* Power drill.
* 1/2" or adjustaMe wrench.
* Straight and Phillips blade screwdriver.
* Two 1/4" outer diameter compression nuts and
2 ferrules (steeves)--to com]ect the copper mbim_g to
the sh 10tof_ valve a]]d the refrigerator water ",'a]ve.
OR
[] SHUT OFF THE MAIN WATER
SUPPLY
Turn on the nearest fimcet long enou,,h_ to clear
the line of water.
[] CHOOSE THE VALVE LOCATION
Choose a location for the xahe that is easily
accessible. It is best to connect into the side of a
;ertical water pipe. _4hen it is necessar) to connect
into a horizontal water pipe, make the connection
to the top or side, rather than at the bottom, to
axuld drawing off' any sediment fl'om the water pipe.
* _f"_r(_ are usim_ga (;E S _ ,rt(, m_ect P,etrigerator
TuN mg kil, the m_ecessar} tittim_gs are preassemb]ed to
the t_bi m_g
* If yore" existi_]g copper water ]i_]e has a flared fittim_g
at the el_d, you will m_eed am_adapter (available at
phm_bing slq@y stores) to c<mm_ect the water ]im_eto
the re{_'igerator OR y<m cam_cl*t o{t the tlared {ittim_g
wJt]] a tube cutter amid the]_ I*se a compressJ<m t]ttim_g,
Do _]ot cm formed ei/d t}'om GE SmartCo_/_/ect'"
* Shutoff valve to co _ _ ect to the col d water ]i _ e_
The shutoff valve shota]d have a _ater h_]et _ith a
m i_ im _*m i_ si d e di a_ *et e r of 5 / 3 2" a t t h e p oi _ t of
co_ectiol_ to the COLD WNFER LINE. Saddle-type
shutoff valves are i_ clouded i_ m a _y water s_q)p]y kils.
Be{ore pm'chasi_]g, make sm'e a saddle-type valve
complies with yore" local [:)]m_bh_g codes.
[] DRILL THE HOLE FOR THE VALVE
Drill a 1/4" hole in the water pipe (exen if using a
self:i)iercing, xalxe), using a sharp bit. Remoxe any
burrs resulting from drilling the hole in the pipe.
Take care not to allow water to drain into the drill.
Faihu'e to drill a 1/4" hole ma} result in reduced
ice production or smaller cubes.
16
Installation Instructions
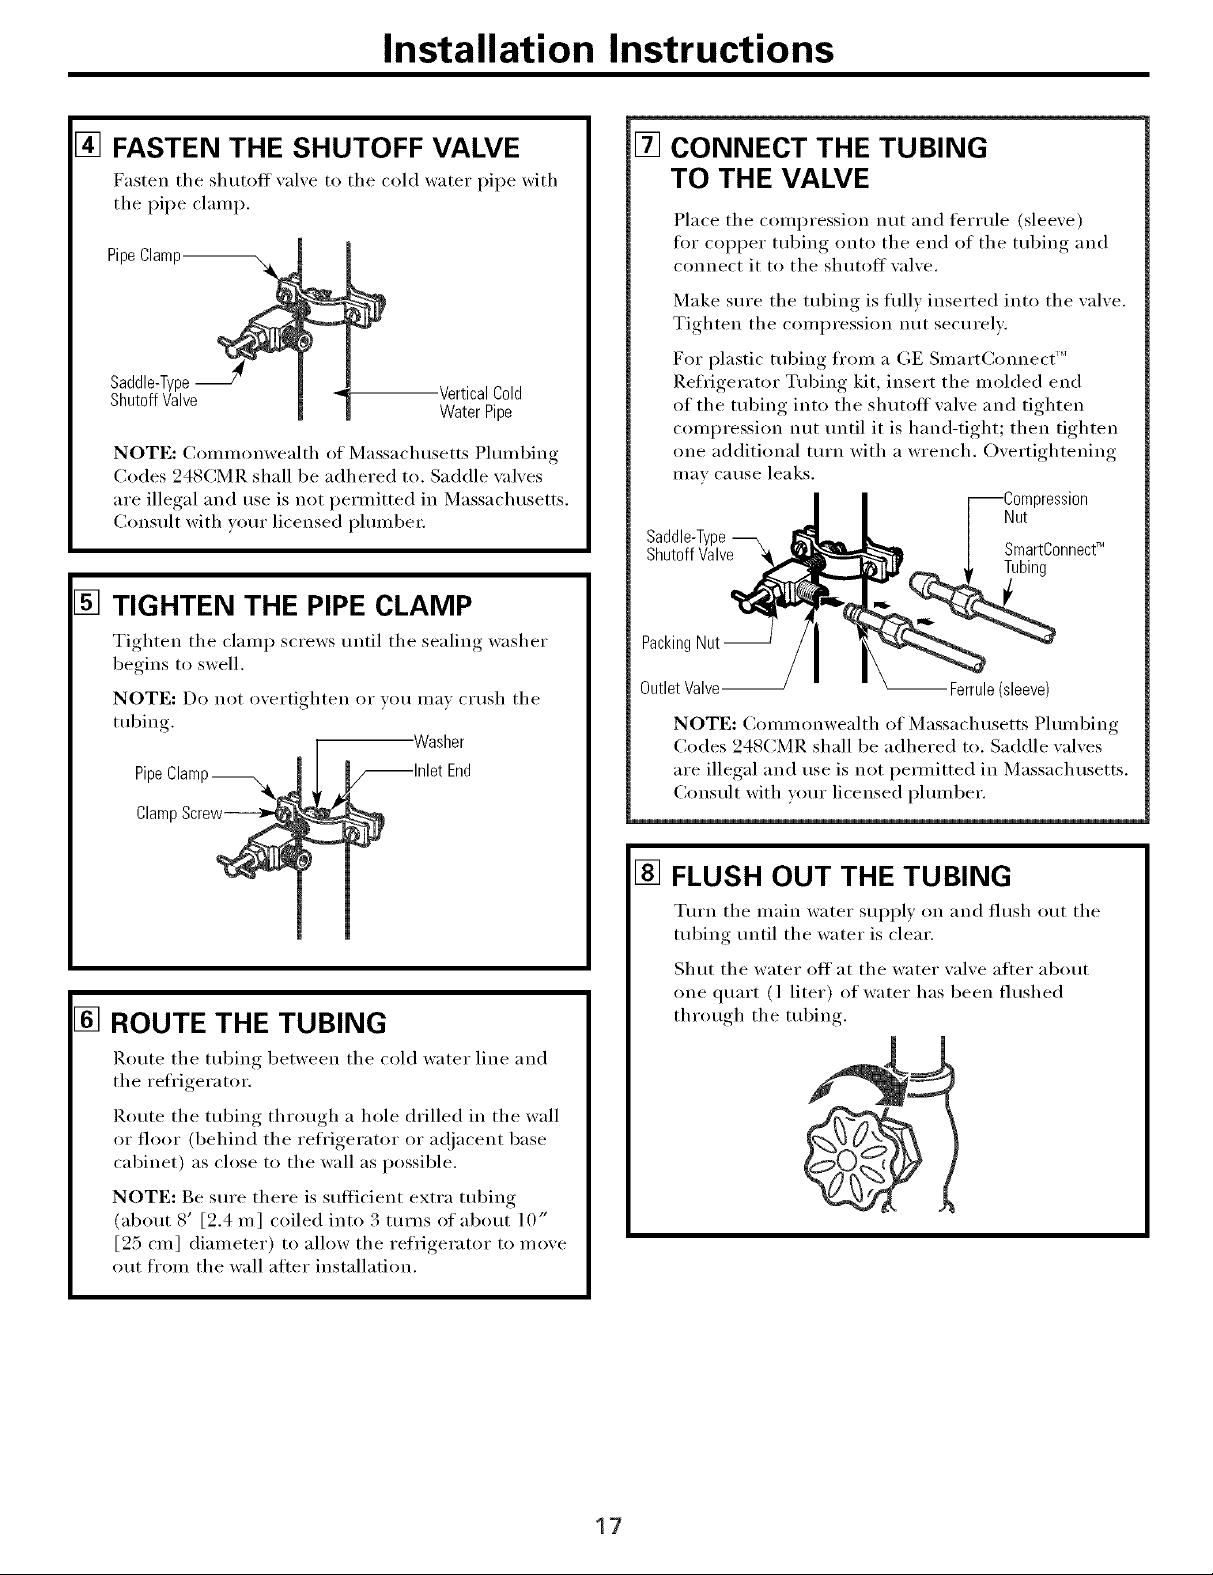
[] FASTEN THE SHUTOFF VALVE
Fasten the shutoff _al_e to the cold water pipe with
the pipe clamp.
PipeClamp
Saddle-Type
ShutoffValve
NOTE: (:ommonwealth of Massachusetts Plmnl)ing
Codes 248CMR shall be adhered to. Saddle \_dves
are illegal and rise is not permitted in Massachusetts.
Consult with vom" licensed i_lmnbe_:
VerticalCold
WaterPipe
[] TIGHTEN THE PIPE CLAMP
Tighten tile clamp screws until tile sealing washer
begins to swell.
NOTE: Do not overtighten or VO/I Ill}IV cI'/Ish the
tubing.
Pipe End
ClamF
-Washer
[] CONNECT THE TUBING
TO THE VALVE
Place tile compression nut and ti_Hule (sleexe)
for COl)per tubing onto the end of tile tubing and
connect it to tile shutoff xalxe.
Make sm'e tile tubing is flflly inserted into tile valve.
Tighten the compression nut securely.
For plastic tubing ti'om a GE Slnart()mnect "_
Refrigerator Tubing kit, insert tile molded end
of the robing into the shutoff valve and tighten
compression nut tmtil it is hand-tight; then tighten
one additional turn with a wrench. Overtightening
III_IV C_I rise lea ks.
--Compression
Nut
Saddle-Type
ShutoffValve
PackingNut-
OutletValve-- Ferrule(sleeve)
NOT[]: Coiilillonwealth ot Massachusetts Ph/iilbino
Codes 248CMR shall be adhered to. Saddle xalxes
are illegal and use is not pemdtted in Massachusetts.
Consult with yore" licensed i)lmnber.
SmartConnectTM
ubing
[] ROUTE THE TUBING
Route tile tubing between tile cold water line and
tile refl'igera tot.
Route tile tubing through a hole drilled in tile wall
or floor (behind tile refrigerator or a@_cent base
cabinet) as close to the wall as possible,
NOTE: Be sm'e there is sufficient extra tubing
(about 8' [2.4 m] coiled into 3 turns of about 10"
[25 cm] diameter) to allow tile refrigerator to move
out ti'onl tile wall alter installation.
[] FLUSH OUT THE TUBING
Turn tile main water sui)ply on and flush out tile
tubing until tile water is clear.
Shut tile water ott at tile water valve after about
one quart (l liter) of water has been flushed
through the tubing,
17
Installation Instructions
INSTALLING THE WATER LINE (CONT.)
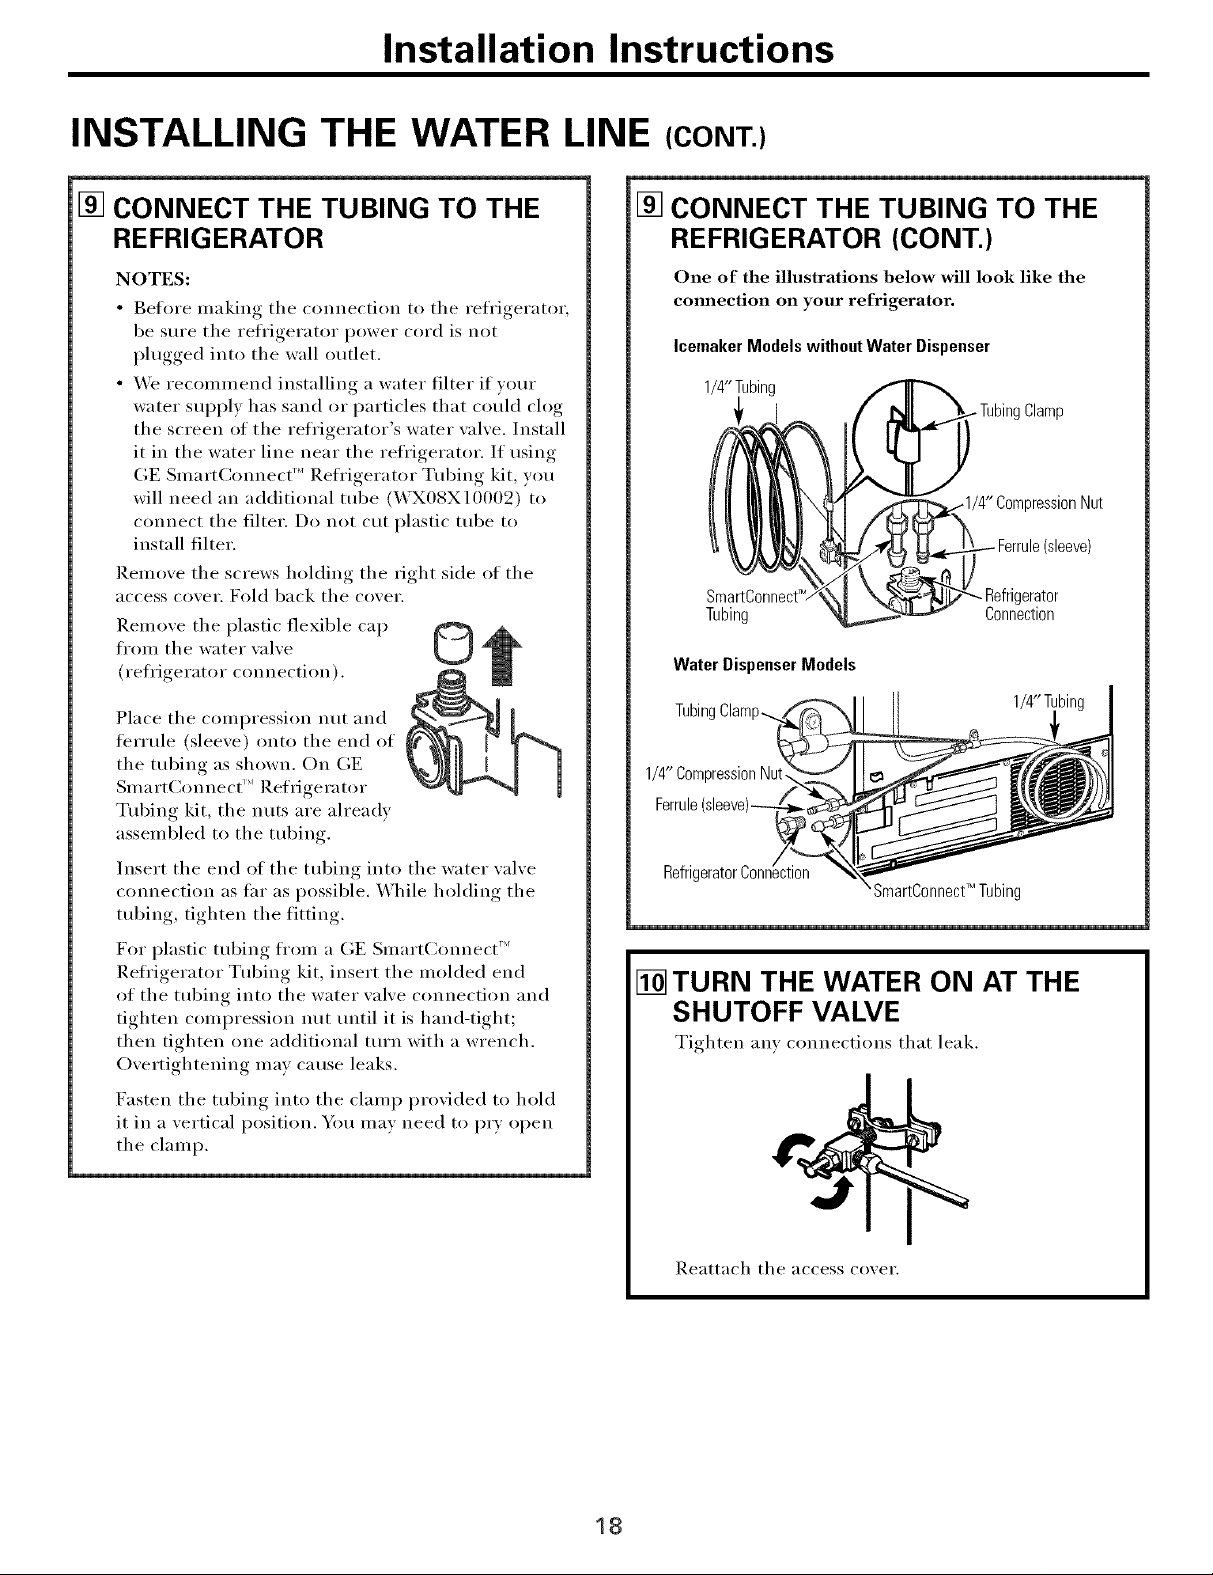
[] CONNECT THE TUBING TO THE
REFRIGERATOR
NOTES:
• gelm'e making the connection to the reti'igerator,
be sure the refligerator power cord is not
plugged into the wall outlet.
• _4'e recommend installing a water filter if wmr
water supply has sand or particles that could clog
the screen of the refrigerator's water wdve. Install
it in the water line near the refligerator. If using
GE SmartConnect "_ Refl'igerator Tubing kit, you
will need an additional tube (WX08X10002) to
connect the filter. Do not cut plastic tube to
install filter.
Remove the screws holding the right side of the
access cover. Fold back the cover.
Remoxe the plastic flexible cap
fl'om the water xalxe
(refi'igerator connection),
Place the compression nut and
fenule (sleexe) onto the end of
the tubing as shown. On (;E
Sma_t()mnect '*Refrigerator
Tubing kit, the nuts are already
assembled to the tubing
Insert the end of the tubing into the water xalxe
com_ection as fin" as possible. X4bile holding the
tubing tighten the fitting
CJ
[] CONNECT THE TUBING TO THE
REFRIGERATOR (CONT.)
One of the illustrations below will look like the
cmmection on your refrigerator.
Icemaker Models withoutWater Dispenser
1/4"Tubing
_ressionNut
(sleeve)
SmartG
Tubing
Water Dispenser Models
Tubing Clamp_.
1/4" CompressionNut.
Refrig
SmartConnect_ Tubing
- Refrigerator
Connection
1/4"Tubir
For plastic tubing from a GE Slnalt(_onnect '*
Refrigerator Tubing kit, insert the molded end
of the tubing into the water xalxe connection and
tighten compression nut tmtil it is hand-tight;
then tighten one additional turn with a wrench.
Oxertightening may cause leaks.
Fasten the tubing into the clamp proxided to hold
it in a xertical position. You may need to I)_T open
the clamp.
[] TURN THE WATER ON AT THE
SHUTOFF VALVE
Tighten any connections that leak.
Reattach the access coxer.
18

Installation Instructions
[] PLUG IN THE REFRIGERATOR
__rranoe the coil ot tubing so that it does not _ibrate
2
against the back of the refi'igerator or against the
wall. Push the refl'igerator back to the wall.
START THE ICEMAKER
On power switch models, set the icemaker power
switch to the I (On) position. On feeler arm models,
move the feeler arm to the ON (down) position. The
icemaker will not begin to operate until it reaches
its operating temperature of 15°F (-9°C) or below.
It will then begin operation automatically:
in
the ON(down)position
Feelerarmmodel
NOTE: In lower water pressm'e conditions, the
water xalxe may turn on up to 3 times to delixer
enough water to the icemaker.
REVERSING THE DOOR SWING
IMPORTANT NOTES
_hen reversing the door swing:
• Read the instluctions all the way through before
startin *
• Handle parts carefifllv to a_oid scratching, I)aint
• Set screws down b_ their related parts to a',oid usim,,
them in the wrong places.
• Proxide a non-scratching work surtace for
the clooI_.
IMPORTANT: Once you begin, do not moxe the
cabinet tmtil dooi:swing rexersal is completed.
These instructions are fin" chamdng_ , the hinges from
the fight side to the leli side--if you exer want to change
the hinges back to the fight side, follow these same
instructions and rexei_e all references to lett and right.
Unplug the refrigerator from its electrical outlet.
Empty all door shelves, including the dairy
compartment,
TOOLS YOU WILL NEED
Phillipsscrewdriver
Maskingtape
T2OorT25Torx®
driver,whicheveryour
modelrequires
3/8" Head socket driver
(a 6-point socket is
recommended)
Puttyknifeor
thin-bladescrewdriver
19

Installation Instructions
REVERSING THE DOOR SWING (CONT.)
[] REMOVE THE FREEZER DOOR
Tape the door shut with masking tape.
I(emove the hinge cover on top (ff the fl'eezer door
(on some models).
Remove the two Torx': screws, then 1N the hinge
straight up to flee the hinge pin fi'om the socket in
the top of the dora:
TopHinge_'_
Remove the tape and tilt the door away from the
cabinet. I,ifl it off the center hinge pin.
Set the door on a non-scratching surtace with
the inside up.
[] REMOVE THE REFRIGERATOR
DOOR
Tape the door shut with masking tape.
Remoxe the center him,eo pin with a ./8 socket
and ratchet.
PlasticWasher
HingePin--
|
CenterHinge _
Bracket
FreshFoodDoor
Remove the tripe and flit the door away fl'om the
cabinet, Remove and save the washer on the hinge pin.
i,ifl the door straight up to fl'ee its bottom socket fl'om
the pin in the bottom hinge bracket.
Set the door on a non-scratching sm'fi_ce with the
inside up.
|
CAUTION: Do not let door drop to the floor.
To do so could damage the door stop.
[] TRANSFER TOP HINGE TO
THE LEFT
Interchange, him,e_ and screws at toI_ fight, with screws
at the top left of cabinet.
Do not tighten screws on hinge side at this time.
tr
2O
mnstaiiation mnstructions
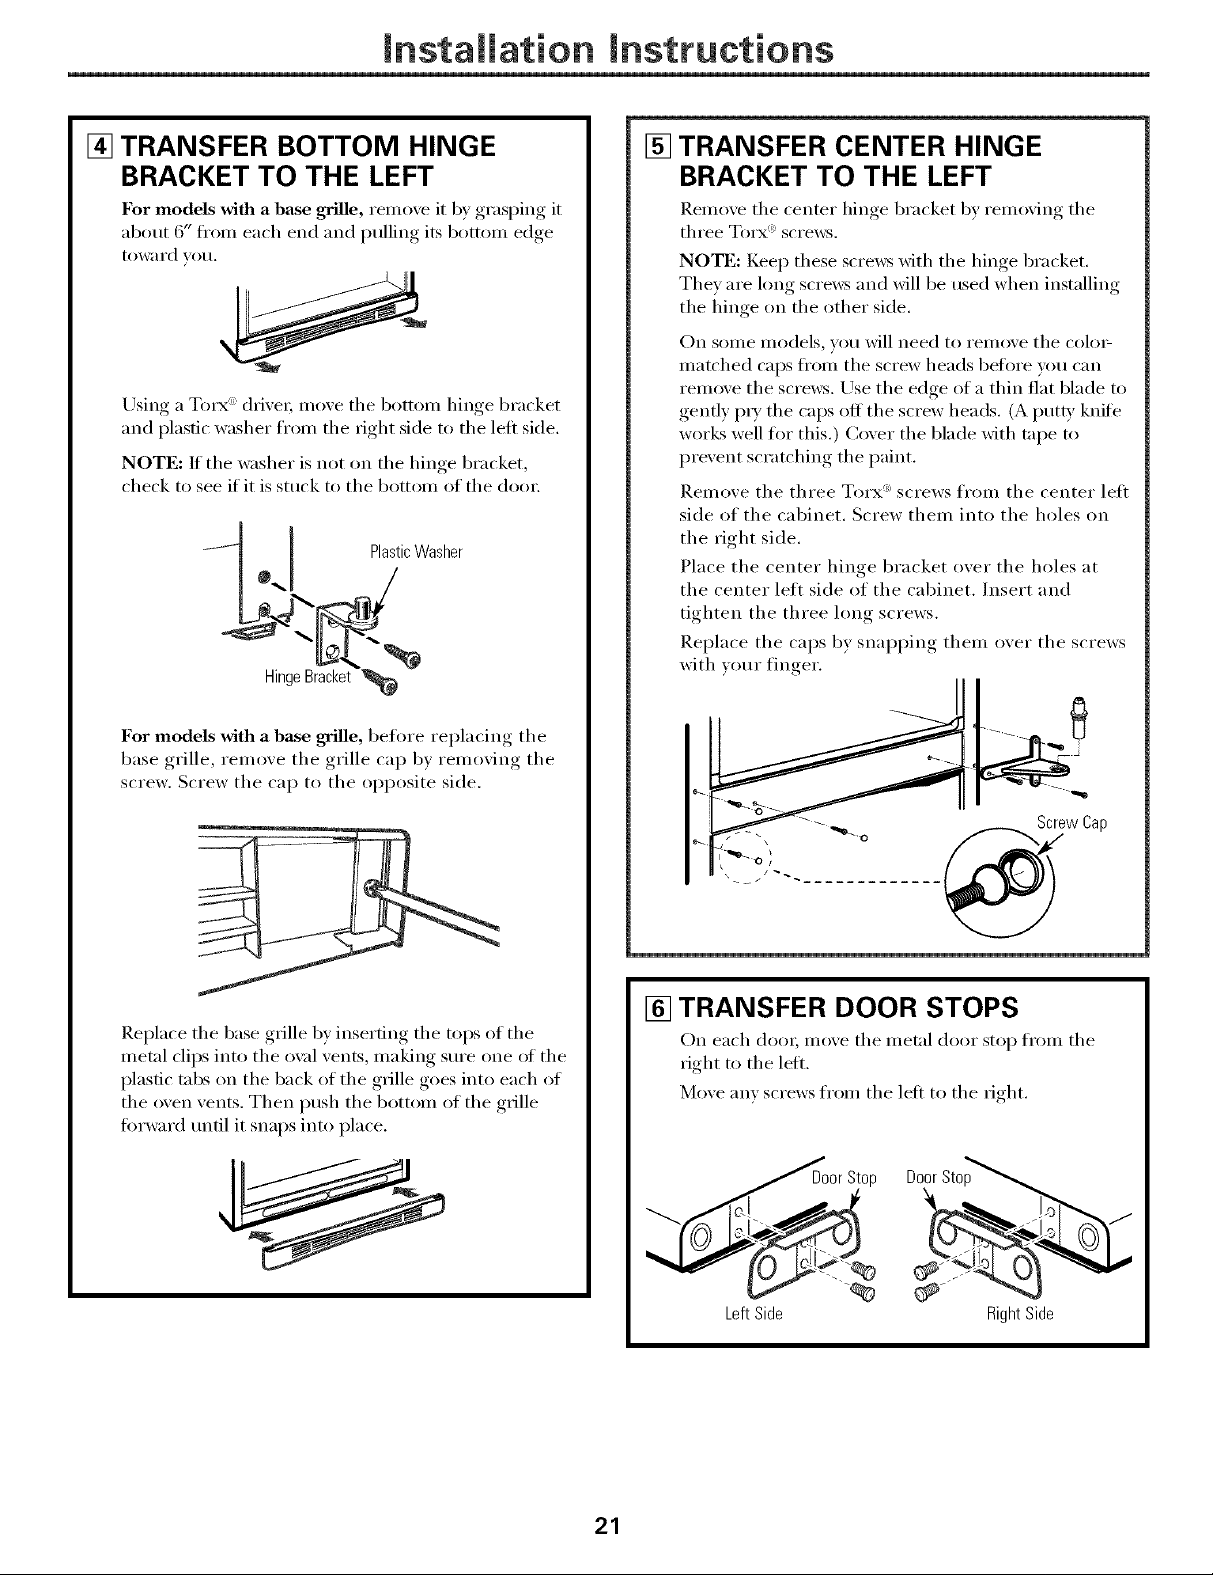
[] TRANSFER BOTTOM HINGE
BRACKET TO THE LEFT
For models with a base grille, remo_e it by ,grasI)ing, it
about 6" fl'om each end and Imllim"_ its bottom edge
toward veil.
Using a Torx _':driver; move the bottom hinge bracket
and plastic washer fl'om the right side to the left side,
NOTE: If the washer is not on the hinge bracket,
check to see if it is stuck to the bottom of the dora:
q 0_.[ Plasiic Washer
.4"-
[] TRANSFER CENTER HINGE
BRACKET TO THE LEFT
Remo_e the center hinge bracket by removing the
three _'Torx sci ews.
NOTE: Keep these screws with the hinge bracket,
They are hmg screws and will be used when installing
the hinge on the other side,
On some models, you will need to remo',e the cole>
matched caps fl'om the screw heads before _ou can
remo_e the screws. Use the edge of a thin flat blade to
genfl) P_T the caps off the screw heads, (A put B' knife
works well for this,) Coxer the blade with tape to
prex ent scratching, the l)aim.
Remoxe the three Torx <_>screws from the center left
side of the cabinet, Screw them into the holes on
the right side,
Place the center hinge bracket oxer the holes at
the center left side of the cabinet. Insert and
tighten the three hmg screws,
Replace the caps b) snapping them oxer the screws
with )our finger.
For models with a base grille, before rel)lacino_ the
base grille, remoxe the grille cap b) remoxing the
screw, Screw the cap to the opposite side,
Replace the base grille by inserting the tops of the
metal clips into the o_;d vents, making sm'e one of the
plastic tabs on the back of the grille goes into each of
the oven vents. Then push the bottom of the grille
fi)rward until it snaps into place.
Screw Cap
[] TRANSFER DOOR STOPS
On each dora; moxe the metal door stop h'om the
right to the lelL
Moxe any screws from the left to the fight.
Door Sto
LeftSide RightSide
21

Installation Instructions
REVERSING THE DOOR SWING (CONT.)
[] TRANSFER REFRIGERATOR
DOOR HANDLE TO THE RIGHT
To remove the handle: I_emo_e the plug butt(m by
careflflly p_Ting under the edge with a put V knife.
Remove the exposed screw holding the handle.
Handle Plug
Remove the two screws holding the handle to the
top of the do(n:
Handle
_jug
[] TRANSFER REFRIGERATOR DOOR
HANDLE TO THE RIGHT (CONT.)
Transfer the door l_lug, button to the opposite side.
Butt(
Reinstalling the hmadle: Attnch the handle to the
right side of the dora:
Handle
Plug_ _'
After removing the hmldle: Move the small plug
buttons fl'om the top right side of the door top and
insert them into the holes on the opposite side,
SmallPlu(
Buttons
Move the large plug button fl'om the left edge of the
door and insert it into the hole on the opposite side,
PlugButton
I
22
Installation Instructions
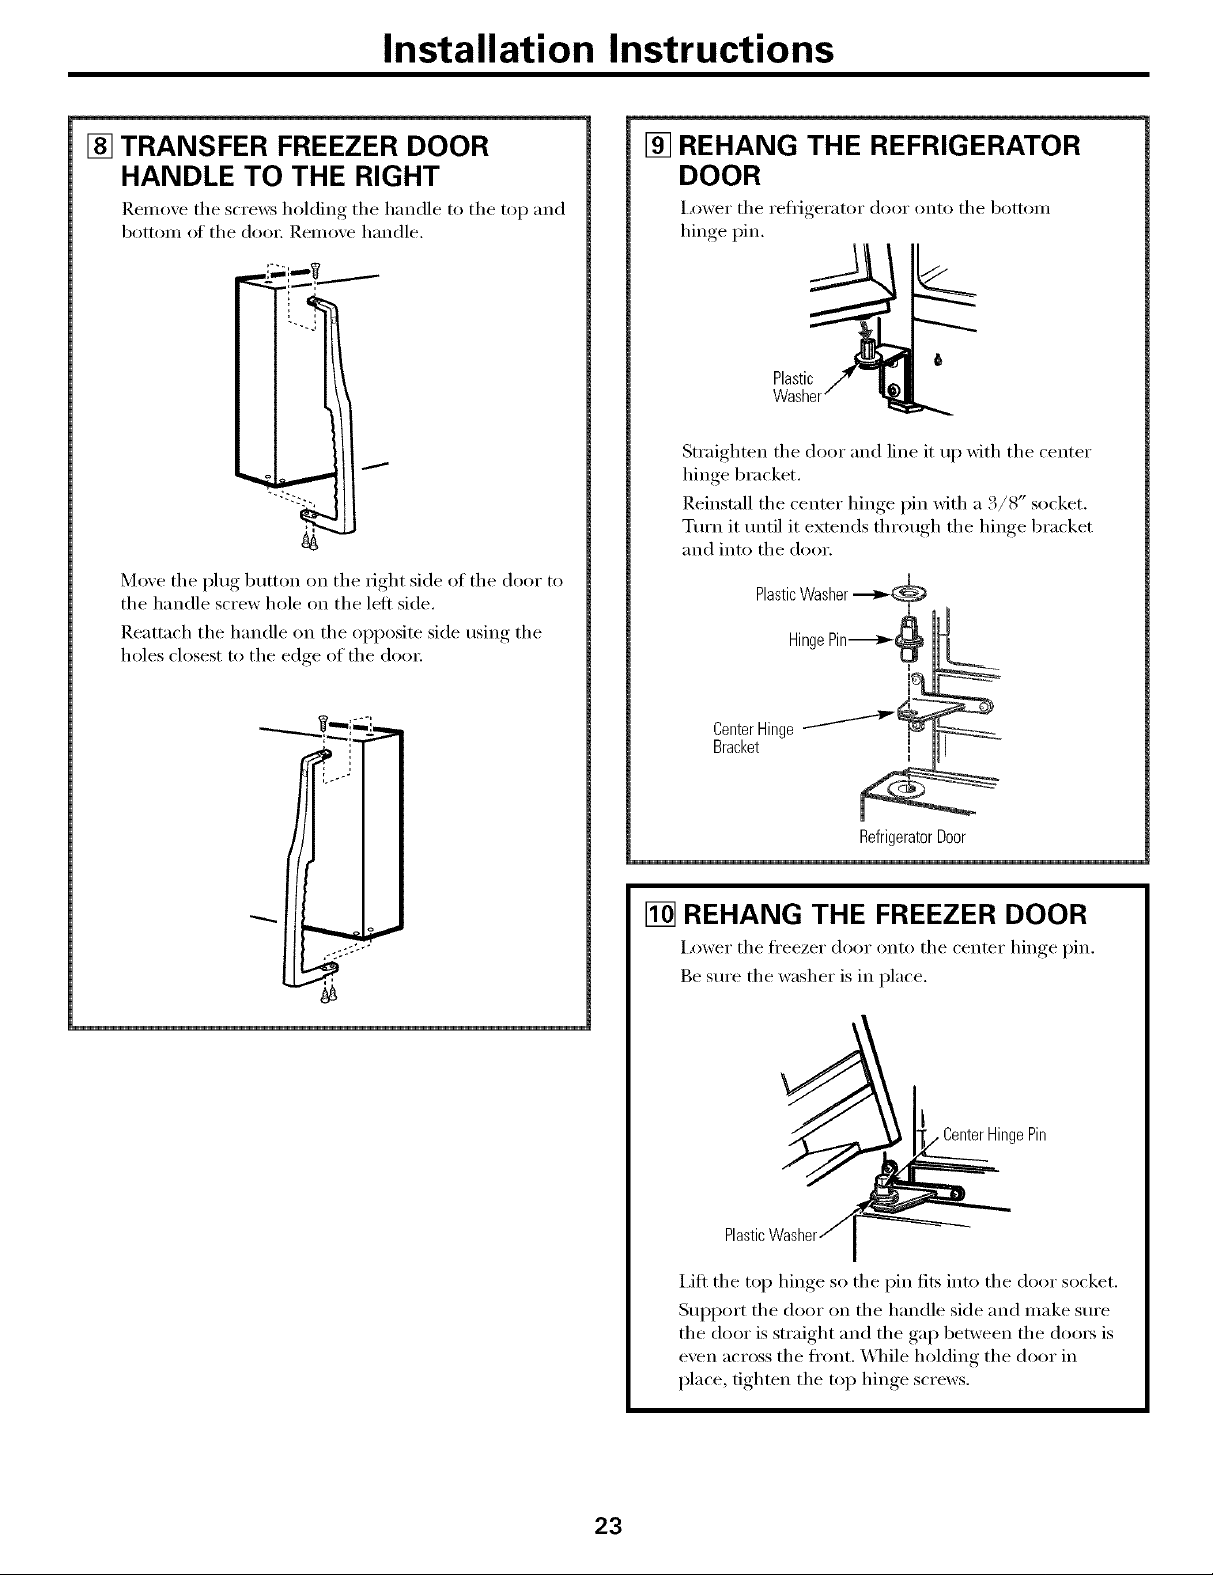
[] TRANSFER FREEZER DOOR
HANDLE TO THE RIGHT
Remo_e the screws holding the handle to the top and
botton] of the doo_: Remo_e handle.
Move the plug button on the right side of the door to
the handle screw hole on the left side,
Reattach the handle on the opposite side using the
holes closest to the edge of the dora;
[] REHANG THE REFRIGERATOR
DOOR
I,ower the i'etl_gei'atoi" dooI" onto the bottoI/l
hinge pin.
t
Plastic
Straighten the door and line it up with the center
hinge bracket.
Reinstall the center hinge pin with a 3/8" socket.
Tm'n it tmtil it extends through the hinge bracket
and into the door.
PlasticWasher ._,-(_,
Hinge Pin-_>-I_
Center Hinge --'''''"'_
Bracket _
m
Refrigerator Door
[] REHANG THE FREEZER DOOR
i,ower the fl'eezer door onto the center hinge pin.
Be sm'e the washer is in place.
I} CenterHingePin
Plastic
i,ifl the top hinge so the pin fits into the door socket.
Support the door on the handle side and make sm'e
the door is straight and the gap between the doors is
even across the fl'ont. \._lfile holding the door in
place, tighten the top hinge screws.
23
Normal operating sounds.
Newer refrigerators sound different from older refrigerators. Modem refrigerators
have more features and use newer technology.
Do you hear what I hear? These sounds are normal.
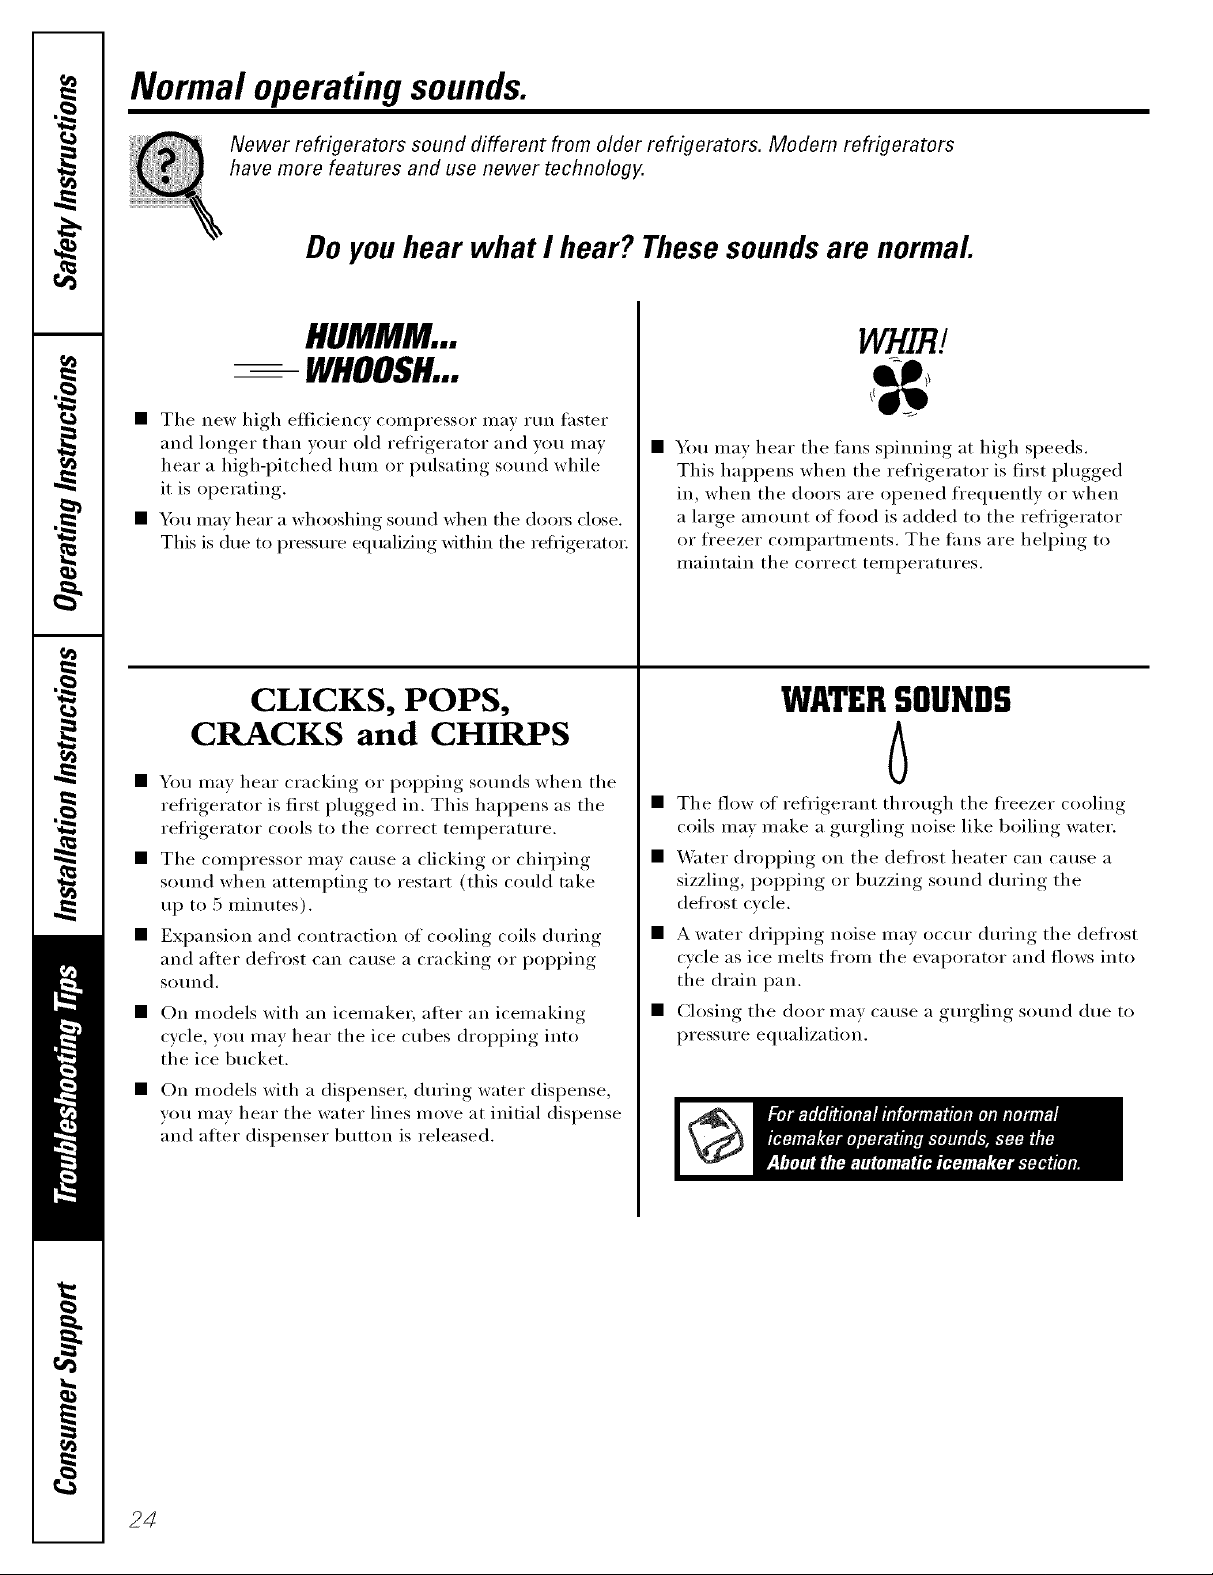
HUMMM...
-- WHOOSH...
• The new high efficiency compressor may mn faster
and longer than w)ur old refl'igerator and you may
hear a high-i_itched hum or pulsating sound while
it is operating.
• _4m may hear a whooshing sound when the (loo_ close.
This is due to pressure equalizing within the refl'igerato_:
CLICKS, POPS,
CRACKS and CHIRPS
• You may hear cracking or i)oi)ping sounds when the
refrigerator is first i)lugged in. This hal)pens as the
ref'rigerator cools to the correct tell/l)eY_lttlYe.
• The compressor may cause a clicking or chiq_ing
sound when attempting to restart (this could take
up to 5 minutes).
• Expansion and contraction of cooling coils dm'ing
and after defl'ost can cause a cracking or i)oi)ping
SOtlnd.
• On models with an icemake_; after an icemaking
cycle, you may hear the ice cubes dropping into
the ice bucket.
• On models with a dispense_; during water dispense,
you may hear the water lines move at initial dispense
and after dispenser button is released.
WHIR./
• You may hear the rims spinning at high speeds.
This hai_pens when the refiigerator is first plugged
in, when the doors are opened frequently or when
a large ainount of fl)od is added to the refl'igerator
or freezer compartments. The rims are helping to
maintain the correct temperatures.
WATERSOUNDS
6
• The flow of refl'igerant through the fl'eezer cooling
coils may make a gurgling noise like boiling water,
• Water dropping on the defl'ost heater can Catlse a
sizzling, poi)ping or buzzing sound during the
defrost cycle.
• A water dripping noise may occm" dm'ing the defl'ost
cycle as ice melts ti'om the evaporator and flows into
the drain pan.
• Closing the door mav cause a gurgling sound due to
pressure equalization.
24z

Troubleshooting -tips
Save time and money! Review the charts on the following
pages first and you may not need to call for service.
Possible Causes
Freezer doorpops open This is normal if, after
when refrigerator door popping open, the freezer
is closed door closed on its own.
Door does not close Rollers need adjusting. • See Rollers.
by itseff
Refrigerator does Refrigerator in defrost cycle. • Wait ab()t/t 40 nfiuutes tt w defi'ost cycle to end.
not operate Refrigerator control in • Move the refiJgerator Mud fl'eezel" c()utrol to a
0 (Off)position, telu l)el'attlre settiug .
Refrigerator is unplugged. • Push the pltlg c(,Hpletely lute the out et.
The fuse is blob,s/circuit • Replace fi/se or reset the breaker:
breaker is tripped.
Vibration or rattling Refrigerator is not resting • A(!i ust r()ll e_s (See Rollers).
(slightvihration on all four rogers.
is normal)
Motor operates for Normal when refrigerator • _4'ait 24 hotH_ fi:,r the refiige_utor to conq)letely
long periods or cycles is fh'st plugged in. c()()l d()wu.
on and off frequently
(Modern refrigerators
with more storage amounts of food are
space and a larger placed in refrigerator.
freezer require more Door leo open. • (_he( k to see if l)ackage, is holding door open.
operating time. They
start and stop often Hot weather or frequent • This is u(._nal.
tomaintain even door ope_fings.
temperatures.) Temperature controls set • See About the controls.
Often occurs when large • This is uo_nal.
at the coldest setting.
What ToDo
• This indicates that there is a good seal ou tile fi'eezel"
dooI: If' the fl'eezer duel" does uot atltol_aticallv close after
popping opeu, the rollers ueed ac!jttsting. See Rollers.
Refrigerator or freezer Temperature control not set • See About the controls.
compartment too warm cold enough.
WaJcm weather or frequent • Set the telnl)erattu'e coutrol oue step coldel:
door openings. See About the controls.
if )a(ka,,e is holding door open.Door left open. • Check to see l
Freezer door popped open. • See the pr()blem Freezer door pops open when
refrigerator door is closed.
if )a(ka,,e is holding door open.Frost orice crystals Door left open. • Check to see l ,',
on frozen food
(frost within package Too frequent or too long
is normal) door openings.
Food blocking freezer air vents. • Move items away fl'on_ the ba(k wall of the fl'eezeL
Frequent "buzzing" lcemaker power switch is in • Set the power switch to the 0 (off) position. Keeping it
sound the I (on) position, but the in the I(on) position will damage the water xalve.
water supply to the refrigerator
has not been comaected.
Small orhollow cubes Water f'dter clogged. • Replace filter cartridge, with new cartI_i(lge or with I)lu_
25
Beforeyou call forservice...
Troubleshooting -tips
Possible Causes What ToDo
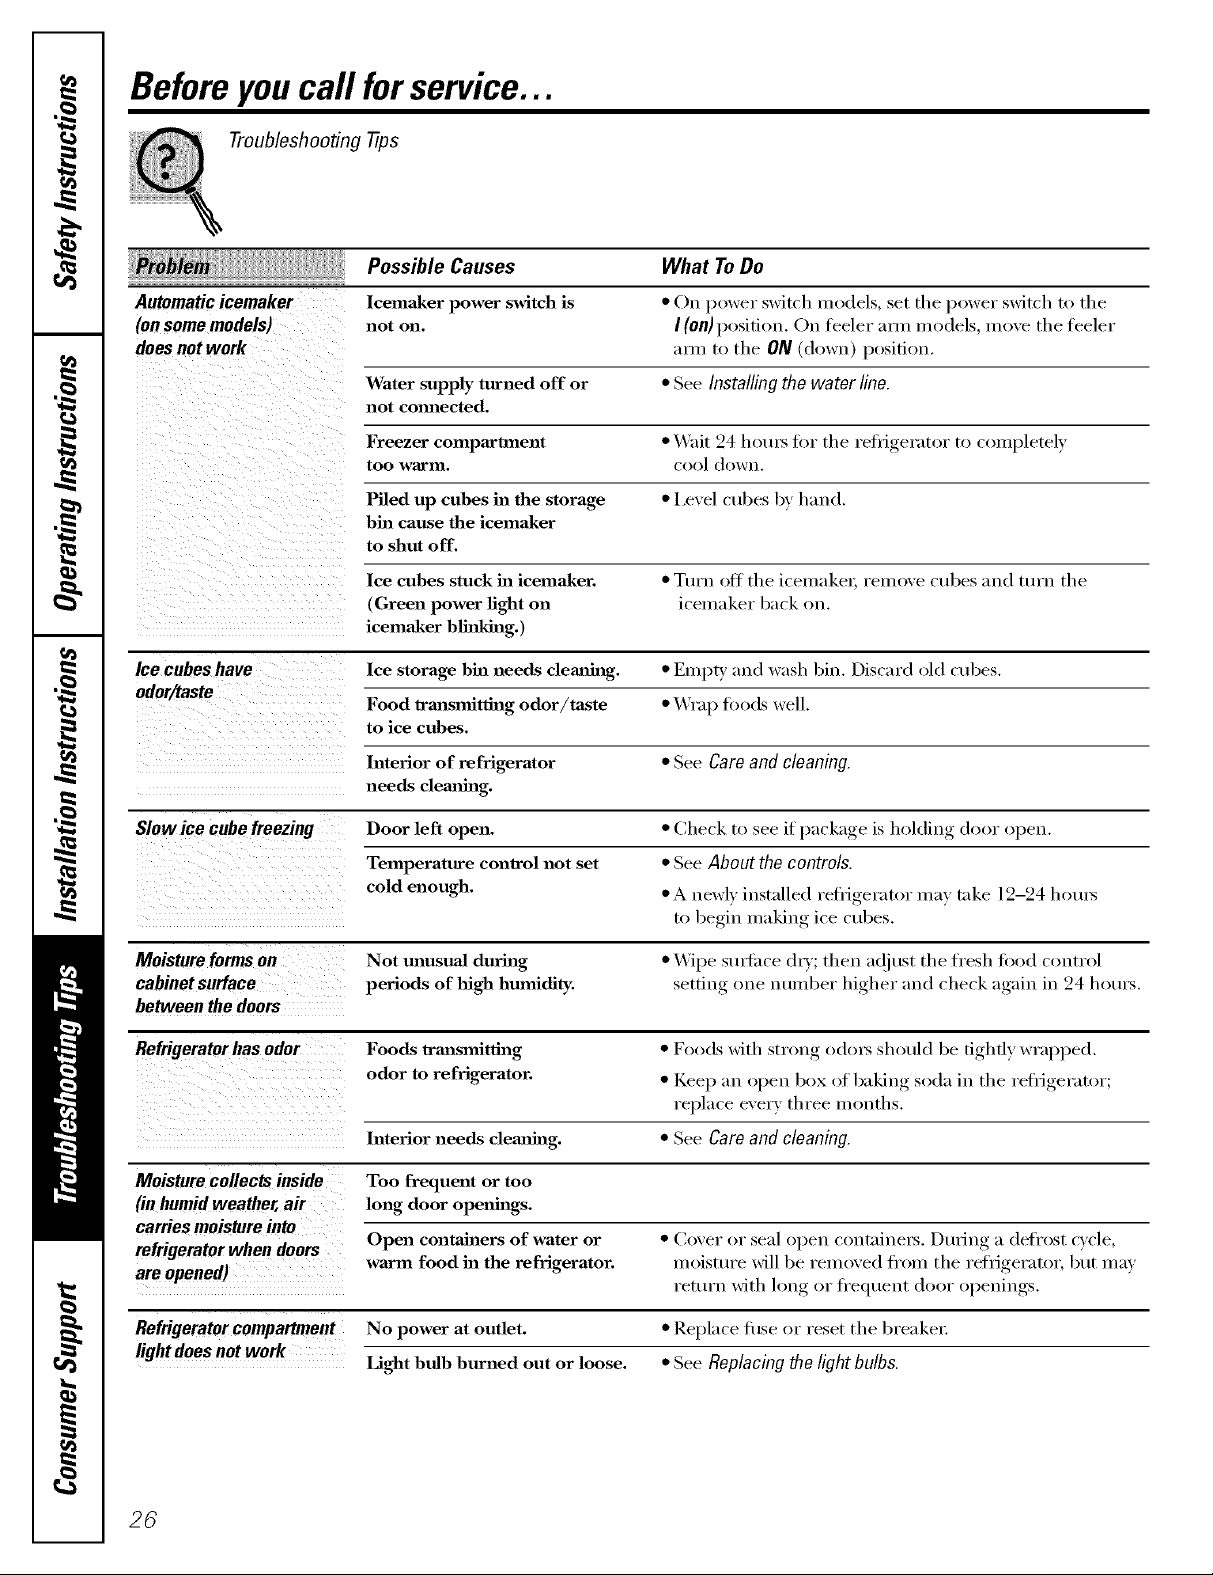
Automaticicemaker
(onsomemodels)
doesnotwork
Ice cubes have Ice storage bin needs clemlhag. • Empty mad wash bin. Discard old cubes.
odor/taste
Icema_ker power switch is
not on,
Water supply turned off or • See Installing the water line.
not comlected,
Freezer compartment • Wait 24 hotu_ _'_)r the reflJgerat_)r t() (()mpletely
too warln, cool dowu,
Piled up cubes in the storage • I.evel cubes by hand.
bin cause the icemaker
to shut off.
Ice cubes stuck in icema_ker. • Tm'n off the iceluakeI; renlove cubes and turu tile
(Green power light on icelnaker back on.
icemaker blinking.)
Food transmitting odor/taste • Wrap fi)ods well.
to ice cubes,
• ()n power switch models, set the power switch to the
I (on) position. On feeler am_ models, moxe the feeler
am/to the O/V (down) position.
Interior of refrigerator • See Care and cleaning.
needs clemfing.
if )acka,,e is holding door Ol)en.Slow ice cube freezing Door left open. • Check to see 1
Temperature control not set • See About thecontrols.
cold enough. • A newh" installed refl_igerator may tnke 12-24 hot/i_
to be,du makiu,_ ice cubes.
Moisture forms on Not unusual during • \_'il)e suY/ilce dYy; then a(!it/st tile fresh fi)od control
cabinet surface periods of high hmnidity. ,setfilw_ one numl)er higher, and check again, in 24 hems.
between the doors
Foods _'m_s_mitth_g • F()()(ls with str_)ng ()d()_ should be tightly wral)ped.
odor to refrigerator. • Kee l) an ol)eu box of baking, soda in tile reflJgerator;
rel)lace every three mouths.
Interior needs clemfing. • See Care and cleaning.
Moisturecollectsinside Too frequent or too
(inhumid weather, air long door openings,
carriesmoistureinto
refrigerator when doors Open containers of water or • Cover or seal open ('outnine_. L)mJng a defrost cycle
are opened) return with long or fl'equeut door openings.
Refrigerator compartment No power at outlet. • Replace fi/se or reset tile breakel:
warm food in the refrigerator, moisture will be removed fl'om the refrigerator, but may
light does not work Light bulb burned out or loose. • See Replacingthe light bulbs.
26

www.GEAppliances.com
Possible Causes What ToDo
Hotair frombottom
ofrefrigerator
Normal air flow cooling
motor, ha the refrigeration
process, it is norma] that
heat be expelled ha the
area under the refrigerator.
Some floor coverhlgs will
discolor at these normal
mad safe temperatures.
Foodfreezing in Food too close to the air vent * Move tile fl)od away from tire air veut (nero" tire
therefrigerator at the back of the refrigerator, controls).
Refrigerator control is set * Move the x'eliJgex'ator control to a W_IX]//eX"
too cold. teInperatuI'e settiug one iucren/eut at a dine.
Orange glow Defrost heater is on. * This ix mmn:d.
in the freezer
Door bins do not fit The freezer door bins are • Txa to iustnll tire bins in b()th do(,x_.
in the door a different size than the
refrigerator door bins.
Freezerlightdoes
notwork
Some models do not have a
freezer light.
Light bulb burned out • See Replacingthelight bulbs.
or loose.
• Check fi)r a senti-clear dome light shield in the Ji'eezer
ceiling. It the dome ix opaque white, the model does not
have a fl'eezer light. Check fi)r a door acfi_lted light
switch on tire fight side (ff tire ['x'eezeL 11 there ix only
a cap in place oI a switch, the model does not have
a tl'eezer light.
Controls do notlight up Some models do not have • If you can read white utmxbex_ on tire control setting,
lighted controls, tire model does not have lighted controls.
Refrigerator fight bulb burned • See Replacingthelight bulbs.
out or loose.
Water has poor Water dispenser has not been • Dispense water m]til :111water in system ix
taste/odor used for a long time. replenished.
Waterin firstglass Normal when refrigerator • _4'ait 24 horns fl)r the reflJgemtor to completely
is warm is first hlstalled, cool down.
Water dispenser has not been • Dispense water tu]til all water ix system ix
used for a long time. replenished.
Water system has been drained. • _dlow several horus fi)r replenished stq)ply to chill.
27

Beforeyou call forservice...
Troubleshooting -tips
Possible Causes What ToDo
Water dispenser Water supply line turned off * See Installing the water line.
does not work or not cmmected.
Water filter clogged. * Replace filter (artYidge or l'elllOVe _]lter aud install l)lug.
Air may be trapped in * Press the dispenser aHn flw at lea,4 2 unuutes.
the water system.
Water spurting from Newly-hastaUed filter cartridge. * Run water fl'om the dispenser for 3 minutes
dispenser (about 1½ galh)us).
Wateris not dispensed Water in reservoir is frozen * Set tile refi_igerator control to a w:muer setting and
but icemaker is working because the controls are wait 24 hotu_. If water does not disl)ense after 24 hotn_,
set too cold. call fin" service.
No water or icecube Supply line or shutoff valve * Call a l)lttmbe_:
production is dogged.
Water filter dogged. * Replace filter cartridge or rem_we filter and install l)lug.
54 • "
Filter cm'tridge not * Remove and reiustnll filter cartridge, being certnin that
properly h_staUed, it locks into place. The blade on tile eud of tile cartridge
should be positioned \'erticall):
Water is leaking from Glass not being held under * Hold the glass tmderueath the dispenser fin" 2-3 seconds
dispenser the dispenser long enough after releasing tile disl)enser button. _Viter may continue
after button is released, to disl)ense after tile butt_m is released.
Air may be present in the
water line system, caush_g
water to drip after being
dispensed.
• Dispense water tbr at least 2 llliut/tes to l'elllOVe ;liI"
fl'OlU svstell/,
28

GE Service Protection Plus '_'
GE, a imme recogifized _orhh_hte for qtmlhy a_d depeildabiHty; offers yot_
Ser_h-e Prote(tkm t h_s --comp_ehem_ e protecfio_ o_ aH )our app]iaI_(:es--
) t "X
No Matter What Brand!
WaTt Cover Any Appliance.
Benefits Include:
o Backed by GE
o All brands covered
o Unfimited service calls
o All parts and labor costs included
o No out-of-pocket expenses
* No hidden deductibles
* One 800 number to ca]]
Y(a_ wi]] be completely satisfied with ol_r serxice protecti(m or )(m may re(p_est y(mr m(mey back
(m the remaim_im_g vahm of)(mr c(mtract. No ql_esti(ms asked. It's that simple.
Protect veto" reI)'igerato_; dishwasher; washer amt dryer; rm_ge, _i VCR amt milch more--aoy brand!
Ph_s there's m_o extra charge %r emergem_cy service am] ]o_ mol_th]y fi_lal_ch_g is available. Evel_ icemaker
coverage am] {ood spoilage protectioN_ is oflbre(L _}m cam_ rest easy, kl_m,,i_g that a]] y(mr yah*able
ho_*seho]d products are protected agah_st expe_sive repairs.
Angwhom. Angtimo.
k!l b_mds cox_ r_d, up to 20 }(ars old, i_} tb_ condnemal /.S.
_(ui h( 1(:
Pleaseplace in envelopeand mail to:
General Electric Cempang
Warranty Registration Department
P.O. Box 32150
Lou_ville, KY 4(}232-2150
29

Consumer Product Ownership Registration
Dear Customer:
Thank you for purchasing our product and thank you for placing your confidence in us.
_A/eare proud to ha'_e you as a customer!
Follow these three steps to protect your new appliance investment:
Complete mid nlall
your Consumer
Product Owuerslfip
Registration today.
t]a_e the t)eace o/
mind of knowing we
c_ln contact you ill
th( unlikely (v(nt of
a sa/;vty lllodJ/ication.
AJler mailing the
registration below,
store this dOCtll//ent
in a sa/(' place. It
contains intbrmation
you will need should
you require service.
Our service nmnber is
800 (;E CARES
(800.432.2737).
Model Number Serial Number
, , , , , , I I , , , , ,
Important: If you did not get a registration card with your
product, detach and return the form below to
ensure that your product is registered, or register
online at ge.com.
Consumer Product Ownership Registration
[_C_t(t VO/IF OwnelT'S
Mamml carefulh.
It will hel t ) you
operate your new
appliance properly.
, I
_,,- (MI h(r(
Model Number Serial Number
Ms. M*>,. Mix_,
Fir,,1 I I Lasl]
Name I I I I I I I I I Nain(! I I I I I I I I I I I I
_11-( (!1 I
Addr( ss I I I I I I I I I I I I I I I I I I I I I I I I
AI t.#l, , , , , , , I E-mailAddress*
Zip I
1)ale Pla_ ed
Monlh
* Please provide your emmil address to receive, via emmil, discounts, special ottk,r_,and other
important communications from GE Appliances (GEA).
[ Check here if you do not want to receixe COlnmunications ti-om GEA's carefully selected partners.
FAILI JRE TO C()MPIA_TFE AND RETI JRN TIIIS CARD DOES NOT DIMINISII h_)l JR WARI_\N_IY
RIGIITS.
For information about GEA's privacy and data usage poliQ; go to ge.com and click on 'Prixacv
Policy" or call 800.626.2224.
3O
GF Consumer& hldusttiM
App#_nces
Generaf E[ectric Comp_l_y
Louisvi_, KY _2Z5
ge com
GEAppliances
I
I
I
I
 Loading...