

Page 1

0
1,...
GEAppliances.com
Safetg Instructions ............. 2,3
Operating Instructions
Care and Cleaning .................. 6, 7
Control Settings ....................... 4
Ice Service .............................. 5
Storage Drawers ....................... 4
Installation Instructions
Preparing to Install
the Refrigerator ...................... 8
Reversing the Door Swing .......... 9-12
Troubleshooting Tips ........ 13-15
Normal Operating Sounds ........... 13
Consumer Support
Consumer Support .................. 18
Warrantu (U.S.) ...................... 17
GTL12HBX
GTRIOHAX
GTR12HBX
!,..
Write the model and serial
numbers here:
Model #
Seriol #
You can find them on a label inside
the refrigerator.
197D8071PO02 49-60602 04-09JR
Page 2
IMPORTANT SAFETY INFORMATION.
READ ALL INSTRUCTIONS BEFORE USING.
WARNING!
Use this appliance only for its intended purpose as described in this Owner's Manual.
SAFETYPRECAUTIONS
When using electrical appliances, basic safety precautions should be followed, including the following:
This refrigerator must be properly installed
and located in accordance with the Installation
Instructions before it isused.
i!!!}i}ii_
Do not allow children to climb, stand or hang
on the shelvesin the refrigerator.They could
damage the refrigerator and seriously injure
themselves.
iiiiiiiiii_,Do not touch the cold surfaces inthe freezer
compartment, particularly when hands are
damp or wet. Skinmay stick to these extremely
cold surfaces.
iiiiiiiiii_,
Do not store or usegasoline or other flammable
vapors and liquids inthe vicinity of this or any other
appliance.
iiiiiiiiiii_
In refrigerators with automatic icemakers,
avoid contact with the moving parts of the
ejector mechanism,or with the heating element
that releasesthe cubes. Donot placefingers or
hands on the automatic icemaking mechanism
while the refrigerator isplugged in.
Keepfingers out of the "pinch point" areas;
clearances between the doors and between
the doors and cabinet are necessarily small.
Becareful closing doors when children are
in the area.
Unplug the refrigerator beforecleaning and making
repairs.
NOTE.:Westrongly recommend that ang servicing
beperformed by a qualified individual.
Turning the control to the COLDpositiondoes
not remove power to the light circuit.
Do not refreezefrozen foods which have
thawed completely.
_Before replacing a burned-out light bulb, the
refrigerator should be unplugged in order to avoid
contact with a livewire filament. (Aburned-out light
bulb may break when beingreplaced.)
DANGER! RISK OF CHILD ENTRAPMENT
PROPERDISPOSAL OF THE REFRIGERATOR
Childentrapment and suffocation are not problems
of the past.Junked or abandoned refrigerators are
still dangerous._evenif they will sit for "just afew
days." If you aregetting ridof your old refrigerator,
pleasefollow the instructions below to help prevent
accidents.
Before You Throw Away Your Old
Refrigerator or Freezer:
iiiiiiiiiiiTakeoffthe doors.
Leavethe shelvesin place sothat children may not
easily climb inside.
Refrigerants
All refrigeration products contain refrigerants,
which must be removed prior to product disposal.
If you are getting rid of an oldrefrigeration product,
check with the company handling the disposalabout
what to do.
USEOF EXTENSION CORDS
Because of potential safet_l hazards under certain conditions, we strongl_t recommend against the
use of an extension cord.
However,if you must usean extension cord,it isabsolutely necessarythat it bea UL-listed,5-wire,grounding-
type appliance extension cord having a grounding-type plug andoutlet and that the electrical rating of the
2
cord be 15 amperes (minimum) and 120volts.
Page 3

GEAppliances.com
WARNING!
HOW TOCONNECTELECTRICITY
Do not, under any circumstances, cut or remove the third (ground) prong from the power cord.
For personal safety, this appliance must be properly grounded.
Thepower cord of this appliance is equipped
with a 3-prong (grounding)plug which mates
with a standard 3-prong (grounding)wall outlet
to minimize the possibilitg of electric shock hazard
from this appliance.
Have the wall outlet and circuit checked bg
a qualified electrician to make sure the outlet
isproperlg grounded.
Where a standard 2-prong wall outlet is encountered,
it is gour personal responsibilitg and obligation to
have it replaced with a properlg grounded 3-prong
wall outlet.
Therefrigerator should alwags be plugged into its
own individual electricaloutlet which hasa voltage
rating that matches the rating plate.
Thisprovides the best performance and alsoprevents
overloading house wiring circuits which could cause
a fire hazard from overheated wires.
Never unplug gour refrigerator bg pulling on the
power cord.Alwags grip plug firmlg and pull straight
out from the outlet.
Repairorreplace immediatelg all power cordsthat
have become fraged or otherwise damaged. Do not
usea cord that shows cracks or abrasion damage
along its length or at either end.
When moving the refrigerator awag from the wall,
be careful not to rolloveror damage the power cord.
READAND FOLLOWTHISSAFETYINFORMATIONCAREFULLY.
SAVETHESEINSTRUCTIONS
Page 4

About the control on the refrigerator.
1 2 3 4 5
Freezer 3 is Normal
Temperature 5 is Cold
There is a temperature control in the fresh food compartment
as well as the freezer compartment. Initially set the control
to Normu! in the fresh food and freezer compartments.
Allow 24 hours for the temperature to stabilize.
Refrigerator
Tempereture
Adjust
1 is Cold
7 is Normol
9 is Coldest
ControlSettings
Adjust the fresh food control one increment
at a time. Allow 12 hours after each adjustment
for the refrigeratorto reach the temperature you
have set.
Adjust the freezer control one increment at a time.
Allow 12 hours after each adjustment for the freezer
to reach the temperature you have set.
After each adjustment, check both the freezer
and the fresh food compartments. Changingthe fresh
food control will affect the temperature of the freezer
compartment. Likewise,changing the freezer control
can affect the temperature of the fresh food
compartment.
Control settings will vary basedon personal
preferences,usage and operating conditions
and may requiremore than oneadjustment.
Factors that affect temperature includethe amount
of food inthe fresh food and freezercompartments,
frequency of door opening,and temperature of food
when placed in either compartment.
About the storage drawers.
Fruit und Vegetuble Druwers
Thesestorage drawers providespaceto store fruits,
vegetables and meats.
4
Toreplacethe drawers and the cover abovethem,
the door must befully opened. Insomeinstallations,
the refrigerator may haveto bemoved away from
the wall for the doorto be fully opened.
Page 5

About ice service. GEApplionces.com
Ice Trays
Toreleaseicecubes,turn the tray upside
down, hold it over a container and twist
both ends.
Foronly oneor two icecubes, leavethe tray
right-side up,twist both endsslightly and
remove asmany cubes as you want.
Wash icetrays in lukewarm water only-
do not put them inanautomatic dishwasher.
Icemaker Accessory Kit (Models GTR22HBX and GTL22HBX on!g)
An icemaker accessory kit isavailable
from your dealer.The IM-4A, IM-6 or
equivalent accessory kit will work with
your refrigerator.
The water valve cover that came with the
Owner's Manual must be installed when
installing the optional icemaker kit.
Water Supply Kits (Models GTR!2HBX and GTL22HBX only)
Kits containing copper tubing, shutoff valve,
fittings and instructions needed to connect
the icemaker to your cold water line are
available at extra cost from your dealer
or from Partsand Accessories.Inthe U.S.,
coil 800.626.2002.
Page 6
Care and cleaning of the refrigerator.
Cleaning the Outside
Keepthe outsideclean. Wipe with a clean
cloth lightly dampened with mild liquiddish
detergent. Dry with a clean, soft cloth.
Donot wipe the refrigerator with a soileddish
cloth or wet towe!. Thesemag leavea residue
that can erodethe paint. Donot usescouring
pads, powdered cleaners,bleachor cleaners
containing bleach becausetheseproducts
can scratch and weaken the paint finish.
Protect the paint finish. Thefinish on the
outside of the refrigerator isa high quality,
baked-on paint finish.With proper care,
it will stay new-looking and rust free for
years.Apply a coat of kitchen/appliance
wax when the refrigerator isnew, and then
at leasttwice a year.
Cleaning the inside
Tohelpprevent odors, leavean openbox
of baking soda in the fresh food and freezer
compartments.
Unplug the refrigerator before cleaning.
If this isnot practical, wring excess moisture
out of spongeor cloth when cleaning around
switches, lights or controls.
Usewarm water and baking soda solution-
about a tablespoon (15 ml)of baking sodato
a quart (1 liter)of water. This both cleans and
neutralizesodors. Rinseandwipe dry.
Other parts of the refrigerator-including door
gaskets,fruit and vegetable drawers, andall
plastic parts-can be cleanedthe sameway.
After cleaning the door gaskets,apply athin
layer of petroleum jelly to the door gaskets
at the hingeside.Thishelpskeepthe gaskets
from sticking and bending out of shape.Do
not use cleansing powders or other abrasive
cleaners.
Behind the Refrigerator
Donot wash any plastic refrigerator parts
in the dishwasher.
Avoid cleaning coldglassshelves
(onsome models)with hot water because
the extreme temperature difference mag
causethem to break. Handle glassshelves
carefu!!g.Bumping tempered glasscan cause
it to shatter.
Oncea year,move the refrigerator out
and vacuum the backcoils.Becareful when
moving the refrigerator away from the wall.
Alltypes of floor coverings can be damaged,
particularly cushioned coverings andthose
with embossed surfaces.
6
Pullthe refrigerator straight out and return
it to positionby pushing it straight in.
Movingthe refrigerator in a side direction
may resultindamage to the floor covering
or refrigerator.
Whenpushing the refrigerator back, make
suregoudon't ro!!over thepower cord.Also
be sureto leaveaminimum o1:3"between
the wa!! and thecondensercoils
Page 7

Replacing the Light Bulb
GEAppliances.com
Moving the contro! to COLD does not remove
Screw
Hole
power to the light circuit.
The bulb is IocQted behind the shield
in the bQckwall.
0 Unplug the refrigerator.
0 Removethe shelves (ifnecessQry).
Gentlg remove the light shield bg
Bulb inserting a flat heQd screwdriver
into the slot at the top of the shield
and pop it off.
0 Removethe screw.
Cover
Preparing for Vacation
Forlong VQcQtionsor absences,remove food
and unplug the refrigerator. Cleonthe interior
with a bQkingsodQsolution of one
tablespoon (15ml)of bQkingsodQto one
quQrt(1liter)of water. LeQvethe doors open.
ReplQcethe bulb with a 25W appliance
bulb with an E12candelabra base.
NOTE:Ifthe bulbisnot avQilQbleat your IocQI
hardware store, contact GEcustomer service.
O Insert the tab at the bottom of the light
shield into the light bulb housing and
snQpinto plQce.
Replace the screw.
Replace the shelves if removed.
Plug in the refrigerator.
Preparing to Move
Secureoil looseitems suchas shelvesond
drawers bg taping them securelg in plQce
to prevent dQmage.
Besurethe refrigerotor stogs inonupright
position during moving.
Page 8
I
stallti
efrigerator
structi
I
BEFORE YOU BEGIN
Readthese instructions completely and carefully.
•IMPORTANT -Soretheseinstructionsfor
locolinspector'suse.
• IMPORTANT - Observeoligoverningcodes
ond ordinonces.
• Note to Installer - Be sure to leove these
instructions with the Consumer.
• Note to Consumer - Keepthese instructions
for future reference.
• Skilllevel- Instollotion of this opplionce requires bosic
mechonicol skills.
• Completiontime - RefrigerotorInstollotion
15 minutes
Reversingthe DoorSwing
1 hour
• Properinstollotion isthe responsibility of the instoller.
• Productfoilure due to improper instollotion is not covered
under the Worrontg.
Models GTL12HBX, GTRIOHAX,
GTR12HBX
CLEARANCES
Free-stondinginstollotion only.
Minimum Cleoronces:
Bock- 3"from the condenser coils
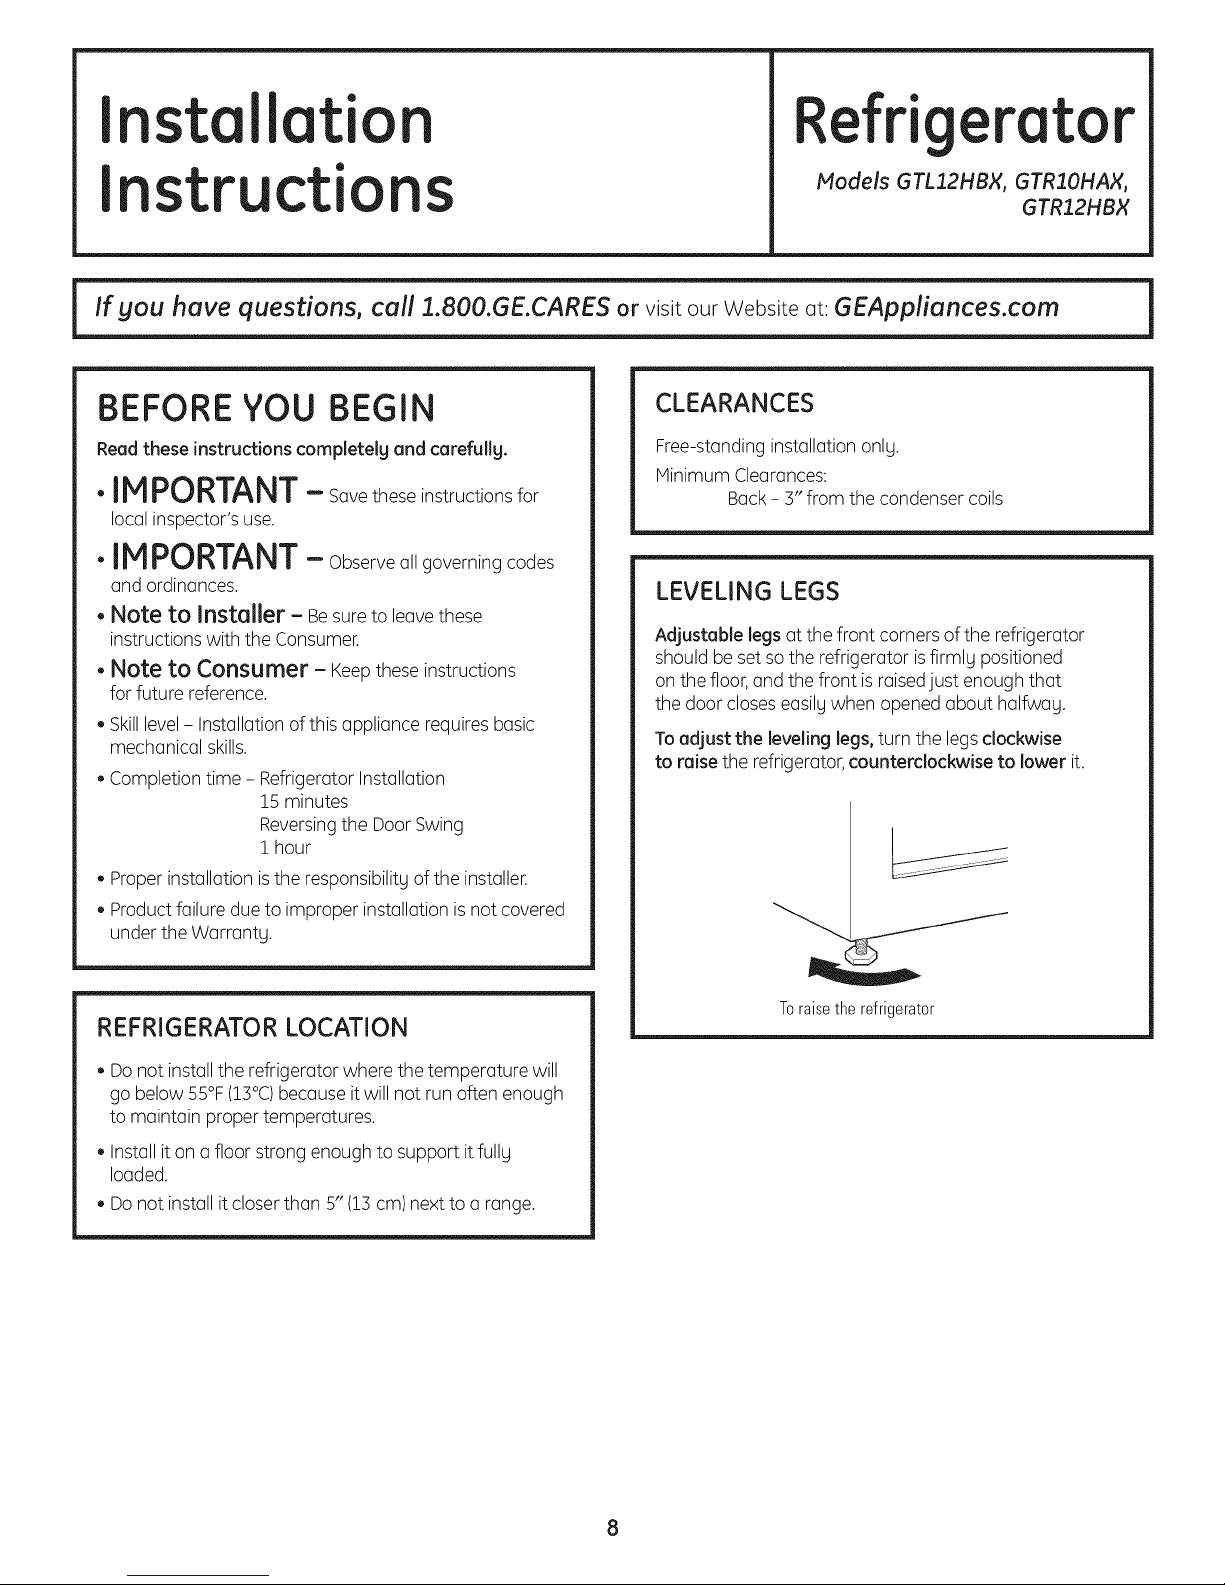
LEVELING LEGS
Adjustable legsot the front corners of the refrigerotor
should be set so the refrigerotor is firmly positioned
on the floor, ond the front isroisedjust enough thot
the door closes eosilgwhen opened obout holfwog.
To adjust the leveling legs, turn the legs clockwise
to raise the refrigerator, counterclockwise to lower it.
REFRIGERATOR LOCATION
• Donot instollthe refrigerotor where the temperoture will
go below 55% (13°C)becouseit will not run often enough
to mointoin proper temperotures.
• Instollit on ofloor strong enough to support itfully
Iooded.
• Donot instollit closerthon 5" 113cm) next to o ronge.
Toraisethe refrigerator
Page 9
Installation Instructions
REVERSING THE DOOR SWING
IMPORTANT NOTES
When reversing the door swing:
• Readthe instructions all the way through before starting.
Handle parts carefully to avoid scratching paint.
Setscrews down by their related parts to avoid using
them inthe wrong places.
Providea non-scratching work surfacefor the doors.
IMPORTANT:Once you begin,do not move the cabinet
until door-swing reversal iscompleted.
Theseinstructions are for changing the hingesfrom the
right sideto the leftside-if you ever want to change the
hinges back to the right side,follow these same instructions
and reverseall referencesto leftand right.
Unplug the refrigerator from its electrical outlet.
Empty all door shelves.
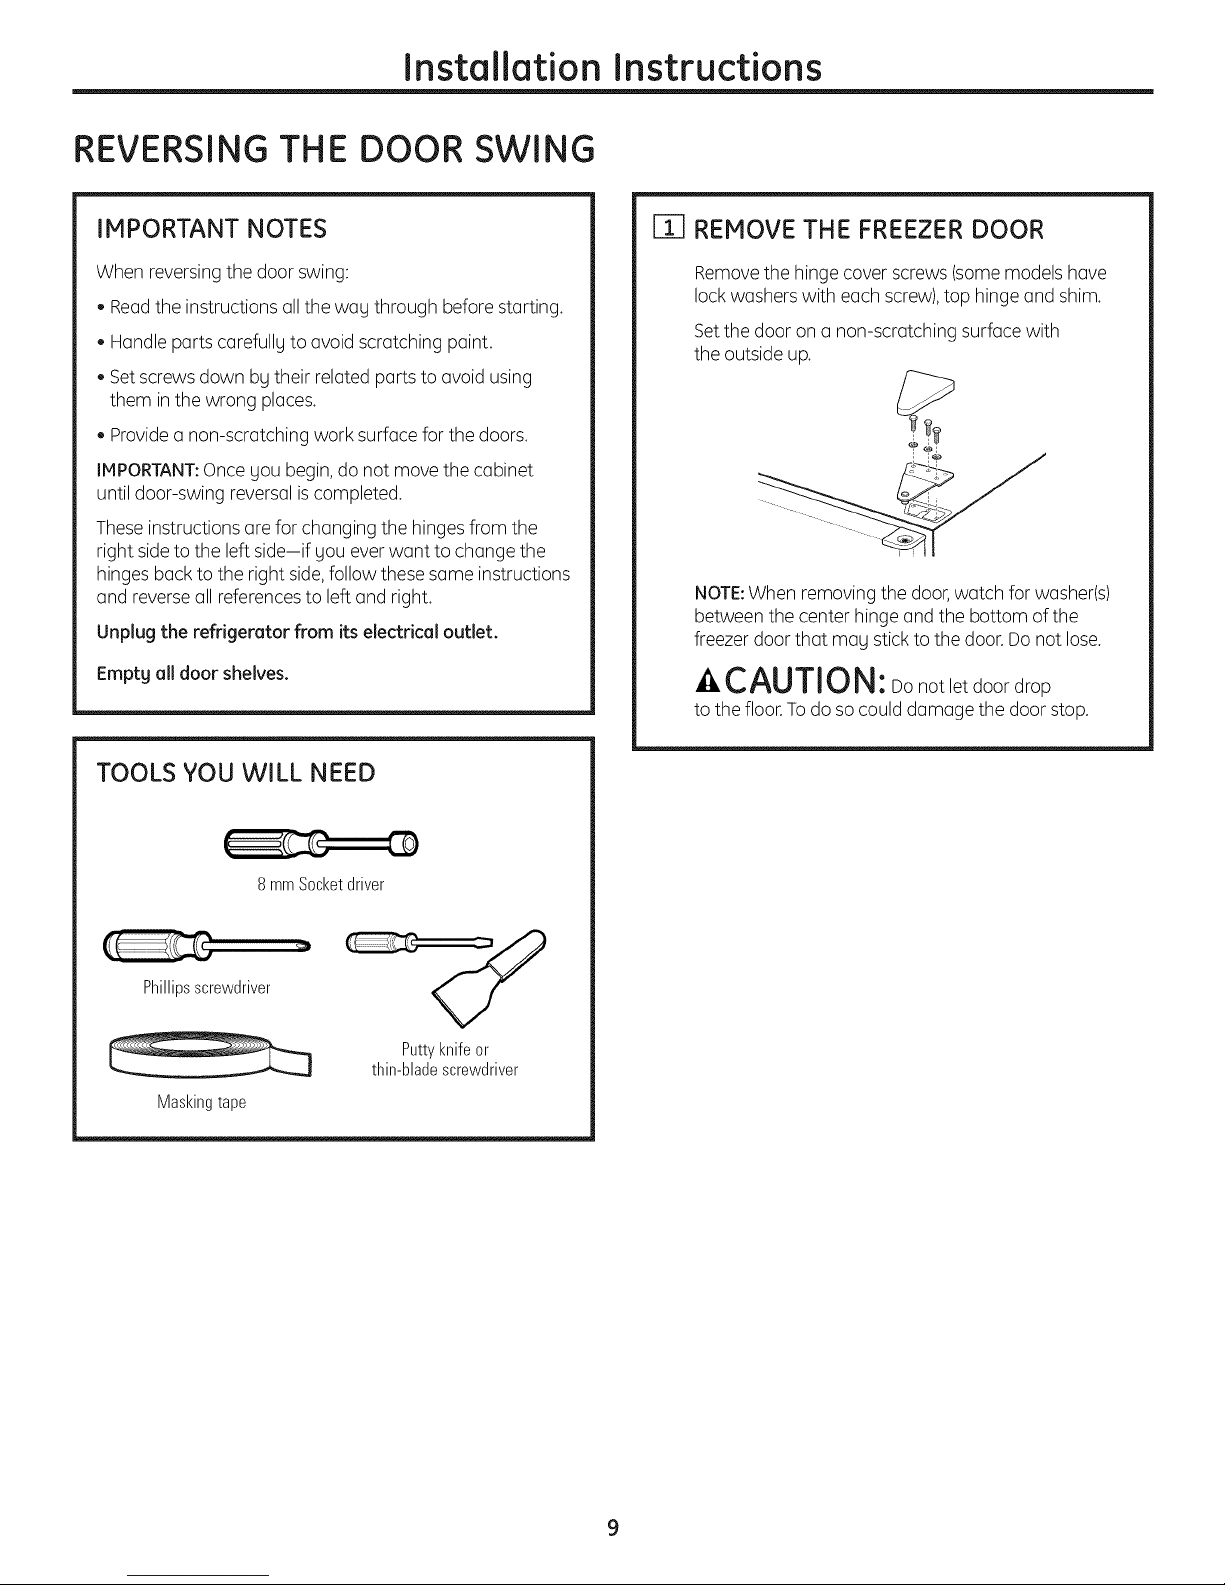
TOOLS YOU WILL NEED
[] REMOVE THE FREEZER DOOR
Removethe hingecoverscrews(somemodelshave
lock washerswith each screw),top hinge and shim.
Setthe dooron a non-scratching surface with
the outside up.
NOTE:When removing the door,watch for washer(s)
between the center hinge and the bottom ofthe
freezer door that may stickto the door.Donot lose.
CAUTION: Donotletdoordrop
to the floor.Todoso could damage the door stop.
8mmSocketdriver
Phillipsscrewdriver
Maskingtape
Puttyknifeor
thin-bladescrewdriver
Page 10
Installation Instructions
REVERSING THE DOOR SWING {CONT.}
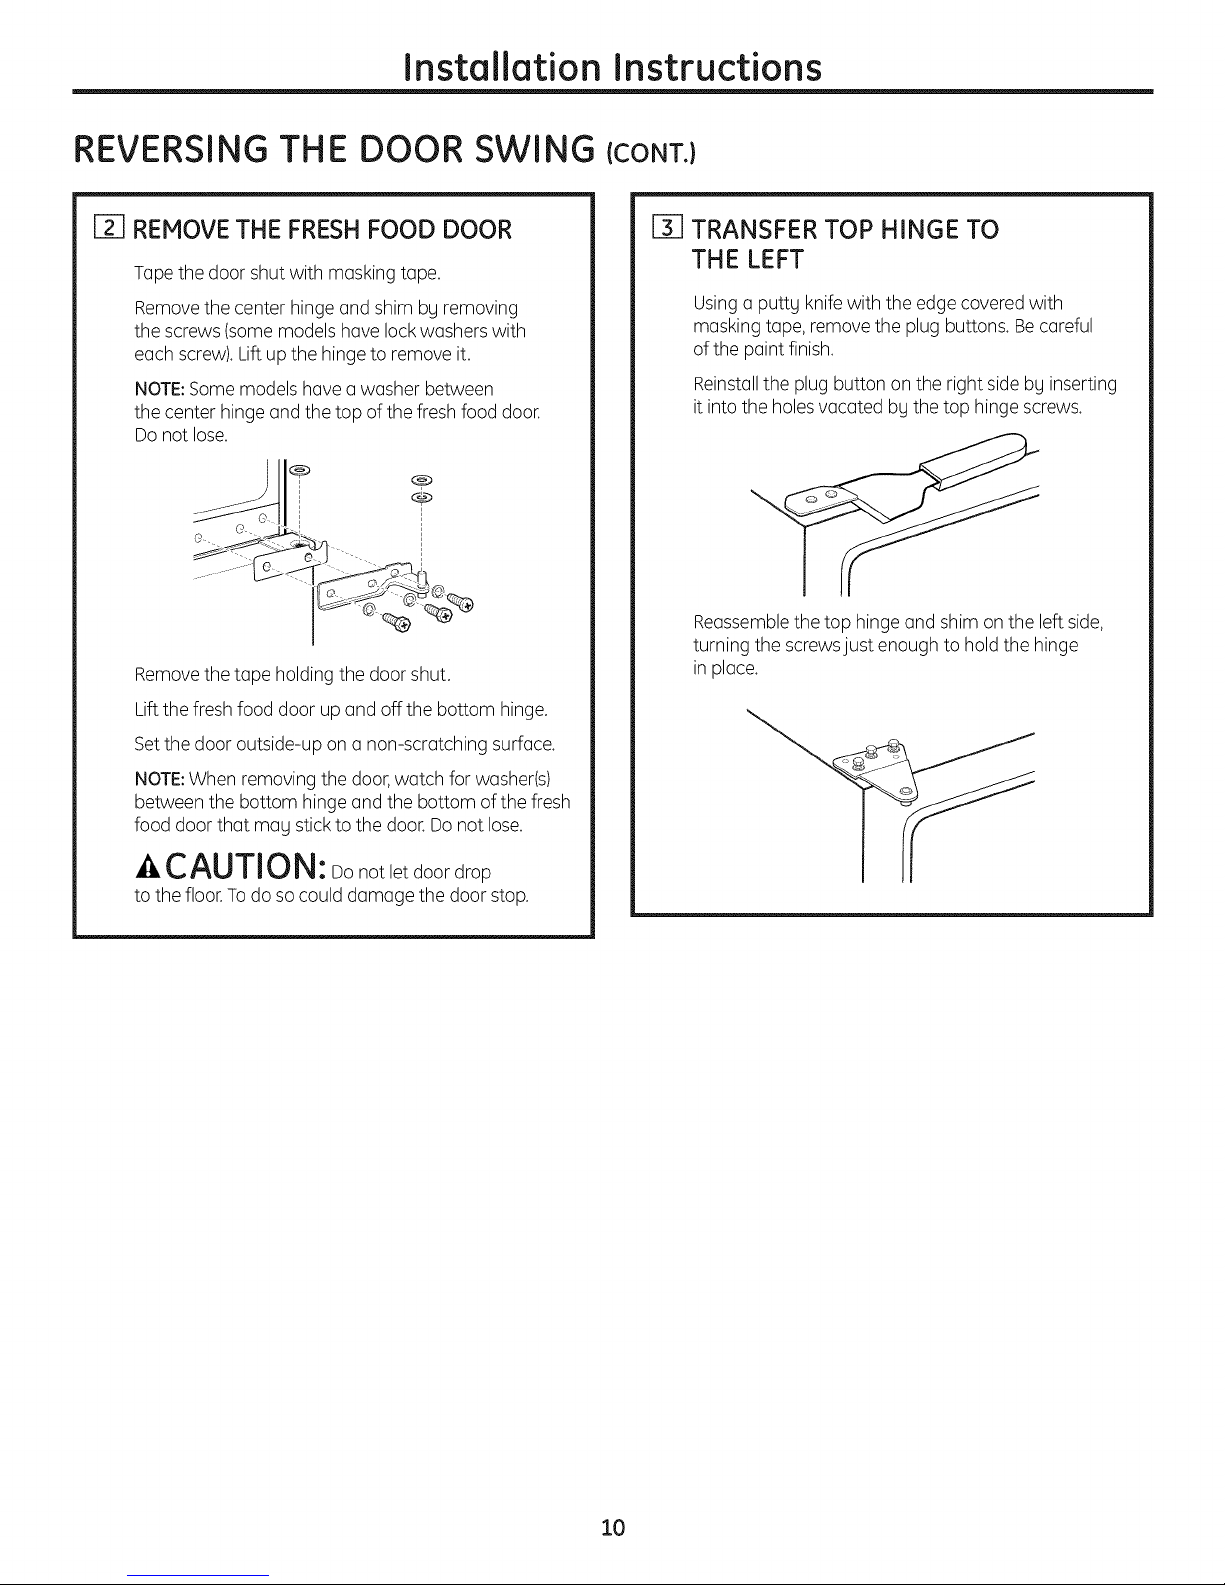
[] REMOVE THE FRESH FOOD DOOR
Tape the door shut with masking tape.
Removethe center hinge and shim bg removing
the screws (some models have lock washers with
each screw).Liftupthe hinge to remove it.
NOTE:Some models have a washer between
the center hinge and the top of the fresh food door.
Do not lose.
®
Removethe tape holding the door shut.
Lift the fresh food door upand off the bottom hinge.
Setthe door outside-up on a non-scratching surface.
NOTE:When removing the door, watch for washer(s)
between the bottom hingeand the bottom of the fresh
food door that mag stickto the door.Donot lose.
®
®
[] TRANSFER TOP HINGE TO
THE LEFT
Usinga puttg knifewith the edge covered with
masking tape, remove the plug buttons. Becareful
of the paint finish.
Reinstallthe plug button onthe right sidebg inserting
it into the holesvacated bg the top hinge screws.
Reassemblethe top hinge and shim on the leftside,
turning the screwsjust enough to hold the hinge
in place.
CAUTION: Donotletdoordrop
to the floor.Todo socould damage the door stop.
10
Page 11

Installation Instructions
I%-ITRANSFER BOTTOM HINGE
TO THE LEFT
To accessthe bottom hinge, move the refrigerator
so it is]0" from a wall. Then carefully tip the
refrigerator back until it restsagainst the wall.
CAUTION: Besurethatthecoils
on the back of the refrigerator do not rest against
the walk Doing socould damage the coils.
I
|
I
I
30"
Removethe screws (some models havewashers
with each screw),levelingleg and bottom hinge from
the right side.Removethe levelingleg from the leftside
of the cabinet and install itin the right side.
Reassemblethe bottom hinge onthe left side.
NOTE: The leveling legs are not interchangeable.
I-_ REHANG THE FRESHFOOD DOOR
Makesurethewasher(s)oreinplaceon thebottom
hingepin.Placethefreshfooddooronthebottom
hinge,close the door and tope it in placewith
masking tape.
Removethe plug button from the left edge of the door
and insert it into the hole on the oppositeside.
Plugiut_
i-7-1INSTALL CENTER HINGE
ON THE LEFT
Removethe three plug buttons onthe left side
and install them on the right.
[] TRANSFER FRESH FOOD DOOR STOP
TO THE LEFT
Removethe door stop from the bottom of the right
sideof the door. Transferthe plug buttons from
the bottom left sideto the right side.
Installthe doorstop onthe left side.
Installthe center hingedesignedfor the left side
that camewith the refrigerator,with the screws,spacer
and washer(s)(onsome models)that you removed
in Step2.
®
®
Removethe tape holding the door shut.
CAUTION: When assembled correctly,
the hinge is tight against the cabinet.
ATTENTION:The screws must be properly tightened.
Turnthe screws until snug.Thentighten the screws
a minimum of 1/2 turn usingboth hands.
11
Page 12

Installation Instructions
REVERSING THE DOOR SWING {CONT.}
[]
TRANSFER FREEZER DOOR STOP
TO THE LEFT
Removethe door stop from the bottom of the right
sideof the door. Transferthe plug buttons from
the bottom left sideto the right side.
Installthe doorstop onthe left side.
I-9--1REHANG THE FREEZER DOOR
ALIGN THE DOORS
Alignthe freezer door with the freshfood door sothat
the gap between the doors is even.
Tighten the top hingescrewsby turning them until
snug.Thenturn the screws a minimum of 1/2 turn
using both hands.
Plocethe freezerdooron the center hinge over
the pin.
Raisethe top hinge by hand and insert the top
hinge pin into the holeinthe door.Then swing
the door shut.
Transfer the plug button ontop of the door
to the opposite side.
Plugbutton
Instollthe hingecoverover the top hinge.
12
Page 13

Normal operating sounds.
Newer refrigerators sound different from older refrigerators. Modern refrigerators
have more features and use newer technology.
Do you hear what ! hear? These sounds are normal.
GEAppliances.com
HUMMM...
--WHOOSH...
[]
The new high efficiency compressor may run faster
and longer than your old refrigerator and you may
hear a high-pitched hum or pulsating sound while
it is operating.
[]
Youmay heara whooshing sound when the doors close.
Thisisdueto pressureequalizing within the refrigerator.
CLICKS, POPS,
CRACKS and CHIRPS
[]
You may hear cracking or popping sounds when
the refrigerator is first plugged in.This happens []
as the refrigerator cools to the correct temperature.
[]
The compressor may cause a clicking or chirping []
sound when attempting to restart (this could take
up to 5 minutes).
[]
Expansion and contraction of cooling coils during and []
after defrost can cause a cracking or popping sound.
[]
On models with an icemaker, after an icemaking cycle,
you may hear the ice cubes dropping into the ice []
bucket.
WHIR./
[] You may hear the fans spinning at high speeds.
This happens when the refrigerator isfirst plugged in,
when the doors are opened frequently or when a large
amount of food is added to the refrigerator or freezer
compartments. The fans are helping to maintain
the correct temperatures.
WATERSOUNDS
6
The flow of refrigerant through the freezer cooling coils
may make a gurgling noise like boiling water.
Water dropping on the defrost heater can cause a
sizzling, popping or buzzing sound during the defrost
cycle.
A water dripping noise may occur during the defrost
cycle as ice melts from the evaporator and flows into
the drain pan.
Closing the door may cause a gurgling sound due
to pressure equalization.
13
Page 14

Before gou call for service...
TroubleshootingTips
Savetime and moneg! Reviewthecharts on the following
pagesfirst andgou mag not needto callforservice.
Possible Causes What To Do
Refrigerator does not Refrigerator in defrost cgcle. +Wait about 30 minutes for defrost cgcle to end.
operate Refrigeratoris unplugged. +Pushthe plugcompletelg into the outlet.
Thefuse is blown/circuit + Replacefuse or reset the breaker.
breaker istripped.
Vibration or rattling Front leveling legs need +SeeLevelingLegs.
(slight vibration adjusting.
is normal)
Motor operatesfor Normal when refrigerator • Wait 24 hoursfor the refrigerator to completely
long periods or is first plugged in. cool down.
cgcles on and off
frequent O. (Modern amounts of food are
refrigerators with
more storage space pieced in refrigerator.
and a larger freezer Door left open. +Check to see ifpackage is holding door open.
require more
operating time. Theg Hot weather or frequent • This is normal.
start and stop often door openings.
to maintain even Temperature control • See About the contro!.
temperatures.; set at the coldest setting.
Often occurs when large +This is normal.
Fresh food or freezer Temperature control not • See About the contro!.
compartment too warm set cold enough.
Warm weather or frequent • Set the temperature control one step colder.
door openings. See About the contro!.
Door left open. +Check to see ifpackage is holding door open.
Frost or ice crgstals Door left open. +Check to see ifpackage is holding door open.
on frozen food
(frost within package Too frequent or too long
is normolJ door openings.
Ice cubes have Food transmitting odor/taste • Wrap foods well.
odor/taste to ice cubes.
Interior of refrigerator • SeeCareand cleaning.
needs cleaning.
Slowice cube freezing Door left open. +Check to see ifpackage is holding door open.
Temperature control not • See About the contro!.
set cold enough.
14
Page 15

GEAppliances.com
Possible Causes What To Do
Refrigerator has odor Foods transmitting odor • Foods with strong odors should be tightly wrapped.
to refrigerator. • Keepan open box of baking soda in the refrigerator;
replaceevery three months.
Interior needs cleaning. • SeeCareand cleaning.
Moisture forms on Not unusual during periods • Wipe surface dry.
outside of refrigerator of high humiditg.
Moisture collects inside
(in humid weather, air
Too frequent or too long
door openings.
carries moisture into
refrigerator when doors
are opened)
Interior light does No power at outlet. • Replacefuseor reset the breaker.
not work
Light bulb burned out. • SeeRep!acingthe light bulb.
Foodis freezing Food too close to the air vent • Hovethe food away from the airvent.
in the refrigerator at the back of the refrigerator.
Refrigerator control is set
too cold.
• Hovethe refrigerator control to a warmer temperature
setting one increment at a time.
15
Page 16

Notes.
0
n
v A
vm r_
A .
(D
0
up
0
E
C)
L_
16
Page 17

Refrigerator Warranty.
All warranty service provided by our Factory Service Centers,
or an authorized Customer Care ®technician. To schedule service
on-line, visit us at GEAppliances.com, or call 800.GE.CARES
(800.432.2737). Please have serial number and model number
Staple Four receipt here.
Proof of the origina! purchase
date is needed to obtain service
under the warrant F.
available when calling for service.
6E Will Replace:
OneYear Ang part of the refrigerator which fails due to a defect in materials or workmanship.
From During this limited one-year warranty, GEwill also provide,free of charge, all labor and
theoriginol purchase related serviceto replacethe defective part.
Servicetripstogour home toteach gou how to use
the product.
Improper installation,delivergor maintenance.
Failureof theproduct ifitisabused,misused,or used for
otherthen the intendedpurpose or used commerdallg.
Loss offood due to spoilage.
Replacement ofhouse fusesor resettingofcircuit
breakers.
Damage caused after deliverg.
Replacement of the water filter cartridge, if included, due
to water pressure that is outside the specified operating
range or dueto excessive sediment in the water supplg.
Replacement of the light bulbs, if included, or water filter
cartridge, if included, other than as noted above.
Damage to the product caused bgaccident, fire, floods
or acts of God.
Incidental or consequential damage caused bg possible
defects with th is a pplia nce.
Product not accessible to provide required service.
EXCLUSION OF IMPLIED WARRANTIES--Your sole and exclusive remedg is product repair as provided in
this Limited Warranty. Any implied warranties, including the implied warranties of merchantability or
fitness for a particular purpose, are limited to one year or the shortest period allowed by law.
This warranty is extended to the original purchaser and any succeeding owner for products purchased
for home use within the USA. If the product is located in an area where service by a GE Authorized Servicer
is not available, you may be responsible for a trip charge or you may be required to bring the product to an
Authorized GE Service location for service. In Alaska, the warranty excludes the cost of shipping or service calls
to Four home.
Some states do not allow the exclusion or limitation of incidental or consequential damages. This warranty
gives you specific legal rights, and you may also have other rights which vary from state to state. To know
what your legal rights are, consult your local or state consumer affairs office or your state's Attorney General.
Warrantor: General Electric Company. Louisville, KY40225
17
Page 18

Consumer Support.
GEAppliances Website GEAppliances.com
Have a question or need assistancewith your appliance?Try the GEAppliancesWebsite, 24 hoursa day,any day
of the year! Forgreater convenienceand faster service, you can now download Owner's Manuals,order parts
or evenschedule service on-line.
Schedule Service GEAppliances.com
Expert GErepair service is only one step away from your door.Geton-lineand scheduleyour serviceat your
convenience any day of the year! Orcall 800.GE.CARES(800./432.2737)duringnormal business hours.
RealLifeDesignStudio GEAppliances.cam
GEsupports the UniversalDesignconcept-products, services and environments that can be usedby people of all
ages,sizesand capabilities.We recognizethe needto designfor awide range of physical and mental abilities and
impairments. For details of GE'sUniversalDesignapplications, including kitchen designideas for people with disabilities,
check out our Websitetoday. Forthe hearingimpaired, pleasecall 800.TDD.GEAC(800.833./4322).
Extended Warranties
Purchasea GEextended warranty and learn about specialdiscountsthat areavailable while your warranty isstill
in effect. You can purchase it on-line anytime, or call 800.626.222/4during normal businesshours.GEConsumer Home
Serviceswill still be there after your warranty expires.
Parts and Accessories
Individualsqualified to service their own appliancescan have partsor accessoriessent directly to their homes
(VISA,MasterCardand Discovercardsare accepted).Orderon-line today, 2/4hours every day or by phoneat
800.626.2002during normal business hours.
Instructions contained in this manual cover procedures to be performed bU anU user. Other servicing generall U
should be referred to qualified service personnel Caution must be exercised, since improper servicing me U cause
unsafe operation.
Contact Us
If you are not satisfiedwith the service you receivefrom GE,contact uson our Website with all the details including your
phone number,or write to: General Manager,Customer Relations
GEAppliances,Appliance Park
Louisville,KY/40225
GEAppliances.com
GEAppliances.com
GEAppliances.com
Register Your Appliance GEAppliances.com
Register gour new appliance on-line-at gour convenience! Timely product registration will allow for enhanced
communication and prompt serviceunder the terms of your warranty, should the needarise.Vou may also
mail in the pre-printed registration card included inthe packing material.
78 Printed in China
Page 19

0
GEAppliances.com
0
01
0
O_
0
Instrucciones de seguridad ..... 2, ]
Instrucciones de operuci6n
Caj6nes de almacenamiento .......... 4
Configuraciones de control ........... 4
Cuidado Ulimpieza ................. 6, 7
Servicio de hielo ........................ 5
Instrucciones de instuluci6n
C6mo invertir el vaiv6n
de la puerta ...................... 9-12
Preparaci6n para instalar
el refrigerador ....................... 8
Consejos para la identificuci6n
y soluci6n de problemas ... 1s-is
Sonidos normales de la operaci6n ... 13
Apoyo u! cliente
Apogo al cliente ..................... 18
Garantia ............................ 16
GTL12HBX
GTRIOHAX
GTR12HBX
Escriba los n_meros de modelo g de serie aqui:
Modelo #
Serie #
Usted puede encontrarlos en una etiqueta dentro
del refrigerador.
197D8071PO02 49-60602 04-09JR
Page 20

INFORMACiONES IMPORTANTES DE SEGURIDAD.
LEA PRIMERO TODAS LAS INSTRUCCiONES.
iADVERTENCIA!
Use este aparato solo para los fines que se descfiben en este Manual del propietafio.
PRECAUCIONESDE SEGURIDAD
Cuando use electrodom4sticos, siga las precauciones bdsicas de seguridad, incluyendo las siguientes:
Antes de usarse,este refrigerador deber6estar
instalado g ubicado de acuerdo con las
instrucciones de instalaci6n.
i!!!}i}ii_
No permita que los ni_os se suban, separeno se
cuelguende las charolas del refrigerador.Podrfa
daharse el refrigerador gcausarlesserias lesiones.
iiiiiiiiiii_
Notoque lassuperficies frfasdel congelador
cuando tenga las manos hOmedaso mojadas.
La piel sepodrfa adherir alas superficies
extremadamente frfas.
iiiiiiiiii:,
Noguardeniusegasolinau otrosvaporeso Ifquidos
inflamablescerca de esteo cualquierotto aparato.
iiiiiiiiiii_
Sisurefrigerador tiene undispositivoautom6tico
para hacer hielo, evite el contacto con las partes
m6vilesdel mecanismo de expulsi6n, o con
el elemento calefactor Iocalizadoen la parte
inferior del dispositivo para hacer hielo.No ponga
losdedos ni las manos en el mecanismo
autom6tico para hacer hielo mientras el
refrigerador est@conectado.
iPELIGRO! RIESGO
UN
NINO PUEDA
QUEDAR ATRAPADO
_, Alejelosdedos fuera de las6reasdonde sepuede
pinchar los dedos;losespaciosentre laspuertas
g entre las puertas g los gabinetes son
necesariamente estrechos.Cierre laspuertas
con cuidado en la presencia de los nihos.
Desconecteel refrigerador antesde limpiarlo
o efectuar reparaciones.
NOTA:Recomendamosenfdticamente encargar
cualquierservicio a un personalcalificado.
Eltorneado del control a la posici6n COLD
no quita energfa al circuito ligero.
Do not refreezefrozen foods which have thawed
completelg.
_Antes de substituir una bombilla quemada,
el refrigerador debe ser desenchufado pa ra evita r
el contacto con un filamento delalambre vivo.
(Labombilla quemada de A puede romperse
al ser substituido.)
DE QUE
DESHACERSEDEBIDAMENTE DE SU REFRIGERADOR
Elatrapamiento g la sofocaci6n de losnihos no
son un problema del pasado. Losrefrigeradores
abandonados son un peligro...aunqueseas61opor
"pocos dias."Sise deshace de suviejo refrigerador,
por favor siga las instruccionesabajo para agudarnos
a preveniralgOnaccidente.
Antes de deshacerse de su viejo
refrigerador o congelador:
Quite las puertas.
Dejelos entrepafios en su sitio para que losnifios
no sesuban.
Refrigeruntes
Todoslosaparatos de refrigeraci6n contienen
refrigerantes, loscuales se deben retirar antes
de la eliminaci6n del producto de acuerdo con laleg
federal. Siva a desechar alg0n aparato antiguo
de refrigeraci6n, consulte con la compahfa acargo
de desechar elaparato para saberqu_ hacer.
USO DE CABLES DE EXTENSION
Debido a los accidentes potenciales que pudieran ocurrir bajo determinadas condiciones,
se recomienda estfictamente no usar cables de extensi6n.
Sinembargo, sidecidiera usarlos,es absolutamente necesarioque seadeltipo ULtrifilar paraaparatos
g cuente con una clavija con conexi6n a tierra g que el cable el_ctrico sea de 15 amperios (mfnimo)
2
g 120voltios.
Page 21

GEAppliances.com
iADVERTENCIA!
COMO CONECTARLA ELECTRICIDAD
Bajo ninguna cimunstancia debe cortar o quitar la tercem punta (tierra) de la clavija. Pare su seguridad
personal, este apamto deberd conectarse debidamente a tierra.
Elcable el_ctrico de este aparato est6 equipado
con unu clavijade tres puntas(tierra)que enchufa en
un contacto est6ndar de pareddetres salidas(tierra)
para reducir al mfnimo laposibilidad de dahos por
un choque el_ctrico con este aparato.
Haga queun electricista calificado verifique
el enchufe de la pared g el circuito para asegurarse
que la salidaest_ conectada debidamente atierra.
Dondesedispongas61odeuncontactodeparedcon
salidapara dospuntas,essu responsabilidadpersonal
g suobligaci6nreemplazarloporun contacto adecuado
para tres puntas conconexi6na tierra.
Elrefrigerador deber(i conectarse siempre en
su propio contacto el#ctrico individual que tenga
un voltaje que vaga de acuerdo con la tabla
de clasificaci6n.
Estogarantiza lamejor ejecuci6n y evita
la sobrecarga del circuito el_ctrico de la casa y los
dahos a causa del sobrecalentamiento de loscables.
Nunca desconecte el refrigeradorjalando el cable.
Tomesiempre firmemente laclavija y s6quela
del contacto sindoblarla.
Repareo reemploce inmediatomente todos loscables
el_ctricos de servicioque se hagan desgastado
o dahado enalguna otra forma. No utilice cables
que muestren roturas o dahos por abrasi6n a Io largo
de _ste ni en la clavija o en alguno de sus extremos.
AIalejarsu refrigerador de la pared, cuide que
no pasesobre el cableo Iodahe.
FAVORDE LEERY5EGUIRCUIDADOSAMENTE
LAS PRECAUCIONESDE SEGURIDAD.
GUARDE ESTAS INSTRUCCiONES
Page 22

Sobre el control dd refrigerador.
1 2 3 4 5
Freezer 3 is Normal
Temperature 5 is Cold
Hag un control de tempemtura en el compartimento de
alimentos frescos _I en el compartimento del congelador.
Inicialmente configure el control en Normal de los
compartimentos de alimentos frescos bldel congelador.
Deje pasar 24 horas hasta que la temperatura se estabilice.
5
3 7
Refrigerator
Temperature
Adjust
2 8
I is Cold
7 is Normal
9 is Coldest
Configuracionesdecontrol
Ajuste el control de alimentos frescos subiendo una
unidad pot vez. Permita que transcurran 12 horas
despu_s de cada ajuste para que el refrigerador
alcance la nueva temperatura configurada.
Ajuste el control del congelador un incremento por
vez.Permitaquetranscurran 12horas despu_sde
cada ajuste para que el refrigerador alcance lanueva
temperatura configurada.
Despu@sde cada ajuste,controle los compartimentos
del congelador y de alimentos frescos. Cambiar el
control de alimentos frescos afectar6 latemperatura
del compartimento del congelador. Delmismo modo,
cambiar elcontrol del congelador afectar6 la
temperatura del compartimento dealimentos frescos.
Lasconfiguraciones de control varfan en base
alas preferencias personales,uso y condiciones
de operaci6n y pueden requerir m6s de un ajuste.
Losfactores que afectan latemperatura incluyen
la cantidad dealimentos en loscompartimentos
de alimentos frescos y delcongelador,la frecuencia
de apertura de la puerta y latemperatura
de los alimentos cuando se loscoloca en cualquiera
de los dos compartimentos.
Sobre los cajones de almacenamiento.
Cajones de frutas g vegetales
Estoscajones de almacenamiento ofrecen espacio
para almacenar frutas, vegetales y carnes.
q
Para reemplazar loscajonesy la tapa que los cubre,
la puerta debe estar completamente abierta.
Enalgunas instalaciones,el refrigerador puedetener
que alejarsede la pared para que la puerta pueda
abrirse por completo.
Page 23

So6re el servicio de hielo. GEAppliances.com
Bandejas para cu6itos de hielo
Para liberar loscubitos de hielo,d_vuelta
la bandeja,sost_ngala sabreun recipiente
y retuerza ambos extremos.
Paras61ouno o dos cubitos de hielo,deje
la bandeja hacia arriba, retuerza ambos
extremos ligeramente y quite todos los
cubitos que desee.
Lavelas bandejaspara cubitos de hie!os6!o
en agua tibia-no las co!oqueen e!lavaplatos.
Kit de accesorios para la m6quina de hielo ($6!omode!asGTR!2HBXg GTL!2HBX)
Su vendedor tiene disponible un kit
de accesorios para la m6quina de hielo.
El IM-4A, IN-6 o kit de accesorios
equivalente funcionar6 con su refrigerador.
Latapa de la vhlvula de agua provista
junto con el manual del usuario se debe
instalar al realizar la instalaci6n del kit
opciona de la m6quina de hacer hielo.
Kits de suministro de agua (56!omode!asGTR!2HBXg GTL!2HBX)
Suvendedor o PiezasUAccesorios ponen
a su alcance, a un costa extra, kitsque
contienen tuberfas de cobre, una v61vula
de cierre,accesorios e instrucciones
necesariaspara conectar la m6quina de hielo
a su Ifneadeagua frfa. EnlosEEUU.,Ilame
al 800.626.2002.
Page 24

Cuidado g iimpieza de! refrigerador.
Limpieza de la parte exterior
Mantenga la parte exterior fimpia. Lfmpiela
con un paho ligeramente humedecido con
un detergente Ifquidopara platos no agresivo.
Sequecon un patio suaveg limpio.
No limpie e!refrigemdorcon un mpasador
sucio o con una toa!!a mojada. Estospueden
dejar un residuoquepuededesgastarla
pintura. No utilice esponji!lasabmsivas,
limpiadores en polvo,blanqueadoreso
limpiadores que contengan blanqueadores
porque estosproductos puedenrayar y dahar
e!acabado de lapintum.
Limpieza de la parte interior
Para agudar a prevenir olores, deje una
caja abierta debicarbonato desodio en los
compartimentos de alimentos frescos g del
congelador.
Desenchufe el refrigerador antes de
limpiarlo. Siesto no resulta pr6ctico, seque la
humedad excesiva con una esponja o patio
cuando limpie alrededor de losinterruptores,
luces o controles.
Utiliceuna soluci6n de agua tibia con
bicarbonato desodio-alrededor de una
cucharada (15ml)de bicarbonato de sodio
gun cuarto de gal6n (! litro) de agua. Esta
soluci6n limpia g neutraliza los olores.
Enjuague g sequecon unpatio.
Proteja el acabado de la pintura. Elacabado
de la parte exterior del refrigerador es de una
pintura cocida de alta calidad. Con los
cuidados adecuados,permanecer6 coma
nueva g librede herrumbre durante atlas.
Aplique una mano de cera para cocinas/
aparatos al refrigerador nuevo, g luego
par Iomenos dos vecespar aria.
Despu@sde limpiar lasjuntas de la puerta,
aplique una fina capa de vaselina a lasjuntas
sabre el lado de la bisagra. Estoaguda a que
lasjuntas no sepeguen gque nose
deformen. No utilice polvos limpiadores
u otros limpiadores abrasivos.
No lave ninguna piezapldstico de!reffigerador
en e!lavaplatos.
No limpie losestantesdevidriofrfos
(enalgunosmode!as)con agua caliente
porque pueden quebrarsedebido a la extrema
diferencia de temperature. Maneje los
estantes de vidrio con cuidado. Golpear
e! vidrio templado puede hacer!o quebrar.
Otras piezasdel refrigerador-inclugendo
juntas delas puertas,cajonespara frutas
g vegetales g todas las piezaspl6sticas-
pueden limpiarse de la misma manera.
Detr(Ts del refrigerador
Unavezalado,quite el refrigerador g aspire
lasserpentinastraseras.Tenga cuidado al
alejar el refrigerador de la pared.Todos los
tipos de pisos pueden daflarse, en especial
losrecubrimientos acolchados g losque
tienen superficies en relieve.
Tiredelrefrigerador hacia afuera en forma
recta g devu_lvala a su posici6n tambi_n
en forma recta. Mover el refrigerador
de costado puede provocar daflos
al recubrimiento del piso o al refrigerador.
Cuandoempuje e!reffigemdor hada atrds,
asegOresede no aplastar e!cablede energfa.
Ademds asegOresededejar un mfnimo de
3" entre la pared g/as serpentinasde!
condensador.
6
Page 25

C6mo reemplazar las bombillus de luz
GEAppliances.com
= -,,--, i =
L © J
_ -- %mbilla
Taoa
Desplazare!contro! alaposici6nCOLD(frfa)
no elimina la corriente de electficidad difigida
a!circuito de !aluz.
La bombilla se encuentra ubicada detr6s
de la protecci6n en la pared trasera.
_! Desenchufe el refrigerador.
O Retire los estantes (si fuera necesario).
Quite el tornillo.
O Con cuidado quite la protecci6n de
la luz introduciendo un destornillador
piano dentro de la ranura en la parte
superior de la protecci6n U ejerciendo
presi6n.
Preparaci6n para vacaciones
Durante largasvacaciones o ausencias,quite
losalimentos Udesenchufe el refrigerador.
Limpie la parte interior con una soluci6n
compuesta poruna cucharada bicarbonato
de sodio (15ml)y uncuarto (! litro)de agua.
Dejelas puertas abiertas.
Reempl6cela con una bombilla para
electrodom@sticos de 25W con una
base de candelabro E12.
NOTA:Si la bombilla no est6 disponible en
su tienda local, comunfquese con el
servicio al cliente de GE.
O Introduzca la leng0eta en la parte
inferior de la protecci6n de la luz
dentro de la carcasa de la bombilla
de luz y tr6bela en su lugar.
Coloque el tornillo.
Vuelva a colocar los estantes si los
ha quitado.
Enchufe el refrigerador.
Preparaci6n para una mudanzu
Fijetodos los elementos sueltos como
estantes o cajones asegur6ndolos bien
con cinta adhesiva para evitar dafios.
AsegOresede que el reffigerador quede
en posici6nvertical durante la mudanza.
Page 26

I strucciones
Refri erador
deInstalaci6n
ANTES DE COMENZAR
Lea estas instrucdones por completo g con detenimiento.
•IMPORTANTE- Guardeestasinstrucciones
para el uso de inspectores locales.
•IMPORTANTE-- Cumpla con todoslos
c6digos g ordenanzas vigentes.
• Nota al instalador - Aseg0resede dejar estas
instruccionescon el Consumidor.
• Nota al consumidor - Conserveestas
instrucciones para referenciafutura.
• Nivelde capacidad - La instalaci6n deesteaparato
requiere capacidades mec6nicas b6sicas.
• Tiempo definalizaci6n- Instalaci6n del refrigerador
15 minutos
Invertirelvaiv_n de la puerta
! hora
• Elinstalador tiene la responsabilidad de efectuar
una instalaci6n adecuada.
• LaGarantfa no cubre lasfallas del producto debido
a una instalaci6n incorrecta.
Modelos GTL12HBX, GTRIOHAX,
GTR12HBX
DISTANCIAS
S61oinstalaci6n independiente.
DespejeMfnimo:
Partetrasera - 3" desde las serpentinas
del condensador
PATAS DE NIVELACI6N
Debeninstalarse patas ajustables en lasesquinas
frontales del refrigerador para que@stese encuentre
bien asentado en el piso,g el frente debe estar elevado
Iosuficiente para que la puerta cierref6cilmente cuando
seabre hasta alrededor de la mitad.
Pare ajustar las patas de nivelaci6n, gire laspatas
patas ensentido de las agujas del reloj pare levantar
el refrigerador o en sentido contrario alas agujas del reloj
para bajarlo.
UBICACI6N DEL REFRIGERADOR
• No instaleel refrigerador donde latemperatura pueda
sermenor a los 55°F(13°C)porque no funcionar6 con
la regularidad suficiente para mantener lastemperaturas
adecuadas.
• Inst61elosobre un piso Io suficientemente resistente para
soportarlo completamente cargado.
No Io instale a menos 5" (13cm) de una cocina.
Paraelevarel refrigerador
Page 27

Instruccionesde instalaci6n
J
COMO INVERTIR ELVAIVEN DE LA PUERTA
NOTAS IMPORTANTES
Cuando invierta el vaiv@nde lapuerta:
• Leaporcompleto todas lasinstrucciones antes
de comenzar.
• Manipule laspiezascon cuidado para no rayar lapintura.
Separelostornillos porsuspiezasrelacionadaspara
evitar usarlos en lugaresequivocados.
• Coloquelaspuertas sobre una superficie detrabajo que
no rage.
IMPORTANTE:Una vez que haya comenzado, no mueva
el gabinete hasta haber finalizado la inversi6n delvaiv@n
de la puerta.
Estasinstrucciones son para cambiar las bisagras del lado
derecho al lado izquierdo;si alguna vez deseacambiarlas
de nuevo al lado derecho, siga lasmismas instrucciones
e invierta todas lasreferencias de la izquierdaa laderecha.
Desenchufe el refrigerador del tomacorriente.
Vacie todos los estantes de la puerta.
HERRAMIENTAS NECESARIAS
I-_ QUITE LA PUERTA
DEL CONGELADOR
Quitelos tornillos de la tapa dela bisagra (algunos
modelos cuentan con arandelas de presi6ncon cada
tornillo), la bisagra superior y la cu_a.
Coloquela puerta sobreuna superficie que no rage
con la parte exteriorhacia arriba.
!%
NOTA:Cuando quite la puerta, preste atenci6n
alas arandelas entre la bisagra central y la parte
inferior de la puerta decongelador porque pueden
pegarsea la puerta. No laspierda.
J
_ PRECAUCION: Nodejecaer
la puerta al piso.Siesto sucede, puede da_arse
la traba de la puerta.
Llavedecubode8 mm
Destornilladordeestrella
Cintaadhesiva
Esp4tulao destornillador
de ladosfinos
Page 28

Instruccionesde instalaci6n
J
COMO INVERTIR EL VAIVEN DE LA PUERTA {CONT.}
[] OUITE LA PUERTA DE ALIMENTOS
FRESCOS
Cierrelapuerta con cinta adhesiva.
Quite la bisagra central g curia sacando los tornillos
(algunosmodelos cuentan con arandelas de presi6n
con cada tornillo). Levante la bisagra para quitarla.
NOTA:Algunos modelos cuentan con una arandela
entre la bisagra central g la parte superior de la puerta
de alimentos frescos. Nolapierda.
®
Quite la cinta que sostiene la puerta cerrada.
Levante la puerta de alimentos frescos g quftela
de la bisagra inferior.
Coloquela puerta con la parte exterior hacia arriba
sobre una superficie que no rage.
®
®
[] TRANSFIERA LA BISAGRA SUPERIOR
A LA IZQUIERDA
Utilizandouna esp6tula con los bordes recubiertos
con cinta adhesiva, quite los botones obturadores.
Tengacuidado con el acabado de pintura.
Vuelvaa instalar el bot6n obturador en el lado derecho
introduci_ndolo en losorificios dejados por los tornillos
de la bisagra superior.
Vuelvaa armar la bisagra superior g la curia sobre el
lado izquierdo,girando lostornillos Iosuficiente para
mantener labisagra en su lugar.
NOTA:Cuando quite la puerta, preste atenci6n
alas arandelas entre la bisagra central g laparte
inferior de la puerta de congelador porque pueden
pegarse a la puerta. No laspierda.
J
A PRECAUCION: Node;ecaer
la puerta al piso.Siestosucede,puede dafiarse
la traba de la puerta.
10
Page 29

Instruccionesde instalaci6n
[] TRANSFIERA LA BISAGRA INFERIOR
A LA IZOUIERDA
Pare acceder ala bisagra inferior,mueva
el refrigerador a 50" de la pared.Luegoincline
con cuidado elrefrigerador hacia atr6s haste
que descanse sabre la pared.
J
-a,PRECAUCl0 N:Aseg rese
de que lasserpentinas ubicadas en la parte trasera
del refrigerador no descansen contra la pared.
AIhacerlo podrfan dafiarse las serpentinas.
I
30"(76.2cm)
Quite lostornillos (algunosmodelos cuentan con
arandelas en coda tornillo),lapate de nivelaci6n
g la bisagra inferior del lado derecho.Quite la pate
de nivelaci6n del lado izquierdodel gabinete e inst61ela
en el lado derecho.
Vuelvaa armar la bisagra inferior en el lado izquierdo.
NOTA:Lasparasdenivelaci6nno son intercambiables.
[] VUELVA A COLGAR LA PUERTA
DE ALIMENTOS FRESCOS
AsegOreseque losarandelas est@nensu lugar
en el perno inferior de la bisagra.Coloque la puerta
de alimentos frescos en la bisagra inferior,cierre
la puerto g ci@rrelacon cinta adhesive.
Quiteel bot6n obturador del lado izquierdo de la
puerto e introdOzcalodentro del orificio del lado
opuesto.
Bot6nobt]rad_
F7] INSTALE LA BISAGRA CENTRAL
EN LA IZgUIERDA
Quite los tres botones obturadores sobreel lado
izquierdoe inst61elossobre el derecho.
I-_ TRANSFIERA LA TRABA DE LA
PUERTA DE ALIMENTOS FRESCOS
A LA IZQUIERDA
Quite latraba delapuerta de la porte inferior del
lado derechode la puerta. Transfiera losbotones
obturadores del lado inferior izquierdo al lado derecho.
Instale la traba delapuerto sobre elladoizquierdo.
Instalela bisagra central diseflada para el lado
izquierdoque vino con el refrigerador,con lostornillos
espaciador g arandelas (enalgunos modelos)que
sequitaron en el Paso2.
®
®
Quite la cinta que sostiene la puerto cerrada.
-a,PRECAUCION: Cuandosearma
correctamente, la bisagraqueda firme contra el
gabinete.
ATENCION:Lostornillos deben ester bien ejustados.
Girelostornillos haste quequeden firmes. Luegoajuste
lostornillos con 1/2 vuelta como mfnimo utilizando
ambas manos.
11
Page 30

Instruccionesde instalaci6n
J
COMO INVERTIR EL VAIVEN DE LA PUERTA {CONT.}
[]
TRANSFIERA LA TRABA DE
LA PUERTA DEL CONGELADOR
A LA IZgUIERDA
Quite la traba de la puerta de la parte inferior del
lado derecho de la puerta. Transfiera los botones
obturadores del lado inferior izquierdo al lado derecho.
Instale la trabade la puerta sobre el lado izquierdo.
[]
VUELVA A COLGAR LA PUERTA
DEL CONGELADOR
[-_ ALINEE LAS PUERTAS
Alinee la puerta del congelador con la puerta
de alimentos frescos para que el espacio entre elias
se encuentre equilibrado.
Ajuste lostornillosde la bisagra inferior gir6ndolos
hasta que queden firmes. Luegogire lostornillos
1/2vuelta como mfnimo utilizandoambas manos.
Coloquela puerta del congelador en la bisagra central
sobreel perno.
Levante la bisagra superior a mano e introduzca
el perno de la bisagra superior dentro del orificio
de la puerta. Luego cierre la puerta.
Transfiera el bot6n obturador de la parte superior
de la puerta al lado opuesto.
Bot6nobturador
Instale la tapa de la bisagra sobre la bisagra superior.
12
Page 31

Sonidos normales de la operaciSn. GEAppliances.com
Los refrigeradores mds nuevos producen sonidos diferentes a los modelos mds antiguos.
Los refrigeradores modemos tienen rods funciones btusan tecnologia rods reciente.
_Usted escucha !o que yo escucho? Estos sonidos son normales.
HUMMM...
--WHOOSH...
[] Elnuevo compresor de alta eficiencia puede funcionar
m6s r6pido g durar m6s que el de su refrigerador
anterior g puede escuchar un zumbido de tono alto
o un sonido pulsante mientras opera.
[] Puede escuchar un sonido de soplido cuando
las puertas se cierran. Estose debe a que la presi6n
se est6 estabilizando dentro del refrigerador.
CHASQUIDOS, ESTALLIDOS,
CRUJIDO
[] Puede escuchar sonidos como de crujido o estallidos
cuando el refrigerador se conecta pot primera vez.
Esto pasa a medida que el refrigerador se enfrfa hasta
la temperatura correcta.
[] Elcompresor puede causar un chasquido o un gorjeo
cuando intenta volver a arrancar (esto puede tomar
hasta 5 minutos).
[] Expansi6n g contracci6n de las bobinas durante
o despu_s del ciclo de descongelaci6n puede causar
sonidos como de crujido o estallidos.
[] Enmodelos con m6quina de hielos, despu@sde
completar un ciclo de hacer hielo, se pueden escuchar
los cubos de hielo cuando caen a la bandeja de hielos.
WHIR!
[]
Puede escuchar los ventiladores movi@ndosea gran
velocidad. Esto pasa cuando el refrigerador se conecta
pot primera vez, cuando las puertas se abren
frecuentemente o cuando se guarda gran cantidad
de alimentos en el refrigerador o en los
compartimientos del congelador. Losventiladores
est6n agudando a mantener las temperaturas
correctas.
SONIDOSDEAGUA
6
[]
Elfluido del refrigerante a trav@sde las bobinas puede
producir un sonido de borboteo como de agua
hirviendo.
[] Elagua que cae en elcalentador de descongelaci6n
puede causar un chisporroteo, estallido o zumbido
durante el ciclo de descongelaci6n.
[] Un ruido de agua cagendo se puede escuchar durante
el ciclo dedescongelaci6n a medida que el hielo
se derrite del evaporador g fluge hacia la bandeja
de drenaje.
[] Elcierre de las puertas puede producir un sonido
de gorgoteo debido a la estabilizaci6n de la presi6n.
13
Page 32

Antes de solicitar un servicio...
5olucionar problemas
iAhorre tiempo y dinero! Revise las tablas en las siguientes
pdginas g tal vez no necesitard de solicitor un servicio.
Causas Posibles Qu6 hacer
Elrefrigerador El refrigerador est6 en el dclo • Esperealrededor de30 minutos para que termine
no funciona de descongelado, el ciclo de descongelado.
El refrigerador est6 desenchufado. • Presioneel enchufe completamente dentro
del tomacorriente.
Fusible quemado/interruptor • Cambieelfusibleo reconfigureelinterruptor.
de circuitos acdonado.
Vibraci6n o golpeteo Las patas de nivelaci6n frontales • Ver Patasde nivelacidn.
(una lave vibraci6n deben ajustarse.
esnormal)
Elmotor funciona par Normal cuando el refrigerador • Espere24 horas para que el refrigerador se enfrfe
periodos prolongados se enchufa par primera vez. par completo.
o se enciendeg apaga Esto ocurre a menudo cuando • Esto es normal.
frecuentemente
(Los refrigeradores se colocan grandes cantidades
modernos con m6s
espacio de Sedej6 la puerto abierta. • Constatequeun paquete no est_ manteniendo
almacenamiento g un la puerto abierta.
congelador m6s grande Clima caluroso oaperturas • Estoesnormal.
requieren m6s tiempo
de operaci6n. Se frecuentes de la puerto.
encienden g apagan a Control de temperature • Ver Sabre e! control
menudo para mantener configumdo en el nivel m6s frio.
temperaturas parejas)
de alimentos en el refrigerador.
Elcompartimento de Elcontrol de temperature no • Ver Sabre e! contro!.
alimentos frescos o del se ha configumdo Io
congelador est6n mug sufidentemente frio.
calientes Clima calumso o apertures • Configure el control de temperatura un paso m6sfrb.
frecuentes de la puerto. VerSabree!contro!.
Sedej6 la puerto abierta. • Constatequa un paquete no est# manteniendo
la puerto abierta.
Escarcha o cristales de Se dej6 la puerto abierta. • Constate queun paquete no est# manteniendo
hielo sabre los alimentos la puerto abierta.
congelados (la escarcha
dentro del paquete Aperturas de la puerto mug
es normal) frecuentes o mug pmlongadas
Los cubitos de hielo Los alimentos transmiten • Envuelva bien los alimentos.
tienen olor/sabor olor/sabor a los cubitos de hielo
Debe limpiarse la parte • Ver Cuidodo g limpiezo.
interior del refrigemdor.
Loscubitos de hielo Sedej6 la puerto abierta. • Constatequeun paquete no est6 manteniendo
tardan en hacerse la puerto abierta.
Elcontrol de temperatura no • Ver Sabree!contro!.
se ha configurado Io
suficientemente frio.
14
Page 33

GEAppliances.com
Causas Posibles Qu_ hacer
Elrefrigerador tiene olor Los alimentos transmiten olor • Losalimentos con olores fuertes deben envolverse bien.
al refdgerador. • Mantenga una caja abierta de bicarbonato de sodio
en el refrigerador; c6mbiela casa tres meses.
Debe limpiarse la parte interne. • Ver Cuidado y limpieza.
Se forma humedad en Resulta comOn durante periodos • Seque IQsuperficie con un pQfio.
lu parte exterior del de humedad elevada.
refrigerador
Seacumula humedad
en el interior _enclimas
Aperturas de la puerta mug
frecuentes o mug pmlongadas.
h_medos, el aire
transporta humedad
dentro del refrigerador
cuando se abren las
puertas)
La luz interior no Eltomacordente no recibeenergia. • CQmbieelfusibleo reconfigureelinterruptor.
funciona
La bombilla de luz se ha quemado. • Ver C6mo cambiar !a bombi!!a de luz.
Losalimentos se Los alimentos se encuentran • Aleje losalimentos de IQventilQci6nde aire.
congelan en el mug cerca de la ventilaci6n de
refrigerodor aire en la parte tmsem del
reffigemdor.
Elcontrol del refdgemdor est6
configumdo en una temperature
• Muevaelcontrol del refrigerador QunQconfiguraci6n
m6s elevQdQsubiendo unQunidQdpor vez.
mug baja.
15
Page 34

Garantia del Refrigerador. ipo o muu.I
Todos los servicios de garantia los proporcionan nuestros Centros
de ReparaciOnde Fdbrica o nuestros t4cnicos Customer Care®
autorizados. Para concertar una cita de reparaciOn,en linea,
visite nosal GEAppliances.com, o Ilame al 800.GE.CARES
(800.432.2737).Cuando Ilame para solicitar servicio, par Favor
Grape aquf su recibo.
Serequiere faci!itar prueba
de la fecha de compra
original para obtener un
servicio bajo la garanda.
tenga a mano el nOmerode serie _tel nOmero de modelo.
GE reemplazar(7:
Un a_o Cualquierparte del refrigerador quefalle debido a defectos en losmateriales o en
Aportirdelabcho la fabricaci6n. Durante estagaranda limitada de un a_o, GEtambi@nproporcionar6, sin costa
delacompraoriginal alguno, toda la mano de obra g el serviciorelacionado-para reemplazarpartes defectuosas.
Viajesde servido a su hogar pare enseharle c6mo usar
el producto.
Instalad6n o entrega inapropiada, o mantenimiento
impropio.
Fallas del producto si hag abuso, mal usa, o usa pare
arras prop6sitos que los propuestos, o usa pare fines
comerdales.
P_rdida de alimentos por aver_as.
Causar dahos despu_s de la entrega.
Reemplazo de fusibles desu hogar o reajuste
de interruptores de ¢ircuito.
Reemplazo del cartucho del filtm pare agua, si incluidos,
debido a presi6n de agua afuera de las limites de
opemd6n espedficados o sedimento excesivo en
el suministro de agua.
Reemplazo de las bombillas, si incluidos, o los filtros
de agua, si incluidos otto entonces segOnIoobservado
arriba.
Daho al producto causado par acddente, fuego,
inundaciones, o actos de Dios.
Daho incidental o consecuencial causado par posibles
defectos con el apamto.
Producto no accesible pare facilitar el servicio requerido.
EXCLUSION DE GARANT[AS IMPL[CITAS--Su (mica g exdusivo derecho es la reparaci6n del producto,
tal g coma se indica en esta Garantia limitada. Cualquier garantia implicita, indugendo las garantias
implicitas de comerciabilidad o adecuaci6n para un fin determinado, estSn limitadas a un aria
o el pefiodo de tiempo ross breve permitido par la leg.
Esta garantia se extiende al comprador original g cualquier comprador posterior de productos comprados para usa
residencial dentro de Estados Unidos. Si el producto estd situado en undrea que no dispone de servicio par parte
de un proveedor de servicio autorizado de GE, podria tenet que hacerse cargo de los castes de envio o bien
podria solicitdrsele que Ileve el producto a una centro de servicio de GE autorizado para realizar la reparaci6n.
En Alaska, la garantia excluge el costa de envio olas visitas de servicio a su casa.
Algunos estados no permiten la exclusi6n olas limitaciones de dahos incidentales o consecuenciales. Esta garantia
da derechos legales espedficos, gusted podria tenet otros derechos que variardn de estado a estado. Para saber
cudles son sus derechos legales, consulte a la oficina de asuntos del consumidor local o la oficina del AttomeLt General
en su Iocalidad.
Garante: General Electric Compang. Louisville, KY 40225
16
Page 35

Notas.
GEAppliances.com
0
¢o
O_
"0
_o
O_
¢h
Q
10
Q
o_
0
17
Page 36

Servicioal consumidor.
Pdgina Webde GEAppliances GEAppliances.com
_LTienealguna pregunta sabre suelectrodom6stico? iPruebela p6ginaWeb de GEAppliances,24 horas al dfa,
cualquier dfa del aflo! Para magor conveniencia g servicio m6s r6pido, ga puede descargar los Manuales de los
Propietarios,pedir piezaso inclusohacer una cita en Ifneapara que vengan a realizar una reparaci6n.
Soliciteuna reparaci6n GEAppliances.corn
Elserviciode expertosGEest6 a tan s61oun paso de su puerta, iEntre en Ifneag solicite sureparaci6n cuando
le venga cualquier dfa del aria! O Ilameal 800.GE.CARES(800.432.2737)durante horas normales de oflcina.
RealLifeDesignStudio(Estudiodedisehoparalavidareal)GEAppliances.com
GEapoga el concepto de DisehoUniversal-productos, servicios g ambientes que pueden usar gente de todas
lasedades,tamaflos g capacidades. Reconocemosla necesidadde diseflar para una gran gama de habilidades
g dificultades fisicas g mentales. Param6s detalles cobre las aplicacionesde GEDisehoUniversal,inclugendo
ideasde diseflo para la cocina para personas con discapacidades,mire nuestra p6gina Web hog mismo.
Para personas con dificultades auditivas,favor de Ilamar al 800.TDD.GEAC(800.833.4322).
GaranEas amp/iadas GEAppliances.corn
Compre una garantfa ampliada g obtenga detallessabre descuentos especialesdisponiblesmientras sugarantfa
est6 a0n activa. Puedecomprarla en Ifneaencualquier momenta, o Ilamar al (800.626.2224)durante horas
normales de oficina.GEConsumerHome Servicesestar6 a0n ahf cuando su garantfa termine.
Piezosg occesorios 6EAppliances.corn
Aquellosindividuos con la calificaci6n necesaria para reparar sus propios electrodom6sticos pueden
pedir que seles manden las piezaso accesorios directamente a sus hogares (aceptamos las tarjetas
VISA,MasterCardg Discover).Haga supedido en Ifneahog, 24 horas cada dfa o Ilamar par tel6fono
al 800.626.2002durante horas normales de oficina.
Las instrucciones descritas eneste manual cubren los procedimientos a seguir por cualquier usuario.
Cualquierotra reparaci6n deberia, por regla general, referirse a personal calificado autorizado. Debe
ejercerse precauci6n ya que las reparaciones incorrectas pueden causar condiciones de funcionamiento
inseguras.
P6ngase en contacto con nosotros 6EAppliances.corn
Sino est6 satisfecho con el servicioque recibede GE,p6ngase en contacto con nosotrosen nuestra
p6gina Web indicando todos losdetalles asf coma su n0mero de teldono o escrfbanos a:
General Manager,Customer Relations
GEAppliances,Appliance Park
Louisville,KV40225
Registre su electrodomdstico GEAppliances.com
iRegistre su nuevo electrodom_stico en linea--cuando usted prefiera! Elregistrar su producto a tiempo
le proporcionar6, sisurgiera la necesidad,una mejor comunicaci6n gun servicio m6s r6pido bajo lost6rminos
de su garantfa. Tambi6n puede enviar su tarjeta deregistropre-impresa que seincluge enelmaterial de
embalaje.
].8 Impmso en China
 Loading...