

GE GTH21KCXAWW, GTH21KCXABB, GTH21KCWAWW, GTH21KCWABB Owner’s Manual

ge.com
Safety Instructions ........... 2-4
Operating Instructions
Automatic Icemaker . ........... 9
Controls ...................... 5
Crispers and Pans ............ 7, 8
Shelxes and Bins ............... 6
Modds GTH2 l and GTL2 l
Cong_lateur sup_rieur
Care and Cleaning
(:are and Cleaning .......... 10, 11
Replacing the Light Bulb ....... 11
Installation Instructions
Icemaker Installation ........ 13-16
Preparing to Install
the Refligerator . .............. 19
Reversing the Door Swing .... 91-25
V(ater Line Installation ...... 17-91
Troubleshooting Tips ....... 96-29
Normal Operating Sounds ...... 96
Consumer Support
Consumer Support ..... Back Cover
Product Registration
for Canadian Customers ..... 33, 34
Product Registration
for U.S. Customers ......... 31,39
_'arranty tbr
Canadian Customers ........... 35
Warranty for U.S. Customers ..... 36
Rdfrigdrateurs
La section fran_aise commence a la page 37
Congelador superior
Refrigeradores
Laseccion en espa_olempieza en la pagina73
Write the model and serial numbers here:
Model #
Serial #
Find these numbers on the gray label
on the left side, near the top of the
reti'igera tot compartment.
Note to Installer - Besureto leave
these instructions with the Consumer.
Note to Consumer - Keepthese
instructions tot flmn'e reterence.
Note fi Hns "tallateur - _<_sur_z-vous
de laisser ces instructions au
consolili/late tli;
Note au consommateur -
Conservez ces instructions pour
I'ele I'e I1t-'e flirt II'e.
Nota al instalador - Asegfirese
de dejar estas instrucciones con el
constlli/idoi;
Sota al consumidor - Conserve
estas instrucciones para reterencia fllttlI'a.
197D7733PO01 49-80505-1 07-07 Jfl
iMPORTANTSAFETYiNFORMATiON.
READALLiNSTRUCTiONSBEFOREUSING.
,&WARNING!
Use this appliance only for its intended purpose as described in this Owner's Manual.
SAFETYPRECAUTIONS
When using electrical appliances, basic safety precautions should be followed, including the following:
i)::This refi'igerator must be properly installed
and located in accordance with tile Installation
Instructions before it is used.
i)::Do not allow children to climb, st;rod or hang
on the shelves in the reli-Jgerato_: They could
damage the reti-Jgerator and seriously injure
themselves.
::_ Do not touch tile cold surlilces in tile fl'eezer
compartment when hands are damp or wet.
Skin may stick to these extremely cold s/mfhces,
}/<Do not store or use gasoline or other flammable
\_q)o_ and liquids in tile vicini_,' of this or any
other appliance.
i)_:In refl-Jgerato_ with automatic icemake_,
avoid conta ct with th e m oving parts of th e
ejector mechanism, or with tile heating element
locamd on tile bottom of tile icemake_: Do not
place finge_ or hands on tile automatic
icemaking mechanism while tile retiigerator
is plugged in.
i)::Kee I) fingers out ot tile "pinch point" areas;
clearances between the doo_s and between the
doo_s and cabinet are necessarily small. Be ca_eflfl
closing doo_s when children are in the area.
i)::Uni)lug tile refrigerator befi)re cleaning and
making repai_.
NOTE"We strong/}/recommend that anyservlklng be
performedby a qualified individual
_'_Setting either or both controls (SOlne In odels only
have one control) to the I (0f0 position does not
remove power to the light circuit,
i)::Do not refi'eeze fi'ozen fi)ods which have
thawed completely:
2
DANGER!RISKOFCHILDENTRAPMENT
PROPERDISPOSALOFTHEREFRIGERATOR
ge.com
Child entrapment and suffocation are not
problen_s of the past.Junked or abandoned
refrigerators are still dangerous...even if they will
sit fin" "just a fi_w days." If you are getting rid of
your old refi_igerato_; please follow the instructions
below to help prevent accidents.
Refrigerants
_dl refrigeration products contain refligerants,
which under federal law must be removed prior
to product disposal. If you are getting rid of an
old reti_igeration product, check with the company
handling the disposal about what to do.
Before YouThrowAway YourOld
RefrigeratororFreezer:
::Ji::Take off the doo_.
!i_:i,eave the shelves in place so that children
may not easily climb inside.
USEOFEXTENSIONCORDS
Because of potential safety hazards under certain conditions, we strongly recommend against the
use of an extension cord.
Ho_vve_; if you must use an extension cord, it is absolutely necessa_ T that it be a UiAisted (in the United
States) or a CSA-listed (in Canada), 3-wire grounding type appliance extension cord having a grounding
type plug and outlet and that the electrical rating of the cord be 15 amperes (minimum) and 120 w_lts.
IMPORTANTSAFETYINFORMATION.
READALLINSTRUCTIONSBEFOREUSING.
WARNING!
HOWTOCONNECTELECTRICITY
Do not, under anv circumstances, cut or remove the third (ground) prong from the power cord.
For personal safe_ this appliance must be properly grounded.
The power cord of this appliance is equipped with
a 3-prong (grounding) plug which mates with a
standard 3-prong (grotmding) wall outlet to
minimize the possibili F of electric shock hazard
fl'om this appliance.
Have the wall outlet and circuit checked by a
qualified electridan to make sure the outlet is
propedy gromMed.
Where a standard 2-prong wall outlet is
encotmtered, it is vom" personal responsibility and
obligation to have it replaced with a properly
grotmded 3-prong wall outlet.
The refligerator should always be plugged into its
own individual electrical outlet which has a voltage
rating that matches the rating plate.
This provides the best pe_imnance and also
I_rexents oxerloading, house wiring circuits which
could cause a fire hazard fl'om oxerheated wires.
Never tmplug yore" refl_igerator by pulling on the
power cord. Mways grip plug firmly and pull
straight out fl'onl the outlet.
Repair or replace immediately all power cords that
have become fl'aved or otherwise damaged. Do not
use a cord that shows cracks or abrasion damage
along its length or at either end.
\._q_en moving the refl_igerator away from the
wall, be careflfl not to roll over or damage the
power cord.
READANDFOLLOWTHISSAFETYINFORMATIONCAREFULLY.
SAVETHESEINSTRUCTIONS
4
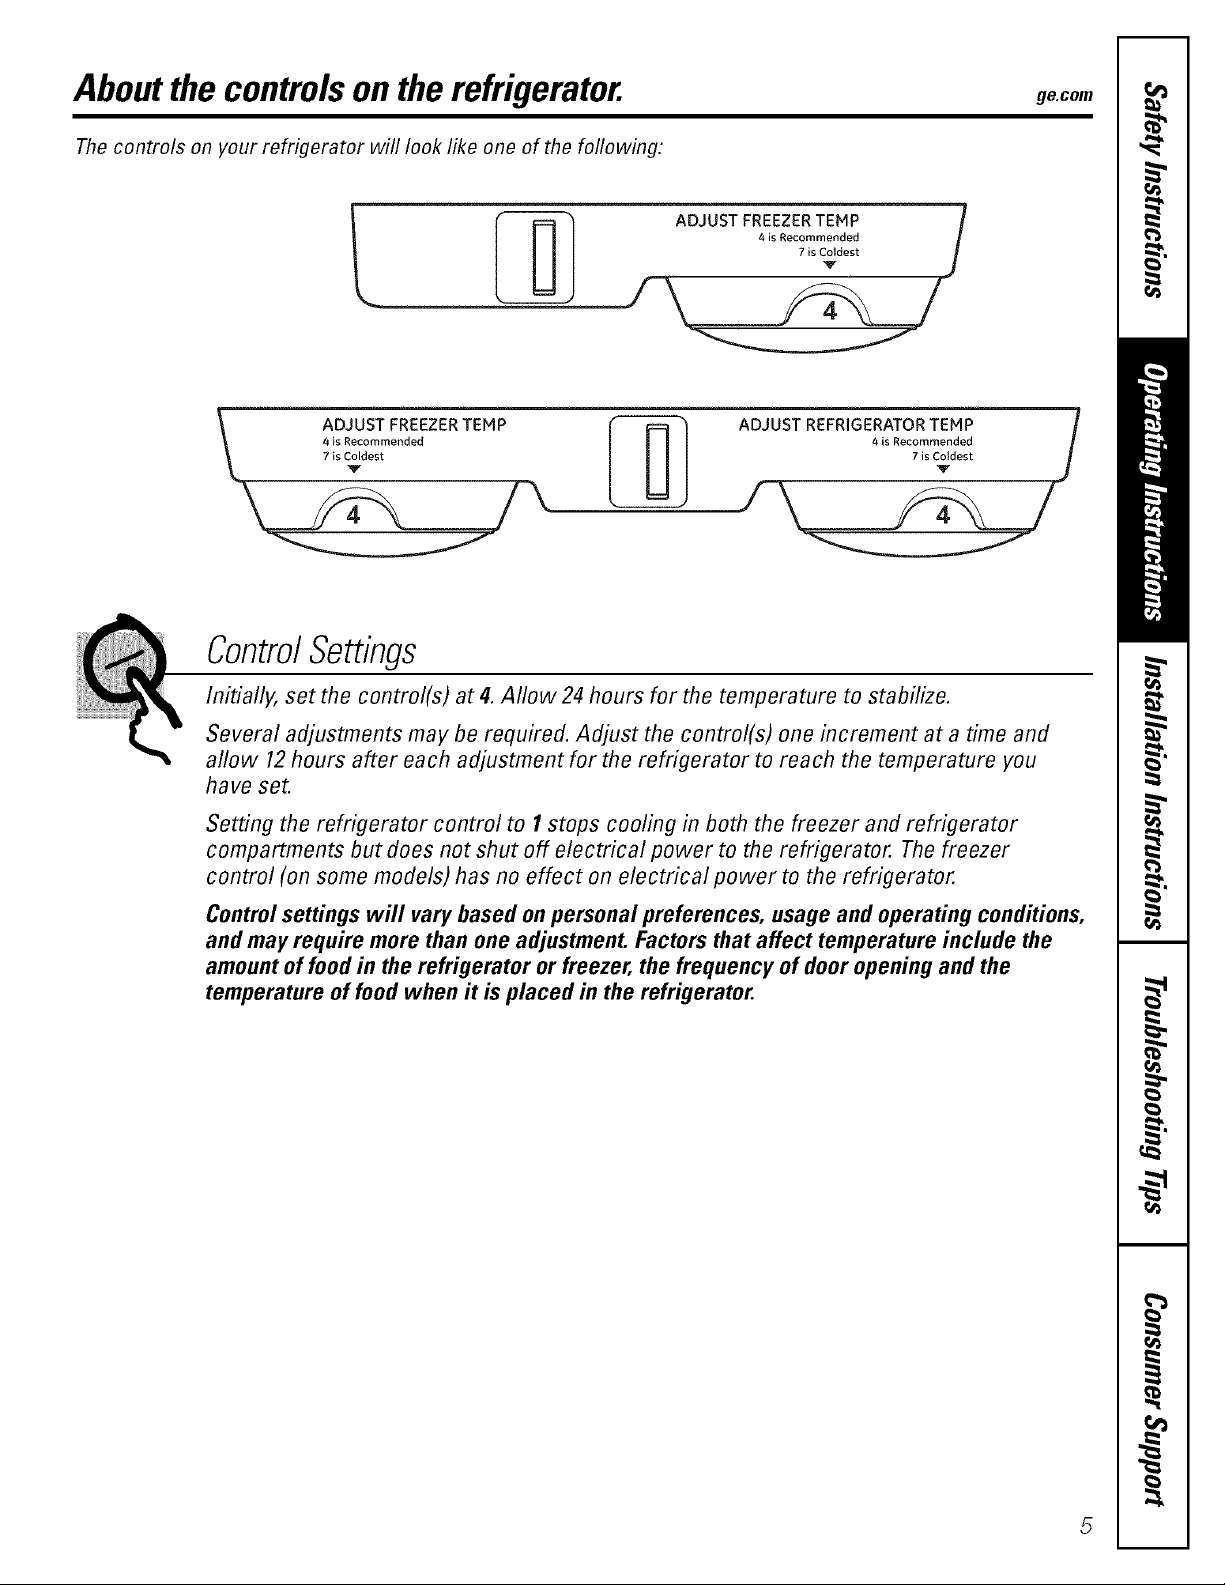
Aboutthe controlsonthe refrigerator, gecom
The controls on your refrigerator will look like one of the following:
i ;--_q ADJUS_FR_L_,_ I
_/7 is ¢_dest
_- ADJUST FREEZER TEF4P _ ADJUST REFRIGERATOR TEMP
\ ;',:_:,_o_:r°°ded I III 4 is Rec7 in_cej eedt /
ControlSettings
Initially, set the control(s) at 4.Allow 24 hours for the temperature to stabilize.
Several adjustments may be required. Adjust the control(s) one increment at atime and
allow 12hours after each adjustment for the refrigerator to reach the temperature you
have set.
Setting the refrigerator control to I stops cooling in both the freezer and refrigerator
compartments but does not shut off electrical power to the refrigerator. The freezer
control (on some models) has no effect on electrical power to the refrigerator.
Controlsettings will vary based on personal preferences, usage and operating conditions,
and may require more than one adjustment. Factors that affect temperature include the
amount of food in the refrigerator or freezer, the frequency of door opening and the
temperature of food when it is placed in the refrigerator.
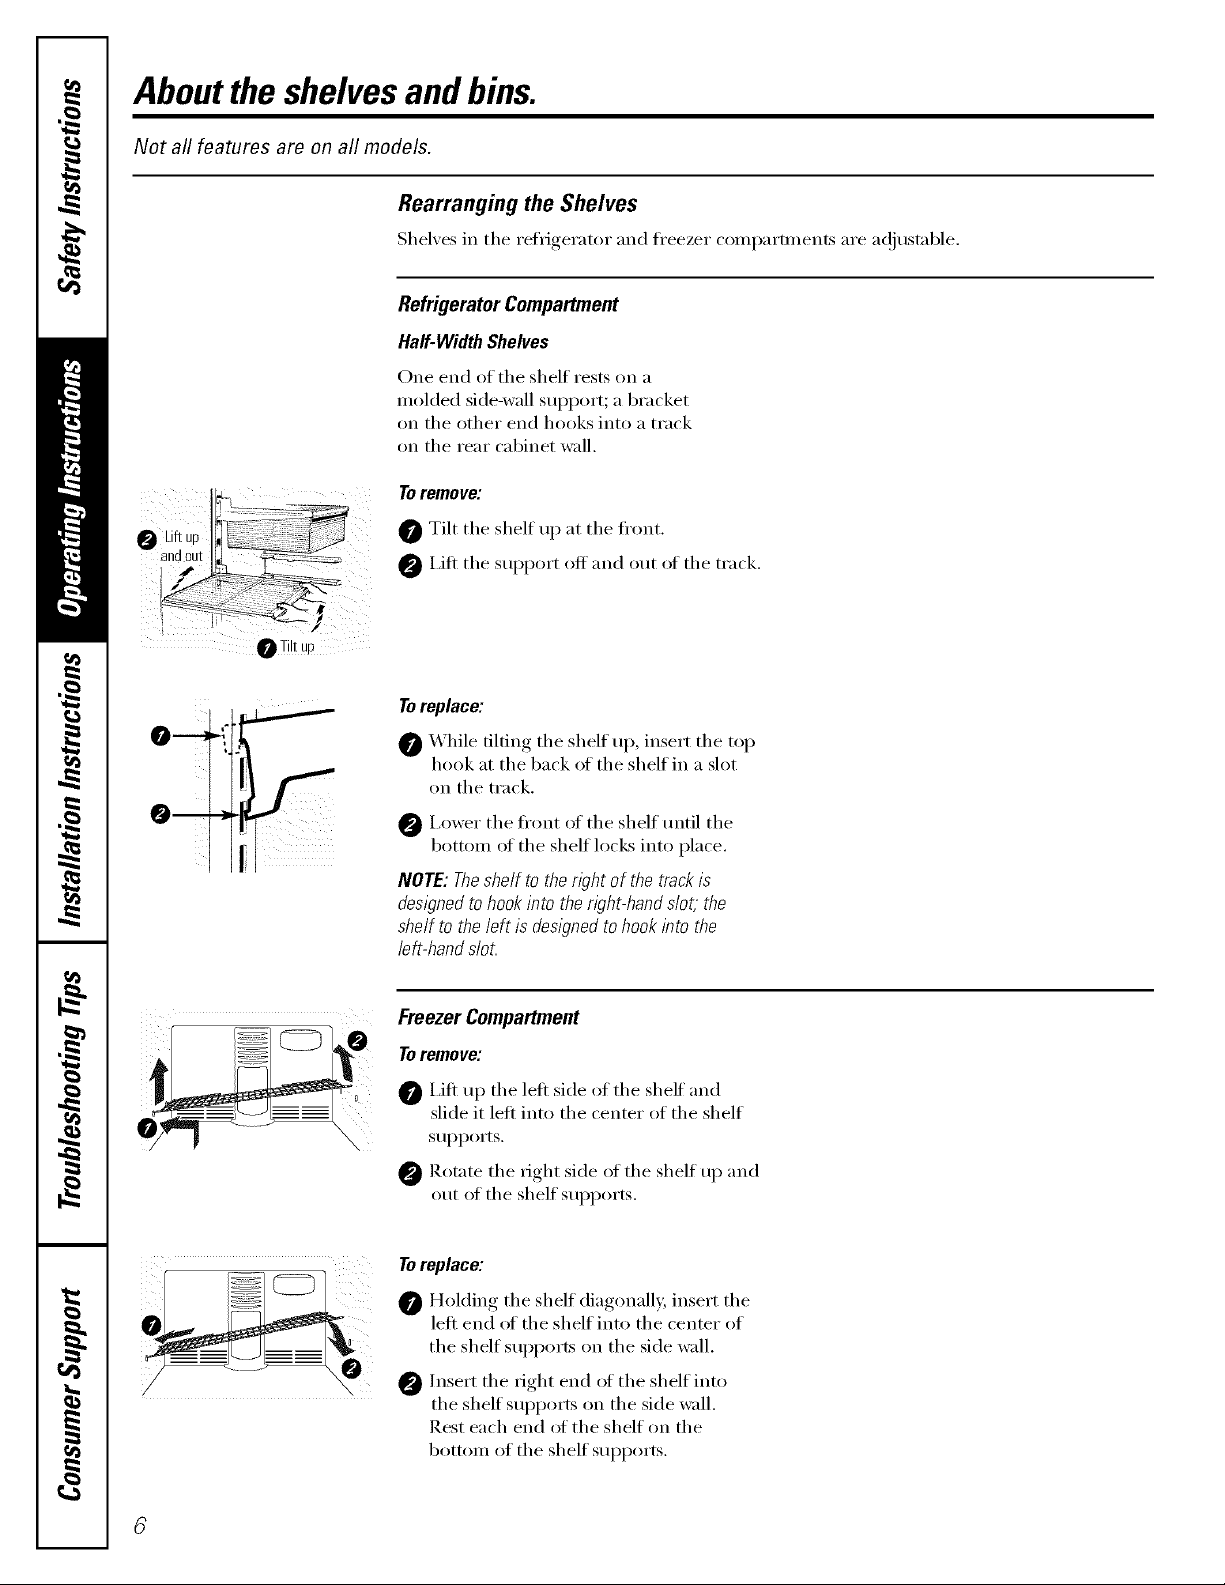
Aboutthe shelvesandbins.
Not all features are on all models.
Rearranging the Shelves
Shel'_es in the refrigerator and freezer comi_arm_ents are a(!justnble.
RefrigeratorCompartment
Half-WidthShelves
One end of the shelf rests on a
molded side-wall supl)ort; a bracket
on the other end hooks into a track
on the rear cabinet wall.
To remove:
0 Tilt the shelf up at the fl'ont.
0 I,ifl the suI_port off and out of the track.
/
_Tilt up
e--
iiii
Toreplace:
0 _'_ hile tilting the shelf up, insert the top
hook at the back of the shelf in a slot
on the track,
0 I,ower the fl'ont of tile shelf tmtil the
bottom ot the shelf locks into place.
NOTE:Theshelf to therightof thetrackis
designedtohookinto the right-hands/ot;the
shelf to the left is designedto hookinto the
left-handslot.
Freezer Compartment
To remove:
I,ifl up the left side oI the shelf and
slide it left into the center of the shelf
suI_ports.
0 Rotnte the right side of the shelf up and
out oI the shelf supports.
Toreplace:
0 Holding tile shelf diagonally, insert the
left end oI the shelf into the center of
the shelf suI_ports on the side wall.
0 Insert the right end of the shelf into
the shelf sui_ports on the side wall.
Rest ead_ end oI the shelf on the
bottom of the shelf suI_ports.
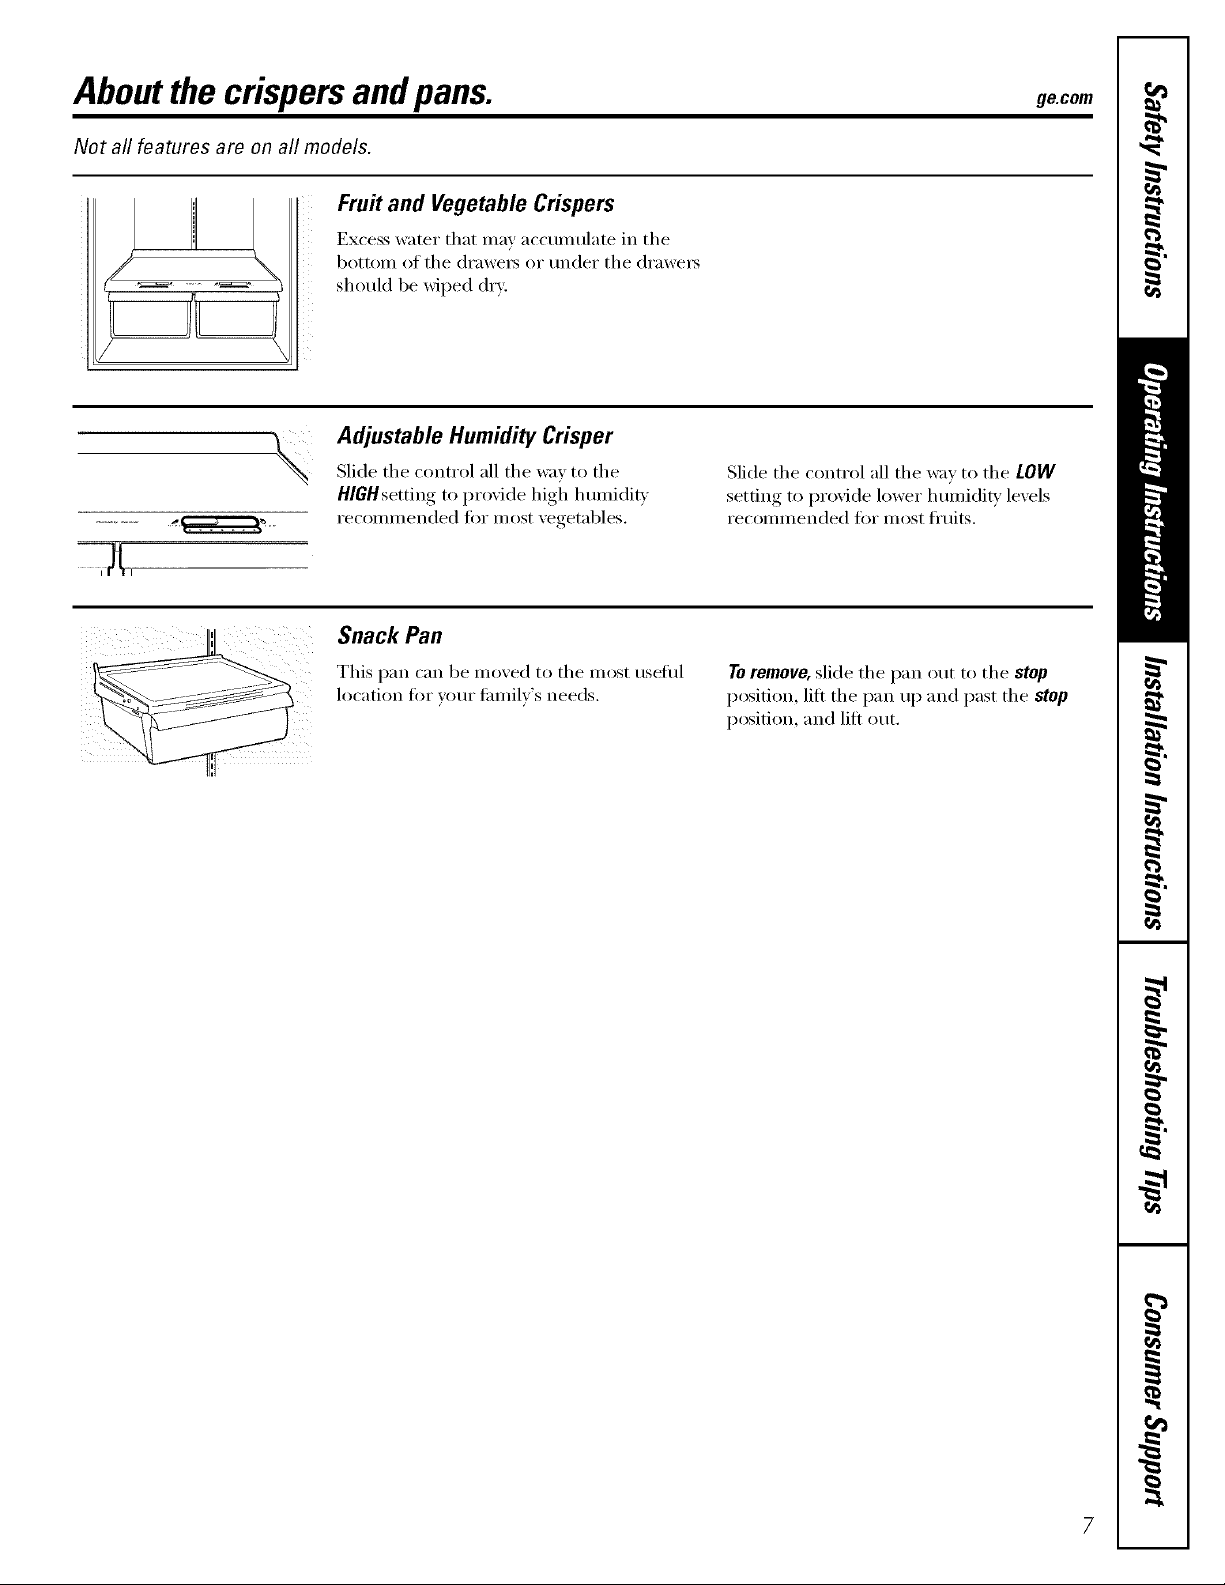
Aboutthe crispersandpans. gecom
Not all features are on all models.
Fruit and Vegetable Crispers
/ \
Excess water that mar accumulate in the
botton_ of the (h'awe_ or under the (h'awe_
should be wiped dry.
Adjustable Humidity Crisper
Slide the control all the way to the
HlGHsetting to provide high humidit_
recomm ended fiw most xegetables.
Snack Pan
Slide the control all the way to the LOW
setting to provide h)wer humidity levels
recommended fi)r most fl'uits.
This pan can be mo_ed to the most useful
location fi)r xcour tmnil_'s needs.
To remove, slide the pan out to the stop
position, lift the pan up and past the stop
position, and lift out.
7
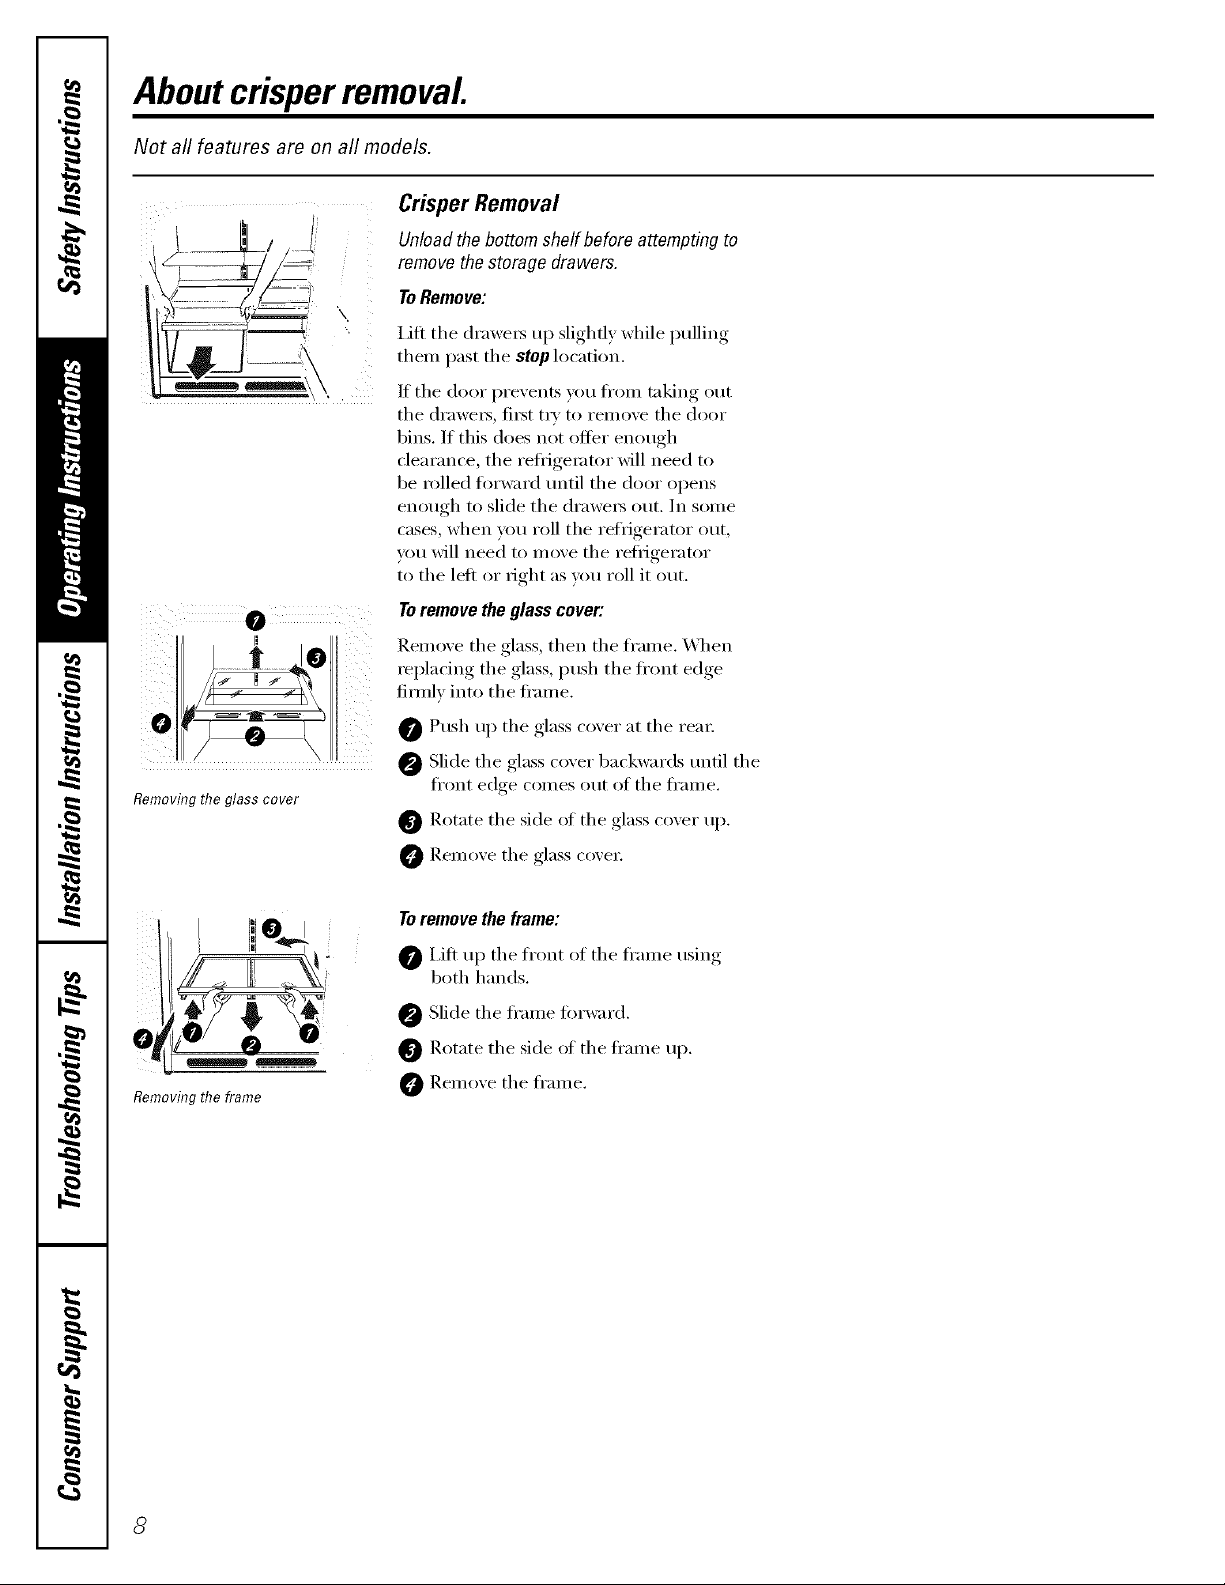
Aboutcrisperremoval
Not all features are on all models.
Crisper Removal
Unload the bottom shelf before attempting to
remove the storage drawers.
I ,\
ToRemove:
Lift the drawe_ up slightly while pulling
them past the stop location.
If the door prevents you from taking out
the drawe_, fi_t tU to remove the door
bins. If this does not offer enough
clearance, the reffige_tor will need to
be rolled torward until the door opens
enough to slide the drawe_ out. In some
cases, when you roll the refl_igerator out,
you will need to move the reii_igerator
to the left or right as you roll it out.
Toremove the glass cover:
Remoxe the glass, then the frame. "_,_qmn
rei_lacino_ the glass, push the front edoe
iii_i
firefly into the fl'ame.
Removingtheglasscover
1, /
1/I I i,i _ ,
Removingtheframe
0 Push up the glass cover at the rea_:
I
Slide the glass cover backwards until the
fl'ont edge corn es out of the fl'ain e.
Rotate the side of the glass cover up.
O Remoxe the glass coxe_:
Toremove the frame:
I,ifl up the fl'ont oI the fl'ame using
both hands.
Slide the ti'ame fin'ward.
0 Rotate the side ot the fl'ame up.
@ Remove the fl'ame.
8
Aboutthe automaticicemaker, ge.com
A newly-installed refrigerator may take 12-24 hours to begin making ice.
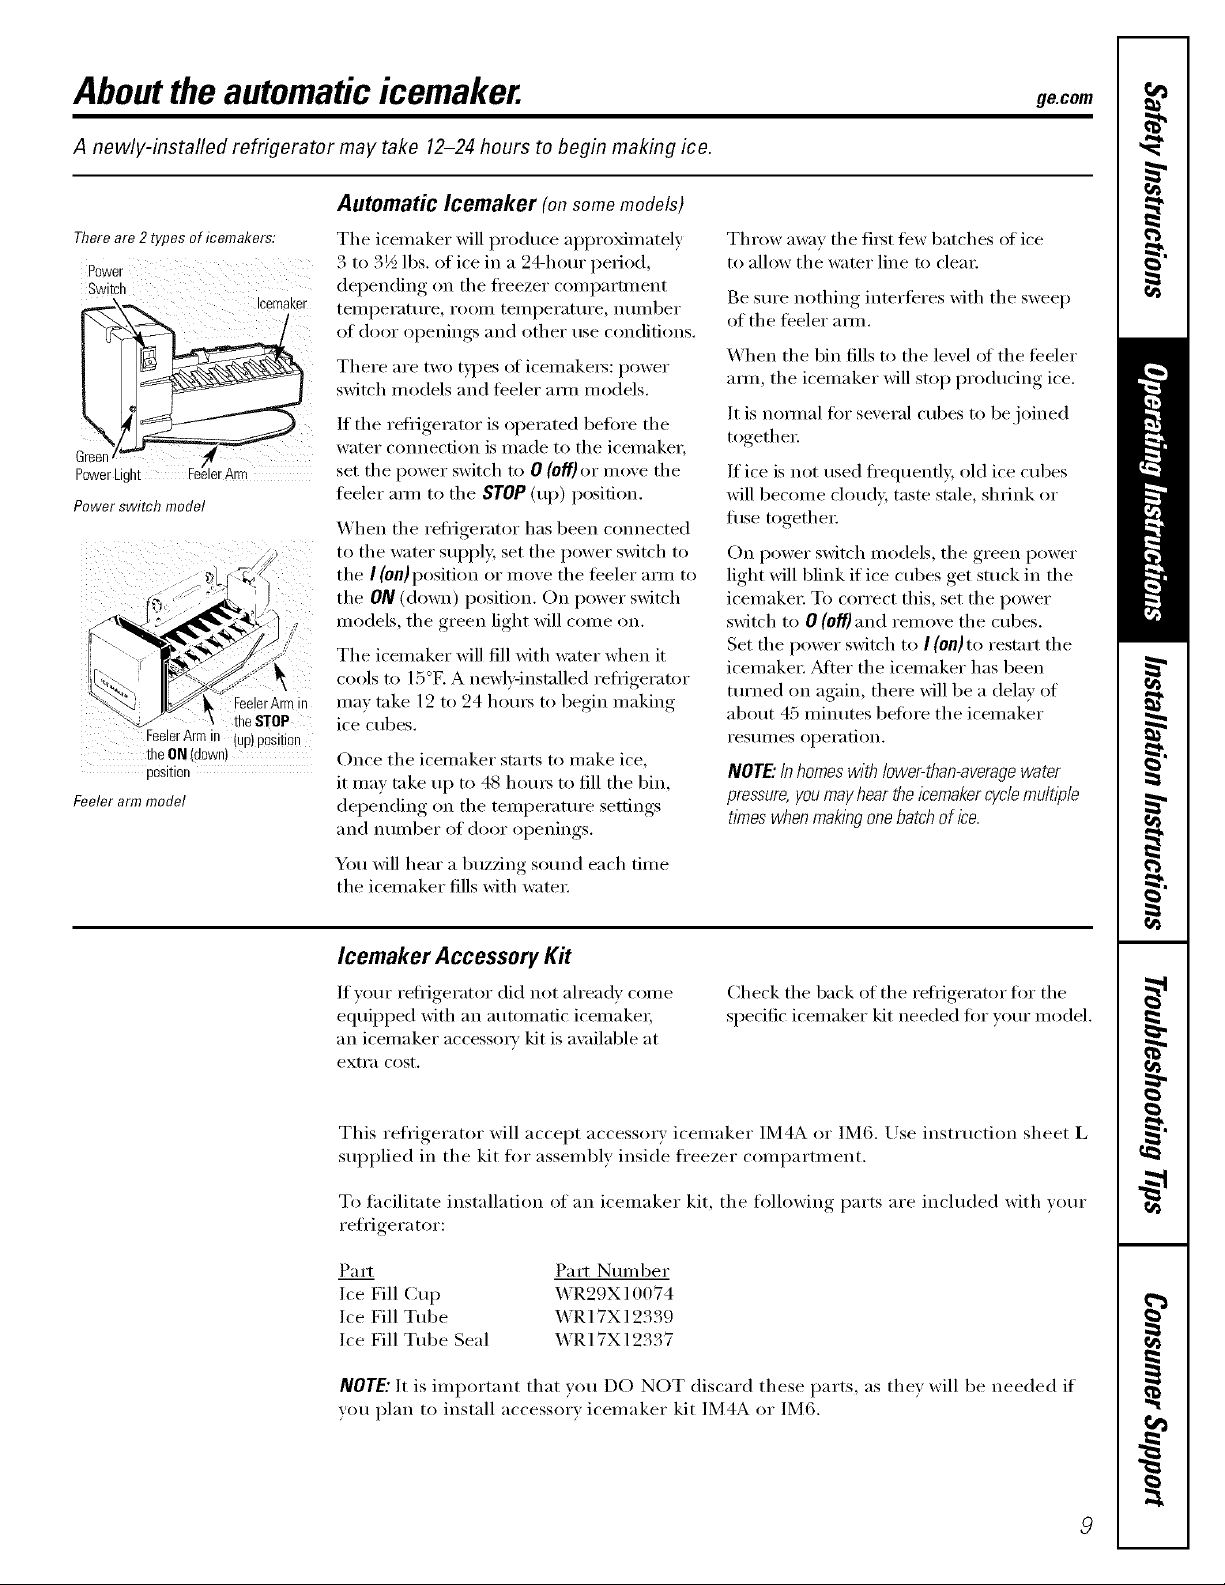
Automatic Icemaker (onsomemodels)
There are 2 types of icemakers:
_PowerL,gl/t i_ !cernaker
Powerswitchmodel
! Ii i ii
FeelerArmin
FeelerArmin (up)P0siti0n
theON (down)
position
Feeler armmodel
[heSTOP
The icemaker will produce api)roxinmtely
3 to 3½ lbs. of ice in a 24-hour period,
depending on the fl'eezer compartment
teiilpei'attii'e, i'OOill teii/pei'attii'e, ntiiilber
of door ol)enings, and other t/se conditions.
There are two tH)es of icemakei_: power
switch models and teeler am/models.
If the refrigerator is operated beflwe the
water connection is made to tile icemaker,
set the power switch to 0 (Off)or mo;e the
libeler am/ to the STOP (up) position.
When the refl_igerator has been connected
to the water supply, set the power switch to
the I (0II)position or move the teeler aml to
the ON (down) position. On power switch
models, the green light will come on.
The icemaker will fill with water when it
cools to 15°1. A newl)qnstalled refl_igerator
may take 12 to 24 hom_ to begin making
ice cubes.
Once the icemaker starts to make ice,
it ma) take up to 48 hom_ to fill the bin,
depending on tile temperature settings
and ntiil/bei" of dooi" ol)enings.
You will hear a btizzin r sotind each time
the icemaker fills with watei:
Throw away the fiIst tew batches of ice
to allow the water line to clem:
Be sure nothing interteres with the sweep
of the teeler aml.
When the bin fills to the level of the teeler
aml, the icemaker will stop producing ice.
It is normal tOT several cubes to be joined
togethei:
If ice is not used fl'equenfl> old ice cubes
will become cloudy, tasm stale, shrink or
fllse togethei:
On power switch models, the green power
light will blink if ice cubes get snick ill the
icelnakei: To correct this, set the power
switch to 0 (otl] and relnove the cubes.
Set the power switch to ! (oo] to restart the
icelnakei: _Mtei" the icelnaker has been
turned on again, there will be a delay of
about 45 nfinutes betore the icelnaker
I'eStlllles ol)eration.
NOTE."In homeswith lower-than-averagewater
pressure,you mayhear the12emakercycle multiple
times when makingonebatch of ice.
Icemaker Accessory Kit
If )our refligerator did not ah'eadv come
equiI)ped with an automatic icelnakei;
an icemaker accessma' kit is ax filable at
extra cost.
This refrigerator will accept accessm) icemaker IM4A or IM6. Use instiuction sheet L
supplied in the kit fi_r assembly inside freezer comi)armlent.
To fhcilitate installation of an icemaker kit, the following parts are included with your
refrigera tOT:
Part Part Nulnber
Ice Fill Cup WR29X10074
Ice Fill Tube WR17X] 2339
Ice Fill Tube Seal WR17X12337
NOTE: It is important that you DO NOT discard these parts, as thex will be needed if
you plan to install accessor_ icelnaker kit IM4A or IM6.
Check the back of the refligerator for the
specific icenlaker kit needed fi)i" xour model.
Careand cleaning oftherefrigerator.
Cleaning the Outside
The doorhandles and trim. Clean with
a cloth dalnl)ened with soapy watei:
Dry with a soft cloth.
a coxnxnerdallv available stainless steel
cleanex: Do not use appliance wax or polish
oil the stainless steel.
Keep tile outside clean. _4'ipe with a clean
cloth lightly dampened with kitchen
appliance wax or mild liquid dish
detergent, Di w and polish with a clean,
soft cloth.
The stainless steel panels and door handles
(on some models) can be cleaned with
Cleaning the Inside
Tohelp prevent odors,leave an open box of
baking soda ill the t_'esh food and ti'eezei"
COIl/I)a i'tlllents.
Unplugthe refrigerator before cleaning. If this
is not i)racti(al, wring excess moisture out
_ff sponge or cloth when cleaning around
switches, lights or controls.
Use warm water and baking soda solution--
about a tablespoon (l 5 ml) of baking soda
to a quart (1 liter) of wateI; This both cleans
and neutralizes o(lm_. Thoroughly rinse
and wipe dry.
Condenser
There is no need fi)r routine condenser
cleanings ill nolinal heine operating
environlnents. Howevei; ill environlnents
that Inav be particularly dusty or greasy, the
condenser shotfld be cleaned periodically
fi)r efficient reflJgerator oi)erafion.
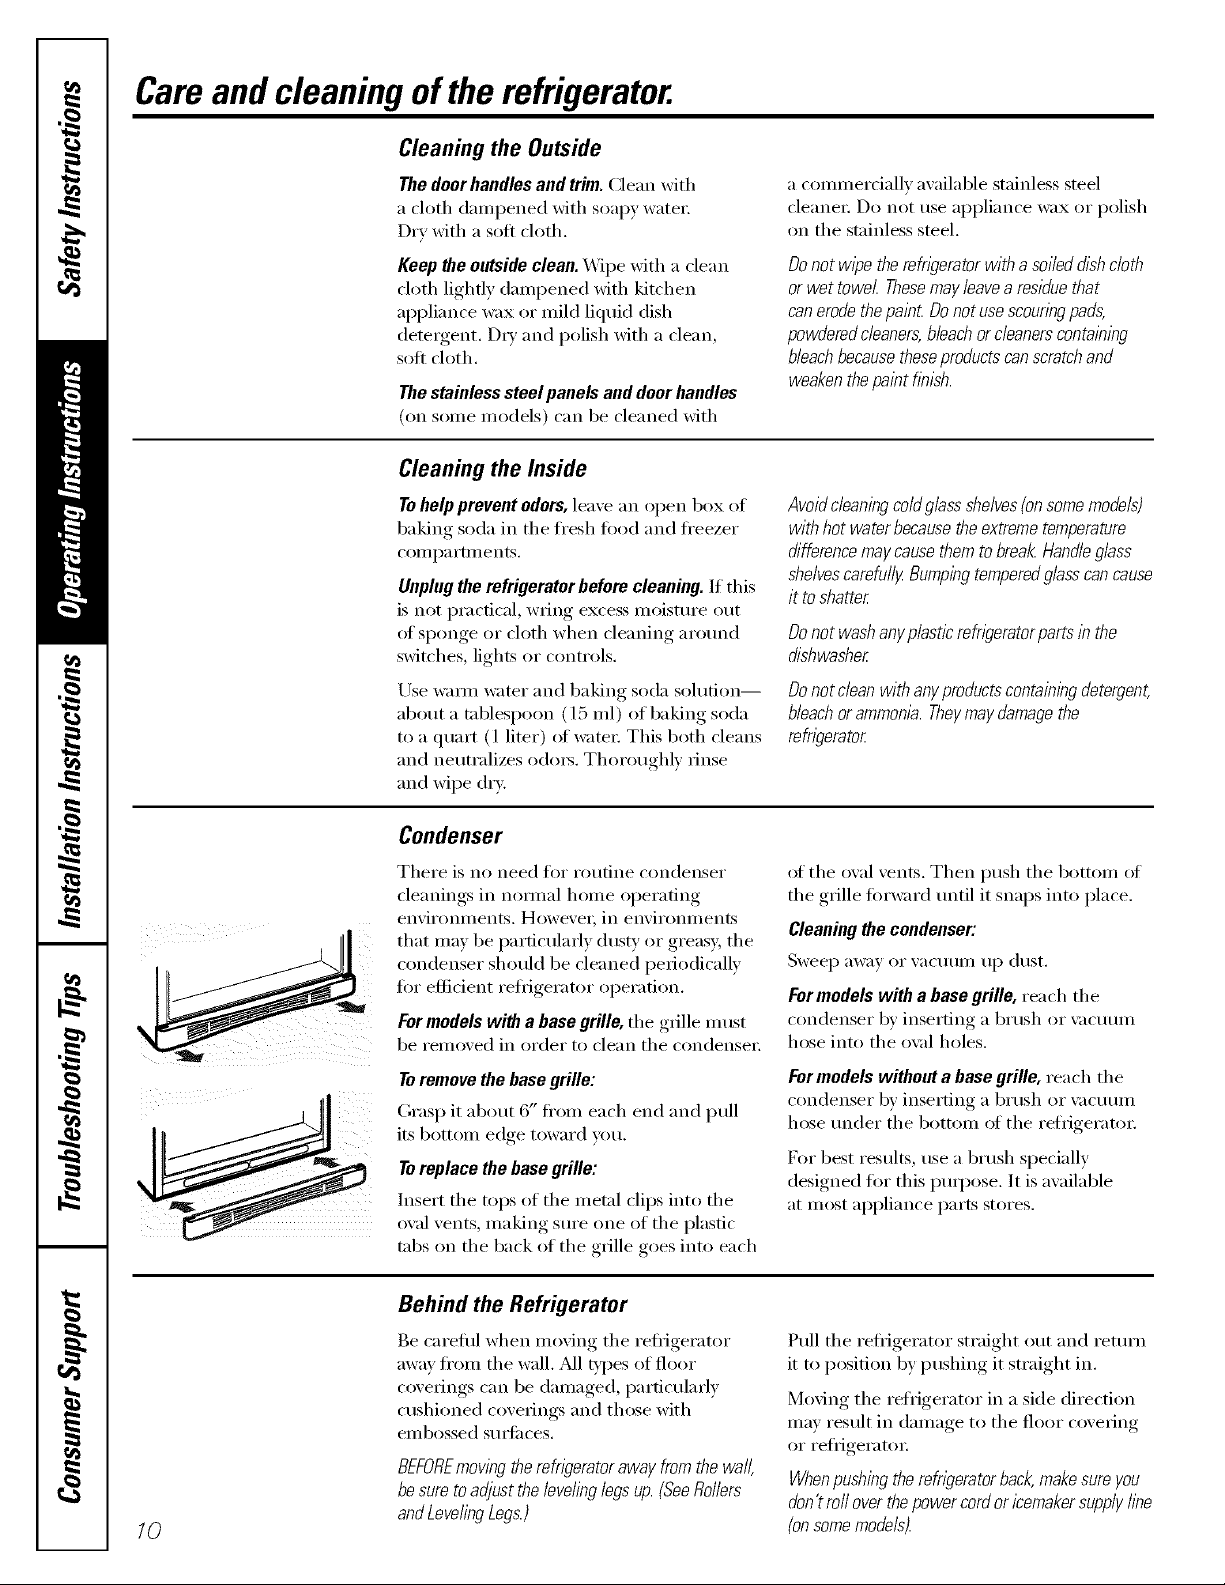
For models with a base grille, the grille nmst
be removed ill order to clean the condensei:
Toremove the base grille:
Grasp it about 6" fl'om each end and pull
its bottoln edge toward v()tl.
Toreplace the basegrille:
Insert the tops of the metnl cliI)s into the
oval vents, lnaking sure one of the plastic
tal)s on the back of the grille goes into each
Do not wipe the refrigerator witha soiled dishcloth
or wet towel Thesemay leavea residuethat
can erodethe pain£ Do notusescouringpads,
powderedcleaners,bleachorc/eaneracontaining
bleachbecausetheseproductscanscratchand
weakenthepaint finish.
Avoid cleaning coldglass shelvesfensome models)
with hot water becausethe extremetemperature
difference maycause themtobreal_Handleglass
shelvescarefullg Bumpingtemperedglasscancause
it to shatter
Donot washanyp/asticrefn)eratorpartsin the
dishwasher
Donotdeanwithanyproductscontainingdetergent,
bleachorammonia.Theymaydamagethe
refngerator
_ff the oval vents. Then push the bottom _ff
the grille forward until it snaps into place.
Cleaning the condenser:
Sweep away or vacumn tlI) dust.
Formodels with a base grille, rea ch th e
condenser b)' inserting a brush or \;Ic/ItlI/l
hose into the ox_d holes.
Formodels without a base grille, reach the
condenser b)' inserting a brush or vacuunl
hose under the bottom of the refiigeratm:
For best results, use a brush specially
designed tot this puq)ose. It is available
at inost al)pliance parts stores.
70
Behind the Refrigerator
Be careful when moving the refi_gerator
away fl'onl the wall. _M1types of floor
coverings can be dalnaged, particularly
cushioned coverings and those with
eillbossed S/li]il ces.
BEFOREmovingtherefrigeratorawayfromthewall,
besuretoadjustthelevelinglegsup.(SeeRollers
andLevelingLegs.)
Pull the reflJgerator straight out and return
it to position by pushing it straight ill.
Moving the refrigerator ill a side direction
lnay result ill dalnage to the floor covering
or refl_igeratoi:
Whenpushing therefrigerator back,make sure you
don't raft over thepower cordor icemakersupply line
(onsomemodels)
Preparing for Vacation
ge.com
For lollg x_lr;l[iOllS or nbsen(es, I'eIllO\P
fl)od and unplug the refiigeratoi: Move
the refligerator control to the 1 (0H)position
and clean the interior with a baking soda
solution of one tablespoon (15 ml) of
baldng socla to one quart (1 liter) of watel;
Leave the doo_ open.
Set the icemaker power switch to the 0 (off)
position or move the feeler man to the STOP
(up) position (depending on model) and
shut off the water supply to the refl-igerato_:
If the temperature can drop below fl'eezing,
have a qualified servicer drain the water
supply s}IsteIll (on soIlle models) to i)_event
serious prope_W)i damage due to flooding.
Preparing to Move
Secure all loose items such as grille,
shelves and drawers by taping them
secm'ely ix*})lace to pre\ ent damage.
Besuretherefrl_leratorstays;))anupn_lhtposition
dunngmowng.
Replacingthelightbulb.
Setting either or both controls to 1(off) does not remove power to the light circuit.
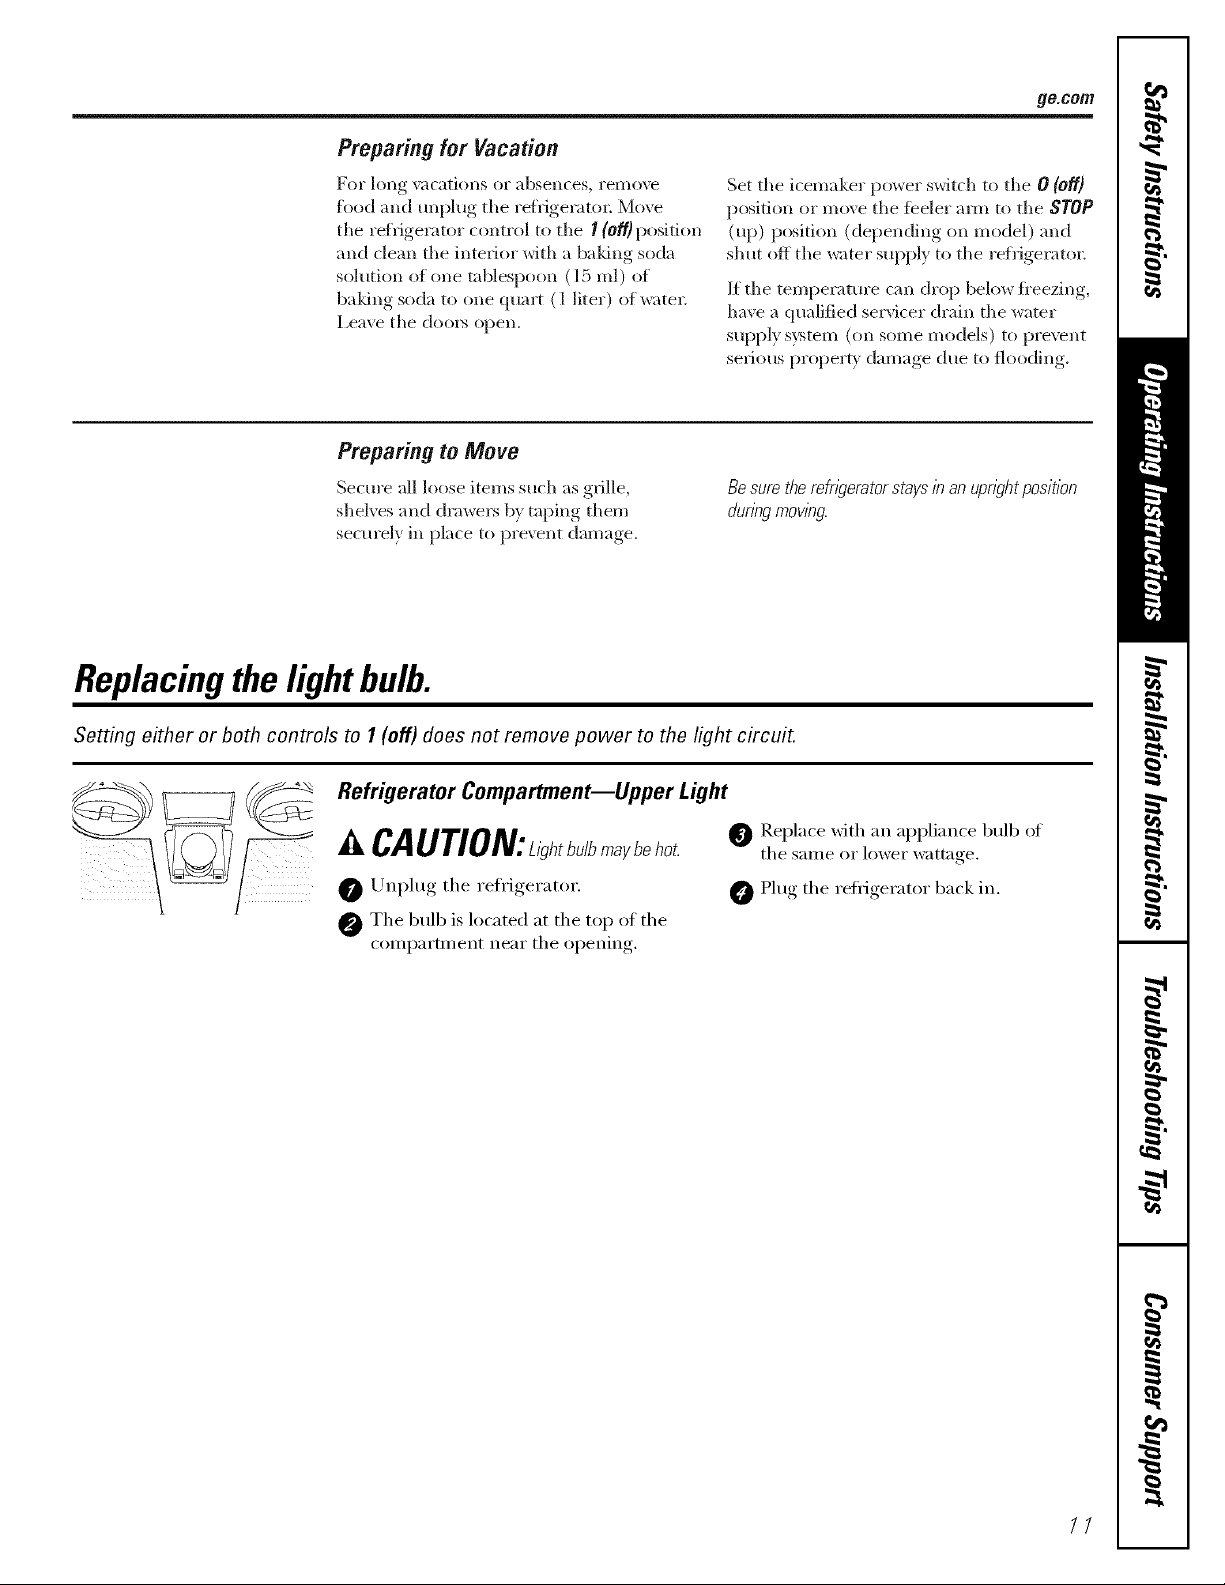
Refrigerator Compartment--Upper Light
CAUTION:L, h,bu/bbehot.
UIq)lug the refrigerator.
0 The bulb is located at the top of the
con_partmei_t near the opelfing.
Replace xfith an al)l)liance bulb of
the same or lower wattage.
0 Plug the refl_igerator back ill
77
Installation
Refrigerator
Instructions
Models GTH21and GTL21
ffyou havequestions,call 1.800.GE.CARESor ,isit our Website at: ge.com I
BEFORE YOU BEGIN
Read these instructions completely and carefully.
" IMPORTANT - S.ve hese
instructions flit local inspector's use.
" IMPORTANT - Obse,,e.ll
governing codes and ordinances.
* Note to Installer - Be sm'e to leave these
instructions with the Consumer.
. Note to Consumer - KeeI)these instructions
fl)r hmlre re_brence.
* SMll level - Installation of this appliance requires
basic mechanical skills.
* Completion time - Refrigerator Installation
15 minutes.
* Proper installation is the responsibility of the
installer.
" Product fldlure due to improper installation is not
covered under the _'\.u'mnty.
WATER SUPPLY TO THE ICEMAKER
(ON SOME MODELS)
If the refrigerator has an icelnaker, it will have
to be COlmected to a cold water line. AGE water
supply kit (COlmfilfing tubing, shutoff valve, fittings
and insti uctions) is awdlable at extra cost fl'oln vour
dealer or by visiting our X_bbsite at ge.coln or Parts
and Accessories, 800.626.2002.
REFRIGERATOR LOCATION
• Do not install the reflJgerator where the telnperature
will go below 60°F (l 6°C) because it will not run often
enough to nmilmfin proper telnperatures.
• Do not install the refrigerator where the telnperature
will go above 100°F (37°C) because it will not periorln
properly.
• Install it on a floor strong enough to suppoi_t it hilly
loaded.
CLEARANCES
_Mlow the fi)llowing clearances for ease of ii_stallation,
proper air circulation and phunlfii_g and electrical
connections.
• Sides 1/8" (3 ram)
• Top 1" (25 ram)
• Back 1" (25 ram)
If the refl_igerator is to be installed next to a wall on the
hinge side, allow 5/16" (8 ram) door clearance.
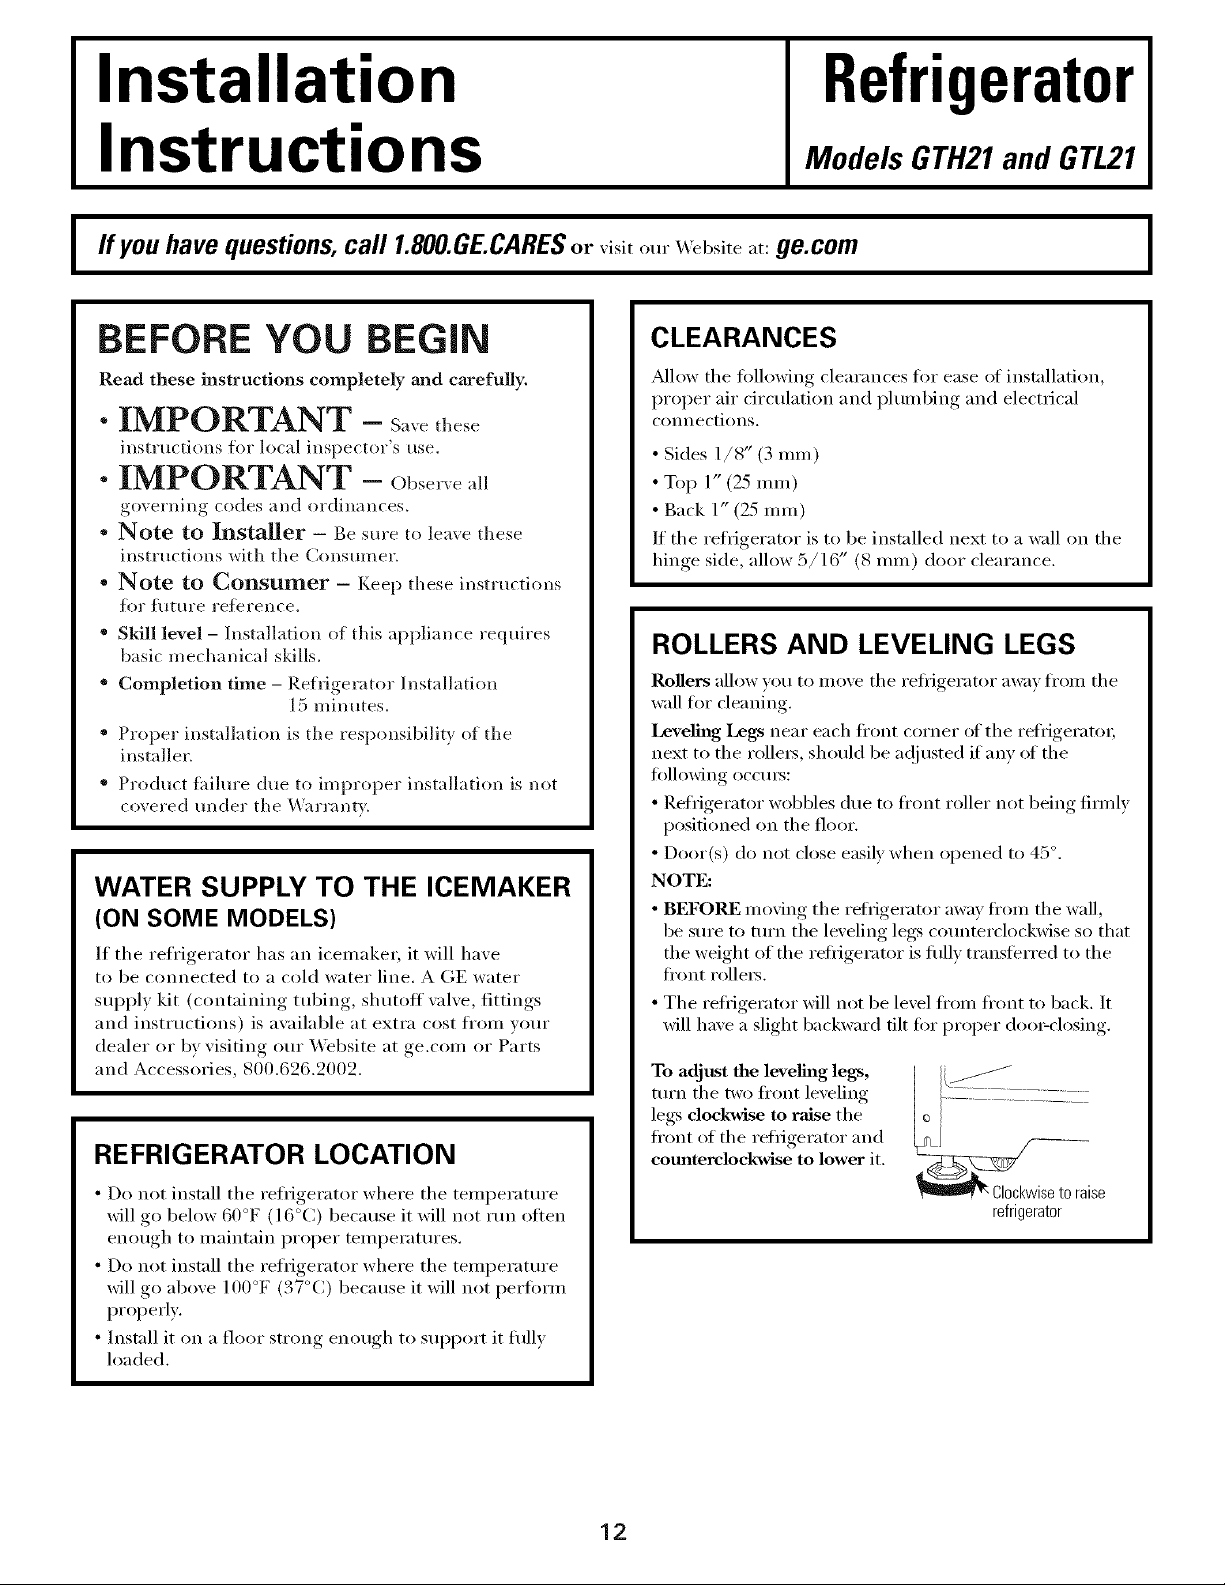
ROLLERS AND LEVELING LEGS
Rogers allow you to inove the refl_igerator away fl'oln the
wall fl)r cleaning.
Leveling Legs near each fl'ont corner of the refl_igeratoi;
next to the rollei_, should be ac!iusted if anv of the
following occui_:
• Refrigerator wobbles due to fl'ont roller not being firefly
positioned on the rio(n:
• Do(it(s) (1(5not close easily when opened t() 45 °.
NOTE:
• BEFORE n_oving the refl_igerator away fl'Oln the wall,
be sure to turn the leveling legs counterclockwise so that
the weight of the reti_igerator is filllv transterred to the
fi'ont rolleI_.
• The refiJgerator will not be lexel fl'oln fl'ont to back. It
will haxe a ,sli(*ht_backward tilt fi)r proper dooi_closing.
To adjust the leveling legs,
turn the two fl'ont leveling
legs dockwise to raise the
fl'ont of the refrigerator and
comlterclockwise to lower it.
__0_ai!)_'_-7-_
se
refrigerator
12
Installation Instructions
ICEMAKER INSTALLATION INSTRUCTIONS
BEFORE YOU BEGIN
Read each step thoroughly before proceeding.
• CAUTION - the
Refrigeratoi: To elimilmte tile danger
of electric shock during installation,
VOtl II, tlst UI,l)lug tile refligerator fl'om
its electrical outlet.
TOOLS YOU WILL NEED
FlatbladeandPhillips Pliers
screwdrivers
PARTS INCLUDED
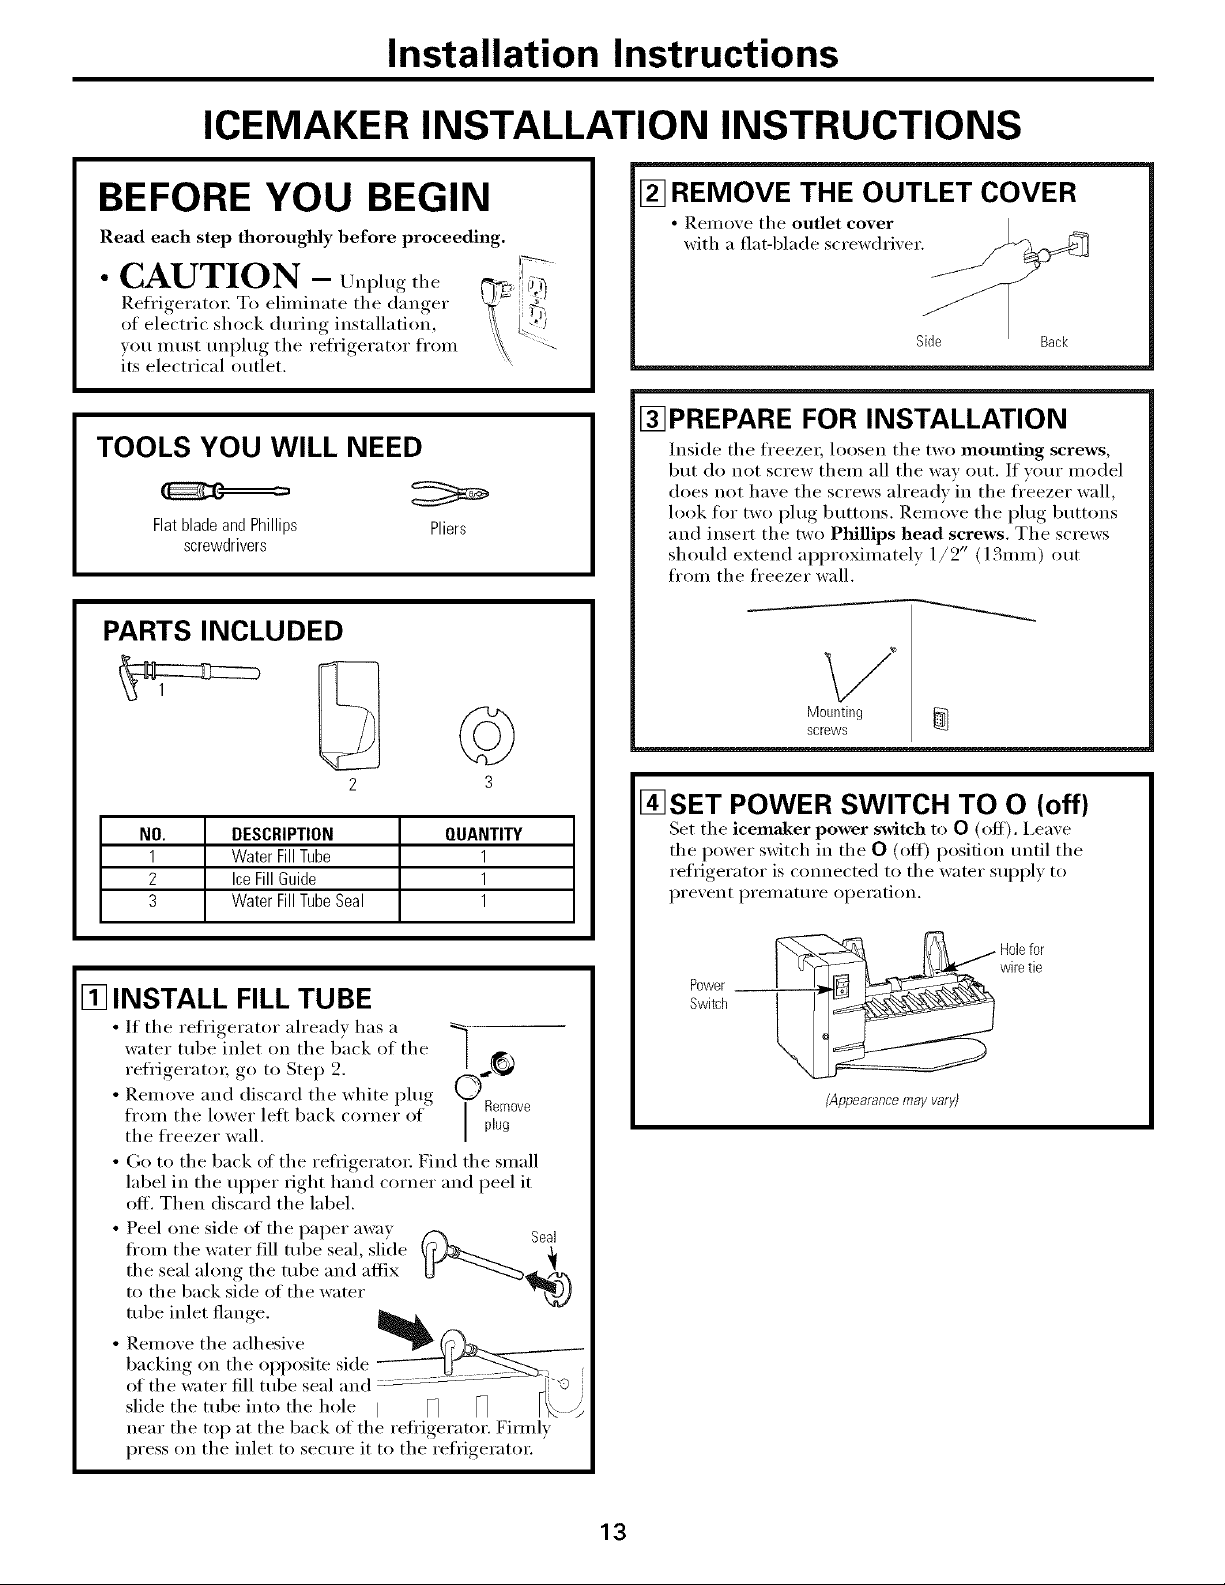
[] REMOVE THE OUTLET COVER
• ]_.ell, O_,e tile outlet cover
with a fiat-blade screwdrixer.
Side Back
I_PREPARE FOR INSTALLATION
Inside tile freezer; loosen tile two mounting screws,
but do not scI'ew them all tile way otlt. If )ore" model
does not haxe tile screws alreadx in tile freezer wall,
look for two I)lug buttons. Relnoxe tile I)lug buttons
and insert the two Phillips head screws, The screws
should extend approximately 1/2" (131,,1,,) out
from the freezer wall.
Mounting
screws
2 3
NO. DESCRIPTION QUANTITY
1 WaterFillTube 1
2 IceFill Guide 1
3 WaterFillTubeSeal 1
[] INSTALL FILL TUBE
• If tile reli'igerator ah'eady has a
water tube inlet on tile back of tile
refl'igerato_; go to Step 2.
• Remove and discard tile white plug
ti'om the lower left back corner of
the fl'eezer wall.
• Go to tile back (ff tile refligerat(n: Find tile small
label in tile upper right hand corner and peel it
off. Then discard the label.
• Peel one side of tile paper away Seal
fl'Oln the water fill tube seal, slide
the seal along the tube and affix
to the back side (ff the water
tube inlet flange.
• I_.emove the adhesive
backing on the opposite side
of tile water fill tube seal and
slide tile tube into tile hole I
near tile top at tile back of tile refl'igerator. Fimdy
press on tile inlet to secure it to tile reflJgerator
I_SET POWER SWITCH TO O (off)
Set tile icema_ker power switch to 0 (off). I.eave
the power switch in tile 0 (off) i)osflion until tile
reflJgerator is coi, nected to tile water sui)ply to
l)revent l)relnature operation.
wiretie
Power
Switch
Holefor
(Appearancemayvary)
13
Installation Instructions
ICEMAKER INSTALLATION INSTRUCTIONS (CONT.)
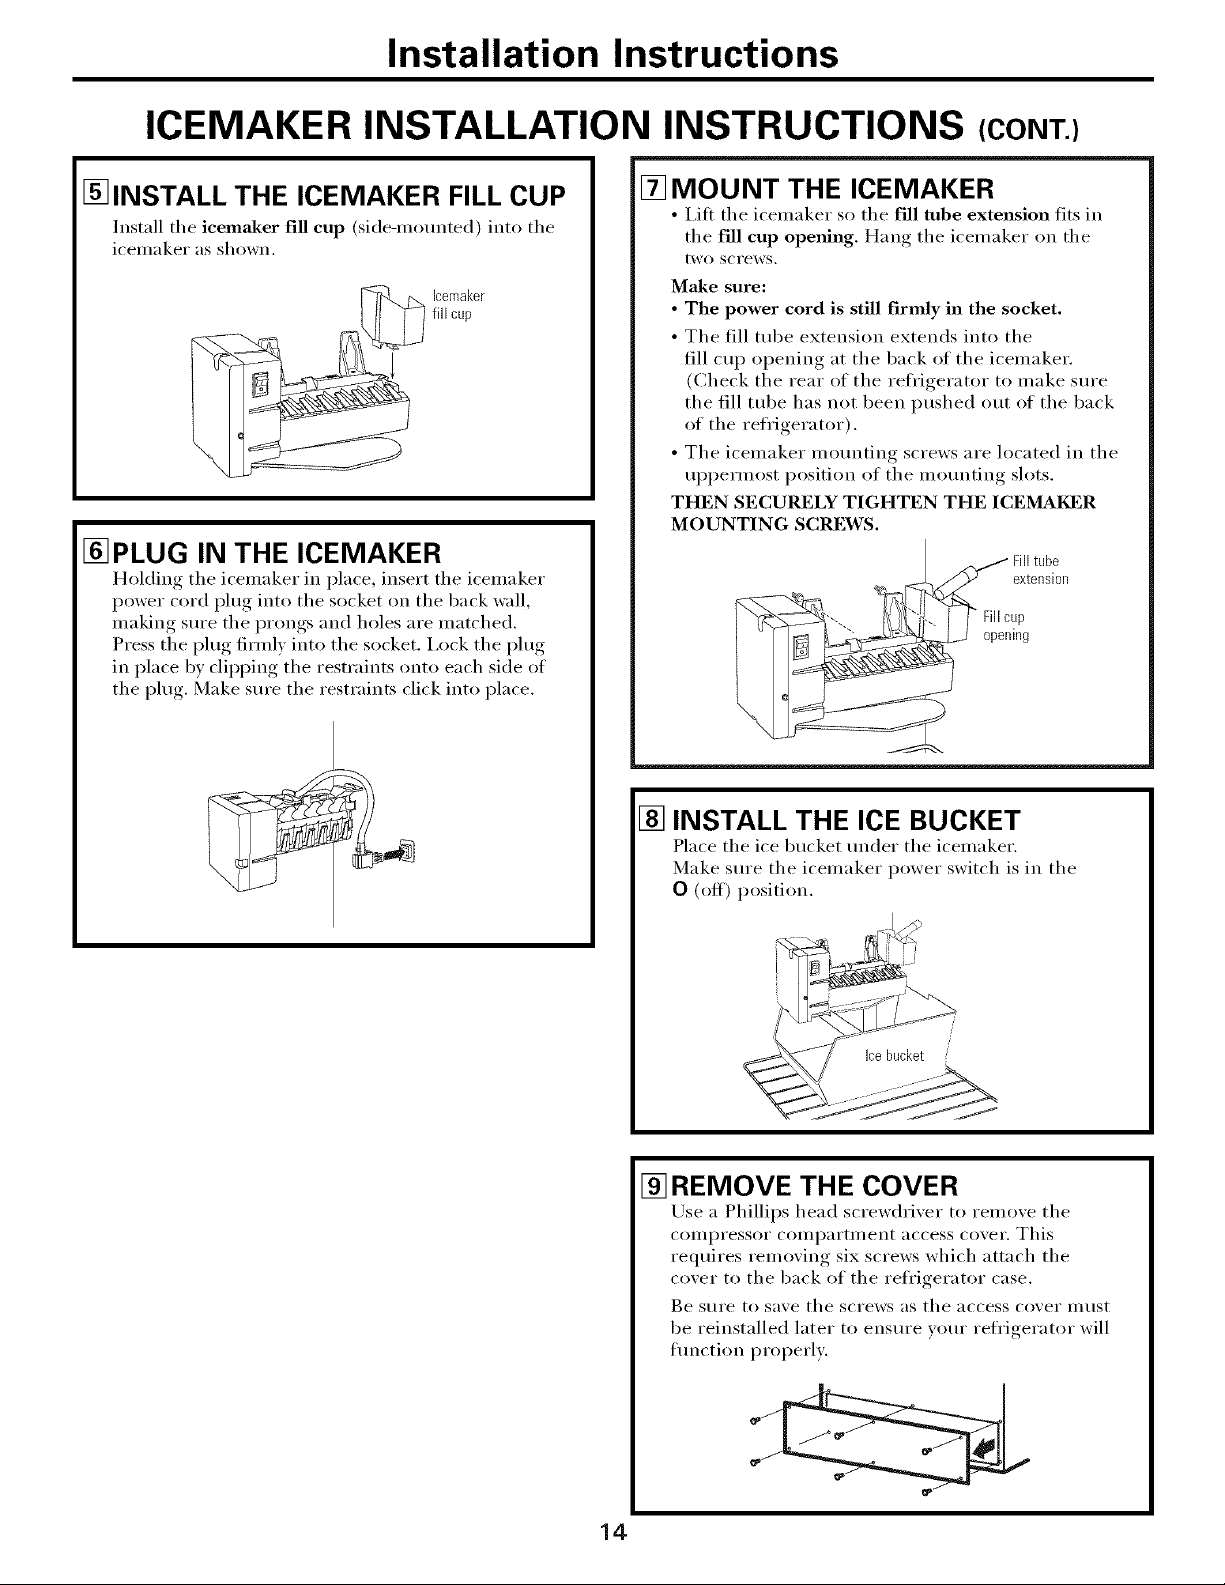
[_INSTALL THE ICEMAKER FILL CUP
Install the icema_ker fill cup (skle-mom_ted) into the
icemaker as shovcn,
[_ cemaker
fill cup
I_PLUG IN THE ICEMAKER
Holding the icemaker in place, insert the icemaker
power cord plug into the socket on the back wall,
making sure the prongs and holes are matched.
Press the plug firmlv into the socket, i,ock the plug
in place by clipping the restraints onto each side of
the plug. Make sm'e the restraints click into place.
[] MOUNT THE ICEMAKER
• I,ifi the icemaker so the fill tube extension fits in
the fill cup opening. Hang the icemaker on the
two screws.
Make sure:
• The power cord is still firmly in the socket.
• The fill tube extension extends into the
fill cup opening at the back of the icemaker.
(Check the rear of the refl'igerator to make sure
the fill tube has not been imshed out of the back
of the refl'igerator).
• The icemaker mounting screws are located in the
ul)permost position of the motmting slots.
THEN SECURELY TIGHTEN THE ICEMAI_]R
MOUNTING SCREWS.
tube
extension
Fillcup
opening
[] INSTALL THE ICE BUCKET
Place the ice bucket m_der the icemaker.
Make sm'e the icemaker power switch is in the
0 (off) position.
Icebucket
I_REMOVE THE COVER
Use a Phillips head screwdriver to relnove the
COlllI)YessoI" COllli)ai'ti/lent access coveI', This
requires removing six screws which attach the
cover to the back of the refl'igerator case.
Be s/li'e to save the scYews as the access covei" iiltlst
be reinstalled later to ensure wmr refligerator will
flmction i)roperly:
14

Installation instructions
[] ATTACH THE WATER VALVE
• Locate the temale connector plug. Plug the
female connector onto the male terminals on
the water valve. Either wire can go on either
terminal. Female
connector_._.j [
terleinals
• Fasten the water xalxe to the cabinet by drixing
the Phillips head screw from the kit into the hole
in the cabinet leg.
., Plilillipshead
[] INSTALL WATER LINE CLAMP
• Attach the metal water line clmnp (strain relief)
to the refrigerator. Drive the screw from the kit
through the clamp at the indent into the back
of the cabinet.
• The metal clamp is for the house water line (see
the _'ater I,ine Installation Instructions). It is not
to be used fl)r the tubing fl'om the water wdve up
to the icemaker,
[] CONNECT THE WATER LINE
• Make sure there is enough plastic water line to
extend fl'om the water wdve to well into the
water tube inlet. Cut off any excess tubing.
• Squeeze the ends of the hose damp fl'om the
kit with pliers and slide the clamp over the water
tube inlet.
•X_]_ile still squeezing the clamp, insert the plastic
water line into the inlet as flu" as it will go
(approximately 1" [25 mm ]).
•Then slide the clamp downward to capture the
plastic water line in place.
•Make sure the fill tube is aimed down.
Water tube
Hose clam
inlet 7_
[] ROUTE AND ATTACH THE
PLASTIC WATER LINE
• Fasten the plastic water line to the back
of the cabinet with adhesive-backed fasteners,
spacing the tasteners as shown to take up slack
in the line.
i
Screw _ Strain
¢,_[ _ relief
/
Adhesive-backedfasteners
for plasticwater line
15

Installation instructions
ICEMAKER INSTALLATION INSTRUCTIONS (CONT.)
[] WATER VALVE INSTALLED
Refer to the Water i,ine Installation Instructions
for connection to the home water supply. After
water line installation is completed, set the
icema_ker power switch to I (on).
The icemaking cycle will not begin until the icemaher
and freezer compartment reach operating temperature,
then icemahing _will begin automatically.
[] ATTACH WARRANTY LABEL
A label is provided with this kit to record the date
of installation for warranty purposes. Apply it to the
back of the reli'igerator. The icemaker installation
inside the ti'eezer is now complete.
16
Installation instructions
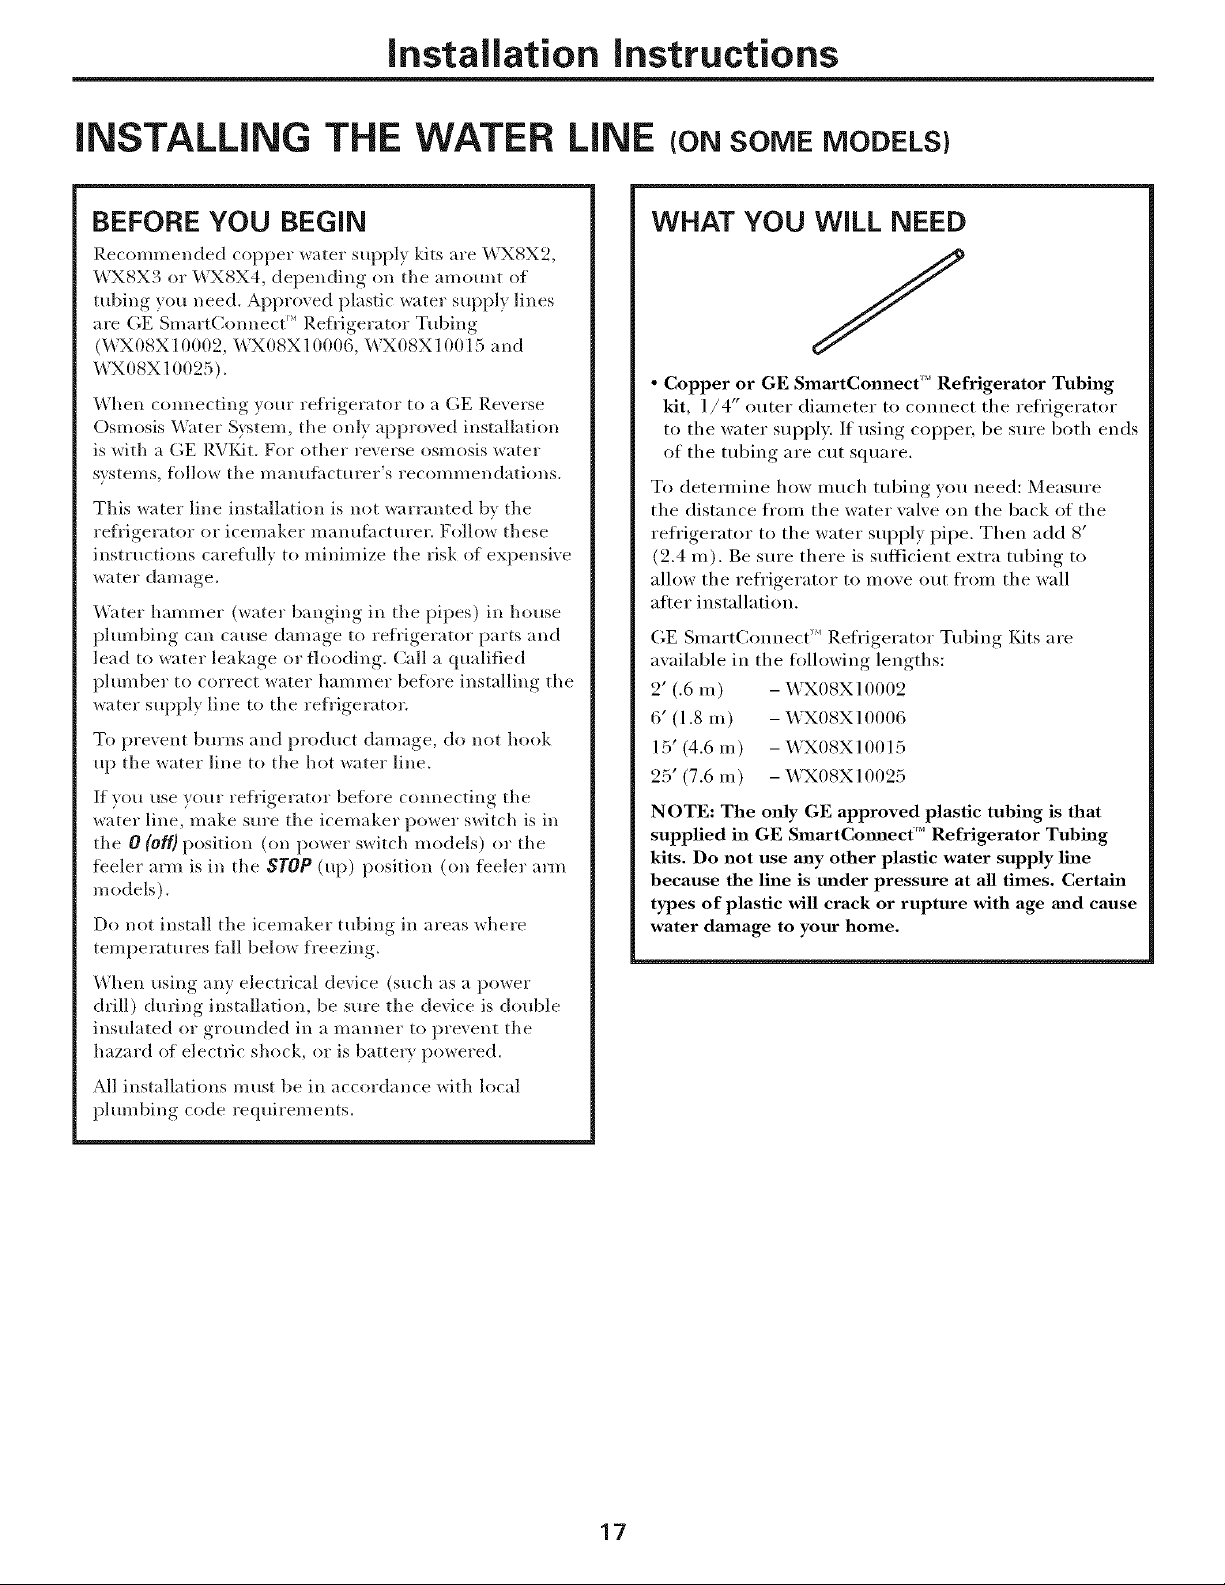
iNSTALLiNG THE WATER LiNE (ONSOMEMODELS)
BEFORE YOU BEGIN
I_.e{on/mended copper water supply kits m'e WXSX2,
WX8X3 or WX8X4, depending {)n tile amount of
tubing you need. Approved plastic water supply lines
ate GE SmartConnect" Refl'igerator Tubing
(WX08X10002, WX08X10006, WX08X10015 and
WX08X10025).
When connecting your refl'igerator to a GE Reverse
Osmosis Water System, tile only approved installation
is with a GE RVKit. For other reverse osmosis water
systems, fl)llow tile l//a(ltl[_lcttlrer's recol/ll//e(ldatio(is.
This water line installation is not warranted by tile
refi'igerator or icemaker manufi(cturer. Follow these
instructions carefully to minimize tile risk of expensive
water damage.
_ter hammer (water banging ill tile pipes) ill house
plumbing can cause damage to t e_/"igerator parts and
lead to water leakage or flooding. (:all a qualified
ph*mber to correct water hammer beflwe installing tile
water supply line to tile refi'igerator.
To prevent burns and product damage, do *lot hook
up tile water line to tile hot water line.
If you use your rei/"igerator beflwe connecting tile
water line, make sure tile icemaker power switch is in
tile 0 (Off} position (on power switch models) (55"tile
fbele_ arm is in tile STOP(up) position (on ieeler arm
models).
Do not install tile icemaker tubing in areas where
temperatures thll below freezing.
WHAT YOU WiLL NEED
/
• Copper or GE SmartConnect '' Refrigerator Tubing
kit, 1/4" outer dialneter to connect the refl'igerator
to the water supply, If using copper, be sure both ends
of the tubing are cut square.
T(( detelmine how inuch tubing you need: Measure
tile distance ti'oln the water valve on the back of the
reli'igerator to the water supply pipe. Then add 8'
(2.4 m). Be sure there is sulticient extra tubing to
allow the refrigerator to Inove ()tit ti'()Ill the wall
aDer installation.
GE Slnart(_olmect ''_Refrigerator Tubing Kits are
available in the fi)llowing lengths:
2' (.6 m) - WXO8XIO002
6' (1.8 m) - WXOSXIO006
15' (4.6 m) - WXOSXIO015
25' (7.6 m) - WXOSXlO025
NOTE: The only GE approved plastic tubing is that
supplied in GE SmartCmmec( _' Refrigerator Tubing
kits. Do not use any other plastic water supply line
because the line is under pressure at all times. Certain
types of plastic will crack or rupture with age mid cause
water damage to your home.
When using any electrical device (such as a power
drill) during installation, be sure tile device is double
insulated or grounded ill a manner to prevent tile
hazard of electric shock, or is battery powered.
All installations must be in accordance with local
plumbing code requirements.
17

Installation Instructions
iNSTALLiNG THE WATER LiNE (CONT.)
Install tile shutoff wflve on tile nearest frequently used
WHAT YOU WILL NEED (CONT.)
drinking water line.
• AGE water supply Mt (containing tubing, shutoff
_dve and fittings listed below) is a_ilable at extra
cost ]_]x)nl VO/lr dealer or t]'oI// lIill'tS illld Accessories,
800.626.2002.
• A cold water supply. The water pressure must be
between 2(1 and 12(1 p.s.i. (I.4-8.1 bar).
• Power drill.
• 1/2" or adjustable wrench.
• Straight and Phillips blade screwdriver.
• Two 1/4" outer diameter compression nuts and
2 ferrules (sleeves)--to connect tile copper tubino_ to
the shutoff valve and the refrigerator water valve.
OR
[] SHUT OFF THE MAIN WATER
SUPPLY
Turn on tile nearest fimcet hmg enough to clear
tile line of water.
[] CHOOSE THE VALVE LOCATION
Choose a location fin" tile vah'e that is easily
accessible. It is best to COlmect into tile side of a
vertical water pipe. When it is necessary to connect
into a hofiZOlmfl water pipe, make tile colmection
to tile top or side, rather than at tile bottoln, to
aw)id drawing off any sedilnent froul the water pipe.
* If xou are usino "t (;E _ mai_(,(_mlect Refrigerator
Tubino_ kit, tile necessar', fittings, are preassembled to
tile tubing
• If your existing copper water lille has a flared fitting
at tile end, you will need all adapter (available at
plumbing supply stores) to connect tile water lille to
tile ,efl'igerator OR you can cut off tile flared fitting
with a tube cutter and then use a compression fitting.
Do not cut fl)rmed end fl'om GE SmartConnect"'
Refl'igerator tubing.
• Shutoff valve to connect to tile cold water line.
Tile shutoff _:dve should have a water inlet with a
miniumm inside diameter of 5/32" at tile point of
connection to the COLD WATER LINE. Saddle-t_pe
shutoff valves are included ill many water supply kits.
Befln'e purchasing, make sure a saddle-t)pe _dve
complies with your local phunbing codes.
[] DRILL THE HOLE FOR THE VALVE
Drill a 1/4" hole in tile water pipe (even it using a
sell:piercing valve), using a sharp bit. I_eluove anv
braTS resulting fl'om drilling tile hole in tile pipe.
Take care not to allow water to drain into the drill.
Faihu'e to drill a 1/4" hole may result in reduced
ice production or smaller cubes.
18
Installation Instructions
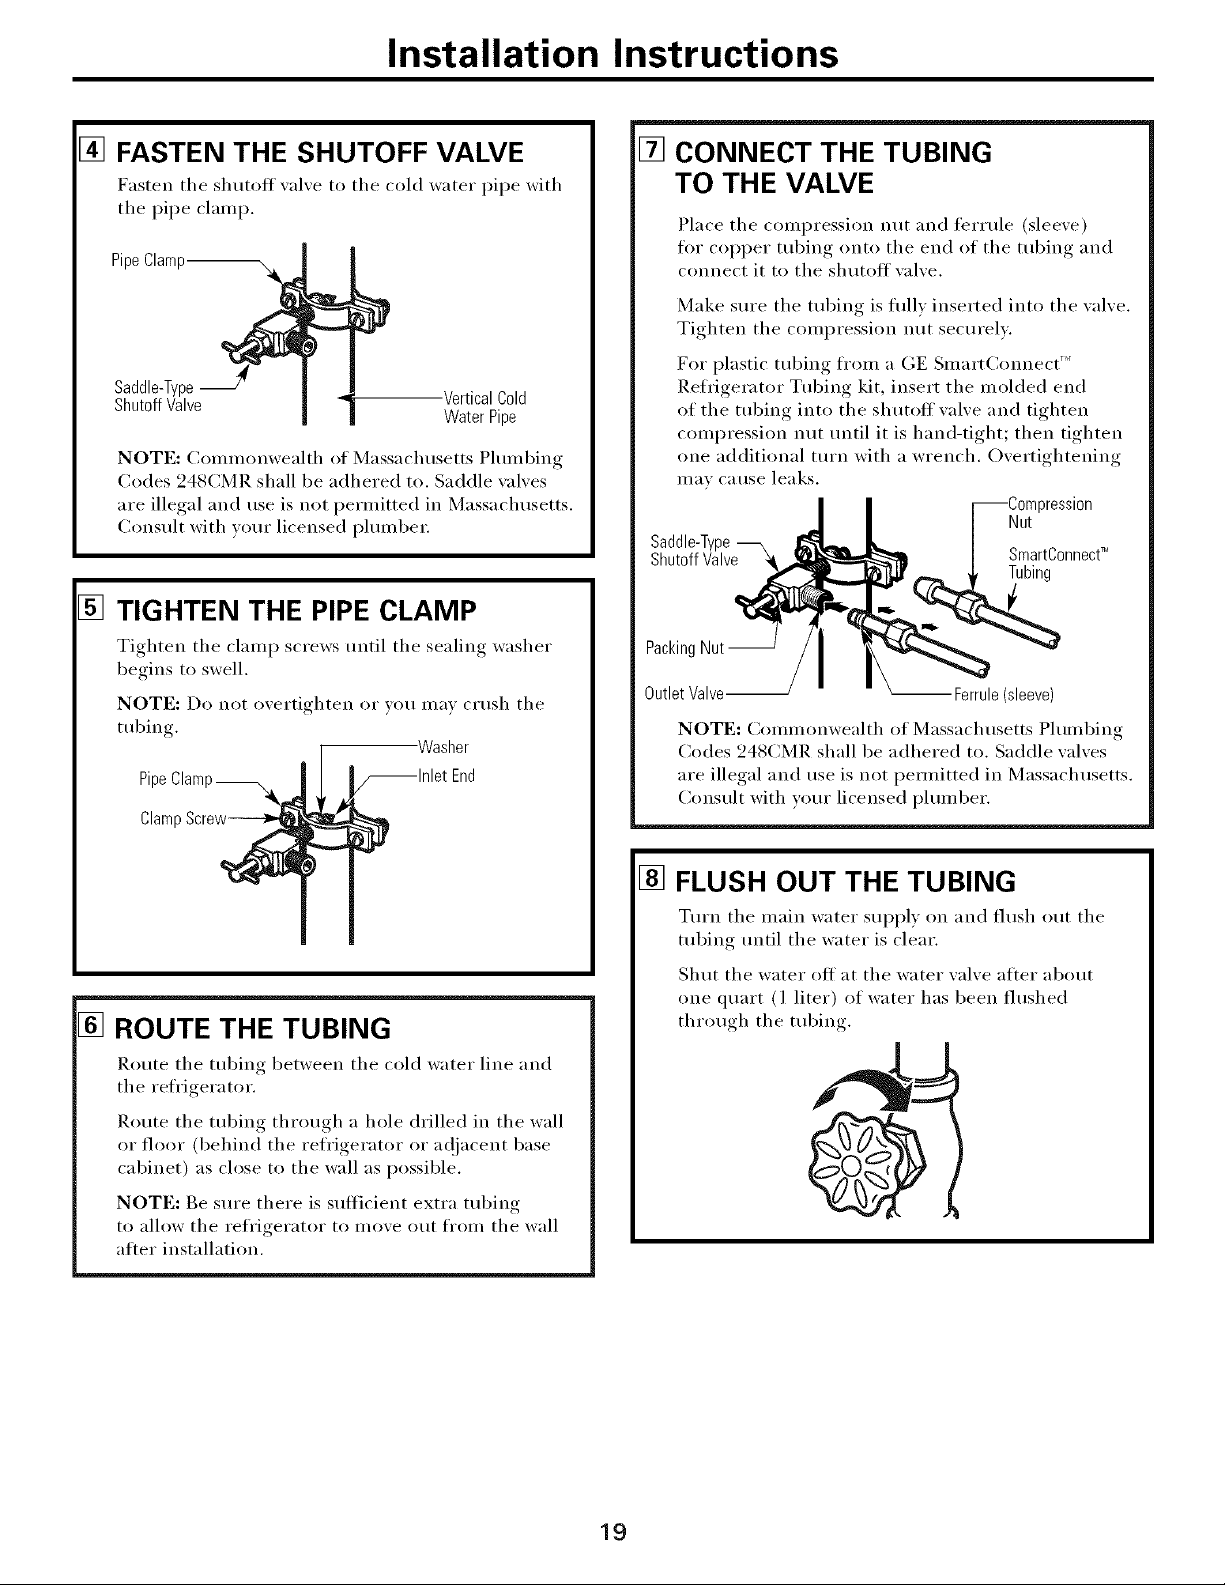
[] FASTEN THE SHUTOFF VALVE
Fasten the shutoff _al_e to the cold water pipe with
the pipe clamp.
PipeClamp
Saddle-Type
ShutoffValve
NOTE: Conm_onwealth of Massachusetts Plmnl)ing
Codes 248CMR shall be adhered to. Saddle wdves
are illegal and rise is not permitted in Massachusetts.
(_onsult with vom" licensed i_lmnbe_:
VerticalCold
WaterPipe
[] TIGHTEN THE PIPE CLAMP
Tighten tile clamp screws until tile sealing washer
begins to swell.
NOTE: Do not overtighten or VO/1 Ill}IV cI'/Ish the
tubing.
PipeClamp_ End
-Washer
[] CONNECT THE TUBING
TO THE VALVE
Place tile compression nut and teHule (sleexe)
for COl)per tubing onto the end of tile tubin(,_ and
connect it to tile shutoff xalxe.
Make sm'e tile tubing is flflly inserted into tile valve.
Tighten the compression nut securely.
For plastic tubing ti'om a GE Sinart()mnect "_
Refrigerator Tubing kit, insert tile molded end
of the robing into the shutoff valve and tighten
compression nut until it is hand-tight; then tighten
one additional turn with a wrench. Overtightening
III_IV C_l rise lea ks.
)ression
Nut
Saddle-Type
ShutoffValve _1 SmartO°nnect_"
PackingNut-
OutletValve_ Ferrule(sleeve)
NOTE: Collllllonwealth ot Massachusetts Phmlbing
Codes 248CMR shall be adhered to. Saddle valves
are illegal and use is not pem_itted in Massachusetts.
Consult with y<mr licensed i)lmnber.
Tubing
[] ROUTE THE TUBING
Route tile tubing between tile cold water line and
tile refl'igera tot.
Route tile tubing through a hole drilled in tile wall
or floor (behind tile refrigerator or a@_cent base
cabinet) as close to the wall as possible,
NOTE: Be sm'e there is sufficient extra robing
to allow the refl'igerator to move out fl'om the wall
atter installation.
[] FLUSH OUT THE TUBING
Turn tile main water sui_ply on and flush out tile
tubing tmtil tile water is clear.
Sh tit th e water ott a t the water valve after about
one quart (1 liter) of water has been flushed
through tile tubing.
19

Installation Instructions
INSTALLING THE WATER LINE (CONT.)
[] CONNECT THE TUBING TO THE
REFRIGERATOR
NOTES:
• Before making the connection to the reti'igerator,
be sure the refl'igerator power cord is not
plugged into the wall outlet.
• _'e recommend installing a water filter if your
water supply has sand or particles that could clog
the screen of the refl'igerator's water wdve. ]nstall
it in the water line near the refl'igerator. If using
GE Smart(_onnect "_ Refl'igerator Tubing kit, you
will need an additional tube (WX08X10002) to
connect the filter. Do not cut plastic tube to
install filter.
Remove the screws holding the right side of the
access cover. Fold back the cover.
Remoxe the plastic flexible cap
fl'om the water xalxe
(refi'igerator connection),
Place the compression nut and
ferrule (sleeve) onto the end of
the tubing as shown. On GE
Smart(:onnect "_ Refrigerator
Tubing kit, the nuts are alreadv
assembled to the tubing.
Insert the end of the tubing into the water wdve
connection as flu" as possible. While holding the
tubing, tighten the fitting.
CJ
[] CONNECT THE TUBING TO THE
REFRIGERATOR (CONT.)
One of the illustrations below will look like the
cmmection on your refrigerator.
1/4"Tubing
_Tubing Clamp
)ressionNut
(sleeve)
SmartC_ -Refrigerator
Tubing Connection
[] TURN THE WATER ON AT THE
SHUTOFF VALVE
Tighten any connections that leak.
For plastic tubing fl'om a GE Smart(_onnect "_
Refi'igerator Tubing kit, insert the molded end
of the tubing into the water wdve connection and
tighten compression nut until it is hand-tight;
then tighten one additional turn with a wrench.
Overtightening may cause leaks.
Fasten the tubing into the clamp provided to hold
it in a vertical position. You may need to PU open
the clamp.
Reattach the access coxer.
2O
Installation Instructions
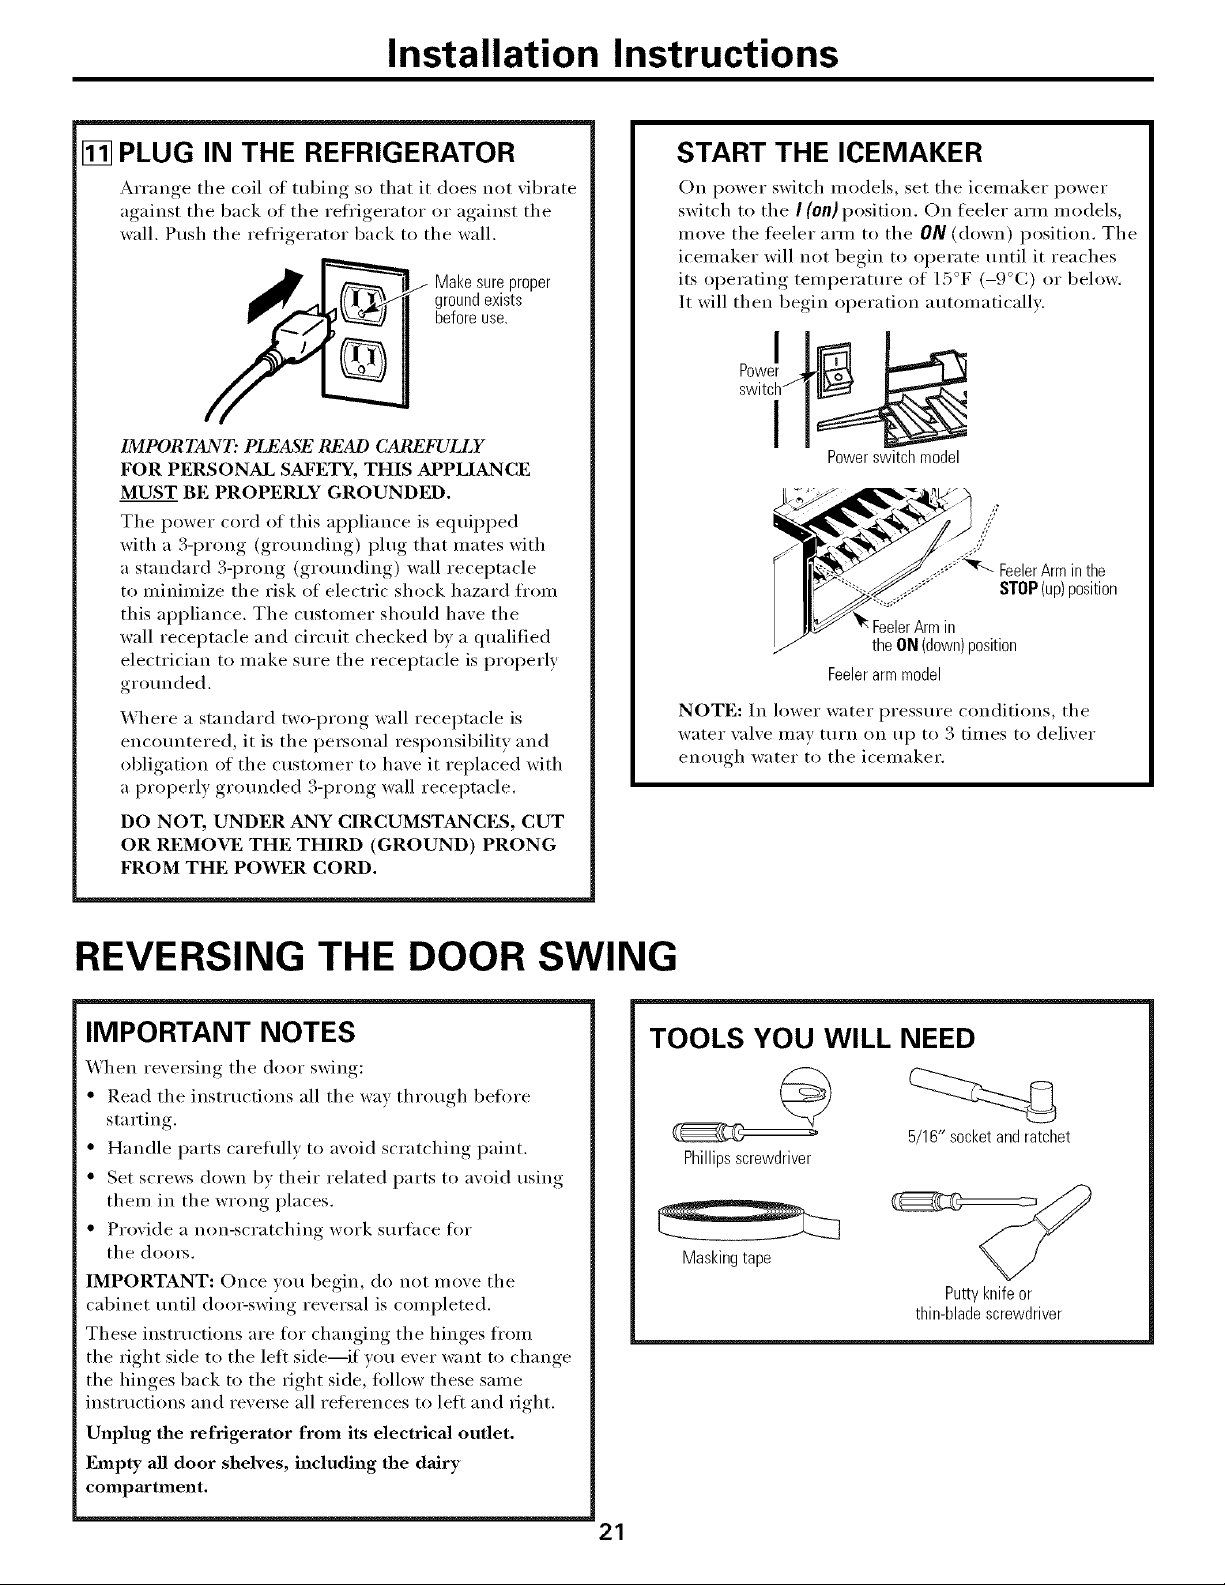
[] PLUG IN THE REFRIGERATOR
Arrange the coil ot tubing so that it does not _ibrate
against the back of the refl'igerator or against the
wall. Push the refl'igerator back to the wall.
Make sure proper
ground exists
before use.
IMPORTANT: PLFASE RJ_2AD (_AR_FULLY
FOR PERSONAL SAFETY, THIS APPLIANCE
MUST BE PROPERLY GROUNDED.
The power cord of this appliance is equii_i)ed
with a 3-prong (grounding) plug that mates with
a standard S-prong (grounding) wall receptacle
to minimize the risk of electric shock hazard fl'om
this appliance. The customer should have the
wall receptacle and circuit checked by a qualified
electrician to make sure the receptacle is properly
grounded.
Where a standard two-prong wall receptacle is
encountered, it is the personal responsibility and
obligation of the customer to have it replaced with
a properly grounded 3-prong wall receptacle.
DO NOT, UNDER ANY CIRCUMSTANCES, CUT
OR REMOVE THE THIRD (GROUND) PRONG
FROM THE POWER CORD.
START THE ICEMAKER
On power switch models, set the icemaker power
switch to the I (On) position. On feeler arm models,
move the feeler arm to the ON (down) position. The
icemaker will not begin to operate until it reaches
its operating temperature of 15°F (-9°C) or below.
It will then begin operation automatically:
I
Powerswitchmodel
the ON(down)position
Feelerarmmodel
NOTE: In lower water pressure conditions, the
water xalxe may turn on up to 3 times to delixer
enough water to the icemaker.
REVERSING THE DOOR SWING
IMPORTANT NOTES
When reversing the door swing:
• Read the instHictions all the way through befl)re
starting.
• Handle parts careflfllv to avoid scratching paint.
• Set screws down bv their related parts to avoid using
them in the wrong places.
• Provide a non-scratching work surtace fin.
the doo_.
IMPORTANT: Once you begin, do not move the
cabinet until doo>swing reversal is completed.
These inst_ uctions are fin" changing the hinges fl'om
the right side to the lett side--if wm ever want to change
the hinges back to the right side, tollow these same
instructions and reve_e all refl_rences to lett and right.
Unplug the refrigerator from its electrical outlet.
Empty all door shelves, including the dairy
compaactment.
TOOLS YOU WILL NEED
5/16" socketandratchet
Phillipsscrewdriver
Maskingtape
Puttyknifeor
thin-bladescrewdriver
Installation Instructions
REVERSING THE DOOR SWING (CONT.)
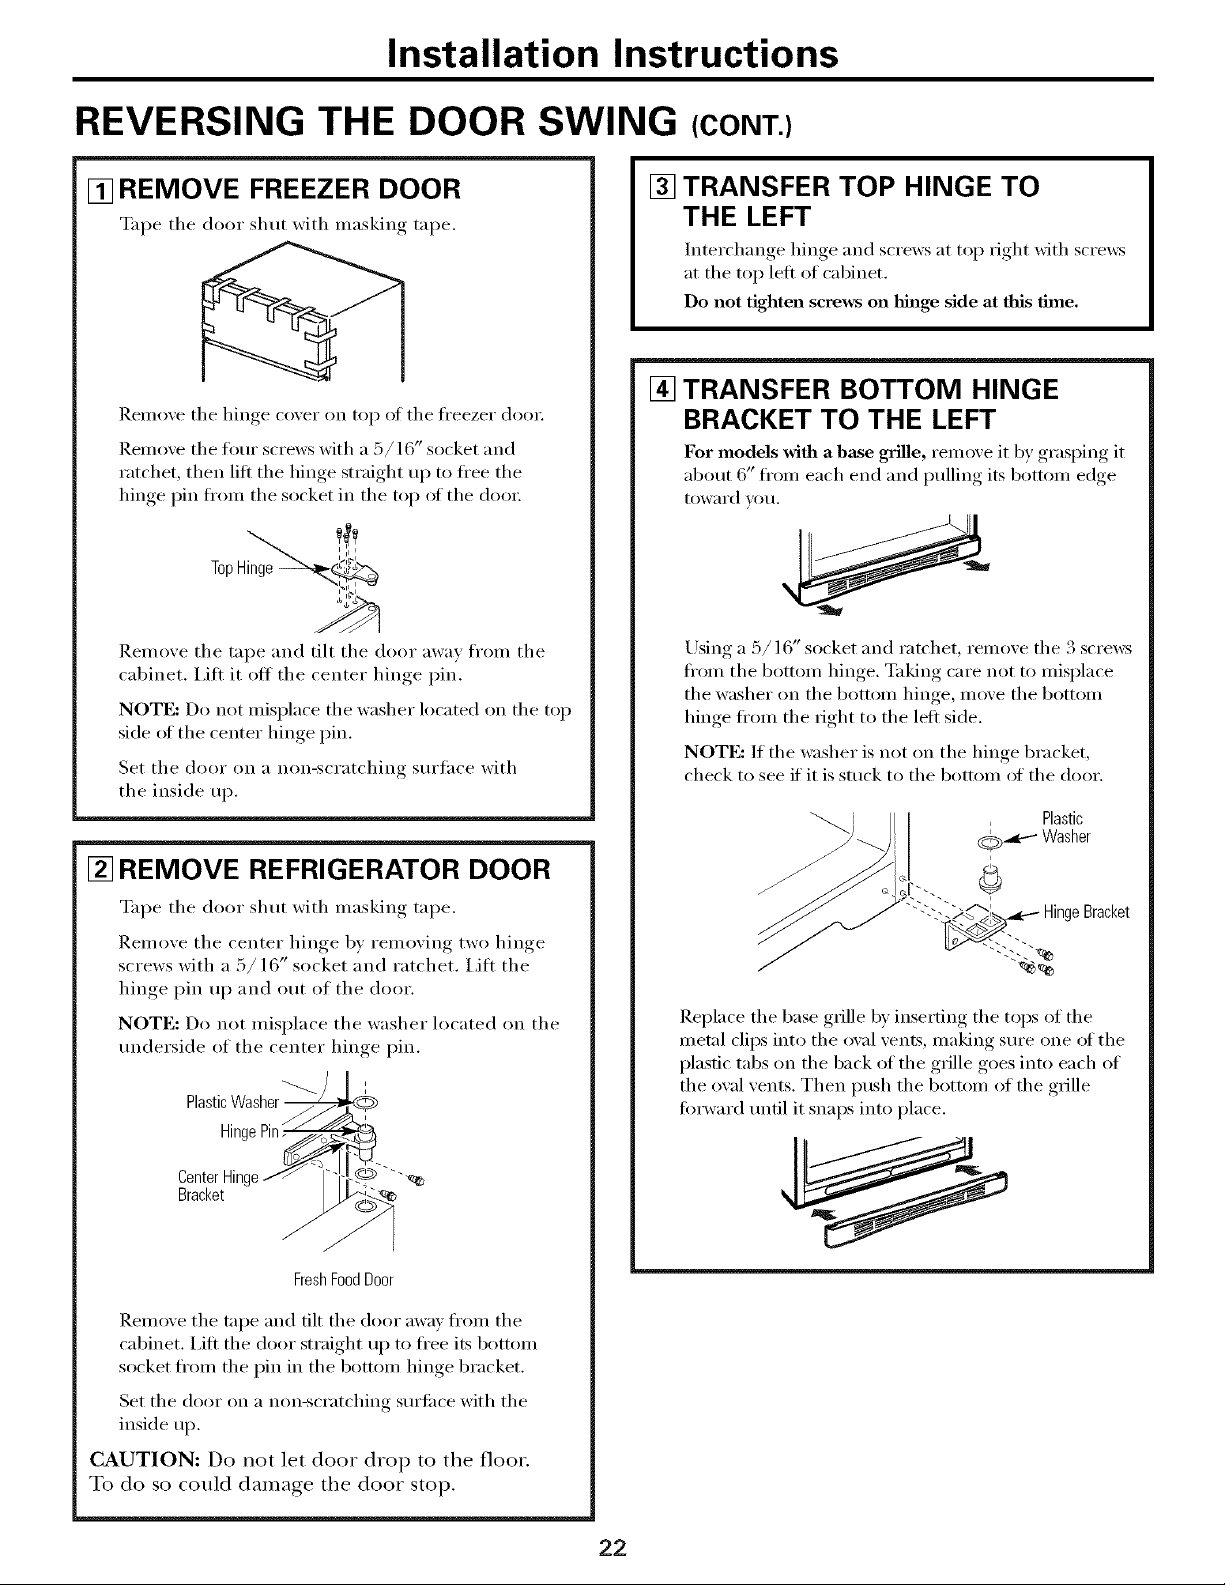
[] REMOVE FREEZER DOOR
%_I_e the door shut with masking tape.
Remove the hinge cover on top ot the fl'eezer doo_:
Remove the four screws with a 5/16" socket and
ratchet, then liti the hinge straight up to ti'ee the
hinge pin ti'om the socket in the top oI the doo_:
TopHinge
Remove the tape and tilt the door away fl'om the
cabinet. I,itt it off the center hinge pin.
NOTE: Do not misplace the washer located on the top
side (ff the center hinge pin.
Set the door on a non-scratching s/irt;ice with
the inside up.
[] REMOVE REFRIGERATOR DOOR
[] TRANSFER TOP HINGE TO
THE LEFT
Interchange hinge and screws at top right with scre_:s
at the top left of cabinet.
Do not tighten screws on hinge side at this time,
[] TRANSFER BOTTOM HINGE
BRACKET TO THE LEFT
For models with a base grille, remo_ e it by ,grasI_ing, it
abotlt 6" I'i'on/each end and I_ullin'"_ its bottom edge
toward VOtl.
L)sing a 5/16" socket and ratchet, remove the 3 screws
ti'om the bottom hinge. Taking care not to misplace
the washer on the bottom hinge, move the bottom
hinge ti'om the right to the lett side.
NOTE: If the washer is not on the hinge bracket,
check to see if it is stuck to the bottom _ff the door.
i
_:_..,L_----Washer
Plastic
%_I_e the door shut with masking tape.
Remove the center hinge by removing two hinge
screws with a 5/16" socket and ratchet, i,ift the
hinge pin up and out of the door.
NOTE: Do not misplace the washer located on the
underside of the center hinge pin.
i
PlasticWasher_z
HingePin
CenterHinge//
Bracket
FreshFoodDoor
Remove the tape and tilt the door away fl'om the
cabinet, i,ift the door straight up to fl'ee its bottom
socket fl'om the pin in the bottom hinge bracket.
Set the door on a non-scratching surti_ce with the
inside up.
CAUTION: Do not let door drop to the floor.
To do so could damage the door stop.
i
/
Bracket
Replace the base grille by inserting the tops of the
metal clips into the oval vents, making sure one ot the
plastic tabs on the back of the grille goes into each of
the owd vents. Then push the bottom of the grille
forward until it snaps into place.
22
installation instructions
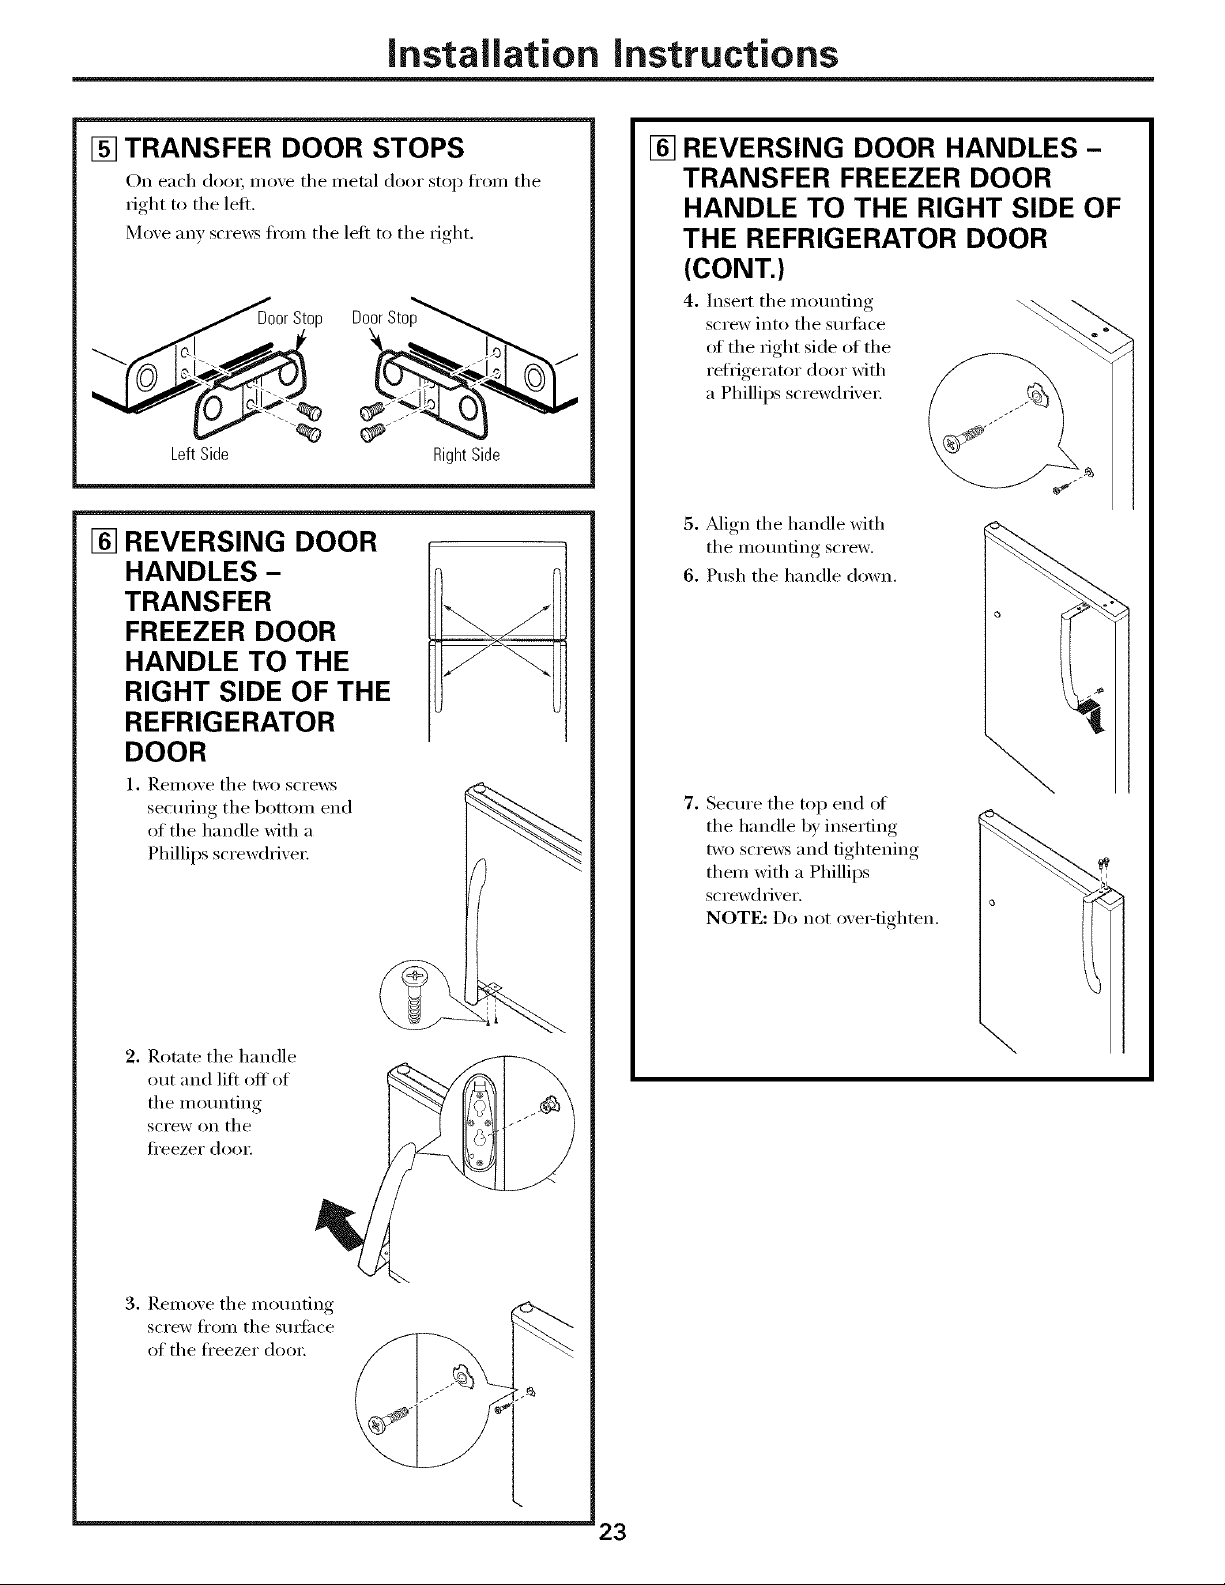
[] TRANSFER DOOR STOPS
On each dooL mo_e the metal door stop ti'()m the
right to the leiL
Moxe any screws fl'om the left to the right,
p Door
LeftSide RightSide
[] REVERSING DOOR
HANDLES -
TRANSFER
FREEZER DOOR
HANDLE TO THE
RIGHT SIDE OF THE
REFRIGERATOR
DOOR
1, Rei/love the two sci'ews
securing the bottom end
of the handle with a
Phillips screwdriver:
[] REVERSING DOOR HANDLES-
TRANSFER FREEZER DOOR
HANDLE TO THE RIGHT SIDE OF
THE REFRIGERATOR DOOR
(CONT.)
4, Insert the mounting
screw into the surfi_ce
ot the right side of the
i'eti_igei'ator door with
a Phillips screwdrivei:
5. _Mign the handle with
the mounting screw.
6. Push the handle down.
7. Secure the top end (ff
the handle by inserting
two scre_vs and tightening
them with a Phillips
screwdriver.
NOTE: Do not oxe>fighten.
J
2. Rotate the handle
out and lift off of
the mounting
SCI'eW OIl the
fl'eezer dooi;
3. Remoxe the mom_fing
screw fl'om the surIi_ce
of the fl'eezer doo_;
\
23

installation instructions
REVERSING THE DOOR SWING (CONT.)
[] REVERSING DOOR HANDLES-
TRANSFER REFRIGERATOR
DOOR HANDLE TO THE RIGHT
SIDE OF THE FREEZER DOOR
1, Reiilove the two SCI'eWS
secming the top end oI
the handle with a Phillips
screwdrivei:
2. Rotnte the
handle out
and lift off of
the motmting
screw on the
refl_igerator
dooI',
[] REVERSING DOOR HANDLES-
TRANSFER REFRIGERATOR
DOOR HANDLE TO THE RIGHT
SIDE OF THE FREEZER DOOR
(CONT.)
4, Insert the motmting screw
into the stwIi_ce of the right
side of the fl'eezer door
with a Phillips screwdriver:
5. _Mign the handle with
the mounting screw.
6. Rotate the handle.
3. Remove the mounting
screw fl'om the sm_Ii_ce
of the reti_igerator
dooI'.
7. Secm'e the bottom end
ot the handle by inserting
two scre_vs and tightening
them with a Phillips
screwdriver.
NOTE: Do not ore>tighten.
{
i
24

Installation Instructions
[] REHANG THE REFRIGERATOR
DOOR
I,ower tile i'etiJ_ei_Kor door onto tile bottoi/l
hinge pin.
Plastic
Screw tile two screws into tile center hinge location
oil tile left side with a 5/16" socket and ratchet.
Straighten tile door and place tile center hinge pin
into tile opening on top of tile dora: Remember to
include tile washe_:
Move tile door into place, so you can align tile center
hinge bracket over tile center hinge holes on the left
side. Insert and tighten tile two screws with a 5/16"
socket and ratchet.
NOTE: Ensure tile washer is in place on top of tile
hinge pin.
PlasticWasher._>-_
CenterHinge _-"-_D
Bracket
l
RefrigeratorDoor
ADJUST THE DOORS
[]
{IF NEEDED)
If the freezer door is too high:
Remove tile hinge
cover on top ot tile
fl'eezer door _llld
loosen tile four
screws will/a 5/16"
socket and ratchet.
Replace tile hinge
cover
If both doors axe too high:
1. Remove
tile hinge
cover on Looser]screws.
top of tile
fl'eezer
door and
loosen tile
tO/lI" Sci'ews
with a
5/16"
socket and
ratchet.
2. i,oosen tile two center hinge screws with a 5/16"
socket and ratchet.
3. Slide tile center hinge to tile left to lower
tile dooi_.
4. Fully tighten all screws and replace top hinge coxei:
Loosenscrews. 5/16_"
5/16"
5/16"
slide leftto
lowerdoors.
[] REHANG THE FREEZER DOOR
i,ower tile freezer door onto tile center hinoe_ pin.
Be sm'e tile washer is in place.
HingePin
Washer
I,ifl tile top hinge so tile pin fits into tile door socket.
Support tile door on tile handle side and nlake sure
tile door is straight and tile gap between tile doo_ is
even across tile fl'ont. _]/ile holding tile door in
place, tighten tile top hinge screws.
25
If both doors are too low:
1. Remove tile
hinge cover
on top of
tile fl'eezer
door and
loosen the
li )/lI" screws
with a 5/16"
socket and
ratchet.
2. Ix_osen tile
Fwo center
hinge screws
x_atl/a :)/16 socket and ratchet.
3. Slide tile center hinge to tile right to raise tile
doolN.
Loosenscrews. 5/16'_'
4. Fully tighten all screws and replace top hinge coxei:
NOTE: Saxe the door space_:
Doot_ max settle with use.
DoorSpacer

Normal operating sounds.
Newer refrigerators sound different from older refrigerators. Modem refrigerators
have more features and use newer technology.
Do you hear what I hear? These sounds are normal.
HUMMM...
-- WHOOSH...
• The new high efficiency compressor may mn taster
and longer than your old refl'igerator and wm may
hear a high-pitched hum or pulsating sound while
it is operating.
• _4m may hear a whooshing sound when tile (loo_ close.
This is due to pressure equalizing within tile reti'igerato_:
CLICKS, POPS,
CRACKS and CHIRPS
• You may hear cracking or popping sounds when tile
refrigerator is first plugged in. This happens as tile
refrigerator cools to tile correct teil/perattlre.
• Tile compressor may cause a clicking or chiq)ing
sound when attempting to restart (this could take
up to 5 minutes).
• Expansion and contraction of cooling coils during
and after deti'ost can cause a cracking or popping
so/ind.
• On models with an icemake_; after an icemaking
cycle, you may hear tile ice cubes dropping into
tile ice bucket.
• On models with a dispense_; during water dispense,
wm may hear tile water lines move at initial dispense
and after dispenser button is released.
WHIR./
• You may hear tile rims spinning at high speeds.
This happens when tile refrigerator is first plugged
in, when tile doors are opened frequently or when
a large alllOtlllt of tood is added to tile refl'igerator
or freezer compartments. Tile rims are helping to
maintain tile correct temperatures.
WATERSOUNDS
6
• Tile flow of refl'igerant through tile fl'eezer cooling
coils may make a gurgling noise like boiling water,
• X._hter dropping on tile defl'ost heater can Catlse a
sizzling, popping or buzzing sound during tile
defrost cycle.
• A water dripping noise may occur during tile deli'ost
cvcle as ice melts ti'om tile evaporator and flows into
tile drain pan.
• Closing tile door mav cause a gurgling SOtlild due to
pressure equalization.
26

Beforeyoucarl forservice.., reco,,
Troubleshooting -tips
Save time and money! Review the charts on the following
pages first and you may not need to call for service.
Possible Causes
Freezer doorpops open This is normal if, after
when refrigerator door popping open, the freezer
is closed door closed on its own.
Door does not close Leveling legs need adjusting. • See Rollers and Leveling Legs.
by #serf
Refrigerator does Refrigerator in defrost cycle. • _'ait ab()ut 40 minutes h n" deft'()st cycle to end.
not operate Refrigerator control ha • rVhwe the l'etiigel'at()r aud ti'eezer c( )UtI'( )l [( ) ;I
1(off)position. rein )el'attu'e setting
Refrigerator is unplugged. • Push the plug completely into the outlet.
The fuse is blown/drcuit • Replace fi/se or reset the breakel:
breaker is tripped.
Vibration orrattling Refrigerator is not resting • A(!i ust leveling legs (See Rollers and Leveling Legs).
(slight vibration on all four rollers.
What ToDo
• This indicates that there is a good seal on the freezer
(loo_; If the ti'eezer door does not autonmticallv close after
popping open, the rollers need a(!iusting. See Rollers and
Leveling Legs.
is normal)
Motor operates for Normal when refrigerator • _'ait 94 houl_ fin" the refi_igemtor to completely
long periods or cycles is first plugged in. co()l d()wn.
on and offfrequently
(Modern refrigerators amounts of food are
with more storage
space anda larger placed ha refrigerator.
freezerreqnire more Door left open. • Check to see if package is holding door open.
operating time. They
start and stop often Hot weather or frequent • This is hernial.
to maintain even door openhags.
temperatures.) Temperature controls set • See About the controls.
Often occurs when large • This is uomml.
at the coldest setting,
Refrigerator or freezer Temperature control not set • See About the controls.
compartment too warm cold enough.
Warm weather or frequent • Set tile temperature control one step coldel;
door openhags. See About the controls
Door left open. • Check to see if l)ackage, is holding door open.
Freezer door popped open. • See the problem Freezer door pops open when
refrigerator door is closed.
Frost or ice crystals Door left open. • (;he('k to see if l)a(kage, is holding, door open.
on frozenfood
(frost within package Too frequent or too long
is normal)
Frequent "buzzing" lcemaker power switch is ha • Set tile power switch to tile O (off) l)ositiou. Keel)iu(_ it
sound the I (on) position, but the in tile I(on) l)ositiou will damage the water xalve.
Small orhollow cubes Water f'flter clogged. • Replace filter cartrid,_e_ with new cartridge or with l)lu_"
door opmfings.
Food blocking freezer air vents. • Move items away ti'()I// tile back wall ot tile ti'eeze_:
water supply to the refrigerator
has not been commcted.
27

Beforeyoucall forservice...
Troubleshooting -tips
Possible Causes What ToDo
Automaticicemaker
(onsomemodels)
doesnotwork
Ice cubes have Ice storage bin needs cleaning. • Emlm rand wash bin. Discard old cubes.
odor/taste
Icema_ker power switch is
not on.
Water supply turned off or • See Installing the water line.
not comaected.
Freezer compartment • Wait 24 hotu_ fi)r the refiJgerat(w t() c()mpletelv
too warm. cool down.
Piled up cubes in the storage • I,evel cul_es by hand.
bin cause the icemaker
to shut off.
Ice cubes stuck ha icemaker. • Turn off the icemake_, remove cubes and turn tile
(Green power light on icelnaker back on.
icema_ker blinking.)
Food trmasmitthag odor/taste • Wrap toods well.
to ice cubes.
• On pt)wer switch models, set tile power switch to the
I (on) position. On feeler am_ models, moxe the feeler
ax_n to the O/V (down) position,
Interior of refrigerator • See Careandcleaning.
needs cleaafing.
Slowice cubefreezing Door left open. • Check to see if package is holding door open.
Temperature control not set • See About thecontrols.
cold enough. • A uewlv iustalled l'eflJgei'ator Ill,IV take 12-24 houl>
to be(du making ice cubes.
Moisture forms on Not mmsual during • Wipe stu_ilce (liT; then a(!ittst the fresh fi)od control
cabinet surface periods of high hmnidity..setfin,_ one mmiber higher :rod check again, ill 24 horus.
between the doors
Refrigerator has odor Foods trmas_mitthag • Foods with strong odo_ should be tightly wrapped.
odor to refrigerator. • Keep an open box of baking soda in the refiJgerator;
relalace every three lllouths.
Interior needs clemfing. • See Care and cleaning.
Moisture collects inside Too frequent or too
(inhumidweather,air long door openings.
carries moisture into
refrigerator when doors Open containers of water or • Cover or seal open ('ontaiuel_. During a defrost ca'tie,
are opened) warm food ha the refrigerator, moisture will be removed fl'om the refrigerator, but 1_:_ r
Refrigerator compartment No power at outlet. • Rel)lace fi/se or reset tile breaker:
light does not work Light bulb burned out or loose. • See Replacing the light bulbs.
rettu'n _6th hmg, or ti'e(lueut door opeuiugs.
28

Possible Causes What ToDo
Hotairfrombottom
ofrefrigerator
Food freezing in Food too close to the air vent * Move the filed away fl'om the air vent (near the
the refrigerator at the back of the refrigerator, controls).
Orange glow Defrost heater is on. • This is n(mnal.
in the freezer
Normal air flow cooling
motor, ha the refrigeration
process, it is normal that
heat be expelled in the
area under the refrigerator.
Some floor coverings _ll
discolor at these normal
mad safe temperatures.
Refrigerator control is set * Move the reti'igerator control to a wmmer
too cold. temperature setting one increment at a time.
ge.com
Door bins do not fit The freezer door bills are * Tl'v to install tile bins in 19()th do(n_.
in the door a different size than the
refrigerator door bills.
Controls do notlightup Some models do not have * If you can read white ntunbel_ oil the control setting,
righted controls, the model does not have lighted controls.
Refrigerator right bulb bmnmd * See Replacing the light bulbs.
out or loose.
Water has poor Water dispenser has not been * Dispense water until all water in sx:_tem is
taste/odor used for a long time. replenished.
Waterin firstglass Normal when refrigerator * X.%it 24 hottl_ fill" tile refiJgelutor to completely
is warm is first illstalled, cool down.
Water dispenser has not been • Dispense water until all water is system is
used for a long time. replenished.
Water system has been drained. * Pdlow several hotu_ fi)r replenished supply to chill.
No water or ice cube Supply line or shutoff valve * (2dl a plumlgel:
production is dogged.
29

m
_ Notes_
€_
m
q
w4r_
m
Q_
qll
I
3O
 Loading...